Philips AVENT IQ Baby Bottle and Food Warmer SCF260 - Instructions
MilkSPA™ Breast Milk & Bottle Warmer
Chauffe-biberon et Chauffe-lait Maternel
MilkSPAMC
Calentador deBiberones y Leche Materna MilkSPA™
™
IMPORTANT SAFETY INSTRUCTIONSREAD AND SAVE THESE IMPORTANT SAFETY INSTRUCTIONS BEFORE USING THIS APPLIANCE
WHEN USING ELECTRICAL APPLIANCES, PRECAUTIONS SHOULD ALWAYS BE FOLLOWED TO REDUCE THE RISK OF FIRE, ELECTRICAL SHOCK AND INJURY TO PERSONS, INCLUDING THE FOLLOWING:
• Read all instructions.• Do not touch hot surfaces or heated water in the reservoir.• To protect against electrical shock, do not immerse appliance in water or other liquid.• Close supervision is necessary when any appliance is used near children.• Unplug from outlet when not in use and before cleaning. Allow to cool before putting on or taking off parts.• Do not operate any appliance with a damaged cord or plug or after the appliance malfunctions or has been damaged in any manner. Call Handi-Craft’s Customer Service at 1-800-778-9001.• Misuse of the product may cause potential injury.• The heating element surface is subject to residual heat after use.• The use of accessory attachments not recommended by Handi-Craft Company may cause injuries.• Do not use outdoors. Household and indoor use only.• Do not let cord hang over edge of table or counter, or touch hot surfaces.• Do not place on or near a hot gas or electric burner, or in a heated oven.• Extreme caution must be used when moving an appliance containing hot liquids.• To operate, plug cord into wall outlet. To disconnect, turn any control to “off”, then remove plug from wall outlet.• Do not use appliance for other than intended use.• Never immerse the warmer or power cord in water.• When in use, the warmer contains hot water. Be careful to avoid spilling or splashing any water on yourself when removing contents from the warmer.• Before serving be sure food is at a safe temperature.• Warming food for long periods is not recommended.• Before feeding, pour a few drops of the liquid content from the baby bottle on to the back of your hand to test the temperature.CAUTION: Always check the content temperature of the bottle or food jar before feeding your baby.• This appliance has a polarized plug (one blade is wider than the other). To reduce the risk of electric shock, this plug is intended to fit into a polarized outlet only one way. If the plug does not fit fully into the outlet, reverse the plug. If it still does not fit, contact a qualified electrician. Do not attempt to modify the plug in any way.
READ AND SAVE THESE INSTRUCTIONSSpecifications:Nominal voltage: 120VAC/60Hz
Package Contents:MilkSPA™ Breast Milk & Bottle WarmerQuick Reference Guide2x Storage Caps
EN
WARNING: Read the entire instruction manual to become familiar with the features of the product before operating. Failure to operate the product correctly can result in damage to the product, personal property and cause serious injury. Failure to operate this Product in a safe and responsible manner could result in injury or damage to the product or other property. This product is not intended for use by children without direct adult supervision. Do not attempt disassembly or use with incompatible components. This manual contains instructions for safety, operation and maintenance. It is essential to read and follow all the instructions and warnings in the manual, prior setup or use, in order to operate correctly and avoid damage or serious injury.
1
2
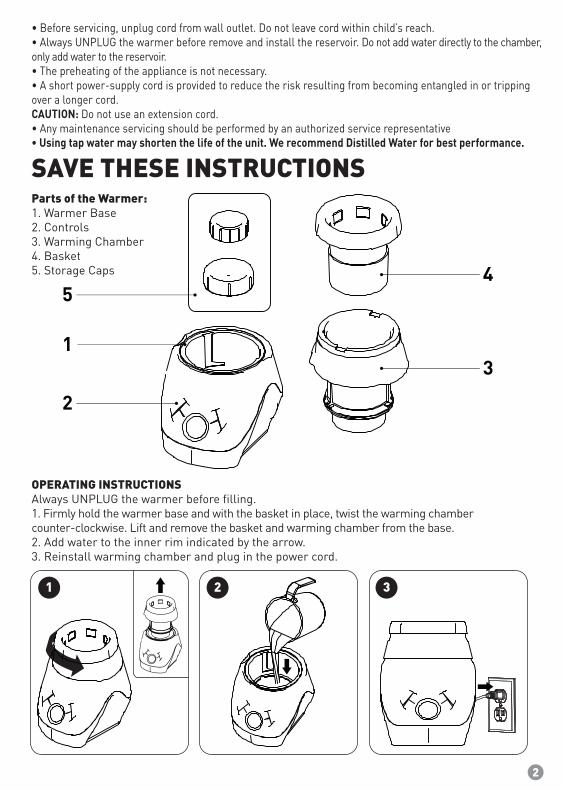
• Before servicing, unplug cord from wall outlet. Do not leave cord within child’s reach.• Always UNPLUG the warmer before remove and install the reservoir. Do not add water directly to the chamber, only add water to the reservoir. • The preheating of the appliance is not necessary.• A short power-supply cord is provided to reduce the risk resulting from becoming entangled in or tripping over a longer cord.CAUTION: Do not use an extension cord.• Any maintenance servicing should be performed by an authorized service representative• Using tap water may shorten the life of the unit. We recommend Distilled Water for best performance.
SAVE THESE INSTRUCTIONSParts of the Warmer:1. Warmer Base2. Controls3. Warming Chamber4. Basket5. Storage Caps
OPERATING INSTRUCTIONSAlways UNPLUG the warmer before filling.1. Firmly hold the warmer base and with the basket in place, twist the warming chamber counter-clockwise. Lift and remove the basket and warming chamber from the base.2. Add water to the inner rim indicated by the arrow.3. Reinstall warming chamber and plug in the power cord.
1 32
4
31
2
5
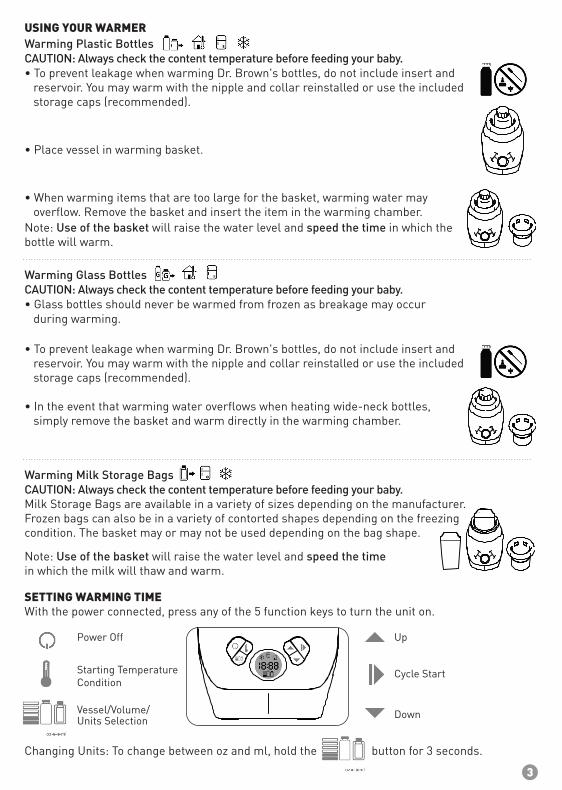
USING YOUR WARMERWarming Plastic BottlesCAUTION: Always check the content temperature before feeding your baby.• To prevent leakage when warming Dr. Brown's bottles, do not include insert and reservoir. You may warm with the nipple and collar reinstalled or use the included storage caps (recommended).
• Place vessel in warming basket.
• When warming items that are too large for the basket, warming water may overflow. Remove the basket and insert the item in the warming chamber. Note: Use of the basket will raise the water level and speed the time in which the bottle will warm.
Warming Glass BottlesCAUTION: Always check the content temperature before feeding your baby.• Glass bottles should never be warmed from frozen as breakage may occur during warming.
• To prevent leakage when warming Dr. Brown's bottles, do not include insert and reservoir. You may warm with the nipple and collar reinstalled or use the included storage caps (recommended).
• In the event that warming water overflows when heating wide-neck bottles, simply remove the basket and warm directly in the warming chamber.
Warming Milk Storage BagsCAUTION: Always check the content temperature before feeding your baby.Milk Storage Bags are available in a variety of sizes depending on the manufacturer. Frozen bags can also be in a variety of contorted shapes depending on the freezing condition. The basket may or may not be used depending on the bag shape.
Note: Use of the basket will raise the water level and speed the timein which the milk will thaw and warm.
SETTING WARMING TIMEWith the power connected, press any of the 5 function keys to turn the unit on.
Starting Temperature Condition
Up
Cycle Start
DownVessel/Volume/Units Selection
Power Off
Changing Units: To change between oz and ml, hold the button for 3 seconds.
3
4
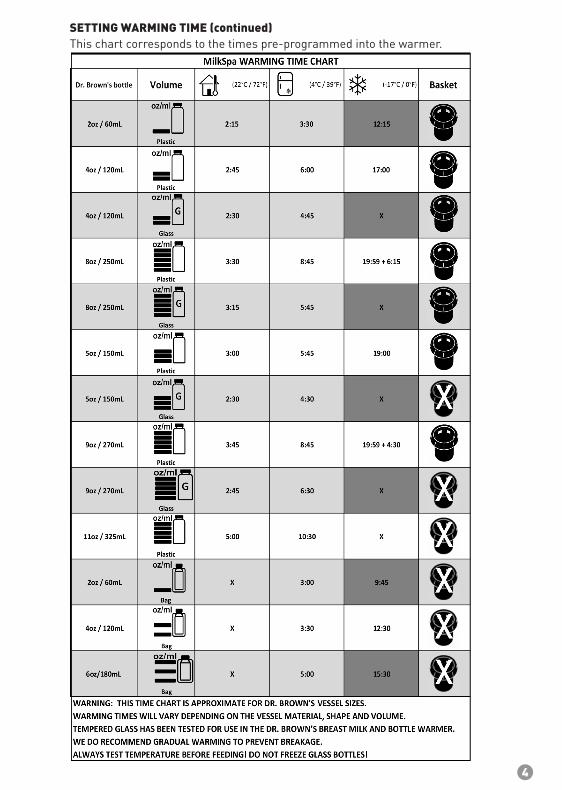
SETTING WARMING TIME (continued)This chart corresponds to the times pre-programmed into the warmer.
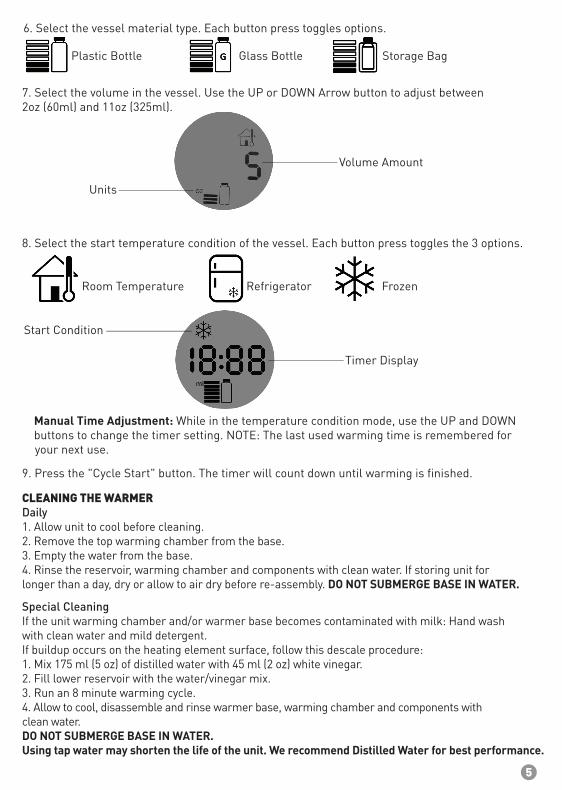
6. Select the vessel material type. Each button press toggles options.
Plastic Bottle Glass Bottle Storage Bag
7. Select the volume in the vessel. Use the UP or DOWN Arrow button to adjust between2oz (60ml) and 11oz (325ml).
8. Select the start temperature condition of the vessel. Each button press toggles the 3 options.
Room Temperature Refrigerator Frozen
Manual Time Adjustment: While in the temperature condition mode, use the UP and DOWN buttons to change the timer setting. NOTE: The last used warming time is remembered for your next use.
9. Press the "Cycle Start" button. The timer will count down until warming is finished.
Volume Amount
Units
Start Condition
Timer Display
CLEANING THE WARMERDaily1. Allow unit to cool before cleaning.2. Remove the top warming chamber from the base.3. Empty the water from the base.4. Rinse the reservoir, warming chamber and components with clean water. If storing unit for longer than a day, dry or allow to air dry before re-assembly. DO NOT SUBMERGE BASE IN WATER.
Special CleaningIf the unit warming chamber and/or warmer base becomes contaminated with milk: Hand washwith clean water and mild detergent.If buildup occurs on the heating element surface, follow this descale procedure:1. Mix 175 ml (5 oz) of distilled water with 45 ml (2 oz) white vinegar.2. Fill lower reservoir with the water/vinegar mix.3. Run an 8 minute warming cycle.4. Allow to cool, disassemble and rinse warmer base, warming chamber and components withclean water.DO NOT SUBMERGE BASE IN WATER.Using tap water may shorten the life of the unit. We recommend Distilled Water for best performance.
5
6
TROUBLESHOOTINGIf the warmer is not operating, check that:1. The power cable is connected to the power outlet.2. The water is filled to the proper level.3. The unit is correctly assembled.4. If display shows the error “ERR"-"H2O”, the warmer has low water condition. Unplug from power. Fill water to the correct level. Reconnect to Power.5. Water overflowing from the warming chamber: This can occur if the bottle has a very large diameter such as with a wide-neck glass bottle with silicone sleeve. Remove the basket and warm bottle directly in the warming chamber.
WARRANTY This warming appliance is warranted against defective material or workmanship for a period of one year from the date of purchase. Any defective part will be repaired or replaced at no charge if it has not been tampered with and appliance has been used according to these printed instructions. This Warranty gives you specific legal rights as well as other rights which vary from state to state.
CUSTOMER SERVICE If you experience unsatisfactory operation or have any questions/comments, call Handi-Craft’s Customer Service at 1-800-778-9001, send an email to [email protected], or write to Handi-Craft Company, Customer Service, 4433 Fyler Avenue, St. Louis, Missouri 63116 USA. Our Customer Service Representative will advise you how to correct the problem yourself, or will ask you to return the product for repair or replacement.
FCC Compliance Statement This device complies with Part 18 of the FCC Rules, Importer: Handi-Craft Company Inc., Address: 4433 Fyler Ave., St. Louis, MO 63116.This product has been tested and complies with the requirements for Federal Communica-tions Commission, Part 18 for Radio/TV/Communication interference. Although tested, it may affect these devices. If the humidifier is found to interfere, separate the device and/or the humidifier. Conduct only the user maintenance found in this manual. Other maintenance and servicing can cause harmful interference and can void the required FCC compliance. If this equipment does cause harmful interference to radio or television reception which can be determined by turning the equipment off and on, the user is encouraged to try to correct interference by one or more of the following measures:- Reorient or relocate the receiving antenna. - Increase the separation between the equipment and receiver. - Connect the equipment into an outlet on circuit different from that to which the receiveris connected. - Consult the dealer or an experienced radio/TV technician for help.
WSW001_F1