Microwave Oven - GE Appliances - Kitchen Appliances, Refrigerator
32
Microwave Oven Owner’s Manual 700 Watts Model: JES738 2 25 Helpful Information Microwave Terms 25 Care and Cleaning 26 28 If Something Goes Wrong Troubleshooting Tips 28 GE Service Numbers 31 Warranty Back Cover GE Appliances 11 Important Safety Information Precautions to Avoid Possible Exposure to Excessive Microwave Energy 2 Special Notes About Microwaving 6 Operating Instructions Features of Your Microwave 11 The Controls on Your Microwave 12 Time Cooking 15 Automatic Cooking 18 Other Features 22
Transcript of Microwave Oven - GE Appliances - Kitchen Appliances, Refrigerator

Microwave OvenOwner’s Manual
700 WattsModel: JES738
2
25Helpful InformationMicrowave Terms 25Care and Cleaning 26
28If Something Goes WrongTroubleshooting Tips 28GE Service Numbers 31Warranty Back Cover
GE Appliances
11
Important Safety InformationPrecautions to Avoid Possible Exposure
to Excessive Microwave Energy 2Special Notes About Microwaving 6
Operating InstructionsFeatures of Your Microwave 11The Controls on Your Microwave 12Time Cooking 15Automatic Cooking 18Other Features 22

2
IMPORTANT SAFETY INFORMATION
READ ALL SAFETYINFORMATION BEFORE USING
FOR YOURSAFETY
PRECAUTIONSTO AVOIDPOSSIBLEEXPOSURE TO EXCESSIVEMICROWAVEENERGY
For your safety the information in this manualmust be followed to minimize the risk of fire or explosion or to prevent property damage,personal injury or loss of life.
Do Not Attempt to operate this ovenwith the door opensince open-dooroperation can result in harmful exposure to microwave energy. It is important not todefeat or tamper withthe safety interlocks.
Do Not Place any objectbetween the oven frontface and the door orallow soil or cleanerresidue to accumulateon sealing surfaces.
Do Not Operate the oven if it is damaged. It isparticularly importantthat the oven door closeproperly and that thereis no damage to the:
1 door (bent),2 hinges and latches
(broken or loosened),3 door seals and sealing
surfaces.
The Oven Should Not be adjusted or repairedby anyone exceptproperly qualifiedservice personnel.

3
Welcome
Write down the model and serial numbers here.They are on a label insidethe oven.
Model number
Serial number
Date of purchase
Staple your receipt to theinside back cover of thismanual. You will need it to make a warranty claim.
Read this manual. It contains instructions tohelp you use and maintainyour microwave properly.
If you received a damagedoven…immediately contactthe dealer (or builder)that sold you the oven.
Save time and money. Check the section titled “If Something GoesWrong.” This section helps you solve commonproblems that might occur.
Need Help?
Start Here!…Before using your Microwave

When using electrical appliances, basic safety precautions should be followed, includingthe following:
WARNING
• Read and follow thespecific “Precautions toAvoid Possible Exposureto Excessive MicrowaveEnergy” on page 2.
• This appliance must begrounded. Connect onlyto properly groundedoutlet. See GroundingInstructions section onpage 9.
• Do not mount thisappliance over a sink.
• Install or locate thisappliance only inaccordance with theprovided InstallationInstructions.
• Be certain to place thefront surface of the doorthree inches or moreback from the countertopedge to avoid accidentaltipping of the appliancein normal usage.
• Do not mount themicrowave oven over or near any portion of a heating or cookingappliance.
• Do not store anythingdirectly on top of themicrowave oven surfacewhen the oven is inoperation.
• Do not operate anyheating or cookingappliance beneath this microwave.
• Use this appliance onlyfor its intended use asdescribed in this guide.Do not use corrosivechemicals or vapors inthis appliance. Thismicrowave oven isspecifically designed toheat, dry or cook food,and is not intended for laboratory orindustrial use.
This microwave oven isnot approved or testedfor marine use.
SAFETYPRECAUTIONS
4
IMPORTANT SAFETY INFORMATION
READ ALL SAFETYINFORMATION BEFORE USING

• Do not operate thisappliance if it has adamaged power cord orplug, if it is not workingproperly or if it has beendamaged or dropped.
• Do not cover or block any openings on theappliance.
• Do not store thisappliance outdoors. Do not use this productnear water---for example,in a wet basement, near a swimming pool, near a sink or in similarlocations.
• Keep power cord awayfrom heated surfaces.
• Do not immerse powercord or plug in water.
• Do not let power cordhang over edge of tableor counter.
• To reduce the risk of firein the oven cavity:
— Do not overcook food.Carefully attendappliance when paper,plastic or other combustible materialsare placed inside theoven while cooking.
— Remove wire twist-tiesand metal handles from paper or plasticcontainers beforeplacing them in theoven.
— Do not use the oven for storage purposes. Do not leave paperproducts, cookingutensils or food in theoven when not in use.
— If materials inside ovenignite, keep the ovendoor closed, turn theoven off and disconnectthe power cord, or shutoff power at the fuse orcircuit breaker panel. If the door is opened,the fire may spread.
• See door surfacecleaning instructions inthe Care and Cleaningsection(s) of this guide.
• GE does not support any servicing of themicrowave. We stronglyrecommend that you donot attempt to service the microwave yourself.
• As with any appliance,close supervision isnecessary when used by children.
SAVE THESE INSTRUCTIONS
5

IMPORTANT SAFETY INFORMATION
SPECIAL NOTES ABOUT MICROWAVING
Arcing is the microwaveterm for sparks in theoven. Arcing is caused by:
• Metal or foil touchingthe side of the oven.
• Foil not molded to food(upturned edges act likeantennas).
• Metal, such as twist-ties,poultry pins, or gold-rimmed dishes, in the microwave.
• Recycled paper towelscontaining small metalpieces being used in the microwave.
If you see arcing, pressthe STOP/CLEAR padand correct the problem.
ARCING
• Do not pop popcorn inyour microwave ovenunless in a specialmicrowave popcornaccessory or unless youuse popcorn labeled foruse in microwave ovens.
• Some products such aswhole eggs and sealedcontainers---for example,closed jars---are able toexplode and should notbe heated in thismicrowave oven. Such useof the microwave ovencould result in injury.
• Do not boil eggs in amicrowave oven. Pressurewill build up inside eggyolk and will cause it toburst, possibly resultingin injury.
• Operating the microwavewith no food inside formore than a minute ortwo may cause damage tothe oven and could start afire. It increases the heataround the magnetronand can shorten the lifeof the oven.
• Foods with unbrokenouter “skin” such aspotatoes, hot dogs,sausages, tomatoes,apples, chicken livers and other giblets, andegg yolks should bepierced to allow steam to escape duringcooking.
FOODS
6

7
SAFETY FACTSUPERHEATED WATER
Liquids, such as water,coffee or tea are able to be overheated beyond the boiling point withoutappearing to be boiling.Visible bubbling or boilingwhen the container isremoved from the microwaveoven is not always present.THIS COULD RESULT IN VERY HOT LIQUIDSSUDDENLY BOILING OVERWHEN THE CONTAINER ISDISTURBED OR A SPOON OR OTHER UTENSIL ISINSERTED INTO THE LIQUID.
To reduce the risk of injuryto persons:
— Do not overheat theliquid.
— Stir the liquid bothbefore and halfwaythrough heating it.
— Do not use straight-sidedcontainers with narrownecks.
— After heating, allow thecontainer to stand inthe microwave oven fora short time beforeremoving the container.
— Use extreme care wheninserting a spoon orother utensil into thecontainer.
• Avoid heating baby foodin glass jars, even withthe lid off. Make sure allinfant food is thoroughlycooked. Stir food todistribute the heat evenly.Be careful to preventscalding when warmingformula. The containermay feel cooler than theformula really is. Alwaystest the formula beforefeeding the baby.
• Don’t defrost frozenbeverages in narrow-necked bottles (especiallycarbonated beverages).Even if the container isopened, pressure canbuild up. This can causethe container to burst,possibly resulting ininjury.
• Hot foods and steam can cause burns. Becareful when opening any containers of hotfood, including popcornbags, cooking pouchesand boxes. To preventpossible injury, directsteam away from handsand face.
• Do not overcookpotatoes. They coulddehydrate and catch fire, causing damage to your oven.
• Cook meat and poultrythoroughly---meat to at least an INTERNALtemperature of 160°F and poultry to at least anINTERNAL temperature of 180°F. Cooking to thesetemperatures usuallyprotects against foodborneillness.

IMPORTANT SAFETY INFORMATION
SPECIAL NOTES ABOUT MICROWAVING
Make sure all cookwareused in your microwaveoven is suitable formicrowaving. Most glasscasseroles, cooking dishes,measuring cups, custardcups, pottery or chinadinnerware which does nothave metallic trim or glazewith a metallic sheen canbe used. Some cookware is labeled “suitable formicrowaving.”
• If you are not sure if adish is microwave-safe,use this test: Place in theoven both the dish youare testing and a glassmeasuring cup filled with1 cup of water—set themeasuring cup either in or next to the dish.Microwave 1 minute athigh. If the dish heats, it should not be used for microwaving.
If the dish remains cooland only the water in thecup heats, then the dishis microwave-safe.
• If you use a meat thermometer whilecooking, make sure it is safe for use inmicrowave ovens.
• Do not use recycledpaper products. Recycledpaper towels, napkinsand waxed paper cancontain metal fleckswhich may cause arcingor ignite. Paper productscontaining nylon ornylon filaments shouldbe avoided, as they mayalso ignite.
• Some styrofoam trays (like those that meat ispackaged on) have a thinstrip of metal embeddedin the bottom. Whenmicrowaved, the metal canburn the floor of the ovenor ignite a paper towel.
• Do not use the microwaveto dry newspapers.
• Not all plastic wrap issuitable for use inmicrowave ovens. Checkthe package for proper use.
• Paper towels, waxedpaper and plastic wrapcan be used to coverdishes in order to retainmoisture and preventspattering. Be sure tovent plastic wrap so steamcan escape.
• Cookware may becomehot because of heattransferred from theheated food. Pot holdersmay be needed to handlethe cookware.
• “Boilable” cookingpouches and tightlyclosed plastic bags shouldbe slit, pierced or ventedas directed by package. If they are not, plasticcould burst during orimmediately aftercooking, possibly resultingin injury. Also, plasticstorage containers shouldbe at least partiallyuncovered because theyform a tight seal. Whencooking with containerstightly covered withplastic wrap, removecovering carefully anddirect steam away fromhands and face.
MICROWAVE-SAFECOOKWARE
8
How to test for a microwave-safe dish.

GROUNDING INSTRUCTIONS
• Use foil only as directedin this guide. TV dinnersmay be microwaved infoil trays less than 3/4″high; remove the top foilcover and return the trayto the box. When usingfoil in the microwaveoven, keep the foil at least 1″ away from the sides of the oven.
• Plastic cookware—Plasticcookware designed formicrowave cooking is veryuseful, but should be usedcarefully. Even microwave-safe plastic may not be astolerant of overcookingconditions as are glass orceramic materials and maysoften or char if subjectedto short periods ofovercooking. In longerexposures to overcooking,the food and cookwarecould ignite.
Follow these guidelines:
1 Use microwave-safeplastics only and use them in strict compliance with the cookwaremanufacturer’srecommendations.
2 Do not microwave emptycontainers.
3 Do not permit children to use plastic cookwarewithout completesupervision.
WARNINGImproper use of thegrounding plug can result in a risk of electric shock.
This appliance must begrounded. In the event ofan electrical short circuit,grounding reduces the risk of electric shock byproviding an escape wirefor the electric current.This appliance is equippedwith a power cord having a grounding wire with agrounding plug. The plugmust be plugged into anoutlet that is properlyinstalled and grounded.
Consult a qualified electricianor service technician if thegrounding instructions arenot completely understood,or if doubt exists as towhether the appliance isproperly grounded.
If the outlet is a standard 2-prong wall outlet, it isyour personal responsibilityand obligation to have itreplaced with a properlygrounded 3-prong walloutlet.
Do not under anycircumstances cut orremove the third (ground) prong from the power cord.
For best operation, plug this appliance into its own electrical outlet toprevent flickering of lights,blowing of fuse or trippingof circuit breaker.
GROUNDINGINSTRUCTIONS
Ensure proper groundexists before use.
PREFERREDMETHOD
9

IMPORTANT SAFETY INFORMATION
GROUNDING INSTRUCTIONS
Usage situations whereappliance’s power cord will be disconnected infrequently.
Because of potential safetyhazards under certainconditions, we stronglyrecommend against the use of an adapter plug.However, if you still elect to use an adapter, wherelocal codes permit, a TEMPORARYCONNECTION may be made to a properlygrounded two-prong wallreceptacle by the use of a UL listed adapter which is
available at most localhardware stores.
The larger slot in theadapter must be alignedwith the larger slot in thewall receptacle to provideproper polarity in theconnection of the powercord.
CAUTION: Attaching theadapter ground terminal to the wall receptacle coverscrew does not ground theappliance unless the coverscrew is metal, and notinsulated, and the wallreceptacle is groundedthrough the house wiring.
You should have the circuit checked by aqualified electrician to make sure the receptacle is properly grounded.
When disconnecting thepower cord from the
adapter, always hold theadapter with one hand. Ifthis is not done, the adapterground terminal is verylikely to break with repeateduse. Should this happen,DO NOT USE the applianceuntil a proper ground hasagain been established.
Usage situations whereappliance’s power cord willbe disconnected frequently.
Do not use an adapter plugin these situations becausefrequent disconnection ofthe power cord placesundue strain on the adapterand leads to eventual failureof the adapter groundterminal. You should havethe two-prong wallreceptacle replaced with athree-prong (grounding)receptacle by a qualifiedelectrician before using the appliance.
ADAPTER PLUGS
A short power supply cord isprovided to reduce the risksresulting from becomingentangled in or tripping overa longer cord.
Extension cords may be usedif you are careful in usingthem.
If an extension cord is used—
1 The marked electricalrating of the extensioncord should be at least asgreat as the electricalrating of the appliance;
2 The extension cord mustbe a grounding-type 3-wire cord and it must be plugged into a 3-slotoutlet;
3 The extension cordshould be arranged sothat it will not drape overthe countertop or tabletopwhere it can be pulled onby children or trippedover unintentionally.
If you use an extension cord,the interior light may flickerand the blower sound mayvary when the microwaveoven is on. Cooking timesmay be longer, too.
EXTENSIONCORDS
Ensure proper groundand firm connectionbefore use.
TEMPORARYMETHOD
Align largeprongs/slots
(Adapter plugs notpermitted in Canada)
10

Operating Instructions
Features of Your Microwave(Throughout this manual, features and appearancemay vary from your model.)
1 Door Latches.
2 Window with MetalShield. Screen allowscooking to be viewedwhile keepingmicrowaves confined in the oven.
3 Touch Control PanelDisplay.
4 Door Latch Release.Press latch release to open door.
5 Removable Turntable.Turntable and supportmust be in place whenusing the oven. Theturntable may beremoved for cleaning.
6 Convenience Guide.
NOTE: Rating plate, ovenvent(s) and oven light arelocated on the inside wallsof the microwave oven.
Features
21 6
5 4
3
11
700 Watts

Time Features
Press Enter
TIME COOK (Press once, twice or three times) Amount of cooking time.
30 SEC. Starts automatically!
POWER LEVEL Power level 1–9 (automatically set at Hi).
12
Quick Start
The Controls on Your Microwave Oven(Throughout this manual, features and appearance may vary from your model.)
TIME COOK
POWERLEVEL
30 SEC
1
You canmicrowave by time or with theconveniencefeatures.

Press Enter
POPCORN 3.5 oz., 3.0 oz. or 1.75 oz. package
PIZZA 1–3 slices
BEVERAGE 1 cup (8 oz.) or 2 cups (16 oz.) beverage
POTATO 1–4 servings
VEGETABLE 1–4 cups
REHEAT Food type, serving size
AUTO DEFROST Food type, food weight
Convenience Features
13
REHEAT
POPCORN BEVERAGE
VEGETABLEPOTATO
PIZZA
AUTO DEFROST
* * *
2
GUIDE ON MICROWAVEBefore you begin, check the guide locatedon the inside front of the oven when youopen the door.
GUIDES IN BOOK• Cooking

Operating Instructions
Variable power levels addflexibility to microwavecooking. The power levelson the microwave oven can be compared to thesurface units on a range.Power level Hi or fullpower is the fastest way tocook and gives you 100%power. Each power levelgives you microwaveenergy a certain percent ofthe time. Power level 7 ismicrowave energy 70% ofthe time. Power level 3 isenergy 30% of the time.
A high setting will cookfaster but food may needmore frequent stirring,rotating or turning over.Most cooking will be doneon power level Hi. A lowersetting will cook moreevenly and need lessstirring or rotating of the food.
Some foods may havebetter flavor, texture orappearance if one of thelower settings is used. Usea lower power level whencooking foods that have a tendency to boil over,such as scalloped potatoes.
Rest periods (when themicrowave energy cyclesoff) give time for the food
to “equalize” or transferheat to the inside of thefood. An example of this isshown with power level 3—the defrost cycle. Ifmicrowave energy did notcycle off, the outside of thefood would cook beforethe inside was defrosted.
Here are some examples of uses for various powerlevels:
Power Level Best Uses
Hi Fish, bacon, vegetables, boiling liquids.
Med-High 7 Gentle cooking of meat and poultry; baking casserolesand reheating.
Medium 5 Slow cooking and tenderizingsuch as stews and less tender cuts of meat.
Low 2 or 3 Defrosting without cooking; simmering; delicate sauces.
Warm 1 Keeping food warm without overcooking; softening butter.
How to Change the Power Level The power level may be entered or changedimmediately afterentering the featuretime for TIME COOK.
1 Press TIME COOK.
2 Enter cooking time.
3 Press POWER LEVEL.
4 Select desired powerlevel 1–9.
5 Press START.
Changing PowerLevels
1 32
5 6
7 8 9
0
4
POWERLEVEL
START
14

Time Features
Time Cook IAllows you to microwavefor any time up to 99minutes and 99 seconds.
Power level Hi isautomatically set, but you may change it formore flexibility.
You may open the doorduring Time Cook tocheck the food. Close thedoor and press START to resume cooking.
Time Cook II & IIILets you change powerlevels automatically duringcooking. Here’s how to do it:
1 Press TIME COOK.
2 Enter the first cook time.
3 Change the power level if you don’t want fullpower. (Press POWERLEVEL. Select a desiredpower level 1–9.)
4 Press TIME COOKagain.
5 Enter the second cooktime.
6 Change the power level if you don’t want fullpower. (Press POWERLEVEL. Select a powerlevel 1–9.)
7 Press START, or, to set a third cooking stage,repeat steps 4–6 andpress START.
Time Cook I will countdown first, followed byTime Cook II, then TimeCook III. If an AutoDefrost stage was set, it will count down beforethe Time Cook stages.
Time Cook allows you to program up to threedifferent cooking stages.In addition, you can also set one AutoDefrost stage for a totalof four stages. See theAuto Defrost section for instructions on how to set Auto Defrost.
1 Press TIME COOK.
2 Enter cooking time.
3 Change power level if you don’t want fullpower. (Press POWERLEVEL. Select a desiredpower level 1–9.)
4 Press START.
Time Cook
1 32
5 6
7 8 9
0
4
TIME COOK
START
15

16
Operating Instructions
Cooking Guide for Time Cook
NOTE: Use power level Hi unless otherwise noted.
Vegetable Amount Time Comments
Asparagus(fresh spears) 1 lb. 7 to 10 min., In 11⁄2-qt. casserole, place 1/4 cup water.
Med-High (7)(frozen spears) 10-oz. package 5 to 8 min. In 1-qt. casserole.
Beans(fresh green) 1 lb. cut in half 12 to 17 min. In 11⁄2-qt. casserole, place 1/2 cup water.(frozen green) 10-oz. package 6 to 9 min. In 1-qt. casserole, place 2 tablespoons
water.(frozen lima) 10-oz. package 6 to 9 min. In 1-qt. casserole, place 1/4 cup water.
Beets(fresh, whole) 1 bunch 18 to 25 min. In 2-qt. casserole, place 1/2 cup water.
Broccoli(fresh cut) 1 bunch 7 to 10 min. In 2-qt. casserole, place 1/2 cup water.
(11⁄4 to 11⁄2 lbs.)(fresh spears) 1 bunch 9 to 13 min. In 2-qt. casserole, place 1/4 cup water.
(11⁄4 to 11⁄2 lbs.)(frozen, 10-oz. package 5 to 8 min. In 1-qt. casserole.chopped)(frozen spears) 10-oz. package 5 to 8 min. In 1-qt. casserole, place 3 tablespoons
water.
Cabbage(fresh) 1 medium head 8 to 13 min. In 11⁄2- or 2-qt. casserole, place 1/4 cup
(about 2 lbs.) water.(wedges) 7 to 14 min. In 2- or 3-qt. casserole, place 1/4 cup
water.
Carrots(fresh, sliced) 1 lb. 6 to 9 min. In 11⁄2-qt. casserole, place 1/4 cup water.(frozen) 10-oz. package 5 to 8 min. In 1-qt. casserole, place 2 tablespoons
water.
Cauliflower(flowerets) 1 medium head 9 to 14 min. In 2-qt. casserole, place 1/2 cup water.(fresh, whole) 1 medium head 9 to 17 min. In 2-qt. casserole, place 1/2 cup water.(frozen) 10-oz. package 5 to 8 min. In 1-qt. casserole, place 2 tablespoons
water.

17
Vegetable Amount Time Comments
Corn(frozen kernel) 10-oz. package 4 to 8 min. In 1-qt. casserole, place 2 tablespoons
water.
Corn on the cob(fresh) 1 to 5 ears 3 to 5 min. In 2-qt. glass baking dish, place corn.
per ear If corn is in husk, use no water; if corn has been husked, add 1/4 cup water. Rearrange after half of time.
(frozen) 1 ear 5 to 7 min. Place in 2-qt. glass baking dish. 2 to 6 ears 2 to 4 min. Cover with vented plastic wrap.
per ear Rearrange after half of time.
Mixed vegetables(frozen) 10-oz. package 4 to 8 min. In 1-qt. casserole, place 3 tablespoons
water.
Peas(fresh, shelled) 2 lbs. unshelled 9 to 12 min. In 1-qt. casserole, place 1/4 cup water.(frozen) 10-oz. package 4 to 8 min. In 1-qt. casserole, place 2 tablespoons
water.
Potatoes(fresh, cubed, 4 potatoes 11 to 14 min. Peel and cut into 1 inch cubes. Place in white) (6 to 8 oz. each) 2-qt. casserole with 1/2 cup water. Stir
after half of time.(fresh, whole, 1 (6 to 8 oz.) 2 to 5 min. Pierce with cooking fork. Place in sweet or white) center of the oven. Let stand 5 minutes.
Spinach(fresh) 10 to 16 oz. 5 to 8 min. In 2-qt. casserole, place washed spinach.(frozen, 10-oz. package 5 to 8 min. In 1-qt. casserole, place 3 tablespoons chopped water.and leaf)
Squash(fresh, summer 1 lb. sliced 4 to 7 min. In 11⁄2-qt. casserole, place 1/4 cup water.and yellow)(winter, acorn 1 to 2 squash 7 to 11 min. Cut in half and remove fibrous or butternut) (about 1 lb. each) membranes. In 2-qt. glass baking dish,
place squash cut-side-down. Turn cut-side-up after 4 minutes.

Operating Instructions
Time Features
Convenience Features
You can use this featuretwo ways:
• It will add 30 seconds tothe time counting downeach time the pad ispressed.
• It can be used as a quickway to set 30 seconds ofcooking time.
30 Seconds
30 SEC
How to Use the Popcorn Feature
1 Follow packageinstructions. Place the package of popcornin the center of themicrowave.
2 Press POPCORN oncefor a 3.5 ounce packageof popcorn, twice for a 3.0 ounce package or three times for a 1.75 ounce package. The oven startsautomatically.
Popcorn
Use only with prepackagedmicrowave popcorn weighing1.75 to 3.5 ounces.
The Pizza feature is forreheating 1–3 slices ofpizza.
Press PIZZA once for oneslice of pizza, twice for twoslices or three times forthree slices. The oven startsautomatically.
Pizza
PIZZA
POPCORN
18

The Beverage feature worksbest for heating a beveragethat is at room temperature.
Press BEVERAGE once for1 cup (8 oz.), or twice for 2 cups (16 oz.). The ovenstarts automatically.
Beverages heated with theBeverage feature may bevery hot. Remove thecontainer with care.
Beverage
The Potato feature cooks upto four 8–10 ounce potatoes.
Press POTATO. The serving size is automaticallyset at 1, but can be changedby pressing POTATO asecond time for 2 potatoes,
a third time for 3 potatoesor a fourth time for 4potatoes. The oven startsautomatically.
Potato
BEVERAGE
POTATO
19

20
Operating Instructions
Convenience Features
Use the Vegetable featureto cook up to 4 cups offresh vegetables.
Press VEGETABLE once to cook 1 cup of vegetables,twice to cook 2 cups, three times to cook 3 cupsor four times to cook 4 cups. The oven startsautomatically.
Vegetable
VEGETABLE
The Reheat feature reheatspreviously cooked foods.
Press REHEAT once toreheat a plate of leftovers(2–3 foods) or twice toreheat pasta (8–10 oz.).The oven startsautomatically.
Reheat
REHEAT

21
Auto Defrost
Auto Defrost automaticallysets the defrosting timesand power levels to giveeven defrosting results formeats and poultry.
There is a handy guidelocated on the inside frontof the oven.
• Remove meat frompackage and place onmicrowave-safe dish.
• Twice during defrost, the oven signals. At eachsignal, turn the food over.Remove defrosted meator shield warm areas withsmall pieces of foil.
• After defrosting, mostmeats need to stand 5 minutes to completedefrosting.
Conversion Guide
If the weight of food isstated in pounds andounces, the ounces mustbe converted to tenths(.1) of a pound.
Weight of Enter Food Food in Weight Ounces (tenths of
a pound)
1–2 .1
3 .2
4–5 .3
6–7 .4
8 .5
9–10 .6
11 .7
12–13 .8
14–15 .9
Auto Defrost Guide
Auto Defrost will defrost0.1 lbs to 6.0 lbs(0.1 kg to 4.0 kg) of meator poultry.
1 Meat: Beef---ground beef, roasts Pork---roasts
2 Poultry: Poultry---whole (under 4 lbs), boneless cut-up breastsCornish hens---wholeTurkey---breast (under 6 lbs)
3 Steaks/Chops: Beef---steaks, stew meat Lamb---chops, roastsPork---chops, hot dogs, ribs, sausagesVeal---cutlets
1 Press AUTO DEFROST1–3 times to select thedesired defrostingcategory (see AutoDefrost Guide at right).
2 Using the ConversionGuide at right, enterfood weight. Forexample, press pads 1 and 2 for 1.2 pounds (1 pound, 3 ounces).
3 Press START.
Guide
AUTO DEFROST
* * *
1 32
5 6
7 8 9
0
4
START
Operating Instructions
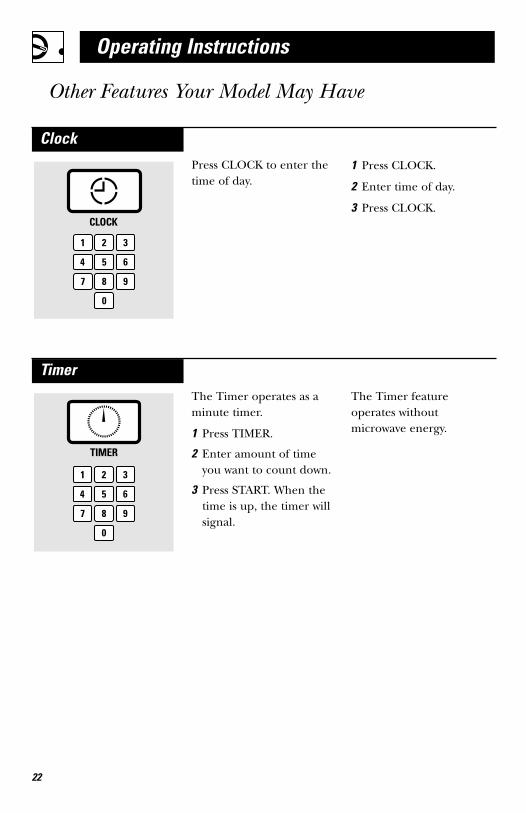
Other Features Your Model May Have
Press CLOCK to enter thetime of day.
1 Press CLOCK.
2 Enter time of day.
3 Press CLOCK.
Clock
1 32
5 6
7 8 9
0
4
CLOCK
22
The Timer operates as aminute timer.
1 Press TIMER.
2 Enter amount of timeyou want to count down.
3 Press START. When thetime is up, the timer willsignal.
The Timer featureoperates withoutmicrowave energy.
Timer
1 32
5 6
7 8 9
0
4
TIMER

23
Press once to pausecooking (all settings will be saved).
Press START to continuecooking.
Press twice to stop anderase your cookingsettings.
Stop/Clear
STOPCLEAR
You may lock the controlpanel to prevent themicrowave from beingaccidentally started or usedby children.
To lock or unlock thecontrols, press and hold 0for about three seconds.When the control panel is locked, LOCK or L appears in the display.
Child Lock-Out
0

24
Notes

25
Arcing Arcing is the microwave term for sparks in the oven. Arcing is caused by:
• metal or foil touching the side of the oven.
• foil that is not molded to food (upturned edges act like antennas).
• metal such as twist-ties, poultry pins, gold-rimmed dishes.
• recycled paper towels containing small metal pieces.
Covering Covers hold in moisture, allow for more even heating and reduce cooking time. Venting plastic wrap or covering with wax paper allows excess steam to escape.
Shielding In a regular oven, you shield chicken breasts or baked foods to prevent over-browning. When microwaving, you use small strips of foil to shield thin parts, such as the tips of wings and legs on poultry,which would cook before larger parts.
Standing Time When you cook with regular ovens, foods such as roasts or cakes are allowed to stand to finish cooking or to set. Standing time is especially important in microwave cooking. Note that a microwaved cake is not placed on a cooling rack.
Venting After covering a dish with plastic wrap, you vent the plastic wrap by turning back one corner so excess steam can escape.
Term Definition
Helpful Information
Microwave Terms

26
An occasional thoroughwiping with a solution ofbaking soda and waterkeeps the inside fresh.
UNPLUG THE CORD BEFORECLEANING ANY PART OFTHIS OVEN.
Helpful Hints
Walls, Floor, Inside Window,Metal and Plastic Parts onthe Door
Some spatters can beremoved with a papertowel, others may require a damp cloth. Removegreasy spatters with a sudsycloth, then rinse with adamp cloth. Do not useabrasive cleaners or sharputensils on oven walls. To clean the surface of the door and the surfaceof the oven that cometogether upon closing, use only mild, nonabrasivesoaps or detergents using asponge or soft cloth. Rinsewith a damp cloth and dry.
Never use a commercialoven cleaner on any part of your microwave.
Removable Turntable andTurntable Support
To prevent breakage, do not place the turntableinto water just aftercooking. Wash it carefullyin warm, sudsy water or in the dishwasher. Theturntable and support can be broken if dropped.Remember, do not operatethe oven without theturntable and support in place.
How to Clean the Inside
Helpful Information
Care and Cleaning

27
Case
Clean the outside of themicrowave with a sudsycloth. Rinse and then dry.Wipe the window cleanwith a damp cloth.
Control Panel and Door
Wipe with a damp cloth.Dry thoroughly. Do not use cleaning sprays, largeamounts of soap and water,abrasives or sharp objectson the panel—they candamage it. Some papertowels can also scratch the control panel.
Door Surface
It’s important to keep the area clean where thedoor seals against themicrowave. Use only mild,non-abrasive detergentsapplied with a clean spongeor soft cloth. Rinse well.
Power Cord
If the cord becomes soiled,unplug and wash with adamp cloth. For stubbornspots, sudsy water may beused, but be certain torinse with a damp clothand dry thoroughly beforeplugging cord into outlet.
Do not use cleanerscontaining ammonia oralcohol on themicrowave oven.Ammonia or alcohol candamage the appearance of the microwave.
How to Clean the Outside

28
Oven will not start
Control panellighted, yet oven will not start
Problem Possible Cause What to Do
A fuse in your home • Replace fuse or reset circuit breaker.may be blown or the circuit breaker tripped.
Power surge. • Unplug the microwave oven, then plug it back in.
Plug not fully inserted • Make sure the 3-prong plug on theinto wall outlet. oven is fully inserted into wall outlet.
Door not • Open the door and close securely.securely closed.
START not pressed • Press START.after entering cookingselection.
Another selection • Press STOP/CLEAR twice.entered already in ovenand STOP/CLEAR notpressed to cancel it.
Cooking time not • Make sure you have entered cooking entered after pressing time after pressing TIME COOK.TIME COOK.
STOP/CLEAR was • Reset cooking program and press pressed accidentally. START.
Defrosting category • Make sure you have entered a or food weight not defrosting category and food weight entered after pressing after pressing AUTO DEFROST.AUTO DEFROST.
If Something Goes Wrong
Troubleshooting Tips

• Steam or vapor escapingfrom around the door.
• Light reflection arounddoor or outer case.
• Dimming oven light andchange in the blowersound at power levelsother than high.
• Dull thumping soundwhile oven is operating.
• TV-radio interferencemight be noticed whileusing the microwave.Similar to the interferencecaused by other smallappliances, it does notindicate a problem withthe microwave. Plug themicrowave into a differentelectrical circuit, move theradio or TV as far awayfrom the microwave aspossible, or check theposition and signal of the TV/radio antenna.
Things ThatAre Normal
29

30
Notes

31
GE Service Numbers
We’ll Be There!
www.GEAppliances.com
Have a question or needassistance with yourappliance? Try the GEAppliances Website 24 hoursa day, any day of the year!
For greater convenience andfaster service, you can nowdownload Owner’s Manuals,or even order parts andcatalogs on-line. You can also“Ask Our Team of Experts™”your questions, and so muchmore…
GE AppliancesWebsite
www.GEAppliances.com
800.TDD.GEAC(800.833.4322)
GE supports the UniversalDesign concept---products,services and environmentsthat can be used by peopleof all ages, sizes andcapabilities. We recognizethe need to design for a widerange of physical and mentalabilities and impairments.
For details of GE’s UniversalDesign applications,including kitchen designideas for people withdisabilities, check out our Website today. For the hearing impaired, please call 800.TDD.GEAC(800.833.4322).
Real Life Design Studio
www.GEAppliances.com
800.626.2002
A replacement turntable(WB49X10134) or turntablesupport ring (WB06X10577)is available at extra costfrom our Parts Center andcan be sent directly to yourhome (VISA, MasterCardand Discover cards areaccepted).
Order on-line today, 24 hours every day or by phone at 800.626.2002during normal businesshours.
Accessories
If you are not satisfied withthe service you receivefrom GE, contact us onour Website with all thedetails including yourphone number, or write to:
General Manager,Customer Relations, GE Appliances, Appliance Park,Louisville, KY 40225
Contact Us
www.GEAppliances.com

LIMITED ONE-YEAR WARRANTY
Replacement unit for any product which fails due to a defect in materials or workmanship. The exchange unit is warranted for the remainder of your product’s original one-year warranty period.
************************************
This warranty is extended to the originalpurchaser and any succeeding owner forproducts purchased for ordinary home usewithin the U.S.A.
Exclusion of implied warranties: Except where prohibited or restricted by law, there are no warranties, whetherexpress, oral or statutory which extendbeyond the description on the face hereof,including specifically the impliedwarranties of merchantability or fitness for a particular purpose.
GE Microwave OvenOne Year Limited Warranty
What GE Will Provide
In Order to Make a Warranty Claim
What Is Not Covered
Staple sales slip or cancelled check here. Proof of originalpurchase date is needed to make a warranty claim.
• Customer instruction. This owner’s manualprovides information regarding operatinginstructions and user controls.
• Improper installation, delivery ormaintenance.If you have an installation problem, contactyour dealer or installer. You are responsiblefor providing adequate electrical,exhausting and other connecting facilities.
• Replacement of house fuses or resetting of circuit breakers.
• Failure of the product if it is misused, or used for other than the intendedpurpose or used commercially.
• Damage to product caused by accident,fire, floods or acts of God.
• Incidental or consequential damage causedby possible defects with this appliance.
• Damage caused after delivery.
Some states do not allow the exclusion or limitation of incidental or consequential damages,so the above limitation or exclusion may not apply to you. This warranty gives you specificlegal rights, and you may also have other rights which vary from state to state. To know whatyour legal rights are in your state, consult your local or state consumer affairs office or yourstate’s Attorney General.
Warrantor: General Electric Company. Louisville, KY 40225
• Properly pack your unit. We recommendusing the original carton and packingmaterials.
• Return the product to the retail locationwhere it was purchased.
• Include in the package a copy of thesales receipt or other evidence of date of original purchase. Also print yourname and address and a description of the defect.
164D3370P34049-40418 JES738Printed in China02-04 JR