MicroType 4 Installation Manual - Cengage Learning · MT 4.1 Installation Manual Date: 9/11/2005...
22
Prepared By Approved By Issued By: MicroType 4 Installation Manual Issue Date: 09-09-2005
Transcript of MicroType 4 Installation Manual - Cengage Learning · MT 4.1 Installation Manual Date: 9/11/2005...

Prepared By Approved By Issued By:
MicroType 4 Installation Manual
Issue Date: 09-09-2005

MT 4.1 Installation Manual
Date: 9/11/2005 Version: 1.1 Page No:
2
Contents
1 INTRODUCTION ......................................................................................... 3
2 INDIVIDUAL SETUP.................................................................................... 4
2.1 Minimum System Requirements ............................................................ 4
2.2 Steps to get you started on Single Setup ............................................... 4
2.3 To Start Single Setup MicroType 4....................................................... 15
3 WORKSTATION (SITE) LICENSE INSTALLER ............................................. 16
3.1 Minimum System Requirements .......................................................... 16
3.2 Steps to get you started on Workstation Setup.................................... 16
4 NETWORK INSTALLER .............................................................................. 17
4.1 Minimum System Requirements .......................................................... 17
4.2 Steps to get you started on Network Server ........................................ 17
4.3 Steps to get you started on Remote Client........................................... 18
4.4 To Start MicroType 4 on Network Server ............................................. 21
4.5 To Start MicroType 4 Remote Client..................................................... 22
4.6 Basic Troubleshooting on Network Installation ................................... 22

MT 4.1 Installation Manual
Date: 9/11/2005 Version: 1.1 Page No:
3
1 Introduction
Welcome to MicroType 4.0, the new keyboarding application from Thomson South-Western Educational Publishing. The new software comes with great features like Textbook Keying, Assessment, & on-screen Timed Writings, to name a few features which make learning keyboarding a truly novel experience. This manual contains useful information to assist you during the installation of MicroType 4.0. From fundamental concepts such as installation preparation to the step-by-step installation procedure, this manual will be a valuable resource as you install MicroType 4.0. This manual will walk you through a typical installation using the MicroType 4.0/4.1 CD(s). Once you have completed the installation as outlined in this manual, your application should be properly installed and running smoothly. NOTE: This Installation Manual applies to the following versions of MicroType 4: Individual License: Version 4.1 Site Workstation/Network License: Version 4.1 Home Advantage Edition: Version 4.1
If you are not sure which version you have, refer to the CD label.

MT 4.1 Installation Manual
Date: 9/11/2005 Version: 1.1 Page No:
4
2 Individual Setup
This installer will install MicroType 4.0 on the machine in one of the following modes:
o Full o Standard o Custom
For Standard Installation, it is required that the CD or the Location from where the Installer is being run has the Movies Folder retained whenever MicroType 4 is being used. That folder is the location where the application will try to retrieve the Movies.
2.1 Minimum System Requirements
Before installing the MicroType 4.0 software, make sure that your PC meets these minimum system requirements
• PC (or 100%-compatible) with 233 MHz Pentium II or higher
processor • 128 MB • Hard disk with 350 MB free disk space • Windows 98SE, ME, 2000, XP (SP2) • 8X CD-ROM drive • SoundBlaster compatible sound card and speakers • 800 x 600 monitor capable of displaying 256 colors • IE 5+ • Login as the Administrator of the machine (This is needed for the
SOAP dll registration) 2.2 Steps to get you started on Single Setup
The installation process typically takes a couple of minutes depending upon the speed of your computer. To ensure that the installation process runs smoothly, close all other windows applications that you are running before you begin the actual installation. The instructions outlined below take you through a step-by-step process (with graphical illustrations) to install MicroType 4.0 Single Setup on your system. 1. Insert the MicroType 4 into your CD-ROM drive.
2. Click on Start, go to Run and type x:\MicroType-Single.EXE, where “x” is the letter corresponding to your CD-ROM drive, and tap ENTER. This will get the installer started.
3. The installer first examines your machine for any previous installation of MicroType. While it is searching your computer the following message would be displayed on your screen
‘Checking for Previous Installation’

MT 4.1 Installation Manual
Date: 9/11/2005 Version: 1.1 Page No:
5
While this message is being displayed please wait, this may take some time.
4. Once the search is complete, it displays the Welcome Screen for MicroType 4 as shown in Fig 1. Click on NEXT to continue with the installation process
Fig 1
5. The next screen that comes up is the license agreement screen (Fig 2). Please read the agreement and, if you agree with it, select “I agree.” If you do not accept the conditions of the license, then click on “Cancel” to terminate the installation process. If “I agree” is selected then the Next button becomes active. Click on the “Next” button to continue with the installation process.

MT 4.1 Installation Manual
Date: 9/11/2005 Version: 1.1 Page No:
6
Fig 2
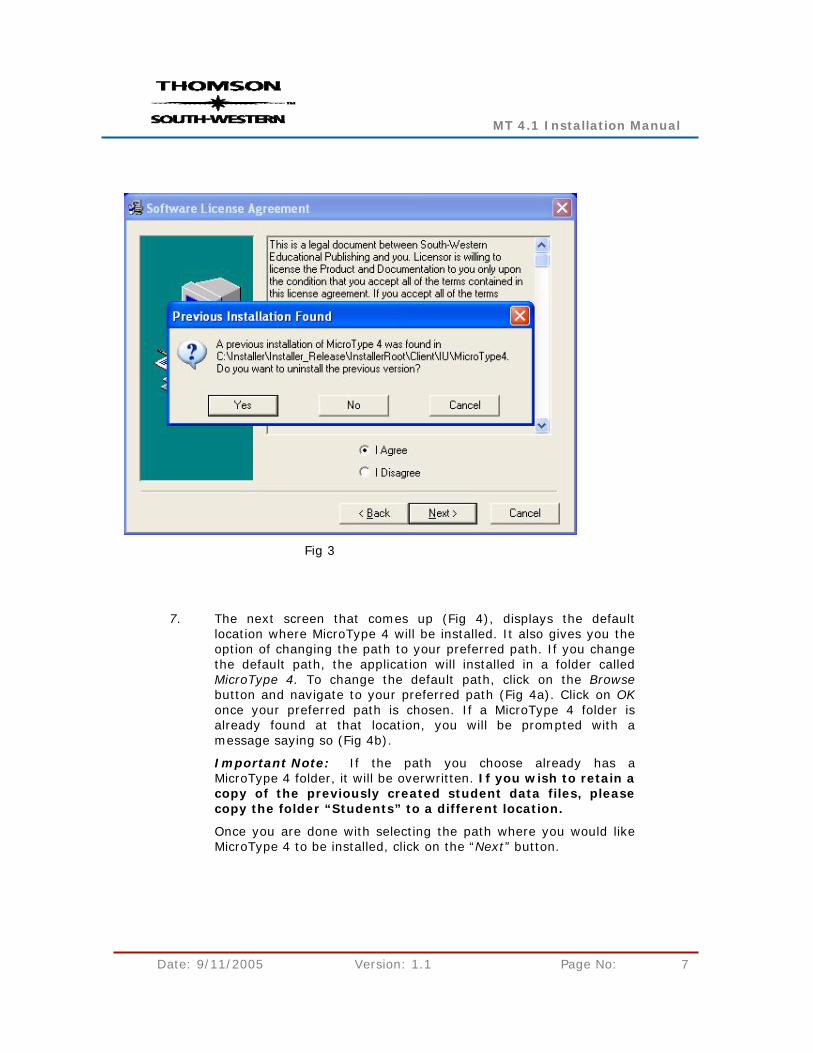
6. If a previous installation of MicroType 4 was found on your machine, the installer now prompts with the option of uninstalling the previous version (Fig 3). The installer also displays the path from where MicroType 4 will be uninstalled. In case you choose to uninstall MicroType 4, the installer will remove the MicroType 4 folder found at the specified path. If you want to retain the previously created student data files, please copy the Student folder found in the specified path to a separate location.
If you choose not to uninstall, the MicroType 4 Folder found at the specified path will be retained.
MT 4.1 Installation Manual
Date: 9/11/2005 Version: 1.1 Page No:
7
Fig 3
7. The next screen that comes up (Fig 4), displays the default location where MicroType 4 will be installed. It also gives you the option of changing the path to your preferred path. If you change the default path, the application will installed in a folder called MicroType 4. To change the default path, click on the Browse button and navigate to your preferred path (Fig 4a). Click on OK once your preferred path is chosen. If a MicroType 4 folder is already found at that location, you will be prompted with a message saying so (Fig 4b).
Important Note: If the path you choose already has a MicroType 4 folder, it will be overwritten. If you wish to retain a copy of the previously created student data files, please copy the folder “Students” to a different location.
Once you are done with selecting the path where you would like MicroType 4 to be installed, click on the “Next” button.

MT 4.1 Installation Manual
Date: 9/11/2005 Version: 1.1 Page No:
8
Fig 4

MT 4.1 Installation Manual
Date: 9/11/2005 Version: 1.1 Page No:
9
Fig 4a
Fig 4b
8. This screen (Fig 5a and 5b) displays the three different modes in which you can install MicroType 4, with a description of what each of the installation mode means. Follow the instructions provided

MT 4.1 Installation Manual
Date: 9/11/2005 Version: 1.1 Page No:
10
on the screen. Click on "Next" once you have chosen the installation mode.
Fig 5a
Fig 5b

MT 4.1 Installation Manual
Date: 9/11/2005 Version: 1.1 Page No:
11
9. Click on “Next” once you have chosen the installation mode. This will display the Distance Learning Options screen. (Fig 6a) On the Distance Learning Options screen, select the “Enable Distance Learning” checkbox, if you want the distance learning options to be enabled. Click on “Next” to continue with the installation.
Note:
If the distance learning option is enabled, a new Configuration file will be created in the root directory where MicroType 4 is installed.
At any point after the installation, if you have to make changes to the URLs that you connect to through the application, you can update them in this Configuration file found at:
<Installation Path>/MicroType 4/distance_learning_url.ini.
This Configuration file has 5 properties that you can update after the installation:
1) Web reporter URL- To change the URL to connect to the Web Reporter through MicroType 4.
For example:
http://webreporter.swlearning.com
2) Register URL – To change the URL when you click on Register Now on the Instructor Verification screen to register an Instructor.
For example:
http://webreporter.swlearning.com/distancelearning/webreporter/ver4/register.html
3) Password URL – To change the URL for the Forgotten Password Link.
For example:
https://ecomtools.thomsonlearning.com/olr/password?template=http://webreporter.swlearning.com/webreporter/password_template.html
4) Web Service WSDL URL – To change the URL of the Web Service WSDL.
For example:
http://<Your m/c name or IP>:<ProxyPort>/WebReporterWebService/WebReporterService
Provider?WSDL

MT 4.1 Installation Manual
Date: 9/11/2005 Version: 1.1 Page No:
12
5) Web Service Provider Name – To change the name of the Web Service Provider.
For example: WebReporterWebServiceProvider
Fig 6a
10. This screen tells you the installer is ready to begin the installation of MicroType 4 on your machine. Click on “Next” to begin installation.
11. The installation process begins and while it is on a progress bar is displayed (Fig 7a and 7b). During the installation process only the “Cancel” button is available to stop the installation at any point of time. The “Next” button is available only after the installation is complete.

MT 4.1 Installation Manual
Date: 9/11/2005 Version: 1.1 Page No:
13
Fig 7a
Fig 7b
12. This screen gives you the option of importing textbooks into the application for use in the Textbook Keying Module (Fig 8a). Browse to the location where the text book xml file can be retrieved (check the Instructor Resource CD for the specific textbook) or specify the URL. (Note: The text keying file should be a valid XML file, using the Thomson Proprietary format). Click on the “Add Textbook to list” to import the XML file. Add as many text books as you want. Click on “Import” to import the textbook(s) into the MicroType 4 application. Once the import is complete, it shows you the status screen (Fig 8b). Click on the “Finish” button to complete the installation process.

MT 4.1 Installation Manual
Date: 9/11/2005 Version: 1.1 Page No:
14
Fig 8a
Fig 8b
13. The last screen displays the MicroType installation status (Fig 9). If you see this screen as shown below – CONGRATULATIONS! You have successfully installed MicroType 4 on your machine.

MT 4.1 Installation Manual
Date: 9/11/2005 Version: 1.1 Page No:
15
Fig 9
2.3 To Start Single Setup MicroType 4
In the Windows Start -> Programs two links will be created
South-Western Keyboarding
MicroType 4 – Single
Remove MicroType 4 – Single
As shown below. Use this link to run MicroType 4 on your machine.

MT 4.1 Installation Manual
Date: 9/11/2005 Version: 1.1 Page No:
16
3 Workstation (Site) License Installer 3.1 Minimum System Requirements
Before installing the MicroType 4.0 software, make sure that your PC meets these minimum system requirements
• PC (or 100%-compatible) with 233 MHz Pentium II or higher
processor • 128 MB • Hard disk with 350 MB free disk space • Windows 98SE, ME, 2000, XP (SP2) • 8X CD-ROM drive • SoundBlaster compatible sound card and speakers • 800 x 600 monitor capable of displaying 256 colors • IE 5+ • Login as the Administrator of the machine (This is needed for the
SOAP dll registration)
3.2 Steps to get you started on Workstation Setup
The installation process typically takes a couple of minutes depending upon the speed of your computer. To ensure that the installation process runs smoothly, close all other windows applications that you are running before you begin the actual installation. The instructions outlined below take you through a step-by-step process (with graphical illustrations) to install MicroType 4.0 Single Setup on your system.
1. Insert the MicroType 4 Disc 1 into your CD-ROM drive.
2. Click on Start, go to Run and type x:\Workstation Install\MicroType-Workstation.EXE, where “x” is the letter corresponding to your CD-ROM drive, and tap ENTER. This will get the installer started.
3. The installer first examines your machine for any previous installation of MicroType. While it is searching your computer the following message would be displayed on your screen
‘Checking for Previous Installation’
While this message is being displayed please wait, this may take some time.
Once the search is complete, it displays the Welcome Screen for MicroType 4 as shown in Fig 1. Click on NEXT to continue with the installation process
To continue the installation, follow the same procedure as for a Single License install beginning on page 5.

MT 4.1 Installation Manual
Date: 9/11/2005 Version: 1.1 Page No:
17
4 Network Installer
4.1 Minimum System Requirements
Before installing the MicroType 4.0 Network Version, make sure that your Network meets these minimum system requirements
Server: Windows 2000/2003/Advanced Server, Novell Netware 4.0, 5.11,
6.0 Client: Windows 98SE, ME, 2000 or XP (SP2) Domain: All machines must be part of a single Domain, controlled by the
domain controller on the Server. All network clients should be accessible from the server and vice versa. The network clients should have the C (local hard) drive accessible (i.e., writable from the server). Windows 98SE and ME Clients should have the RemoteReg tool installed on it (comes by default with 98SE, in the CD) to enable remote access of the Registry on the client machine.
The installation process typically takes a couple of minutes depending on the speed of your Server. To ensure that the installation process runs smoothly, close all other Windows applications that you are running before you begin the actual installation. The network installation is a two step process with the server installation being the first step followed by the client installation.
4.2 Steps to get you started on Network Server
The instructions outlined below describe the process to install MicroType 4.1 Network Server.
1. Verify that your permissions and prerequisites meet the requirements outlined in Section 4.1 above.
2. Insert disc 1 into your CD-ROM drive. Navigate to the MicroType
Server Installation folder.
3. Copy the contents of the folder to a directory on the server. Do not attempt to run the executable from the CD.
4. Click on Start, go to Run, and type x:\path\MicroType-Server.EXE where “x” is the letter corresponding to your drive and “path” is the path to the directory where you copied the contents of Disc 1. This will get the Server Installer started.
5. The installer first searches your Server for any previous installation of MicroType. While it is searching your computer, the following message would be displayed on your screen
“Checking for Previous Installation”

MT 4.1 Installation Manual
Date: 9/11/2005 Version: 1.1 Page No:
18
While this message is being displayed, please wait. This may take some time. Once the search is complete, it displays the Welcome Screen and the license screen. If you accept the license, click on “Next” to continue with the SERVER installation process
This process will install the server version of the software at the path specified by you and share the MicroType 4 folder for access over the network
If a previous installation of the MicroType 4 was found on your Server, the installer prompts you with the option of uninstalling the previous version. The installer also displays the path from where MicroType 4 will be uninstalled. In case you choose to uninstall MicroType 4, the installer will remove the MicroType 4 folder found at the specified path. If you want to retain the previously created student data files, please copy the “Students” folder found in the specified path to a separate location.
If you choose not to uninstall the application, the MicroType 4 folder found at the specified path will be retained.
The server installation is always a FULL installation of MicroType 4, with the Instructor Utility software. IMPORTANT Note: Begin the client installation only after the server installation is complete and successful.
4.3 Steps to get you started on Remote Client Note: Before you begin Remote Client Installation, ensure that the client machines have all applications closed. While the Installation process is on, any application running on the remote client may slow down considerably. The remote client may also reboot on its own, if it is required, without any warning.
The instructions outlined below take you through a step-step process (with graphical illustrations) to install MicroType 4.0 Network Server.
1. Insert the MicroType 4 Disc 2 CD into the CD drive.
2. Copy the entire contents of the Disc 2 CD to a directory on the Server.
3. Click on Start, go to Run, and type x:\path\ MicroTypeClientInstaller.EXE, where “x” is the letter corresponding to your drive and “path” is the path to the directory where you copied the contents of Disc 2. This will get the Client Installer started.
4. The first screen (Screen 1) that comes up lists all computers on the network that the installer has been able to identify (these are the computers that are currently live on the network)
On this screen, select the computers on which the client installation has to be carried out, select the installation type, and click on “Install.”

MT 4.1 Installation Manual
Date: 9/11/2005 Version: 1.1 Page No:
19
Screen 1
5. This will begin the Silent, unattended installation on all the selected
computers. The installation is by default carried out at the location C:\ProgramFiles\MicroType 4
6. For this installation to be successful a disk space of 350 MB is required on
the C drive of the remote client.
7. Once the installation is complete on all the selected computers on the network, the second screen (Screen 2) is displayed. This screen displays to the Administrator the installation status across the selected remote computers.

MT 4.1 Installation Manual
Date: 9/11/2005 Version: 1.1 Page No:
20
Screen 2
For remote computers where installation has failed, the Administrator has the option of re-installing the application, for the second time, by selecting the computers and clicking on NEXT. At this point, having failed remote installation, the installer now tries to manually write into the Registry and copy the .exe onto the client machines. All such machines where this mode of installation is done will require a machine reboot by the Administrator.
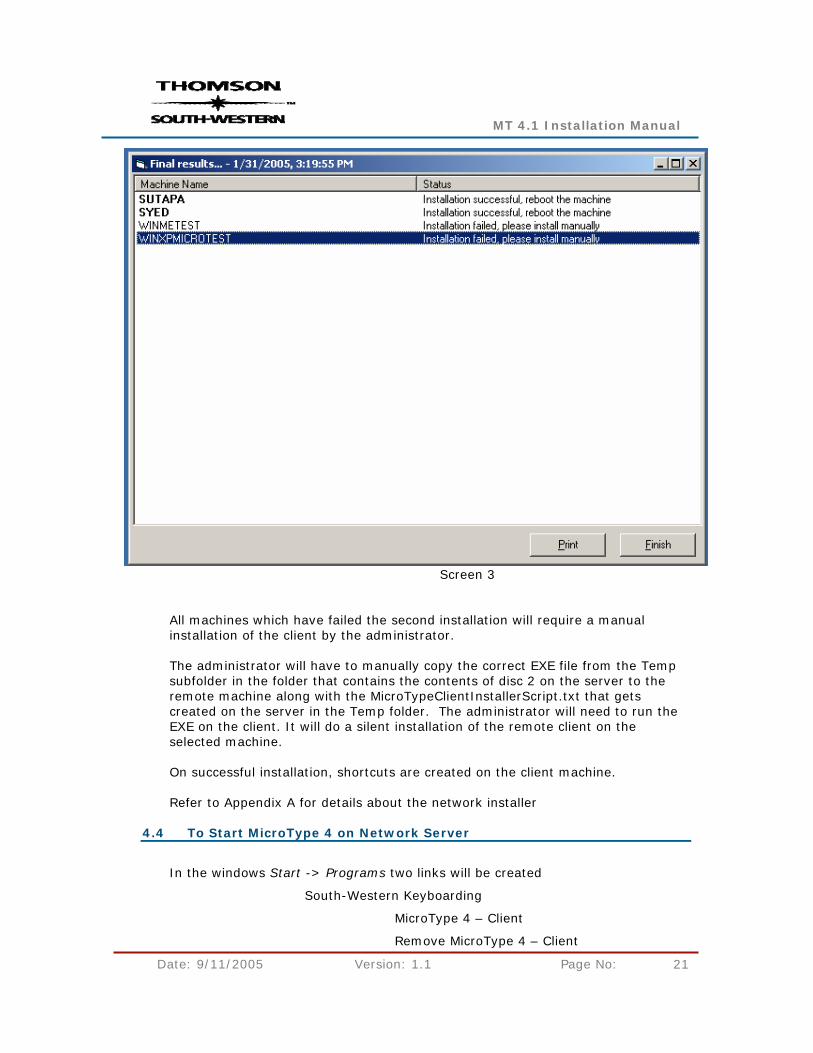
8. On completion of the Second Installation, a report as shown below is displayed to the Administrator giving details of machines that require a reboot (Screen 3).
MT 4.1 Installation Manual
Date: 9/11/2005 Version: 1.1 Page No:
21
Screen 3
All machines which have failed the second installation will require a manual installation of the client by the administrator. The administrator will have to manually copy the correct EXE file from the Temp subfolder in the folder that contains the contents of disc 2 on the server to the remote machine along with the MicroTypeClientInstallerScript.txt that gets created on the server in the Temp folder. The administrator will need to run the EXE on the client. It will do a silent installation of the remote client on the selected machine. On successful installation, shortcuts are created on the client machine. Refer to Appendix A for details about the network installer
4.4 To Start MicroType 4 on Network Server
In the windows Start -> Programs two links will be created
South-Western Keyboarding
MicroType 4 – Client
Remove MicroType 4 – Client

MT 4.1 Installation Manual
Date: 9/11/2005 Version: 1.1 Page No:
22
(as shown below). Use this link to run MicroType 4 on your machine.
4.5 To Start MicroType 4 Remote Client
In the windows Start -> Programs two links will be created
South-Western Keyboarding
MicroType 4 – Client
Remove MicroType 4 – Client
As shown below. Use this link to run MicroType 4 on your machine.
4.6 Basic Troubleshooting on Network Installation
If the network installation fails, there are several settings you can check to possibly rectify the problem. The following conditions MUST exist for the installation to be successful:
• Be sure that you have full domain administrative privileges to the server and the client workstations.
• Make sure that the folders where you have copied the contents of the CDs are Shared folders.
• If clients are running XP, make sure they have been updated to Service Pack 2 (SP 2). MicroType 4 will not run on the Service Pack 1 version of XP.
• MicroType 4 is not certified on terminal services network configurations nor on thin client workstation configurations such as Citrix. The application must conduct real-time calculations on the local machine. All keystroking rate (GWAM) calculations may be affected and not recorded or reported accurately under terminal services or thin client environments.
• MicroType 4 is certified for the WIN 2000, WIN 2003/Advanced, Novell 4.0, 5.11 and 6.0 network operating systems. If you are having difficulty installing on a Novell network, we recommend having a Windows machine running WIN 2000/2003 on which to install MicroType 4.
• If you fail to receive a course code using the Distance Learning feature in the MicroType 4 network installation, you should ensure that you have a valid Thomson log in ID. This is not the same log in you use to access the MicroType application itself.
• It is not possible to test for every possible network configuration. If the network install continues to fail, we recommend installing the Workstation version found on Disc 1 in the Workstation Install directory. The Workstation version must be installed on local machines as described on page 16.
If the above do not resolve your installation issues, please contact Thomson Learning Technical Support at 1-800-423-0563 or email [email protected].