Microsoft SharePoint 2010 Administrator's Pocket ... · Microsoft ® SharePoint 2010...
146
Transcript of Microsoft SharePoint 2010 Administrator's Pocket ... · Microsoft ® SharePoint 2010...

Microsoft® SharePoint 2010Administrator’s Pocket Consultant
Ben Curry with SharePoint Community Experts

� �
PUBLISHED BYMicrosoft PressA Division of Microsoft CorporationOne Microsoft WayRedmond, Washington 98052-6399
Copyright © 2010 by Ben Curry
All rights reserved. No part of the contents of this book may be reproduced or transmitted in any form or by any means without the written permission of the publisher.
Library of Congress Control Number: 2010924443
Printed and bound in the United States of America.
2 3 4 5 6 7 8 9 10 11 QGT 6 5 4 3 2 1
A CIP catalogue record for this book is available from the British Library.
Microsoft Press books are available through booksellers and distributors worldwide. For further infor mation about international editions, contact your local Microsoft Corporation office or contact Microsoft Press International directly at fax (425) 936-7329. Visit our Web site at www.microsoft.com/mspress. Send comments to [email protected].
Microsoft, Microsoft Press, Access, Active Directory, Excel, Fluent, Forefront, InfoPath, IntelliSense, Internet Explorer, MSDN, Outlook, PerformancePoint, PowerPoint, SharePoint, Silverlight, SQL Server, Visio, Visual Studio, Windows, Windows NT, Windows PowerShell, Windows Server and Windows Vista are either registered trademarks or trademarks of the Microsoft group of companies. Other product and company names mentioned herein may be the trademarks of their respective owners.
The example companies, organizations, products, domain names, e-mail addresses, logos, people, places, and events depicted herein are fictitious. No association with any real company, organization, product, domain name, e-mail address, logo, person, place, or event is intended or should be inferred.
This book expresses the author’s views and opinions. The information contained in this book is provided without any express, statutory, or implied warranties. Neither the authors, Microsoft Corporation, nor its resellers, or distributors will be held liable for any damages caused or alleged to be caused either directly or indirectly by this book.
Acquisitions Editor: Martin DelReDevelopmental Editor: Karen SzallProject Editor: Valerie WoolleyEditorial Production: Waypoint Press, www.waypointpress.comTechnical Reviewer: Bob Hogan; Technical Review services provided by Content Master, a member of CM Group, Ltd. Cover: Tom Draper Design
Body Part No. X16-88501

For my dedicated and loving wife. She continues to stand by me through the good times and the bad. I love you, Kim.

Contents at a Glance
Acknowledgments xix
Introduction xxi
PART I DEPLOYING SHAREPOINT SERVER 2010
CHAPTER 1 Deploying SharePoint Server 2010 3
CHAPTER 2 Scaling to a MultiServer Farm 51
CHAPTER 3 Configuring Core Operations 81
CHAPTER 4 Building and Managing Web Applications 109
CHAPTER 5 Creating and Managing Site Collections 141
CHAPTER 6 Configuring Service Applications 181
PART II CONFIGURING SHAREPOINT SERVER 2010
CHAPTER 7 Web Parts, Features, and Solutions 205
CHAPTER 8 Configuring the Search Service Application 239
CHAPTER 9 Managing the Search Experience 265
CHAPTER 10 Enterprise Content Types and Metadata 329
CHAPTER 11 Document Management 361
CHAPTER 12 Records Management 385
CHAPTER 13 Portals and Collaboration 405
CHAPTER 14 User Profiles and My Sites 419
PART III OPERATING SHAREPOINT SERVER 2010
CHAPTER 15 Configuring Policies and Security 451
CHAPTER 16 Monitoring, Logging, and Availability 489
CHAPTER 17 Upgrading to SharePoint Server 2010 517
CHAPTER 18 Backup and Restore 539
APPENDIX A Working with Windows PowerShell and SharePoint 2010 561

vii
What do you think of this book? We want to hear from you! Microsoft is interested in hearing your feedback so we can continually improve our books and learning resources for you. To participate in a brief online survey, please visit:
microsoft.com/learning/booksurvey
ContentsAcknowledgments xix
Introduction x
PART I DEPLOYING SHAREPOINT SERVER 2010
Chapter 1 Deploying SharePoint Server 2010 3
Preparing for Installation . . . . . . . . . . . . . . . . . . . . . . . . . . . . . . . . . . . 4
Hardware and Software Requirements 5
Considerations 7
Prerequisites Installer 7
Service Accounts 8
Farm Topologies . . . . . . . . . . . . . . . . . . . . . . . . . . . . . . . . . . . . . . . . . . . 9
Installing the First SharePoint Foundation 2010 Server in the Farm . . . . . . . . . . . . . . . . . . . . . . . . . . . . . . . . . . . . . . . . . . . . 13
Running the SharePoint Products and Technologies Preparation Tool 14
Installing SharePoint Foundation 2010 Binaries 15
Running the SharePoint 2010 Products Configuration Wizard 17
Using the SharePoint Foundation 2010 Farm Configuration Wizard 23
Performing a Scripted Deployment Using Windows PowerShell 24
Understanding Databases Created During Installation 26
Installing the First SharePoint Server 2010 Server in the Farm . . . . . . . . . . . . . . . . . . . . . . . . . . . . . . . . . . . . . . . . . . . . . . 26
Running the Microsoft SharePoint Products and Technologies Preparation Tool 27
Installing the SharePoint Server 2010 Binaries 28

viii Contents
Running the SharePoint Products Configuration Wizard 30
Using the SharePoint Server 2010 Farm Configuration Wizard 32
Performing a Scripted Deployment Using Windows PowerShell 33
Understanding Databases Created During Installation 35
Post-Installation Configuration . . . . . . . . . . . . . . . . . . . . . . . . . . . . . 36
Configure Farm Administrators Group 36
Configure Outgoing E-mail Settings 37
Create a Web Application to Host Site Collections 37
Configure Usage and Health Data Collection 40
Configure Diagnostic Logging 42
Install and Configure Remote BLOB Storage 43
Assigning IP Addresses to Web Applications 46
Language Packs 47
Upgrading SharePoint Foundation to SharePoint Server . . . . . . . 49
Installing SharePoint Server 2010 Binaries 49
Running the SharePoint Products Configuration Wizard 49
Chapter 2 Scaling to a MultiServer Farm 51
Preparing for Scaling Out to a Server Farm . . . . . . . . . . . . . . . . . . . 51
Single-Server Farm 52
Two-Tier Farm 52
Two-Tier Small Farm 53
Three-Tier Small Farm Not Optimized for Search 53
Three-Tier Small Farm Optimized for Search 54
Medium Farm 55
Large Farm 56
Scaling Web Applications . . . . . . . . . . . . . . . . . . . . . . . . . . . . . . . . . . 57
Adding a Web Server to the Farm 57
Web Parts and Custom Code 64
Internet Information Services 65
ixContents
Scaling System Services and Service Applications . . . . . . . . . . . . . 65
Service Application Architecture 66
Scaling SharePoint Server 2010 Search 74
Chapter 3 Configuring Core Operations 81
Introducing Central Administration . . . . . . . . . . . . . . . . . . . . . . . . . 81
Central Administration Architecture 82
Working with the Central Administration Web Application 84
System Settings . . . . . . . . . . . . . . . . . . . . . . . . . . . . . . . . . . . . . . . . . . . 86
Servers 86
E-mail and Text Messages 88
Farm Timer Jobs 93
Farm Management 96
Database Management . . . . . . . . . . . . . . . . . . . . . . . . . . . . . . . . . . . . 97
Content Databases 98
Default Database Server 104
Data Retrieval Service 104
Configuring Send To Connections . . . . . . . . . . . . . . . . . . . . . . . . . 105
Site Subscription Settings 106
Configuring the Content Organizer in the Destination Site 106
Send To Connections 106
Allow Manual Submissions 107
Chapter 4 Building and Managing Web Applications 109
Web Application Architecture . . . . . . . . . . . . . . . . . . . . . . . . . . . . . 110
Managing a Web Application 110
Application Pools 111
Content Databases 112
Creating and Extending Web Applications . . . . . . . . . . . . . . . . . . 115
Create a Web Application 115
Extending a Web Application 123
Deleting a Web Application 126
Deleting an Extended Zone 127
x Contents
Managing Web Applications . . . . . . . . . . . . . . . . . . . . . . . . . . . . . . 128
Configuring Web Applications 128
SharePoint Designer 2010 Governance 135
Alternate Access Mappings . . . . . . . . . . . . . . . . . . . . . . . . . . . . . . . 137
Configure Alternate Access Mapping 139
Chapter 5 Creating and Managing Site Collections 141
Site Creation Modes . . . . . . . . . . . . . . . . . . . . . . . . . . . . . . . . . . . . . . 141
Determining Which Mode to Use 142
Enabling Self-Service Site Creation 142
Site Use Confirmation and Deletion 143
Creating Site Collections . . . . . . . . . . . . . . . . . . . . . . . . . . . . . . . . . . 144
Creating a Site Collection Through Central Administration 145
Creating a Site Collection Using the Self-Service URL 146
Site Settings . . . . . . . . . . . . . . . . . . . . . . . . . . . . . . . . . . . . . . . . . . . . . 147
Regional Settings 148
Creating and Managing Document Libraries 148
Creating and Managing Lists 154
Sandboxed Solutions 160
User Alerts 160
Discussions 162
RSS (Really Simple Syndication) 163
Recycle Bin 164
Portal Site Connection 166
Information Management Policies 167
SharePoint Designer Settings 169
Site Collection Security . . . . . . . . . . . . . . . . . . . . . . . . . . . . . . . . . . . 171
Site Collection Administrators and Site Owners 171
People and Groups 171
List and Library Security 179
xiContents
Chapter 6 Configuring Service Applications 181
Service Application Architecture . . . . . . . . . . . . . . . . . . . . . . . . . . . 181
Service Application Topologies 182
Deploying and Managing Service Applications . . . . . . . . . . . . . . 183
Edit Service Application Connections for a Web Application 184
Manage Administrators of a Service Application 185
Delete a Service Application 185
Publish a Service Application 185
Connect to a Service Application on a Remote Farm 186
Service Applications in SharePoint Server 2010 . . . . . . . . . . . . . . 187
Access Services 187
Business Connectivity Services 189
Excel Services 189
Managed Metadata Service 194
PerformancePoint Services 194
Search Service 196
Secure Store Service 199
Security Token Service 199
State Service 199
Visio Graphics Service 199
Usage and Health Data Collection Service 199
User Profile Service 200
Web Analytics Service 201
Word Automation Service 201
PART II CONFIGURING SHAREPOINT SERVER 2010
Chapter 7 Web Parts, Features, and Solutions 205
Installing and Configuring Web Parts . . . . . . . . . . . . . . . . . . . . . . . 205
Web Part Architecture 206
Web Parts and Pages 207
Deleting and Closing Web Parts 210
Web Part Connections 211
Web Part Properties and Personalization 212
xii Contents
Installing and Configuring Features . . . . . . . . . . . . . . . . . . . . . . . . 215
Feature Architecture 215
Feature Life Cycle 216
Managing Solutions . . . . . . . . . . . . . . . . . . . . . . . . . . . . . . . . . . . . . . 221
Full-Trust Solutions 222
Managing Full-Trust Solutions 223
Deploying Full-Trust Solutions 225
Retracting Full-Trust Solutions 228
Deleting Full-Trust Solutions 230
Upgrading Full-Trust Solutions 231
Managing Sandboxed Solutions 232
Chapter 8 Configuring the Search Service Application 239
Farm-Wide Search Settings . . . . . . . . . . . . . . . . . . . . . . . . . . . . . . . 240
Managing Crawler Impact Rules . . . . . . . . . . . . . . . . . . . . . . . . . . . 241
Creating the Search Service Application . . . . . . . . . . . . . . . . . . . . 243
Examining the Search Administration Page . . . . . . . . . . . . . . . . . 245
Creating and Managing Content Sources . . . . . . . . . . . . . . . . . . . 246
Creating and Managing Crawl Rules . . . . . . . . . . . . . . . . . . . . . . . . 247
Crawl Rule Paths 249
Exclude/Include Options 249
Crawl Rule Authentication 249
Managing Server Name Mappings . . . . . . . . . . . . . . . . . . . . . . . . . 250
Managing File Types . . . . . . . . . . . . . . . . . . . . . . . . . . . . . . . . . . . . . 250
Managing the Search Application Topology . . . . . . . . . . . . . . . . . 252
Crawl Databases 254
Crawl Component 255
Property Database 256
Index Partition and Query Component 257
Managing Host Distribution Rules . . . . . . . . . . . . . . . . . . . . . . . . . 258
Troubleshooting Search with Crawl Logs . . . . . . . . . . . . . . . . . . . . 259

xiiiContents
Chapter 9 Managing the Search Experience 265
Configuring the Thesaurus and Noise Word Files . . . . . . . . . . . . 266
Noise Word Files 266
Configuring the Thesaurus 267
Defining Authoritative Pages . . . . . . . . . . . . . . . . . . . . . . . . . . . . . . 268
Federated Queries . . . . . . . . . . . . . . . . . . . . . . . . . . . . . . . . . . . . . . . 270
Federated Location Management 270
Managed Properties . . . . . . . . . . . . . . . . . . . . . . . . . . . . . . . . . . . . . 278
Creating and Managing Search Scopes . . . . . . . . . . . . . . . . . . . . . 284
Search Results Removal . . . . . . . . . . . . . . . . . . . . . . . . . . . . . . . . . . . 289
Site Collection Search Management . . . . . . . . . . . . . . . . . . . . . . . . 290
Configuring the Master Page Query Box Control 290
Site Collection Search Scope Management 291
Working with Keywords and Best Bets . . . . . . . . . . . . . . . . . . . . . . 293
Creating and Customizing Search Centers . . . . . . . . . . . . . . . . . . 297
Customizing the Enterprise Search Center 297
Creating New Search Pages 298
Creating New Tabs 299
Configuring Custom Page Access 300
Customizing Search Pages . . . . . . . . . . . . . . . . . . . . . . . . . . . . . . . . 300
Working with Query Reporting . . . . . . . . . . . . . . . . . . . . . . . . . . . . 325
Local Search Configuration Options . . . . . . . . . . . . . . . . . . . . . . . . 325
Searchable Columns 325
Site-Level Crawl Rules 326
Crawl Options for Lists and Libraries 326
Related Links Scope 327
Chapter 10 Enterprise Content Types and Metadata 329
Understanding Enterprise Content Management . . . . . . . . . . . . 329
Configuring the Managed Metadata Service . . . . . . . . . . . . . . . . 331
Creating the Content Type Syndication Hub Web Application 332
Creating the Content Type Syndication Hub Site Collection 333
xiv Contents
Activating the Content Type Syndication Hub 335
Creating the Managed Metadata Service Application 336
Modifying the Managed Metadata Service Connection 338
Associating Managed Metadata Service Applications 338
Publishing the Managed Metadata Service Application 340
Starting the Managed Metadata Web Service 341
Administrators for Management Metadata Services 341
Managed Taxonomies, Folksonomies, and Term Sets . . . . . . . . . 342
Enterprise Metadata: The Term Store 342
The Term Store Management Tool 344
Enterprise Content Types . . . . . . . . . . . . . . . . . . . . . . . . . . . . . . . . . 349
Creating Content Types 349
Dealing with Content Type Dependencies 351
Consuming Metadata . . . . . . . . . . . . . . . . . . . . . . . . . . . . . . . . . . . . 351
Working with Site Columns 351
Managed Metadata Site Columns 353
Managed Metadata and the Document Information Panel 356
Metadata Navigation Settings 359
Chapter 11 Document Management 361
Managing Documents in SharePoint 2010 . . . . . . . . . . . . . . . . . . 361
What Is Document Management? 362
Document Collaboration 363
Document Libraries 363
Document IDs and Sets . . . . . . . . . . . . . . . . . . . . . . . . . . . . . . . . . . . 365
Document IDs 365
Document Sets 367
List and Library Relationships . . . . . . . . . . . . . . . . . . . . . . . . . . . . . . 369
Check In/Check Out 370
Content Types 370
xvContents
Document Version Control . . . . . . . . . . . . . . . . . . . . . . . . . . . . . . . . 372
Content Approval 372
Major Versioning 373
Major and Minor Versioning 373
Version Pruning 373
Draft Item Security 373
Workflows . . . . . . . . . . . . . . . . . . . . . . . . . . . . . . . . . . . . . . . . . . . . . . 374
Assigning Workflow Settings 375
Inbound E-mail . . . . . . . . . . . . . . . . . . . . . . . . . . . . . . . . . . . . . . . . . . 375
Grouping Submissions 376
Allowing Contributions from Outside the Organization 376
Offline Support . . . . . . . . . . . . . . . . . . . . . . . . . . . . . . . . . . . . . . . . . . 377
The Document Center . . . . . . . . . . . . . . . . . . . . . . . . . . . . . . . . . . . . 378
Content Organizer and Send To Functionality 379
Metadata Navigation and Filtering 382
Chapter 12 Records Management 385
Information Management Policies . . . . . . . . . . . . . . . . . . . . . . . . . 385
Retention 387
Nonrecords 388
Records 389
Auditing 389
Document Bar Codes 390
Document Labels 390
In-Place Records Management . . . . . . . . . . . . . . . . . . . . . . . . . . . . 392
Allowing Record Declaration at the List and Library Level 393
The Records Center . . . . . . . . . . . . . . . . . . . . . . . . . . . . . . . . . . . . . . 394
Planning for the Records Center 395
Managing the Records 401
xvi Contents
Chapter 13 Portals and Collaboration 405
Publishing Infrastructure . . . . . . . . . . . . . . . . . . . . . . . . . . . . . . . . . . 405
Enabling the Publishing Infrastructure 406
Master Pages 407
Page Layouts 411
SharePoint Designer 2010 Access 412
Themes 414
Large Pages Library 415
Navigation 415
Chapter 14 User Profiles and My Sites 419
Creation and Maintenance Tasks in the User Profile Service . . . . . . . . . . . . . . . . . . . . . . . . . . . . . . . . . . . . . . . . 420
Service Administration . . . . . . . . . . . . . . . . . . . . . . . . . . . . . . . . . . . . 424
Profile Property Administration . . . . . . . . . . . . . . . . . . . . . . . . . . . . 426
Profile Synchronization . . . . . . . . . . . . . . . . . . . . . . . . . . . . . . . . . . . 429
Enabling Social Features for Users and Groups . . . . . . . . . . . . . . 436
Social Tags and Note Boards . . . . . . . . . . . . . . . . . . . . . . . . . . . . . . 437
My Site Settings . . . . . . . . . . . . . . . . . . . . . . . . . . . . . . . . . . . . . . . . . 440
Setup of My Sites Web Sites 441
Adding or Deleting a Trusted My Site Host Location 443
Personalization Site Links 445
Links to the Microsoft Office 2010 Client Applications 446
PART III OPERATING SHAREPOINT SERVER 2010
Chapter 15 Configuring Policies and Security 451
Server Farm Security . . . . . . . . . . . . . . . . . . . . . . . . . . . . . . . . . . . . . 451
Farm Administrators 453
Password and Account Management 453
Information Policies 460
Web Application Security . . . . . . . . . . . . . . . . . . . . . . . . . . . . . . . . . 464
SSL and Assigned IP Addresses 465
Authentication 470

xviiContents
Web Application User Permissions 475
Secure Store Service 476
Blocked File Types 478
Self-Service Site Creation 479
Antivirus Settings 480
Web Application Policies . . . . . . . . . . . . . . . . . . . . . . . . . . . . . . . . . . 481
Zones 481
Web Application Permission Policies 483
SharePoint Designer 2010 Governance 486
Chapter 16 Monitoring, Logging, and Availability 489
Windows Server 2008 . . . . . . . . . . . . . . . . . . . . . . . . . . . . . . . . . . . . 489
Event Viewer 490
Monitoring Tools 491
Windows Task Manager 492
Internet Information Services 494
SharePoint Server 2010 . . . . . . . . . . . . . . . . . . . . . . . . . . . . . . . . . . . 495
SharePoint Server 2010 Health Analyzer 495
Monitoring 496
Health Analyzer 496
Timer Jobs 498
Reporting 501
Web Analytics 504
Diagnostic Logging 514
SQL 2008 Server . . . . . . . . . . . . . . . . . . . . . . . . . . . . . . . . . . . . . . . . . 515
Chapter 17 Upgrading to SharePoint Server 2010 517
Planning Tools . . . . . . . . . . . . . . . . . . . . . . . . . . . . . . . . . . . . . . . . . . . 518
Farm Planning 519
Web Enumeration 525
In-Place Upgrade . . . . . . . . . . . . . . . . . . . . . . . . . . . . . . . . . . . . . . . . 526
Installing the Prerequisites and Binaries 526
Post In-Place Upgrade Tasks 530
Database Attach Upgrade . . . . . . . . . . . . . . . . . . . . . . . . . . . . . . . . 533
Upgrading Sites and Site Collections . . . . . . . . . . . . . . . . . . . . . . . 537

xviii Contents
Chapter 18 Backup and Restore 539
Server Farm Backup and Recovery . . . . . . . . . . . . . . . . . . . . . . . . . 540
Preparing for Server Farm Backups 540
Farm Backup and Restores Using Central Administration 542
Farm Backup and Restore Using Windows PowerShell 547
Farm Backup and Restore Using Stsadm .exe 551
Service and Web Application Backup and Restore . . . . . . . . . . . 553
Granular Backup and Restore . . . . . . . . . . . . . . . . . . . . . . . . . . . . . . 555
Site Collection Backup and Restore 555
Recovering from an Unattached Content Database 559
Appendix A Working with Windows PowerShell and SharePoint 2010 561
SharePoint 2010 Management Shell . . . . . . . . . . . . . . . . . . . . . . . . 562
Working with Commands . . . . . . . . . . . . . . . . . . . . . . . . . . . . . . . . . 562
Working with Cmdlets 562
Working with Functions 574
Working with SharePoint Cmdlets . . . . . . . . . . . . . . . . . . . . . . . . . 574
Farms 574
Servers 575
Web Applications 576
Managing Sites 578
Managing Webs 579
Assigning Resources 580
SharePoint Cmdlet Listing . . . . . . . . . . . . . . . . . . . . . . . . . . . . . . . . 582
Index 599
What do you think of this book? We want to hear from you! Microsoft is interested in hearing your feedback so we can continually improve our books and learning resources for you. To participate in a brief online survey, please visit:
microsoft.com/learning/booksurvey
xix
Acknowledgments
One of the challenges when writing a Pocket Consultant is that you don’t have the space to fully explain all aspects of a product . This is true with any product,
but even more so with a product as large as SharePoint Server 2010 . Therefore, I have left out information unessential to administrative tasks and provided a techni-cally dense, daily reference guide . This narrow scope allowed the book to be very detailed in the areas that are poorly documented or poorly understood . I really wanted to provide an accurate reference guide that could also be read cover to cover, and I think it fills that bill .
I first want to thank Bill English, who gave me the opportunity to begin my writing career and has helped me immensely through the years . I consider him a mentor and a friend . Thank you, Bill . I also want to thank Martin DelRe, acquisitions editor, because he believed in this book from the very beginning . Karen Szall was the project editor, and she kept me on track and on schedule throughout . She is a wonderful editor, and I learned a great deal from her . Thanks also to Valerie Woolley who helped get chapters through the editing process . Although it is difficult to write original content, answering the technical edits is sometimes harder! Microsoft Press has the most thorough editing review processes in the business, and though they create more work for the author, they result in a better book for the reader . Bob Hogan was the technical reviewer for this book; his input and assistance were invaluable in creating a relevant and accurate book . He was top notch and made sure things worked as expected .
Because there were so many new features in the product, it was impossible for a single person to write this book . To assist me, I asked several SharePoint Products industry experts to contribute content to the book . Core to the success of this book were the contributing authors, and you can find their full bios in the back of the book . Thank you to Josh Meyer, Jim Curry, Philip Greninger, Daniel Webster (one of the best SharePoint professionals I know), Fred Devoir, Michael Mukalian, and Darrin Bishop . Each of these authors provided a unique contribution in their area of specialty . This allowed me to focus on the core features of the product and still deliver top-notch content throughout .
Because of the late release of the beta versions of the product and the depth of the product stack, it took several people to get this book content written . Thanks to Joy Curry, Lori Gowin, Cathy Dew, Spencer Harbar, Mike Watson, Jenn Parry, and the product team at Microsoft for answering a ton of questions and providing content!
Thank you to all of the staff at Microsoft who helped along the way; there are too many of you to count . I also want to thank my father; he has helped me along my writing career and served as a wonderful role model . If I forgot someone, it was truly an accident!
xxi
Introduction
From the beginning of the project, the SharePoint Server 2010 Administrator’s Pocket Consultant was written to be a concise and accurate guide that you can
use when you have questions about SharePoint Server 2010 administration . The purpose of the Administrator’s Pocket Consultants series is to give you valuable, real-world information in an easily referenced format . A thorough index has been provided to help you quickly find the information you need . This is a guide you will want close by when working with the new versions of SharePoint Products and Technologies .
This book provides administrative procedures, quick answers, tips, and tested design examples . In addition, it covers some of the most difficult tasks, such as scaling out to a server farm and implementing disaster recovery . It also covers many of the new Windows PowerShell commands now needed for building and maintaining SharePoint Server . The text contains illustrative examples of many advanced tasks required to implement a SharePoint Products solution for almost any size of organization .
Who Is This Book For?
SharePoint Server 2010 Administrator’s Pocket Consultant covers SharePoint Server 2010 Standard and SharePoint Server 2010 Enterprise editions . This book is designed for the following:
■ Administrators migrating from Windows SharePoint Services 3 .0 and SharePoint Server 2007
■ Administrators who are experienced with Windows Server 2008 and Internet Information Services
■ Current SharePoint Foundation 2010 and SharePoint Server 2010 administrators
■ Administrators who are new to Microsoft SharePoint 2010 Technologies■ Technology specialists, such as site collection administrators, search
administrators, and Web designers
Because this book is limited in size, and I wanted to give you the maximum value, I assumed a basic knowledge of Windows Server 2008, Active Directory, Internet Information Services (IIS), SQL Server, and Web browsers . These technologies are not presented directly, but this book contains material on all of these topics that relate to the administrative tasks of SharePoint Products .
xxii Introduction
How Is This Book Organized?
SharePoint Server 2010 Administrator’s Pocket Consultant is written to be a daily reference for administrative tasks . The ability to quickly find and use information is the hallmark of this book . For this reason, the book is organized into job-related tasks . It has an expanded table of contents and an extensive index for locating relevant answers . In addition, there is an appendix for many of the new SharePoint Sever 2010 Windows PowerShell cmdlets . If you are looking for a comprehensive guide to implementing SharePoint Products, you should consider purchasing the Microsoft Office SharePoint Server 2010 Administrator’s Companion, since the books in the Administrator’s Pocket Consultant series are stripped to the bare essentials required to complete a task .
The book is organized into three parts and eighteen chapters: Part I, “ Deploying SharePoint Server 2010,” introduces you to the new features, functionality, and deployment options of SharePoint Server 2010 . Chapter 1 provides instructions for preparing for and installing SharePoint Server 2010, implementing database best practices, and creating the required server farm service applications . Chapter 2 shows you the basics of scaling to a multi-server farm for availability and perfor-mance . Chapter 3 covers the management of core server farm operations . Chapter 4 guides you through Web application creation and management, a foundational part of SharePoint Server 2010 . Chapter 5 is an administrator’s guide to creating and managing site collections . Chapter 6 is an installation guide and design overview of the new SharePoint Server 2010 service application architecture .
Part II, “Configuring SharePoint Server 2010,” dives deeper into the product stack and extends the basic functionality configured in Part I . Chapter 7 is a guide to installing and managing Web parts, features, and solutions . Chapter 8 is a step-by-step guide to configuring and scaling the search service application . Chapter 9 provides detailed configuration on managing the search experience for users . Chapter 10 is an introduction to Enterprise Content Management (ECM) and a good start for most SharePoint Server 2010 administrators new to ECM . Chapter 11 shows you the new features of Document Management, such as Document Sets and Document IDs . Chapter 12 is an administrator-focused chapter on Records Management . It is not an exhaustive guide for all things Records related; only the administrative tasks to operate and maintain them . Chapter 13 is a configura-tion guide for creating portals, most importantly the publishing infrastructure . Chapter 14 covers the new and exciting areas of Social Collaboration and profile management .
xxiiiIntroduction
Part III, “ Operating SharePoint Server 2010,” primarily deals with operational tasks having to do with service level agreements and upgrades . Chapter 15 will show you how to configure Web application and site collection security policies, in addition to recommended Permissioning guidelines . Chapter 16 details the areas of SharePoint Server 2010 you should monitor and the available tools to do so . Chapter 17 is a basic SharePoint Server 2007 upgrade installation guide, and covers many of the new upgrade tools available in SharePoint Server 2010 . Chapter 18 includes the new backup and restore tools, including granular backups . The book completes with Appendix A, an introduction to Windows PowerShell for SharePoint Server 2010 .
Conventions Used in This Book
A variety of elements are used in this book to help you understand what you need to know and to keep it easy to read .
■ Note A Note points out an easily overlooked detail or design issue .■ Tip A Tip provides helpful information or spotlights the command-line
option available for an administrative task .■ Caution When you see a Caution, you should look out for potential
problems . Many Cautions were learned through real-world experience .
In addition, terms that are new are in italics.
I really hope you find the SharePoint Server 2010 Administrator’s Pocket Consultant useful and accurate . I have an open door policy for e-mail at [email protected] . Because my inbox stays quite full, please be patient; replies sometimes take a week or longer . You may also visit http://pocketconsultant.mindsharp.com for updates and discussion boards concerning the latest in SharePoint Products and Technologies news .
Questions and Support
Every effort has been made to ensure the accuracy of this book . Microsoft Press provides corrections for books at http://mspress.microsoft.com/support/. If you have questions or comments regarding this book, please send them to Microsoft Press using this e-mail address:
Please note that product support is not offered through this address . For support information, visit Microsoft’s Web site at http://support.microsoft.com.
81
CHAP TER 3
Configuring Core Operations■ Introducing Central Administration 81
■ System Settings 86
■ Database Management 97
■ Configuring Send To Connections 105
Core operations refers to farm-level settings and applications such as Central Administration, server services settings, and e-mail configuration . There are
items—such as Service Applications, Search, and Web Applications—that are such large and important topics that they have dedicated chapters . This chapter will cover the core farm operations not covered elsewhere in the book . Much of this chapter will show you how to set up farm operations that are configured only once, such as Short Messaging Service (SMS) mobile services . Although the inter-action with other Microsoft SharePoint Server functional areas will be discussed, please reference the chapter for each of those functional areas for detailed information .
Introducing Central Administration
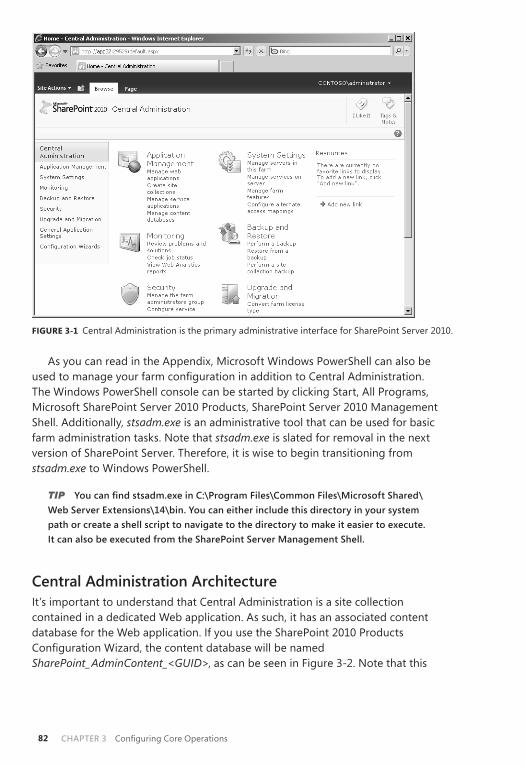
At the heart of every server farm is the configuration database . This database stores the majority of your core server farm configuration . The association of Service Applications, configuration of Web Applications and content databases, e-mail settings, server services architecture, farm solutions, and farm features are stored in this database . To manage all of this configuration data, you need a tool to do so . Central Administration is the primary administrative tool available to you . The Central Administration interface can be started by clicking Start, All Programs, Microsoft SharePoint Server 2010 Products, SharePoint Server 2010 Central Administration . Figure 3-1 shows Central Administration as installed out of the box .
CHAPTER 3 Configuring Core Operations82
FIGURE 3-1 Central Administration is the primary administrative interface for SharePoint Server 2010 .
As you can read in the Appendix, Microsoft Windows PowerShell can also be used to manage your farm configuration in addition to Central Administration . The Windows PowerShell console can be started by clicking Start, All Programs, Microsoft SharePoint Server 2010 Products, SharePoint Server 2010 Management Shell . Additionally, stsadm.exe is an administrative tool that can be used for basic farm administration tasks . Note that stsadm.exe is slated for removal in the next version of SharePoint Server . Therefore, it is wise to begin transitioning from stsadm.exe to Windows PowerShell .
TIP You can find stsadm.exe in C:\Program Files\Common Files\Microsoft Shared\Web Server Extensions\14\bin. You can either include this directory in your system path or create a shell script to navigate to the directory to make it easier to execute. It can also be executed from the SharePoint Server Management Shell.
Central Administration ArchitectureIt’s important to understand that Central Administration is a site collection contained in a dedicated Web application . As such, it has an associated content database for the Web application . If you use the SharePoint 2010 Products Configuration Wizard, the content database will be named SharePoint_AdminContent_<GUID>, as can be seen in Figure 3-2 . Note that this

Configuring Core Operations CHAPTER 3 83
database is not easily changed after the fact . Therefore, if you want a different name for your Central Administration content database, you need to use Windows PowerShell to create your server farm .
FIGURE 3-2 You can view your Central Administration content database using Microsoft SQL Server Management Studio .
Because Central Administration requires write access to your server farm configuration database, you should never use this Web application or associ-ated application pool for collaborative Web applications . Doing so could provide a hacker with potential write access through another Web application . Central Administration was created automatically when you ran the SharePoint 2010 Products Configuration Wizard and should not be modified . Although Central Administration is technically just another site collection and can be modified as such, a best practice is to leave it in the default state . Only administrators access the site collection, so branding and customization shouldn’t be an issue .
As seen in Figure 3-1, Central Administration has eight primary areas:■ Application Management Hosts administrative links to Web applications,
site collections, service applications, and databases . Chapter 4, “Building and Managing Web Applications,” explains this section and associated tasks in depth .
■ System Settings Contains your server and server service management, e-mail and text messaging, and other farm management settings . Most of the functionality discussed in this chapter can be found in System Settings .

CHAPTER 3 Configuring Core Operations84
■ Monitoring Has been greatly expanded in SharePoint Server 2010 and includes Reporting, Analytics, Timer Jobs, Health Analyzer, and Usage information . Chapter 16, “Monitoring, Logging, and Availability,” covers Reporting and the Health Analyzer in detail . Only the server farm timer jobs are discussed in this chapter .
■ Backup And Restore Location where both farm and granular backups and restores are performed . Chapter 18, “Backup and Restore,” provides more information .
■ Security Includes links to manage the farm administrators group, configure farm accounts, manage passwords for those accounts, define blocked file types, configure antivirus settings, manage Web Part security, and control Information Management Policies global settings . Chapter 15, “ Configuring Policies and Security,” instructs you how to align SharePoint Server 2010 security settings with your environment .
■ Upgrade And Migration Upgrade-specific information can be found in Chapter 17, “Upgrading to SharePoint Server 2010 .”
■ General Application Settings Includes external service connections, document conversions, InfoPath forms services, site directory, SharePoint Designer, farm-scoped search settings, and content deployment .
■ Configuration Wizards Contains configuration wizards for your installation . Depending on additionally installed products, this screen can present multiple options for the automated configuration of your farm .
As you manage a SharePoint Server 2010 farm, there will be administrative tasks you perform on a regular basis . Remember that Central Administration is a Web-based interface, so you can create favorites in your Web browser to save time . Additionally, you will see multiple locations to manage the same item, such as Web application general settings, within Central Administration .
Working with the Central Administration Web ApplicationAlthough Central Administration is a SharePoint Server Web application, it differs from others because you don’t create and deploy the Web application . Because the deployment of other Web applications is done from Central Administration, the provisioning of Central Administration itself is performed at either the command line or via the SharePoint 2010 Products Configuration Wizard . To deploy Central Administration to a server other than the one on which you first installed SharePoint Server, you must install the SharePoint Server binaries and run the SharePoint 2010 Products Configuration Wizard . You can run this wizard at any time by clicking Start, All Programs, Microsoft SharePoint Server 2010 Products, SharePoint Server 2010 Products Configuration Wizard . Be very careful not to disconnect from the server farm, which can be specified with the option shown in Figure 3-3 .

Configuring Core Operations CHAPTER 3 85
FIGURE 3-3 If provisioning Central Administration, be sure to not disconnect from the server farm .
After you click Next twice, select Advanced Settings to provision Central Administration . Select Use This Machine To Host The Web Site as seen in Figure 3-4 .
FIGURE 3-4 Select Use This Machine To Host The Web Site, and click OK .
You must wait for the farm timer job to complete and the Web application to provision before use . Upon completion, the wizard will take you to Central Administration .
CHAPTER 3 Configuring Core Operations86
You can also use the SharePoint 2010 Products Configuration Wizard to repair a broken Central Administration, assuming it is an Internet Information Services (IIS) configuration error causing the fault . To unprovision Central Administration, simply choose Yes, I Want To Remove The Web Site From This Machine . You should wait a few minutes to allow the farm configuration to update and also to allow time for the local IIS configuration to update . When the Web application is no longer visible from IIS, you can re-run the SharePoint 2010 Products Configuration Wizard to reprovision the Central Administration on that server .
NOTE A Web application problem with Central Administration might require you to make a technical support call. The actual content of Central Administration is con-tained in the associated content database, and farm configuration is contained in the configuration database.
System Settings
The System Settings area of Central Administration contains crucial settings that you need to plan and carefully control modification of . Most of the system settings affect all Web applications and associated users in your server farm . System Settings is divided into three sections:
■ Servers■ E-Mail And Text Messages (SMS)■ Farm Management
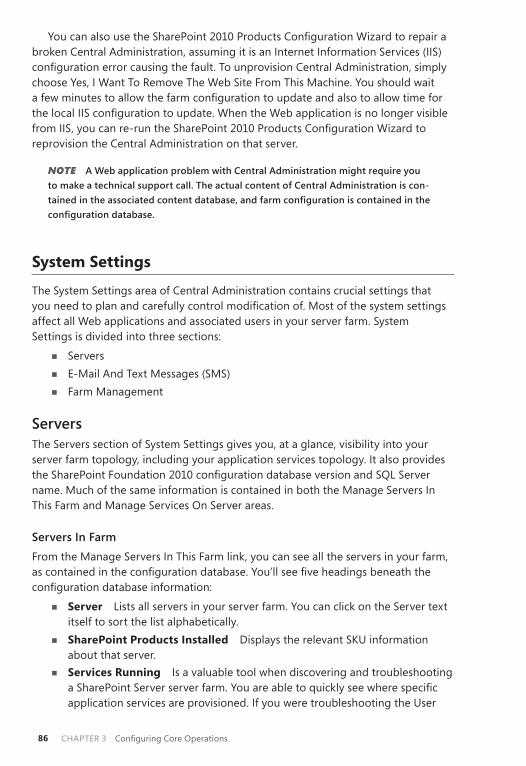
ServersThe Servers section of System Settings gives you, at a glance, visibility into your server farm topology, including your application services topology . It also provides the SharePoint Foundation 2010 configuration database version and SQL Server name . Much of the same information is contained in both the Manage Servers In This Farm and Manage Services On Server areas .
Servers In FarmFrom the Manage Servers In This Farm link, you can see all the servers in your farm, as contained in the configuration database . You’ll see five headings beneath the configuration database information:
■ Server Lists all servers in your server farm . You can click on the Server text itself to sort the list alphabetically .
■ SharePoint Products Installed Displays the relevant SKU information about that server .
■ Services Running Is a valuable tool when discovering and troubleshooting a SharePoint Server server farm . You are able to quickly see where specific application services are provisioned . If you were troubleshooting the User
Configuring Core Operations CHAPTER 3 87
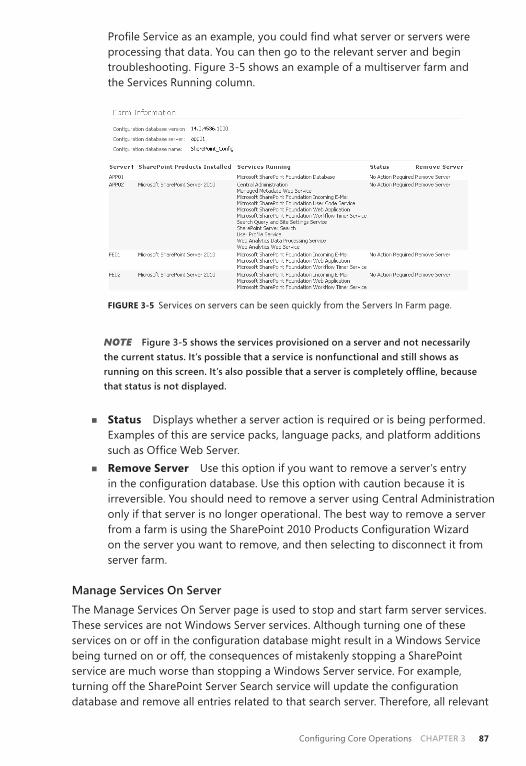
Profile Service as an example, you could find what server or servers were processing that data . You can then go to the relevant server and begin troubleshooting . Figure 3-5 shows an example of a multiserver farm and the Services Running column .
FIGURE 3-5 Services on servers can be seen quickly from the Servers In Farm page .
NOTE Figure 3-5 shows the services provisioned on a server and not necessarily the current status. It’s possible that a service is nonfunctional and still shows as running on this screen. It’s also possible that a server is completely offline, because that status is not displayed.
■ Status Displays whether a server action is required or is being performed . Examples of this are service packs, language packs, and platform additions such as Office Web Server .
■ Remove Server Use this option if you want to remove a server’s entry in the configuration database . Use this option with caution because it is irreversible . You should need to remove a server using Central Administration only if that server is no longer operational . The best way to remove a server from a farm is using the SharePoint 2010 Products Configuration Wizard on the server you want to remove, and then selecting to disconnect it from server farm .
Manage Services On ServerThe Manage Services On Server page is used to stop and start farm server services . These services are not Windows Server services . Although turning one of these services on or off in the configuration database might result in a Windows Service being turned on or off, the consequences of mistakenly stopping a SharePoint service are much worse than stopping a Windows Server service . For example, turning off the SharePoint Server Search service will update the configuration database and remove all entries related to that search server . Therefore, all relevant
CHAPTER 3 Configuring Core Operations88
search content, such as the index, will be deleted and the associated Windows Server service will be stopped . Basically, everything you start or stop in this screen is making configuration database changes . The timer job will subsequently pick up those changes from the database and modify application services accordingly .
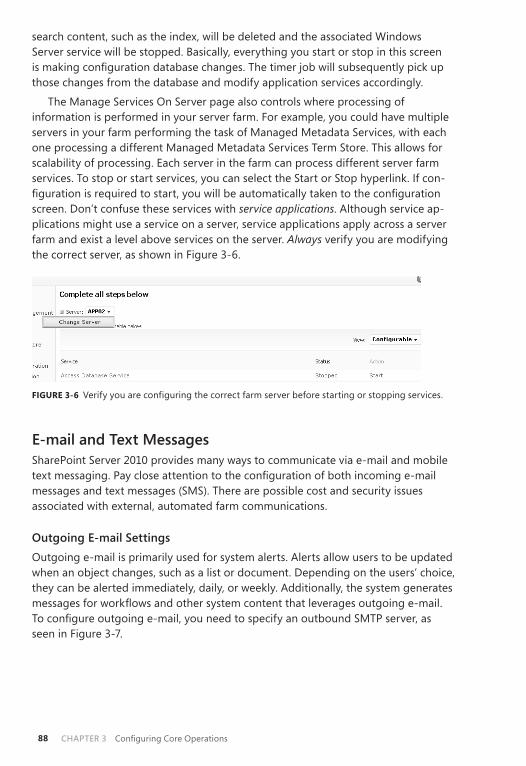
The Manage Services On Server page also controls where processing of information is performed in your server farm . For example, you could have multiple servers in your farm performing the task of Managed Metadata Services, with each one processing a different Managed Metadata Services Term Store . This allows for scalability of processing . Each server in the farm can process different server farm services . To stop or start services, you can select the Start or Stop hyperlink . If con-figuration is required to start, you will be automatically taken to the configuration screen . Don’t confuse these services with service applications . Although service ap-plications might use a service on a server, service applications apply across a server farm and exist a level above services on the server . Always verify you are modifying the correct server, as shown in Figure 3-6 .
FIGURE 3-6 Verify you are configuring the correct farm server before starting or stopping services .
E-mail and Text MessagesSharePoint Server 2010 provides many ways to communicate via e-mail and mobile text messaging . Pay close attention to the configuration of both incoming e-mail messages and text messages (SMS) . There are possible cost and security issues associated with external, automated farm communications .
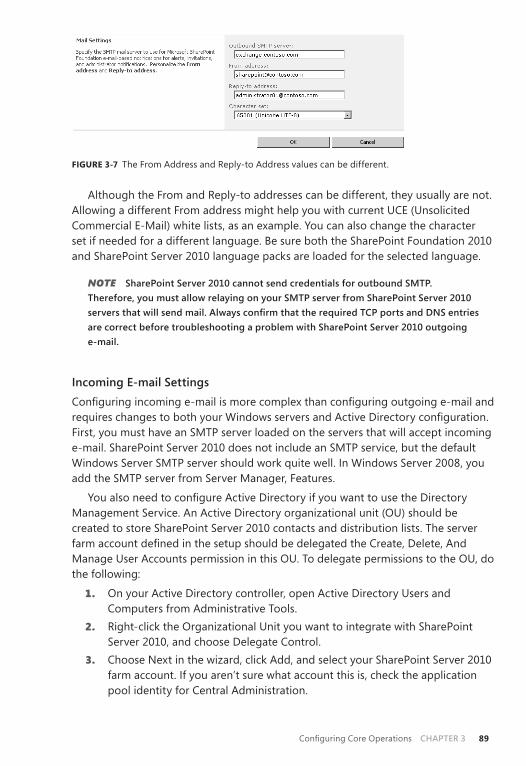
Outgoing E-mail SettingsOutgoing e-mail is primarily used for system alerts . Alerts allow users to be updated when an object changes, such as a list or document . Depending on the users’ choice, they can be alerted immediately, daily, or weekly . Additionally, the system generates messages for workflows and other system content that leverages outgoing e-mail . To configure outgoing e-mail, you need to specify an outbound SMTP server, as seen in Figure 3-7 .
Configuring Core Operations CHAPTER 3 89
FIGURE 3-7 The From Address and Reply-to Address values can be different .
Although the From and Reply-to addresses can be different, they usually are not . Allowing a different From address might help you with current UCE (Unsolicited Commercial E-Mail) white lists, as an example . You can also change the character set if needed for a different language . Be sure both the SharePoint Foundation 2010 and SharePoint Server 2010 language packs are loaded for the selected language .
NOTE SharePoint Server 2010 cannot send credentials for outbound SMTP. Therefore, you must allow relaying on your SMTP server from SharePoint Server 2010 servers that will send mail. Always confirm that the required TCP ports and DNS entries are correct before troubleshooting a problem with SharePoint Server 2010 outgoing e-mail.
Incoming E-mail SettingsConfiguring incoming e-mail is more complex than configuring outgoing e-mail and requires changes to both your Windows servers and Active Directory configuration . First, you must have an SMTP server loaded on the servers that will accept incoming e-mail . SharePoint Server 2010 does not include an SMTP service, but the default Windows Server SMTP server should work quite well . In Windows Server 2008, you add the SMTP server from Server Manager, Features .
You also need to configure Active Directory if you want to use the Directory Management Service . An Active Directory organizational unit (OU) should be created to store SharePoint Server 2010 contacts and distribution lists . The server farm account defined in the setup should be delegated the Create, Delete, And Manage User Accounts permission in this OU . To delegate permissions to the OU, do the following:
1. On your Active Directory controller, open Active Directory Users and Computers from Administrative Tools .
2. Right-click the Organizational Unit you want to integrate with SharePoint Server 2010, and choose Delegate Control .
3. Choose Next in the wizard, click Add, and select your SharePoint Server 2010 farm account . If you aren’t sure what account this is, check the application pool identity for Central Administration .
CHAPTER 3 Configuring Core Operations90
4. Under Delegate The Following Common Tasks, select Create, Delete, And Manage User Accounts .
5. Click Next and then click Finish .After you have created and delegated permissions in Active Directory, you can
proceed with configuring Central Administration Incoming E-Mail settings . If you have enabled the Directory Management Service, distribution lists can be created automatically when enabled for SharePoint Server sites . Creating distribution lists automatically creates a distribution list in Active Directory and keeps it synchronized from SharePoint Server to Active Directory . Doing so allows users to easily send e-mail to SharePoint Server groups when needed .
NOTE The Directory Management Service is a one-way service. In other words, users are added to the Active Directory distribution list when they are added to a SharePoint group, but users are not added to the SharePoint group when they are added directly to the Active Directory distribution list.
An additional function of the Directory Management Service is that it automati-cally creates an Active Directory contact when e-mail–enabling a list or library . Although it is not required or always desired, you can have the e-mail address available in the Global Address List (GAL) after e-mail enabling a list . If you have not enabled the Directory Management Service, you must manually, or through a custom process, create an entry for each mail-enabled document library and list you want to receive e-mail .
To configure incoming e-mail, select Configure Incoming E-mail Settings in the System Settings area . You must then fill out the configuration page as follows:
1. Select Yes to enable sites on this server to receive e-mail . 2. Select Automatic unless you are using an SMTP server other than the native
Windows Server SMTP Service . If you are using a third-party SMTP server, be sure to define the e-mail drop folder at the bottom of the page . Be aware that many third-party SMTP servers will not integrate with SharePoint Server 2010 .
3. Select Yes to create a distribution group or contact, or select Use Remote if you already have an existing Directory Management Service . Note that if you do not have Microsoft Exchange Server installed in this Active Directory, you need to extend the schema with both the ms-Exch-mail-Nickname and ms-Exch-RequireAuthToSendTo attributes . You can add these by using the Exchange Server installation media . For more information on extending the Active Directory schema, please reference http://technet.microsoft.com/exchange . Note that you do not have to install Exchange Server binaries to enable Directory Management Services integration; you need only to extend the schema .
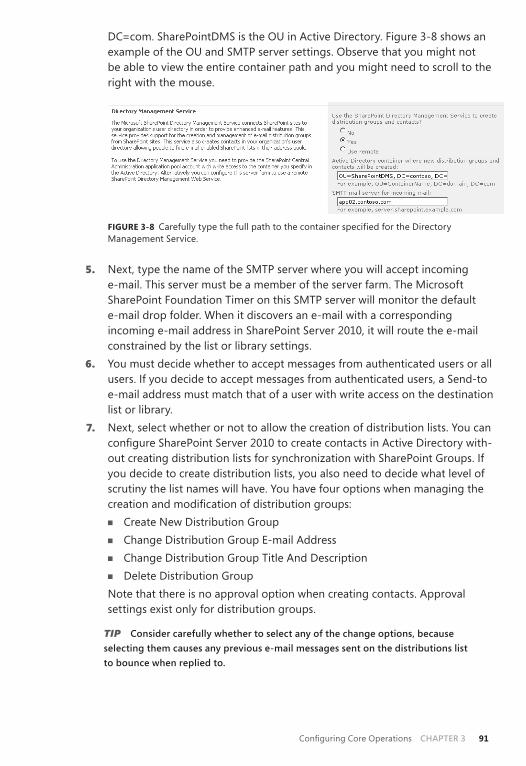
4. This step requires you to have previously configured the OU in Active Directory . In this example, we are using OU=SharePointDMS, DC=contoso,
Configuring Core Operations CHAPTER 3 91
DC=com . SharePointDMS is the OU in Active Directory . Figure 3-8 shows an example of the OU and SMTP server settings . Observe that you might not be able to view the entire container path and you might need to scroll to the right with the mouse .
FIGURE 3-8 Carefully type the full path to the container specified for the Directory Management Service .
5. Next, type the name of the SMTP server where you will accept incoming e-mail . This server must be a member of the server farm . The Microsoft SharePoint Foundation Timer on this SMTP server will monitor the default e-mail drop folder . When it discovers an e-mail with a corresponding incoming e-mail address in SharePoint Server 2010, it will route the e-mail constrained by the list or library settings .
6. You must decide whether to accept messages from authenticated users or all users . If you decide to accept messages from authenticated users, a Send-to e-mail address must match that of a user with write access on the destination list or library .
7. Next, select whether or not to allow the creation of distribution lists . You can configure SharePoint Server 2010 to create contacts in Active Directory with-out creating distribution lists for synchronization with SharePoint Groups . If you decide to create distribution lists, you also need to decide what level of scrutiny the list names will have . You have four options when managing the creation and modification of distribution groups: ■ Create New Distribution Group■ Change Distribution Group E-mail Address■ Change Distribution Group Title And Description■ Delete Distribution GroupNote that there is no approval option when creating contacts . Approval settings exist only for distribution groups .
TIP Consider carefully whether to select any of the change options, because selecting them causes any previous e-mail messages sent on the distributions list to bounce when replied to.
CHAPTER 3 Configuring Core Operations92
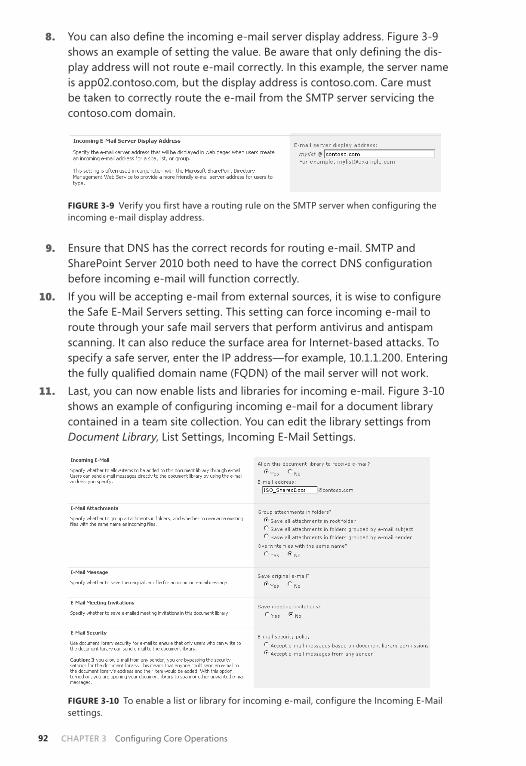
8. You can also define the incoming e-mail server display address . Figure 3-9 shows an example of setting the value . Be aware that only defining the dis-play address will not route e-mail correctly . In this example, the server name is app02 .contoso .com, but the display address is contoso .com . Care must be taken to correctly route the e-mail from the SMTP server servicing the contoso .com domain .
FIGURE 3-9 Verify you first have a routing rule on the SMTP server when configuring the incoming e-mail display address .
9. Ensure that DNS has the correct records for routing e-mail . SMTP and SharePoint Server 2010 both need to have the correct DNS configuration before incoming e-mail will function correctly .
10. If you will be accepting e-mail from external sources, it is wise to configure the Safe E-Mail Servers setting . This setting can force incoming e-mail to route through your safe mail servers that perform antivirus and antispam scanning . It can also reduce the surface area for Internet-based attacks . To specify a safe server, enter the IP address—for example, 10 .1 .1 .200 . Entering the fully qualified domain name (FQDN) of the mail server will not work .
11. Last, you can now enable lists and libraries for incoming e-mail . Figure 3-10 shows an example of configuring incoming e-mail for a document library contained in a team site collection . You can edit the library settings from Document Library, List Settings, Incoming E-Mail Settings .
FIGURE 3-10 To enable a list or library for incoming e-mail, configure the Incoming E-Mail settings .
Configuring Core Operations CHAPTER 3 93
Mobile AccountThe Mobile Alert feature allows users to subscribe to alerts with their mobile phones . The idea behind the functionality is many professionals prefer to get important alerts via mobile text (SMS) rather than via e-mail . Not all users have smart phones or smart phones that are compatible with their corporate e-mail system . Configur-ing mobile alerts allows notification to almost any cellular telephone . The feature does come with some drawbacks, however . First of all, you must have a subscription with a third-party SMS provider . The SMS provider acts as a “man in the middle” to relay mobile messages to cellular providers . This comes at a cost . Although the future of this space is widely unknown, current prices range from $ .02 USD to $ .06 USD . You can find a list of SharePoint Server 2010– compatible providers at http://messaging.office.microsoft.com/HostingProviders.aspx?src=O14&lc=1033 . There is a constantly changing list, and your costs will vary based on your geographic location and volume of prepaid SMS alerts .
NOTE There is no method to throttle alerts at the Web-application level. If you have a user who subscribes to hundreds of alerts or you have a system error, you could quickly increase the costs associated with your third-party provider. Most administra-tors will want to configure throttling with the third-party provider to mitigate these risks.
To configure the text message (SMS) service, do the following:
1. Subscribe to an online SMS provider, and note the URL and user name and password given by the provider .
2. Browse to Central Administration, System Settings, Configure Mobile Account .
3. Enter the URL provided by the SMS provider . 4. Enter the user name and password given to you by the SMS provider . 5. Test account settings .
Farm Timer JobsThe Microsoft SharePoint Foundation Timer service runs on each server in the farm and is the master process for all timer jobs . It is not configurable—that is, it can-not be started and stopped from within Central Administration . It can, however, be restarted if you suspect a problem from Windows Server services from Start, All Programs, Administrative Tools, Services . It is listed as SharePoint 2010 Timer . You should not directly modify the logon account or other settings directly from Windows Server . You should restart only if necessary .
Timer jobs are created and deleted by SharePoint Server 2010 features or by developers via custom code . If your developers will deploy timer jobs to support custom code, be sure to test on an environment other than your production servers, and test for 24 hours or longer . Many timer jobs do not immediately display errors .
CHAPTER 3 Configuring Core Operations94
Only time will show if the custom timer job has a problem . Third-party products that create timer jobs should be tested to the same level as customer code . Be sure to test any custom timer jobs before a major service pack or SharePoint Server 2010 version change .
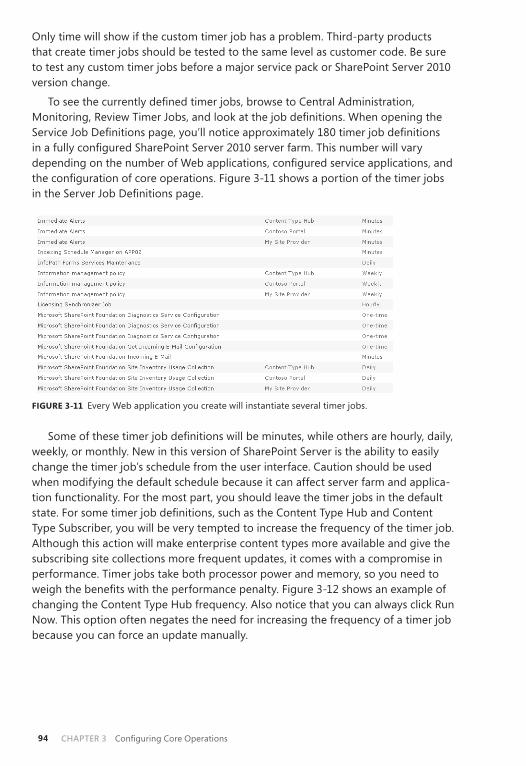
To see the currently defined timer jobs, browse to Central Administration, Monitoring, Review Timer Jobs, and look at the job definitions . When opening the Service Job Definitions page, you’ll notice approximately 180 timer job definitions in a fully configured SharePoint Server 2010 server farm . This number will vary depending on the number of Web applications, configured service applications, and the configuration of core operations . Figure 3-11 shows a portion of the timer jobs in the Server Job Definitions page .
FIGURE 3-11 Every Web application you create will instantiate several timer jobs .
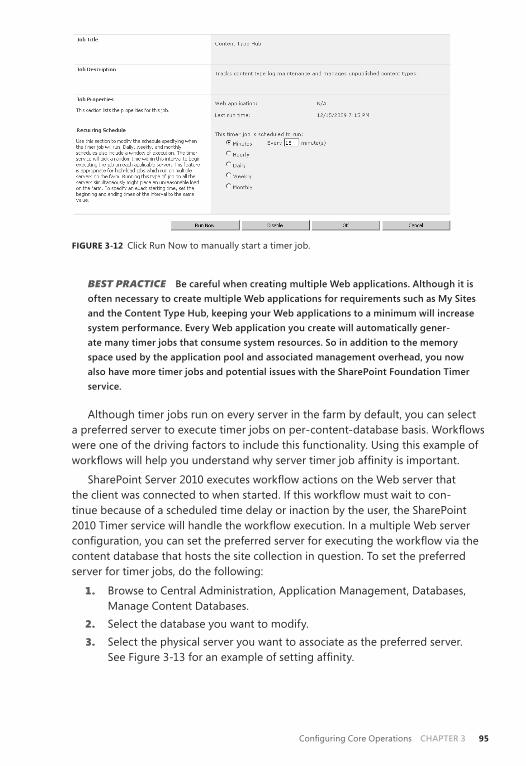
Some of these timer job definitions will be minutes, while others are hourly, daily, weekly, or monthly . New in this version of SharePoint Server is the ability to easily change the timer job’s schedule from the user interface . Caution should be used when modifying the default schedule because it can affect server farm and applica-tion functionality . For the most part, you should leave the timer jobs in the default state . For some timer job definitions, such as the Content Type Hub and Content Type Subscriber, you will be very tempted to increase the frequency of the timer job . Although this action will make enterprise content types more available and give the subscribing site collections more frequent updates, it comes with a compromise in performance . Timer jobs take both processor power and memory, so you need to weigh the benefits with the performance penalty . Figure 3-12 shows an example of changing the Content Type Hub frequency . Also notice that you can always click Run Now . This option often negates the need for increasing the frequency of a timer job because you can force an update manually .
Configuring Core Operations CHAPTER 3 95
FIGURE 3-12 Click Run Now to manually start a timer job .
BEST PRACTICE Be careful when creating multiple Web applications. Although it is often necessary to create multiple Web applications for requirements such as My Sites and the Content Type Hub, keeping your Web applications to a minimum will increase system performance. Every Web application you create will automatically gener-ate many timer jobs that consume system resources. So in addition to the memory space used by the application pool and associated management overhead, you now also have more timer jobs and potential issues with the SharePoint Foundation Timer service.
Although timer jobs run on every server in the farm by default, you can select a preferred server to execute timer jobs on per-content-database basis . Workflows were one of the driving factors to include this functionality . Using this example of workflows will help you understand why server timer job affinity is important .
SharePoint Server 2010 executes workflow actions on the Web server that the client was connected to when started . If this workflow must wait to con-tinue because of a scheduled time delay or inaction by the user, the SharePoint 2010 Timer service will handle the workflow execution . In a multiple Web server configuration, you can set the preferred server for executing the workflow via the content database that hosts the site collection in question . To set the preferred server for timer jobs, do the following:
1. Browse to Central Administration, Application Management, Databases, Manage Content Databases .
2. Select the database you want to modify . 3. Select the physical server you want to associate as the preferred server .
See Figure 3-13 for an example of setting affinity .

CHAPTER 3 Configuring Core Operations96
FIGURE 3-13 You can select any server farm member to be the preferred server for a content database .
NOTE If the preferred server is unavailable, another will be selected automatically until the preferred server is back online.
In addition to managing timer jobs, you can also check the job status from Central Administration, Monitoring, Timer Jobs, Check Job Status . (See Figure 3-14 .)
FIGURE 3-14 The Timer Job Status page .
The Timer Job Status page allows you to view the status of scheduled jobs, see running jobs, and view timer job history . You’ll find this page useful when trouble-shooting problems within your farm . Hung processes, such as workflows or backup and restore, can be deleted to allow for future instances . It is recommended that you not delete timer jobs when you are not sure of the consequences of that action . The product team has removed the option for you to delete platform-level jobs that would have dire consequences . Instead, they have replaced the delete option with a disable option . Always document your action for future reference if you delete or disable a timer job .
Farm ManagementThe Farm Management area, located under System Settings, is essentially a bucket for items that are associated with the configuration database or didn’t fit neatly elsewhere . The Farm Management functional areas are as follows:
■ Alternate Access Mappings Details about this configuration option can be found in Chapter 4 .
■ Manage Farm Features, Manage Farm Solutions, and Manage User Solutions Details on these options are presented in Chapter 7, “Web Parts, Features, and Solutions .”

Configuring Core Operations CHAPTER 3 97
■ Configure Cross-Firewall Access Zone This option is discussed in Chapter 15 .
■ Configure Privacy Options This configuration option allows you to decide whether your server farm will automatically connect to Microsoft for the Customer Experience Improvement Program (CEIP), error reporting, and external Web-based help . Be careful when turning these on if you are in a secure environment . Many times, servers in a secure environment will not have outbound HTTP enabled . If that is the case, Web-based help will not function .
Database Management
The bulk of SharePoint Server 2010 content is almost entirely contained in SQL Server . As such, a properly designed and managed SQL Server infrastructure is critical to a well-running SharePoint Server environment . Because SQL Server has many books dedicated to the product, you’ll be introduced only to the topics every SharePoint Server administrator should know in this section . Database management is contained in the Application Management section of Central Administration . The majority of Application Management deals with Web applications, service applica-tions, and site collections . Although databases are used with all three of these, there is a dedicated section for database management, as seen in Figure 3-15 .
FIGURE 3-15 Databases are contained in the Application Management grouping .
CHAPTER 3 Configuring Core Operations98
Content DatabasesThere are many farm-level settings and configuration options you should be aware of with content databases . While the first content database is created during the Web application creation, it is created with several default options . The following configuration options should be taken into consideration when managing content databases:
■ Size of the content database■ Number of site collections per content database■ Status of content databases■ Read-only content databases■ Location on SQL Server physical disk
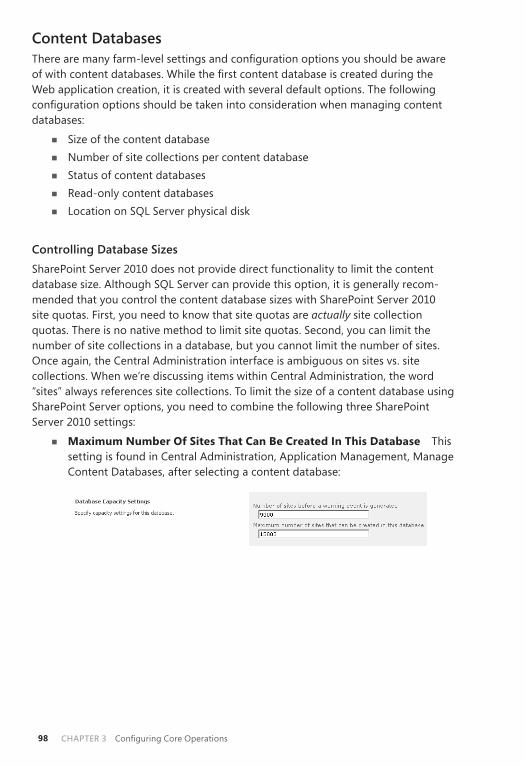
Controlling Database SizesSharePoint Server 2010 does not provide direct functionality to limit the content database size . Although SQL Server can provide this option, it is generally recom-mended that you control the content database sizes with SharePoint Server 2010 site quotas . First, you need to know that site quotas are actually site collection quotas . There is no native method to limit site quotas . Second, you can limit the number of site collections in a database, but you cannot limit the number of sites . Once again, the Central Administration interface is ambiguous on sites vs . site collections . When we’re discussing items within Central Administration, the word “sites” always references site collections . To limit the size of a content database using SharePoint Server options, you need to combine the following three SharePoint Server 2010 settings:
■ Maximum Number Of Sites That Can Be Created In This Database This setting is found in Central Administration, Application Management, Manage Content Databases, after selecting a content database:
Configuring Core Operations CHAPTER 3 99
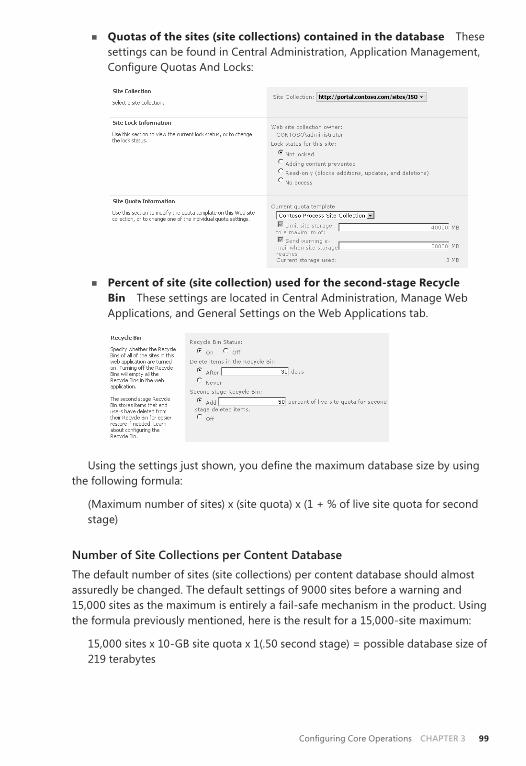
■ Quotas of the sites (site collections) contained in the database These settings can be found in Central Administration, Application Management, Configure Quotas And Locks:
■ Percent of site (site collection) used for the second-stage Recycle Bin These settings are located in Central Administration, Manage Web Applications, and General Settings on the Web Applications tab .
Using the settings just shown, you define the maximum database size by using the following formula:
(Maximum number of sites) x (site quota) x (1 + % of live site quota for second stage)
Number of Site Collections per Content DatabaseThe default number of sites (site collections) per content database should almost assuredly be changed . The default settings of 9000 sites before a warning and 15,000 sites as the maximum is entirely a fail-safe mechanism in the product . Using the formula previously mentioned, here is the result for a 15,000-site maximum:
15,000 sites x 10-GB site quota x 1( .50 second stage) = possible database size of 219 terabytes
CHAPTER 3 Configuring Core Operations100
A more likely scenario is this:
20 sites x 10-GB site quota x 1( .20 second stage) = possible database size of 250 GB
The maximum database size recommended is somewhere between 200 GB and 300 GB . Your databases can be much larger in theory, but the practical daily management becomes difficult beyond the recommended limit .
TIP You should be very careful with maximum site collection sizes (the site quota settings). Large, busy site collections are likely to have SQL locking/blocking errors. A rule of thumb is to have large site collections and a few users, or small site collections with a large user population.
If you must have large content databases, try to isolate very busy site collections in a dedicated content database . This gives you the flexibility of managing the disk I/O of the site collection at the SQL level . Note that this does not scale, however . It is recommended that you have no more than 100 content databases per Web application .
Content Database StatusThe Content Database Status can be set to either Ready or Offline . The status of Offline is a bit confusing because the real purpose of taking a content database offline is to not allow more site collections to be created therein . In fact, site col-lections contained in an offline content database can still be seen and written to . However, there were unexpected problems with this in SharePoint Server 2007 and there might be again in SharePoint Server 2010 . The safest way to limit the number of site collections in a content database is by following these steps:
1. Turn off warning events by setting the threshold to zero . 2. Set the maximum number of site collections to the current number listed in
the user interface . Be sure to create a new content database before creating a site collection; otherwise, the creation will fail .
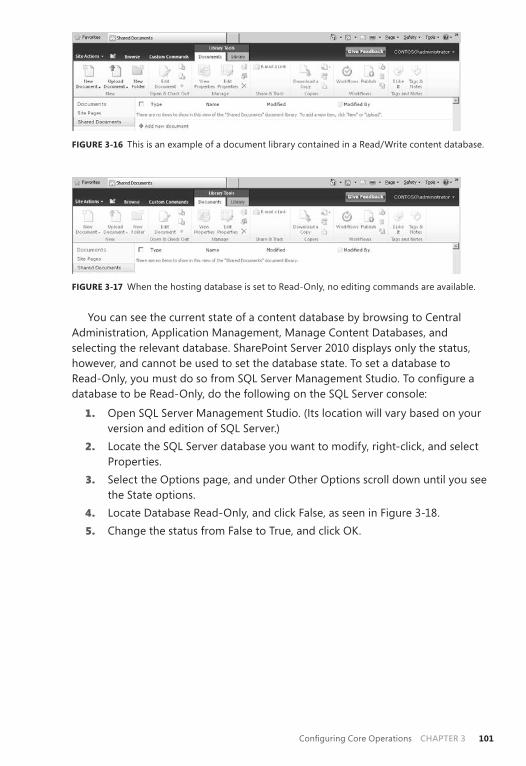
Read-Only Content DatabasesSharePoint Server 2010 now supports read-only SQL Server content databases . When you set a content database to Read-Only, the permissions in all site col-lections will automatically be reflected in the users’ Web browser . For example, Figure 3-16 shows an example of a document library contained in a read/write content database, and Figure 3-17 is the same document library after setting the content database to Read-Only .
Configuring Core Operations CHAPTER 3 101
FIGURE 3-16 This is an example of a document library contained in a Read/Write content database .
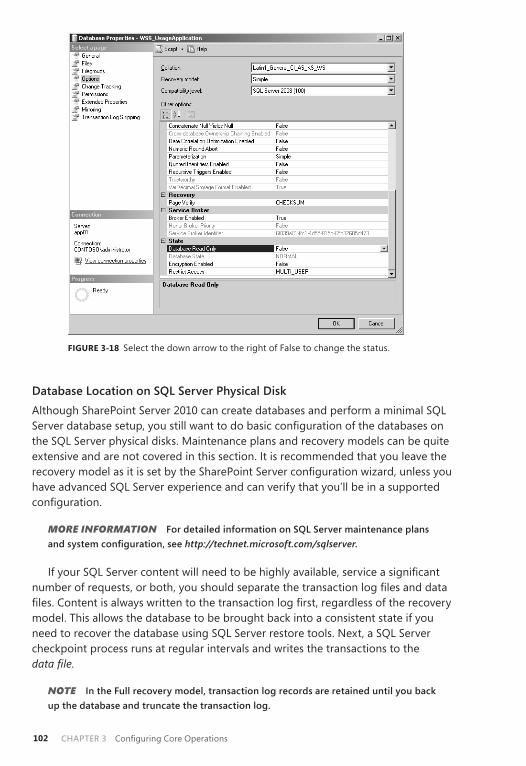
FIGURE 3-17 When the hosting database is set to Read-Only, no editing commands are available .
You can see the current state of a content database by browsing to Central Administration, Application Management, Manage Content Databases, and selecting the relevant database . SharePoint Server 2010 displays only the status, however, and cannot be used to set the database state . To set a database to Read-Only, you must do so from SQL Server Management Studio . To configure a database to be Read-Only, do the following on the SQL Server console:
1. Open SQL Server Management Studio . (Its location will vary based on your version and edition of SQL Server .)
2. Locate the SQL Server database you want to modify, right-click, and select Properties .
3. Select the Options page, and under Other Options scroll down until you see the State options .
4. Locate Database Read-Only, and click False, as seen in Figure 3-18 . 5. Change the status from False to True, and click OK .
CHAPTER 3 Configuring Core Operations102
FIGURE 3-18 Select the down arrow to the right of False to change the status .
Database Location on SQL Server Physical DiskAlthough SharePoint Server 2010 can create databases and perform a minimal SQL Server database setup, you still want to do basic configuration of the databases on the SQL Server physical disks . Maintenance plans and recovery models can be quite extensive and are not covered in this section . It is recommended that you leave the recovery model as it is set by the SharePoint Server configuration wizard, unless you have advanced SQL Server experience and can verify that you’ll be in a supported configuration .
MORE INFORMATION For detailed information on SQL Server maintenance plans and system configuration, see http://technet.microsoft.com/sqlserver.
If your SQL Server content will need to be highly available, service a significant number of requests, or both, you should separate the transaction log files and data files . Content is always written to the transaction log first, regardless of the recovery model . This allows the database to be brought back into a consistent state if you need to recover the database using SQL Server restore tools . Next, a SQL Server checkpoint process runs at regular intervals and writes the transactions to the data file .
NOTE In the Full recovery model, transaction log records are retained until you back up the database and truncate the transaction log.
Configuring Core Operations CHAPTER 3 103
When users are viewing your Web applications, they are almost always consuming the data file on SQL Server . By contrast, write actions are processed in the transaction log . Therefore, it is safe to assume that in a read-only server farm the data file physical disk will be the most utilized . Because of the nature of SharePoint Server transactions, the transaction log and data file are usually equally used in a collaborative environment .
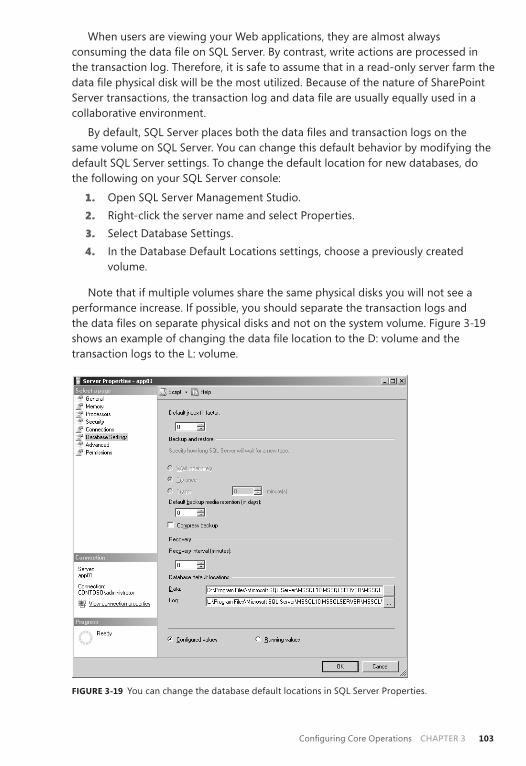
By default, SQL Server places both the data files and transaction logs on the same volume on SQL Server . You can change this default behavior by modifying the default SQL Server settings . To change the default location for new databases, do the following on your SQL Server console:
1. Open SQL Server Management Studio . 2. Right-click the server name and select Properties . 3. Select Database Settings . 4. In the Database Default Locations settings, choose a previously created
volume .
Note that if multiple volumes share the same physical disks you will not see a performance increase . If possible, you should separate the transaction logs and the data files on separate physical disks and not on the system volume . Figure 3-19 shows an example of changing the data file location to the D: volume and the transaction logs to the L: volume .
FIGURE 3-19 You can change the database default locations in SQL Server Properties .
CHAPTER 3 Configuring Core Operations104
BEST PRACTICE For current best practice information on separating the disk location of transaction log files and data files, browse to http://technet.microsoft.com/en-us/library/bb402876.aspx.
MORE INFORMATION For information on testing the SQL Server I/O subsystem, browse to http://technet.microsoft.com/en-us/library/cc966412.aspx. Specifically, you can find more information here about using the SQLIO.exe tool.
Default Database ServerWhen you installed SharePoint Server 2010, you selected a database server for the configuration database . The SQL Server you selected became the default content database server . You can change this default at any time from Central Administra-tion, Application Management, Specify The Default Database Server . Unless you are in a specialized environment, do not use SQL Server authentication . Windows authentication is almost always the correct choice . Do not fill in the Database Username and Password fields when using Windows authentication . SharePoint Server 2010 automatically configures the SQL Server permissions when using Windows authentication .
Data Retrieval ServiceThe Data Retrieval Service was first introduced in Windows SharePoint Services 2 .0 and allowed for a connection to internal or external data sources via Web services . SharePoint Server 2010 continues to build on the service, and it can be configured for the entire server farm or on a per–Web application basis . For the most part, you leave this configuration set to default unless you are requested to change it by a designer or developer . For example, you might need to change it when requiring access to stored procedures on a non–SharePoint Server database, external content source (OLEDB), or XML and SOAP Web services from within SharePoint Server 2010 .
To configure the Data Retrieval Service, browse to Central Administration, Application Management, Configure The Data Retrieval Service . There are seven configuration options:
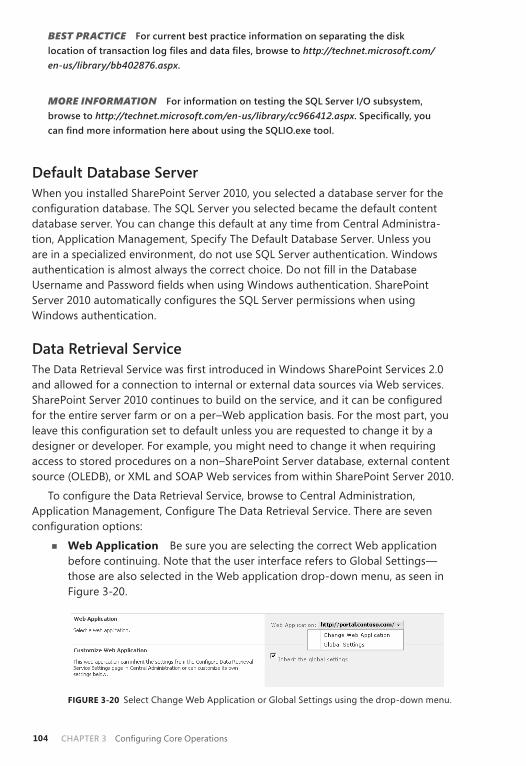
■ Web Application Be sure you are selecting the correct Web application before continuing . Note that the user interface refers to Global Settings—those are also selected in the Web application drop-down menu, as seen in Figure 3-20 .
FIGURE 3-20 Select Change Web Application or Global Settings using the drop-down menu .
Configuring Core Operations CHAPTER 3 105
■ Customize Web Application If you want to use Web-application scoped settings, clear this option . If you want to override prior Web-application changes, you can also select this box to reapply the global settings . This is useful if you made a mistake configuring a specific Web application .
■ Enable Data Retrieval Services Be careful when deciding whether to turn off this option . Both SharePoint Designer 2010 and Visual Studio 2010 might leverage these services via Web parts and custom code . Check with your development team before disabling these services .
■ Limit Response Size Unless directed by your development team, the default OLEDB response size should be selected . You should monitor your server’s memory utilization if you increase the defaults, and you should do so over a period of several days . Large OLEDB queries can quickly use server memory .
■ Update Support This option is disabled by default, but many develop-ers will want to enable this option . A common reason for doing so is that custom code might call a stored procedure in a non–SharePoint Server 2010 database . This is often more efficient than bringing the data into .NET for processing .
■ Data Source Time-Out Unless you are calling data sources over a wide area network (WAN), the default time-outs should be sufficient .
■ Enable Data Source Controls Data Source Controls allow controls to bind to other controls, without the need for custom code . This option is usually enabled .
Configuring Send To Connections
SharePoint Server 2010 has dramatically improved an administrator’s ability to connect services and site collections without custom code . If you worked with SharePoint Server 2007, you’ll recognize the Web service used for connections, officialfile.asmx . That was the Records Center connection, and it was scoped to the farm level . SharePoint Server 2010 allows connections between many site collec-tions, not just the Records Center . Connections can also be scoped to Web applica-tions instead of to the farm . The most common uses of Send To connections are Records Management and Published Documents . This section will walk you through the configuration options of an external service connection in Central Adminis-tration, and how to connect to a site collection for the purpose of publishing a document .
Before you can use Send To connections in a site collection, you must first configure the service in Central Administration . The connection is valid for an entire Web application, but you must configure an entry to each site collection you want to connect to . In the following example, the destination site collection is http://portal.contoso.com/sites/ISO .
CHAPTER 3 Configuring Core Operations106
To begin configuration, browse to Central Administration, General Application Settings, External Service Connections, Configure Send To Connections . Always verify you are configuring the correct Web application before continuing .
Site Subscription SettingsSharePoint Server 2010 allows for multitenancy and was primarily targeted at SharePoint Server hosting providers . This allows for isolation of hosted site collections, as well as the ability to consume service applications at the site collection level . This segmentation is known as a site subscription . Although most readers will not have their implementation configured in such a fashion because of the complexity involved, you can limit the ability of these tenants to create connec-tions beyond their environment . If you do not have multitenancy configured, this option can be left as the default . If you do have multitenancy enabled, you must decide whether to allow connections between tenants . This decision is a business, process, and security decision .
Configuring the Content Organizer in the Destination SiteBefore you can configure Central Administration for Send To connections, you must first enable the Content Organizer feature in the destination site . The Content Organizer feature allows settings and rules to route inbound files to the site . Based on the defined settings and rules, the destination site will sort and route files to the appropriate library, or even to other site collections . To enable the Content Organizer in the destination site, do the following:
1. Browse to the site where you want files to be routed to . 2. From the Site Actions menu, select Site Settings . 3. Under the Site Actions grouping, select Manage Site Features . 4. Locate the Content Organizer feature, and click Activate . 5. From Site Actions, Site Settings, configure Content Organizer Settings And
Rules .
MORE INFORMATION For more details on configuring the Content Organizer, see Chapter 12, “Records Management.”
Send To ConnectionsYou can configure multiple Send To connections and even create multiple connections to the same site using different rules . If this is your first connection, just continue completing the form . If this is a subsequent connection, either choose New Connection or select one for editing . Note that you can select the Add Connection control if you’ll configure multiple Send To connections . This prevents the configu-ration screen from closing and allows you to immediately add another connection .
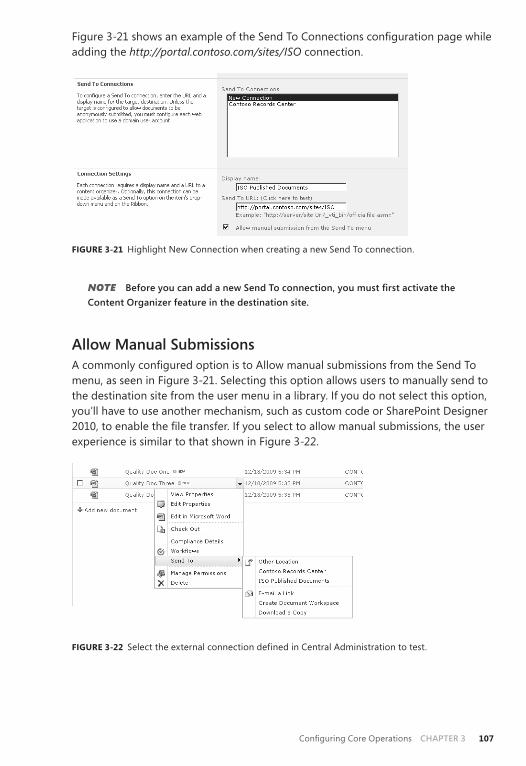
Configuring Core Operations CHAPTER 3 107
Figure 3-21 shows an example of the Send To Connections configuration page while adding the http://portal.contoso.com/sites/ISO connection .
FIGURE 3-21 Highlight New Connection when creating a new Send To connection .
NOTE Before you can add a new Send To connection, you must first activate the Content Organizer feature in the destination site.
Allow Manual SubmissionsA commonly configured option is to Allow manual submissions from the Send To menu, as seen in Figure 3-21 . Selecting this option allows users to manually send to the destination site from the user menu in a library . If you do not select this option, you’ll have to use another mechanism, such as custom code or SharePoint Designer 2010, to enable the file transfer . If you select to allow manual submissions, the user experience is similar to that shown in Figure 3-22 .
FIGURE 3-22 Select the external connection defined in Central Administration to test .

265
CHAP TER 9
Managing the Search Experience■ Configuring the Thesaurus and Noise Word Files 266
■ Defining Authoritative Pages 268
■ Federated Queries 270
■ Managed Properties 278
■ Creating and Managing Search Scopes 284
■ Search Results Removal 289
■ Site Collection Search Management 290
■ Working with Keywords and Best Bets 293
■ Creating and Customizing Search Centers 297
■ Customizing Search Pages 300
■ Working with Query Reporting 325
■ Local Search Configuration Options 325
When a user executes a search query, the goal is quite simple—to get a results set that includes everything relevant to the search and nothing else .
Achieving this goal is not so simple, but this chapter will show how to configure search so that users can easily define and refine both the query and the results . The chapter is organized according to the scope of the configurations: starting with the file systems and then moving on to the search services application, the site collection, and the search centers .
CHAPTER 9 Managing the Search Experience266
Configuring the Thesaurus and Noise Word Files
Microsoft SharePoint 2010 continues to provide thesaurus and noise word files to manipulate the search process, but the scope of their usage has been changed in this product . In this section, we discuss the more common ways to configure these elements .
Crawl components no longer use the files to eliminate words from the index . However, query components use both the noise word files to remove words from query terms and thesaurus files to modify queries .
Noise Word FilesA noise word file is a text file that contains all the words that have little or no refinement value in a search query in your environment . Such words often include your organization’s name, product names, registered names, and so on . Noise words apply only to text content, not metadata .
SharePoint Server 2010 provides noise word and thesaurus files in 54 languages . They are located in a number of directories named Config . The hierarchy of these directories is significant because the installation and implementation of SharePoint Server determine which set of files is used during a query .
Files located in the %ProgramFiles%\Microsoft Office Servers\14 .0\Data\Config folder are for SharePoint Foundation Server installations . This folder is not used in SharePoint Server 2010 .
For a SharePoint Server 2010 standalone server farm or Microsoft Search Server 2010, the files under %ProgramFiles%\Microsoft Office Servers\14 .0\Data\Office Server\config are copied to the Microsoft Office Servers\14 .0\Data\Office Server\Applications\(serviceGUID)\Config folder to be used at query time .
When you are setting up a complete server farm, whether it contains one server or more, files under %ProgramFiles%\Microsoft Office Servers\14 .0\Data\Office Server\config are copied to all %ProgramFiles%\Microsoft Office Servers\14 .0\Data\Office Server\Applications\(service and service component GUID)\Config folders . However, only files under query component GUIDs are used at query time .
For consistent query responses, all files under all query components on all servers should be identical . If noise word and thesaurus file modifications are known before you create search service applications, the set of files in the %ProgramFiles%\Microsoft Office Servers\14 .0\Data\Office Server\config folder can be modified prior to the copy process . These files must be identical on all members of the farm because any member can host the search service components .
To configure a noise word file, perform the following steps:
1. Go to the appropriate noise word file, and open it using a text editor such as Notepad .
2. Enter the words you do not want used in queries, one word per line . Maintaining the list in alphabetical order makes reviewing terms easier .
Managing the Search Experience CHAPTER 9 267
3. Save the file .
IMPORTANT A noise word file must have at least one entry in it, even if the entry is only a period (.) character.
Configuring the ThesaurusThe thesaurus provides a mechanism to assist users in constructing a query by expanding or replacing query terms as the query is executed against the index . It differs from search suggestions in that the changes are transparent to the user and are not optional for the user . You can create expansion or replacement sets, as well as weight or stem the terms within the expansion or replacement sets .
You can use thesaurus file entries to correct commonly misspelled query terms, add synonyms to queries, or replace query terms . Because modifying these files requires access to the file system of all Web front ends, you probably will find the new functionality of search suggestions easier to maintain .
The thesaurus is configured via an XML file, which has the format of TS<XXX> .XML, where XXX is the standard three-letter code for a specific language . For English, the file name is Tsenu .xml .
The default code for the file is as follows:
<XML ID="Microsoft Search Thesaurus"> <!-- Commented out <thesaurus xmlns="x-schema:tsSchema.xml"> <diacritics_sensitive>0</diacritics_sensitive> <expansion> <sub>Internet Explorer</sub> <sub>IE</sub> <sub>IE5</sub> </expansion> <replacement> <pat>NT5</pat> <pat>W2K</pat> <sub>Windows 2000</sub> </replacement> <expansion> <sub>run</sub> <sub>jog</sub> </expansion> </thesaurus> --> </XML>
To create new expansion sets, perform the following steps:
1. Open Windows Explorer, and go to the location of the thesaurus XML file . 2. Open the XML file using Notepad or some other text editor .
CHAPTER 9 Managing the Search Experience268
3. Enter your expansion terms within the tags using well-formed XML, as illustrated here:
<expansion> <sub>term1</sub> <sub>term2</sub> <sub>term3</sub> </expansion>
4. Save the file . 5. Restart the Mssearch .exe service .
To create new replacement sets, perform the following steps:
1. Open My Computer, and go to the location of the thesaurus XML file . 2. Open the XML file using Notepad or some other text editor . 3. Enter your replacement terms within the tags using well-formed XML . Note
that the terms being replaced are in the <sub> extensions, and the term to replace them is in the <pat> extension . This is illustrated here:
<replacement> <sub>term1</sub> <sub>term2</sub> <pat>term3</pat> </replacement>
4. Save the file . 5. Restart the SharePoint Server Search 14 service (Net stop/start osearch14) .
Defining Authoritative Pages
Search results relevance settings can be managed through the authoritative pages in the search service . The relationship of individual documents or content items to authoritative pages is defined in terms of click distance . Click distance is not based on URL depth . If all other ranking elements are equal, the more clicks that are re-quired to traverse from the authoritative page to the content item, the less relevant that item is for a given query . Placing a link to an object on an authoritative page elevates that object in search results, with no regard to the actual location of the object .
Your farm will have some locations that contain official, approved content for your organization . These locations are the URLs you should enter into the Authoritative Web Pages input boxes, which are shown in Figure 9-1 .
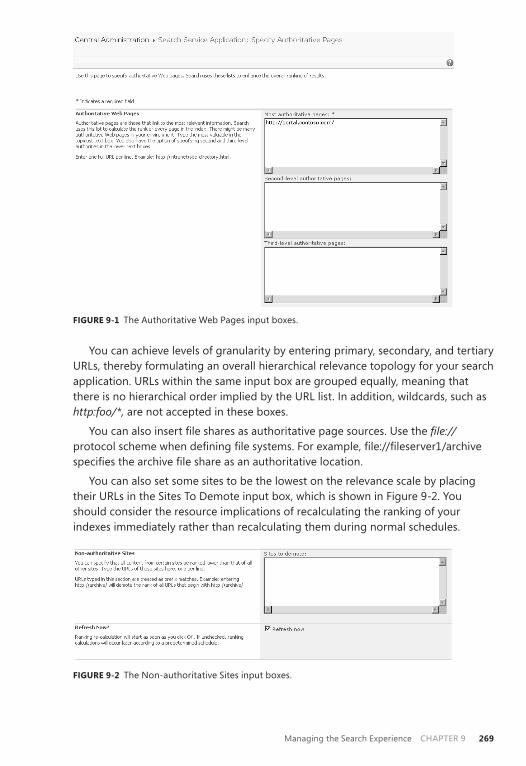
Managing the Search Experience CHAPTER 9 269
FIGURE 9-1 The Authoritative Web Pages input boxes .
You can achieve levels of granularity by entering primary, secondary, and tertiary URLs, thereby formulating an overall hierarchical relevance topology for your search application . URLs within the same input box are grouped equally, meaning that there is no hierarchical order implied by the URL list . In addition, wildcards, such as http:foo/*, are not accepted in these boxes .
You can also insert file shares as authoritative page sources . Use the file:// protocol scheme when defining file systems . For example, file://fileserver1/archive specifies the archive file share as an authoritative location .
You can also set some sites to be the lowest on the relevance scale by placing their URLs in the Sites To Demote input box, which is shown in Figure 9-2 . You should consider the resource implications of recalculating the ranking of your indexes immediately rather than recalculating them during normal schedules .
FIGURE 9-2 The Non-authoritative Sites input boxes .
CHAPTER 9 Managing the Search Experience270
To set relevance settings, perform the following steps:
1. Open the Administration page for your search service . 2. In the Quick Launch area, click the Specify Authoritative Pages link under the
Queries And Results heading . 3. Input the URLs in the appropriate boxes as required to configure relevance
settings for your environment . 4. Select the Refresh Now check box if you want to have the relevance settings
recomputed immediately . 5. Click OK .
Federated Queries
Federated queries permit end users to search for and retrieve content from an OpenSearch 1 .1–compliant search server . These content sources can be enterprise content repositories, other search engines (including remote SharePoint search), or your SharePoint Server 2010 search services . With a federated query, the server sends the queries to the federated locations, retrieves the results from the loca-tion feed, and then formats and renders the results to your users on the same page as results from your crawled content . With SharePoint Server 2010, all queries ( including those to the local search service applications) are federated .
Federated Location ManagementTo access the management page for the federated locations shown in Figure 9-3, click Federated Locations on the Search Service Application page . This discussion will focus primarily on actions available from the Manage Federated Locations page:
■ Add a federated location by using the provided New Location UI or by importing existing definition files .
■ Edit a federated location using the UI . ■ Copy a federated location to use as the basis for another location .■ Delete a federated location .■ Export a federated location into a portable file .
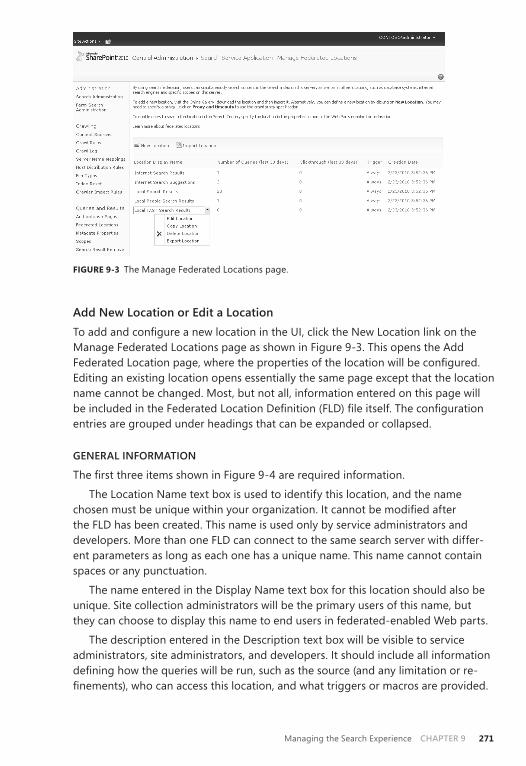
Managing the Search Experience CHAPTER 9 271
FIGURE 9-3 The Manage Federated Locations page .
Add New Location or Edit a Location To add and configure a new location in the UI, click the New Location link on the Manage Federated Locations page as shown in Figure 9-3 . This opens the Add Federated Location page, where the properties of the location will be configured . Editing an existing location opens essentially the same page except that the location name cannot be changed . Most, but not all, information entered on this page will be included in the Federated Location Definition (FLD) file itself . The configuration entries are grouped under headings that can be expanded or collapsed .
GENERAL INFORMATION
The first three items shown in Figure 9-4 are required information .
The Location Name text box is used to identify this location, and the name chosen must be unique within your organization . It cannot be modified after the FLD has been created . This name is used only by service administrators and developers . More than one FLD can connect to the same search server with differ-ent parameters as long as each one has a unique name . This name cannot contain spaces or any punctuation .
The name entered in the Display Name text box for this location should also be unique . Site collection administrators will be the primary users of this name, but they can choose to display this name to end users in federated-enabled Web parts .
The description entered in the Description text box will be visible to service administrators, site administrators, and developers . It should include all information defining how the queries will be run, such as the source (and any limitation or re-finements), who can access this location, and what triggers or macros are provided .
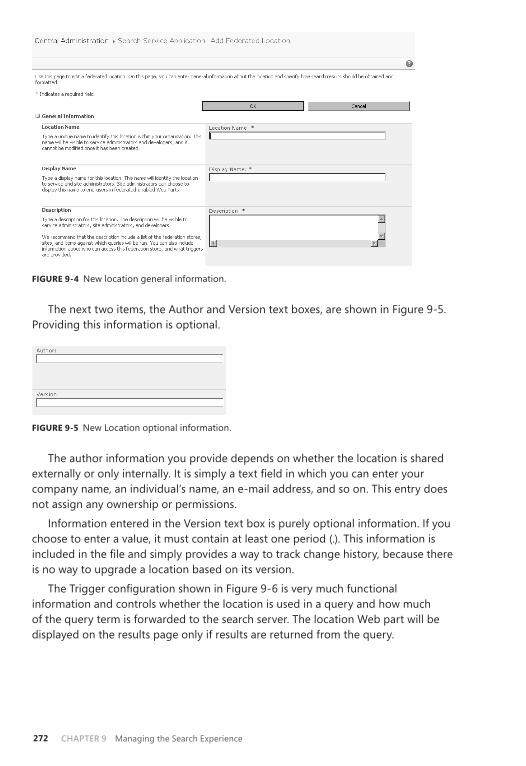
CHAPTER 9 Managing the Search Experience272
FIGURE 9-4 New location general information .
The next two items, the Author and Version text boxes, are shown in Figure 9-5 . Providing this information is optional .
FIGURE 9-5 New Location optional information .
The author information you provide depends on whether the location is shared externally or only internally . It is simply a text field in which you can enter your company name, an individual’s name, an e-mail address, and so on . This entry does not assign any ownership or permissions .
Information entered in the Version text box is purely optional information . If you choose to enter a value, it must contain at least one period ( .) . This information is included in the file and simply provides a way to track change history, because there is no way to upgrade a location based on its version .
The Trigger configuration shown in Figure 9-6 is very much functional information and controls whether the location is used in a query and how much of the query term is forwarded to the search server . The location Web part will be displayed on the results page only if results are returned from the query .
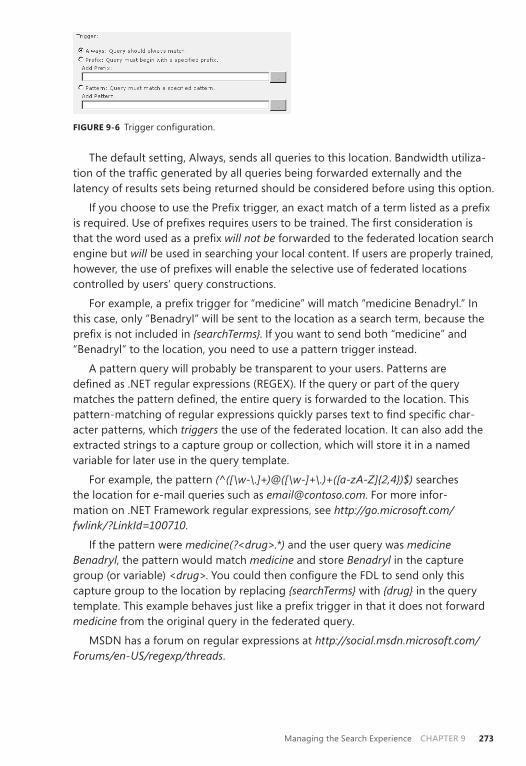
Managing the Search Experience CHAPTER 9 273
FIGURE 9-6 Trigger configuration .
The default setting, Always, sends all queries to this location . Bandwidth utiliza-tion of the traffic generated by all queries being forwarded externally and the latency of results sets being returned should be considered before using this option .
If you choose to use the Prefix trigger, an exact match of a term listed as a prefix is required . Use of prefixes requires users to be trained . The first consideration is that the word used as a prefix will not be forwarded to the federated location search engine but will be used in searching your local content . If users are properly trained, however, the use of prefixes will enable the selective use of federated locations controlled by users’ query constructions .
For example, a prefix trigger for “medicine” will match “medicine Benadryl .” In this case, only “Benadryl” will be sent to the location as a search term, because the prefix is not included in {searchTerms} . If you want to send both “medicine” and “Benadryl” to the location, you need to use a pattern trigger instead .
A pattern query will probably be transparent to your users . Patterns are defined as .NET regular expressions (REGEX) . If the query or part of the query matches the pattern defined, the entire query is forwarded to the location . This pattern- matching of regular expressions quickly parses text to find specific char-acter patterns, which triggers the use of the federated location . It can also add the extracted strings to a capture group or collection, which will store it in a named variable for later use in the query template .
For example, the pattern (^([\w-\.]+)@([\w-]+\.)+([a-zA-Z]{2,4})$) searches the location for e-mail queries such as [email protected] . For more infor-mation on .NET Framework regular expressions, see http://go.microsoft.com/fwlink/?LinkId=100710 .
If the pattern were medicine(?<drug>.*) and the user query was medicine Benadryl, the pattern would match medicine and store Benadryl in the capture group (or variable) <drug> . You could then configure the FDL to send only this capture group to the location by replacing {searchTerms} with {drug} in the query template . This example behaves just like a prefix trigger in that it does not forward medicine from the original query in the federated query .
MSDN has a forum on regular expressions at http://social.msdn.microsoft.com/Forums/en-US/regexp/threads .
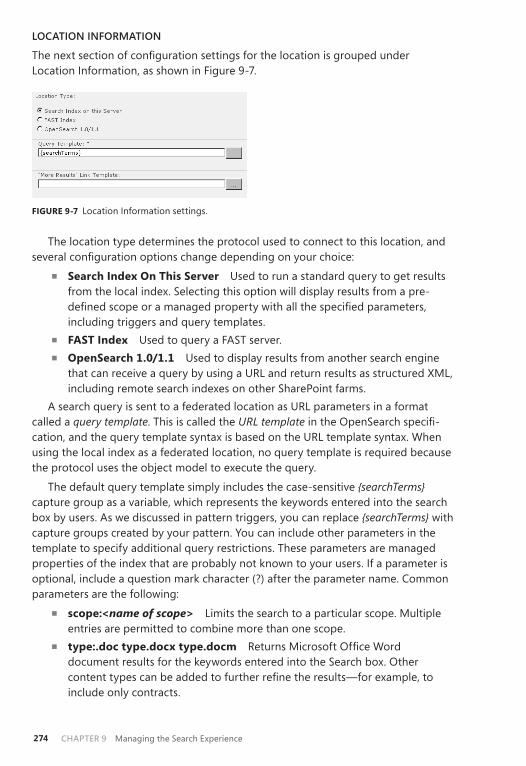
CHAPTER 9 Managing the Search Experience274
LOCATION INFORMATION
The next section of configuration settings for the location is grouped under Location Information, as shown in Figure 9-7 .
FIGURE 9-7 Location Information settings .
The location type determines the protocol used to connect to this location, and several configuration options change depending on your choice:
■ Search Index On This Server Used to run a standard query to get results from the local index . Selecting this option will display results from a pre-defined scope or a managed property with all the specified parameters, including triggers and query templates .
■ FAST Index Used to query a FAST server .■ OpenSearch 1.0/1.1 Used to display results from another search engine
that can receive a query by using a URL and return results as structured XML, including remote search indexes on other SharePoint farms .
A search query is sent to a federated location as URL parameters in a format called a query template . This is called the URL template in the OpenSearch specifi-cation, and the query template syntax is based on the URL template syntax . When using the local index as a federated location, no query template is required because the protocol uses the object model to execute the query .
The default query template simply includes the case-sensitive {searchTerms} capture group as a variable, which represents the keywords entered into the search box by users . As we discussed in pattern triggers, you can replace {searchTerms} with capture groups created by your pattern . You can include other parameters in the template to specify additional query restrictions . These parameters are managed properties of the index that are probably not known to your users . If a parameter is optional, include a question mark character (?) after the parameter name . Common parameters are the following:
■ scope:<name of scope> Limits the search to a particular scope . Multiple entries are permitted to combine more than one scope .
■ type:.doc type.docx type.docm Returns Microsoft Office Word document results for the keywords entered into the Search box . Other content types can be added to further refine the results—for example, to include only contracts .
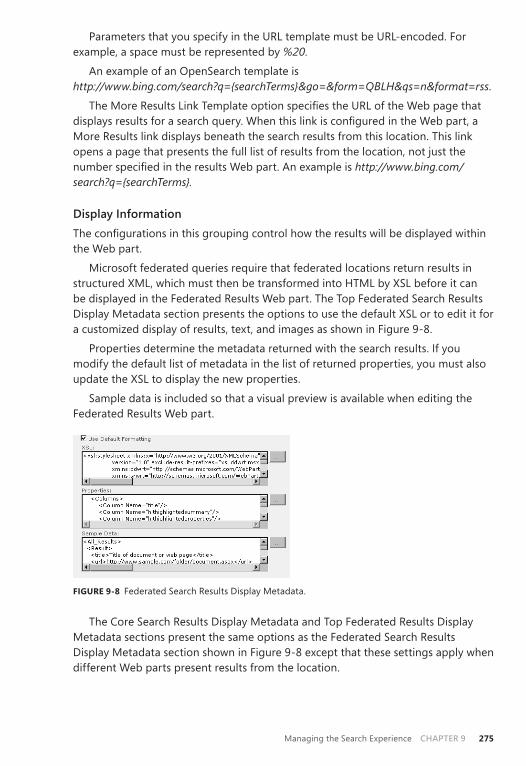
Managing the Search Experience CHAPTER 9 275
Parameters that you specify in the URL template must be URL-encoded . For example, a space must be represented by %20 .
An example of an OpenSearch template is http://www.bing.com/search?q={searchTerms}&go=&form=QBLH&qs=n&format=rss .
The More Results Link Template option specifies the URL of the Web page that displays results for a search query . When this link is configured in the Web part, a More Results link displays beneath the search results from this location . This link opens a page that presents the full list of results from the location, not just the number specified in the results Web part . An example is http://www.bing.com/search?q={searchTerms} .
Display InformationThe configurations in this grouping control how the results will be displayed within the Web part .
Microsoft federated queries require that federated locations return results in structured XML, which must then be transformed into HTML by XSL before it can be displayed in the Federated Results Web part . The Top Federated Search Results Display Metadata section presents the options to use the default XSL or to edit it for a customized display of results, text, and images as shown in Figure 9-8 .
Properties determine the metadata returned with the search results . If you modify the default list of metadata in the list of returned properties, you must also update the XSL to display the new properties .
Sample data is included so that a visual preview is available when editing the Federated Results Web part .
FIGURE 9-8 Federated Search Results Display Metadata .
The Core Search Results Display Metadata and Top Federated Results Display Metadata sections present the same options as the Federated Search Results Display Metadata section shown in Figure 9-8 except that these settings apply when different Web parts present results from the location .
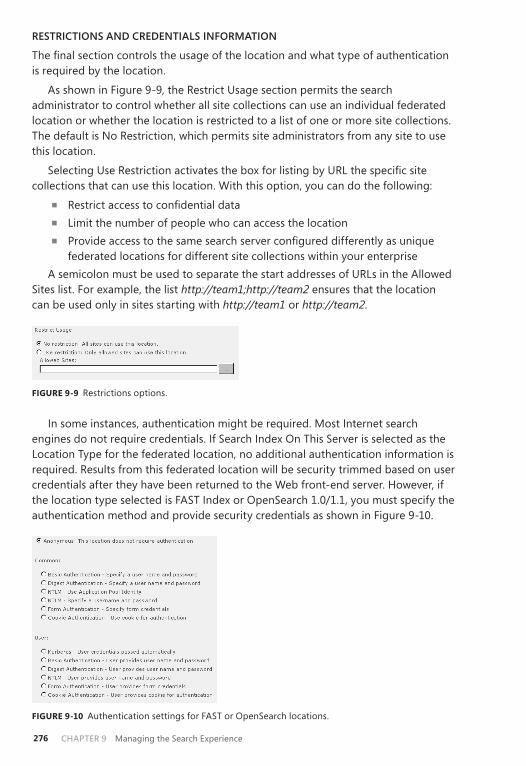
CHAPTER 9 Managing the Search Experience276
RESTRICTIONS AND CREDENTIALS INFORMATION
The final section controls the usage of the location and what type of authentication is required by the location .
As shown in Figure 9-9, the Restrict Usage section permits the search administrator to control whether all site collections can use an individual federated location or whether the location is restricted to a list of one or more site collections . The default is No Restriction, which permits site administrators from any site to use this location .
Selecting Use Restriction activates the box for listing by URL the specific site collections that can use this location . With this option, you can do the following:
■ Restrict access to confidential data ■ Limit the number of people who can access the location■ Provide access to the same search server configured differently as unique
federated locations for different site collections within your enterprise A semicolon must be used to separate the start addresses of URLs in the Allowed
Sites list . For example, the list http://team1;http://team2 ensures that the location can be used only in sites starting with http://team1 or http://team2 .
FIGURE 9-9 Restrictions options .
In some instances, authentication might be required . Most Internet search engines do not require credentials . If Search Index On This Server is selected as the Location Type for the federated location, no additional authentication information is required . Results from this federated location will be security trimmed based on user credentials after they have been returned to the Web front-end server . However, if the location type selected is FAST Index or OpenSearch 1 .0/1 .1, you must specify the authentication method and provide security credentials as shown in Figure 9-10 .
FIGURE 9-10 Authentication settings for FAST or OpenSearch locations .
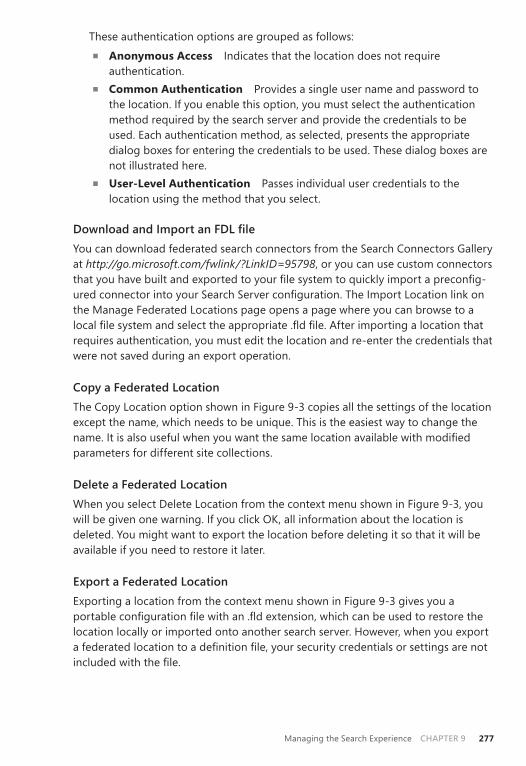
Managing the Search Experience CHAPTER 9 277
These authentication options are grouped as follows:■ Anonymous Access Indicates that the location does not require
authentication .■ Common Authentication Provides a single user name and password to
the location . If you enable this option, you must select the authentication method required by the search server and provide the credentials to be used . Each authentication method, as selected, presents the appropriate dialog boxes for entering the credentials to be used . These dialog boxes are not illustrated here .
■ User-Level Authentication Passes individual user credentials to the location using the method that you select .
Download and Import an FDL fileYou can download federated search connectors from the Search Connectors Gallery at http://go.microsoft.com/fwlink/?LinkID=95798, or you can use custom connectors that you have built and exported to your file system to quickly import a preconfig-ured connector into your Search Server configuration . The Import Location link on the Manage Federated Locations page opens a page where you can browse to a local file system and select the appropriate .fld file . After importing a location that requires authentication, you must edit the location and re-enter the credentials that were not saved during an export operation .
Copy a Federated LocationThe Copy Location option shown in Figure 9-3 copies all the settings of the location except the name, which needs to be unique . This is the easiest way to change the name . It is also useful when you want the same location available with modified parameters for different site collections .
Delete a Federated LocationWhen you select Delete Location from the context menu shown in Figure 9-3, you will be given one warning . If you click OK, all information about the location is deleted . You might want to export the location before deleting it so that it will be available if you need to restore it later .
Export a Federated LocationExporting a location from the context menu shown in Figure 9-3 gives you a portable configuration file with an .fld extension, which can be used to restore the location locally or imported onto another search server . However, when you export a federated location to a definition file, your security credentials or settings are not included with the file .
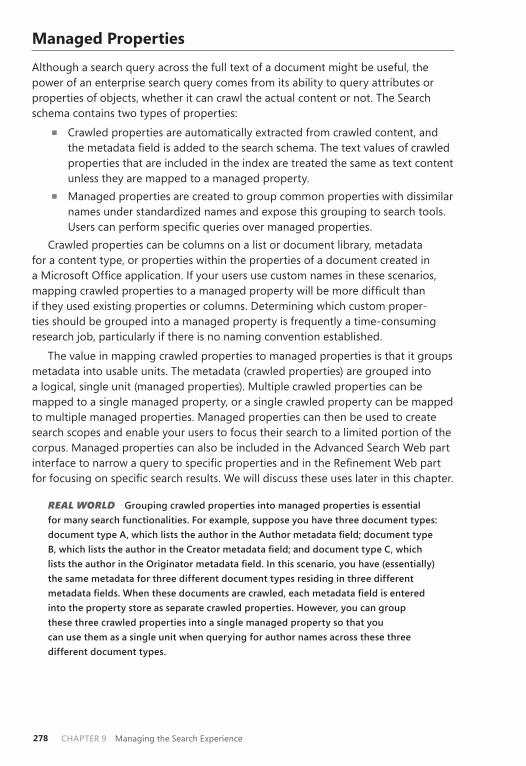
CHAPTER 9 Managing the Search Experience278
Managed Properties
Although a search query across the full text of a document might be useful, the power of an enterprise search query comes from its ability to query attributes or properties of objects, whether it can crawl the actual content or not . The Search schema contains two types of properties:
■ Crawled properties are automatically extracted from crawled content, and the metadata field is added to the search schema . The text values of crawled properties that are included in the index are treated the same as text content unless they are mapped to a managed property .
■ Managed properties are created to group common properties with dissimilar names under standardized names and expose this grouping to search tools . Users can perform specific queries over managed properties .
Crawled properties can be columns on a list or document library, metadata for a content type, or properties within the properties of a document created in a Microsoft Office application . If your users use custom names in these scenarios, mapping crawled properties to a managed property will be more difficult than if they used existing properties or columns . Determining which custom proper-ties should be grouped into a managed property is frequently a time-consuming research job, particularly if there is no naming convention established .
The value in mapping crawled properties to managed properties is that it groups metadata into usable units . The metadata (crawled properties) are grouped into a logical, single unit (managed properties) . Multiple crawled properties can be mapped to a single managed property, or a single crawled property can be mapped to multiple managed properties . Managed properties can then be used to create search scopes and enable your users to focus their search to a limited portion of the corpus . Managed properties can also be included in the Advanced Search Web part interface to narrow a query to specific properties and in the Refinement Web part for focusing on specific search results . We will discuss these uses later in this chapter .
REAL WORLD Grouping crawled properties into managed properties is essential for many search functionalities. For example, suppose you have three document types: document type A, which lists the author in the Author metadata field; document type B, which lists the author in the Creator metadata field; and document type C, which lists the author in the Originator metadata field. In this scenario, you have (essentially) the same metadata for three different document types residing in three different metadata fields. When these documents are crawled, each metadata field is entered into the property store as separate crawled properties. However, you can group these three crawled properties into a single managed property so that you can use them as a single unit when querying for author names across these three different document types.
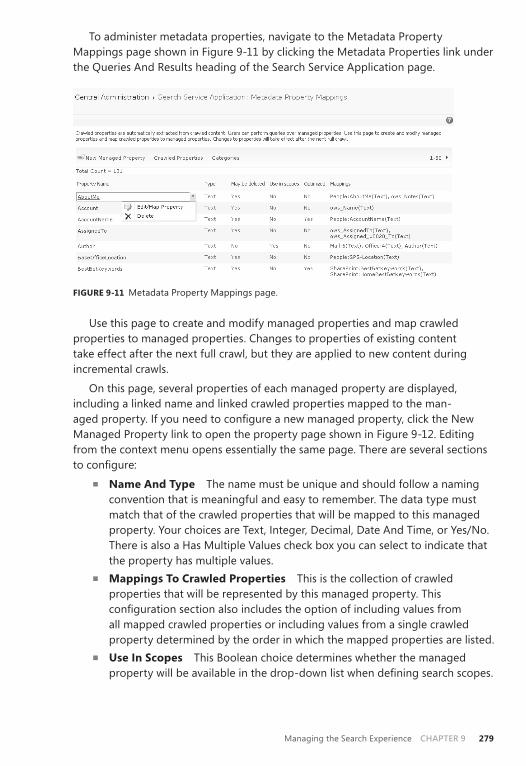
Managing the Search Experience CHAPTER 9 279
To administer metadata properties, navigate to the Metadata Property Mappings page shown in Figure 9-11 by clicking the Metadata Properties link under the Queries And Results heading of the Search Service Application page .
FIGURE 9-11 Metadata Property Mappings page .
Use this page to create and modify managed properties and map crawled properties to managed properties . Changes to properties of existing content take effect after the next full crawl, but they are applied to new content during incremental crawls .
On this page, several properties of each managed property are displayed, including a linked name and linked crawled properties mapped to the man-aged property . If you need to configure a new managed property, click the New Managed Property link to open the property page shown in Figure 9-12 . Editing from the context menu opens essentially the same page . There are several sections to configure:
■ Name And Type The name must be unique and should follow a naming convention that is meaningful and easy to remember . The data type must match that of the crawled properties that will be mapped to this managed property . Your choices are Text, Integer, Decimal, Date And Time, or Yes/No . There is also a Has Multiple Values check box you can select to indicate that the property has multiple values .
■ Mappings To Crawled Properties This is the collection of crawled properties that will be represented by this managed property . This configuration section also includes the option of including values from all mapped crawled properties or including values from a single crawled property determined by the order in which the mapped properties are listed .
■ Use In Scopes This Boolean choice determines whether the managed property will be available in the drop-down list when defining search scopes .
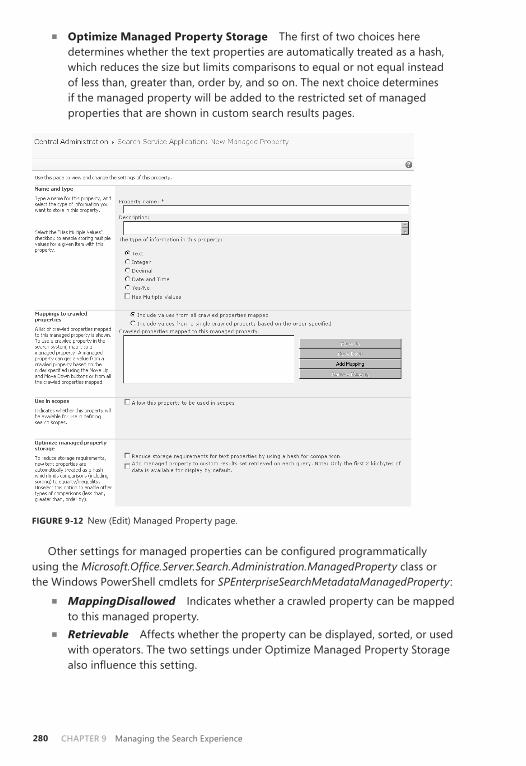
CHAPTER 9 Managing the Search Experience280
■ Optimize Managed Property Storage The first of two choices here determines whether the text properties are automatically treated as a hash, which reduces the size but limits comparisons to equal or not equal instead of less than, greater than, order by, and so on . The next choice determines if the managed property will be added to the restricted set of managed properties that are shown in custom search results pages .
FIGURE 9-12 New (Edit) Managed Property page .
Other settings for managed properties can be configured programmatically using the Microsoft.Office.Server.Search.Administration.ManagedProperty class or the Windows PowerShell cmdlets for SPEnterpriseSearchMetadataManagedProperty:
■ MappingDisallowed Indicates whether a crawled property can be mapped to this managed property .
■ Retrievable Affects whether the property can be displayed, sorted, or used with operators . The two settings under Optimize Managed Property Storage also influence this setting .
Managing the Search Experience CHAPTER 9 281
■ FullTextQueriable Governs whether this managed property is stored in the index and can be used in a CONTAINS or FREETEXT clause so that the property is specified through a query .
■ NoWordBreaker Controls whether the values for this managed property go through a word breaker .
■ RemoveDuplicates Determines whether the managed property receives multiple values, if there are duplicates .
■ Weight Adjusts the relevance configuration .To see all the crawled properties, from the Metadata Property Mappings page
click the Crawled Properties link to open the page shown in Figure 9-13 . This page presents a view of crawled properties in alphabetical order by name and displays the type, managed property mappings, whether a particular property is included in the index, and whether a particular property is multivalued .
FIGURE 9-13 Crawled Properties page .
To edit a crawled property, select Edit/Map Property from the context menu, which opens the page shown in Figure 9-14 .
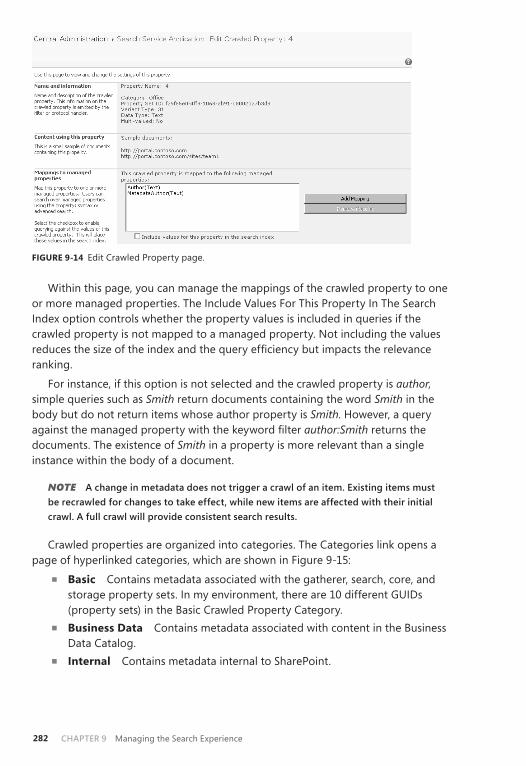
CHAPTER 9 Managing the Search Experience282
FIGURE 9-14 Edit Crawled Property page .
Within this page, you can manage the mappings of the crawled property to one or more managed properties . The Include Values For This Property In The Search Index option controls whether the property values is included in queries if the crawled property is not mapped to a managed property . Not including the values reduces the size of the index and the query efficiency but impacts the relevance ranking .
For instance, if this option is not selected and the crawled property is author, simple queries such as Smith return documents containing the word Smith in the body but do not return items whose author property is Smith . However, a query against the managed property with the keyword filter author:Smith returns the documents . The existence of Smith in a property is more relevant than a single instance within the body of a document .
NOTE A change in metadata does not trigger a crawl of an item. Existing items must be recrawled for changes to take effect, while new items are affected with their initial crawl. A full crawl will provide consistent search results.
Crawled properties are organized into categories . The Categories link opens a page of hyperlinked categories, which are shown in Figure 9-15:
■ Basic Contains metadata associated with the gatherer, search, core, and storage property sets . In my environment, there are 10 different GUIDs (property sets) in the Basic Crawled Property Category .
■ Business Data Contains metadata associated with content in the Business Data Catalog .
■ Internal Contains metadata internal to SharePoint .
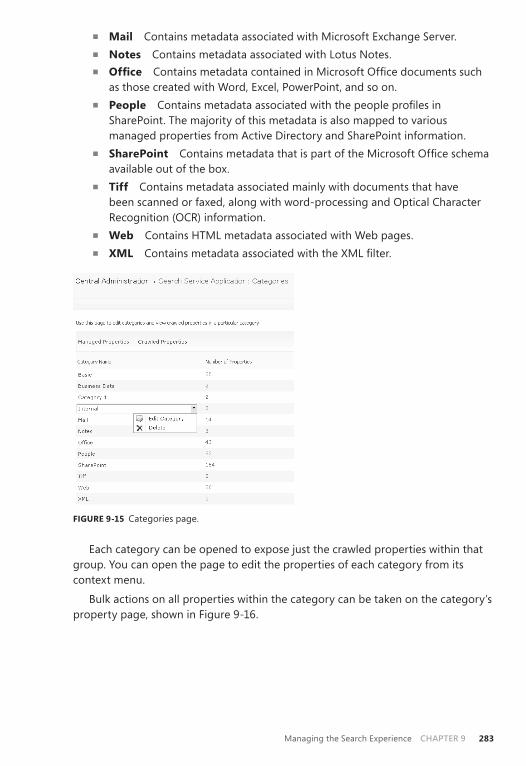
Managing the Search Experience CHAPTER 9 283
■ Mail Contains metadata associated with Microsoft Exchange Server .■ Notes Contains metadata associated with Lotus Notes .■ Office Contains metadata contained in Microsoft Office documents such
as those created with Word, Excel, PowerPoint, and so on .■ People Contains metadata associated with the people profiles in
SharePoint . The majority of this metadata is also mapped to various managed properties from Active Directory and SharePoint information .
■ SharePoint Contains metadata that is part of the Microsoft Office schema available out of the box .
■ Tiff Contains metadata associated mainly with documents that have been scanned or faxed, along with word-processing and Optical Character Recognition (OCR) information .
■ Web Contains HTML metadata associated with Web pages .■ XML Contains metadata associated with the XML filter .
FIGURE 9-15 Categories page .
Each category can be opened to expose just the crawled properties within that group . You can open the page to edit the properties of each category from its context menu .
Bulk actions on all properties within the category can be taken on the category’s property page, shown in Figure 9-16 .
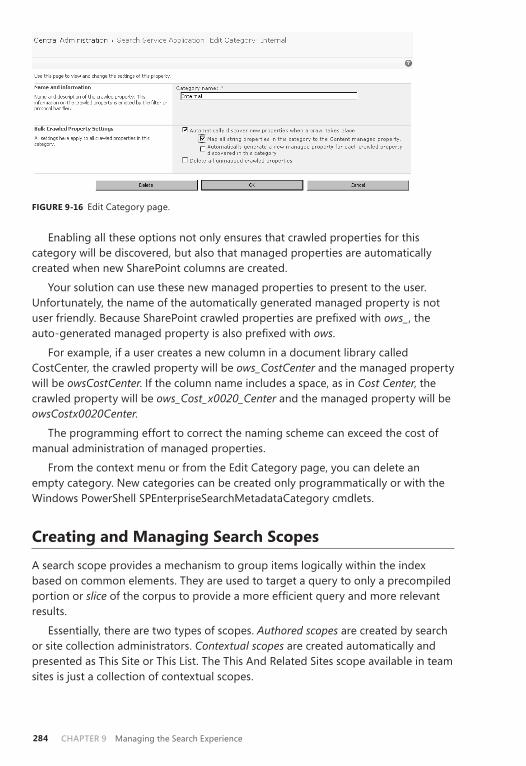
CHAPTER 9 Managing the Search Experience284
FIGURE 9-16 Edit Category page .
Enabling all these options not only ensures that crawled properties for this category will be discovered, but also that managed properties are automatically created when new SharePoint columns are created .
Your solution can use these new managed properties to present to the user . Unfortunately, the name of the automatically generated managed property is not user friendly . Because SharePoint crawled properties are prefixed with ows_, the auto-generated managed property is also prefixed with ows .
For example, if a user creates a new column in a document library called CostCenter, the crawled property will be ows_CostCenter and the managed property will be owsCostCenter . If the column name includes a space, as in Cost Center, the crawled property will be ows_Cost_x0020_Center and the managed property will be owsCostx0020Center .
The programming effort to correct the naming scheme can exceed the cost of manual administration of managed properties .
From the context menu or from the Edit Category page, you can delete an empty category . New categories can be created only programmatically or with the Windows PowerShell SPEnterpriseSearchMetadataCategory cmdlets .
Creating and Managing Search Scopes
A search scope provides a mechanism to group items logically within the index based on common elements . They are used to target a query to only a precompiled portion or slice of the corpus to provide a more efficient query and more relevant results .
Essentially, there are two types of scopes . Authored scopes are created by search or site collection administrators . Contextual scopes are created automatically and presented as This Site or This List . The This And Related Sites scope available in team sites is just a collection of contextual scopes .
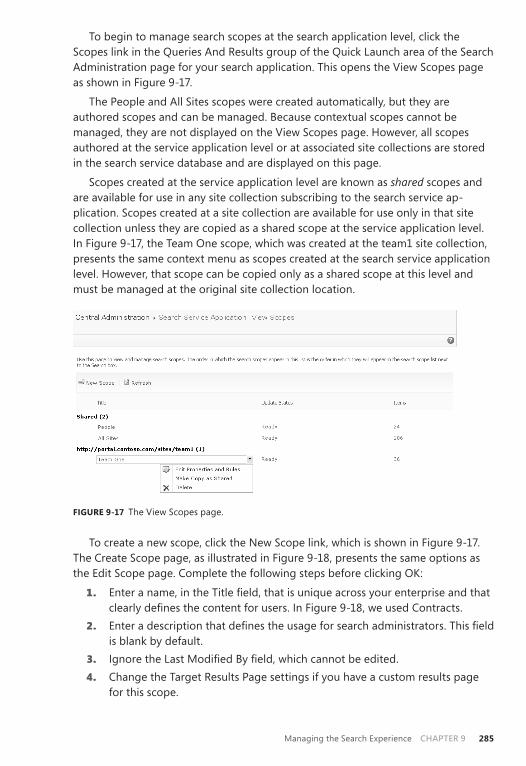
Managing the Search Experience CHAPTER 9 285
To begin to manage search scopes at the search application level, click the Scopes link in the Queries And Results group of the Quick Launch area of the Search Administration page for your search application . This opens the View Scopes page as shown in Figure 9-17 .
The People and All Sites scopes were created automatically, but they are authored scopes and can be managed . Because contextual scopes cannot be managed, they are not displayed on the View Scopes page . However, all scopes authored at the service application level or at associated site collections are stored in the search service database and are displayed on this page .
Scopes created at the service application level are known as shared scopes and are available for use in any site collection subscribing to the search service ap-plication . Scopes created at a site collection are available for use only in that site collection unless they are copied as a shared scope at the service application level . In Figure 9-17, the Team One scope, which was created at the team1 site collection, presents the same context menu as scopes created at the search service application level . However, that scope can be copied only as a shared scope at this level and must be managed at the original site collection location .
FIGURE 9-17 The View Scopes page .
To create a new scope, click the New Scope link, which is shown in Figure 9-17 . The Create Scope page, as illustrated in Figure 9-18, presents the same options as the Edit Scope page . Complete the following steps before clicking OK:
1. Enter a name, in the Title field, that is unique across your enterprise and that clearly defines the content for users . In Figure 9-18, we used Contracts .
2. Enter a description that defines the usage for search administrators . This field is blank by default .
3. Ignore the Last Modified By field, which cannot be edited . 4. Change the Target Results Page settings if you have a custom results page
for this scope .
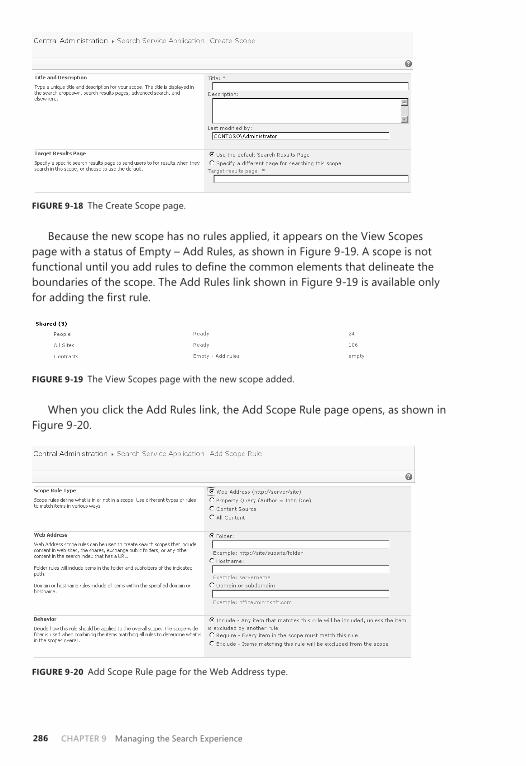
CHAPTER 9 Managing the Search Experience286
FIGURE 9-18 The Create Scope page .
Because the new scope has no rules applied, it appears on the View Scopes page with a status of Empty – Add Rules, as shown in Figure 9-19 . A scope is not functional until you add rules to define the common elements that delineate the boundaries of the scope . The Add Rules link shown in Figure 9-19 is available only for adding the first rule .
FIGURE 9-19 The View Scopes page with the new scope added .
When you click the Add Rules link, the Add Scope Rule page opens, as shown in Figure 9-20 .
FIGURE 9-20 Add Scope Rule page for the Web Address type .
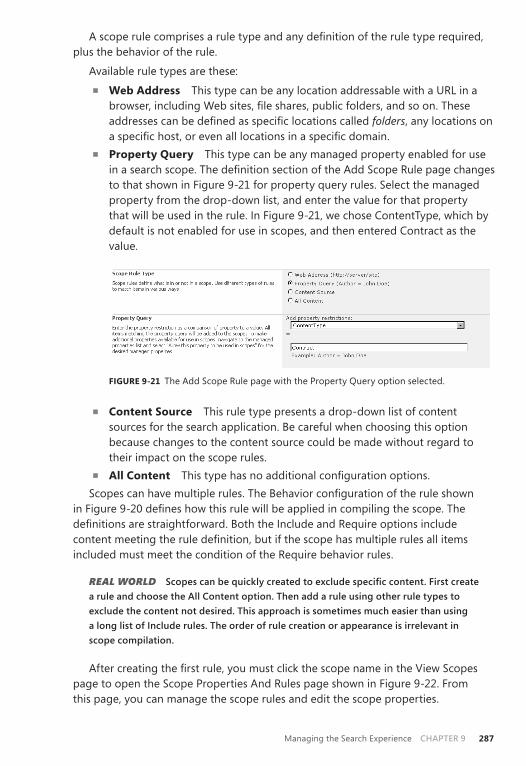
Managing the Search Experience CHAPTER 9 287
A scope rule comprises a rule type and any definition of the rule type required, plus the behavior of the rule .
Available rule types are these:■ Web Address This type can be any location addressable with a URL in a
browser, including Web sites, file shares, public folders, and so on . These addresses can be defined as specific locations called folders, any locations on a specific host, or even all locations in a specific domain .
■ Property Query This type can be any managed property enabled for use in a search scope . The definition section of the Add Scope Rule page changes to that shown in Figure 9-21 for property query rules . Select the managed property from the drop-down list, and enter the value for that property that will be used in the rule . In Figure 9-21, we chose ContentType, which by default is not enabled for use in scopes, and then entered Contract as the value .
FIGURE 9-21 The Add Scope Rule page with the Property Query option selected .
■ Content Source This rule type presents a drop-down list of content sources for the search application . Be careful when choosing this option because changes to the content source could be made without regard to their impact on the scope rules .
■ All Content This type has no additional configuration options .Scopes can have multiple rules . The Behavior configuration of the rule shown
in Figure 9-20 defines how this rule will be applied in compiling the scope . The definitions are straightforward . Both the Include and Require options include content meeting the rule definition, but if the scope has multiple rules all items included must meet the condition of the Require behavior rules .
REAL WORLD Scopes can be quickly created to exclude specific content. First create a rule and choose the All Content option. Then add a rule using other rule types to exclude the content not desired. This approach is sometimes much easier than using a long list of Include rules. The order of rule creation or appearance is irrelevant in scope compilation.
After creating the first rule, you must click the scope name in the View Scopes page to open the Scope Properties And Rules page shown in Figure 9-22 . From this page, you can manage the scope rules and edit the scope properties .
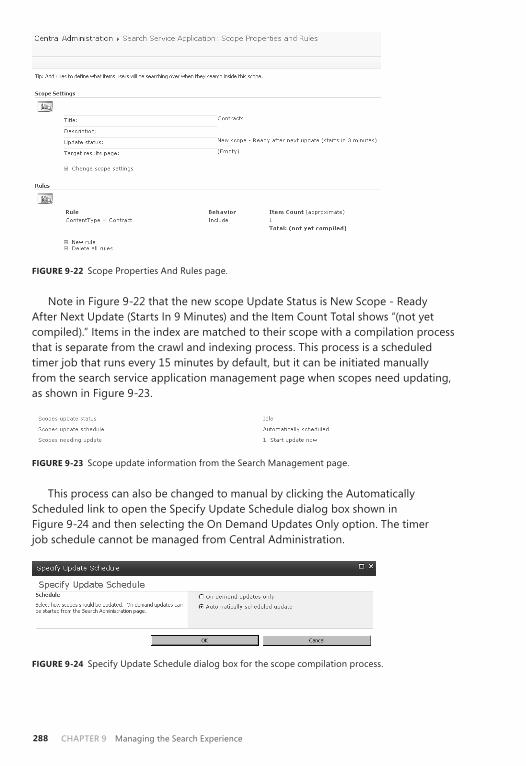
CHAPTER 9 Managing the Search Experience288
FIGURE 9-22 Scope Properties And Rules page .
Note in Figure 9-22 that the new scope Update Status is New Scope - Ready After Next Update (Starts In 9 Minutes) and the Item Count Total shows “(not yet compiled) .” Items in the index are matched to their scope with a compilation process that is separate from the crawl and indexing process . This process is a scheduled timer job that runs every 15 minutes by default, but it can be initiated manually from the search service application management page when scopes need updating, as shown in Figure 9-23 .
FIGURE 9-23 Scope update information from the Search Management page .
This process can also be changed to manual by clicking the Automatically Scheduled link to open the Specify Update Schedule dialog box shown in Figure 9-24 and then selecting the On Demand Updates Only option . The timer job schedule cannot be managed from Central Administration .
FIGURE 9-24 Specify Update Schedule dialog box for the scope compilation process .
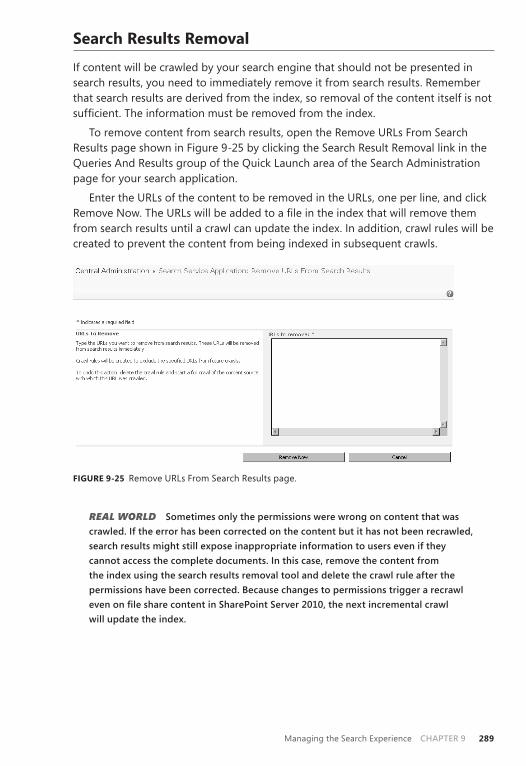
Managing the Search Experience CHAPTER 9 289
Search Results Removal
If content will be crawled by your search engine that should not be presented in search results, you need to immediately remove it from search results . Remember that search results are derived from the index, so removal of the content itself is not sufficient . The information must be removed from the index .
To remove content from search results, open the Remove URLs From Search Results page shown in Figure 9-25 by clicking the Search Result Removal link in the Queries And Results group of the Quick Launch area of the Search Administration page for your search application .
Enter the URLs of the content to be removed in the URLs, one per line, and click Remove Now . The URLs will be added to a file in the index that will remove them from search results until a crawl can update the index . In addition, crawl rules will be created to prevent the content from being indexed in subsequent crawls .
FIGURE 9-25 Remove URLs From Search Results page .
REAL WORLD Sometimes only the permissions were wrong on content that was crawled. If the error has been corrected on the content but it has not been recrawled, search results might still expose inappropriate information to users even if they cannot access the complete documents. In this case, remove the content from the index using the search results removal tool and delete the crawl rule after the permissions have been corrected. Because changes to permissions trigger a recrawl even on file share content in SharePoint Server 2010, the next incremental crawl will update the index.
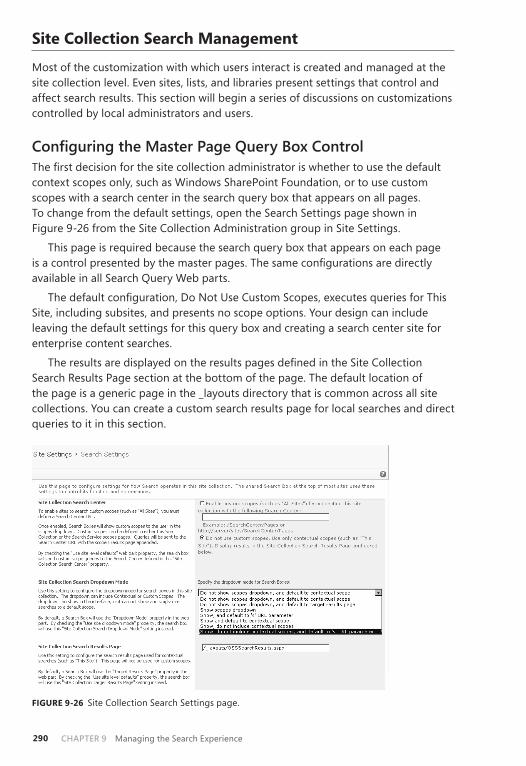
CHAPTER 9 Managing the Search Experience290
Site Collection Search Management
Most of the customization with which users interact is created and managed at the site collection level . Even sites, lists, and libraries present settings that control and affect search results . This section will begin a series of discussions on customizations controlled by local administrators and users .
Configuring the Master Page Query Box ControlThe first decision for the site collection administrator is whether to use the default context scopes only, such as Windows SharePoint Foundation, or to use custom scopes with a search center in the search query box that appears on all pages . To change from the default settings, open the Search Settings page shown in Figure 9-26 from the Site Collection Administration group in Site Settings .
This page is required because the search query box that appears on each page is a control presented by the master pages . The same configurations are directly available in all Search Query Web parts .
The default configuration, Do Not Use Custom Scopes, executes queries for This Site, including subsites, and presents no scope options . Your design can include leaving the default settings for this query box and creating a search center site for enterprise content searches .
The results are displayed on the results pages defined in the Site Collection Search Results Page section at the bottom of the page . The default location of the page is a generic page in the _layouts directory that is common across all site collections . You can create a custom search results page for local searches and direct queries to it in this section .
FIGURE 9-26 Site Collection Search Settings page .
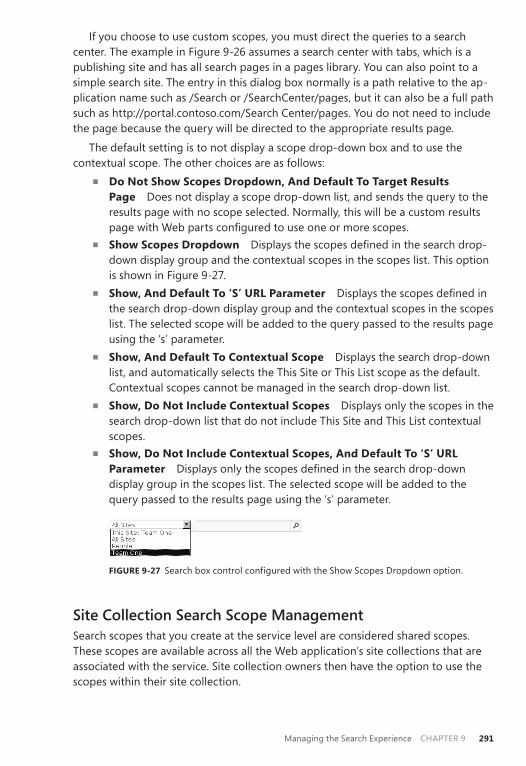
Managing the Search Experience CHAPTER 9 291
If you choose to use custom scopes, you must direct the queries to a search center . The example in Figure 9-26 assumes a search center with tabs, which is a publishing site and has all search pages in a pages library . You can also point to a simple search site . The entry in this dialog box normally is a path relative to the ap-plication name such as /Search or /SearchCenter/pages, but it can also be a full path such as http://portal .contoso .com/Search Center/pages . You do not need to include the page because the query will be directed to the appropriate results page .
The default setting is to not display a scope drop-down box and to use the contextual scope . The other choices are as follows:
■ Do Not Show Scopes Dropdown, And Default To Target Results Page Does not display a scope drop-down list, and sends the query to the results page with no scope selected . Normally, this will be a custom results page with Web parts configured to use one or more scopes .
■ Show Scopes Dropdown Displays the scopes defined in the search drop-down display group and the contextual scopes in the scopes list . This option is shown in Figure 9-27 .
■ Show, And Default To ‘S’ URL Parameter Displays the scopes defined in the search drop-down display group and the contextual scopes in the scopes list . The selected scope will be added to the query passed to the results page using the ‘s’ parameter .
■ Show, And Default To Contextual Scope Displays the search drop-down list, and automatically selects the This Site or This List scope as the default . Contextual scopes cannot be managed in the search drop-down list .
■ Show, Do Not Include Contextual Scopes Displays only the scopes in the search drop-down list that do not include This Site and This List contextual scopes .
■ Show, Do Not Include Contextual Scopes, And Default To ‘S’ URL Parameter Displays only the scopes defined in the search drop-down display group in the scopes list . The selected scope will be added to the query passed to the results page using the ‘s’ parameter .
FIGURE 9-27 Search box control configured with the Show Scopes Dropdown option .
Site Collection Search Scope Management Search scopes that you create at the service level are considered shared scopes . These scopes are available across all the Web application’s site collections that are associated with the service . Site collection owners then have the option to use the scopes within their site collection .
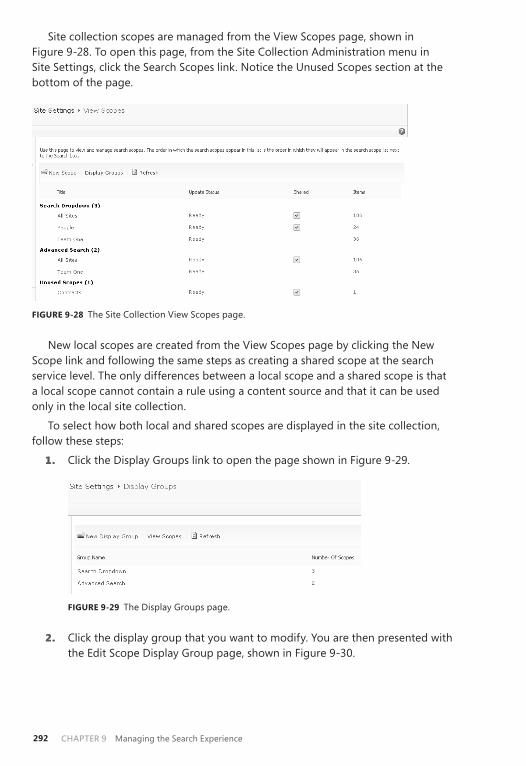
CHAPTER 9 Managing the Search Experience292
Site collection scopes are managed from the View Scopes page, shown in Figure 9-28 . To open this page, from the Site Collection Administration menu in Site Settings, click the Search Scopes link . Notice the Unused Scopes section at the bottom of the page .
FIGURE 9-28 The Site Collection View Scopes page .
New local scopes are created from the View Scopes page by clicking the New Scope link and following the same steps as creating a shared scope at the search service level . The only differences between a local scope and a shared scope is that a local scope cannot contain a rule using a content source and that it can be used only in the local site collection .
To select how both local and shared scopes are displayed in the site collection, follow these steps:
1. Click the Display Groups link to open the page shown in Figure 9-29 .
FIGURE 9-29 The Display Groups page .
2. Click the display group that you want to modify . You are then presented with the Edit Scope Display Group page, shown in Figure 9-30 .
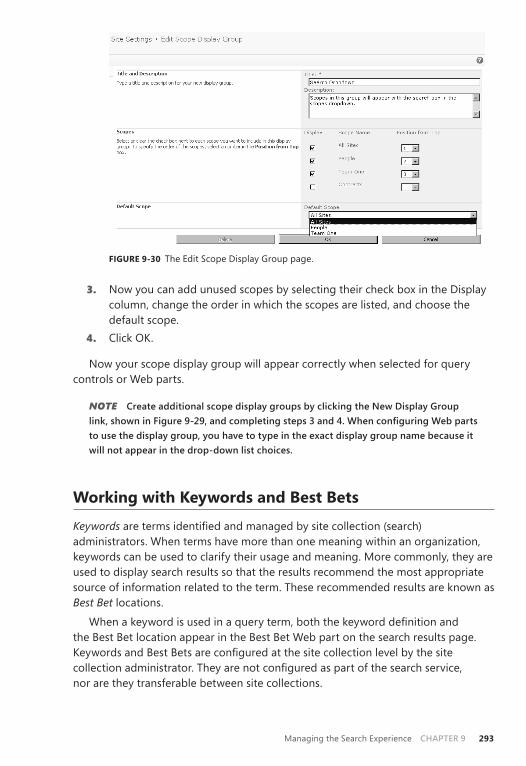
Managing the Search Experience CHAPTER 9 293
FIGURE 9-30 The Edit Scope Display Group page .
3. Now you can add unused scopes by selecting their check box in the Display column, change the order in which the scopes are listed, and choose the default scope .
4. Click OK .
Now your scope display group will appear correctly when selected for query controls or Web parts .
NOTE Create additional scope display groups by clicking the New Display Group link, shown in Figure 9-29, and completing steps 3 and 4. When configuring Web parts to use the display group, you have to type in the exact display group name because it will not appear in the drop-down list choices.
Working with Keywords and Best Bets
Keywords are terms identified and managed by site collection (search) administrators . When terms have more than one meaning within an organization, keywords can be used to clarify their usage and meaning . More commonly, they are used to display search results so that the results recommend the most appropriate source of information related to the term . These recommended results are known as Best Bet locations .
When a keyword is used in a query term, both the keyword definition and the Best Bet location appear in the Best Bet Web part on the search results page . Keywords and Best Bets are configured at the site collection level by the site collection administrator . They are not configured as part of the search service, nor are they transferable between site collections .

CHAPTER 9 Managing the Search Experience294
To open the Manage Keywords page, shown in Figure 9-31, from the Site Actions menu at the root of a site collection, select Site Settings . The Search keywords link in the Site Collection Administration group will open the page .
FIGURE 9-31 Manage Keywords page .
In the Quick Launch area are links to three views: All Keywords (the default), Expired Keywords, and Keywords Requiring Review . Two links to usage reports are Best Bet Usage and Best Bet Suggestions . These will be covered later as part of the usage reports discussion .
Because the number of keywords can be quite large, these filter views are useful, as is the keyword search tool shown in Figure 9-32 . Using this tool, you can locate keywords by choosing either Keyword, Synonyms, Best Bet Title, Best Bet URL, or Contact .
FIGURE 9-32 Keyword search tool .
Click the Add Keyword link to open the Add Keyword page . The first section of the page, as seen in Figure 9-33, manages the keyword phrase and any synonyms . Any phrase entered in either box will return the keyword results when used as a search term . Synonyms should be separated by semi-colons .
NOTE The Edit Keyword page uses the same.aspx page as the Add Keyword page.
FIGURE 9-33 Keyword Phrase and Synonyms text boxes .
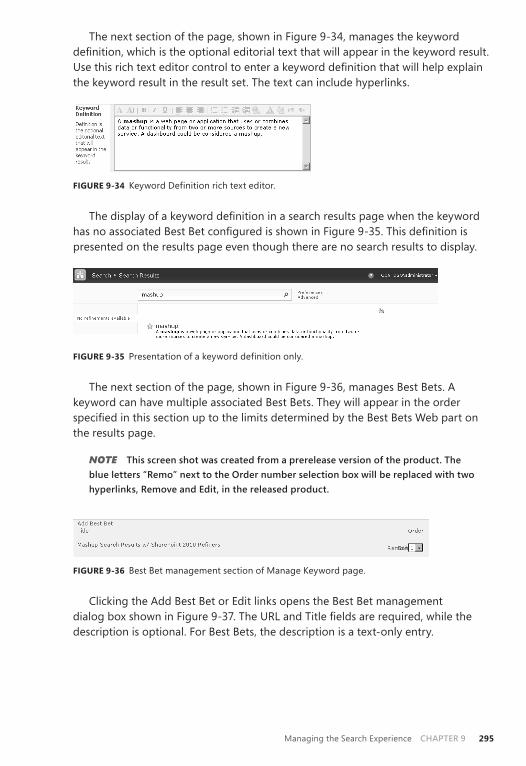
Managing the Search Experience CHAPTER 9 295
The next section of the page, shown in Figure 9-34, manages the keyword definition, which is the optional editorial text that will appear in the keyword result . Use this rich text editor control to enter a keyword definition that will help explain the keyword result in the result set . The text can include hyperlinks .
FIGURE 9-34 Keyword Definition rich text editor .
The display of a keyword definition in a search results page when the keyword has no associated Best Bet configured is shown in Figure 9-35 . This definition is presented on the results page even though there are no search results to display .
FIGURE 9-35 Presentation of a keyword definition only .
The next section of the page, shown in Figure 9-36, manages Best Bets . A keyword can have multiple associated Best Bets . They will appear in the order specified in this section up to the limits determined by the Best Bets Web part on the results page .
NOTE This screen shot was created from a prerelease version of the product. The blue letters “Remo” next to the Order number selection box will be replaced with two hyperlinks, Remove and Edit, in the released product.
FIGURE 9-36 Best Bet management section of Manage Keyword page .
Clicking the Add Best Bet or Edit links opens the Best Bet management dialog box shown in Figure 9-37 . The URL and Title fields are required, while the description is optional . For Best Bets, the description is a text-only entry .
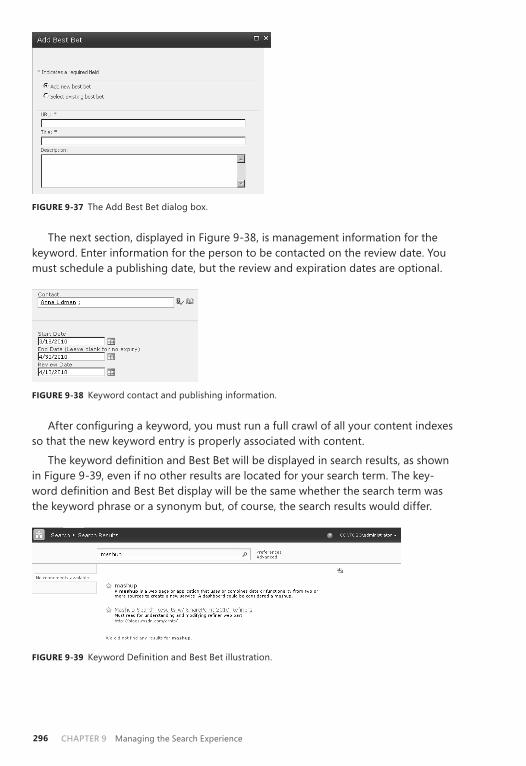
CHAPTER 9 Managing the Search Experience296
FIGURE 9-37 The Add Best Bet dialog box .
The next section, displayed in Figure 9-38, is management information for the keyword . Enter information for the person to be contacted on the review date . You must schedule a publishing date, but the review and expiration dates are optional .
FIGURE 9-38 Keyword contact and publishing information .
After configuring a keyword, you must run a full crawl of all your content indexes so that the new keyword entry is properly associated with content .
The keyword definition and Best Bet will be displayed in search results, as shown in Figure 9-39, even if no other results are located for your search term . The key-word definition and Best Bet display will be the same whether the search term was the keyword phrase or a synonym but, of course, the search results would differ .
FIGURE 9-39 Keyword Definition and Best Bet illustration .
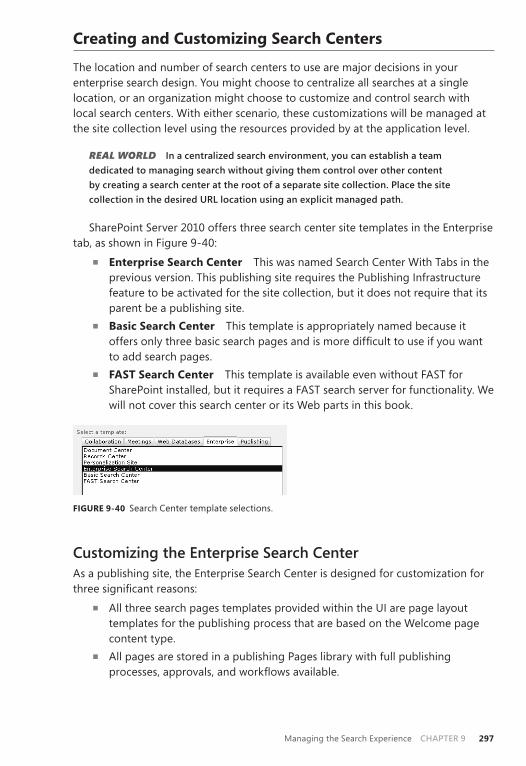
Managing the Search Experience CHAPTER 9 297
Creating and Customizing Search Centers
The location and number of search centers to use are major decisions in your enterprise search design . You might choose to centralize all searches at a single location, or an organization might choose to customize and control search with local search centers . With either scenario, these customizations will be managed at the site collection level using the resources provided by at the application level .
REAL WORLD In a centralized search environment, you can establish a team dedicated to managing search without giving them control over other content by creating a search center at the root of a separate site collection. Place the site collection in the desired URL location using an explicit managed path.
SharePoint Server 2010 offers three search center site templates in the Enterprise tab, as shown in Figure 9-40:
■ Enterprise Search Center This was named Search Center With Tabs in the previous version . This publishing site requires the Publishing Infrastructure feature to be activated for the site collection, but it does not require that its parent be a publishing site .
■ Basic Search Center This template is appropriately named because it offers only three basic search pages and is more difficult to use if you want to add search pages .
■ FAST Search Center This template is available even without FAST for SharePoint installed, but it requires a FAST search server for functionality . We will not cover this search center or its Web parts in this book .
FIGURE 9-40 Search Center template selections .
Customizing the Enterprise Search CenterAs a publishing site, the Enterprise Search Center is designed for customization for three significant reasons:
■ All three search pages templates provided within the UI are page layout templates for the publishing process that are based on the Welcome page content type .
■ All pages are stored in a publishing Pages library with full publishing processes, approvals, and workflows available .
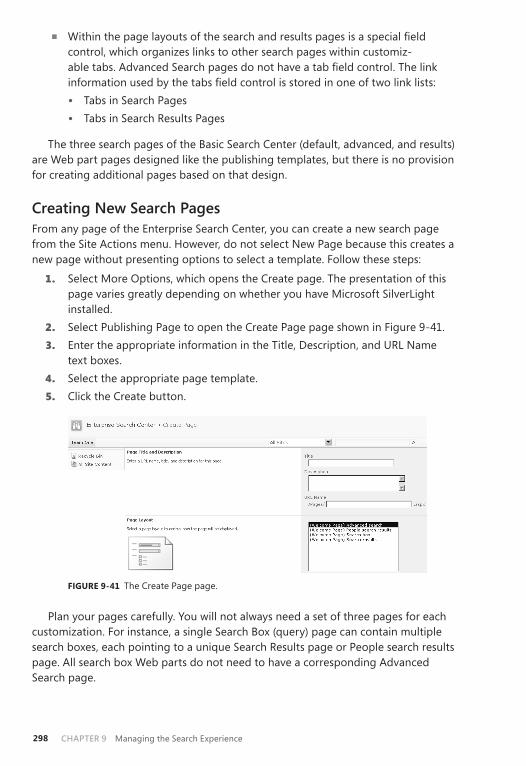
CHAPTER 9 Managing the Search Experience298
■ Within the page layouts of the search and results pages is a special field control, which organizes links to other search pages within customiz-able tabs . Advanced Search pages do not have a tab field control . The link information used by the tabs field control is stored in one of two link lists:• Tabs in Search Pages• Tabs in Search Results Pages
The three search pages of the Basic Search Center (default, advanced, and results) are Web part pages designed like the publishing templates, but there is no provision for creating additional pages based on that design .
Creating New Search PagesFrom any page of the Enterprise Search Center, you can create a new search page from the Site Actions menu . However, do not select New Page because this creates a new page without presenting options to select a template . Follow these steps:
1. Select More Options, which opens the Create page . The presentation of this page varies greatly depending on whether you have Microsoft SilverLight installed .
2. Select Publishing Page to open the Create Page page shown in Figure 9-41 . 3. Enter the appropriate information in the Title, Description, and URL Name
text boxes . 4. Select the appropriate page template . 5. Click the Create button .
FIGURE 9-41 The Create Page page .
Plan your pages carefully . You will not always need a set of three pages for each customization . For instance, a single Search Box (query) page can contain multiple search boxes, each pointing to a unique Search Results page or People search results page . All search box Web parts do not need to have a corresponding Advanced Search page .
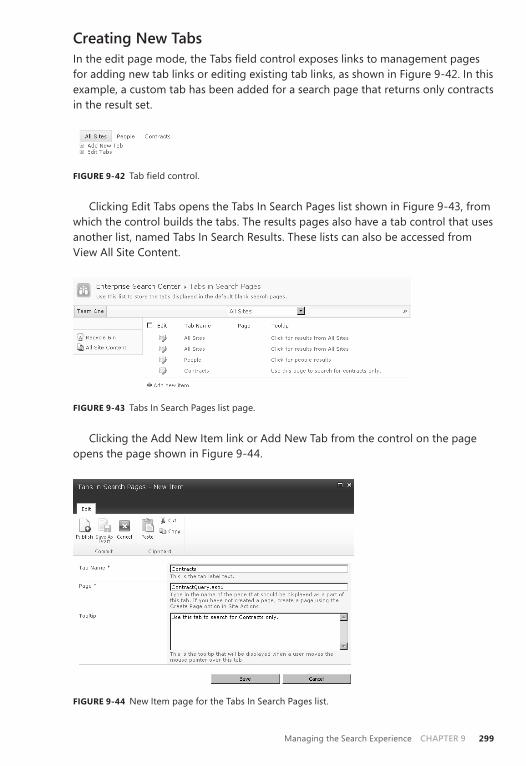
Managing the Search Experience CHAPTER 9 299
Creating New TabsIn the edit page mode, the Tabs field control exposes links to management pages for adding new tab links or editing existing tab links, as shown in Figure 9-42 . In this example, a custom tab has been added for a search page that returns only contracts in the result set .
FIGURE 9-42 Tab field control .
Clicking Edit Tabs opens the Tabs In Search Pages list shown in Figure 9-43, from which the control builds the tabs . The results pages also have a tab control that uses another list, named Tabs In Search Results . These lists can also be accessed from View All Site Content .
FIGURE 9-43 Tabs In Search Pages list page .
Clicking the Add New Item link or Add New Tab from the control on the page opens the page shown in Figure 9-44 .
FIGURE 9-44 New Item page for the Tabs In Search Pages list .

CHAPTER 9 Managing the Search Experience300
The Tab Name field should be self-explanatory to users . The Page field can point to an existing or future custom page . The Tooltip field should briefly explain the purpose of the custom page .
After the custom set of search pages and tabs are created, the new query page can be accessed from its custom tab . The query Web part can then point to the appropriate custom results page, and the Advanced query link can point to the appropriate custom advanced query page .
When a query opens one results page, it will be automatically passed to the results page opened by another tab on the results page .
This combination of UI tools for creating custom search pages plus the control that presents a series of tabs within the pages presents a search center that can be quickly and easily customized for multiple search business needs .
Configuring Custom Page AccessAlthough we have not yet discussed them all, here are some of the ways that these custom pages can be accessed:
■ Site collections can be configured to use a custom set of search pages, even those located elsewhere .
■ Scopes, both local and shared, can be configured for a specific results page .■ Query Web parts can be configured to use a specific results page .■ More Results links can point to custom results pages .■ Advanced Search links can point to custom advanced search pages .■ Links placed anywhere within your pages or link lists can point to custom
query pages .■ Favorite links in Internet Explorer can be prepopulated with links to custom
query pages using Active Directory group policies .■ Internet Explorer and Desktop Search can be configured to use custom query
pages .■ Office applications can be configured to use search pages by URL .
Customizing Search Pages
Because the basic three search pages are essentially the same in the Basic and Enterprise search centers, we will first discuss customizing each of these pages and their corresponding Web parts and then discuss the extended customizations available in the Enterprise search center .
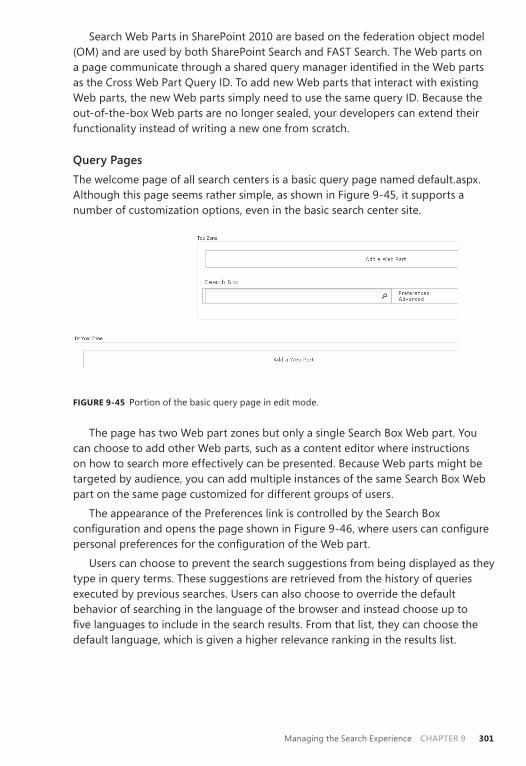
Managing the Search Experience CHAPTER 9 301
Search Web Parts in SharePoint 2010 are based on the federation object model (OM) and are used by both SharePoint Search and FAST Search . The Web parts on a page communicate through a shared query manager identified in the Web parts as the Cross Web Part Query ID . To add new Web parts that interact with existing Web parts, the new Web parts simply need to use the same query ID . Because the out-of-the-box Web parts are no longer sealed, your developers can extend their functionality instead of writing a new one from scratch .
Query PagesThe welcome page of all search centers is a basic query page named default .aspx . Although this page seems rather simple, as shown in Figure 9-45, it supports a number of customization options, even in the basic search center site .
FIGURE 9-45 Portion of the basic query page in edit mode .
The page has two Web part zones but only a single Search Box Web part . You can choose to add other Web parts, such as a content editor where instructions on how to search more effectively can be presented . Because Web parts might be targeted by audience, you can add multiple instances of the same Search Box Web part on the same page customized for different groups of users .
The appearance of the Preferences link is controlled by the Search Box configuration and opens the page shown in Figure 9-46, where users can configure personal preferences for the configuration of the Web part .
Users can choose to prevent the search suggestions from being displayed as they type in query terms . These suggestions are retrieved from the history of queries executed by previous searches . Users can also choose to override the default behavior of searching in the language of the browser and instead choose up to five languages to include in the search results . From that list, they can choose the default language, which is given a higher relevance ranking in the results list .
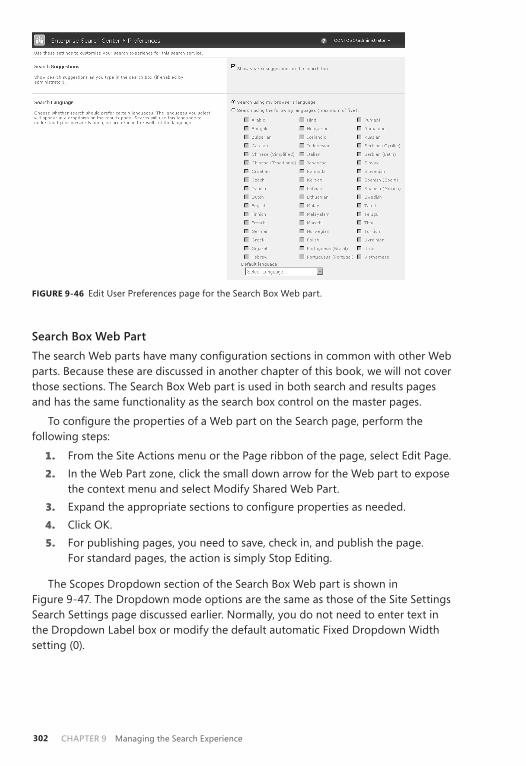
CHAPTER 9 Managing the Search Experience302
FIGURE 9-46 Edit User Preferences page for the Search Box Web part .
Search Box Web PartThe search Web parts have many configuration sections in common with other Web parts . Because these are discussed in another chapter of this book, we will not cover those sections . The Search Box Web part is used in both search and results pages and has the same functionality as the search box control on the master pages .
To configure the properties of a Web part on the Search page, perform the following steps:
1. From the Site Actions menu or the Page ribbon of the page, select Edit Page . 2. In the Web Part zone, click the small down arrow for the Web part to expose
the context menu and select Modify Shared Web Part . 3. Expand the appropriate sections to configure properties as needed . 4. Click OK . 5. For publishing pages, you need to save, check in, and publish the page .
For standard pages, the action is simply Stop Editing .
The Scopes Dropdown section of the Search Box Web part is shown in Figure 9-47 . The Dropdown mode options are the same as those of the Site Settings Search Settings page discussed earlier . Normally, you do not need to enter text in the Dropdown Label box or modify the default automatic Fixed Dropdown Width setting (0) .
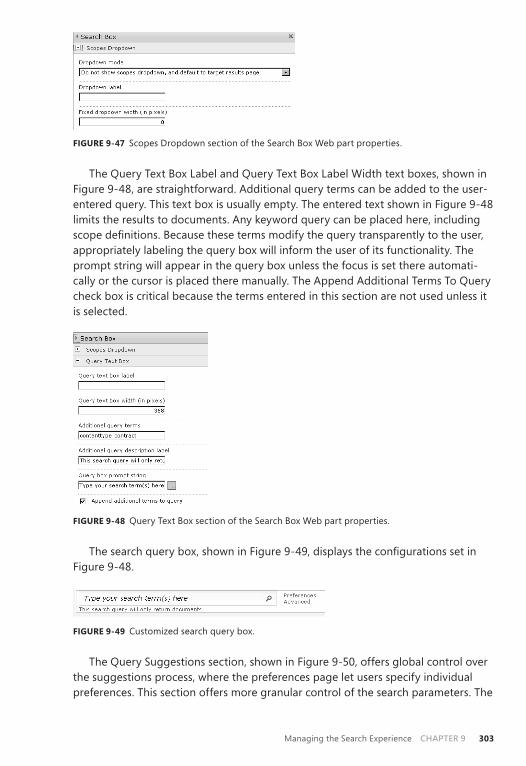
Managing the Search Experience CHAPTER 9 303
FIGURE 9-47 Scopes Dropdown section of the Search Box Web part properties .
The Query Text Box Label and Query Text Box Label Width text boxes, shown in Figure 9-48, are straightforward . Additional query terms can be added to the user-entered query . This text box is usually empty . The entered text shown in Figure 9-48 limits the results to documents . Any keyword query can be placed here, including scope definitions . Because these terms modify the query transparently to the user, appropriately labeling the query box will inform the user of its functionality . The prompt string will appear in the query box unless the focus is set there automati-cally or the cursor is placed there manually . The Append Additional Terms To Query check box is critical because the terms entered in this section are not used unless it is selected .
FIGURE 9-48 Query Text Box section of the Search Box Web part properties .
The search query box, shown in Figure 9-49, displays the configurations set in Figure 9-48 .
FIGURE 9-49 Customized search query box .
The Query Suggestions section, shown in Figure 9-50, offers global control over the suggestions process, where the preferences page let users specify individual preferences . This section offers more granular control of the search parameters . The
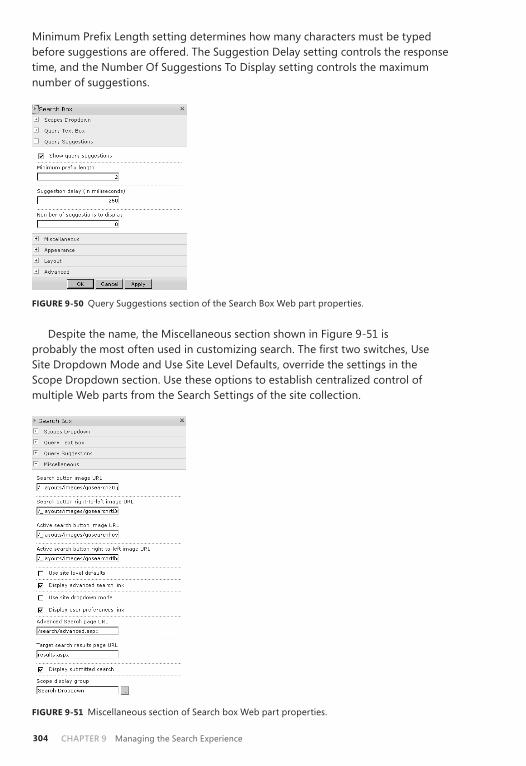
CHAPTER 9 Managing the Search Experience304
Minimum Prefix Length setting determines how many characters must be typed before suggestions are offered . The Suggestion Delay setting controls the response time, and the Number Of Suggestions To Display setting controls the maximum number of suggestions .
FIGURE 9-50 Query Suggestions section of the Search Box Web part properties .
Despite the name, the Miscellaneous section shown in Figure 9-51 is probably the most often used in customizing search . The first two switches, Use Site Dropdown Mode and Use Site Level Defaults, override the settings in the Scope Dropdown section . Use these options to establish centralized control of multiple Web parts from the Search Settings of the site collection .
FIGURE 9-51 Miscellaneous section of Search box Web part properties .
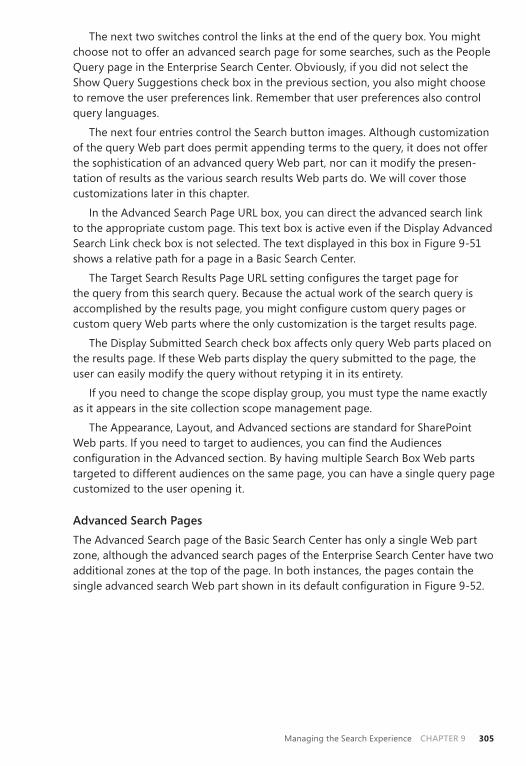
Managing the Search Experience CHAPTER 9 305
The next two switches control the links at the end of the query box . You might choose not to offer an advanced search page for some searches, such as the People Query page in the Enterprise Search Center . Obviously, if you did not select the Show Query Suggestions check box in the previous section, you also might choose to remove the user preferences link . Remember that user preferences also control query languages .
The next four entries control the Search button images . Although customization of the query Web part does permit appending terms to the query, it does not offer the sophistication of an advanced query Web part, nor can it modify the presen-tation of results as the various search results Web parts do . We will cover those customizations later in this chapter .
In the Advanced Search Page URL box, you can direct the advanced search link to the appropriate custom page . This text box is active even if the Display Advanced Search Link check box is not selected . The text displayed in this box in Figure 9-51 shows a relative path for a page in a Basic Search Center .
The Target Search Results Page URL setting configures the target page for the query from this search query . Because the actual work of the search query is accomplished by the results page, you might configure custom query pages or custom query Web parts where the only customization is the target results page .
The Display Submitted Search check box affects only query Web parts placed on the results page . If these Web parts display the query submitted to the page, the user can easily modify the query without retyping it in its entirety .
If you need to change the scope display group, you must type the name exactly as it appears in the site collection scope management page .
The Appearance, Layout, and Advanced sections are standard for SharePoint Web parts . If you need to target to audiences, you can find the Audiences configuration in the Advanced section . By having multiple Search Box Web parts targeted to different audiences on the same page, you can have a single query page customized to the user opening it .
Advanced Search PagesThe Advanced Search page of the Basic Search Center has only a single Web part zone, although the advanced search pages of the Enterprise Search Center have two additional zones at the top of the page . In both instances, the pages contain the single advanced search Web part shown in its default configuration in Figure 9-52 .
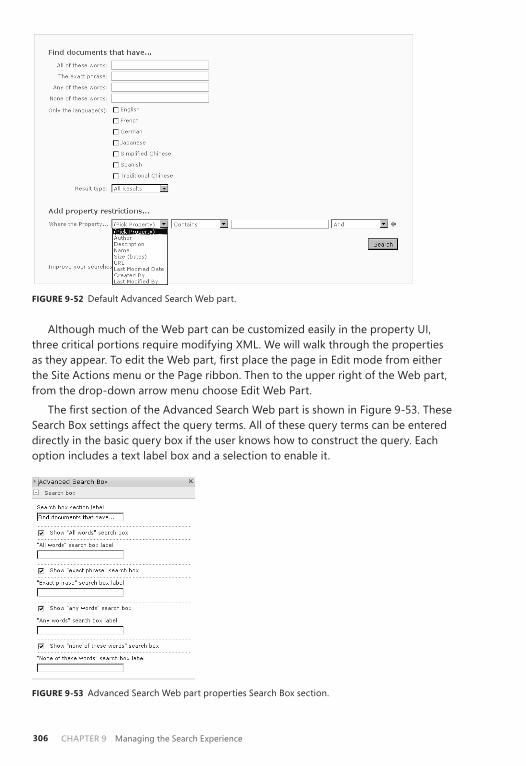
CHAPTER 9 Managing the Search Experience306
FIGURE 9-52 Default Advanced Search Web part .
Although much of the Web part can be customized easily in the property UI, three critical portions require modifying XML . We will walk through the properties as they appear . To edit the Web part, first place the page in Edit mode from either the Site Actions menu or the Page ribbon . Then to the upper right of the Web part, from the drop-down arrow menu choose Edit Web Part .
The first section of the Advanced Search Web part is shown in Figure 9-53 . These Search Box settings affect the query terms . All of these query terms can be entered directly in the basic query box if the user knows how to construct the query . Each option includes a text label box and a selection to enable it .
FIGURE 9-53 Advanced Search Web part properties Search Box section .
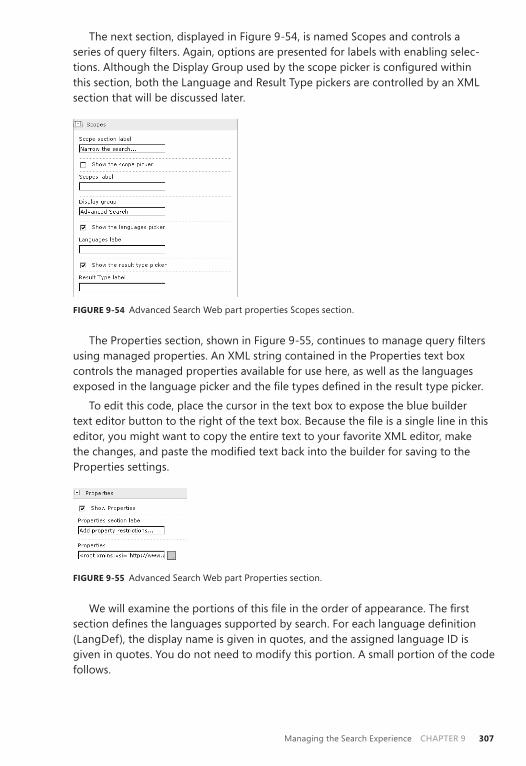
Managing the Search Experience CHAPTER 9 307
The next section, displayed in Figure 9-54, is named Scopes and controls a series of query filters . Again, options are presented for labels with enabling selec-tions . Although the Display Group used by the scope picker is configured within this section, both the Language and Result Type pickers are controlled by an XML section that will be discussed later .
FIGURE 9-54 Advanced Search Web part properties Scopes section .
The Properties section, shown in Figure 9-55, continues to manage query filters using managed properties . An XML string contained in the Properties text box controls the managed properties available for use here, as well as the languages exposed in the language picker and the file types defined in the result type picker .
To edit this code, place the cursor in the text box to expose the blue builder text editor button to the right of the text box . Because the file is a single line in this editor, you might want to copy the entire text to your favorite XML editor, make the changes, and paste the modified text back into the builder for saving to the Properties settings .
FIGURE 9-55 Advanced Search Web part Properties section .
We will examine the portions of this file in the order of appearance . The first section defines the languages supported by search . For each language definition (LangDef), the display name is given in quotes, and the assigned language ID is given in quotes . You do not need to modify this portion . A small portion of the code follows .
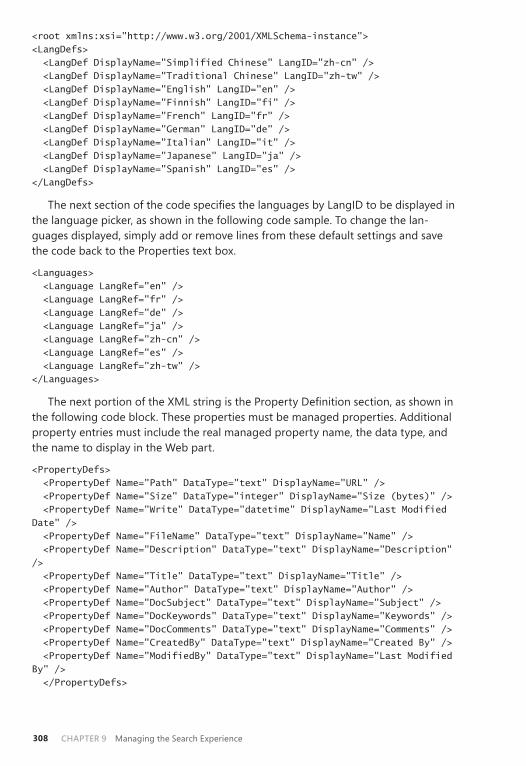
CHAPTER 9 Managing the Search Experience308
<root xmlns:xsi="http://www.w3.org/2001/XMLSchema-instance"> <LangDefs> <LangDef DisplayName="Simplified Chinese" LangID="zh-cn" /> <LangDef DisplayName="Traditional Chinese" LangID="zh-tw" /> <LangDef DisplayName="English" LangID="en" /> <LangDef DisplayName="Finnish" LangID="fi" /> <LangDef DisplayName="French" LangID="fr" /> <LangDef DisplayName="German" LangID="de" /> <LangDef DisplayName="Italian" LangID="it" /> <LangDef DisplayName="Japanese" LangID="ja" /> <LangDef DisplayName="Spanish" LangID="es" /> </LangDefs>
The next section of the code specifies the languages by LangID to be displayed in the language picker, as shown in the following code sample . To change the lan-guages displayed, simply add or remove lines from these default settings and save the code back to the Properties text box .
<Languages> <Language LangRef="en" /> <Language LangRef="fr" /> <Language LangRef="de" /> <Language LangRef="ja" /> <Language LangRef="zh-cn" /> <Language LangRef="es" /> <Language LangRef="zh-tw" /> </Languages>
The next portion of the XML string is the Property Definition section, as shown in the following code block . These properties must be managed properties . Additional property entries must include the real managed property name, the data type, and the name to display in the Web part .
<PropertyDefs> <PropertyDef Name="Path" DataType="text" DisplayName="URL" /> <PropertyDef Name="Size" DataType="integer" DisplayName="Size (bytes)" /> <PropertyDef Name="Write" DataType="datetime" DisplayName="Last Modified Date" /> <PropertyDef Name="FileName" DataType="text" DisplayName="Name" /> <PropertyDef Name="Description" DataType="text" DisplayName="Description" /> <PropertyDef Name="Title" DataType="text" DisplayName="Title" /> <PropertyDef Name="Author" DataType="text" DisplayName="Author" /> <PropertyDef Name="DocSubject" DataType="text" DisplayName="Subject" /> <PropertyDef Name="DocKeywords" DataType="text" DisplayName="Keywords" /> <PropertyDef Name="DocComments" DataType="text" DisplayName="Comments" /> <PropertyDef Name="CreatedBy" DataType="text" DisplayName="Created By" /> <PropertyDef Name="ModifiedBy" DataType="text" DisplayName="Last Modified By" /> </PropertyDefs>
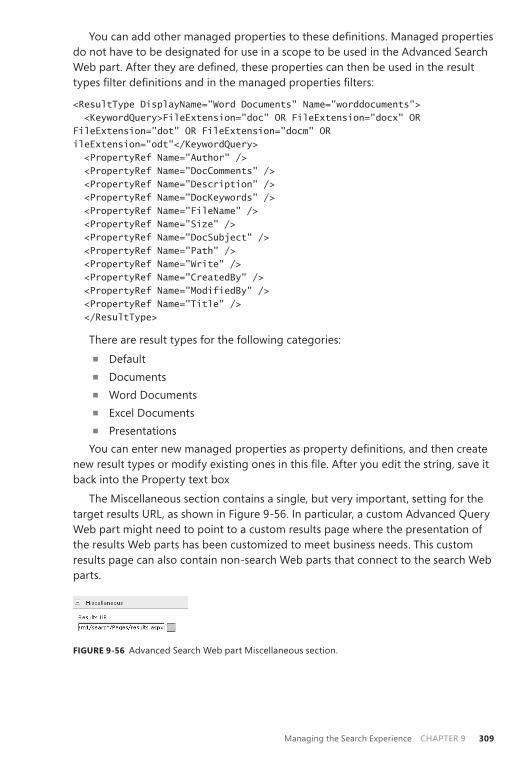
Managing the Search Experience CHAPTER 9 309
You can add other managed properties to these definitions . Managed properties do not have to be designated for use in a scope to be used in the Advanced Search Web part . After they are defined, these properties can then be used in the result types filter definitions and in the managed properties filters:
<ResultType DisplayName="Word Documents" Name="worddocuments"> <KeywordQuery>FileExtension="doc" OR FileExtension="docx" OR FileExtension="dot" OR FileExtension="docm" OR ileExtension="odt"</KeywordQuery> <PropertyRef Name="Author" /> <PropertyRef Name="DocComments" /> <PropertyRef Name="Description" /> <PropertyRef Name="DocKeywords" /> <PropertyRef Name="FileName" /> <PropertyRef Name="Size" /> <PropertyRef Name="DocSubject" /> <PropertyRef Name="Path" /> <PropertyRef Name="Write" /> <PropertyRef Name="CreatedBy" /> <PropertyRef Name="ModifiedBy" /> <PropertyRef Name="Title" /> </ResultType>
There are result types for the following categories:■ Default■ Documents■ Word Documents■ Excel Documents■ Presentations
You can enter new managed properties as property definitions, and then create new result types or modify existing ones in this file . After you edit the string, save it back into the Property text box
The Miscellaneous section contains a single, but very important, setting for the target results URL, as shown in Figure 9-56 . In particular, a custom Advanced Query Web part might need to point to a custom results page where the presentation of the results Web parts has been customized to meet business needs . This custom results page can also contain non-search Web parts that connect to the search Web parts .
FIGURE 9-56 Advanced Search Web part Miscellaneous section .
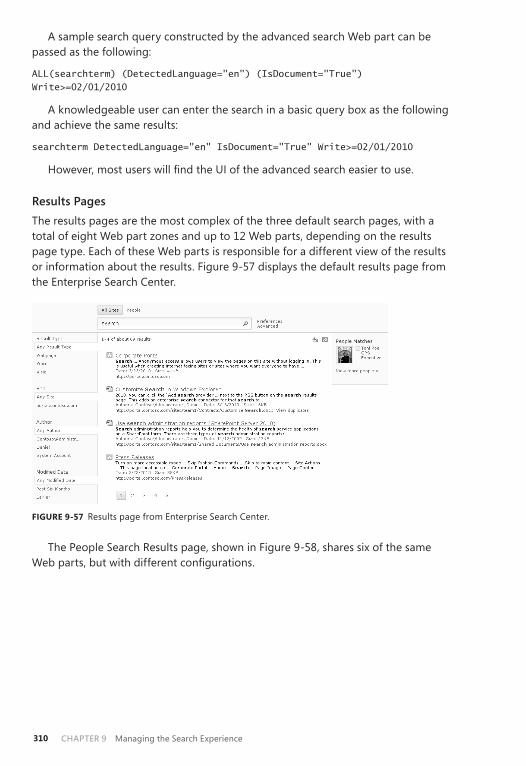
CHAPTER 9 Managing the Search Experience310
A sample search query constructed by the advanced search Web part can be passed as the following:
ALL(searchterm) (DetectedLanguage="en") (IsDocument="True") Write>=02/01/2010
A knowledgeable user can enter the search in a basic query box as the following and achieve the same results:
searchterm DetectedLanguage="en" IsDocument="True" Write>=02/01/2010
However, most users will find the UI of the advanced search easier to use .
Results PagesThe results pages are the most complex of the three default search pages, with a total of eight Web part zones and up to 12 Web parts, depending on the results page type . Each of these Web parts is responsible for a different view of the results or information about the results . Figure 9-57 displays the default results page from the Enterprise Search Center .
FIGURE 9-57 Results page from Enterprise Search Center .
The People Search Results page, shown in Figure 9-58, shares six of the same Web parts, but with different configurations .
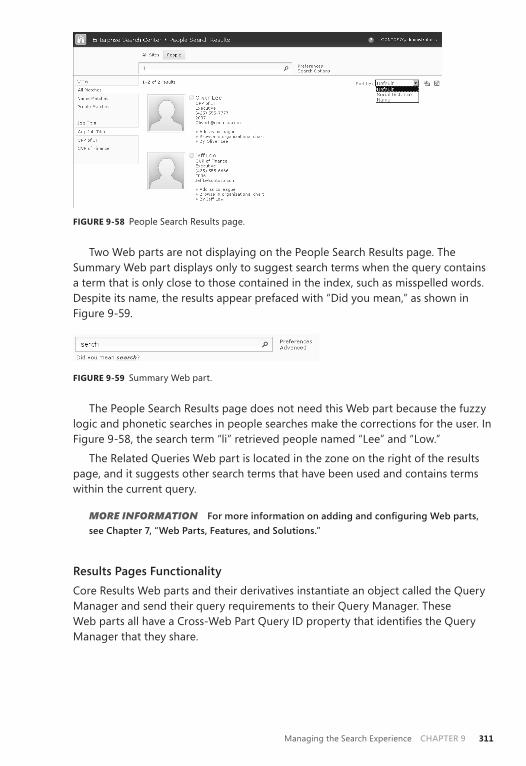
Managing the Search Experience CHAPTER 9 311
FIGURE 9-58 People Search Results page .
Two Web parts are not displaying on the People Search Results page . The Summary Web part displays only to suggest search terms when the query contains a term that is only close to those contained in the index, such as misspelled words . Despite its name, the results appear prefaced with “Did you mean,” as shown in Figure 9-59 .
FIGURE 9-59 Summary Web part .
The People Search Results page does not need this Web part because the fuzzy logic and phonetic searches in people searches make the corrections for the user . In Figure 9-58, the search term “li” retrieved people named “Lee” and “Low .”
The Related Queries Web part is located in the zone on the right of the results page, and it suggests other search terms that have been used and contains terms within the current query .
MORE INFORMATION For more information on adding and configuring Web parts, see Chapter 7, “Web Parts, Features, and Solutions.”
Results Pages FunctionalityCore Results Web parts and their derivatives instantiate an object called the Query Manager and send their query requirements to their Query Manager . These Web parts all have a Cross-Web Part Query ID property that identifies the Query Manager that they share .
CHAPTER 9 Managing the Search Experience312
The Query Manager object executes the query for local results, receives the search results as XML data, and passes the appropriate results to the different search Web parts on the results page . The content and format of the XML data that is passed depends on the Web part that is receiving the data based upon the param-eters originally sent to the Query Manager . Each Web part then displays the XML data, formatted according to the XSL Transform specified for that Web part’s XSL property .
Federated Results Web parts using OpenSearch 1 .1 pass the query to the target search engine directly and format the results according to the XSL configured for the Web part . Because these Web parts are not participating with the Query Manager, they can load asynchronously .
Search Web Parts ConfigurationsSearch Web parts have many configurations that are common to all SharePoint Web parts . Because those were covered in Chapter 7, we will not include those in this discussion . Our focus will be the configurations that are unique to each Web part or that affect the functionality of the Web part . Because FAST Search for SharePoint uses the same Web parts, there seem to be some options that have functionality only with that product .
SEARCH CORE RESULTS
This same Web part with different configurations is used in multiple locations on results pages . We will show only the properties of the Core Search Results from the Results .aspx and indicate the variations between that and the People Core Results and Search Action Links uses .
■ Location Properties Because SharePoint Server 2010 search uses the Federated Search object model, the first section is Location Properties, which is shown in Figure 9-60 . For Core Results, the location is Local Search Results as defined in Federated Search Locations . For both People Search Results and Search Action Links, the location is None .The Description box is populated from the location selected . Enter the name in the Scope box if you want to filter the results to a particular scope . You need to type the exact scope name because there is no drop-down list .
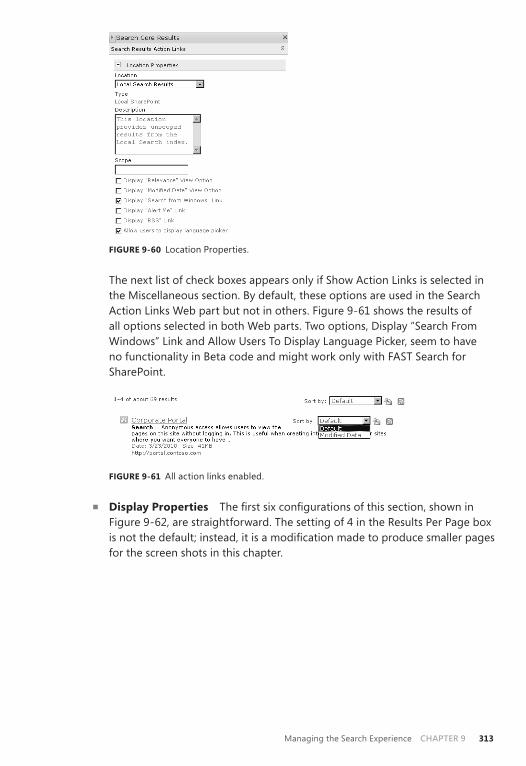
Managing the Search Experience CHAPTER 9 313
FIGURE 9-60 Location Properties .
The next list of check boxes appears only if Show Action Links is selected in the Miscellaneous section . By default, these options are used in the Search Action Links Web part but not in others . Figure 9-61 shows the results of all options selected in both Web parts . Two options, Display “Search From Windows” Link and Allow Users To Display Language Picker, seem to have no functionality in Beta code and might work only with FAST Search for SharePoint .
FIGURE 9-61 All action links enabled .
■ Display Properties The first six configurations of this section, shown in Figure 9-62, are straightforward . The setting of 4 in the Results Per Page box is not the default; instead, it is a modification made to produce smaller pages for the screen shots in this chapter .
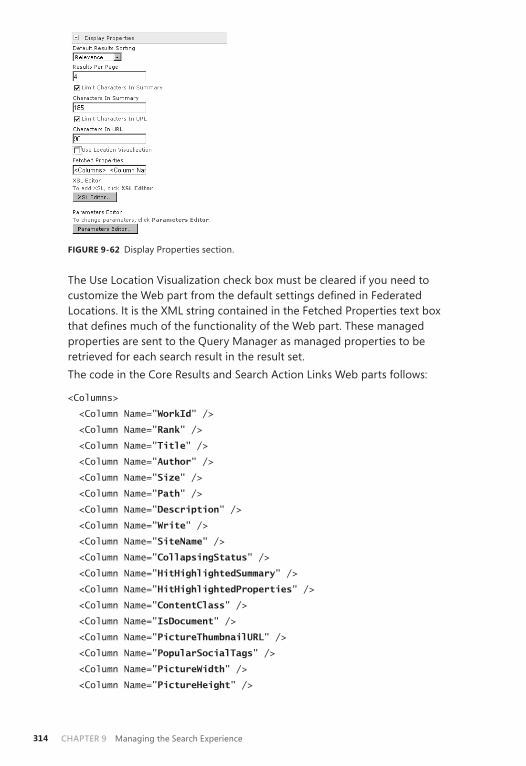
CHAPTER 9 Managing the Search Experience314
FIGURE 9-62 Display Properties section .
The Use Location Visualization check box must be cleared if you need to customize the Web part from the default settings defined in Federated Locations . It is the XML string contained in the Fetched Properties text box that defines much of the functionality of the Web part . These managed properties are sent to the Query Manager as managed properties to be retrieved for each search result in the result set . The code in the Core Results and Search Action Links Web parts follows:
<Columns>
<Column Name="WorkId" />
<Column Name="Rank" />
<Column Name="Title" />
<Column Name="Author" />
<Column Name="Size" />
<Column Name="Path" />
<Column Name="Description" />
<Column Name="Write" />
<Column Name="SiteName" />
<Column Name="CollapsingStatus" />
<Column Name="HitHighlightedSummary" />
<Column Name="HitHighlightedProperties" />
<Column Name="ContentClass" />
<Column Name="IsDocument" />
<Column Name="PictureThumbnailURL" />
<Column Name="PopularSocialTags" />
<Column Name="PictureWidth" />
<Column Name="PictureHeight" />
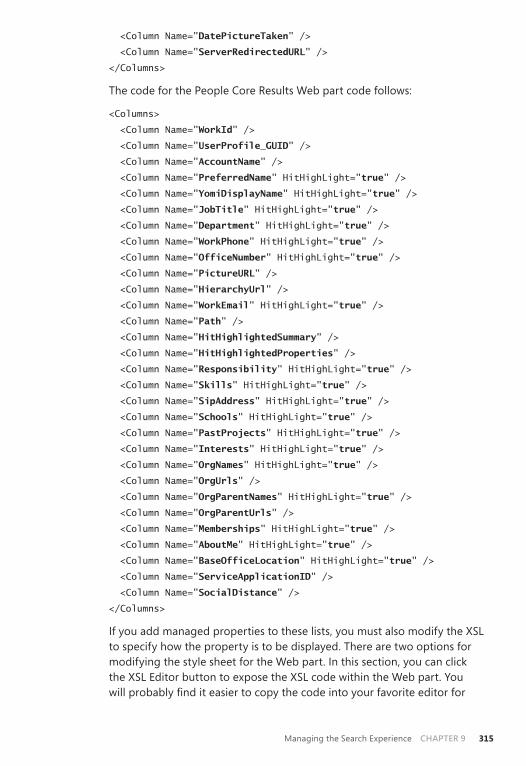
Managing the Search Experience CHAPTER 9 315
<Column Name="DatePictureTaken" />
<Column Name="ServerRedirectedURL" />
</Columns>
The code for the People Core Results Web part code follows:
<Columns>
<Column Name="WorkId" />
<Column Name="UserProfile_GUID" />
<Column Name="AccountName" />
<Column Name="PreferredName" HitHighLight="true" />
<Column Name="YomiDisplayName" HitHighLight="true" />
<Column Name="JobTitle" HitHighLight="true" />
<Column Name="Department" HitHighLight="true" />
<Column Name="WorkPhone" HitHighLight="true" />
<Column Name="OfficeNumber" HitHighLight="true" />
<Column Name="PictureURL" />
<Column Name="HierarchyUrl" />
<Column Name="WorkEmail" HitHighLight="true" />
<Column Name="Path" />
<Column Name="HitHighlightedSummary" />
<Column Name="HitHighlightedProperties" />
<Column Name="Responsibility" HitHighLight="true" />
<Column Name="Skills" HitHighLight="true" />
<Column Name="SipAddress" HitHighLight="true" />
<Column Name="Schools" HitHighLight="true" />
<Column Name="PastProjects" HitHighLight="true" />
<Column Name="Interests" HitHighLight="true" />
<Column Name="OrgNames" HitHighLight="true" />
<Column Name="OrgUrls" />
<Column Name="OrgParentNames" HitHighLight="true" />
<Column Name="OrgParentUrls" />
<Column Name="Memberships" HitHighLight="true" />
<Column Name="AboutMe" HitHighLight="true" />
<Column Name="BaseOfficeLocation" HitHighLight="true" />
<Column Name="ServiceApplicationID" />
<Column Name="SocialDistance" />
</Columns>
If you add managed properties to these lists, you must also modify the XSL to specify how the property is to be displayed . There are two options for modifying the style sheet for the Web part . In this section, you can click the XSL Editor button to expose the XSL code within the Web part . You will probably find it easier to copy the code into your favorite editor for

CHAPTER 9 Managing the Search Experience316
modification and then paste the modified code back into the editor to save it . In the Miscellaneous section, you can enter the URL for an external style sheet used by one or more Web parts .Finally, the Parameters Editor permits the addition of parameters to the Web part .
■ Results Query Options The Query Language picker shown in Figure 9-63 appears only if the Show Action Links is check box is not selected in the Mis-cellaneous section . The default setting, Browser Locale, probably should read “Default” because using the language of the browser locale configuration can be overwritten by a user preference in the search box .
FIGURE 9-63 Results Query Options section .
The Cross-Web Part Query ID picker options are User Query, Query 2, Query 3, Query 4, and Query 5 . As discussed earlier in Results Pages Functionality, this ID is used by results Web parts to identify the Query Manager that they share . Web parts with the User Query option selected share the query sent to the results page . Those with Query IDs 2 through 5 share a Fixed Keyword Query and can be placed on any page where they process the query when the page loads . Remove Duplicate Results causes “duplicate” results to be merged . “ Duplicate” in this case does not mean exact matches, particularly in the case of large files, because the crawler indexes only the first 16 megabytes (MB) of a file . Sometimes, if the content is the same, even a variation in file name does not disqualify a file as a duplicate .You can select Enable Search Term Stemming to link word forms to their base form . For example, variations of “run” include “running,” “ran,” and “runs .” Stemmers are not available for all languages .When the Ignore Noise Words check box is selected, any words listed in the noise word file for the query language are eliminated from queries . In SharePoint 2010, noise words are indexed and can be used for searches if this option is not selected .The Fixed Keyword Query text box can specify that the query contain any search term, including filters such as managed properties and scopes . Do not enter anything in this box if using the User Query Cross-Web Part query
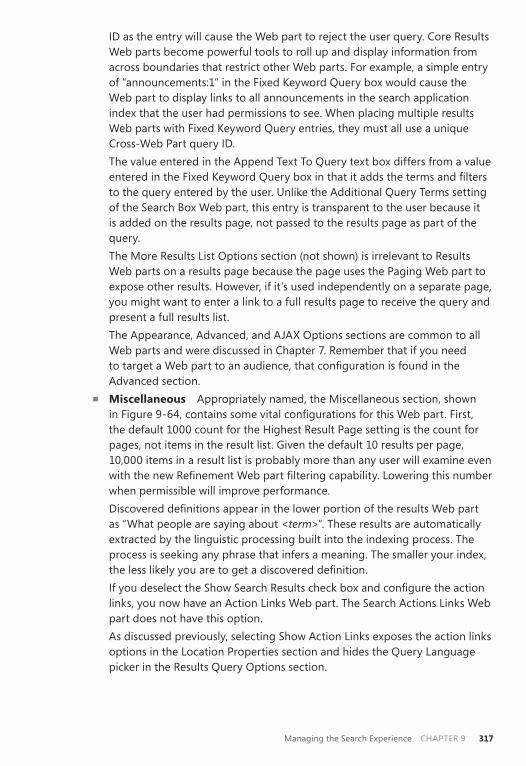
Managing the Search Experience CHAPTER 9 317
ID as the entry will cause the Web part to reject the user query . Core Results Web parts become powerful tools to roll up and display information from across boundaries that restrict other Web parts . For example, a simple entry of “ announcements:1” in the Fixed Keyword Query box would cause the Web part to display links to all announcements in the search application index that the user had permissions to see . When placing multiple results Web parts with Fixed Keyword Query entries, they must all use a unique Cross-Web Part query ID .The value entered in the Append Text To Query text box differs from a value entered in the Fixed Keyword Query box in that it adds the terms and filters to the query entered by the user . Unlike the Additional Query Terms setting of the Search Box Web part, this entry is transparent to the user because it is added on the results page, not passed to the results page as part of the query . The More Results List Options section (not shown) is irrelevant to Results Web parts on a results page because the page uses the Paging Web part to expose other results . However, if it’s used independently on a separate page, you might want to enter a link to a full results page to receive the query and present a full results list .The Appearance, Advanced, and AJAX Options sections are common to all Web parts and were discussed in Chapter 7 . Remember that if you need to target a Web part to an audience, that configuration is found in the Advanced section .
■ Miscellaneous Appropriately named, the Miscellaneous section, shown in Figure 9-64, contains some vital configurations for this Web part . First, the default 1000 count for the Highest Result Page setting is the count for pages, not items in the result list . Given the default 10 results per page, 10,000 items in a result list is probably more than any user will examine even with the new Refinement Web part filtering capability . Lowering this number when permissible will improve performance .Discovered definitions appear in the lower portion of the results Web part as “What people are saying about <term>” . These results are automatically extracted by the linguistic processing built into the indexing process . The process is seeking any phrase that infers a meaning . The smaller your index, the less likely you are to get a discovered definition .If you deselect the Show Search Results check box and configure the action links, you now have an Action Links Web part . The Search Actions Links Web part does not have this option .As discussed previously, selecting Show Action Links exposes the action links options in the Location Properties section and hides the Query Language picker in the Results Query Options section .
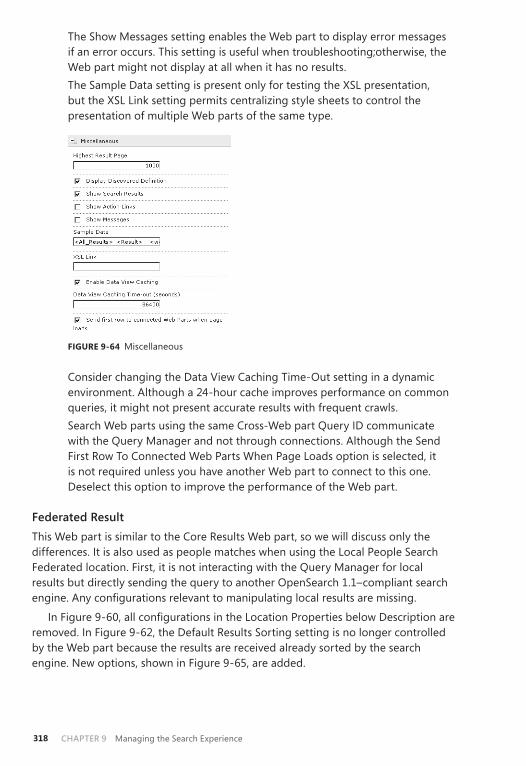
CHAPTER 9 Managing the Search Experience318
The Show Messages setting enables the Web part to display error messages if an error occurs . This setting is useful when troubleshooting;otherwise, the Web part might not display at all when it has no results .The Sample Data setting is present only for testing the XSL presentation, but the XSL Link setting permits centralizing style sheets to control the presentation of multiple Web parts of the same type .
FIGURE 9-64 Miscellaneous
Consider changing the Data View Caching Time-Out setting in a dynamic environment . Although a 24-hour cache improves performance on common queries, it might not present accurate results with frequent crawls .Search Web parts using the same Cross-Web part Query ID communicate with the Query Manager and not through connections . Although the Send First Row To Connected Web Parts When Page Loads option is selected, it is not required unless you have another Web part to connect to this one . Deselect this option to improve the performance of the Web part .
Federated ResultThis Web part is similar to the Core Results Web part, so we will discuss only the differences . It is also used as people matches when using the Local People Search Federated location . First, it is not interacting with the Query Manager for local results but directly sending the query to another OpenSearch 1 .1–compliant search engine . Any configurations relevant to manipulating local results are missing .
In Figure 9-60, all configurations in the Location Properties below Description are removed . In Figure 9-62, the Default Results Sorting setting is no longer controlled by the Web part because the results are received already sorted by the search engine . New options, shown in Figure 9-65, are added .
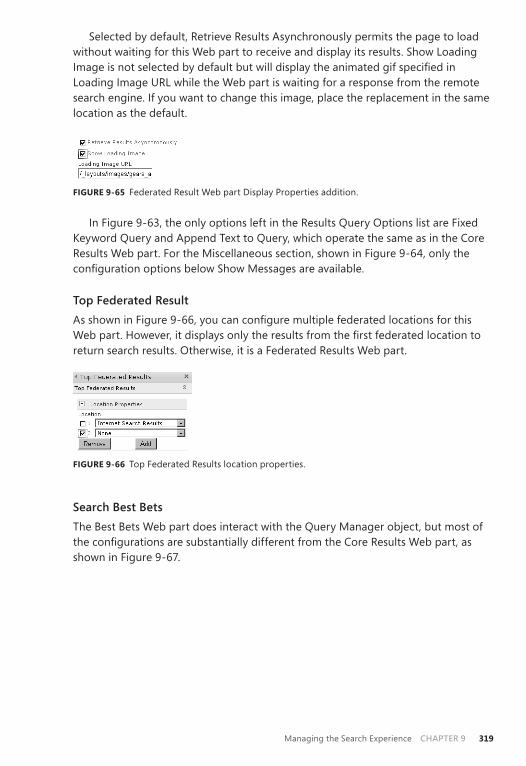
Managing the Search Experience CHAPTER 9 319
Selected by default, Retrieve Results Asynchronously permits the page to load without waiting for this Web part to receive and display its results . Show Loading Image is not selected by default but will display the animated gif specified in Loading Image URL while the Web part is waiting for a response from the remote search engine . If you want to change this image, place the replacement in the same location as the default .
FIGURE 9-65 Federated Result Web part Display Properties addition .
In Figure 9-63, the only options left in the Results Query Options list are Fixed Keyword Query and Append Text to Query, which operate the same as in the Core Results Web part . For the Miscellaneous section, shown in Figure 9-64, only the configuration options below Show Messages are available .
Top Federated ResultAs shown in Figure 9-66, you can configure multiple federated locations for this Web part . However, it displays only the results from the first federated location to return search results . Otherwise, it is a Federated Results Web part .
FIGURE 9-66 Top Federated Results location properties .
Search Best BetsThe Best Bets Web part does interact with the Query Manager object, but most of the configurations are substantially different from the Core Results Web part, as shown in Figure 9-67 .

CHAPTER 9 Managing the Search Experience320
FIGURE 9-67 Best Bets Web part .
The Results Display section has a configuration only for the query ID . This Web part has no configuration for a fixed query, but it will use the fixed query from a results Web part on the page that uses the same query ID even if it is hidden or has no results to display .
For Keywords, choose whether to display the keyword, keyword definitions, or both . For Best Bets, you can modify the display without changing the style sheet . Your options are Display Title, Display Description, Display URL, and Best Bets Limit . Displaying only the description does not give the user a hyperlink to access the Best Bet object .
This Web part was called the High Confidence Results Web part in previous versions of SharePoint Search . This section is configured to display an exact match in a people search . Much of this functionality has been replaced and enhanced by the Local People Search Federated Location, which is used by a Federation Results Web part .
Search PagingFor a search results page, this Web part extends the capabilities of a simple More Results link to a new page by providing a series of paging links before and after the current page of results within the Core Results Web part . Although the Results Web part controls the number of results in each page, the Paging Web part presents a common interface for scrolling through the results set . The properties, shown in Figure 9-68, are straightforward and easy to understand . Labels for the Previous and Next links are probably not necessary, and if you choose to change the images, be sure to place your images in the same location to avoid permissions issues . The only

Managing the Search Experience CHAPTER 9 321
configuration that seems out of place is the Cross-Web part query ID, which is in the Miscellaneous section . This Web part must share the query ID of the Results Web part .
FIGURE 9-68 Search Paging properties .
Search StatisticsThe Search Statistics Web part is also easy to understand and configure as shown in Figure 9-69 . The display mode options are One Line or Two Lines . Selecting Display Total Number Of Results produces a disturbing “of about ## results .”
FIGURE 9-69 Search Statistics properties .
This number changes if the user re-sorts the results or scrolls through pages of results . Security trimming of the results list is performed on the results page . With the default potential results list being 10,000 items, the overhead of security trimming the entire list prior to displaying 10 items would be tremendous . So the

CHAPTER 9 Managing the Search Experience322
trimming is done as the items are prepared to be displayed . Because the Statistics Web part total number of results will include items that might be trimmed due to security, the count cannot be accurate until all items are viewed .
If your server response time is really good, you can choose Display Search Re-sponse Time . Again, this Web part must share the query ID of the Results Web part .
Related QueriesThis Web part displays user queries that contain the term that the current query contains . The more search is used, the more valuable this Query Suggestions tool becomes . The configuration options are very limited, as shown in Figure 9-70 . Probably the only change that you might make will be the Results Per Page setting .
FIGURE 9-70 Related Queries properties .
Search SummaryThe simplest Web part to configure is Search Summary, shown in Figure 9-71 . Other than the standard Appearance, Layout, and Advanced sections, there is only a Show Messages check box and the Cross-Web Part query ID section . Deceptively named, this Web part is located just below the Search Query Web part and presents terms from the index that are similar to the query term passed to the results page . It is probably most useful for correcting misspelled query terms .
FIGURE 9-71 Search Summary properties .
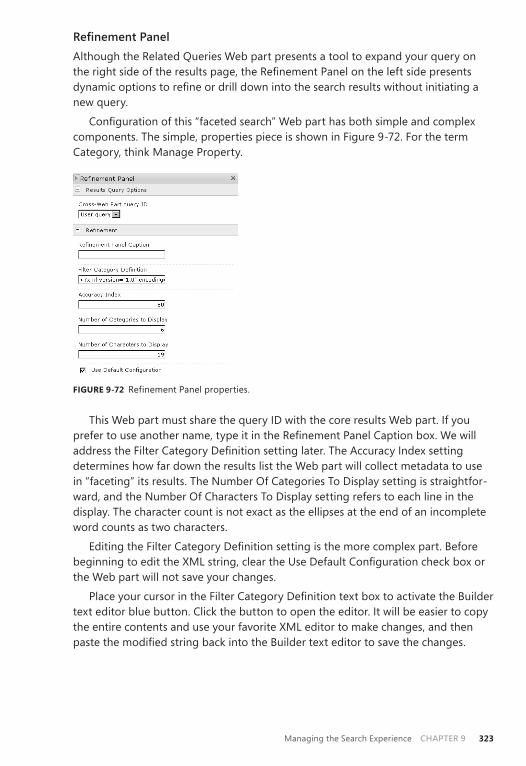
Managing the Search Experience CHAPTER 9 323
Refinement PanelAlthough the Related Queries Web part presents a tool to expand your query on the right side of the results page, the Refinement Panel on the left side presents dynamic options to refine or drill down into the search results without initiating a new query .
Configuration of this “faceted search” Web part has both simple and complex components . The simple, properties piece is shown in Figure 9-72 . For the term Category, think Manage Property .
FIGURE 9-72 Refinement Panel properties .
This Web part must share the query ID with the core results Web part . If you prefer to use another name, type it in the Refinement Panel Caption box . We will address the Filter Category Definition setting later . The Accuracy Index setting determines how far down the results list the Web part will collect metadata to use in “faceting” its results . The Number Of Categories To Display setting is straightfor-ward, and the Number Of Characters To Display setting refers to each line in the display . The character count is not exact as the ellipses at the end of an incomplete word counts as two characters .
Editing the Filter Category Definition setting is the more complex part . Before beginning to edit the XML string, clear the Use Default Configuration check box or the Web part will not save your changes .
Place your cursor in the Filter Category Definition text box to activate the Builder text editor blue button . Click the button to open the editor . It will be easier to copy the entire contents and use your favorite XML editor to make changes, and then paste the modified string back into the Builder text editor to save the changes .
CHAPTER 9 Managing the Search Experience324
The first portion of the code that specifies a category based on file extensions follows:
<?xml version="1.0" encoding="utf-8" ?> <FilterCategories> <Category Title="Result Type" Description="The file extension of the item" Type="Microsoft.Office.Server.Search.WebControls.ManagedPropertyFilterGenerator"MetadataThreshold="5" NumberOfFiltersToDisplay="4" MaxNumberOfFilters="0"SortBy="Frequency" SortDirection="Descending" SortByForMoreFilters="Name"SortDirectionForMoreFilters="Ascending" ShowMoreLink="True"MappedProperty="FileExtension" MoreLinkText="show more" LessLinkText="show fewer"> <CustomFilters MappingType="ValueMapping" DataType="String" ValueReference="Absolute" ShowAllInMore="False"> <CustomFilter CustomValue="Word"> <OriginalValue>doc</OriginalValue> <OriginalValue>docm</OriginalValue> <OriginalValue>docx</OriginalValue> <OriginalValue>dot</OriginalValue> <OriginalValue>nws</OriginalValue> </CustomFilter>
If you have additional file types that are not included in the XML, you can add them by carefully following the structure given, where CustomValue is the display name of the application and the multiple entries of OriginalValue are all the possible file extensions for this application .
The following string identifies a specific managed property to be used as a facet for filtering search results . This construct can be used to add any custom managed property . Text managed properties must not be stored as a hash to be used in the Refinement Web part. The managed property must also have the Add Managed Property To Custom Results Set Retrieved On Each Query option selected .
<Category Title="Author" Description="Use this filter to restrict results authored by a specific author" Type="Microsoft.Office.Server.Search.WebControls.ManagedProperty FilterGenerator"MetadataThreshold="5"NumberOfFiltersToDisplay="4" MaxNumberOfFilters="20"SortBy="Frequency" SortByForMoreFilters="Name" SortDirection="Descending"SortDirectionForMoreFilters="Ascending" ShowMoreLink="True"MappedProperty="Author" MoreLinkText="show more" LessLinkText="show fewer" />
Following the examples in the default XML string, even nonprogrammers can easily modify the metadata used to refine the search results if it exists for the objects in the results list .
Use the XSL Editor to customize the style sheet where needed .
Managing the Search Experience CHAPTER 9 325
Working with Query Reporting
Within the search service and at the site collection level, you can view query activities to help you understand the words and phrases used in search queries and the usage within the results . These reports also assist in determining what sites and keywords to configure as Best Bets . In addition, you might be able to discover how to better train your users in using the search features by learning about their past behavior .
At the site-collection level, Search Web Analytics reports include the following:■ Number of Queries ■ Top Queries ■ Failed Queries ■ Best Bet Usage ■ Best Bet Suggestions ■ Best Bet Suggestions Action History ■ Search Keywords
MORE INFORMATION For more information on Query Reports, see Chapter 14 in SharePoint Server 2010 Administrator’s Companion (Microsoft Press, 2010).
Local Search Configuration Options
Site owners and list or library owners have configuration options that have an impact on search results .
Searchable ColumnsAt the site level, any column created within the site can be excluded from search results . For the root site of a site collection, this means all columns can be managed except those created at a subsite level . At the subsite level, only columns created at that level can be managed .
There is no granularity for this setting . The metadata contained in the column for any object within the site will be affected . To configure these settings, from the Site Actions menu, select Site Settings . On the Site Settings page, under Site Administra-tion, select Searchable Columns to open the page shown in Figure 9-73 . Locate the appropriate column, and select the box beside it .
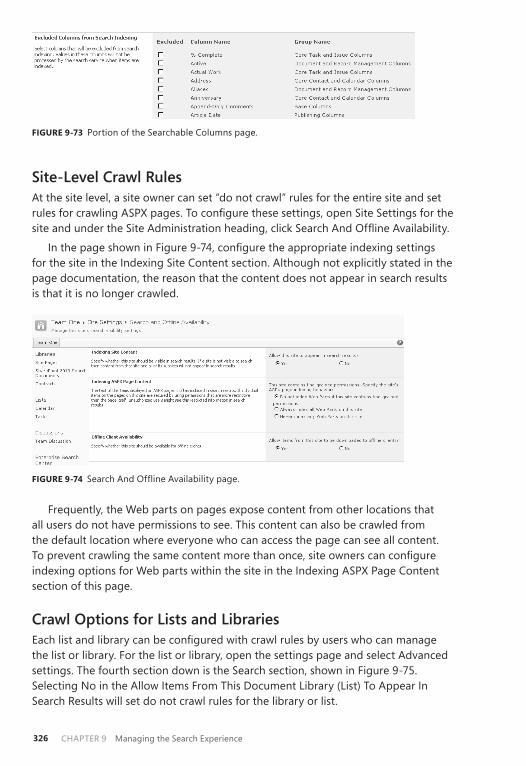
CHAPTER 9 Managing the Search Experience326
FIGURE 9-73 Portion of the Searchable Columns page .
Site-Level Crawl RulesAt the site level, a site owner can set “do not crawl” rules for the entire site and set rules for crawling ASPX pages . To configure these settings, open Site Settings for the site and under the Site Administration heading, click Search And Offline Availability .
In the page shown in Figure 9-74, configure the appropriate indexing settings for the site in the Indexing Site Content section . Although not explicitly stated in the page documentation, the reason that the content does not appear in search results is that it is no longer crawled .
FIGURE 9-74 Search And Offline Availability page .
Frequently, the Web parts on pages expose content from other locations that all users do not have permissions to see . This content can also be crawled from the default location where everyone who can access the page can see all content . To prevent crawling the same content more than once, site owners can configure indexing options for Web parts within the site in the Indexing ASPX Page Content section of this page .
Crawl Options for Lists and LibrariesEach list and library can be configured with crawl rules by users who can manage the list or library . For the list or library, open the settings page and select Advanced settings . The fourth section down is the Search section, shown in Figure 9-75 . Selecting No in the Allow Items From This Document Library (List) To Appear In Search Results will set do not crawl rules for the library or list .
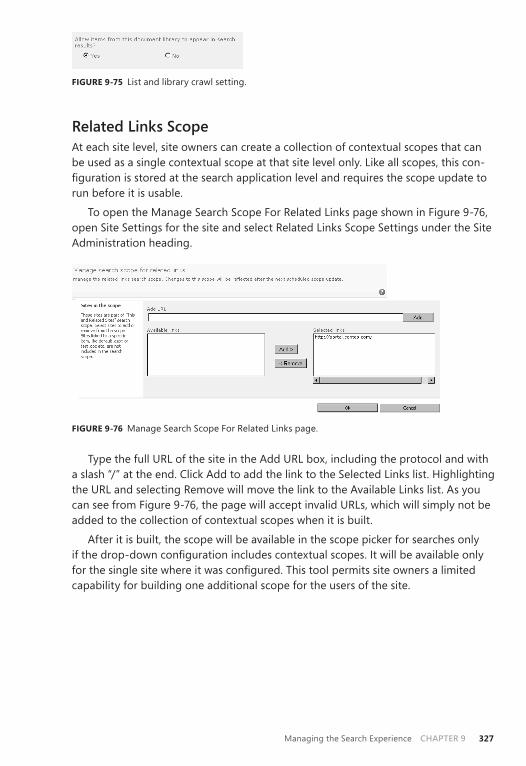
Managing the Search Experience chaptEr 9 327
Figure 9-75 List and library crawl setting.
related Links ScopeAt each site level, site owners can create a collection of contextual scopes that can be used as a single contextual scope at that site level only. Like all scopes, this con-figuration is stored at the search application level and requires the scope update to run before it is usable.
To open the Manage Search Scope For Related Links page shown in Figure 9-76, open Site Settings for the site and select Related Links Scope Settings under the Site Administration heading.
Figure 9-76 Manage Search Scope For Related Links page.
Type the full URL of the site in the Add URL box, including the protocol and with a slash “/” at the end. Click Add to add the link to the Selected Links list. Highlighting the URL and selecting Remove will move the link to the Available Links list. As you can see from Figure 9-76, the page will accept invalid URLs, which will simply not be added to the collection of contextual scopes when it is built.
After it is built, the scope will be available in the scope picker for searches only if the drop-down configuration includes contextual scopes. It will be available only for the single site where it was configured. This tool permits site owners a limited capability for building one additional scope for the users of the site.
C09627222.indd 327 6/4/2010 2:51:27 PM

599
Index
AAAMs (alternate access mappings), 128,
137–139, 469–470 access control, 171Access Database Services, 70Access Server Settings page, 188Access Services, 187–189
software requirements for, 7account management, 453–460Active Directory
account creation, 21configuring for incoming e-mail,
89–90groups, 174, 453 organizational units, delegating
permissions to, 89–90 schema, extending, 90
Active Directory Domain Services (AD DS), 430
Active Directory Rights Management Services (Active Directory RMS)
IRM, 460Add and Customize Pages permissions,
176Add Content Source page, 196, 247Add Content Types page, 153Add Crawl Component page, 255–256Add Crawl Database dialog box, 254–255Add Crawl Rule page, 248Add Federated Location page, 271Add File Type page, 251Add Host Rule page, 259–260Add Items permissions, 175Add Keyword page, 294Add New Synchronization Connection
page, 431Add Personalization Site Link page,
445–446Add Property Database dialog box,
256–257Add Published Link page, 447Add Query Component dialog box, 258Add/Remove Personal Web Parts
permissions, 178AD DS (Active Directory Domain
Services), 430
Add Scope Rule page, 286Add Server Name Mapping page, 250Add Trusted Data Connection Library
page, 193Add Trusted File Location page, 191Add Trusted Host Location page, 444Add User-Defined Assembly page, 193Add User Profile Property page, 427–428administration interface of service
applications, 182administrative tasks
farm account for, 4Windows PowerShell for, 24–26
administrative toolsCentral Administration . See Central
Administration; Central Administration Web site
stsadm .exe, 82Windows PowerShell, 82
administratorsassigning, 4of Managed Metadata Service,
341–342, 532secondary site collection
administrators, 146of service applications, 185site collection administrators, 146,
147, 171–172site creation, 142term store administrators, 344
Administrators dialog box, 185Administrators For User Profile Service
Application dialog box, 425–426Advanced Search pages, 305–310Advanced Search Web part, 278, 306
languages, 308Miscellaneous section, 309Properties section, 307Property Definition section, 308–309Scopes section, 307search queries, passing, 310
alertsconfiguring for, 37creating, 160–161for mobile accounts, 134–135Mobile Alert feature, 93throttling, 93, 134

600
alerts (continued)for Web applications, 130–131for workflows, 133
All Content scope rules, 287AllowCASPolicies, 231AllowGACDeployment, 231All Site Content page, 209alternate access mappings (AAMs)
accessing, 137–138changes, 469–470configuring, 139managing, 128
Alternate Access Mappings area (Farm Management), 96
Alternate Access Mappings page, 138analytics information service, 201 . See
also Web AnalyticsAnnouncements list, 146anonymous access, 118
site collections, enabling for, 474–475Web applications, enabling for, 474
anonymous messages, allowing, 37antivirus protection, 480–481application bits, 182application connection groups, editing,
184–185Application Logs, 490Application Management section (Central
Administration), 83, 97, 188application .master pages, 131application pool accounts, 9application pools, 111–112
configuring, 120creating, 39extended sites and, 125finding, 471for Managed Metadata Services and
Content Type Syndication Hub, 332isolating, 4for publishing content types and
metadata, 336for search service, 244–245for service applications, 182, 421sharing, 112for upgraded shared services, 533
application proxy groups, 184Application Registry Service, 70Application Registry Service database, 36application servers, 51
RBS, installing on, 45–46for service application redundancy,
182service applications on, 181services, placing on, 70–73
application services, finding and viewing, 86
Apply Style Sheets permissions, 177Apply Themes and Borders permissions,
176Approval workflow, 374Approve Items permissions, 176artifacts
deploying, 222 . See also full-trust solutions
retracting, 228–230ASP .NET, membership and role provider
settings, 119assemblies
Safe Control entries, 206for Web parts, 206
assigned IP addresses, 124use of, 65
associations, changing, 339audiences, 200audience targeting, 151auditing, 389–390
Information Management, 464auditing policy features, 167auditing reports, 404audit trial policies, 389–390authentication
Basic authentication, 473–474for crawl rules, 249–250double-hop issue, 476for federated locations, 276–277for Web applications, 470–475Windows Integrated authentication,
470–472authentication providers, 118authentication types
for databases, 122for Web applications, 115, 125
authorative pages, defining, 268–270authored search scopes, 284Authoritative Web Pages input boxes,
268–269Auto Host Distribution page, 260–261Automatically Declare Items As Records
When They Are Added To This List option, 394
Automatic password changes, 457–458auto-navigation, 415availability, Search Service, 79–80
601
Bbackup
before upgrading, 526capacity for, 541, 544with Central Administration, 542–547,
556disk write speeds and, 541errors during, 544granular, 555–560long-term storage and, 541network speed and, 541restoring from, 547scheduling, 552of server farms, 540–552of service applications, 553–555of site collections, 555–559strategy for, 540with Stsadm .exe, 551–552, 559tools for, 539 . See also Central
Administration; Stsadm .exe; Windows PowerShell
troubleshooting, 545of Web applications, 553–555with Windows PowerShell, 547–550,
556–558Backup And Restore area (Central
Administration), 84backup files, storage of, 540–541Backup-SPFarm cmdlet, 548Backup-SPSite cmdlet, 557bar code labels, 464barcode policy features, 167bar codes, document, 390Basic authentication, 116, 119, 473–474
for crawl rules, 249Basic Search Centers
search pages, 298site template, 297
BCPs (Business Continuity Plans), 539–540 BCS (Business Connectivity Services), 189 BDC (Business Data Catalog), 189BDC (Business Data Connectivity)
Services, 24, 70, 430Bdc_Service_DB_<GUID>, 26Best Bet management dialog box,
295–296Best Bets, 293–296
display of, 296managing, 295
Best Bets Web part, 295, 319–320binaries
installing, 528SharePoint Foundation 2010, 15–16SharePoint Server 2010, 28–30, 49–50
binary large objects (BLOBs), storage of, 43–46
blocked file types, for Web applications, 478–479
Blocked File Types list, 151Blog API, 130blog settings, 130Body Only page layout, 208Boolean Ignore SSL Warnings choice, 241breadcrumb links to portal sites, 166Browse Directories permissions, 177browser file handling settings, 130Browse User Information permissions, 177Business Connectivity Service DB, 26, 35Business Connectivity Services (BCS), 189Business Continuity Plans (BCPs), 539–540Business Data Catalog (BDC), 189Business Data Connectivity (BDC)
Services, 24, 70, 430
Ccabinet ( .CAB) files, 222calendar settings, 148CAS (Code Access Security) policies, 225 CEIP (Customer Experience Improvement
Program), 97, 123, 132 Central Administration, 81–86
Application Management section, 97, 188
architecture of, 82–84areas of, 83–84Backup And Restore section, 545changes made from, 65Configure Alternate Access Mappings,
63, 128Configure Password Change Settings,
457Configure Send To Connections, 106Configure Service Application
Associations section, 338, 339Configure The Data Retrieval Service,
104content database, 83content database upgrade status, 536Crawler Impact Rules management
page, 241deploying to other servers, 84Farm Backup And Restore section,
542features management from, 217–218full-trust solutions, deleting with, 230full-trust solutions, deploying with,
226–227
602
Central Administration service, 70Central Administration Web application,
server host for, 51Central Administration Web site
Configuration Wizards page, 23Configure Alternate Access Mappings,
47configuring, 20hosts for, 61installation of, 36Manage The Farm Administrators
Group tab, 36Manage Web Applications, 37Monitoring page, 40
centralized search environments, 297 .cer files, 478certificate authorities, 465–467check in/check out, 149–150, 370Check Permissions dialog box, 180Claims-Based authentication, 115, 119,
199security configuration, 118–119
Classic Mode Authentication, 115security configuration, 117–119
classification of content, 329–330click distance, 268client applications, adding links to,
447–448client certificates, 249Closed Web Parts gallery, 210Code Access Security (CAS) policies, 225collaboration on documents, 363collaboration spaces, and offline access,
377Colleagues feature, 436Collect Feedback workflow, 374Collect Signatures workflow, 374 .com files, 479Compliance Details command, 391Compliance dialog box, 391–392compliance management functions,
401–404compliance officers, 385config DB, 26Config directory, 266configuration
post-installation, 36–49problems, viewing, 497settings, backing up, 543
configuration databases, 81, 109administrative access to, 453connecting to, 58provisioning, 19
Central Administration (continued)General Application Settings section,
196Health Analyzer Rules Definition
page, 495IM Policy Configuration page, 462IRM management in, 461Manage Content Databases, 113for managed accounts configuration,
454Manage Farm Solutions link, 226Manage Service Applications page,
183, 420Manage Services On Server, 67Manage Web Applications page,
110–111, 339Monitoring link, 496permission levels, 483provisioning, 84–85Recycle Bin management from, 165repairing, 86Review Problems And Solutions page,
200Ribbon interface, 128–129Search Administration page, 73security of, 83Send To function configuration, 398for server farm backup and restore,
541–547service application management
from, 66Services On Server page, 69, 341SharePoint 2010 Timer, 93SharePoint Designer 2010 policy
management, 486–487site collection backups with, 556site collection creation with, 334site creation in, 145–147social features, enabling with,
436–437solutions, retracting with, 229System Settings area, 86–97unattached databases in, 560unprovisioning, 86Upgrade Status screen, 530Web application creation in, 110Web application management with,
110–111working with Web applications in,
84–86zone management with, 481
Central Administration content database, 26, 35
603
content databases (continued)Failover Server setting, 114isolation of, 112management of, 98–104, 113–115,
128naming, 39Preferred Server For Timer Jobs
setting, 114properties of, 113–114read-only, 100recovering, 545Remove Content Database setting,
114removing, 114Search Server setting, 114site collections, number of, 99–100sizes of, 98–99state of, viewing, 101status of, 100unattached, restoring, 559–560upgrading, 533–534for Web applications, 109Web applications and site collections
and, 110content database servers, default, 104content locations
adding, 196–197trusted, 195
content organizerenabling, 379Send To function and, 379
Content Organizer feature, enabling, 106Content Organizer Processing timer jobs,
381content organizer rules, 379–380, 397
creating, 399–400verifying, 400
content sourcesadding, 196–197crawling, 198creating, 246–247types of, 247
Content Source scope rules, 287Content Sources link, 247content types, 156–158, 349
configuration settings, 371creating, 349–350dependencies of, 351in document libraries, 153, 370–371document management and,
349–351document sets, 367–368enterprise level, 329–331, 386
configuration databases (continued)servers, removing from, 87specifying settings, 59SQL Server cluster for, 57
Configuration Wizards area (Central Administration), 84
Configure Cross-Firewall Access Zone area (Farm Management), 97
Configure Incoming E-mail Settings (System Settings), 90–91
Configure Privacy Options area (Farm Management), 97
Configure Service Accounts page, 243Configure Service Application
Associations dialog box, 184, 339Configure Synchronization Settings page,
435Confirm parameter (features), 217Confirm Site Use And Deletion link, 143connection filters, editing, 431connections
default service connections list, 338Managed Metadata Service
Connection, 338profile synchronization, 430–433Web part connections, 211–212
connection strings of Web parts, 214Connect To A Remote Service Application
dialog box, 186contacts
creating, 90storing, 89
contentapproval for documents and
document sets, 372–373backing up, 543classification of, 329–330content metadata, 156 content pages, adding Web parts to,
208–209 offline access to, 377
Content Access account, 9content crawling, 79content databases, 26, 35, 112–115
attaching to Web applications, 524–525, 534–536
backing up, 526Central Administration, 83configuration options, 98Database Capacity settings, 114database information, 113Database Versioning and Upgrade
property, 114deleting, 126

604
crawlingafter adding keywords, 296content sources, 198full crawls, 282recrawls, 289
crawl logs, 259–263Crawl History view, 262–263Error Message view, 263URL page, 261–262
Crawl Logs page, 259–261crawl rule paths, 249–250crawl rules
adding, 197–198application of, 248authentication, 249–250exclude/include options, 249file type management, 250–252for lists and libraries, 326–327managing, 247–250site-level rules, 326–327
crawl times, improving, 78Create Alerts permissions, 176Create A New Server Farm option, 18Create Column page, 353Create Group page, 172Create Groups permissions, 177Create New Managed Metadata Service
dialog box, 336Create New User Profile Service
Application dialog box, 420–421Create New Web Application dialog box,
332Create Personal Site feature, 436Create, Read, Update, and Delete (CRUD)
functions, 158–160Create Site Collection page, 145–146Create Site Collections link, 145Create Subsites permissions, 176credential management, 459Cross-Web Part Query ID picker, 316–317Cross-Web Part Query ID property, 311Current Navigation menu, 415–418custom code, 221
installing in server farms, 64upgrading and, 537
Customer Experience Improvement Program (CEIP), 97, 123, 132
custom locations, installing SharePoint to, 29
custom site groups, creating, 171–172
content types (continued)information management policies,
associating with, 168information management policy on,
387levels of, 371management of, enabling, 368management of, in lists, 371management settings, 150for page layouts, 411republishing, 391scope of, 156sealed, 351submission content types, 380
Content Types Subscriber timer jobs, 391Content Type Syndication Hub, 331–332
activating, 335isolation of, 332multiple, 333–334naming, 336site collection, creating, 333–334Web application, creating, 332
content zones, 411contextual search scopes, 284Contribute permissions, 175Contributor role, 343cookie-based authentication, for crawl
rules, 250core operations, 81Core Search Results, 312–317corruptions, repairing, 524crawl components, adding, 255–256crawl databases, 36, 254–255
host distribution rules, 258–259redundancy and availability of, 80
crawled properties, 278–284bulk actions on, 283–284categories of, 282–283editing, 281–282grouping, 278mapping, 278–279, 282
Crawled Properties page, 281crawler impact rules, 241–242Crawler Impact Rules management page,
241crawlers, 239
crawl rate, 242crawl times, 242farm-wide search settings, 240–241functionality of, 240redundancy and availability of, 80requests, number of, 242
Crawl History page, 259
605
Delete Service Application dialog box, 424–425
Delete Versions permissions, 176dependencies of content types, 351Deployed element (solutions), 224deployment locations, 222
for full-trust solutions, 225Deploy Solution hyperlink, 227Design permissions, 174destination sites, enabling Content
Organizer feature for, 106developer artifacts . See also full-trust
solutions; sandboxed solutionsmanaging, 221
diagnostic logging, 514configuring, 42–43
Diagnostic Logging page, 501–502diagnostics . See logging; monitoringDIPs (Document Information Panels), 351,
356–360 Directory Management Service, 89–90discover and hold records, 402–403discussion lists, 162–163discussion topics
creating, 163replies, posting, 163views of, 162–163
disk usage, logging and, 503Display Groups page, 292Disposition Approval workflow, 374distribution groups, creating, 90distribution lists
creating, 91creating automatically, 90storing, 89
.dll files, 479DNS configuration for incoming e-mail,
92DNS entries for Web servers, 63document bar codes, 390document centers, 378–383
adding documents, 378–379content organizer feature, 379–382default functionality, 378
document collaboration, 363Document content type, 153, 350Document Conversions Launcher service,
51, 70Document Conversions Load Balancer
service, 70document declaration, 392–394
locked documents and, 394document IDs, 365–367
Ddatabase attach upgrades, 518, 533–536
planning for, 519–520database errors, resolving, 524database maintenance, 26database management, 97–105database mirroring, 40, 114, 122database names, configuring, 121databases
authentication type, configuring, 122cleaning, 523–524created during installation, 26, 35dedicated SQL Server installation
for, 3location, configuring, 103securing access to, 452for service applications, 182size of, 98Web application logical structure in,
109database servers
default, 104number of, 55RBS, installing on, 45specifying, 121
data files, separating from transaction log files, 102
data integrity, 369data repositories, 350
organization of, 331Data Retrieval Service, configuring,
104–105datasheet mode, 151Deactivate Feature Warning page, 438Declare Record button, 394dedicated servers
grouping services and databases on, 56
for sandboxed solutions, 233Default Content Access Account, 246default content database servers, 104default permissions, 484default service connections list, 338default URLs
choosing, 123editing, 140
default workflows, 374default zone, 481deleted documents, preservation in
Recycle Bin, 164Delete Items permissions, 175deletes, restricting, 369
606
document management (continued)inbound e-mail, enabling, 375–377metadata, gathering for, 356overhead of, 363version control, 149–150, 372–374workflows, 374–375
document management plans, 362–363catalog of document types, 362document movement plans, 362document versioning requirements,
372organizational taxonomy, 362participant roles descriptions, 362workflow plans, 362
document repositories, 378 . See also document centers
documents . See also document management; records
check in/check out, 149–150, 370compliance details, 391content approval, 372–373conversion into Microsoft Office
Word formats, 201dialog box settings, 151document center, sending to, 389folder settings, 151major and minor versioning, 373nonrecords, 388–389opening settings, 150ownership of, 370ratings for, 151restoring from Recycle Bin, 165search settings, 151send to options, 150size limitations on, 152tagging, 357–358
Document Set content types, 368–369document sets, 365, 367–369
content approval, 372–373document submission, journaling
methods, 401document templates, 149, 150domain administrators, 453double-hop issue, 476draft item security, 373–374drop-off libraries, 379, 381
EECM (enterprise content management),
329–331 Edit Connection Filters page, 432Edit Crawled Property page, 282Edit Items permissions, 175
Document ID Service, enabling, 366Document Information Panels (DIPs),
356–359custom, 359–360default, 356overwriting of, 351Required Properties warning, 356templates, uploading or publishing,
359Document Information Panel Settings
link, 359–360document labels, 390–392document libraries, 363–365, 386
Advanced Settings page, 150Allow Manual Submission setting, 400audience targeting, 151Blocked File Types list, 151check in/check out, 370column values settings, 151configuring, 364content organizer rules, 397content types and, 153–154, 370–371creating and managing, 148–154custom Send To destination links, 381datasheet mode, 151document sets, enabling, 367–368draft item security, 373–374filtering and sorting content in, 383inbound e-mail, enabling for,
375–377information management policies,
associating with, 168information management policies
for, 397IRM settings, 461–462manual submission, 400–401metadata navigation, 151, 382–383offline client availability settings, 151permissions for, 364–365retention settings, 386–388source template document types, 371templates of, 364validation settings, 151version control in, 372–374view management, 151
Document Library Settings page, 153, 168document life cycles, 362 . See
also document managementdocument management, 361–383 . See
also managed metadata; metadata; taxonomies
content types and, 349–351vs . document collaboration, 363document libraries, 363–365
607
FFailed Request Tracing Rules, 494failover database servers, 40
defining, 122failover servers
for social tagging database, 422for synchronization database, 422
farm account, for administrative tasks, 4farm administrators, 343
access privileges, 453configuring, 36delegation capability, 424User Profile Service administration,
424–425Farm Administrators group, 36
service application management, 184–186
updating, 453farm backups . See also backup
before deletions, 126content and configuration settings,
backing up, 543Farm Configuration Wizard, 23–24, 32–33
Configure Your SharePoint Farm page, 23, 24
running, 32–33for service application deployment,
183for State Service configuration,
199–200Web application creation with, 110
farm encryption keys (FEKs), 459Farm Management area (System Settings),
96–97farm operations, core operations, 81–107farm passphrases, 459–460farm planning for upgrades, 519–526farm security . See also security
Completing the SharePoint Products Configuration Wizard page, 21
farm topologies, 9–13Farm-Wide Search Administration page,
243farm-wide search settings, 240–241Farm-Wide Search Settings page, 241FAST indexes, 274FAST Search Center site template, 297fault tolerance, 52Favorite Links section, 446FBA (Forms-Based authentication), 116,
119, 250 feature header files, 215feature receivers, 216
Edit Permissions page, 179Edit Personal User Information
permissions, 177Edit Policy page, 167Edit Scope Display Group page, 292–293Edit Trusted Content Location dialog box,
196Edit User Profile Property page, 434Edit User Profile Service Application
dialog box, 423element files, 215e-mail . See also inbound e-mail; outgoing
e-mailintegrating SharePoint with, 375
E-mail and Text Messages section (System Settings), 88–93
e-mail drop folders, 91end user Recycle Bin, 164enterprise content management (ECM),
329–331enterprise content types, 329–331Enterprise Search Centers, 297–298
results page, 310search pages, 298site template, 297
Enumerate Permissions permissions, 177EnumSolutions, 224–225errors, in upgrading, 530event logs, 490–491, 504
disk space usage, 43flood protection, 43storage of, 43tracing, 43
events, logging, 40event throttling, configuring, 42, 502–503Excel Calculation services, 70Excel Services, 189–194
configuring, 190–191trusted data connection libraries,
192–193trusted file locations, 191–192user-defined function assemblies,
registering, 193–194Excel Services Application Settings page,
190 .exe files, 479expansion sets for search thesaurus,
267–268expiration policy features, 167exporting information, 429extended zones, deleting, 127external certificate authorities, 465–466external data sources, 430external entity management systems, 435
608
folders, in publishing site libraries, 415folksonomies, 330, 342, 344Force parameter (features), 220, 221Forms-Based authentication (FBA), 116,
119for crawl rules, 250
forms, custom, 156Form Settings page, 158Full Control permissions, 142, 174full crawls, 282 . See also crawlingfull-trust solutions, 221–232
adding, 223–224contents, inspecting, 222deleting, 230–231deploying, 222, 225–228ID of, 224life cycle of, 222–223managing, 223–225Manifest .xml file, 225retracting, 228–230upgrading, 231–232
GGAC (global assembly cache), 225 General Application Settings area (Central
Administration), 84Get-SPFeature cmdlet, 438Get-SPServiceApplication cmdlets, 425global assembly cache (GAC), solutions
deployed to, 225Global Navigation menu, 415–418global password management settings,
457–458global taxonomies, 342Go To Top Level Site Settings hyperlink,
218governance, with Web application
policies, 481–487grant sets, 27granular backup and restore, 555–560Groove, 377Group manager role, 343group permissions
custom levels, 175–177default levels, 174viewing, 172–173
groupsnesting Active Directory groups in,
174security groups, 171
features, 205, 215activating and deactivating, 217–220architecture of, 215–216Central Adminsitration management
of, 217–218dependencies of, 216element files, 215feature header files, 215installing, 216–217life cycle of, 216–217managing, 136–137scopes of, 215uninstalling, 220–221uses of, 215
Feature .xml files, 215, 217Federated Claims authentication, 119Federated Location Definition (FLD) files,
271federated locations
adding, 271authentication for, 276–277author information, 272copying, 277deleting, 277description, 271–272display information, 275–276editing, 271exporting, 277location information, 274–275managing, 270–277name of, 271prefix trigger, 273restrictions, 276trigger configuration, 272version information, 272
federated queries, 270–277Federated Results Web part, 275, 318–319feeds, subscribing to, 164FEKs (farm encryption keys), 459 field controls, placement of, 411file access, 331Filename parameter (features), 219, 221file plan matrix, 395file plan reports, 403–404file retention, approaches to, 330file shares, 330–331
backing up to, 540–541, 544, 545FILESTREAM, enabling, 43file types, blocking, 479file upload properties, 358–359firewalls, 452FLD (Federated Location Definition) files,
271 flood protection, for event logs, 43
609
inbound e-mail (continued)DNS configuration, 92enabling in document libraries,
375–377list e-mail address, 375lists and libraries for, 92Safe E-Mail Servers setting, 92server display address, 92submissions, grouping, 376
incoming traffic, zones, 120indexer, functionality of, 240indexes, 74, 239
freshness, improving, 78removing information from, 289
index partitions, 74, 257, 258redundancy and availability of, 79
index servers, placing services on, 70Information Management (IM) Policies,
167–169, 385–392, 462–464auditing, 389–390creating, 167defining, 386document bar codes, 390document labels, 390–392document libraries, associating with,
168in-place records management,
392–394nonrecords, 388–389policy features, 167record center design and, 395–396records, 389retention, 387–388
information policies, 460–464Information Rights Management (IRM),
249, 460–462in-place records management, 385,
392–394in-place upgrades, 526–533
upgrade process tasks, 518–519installation
considerations for, 7databases created during, 26, 35of first SharePoint Foundation 2010
server, 13of first SharePoint Server 2010 server,
26–36hardware and software requirements,
5–6preparing for, 4–9prerequisites, 7–8service accounts, planning, 8–9of SharePoint Foundation 2010, 4
Hhardware requirements, 5–6Header-Footer-4-Columns page, 209Health Analyzer, 200, 496–498
Review Problems And Solutions screen, 496–497
Rule Definitions page, 497–498Health Analyzer Reports list, 200health-related timer jobs, 41Health Reports list, 200health status data collection service, 199Hierarchy Manager permissions, 142high availability
increasing, 53scaling out for, 51
host distribution rules, managing, 258–259
Host Distribution Rules management page, 259
host headers, 3, 63defining, 117, 124with wildcard SSL certificates, 465
hosts, for My Site Web sites, 442hotfix KB963676, 27HTTP, accessing Web applications with,
469–470HTTPS, accessing Web applications with,
469–470
Iidentity management services, 199Identity parameter (features), 220, 221identity providers, 118–119Identity Provider Security Token Service
(IP-STS), 118ID parameter (features), 219–220, 221iFilters, 240, 251–252IIS (Internet Information Services), 37, 65,
111–112, 494–495 IISReset, 530IIS Web sites
creating, 116deleting, 126, 127path for, 117port numbers for, 117removing SharePoint from, 127
I Like It button, 436import files, for term sets, 348–349importing information, 429inbound e-mail
configuring, 89–93contributions from outside the
organization, allowing, 376–377
610
languagesfor My Site Web sites, 443for sites, 145
large farms, 12–13, 56layout of Web parts pages, 208layout pages, customizing, 169_layouts pages, 131least-privileged accounts, 8Left-Column-Header-Footer pages, 209libraries . See also document libraries
crawl rules for, 326–327Manual Record Declaration
Availability option, 393permissions on, 364–365relationships to other libraries,
369–371security for, 179–180
Library Based Retention Schedule page, 386
Library Record Declaration Settings page, 393
Library Settings administration page, 364library types, 154links to Office client applications, 447–448list content types, 156list forms, 158–160list metadata, 349lists
content type management, enabling, 371
crawl rules for, 326–327Create, Read, Update, and Delete
functions, 158–160creating, 154discussion lists, 162–163mail enabling, 375–376managed terms, linking with, 359managing, 154–159metadata naviagtion, 359–360relationships to other lists, 369–371RSS settings for, 164security for, 179–180shared list columns in, 154–155site columns, adding to, 156
List Settings page, 158, 164load balancing, 53
readying servers for, 63sandboxed solutions, 238
Locale settings, 148local-only rules, 523local server administrators, 453locked documents, 394
installation (continued)of SharePoint Foundation 2010
binaries, 15–17SharePoint Products and
Technologies Preparation Tool, 14–15
installation media, 526Install Or Uninstall Display Languages
dialog box, 48internal certificate authorities, 467–468internal URLs, editing, 140Internet Information Services (IIS), 37
application pools, 111–112health and diagnostic tools, 494–495for server farm management, 65
Internet Information Services (IIS) Manager, configuring SSL in, 465–466
IP addressesassigned, 3assigning, 469assigning to Web applications, 46–47
IP-STS (Identity Provider Security Token Service), 118
IRM (Information Rights Management), 249, 460–462
Jjournaling methods, 401
KKerberos, 471–473
for user authentication, 118service principal name, 125
Kerberos Distribution Center (KDC), 118key filters, configuring, 360keyword search tool, 294keywords, managed, 347, 359–360keywords, search, 293–296
adding, 294–295display of, 296filter views of, 294keyword definitions, 295
Llabeling policy features, 167labels, Information Management, 464language packs
installing, 47–49as SharePoint prerequisite, 520
611
Managed Metadata Service Applications (continued)
settings for, 337–338starting, 341
Managed Metadata Service Connectionsassociating with Web applications,
338–339managing, 338
Managed Metadata Servicesadministrators of, 341–342configuring, 331–342managed taxonomies, 342
Managed Metadata Services Content Type Syndication Hub, 331–332
managed metadata site columns, 353–355Managed Metadata Web service, 71managed paths, 136, 145
creating, 334for personal sites, 423–424wildcard, 147
managed properties, 278–284automatically generated, 284properties of, 279–281
managed taxonomies, 342managed terms, 345–346
converting from managed keywords, 347
linking with lists, 359taxonomy of, 346–347
managed term sets . See also term setscreating, 345selecting, 354–355
Manage Excel Services Application page, 191, 192
Manage Farm Features area (Farm Management), 96, 437–438
Manage Farm Solutions area (Farm Management), 96
Manage Farm Solutions link, 226, 227Manage Features option, 136–137Manage Federated Locations page, 271Manage File Types page, 250–251Manage Keywords page, 294Manage Lists permissions, 175Manage Paths option, 136Manage PerformancePoint Services
Application page, 195, 196Manage Permissions permissions, 176Manage Personal Views permissions, 178Manage Profile Service page, 426Manage Profile Service: User Profile
Service Application page, 426Manage Search Application Topology
page, 253
log filescreating, 501–503location of, 41, 503maximum size, 41for setup, 17size of, 503for upgrades, 529viewing, 503–504
loggingevent logs, 490–491events, 40event throttling, configuring, 502–503flood protection, 502IIS feature, 494Trace and Service Application log
files, 504trace logs, 502usage and health data, 502–503
Logging database, 509Logging Web Service data, 504Lotus Notes Connector service, 70
Mmajor versioning, 373Manage Alerts permissions, 177Manage Content Sources page, 196managed accounts, 454–456
creating, 454–455editing, 455registering, 421removing, 456–457selecting, 121service accounts, 459–460
managed farm accounts, 454managed keywords
consumption of, 360converting to managed terms, 347
managed metadata, 194 . See also metadata
Document Information Panels and, 356–359
roles and capabilities, 343Managed Metadata database, 36Managed Metadata Service, adding
administrators, 532Managed Metadata Service Applications,
531accessing, 336application pool settings, 337multiple, 333provisioning, 336–338publishing, 340–341server for, 341
612
Microsoft InfoPath Designer 2010, 158Microsoft Office
Microsoft Office 2010, integration with SharePoint 2010, 446–448
themes files, creating, 414Microsoft Office Outlook 2003 and later,
offline content access with, 377Microsoft.Office.Server.Search.
Administration.ManagedProperty class, 280
Microsoft Office Visio, 4Microsoft Office Word, conversion of
documents into, 201Microsoft Server Speech Platform, 7Microsoft SharePoint Foundation
Incoming E-mail service, 71Microsoft SharePoint Foundation
Sandboxed Code service, 51Microsoft SharePoint Foundation
Subscription Settings service, 71Microsoft SharePoint Foundation Timer
service, 93–96Microsoft SharePoint Foundation User
Code service, 71Microsoft SharePoint Foundation Web
Application service, 72Microsoft SharePoint Foundation
Workflow Timer service, 72Microsoft SharePoint Products and
Technologies Preparation Tool, 5Microsoft SharePoint Workspace 2010,
377Microsoft software licenses, 28minor versioning, 373mobile alert feature, 93, 134–135Modify Topology link, 243monitoring
Performance and Reliability monitors, 491–492
SharePoint tools for, 496–505SQL Server, 515–516Windows Event Viewer, 490–491
Monitoring area (Central Administration), 84
Monitoring Resource Usage tool, 516Mount-SPContentDatabase cmdlet,
534–535 .mp3 files, 479 .mpg files, 479ms-Exch-mail-Nickname attributes, 90ms-Exch-RequireAuthToSendTo attribute,
90Msinfo32 .exe, 494multitenancy, 106
Manage Search Scope For Related Links page, 327
Manage Servers In This Farm link (Servers section), 86–87
Manage Service Applications page, 183, 243–245, 420
Access Services link, 188Manage Services On Server page (Servers
section), 87–88Manage Site Features hyperlink, 219Manage User Properties page, 426,
433–434Manage User Solutions area (Farm
Management), 96Manage Web Site permissions, 176Manifest .xml files, 222, 225Manual Record Declaration Availability
option, 393manual submissions for Send To
connections, 107mapping
crawled properties, 278–279, 282user profile properties, 433–436
master key, changing, 553Master Page And Page Layout Gallery, 410master pages, 131, 405, 407–410
branding, 407custom, 409customizing, 169publishing, 410site master page, 408system master page, 408
Master Page Setting For Application _Layouts Pages option, 408
Maximum Number Of Sites That Can Be Created In This Database setting, 98
Maximum Upload Size setting, 153medium farms, 12, 55Memberships feature, 436Members security group, 171memory, application pools and, 4, 112Message content types, 162metadata . See also managed metadata
consuming, 351–360custom, 382enterprise metadata, 329gathering, 356list metadata, 349navigation, 359–360tagging, 351
metadata groups, 344–345metadata navigation, 151, 382–383Metadata Property Mappings page, 279Microsoft Access services, 187–189
613
Oobject names for Pre-Upgrade Check tool,
522–523objects, controlling access to, 171Office Communicator Server (OCS), 129OfficeServer .exe, 33officialfile .asmx, 105, 396offline backups, 540offline client availability, 151offline support, 377Open Items permissions, 176Open permissions, 177OpenSearch 1 .0/1 .1, 274Operation Completed Successfully screen,
401–402organization profiles, 200OssPreUpgradeCheck .xml file, 523–524outbound HTTP, 97outgoing e-mail
alerts and, 161configuring settings for, 37, 133–134settings for, 88–89
Override Check Out permissions, 175Owners security group, 171
Ppage content area, editing, 208page layouts, 405–406, 411pages, 207 . See also Web part pages
Body Only page layout, 208detaching, 169Web parts and, 207–210
passphrasesfor farm security, 19, 31for server farms, 60
password management, 453–460automatic password changes,
457–458farm passphrases, 459–460global password settings, 457–458
password roll policies, 456Path parameter (features), 217paths, managed, 136pattern queries, 273People and All Sites scopes, 285People And Groups page, 178People Picker, 147People Search Results page, 310–311Perform A Backup option, 542performance
BLOB storage and, 43logging and, 503problems, viewing, 497
My Alerts page, 162My Colleagues, 440My Content, 440My Interests, 440My Links feature, 436My Newsfeed, 440–441My Personalization Links feature, 436My Profile, 440My Site hosts, provisioing, 423My Site host template, 420My Sites, 200My Site Settings page, 441–442My Site Web sites, 440–448
configuring, 441–443personalization site links, 445–446site naming format, 443Trusted My Site host locations,
443–445
NName parameter (features), 217, 219, 221naming conventions for document IDs,
366navigation, 415–417
metadata navigation, 359–360nested folder structures, 415network infrastructure, planning, 51–52Network Interface Card (NIC) teaming, 52Network Load Balancing (NLB) service, 53New Alert page, 161New Search Service Application page, 243New Site Collection page, 144, 147New Site Column page, 352New Site Content Type page, 157, 350New Web Parts page, 206NIC (Network Interface Card) teaming, 52 NLB (Network Load Balancing) service, 53 noise word files, configuring, 266–267noise words, ignoring, 316nonrecords, 388–389
retention policies for, 387–388notes, 200
deleting, 439Notes feature, 436–440notification e-mail address for password
management, 457notifications about sites, 143Novell eDirectory v . 8 .7 .3 LDAP, 430NTLM, 473
for authentication, 118
614
permissions (continued)Site Collection Administrator
permissions, 485Site Collection Auditor permissions,
485for site collections and subsites, 142specifying, 171Update Personal Web Parts
permissions, 178Use Client Integration Features
permissions, 177Use Remote Interfaces permissions,
177user permissions, for Web
applications, 475–476Use Self-Service Site Creation
permissions, 177View Application Pages permissions,
176 viewing, 172–173View Items permissions, 176View Pages permissions, 177View Versions permissions,
176 View Web Analytics Data permissions,
176on Web applications, 475–476
Permissions For User Profile Service Application dialog box, 437–438
personalization of Web part pages, 213–214
personalization site links, 445–446Personalization Site Links page, 445Personalize This Page option, 213–214phonetic name-matching functionality, 7policy features, 167portals, 166
lack of, 405portal site connections, 166–167port numbers for IIS Web sites, 117prerequisites, 519
installing, 7–8, 527Prerequisites installer, 7–8presence settings for Web applications,
129Pre-Upgrade Checker, 520–521
tool warnings, 523–524preupgradecheck (Stsadm .exe), 520–521
local only option, 523process security, 4product keys, entering, 28profile databases, 421–422
performance (continued)of SharePoint 2010 Search, 78–79scaling out and, 51SQL Server environment and, 515
Performance and Reliability monitors, 491–492
performance counters for SQL Server monitoring, 515–516
PerformancePoint Services, 72, 194–196PerformancePoint Services Application
Settings page, 195permission inheritance, breaking, 179permission levels, 483permission policies, 483–485permissions . See also user permissions
assigning to users, 174available permissions, 175–177checking, 180Contribute permissions, 175Create Alerts permissions, 176Create Groups permissions, 177Create Subsites permissions, 176custom permission levels, creating,
175–177default permissions, 484delegating to site owners, 487Delete Items permissions, 175Delete Versions permissions, 176Design permissions, 174Edit Items permissions, 175Edit Personal User Information
permissions, 177Enumerate Permissions permissions,
177Full Control permissions, 142, 174group permissions, 172–174Hierarchy Manager, 142levels of, 142, 174for libraries, 179–180for lists, 179–180Manage Alerts permissions, 177Manage Lists permissions, 175Manage Permissions permissions, 176Manage Personal Views permissions,
178Manage Web Site permissions, 176modifying, 176, 178for objects, 171Open Items permissions, 176Open permissions, 177Override Check Out permissions, 175Read permissions, 175 for search administrators, 245–246for SharePoint Designer, 135
615
query components, 257failover-only, 258mirroring, 77–78moving to another server, 74–76multiple, 258redundancy and availability of, 80
Query Language picker, 316query logging, 246Query Manager, 311–312query pages, 301–302query reporting, 325query response times
improving, 79query role, hosting, 74query servers, 74
redundancy of, 74query templates, 274Quick Launch area
Content Sources link, 247Crawl Rules link, 248File Types link, 251links to search management pages,
245quota templates for Web applications,
129
Rrapid application development (RAD), 187RBS (Remote BLOB Storage), 43–47 read-only content databses, 100Read permissions, 175Really Simple Syndication (RSS), 163
Web application settings, 130Record Declaration settings, 389records, 389
declaring, 388–389, 393–394discovering and holding, 402–403list- and library-level, 393–394manual submission to document
library, 400–401retention policies for, 387–388, 389
Records Center connection, 105Records Center Management page, 397records centers, 385, 394–404
access to, 395auditing reports, 404compliance management functions,
401–404file plan reports, 403–404isolating, 396planning for, 395–397records management, 401–404routing information to, 397–401
profile propertiescustom, 426mapping, 433–436
profile synchronization, 429–435profile synchronization connections,
430–433profile synchronization databases, 36, 422properties of Search schema, 278–284property databases, 256–257
redundancy and availability of, 80Property Query scope rules, 287proxy groups, 122proxy server error messages, 63proxy servers
local addresses and, 31for search service applications, 246
pruning, 373PSCDiagnostics files, 22, 31 .pst files, 479public URLs
defining, 126editing, 139for Web applications, 120for Web servers, 63
Publish A Major Version option, 410Published Links To Office Client
Applications page, 447publishing infrastructure, 405–417
enabling, 406–407master pages, 405, 407–410navigational options, 415–417page layouts, 405–406, 411service applications, 185–186SharePoint Designer 2010, disabling,
412themes, 406, 414
publishing site libraries, folders in, 415Publish Service Application dialog box,
185, 340
Qqueries . See also search queries
duplicate results, removing, 316federated queries, 270–277keywords in, 293pattern queries, 273query pages, 301–302query reports, 325query terms, modifying, 267restrictions on, 274thesaurus and noise word file usage,
266query availability, improving, 79
616
reporting, 501–504on system diagnostics, 492–493
resource measures, 237resource points, 236–237resources per point values, 237resource throttling, enabling, 132–133restore
with Central Administration, 542–547granular, 555–560scope of, 539of server farm, 545–547, 549–550,
551–552of single components, 555of site collections, 555–559with Stsadm .exe, 551–552, 559tools for, 539of unattached content databases,
559–560of Web applications, 553–555with Windows PowerShell, 547–550,
556–558Restore-SPFarm cmdlet, 549–550
-item option, 553Restore-SPSite cmdlet, 557–558results pages, 310–312retention, 387–388
Information Management, 464 source of, setting, 386
Retract Solution hyperlink, 229Ribbon interface, 128–129
Administrators and Permissions groups, 340
Authentication Providers, 472Delete button, 126, 127Extend button, 123, 481focus of, 128Format Text tab, 208i Like It button, 436Insert tab, 208Library tab, 149, 153, 353, 386Library Tools tab, 409Manage button, 245Manage Features button, 136,
136–137Manage Paths option, 136Manage section, 152New button, 115Permission Policy, 484Resource Throttling option, 132Security section, 142Share and Track section, 163Site Permissions page, 171Solutions tab, 234
records centers (continued)routing mechanism, 396site configuration, 396–397site features, 396submitting items to, 396
Records Center template, 378Records Center Web Service Submitters
group, 396Records Center Web Service Submitters
page, 399records management, 385
file plan matrix, 395in-place, 392–394record declaration, 393–394records centers, 385, 394–404
records managers, 385record submission Operation Completed
Successfully screen, 401–402recoverability, 165recovery . See also restore
of server farms, 540–552Recovery Point Objectives (RPOs), 540Recovery Time Objectives (RTOs),
539–540Recycle Bin, 164–165
configuring use of, 131redundancy
of query servers, 74of Search Service, 79–80of service applications, 182–183
Refinement Panel Web part, 323–324regional site settings, 148Register Managed Account dialog box,
421Related Queries Web part, 311, 322relationship behavior, enforcing, 369relevance settings for search, 270Remote BLOB Storage (RBS)
configuring, 46–47enabling, 45installing, 43–44, 44–45testing, 46
remote farmsservice applications, connecting to,
186–187trust relationships with, 340
Remove SharePoint From IIS Web Site option, 127
Remove URLs From Search Results page, 289
replacement sets for search thesaurus, 268
617
Scope Properties And Rules page, 287–288
scopes, of features, 215scripted deployment, Windows
PowerShell for, 24–26, 33–35search . See also search service; SharePoint
Server 2010 Searchbest bets, 293–296centralized search environments, 297compilation process, 288configuration options, 325–327contextual scopes, 327custom pages, 300FAST indexes, 274federated queries, 270–277keywords, 293–296local indexes, 274managed properties, 278–284noise word files, configuring, 266OpenSearch 1 .0/1 .1, 274optimized, 54 query reports, 325relevance settings, 270results pages functionality, 311–312searchable columns, 325–326search pages, customizing, 300–324Search Web parts configuration,
312–318site-level crawl rules, 326–327term stemming, 316thesaurus, configuring, 267–268
Search Administration component, redundancy and availability of, 80
Search administration database, 35redundancy and availability of, 80
Search Administration page, 196, 245–246search administrators permissions,
245–246Search And Offline Availability page, 326search application topology, managing,
252–258Search Application Topology dashboard,
245–246, 253–254Search Box Web part, 301–305
advanced search link, 305Display Submitted Search check box,
305links management, 305Miscellaneous section, 304Query Suggestions section, 303–304Query Text Box section of, 303scope display group, 305Scopes Dropdown section of,
302–303
Ribbon interface (continued)Tags & Notes button, 436User Permissions, 475–476Web Applications tab, 218, 408Web Part Tools tab, 210
Right-Column-Header-Footer pages, 209roles, managed metsdata, 343routing mechanism
for incoming documents, 379records center, 396
RPOs (Recovery Point Objectives), 540 RSS (Really Simple Syndication), 130, 163RTOs (Recovery Time Objectives),
539–540 rule files, 523
SSafe Control entries, 206–207safe controls, 207Safe E-Mail Servers setting, 92Sandboxed Code service, 234sandboxed solutions, 160–161, 221,
232–238allowed and disallowed functions,
233–234architecture of, 233blocking, 238downloading, 234–235life cycle of, 234load balancing, 238monitoring, 235–238resource points, 236security of, 232uploading, 234usage quotas, 235–237
Sandboxed Solutions Resource Quota value, 236
Save As dialog box, Favorite Links section, 446
scaling outaccount for performing, 57high availability and, 51performance and, 51preparing for, 51–56Search Service application, 74–80service applications, 65–80setup and, 3SharePoint Server 2010 Search, 74–80system services, 65–80Web servers, adding, 57–64Web servers per SQL Server cluster,
57
618
search servers, defining, 122search service, 73, 196–198 . See also
searchcontent sources, 196–197crawler, 239crawling, starting, 198crawl rules, 197–198, 247–250farm-wide search settings, 240–241index partitions, 257–258multiple instances of, 240starting, 240
search service accounts, 9, 243Search Service Application page,
Federated Locations, 270–271search service applications, 532
Contact E-mail Address setting, 246creating, 243–245Query Logging option, 246scaling out, 74–80Scopes Update Schedule option, 246Search Alerts Status setting, 246topology of, 243
Search Settings page, 290Search Statistics Web part, 321–322Search Summary Web part, 322search topology, simplifying, 533Search Web Analytics reports, 325Search Web parts, 301
Best Bets Web part, 319–320configuration, 312–318display properties, 313–316Federated Result Web part, 318–319location properties, 312–313miscellaneous conguration options,
317–318Refinement Panel Web part, 323–324Related Queries Web part, 322results query options, 316–317Search Paging Web part, 320–321Search Statistics Web part, 321–322Search Summary Web part, 322Top Federated Result Web part, 319
secondary contacts, 143secondary site collection administrators,
146Secure Sockets Layer (SSL), 116, 465–470
Alternate Access Mapping changes, 469
certificates, binding to Web applications, 467–468
configuring, 465–466enabling, 118server certificates, configuring,
465–467
Search Box Web part (continued)Search button images, 305Target Search Results Page URL
setting, 305search centers, 297–300
Advanced Search pages, 305–310custom scopes with, 291designating, 442Enterprise Search Center, 297–298local, 297new tabs, creating, 299–300query pages, 301–302, 301–325Related Queries Web part, 311results pages, 310–312search pages, 298site templates, 297Summary Web part, 311
search connectors, downloading, 277Search Connectors Gallery, 277search databases, hardware for, 54search pages
accessing, 300Advanced Search pages, 305–310creating, 298customizing, 300–324Preferences link, 301results pages, 310–312Search Box Web part, 301–305tabs, adding, 299–300
Search Paging Web part, 320–321Search Property Database, 35search queries, 265 . See also queries
noise word files, 266–267viewing, 325
Search Query And Site Settings Web Service, 72, 244
search query box, configuring, 290–291Search Query Web parts, 290search results
displaying, 275relevance settings, 268–270removing, 289
search results pages, custom pages, 290search scopes, 284–288
adding rules, 286compilation process, 288contextual scopes, 327creating, 285–286excluding specific content, 287People and All Sites scopes, 285scope display groups, 293scope rules, 287shared scopes, 291site-level management, 291–293
619
server certificatescreating, 465–466Web applications, binding to,
467–468server farms, 28
account/database access account, 9administrator account name, 30backup and recovery of, 540–552configuration databases, 81configuration failures, 63configuring, 23–24, 32–33connecting to, 58custom code, installing, 64definition of, 17farm passphrases, 459–460IIS management, 65information processing, location of,
88large farms, 56medium farms, 55passphrase for, 60provisioning, 17–22, 30–31scaling, 3, 51–80securing, 451–464server management, 86–87single-server farms, 52three-tier small farms, 53–54traffic patterns, viewing, 509–510two-tier farms, 52–53Web parts, installing, 64Web servers, adding, 57–64
server groups, 10, 78server hardware planning, 51Server Manager Diagnostics console, 490Server Name Mapping management
page, 250server name mappings, 250servers
configuration, performance, and security problems, viewing, 497
health and reliability of, 491–492IISReset on, 530managing, 86–87removing from configuration
database, 87security of, 452sizing properly, 489SKU information, 86status of, viewing, 87for timer jobs, 95upgrading to SharePoint Server 2010,
526–529server services, managing, 87–88
Secure Store Service, 72, 199, 476–478backing up, 553managing, 477–478
Secure Store Service applications, 532creating, 477–478multiple, 478
Secure Store Service DB, 35security
account management, 453–460application pools and, 112assigned IP addresses and, 3of Central Administration, 83example configuration, 452farm security passphrase, 19, 31of incoming e-mail, 92information policies, 460–464least-privileged accounts, 8password management, 453–460process security, 4sandboxed solutions and, 232of server farms, 451–464for site collections, 171–180for term groups, 342Web application policies, 481–487for Web applications, 117–119,
464–480Web page security validation, 130workflow settings and, 133
Security area (Central Administration), 84security groups, default, 171security logs, 490security problems, viewing, 497Security Token Service (STS), 119, 199security trimming, 171self-service site-collection creation, 479Self-Service Site Collection Management
dialog box, 143self-service site creation, 142–143Self-Service Site Creation button, 142self-service URL for site creation, 146–147Send To connections
configuring, 105–107manual submissions, 107multiple, 106
Send To destination links, custom, 381Send To function
content organizer and, 379defining, 398–399
Send To locations, multiple, 398Send User Name And Password In E-mail
option, 130
620
service applications (continued)User Profile Service, 200–201Visio Graphics Service, 199Web Analytics Service, 201Web applications, associated with, 67Word Automation Service, 201–202
Service Applications Associations page, 184
service application service instances, 66Service Applications model, 9service connections list, default, 338service instances, 182
multiple, 183Service Job Definitions page, 94service principal names (SPNs),
configuring, 471–472services
grouping on servers, 10installing, 33services infrastructure, 65upgrading, 533
Services On Server page, 341Set-SPPassPhrase cmdlet, 60, 460setup, failure of, 17Setup .exe, 14Set Up Groups For This Site page, 147setup program, starting, 526Setup user account, 8setup wizard, options in, 3–4shared scopes, 285, 291
versus local scopes, 292shared service providers (SSPs), 122, 181,
530shared services, 66
upgrades and, 530–531Shared Services Provider model, 9SharePoint 2010
for file retention, 330–331Office 2010, integration with,
446–448offline support, 377
SharePoint 2010 Best Practices Analyzer, 495
SharePoint 2010 Health Analyzer, 495–496
SharePoint 2010 Products Configuration Wizard
Central Administration, repairing with, 86
Completing The SharePoint Products Configuration Wizard page, 31, 60–61
Configuration Successful page, 62
Servers section (System Settings), 86–88Manage Servers In This Farm link,
86–87service account management, 459–460service account password management,
453service accounts
for services configuration, 23specifying, 8–9
service administrators, 424My Site Web site management,
441–442social features administration,
438–439user profile administration, 419
service application connection groups, 184
service application instances, system services as, 68
service application proxies, 182service applications, 181
Access services, 187administration interface, 182administrators, managing, 185after upgrading, 531application bits, 182application pools, 182, 421architecture of, 66–73, 181–183backup and recovery of, 553–555Business Connectivity Services, 189Central Administration management
of, 66connections configuration, 122consumption of, 69creating and configuring, 32databases, 182deleting, 185Excel Services, 189–194PerformancePoint Services, 194–196publishing, 68–69, 185–186redundancy of, 182–183remote, connecting to, 186–187scaling, 65–80search applications, 243–245Search service, 196–198Secure Store Service, 199security token service, 199and services interaction, 67in SharePoint Server, 187–202versus SharePoint services, 88State Service, 199–200topologies, 182–183 Usage And Health Data Collection
Service, 199
621
SharePoint Foundation Search service, 72SharePoint Foundation User Code service
starting, 233SharePoint Foundation Workflow Timer
service, malfunctioning of, 464SharePoint Health Analyzer, 200SharePoint Product 2010 Configuration
Wizard, 529SharePoint Products and Technologies
Preparation ToolInstallation Complete page, 15License Terms For Software Products
page, 14running, 14–15, 27SharePoint Foundation 2010 Start
page, 14Welcome To The Microsoft
SharePoint Products And Technologies Preparation Tool page, 14
SharePoint Products Configuration WizardCompleting the SharePoint Products
Configuration Wizard page, 22Configuration Successful page, 22running, 17–22, 30–31, 49
SharePoint Search 2010, phonetic name-matching functionality, 7
SharePoint Servercustom location, installing to, 29service applications in, 187–202upgrading from SharePoint
Foundation, 49–50SharePoint Server 2007, upgrading from,
517–538SharePoint Server 2010
binaries, installing, 28–30, 49–50configuration failures, 31default services in, 33diagnostic-logging capabilities, 514document management in, 361–365feature set, 405hardware and software requirements,
5–6mirroring awareness, 114monitoring and diagnostic
capabilities, 495–514monitoring functionality of, 496–505prerequisites for, 519servers, installing first server, 26–36SharePoint 2010 Health Analyzer,
495–496upgrading to, 517–538Web Analytics, 504–514
SharePoint 2010 Products Configuration Wizard (continued)
Configure SharePoint Central Administration Web Application page, 20, 31
Connect To A Server Farm page, 18, 30, 58
for provisioning servers, 58running, 84running after language pack
installation, 48Specify Configuration Database
Settings page, 19, 30, 59Specify Farm Security Settings page,
19, 31starting, 30for upgrading to SharePoint Server, 49Welcome To SharePoint Products
page, 17, 30, 58SharePoint 2010 Timer service server, 114SharePoint_AdminContent_<GUID>
database, 82SharePoint configuration database, 26, 35SharePoint Designer
access to, 406, 412–413blocking of, 170–171enabling, 169governance, 486–487setting restrictions, 413–414settings, 169–171Settings page, 169users, governance of, 135–137workflow creation with, 374
SharePoint .exe, 14SharePoint Foundation
binaries, installing, 15–17configuration failures, 22default service applications, 24hardware and software requirements,
5–6installing, 4, 13installing first server, 13–26service applications in, 187services infrastructure, 65–66system services, 66upgrading to SharePoint Server,
49–50SharePoint Foundation 2010 Farm
Configuration Wizard, 23–24SharePoint Foundation 2010 Start page,
14SharePoint Foundation Logging database,
26SharePoint Foundation Sandboxed Code
service, 233

622
site collections (continued)SharePoint Designer settings for,
169–170upgrading, 537–538URL structure, 169usage quotas, 235Web application for hosting, 37–40Web applications and content
databases and, 110Web part gallery, 206
site collection search management, 290search scopes, 291–293
Site Collection Search Settings page, 290site columns, 154–155
custom, 353–355definitions, document property
mappings to, 349modifying, 352predefined, 351–352sealed and unsealed, 352–353
Site Columns gallery, 351Site Columns page, 155Site Content Types page, 157Site Content Type summary page, 350site creation
administratively-controlled, 142–143modes of, 141–144secondary contacts, 143self-service mode, 142–143, 146–147
site definitions, listing, 526site groups, 171
custom, creating, 171–172Site Master Page master pages, 408site owners, 147
delegating permissions to, 487Site Permissions page, 171site quotas, 114
configuring, 99sites
adding users to, 147, 178Announcements list, 146contextual search scopes, 327crawl rules for, 326–327deleting, 143–144diagnostic reports on, 513features managements, 219listing, 525–526managed paths for, 145navigation options, 415–417notifications about, 143regional settings, 148settings, 147–170upgrading, 537–538
SharePoint Server 2010 Search, 73 . See also search; search service
performance, improving, 78–79role configuration, 74scaling out, 74–80
SharePoint Server Logging database, 35SharePoint services versus service
applications, 88Show Shared View option, 214Simple Mail Transport Protocol (SMTP)
service, configuring, 37single-server farms, 10, 52single-server topology for service
applications, 182Single Sign-on service, 199Site Actions menu, 144
Manage Content And Structure option, 406
New Page option, 208Site Assets Library, 151Site Collection Administrator permissions,
485site collection administrators, 147,
170–172record declaration control, 388
Site Collection Auditor permissions, 485Site Collection feature, enabling, 392–393Site Collection Features hyperlink, 218site collection galleries, sandboxed
solutions in, 232Site Collection Policies page, 167site collection quotas, 98site collection Recycle Bin, 165–166site collections
anonymous access, enabling for, 474–475
backing up and restoring, 555–559content databases for, 112creating, 33, 110, 144–147, 334, 479creating in Central Administration,
334document IDs, enabling, 366features management for, 218–219Information Management policies,
462isolating, 100, 106listing, 525–526managing, 147number of, 99–100, 114sandboxed solutions for, 160–161security for, 171–180SharePoint Designer, limiting
functionality in, 412–413
623
SQL Server (continued)default content server, 104host for, 526maintenance plans and system
configuration, 102monitoring, 515–516planning installation, 52SQL Server 2005/SQL Server 2008 as
SharePoint prerequisite, 520SQL Server 2008 R2 Reporting
Services Add-in for SharePoint Technologies, 7
updating for use with SharePoint, 7SQL Server clusters
adding, 57for configuration database, 57ratio to Web servers, 57
SQL Server Express, installing, 3SQL Server Management Studio, 44SQL Server service account, 8SQL Server type, choosing, 3SSL (Secure Sockets Layer), 116, 118,
465–470 SSL certificates, 125SSP database, 35SSPs (shared service providers), 122, 181,
530 Stage Properties dialog box, 168stakeholders, 345start addresses, 247State database, 36State Service, 199–200storage, securing, 452structured file retention, 330STS (Security Token Service), 119, 199 Stsadm .exe, 82, 109
Catastrophic Mode, 551content databases, attaching with,
535–536EnumSolutions, 224–225features, activating and deactivating
with, 219–220features, installing with, 217features, uninstalling with, 221full-trust solutions, managing with,
223-o enumallwebs, 525–526preupgradecheck, 520–521preupgradecheck, local only, 523for server farm backup and restore,
542, 551–552site collection backups with, 559solutions, deleting with, 230solutions, deploying with, 225–226
Site Settings page, 147, 169Regional Settings link, 148
site subscription, 106site templates, 145 . See also templates
Document Center, 378–383for Web application root, 4
site use confirmation and deletion, 143–144
Site Use Confirmation And Deletion page, 144
SMTP serversadding, 89relaying, allowing, 89third-party, 90
SMTP (Simple Mail Transport Protocol) service, 37
social featuresaccess to, 436enabling, 436–437tags and notes, 200, 437–440
social tagging databases, 36, 422social tags, 200, 437–440Social Tags And Note Board Ribbon
Controls feature, 438software requirements for SharePoint,
5–6Solution Management interface, 226solution packages, 206, 216
feature files, removing, 220solutions, 205
full-trust solutions, 221–232managing, 221–238sandboxed, 160–161, 232–238Web application–specific, 224–225
Solutions hyperlink, 234solution stores contents, displaying, 224Sort Order settings, 148Spbrtoc .xml file, 544–545Specify Update Schedule dialog box, 288speech recognition, registry changes
and, 7SPEnterpriseSearchMetadata-
ManagedProperty, 280SPNs (service principal names), 471–472 SPUCWorkerProcess process, 235SQL authentication, 122SQLIO .exe tool, 104SQL Server
backing up, 526backing up from, 541clustered back end, 51clustering or mirroring, 53databases created during installation,
26, 35
624
termscopying, 346–347creating, 345–346deprecating, 347disabling, 346keywords, 347management of, 342merging, 346moving, 347reuse of, 346siblings of, 346subscription of, 342synonyms for, 347
term set contacts, 345term set groups
creating, 344deleting, 345
term sets, 331, 342 . See also managed term sets
copying, 346–347importing, 348–349managed, 345moving, 347organization of, 344taxonomies of, 346–347
term stemming, 316term store administrators, 343
assigning, 344Term Store Management Tool, 194,
344–349term stores, 331, 342–343
administrators of, 343, 344managed metadata roles and, 343searching, 355
term synonyms, 347Test-SPContentDatabase cmdlet, 524–525Text Message (SMS) service, configuring,
93, 134–135theme gallery, 414themes, 406, 414
Office applications, creating in, 414thesaurus, configuring, 267–268Thread content types, 162Three-State workflow, 374three-tiered server farm, 11, 53
security for, 452throttling, 132–133
alerts, 93, 134time format settings, 148timer jobs, 498–501
configuration settings, 499–500creating and deleting, 93definitions of, 498–499server for, 95
Stsadm .exe (continued)solutions, retracting with, 229–230solutions, upgrading with, 231
submission content types, specifying, 380submissions, grouping, 376Subscriptions, 491–492subsites, creation of, 142, 144Success dialog box, 187Summary Web part, 311SunOne v . 5 .2 LDAP, 430support upgrade paths, 517synchronization connections, 430–433Synchronization Connections page, 430synchronization databases for user
profiles, 422synchronization settings, configuring, 435synonyms, term, 347system alerts, 88–89 . See also alertssystem-generated e-mail messages, 123System Information tool, 494system logs, 490 . See also loggingSystem Master Page master pages, 408system services, 66
placement of, 69scaling, 65–80as service application instances, 68
System Settings area (Central Administration), 83, 86–97
E-mail and Text Messages section, 88–93
Farm Management area, 96–97Servers section, 86–88
System Status dashboard, 246system upgrades, 519 . See also upgrading
TTabs In Search Pages list page, 299tagging, 200, 357–358, 436, 437–440
deleting tags, 439metadata and, 351
Tags & Notes button, 436task forms, modifying, 158–160taxonomies, 329–330
of managed terms, 346–347term sets in, 342
_Taxonomy suffix, 531TEMPLATE\FEATURES directory, 215templates . See also site templates
of document libraries, 364document templates, 149, 150for sites, 145
template .xls, 153Term Label Selection dialog box, 358
625
upgrading (continued)IISReset after, 530in-place upgrades, 526–533manually restarting, 536planning for, 519–520planning tools for, 518–526services, 533sites and site collections, 537–538steps for, 517–518support upgrade paths, 517time for, 518visual upgrades, 529, 537–538
uploadsfile properties, 358–359Maximum Upload Size setting, 153size settings, 132–133
URLs . See also public URLsalternate access mapping for, 138on authoritative pages, 268–269changes in, 469–470for connecting to service applications,
341for crawl rule paths, 249–250mapping, 140Send To URL, 398for service applications, 186
URL templates, 274Usage And Health Data collections, 24
configuring, 40–42Usage And Health Data Collection
Service, 199usage data
collecting, 504enabling collection, 40
usage quotas, for site collections, 235Use Client Integration Features
permissions, 177user alerts . See alertsuser authentication, Kerberos for, 118user content, storage of, 109user-defined function assemblies,
registering, 193–194User-Defined Functions page, 193user-defined workflows, 133Use Remote Interfaces permissions, 177User Information page, 161user permissions, for Web applications,
475–476 . See also permissionsUser Personal Features, 436User Profile Database, 36user profile properties
creating new, 426–428deleting, 429–430editing, 429
timer jobs (continued)status of, 96, 499–500Timer service and, 93for upgrades, 529viewing, 94
Timer Job Status page, 96time zones settings, 148
for Web applications, 129Top Federated Result Web part, 319topology
changes in, 73design of, 9–13
Trace and Service Application log files, 504
trace logs, configuring, 502tracing, for event logs, 43traffic patterns, viewing, 509–510transaction log files, separating from data
files, 102Trusted Content Locations page, 195trusted data connection libraries
adding, 192–193trusted file locations, adding, 191–192Trusted File Locations page, 191Trusted My Site host locations, 443–445
deleting, 444–445trust relationships, with remote farms, 340Tsenu .xml file, 267two-server farms, 10two-tier farms, 11, 52–53
UULS Viewer, 501unattached content databases, restoring,
559–560unattended installations, 26, 35Undeclare Record button, 394unghosting, 169Unified Logging Service (ULS), 501Universal Naming Convention (UNC) file
share, backing up to, 540unstructured file retention, 330Update Personal Web Parts permissions,
178Upgrade And Migration area (Central
Administration), 84Upgrade Status screen, 530upgrading
backing up and testing restores before, 518
custom code and, 537database attach upgrade method,
533–536errors, viewing, 530

626
View Application Pages permissions, 176View Items permissions, 176View Pages permissions, 177View Scopes page, 285, 286, 292View Versions permissions, 176View Web Analytics Data permissions, 176Visio Graphics Service, 73, 199Visitors security group, 171Visitors To This Site section, 147Visual Studio, workflow creation with, 374visual upgrades, 529, 537–538volatile functions, 192
WWeb Address scope rules, 287Web Analytics, 201, 504–514
administration reports, 510–511configuring, 505–507report data, exporting, 510reports, viewing, 507–515site-collection reports, 513–514Summary page, 509traffic patterns, viewing, 509–510
Web Analytics Data Processing service, 73Web Analytics Reporting Database, 36Web Analytics Reports - Summary page,
507–508Web Analytics service applications
adding, 505starting, 506
Web Analytics Staging Database, 36Web Analytics Web service, 73Web Application General Settings page,
152Web application policies, 481–487
applying, 485creating, 484–485
Web application root, site template for, 4Web applications
accessing with HTTPS and HTTP, 469–470
alerts, 130analytics on, 507–514anonymous access, enabling for, 474antivirus protection, 480–481application pools, 111–112architecture of, 110–114assigning IP addresses to, 46–47associations of, 339–340authetication type, 115backing up and restoring, 553–555blocked file types, 478–479blog settings, 130
User Profile Properties feature, 436user profiles, 200
admninistration of, 419external data sources and, 430policy settings, 428profile synchronization, 429–435property mapping for
synchronization, 429property settings, 427search settings, 428
User Profile Service, 68, 73, 200–201administration of, 424–425creation or maintenance tasks,
420–424features and capabilities managed
by, 419Manage Profile Service page, 426My Site Web sites, 440–448profile synchronization, 429–435properties management, 426–429social features, enabling, 436tags and notes, 437–440
User Profile Service applications, 68creating, 420–422deleting, 423–424editing, 423
User Profile Synchronization service, 73users
Active Directory accounts for, 21adding to sites, 177, 178alerts management, 162My Sites, 200permissions, modifying, 178properties, modifying, 178site creation by, 142–144Web part pages, personalizing,
213–214Web parts modification, 205
user solutions, 160Use Self-Service Site Creation permissions,
177
Vvalidation, for site columns, 156version control, 372–374
content approval, 372–373draft item security, 373–374major versioning, 373minor versioning, 373version pruning, 373
versioning, 149–150Versioning Settings page, 150version pruning, 373
627
Web part pagesadding Web parts, 210creating, 208–210Header-Footer-4-Columns page, 209Left-Column-Header-Footer pages,
209Right-Column-Header-Footer pages,
209shared view of, 214
Web parts, 205 . See also Search Web partsadding to page, 301adding to Web part pages, 210architecture of, 206–207assemblies, 206closed, viewing, 211Closed Web Parts gallery, 210closing, 210–211connection strings and, 214connectivity model, 211–212Cross-Web Part Query ID property,
311custom, 206deleting, 210installing in server farms, 64pages and, 207–210placing on page, 207–208private, 214properties of, 212–214properties, states of, 213–214Safe Control entries, 206–207on search pages, 301–305XML files for, 206–207
Web Parts Maintenance page, 211Web part zones, 207, 411
empty, 208–209Web servers
adding to server farm, 57–64for Central Administration Web
application, 51DNS entries for, 63language packs, installing, 47public URL for, 63query role, hosting, 74ratio to SQL Server clusters, 57RBS, installing on, 45server tiers, 66services, placing on, 71–73
Web single sign-on (SSO) authentication, 116
Web sites . See also IIS Web sitesfor Web applications, 110
Welcome User control, 213WFE (Web front end), 51, 124, 182 WIF (Windows Identity Foundation), 116
Web applications (continued)browser file handling settings, 130configuration databases for, 109configuring, 32, 128–135content databases, attaching to,
524–525, 534–536content databases for, 26, 112–115creating, 32, 110, 115–123deleting, 126enabling for Kerberos, 472–473extending, 123–126general settings, 129–133host headers for, 117for hosting site collections, 37–40installing on servers, 64IP addresses, assigning, 3logical structure of, 109managing, 110–111, 128–137master page settings, 131multiple, 95permission policies, 483–485presence settings, 129quota template settings, 129Recycle Bin settings, 131resource throttling, 132–133RSS settings, 130scaling, 57–65securing, 464–480security configuration of, 117–119security validation, 130Send User Name And Password In
E-mail option, 130server certificates, binding to,
467–468service applications associated with,
67serving, 63–64site-collection creation, 479site collections and content databases
and, 110timer jobs of, 94time zone settings, 129upload settings, 132user content, 109user permissions, 475–476Web sites for, 110worker processes, 111workflows, configuring, 133
Web front end (WFE), service application proxy on, 182
Web front-end (WFE) servers, 51, 124Web page security validation, 130Web part gallery, 206
628
Windows Server 2008 (continued)Performance and Reliability monitors,
491–492Server Manager Diagnostics console,
490updating to work with SharePoint, 7Windows Server 2008/Windows
Server 2008 R2 as SharePoint prerequisite, 519
Windows Task Manager, 492–494Windows Task Manager, 492–494
Performance tab, 493Resource Monitor button, 493
.wmv files, 479Word Automation Services, 73, 201–202Word Automation Services database, 36Word Automation Services page, 201worker processes, 111
IIS view into, 494workflows, 156
configuring, 133for documents, 374–375execution of, 95participants in, 133settings, assigning, 375
work week settings, 148WPCATALOG folder, 206 .wsp file extension, 224WSS_Logging, 26, 35WssPreUpgradeCheck .xml file, 523–524
XXML files for Web parts, 206–207
Zzones, 120, 123, 481–484
adding, 470configuration options, 482creating, 481deleting, 127security settings and, 483
wildcard SSL certificates, 465Windows authentication, 39, 42
use of, 104Windows Event Viewer, 490–491Windows Identity Foundation (WIF), 116Windows Integrated authentication,
470–472Windows PowerShell
content databases, attaching with, 534–536
deactivation of features with, 438for farm configuration, 82farm passphrase management with,
460features, activating and deactivating
with, 220features, installing with, 217features, uninstalling with, 221full-trust solutions, deleting with,
231–232full-trust solutions, deploying with,
227–228full-trust solutions, managing with,
223–225for managed accounts configuration,
454sandboxed solutions metrics,
displaying, 236for scripted deployment, 24–26,
33–35for server farm backup and restore,
541, 547–550service administration privileges,
delegating with, 425service and Web applications,
backing up and restoring with, 553–555
Set-SPPassPhrase cmdlet, 60site collection backups with, 556–558solutions, retracting with, 230–231solutions, upgrading with, 232–233for State Service configuration,
199–200version compatibility, 7
Windows Server 2008Event Viewer, 490–491monitoring tools, 489–495
629
About the Author
Ben Curry (CISSP, MVP, MCP, MCT) is an author and enterprise network architect specializing in knowledge management and collaboration technologies . Ben is a Managing Partner at Summit 7 Systems, a company focused on the next generation of Microsoft products . Ben’s philosophy is that the best solutions are inspired by the best ideas, and he encourages his team to generate and share ideas on a continuous basis . His philosophy is also exemplified in his numerous published books, and in his willingness to share his ideas as an instructor, both in the IT world and in the under-world—Ben is a certified scuba instructor with a passion for diving . Other passions for life include riding his Harley Davidson through his hometown of Huntsville, Alabama, coaching his daughter’s softball team, and of course, being a husband to his wife, Kimberly, and a proud father of his children, Madison and Bryce .
These industry experts contributed to this volume as well:
James R. W. Curry is the Lead Developer with Summit 7 Systems where he has worked with companies in the finance, entertainment, health, manufacturing, utilities and education sectors as well as numerous government organizations . James has been developing for so long it is starting to make him feel old telling people how long . James is an alumnus of Marshall Space Flight Center and resides in Madison, Alabama with his wife, the love of his life, Joy .
Josh Meyer (MCSD,MCTS) is a Developer/Architect with 8 years of experience developing in .NET, with the past 5 years spent primarily on SharePoint architecture and development . He has contributed to multiple books, including Developer’s Guide to Windows SharePoint Services 3.0 and SharePoint Products and Technologies Administrator’s Pocket Consultant . He currently serves as the president of the Rocket City SharePoint User Group .
Phil Greninger (MCSE, MCSA, PMP, CSM, CGEIT) is a solutions architect and project manager with more than 15 years of experience designing and implementing Microsoft enterprise infrastructure solutions . He recently completed a Master of Project Management degree and resides in the northern suburbs of Atlanta with his wife and four kids . He spends his free time coaching youth soccer and volunteering as a Boy Scout leader .
Daniel Webster is a SharePoint Enterprise Architect and has worked with all versions of SharePoint technology . His clients include industries such as international energy, interstate health providers, international law, global professional organizations, international financial institutions, federal agencies and all branches of the US military . As an author, speaker and educator, Daniel has specialized on SharePoint technologies since 2003 . He was coauthor, Microsoft Office SharePoint Server 2007
630
Administrator’s Companion and Technical Editor, Microsoft Office SharePoint Server 2007 Best Practices . Daniel began as a technical trainer teaching Windows 3 .1 in 1994 and has been certified as a MCT since 1995 .
Fred Devoir is an author and Senior Systems Analyst focusing on Microsoft SharePoint Technologies . Fred is the principal partner and lead analyst for Aspire Interactive Technologies, LLC, a Midwest-based Microsoft Partner focused on cloud technologies to deliver SharePoint, Exchange, Communication Server, and other business process and collaboration tools . Fred has worked with NASA and other Government Services to implement SharePoint portals and collaboration, as well as business process management systems . Fred has worked with SharePoint Technologies since the release of SharePoint Portal Server 2003 . You can contact Fred via e-mail at fred .devoir@aspireforit .com or twitter (devoirf) .
Darrin Bishop is a speaker, author and developer focusing on Microsoft SharePoint Technologies . Darrin is the president and lead developer for Darrin Bishop Group, Inc ., a Midwest-based Microsoft Partner focusing on SharePoint Technologies, portals and collaboration . Darrin is an international speaker and speaks at many SharePoint conferences, SharePoint Saturdays, MOSS Camps and User Groups . Darrin has been working with SharePoint Technologies since the release of SharePoint Portal Server 2001 . You can contact Darrin via his blog (www.darrinbishop.com/blog) or twitter (bishopd) .
Michael Mukalian is a 2010 Microsoft SharePoint Services MVP, Director and Architect for LiquidHub, Inc . (www.liquidhub.com) an information technol-ogy consultancy based in the Philadelphia area serving clients worldwide . With over 20 years of IT experience and certifications in VB .NET and Microsoft Office SharePoint Server 2007 and involvement with the Tri-State SharePoint User Group (www.tristatesharepoint.com), Michael has architected and developed solutions for companies of all sizes . Check out Michael’s blog, the SharePoint Coffee House, at http://www.mukalian.com/blog .