Microsoft Dynamics Retail - Firebrand Training UK ... · PDF fileMicrosoft Retail in eCommerce...
270
Table of Contents 1 Microsoft Dynamics® 80639 Training Retail in eCommerce Stores: Installation and Configuration for Microsoft Dynamics AX 2012 R3
Transcript of Microsoft Dynamics Retail - Firebrand Training UK ... · PDF fileMicrosoft Retail in eCommerce...
Table of Contents
1
Microsoft Dynamics® 80639 Training
Retail in eCommerce Stores: Installation and Configuration for Microsoft
Dynamics AX 2012 R3
Microsoft Retail in eCommerce Stores: Installation and Configuration for
Microsoft Dynamics AX 2012 R3
2
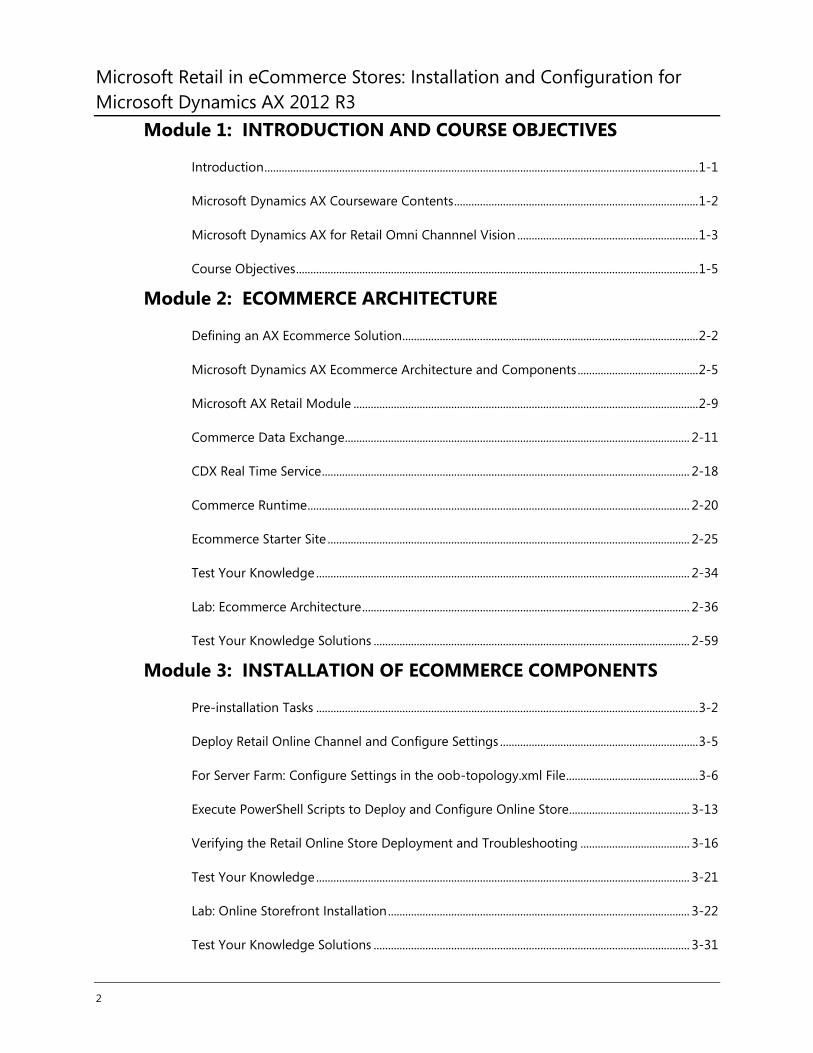
Module 1: INTRODUCTION AND COURSE OBJECTIVES
Introduction ....................................................................................................................................................... 1-1
Microsoft Dynamics AX Courseware Contents ..................................................................................... 1-2
Microsoft Dynamics AX for Retail Omni Channnel Vision ............................................................... 1-3
Course Objectives ............................................................................................................................................ 1-5
Module 2: ECOMMERCE ARCHITECTURE
Defining an AX Ecommerce Solution....................................................................................................... 2-2
Microsoft Dynamics AX Ecommerce Architecture and Components .......................................... 2-5
Microsoft AX Retail Module ........................................................................................................................ 2-9
Commerce Data Exchange ........................................................................................................................ 2-11
CDX Real Time Service ................................................................................................................................ 2-18
Commerce Runtime ..................................................................................................................................... 2-20
Ecommerce Starter Site .............................................................................................................................. 2-25
Test Your Knowledge .................................................................................................................................. 2-34
Lab: Ecommerce Architecture .................................................................................................................. 2-36
Test Your Knowledge Solutions .............................................................................................................. 2-59
Module 3: INSTALLATION OF ECOMMERCE COMPONENTS
Pre-installation Tasks ..................................................................................................................................... 3-2
Deploy Retail Online Channel and Configure Settings ..................................................................... 3-5
For Server Farm: Configure Settings in the oob-topology.xml File .............................................. 3-6
Execute PowerShell Scripts to Deploy and Configure Online Store.......................................... 3-13
Verifying the Retail Online Store Deployment and Troubleshooting ...................................... 3-16
Test Your Knowledge .................................................................................................................................. 3-21
Lab: Online Storefront Installation ......................................................................................................... 3-22
Test Your Knowledge Solutions .............................................................................................................. 3-31
Table of Contents
3
Module 4: ONLINE STORE SETUP AND PUBLISHING
Module Overview ............................................................................................................................................ 4-1
Set Up Online Store Integration ................................................................................................................ 4-7
Create the Online Store Navigation Structure .................................................................................. 4-14
Configure Data Distribution and Publish the Online Store .......................................................... 4-22
Manage and Publish Online Store Products ...................................................................................... 4-32
Set Up Shipping Charges for the Online Store ................................................................................. 4-49
Module Review .............................................................................................................................................. 4-52
Test Your Knowledge .................................................................................................................................. 4-53
Test Your Knowledge Solutions .............................................................................................................. 4-55
Lab: Online Store Setup and Publishing .............................................................................................. 4-56
Module 5: MANAGE THE ONLINE STORE IN SHAREPOINT
Module Overview ............................................................................................................................................ 5-1
Search Driven Sites .......................................................................................................................................... 5-2
Cross-Site Publishing ...................................................................................................................................... 5-3
Web Parts and Display Templates ............................................................................................................ 5-6
Query Rules ..................................................................................................................................................... 5-15
Refiners and Faceted Navigation ........................................................................................................... 5-20
Query Suggestion and Query Spelling ................................................................................................. 5-26
Usage Analytics and Recommendations ............................................................................................. 5-30
Test Your Knowledge .................................................................................................................................. 5-33
Lab: Online Storefront SharePoint Administration .......................................................................... 5-34
Test Your Knowledge Solutions ............................................................................................................. 5-53

Microsoft Retail in eCommerce Stores: Installation and Configuration for
Microsoft Dynamics AX 2012 R3
4
Module 6: ECOMMERCE DEPLOYMENT TOPOLOGY
Module Overview ............................................................................................................................................ 6-1
Ecommerce Deployment .............................................................................................................................. 6-2
Online Store Topology .................................................................................................................................. 6-8
Module Review .............................................................................................................................................. 6-21
Test Your Knowledge .................................................................................................................................. 6-21
Test Your Knowledge Solutions .............................................................................................................. 6-23
1 - 1
MODULE 1: INTRODUCTION AND COURSE
OBJECTIVES
Module Overview
Microsoft Dynamics AX 2012 for Retail supports multiple retail channels.
Retail channels include online stores, online marketplaces, and brick-and-
mortar stores. In Microsoft Dynamics AX 2012 for Retail, the e-commerce
transactions are performed through an “online store.”
This module introduces the E-commerce Installation and Configuration
course and the course objectives.
Objectives
The objectives of this module are as follows:
Describe how the e-commerce solution is an important part of
the Microsoft Dynamics AX for Retail Omni-channel vision.
Explain the course structure and objectives.
INTRODUCTION
Training is an important component of maintaining the value of a Microsoft
Dynamics® AX investment. Quality training from industry experts keeps you
up-to-date and helps develop the skills that you must have to fully
maximize the value of the solution. Microsoft Dynamics AX provides many
kinds of training to meet different requirements, and includes online
training, classroom training, or training materials. Select the training type
that will best help you stay ahead of the competition.
Online Training
Online training delivers convenient, detailed training in the comfort of your
own home or office. Online training provides immediate access to training
24 hours a day, and is perfect for the customer who does not have the time
or the budget to travel. Online training options combine the efficiency of
online training with the thorough product coverage of classroom training.
Retail in eCommerce Stores: Installation and Configuration for Microsoft
Dynamics AX 2012 R3
1 - 2
Classroom Training
Classroom training provides, comprehensive learning through hands-on
interaction. From demonstrations to presentations to classroom activities,
you receive practical experience with instruction from a certified staff of
experts.
Training Materials
Training materials help you learn at your own pace, in your own time, with
information-packed training manuals. The many training manuals feature
many tips, tricks, and insights that you can reference continuously.
Microsoft Dynamics AX Courseware
The Microsoft Dynamics AX courseware consists of detailed training
manuals that are designed from a training standpoint. These manuals
include advanced topics, training objectives, exercises, interactions, and
quizzes.
Manuals that are available for purchase are located on CustomerSource or
PartnerSource.
Microsoft Dynamics AX Courseware Contents
Microsoft Dynamics AX courseware contains labs and quick interactions.
These labs and interactions help you improve the learning experience
through practical application.
Lab
Microsoft Dynamics AX training materials include labs. Typically, the labs are
offered in two levels to accommodate each student’s knowledge and
expertise. We recommend that you try the High level steps first. If you need
help to complete the task, review the information in the Detailed steps.
High Level Steps
High levels steps are the most challenging. These steps are designed for the
experienced student who requires little instruction to complete the required
task.
Module 1: Introduction and Course Objectives
1 - 3
Detailed Steps
Detailed steps are designed for new users who require detailed instructions
and explanations to complete the lab. Detailed steps guide you through the
whole task. This includes navigation.
Microsoft Dynamics AX for Retail Omni Channel
Vision
The e-commerce solution is an important part of the Microsoft Dynamics
AX for Retail Omni-channel vision.
Lesson Objectives
The objectives are as follows:
Describe Microsoft Dynamics AX for Retail Omni-channel vision.
Explain why the e-commerce solution is an important part of
this vision.
Microsoft Dynamics AX for Retail Omni Channel Vision
The retail environment offers exceptional opportunities and many challenges.
Current economic factors that include an increase in products and shopping
formats, and easy access to information lets shoppers experience a comprehensive
retail experience. The retail experience is multifaceted and includes many aspects,
from the retailer’s website and call center to marketplaces and social networks.
The different ways that retailers try to engage customers also shows that customers
expect their retail experience to be connected, transparent, and consistent.
Microsoft Dynamics AX for Retail helps deliver an end-to-end solution for midsize
and enterprise retailers while offering many features across all retail channels. This
includes brick-and-mortar stores and e-commerce. Additionally, Microsoft
Dynamics AX for Retail offers powerful, flexible, role-tailored, Omni-channel
scenarios seamlessly through modern, unified technology.
Features in Microsoft Dynamics AX for Retail include the following:
End-to-end, search-based e-commerce.
Next-generation point of sale (POS).
A true Omni-channel commerce engine across all retail channels.
Retail in eCommerce Stores: Installation and Configuration for Microsoft
Dynamics AX 2012 R3
1 - 4
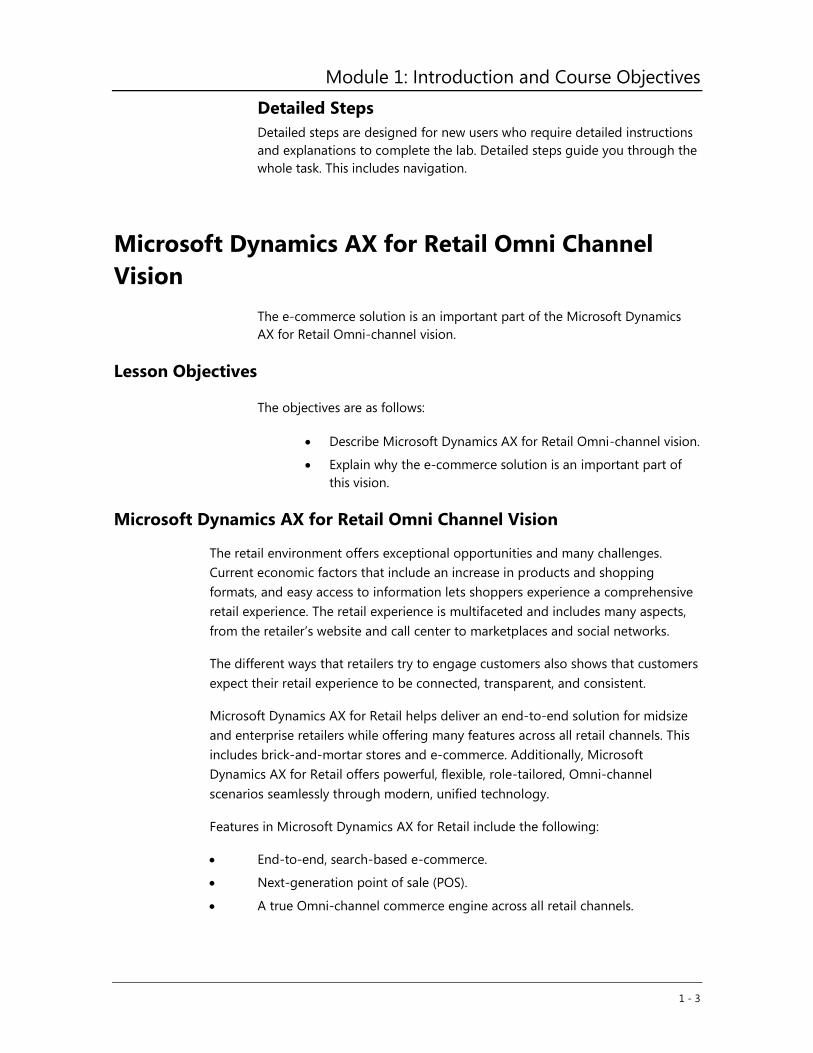
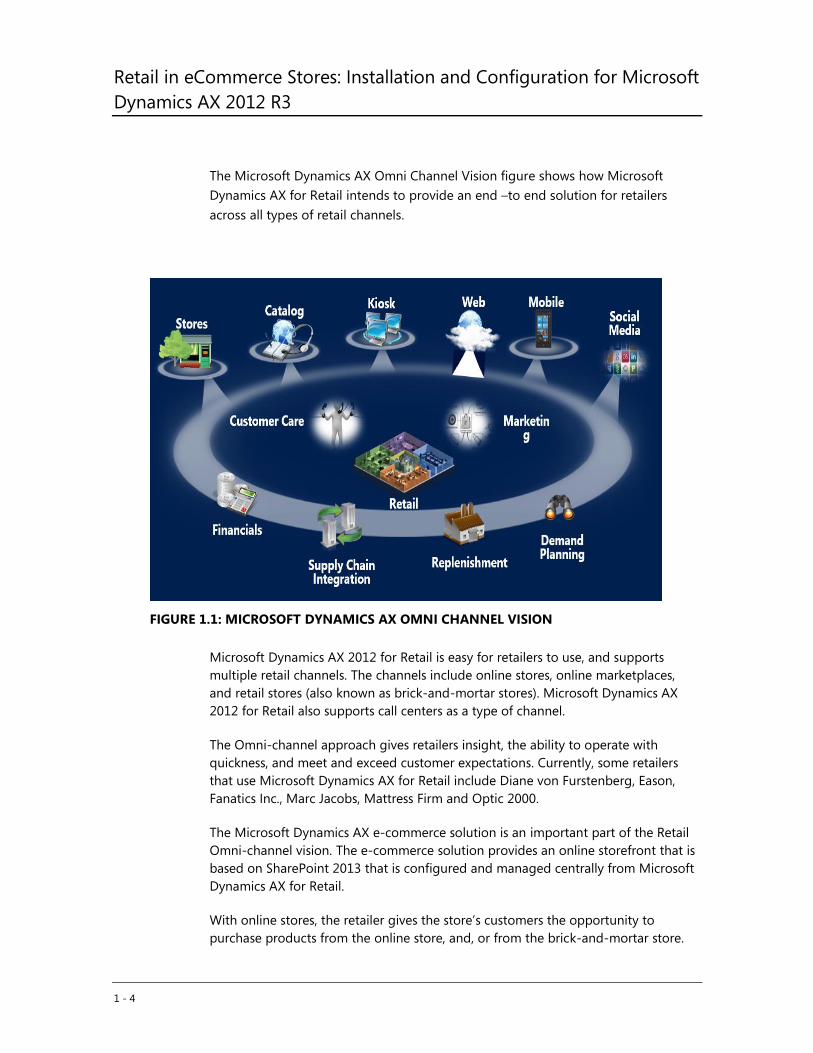
The Microsoft Dynamics AX Omni Channel Vision figure shows how Microsoft
Dynamics AX for Retail intends to provide an end –to end solution for retailers
across all types of retail channels.
FIGURE 1.1: MICROSOFT DYNAMICS AX OMNI CHANNEL VISION
Microsoft Dynamics AX 2012 for Retail is easy for retailers to use, and supports
multiple retail channels. The channels include online stores, online marketplaces,
and retail stores (also known as brick-and-mortar stores). Microsoft Dynamics AX
2012 for Retail also supports call centers as a type of channel.
The Omni-channel approach gives retailers insight, the ability to operate with
quickness, and meet and exceed customer expectations. Currently, some retailers
that use Microsoft Dynamics AX for Retail include Diane von Furstenberg, Eason,
Fanatics Inc., Marc Jacobs, Mattress Firm and Optic 2000.
The Microsoft Dynamics AX e-commerce solution is an important part of the Retail
Omni-channel vision. The e-commerce solution provides an online storefront that is
based on SharePoint 2013 that is configured and managed centrally from Microsoft
Dynamics AX for Retail.
With online stores, the retailer gives the store’s customers the opportunity to
purchase products from the online store, and, or from the brick-and-mortar store.
Module 1: Introduction and Course Objectives
1 - 5
Customers can select to purchase the products from the online store and have the
products shipped to locations that they select, or customers can obtain the products
at a local retail store.
The online store is created in the Microsoft Dynamics AX client, and is then
published to a Microsoft SharePoint site. The properties that are defined for the
online store in Microsoft Dynamics AX control the behavior of the online store. For
example, the navigation category hierarchy is defined in Microsoft Dynamics AX and
assigned to the online store. When the online store is published to a SharePoint site,
the navigation category hierarchy is displayed in the online version of the store.
Shoppers use the navigation category hierarchy to browse the online store and to
search for products.
To create the online store, the components that are used to process the transactions
for the store must first be set up. This includes having to add assortments, apply
attributes, set up payment methods, and set up shipping methods. You can also
define prices, promotions, discounts, trade agreements, and shipping terms that are
specific to the online store.
After the online store is published to the SharePoint site, retail product catalogs can
be created for the online store. The products in the catalog become product listings
in the online store. When a shopper purchases products from the online store, the
available inventory is updated and synchronized in the Microsoft Dynamics AX
client. Also, sales orders are generated for the purchases and sent to the Microsoft
Dynamics AX client for order fulfillment and processing.
This course describes the architecture and the components of the e-commerce
solution. The course also describes how to install the online storefront, how to
configure and publish the online store, how to manage the products for the store,
and how to manage the store SharePoint experience. Additionally, the course
discusses deployment considerations for the e-commerce solution.
Course Objectives
The objectives of this course are as follows:
Describe the architecture of the e-commerce solution and the
components.
Explain Installation and Configuration of an online store.
Explain how to manage the SharePoint experience for an online
store.
Explain the deployment considerations for an e-commerce
solution.
The course consists of the following modules:
Introduction and course objectives
Retail in eCommerce Stores: Installation and Configuration for Microsoft
Dynamics AX 2012 R3
1 - 6
E-commerce architecture
Installing an online store
Online store setup and publishing
Online store SharePoint experience
E-commerce deployment

Module 1: Introduction and Course Objectives
1 - 7
Module Review
Student Objectives
Test Your Knowledge
Test your knowledge with the following questions.
1. What do you expect to learn by participating in this course?
List three main objectives.
Retail in eCommerce Stores: Installation and Configuration for Microsoft
Dynamics AX 2012 R3
1 - 8
Test Your Knowledge Solutions
Module Review and Takeaways
1. What do you expect to learn by participating in this course?
2. List three main objectives.
2 - 1
MODULE 2: ECOMMERCE ARCHITECTURE
Module Overview
This module focuses on the architecture of Microsoft Dynamics Ecommerce
solution and its components.
Objectives
The objectives of this module are as follows:
Explain the Microsoft Dynamics AX Ecommerce solution.
Describe the Ecommerce solution architecture and its components.
Explain Commerce Data Exchange and the services that it contains.
Examine Commerce Runtime architecture and services.
Review the architecture of the starter site and its components.
Retail in eCommerce Stores: Installation and Configuration for Microsoft
Dynamics AX 2012 R3
2 - 2
Defining an AX Ecommerce Solution
This lesson provides an overview of features of Microsoft Dynamics AX
Ecommerce solution.
Lesson Objectives
Define the Microsoft Dynamics AX Ecommerce solution.
Explain its features.
Microsoft Dynamics AX 2012 R3 Ecommerce Solution
Microsoft Dynamics AX 2012 R3 Ecommerce is an end-to-end solution, based on a powerful
search technology. It contains a fully integrated web storefront, complete catalog, and real-
time order management. The online storefront uses the cross-site publishing features and the
search capabilities of Microsoft SharePoint Server 2013. Microsoft Dynamics AX provides the
centralized store management capabilities.
A retailer creates an online store in Microsoft Dynamics AX, and then publishes it to a
SharePoint site. The properties that are defined for the online store in Microsoft Dynamics AX
control the behavior of the online store. For example, you define the navigation category
hierarchy in Microsoft Dynamics AX, and then assign the navigation category hierarchy to the
online store. When you publish the online store to a SharePoint site, the navigation category
hierarchy appears in the online version of the store. Shoppers use the navigation category
hierarchy to browse the online store and to search for products.
To create the online store, you must set up the components that enable transactions to process
for the store. This includes the following tasks:
Adding assortments.
Applying attributes.
Setting up payment methods.
Setting up shipping methods.
o Define prices, promotions, discounts, trade agreements, and shipping terms
that are specific to the online store.
o Create retail product catalogs for the online store.
Products in the catalog become product listings in the online store. When a shopper purchases
products from the online store, sales orders are generated for the purchases, and then sent to
Microsoft Dynamics AX for order fulfillment and processing. The available inventory is updated.
Module 2: ECOMMERCE ARCHITECTURE
2 - 3
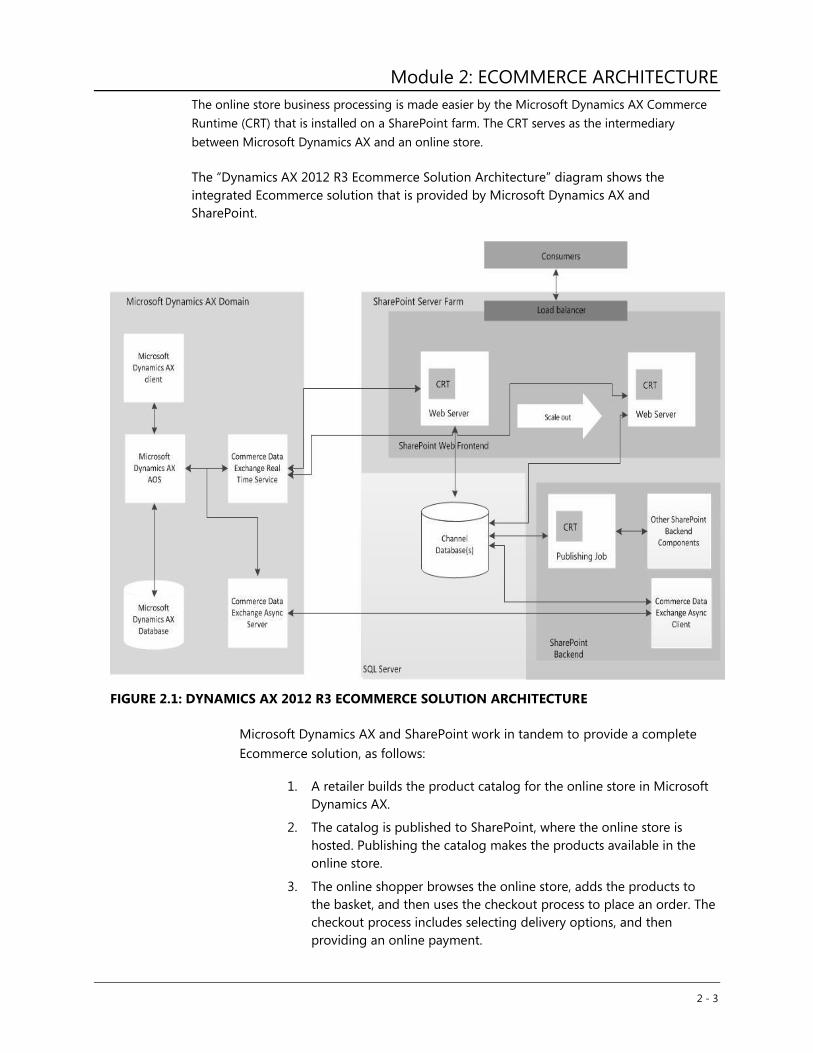
The online store business processing is made easier by the Microsoft Dynamics AX Commerce
Runtime (CRT) that is installed on a SharePoint farm. The CRT serves as the intermediary
between Microsoft Dynamics AX and an online store.
The “Dynamics AX 2012 R3 Ecommerce Solution Architecture” diagram shows the
integrated Ecommerce solution that is provided by Microsoft Dynamics AX and
SharePoint.
FIGURE 2.1: DYNAMICS AX 2012 R3 ECOMMERCE SOLUTION ARCHITECTURE
Microsoft Dynamics AX and SharePoint work in tandem to provide a complete
Ecommerce solution, as follows:
1. A retailer builds the product catalog for the online store in Microsoft
Dynamics AX.
2. The catalog is published to SharePoint, where the online store is
hosted. Publishing the catalog makes the products available in the
online store.
3. The online shopper browses the online store, adds the products to
the basket, and then uses the checkout process to place an order. The
checkout process includes selecting delivery options, and then
providing an online payment.
Retail in eCommerce Stores: Installation and Configuration for Microsoft
Dynamics AX 2012 R3
2 - 4
4. After the order is placed in the online store, it is returned to Microsoft
Dynamics AX for fulfillment and processing.
5. The fulfilled order is delivered to the online shopper.
Ecommerce Solution Highlights
The highlights of Ecommerce solution include, but are not limited to, the
following:
Online Storefront and Content Management, including the following:
o Fully integrated online storefront, with content management that
uses industry-standard tools.
o Unique search-based technology that builds an online experience
from managed content, authored content, catalogs, and more, to
deliver the most accurate, timely, and consistent experience.
o Historical click pattern and device recognition to guarantee that
content is relevant.
o Centralized Ecommerce Management, including the following:
o All aspects of storefront management that are managed by
Microsoft Dynamics AX at retail headquarters and fully integrated
out of the box. These aspects include the following:
Hierarchies
Categories
Refiners
Payments
Shopping cart
Order fulfillment
Shipping
o Complete catalog management in Microsoft Dynamics AX to
significantly reduce complexity and coding.
o Elimination of middleware, nonstandard integration, and
challenges with order fidelity.
Ecommerce Solution Pillars
With this solution, a retailer can integrate assortment and category management
across channels, such as brick-and-mortar stores and online stores to provide a
consistent and connected customer experience. Customer convenience is
improved with cross-channel scenarios, such as “buy online/pick up in store.” The
cross-channel capabilities deliver convenience and transparency across all
Module 2: ECOMMERCE ARCHITECTURE
2 - 5
channels. Customers can buy, pick up, return, or replace on their own terms.
Support for social and mobile commerce means that the retailer can offer
promotions, discounts, or coupons that are targeted to devices or social networks,
and create new opportunities for customer engagement.
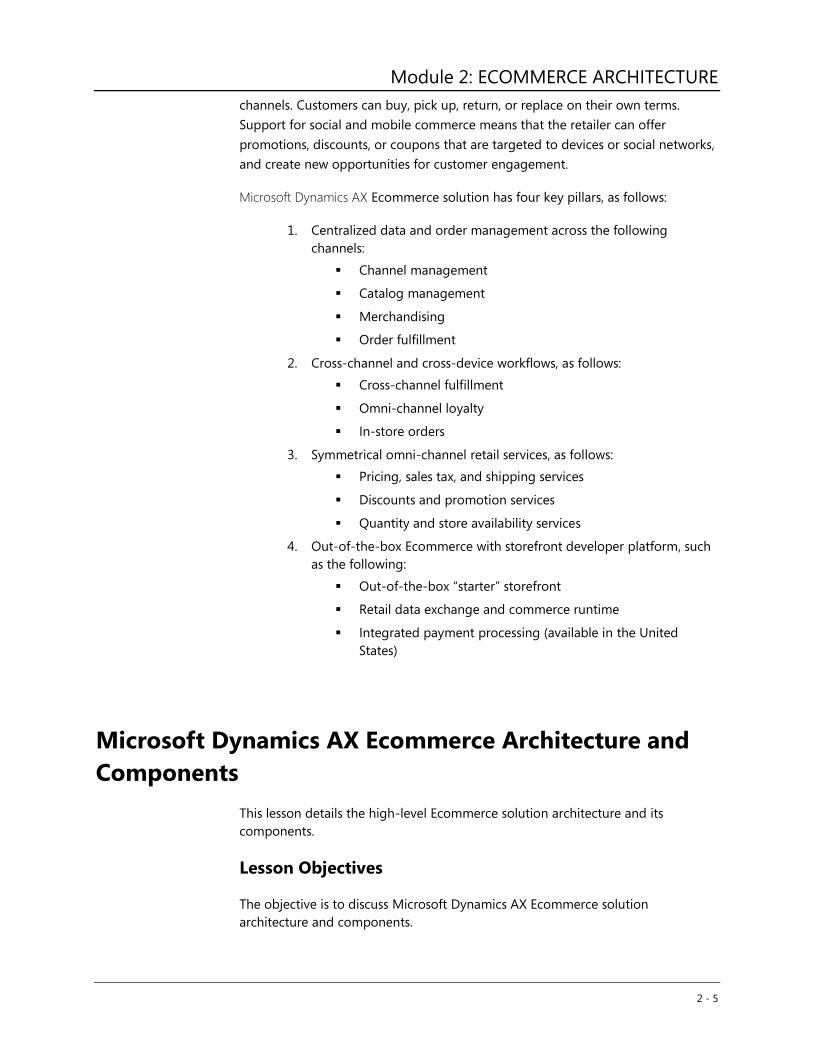
Microsoft Dynamics AX Ecommerce solution has four key pillars, as follows:
1. Centralized data and order management across the following
channels:
Channel management
Catalog management
Merchandising
Order fulfillment
2. Cross-channel and cross-device workflows, as follows:
Cross-channel fulfillment
Omni-channel loyalty
In-store orders
3. Symmetrical omni-channel retail services, as follows:
Pricing, sales tax, and shipping services
Discounts and promotion services
Quantity and store availability services
4. Out-of-the-box Ecommerce with storefront developer platform, such
as the following:
Out-of-the-box “starter” storefront
Retail data exchange and commerce runtime
Integrated payment processing (available in the United
States)
Microsoft Dynamics AX Ecommerce Architecture and
Components
This lesson details the high-level Ecommerce solution architecture and its
components.
Lesson Objectives
The objective is to discuss Microsoft Dynamics AX Ecommerce solution
architecture and components.
Retail in eCommerce Stores: Installation and Configuration for Microsoft
Dynamics AX 2012 R3
2 - 6
Microsoft Dynamics Ecommerce Solution Architecture
Microsoft Dynamics AX Ecommerce solution architecture is distributed across
multiple computers and locations and consists of the following components.
Commerce Data Exchange: Real Time Service
The Commerce Data Exchange Real-time Service is a Windows Communication
Foundation (WCF) service that uses .NET Business Connector to make
communication easier between Microsoft Dynamics AX Retail headquarters and
the Microsoft Dynamics AX commerce runtime (CRT). In previous releases, this
service was called the Retail Transaction Service. Install this service by using
Microsoft Dynamics AX Setup.
Commerce Data Exchange: Async Server
Commerce Data Exchange: Async Server is part of the system for asynchronous
data exchange between Microsoft Dynamics AX and retail channels, such as the
Retail online store. Async Server is installed at headquarters and communicates
with Microsoft Dynamics AX.
Commerce Data Exchange: Async Client
Commerce Data Exchange: Async Client is part of the system for asynchronous
data exchange between Microsoft Dynamics AX and retail channels, such as the
Retail online store. Async Client is installed at the channel, and communicates with
the channel database. You typically install one instance of Async Client for each
channel.
Commerce Runtime (CRT)
The Microsoft Dynamics AX Commerce Runtime is a set of .dlls that perform
business logic and data processing for an online store. The CRT has four layers
(data access, services, workflow, API) and a database.
SharePoint 2013 Search
The Microsoft SharePoint Server 2013 cross-site publishing platform uses Search
and search-driven pages to dynamically display content for customers.
Term Sets
You use term sets to tag catalog content, such as pages or list items, on the
authoring site. By doing this, terms categorize the content into a hierarchy. These
same terms are later used on the publishing site to issue queries, show
information about category and catalog item pages, create friendly URLs, and for
Module 2: ECOMMERCE ARCHITECTURE
2 - 7
managed navigation.
Retail Online Store Databases
When you deploy the online store, the system creates the following databases in
Microsoft SQL Server.
Channel database(s)
Identity Provider database
Custom Claims Provider database
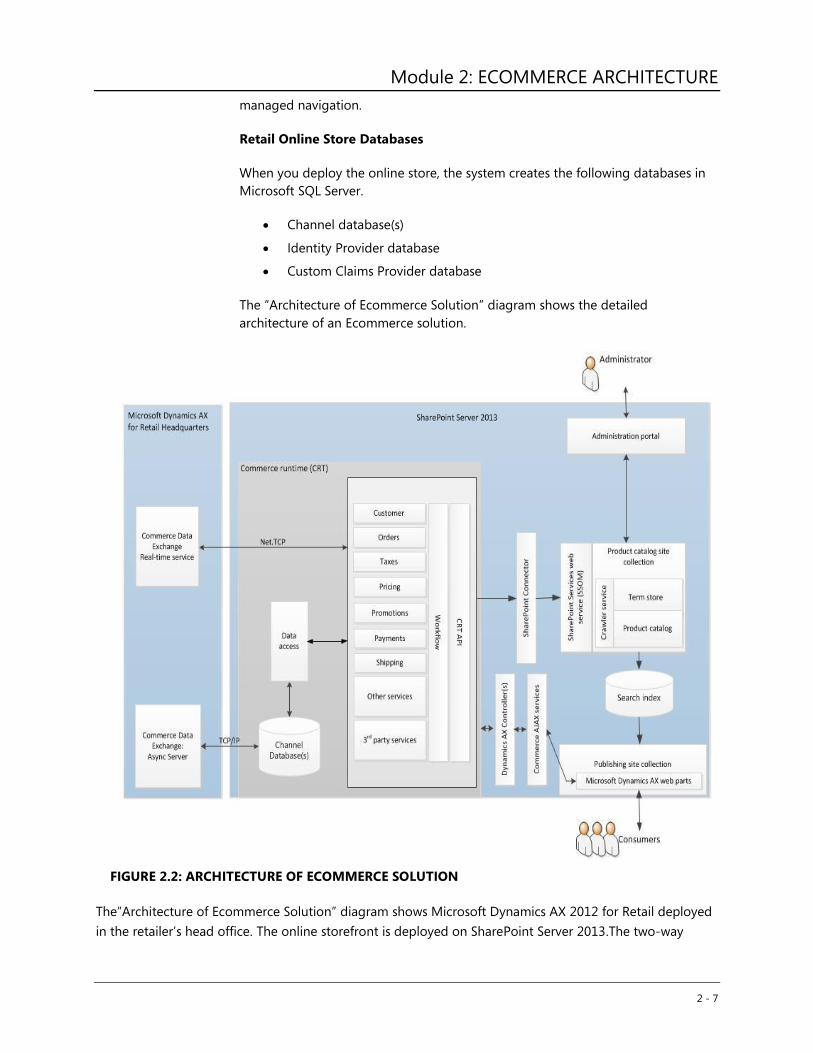
The “Architecture of Ecommerce Solution” diagram shows the detailed
architecture of an Ecommerce solution.
FIGURE 2.2: ARCHITECTURE OF ECOMMERCE SOLUTION
The”Architecture of Ecommerce Solution” diagram shows Microsoft Dynamics AX 2012 for Retail deployed
in the retailer’s head office. The online storefront is deployed on SharePoint Server 2013.The two-way
Retail in eCommerce Stores: Installation and Configuration for Microsoft
Dynamics AX 2012 R3
2 - 8
connection between the head office and the online storefront is implemented by Commerce data
exchange (CDX).
You must install the commerce runtime (CRT) component on SharePoint 2013. It includes a specially
configured CRT database that stores data from the web storefront and shares it regularly with Microsoft
Dynamics AX in the head office. Data replication makes sure that important updates are made across the
organization. These important updates include sales order payments, gift card usage, and loyalty program.
CRT provides a set of assemblies that connect to the CRT database.
The online storefront is fully search-driven. It provides an online store experience on multiple devices.
These devices used to access the Online Store can be computers, tablets, and mobile phones.
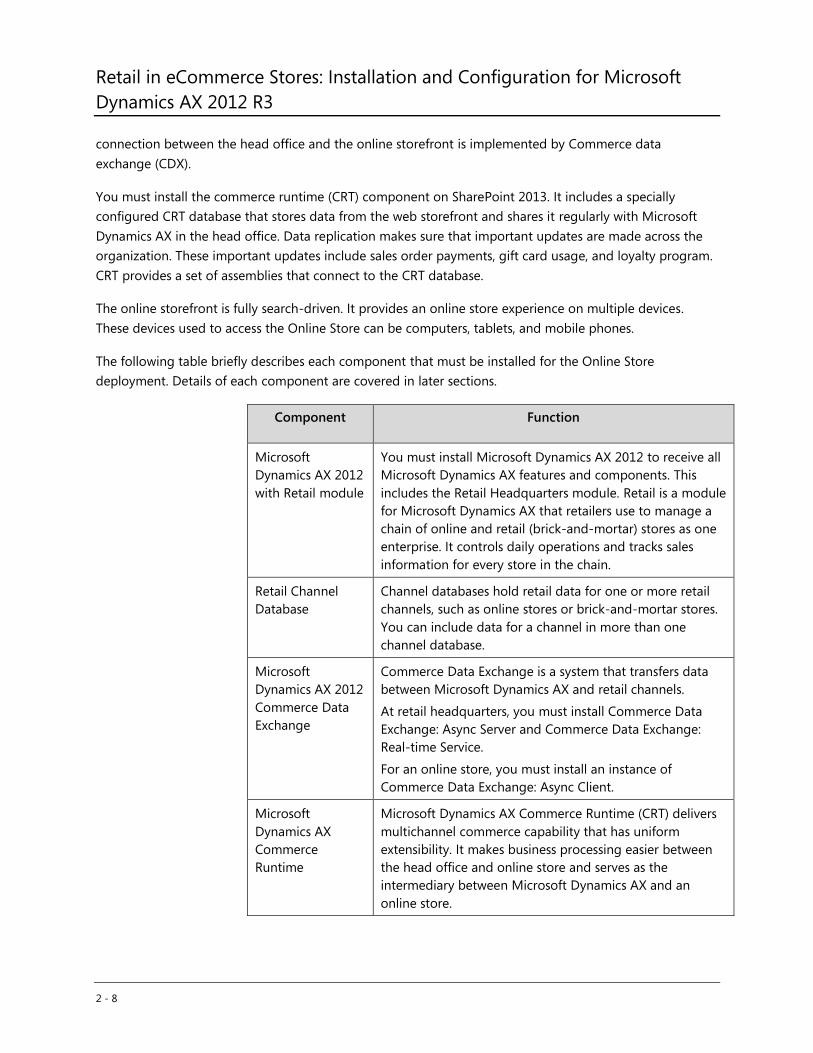
The following table briefly describes each component that must be installed for the Online Store
deployment. Details of each component are covered in later sections.
Component Function
Microsoft
Dynamics AX 2012
with Retail module
You must install Microsoft Dynamics AX 2012 to receive all
Microsoft Dynamics AX features and components. This
includes the Retail Headquarters module. Retail is a module
for Microsoft Dynamics AX that retailers use to manage a
chain of online and retail (brick-and-mortar) stores as one
enterprise. It controls daily operations and tracks sales
information for every store in the chain.
Retail Channel
Database
Channel databases hold retail data for one or more retail
channels, such as online stores or brick-and-mortar stores.
You can include data for a channel in more than one
channel database.
Microsoft
Dynamics AX 2012
Commerce Data
Exchange
Commerce Data Exchange is a system that transfers data
between Microsoft Dynamics AX and retail channels.
At retail headquarters, you must install Commerce Data
Exchange: Async Server and Commerce Data Exchange:
Real-time Service.
For an online store, you must install an instance of
Commerce Data Exchange: Async Client.
Microsoft
Dynamics AX
Commerce
Runtime
Microsoft Dynamics AX Commerce Runtime (CRT) delivers
multichannel commerce capability that has uniform
extensibility. It makes business processing easier between
the head office and online store and serves as the
intermediary between Microsoft Dynamics AX and an
online store.
Module 2: ECOMMERCE ARCHITECTURE
2 - 9
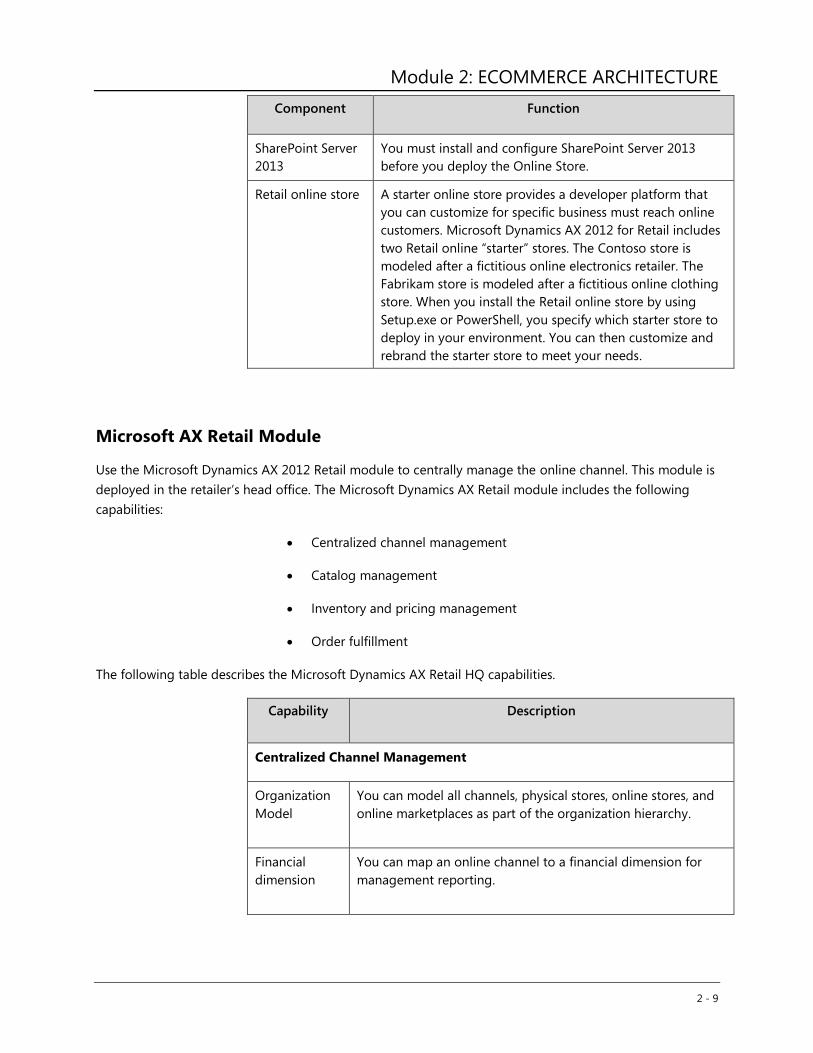
Component Function
SharePoint Server
2013
You must install and configure SharePoint Server 2013
before you deploy the Online Store.
Retail online store A starter online store provides a developer platform that
you can customize for specific business must reach online
customers. Microsoft Dynamics AX 2012 for Retail includes
two Retail online “starter” stores. The Contoso store is
modeled after a fictitious online electronics retailer. The
Fabrikam store is modeled after a fictitious online clothing
store. When you install the Retail online store by using
Setup.exe or PowerShell, you specify which starter store to
deploy in your environment. You can then customize and
rebrand the starter store to meet your needs.
Microsoft AX Retail Module
Use the Microsoft Dynamics AX 2012 Retail module to centrally manage the online channel. This module is
deployed in the retailer’s head office. The Microsoft Dynamics AX Retail module includes the following
capabilities:
Centralized channel management
Catalog management
Inventory and pricing management
Order fulfillment
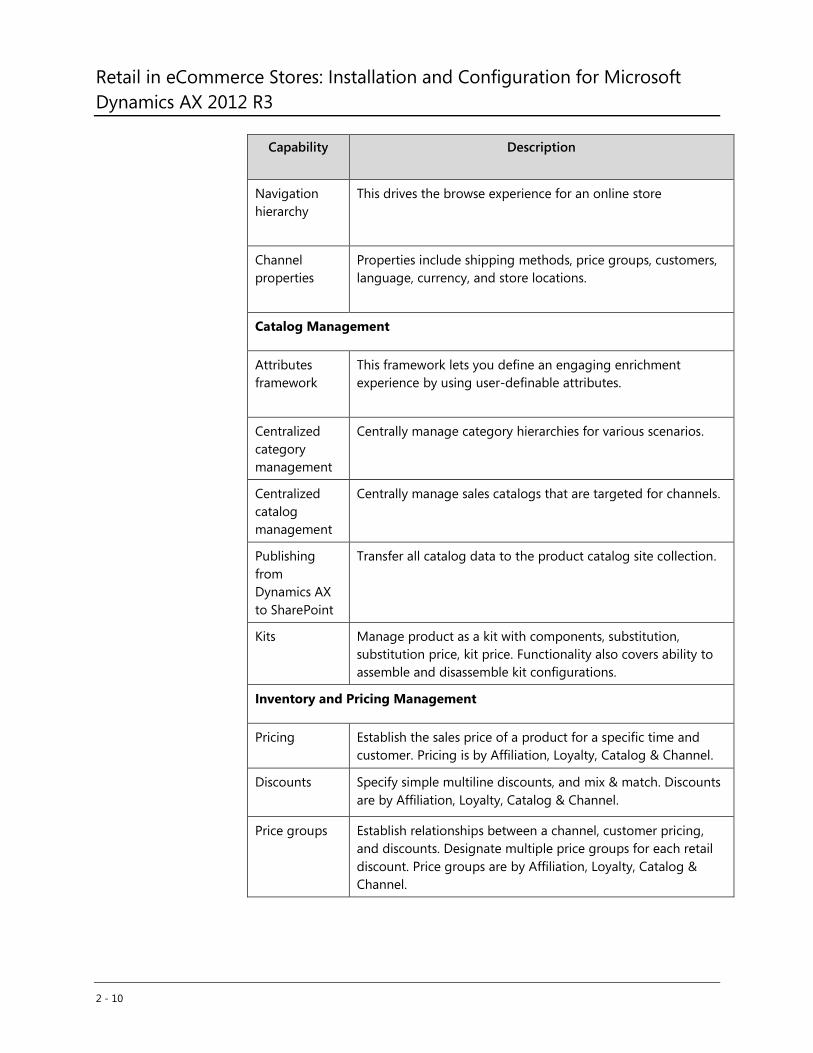
The following table describes the Microsoft Dynamics AX Retail HQ capabilities.
Capability Description
Centralized Channel Management
Organization
Model
You can model all channels, physical stores, online stores, and
online marketplaces as part of the organization hierarchy.
Financial
dimension
You can map an online channel to a financial dimension for
management reporting.
Retail in eCommerce Stores: Installation and Configuration for Microsoft
Dynamics AX 2012 R3
2 - 10
Capability Description
Navigation
hierarchy
This drives the browse experience for an online store
Channel
properties
Properties include shipping methods, price groups, customers,
language, currency, and store locations.
Catalog Management
Attributes
framework
This framework lets you define an engaging enrichment
experience by using user-definable attributes.
Centralized
category
management
Centrally manage category hierarchies for various scenarios.
Centralized
catalog
management
Centrally manage sales catalogs that are targeted for channels.
Publishing
from
Dynamics AX
to SharePoint
Transfer all catalog data to the product catalog site collection.
Kits Manage product as a kit with components, substitution,
substitution price, kit price. Functionality also covers ability to
assemble and disassemble kit configurations.
Inventory and Pricing Management
Pricing Establish the sales price of a product for a specific time and
customer. Pricing is by Affiliation, Loyalty, Catalog & Channel.
Discounts
Specify simple multiline discounts, and mix & match. Discounts
are by Affiliation, Loyalty, Catalog & Channel.
Price groups
Establish relationships between a channel, customer pricing,
and discounts. Designate multiple price groups for each retail
discount. Price groups are by Affiliation, Loyalty, Catalog &
Channel.

Module 2: ECOMMERCE ARCHITECTURE
2 - 11
Capability Description
Inventory
Management
Provides comprehensive inventory management for
purchasing, receiving, allocation, replenishment, item
availability, and more.
Loyalty
Program
Gives customers specific prices and discounts, multiple
programs associated to a loyalty card, and the ability to
redeem points. You can base earning rules on product/variant/
category, tiers, date and channel, and the ability to have
redeemable and non-redeemable points. Restrict rewards for
specific products.
Order Fulfillment
Centralized
order
fulfillment
Centralized order fulfillment from Microsoft Dynamics AX that
is independent of order origination with comprehensive
picking, shipping, and notifications.
Cross-channel
workflows
Lets you order online and pickup in store or order online and
return in store, and receive loyalty points.
Integrated
payment
processing
Extensible process that is PCI/PA-DSS certified, tokenization for
delayed capture.
Call Center Sales
Call Center
Sales
Management
Lets you do any of the following:
Upsell/cross-sell
Order hold
View configured telesales script
Continuity programs
Price adjustment post sales
Issue/redeem coupons
Duplicate customer management.
Reference Links: For more information about Microsoft Dynamics AX for
Retail capabilities, go to http://technet.microsoft.com/en-
us/library/hh597299.aspx.
Commerce Data Exchange
This lesson discusses the Commerce Data Exchange and the services that it
Retail in eCommerce Stores: Installation and Configuration for Microsoft
Dynamics AX 2012 R3
2 - 12
includes.
Lesson Objectives
The objective is to describe Commerce Data Exchange services.
Commerce Data Exchange
Commerce Data Exchange is a system that transfers data between Microsoft
Dynamics AX and retail channels, such as online stores or brick-and-mortar stores.
The database that stores data for a retail channel is separate from the Microsoft
Dynamics AX database. A “channel database” holds only the data that is required
for retail transactions. For a brick-and-mortar store, the channel database is also
known as a “store database” and is typically located on the premises.
Master data is configured in Microsoft Dynamics AX and is distributed to channels.
Transactional data is created in the point of sale (POS) system or the online store,
and then is uploaded to Microsoft Dynamics AX. Data distribution is
asynchronous. In other words, collecting and packaging data at the source occurs
separately from receiving and applying data at the destination.
For some scenarios, such as price and inventory lookups, you must retrieve data in
real time. To support these scenarios, Commerce Data Exchange also includes a
service that enables real-time communication between Microsoft Dynamics AX
and a channel.
CDX is illustrated in the “Commerce Data Exchange Overview “diagram.
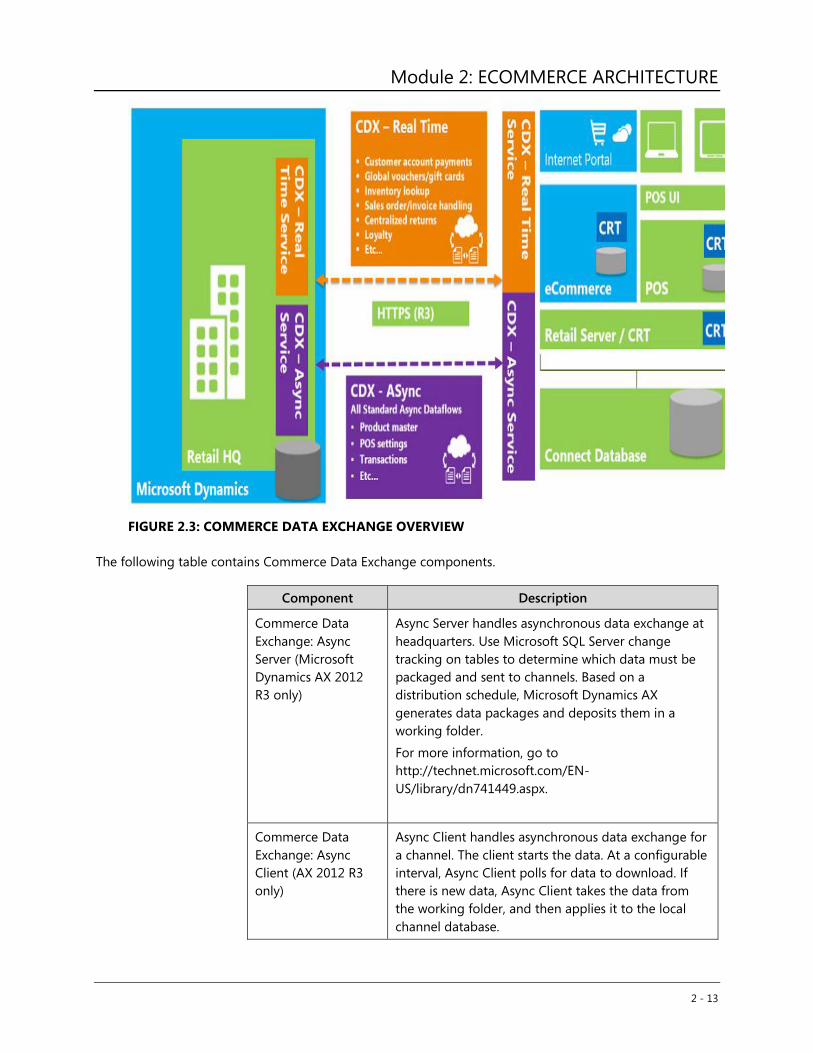
Module 2: ECOMMERCE ARCHITECTURE
2 - 13
FIGURE 2.3: COMMERCE DATA EXCHANGE OVERVIEW
The following table contains Commerce Data Exchange components.
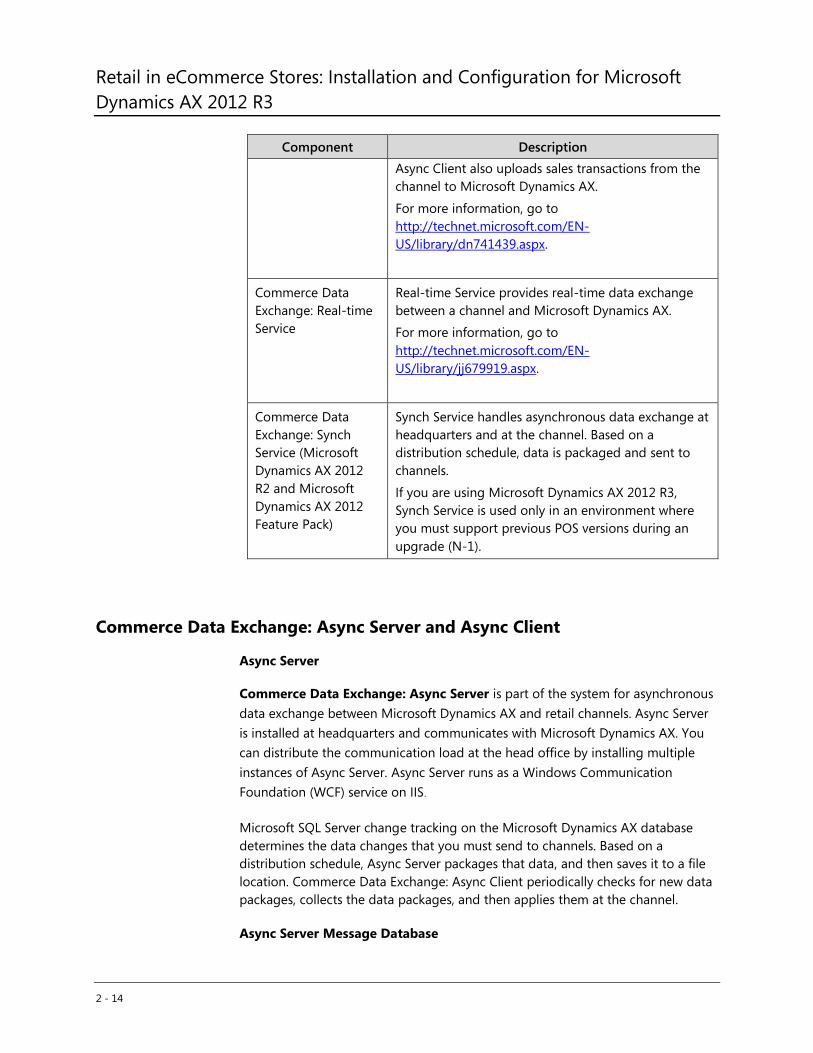
Component Description
Commerce Data
Exchange: Async
Server (Microsoft
Dynamics AX 2012
R3 only)
Async Server handles asynchronous data exchange at
headquarters. Use Microsoft SQL Server change
tracking on tables to determine which data must be
packaged and sent to channels. Based on a
distribution schedule, Microsoft Dynamics AX
generates data packages and deposits them in a
working folder.
For more information, go to
http://technet.microsoft.com/EN-
US/library/dn741449.aspx.
Commerce Data
Exchange: Async
Client (AX 2012 R3
only)
Async Client handles asynchronous data exchange for
a channel. The client starts the data. At a configurable
interval, Async Client polls for data to download. If
there is new data, Async Client takes the data from
the working folder, and then applies it to the local
channel database.
Retail in eCommerce Stores: Installation and Configuration for Microsoft
Dynamics AX 2012 R3
2 - 14
Component Description
Async Client also uploads sales transactions from the
channel to Microsoft Dynamics AX.
For more information, go to
http://technet.microsoft.com/EN-
US/library/dn741439.aspx.
Commerce Data
Exchange: Real-time
Service
Real-time Service provides real-time data exchange
between a channel and Microsoft Dynamics AX.
For more information, go to
http://technet.microsoft.com/EN-
US/library/jj679919.aspx.
Commerce Data
Exchange: Synch
Service (Microsoft
Dynamics AX 2012
R2 and Microsoft
Dynamics AX 2012
Feature Pack)
Synch Service handles asynchronous data exchange at
headquarters and at the channel. Based on a
distribution schedule, data is packaged and sent to
channels.
If you are using Microsoft Dynamics AX 2012 R3,
Synch Service is used only in an environment where
you must support previous POS versions during an
upgrade (N-1).
Commerce Data Exchange: Async Server and Async Client
Async Server
Commerce Data Exchange: Async Server is part of the system for asynchronous
data exchange between Microsoft Dynamics AX and retail channels. Async Server
is installed at headquarters and communicates with Microsoft Dynamics AX. You
can distribute the communication load at the head office by installing multiple
instances of Async Server. Async Server runs as a Windows Communication
Foundation (WCF) service on IIS.
Microsoft SQL Server change tracking on the Microsoft Dynamics AX database
determines the data changes that you must send to channels. Based on a
distribution schedule, Async Server packages that data, and then saves it to a file
location. Commerce Data Exchange: Async Client periodically checks for new data
packages, collects the data packages, and then applies them at the channel.
Async Server Message Database
Module 2: ECOMMERCE ARCHITECTURE
2 - 15
Async Server uses a message database to store status information for data
transfers that are in progress or are completed. Async Client contacts the message
database to determine whether there are new data packages to pick up.
You can use Async Server to transfer status messages from the message database
to the Microsoft Dynamics AX database. Then you can view the messages in
Microsoft Dynamics AX.
Each instance of Async Server can refer to only one message database. However, a
message database can have multiple instances of Async Server that refer to it. You
can have only one message database per partition in Microsoft Dynamics AX.
Async Client
Commerce Data Exchange: Async Client is part of the system for asynchronous
data exchange between Microsoft Dynamics AX and retail channels. Async Client
is installed at the channel, and communicates with the channel database. You
typically install one instance of Async Client for each channel.
Async Client runs as a Windows service. At a configurable interval, Async Client
checks with Async Server to see whether new data packages are available. If there
is new data, Async Client takes the data from the working folder, and then applies
it to the local channel database. Async Client also uploads sales transactions from
the channel to Microsoft Dynamics AX.
By default, Async Client uses the WS-ReliableMessaging protocol to transfer data.
Reliable messaging guarantees that the data transfers successfully over the
network. However, the confirmation actions that are sent between the source and
the destination can cause slower data transfers. For better throughput, use
streaming instead. However, streaming does not handle network problems.
Streaming is ideal for initial high-speed data synchronization or for ongoing
synchronization of large amounts of data. If you have a reliable network and high
data volume, we recommend that you stream data.
Async Client Message Database
Async Client uses a message database to store status information for data
transfers that are in progress or are completed.
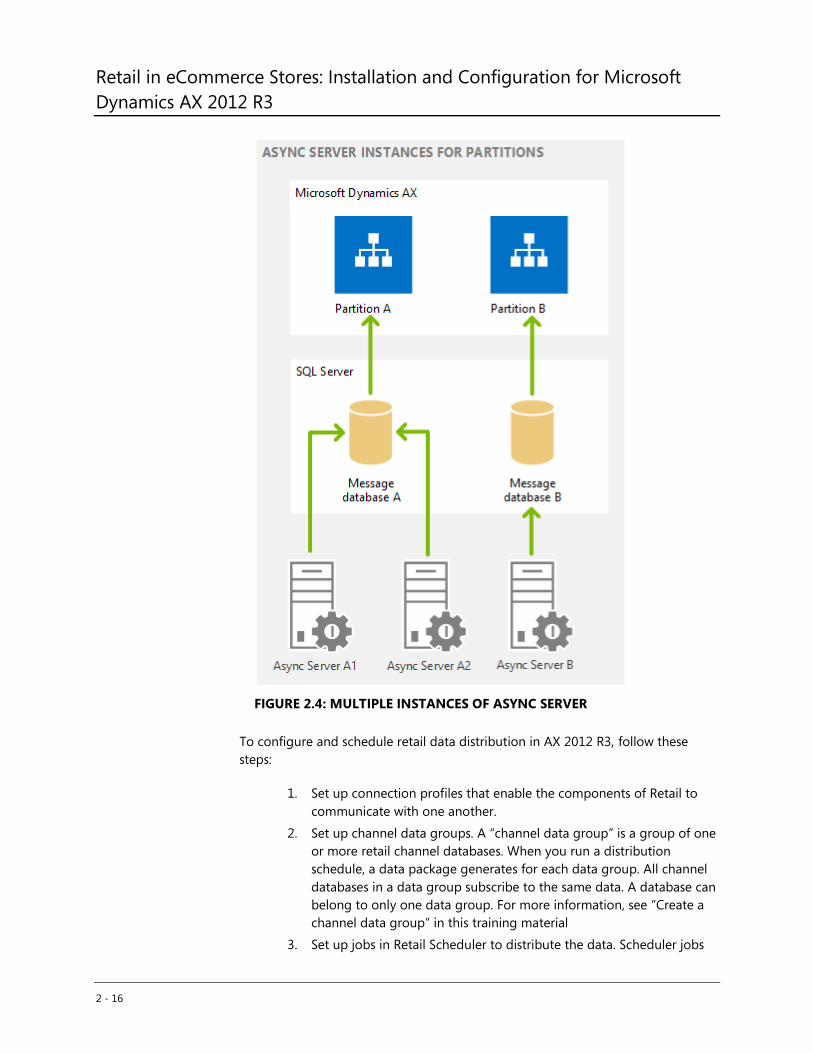
The “Multiple Instances of Async Server” diagram shows the relationships between
partitions, message databases, and instances of Async Server.
Retail in eCommerce Stores: Installation and Configuration for Microsoft
Dynamics AX 2012 R3
2 - 16
FIGURE 2.4: MULTIPLE INSTANCES OF ASYNC SERVER
To configure and schedule retail data distribution in AX 2012 R3, follow these
steps:
1. Set up connection profiles that enable the components of Retail to
communicate with one another.
2. Set up channel data groups. A “channel data group” is a group of one
or more retail channel databases. When you run a distribution
schedule, a data package generates for each data group. All channel
databases in a data group subscribe to the same data. A database can
belong to only one data group. For more information, see “Create a
channel data group” in this training material
3. Set up jobs in Retail Scheduler to distribute the data. Scheduler jobs
Module 2: ECOMMERCE ARCHITECTURE
2 - 17
are the mechanism for distributing data to and from locations. Jobs
are made up of subjobs that specify the tables and table fields that
contain the data to distribute. For more information, see “Configure
jobs and subjobs in Retail Scheduler” in this training material.
4. Set up distribution schedules. The distribution schedule is used to run
the data transfer, either manually or by scheduling a batch job in
Microsoft Dynamics AX. A distribution schedule can contain one or
more channel data groups and one or more scheduler jobs. For more
information, see “Schedule and run jobs in Retail Scheduler” in this
training material.
Reference Links: < For more information about the typical configuration of
Asynch Server, go to http://technet.microsoft.com/EN-US/library/dn741219.aspx.
Connection profiles enable the components of Retail to communicate with one
another. Set up connection profiles before you configure data distribution settings
for Retail.
You must set up the following connections:
Real-time Service profile
Profile for Async Server
Profile for Synch Service
Channel profile
Channel database profile
AOS profile
Store database profile
Reference Links: For more information on how to set up connection
profiles, go to http://technet.microsoft.com/EN-US/library/jj679913.aspx.Add
Reference Links here>
An online store has a Channel Database; similar channel databases are assembled
into a data group. For example, for stores that are in the same region or stores
that are of the same type, the databases are in one data group; an online store is
in another data group. All channel databases in a data group subscribe to the
same data. When a distribution schedule is run, a data package generates for each
data group. Use data groups to reduce the number of data packages that
generate from Microsoft Dynamics AX. This improves performance.
Reference Links: < For more Information about channel data groups, go to
http://technet.microsoft.com/EN-US/library/dn621060.aspx. Add Reference Links
here>
Retail in eCommerce Stores: Installation and Configuration for Microsoft
Dynamics AX 2012 R3
2 - 18
In Retail, scheduler jobs are the mechanism for distributing data to and from
locations. Each job consists of one or more subjobs.
In AX 2012 R3, the following types of predefined jobs are created:
Download jobs – Download jobs send data that has changed from
Microsoft Dynamics AX to channel databases. Modifications to records are
tracked through SQL Server change tracking.
Upload jobs (P jobs) – Upload jobs pull sales transactions from a channel
into the Microsoft Dynamics AX database.
P jobs upload data incrementally. When a P job runs, Async Client checks the
replication counter for records that have already been received from a location.
The instance of Async Client for the channel sends only those records that have a
replication counter that is greater than the largest value found. P jobs do not
update data that was previously uploaded. To schedule and run the data transfer
between Microsoft Dynamics AX and retail channels, Commerce Data Exchange
uses Retail Scheduler jobs and distribution schedules.
Reference Links: For more information about jobs and subjobs in Retail
Scheduler, go to http://technet.microsoft.com/EN-US/library/jj680084.aspx.
Jobs and subjobs contain the data distribution settings for specific tables and
fields in the database. A distribution schedule associates scheduler jobs with the
locations where data must be synchronized. After you create distribution
schedules, you can run them automatically in a batch, or run them manually.
Before you set up a distribution schedule in Microsoft Dynamics AX 2012 R3, you
must create scheduler jobs and data groups. You can view information about past
runs of a distribution schedule job by examining the view history of a distribution
schedule form.
Reference Links: For more Information about Distribution Scheduler, go to
http://technet.microsoft.com/EN-US/library/jj710363.aspx.
CDX Real Time Service
Online store uses a CRT database that is synchronized periodically with Microsoft
Dynamics AX in the head office through the CDX Synch Service. Although you can
Module 2: ECOMMERCE ARCHITECTURE
2 - 19
perform most key operations in the CRT database, certain scenarios require direct
access to the data that is stored in Microsoft Dynamics AX.
Online store calls the CDX Real-Time Service to communicate with Microsoft
Dynamics AX. Real-Time Service is a Windows Communications Framework (WCF)
service that you deploy on Internet Information Services (IIS) on a
communications server at the retailer’s head office. You can create a new website
for Real-Time Service, or you can use an existing site.
Real-Time Service enables multiple scenarios for the online store. This includes the
following:
Issue and redeem gift cards.
Redeem loyalty points.
Issue and redeem credit memos.
Create and update customer records.
Create, update, and complete sales orders.
Receive inventory against a purchase order or transfer order.
Perform inventory counts.
Retrieve sales transactions across stores and complete return transactions.
When you install the Real time Service, you also install the Retail Salt Utility and
.NET Business Connector. The Retail Salt Utility provides additional encryption for
the passwords and credentials that are associated with the Retail system.
Real-time Service uses .NET Business Connector to communicate with Microsoft
Dynamics AX, as shown in the “Real-Time Service” diagram.
Retail in eCommerce Stores: Installation and Configuration for Microsoft
Dynamics AX 2012 R3
2 - 20
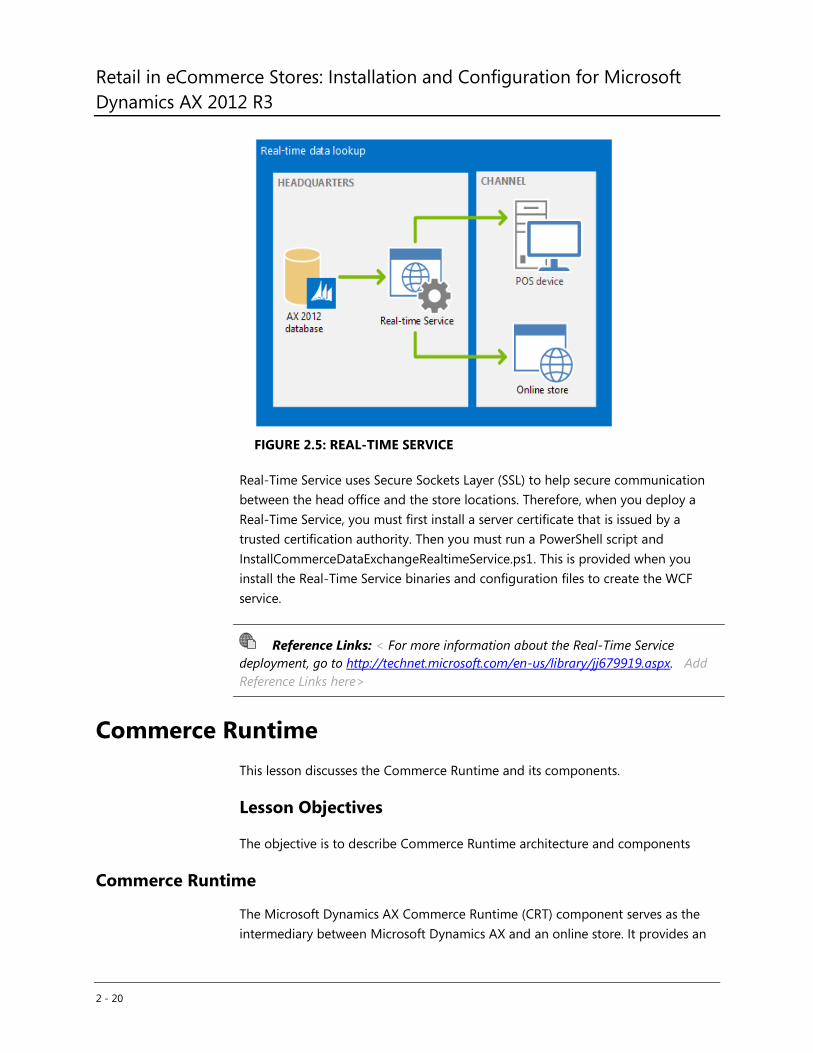
FIGURE 2.5: REAL-TIME SERVICE
Real-Time Service uses Secure Sockets Layer (SSL) to help secure communication
between the head office and the store locations. Therefore, when you deploy a
Real-Time Service, you must first install a server certificate that is issued by a
trusted certification authority. Then you must run a PowerShell script and
InstallCommerceDataExchangeRealtimeService.ps1. This is provided when you
install the Real-Time Service binaries and configuration files to create the WCF
service.
Reference Links: < For more information about the Real-Time Service
deployment, go to http://technet.microsoft.com/en-us/library/jj679919.aspx. Add
Reference Links here>
Commerce Runtime
This lesson discusses the Commerce Runtime and its components.
Lesson Objectives
The objective is to describe Commerce Runtime architecture and components
Commerce Runtime
The Microsoft Dynamics AX Commerce Runtime (CRT) component serves as the
intermediary between Microsoft Dynamics AX and an online store. It provides an
Module 2: ECOMMERCE ARCHITECTURE
2 - 21
engine for a retail channel and enables delivery of content and retail services in a
scalable way.
Commerce Runtime provides a set of assemblies that connect to the CRT database
that stores business data for the online store. CRT assemblies also use the CDX
Real-Time Service to connect to Microsoft Dynamics AX.
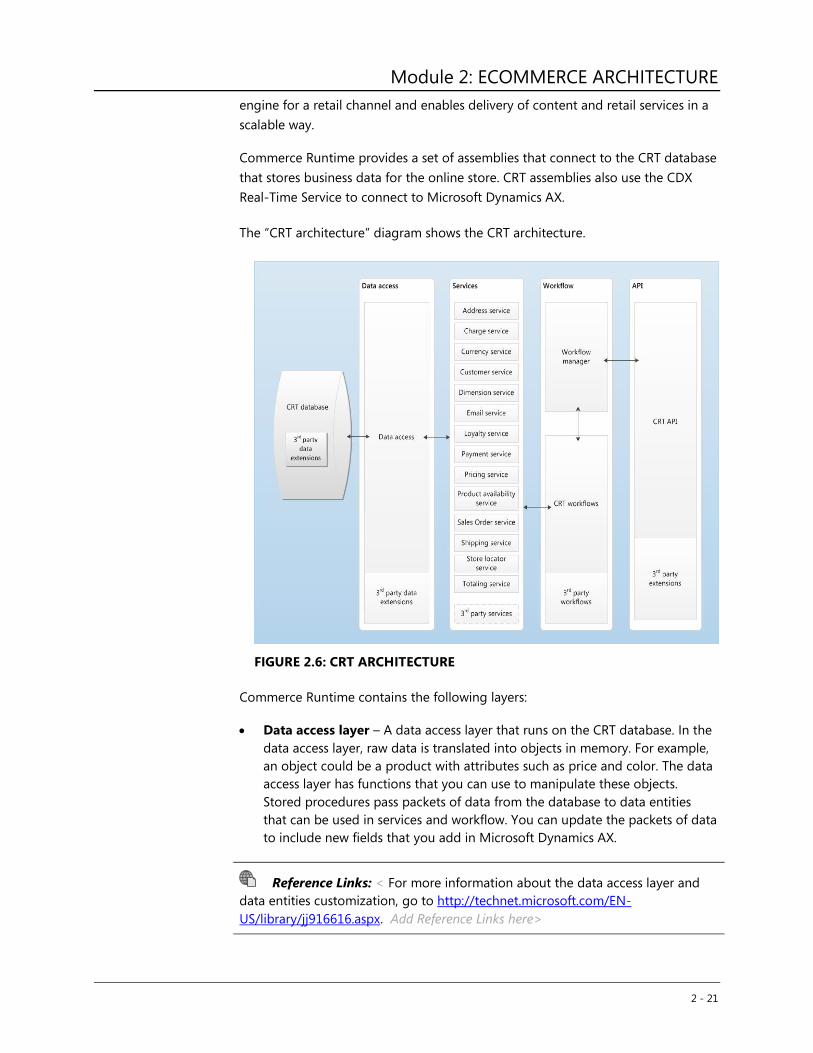
The “CRT architecture” diagram shows the CRT architecture.
FIGURE 2.6: CRT ARCHITECTURE
Commerce Runtime contains the following layers:
Data access layer – A data access layer that runs on the CRT database. In the
data access layer, raw data is translated into objects in memory. For example,
an object could be a product with attributes such as price and color. The data
access layer has functions that you can use to manipulate these objects.
Stored procedures pass packets of data from the database to data entities
that can be used in services and workflow. You can update the packets of data
to include new fields that you add in Microsoft Dynamics AX.
Reference Links: < For more information about the data access layer and
data entities customization, go to http://technet.microsoft.com/EN-
US/library/jj916616.aspx. Add Reference Links here>
Retail in eCommerce Stores: Installation and Configuration for Microsoft
Dynamics AX 2012 R3
2 - 22
Services layer – On top of the data access layer is a services layer. Services
query for real-time data. You can use these services to customize existing
functionality, or add your own services that have new functionality.
Reference Links: For more information about the CRT Services, go to
http://technet.microsoft.com/EN-US/library/jj916617.aspx.
Workflow layer –On top of the services layer, there is the workflow layer. A
“workflow” is a collection of services and business logic that together define
business processes. For example, when a customer adds an item to the cart,
you can use workflow to do any of the following:
o Obtain the price.
o Perform validation.
o Check inventory quantity.
o Calculate shipping.
o Calculate tax.
o Calculate discounts.
You can use workflows that are included in Microsoft Dynamics AX, or you
can create new workflows. You can also use a workflow to connect to a third-
party system as part of your business processes.
Reference Links: < For more information about how to create workflows,
go to http://technet.microsoft.com/EN-US/library/jj916618.aspx.
Application Programming Interface (API): On top of the workflow layer is
the API layer. You can use the API for any of the following:
o Information about items
o Price calculation
o Shipping calculation
o Placing orders
You can extend the API to fit your business processes.
Module 2: ECOMMERCE ARCHITECTURE
2 - 23
Reference Links: For more information about APIs, go to
http://technet.microsoft.com/en-us/library/jj992752.aspx. <Add Reference Links
here>
CRT Services
Microsoft Dynamics AX retail services are scalable and extensible services that are
empowered through a combination of the commerce data exchange and the
commerce runtime. Several services exist in the Commerce Runtime that support
the functionality of an online store. You can add your own services, or extend the
prebuilt services.
Services are enumerated as types in the Commerce Runtime configuration file that
is named commerceRuntime.config. You can add types in the Commerce Runtime
configuration file to control the services that are loaded in the Commerce
Runtime. Services are loaded in the order in which they are listed in the
configuration file. All default services are loaded automatically. However, if you
add a new service above one of the default services, the new service replaces the
default service.
Reference Links: For more information about how to integrate a service
into the Commerce Runtime, go to http://technet.microsoft.com/EN-
US/library/jj916619.aspx.
The following table describes the CRT prebuilt services.
Service Description
AddressService Verifies addresses and obtains location information, such as
cities, counties, or states.
ChargeService Calculates auto-charges, price charges, and shipping
charges for a transaction.
CurrencyService Converts currencies based on exchange rates.
CustomerService Maintains customer information.
DimensionService Enables customers to find items in your store based on
criteria like category or color.
EmailService Sends email to customers based on an email template that
is defined in Microsoft Dynamics AX.
LoyaltyService Implements a program that rewards repeat customers.
PaymentService Connects your online store to a payment service to provide
credit card authorization and use preconfigured payment
Retail in eCommerce Stores: Installation and Configuration for Microsoft
Dynamics AX 2012 R3
2 - 24
Service Description
processing. You can also extend the payment service to add
third-party payment processors.
PricingService Obtains the price of an item in real time. The price is
adjusted based on the base price and any applicable
discounts. You can customize discounts for each retailer.
ProductAvailabilit
yService
Calculates the quantities of available products for sale.
RoundingService Rounds the tender amount based on the tender type and
store.
SalesOrderService Creates a sales order based on a customer shopping cart.
ShippingService Calculates shipping costs and determine shipping options
for the current order. You can use shipping data from
Microsoft Dynamics AX or from a third-party shipping
service.
StoreLocatorServi
ce
Generates a list of stores based on criteria like nearness and
product availability.
TaxService Calculates the sales tax for the current order. You can use
sales tax information from Microsoft Dynamics AX or from a
third-party sales tax service.
TotalingService Calculates the totals on the sales transactions and sales lines.
Module 2: ECOMMERCE ARCHITECTURE
2 - 25
Ecommerce Starter Site
This lesson provides an overview of the Ecommerce starter site and its
components.
Lesson Objectives
The objective is to describe the Ecommerce starter site and its components.
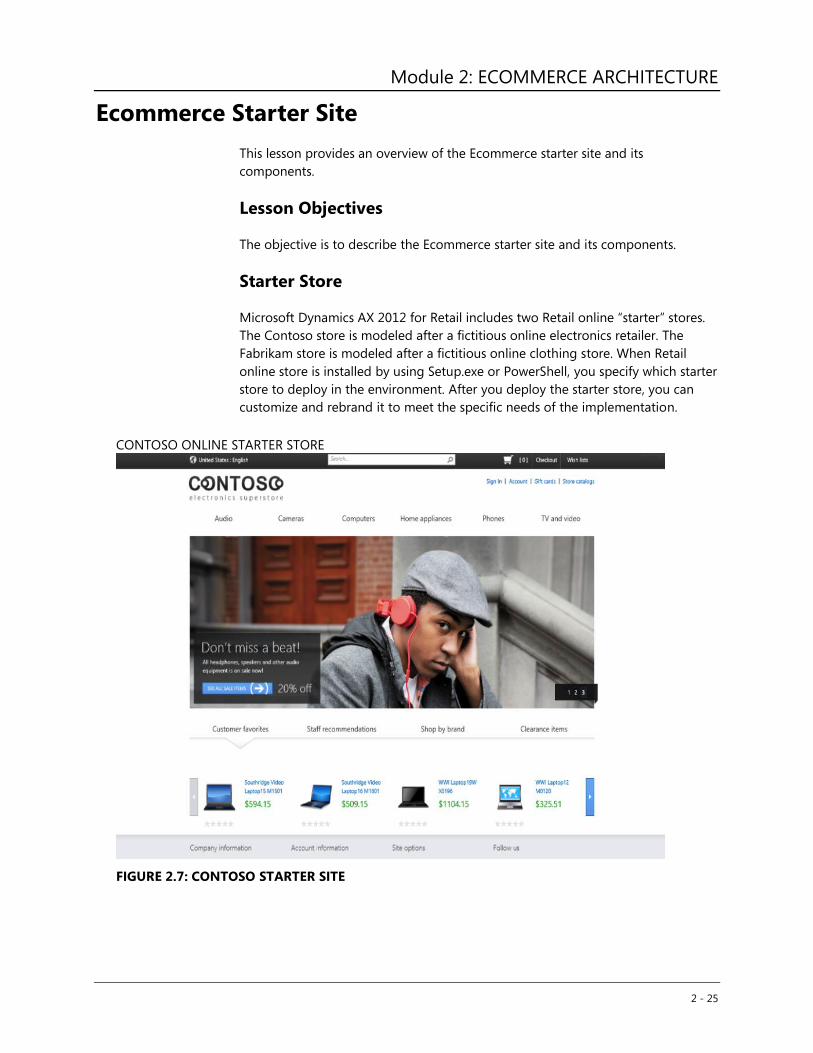
Starter Store
Microsoft Dynamics AX 2012 for Retail includes two Retail online “starter” stores.
The Contoso store is modeled after a fictitious online electronics retailer. The
Fabrikam store is modeled after a fictitious online clothing store. When Retail
online store is installed by using Setup.exe or PowerShell, you specify which starter
store to deploy in the environment. After you deploy the starter store, you can
customize and rebrand it to meet the specific needs of the implementation.
CONTOSO ONLINE STARTER STORE
FIGURE 2.7: CONTOSO STARTER SITE

Retail in eCommerce Stores: Installation and Configuration for Microsoft
Dynamics AX 2012 R3
2 - 26
FIGURE 2.8: FABRIKAM STARTER SITE
The Contoso starter store is installed as part of the solution installation process
when you deploy the Ecommerce solution on SharePoint.
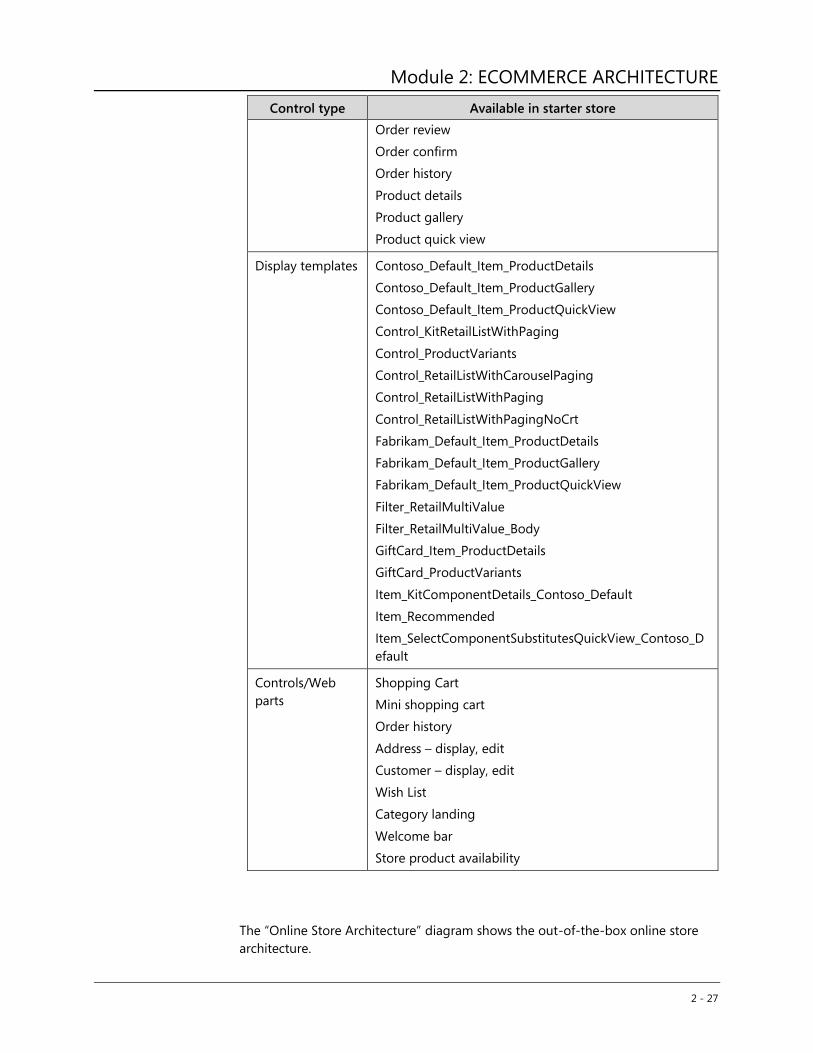
The online starter store provides customizable controls as described in the
following table.
Control type Available in starter store
Page layouts Address edit
Associate customer
Change password
Checkout confirm
Facebook logon
Issue gift card
Logon
Loyalty
My account
Module 2: ECOMMERCE ARCHITECTURE
2 - 27
Control type Available in starter store
Order review
Order confirm
Order history
Product details
Product gallery
Product quick view
Display templates Contoso_Default_Item_ProductDetails
Contoso_Default_Item_ProductGallery
Contoso_Default_Item_ProductQuickView
Control_KitRetailListWithPaging
Control_ProductVariants
Control_RetailListWithCarouselPaging
Control_RetailListWithPaging
Control_RetailListWithPagingNoCrt
Fabrikam_Default_Item_ProductDetails
Fabrikam_Default_Item_ProductGallery
Fabrikam_Default_Item_ProductQuickView
Filter_RetailMultiValue
Filter_RetailMultiValue_Body
GiftCard_Item_ProductDetails
GiftCard_ProductVariants
Item_KitComponentDetails_Contoso_Default
Item_Recommended
Item_SelectComponentSubstitutesQuickView_Contoso_D
efault
Controls/Web
parts
Shopping Cart
Mini shopping cart
Order history
Address – display, edit
Customer – display, edit
Wish List
Category landing
Welcome bar
Store product availability
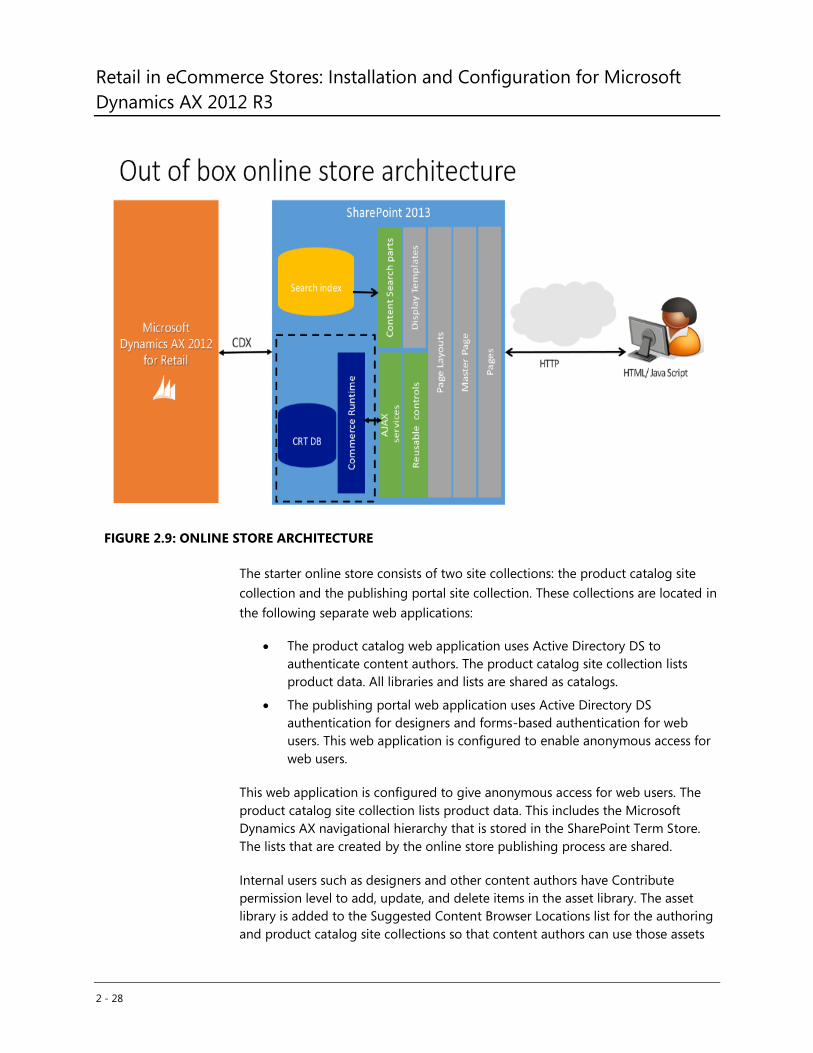
The “Online Store Architecture” diagram shows the out-of-the-box online store
architecture.
Retail in eCommerce Stores: Installation and Configuration for Microsoft
Dynamics AX 2012 R3
2 - 28
FIGURE 2.9: ONLINE STORE ARCHITECTURE
The starter online store consists of two site collections: the product catalog site
collection and the publishing portal site collection. These collections are located in
the following separate web applications:
The product catalog web application uses Active Directory DS to
authenticate content authors. The product catalog site collection lists
product data. All libraries and lists are shared as catalogs.
The publishing portal web application uses Active Directory DS
authentication for designers and forms-based authentication for web
users. This web application is configured to enable anonymous access for
web users.
This web application is configured to give anonymous access for web users. The
product catalog site collection lists product data. This includes the Microsoft
Dynamics AX navigational hierarchy that is stored in the SharePoint Term Store.
The lists that are created by the online store publishing process are shared.
Internal users such as designers and other content authors have Contribute
permission level to add, update, and delete items in the asset library. The asset
library is added to the Suggested Content Browser Locations list for the authoring
and product catalog site collections so that content authors can use those assets
Module 2: ECOMMERCE ARCHITECTURE
2 - 29
in their content.
The search system indexes content from the authoring site and the product
catalog site collection. When a user views a page on one of the publishing sites,
queries from Search Web Parts on that page are sent to the search index. Results
are returned from the search index, and shown in the Search Web Parts on the
page.
Note: Because the publishing site collection is outside the firewall, the asset
library is located in a separate site collection in the same web application as the
publishing site collection. This gives users on the publishing sites read access to
those assets. Internal users, such as designers and other content authors, have
Contribute permission level to add, update, and delete items in the asset library. The
asset library is added to the Suggested Content Browser Locations list for the
authoring and product catalog site collections. This enables content authors to use
those assets in their content.
The Microsoft Dynamics AX SharePoint Connector is a service that includes a
SharePoint publishing job that runs in the OWSTimer.exe service. The job is called
RetailPublishingJob, and you can monitor it in SharePoint 2013 Central
Administration. It retrieves updated store and product information from the CRT
database, and then pushes it into the product catalog site collection. The
information is then crawled by Search.
Online Store Databases
When you deploy the online store, the system creates the following databases in
Microsoft SQL Server.
CRT database – The online store uses this database as a data store before
pushing data into SharePoint. By default, the database is named AxRetailSP.
Settings for this database are stored in the oob-topology.xml file under
Settings/Channel.
Identity Provider database – This database stores user credentials for
forms-based authentication. By default, the database is named SPFBA.
Settings for this database are stored in the oob-topology.xml file under
Settings/IdentityProvider.
Custom Claims Provider database – This database stores the mapping
between user identity and Microsoft Dynamics AX customer number when
the user creates an account. By default, the database is named SPAuthZ.
Settings for this database are stored in the oob-topology.xml file under
Settings/CustomClaimsProvider.
Retail in eCommerce Stores: Installation and Configuration for Microsoft
Dynamics AX 2012 R3
2 - 30
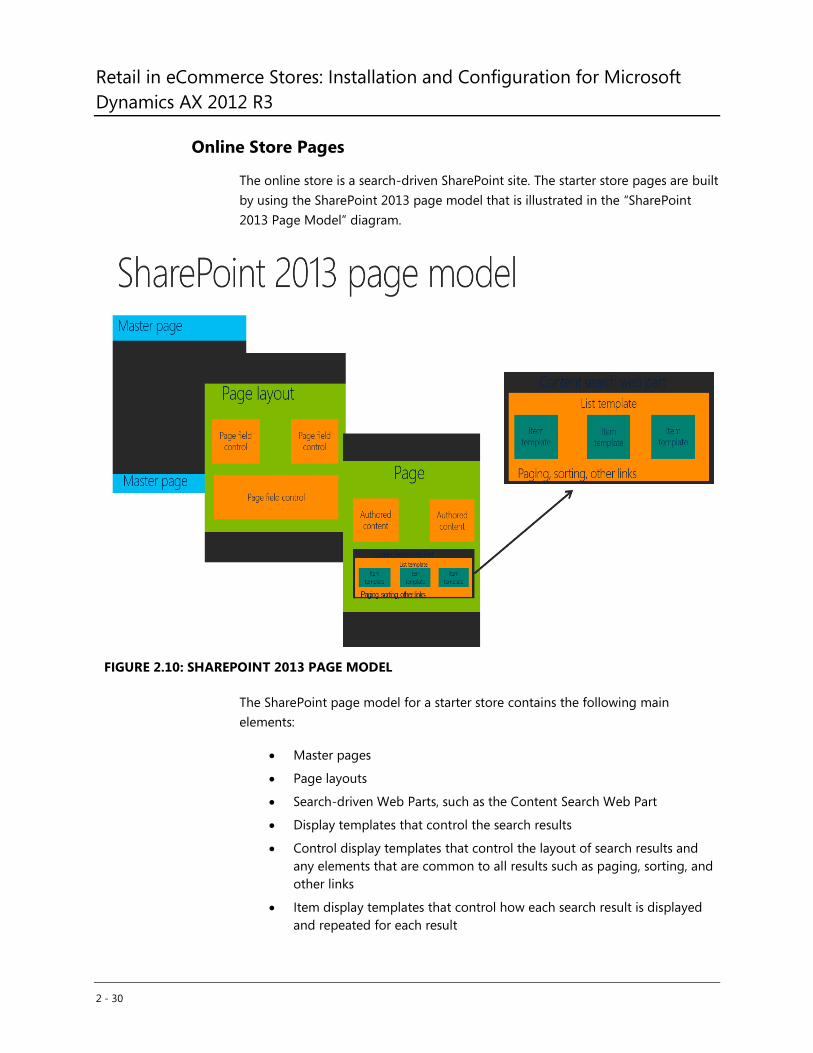
Online Store Pages
The online store is a search-driven SharePoint site. The starter store pages are built
by using the SharePoint 2013 page model that is illustrated in the “SharePoint
2013 Page Model” diagram.
FIGURE 2.10: SHAREPOINT 2013 PAGE MODEL
The SharePoint page model for a starter store contains the following main
elements:
Master pages
Page layouts
Search-driven Web Parts, such as the Content Search Web Part
Display templates that control the search results
Control display templates that control the layout of search results and
any elements that are common to all results such as paging, sorting, and
other links
Item display templates that control how each search result is displayed
and repeated for each result
Module 2: ECOMMERCE ARCHITECTURE
2 - 31
The starter store provides several master pages, page layouts, display templates,
and web parts. Each page layout uses a specific master page, and each page has a
corresponding page layout. For example, the welcome page for the site,
Welcome.aspx, has a corresponding page layout file that is named
WelcomeLayout.aspx. You can customize the master templates and page layouts
and create your own.
Reference Links: For more information about how to customize the online
store, go to http://technet.microsoft.com/EN-US/library/dn387566.aspx. <Add
Reference Links here>
The starter site master pages include the following:
Storefront.master
StorefrontMobile.master
The page layouts in the online store include the following:
My account
Order history
Product details
Product gallery
Product quick view
Address edit
Associate customer
Change password
Checkout confirm
Facebook® Logon
The prebuilt display templates are as follows:
Item Product Detail
Item Product Gallery
Item Product Quick View
The web parts that are available out-of-the box include the following:
Add To Cart
Checkout
Promotion Code
Submit Order
Mini shopping cart
Shopping cart
Address
Retail in eCommerce Stores: Installation and Configuration for Microsoft
Dynamics AX 2012 R3
2 - 32
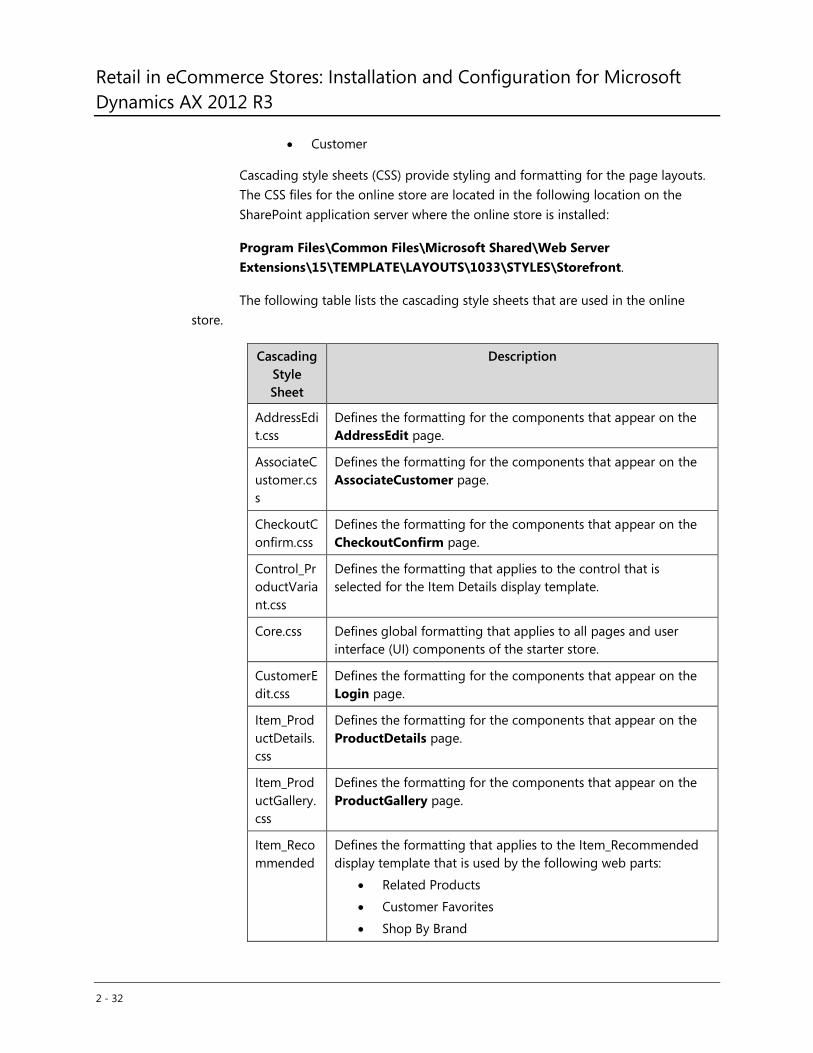
Customer
Cascading style sheets (CSS) provide styling and formatting for the page layouts.
The CSS files for the online store are located in the following location on the
SharePoint application server where the online store is installed:
Program Files\Common Files\Microsoft Shared\Web Server
Extensions\15\TEMPLATE\LAYOUTS\1033\STYLES\Storefront.
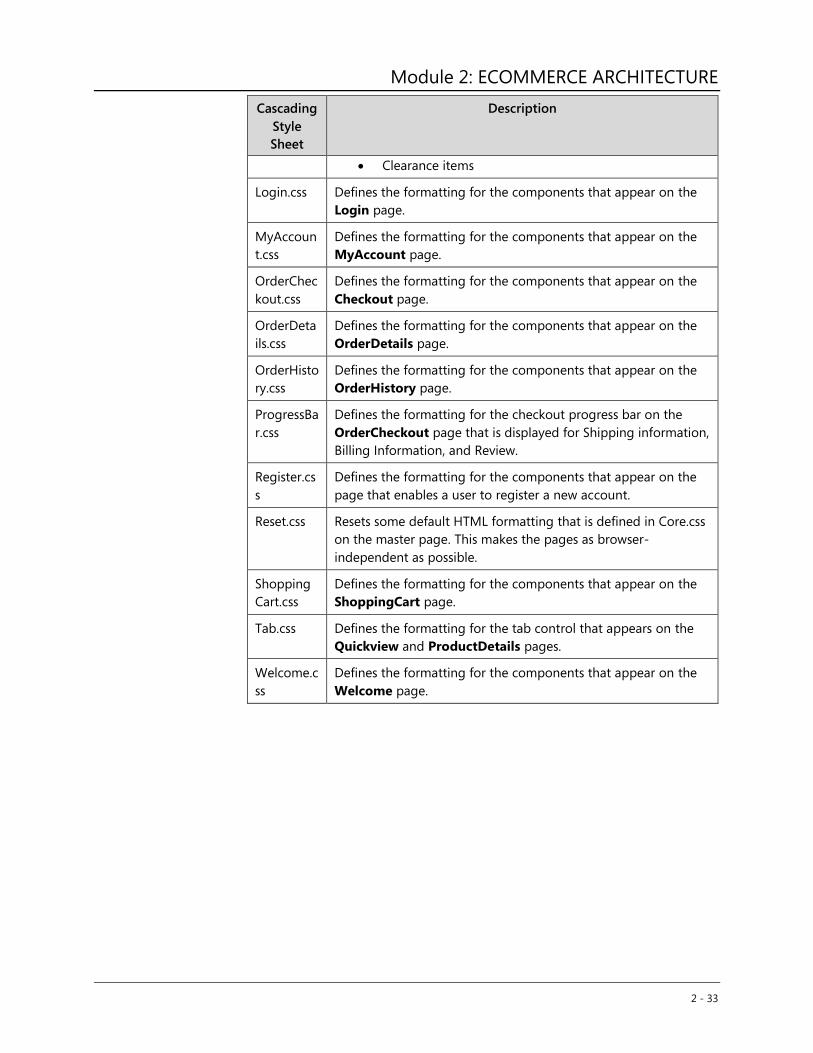
The following table lists the cascading style sheets that are used in the online
store.
Cascading
Style
Sheet
Description
AddressEdi
t.css
Defines the formatting for the components that appear on the
AddressEdit page.
AssociateC
ustomer.cs
s
Defines the formatting for the components that appear on the
AssociateCustomer page.
CheckoutC
onfirm.css
Defines the formatting for the components that appear on the
CheckoutConfirm page.
Control_Pr
oductVaria
nt.css
Defines the formatting that applies to the control that is
selected for the Item Details display template.
Core.css Defines global formatting that applies to all pages and user
interface (UI) components of the starter store.
CustomerE
dit.css
Defines the formatting for the components that appear on the
Login page.
Item_Prod
uctDetails.
css
Defines the formatting for the components that appear on the
ProductDetails page.
Item_Prod
uctGallery.
css
Defines the formatting for the components that appear on the
ProductGallery page.
Item_Reco
mmended
Defines the formatting that applies to the Item_Recommended
display template that is used by the following web parts:
Related Products
Customer Favorites
Shop By Brand
Module 2: ECOMMERCE ARCHITECTURE
2 - 33
Cascading
Style
Sheet
Description
Clearance items
Login.css Defines the formatting for the components that appear on the
Login page.
MyAccoun
t.css
Defines the formatting for the components that appear on the
MyAccount page.
OrderChec
kout.css
Defines the formatting for the components that appear on the
Checkout page.
OrderDeta
ils.css
Defines the formatting for the components that appear on the
OrderDetails page.
OrderHisto
ry.css
Defines the formatting for the components that appear on the
OrderHistory page.
ProgressBa
r.css
Defines the formatting for the checkout progress bar on the
OrderCheckout page that is displayed for Shipping information,
Billing Information, and Review.
Register.cs
s
Defines the formatting for the components that appear on the
page that enables a user to register a new account.
Reset.css Resets some default HTML formatting that is defined in Core.css
on the master page. This makes the pages as browser-
independent as possible.
Shopping
Cart.css
Defines the formatting for the components that appear on the
ShoppingCart page.
Tab.css Defines the formatting for the tab control that appears on the
Quickview and ProductDetails pages.
Welcome.c
ss
Defines the formatting for the components that appear on the
Welcome page.
Retail in eCommerce Stores: Installation and Configuration for Microsoft
Dynamics AX 2012 R3
2 - 34
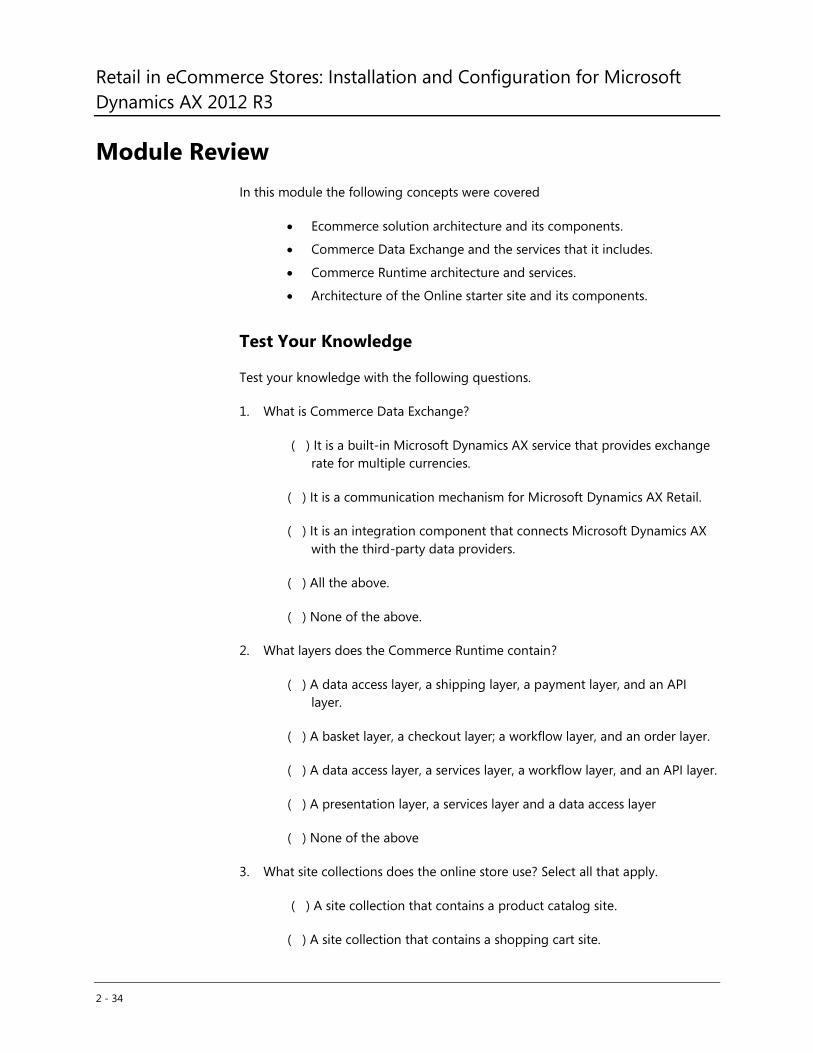
Module Review
In this module the following concepts were covered
Ecommerce solution architecture and its components.
Commerce Data Exchange and the services that it includes.
Commerce Runtime architecture and services.
Architecture of the Online starter site and its components.
Test Your Knowledge
Test your knowledge with the following questions.
1. What is Commerce Data Exchange?
( ) It is a built-in Microsoft Dynamics AX service that provides exchange
rate for multiple currencies.
( ) It is a communication mechanism for Microsoft Dynamics AX Retail.
( ) It is an integration component that connects Microsoft Dynamics AX
with the third-party data providers.
( ) All the above.
( ) None of the above.
2. What layers does the Commerce Runtime contain?
( ) A data access layer, a shipping layer, a payment layer, and an API
layer.
( ) A basket layer, a checkout layer; a workflow layer, and an order layer.
( ) A data access layer, a services layer, a workflow layer, and an API layer.
( ) A presentation layer, a services layer and a data access layer
( ) None of the above
3. What site collections does the online store use? Select all that apply.
( ) A site collection that contains a product catalog site.
( ) A site collection that contains a shopping cart site.
Module 2: ECOMMERCE ARCHITECTURE
2 - 35
( ) A site collection that contains a publishing portal site.
( ) Two Site Collections that contains a product catalog site and
publishing portal site.
( ) None of the above.
4. What should be deployed in the Retail Headquarters as part of the commerce
data exchange setup to manage communication between the Retail
Headquarters and the online store?
( ) CDX Async Client
( ) CDX Async Server
( ) CDX Synch Service
( ) All the above
( ) None of the above
5. What are the key pillars of the Microsoft Dynamics AX Ecommerce solution?
( ) Centralized data and order management across all channels.
( ) Cross-channel and cross-device workflows.
( ) Symmetrical omni-channel retail services.
( ) OOB e-commerce with storefront developer platform.
( ) All the above
Retail in eCommerce Stores: Installation and Configuration for Microsoft
Dynamics AX 2012 R3
2 - 36
Lab: ECOMMERCE ARCHITECTURE
Scenario
In this lab, you explore the online store, place an online order, and then
synchronize the order from the online store to AX. The Contoso online store
provides an opportunity for web shoppers to pick up merchandise that they have
ordered online in Contoso brick-and-mortar stores. You use the POS register to
pick up this order in Contoso’s Boston brick-and-mortar store. Then you explore
the components of the online storefront, such as the Product Catalog site, the
products listings, and the Retail publishing job.
Objectives
The objectives of this lab are:
1. Explain the online store structure and navigation, the search-driven
experience, the product pages, and the checkout process.
2. Show how to sync the orders from the online store to AX manually.
3. Review the omni-channel experience that is enabled by AX Retail
when the online order is picked up in the brick-and-mortar store.
4. Explore the components of the online storefront solution, such as the
Product Catalog site, the products listings, and the Retail publishing
job.
Lab Setup
1. This Lab uses the Microsoft Dynamics AX 2012 R3 Demo VM Available
on Partner Source. Link :
https://mbs.microsoft.com/partnersource/northamerica/AX/download
s/service-
packs/AX2012DemoToolsMaterials#MicrosoftDynamicsAX2012R3Solu
tionDemoPackageV1.0
2. The VM on Partner Source comes together with the following
documentation. Please review the documentation to set up the VM
before completing the Lab.
Release Notes
https://mbs.microsoft.com/files/customer/AX/Downloads/Servicepacks/ReleaseNo
tesAX2012R3SolutionDemoPackageV10.pdf
Technical Guide
Module 2: ECOMMERCE ARCHITECTURE
2 - 37
https://mbs.microsoft.com/files/customer/AX/Downloads/Servicepacks/TechnicalG
uideAX2012R3SolutionDemoPackageV10.pdf
Known Issues
https://mbs.microsoft.com/files/customer/AX/Downloads/Servicepacks/KnownIssu
esforAX2012R3SolutionDemoPackageV10.pdf
Sample data
https://mbs.microsoft.com/files/customer/AX/Downloads/Servicepacks/AX2012R3
SolutionDemoPackageOverview.pdf
How to set up Network Adapter Priority
https://mbs.microsoft.com/files/customer/AX/Downloads/Servicepacks/HowtoSet
NetworkAdapterPriorities.pdf
How to Start Crawl for Microsoft SharePoint Server Search
https://mbs.microsoft.com/files/customer/AX/Downloads/Servicepacks/HowtoIniti
ateCrawlMicrosoftSharePointSearch.pdf
How to Use Virtual Machine Profile Manager
How to User Virtual Machine Profile Manager
3. Use USRT as the default company for all the Labs.
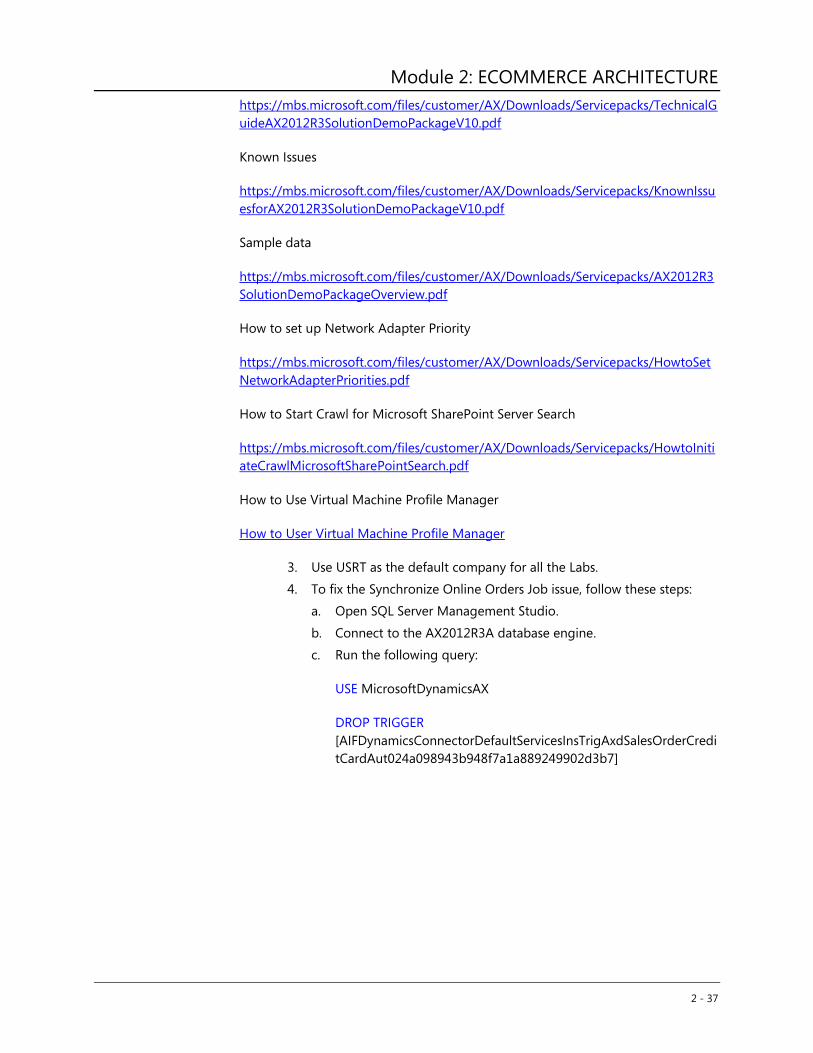
4. To fix the Synchronize Online Orders Job issue, follow these steps:
a. Open SQL Server Management Studio.
b. Connect to the AX2012R3A database engine.
c. Run the following query:
USE MicrosoftDynamicsAX
DROP TRIGGER
[AIFDynamicsConnectorDefaultServicesInsTrigAxdSalesOrderCredi
tCardAut024a098943b948f7a1a889249902d3b7]
Retail in eCommerce Stores: Installation and Configuration for Microsoft
Dynamics AX 2012 R3
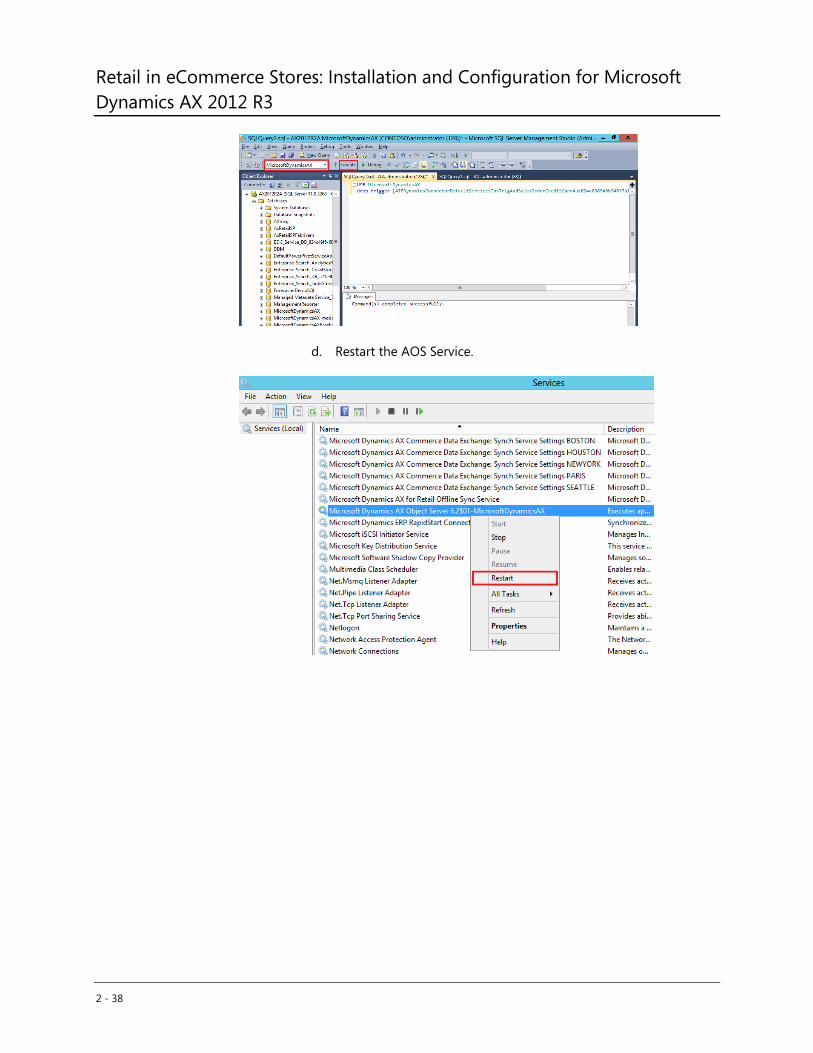
2 - 38
d. Restart the AOS Service.
Module 2: ECOMMERCE ARCHITECTURE
2 - 39
Exercise 1: Explore Online Store and Place an Order
Exercise Scenario
In this exercise, you browse the online starter store, refine the product listing, add
a product to a shopping cart, and then perform the checkout process.
Task 1: Browse the Online Starter Store.
High Level Steps
Browse the online store.
Detailed Steps
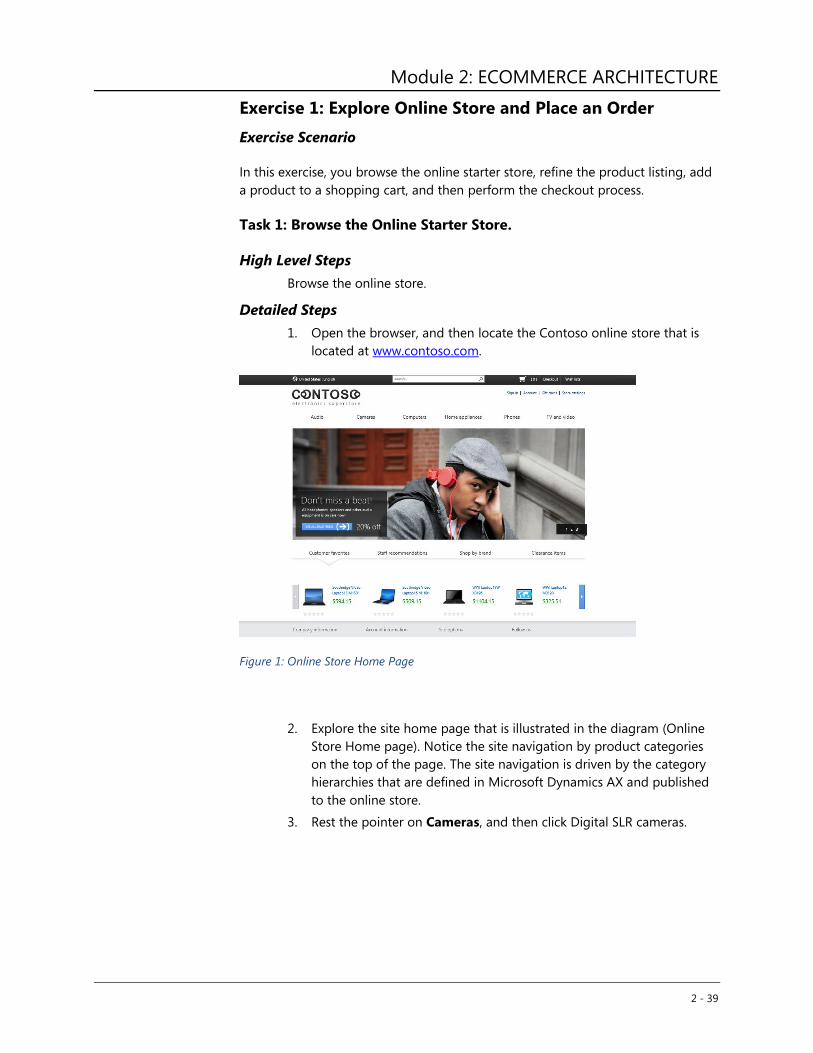
1. Open the browser, and then locate the Contoso online store that is
located at www.contoso.com.
Figure 1: Online Store Home Page
2. Explore the site home page that is illustrated in the diagram (Online
Store Home page). Notice the site navigation by product categories
on the top of the page. The site navigation is driven by the category
hierarchies that are defined in Microsoft Dynamics AX and published
to the online store.
3. Rest the pointer on Cameras, and then click Digital SLR cameras.
Retail in eCommerce Stores: Installation and Configuration for Microsoft
Dynamics AX 2012 R3
2 - 40
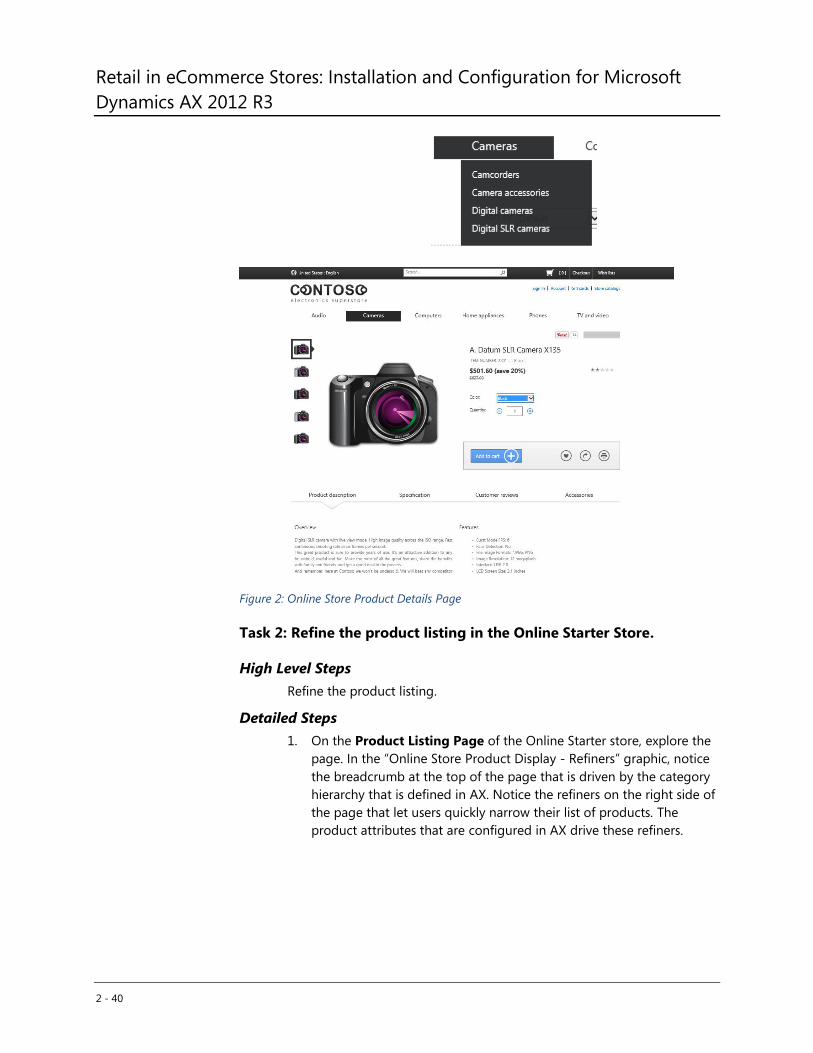
Figure 2: Online Store Product Details Page
Task 2: Refine the product listing in the Online Starter Store.
High Level Steps
Refine the product listing.
Detailed Steps
1. On the Product Listing Page of the Online Starter store, explore the
page. In the “Online Store Product Display - Refiners” graphic, notice
the breadcrumb at the top of the page that is driven by the category
hierarchy that is defined in AX. Notice the refiners on the right side of
the page that let users quickly narrow their list of products. The
product attributes that are configured in AX drive these refiners.

Module 2: ECOMMERCE ARCHITECTURE
2 - 41
Figure 3: Online Store Product Display- Refiners
2. In the Refiners panel, under Price, click $1000 to display cameras
under this price.
3. On the Product listing page that displays cameras under $1000, in
the Refiners panel, under Brand, click A. Datum. This filters the
product list and displays A.Datum cameras that are under $1000.
4. Click A. Datum SLR Camera X135. The Product details page is
displayed.
5. In the Product details page, notice the rich product details, such as
the product description, images, feature lists, and specifications. These
details are all managed centrally in AX.
Task 3: In the Online Store, add a product to the shopping cart and
submit the order.
High Level Steps
1. Add a product to a shopping cart.
2. Provide the shipping information.
3. Provide the billing information.
4. Submit an order and receive the order confirmation.
Detailed Steps
1. In Contoso Online Store, open the Product details page for A.
Datum SLR Camera X135. See the “___” illustration.
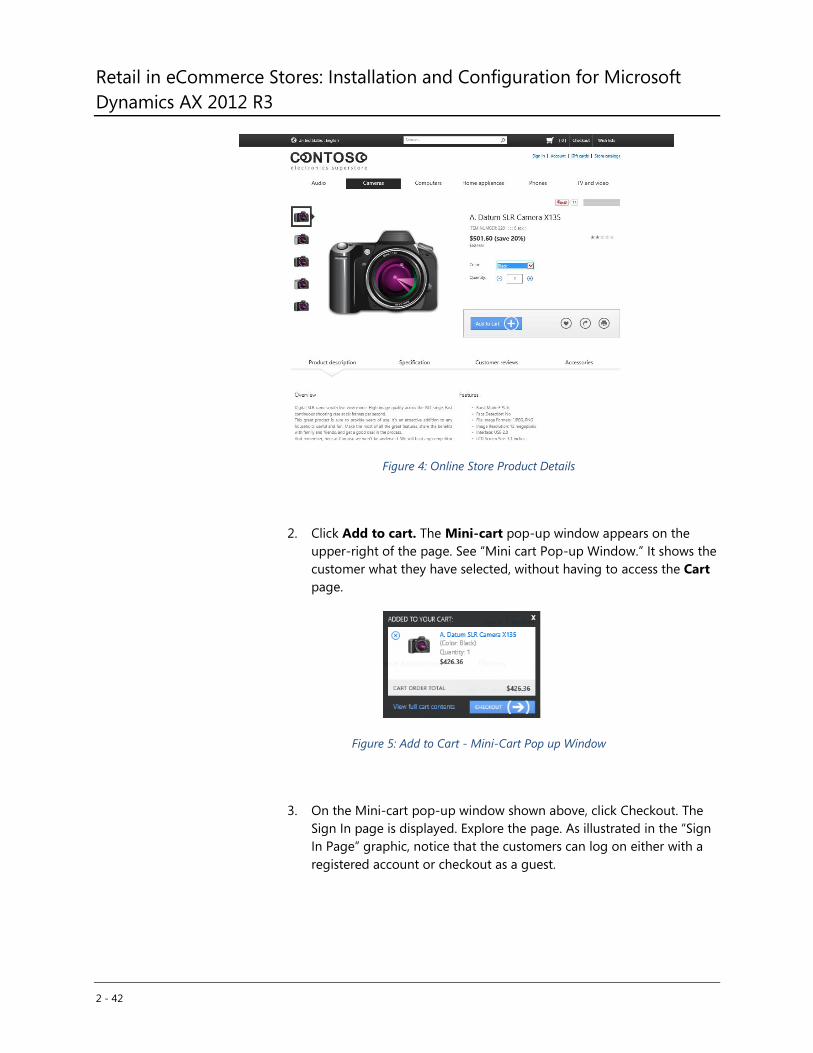
Retail in eCommerce Stores: Installation and Configuration for Microsoft
Dynamics AX 2012 R3
2 - 42
Figure 4: Online Store Product Details
2. Click Add to cart. The Mini-cart pop-up window appears on the
upper-right of the page. See “Mini cart Pop-up Window.” It shows the
customer what they have selected, without having to access the Cart
page.
Figure 5: Add to Cart - Mini-Cart Pop up Window
3. On the Mini-cart pop-up window shown above, click Checkout. The
Sign In page is displayed. Explore the page. As illustrated in the “Sign
In Page” graphic, notice that the customers can log on either with a
registered account or checkout as a guest.

Module 2: ECOMMERCE ARCHITECTURE
2 - 43
Figure 6 :Sign In page
4. Click Checkout as guest. The Shipping Information page is
displayed. See the “Shipping Information Page” figure. Explore the
page. Notice that the orders can be shipped to the customer or the
customer can select to locate a nearby store for pickup.
5. Select Pick up Items in Store. The Delivery information page
opens. See the “Delivery information Page” figure.
Figure 7: Shipping Information Page
6. As illustrated in the “Delivery information Page graphic,” notice that a
map is displayed to help find the closest store. The stores are
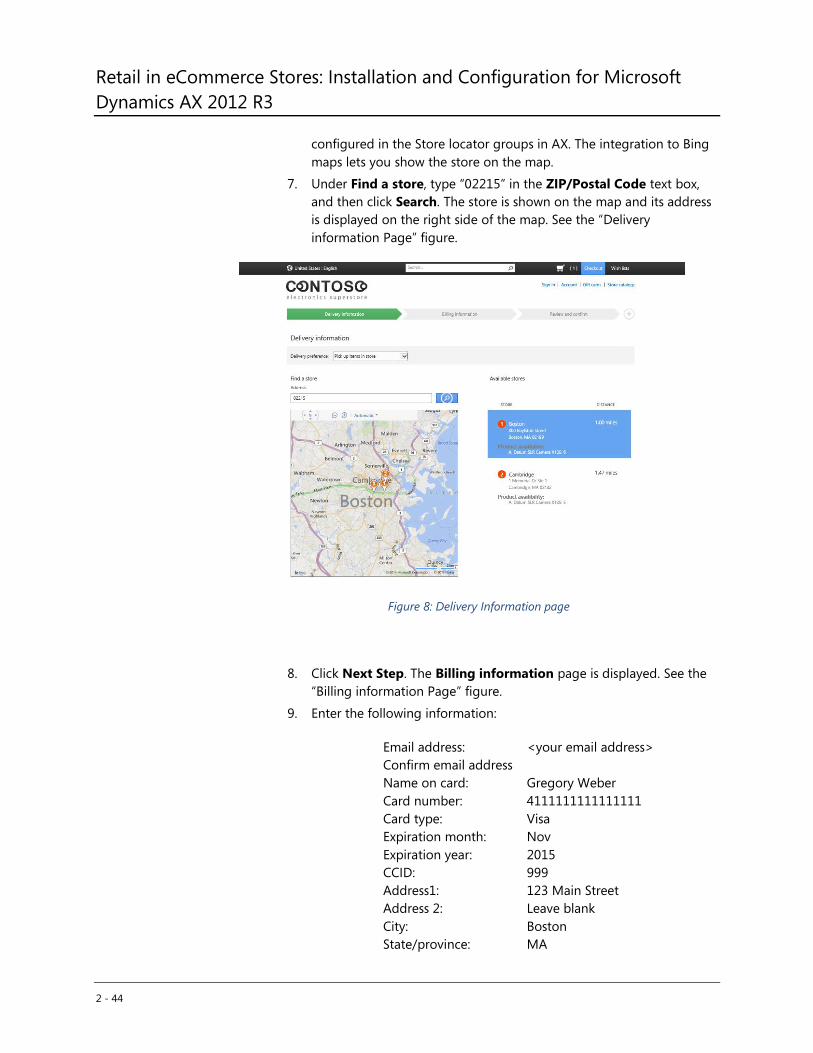
Retail in eCommerce Stores: Installation and Configuration for Microsoft
Dynamics AX 2012 R3
2 - 44
configured in the Store locator groups in AX. The integration to Bing
maps lets you show the store on the map.
7. Under Find a store, type “02215” in the ZIP/Postal Code text box,
and then click Search. The store is shown on the map and its address
is displayed on the right side of the map. See the “Delivery
information Page” figure.
Figure 8: Delivery Information page
8. Click Next Step. The Billing information page is displayed. See the
“Billing information Page” figure.
9. Enter the following information:
Email address: <your email address>
Confirm email address
Name on card: Gregory Weber
Card number: 4111111111111111
Card type: Visa
Expiration month: Nov
Expiration year: 2015
CCID: 999
Address1: 123 Main Street
Address 2: Leave blank
City: Boston
State/province: MA
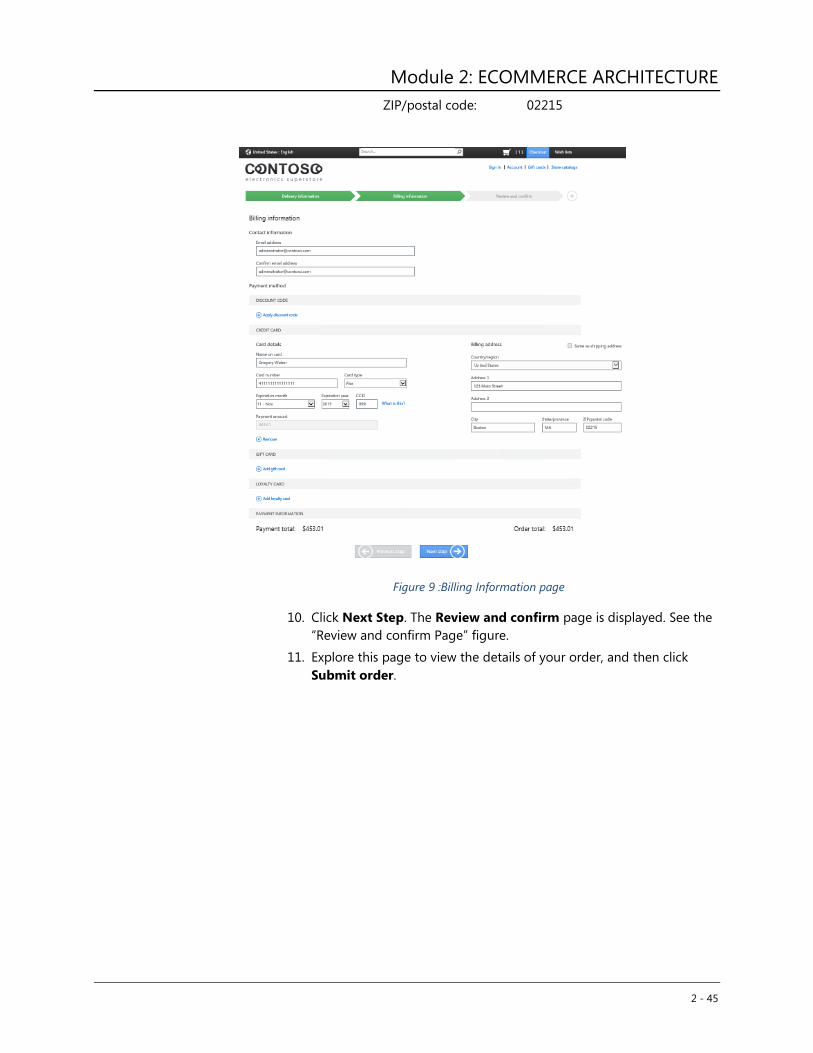
Module 2: ECOMMERCE ARCHITECTURE
2 - 45
ZIP/postal code: 02215
Figure 9 :Billing Information page
10. Click Next Step. The Review and confirm page is displayed. See the
“Review and confirm Page” figure.
11. Explore this page to view the details of your order, and then click
Submit order.
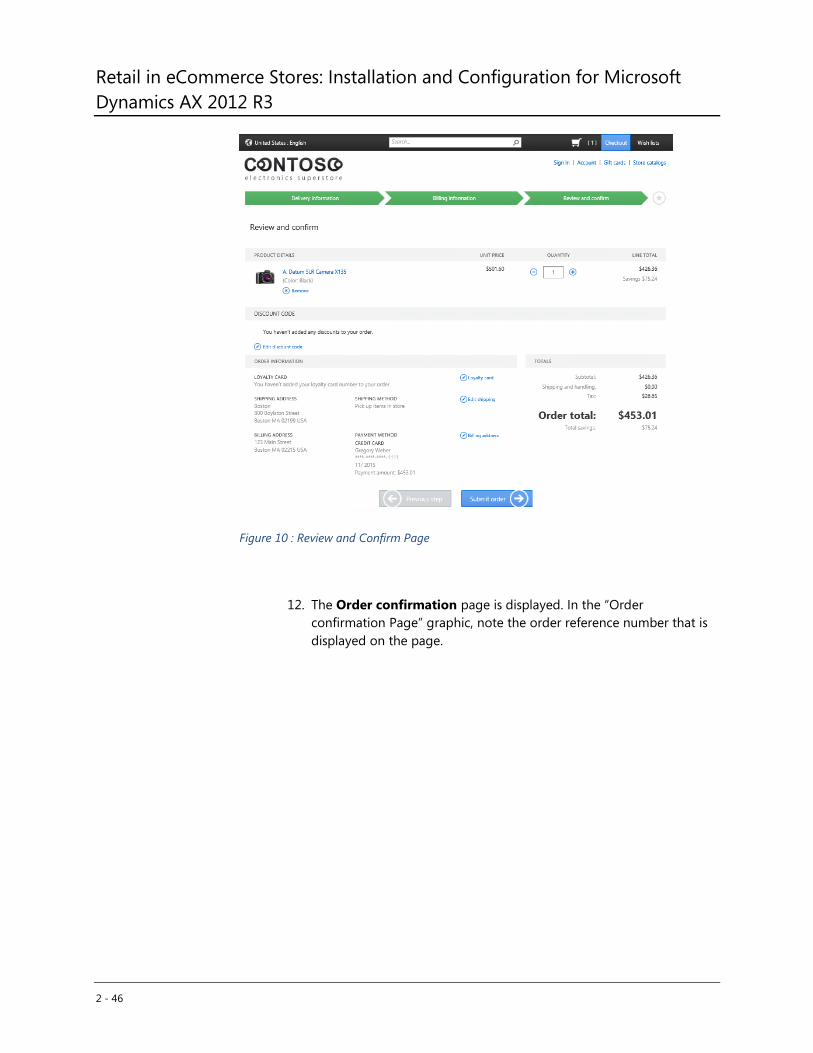
Retail in eCommerce Stores: Installation and Configuration for Microsoft
Dynamics AX 2012 R3
2 - 46
Figure 10 : Review and Confirm Page
12. The Order confirmation page is displayed. In the “Order
confirmation Page” graphic, note the order reference number that is
displayed on the page.

Module 2: ECOMMERCE ARCHITECTURE
2 - 47
Figure 11 : Order Confirmation page
13. Close the browser.
Results
You learned about the store structure and navigation, the search-driven
experience, the product pages, and the checkout process.
Retail in eCommerce Stores: Installation and Configuration for Microsoft
Dynamics AX 2012 R3
2 - 48
Exercise 2: Synchronize Online Orders and Pick Up Online
Order from a Brick-and-Mortar Store
Exercise Scenario
In this exercise you synchronize the orders from the online store to Microsoft
Dynamics AX. Data typically is scheduled to synchronize between the CRT and
Microsoft Dynamics AX periodically by using CDX: ASync Service. For lab
purposes, you can do this manually, on demand. Then you use the POS register to
obtain the order details and enable the customer to pick up the order in the store
that they selected for delivery.
Task 1: Run a job to bring online sales orders into Microsoft
Dynamics AX and synchronize the sales orders.
High Level Steps
1. Run a job to bring the online orders from the CRT database into
Microsoft Dynamics AX.
2. Synchronize online orders in Microsoft Dynamics AX.
Detailed Steps
1. Open the Microsoft Dynamics AX client, and then select Retail
2. Click Periodic> Data distribution > Distribution schedule. The
Distribution Window opens. See the “Distribution Window” figure.
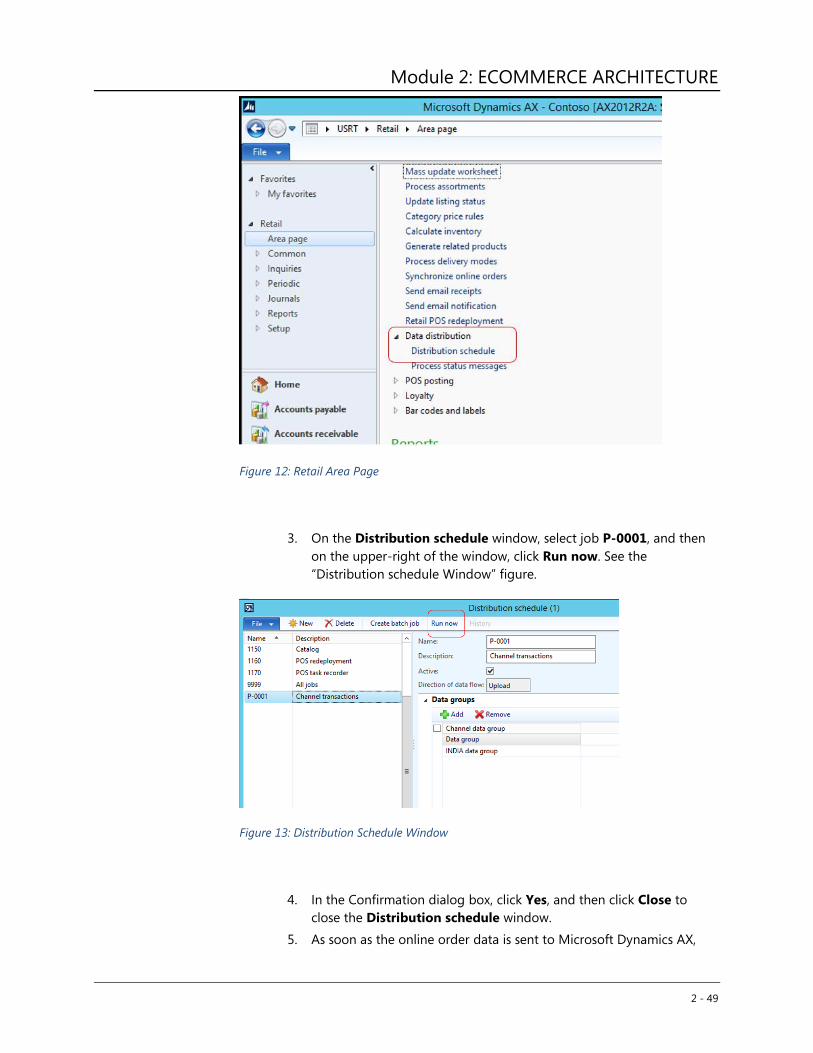
Module 2: ECOMMERCE ARCHITECTURE
2 - 49
Figure 12: Retail Area Page
3. On the Distribution schedule window, select job P-0001, and then
on the upper-right of the window, click Run now. See the
“Distribution schedule Window” figure.
Figure 13: Distribution Schedule Window
4. In the Confirmation dialog box, click Yes, and then click Close to
close the Distribution schedule window.
5. As soon as the online order data is sent to Microsoft Dynamics AX,

Retail in eCommerce Stores: Installation and Configuration for Microsoft
Dynamics AX 2012 R3
2 - 50
the online orders must be processed.
6. Point the legal entity to USRT.
7. On the Retail Area page, under Periodic, click Synchronize online
orders.
8. In the Synchronize online order jobs dialog box, click OK.
9. Close Microsoft Dynamics AX client.
Task 2: Pick Up an Online Order from the Store
High Level Steps
1. Log on to the POS terminal in the Boston store.
2. Search for the online order.
3. Select the online order items for pickup.
4. Take the payment.
Detailed Steps
1. Make sure that the POS is pointing to the Boston store by locating to
the folder at C:\Program Files (x86)\Microsoft Dynamics
AX\60\Retail POS, and then open the Pos.exe.config file in Notepad.
See the “Pos.exe config file” figure.
2. Do one of the following:
If the StoreId is pointing to BOSTON, then continue to step three.
If the StoreId is not pointing to BOSTON, close the file. In the
location in the same folder, find the Pos.exe.Boston-1.config file,
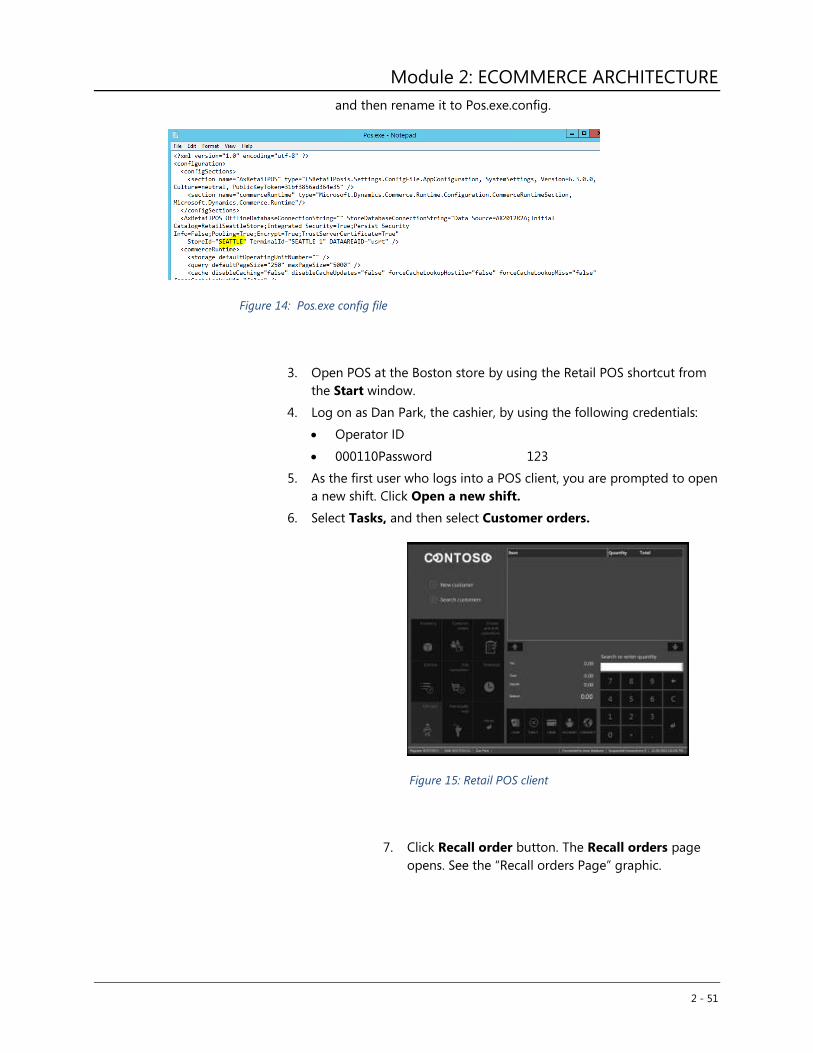
Module 2: ECOMMERCE ARCHITECTURE
2 - 51
and then rename it to Pos.exe.config.
Figure 14: Pos.exe config file
3. Open POS at the Boston store by using the Retail POS shortcut from
the Start window.
4. Log on as Dan Park, the cashier, by using the following credentials:
Operator ID
000110Password 123
5. As the first user who logs into a POS client, you are prompted to open
a new shift. Click Open a new shift.
6. Select Tasks, and then select Customer orders.
Figure 15: Retail POS client
7. Click Recall order button. The Recall orders page
opens. See the “Recall orders Page” graphic.
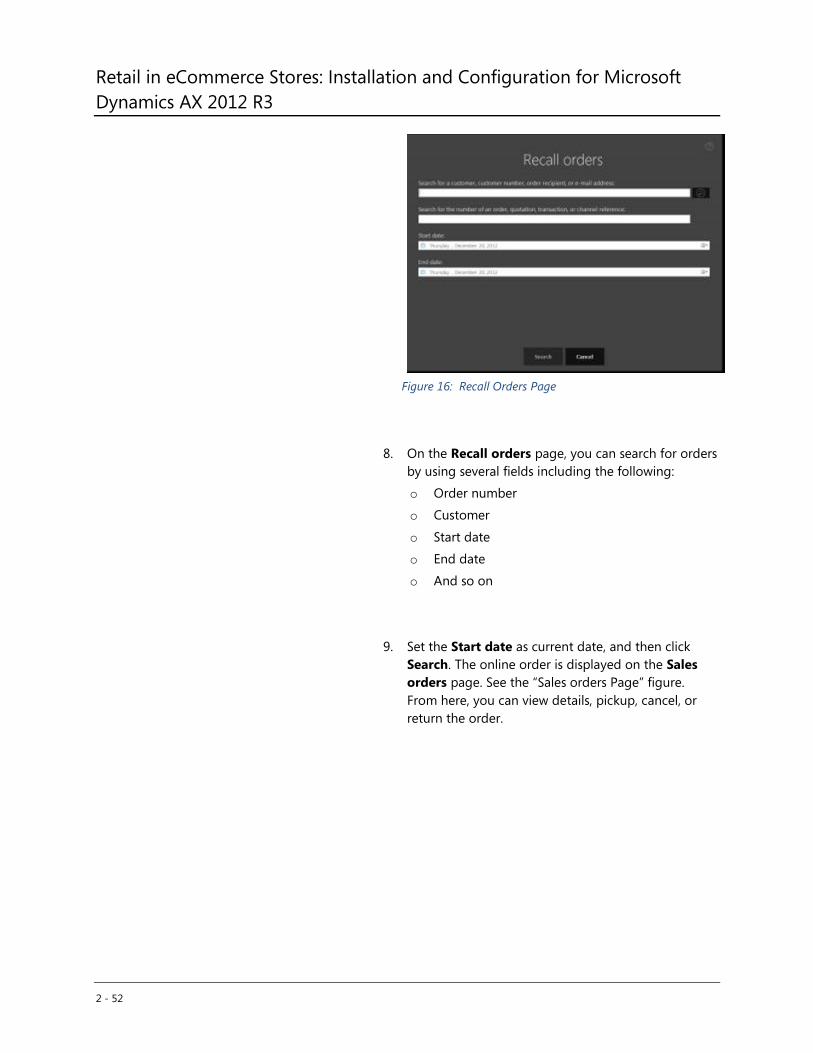
Retail in eCommerce Stores: Installation and Configuration for Microsoft
Dynamics AX 2012 R3
2 - 52
Figure 16: Recall Orders Page
8. On the Recall orders page, you can search for orders
by using several fields including the following:
o Order number
o Customer
o Start date
o End date
o And so on
9. Set the Start date as current date, and then click
Search. The online order is displayed on the Sales
orders page. See the “Sales orders Page” figure.
From here, you can view details, pickup, cancel, or
return the order.
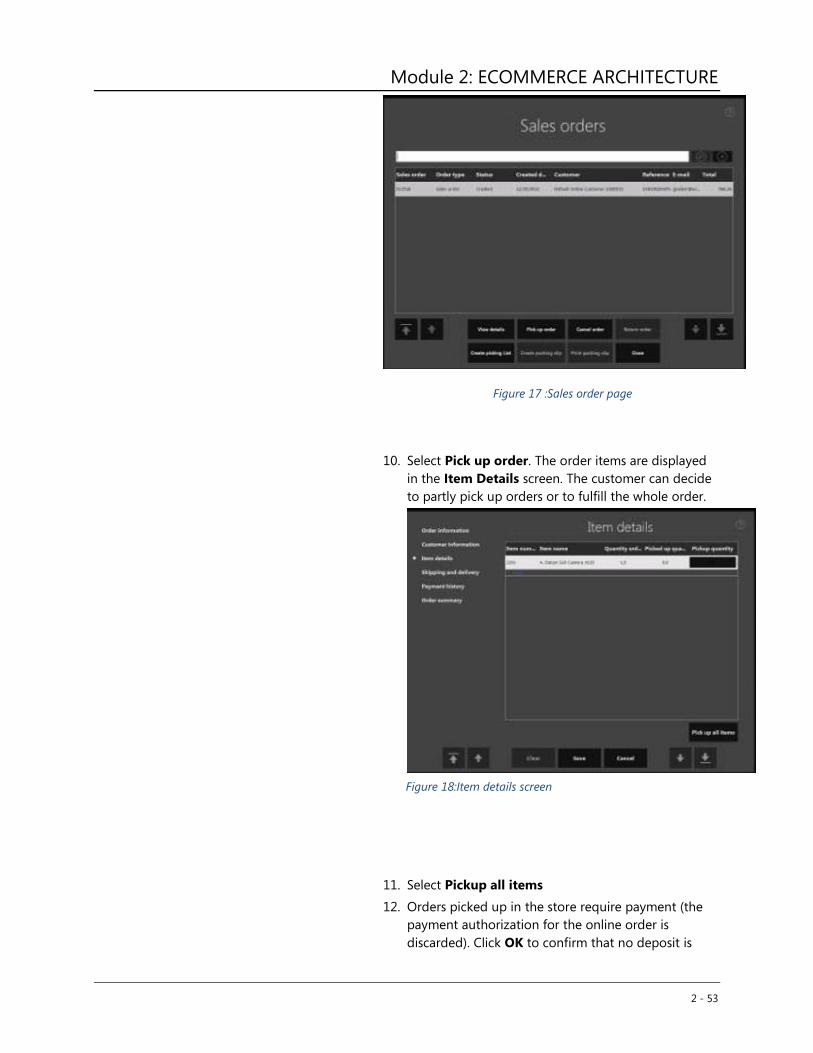
Module 2: ECOMMERCE ARCHITECTURE
2 - 53
Figure 17 :Sales order page
10. Select Pick up order. The order items are displayed
in the Item Details screen. The customer can decide
to partly pick up orders or to fulfill the whole order.
Figure 18:Item details screen
11. Select Pickup all items
12. Orders picked up in the store require payment (the
payment authorization for the online order is
discarded). Click OK to confirm that no deposit is
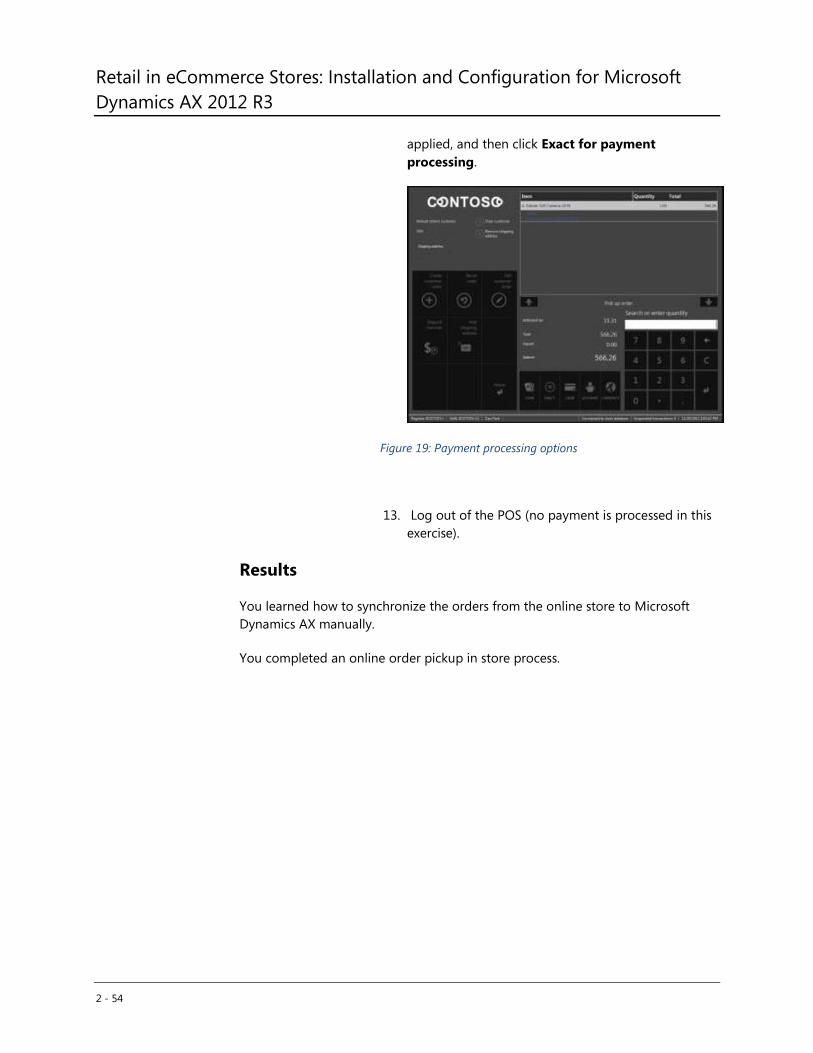
Retail in eCommerce Stores: Installation and Configuration for Microsoft
Dynamics AX 2012 R3
2 - 54
applied, and then click Exact for payment
processing.
Figure 19: Payment processing options
13. Log out of the POS (no payment is processed in this
exercise).
Results
You learned how to synchronize the orders from the online store to Microsoft
Dynamics AX manually.
You completed an online order pickup in store process.
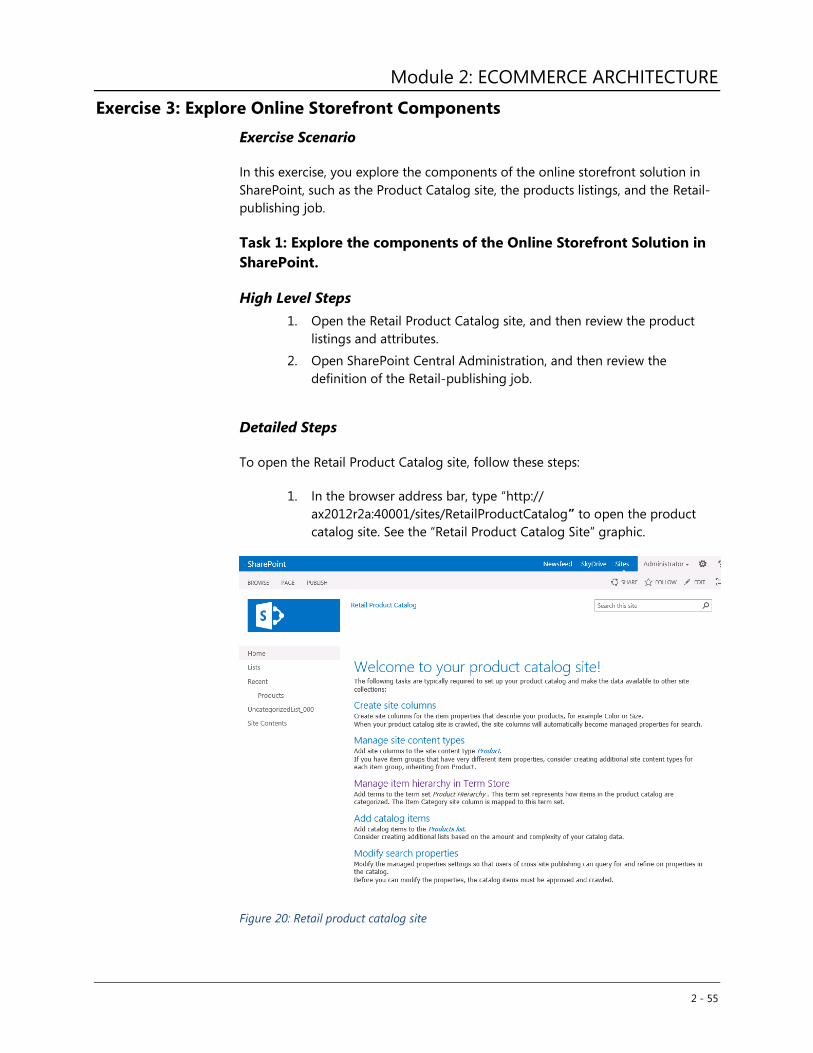
Module 2: ECOMMERCE ARCHITECTURE
2 - 55
Exercise 3: Explore Online Storefront Components
Exercise Scenario
In this exercise, you explore the components of the online storefront solution in
SharePoint, such as the Product Catalog site, the products listings, and the Retail-
publishing job.
Task 1: Explore the components of the Online Storefront Solution in
SharePoint.
High Level Steps
1. Open the Retail Product Catalog site, and then review the product
listings and attributes.
2. Open SharePoint Central Administration, and then review the
definition of the Retail-publishing job.
Detailed Steps
To open the Retail Product Catalog site, follow these steps:
1. In the browser address bar, type “http://
ax2012r2a:40001/sites/RetailProductCatalog” to open the product
catalog site. See the “Retail Product Catalog Site” graphic.
Figure 20: Retail product catalog site
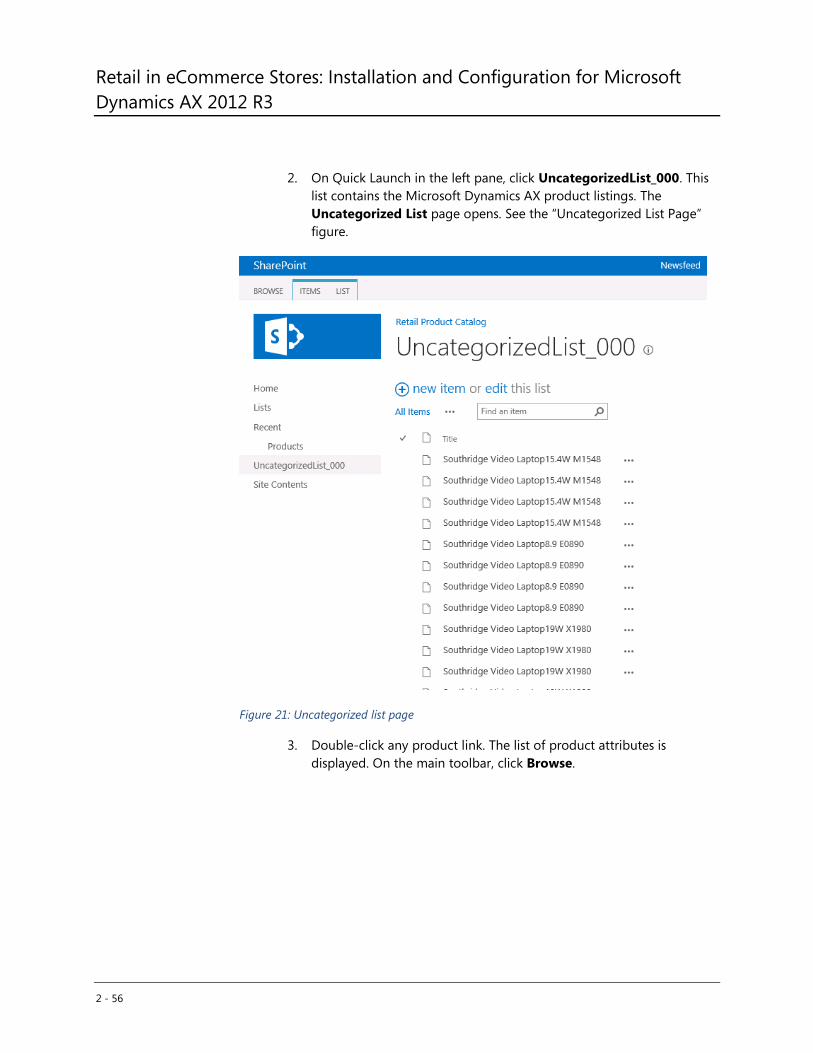
Retail in eCommerce Stores: Installation and Configuration for Microsoft
Dynamics AX 2012 R3
2 - 56
2. On Quick Launch in the left pane, click UncategorizedList_000. This
list contains the Microsoft Dynamics AX product listings. The
Uncategorized List page opens. See the “Uncategorized List Page”
figure.
Figure 21: Uncategorized list page
3. Double-click any product link. The list of product attributes is
displayed. On the main toolbar, click Browse.
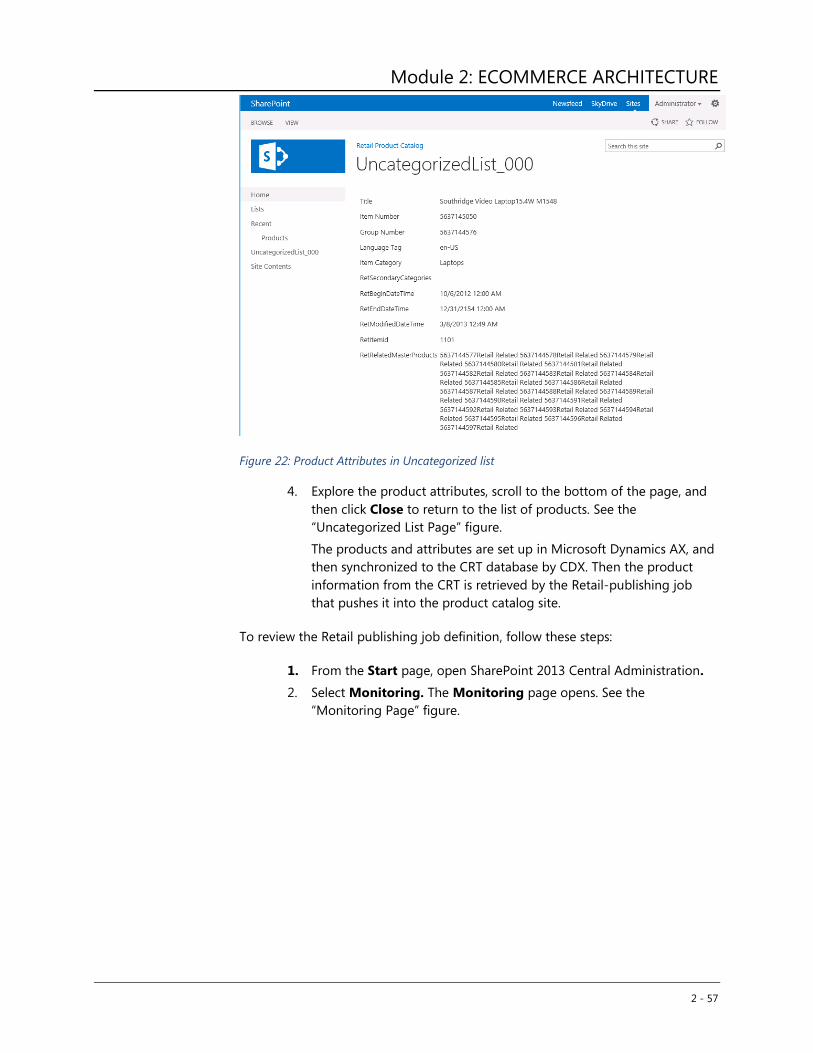
Module 2: ECOMMERCE ARCHITECTURE
2 - 57
Figure 22: Product Attributes in Uncategorized list
4. Explore the product attributes, scroll to the bottom of the page, and
then click Close to return to the list of products. See the
“Uncategorized List Page” figure.
The products and attributes are set up in Microsoft Dynamics AX, and
then synchronized to the CRT database by CDX. Then the product
information from the CRT is retrieved by the Retail-publishing job
that pushes it into the product catalog site.
To review the Retail publishing job definition, follow these steps:
1. From the Start page, open SharePoint 2013 Central Administration.
2. Select Monitoring. The Monitoring page opens. See the
“Monitoring Page” figure.
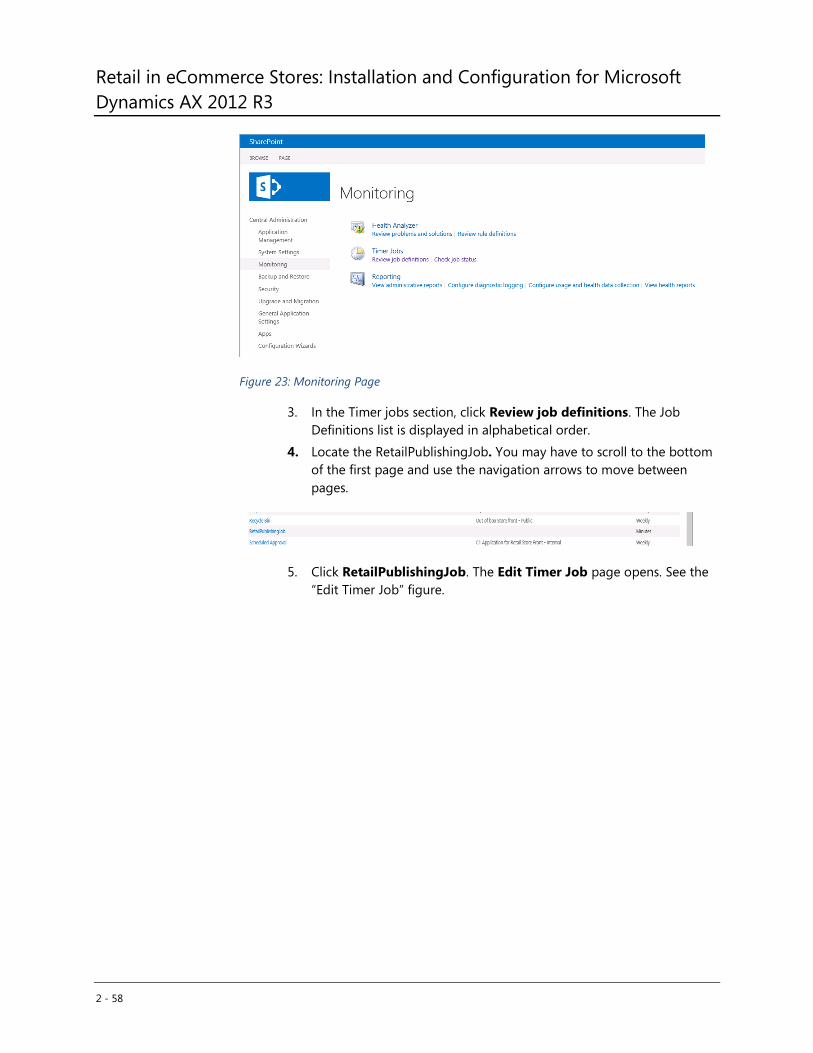
Retail in eCommerce Stores: Installation and Configuration for Microsoft
Dynamics AX 2012 R3
2 - 58
Figure 23: Monitoring Page
3. In the Timer jobs section, click Review job definitions. The Job
Definitions list is displayed in alphabetical order.
4. Locate the RetailPublishingJob. You may have to scroll to the bottom
of the first page and use the navigation arrows to move between
pages.
5. Click RetailPublishingJob. The Edit Timer Job page opens. See the
“Edit Timer Job” figure.
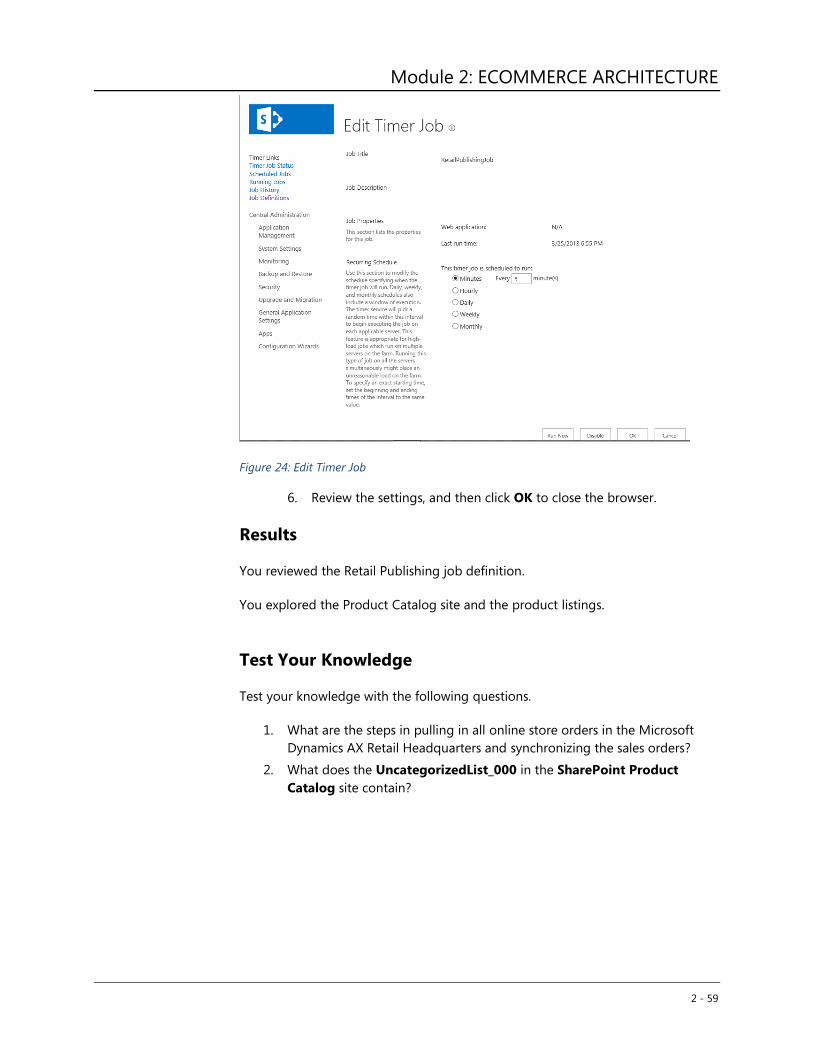
Module 2: ECOMMERCE ARCHITECTURE
2 - 59
Figure 24: Edit Timer Job
6. Review the settings, and then click OK to close the browser.
Results
You reviewed the Retail Publishing job definition.
You explored the Product Catalog site and the product listings.
Test Your Knowledge
Test your knowledge with the following questions.
1. What are the steps in pulling in all online store orders in the Microsoft
Dynamics AX Retail Headquarters and synchronizing the sales orders?
2. What does the UncategorizedList_000 in the SharePoint Product
Catalog site contain?
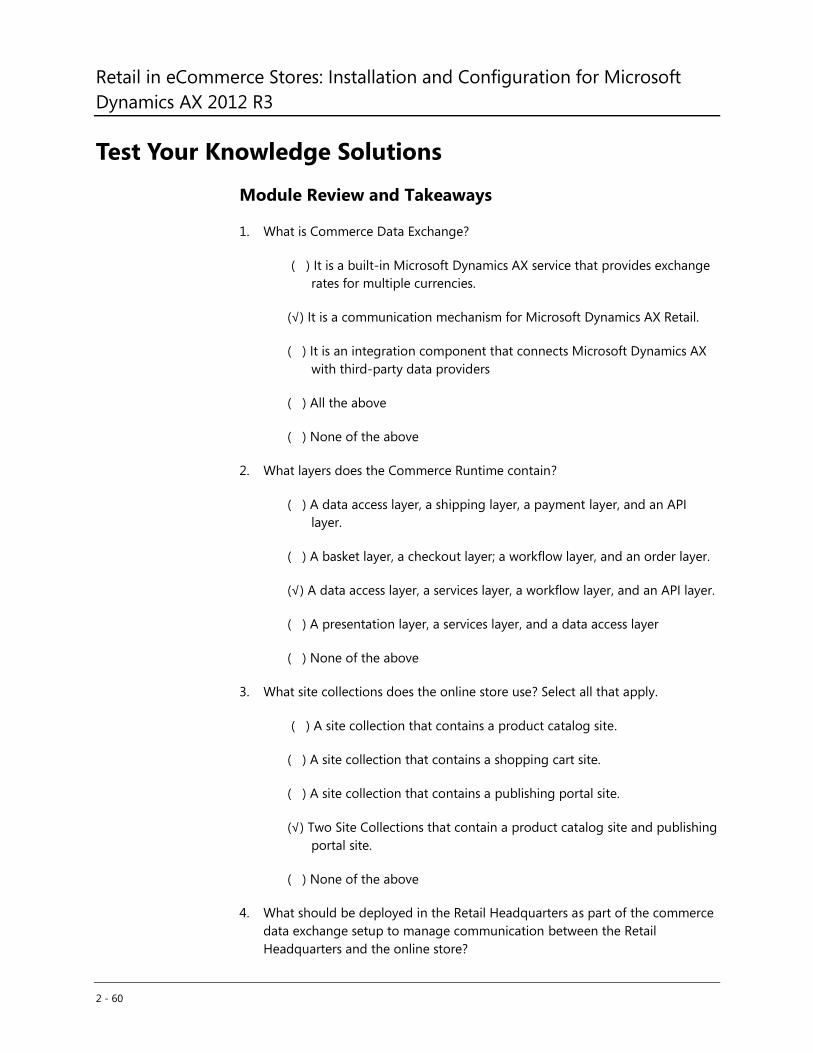
Retail in eCommerce Stores: Installation and Configuration for Microsoft
Dynamics AX 2012 R3
2 - 60
Test Your Knowledge Solutions
Module Review and Takeaways
1. What is Commerce Data Exchange?
( ) It is a built-in Microsoft Dynamics AX service that provides exchange
rates for multiple currencies.
(√) It is a communication mechanism for Microsoft Dynamics AX Retail.
( ) It is an integration component that connects Microsoft Dynamics AX
with third-party data providers
( ) All the above
( ) None of the above
2. What layers does the Commerce Runtime contain?
( ) A data access layer, a shipping layer, a payment layer, and an API
layer.
( ) A basket layer, a checkout layer; a workflow layer, and an order layer.
(√) A data access layer, a services layer, a workflow layer, and an API layer.
( ) A presentation layer, a services layer, and a data access layer
( ) None of the above
3. What site collections does the online store use? Select all that apply.
( ) A site collection that contains a product catalog site.
( ) A site collection that contains a shopping cart site.
( ) A site collection that contains a publishing portal site.
(√) Two Site Collections that contain a product catalog site and publishing
portal site.
( ) None of the above
4. What should be deployed in the Retail Headquarters as part of the commerce
data exchange setup to manage communication between the Retail
Headquarters and the online store?
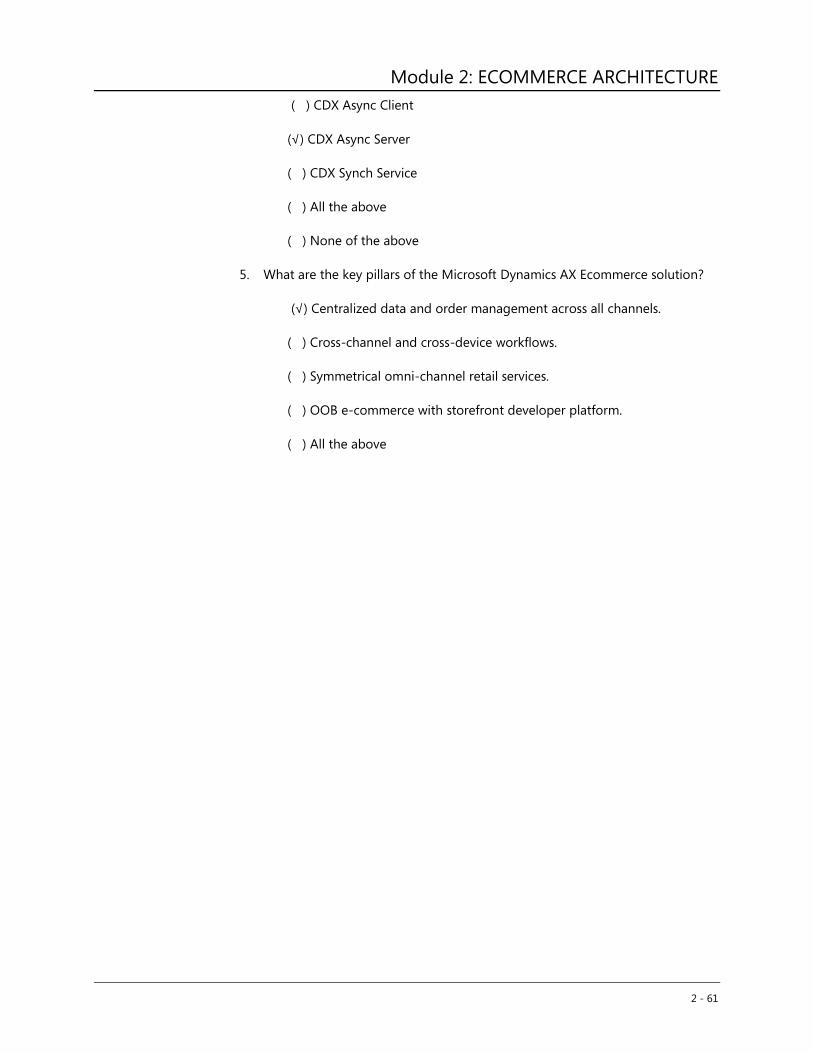
Module 2: ECOMMERCE ARCHITECTURE
2 - 61
( ) CDX Async Client
(√) CDX Async Server
( ) CDX Synch Service
( ) All the above
( ) None of the above
5. What are the key pillars of the Microsoft Dynamics AX Ecommerce solution?
(√) Centralized data and order management across all channels.
( ) Cross-channel and cross-device workflows.
( ) Symmetrical omni-channel retail services.
( ) OOB e-commerce with storefront developer platform.
( ) All the above
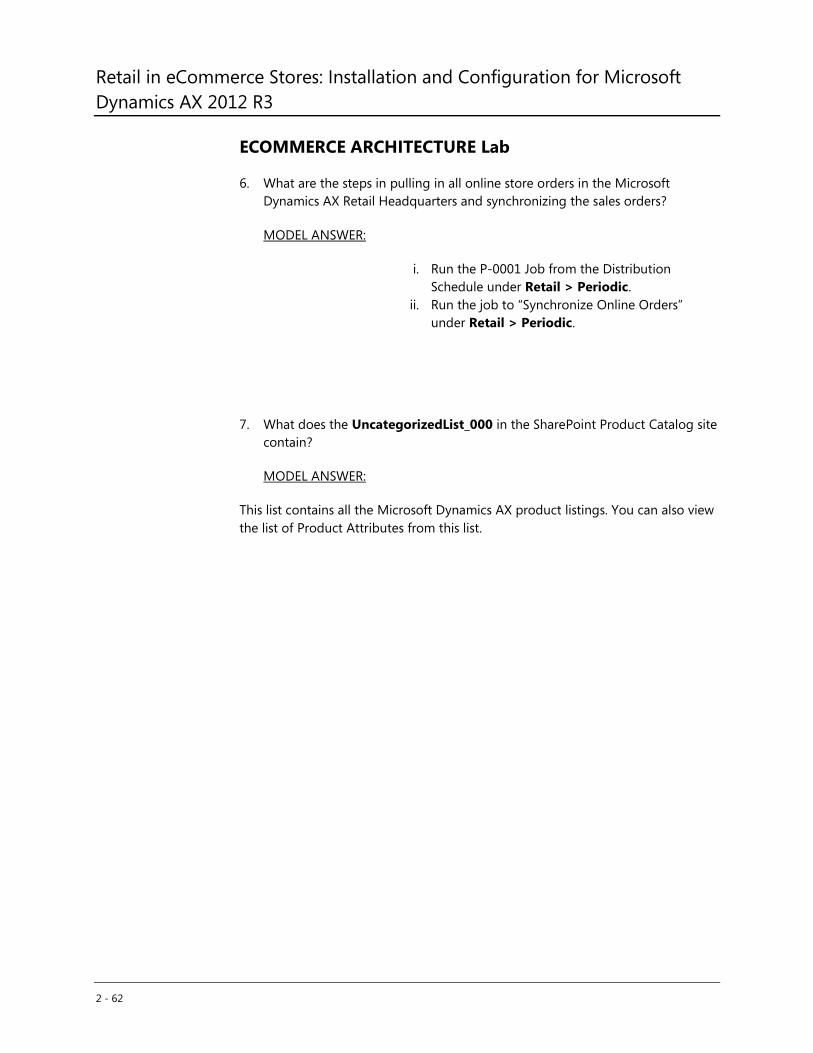
Retail in eCommerce Stores: Installation and Configuration for Microsoft
Dynamics AX 2012 R3
2 - 62
ECOMMERCE ARCHITECTURE Lab
6. What are the steps in pulling in all online store orders in the Microsoft
Dynamics AX Retail Headquarters and synchronizing the sales orders?
MODEL ANSWER:
i. Run the P-0001 Job from the Distribution
Schedule under Retail > Periodic.
ii. Run the job to “Synchronize Online Orders”
under Retail > Periodic.
7. What does the UncategorizedList_000 in the SharePoint Product Catalog site
contain?
MODEL ANSWER:
This list contains all the Microsoft Dynamics AX product listings. You can also view
the list of Product Attributes from this list.
3 - 1
MODULE 3: INSTALLATION OF ECOMMERCE
COMPONENTS
Module Overview
Microsoft Dynamics AX 2012 R3 Ecommerce solution includes a starter online
store that is built by using Microsoft SharePoint Server 2013, developer tools, and
administrative and runtime components that integrate the SharePoint Ecommerce
site with Microsoft Dynamics AX. You can deploy Microsoft Dynamics AX Retail
online store on a single server in a development or evaluation environment, or in
a Microsoft SharePoint 2013 Server scaled farm with multiple web front-ends for
production environments. This module covers the installation process and
validation of deployment and troubleshooting.
Objectives
The objectives are as follows:
Explain preinstallation tasks.
Present how to install online channel and configure settings.
Describe how to create and configure the online store by using the
PowerShell.
Review the online store deployment and troubleshoot online store
deployment issues.
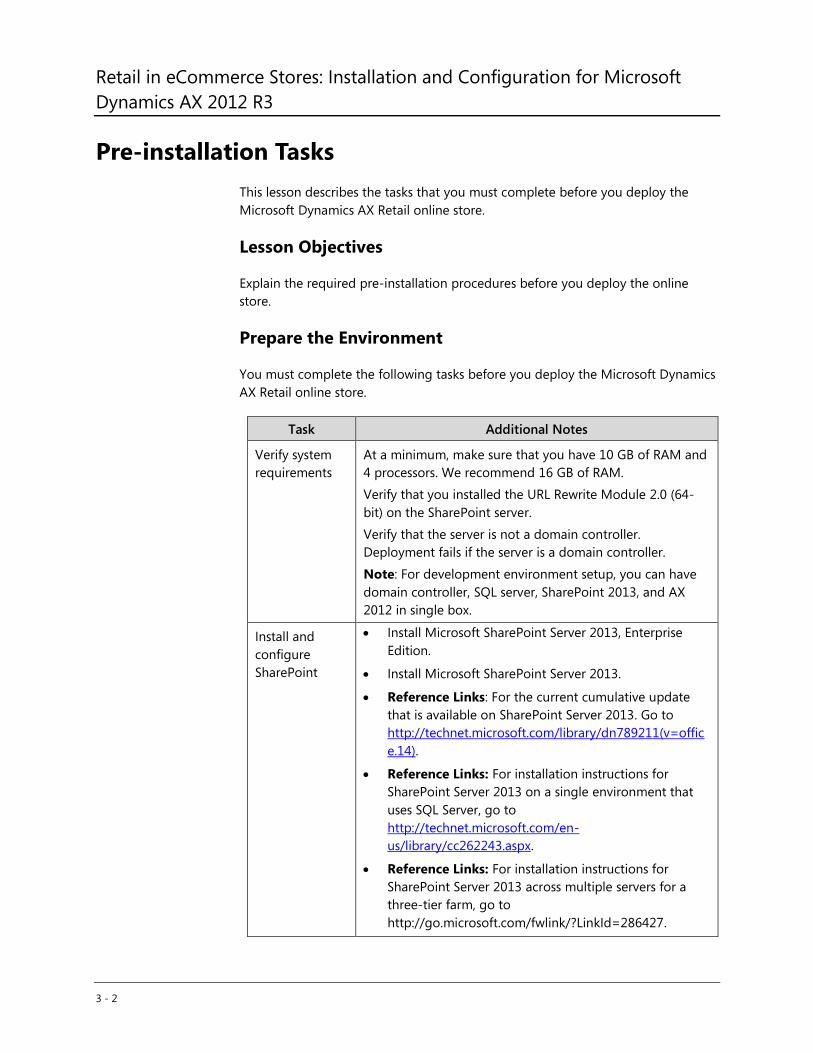
Retail in eCommerce Stores: Installation and Configuration for Microsoft
Dynamics AX 2012 R3
3 - 2
Pre-installation Tasks
This lesson describes the tasks that you must complete before you deploy the
Microsoft Dynamics AX Retail online store.
Lesson Objectives
Explain the required pre-installation procedures before you deploy the online
store.
Prepare the Environment
You must complete the following tasks before you deploy the Microsoft Dynamics
AX Retail online store.
Task Additional Notes
Verify system
requirements
At a minimum, make sure that you have 10 GB of RAM and
4 processors. We recommend 16 GB of RAM.
Verify that you installed the URL Rewrite Module 2.0 (64-
bit) on the SharePoint server.
Verify that the server is not a domain controller.
Deployment fails if the server is a domain controller.
Note: For development environment setup, you can have
domain controller, SQL server, SharePoint 2013, and AX
2012 in single box.
Install and
configure
SharePoint
Install Microsoft SharePoint Server 2013, Enterprise
Edition.
Install Microsoft SharePoint Server 2013.
Reference Links: For the current cumulative update
that is available on SharePoint Server 2013. Go to
http://technet.microsoft.com/library/dn789211(v=offic
e.14).
Reference Links: For installation instructions for
SharePoint Server 2013 on a single environment that
uses SQL Server, go to
http://technet.microsoft.com/en-
us/library/cc262243.aspx.
Reference Links: For installation instructions for
SharePoint Server 2013 across multiple servers for a
three-tier farm, go to
http://go.microsoft.com/fwlink/?LinkId=286427.
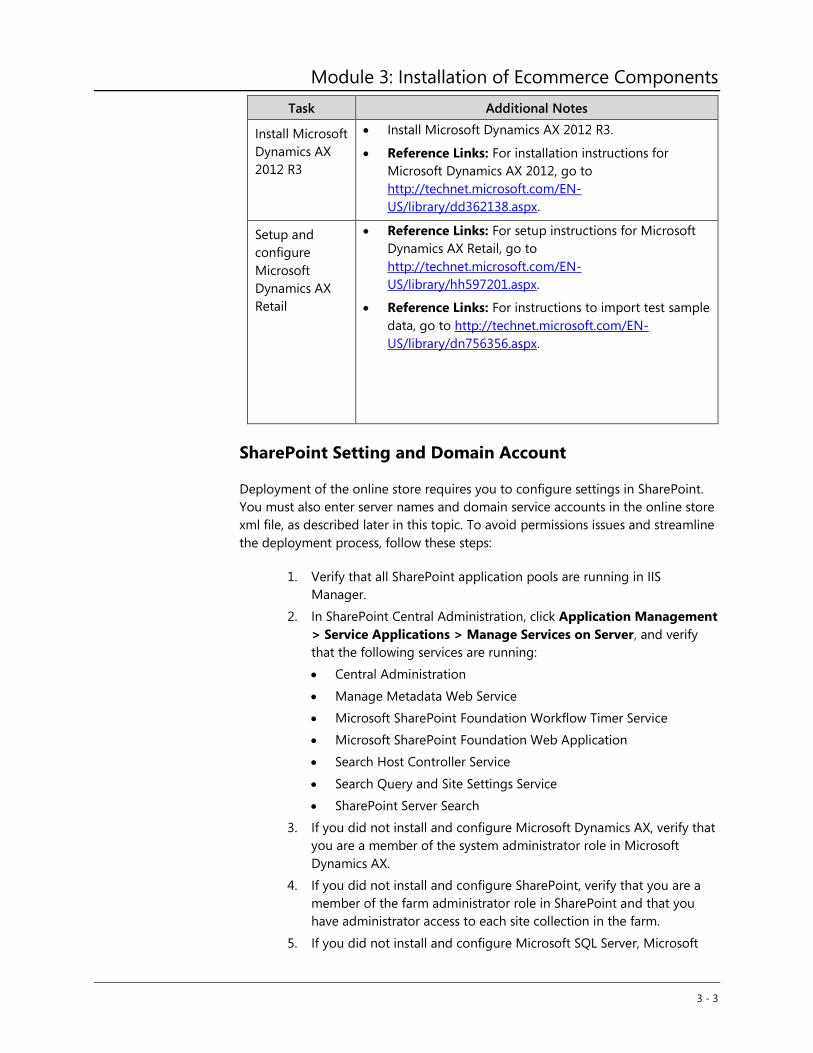
Module 3: Installation of Ecommerce Components
3 - 3
Task Additional Notes
Install Microsoft
Dynamics AX
2012 R3
Install Microsoft Dynamics AX 2012 R3.
Reference Links: For installation instructions for
Microsoft Dynamics AX 2012, go to
http://technet.microsoft.com/EN-
US/library/dd362138.aspx.
Setup and
configure
Microsoft
Dynamics AX
Retail
Reference Links: For setup instructions for Microsoft
Dynamics AX Retail, go to
http://technet.microsoft.com/EN-
US/library/hh597201.aspx.
Reference Links: For instructions to import test sample
data, go to http://technet.microsoft.com/EN-
US/library/dn756356.aspx.
SharePoint Setting and Domain Account
Deployment of the online store requires you to configure settings in SharePoint.
You must also enter server names and domain service accounts in the online store
xml file, as described later in this topic. To avoid permissions issues and streamline
the deployment process, follow these steps:
1. Verify that all SharePoint application pools are running in IIS
Manager.
2. In SharePoint Central Administration, click Application Management
> Service Applications > Manage Services on Server, and verify
that the following services are running:
Central Administration
Manage Metadata Web Service
Microsoft SharePoint Foundation Workflow Timer Service
Microsoft SharePoint Foundation Web Application
Search Host Controller Service
Search Query and Site Settings Service
SharePoint Server Search
3. If you did not install and configure Microsoft Dynamics AX, verify that
you are a member of the system administrator role in Microsoft
Dynamics AX.
4. If you did not install and configure SharePoint, verify that you are a
member of the farm administrator role in SharePoint and that you
have administrator access to each site collection in the farm.
5. If you did not install and configure Microsoft SQL Server, Microsoft

Retail in eCommerce Stores: Installation and Configuration for Microsoft
Dynamics AX 2012 R3
3 - 4
Dynamics AX, or SharePoint, verify that you are a member of the
Sysadmin role on the Microsoft Dynamics AX databases and all
SharePoint databases.
Domain accounts: The deployment process requires domain user accounts for
the following.
Retail Job User: You specified this account when you installed SharePoint. It
is the account under which the SharePoint Timer Service runs.
Product Catalog Web App Pool User: This account is specified in the
deployment XML file that is discussed later in this topic.
Store Front Web App Pool User: You specified this account when you
installed SharePoint. It is the account under which the Security Token Service
application pool runs in IIS Manager.
Verify or create a domain account for each of these users. You enter these
accounts in the deployment XML file later in this topic.
Prerequisite Validation
Before you install the Retail online store, run the prerequisite validation utility to
verify that system requirements are met. If requirements are not met, the utility
helps you install or configure most prerequisites. Additionally, you can view or
print a report that shows the results of the prerequisite validation. After you run
the prerequisite validation utility, and all validation results are successful, run
Windows Update to identify and install the latest updates before you continue
with the installation of Microsoft Dynamics AX Retail online store.
For Server Farm: Configure All Servers to Receive Remote
Commands
You must run the Enable-PSRemoting -Force PowerShell cmdlet on each server
and web front-end in the farm. This command configures the computer to receive
Windows PowerShell remote commands that WS-Management technology sends.
By default, Windows Server2012 Windows PowerShell remoting is enabled. You
can use Enable-PSRemoting to enable Windows PowerShell remoting on other
supported versions of Windows and to re-enable remoting on Windows Server
2012 if it becomes disabled.
Reference Links: Reference Links: For more information about this cmdlet,
including syntax and other parameters see http://technet.microsoft.com/en-
us/library/hh849694.aspx.
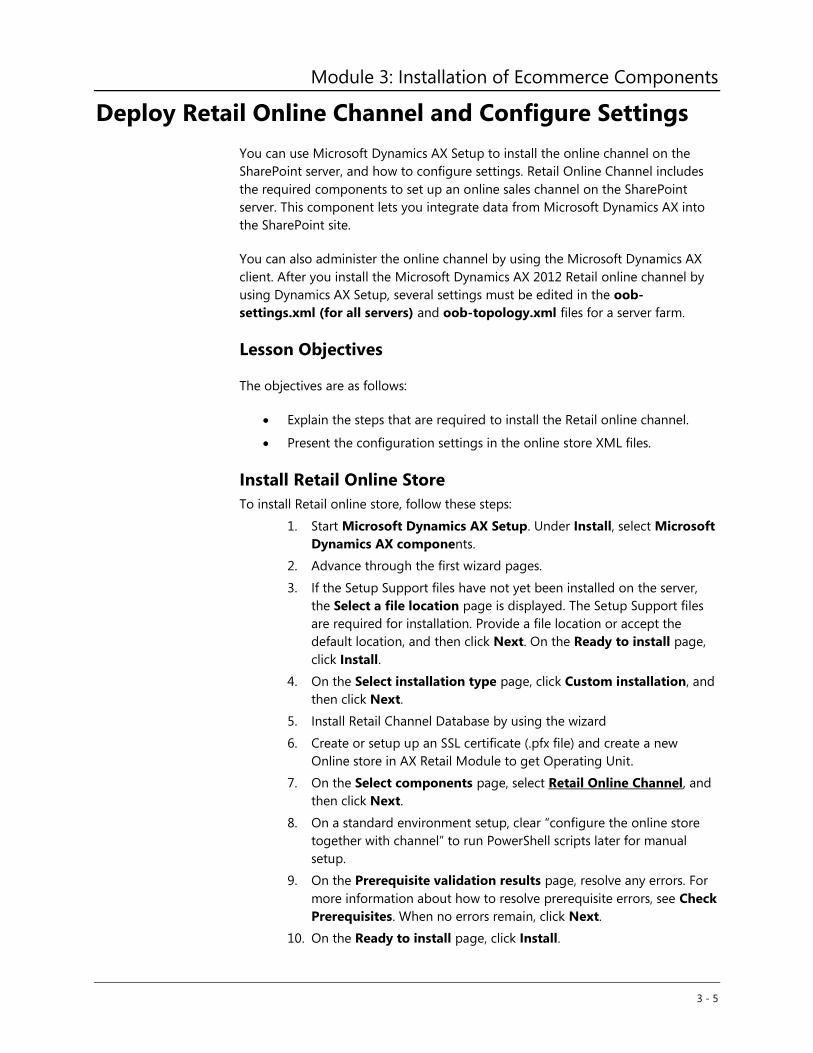
Module 3: Installation of Ecommerce Components
3 - 5
Deploy Retail Online Channel and Configure Settings
You can use Microsoft Dynamics AX Setup to install the online channel on the
SharePoint server, and how to configure settings. Retail Online Channel includes
the required components to set up an online sales channel on the SharePoint
server. This component lets you integrate data from Microsoft Dynamics AX into
the SharePoint site.
You can also administer the online channel by using the Microsoft Dynamics AX
client. After you install the Microsoft Dynamics AX 2012 Retail online channel by
using Dynamics AX Setup, several settings must be edited in the oob-
settings.xml (for all servers) and oob-topology.xml files for a server farm.
Lesson Objectives
The objectives are as follows:
Explain the steps that are required to install the Retail online channel.
Present the configuration settings in the online store XML files.
Install Retail Online Store
To install Retail online store, follow these steps:
1. Start Microsoft Dynamics AX Setup. Under Install, select Microsoft
Dynamics AX components.
2. Advance through the first wizard pages.
3. If the Setup Support files have not yet been installed on the server,
the Select a file location page is displayed. The Setup Support files
are required for installation. Provide a file location or accept the
default location, and then click Next. On the Ready to install page,
click Install.
4. On the Select installation type page, click Custom installation, and
then click Next.
5. Install Retail Channel Database by using the wizard
6. Create or setup up an SSL certificate (.pfx file) and create a new
Online store in AX Retail Module to get Operating Unit.
7. On the Select components page, select Retail Online Channel, and
then click Next.
8. On a standard environment setup, clear “configure the online store
together with channel” to run PowerShell scripts later for manual
setup.
9. On the Prerequisite validation results page, resolve any errors. For
more information about how to resolve prerequisite errors, see Check
Prerequisites. When no errors remain, click Next.
10. On the Ready to install page, click Install.
Retail in eCommerce Stores: Installation and Configuration for Microsoft
Dynamics AX 2012 R3
3 - 6
11. After the installation is complete, click Finish to exit the wizard.
Windows Server 2012
If you deployed SharePoint Server 2013 on a server that runs Windows Server
2012, then you must complete the following procedure to make sure that the
Microsoft.Web.Administration.dll is not overwritten in the server’s global assembly
cache when you execute deployment scripts.
Note: You do not have to perform this procedure on Windows Server 2008
R2.
1. Open the manifest.xml file in the following directory on the
SharePoint server:
C:\Program Files (x86)\ Microsoft Dynamics AX\60\Retail Online
Channel\StoreFront\SP
2. Delete the following line of code from the manifest.xml file:
<Assembly Location="Microsoft.Web.Administration.dll"
DeploymentTarget="GlobalAssemblyCache" />.
3. Click Save, and then close the file.
For Server Farm: Configure Settings in the oob-
topology.xml File
After you install the online channel by using Microsoft Dynamics AX Setup, locate
the oob-topology.xml file in the C:\Program Files (x86)\ Microsoft Dynamics
AX\60\Retail Online Channel\tools folder. This file stores configurations and
settings for your online store.
This section describes how to configure settings in the oob-topology.xml file. You
must configure database server names and SharePoint service account settings in
this file. If you do not configure the values that are described here, the
deployment fails.
Lesson Objectives
Explain how to configure settings in the oob-topology.xml file
Explain how to configure the settings of the connector service
Present the product catalog settings and the Retail Online Store publishing portal
settings
Module 3: Installation of Ecommerce Components
3 - 7
Explain how to configure Facebook integration.
Connector Settings
The oob-topology.xml file stores account and server settings for a connector
service that runs under the SharePoint OWSTimer.exe service. The connector
service uses a domain account to publish Retail jobs from Microsoft Dynamics AX
to SharePoint. When you execute the PowerShell scripts to deploy the online
store, the system creates a new SharePoint service and a service instance. You can
then view the service instance in SharePoint Central Administration on the System
Settings > Manage Services on Server page.
The new service instance is called Dynamics AX Publishing Connector Service. In a
production environment, the connector service should be installed on at least two
application servers (not web front-end servers). SharePoint prevents two service
instances from running at the same time, but does allow for failover support. You
can specify two application servers where the service instance should run in the
oob-topology.xml file, as described in the following procedure.
For application servers where the service instance should run in the oob-
topology.xml file, follow these steps:
1. Open the oob-topology.xml file in a simple text editor, such as
Notepad or Microsoft® Visual Studio.
2. Search for and replace [RetailJobUser] with the domain account
under which the retail publishing job should run; remove the
brackets. Type the domain account in this format:
Domain\UserAccount.
3. Search for and replace
[PublishingConnectorServiceInstanceServers] with the name(s) of
the application servers where the connector service should run, and
then remove the brackets. Type the application server names in the
format: “server1,server2”, and include the quotation marks.
4. Find [TargetServerNames], and then provide the server name.
5. Save your changes in the oob-topology.xml file.
Configure Settings in the oob-settings.xml File
This section describes how to configure settings in the oob-settings.xml file. By
default, the files are located in C:\Program Files (x86)\ Microsoft Dynamics
AX\60\Retail Online Channel\tools.
Product Catalog Settings
The PowerShell deployment scripts (described in the next lesson) create a product
catalog web application in SharePoint. The SharePoint Search indexer uses this
application. For more information about the product catalog and publishing
Retail in eCommerce Stores: Installation and Configuration for Microsoft
Dynamics AX 2012 R3
3 - 8
portal site collections, refer to Module 01 of this course.
To specify settings for the product catalog application, follow these steps:
1. Open the oob-settings.xml file in a text editor, such as Notepad.
2. Search in the oob-settings.xml file for the parameters in the following
table. Enter a new value for each parameter. For each value, keep the
quotation marks (“”), but remove percent signs (%).
Parameter Replacement value
“ProductCatal
ogWebAppPo
olUser”
Replace this value with the domain account under which the
product catalog application pool should run, for example
value="Domain\User".
“FarmAdminist
ratorAlias”
Replace the value with the domain account and alias of a
SharePoint farm administrator, for example
value="Domain\User".
“FarmAdminist
ratorEmail”
Replace the value with the email address of a SharePoint
farm administrator in the form
value="[email protected]"
3. Save your changes in the oob-settings.xml file.
Retail Online Store Publishing Portal Settings
The PowerShell deployment scripts (described in the next lesson) create a web
application named C2WebApplication in IIS and SharePoint. The deployment
scripts then create site collections on the C2WebApplication. The following table
shows the default details of the site collections.
Zone Authentication URLs
Default Forms, Facebook http://%ComputerName%:40002
Intranet Windows http://%ComputerName%:40003
Internet Forms, Facebook http://www.contoso.com:40002
Extranet Forms, Facebook http://%ComputerName%:40004
Custom Forms, Facebook http://www.contoso.com:40004
Use the following table to specify settings for the Retail online store Publishing
portal in the oob-setting.xml file.
Module 3: Installation of Ecommerce Components
3 - 9
Parameter Replacement value
“StoreFrontWebAppPool
User”
Replace the value with the domain account under
which the Retail Store Publishing Portal application
pool should run, for example value="Domain\User".
“STSWebAppPoolUser” Replace the value with the domain account under
which the SecurityTokenServiceApplicationPool is
running. You specified this account when you
installed SharePoint. To locate the account name in
IIS Manager, click Application Pools, right-click
SecurityTokenServiceApplicationPool, and then
click Advanced Settings. The account name for this
application pool is listed under Process Model >
Identity. For example value="Domain\User".
“RetailJobUser” Replace the value with the domain account under
which the SharePoint Timer service is running. This
account was specified when you installed SharePoint,
for example value="Domain\User".
Encryption Settings
The Retail store publishing portal uses Secure Sockets Layer (SSL) encryption. For
production environments, you must register your domain and obtain a valid,
registered SSL certificate from a provider. For developer and evaluation
environments, you can use a self-signed certificate.
Reference Links: For information about how to work with certificates, see
Certificate Overview at http://technet.microsoft.com/en-
us/library/cc732331(v=ws.10).aspx.
You must configure the following parameters in the oob-settings.xml for
developer/evaluation and production environments.
Parameter Replacement value
“StoreFrontPublicSSLCertT
humbprint”
Replace the value with the thumbprint that is
provided by your SSL certificate. Remove all spaces
between numbers and letters when you enter the
thumbprint in the oob-settings.xml file.
“StoreFrontPublicSSLCert
Directory”
Replace the value with the path of the directory
where the certificate’s .pfx file is stored.
“StoreFrontPublicSSLCert
PfxFileName”
Replace the value with the file name and extension.
By default, the extension is .pfx.
“StoreFrontPublicSSLCert
PfxPassword”
Replace the value with the password of the .pfx file.
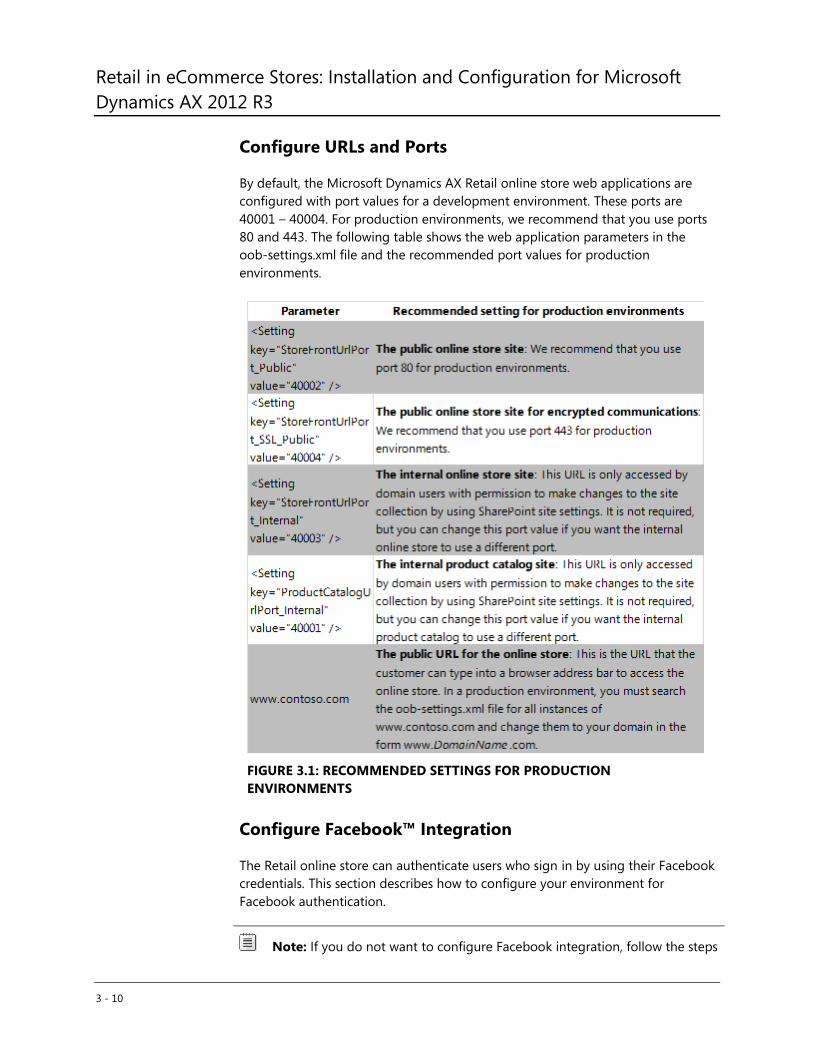
Retail in eCommerce Stores: Installation and Configuration for Microsoft
Dynamics AX 2012 R3
3 - 10
Configure URLs and Ports
By default, the Microsoft Dynamics AX Retail online store web applications are
configured with port values for a development environment. These ports are
40001 – 40004. For production environments, we recommend that you use ports
80 and 443. The following table shows the web application parameters in the
oob-settings.xml file and the recommended port values for production
environments.
FIGURE 3.1: RECOMMENDED SETTINGS FOR PRODUCTION
ENVIRONMENTS
Configure Facebook™ Integration
The Retail online store can authenticate users who sign in by using their Facebook
credentials. This section describes how to configure your environment for
Facebook authentication.
Note: If you do not want to configure Facebook integration, follow the steps
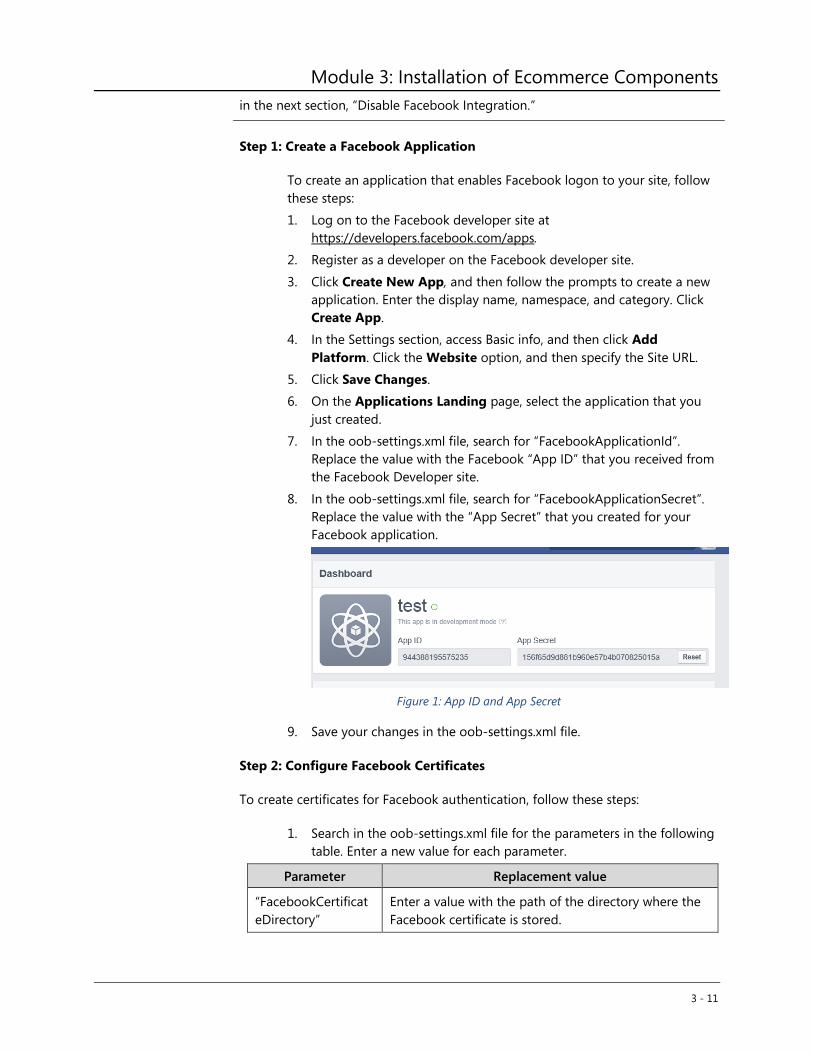
Module 3: Installation of Ecommerce Components
3 - 11
in the next section, “Disable Facebook Integration.”
Step 1: Create a Facebook Application
To create an application that enables Facebook logon to your site, follow
these steps:
1. Log on to the Facebook developer site at
https://developers.facebook.com/apps.
2. Register as a developer on the Facebook developer site.
3. Click Create New App, and then follow the prompts to create a new
application. Enter the display name, namespace, and category. Click
Create App.
4. In the Settings section, access Basic info, and then click Add
Platform. Click the Website option, and then specify the Site URL.
5. Click Save Changes.
6. On the Applications Landing page, select the application that you
just created.
7. In the oob-settings.xml file, search for “FacebookApplicationId”.
Replace the value with the Facebook “App ID” that you received from
the Facebook Developer site.
8. In the oob-settings.xml file, search for “FacebookApplicationSecret”.
Replace the value with the “App Secret” that you created for your
Facebook application.
Figure 1: App ID and App Secret
9. Save your changes in the oob-settings.xml file.
Step 2: Configure Facebook Certificates
To create certificates for Facebook authentication, follow these steps:
1. Search in the oob-settings.xml file for the parameters in the following
table. Enter a new value for each parameter.
Parameter Replacement value
“FacebookCertificat
eDirectory”
Enter a value with the path of the directory where the
Facebook certificate is stored.
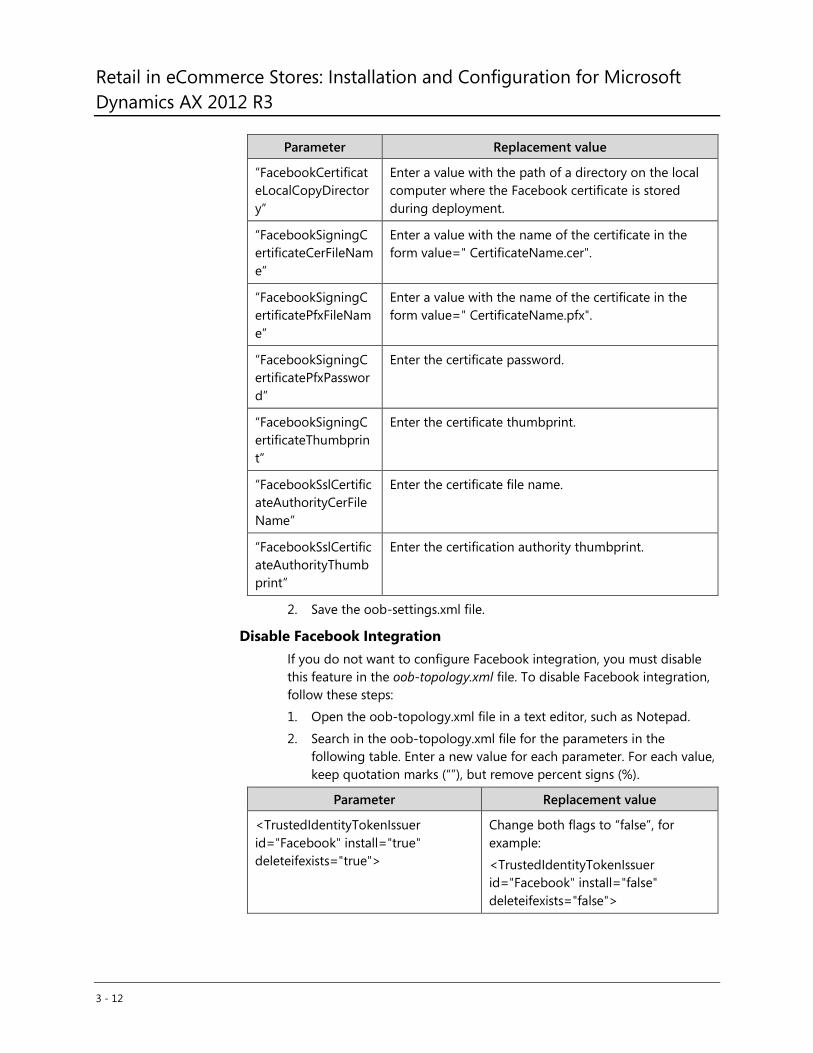
Retail in eCommerce Stores: Installation and Configuration for Microsoft
Dynamics AX 2012 R3
3 - 12
Parameter Replacement value
“FacebookCertificat
eLocalCopyDirector
y”
Enter a value with the path of a directory on the local
computer where the Facebook certificate is stored
during deployment.
“FacebookSigningC
ertificateCerFileNam
e”
Enter a value with the name of the certificate in the
form value=" CertificateName.cer".
“FacebookSigningC
ertificatePfxFileNam
e”
Enter a value with the name of the certificate in the
form value=" CertificateName.pfx".
“FacebookSigningC
ertificatePfxPasswor
d”
Enter the certificate password.
“FacebookSigningC
ertificateThumbprin
t”
Enter the certificate thumbprint.
“FacebookSslCertific
ateAuthorityCerFile
Name”
Enter the certificate file name.
“FacebookSslCertific
ateAuthorityThumb
print”
Enter the certification authority thumbprint.
2. Save the oob-settings.xml file.
Disable Facebook Integration
If you do not want to configure Facebook integration, you must disable
this feature in the oob-topology.xml file. To disable Facebook integration,
follow these steps:
1. Open the oob-topology.xml file in a text editor, such as Notepad.
2. Search in the oob-topology.xml file for the parameters in the
following table. Enter a new value for each parameter. For each value,
keep quotation marks (“”), but remove percent signs (%).
Parameter Replacement value
<TrustedIdentityTokenIssuer
id="Facebook" install="true"
deleteifexists="true">
Change both flags to “false”, for
example:
<TrustedIdentityTokenIssuer
id="Facebook" install="false"
deleteifexists="false">
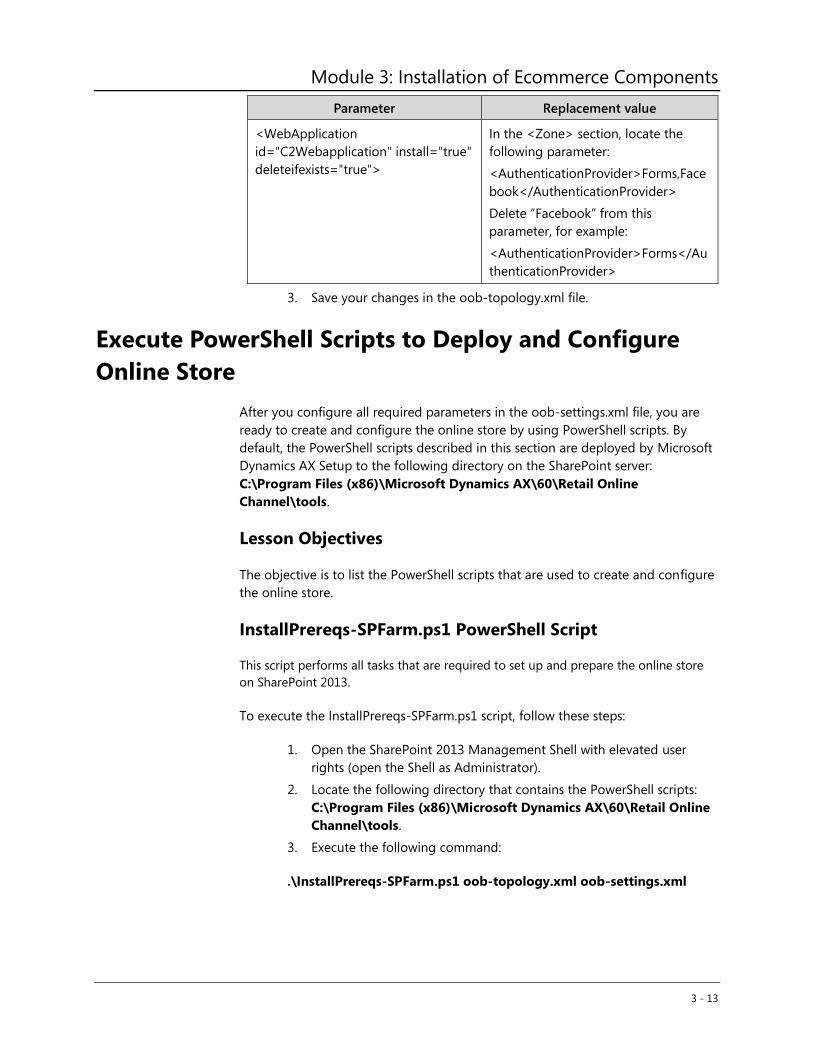
Module 3: Installation of Ecommerce Components
3 - 13
Parameter Replacement value
<WebApplication
id="C2Webapplication" install="true"
deleteifexists="true">
In the <Zone> section, locate the
following parameter:
<AuthenticationProvider>Forms,Face
book</AuthenticationProvider>
Delete “Facebook” from this
parameter, for example:
<AuthenticationProvider>Forms</Au
thenticationProvider>
3. Save your changes in the oob-topology.xml file.
Execute PowerShell Scripts to Deploy and Configure
Online Store
After you configure all required parameters in the oob-settings.xml file, you are
ready to create and configure the online store by using PowerShell scripts. By
default, the PowerShell scripts described in this section are deployed by Microsoft
Dynamics AX Setup to the following directory on the SharePoint server:
C:\Program Files (x86)\Microsoft Dynamics AX\60\Retail Online
Channel\tools.
Lesson Objectives
The objective is to list the PowerShell scripts that are used to create and configure
the online store.
InstallPrereqs-SPFarm.ps1 PowerShell Script
This script performs all tasks that are required to set up and prepare the online store
on SharePoint 2013.
To execute the InstallPrereqs-SPFarm.ps1 script, follow these steps:
1. Open the SharePoint 2013 Management Shell with elevated user
rights (open the Shell as Administrator).
2. Locate the following directory that contains the PowerShell scripts:
C:\Program Files (x86)\Microsoft Dynamics AX\60\Retail Online
Channel\tools.
3. Execute the following command:
.\InstallPrereqs-SPFarm.ps1 oob-topology.xml oob-settings.xml
Retail in eCommerce Stores: Installation and Configuration for Microsoft
Dynamics AX 2012 R3
3 - 14
Generate-WSP.ps1 PowerShell Script
This script creates SharePoint solution packages (.wsp files) for your environment.
The solution packages include properties such as connection strings, URLs, and
ports from the oob-topology.xml and oob-settings.xml files. The solution
packages also include binaries, images, and static web pages that were deployed
by Microsoft Dynamics AX setup to the Retail Online storefront directory.
To execute the Generate-WSP.ps1 script, follow these steps:
1. Open the SharePoint 2013 Management Shell with elevated user
rights (open the Shell as Administrator).
2. Locate the following directory that contains the PowerShell scripts:
C:\Program Files (x86)\Microsoft Dynamics AX\60\Retail Online
Channel\tools.
3. Execute the following command:
.\Generate-WSP.ps1 oob-topology.xml oob-settings.xml
Toggling options while rerunning scripts to preserve
previous installations
By default, existing databases, web applications, features, and settings are deleted
on rerunning PowerShell scripts; however, you can toggle different parameters in
the oob-topology.xml file to preserve databases, web applications, features, and
settings. You change a “true” flag to “false” to preserve deletions. For example, in
the oob-topology file, in the <Channel> section, the Database is configured as
follows:
<Database install="true" dropifexists="true">
By changing each flag to “false”, the deployment scripts preserve the existing
databases.
Deploy-FarmSolutions.ps1 PowerShell Script
This script deploys the generated SharePoint solution packages, starts the
SharePoint features on the corresponding sites, and executes any post-
deployment tasks that are required for setting up the store front.
To execute the Deploy-FarmSolutions.ps1 script, follow these steps:
1. Open the SharePoint 2013 Management Shell with elevated user
rights (open the Shell as Administrator).
2. Locate the following directory that contains the PowerShell scripts:
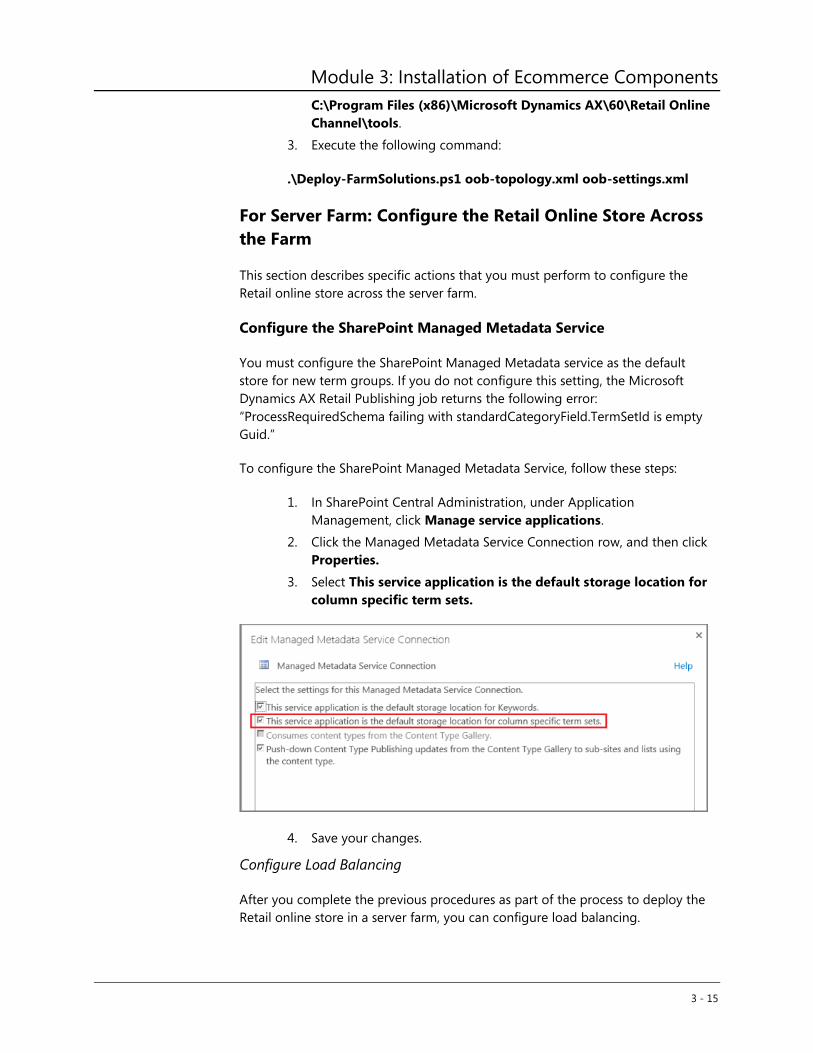
Module 3: Installation of Ecommerce Components
3 - 15
C:\Program Files (x86)\Microsoft Dynamics AX\60\Retail Online
Channel\tools.
3. Execute the following command:
.\Deploy-FarmSolutions.ps1 oob-topology.xml oob-settings.xml
For Server Farm: Configure the Retail Online Store Across
the Farm
This section describes specific actions that you must perform to configure the
Retail online store across the server farm.
Configure the SharePoint Managed Metadata Service
You must configure the SharePoint Managed Metadata service as the default
store for new term groups. If you do not configure this setting, the Microsoft
Dynamics AX Retail Publishing job returns the following error:
“ProcessRequiredSchema failing with standardCategoryField.TermSetId is empty
Guid.”
To configure the SharePoint Managed Metadata Service, follow these steps:
1. In SharePoint Central Administration, under Application
Management, click Manage service applications.
2. Click the Managed Metadata Service Connection row, and then click
Properties.
3. Select This service application is the default storage location for
column specific term sets.
4. Save your changes.
Configure Load Balancing
After you complete the previous procedures as part of the process to deploy the
Retail online store in a server farm, you can configure load balancing.
Retail in eCommerce Stores: Installation and Configuration for Microsoft
Dynamics AX 2012 R3
3 - 16
Load balancing for the online store is implemented by using a Microsoft
SharePoint Server 2013 component called Request Manager. Similar to Microsoft
Network Load Balancing (NLB), Request Manager enables administrators to
manage incoming requests and determine how SharePoint routes these requests.
Reference Links: For more information about Configure Request Manager
in SharePoint Server 2013, refer to http://technet.microsoft.com/en-
us/library/jj712708.aspx.
For instructions on how to set up Microsoft Dynamics Retail Online store
ECommerce, refer to http://technet.microsoft.com/en-
us/library/jj991927.aspx#Setup.
Verifying the Retail Online Store Deployment and
Troubleshooting
After you run the deployment scripts and they complete without errors, you are now
able to verify and validate the online store deployment process.
This lesson includes troubleshooting tips and actions to take for specific error
messages.
Lesson Objectives
The objectives are as follows:
Explain how to validate the deployment of Retail online store.
Explain how to handle error messages.
Verify Dynamics AX Publishing Connector
After a successful deployment, the Dynamics AX Publishing Connector Service
runs in SharePoint Central Administration. At this point, the service displays the
following error: “No channel configuration could be found in the database.” This
means that the channel has not been configured in Microsoft Dynamics AX yet.
Reference Links: You must configure the channel in Microsoft Dynamics
AX. For directions for how to do this, go to: http://technet.microsoft.com/EN-
US/library/jj728704.aspx.
Module 3: Installation of Ecommerce Components
3 - 17
Verify Online Store SharePoint Site Collections
After a successful deployment, you can view the Retail online store web
applications and site collections in SharePoint Central Administration. If you
specified different URLs for your web applications, adjust the following URLS by
following these steps:
1. In SharePoint Central Administration, open Application
Management, and then open View all site collections. You can view
all site collections that are created under each web application.
2. To check the Retail Catalog site and Retail Publishing site, copy the
following URLs into a browser, and then validate that you can locate
each site:
http://ServerName:40001/sites/RetailProductCatalog
This is your Retail Product Catalog site.
http://ServerName:40002/sites/RetailPublishingPortal
This is your Retail Publishing portal that is the Contoso Electronics
Superstore site.
Verify Creation and Sign In with a New Forms-Based User
Account
You should be able to register a new user account and logon from the public URL.
By completing the sign-up process, you verify SQL Server connectivity, SSL port
settings, and SSL certificate bindings.
To verify and sign in with a new forms-based user account, follow these steps:
1. Paste the public URL into a browser, and press Enter. For example:
http://ServerName:40002/sites/RetailPublishingPortal
2. Click Register a new account.
3. Type an email address and a strong password in the required fields,
and then click Create account. If you see more than one email and
password field on the page, it means that you executed the Deploy-
FarmSolutions.ps1 script multiple times on this server. This is a known
issue. To create the forms-based user account, you must type the
email address and strong password in each field. Also be aware that
you receive an error after you register the account because the online
channel has not been configured in Microsoft Dynamics AX.
4. Browse to the public portal site again (http://
ServerName:40002/sites/RetailPublishingPortal).
Click the Sign In link, and then enter the information for the account that you just
created. The system logs you onto the Contoso electronics site as a registered
user.
Retail in eCommerce Stores: Installation and Configuration for Microsoft
Dynamics AX 2012 R3
3 - 18
Verify Browsing to the Public URL
If you registered a domain, you should be able to surf the web address for your
site. For example, you should be able to browse to
http://www.<your_domain>.com/sites/RetailPublishingPortal.
If you have not yet registered the domain, then you must create a hosts file entry
and disable proxy settings in your browser (if applicable) before you try to browse
to the web address.
Troubleshoot Online Store Deployment Issues
General tips: If you experience an error during the execution phase of one of the
deployment PowerShell scripts, you can rerun the script after you have resolved
the error.
You do not have to rerun completed scripts. If you rerun the Deploy-
FarmSolutions script, the system automatically invokes the DeactivateOnly-
Features.ps1 and RetractOnly-Solutions.ps1 scripts before you deploy the farm
solution. These scripts clean up actions that are performed by the Deploy-
FarmSolutions script before redeploying.
Developer Environment Setup tips: On a real-time scenario, the development
environments needs custom code to be built as a wsp package by using Visual
Studio, and then opening the Storefront solution. To do this, follow these steps:
1. Update the storefront solution with a new Storenamekey.snk file.
Resolve reference errors, and then build the solution.
2. Upon a successful build, drop the solution in the Final_WSP folder,
which is located at C:\Program Files (x86)\Microsoft Dynamics
AX\60\Retail Online Channel\Storefront\Final_WSP.
3. Similar steps must be followed for Retailjobs, ContosoDemoData and
FabrikamDemoData solution, if you have any changes. These
development solutions are located at the default location of the Retail
Sdk installation folder during the Microsoft Dynamics AX installation.
Out of the box, the default location is:
C:\Users\<CurrentAdminUser>\Documents\Retail SDK\Online
Channel.
4. Before you run the “Execute PowerShell scripts to deploy and
configure online store” steps in the previous section, run the
.\Prepare-FromWSP.ps1 oob-topology.xml oob-settings.xml.
5. Unpack the built Visual Studio package into the SP folder. This step
gets the built WSP package, and unpacks and adds metadata to the
manifest file, depending on the topology settings of the online portal
URL. When you follow the “Execute PowerShell scripts to deploy and

Module 3: Installation of Ecommerce Components
3 - 19
configure online store” procedure in the previous section, the
custom-built solution is deployed. If you receive any “.dlls missing”
errors during the deploy steps, follow these steps:
a. From the build Visual Studio solution, perform a GAC
update to push custom built assemblies that are thrown
as errors.
b. Rerun the current PowerShell script.
Search the SharePoint Unified Service Logging (ULS) logs: The SharePoint
ULS logs provides more information about errors. Search the event logs for a time
stamp that reflects your deployment activities. By default, the logs are stored at
the following location: C:\Program Files\Common Files\Microsoft Shared\Web
Server Extensions\15\LOGS.
Configure tracing details in SharePoint Diagnostic Logging: The Windows
Event log and the SharePoint ULS log (C:\Program Files\Common
Files\Microsoft Shared\Web Server Extensions\15\LOGS) store exceptions for
events that are triggered when you deploy the Retail online store. Traces for the
Retail online store display “Dynamics AX Retail”. To help you troubleshoot the
deployment, you can adjust tracing and information levels by following these
steps:
1. In SharePoint Central Administration, click Monitoring, and then
click Configure diagnostic logging.
2. Select Dynamics AX Retail.
3. Use the drop-down lists in Categories, and select Verbose as the least
critical events and traces to log.
4. Save your changes.
Error: The file name is required: If you receive this error in the Command
Prompt window after you execute a script, it means that you did not add the
oob-topology.xml and oob-settings.xml files to the end of the script. Each script
must be executed in the following form: powershell .\ScriptName.ps1 oob-
topology.xml oob-settings.xml.
Error: 500 Internal Server: If you see this error in the Command Prompt
window after you execute the Deploy-FarmSolutions script, it means that you
have not installed the URL Rewrite Module 2.0 on the SharePoint server. Install the
URL Rewrite Module, and then execute the Deploy-FarmSolutions script again.
Error: System.Servicemodel.ServiceActivationException: If you see this error in
the Command Prompt window after you execute any of the PowerShell scripts, it
means that the server has insufficient RAM to complete the operation. Verify that
the server has at least 10 GB of RAM. If it is possible, increase the RAM to 16 GB,
and then execute the scripts again.
Error: System.InvalidOperationException: standardCategoryField.TermSetId
Retail in eCommerce Stores: Installation and Configuration for Microsoft
Dynamics AX 2012 R3
3 - 20
is empty Guid: This error can mean one of the following.
One of the SharePoint application pools is not running in
IIS Manager.
The Managed Metadata Service application is not
installed in SharePoint.
The wrong SKU of SharePoint is installed on the server.
Verify that all application pools are running in IIS Manager and that the Managed
Metadata Service application is installed and running in SharePoint. If you still see
this error, then uninstall all versions of SharePoint and restart the server. Reinstall
SharePoint Server 2013, and execute the PowerShell scripts again.
Domain account password changed: If a password for one or more of the
required domain accounts changes, then you must update the credentials for that
domain account in the following locations:
1. In IIS Manager, update credentials for any application pools that were
configured with the domain account.
2. In the Windows Services console, filter the list of services according to
Log On As and change any service that was configured with the
domain account.
3. If it is necessary, in SharePoint Central Administration, click Security
> Configure managed accounts. Edit or delete accounts as
necessary.
Return SharePoint Server to a Clean State
If for any reason, you want to return the server to a clean state, follow
these steps:
1. In SharePoint Central Administration, click System Settings, and
then click Manage Farm features. Deactivate the following features:
CustomClaimsProviderFeature
LoggingServiceFeature
RetailPublishingJobFeature.
If you do not see one or more of these features, go to step 2. Otherwise,
go to step 3.
2. On the System Settings page, click Manage farm solutions. Retract
each solution, and then click OK. IIS and SharePoint Central
Administration are temporarily unavailable.
3. On the Application Management page, click Manage web
applications. Delete C1 Application for Retail Store Front - Internal
and Out of box Store front – Public.
4. Restart the web service.
Module 3: Installation of Ecommerce Components
3 - 21
Retail in eCommerce Stores: Installation and Configuration for Microsoft
Dynamics AX 2012 R3
3 - 22
Module Review
This course highlighted the features and deployment steps of the Microsoft
Dynamics AX 2012 R3 Ecommerce Retail online store that is built by using
Microsoft SharePoint Server 2013.
Test Your Knowledge
Test your knowledge with the following questions.
1. What will you use to install the Retail online channel components on
SharePoint Server 2013?
( ) InstallPrereqs-SPFarm.ps1 PowerShell script
( ) SharePoint Central Administration
( ) Microsoft Dynamics AX 2012 R3 Setup
Module 3: Installation of Ecommerce Components
3 - 23
Lab: Online Storefront Installation
Scenario
Ecommerce solution includes a starter online store that is built by using Microsoft
SharePoint Server 2013, developer tools, and administrative and runtime
components that integrate the SharePoint Ecommerce site with Microsoft
Dynamics AX.
Objectives
This lab discusses installation of the Online Storefront
After you complete this lab, you can do the following:
Install online channel and configure settings.
Create and configure the online store by using PowerShell.
Verify the online store deployment.
Exercise 1: DEPLOY RETAIL ONLINE CHANNEL AND
CONFIGURE SETTINGS
Exercise Scenario
This lab takes you through setting up the online channel. Retail Online Channel
includes components that you need to set up an online sales channel on the
SharePoint server. This component lets you integrate data from Microsoft
Dynamics AX into the SharePoint site.
You can also administer the online channel by using the Microsoft Dynamics AX
client. After you install the Microsoft Dynamics AX 2012 Retail online channel by
using Dynamics AX Setup, there are several settings that must you must edit in the
oob-settings.xml.
Task 1: Install Retail Online Store
High Level Steps
Install Retail Online Store
Configure Settings in the oob-settings.xml file
Retail Online Store Publishing Portal Settings
Encryption Settings
Detailed Steps
To install Retail Online Store, follow these steps:
1. Start Microsoft Dynamics AX Setup. Under Install, select Microsoft

Retail in eCommerce Stores: Installation and Configuration for Microsoft
Dynamics AX 2012 R3
3 - 24
Dynamics AX components.
2. Advance through the first wizard pages.
3. If the Setup Support files have not yet been installed on the server,
the Select a file location page is displayed. The Setup Support files
are required for installation. Provide a file location or accept the
default location, and then click Next. On the Ready to install page,
click Install.
4. On the Select installation type page, click Custom installation, and
then click Next.
5. On the Select components page, select Retail Channel Database,
click Next, and then click Finish to exit the wizard.
6. Repeat steps 1 to 4, and then on the Select Components page, select
Commerce Data Exchange and configure with the respective values
on the wizard.
7. Click Finish to exit the wizard.
8. Repeat steps 1 to 4, then on the Select components page, select
Retail Online Channel, and then click Next.
9. Select Configure Later, and then click Next.
10. On the Prerequisite validation results page, resolve any errors. For
more information about how to resolve prerequisite errors, see Check
prerequisites. When no errors remain, click Next.
11. On the Ready to install page, click Install.
12. After the installation is complete, click Finish to exit the wizard.
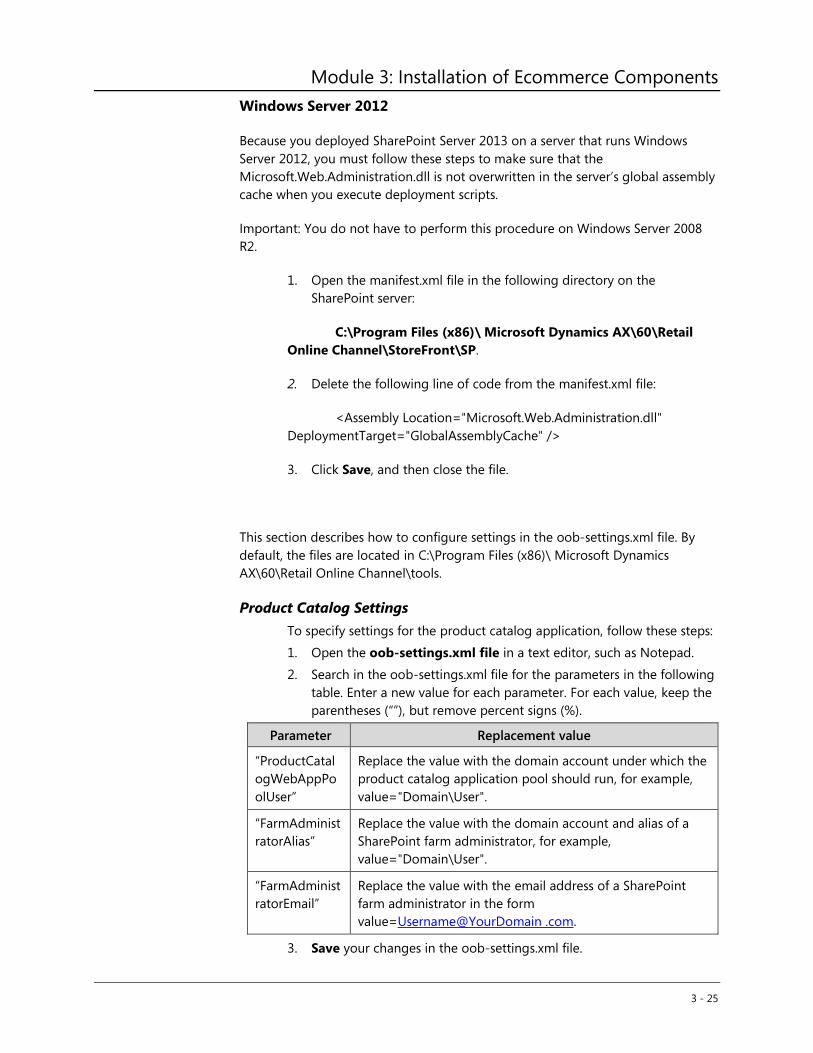
Module 3: Installation of Ecommerce Components
3 - 25
Windows Server 2012
Because you deployed SharePoint Server 2013 on a server that runs Windows
Server 2012, you must follow these steps to make sure that the
Microsoft.Web.Administration.dll is not overwritten in the server’s global assembly
cache when you execute deployment scripts.
Important: You do not have to perform this procedure on Windows Server 2008
R2.
1. Open the manifest.xml file in the following directory on the
SharePoint server:
C:\Program Files (x86)\ Microsoft Dynamics AX\60\Retail
Online Channel\StoreFront\SP.
2. Delete the following line of code from the manifest.xml file:
<Assembly Location="Microsoft.Web.Administration.dll"
DeploymentTarget="GlobalAssemblyCache" />
3. Click Save, and then close the file.
This section describes how to configure settings in the oob-settings.xml file. By
default, the files are located in C:\Program Files (x86)\ Microsoft Dynamics
AX\60\Retail Online Channel\tools.
Product Catalog Settings
To specify settings for the product catalog application, follow these steps:
1. Open the oob-settings.xml file in a text editor, such as Notepad.
2. Search in the oob-settings.xml file for the parameters in the following
table. Enter a new value for each parameter. For each value, keep the
parentheses (“”), but remove percent signs (%).
Parameter Replacement value
“ProductCatal
ogWebAppPo
olUser”
Replace the value with the domain account under which the
product catalog application pool should run, for example,
value="Domain\User".
“FarmAdminist
ratorAlias”
Replace the value with the domain account and alias of a
SharePoint farm administrator, for example,
value="Domain\User".
“FarmAdminist
ratorEmail”
Replace the value with the email address of a SharePoint
farm administrator in the form
value=Username@YourDomain .com.
3. Save your changes in the oob-settings.xml file.
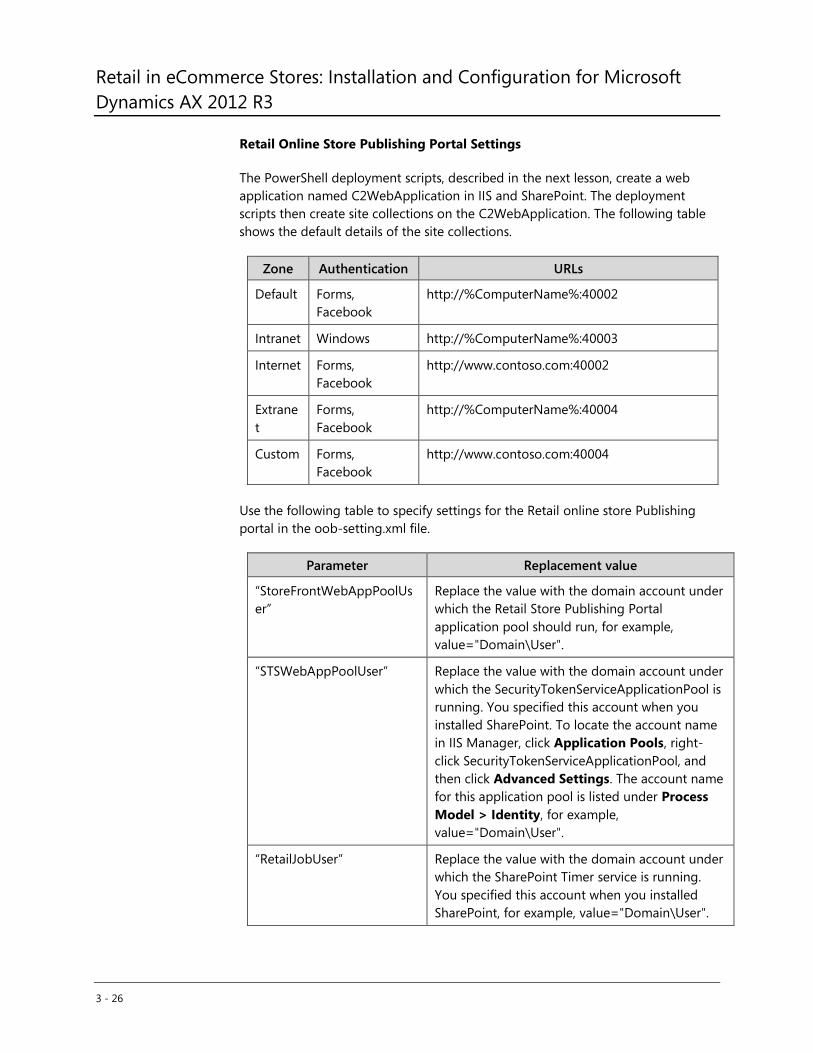
Retail in eCommerce Stores: Installation and Configuration for Microsoft
Dynamics AX 2012 R3
3 - 26
Retail Online Store Publishing Portal Settings
The PowerShell deployment scripts, described in the next lesson, create a web
application named C2WebApplication in IIS and SharePoint. The deployment
scripts then create site collections on the C2WebApplication. The following table
shows the default details of the site collections.
Zone Authentication URLs
Default Forms,
http://%ComputerName%:40002
Intranet Windows http://%ComputerName%:40003
Internet Forms,
http://www.contoso.com:40002
Extrane
t
Forms,
http://%ComputerName%:40004
Custom Forms,
http://www.contoso.com:40004
Use the following table to specify settings for the Retail online store Publishing
portal in the oob-setting.xml file.
Parameter Replacement value
“StoreFrontWebAppPoolUs
er”
Replace the value with the domain account under
which the Retail Store Publishing Portal
application pool should run, for example,
value="Domain\User".
“STSWebAppPoolUser” Replace the value with the domain account under
which the SecurityTokenServiceApplicationPool is
running. You specified this account when you
installed SharePoint. To locate the account name
in IIS Manager, click Application Pools, right-
click SecurityTokenServiceApplicationPool, and
then click Advanced Settings. The account name
for this application pool is listed under Process
Model > Identity, for example,
value="Domain\User".
“RetailJobUser” Replace the value with the domain account under
which the SharePoint Timer service is running.
You specified this account when you installed
SharePoint, for example, value="Domain\User".
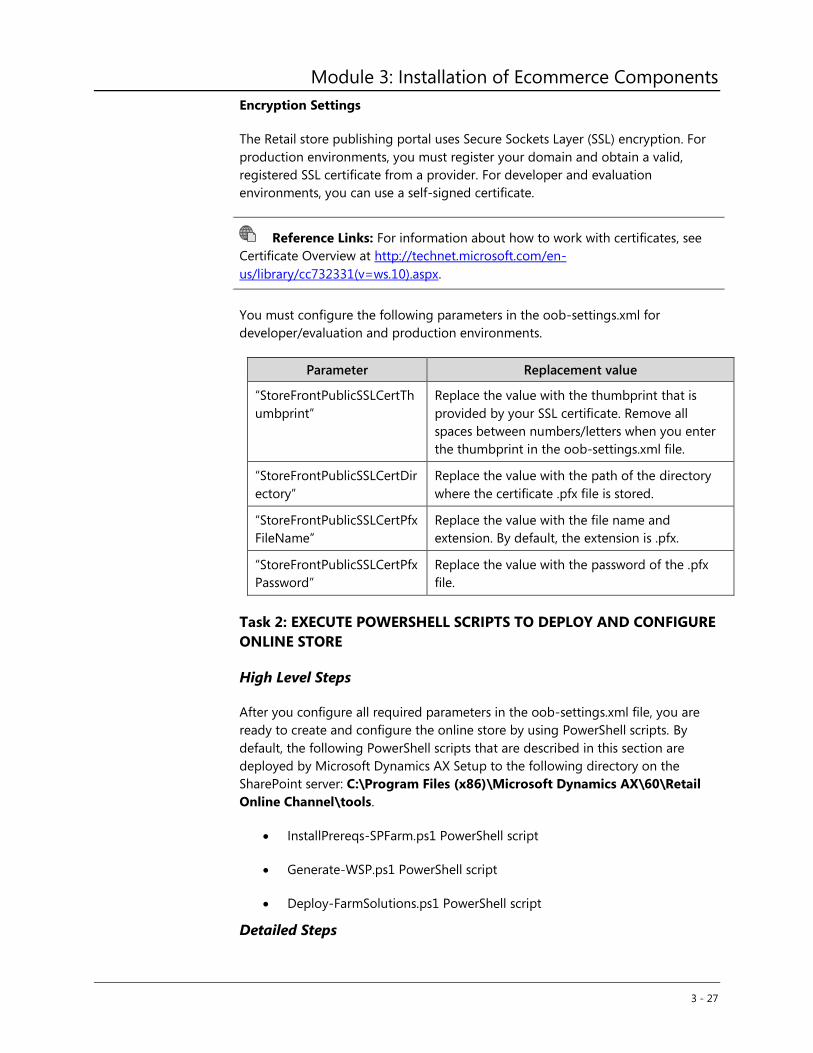
Module 3: Installation of Ecommerce Components
3 - 27
Encryption Settings
The Retail store publishing portal uses Secure Sockets Layer (SSL) encryption. For
production environments, you must register your domain and obtain a valid,
registered SSL certificate from a provider. For developer and evaluation
environments, you can use a self-signed certificate.
Reference Links: For information about how to work with certificates, see
Certificate Overview at http://technet.microsoft.com/en-
us/library/cc732331(v=ws.10).aspx.
You must configure the following parameters in the oob-settings.xml for
developer/evaluation and production environments.
Parameter Replacement value
“StoreFrontPublicSSLCertTh
umbprint”
Replace the value with the thumbprint that is
provided by your SSL certificate. Remove all
spaces between numbers/letters when you enter
the thumbprint in the oob-settings.xml file.
“StoreFrontPublicSSLCertDir
ectory”
Replace the value with the path of the directory
where the certificate .pfx file is stored.
“StoreFrontPublicSSLCertPfx
FileName”
Replace the value with the file name and
extension. By default, the extension is .pfx.
“StoreFrontPublicSSLCertPfx
Password”
Replace the value with the password of the .pfx
file.
Task 2: EXECUTE POWERSHELL SCRIPTS TO DEPLOY AND CONFIGURE
ONLINE STORE
High Level Steps
After you configure all required parameters in the oob-settings.xml file, you are
ready to create and configure the online store by using PowerShell scripts. By
default, the following PowerShell scripts that are described in this section are
deployed by Microsoft Dynamics AX Setup to the following directory on the
SharePoint server: C:\Program Files (x86)\Microsoft Dynamics AX\60\Retail
Online Channel\tools.
InstallPrereqs-SPFarm.ps1 PowerShell script
Generate-WSP.ps1 PowerShell script
Deploy-FarmSolutions.ps1 PowerShell script
Detailed Steps
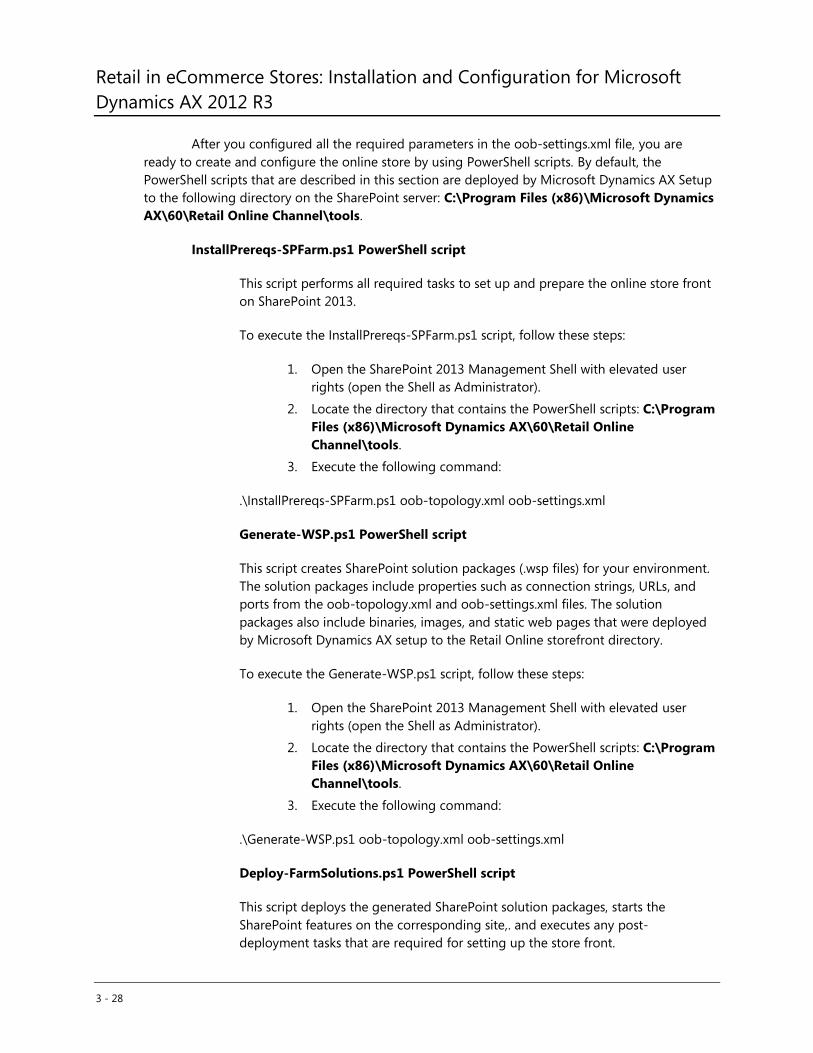
Retail in eCommerce Stores: Installation and Configuration for Microsoft
Dynamics AX 2012 R3
3 - 28
After you configured all the required parameters in the oob-settings.xml file, you are
ready to create and configure the online store by using PowerShell scripts. By default, the
PowerShell scripts that are described in this section are deployed by Microsoft Dynamics AX Setup
to the following directory on the SharePoint server: C:\Program Files (x86)\Microsoft Dynamics
AX\60\Retail Online Channel\tools.
InstallPrereqs-SPFarm.ps1 PowerShell script
This script performs all required tasks to set up and prepare the online store front
on SharePoint 2013.
To execute the InstallPrereqs-SPFarm.ps1 script, follow these steps:
1. Open the SharePoint 2013 Management Shell with elevated user
rights (open the Shell as Administrator).
2. Locate the directory that contains the PowerShell scripts: C:\Program
Files (x86)\Microsoft Dynamics AX\60\Retail Online
Channel\tools.
3. Execute the following command:
.\InstallPrereqs-SPFarm.ps1 oob-topology.xml oob-settings.xml
Generate-WSP.ps1 PowerShell script
This script creates SharePoint solution packages (.wsp files) for your environment.
The solution packages include properties such as connection strings, URLs, and
ports from the oob-topology.xml and oob-settings.xml files. The solution
packages also include binaries, images, and static web pages that were deployed
by Microsoft Dynamics AX setup to the Retail Online storefront directory.
To execute the Generate-WSP.ps1 script, follow these steps:
1. Open the SharePoint 2013 Management Shell with elevated user
rights (open the Shell as Administrator).
2. Locate the directory that contains the PowerShell scripts: C:\Program
Files (x86)\Microsoft Dynamics AX\60\Retail Online
Channel\tools.
3. Execute the following command:
.\Generate-WSP.ps1 oob-topology.xml oob-settings.xml
Deploy-FarmSolutions.ps1 PowerShell script
This script deploys the generated SharePoint solution packages, starts the
SharePoint features on the corresponding site,. and executes any post-
deployment tasks that are required for setting up the store front.

Module 3: Installation of Ecommerce Components
3 - 29
To execute the Deploy-FarmSolutions.ps1 script, follow these steps:
4. Open the SharePoint 2013 Management Shell with elevated user
rights (open the Shell as Administrator).
5. Locate the directory that contains the PowerShell scripts: C:\Program
Files (x86)\Microsoft Dynamics AX\60\Retail Online
Channel\tools.
6. Execute the following command:
.\Deploy-FarmSolutions.ps1 oob-topology.xml oob-settings.xml
Task 3: VERIFYING THE RETAIL ONLINE STORE DEPLOYMENT
High Level Steps
After you run the deployment scripts and complete without errors, you can verify
and validate the following online store deployment processes:
Verify Dynamics AX Publishing Connector.
Verify Online store SharePoint Site Collections.
Verify creation and sign-in with a new forms-based user account.
Verify browsing to the URL.
Detailed Steps
After you run the deployment scripts and complete without errors, you can verify
and validate the online store deployment process.
Verify Dynamics AX Publishing Connector
After a successful deployment, the Dynamics AX Publishing Connector Service
runs in SharePoint Central Administration. At this point, the service displays the
following error: “No channel configuration could be found in the database.” This
means that the channel has not yet been configured in Microsoft Dynamics AX.
Reference Links: You must configure the channel in Microsoft Dynamics
AX. For more information about how to do this, go to
http://technet.microsoft.com/EN-US/library/jj728704.aspx.
Verify Online store SharePoint Site Collections
After a successful deployment, you can view the Retail online store web
applications and site collections in SharePoint Central Administration, by following
these steps:
1. In SharePoint Central Administration, open Application
Management.
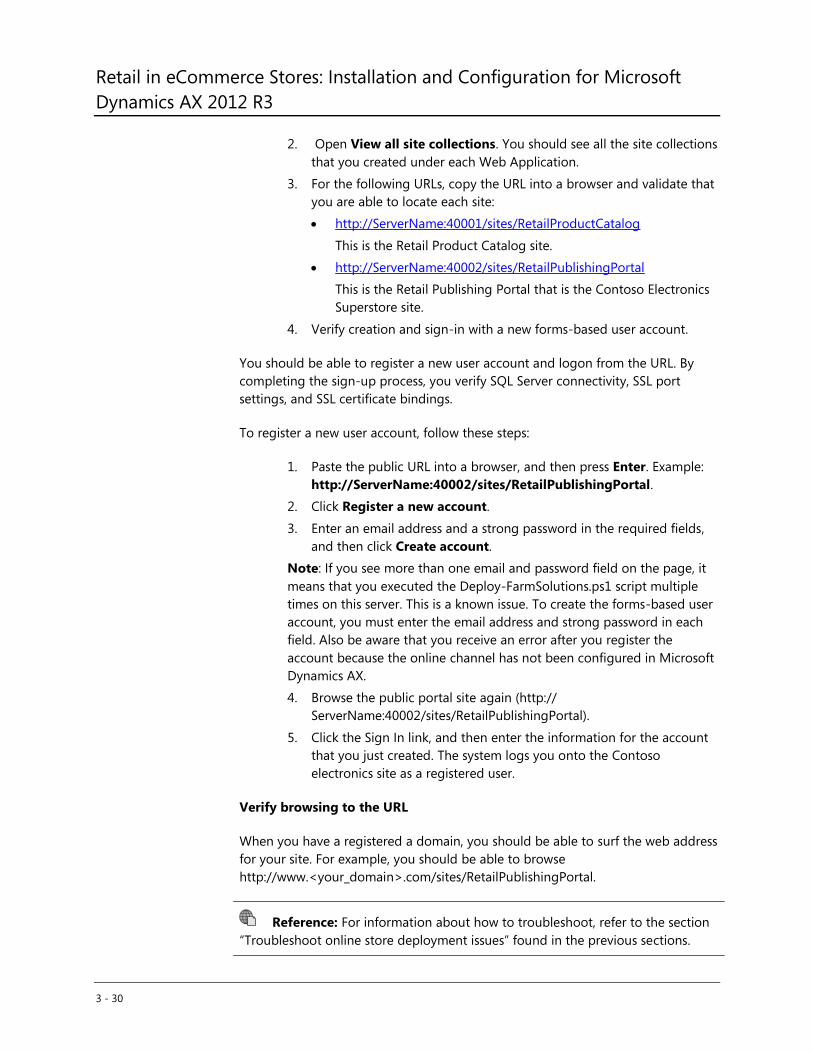
Retail in eCommerce Stores: Installation and Configuration for Microsoft
Dynamics AX 2012 R3
3 - 30
2. Open View all site collections. You should see all the site collections
that you created under each Web Application.
3. For the following URLs, copy the URL into a browser and validate that
you are able to locate each site:
http://ServerName:40001/sites/RetailProductCatalog
This is the Retail Product Catalog site.
http://ServerName:40002/sites/RetailPublishingPortal
This is the Retail Publishing Portal that is the Contoso Electronics
Superstore site.
4. Verify creation and sign-in with a new forms-based user account.
You should be able to register a new user account and logon from the URL. By
completing the sign-up process, you verify SQL Server connectivity, SSL port
settings, and SSL certificate bindings.
To register a new user account, follow these steps:
1. Paste the public URL into a browser, and then press Enter. Example:
http://ServerName:40002/sites/RetailPublishingPortal.
2. Click Register a new account.
3. Enter an email address and a strong password in the required fields,
and then click Create account.
Note: If you see more than one email and password field on the page, it
means that you executed the Deploy-FarmSolutions.ps1 script multiple
times on this server. This is a known issue. To create the forms-based user
account, you must enter the email address and strong password in each
field. Also be aware that you receive an error after you register the
account because the online channel has not been configured in Microsoft
Dynamics AX.
4. Browse the public portal site again (http://
ServerName:40002/sites/RetailPublishingPortal).
5. Click the Sign In link, and then enter the information for the account
that you just created. The system logs you onto the Contoso
electronics site as a registered user.
Verify browsing to the URL
When you have a registered a domain, you should be able to surf the web address
for your site. For example, you should be able to browse
http://www.<your_domain>.com/sites/RetailPublishingPortal.
Reference: For information about how to troubleshoot, refer to the section
“Troubleshoot online store deployment issues” found in the previous sections.
Module 3: Installation of Ecommerce Components
3 - 31
Results
Retail Online Store Site is set up.
You can logon into the Retail Online Store site as a user.
Retail in eCommerce Stores: Installation and Configuration for Microsoft
Dynamics AX 2012 R3
3 - 32
Test Your Knowledge Solutions
Module Review and Takeaways
1. What do you use to install the Retail online channel components on
SharePoint Server 2013?
( ) InstallPrereqs-SPFarm.ps1 PowerShell script
( ) SharePoint Central Administration
(√) Microsoft Dynamics AX 2012 R3 Setup
4 - 1
MODULE 4: ONLINE STORE SETUP AND PUBLISHING
Module Overview
After the online storefront is deployed on the SharePoint farm, you can set up the
online store in Microsoft Dynamics AX. Then, you can publish the online store to
the online storefront, and manage and publish the online store catalog.
An online store is modeled as a retail channel, and is added as a part of the
organization hierarchy. You create an online store in the Microsoft Dynamics AX
client. This store represents the online store that is published to a
Microsoft SharePoint site. The properties that you define for the online store in
Microsoft Dynamics AX control the behavior of the online store. For example, you
define the navigation category hierarchy in Microsoft Dynamics AX and assign the
navigation category hierarchy to the online store. When you publish the online
store to a SharePoint site, the navigation category hierarchy is displayed in the
online version of the store. Shoppers use the navigation category hierarchy to
browse the online store and to search for products.
To create the online store, you must set up the components so that the store’s
transactions can be processed. The components include adding assortments,
applying attributes, setting up payment methods, and setting up shipping methods.
You can also define prices, promotions, discounts, trade agreements, and shipping
terms that are specific to the online store.
After you publish the store to the SharePoint site, you can create retail product
catalogs for the online store. The products in the catalog become product listings
in the online store. When a shopper purchases products from the online store, the
available inventory is updated and synchronized in the Microsoft Dynamics AX
client. Also, sales orders are generated for the purchases and sent to the Microsoft
Dynamics AX client for order fulfillment and processing.
A conceptual model for the online store is shown in the Online Store Model figure.
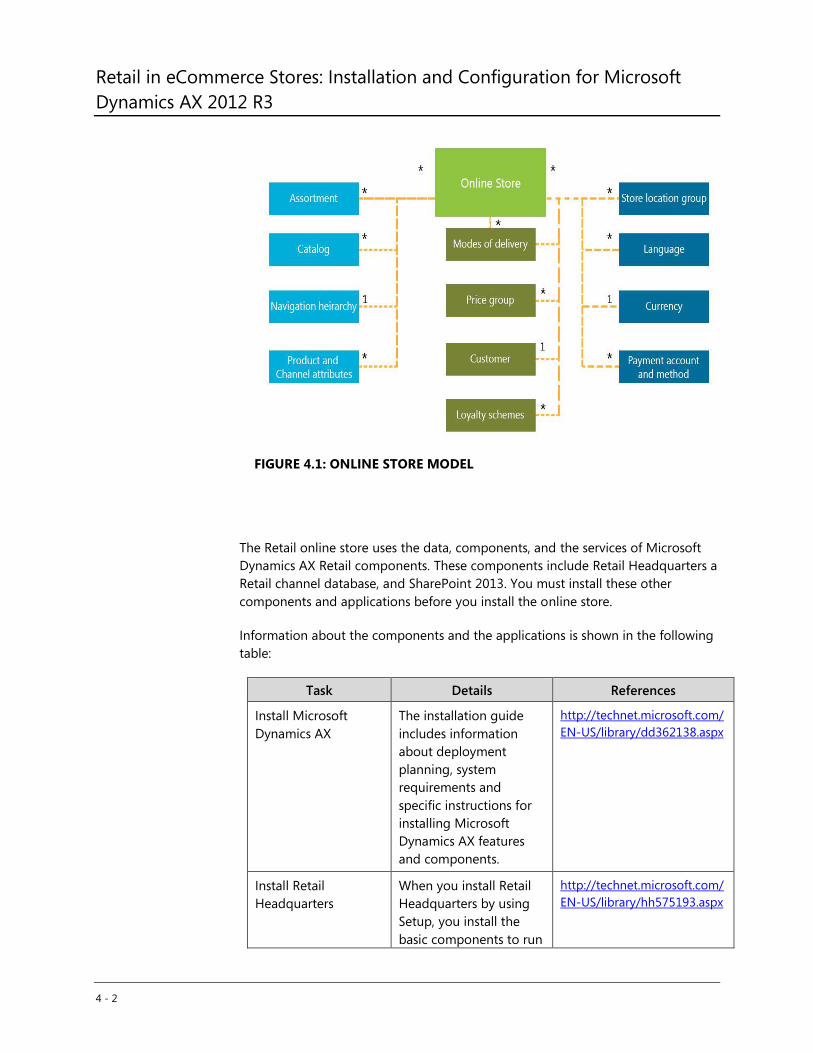
Retail in eCommerce Stores: Installation and Configuration for Microsoft
Dynamics AX 2012 R3
4 - 2
FIGURE 4.1: ONLINE STORE MODEL
The Retail online store uses the data, components, and the services of Microsoft
Dynamics AX Retail components. These components include Retail Headquarters a
Retail channel database, and SharePoint 2013. You must install these other
components and applications before you install the online store.
Information about the components and the applications is shown in the following
table:
Task Details References
Install Microsoft
Dynamics AX
The installation guide
includes information
about deployment
planning, system
requirements and
specific instructions for
installing Microsoft
Dynamics AX features
and components.
http://technet.microsoft.com/
EN-US/library/dd362138.aspx
Install Retail
Headquarters
When you install Retail
Headquarters by using
Setup, you install the
basic components to run
http://technet.microsoft.com/
EN-US/library/hh575193.aspx
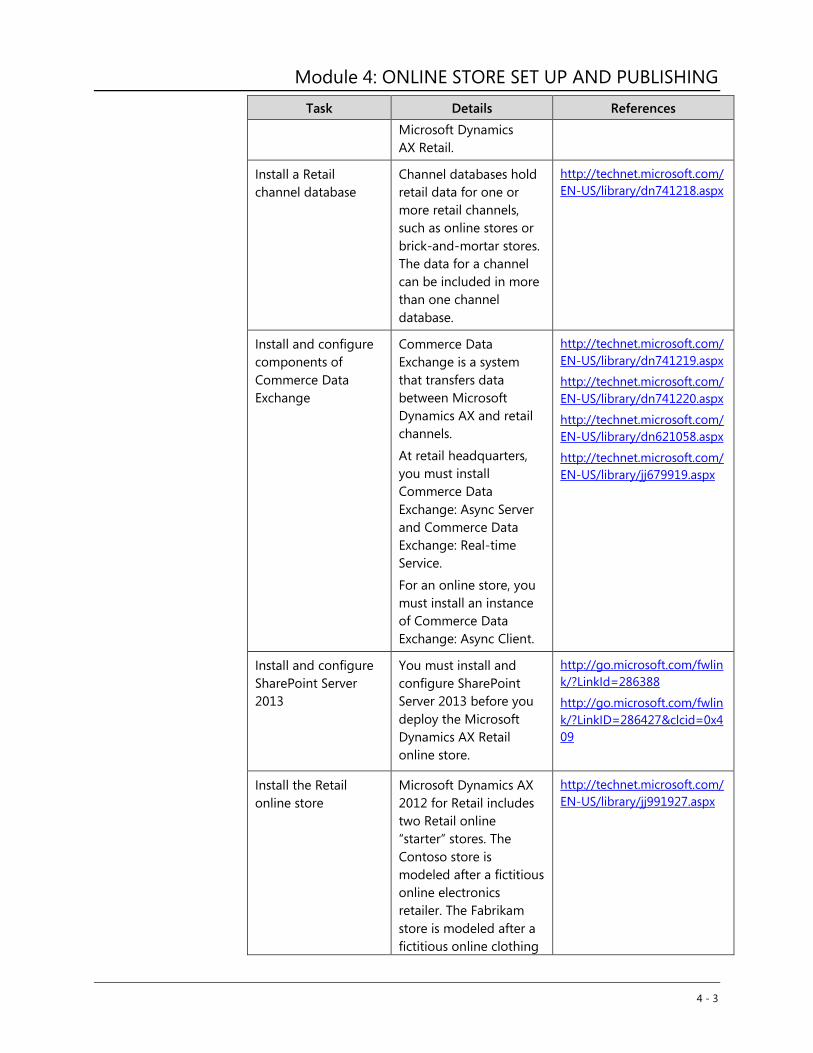
Module 4: ONLINE STORE SET UP AND PUBLISHING
4 - 3
Task Details References
Microsoft Dynamics
AX Retail.
Install a Retail
channel database
Channel databases hold
retail data for one or
more retail channels,
such as online stores or
brick-and-mortar stores.
The data for a channel
can be included in more
than one channel
database.
http://technet.microsoft.com/
EN-US/library/dn741218.aspx
Install and configure
components of
Commerce Data
Exchange
Commerce Data
Exchange is a system
that transfers data
between Microsoft
Dynamics AX and retail
channels.
At retail headquarters,
you must install
Commerce Data
Exchange: Async Server
and Commerce Data
Exchange: Real-time
Service.
For an online store, you
must install an instance
of Commerce Data
Exchange: Async Client.
http://technet.microsoft.com/
EN-US/library/dn741219.aspx
http://technet.microsoft.com/
EN-US/library/dn741220.aspx
http://technet.microsoft.com/
EN-US/library/dn621058.aspx
http://technet.microsoft.com/
EN-US/library/jj679919.aspx
Install and configure
SharePoint Server
2013
You must install and
configure SharePoint
Server 2013 before you
deploy the Microsoft
Dynamics AX Retail
online store.
http://go.microsoft.com/fwlin
k/?LinkId=286388
http://go.microsoft.com/fwlin
k/?LinkID=286427&clcid=0x4
09
Install the Retail
online store
Microsoft Dynamics AX
2012 for Retail includes
two Retail online
“starter” stores. The
Contoso store is
modeled after a fictitious
online electronics
retailer. The Fabrikam
store is modeled after a
fictitious online clothing
http://technet.microsoft.com/
EN-US/library/jj991927.aspx
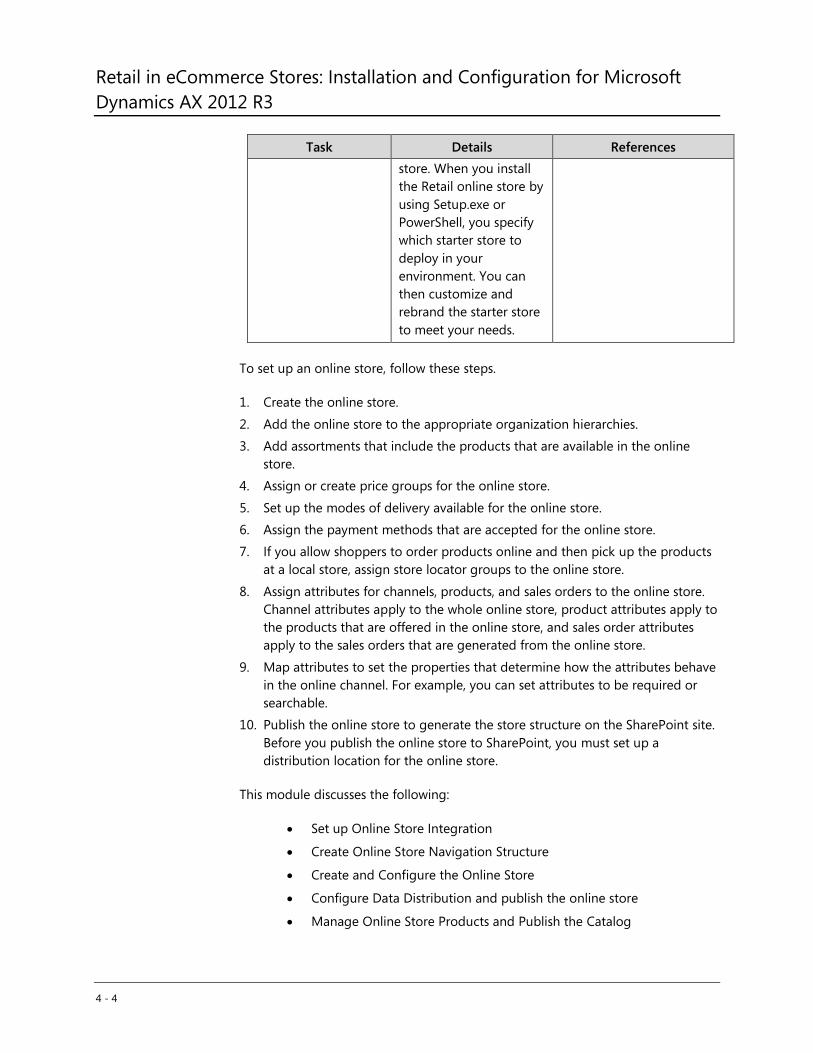
Retail in eCommerce Stores: Installation and Configuration for Microsoft
Dynamics AX 2012 R3
4 - 4
Task Details References
store. When you install
the Retail online store by
using Setup.exe or
PowerShell, you specify
which starter store to
deploy in your
environment. You can
then customize and
rebrand the starter store
to meet your needs.
To set up an online store, follow these steps.
1. Create the online store.
2. Add the online store to the appropriate organization hierarchies.
3. Add assortments that include the products that are available in the online
store.
4. Assign or create price groups for the online store.
5. Set up the modes of delivery available for the online store.
6. Assign the payment methods that are accepted for the online store.
7. If you allow shoppers to order products online and then pick up the products
at a local store, assign store locator groups to the online store.
8. Assign attributes for channels, products, and sales orders to the online store.
Channel attributes apply to the whole online store, product attributes apply to
the products that are offered in the online store, and sales order attributes
apply to the sales orders that are generated from the online store.
9. Map attributes to set the properties that determine how the attributes behave
in the online channel. For example, you can set attributes to be required or
searchable.
10. Publish the online store to generate the store structure on the SharePoint site.
Before you publish the online store to SharePoint, you must set up a
distribution location for the online store.
This module discusses the following:
Set up Online Store Integration
Create Online Store Navigation Structure
Create and Configure the Online Store
Configure Data Distribution and publish the online store
Manage Online Store Products and Publish the Catalog
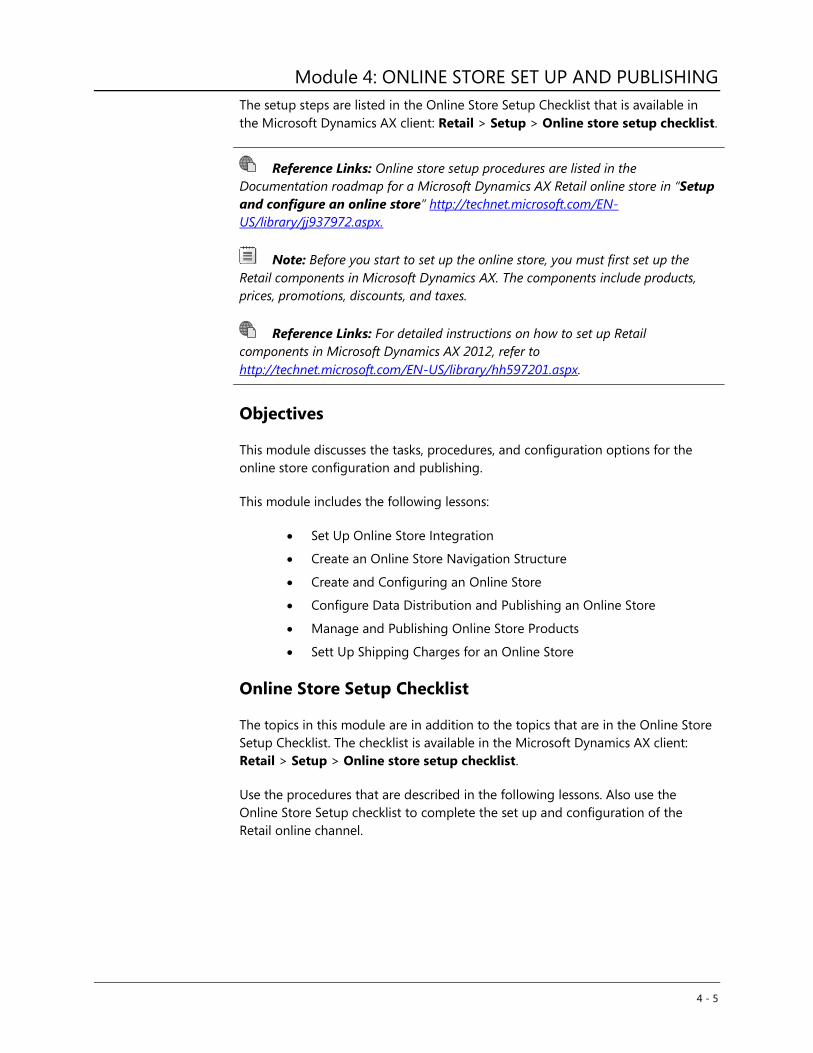
Module 4: ONLINE STORE SET UP AND PUBLISHING
4 - 5
The setup steps are listed in the Online Store Setup Checklist that is available in
the Microsoft Dynamics AX client: Retail > Setup > Online store setup checklist.
Reference Links: Online store setup procedures are listed in the
Documentation roadmap for a Microsoft Dynamics AX Retail online store in “Setup
and configure an online store” http://technet.microsoft.com/EN-
US/library/jj937972.aspx.
Note: Before you start to set up the online store, you must first set up the
Retail components in Microsoft Dynamics AX. The components include products,
prices, promotions, discounts, and taxes.
Reference Links: For detailed instructions on how to set up Retail
components in Microsoft Dynamics AX 2012, refer to
http://technet.microsoft.com/EN-US/library/hh597201.aspx.
Objectives
This module discusses the tasks, procedures, and configuration options for the
online store configuration and publishing.
This module includes the following lessons:
Set Up Online Store Integration
Create an Online Store Navigation Structure
Create and Configuring an Online Store
Configure Data Distribution and Publishing an Online Store
Manage and Publishing Online Store Products
Sett Up Shipping Charges for an Online Store
Online Store Setup Checklist
The topics in this module are in addition to the topics that are in the Online Store
Setup Checklist. The checklist is available in the Microsoft Dynamics AX client:
Retail > Setup > Online store setup checklist.
Use the procedures that are described in the following lessons. Also use the
Online Store Setup checklist to complete the set up and configuration of the
Retail online channel.
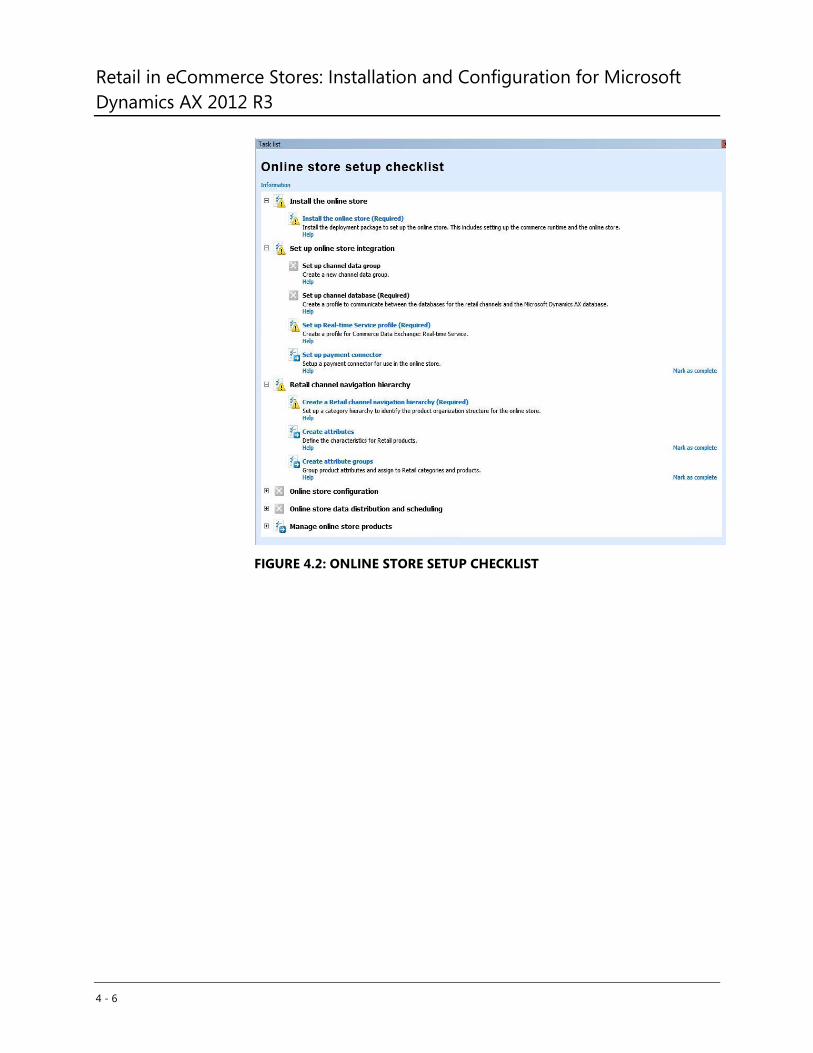
Retail in eCommerce Stores: Installation and Configuration for Microsoft
Dynamics AX 2012 R3
4 - 6
FIGURE 4.2: ONLINE STORE SETUP CHECKLIST
Module 4: ONLINE STORE SET UP AND PUBLISHING
4 - 7
Set Up Online Store Integration
This lesson discusses how to configure the online store integration in Microsoft
Dynamics AX 2012 R3.
Lesson Objectives
The objectives include the following:
Provide an overview of the Online Store Integration in Microsoft
Dynamics AX 2012 R3.
Explain how to set up the profile for an Async Server.
Explain how to set up the real time service profile.
Explain how to set up the channel profile.
Explain how to set up the channel database profile.
Provide an overview of how to set the payment connector.
Overview of Online Store Integration
To set up the online store integration, you must set up the data exchange
between Microsoft Dynamics AX and the Online Store. Tasks that are involved to
set up the online store integration include the following:
Task Details References
Set up channel
integration profiles
Profiles enable the
components of
Retail to
communicate with
one another. Set up
profiles before you
configure data
exchange settings.
Set up a profile for Async
Server:
http://technet.microsoft.com/EN-
US/library/dn621048.aspx
Set up a Real-time Service
profile :
http://technet.microsoft.com/EN-
US/library/hh580631.aspx
Set up a channel profile :
http://technet.microsoft.com/EN-
US/library/jj677402.aspx
Set up a channel database
profile :
http://technet.microsoft.com/EN-
US/library/dn621049.aspx
Configure data
distribution and
scheduling
In Microsoft
Dynamics AX 2012
R3, a channel data
group is a group of
one or more retail
Create a channel data group :
http://technet.microsoft.com/EN-
US/library/dn621060.aspx
Configure jobs and subjobs in
Retail Scheduler:
Retail in eCommerce Stores: Installation and Configuration for Microsoft
Dynamics AX 2012 R3
4 - 8
Task Details References
channel databases.
A data package is
generated for each
data group. All
channel databases
in a data group
subscribe to the
same data.
Scheduler jobs are
used to distribute
data to and from
stores. Jobs are
made up of subjobs.
Subjobs specify how
to distribute the
data in selected
tables and selected
table fields.
http://technet.microsoft.com/EN-
US/library/jj680084.aspx
Send configuration
settings and data to
the stores
After online store
settings and data
exchange settings
are configured in
Microsoft Dynamics
AX, run jobs to
distribute data to
the online store
database.
Synchronize all data
for the channel
database. In the
Channel database
form, click Full data
sync, and then
select the
distribution
schedule that is
named Full sync.
Schedule and run jobs in Retail
Scheduler :
http://technet.microsoft.com/EN-
US/library/jj710363.aspx
Topics that are explained in detail in the next sections include the following:
How to Set Up the Profile for an Async Server
How to Set Up the Real Time Service Profile
How to Set Up the Channel Profile
Module 4: ONLINE STORE SET UP AND PUBLISHING
4 - 9
How to Set Up the Channel Database Profile
Payment Connector (United States only)
How to Set Up the Profile for the Async Server
The profile for Async Server specifies how frequently Async Client checks for data
packages to download and creates data packages to upload. You must configure
data download and upload intervals for each instance of Async Client in the
environment.
Async Client is part of Commerce Data Exchange, the asynchronous system that
shares data between the Microsoft Dynamics AX database and retail channel
databases. Async Client is installed for each channel, and communicates with the
channel database. Commerce Data Exchange also includes Async Server. Async
Server is installed at headquarters and communicates with the Microsoft Dynamics
AX database.
Reference Links: For more information about Commerce Data Exchange,
refer to the Commerce Data Exchange documentation on TechNet
http://go.microsoft.com/fwlink/?LinkID=391057. >
To create a new profile, follow these steps.
1. Click Retail > Setup > Retail scheduler > Channel integration > Async
Server profile.
2. Click New to create a new profile.
3. Enter a name and description for the profile.
4. In the Data download interval in minutes field, enter the interval at which
Async Client checks for data packages that are ready to be downloaded from
Microsoft Dynamics AX to the channel. Data packages are downloaded from
the working folder for Commerce Data Exchange.
5. In the Data upload interval in minutes field, enter the interval at which
Async Client creates and uploads data from the channel. Data packages are
uploaded to the working folder for Commerce Data Exchange.
Note: The procedure to set up the Real-time Service profile can be found later
in this lesson.
How to Set Up the Real Time Service Profile
When you set up a profile for Commerce Data Exchange: Real-time Service, you
enable a point of sale (POS) device or a store to retrieve or update real-time data
from Microsoft Dynamics AX.
Real-time Service performs as an agent for a device or a store. The POS device and
Retail in eCommerce Stores: Installation and Configuration for Microsoft
Dynamics AX 2012 R3
4 - 10
the store never access the remote AOS instance.
Note: In Microsoft Dynamics AX 2012 R2 and Microsoft Dynamics AX 2012
Feature Pack, Real-time Service is also used by Commerce Data Exchange: Synch
Service to upload status messages to Microsoft Dynamics AX.
This topic describes how to perform the following functions:
Set up a Real-time Service profile.
Assign a Real-time Service profile to a retail store (Microsoft Dynamics
AX 2012 R3).
Assign a Real-time Service profile to an online store.
In Microsoft Dynamics AX, to create the Real time Service profile, follow these
steps.
1. Click Retail > Setup > Retail scheduler > Channel integration > Real-time
Service profiles.
2. Select an existing profile, or press CTRL+N to create a new profile.
3. Enter a name and a description for the profile.
4. On the Connection FastTab, enter the following information:
o Server – Enter the server name or IP address where Real-time
Service is running.
o Port – Enter the port number that the web service for Real-time
Service uses.
Note: A port number is associated with each communication protocol that is
bound to the website. By default, the port number for the net.tcp protocol is 808
and the port number for the https protocol is 9081.
o Protocol – Select the communication protocol that Real-time
Service uses.
Note: By default, the protocol is net.tcp. However, the https protocol is also
supported. To use the https protocol, you must modify the web.config file for the
website.
o Web application name – Enter the name of the web application
that hosts Real-time Service.
o Common name – Enter the common name for the certificate
that is used to establish an encrypted channel with Real-time
Module 4: ONLINE STORE SET UP AND PUBLISHING
4 - 11
Service.
Note: To find the common name, right-click the server certificate in IIS
Manager and select View. The common name for the certificate is displayed on the
Details FastTab, in the Subject field. This is usually the name of the domain for
which the certificate is issued. If you use a self-signed certificate, the common name
is usually the name of the computer for which the certificate is issued.
o Passphrase – Enter the passphrase that is used to authenticate
the connection.
o Language – Select the language that will be used for error
messages. You do not have to select the same language as the
AOS uses. However, you must select a language for which you
have a Microsoft Dynamics AX license.
o Real-time Service version – If the service has a different release
version than Microsoft Dynamics AX, select the version of this
instance of the service.
5. On the Settings FastTab, select the Commerce Data Exchange: Real-time
Service staff check box to enable the POS system to validate the operator
logon through the service.
Before an online store can access AOS to retrieve or update information in real
time, you must assign the online store a Real-time Service profile.
To assign a Real-time Service profile to an online store, follow these steps.
1. Click Retail > Common > Retail channels > Online stores.
2. Double-click the online store to modify, and then click the Maintain button.
3. In the Online store form, click the General FastTab.
4. On Profiles, in the Real-time Service profile field, select the appropriate
Real-time Service profile.
To synchronize profile settings with the channel database in Microsoft Dynamics
AX 2012 R3, run the predefined 1070 job, or run the job that you have set up to
synchronize online channel data.
How to Set Up a Channel Profile
A channel profile contains properties that must be defined for a retail channel,
such as URLs for site collections. The available properties depend on the type of
channel.
To set up a channel profile, follow these steps.
1. Click Retail > Setup > Retail scheduler > Channel integration > Channel
profiles.
Retail in eCommerce Stores: Installation and Configuration for Microsoft
Dynamics AX 2012 R3
4 - 12
2. Press CTRL+N to create a new channel profile.
3. In the Name field, enter a unique name for the profile.
4. Select the type of online channel that the profile is for. In Microsoft Dynamics
AX 2012 R2, only SharePoint online store is available. In Microsoft Dynamics
AX 2012 R3, you can also set properties for eBay, Amazon, and Retail Server.
5. Click Add to add a property to the profile. For each property, provide the
following information:
o Property key – Select the type of property to set for the selected
channel profile. The available properties depend on the profile
type that you selected. For example, for a profile type of
SharePoint online store, you can select the Catalog site
collection URL property.
o Property value – Specify a value for the property.
6. Click Validate profile to confirm that the property information for the profile
is correct.
How to Set Up a Channel Database Profile
In Microsoft Dynamics AX 2012 R3, a channel database profile provides the
information that is used for Microsoft Dynamics AX to communicate with a retail
channel database.
To set up a channel database profile, follow these steps.
1. Click Retail > Setup > Retail scheduler > Channel integration > Channel
database.
2. Click New to create a new channel database profile.
3. Enter the following information:
o Channel database ID – Type a name for the profile.
o Channel data group – Select a channel data group for the
database. When you run a distribution schedule, a data package
is generated for each data group. All channel databases in a data
group subscribe to the same data. A data group can contain one
or more databases. However, a database can belong to only one
data group.
o User name and Password – Enter the user name and password
that Async Client uses to communicate with Async Server. You
must use a unique user name for each channel database profile.
The user name and password that you enter are created and used
only for the channel database profile. The user is not required to
exist in Microsoft Dynamics AX, in Active Directory, or on the
local operating system.
o Async Server profile – Select the Async Server profile to use with
Module 4: ONLINE STORE SET UP AND PUBLISHING
4 - 13
the database.
4. On the Retail channel FastTab, click Add to select the channels that use this
database.
5. If you use features that require Retail Server, such as Modern POS, enter
channel database information in the Retail Server FastTab. Enter the name of
the server that hosts the channel database, and then enter the name of the
channel database.
Reference Links: For more information about how to use earlier versions of
Retail POS, refer to the Support for Previous POS Versions white paper -
http://go.microsoft.com/fwlink/?LinkID=259822.
6. To synchronize all data for the channel database, click Full data sync and
then select the distribution schedule that is named Full sync.
How to Set Up the Payment Connector (United States
Only)
In the United States, you can integrate Microsoft Dynamics AX with Payment
Services. By doing this, the Microsoft Dynamics AX application can process credit
card transactions in an online store. Payment Services accepts many payment
types, and you can select from several payment providers.
Note: Important: The Payment Services for Microsoft Dynamics ERP are not
available outside the United States.
The process for how to set up Payment Services involves the retailer and the
Microsoft Dynamics AX partner.
To set up Payment Services, you must follow these steps in the order in which they
are shown here.
1. Partner – In Partner Portal, create a Payment Services account for the
retailer.
2. Retailer – In Customer Portal, set up a merchant account that uses a
payment provider.
3. Partner – In Partner Portal, start the payment provider.
4. Retailer – In Customer Portal, test the payment service.
5. Retailer – In Microsoft Dynamics AX, set up Accounts receivable for
Payment Services.
6. Retailer – In Microsoft Dynamics AX, set up online stores for Payment
Services.
Reference Links: For detailed instructions on how to set up Payment Services,
Retail in eCommerce Stores: Installation and Configuration for Microsoft
Dynamics AX 2012 R3
4 - 14
refer to http://technet.microsoft.com/EN-US/library/jj680904.aspx.
Create the Online Store Navigation Structure
This lesson discusses how to set up a navigation structure for an online store. Before
you create an online store, you must define the retail channel navigation hierarchy
that you want to use in the online store. The retail channel navigation hierarchy
represents the category hierarchy that is displayed in the online store after the store
is published. When you publish retail product catalogs to the online store, the
products in the catalog map to the categories in the retail channel navigation
hierarchy. The hierarchy is also used by shoppers to browse in the online store.
Lesson Objectives
The objectives include the following:
Present the retail Online Store Navigation.
Explain how to set up the Retail Navigation Hierarchy.
Explain how to enrich the navigation category data.
Overview of Online Store Navigation
A retail channel navigation hierarchy is required to create the product navigation
structure that is used in the online store. You must create the navigation hierarchy,
assign the navigation hierarchy to a retail channel navigation hierarchy type, and
then assign the navigation hierarchy to the online store. When the online store is
published, the category structure that is defined in the retail channel navigation
hierarchy is displayed in the online store. You can maintain the online store
navigation structure through the retail channel navigation hierarchy in Microsoft
Dynamics AX. Any changes that you make are updated when you republish the
online store to the Microsoft SharePoint Server 2013 site.
In Microsoft Dynamics AX, to set up the online store navigation, you must:
Set up the retail channel navigation hierarchy.
Improve the category data for the presentation in the online store.
How to Set Up the Retail Channel Navigation Hierarchy
The Retail navigation category hierarchy for a retail channel is created to set up a
category structure for products that you offer through an online store. You define
the category hierarchy, and then assign products, product attribute groups, and
attribute values to the categories. Then, you can assign the category hierarchy to
Module 4: ONLINE STORE SET UP AND PUBLISHING
4 - 15
an online store. When the online store is published, the category structure that is
defined in the category hierarchy is displayed in the online store.
If you change a category in a navigation category hierarchy that is assigned to a
retail channel or a retail product catalog, you must follow these additional steps:
1. If you add or delete a category node, republish the channel and the
catalog that use the category hierarchy.
2. If you activate or inactivate a category, republish the channel and the
catalog that use the category hierarchy.
3. If you change the name of a category, republish the channel that uses
the category hierarchy.
Note: Before you can publish an online store, you must create a navigation
category hierarchy for a retail channel and assign the navigation category hierarchy
to the online store.
To maintain a retail channel navigation hierarchy, follow these steps.
1. Click Retail > Setup > Category hierarchies > Retail channel navigation
hierarchies.
2. On the Retail channel navigation hierarchies list page, on the Action Pane,
in the New group, click Category hierarchy to create a new channel
navigation hierarchy. Then, enter a name and description for the category
hierarchy. To modify an existing category hierarchy, select the category
hierarchy in the list.
3. Click Edit to open the Category hierarchy form, and then modify the
structure of the category hierarchy.
4. In the left navigation pane, select a category in the tree structure. Then, on
the Products FastTab, click Add to add one product at a time from the
products list. Or, click Add products to open the Add products form, and
then add one or more products to a selected category. If you use the Add
products form to add products to the category, you can select products from
any retail product hierarchy or any other hierarchy.
5. On the Product attribute groups FastTab, click Add to assign attribute
groups to the category.
6. Click View attributes to view the list of attributes that are included in the
attribute group.
7. Close the Category hierarchy form.
Reference Links: For detailed instructions on how to set up
Attributes and Attribute types, refer to
http://technet.microsoft.com/EN-US/library/hh227548.aspx.
For detailed instructions on how to set up Attribute groups, refer to
http://technet.microsoft.com/EN-US/library/jj728713.aspx .
Retail in eCommerce Stores: Installation and Configuration for Microsoft
Dynamics AX 2012 R3
4 - 16
How to Enrich Navigation Category Data for Presentation
After the category hierarchy is created, you can enrich the category data for the
presentation. You can set up text, images, or videos for a category hierarchy or
specific categories that can be presented to the web shoppers in the online store.
To add presentation text, images, or videos to a category hierarchy or specific
categories, follow these steps.
1. On the Retail channel navigation hierarchies list page, double-click a
category hierarchy.
2. In the left navigation pane, select the root node or a specific category node.
3. Click Edit presentation text to open the Catalog product presentation
form, and then click Edit to enter the text.
Note: You can add presentation text to add the category data that shoppers
can view when the shoppers browse in the online store.
4. Click Images to open the Images form, and then enter the URL for where the
image is stored. You can also view the images that you already added and
select one image to be the default image. The default image is displayed for
the category in the online store.
5. Click Videos to open the Videos form, and then enter the URL for where the
video is located. You can also view the videos that you already added and
select one video to be the default video. The default video is displayed for the
category in the online store.
Create and Configure the Online Store
This lesson explains how to set up an online store. The online store is a type of
retail channel that customers can access on the web. An online store gives a
retailer an online presence so that their customers can purchase products from
the retailer’s online store in addition to the retailer’s brick-and-mortar store.
Customers who purchase products from the online store can have the products
shipped, or the customers can pick up the products from a local store.
The objectives include the following:
Explain how to create an online store in Microsoft Dynamics AX 2012.
Explain how to assign an online store to an Organization Hierarchy.
Describe how to configure the online store.
Explain how to publish the newly created online store to SharePoint
2013.
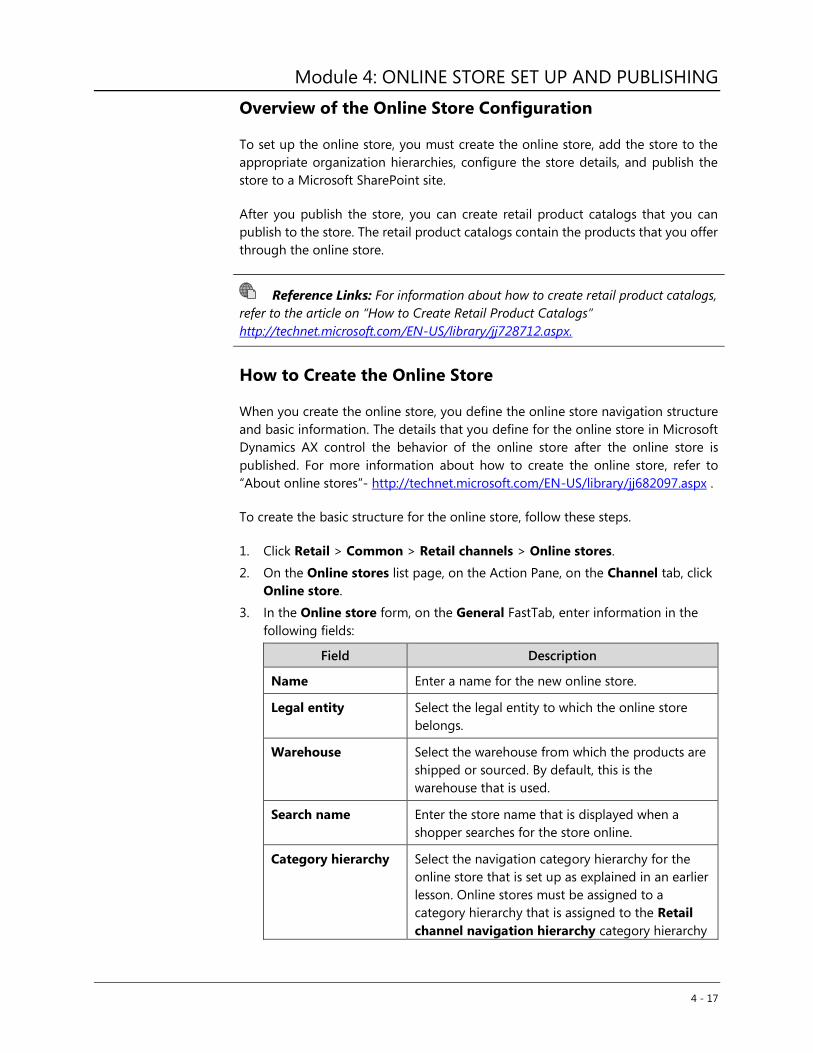
Module 4: ONLINE STORE SET UP AND PUBLISHING
4 - 17
Overview of the Online Store Configuration
To set up the online store, you must create the online store, add the store to the
appropriate organization hierarchies, configure the store details, and publish the
store to a Microsoft SharePoint site.
After you publish the store, you can create retail product catalogs that you can
publish to the store. The retail product catalogs contain the products that you offer
through the online store.
Reference Links: For information about how to create retail product catalogs,
refer to the article on “How to Create Retail Product Catalogs”
http://technet.microsoft.com/EN-US/library/jj728712.aspx.
How to Create the Online Store
When you create the online store, you define the online store navigation structure
and basic information. The details that you define for the online store in Microsoft
Dynamics AX control the behavior of the online store after the online store is
published. For more information about how to create the online store, refer to
“About online stores”- http://technet.microsoft.com/EN-US/library/jj682097.aspx .
To create the basic structure for the online store, follow these steps.
1. Click Retail > Common > Retail channels > Online stores.
2. On the Online stores list page, on the Action Pane, on the Channel tab, click
Online store.
3. In the Online store form, on the General FastTab, enter information in the
following fields:
Field Description
Name Enter a name for the new online store.
Legal entity Select the legal entity to which the online store
belongs.
Warehouse Select the warehouse from which the products are
shipped or sourced. By default, this is the
warehouse that is used.
Search name Enter the store name that is displayed when a
shopper searches for the store online.
Category hierarchy Select the navigation category hierarchy for the
online store that is set up as explained in an earlier
lesson. Online stores must be assigned to a
category hierarchy that is assigned to the Retail
channel navigation hierarchy category hierarchy
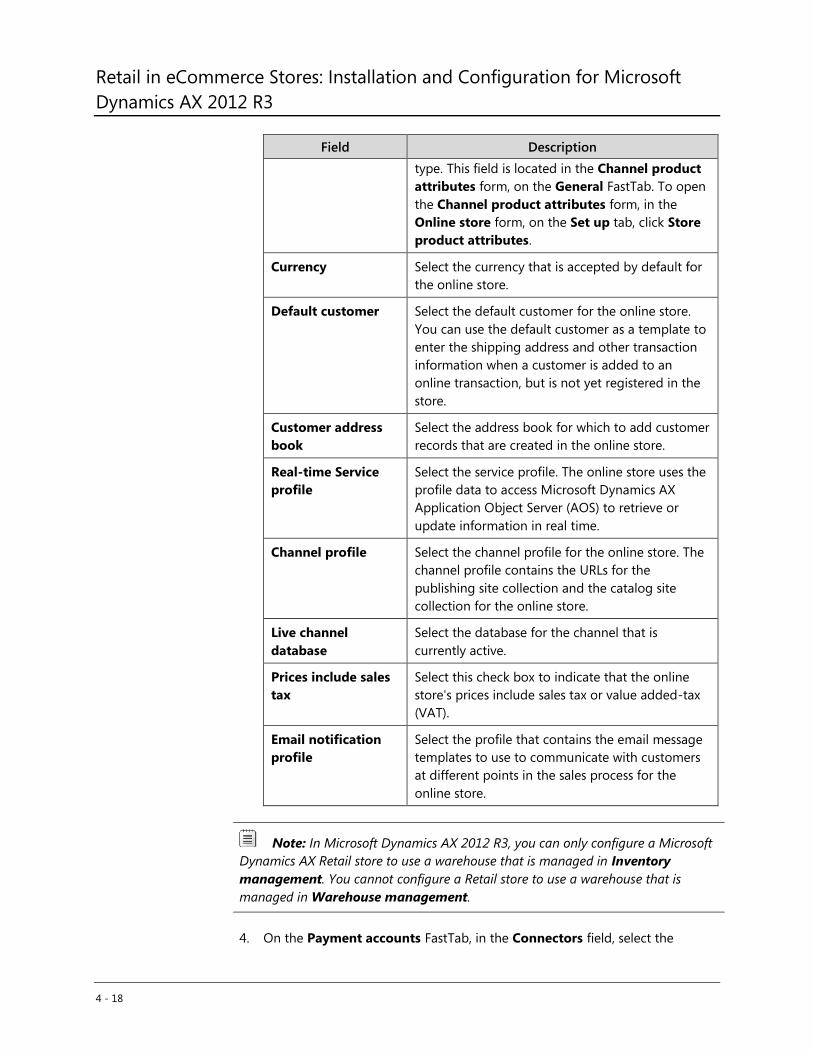
Retail in eCommerce Stores: Installation and Configuration for Microsoft
Dynamics AX 2012 R3
4 - 18
Field Description
type. This field is located in the Channel product
attributes form, on the General FastTab. To open
the Channel product attributes form, in the
Online store form, on the Set up tab, click Store
product attributes.
Currency Select the currency that is accepted by default for
the online store.
Default customer Select the default customer for the online store.
You can use the default customer as a template to
enter the shipping address and other transaction
information when a customer is added to an
online transaction, but is not yet registered in the
store.
Customer address
book
Select the address book for which to add customer
records that are created in the online store.
Real-time Service
profile
Select the service profile. The online store uses the
profile data to access Microsoft Dynamics AX
Application Object Server (AOS) to retrieve or
update information in real time.
Channel profile Select the channel profile for the online store. The
channel profile contains the URLs for the
publishing site collection and the catalog site
collection for the online store.
Live channel
database
Select the database for the channel that is
currently active.
Prices include sales
tax
Select this check box to indicate that the online
store's prices include sales tax or value added-tax
(VAT).
Email notification
profile
Select the profile that contains the email message
templates to use to communicate with customers
at different points in the sales process for the
online store.
Note: In Microsoft Dynamics AX 2012 R3, you can only configure a Microsoft
Dynamics AX Retail store to use a warehouse that is managed in Inventory
management. You cannot configure a Retail store to use a warehouse that is
managed in Warehouse management.
4. On the Payment accounts FastTab, in the Connectors field, select the
Module 4: ONLINE STORE SET UP AND PUBLISHING
4 - 19
payment connector that is used to connect to the payment provider. Then,
enter the configuration data to enable payment processing for transactions
that are received through the online store.
5. On the Languages FastTab, click Add to add the languages that can be
displayed in the online store. Select the Default check box to specify the
language that appears by default.
How to Assign the Online Store to the Organization
Hierarchy
Before you can assign product assortments or fulfill orders for the online store that
you created, you must assign the store to one or more organization hierarchies. At
minimum, you must assign the online store to an organization hierarchy that
includes product assortments. Retail uses organization hierarchies to structure retail
channels. Organization hierarchies represent the relationships between the
organizations that make up the business. When you set up online stores, you can
add the online stores to an organization hierarchy. The stores then share the data
that is used for assortments, replenishment, and reporting.
When you create an organization hierarchy, you must assign the organization
hierarchy a purpose. The purpose indicates how the hierarchy is used in the business
structure. You can create one organization hierarchy for the store operations, and
use that hierarchy for assortments, replenishment, and reporting. Or, you can create
a separate organization hierarchy for each purpose. You can also create multiple
hierarchies that have the same purpose and assign a channel to each hierarchy.
If you intend to publish retail product catalogs to the online store, you should, at a
minimum, add the online stores to an organization hierarchy for assortments. The
products in a catalog are selected from the assortments that are assigned to the
online store. When the catalog is published, the publishing process compares the
effective dates for the assortment that is assigned to the online store with the
products that are included in the catalog. By doing this, the process determines the
products that will be available in the online store.
Reference Links: For more information about how to create and modify
organization hierarchies refer to http://technet.microsoft.com/EN-
US/library/hh227463.aspx.
To assign the online store to an organization hierarchy, in Microsoft Dynamics AX
2012 R3, following these steps.
1. Click Organization administration > Setup > Organization >
Organization hierarchies.
2. In the Organization hierarchies form, select the hierarchy for which to add
the online store, and then click View.
Retail in eCommerce Stores: Installation and Configuration for Microsoft
Dynamics AX 2012 R3
4 - 20
3. In the Hierarchy designer form, on the Action Pane, click Edit.
4. Click Insert, and then click Retail channel. In the Retail channel form, select
an organization for which to add the online store, and then click OK.
5. After you finish making the changes, you have to do one of the following.
a. To save a draft, on the Action Pane, click Save as draft. Your changes
are saved. However, the hierarchy does not become active.
b. If you finished making changes to the hierarchy, click Publish and
close. When you publish a hierarchy, you must specify an effective
date. The effective date indicates when the hierarchy becomes active.
Note: If you close the Hierarchy designer form without saving the changes,
you may see a message that asks you to save the hierarchy as a draft or delete the
changes. If you close the message without making a selection, the changes are
deleted.
6. Repeat steps 2 through 5 to add the online store to additional organization
hierarchies, if this is necessary.
How to Configure the Online Store
After you have set up the basic information for an online store and added the
information to the appropriate organization hierarchies, you can add more
configuration data for the store, such as attributes and delivery modes. Then,
publish the online store to create the basic store structure for the SharePoint site.
After the online store is published, you can assign product catalogs to the online
store. Then, you can publish the retail products to the online store so that the
products are made available to the customers.
Note: How to add more configuration data for the online store, such as the
assortments and the distribution location is discussed later in this module.
In Microsoft Dynamics AX 2012 R3, to configure the online store, follow these
steps.
1. Click Retail > Common > Retail channels > Online stores. In the Online
stores list, double-click a store.
2. In the Online store form, on the Action Pane, on the Channel FastTab, in the
Inventory group, click View assortments.
3. In the View assortments list, double-click an assortment. Or, on the Action
Pane, in the New group, click Assortment to add a new assortment.
4. In the Assortments form, on the Retail channels FastTab, add the online
store. If you add a new assortment, enter any additional details for the
assortment. When you finish, close the form.
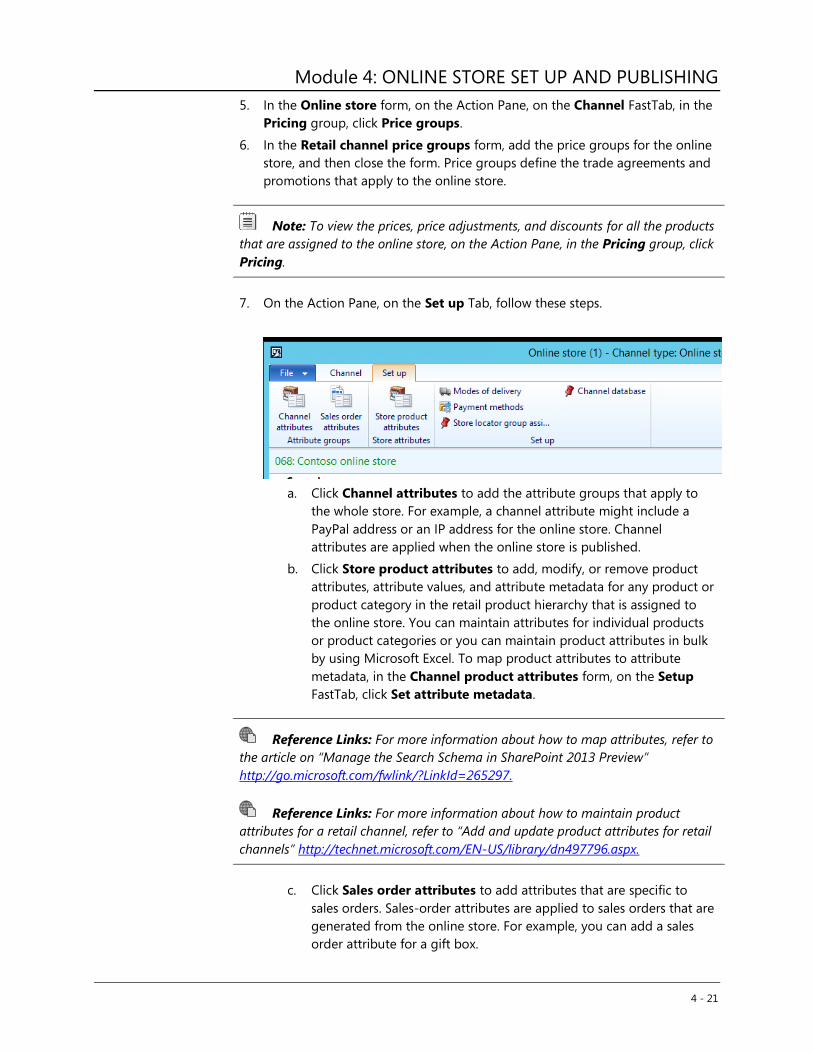
Module 4: ONLINE STORE SET UP AND PUBLISHING
4 - 21
5. In the Online store form, on the Action Pane, on the Channel FastTab, in the
Pricing group, click Price groups.
6. In the Retail channel price groups form, add the price groups for the online
store, and then close the form. Price groups define the trade agreements and
promotions that apply to the online store.
Note: To view the prices, price adjustments, and discounts for all the products
that are assigned to the online store, on the Action Pane, in the Pricing group, click
Pricing.
7. On the Action Pane, on the Set up Tab, follow these steps.
a. Click Channel attributes to add the attribute groups that apply to
the whole store. For example, a channel attribute might include a
PayPal address or an IP address for the online store. Channel
attributes are applied when the online store is published.
b. Click Store product attributes to add, modify, or remove product
attributes, attribute values, and attribute metadata for any product or
product category in the retail product hierarchy that is assigned to
the online store. You can maintain attributes for individual products
or product categories or you can maintain product attributes in bulk
by using Microsoft Excel. To map product attributes to attribute
metadata, in the Channel product attributes form, on the Setup
FastTab, click Set attribute metadata.
Reference Links: For more information about how to map attributes, refer to
the article on “Manage the Search Schema in SharePoint 2013 Preview”
http://go.microsoft.com/fwlink/?LinkId=265297.
Reference Links: For more information about how to maintain product
attributes for a retail channel, refer to “Add and update product attributes for retail
channels” http://technet.microsoft.com/EN-US/library/dn497796.aspx.
c. Click Sales order attributes to add attributes that are specific to
sales orders. Sales-order attributes are applied to sales orders that are
generated from the online store. For example, you can add a sales
order attribute for a gift box.

Retail in eCommerce Stores: Installation and Configuration for Microsoft
Dynamics AX 2012 R3
4 - 22
d. Click Modes of delivery to select the delivery methods that are
offered by the online store.
e. Click Payment methods to select the payment methods that are
accepted by the online store, such as credit cards and PayPal.
f. Click Store locator group assignment to assign the online store to a
store locator group. When you assign stores to store locator groups,
customers can be directed to locations where products are available,
based on the retail store or the online store where a product inquiry is
made.
g. Click Channel database to set up the links between the online store
in Microsoft Dynamics AX and the database that you use to publish
the online store.
Configure Data Distribution and Publish the Online
Store
This lesson discusses how to set up data distribution for an online store and the
publishing process. In Microsoft Dynamics AX 2012 R3, a channel data group is a
group of one or more retail channel databases. A data package is generated for
each data group. All channel databases in a data group subscribe to the same
data. Scheduler jobs are used to distribute data to and from stores. Jobs are made
up of subjobs. Subjobs specify how to distribute the data in selected tables and
selected table fields.
After the online store settings and the data exchange settings are configured in
Microsoft Dynamics AX, you can run jobs to distribute data to the online store
database. In Microsoft Dynamics AX 2012 R3, you can synchronize all data for the
channel database. In the Channel database form, click Full data sync and then
select the distribution schedule that is named Full sync.
To publish the Retail online store channel, you have to replicate the basic
structure of the online store between Microsoft Dynamics AX and SharePoint. You
create the basic structure of the online store channel in the Microsoft Dynamics
AX Retail module. You must complete the set up tasks before you can publish the
channel.
Lesson Objectives
The objectives include the following:
Provide an overview of how to configure data distribution and
perform scheduling for an online store in Microsoft Dynamics AX
2012.
Module 4: ONLINE STORE SET UP AND PUBLISHING
4 - 23
Explain how to set up a Channel Data Group.
Explain how to configure job and subjobs in retail scheduler.
Explain how to send configuration settings and data to the stores.
Explain how to publish the online store from Microsoft Dynamics AX
2012 to the online storefront in SharePoint 2013.
Data Distribution and Publishing
In Microsoft Dynamics AX, you will set up data distribution and publishing.
Additionally, you will learn how to do the following:
Provide an overview of data distribution and publishing.
Set up the channel data group.
Configure jobs and a subjob for data distribution.
Publish the online store.
Send the first configuration setting and data to the online store.
How to Set Up the Channel Group
Channel Data Group is used to group similar channel databases. For example, to
group the databases for stores that are in the same region or stores that are of the
same type. All channel databases in a data group subscribe to the same data.
When you run a distribution schedule, a data package is generated for each data
group. Use data groups to reduce the number of data packages that are
generated from Microsoft Dynamics AX. This helps improve performance.
Note: Channel Data Groups are available only in Microsoft Dynamics AX
2012 R3.
The Data Distribution in Microsoft Dynamics AX 2012 R3 figure shows the
relationships between stores, databases, data groups, and data packages.
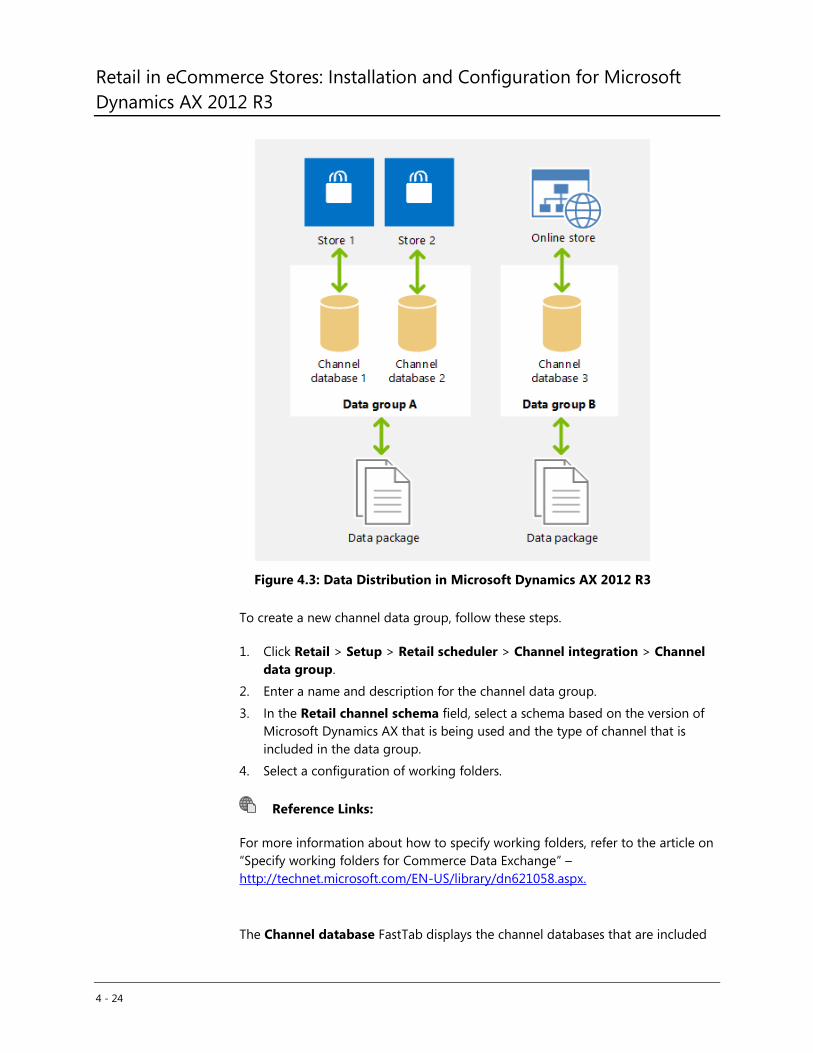
Retail in eCommerce Stores: Installation and Configuration for Microsoft
Dynamics AX 2012 R3
4 - 24
Figure 4.3: Data Distribution in Microsoft Dynamics AX 2012 R3
To create a new channel data group, follow these steps.
1. Click Retail > Setup > Retail scheduler > Channel integration > Channel
data group.
2. Enter a name and description for the channel data group.
3. In the Retail channel schema field, select a schema based on the version of
Microsoft Dynamics AX that is being used and the type of channel that is
included in the data group.
4. Select a configuration of working folders.
Reference Links:
For more information about how to specify working folders, refer to the article on
“Specify working folders for Commerce Data Exchange” –
http://technet.microsoft.com/EN-US/library/dn621058.aspx.
The Channel database FastTab displays the channel databases that are included
Module 4: ONLINE STORE SET UP AND PUBLISHING
4 - 25
in the group. You cannot change this information in this form. To change the data
group to which a database belongs, use the Channel database form.
Note: For more information, refer to the article “Set up a channel database
profile” – http://technet.microsoft.com/EN-US/library/dn621049.aspx.
How to Configure Jobs and Subjobs in Retail Scheduler
In Retail, scheduler jobs are used to distribute data to and from locations. Each job
consists of one or more subjobs. This topic explains how to create jobs and
subjobs to distribute retail data.
Initial Predefined Jobs and Subjobs
Microsoft Dynamics AX 2012 includes predefined scheduler jobs and subjobs that
meet the replication requirements of most organizations. To populate these jobs
and subjobs, you must initialize Retail. Complete this task even if you want to
customize these jobs and subjobs, because it helps save time.
To initialize Retail, follow these steps.
1. Click Retail > Setup > Parameters > Retail parameters.
2. On the General FastTab, click Initialize.
Note: If you already completed this task when you deployed Retail, you can
omit this procedure. The procedures in this documentation assume that you use the
jobs that are already set up when you initialized jobs and subjobs. If you have
modified these jobs or created additional jobs, you might want to modify the
procedures.
Predefined Jobs in Microsoft Dynamics AX 2012 R3
In Microsoft AX 2012 R3, the following types of predefined jobs are created:
Download jobs – Download jobs send data that has changed from Microsoft
Dynamics AX to channel databases. Modifications to records are tracked
through SQL Server change tracking.
Upload jobs (P jobs) – Upload jobs pull sales transactions from a channel
into the Microsoft Dynamics AX database.
P jobs upload data incrementally. When a P job runs, Async Client checks the
replication counter for records that are already received from a location. The
instance of Async Client for the channel sends only those records that have a
replication counter that is more than the largest value found. P jobs do not
update data that is previously uploaded.
Retail in eCommerce Stores: Installation and Configuration for Microsoft
Dynamics AX 2012 R3
4 - 26
Create or Modify a Subjob
A subjob contains information about a single table. In Microsoft Dynamics AX
2012 R3, to create or modify subjobs that distribute data between Microsoft
Dynamics AX and retail channels, follow these steps.
1. Click Retail > Setup > Retail scheduler > Scheduler subjobs.
2. Click New to create a new subjob, or select the subjob to modify. You can
also copy the settings of an existing subjob to a new subjob.
3. If you create a subjob, enter a unique identifier for the subjob in the Subjob
number field. Optionally, enter a description.
4. If the subjob replicates data from the channel database and writes data to the
Microsoft Dynamics AX database, select the Pull data check box.
5. In the Retail channel schema field, select the schema to use for the subjob,
based on the Microsoft Dynamics AX version and the type of channel.
6. In the Channel table name field, enter the name of the table in the channel
database. In the Microsoft Dynamics AX table name field, enter the name
of the table in the Microsoft Dynamics AX database. For P jobs, you must also
specify the temporary database table to use. To create the temporary table,
click Create staging table.
7. Enter other information in the form, if more information is required.
Reference Links: For more information about fields that are not described in
this topic, refer to the article on scheduler subjobs (form) –
http://technet.microsoft.com/en-us/library/hh597422.aspx.
Create or Modify the Scheduler Job
Each scheduler job consists of one or more subjobs. Jobs should contain subjobs
that are related. For example, the Currency job contains subjobs that update
currencies and exchange rates.
To create or modify a new job that has subjobs, follow these steps.
1. Click Retail > Setup > Retail scheduler > Scheduler jobs.
2. Click New to create a new job, or select the job to modify. You can also copy
the settings of an existing job to a new job.
3. If you create a job, enter a unique identifier for the job in the Job name field.
Optionally, add a description.
4. In the Retail channel schema field, select the schema to use for the job,
based on the Microsoft Dynamics AX version and the type of channel.
Module 4: ONLINE STORE SET UP AND PUBLISHING
4 - 27
5. In Microsoft Dynamics AX 2012 R3, if the subjob replicates data from the
channel database and writes data to the Microsoft Dynamics AX database,
select the Is upload check box.
6. Add subjobs to the job.
7. Enter other information in the form, if more information is required.
8. Enter other information in the form, if more information is required.
Reference Links: For more information about fields that are not described in
this topic, refer to the article on Scheduler job (form) –
http://technet.microsoft.com/en-us/library/hh672166.aspx.
How to Publish the Online Store
When you publish the Retail online store channel, you must replicate the basic
structure of the online store between Microsoft Dynamics and SharePoint. You
create the basic structure of the online store channel in the Microsoft Dynamics
AX Retail module.
Before you can publish the channel, you must follow these steps.
1. Add the online store to the organization hierarchy.
Reference Links: For more information, refer to “Create or modify an
organization hierarchy” – http://technet.microsoft.com/EN-
US/library/hh227463.aspx.
2. Create the online store and configure properties in Microsoft Dynamics AX.
Reference Links: For more information, refer to “Set up an online store” –
http://technet.microsoft.com/EN-US/library/jj682095.aspx.
3. Configure the category hierarchy of the site.
Reference Links: For more information, refer to “Set up a retail hierarchy” –
http://technet.microsoft.com/EN-US/library/hh580593.aspx.
4. Create the online store in SharePoint.
5. After you complete steps 1 through 4, you can publish the product schema to
SharePoint.
The Process for Publishing the Online Store figure shows how to publish a Retail
online store channel.
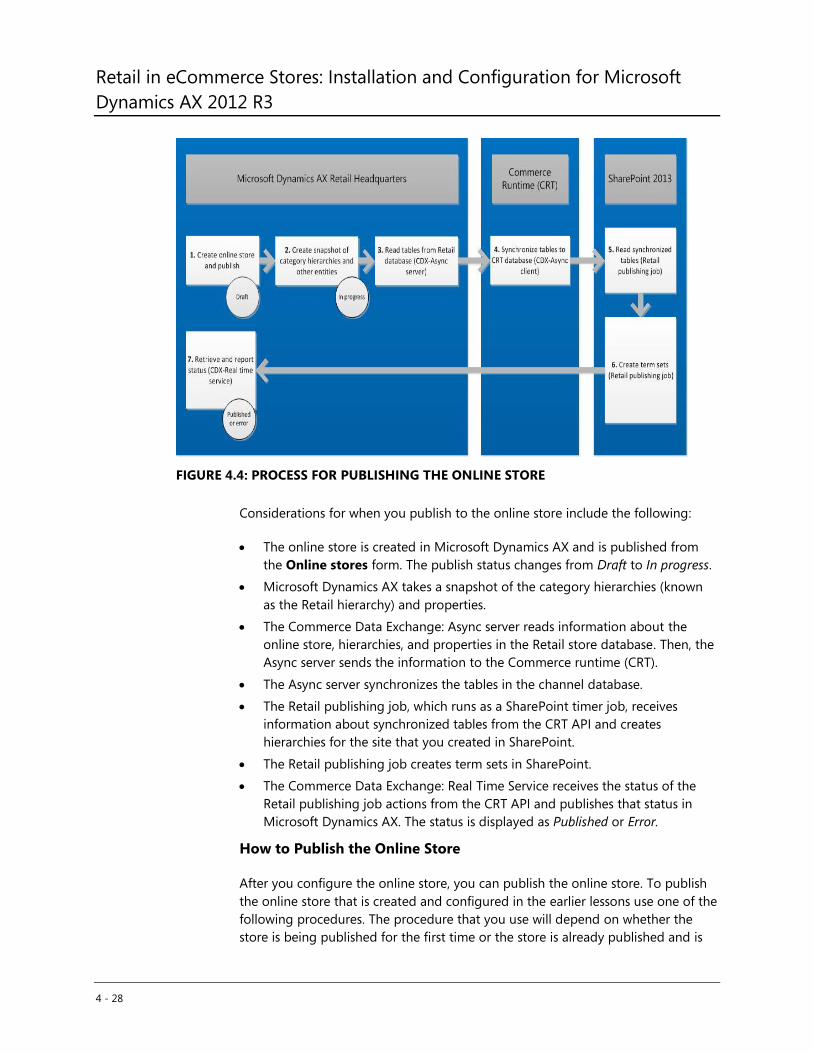
Retail in eCommerce Stores: Installation and Configuration for Microsoft
Dynamics AX 2012 R3
4 - 28
FIGURE 4.4: PROCESS FOR PUBLISHING THE ONLINE STORE
Considerations for when you publish to the online store include the following:
The online store is created in Microsoft Dynamics AX and is published from
the Online stores form. The publish status changes from Draft to In progress.
Microsoft Dynamics AX takes a snapshot of the category hierarchies (known
as the Retail hierarchy) and properties.
The Commerce Data Exchange: Async server reads information about the
online store, hierarchies, and properties in the Retail store database. Then, the
Async server sends the information to the Commerce runtime (CRT).
The Async server synchronizes the tables in the channel database.
The Retail publishing job, which runs as a SharePoint timer job, receives
information about synchronized tables from the CRT API and creates
hierarchies for the site that you created in SharePoint.
The Retail publishing job creates term sets in SharePoint.
The Commerce Data Exchange: Real Time Service receives the status of the
Retail publishing job actions from the CRT API and publishes that status in
Microsoft Dynamics AX. The status is displayed as Published or Error.
How to Publish the Online Store
After you configure the online store, you can publish the online store. To publish
the online store that is created and configured in the earlier lessons use one of the
following procedures. The procedure that you use will depend on whether the
store is being published for the first time or the store is already published and is
Module 4: ONLINE STORE SET UP AND PUBLISHING
4 - 29
being republished.
Note: If you change a category in a navigation category hierarchy that is
assigned to an online store or a retail product catalog, you must republish the
online store or catalog as follows:
If you add or delete a category node, republish the online store and
the catalog that use the category hierarchy.
If you start or stop a category, republish the online store and the
catalog that use the category hierarchy.
If you change the name of a category, republish the online store that
uses the category hierarchy.
If the online store is being published for the first time, follow these steps.
1. Click Retail > Common > Retail channels > Online stores. In the Online
stores list, double-click a store.
2. In the Online store form, on the Action Pane, on the Channel FastTab, click
Publish to publish the channel to a SharePoint site. When you click the
Publish button, the Publishing status is set to In progress.
3. Click Retail > Periodic > Data distribution > Distribution schedule. Select
the distribution schedule 1070, and then click OK.
4. In the Job for initial replication of data to an environment form, leave all
fields as they appear by default, and then click OK.
5. After the scheduler job is finished, one of the following publishing statuses is
displayed for the online store:
a. Published – The online store is published to the SharePoint site.
The category navigation is created in the online store, and retail
product catalogs can be published to the online store.
b. Failed – An error has occurred and the publishing process could
not be completed.
If an existing online store is being republished, follow these steps.
1. Click Retail > Common > Retail channels > Online stores. In the Online
stores list, double-click a store.
2. In the Online store form, on the Action Pane, on the Channel FastTab, click
Publish to publish the channel to a SharePoint site. When you click the
Publish button, the Publishing status is set to In progress.
3. Click Retail > Periodic > Data distribution > Distribution schedule. In the
Distribution schedule form, in the left navigation pane, select the
distribution schedule 1070.
4. Run the scheduler job.
i. To manually run the scheduler job, on the menu bar at the

Retail in eCommerce Stores: Installation and Configuration for Microsoft
Dynamics AX 2012 R3
4 - 30
top of the form, click Run now.
ii. To run the scheduler job in batch mode, on the Scheduler
jobs FastTab, verify that the Enabled check box is selected
for the job, and then click Create batch job.
iii. In the form that opens, enter information about the batch
job.
Reference Links: For more information about the options in the form, refer to
“Submit a batch processing job from a form” – http://technet.microsoft.com/EN-
US/library/aa619588.aspx.
5. After the scheduler job is finished, one of the following publishing statuses is
displayed for the online store:
o Published – The online store is published to the SharePoint site.
The category navigation is updated in the online store, and retail
product catalogs can be published to the online store.
o Failed – An error has occurred and the publishing process could
not be completed.
6. If a retail catalog is set up for the online store, also run the 1150 (Catalog) job
to publish the catalog data by following the instructions in step 3.
Note: An online store must be set to a status of Published before a retail
product catalog can be published to the online store.
Reference Links: For information about how to create retail product catalogs,
refer to the article “Create retail product catalogs” –
http://technet.microsoft.com/EN-US/library/jj728712.aspx.
How to Schedule and Run Jobs in Retail Scheduler
To schedule and run the data transfer between Microsoft Dynamics AX and retail
channels, Commerce Data Exchange uses Retail Scheduler jobs and distribution
schedules.
Jobs and subjobs contain the data distribution settings for specific tables and
fields in the database. A distribution schedule associates scheduler jobs with the
locations where data must be synchronized. After you create distribution
schedules, you can automatically run the distribution schedules in a batch, or you
can manually run the distribution schedules.
Before you can set up a distribution schedule, you must create scheduler jobs and
channel data groups.
Module 4: ONLINE STORE SET UP AND PUBLISHING
4 - 31
If you use Microsoft Dynamics AX 2012 R3, follow these steps to create a
distribution schedule.
1. Click Retail > Periodic > Data distribution > Distribution schedule.
2. Click New to create a new distribution schedule, or select a distribution
schedule to modify.
3. Enter a name and description for the distribution schedule.
4. Select Active to start the distribution schedule. If this option is not marked,
the distribution schedule will not run.
5. If you create a new distribution schedule, select the direction in which the
data will move. You can select from the following:
Download if the jobs in the distribution schedule transfer
data from Microsoft Dynamics AX to channels.
Upload if the jobs in the distribution schedule transfer
data from channels to Microsoft Dynamics AX. The
direction that you select determines the jobs that are
available to add to the distribution schedule.
6. On the Data groups FastTab, click Add to add one or more data groups to
the schedule. When you run the distribution schedule, a data package is
generated for each data group. All channel databases in a data group
subscribe to the same data. To remove a data group from the schedule, select
the data group and then click Remove.
7. On the Scheduler jobs FastTab, click Add to add one or more jobs to the
schedule. To remove a job from the schedule, select the job, and then click
Remove.
A batch job is a scheduled run of a job or a group of jobs. When you create a
batch job, you set up a timer in the AOS instance. The job is then run
automatically on the server. To run batch jobs, you must configure the batch
server.
To set up a batch job for a distribution schedule, follow these steps.
Reference Links: For more information about how to configure an AOS
instance as a batch server, refer to http://technet.microsoft.com/EN-
US/library/gg731831.aspx .
1. Click Retail > Periodic > Data distribution > Distribution schedule.
2. Select a distribution schedule.
3. On the Scheduler jobs FastTab, select the Enabled check box for each
scheduler job that the batch job should run.
4. Click Create batch job. In the form that is displayed, enter information about
the batch job.
Retail in eCommerce Stores: Installation and Configuration for Microsoft
Dynamics AX 2012 R3
4 - 32
Reference Links: For more information about how to submit a batch
processing job from a form, refer to http://technet.microsoft.com/EN-
US/library/aa619588.aspx .
Manage and Publish Online Store Products
This lesson discusses how to manage the online store products. A Retail product
catalog lets you identify the products that you want to offer in the online stores.
Lesson Objective
The objective is to explain how to manage online store products in Microsoft
Dynamics AX 2012.
The topics discussed in this lesson include the following:
How to Manage Online Store Products
How to Assign an Assortment to an Online Store
How to Add Price Groups to an Online Store
How to Manage an Online Store Catalog
How to Create an Online Store Catalog
How to Validate an Online Store Catalog
How to Submit an Online Store Catalog for Review and Approval
How to Publish the Online Store Catalog
How to Bulk Edit Product Attributes by using Microsoft Excel
Overview of How to Manage the Online Store Products
A Retail product catalog lets you identify the products that you want to offer in
the online stores. When you create a catalog, you identify the online stores where
the products will be offered, add products, and improve the product offerings by
adding merchandising details. After the catalog is approved, you publish the
catalog so that the products are made available in the online store.
Before you can publish a catalog, you must follow these steps.
1. Set up retail products and configure hierarchies, assortments, and variants.
Reference Links: For more information about how to set up retail products
refer to http://technet.microsoft.com/EN-US/library/hh597210.aspx.
Module 4: ONLINE STORE SET UP AND PUBLISHING
4 - 33
2. Set up retail product catalogs and configure attribute groups and workflow.
Reference Links: For more information about how to set up retail product
catalogs refer to http://technet.microsoft.com/EN-US/library/jj728683.aspx.
When you manage the online store products in Microsoft Dynamics AX, you must
perform the following activities:
Add an assortment to an online store
Manage an online store catalog
Manage prices and taxes
Publish an online store catalog
Note: Important: This lesson begins by adding assortments and price groups
to the online store. Then the lesson focuses on how to manage and publish the
online store catalog. The activities to manage prices, taxes, price adjustments and
discounts are not unique to the online store and are performed by using the
Microsoft Dynamics AX Retail module.
Reference Links: For instructions on how to set up a price
group, refer to http://technet.microsoft.com/EN-
US/library/hh597133.aspx .
For instructions on how to set up taxes, refer to
http://technet.microsoft.com/EN-US/library/hh580571.aspx .
For instructions on how to set up price adjustments and discounts,
refer to http://technet.microsoft.com/EN-US/library/hh597114.aspx .
How to Assign an Assortment to the Online Store
In Microsoft Dynamics AX, to assign an assortment to the online store, follow
these steps.
1. Click Retail > Common > Retail channels > Online stores. In the Online
stores list, double-click a store.
2. In the Online store form, on the Action Pane, on the Channel FastTab, in the
Inventory group, click View assortments.
3. On the Action Pane, in the New group, click Assortment to add a new
assortment. Or, in the View assortments list, double-click an existing
assortment.
4. In the Assortments form, on the Retail channels FastTab, add the online
store. If you add a new assortment, enter any additional details for the
assortment.
5. Close the form.
Retail in eCommerce Stores: Installation and Configuration for Microsoft
Dynamics AX 2012 R3
4 - 34
How to Add Price Groups to the Online Store
In Microsoft Dynamics AX, to add price groups to the online store, follow these
steps.
1. Click Retail > Common > Retail channels > Online stores. In the Online
stores list, double-click a store.
2. In the Online store form, on the Action Pane, on the Channel FastTab, in the
Pricing group, click Price groups.
3. In the Retail channel price groups form, add the price groups for the online
store, and then close the form. Price groups define the trade agreements and
the promotions that apply to the online store
4. To view the prices, price adjustments, and discounts for all the products that
are assigned to the online store, on the Action Pane, in the Pricing group,
click Price list.
Note: The Online store has to be in Draft status for the price group to be added.
Manage the Online Store Catalog
Retail product catalogs identify the products that you want to offer in the online
stores. When you create the catalog, you identify the online stores that the
products are offered in, add the products that you want to include, and improve
the product offerings by adding merchandising details. You can create multiple
catalogs for an online store.
The Retail Product Catalog Components figure shows the components that are
included in a retail product catalog.
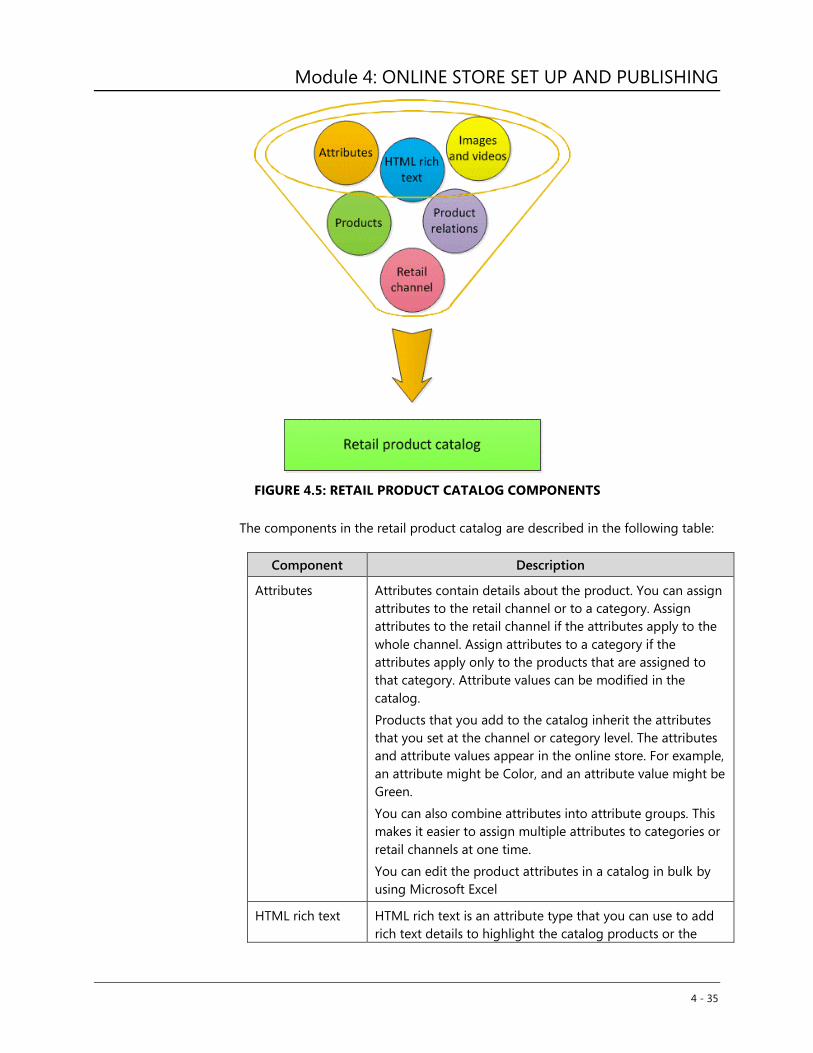
Module 4: ONLINE STORE SET UP AND PUBLISHING
4 - 35
FIGURE 4.5: RETAIL PRODUCT CATALOG COMPONENTS
The components in the retail product catalog are described in the following table:
Component Description
Attributes Attributes contain details about the product. You can assign
attributes to the retail channel or to a category. Assign
attributes to the retail channel if the attributes apply to the
whole channel. Assign attributes to a category if the
attributes apply only to the products that are assigned to
that category. Attribute values can be modified in the
catalog.
Products that you add to the catalog inherit the attributes
that you set at the channel or category level. The attributes
and attribute values appear in the online store. For example,
an attribute might be Color, and an attribute value might be
Green.
You can also combine attributes into attribute groups. This
makes it easier to assign multiple attributes to categories or
retail channels at one time.
You can edit the product attributes in a catalog in bulk by
using Microsoft Excel
HTML rich text HTML rich text is an attribute type that you can use to add
rich text details to highlight the catalog products or the
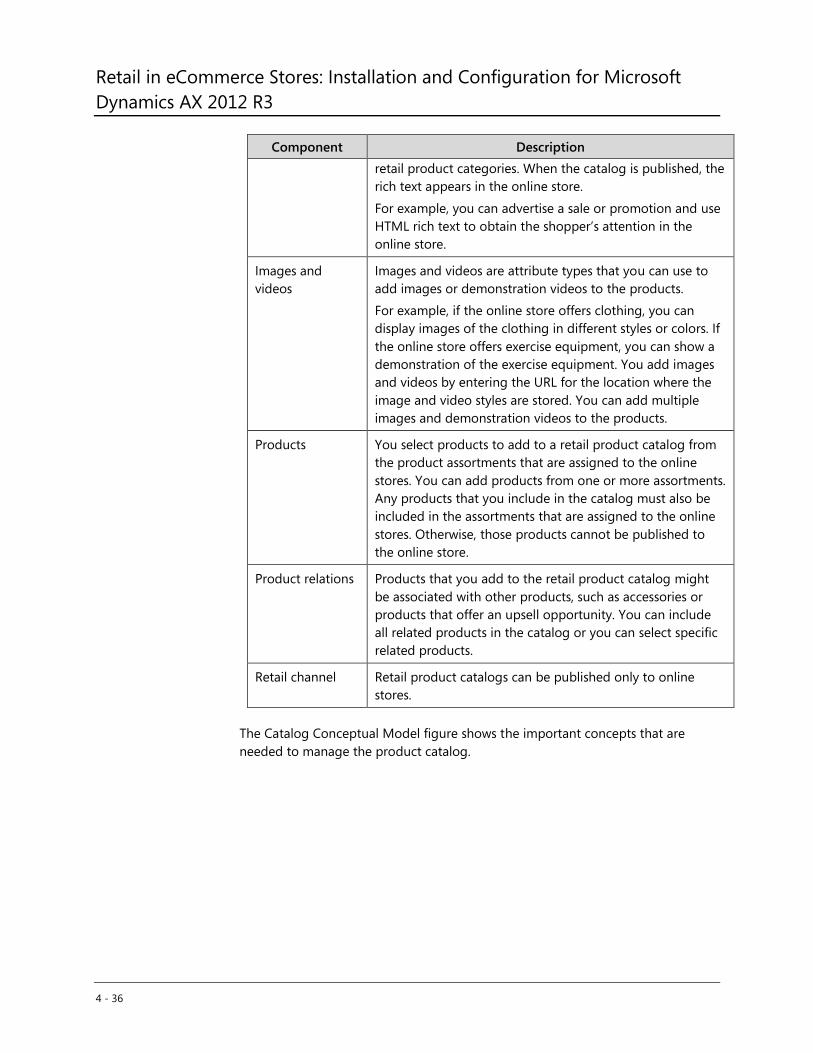
Retail in eCommerce Stores: Installation and Configuration for Microsoft
Dynamics AX 2012 R3
4 - 36
Component Description
retail product categories. When the catalog is published, the
rich text appears in the online store.
For example, you can advertise a sale or promotion and use
HTML rich text to obtain the shopper’s attention in the
online store.
Images and
videos
Images and videos are attribute types that you can use to
add images or demonstration videos to the products.
For example, if the online store offers clothing, you can
display images of the clothing in different styles or colors. If
the online store offers exercise equipment, you can show a
demonstration of the exercise equipment. You add images
and videos by entering the URL for the location where the
image and video styles are stored. You can add multiple
images and demonstration videos to the products.
Products You select products to add to a retail product catalog from
the product assortments that are assigned to the online
stores. You can add products from one or more assortments.
Any products that you include in the catalog must also be
included in the assortments that are assigned to the online
stores. Otherwise, those products cannot be published to
the online store.
Product relations Products that you add to the retail product catalog might
be associated with other products, such as accessories or
products that offer an upsell opportunity. You can include
all related products in the catalog or you can select specific
related products.
Retail channel Retail product catalogs can be published only to online
stores.
The Catalog Conceptual Model figure shows the important concepts that are
needed to manage the product catalog.
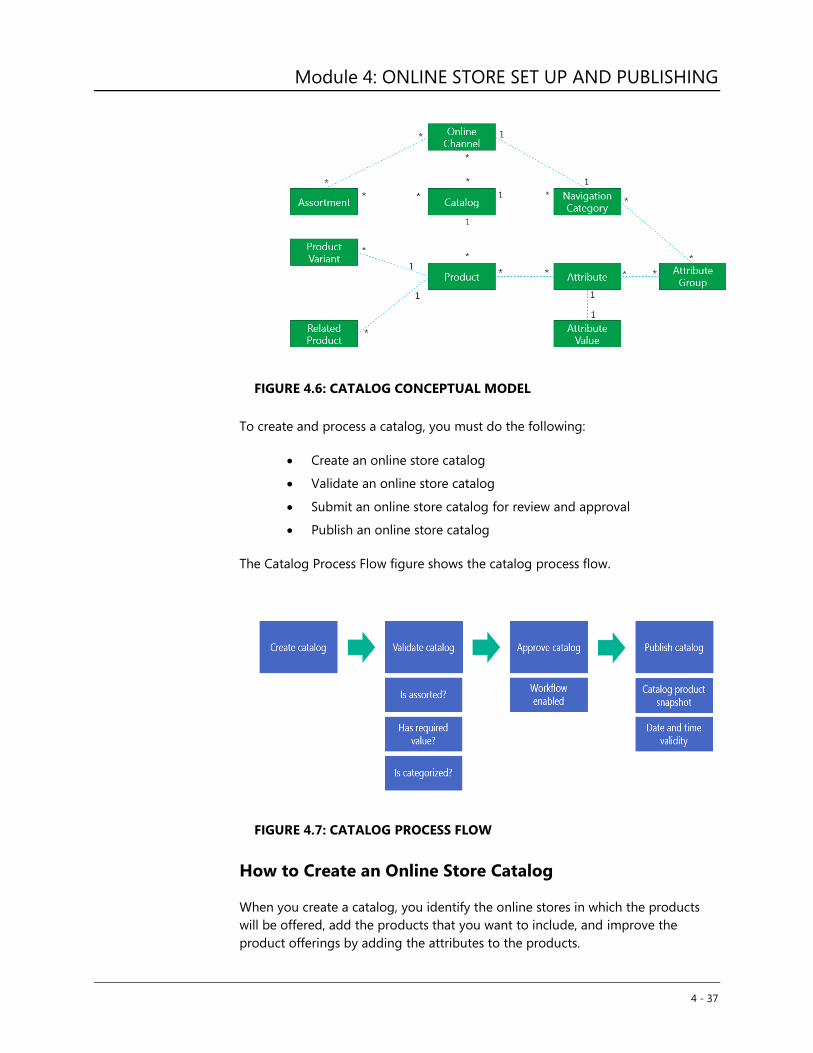
Module 4: ONLINE STORE SET UP AND PUBLISHING
4 - 37
FIGURE 4.6: CATALOG CONCEPTUAL MODEL
To create and process a catalog, you must do the following:
Create an online store catalog
Validate an online store catalog
Submit an online store catalog for review and approval
Publish an online store catalog
The Catalog Process Flow figure shows the catalog process flow.
FIGURE 4.7: CATALOG PROCESS FLOW
How to Create an Online Store Catalog
When you create a catalog, you identify the online stores in which the products
will be offered, add the products that you want to include, and improve the
product offerings by adding the attributes to the products.
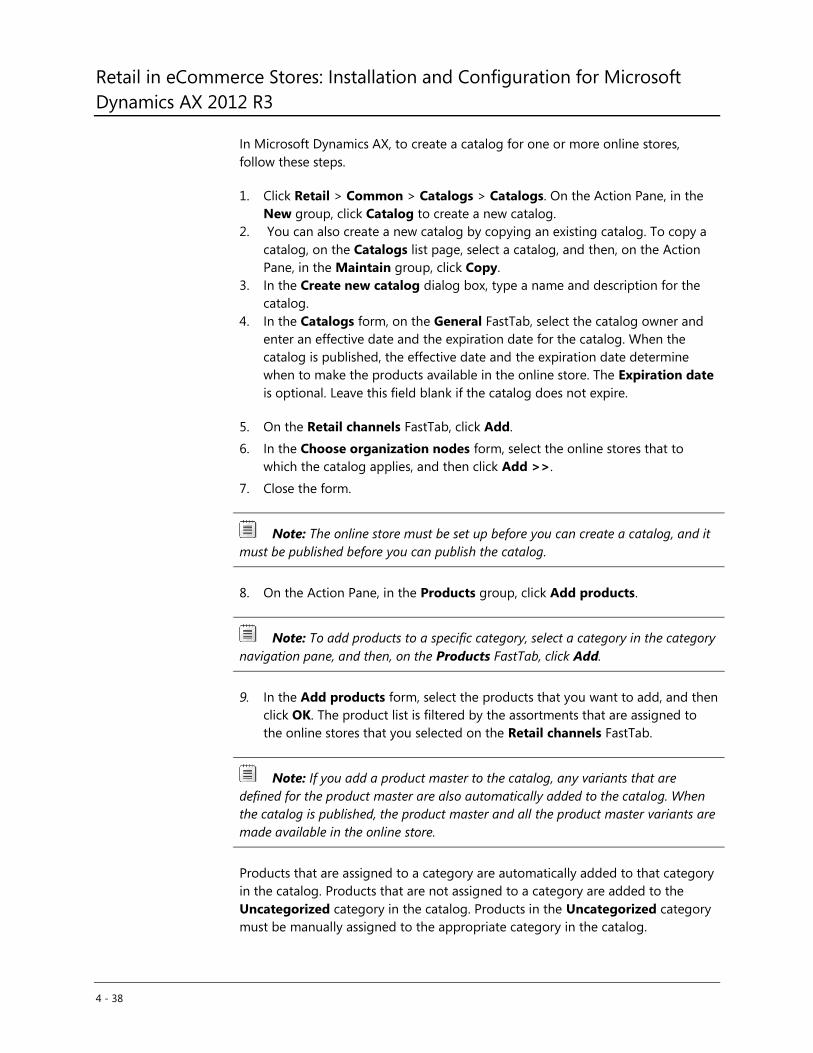
Retail in eCommerce Stores: Installation and Configuration for Microsoft
Dynamics AX 2012 R3
4 - 38
In Microsoft Dynamics AX, to create a catalog for one or more online stores,
follow these steps.
1. Click Retail > Common > Catalogs > Catalogs. On the Action Pane, in the
New group, click Catalog to create a new catalog.
2. You can also create a new catalog by copying an existing catalog. To copy a
catalog, on the Catalogs list page, select a catalog, and then, on the Action
Pane, in the Maintain group, click Copy.
3. In the Create new catalog dialog box, type a name and description for the
catalog.
4. In the Catalogs form, on the General FastTab, select the catalog owner and
enter an effective date and the expiration date for the catalog. When the
catalog is published, the effective date and the expiration date determine
when to make the products available in the online store. The Expiration date
is optional. Leave this field blank if the catalog does not expire.
5. On the Retail channels FastTab, click Add.
6. In the Choose organization nodes form, select the online stores that to
which the catalog applies, and then click Add >>.
7. Close the form.
Note: The online store must be set up before you can create a catalog, and it
must be published before you can publish the catalog.
8. On the Action Pane, in the Products group, click Add products.
Note: To add products to a specific category, select a category in the category
navigation pane, and then, on the Products FastTab, click Add.
9. In the Add products form, select the products that you want to add, and then
click OK. The product list is filtered by the assortments that are assigned to
the online stores that you selected on the Retail channels FastTab.
Note: If you add a product master to the catalog, any variants that are
defined for the product master are also automatically added to the catalog. When
the catalog is published, the product master and all the product master variants are
made available in the online store.
Products that are assigned to a category are automatically added to that category
in the catalog. Products that are not assigned to a category are added to the
Uncategorized category in the catalog. Products in the Uncategorized category
must be manually assigned to the appropriate category in the catalog.
Module 4: ONLINE STORE SET UP AND PUBLISHING
4 - 39
To assign any uncategorized products to the appropriate category in the catalog,
follow these steps:
1. In the category navigation pane, select the Uncategorized category.
2. On the Products FastTab, select the products that you want to categorize.
3. Click Categorize products.
4. Select the categories to which you want to move the products to.
You can select one or more products to move to a single category at the same
time. To move products to different categories, you must select the products and
move the products one at a time.
5. In the category navigation pane, select each category in the catalog and do
one or more of the following:
a. On the Products FastTab, review the list of products in the selected
category.
b. Click Add to add products to the selected category.
c. Click Remove to remove any products from the selected category. If
the catalog is not published, you can delete the products from the
catalog category. If the catalog is published, you can remove
products from the catalog category. However, the catalog must be
republished for the product listings to be removed from the online
store.
Note: To remove products from the whole catalog, on the Action Pane, click
Remove products, and then in the Remove products dialog box, select the
products that you want to remove.
d. Click Related products to open the Related products form and then
view the list of products that are associated with the product. You can
select whether to include or exclude the related products in the
catalog.
6. Click Attributes to view the attributes that are assigned to the products and
to add or modify attribute values. If HTML rich text attributes, image
attributes, or video attributes are assigned to the product, in the Product
attribute values form, click Edit to add the HTML rich text or the URLs for
the images or video files.
How to Validate an Online Store Catalog
After you add the catalog components to the catalog, you must validate the
catalog. The validation process makes sure that all the required data is included
and is valid so that the publishing process can succeed.
The validation process verifies that required data for channel attributes and
Retail in eCommerce Stores: Installation and Configuration for Microsoft
Dynamics AX 2012 R3
4 - 40
product attributes is complete and valid. The process also verifies that the online
stores that are assigned to the catalog are complete and valid, and have a status
of Published.
After the validation process is completed, you can view a detailed explanation for
any warnings or errors that are found. Products that generate a warning cannot
be published to the online store. A catalog that contains any errors cannot be
published until the errors are resolved.
Note: You can publish a catalog that contains products that have warnings.
However, these products do not appear in the online store.
In Microsoft Dynamics AX, to validate the catalog, follow these steps.
1. Click Retail > Common > Catalogs > Catalogs. On the Catalogs list page,
select a catalog, and then, on the Action Pane, in the Maintain group, click
Edit.
2. In the Catalogs form, on the Action Pane, in the Publish group, click
Validate catalog.
3. In the Validate catalog form, click Validate catalog to run the validation
process. If you have never run the validation process for the catalog, then the
fields in the form are blank. If you have run the validation process for the
catalog, then the results from the last validation are displayed in the form.
You can run the validation process as many times as needed.
4. In the Channel summary section, review any errors or warnings for the online
store.
5. In the Product summary section, in the Channel field, select the online
stores that are assigned to the catalog, and then review any errors or warnings
for the products.
6. Correct any errors that are found by the validation process. Then, repeat steps
2 through 5 until the catalog is valid and ready to be submitted for review.
How to Submit an Online Store Catalog for Review and
Approval
After a catalog is validated, you can submit the catalog for review and approval. A
catalog must be approved before it can be published. You can configure workflow
so that catalogs are automatically approved or require manual approval.
Reference Links: For detailed instructions on how to configure workflow for
retail product catalogs, refer to http://technet.microsoft.com/EN-
Module 4: ONLINE STORE SET UP AND PUBLISHING
4 - 41
US/library/jj728696.aspx.
In Microsoft Dynamics AX, to submit the catalog for approval, follow these steps.
1. Click Retail > Common > Catalogs > Catalogs.
2. On the Catalogs list page, select a catalog, and then, on the Action Pane, in
the Maintain group, click Edit.
3. In the Catalogs form, in the workflow message bar, click Submit. The catalog
status is changed from Draft to Submitted for approval.
4. If you are an approver, in the Catalogs form, in the workflow message bar,
click Approve. When the catalog is approved, the catalog status changes to
Approved.
Publish an Online Store Catalog
When you publish a catalog this makes the products and product information
available in a specific online store. Before you publish the catalog, you must
publish any online stores that are assigned to the catalog. When you publish the
online store this generates the online store structure and the navigation
categories, whereas when you publish the catalog, this generates the product
listings that appear in the online store. After the catalog is published, you can view
the product listings that are generated during the publishing process.
The Retail Product Catalog Publishing Architecture figure shows the online
channel (that is the online store) publishing and the catalog publishing.

Retail in eCommerce Stores: Installation and Configuration for Microsoft
Dynamics AX 2012 R3
4 - 42
FIGURE 4.8: RETAIL PRODUCT CATALOG PUBLISHING ARCHITECTURE
The retail product catalog from Microsoft Dynamics AX 2012 is published to the
SharePoint product catalog site. When the online channel and the catalog are
published, their entities are mapped to the entities in the SharePoint cross-site
publishing platform. The Microsoft Dynamics AX Retail Catalogs Features figure
shows several features of the retail product catalog that are published to
SharePoint.
The Microsoft Dynamics AX Retail Catalogs Features figure also shows the Product
catalog features that are published to the SharePoint product catalog site.
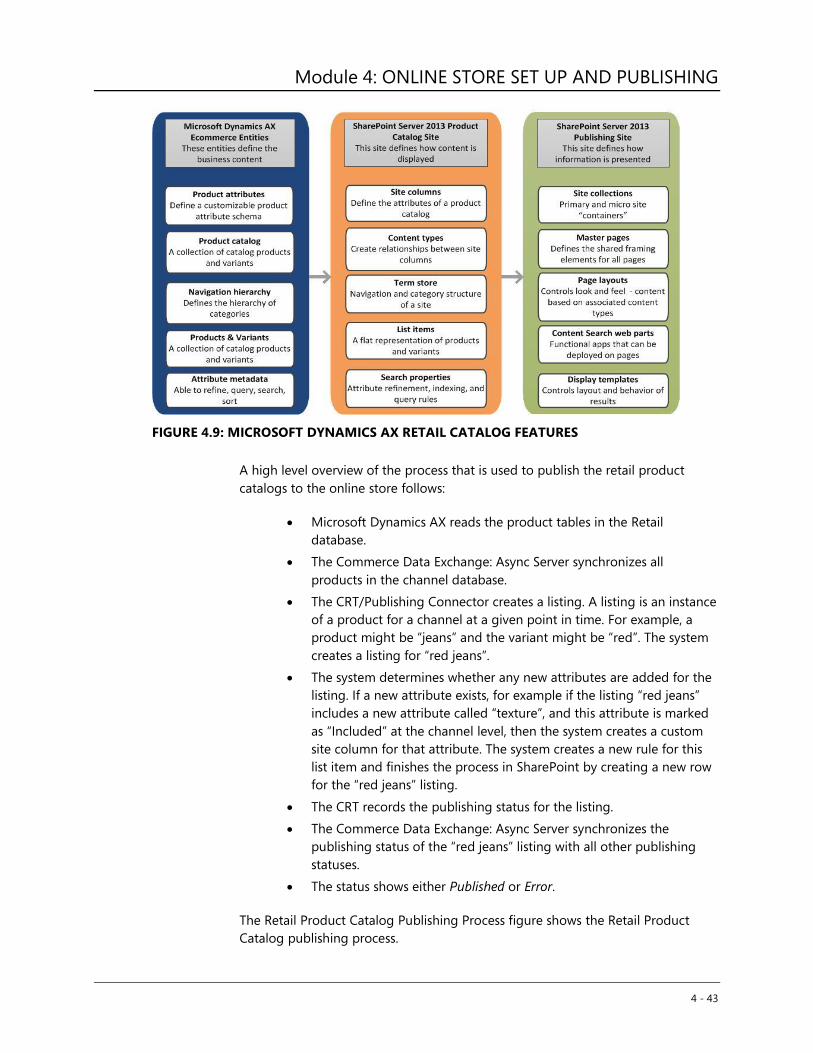
Module 4: ONLINE STORE SET UP AND PUBLISHING
4 - 43
FIGURE 4.9: MICROSOFT DYNAMICS AX RETAIL CATALOG FEATURES
A high level overview of the process that is used to publish the retail product
catalogs to the online store follows:
Microsoft Dynamics AX reads the product tables in the Retail
database.
The Commerce Data Exchange: Async Server synchronizes all
products in the channel database.
The CRT/Publishing Connector creates a listing. A listing is an instance
of a product for a channel at a given point in time. For example, a
product might be “jeans” and the variant might be “red”. The system
creates a listing for “red jeans”.
The system determines whether any new attributes are added for the
listing. If a new attribute exists, for example if the listing “red jeans”
includes a new attribute called “texture”, and this attribute is marked
as “Included” at the channel level, then the system creates a custom
site column for that attribute. The system creates a new rule for this
list item and finishes the process in SharePoint by creating a new row
for the “red jeans” listing.
The CRT records the publishing status for the listing.
The Commerce Data Exchange: Async Server synchronizes the
publishing status of the “red jeans” listing with all other publishing
statuses.
The status shows either Published or Error.
The Retail Product Catalog Publishing Process figure shows the Retail Product
Catalog publishing process.
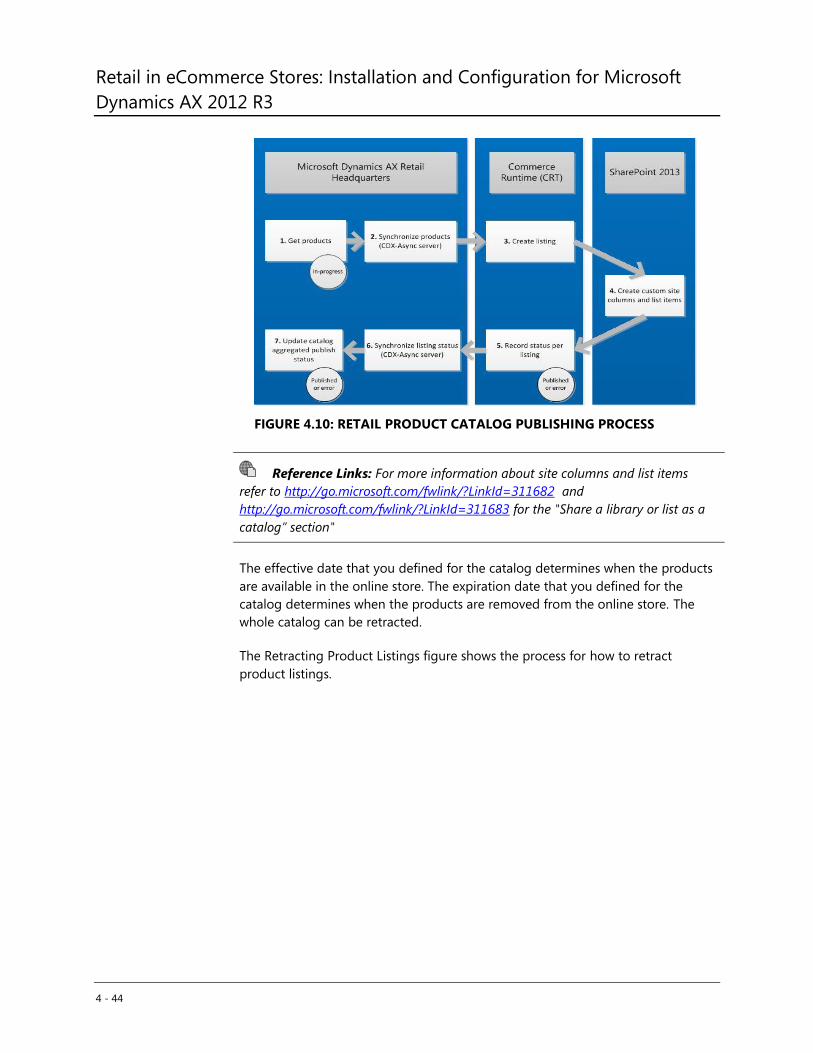
Retail in eCommerce Stores: Installation and Configuration for Microsoft
Dynamics AX 2012 R3
4 - 44
FIGURE 4.10: RETAIL PRODUCT CATALOG PUBLISHING PROCESS
Reference Links: For more information about site columns and list items
refer to http://go.microsoft.com/fwlink/?LinkId=311682 and
http://go.microsoft.com/fwlink/?LinkId=311683 for the "Share a library or list as a
catalog” section"
The effective date that you defined for the catalog determines when the products
are available in the online store. The expiration date that you defined for the
catalog determines when the products are removed from the online store. The
whole catalog can be retracted.
The Retracting Product Listings figure shows the process for how to retract
product listings.
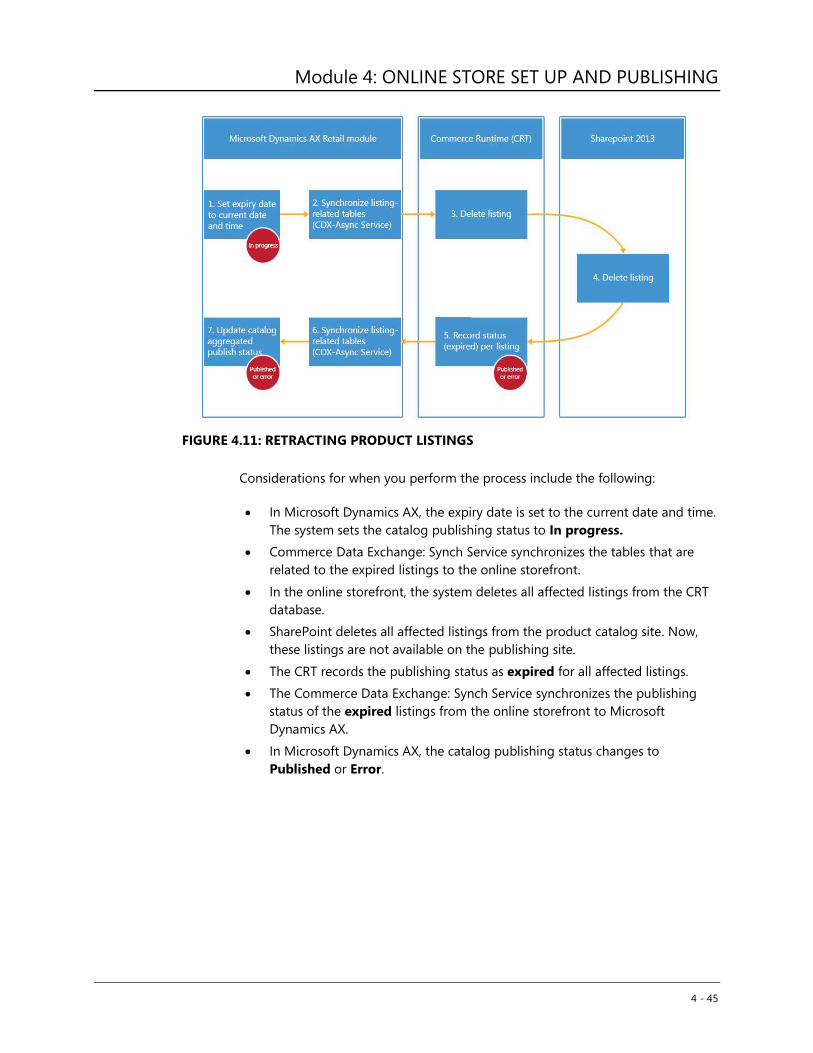
Module 4: ONLINE STORE SET UP AND PUBLISHING
4 - 45
FIGURE 4.11: RETRACTING PRODUCT LISTINGS
Considerations for when you perform the process include the following:
In Microsoft Dynamics AX, the expiry date is set to the current date and time.
The system sets the catalog publishing status to In progress.
Commerce Data Exchange: Synch Service synchronizes the tables that are
related to the expired listings to the online storefront.
In the online storefront, the system deletes all affected listings from the CRT
database.
SharePoint deletes all affected listings from the product catalog site. Now,
these listings are not available on the publishing site.
The CRT records the publishing status as expired for all affected listings.
The Commerce Data Exchange: Synch Service synchronizes the publishing
status of the expired listings from the online storefront to Microsoft
Dynamics AX.
In Microsoft Dynamics AX, the catalog publishing status changes to
Published or Error.
Retail in eCommerce Stores: Installation and Configuration for Microsoft
Dynamics AX 2012 R3
4 - 46
How to Publish the Online Store Catalog
In Microsoft Dynamics AX, to publish the catalog, follow these steps.
1. Click Retail > Common > Catalogs > Catalogs.
2. On the Catalogs list page, select a catalog, and then, on the Action Pane, in
the Maintain group, click Edit.
3. In the Catalogs form, on the Action Pane, in the Publish group, click Publish.
4. In the Publish catalog form, in the Publish field, select one of the following
options:
a. Only products that have changed – Select this option to
publish only the changes that are made to the catalog since
the last time that the catalog is published.
a. All products – Select this option if this is the first time that the
catalog is being published, or if you want to republish the whole
catalog.
5. In the Product totals by channel grid, review the total number of product
listings to be created, updated, or deleted when the publishing process is
completed.
6. Click OK to start the publishing process.
7. In the Catalogs form, on the Retail channels FastTab, select an online store,
and then click Listings.
8. Or, on the Products FastTab, click Listings to review the product listings for a
specific category.
9. In the Listings form, review the product listings that the publishing process is
creating, updating, or deleting for the selected online store. You can also
review the listing status that is updated by Microsoft Dynamics AX Commerce
Runtime. The following statuses are displayed:
a. In progress – The catalog is being published, republished, or
retracted.
b. Success – The publishing process has completed and the product
listings are updated in the online store.
c. Error – An error occurred, and the product listing could not be
processed.
How to Bulk Edit Product Attributes by Using Microsoft
Excel
This topic explains how to use Microsoft Excel to update attributes such as size,
color, and dimensions for products that you sell in the retail channels. You can use
Excel to update attributes for products in a catalog. In Microsoft Dynamics AX
2012 R3, you can also use Excel to update products that are not included in a
Module 4: ONLINE STORE SET UP AND PUBLISHING
4 - 47
catalog.
In Microsoft Dynamics AX 2012 for Retail, you use product attributes to add
merchandising details to the products that you offer in the online store. Product
attributes include color, size, product dimensions, and other product details. To
make product attributes visible in the online store, you add the product attributes
to the products that are listed in the retail catalog.
You can edit product attributes at any time. You can edit product attributes one
by one in the retail catalog by using the Catalog details form, or you can bulk
edit product attributes by exporting them to Excel. Then, in Excel, you can edit the
product attributes and import the changes back into the retail catalog. In Excel,
you can also edit product attributes for the whole catalog or you can edit only the
product attributes that are assigned to a specific category.
Using Excel in Microsoft Dynamics AX 2012 R3
You can use Excel to bulk edit product attributes for products that are offered in
any retail channel, even if the products are not included in a retail catalog. In
Microsoft AX 2012 R3, bulk editing product attributes in Excel is even easier.
Improvements to functionality let you to do the following:
Easily identify required attributes.
Enter URLs for images and videos directly in the spreadsheet and
upload that data back to Microsoft Dynamics AX.
Select the appropriate value from a fixed list when multiple values are
assigned to a specific attribute.
More easily assign an appropriate value to attributes that include a
minimum and maximum value range. If minimum and maximum
value ranges are not defined for an attribute, the minimum and
maximum value ranges that are defined for the system are used.
Prerequisites
Before you can use Excel to bulk edit product attributes in a retail catalog, you
must complete the following tasks.
Task More information
Enable digitally signed macros and
disable all other macros in Excel.
http://technet.microsoft.com/EN-
US/library/dn292561.aspx
Define product attributes. http://technet.microsoft.com/EN-
US/library/hh227548.aspx
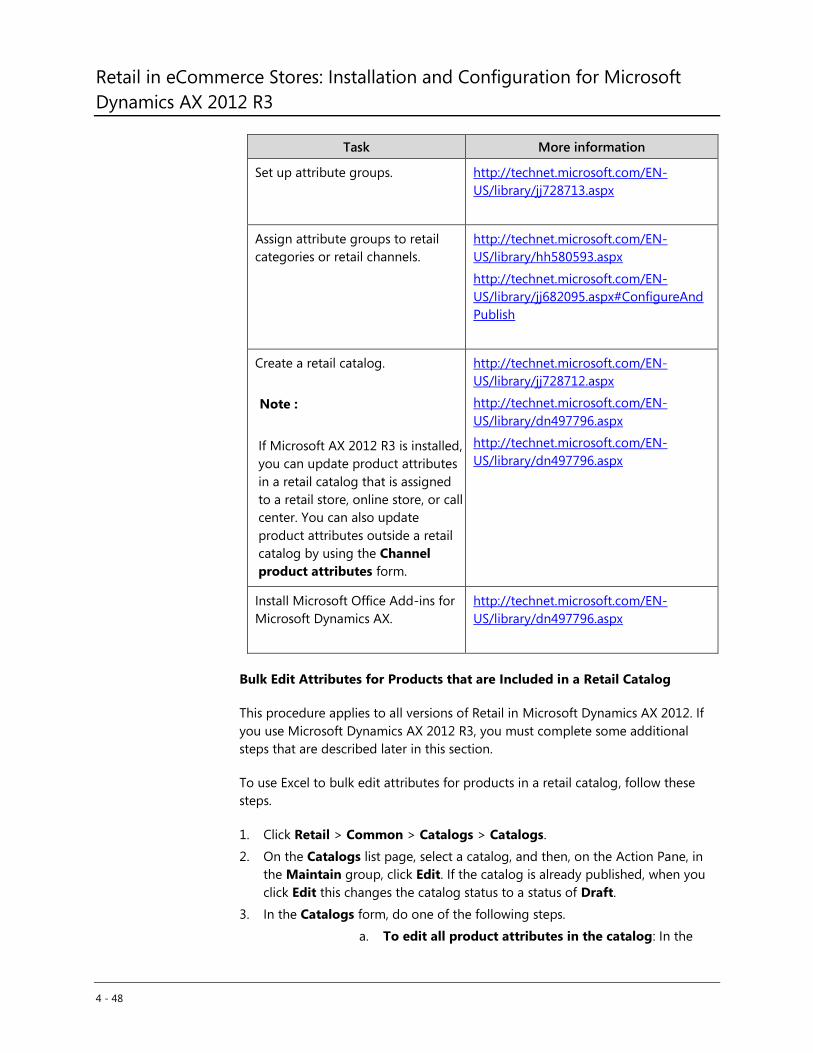
Retail in eCommerce Stores: Installation and Configuration for Microsoft
Dynamics AX 2012 R3
4 - 48
Task More information
Set up attribute groups. http://technet.microsoft.com/EN-
US/library/jj728713.aspx
Assign attribute groups to retail
categories or retail channels.
http://technet.microsoft.com/EN-
US/library/hh580593.aspx
http://technet.microsoft.com/EN-
US/library/jj682095.aspx#ConfigureAnd
Publish
Create a retail catalog.
Note :
If Microsoft AX 2012 R3 is installed,
you can update product attributes
in a retail catalog that is assigned
to a retail store, online store, or call
center. You can also update
product attributes outside a retail
catalog by using the Channel
product attributes form.
http://technet.microsoft.com/EN-
US/library/jj728712.aspx
http://technet.microsoft.com/EN-
US/library/dn497796.aspx
http://technet.microsoft.com/EN-
US/library/dn497796.aspx
Install Microsoft Office Add-ins for
Microsoft Dynamics AX.
http://technet.microsoft.com/EN-
US/library/dn497796.aspx
Bulk Edit Attributes for Products that are Included in a Retail Catalog
This procedure applies to all versions of Retail in Microsoft Dynamics AX 2012. If
you use Microsoft Dynamics AX 2012 R3, you must complete some additional
steps that are described later in this section.
To use Excel to bulk edit attributes for products in a retail catalog, follow these
steps.
1. Click Retail > Common > Catalogs > Catalogs.
2. On the Catalogs list page, select a catalog, and then, on the Action Pane, in
the Maintain group, click Edit. If the catalog is already published, when you
click Edit this changes the catalog status to a status of Draft.
3. In the Catalogs form, do one of the following steps.
a. To edit all product attributes in the catalog: In the
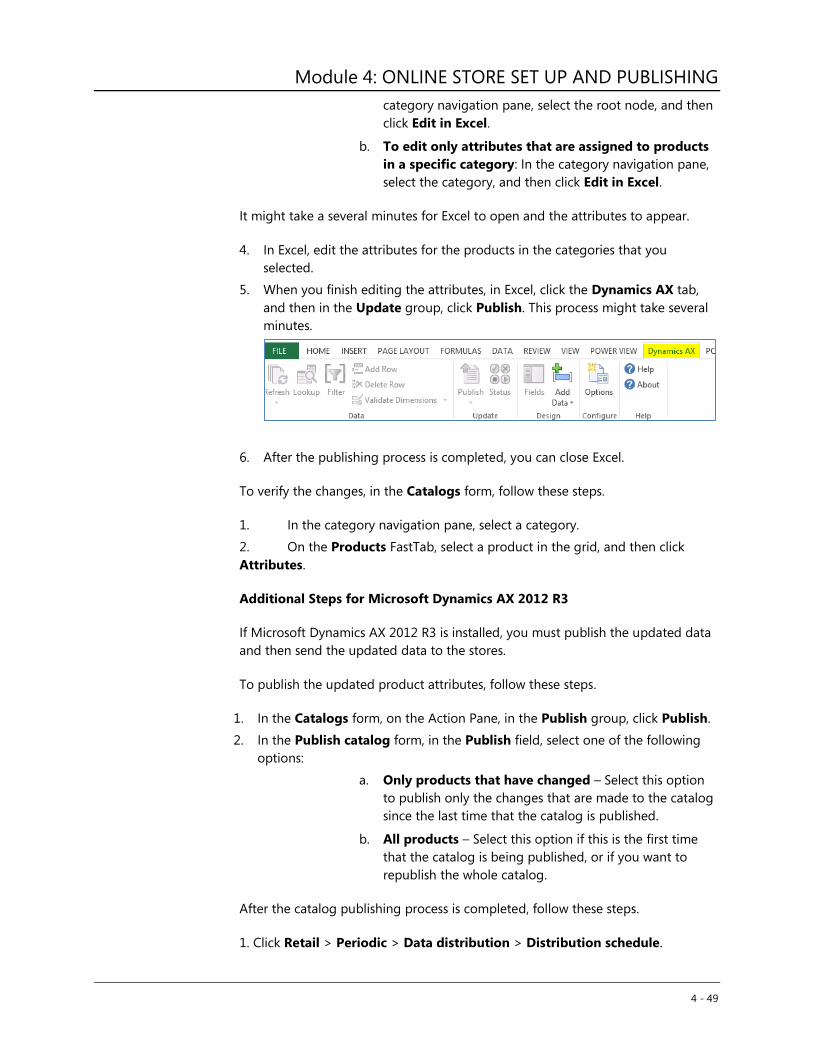
Module 4: ONLINE STORE SET UP AND PUBLISHING
4 - 49
category navigation pane, select the root node, and then
click Edit in Excel.
b. To edit only attributes that are assigned to products
in a specific category: In the category navigation pane,
select the category, and then click Edit in Excel.
It might take a several minutes for Excel to open and the attributes to appear.
4. In Excel, edit the attributes for the products in the categories that you
selected.
5. When you finish editing the attributes, in Excel, click the Dynamics AX tab,
and then in the Update group, click Publish. This process might take several
minutes.
6. After the publishing process is completed, you can close Excel.
To verify the changes, in the Catalogs form, follow these steps.
1. In the category navigation pane, select a category.
2. On the Products FastTab, select a product in the grid, and then click
Attributes.
Additional Steps for Microsoft Dynamics AX 2012 R3
If Microsoft Dynamics AX 2012 R3 is installed, you must publish the updated data
and then send the updated data to the stores.
To publish the updated product attributes, follow these steps.
1. In the Catalogs form, on the Action Pane, in the Publish group, click Publish.
2. In the Publish catalog form, in the Publish field, select one of the following
options:
a. Only products that have changed – Select this option
to publish only the changes that are made to the catalog
since the last time that the catalog is published.
b. All products – Select this option if this is the first time
that the catalog is being published, or if you want to
republish the whole catalog.
After the catalog publishing process is completed, follow these steps.
1. Click Retail > Periodic > Data distribution > Distribution schedule.
Retail in eCommerce Stores: Installation and Configuration for Microsoft
Dynamics AX 2012 R3
4 - 50
2. In the Distribution schedule form, in the left navigation pane, in the Name
column, select the 1150 (Catalog) scheduler job.
3. To run the job manually or in batch mode, do one of the following:
a. To manually run the scheduler job, on the menu bar at
the top of the form, click Run now.
b. To run the scheduler job in batch mode, on the
Scheduler jobs FastTab, verify that the Enabled check
box is selected for the job, and then click Create batch
job. In the form that is displayed, enter information
about the batch job.
Set Up Shipping Charges for the Online Store
This lesson discusses how to configure shipping charges for the online store.
Lesson Objective
The objective is to explain how to set up shipping charges for the online store in
Microsoft Dynamics AX 2012 R3.
Set Up Shipping Charges for the Online Store
In Microsoft Dynamics AX, when you set up up shipping charges for the online
store, you must also set up modes of delivery and shipping charges for the online
store.
How to Set Up Modes of Delivery for the Online Store
You can specify the modes of delivery that are available to customers during
checkout in the online store. You can also specify different modes of delivery for
specific combinations of products and addresses.
Note: Before you can set up the modes of delivery for the online store, you
must create modes of delivery.
This topic explains how to specify the modes of delivery that are available to
customers in the retail stores and the online stores. You can also specify different
modes of delivery for specific combinations of retail channels, products, and
geographic areas.
To set up the modes of delivery that are offered to customers, follow these steps.
1. Click Procurement and sourcing > Setup > Distribution > Modes of
Module 4: ONLINE STORE SET UP AND PUBLISHING
4 - 51
delivery.
2. Click New or select an existing mode of delivery, and then, on the Retail
channels FastTab, click Add line to add one or more channels that use the
mode of delivery.
3. In the Choose organization nodes form, select an organization hierarchy.
4. Expand the Available organization nodes: list, select an organization node
that includes the channels that you want to add, and then click Add.
5. When you finish adding channels, click Close.
6. On the Products FastTab, specify the products to include or exclude from the
mode of delivery. Click Add line to add one line, or click Add products to add
multiple lines.
7. On each line, in the Category and Product fields, specify the product. If the
product is a variant, select the product in the Product variant field.
8. In the Line type field, specify whether to include or exclude the product from
the mode of delivery. For example, if all the products except one product use
the mode of delivery, add two lines. On the first line, select ALL in the
Category field, and select Include in the Line type field. On the second line,
specify the product to exclude, and then select Exclude in the Line type field.
9. On the Addresses FastTab, click Add line to specify the countries or regions
and states or provinces to include or exclude from the mode of delivery. For
example, if the mode of delivery does not serve Alaska or Hawaii, add three
lines. On the first line, select USA in the Country/region field, and then select
Include in the Line type field. On the second line, select USA in the
Country/region field, select AK in the State/province field, and then select
Exclude in the Line type field. On the third line, do the same to exclude
Hawaii.
For information about how to create modes of delivery, refer to
http://technet.microsoft.com/EN-US/library/aa619881.aspx. <
How to Set Up Shipping Charges for Online Store
In Retail, you can define the following types of shipping charges for online orders:
A fixed amount for a range of order totals. This includes free shipping
for order totals greater than a specified amount.
A fixed amount for each item.
A charge that is provided by the shipping carrier. This charge can be
marked up by a specified percentage.
A percentage of the total.
You can also define a shipping charge for a mode of delivery, a group of modes of
delivery, or all modes of delivery.
To setup the shipping charges to be used by an Online Store, follow these steps.
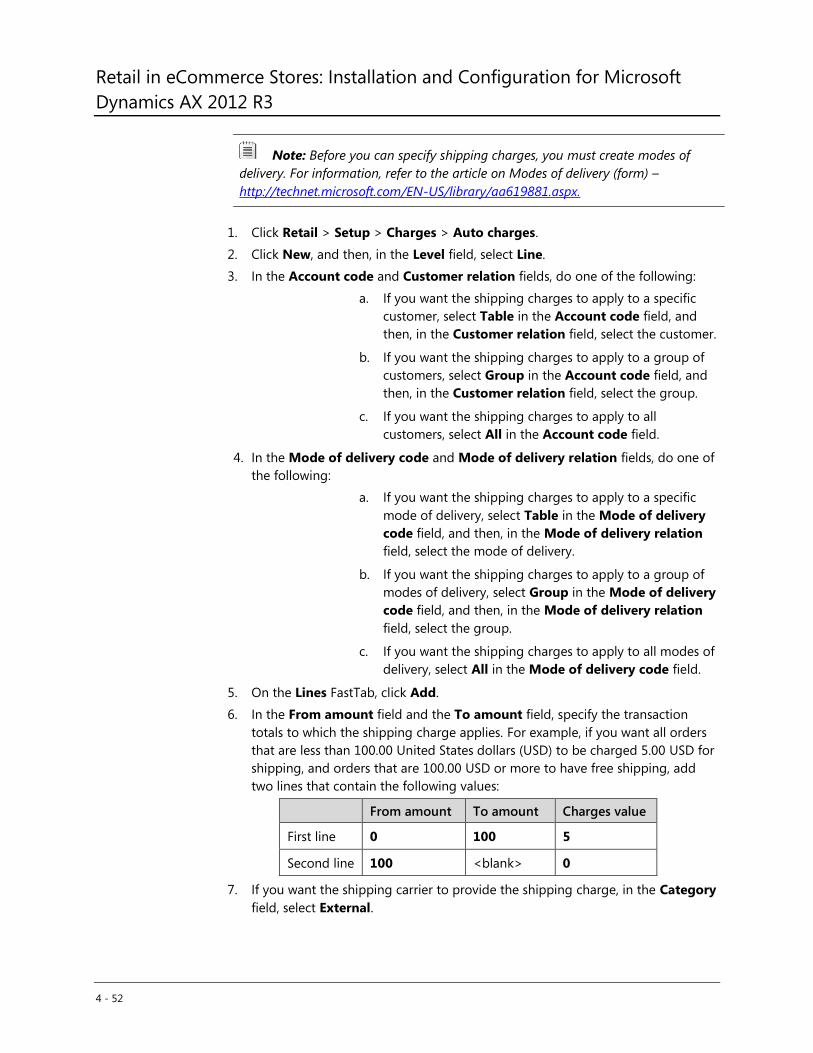
Retail in eCommerce Stores: Installation and Configuration for Microsoft
Dynamics AX 2012 R3
4 - 52
Note: Before you can specify shipping charges, you must create modes of
delivery. For information, refer to the article on Modes of delivery (form) –
http://technet.microsoft.com/EN-US/library/aa619881.aspx.
1. Click Retail > Setup > Charges > Auto charges.
2. Click New, and then, in the Level field, select Line.
3. In the Account code and Customer relation fields, do one of the following:
a. If you want the shipping charges to apply to a specific
customer, select Table in the Account code field, and
then, in the Customer relation field, select the customer.
b. If you want the shipping charges to apply to a group of
customers, select Group in the Account code field, and
then, in the Customer relation field, select the group.
c. If you want the shipping charges to apply to all
customers, select All in the Account code field.
4. In the Mode of delivery code and Mode of delivery relation fields, do one of
the following:
a. If you want the shipping charges to apply to a specific
mode of delivery, select Table in the Mode of delivery
code field, and then, in the Mode of delivery relation
field, select the mode of delivery.
b. If you want the shipping charges to apply to a group of
modes of delivery, select Group in the Mode of delivery
code field, and then, in the Mode of delivery relation
field, select the group.
c. If you want the shipping charges to apply to all modes of
delivery, select All in the Mode of delivery code field.
5. On the Lines FastTab, click Add.
6. In the From amount field and the To amount field, specify the transaction
totals to which the shipping charge applies. For example, if you want all orders
that are less than 100.00 United States dollars (USD) to be charged 5.00 USD for
shipping, and orders that are 100.00 USD or more to have free shipping, add
two lines that contain the following values:
From amount To amount Charges value
First line 0 100 5
Second line 100 <blank> 0
7. If you want the shipping carrier to provide the shipping charge, in the Category
field, select External.
Module 4: ONLINE STORE SET UP AND PUBLISHING
4 - 53
Reference Links: For more information about the Auto charges form, refer to
http://technet.microsoft.com/EN-US/library/aa582856.aspx.
Retail in eCommerce Stores: Installation and Configuration for Microsoft
Dynamics AX 2012 R3
4 - 54
Module Review
This module discussed the tasks, procedures and configuration options that are
required to set up the online store in Microsoft Dynamics AX 2012.
The lessons described in this module include the following:
How to use the Online Store Setup Checklist
How to Set up the Online Store Integration
How to create the Online Store Navigation Hierarchy
How to Create and Configure the Online Store
How to Configure Data Distribution and Publish the
Online Store
How to Manage and Publish Online Store Products
How to Set Up Shipping Charges for the Online Store
.
Best Practice: How you publish the online store depends on the version of
Microsoft Dynamics AX 2012 that you use and whether you publish the online store
for the first time or republish an existing online store.
If you change a category in a navigation category hierarchy that is assigned to an
online store or a retail product catalog, you must republish the online store or
catalog as follows:
If you add or delete a category node, republish the online store and
the catalog that use the category hierarchy.
If you start or disable a category, republish the online store and the
catalog that use the category hierarchy.
If you change the name of a category, republish the online store that uses the
category hierarchy.
The online store must be set to a status of Published before a retail product catalog
can be published to the online store. For information about how to create retail
product catalogs refer to http://technet.microsoft.com/en-us/library/jj728697.aspx
Module 4: ONLINE STORE SET UP AND PUBLISHING
4 - 55
Test Your Knowledge
Test your knowledge with the following questions.
1. How many Catalog site collection URL properties can you set up in the online
channel profile?
( ) You can set up two Catalog site collection URL properties in the
online channel profile.
( ) You can set up multiple Catalog site collection URL properties in the
online channel profile.
( ) You can set up one Catalog site collection URL property in the online
channel profile.
2. Which components must be set up in Microsoft Dynamics AX for the online
store integration in Microsoft Dynamics AX 2012 R3?
( ) CDX Async Server Profile, Real Time Service Profile, Channel Profile,
Channel Database profile, Channel Data Group
( ) CDX profile; online store database profile; AOS profile; online channel
profile.
( ) Synch Service profile; online product catalog profile; AOS profile;
online channel profile; Real-time Service profile
3. Where is the navigation hierarchy for the online store configured?
( ) SharePoint Central Administration
( ) Microsoft Dynamics AX Retail Module
( ) SharePoint publishing site collection
4. Can you assign the online store to one or more organizational hierarchies?
( ) No, you cannot assign the online channel to an organizational
hierarchy.
( ) Yes, you can assign the online channel to only one organizational
hierarchy.
( ) Yes, you can assign the online channel to one or more organizational
Retail in eCommerce Stores: Installation and Configuration for Microsoft
Dynamics AX 2012 R3
4 - 56
hierarchies.
5. Select the component that is created at a SharePoint site when the online
store is published.
( ) The layout for the online store home page
( ) The online store navigation hierarchy
( ) The online product catalog
6. Which of the following is the correct process that is used to create and
process the online store catalog?
( ) Create a catalog, validate the catalog, publish the catalog
( ) Create a catalog, add products and categories, submit the catalog for
approval, publish the catalog
( ) Create a catalog, validate the catalog, submit the catalog for approval,
publish the catalog
7. Where can you configure the shipping charges for the online store?
( ) Microsoft Dynamics AX Retail
( ) Microsoft Dynamics AX Sales and Marketing
( ) CRT shipping service
Module 4: ONLINE STORE SET UP AND PUBLISHING
4 - 57
Test Your Knowledge Solutions
Module Review and Takeaways
1. How many Catalog site collection URL properties can you set up in the online
channel profile?
( ) You can set up two Catalog site collection URL properties in the
online channel profile.
( ) You can set up multiple Catalog site collection URL properties in the
online channel profile.
(√) You can set up one Catalog site collection URL property in the online
channel profile.
2. Which components must be set up in Microsoft Dynamics AX for the online
store integration in Microsoft Dynamics AX 2012 R3?
(√) CDX Async Server Profile, Real Time Service Profile, Channel Profile,
Channel Database profile, Channel Data Group
( ) CDX profile; online store database profile; AOS profile; online channel
profile.
( ) Synch Service profile; online product catalog profile; AOS profile;
online channel profile; Real-time Service profile
3. Where is the navigation hierarchy for the online store configured?
( ) SharePoint Central Administration
(√) Microsoft Dynamics AX Retail Module
( ) SharePoint publishing site collection
4. Can you assign the online store to one or more organizational hierarchies?
( ) No, you cannot assign the online channel to an organizational
hierarchy.
( ) Yes, you can assign the online channel to only one organizational
hierarchy.
(√) Yes, you can assign the online channel to one or more organizational
hierarchies.
5. Select the component that is created at a SharePoint site when the online
Retail in eCommerce Stores: Installation and Configuration for Microsoft
Dynamics AX 2012 R3
4 - 58
store is published.
( ) The layout for the online store home page
(√) The online store navigation hierarchy
( ) The online product catalog
6. Which of the following is the correct process that is used to create and
process the online store catalog?
( ) Create a catalog, validate the catalog, publish the catalog
( ) Create a catalog, add products and categories, submit the catalog for
approval, publish the catalog
(√) Create a catalog, validate the catalog, submit the catalog for approval,
publish the catalog
7. Where can you configure the shipping charges for the online store?
(√) Microsoft Dynamics AX Retail
( ) Microsoft Dynamics AX Sales and Marketing
( ) CRT shipping service
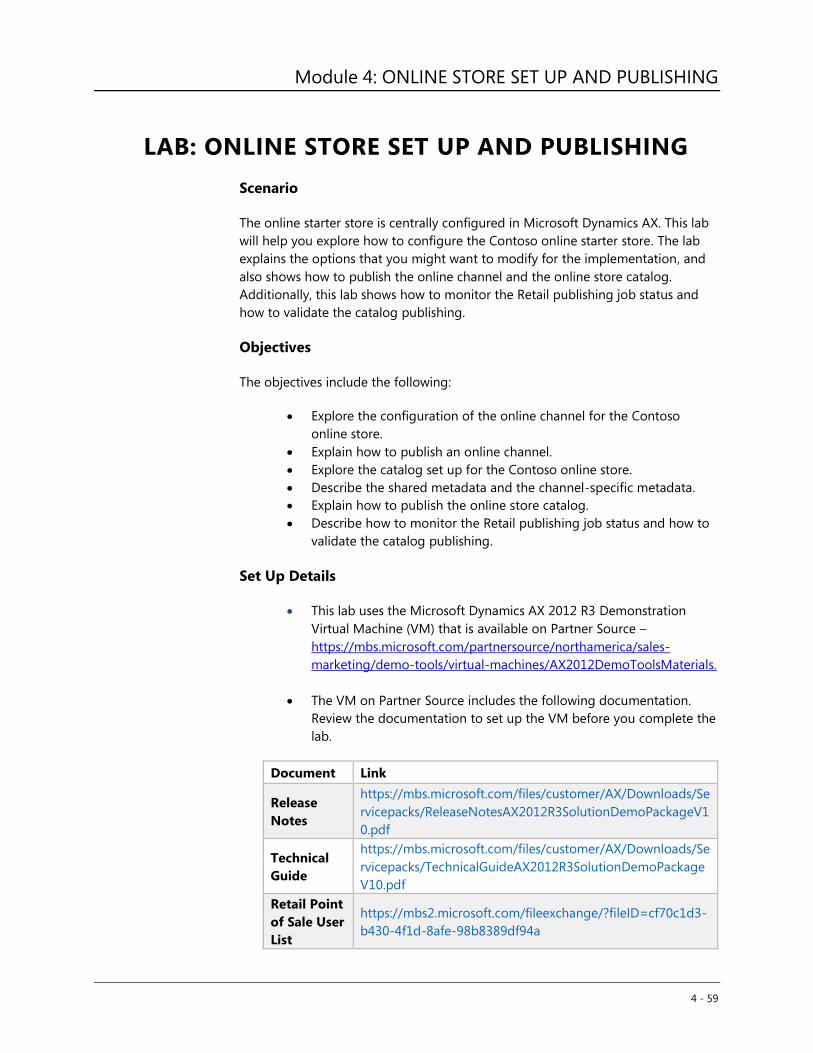
Module 4: ONLINE STORE SET UP AND PUBLISHING
4 - 59
LAB: ONLINE STORE SET UP AND PUBLISHING
Scenario
The online starter store is centrally configured in Microsoft Dynamics AX. This lab
will help you explore how to configure the Contoso online starter store. The lab
explains the options that you might want to modify for the implementation, and
also shows how to publish the online channel and the online store catalog.
Additionally, this lab shows how to monitor the Retail publishing job status and
how to validate the catalog publishing.
Objectives
The objectives include the following:
Explore the configuration of the online channel for the Contoso
online store.
Explain how to publish an online channel.
Explore the catalog set up for the Contoso online store.
Describe the shared metadata and the channel-specific metadata.
Explain how to publish the online store catalog.
Describe how to monitor the Retail publishing job status and how to
validate the catalog publishing.
Set Up Details
This lab uses the Microsoft Dynamics AX 2012 R3 Demonstration
Virtual Machine (VM) that is available on Partner Source –
https://mbs.microsoft.com/partnersource/northamerica/sales-
marketing/demo-tools/virtual-machines/AX2012DemoToolsMaterials.
The VM on Partner Source includes the following documentation.
Review the documentation to set up the VM before you complete the
lab.
Document Link
Release
Notes
https://mbs.microsoft.com/files/customer/AX/Downloads/Se
rvicepacks/ReleaseNotesAX2012R3SolutionDemoPackageV1
0.pdf
Technical
Guide
https://mbs.microsoft.com/files/customer/AX/Downloads/Se
rvicepacks/TechnicalGuideAX2012R3SolutionDemoPackage
V10.pdf
Retail Point
of Sale User
List
https://mbs2.microsoft.com/fileexchange/?fileID=cf70c1d3-
b430-4f1d-8afe-98b8389df94a
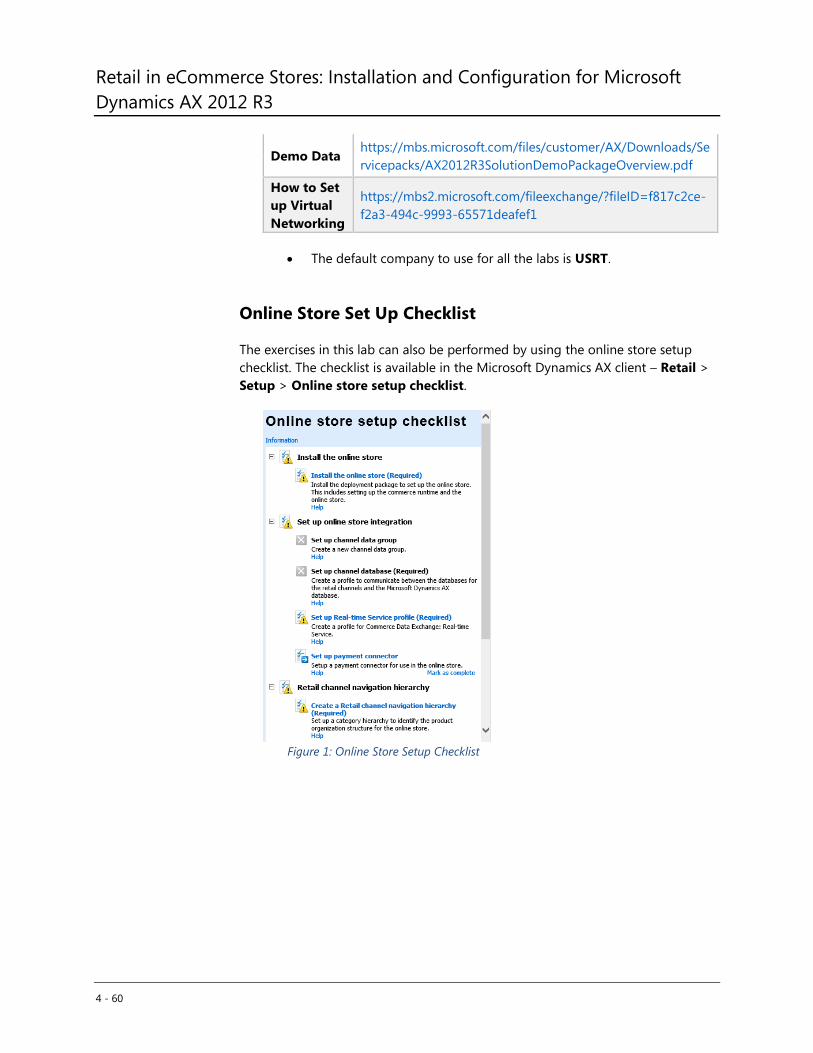
Retail in eCommerce Stores: Installation and Configuration for Microsoft
Dynamics AX 2012 R3
4 - 60
Demo Data https://mbs.microsoft.com/files/customer/AX/Downloads/Se
rvicepacks/AX2012R3SolutionDemoPackageOverview.pdf
How to Set
up Virtual
Networking
https://mbs2.microsoft.com/fileexchange/?fileID=f817c2ce-
f2a3-494c-9993-65571deafef1
The default company to use for all the labs is USRT.
Online Store Set Up Checklist
The exercises in this lab can also be performed by using the online store setup
checklist. The checklist is available in the Microsoft Dynamics AX client – Retail >
Setup > Online store setup checklist.
Figure 1: Online Store Setup Checklist
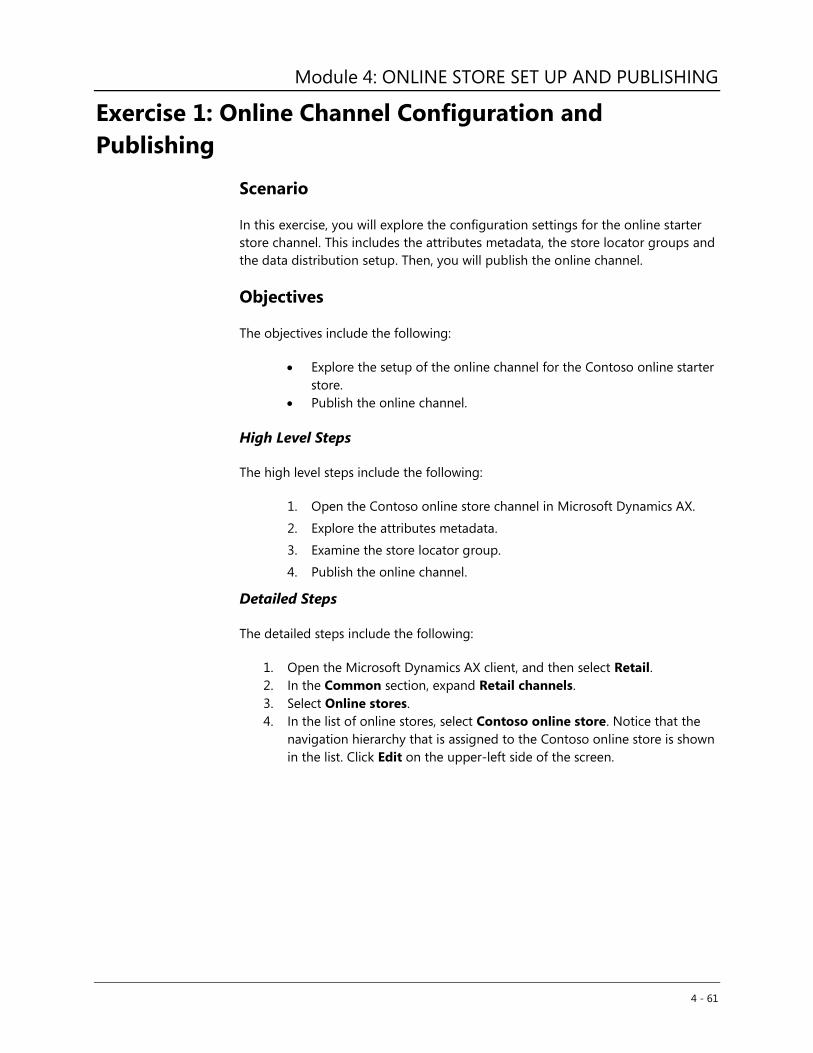
Module 4: ONLINE STORE SET UP AND PUBLISHING
4 - 61
Exercise 1: Online Channel Configuration and
Publishing
Scenario
In this exercise, you will explore the configuration settings for the online starter
store channel. This includes the attributes metadata, the store locator groups and
the data distribution setup. Then, you will publish the online channel.
Objectives
The objectives include the following:
Explore the setup of the online channel for the Contoso online starter
store.
Publish the online channel.
High Level Steps
The high level steps include the following:
1. Open the Contoso online store channel in Microsoft Dynamics AX.
2. Explore the attributes metadata.
3. Examine the store locator group.
4. Publish the online channel.
Detailed Steps
The detailed steps include the following:
1. Open the Microsoft Dynamics AX client, and then select Retail.
2. In the Common section, expand Retail channels.
3. Select Online stores.
4. In the list of online stores, select Contoso online store. Notice that the
navigation hierarchy that is assigned to the Contoso online store is shown
in the list. Click Edit on the upper-left side of the screen.
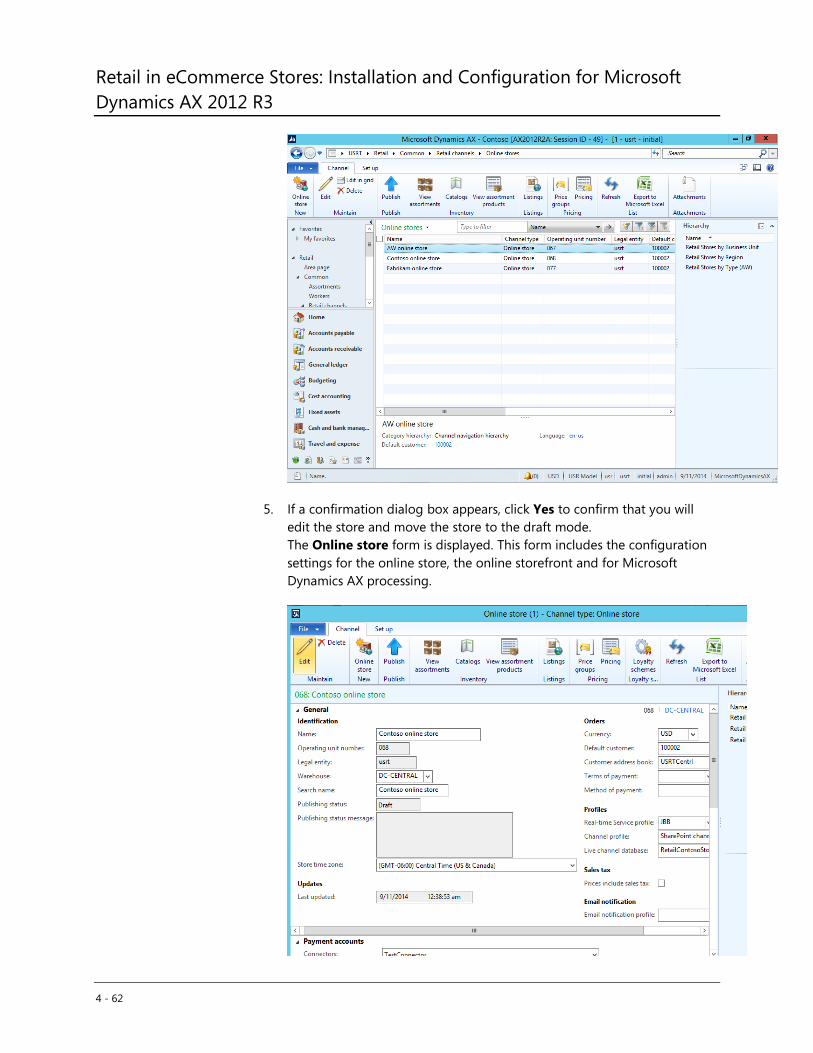
Retail in eCommerce Stores: Installation and Configuration for Microsoft
Dynamics AX 2012 R3
4 - 62
5. If a confirmation dialog box appears, click Yes to confirm that you will
edit the store and move the store to the draft mode.
The Online store form is displayed. This form includes the configuration
settings for the online store, the online storefront and for Microsoft
Dynamics AX processing.
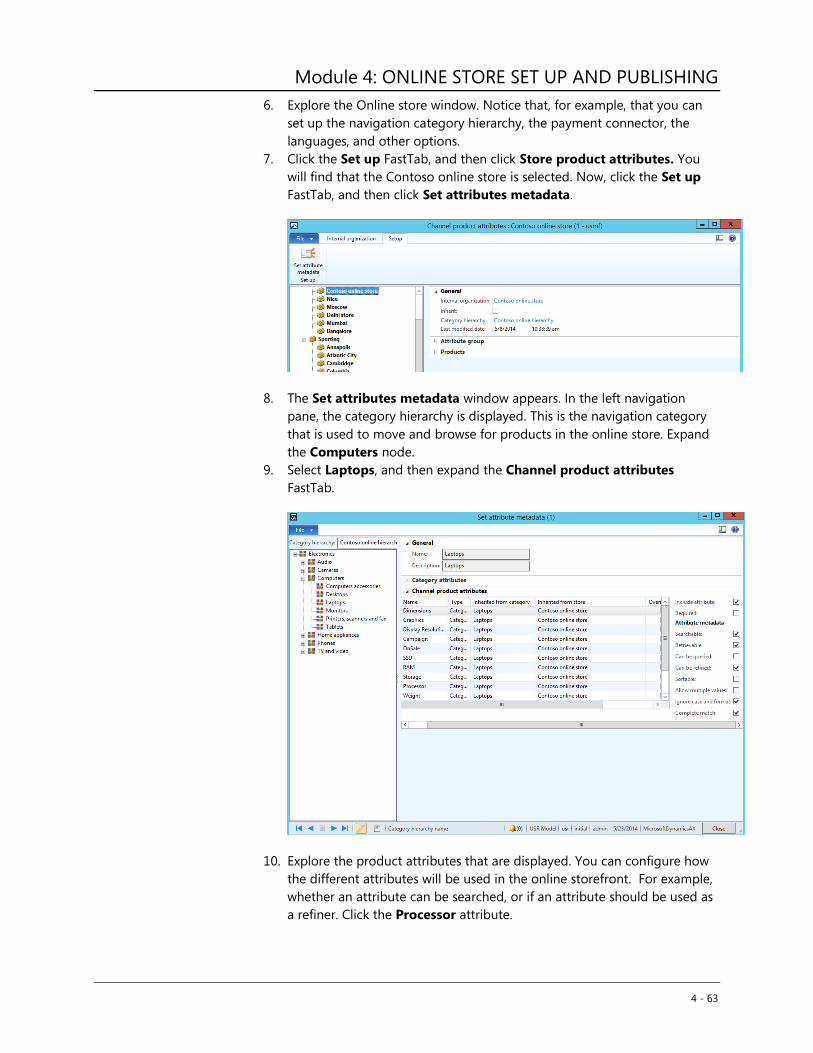
Module 4: ONLINE STORE SET UP AND PUBLISHING
4 - 63
6. Explore the Online store window. Notice that, for example, that you can
set up the navigation category hierarchy, the payment connector, the
languages, and other options.
7. Click the Set up FastTab, and then click Store product attributes. You
will find that the Contoso online store is selected. Now, click the Set up
FastTab, and then click Set attributes metadata.
8. The Set attributes metadata window appears. In the left navigation
pane, the category hierarchy is displayed. This is the navigation category
that is used to move and browse for products in the online store. Expand
the Computers node.
9. Select Laptops, and then expand the Channel product attributes
FastTab.
10. Explore the product attributes that are displayed. You can configure how
the different attributes will be used in the online storefront. For example,
whether an attribute can be searched, or if an attribute should be used as
a refiner. Click the Processor attribute.
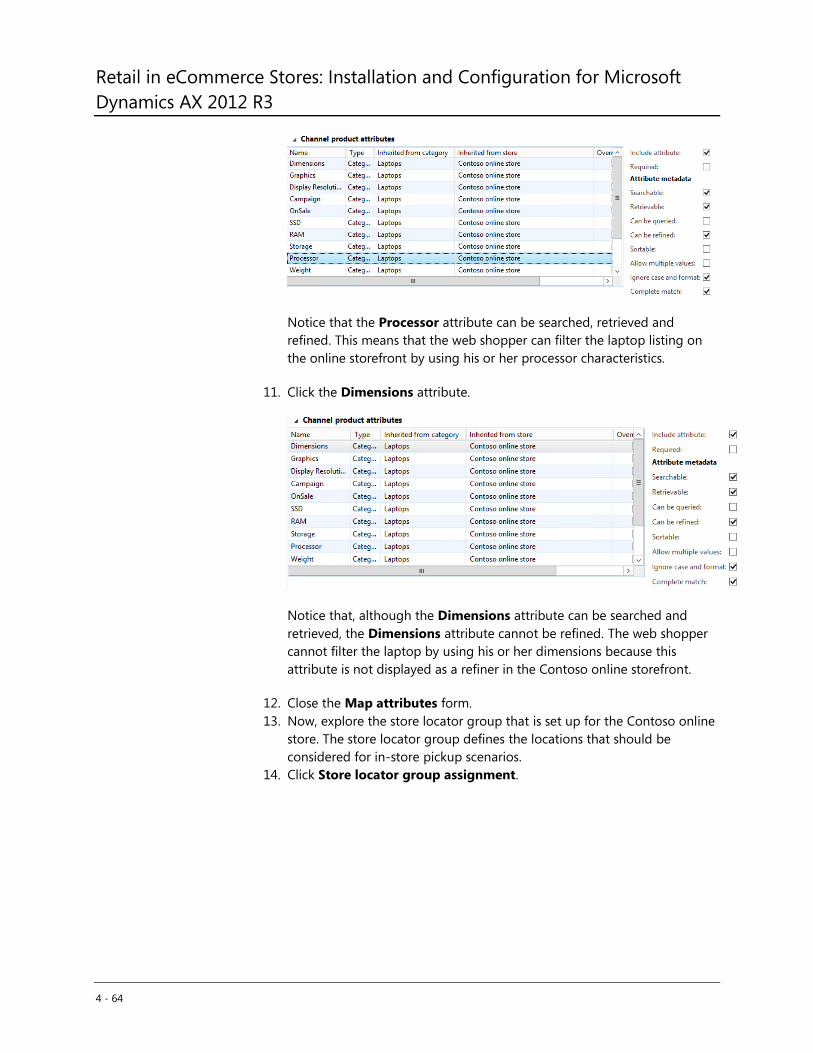
Retail in eCommerce Stores: Installation and Configuration for Microsoft
Dynamics AX 2012 R3
4 - 64
Notice that the Processor attribute can be searched, retrieved and
refined. This means that the web shopper can filter the laptop listing on
the online storefront by using his or her processor characteristics.
11. Click the Dimensions attribute.
Notice that, although the Dimensions attribute can be searched and
retrieved, the Dimensions attribute cannot be refined. The web shopper
cannot filter the laptop by using his or her dimensions because this
attribute is not displayed as a refiner in the Contoso online storefront.
12. Close the Map attributes form.
13. Now, explore the store locator group that is set up for the Contoso online
store. The store locator group defines the locations that should be
considered for in-store pickup scenarios.
14. Click Store locator group assignment.
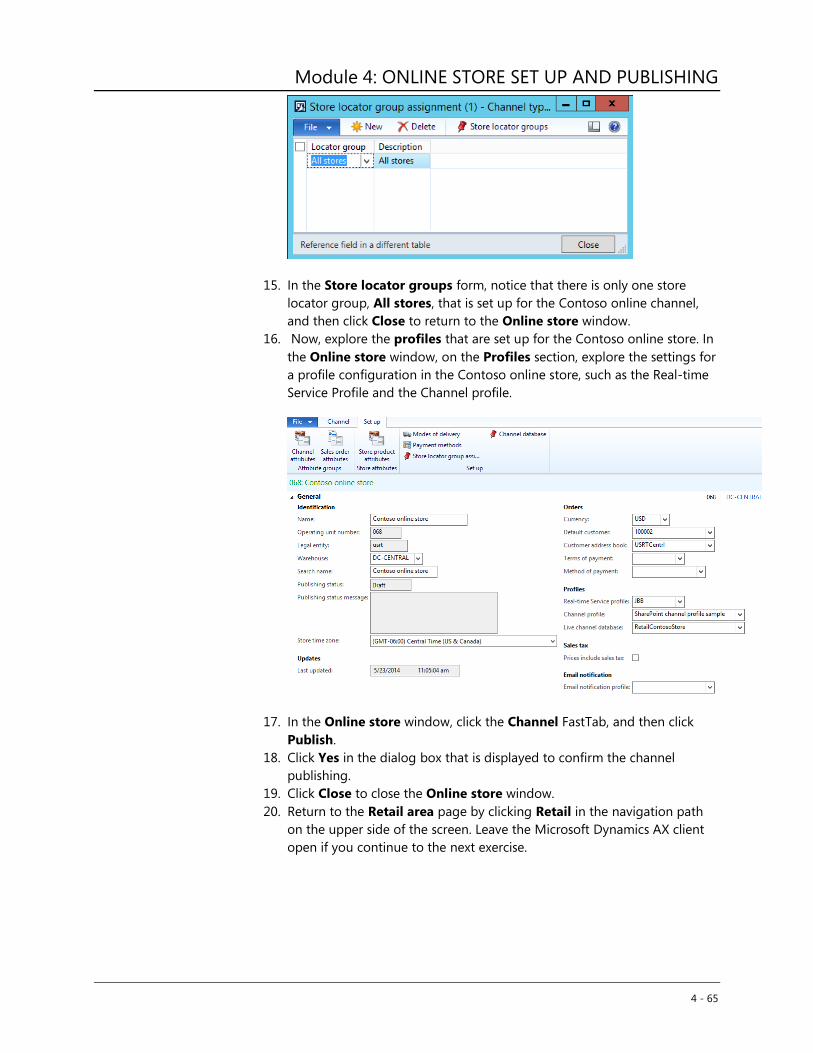
Module 4: ONLINE STORE SET UP AND PUBLISHING
4 - 65
15. In the Store locator groups form, notice that there is only one store
locator group, All stores, that is set up for the Contoso online channel,
and then click Close to return to the Online store window.
16. Now, explore the profiles that are set up for the Contoso online store. In
the Online store window, on the Profiles section, explore the settings for
a profile configuration in the Contoso online store, such as the Real-time
Service Profile and the Channel profile.
17. In the Online store window, click the Channel FastTab, and then click
Publish.
18. Click Yes in the dialog box that is displayed to confirm the channel
publishing.
19. Click Close to close the Online store window.
20. Return to the Retail area page by clicking Retail in the navigation path
on the upper side of the screen. Leave the Microsoft Dynamics AX client
open if you continue to the next exercise.
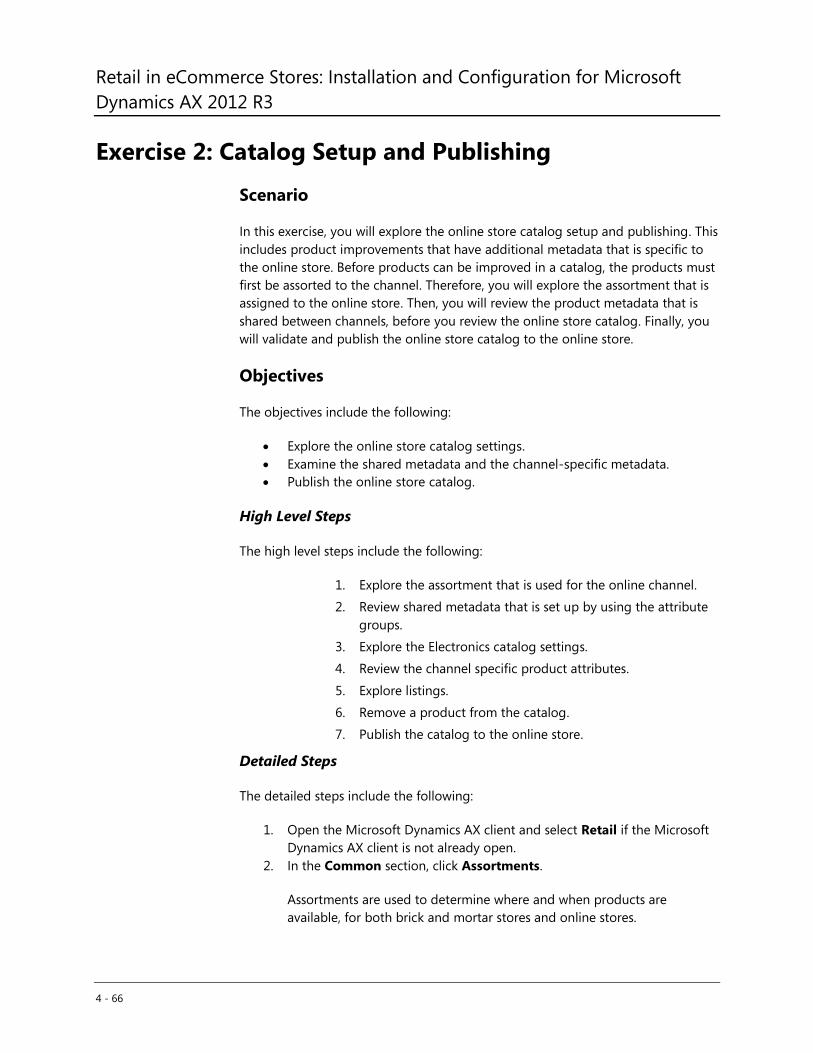
Retail in eCommerce Stores: Installation and Configuration for Microsoft
Dynamics AX 2012 R3
4 - 66
Exercise 2: Catalog Setup and Publishing
Scenario
In this exercise, you will explore the online store catalog setup and publishing. This
includes product improvements that have additional metadata that is specific to
the online store. Before products can be improved in a catalog, the products must
first be assorted to the channel. Therefore, you will explore the assortment that is
assigned to the online store. Then, you will review the product metadata that is
shared between channels, before you review the online store catalog. Finally, you
will validate and publish the online store catalog to the online store.
Objectives
The objectives include the following:
Explore the online store catalog settings.
Examine the shared metadata and the channel-specific metadata.
Publish the online store catalog.
High Level Steps
The high level steps include the following:
1. Explore the assortment that is used for the online channel.
2. Review shared metadata that is set up by using the attribute
groups.
3. Explore the Electronics catalog settings.
4. Review the channel specific product attributes.
5. Explore listings.
6. Remove a product from the catalog.
7. Publish the catalog to the online store.
Detailed Steps
The detailed steps include the following:
1. Open the Microsoft Dynamics AX client and select Retail if the Microsoft
Dynamics AX client is not already open.
2. In the Common section, click Assortments.
Assortments are used to determine where and when products are
available, for both brick and mortar stores and online stores.
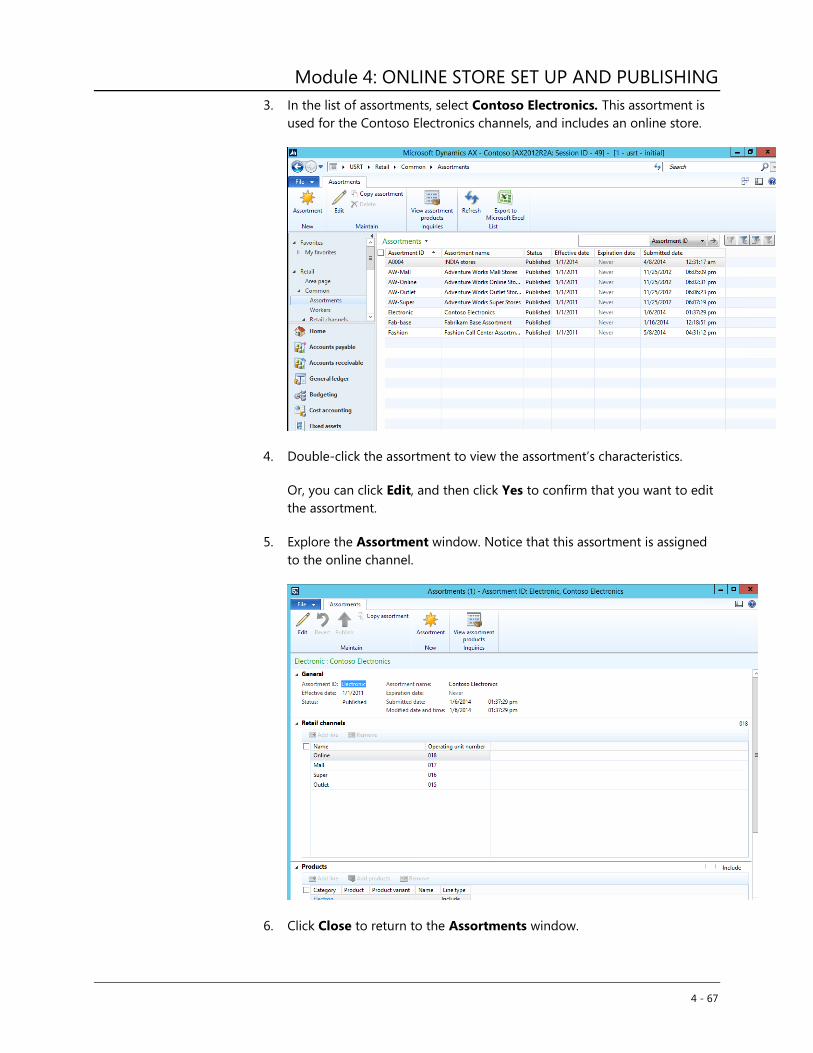
Module 4: ONLINE STORE SET UP AND PUBLISHING
4 - 67
3. In the list of assortments, select Contoso Electronics. This assortment is
used for the Contoso Electronics channels, and includes an online store.
4. Double-click the assortment to view the assortment’s characteristics.
Or, you can click Edit, and then click Yes to confirm that you want to edit
the assortment.
5. Explore the Assortment window. Notice that this assortment is assigned
to the online channel.
6. Click Close to return to the Assortments window.
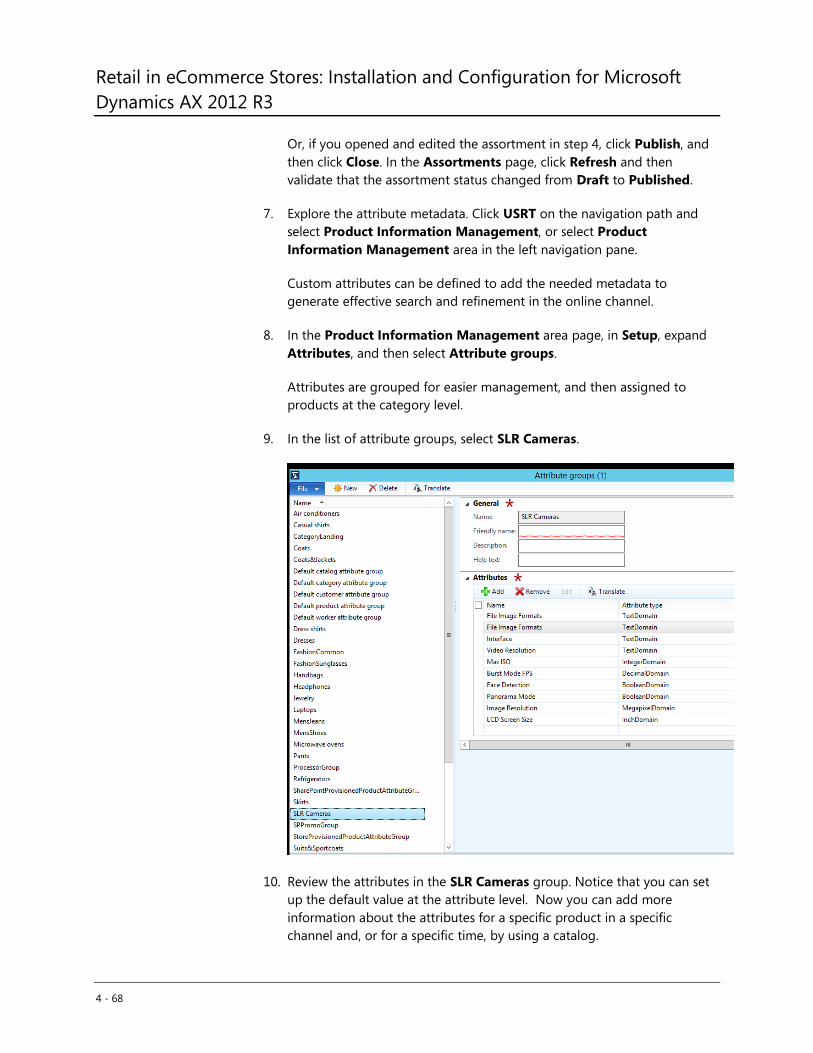
Retail in eCommerce Stores: Installation and Configuration for Microsoft
Dynamics AX 2012 R3
4 - 68
Or, if you opened and edited the assortment in step 4, click Publish, and
then click Close. In the Assortments page, click Refresh and then
validate that the assortment status changed from Draft to Published.
7. Explore the attribute metadata. Click USRT on the navigation path and
select Product Information Management, or select Product
Information Management area in the left navigation pane.
Custom attributes can be defined to add the needed metadata to
generate effective search and refinement in the online channel.
8. In the Product Information Management area page, in Setup, expand
Attributes, and then select Attribute groups.
Attributes are grouped for easier management, and then assigned to
products at the category level.
9. In the list of attribute groups, select SLR Cameras.
10. Review the attributes in the SLR Cameras group. Notice that you can set
up the default value at the attribute level. Now you can add more
information about the attributes for a specific product in a specific
channel and, or for a specific time, by using a catalog.
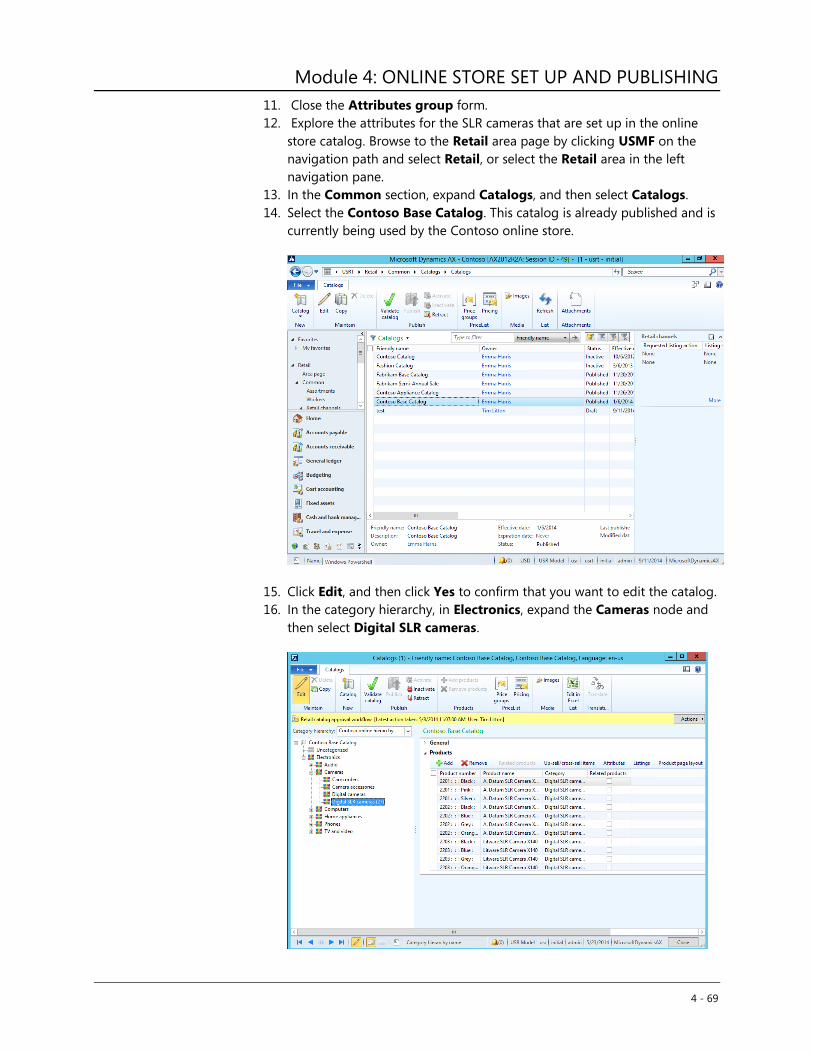
Module 4: ONLINE STORE SET UP AND PUBLISHING
4 - 69
11. Close the Attributes group form.
12. Explore the attributes for the SLR cameras that are set up in the online
store catalog. Browse to the Retail area page by clicking USMF on the
navigation path and select Retail, or select the Retail area in the left
navigation pane.
13. In the Common section, expand Catalogs, and then select Catalogs.
14. Select the Contoso Base Catalog. This catalog is already published and is
currently being used by the Contoso online store.
15. Click Edit, and then click Yes to confirm that you want to edit the catalog.
16. In the category hierarchy, in Electronics, expand the Cameras node and
then select Digital SLR cameras.

Retail in eCommerce Stores: Installation and Configuration for Microsoft
Dynamics AX 2012 R3
4 - 70
17. Select A. Datum SLR Camera X135, and then click Attributes.
18. Expand Channel product attributes. Notice that there are different tabs
for the Shared product attributes and for the Channel product attributes
that are specific for the online channel. For example, the Brand attribute
is specific for the Contoso online channel. Additional channel-specific
attributes improve the product in the online store with additional
information.
19. The attributes can also be viewed in list form. Click Show list to view the
attributes in a list. Notice the Attribute source column that lists where the
attribute is set up.
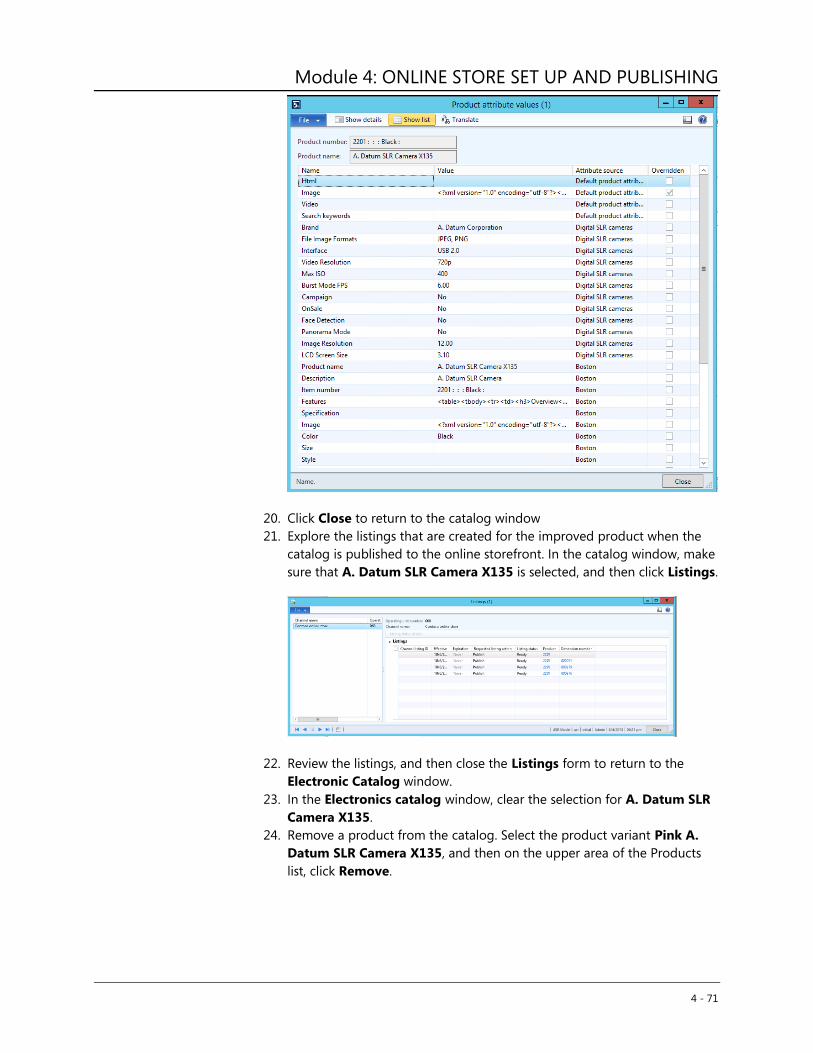
Module 4: ONLINE STORE SET UP AND PUBLISHING
4 - 71
20. Click Close to return to the catalog window
21. Explore the listings that are created for the improved product when the
catalog is published to the online storefront. In the catalog window, make
sure that A. Datum SLR Camera X135 is selected, and then click Listings.
22. Review the listings, and then close the Listings form to return to the
Electronic Catalog window.
23. In the Electronics catalog window, clear the selection for A. Datum SLR
Camera X135.
24. Remove a product from the catalog. Select the product variant Pink A.
Datum SLR Camera X135, and then on the upper area of the Products
list, click Remove.
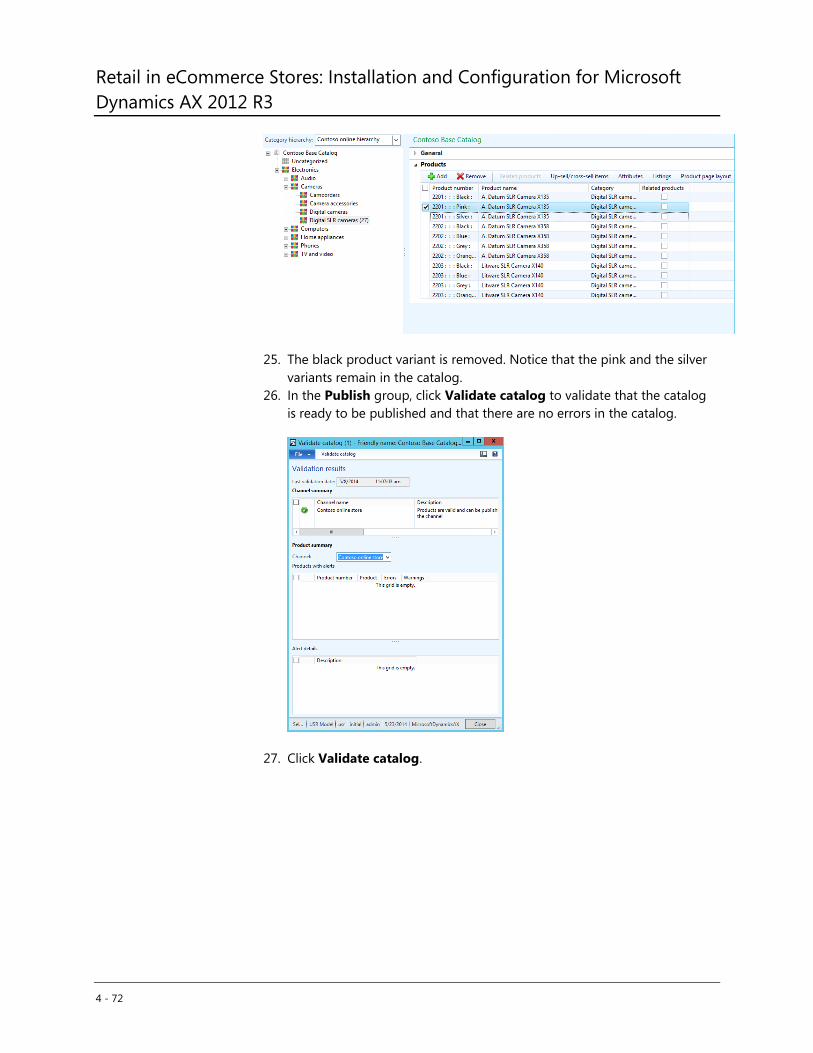
Retail in eCommerce Stores: Installation and Configuration for Microsoft
Dynamics AX 2012 R3
4 - 72
25. The black product variant is removed. Notice that the pink and the silver
variants remain in the catalog.
26. In the Publish group, click Validate catalog to validate that the catalog
is ready to be published and that there are no errors in the catalog.
27. Click Validate catalog.
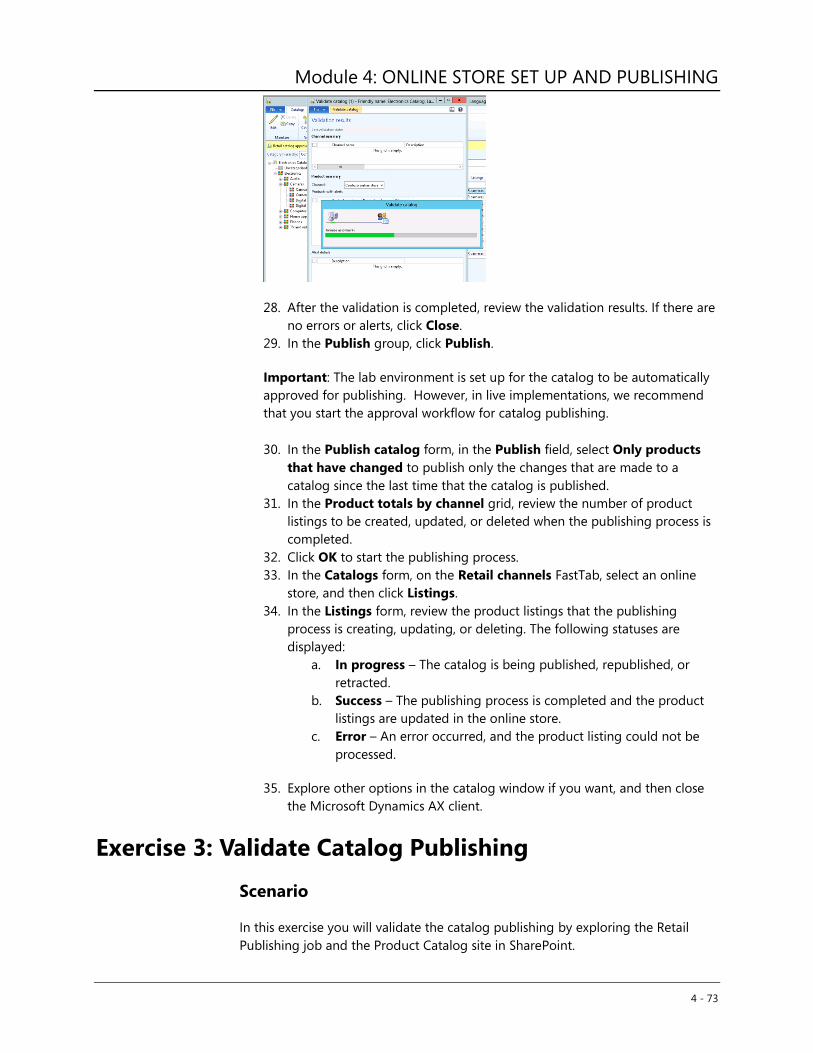
Module 4: ONLINE STORE SET UP AND PUBLISHING
4 - 73
28. After the validation is completed, review the validation results. If there are
no errors or alerts, click Close.
29. In the Publish group, click Publish.
Important: The lab environment is set up for the catalog to be automatically
approved for publishing. However, in live implementations, we recommend
that you start the approval workflow for catalog publishing.
30. In the Publish catalog form, in the Publish field, select Only products
that have changed to publish only the changes that are made to a
catalog since the last time that the catalog is published.
31. In the Product totals by channel grid, review the number of product
listings to be created, updated, or deleted when the publishing process is
completed.
32. Click OK to start the publishing process.
33. In the Catalogs form, on the Retail channels FastTab, select an online
store, and then click Listings.
34. In the Listings form, review the product listings that the publishing
process is creating, updating, or deleting. The following statuses are
displayed:
a. In progress – The catalog is being published, republished, or
retracted.
b. Success – The publishing process is completed and the product
listings are updated in the online store.
c. Error – An error occurred, and the product listing could not be
processed.
35. Explore other options in the catalog window if you want, and then close
the Microsoft Dynamics AX client.
Exercise 3: Validate Catalog Publishing
Scenario
In this exercise you will validate the catalog publishing by exploring the Retail
Publishing job and the Product Catalog site in SharePoint.

Retail in eCommerce Stores: Installation and Configuration for Microsoft
Dynamics AX 2012 R3
4 - 74
Objectives
The objectives include the following:
Monitor the Retail Publishing job status.
Work with the Product Catalog site and the product listings.
Validate that the catalog is successfully published.
High Level Steps
The high level steps include the following:
1. Open the SharePoint Central Administration and check the
status of the Retail publishing job.
2. Open the Product Catalog site and validate that the black A.
Datum SLR Camera X135 is removed from the product
catalog.
3. Open the online store site and validate that the black A.
Datum SLR Camera X135 is no longer available.
Detailed Steps
The detailed steps include the following:
1. Open SharePoint 2013 Central Administration from the Start screen.
2. Select Monitoring.
3. In the Timer jobs section, click Check job status.
4. In the Timer Job Status page, on the upper-left side of the screen, click
Job history.
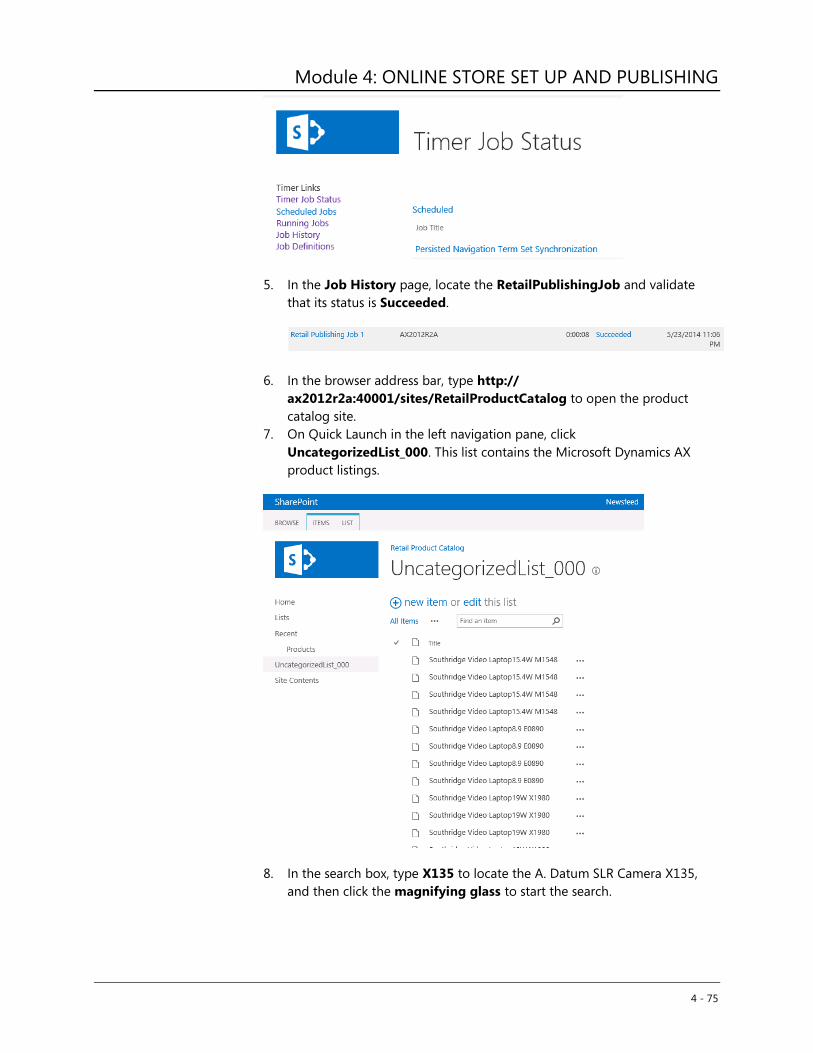
Module 4: ONLINE STORE SET UP AND PUBLISHING
4 - 75
5. In the Job History page, locate the RetailPublishingJob and validate
that its status is Succeeded.
6. In the browser address bar, type http://
ax2012r2a:40001/sites/RetailProductCatalog to open the product
catalog site.
7. On Quick Launch in the left navigation pane, click
UncategorizedList_000. This list contains the Microsoft Dynamics AX
product listings.
8. In the search box, type X135 to locate the A. Datum SLR Camera X135,
and then click the magnifying glass to start the search.
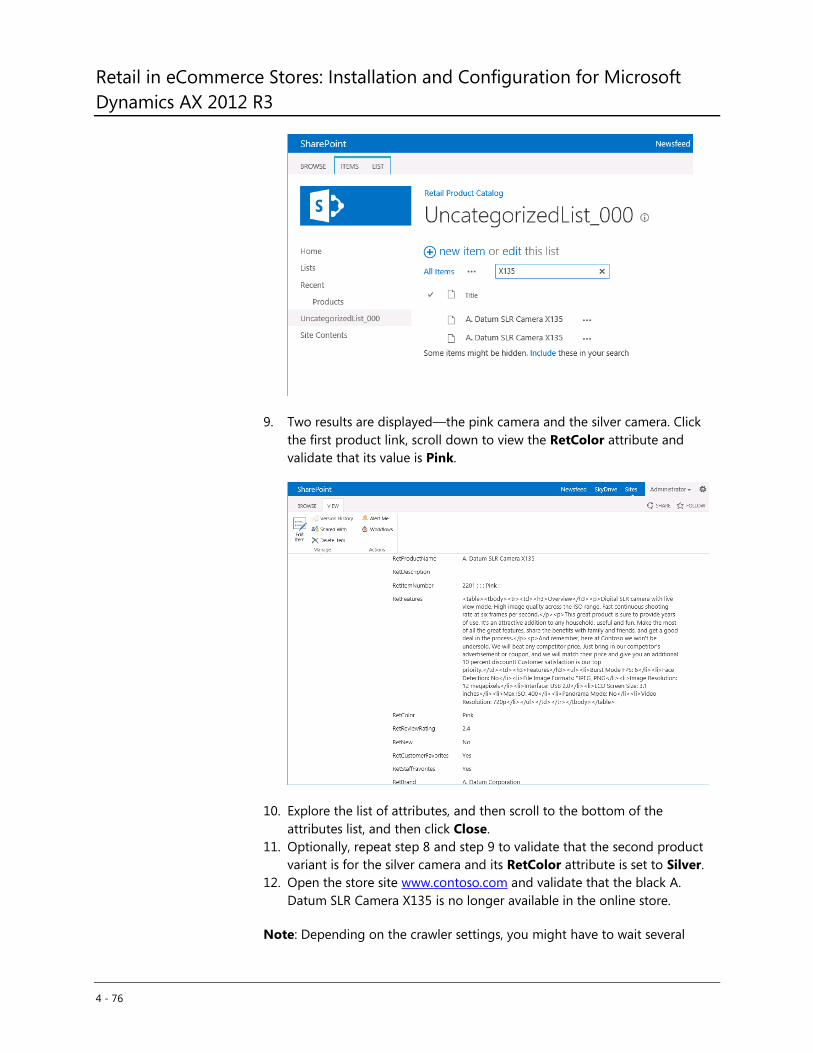
Retail in eCommerce Stores: Installation and Configuration for Microsoft
Dynamics AX 2012 R3
4 - 76
9. Two results are displayed—the pink camera and the silver camera. Click
the first product link, scroll down to view the RetColor attribute and
validate that its value is Pink.
10. Explore the list of attributes, and then scroll to the bottom of the
attributes list, and then click Close.
11. Optionally, repeat step 8 and step 9 to validate that the second product
variant is for the silver camera and its RetColor attribute is set to Silver.
12. Open the store site www.contoso.com and validate that the black A.
Datum SLR Camera X135 is no longer available in the online store.
Note: Depending on the crawler settings, you might have to wait several
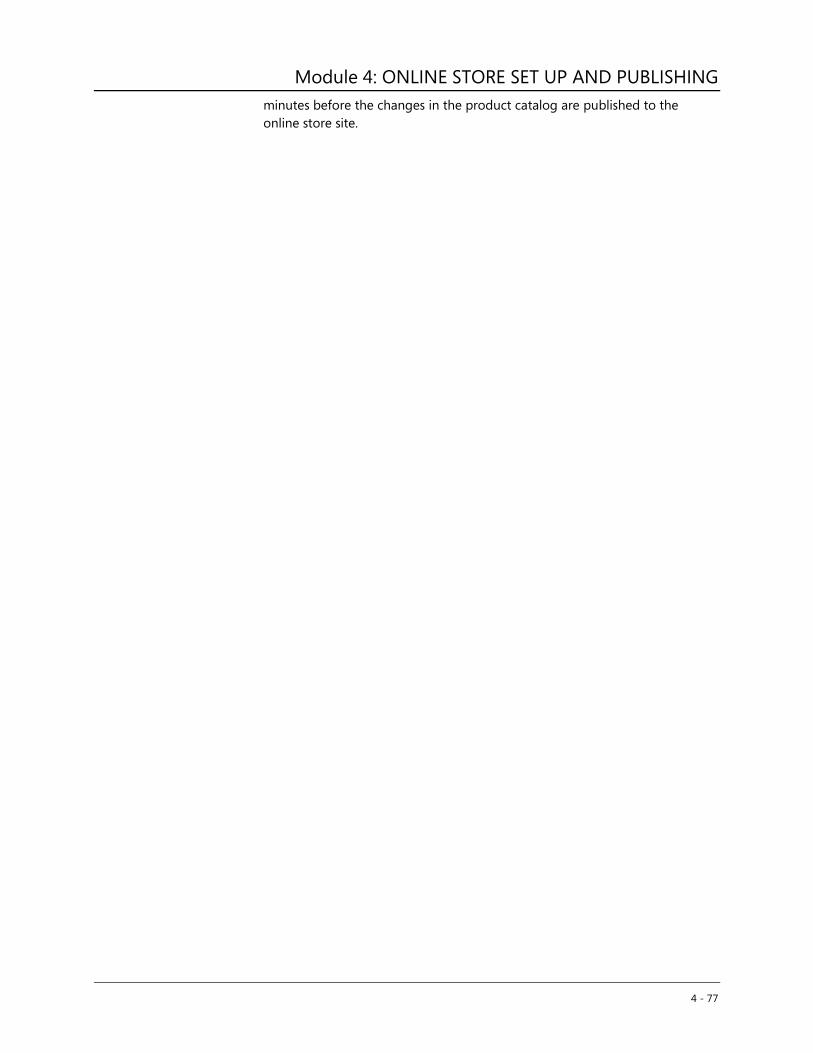
Module 4: ONLINE STORE SET UP AND PUBLISHING
4 - 77
minutes before the changes in the product catalog are published to the
online store site.
5 - 1
MODULE 5: MANAGE THE ONLINE STORE IN
SHAREPOINT
Module Overview
The starter online store includes the patterns and best practices that are required
to support production-ready deployments. The starter online store also includes
powerful, search-driven, adaptive experiences that are offered by SharePoint
Server 2013.
The crawl component indexes the product catalog lists and the term store of the
Product Catalog Site collection. The crawled data is stored in the Search Index.
Cross-site publishing uses one or more authoring site collections to author and
store content, and one or more publishing site collections to control the design of
the site. Search-driven pages dynamically display content for customers.
When a user views a page on one of the publishing sites, queries from Search
Web Parts on that page are sent to the search index. Results are returned from the
search index and the CRT, and the results are shown in the Search Web Parts on
the page. There are several ways that the search can be adjusted to meet specific
use cases, for example by using query rules, query suggestions, content search
web parts, and recommendations.
Reference Links: For more information about Search in SharePoint 2013,
refer to “Overview of search in SharePoint Server 2013” at
http://technet.microsoft.com/en-us/library/jj219738.aspx.
Objectives
The objectives of this module are as follows:
Provide specific information on how search affects the e-commerce
storefront.
Explain how cross-site publishing and search in SharePoint 2013 are
used to provide the following:
o Dynamic pages (through Web Parts and display templates).
o Targeted content (through query rules).
o Navigation and facets.
o Query suggestions and query spelling (“did you mean”).
o Recommendations (to improve the end-user relevance over time).
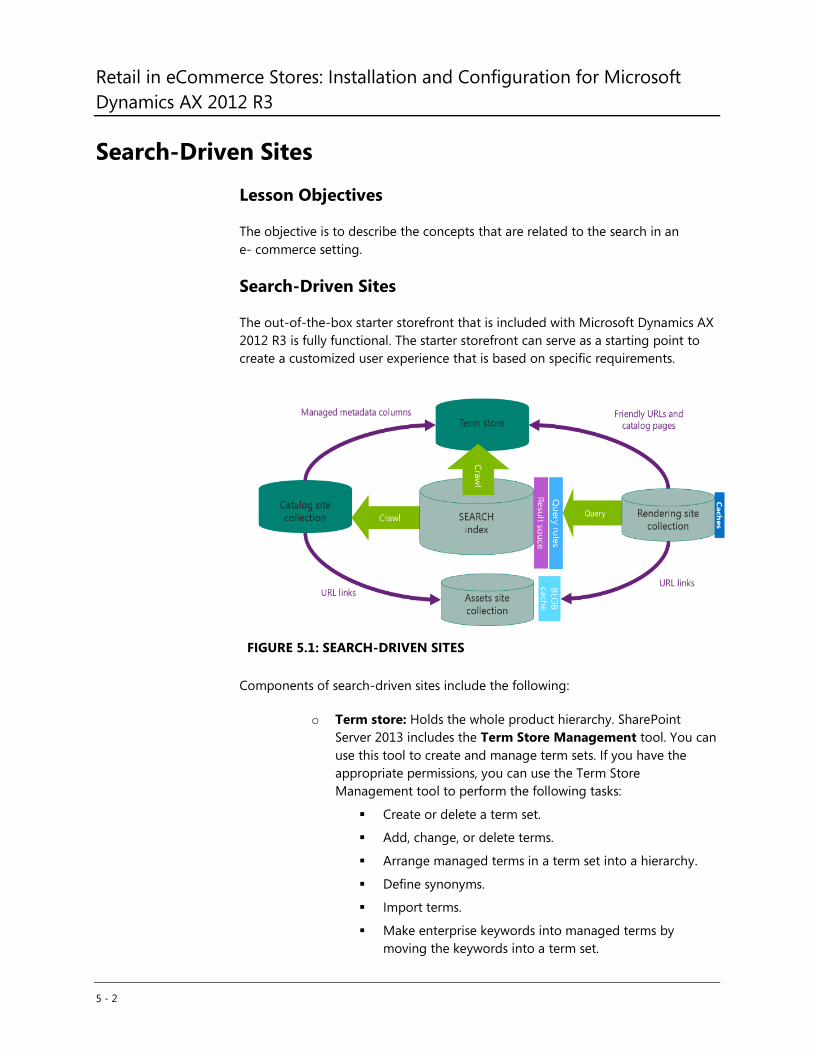
Retail in eCommerce Stores: Installation and Configuration for Microsoft
Dynamics AX 2012 R3
5 - 2
Search-Driven Sites
Lesson Objectives
The objective is to describe the concepts that are related to the search in an
e- commerce setting.
Search-Driven Sites
The out-of-the-box starter storefront that is included with Microsoft Dynamics AX
2012 R3 is fully functional. The starter storefront can serve as a starting point to
create a customized user experience that is based on specific requirements.
FIGURE 5.1: SEARCH-DRIVEN SITES
Components of search-driven sites include the following:
o Term store: Holds the whole product hierarchy. SharePoint
Server 2013 includes the Term Store Management tool. You can
use this tool to create and manage term sets. If you have the
appropriate permissions, you can use the Term Store
Management tool to perform the following tasks:
Create or delete a term set.
Add, change, or delete terms.
Arrange managed terms in a term set into a hierarchy.
Define synonyms.
Import terms.
Make enterprise keywords into managed terms by
moving the keywords into a term set.
Module 5: MANAGE THE ONLINE STORE IN SHAREPOINT
5 - 3
o Catalog site collection: Holds the product catalogs that are
published from Microsoft Dynamics AX.
o Asset site collection: Stores images, videos, and other assets.
o Search index: Holds all content and metadata that is crawled. To
build the search index, you must first start a full crawl of content
that is specified in one or more content sources.
A content source is a set of options that you can use to
specify what type of content is crawled, what URLs to
crawl, and how frequently the content should be crawled.
Content sources are set up and maintained in Central
Administration by a Search service application
administrator.
o Publishing (rendering) site collection: Holds the online store
(UI).
As an administrator, you can define result sources (six) based on the content that
is available from the search index. One way to quickly understand the concept of a
result source is to consider the result source as a reusable query. You can create
result sources to specify a location from which search results can be retrieved, for
example, the URL for a catalog. Or you can specify that search results are only to
be retrieved for a particular item type—for example, pictures.
One example might be to set the result source to include all listings that are
currently valid (in other words, outdated listings never appear on the site).
Finally, the online store queries (seven) the index. When the query-processing
component receives a query from the search front end, the query-processing
component analyzes and processes the query to improve precision, recall, and
relevance. The processed query is submitted to the index component. The index
component returns a result set. The result set is based on the processed query that
is sent to the query-processing component. Then, the query-processing
component processes the result set, before the result set is returned to the search
front end.
Reference Links: For more information about the search components, refer
to http://technet.microsoft.com/EN-US/library/jj219738.aspx.
Cross-Site Publishing
This lesson describes the basic concepts that are related to cross-site publishing
and how to verify cross-publishing in an e-commerce setting.
Retail in eCommerce Stores: Installation and Configuration for Microsoft
Dynamics AX 2012 R3
5 - 4
Lesson Objectives
The objective is to describe the concepts that are related to the cross-site
publishing.
Cross-Site Publishing
The cross-site collection publishing feature in SharePoint Server 2013 works as
follows: you use the authoring site collection (product catalog site) to author and
store content, and one or more publishing site collections to control the design of
the site and to show the content. The functionality that is provided by this feature
is called cross-site publishing. Site collections are available as part of the Retail
online starter store.
The authoring site collection, known as the Product Catalog Site, includes a list
of product data and all libraries and lists are shared as catalogs.
The product catalog content web application uses Active Directory to authenticate
content authors. The catalogs are indexed by the search system and made
available to the publishing site collection (publishing portal).
The publishing site collection (publishing portal) issues queries for data that is
indexed. The publishing site collection shows the data on web pages by using
Web Parts that use search technology (for more information, refer to the
following section).
The publishing portal web application uses Active Directory authentication for
designers and forms-based authentication for web users. This web application is
configured so that web users can have anonymous access. Additionally, you brand
content on the publishing site.
Note: As mentioned in the, “E-commerce Architecture” module the publishing
site collection is outside the firewall. Therefore, the asset library is located in a
separate site collection (in the same web application as the publishing site
collection) so that users on the publishing sites have read access to those assets.
Internal users such as designers and other content authors have Contribute
permission to add, update, and delete items in the asset library. The asset library is
added to the Suggested Content Browser Locations list for the authoring and
product catalog site collections so that content authors can use those assets in their
content.
Validate the Connection between the Publishing Portal and Authoring Site
To validate that the E-commerce Publishing Portal is connected to the Product
catalog/Authoring site (achieved automatically when the starter store is
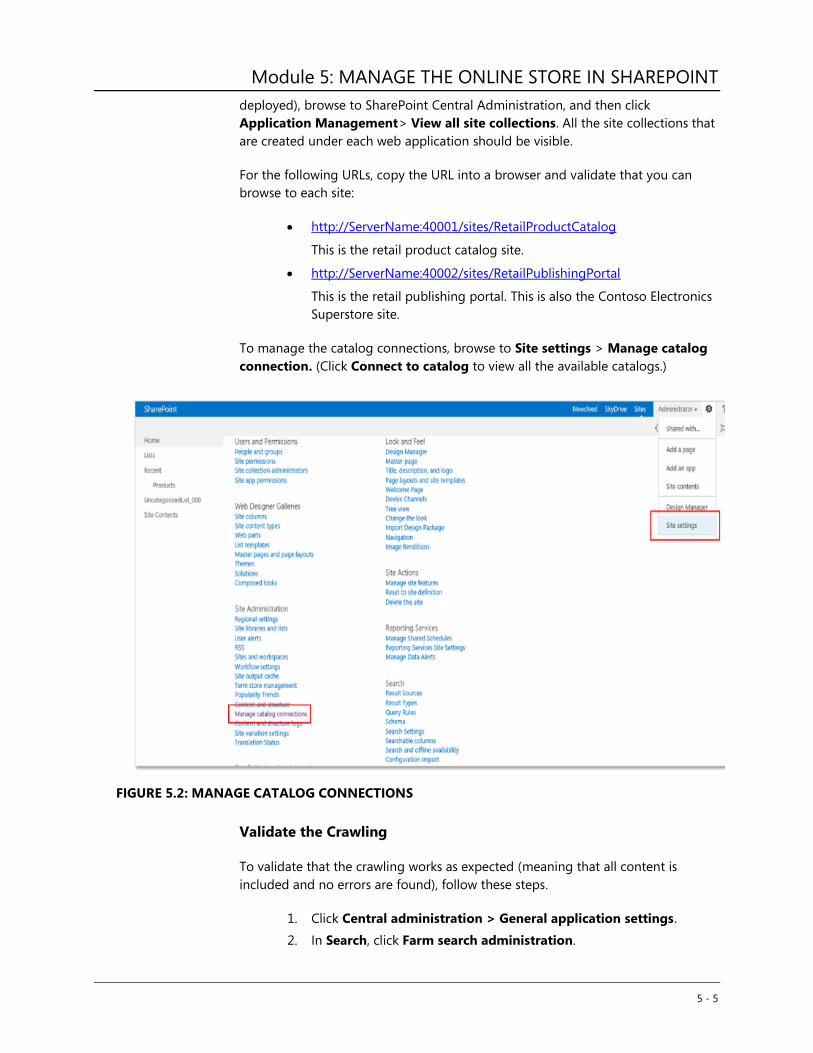
Module 5: MANAGE THE ONLINE STORE IN SHAREPOINT
5 - 5
deployed), browse to SharePoint Central Administration, and then click
Application Management> View all site collections. All the site collections that
are created under each web application should be visible.
For the following URLs, copy the URL into a browser and validate that you can
browse to each site:
http://ServerName:40001/sites/RetailProductCatalog
This is the retail product catalog site.
http://ServerName:40002/sites/RetailPublishingPortal
This is the retail publishing portal. This is also the Contoso Electronics
Superstore site.
To manage the catalog connections, browse to Site settings > Manage catalog
connection. (Click Connect to catalog to view all the available catalogs.)
FIGURE 5.2: MANAGE CATALOG CONNECTIONS
Validate the Crawling
To validate that the crawling works as expected (meaning that all content is
included and no errors are found), follow these steps.
1. Click Central administration > General application settings.
2. In Search, click Farm search administration.
Retail in eCommerce Stores: Installation and Configuration for Microsoft
Dynamics AX 2012 R3
5 - 6
3. Click the Search Service application (link).
4. In Diagnostics (on the left side column), click Crawl log.
Web Parts and Display Templates
This lesson describes how search-driven Web Parts and display templates are used
to present content in the online storefront.
Lesson Objectives
The objectives are as follows:
Describe how search-driven Web Parts and display templates are
managed.
Describe how search-driven Web Parts and display templates can be
used to create dynamic pages and manage metadata.
Managed Properties: Map Attributes
When content is crawled, the metadata of the items that are crawled is
represented as crawled properties, whereas the publishing content from Microsoft
Dynamics AX is crawled and managed properties are mapped. This explicitly
controls names for the managed properties (only managed properties are
included in search results).
In a catalog, managed properties are the specifications of the items in the library
or list, such as Title, Color, or Product Category.
Reference Links: For more conceptual information about crawled and
managed properties, refer to the article on automatically created managed
properties in SharePoint Server 2013 (http://technet.microsoft.com/en-
us/library/jj613136).
You can specify settings for managed properties to affect how content appears in
Search Web Parts and in search results. We recommend that you maintain and
control managed properties from Microsoft Dynamics AX. We recommend that
you do this because the changes that are made in SharePoint are overwritten
every time that a new publishing is performed in Microsoft Dynamics AX.
In Microsoft Dynamics AX, to control managed properties, follow these steps.
1. Click Retail > Common > Retail channels > Online stores. In the
Online stores list, double-click a store.
2. Click Map attributes.
Module 5: MANAGE THE ONLINE STORE IN SHAREPOINT
5 - 7
3. In the Map attributes form, for each category in the online store,
select the options that indicate how the attributes for each category
or channel product should behave in the online store on the
SharePoint site. The attributes are mapped to the managed properties
on the SharePoint site.
For example, you can select whether an attribute can be searched, refined,
retrieved, sorted, and queried. These options determine how the value of this
attribute is saved in the search index on the SharePoint site, and if and how this
attribute appears in the online store pages.
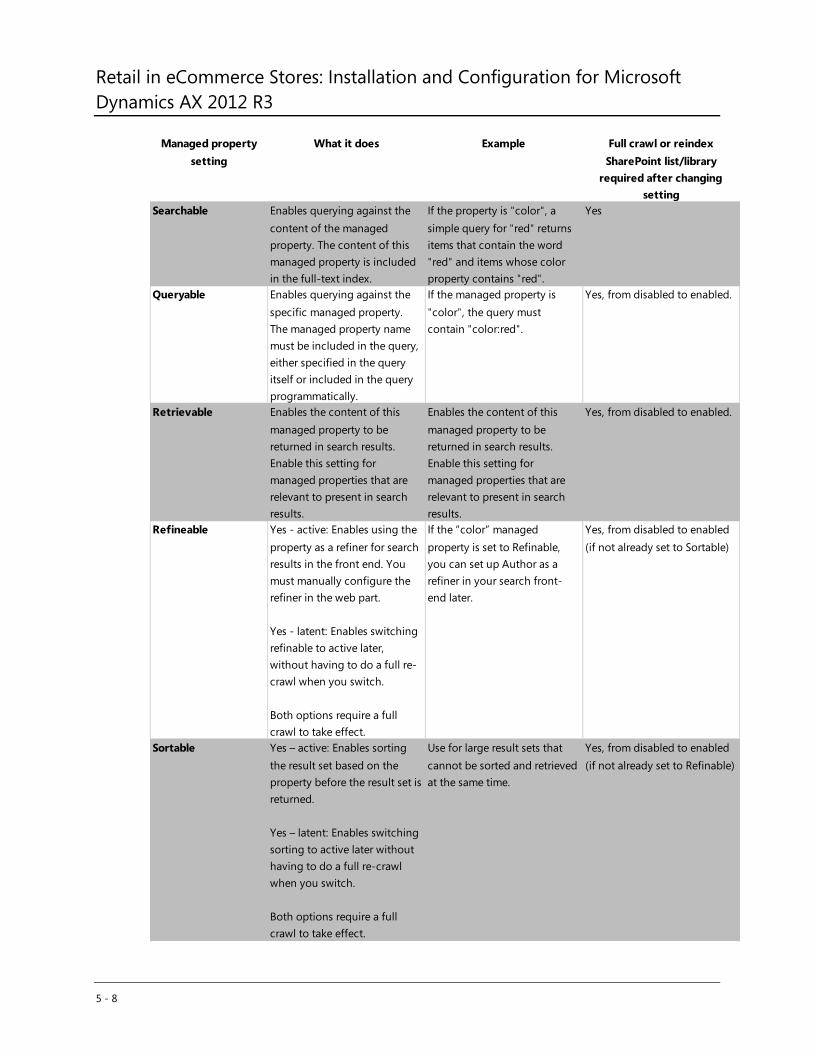
Retail in eCommerce Stores: Installation and Configuration for Microsoft
Dynamics AX 2012 R3
5 - 8
Managed property
setting
What it does Example Full crawl or reindex
SharePoint list/library
required after changing
setting
Searchable Enables querying against the
content of the managed
property. The content of this
managed property is included
in the full-text index.
If the property is "color", a
simple query for "red" returns
items that contain the word
"red" and items whose color
property contains "red".
Yes
Queryable Enables querying against the
specific managed property.
The managed property name
must be included in the query,
either specified in the query
itself or included in the query
programmatically.
If the managed property is
"color", the query must
contain "color:red".
Yes, from disabled to enabled.
Retrievable Enables the content of this
managed property to be
returned in search results.
Enable this setting for
managed properties that are
relevant to present in search
results.
Enables the content of this
managed property to be
returned in search results.
Enable this setting for
managed properties that are
relevant to present in search
results.
Yes, from disabled to enabled.
Refineable Yes - active: Enables using the
property as a refiner for search
results in the front end. You
must manually configure the
refiner in the web part.
Yes - latent: Enables switching
refinable to active later,
without having to do a full re-
crawl when you switch.
Both options require a full
crawl to take effect.
If the “color” managed
property is set to Refinable,
you can set up Author as a
refiner in your search front-
end later.
Yes, from disabled to enabled
(if not already set to Sortable)
Sortable Yes – active: Enables sorting
the result set based on the
property before the result set is
returned.
Yes – latent: Enables switching
sorting to active later without
having to do a full re-crawl
when you switch.
Both options require a full
crawl to take effect.
Use for large result sets that
cannot be sorted and retrieved
at the same time.
Yes, from disabled to enabled
(if not already set to Refinable)
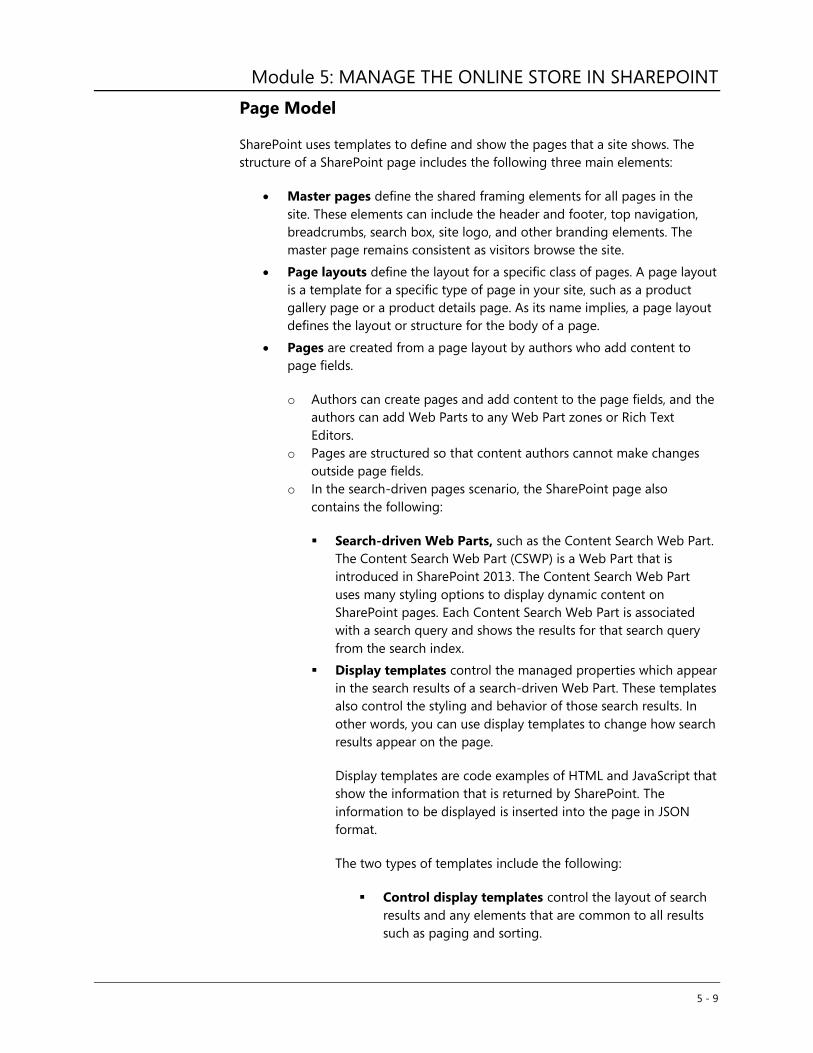
Module 5: MANAGE THE ONLINE STORE IN SHAREPOINT
5 - 9
Page Model
SharePoint uses templates to define and show the pages that a site shows. The
structure of a SharePoint page includes the following three main elements:
Master pages define the shared framing elements for all pages in the
site. These elements can include the header and footer, top navigation,
breadcrumbs, search box, site logo, and other branding elements. The
master page remains consistent as visitors browse the site.
Page layouts define the layout for a specific class of pages. A page layout
is a template for a specific type of page in your site, such as a product
gallery page or a product details page. As its name implies, a page layout
defines the layout or structure for the body of a page.
Pages are created from a page layout by authors who add content to
page fields.
o Authors can create pages and add content to the page fields, and the
authors can add Web Parts to any Web Part zones or Rich Text
Editors.
o Pages are structured so that content authors cannot make changes
outside page fields.
o In the search-driven pages scenario, the SharePoint page also
contains the following:
Search-driven Web Parts, such as the Content Search Web Part.
The Content Search Web Part (CSWP) is a Web Part that is
introduced in SharePoint 2013. The Content Search Web Part
uses many styling options to display dynamic content on
SharePoint pages. Each Content Search Web Part is associated
with a search query and shows the results for that search query
from the search index.
Display templates control the managed properties which appear
in the search results of a search-driven Web Part. These templates
also control the styling and behavior of those search results. In
other words, you can use display templates to change how search
results appear on the page.
Display templates are code examples of HTML and JavaScript that
show the information that is returned by SharePoint. The
information to be displayed is inserted into the page in JSON
format.
The two types of templates include the following:
Control display templates control the layout of search
results and any elements that are common to all results
such as paging and sorting.
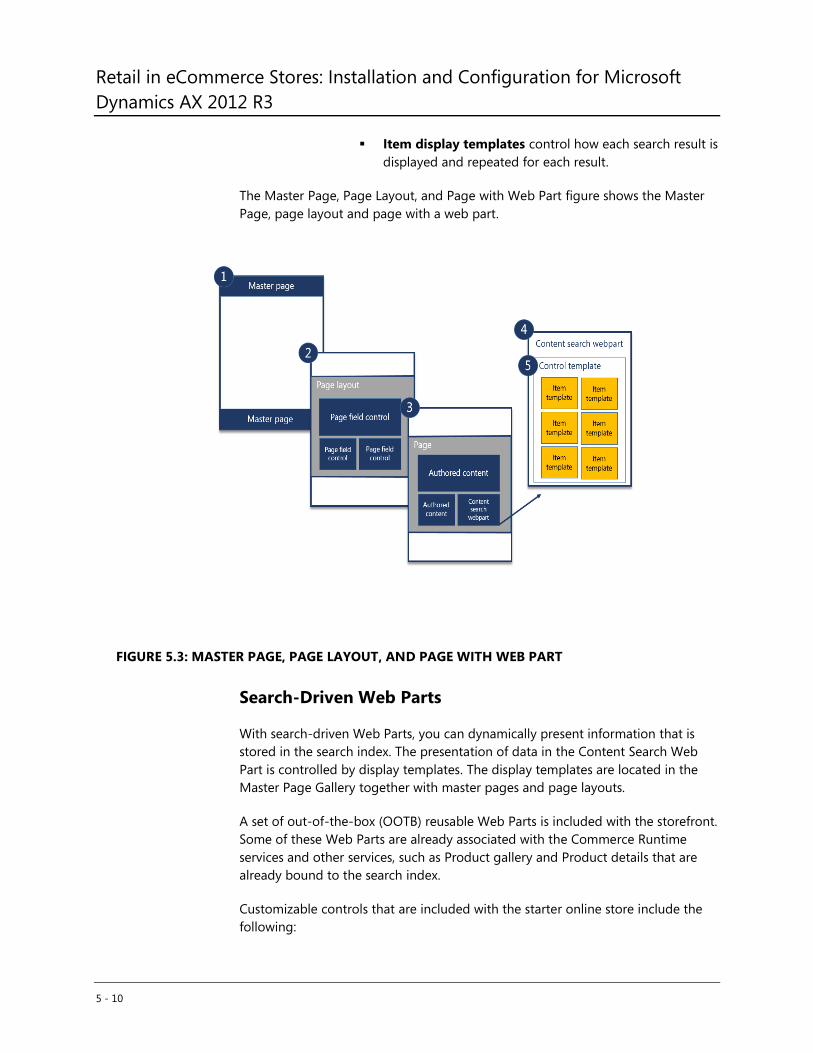
Retail in eCommerce Stores: Installation and Configuration for Microsoft
Dynamics AX 2012 R3
5 - 10
Item display templates control how each search result is
displayed and repeated for each result.
The Master Page, Page Layout, and Page with Web Part figure shows the Master
Page, page layout and page with a web part.
FIGURE 5.3: MASTER PAGE, PAGE LAYOUT, AND PAGE WITH WEB PART
Search-Driven Web Parts
With search-driven Web Parts, you can dynamically present information that is
stored in the search index. The presentation of data in the Content Search Web
Part is controlled by display templates. The display templates are located in the
Master Page Gallery together with master pages and page layouts.
A set of out-of-the-box (OOTB) reusable Web Parts is included with the storefront.
Some of these Web Parts are already associated with the Commerce Runtime
services and other services, such as Product gallery and Product details that are
already bound to the search index.
Customizable controls that are included with the starter online store include the
following:
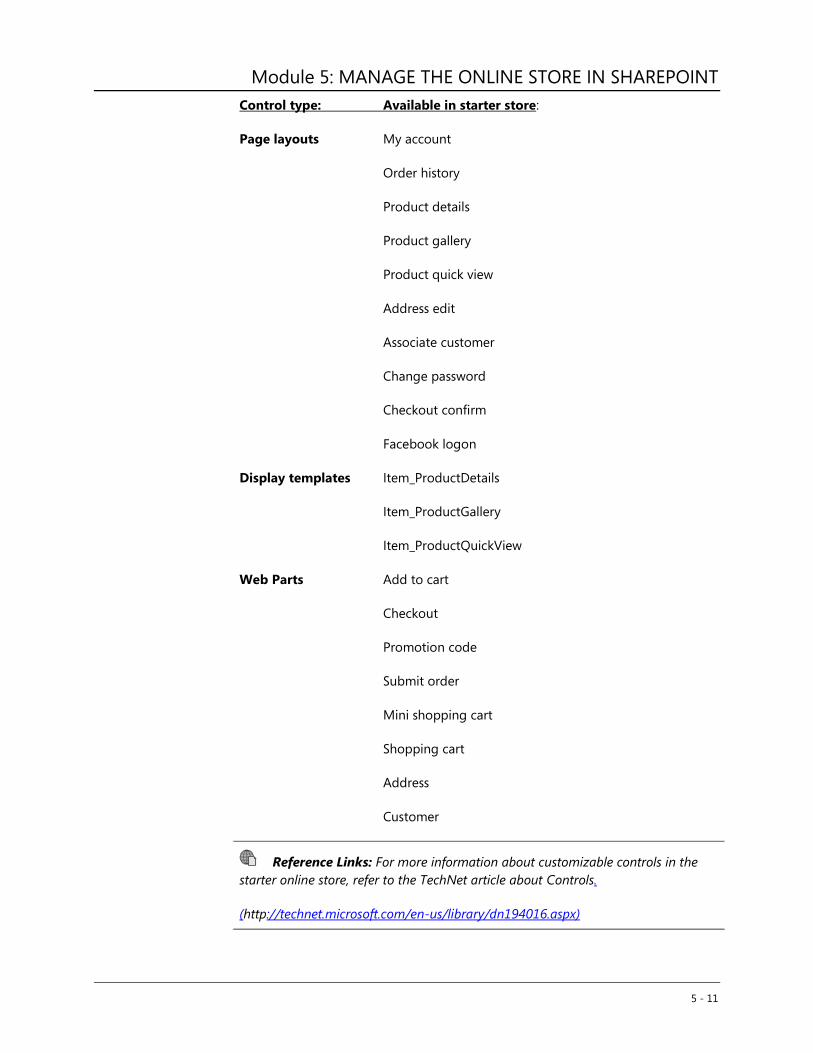
Module 5: MANAGE THE ONLINE STORE IN SHAREPOINT
5 - 11
Control type: Available in starter store:
Page layouts My account
Order history
Product details
Product gallery
Product quick view
Address edit
Associate customer
Change password
Checkout confirm
Facebook logon
Display templates Item_ProductDetails
Item_ProductGallery
Item_ProductQuickView
Web Parts Add to cart
Checkout
Promotion code
Submit order
Mini shopping cart
Shopping cart
Address
Customer
Reference Links: For more information about customizable controls in the
starter online store, refer to the TechNet article about Controls.
(http://technet.microsoft.com/en-us/library/dn194016.aspx)
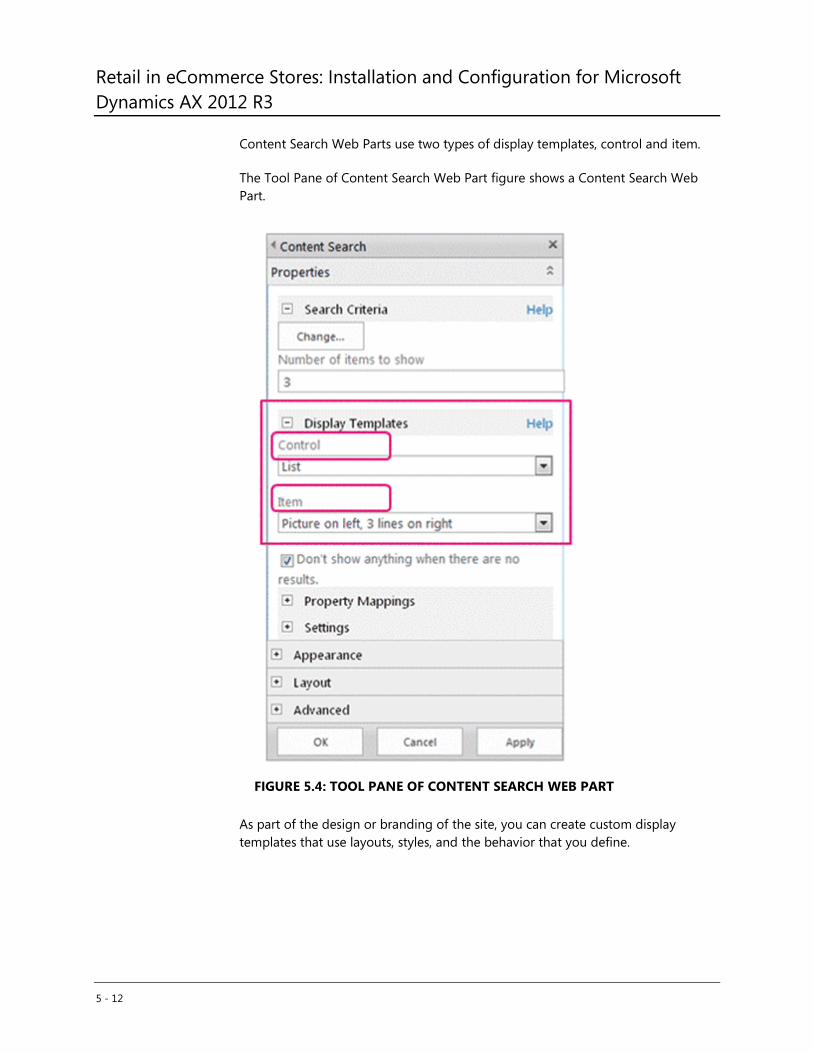
Retail in eCommerce Stores: Installation and Configuration for Microsoft
Dynamics AX 2012 R3
5 - 12
Content Search Web Parts use two types of display templates, control and item.
The Tool Pane of Content Search Web Part figure shows a Content Search Web
Part.
FIGURE 5.4: TOOL PANE OF CONTENT SEARCH WEB PART
As part of the design or branding of the site, you can create custom display
templates that use layouts, styles, and the behavior that you define.
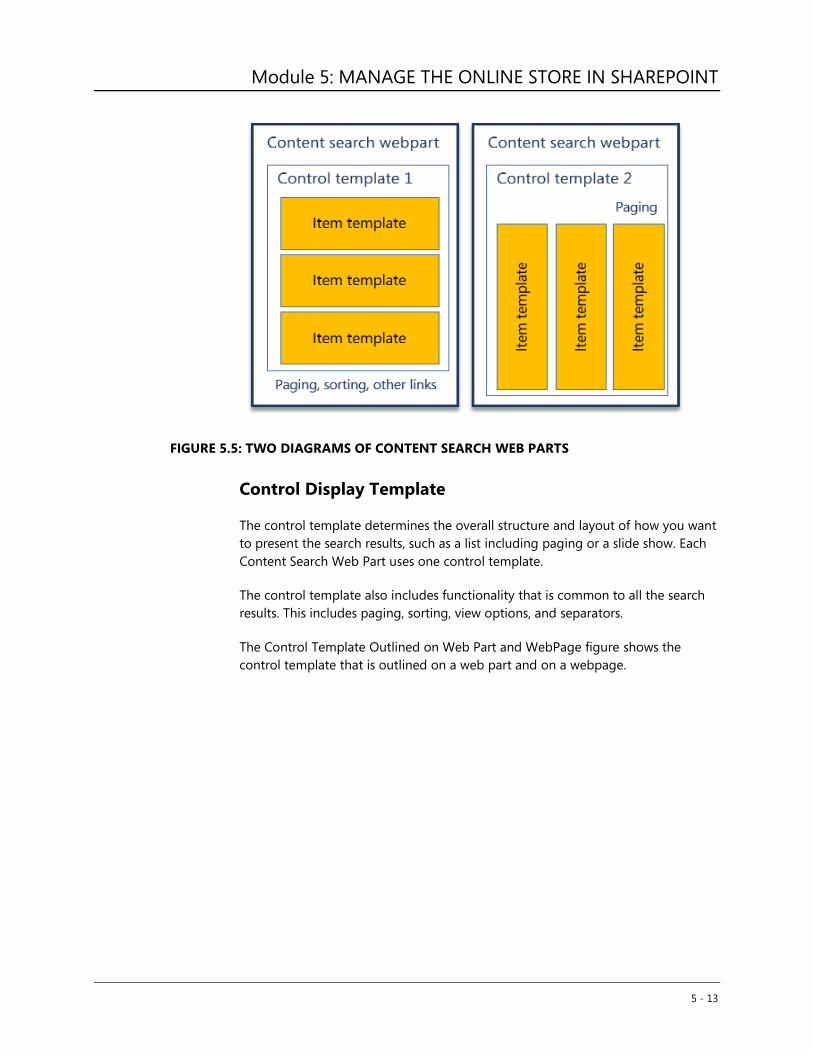
Module 5: MANAGE THE ONLINE STORE IN SHAREPOINT
5 - 13
FIGURE 5.5: TWO DIAGRAMS OF CONTENT SEARCH WEB PARTS
Control Display Template
The control template determines the overall structure and layout of how you want
to present the search results, such as a list including paging or a slide show. Each
Content Search Web Part uses one control template.
The control template also includes functionality that is common to all the search
results. This includes paging, sorting, view options, and separators.
The Control Template Outlined on Web Part and WebPage figure shows the
control template that is outlined on a web part and on a webpage.
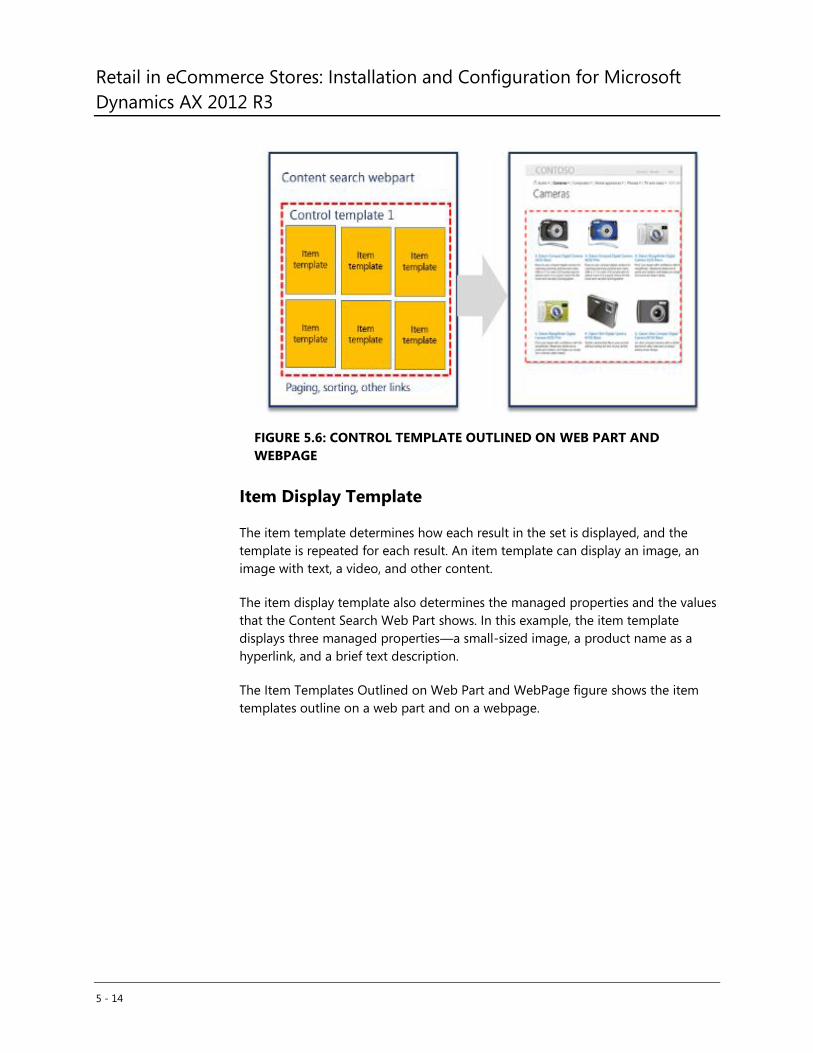
Retail in eCommerce Stores: Installation and Configuration for Microsoft
Dynamics AX 2012 R3
5 - 14
FIGURE 5.6: CONTROL TEMPLATE OUTLINED ON WEB PART AND
WEBPAGE
Item Display Template
The item template determines how each result in the set is displayed, and the
template is repeated for each result. An item template can display an image, an
image with text, a video, and other content.
The item display template also determines the managed properties and the values
that the Content Search Web Part shows. In this example, the item template
displays three managed properties—a small-sized image, a product name as a
hyperlink, and a brief text description.
The Item Templates Outlined on Web Part and WebPage figure shows the item
templates outline on a web part and on a webpage.
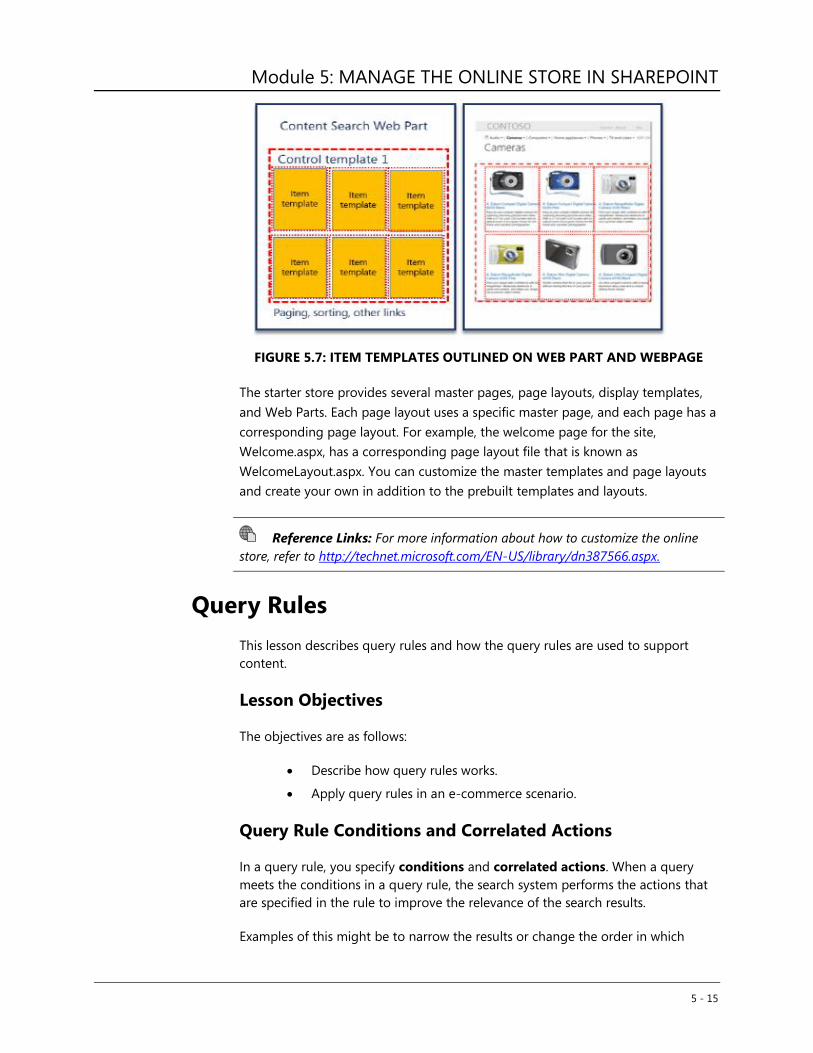
Module 5: MANAGE THE ONLINE STORE IN SHAREPOINT
5 - 15
FIGURE 5.7: ITEM TEMPLATES OUTLINED ON WEB PART AND WEBPAGE
The starter store provides several master pages, page layouts, display templates,
and Web Parts. Each page layout uses a specific master page, and each page has a
corresponding page layout. For example, the welcome page for the site,
Welcome.aspx, has a corresponding page layout file that is known as
WelcomeLayout.aspx. You can customize the master templates and page layouts
and create your own in addition to the prebuilt templates and layouts.
Reference Links: For more information about how to customize the online
store, refer to http://technet.microsoft.com/EN-US/library/dn387566.aspx.
Query Rules
This lesson describes query rules and how the query rules are used to support
content.
Lesson Objectives
The objectives are as follows:
Describe how query rules works.
Apply query rules in an e-commerce scenario.
Query Rule Conditions and Correlated Actions
In a query rule, you specify conditions and correlated actions. When a query
meets the conditions in a query rule, the search system performs the actions that
are specified in the rule to improve the relevance of the search results.
Examples of this might be to narrow the results or change the order in which
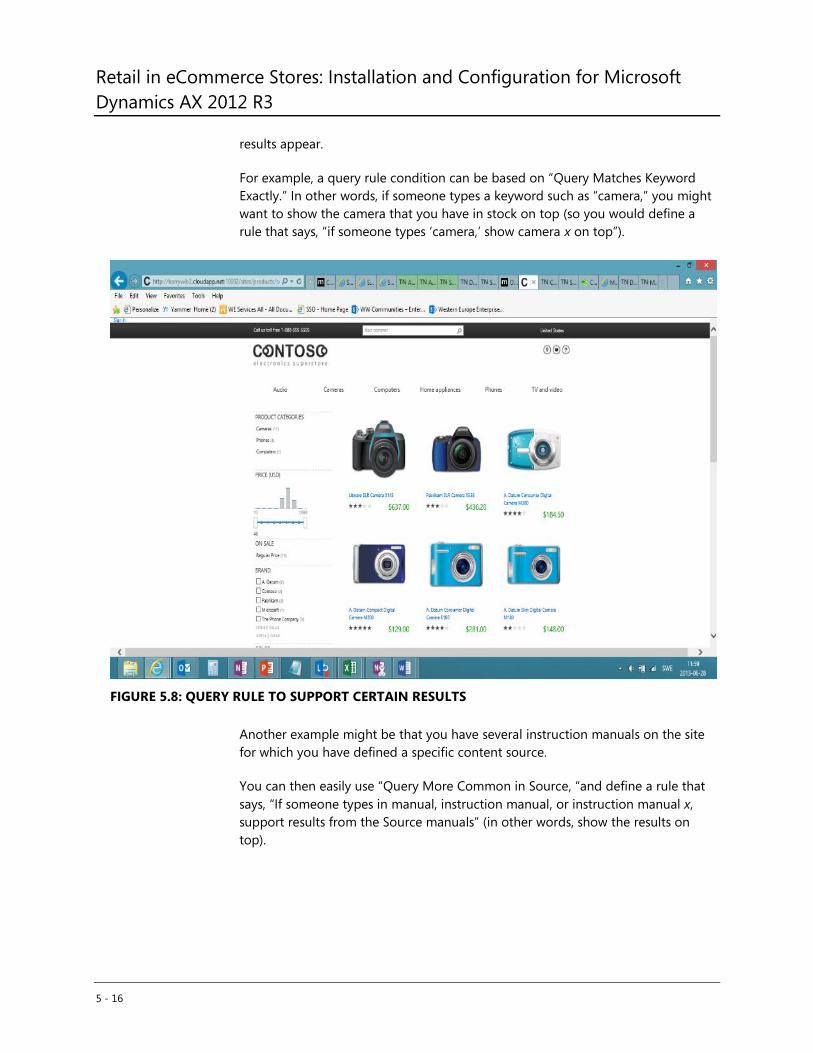
Retail in eCommerce Stores: Installation and Configuration for Microsoft
Dynamics AX 2012 R3
5 - 16
results appear.
For example, a query rule condition can be based on “Query Matches Keyword
Exactly.” In other words, if someone types a keyword such as “camera,” you might
want to show the camera that you have in stock on top (so you would define a
rule that says, “if someone types ‘camera,’ show camera x on top”).
FIGURE 5.8: QUERY RULE TO SUPPORT CERTAIN RESULTS
Another example might be that you have several instruction manuals on the site
for which you have defined a specific content source.
You can then easily use “Query More Common in Source, “and define a rule that
says, “If someone types in manual, instruction manual, or instruction manual x,
support results from the Source manuals” (in other words, show the results on
top).
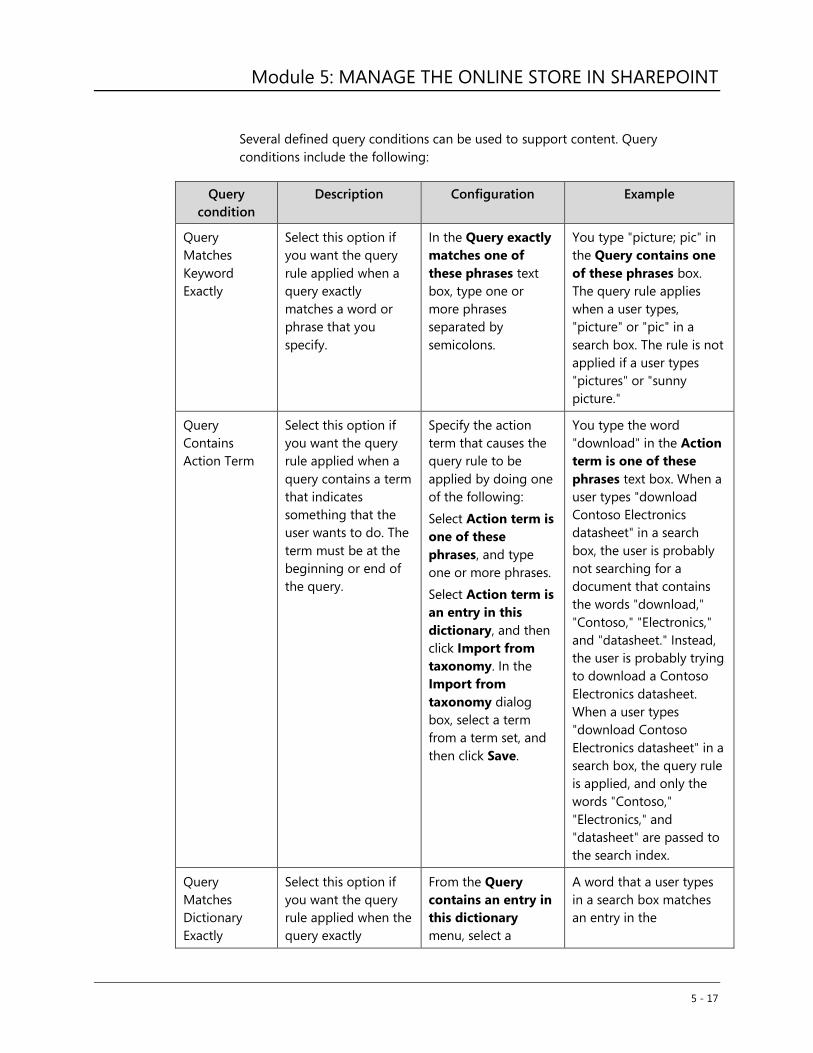
Module 5: MANAGE THE ONLINE STORE IN SHAREPOINT
5 - 17
Several defined query conditions can be used to support content. Query
conditions include the following:
Query
condition
Description Configuration Example
Query
Matches
Keyword
Exactly
Select this option if
you want the query
rule applied when a
query exactly
matches a word or
phrase that you
specify.
In the Query exactly
matches one of
these phrases text
box, type one or
more phrases
separated by
semicolons.
You type "picture; pic" in
the Query contains one
of these phrases box.
The query rule applies
when a user types,
"picture" or "pic" in a
search box. The rule is not
applied if a user types
"pictures" or "sunny
picture."
Query
Contains
Action Term
Select this option if
you want the query
rule applied when a
query contains a term
that indicates
something that the
user wants to do. The
term must be at the
beginning or end of
the query.
Specify the action
term that causes the
query rule to be
applied by doing one
of the following:
Select Action term is
one of these
phrases, and type
one or more phrases.
Select Action term is
an entry in this
dictionary, and then
click Import from
taxonomy. In the
Import from
taxonomy dialog
box, select a term
from a term set, and
then click Save.
You type the word
"download" in the Action
term is one of these
phrases text box. When a
user types "download
Contoso Electronics
datasheet" in a search
box, the user is probably
not searching for a
document that contains
the words "download,"
"Contoso," "Electronics,"
and "datasheet." Instead,
the user is probably trying
to download a Contoso
Electronics datasheet.
When a user types
"download Contoso
Electronics datasheet" in a
search box, the query rule
is applied, and only the
words "Contoso,"
"Electronics," and
"datasheet" are passed to
the search index.
Query
Matches
Dictionary
Exactly
Select this option if
you want the query
rule applied when the
query exactly
From the Query
contains an entry in
this dictionary
menu, select a
A word that a user types
in a search box matches
an entry in the
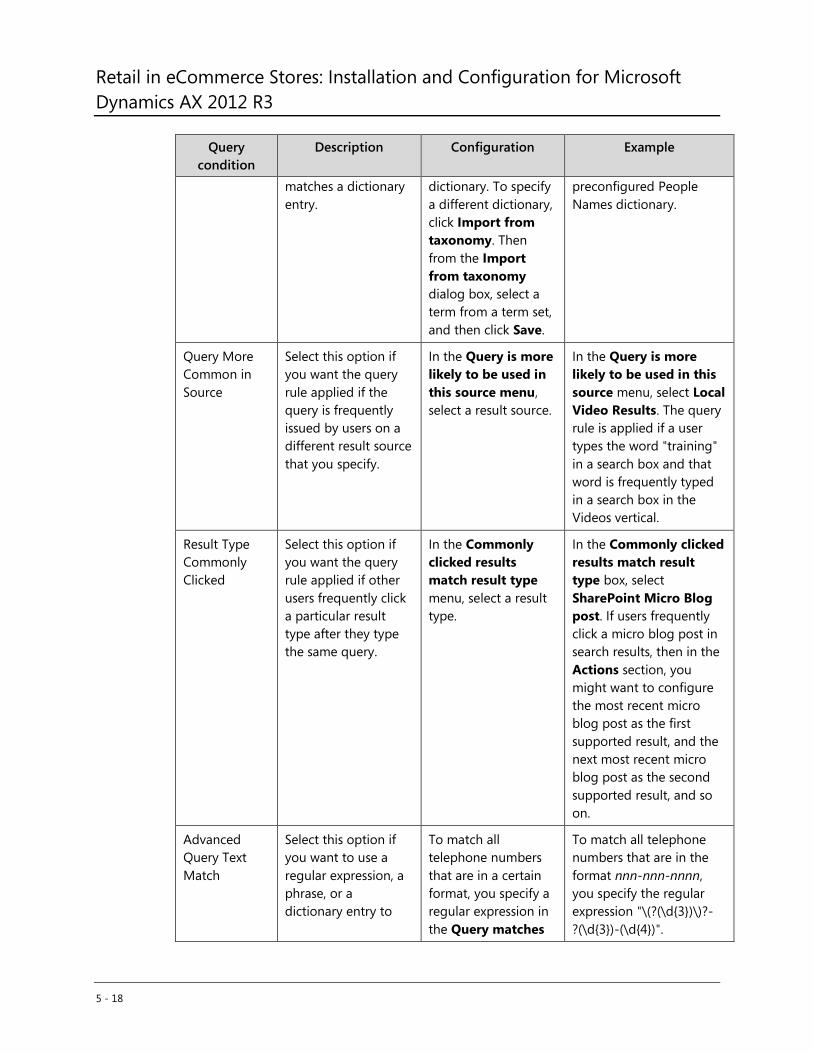
Retail in eCommerce Stores: Installation and Configuration for Microsoft
Dynamics AX 2012 R3
5 - 18
Query
condition
Description Configuration Example
matches a dictionary
entry.
dictionary. To specify
a different dictionary,
click Import from
taxonomy. Then
from the Import
from taxonomy
dialog box, select a
term from a term set,
and then click Save.
preconfigured People
Names dictionary.
Query More
Common in
Source
Select this option if
you want the query
rule applied if the
query is frequently
issued by users on a
different result source
that you specify.
In the Query is more
likely to be used in
this source menu,
select a result source.
In the Query is more
likely to be used in this
source menu, select Local
Video Results. The query
rule is applied if a user
types the word "training"
in a search box and that
word is frequently typed
in a search box in the
Videos vertical.
Result Type
Commonly
Clicked
Select this option if
you want the query
rule applied if other
users frequently click
a particular result
type after they type
the same query.
In the Commonly
clicked results
match result type
menu, select a result
type.
In the Commonly clicked
results match result
type box, select
SharePoint Micro Blog
post. If users frequently
click a micro blog post in
search results, then in the
Actions section, you
might want to configure
the most recent micro
blog post as the first
supported result, and the
next most recent micro
blog post as the second
supported result, and so
on.
Advanced
Query Text
Match
Select this option if
you want to use a
regular expression, a
phrase, or a
dictionary entry to
To match all
telephone numbers
that are in a certain
format, you specify a
regular expression in
the Query matches
To match all telephone
numbers that are in the
format nnn-nnn-nnnn,
you specify the regular
expression "\(?(\d{3})\)?-
?(\d{3})-(\d{4})".
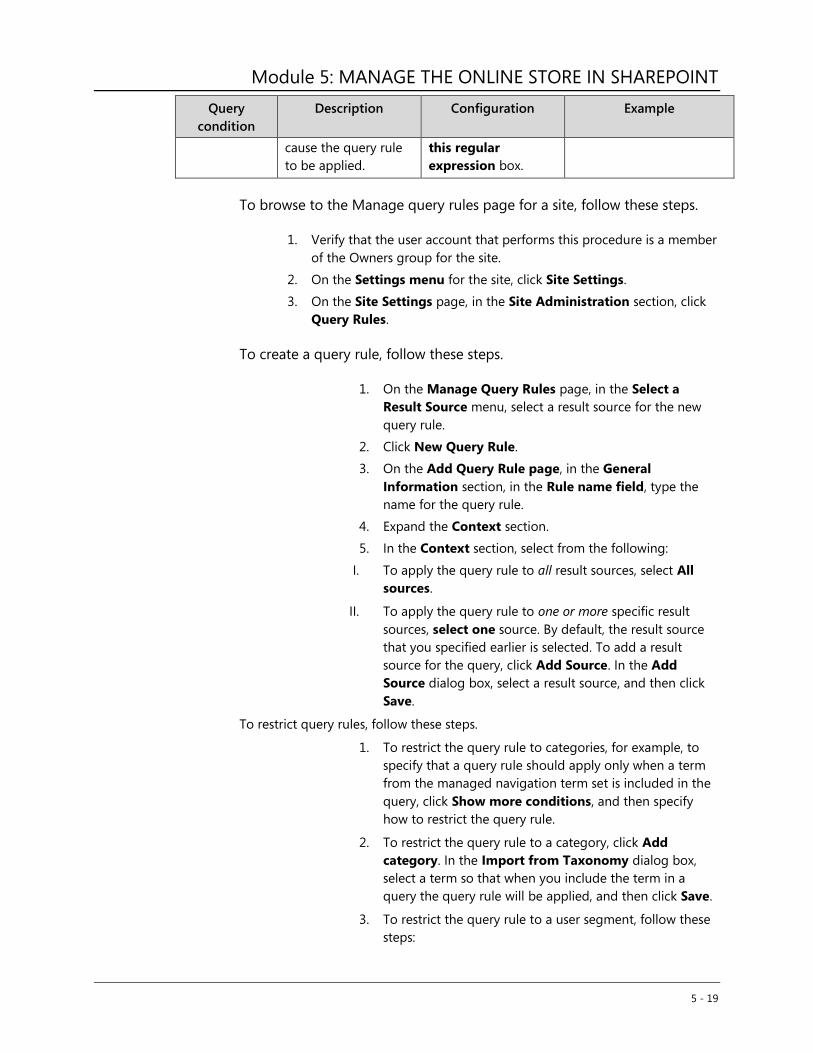
Module 5: MANAGE THE ONLINE STORE IN SHAREPOINT
5 - 19
Query
condition
Description Configuration Example
cause the query rule
to be applied.
this regular
expression box.
To browse to the Manage query rules page for a site, follow these steps.
1. Verify that the user account that performs this procedure is a member
of the Owners group for the site.
2. On the Settings menu for the site, click Site Settings.
3. On the Site Settings page, in the Site Administration section, click
Query Rules.
To create a query rule, follow these steps.
1. On the Manage Query Rules page, in the Select a
Result Source menu, select a result source for the new
query rule.
2. Click New Query Rule.
3. On the Add Query Rule page, in the General
Information section, in the Rule name field, type the
name for the query rule.
4. Expand the Context section.
5. In the Context section, select from the following:
I. To apply the query rule to all result sources, select All
sources.
II. To apply the query rule to one or more specific result
sources, select one source. By default, the result source
that you specified earlier is selected. To add a result
source for the query, click Add Source. In the Add
Source dialog box, select a result source, and then click
Save.
To restrict query rules, follow these steps.
1. To restrict the query rule to categories, for example, to
specify that a query rule should apply only when a term
from the managed navigation term set is included in the
query, click Show more conditions, and then specify
how to restrict the query rule.
2. To restrict the query rule to a category, click Add
category. In the Import from Taxonomy dialog box,
select a term so that when you include the term in a
query the query rule will be applied, and then click Save.
3. To restrict the query rule to a user segment, follow these
steps:
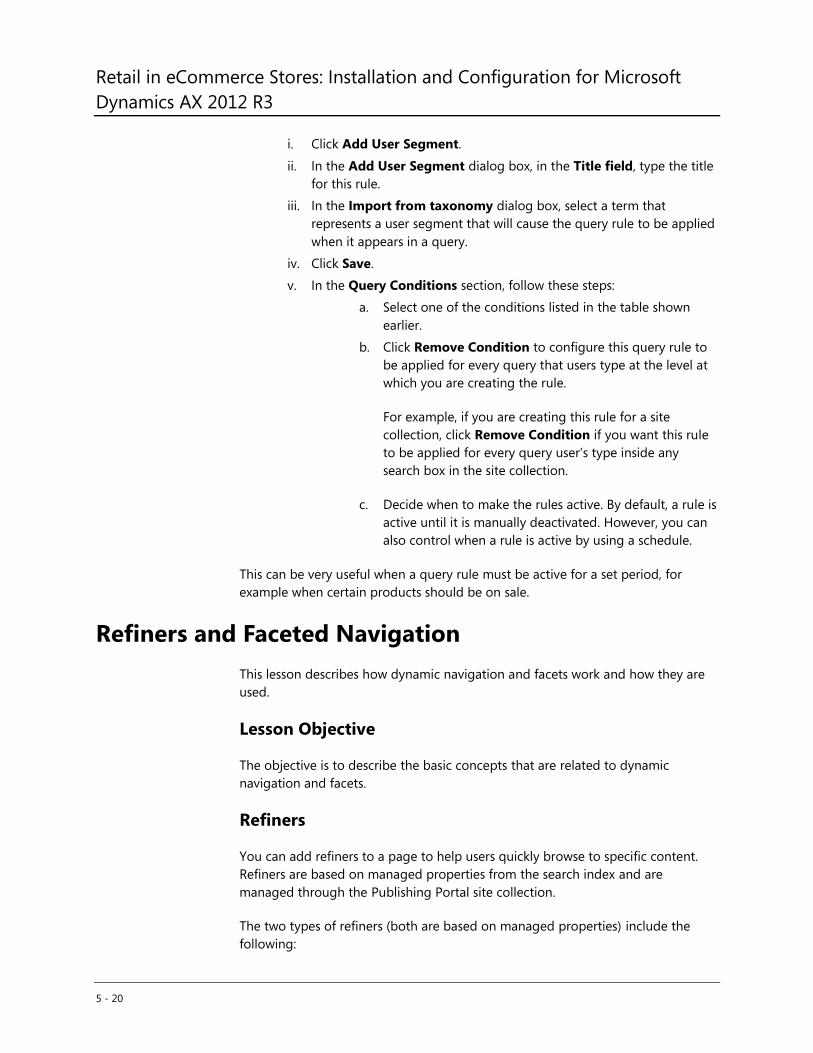
Retail in eCommerce Stores: Installation and Configuration for Microsoft
Dynamics AX 2012 R3
5 - 20
i. Click Add User Segment.
ii. In the Add User Segment dialog box, in the Title field, type the title
for this rule.
iii. In the Import from taxonomy dialog box, select a term that
represents a user segment that will cause the query rule to be applied
when it appears in a query.
iv. Click Save.
v. In the Query Conditions section, follow these steps:
a. Select one of the conditions listed in the table shown
earlier.
b. Click Remove Condition to configure this query rule to
be applied for every query that users type at the level at
which you are creating the rule.
For example, if you are creating this rule for a site
collection, click Remove Condition if you want this rule
to be applied for every query user’s type inside any
search box in the site collection.
c. Decide when to make the rules active. By default, a rule is
active until it is manually deactivated. However, you can
also control when a rule is active by using a schedule.
This can be very useful when a query rule must be active for a set period, for
example when certain products should be on sale.
Refiners and Faceted Navigation
This lesson describes how dynamic navigation and facets work and how they are
used.
Lesson Objective
The objective is to describe the basic concepts that are related to dynamic
navigation and facets.
Refiners
You can add refiners to a page to help users quickly browse to specific content.
Refiners are based on managed properties from the search index and are
managed through the Publishing Portal site collection.
The two types of refiners (both are based on managed properties) include the
following:
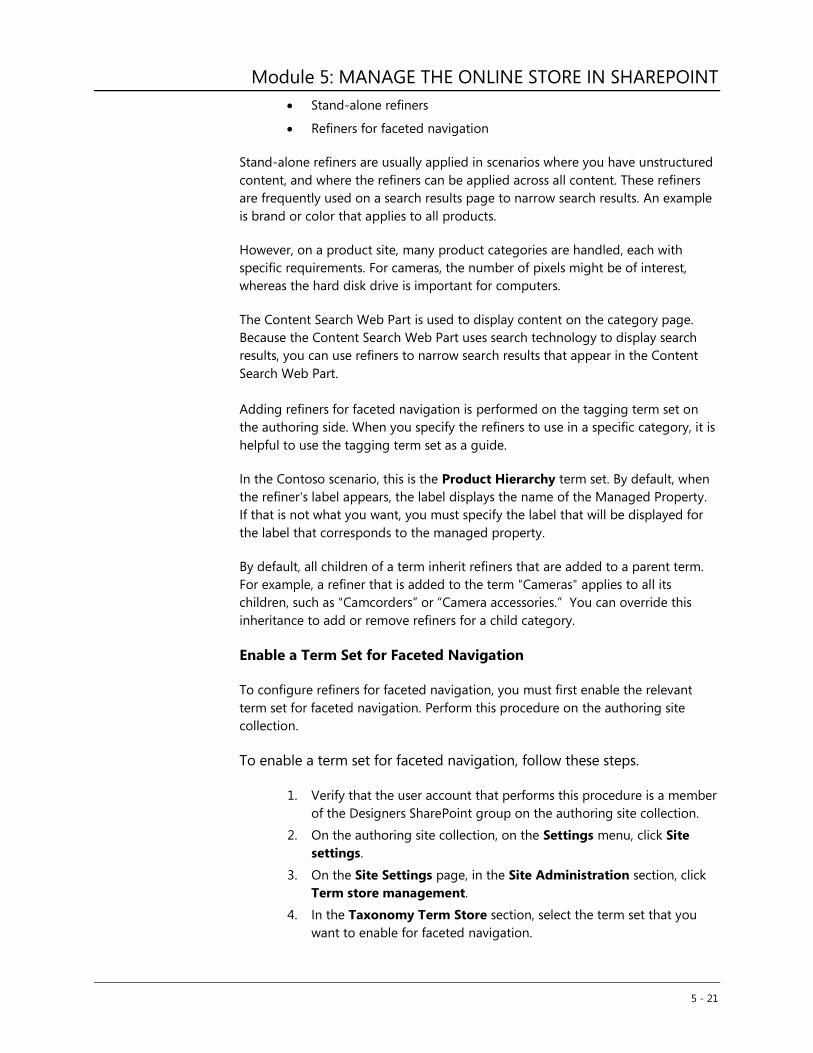
Module 5: MANAGE THE ONLINE STORE IN SHAREPOINT
5 - 21
Stand-alone refiners
Refiners for faceted navigation
Stand-alone refiners are usually applied in scenarios where you have unstructured
content, and where the refiners can be applied across all content. These refiners
are frequently used on a search results page to narrow search results. An example
is brand or color that applies to all products.
However, on a product site, many product categories are handled, each with
specific requirements. For cameras, the number of pixels might be of interest,
whereas the hard disk drive is important for computers.
The Content Search Web Part is used to display content on the category page.
Because the Content Search Web Part uses search technology to display search
results, you can use refiners to narrow search results that appear in the Content
Search Web Part.
Adding refiners for faceted navigation is performed on the tagging term set on
the authoring side. When you specify the refiners to use in a specific category, it is
helpful to use the tagging term set as a guide.
In the Contoso scenario, this is the Product Hierarchy term set. By default, when
the refiner's label appears, the label displays the name of the Managed Property.
If that is not what you want, you must specify the label that will be displayed for
the label that corresponds to the managed property.
By default, all children of a term inherit refiners that are added to a parent term.
For example, a refiner that is added to the term "Cameras" applies to all its
children, such as "Camcorders” or “Camera accessories.” You can override this
inheritance to add or remove refiners for a child category.
Enable a Term Set for Faceted Navigation
To configure refiners for faceted navigation, you must first enable the relevant
term set for faceted navigation. Perform this procedure on the authoring site
collection.
To enable a term set for faceted navigation, follow these steps.
1. Verify that the user account that performs this procedure is a member
of the Designers SharePoint group on the authoring site collection.
2. On the authoring site collection, on the Settings menu, click Site
settings.
3. On the Site Settings page, in the Site Administration section, click
Term store management.
4. In the Taxonomy Term Store section, select the term set that you
want to enable for faceted navigation.

Retail in eCommerce Stores: Installation and Configuration for Microsoft
Dynamics AX 2012 R3
5 - 22
5. Click the Indented use tab, and then select Use this Term Set for
Faceted Navigation.
6. Click Save.
Add Refiners to a Term Set
When you configure refiners for faceted navigation, you can add refiners to all
terms or to specific terms in a term set. Perform this procedure on the authoring
site collection.
To add refiners to all terms in a term set, follow these steps.
1. Verify that the user account that performs this procedure is a member
of the Designers SharePoint group on the authoring site collection.
2. On the authoring site collection, on the Settings menu, click Site
settings.
3. On the Site Settings page, in the Site Administration section, click
Term store management.
4. In the TAXONOMY TERM STORE section, click the term set that you
have enabled for faceted navigation.
5. Click the FACETED NAVIGATION tab, and then click Customize
refiners.
6. On the Refinement Configuration page, in the Available refiners
section, use the buttons to select the refiners that should be added to
the term set, and also to specify the order in which you want the
refiners to appear. If you have specified an alias for a managed
property that can be refined, this alias is displayed in the
Configuration section.
7. In the Configuration for section, specify how you want each refiner
to appear.
8. Click OK to close the Refinement Configuration page, and then
click Save.
To add refiners to specific terms in a term set, follow these steps.
1. Verify that the user account that performs this procedure is a member
of the Designers SharePoint group on the authoring site collection.
2. On the authoring site collection, on the Settings menu, click Site
settings.
3. On the Site Settings page, in the Site Administration section, click
Term store management.
4. In the Taxonomy term store section, click the term set that you have
enabled for faceted navigation, and then click the term to which you
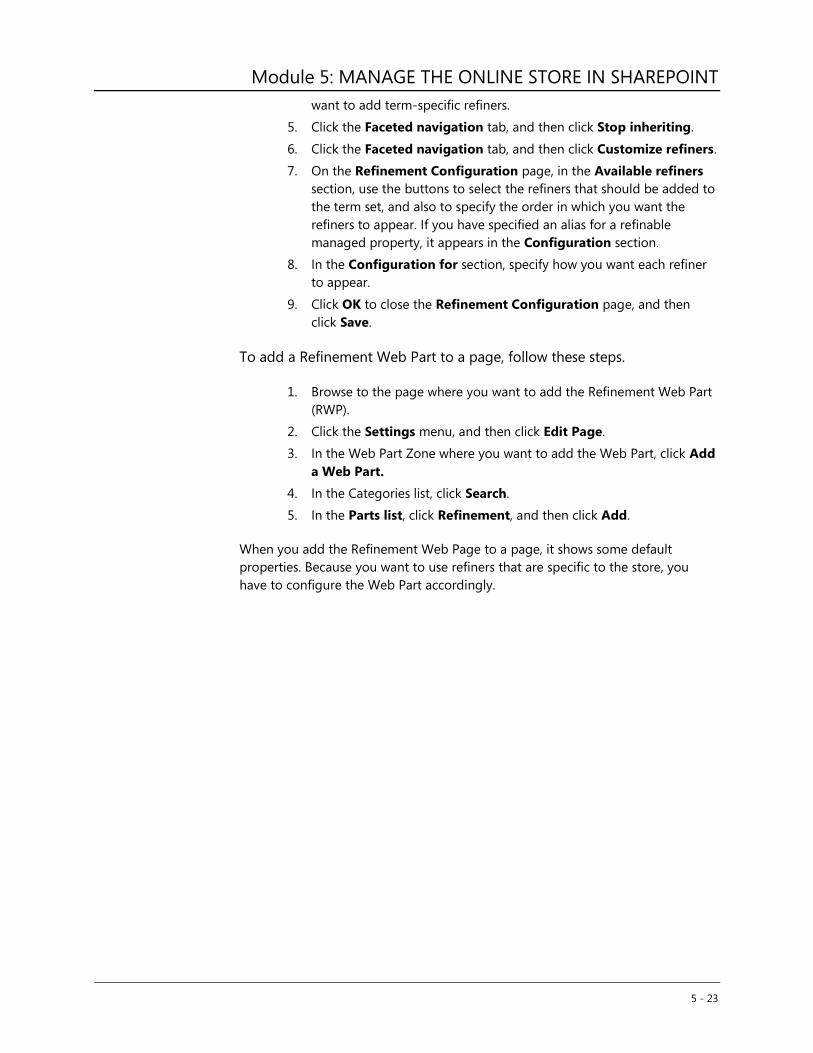
Module 5: MANAGE THE ONLINE STORE IN SHAREPOINT
5 - 23
want to add term-specific refiners.
5. Click the Faceted navigation tab, and then click Stop inheriting.
6. Click the Faceted navigation tab, and then click Customize refiners.
7. On the Refinement Configuration page, in the Available refiners
section, use the buttons to select the refiners that should be added to
the term set, and also to specify the order in which you want the
refiners to appear. If you have specified an alias for a refinable
managed property, it appears in the Configuration section.
8. In the Configuration for section, specify how you want each refiner
to appear.
9. Click OK to close the Refinement Configuration page, and then
click Save.
To add a Refinement Web Part to a page, follow these steps.
1. Browse to the page where you want to add the Refinement Web Part
(RWP).
2. Click the Settings menu, and then click Edit Page.
3. In the Web Part Zone where you want to add the Web Part, click Add
a Web Part.
4. In the Categories list, click Search.
5. In the Parts list, click Refinement, and then click Add.
When you add the Refinement Web Page to a page, it shows some default
properties. Because you want to use refiners that are specific to the store, you
have to configure the Web Part accordingly.

Retail in eCommerce Stores: Installation and Configuration for Microsoft
Dynamics AX 2012 R3
5 - 24
To configure refiners, follow these steps.
FIGURE 5.9: WEB PART TOOL PANE
1. In the Web Part (refiners), click the Web Part Menu, and
then click Edit Web Part.
2. In the Web Part tool pane, in the Refiners section,
select “Use the refinement configuration defined in the
Managed navigation term set.”
3. Click OK, and then Save the page.
How to Display Refiners
Generally, there are two ways refiner values can be displayed—as a list or grouped
in intervals. For refiners such as brand or zoom, you can usually show these
refiners as lists.
However, when you use numeric refiner values, we recommend that you display
the numeric refiner values as intervals. For example, consider all the refiner values
for a refiner such as Price.
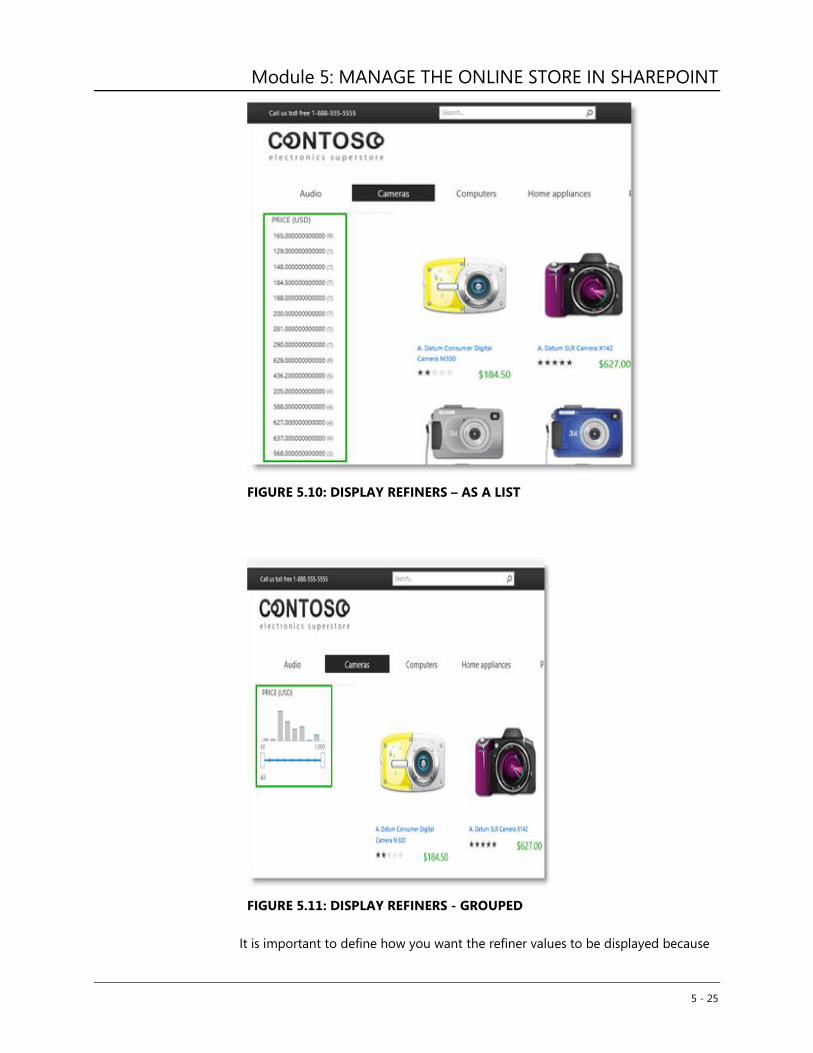
Module 5: MANAGE THE ONLINE STORE IN SHAREPOINT
5 - 25
FIGURE 5.10: DISPLAY REFINERS – AS A LIST
FIGURE 5.11: DISPLAY REFINERS - GROUPED
It is important to define how you want the refiner values to be displayed because
Retail in eCommerce Stores: Installation and Configuration for Microsoft
Dynamics AX 2012 R3
5 - 26
the different display options are connected to the property type.
To set ranges for refiner values, follow these steps.
1. Browse to the Refinement Configuration page, in the Selected
refiners section.
2. Click the refiner for which you want to set ranges.
3. In the Configuration for section for Intervals, select Custom, and
then type the ranges in the Thresholds box.
4. Click OK to close the Refinement Configuration page, and then
click Save.
Query Suggestion and Query Spelling
Lesson Objectives
The objectives are as follows:
Describe how query suggestion and query spelling works.
Configure query suggestion and spelling.
Query Suggestions
Query suggestions, also known as search suggestions, are suggested phrases for
which users have already searched. Query suggestions appear in a list in the
Search Box as the user types a query.
By default, the search system automatically creates suggestions for a query when
users have clicked the results for that query at least six times. This can be one
result, or any combination of results for that query. A query suggestion appears
only if it contains at least one of the words that are typed. The search system
generates query suggestions daily for each result source and for each site
collection. Therefore, the automatically generated query suggestions can be
different for each result source and for each site collection.
When you manually add query suggestions by using the steps in this procedure,
the query suggestions are added on the Search service application level.
Additionally, the query suggestions apply to all result sources and all site
collections.
Add Phrases that are Always or Never Used as Query Suggestions
To add phrases that are always or never suggested to a user as he or she performs
a query, you first have to create one or several text files that contain these
Module 5: MANAGE THE ONLINE STORE IN SHAREPOINT
5 - 27
phrases. Then, you must import the text files into the search system. You must add
each phrase as a separate line in the text file that you create.
Note: If you import a text file that has phrases for query suggestions, you
overwrite any existing query suggestions in the search system.
To add phrases that are always or never used as query suggestions, follow
these steps.
1. Verify that the user account that is performing this procedure is an
administrator for the Search service application.
2. Click the Query Suggestion Settings page.
3. On the home page of the SharePoint Central Administration website,
in the Application Management section, click Manage service
applications.
4. On the Manage Service Applications page, click the Search service
application.
5. On the Search Administration Page, in the Queries and Results
section, click Query Suggestions. The Query Suggestion Settings
page opens.
6. In the Language for suggestion phrases section, select the
language of the query suggestions that you always want to suggest.
7. In the Always suggest phrases section, click Import from text file.
8. Browse to the file that you want to import, and then click OK.
9. Click Save Settings.
To add phrases that are never used as query suggestions, follow these
steps.
1. Verify that the user account that is performing this procedure is an
administrator for the Search service application.
2. Open the Query Suggestion Settings page.
3. On the home page of the SharePoint Central Administration website,
in the Application Management section, click Manage service
applications.
4. On the Manage Service Applications page, click the Search service
application.
5. On the Search Administration Page, in the Queries and Results
section, click Query Suggestions. The Query Suggestion Settings
page opens.
6. In the Language for suggestion phrases section, select the
language of the query suggestions that you never want to suggest.
7. In the Never suggest phrases section, click Import from text file.
8. Browse to the file that you want to import and then click OK.
Retail in eCommerce Stores: Installation and Configuration for Microsoft
Dynamics AX 2012 R3
5 - 28
9. Click Save Settings.
To enable or disable query suggestions, follow these steps.
Note: By default, query suggestions are turned on.
1. Verify that the user account that is performing this procedure is an
administrator for the Search service application.
2. Open the Query Suggestion Settings page.
3. On the home page of the SharePoint Central Administration website,
in the Application Management section, click Manage service
applications.
4. On the Manage Service Applications page, click the Search service
application.
5. On the Search Administration page, in the Queries and Results
section, click Query Suggestions. The Query Suggestion Settings
page opens.
6. In the Search Suggestions section, do one of the following:
i. To enable query suggestions, select the Show search suggestions
check box.
ii. To disable query suggestions, clear the Show search suggestions
check box.
7. Click Save Settings.
Query Spelling
If a user enters a word in a search query that might be misspelled, the search
results page displays query spelling corrections. This is also known as "Did you
mean?" For example, if someone enters a query that contains the word "laptop,”
the query spelling correction would be "laptop".
These query spelling suggestions are based on the closest matches in the default
spelling dictionaries and the Query Spelling Inclusions list. For terms that you
enter in the Query Spelling Exclusions list, query spelling suggestions are never
displayed.
Although you can edit the Query Spelling Inclusions and the Query Spelling
Exclusions list, you cannot edit the default spelling dictionaries. However, this
action might require 10 minutes for any changes to the Query Spelling Exclusions
or the Query Spelling Inclusions list to take effect.
The query spelling exclusions and inclusions lists are managed in the Term Store.
Module 5: MANAGE THE ONLINE STORE IN SHAREPOINT
5 - 29
To access the Term Store Management Tool, follow these steps.
1. Verify that the user account that is performing this procedure is an
administrator for the Search service application.
2. On the home page of the SharePoint Central Administration website,
in the Application Management section, click Manage service
applications.
3. On the Manage Service Applications page, click the Search service
application.
4. On the Search Administration Page, in the Queries and Results
section, click Search Dictionaries. The Term Store Management Tool
opens.
To exclude words from query spelling corrections, add the terms to the Query
Spelling Exclusions list.
To exclude terms from query spelling corrections, follow these steps.
Note: Create a separate term for each query spelling correction exclusion. Do
not create subterms for terms in the Query Spelling Exclusions list. Term hierarchies
are ignored in this context.
1. On the Site Settings: Term Store Management Tool page, click the
arrow to expand the Search Dictionaries menu.
2. Click Query Spelling Exclusions, click the arrow, and then click
Create Term.
3. Type the word that you want to exclude in the box that appears.
4. Click anywhere on the page to add the term to the Query Spelling
Exclusions list.
To include words in query spelling corrections, add terms to the Query Spelling
Inclusions list.
To include terms in query spelling corrections, follow these steps.
Note: Create a separate term for each query spelling correction inclusion. Do
not create subterms for terms in the Query Spelling Inclusions list. Term hierarchies
will be ignored in this context.
1. On the Site Settings: Term Store Management Tool page, click the
arrow to expand the Search Dictionaries menu.
2. Click Query Spelling Inclusions, click the arrow, and then click
Create Term.
3. Type the word that you want to include in the box that appears.
Retail in eCommerce Stores: Installation and Configuration for Microsoft
Dynamics AX 2012 R3
5 - 30
4. Click anywhere on the page to add the term to the Query Spelling
Inclusions list.
You can edit the names of terms in the Query Spelling Exclusions and Query
Spelling Inclusions lists.
To edit a term, follow these steps.
1. On the Site Settings: Term Store Management Tool page, click the
arrow to expand the Search Dictionaries menu.
2. Depending on the list in which the term is located, click Query
Spelling Exclusions or Query Spelling Inclusions.
3. Double-click the term that you want to edit.
4. Type the new name for the term.
5. Click anywhere on the page to save the edited term.
Usage Analytics and Recommendations
Usage analytics in SharePoint Server 2013 automatically tracks how users view
different items. Every time that a user views an item, the system issues a usage
event and adds the event to the total and recent view counts for that item.
Usage events that are preconfigured include the following:
Views – Number of views for a single item, page, or
document.
Recommendations Displayed – Number of times a
single item, page, or document appeared as a
recommendation.
Recommendation Clicks – Number of times a single
item, page, or document is clicked when it is displayed as
a recommendation.
The usage analytics information can help you configure recommendations on the
site. The recommendations that are shown are based on how users previously
interacted with a site, tracked by the usage events.
You can use the data that is generated by usage events in the following ways:
Show recommendations or popular items on your
site – By using recommendations, you can guide users to
other content that might be relevant to the users, based
on how the users previously interacted with the site. You
can add recommendations to a page by adding one or
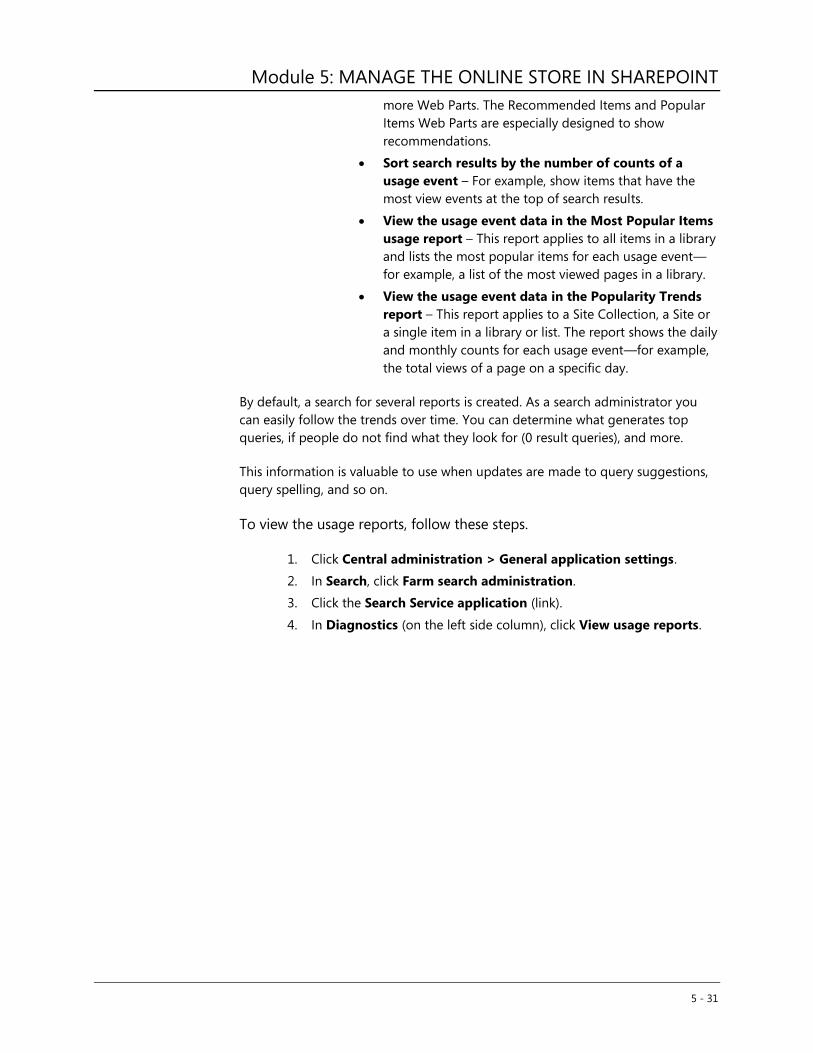
Module 5: MANAGE THE ONLINE STORE IN SHAREPOINT
5 - 31
more Web Parts. The Recommended Items and Popular
Items Web Parts are especially designed to show
recommendations.
Sort search results by the number of counts of a
usage event – For example, show items that have the
most view events at the top of search results.
View the usage event data in the Most Popular Items
usage report – This report applies to all items in a library
and lists the most popular items for each usage event—
for example, a list of the most viewed pages in a library.
View the usage event data in the Popularity Trends
report – This report applies to a Site Collection, a Site or
a single item in a library or list. The report shows the daily
and monthly counts for each usage event—for example,
the total views of a page on a specific day.
By default, a search for several reports is created. As a search administrator you
can easily follow the trends over time. You can determine what generates top
queries, if people do not find what they look for (0 result queries), and more.
This information is valuable to use when updates are made to query suggestions,
query spelling, and so on.
To view the usage reports, follow these steps.
1. Click Central administration > General application settings.
2. In Search, click Farm search administration.
3. Click the Search Service application (link).
4. In Diagnostics (on the left side column), click View usage reports.
Retail in eCommerce Stores: Installation and Configuration for Microsoft
Dynamics AX 2012 R3
5 - 32
FIGURE 5.12: USAGE REPORTS
Reference Links: For more information about analytics, refer to Overview of
analytics processing in SharePoint Server 2013.
http://technet.microsoft.com/en-us/library/jj219554
Module 5: MANAGE THE ONLINE STORE IN SHAREPOINT
5 - 33
Module Review
This course highlighted the features that are provided by the Search in SharePoint
2013.
Test Your Knowledge
Test your knowledge with the following questions.
1. Which component determines the managed properties and the values that
the Content Search Web Part displays?
( ) The Content Search Web Part
( ) The Control display template
( ) The Item display template
Retail in eCommerce Stores: Installation and Configuration for Microsoft
Dynamics AX 2012 R3
5 - 34
Lab: Online Storefront SharePoint Administration
Scenario
The starter online store includes the patterns and best practices that are required
to support production-ready deployments. This includes powerful, search-driven,
adaptive experiences that are offered by SharePoint Server 2013.
Objectives
The goal for this lab is to familiarize you with the new concepts for Web Content
Management (WCM) and Search in SharePoint 2013.
After you complete this lab, you will be able to perform the following:
Explain the new Content Search Web Part.
Explain the basics of page templates.
Define the Content Search Web Part.
Describe how promotions can be used and how
promotions are started.
Lab Setup
Before you begin, consider the following.
This lab uses the Microsoft Dynamics AX 2012 R3 Demo Virtual
Machine (VM) that is available on Partner Source at https://mbs.microsoft.com/partnersource/northamerica/sales-
marketing/demo-tools/virtual-
machines/AX2012DemoToolsMaterials.
The VM on Partner Source includes the following documentation.
Review the documentation to set up the VM before you complete
the lab.
Document Link
Release Notes https://mbs.microsoft.com/files/customer/AX/Downloads/S
ervicepacks/ReleaseNotesAX2012R3SolutionDemoPackageV
10.pdf
Technical Guide https://mbs.microsoft.com/files/customer/AX/Downloads/S
ervicepacks/TechnicalGuideAX2012R3SolutionDemoPackag
eV10.pdf
Module 5: MANAGE THE ONLINE STORE IN SHAREPOINT
5 - 35
Retail Point of Sale User
List
https://mbs2.microsoft.com/fileexchange/?fileID=cf70c1d3-
b430-4f1d-8afe-98b8389df94a
Sample Data https://mbs.microsoft.com/files/customer/AX/Downloads/S
ervicepacks/AX2012R3SolutionDemoPackageOverview.pdf
https://mbs.microsoft.com/files/customer/AX/Downloads/S
ervicepacks/DemoDataElementsMicrosoftDynamicsAX.pdf
How to Set up Virtual
Networking
https://mbs2.microsoft.com/fileexchange/?fileID=f817c2ce-
f2a3-494c-9993-65571deafef1
In addition to the documents that are listed here, you must also use
the attached documents for any issues that are created by the
outage of SharePoint 2013 Managed Metadata Service.
Workaround for
eCommerce issue related to outage of Managed Metadata Service (SharePoint).docx
The default company that you must use for all labs is USRT.
To connect to the lab environment, you must log on to the SharePoint (SP) Virtual
Machine (VM) as the Administrator with the following credentials:
Username: CONTOSO\Administrator
Password: pass@word1
To complete this lab, you must change Web.config and the Master Page to edit
the Content Search Web Part (CSWP).
To change the Web.config, follow these steps.
1. Search for IIS Manager by using Windows key + Q to start to search
the application in the modern user interface (UI). Type IIS and then
the application shortcut will be displayed.
2. Click to open IIS Manager.
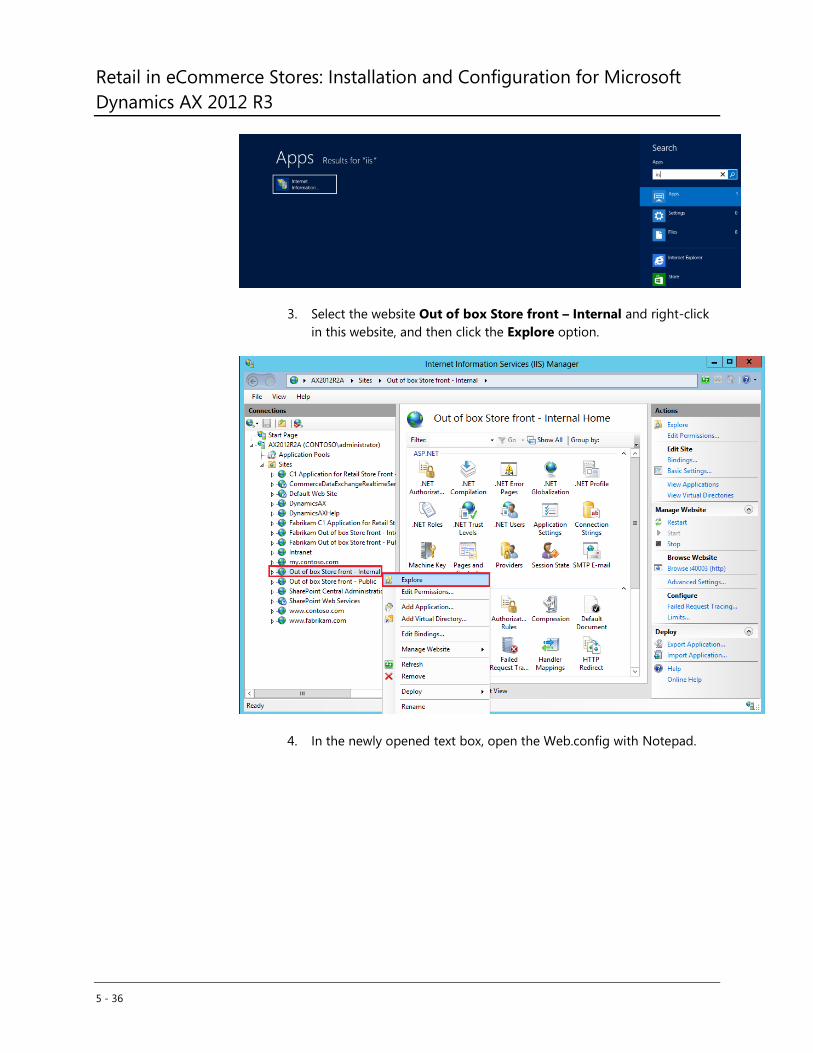
Retail in eCommerce Stores: Installation and Configuration for Microsoft
Dynamics AX 2012 R3
5 - 36
3. Select the website Out of box Store front – Internal and right-click
in this website, and then click the Explore option.
4. In the newly opened text box, open the Web.config with Notepad.
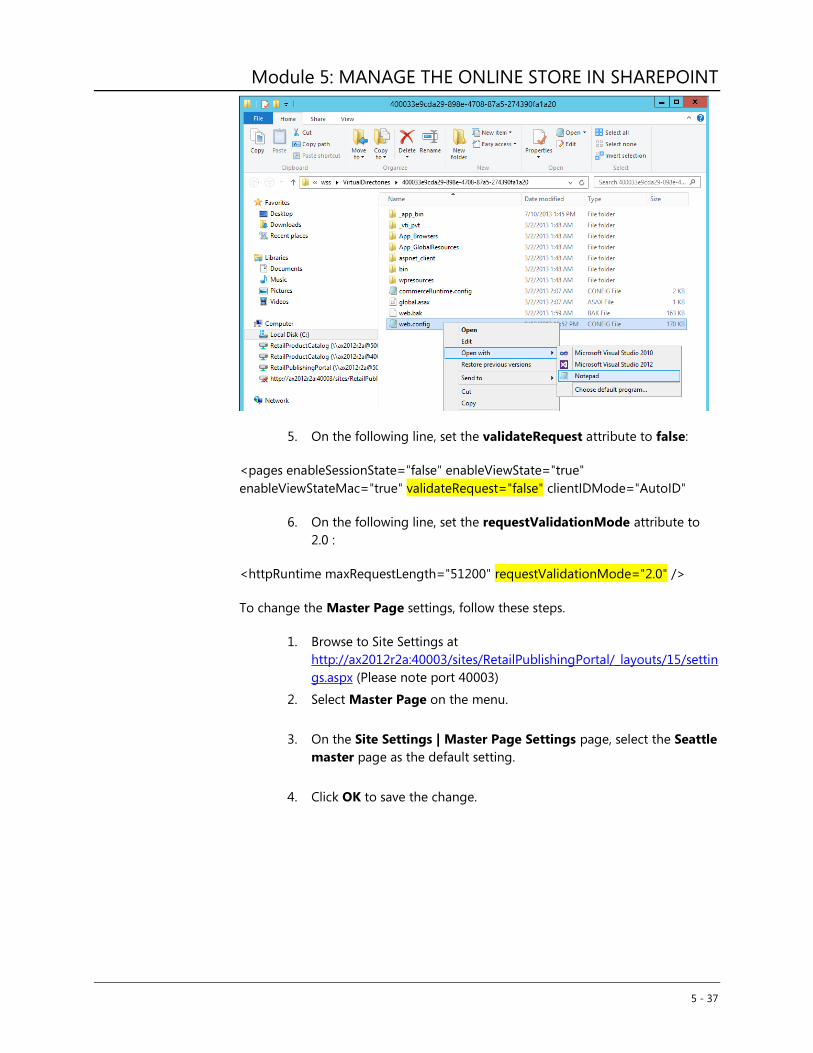
Module 5: MANAGE THE ONLINE STORE IN SHAREPOINT
5 - 37
5. On the following line, set the validateRequest attribute to false:
<pages enableSessionState="false" enableViewState="true"
enableViewStateMac="true" validateRequest="false" clientIDMode="AutoID"
6. On the following line, set the requestValidationMode attribute to
2.0 :
<httpRuntime maxRequestLength="51200" requestValidationMode="2.0" />
To change the Master Page settings, follow these steps.
1. Browse to Site Settings at
http://ax2012r2a:40003/sites/RetailPublishingPortal/_layouts/15/settin
gs.aspx (Please note port 40003)
2. Select Master Page on the menu.
3. On the Site Settings | Master Page Settings page, select the Seattle
master page as the default setting.
4. Click OK to save the change.
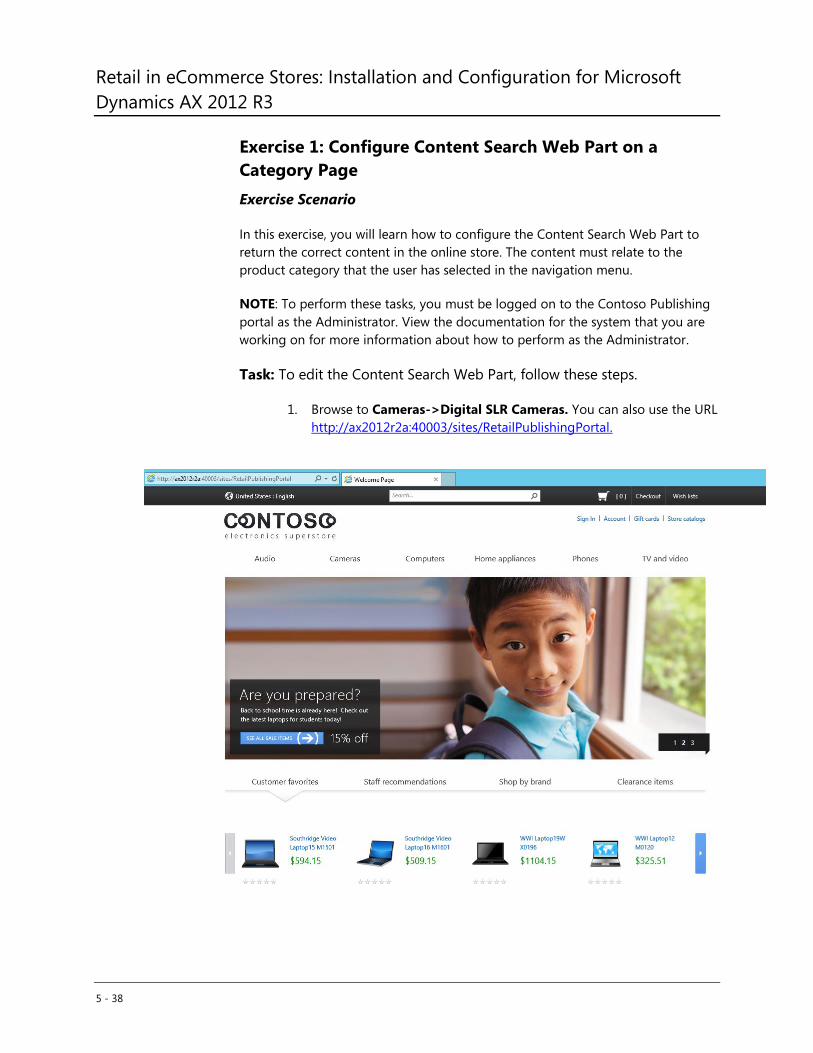
Retail in eCommerce Stores: Installation and Configuration for Microsoft
Dynamics AX 2012 R3
5 - 38
Exercise 1: Configure Content Search Web Part on a
Category Page
Exercise Scenario
In this exercise, you will learn how to configure the Content Search Web Part to
return the correct content in the online store. The content must relate to the
product category that the user has selected in the navigation menu.
NOTE: To perform these tasks, you must be logged on to the Contoso Publishing
portal as the Administrator. View the documentation for the system that you are
working on for more information about how to perform as the Administrator.
Task: To edit the Content Search Web Part, follow these steps.
1. Browse to Cameras->Digital SLR Cameras. You can also use the URL
http://ax2012r2a:40003/sites/RetailPublishingPortal.
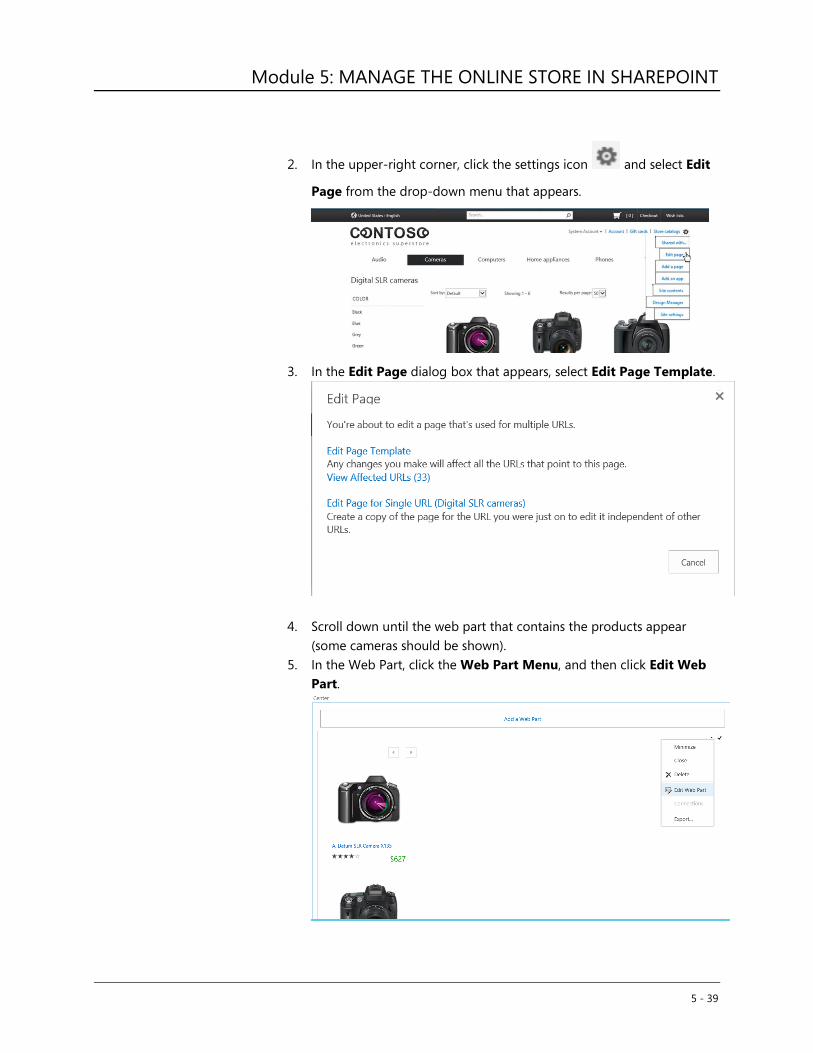
Module 5: MANAGE THE ONLINE STORE IN SHAREPOINT
5 - 39
2. In the upper-right corner, click the settings icon and select Edit
Page from the drop-down menu that appears.
3. In the Edit Page dialog box that appears, select Edit Page Template.
4. Scroll down until the web part that contains the products appear
(some cameras should be shown).
5. In the Web Part, click the Web Part Menu, and then click Edit Web
Part.
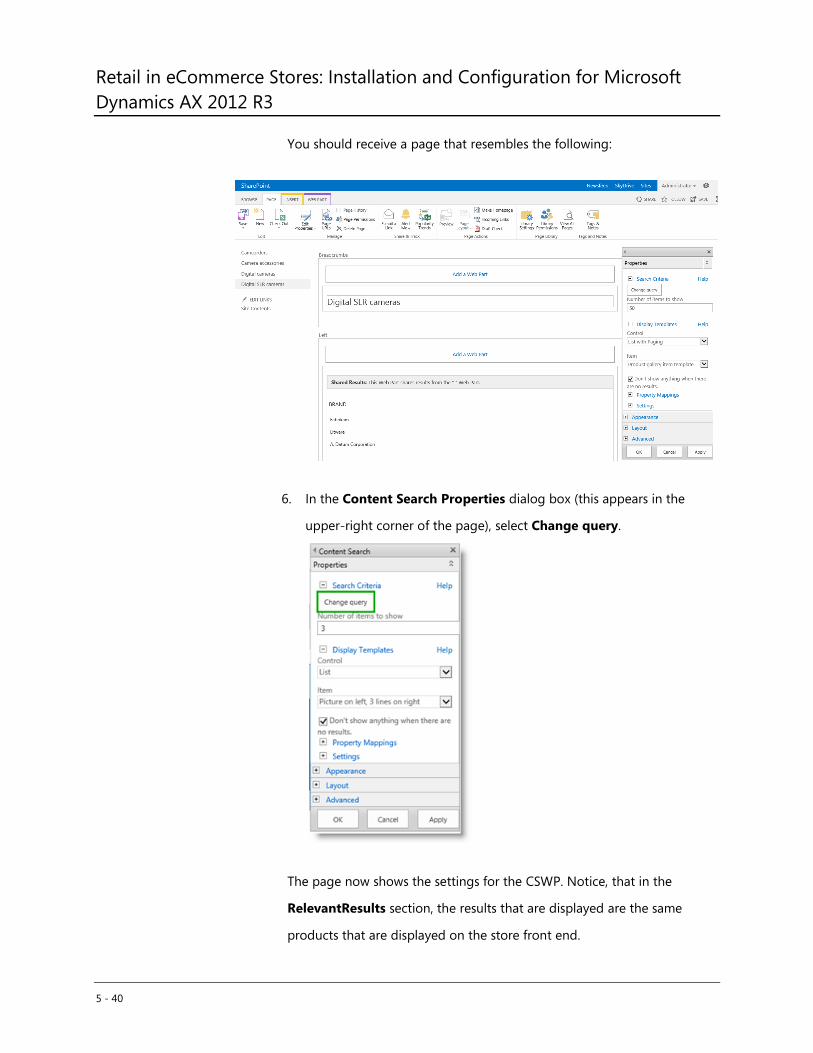
Retail in eCommerce Stores: Installation and Configuration for Microsoft
Dynamics AX 2012 R3
5 - 40
You should receive a page that resembles the following:
6. In the Content Search Properties dialog box (this appears in the
upper-right corner of the page), select Change query.
The page now shows the settings for the CSWP. Notice, that in the
RelevantResults section, the results that are displayed are the same
products that are displayed on the store front end.

Module 5: MANAGE THE ONLINE STORE IN SHAREPOINT
5 - 41
In the Select a query drop-down list box, the Retail Listings result source
is preselected. This is a predefined result source that lists all products in
the product catalog.
In the Restrict by tag section, if you select any radio buttons, the results
change according to the radio buttons that you have selected.
7. Select Don’t restrict by any tag. The result preview update should
be visible.
8. In the Add additional filters, type southridge and then click
outside the text box to force an update. The result preview should
now contain only products that include southridge.
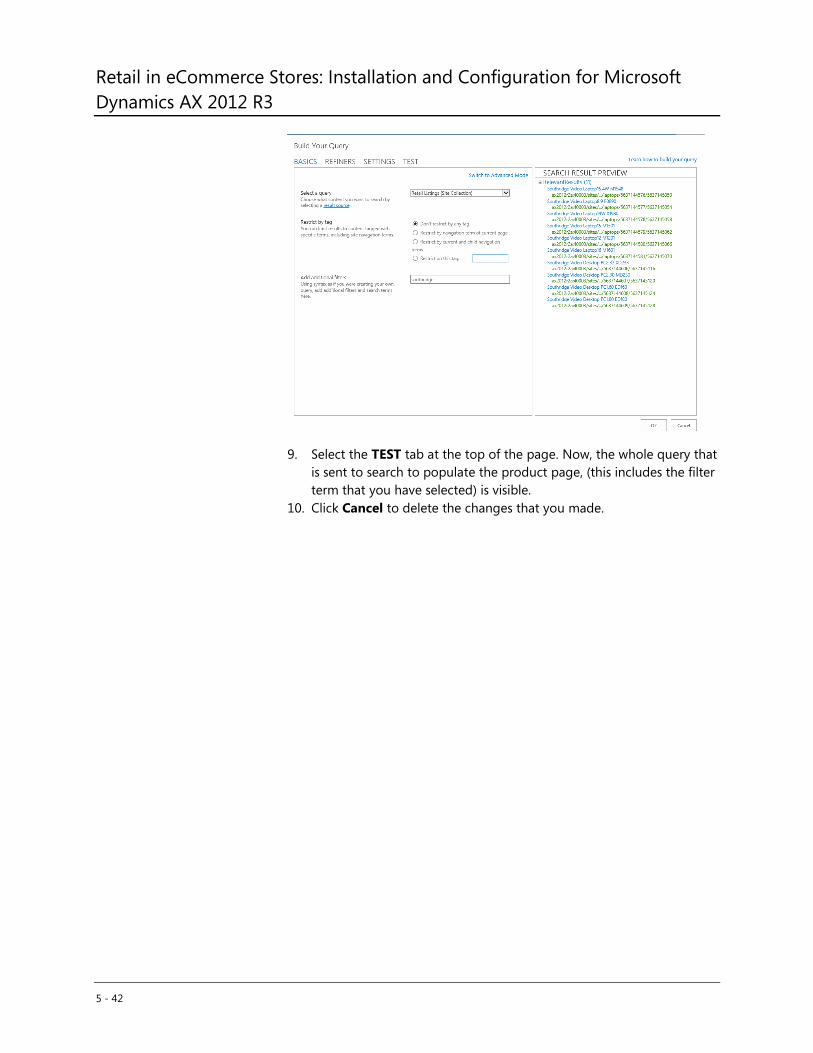
Retail in eCommerce Stores: Installation and Configuration for Microsoft
Dynamics AX 2012 R3
5 - 42
9. Select the TEST tab at the top of the page. Now, the whole query that
is sent to search to populate the product page, (this includes the filter
term that you have selected) is visible.
10. Click Cancel to delete the changes that you made.
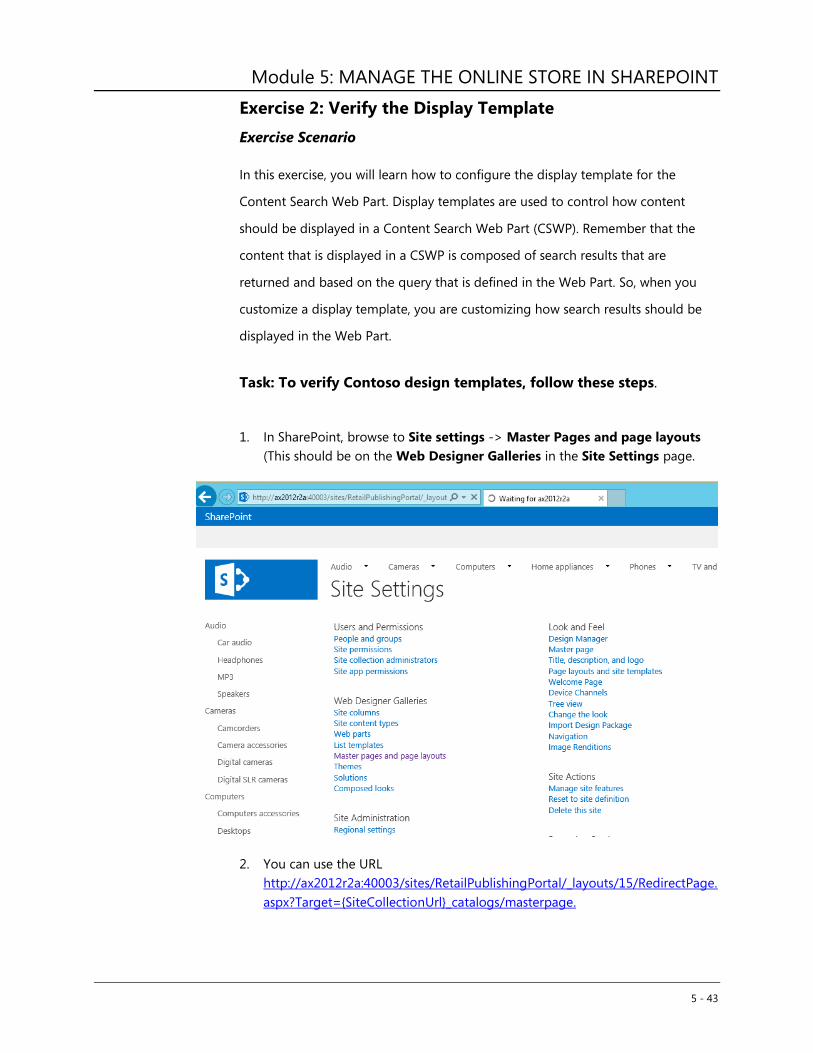
Module 5: MANAGE THE ONLINE STORE IN SHAREPOINT
5 - 43
Exercise 2: Verify the Display Template
Exercise Scenario
In this exercise, you will learn how to configure the display template for the
Content Search Web Part. Display templates are used to control how content
should be displayed in a Content Search Web Part (CSWP). Remember that the
content that is displayed in a CSWP is composed of search results that are
returned and based on the query that is defined in the Web Part. So, when you
customize a display template, you are customizing how search results should be
displayed in the Web Part.
Task: To verify Contoso design templates, follow these steps.
1. In SharePoint, browse to Site settings -> Master Pages and page layouts
(This should be on the Web Designer Galleries in the Site Settings page.
2. You can use the URL
http://ax2012r2a:40003/sites/RetailPublishingPortal/_layouts/15/RedirectPage.
aspx?Target={SiteCollectionUrl}_catalogs/masterpage.
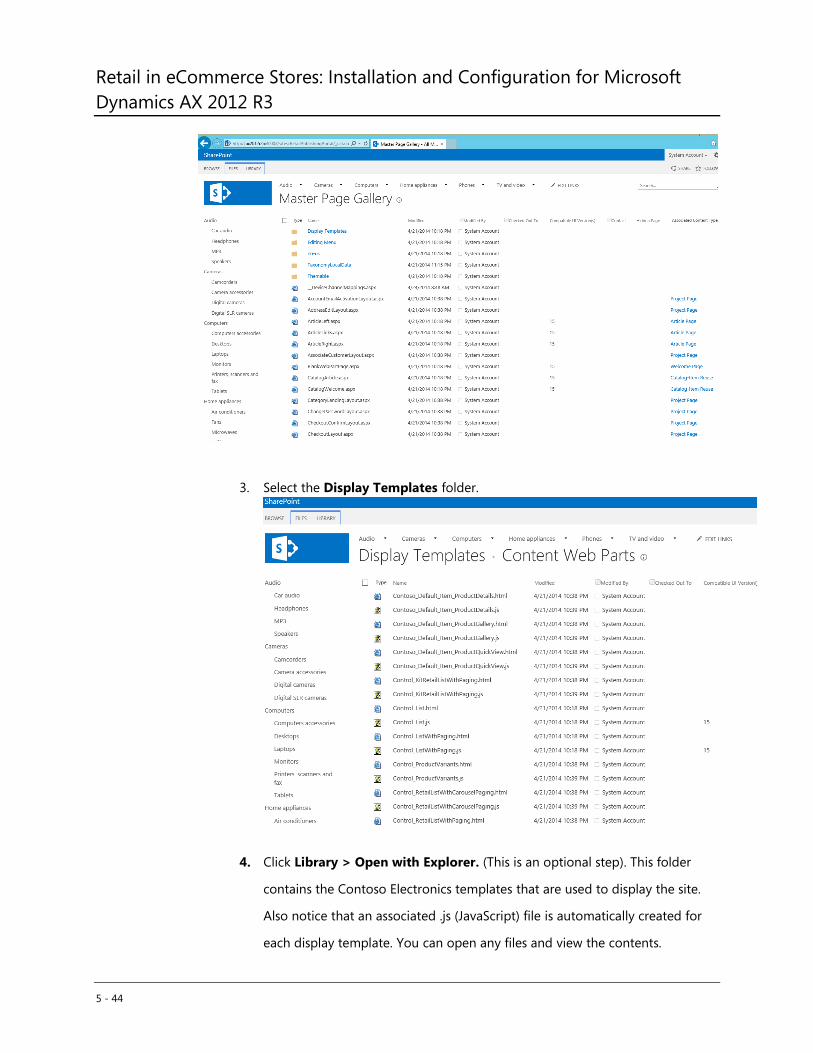
Retail in eCommerce Stores: Installation and Configuration for Microsoft
Dynamics AX 2012 R3
5 - 44
3. Select the Display Templates folder.
4. Click Library > Open with Explorer. (This is an optional step). This folder
contains the Contoso Electronics templates that are used to display the site.
Also notice that an associated .js (JavaScript) file is automatically created for
each display template. You can open any files and view the contents.
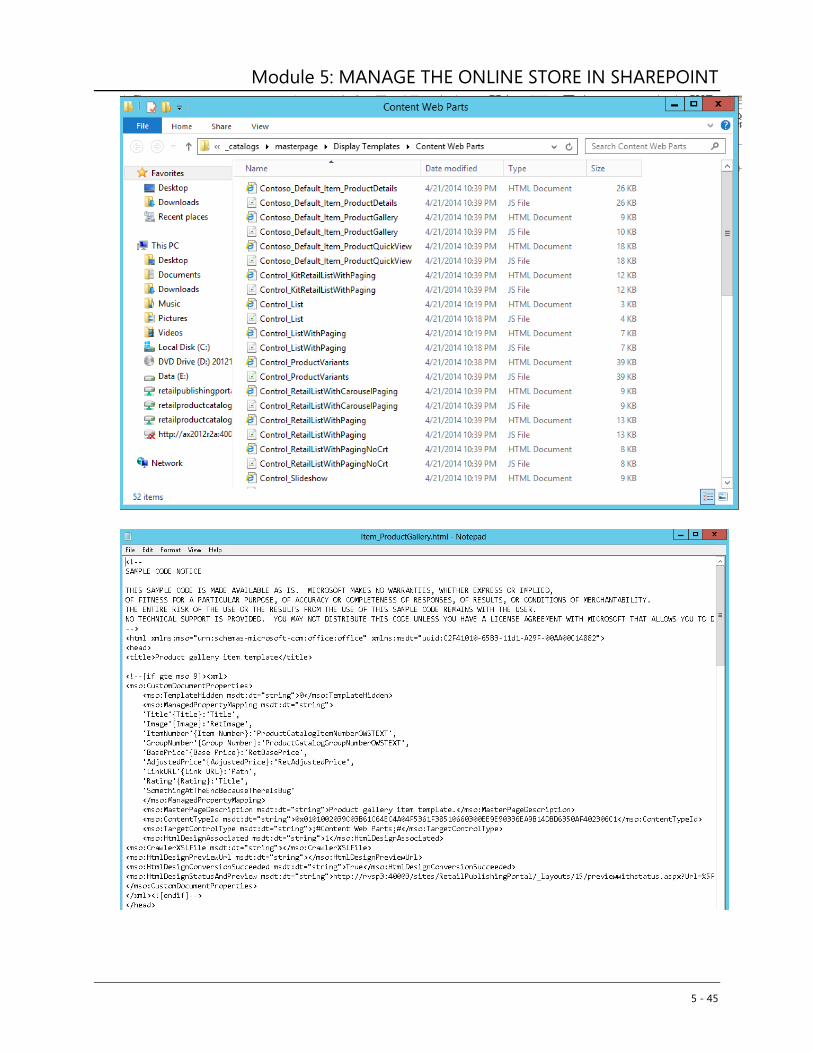
Module 5: MANAGE THE ONLINE STORE IN SHAREPOINT
5 - 45
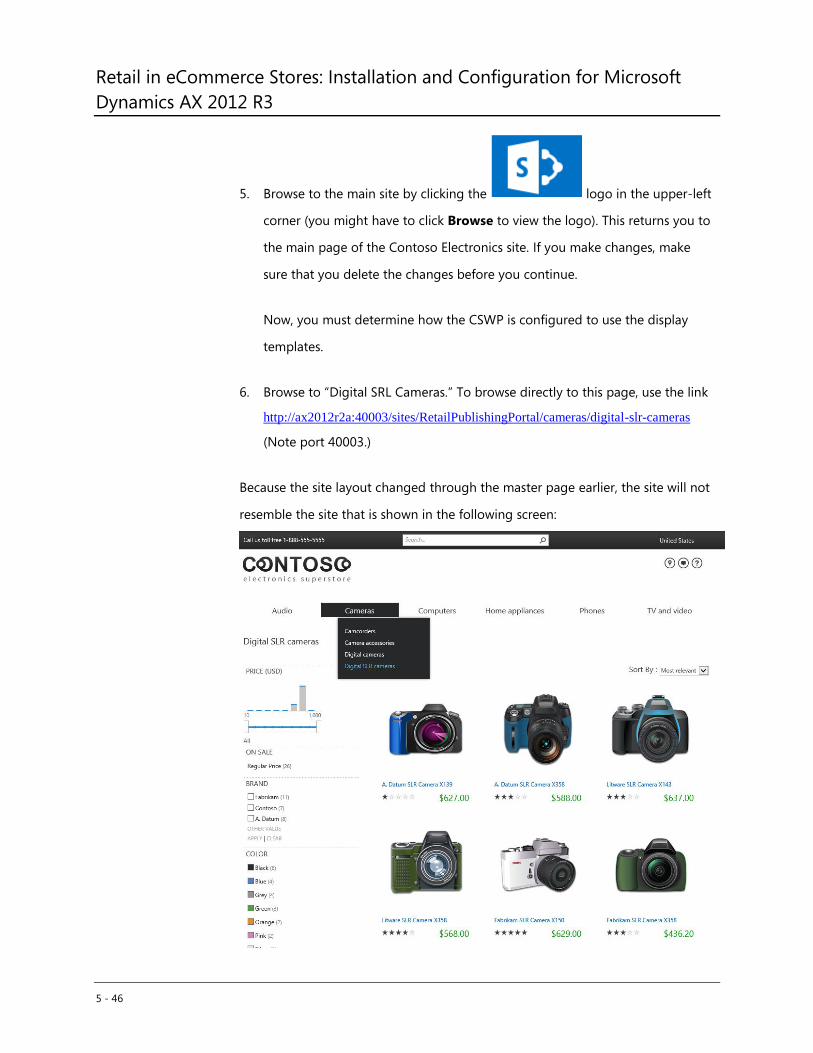
Retail in eCommerce Stores: Installation and Configuration for Microsoft
Dynamics AX 2012 R3
5 - 46
5. Browse to the main site by clicking the logo in the upper-left
corner (you might have to click Browse to view the logo). This returns you to
the main page of the Contoso Electronics site. If you make changes, make
sure that you delete the changes before you continue.
Now, you must determine how the CSWP is configured to use the display
templates.
6. Browse to “Digital SRL Cameras.” To browse directly to this page, use the link
http://ax2012r2a:40003/sites/RetailPublishingPortal/cameras/digital-slr-cameras
(Note port 40003.)
Because the site layout changed through the master page earlier, the site will not
resemble the site that is shown in the following screen:

Module 5: MANAGE THE ONLINE STORE IN SHAREPOINT
5 - 47
Instead, the site resembles the site that is shown in the following screen:
7. Click Settings > Edit Page. The Edit Page screen appears with a message
that states “You’re about to edit a page that’s used for multiple URLS.”
8. To view the pages that use the same template page, click the “View Affected
URLs” link. The Page URLs window opens. Now, all the category pages that
use the same template page are visible. This functionality lets you make a
change in only one place. However, the change is shown in each product
category

Retail in eCommerce Stores: Installation and Configuration for Microsoft
Dynamics AX 2012 R3
5 - 48
9. Close the Page URLs window to continue.
10. Return to the Edit Page screen, and then click “Edit Page Template”.
11. In the Web Part, click the Web Part Menu > Edit Web Part. Now, you have
to verify the item display template.
12. On the Item menu, verify that the Product Gallery Item Template is
selected.
13. Click OK, and then save the page
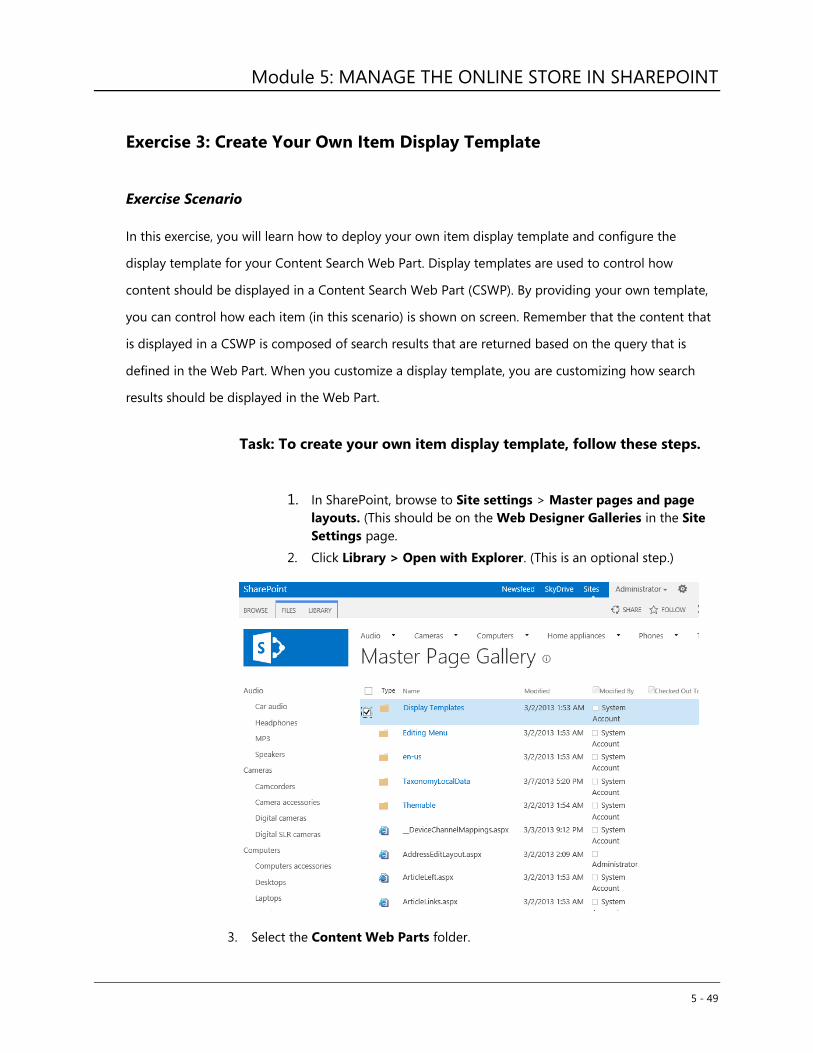
Module 5: MANAGE THE ONLINE STORE IN SHAREPOINT
5 - 49
Exercise 3: Create Your Own Item Display Template
Exercise Scenario
In this exercise, you will learn how to deploy your own item display template and configure the
display template for your Content Search Web Part. Display templates are used to control how
content should be displayed in a Content Search Web Part (CSWP). By providing your own template,
you can control how each item (in this scenario) is shown on screen. Remember that the content that
is displayed in a CSWP is composed of search results that are returned based on the query that is
defined in the Web Part. When you customize a display template, you are customizing how search
results should be displayed in the Web Part.
Task: To create your own item display template, follow these steps.
1. In SharePoint, browse to Site settings > Master pages and page
layouts. (This should be on the Web Designer Galleries in the Site
Settings page.
2. Click Library > Open with Explorer. (This is an optional step.)
3. Select the Content Web Parts folder.
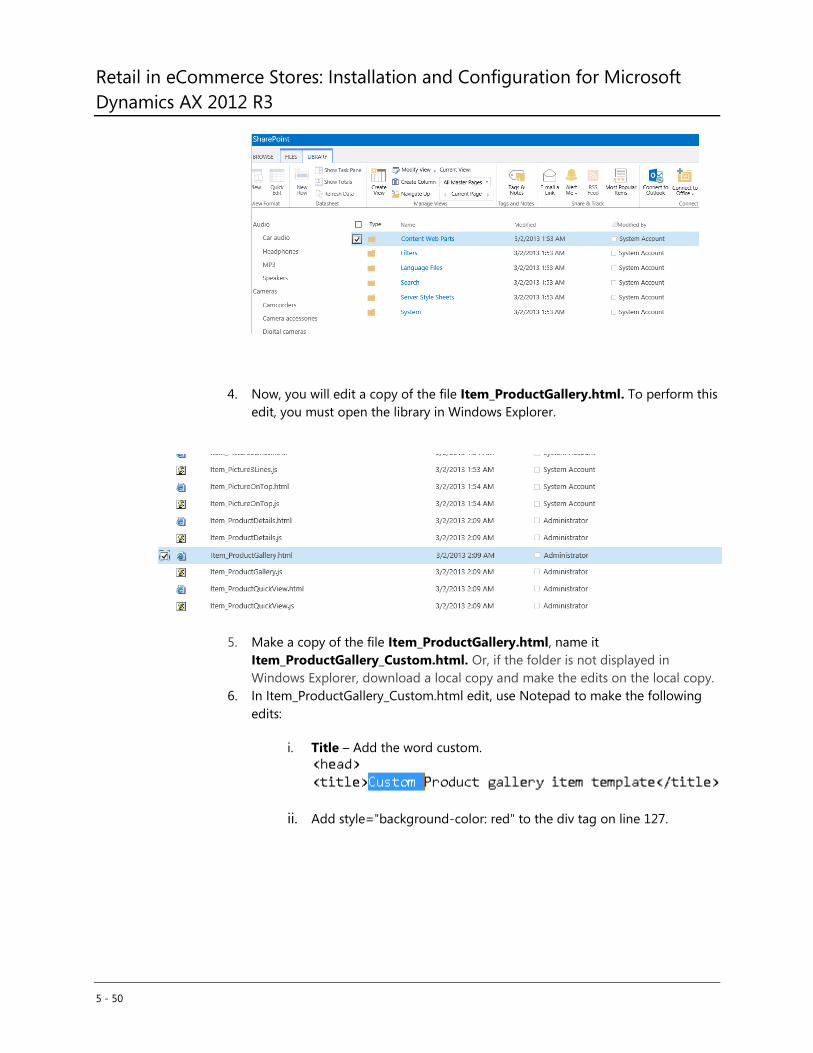
Retail in eCommerce Stores: Installation and Configuration for Microsoft
Dynamics AX 2012 R3
5 - 50
4. Now, you will edit a copy of the file Item_ProductGallery.html. To perform this
edit, you must open the library in Windows Explorer.
5. Make a copy of the file Item_ProductGallery.html, name it
Item_ProductGallery_Custom.html. Or, if the folder is not displayed in
Windows Explorer, download a local copy and make the edits on the local copy.
6. In Item_ProductGallery_Custom.html edit, use Notepad to make the following
edits:
i. Title – Add the word custom.
ii. Add style="background-color: red" to the div tag on line 127.

Module 5: MANAGE THE ONLINE STORE IN SHAREPOINT
5 - 51
iii. Save the file and exit Notepad. Note: If you have not used the
Windows Explorer mode, you must upload the file. For more
information about how to upload a file, view the documentation that
is available on TechNet. .
7. After the file is saved, return to SharePoint, and browse to a product page, by
using the URL
http://ax2012r2a:40003/sites/RetailPublishingPortal/cameras/digital-slr-
cameras.
8. Select Edit page.
9. Scroll down the page to the Product Gallery Web part and select Edit Page in
the right-side corner of the web part.

Retail in eCommerce Stores: Installation and Configuration for Microsoft
Dynamics AX 2012 R3
5 - 52
10. Scroll back up the page to view the Properties dialog box. In the Display
Templates section on the Item, the Custom Product gallery item template
should be visible.
11. Select the template.
12. Select the Display Templates folder.
13. Scroll down to view the product listing change according to the selected
template.
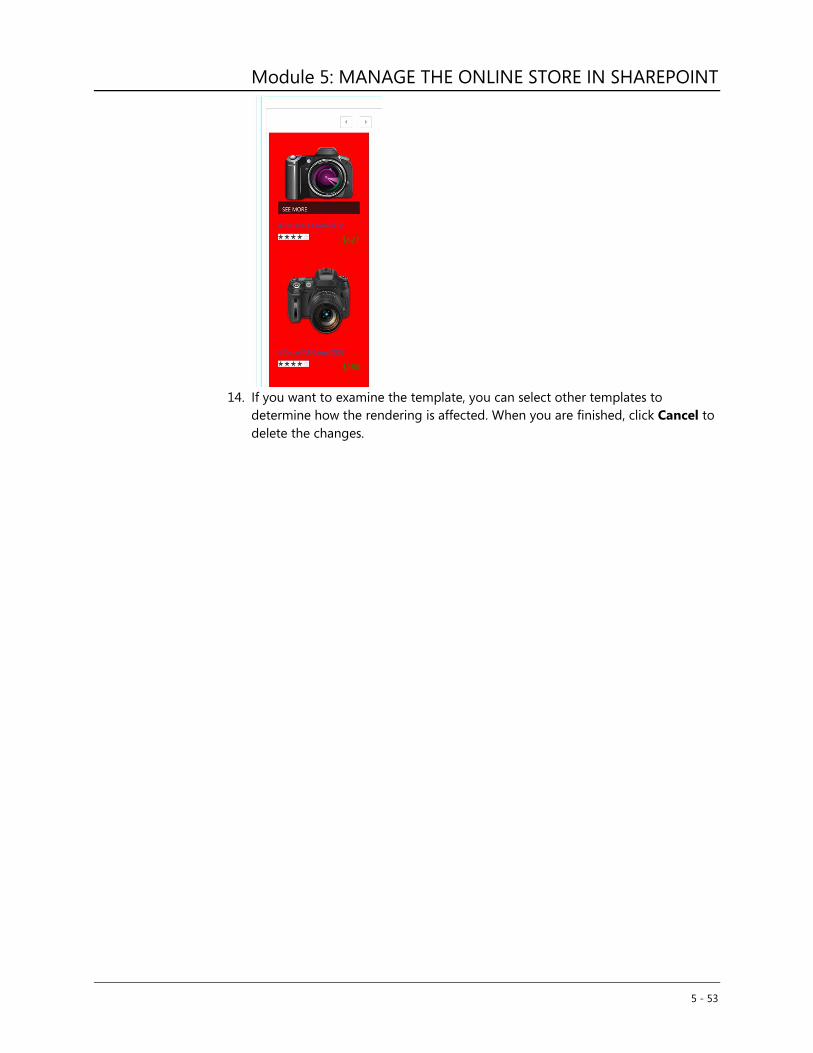
Module 5: MANAGE THE ONLINE STORE IN SHAREPOINT
5 - 53
14. If you want to examine the template, you can select other templates to
determine how the rendering is affected. When you are finished, click Cancel to
delete the changes.
Retail in eCommerce Stores: Installation and Configuration for Microsoft
Dynamics AX 2012 R3
5 - 54
Test Your Knowledge Solutions
Module Review and Takeaways
1. Which component determines the managed properties and the values that
the Content Search Web Part displays?
( ) The Content Search Web Part
( ) The Control display template
(√) The Item display template
6 - 1
MODULE 6: E-COMMERCE DEPLOYMENT TOPOLOGY
Module Overview
The e-commerce deployment includes the Microsoft Dynamics AX 2012 for Retail
components. The Retail components are located in the headquarters office and on
the SharePoint Server 2013 farm that is used for the online store.
You must carefully plan the system topology before you deploy the e-commerce
solution. The development, testing, and production environments should be
improved for throughput, response time, scalability, and availability.
This module discusses the considerations that are used to plan the deployment
topology for the e-commerce solution. The module focuses on the online store
topologies, server roles, and the increased availability and performance
considerations.
This module includes the following lessons:
E-commerce deployment
Online store topology
Objectives
The objectives are as follows:
Explain the e-commerce deployment topology considerations.
Review reference and examples that are used to plan the topology for
an online store implementation.
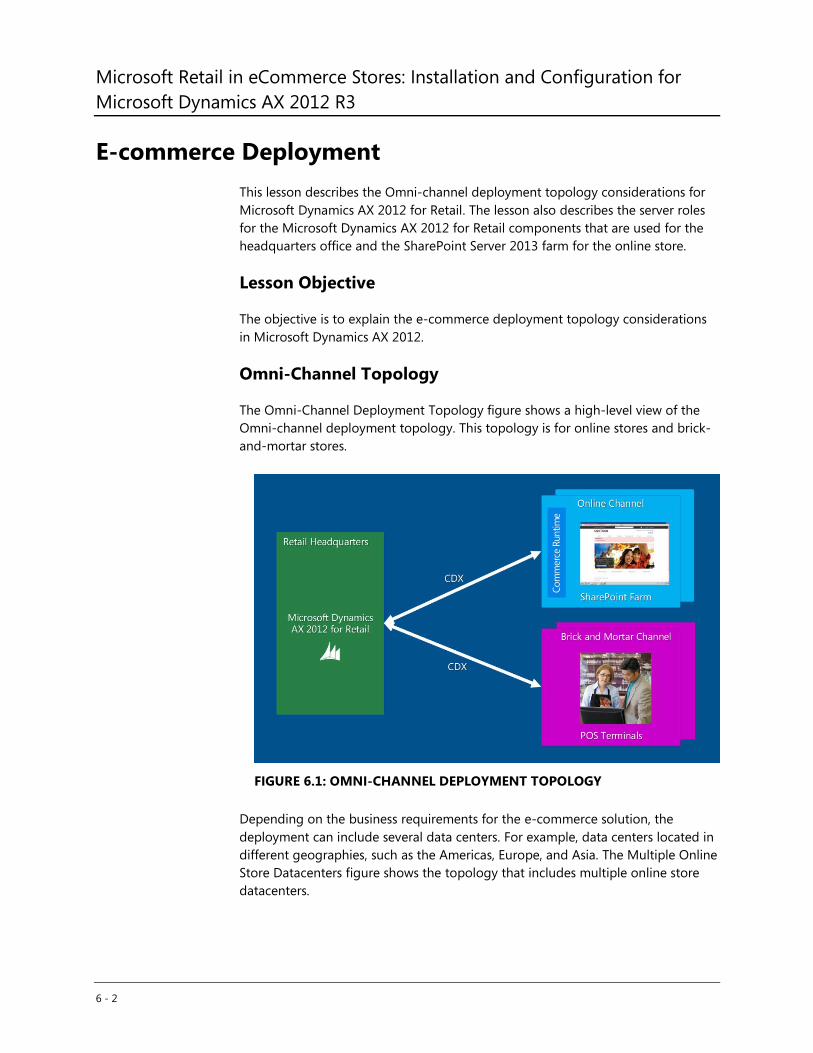
Microsoft Retail in eCommerce Stores: Installation and Configuration for
Microsoft Dynamics AX 2012 R3
6 - 2
E-commerce Deployment
This lesson describes the Omni-channel deployment topology considerations for
Microsoft Dynamics AX 2012 for Retail. The lesson also describes the server roles
for the Microsoft Dynamics AX 2012 for Retail components that are used for the
headquarters office and the SharePoint Server 2013 farm for the online store.
Lesson Objective
The objective is to explain the e-commerce deployment topology considerations
in Microsoft Dynamics AX 2012.
Omni-Channel Topology
The Omni-Channel Deployment Topology figure shows a high-level view of the
Omni-channel deployment topology. This topology is for online stores and brick-
and-mortar stores.
FIGURE 6.1: OMNI-CHANNEL DEPLOYMENT TOPOLOGY
Depending on the business requirements for the e-commerce solution, the
deployment can include several data centers. For example, data centers located in
different geographies, such as the Americas, Europe, and Asia. The Multiple Online
Store Datacenters figure shows the topology that includes multiple online store
datacenters.
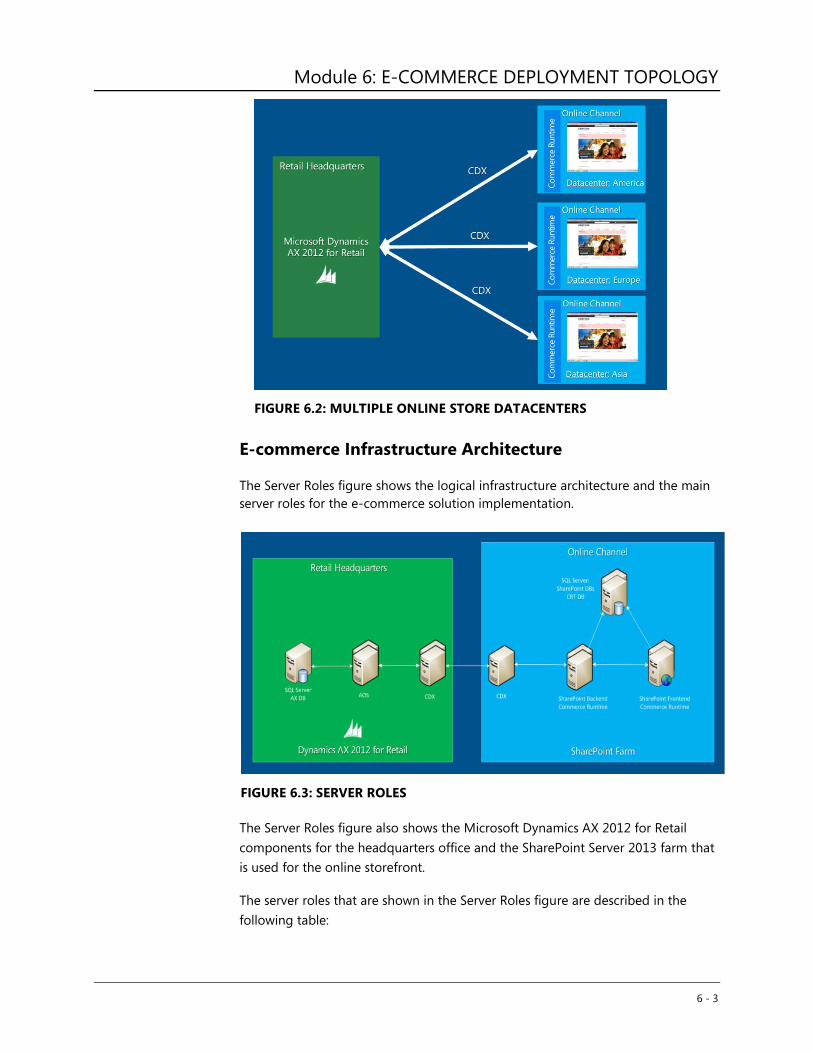
Module 6: E-COMMERCE DEPLOYMENT TOPOLOGY
6 - 3
FIGURE 6.2: MULTIPLE ONLINE STORE DATACENTERS
E-commerce Infrastructure Architecture
The Server Roles figure shows the logical infrastructure architecture and the main
server roles for the e-commerce solution implementation.
FIGURE 6.3: SERVER ROLES
The Server Roles figure also shows the Microsoft Dynamics AX 2012 for Retail
components for the headquarters office and the SharePoint Server 2013 farm that
is used for the online storefront.
The server roles that are shown in the Server Roles figure are described in the
following table:
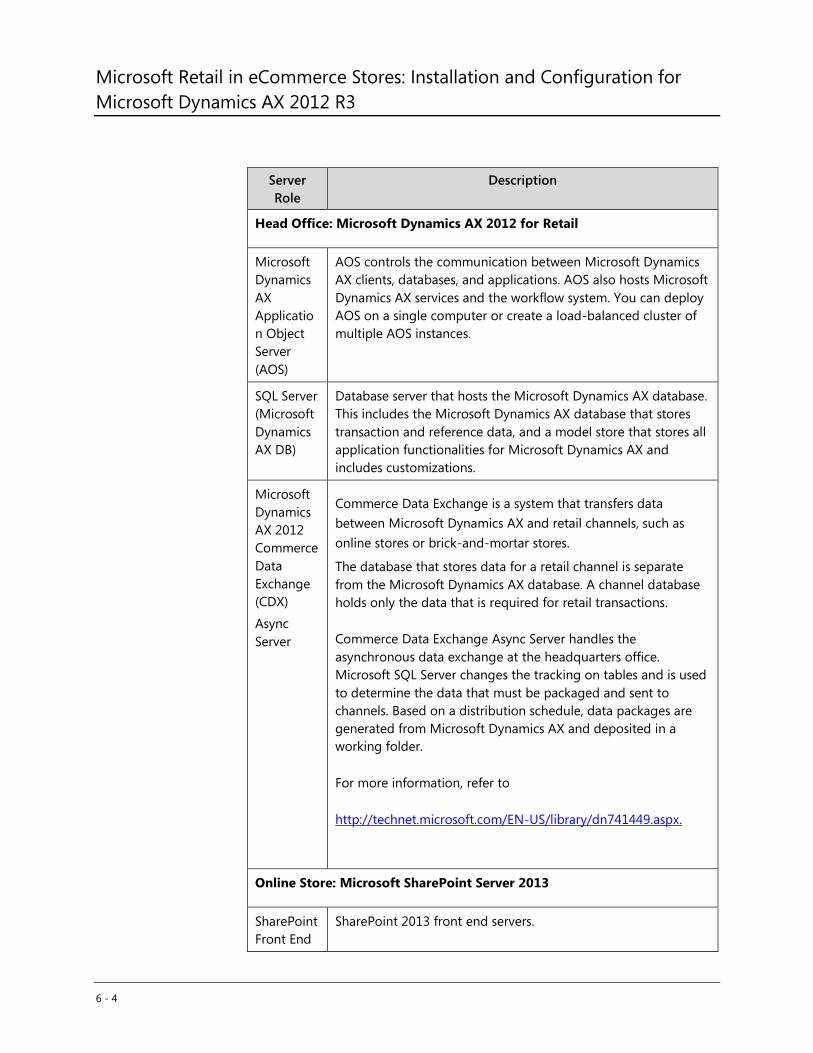
Microsoft Retail in eCommerce Stores: Installation and Configuration for
Microsoft Dynamics AX 2012 R3
6 - 4
Server
Role
Description
Head Office: Microsoft Dynamics AX 2012 for Retail
Microsoft
Dynamics
AX
Applicatio
n Object
Server
(AOS)
AOS controls the communication between Microsoft Dynamics
AX clients, databases, and applications. AOS also hosts Microsoft
Dynamics AX services and the workflow system. You can deploy
AOS on a single computer or create a load-balanced cluster of
multiple AOS instances.
SQL Server
(Microsoft
Dynamics
AX DB)
Database server that hosts the Microsoft Dynamics AX database.
This includes the Microsoft Dynamics AX database that stores
transaction and reference data, and a model store that stores all
application functionalities for Microsoft Dynamics AX and
includes customizations.
Microsoft
Dynamics
AX 2012
Commerce
Data
Exchange
(CDX)
Async
Server
Commerce Data Exchange is a system that transfers data
between Microsoft Dynamics AX and retail channels, such as
online stores or brick-and-mortar stores.
The database that stores data for a retail channel is separate
from the Microsoft Dynamics AX database. A channel database
holds only the data that is required for retail transactions.
Commerce Data Exchange Async Server handles the
asynchronous data exchange at the headquarters office.
Microsoft SQL Server changes the tracking on tables and is used
to determine the data that must be packaged and sent to
channels. Based on a distribution schedule, data packages are
generated from Microsoft Dynamics AX and deposited in a
working folder.
For more information, refer to
http://technet.microsoft.com/EN-US/library/dn741449.aspx.
Online Store: Microsoft SharePoint Server 2013
SharePoint
Front End
SharePoint 2013 front end servers.
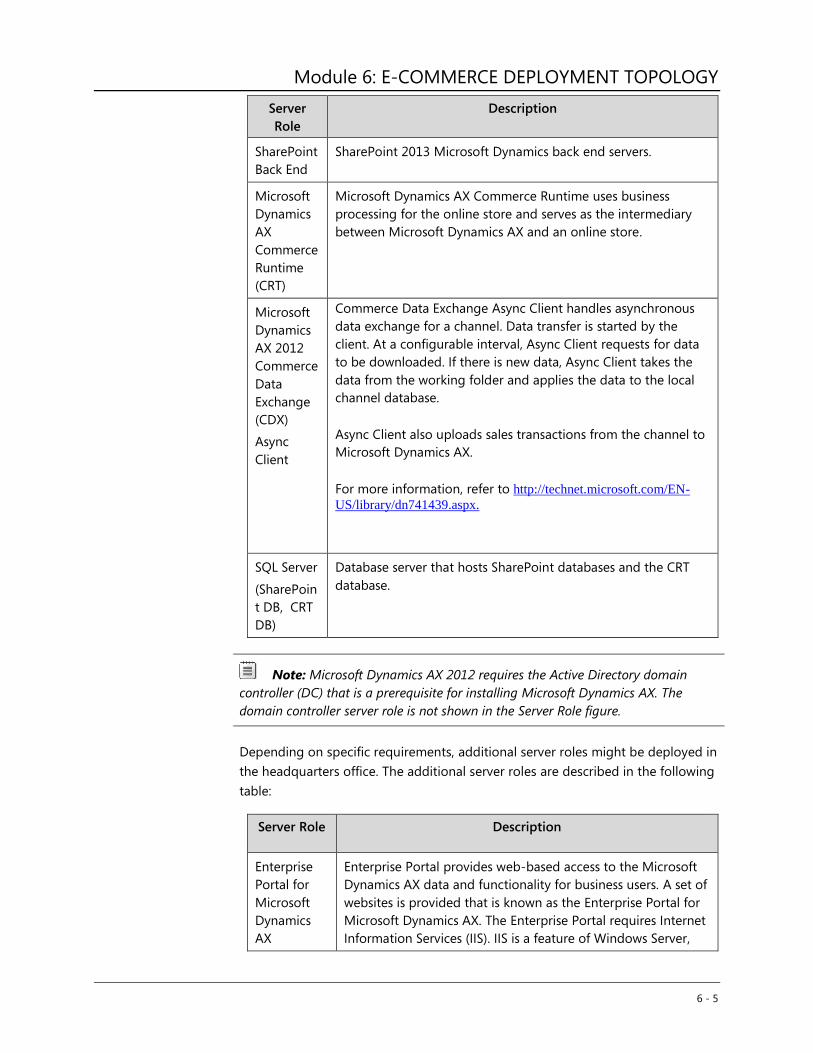
Module 6: E-COMMERCE DEPLOYMENT TOPOLOGY
6 - 5
Server
Role
Description
SharePoint
Back End
SharePoint 2013 Microsoft Dynamics back end servers.
Microsoft
Dynamics
AX
Commerce
Runtime
(CRT)
Microsoft Dynamics AX Commerce Runtime uses business
processing for the online store and serves as the intermediary
between Microsoft Dynamics AX and an online store.
Microsoft
Dynamics
AX 2012
Commerce
Data
Exchange
(CDX)
Async
Client
Commerce Data Exchange Async Client handles asynchronous
data exchange for a channel. Data transfer is started by the
client. At a configurable interval, Async Client requests for data
to be downloaded. If there is new data, Async Client takes the
data from the working folder and applies the data to the local
channel database.
Async Client also uploads sales transactions from the channel to
Microsoft Dynamics AX.
For more information, refer to http://technet.microsoft.com/EN-
US/library/dn741439.aspx.
SQL Server
(SharePoin
t DB, CRT
DB)
Database server that hosts SharePoint databases and the CRT
database.
Note: Microsoft Dynamics AX 2012 requires the Active Directory domain
controller (DC) that is a prerequisite for installing Microsoft Dynamics AX. The
domain controller server role is not shown in the Server Role figure.
Depending on specific requirements, additional server roles might be deployed in
the headquarters office. The additional server roles are described in the following
table:
Server Role Description
Enterprise
Portal for
Microsoft
Dynamics
AX
Enterprise Portal provides web-based access to the Microsoft
Dynamics AX data and functionality for business users. A set of
websites is provided that is known as the Enterprise Portal for
Microsoft Dynamics AX. The Enterprise Portal requires Internet
Information Services (IIS). IIS is a feature of Windows Server,
Microsoft Retail in eCommerce Stores: Installation and Configuration for
Microsoft Dynamics AX 2012 R3
6 - 6
Server Role Description
Microsoft SharePoint Foundation and Microsoft SharePoint
Server.
SQL Server
Reporting
Services
(SSRS), SQL
Server
Analysis
Services
(SSAS)
Microsoft SQL Server Reporting Services is the primary
reporting platform for Microsoft Dynamics AX. Microsoft SQL
Server Analysis Services is a server-based solution that provides
functionality for online analytical processing (OLAP). OLAP
reports help users analyze business data and identify trends
that users might not discover if they view the data in
traditional reports.
Headquarters Office Infrastructure Considerations
When you deploy the Microsoft Dynamics AX e-commerce solution, you must
have a good understanding of the organization or the customer requirements.
This helps make good decisions as you plan the solution implementation. You
must carefully consider the performance requirements for the deployment during
the planning stage. This helps guarantee that the deployment is successful.
Reference Links: For more information about how to plan the Microsoft
Dynamics AX system topology and sample deployment scenarios, refer to
http://technet.microsoft.com/en-us/library/dd309725.aspx .
Based on the performance requirements, the server components in the head
office support scale-out options. The scale-out options include clustering or multi-
instance. For smaller implementations, you can also combine multiple
components on the same server.
You must consider several factors when you plan the hardware infrastructure for
the Microsoft Dynamics AX deployment in the headquarters office. Some factors
include the total average number of transactions that are processed for each work
hour, and the transactional volume for when you plan the hardware and software
components. The hardware and software components include the following:
Database server infrastructure, such as the type and number of drives
How many Application Object Server (AOS) clusters
How many AOS instances in a cluster
How many batch servers
Network capacity
Module 6: E-COMMERCE DEPLOYMENT TOPOLOGY
6 - 7
Note: IMPORTANT: In Microsoft Dynamics AX, a transaction is the
processing of a single line item. For example, a sales order that has 100 line items is
considered 100 transactions.
The performance of the database can significantly affect overall Microsoft
Dynamics AX performance. For the best performance, the SQL Server environment
and storage subsystem must be configured correctly.
Reference Links: For more information about how to configure SQL Server
and storage settings, refer to http://technet.microsoft.com/EN-
US/library/dd309734.aspx.
When you evaluate the e-commerce transactional volume, you must estimate how
many transactions are generated by the online store and how many
corresponding transactions could be triggered. You must also determine whether
there are any integration points to internal or external applications. For example, a
large volume of transactions can originate from the integration with the logistics
providers. This volume of transactions must be factored into the infrastructure and
topology planning.
Reference Links: For more information about how to plan the hardware
infrastructure for Microsoft Dynamics AX deployments, refer to
http://technet.microsoft.com/EN-US/library/dd362104.aspx.
Several performance benchmarks can help you plan the hardware infrastructure.
As part of the release process for Microsoft Dynamics AX 2012 R2, Microsoft
performed a series of performance tests to help customers and partners better
size capacity for the infrastructure that they required for their implementations.
The performance tests showcase how the solution can be scaled based on
important business scenarios that are related to the retail industry. The
performance tests included many functional scenarios across different client and
integration technologies and provided a view of the core retail scenarios. The
benchmark tests results are published on the Partner Source website and in the
Microsoft Dynamics AX 2012 Retail Performance white paper that is available for
download.
Reference Links: You can download the Microsoft Dynamics AX 2012 Retail
Performance white paper from Partner Source at
https://mbs.microsoft.com/partnersource/global/deployment/documentation/white
-papers/ax2012_retailperformance . You must sign in to Partner Source to
download the white paper.
Microsoft Retail in eCommerce Stores: Installation and Configuration for
Microsoft Dynamics AX 2012 R3
6 - 8
Online Store Topology
The online store is a search-driven site that uses SharePoint 2013 search
technology to dynamically show content. This lesson begins with the overview of
search components and then discusses the server roles that are included in the
online store topology. The lesson also discusses the sample online store
topologies and hardware sizing. Additionally, the lesson provides the increased
availability and performance considerations that you must have to plan the online
store deployment.
Lesson Objective
The objective is to provide reference and examples to help you plan the topology
for the online store implementation.
Search Components
The search architecture in SharePoint 2013 includes several search components
and databases. SharePoint 2013 search components include the following:
Crawl
Content-processing
Analytics-processing
Index
Query-processing
Search administration
The crawl component crawls the content sources. You can crawl many content
sources, for example, file shares, product catalog, and SharePoint content. To
retrieve information, the crawl component connects to the content sources by
invoking the appropriate indexing connector or protocol handler. After the crawl
component retrieves the content, the crawl component passes crawled items to
the content-processing component.
The content-processing component processes crawled items and sends these
items to the index component. The content-processing component performs
operations such as document parsing and property mapping. The content-
processing component also performs linguistics processing such as language
detection and entity extraction, and transforms crawled items into artifacts that
are included in the search index. Additionally, the content-processing component
also writes information about links and URLs to the link database.
Reference Links: For more information about crawling content sources and
Module 6: E-COMMERCE DEPLOYMENT TOPOLOGY
6 - 9
content processing, refer to http://technet.microsoft.com/EN-
US/library/jj219577.aspx.
The analytics-processing component performs two types of analyses—search
analytics and usage analytics. The analytics-processing component uses
information from these analyses to improve search relevance, create search
reports, and generate recommendations.
Search analytics is about how to extract information, such as links, how many
times an item is clicked, anchor text, data that is related to people, and metadata,
from the link database. This information is important to relevance.
Usage analytics is about how to analyze usage log information that is received
from the front end through the event store. Usage analytics generates usage and
statistics reports.
The results from the analyses are added to the items in the search index.
Additionally, results from usage analytics are stored in the analytics-reporting
database.
Reference Links: For more information about analytics processing, refer to
http://technet.microsoft.com/EN-US/library/jj219554.aspx .
The index component receives processed items from the content-processing
component and writes those items to an index file. Index files are stored on a disk
in the server that hosts the index component.
The index component also receives queries from the query-processing component
and returns result sets.
You can divide the search index into discrete portions that are known as index
partitions. The search index is the aggregation of all index partitions. Each index
partition holds one or more index replicas that contain the same information. To
achieve fault tolerance and redundancy, you can create additional index replicas
for each index partition and distribute the index replicas over multiple servers.
The index component is the logical representation of an index replica. In the
search topology, you have to set up one index component for each index replica.
Reference Links: For more information about search index and search
schema, refer to http://technet.microsoft.com/EN-US/library/jj219669.aspx.
The query-processing component analyzes and processes queries and results. The
query-processing component also performs linguistics processing, such as word
breaking and stemming. When the query-processing component receives a query
from the web front end, the query-processing component analyzes and processes

Microsoft Retail in eCommerce Stores: Installation and Configuration for
Microsoft Dynamics AX 2012 R3
6 - 10
the query to improve precision, recall, and relevance. The processed query is
submitted to the index component. The index component returns a result set that
is based on the processed query to the query-processing component. Then, the
query-processing component processes that result set, before the result set is
returned to the web front end.
Reference Links: For more information about query-processing and order
results, refer to http://technet.microsoft.com/EN-US/library/jj219669.aspx.
The search administration component runs the system processes for search. This
component is used to set up the search, and then adds and starts instances of the
other search components.
Search Databases
SharePoint 2013 search databases include the following:
Crawl
Link
Analytics-reporting
Search administration
The crawl database stores tracking information and historical information about
crawled items. For example, the crawl database stores information about the last
crawl time, the last crawl ID and the type of update that occurs during the last
crawl.
The link database stores information that is extracted by the content-processing
component. The link database also stores information about search clicks. The
information includes how many times people click a search result from the search
result page. This information is stored unprocessed, and then is analyzed by the
analytics-processing component.
The analytics-reporting database stores the results of usage analytics and statistics
information from the analyses. SharePoint uses this information to create Excel
reports that show different statistics.
The search administration database stores search configuration data, such as the
topology, crawl rules, query rules, and mappings between crawled and managed
properties. The search administration database also stores the access control list
for the crawl component. There can be only one search administration database
for each search service application.
Reference Links:
Module 6: E-COMMERCE DEPLOYMENT TOPOLOGY
6 - 11
For more information about how search components and databases interact, refer
to the “Search architectures for SharePoint Server 2013” technical diagram that can
be downloaded from http://go.microsoft.com/fwlink/p/?LinkId=258449.
For more information on Search in SharePoint Server 2013 refer to -
http://technet.microsoft.com/en-us/library/jj219738(v=office.15).aspx
Server Roles
Server Roles that are included in the online store topology include the following:
Front end SharePoint web server
SharePoint application server
Database server
The front end SharePoint web server role performs the following functions:
Hosts search web parts and web part pages to answer search queries.
Can be shared with the SharePoint application server. In the online
store, the query-processing component and the index components
exist on the front end web servers to make the maximum use of the
available hardware resources and to simplify scaling out the search
topology.
Hosts CRT.
Holds the whole search index if only one index partition is configured.
Otherwise, the front end SharePoint web server role holds parts of the
index that are associated with the index partitions as the partitions
are configured by the administrator.
Consider the following when you plan the location and topology for the search
index:
The query-processing component routes incoming queries to index
replicas.
Each index replica is an index component.
At least one index partition must be configured for each farm.
Add more index replicas to increase query throughput.
Add one index partition for every 10 million items in the search index.
The SharePoint application server role hosts all the search components and the
Commerce Runtime (CRT) if only one server is configured. Otherwise, the
SharePoint application server role holds the search components that are
associated with the server, as the search components are configured by the
Microsoft Retail in eCommerce Stores: Installation and Configuration for
Microsoft Dynamics AX 2012 R3
6 - 12
administrator, and the CRT.
At least one of each search component must be configured for each farm.
Note: Important: You cannot have multiple search components of the same
type on one application server.
To provide redundancy, you can add search components on separate servers. You
can use Windows PowerShell to deploy the search components on separate
SharePoint 2013 servers so that you can scale out the search topology.
Reference Links: For more information about how to manage search
topology in SharePoint Server 2013, refer to http://technet.microsoft.com/EN-
US/library/jj219705.aspx .
The database server role hosts the following databases:
Search.
CRT
Optional SharePoint Server 2013 databases
The database server can be mirrored or clustered for increased availability. To
increase performance and capacity, consider adding disks to the database server
or adding database servers (this depends on the cause of the slowdown in the
system).
Sample Online Store Topologies
When you plan the online store topology, consider the volume of the content, the
estimated amount of page views, the queries for every second, and the increased
availability and fault tolerance.
The sample topologies in this section show the online store deployments that are
based on SharePoint 2013 search technology.
Note: SharePoint Server 2013 is a complex and powerful product, and there is
no one-size-fits-all topology solution. Each SharePoint Server 2013 deployment is
defined by its usage and data characteristics.
Single Server
The single server online store deployment consists of one server that runs
SharePoint Server 2013 and hosts all search components, Commerce Runtime
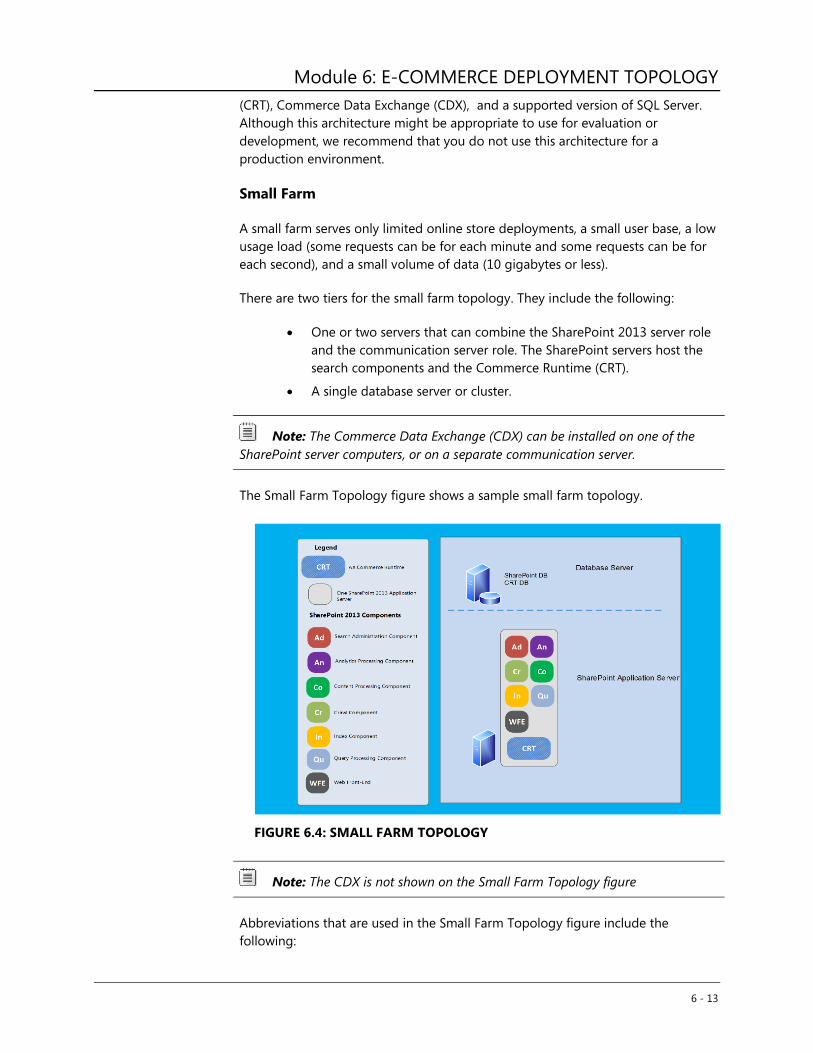
Module 6: E-COMMERCE DEPLOYMENT TOPOLOGY
6 - 13
(CRT), Commerce Data Exchange (CDX), and a supported version of SQL Server.
Although this architecture might be appropriate to use for evaluation or
development, we recommend that you do not use this architecture for a
production environment.
Small Farm
A small farm serves only limited online store deployments, a small user base, a low
usage load (some requests can be for each minute and some requests can be for
each second), and a small volume of data (10 gigabytes or less).
There are two tiers for the small farm topology. They include the following:
One or two servers that can combine the SharePoint 2013 server role
and the communication server role. The SharePoint servers host the
search components and the Commerce Runtime (CRT).
A single database server or cluster.
Note: The Commerce Data Exchange (CDX) can be installed on one of the
SharePoint server computers, or on a separate communication server.
The Small Farm Topology figure shows a sample small farm topology.
FIGURE 6.4: SMALL FARM TOPOLOGY
Note: The CDX is not shown on the Small Farm Topology figure
Abbreviations that are used in the Small Farm Topology figure include the
following:
Microsoft Retail in eCommerce Stores: Installation and Configuration for
Microsoft Dynamics AX 2012 R3
6 - 14
Ad Search administration component
An Analytics-processing component
Co Content-processing component
Cr Crawl component
In Index component
Qu Query-processing component
WFE Web front end
The CRT abbreviation in the Small Farm Topology figure refers to the Commerce
Runtime that is used earlier in this module.
The major characteristics of this sample topology include limited redundancy and
failover.
Medium Farm
The medium farm topology that is used for the online store introduces the three
tier farm architecture, and includes the following:
Dedicated front end SharePoint web servers that have the index
component and the query-processing component.
Dedicated back end SharePoint application servers.
One or more database servers or clusters.
Separating the front end server tier from the application server tier provides more
flexibility in service isolation and helps balance the load across the system.
The medium farm topology is the most common architecture. The medium farm
topology includes many topologies and farm sizes, and serves environments that
have the following characteristics:
Usage load of up to about 160 page views each second
Data store of one or two terabytes.
The sample medium farm that is shown in the “Medium Farm That
Accommodates 85 Page Views Each Second” figure shows a fault-tolerant
SharePoint Server 2013 search farm topology that is improved for 3,400,000 items.
The sample farm accommodates 85 page views every second (306 000 page views
every hour) and 100 queries every second (360 000 queries every second).
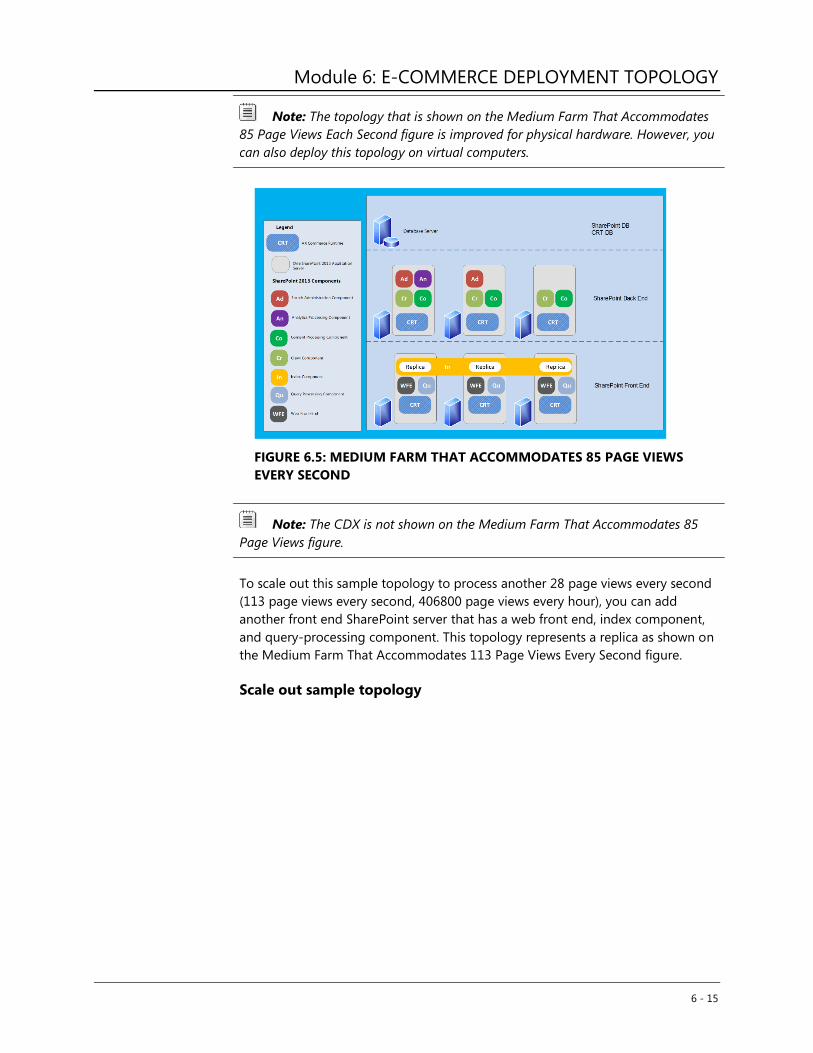
Module 6: E-COMMERCE DEPLOYMENT TOPOLOGY
6 - 15
Note: The topology that is shown on the Medium Farm That Accommodates
85 Page Views Each Second figure is improved for physical hardware. However, you
can also deploy this topology on virtual computers.
FIGURE 6.5: MEDIUM FARM THAT ACCOMMODATES 85 PAGE VIEWS
EVERY SECOND
Note: The CDX is not shown on the Medium Farm That Accommodates 85
Page Views figure.
To scale out this sample topology to process another 28 page views every second
(113 page views every second, 406800 page views every hour), you can add
another front end SharePoint server that has a web front end, index component,
and query-processing component. This topology represents a replica as shown on
the Medium Farm That Accommodates 113 Page Views Every Second figure.
Scale out sample topology
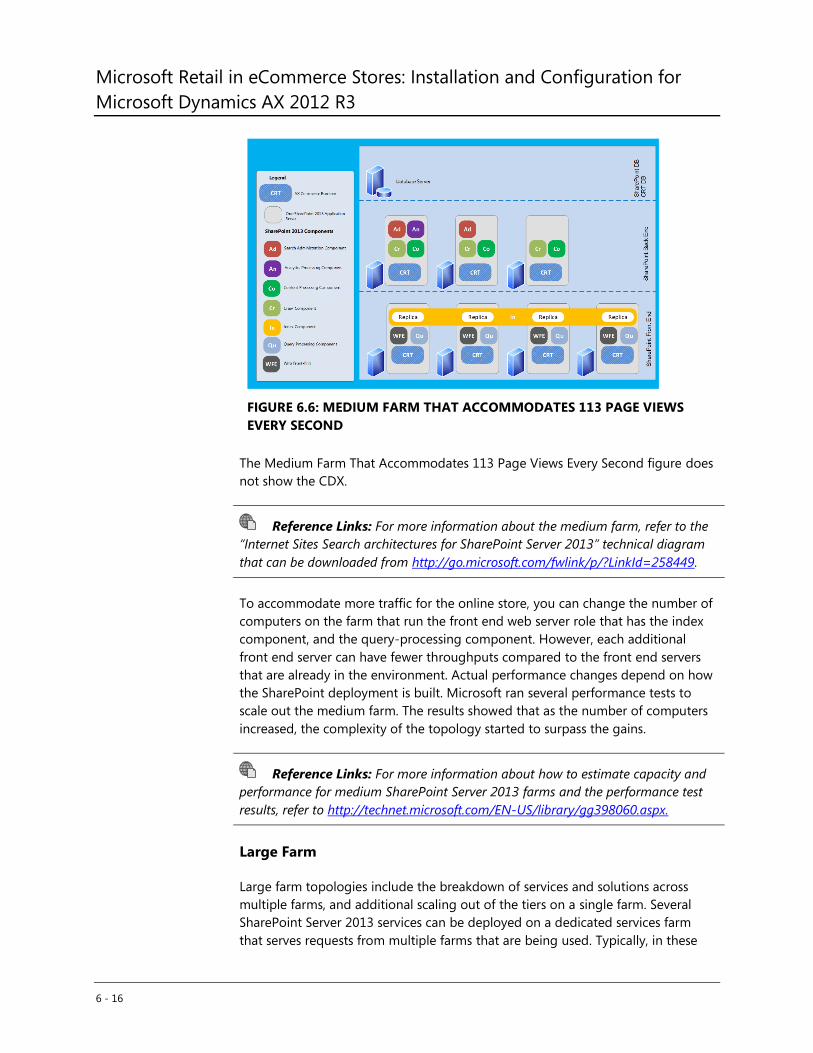
Microsoft Retail in eCommerce Stores: Installation and Configuration for
Microsoft Dynamics AX 2012 R3
6 - 16
FIGURE 6.6: MEDIUM FARM THAT ACCOMMODATES 113 PAGE VIEWS
EVERY SECOND
The Medium Farm That Accommodates 113 Page Views Every Second figure does
not show the CDX.
Reference Links: For more information about the medium farm, refer to the
“Internet Sites Search architectures for SharePoint Server 2013” technical diagram
that can be downloaded from http://go.microsoft.com/fwlink/p/?LinkId=258449.
To accommodate more traffic for the online store, you can change the number of
computers on the farm that run the front end web server role that has the index
component, and the query-processing component. However, each additional
front end server can have fewer throughputs compared to the front end servers
that are already in the environment. Actual performance changes depend on how
the SharePoint deployment is built. Microsoft ran several performance tests to
scale out the medium farm. The results showed that as the number of computers
increased, the complexity of the topology started to surpass the gains.
Reference Links: For more information about how to estimate capacity and
performance for medium SharePoint Server 2013 farms and the performance test
results, refer to http://technet.microsoft.com/EN-US/library/gg398060.aspx.
Large Farm
Large farm topologies include the breakdown of services and solutions across
multiple farms, and additional scaling out of the tiers on a single farm. Several
SharePoint Server 2013 services can be deployed on a dedicated services farm
that serves requests from multiple farms that are being used. Typically, in these
Module 6: E-COMMERCE DEPLOYMENT TOPOLOGY
6 - 17
large architectures, there are web servers, multiple application servers, and
multiple SQL Server–based servers or SQL server clusters.
Characteristics for large farm topology deployments include the following:
Usage load in the range of hundreds of requests every second
Dataset in the range of 10 or more terabytes
Increased Availability Considerations
For an online store deployment topology that has increased availability, you must
add the following features:
Additional computers to sustain the load if one or more of the front
end web server computers that has Index nodes are not available.
Additional computer that runs crawl and content-processing
components (CPC) to make sure that the site still reflects updates
when the computer that has the CPC role is not available.
Additional computer that runs with the service applications in
distributed cache roles if the existing computer is not available.
SQL Server topology that continues to serve database queries if one
of the database servers is not available.
Hardware Requirements
This section describes the minimum hardware requirements for online store
servers that host a medium farm topology. The hardware requirements apply to
the following servers:
SharePoint 2013 application servers and web servers that have search
components and CRT.
Database servers that have search databases.
The minimum amount of random access memory (RAM) requirements for a server
that hosts a search component is the total amount of RAM that is required for
that server. For example, if you host a content-processing component, a search
administration component and a crawl component on one server, the total
minimum amount of RAM that is required for that server is 24 gigabytes (GB).
Each server must have sufficient disk space for the base installation of the
Windows Server operating system. Additionally, each server must have sufficient
disk space for diagnostics such as logging, debugging, and creating memory
dumps, and so on. For production use, the server must also have additional free
disk space for day-to-day operations and for the page file.
The minimum hardware requirements for SharePoint application servers and front
end web servers that host search components are shown in the following table.
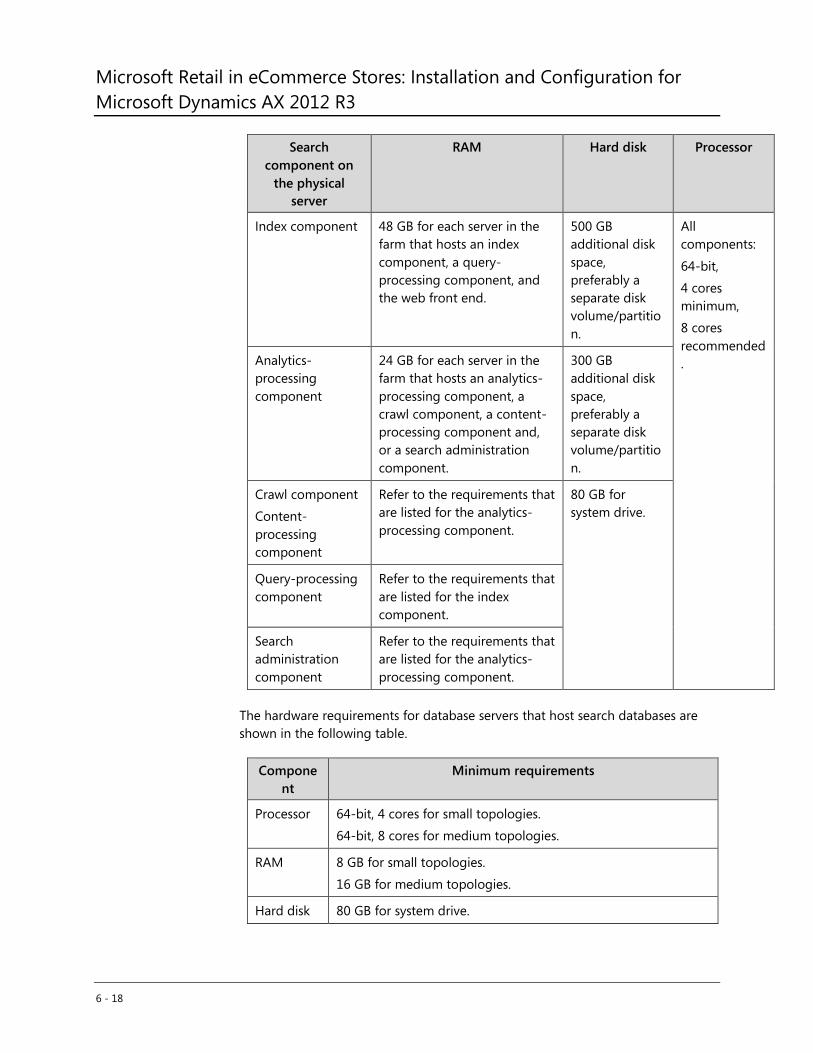
Microsoft Retail in eCommerce Stores: Installation and Configuration for
Microsoft Dynamics AX 2012 R3
6 - 18
Search
component on
the physical
server
RAM Hard disk Processor
Index component 48 GB for each server in the
farm that hosts an index
component, a query-
processing component, and
the web front end.
500 GB
additional disk
space,
preferably a
separate disk
volume/partitio
n.
All
components:
64-bit,
4 cores
minimum,
8 cores
recommended
. Analytics-
processing
component
24 GB for each server in the
farm that hosts an analytics-
processing component, a
crawl component, a content-
processing component and,
or a search administration
component.
300 GB
additional disk
space,
preferably a
separate disk
volume/partitio
n.
Crawl component
Content-
processing
component
Refer to the requirements that
are listed for the analytics-
processing component.
80 GB for
system drive.
Query-processing
component
Refer to the requirements that
are listed for the index
component.
Search
administration
component
Refer to the requirements that
are listed for the analytics-
processing component.
The hardware requirements for database servers that host search databases are
shown in the following table.
Compone
nt
Minimum requirements
Processor 64-bit, 4 cores for small topologies.
64-bit, 8 cores for medium topologies.
RAM 8 GB for small topologies.
16 GB for medium topologies.
Hard disk 80 GB for system drive.
Module 6: E-COMMERCE DEPLOYMENT TOPOLOGY
6 - 19
Compone
nt
Minimum requirements
Hard disk space depends on how much content is already on
the disk.
Performance Considerations
When you plan an online store deployment, consider the following to improve
performance.
Cache
The query and the query results are cached with Windows Server AppFabric, in
key-value pairs. The query is the key and the results are the value. For each query,
there is an approximate 50 percent cache ratio. This means that if you have a
usage pattern of 200 queries every second, about 100 queries are sent to the
search index and the other 100 queries are cached. The results from the cache
have reduced query latency than those that you retrieve from the search index.
For example, results for the home-page queries that are frequently run are likely
to be cached.
Continuous crawl
Consider enabling continuous crawl with an interval of one minute, instead of the
default interval of 15 minutes. You can only enable continuous crawl on
SharePoint content sources.
Anonymous access
Anonymous queries are cached. Therefore, the anonymous queries are less
expensive because of the reduced query latency.
Query latency
Query latency is influenced by caching, anonymous access, and factors such as the
number and complexity of query rules that are applied and started. Also, consider
the characteristics of the storage on which the search index is stored. For example,
a disk that has multiple spindles can improve the access speed of the disk and
reduce query latency
Index partition size
More items in the search index generally mean increased latency. Each index
partition can contain up to 10 million items. Online stores would rarely have more
than 10 million items to show. Therefore, the online stores must have only one
partition as described in the earlier topology. You can use more index partitions to
either host more than 10 million items or to have more, smaller, and faster index
partitions.
Microsoft Retail in eCommerce Stores: Installation and Configuration for
Microsoft Dynamics AX 2012 R3
6 - 20
Reference Links: For more information about how to use multiple search
partitions, refer to http://technet.microsoft.com/EN-US/library/jj219628.aspx.
Number of Controls on a Page
Each control or Web Part that you add to a page (or page layout) adds some
overhead to the server response time for the page.
Number of Synchronous Content Search Web Parts on a Page.
Avoid having to use more than five synchronous Content Search Web Parts on a
page. When you process a request for a page, SharePoint Server 2013 performs as
many as five queries in parallel and returns the results. If more than five queries
are on a page, SharePoint Server 2013 performs the first five queries before
SharePoint Server 2013 starts to execute the next set of five queries. If pages
require more than five Content Search Web Parts, you might run the additional
Content Search Web Parts in asynchronous mode or use query rules and result
blocks.
Asynchronous CSWP Mode for Slow Queries
Content Search Web Parts has an asynchronous mode. The query that is
associated with the web part is performed after the browser loads the page. Use
this mode for slow queries so that the rest of the page appears faster for users.
Otherwise, we recommend that you use synchronous queries for best page load
times.
Number of Refiners
A Refinement Panel Web Part that has many refiners increases the time to process
a query. You can change the number of refiners.
Reference Links: For more information about how to configure refiners, refer
to http://technet.microsoft.com/EN-US/library/jj679902.aspx .
Module 6: E-COMMERCE DEPLOYMENT TOPOLOGY
6 - 21
Module Review
This module described the tasks, procedures, and configuration options that are
required to set up the online store in Microsoft Dynamics AX 2012.
For more information about deployment topologies for an Online Store in
Microsoft Dynamics AX 2013 R3, refer to
http://technet.microsoft.com/EN-US/library/jj991928.aspx#Topology63.
Test Your Knowledge
Test your knowledge with the following questions.
1. Is the following statement true or false: “The e-commerce implementation can
include only one datacenter that hosts the online store”?
( ) True
( ) False
2. What search component receives queries from the query-processing
component and returns the result sets?
( ) Index component
( ) Content-processing component
( ) Crawl component
3. How can you deploy the search components on separate SharePoint 2013
servers so that you can scale out the search topology?
( ) Use Windows PowerShell
( ) Use SharePoint Central Administration
( ) Use SharePoint setup
4. How many queries can SharePoint Server 2013 perform in parallel when a
request for a page is being processed?
( ) 10
( ) 5
( ) 4
5. How many items can an index partition contain?
Microsoft Retail in eCommerce Stores: Installation and Configuration for
Microsoft Dynamics AX 2012 R3
6 - 22
( ) Each index partition can contain up to 1 million items.
( ) Each index partition can contain up to 10 million items.
( ) Each index partition can contain up to 5 million items.
Module 6: E-COMMERCE DEPLOYMENT TOPOLOGY
6 - 23
Test Your Knowledge Solutions
MODEL ANSWER:
1. Is the following statement true or false: “The e-commerce implementation can
include only one datacenter that hosts the online store”?
( ) True
(√) False
2. What search component receives queries from the query-processing
component and returns the result sets?
(√) Index component
( ) Content-processing component
( ) Crawl component
3. How can you deploy the search components on separate SharePoint 2013
servers so that you can scale out the search topology?
( ) Use Windows PowerShell
( ) Use SharePoint Central Administration
(√) Use SharePoint setup
4. How many queries can SharePoint Server 2013 execute in parallel when a
request for a page is being processed?
( ) 10
( ) 5
(√) 4
5. How many items can an index partition contain?
( ) Each index partition can contain up to 1 million items.
(√) Each index partition can contain up to 10 million items.
( ) Each index partition can contain up to 5 million items.

Course 80639:
Microsoft Dynamics AX 2012 R3 for
Retail in e-Commerce Stores: Installation and
Configuration
This courseware is provided “as-is”. Information and views expressed in this courseware, including URL and
other Internet Web site references, may change without notice.
Unless otherwise noted, the examples depicted herein are provided for illustration only and are fictitious. No
real association or connection is intended or should be inferred.
This courseware does not provide you with any legal rights to any intellectual property in any Microsoft
product. Complying with all applicable copyright laws is the responsibility of the user. Without limiting the
rights under copyright, no part of this courseware may be reproduced, stored in or introduced into a retrieval
system, or transmitted in any form or by any means or for any purpose, without the express written
permission of Microsoft Corporation.
Copyright © 2012 Microsoft Corporation. All rights reserved.
Microsoft®, Microsoft Dynamics®, Microsoft® PowerPoint®, Microsoft® SQL Server® data management
software and Microsoft Dynamics® NAV are trademarks of the Microsoft group of companies. All other
trademarks are property of their respective owners.

MICROSOFT LICENSE TERMS
MICROSOFT INSTRUCTOR-LED COURSEWARE
These license terms are an agreement between Microsoft Corporation (or based on where you live, one of its
affiliates) and you. Please read them. They apply to your use of the content accompanying this agreement which
includes the media on which you received it, if any. These license terms also apply to Trainer Content and any updates and supplements for the Licensed Content unless other terms accompany those items. If so, those terms
apply.
BY ACCESSING, DOWNLOADING OR USING THE LICENSED CONTENT, YOU ACCEPT THESE TERMS. IF YOU DO NOT ACCEPT THEM, DO NOT ACCESS, DOWNLOAD OR USE THE LICENSED CONTENT.
If you comply with these license terms, you have the rights below for each license you acquire.
1. DEFINITIONS.
a. “Authorized Learning Center” means a Microsoft IT Academy Program Member, Microsoft Learning
Competency Member, or such other entity as Microsoft may designate from time to time.
b. “Authorized Training Session” means the instructor-led training class using Microsoft Instructor-Led Courseware conducted by a Trainer at or through an Authorized Learning Center.
c. “Classroom Device” means one (1) dedicated, secure computer that an Authorized Learning Center owns
or controls that is located at an Authorized Learning Center’s training facilities that meets or exceeds the
hardware level specified for the particular Microsoft Instructor-Led Courseware.
d. “End User” means an individual who is (i) duly enrolled in and attending an Authorized Training Session or Private Training Session, (ii) an employee of a MPN Member, or (iii) a Microsoft full-time employee.
e. “Licensed Content” means the content accompanying this agreement which may include the Microsoft Instructor-Led Courseware or Trainer Content.
f. “Microsoft Certified Trainer” or “MCT” means an individual who is (i) engaged to teach a training session
to End Users on behalf of an Authorized Learning Center or MPN Member, and (ii) currently certified as a
Microsoft Certified Trainer under the Microsoft Certification Program.
g. “Microsoft Instructor-Led Courseware” means the Microsoft-branded instructor-led training course that educates IT professionals and developers on Microsoft technologies. A Microsoft Instructor-Led
Courseware title may be branded as MOC, Microsoft Dynamics or Microsoft Business Group courseware.
h. “Microsoft IT Academy Program Member” means an active member of the Microsoft IT Academy
Program.
i. “Microsoft Learning Competency Member” means an active member of the Microsoft Partner Network program in good standing that currently holds the Learning Competency status.
j. “MOC” means the “Official Microsoft Learning Product” instructor-led courseware known as Microsoft Official Course that educates IT professionals and developers on Microsoft technologies.
k. “MPN Member” means an active silver or gold-level Microsoft Partner Network program member in good
standing.
l. “Personal Device” means one (1) personal computer, device, workstation or other digital electronic device
that you personally own or control that meets or exceeds the hardware level specified for the particular Microsoft Instructor-Led Courseware.
m. “Private Training Session” means the instructor-led training classes provided by MPN Members for
corporate customers to teach a predefined learning objective using Microsoft Instructor-Led Courseware.
These classes are not advertised or promoted to the general public and class attendance is restricted to individuals employed by or contracted by the corporate customer.
n. “Trainer” means (i) an academically accredited educator engaged by a Microsoft IT Academy Program
Member to teach an Authorized Training Session, and/or (ii) a MCT.
o. “Trainer Content” means the trainer version of the Microsoft Instructor-Led Courseware and additional
supplemental content designated solely for Trainers’ use to teach a training session using the Microsoft Instructor-Led Courseware. Trainer Content may include Microsoft PowerPoint presentations, trainer
preparation guide, train the trainer materials, Microsoft One Note packs, classroom setup guide and Pre-release course feedback form. To clarify, Trainer Content does not include any software, virtual hard
disks or virtual machines.
2. USE RIGHTS. The Licensed Content is licensed not sold. The Licensed Content is licensed on a one copy
per user basis, such that you must acquire a license for each individual that accesses or uses the Licensed Content.
2.1 Below are five separate sets of use rights. Only one set of rights apply to you.
a. If you are a Microsoft IT Academy Program Member: i. Each license acquired on behalf of yourself may only be used to review one (1) copy of the Microsoft
Instructor-Led Courseware in the form provided to you. If the Microsoft Instructor-Led Courseware is in digital format, you may install one (1) copy on up to three (3) Personal Devices. You may not
install the Microsoft Instructor-Led Courseware on a device you do not own or control.
ii. For each license you acquire on behalf of an End User or Trainer, you may either: 1. distribute one (1) hard copy version of the Microsoft Instructor-Led Courseware to one (1) End
User who is enrolled in the Authorized Training Session, and only immediately prior to the commencement of the Authorized Training Session that is the subject matter of the Microsoft
Instructor-Led Courseware being provided, or
2. provide one (1) End User with the unique redemption code and instructions on how they can access one (1) digital version of the Microsoft Instructor-Led Courseware, or
3. provide one (1) Trainer with the unique redemption code and instructions on how they can access one (1) Trainer Content,
provided you comply with the following: iii. you will only provide access to the Licensed Content to those individuals who have acquired a valid
license to the Licensed Content,
iv. you will ensure each End User attending an Authorized Training Session has their own valid licensed copy of the Microsoft Instructor-Led Courseware that is the subject of the Authorized Training
Session, v. you will ensure that each End User provided with the hard-copy version of the Microsoft Instructor-
Led Courseware will be presented with a copy of this agreement and each End User will agree that
their use of the Microsoft Instructor-Led Courseware will be subject to the terms in this agreement prior to providing them with the Microsoft Instructor-Led Courseware. Each individual will be required
to denote their acceptance of this agreement in a manner that is enforceable under local law prior to their accessing the Microsoft Instructor-Led Courseware,
vi. you will ensure that each Trainer teaching an Authorized Training Session has their own valid licensed copy of the Trainer Content that is the subject of the Authorized Training Session,

vii. you will only use qualified Trainers who have in-depth knowledge of and experience with the
Microsoft technology that is the subject of the Microsoft Instructor-Led Courseware being taught for all your Authorized Training Sessions,
viii. you will only deliver a maximum of 15 hours of training per week for each Authorized Training Session that uses a MOC title, and
ix. you acknowledge that Trainers that are not MCTs will not have access to all of the trainer resources
for the Microsoft Instructor-Led Courseware.
b. If you are a Microsoft Learning Competency Member: i. Each license acquired on behalf of yourself may only be used to review one (1) copy of the Microsoft
Instructor-Led Courseware in the form provided to you. If the Microsoft Instructor-Led Courseware is in digital format, you may install one (1) copy on up to three (3) Personal Devices. You may not
install the Microsoft Instructor-Led Courseware on a device you do not own or control.
ii. For each license you acquire on behalf of an End User or Trainer, you may either: 1. distribute one (1) hard copy version of the Microsoft Instructor-Led Courseware to one (1) End
User attending the Authorized Training Session and only immediately prior to the commencement of the Authorized Training Session that is the subject matter of the Microsoft
Instructor-Led Courseware provided, or
2. provide one (1) End User attending the Authorized Training Session with the unique redemption code and instructions on how they can access one (1) digital version of the Microsoft Instructor-
Led Courseware, or 3. you will provide one (1) Trainer with the unique redemption code and instructions on how they
can access one (1) Trainer Content, provided you comply with the following:
iii. you will only provide access to the Licensed Content to those individuals who have acquired a valid
license to the Licensed Content, iv. you will ensure that each End User attending an Authorized Training Session has their own valid
licensed copy of the Microsoft Instructor-Led Courseware that is the subject of the Authorized Training Session,
v. you will ensure that each End User provided with a hard-copy version of the Microsoft Instructor-Led
Courseware will be presented with a copy of this agreement and each End User will agree that their use of the Microsoft Instructor-Led Courseware will be subject to the terms in this agreement prior to
providing them with the Microsoft Instructor-Led Courseware. Each individual will be required to denote their acceptance of this agreement in a manner that is enforceable under local law prior to
their accessing the Microsoft Instructor-Led Courseware,
vi. you will ensure that each Trainer teaching an Authorized Training Session has their own valid licensed copy of the Trainer Content that is the subject of the Authorized Training Session,
vii. you will only use qualified Trainers who hold the applicable Microsoft Certification credential that is the subject of the Microsoft Instructor-Led Courseware being taught for your Authorized Training
Sessions, viii. you will only use qualified MCTs who also hold the applicable Microsoft Certification credential that is
the subject of the MOC title being taught for all your Authorized Training Sessions using MOC,
ix. you will only provide access to the Microsoft Instructor-Led Courseware to End Users, and x. you will only provide access to the Trainer Content to Trainers.
c. If you are a MPN Member:
i. Each license acquired on behalf of yourself may only be used to review one (1) copy of the Microsoft Instructor-Led Courseware in the form provided to you. If the Microsoft Instructor-Led Courseware is
in digital format, you may install one (1) copy on up to three (3) Personal Devices. You may not install the Microsoft Instructor-Led Courseware on a device you do not own or control.
ii. For each license you acquire on behalf of an End User or Trainer, you may either:
1. distribute one (1) hard copy version of the Microsoft Instructor-Led Courseware to one (1) End User attending the Private Training Session, and only immediately prior to the commencement
of the Private Training Session that is the subject matter of the Microsoft Instructor-Led Courseware being provided, or
2. provide one (1) End User who is attending the Private Training Session with the unique redemption code and instructions on how they can access one (1) digital version of the
Microsoft Instructor-Led Courseware, or
3. you will provide one (1) Trainer who is teaching the Private Training Session with the unique redemption code and instructions on how they can access one (1) Trainer Content,
provided you comply with the following: iii. you will only provide access to the Licensed Content to those individuals who have acquired a valid
license to the Licensed Content,
iv. you will ensure that each End User attending an Private Training Session has their own valid licensed copy of the Microsoft Instructor-Led Courseware that is the subject of the Private Training Session,
v. you will ensure that each End User provided with a hard copy version of the Microsoft Instructor-Led Courseware will be presented with a copy of this agreement and each End User will agree that their
use of the Microsoft Instructor-Led Courseware will be subject to the terms in this agreement prior to providing them with the Microsoft Instructor-Led Courseware. Each individual will be required to
denote their acceptance of this agreement in a manner that is enforceable under local law prior to
their accessing the Microsoft Instructor-Led Courseware, vi. you will ensure that each Trainer teaching an Private Training Session has their own valid licensed
copy of the Trainer Content that is the subject of the Private Training Session, vii. you will only use qualified Trainers who hold the applicable Microsoft Certification credential that is
the subject of the Microsoft Instructor-Led Courseware being taught for all your Private Training
Sessions, viii. you will only use qualified MCTs who hold the applicable Microsoft Certification credential that is the
subject of the MOC title being taught for all your Private Training Sessions using MOC, ix. you will only provide access to the Microsoft Instructor-Led Courseware to End Users, and
x. you will only provide access to the Trainer Content to Trainers.
d. If you are an End User:
For each license you acquire, you may use the Microsoft Instructor-Led Courseware solely for your personal training use. If the Microsoft Instructor-Led Courseware is in digital format, you may access the
Microsoft Instructor-Led Courseware online using the unique redemption code provided to you by the training provider and install and use one (1) copy of the Microsoft Instructor-Led Courseware on up to
three (3) Personal Devices. You may also print one (1) copy of the Microsoft Instructor-Led Courseware.
You may not install the Microsoft Instructor-Led Courseware on a device you do not own or control.
e. If you are a Trainer. i. For each license you acquire, you may install and use one (1) copy of the Trainer Content in the
form provided to you on one (1) Personal Device solely to prepare and deliver an Authorized
Training Session or Private Training Session, and install one (1) additional copy on another Personal Device as a backup copy, which may be used only to reinstall the Trainer Content. You may not
install or use a copy of the Trainer Content on a device you do not own or control. You may also print one (1) copy of the Trainer Content solely to prepare for and deliver an Authorized Training
Session or Private Training Session.
ii. You may customize the written portions of the Trainer Content that are logically associated with instruction of a training session in accordance with the most recent version of the MCT agreement.
If you elect to exercise the foregoing rights, you agree to comply with the following: (i) customizations may only be used for teaching Authorized Training Sessions and Private Training
Sessions, and (ii) all customizations will comply with this agreement. For clarity, any use of
“customize” refers only to changing the order of slides and content, and/or not using all the slides or content, it does not mean changing or modifying any slide or content.
2.2 Separation of Components. The Licensed Content is licensed as a single unit and you may not
separate their components and install them on different devices.
2.3 Redistribution of Licensed Content. Except as expressly provided in the use rights above, you may
not distribute any Licensed Content or any portion thereof (including any permitted modifications) to any third parties without the express written permission of Microsoft.
2.4 Third Party Programs and Services. The Licensed Content may contain third party programs or
services. These license terms will apply to your use of those third party programs or services, unless other
terms accompany those programs and services.
2.5 Additional Terms. Some Licensed Content may contain components with additional terms, conditions, and licenses regarding its use. Any non-conflicting terms in those conditions and licenses also
apply to your use of that respective component and supplements the terms described in this agreement.
3. LICENSED CONTENT BASED ON PRE-RELEASE TECHNOLOGY. If the Licensed Content’s subject
matter is based on a pre-release version of Microsoft technology (“Pre-release”), then in addition to the other provisions in this agreement, these terms also apply:
a. Pre-Release Licensed Content. This Licensed Content subject matter is on the Pre-release version of
the Microsoft technology. The technology may not work the way a final version of the technology will
and we may change the technology for the final version. We also may not release a final version. Licensed Content based on the final version of the technology may not contain the same information as
the Licensed Content based on the Pre-release version. Microsoft is under no obligation to provide you with any further content, including any Licensed Content based on the final version of the technology.
b. Feedback. If you agree to give feedback about the Licensed Content to Microsoft, either directly or through its third party designee, you give to Microsoft without charge, the right to use, share and
commercialize your feedback in any way and for any purpose. You also give to third parties, without charge, any patent rights needed for their products, technologies and services to use or interface with
any specific parts of a Microsoft software, Microsoft product, or service that includes the feedback. You will not give feedback that is subject to a license that requires Microsoft to license its software,
technologies, or products to third parties because we include your feedback in them. These rights
survive this agreement.
c. Pre-release Term. If you are an Microsoft IT Academy Program Member, Microsoft Learning Competency Member, MPN Member or Trainer, you will cease using all copies of the Licensed Content on
the Pre-release technology upon (i) the date which Microsoft informs you is the end date for using the
Licensed Content on the Pre-release technology, or (ii) sixty (60) days after the commercial release of the technology that is the subject of the Licensed Content, whichever is earliest (“Pre-release term”).
Upon expiration or termination of the Pre-release term, you will irretrievably delete and destroy all copies of the Licensed Content in your possession or under your control.
4. SCOPE OF LICENSE. The Licensed Content is licensed, not sold. This agreement only gives you some
rights to use the Licensed Content. Microsoft reserves all other rights. Unless applicable law gives you more rights despite this limitation, you may use the Licensed Content only as expressly permitted in this
agreement. In doing so, you must comply with any technical limitations in the Licensed Content that only allows you to use it in certain ways. Except as expressly permitted in this agreement, you may not:
access or allow any individual to access the Licensed Content if they have not acquired a valid license
for the Licensed Content,
alter, remove or obscure any copyright or other protective notices (including watermarks), branding
or identifications contained in the Licensed Content, modify or create a derivative work of any Licensed Content,
publicly display, or make the Licensed Content available for others to access or use,
copy, print, install, sell, publish, transmit, lend, adapt, reuse, link to or post, make available or
distribute the Licensed Content to any third party,
work around any technical limitations in the Licensed Content, or
reverse engineer, decompile, remove or otherwise thwart any protections or disassemble the
Licensed Content except and only to the extent that applicable law expressly permits, despite this limitation.
5. RESERVATION OF RIGHTS AND OWNERSHIP. Microsoft reserves all rights not expressly granted to
you in this agreement. The Licensed Content is protected by copyright and other intellectual property laws
and treaties. Microsoft or its suppliers own the title, copyright, and other intellectual property rights in the Licensed Content.
6. EXPORT RESTRICTIONS. The Licensed Content is subject to United States export laws and regulations.
You must comply with all domestic and international export laws and regulations that apply to the Licensed Content. These laws include restrictions on destinations, end users and end use. For additional information,
see www.microsoft.com/exporting.
7. SUPPORT SERVICES. Because the Licensed Content is “as is”, we may not provide support services for it.
8. TERMINATION. Without prejudice to any other rights, Microsoft may terminate this agreement if you fail
to comply with the terms and conditions of this agreement. Upon termination of this agreement for any
reason, you will immediately stop all use of and delete and destroy all copies of the Licensed Content in your possession or under your control.
9. LINKS TO THIRD PARTY SITES. You may link to third party sites through the use of the Licensed
Content. The third party sites are not under the control of Microsoft, and Microsoft is not responsible for
the contents of any third party sites, any links contained in third party sites, or any changes or updates to third party sites. Microsoft is not responsible for webcasting or any other form of transmission received
from any third party sites. Microsoft is providing these links to third party sites to you only as a convenience, and the inclusion of any link does not imply an endorsement by Microsoft of the third party
site.
10. ENTIRE AGREEMENT. This agreement, and any additional terms for the Trainer Content, updates and
supplements are the entire agreement for the Licensed Content, updates and supplements.
11. APPLICABLE LAW. a. United States. If you acquired the Licensed Content in the United States, Washington state law governs
the interpretation of this agreement and applies to claims for breach of it, regardless of conflict of laws
principles. The laws of the state where you live govern all other claims, including claims under state consumer protection laws, unfair competition laws, and in tort.
b. Outside the United States. If you acquired the Licensed Content in any other country, the laws of that
country apply.
12. LEGAL EFFECT. This agreement describes certain legal rights. You may have other rights under the laws of your country. You may also have rights with respect to the party from whom you acquired the Licensed
Content. This agreement does not change your rights under the laws of your country if the laws of your
country do not permit it to do so.
13. DISCLAIMER OF WARRANTY. THE LICENSED CONTENT IS LICENSED "AS-IS" AND "AS AVAILABLE." YOU BEAR THE RISK OF USING IT. MICROSOFT AND ITS RESPECTIVE
AFFILIATES GIVES NO EXPRESS WARRANTIES, GUARANTEES, OR CONDITIONS. YOU MAY HAVE ADDITIONAL CONSUMER RIGHTS UNDER YOUR LOCAL LAWS WHICH THIS AGREEMENT
CANNOT CHANGE. TO THE EXTENT PERMITTED UNDER YOUR LOCAL LAWS, MICROSOFT AND
ITS RESPECTIVE AFFILIATES EXCLUDES ANY IMPLIED WARRANTIES OF MERCHANTABILITY, FITNESS FOR A PARTICULAR PURPOSE AND NON-INFRINGEMENT.
14. LIMITATION ON AND EXCLUSION OF REMEDIES AND DAMAGES. YOU CAN RECOVER FROM
MICROSOFT, ITS RESPECTIVE AFFILIATES AND ITS SUPPLIERS ONLY DIRECT DAMAGES UP
TO US$5.00. YOU CANNOT RECOVER ANY OTHER DAMAGES, INCLUDING CONSEQUENTIAL, LOST PROFITS, SPECIAL, INDIRECT OR INCIDENTAL DAMAGES.
This limitation applies to
o anything related to the Licensed Content, services, content (including code) on third party Internet sites or third-party programs; and
o claims for breach of contract, breach of warranty, guarantee or condition, strict liability, negligence,
or other tort to the extent permitted by applicable law.
It also applies even if Microsoft knew or should have known about the possibility of the damages. The above limitation or exclusion may not apply to you because your country may not allow the exclusion or
limitation of incidental, consequential or other damages.
Please note: As this Licensed Content is distributed in Quebec, Canada, some of the clauses in this
agreement are provided below in French.
Remarque : Ce le contenu sous licence étant distribué au Québec, Canada, certaines des clauses
dans ce contrat sont fournies ci-dessous en français.
EXONÉRATION DE GARANTIE. Le contenu sous licence visé par une licence est offert « tel quel ». Toute utilisation de ce contenu sous licence est à votre seule risque et péril. Microsoft n’accorde aucune autre garantie
expresse. Vous pouvez bénéficier de droits additionnels en vertu du droit local sur la protection dues consommateurs, que ce contrat ne peut modifier. La ou elles sont permises par le droit locale, les garanties
implicites de qualité marchande, d’adéquation à un usage particulier et d’absence de contrefaçon sont exclues.
LIMITATION DES DOMMAGES-INTÉRÊTS ET EXCLUSION DE RESPONSABILITÉ POUR LES
DOMMAGES. Vous pouvez obtenir de Microsoft et de ses fournisseurs une indemnisation en cas de dommages directs uniquement à hauteur de 5,00 $ US. Vous ne pouvez prétendre à aucune indemnisation pour les autres
dommages, y compris les dommages spéciaux, indirects ou accessoires et pertes de bénéfices.
Cette limitation concerne: tout ce qui est relié au le contenu sous licence, aux services ou au contenu (y compris le code)
figurant sur des sites Internet tiers ou dans des programmes tiers; et.
les réclamations au titre de violation de contrat ou de garantie, ou au titre de responsabilité
stricte, de négligence ou d’une autre faute dans la limite autorisée par la loi en vigueur.

Elle s’applique également, même si Microsoft connaissait ou devrait connaître l’éventualité d’un tel dommage. Si
votre pays n’autorise pas l’exclusion ou la limitation de responsabilité pour les dommages indirects, accessoires ou de quelque nature que ce soit, il se peut que la limitation ou l’exclusion ci-dessus ne s’appliquera pas à votre
égard.
EFFET JURIDIQUE. Le présent contrat décrit certains droits juridiques. Vous pourriez avoir d’autres droits
prévus par les lois de votre pays. Le présent contrat ne modifie pas les droits que vous confèrent les lois de votre pays si celles-ci ne le permettent pas.
Revised September 2012