Azure IaaS にフル活用! 本番環境 テスト環境 ASR IaaSマイグレーション Database マイグレーション Azure PaaS へマイグレーション Azure Container
Upload
packt-publishingCategory
view
268download
0
Free Sample
In this package, you will find: • The author biography • A preview chapter from the book, Chapter 2 'Creating and Deploying
a Windows Virtual Machine' • A synopsis of the book’s content • More information on Microsoft Azure IaaS Essentials
About the Author Gethyn Ellis runs a small IT consulting and training company that offers services to cloud, virtualization, and database technologies. He is based mainly in the UK and has been working with clients in both the private and public sectors. He does, however, support clients in both North America and the rest of Europe. He has been involved in several projects in deploying a virtual machine infrastructure to Azure and other cloud offerings. He has also written Getting Started with SQL Server 2014 Administration, Packt Publishing. You can follow his blog at http://www.gethynellis.com.
Microsoft Azure IaaS Essentials Cloud computing has been a buzzword in the IT industry for some time, and there are several cloud providers on the market. Microsoft Azure is Microsoft's cloud offering. Microsoft Azure has evolved very quickly over the last few years and now offers a comprehensive set of services, including Infrastructure as a Service (IaaS). In this book, we will start by explaining what is meant by some cloud terminology. We will take a look at how we can deploy both Windows/Linux-based virtual machines in Azure. We will take a look at how to set up a virtual network, so that our cloud-based resources can communicate with each other. Much like an on-premises server, our cloud-based servers will need to be monitored for any potential issues, and we will take a look at how we can design cloud systems that are both highly available and fault-tolerant.
What This Book Covers Chapter 1, Introduction to Microsoft Azure Cloud Services, discusses some of the terminology around cloud, from the services offered to some of the specific features available in Microsoft Azure. You should be able to differentiate between a public and private cloud.
Chapter 2, Creating and Deploying a Windows Virtual Machine, shows you how we can create a new Windows-based virtual machine in Microsoft Azure. We will take a look at how we can connect to and work on the virtual machine and how we can control the VM using PowerShell. Finally, we will see how we can convert an existing server and make it an Azure-based VM.
Chapter 3, Deploying Linux Virtual Machines on Azure, shows you how we can create and configure a Linux-based virtual machine in Microsoft Azure's cloud. We will take a look at the different flavors of Linux available, how we can create the virtual machine, how we can use the command-line interface and Putty, and how we can connect via RDP to work with Linux.
Chapter 4, Virtual Networks, shows you how we can create a virtual network in Azure. We will take a look at how we can approach moving an existing virtual machine to a new virtual network and what is needed to configure point-to-site connectivity for hybrid networks that allow you to combine your on-premises network with your cloud-based resources.
Chapter 5, Managing and Monitoring Virtual Machines, shows you how we can set up and collect the diagnostic information on our cloud-based virtual machine. We will take a look at what we need to do in order to store this information in the cloud and also how we can integrate the monitoring with on-premises tools, such as SCOM.
Chapter 6, Microsoft Azure and Active Directory, discusses the options that are available to you when it comes to making use of Microsoft Azure Directory Services. We will take a look at how we can create a cloud-based directory and discuss the options available for integrating your on-premises Active Directory with the cloud.
Chapter 7, High Availability and Disaster Recovery for Azure Virtual Machines, shows you the High Availability options that you have when configuring virtual machines in Azure. You have a number of options available to you when you configure both your Azure-based VMs to be highly available, including the ability to create availability sets. You can make use of site recovery to use the Azure cloud as a disaster recovery site for both your cloud-based virtual machines and on-premises Hyper-V virtual machines.
[ 17 ]
Creating and Deploying a Windows Virtual Machine
In this chapter, we will focus on deploying a virtual machine to Microsoft Azure. In this chapter, you will learn the following topics:
• Creating a new virtual machine running Windows• Connecting to your Windows virtual machine• Deploying an existing Windows server to Azure
In this chapter, we will deploy a virtual machine with a Windows server installed. We will take a look at the options to connect to the virtual machine and then, we will discuss the options to deploy an existing server, either a physical or virtual server, to Microsoft Azure.
Creating a new Windows server virtual machineIn order to create a new virtual machine in Microsoft Azure, you need to have a Microsoft Azure account. This was discussed in Chapter 1, Introduction to Microsoft Azure Cloud Services. Feel free to revert if you need any guidance on creating your Microsoft Azure account. If you have already created your Microsoft Azure account, visit https://azure.microsoft.com.
Creating and Deploying a Windows Virtual Machine
[ 18 ]
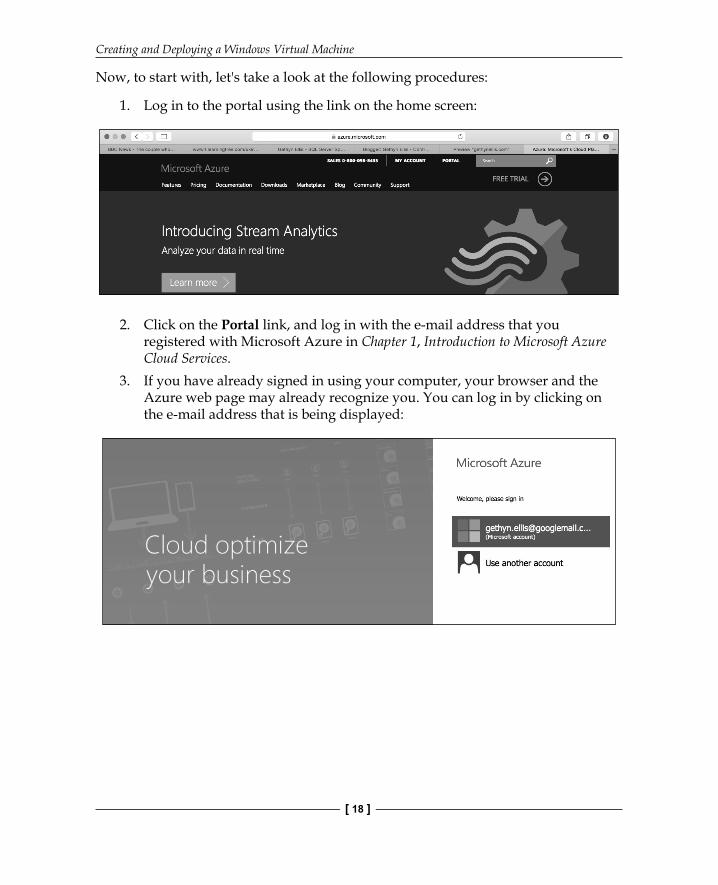
Now, to start with, let's take a look at the following procedures:
1. Log in to the portal using the link on the home screen:
2. Click on the Portal link, and log in with the e-mail address that you registered with Microsoft Azure in Chapter 1, Introduction to Microsoft Azure Cloud Services.
3. If you have already signed in using your computer, your browser and the Azure web page may already recognize you. You can log in by clicking on the e-mail address that is being displayed:
Chapter 2
[ 19 ]
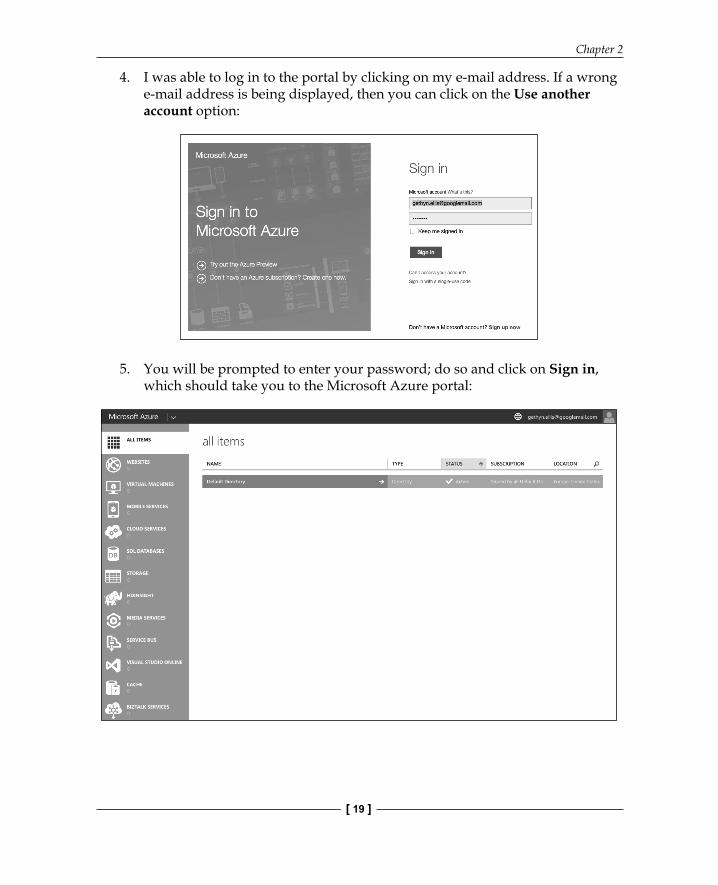
4. I was able to log in to the portal by clicking on my e-mail address. If a wrong e-mail address is being displayed, then you can click on the Use another account option:
5. You will be prompted to enter your password; do so and click on Sign in, which should take you to the Microsoft Azure portal:
Creating and Deploying a Windows Virtual Machine
[ 20 ]
Now you are successfully logged into the portal; you can create a Windows virtual machine. We will take a look at the following two options to create a server from scratch:
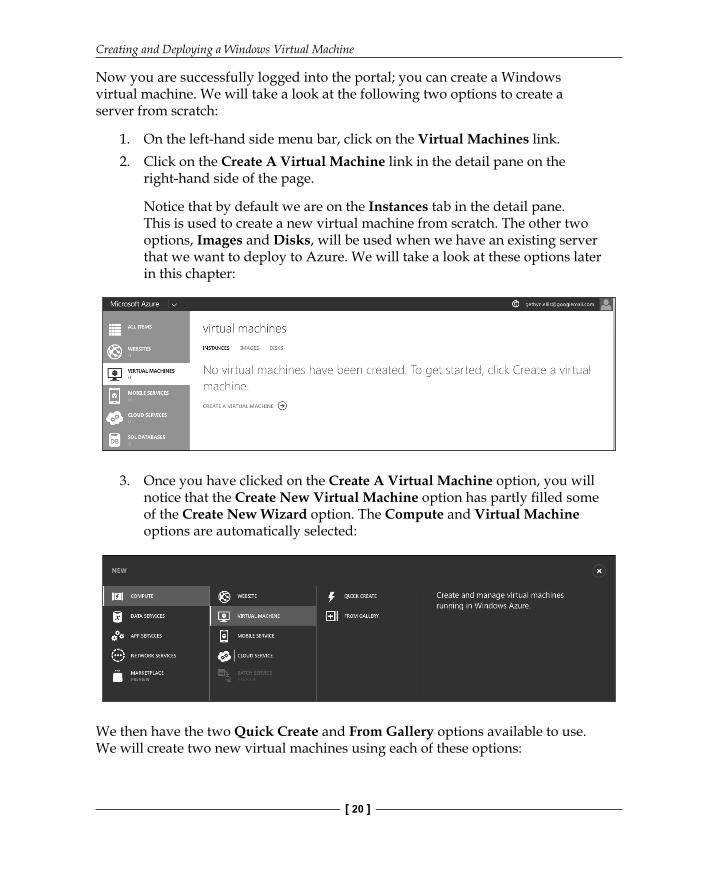
1. On the left-hand side menu bar, click on the Virtual Machines link.2. Click on the Create A Virtual Machine link in the detail pane on the
right-hand side of the page.
Notice that by default we are on the Instances tab in the detail pane. This is used to create a new virtual machine from scratch. The other two options, Images and Disks, will be used when we have an existing server that we want to deploy to Azure. We will take a look at these options later in this chapter:
3. Once you have clicked on the Create A Virtual Machine option, you will notice that the Create New Virtual Machine option has partly fi lled some of the Create New Wizard option. The Compute and Virtual Machine options are automatically selected:
We then have the two Quick Create and From Gallery options available to use. We will create two new virtual machines using each of these options:
Chapter 2
[ 21 ]
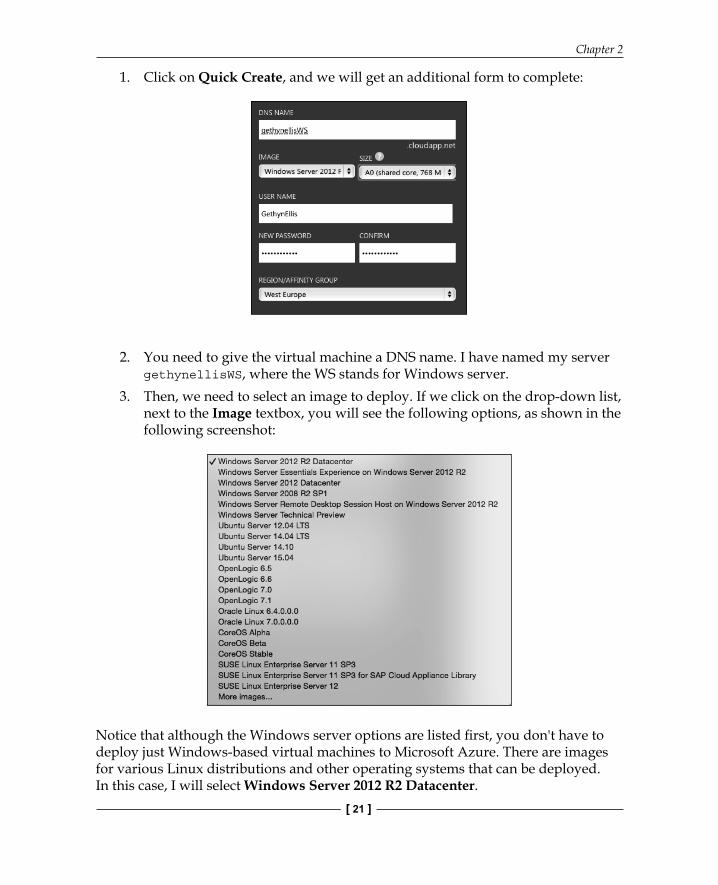
1. Click on Quick Create, and we will get an additional form to complete:
2. You need to give the virtual machine a DNS name. I have named my server gethynellisWS, where the WS stands for Windows server.
3. Then, we need to select an image to deploy. If we click on the drop-down list, next to the Image textbox, you will see the following options, as shown in the following screenshot:
Notice that although the Windows server options are listed fi rst, you don't have to deploy just Windows-based virtual machines to Microsoft Azure. There are images for various Linux distributions and other operating systems that can be deployed. In this case, I will select Windows Server 2012 R2 Datacenter.
Creating and Deploying a Windows Virtual Machine
[ 22 ]
Pricing for virtual machinesThe next option that we need to pick is very important, as the size and specifi cation we choose will defi ne the performance that we get and also the price and cost of the virtual machine when it's running. I think you'll agree that getting this right is probably important. You can get up-to-date price information from the Microsoft Azure website (http://azure.microsoft.com/pricing/).
Now, the virtual machine gets billed on a per minute basis, while the machine is running. Virtual machines are supported by Microsoft Azure in both the Basic and Standard tiers along with the Premium tier. As I mentioned earlier, there is a hierarchical structure to the pricing. The more basic the tier, the cheaper the virtual machine is to run.
It is important to note that you only get billed when your virtual machines are running. If you have a virtual machine built but it is shut down, then the subscription will remain active, but you will not be charged. You can leave your virtual machine housed on Azure with no cost as long as it's shut down.
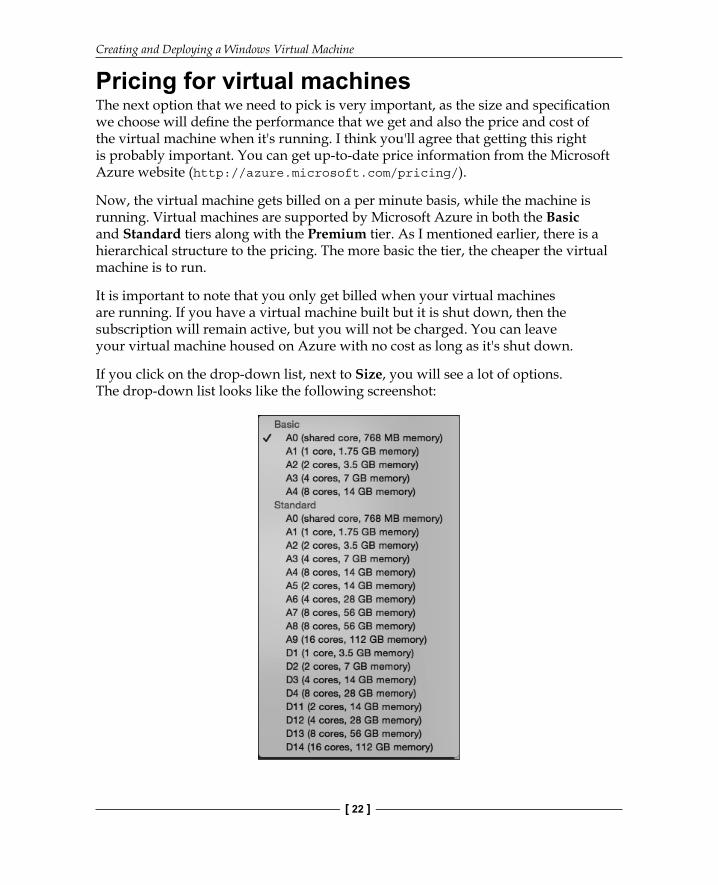
If you click on the drop-down list, next to Size, you will see a lot of options. The drop-down list looks like the following screenshot:
Chapter 2
[ 23 ]
For the purposes of this demonstration, I have selected A0 under the Basic tier—the cheapest option. At the time of writing, A0 in the Basic tier offers the following:
• Instance: A0• Cores: 1• RAM: 0.75 GB• Disk Size: 20 GB• Price: £0.011 per hour (approximately £8 a month)
For comparison, the maximum size in the Basic tier offers the following options:
• Instance: D14• Cores: 16• RAM: 112 GB• Disk Size: 800 GB• Price: £1.6617 per hour (approximately £1187 a month)
As you can see, there is quite a signifi cant difference in price, capacity, and performance. Azure pricing changes very regularly; you can check out the Azure pricing web page for the latest price information at http://azure.microsoft.com/en-gb/pricing/.
The Basic tier is perfectly fi ne to use for development and test purposes, so I have chosen the cheapest option for my virtual machine. You will obviously make your decision based on the performance and capacity you need and what the virtual machine will eventually be used for.
The Microsoft Azure pricing is fairly fl uid; I don't want to include pricing or prices in this book, as obviously, they could change over time. For a detailed breakdown on the pricing of Microsoft Azure virtual machines, you can visit http://azure.microsoft.com/en-us/pricing/details/virtual-machines/.
Then, we need to create a username, which will act as the administrator on this virtual machine. For the purposes of this example, I will use GethynEllis as a password. You can use whatever best suits your needs here.
When it comes to the Region/Affi nity Group section, for the purposes of this chapter, you will pick the region closest to you. I'll talk more about this option in a later chapter, which is based on networking. When the virtual machine is created, the Blob storage is used to store the image. When you choose an affi nity group or a region, this can affect where, in the world, the virtual machine gets placed in the Blob storage. If you don't specify an affi nity group, a Blob storage container will automatically get created in the region specifi ed, so choose appropriately.
Creating and Deploying a Windows Virtual Machine
[ 24 ]
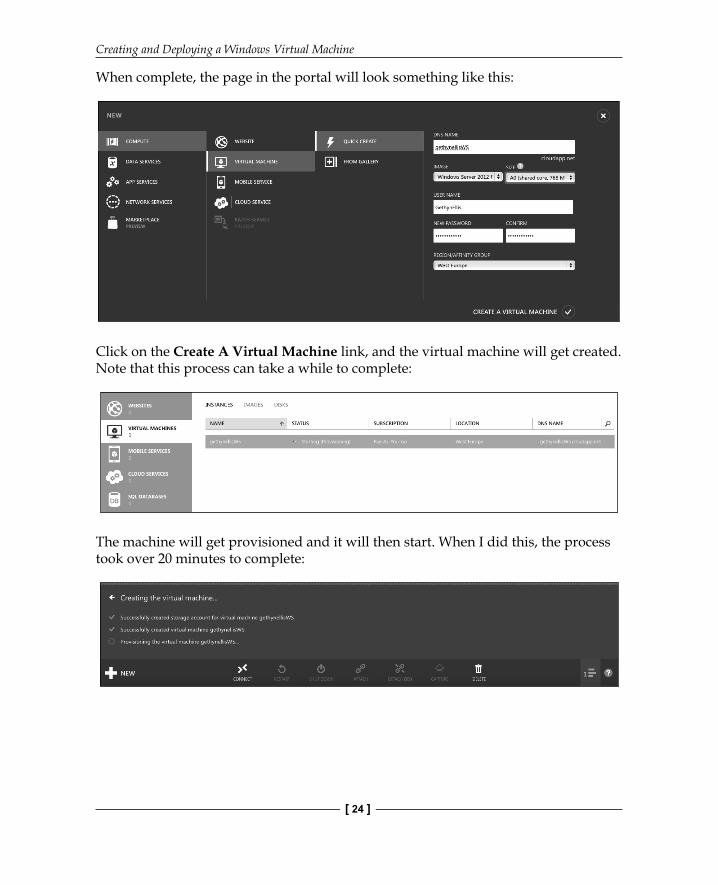
When complete, the page in the portal will look something like this:
Click on the Create A Virtual Machine link, and the virtual machine will get created. Note that this process can take a while to complete:
The machine will get provisioned and it will then start. When I did this, the process took over 20 minutes to complete:
Chapter 2
[ 25 ]
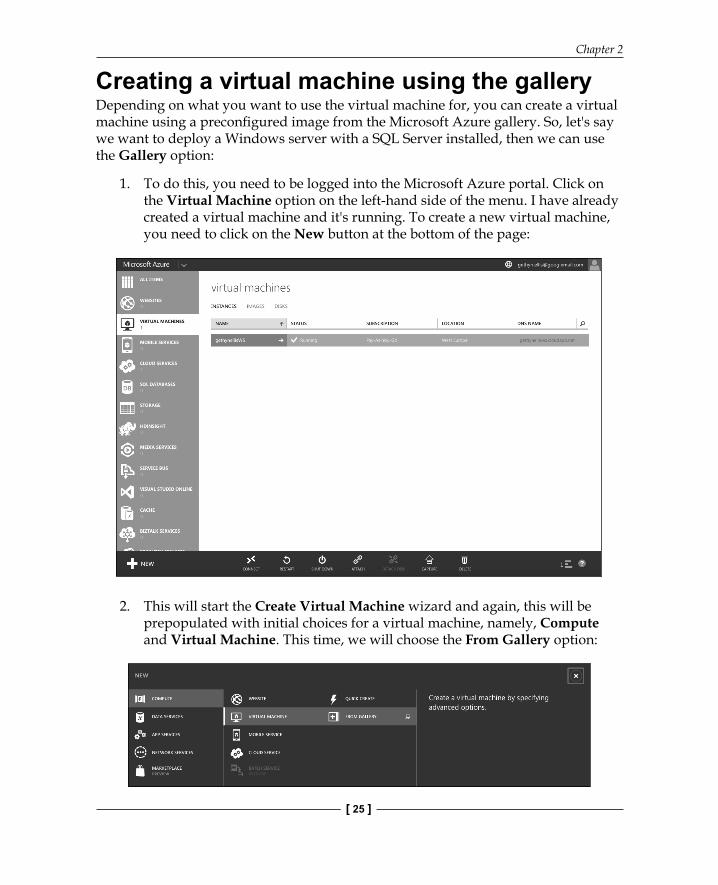
Creating a virtual machine using the galleryDepending on what you want to use the virtual machine for, you can create a virtual machine using a preconfi gured image from the Microsoft Azure gallery. So, let's say we want to deploy a Windows server with a SQL Server installed, then we can use the Gallery option:
1. To do this, you need to be logged into the Microsoft Azure portal. Click on the Virtual Machine option on the left-hand side of the menu. I have already created a virtual machine and it's running. To create a new virtual machine, you need to click on the New button at the bottom of the page:
2. This will start the Create Virtual Machine wizard and again, this will be prepopulated with initial choices for a virtual machine, namely, Compute and Virtual Machine. This time, we will choose the From Gallery option:
Creating and Deploying a Windows Virtual Machine
[ 26 ]
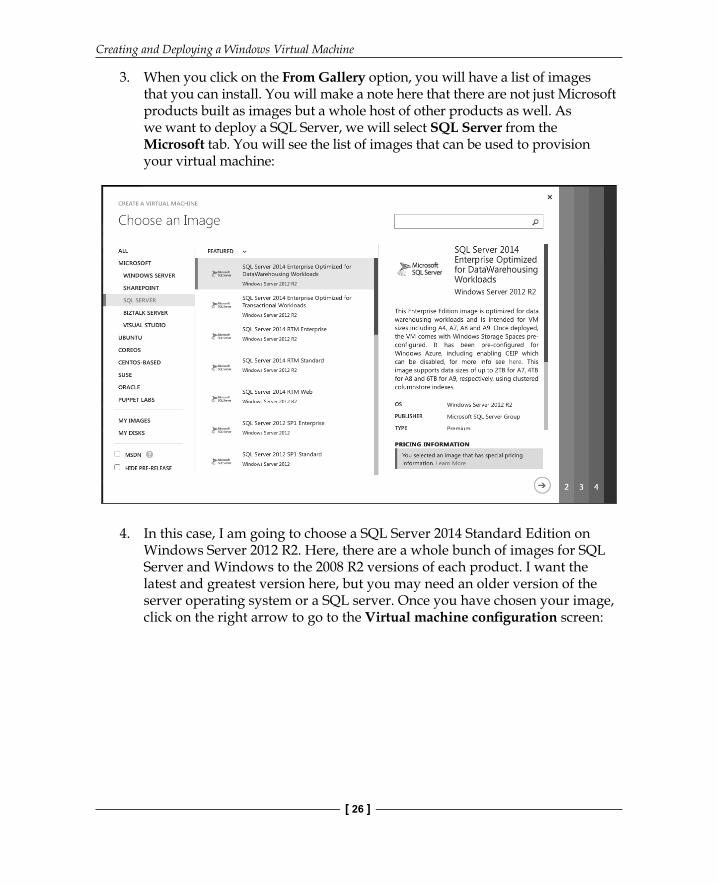
3. When you click on the From Gallery option, you will have a list of images that you can install. You will make a note here that there are not just Microsoft products built as images but a whole host of other products as well. As we want to deploy a SQL Server, we will select SQL Server from the Microsoft tab. You will see the list of images that can be used to provision your virtual machine:
4. In this case, I am going to choose a SQL Server 2014 Standard Edition on Windows Server 2012 R2. Here, there are a whole bunch of images for SQL Server and Windows to the 2008 R2 versions of each product. I want the latest and greatest version here, but you may need an older version of the server operating system or a SQL server. Once you have chosen your image, click on the right arrow to go to the Virtual machine confi guration screen:
Chapter 2
[ 27 ]
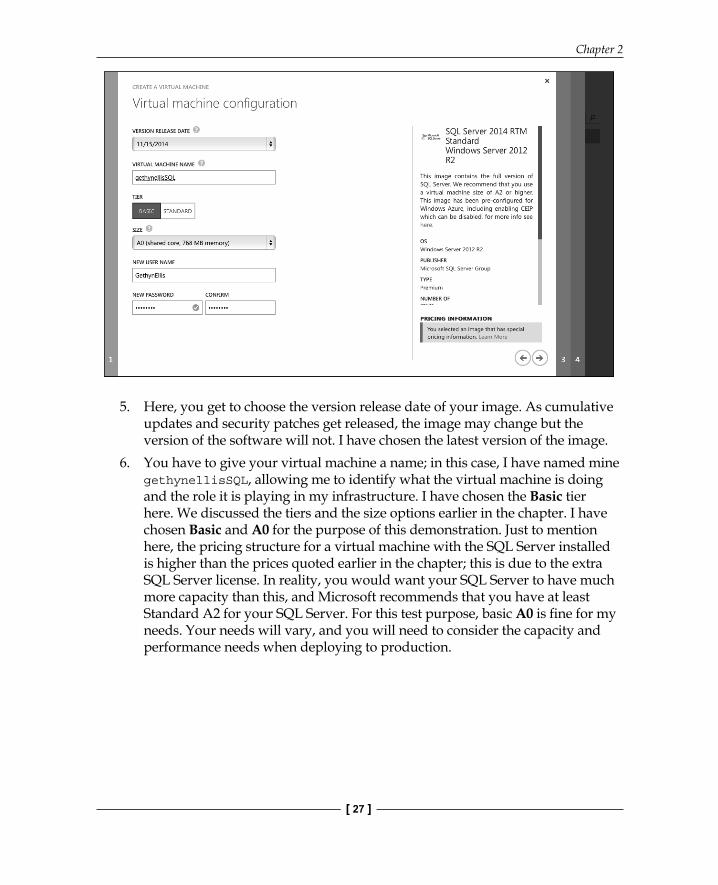
5. Here, you get to choose the version release date of your image. As cumulative updates and security patches get released, the image may change but the version of the software will not. I have chosen the latest version of the image.
6. You have to give your virtual machine a name; in this case, I have named mine gethynellisSQL, allowing me to identify what the virtual machine is doing and the role it is playing in my infrastructure. I have chosen the Basic tier here. We discussed the tiers and the size options earlier in the chapter. I have chosen Basic and A0 for the purpose of this demonstration. Just to mention here, the pricing structure for a virtual machine with the SQL Server installed is higher than the prices quoted earlier in the chapter; this is due to the extra SQL Server license. In reality, you would want your SQL Server to have much more capacity than this, and Microsoft recommends that you have at least Standard A2 for your SQL Server. For this test purpose, basic A0 is fi ne for my needs. Your needs will vary, and you will need to consider the capacity and performance needs when deploying to production.
Creating and Deploying a Windows Virtual Machine
[ 28 ]
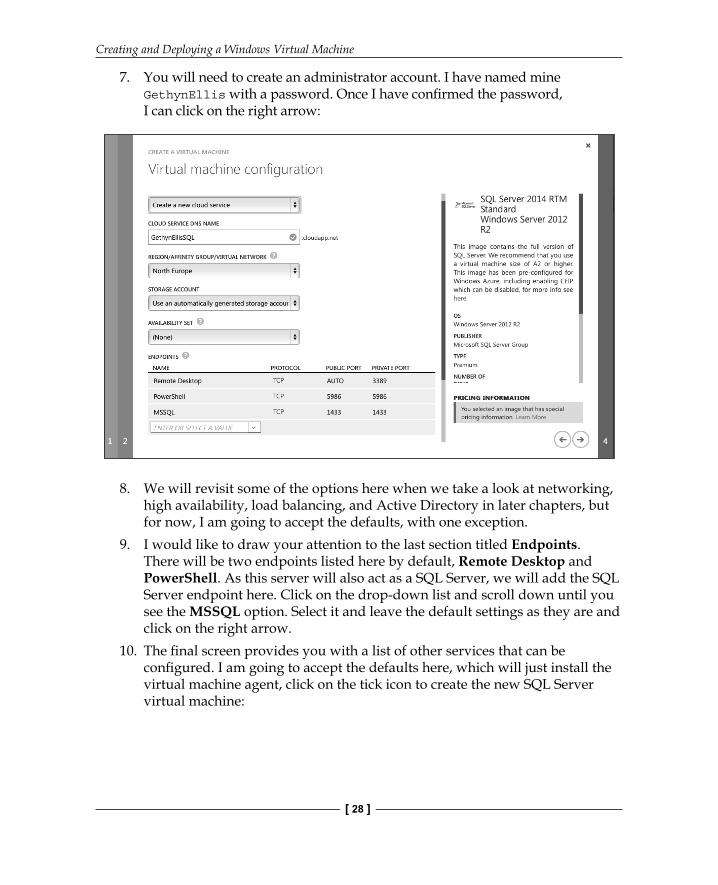
7. You will need to create an administrator account. I have named mine GethynEllis with a password. Once I have confi rmed the password, I can click on the right arrow:
8. We will revisit some of the options here when we take a look at networking, high availability, load balancing, and Active Directory in later chapters, but for now, I am going to accept the defaults, with one exception.
9. I would like to draw your attention to the last section titled Endpoints. There will be two endpoints listed here by default, Remote Desktop and PowerShell. As this server will also act as a SQL Server, we will add the SQL Server endpoint here. Click on the drop-down list and scroll down until you see the MSSQL option. Select it and leave the default settings as they are and click on the right arrow.
10. The fi nal screen provides you with a list of other services that can be confi gured. I am going to accept the defaults here, which will just install the virtual machine agent, click on the tick icon to create the new SQL Server virtual machine:

Chapter 2
[ 29 ]
Again, this process can take some time while the virtual machine is provisioned.
Connecting and managing your new Windows server virtual machineIn this section, we will take a look at how you can connect and manage your new Windows-based virtual machine. You will learn how to start and stop and your virtual machine in the Azure portal and how you can connect to the virtual machine to work on it.
Starting and stopping the virtual machineYou can start and stop your virtual machine using the Microsoft Azure portal as follows:
1. To start and stop the virtual machine, you need to be logged into the Azure portal.
2. When you are logged into the portal, you need to select the Virtual Machinesoption on the left-hand side of the page.
Creating and Deploying a Windows Virtual Machine
[ 30 ]
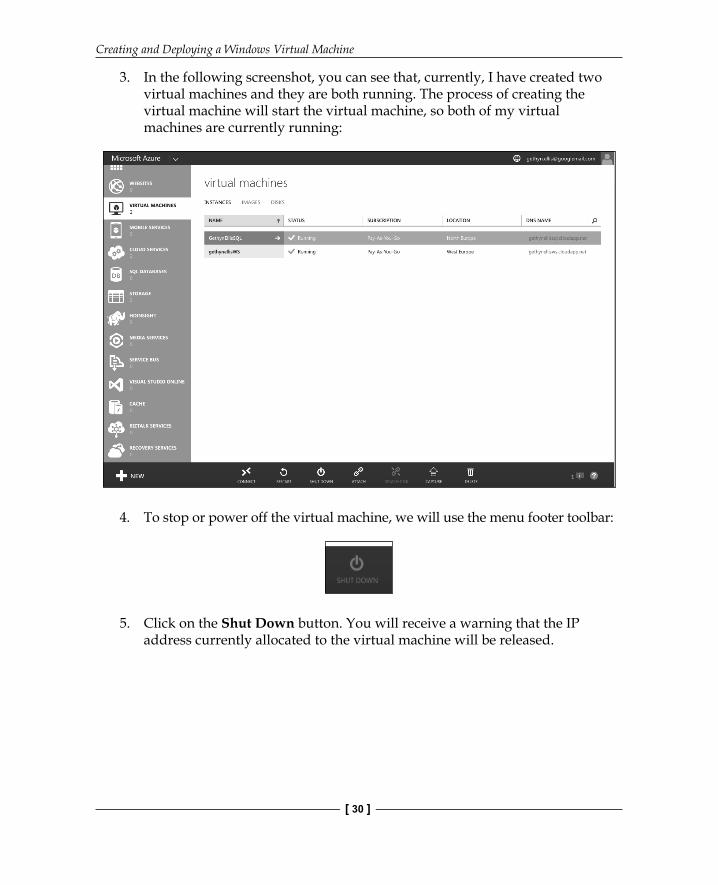
3. In the following screenshot, you can see that, currently, I have created two virtual machines and they are both running. The process of creating the virtual machine will start the virtual machine, so both of my virtual machines are currently running:
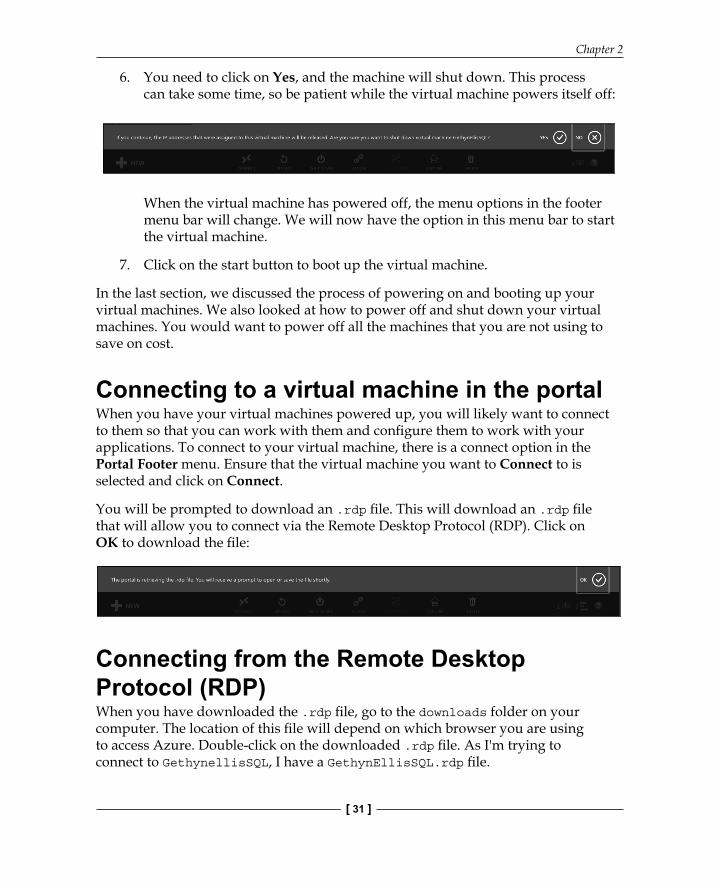
4. To stop or power off the virtual machine, we will use the menu footer toolbar:
5. Click on the Shut Down button. You will receive a warning that the IP address currently allocated to the virtual machine will be released.
Chapter 2
[ 31 ]
6. You need to click on Yes, and the machine will shut down. This process can take some time, so be patient while the virtual machine powers itself off:
When the virtual machine has powered off, the menu options in the footer menu bar will change. We will now have the option in this menu bar to start the virtual machine.
7. Click on the start button to boot up the virtual machine.
In the last section, we discussed the process of powering on and booting up your virtual machines. We also looked at how to power off and shut down your virtual machines. You would want to power off all the machines that you are not using to save on cost.
Connecting to a virtual machine in the portalWhen you have your virtual machines powered up, you will likely want to connect to them so that you can work with them and confi gure them to work with your applications. To connect to your virtual machine, there is a connect option in the Portal Footer menu. Ensure that the virtual machine you want to Connect to is selected and click on Connect.
You will be prompted to download an .rdp fi le. This will download an .rdp fi le that will allow you to connect via the Remote Desktop Protocol (RDP). Click on OK to download the fi le:
Connecting from the Remote Desktop Protocol (RDP)When you have downloaded the .rdp fi le, go to the downloads folder on your computer. The location of this fi le will depend on which browser you are using to access Azure. Double-click on the downloaded .rdp fi le. As I'm trying to connect to GethynellisSQL, I have a GethynEllisSQL.rdp fi le.
Creating and Deploying a Windows Virtual Machine
[ 32 ]
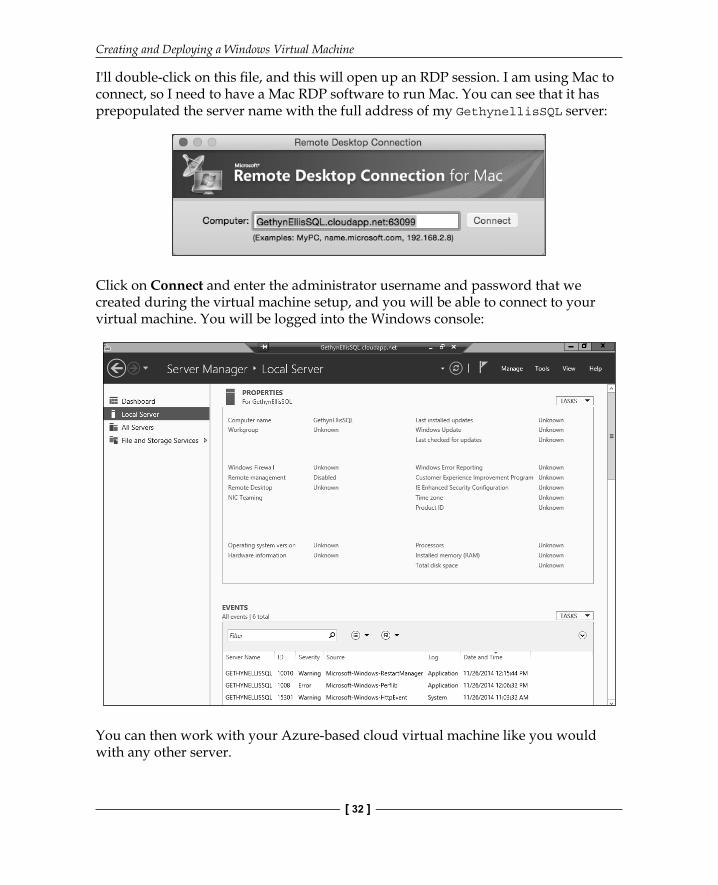
I'll double-click on this fi le, and this will open up an RDP session. I am using Mac to connect, so I need to have a Mac RDP software to run Mac. You can see that it has prepopulated the server name with the full address of my GethynellisSQL server:
Click on Connect and enter the administrator username and password that we created during the virtual machine setup, and you will be able to connect to your virtual machine. You will be logged into the Windows console:
You can then work with your Azure-based cloud virtual machine like you would with any other server.

Chapter 2
[ 33 ]
Working with your virtual machine with PowerShellWhen we created the two virtual machines earlier in this chapter, the RDP and PowerShell endpoints were installed by default. PowerShell has become Microsoft's scripting language of choice over the last few years. You can use PowerShell to work with and manage your Azure-based virtual machines. You will need PowerShell for Azure, which you can download and install from http://azure.microsoft.com/en-gb/documentation/articles/install-configure-powershell/#Install.
Follow the installation wizard, and when you have Azure PowerShell installed, you can connect to your Microsoft Azure account. I'm using Windows 7, so I can start Azure PowerShell by navigating to Start | All Programs | Microsoft Azure PowerShell. This will take you to the Microsoft Azure PowerShell command line:
1. On the command prompt, you can type the following command:Add-azureaccount
2. Press Enter:
Creating and Deploying a Windows Virtual Machine
[ 34 ]
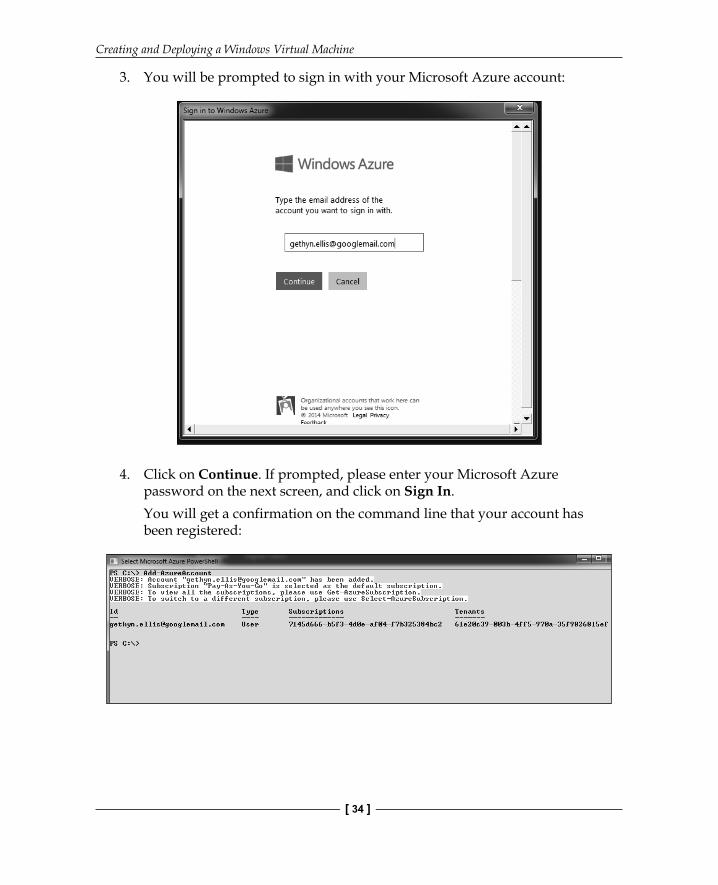
3. You will be prompted to sign in with your Microsoft Azure account:
4. Click on Continue. If prompted, please enter your Microsoft Azure password on the next screen, and click on Sign In.You will get a confirmation on the command line that your account has been registered:
Chapter 2
[ 35 ]
5. You can list the accounts added by running the following command:Get-AzureAccount
This will list the accounts that have been registered with Azure PowerShell.
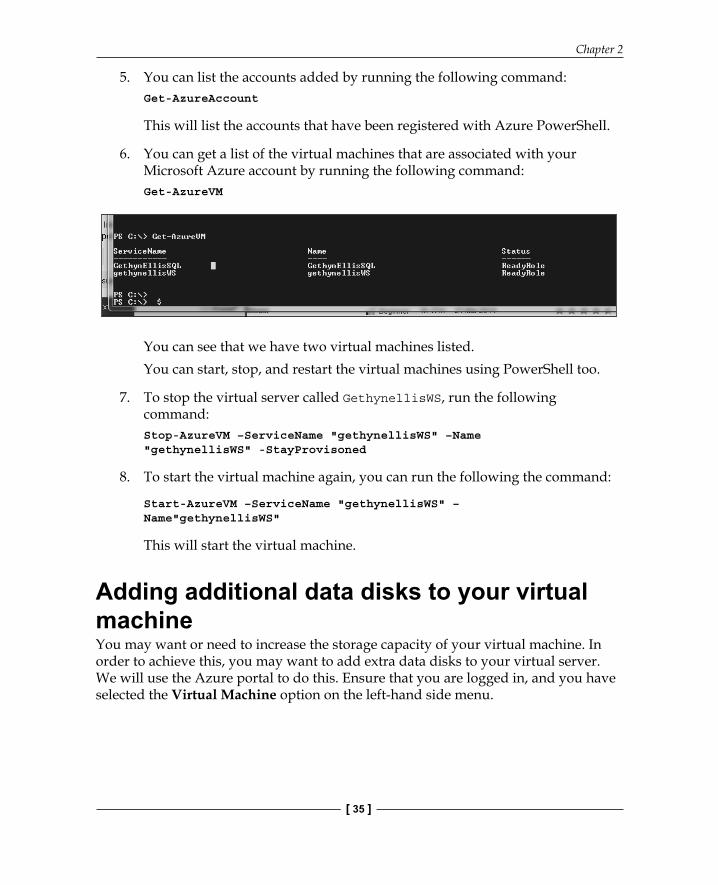
6. You can get a list of the virtual machines that are associated with your Microsoft Azure account by running the following command:Get-AzureVM
You can see that we have two virtual machines listed.You can start, stop, and restart the virtual machines using PowerShell too.
7. To stop the virtual server called GethynellisWS, run the following command:Stop-AzureVM –ServiceName "gethynellisWS" –Name "gethynellisWS" -StayProvisoned
8. To start the virtual machine again, you can run the following the command:
Start-AzureVM –ServiceName "gethynellisWS" –Name"gethynellisWS"
This will start the virtual machine.
Adding additional data disks to your virtual machineYou may want or need to increase the storage capacity of your virtual machine. In order to achieve this, you may want to add extra data disks to your virtual server. We will use the Azure portal to do this. Ensure that you are logged in, and you have selected the Virtual Machine option on the left-hand side menu.

Creating and Deploying a Windows Virtual Machine
[ 36 ]
Select the virtual machine where you want to add the disks. In this case, I will add the disk to the GethynEllisSQL virtual machine. Ensure that the virtual machine is highlighted, and in the footer options menu, choose Attach and click on Empty Disk:
Then, we will need to complete the new disk wizard. You need to complete the Attach an empty disk to the virtual machine wizard:
Chapter 2
[ 37 ]
Follow these steps to add additional disks to your virtual machine:
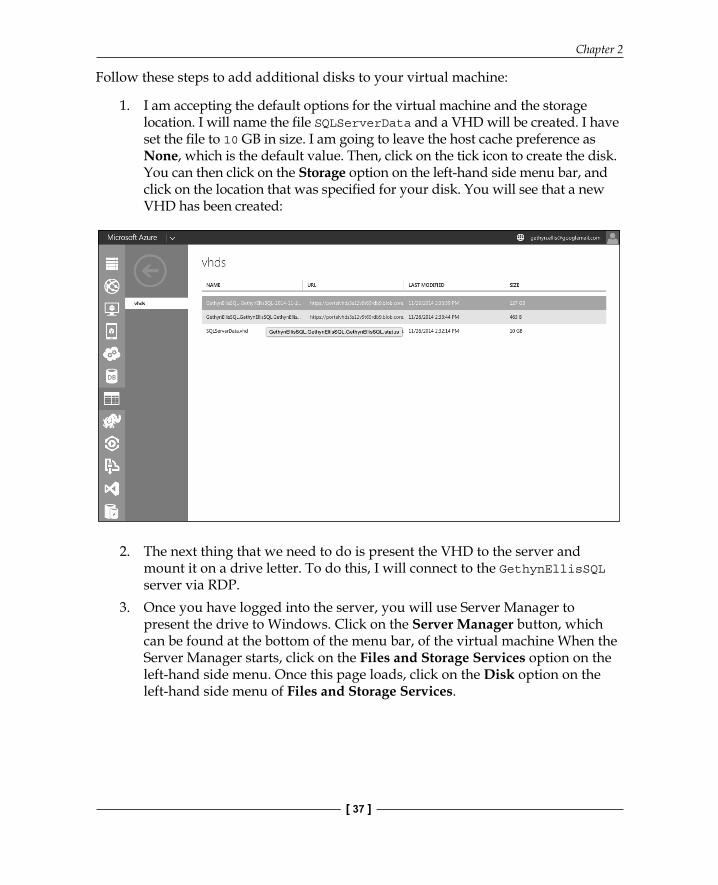
1. I am accepting the default options for the virtual machine and the storage location. I will name the fi le SQLServerData and a VHD will be created. I have set the fi le to 10 GB in size. I am going to leave the host cache preference as None, which is the default value. Then, click on the tick icon to create the disk. You can then click on the Storage option on the left-hand side menu bar, and click on the location that was specifi ed for your disk. You will see that a new VHD has been created:
2. The next thing that we need to do is present the VHD to the server and mount it on a drive letter. To do this, I will connect to the GethynEllisSQL server via RDP.
3. Once you have logged into the server, you will use Server Manager to present the drive to Windows. Click on the Server Manager button, which can be found at the bottom of the menu bar, of the virtual machine When the Server Manager starts, click on the Files and Storage Services option on the left-hand side menu. Once this page loads, click on the Disk option on the left-hand side menu of Files and Storage Services.
Creating and Deploying a Windows Virtual Machine
[ 38 ]
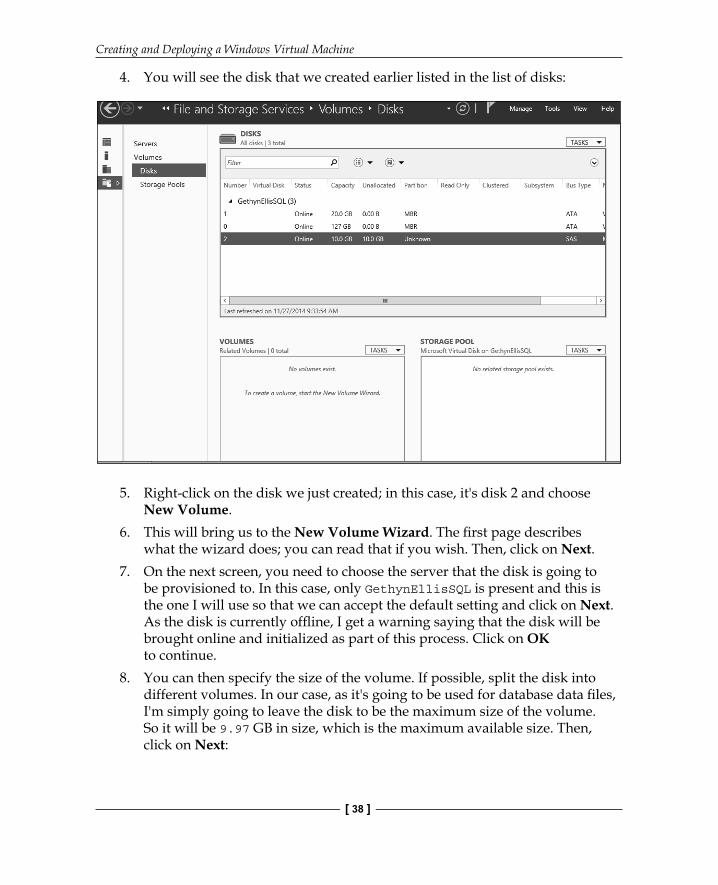
4. You will see the disk that we created earlier listed in the list of disks:
5. Right-click on the disk we just created; in this case, it's disk 2 and choose New Volume.
6. This will bring us to the New Volume Wizard. The fi rst page describes what the wizard does; you can read that if you wish. Then, click on Next.
7. On the next screen, you need to choose the server that the disk is going to be provisioned to. In this case, only GethynEllisSQL is present and this is the one I will use so that we can accept the default setting and click on Next. As the disk is currently offl ine, I get a warning saying that the disk will be brought online and initialized as part of this process. Click on OK to continue.
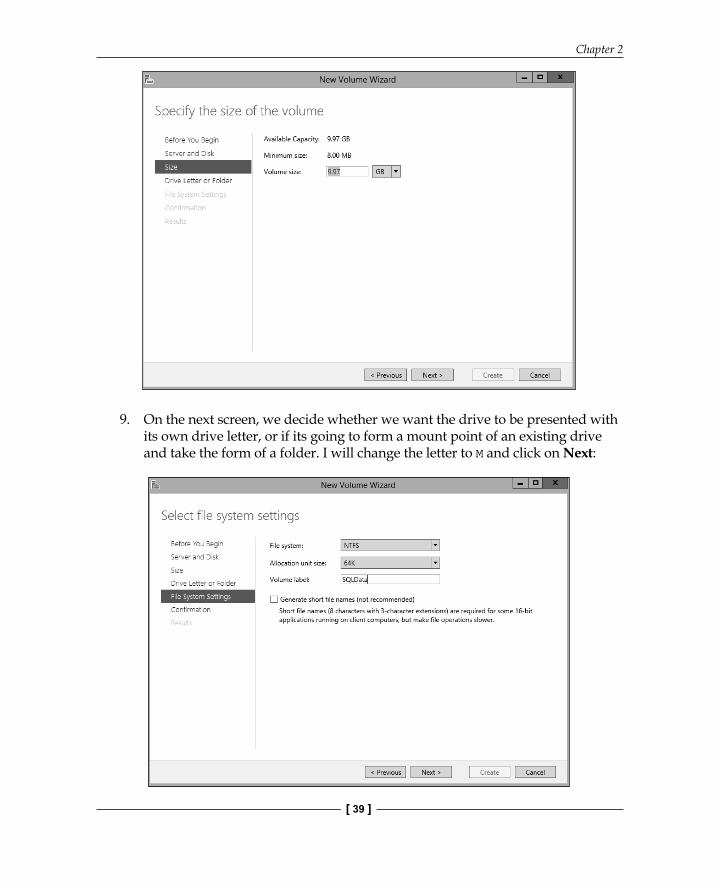
8. You can then specify the size of the volume. If possible, split the disk into different volumes. In our case, as it's going to be used for database data fi les, I'm simply going to leave the disk to be the maximum size of the volume. So it will be 9.97 GB in size, which is the maximum available size. Then, click on Next:
Chapter 2
[ 39 ]
9. On the next screen, we decide whether we want the drive to be presented with its own drive letter, or if its going to form a mount point of an existing drive and take the form of a folder. I will change the letter to M and click on Next:

Creating and Deploying a Windows Virtual Machine
[ 40 ]
10. Then, we need to choose the File system, which I'm going to leave as NTFS. As an alternative, you could pick ReFS, which stands for Resilient File System. For more information on this new type of fi le system in Windows 2012, visit http://msdn.microsoft.com/en-us/library/windows/desktop/hh848060(v=vs.85).aspx. As I'm going to be using the drive for SQL Server database fi les, I am going to change the Allocation unit size to 64K.
11. Click on Next, and then click on Create to add the drive as the disk in your Azure virtual machine. When complete, the disk will show in the fi lesystem:
Chapter 2
[ 41 ]
Deploying an existing server to Microsoft AzureWe have seen the process of creating a new server from scratch. What would we do with the existing physical servers or virtual servers running on an on-premises hypervisor such as ESX or Hyper-V so that we can move to the cloud? Well, the answer is relatively straightforward.
Let's assume that for the purposes of this exercise, you want to convert an existing server as it is, but with confi guration changes.
In order to migrate an existing server to a Microsoft Azure virtual machine, we need to have our server's disks as VHDs. Unsurprisingly, VHDs are the disk formats that Hyper-V uses too. So, if you have a physical server, you can use your Virtual Machine Manager (VMM) that is part of System Center to perform a physical-to-virtual (P2V) migration of the server and its disks. This would need to be done on premises. There are other third-party P2V tools that could also be used to perform the migration. Alternatively, if you are using a different non-Hyper-V hypervisor, you can run a virtual-to-virtual (V2V) on the virtual machine to get the disks to the correct format.
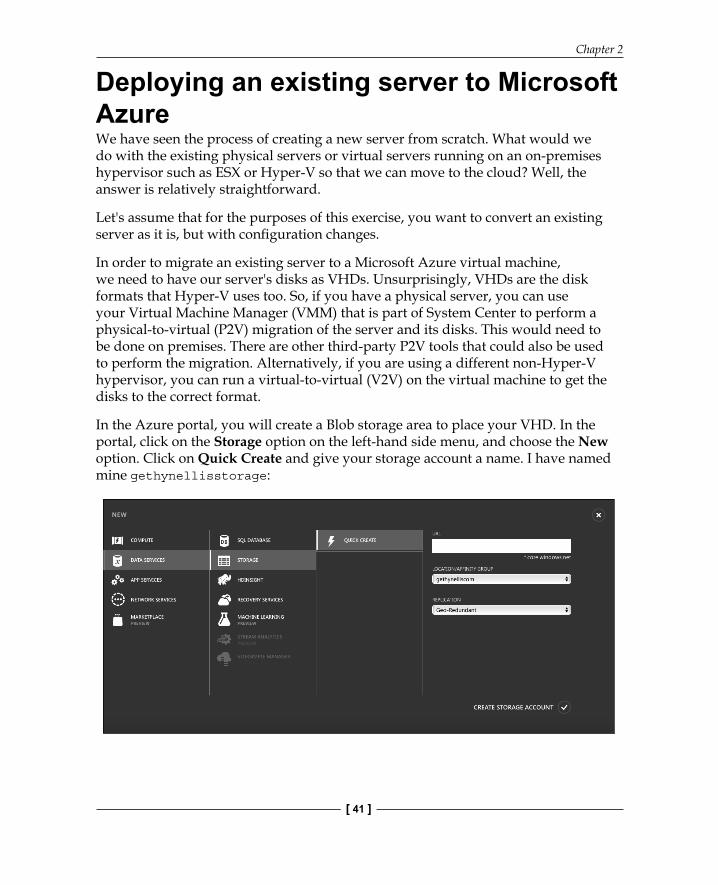
In the Azure portal, you will create a Blob storage area to place your VHD. In the portal, click on the Storage option on the left-hand side menu, and choose the New option. Click on Quick Create and give your storage account a name. I have named mine gethynellisstorage:

Creating and Deploying a Windows Virtual Machine
[ 42 ]
You will then create a new container in this account. Click on the account that we just created, and click on the Containers option that can be found at the top of the screen. Then, click on Create a Container. I have named my container vhdimsages, and click on the tick icon to create the container. When it has been successfully created, you will have a storage container, and you will be able to see the storage container URL:
Then, you are ready to upload your .vhd fi le; you can place the .vhd fi le anywhere within the Blob storage we just created. In the following PowerShell examples, BlobStorageURL is the URL for the storage account that we created earlier. vhdimages is the container within the Blob storage we created earlier. VHDName is the label that appears in the management portal to identify the virtual hard disk. PathToVHDFile is the full path and name of the .vhd fi le.
From the Microsoft Azure PowerShell window, you can execute the following command:
Add-AzureVhd -Destination "<BlobStorageURL>/<vhdimage>/<VHDName>.vhd" -LocalFilePath <PathToVHDFile>
Chapter 2
[ 43 ]
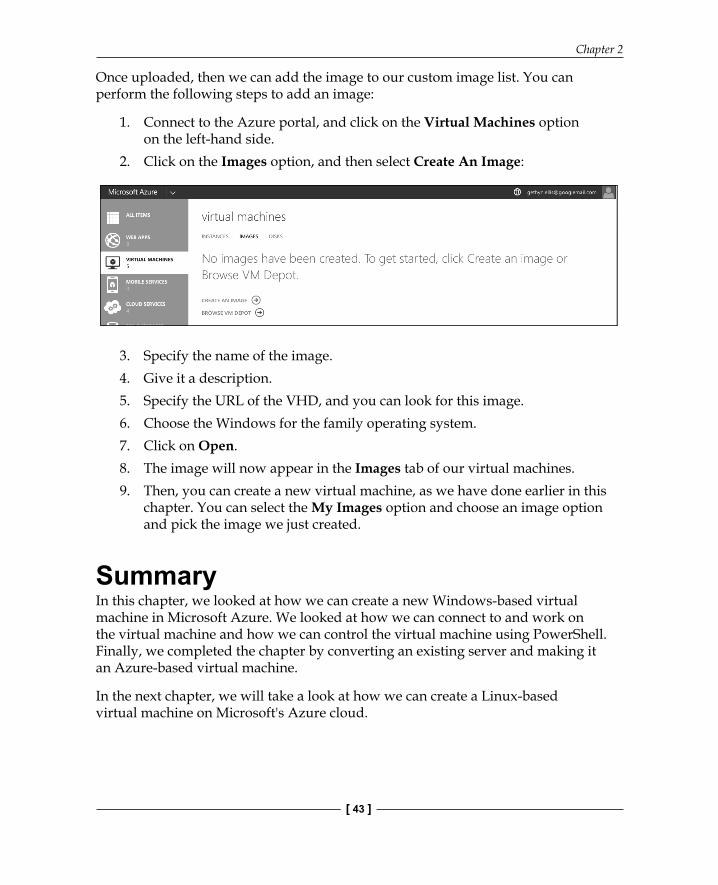
Once uploaded, then we can add the image to our custom image list. You can perform the following steps to add an image:
1. Connect to the Azure portal, and click on the Virtual Machines option on the left-hand side.
2. Click on the Images option, and then select Create An Image:
3. Specify the name of the image.4. Give it a description.5. Specify the URL of the VHD, and you can look for this image.6. Choose the Windows for the family operating system.7. Click on Open.8. The image will now appear in the Images tab of our virtual machines.9. Then, you can create a new virtual machine, as we have done earlier in this
chapter. You can select the My Images option and choose an image option and pick the image we just created.
SummaryIn this chapter, we looked at how we can create a new Windows-based virtual machine in Microsoft Azure. We looked at how we can connect to and work on the virtual machine and how we can control the virtual machine using PowerShell. Finally, we completed the chapter by converting an existing server and making it an Azure-based virtual machine.
In the next chapter, we will take a look at how we can create a Linux-based virtual machine on Microsoft's Azure cloud.
Where to buy this book You can buy Microsoft Azure IaaS Essentials from the Packt Publishing website. Alternatively, you can buy the book from Amazon, BN.com, Computer Manuals and most internet book retailers.
Click here for ordering and shipping details.
www.PacktPub.com
Stay Connected:
Get more information Microsoft Azure IaaS Essentials