Micro-Propagation of Bamboo - Betuco bambu/Micro-Propagation of Bamboo.pdf · Micro-propagation? 09...
35
TABLE OF CONTENTS http://www.inbar.int/publication/txt/INBAR_Technical_Report_No27.htm 1 van 35 31/01/2008 14:34 Training Manual "The INBAR-UPLB-ERDB International Training on Bamboo Propagation: Techniques, Utilization and Program Development" Micro-Propagation of Bamboo Produced by Dr. Alfinetta B. Zamora Plant Cell and Tissue Culture laboratory Institute of Plant Breeding, College of Agriculture, University of the Philippines Los Banos, Los Banos, Laguna, Philippines Funded and On-line Published by International Network for Bamboo and Rattan (INBAR) Branch Box 100101-80, Beijing 100101 Peoples’ Republic of China October 2001
Transcript of Micro-Propagation of Bamboo - Betuco bambu/Micro-Propagation of Bamboo.pdf · Micro-propagation? 09...
TABLE OF CONTENTS http://www.inbar.int/publication/txt/INBAR_Technical_Report_No27.htm
1 van 35 31/01/2008 14:34
Training Manual"The INBAR-UPLB-ERDB International Training on Bamboo Propagation:
Techniques, Utilization and Program Development"
Micro-Propagation of Bamboo
Produced byDr. Alfinetta B. Zamora
Plant Cell and Tissue Culture laboratoryInstitute of Plant Breeding, College of Agriculture,
University of the Philippines Los Banos,Los Banos, Laguna, Philippines
Funded and On-line Published byInternational Network for Bamboo and Rattan (INBAR)
Branch Box 100101-80, Beijing 100101Peoples’ Republic of China
October 2001
TABLE OF CONTENTS http://www.inbar.int/publication/txt/INBAR_Technical_Report_No27.htm
2 van 35 31/01/2008 14:34
TABLE OF CONTENTS
PAGE
Foreword
Acknowledgments
1. Micro-propagation Protocols 01
2. What Do I Need To DoMicro-propagation?
09
3. Making the Most of Seeds andSeedlings
15
4. I Wanna Be Just Like You 43
5. Getting Ready for the Real World 66
6. Try Mini-clump Division 74
7. Making Up For Lost Forests 80
8. Help Me Out 89
Appendix . Preparation of Stock Solution 101
References 112
SECTION 1. MICROPROPAGATION PROTOCOLS
In this section, we would like you to learn about in vitro technologies and their application to plant propagation. "In vitro" connotesartificiality and the first mental picture that you might have will be a test tube. This is essentially what micropropagation is. Plants aregrown under an artificial environment within confines of a culture vessel typified by a test tube. How can a plant grow in suchconditions? Will you have to use seeds?
What is micropropagation?
Micropropagation is the development of new plants in an artificial medium under aseptic conditions. You do not have to start withseeds but you can use different parts of a plant as a starting materials to establish an in vitro culture. These will include embryos,pollen grains and parts such as stems, shoot tips, nodes, root tips, callus and single cells.
You may consider using seeds when asexual methods using traditional horticultural techniques are not possible, for example incoconut. Seeds are not useful to initiate tissue cultures when the candidate plant are apomictic. In such plants, the embryos are not
TABLE OF CONTENTS http://www.inbar.int/publication/txt/INBAR_Technical_Report_No27.htm
3 van 35 31/01/2008 14:34
regular embryos that form from fusion of male and female gametes. Instead, it develop from the cells in the nucellus or integuments ofthe seed. Seeds are also useful for initiating in vitro cultures of plants when it is difficult to use other plant parts and when it is notnecessary that the plants are copies of a selection. Such is the present situation in bamboo.
When other parts of the plant are used for in vitro culture, you can anticipate the outcome. Almost exact copies of the source plant aretypical.
High tech stuff?
The beginnings of this method can be traced to the earliest (although unsuccessful) attempt to grow plant tissues in aseptic culture byHaberlandt in 1902. Initially, the tissue culture methodologies were research tools. However, with a greater understanding of how cellsgrow and how shoots and roots can form in vitro in many economic plants, the methodologies were applied to propagation.
Why propagate plant through in vitro technologies? The primary applications of these techniques to plant propagation are: (a) to enablerapid multiplication under conditions that maintain freedom from disease, (b) to establish pathogen-free plants, and (c) to isolategenetically unique cells or cell lines that can become new plant variants (Hartmann and Kester, 1975).
Can we micropropagate bamboo?
The bamboo is among the many plants that have been successfully propagated by in vitro technologies, being the subject of manyresearches undertaken by several laboratories for many years (Zamora, 1994). The earliest report on bamboo tissue culture was in 1968by Alexander and Rao. The increase in published papers in the last 10 – 15 years signify that it will simply be a matter of time (andresearch and interested scientists) before each and every economic bamboo would be cultured in vitro. Table 1.1 summarizes thegenera and species for which reports are available on micropropagation.
What can you use for establishing cultures?
A scan of literature shows that the most amenable initial material for micropropagation is the seed. The seed, specifically the embryo,is most adapted to any propagation system, be this in vitro or ex vitro. It has several characteristics that make it ideal as plantingmaterial for tissue culture. First, it is small and as such several seeds can be disinfected in a small container at the same time. Second,the embryo is dormant and as such more amenable to harsher disinfection procedures, Third, seeds are easier to transport than otherplant parts, Fourth, you may store them and initiate cultures from them throughout the year.
Other juvenile materials, e.g. seedlings, are also very amenable to culture. Seeds can be aseptically germinated and the seedlings invitro can be used to initiate new cultures.
Aside from juvenile plant materials, the initial plant materials for culture may be obtained from well-grown bamboo mats. The nodesand internodes from secondary branches and tissues from the ground corm are among plant parts in mature clumps which are used forculture. Some have also used flowers of bamboo to initiate cultures.
Table 1.2 compares three explants or explant sources (i.e. the seed, seedlings and adult clump) for micropropagatiing bamboos. Somepoints were taken from Saxena and Dhawan (1994).
How can you approach micropropagation?
You may consider several approaches to micropropagation in bamboo (Fig. 1.1 and 1.2). You may germinate seeds or embryos directlyin vitro. You may induce the seeds to form multiple shoots or callus depending on the culture medium and environment. You may usethe seedlings as sources of nodes for multiple shoot formation in media with cytokinins and auxins. Subsequently, you may root theseshoots in vitro with auxin-supplemented medium.
You may induce seedling tissues to form calli. Then, you may multiply the calli by subculturing them regularly in an appropriateculture medium (usually with 2,4-D or a combination of auxins) and induce them to regenerate new shoots. If you were able to inducesomatic embryoids, you may germinate them in vitro.
These different approaches using seed, embryo, seed/seedling tissues will give you more plants. If you label the individual sources, youwill be able to tell later on on that some seeds and seed sources propagate better than others. We observed this in Gigantochloa levis.With this observation, several questions came to mind. First, if there is no selection, will I be propagating more of the potentially goodbamboos? Does growth rate in vitro match growth rate ex vitro. Will the more persistent genotypes in vitro also have longer life spansex vitro? We still have many questions regarding the possible performance of these propagations.
Aside from seed, you may use non-seed tissues that are meristematic (or with a capacity to cell division). You may induce callus with

TABLE OF CONTENTS http://www.inbar.int/publication/txt/INBAR_Technical_Report_No27.htm
4 van 35 31/01/2008 14:34
auxins (usually 2,4-D) and micropropagate the calli. Plants may also be obtained through the intermediary callus stage or through thegermination of somatic embryoids formed directly from seed tissues or from embryogenic calli. You may use the nodes of lateralbranches or culm buds for multiple shoot formatiom.
What is significant in the micropropagation protocols is that you use plant parts from mature clumps. Thus, this approach would bemost useful in propagating superior bamboo clones. Succeeding sections shall describe various methodologies commonly applied tobamboo micropropagation. These will include the use of seed and seedling tissues as well as tissues and nodes from mature clumps.
Thought For the Section:
And God said, Let the earth bring forth grass, the herb yielding seed, and the fruit yielding fruit after hiskind, whose seed is in itself, upon the earth: and it was so.
And the earth brought forth grass, and herb yielding seed after his kind, and the tree yielding fruit, whoseseed was in itself, after his kind: and God saw that it was good. Taken from the book of Genesis 1:11-12(Holy Bible).
The striking part of this page from the Holy bible is that the first group of plants God singled out was grass. When Mt. Pinatuboerupted in the Philippines, lahar and ashfall covered many towns in the Philippines. People thought these areas would take many yearsbefore anything could grow. The first vegetation that grew without man’s intervention was grass. Grass is the first among plants, in thesuccession of growths possible on land.
Bamboo belongs to the grass family and biblically can be used as one of the choices for man to reforest and rehabilitate degradedlands. Have you ever thought that we are in line with bible when we choose bamboo for replanting degraded lands?
SECTION 2. "WHAT DO I NEED TO DO MICROPROPAGATION?"
Now that you are interested in propagating bamboo by micropropagation, let us consider what you will need. Basic to allmicropropagation technologies is a tissue culture facility. This does not have to fancy, just functional.
There are two main activities in a laboratory. These are preparative activities such as preparation of stock solutions and culture media,preparation of culture vessels when making media, preparation of plant materials for introduction to culture and when you want to potthem out. The other activities are all asepsis-related, such as disinfection and introduction to clean culture and maintenance forpropagation and rooting. You should allot space in your laboratory for these activities.
A typical research laboratory would define space for distinct activities. So, separate rooms may be allotted to the storage of chemicalsand equipment, culture media preparation, sterilization, inoculation, culture storage, observation and acclimatization.
On the other hand, a production laboratory needs not to be fancy. For example, orchid cultures have been stored in a nursery, in agarage, ordinary bedroom or in just a spare room in the house. What can we recommend for bamboo? It is up to you whether it is oneroom or more. However, you should consider the following points in your decision-making (a) mandate of the laboratory, and the (b)resources available for the laboratory. The mandate is important and covers questions like what crops will be cultured and whether itwill be production only or research-production. The resources to be allocated are important. Whether you will consider an availablespace for renovation or construct a facility, when you will hire or whether you have to generate income to sustain your activities are allrelated to available resources.
With these considerations in mind, we can best help you to other references on establishing a facility and our perspective onestablishing a facility. Among these references is "Mageau, O.C. 1991. Laboratory Design. Pp. 15-30. In: Micropropagationtechnology and application. Edited by P.C. Deberg and R.H. Zimmerman and published by Kluwer Academic Publishers,Netherlands." Other references for laboratory designs are included in this article. The floor layouts of a few laboratories that adaptedavailable space are included in this section (Fig. 2.1).
Activities and suggested equipment vis a vis space
Enumerated are activities that you need to consider in the planning of your laboratory and the suggested equipment for these activities:
Stock solution preparation and storage1.
This area will house (a) weighing balances, (b) a refrigerator with freezer, (c) a distilling apparatus, (d) a stirrer-hot plate and (e)a work area with drawers and cabinets.
In places where power failure is frequent or unannounced, have pre-weighed amounts of chemicals for stock solution/mediapreparation. Stock solutions and crystals of growth regulators are often stored under reduced temperatures. Stock solutions are
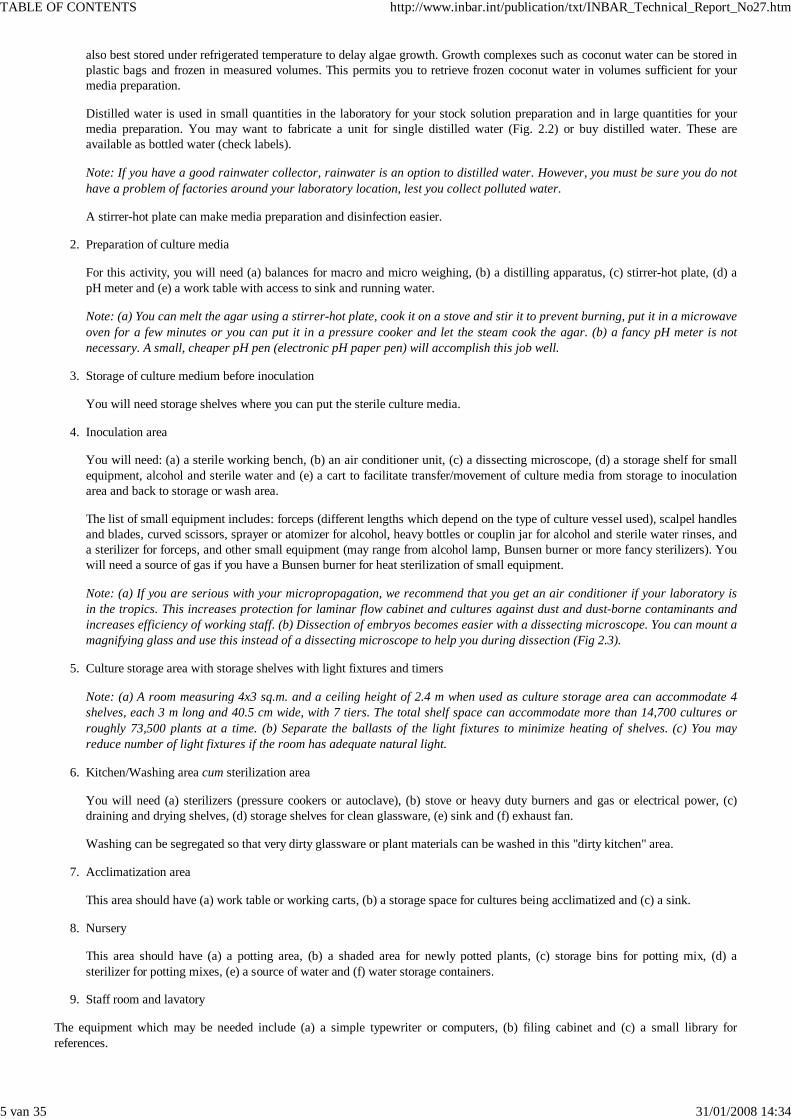
TABLE OF CONTENTS http://www.inbar.int/publication/txt/INBAR_Technical_Report_No27.htm
5 van 35 31/01/2008 14:34
also best stored under refrigerated temperature to delay algae growth. Growth complexes such as coconut water can be stored inplastic bags and frozen in measured volumes. This permits you to retrieve frozen coconut water in volumes sufficient for yourmedia preparation.
Distilled water is used in small quantities in the laboratory for your stock solution preparation and in large quantities for yourmedia preparation. You may want to fabricate a unit for single distilled water (Fig. 2.2) or buy distilled water. These areavailable as bottled water (check labels).
Note: If you have a good rainwater collector, rainwater is an option to distilled water. However, you must be sure you do nothave a problem of factories around your laboratory location, lest you collect polluted water.
A stirrer-hot plate can make media preparation and disinfection easier.
Preparation of culture media2.
For this activity, you will need (a) balances for macro and micro weighing, (b) a distilling apparatus, (c) stirrer-hot plate, (d) apH meter and (e) a work table with access to sink and running water.
Note: (a) You can melt the agar using a stirrer-hot plate, cook it on a stove and stir it to prevent burning, put it in a microwaveoven for a few minutes or you can put it in a pressure cooker and let the steam cook the agar. (b) a fancy pH meter is notnecessary. A small, cheaper pH pen (electronic pH paper pen) will accomplish this job well.
Storage of culture medium before inoculation3.
You will need storage shelves where you can put the sterile culture media.
Inoculation area4.
You will need: (a) a sterile working bench, (b) an air conditioner unit, (c) a dissecting microscope, (d) a storage shelf for smallequipment, alcohol and sterile water and (e) a cart to facilitate transfer/movement of culture media from storage to inoculationarea and back to storage or wash area.
The list of small equipment includes: forceps (different lengths which depend on the type of culture vessel used), scalpel handlesand blades, curved scissors, sprayer or atomizer for alcohol, heavy bottles or couplin jar for alcohol and sterile water rinses, anda sterilizer for forceps, and other small equipment (may range from alcohol lamp, Bunsen burner or more fancy sterilizers). Youwill need a source of gas if you have a Bunsen burner for heat sterilization of small equipment.
Note: (a) If you are serious with your micropropagation, we recommend that you get an air conditioner if your laboratory isin the tropics. This increases protection for laminar flow cabinet and cultures against dust and dust-borne contaminants andincreases efficiency of working staff. (b) Dissection of embryos becomes easier with a dissecting microscope. You can mount amagnifying glass and use this instead of a dissecting microscope to help you during dissection (Fig 2.3).
Culture storage area with storage shelves with light fixtures and timers5.
Note: (a) A room measuring 4x3 sq.m. and a ceiling height of 2.4 m when used as culture storage area can accommodate 4shelves, each 3 m long and 40.5 cm wide, with 7 tiers. The total shelf space can accommodate more than 14,700 cultures orroughly 73,500 plants at a time. (b) Separate the ballasts of the light fixtures to minimize heating of shelves. (c) You mayreduce number of light fixtures if the room has adequate natural light.
Kitchen/Washing area cum sterilization area6.
You will need (a) sterilizers (pressure cookers or autoclave), (b) stove or heavy duty burners and gas or electrical power, (c)draining and drying shelves, (d) storage shelves for clean glassware, (e) sink and (f) exhaust fan.
Washing can be segregated so that very dirty glassware or plant materials can be washed in this "dirty kitchen" area.
Acclimatization area7.
This area should have (a) work table or working carts, (b) a storage space for cultures being acclimatized and (c) a sink.
Nursery8.
This area should have (a) a potting area, (b) a shaded area for newly potted plants, (c) storage bins for potting mix, (d) asterilizer for potting mixes, (e) a source of water and (f) water storage containers.
Staff room and lavatory9.
The equipment which may be needed include (a) a simple typewriter or computers, (b) filing cabinet and (c) a small library forreferences.

TABLE OF CONTENTS http://www.inbar.int/publication/txt/INBAR_Technical_Report_No27.htm
6 van 35 31/01/2008 14:34
Human resources are critical. Your propagation strategies may be implemented well with well-trained personnel. Changes intechnicians also affect the productivity of a laboratory. So, help your staff remain with your laboratory. A room for the staff and alavatory area should be included in the design of the laboratory. Provide a table where they can meet and discuss problems regardingtheir work or just to relax and eat. A lot of the work becomes routine and boring. You should invest in your staff to encourage them toremain with you.
Other considerations
Aside from function, you must plan for safety and efficiency in the layout of the available space you want to adapt for the facility. Youshould consider the number of access doors, ease of monitoring potential accidents and the ease of movement in case you need tovacate a room or the facility. Monitoring for potential accidents can be made easier if your work areas have glass panels (Fig. 2.4).
Safety also includes the availability of fire extinguishers, a manual on safety precautions regarding equipment use and first aidinstructions particularly with materials used in the laboratory.
Efficiency considers the flow of activities and materials from the start to the finish of the culture systems and the maximum use ofavailable resources.
You may also want to invest in a generator so that you have stand-by power in case of power failures.
Chemicals and other supplies
Aside from work areas and equipment, chemicals, laboratory and nursery supplies are necessary for the laboratory. The chemicals forthe culture media are dependent on the formulation to be used. You will also need (a) ethyl alcohol, (b) buffer solutions, potassiumhydroxide and hydrochloric acid to adjust pH of the media and solutions, (c) agar and (d) sucrose (or white high grade refined sugar).
The list of supplies include: (a) glassware such as measuring cylinders, culture vessels, amber glass bottles, etc., (b) detergent, (c)bleach, (d) matches, (e) liquefied petroleum gas for cooking, (f) rubber slippers which you can wash and disinfect, (g) cleaningimplements (scotch brite, brush for bottles, sink, etc.) and (h) other supplies (fluorescent bulbs, cleaning materials) to maintain thelaboratory.
Thought For the Section:
"Yea, if thou criest after knowledge, and liftest up thy voice for understanding; If thou seekest her as silver,and searchest for her as for hid treasures; Then shalt thou understand the fear of the Lord, and findknowledge of God. For the Lord giveth wisdom; out of His mouth cometh knowledge and understanding."Proverbs 2:3-6.
SECTION 3. MAKING THE MOST OF SEEDS AND SEEDLINGS
In the heart of a seed, very deep so deep,
A dear little plant lay fast asleep,
"Wake up!" said the sunshine, "and creep to the light"
"Wake up!" said the voice of the raindrops bright,
The little plant heard and he rose to see
What a wonderful world God made for you and me!
-V. B. S. Manual (1992)-
Seeds just might be available for the bamboo species of interest to you. Literature on bamboo flowering in your area would be mostuseful. Get in contact with the Forestry Department and you may be able to contact people who have many observations on times (ormonths) of flowering of particular species of bamboo.
Bamboo species have different types of inflorescences. Gigantochloa levis have long inflorescences, which looks like a "curtain"around the culm (Fig. 3.1). Schizostachyum lumampao has short inflorescences that are near terminally located. When we sawgregarious flowering of Bambusa vulgaris and G. levis even the old stumps had flowers. You will have to adjust on how to proceedwith each collecting situation.
A. Collecting seeds and seedlings

TABLE OF CONTENTS http://www.inbar.int/publication/txt/INBAR_Technical_Report_No27.htm
7 van 35 31/01/2008 14:34
First, let us go through some dos and don’ts.
1. Plan the collection trip. You must have an idea where flowering clumps of bamboo have been sighted. It is helpful to have asurvey trip.
What should you bring? The following are the things (Fig. 3.2) we found convenient to have on a collection trip:2.
a. Binoculars
b. Large net which we can lay on the ground to catch inflorescences
c. Pruning shears
d. "Bolo" (similar to machete) or scythe
e. Rope, preferably nylon (long enough to lasso bamboo branches or support a collector, about 20-25 m long)
Note: At times, the flowering clump may be located along the river or creekside. Under theseconditions, it will be difficult to position the net for the collection. Once, our driver tied a rope to thebridge. Then he used the rope to swing down to the flowering culm so that he could reach theinflorescences to get us some samples.
Fine nylon net bags (for the seeds and florets and for sheaths and leaves)f.
Note: You may use paper, cloth or plastic bags to hold unprocessed flowers and seeds. Protect the seedsfrom increased humidity in these bags by rolling down their sides during the collection trip and travel backto the laboratory. Protect from heat by putting bags in shade. Do not put them in a parked vehicle because
temperatures may rise above 40oC. Excessive prolonged heat could drastically affect seed viability.
g. Stick broom for sweeping fallen inflorescences/ floretsg.
Permanent markers and shipping tagsh.
Polystyrene boxi.
Jacket or long-sleeved shirt which you can button up and a cap or hatj.
Note: This protective gear can save you from scratches and itching.
Medicine kit (insect creams, Band-Aids, etc.)k.
When you locate a flowering clump, seek the owner of the land or its caretaker. 3.
Record his name, address, date and interview notes to include when flowering was first observed and tentative identification of the species.
a.
Make a location map showing the flowering clump in relation to other structures, trees or landmarks.b.
Collect culm sheaths. These will help you identify the bamboo. Culm sheaths of different bamboos have distinct features (Fig.3.3). Put all the materials from one clump together.
c.
Seeds
You may collect seeds following one or more techniques or their combinations (Pukittayacamee, 1996). These methods include (a)collecting from seeds that had fallen to the ground naturally, (b) collecting by shaking the culms and (c) collecting from the felledculms. Aside from these techniques and depending on fertility of the bamboo species, you may also cut inflorescence from unfelledculms
Of the different methods, the least preferred is to cut down the flowering culm. However, some situations warrant the use of thismethod. For example, some communities have an aversion to flowering bamboo because this signals bad luck or hard times to them(Fig. 3.4). The flowering bamboo will soon be cut down anyway.
Of the various methods of collection, culm-shaking yielded seeds with the highest percent germination, followed by culm branchcutting in Bambusa bambos while germination was closely similar for ground collection and culm-shaking for Thyrsostachyssiamensis (Pukittayacamee, 1996). We also recommend this method for species with low fertility such as Gigantochloa levis.
Collecting from seeds which have fallen on the ground naturally
TABLE OF CONTENTS http://www.inbar.int/publication/txt/INBAR_Technical_Report_No27.htm
8 van 35 31/01/2008 14:34
You may opt for this technique when the flowering clump is near a community and you can arrange with a possible collector. The technique is most useful if the clump is accessible and you can return to collect seeds every 3-5 days. However, daily collection would minimize the exposure of seeds to soil-borne pests.
1.
Clear the area beneath the flowering clump.2.
Lay a large fine net underneath the flowering clump. A plastic sheet or canvas can be spread late in the afternoon each day to avoid morning dew and condensation that would moisten the seeds and make them more susceptible to fungal infection (Seethalakshmi and Soman, 1992 and Pukittayacamee, 1996).
3.
Note: If you do not have a net, canvas or sheets of plastic or woven mats, particularly for unplanned collections, sweep thearea underneath the clump thoroughly with a stick broom. Collect fallen inflorescences and seeds.
Protect the collection area from rats, birds and other animals that eat the seed. 4.
Label the bags. Include tentative identification of clump source, area of location, owner and date collected.5.
Collecting by shaking the culms
Clear the area of tall grass or small shrubs (if permitted) with your "bolo"/scythe. 1.
Spread the net underneath the flowering clump. Consider the direction of the wind when positioning the net (Fig. 3.5).2.
Tie the rope on the culm so that you can tug on the rope to shake the culm. You may climb up the culm, jump on it or shake other stems and branches (Fig. 3.6).
3.
Collect the florets that fall into the net. Transfer the florets into net bags.4.
Label the bags. Include tentative identification of clump source, area and, whenever possible, the owner of the land. If more thanone mat is flowering within the same area, label each mat as individuals.
5.
Collecting seed-bearing inflorescence from felled and unfelled culms
Inspect the culm for relative fertility. Highly fertile bamboos, e.g. S. lima, S. lumampao, have many seeds in clumped inflorescence.
1.
Collect inflorescence that has turned brown (due to maturity). Pick mature seeds or cut inflorescence from low-lying unfelled culms with a pruning shears (Fig. 3.7).
2.
Note: If bamboo clumps are easily accessible, collect mature seeds only. Leave immature seeds to develop further and inspectafter a week or so for another collection.
Return to collect more inflorescence as they mature.3.
Transport inflorescence in a paper or wrapped in newspapers, within net bags. 4.
Put all net bags in a polystyrene box to ensure safety during transport.5.
Handling after harvest
Remember that drying and cleaning affect the quality of your seed lots since seed moisture at harvest may vary with species, e.g. 16% for T. siamensis to 21% for B. tulda. You will have to reduce moisture content.
1.
If you collect seeds during the rainy season and if the seeds remain wet for a sufficient time, they may germinate before you even use them. So, dry them. You may need to lay the seeds on lots of newspapers or other absorbent material to absorb excessmoisture (Fig 3.8).
2.
Air dry inflorescence or seeds as soon as possible. You may hasten air drying with a fan or hair dryer during the trip.3.
Seedlings
It is also worthwhile to investigate if seeds had fallen earlier around the flowering clump. These seedlings can be gently lifted andpotted in the nursery. You may want to use them to improve methodologies using juvenile tissues, including nodes and shoot tips.
Locate seedlings beneath the canopy of flowering bamboo, particularly near sources of water.1.
Use a stick or other alternative to lift the roots and soil of the seedling.2.
Put some moist soil from the vicinity of the seedling in a plastic bag or alternative container, which will help keep the humidity around the plant during the trip. Moisten soil if it needs a bit of water.
3.

TABLE OF CONTENTS http://www.inbar.int/publication/txt/INBAR_Technical_Report_No27.htm
9 van 35 31/01/2008 14:34
Put the seedlings with some leaf mold on the soil and ensure that these are protected from desiccation.4.
Place these seedlings in the shade until all collection activities have been completed. You may put them in the vehicle when it is time to go.
5.
B. Processing of the inflorescences for seeds
You need to process the collected inflorescence and florets for seed. The technique for processing will depend largely on thecharacteristics of the flowers. The flowers may vary, depending on the bamboo species. Glumes may be absent, loosely enveloping theseed or closely clinging to the seed. Seed-bearing florets and seeds, before and after processing, are shown for G. levis, S. lumampaoand D. strictus (Fig 3.9). Processing would mean selection of florets with seed and cleaning seeds.
Winnow the florets to separate chaff from the filled florets. Most of the empty florets will separate from those with seed duringwinnowing.
1.
Press each floret. Florets with seed are hard to the touch. If the seed is immature, the floret will be more malleable to the touch.2.
Note: We have tried to improve on the processing for G. levis using seed processing equipment but to noavail. For other species without glumes, postharvest equipment may make work simpler.
3. Extract the seed from the glumes manually.
Sort the seeds to mature (hard dough stage), less mature (soft dough stage) or immature (milk stage).1.
Note: The seeds can also be differentiated by the flotation method. Put some seeds in water. Those that float are most likelyimmature and at the milk stage. Those that sink are mature seeds. Inspect the seeds and differentiate each batch based oncolor and "feel". Use these observations in subsequent batches to sort seeds. For G. levis, the immature seeds are green whilethe mature seeds are brown. For S. lumampao, immature seeds are purplish-green, mature seeds are brown.
Discard seeds that are at the milk stage. 2.
Store mature seeds.3.Germinate embryos from less mature seeds.4.
Storage of seedsC.
You may need to store seeds since their availability is very limited. Bamboo seeds are orthodox. They can withstand desiccation and storage.
1.
2. Test each seed batch for viability and percentage moisture content if you want to store the seeds for several months.
Note: If your seeds are too few, you may not want to waste any of the seeds by using them for a viabilitytest. You will have to rely on visual appraisal of the embryos. Healthy embryos are white and plump. Withprolonged storage, the embryo may look shriveled and on the creamy side. Not all of these will germinate,but some will.
3. You may use a desiccant to dry seeds to 5-6% MC. You may also sun dry or kiln dry the seeds at 40-50oC for 3-6 hrs(Pukittayacamee, 1996).
Line a plastic bag or plastic/glass bottle with an absorbent material such as cotton or paper.3.
Put in the seeds and seal the container.4.
Label properly. Include species, collection data, percentage viability, and date of storage.5.
Store in a refrigerator (about 15oC) for 18 months. You can prolong storage life with storage at even lower temperatures (2oC). 6.
Testing for Seed Viability (Taken from Pukittayacamee, 1996)
Deglume seed to get the embryo.a.Soak seeds in 1% H2O2 solution (100 ml/50 seeds) and incubate overnight in the dark at room temperature. Change thesolutions daily for 3 days.
b.
Observe for radicle protrusion. Renew the solution for another 3 days if the radicle has not yet protruded.c.
TABLE OF CONTENTS http://www.inbar.int/publication/txt/INBAR_Technical_Report_No27.htm
10 van 35 31/01/2008 14:34
Evaluate radicle protrusion. Viable seed would have radicles longer than 5 mm.d.
D. Aseptic germination
In vitro germinated seedlings represent opportunities for a micropropagator. They serve as sources of nodes, shoots and rhizomes forother micropropagation techniques.
1. Disinfection
Disinfection is successful if aseptic materials are established from the tissues of interest. Seeds of different bamboo species vary inshape and characteristics (Fig. 3.9). Although seeds are generally amenable to disinfection, the harshness and duration of treatment areinfluenced by the characteristics of the seed. Some seeds have very smooth and tough surfaces; these are easily disinfected. Others havefine hairs and a thin skin. These characteristics make them more difficult to disinfect. Contaminants may not be easily disinfected sinceair bubbles may be trapped in the tufts and the thin skin makes the seed less resistant to the disinfecting solutions.
With variations among species, it is best to look for literature on the species of interest to you or to choose a procedure for a specieswith seed characteristics like your species. Table 3.1 summarizes some disinfection procedures for seeds of some bamboo species.Whenever data is available, the characteristics of the seeds are also indicated.
The following disinfection protocol works for D. strictus and G. levis. Seed batches of G. levis stored for 7-8 weeks and used forembryo culture showed 79-84% germination.
a. Obtain an appropriate quantity of seeds from storage.
b. Wrap the seeds loosely in a piece of gauze, fine net, nylon stocking or similar material.
c. Tie the "seed bag" to the water tap (faucet) and leave the water running for two hours.
Note: If your water source warms up with time, you need to modify the system. Collect water in a container(e.g. plastic jug, clay water container) with a tap. Allow the water to cool. Wash your seeds.
d. Transfer the seed bag to a flask or appropriate vessel, add pure commercial bleach and cover with a piece of foil. Shakethe solution or stir the seeds with a magnetic bar on a magnetic stirrer for fifteen minutes.
e. Transfer the flask to a clean air bench or a sterile inoculation box.
Wash the seeds thoroughly with sterilized (distilled or tap) water to remove the bleach. f.
Table 3.1. Disinfection procedures for seeds of bamboo species.
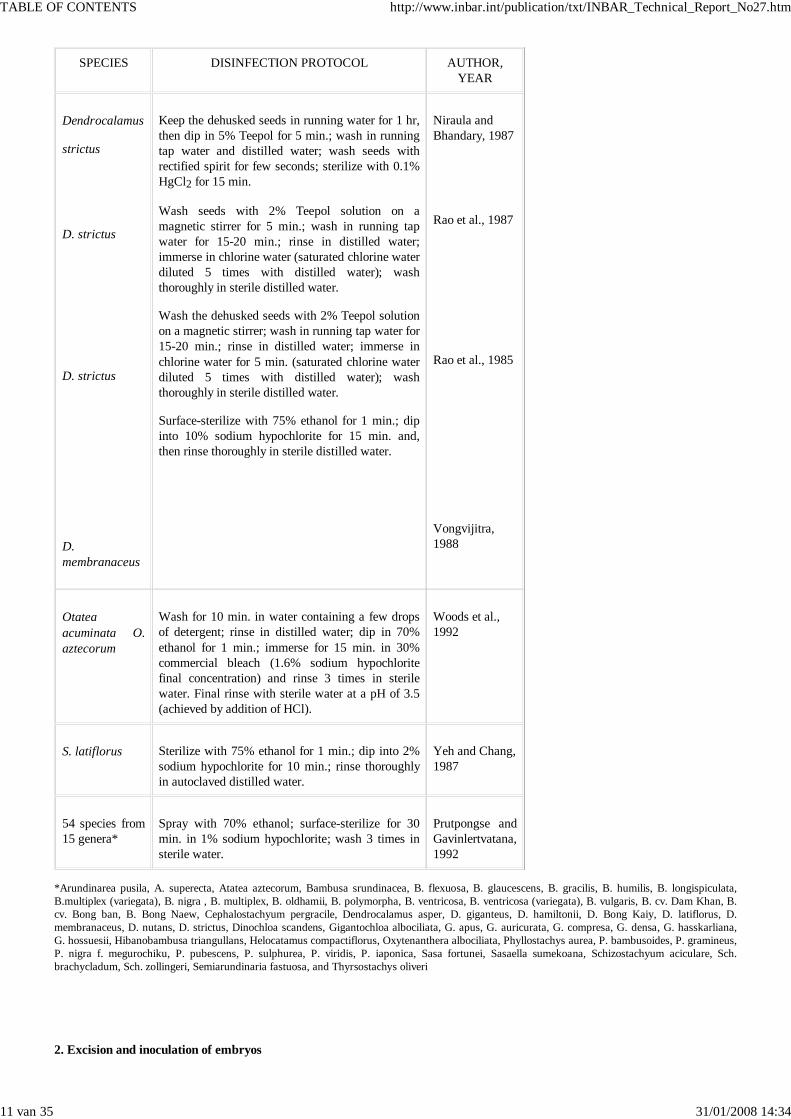
TABLE OF CONTENTS http://www.inbar.int/publication/txt/INBAR_Technical_Report_No27.htm
11 van 35 31/01/2008 14:34
SPECIES DISINFECTION PROTOCOL AUTHOR, YEAR
Dendrocalamus
strictus
D. strictus
D. strictus
D. membranaceus
Keep the dehusked seeds in running water for 1 hr,then dip in 5% Teepol for 5 min.; wash in runningtap water and distilled water; wash seeds withrectified spirit for few seconds; sterilize with 0.1%HgCl2 for 15 min.
Wash seeds with 2% Teepol solution on amagnetic stirrer for 5 min.; wash in running tapwater for 15-20 min.; rinse in distilled water;immerse in chlorine water (saturated chlorine waterdiluted 5 times with distilled water); washthoroughly in sterile distilled water.
Wash the dehusked seeds with 2% Teepol solutionon a magnetic stirrer; wash in running tap water for15-20 min.; rinse in distilled water; immerse inchlorine water for 5 min. (saturated chlorine waterdiluted 5 times with distilled water); washthoroughly in sterile distilled water.
Surface-sterilize with 75% ethanol for 1 min.; dipinto 10% sodium hypochlorite for 15 min. and,then rinse thoroughly in sterile distilled water.
Niraula and Bhandary, 1987
Rao et al., 1987
Rao et al., 1985
Vongvijitra,1988
Otateaacuminata O.aztecorum
Wash for 10 min. in water containing a few dropsof detergent; rinse in distilled water; dip in 70%ethanol for 1 min.; immerse for 15 min. in 30%commercial bleach (1.6% sodium hypochloritefinal concentration) and rinse 3 times in sterilewater. Final rinse with sterile water at a pH of 3.5(achieved by addition of HCl).
Woods et al., 1992
S. latiflorus Sterilize with 75% ethanol for 1 min.; dip into 2%sodium hypochlorite for 10 min.; rinse thoroughlyin autoclaved distilled water.
Yeh and Chang, 1987
54 species from15 genera*
Spray with 70% ethanol; surface-sterilize for 30min. in 1% sodium hypochlorite; wash 3 times insterile water.
Prutpongse andGavinlertvatana,1992
*Arundinarea pusila, A. superecta, Atatea aztecorum, Bambusa srundinacea, B. flexuosa, B. glaucescens, B. gracilis, B. humilis, B. longispiculata,B.multiplex (variegata), B. nigra , B. multiplex, B. oldhamii, B. polymorpha, B. ventricosa, B. ventricosa (variegata), B. vulgaris, B. cv. Dam Khan, B.cv. Bong ban, B. Bong Naew, Cephalostachyum pergracile, Dendrocalamus asper, D. giganteus, D. hamiltonii, D. Bong Kaiy, D. latiflorus, D.membranaceus, D. nutans, D. strictus, Dinochloa scandens, Gigantochloa albociliata, G. apus, G. auricurata, G. compresa, G. densa, G. hasskarliana,G. hossuesii, Hibanobambusa triangullans, Helocatamus compactiflorus, Oxytenanthera albociliata, Phyllostachys aurea, P. bambusoides, P. gramineus,P. nigra f. megurochiku, P. pubescens, P. sulphurea, P. viridis, P. iaponica, Sasa fortunei, Sasaella sumekoana, Schizostachyum aciculare, Sch.brachycladum, Sch. zollingeri, Semiarundinaria fastuosa, and Thyrsostachys oliveri
2. Excision and inoculation of embryos

TABLE OF CONTENTS http://www.inbar.int/publication/txt/INBAR_Technical_Report_No27.htm
12 van 35 31/01/2008 14:34
Place the sterile stainless steel dishes lined with sterile paper, scalpels, forceps, alcohol lamp, a couplin jar with 95% ethyl alcohol, bottles with sterile water and soapy solution (Fig. 3.10), in the sterile working area. A dissecting microscope is also helpful.
a.
Note: Kitchenware steel plates may be replaced with petri dishes.
Open the flask with caution to maintain sterility of seed.b.
Transfer some seeds onto the sterile paper on petri dishes or steel plate with a pair of sterile forceps.c.
Hold the seed aseptically with the forceps and make a slit on the seed coat over the embryo with the tip of the scalpel blade. d.
Excise the embryo from the rest of the seed tissues. Use a dissecting microscope to make your work easier.e.
Inspect the embryo.f.
Inoculate the embryo onto the culture medium.f.
Note: (a) In literature, others use the intact seed. We have also used the embryonal end, without theendosperm. However, the bigger the explant, the higher the risk of contamination. With many grooves in thebamboo seed, it is best to reduce the size of the explant to the essentials. For callus and somaticembryogenesis, clean the embryo of other tissues. (b) A culture medium recommended for seed germinationconsists of half-strength MS macronutrients and micronutrients, full strength MS vitamins and iron and 20g/l sucrose, pH 5.7.
h. Position of the embryo on the culture medium embryo-side up and away from the culture medium (Fig. 3.11).
Note: The components of the culture medium vary depending on the route for multiplication. See Table 3.2.Routes of micropropagation and culture media for seed-based tissue cultures of B. arundinacea and D.strictus.
i. Maintain the cultures under 16-hour photoperiod, 42 uE m-1 sec-1 in an air-conditioned room at 22-27 oC.
j. Inspect for bacterial and fungal contamination. Discard contaminated cultures.
k. Observe for germination 4 to 8 days after inoculation.
Table 3.2. Routes of micropropagation and culture media for seed-based tissue cultures of B. arundinacea and D.strictus.
MICROPROPAGATION/
BAMBOO SPECIES
CULTURE MEDIA AUTHOR, YEAR
In vitro germination
a. B. arundinacea
b. D. strictus
WP/MS
Whites + 2% sucrose
Vasana,1985
Nadgir et al, 1984
Multiple shoot formation
a. B. arundinacea
b. D. strictus
Medium + 1 mg/L NAA + 4 mg/L 6-BAP
-
Vasana et al, 1985
Callus/somaticembryogenesis
a. B. arundinacea
b. D. strictus
N6 + 7 mg/L 2,4-D
B5 (0.5x) + vitamins + 30 uM 2,4-D + 2%sucrose + 0.8% agar, pH5.8
Metha et al,1982
Rao et al,1987

TABLE OF CONTENTS http://www.inbar.int/publication/txt/INBAR_Technical_Report_No27.htm
13 van 35 31/01/2008 14:34
Note: You will first observe swelling of the embryonal end, a change in color to more opaque to creamy,radicle protrusion and lastly shoot growth.
You are successful! Your seedlings are slowly putting on more leaves and nodes! (Fig. 3.12). You are now in business.h.
E. Multiple shoot formation from nodes of aseptic seedlings
Using aseptically germinated seedlings as sources of node cuttings can amplify your propagation scheme. Seedlings would have theadvantage of the full utilization of its biological life span.
Inspect cultures of germinated seedlings. In a month or so after seed/embryo establishment, sort the seedlings according to vigor.1.
Note: If you had opted to use the culture medium for multiple shoot formation right at germination, shoot growth will beslower.
Establish your coding system so that you can sort out the sister lines from one embryo and from one clump source. This will helpus release plants from several genotypes to supply requests of communities responsibly.
2.
Prepare appropriate culture media for multiple shoot formation. 3.
Important! The culture medium for multiple shoot regeneration in juvenile sources of nodes consists of MS at full strength, 30g/l sucrose, 1 mg/L NAA,and 4 mg/L BAP, pH 5.7.
Using aseptic techniques and working in a clean air cabinet cut the stems near the base of the plant with a pair of curved scissors(Fig. 3.13). Leave some nodes at the base to keep the remainder of the seedling productive.
4.
Draw out the cut stems (upper part) and place them on a stainless steel dish.5.
Prepare node cuttings. Cut shorter stub on the upper part of the node cutting to differentiate polarity and favor early bud break.6.
Inspect node cuttings for lateral buds by pulling on the leaf sheath encasing the node area. 7.
Note: Some cuttings may have blind nodes (i.e. lateral buds are not observed). Discard these nodes.
Inoculate cuttings unto a culture medium for multiple shoot formation.8.
Maintain the cultures under 16 hours photoperiod, 42-uE m-1 sec-1 in an air-conditioned room at 22 - 27 oC.9.

TABLE OF CONTENTS http://www.inbar.int/publication/txt/INBAR_Technical_Report_No27.htm
14 van 35 31/01/2008 14:34
New stems developed within 2 to 4 weeks. 10.
You may repeat the whole cycle of multiplication.11.
Note: If your species does not form multiple shoots on the suggested culture medium, try these publishedmedia. Table 3.3 summarizes literature on multiple shoot formation using seed and seedlings of variousbamboo species. If none of these works, experiment!
F. Micro-division
With the stems cut short to the base, it is unnecessary to throw away the remaining basal tissues. The rhizome developed during thegermination is best used as planting material. You may extend its usefulness by adding fresh medium and waiting for new shoots. Youmay also trim the roots near the rhizome and transfer the whole shoot to a new culture medium. Alternatively, you can propagate themby micro-division.
Trim roots with close to the rhizome with a pair of curved scissors 1.
Take out the shoot from the culture vessel and transfer to a sterile paper.2.
Cut it along the rhizome to get small shoot clusters.3.
Inoculate to fresh medium.4.
Repeat the whole cycle of multiplication.5.
G. Calli and somatic embryogenesis from embryo tissues
Embryos are easier to induce to callus and to form somatic embryoids. This approach is potentially more productive within a shorterperiod of culture than multiple shoot formation. However, the risk of getting somatic variations is potentially higher among plants thatwere regenerated from calli/somatic embryoids than from multiple shoot formation.
Use procedures for aseptic germination. Follow disinfection procedures. You may use intact seeds (Rao and Rao, 1985) or excisedembryos following our procedures adapted from institute procedures for wheat tissue culture. The procedures described below workedfor G. levis, D.strictus, and B. bambos and are based on Zamora and Gruezo (1989).
1. Inoculation
Disinfect the seeds to be used for embryo culture.a.
Use aseptic techniques.b.
Transfer to sterile petri plates lined with paper to absorb excess moisture.c.
Hold the seed aseptically with the forceps and make a slit on the seed coat over the embryo with the tip of the scalpel blade. d.
Excise the embryo from the rest of the seed tissues. Use a dissecting microscope to make your work easier.e.
Inspect which is the scutellum-side of the embryo.f.
Inoculate the embryo with scutellum-side up onto a solid culture medium for callus induction. The embryo-side should face the culture medium.
g.
Important! The culture medium we found useful for inducing and propagating calli/somatic embryos consists of full-strengthMS, 20 g/L sucrose, 2 mg/L 2,4-D, 5.0 g/l agar, pH 5.7.
Note: Table 3.4 summarizes the culture media for callusing and somatic embryogenesis in various bamboo species.
Maintain the cultures in eight hr-diffused lights in an air-conditioned room at 22-27 oC. h.
Note: Cooler temperatures are very favorable for callus induction and propagation.
Inspect for bacterial and fungal contamination. Discard contaminated cultures.i.
2. Propagation of Calli/Somatic Embryoids
Inspect callus growth after 4 weeks inoculation.a.
TABLE OF CONTENTS http://www.inbar.int/publication/txt/INBAR_Technical_Report_No27.htm
15 van 35 31/01/2008 14:34
Sort callus cultures into compact, loose-type or combination (Fig. 3.14). Discard the cultures showing only loose-type calli.b.
Note: (a) If callus is still small, subculture the whole callus to fresh culture medium. (b) The base medium and the growthregulators are important for the type and extent of callus growth (Fig. 3.15).
If compact callus is big enough, segregate it from the loose-type. Subculture onto freshly prepared callus medium. c.
Note: (a) It generally takes two subcultures (a month apart) before the callus sufficiently enlarges for you to decipher thepresence of compact calli.
(b) Embryogenic compact calli give rise to somatic embryoids.
Propagate the compact-type calli/somatic embryoids by subculturing every 2 weeks to fresh culture medium. Break up theproliferations along weak points.
d.
Note: (a) Do not break up calli forcibly with a scalpel. Cutting up will cause the calli to turn brown die. (b) Compact calli thesize of an eraser head of a Mongol pencil will yield callus more than four times its size in 4 weeks (Fig. 3.16).
Inspect for any signs of bacterial contamination. Discard contaminated cultures.e.
Note: Any clouding of the culture medium at the immediate vicinity of the calli makes the culture suspect.
Strategize the propagation of calli/somatic embryoids and regeneration of plants.f.
Note: When you observe albino callous or plants transfer all calli stock belonging to this batch to theregeneration medium.
g. Initiate a fresh batch of seeds every six months to ensure a continuous stock of embryogenic calli capable ofregenerating green plants.
3. Plant Regeneration
a. When you have built up the stock of e-calli/somatic embryoid stock, subculture some stock to the culture medium forplant regeneration and to fresh 2,4-D culture medium to propagate the e-calli/somatic embryoid stock.
Important! The culture medium we found useful for plant regeneration consists of full-strength MSmacronutrients, vitamins and iron, half-strength MS miconutrients, 20 g/l sucrose, 150 ml/l coconutwater (from young green nuts), 0.1 g/l myo-inositol, 5.0 g/l agar, pH 5.7.
b. Maintain the cultures under 16 hours photoperiod, 42 uEm-1sec-1 in an air-conditioned room at 22 - 27 oC.
c. You will observe the greening up of the compact calli and soon you will see shoot points that develop which will formplantlets within 4 to 8 weeks (Fig. 3.17).
You may use the plants for multiple shoot formation and micro-division if you still need more plants. a.
H. Wildings or Nursery-Grown Seedlings
Remember the wildlings you collected? These can be cultured. However, the major obstacle is decontamination. We get about 55%clean cultures from greenhouse-grown materials. This could have been improved by improving on nursery culture.
Briefly, our procedures are as follows:
Harvest shoots with at least seven leaves. 1.
Note: Each leaf corresponds to a node so that by counting the leaves, you can approximate the number of nodes.
Cut off the top 3 leaves, including the extended spindle leaf. Discard.2.
Scrub the remaining shoots under running tap water. Use cotton wad dipped in soapy water. Rinse thoroughly.3.
Cut the stem into cuttings with one to two nodes, depending on closeness of internodes.4.
Put the segments in a flask.5.
Soak the segments in soapy water for 10 min. Decant solution.6.
Add bleach to flask, soak segments for 15 min. Decant the disinfectant, and rinse with sterile tap water.7.

TABLE OF CONTENTS http://www.inbar.int/publication/txt/INBAR_Technical_Report_No27.htm
16 van 35 31/01/2008 14:34
Transfer segments to 70% ethyl alcohol. Decant solution after 1-2 seconds.8.
Add 0.12% calcium hypochlorite (CaOCl2) and soak segments for 10 minutes. Decant bleach.9.
Add streptomycin (1 g/L) solution and soak segments for 10 min.10.
Put the segments onto a sterile petri dish lined with sterile paper.11.
Cut along the base of the sheath along the node. Remove the sheath.12.
Trim the internodes below and above the bud. Make a shorter stub above the node.13.
Inoculate onto the culture medium.14.
Note: The culture medium varies with the propagation methodology. Prepare appropriate medium.
Observe new shoot growth after three to four weeks (Fig. 3.18).15.
I. Invitro Rooting
Prepare appropriate culture media for in vitro rooting.1.
Using aseptic techniques and working in a clean air cabinet cut the stems near the base of the plant with a pair of curved scissors. Leave some nodes at the base to keep the remainder of the seedling productive.
2.
Draw out the cut stems (upper part) and place them on a stainless steel dish.3.
Inoculate shoots or cuttings unto a culture medium for rooting.4.
Maintain the cultures under 16 hours photoperiod, 42 uE m-1 sec-1 in an air-conditioned room at 22 - 27 oC.5.
Observe roots after 2 to 4 weeks. 6.
Acclimatize them for potting out.7.
Thought for the Section:
Hearken; behold, there went out a sower to sow;
And it came to pass, as he sowed, some fell by the way side, and the fowls of the air came and devoured itup.
And some fell on stony ground, where it had not much earth; and immediately it sprang up, because it hadno depth of earth;
But when the sun was up, it was scorched; and because it had no root, it withered away,
And some fell among thorns, and the thorns grew up, and choked it, and it yielded no fruit.
And the other fell on good ground, and did yield fruit that sprang up and increased; and brought forth,some thirty, and some sixty, and some a hundred. Mark 4:3-8.
We hope the seed you collected will all fall under the last category. For bamboo, seed is precious. "Limited quantity" is not necessarilya hindrance to propagation with tissue culture because we can multiply whatever seed is available by many techniques in vitro insteadof waiting for just one plant to arise from one seed. As the word in Mark 4:3-8 says that if seed falls on good ground, and is taken careof, it will increase.
SECTION 4. I WANNA BE JUST LIKE YOU!
"When I grow up, I will be just like you".
If you grow bamboo, you may observe that their performance in terms of growth rate, yield, culm diameter, fiber strength or othercharacteristics vary. If you have a better plant, you may prefer propagating this selection to the others. You can increase this clone by

TABLE OF CONTENTS http://www.inbar.int/publication/txt/INBAR_Technical_Report_No27.htm
17 van 35 31/01/2008 14:34
macropropagation and by micropropagation. We expect the plants propagated by micropropagation techniques to be identical to thesource of the initial plant material. They are somaclones or sister lines from somatic tissues.
There are several candidate sources of initial tissues for micropropagation. You may culture small bits of tissues from the softinternode tissues in extended and unextended branches. If you look at the bamboo during the onset of the rainy season, there will bemany new branches. However, from each branch, the number of sections you can get is rather limited compared to the fast growingground corm. What is a ground corm? Are you familiar with the less technical name "bamboo shoot"? When the new shoot isdeveloping and fast elongating, you can get many tissues from the soft internode and node areas for tissue culture work. Common tothese tissues in the branches and ground corms are the highly active and dividing groups of cells that can be induced to further dividein culture to form calli.
Aside from these tissues, nodes from unextended and extended branches as well as unenlarged buds are candidate materials. There aredifferentiated buds, which can serve as the source of new growths by multiple shoot formation. However, the requirements forculturing nodes from mature clumps, whether non-flowering of flowering, are different from nodes from seedlings. Researches usingtissues and nodes from mature clumps are limited compared to seed and seedling tissues (Saxena and Dhawan, 1994; Zamora, 1994).
The following protocols were developed in the Institute of Plant Breeding of the College of Agriculture, University of the PhilippinesLos Baños, Philippines.
I. GROUND CORMS
A. Collecting ground corms
Let us start with some dos and don’ts.
Plan the collection trip. Bring what you need because you might end up not being able to excavate the ground corm. Whatshould you bring? The following is a list of things we found convenient to have to collect ground corms:
1.
a. Sharp pruning shears
b. Desuckering bar, "bolo" or machete
c. Net bags (heavy duty) and newspapers for wrapping
d. Clean water to wet newspapers
e. Markers and shipping tags
f. Polystyrene box, if collection area is far from the laboratory
g. Jacket or long sleeved shirt which you can button up
h. Cap or hat, boots and gloves (or plastic bag)
Visit the clumps two weeks well in the rainy season and inspect if new shoots have come out. Cover with some decomposingleaves or litter fall to protect your discovery!
2.
Note: Guard your mats when two to three weeks of rain has fallen! By this time, the
bamboo would have new shoots and, boy, are they tasty at this time!
Return after a few days to about a week. Harvest when the shoots are about 1.5 to 2 feet high from ground level.3.
Note: Growth rates of shoots vary with species so familiarize yourself with the species of interest! If you missed the preferredheight of the bamboo shoot, make do with your harvest. Your cultures will be restricted to the younger nodes.
When you return, dress for the occasion, with long sleeves, a cap and boots. Be prepared in case it rains.4.
Note: Some bamboos have many trichomes on them that can be a nuisance to you.
Remove the litter cover to expose the shoot and excavate around the base of the new shoot.5.
Extract a new shoot with a "bolo" or desuckering bar (Fig. 4.1).6.
Note: Exercise great care during extraction because the new shoot is tender. Avoid shaking movements that tend to crack thebase and open wounds. Make clean cuts. Avoid bruising the sides of the shoots.
Once separated from the rhizome, gently lift the shoot to flat ground and clean the base of adhering soil.7.
Dampen the newspapers and lay the shoot on them. Wrap the shoot with damp newspaper.8.

TABLE OF CONTENTS http://www.inbar.int/publication/txt/INBAR_Technical_Report_No27.htm
18 van 35 31/01/2008 14:34
Label. Include species, date/area of collection, and if taken from someone’s backyard, the name of the owner.9.
Transport in a polystyrene box to prevent cooking or dehydrating the corm.10.
B. Handling of corms for culture (Fig. 4.2)
In the laboratory, wash the shoots thoroughly in running water. 1.
Trim off the ligules (small leafy structure at the tip) from the leaf sheaths with the pruning shears.2.
Chop off the very hard tissues in the ground corm.3.
Remove the outermost leaf sheaths and all loosely fitted sheaths. 4.
Scrub the remaining surfaces with a scrubbing pad or soft brush with soapy water to remove dirt and possibly pests such asinsect eggs, aphids and mites.
5.
Rinse with clean water. Air dry.6.
C. Storage of corms
If you come in from your trip on a weekend and dead-tired from the trip, store the corms. Anyway, who wants to work on a Sunday!They will have to be stored until the next workday!
1. Remove the damp newspapers.
2. Wash the shoots thoroughly in soapy water dry with newspapers and when air-dried, re-wrap in a dry newspaper.
3. Store in the refrigerator.
4. Remember to use them for culture within a week.
Note: The longer you keep them in the refrigerator, the poorer will be your results. In other words, don’tprocrastinate! It is best to use them freshly collected.
D. Disinfection of corms (Fig 4.3)
Wrap the shoots in a thin layer of cotton. 1.
Transfer to a big plastic bag. 2.
Wet the entire surface with pure bleach and let this soak for 60 minutes.3.
Transfer the bag containing the ground corm to the clean air bench. 4.
Remove shoots from the bleach by peeling away the cotton layer. 5.
Transfer to a small tray that will hold the shoot and the water to be used for rinsing.6.
Hold the shoot by the tip, position the shoot perpendicular to the tray and rinse with sterile water.7.
Transfer the shoot to a dry tray.8.
E. Preparation and inoculation of explants (Fig. 4.4)
Remove the bottommost sheath by making an incisive slit at the base of the sheath and pull the sheath away from the shoot toexpose the internode and node.
1.
Cut the internode tissues just above the nodal ring. This will be about 3 - 4 mm thick.2.
Put the layer in petri dish lined with paper and wrap the dish with a piece of paper to minimize exposure to light. From ourexperiences, these tissues are very susceptible to browning when left exposed to light. The browning is irreversible.
3.
Continue processing the shoot and extracting internode layers until you have finished nearly all layers.4.
Discard sections less than 2 cm wide. 5.
From each layer, make a strip 3-4 mm wide that includes the epidermis and inner tissues.6.

TABLE OF CONTENTS http://www.inbar.int/publication/txt/INBAR_Technical_Report_No27.htm
19 van 35 31/01/2008 14:34
From the strip, cut perpendicular to the epidermis so that you will have 3-4 mm cubes. Each cube should have a piece of theepidermis. These tissues are more responsive for callusing.
7.
Inoculate each explant cube onto the solid culture media consisting of MS, 40 g/L sugar, 1 ppm 2,4-D and 1 ppm BAP, 5 g/Lagar (HiMedia), pH 5.7.
8.
Important! If there are protocols reported for your bamboo species, first try these protocols. If yourcultures do not form callus, try other media summarized in Table 4.1. It will be a good idea to try severalculture media at the onset of experimentation.
Note: See appendices for the preparation of culture media and aseptic techniques. Depending on the widthof the vessel used, the number of explants may be more than one. In vessels 18-20 mm diameter (like testtubes), inoculate one explant. In screw-capped bottles (4.5 cm outer diameter), you may inoculate up to 5pieces.
9. To minimize browning, you may opt to extract the internode layer and immediately process this to get the explant cubes forinoculation. However, you are stuck with a shoot in the laminar flow cabinet, which is not very convenient.
10. Place the cultures in the dark immediately after inoculate to control browning.
Note: You may put cultures in a cabinet, in paper bags or wrap your vessels in carbon paper. Cultures are
very susceptible to heat and require cool temperatures from 20 - 25 oC. The lower setting was attainedusing a growth chamber. However, in the absence of a growth chamber, cooling was achieved with the use
of an airconditioner. Temperature ranged from 23-25 oC. Expect some growth (either enlarging, callusingor both) within a month.
F. Subculture and selection of calli (Fig. 4.5)
1. Inspect the explants two weeks after culture.
2. Transfer all explants to fresh media every two weeks.
At the end of the second month (after three transfers), sort out cultures that have formed callus.3.
Discard brown and unresponsive cultures.4.
Transfer the remaining cultures (those with callus growth) to fresh media and incubate in darkness under recommendedtemperatures.
5.
Inspect after a month and select cultures with compact type-calli. 6.
7. Discard the rest of the cultures, including the loose-type calli.
G. Propagation of compact-type calli
Transfer the compact calli to fresh medium containing BA and 2,4-D monthly.1.
From the compact-type calli, you will recover somatic embryos, which may be propagated by regular transfers to fresh 2,4-Dmedium.
2.
Note: Avoid making cuts or injuries on the cultures that may induce browning.
H. Shoot and shoot-like structures and plant regeneration (Fig. 4.6)
Observe shoots and shoot-like structures that will form from the compact-type calli even in the presence of 2,4-D or BAP in themedium.
1.
Transfer the cultures bearing shoots and shoot-like structures to semi-solid medium (one-fourth strength MS macronutrients andmicronutrients) with 5 ppm NAA to recover plants. Check Table 4.1 for other culture media for germination of somaticembryoids/rooting of shoots.
2.

TABLE OF CONTENTS http://www.inbar.int/publication/txt/INBAR_Technical_Report_No27.htm
20 van 35 31/01/2008 14:34
At this point, you may micropropagate by multiple shoot formation to maximize the plantlets.3.
Each plant can be used as the initial plant source of nodes for multiple shoot formation.4.
II. UNEXTENDED AND EXTENDED BRANCHES
Collecting branches (Fig. 4.7)A.
Prepare for a collection at the onset of the rainy season1.
Prepare the necessary equipment and paraphernalia for collection, including the culture medium to be used when you return tothe laboratory.
2.
a. Sharp pruning shears
b. Plastic bags/pail, net bags (heavy duty) and newspapers for wrapping
c. Clean water to wet newspapers
d. Markers and shipping tags
e. Polystyrene box, if collection area is far from the laboratory
f. Jacket or long sleeved shirt which you can button up
g. Cap or hat, gloves and boots
Inspect the clumps for extended and unextended branches. 3.
Note: Avoid collecting branches with mealy bugs or aphids. They make decontamination difficult.
Cut these branches with a pruning shears and put them in plastic bags or pail with water.4.
Note: The branches dry up easily so keep the environment most favorable for them. You may wrap them in moist newspapersand transport them within a plastic bag or net bag, depending on travel time.
Bring the branches to the laboratory.5.
B1. Preparation of nodes and disinfection (Fig. 4.8)
There are other protocols for preparation and disinfection based on literatures that are summarized in Table 4.2. The following are theprocedures presently used by the authors.
Cut branches into sections. Each section should contain a node. Discard the upper stem bearing the spindle and two-threeexpanded leaves.
1.
Trim the section 0.5-cm below the node and 2 cm from the node to the tip.2.Select sections with tight enclosing sheaths. 3.With a pad of cotton dipped in 95 % alcohol, wipe each nodal section clean to remove the trichomes.4.
Note: You can use 70% ethyl alcohol but it is easier to wipe of trichomes with 95% alcohol.
Soak in soapy sterile tap water for 30 minutes, change the soapy water and soak the nodal sections again for 30 minutes. Use amagnetic stirrer. Decant the soapy solution.
5.
Soak in antibiotic (1 g/l streptomycin) for 60 minutes. Use a magnetic stirrer. Decant the antibiotic solution.6.Soak in commercial bleach (5.25% a.i.) for 60 minutes. Use a magnetic stirrer. Decant the bleach.7.Rinse thrice with sterile water.8.Transfer the sections onto a sterile steel plate lined with sterile paper.9.Make a cut along the base of the leaf sheath and remove the enclosing sheath.10.Inspect for buds. If the section is blind, discard it.11.Trim stem 1-2 mm above the bud and 3-5 mm below the node.12.
Note: Use the bud section for multiple shoot formation and the soft internode tissues above the bud section for establishingcallus cultures.
Section the soft internode tissues above the bud section into 2-2.5 mm thick slices.13.
B2. Preparation of unextended branches and disinfection (Fig. 4.9)

TABLE OF CONTENTS http://www.inbar.int/publication/txt/INBAR_Technical_Report_No27.htm
21 van 35 31/01/2008 14:34
1. In the laboratory, wash the unextended branches thoroughly in running water.
2. Trim off the ligules from the leaf sheaths and the hard basal portion with the pruning shears.
3. Wipe the remaining surfaces with a cotton pad wet with 95% ethyl alcohol.
4. Wrap the shoots in a thin layer of cotton.
5. Wet the entire surface with pure bleach. Cover with aluminum foil and let this soak for 60 minutes.
6. Transfer the disinfected unextended branches to the clean air bench.
7. Remove shoots from the bleach by removing the aluminum foil and peeling away the cotton layer.
8. Put each branch in a flask and rinse thoroughly with sterile water (tap or distilled).
9. Take out unextended branches and peel off all sheaths until all soft tissues are exposed.
10. Section the soft tissues (about 3-4 mm thick slices) and inoculate onto a culture medium for callus induction consisting ofMS, 40 g/L sugar, 1 ppm 2,4-D and 1 ppm BAP, 5 g/L agar (HiMedia), pH 5.7.
C1. Callus cultures
1. Inoculate the soft internode tissues from lateral branches on the culture medium.
2. Follow procedures for tissues extracted from ground corms for inspection, sorting for
compact and embryogenic calli, e-calli propagation, and plant regeneration.
Maximize plants by multiple shoot formation.1.
C2. Multiple shoot formation from nodes (Fig. 4.10)
1. Inoculate the node sections onto the culture medium for bud break, bud germination and shoot growth.
Note: Culture media for node culture in other species are listed in Table 4.2.
Observe bud break within two weeks.2.
3. Observe shoot growth within four weeks.
Note: You may not be successful the first time you try your hand on multiple shoot formation. Rememberthat Prutponge and Gavinlertvatana (1992) had success in 54 species but not in 13 species. So, let us hopethat your species shall respond to any one of the reported protocols. Otherwise, you guessed it. Back to thedrawing board!
4. You may repeat the cycles of cutting up and reculturing to get more multiple shoots.
Note: Saxena and Dhawan (1994) demonstrated that multiplication could be induced for 15 cycles. Beyondthis limit, the material did not form any more shoots.
D. In vitro rooting
Prepare appropriate culture media for in vitro rooting.1.
Important! First, check Table 4.3. Is your bamboo species in the list? Try the medium for rooting others have been used foryour species.
Using aseptic techniques and working in a clean air cabinet, break up the multiple shoots.2.
Inoculate the shoots onto a culture medium for rooting.3.
Maintain the cultures under daylength and incubation temperature appropriate for your species.4.
TABLE OF CONTENTS http://www.inbar.int/publication/txt/INBAR_Technical_Report_No27.htm
22 van 35 31/01/2008 14:34
When roots have formed and developed, you may acclimatize them for potting out.5.
Thought For the Section:
Either make the tree good, and his fruit good; or else make the tree corrupt, and his fruit corrupt; for thetree is known by his fruit. Matthew 12:33
A good bamboo? Micropropagators are generally not the ones tasked to determine whether a bamboo is good or not. Technicallytrained breeders are not a common people for bamboo because of technical limitations including the infrequency of flowering,non-synchrony in flowering, sterility and long juvenile growth stage. However, there is also a perception that bamboos are unlimitednatural resources and that bamboos can readily adapt to changes in the environment.
We rely on field men who have observed clumps in field trials to determine a better bamboo clone. As micropropagators, we hope thatwe can become partners with field men in propagating better bamboo.
Section 5. Getting Ready for the Real World
An excellent micropropagation protocol needs to address potting out requirements of the tissue cultured plants. Within the confines ofthe culture vessel, plantlets are pampered with a continuous supply of nutrients. Humidity is high as evidenced by water droplets on thesides of the vessels. These pampered plants are fragile and require hardening to prepare them for the conditions in the nursery.
Acclimatization is the process whereby these plants become adjusted to the real world! The possible shift from the environmentprovided within the culture vessel to the rigors of a nursery is to be addressed. In vitro plants are prepared for these changes by one ofseveral techniques or by their combinations:
Change the culture medium.1.
Some opt to increase the sugar concentration in the last stage of culture, while others reduce sugar.
Reduce the relative humidity within the vessel.2.
The relative humidity can be reduced by removing the vessel closures. The stomates of the plantlets need to get used to somestress to do work!
Transfer the cultures to room temperature.3.
Laboratories in the tropics need to address the possible negative effects of the shift from air conditioned culture rooms to elevatedtemperatures in the nurseries. Generally, the cultures are grown under ambient temperatures before moving them to the nurseryarea.
Increase light intensity in the culture room during the rooting stage.4.
The typical laboratory combines several techniques so that the plants are better acclimatized.
After acclimatization, the next step is to get the plantlets out of the sterile confines of the culture vessel and into a potting mix whichwill support their subsequent growth and development. The readiness of the plant for potting out, the potting mixture and theenvironment (light intensity, temperature and wind factor) and the hardening techniques prior to potting out all combine and contributetowards the successful transfer of tissue cultured plants to the real world.
In this section, are the techniques we found workable in Los Baños, Philippines. Some published methodologies are also included.
A. Acclimatization of plantlets for potting out
Inspect cultures if the plants have formed sufficient roots (Fig 5.1). Plants should have at least two roots because unrooted plantshave poor chances of survival.
1.
Transfer the cultures to room temperature in the laboratory or nearby nursery.2.
TABLE OF CONTENTS http://www.inbar.int/publication/txt/INBAR_Technical_Report_No27.htm
23 van 35 31/01/2008 14:34
Note: Los Baños, Laguna (Philippines) has rainy and dry seasons. Temperatures range from 22.7 – 31.5 oC. A specializedchamber for acclimatization from culture vessels has not been necessary to increase potting out successes.
Select a brightly lit area of the laboratory or nursery (49 – 61 watts/m2). A window sill that is exposed to morning light is a goodspot.
3.
Note: Take care that the cultures are not exposed to direct sunlight by midday. They may cook!
If humidity is a problem:
The Institute of Forest Genetics and Tree Breeding (Tamil Nadu) recommends the use of poly-globules for 2 weeks to harden the tissuecultured bamboo plantlets. The poly-globules are cylindrical frames enclosed with clear polyethylene sheets. The poly-globules areopened and the plantlets are transferred to a shade house for a month (ICRFE Technical Bulletin, 1992).
If you have a growth chamber:
There are many types of growth chambers which can be used for acclimatization, but these generally are expensive. Rao, et al. (1990)reported the fabrication of a simpler and less expensive growth chamber for establishing tissue cultured plantlets from culture vessels.
The growth chamber provided light to plantlets by 4 40-W tubelights (cool-white daylight type) fixed at a distance of 30 cm from theplantlets. The fluorescent tube ballasts were located outside the chamber to reduce heat load.
Temperature was addressed through air-conditioning which also took care of dehumidification. Aerosol humidifiers are included intheir design to increase humidity and reduce the heat load through evaporative cooling. Two fans which were provided permittedadequate air circulation. There was a provision also for the intake of fresh air. Temperature and humidity were monitored andcontrolled by digital controllers. A thermostat and an alarm were also installed to ensure safety of the plants in the facility.
The facility could accommodate 12,000 plants for acclimatization at any one time.
If you have imported micropropagated plantlets from another laboratory, you may want to consider the following before pottingthem out:
When you receive the cultures, take them out from the box used during transport. Inspect for contamination. If with fungalinfection, transfer them to the nursery area for acclimatization and potting out.
1.
Transfer the cultures to a bright location in the laboratory for a few days. Keep them separated from your own cultures. Observefor possible mite infection. This is generally associated with fungal contamination.
2.
Consider using plantlets as source of some nodes to initiate your own cultures of the species.
The nurseryB.
Consider the area you want to designate as nursery.1.
Note: You may want to take the following questions into account:
Is there enough protection from excessive light and wind at the initial stage of potlet establishment? Is there a way for you toincrease the light once the plants are established? Is there sufficient space for transportation, e.g. truck, to maneuver to pickup plants? Will stray animals be a problem? Will you able to recoup your investment?
In the tropics, we have several options as to the type of nursery area you may develop (Fig. 5.2). Basically, lathhouses are morethan sufficient to meet the requirements.
2.
Potting out and nursery care
Several potting mixes have been evaluated for tissue cultured plantlets of bamboo during the cool (November to January) and warm(February to April run) months under greenhouse conditions (Fig. 5.3). Survival and growth were better during the warm months.
A good potting mix should always retain moisture, have good drainage, be "light" and not easily compacted and provide sufficientnutrients to the plantlets.
TABLE OF CONTENTS http://www.inbar.int/publication/txt/INBAR_Technical_Report_No27.htm
24 van 35 31/01/2008 14:34
If a two-step potting strategy is employed, one can select for a medium which allows for very high survival and repot to mixture whichallows for very good plant growth. Or alternatively, one can use a potting mixture that allows high survival and good growth at thesame time or a one-step potting strategy.
During the warm months, survival of potted plants was very high (80 - 100%) in soil:sand:compost (2:2:1) while growth was verygood on soil:compost and soil:sand and sand:compost. Survival was high (60 - 80%) and growth was good to very good on soil:sandand sand:compost and soil.
During the cool months, survival was very high in sand:coirdust and soil:sand:coirdust and growth was good to very good on soil fromcreekside and soil:compost. For a one-step potting strategy during the cool months, survival was high and growth was good on soilfrom the creekside.
Procedures
Prepare suitable potting mixture. The mixture of 1:1 (v:v) soil:compost gives consistent results. When possible, sterilize mixtureor apply fungicide to the mixture after potting.
1.
Moisten potting mixture before use. Put enough potting material to fill pots or plastic bags or plastic cups (or equivalentmaterial) to two cm below the brim of the pot.
2.
With a pair of forceps, grasp plantlets at the base of the shoots. Pull gently from the culture bottle. A small amount of wateradded to the culture bottle can make the harvest of plants easier.
3.
Wash the agar medium from the roots thoroughly with plain tap water. Be careful with the root system.4.
Make a hole in the moist potting mixture large enough to plant the tissue culture bamboo. Place bamboo in the hole and gentlypress soil around the root system. Label plants if several species are to be potted out.
5.
Transfer the plants to shaded conditions. Water when needed. Keep surroundings shaded and moist. Avoid overwatering. Theclump of young leaves show yellowing and leaf drop when plants are overwatered.
6.
Maintain plantlets in the nursery for three to four months (Fig. 5.4). The plants are now ready for further division by miniclumpdivision, repotting to a bigger plastic bag or transport for field planting.
7.
Thought For the Section:
"For when the time ye ought to be teachers, ye have need that one teach you again which be the firstprinciples of the oracles of God; and are become such as have need of milk, and not of strong meat. Foreveryone that useth milk is unskillful in the word of righteousness: for he is a babe. But strong meatbelongeth to them that are of full age, even those who by reason of use have their senses exercised todiscern both good and evil. Hebrews 5:12-14 (Holy Bible, King James Version).
In this section, we addressed the need to prepare the tissue cultured plants for the new environments. Tissue cultured plants have beencalled test-tube babies. They have been pampered in the artificial world of a culture vessel where they were fed daily with nutrientsfrom the culture medium and bathed in moist air. They need to be prepared for the real world so the majority, if not all, may surviveand be of use as planting materials.
SECTION 6. TRY MINI-CLUMP DIVISION
A nursery filled with bamboo plants looks like an overgrown lawn. Once you have potted out tissue culture-derived plants in thenursery, it is easy to build up planting materials for bamboo. However, one of the issues raised against mass propagation throughtissue culture methodologies is the lack of control of the common propagator over the technology. He has to rely on laboratory-basedtechnicians to produce planting stocks for him. Costs will be high because of the nature of the propagation techniques.
The idea of using tissue cultured plants as mother stocks came about after trying to divide wildlings of bamboo. Wildings werecollected from Abra and Zambales, grown in the nursery, and used for an experiment on macroproliferation (Banik, 1991).Macroproliferation makes use of one to two-year-old seedling stocks for propagation. The seedlings are divided to yield several clumpswith one or more stems. From our own experiments, we noted that even one-stemmed propagations from the seedlings recovered anddeveloped new stem growths. However, seedling stocks take more than a year to form new stems. It is about a year for S. lumampaoand up to 2 years for B. bambos.
Macropropliferation has been used to describe divisions using tissue-cultured plants by Institute of Forest Genetics and Tree Breeding(ICFRE Technical bulletin, 1992). However, we decided to differentiate plant materials propagated by dividing tissue culture-derivedmother stocks apart from macroproliferation by coining the term "mini-clump division". Why did it matter to have a new name? Forone, established tissue cultured plants may be divided when sufficient stems and rhizomes have developed in the nursery. This can bethree to four months after potting out unlike macroproliferation that can commence only after one to two years after establishment.Division can be done every 2-3 months, depending on species. Although mini-clump division and macroproliferation both involve the

TABLE OF CONTENTS http://www.inbar.int/publication/txt/INBAR_Technical_Report_No27.htm
25 van 35 31/01/2008 14:34
division of juvenile clumps, mini-clumps permit earlier division and shorter intervals between division cycles.
The nursery propagation techniques are simple and can be translated into livelihood projects. The propagation activities can be fannedout from the laboratories to the elderly, housewives or out-of-school youths in the community, providing them income.
Advantages of tissue cultured plants and mini-clumps
Tissue cultured plants of bamboo have the following advantages as planting materials. They are light, small, and compact, easilytransported and have high survival rates in the field. Tissue cultured plants potted in small plastic bags planted out in Bataan,Pampanga and Zambales when they were about four, six and eight months old in the nursery showed high survival of 95-100. Olderplants had lower survival.
The advantages of tissue cultured plants as planting materials are shared by mini-clumps. They are light. About 4-5 clumps (potted insoil mix) would weigh a kilo. They are small. About 10 to 14 mini-clumps can be packed in an ordinary plastic grocery bag. They arecompact. About two thousand plants can be loaded in a long-bed truck to transport them for field planting. Lastly, their survival is highwhen planting is timed with the onset of the rainy season.
Limitations of mini-clumps
The initial stock plants come from a laboratory and this is where the linkage of propagators to a source laboratory is important. Thepropagator has to rely on the tissue culture propagator for proper identification of the bamboo.
The nursery propagator has to inquire about the age of the stocks. How many cycles of propagations have these clumps undergone.How old are they? How many genotypes are available?
How is mini-clump division done?
Check if the tissue culture-derived plant stocks are ready for division. Inspect the potted out tissue cultured plant if there are atleast 5 stems and if the new shoots are developing from the rhizome (Fig. 6.1).
1.
Lift the plants to be divided and cut roots outside the plastic bags. Bring plants to the potting area.2.
Check if the other materials needed for potting are available and bring them to the potting area. All these materials should bewithin reach (Fig. 6.2). We will need the following:
3.
a. Plastic bags (2.5 in x 2.5 in) or disposable cups
Potting medium (1:2 compost and soil or other well-drained potting mixes high in composted plant material)a.
Note: Select a potting mix which is not prone to compaction.
c. Water and watering can
d. Sprinkler
Labels and marking pensa.
From among the potted out tissue cultured plants, select clumps with at least 5 stems.1.
Remove the clump from the plastic bag to expose the root system and the rhizome (Fig. 6.3). Gently shake the soil from the rootsystem or dip the roots in water to facilitate root separation.
2.
Note: (a) It is best to divide the mini-clump before the rhizome strike out of the plastic bag. (b) If clumps are over-grown, trimsome stems or leaves. Retain at least 40% of the existing growth or plant recovery is slow.
Inspect the rhizome and check for weak points. 3.
Note: (a) Each division should have 2 or more roots and as much as possible, a new shoot growth. (b) If the soil is compactedand does not easily fall away from the roots (particularly in over-grown plants), dip the root system in water to remove asmuch mix around the roots.
Divide at the weak points along the rhizome to get one to three stems per division (Figs. 6.4 and 6.5).4.
Note: There are two options in dividing the clump: (a) Separate the clumps at the weakest points of the rhizome by gentlytugging and breaking the rhizome,
(b) Use pruning shears or scissors to cut the rhizome.
Keep all divisions moist, avoiding drying up of leaves.5.Put the plants into plastic bags half-filled with potting mix (Fig. 6.6). Position the plants in the middle of the bag. Fill with thepotting mix.
6.

TABLE OF CONTENTS http://www.inbar.int/publication/txt/INBAR_Technical_Report_No27.htm
26 van 35 31/01/2008 14:34
Note: Minimize time interval between division and repotting.
Water plants thoroughly (Fig. 6.7).7.Transfer to plots and again water. 8.Ensure sufficient shade for the first two weeks.9.
Note: Some leaves may wilt or dry up.
Water sparingly for three days but keep the potting mix moist. Apply water more generously after this period.10.
New stems will grow within 4 weeks.11.Repeat the procedures when you have sufficient new growth. 12.
Note: (a) The interval between division cycles may be 2 to 3 months, depending on the growth rate of thespecies and cultural practices in the nursery. (b) Growth rate is faster in open sun with regular wateringand nutrient application.
16. If you want to use plants for field planting, grow them for at least another month. Three-to-four month old plants have veryhigh transport and field planting survival.
Micro-enterprises using mini-clump division
The mini-clump divisions can be used to start a livelihood project in the community. Table 1 is a production strategy for multiplyingbamboo by mini-clump division. This permits the multiplication of stocks, maintenance of stock plants and sale/disposal ofpropagating materials.
The division cycle is two months, based on growth rates of mini-clumps of D. strictus under open culture and regular nutrient feeding.The interval need to be adjusted to the species. Growth rates vary. Among the species grown in the nursery, D. strictus and B. bambosproduced 4-8 new stems in two months compared to 1 stem in 3 month for G. levis.
The methodology is simple and does not require sophisticated materials or structures. It requires the basic skills of a nurserypropagator.
Table 6.1. Production strategy of bamboo by mini-clump division after one year following at 2-month division cycle.
MONTHS MOTHER
STOCKS
MINI-CLUMP DIVISIONS
DIVISIONS FOR
SALE / DISPOSAL
1 170 500 None
2 Grow on None
3 500 1, 500 None
4 Grow on 1,000
5 500 1, 500
6 Grow on 1,000
7 500 1, 500
8 Grow on 1,000
9 500 1, 500
10 Grow on 1,000
11 500 1, 500

TABLE OF CONTENTS http://www.inbar.int/publication/txt/INBAR_Technical_Report_No27.htm
27 van 35 31/01/2008 14:34
12 Grow on 1,000
Based on growth and multiplication rates of D. strictus.
Thought For the Section:
"Give us this day our daily bread…" Matthew 6:11
We ask God for food daily. The Lord Jesus instructed his disciples to pray for food daily. This is the same way with plants. In naturalstands and once established in the field, bamboos are sturdy and may grow inspite of neglect. However, plants in small plastic bags inthe are very prone to drying. You will have to care for them.
Section 7. Making up for lost forests
Preparation of plants, transport and field planting A.
1. You can bring the tissue cultured plantlets to the field when the rhizome system is well developed (Fig. 7.1). From ourexperience, this takes about three months after potting out.
Note: With good potting mixes that are loose, rich and well watered, the wait may even be shorter thanthree months for tissue cultured plants. You may also field plant later if you prefer bigger plants but youhave to be careful to feed them well particularly if you will retain them in small plastic bags.
Mini-clumps are ready two to four weeks after repotting and best for field planting three month after re-potting. Olderclumps may also be transported and field planted but the bigger the plant and bag, the heavier the material to betransported.
2. Field-plant bamboo clumps before or during the rainy season. Otherwise, be ready to irrigate them.
3. When you are ready to transport the plants, work within a schedule. A week before transport, lift each bag . Sometimesthe roots of the plants have gone beyond the bag and lifting them is part of the acclimatization process. Lifting breaks theroots. However, since plants remain in the nursery, they are recovered in time for transport the following week. Reduce theshade also. Two days before transport, do not water as frequently to further harden the plants, but do not allow them to dryout.
4. Pack the plants according to any of the following suggested techniques, depending on the volume of plants to betransported:
For small quantities:
a. Put plants in plastic bags.
b. Pack them in trays or boxes (Fig. 7.2).
For large quantities:
You may use several bags, boxes or trays.a.
Put second or third layers of bagged plants on top of the first layer of bag (Fig. 7.3).b.
5. Dig a hole sufficient to accommodate some organic fertilizer and the root ball of the plant in the selected site. Mix theorganic matter with the soil. (Fig. 7.4).
6. Put the plantlet in the hole and replace the ameliorated soil. Cover the base of the plantlet with enough soil and pressfirmly around the root system.
7. Water the plantlet after transplanting. Put some dried grass or other mulching material around the base of the plant (Fig.7.5).
8. Protect plantlet from animals with some twigs (fig. 7.6) of bamboo or other appropriate plants or materials from aroundthe site. Branches of spiny bamboo (Bambusa blumeana) are suitable.
9. You can expect rapid growth after initial establishment phase on flat and good soils. Canopy closure was attained 2years after planting in Bataan (Fig. 7.7a and b).

TABLE OF CONTENTS http://www.inbar.int/publication/txt/INBAR_Technical_Report_No27.htm
28 van 35 31/01/2008 14:34
B. Degraded soils along the slopes of a mountain
Bamboos are very hardy plant materials most suitable for hard environments which you would like to reforest. Bamboos are weeds andcompete well with persistent grasses such as "talahib" and cogon.
We have planted TC bamboos and mini-clumps along denuded mountainsides and where the soil was degraded and acidic. The soilwas very thin. Stones, rocks and boulders were visible (Fig. 7.8).
To plant along denuded mountainsides, we suggest the following:
1. Plant along the contour. Use an A-frame and other techniques associated with Sloping Agricultural Land Technology(SALT).
2. Try to choose best spot along the contour, inspecting for better soil depth.
Note: If none, create a spot by putting rocks or stones along the contour. Put grass or similarmaterial that will form a matting so that added soil will not be eroded by rain.
3. Dig as deep as possible and put some soil mixed with organic matter at the base of the hole.
4. Position the plant and refill the remainder of the hole with soil ameliorated with organic matter. Composted grass, freshor composted leguminous leaves are good materials to put around the plants.
Table 7.1. Common leguminous trees.
Tree Species
Common name
Cassia siamea
Delonix regia
Gliricidia sepium
Leucaena diversifolia
L. leucochepala
Thailand shower
Fire tree
Kakawate
Acid ipil-ipil
Ipil-ipil
5. Secure plants with stones and rocks to prevent soil erosion (Fig. 7.9) and help retain moisture around the plants.
6. Cover stones with some grass. Uncovered stones absorb heat and may result in excessive heating of plants.
7. Do not remove the grass around the plants for about two years. This permits good root development. Soil erosion iscontrolled by the grass, water is retained for a longer period of time around the root zone and humidity around the plants ishigher (7.10).
Note: You may cut the grass but leave the roots intact.
8. Whenever possible, apply organic matter to hasten growth.
Bamboo takes two years to re-establish along slopes of degraded lands.

TABLE OF CONTENTS http://www.inbar.int/publication/txt/INBAR_Technical_Report_No27.htm
29 van 35 31/01/2008 14:34
C. Planting in Lahar
Lahar-covered areas are difficult to make profitable because organic matter is low, of its tendency to compaction, retention of heatduring the day and rapid cooling at night. However, some areas have become seeded with grass. Although our experience withplanting bamboo in lahar is still limited, let us share with you our experiences with this kind of "soil" in Porac, Botolan, Zambaleswhere bamboo mini-clumps survived planting on lahar.
Follow the suggestions that may apply to the site.
1. Dig a small hole sufficient to accommodate some organic fertilizer and the root ball of the plant in the selected site. Mixthe organic matter with the lahar.
2. Put the plantlet in the hole and replace the ameliorated lahar. Cover the base of the plantlet with sufficient lahar andpress firmly around the root system. Composted grass or leguminous leaves are good materials to put around the plants.
3. Water the plantlet after transplanting. Protect plantlet from animals with some twigs of bamboo or other appropriateplants or materials from around the site.
4. Allow grass to grow near the bamboo plants to function as "nurse plants" (Fig 7.11). Water is retained for a longerperiod of time around the root zone and humidity around the plants is higher. Temperature in the microenvironment shallalso be cooler with the companion grasses.
5. Whenever possible, apply organic matter to hasten growth.
Note: As a general rule, see to it that the plants are supplied with some kind of fertilizer. With problem soils, it isbest to use organic fertilizers or if the budget permits, slow release pelletted fertilizers.
Thought For the Section:
"If my people, which are called by my name shall humble themselves, and pray, and seek my face, and turnfrom their wicked ways; then will I hear from heaven, and will forgive their sin, and will heal their land." 2Chronicles 7:14 (Holy Bible, King James Version).
How we desire to see a barren land greened up, denuded mountainside reforested and riverbanks strengthened to prevent furthererosion! How we desire the land to be healed.
Man’s programs address the rehabilitation of land from the natural prospective-"…replant, manage and make sure that all will profitfrom the venture…" When the grass, the bamboo, the trees have fully covered the mountainsides, will others after our generationconserve and enrich them? Or will the cycle of misuse and neglect arise again? Will the underlying factors to poverty, inequity insharing fruits of labor, lack of access to appropriate knowledge remain to drive resource-poor communities to cut down the remainingtrees?
SECTION 8. HELP ME OUT!
Have you been having some problems with your culture and nursery work? We have many experiences with in vitro propagation ofbamboo and with tissue culture in general that may help you. In this section, we present possible solutions to the problems we havepersonally encountered or have heard others encounter.
The proposed solutions were found workable under our conditions. Since your laboratory may have different conditions, some proposedsolutions may not be applicable to your situation.
SECURING THE INITIAL PLANTING MATERIALA.
PROBLEMS POSSIBLE CAUSE(S) PROPOSED SOLUTION
Seed Collection and Transport
1. Locating flowering clumps and identification of species
a. Lack of contacts
b. Lack of knowledge on the geographical location of species
Make inquiries with closest forestry department (ForPhilippines, CENRO/PENRO-DENR, ERDB/ERDS- DENR offices, etc.).
a.
Look up for the geographical location/distribution of thespecies of interest.
b.
Learn about the descriptions/characteristics of the speciesof interest through available literature to be able to identify
c.

TABLE OF CONTENTS http://www.inbar.int/publication/txt/INBAR_Technical_Report_No27.htm
30 van 35 31/01/2008 14:34
c. Lack of knowledge about the description or characteristics perspecies
the flowering clump.Conduct surveys and personal interviews with peoplewithin the place.
d.
2. Strategy/methods of collecting seeds
Lack of contacts and experience in collecting seeds Make an inquiry with the closest forestry department – how
are the authorities on the bamboo species of interest. Lookup the geographical location of the species. Learn about thespecies through available literature to be able to identify theflowering clump.
A. SECURING . . . (Continued)
PROBLEMS POSSIBLE CAUSE(S) PROPOSED SOLUTION
3. Germination of seeds during transport (before properprocessing)
High moisture during collection trip
a.
b. Wet/moist seeds
Avoid transporting materials in plastic bags which allowmoisture to build up. Use fine net bags. Store dry in polystyrene boxes that are cool.
a.
Reduce moisture of seed lot using dessicant, dry charcoal,similar materials that will draw moisture.
b.
Use a thermos to transport seeds. c.If you collected seeds during a rainy day, dry them as soonas possible by laying them on very absorbent materials, e.g.towel, newspaper,or disposable nappies. You can get themoisture-drawing gels from the baby’s nappies and put theseeds on them to dry the seeds during transport.
d.
4. Seeds difficult to collect a. Flowering culms are tall
b. Relative access to flowering clump, i.e. location of the culm.
Lay large net underneath the culms, shake culms to bringthe seeds down (See Section )
a.
Use a rope to pull the culm to where the collecting net islaid.
b.
5. Unknown species Lack of familiarity of seed collectors with the descriptionsof the flowering bamboo species
Collect plant parts for identification in the laboratory (SeeSection on bamboo species identification)
a.
Take a photograph and note down outstanding plant characteristics
b.
Collecting ground corms and lateral branches
1. Unavailability of ground corms and young lateral branches.
Seasonality of materials. Time introduction to culture of explants during the rainyseason. Ground corms and young lateral branches are readily available during the rainy season.
a.
Irrigate clumps until ground corms are induced. Continueirrigation to ensure rapid growth of corm or lateral branches.
b.
2. Difficulty of cutting lateral branches.
Branches fully mature are hard and not suited for culture work
a. Time introduction to culture of explants during the rainyseason.
b. Initiate new growths by irrigation.

TABLE OF CONTENTS http://www.inbar.int/publication/txt/INBAR_Technical_Report_No27.htm
31 van 35 31/01/2008 14:34
A. SECURING . . . (Continued)
Transporting ground corms and lateral branches
1. Drying out of ground corms and lateral branches
Difficulty in maintaining moisture in the materials
Wrap ground corm/branches in damp newspapers, towelsor cloth or other similar materials
2. Heating up and cooking of ground corms
Avoiding getting corms cooked during transport Do not put unprotected ground corms in back of pick-up
during transport. Wrap them properly and transport using polystyrene box and other materials that would ensureground corms are kept cool and acceptable.
LABORATORY-BASED ACTIVITIESB.
PROBLEMS POSSIBLE CAUSE(S) PROPOSED SOLUTIONS
General
1. Preparation of the culture media
a. Precipitation of salts High concentration of stock solutions
a. Reduce strength of stock solutions during mixing.
b. Add water to your mixing container before adding any stock solution. After adding one stock solution, mix wellbefore slowly adding the next solution.
c. Add water to the measuring cylinder before using it for the next stock solution.
d. Check sequence of addition of stock solutions.
b. Agar medium does not gel after media sterilization.
a. Gelling quality of new brand of agar
b. Low pH
a. Check concentration appropriate for the desired gelling consistency
b. Check pH, buffer solution and pH meter.
B. LABORATORY-BASED . . . (Continued)
PROBLEMS POSSIBLE CAUSE(S) PROPOSED SOLUTIONS
2. Contamination before inoculation
a. Improper sterilization
b. Contaminated storage space (You might have mites in the laboratory).
c. Improper storage
a. Check procedures of technicians for proper use of pressure cookers or sterilizers. Check also the pressurecookers/sterilizers gauge if it is working well.
b. Check and disinfect storage space for medium.

TABLE OF CONTENTS http://www.inbar.int/publication/txt/INBAR_Technical_Report_No27.htm
32 van 35 31/01/2008 14:34
c. Check that culture media closures (e.g. plugs, covers) are dry when stored.
Establishment of Cultures from Seeds
1. Contamination of cultured seeds (fungal mycellium, milkiness around seed or embryowhich increases with time, Fig. 8.1)
High microbial loada.
b. Inadequate disinfection procedure
Reduce microbial load by washing in running water and proper disinfection.
a.
Bamboo seeds vary in characteristics, e.g. hairy, marked, with grooves, smooth, which influence ease of disinfection
b.
2. Death of embryos Decline of viability associated with storage conditions and length ofstorage time.
a.
Disinfection too rigorous and inappropriate.
b.
a. Improving conditions of storage.
b. Use seeds as soon as possible.
c. Check procedure to minimize over-disinfection or bleaching.
3. Uneven growth of seed batch.
Most probably a genotype response. Each seed is different.
Discard very slow growers. Tag individual seedlings and carry the tag to all subsequent propagations.
B. LABORATORY-BASED . . . (Continued)
PROBLEMSPOSSIBLE CAUSE(S)
PROPOSED SOLUTIONS
Establishment of Cultures from Nodes and Tissues from Lateral Branches
Browning of explants and medium
1. Polyphenols; expected to some degree
a.
Exposures to light esp. at initial stage of culture.
b.
Try activated charcoal (0.1g/l medium). Antioxidants such as citric acid (0.1 g/l, filter sterilized, soak tissues beforeimplanting in medium) and ascorbic acid ( 0.1 g/l, filtersterilized, soak tissues before implanting in medium).
a.
Cut explants under water or anti-oxidant solutionsb.Shield sections of tissues from light during handling in laminar flow.
c.
Frequent subcultures (i.e. every 2 weeks or until browning has subsided for D. latiflorus)
d.
Dark incubatione.
2. Milkiness of culture media Bacterial contamination associated with the explant or techniques
a. Chec a. techniques for disinfection and tissue culture
b. Discard cultures
3. Fungal growth on new cultures
Contamination associated with high microbial load on explant, particularly whenpest eggs are on the nodes, inadequate disinfection or improper techniques ofhandling
Evaluate techniques for disinfection and tissue culturea.Pre-treat branches of clumps before nodes are taken for culture to reduce microbial load and pests.
b.

TABLE OF CONTENTS http://www.inbar.int/publication/txt/INBAR_Technical_Report_No27.htm
33 van 35 31/01/2008 14:34
B. LABORATORY-BASED . . . (Continued)
PROBLEMS POSSIBLE CAUSE(S) PROPOSED SOLUTIONS
4. Slow response to rootinga. Inappropriate stage of growth of explant
b. Improper growth medium
a. Try getting mature materials.
b. Try adding different concentrations of IBA or NAA to medium (0-10 ppm).
Establishment of Cultures from Tissues of Ground Corms
1. Browning of ground corm tissues during handling
Oxidation Protect corm after stripping away all sheaths by covering the tissues with sterile paper.
2. Browning of tissues during culture storage (Fig. 8.2)
Oxidation Protect explants by storage in the dark in an air-conditioned
room at 20-22oC.
Subcultures
1. Slight discoloration of the medium (Fig. 8.3)
Phenolics Avoid making too many new cuts during subculture.a.Check for bacterial contamination.b.
c. Check subculture cycles if overdue.
2. In vitro flowering (Fig. 8.4)
Associated with stress; mayne induced by growth regulators in medium
Subculture regularly.a.Check incubation temperature and adjust accordingly.b.Monitor other cultures from the same batch.c.
3. Slowing down in growth rates (Fig. 8.5)
Stress a. Subculture regularly.
b. Check incubation temperature and adjust accordingly.
4. Plant variegation and albinism (Fig. 8.6)
Continuous subculturinga. Check culture medium requirements for higher subculture cycles.
b. Avoid prolonged subculture interval to prevent ageing of cultures.
c. Check number of subculture cycle.
C. NURSERY-BASED ACTIVITIES
PROBLEM POSSIBLE CAUSE(S) PROPOSED SOLUTIONS
Potting out and nursery cultivation

TABLE OF CONTENTS http://www.inbar.int/publication/txt/INBAR_Technical_Report_No27.htm
34 van 35 31/01/2008 14:34
1. Plants look dry and leaf are very limp.
Insufficient hardening or acclimatization. Most probably, plants were pottedout directly from the airconditioned culture room storage.
Practice acclimatization. Transfer cultures to bright, natural but indirect light before potting out. Put plants that are potted out in amoist place for a week or so, then transfer to a brighter location.
2. Survival is low. Conditions are not suitable to survival.
a. Make sure the plants are well rooted.
b. Use sterile soil mixes.
c. Increase shading at potting out and during the first week of cultivation in the nursery.
d. Do not expose plantlets to excessive wind.
3. Leaves yellowinga. If restricted to specific areas, may be due to a pest problem.
b. If in general, may be a problem of insufficient feeding
a. Mealy bugs can be washed off with soap and water. (See section on nursery pests)
b. Check if plants are regularly fertilized. With compost, plants will require extra feeding after 8 weeks.
D. FIELD ACTIVITIES
PROBLEM POSSIBLE CAUSE(S) PROPOSED SOLUTIONS
1. Low survival a. Improper timing of planting.
b. Brush fire
c. Rhizome not developed
a. Time field planting at the onset of rainy season. Avoid planting during summer unless you have irrigationfacilities.
b. Ensure you have a fire line and clean grass around the plants (about 1 m).
c. Check your plants for good rhizome development.
2. Plants wilted after field planting
Root systems were disturbed during nursery operation of moving plants out
a. Reduce leaves in the nursery before field planting.
b. Provide shade to newly planted out bamboo.
3. Stems black, burnt look Brush/grass fireWater the plants to hasten regrowth from rhizomes if rainy season to far off.

TABLE OF CONTENTS http://www.inbar.int/publication/txt/INBAR_Technical_Report_No27.htm
35 van 35 31/01/2008 14:34
4. Stems always cut back; slow height increases but good new growths
Grazing animals most probably Put some protection around young clumps.