micro-Pipettierhelfer micro Pipette Controller · PDF filefunction, immediately stop...
29
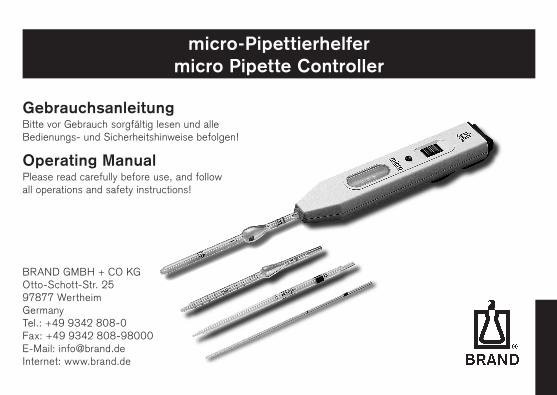
micro-Pipettierhelfer micro Pipette Controller Gebrauchsanleitung Bitte vor Gebrauch sorgfältig lesen und alle Bedienungs- und Sicherheitshinweise befolgen! BRAND GMBH + CO KG Otto-Schott-Str. 25 97877 Wertheim Germany Tel.: +49 9342 808-0 Fax: +49 9342 808-98000 E-Mail: [email protected] Internet: www.brand.de Operating Manual Please read carefully before use, and follow all operations and safety instructions!
Transcript of micro-Pipettierhelfer micro Pipette Controller · PDF filefunction, immediately stop...
micro-Pipettierhelfermicro Pipette Controller
GebrauchsanleitungBitte vor Gebrauch sorgfältig lesen und alle Bedienungs- und Sicherheitshinweise befolgen!
BRAND GMBH + CO KGOtto-Schott-Str. 2597877 WertheimGermanyTel.: +49 9342 808-0Fax: +49 9342 808-98000E-Mail: [email protected]: www.brand.de
Operating ManualPlease read carefully before use, and followall operations and safety instructions!

- 3 -
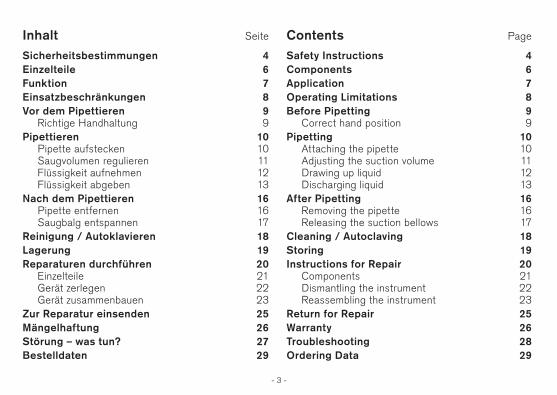
Inhalt Seite
Sicherheitsbestimmungen 4Einzelteile 6Funktion 7Einsatzbeschränkungen 8Vor dem Pipettieren 9
Richtige Handhaltung 9Pipettieren 10
Pipette aufstecken 10Saugvolumen regulieren 11Flüssigkeit aufnehmen 12Flüssigkeit abgeben 13
Nach dem Pipettieren 16Pipette entfernen 16Saugbalg entspannen 17
Reinigung / Autoklavieren 18Lagerung 19Reparaturen durchführen 20
Einzelteile 21Gerät zerlegen 22Gerät zusammenbauen 23
Zur Reparatur einsenden 25Mängelhaftung 26Störung – was tun? 27Bestelldaten 29
Contents Page
Safety Instructions 4Components 6Application 7Operating Limitations 8Before Pipetting 9
Correct hand position 9Pipetting 10
Attaching the pipette 10Adjusting the suction volume 11Drawing up liquid 12Discharging liquid 13
After Pipetting 16Removing the pipette 16Releasing the suction bellows 17
Cleaning / Autoclaving 18Storing 19Instructions for Repair 20
Components 21Dismantling the instrument 22Reassembling the instrument 23
Return for Repair 25Warranty 26Troubleshooting 28Ordering Data 29
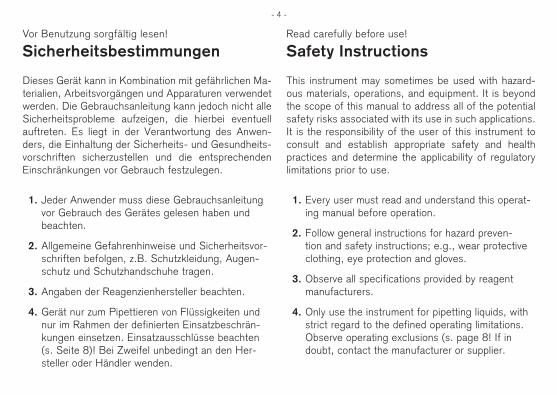
Vor Benutzung sorgfältig lesen!
Sicherheitsbestimmungen
Dieses Gerät kann in Kombination mit gefährlichen Ma-terialien, Arbeitsvorgängen und Apparaturen verwendet werden. Die Gebrauchsanleitung kann jedoch nicht alle Sicherheitsprobleme aufzeigen, die hierbei eventuell auftreten. Es liegt in der Verantwortung des Anwen-ders, die Einhaltung der Sicherheits- und Gesundheits-vorschriften sicherzustellen und die entsprechenden Einschränkungen vor Gebrauch festzulegen.
Read carefully before use!
Safety Instructions
This instrument may sometimes be used with hazard-ous materials, operations, and equipment. It is beyond the scope of this manual to address all of the potential safety risks associated with its use in such applications. It is the responsibility of the user of this instrument to consult and establish appropriate safety and health practices and determine the applicability of regulatory limitations prior to use.
- 4 -
1. Every user must read and understand this operat-ing manual before operation.
2. Follow general instructions for hazard preven-tion and safety instructions; e.g., wear protective clothing, eye protection and gloves.
3. Observe all specifications provided by reagent manufacturers.
4. Only use the instrument for pipetting liquids, with strict regard to the defined operating limitations. Observe operating exclusions (s. page 8! If in doubt, contact the manufacturer or supplier.
1. Jeder Anwender muss diese Gebrauchsanleitung vor Gebrauch des Gerätes gelesen haben und beachten.
2. Allgemeine Gefahrenhinweise und Sicherheitsvor-schriften befolgen, z.B. Schutzkleidung, Augen-schutz und Schutzhandschuhe tragen.
3. Angaben der Reagenzienhersteller beachten.
4. Gerät nur zum Pipettieren von Flüssigkeiten und nur im Rahmen der definierten Einsatzbeschrän-kungen einsetzen. Einsatzausschlüsse beachten (s. Seite 8)! Bei Zweifel unbedingt an den Her-steller oder Händler wenden.

5. Always use the instrument in such a way that nei-ther the user nor any other person is endangered. Avoid splashes. Only use suitable vessels.
6. Only fit empty pipettes to avoid the risk of conta-mination and infection.
7. Take care that the liquid does not penetrate into the instrument.
8. Never use force on the instrument!
9. Only use original manufacturer’s accessories and spare parts. Do not attempt to make any technical alterations. Do not dismantle the instrument any further than is described in the operating manual!
10. Always check the instrument for visible damage before use. If there is a sign of a potential mal-function, immediately stop pipetting. Consult the ‘Troubleshooting’ section of this manual (see page 28), and contact the manufacturer if needed.
5. Stets so arbeiten, dass weder der Anwender noch andere Personen gefährdet werden. Spritzer vermeiden. Nur geeignete Gefäße verwenden.
6. Stets nur ungefüllte Pipetten aufschieben, um Kontaminations- und Infektionsgefahren zu ver-meiden.
7. Darauf achten, dass keine Flüssigkeit in das Gerät gelangt.
8. Nie Gewalt anwenden.
9. Nur Original-Zubehör und Original-Ersatzteile verwenden. Keine technischen Veränderungen vornehmen. Das Gerät nicht weiter zerlegen, als in der Gebrauchsanleitung beschrieben ist!
10. Vor Verwendung stets den ordnungsgemäßen Zustand des Gerätes prüfen. Sollten sich Stö-rungen des Gerätes ankündigen, sofort aufhören zu pipettieren und das Kapitel ‚Störung – was tun‘ befolgen (s. Seite 27). Ggf. an den Hersteller wenden.
- 5 -
- 6 -
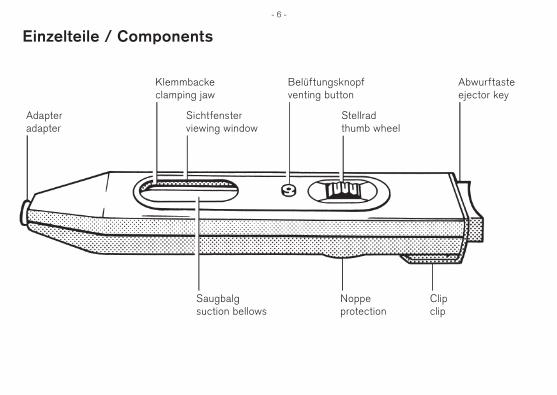
Einzelteile / Components
Adapteradapter
Klemmbackeclamping jaw
Sichtfensterviewing window
Belüftungsknopfventing button
Stellradthumb wheel
Abwurftasteejector key
Saugbalgsuction bellows
Noppeprotection
Clipclip
FunktionDas Gerät dient als Hilfe zum Pipettieren und verringert die Infektionsgefahr beim Pipettieren von Flüssigkeiten mit Einmal-Mikropipetten mit Ring-marke, Blutmischpipetten und anderen Pipetten mit einem Schaftdurchmesser < 5,5 mm und einem Volumen bis 1 ml.
Bei richtiger Handhabung des Geräts kommt die pipettierte Flüssigkeit nur mit der Pipette in Kontakt.
ApplicationThis instrument provides for pipetting liquids, and reduces the risk of infection, when pipetting liquids with ring-mark disposable micropipettes, blood diluting pipettes, and other pipettes of a shaft diameter < 5.5 mm and a volume of up to 1 ml.
When the instrument is correctly used, the pipetted liquid comes only into contact with the pipette.
- 7 -

Achtung!
Gerät nicht mit End-to-End-Mikropipetten ver-wenden.
- 8 -
Einsatzbeschränkungen Operating Limitations
Flüssigkeitsdämpfe können in das Saugsystem gelangen. Deshalb das Gerät nie für Flüssigkeiten einsetzen, die Silikon angreifen.
Hinweis:
Das Gerät ist autoklavierbar bei 121 °C (2 bar), nach DIN EN 285. Die Wirksamkeit des Autokla-vierens ist vom Anwender jeweils selbst zu prüfen.
Attention:
This instrument must not be used with end-to-end micropipettes.
Vapors of liquids may penetrate into the suction system. Therefore never use the instrument for liquids which attack silicone.
Note:
This instrument is autoclavable at 121 °C (250 °F), 2 bar absolute according to DIN EN 285. It is the user's responsibility to ensure effec-tive autoclaving.

- 9 -
Vor dem Pipettieren Before Pipetting
Richtige Handhaltung
Gerät wie auf der Abbildung darge-stellt, waagerecht in die Hand nehmen. Die Noppe auf der Geräte-Rückseite liegt zwischen Zeigefinger und Mittel-finger.
Correct hand position
Hold the instrument horizontally as shown in figure. The projection at the back of the housing is placed between index and middle fingers.
- 10 -
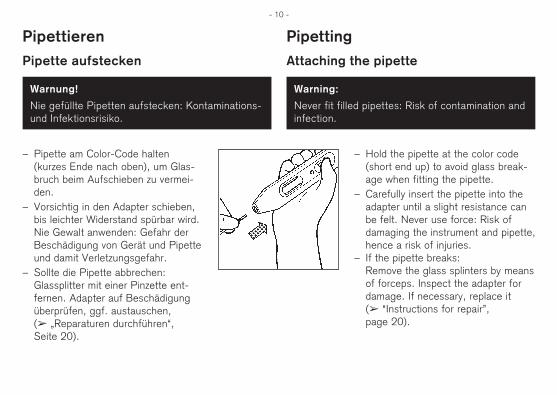
– Pipette am Color-Code halten (kurzes Ende nach oben), um Glas-bruch beim Aufschieben zu vermei-den.
– Vorsichtig in den Adapter schieben, bis leichter Widerstand spürbar wird.
Nie Gewalt anwenden: Gefahr der Beschädigung von Gerät und Pipette und damit Verletzungsgefahr.
– Sollte die Pipette abbrechen: Glassplitter mit einer Pinzette ent-fernen. Adapter auf Beschädigung überprüfen, ggf. austauschen, ( „Reparaturen durchführen“, Seite 20).
Warnung!
Nie gefüllte Pipetten aufstecken: Kontaminations- und Infektionsrisiko.
Warning:
Never fit filled pipettes: Risk of contamination and infection.
Pipettieren
Pipette aufstecken
Pipetting
Attaching the pipette
– Hold the pipette at the color code (short end up) to avoid glass break-age when fitting the pipette.
– Carefully insert the pipette into the adapter until a slight resistance can be felt. Never use force: Risk of damaging the instrument and pipette, hence a risk of injuries.
– If the pipette breaks: Remove the glass splinters by means of forceps. Inspect the adapter for damage. If necessary, replace it ( “Instructions for repair”, page 20).
- 11 -
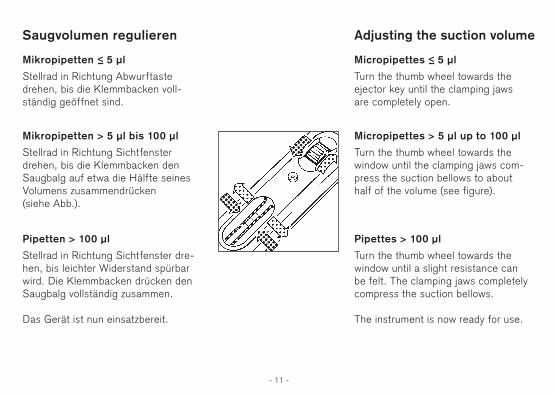
Saugvolumen regulieren Adjusting the suction volume
Mikropipetten > 5 µl bis 100 µl
Stellrad in Richtung Sichtfenster drehen, bis die Klemmbacken den Saugbalg auf etwa die Hälfte seines Volumens zusammendrücken (siehe Abb.).
Pipetten > 100 µl
Stellrad in Richtung Sichtfenster dre-hen, bis leichter Widerstand spürbar wird. Die Klemmbacken drücken den Saugbalg vollständig zusammen.
Das Gerät ist nun einsatzbereit.
Micropipettes > 5 µl up to 100 µl
Turn the thumb wheel towards the window until the clamping jaws com-press the suction bellows to about half of the volume (see figure).
Pipettes > 100 µl
Turn the thumb wheel towards the window until a slight resistance can be felt. The clamping jaws completely compress the suction bellows.
The instrument is now ready for use.
Mikropipetten <– 5 µl
Stellrad in Richtung Abwurftaste drehen, bis die Klemmbacken voll- ständig geöffnet sind.
Micropipettes <– 5 µl
Turn the thumb wheel towards the ejector key until the clamping jaws are completely open.
- 12 -
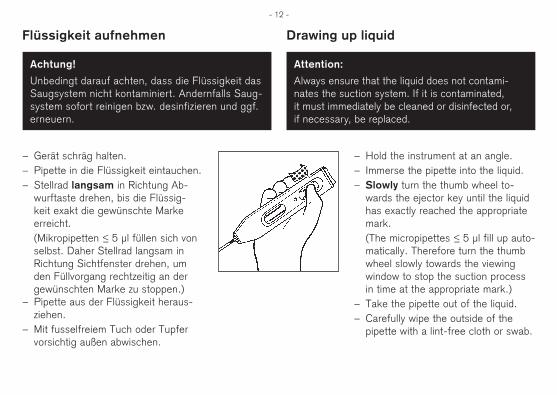
Drawing up liquidFlüssigkeit aufnehmen
Achtung!
Unbedingt darauf achten, dass die Flüssigkeit das Saugsystem nicht kontaminiert. Andernfalls Saug-system sofort reinigen bzw. desinfizieren und ggf. erneuern.
Attention:
Always ensure that the liquid does not contami- nates the suction system. If it is contaminated, it must immediately be cleaned or disinfected or, if necessary, be replaced.
– Gerät schräg halten.– Pipette in die Flüssigkeit eintauchen.– Stellrad langsam in Richtung Ab-
wurftaste drehen, bis die Flüssig-keit exakt die gewünschte Marke erreicht.
(Mikropipetten <– 5 µl füllen sich von selbst. Daher Stellrad langsam in Richtung Sichtfenster drehen, um den Füllvorgang rechtzeitig an der gewünschten Marke zu stoppen.)
– Pipette aus der Flüssigkeit heraus-ziehen.
– Mit fusselfreiem Tuch oder Tupfer vorsichtig außen abwischen.
– Hold the instrument at an angle.– Immerse the pipette into the liquid.– Slowly turn the thumb wheel to-
wards the ejector key until the liquid has exactly reached the appropriate mark.
(The micropipettes <– 5 µl fill up auto-matically. Therefore turn the thumb wheel slowly towards the viewing window to stop the suction process in time at the appropriate mark.)
– Take the pipette out of the liquid.– Carefully wipe the outside of the
pipette with a lint-free cloth or swab.
- 13 -
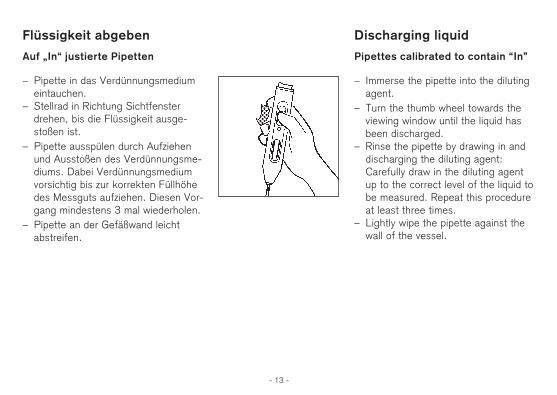
Flüssigkeit abgeben
Auf „In“ justierte Pipetten
Discharging liquid
Pipettes calibrated to contain “In”
– Pipette in das Verdünnungsmedium eintauchen.
– Stellrad in Richtung Sichtfenster drehen, bis die Flüssigkeit ausge- stoßen ist.
– Pipette ausspülen durch Aufziehen und Ausstoßen des Verdünnungsme-diums. Dabei Verdünnungsmedium vorsichtig bis zur korrekten Füllhöhe des Messguts aufziehen. Diesen Vor-gang mindestens 3 mal wiederholen.
– Pipette an der Gefäßwand leicht abstreifen.
– Immerse the pipette into the diluting agent.
– Turn the thumb wheel towards the viewing window until the liquid has been discharged.
– Rinse the pipette by drawing in and discharging the diluting agent: Carefully draw in the diluting agent up to the correct level of the liquid to be measured. Repeat this procedure at least three times.
– Lightly wipe the pipette against the wall of the vessel.
- 14 -
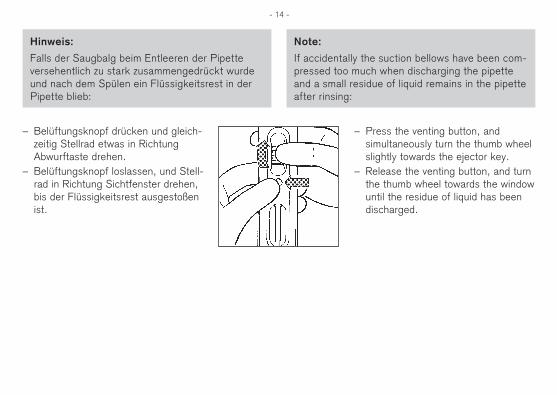
Hinweis:
Falls der Saugbalg beim Entleeren der Pipette versehentlich zu stark zusammengedrückt wurde und nach dem Spülen ein Flüssigkeitsrest in der Pipette blieb:
Note:
If accidentally the suction bellows have been com-pressed too much when discharging the pipette and a small residue of liquid remains in the pipette after rinsing:
– Belüftungsknopf drücken und gleich-zeitig Stellrad etwas in Richtung Abwurftaste drehen.
– Belüftungsknopf loslassen, und Stell-rad in Richtung Sichtfenster drehen, bis der Flüssigkeitsrest ausgestoßen ist.
– Press the venting button, and simultaneously turn the thumb wheel slightly towards the ejector key.
– Release the venting button, and turn the thumb wheel towards the window until the residue of liquid has been discharged.

- 15 -
Auf „Ex“ justierte Pipetten
– Gerät senkrecht halten, Pipetten-spitze an die Wand eines schräg gehaltenen Gefäßes anlegen.
– Belüftungsknopf drücken, bis die Flüssigkeit abgelaufen ist.
– Sobald der Meniskus in der Pipetten-spitze zum Stillstand kommt, beginnt (sofern vorgesehen) die Wartezeit.
– Danach Pipette an der Gefäßwand durch Hochziehen abstreifen. Dabei läuft ein Teil der Restflüssigkeit ab.
Pipettes calibrated to deliver “Ex”
– Hold the instrument upright, and place the pipette tip against the wall of a vessel (inclined position of the vessel).
– Press the venting button until the liquid has run out.
– As soon as the meniscus comes to a standstill in the pipette tip, the wait-ing time (if applicable) starts.
– Then take the pipette out of the vessel by wiping it against the wall of the vessel. During this procedure the residue of liquid partly runs out.

- 16 -
Warnung!
Den kontaminierten Bereich der Pipette nicht berühren. Schutzhandschuhe tragen.
Warning:
Do not touch the contaminated area of the pipet-te. Wear protective gloves.
Nach dem Pipettieren
Pipette entfernen
After Pipetting
Removing the pipette
Einmal-Mikropipetten bis 50 µl
– Gerät senkrecht über ein Entsorgungs-gefäß halten (Pipette nach unten).
– Abwurftaste drücken.– Abgeworfene Pipette vorschriftsmäßig
entsorgen.
Disposable micropipettes up to 50 µl
– Hold the instrument upright over a vessel (pipette down).
– Press the ejector key.– Dispose the removed pipette accor-
ding to the relevant provisions.
- 17 -
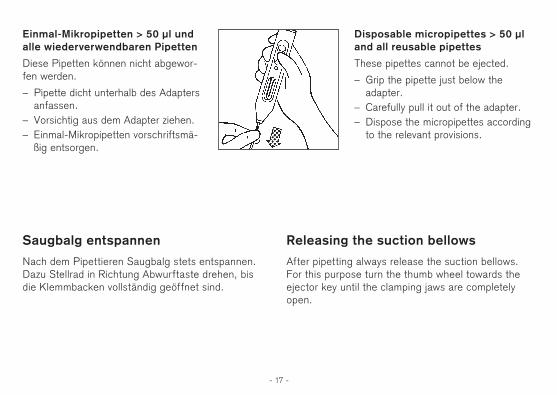
Einmal-Mikropipetten > 50 µl und alle wiederverwendbaren Pipetten
Diese Pipetten können nicht abgewor-fen werden.
– Pipette dicht unterhalb des Adapters anfassen.
– Vorsichtig aus dem Adapter ziehen.– Einmal-Mikropipetten vorschriftsmä-
ßig entsorgen.
Disposable micropipettes > 50 µl and all reusable pipettes
These pipettes cannot be ejected.
– Grip the pipette just below the adapter.
– Carefully pull it out of the adapter.– Dispose the micropipettes according
to the relevant provisions.
Saugbalg entspannen
Nach dem Pipettieren Saugbalg stets entspannen. Dazu Stellrad in Richtung Abwurftaste drehen, bis die Klemmbacken vollständig geöffnet sind.
Releasing the suction bellows
After pipetting always release the suction bellows. For this purpose turn the thumb wheel towards the ejector key until the clamping jaws are completely open.

- 18 -
Reinigung / AutoklavierenGerät gelegentlich mit einem feuchten Tuch ab-wischen. Bei ordnungsgemäßer Handhabung ist das Gerät wartungsfrei.
Hat Flüssigkeit das Saugsystem und den Saug-schlauch kontaminiert, so müssen diese Teile sofort gereinigt bzw. desinfiziert und ggf. erneuert werden. ( „Reparaturen durchführen“, Seite 20).
Cleaning / AutoclavingOccasionally wipe the instrument with a damp cloth. When properly used, the instrument is maintenance free.
If liquid has contaminated the suction system, these parts must immediately be cleaned or disinfected or, if necessary, be replaced ( “Instructions for repair”, page 20).
Warnung!
Kontaminations- und Infektionsrisiko. Schutzhandschuhe und Augenschutz tragen.
– Saugsystem aus dem Gerät herausnehmen und in ein Reinigungs- oder Desinfektionsbad geben.
– Danach trocknen lassen.– Ggf. das Gerät autoklavieren.
Warning!
Risk of contamination and infection. Wear protective gloves and eye protection.
– Remove the suction system and put all parts in a cleansing or disinfecting bath.
– Then allow to dry completely.– Autoclave the instrument, if necessary.
- 19 -
Hinweis:
Das Gerät ist autoklavierbar bei 121 °C (2 bar) und einer Haltezeit von mindestens 15 Minuten nach DIN EN 285. Die Wirksamkeit des Auto-klavierens ist vom Anwender jeweils selbst zu prüfen.
Note:
The instrument is autoclavable at 121 °C (250 °F), 2 bar absolute (30 psi) with a holding time of at least 15 minutes according to DIN EN 285. It is the user's responsibility to ensure effective autoclaving.
– Gerät zusammenbauen ( „Reparaturen durchführen“, Seite 20).
– Funktionsfähigkeit aller Bedienungselemente überprüfen.
– Reassemble the instrument ( “Instructions for repair”, page 20).
– Check that all operating elements work properly.
LagerungGerät nur mit vollständig entspanntem Saugbalg lagern ( „Saugbalg entspannen“, Seite 17).
StoringWhen storing the instrument, the suction bellows must be completely released ( “Releasing the suc-tion bellows”, page 17).
- 20 -
Reparaturen durchführen
Saugsystem austauschen /Gerät zerlegen
Instructions for Repair
Replacing the suction system /Dismantling the instrument
Warnung!
Den kontaminierten Bereich der Pipette nicht berühren. Augenschutz und Schutzhandschuhe tragen.
Warning!
Do not touch the contaminated area of the pipet-te. Wear eye protection and protective gloves.
Glasreste abgebrochener Pipetten nicht mit der Hand, sondern mittels einer Pinzette entfernen.
Never remove glass fragments of broken pipettes by hand but always use a forcep.

- 21 -
Einzelteile / Components
Vorderes Geräteteil
1 Stellrad
2 Belüftungsknopf
3 Sichtfenster
4 Klemmbacken
Hinteres Geräteteil
5 Abwurftaste
6 Seitenschienen
7 Ventil
8 Saugsystem
8a Saugbalg
8b Kunststoffleiste
8c Adapter
9 Clip
Front part of the instrument
1 thumb wheel
2 venting button
3 window
4 clamping jaws
Back part of the instrument
5 ejector key
6 side rails
7 valve
8 suction system
8a suction bellows
8b plastic ridge
8c adapter
9 clip
- 22 -
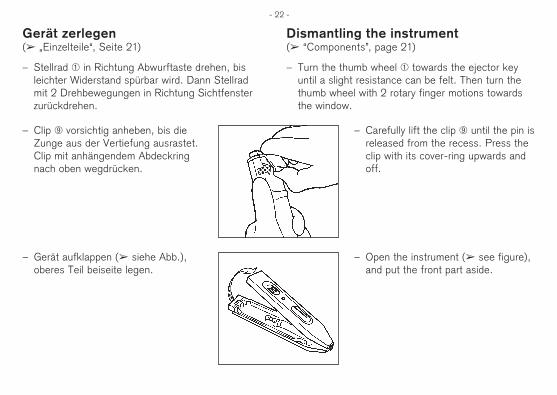
Gerät zerlegen( „Einzelteile“, Seite 21)
– Stellrad in Richtung Abwurftaste drehen, bis leichter Widerstand spürbar wird. Dann Stellrad mit 2 Drehbewegungen in Richtung Sichtfenster zurückdrehen.
Dismantling the instrument( “Components”, page 21)
– Turn the thumb wheel towards the ejector key until a slight resistance can be felt. Then turn the thumb wheel with 2 rotary finger motions towards the window.
– Gerät aufklappen ( siehe Abb.), oberes Teil beiseite legen.
– Clip vorsichtig anheben, bis die Zunge aus der Vertiefung ausrastet. Clip mit anhängendem Abdeckring nach oben wegdrücken.
– Open the instrument ( see figure), and put the front part aside.
– Carefully lift the clip until the pin is released from the recess. Press the clip with its cover-ring upwards and off.
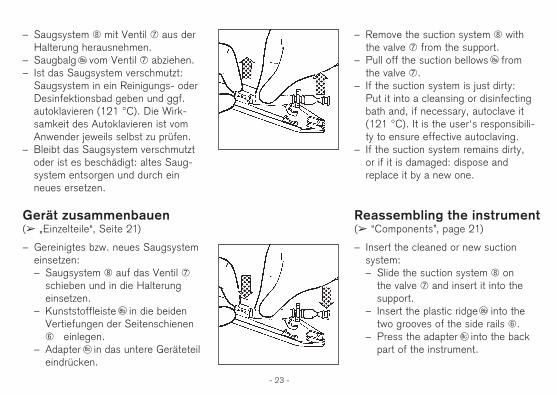
– Insert the cleaned or new suction system:– Slide the suction system on
the valve and insert it into the support.
– Insert the plastic ridge into the two grooves of the side rails .
– Press the adapter into the back part of the instrument.
– Gereinigtes bzw. neues Saugsystem einsetzen:– Saugsystem auf das Ventil
schieben und in die Halterung einsetzen.
– Kunststoffleiste in die beiden Vertiefungen der Seitenschienen einlegen.
– Adapter in das untere Geräteteil eindrücken.
- 23 -
– Saugsystem mit Ventil aus der Halterung herausnehmen.
– Saugbalg vom Ventil abziehen. – Ist das Saugsystem verschmutzt:
Saugsystem in ein Reinigungs- oder Desinfektionsbad geben und ggf.
autoklavieren (121 °C). Die Wirk-samkeit des Autoklavieren ist vom Anwender jeweils selbst zu prüfen.
– Bleibt das Saugsystem verschmutzt oder ist es beschädigt: altes Saug-system entsorgen und durch ein neues ersetzen.
Gerät zusammenbauen( „Einzelteile“, Seite 21)
– Remove the suction system with the valve from the support.
– Pull off the suction bellows from the valve .
– If the suction system is just dirty: Put it into a cleansing or disinfecting bath and, if necessary, autoclave it (121 °C). It is the user's responsibili-ty to ensure effective autoclaving.
– If the suction system remains dirty, or if it is damaged: dispose and replace it by a new one.
Reassembling the instrument( “Components”, page 21)
8b
8c
8b
8c
8a 8a

- 24 -
– Oberes Geräteteil hinter dem äuße-ren Adapter-Wulst ansetzen und in die Haken des unteren Geräteteils einhängen.
– Beide Geräteteile langsam und gleichmäßig zusammendrücken.
– Gerät locker in der Hand halten und kurz auf die Abwurftaste drücken.
– Clip aufschieben und einrasten lassen.
– Funktionsfähigkeit aller Bedien-elemente überprüfen.
– Place the front part of the instru-ment behind the outer bulge of the adapter, and attach it to the hooks of the back part of the instrument.
– Press both parts of the instrument slowly and uniformly together.
– Hold the instrument loosely, and shortly press down the ejector key.
– Slide on the clip, and make it snap in.
– Check that all operating elements work properly.
Zur Reparatur einsenden Return for Repair
Achtung:
Aus Sicherheitsgründen können nur saubere/de-kontaminierte Geräte geprüft/repariert werden.
- 25 -
– Daher: Gerät gründlich reinigen und dekontaminie-ren!
– „Erklärung zur gesundheitlichen Unbedenklich-keit“ ausfüllen (Vordrucke können beim Händler oder Hersteller angefordert werden, bzw. stehen unter www.brand.de zum Download bereit) und gemeinsam mit dem Gerät an Hersteller oder Händler senden unter Angabe von:
– Art der Störung– dosiertem Medium.
Der Rücktransport geschieht auf Gefahr und Kosten des Einsenders.
Attention:
For safety reasons, instruments returned for repair must be clean and decontaminated.
– Therefore: Clean and decontaminate the instru-ment carefully.
– Complete the “Declaration on Absence of Health Hazards” (ask your supplier or manufacturer for the form. The form can also be downloaded from www.brand.de) and send the instrument to the manufacturer or supplier and describe:
– the nature of the problem– the pipetted liquids.
Return shipment has to be effected at the risk and the cost of the sender.

MängelhaftungWir haften nicht für Folgen unsachgemäßer Behand-lung, Verwendung, Wartung, Bedienung oder nicht autorisierter Reparatur des Gerätes oder für Folgen normaler Abnutzung, insbesondere von Verschleißtei-len wie z. B. Kolben, Dichtungen, Ventilen sowie bei Glasbruch. Gleiches gilt für die Nichtbeachtung der Gebrauchsanleitung. Insbesondere übernehmen wir keine Haftung für entstandene Schäden, wenn das Gerät weiter zerlegt wurde als in der Gebrauchsanlei-tung beschrieben oder wenn fremde Zubehör- bzw. Ersatzteile eingebaut wurden.
WarrantyWe shall not be liable for the consequences of im-proper handling, use, servicing, operation or unau-thorized repairs of the instrument or the consequenc-es of normal wear and tear especially of wearing parts such as pistons, seals, valves and the breakage of glass as well as the failure to follow the instruc-tions of the operating manual. We are not liable for damage resulting from any actions not described in the operating manual or if non-original spare parts or components have been used.
- 26 -
Technische Änderungen, Irrtum und Druckfehler vorbe-halten.
Subject to technical modification without notice. Errors excepted.
- 27 -
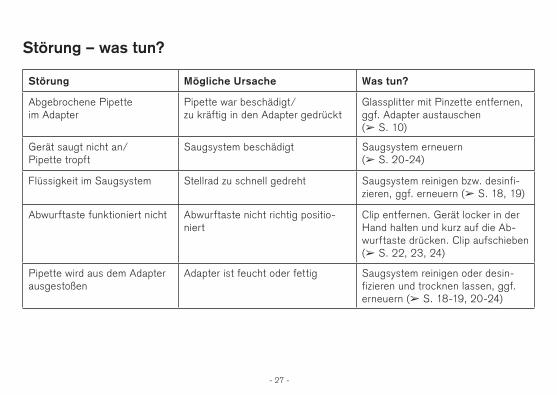
Störung – was tun?
Störung Mögliche Ursache Was tun?
Abgebrochene Pipette im Adapter
Pipette war beschädigt/zu kräftig in den Adapter gedrückt
Glassplitter mit Pinzette entfernen, ggf. Adapter austauschen ( S. 10)
Gerät saugt nicht an/Pipette tropft
Saugsystem beschädigt Saugsystem erneuern ( S. 20-24)
Flüssigkeit im Saugsystem Stellrad zu schnell gedreht Saugsystem reinigen bzw. desinfi-zieren, ggf. erneuern ( S. 18, 19)
Abwurftaste funktioniert nicht Abwurftaste nicht richtig positio-niert
Clip entfernen. Gerät locker in der Hand halten und kurz auf die Ab-wurftaste drücken. Clip aufschieben ( S. 22, 23, 24)
Pipette wird aus dem Adapter ausgestoßen
Adapter ist feucht oder fettig Saugsystem reinigen oder desin-fizieren und trocknen lassen, ggf. erneuern ( S. 18-19, 20-24)
- 28 -
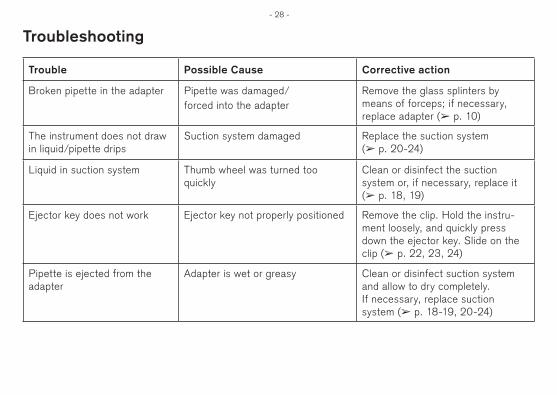
Troubleshooting
Trouble Possible Cause Corrective action
Broken pipette in the adapter Pipette was damaged/forced into the adapter
Remove the glass splinters by means of forceps; if necessary, replace adapter ( p. 10)
The instrument does not draw in liquid/pipette drips
Suction system damaged Replace the suction system ( p. 20-24)
Liquid in suction system Thumb wheel was turned too quickly
Clean or disinfect the suction system or, if necessary, replace it ( p. 18, 19)
Ejector key does not work Ejector key not properly positioned Remove the clip. Hold the instru-ment loosely, and quickly press down the ejector key. Slide on the clip ( p. 22, 23, 24)
Pipette is ejected from the adapter
Adapter is wet or greasy Clean or disinfect suction system and allow to dry completely. If necessary, replace suction system ( p. 18-19, 20-24)

- 29 -
Bestelldaten
micro-Pipettierhelfer, komplett Best.-Nr. 258 00
Saugsystem, 3 Stück Best.-Nr. 258 05
Ordering Data
micro pipette controller, complete Cat. No. 258 00
Suction system, pack of 3 Cat. No. 258 05