MHz Beginners+ Tutorial Projects - libstock.mikroe.com · ~ MHz Beginners+ Tutorial Projects ~ ......
33
~ MHz Beginners+ Tutorial Projects ~ Files: The User Code program templates Complete with MikroBASIC Pro for PIC32 and dsP33EP MMB Example Files for a 9,999,999 Event Counter Custom Display Gadget (PIC18F MMB mPASCAL version coming soon) MANUAL CONTENTS by ORDER: Version 3.0.0 12/15/2013 Introduction: Legal Stuff. First Things. About Visual-TFT for new users: Note to Experienced and Advanced level Users. Visual-TFT. About what V-TFT does not do. What V-TFT is NOT. What V-TFT IS. What V-TFT Creates. The intentions of the manual and project example. VISUAL-TFT TIPS & TRICKS for success: For All Skill Levels Visual-TFT Components and Layers Tutorials: About Components and Objects in Visual-TFT. Important facts about components “ static ” property. How to Display Changing Alphanumerical Data with Components. NEW for Version 3.0 Making your own Components. Layers and Layering Objects. Object Layering in V-TFT. ABOUT EVE FT800 PROJECT OBJECTS. NEW for Version 3.0 Objects and Layers used in the Example Project. Moving Objects on the Layers Tutorial. MegaHurts BONUS CONTENT Descriptions, Usage & Download Info. NEW for Version 3.0 The MAIN Loop and Multitasking in V-TFT Flowcharts. Visual-TFT Project Files “User Code” Template Areas: Where they are and example usages in mikroBASIC Pro. Overview of Program Files. Colored view of blank main file. Colored view of blank events_code file. COLOR Conventions used in the Code Listings. Event Counter Program Main File code Listing. Event Counter Program Events Code File code listing. Stuff you can add and challenges for advanced users. The V-TFT Driver File Breakdown of Importan t Parts for Users: NEW for Version 3.0 Overview of the Driver Module file. Object Drawing Routines to Use List. Dynamic Objects Properties Declarations . Additional Community Submitted Tutorial Code Examples, Tips & Tricks & Project Expansions: Alternative optimized code versions in 'events_code' file by Aleksandar Vukelic. Sneak Peak of Mhz Ebay1 ( Expansion Bay One ) R.E.G. Kit and Event Counter GUI update. Credits and Thanks. About the Author – As a separate PDF document that is available at Examples Libstock Blog for download . New for this Version: Longer page format to allow for expanding the information in the topics, Sectioning applied to subtopics, Made with Apache OpenOffice 4.0.1. Graphics: Pro Tips Scrolls, Fontwork Gallery, Flowcharts, Callouts, Block Arrows, Symbol Shapes, Gallery Images. Designer: Robert Townsley {MegaHurts} © 2013 || Visual-TFT, MikroBASIC, MikroC, MikroPASCAL © MikroElectronika 2013
Transcript of MHz Beginners+ Tutorial Projects - libstock.mikroe.com · ~ MHz Beginners+ Tutorial Projects ~ ......
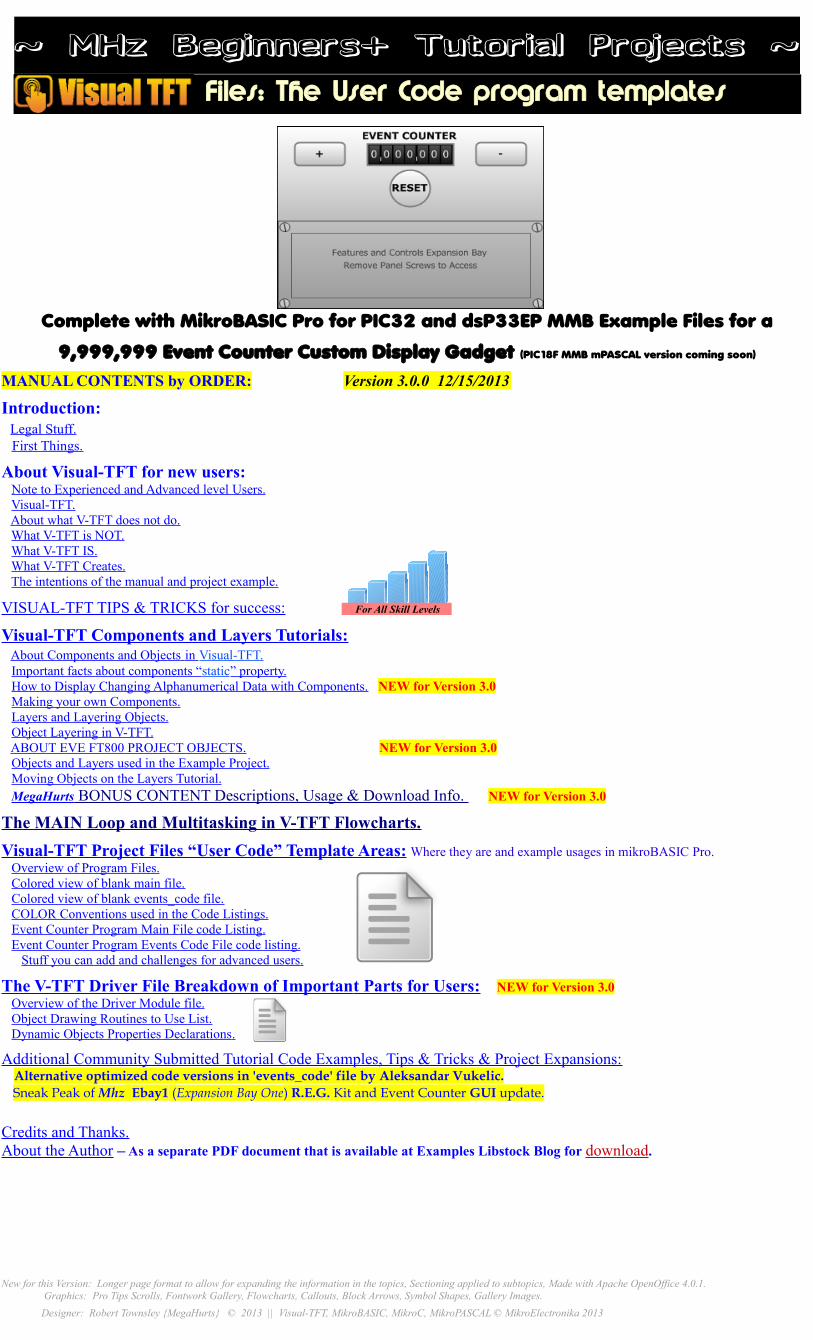
~ MHz Beginners+ Tutorial Projects ~ Files: The User Code program templates
Complete with MikroBASIC Pro for PIC32 and dsP33EP MMB Example Files for a
9,999,999 Event Counter Custom Display Gadget (PIC18F MMB mPASCAL version coming soon)
MANUAL CONTENTS by ORDER: Version 3.0.0 12/15/2013
Introduction: Legal Stuff. First Things.
About Visual-TFT for new users: Note to Experienced and Advanced level Users. Visual-TFT. About what V-TFT does not do. What V-TFT is NOT. What V-TFT IS. What V-TFT Creates. The intentions of the manual and project example.
VISUAL-TFT TIPS & TRICKS for success: For All Skill Levels
Visual-TFT Components and Layers Tutorials: About Components and Objects in Visual-TFT. Important facts about components “ static ” property. How to Display Changing Alphanumerical Data with Components. NEW for Version 3.0 Making your own Components. Layers and Layering Objects. Object Layering in V-TFT. ABOUT EVE FT800 PROJECT OBJECTS. NEW for Version 3.0 Objects and Layers used in the Example Project. Moving Objects on the Layers Tutorial. MegaHurts BONUS CONTENT Descriptions, Usage & Download Info. NEW for Version 3.0
The MAIN Loop and Multitasking in V-TFT Flowcharts.
Visual-TFT Project Files “User Code” Template Areas: Where they are and example usages in mikroBASIC Pro. Overview of Program Files. Colored view of blank main file. Colored view of blank events_code file. COLOR Conventions used in the Code Listings. Event Counter Program Main File code Listing. Event Counter Program Events Code File code listing. Stuff you can add and challenges for advanced users.
The V-TFT Driver File Breakdown of Importan t Parts for Users: NEW for Version 3.0 Overview of the Driver Module file. Object Drawing Routines to Use List. Dynamic Objects Properties Declarations .
Additional Community Submitted Tutorial Code Examples, Tips & Tricks & Project Expansions: Alternative optimized code versions in 'events_code' file by Aleksandar Vukelic. Sneak Peak of Mhz Ebay1 (Expansion Bay One) R.E.G. Kit and Event Counter GUI update.
Credits and Thanks.About the Author – As a separate PDF document that is available at Examples Libstock Blog for download.
New for this Version: Longer page format to allow for expanding the information in the topics, Sectioning applied to subtopics, Made with Apache OpenOffice 4.0.1. Graphics: Pro Tips Scrolls, Fontwork Gallery, Flowcharts, Callouts, Block Arrows, Symbol Shapes, Gallery Images.
Designer: Robert Townsley {MegaHurts} © 2013 || Visual-TFT, MikroBASIC, MikroC, MikroPASCAL © MikroElectronika 2013

I think there is a law somewhere that says I have to say this: Not responsible for anything that goes wrong. No warranty isimplied or applied. Use at Own Risk. If you suddenly feel ill or faint or vision goes blurry or experience chest pains or havedifficulty breathing, Stop using this Tutorial and seek medical attention. All trademarks are the properties of their owners.
First Things:First Things: For those friends viewing this from around the world; I am American- So Please Forgive My English.I have No intentions of insulting anyone. So if you use any translator application(s) on this document, I did not say anythingabout your Mother, Brother, Sister, Wife, Husband, Girlfriend, Boyfriend or any family members including the Dog or Cat nomatter what it says I said ok? ;^)
Legal Stuff:
This is the manual for the V-TFT Event Counter Tutorial Example project. This manual has additional information about the design and operation of the project and information about creating projects in V-TFT that apply in general so no matter whichprogramming language or hardware you are working with, the information still applies, unless stated otherwise.
All code examples and the entire project are in the mikroBASIC (mBASIC), language from MikroElektronika. This manuals instructions assume the reader (you), have already read the V-TFT Help file that comes with it. If you have not read the Help file, it advised that you do so first before reading this tutorial. It is not required to before using this manual, but this manual is intended as a supplement to the Help file, not a replacement. There is information in the Help file you will also need to know in order to be successful in creating working projects in V-TFT. I will try very hard to keep the references generic and non-specific to any HW whenever possible. This can't be helped in the projects code listing section obviously.Since all of the example code was written in mikroBASIC, I have included the 2 files complete code listings that are the focus of this tutorials topics in this document so users of mikroC and mikroPASCAL have an easy way to also access their contents.I did not want to exclude any users of V-TFT just because I or you do not have and use all of the compilers. My wanting to make sure everybody could benefit from the example project is how this PDF manual got started. Once that happened, it seemed only natural to make use of its potential to include more than just commented text, and I just cannot help myself from pushing buttons and clicking format controls when they are on my screen.
This project is not a fully dressed out application as the result of keeping it sleek and simple. But it can be used as the starting point for anyone to expand it more. That was intentional planning also.I guess it could be thought of being kind of like a science experimenter kit many of us have grown up with. The parts are here (mostly), you just have to finish putting it together the way you want.
This tutorial manual is also a work-in-progress effort. I want to give you as close to 100% of the accumulated knowledgeof using V-TFT as I can. But I cannot do it all at once, so there will be updates to this manual over time as I get the materialput into it. I am also learning to use some features of Apache Office that I have not tried before and the editing does not always go as I would have liked. But I have discovered features that I can use to make this document present the information in better ways than just text (and I'm sure some would really like that). (Or you can look at it as lessons in American English?)
So please bear with me as I work on getting this finished. I hope you enjoy the results. R.M.T.
BACK TO TABLE OF CONTENTS

Note to Experienced and Advanced level Users: While I targeted this manual as a beginners tutorial, I feel I included material that everyone, no matter the skill level, can finduseful. If not, you didn't waste any money right? Most of that material is in the section V-TFT TIPS & TRICKS but youmight find other bits of useful information in the rest of the material and I hope so. Check also the The MAIN Loop andMultitasking in V-TFT Flowcharts section and challenges at the end of this document.
Visual-TFT (V-TFT here on), is a unique software development tool for creating GUI or non-GUI applications for all of the Mikro Media Boards (MMB), and hardware development tools that use a TFT display device from MikroElektronika. This means it also supports all of the different Compiler languages too. This makes it a very versatile platform, allowing usersto have the choices of what hardware and programming platforms they work with. That being said, it would be impossible for me to write a tutorial that covers every HW device and programming language. So details are limited to being general and inmBASIC.
Knowledge of programming Micro controllers in one of the programming languages {mBASIC , mPASCAL or mikroC}is required to finish a V-TFT project and having a licensed unlocked Compiler (in one of the languages) to compile anyproject(s) you make. V-TFT projects are too big for Demo versions of the compilers.
The information in this document is intended to help you get a good idea of what is possible and not possible using V-TFT.It was clear to me that new users can have a distorted idea of what V-TFT does and how to make use of what it actually can do, from my own experiences and seeing what questions are being asked in the forums. I felt I could contribute some help to the community of users by making this example project that explains in more detail how V-TFTs output code is organized.
One of the problems, I feel V-TFT causes, is that first time users initially are presented with program files it creates that are not, on first look, understandable, because many new users have minimal experiences with multiple file projects and the V-TFT Help file does not contain the information they need to clear up the confusion. It is also my hopes that MikroElektronika will address this in the future.
V-TFT creates a Framework for you to fill out and complete to make a fully functional application. The Framework code V-TFT produces to manage your screen display and TP input associated to your Objects usage is structured as a Task (Routine. Check_TP()) that needs to be executed (called) repeatedly in order to detect (catch) TP touch activity. This Task does not sit and wait for TP activity to happen and respond to it. It checks for activity when executed, and if none detected, exits theTask Routine. So users have available the groundwork for multitasking Task (procedures) management. This powerful framework design means you can make applications that are run entirely inside the Framework of the “Check_TP” routine for simple applications, or your project may require the management of other HW be done as a Task of their own.
This Tutorial and Example V-TFT Project → mikroBASIC Pro (for PIC32 mmB) Compiler Language Program files demonstrate a simple 2 Task example to help you get familiar with the “User Code” areas and the Framework of the V-TFT output Code Template so You can plan how to get your project idea up and working.
BACK TO TABLE OF CONTENTS
About what V-TFT does not do: It can not create fully programmed programmable applications from what you design in it. You will still have to edit at least one of the files it makes in a compiler and add additional programming code to complete the templates of code it does make for the objects you used on the projects screen(s). The output for a project made in V-TFT must also be loaded in to a Compiler as a multiple file project so it can be compiled in to the binary file needed to program a device with. V-TFT does not output files that are ready to be programed into a device.The output of files it makes need to be put in to a compiler for the language it is set to use and compiled before the project canbe programmed into a device.
Only a very simple project could be made that did not require you to do additional programming. Sorry but you still have to dosome work. Good news is that it would not be as much as you would have to do if you did not use V-TFT.
BACK TO TABLE OF CONTENTS
What V-TFT is NOT: V-TFT is not a add on library to the compilers. V-TFT is not a tool that makes libraries for the compilers either. V-TFT is not a code editor or a code compiler. V-TFT is not a device programmer. V-TFT is not a device library maker.V-TFT is not required to be running while editing a project in a compiler or even required to be installed on a PC for the project files it makes to be finished in a compiler and programmed into a device.
BACK TO TABLE OF CONTENTS
What V-TFT is: V-TFT is a stand-alone development tool to aid the user (you), in creating TFT screen content that can be almost any mixture of Touch Panel (TP), input controls and output displays of control settings, text, graphics and anything the target device is capable of needing displayed on a TFT screen. V-TFT gives the user a graphical development environment in which to work and a selection of screen Components (also referred to as Objects), you may use individually or in combination to make the I/O graphics you need for your desired applications. It (V-TFT), provides a What You See Is What You Get (WYSIWYG), designing environment for the target hardware (HW) you want that it supports. V-TFT is a project application code template generator. V-TFT is a projects screens code manager so users can have multiple screens for different organizations of I/O designs as they need, within the capabilities of the target HW (memory available, MCU functions embedded …..).
BACK TO TABLE OF CONTENTS
What V-TFT creates:V-TFT will make programming language code files based on your selections of project options to use. You can see more information about this in the V-TFT Help File. The Help File will show you information about every menu item and control available. What files are created and what they contain depends on the users project selections made at anytime during its designing. If you need to, see the Help File for more information on this. V-TFT takes the graphical elements (Objects), you place on a screen and creates the program template and program code that sends the data to a display controller to reproduce the Objects as you designed them on a TFT TP screen. This is done for everything created in V-TFT or needed as supporting Data or Executable code for a project so it will be included when the project is compiled before programming the target HW device. See the Help File about project Objects File and Resources File.They contain the needed supporting Data Code. Objects and screens are configured as different object structures. Some are Dynamic (RAM Variables) or Static (Code constants) and each has its supporting Pointers and data type structures. The program template it creates provides areas for your applications User code, for Event Handler routines, (empty of executablecode), for screen objects that are active to touch. Routines for the devices HW initializations and what is called the V-TFT Stack and Core code in the projects driver module file. These files will be in a format that corresponds to the Compiler language selected in the projects options.
BACK TO TABLE OF CONTENTS
The Intentions for this manual and example project: Since I intended for this to be a fun beginners guide and tutorial manual, the more advanced features and descriptions will not be covered in this document. A future advanced topics document is planned, but I am waiting to see what MikroElektronika will have in the official Visual-TFT Users Manual that is to be released, date unknown.
That is also why I decided to make this beginners tutorial, as a band-aid for everyone who needs it until something official is released. If you found the V-TFT Help File not helpful for every question that arises when you use V-TFT, this document might address a few or more of those new user questions. I tried to remember of as many as I could that are important enough to get you started on making V-TFT projects that won't have conflicts with how the program template is intended to be used.
This tutorial is a guide to help you get started and make you aware of some dangers that can cause your project to not function as intended. Where I stress the importance of doing something or not doing something in the projects code files, is not absolute, but my suggestion that unless or until you are more advanced in skills enough to know how to avoid the dangersassociated with going against the suggestions, you should not, but keep in mind there are usually exceptions to the rules implied and you may one day need to disregard them to have success with what you want to do in a V-TFT project.It is easy to say “Keep an Open Mind”, but hard to do daily.
I also wanted to pass on some Tips and Tricks I have discovered myself or learned at some point in my life or found on the forums. I will try to acknowledge who's Tip, Trick it is if not my own or of public domain source. I do not want to anger anyone by any usage of any content in this document. If you think you should have credit or reason for anything to be removed, contact me by email and I will discuss the matter with you.If you want to submit any thing that would be helpful also or a good alternative to any procedures, please do and I'll do updates to the document. Post on forum thread or comments at the Examples LibStock blog.
At the time of this writing, Visual-TFT's Version is 3.7.0. So the information in this documentation is subject to being out of date or inaccurate at any time. I plan on updating it from time to time or if something important needs to be added or removed or changed. There are some topics about V-TFT that I want to expand the coverage on so there will be updates as thenew material is completed. So check periodically if there is a new version of this document available.
BACK TO TABLE OF CONTENTS

TIPS & TRICKS for success: (For All Skill Levels)
First, 3 rules you should know before, and while programming anything: I call these RULES the 3 Laws* of programming. *(like the 3 laws of Robotics)
RULE #1- NO program YOU write will EVER run and DO what you wanted it to DO, it will ALWAYS run and do EXACTLY what YOU told it to DO!
RULE #2- If data is corrupted, it will still run and do EXACTLY what it was told to DO,if it can, but NOT what YOU told it to DO.
RULE #3-* Just because a program compiled without errors, it does not mean there are no errors or guarantee it will execute as wanted – see RULE #1. * Aleksandar and I agreed during a discussion there needed to be a RULE #3 to complete the LOGIC circle.
So learning how programmable digital systems actually operate to follow a programs instructions will beone of the best tools you will use when writing your own programs. I did not make the rules, they are anatural result and inherent to all programmable digital devices.
V-TFT USER MANUAL?As of this writing, there is no V-TFT users manual published yet. There is its included help file [F1], andthe forum and MikroE's support desk for serious problems to be handled promptly by staff members.The forum is a great and valuable resource for solving most issues you might have while using V-TFTor their other HW and SW. Questions will be answered if anybody knows the answer. So use it whenneeded and maybe you will avoid many frustrations others have already had and solved.
Bit Calculator:Get the “BitCalc” tool that Aleksandar Vukelic made and can be downloaded at
http://www.libstock.com/projects/view/666/bitcalc if you do not already have it.
It will aid you in learning about Bit Masking and using Bit operators in programming + much more!
I consider it an essential tool for programming and troubleshooting your code and analyzing others code to see how logical operations programmed get the right results (or wrong). It is a stand-alone application that can be added to your compilers External Tool's configuration so it is always at hand.
When designing in V-TFT, it is usually better to make the least complicated interface at first, then test it,and if that works, then consider what to change to add more elaborate features,
Try to do the project in discreet small chunks of functions, checking the functionality of each as you go.
Use, Use, Use your compilers comment feature to give yourself guidelines and reasons why that codeis there, and what it is supposed to do – remember RULE #1?
You do not have to comment everything just like I did for this example project, but try to help your futureself with what you are doing now in your code.
Start Simple to test devices configurations FIRST:Before jumping in and trying to make that multi-screen GUI you have been thinking about for a long time now, you shoulddo a very simple 1 screen test project from scratch to make sure you have selected the correct device HW configurationsettings that work and you can get the device to show the TP calibration (if equipped) screen and the first screen of theV-TFT test project with at least 1 (active) Button on it, so you can test that the TP works at desired touch pressures andcan be accurately calibrated when programmed and powered up to run the program.Simple test setup = simpler troubleshooting to do, if needed.
V-TFT examples to consider also:There are a great many program examples available for all of the hardware and software MikroElektronika makes.Some examples you may not consider to check is because you do not have that hardware, but you might pass upthe exact or helpful example if you do not consider them. For example; you must have one of the TFT productsif you are even reading this, but have you gotten and looked over all of the examples for any of their products thatinclude or can have connected a TFT display?
If you are using one of their MMB's for PIC, but do not have the mikromediaWorkStation development system,you should still get all examples, libraries and the documentation for it. Now you would have schematics forwiring the MMB to a lot of other external HW AND examples to run or examine for how to interface to such stuff.There is a good chance that there is something just like you want to do or very close, to use as an example that canhelp you with your project. This applies to any common core HW and SW product lines you use of theirs.
Do not short yourself of what is available to aid you.
BACK TO TABLE OF CONTENTS
Rename the Objects in your Project: Take notice of how I named the V-TFT button objects in this example. By putting a Underscore “_” at the end of the name, the “OnClick()” V-TFT adds won't make the name so hard to read in the code. Change the names of your Objects before you assign any events to them. V-TFT does not change the name of an Action Event routine name assigned to an Object when the Objects name has been changed. You only need to do this to Objects that will have touch events assigned, it won't be needed for other Objects as they don't get suffixes added to their names by V-TFT unless you assign an Event to it.
Even though V-TFT automatically assigns names to the Objects as they are added to a project, leaving the names as is will cause you difficulty for keeping track of many Objects and their properties on different screens in large projects. I have developed this naming convention that helps me out and maybe it will help you too, or give you ideas on doing your own version.
If a project has more than one (1) screen, I name every Object with the screen name it belongs to as the prefix to the name – Screen1Box1 and a Screen2Button1_ Object will have Screen2Button1_OnClick() for its routine name, when assigned.
If an Object is used as a display of data or indicator, Its name should reflect its purpose - Screen1OnLight instead of Circle1 ... You will have to remember the Objects type so you use the correct V-TFT drawing routine for each Object, but you will find writing your code easier to do and reading it will make more sense with descriptive names. You do not have to rename every Object used in a project, but any that you have to refer to in your User Code should be renamed.
Variables and constants naming: You might find this useful or not. Normally Constant identifiers (names) are done all in UPPERCASE so just looking at the name tells you it is a Constant. If you look at the User Code in this tutorials example project, you will see that I also have all of the Variables names in UPPERCASE too. I find this helps me when looking over the code I write. There is no confusing them with routine names or language Keywords by doing this I find. I leave all programming Keywords in lowercase and routine names are just capitalized (each word in the identifier, like this: Reset_Counter() ). The point is to have a system, any system, and beconsistent with its usage. Making the code legible and easy to discern the elements is the goal.
If you save the job of assigning events (creating event subroutines in event module), to the objects for last, and you have more than one screen in your project, you can assign events one screen at a timeand the created routines will be grouped by screen together in the events file. If that confused you, do not worry, you will understand it when you make your first project with more than one screen.
You Can re-arrange the Event-Action Routines once they have been made in the “Event Handler” section of a Projects events_code File. Edit either in V-TFT, or in a Compiler. If in V-TFT, any new ones made are placed after the last end Routine statement.
You should save the job of assigning Events to Objects for the last if possible.
If you can, do all of the graphical work of your screen(s) layout and components properties before you have time invested in programming code for them. There is always a good chance that you will change the design at least once before you get the design how you like or need it to be, in order to function. Test compiling and loading a screen before doing the code work can save you from doing work that won't be used in the end project.V-TFT object editing is a lot harder if there is also program code associated to the objects. Example: If you copy an object that you have assigned a TP activity event to do when triggered, the copy will also have the same event action assigned. You may or may not have wanted that to be. If you did, then no problems, but if you want a different event routine to be assigned to the copied new object, you will probably end up deleting the original objects event routine trying to clear the assignment from the copied object.
Only copy an object that already has an event action routine assigned to it, if you want the copy to use same routine or there is already a event routine made you want it to use instead. Otherwise – using a new component instead is easier and saves you trouble.
You cannot rely on the V-TFT “Undo button”s functionality to save you from project damage due to a software bug. Keep a backup in a separate folder that you can update manually after a editing session is finished. I have rarely gotten the results I expected from using it.It may function correctly for normal editing mistakes, but if you are trying to reverse the results of a V-TFT software bug, there is a good chance it will cause more damage to your project, up to and including TOTAL LOSS of project being usable or loadable into V-TFT again.
It is easier to copy an object that has a lot of properties set like you want another one to have, than configure a new one added from the component palette.
Bug in V-TFT ver. 3.7.0 - Grouped Objects. Having any group(s) of Objects in your V-TFT project when project issaved or sent to compiler directly, when compiled and run on device after loading, will cause your application to freeze up trying to draw the screen that has any Objects Grouped together. Make sure you UN-group all Objects in your project IN V-TFT before trying to compile and run it on a device.
The keyboard “SHIFT” key when held down, allows you to left-click on objects to add or subtract themto/from multiple selected objects for grouping or moving or deleting.
The keyboard “Ins” or “Insert” key toggles between Insert and Overwrite modes in text (code) editors.
Not all Components have a “Static” property because they have properties whose values must change in order tofunction as designed. Since they are “Dynamic”, you can take advantage of changing any of their properties to achieve visual effects to help indicate a state or condition is in affect in your application instead of adding more Objects to your project to do the same.
If you need to change any Objects properties from your code during run-time, it MUST have its “Static” property set to False in V-TFT before you send the project to a compiler. If you will not be changing an Objects properties from your code during run-time, you should set its “Static” property to True so RAM memory is not wasted holding all of its properties values.
For your own V-TFT projects, it is best that you save them in a different folder than the 'Projects' folder in the Visual-TFT install folder. If you have to uninstall V-TFT before an update can be installed, your projects may get deleted if in that folder.Putting your projects in a folder in the 'Projects' folder should prevent that from happening also.
You can use Layers to group same object types together by layer or have all objects used to make a custom display or control on its own layer so easier to move or hide on the screen
If you use any Objects to make a background for the screen, putting them all on a Layer by themselves makes it easier to get the background back underneath all other objects should you need to. Right-Click the background Layer in the “Layer Window”, select all Layers Objects, Right-Click on a selected Object, select “Send to Back”.
When using many layers to separate and organize the objects on multiple screens, any time you change the screen being displayed in the V-TFT screen edit window, the selected Layer for editing activity will be the last Layer (Bottom of the Layer window list), not the one you were using last on that screen. The Layer selected for a screen is not persistent.
An indication that there is a “Object Party” happening you were not invited to:Check what LAYER is selected after adding a new component from the Palette or Pasting a Cut/Copied object tothe screen, if you are using multiple LAYERS. I say this because I still find some of my Screen Objects having a party with Objects that live on a different Layerthan the ones I “thought” I put it with. (See the section about moving Objects around on Layers to fix)
If an Object has its Static Property set to “TRUE”, during run-time the Only thing you can do with it is “Redraw” it. You cannot move it. You cannot change its colors. You cannot change if visible or not. You can only redraw it orany other Objects layered over it. No properties of a Static Object can be changed during run-time.
It is much easier to do the coding in a Compiler than in V-TFT. The only file you have full Read and Write access to is the “User Code” 'events_code' file. You can not even copy any code from the other project files while in V-TFT.
BACK TO TABLE OF CONTENTS
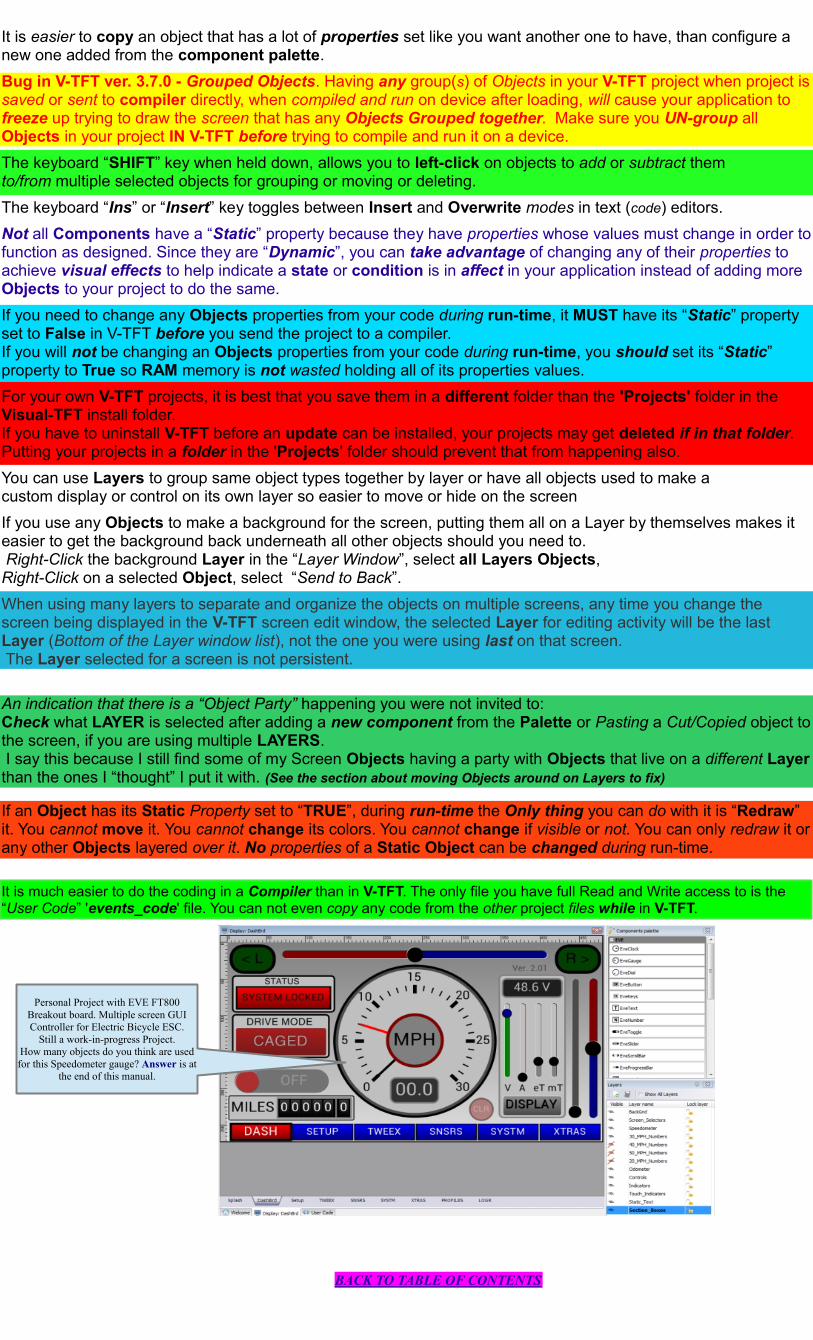
Personal Project with EVE FT800 Breakout board. Multiple screen GUI Controller for Electric Bicycle ESC.
Still a work-in-progress Project.How many objects do you think are used for this Speedometer gauge? Answer is at
the end of this manual.

NEW TOPIC
Components & Objects Tutorial:
First lets make sure we are on the same page about Components and Objects. You will see both terms used in this document and in Visual-TFTs official documents (Help File), as referring to the same thing, and this is correct, mostly.In the V-TFT program, they are listed in the Components Palette and divided into two groups – BASIC and COMMON.I have come to think of it this way, and so I must let you know this so there is no confusion between us about term usage.
Component(s) – Term to apply to the different types of Objects available for you to use in your projects. Components are usually made from multiple Objects.
Object(s) – Generic term a Component type is called once it has been placed into the project on any screen. An Object is the simplest V-TFT element that you can use in a project.
IMPORTANT FACTS ABOUT COMPONENTS “STATIC” PROPERTY:If the objects property is set to "Static = True" in V-TFT, you can not change any of its properties during run-time.The property "Static" must be set to "False" for ANY objects you want to have their properties changed by code during run-time.The Static property determines if the component will be coded in the output files as a structure of variables or of constants.Static = True: Object is coded as Constants structure. NOT CHANGEABLE DURING RUN-TIME!Static = False: Object is coded as Variables structure. IS CHANGEABLE DURING RUN-TIME! This setting of the 'Static' property has to be done to the object(s) when you edit them in V-TFT so they are structured in the output code as either dynamic (variables in RAM) or static (constants in program memory-ROM).You can not change them afterwords in a compiler as the whole structure for the object must be coded by V-TFT based on the setting of the Object(s) "Static" property. All code that handles the Objects structures (pointers) is set at build time in V-TFTalso, so the setting of this must be done in V-TFT before compiling is done. Once an Objects Static property is set to TRUE,the Only operations that can be done with it is to redraw it and assign any Action Event TP trap to it. Events can be assignedto Objects with the Static property set to either TRUE or FALSE.
How to Display Changing Alphanumerical Data with Components:(I apologize that this lesson was not in the original tutorial manual, as it is a very important one for new V-TFT users)
The V-TFT help file implies that users only have the LABEL component to use for displaying changing alphanumerical characters. This is incorrect. ANY component that has a “Caption” property is capable of displaying changing data, as long as its “Static” property is set to 'FALSE' (see above about the Static property). In my experience, using a Label for doing this is the hardest way to do so. Here is a short lesson on using the Label component to show changing data and the alternatives.
Using the Label Component to show changing alphanumerical Data on a Screen: The Label object requires that you first erase the old data on the screen by changing the font color to that of the background color and redrawing the exact same data in the background color (and at the exact same location), then putting the new data in to the Labels Caption property and change the font color again to a different color than the background color and then redraw the Label to show the new data. Important – There is another component property that must be set correctly when using ANY object to display changing alphanumerical data; The 'Max Length' property! This properties value must be set to the maximum number of characters that you will be placing into the Caption property of the object. The default value of zero (0) is to be only used if the contents of the Caption property will NOT be changing during run-time. A zero value means that V-TFT will automatically set the correct value (in the output code) based on the number of characters the Caption property contains at project build or save and usually reserved for Labels that are Static in nature.
There is another way to erase the old data without the steps stated above; you can have the Label layered over a Box object and redraw it to erase the old data before drawing the Label after its Caption property is loaded with the new data.
As you can see, using the Label component to display changing information on the screen is not straight-forward and easy.And there is no justification that can be applied to the contents (left , right , center). Labels are fixed with left justification.Labels do have uses though. They are great for writing alphanumerical characters that are Static and need never change.
The Alternatives:The alternatives are to use one of the other components that also have a Caption property like the Buttons. The advantages?
Buttons automatically erase the old displayed data as they write the new data. (less user code instructions needed)Buttons do not require you to change the font colors, but you can if you want to. (again less user code instructions needed)Buttons have a justification property you can set as you want or change during run-time. (again, less user code to implement)Buttons have a size adjustable boarder of selectable color and width you can use to emphasize the captions content. (the equivalent of a Label drawn inside of a Box object, but a lot less user code to implement)
The downside to using a Button as a Label:There will always* be an area around the Caption contents that gets drawn also. This can be a problem for you based on how you have your layout designed, but changing the layout design can overcome this most of the time.The Button must be dynamic (Static = FALSE) so having many buttons doing labels function eats up RAM memory fast. (you can use Static Buttons for displaying non changing data still)
You can set the properties of a Button so that it does not appear to be a Button also. Setting the Pen Width Property to zero (0) will make it so there is no boarder and setting the gradient property to False and the solid color to match the background achieves this. *But if you set the Transparent property to True (so background shows thru), you will have the same problems with erasing old data as you have with using the Label component.
PRO TIP: The Number of different Objects used in a Project has a Major impact on the Code File sizes. Use fewer Types to save RAM & ROM MEMORY.
PRO TIP: The Number of different Objects used in a Project has a Major impact on the Code File sizes. Use fewer Types to save RAM & ROM MEMORY.
Did you know? That Components are just a lot of TFT Library drawing functions that V-TFTgenerated code uses to make the Objects. Theyare pure data constructs that V-TFT driver codemakes into components from predetermined codeTemplates for each Component.
Did you know? That Components are just a lot of TFT Library drawing functions that V-TFTgenerated code uses to make the Objects. Theyare pure data constructs that V-TFT driver codemakes into components from predetermined codeTemplates for each Component.
All Caption properties are expecting the information assigned to it to be in the String data type format with a Null character (0) terminating the String. There is no automatic conversions done to the data. You must have the data already in the proper type format (String) before trying to assign it to the Caption property. This is not a problem if only using alphabetical characters.They are already of the String data type. But when you need to display numerical data with a components caption, you haveto do the conversion to String data type first (exception is the EVE Numbers component).
The Conversions Library in your compiler has the functions needed to do this for every numerical data type supported by thecompiler. Be aware though, the result from the conversion will be Right justified in the target String with leading spaces padding the string if the number of characters in conversion is less than the declared target string variables length.
The “Max Length” property of the components Caption property is its declared character length.Another Library has a function that can strip the spaces from the front (left) of a number-to-string conversion that is less in length than the target strings declared length if you need to have the spaces removed so your display looks like you wanted.The Library is the String Library, and the function is: ltrim(string_variable) (left trim).
If you want more information and Code examples about this Topic, I made another Tutorial about it and it can be gotten at Libstock site also. That V-TFT example project does not have a PDF manual like this one with it though. All explanations aredone as comments in the mBASIC Pro for PIC32 Source Code Files – Main and Events_Code project files. This is why I have not included code examples in this tutorial, I had already made them.Click HERE to open the Examples page at Libstock.com.
BACK TO TABLE OF CONTENTS
Making your own Components:
I feel some talk about this is required. There has been requests for some additional components to be added to V-TFT and the ability to create custom components that become part of the components palette. While having some new components added to V-TFT would be nice, I think users are not taking full advantage of what can be done with what it has now. This is the main reason I made the example project that would be the reference for this tutorial. The Event Counter display-Gadget is an example of how to make a custom component using the available objects in V-TFT. By demonstrating how the Display-Gadget was made, you will also get a lesson about Layers and layering Objects. When you think about it, it is the purpose of V-TFT to give you the tools to make as intricate an interface asyou want. If you use this concept, you can start building up a “library” of reusable gadgets you make or be able to use any that others put up to share freely. The Display-Gadget is the first one available, from hopefully, a growing list of them soon.
Here is the concept:A custom gadget, like any built-in V-TFT components, requires two parts in order to work, 1st are the graphical elements to make it a visual construct (of objects) and 2nd is the code to be executed that provides the functionality of the gadget. This seems simple enough right? So,,, lets build one (a fictional one for now). Here are the steps to take –
1 – Make the custom component from the Objects available on a screen by itself.2 – Make the routine(s) and declarations needed to support its functionality, in “Event Handlers” and/or “User Code” and/or “ User code declarations”.3 – Export the screen so it can be imported in to other projects.4 – Load the “V-TFT Project” for the Gadget in to your compiler.5 – Add a blank Module file to the project and place all routines in the new module file below “implements”, and any declarations for variables and constants above “implements”.6 – Make entries of “Forwards” for the routine(s) that need to be seen external to this module above the variables and constants declarations. The modules name should indicate what “Gadget” it provides support for.
The objects used to make your “Gadget” that need to be manipulated by code should have unique names that can help indicate what functionality they are there for, so calling on them from the main project body will be easier to understand.
There will be more effort to get a better way to implement something like this functionality integrated into V-TFT.For now will have to wait and see if the software development department at MikroElektronika will use some ideas submitted on having the feature added and to what extent they go with the concept. The biggest problem now with doing this is the way V-TFT will rename the Objects on the imported screen when bringing a Gadget into a project. If you try this, you will see what I mean and the problems it causes. I am pushing to have this fixed for a future release of V-TFT.
BACK TO TABLE OF CONTENTS

Layers and Layering Objects:
A few words about Layers in V-TFT needs to be said before we continue on.Layers are only a organization tool for users to use to help with the tasks of editing Objects and doing your design. They do not have any effect on the display order or visibility of objects in the final output.Layers in V-TFT have no code structure or existence in the output code. They are to use only in aiding you while editing in V-TFT. A lot of users have voiced opinions that it would be nice if they were a part of the output framework and could be controlled by user code to have a form of control over the objects on a Layer as a whole. Maybe it would be nice, but for now it is only a wish request and layers cease to have any function outside of V-TFT. This does not mean they are useless or cannot provide you with assistance in making your design.
Here are some examples of Layers and their purpose for possible usage practices for organizing a V-TFT project: (You can rename a Layer by double clicking on its name in the Layers Window)
[Example Layers] [--------------------------------------- Description of usage --------------------------------------------]---------------------------------------------------------------------------------------------------------------------------------------------------------------[Background] All objects that make up a screens inactive background graphics[Section Boxes] For placing Box objects that define the borders of areas by function.[Static Labels] For placing all label objects that will not change their properties.[Dynamic Labels] For placing all label objects that will have their properties or caption change.[Controls] For placing TP input objects [Indicators] For placing any objects that function as a condition indicator or Change appearance.[Control name] For placing all of the objects that are used to make a custom TP input.[Display name] For placing all of the objects that are used to make a custom output.[For Hiding] For any object(s) that your code controls the visibility but you need to not
be seen while you continue editing in V-TFT.
There are more uses the Layers can be used for, and you will find the ones that are most helpful to you as you go.Each Project may be different in how you use them if at all, based on the complexity of the design you are working on.
See the BONUS CONTENT Section in this manual for access to real hands-on V-TFT Screens you can examine (and usethe Objects from it if you want) examples of the Layers Usages described above.
BACK TO TABLE OF CONTENTS

Object Layering in V-TFT:
While the Layers in V-TFT do not have any effect on the output code, how you layer Objects in V-TFT has great impact on the output and how the TFT display will be drawn. The drawing priority for the objects on a screen is first determined by the order they are placed on the screen. Objects placed first are drawn first and Objects placed last get drawn last by the drawscreen() routine in the driver file. The drawing priority can be changed for any object by right-Clicking it and picking one of the two options to move it to front or back. Many objects can be stacked (Layered) over one another to create a visual display you want. Depending on the display controller you are using and the device MCU and architecture, having many objects layered on the screen may or may not look good in actual practice for any given device. It will depend on how you have them stacked and which one(s) need to be redrawn to perform its desired function. My best advice is for you to play around with some objects stacked (layered) over each other and see what happens when they are redrawn in different orders. For most display controllers, any area on a screen shows the last thing drawn there and what used to be there can be lost (not visible), until told to redraw it again. For many applications, this is not a problem. For some, it will be due to how the designerwants to manipulate the display. If you change an Objects property that affects it visually, it won't actually happen until you redraw the Object using the proper object drawing routine (see the section about Driver file drawing routine list also).
One way to see how things will look when different objects are displayed or not, is to put the objects you want to test how theyappear when stacked (layered) over each other on separate Layers and use the visibility control to make different objects visible or not to see the results. This can help you set up the proper front to back ordering so the application will give the results you wanted.
! The number of Layers added to a Screen has no effect on the projects build for run file size. The number of different components and number of different Fonts used are the biggest factors of a V-TFT projects final file size.
See the V-TFT Help file for more information on Layers and the controls available if you need more than this to work with.
TIPS for usage: If you are making a custom input or output gadget that uses multiple objects stacked over one another and will be copying it to make others, DO NOT have the objects on different layers. Place all of the objects on a single layer. It is easier to start and build a gadget on one layer than to move the objects to a layer after starting to build it.
If you redraw an object that has other objects over it, they will not be visible any more and will require being redrawn also, ifyour design needs them to be visible too. The general rule is that you will need to redraw all objects “forward” (to front), of any object that you have your code redraw, if they are affected visibly by the rear-most object you had the program redraw.The V-TFT core code does not keep track of what has been redrawn by user code so the users must do this themselves.
For most display controllers, the TFT display is like a school chalk board, in that whatever is drawn last erases what was therebefore. But unlike a chalk board, you can redraw an object that lies underneath other objects drawn over it and have it now made visible, until other objects get drawn over it. This is the basis for layering objects on a screen. The Layers tool inV-TFT has nothing to do with this architecture of what is drawn on the display, unless you organize the objects to match the layering in the Layers you have made in V-TFT. You have the freedom to organize the objects and Layers this way or not. Just remember that the Layers cease to exists outside of V-TFT (for the time being) and the objects priority is the factor that determines which object is drawn over other objects when doing a DrawScreen() function.
An objects draw priority value is set in V-TFT and changing this with user code is not supported by current design.Most of an Objects properties settings in V-TFT have a direct affect to how the Object will initially appear on the screen when the project is compiled and run on a device, so set your objects properties in V-TFT to the settings you want them to exhibit when the application is actually run on a device. If an Object is not Static, you can pre-load property values from user code before it is actually displayed or change them at any time afterwords from user code to achieve the desired visual effects. * Any object that has another one layered over it still gets completely drawn before the one over it gets drawn. V-TFT does not sort out if any part of an object is not visible due to another object covering any part of it. Every object gets completely drawn based on its properties settings at time of being drawn. Most display controllers do this so fast it is hard to see it happen, but you may notice it at some point with your projects.
ABOUT EVE FT800 PROJECT OBJECTS:The EVE FT800 display controller based devices are an exception to the rules stated above. Its methodology for displayinga screens objects is handled differently. With the EVE, a user makes a change to an objects property or properties that affectits appearance with user code and then issues a complete screen redraw command to have the change(s) manifest on the TFT.The EVE redraws the whole screen following a LIST of drawing commands whose place in the List determines which objects are shown in front of others. With the EVE, the priority assigned to an Object actually determines its place in the List of drawing commands. But the EVE has the ability to move the commands around in this list also.This ability is equivalent to changing an Objects drawing priority value, which is not supported during run-time with the other display controllers supported by V-TFT.
In truth, the EVE controller would need a whole book dedicated to its features and functions, so I am not going to go any further into its capabilities here, just this information to let you readers know that there are differences with the EVE displaycontrollers and the original display controllers that V-TFT was originally made to work with.
BACK TO TABLE OF CONTENTS
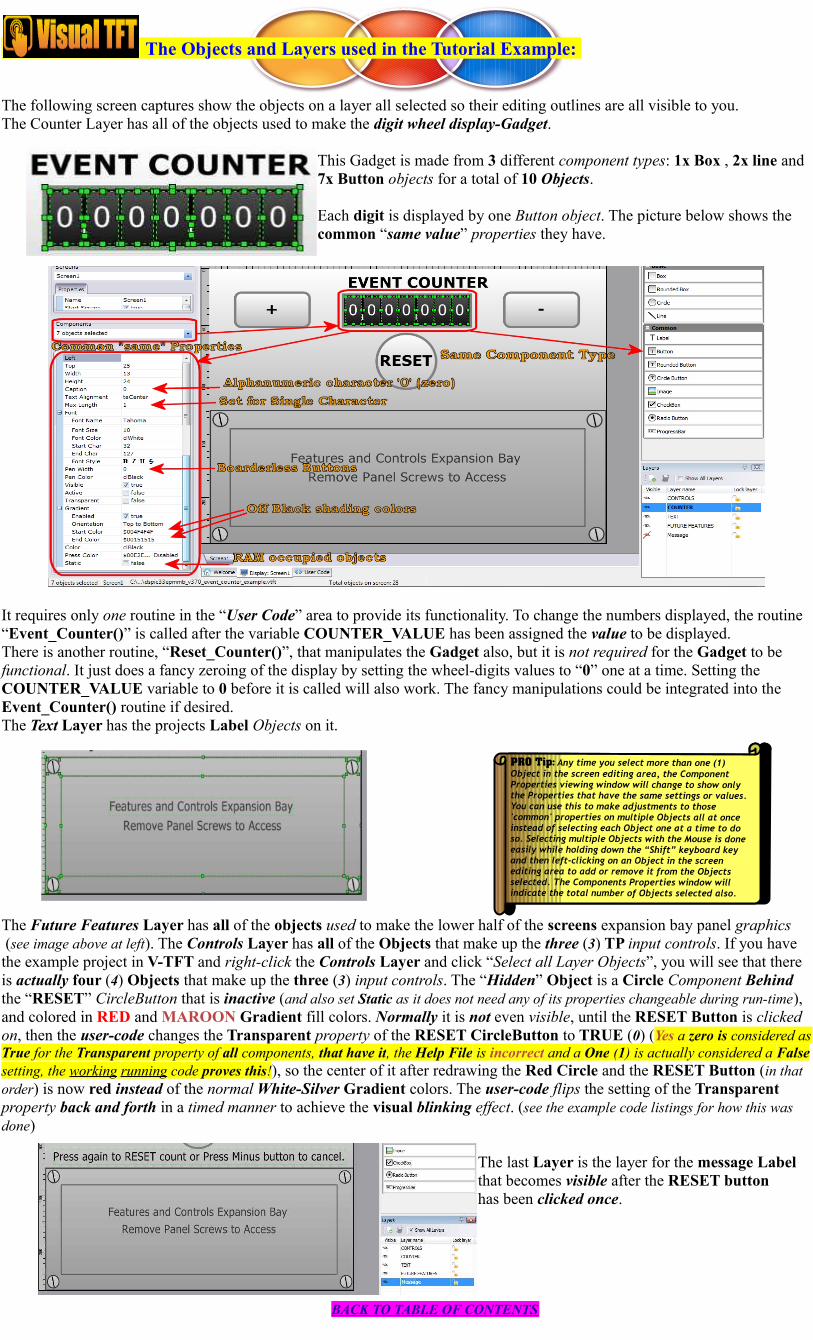
The Objects and Layers used in the Tutorial Example:
The following screen captures show the objects on a layer all selected so their editing outlines are all visible to you.The Counter Layer has all of the objects used to make the digit wheel display-Gadget.
This Gadget is made from 3 different component types: 1x Box , 2x line and 7x Button objects for a total of 10 Objects.
Each digit is displayed by one Button object. The picture below shows the common “same value” properties they have.
It requires only one routine in the “User Code” area to provide its functionality. To change the numbers displayed, the routine “Event_Counter()” is called after the variable COUNTER_VALUE has been assigned the value to be displayed.There is another routine, “Reset_Counter()”, that manipulates the Gadget also, but it is not required for the Gadget to be functional. It just does a fancy zeroing of the display by setting the wheel-digits values to “0” one at a time. Setting the COUNTER_VALUE variable to 0 before it is called will also work. The fancy manipulations could be integrated into the Event_Counter() routine if desired.The Text Layer has the projects Label Objects on it.
The Future Features Layer has all of the objects used to make the lower half of the screens expansion bay panel graphics (see image above at left). The Controls Layer has all of the Objects that make up the three (3) TP input controls. If you have the example project in V-TFT and right-click the Controls Layer and click “Select all Layer Objects”, you will see that there is actually four (4) Objects that make up the three (3) input controls. The “Hidden” Object is a Circle Component Behind the “RESET” CircleButton that is inactive (and also set Static as it does not need any of its properties changeable during run-time), and colored in RED and MAROON Gradient fill colors. Normally it is not even visible, until the RESET Button is clicked on, then the user-code changes the Transparent property of the RESET CircleButton to TRUE (0) (Yes a zero is considered asTrue for the Transparent property of all components, that have it, the Help File is incorrect and a One (1) is actually considered a Falsesetting, the working running code proves this!), so the center of it after redrawing the Red Circle and the RESET Button (in that order) is now red instead of the normal White-Silver Gradient colors. The user-code flips the setting of the Transparent property back and forth in a timed manner to achieve the visual blinking effect. (see the example code listings for how this was done)
The last Layer is the layer for the message Label that becomes visible after the RESET button
has been clicked once.
BACK TO TABLE OF CONTENTS
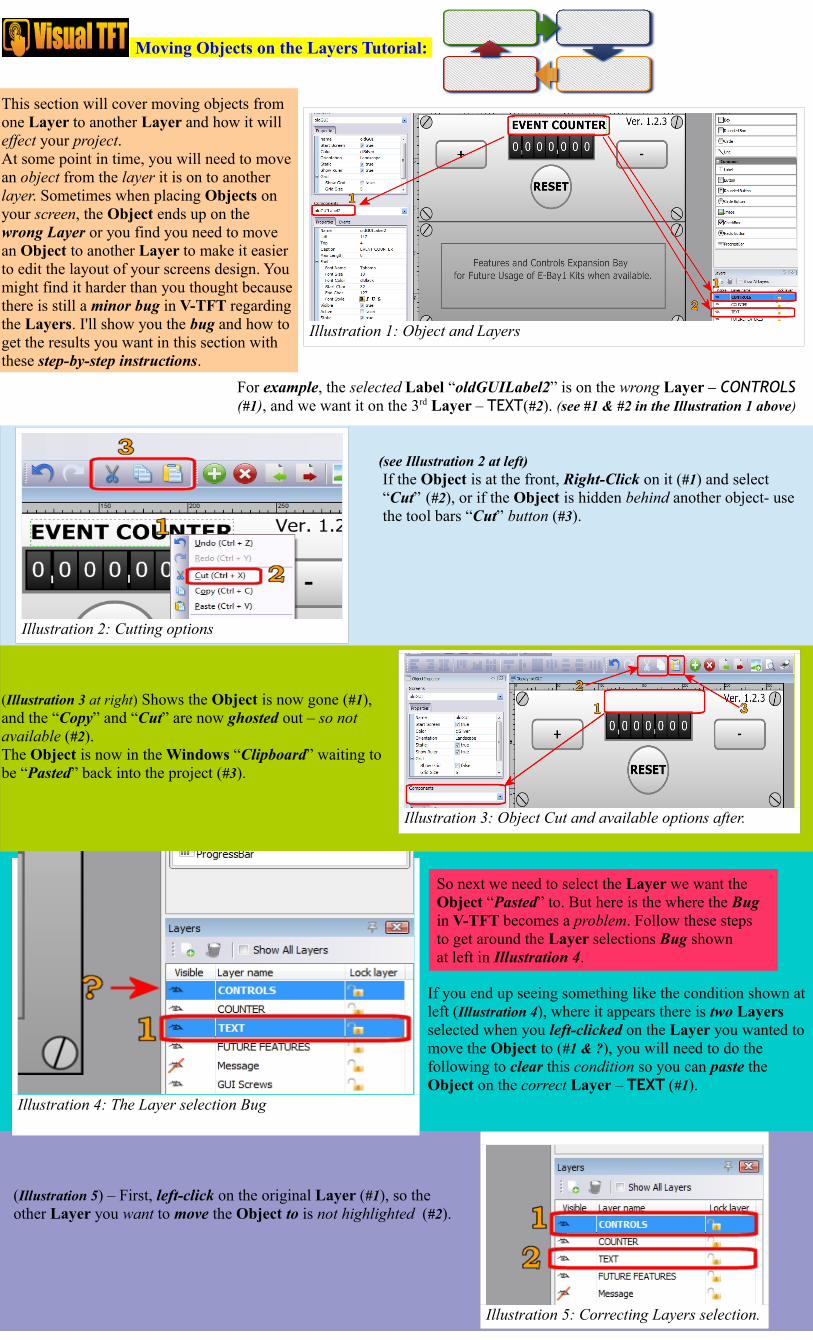
Moving Objects on the Layers Tutorial:
This section will cover moving objects fromone Layer to another Layer and how it will effect your project.At some point in time, you will need to movean object from the layer it is on to another layer. Sometimes when placing Objects onyour screen, the Object ends up on the wrong Layer or you find you need to movean Object to another Layer to make it easierto edit the layout of your screens design. Youmight find it harder than you thought becausethere is still a minor bug in V-TFT regardingthe Layers. I'll show you the bug and how toget the results you want in this section withthese step-by-step instructions.
For example, the selected Label “oldGUILabel2” is on the wrong Layer – CONTROLS (#1), and we want it on the 3rd Layer – TEXT(#2). (see #1 & #2 in the Illustration 1 above)
(see Illustration 2 at left) If the Object is at the front, Right-Click on it (#1) and select “Cut” (#2), or if the Object is hidden behind another object- use the tool bars “Cut” button (#3).
(Illustration 3 at right) Shows the Object is now gone (#1),and the “Copy” and “Cut” are now ghosted out – so notavailable (#2).The Object is now in the Windows “Clipboard” waiting tobe “Pasted” back into the project (#3).
If you end up seeing something like the condition shown atleft (Illustration 4), where it appears there is two Layers selected when you left-clicked on the Layer you wanted to move the Object to (#1 & ?), you will need to do the following to clear this condition so you can paste the Object on the correct Layer – TEXT (#1).
(Illustration 5) – First, left-click on the original Layer (#1), so the other Layer you want to move the Object to is not highlighted (#2).
Illustration 1: Object and Layers
So next we need to select the Layer we want theObject “Pasted” to. But here is the where the Bugin V-TFT becomes a problem. Follow these stepsto get around the Layer selections Bug shownat left in Illustration 4.
Illustration 2: Cutting options
Illustration 3: Object Cut and available options after.
Illustration 4: The Layer selection Bug
Illustration 5: Correcting Layers selection.
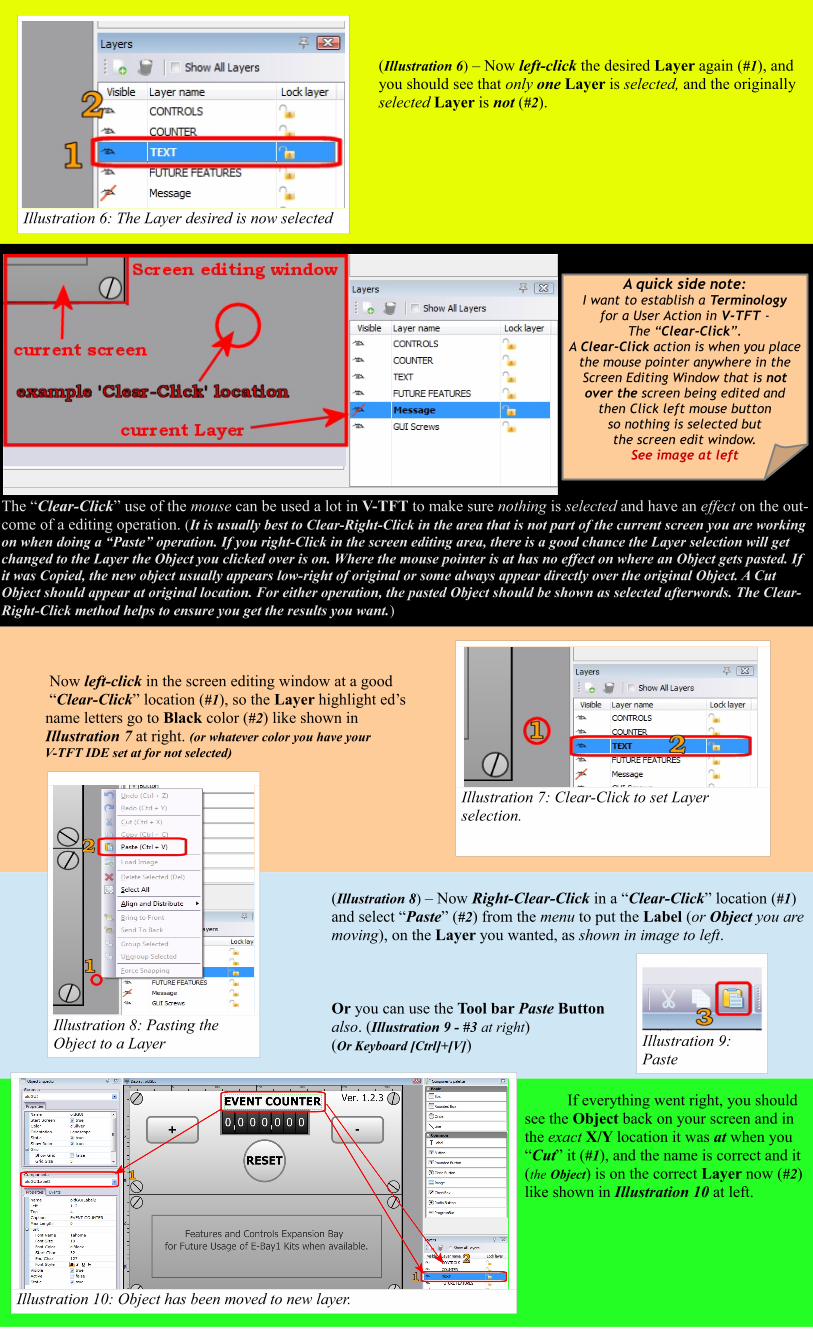
(Illustration 6) – Now left-click the desired Layer again (#1), and you should see that only one Layer is selected, and the originally
selected Layer is not (#2).
The “Clear-Click” use of the mouse can be used a lot in V-TFT to make sure nothing is selected and have an effect on the out-come of a editing operation. (It is usually best to Clear-Right-Click in the area that is not part of the current screen you are working on when doing a “Paste” operation. If you right-Click in the screen editing area, there is a good chance the Layer selection will get changed to the Layer the Object you clicked over is on. Where the mouse pointer is at has no effect on where an Object gets pasted. If it was Copied, the new object usually appears low-right of original or some always appear directly over the original Object. A Cut Object should appear at original location. For either operation, the pasted Object should be shown as selected afterwords. The Clear-Right-Click method helps to ensure you get the results you want.)
Now left-click in the screen editing window at a good “Clear-Click” location (#1), so the Layer highlight ed’s name letters go to Black color (#2) like shown in Illustration 7 at right. (or whatever color you have your V-TFT IDE set at for not selected)
(Illustration 8) – Now Right-Clear-Click in a “Clear-Click” location (#1)and select “Paste” (#2) from the menu to put the Label (or Object you aremoving), on the Layer you wanted, as shown in image to left.
Or you can use the Tool bar Paste Buttonalso. (Illustration 9 - #3 at right)(Or Keyboard [Ctrl]+[V])
If everything went right, you should see the Object back on your screen and in the exact X/Y location it was at when you “Cut” it (#1), and the name is correct and it (the Object) is on the correct Layer now (#2) like shown in Illustration 10 at left.
Illustration 6: The Layer desired is now selected
Illustration 7: Clear-Click to set Layer selection.
A quick side note:I want to establish a Terminology
for a User Action in V-TFT -The “Clear-Click”.
A Clear-Click action is when you placethe mouse pointer anywhere in theScreen Editing Window that is notover the screen being edited and
then Click left mouse buttonso nothing is selected butthe screen edit window.
See image at left
Illustration 8: Pasting the Object to a Layer Illustration 9:
Paste
Illustration 10: Object has been moved to new layer.
Any Object(s) you move will be Top or Front Most after being pasted now, no matter where it was in the Object layering (Priority) list before being moved. If it has not happened to you yet, at some point while working in V-TFT, you will be moving Objects around the Layers or putting copies of some Objects on a screen and you will find that the draw order (Priority) is wrong with the Objects now and you will find you need to be clever about how you get them sorted so they are allbeing displayed correctly. I had some cases where I wasn't sure I would get the Layering mess sorted out right without surrendering to frustration and deleting the problem Object(s) and making new ones from scratch, because I could not see a workable solution to get things right. (actually did resort to deleting and using new components, but that was with a very buggy V-TFT version. It has not happened for some time now I am happy to say)
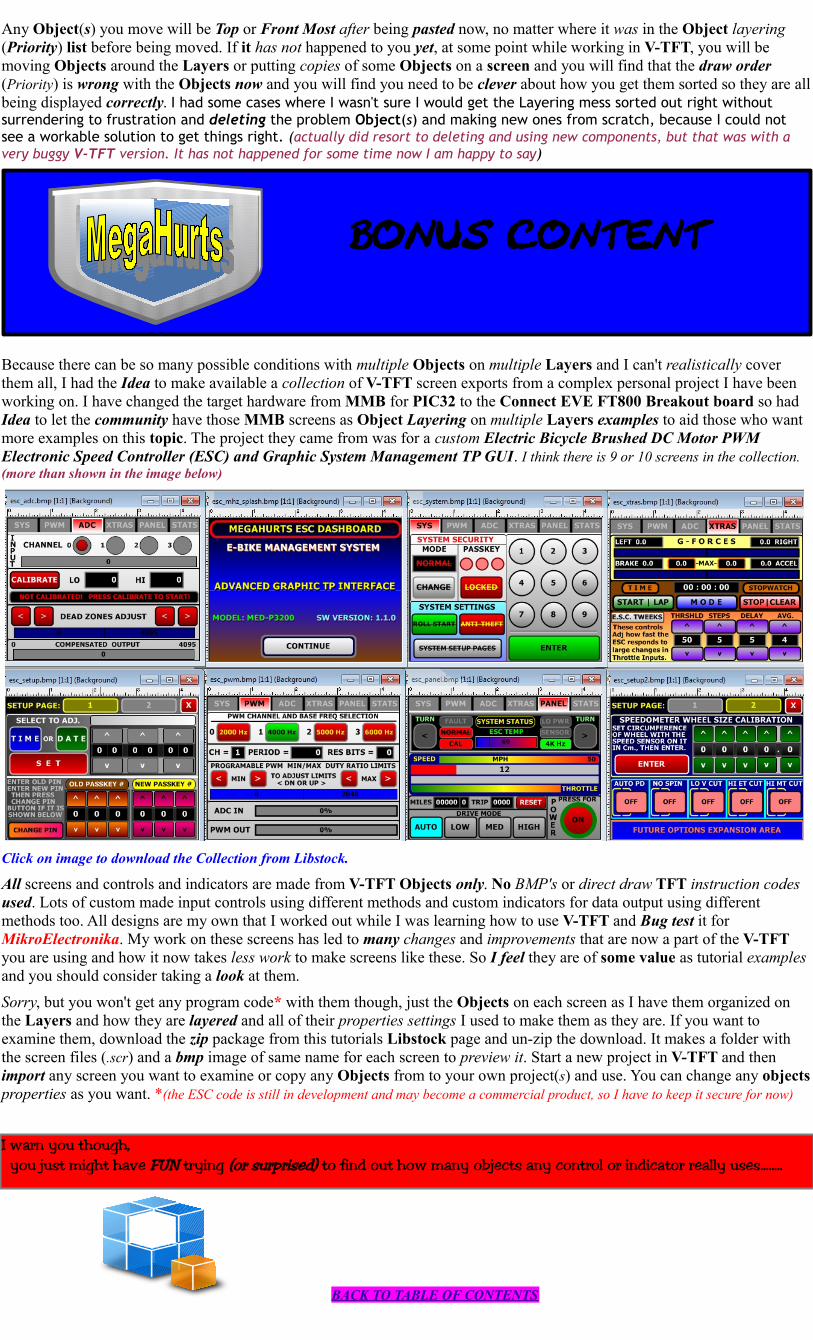
BONUS CONTENT
Because there can be so many possible conditions with multiple Objects on multiple Layers and I can't realistically cover them all, I had the Idea to make available a collection of V-TFT screen exports from a complex personal project I have been working on. I have changed the target hardware from MMB for PIC32 to the Connect EVE FT800 Breakout board so had Idea to let the community have those MMB screens as Object Layering on multiple Layers examples to aid those who want more examples on this topic. The project they came from was for a custom Electric Bicycle Brushed DC Motor PWM Electronic Speed Controller (ESC) and Graphic System Management TP GUI. I think there is 9 or 10 screens in the collection.(more than shown in the image below)
Click on image to download the Collection from Libstock.
All screens and controls and indicators are made from V-TFT Objects only. No BMP's or direct draw TFT instruction codes used. Lots of custom made input controls using different methods and custom indicators for data output using different methods too. All designs are my own that I worked out while I was learning how to use V-TFT and Bug test it for MikroElectronika. My work on these screens has led to many changes and improvements that are now a part of the V-TFT you are using and how it now takes less work to make screens like these. So I feel they are of some value as tutorial examples and you should consider taking a look at them.
Sorry, but you won't get any program code* with them though, just the Objects on each screen as I have them organized on the Layers and how they are layered and all of their properties settings I used to make them as they are. If you want to examine them, download the zip package from this tutorials Libstock page and un-zip the download. It makes a folder with the screen files (.scr) and a bmp image of same name for each screen to preview it. Start a new project in V-TFT and then import any screen you want to examine or copy any Objects from to your own project(s) and use. You can change any objectsproperties as you want. *(the ESC code is still in development and may become a commercial product, so I have to keep it secure for now)
I warn you though, you just might have FUN trying (or surprised) to find out how many objects any control or indicator really uses........
BACK TO TABLE OF CONTENTS
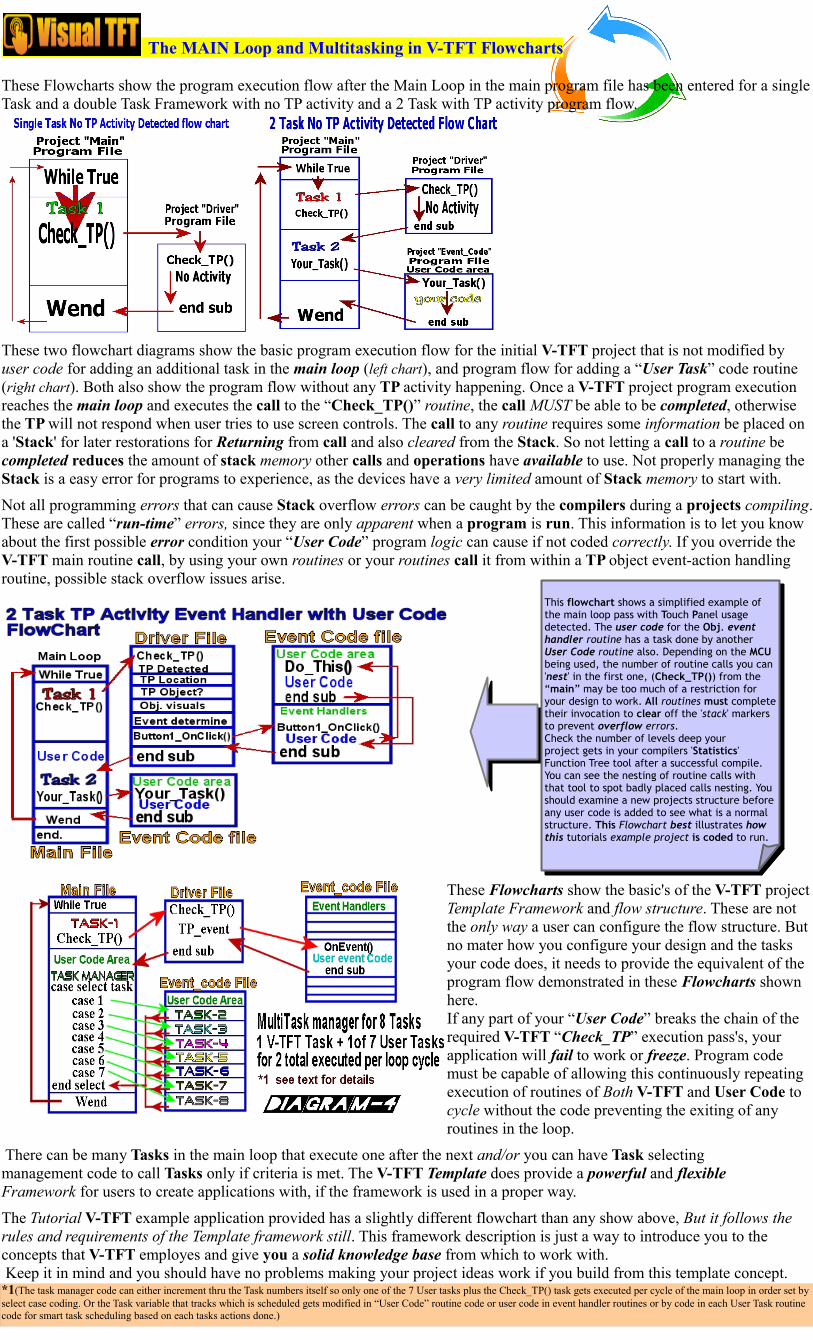
The MAIN Loop and Multitasking in V-TFT Flowcharts
These Flowcharts show the program execution flow after the Main Loop in the main program file has been entered for a singleTask and a double Task Framework with no TP activity and a 2 Task with TP activity program flow.
These two flowchart diagrams show the basic program execution flow for the initial V-TFT project that is not modified by user code for adding an additional task in the main loop (left chart), and program flow for adding a “User Task” code routine (right chart). Both also show the program flow without any TP activity happening. Once a V-TFT project program execution reaches the main loop and executes the call to the “Check_TP()” routine, the call MUST be able to be completed, otherwise the TP will not respond when user tries to use screen controls. The call to any routine requires some information be placed on a 'Stack' for later restorations for Returning from call and also cleared from the Stack. So not letting a call to a routine be completed reduces the amount of stack memory other calls and operations have available to use. Not properly managing the Stack is a easy error for programs to experience, as the devices have a very limited amount of Stack memory to start with.
Not all programming errors that can cause Stack overflow errors can be caught by the compilers during a projects compiling.These are called “run-time” errors, since they are only apparent when a program is run. This information is to let you know about the first possible error condition your “User Code” program logic can cause if not coded correctly. If you override theV-TFT main routine call, by using your own routines or your routines call it from within a TP object event-action handling routine, possible stack overflow issues arise.
These Flowcharts show the basic's of the V-TFT projectTemplate Framework and flow structure. These are not the only way a user can configure the flow structure. But no mater how you configure your design and the tasks your code does, it needs to provide the equivalent of the program flow demonstrated in these Flowcharts shown here. If any part of your “User Code” breaks the chain of the required V-TFT “Check_TP” execution pass's, your application will fail to work or freeze. Program code must be capable of allowing this continuously repeating execution of routines of Both V-TFT and User Code to cycle without the code preventing the exiting of any routines in the loop.
There can be many Tasks in the main loop that execute one after the next and/or you can have Task selecting management code to call Tasks only if criteria is met. The V-TFT Template does provide a powerful and flexible Framework for users to create applications with, if the framework is used in a proper way.
The Tutorial V-TFT example application provided has a slightly different flowchart than any show above, But it follows the rules and requirements of the Template framework still. This framework description is just a way to introduce you to the concepts that V-TFT employes and give you a solid knowledge base from which to work with. Keep it in mind and you should have no problems making your project ideas work if you build from this template concept.
*1(The task manager code can either increment thru the Task numbers itself so only one of the 7 User tasks plus the Check_TP() task gets executed per cycle of the main loop in order set by select case coding. Or the Task variable that tracks which is scheduled gets modified in “User Code” routine code or user code in event handler routines or by code in each User Task routine code for smart task scheduling based on each tasks actions done.)
This flowchart shows a simplified example of the main loop pass with Touch Panel usage detected. The user code for the Obj. event handler routine has a task done by another User Code routine also. Depending on the MCU being used, the number of routine calls you can 'nest' in the first one, (Check_TP()) from the “main” may be too much of a restriction for your design to work. All routines must complete their invocation to clear off the 'stack' markers to prevent overflow errors.Check the number of levels deep yourproject gets in your compilers 'Statistics'Function Tree tool after a successful compile. You can see the nesting of routine calls with that tool to spot badly placed calls nesting. You should examine a new projects structure before any user code is added to see what is a normal structure. This Flowchart best illustrates how this tutorials example project is coded to run.
This flowchart shows a simplified example of the main loop pass with Touch Panel usage detected. The user code for the Obj. event handler routine has a task done by another User Code routine also. Depending on the MCU being used, the number of routine calls you can 'nest' in the first one, (Check_TP()) from the “main” may be too much of a restriction for your design to work. All routines must complete their invocation to clear off the 'stack' markers to prevent overflow errors.Check the number of levels deep yourproject gets in your compilers 'Statistics'Function Tree tool after a successful compile. You can see the nesting of routine calls with that tool to spot badly placed calls nesting. You should examine a new projects structure before any user code is added to see what is a normal structure. This Flowchart best illustrates how this tutorials example project is coded to run.
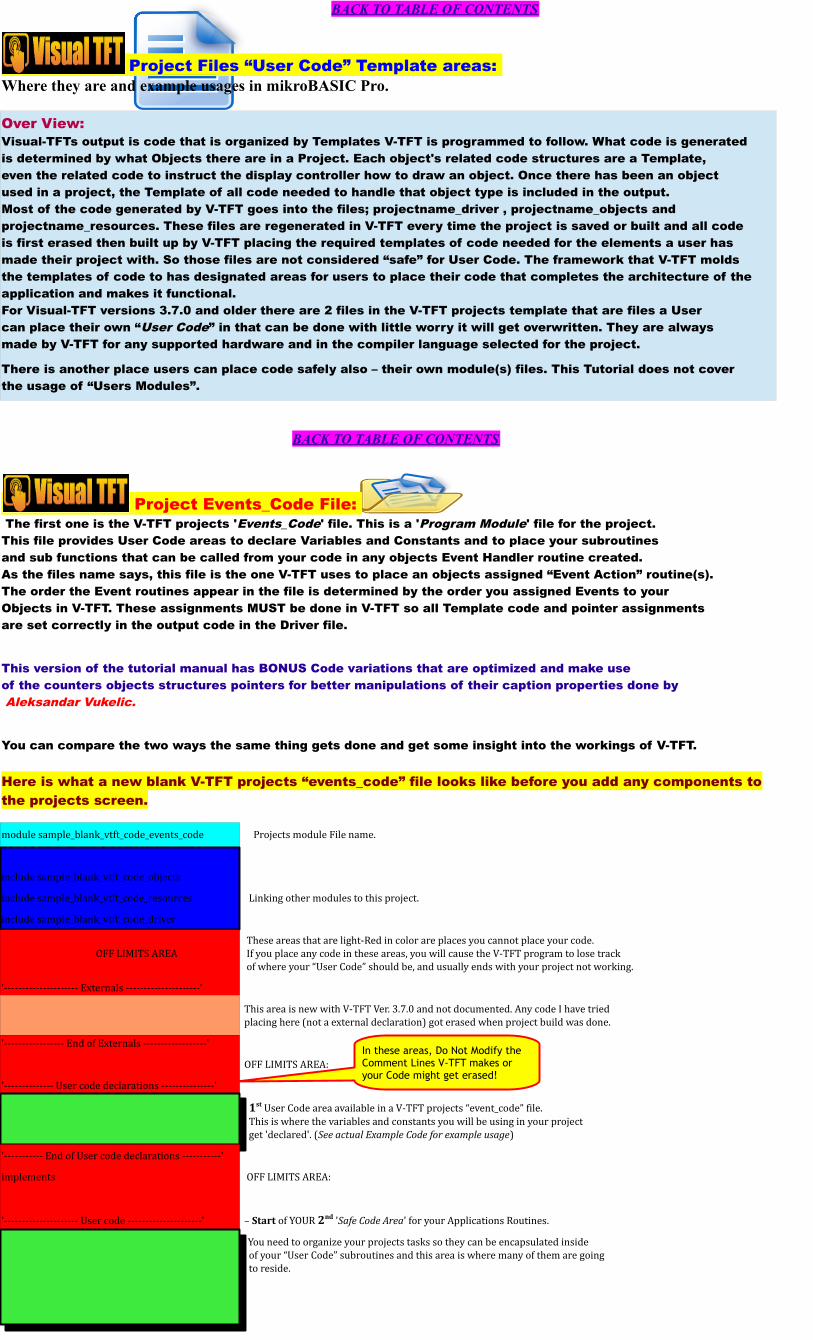
In these areas, Do Not Modify the Comment Lines V-TFT makes or your Code might get erased!
BACK TO TABLE OF CONTENTS
Project Files “User Code” Template areas: Where they are and example usages in mikroBASIC Pro.
Over View:Visual-TFTs output is code that is organized by Templates V-TFT is programmed to follow. What code is generatedis determined by what Objects there are in a Project. Each object's related code structures are a Template,even the related code to instruct the display controller how to draw an object. Once there has been an objectused in a project, the Template of all code needed to handle that object type is included in the output. Most of the code generated by V-TFT goes into the files; projectname_driver , projectname_objects andprojectname_resources. These files are regenerated in V-TFT every time the project is saved or built and all codeis first erased then built up by V-TFT placing the required templates of code needed for the elements a user hasmade their project with. So those files are not considered “safe” for User Code. The framework that V-TFT molds the templates of code to has designated areas for users to place their code that completes the architecture of theapplication and makes it functional.For Visual-TFT versions 3.7.0 and older there are 2 files in the V-TFT projects template that are files a Usercan place their own “User Code” in that can be done with little worry it will get overwritten. They are alwaysmade by V-TFT for any supported hardware and in the compiler language selected for the project.
There is another place users can place code safely also – their own module(s) files. This Tutorial does not coverthe usage of “Users Modules”.
BACK TO TABLE OF CONTENTS
Project Events_Code File: The first one is the V-TFT projects 'Events_Code' file. This is a 'Program Module' file for the project.This file provides User Code areas to declare Variables and Constants and to place your subroutinesand sub functions that can be called from your code in any objects Event Handler routine created.As the files name says, this file is the one V-TFT uses to place an objects assigned “Event Action” routine(s).The order the Event routines appear in the file is determined by the order you assigned Events to yourObjects in V-TFT. These assignments MUST be done in V-TFT so all Template code and pointer assignmentsare set correctly in the output code in the Driver file.
This version of the tutorial manual has BONUS Code variations that are optimized and make useof the counters objects structures pointers for better manipulations of their caption properties done by Aleksandar Vukelic.
You can compare the two ways the same thing gets done and get some insight into the workings of V-TFT.
Here is what a new blank V-TFT projects “events_code” file looks like before you add any components tothe projects screen.
module sample_blank_vtft_code_events_code Projects module File name.
include sample_blank_vtft_code_objects
include sample_blank_vtft_code_resources Linking other modules to this project.
include sample_blank_vtft_code_driver
These areas that are light-Red in color are places you cannot place your code.OFF LIMITS AREA If you place any code in these areas, you will cause the V-TFT program to lose track
of where your “User Code” should be, and usually ends with your project not working.
'--------------------- Externals ---------------------'
This area is new with V-TFT Ver. 3.7.0 and not documented. Any code I have tried placing here (not a external declaration) got erased when project build was done.
'----------------- End of Externals ------------------'
OFF LIMITS AREA:
'-------------- User code declarations ---------------'
1st User Code area available in a V-TFT projects “event_code” file. This is where the variables and constants you will be using in your project get 'declared'. (See actual Example Code for example usage)
'----------- End of User code declarations -----------'
implements OFF LIMITS AREA:
'--------------------- User code ---------------------' – Start of YOUR 2nd 'Safe Code Area' for your Applications Routines.
You need to organize your projects tasks so they can be encapsulated inside of your “User Code” subroutines and this area is where many of them are going
to reside.
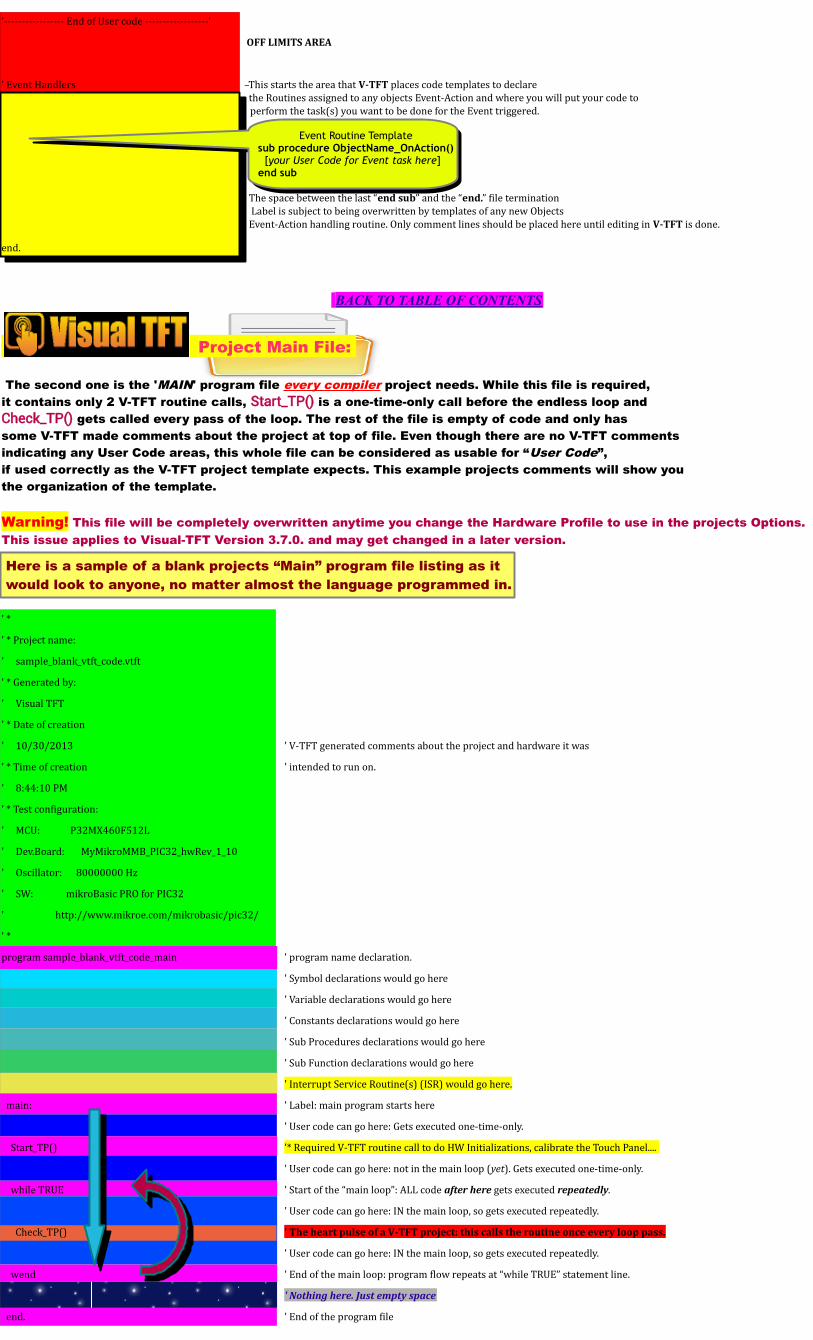
'----------------- End of User code ------------------'
OFF LIMITS AREA
' Event Handlers –This starts the area that V-TFT places code templates to declare the Routines assigned to any objects Event-Action and where you will put your code to
perform the task(s) you want to be done for the Event triggered.
The space between the last “end sub” and the “end.” file termination Label is subject to being overwritten by templates of any new Objects Event-Action handling routine. Only comment lines should be placed here until editing in V-TFT is done.
end.
BACK TO TABLE OF CONTENTS
Project Main File:
The second one is the 'MAIN' program file every compiler project needs. While this file is required,it contains only 2 V-TFT routine calls, Start_TP() is a one-time-only call before the endless loop andCheck_TP() gets called every pass of the loop. The rest of the file is empty of code and only hassome V-TFT made comments about the project at top of file. Even though there are no V-TFT commentsindicating any User Code areas, this whole file can be considered as usable for “User Code”,if used correctly as the V-TFT project template expects. This example projects comments will show youthe organization of the template.
Warning! This file will be completely overwritten anytime you change the Hardware Profile to use in the projects Options.This issue applies to Visual-TFT Version 3.7.0. and may get changed in a later version.
Here is a sample of a blank projects “Main” program file listing as it would look to anyone, no matter almost the language programmed in.
' *
' * Project name:
' sample_blank_vtft_code.vtft
' * Generated by:
' Visual TFT
' * Date of creation
' 10/30/2013 ' V-TFT generated comments about the project and hardware it was
' * Time of creation ' intended to run on.
' 8:44:10 PM
' * Test configuration:
' MCU: P32MX460F512L
' Dev.Board: MyMikroMMB_PIC32_hwRev_1_10
' Oscillator: 80000000 Hz
' SW: mikroBasic PRO for PIC32
' http://www.mikroe.com/mikrobasic/pic32/
' *
program sample_blank_vtft_code_main ' program name declaration.
' Symbol declarations would go here
' Variable declarations would go here
' Constants declarations would go here
' Sub Procedures declarations would go here
' Sub Function declarations would go here
' Interrupt Service Routine(s) (ISR) would go here.
main: ' Label: main program starts here
' User code can go here: Gets executed one-time-only.
Start_TP() '* Required V-TFT routine call to do HW Initializations, calibrate the Touch Panel....
' User code can go here: not in the main loop (yet). Gets executed one-time-only.
while TRUE ' Start of the “main loop”: ALL code after here gets executed repeatedly.
' User code can go here: IN the main loop, so gets executed repeatedly.
Check_TP() ' The heart pulse of a V-TFT project: this calls the routine once every loop pass.
' User code can go here: IN the main loop, so gets executed repeatedly.
wend ' End of the main loop: program flow repeats at “while TRUE” statement line.
' Nothing here. Just empty space
end. ' End of the program file
Event Routine Template sub procedure ObjectName_OnAction()
[your User Code for Event task here]end sub
Event Routine Template sub procedure ObjectName_OnAction()
[your User Code for Event task here]end sub

BACK TO TABLE OF CONTENTS
Project File Areas by the COLOR's To help make clear the different parts and areas of the Project Template code generated, The User Code areas and the V-TFT code areas backgrounds will be differently colored. These project code files listings have a coloring scheme of the background colors as follows:
V-TFT Generated Program Code Colors KeyV-TFT Template generated Program Code.
V-TFT Template generated Event Handler subroutine Code.
V-TFT Template generated Program Comments.
V-TFT Template generated AREAS – Comments – Code That are crucial, and should not be modified!
The User Code Colors KeyThe Examples Tutorial Comments.
The Examples User Code Declarations
The Example User Code Program Code
The Example Event Handler User Code
Open to use for “User Code”
Event Counter Program Main File code Listing
' *
' * Project name:' pic32mmb_v370_example_tutorial.vtft' * Generated by:' Visual TFT' * Date of creation' 10/18/2013' * Time of creation' 2:51:18 AM' * Test configuration:' MCU: P32MX460F512L' Dev.Board: MyMikroMMB_PIC32_hwRev_1_10' Oscillator: 80000000 Hz' SW: mikroBasic PRO for PIC32' http://www.mikroe.com/mikrobasic/pic32/' *' Original Programming and Tutorial comments done by Robert Townsley ' Alternative optimized code versions in 'events_code' file by Aleksandar Vukelic ' ' * Program Description: ' This is a V-TFT example project by Robert Townsley (MegaHurts), to show how ' to make a simple lab instrument event counter that can count up to 9,999,999 ' events. It can be modified to count higher by any body that has a need to do so. ' This V-TFT example project also shows how to use multiple components to create' what looks like a single screen indicator object. The indicator object was designed' to look like a mechanical multi-wheel numerical counter. The indicator object ' uses seven Button components to display a single digit each of the events total ' counts in order to get the appearance of a mechanical wheel counter. ' I did not attempt to program any wheel digit rolling to the next higher digit value ' in this example project. That is beyond the scope of this demo/example. ' (The wheel counter looks pretty good as is anyway) '' This V-TFT project also shows how to make a proper user code single pass ' routine get called from within the main endless loop that V-TFT sets up in ' this module to drive its TP checking and event handling core code. ' Or you could call it a 'How to share the loop' example. ' It demonstrates how to do this and have it manage the RESET buttons visual ' effects to show confirmation is required before a counter reset gets done by ' calling a routine located in the events modules "User Code" area from the ' loop here when it is needed to do so. It also shows how to add confirmation ' safety to any button press method. '

'' You are invited to examine this projects code and screen components in V-TFT ' and a compiler in order to see how it all gets done, and use the knowledge you ' get from it in your own projects or you can take the simple work done here and ' use it as the base for making a more complex feature filled application to suit ' your needs or just to experiment more on. Your choices, you do as you want with it.
' So I hope you take the time to read all of the comments, and that they help you ' to a better understanding and usage of MikroElektronika's Visual TFT software. ' If you find anything hard to read, understand or confusing to you, ' please let me know, post a comment on its LibStock code page or forum thread. ' Best Regards to all, Robert. ' ' * Note to users of MikroC and MikroPASCAL languages: ' Sorry, but I do not use those compilers so MikroBASIC versions are all I can ' make for now. I may someday add PASCAL to my arsenal, but not C. Sorry, but ' I just do not like that language, and never have (any version). But you users ' of those others should be able to understand what is going on in BASIC in this ' project without too much trouble, and more so for you PASCAL users, not much ' difference between them really. The coding is simple and the comments apply ' to all languages as for how V-TFT is organized. 'program pic32mmb_v370_example_tutorial_main
Users code can go any where in this module as long as its placement follows the ' compilers rules for a programs organization layout that is always in effect. ' New users to V-TFT may at first be confused by this very plain, bare almost, ' MAIN program file and its lack of all the normal coding you were expecting. ' With V-TFT projects, the main file is left bare so users can still have a place ' to do their coding in, but it will have to be done a little differently than ' some of you are familiar with in order to work without breaking how the V-TFT ' generated stuff works. Please read all of the comments in this file for more ' detailed instructions about this. '' User Symbol defines can go here, but they will only work in this module. ' (see compiler help file or manual for more information on symbols and program organization)'-------------------------------------------------------------------------------
' Users Variables declarations can go here.(global) ' (see compiler help file or manual for more information on variables) '-------------------------------------------------------------------------------
' Users Constants defines can go here.(global) ' (see compiler help file or manual for more information on constants) '-------------------------------------------------------------------------------
' Users subroutines coding can go here. ' (see compiler help file or manual for more information on subroutines) '-------------------------------------------------------------------------------
' Users Function routines can go here. ' (see compiler help file or manual for more information on function routines) '-------------------------------------------------------------------------------
' Users ISR routine(s) go here.' (see compiler help file or manual for more information on Interrupt Service Routines)'-------------------------------------------------------------------------------
' Start of main program body. Program execution begins at the first instruction' after the "main:" label marker and proceeds downwards towards the "end." label.
main:
' User code here gets executed one time only on power up' or after a reset because of endless loop below.
' User variables initialize. (these variables are declared in events module)
COUNTER_VALUE = 0 ' set value to zero RESET_FLAG = 0 ' clear flag state BLINK_TIMER = 0 ' set value to zero
Start_TP() ' Generated call to initialize HW and V-TFT screen(s) and objects. ' The routine called is in the 'driver' module and it calls on ' other routines in the driver module before returning program ' execution flow back here. It is only called once per ' device power-up or after a hard or soft restart (reset).
' main program endless loop section begin
while TRUE
' V-TFT makes this endless loop as part of a V-TFT project. It is ' a important part of how a V-TFT program executes. Once program ' execution flow enters this loop, it never can exit it, and ' should not, so do not change the loop set up or put code that ' will cause program execution to exit it out the bottom. ' If it does, the application will enter a continuous NOP loop ' state (at the 'end.' statement), and become 'locked up' and ' unresponsive to any input.
Remember: This color showsthe open for “User Code”
areas.
Remember: This color showsthe open for “User Code”
areas.
V-TFT core code in Driver Moduleto initialize HW and SW V-TFT Objects, Resources and Screens.
V-TFT core code in Driver Moduleto initialize HW and SW V-TFT Objects, Resources and Screens.
Start ofProgram execution
flow during run-time.
Start ofProgram execution
flow during run-time.Routine Call:Start_TP() inProjectsDriverModule
Routine Call:Start_TP() inProjectsDriverModule
This gets calledOne (1) time
Only on power-up.
This gets calledOne (1) time
Only on power-up.
ReturnFrom subRoutine:end sub
ReturnFrom subRoutine:end sub
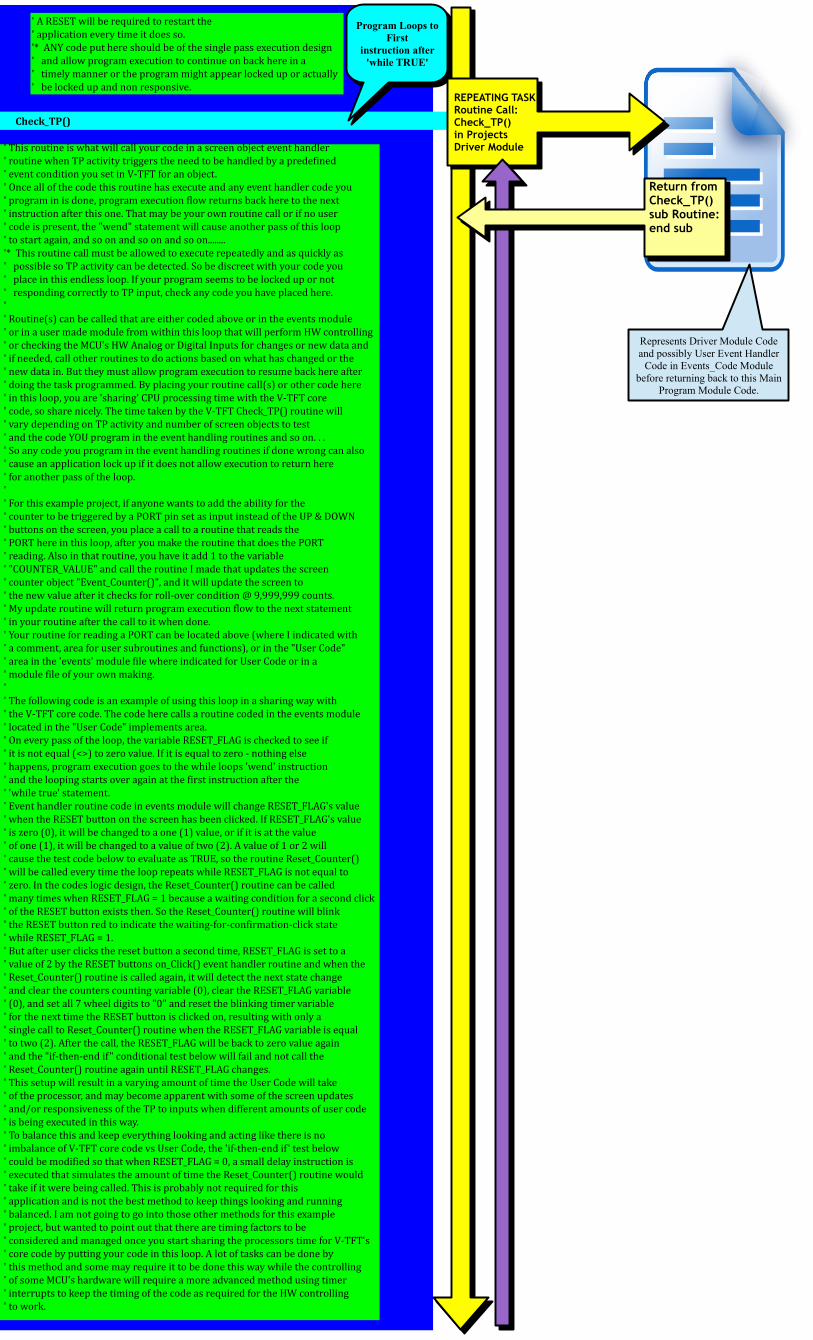
' A RESET will be required to restart the ' application every time it does so. '* ANY code put here should be of the single pass execution design ' and allow program execution to continue on back here in a ' timely manner or the program might appear locked up or actually ' be locked up and non responsive.
Check_TP()
' This routine is what will call your code in a screen object event handler ' routine when TP activity triggers the need to be handled by a predefined ' event condition you set in V-TFT for an object. ' Once all of the code this routine has execute and any event handler code you ' program in is done, program execution flow returns back here to the next ' instruction after this one. That may be your own routine call or if no user ' code is present, the "wend" statement will cause another pass of this loop ' to start again, and so on and so on and so on........ '* This routine call must be allowed to execute repeatedly and as quickly as ' possible so TP activity can be detected. So be discreet with your code you ' place in this endless loop. If your program seems to be locked up or not ' responding correctly to TP input, check any code you have placed here. ' ' Routine(s) can be called that are either coded above or in the events module ' or in a user made module from within this loop that will perform HW controlling ' or checking the MCU's HW Analog or Digital Inputs for changes or new data and ' if needed, call other routines to do actions based on what has changed or the ' new data in. But they must allow program execution to resume back here after ' doing the task programmed. By placing your routine call(s) or other code here ' in this loop, you are 'sharing' CPU processing time with the V-TFT core ' code, so share nicely. The time taken by the V-TFT Check_TP() routine will ' vary depending on TP activity and number of screen objects to test ' and the code YOU program in the event handling routines and so on. . . ' So any code you program in the event handling routines if done wrong can also ' cause an application lock up if it does not allow execution to return here ' for another pass of the loop. ' ' For this example project, if anyone wants to add the ability for the ' counter to be triggered by a PORT pin set as input instead of the UP & DOWN ' buttons on the screen, you place a call to a routine that reads the ' PORT here in this loop, after you make the routine that does the PORT ' reading. Also in that routine, you have it add 1 to the variable ' "COUNTER_VALUE" and call the routine I made that updates the screen ' counter object "Event_Counter()", and it will update the screen to ' the new value after it checks for roll-over condition @ 9,999,999 counts. ' My update routine will return program execution flow to the next statement ' in your routine after the call to it when done. ' Your routine for reading a PORT can be located above (where I indicated with ' a comment, area for user subroutines and functions), or in the "User Code" ' area in the 'events' module file where indicated for User Code or in a ' module file of your own making. ' ' The following code is an example of using this loop in a sharing way with ' the V-TFT core code. The code here calls a routine coded in the events module ' located in the "User Code" implements area. ' On every pass of the loop, the variable RESET_FLAG is checked to see if ' it is not equal (<>) to zero value. If it is equal to zero - nothing else ' happens, program execution goes to the while loops 'wend' instruction ' and the looping starts over again at the first instruction after the ' 'while true' statement. ' Event handler routine code in events module will change RESET_FLAG's value ' when the RESET button on the screen has been clicked. If RESET_FLAG's value ' is zero (0), it will be changed to a one (1) value, or if it is at the value ' of one (1), it will be changed to a value of two (2). A value of 1 or 2 will ' cause the test code below to evaluate as TRUE, so the routine Reset_Counter() ' will be called every time the loop repeats while RESET_FLAG is not equal to ' zero. In the codes logic design, the Reset_Counter() routine can be called ' many times when RESET_FLAG = 1 because a waiting condition for a second click ' of the RESET button exists then. So the Reset_Counter() routine will blink ' the RESET button red to indicate the waiting-for-confirmation-click state ' while RESET_FLAG = 1. ' But after user clicks the reset button a second time, RESET_FLAG is set to a ' value of 2 by the RESET buttons on_Click() event handler routine and when the ' Reset_Counter() routine is called again, it will detect the next state change ' and clear the counters counting variable (0), clear the RESET_FLAG variable ' (0), and set all 7 wheel digits to "0" and reset the blinking timer variable ' for the next time the RESET button is clicked on, resulting with only a ' single call to Reset_Counter() routine when the RESET_FLAG variable is equal ' to two (2). After the call, the RESET_FLAG will be back to zero value again ' and the "if-then-end if" conditional test below will fail and not call the ' Reset_Counter() routine again until RESET_FLAG changes. ' This setup will result in a varying amount of time the User Code will take ' of the processor, and may become apparent with some of the screen updates ' and/or responsiveness of the TP to inputs when different amounts of user code ' is being executed in this way. ' To balance this and keep everything looking and acting like there is no ' imbalance of V-TFT core code vs User Code, the 'if-then-end if ' test below ' could be modified so that when RESET_FLAG = 0, a small delay instruction is ' executed that simulates the amount of time the Reset_Counter() routine would ' take if it were being called. This is probably not required for this ' application and is not the best method to keep things looking and running ' balanced. I am not going to go into those other methods for this example ' project, but wanted to point out that there are timing factors to be ' considered and managed once you start sharing the processors time for V-TFT's ' core code by putting your code in this loop. A lot of tasks can be done by ' this method and some may require it to be done this way while the controlling ' of some MCU's hardware will require a more advanced method using timer ' interrupts to keep the timing of the code as required for the HW controlling ' to work.
Program Loops to First
instruction after 'while TRUE'
Program Loops to First
instruction after 'while TRUE'
REPEATING TASKRoutine Call:Check_TP()in ProjectsDriver Module
REPEATING TASKRoutine Call:Check_TP()in ProjectsDriver Module
Return fromCheck_TP()sub Routine:end sub
Return fromCheck_TP()sub Routine:end sub
Represents Driver Module Codeand possibly User Event Handler
Code in Events_Code Modulebefore returning back to this Main
Program Module Code.

Aleksandar s alternate code' using pointers declaration goes here: const digits as TButtonPtr[7] = (@Button_One, @Button_Ten, @Button_Hundred, @Button_Thousand, @Button_TenThousand, @Button_HundredThousand, @Button_Million)
Aleksandar s alternate code' using pointers declaration goes here: const digits as TButtonPtr[7] = (@Button_One, @Button_Ten, @Button_Hundred, @Button_Thousand, @Button_TenThousand, @Button_HundredThousand, @Button_Million)
' I will try to make an example project that demonstrates that method in the ' maybe near future or sooner if a lot of requests for it I get.
'* user code for sharing V-TFT endless loop to get repeating passes of execution ' on some user code that is of single-pass execution design.
if (RESET_FLAG > 0) then
Reset_Counter() ' call this routine if the RESET_FLAG variable is not end if ' equal to zero which is the indicator that it (screen ' RESET button), has been clicked at least once. ' On first click, flag is set to 1 and Reset_Counter() ' routine will cause a message to appear and the RESET ' button to blink* between its normal colors and red ' and maroon colors until it is clicked again to ' confirm reset wanted (RESET_FLAG now set to 2), or ' user presses MINUS (-) button to cancel ' (RESET_FLAG set to 0 - cleared) and the count total ' is not lost. '* See the code and comments in Reset_Counter() ' subroutine to see how this effect was done.* wend
' end of while loop, because configured as endless loop, ' this makes program execution flow go to the next instruction after the ' 'while true' statement. goto main ' EOF trap. Prevent execution to end, jump to main to start over
' End of main program code and file. End.
BACK TO TABLE OF CONTENTS
Event Counter Program Events_Code File code listing
module pic32mmb_v370_example_tutorial_events_code
include pic32mmb_v370_example_tutorial_objectsinclude pic32mmb_v370_example_tutorial_resourcesinclude pic32mmb_v370_example_tutorial_driver
sub procedure ButtonRound_MINUS_OnClick()sub procedure ButtonRound_PLUS_OnClick()sub procedure CircleButton_RESET_OnClick()'--------------------- Externals ---------------------'
'----------------- End of Externals ------------------'
'-------------- User code declarations ---------------''' This area should be used to declare your "User Code" routines forwards for ' those routines that need to be called from outside of this project module. sub procedure Reset_Counter() ' forward declaration so the calls from the main ' program file to it will work. ' This area is where users variables and constants are declared and defined ' that will be used by users executable code in users own routines or the ' routines V-TFT generates for screen objects touched event handling in ' the area below marked as "Event Handlers" because users must supply the code ' to be executed in those event handler routines. ' V-TFT just makes empty routine declarations for you, the user/programmer. ' User Code variables (GLOBAL) dim COUNTER_VALUE as longword ' variable to hold counted events total RESET_FLAG as byte ' variable for tracking RESET button clicks ' and Reset_Counter() routine operations BLINK_TIMER as byte ' variable for counting number of passes in ' Reset_Counter as time control for blinking ' colors of RESET button. ' User Code constants (GLOBAL) const bTRUE as byte = 1 ' constant for setting or testing a logical ' One (1) True state bFALSE as byte = 0 ' constant for setting or testing a logical ' Zero (0) False state BLINK as word = 200 ' change value to adjust rate RESET button ' blinks colors. Lower = faster, Higher = slower ' when BLINK_TIMER value gets greater than ' this constant, RESET button colors change.
RESET_FLAG > 0 YES NO
RESET_FLAG > 0 YES NO
Routine Call:Reset_Counter()in the Projectsevents_codeFile- User Code. Repeating Task.
Routine Call:Reset_Counter()in the Projectsevents_codeFile- User Code. Repeating Task.
Return fromReset_Counter()subroutine Call Out: end sub
Return fromReset_Counter()subroutine Call Out: end sub
Program flowto LOOP @while TRUE
Program flowto LOOP @while TRUE
V-TFT puts a forwardsdeclaration here for every
Object Event Action you set
V-TFT puts a forwardsdeclaration here for every
Object Event Action you set
Project Module NameProject Module Name
External Declarations gohere. These point to
Identifiers in other modules.
External Declarations gohere. These point to
Identifiers in other modules.
Linking Other Project FilesLinking Other Project Files

'----------- End of User code declarations -----------'
implements
'--------------------- User code ---------------------'
' User code that is located below the "implements" statement must be of a ' sub procedure or sub function routine nature. Program execution is not allowed ' to just follow the 'TOP-to-BOTTOM' flow like it does in the Main program file. ' All code here is contained within either a sub procedures or a sub functions ' routine starting and its ending declarations and is called on from either ' V-TFT core code (event handler routine), or user code in an event handler ' routine or from user code in the 'main' program file. ' Program execution flow inside the routines DOES flow 'TOP-to-BOTTOM', but must ' encounter a 'end routine' statement so execution point goes back to the ' instruction after the ONE that called the routine. ' (If your routines coding (logic) does not allow program execution flow to exit ' the routines in a timely manner, your application might appear to be hung-up or ' slow to respond to inputs or other HW you are trying to control does not work ' like it did in a different example that you tested.) ' ' The code a user places in this area is safe from V-TFT overwriting as long as ' nothing is done to the beginning/ending User Code comment markers. ' V-TFT does rewrite all of the code in the driver and objects files every time ' you have made any changes to any objects used in your project, so doing any ' code editing in those files is not recommended unless you do it in a compiler ' and will not be loading it back in to V-TFT again. ' '* Other modules may require that any routines coded here also have an associated ' 'Forwards' code line placed in the User Declarations area above in order to be ' 'visible' to that and other modules. All V-TFT generated event handler routines ' will have a 'forwards' declaration automatically added to 'externals' area above ' the 'User Declarations' area, so users only have to declare a routines forward if ' they write their own and it needs to be visible to other modules in the project. ' V-TFT will take care of this automatically for all routines it generates and needs to. ' '------------------------------------------------------------------------------- ' '* Note from the Author; ' V-TFT Users, You can use the objects that make up the counter (copy them to ' your project), and copy this entire sub procedures code also to your V-TFT ' project to easily add this custom numerical wheels display to your design, ' as is, or modify it to meet your needs of more or less digits displayed. ' Just make sure the naming matches between code and objects and you will need ' to also declare a global Variable named "COUNTER_VALUE" (longword type), to ' hold the value you want to be displayed when you call this routine, (the way ' it is coded now), or change this sub procedures declaration so value is ' passed as argument to it and you can use what ever variable name in your ' projects code to accumulate a value you want displayed by this custom wheel ' digital display. ' ' I hope you reading this and looking this example project over have found it ' useful and easy to understand how it works or at least gotten something useful ' from it to spark your own creative design ideas to do in V-TFT. ' This is the best way I have found to share or acquire custom components so far ' for V-TFT. ' Use any combination of objects to make a custom display gadget or TP ' input/control/indicator gadget and include any routines needed to implement ' it, and make a simple V-TFT project to hold and show it off with and post it ' for others to download and check out. ' (please include enough instructions or comments for others, to keep it at ' least easy to use in their own projects)' ' I invite you to use any part of the user code or methods I demonstrated in your ' own projects and if you do put your project up for downloading by others to ' have as your example, please have comments by my code you used stating that ' you got it from this example, so others can trace back to get original material ' for use if they want it. ' Thank you for any passing and sharing of methods, ideas, solutions, examples ' you have or may do with the community. '============================================'////////////////////////////////////////////////// '============================================' User code subroutines and/or function routines ' '+ COUNTER DISPLAY OBJECTS DRIVER AND DISPLAY UPDATER ROUTINE. ' Routine takes the value in COUNTER_VALUE variable and converts it to a string ' of 10 characters and updates the 7 Buttons captions with the 7 right most ' characters in the temp string after the longword to string with zeros conversion. ' This was the best way I could think of to get the digits separated out of a ' single variable holding the count total. One method I actually tried (wrote ' code for), was to have the routine keep track of each digits displayed value ' separately and only update the Button(s) that have changed values. ' Even though it worked, I realized it was too complicated for what needed to ' be done and while this routines solution redraws all 7 Buttons whether the ' value for a Button has changed or not, it is much simpler, uses a lot less ' variables (always a good thing), and executes much faster due to less code ' and almost no conditional testing required. I have to give thanks to aCkO ' (Aleksandar), for a bunch of help information about the proper way(s) to do ' string elements manipulations without causing memory corruption. ' Without his advise and intimate knowledge of these compilers, many of us ' would be struggling and much frustrated. Thank You Again Aleksandar. ' So as a bonus, now you also get a little bit of example code about string ' element direct manipulations that the compilers manuals do not provide correctly*. ' *(the mBASIC help file does not provide it at this time, go see what I mean)
OFF Limits areas!Do Not Modify!
OFF Limits areas!Do Not Modify!
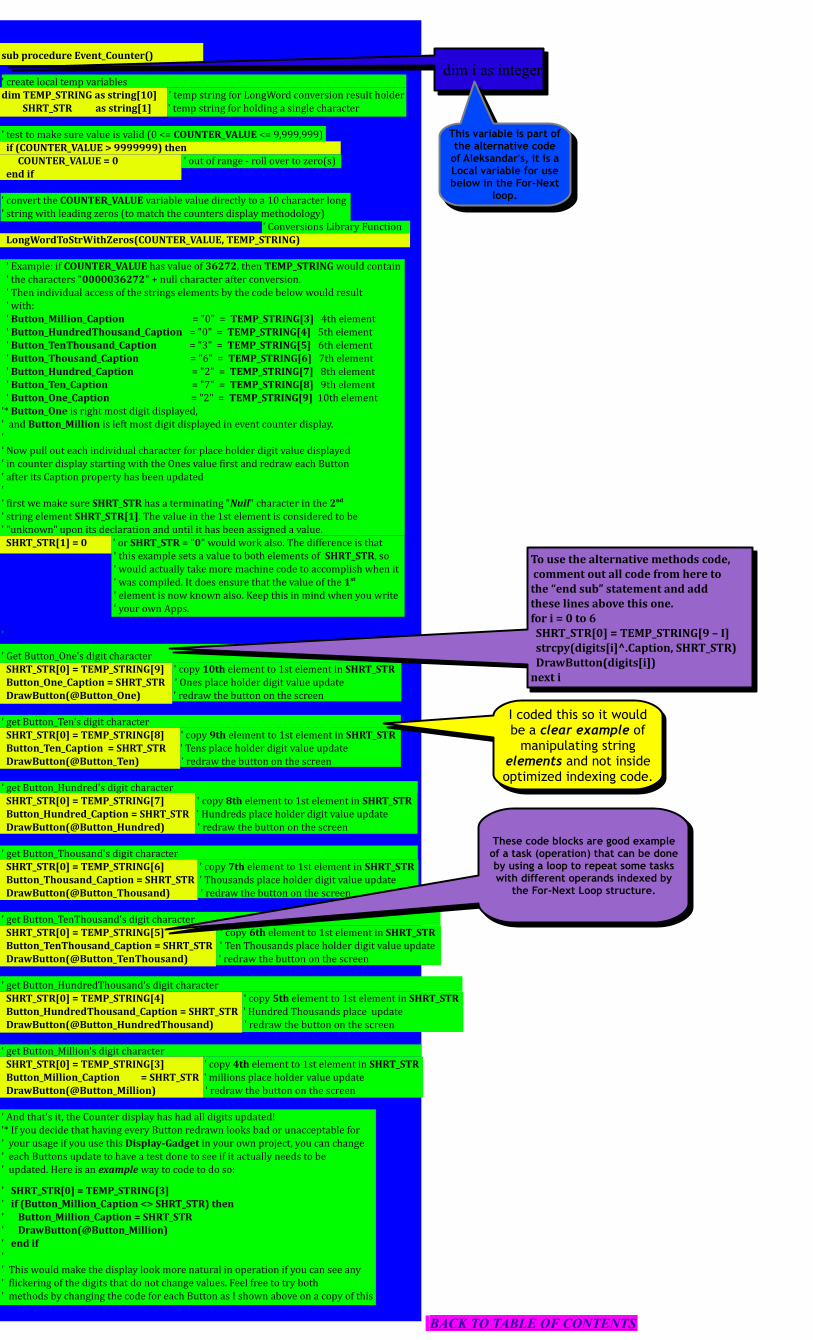
sub procedure Event_Counter() ' create local temp variables dim TEMP_STRING as string[10] ' temp string for LongWord conversion result holder SHRT_STR as string[1] ' temp string for holding a single character ' test to make sure value is valid (0 <= COUNTER_VALUE <= 9,999,999) if (COUNTER_VALUE > 9999999) then COUNTER_VALUE = 0 ' out of range - roll over to zero(s) end if ' convert the COUNTER_VALUE variable value directly to a 10 character long ' string with leading zeros (to match the counters display methodology) ' Conversions Library Function LongWordToStrWithZeros(COUNTER_VALUE, TEMP_STRING) ' Example: if COUNTER_VALUE has value of 36272, then TEMP_STRING would contain ' the characters "0000036272" + null character after conversion. ' Then individual access of the strings elements by the code below would result ' with: ' Button_Million_Caption = "0" = TEMP_STRING[3] 4th element ' Button_HundredThousand_Caption = "0" = TEMP_STRING[4] 5th element ' Button_TenThousand_Caption = "3" = TEMP_STRING[5] 6th element ' Button_Thousand_Caption = "6" = TEMP_STRING[6] 7th element ' Button_Hundred_Caption = "2" = TEMP_STRING[7] 8th element ' Button_Ten_Caption = "7" = TEMP_STRING[8] 9th element ' Button_One_Caption = "2" = TEMP_STRING[9] 10th element '* Button_One is right most digit displayed, ' and Button_Million is left most digit displayed in event counter display. ' ' Now pull out each individual character for place holder digit value displayed ' in counter display starting with the Ones value first and redraw each Button ' after its Caption property has been updated ' ' first we make sure SHRT_STR has a terminating "Null" character in the 2nd ' string element SHRT_STR[1]. The value in the 1st element is considered to be ' "unknown" upon its declaration and until it has been assigned a value. SHRT_STR[1] = 0 ' or SHRT_STR = "0" would work also. The difference is that ' this example sets a value to both elements of SHRT_STR, so ' would actually take more machine code to accomplish when it ' was compiled. It does ensure that the value of the 1st ' element is now known also. Keep this in mind when you write ' your own Apps.
'
' Get Button_One's digit character SHRT_STR[0] = TEMP_STRING[9] ' copy 10th element to 1st element in SHRT_STR Button_One_Caption = SHRT_STR ' Ones place holder digit value update DrawButton(@Button_One) ' redraw the button on the screen ' get Button_Ten's digit character SHRT_STR[0] = TEMP_STRING[8] ' copy 9th element to 1st element in SHRT_STR Button_Ten_Caption = SHRT_STR ' Tens place holder digit value update DrawButton(@Button_Ten) ' redraw the button on the screen ' get Button_Hundred's digit character SHRT_STR[0] = TEMP_STRING[7] ' copy 8th element to 1st element in SHRT_STR Button_Hundred_Caption = SHRT_STR ' Hundreds place holder digit value update DrawButton(@Button_Hundred) ' redraw the button on the screen
' get Button_Thousand's digit character SHRT_STR[0] = TEMP_STRING[6] ' copy 7th element to 1st element in SHRT_STR Button_Thousand_Caption = SHRT_STR ' Thousands place holder digit value update DrawButton(@Button_Thousand) ' redraw the button on the screen
' get Button_TenThousand's digit character SHRT_STR[0] = TEMP_STRING[5] ' copy 6th element to 1st element in SHRT_STR Button_TenThousand_Caption = SHRT_STR ' Ten Thousands place holder digit value update DrawButton(@Button_TenThousand) ' redraw the button on the screen ' get Button_HundredThousand's digit character SHRT_STR[0] = TEMP_STRING[4] ' copy 5th element to 1st element in SHRT_STR Button_HundredThousand_Caption = SHRT_STR ' Hundred Thousands place update DrawButton(@Button_HundredThousand) ' redraw the button on the screen ' get Button_Million's digit character SHRT_STR[0] = TEMP_STRING[3] ' copy 4th element to 1st element in SHRT_STR Button_Million_Caption = SHRT_STR ' millions place holder value update DrawButton(@Button_Million) ' redraw the button on the screen
' And that's it, the Counter display has had all digits updated! '* If you decide that having every Button redrawn looks bad or unacceptable for ' your usage if you use this Display-Gadget in your own project, you can change ' each Buttons update to have a test done to see if it actually needs to be ' updated. Here is an example way to code to do so:
' SHRT_STR[0] = TEMP_STRING[3] ' if (Button_Million_Caption <> SHRT_STR) then ' Button_Million_Caption = SHRT_STR ' DrawButton(@Button_Million) ' end if ' ' This would make the display look more natural in operation if you can see any ' flickering of the digits that do not change values. Feel free to try both ' methods by changing the code for each Button as I shown above on a copy of this
BACK TO TABLE OF CONTENTS
To use the alternative methods code, comment out all code from here to the “end sub” statement and add these lines above this one. for i = 0 to 6 SHRT_STR[0] = TEMP_STRING[9 – I] strcpy(digits[i]^.Caption, SHRT_STR) DrawButton(digits[i]) next i
To use the alternative methods code, comment out all code from here to the “end sub” statement and add these lines above this one. for i = 0 to 6 SHRT_STR[0] = TEMP_STRING[9 – I] strcpy(digits[i]^.Caption, SHRT_STR) DrawButton(digits[i]) next i
I coded this so it wouldbe a clear example of
manipulating stringelements and not insideoptimized indexing code.
I coded this so it wouldbe a clear example of
manipulating stringelements and not insideoptimized indexing code.
dim i as integer dim i as integer
These code blocks are good exampleof a task (operation) that can be doneby using a loop to repeat some taskswith different operands indexed by
the For-Next Loop structure.
These code blocks are good exampleof a task (operation) that can be doneby using a loop to repeat some taskswith different operands indexed by
the For-Next Loop structure.
This variable is part ofthe alternative code
of Aleksandar's, it is aLocal variable for usebelow in the For-Next
loop.
This variable is part ofthe alternative code
of Aleksandar's, it is aLocal variable for usebelow in the For-Next
loop.

' project and recompile it and program your device to see what any differences ' there may be visually. I have not tried this on multiple devices, so I can not ' state that it will look the same or different when run on different devices.
end sub '------------------------------------------------------------------------------------ '++++++++++++++++++++++++++++++++++++++++++++++++++ '------------------------------------------------------------------------------------ ' the first block of code in this routine handles the repeating calls made to it ' from the loop in main program module. The repeating calls serve a purpose for ' timing of the RESET buttons blinking effect. This is done by changing the ' RESET buttons Transparent property between True (0) and False (1) after every ' BLINK (constant value set in User Declarations above), + 1 times this routine ' is called while the RESET_FLAG variable equals 1. ' The variable BLINK_TIMER is used to keep track of the number of execution passes ' (or calls), this routine gets from the main program loop. ' When the RESET buttons Transparent property is set True (0), another circle that ' is behind the button and colored red to maroon gradient will be visible for ' BLINK + 1 number of execution passes, then the buttons transparent property ' will be set to False (1) for the same number of execution passes and will ' repeat until the user either presses the RESET button again to confirm reset ' or presses the Minus [-] button to cancel the reset counter state. A text ' message of instructions is also displayed while waiting for confirmation or ' cancellation. It gets set visible or not by the RESET buttons event handler ' routine and made not visible also by the Minus buttons event handler routine' if canceling RESET condition.
sub procedure Reset_Counter()
if (RESET_FLAG = 1) then ' test if RESET clicked one time if (BLINK_TIMER < BLINK) then ' yes, so do blink timing handling inc(BLINK_TIMER) ' not enough passes have happened yet else ' so add to counter BLINK_TIMER = 0 ' OK, change RESET buttons colors and if (CircleButton_RESET_.Transparent = 1) then ' start over counting passes CircleButton_RESET_.Transparent = 0 ' Transparent is set TRUE -YES this is TRUE DrawCCircle(@Circle2) ' redraw red circle else ' flip state of transparent property CircleButton_RESET_.Transparent = 1 ' Transparent is set FALSE -YES this is FALSE end if ' Transparent logic is reversed of others in V-TFT DrawCircleButton(@CircleButton_RESET_) ' redraws RESET button transparent end if ' or not. end if
' This second block of code when executed will reset the button objects that display' the individual digits for the value of what COUNTER_VALUE is currently at and clear ' its value to zero and clear the RESET_FLAG to zero and make sure the RESET buttons ' normal colors are visible. It is coded so that it resets ONE digit at a time, ' starting from least to most significant digit (right to left), with a little delay ' between each digit resetting (change all Delay_ms(xxxx) values to suit).
if (RESET_FLAG = 2) then COUNTER_VALUE = 0 Delay_ms(1000) Button_One_Caption = "0" DrawButton(@Button_One) Button_Ten_Caption = "0" Delay_ms(100) DrawButton(@Button_Ten) Button_Hundred_Caption = "0" Delay_ms(100) DrawButton(@Button_Hundred) Button_Thousand_Caption = "0" Delay_ms(100) DrawButton(@Button_Thousand) Button_TenThousand_Caption = "0" Delay_ms(100) DrawButton(@Button_TenThousand) Button_HundredThousand_Caption = "0" Delay_ms(100) DrawButton(@Button_HundredThousand) Button_Million_Caption = "0" Delay_ms(100) DrawButton(@Button_Million) RESET_FLAG = bFALSE ' clear the flag BLINK_TIMER = bFALSE ' clear the timer CircleButton_RESET_.Transparent = 1 ' make sure the buttons real colors show Delay_ms(600) DrawScreen(Screen1ScreenID) ' redraw whole screen so RESET message is erased. end if ' this approach was used because it is the easiest ' way to solve the problem of the message text ' being 'printed' over a gradient background. ' Normal method to erase text would still leave ' visible text of a single color standing out ' from the gradient colors. So redrawing the ' whole screen with message label visibility ' set False is the only way to keep screen ' looking correct. end sub'-------------------------------------------------------------------------------------------'======================================================'-------------------------------------------------------------------------------------------'----------------- End of User code ------------------'
' Event Handlers
' BACK TO TABLE OF CONTENTS
dim i as integer dim i as integer
Replace with this code:
for i = 0 to 6 strcpy(digits[i]^.Caption, "0") DrawButton(digits[i]) Delay_ms(100) next i
Replace with this code:
for i = 0 to 6 strcpy(digits[i]^.Caption, "0") DrawButton(digits[i]) Delay_ms(100) next i
Do Not Modify thiscomment or put
any code above itand below the
comment line above!
Do Not Modify thiscomment or put
any code above itand below the
comment line above!
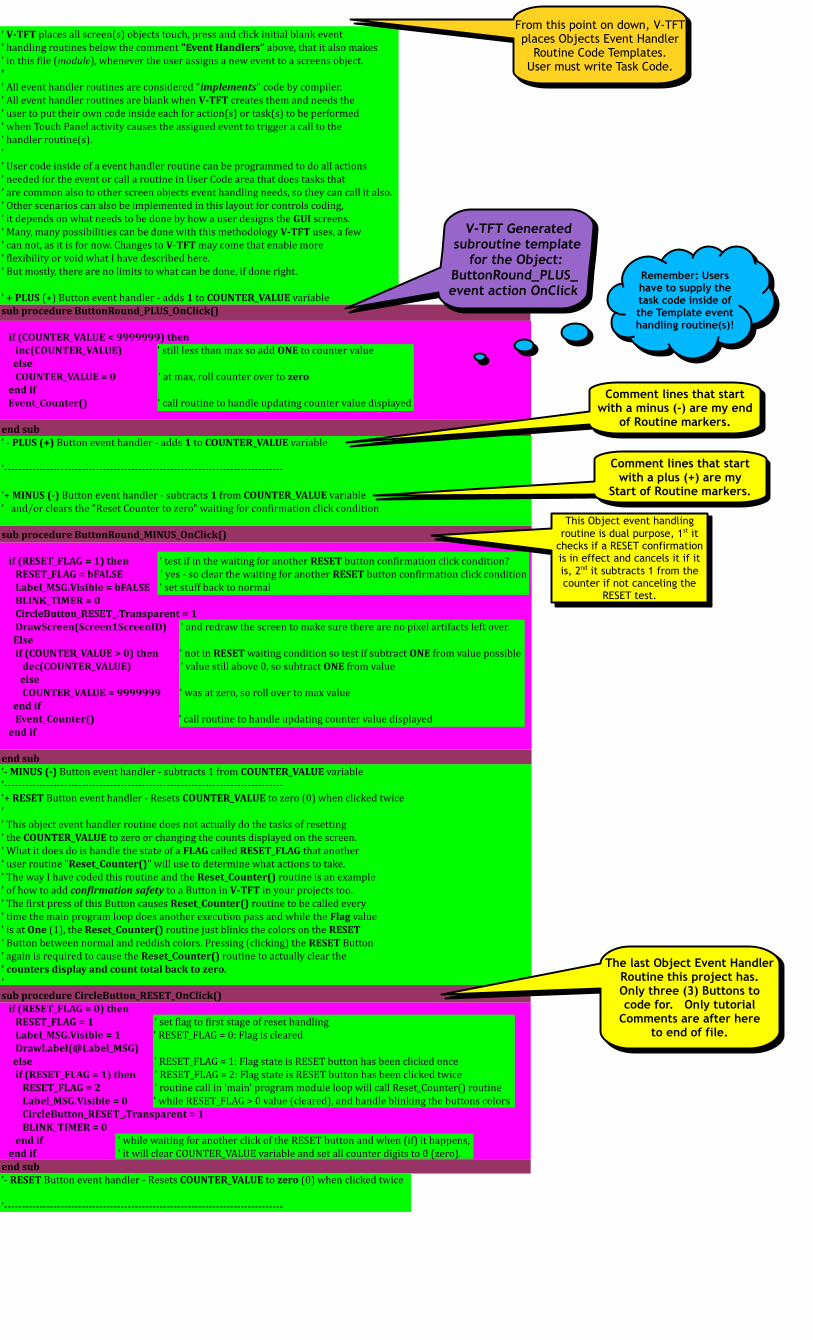
' V-TFT places all screen(s) objects touch, press and click initial blank event ' handling routines below the comment "Event Handlers" above, that it also makes ' in this file (module), whenever the user assigns a new event to a screens object. ' ' All event handler routines are considered "implements" code by compiler. ' All event handler routines are blank when V-TFT creates them and needs the ' user to put their own code inside each for action(s) or task(s) to be performed ' when Touch Panel activity causes the assigned event to trigger a call to the ' handler routine(s). ' ' User code inside of a event handler routine can be programmed to do all actions ' needed for the event or call a routine in User Code area that does tasks that ' are common also to other screen objects event handling needs, so they can call it also. ' Other scenarios can also be implemented in this layout for controls coding, ' it depends on what needs to be done by how a user designs the GUI screens. ' Many, many possibilities can be done with this methodology V-TFT uses, a few ' can not, as it is for now. Changes to V-TFT may come that enable more ' flexibility or void what I have described here. ' But mostly, there are no limits to what can be done, if done right.
' + PLUS (+) Button event handler - adds 1 to COUNTER_VALUE variable sub procedure ButtonRound_PLUS_OnClick() if (COUNTER_VALUE < 9999999) then inc(COUNTER_VALUE) ' still less than max so add ONE to counter value else COUNTER_VALUE = 0 ' at max, roll counter over to zero end if Event_Counter() ' call routine to handle updating counter value displayed end sub ' - PLUS (+) Button event handler - adds 1 to COUNTER_VALUE variable '-------------------------------------------------------------------------------
'+ MINUS (-) Button event handler - subtracts 1 from COUNTER_VALUE variable ' and/or clears the "Reset Counter to zero" waiting for confirmation click condition sub procedure ButtonRound_MINUS_OnClick() if (RESET_FLAG = 1) then ' test if in the waiting for another RESET button confirmation click condition? RESET_FLAG = bFALSE ' yes - so clear the waiting for another RESET button confirmation click condition Label_MSG.Visible = bFALSE ' set stuff back to normal BLINK_TIMER = 0 CircleButton_RESET_.Transparent = 1 DrawScreen(Screen1ScreenID) ' and redraw the screen to make sure there are no pixel artifacts left over. Else if (COUNTER_VALUE > 0) then ' not in RESET waiting condition so test if subtract ONE from value possible dec(COUNTER_VALUE) ' value still above 0, so subtract ONE from value else COUNTER_VALUE = 9999999 ' was at zero, so roll over to max value end if Event_Counter() ' call routine to handle updating counter value displayed end if end sub '- MINUS (-) Button event handler - subtracts 1 from COUNTER_VALUE variable '------------------------------------------------------------------------------- '+ RESET Button event handler - Resets COUNTER_VALUE to zero (0) when clicked twice ' ' This object event handler routine does not actually do the tasks of resetting ' the COUNTER_VALUE to zero or changing the counts displayed on the screen. ' What it does do is handle the state of a FLAG called RESET_FLAG that another ' user routine "Reset_Counter()" will use to determine what actions to take. ' The way I have coded this routine and the Reset_Counter() routine is an example ' of how to add confirmation safety to a Button in V-TFT in your projects too. ' The first press of this Button causes Reset_Counter() routine to be called every ' time the main program loop does another execution pass and while the Flag value ' is at One (1), the Reset_Counter() routine just blinks the colors on the RESET ' Button between normal and reddish colors. Pressing (clicking) the RESET Button ' again is required to cause the Reset_Counter() routine to actually clear the ' counters display and count total back to zero. ' sub procedure CircleButton_RESET_OnClick() if (RESET_FLAG = 0) then RESET_FLAG = 1 ' set flag to first stage of reset handling Label_MSG.Visible = 1 ' RESET_FLAG = 0: Flag is cleared DrawLabel(@Label_MSG) else ' RESET_FLAG = 1: Flag state is RESET button has been clicked once if (RESET_FLAG = 1) then ' RESET_FLAG = 2: Flag state is RESET button has been clicked twice RESET_FLAG = 2 ' routine call in 'main' program module loop will call Reset_Counter() routine Label_MSG.Visible = 0 ' while RESET_FLAG > 0 value (cleared), and handle blinking the buttons colors CircleButton_RESET_.Transparent = 1 BLINK_TIMER = 0 end if ' while waiting for another click of the RESET button and when (if) it happens, end if ' it will clear COUNTER_VALUE variable and set all counter digits to 0 (zero). end sub '- RESET Button event handler - Resets COUNTER_VALUE to zero (0) when clicked twice
'-------------------------------------------------------------------------------
From this point on down, V-TFTplaces Objects Event Handler
Routine Code Templates.User must write Task Code.
From this point on down, V-TFTplaces Objects Event Handler
Routine Code Templates.User must write Task Code.
Remember: Usershave to supply thetask code inside ofthe Template eventhandling routine(s)!
Remember: Usershave to supply thetask code inside ofthe Template eventhandling routine(s)!
Comment lines that startwith a minus (-) are my end
of Routine markers.
Comment lines that startwith a minus (-) are my end
of Routine markers.
Comment lines that startwith a plus (+) are my
Start of Routine markers.
Comment lines that startwith a plus (+) are my
Start of Routine markers.
This Object event handling routine is dual purpose, 1st it
checks if a RESET confirmation is in effect and cancels it if it is, 2nd it subtracts 1 from the counter if not canceling the
RESET test.
This Object event handling routine is dual purpose, 1st it
checks if a RESET confirmation is in effect and cancels it if it is, 2nd it subtracts 1 from the counter if not canceling the
RESET test.
The last Object Event HandlerRoutine this project has.Only three (3) Buttons tocode for. Only tutorial
Comments are after hereto end of file.
The last Object Event HandlerRoutine this project has.Only three (3) Buttons tocode for. Only tutorial
Comments are after hereto end of file.
NEW AREA COVERAGENEW AREA COVERAGE
'-------------------------------------------------------------------------------
'* Final word(s) from the Author about this example project: ' ' For those who wanted or expected more features or controls or examples of using different ' sources for trigger events to select, I have to say 'Sorry, but as you can see, ' it took me far longer to type the comments and tutorial info than the actual program ' coding for just what is included in this example project for making custom gadgets, ' and it is intended to only tutor and show some important BASIC facts of what makes ' a working V-TFT project and how V-TFT organizes the project parts it makes from ' a users use of its components. It was meant to be a beginners guide for understanding ' the parts of a V-TFT project and guide source for how to implement a few cool ' tricks or practices. I hoped everyone could gain something from this example ' work, no mater the skill level. ' (but mainly that beginners could use to help make sure their projects start ' off better and work like they wanted with out hitting any common mistakes that ' would make a V-TFT project not work at all on first attempts to make one.) ' ' The method I used to time the "Blink" intervals of the RESET Button is only one ' way to do this and not the best way for every circumstance when other HW modules ' controlling needs more processor time to work. This method works for this ' application because there is not other tasks requirements of precise timing. ' ' For you more skilled users, here are some suggestions for what you can add to this ' project to make it more versatile and take it to the next level as a example project. ' (Or make it a complete project and Lab tool you can use) ' If you have the time, skill, ideas and ambition, please contribute on this and ' post your results of additions or changes back on LibStock site. ' ' Some additional controls and features a 'real' event counter could/would have: ' Start/Stop/Hold count controls. ' Threshold settings for Analog ADC sampling trigger/monitor source(s). ' Multiple counters for multiple trigger sources and controls to configure them. ' Controls to select from many digital inputs connected to One or more PORTS as trigger(s). ' Controls to configure timing test conditions to any source. (ex... was Digital ' input change long or short enough or time between event triggers equal to a setting?) ' Digital inputs that trigger Interrupt events to count. ' Device HW timers configurations for trigger events to count. ' And/Or anything else you can imagine would be a good feature to have added.............. ' ' Additionally, please do not think that just because I said you have to follow ' some rules, (RULEs#1 & 2 & 3 are excluded) that they are set in stone and ' non-violable and are rules that MikroElectronika has established in V-TFT ' (or V-GLCD for that matter). I put those in here as what I have perceived and ' found to be programming practices that work and do not cause issues in V-TFT ' projects. I, like a lot of new users, did just about everything you could do ' wrong with a V-TFT project at my first attempts to make my own application. ' I do not consider myself to be an expert programmer at all and less so when it ' applies to microcontrollers. I am completely self taught on programming PIC's ' and make a lot of mistakes too, so if you find any in this project tutorial, ' do as I do,..... Blame the teacher. B^) ' ' So take the guide lines I have pointed out as at least good practices to start ' with for a V-TFT project and please push those boundaries to find out what really ' can be done or not yourself s. You will not find out what works, if you do not ' find out first, what does not work. ' ' Lastly, I hope you have realized that the counter display can be used as just a ' numerical (or alphanumerical), display for about anything you want displayed in ' the manner it does. You can also add or subtract to the number of digits or places ' it can display as needed. You have the freedom to imagine and change it like you want. BACK TO TABLE OF CONTENTS'' ' Post or email comments or questions about this example if you have any, and I will ' do best to respond or answer any questions if I can. ' ~~~~~~ Robert Townsley 2013 U.S.A. (MegaHurts) ~~~~~~ '
' End of Module
end.--------------------------------------------------------------------------------------
Driver Module file Breakdown of Important Areas for Users:
Overview of the Driver Module file.
Welcome to the New coverage of an important part of any V-TFT project, the Driver Module File.The Driver Module is, as its Name implies: The Force behind any V-TFT (or V-GLCD) application it creates, with your help of course.
The Driver Module is so critical to a project, it is devoid of any User Code areas like what is available in the Events_Code Module and Projects Main File. Any change to any object or its properties causes V-TFT to rewrite the ENTIRE Driver file!
So anything you do to the code in it has a very short life if the project is loaded back into V-TFT. This is just a part of how V-TFT is designed. The Driver file has to have a lot of changes made, based on your screen(s) design(s) and use of the components.While there are no designated “User Code” areas, there are areas that you can place your code into in V-TFT that does end up in this file in special places that correspond to the code entry dialog windows in V-TFTs Project Options menu dialog.
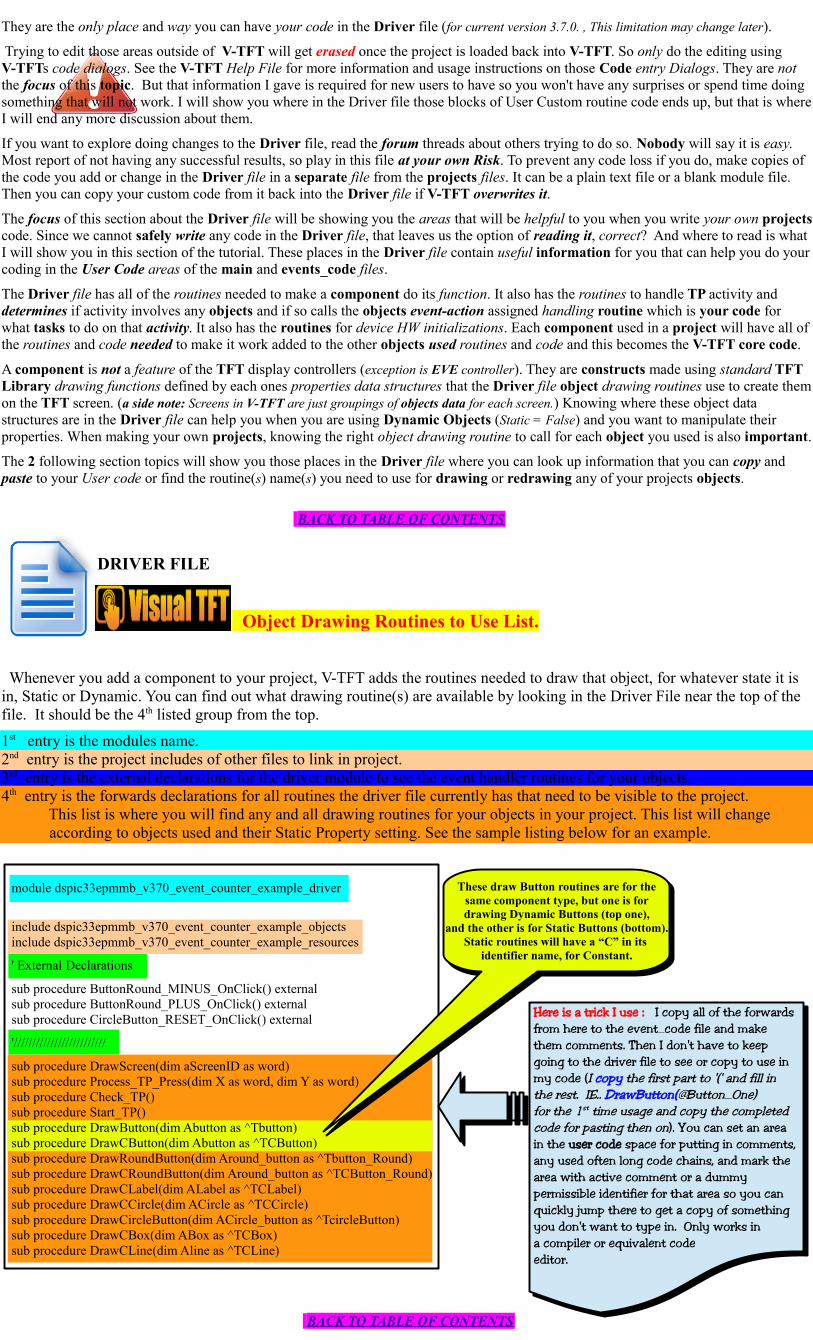
They are the only place and way you can have your code in the Driver file (for current version 3.7.0. , This limitation may change later).
Trying to edit those areas outside of V-TFT will get erased once the project is loaded back into V-TFT. So only do the editing usingV-TFTs code dialogs. See the V-TFT Help File for more information and usage instructions on those Code entry Dialogs. They are not the focus of this topic. But that information I gave is required for new users to have so you won't have any surprises or spend time doing something that will not work. I will show you where in the Driver file those blocks of User Custom routine code ends up, but that is whereI will end any more discussion about them.
If you want to explore doing changes to the Driver file, read the forum threads about others trying to do so. Nobody will say it is easy.Most report of not having any successful results, so play in this file at your own Risk. To prevent any code loss if you do, make copies of the code you add or change in the Driver file in a separate file from the projects files. It can be a plain text file or a blank module file.Then you can copy your custom code from it back into the Driver file if V-TFT overwrites it.
The focus of this section about the Driver file will be showing you the areas that will be helpful to you when you write your own projectscode. Since we cannot safely write any code in the Driver file, that leaves us the option of reading it, correct? And where to read is what I will show you in this section of the tutorial. These places in the Driver file contain useful information for you that can help you do yourcoding in the User Code areas of the main and events_code files.
The Driver file has all of the routines needed to make a component do its function. It also has the routines to handle TP activity and determines if activity involves any objects and if so calls the objects event-action assigned handling routine which is your code for what tasks to do on that activity. It also has the routines for device HW initializations. Each component used in a project will have all of the routines and code needed to make it work added to the other objects used routines and code and this becomes the V-TFT core code.
A component is not a feature of the TFT display controllers (exception is EVE controller). They are constructs made using standard TFT Library drawing functions defined by each ones properties data structures that the Driver file object drawing routines use to create themon the TFT screen. (a side note: Screens in V-TFT are just groupings of objects data for each screen.) Knowing where these object data structures are in the Driver file can help you when you are using Dynamic Objects (Static = False) and you want to manipulate their properties. When making your own projects, knowing the right object drawing routine to call for each object you used is also important.
The 2 following section topics will show you those places in the Driver file where you can look up information that you can copy and paste to your User code or find the routine(s) name(s) you need to use for drawing or redrawing any of your projects objects.
BACK TO TABLE OF CONTENTS
DRIVER FILE
Object Drawing Routines to Use List.
Whenever you add a component to your project, V-TFT adds the routines needed to draw that object, for whatever state it is in, Static or Dynamic. You can find out what drawing routine(s) are available by looking in the Driver File near the top of the file. It should be the 4th listed group from the top.
1st entry is the modules name.2nd entry is the project includes of other files to link in project.3rd entry is the external declarations for the driver module to see the event handler routines for your objects.4th entry is the forwards declarations for all routines the driver file currently has that need to be visible to the project.
This list is where you will find any and all drawing routines for your objects in your project. This list will change according to objects used and their Static Property setting. See the sample listing below for an example.
module dspic33epmmb_v370_event_counter_example_driver
include dspic33epmmb_v370_event_counter_example_objects include dspic33epmmb_v370_event_counter_example_resources
' External Declarations
sub procedure ButtonRound_MINUS_OnClick() external sub procedure ButtonRound_PLUS_OnClick() external sub procedure CircleButton_RESET_OnClick() external
'/////////////////////////
sub procedure DrawScreen(dim aScreenID as word) sub procedure Process_TP_Press(dim X as word, dim Y as word) sub procedure Check_TP() sub procedure Start_TP() sub procedure DrawButton(dim Abutton as ^Tbutton) sub procedure DrawCButton(dim Abutton as ^TCButton) sub procedure DrawRoundButton(dim Around_button as ^Tbutton_Round) sub procedure DrawCRoundButton(dim Around_button as ^TCButton_Round) sub procedure DrawCLabel(dim ALabel as ^TCLabel) sub procedure DrawCCircle(dim ACircle as ^TCCircle) sub procedure DrawCircleButton(dim ACircle_button as ^TcircleButton) sub procedure DrawCBox(dim ABox as ^TCBox) sub procedure DrawCLine(dim Aline as ^TCLine)
BACK TO TABLE OF CONTENTS
Here is a trick I use : I copy all of the forwards from here to the event_code file and make them comments. Then I don t have to keep' going to the driver file to see or copy to use in my code (I copy the first part to ( and fill in' ' the rest. IE.. DrawButton( Button_One)@ for the 1st time usage and copy the completed code for pasting then on). You can set an area in the user code space for putting in comments, any used often long code chains, and mark the area with active comment or a dummy permissible identifier for that area so you can quickly jump there to get a copy of something you don t want to type in. Only works in' a compiler or equivalent code editor.
Here is a trick I use : I copy all of the forwards from here to the event_code file and make them comments. Then I don t have to keep' going to the driver file to see or copy to use in my code (I copy the first part to ( and fill in' ' the rest. IE.. DrawButton( Button_One)@ for the 1st time usage and copy the completed code for pasting then on). You can set an area in the user code space for putting in comments, any used often long code chains, and mark the area with active comment or a dummy permissible identifier for that area so you can quickly jump there to get a copy of something you don t want to type in. Only works in' a compiler or equivalent code editor.
These draw Button routines are for thesame component type, but one is fordrawing Dynamic Buttons (top one),
and the other is for Static Buttons (bottom).Static routines will have a “C” in its
identifier name, for Constant.
These draw Button routines are for thesame component type, but one is fordrawing Dynamic Buttons (top one),
and the other is for Static Buttons (bottom).Static routines will have a “C” in its
identifier name, for Constant.

DRIVER FILE
Dynamic Objects Properties Declarations.
Since 'Static' objects are read only, there is not much to be said about them, except you should remember that the onlyV-TFT operations you can perform on them is to draw them or redraw them and assign a TP event action. You can make it seem like a static object has disappeared from the screen by drawing another static or dynamic object over it. Of course a static object has to be layered in the right position behind it to work as you cannot move a static object during run-time.
The 'Dynamic' objects are where you will spend the time coding to make them do more than just sit on the screen, never changing. So having time saving techniques or procedures to help you get the work done is important. I hope you find this section helpful for this.
All Dynamic objects properties are initialized in the Driver file routine InitializeObjects(), called from the routine Start_TP() (see image 1), that gets called from the Main program file at start up. Every property of a dynamic object (except Static) that can be changed by your code during run-time is group listed by object name in the InitializeObjects() routine. As you will see or have seen, MikroElectronika's programmers did a great job with the code template layout V-TFT makes (see image 2).
image 1 image 2
There is an oops with the comment they have V-TFT put by the routines name though, it should be 'Dynamic' not 'Static'.(A Projects Static objects properties declarations are found above the Modules implements statement.)
All of the dynamic objects used in your project will have their properties listed here. You should not change the first two (2) objects structure values though. They are not normal object properties and are used by the V-TFT core code only. Changing either of them without knowing what you are doing will cause problems with your program running right.
The 1st one is used to indicate the screen that the object belongs to. (IE. Button_Million.OwnerScreenID = 32768)
The 2nd one is the objects drawing Order priority for the DrawScreen() routine(s). (IE. Button_Million.Order = 2)
The rest of the objects property variables and pointers you can see and, Copy the ones you are going to use in your projects User Code routines to change an objects position, size, color(s), visibility, transparency, active or other properties as you need.
Use the same trick of Copying the properties (variables names or pointers names) you plan on affecting with code over to the Events_Code file and Paste them as comments in the routines that will be using them so you can Copy and reuse when you need the property variable in code.This way you will get the names correct and avoid syntax and declarations errors.
You can learn a lot by studying the driver file too. There are some cool codes and methodologies being used in those V-TFT core code routines. If you do not know much about structures, pointers, and complex nesting of conditional tests, if you try to figure out what is going on in this module, you can learn a lot by its example. But it is pretty complex stuff.
Not all of the comments that it does have are helpful or in a few places, wrong. Some of the comments are helpful though but there is not enough of them. There are a few routines I have trouble understanding as to what is being done because it has complex nested logic testing and/or references being done without any comments to illuminate its function.
When I'm working on a project, I check this routine before leaving V-TFT to work on it in the compiler to make sure the objects I wanted to be Dynamic are listed and the objects I wanted to be Static are not in the listing here (they should be in thedeclarations area above the “implements” statement).
There is no harm in exploring the files in a V-TFT project, so look all you want, but remember that editing the driver file or the others that do not have “User Code” areas is not recommended unless you know how to do it without causing problems.There are a few threads on the V-TFT forum about different ways to get around some of the limits that V-TFTs project structure imposes and a very good topic by forum member “aCkO” on how to reuse objects on different screens instead of theway V-TFT has you make a Copy of or make new ones for each screen.

See text below in Yellow section about this property.
Do Not Modify with your code!
See text below about these properties.
1* See text below in Tan section about these Properties.
He has also made a number of utilities for the community in various categories for MikroElectronika product users, includingV-TFT. The last thing to show (maybe it should have been the first) is a comparison of an objects properties in V-TFT and howit gets put into the driver file code.
The image at below left shows all of the properties for the tutorials RESET CircleButton component. The CircleButton Component properties structure variables names are shown to the right of its location in the picture of the component properties explorer window.
The Current Object on the Current Screen Selected.
See text below in Yellow section about this property.CircleButton_RESET_.Left_CircleButton_RESET_.TopCircleButton_RESET_.RadiusCircleButton_RESET__Caption See text below in Orange section about this property.CircleButton_RESET_.TextAlignSee text below in Yellow section about this property.
CircleButton_RESET_.FontNameSee text below in Blue section about this property.CircleButton_RESET_.Font_Color
See text below in Blue section about these properties.
CircleButton_RESET_.Pen_Width (in pixels, zero is a valid setting too)CircleButton_RESET_.Pen_ColorCircleButton_RESET_.Visible (1=True , 0=False)CircleButton_RESET_.Active (1=True , 0=False)CircleButton_RESET_.Transparent ( 0 True , 1 False= = ) See text below in Red section about this property.CircleButton_RESET_.Gradient (1=True , 0=False)CircleButton_RESET_.Gradient_OrientationCircleButton_RESET_.Gradient_Start_ColorCircleButton_RESET_.Gradient_End_ColorCircleButton_RESET_.Color (1=Enabled , 0=Disabled)CircleButton_RESET_.Press_Color CircleButton_RESET_.PressColEnabled
And here is the complete listing of the RESET CircleButton's Properties that are initialized in the InitializeObjects() routine:
CircleButton_RESET_.OwnerScreenID = 32768 CircleButton_RESET_.Order = 34 CircleButton_RESET_.Left_ = 135 CircleButton_RESET_.Top = 56 CircleButton_RESET_.Radius = 23 CircleButton_RESET_.Pen_Width = 2 CircleButton_RESET_.Pen_Color = 0x8410 CircleButton_RESET_.Visible = 1 CircleButton_RESET_.Active = 1 CircleButton_RESET_.Transparent = 1 See text below in Red section about this property. CircleButton_RESET_.Caption = @CircleButton_RESET__Caption CircleButton_RESET__Caption = "RESET" CircleButton_RESET_.TextAlign = _taCenter CircleButton_RESET_.FontName = @Tahoma14x16_Bold CircleButton_RESET_.PressColEnabled = 1 CircleButton_RESET_.Font_Color = 0x0000 CircleButton_RESET_.Gradient = 1 CircleButton_RESET_.Gradient_Orientation = 0 CircleButton_RESET_.Gradient_Start_Color = 0xFFFF CircleButton_RESET_.Gradient_End_Color = 0xC618 CircleButton_RESET_.Color = 0xC618 CircleButton_RESET_.Press_Color = 0x8410 CircleButton_RESET_.OnUpPtr = 0 CircleButton_RESET_.OnDownPtr = 0 CircleButton_RESET_.OnClickPtr = @CircleButton_RESET_OnClick CircleButton_RESET_.OnPressPtr = 0
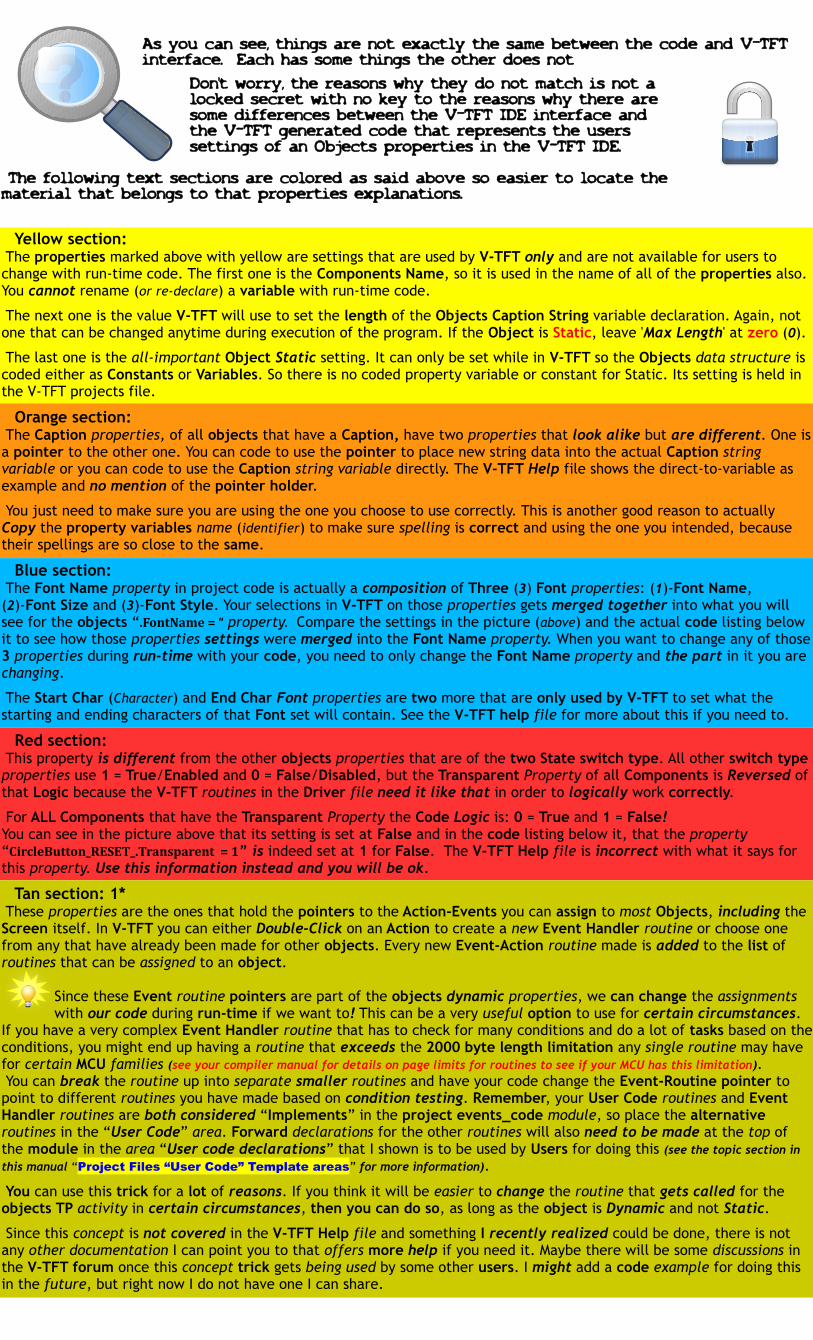
As you can see, things are not exactly the same between the code and V-TFTinterface. Each has some things the other does not
Don't worry, the reasons why they do not match is not alocked secret with no key to the reasons why there aresome differences between the V-TFT IDE interface andthe V-TFT generated code that represents the userssettings of an Objects properties in the V-TFT IDE.
The following text sections are colored as said above so easier to locate thematerial that belongs to that properties explanations.
Yellow section: The properties marked above with yellow are settings that are used by V-TFT only and are not available for users to change with run-time code. The first one is the Components Name, so it is used in the name of all of the properties also. You cannot rename (or re-declare) a variable with run-time code.
The next one is the value V-TFT will use to set the length of the Objects Caption String variable declaration. Again, not one that can be changed anytime during execution of the program. If the Object is Static, leave 'Max Length' at zero (0).
The last one is the all-important Object Static setting. It can only be set while in V-TFT so the Objects data structure is coded either as Constants or Variables. So there is no coded property variable or constant for Static. Its setting is held in the V-TFT projects file.
Orange section: The Caption properties, of all objects that have a Caption, have two properties that look alike but are different. One isa pointer to the other one. You can code to use the pointer to place new string data into the actual Caption string variable or you can code to use the Caption string variable directly. The V-TFT Help file shows the direct-to-variable as example and no mention of the pointer holder.
You just need to make sure you are using the one you choose to use correctly. This is another good reason to actually Copy the property variables name (identifier) to make sure spelling is correct and using the one you intended, because their spellings are so close to the same.
Blue section: The Font Name property in project code is actually a composition of Three (3) Font properties: (1)-Font Name,(2)-Font Size and (3)-Font Style. Your selections in V-TFT on those properties gets merged together into what you will see for the objects “.FontName = “ property. Compare the settings in the picture (above) and the actual code listing below it to see how those properties settings were merged into the Font Name property. When you want to change any of those3 properties during run-time with your code, you need to only change the Font Name property and the part in it you are changing.
The Start Char (Character) and End Char Font properties are two more that are only used by V-TFT to set what the starting and ending characters of that Font set will contain. See the V-TFT help file for more about this if you need to.
Red section: This property is different from the other objects properties that are of the two State switch type. All other switch typeproperties use 1 = True/Enabled and 0 = False/Disabled, but the Transparent Property of all Components is Reversed of that Logic because the V-TFT routines in the Driver file need it like that in order to logically work correctly.
For ALL Components that have the Transparent Property the Code Logic is: 0 = True and 1 = False!You can see in the picture above that its setting is set at False and in the code listing below it, that the property“CircleButton_RESET_.Transparent = 1” is indeed set at 1 for False. The V-TFT Help file is incorrect with what it says for this property. Use this information instead and you will be ok.
Tan section: 1* These properties are the ones that hold the pointers to the Action-Events you can assign to most Objects, including the Screen itself. In V-TFT you can either Double-Click on an Action to create a new Event Handler routine or choose one from any that have already been made for other objects. Every new Event-Action routine made is added to the list of routines that can be assigned to an object.
Since these Event routine pointers are part of the objects dynamic properties, we can change the assignments with our code during run-time if we want to! This can be a very useful option to use for certain circumstances. If you have a very complex Event Handler routine that has to check for many conditions and do a lot of tasks based on theconditions, you might end up having a routine that exceeds the 2000 byte length limitation any single routine may have for certain MCU families (see your compiler manual for details on page limits for routines to see if your MCU has this limitation). You can break the routine up into separate smaller routines and have your code change the Event-Routine pointer to point to different routines you have made based on condition testing. Remember, your User Code routines and Event Handler routines are both considered “Implements” in the project events_code module, so place the alternative routines in the “User Code” area. Forward declarations for the other routines will also need to be made at the top of the module in the area “User code declarations” that I shown is to be used by Users for doing this (see the topic section in this manual “Project Files “User Code” Template areas” for more information).
You can use this trick for a lot of reasons. If you think it will be easier to change the routine that gets called for the objects TP activity in certain circumstances, then you can do so, as long as the object is Dynamic and not Static.
Since this concept is not covered in the V-TFT Help file and something I recently realized could be done, there is not any other documentation I can point you to that offers more help if you need it. Maybe there will be some discussions in the V-TFT forum once this concept trick gets being used by some other users. I might add a code example for doing this in the future, but right now I do not have one I can share.

The project I was working on when I made this realization and am using it in is not something I can put out for the public.The Example project this manual covers did not need to use it because it is such a simple program.
But I decided that it is a too important piece of information to not add it to this manual for you to know about.If there are dangers or reasons to not use this trick (other than the obvious ones), I have not discovered them yet.(mainly, don't forget when and where you pointed the objects Event-Action Handler to.)
If I do find one that is not an obvious one, I will post about it in this Tutorial projects thread and add it to this manuals next update version. If you try it and find one, please let us or me know so it can be made known to all users.
That's it for this section. I think that if you explore the Driver file and become somewhat familiar with its design and contents, you could find other useful ways to exploit what it has to make your work on a project easier.I hope you found these new sections coverage of the Driver file helpful to your working with Visual-TFT.
BACK TO TABLE OF CONTENTS
Additional Community Submitted Tutorial Code Examples, Tips & Tricks & Project Expansions: If you really want to give thanks, consider this:I welcome any submissions anyone would like to have me post on libstock of additions or features to this Tutorial example project. It can be as simple as a project conversion to other compilers or device Hardware.I will add it to the Libstock page with your credits. Submissions should have some form of information or description of what and why the differences or the concept it demonstrates if not a conversion to other HW/SW. This document would also get updated to list submissions and include documentation if included.
Forum and active community member Aleksandar (aka aCkO) helped me a bunch on this project and contributed the alternate optimized code for the routines in the “User Code” area. I had intentionally wrote the code very simplified and not using loops to do repeated tasks so readers would easily understand the examples about accessing directly the String variables elements that the mikroBasic help file lacked. That is why I did not just replace my code with his and just showed his as side notes where it would replace my original code.
I thank Aleksandar for his contribution greatly as I did not think to include an example of the normal looping code practice to do the same also, until he submitted his version. I think it made for a very good coverage of usingstring elements and the object caption property this way. I hope you agree too.
BACK TO TABLE OF CONTENTS
Not so long, long a Time ago, in a Galaxy Not too Far, Far Away, MegaHurts had on
his V-TFT workscreen, a update and add-on R.E.G. Kit for the empty Expansion Bay.
With a strong cup of coffee in hand and the optical mouse in the other, using the force that the coffee supplied made the night in to day so the work of the jedi masters
would not be defeated by the dark and powerful evil empire that wanted to destroy everything the Jedi had $94.:] ";/<&. {>ie sytemez re.
.,, ,..... ,. ,..,.,, ./.. ..,,, .,.,. ,,.,. ,.,.,, ,,, . , .. .,,., .,,
BACK TO TABLE OF CONTENTS
S N E A K P E E K
R. E. G. 2 0 1 4

Additional Credits and MentionsAleksandar- For his always valuable help he provided and provides to the whole community.
And for working with me to make sure the coding is correct and does not violateMCU programming principles. The alternative codes in the program files are hisexamples of using variable pointers and making use of the pointers already presentin the structures of V-TFT Objects. His contributions to this effort will help manyimprove their skill levels, it certainly has helped mine.
Marko for all of the personal help, and correspondences and awesome attitude. Many thanks for all of his hard work on the software (more than two or three I'm sure) we use and working with me on solving some V-TFT issues and taking my suggestions to heart. Always looking forward to working with him again, even if it's about a bug.Filip and the rest of the MikroElectronika staff. Some of the nicest people on the planet and very thankful they are
making more and more development tools that make it easy to embed our ideas. One of the best supportinfrastructures there is and a model for others to follow. Sure to have 30,000+ forum members in 2014. :)(Congratulations by the way!)
Dany – for his many contributions and hosting of this tutorial V-TFT project at his site also. If you use PICs, check his site
out at http://www.rosseeld.be/DRO/PIC/index.htm He keeps a large 'Vault' of goodies there for PIC enthusiasts.
JohnGB for feedback and concept discussions that fueled my desire to find the Framework of the Templates.
Janni for all the answers he has given to me and many others and the many useful Libraries and the list goes on.......
All you guys who answered MY questions I had along the way, many thanks for making the Forums what it is.
You users who have given the courtesy thanks and feedback, you're welcome, and a big Thank You .
To all you forum members that make the effort to help others, I applaud your nature and actions
and as a small way to give thanks and honor your legacy, I dedicate this manual to you and
make it a Present for any who hopefully find it useful. Merry Christmas from Idaho, USA.
BACK TO TABLE OF CONTENTS
The “About the Author” pdf is not required reading. But if you have a sense ofhumor and adventure, you will find everything you (didn't) want to know aboutme in the stories, somewhere, maybe.
I hope you feel you got something valuable from this and it serves you well, Robert. (MegaHurts) B^)
BACK TO TABLE OF CONTENTS
Answer : For the image shown, @ 30 MPH setting – Objects = 12. But the total Objects for it is 34. Not all are ever
shown at any time. There are Four (4) different speed ranges the Gauge can be set to : 20 mph, 30 mph, 40 mph and 50 mph. So there are 4 different EVE Number sets, only one showing at a time. There is also 2 EVEGauge Components used to make the speedometer, but only one is showing its tick marks.