Metadata Manager Custom Metadata Integration Guide Documentation/4/MM... · Metadata Manager Custom...
49
Informatica PowerCenter (Version 9.1.0 Hotfix 3) Metadata Manager Custom Metadata Integration Guide
Transcript of Metadata Manager Custom Metadata Integration Guide Documentation/4/MM... · Metadata Manager Custom...
Informatica PowerCenter (Version 9.1.0 Hotfix 3)
Metadata Manager Custom MetadataIntegration Guide
Informatica PowerCenter Metadata Manager Custom Metadata Integration Guide
Version 9.1.0 Hotfix 3December 2011
Copyright (c) 1998-2011 Informatica. All rights reserved.
This software and documentation contain proprietary information of Informatica Corporation and are provided under a license agreement containing restrictions on use anddisclosure and are also protected by copyright law. Reverse engineering of the software is prohibited. No part of this document may be reproduced or transmitted in any form,by any means (electronic, photocopying, recording or otherwise) without prior consent of Informatica Corporation. This Software may be protected by U.S. and/or internationalPatents and other Patents Pending.
Use, duplication, or disclosure of the Software by the U.S. Government is subject to the restrictions set forth in the applicable software license agreement and as provided inDFARS 227.7202-1(a) and 227.7702-3(a) (1995), DFARS 252.227-7013 © (1)(ii) (OCT 1988), FAR 12.212(a) (1995), FAR 52.227-19, or FAR 52.227-14 (ALT III), asapplicable.
The information in this product or documentation is subject to change without notice. If you find any problems in this product or documentation, please report them to us inwriting.
Informatica, Informatica Platform, Informatica Data Services, PowerCenter, PowerCenterRT, PowerCenter Connect, PowerCenter Data Analyzer, PowerExchange,PowerMart, Metadata Manager, Informatica Data Quality, Informatica Data Explorer, Informatica B2B Data Transformation, Informatica B2B Data Exchange Informatica OnDemand, Informatica Identity Resolution, Informatica Application Information Lifecycle Management, Informatica Complex Event Processing, Ultra Messaging and InformaticaMaster Data Management are trademarks or registered trademarks of Informatica Corporation in the United States and in jurisdictions throughout the world. All other companyand product names may be trade names or trademarks of their respective owners.
Portions of this software and/or documentation are subject to copyright held by third parties, including without limitation: Copyright DataDirect Technologies. All rightsreserved. Copyright © Sun Microsystems. All rights reserved. Copyright © RSA Security Inc. All Rights Reserved. Copyright © Ordinal Technology Corp. All rightsreserved.Copyright © Aandacht c.v. All rights reserved. Copyright Genivia, Inc. All rights reserved. Copyright Isomorphic Software. All rights reserved. Copyright © MetaIntegration Technology, Inc. All rights reserved. Copyright © Intalio. All rights reserved. Copyright © Oracle. All rights reserved. Copyright © Adobe Systems Incorporated. Allrights reserved. Copyright © DataArt, Inc. All rights reserved. Copyright © ComponentSource. All rights reserved. Copyright © Microsoft Corporation. All rights reserved.Copyright © Rogue Wave Software, Inc. All rights reserved. Copyright © Teradata Corporation. All rights reserved. Copyright © Yahoo! Inc. All rights reserved. Copyright ©Glyph & Cog, LLC. All rights reserved. Copyright © Thinkmap, Inc. All rights reserved. Copyright © Clearpace Software Limited. All rights reserved. Copyright © InformationBuilders, Inc. All rights reserved. Copyright © OSS Nokalva, Inc. All rights reserved. Copyright Edifecs, Inc. All rights reserved. Copyright Cleo Communications, Inc. All rightsreserved. Copyright © International Organization for Standardization 1986. All rights reserved. Copyright © ej-technologies GmbH . All rights reserved. Copyright © JaspersoftCorporation. All rights reserved.
This product includes software developed by the Apache Software Foundation (http://www.apache.org/), and other software which is licensed under the Apache License,Version 2.0 (the "License"). You may obtain a copy of the License at http://www.apache.org/licenses/LICENSE-2.0. Unless required by applicable law or agreed to in writing,software distributed under the License is distributed on an "AS IS" BASIS, WITHOUT WARRANTIES OR CONDITIONS OF ANY KIND, either express or implied. See theLicense for the specific language governing permissions and limitations under the License.
This product includes software which was developed by Mozilla (http://www.mozilla.org/), software copyright The JBoss Group, LLC, all rights reserved; software copyright ©1999-2006 by Bruno Lowagie and Paulo Soares and other software which is licensed under the GNU Lesser General Public License Agreement, which may be found at http://www.gnu.org/licenses/lgpl.html. The materials are provided free of charge by Informatica, "as-is", without warranty of any kind, either express or implied, including but notlimited to the implied warranties of merchantability and fitness for a particular purpose.
The product includes ACE(TM) and TAO(TM) software copyrighted by Douglas C. Schmidt and his research group at Washington University, University of California, Irvine,and Vanderbilt University, Copyright ( © ) 1993-2006, all rights reserved.
This product includes software developed by the OpenSSL Project for use in the OpenSSL Toolkit (copyright The OpenSSL Project. All Rights Reserved) and redistribution ofthis software is subject to terms available at http://www.openssl.org and http://www.openssl.org/source/license.html.
This product includes Curl software which is Copyright 1996-2007, Daniel Stenberg, <[email protected]>. All Rights Reserved. Permissions and limitations regarding thissoftware are subject to terms available at http://curl.haxx.se/docs/copyright.html. Permission to use, copy, modify, and distribute this software for any purpose with or withoutfee is hereby granted, provided that the above copyright notice and this permission notice appear in all copies.
The product includes software copyright 2001-2005 ( © ) MetaStuff, Ltd. All Rights Reserved. Permissions and limitations regarding this software are subject to terms availableat http://www.dom4j.org/ license.html.
The product includes software copyright © 2004-2007, The Dojo Foundation. All Rights Reserved. Permissions and limitations regarding this software are subject to termsavailable at http://dojotoolkit.org/license.
This product includes ICU software which is copyright International Business Machines Corporation and others. All rights reserved. Permissions and limitations regarding thissoftware are subject to terms available at http://source.icu-project.org/repos/icu/icu/trunk/license.html.
This product includes software copyright © 1996-2006 Per Bothner. All rights reserved. Your right to use such materials is set forth in the license which may be found at http://www.gnu.org/software/ kawa/Software-License.html.
This product includes OSSP UUID software which is Copyright © 2002 Ralf S. Engelschall, Copyright © 2002 The OSSP Project Copyright © 2002 Cable & WirelessDeutschland. Permissions and limitations regarding this software are subject to terms available at http://www.opensource.org/licenses/mit-license.php.
This product includes software developed by Boost (http://www.boost.org/) or under the Boost software license. Permissions and limitations regarding this software are subjectto terms available at http:/ /www.boost.org/LICENSE_1_0.txt.
This product includes software copyright © 1997-2007 University of Cambridge. Permissions and limitations regarding this software are subject to terms available at http://www.pcre.org/license.txt.
This product includes software copyright © 2007 The Eclipse Foundation. All Rights Reserved. Permissions and limitations regarding this software are subject to termsavailable at http:// www.eclipse.org/org/documents/epl-v10.php.
This product includes software licensed under the terms at http://www.tcl.tk/software/tcltk/license.html, http://www.bosrup.com/web/overlib/?License, http://www.stlport.org/doc/ license.html, http://www.asm.ow2.org/license.html, http://www.cryptix.org/LICENSE.TXT, http://hsqldb.org/web/hsqlLicense.html, http://httpunit.sourceforge.net/doc/license.html, http://jung.sourceforge.net/license.txt, http://www.gzip.org/zlib/zlib_license.html, http://www.openldap.org/software/release/license.html, http://www.libssh2.org,http://slf4j.org/license.html, http://www.sente.ch/software/OpenSourceLicense.html, http://fusesource.com/downloads/license-agreements/fuse-message-broker-v-5-3- license-agreement; http://antlr.org/license.html; http://aopalliance.sourceforge.net/; http://www.bouncycastle.org/licence.html; http://www.jgraph.com/jgraphdownload.html; http://www.jcraft.com/jsch/LICENSE.txt. http://jotm.objectweb.org/bsd_license.html; http://www.w3.org/Consortium/Legal/2002/copyright-software-20021231; http://www.slf4j.org/license.html; http://developer.apple.com/library/mac/#samplecode/HelpHook/Listings/HelpHook_java.html; http://www.jcraft.com/jsch/LICENSE.txt; http://nanoxml.sourceforge.net/orig/copyright.html; http://www.json.org/license.html; http://forge.ow2.org/projects/javaservice/, http://www.postgresql.org/about/licence.html, http://www.sqlite.org/copyright.html, http://www.tcl.tk/software/tcltk/license.html, http://www.jaxen.org/faq.html, http://www.jdom.org/docs/faq.html, and http://www.slf4j.org/license.html.

This product includes software licensed under the Academic Free License (http://www.opensource.org/licenses/afl-3.0.php), the Common Development and DistributionLicense (http://www.opensource.org/licenses/cddl1.php ) the Common Public License (http://www.opensource.org/licenses/cpl1.0.php), the Sun Binary Code LicenseAgreement Supplemental License Terms, the BSD License (http:// www.opensource.org/licenses/bsd-license.php) the MIT License (http://www.opensource.org/licenses/mit-license.php) and the Artistic License (http://www.opensource.org/licenses/artistic-license-1.0).
This product includes software copyright © 2003-2006 Joe WaInes, 2006-2007 XStream Committers. All rights reserved. Permissions and limitations regarding this softwareare subject to terms available at http://xstream.codehaus.org/license.html. This product includes software developed by the Indiana University Extreme! Lab. For furtherinformation please visit http://www.extreme.indiana.edu/.
This Software is protected by U.S. Patent Numbers 5,794,246; 6,014,670; 6,016,501; 6,029,178; 6,032,158; 6,035,307; 6,044,374; 6,092,086; 6,208,990; 6,339,775;6,640,226; 6,789,096; 6,820,077; 6,823,373; 6,850,947; 6,895,471; 7,117,215; 7,162,643; 7,254,590; 7,281,001; 7,421,458; 7,496,588; 7,523,121; 7,584,422, 7,720,842;7,721,270; and 7,774,791 , international Patents and other Patents Pending.
DISCLAIMER: Informatica Corporation provides this documentation "as is" without warranty of any kind, either express or implied, including, but not limited to, the impliedwarranties of noninfringement, merchantability, or use for a particular purpose. Informatica Corporation does not warrant that this software or documentation is error free. Theinformation provided in this software or documentation may include technical inaccuracies or typographical errors. The information in this software and documentation issubject to change at any time without notice.
NOTICES
This Informatica product (the "Software") includes certain drivers (the "DataDirect Drivers") from DataDirect Technologies, an operating company of Progress SoftwareCorporation ("DataDirect") which are subject to the following terms and conditions:
1.THE DATADIRECT DRIVERS ARE PROVIDED "AS IS" WITHOUT WARRANTY OF ANY KIND, EITHER EXPRESSED OR IMPLIED, INCLUDING BUT NOTLIMITED TO, THE IMPLIED WARRANTIES OF MERCHANTABILITY, FITNESS FOR A PARTICULAR PURPOSE AND NON-INFRINGEMENT.
2. IN NO EVENT WILL DATADIRECT OR ITS THIRD PARTY SUPPLIERS BE LIABLE TO THE END-USER CUSTOMER FOR ANY DIRECT, INDIRECT,INCIDENTAL, SPECIAL, CONSEQUENTIAL OR OTHER DAMAGES ARISING OUT OF THE USE OF THE ODBC DRIVERS, WHETHER OR NOT INFORMED OFTHE POSSIBILITIES OF DAMAGES IN ADVANCE. THESE LIMITATIONS APPLY TO ALL CAUSES OF ACTION, INCLUDING, WITHOUT LIMITATION, BREACHOF CONTRACT, BREACH OF WARRANTY, NEGLIGENCE, STRICT LIABILITY, MISREPRESENTATION AND OTHER TORTS.
Part Number: MM-CIG-910-HF3-0001
Table of Contents
Preface . . . . . . . . . . . . . . . . . . . . . . . . . . . . . . . . . . . . . . . . . . . . . . . . . . . . . . . . . . . . . . . . . . . . . . . . . . ivInformatica Resources. . . . . . . . . . . . . . . . . . . . . . . . . . . . . . . . . . . . . . . . . . . . . . . . . . . . . . iv
Informatica Customer Portal. . . . . . . . . . . . . . . . . . . . . . . . . . . . . . . . . . . . . . . . . . . . . . . . iv
Informatica Documentation. . . . . . . . . . . . . . . . . . . . . . . . . . . . . . . . . . . . . . . . . . . . . . . . iv
Informatica Web Site. . . . . . . . . . . . . . . . . . . . . . . . . . . . . . . . . . . . . . . . . . . . . . . . . . . . iv
Informatica How-To Library. . . . . . . . . . . . . . . . . . . . . . . . . . . . . . . . . . . . . . . . . . . . . . . . iv
Informatica Knowledge Base. . . . . . . . . . . . . . . . . . . . . . . . . . . . . . . . . . . . . . . . . . . . . . . v
Informatica Multimedia Knowledge Base. . . . . . . . . . . . . . . . . . . . . . . . . . . . . . . . . . . . . . . . v
Informatica Global Customer Support. . . . . . . . . . . . . . . . . . . . . . . . . . . . . . . . . . . . . . . . . . v
Chapter 1: Understanding Custom Metadata Integration. . . . . . . . . . . . . . . . . . . . . . . . . . . . 1Understanding Custom Metadata Integration Overview. . . . . . . . . . . . . . . . . . . . . . . . . . . . . . . . . . 1
Custom Metadata Integration Process. . . . . . . . . . . . . . . . . . . . . . . . . . . . . . . . . . . . . . . . . . . . 2
Adding and Loading Metadata for a Custom Metadata Source. . . . . . . . . . . . . . . . . . . . . . . . . . 2
Adding Custom Properties. . . . . . . . . . . . . . . . . . . . . . . . . . . . . . . . . . . . . . . . . . . . . . . . . 3
Adding Custom Relationships. . . . . . . . . . . . . . . . . . . . . . . . . . . . . . . . . . . . . . . . . . . . . . . 3
Metadata Manager Concepts. . . . . . . . . . . . . . . . . . . . . . . . . . . . . . . . . . . . . . . . . . . . . . . . . . 4
Models. . . . . . . . . . . . . . . . . . . . . . . . . . . . . . . . . . . . . . . . . . . . . . . . . . . . . . . . . . . . . 4
Classes. . . . . . . . . . . . . . . . . . . . . . . . . . . . . . . . . . . . . . . . . . . . . . . . . . . . . . . . . . . . . 4
Properties. . . . . . . . . . . . . . . . . . . . . . . . . . . . . . . . . . . . . . . . . . . . . . . . . . . . . . . . . . . 4
Groups. . . . . . . . . . . . . . . . . . . . . . . . . . . . . . . . . . . . . . . . . . . . . . . . . . . . . . . . . . . . . 5
Relationships. . . . . . . . . . . . . . . . . . . . . . . . . . . . . . . . . . . . . . . . . . . . . . . . . . . . . . . . . 5
Business Name. . . . . . . . . . . . . . . . . . . . . . . . . . . . . . . . . . . . . . . . . . . . . . . . . . . . . . . . 5
Using the Model Tab. . . . . . . . . . . . . . . . . . . . . . . . . . . . . . . . . . . . . . . . . . . . . . . . . . . . . . . . 6
Browsing Models. . . . . . . . . . . . . . . . . . . . . . . . . . . . . . . . . . . . . . . . . . . . . . . . . . . . . . . 6
Editing Models. . . . . . . . . . . . . . . . . . . . . . . . . . . . . . . . . . . . . . . . . . . . . . . . . . . . . . . . 6
AccessDB Example. . . . . . . . . . . . . . . . . . . . . . . . . . . . . . . . . . . . . . . . . . . . . . . . . . . . . . . . 7
AccessSchema. . . . . . . . . . . . . . . . . . . . . . . . . . . . . . . . . . . . . . . . . . . . . . . . . . . . . . . . 7
AccessTable and AccessView. . . . . . . . . . . . . . . . . . . . . . . . . . . . . . . . . . . . . . . . . . . . . . . 7
AccessTableColumn and AccessViewColumn. . . . . . . . . . . . . . . . . . . . . . . . . . . . . . . . . . . . 7
Chapter 2: Creating and Configuring Custom Models. . . . . . . . . . . . . . . . . . . . . . . . . . . . . . . 9Creating and Editing a Custom Model Overview. . . . . . . . . . . . . . . . . . . . . . . . . . . . . . . . . . . . . . 9
Establish the Model Structure. . . . . . . . . . . . . . . . . . . . . . . . . . . . . . . . . . . . . . . . . . . . . . 10
Configuring a Model. . . . . . . . . . . . . . . . . . . . . . . . . . . . . . . . . . . . . . . . . . . . . . . . . . . . . . . 10
Creating a Model. . . . . . . . . . . . . . . . . . . . . . . . . . . . . . . . . . . . . . . . . . . . . . . . . . . . . . 10
Editing a Model. . . . . . . . . . . . . . . . . . . . . . . . . . . . . . . . . . . . . . . . . . . . . . . . . . . . . . . 10
Deleting a Model. . . . . . . . . . . . . . . . . . . . . . . . . . . . . . . . . . . . . . . . . . . . . . . . . . . . . . 11
Table of Contents i
Configuring Classes. . . . . . . . . . . . . . . . . . . . . . . . . . . . . . . . . . . . . . . . . . . . . . . . . . . . . . . 11
Creating a Class. . . . . . . . . . . . . . . . . . . . . . . . . . . . . . . . . . . . . . . . . . . . . . . . . . . . . . 11
Editing a Class. . . . . . . . . . . . . . . . . . . . . . . . . . . . . . . . . . . . . . . . . . . . . . . . . . . . . . . 12
Deleting a Class. . . . . . . . . . . . . . . . . . . . . . . . . . . . . . . . . . . . . . . . . . . . . . . . . . . . . . . 12
Moving and Copying Classes. . . . . . . . . . . . . . . . . . . . . . . . . . . . . . . . . . . . . . . . . . . . . . 12
Configuring Properties. . . . . . . . . . . . . . . . . . . . . . . . . . . . . . . . . . . . . . . . . . . . . . . . . . . . . . 13
Creating Properties. . . . . . . . . . . . . . . . . . . . . . . . . . . . . . . . . . . . . . . . . . . . . . . . . . . . . 13
Editing Properties. . . . . . . . . . . . . . . . . . . . . . . . . . . . . . . . . . . . . . . . . . . . . . . . . . . . . . 14
Organizing Properties. . . . . . . . . . . . . . . . . . . . . . . . . . . . . . . . . . . . . . . . . . . . . . . . . . . 14
Deleting Properties. . . . . . . . . . . . . . . . . . . . . . . . . . . . . . . . . . . . . . . . . . . . . . . . . . . . . 14
Configuring Relationships. . . . . . . . . . . . . . . . . . . . . . . . . . . . . . . . . . . . . . . . . . . . . . . . . . . . 15
Creating Class-Level Relationships. . . . . . . . . . . . . . . . . . . . . . . . . . . . . . . . . . . . . . . . . . 16
Editing and Removing Class-Level Relationships. . . . . . . . . . . . . . . . . . . . . . . . . . . . . . . . . . 16
Chapter 3: Using the Custom Metadata Configurator. . . . . . . . . . . . . . . . . . . . . . . . . . . . . . 17Using the Custom Metadata Configurator Overview. . . . . . . . . . . . . . . . . . . . . . . . . . . . . . . . . . . 17
Step 1. Create Metadata Source Files. . . . . . . . . . . . . . . . . . . . . . . . . . . . . . . . . . . . . . . . . . . . 18
Metadata Source File Rules and Guidelines. . . . . . . . . . . . . . . . . . . . . . . . . . . . . . . . . . . . . 18
Step 2. Log In to the Custom Metadata Configurator. . . . . . . . . . . . . . . . . . . . . . . . . . . . . . . . . . 19
Step 3. Configure the Custom Resource Template. . . . . . . . . . . . . . . . . . . . . . . . . . . . . . . . . . . . 19
Creating a Custom Resource Template. . . . . . . . . . . . . . . . . . . . . . . . . . . . . . . . . . . . . . . . 20
Editing and Deleting a Custom Resource Template. . . . . . . . . . . . . . . . . . . . . . . . . . . . . . . . 21
Viewing a Custom Resource Template Summary. . . . . . . . . . . . . . . . . . . . . . . . . . . . . . . . . . 21
Step 4. Configure Delimiters for Files. . . . . . . . . . . . . . . . . . . . . . . . . . . . . . . . . . . . . . . . . . . . 22
Step 5. Map Class Attributes. . . . . . . . . . . . . . . . . . . . . . . . . . . . . . . . . . . . . . . . . . . . . . . . . . 22
Step 6. Map Class Relationships. . . . . . . . . . . . . . . . . . . . . . . . . . . . . . . . . . . . . . . . . . . . . . . 24
Step 7. Add Class Rules to Files. . . . . . . . . . . . . . . . . . . . . . . . . . . . . . . . . . . . . . . . . . . . . . . 25
Step 8. Generate the PowerCenter Objects. . . . . . . . . . . . . . . . . . . . . . . . . . . . . . . . . . . . . . . . 27
Chapter 4: Working with Custom Metadata. . . . . . . . . . . . . . . . . . . . . . . . . . . . . . . . . . . . . . . . 28Creating Custom Metadata Overview. . . . . . . . . . . . . . . . . . . . . . . . . . . . . . . . . . . . . . . . . . . . 28
Creating Custom Resources and Metadata Objects. . . . . . . . . . . . . . . . . . . . . . . . . . . . . . . . . . . 28
Creating a Resource. . . . . . . . . . . . . . . . . . . . . . . . . . . . . . . . . . . . . . . . . . . . . . . . . . . . 29
Create Custom Metadata Objects. . . . . . . . . . . . . . . . . . . . . . . . . . . . . . . . . . . . . . . . . . . 29
Deleting Resources and Metadata Objects. . . . . . . . . . . . . . . . . . . . . . . . . . . . . . . . . . . . . . 30
Editing Properties. . . . . . . . . . . . . . . . . . . . . . . . . . . . . . . . . . . . . . . . . . . . . . . . . . . . . . . . . 30
Exporting and Importing Custom Properties. . . . . . . . . . . . . . . . . . . . . . . . . . . . . . . . . . . . . . . . 31
Exporting Custom Properties. . . . . . . . . . . . . . . . . . . . . . . . . . . . . . . . . . . . . . . . . . . . . . 31
Editing Custom Properties. . . . . . . . . . . . . . . . . . . . . . . . . . . . . . . . . . . . . . . . . . . . . . . . 32
Importing Custom Properties. . . . . . . . . . . . . . . . . . . . . . . . . . . . . . . . . . . . . . . . . . . . . . . 32
Rules and Guidelines for Exporting and Importing Custom Properties. . . . . . . . . . . . . . . . . . . . 32
ii Table of Contents
Chapter 5: Migrating Custom Metadata. . . . . . . . . . . . . . . . . . . . . . . . . . . . . . . . . . . . . . . . . . . . 33Migrating Custom Metadata Overview. . . . . . . . . . . . . . . . . . . . . . . . . . . . . . . . . . . . . . . . . . . . 33
Step 1. Migrate the Models. . . . . . . . . . . . . . . . . . . . . . . . . . . . . . . . . . . . . . . . . . . . . . . . . . . 34
Exporting a Model. . . . . . . . . . . . . . . . . . . . . . . . . . . . . . . . . . . . . . . . . . . . . . . . . . . . . 34
Importing a Model. . . . . . . . . . . . . . . . . . . . . . . . . . . . . . . . . . . . . . . . . . . . . . . . . . . . . . 34
Step 2. Migrate Custom Metadata. . . . . . . . . . . . . . . . . . . . . . . . . . . . . . . . . . . . . . . . . . . . . . 35
Exporting Metadata. . . . . . . . . . . . . . . . . . . . . . . . . . . . . . . . . . . . . . . . . . . . . . . . . . . . . 35
Importing Metadata. . . . . . . . . . . . . . . . . . . . . . . . . . . . . . . . . . . . . . . . . . . . . . . . . . . . . 35
Rules and Guidelines for Importing Custom Metadata. . . . . . . . . . . . . . . . . . . . . . . . . . . . . . . 35
Step 3. Migrate Custom Resource Templates. . . . . . . . . . . . . . . . . . . . . . . . . . . . . . . . . . . . . . . 36
Exporting a Custom Resource Template. . . . . . . . . . . . . . . . . . . . . . . . . . . . . . . . . . . . . . . 36
Importing a Custom Resource Template. . . . . . . . . . . . . . . . . . . . . . . . . . . . . . . . . . . . . . . 36
Rules and Guidelines for Migrating Custom Resource Templates. . . . . . . . . . . . . . . . . . . . . . . 37
Step 4. Configure and Load the Custom Resources. . . . . . . . . . . . . . . . . . . . . . . . . . . . . . . . . . . 37
Index. . . . . . . . . . . . . . . . . . . . . . . . . . . . . . . . . . . . . . . . . . . . . . . . . . . . . . . . . . . . . . . 38
Table of Contents iii
PrefaceThe Metadata Manager Custom Metadata Integration Guide provides methodology and procedures for integratingcustom metadata into the Metadata Manager warehouse. This book is written for system administrators who wantto load metadata from a repository type for which Metadata Manager does not package a model. This bookassumes that system administrators have knowledge of relational database concepts, models, and PowerCenter.
Informatica Resources
Informatica Customer PortalAs an Informatica customer, you can access the Informatica Customer Portal site at http://mysupport.informatica.com. The site contains product information, user group information, newsletters,access to the Informatica customer support case management system (ATLAS), the Informatica How-To Library,the Informatica Knowledge Base, the Informatica Multimedia Knowledge Base, Informatica ProductDocumentation, and access to the Informatica user community.
Informatica DocumentationThe Informatica Documentation team takes every effort to create accurate, usable documentation. If you havequestions, comments, or ideas about this documentation, contact the Informatica Documentation team throughemail at [email protected]. We will use your feedback to improve our documentation. Let usknow if we can contact you regarding your comments.
The Documentation team updates documentation as needed. To get the latest documentation for your product,navigate to Product Documentation from http://mysupport.informatica.com.
Informatica Web SiteYou can access the Informatica corporate web site at http://www.informatica.com. The site contains informationabout Informatica, its background, upcoming events, and sales offices. You will also find product and partnerinformation. The services area of the site includes important information about technical support, training andeducation, and implementation services.
Informatica How-To LibraryAs an Informatica customer, you can access the Informatica How-To Library at http://mysupport.informatica.com.The How-To Library is a collection of resources to help you learn more about Informatica products and features. Itincludes articles and interactive demonstrations that provide solutions to common problems, compare features andbehaviors, and guide you through performing specific real-world tasks.
iv
Informatica Knowledge BaseAs an Informatica customer, you can access the Informatica Knowledge Base at http://mysupport.informatica.com.Use the Knowledge Base to search for documented solutions to known technical issues about Informaticaproducts. You can also find answers to frequently asked questions, technical white papers, and technical tips. Ifyou have questions, comments, or ideas about the Knowledge Base, contact the Informatica Knowledge Baseteam through email at [email protected].
Informatica Multimedia Knowledge BaseAs an Informatica customer, you can access the Informatica Multimedia Knowledge Base at http://mysupport.informatica.com. The Multimedia Knowledge Base is a collection of instructional multimedia filesthat help you learn about common concepts and guide you through performing specific tasks. If you havequestions, comments, or ideas about the Multimedia Knowledge Base, contact the Informatica Knowledge Baseteam through email at [email protected].
Informatica Global Customer SupportYou can contact a Customer Support Center by telephone or through the Online Support. Online Support requiresa user name and password. You can request a user name and password at http://mysupport.informatica.com.
Use the following telephone numbers to contact Informatica Global Customer Support:
North America / South America Europe / Middle East / Africa Asia / Australia
Toll FreeBrazil: 0800 891 0202Mexico: 001 888 209 8853North America: +1 877 463 2435
Toll FreeFrance: 0805 804632Germany: 0800 5891281Italy: 800 915 985Netherlands: 0800 2300001Portugal: 800 208 360Spain: 900 813 166Switzerland: 0800 463 200United Kingdom: 0800 023 4632
Standard RateBelgium: +31 30 6022 797France: +33 1 4138 9226Germany: +49 1805 702 702Netherlands: +31 306 022 797United Kingdom: +44 1628 511445
Toll FreeAustralia: 1 800 151 830New Zealand: 09 9 128 901
Standard RateIndia: +91 80 4112 5738
Preface v

vi

C H A P T E R 1
Understanding Custom MetadataIntegration
This chapter includes the following topics:
¨ Understanding Custom Metadata Integration Overview, 1
¨ Custom Metadata Integration Process, 2
¨ Metadata Manager Concepts, 4
¨ Using the Model Tab, 6
¨ AccessDB Example, 7
Understanding Custom Metadata Integration OverviewYou can use Metadata Manager to load metadata from metadata sources for which Metadata Manager packages aresource type. You can also add custom metadata into the Metadata Manager warehouse.
Metadata Manager uses models to define the metadata it extracts from metadata sources. To add custommetadata to the Metadata Manager warehouse, you must first create or edit the model that defines the metadata.Then, you add or load the resource for the custom metadata to the Metadata Manager warehouse.
You can add the following types of custom metadata into the Metadata Manager warehouse:
¨ Metadata for a custom metadata source. Load or add metadata from a source for which Metadata Managerdoes not package a resource type. For example, you want to load metadata from a Microsoft Access database.Metadata Manager does not package a resource type for Microsoft Access. Create a custom model for thesource metadata and then load or add the metadata into the Metadata Manager warehouse.
¨ Properties. Add custom properties to the metadata in the Metadata Manager warehouse. For example, youwant to add a property to a report for Cognos ReportNet. Edit the Cognos ReportNet model in MetadataManager to add the property and then add the metadata for the property on the Browse tab.
¨ Relationships. Add relationships from custom metadata classes to model classes for which Metadata Managerpackages a resource type. For example, a column in a custom metadata source is also used in an Oracle table.Create a class-level relationship between the custom source column and the Oracle table column, and createthe object-level relationship on the Browse tab. Create a relationship to run data lineage analysis on thecustom metadata.
You create or edit models for Metadata Manager on the Model tab in Metadata Manager. After you create or editthe model for the custom metadata, you add the metadata to the Metadata Manager warehouse. You can add themetadata using the metadata catalog. You can also create a custom resource, create a custom resource template
1
and generate PowerCenter workflows using the Custom Metadata Configurator, and load the metadata on theLoad tab in Metadata Manager.
After you add the custom metadata into the Metadata Manager warehouse, use Metadata Manager or thepackaged Metadata Manager reports to analyze the metadata. You can create reports to analyze information.
You can also export and import the models, or export and import the metadata that you added to the metadatacatalog.
Custom Metadata Integration ProcessYou can add metadata for a custom metadata source or modify metadata by adding properties or relationships.The tasks you complete depend on the type of metadata you want to add to the Metadata Manager warehouse.You can add metadata for a custom metadata source, add properties for a packaged model, or configurerelationships from a custom model to a packaged model.
Adding and Loading Metadata for a Custom Metadata SourceWhen you add metadata for a custom metadata source, you define a model for the source metadata to define thetype of metadata that Metadata Manager extracts. You create the model and add classes, properties, andrelationships. After you define the model, add the metadata to the metadata catalog using the Browse tab, or usethe Custom Metadata Configurator to create a custom resource template. Then load the metadata into theMetadata Manager warehouse from metadata source files.
Use the Custom Metadata Configurator to create the template and the PowerCenter objects, including mappings,sessions, and workflows, that Metadata Manager uses to extract metadata from metadata source files. Export themetadata from the metadata source to a metadata source file, create a custom resource in Metadata Manager,and load the metadata from the metadata source files.
Adding Custom MetadataTo add metadata for a custom metadata source, complete the following steps:
1. Create the model. Create the model to represent the metadata in the metadata source using the Model tab inMetadata Manager.
2. Add classes, properties, and relationships. Add custom classes, properties, and relationships to the modelusing the Model tab.
3. Add the metadata to the Metadata Manager warehouse. Create a resource in the metadata catalog thatrepresents the source metadata using the Browse tab. Add custom metadata objects based on the classesthat you create.
RELATED TOPICS:¨ “Creating and Configuring Custom Models” on page 9
¨ “Creating Custom Resources and Metadata Objects” on page 28
Loading Custom MetadataTo load metadata from metadata source files for a custom metadata source, complete the following steps:
1. Create the model. Create the model to represent the metadata in the metadata source using the Model tab inMetadata Manager.
2 Chapter 1: Understanding Custom Metadata Integration
2. Add classes, properties, and relationships. Add custom classes, properties, and relationships to the modelusing the Model tab.
3. Create the custom resource. Create a resource for the model on the Load tab.
4. Create the template and generate PowerCenter objects. Create a custom resource template and generatethe custom PowerCenter objects used by Metadata Manager to load the custom metadata into the MetadataManager warehouse.
5. Configure and load the resource. Configure the custom resource template and metadata source files for theresource and then load the metadata for the custom resource.
This guide uses a Microsoft Access example to demonstrate the custom metadata integration process.
RELATED TOPICS:¨ “Creating and Configuring Custom Models” on page 9
¨ “Using the Custom Metadata Configurator” on page 17
¨ “AccessDB Example” on page 7
Adding Custom PropertiesTo add custom properties to metadata in the Metadata Manager warehouse, complete the following steps:
1. Add the property to the model class. Add the property to a packaged model class.
2. Add the metadata for the property. Edit the metadata object in the metadata catalog to add the metadatafor the property.
RELATED TOPICS:¨ “Configuring Properties” on page 13
¨ “Editing Properties” on page 30
Adding Custom RelationshipsTo add relationships between custom metadata and other metadata objects in the Metadata Manager warehouse,complete the following steps:
1. Add the relationship to the class for the metadata object. Add a class-level relationship to the class of themetadata object that you want to create the relationship for.
2. Create the relationship between the metadata objects. Edit the metadata object to create an object-levelrelationship. You create object-level relationships on the Browse tab.
When you add a relationship from one class to another class on the Model tab, you add a class-level relationship.When you create the relationship between metadata objects in the metadata catalog, you create an object-levelrelationship.
Custom Metadata Integration Process 3
RELATED TOPICS:¨ “Configuring Relationships” on page 15
Metadata Manager ConceptsMetadata Manager uses the following concepts to define custom metadata in the Metadata Manager warehouse:
¨ Models
¨ Classes
¨ Properties
¨ Groups
¨ Relationships
¨ Business Name
Metadata Manager stores the models, including the associated classes, properties, and relationships in theMetadata Manager repository. You can run Metadata Manager reports in the JasperReports application to getmore information about the models, classes, properties, and relationships in the Metadata Manager repository.
ModelsA model is a group of classes, properties, and relationships designed for a particular type of metadata source.Metadata Manager uses models to classify metadata stored in the Metadata Manager warehouse. When you loadmetadata into the Metadata Manager warehouse, Metadata Manager extracts the metadata defined in the model.
You can create or edit the following model types in Metadata Manager:
¨ Packaged models. Models that define the metadata that Metadata Manager can extract from specificapplication, business intelligence, data integration, data modeling, and relational metadata sources. Editpackaged models to add properties.
¨ Custom models. Models you create to define metadata from metadata sources for which Metadata Managerdoes not package a model.
View the packaged and custom models on the Model tab.
ClassesClasses define the types of objects that a metadata source contains. For example, the Source Definition classdefined in the PowerCenter model contains PowerCenter source definitions.
View the classes for packaged models and add custom classes for custom models on the Model tab. For moreinformation about packaged classes for specific models in the Metadata Manager repository, run and review theClasses Exploration model report in the JasperReports application.
PropertiesProperties are characteristics of metadata objects. For example, a metadata object can have a property calledUsage that contains a description of how to use the object or how it is used within a metadata source. You cancreate properties that apply to all objects of a class for a packaged model, or you can add properties that apply toa custom class for a custom model.
4 Chapter 1: Understanding Custom Metadata Integration
For more information about class properties, run and review the Classes Exploration model report in theJasperReports application.
GroupsGroups are metadata objects of the same object class type. Metadata Manager can include metadata objects inlogical groups in the metadata catalog when it extracts metadata. You can specify a group when you create aclass for a metadata object. When you view the metadata for the class in the metadata catalog, Metadata Managergroups objects from the same class type in a logical group.
Objects of different classes can also belong to the same group. Metadata Manager does not store groups asmetadata in the Metadata Manager repository.
RelationshipsRelationships are associations between two classes or two metadata objects. Create or view the following types ofrelationships in Metadata Manager:
¨ Class-level relationship. Association between two specific classes. When Metadata Manager extractsmetadata from a metadata source, it uses the class-level relationships to create object-level relationshipsbetween metadata objects. View relationships between classes and create class-level relationships for customclasses on the Model tab.
¨ Object-level relationship. Association between two metadata objects. View and create object-levelrelationships between metadata objects on the Browse tab.
Some class relationships establish a parent-child relationship. For example, Metadata Manager includes a classrelationship between database tables and columns, where a table is the parent object and a table column is thechild object. The metadata catalog uses the parent-child relationships to display objects in a hierarchical structure,where all child objects appear under their corresponding parent object.
You can also establish parent-child relationships when you create classes on the Model tab. Create a class andthen create a subclass to establish a parent-child relationship between the parent class and the child class, orsubclass.
You can only create relationships from custom classes and custom metadata objects to other classes or metadataobjects. You cannot create relationships from classes or metadata objects for which Metadata Manager packagesa model. For example, you can create a relationship from a custom metadata object to an Oracle table, but youcannot create a relationship from an Oracle table to any other metadata object type.
View object-level relationships you create in data lineage analysis and in the Details panel on the Browse tab.
For more information about class relationships, run and review the Associations by Package model report in theJasperReports application.
Business NameA business name is a property used to identify metadata objects according to their business usage instead of themetadata object name in the metadata catalog. For example, a table named CUST_ADDR identifies a customershipping address. Configure the business name property as Customer Shipping Address to indicate the tablecontains the customer shipping address.
All classes for packaged and custom models include a business name property.
Edit business name properties for metadata objects in custom or packaged resource types in the metadatacatalog. Edit business name properties for metadata objects in a packaged resource type by exporting theproperties to an Excel file, editing the property values, and importing the properties from the Excel file into themetadata catalog.
Metadata Manager Concepts 5
View the business name property for metadata objects in the Details panel on the Browse tab.
Using the Model TabThe Model tab displays the packaged application, business intelligence, data integration, data modeling, andrelational models. It also displays the custom models that you create. Use the Model tab to browse the models inthe Metadata Manager repository, create and edit custom models, properties, and relationships, and createproperties for packaged models.
The Model tab includes the following components:
¨ Model navigator. Displays all models in the Metadata Manager repository in a hierarchical structure.
¨ Content panel. Displays child classes, folders, and groups of models and classes that you select in the Modelsnavigator.
¨ Properties panel. Displays the class details, properties, and relationships for classes that you open to edit.
You can view details for multiple models and classes simultaneously on the Model tab. Each time you open aclass, Metadata Manager opens a tab for the class.
Browsing ModelsUse the Model tab to complete the following tasks:
¨ Browse the model hierarchy. Browse all models and view the model hierarchy in the Models navigator.
¨ View model and class properties. View the hierarchy for a specific class and view the model and childclasses and properties in the Content and Properties panels. Model properties include name and description.Class properties include the name, description, group name, and if the class shows in a lineage diagram. Thepackaged models may include folders in the model hierarchy. You can only create classes for custom models.
Editing ModelsYou can edit model and class properties for custom models and classes. Use the Model tab to perform thefollowing tasks:
¨ Create models and edit model properties. Create or edit a model from the Models navigator.
¨ Create and edit classes and class properties and relationships. Create and edit custom classes,properties, and relationships, view properties and relationships for packaged classes, and add customproperties for packaged models. You can also organize the way in which you want to display the classproperties.
To edit or view properties and relationships for a class, you must select the class and choose Actions > Open orselect Open from the toolbar, or right-click a class and choose Open.
Note: Class properties are called attributes in the Model tab.
6 Chapter 1: Understanding Custom Metadata Integration
AccessDB ExampleThis book uses an example of a Microsoft Access database to show the concepts for custom metadata integration.The Access database contains tables and views. It includes the model, AccessDB, and the following classes:
¨ AccessSchema
¨ AccessTable
¨ AccessTableColumn
¨ AccessView
¨ AccessViewColumn
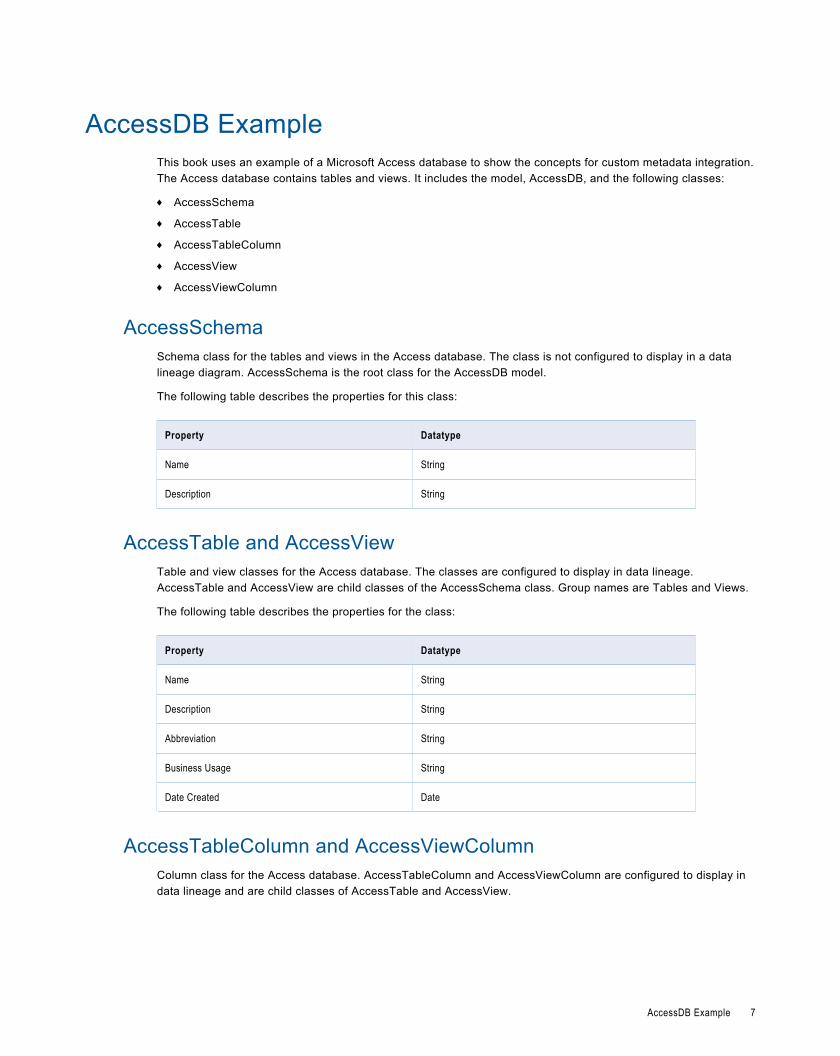
AccessSchemaSchema class for the tables and views in the Access database. The class is not configured to display in a datalineage diagram. AccessSchema is the root class for the AccessDB model.
The following table describes the properties for this class:
Property Datatype
Name String
Description String
AccessTable and AccessViewTable and view classes for the Access database. The classes are configured to display in data lineage.AccessTable and AccessView are child classes of the AccessSchema class. Group names are Tables and Views.
The following table describes the properties for the class:
Property Datatype
Name String
Description String
Abbreviation String
Business Usage String
Date Created Date
AccessTableColumn and AccessViewColumnColumn class for the Access database. AccessTableColumn and AccessViewColumn are configured to display indata lineage and are child classes of AccessTable and AccessView.
AccessDB Example 7
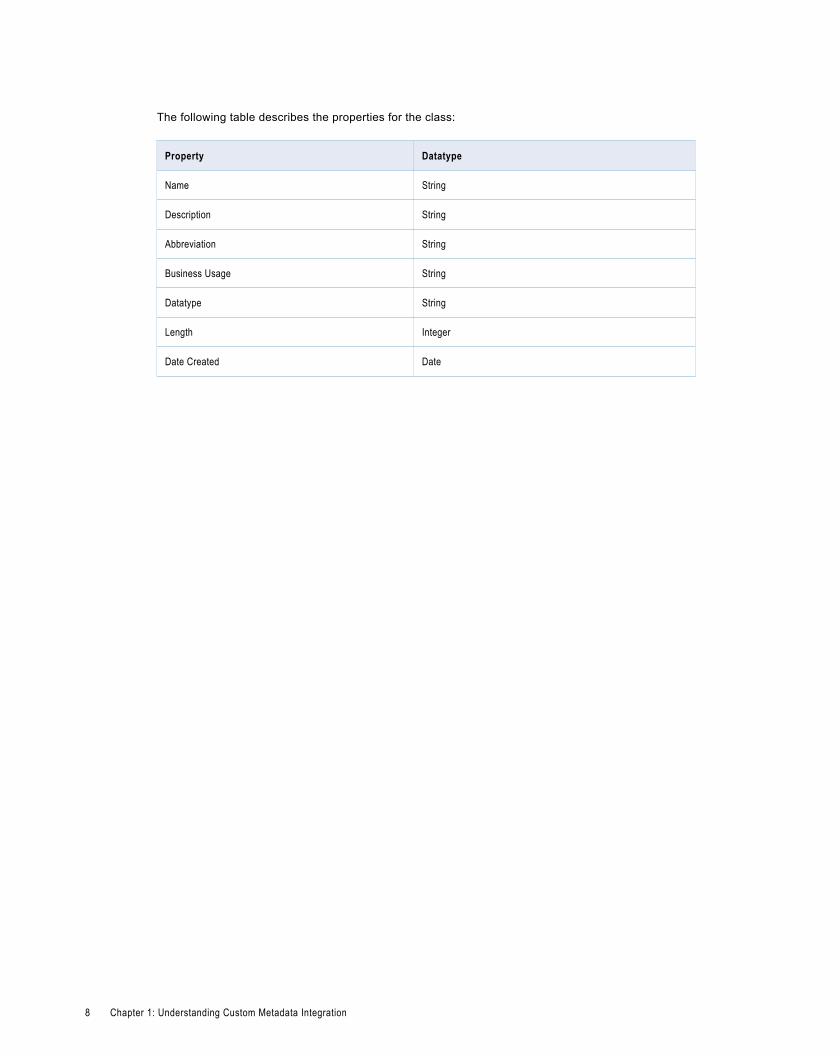
The following table describes the properties for the class:
Property Datatype
Name String
Description String
Abbreviation String
Business Usage String
Datatype String
Length Integer
Date Created Date
8 Chapter 1: Understanding Custom Metadata Integration
C H A P T E R 2
Creating and Configuring CustomModels
This chapter includes the following topics:
¨ Creating and Editing a Custom Model Overview, 9
¨ Configuring a Model, 10
¨ Configuring Classes, 11
¨ Configuring Properties, 13
¨ Configuring Relationships, 15
Creating and Editing a Custom Model OverviewCreate models to define the custom metadata you want to add to the Metadata Manager warehouse. You cancreate and edit custom models. You can create and edit custom properties for packaged application, businessintelligence, data integration, data modeling, and relational models.
To create a model and configure a model, complete the following steps:
1. Create the model. Create the model that will contain the classes for the model in the Model navigator. Youcan edit model properties in the Properties panel.
2. Configure classes. On the Model navigator, create the classes and subclasses for the metadata objects thatyou want to add. You can edit class properties in the Properties panel.
3. Configure the class properties. In the Properties panel, configure the properties for each class. You canalso configure properties for a packaged class.
4. Configure the class relationships. Open the class to configure the relationships for each class.
You can also configure custom properties for the packaged models.
Note: You cannot create a custom model using an existing buisiness glossary model as template.
After you create and configure a model, add or load the metadata using one of the following methods:
¨ Load a custom resource. Use the Custom Metadata Configurator to create a custom resource template toload the metadata.
¨ Add a resource on the Browse tab. Add the metadata objects using the metadata catalog on the Browse tabin Metadata Manager.
9
Establish the Model StructureBefore you begin to create the model, you must establish the required classes and subclasses, and the propertiesand relationships between the classes. Identify the following components of the model:
¨ Model name and description. The Model serves as the container for the classes in the model, and appears asa resource in the metadata catalog when you add or load metadata. For example, AccessDB is the modelname for the Access database example.
¨ Parent classes and subclasses. The classes represent the metadata objects that you want to add or load intothe Metadata Manager warehouse. For example, AccessSchema is the parent class for the Access databaseexample. AccessTable and AccessView are the child classes for the AccessSchema class.
¨ Properties and relationships. Determine the properties for each class and the relationships between thecustom metadata classes and classes in the packaged models. For example, in the Access database example,the columns in the AccessTable schema have a relationship to source columns in an Oracle database.
Configuring a ModelYou can create a model or edit a model. When you create or edit a model, you configure the model name anddescription. You can use a custom model as a template for the model.
Creating a ModelCreate a model and configure the name, description, and template to base the model on.
To create a model:
1. On the Model tab, click Actions > New > Model.
The New Model window appears.
2. Enter the name and description for the model.
3. Optionally, select a model to use as a template.
4. Click OK.
Metadata Manager creates the model. The model appears in the Model navigator.
Editing a ModelYou can edit a model to change the name and description for the model. If you change a model name, MetadataManager updates the model name in the Resource wizard on the Load tab.
Note: You cannot edit model names for packaged models.
To edit a model:
1. On the Model tab, select the model that you want to edit.
2. In the Properties panel, click the Edit icon.
The Edit Model window appears.
3. Update the name or description.
4. Click OK.
10 Chapter 2: Creating and Configuring Custom Models
Deleting a ModelYou can delete any custom model you create. When you delete a model, Metadata Manager removes any classes,properties, and associations for the model.
You cannot delete a model if you added metadata based on the model. If you loaded metadata using the model, orif you added metadata to the metadata catalog based on the model, purge the metadata from the MetadataManager warehouse or delete the resource in the metadata catalog before you delete the model.
To delete a model:
1. Select the model that you want to delete in the Model navigator.
2. Click Actions > Delete.
3. Click OK.
Metadata Manager deletes the model and all classes for the model from the Model navigator and the MetadataManager repository.
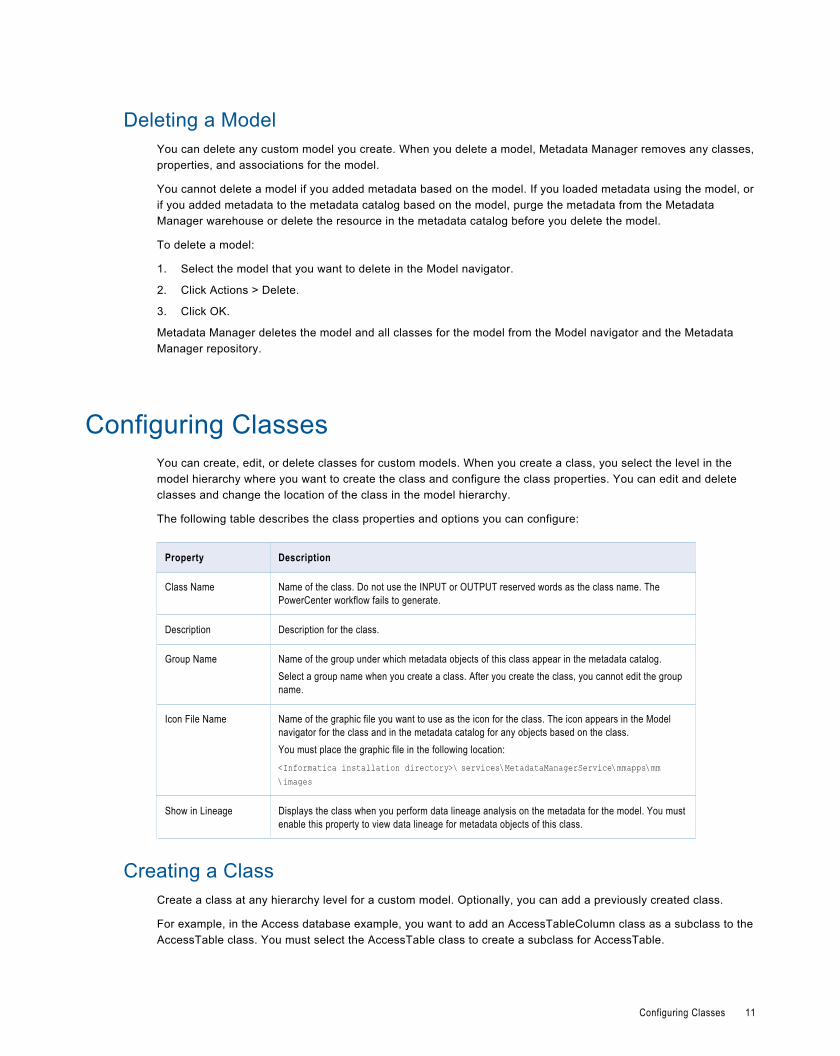
Configuring ClassesYou can create, edit, or delete classes for custom models. When you create a class, you select the level in themodel hierarchy where you want to create the class and configure the class properties. You can edit and deleteclasses and change the location of the class in the model hierarchy.
The following table describes the class properties and options you can configure:
Property Description
Class Name Name of the class. Do not use the INPUT or OUTPUT reserved words as the class name. ThePowerCenter workflow fails to generate.
Description Description for the class.
Group Name Name of the group under which metadata objects of this class appear in the metadata catalog.Select a group name when you create a class. After you create the class, you cannot edit the groupname.
Icon File Name Name of the graphic file you want to use as the icon for the class. The icon appears in the Modelnavigator for the class and in the metadata catalog for any objects based on the class.You must place the graphic file in the following location:<Informatica installation directory>\ services\MetadataManagerService\mmapps\mm\images
Show in Lineage Displays the class when you perform data lineage analysis on the metadata for the model. You mustenable this property to view data lineage for metadata objects of this class.
Creating a ClassCreate a class at any hierarchy level for a custom model. Optionally, you can add a previously created class.
For example, in the Access database example, you want to add an AccessTableColumn class as a subclass to theAccessTable class. You must select the AccessTable class to create a subclass for AccessTable.
Configuring Classes 11
To create a class:
1. On the Model tab, select the model or class under which you want to create the class.
2. If you select the model or class in the Model navigator, click Actions > New > Class.
The New Class window appears.
If you selected a model in the Model navigator, a different New Class window appears.
3. Enter the class properties.
4. Click OK.
Metadata Manager creates the class at the selected level of the hierarchy. After you create the class, configure theclass properties and relationships.
Editing a ClassYou can edit a class to change the name, description, icon file name, or lineage properties. If you edit a class toshow the metadata objects for the class in data lineage, you must load the resource again to view the metadataobjects for the class in the data lineage diagram.
To edit a class:
1. On the Model tab, select the class in the Model navigator or Content panel.
2. In the Properties panel, click the Edit icon.
The Edit Class window appears.
3. Edit the class properties.
4. Click OK.
Metadata Manager updates the class with the changed properties.
Deleting a ClassYou can delete a class from a model. If you delete a class and the metadata catalog contains a metadata objectfor the class, you cannot add more classes of the same type to the catalog. The metadata objects for the class willremain in the catalog.
Note: You cannot delete a class if it has a relationship to another class.
To delete a class:
1. On the Model tab, select the class in the Model navigator or the Content panel.
2. Click Actions > Delete.
Moving and Copying ClassesTo move or copy a class from one level of the model hierarchy to another in the Model navigator, drag the class toanother location.
Use the following rules and guidelines when you move or copy classes:
¨ If you drag a class from one level of the hierarchy to another for the same model, Metadata Manager movesthe class.
¨ If you drag a class from one custom model to another custom model, Metadata Manager copies the class.
¨ If you move or copy a class, Metadata Manager moves or copies all subclasses for the class.
¨ You cannot drag classes into packaged models.
12 Chapter 2: Creating and Configuring Custom Models

To move a class:
1. In the Model navigator, select the class you want to move or copy.
2. Drag the class to another location.
If the location to which you want to move or copy the class is collapsed, move the pointer over the parentclass to expand the child classes in the navigator.
Configuring PropertiesYou can configure properties for custom classes and classes for packaged models. You can create, edit, anddelete properties that apply to all metadata objects for a custom class or a packaged class. Open the class on theModel tab from the Model navigator or the Content panel to configure properties.
The following table describes the properties:
Property Description
Name Name of the property. This name appears for all metadata objects for the class in the metadatacatalog when you add or load metadata.
Description Description of the property.
Type Datatype for the property. You can configure the following datatypes:- Integer- String- Long- Date
After you configure the properties, the method you use to configure the values for the properties depends on themethod you use to add or load the metadata:
¨ Using the Browse tab. Use the Browse tab to edit values for the custom properties.
¨ Using a custom resource. If you create a custom resource to load the metadata, you configure the values thatMetadata Manager uses for the properties in the Attributes Map tab of the Custom Metadata Configurator.
Note: You can also change the order in which properties appear for objects on the Browse tab. To change theorder of a property, click the property and drag it to a different location.
RELATED TOPICS:¨ “Using the Custom Metadata Configurator” on page 17
¨ “Editing Properties” on page 30
Creating PropertiesWhen you create properties, you configure the name, description, and datatype for the property. By default,Metadata Manager includes Name, Label, Description, and Business Name properties for each class.
1. On the Model tab, select the class for which you want to configure properties.
2. In the Model navigator or the Content panel, click Actions > Open.
Metadata Manager opens a tab for the class and lists the default properties for the class.
Configuring Properties 13
3. Click Actions > Add Attribute and configure the name, description, and datatype of the property.
The datatype can be Integer, Long, String, Date, or LongString.
4. Click Save.
Editing PropertiesYou can edit properties for custom and packaged models. If you change the name of a property for whichmetadata objects exist in the metadata catalog, Metadata Manager updates the objects to use the property name.If you change the type of a property for which metadata objects exist in the metadata catalog, Metadata Managerdoes not update the metadata to use the datatype. You must delete the value for type and enter a value that isvalid for the datatype.
1. On the Model tab, select the class for which you want to configure properties.
2. In the Model navigator or the Content panel, click Actions > Open.
Metadata Manager opens a tab for the class and lists the properties.
3. To edit the properties, click the Name, Description, or Type box.
The datatype can be Integer, Long, String, or Date. For custom properties, the datatype can also beLongString.
4. To organize properties, drag them to change their order or to ensure that they appear in either the Basic orAdvanced section of the class properties, in all Metadata Manager perspectives. You can also use Action >Move Up or Action > Move Down to change the order of the class properties.
5. Click Save.
Organizing PropertiesYou can organize the way in which you want to display the class properties.
When you edit the properties, you can drag them to change their order or to ensure that they appear in either theBasic or Advanced section of the class properties, in all Metadata Manager perspectives.
If you move the properties below the properties divider, users need to click More in the Properties pane to viewthese properties in the Advance section. Users need to click Less if they want to hide the properties listed in theAdvanced section.
For a class, Source Creation Date, Source Update Date, MM Creation Date, and MM Update Date properties arereferred as the synthetic date properties. You can set the Show_Synthetic_Dates_In_Basic_Section property inthe imm.properties file to specify if these properties should be located in the Basic or Advanced section.
Synthetic date properties are always grouped together and you cannot change their order. You cannot move anyproperty below the synthetic date properties.
The Class and Location properties are grouped together and you cannot move them below the properties divider.
The Name and Description properties are grouped together and you cannot move any other property above theseproperties.
Deleting PropertiesYou can delete properties for custom classes and custom properties you added for packaged model classes. Youcannot delete the default Name and Description properties for any class.
If you added metadata for the property to any metadata object in the metadata catalog, Metadata Manager alsoremoves the metadata for the property. For example, you added a property to an OracleTable class and then
14 Chapter 2: Creating and Configuring Custom Models
added the metadata for the property on the Browse tab. If you delete the property, Metadata Manager removes theproperty from all metadata objects of type OracleTable in the metadata catalog.
To delete a property:
1. On the Model tab, select the class for which you want to delete a property.
2. In the Model navigator or the Content panel, click Actions > Open.
Metadata Manager opens a tab for the class and lists the properties for the class.
3. Select the property and click Actions > Delete Attribute.
Configuring RelationshipsUse relationships to create associations between metadata objects. To create an association between twometadata objects, use the Model tab to create a class-level relationship between the classes of the metadataobjects that you want to relate. You can only create relationships between custom classes or from custom classesto classes for which Metadata Manager packages a model.
Use the Model tab to create a class-level relationship. When you create a relationship, you configure therelationship properties and the model and class to which you are creating the relationship.
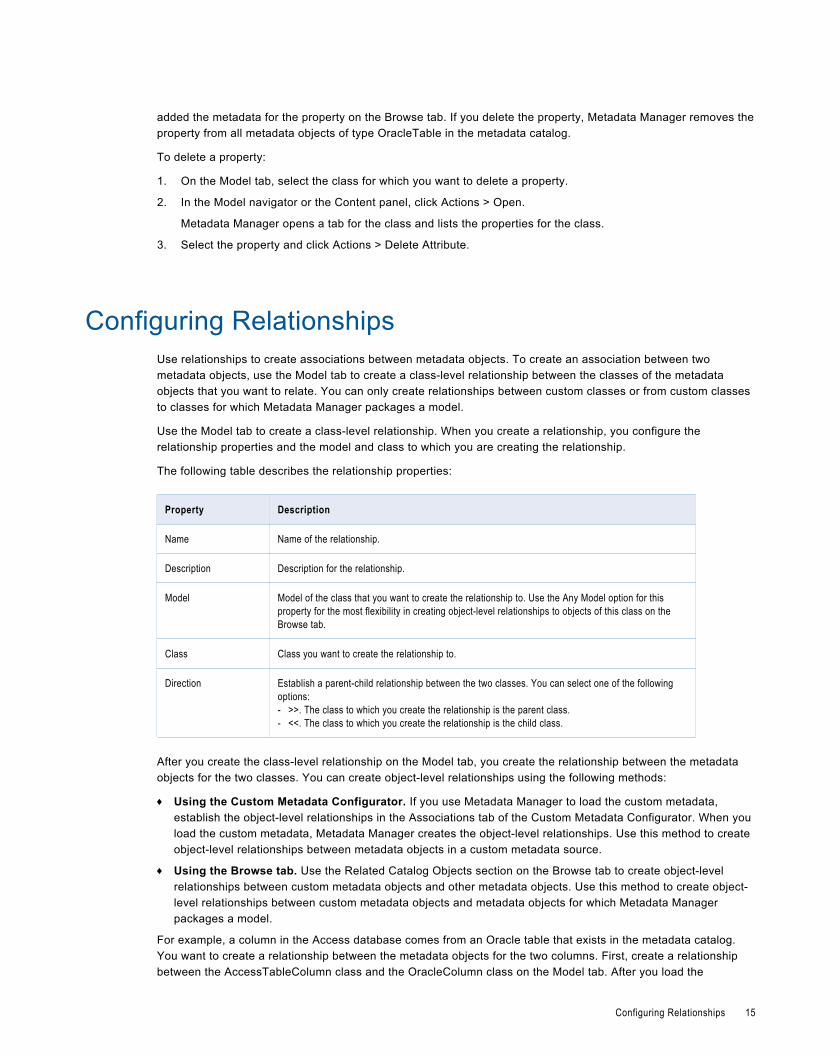
The following table describes the relationship properties:
Property Description
Name Name of the relationship.
Description Description for the relationship.
Model Model of the class that you want to create the relationship to. Use the Any Model option for thisproperty for the most flexibility in creating object-level relationships to objects of this class on theBrowse tab.
Class Class you want to create the relationship to.
Direction Establish a parent-child relationship between the two classes. You can select one of the followingoptions:- >>. The class to which you create the relationship is the parent class.- <<. The class to which you create the relationship is the child class.
After you create the class-level relationship on the Model tab, you create the relationship between the metadataobjects for the two classes. You can create object-level relationships using the following methods:
¨ Using the Custom Metadata Configurator. If you use Metadata Manager to load the custom metadata,establish the object-level relationships in the Associations tab of the Custom Metadata Configurator. When youload the custom metadata, Metadata Manager creates the object-level relationships. Use this method to createobject-level relationships between metadata objects in a custom metadata source.
¨ Using the Browse tab. Use the Related Catalog Objects section on the Browse tab to create object-levelrelationships between custom metadata objects and other metadata objects. Use this method to create object-level relationships between custom metadata objects and metadata objects for which Metadata Managerpackages a model.
For example, a column in the Access database comes from an Oracle table that exists in the metadata catalog.You want to create a relationship between the metadata objects for the two columns. First, create a relationshipbetween the AccessTableColumn class and the OracleColumn class on the Model tab. After you load the
Configuring Relationships 15
metadata for the Access database, create an object-level relationship on the Browse tab between the twometadata objects.
Creating Class-Level RelationshipsWhen you create a class-level relationship, you configure the model and class to which you want to create therelationship.
To create a relationship:
1. On the Model tab, select a class.
2. In the Model navigator or the Content panel, click Actions > Open.
Metadata Manager opens a tab for the class.
3. Select Relationships.
4. Click Actions > Add Relationship and configure the relationship properties.
5. Click the Save icon.
Editing and Removing Class-Level RelationshipsEdit a relationship to change any of the properties or delete a relationship. If you edit a relationship and changethe model, class, or parent-child relationships, Metadata Manager does not remove object-level relationships. Theobject-level relationships that you create use the updated properties.
For example, you edit the relationship for the AccessTableColumn class and remove the OracleColumn class fromthe relationship. Existing object-level relationships in the metadata catalog do not change, but you cannot createadditional object-level relationships from AccessTableColumn objects to the OracleColumn metadata objects.
If you remove a relationship, Metadata Manager does not remove object-level relationships.
To edit a relationship:
1. On the Model tab, select a class.
2. In the Model navigator or the Content panel, click Actions > Open.
Metadata Manager opens a tab for the class.
3. Select Relationships.
4. Edit the relationship properties.
5. Click the Save icon.
6. Optionally, select the relationship and click Actions > Delete Relationship.
16 Chapter 2: Creating and Configuring Custom Models
C H A P T E R 3
Using the Custom MetadataConfigurator
This chapter includes the following topics:
¨ Using the Custom Metadata Configurator Overview, 17
¨ Step 1. Create Metadata Source Files, 18
¨ Step 2. Log In to the Custom Metadata Configurator, 19
¨ Step 3. Configure the Custom Resource Template, 19
¨ Step 4. Configure Delimiters for Files, 22
¨ Step 5. Map Class Attributes, 22
¨ Step 6. Map Class Relationships, 24
¨ Step 7. Add Class Rules to Files, 25
¨ Step 8. Generate the PowerCenter Objects, 27
Using the Custom Metadata Configurator OverviewUse the Custom Metadata Configurator to load metadata for a custom model from metadata source files. Use theCustom Metadata Configurator to configure the custom resource template that contains the format of the metadatasource files and generate the custom PowerCenter objects in the PowerCenter repository. The PowerCenterobjects include the sessions, mappings, and workflows that Metadata Manager uses to load the metadata from themetadata source files.
Complete the following tasks to create a template and the custom PowerCenter objects:
1. Create the metadata files. Create the element and association metadata files.
2. Log in to the Custom Metadata Configurator. Use the Metadata Manager repository connection informationto log in to the Custom Metadata Configurator.
3. Configure the template. Configure the custom resource template name and template properties.
4. Configure delimiters. Configure the delimiters for the metadata files.
5. Map attributes. Map attributes in the element metadata file to the attributes in the custom model.
6. Map relationships. Map relationships in the association metadata file to the relationships for the classes inthe custom model.
7. Add class rules. Add the class rules to select particular records in an element or association metadata.
17
8. Generate the PowerCenter objects. Generate the PowerCenter objects required to load metadata from themetadata source files into the Metadata Manager warehouse.
Note: The Custom Metadata Configurator refers to relationships as associations.
After you create the custom resource template and generate the PowerCenter objects, you configure the customresource you create on the Load tab and configure the template name and metadata source files.
Step 1. Create Metadata Source FilesBefore you log in to the Custom Metadata Configurator, create the element metadata file and the associationmetadata files that contain the metadata source information. You use the files to map attributes and associationsto the classes you created for the model on the Load tab.
Create the following metadata source files:
¨ Element metadata file. Contains metadata object names and attributes. The metadata objects are instances ofthe classes you defined in the model. You map the object attributes in the element metadata file to the classattributes defined in the corresponding model you created on the Model tab.
¨ Association metadata file. Contains relationships between metadata objects in an association metadata file.The relationships between metadata objects are instances of the class associations you defined in the model.You use the Custom Metadata Configurator, which exposes the information in the association metadata file, tomap the associations between the objects.
If you want to preview the data in the element and association metadata files in the Custom MetadataConfigurator, you must map the PATH environment variable to the location of the Microsoft Excel excel.exeexecutable.
Metadata Source File Rules and GuidelinesUse the following rules and guidelines to create the element and association metadata source files:
¨ You can store the metadata object attributes and associations together in the same file or in separate files.
¨ The association metadata file must identify the From and To objects in each association. It should store one ormore object attributes to enable you to uniquely identify each From and To object in the file and store objectattributes in separate columns.
¨ The custom resource fails to load some metadata objects, attributes, and relationships if the metadata sourcesfile names contain any spaces or the following characters:
~ ' ! % ^ & * ( ) - + = { } [ ] | \ : ; " ' < > , . ? / If the column names contain spaces or any of these characters, the Custom Metadata Configurator convertsthem to underscores when you generate the PowerCenter objects. After converting the characters and spacesto underscores, columns may have the same modified name. The Custom Metadata Configurator ignores oneof the columns when you generate the workflows.
¨ The association and element metadata file names cannot start with a number. If the file name starts with anumber, PowerCenter object generation fails.
18 Chapter 3: Using the Custom Metadata Configurator
Step 2. Log In to the Custom Metadata ConfiguratorTo log in to the Custom Metadata Configurator, specify the Metadata Manager warehouse database that containsthe custom model for the metadata source files you want to load.
The following table describes the properties you must configure to log in to the Custom Metadata Configurator:
Property Description
Previous Connections Contains a list of connect strings used to connect to multiple Metadata Manager warehouses. Selecta Metadata Manager warehouse from the list, or configure another warehouse.
User ID User account for the Metadata Manager warehouse database.
Password Password for the Metadata Manager warehouse database user account.
Database Type Type of database for the Metadata Manager warehouse database.
Connection String JDBC connection string for the Metadata Manager warehouse database. The connection stringdepends on the database type you select. For example, if you use an Oracle database, use thefollowing connection string: jdbc:informatica:oracle://[host]:1521;SID=[sid]For Oracle databases, you can enter the SID or edit the string to use the full service name. Forexample:jdbc:informatica:oracle://[host]:1521;ServiceName=[service name]To authenticate the database user credentials using the Windows protocol and establish a trustedconnection to a Microsoft SQL Server repository, append the following text to the connection string:AuthenticationMethod=ntlm. For example:jdbc:informatica:sqlserver://[host]:[port];DatabaseName=[DB name];AuthenticationMethod=ntlm
To log in to the Custom Metadata Configurator:
1. Click Start > Programs > Informatica <version> > Client > PowerCenter Client > Custom MetadataConfigurator.
The Custom Metadata Configurator login window appears.
2. Enter the connection properties.
3. Click OK.
You can override the default database code page for the Metadata Manager warehouse database when you log in.Override the code page if the custom resource templates contain characters that the database code page does notsupport. For example, the Custom Metadata Configurator does not retrieve saved templates correctly. To overridethe code page, add the CODEPAGEOVERRIDE parameter to the connection string and specify a compatible codepage.
For example, use the following JDBC URL to override the default code page with MS932:
jdbc:informatica:sqlserver://myhost:1433;DatabaseName=mm861;CODEPAGEOVERRIDE=MS932;
Step 3. Configure the Custom Resource TemplateA custom resource template stores information about how to map the metadata object attributes to the classattributes and can also store the class relationships between metadata objects. Create a template using attributeand association files.
Step 2. Log In to the Custom Metadata Configurator 19
Map the object attributes in an element metadata file to the class attributes configured in the model. Map classrelationships defined in the model between objects in the custom source repository. Save the associations in atemplate.
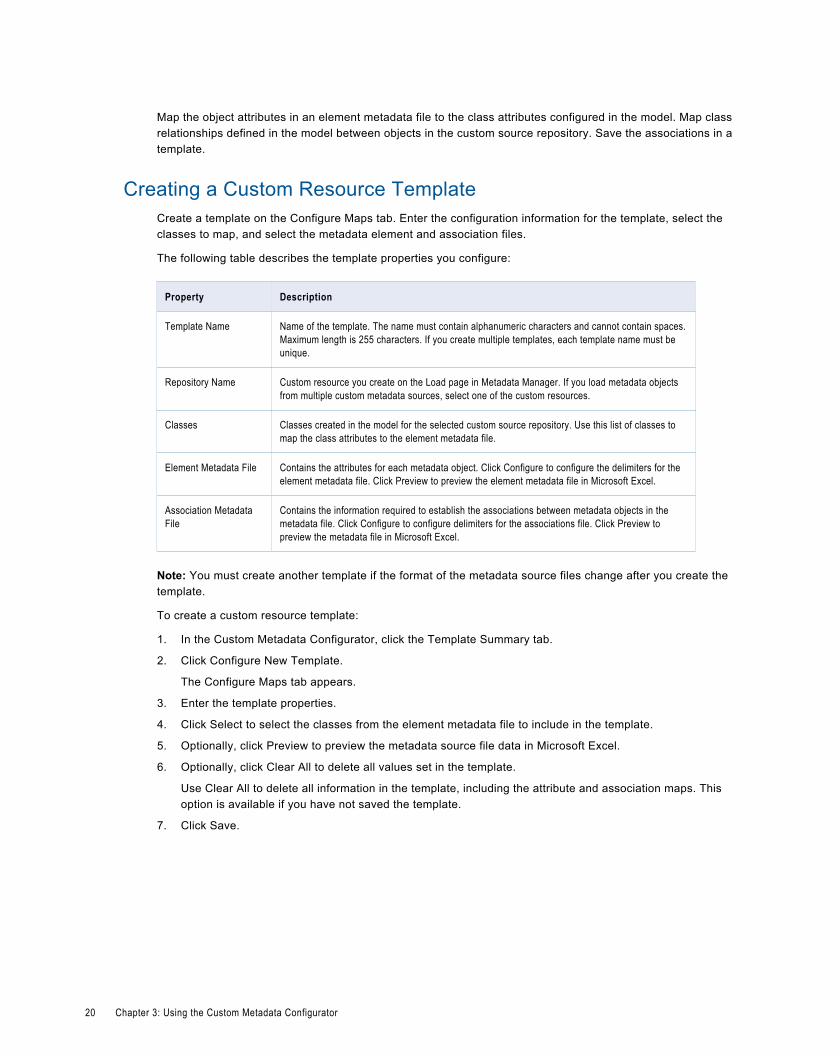
Creating a Custom Resource TemplateCreate a template on the Configure Maps tab. Enter the configuration information for the template, select theclasses to map, and select the metadata element and association files.
The following table describes the template properties you configure:
Property Description
Template Name Name of the template. The name must contain alphanumeric characters and cannot contain spaces.Maximum length is 255 characters. If you create multiple templates, each template name must beunique.
Repository Name Custom resource you create on the Load page in Metadata Manager. If you load metadata objectsfrom multiple custom metadata sources, select one of the custom resources.
Classes Classes created in the model for the selected custom source repository. Use this list of classes tomap the class attributes to the element metadata file.
Element Metadata File Contains the attributes for each metadata object. Click Configure to configure the delimiters for theelement metadata file. Click Preview to preview the element metadata file in Microsoft Excel.
Association MetadataFile
Contains the information required to establish the associations between metadata objects in themetadata file. Click Configure to configure delimiters for the associations file. Click Preview topreview the metadata file in Microsoft Excel.
Note: You must create another template if the format of the metadata source files change after you create thetemplate.
To create a custom resource template:
1. In the Custom Metadata Configurator, click the Template Summary tab.
2. Click Configure New Template.
The Configure Maps tab appears.
3. Enter the template properties.
4. Click Select to select the classes from the element metadata file to include in the template.
5. Optionally, click Preview to preview the metadata source file data in Microsoft Excel.
6. Optionally, click Clear All to delete all values set in the template.
Use Clear All to delete all information in the template, including the attribute and association maps. Thisoption is available if you have not saved the template.
7. Click Save.
20 Chapter 3: Using the Custom Metadata Configurator
RELATED TOPICS:¨ “Step 5. Map Class Attributes” on page 22
Editing and Deleting a Custom Resource TemplateYou edit a template after you save it to perform the following tasks:
¨ Add, edit, or delete class attribute maps to metadata objects in the element metadata file.
¨ Add, edit, or delete association maps between metadata objects.
¨ Delete classes from a template.
¨ Configure delimiters for the element and association metadata files.
¨ Change a class rule.
If you edit classes for a template, the changes occur in the Metadata Manager warehouse when you load theresource. Because of this, the metadata in the Metadata Manager warehouse matches the metadata in theelement and association metadata files.
You can delete a template if it becomes obsolete. If you delete a template, you can purge the metadata loaded bythe custom resource from the Metadata Manager warehouse.
To edit or delete a custom resource template:
1. Log in to the Custom Metadata Configurator and select the Metadata Manager warehouse you used to createthe template.
2. Click the Template Summary tab.
3. Click View/Edit for the template you want to edit.
The Configure Maps tab appears.
4. Edit the template.
You can edit the template properties, and you can edit the attribute and relationship maps.
5. Click Save.
6. Optionally, click Delete to delete the template.
Viewing a Custom Resource Template SummaryAfter you create and save a template, you can view the template under the corresponding custom resource on theTemplate Summary tab of the Custom Metadata Configurator.
To view a custom resource template:
1. Log in to the Custom Metadata Configurator.
The Template Summary tab appears. It displays one of the following statuses for each template:
¨ Saved. Indicates you saved the template, but did not generate the PowerCenter objects.
¨ Last generated date. The date you last generated the PowerCenter objects.
2. Select a template, and then click View/Edit.
The template appears on the Configure Maps tab.
Step 3. Configure the Custom Resource Template 21
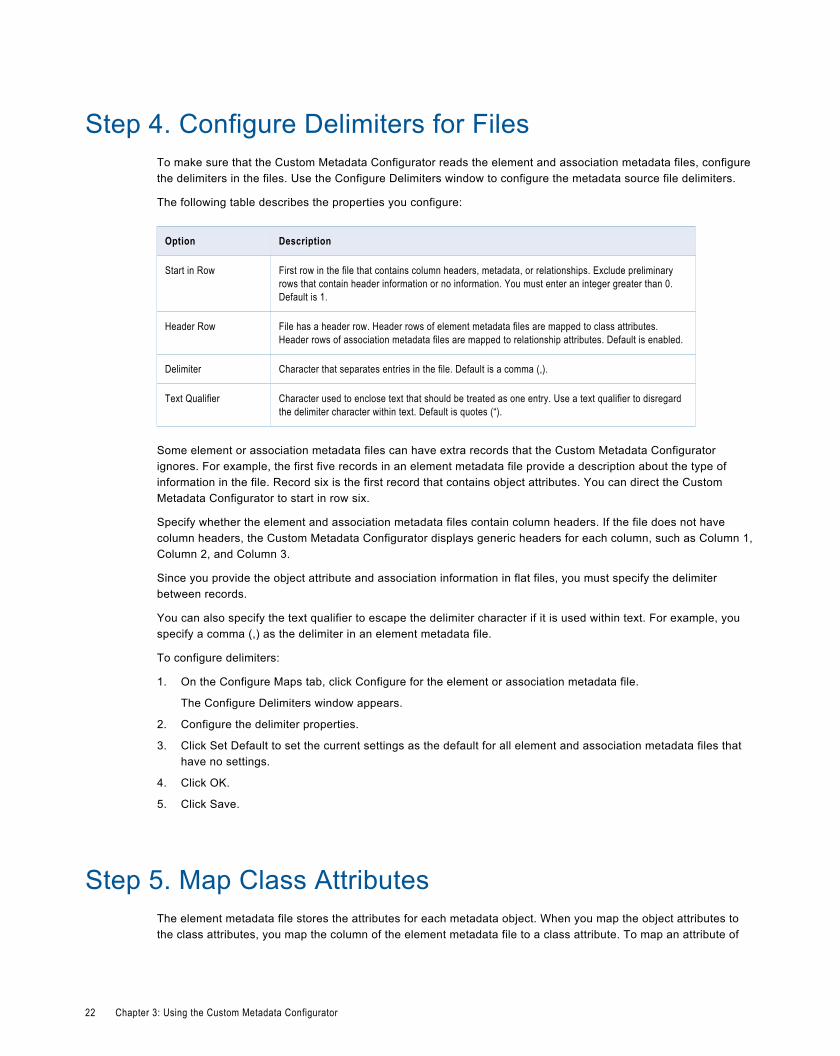
Step 4. Configure Delimiters for FilesTo make sure that the Custom Metadata Configurator reads the element and association metadata files, configurethe delimiters in the files. Use the Configure Delimiters window to configure the metadata source file delimiters.
The following table describes the properties you configure:
Option Description
Start in Row First row in the file that contains column headers, metadata, or relationships. Exclude preliminaryrows that contain header information or no information. You must enter an integer greater than 0.Default is 1.
Header Row File has a header row. Header rows of element metadata files are mapped to class attributes.Header rows of association metadata files are mapped to relationship attributes. Default is enabled.
Delimiter Character that separates entries in the file. Default is a comma (,).
Text Qualifier Character used to enclose text that should be treated as one entry. Use a text qualifier to disregardthe delimiter character within text. Default is quotes (“).
Some element or association metadata files can have extra records that the Custom Metadata Configuratorignores. For example, the first five records in an element metadata file provide a description about the type ofinformation in the file. Record six is the first record that contains object attributes. You can direct the CustomMetadata Configurator to start in row six.
Specify whether the element and association metadata files contain column headers. If the file does not havecolumn headers, the Custom Metadata Configurator displays generic headers for each column, such as Column 1,Column 2, and Column 3.
Since you provide the object attribute and association information in flat files, you must specify the delimiterbetween records.
You can also specify the text qualifier to escape the delimiter character if it is used within text. For example, youspecify a comma (,) as the delimiter in an element metadata file.
To configure delimiters:
1. On the Configure Maps tab, click Configure for the element or association metadata file.
The Configure Delimiters window appears.
2. Configure the delimiter properties.
3. Click Set Default to set the current settings as the default for all element and association metadata files thathave no settings.
4. Click OK.
5. Click Save.
Step 5. Map Class AttributesThe element metadata file stores the attributes for each metadata object. When you map the object attributes tothe class attributes, you map the column of the element metadata file to a class attribute. To map an attribute of
22 Chapter 3: Using the Custom Metadata Configurator

an object to a class attribute, identify the class of the object. Then, map the attribute of the object to the attributedefined for the selected class.
Each column in the element metadata file contains an object attribute. To map the object attribute to the classattribute, map the header of each column in the element metadata file to a class attribute.
If the file does not contain column headers, the Custom Metadata Configurator displays generic header names,such as Column 1, Column 2, and Column 3.
Each model class has a Name attribute. Map an object attribute to the Name attribute for every class. You do notneed to map object attributes to other class attributes.
You must also establish the primary key of the element metadata file. The Custom Metadata Configurator uses theprimary key to identify each record in the element metadata file for a given class. The key can be a compositevalue if you need to specify multiple columns in the element metadata file to uniquely identify each record.
One element metadata file can contain object attributes for multiple classes of objects. You can map a column inthe element metadata file to a class attribute that is common to multiple classes. For example, the elementmetadata file contains the following metadata objects:
Object Object_Description Object Type
Customer Customer information. Database Table
Address Customer address. Database Column
Product Product information. Database Table
The Object_Description column in the element metadata file describes all column and table metadata objects. Inthe Custom Metadata Configurator, you map the Object_Description column to the Description class attribute forthe AccessTableColumn class. Next, you click Apply to All. The Custom Metadata Configurator also maps theObject_Description column to the Description class attribute for the AccessTable class.
To map class attributes:
1. On the Configure Maps tab of the Custom Metadata Configurator, click Map Information.
The Attributes Map tab appears.
2. For each class, map the columns in the element metadata file to the class attributes.
To map an object attribute to the class attribute, select the class attribute from the Class Attributes column foreach applicable column in the File Columns column.
Click the field to display the list of possible values for the Class Attributes columns.
Note: You must map the Name attribute for all classes.
3. Select the Key option for all element metadata file columns that are used to identify each record in theelement metadata file.
4. Click Apply to All to apply the common class attribute settings to all other classes.
5. For each class, click Add Rule to select the records in the element metadata file that apply to the attributemap for a particular class.
You must create a rule for each class if you map multiple classes.
Step 5. Map Class Attributes 23
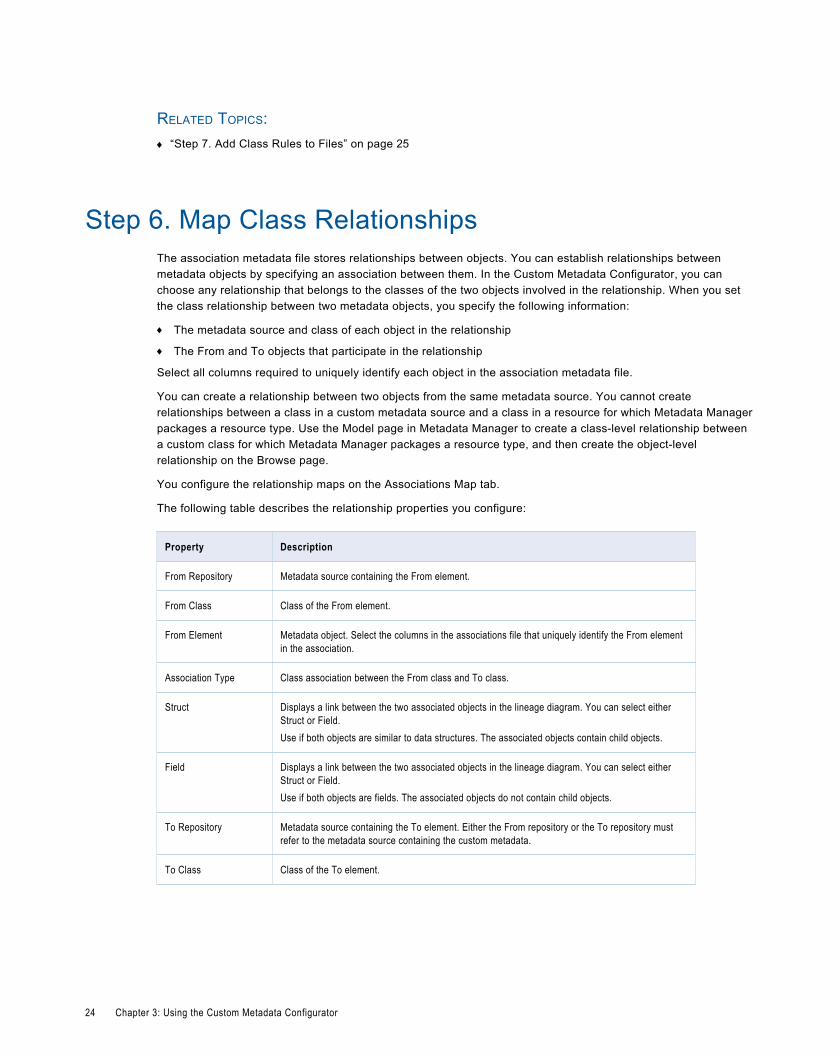
RELATED TOPICS:¨ “Step 7. Add Class Rules to Files” on page 25
Step 6. Map Class RelationshipsThe association metadata file stores relationships between objects. You can establish relationships betweenmetadata objects by specifying an association between them. In the Custom Metadata Configurator, you canchoose any relationship that belongs to the classes of the two objects involved in the relationship. When you setthe class relationship between two metadata objects, you specify the following information:
¨ The metadata source and class of each object in the relationship
¨ The From and To objects that participate in the relationship
Select all columns required to uniquely identify each object in the association metadata file.
You can create a relationship between two objects from the same metadata source. You cannot createrelationships between a class in a custom metadata source and a class in a resource for which Metadata Managerpackages a resource type. Use the Model page in Metadata Manager to create a class-level relationship betweena custom class for which Metadata Manager packages a resource type, and then create the object-levelrelationship on the Browse page.
You configure the relationship maps on the Associations Map tab.
The following table describes the relationship properties you configure:
Property Description
From Repository Metadata source containing the From element.
From Class Class of the From element.
From Element Metadata object. Select the columns in the associations file that uniquely identify the From elementin the association.
Association Type Class association between the From class and To class.
Struct Displays a link between the two associated objects in the lineage diagram. You can select eitherStruct or Field.Use if both objects are similar to data structures. The associated objects contain child objects.
Field Displays a link between the two associated objects in the lineage diagram. You can select eitherStruct or Field.Use if both objects are fields. The associated objects do not contain child objects.
To Repository Metadata source containing the To element. Either the From repository or the To repository mustrefer to the metadata source containing the custom metadata.
To Class Class of the To element.
24 Chapter 3: Using the Custom Metadata Configurator
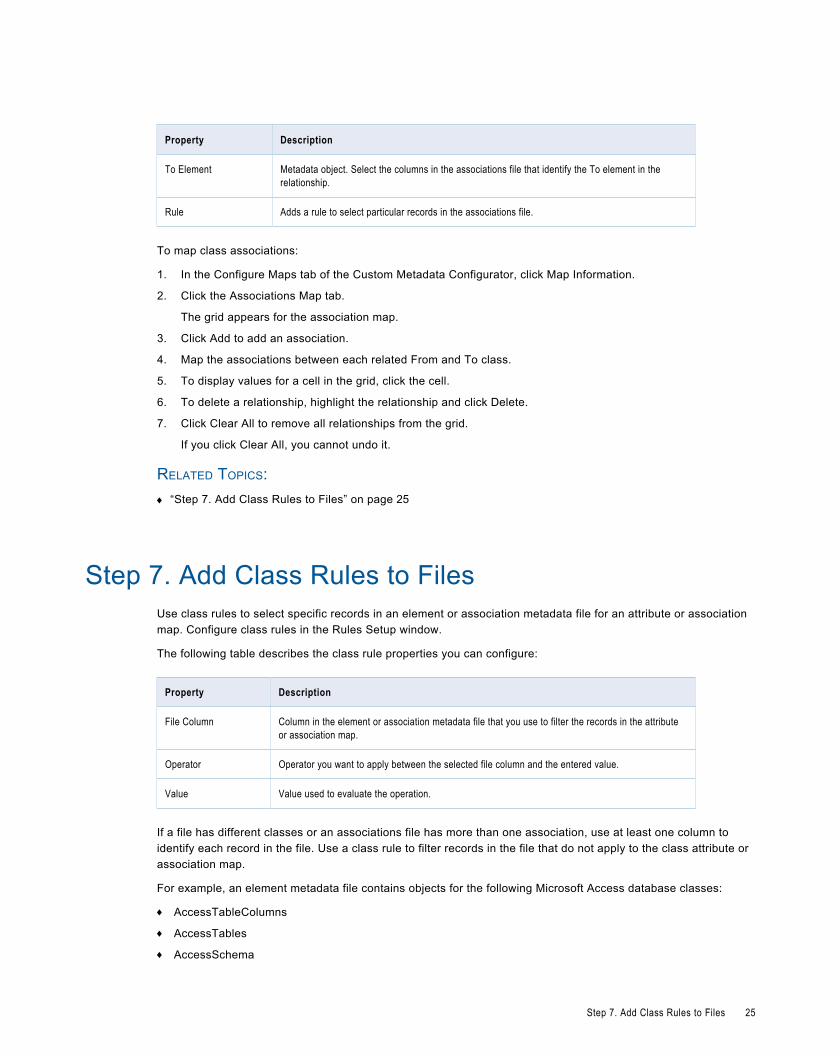
Property Description
To Element Metadata object. Select the columns in the associations file that identify the To element in therelationship.
Rule Adds a rule to select particular records in the associations file.
To map class associations:
1. In the Configure Maps tab of the Custom Metadata Configurator, click Map Information.
2. Click the Associations Map tab.
The grid appears for the association map.
3. Click Add to add an association.
4. Map the associations between each related From and To class.
5. To display values for a cell in the grid, click the cell.
6. To delete a relationship, highlight the relationship and click Delete.
7. Click Clear All to remove all relationships from the grid.
If you click Clear All, you cannot undo it.
RELATED TOPICS:¨ “Step 7. Add Class Rules to Files” on page 25
Step 7. Add Class Rules to FilesUse class rules to select specific records in an element or association metadata file for an attribute or associationmap. Configure class rules in the Rules Setup window.
The following table describes the class rule properties you can configure:
Property Description
File Column Column in the element or association metadata file that you use to filter the records in the attributeor association map.
Operator Operator you want to apply between the selected file column and the entered value.
Value Value used to evaluate the operation.
If a file has different classes or an associations file has more than one association, use at least one column toidentify each record in the file. Use a class rule to filter records in the file that do not apply to the class attribute orassociation map.
For example, an element metadata file contains objects for the following Microsoft Access database classes:
¨ AccessTableColumns
¨ AccessTables
¨ AccessSchema
Step 7. Add Class Rules to Files 25
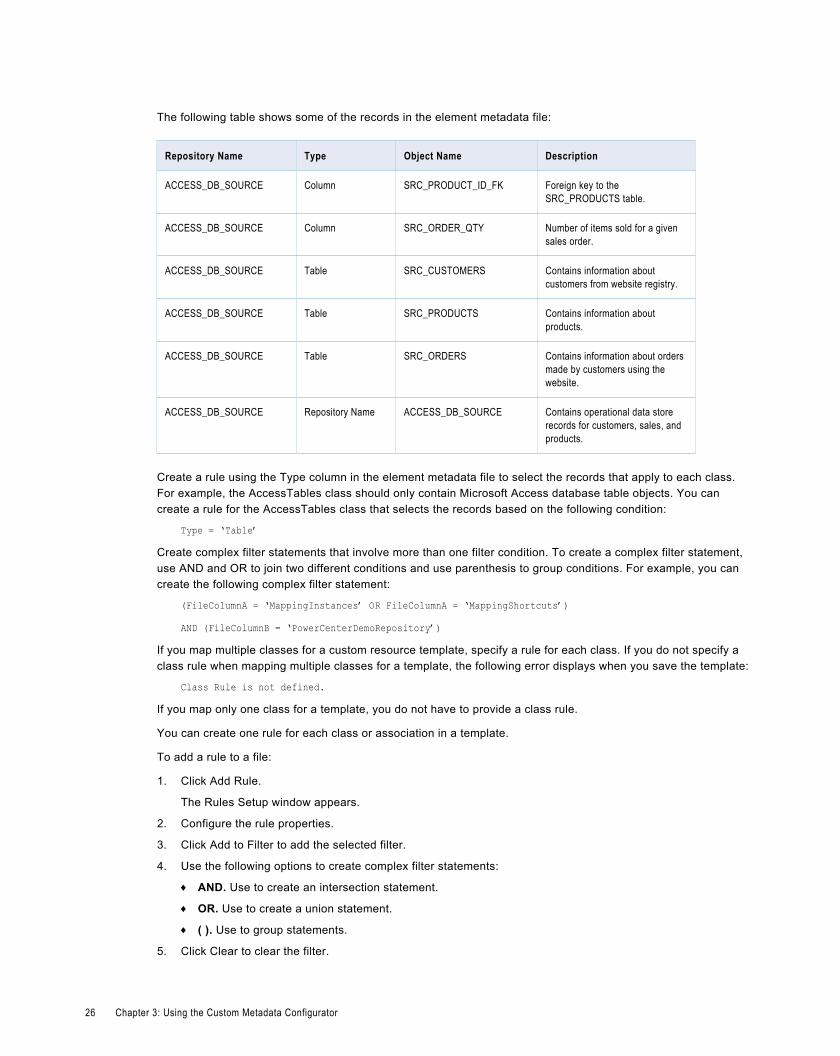
The following table shows some of the records in the element metadata file:
Repository Name Type Object Name Description
ACCESS_DB_SOURCE Column SRC_PRODUCT_ID_FK Foreign key to theSRC_PRODUCTS table.
ACCESS_DB_SOURCE Column SRC_ORDER_QTY Number of items sold for a givensales order.
ACCESS_DB_SOURCE Table SRC_CUSTOMERS Contains information aboutcustomers from website registry.
ACCESS_DB_SOURCE Table SRC_PRODUCTS Contains information aboutproducts.
ACCESS_DB_SOURCE Table SRC_ORDERS Contains information about ordersmade by customers using thewebsite.
ACCESS_DB_SOURCE Repository Name ACCESS_DB_SOURCE Contains operational data storerecords for customers, sales, andproducts.
Create a rule using the Type column in the element metadata file to select the records that apply to each class.For example, the AccessTables class should only contain Microsoft Access database table objects. You cancreate a rule for the AccessTables class that selects the records based on the following condition:
Type = ‘Table’
Create complex filter statements that involve more than one filter condition. To create a complex filter statement,use AND and OR to join two different conditions and use parenthesis to group conditions. For example, you cancreate the following complex filter statement:
(FileColumnA = ‘MappingInstances’ OR FileColumnA = ‘MappingShortcuts’)
AND (FileColumnB = ‘PowerCenterDemoRepository’)
If you map multiple classes for a custom resource template, specify a rule for each class. If you do not specify aclass rule when mapping multiple classes for a template, the following error displays when you save the template:
Class Rule is not defined.
If you map only one class for a template, you do not have to provide a class rule.
You can create one rule for each class or association in a template.
To add a rule to a file:
1. Click Add Rule.
The Rules Setup window appears.
2. Configure the rule properties.
3. Click Add to Filter to add the selected filter.
4. Use the following options to create complex filter statements:
¨ AND. Use to create an intersection statement.
¨ OR. Use to create a union statement.
¨ ( ). Use to group statements.
5. Click Clear to clear the filter.
26 Chapter 3: Using the Custom Metadata Configurator
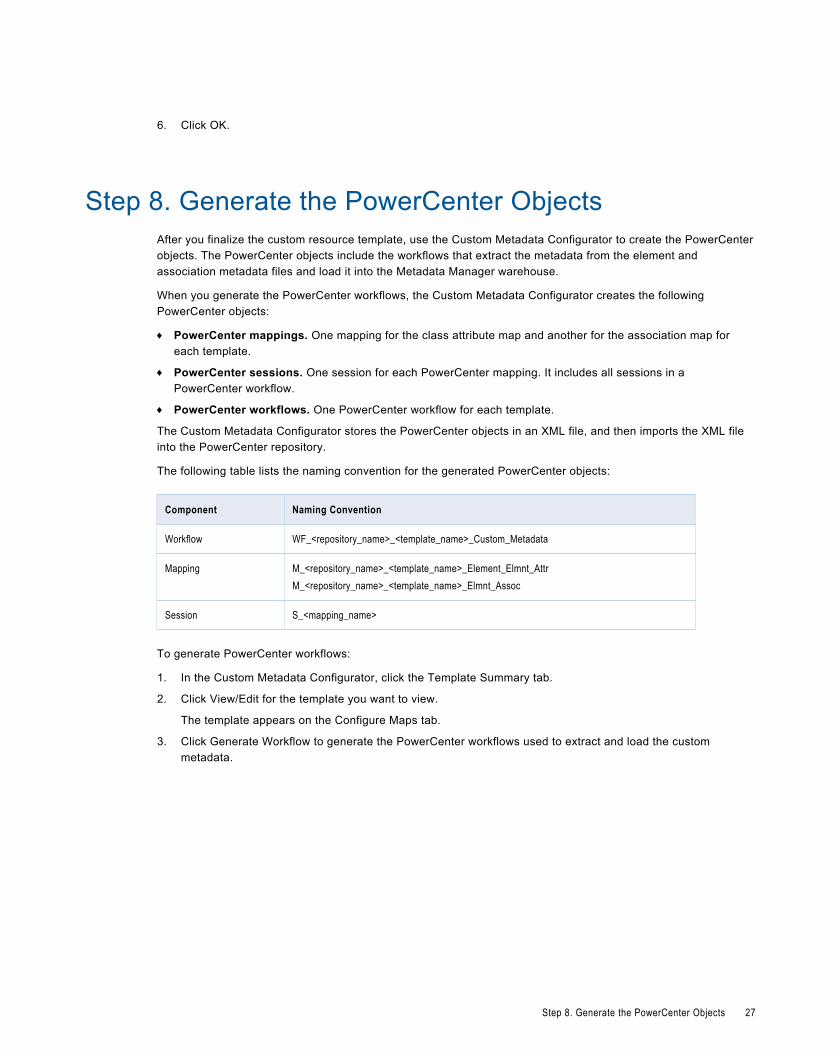
6. Click OK.
Step 8. Generate the PowerCenter ObjectsAfter you finalize the custom resource template, use the Custom Metadata Configurator to create the PowerCenterobjects. The PowerCenter objects include the workflows that extract the metadata from the element andassociation metadata files and load it into the Metadata Manager warehouse.
When you generate the PowerCenter workflows, the Custom Metadata Configurator creates the followingPowerCenter objects:
¨ PowerCenter mappings. One mapping for the class attribute map and another for the association map foreach template.
¨ PowerCenter sessions. One session for each PowerCenter mapping. It includes all sessions in aPowerCenter workflow.
¨ PowerCenter workflows. One PowerCenter workflow for each template.
The Custom Metadata Configurator stores the PowerCenter objects in an XML file, and then imports the XML fileinto the PowerCenter repository.
The following table lists the naming convention for the generated PowerCenter objects:
Component Naming Convention
Workflow WF_<repository_name>_<template_name>_Custom_Metadata
Mapping M_<repository_name>_<template_name>_Element_Elmnt_AttrM_<repository_name>_<template_name>_Elmnt_Assoc
Session S_<mapping_name>
To generate PowerCenter workflows:
1. In the Custom Metadata Configurator, click the Template Summary tab.
2. Click View/Edit for the template you want to view.
The template appears on the Configure Maps tab.
3. Click Generate Workflow to generate the PowerCenter workflows used to extract and load the custommetadata.
Step 8. Generate the PowerCenter Objects 27
C H A P T E R 4
Working with Custom MetadataThis chapter includes the following topics:
¨ Creating Custom Metadata Overview, 28
¨ Creating Custom Resources and Metadata Objects, 28
¨ Editing Properties, 30
¨ Exporting and Importing Custom Properties, 31
Creating Custom Metadata OverviewYou can create custom metadata in the Metadata Manager warehouse. After you create a model, create aresource that represents the model and create metadata objects for the resource using the metadata catalog.
You can also edit the values for custom properties. You can edit metadata object properties you created forcustom classes and properties you created for the packaged application, business intelligence, data integration,data modeling, and relational classes. For example, you created a custom attribute in a report class for CognosReportNet. You can edit the value for the report property.
You can create and edit metadata in the Metadata Manager warehouse using the following methods:
¨ Create a custom resource and custom metadata objects. Use the metadata catalog to add a resourcebased on a custom model, and add metadata objects defined by classes in the model.
After you create the resource and metadata objects, you can edit the properties and relationships for themetadata objects.
¨ Edit custom properties. Edit the values of custom properties for metadata objects.
You can also create object-level relationships for metadata objects after you create class-level relationships forcustom classes on the Model tab.
Note: You can also use the Custom Metadata Configurator and the Metadata Manager Load tab to create acustom resource, create a template for a custom model and generate the PowerCenter objects required to loadthe metadata, and load the metadata for the resource.
Creating Custom Resources and Metadata ObjectsCreate a model with classes, properties, and relationships on the Model tab. After you create the model, you cancreate a resource based on the model to the Metadata Manager warehouse and add metadata objects based on
28
the classes you created. Create resources and metadata objects using the metadata catalog on the Browse tab inMetadata Manager.
To create a custom resource based on a custom model, complete the following steps:
¨ Create the custom resource. Create the resource based on the model for the resource.
¨ Create custom metadata objects. Create the metadata objects based on the model classes. You can createclasses and subclasses.
You can edit or delete resources and metadata objects after you create them.
Creating a ResourceCreate a resource based on a custom model. All the child classes of the resource will appear under the resourcename in the metadata catalog. Create the resource using the Create Custom Metadata window.
The following table describes the Create Custom Metadata properties:
Property Description
Name Name of the custom resource.
Description Description for the custom resource.
Preview of ModelHierarchy
Lists the child classes for the selected model. You can create the metadata objects based on theseclasses after you create the resource.
To create a custom resource:
1. In the Catalog view on the Browse tab, click Actions > New > Custom Metadata.
The Create Custom Metadata window appears.
2. On the left pane, select the model you want to base the custom resource on.
3. Configure the resource properties.
4. Optionally, view the model hierarchy and the classes included in the model you base the custom resource on.
5. Click OK.
Metadata Manager creates the resource and the resource appears in the metadata catalog.
Create Custom Metadata ObjectsAfter you create a custom resource, you can add custom metadata objects to the resource. Add custom metadataobjects based on the classes for the model. When you create the custom metadata object, select the class youwant to create the metadata object for. Add metadata objects based on the model hierarchy you created on theModel tab.
For example, when you add a metadata object to the AccessDB resource, you add metadata objects of typeAccessSchema, because the AccessSchema class is the root class of the model.
Create custom metadata objects in the Create Custom Objects window. You can create multiple metadata objectsusing this window.
By default, Metadata Manager displays Untitled as the name for a metadata object before you configure it. Theproperties you configure depend on the properties you created for the class. For example, the AccessSchemaclass includes the Name, Label, and Description properties.
Creating Custom Resources and Metadata Objects 29
To create a custom metadata object:
1. In the Catalog view, select the metadata object or resource for which you want to create child objects.
2. Click Actions > New and select the name of the class for which you want to create the metadata object.
The Create Custom Objects window appears.
3. Configure the metadata object properties.
4. Click Add.
Metadata Manager adds the metadata object to the Create Custom Objects window.
5. Repeat steps 3 to 4 for each metadata object you want to add.
6. Click the arrow icons to navigate between metadata objects you created to configure the properties.
7. Optionally, select a metadata object you created and click Delete to delete the object.
8. Click OK.
Metadata Manager adds the metadata objects to the metadata catalog.
Deleting Resources and Metadata ObjectsYou can delete any custom resource or custom metadata object from the metadata catalog. You can deleteresources and metadata objects based on the permissions for the resource and metadata objects.
You can delete resources or metadata objects for which you have write permission on the resource or metadataobject and all the child objects. If you do not have write permission on all the child objects, Metadata Managerdeletes any child objects on which you have write permission that do not have any child objects.
For example, you created a custom resource, AccessDB, with a schema object ACCESS_DB_SOURCE.ACCESS_DB_SOURCE contains a child table object named CUSTOMERS. CUSTOMERS has no child objects. Ifyou have write permissions on the resource and all objects and delete the resource, Metadata Manager deletesthe resource and all child objects. However, if you have read permission on ACCESS_DB_SOURCE and writepermission on CUSTOMERS, and delete the resource, Metadata Manager only deletes CUSTOMERS.
You can use the Actions menu or right-click menu to delete a resource or object from the following Catalog viewon the Browse tab.
To delete a custom resource or custom metadata object:
1. Select the metadata object or resource you want to delete.
2. Click Actions > Delete.
Editing PropertiesYou can edit custom metadata object properties or metadata object properties you added to packaged models onthe Model tab. Edit custom metadata object properties and business name properties in the Edit Metadata window.The Edit Properties window displays different properties and options depending on the object types you edit. Youcan edit properties for metadata objects, categories, and business terms.
You can also edit custom metadata object properties you added to packaged model classes and business nameproperties for packaged resource types by exporting the properties to an Excel file. You can then edit theproperties in the Excel file and import the properties into the metadata catalog.
30 Chapter 4: Working with Custom Metadata
You can use the Actions menu or right-click menu to edit properties for a single object from the following areas onthe Browse tab in Metadata Manager:
¨ Shortcuts view
¨ Catalog view
¨ Glossary view
¨ Details panel
¨ Data lineage analysis
To edit properties for an object:
1. Select the object whose properties you want to edit.
2. Click Actions > Edit Properties.
The Edit Properties window appears.
3. Edit the applicable properties.
4. Click OK.
Exporting and Importing Custom PropertiesYou can edit the values for custom properties you add to packaged model classes and business name propertiesusing Microsoft Excel. Export custom properties and business name properties from the metadata catalog to anExcel file. Use the Excel file to edit values for the properties and import the properties from the Excel file into themetadata catalog.
The Excel file contains a worksheet for each object type you export. Each worksheet contains properties for allmetadata objects for a specific object type.
The following table describes the content of each worksheet:
Row or Column Name Description
Export Root Path Metadata catalog root path for the metadata objects in the worksheet. Do not edit the ExportRoot Path.
Class Identifier Name and path of the class in the Metadata Manager repository for the metadata objects inthe worksheet. Do not edit the Class Identifier.
Element ID Resource and object name for a metadata object. Metadata Manager displays the ElementID in the following format: <resource name>.<object name>.
Element Path Hierarchical path for a metadata object in the metadata catalog.
Business Name Business name property for a metadata object.
Custom Attribute Name Custom property for a metadata object.
Exporting Custom PropertiesWhen you export custom and business name properties, Metadata Manager exports the property values for theselected metadata objects and any child objects to the Excel file.
Exporting and Importing Custom Properties 31

To limit the custom and business name properties that Metadata Manager exports, configure catalog preferences.Metadata Manager only exports the resources and object types you configure in catalog preferences.
To export custom and business name properties:
1. On the Browse tab, configure preferences to limit the object types you want to export.
2. In the Catalog view, select the resource, logical group, or metadata object for which you want to exportproperties.
3. Click Actions > Export Metadata > Excel.
4. Click Yes in the Note window to include the business name property.
5. Open or save the Excel file.
The options to save or download in the Excel file depend on your browser.
Editing Custom PropertiesOpen the Excel file to edit custom and business name properties.
To edit custom and business name properties:
1. In Microsoft Excel, open the Excel file that contains the exported properties.
2. Select the worksheet that contains the properties for the class type of the objects you want to edit.
3. In the row that contains the object for which you want to edit properties, enter the property value in theappropriate column.
4. Repeat steps 2 to 3 for all object types and properties that you want to edit.
5. Save the Excel file.
Importing Custom PropertiesMetadata Manager updates the properties for the objects in the metadata catalog with the custom or businessname properties in the Excel file.
Metadata Manager does not import properties for objects that no longer exist in the catalog. If you delete an objectfrom the catalog, Metadata Manager ignores the properties for the object when you import properties.
To import custom and business name properties:
1. In the Catalog view, click Actions > Import Metadata > Excel.
The Import Catalog Metadata window appears.
2. Click Browse and select the Excel file.
3. Click Import.
Metadata Manager imports the properties and displays the number of metadata objects that were updated,not changed, not found, or not valid.
Rules and Guidelines for Exporting and Importing Custom PropertiesUse the following rules and guidelines when you work with Excel files:
¨ If you export a large number of objects for which there are custom or business name properties, you cannotperform any operation in Metadata Manager until all the properties are exported.
¨ If the number of metadata objects in a class is greater than the number of rows in an Excel spreadsheet,Metadata Manager does not export all objects for the object type. Metadata Manager can export a maximum of65,536 objects for each worksheet.
32 Chapter 4: Working with Custom Metadata
C H A P T E R 5
Migrating Custom MetadataThis chapter includes the following topics:
¨ Migrating Custom Metadata Overview, 33
¨ Step 1. Migrate the Models, 34
¨ Step 2. Migrate Custom Metadata, 35
¨ Step 3. Migrate Custom Resource Templates, 36
¨ Step 4. Configure and Load the Custom Resources, 37
Migrating Custom Metadata OverviewYou can migrate metadata between Metadata Manager instances. Use Metadata Manager to export models,custom metadata objects, and custom resource templates from one Metadata Manager repository to another, andthen load the metadata. Migrate custom metadata to avoid re-creating the metadata in a Metadata Managerinstance.
For example, when you move from a development to a production environment, migrate any customization youadded to the development environment to the production environment and then load all resources in theproduction environment.
To migrate custom metadata between source and target Metadata Manager instances, complete the followingsteps:
1. Create the new resource. The resource represents the metadata source that you will import.
2. Migrate models. Export models from the source Metadata Manager repository and import them into thetarget repository. Migrate custom models and custom attributes added to packaged models.
3. Migrate custom metadata objects and properties. Export any custom metadata objects and properties youadded to the source Metadata Manager repository using the metadata catalog and import it into the targetrepository. You can migrate metadata objects for custom resources and custom metadata you added topackaged resources.
4. Migrate custom resource templates. Export custom resource templates from the source Metadata Managerrepository and import them into the target repository.
5. Configure and load custom resources. Generate PowerCenter objects and then configure and load customresources.
You can perform these steps in Metadata Manager or use the Metadata Manager command line to create a scriptthat automatically performs the migration.
Note: Metadata Manager does not have commands to migrate custom resource templates. Use MetadataManager to migrate the templates.
33
Step 1. Migrate the ModelsTo migrate custom models or modified packaged models, you export the models from the source MetadataManager repository to an XML file. You then import the XML file into the target Metadata Manager repository.
When you export a model, the XML file contains all the classes, attributes, and relationships for the model. Whenyou import a model, Metadata Manager analyzes the contents of the XML file and compares it to the existingmodels in Metadata Manager. Metadata Manager imports the models, classes, and relationships in the XML filethat do not exist in the Metadata Manager repository.
For example, you export a custom model from a development environment and then import it into a productionenvironment. If you add a class to the custom model in the development environment and export and import itagain, Metadata Manager imports the class you added.
Exporting a ModelExport a custom model or custom attributes for a packaged model to an XML file. On the Model tab, click Actions> Export Models. Select the models to export in the Export Model window, and click Export. The options to savethe XML file depend on the browser.
You can export a packaged model to an XML file. You can export a custom model or multiple custom models to anXML file. However, you cannot export a combination of packaged and custom model to a single XML file.
Importing a ModelUse the Import Model wizard to import models into a Metadata Manager repository. When you import a model, youselect the XML file that contains models and select the models you want to import.
The Import Model wizard analyzes and validates the XML file you select. If the model does not exist in theMetadata Manager repository, Metadata Manager imports the entire model. If the model exists, Metadata Managerimports the new and changed classes and relationships. If the model in the XML file matches the model in theMetadata Manager repository, Metadata Manager does not import the model.
In this example, the AccessIndex class does not exist in the Metadata Manager repository and the attributes forthe AccessSchema class have changed. Metadata Manager creates the AccessIndex class and updates theAccessSchema class. Metadata Manager also lists the classes and relationships in the model that are unaffectedby the model import process.
To import a model:
1. On the Model tab, click Actions > Import Models.
The Import Model window appears.
2. Click Browse and select the XML file that contains the model you want to import.
3. Click Next.
4. Select the models in the XML file that you want to import.
5. Click Next.
The wizard analyzes the XML file and validates it against the models in the Metadata Manager repository. Thewizard lists the classes and relationships it will create and update, and the classes and relationships that arenot affected by the import process.
6. Click Import to create or update classes and relationships.
7. Optionally, if there are no classes or relationships to create or update, click Back to select another model orclick Cancel to stop the Import Model wizard.
34 Chapter 5: Migrating Custom Metadata

Step 2. Migrate Custom MetadataTo migrate custom metadata, you export the custom metadata from the source Metadata Manager repository to anXML file. You then import the XML file into the target Metadata Manager repository.
Export and import custom metadata between Metadata Manager repositories with the same version. You cannotimport custom metadata from a different version.
You can export and import an XML file that contains resources and metadata objects. When you export metadataobjects for a custom resource, the XML file contains all metadata objects for the resource. When you export apackaged resource type, the XML file contains the custom attributes you added for the resource.
When you import metadata for a custom resource, Metadata Manager imports all metadata objects for theresource in the XML file. When you import metadata for a packaged resource, Metadata Manager imports only thecustom attributes from the XML file.
Exporting MetadataExport metadata to an XML file in the Catalog view on the Browse tab.
To export metadata:
1. On the Browse tab, select the resource for which you want to export metadata.
2. Click Actions > Export Metadata > XML.
The options to save or open the XML file depend on the browser.
Importing MetadataImport metadata from an XML file in the Catalog view on the Browse tab.
Before you import metadata for a resource, complete the following tasks:
¨ Verify that the model exists. Verify that the model for the resource exists in the Metadata Manager repository.If the model does not exist, import it into the Metadata Manager repository.
¨ Verify that the resource exists. Verify that the resource exists in the metadata catalog. If the custom resourcedoes not exist in the metadata catalog, create the resource. If the packaged resource does not exist in themetadata catalog, create the resource and load the metadata for the resource.
To import metadata:
1. On the Browse tab, select the resource for which you want to import metadata.
2. Click Actions > Import Metadata > XML.
The Import Catalog Metadata window appears.
3. Click Browse and select the XML file that contains the metadata you want to import.
4. Click Import.
Rules and Guidelines for Importing Custom MetadataReview the following rules and guidelines before you import custom metadata:
¨ If you export comments and links, verify that the users who added the comments and links areregistered in the target Metadata Manager instance. Metadata Manager does not import a comment or link ifthe user is not registered in the target instance.
Step 2. Migrate Custom Metadata 35
¨ If you export values for custom attributes from a source resource model, verify that the customattributes are defined in the target resource model. Metadata Manager does not import the values forcustom attributes if the custom attributes are not defined in the target resource model.
¨ Metadata Manager writes an entry in the log when it does not import a custom object or customattribute value.
Step 3. Migrate Custom Resource TemplatesCreate a custom resource template in the Custom Metadata Configurator before you load custom metadata intothe metadata catalog. When you migrate a custom resource template, you export the template from the sourceMetadata Manager repository and import it into the target Metadata Manager repository. Use the Custom MetadataConfigurator to export and import custom resource templates.
When you export a custom resource template, the Custom Metadata Configurator exports it to a binary customtemplate file with a .ctf extension. Use the exported custom template file to import the custom resource templateinto the target repository. You can export or import one template at a time.
To troubleshoot errors and get more information about the export and import process, view customwizard.log inthe following location:
<PowerCenter Client installation directory>\client\custom-configurator
Exporting a Custom Resource TemplateTo export a custom resource template:
1. In the Custom Metadata Configurator, log in to the Metadata Manager repository that contains the customresource template you want to export.
2. Click Export.
The Export Custom Template dialog box appears.
3. Select the custom resource for the template you want to export.
4. Enter the path and name of the custom template file that you want to export to or click Browse to select thefile.
5. Click Export.
The Custom Metadata Configurator exports the custom resource template to the file. Import the custom resourcetemplate into the target repository from the file.
Importing a Custom Resource TemplateWhen you import a custom resource template, Metadata Manager creates a template in the Metadata Managerrepository for a custom resource.
Before you import the custom resource template into the repository, you must import the model for the customresource into the Metadata Manager instance. After you import the template, you must generate the PowerCenterobjects that Metadata Manager requires to load the custom metadata.
If the template contains relationships to other resources, you must also configure the resources for therelationships before you import the template. If the resources do not exist in Metadata Manager, you must load theresources before you import the template.
36 Chapter 5: Migrating Custom Metadata
To import a custom resource template:
1. Log in to the Metadata Manager instance where you want to import the custom resource template.
2. Create a custom resource on the Load tab.
3. In the Custom Metadata Configurator, log in to the Metadata Manager repository where you created thecustom resource.
4. Click Import.
The Import Custom Template dialog box appears.
5. Select the name of the custom resource for which you want to import the template.
6. Enter the path and name of the custom template file you want to import or click the Browse button to selectthe custom template file.
7. If the custom resource template contains relationships to other resources, configure a target resource for therelationship for each source resource in the custom template file.
8. Click Import.
The Custom Metadata Configurator imports the template from the custom template file.
Rules and Guidelines for Migrating Custom Resource TemplatesUse the following rules and guidelines when you migrate custom resource templates:
¨ You can migrate custom resource templates between instances of the same version of Metadata Manager only.
¨ You must create a custom resource before you can import a custom resource template.
¨ When you import a custom resource template and configure the source and target resources for relationships,the names of the source and target resources do not need to match.
¨ You can import custom resource templates for custom resources in Metadata Manager only if the customresource does not have a template configured.
¨ If the template you want to import exists in the Metadata Manager repository, the import process fails.
¨ The models for the source and target resources and the model names must be the same.
Step 4. Configure and Load the Custom ResourcesIf you load metadata for a custom resource using a metadata source file, you must generate the PowerCenterobjects, configure the metadata source file, and then load the custom resource.
To configure and load a custom resource, complete the following tasks:
1. Generate the PowerCenter objects. In the Custom Metadata Configurator, generate the PowerCenterobjects, including mappings, sessions, and workflows, that extract the metadata from the metadata sourcefiles and load it into the Metadata Manager warehouse.
2. Configure the metadata source files for the custom resource. On the Load tab in Metadata Manager,configure the custom resource.
3. Load the custom resource. On the Load tab in Metadata Manager, load the custom resource.
RELATED TOPICS:¨ “Step 8. Generate the PowerCenter Objects” on page 27
Step 4. Configure and Load the Custom Resources 37
I N D E X
AAccessDB
AccessSchema class 7AccessTable class 7AccessTableColumn class 7AccessView class 7AccessViewColumn class 7model example 7
AccessSchemaclass 7
AccessTableclass 7
AccessTableColumnclass 7
AccessViewclass 7
AccessViewColumnclass 7
association metadata filesadding class rules 25creating 18delimiters 22guidelines 18
Associations by Package reportrunning 5
Associations Map tabconfiguring relationships 24
Attributes Map tabconfiguring properties 22
BBrowse tab
creating custom metadata objects 29creating resources 29deleting metadata objects 30deleting resources 30editing properties 30exporting and importing metadata 35
business namedescription 5editing 30
Cclass rules
adding to association metadata files 25adding to element metadata files 25
classeschanging the lineage property 12Class Exploration report 4configuring 11configuring groups 11
copying 12creating 11creating properties 13creating relationships 16deleting 12deleting properties 14description 4editing 12editing properties 14editing relationships 16moving 12organizing properties 14removing relationships 16
custom metadataadding 2adding metadata 2creating custom metadata objects 29deleting custom metadata objects 30deleting objects 30editing properties 30integration process overview 2loading 2, 37loading metadata 2migrating 35overview 1, 28
Custom Metadata Configuratorconfiguring class rules 25configuring file delimiters 22creating custom resource templates 19creating rules 25custom resource templates 19deleting custom resource templates 21editing custom resource templates 21logging in 19mapping properties 22mapping relationships 24overview 17viewing custom resource templates 21
custom metadata objectscreating 29deleting 30editing properties 30
custom metadata sourceadding and loading metadata 2
custom modeloverview 9
custom propertiesediting 32export and import overview 31exporting 31importing 32
custom resource templatescreating 19Custom Metadata Configurator 19deleting 21editing 21
38

exporting 36importing 36migrating 36rules and guidelines 37viewing 21
custom resourcescreating in metadata catalog 29creating overview 28
Custom Template Fileusing 36
Ddata lineage
configuring for classes 11delimiters
configuring for metadata and association files 22
Eelement metadata files
adding class rules 25creating 18delimiters 22guidelines 18
Excelexporting from 32
exportingcustom properties 31custom resource templates 36from Excel 32metadata objects 35models 34resources 35
Ggroups
configuring for classes 11description 5
IImport Model wizard
importing models 34importing
custom properties 31, 32custom resource templates 36metadata objects 35models 34resources 35
integration processoverview 2
Mmapping
class properties 22class relationships 24
metadataadding 2loading 2
metadata filesdelimiters 22
Metadata Managerconcepts 4Model tab 6
metadata objectscreating 29creating overview 28deleting 30editing properties 30exporting 35importing 35
Microsoft Excelconfiguring PATH environment variable 18editing properties 31
migratingcustom metadata 35custom resource templates 36models 34
Model tabbrowsing models 6configuring classes 11configuring models 10configuring properties 13configuring relationships 15editing models 6importing and exporting models 34using 6
modelsbrowsing 6configuring 10creating 10custom 4deleting 11description 4editing 6, 10establishing structure 10exporting 34importing 34migrating 34packaged 4running reports 4viewing class properties 6viewing model properties 6
PPATH environment variable
configuring for Microsoft Excel 18properties
adding custom 3configuring 13creating 13deleting 14description 4editing 14, 30editing with Excel 31mapping 22organizing 14
Rrelationships
adding custom 3class-level 5, 15configuring 15
Index 39
creating 16creating parent-child 15description 5editing 16mapping 24object-level 5, 15parent-child 5removing 16
resourcescreating in metadata catalog 29deleting custom resources 30exporting 35
importing 35loading 37
rulescreating in Custom Metadata Configurator 25
TTemplate Summary tab
generating workflows 27
40 Index