Meru Wireless LAN System
447
Meru Wireless LAN System Command Reference Release 3.3 Copyright © Meru Networks, Inc., 2003–2006. All rights reserved. Other names and brands may be claimed as the property of others. Document Number: 882-10033 Rev A
-
Upload
donzqw8194 -
Category
Documents
-
view
369 -
download
3
description
Meru Wireless LAN SystemMeru Wireless LAN System Command Reference
Transcript of Meru Wireless LAN System

Meru Wireless LAN System
Command Reference
Release 3.3
Copyright © Meru Networks, Inc., 2003–2006. All rights reserved.Other names and brands may be claimed as the property of others.
Document Number: 882-10033 Rev A


END USER SOFTWARE LICENSE AGREEMENT
IMPORTANT:
THIS END USER SOFTWARE LICENSE AGREEMENT (THIS “AGREEMENT”) IS A LEGAL AGREEMENT BETWEEN THE END USER (“CUSTOMER”) OF THE SOFTWARE ACCOMPANYING THIS AGREEMENT (THE “SOFTWARE”) AND MERU NETWORKS, INC. (“MERU”). THIS AGREEMENT GOVERNS CUSTOMER’S USE OF, AND THE TERM “SOFTWARE INCLUDES, ANY AND ALL COMPUTER SOFTWARE, ANY PRINTED OR ELECTRONIC DOCUMENTATION, OR OTHER CODE, WHETHER ON A DISK, IN ANY MEMORY DEVICE, EMBEDDED IN A SEMICONDUCTOR, DOWNLOADED OR ON ANY OTHER MEDIA PROVIDED TO CUSTOMER BY MERU NETWORKS, INC. ("MERU") OR ITS AUTHORIZED RESELLER ("RESELLER") AS PART OF A MERU PRODUCT ("MERU PRODUCT") OR AS A STAND-ALONE PRODUCT. CUSTOMER MUST READ THIS AGREEMENT CAREFULLY BEFORE INSTALLING OR OTHERWISE USING THE SOFTWARE. BY INSTALLING, DOWNLOADING, EMBEDDING OR OTHERWISE USING THE SOFTWARE, CUSTOMER AGREES TO BE BOUND BY THE TERMS OF THIS AGREEMENT. THIS AGREEMENT PROVIDES A LICENSE TO USE THE SOFTWARE AND CONTAINS WARRANTY DISCLAIMERS AND LIABILITY LIMITATIONS. BY USING THE SOFTWARE IN ANY WAY, INCLUDING BUT NOT LIMITED TO, REQUESTING A LICENSE KEY FROM MERU, CUSTOMER CONFIRMS ITS ACCEPTANCE OF, AND AGREEMENT TO BE BOUND BY, THE TERMS OF THIS AGREEMENT. IF CUSTOMER DOES NOT AGREE TO BE BOUND BY THE TERMS OF THIS AGREEMENT, THEN CUSTOMER MUST: (I) ERASE ALL ASPECTS OF THE SOFTWARE FROM ITS COMPUTERS; (II) NOT REQUEST FROM MERU OR ANYONE ELSE A LICENSE KEY THAT WOULD ALLOW OPERATION OF THE SOFTWARE; AND (III) NOT OPERATE THE SOFTWARE IN ANY MANNER.
Article 1. License
1.1. Grant. Subject to Customer’s compliance with the terms and conditions in this Agreement, Meru grants Customer a non-exclusive, non-transferable royalty-free license to use the Software exclusively in connection with the Meru Product on which it has been embedded or for which it has been offered, and to use all written materials accompanying the Software (the “Documentation”).
1.2. Ownership of Software and Confidentiality.
(a).The Software is licensed, not sold, to Customer by Meru. CUSTOMER MAY OWN THE MEDIA ON WHICH THE SOFTWARE IS PROVIDED, BUT MERU AND/OR MERU'S LICENSOR(S) RETAIN TITLE TO THE SOFTWARE. Customer acknowledges that the Software and Documentation are protected, among other ways, by federal copyright law and international treaties and that they constitute confidential information of Meru, protected also by this Agreement. The organization, structure, sequence, logic and source code of the Software are valuable trade secrets of Meru and its licensors. Except for those rights expressly granted by this Agreement to Customer, Meru or its licensors retain and shall own all rights, title and interests in and to the Software, and Customer shall have no right, title or interest in or to any of, the Software or Documentation, including without limitation, the intellectual property rights comprising or related to the Software and Documentation.
(b).Customer shall keep the Software and Documentation confidential and shall take all reasonable precautions to preserve its confidentiality, including where applicable, having all of its employees and subcontractors execute confidentiality agreements that cover the Software and Documentation. Customer shall take all steps reasonably necessary to ensure that no person or entity has unauthorized access to the Software or Documentation.
1.3. Permitted Uses. This Agreement allows Customer to use the Software solely as embedded in the Meru Product on which the Software has been installed, for execution on, or (where the applicable documentation permits installation on non-Meru equipment)
iii
for communication with Meru Product owned or leased by the Customer and in accordance with Meru's documentation. Notwithstanding the restrictions set out above in Section 1.2, Customer may make one copy of any Software that is offered separate from, not embedded in, a Meru Product, in a machine-readable form for back-up purposes only, subject to Customer including on the copy all copyright, trademark and other proprietary rights notices, as contained on the original version. Customer may copy the Documentation in a reasonable number for employees using the Software, subject to Customer including on each copy all copyright, trademark and other proprietary rights notices, as contained in the original version of the Documentation.
1.4. Restrictions on Use. Customer may not, nor may Customer permit any third party to: (a) decompile, reverse engineer, disassemble, or otherwise attempt to derive, reconstruct or discover any humanly readable form of the Software source code; (b) modify, translate, copy, reproduce, disclose, or create derivative works of the Software or Documentation; (c) allow access to the Software or Documentation by any third party other than agents and representatives working on Customer’s behalf; or (d) rent, lease, loan, distribute, assign or transfer the Software unless expressly permitted in writing by Meru or by this Agreement. Customer may not disclose, provide, or otherwise make available any trade secret and/or copyrighted material, including without limitation, the specific design and structure of individual programs or trade secrets, contained within or related to the Software to any third party without Meru's prior written consent. Additionally, Customer shall keep any result of any benchmark or other evaluation of the Software confidential and shall not publish any result of any such result without Meru’s prior written consent. Customer will implement reasonable security measures to protect such trade secrets and copyrighted materials. Customer shall not under any circumstance, and shall not permit any third party to, prepare any error correction, modification or derivative work of the Software or Documentation or remove deface or obscure any product identification, copyright, trademark, suppliers' proprietary rights notices, or other notice on or in the Software or on output generated by the Software or the Documentation.
Article 2. Termination. This Agreement is effective until terminated. Customer’s rights under this Agreement will terminate automatically without notice from Meru if Customer violates any of the restrictions in Article 1 or breaches any term(s) of this Agreement. Upon termination, Customer must destroy all copies of the Software in Customer’s possession or control. Customer acknowledges and agrees that any unauthorized use, transfer, sublicensing or disclosure of the Software may cause irreparable injury to Meru, and under such circumstances, Meru shall be entitled to equitable relief, without posting bond or other security, including but not limited to, preliminary and permanent injunctive relief.
Article 3. Disclaimer of Warranty.
3.1. TO THE MAXIMUM EXTENT PERMITTED BY LAW, MERU AND MERU 'S LICENSOR(S) (FOR THE PURPOSES OF ARTICLES 3 AND 4, MERU AND MERU 'S LICENSOR(S) SHALL BE COLLECTIVELY REFERRED TO AS "MERU ") PROVIDES THE SOFTWARE AND DOCUMENTATION “AS IS” AND “WITHOUT WARRANTY”, AND WITH RESPECT TO THE SOFTWARE AND ANY DOCUMENTATION, MERU HEREBY SPECIFICALLY EXCLUDES AND DISCLAIMS THE IMPLIED WARRANTIES OF MERCHANTABILITY, AND FITNESS FOR A PARTICULAR USE AND ALL OTHER WARRANTIES, WHETHER EXPRESS OR IMPLIED BY LAW, STATUTE OR COURSE OF DEALING, AND MERU SPECIFICALLY EXCLUDES ALL REPRESENTATIONS AND WARRANTIES, WHETHER STATUTORY OR OTHERWISE, WITH RESPECT TO NON-INFRINGEMENT OF ANY NATURE OF THE RIGHTS OF ANY THIRD PARTY.
3.2. SPECIFICALLY, MERU DOES NOT WARRANT THAT THE FUNCTIONS CONTAINED IN THE SOFTWARE WILL MEET CUSTOMER’S REQUIREMENTS, OR THAT THE OPERATION OF THE SOFTWARE WILL BE UNINTERRUPTED OR ERROR-FREE, OR THAT DEFECTS IN THE SOFTWARE WILL BE CORRECTED. FURTHERMORE, MERU DOES NOT WARRANT OR MAKE ANY REPRESENTATION REGARDING THE USE OR THE RESULTS OF THE USE OF THE SOFTWARE OR RELATED DOCUMENTATION IN TERMS OF THEIR CORRECTNESS, ACCURACY, RELIABILITY, OR OTHERWISE. NO ORAL OR WRITTEN INFORMATION OR ADVICE GIVEN BY MERU OR MERU AUTHORIZED REPRESENTATIVE SHALL CREATE A WARRANTY OR IN ANY WAY INCREASE THE SCOPE OF THIS WARRANTY.
3.3. Meru does not warrant that the Software or any Appliance will be free of vulnerability to intrusion, virus attack or hacker attacks. The Software is not fault-tolerant nor designed or intended for use in hazardous environments requiring fail-safe performance, including without limitation, in the operation of nuclear facilities, aircraft navigation or communication systems, air
iv

traffic control, weapons systems, direct life-support machines or any other application in which the failure of the Software could lead directly to death, personal injury, or severe physical or property damage (collectively, “High Risk Activities”). Meru expressly disclaims any express or implied warranty of fitness for High Risk Activities.
Article 4. Limitation of Liability.
4.1. CUSTOMER ASSUMES THE ENTIRE RISK AS TO RESULTS AND PERFORMANCE OF THE SOFTWARE. TO THE MAXIMUM EXTENT PERMITTED UNDER LAW, UNDER NO CIRCUMSTANCE SHALL MERU BE LIABLE FOR ANY SPECIAL, INDIRECT, INCIDENTAL, EXEMPLARY OR CONSEQUENTIAL DAMAGES OF ANY KIND OR NATURE WHATSOEVER ARISING OUT OF OR IN ANY WAY RELATED TO THIS AGREEMENT OR THE SOFTWARE. Such limitation of damages includes, but is not limited to, lost good will, lost profits, loss of data or software, work stoppage or impairment of other goods, regardless of the legal theory on which the claim is brought, even if Meru has been advised of the possibility of such damage or if such damage could have been reasonably foreseen, and notwithstanding any failure of essential purpose of any exclusive remedy provided in this Agreement.
4.2. IN NO EVENT SHALL MERU’S TOTAL LIABILITY IN CONNECTION WITH THIS AGREEMENT OR THE SOFTWARE, WHETHER BASED ON CONTRACT, WARRANTY, TORT, INCLUDING NEGLIGENCE, STRICT LIABILITY OR OTHERWISE, EXCEED (i) THE AMOUNT TO MERU FOR THE SOFTWARE LICENSE, OR (ii) IF NO SEPARATE FEE WAS PAID FOR THE SOFTWARE LICENSE, THE AMOUNTS PAID FOR THE MERU PRODUCT IN WHICH THE SOFTWARE IS EMBEDDED. IN NO CASE SHALL MERU BE LIABLE FOR THE COST OF PROCUREMENT OF ANY SUBSTITUTE PRODUCT, SOFTWARE OR SERVICE.
4.3. Customer acknowledges that its agreement to the limitations of liability set out in this article is a crucial part of its consideration for the rights under the license grant.
Article 5. U.S. Government Rights. If Customer is the U.S. Government, Customer acknowledges that it obtains only those rights customarily provided to commercial end use customers. For U.S. governmental entities, this commercial license is provided in accordance with FAR 12.211 (Technical Data) and 12.212 (Computer Software) and, for Department of Defense purchasers, DFAR 252.227-7015 (Technical Data – Commercial Items) and DFAR 227.7202-3 (Rights in Commercial Computer Software or Computer Software Documentation). Use, duplication or disclosure by the U.S. Government is subject to the restrictions set forth in FAR 52.227-14(g), Rights in Data—General (June 1987) and FAR 52.227-19, Commercial Computer Software—Restricted Rights (June 1987), or if under Department of Defense, DFAR 252.227-7015(b), Technical Data—Commercial Items (June 2004) and DFAR 227.7202-3(a) June 2005) in accordance with this Agreement. If Customer is a governmental entity that has a need for rights not addressed above in this Article 5, it must negotiate a separate agreement with Meru. Customer acknowledges that the Software source code is unpublished and that all rights are reserved under the copyright laws of the United States. Any use, modification, reproduction, display or disclosure of the Software or any documentation by the United States Government shall be governed by the terms of this Agreement.
Article 6. Export. The Software may be subject to the United States laws and regulations related to the export of technical data and products produced from such data. Customer shall not, without fully complying with all applicable laws and regulations, including all United States laws and regulations with respect to export, export any Software or any Appliance, allow any Software to be exported or transfer any Software to any person or entity that engages in the research or production of military devices, armaments or any instruments of warfare, including biological, chemical and nuclear warfare.
Article 7. Governing Law. This Agreement will be governed by and construed in accordance with the laws of the State of California, U.S.A., without reference to its conflict of law principles, and the United Nations Convention on Contracts for the International Sale of Goods does not apply. Except for actions for injunctive relief for a violation of intellectual property rights or confidentiality obligations, any action by either party with respect to this Agreement or the Software must be brought in the state or federal courts sitting in Santa Clara County, California, and each party submits to the personal jurisdiction of such courts.
v

Article 8. Injunctive Relief. Customer acknowledges that its violation of any restriction set out in Article 1 or of any obligation set out under Article 2 may cause irreparable harm to Meru and upon any such violation, Meru shall be entitled to seek equitable relief without posting any bond or other security.
Article 9. Entire Agreement; Waiver; Modifications; Severability. This Agreement constitutes the entire agreement between the parties with respect to the subject matter of this Agreement and supersedes and replaces all prior or contemporaneous understandings or agreements, written or oral, with respect to such subject matter. No modification or amendment of this Agreement or any waiver of any right under this Agreement shall be effective unless in writing and signed by an authorized representative of the party to be charged. Any waiver of any breach of any provision of this Agreement shall not be construed as a waiver of any continuing or succeeding breach of such provision or a waiver or modification of the provision. If a court of competent jurisdiction finds any provision of this Agreement invalid or unenforceable, that provision will be amended to achieve as nearly as possible the same economic effect as the original provision and the remainder of this Agreement will remain in full force. Failure of a party to enforce any provision of this Agreement shall not constitute and shall not be construed as a waiver of such provision or of the right to enforce such provision. CUSTOMER ACKNOWLEDGES THAT IT IS NOT RELYING UPON ANY ORAL REPRESENTATION BY Meru OF ANY NATURE, INCLUDING WITH RESPECT TO ANY WARRANTY.
vi
Contents
About This Guide . . . . . . . . . . . . . . . . . . . . . . . . . . . . . xviiAudience . . . . . . . . . . . . . . . . . . . . . . . . . . . . . . . xviiOther Sources of Information . . . . . . . . . . . . . . . . . . . . . . . xviiiGuide Typographic Conventions . . . . . . . . . . . . . . . . . . . . . . xviiiSyntax Notation . . . . . . . . . . . . . . . . . . . . . . . . . . . . . xixContacting Meru . . . . . . . . . . . . . . . . . . . . . . . . . . . . . xx
Chapter 1 Key Concepts . . . . . . . . . . . . . . . . . . . . . . . . . . . . . . . . 1Getting Started . . . . . . . . . . . . . . . . . . . . . . . . . . . . . . 1CLI Command Modes . . . . . . . . . . . . . . . . . . . . . . . . . . . 2Command Line-Only Commands. . . . . . . . . . . . . . . . . . . . . . . 3Abbreviating Commands . . . . . . . . . . . . . . . . . . . . . . . . . . 5Using No and Default Forms of Commands . . . . . . . . . . . . . . . . . . 6Getting Help . . . . . . . . . . . . . . . . . . . . . . . . . . . . . . . 6Using Command History . . . . . . . . . . . . . . . . . . . . . . . . . . 7Finding Words in show Command Output . . . . . . . . . . . . . . . . . . . 8Customizing the CLI Prompt . . . . . . . . . . . . . . . . . . . . . . . . 9Manipulating Terminal Characteristics . . . . . . . . . . . . . . . . . . . . 9Ending a Session . . . . . . . . . . . . . . . . . . . . . . . . . . . . . 10
Chapter 2 User Interface Commands . . . . . . . . . . . . . . . . . . . . . . . . 11? 12disable 13do 14enable 15end 16exit 17help 18prompt 19quit 20show history 21show terminal 22terminal history 23terminal history size 24terminal length 25
Contents vii

terminal width 26
Chapter 3 File Management Commands . . . . . . . . . . . . . . . . . . . . . . 27cd 28copy 29copy running-config 31delete 33dir 35downgrade 36more 37pwd 39reload 40rename 41run 42show controller file systems 43show flash 45show running-config 46show startup-config 47show scripts 48upgrade ap 49upgrade controller 51upgrade system 53
Chapter 4 System Management Commands . . . . . . . . . . . . . . . . . . . . 55audit period 56calendar set 57clear statistics interfaces 58date 59diagnostics 60high-availability initdead 61high-availability peer 62high-availability shared-ip 64high-availability start 65high-availability stop 66license 67management wireless 68ntp 69passwd 70ping 71poweroff controller 72reload 73
viii Meru Wireless LAN System Command Reference

reload-management 74setup 75show alarm 77show calendar 79show controller 80show controller cpu-utilization 83show controller file systems 84show controller memory 86show controller processes 87show flash 89show high-availability 90show hostname 93show license 94show license-file 96show log 97show ntp-server 98show syslog-file 99show syslog-host 100show syslog-table 101show timezones 102statistics period 103syslog-host 104telnet 105timezone 106traceroute 108
Chapter 5 Interface and IP Commands . . . . . . . . . . . . . . . . . . . . . . . 109ip address 110ip address dhcp 112ip default-gateway 113ip dhcp-passthrough 115ip dhcp-server 116ip dns-server 117ip domainname 118ip ftp 119ip scp 120ip sftp 121ip udp-broadcast 122show interfaces FastEthernet ap 124show interfaces FastEthernet controller 127show interfaces FastEthernet statistics 130
Contents ix

show ip 131
Chapter 6 VLAN Commands. . . . . . . . . . . . . . . . . . . . . . . . . . . . . 133show vlan 134vlan 136
Chapter 7 Security Commands. . . . . . . . . . . . . . . . . . . . . . . . . . . . 1378021x-network-initiation 138allowed-l2-modes 139captive-portal 141clear certificates extension-type 142clear certificates name 143description 144encryption-modes ccmp 145encryption-modes tkip 146encryption-modes wep128 147encryption-modes wep64 148import certificate pem 149import certificate pfx 150ip-address 151key 152mac-delimiter 153macfiltering 154port 155psk key 156radius-profile 158radius-server primary 160radius-server secondary 161reauth 162rekey multicast-enable 163rekey period 164security-profile 165shared-authentication 167show aaa statistics 168show certificate detail 169show certificate installed 171show radius-profile 172show security-profile 173show ssl-server 175show web 176ssl-server associate pem 177
x Meru Wireless LAN System Command Reference

ssl-server associate pfx 178ssl-server port 179ssl-server radius-profile 180static-wep key 181static-wep key-index 183vlan 184web login-page 185
Chapter 8 ESSID Commands . . . . . . . . . . . . . . . . . . . . . . . . . . . . 187accounting interim-interval 188accounting primary-radius 189accounting secondary-radius 190ap-discovery join-ess 192ap-discovery join-virtual-ap 193base-tx-rates 195beacon dtim-period 197beacon period 198calls-per-bss 199ess-ap 200essid 201l2bridge ipv6 202multicast-enable 203publish-essid 204remote-ap-enable 205security-profile 206show ess-ap 207show essid 208ssid 210silent-client-enable 211supported-tx-rates 212vlan name 214vlan support 215
Chapter 9 Access Point and Radio Commands . . . . . . . . . . . . . . . . . . . 217admin-mode 219antenna-property 220antenna-selection 221ap 222ap-redirect 224auto-ap-upgrade 225autochannel 227
Contents xi
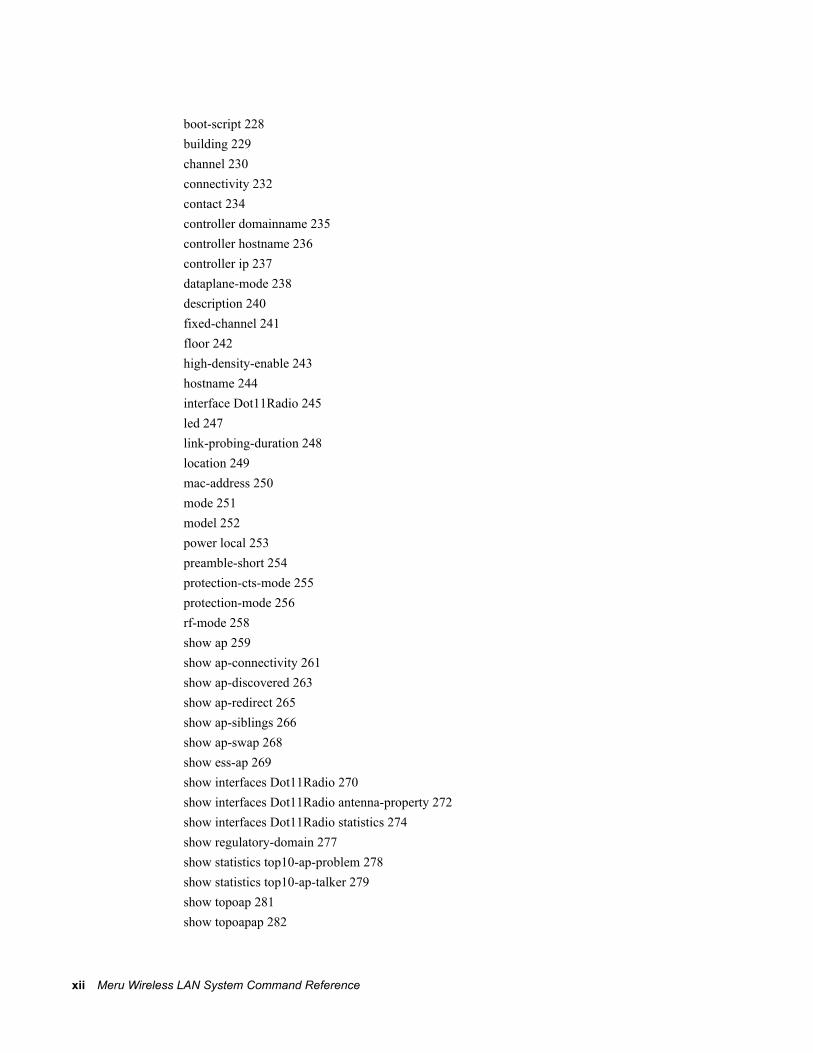
boot-script 228building 229channel 230connectivity 232contact 234controller domainname 235controller hostname 236controller ip 237dataplane-mode 238description 240fixed-channel 241floor 242high-density-enable 243hostname 244interface Dot11Radio 245led 247link-probing-duration 248location 249mac-address 250mode 251model 252power local 253preamble-short 254protection-cts-mode 255protection-mode 256rf-mode 258show ap 259show ap-connectivity 261show ap-discovered 263show ap-redirect 265show ap-siblings 266show ap-swap 268show ess-ap 269show interfaces Dot11Radio 270show interfaces Dot11Radio antenna-property 272show interfaces Dot11Radio statistics 274show regulatory-domain 277show statistics top10-ap-problem 278show statistics top10-ap-talker 279show topoap 281show topoapap 282
xii Meru Wireless LAN System Command Reference

swap 284
Chapter 10 Rogue AP Detection Commands . . . . . . . . . . . . . . . . . . . . . 287rogue-ap acl 288rogue-ap aging 289rogue-ap assigned-aps 290rogue-ap blocked 291rogue-ap detection 293rogue-ap mitigation 294rogue-ap mitigation-frames 295rogue-ap operational-time 296rogue-ap scanning-channels 297rogue-ap scanning-time 299show rogue-ap acl 300show rogue-ap blocked 301show rogue-ap globals 302show rogue-ap-list 303
Chapter 11 MAC Filtering Commands . . . . . . . . . . . . . . . . . . . . . . . . 305access-list deny 306access-list deny import 308access-list permit 310access-list permit import 311access-list radius-server 313access-list state 315show access-list deny 317show access-list permit 318show access-list state 319
Chapter 12 Quality-of-Service Commands . . . . . . . . . . . . . . . . . . . . . . 321action 322avgpacketrate 323droppolicy 324dscp 325dstip 326dstmask 327dstport 328peakrate 329priority 330qoscodec 331qosrule 335
Contents xiii

qosvars admission 338qosvars bwscaling 340qosvars cac-deauth 341qosvars calls-per-ap 342qosvars calls-per-bssid 343qosvars drop-policy 344qosvars enable 345qosvars load-balance-overflow 346qosvars max-stations-per-ap 347qosvars max-stations-per-bssid 348qosvars no enable 349qosvars sip-idle-timeout 350qosvars station-assign-age 351qosvars tcpttl 352qosvars ttl 353qosvars udpttl 354rspecrate 355rspecslack 356srcip 357srcmask 358srcport 359show phones 360show phone-calls 361show qoscodec 362show qosflows 364show qosrule 366show qosstats 369show qosvars 370show statistics call-admission-control 372tokenbucketrate 373tokenbucketsize 374trafficcontrol-enable 375
xiv Meru Wireless LAN System Command Reference

Chapter 13 SNMP Commands. . . . . . . . . . . . . . . . . . . . . . . . . . . . . 377reload snmp 378show snmp-community 379show snmp-trap 380snmp-server community 381snmp-server contact 382snmp-server description 383snmp-server location 384snmp-server trap 385
Chapter 14 Station Commands . . . . . . . . . . . . . . . . . . . . . . . . . . . . 387no station 388show ap-assigned 389show dot11 associations 391show dot11 statistics client-traffic 392show station 394show statistics station-per-ap 398show statistics top10-station-problem 400show statistics top10-station-talker 402show topostaap 404show topostation 405
Chapter 15 Troubleshooting Commands . . . . . . . . . . . . . . . . . . . . . . . 407analyze-capture 408capture-packets 409debug controller 415debug module 416diagnostics 417diagnostics-controller 418remote-log 419
Contents xv

xvi Meru Wireless LAN System Command Reference
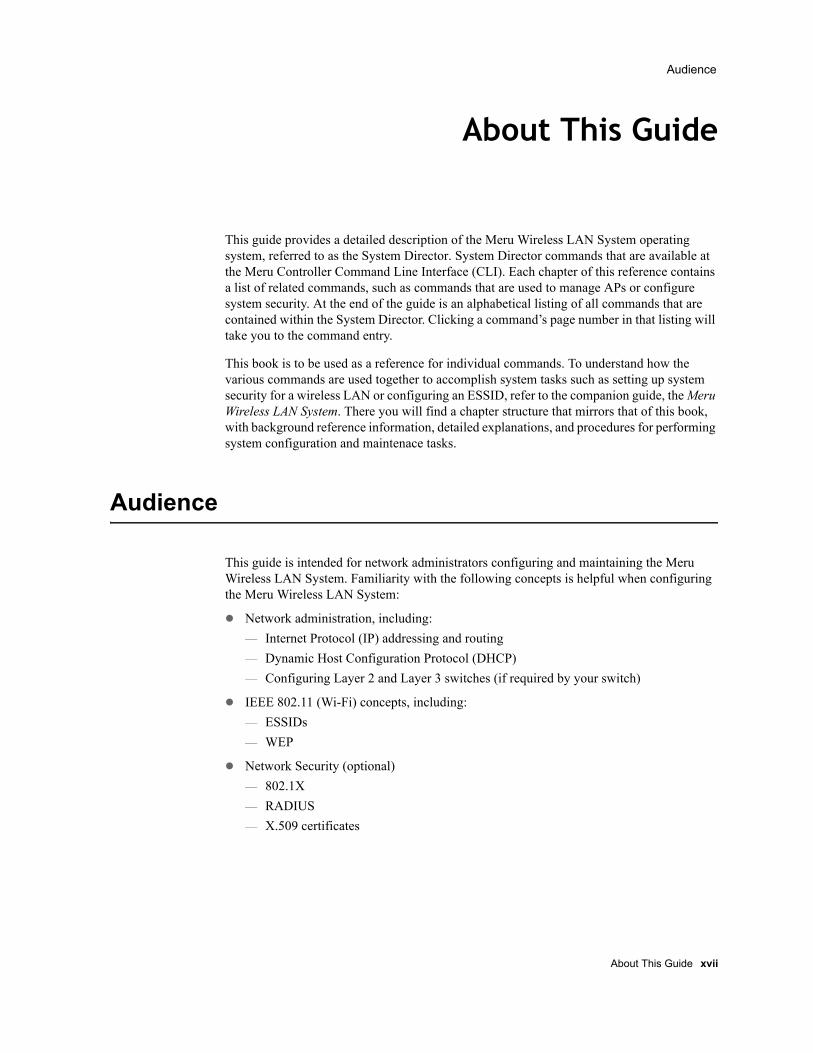
Audience
About This Guide
This guide provides a detailed description of the Meru Wireless LAN System operating system, referred to as the System Director. System Director commands that are available at the Meru Controller Command Line Interface (CLI). Each chapter of this reference contains a list of related commands, such as commands that are used to manage APs or configure system security. At the end of the guide is an alphabetical listing of all commands that are contained within the System Director. Clicking a command’s page number in that listing will take you to the command entry.
This book is to be used as a reference for individual commands. To understand how the various commands are used together to accomplish system tasks such as setting up system security for a wireless LAN or configuring an ESSID, refer to the companion guide, the Meru Wireless LAN System. There you will find a chapter structure that mirrors that of this book, with background reference information, detailed explanations, and procedures for performing system configuration and maintenace tasks.
Audience
This guide is intended for network administrators configuring and maintaining the Meru Wireless LAN System. Familiarity with the following concepts is helpful when configuring the Meru Wireless LAN System:
Network administration, including:— Internet Protocol (IP) addressing and routing— Dynamic Host Configuration Protocol (DHCP)— Configuring Layer 2 and Layer 3 switches (if required by your switch)
IEEE 802.11 (Wi-Fi) concepts, including:— ESSIDs— WEP
Network Security (optional)— 802.1X— RADIUS— X.509 certificates
About This Guide xvii

Other Sources of Information
Other Sources of Information
Additional information is available on the Meru web site and in the following Meru publications and external references.
Meru PublicationsMeru Wireless LAN System Release 3.3 Release Note
Meru Wireless LAN System Getting Started Guide
Meru Access Point and Radio Switch Installation Guide
Meru Controller Installation Guide
Meru Wireless LAN System Configuration Guide
External ReferencesStevens, W. R. 1994. TCP/IP Illustrated, Volume 1, The Protocols. Addison-Wesley, Reading, Mass.
Gast, M.S. 2002. 802.11 Wireless Networks, The Definitive Guide. O’Reilly and Associ-ates, Sebastopol, Calif.
Guide Typographic Conventions
This guide uses the following typographic conventions in paragraph text to help you identify information:
Bold text Identifies commands and keywords in syntax descriptions that are entered literally.
Italic text Used for new terms, emphasis, and book titles; also identifies arguments for which you supply values in syntax descriptions.
Courier fontIdentifies file names, folder names, computer screen output, and text in syntax descriptions that you are required to type.
help Denotes a cross-reference link to a command. Clicking the link takes you to the command reference entry.
Ctrl-
Denotes that the Ctrl key should be used in conjunction with another key, for example, Ctrl-D means hold down the Ctrl and press the D key. Keys are shown in capitals, but are not case sensitive.
xviii Meru Wireless LAN System Command Reference

Syntax Notation
Syntax Notation
In example command syntax descriptions and command examples, the following text elements and punctuation are used to denote user input and computer output for the command. In general, Courier font is used for command input and output at the command line; bold indicates required text and italics indicate values that are to be replaced.
The following figure shows a sample of syntax notation.
Note: Provides extra information, tips, and hints regarding the topic.
Caution!Identifies important information about actions that could result in damage to or loss of data, or could cause the application to behave in unexpected ways.
Warning! Identifies critical information about actions that could result in equipment failure or bodily harm.
bold Required command, keywords, and punctuation.italic Arguments or file names where you substitute a value.no The optional no form of the command disables the feature or function.
[ ] Optional elements are enclosed by square brackets.{ } Braces indicates that one of the enclosed elements must be used.| Choices among elements are separated by vertical bars.
[{}] A required choice within an optional element.… The preceding argument can be repeated.
[no] action target {keyword|keyword}
Command or action. In some cases, action takes you to another command mode.
One or more repeated values
[argument ...]
Choose between the enclosed elements
The optional no form disables the command; without the no, enables or re-enables.
Keyword or command within a submode.
Note: Many commands have a default setting or value, listed in the Default section of the command page.
About This Guide xix

Contacting Meru
Contacting Meru
You can visit the Meru Networks web site on the Internet at this URL:
http://www.merunetworks.com
Customer Services and SupportFor assistance, contact Meru Customer Services and Support 24 hours a day at 1-888-637-8952 (1-888-Meru-WLA(N)) or 1-408-215-5305. Email can be sent to [email protected].
Meru Customer Services and Support provide end users and channel partners with the following:
Telephone technical support
Software update support
Spare parts and repair service
xx Meru Wireless LAN System Command Reference

Getting Started
Chapter 1Key Concepts
This chapter presents tips for working with the System Director command line interface (CLI). It describes the various command modes, provides some tips for getting help, using the history functions, and customizing the prompt and terminal characteristics. The following sections are included in this guide:
Getting Started
CLI Command Modes
Command Line-Only Commands
Abbreviating Commands
Using No and Default Forms of Commands
Getting Help
Using Command History
Finding Words in show Command Output
Customizing the CLI Prompt
Manipulating Terminal Characteristics
Ending a Session
Getting Started
To start using the Command Line Interface:
1. Connect to the Meru Controller using the serial console or Ethernet port, or remotely with a telnet or SSH connection once the controller has been assigned an IP address.
2. At the login prompt, enter a user ID and password. By default, the guest and admin user IDs are configured. — If you log in as the user admin, with the admin password, you are automatically
placed in privileged EXEC mode. — If you log in as the user guest, you are placed in user EXEC mode. From there, you
must type the enable command and the password for user admin before you can enter privileged EXEC mode.
3. Start executing commands.
Key Concepts 1
CLI Command Modes
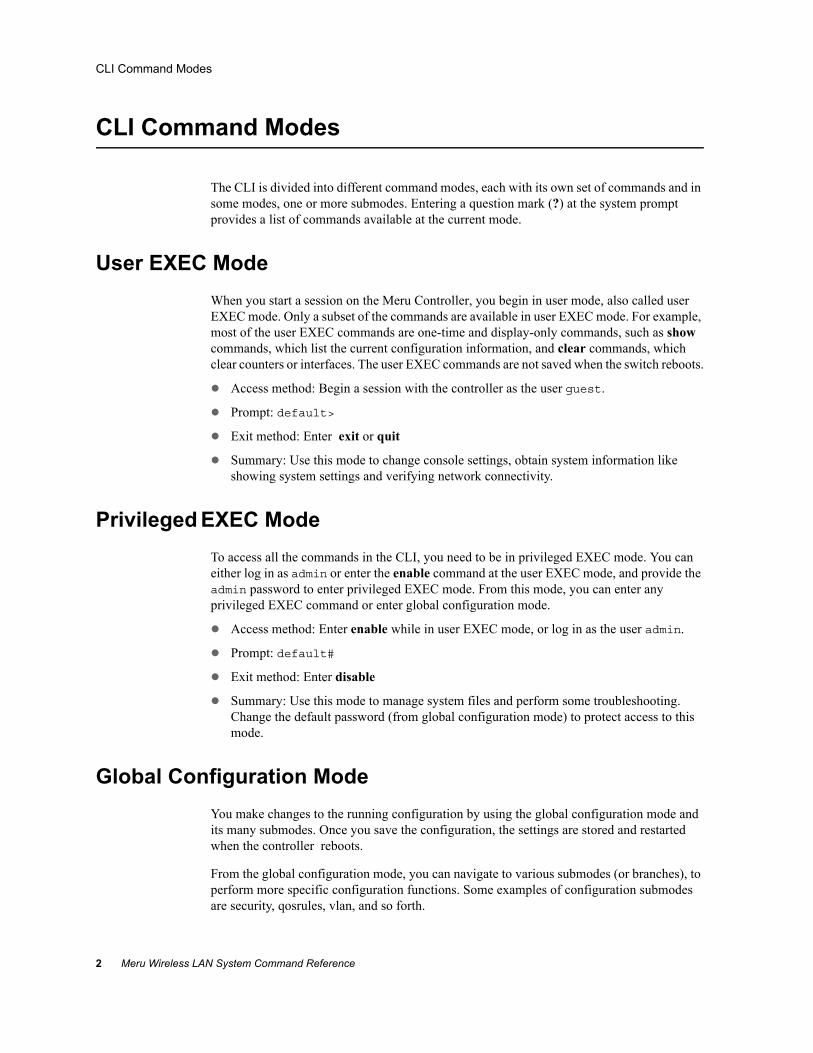
CLI Command Modes
The CLI is divided into different command modes, each with its own set of commands and in some modes, one or more submodes. Entering a question mark (?) at the system prompt provides a list of commands available at the current mode.
User EXEC ModeWhen you start a session on the Meru Controller, you begin in user mode, also called user EXEC mode. Only a subset of the commands are available in user EXEC mode. For example, most of the user EXEC commands are one-time and display-only commands, such as show commands, which list the current configuration information, and clear commands, which clear counters or interfaces. The user EXEC commands are not saved when the switch reboots.
Access method: Begin a session with the controller as the user guest.
Prompt: default>
Exit method: Enter exit or quit
Summary: Use this mode to change console settings, obtain system information like showing system settings and verifying network connectivity.
Privileged EXEC ModeTo access all the commands in the CLI, you need to be in privileged EXEC mode. You can either log in as admin or enter the enable command at the user EXEC mode, and provide the admin password to enter privileged EXEC mode. From this mode, you can enter any privileged EXEC command or enter global configuration mode.
Access method: Enter enable while in user EXEC mode, or log in as the user admin.
Prompt: default#
Exit method: Enter disable
Summary: Use this mode to manage system files and perform some troubleshooting. Change the default password (from global configuration mode) to protect access to this mode.
Global Configuration ModeYou make changes to the running configuration by using the global configuration mode and its many submodes. Once you save the configuration, the settings are stored and restarted when the controller reboots.
From the global configuration mode, you can navigate to various submodes (or branches), to perform more specific configuration functions. Some examples of configuration submodes are security, qosrules, vlan, and so forth.
2 Meru Wireless LAN System Command Reference

Command Line-Only Commands
Description: configures parameters that apply to the controller as a whole.
Access method: Enter configure terminal while in user EXEC mode.
Prompt: controller(config)#
Exit method: enter exit or press Ctrl-Z to return to privileged EXEC mode (one level back).
Summary: Use this mode to configure some system settings and to enter addition config-uration submodes (security, qosrules, vlan).
Command Line-Only Commands
Many CLI commands have an equivalent functionality in the Web Interface, so you can accomplish a task using either interface. The following lists commands that have no Web Interface functionality.
EXEC Mode Commands
configure terminal
no history
no prompt
no terminal length |width
help
cd
copy (including copy running-config startup-config, copy startup-config running-config and all local/remote copy)
delete flash: image
delete filename
dir [ dirname ]
debug
disable
enable
exit
quit
more (including more running-config, more log log-file, more running-script)
prompt
rename
terminal history|size|length|width
Key Concepts 3

Command Line-Only Commands
traceroute
show history
show running-config
show terminal
Config Mode Commands
do
ip username ftp|scp|sftp
ip password ftp|scp|sftp
show context
Commands that Invoke Applications or Scripts
calendar set
timezone set|menu
date
capture-packets
analyze-capture
debug
diagnostics[-controller]
ping
pwd
shutdown controller force
reload controller default
run
setup
sup-cli
upgrade
downgrade
licensing-management
poweroff
show calendar
show timezones
show file systems
show memory
show cpu-utilization
4 Meru Wireless LAN System Command Reference
Abbreviating Commands
show processes
show flash
show high-availability
show qosflows
show scripts
show station details
show syslog-host
show log
access-list permit|deny import
autochannel
high-availability
rogue-ap log clear
telnet
syslog-host
web login-page
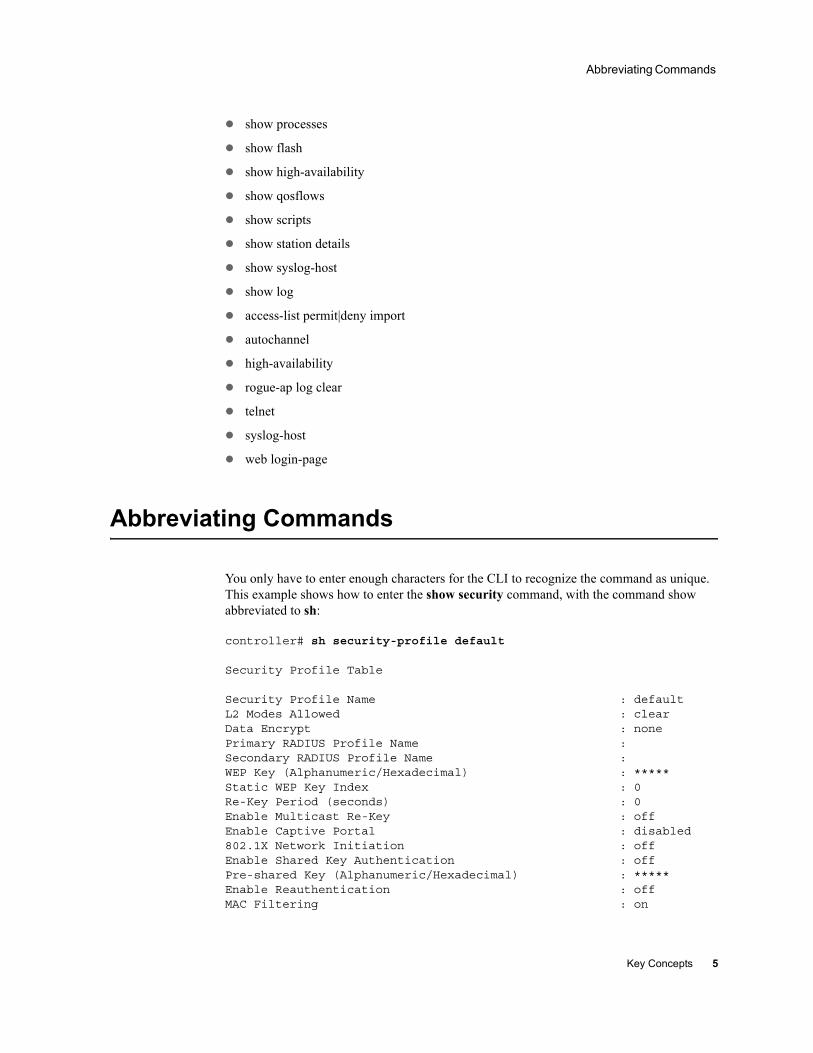
Abbreviating Commands
You only have to enter enough characters for the CLI to recognize the command as unique. This example shows how to enter the show security command, with the command show abbreviated to sh:
controller# sh security-profile default
Security Profile Table
Security Profile Name : defaultL2 Modes Allowed : clearData Encrypt : nonePrimary RADIUS Profile Name : Secondary RADIUS Profile Name : WEP Key (Alphanumeric/Hexadecimal) : *****Static WEP Key Index : 0Re-Key Period (seconds) : 0Enable Multicast Re-Key : offEnable Captive Portal : disabled802.1X Network Initiation : offEnable Shared Key Authentication : offPre-shared Key (Alphanumeric/Hexadecimal) : *****Enable Reauthentication : offMAC Filtering : on
Key Concepts 5

Using No and Default Forms of Commands
Using No and Default Forms of Commands
Almost every configuration command has a no form. In general, use the no form to
1. Disable a feature or function.
2. Reset a command to its default values.
3. Reverse the action of a command.
4. Use the command without the no form to reenable a disabled feature or to reverse the action of a no command.
Configuration commands can also have a default form. The default form of a command returns the command setting to its default. Most commands are disabled by default, so the default form is the same as the no form. However, some commands are enabled by default and have variables set to certain default values. In these cases, the default command enables the command and sets variables to their default values. The reference page for the command describes these conditions.
Getting Help
Entering a question mark (?) at the system prompt displays a list of commands for each command mode.When using context-sensitive help, the space (or lack of a space) before the question mark (?) is significant. To obtain a list of commands that begin with a particular character sequence, enter those characters followed immediately by the question mark (?). Do not include a space. This form of help is called word help, because it completes a word for you.
To list keywords or arguments, enter a question mark (?) in place of a keyword or argument. Include a space before the ?. This form of help is called command syntax help, because it reminds you which keywords or arguments are applicable based on the command, keywords, and arguments you already have entered.
Table 1: Examples of Help Commands
Command Purpose
(prompt)# help Displays a brief description of the help system.
(prompt) # abbreviated-command? Lists commands in the current mode that begin with a particular character string.
(prompt)# abbreviated-command<Tab> Completes a partial command name
(prompt)# ? Lists all commands available in command mode
(prompt)# command? Lists the available syntax options (arguments and keywords) for the command.
(prompt)# command keyword ? Lists the next available syntax for this command.
6 Meru Wireless LAN System Command Reference

Using Command History
The prompt displayed depends on the configuration mode.
You can abbreviate commands and keywords to the number of characters that allow a unique abbreviation. For example, you can abbreviate the configure terminal command to config t.
Entering the help command will provide a description of the help system. This is available in any command mode.
Using Command History
The CLI provides a history of commands that you have entered during the session. This is useful in recalling long and complex commands, and for retyping commands with slightly different parameters. To use the command history feature, you can perform the following tasks:
Set the command history buffer size
Recall commands
Disable the command history feature
Setting the Command History Buffer SizeBy default, the CLI records ten command lines in its history buffer. To set the number of command lines that the system will record during the current terminal session, and enable the command history feature, use the terminal history command:
controller# terminal history [size n]
The terminal no history size command resets the number of lines saved in the history buffer to the default of ten lines or number specified by size.
To display the contents of the history buffer, type default history:
controller# default history
To display the contents of the history buffer, type terminal history
controller# terminal history 7 interface Dot11Radio 1 8 end 9 interface Fast Ethernet controller 1 2 10 show interface Dot11Radio 1 11 end 12 show interfaces FastEthernet controller 1 2 13 sh alarm 14 sh sec 15 sh security
Key Concepts 7

Finding Words in show Command Output
Recalling CommandsTo recall commands from the history buffer, use one of the following commands or key combinations:
Ctrl-P or Up Arrow key. This recalls commands in the history buffer, beginning with the most recent command. Repeat the key sequence to recall successively older commands.
Ctrl-N or Down Arrow key. Returns to more recent commands in the history buffer after recalling commands with Ctrl-P or the Up Arrow key.
!number. Execute the command at the history list number. Use the terminal history or show history commands to list the history buffer, then use this command to re-execute the command listed by its sequence number.
To list the contents of the history buffer, use the show history command:
controller# show history
Disabling the Command History FeatureThe terminal history feature is automatically enabled. To disable it during the current terminal session, type no terminal history in either privileged or non-privileged EXEC mode:
controller# no terminal history
Finding Words in show Command Output
To quickly locate a word in the output of any show command, use the following command:
show argument | grep "string"
For this feature to work, only one show command can be the input to the grep and the show command cannot have arguments (for example, the form of the command such as show ap 54. The "string" is a literal, case-sensitive word to search for (such as AP-54), and must be enclosed in double quotation marks. Only one string search can be performed per command line.
As an example, to search for and display the entry for AP-54 in the output of the show ap command, use the command:
controller# show ap | grep "AP-54"
AP ID AP Name Serial Number Op State Availability Runtime Connectivity AP Model AP Type
54 AP-54 00:0c:e6:00:3e:a8 Disabled Offline 3.1.4-25 None AP201 Local
AP Table(1 entry)
8 Meru Wireless LAN System Command Reference

Customizing the CLI Prompt
Customizing the CLI Prompt
Default CLI PromptBy default, the CLI prompt consists of the system name followed by an angle bracket (>) for EXEC mode or a pound sign (#) for privileged EXEC mode.
Commands to Customize CLI PromptTo customize the CLI prompt for your system, use one of the following commands in global configuration mode:
Manipulating Terminal Characteristics
Displaying Terminal SettingsTo display the current terminal settings, including the screen length and width, type:
controller> show terminalTerminal Length: 0Terminal Width: 80History Buffer Size: 10
Setting Terminal Screen Length and WidthBy default, the terminal length is set to 0 rows, and the width is set to 80 columns. To override this default setting, and set the number of lines or character columns on the current terminal screen for the current session, use the following commands in EXEC mode:
controller> terminal length screen-lengthcontroller> terminal width characters
Table 2: Commands to Customize the CLI Prompt
Command Purpose
prompt string Customizes the CLI prompt.
no prompt Disables the display of the CLI prompt.
default prompt Sets the prompt to the default, which is the hostname.
Key Concepts 9
Ending a Session
To reset the terminal length and width to the default values, use the default command:
controller> default terminal lengthcontroller> default terminal width
Setting the terminal length to a non-zero value turns on paging. When the output length exceeds the terminal length, the output is paused and a ---More--- is displayed:
1. If the user presses the space bar at the ---More--- prompt, another page of output is displayed.
2. If the user presses the ENTER key at the ---More--- prompt, a single line of output is displayed.
3. If the user presses any other character at the ---More--- prompt, this signifies the end of output and the command prompt is displayed.
Ending a Session
To end a session, use the following command in either user or privileged EXEC mode:
controller> exit
10 Meru Wireless LAN System Command Reference
Chapter 2User Interface Commands
The commands in this chapter perform configuration for the user interface, such as changing the prompt, and terminal history and display features. Additionally, commands for working with the interface such as getting help, and exiting and entering command levels are described.
?
disable
do
enable
end
exit
help
prompt
quit
show history
show terminal
terminal history
terminal history size
terminal length
terminal width
User Interface Commands 11
?
Displays a list of applicable subcommands at the command level used.
Syntax ?
Command Mode
All
Default None
Usage Help is available at any level of the CLI by typing the ?. At each level, use ? to view a list of all commands. Use ? after each command to see a list of applicable subcommands.
Examples mc1000> ?
debug Turns on debugging.default Reset to default values.enable Enables privileged mode.exit Exit the CLI.help Displays help information.no Disables various parameters.prompt Customizes the CLI prompt.quit Exit the CLI.show Displays various system parameters.terminal Displays or sets terminal characteristics.
Related Commands
help
12 Meru Wireless LAN System Command Reference

disable
Exits privileged EXEC mode to user EXEC mode.
Syntax disable
Command Mode
User EXEC
Default None
Usage When working in privileged EXEC mode, use the disable command to enter user EXEC mode.
Examples The following command exits privileged EXEC mode and enters user EXEC mode:
mc1000# disablemc1000>
Related Commands
enable
User Interface Commands 13
do
Executes a CLI command from any command mode.
Syntax do command
Command Mode
All configuration modes.
Default None
Usage Use the do command to run an EXEC-level command (such as copy, default, or show) from global configuration mode or any of the configuration submodes.
Examples The following command saves the current configuration to the file startup-config without having to return to the Privileged EXEC mode:
mc1000(config)# do copy running-config startup-config
The following command shows the IP settings for the controller:
mc1000(config)# do show ip
ID IP Address NetMask Type
0 192.168.10.2 255.255.255.0 Static IP Addresses(1 entry)
mc1000(config)#
command CLI command to be executed.
14 Meru Wireless LAN System Command Reference
enable
Enters privileged EXEC mode.
Syntax enable
Command Mode
User EXEC
Default None
Usage Use the enable command in user EXEC mode to enter privileged EXEC mode, which allows you to perform some configuration tasks and enter configuration submodes.
Examples The following command, issued in user EXEC mode, enters privileged EXEC mode after you enter the administrative password:
mc1000> enablePassword:mc1000#
Related Commands
disable
User Interface Commands 15

end
Exits configuration modes and enters privileged EXEC mode.
Syntax end
Command Mode
Default None
Usage Use the end command in most configuration mode to exit that configuration mode and enter privileged EXEC mode.
Examples The following exits the security profile and global configuration mode, and takes you to Privileged EXEC mode:
mc1000(config-security)# endmc1000#
mc1000(config)# endmc1000#
Related Commands
exit
16 Meru Wireless LAN System Command Reference

exit
In any configuration mode, exits that mode and enters the next-highest mode, or in user EXEC mode, exits the CLI.
Syntax exit
Command Mode
All
Default None
Usage The exit command behaves differently, depending on which command mode you are in. If you are in any configuration mode, use the exit command to exit the mode and enters the next-highest mode. If you are in user or privileged EXEC mode, use the exit command to quit the CLI.
Examples The following command exits the security profile configuration mode and enters the next-highest mode, global configuration mode:
mc1000(config-security)# exitmc1000(config)#
Related Commands
quit
User Interface Commands 17
help
Displays help information that describes each command.
Syntax help [command]
Command Mode
All
Default Lists the commands available from the current command level.
Usage The help command displays a list of system commands for the current command mode. The help command behaves differently than the ? command, displaying a larger list of commands and subcommands. Typing help before a command gives a description of that command.
Examples mc1000# help cdcd: Sets the current working directory.
mc1000#
The following example shows the commands available from the radius-profile command submode:
meru-wifi(config-radius)# helpdefault Set radius profile parameters to default value.description Specifies the radius node.do Executes an IOSCLI command.end Save changes, and return to privileged EXEC
mode.exit Save changes, and return to global
configuration mode.help Displays help information.ip-address Configures the IP address.key Configures the secret key.mac-delimiter Configures the MAC Delimiter.no Disabling radius profile parameters.port Configures port number.
Related Commands
?
command Optional. Displays help for the specified command.
18 Meru Wireless LAN System Command Reference
prompt
Changes the CLI prompt.
Syntax prompt prompt-name
Command Mode
Privileged EXEC
Default The default prompt name is default.
Usage Use this command to change the prompt name on the CLI.
Examples The following command changes the prompt name from default to mc1000:
default# prompt mc1000mc1000#
prompt-name The name of the new prompt.
User Interface Commands 19
quit
Exits the CLI.
Syntax quit
Command Mode
User EXEC
Default None
Usage Use the quit command to exit the CLI.
Examples The following command exits the CLI:
default# quit
Related Commands
exit
20 Meru Wireless LAN System Command Reference

show history
Displays a list of the commands last issued in this session.
Syntax show history
Command Mode
Global configuration
Default The default history size is 10.
Usage Use the show history command to list the commands you have recently entered. The number of commands that the history buffer lists is determined by the terminal history size command.
Examples The following command displays the last 10 commands entered during this session:
default> show history 26 access-list permit import acl 27 exit 28 show access-list permit 29 show access-list state 30 configure terminal 31 access-list deny on 32 exit 33 show access-list state 34 show access-list deny 35 disabledefault>
Related Commands
terminal history size
User Interface Commands 21

show terminal
Displays terminal settings.
Syntax show terminal
Command Mode
User EXEC
Default None
Usage Displays the current settings for the terminal, including the length, width and buffer size.
Examples The following command displays the terminal settings:
mc1000# show terminalTerminal Length: 50Terminal Width: 80History Buffer Size: 10mc1000#
Related Commands
terminal historyterminal history size
22 Meru Wireless LAN System Command Reference

terminal history
Displays a history of commands entered.
Syntax terminal history
no terminal history
Command Mode
User EXEC
Default The default history buffer size is 10.
Usage Shows the 10 most recent commands at this terminal. Use the no form to show zero entries.
Examples The following shows the last 10 entries at this terminal:
mc1000# terminal history15 prompt default16 show terminal17 show terminal 18 terminal history19 show terminal20 terminal21 show terminal22 show terminal22 terminal history23 show terminal
mc1000#
Related Commands
show terminalterminal history size
User Interface Commands 23

terminal history size
Changes the number of lines recorded in the history buffer.
Syntax terminal history size historysize
no terminal history
Command Mode
User EXEC
Default The default history size is 10.
Usage Changes the number of lines displayed at the terminal. Zero (0) reduces the number of history lines displayed to “none.” The command no terminal history disables the history function.
Examples The following command changes the history buffer size to save the last 33 commands:
mc1000# terminal history size 33mc1000#
Related Commands
show terminalterminal history
historysize Number of lines recorded in the history buffer. Valid value is from 0 to 1,000.
24 Meru Wireless LAN System Command Reference
terminal length
Adjusts the number of lines that display on the terminal.
Syntax terminal length length
Command Mode
User EXEC
Default Zero (0) lines.
Usage Displays the number of rows on the terminal. Setting this parameter to 0 displays line by line. Numbers greater than 0 display in a block or group length.
Examples mc1000# terminal length 100mc1000#
Related Commands
terminal width
length Number of lines displayed on the terminal. The valid range is 0 to 256.
User Interface Commands 25
terminal width
Adjusts the number of columns that display on the terminal.
Syntax terminal width width
Command Mode
User EXEC
Default Zero (0) lines.
Usage Displays the number of columns on the terminal. Setting this parameter to 0 displays column by column.
Examples mc1000# terminal width 60mc1000#
Related Commands
terminal length
width Number of columns displayed on the terminal. The valid range is 0 80.
26 Meru Wireless LAN System Command Reference

Chapter 3File Management Commands
The commands in this chapter are used to manage the system files, including the system image and backup configuration files. Included are the commands to save configurations, upgrade and downgrade images, and show information to help understand and manage the configuration.
cd
copy
copy running-config
delete
dir
downgrade
more
pwd
reload
rename
run
show controller file systems
show flash
show running-config
show startup-config
show scripts
upgrade ap
upgrade controller
upgrade system
File Management Commands 27
cd
Sets the current working directory.
Syntax cd [directory]
Command Mode
Privileged EXEC
Default The default working directory is images.
Usage Typing cd by itself changes to the default working directory (images). You can also change to ATS/scripts, which contain the AP boot scripts, and capture, which contains the saved packet capture files.
Use the cd command to set the current working directory to one of the following directories:
Examples The following commands change to the directory ATS/scripts, verifies the change, and then goes back to the default /images directory:
mc1000# cd ATS/scriptsmc1000# pwdATS/scriptsmc1000# cdmc1000# pwdimages
Related Commands
dirpwd
directory Optional. Name of new directory to set as current working directory.
ATS/scripts The directory containing AP boot scripts.capture The directory containing packet capture files.images The directory containing upgrade images.
28 Meru Wireless LAN System Command Reference

copy
Copies files locally and remotely.
Syntax copy filename ftp://username[:password]@server/filename (copy file to remote location)copy ftp://username[:password]@server/filename . (copy remote file to local location)
copy filename scp://username[:password]@server/directory/filename (copy file to remote location)copy sftp://username[:password]@server/filename . (copy remote file to local location)
copy filename tftp://server/filename (copy file to remote location)copy tftp://server/filename . (copy remote file to local location)
Command Mode
Privileged EXEC
Default The default is the current running configuration
Usage On a remote file system with an FTP or SSH server, copy files to or from the controller.
Examples The first command copies the file dflt_backup.dbu to the remote location user1@server1/home/backup/ using FTP. The second command copies the remote backup file back into the local directory (using the . (dot) which is a shortcut for the copied file name (dflt_backup.dbu).
mc1000# copy dflt_backup.dbu ftp://user1@server1/home/backup/dflt_backup.dbu
FTP password:
filename | . Name of the remote or local file.
ftp://username[:password]@server
Use FTP to transfer the file between the controller and server, using a valid username on that server. The password can be included or a prompt for the password will be provided.
scp://username@server Use SCP to transfer the file between the controller and server, using a valid username on that server.
sftp://username[:password]@server
Use SFTP to transfer the file between the controller and server, using a valid username on that server. The password can be included or a prompt for the password will be provided.
tftp://server/ Use TFTP to transfer the file between the controller and server (no username needed).
File Management Commands 29

mc1000#
mc1000# copy ftp://user1@server1/home/backup/dflt_backup.dbu .FTP password:mc1000#
30 Meru Wireless LAN System Command Reference

copy running-config
Copies the running configuration to local flash or remote system.
Syntax copy running-config startup-configcopy running-config ftp://username[:password]@server/directory/filenamecopy running-config scp://username[:password]@server/directory/filenamecopy running-config tftp://server/directory/filename copy filename running-config
Command Mode
Privileged EXEC
Default The default is the current running configuration.
Usage Use the copy running-config command to copy the current running configuration to the local flash configuration file that is started upon system bootup, startup-config, or to a remote server for use as a backup. When the remote server is used for the copy, the file can be transferred using FTP, SFTP, SCP, or TFTP. The destination filename is user-selectable.
This command also accepts a file name as input to the running-config, which changes the running configuration to the commands in the input file.
To retrieve the file from the remote location, use the copy command.
Examples The following command copies the current running configuration to the location user1@server1/home/backup/ using either FTP.
mc1000# copy running-config ftp://user1:mypwd@server1/home/backup/running-config
ftp://username[:password]@server
Use FTP to transfer the file between the controller and server, using a valid username on that server. The password can be included or a prompt for the password will be provided.
scp://username@server Use SCP to transfer the file between the controller and server, using a valid username on that server.
tftp://server/ Use TFTP to transfer the file between the controller and server (no username needed).
startup-config Start up configuration.
filename File name of the file to use as the output of or input to the running-config.
File Management Commands 31

Related Commands
copy
32 Meru Wireless LAN System Command Reference

delete
Deletes a file or upgrade image from the system.
Syntax delete {filename | flash: filename}
Command Mode
Privileged EXEC
Default None
Usage Use this command to remove a file or an upgrade image. This command is helpful to delete older, unneeded images that have been downloaded into the images directory, and that take up unnecessary space on the flash card.
Check the contents of the images directory with the dir command or the show flash command.
Examples The following command sequence lists the contents of images directory, deletes the file dflt_backup.mbu, and relists the contents of the directory.
mc1000# cd capturemc1000# pwd/capture
mc1000# dirdirtotal 1-rw-r--r-- 1 root root 28658 May 14 12:02
my_capture_filemc1000# delete my_capture_filemc1000# dirtotal 0
The following command deletes the file 3.0-139 from flash memory:
mc1000# delete flash: 3.0-139mc1000#
filename Name of file to delete.
flash: filename Name of upgrade image to delete.
File Management Commands 33

Related Commands
dirpwdshow flash
34 Meru Wireless LAN System Command Reference
dir
Displays directory contents.
Syntax dir [directory] [ftp_url]
Command Mode
Privileged EXEC
Default Lists the current working directory.
Usage Use dir to display the long listing of the contents of the current directory. Use the optional directory argument to specify another directory. Optional directories include:
ATS/scripts The directory containing the AP bootup scripts.backup The directory containing the backup databases.capture The directory containing packet capture files.images The directory containing the system images.scripts The directory containing the controller scripts.ftp_URL The URL for an FTP location.
Examples The following commands list the name of the current directory and display its contents.
mc1000# pwdimages
mc1000# dirtotal 1drwxrwxr-x 5 522 522 1024 May 12 18:47 meru-3.0-126
Related Commands
pwd
directory Optional. Name of the directory to display.
ftp_url Optional. A URL for an FTP site.
File Management Commands 35

downgrade
Downgrades the system
Syntax downgrade system version
Command Mode
Privileged EXEC
Default Downgrades the system image.
Usage Use the downgrade system command to revert to a system image that was previously installed on the system. A downgrade affects the controller and all APs.
Use the show flash command to view a list of system images that you can downgrade to.
Examples The following command downgrades the system.
mc1000# downgrade system 3.2-116
Related Commands
show flashupgrade system
36 Meru Wireless LAN System Command Reference

more
Displays detailed file or system information
Syntax more {running-config | startup-config | running-script | file pathname | log}
Command Mode
Privileged EXEC
Default None
Usage Use this command to page through the various details about the system configuration, as contained in the running-config, startup-config, and system log (syslogd.log) files. With the file keyword, specify the complete pathname of the file to be viewed.
The more running-config command is a synonym for the show running-config command.
To abort this command, press Ctrl-C.
Examples The following is a partial display of the running-config output.
default# more running-config configure terminal
no ip dhcp-passthroughaccess-list state disabledaccess-list radius-server ip-address 0.0.0.0access-list radius-server port 1812access-list radius-server mac-delimiter hyphenaudit period 60auto-ap-upgrade enableoptimization nonehostname meru-wifiip dhcp-server 10.0.0.10ip address 192.168.10.2 255.255.255.0ip default-gateway 192.168.10.1ip domainname 10.0.0.10qosvars admission admitallqosvars ttl 0qosvars udpttl 0qosvars tcpttl 0qosvars enableqosvars bwscaling 100qosvars intercell-periodicity 30qosvars drop-policy headrogue-ap detection
File Management Commands 37

rogue-ap acl 00:0c:e6:02:9e:6frogue-ap acl 00:0c:e6:03:5f:67rogue-ap acl 00:0c:e6:04:5f:67rogue-ap acl 00:0c:e6:05:b0:7arogue-ap acl 00:0c:e6:06:26:dfrogue-ap acl 00:0c:e6:07:17:d5rogue-ap acl 00:0c:e6:08:e9:29
Related Commands
show running-config
38 Meru Wireless LAN System Command Reference

pwd
Displays the current working directory.
Syntax pwd
Command Mode
Privileged EXEC
Default The current working directory.
Usage Use this command to see the full pathname of the current working directory.
Examples mc1000# pwdimagesmc1000#
Related Commands
dir
File Management Commands 39
reload
Reboots the Meru Controller and/or the specified AP.
Syntax reload ap id | all | controller | default
Command Mode
Privileged EXEC
Default
Usage Use this command to reboot the controller and/or specific APs, or reboot to the factory defaults with the default option.
Examples The following command reboots the controller and all APs to the current startup configuration
mc1000# reload allmc1000#
Related Commands
ap id The AP with the identifier id is rebooted.
all The Meru Controller and all the APs are rebooted, using the current startup configuration.
controller The Meru Controller is rebooted, using the current startup configuration.
default The Meru Controller and all the APs are rebooted at the factory default startup configuration.
40 Meru Wireless LAN System Command Reference

rename
Renames local files.
Syntax rename source file_dst
Command Mode
Privileged EXEC
Default None
Usage Use this command to rename a file.
Examples The following command renames the file dflt_backup.mbu to default_backup.mbu.
mc1000# rename dflt_backup.mbu default_backup.mbumc1000#
Related Commands
dir
source Name of original filename to rename
file_dst Destination, or new name for filename
File Management Commands 41

run
Execute the named script.
Syntax run script_file
Command Mode
Privileged EXEC
Default None
Usage Use this command to run tests or other diagnostic applications and display their results on the screen.
Examples mc1000# cd ATS/scripts mc1000# dir total 4 -rw-rw-r-- 1 root root 3922 Jan 13 10:05 jan01-config mc1000# run jan01-config
script_file The full pathname of the script to execute.
42 Meru Wireless LAN System Command Reference

show controller file systems
Displays information about the controller file system.
Syntax show controller file systems
Command Mode
Privileged EXEC
Default None
Usage This command displays information about the system directories and file systems. It provides the following information:
Table 3: Output of show controller file systems
Examples The following command lists information about the system file system:
mc1000# show controller file systems
Filesystem 1k-blocks Used Available Use% Mounted on/dev/hda2 428972 230456 175630 57% /none 4880 40 4840 1% /dev/shmnone 19528 6256 13272 33% /opt/meru/var/runnone 9764 2944 6820 31% /opt/meru/var/lognone 9764 896 8868 10% /tmpnone 9764 0 9764 0% /opt/meru/capture
Parameter Description
Filesystem Displays the file system name. If the item is a directory, it displays none.
1K blocks Shows the number of 1K byte blocks the file system or directory is configured to use.
Used Show the number of 1K byte blocks the file system or directory currently uses.
Available Show the number of 1K byte blocks the file system or directory has available to use (free space).
Use % Show the percentage of available blocks the file system or directory currently uses.
Mounted on Shows the mount point where the file system is mounted or lists the pathname of the directory.
File Management Commands 43

mc1000#
Related Commands
44 Meru Wireless LAN System Command Reference

show flash
Displays the system image filenames in flash memory.
Syntax show flash
Command Mode
Privileged EXEC
Default None
Usage Use this command to see the flash image filenames.
Examples The following command shows the flash image filenames.
mc1000# show flash 3.1-953.2-116
mc1000#
File Management Commands 45
show running-config
Displays the current controller configuration.
Syntax show running-config
Command Mode
Privileged EXEC
Default None
Usage Use this command to view current system configuration parameters.
.Related Commands
more
46 Meru Wireless LAN System Command Reference

show startup-config
Displays the startup controller configuration.
Syntax show startup-config
Command Mode
Privileged EXEC
Default None
Usage Use this command to view the start-up system configuration parameters, which are implemented when the controller starts up.
.Related Commands
copy running-config
File Management Commands 47
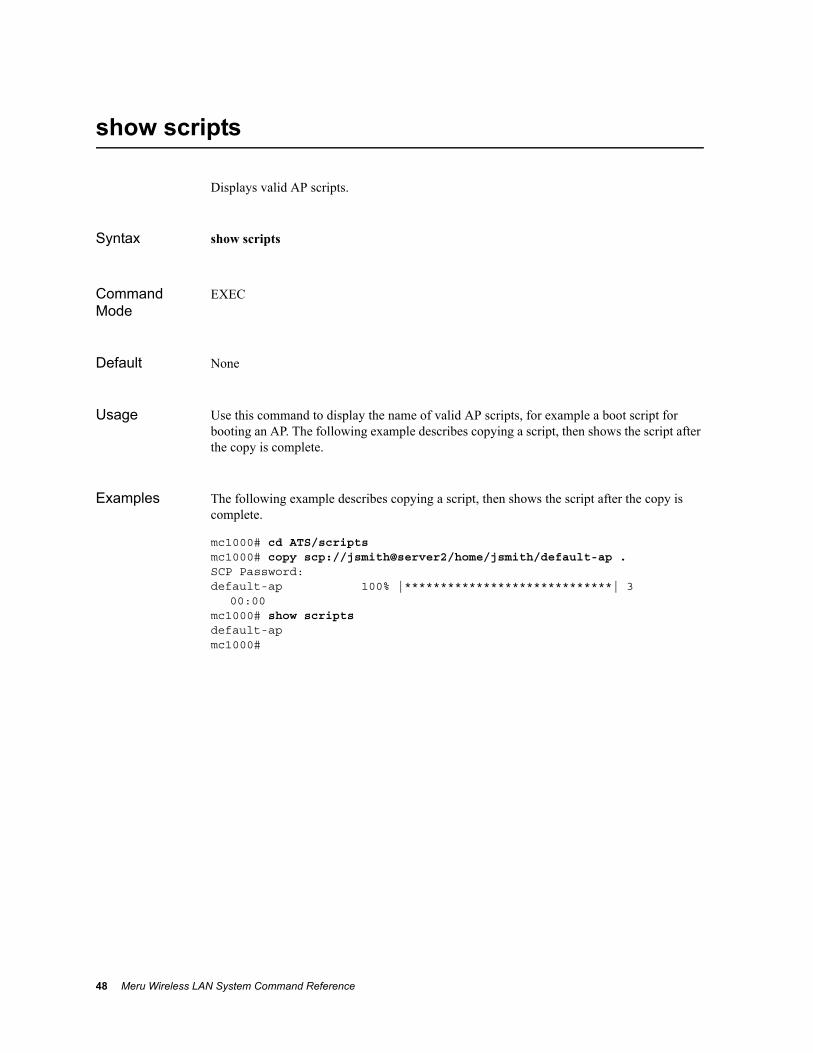
show scripts
Displays valid AP scripts.
Syntax show scripts
Command Mode
EXEC
Default None
Usage Use this command to display the name of valid AP scripts, for example a boot script for booting an AP. The following example describes copying a script, then shows the script after the copy is complete.
Examples The following example describes copying a script, then shows the script after the copy is complete.
mc1000# cd ATS/scripts mc1000# copy scp://jsmith@server2/home/jsmith/default-ap .SCP Password:default-ap 100% |*****************************| 3
00:00 mc1000# show scriptsdefault-apmc1000#
48 Meru Wireless LAN System Command Reference

upgrade ap
Upgrades access point system image.
Syntax upgrade ap {version | same}
Command Mode
Privileged EXEC
Default None
Usage Before you can upgrade an access point’s system image, you must transfer a compressed version of the image to the controller. The image must be in the images directory before you can upgrade. Use the dir command to see the images in that directory.
Transfer the new image file by using the copy command. For example, to use FTP to transfer the file, enter the following:
mc1000# copy ftp://[email protected]/meru-3.2.tar .
If you have not configured a default FTP password using the ip ftp password command, you are prompted for a password.
To verify that the file was transferred properly, enter the following:
mc1000# show flash3.2
When using the range option, the following types of
version Version of System Director system image to be used during upgrade.
same [id | range | all] Upgrades the access point image to the same version of system software that the controller is running.
id—Upgrades the access point with the specified ID to the same version of system software that the controller is running.
range—Upgrades a range of APs, specified as a list using commas and dashes, without spaces or wildcards. AP IDs must be listed in ascending order.
all—Upgrades all access point image to the same version of system software that the controller is running.
File Management Commands 49

Examples The following command upgrades to version 3.3 the access points with the IDs 1, 7, and 10:
mc1000# upgrade ap 3.3 1,7,10
The following command upgrades to version 3.3 the access points with the IDs 4 to 7, 10, and 12 to 20:
mc1000# upgrade ap 3.3 4-7,10,12-20
The following command upgrades all access points to the same version of the system image as the controller is running:
mc1000# upgrade ap sameThis will overwrite all existing system images. Are you sure [y|n]?
y
You see status of the upgrade process. When the upgrade is successful, you see a message similar to the following:
Upgrading APs 1 AP-1 |=========================| Success mc1000#
Related Commands
upgrade system
50 Meru Wireless LAN System Command Reference

upgrade controller
Upgrades system image for the controller.
Syntax upgrade controller version [force]
Command Mode
Privileged EXEC
Default None
Usage Before you can upgrade a controller’s system image, you must transfer a compressed version of the image to the controller /images directory. Use the dir command to see the current controller directory.
Transfer the new image file by using the copy command. For example, to use FTP to transfer the file, enter the following:
mc1000# copy ftp://[email protected]/meru-3.2.tar .
If you have not configured a default FTP password using the ip ftp password command, you are prompted for a password.
To verify that the file was transferred properly, enter the following:
mc1000# show flash3.2
Examples The following command upgrades the controller system image to version 3.2:
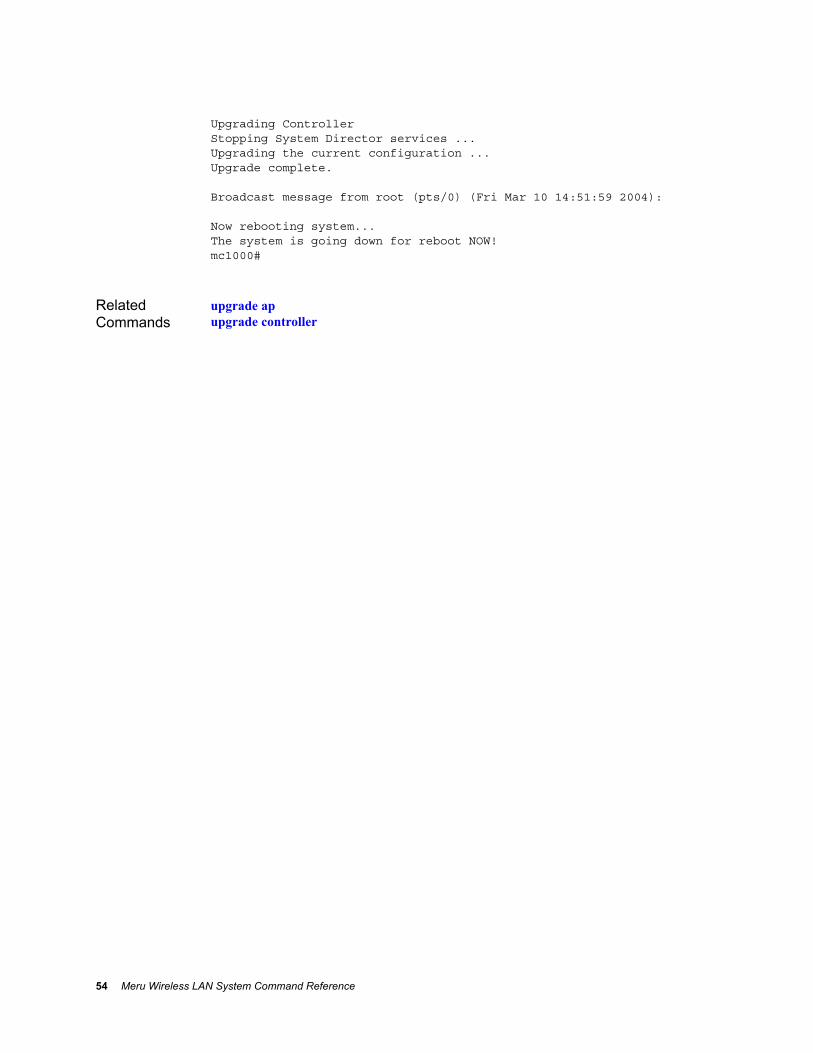
mc1000# upgrade controller 3.2This will overwrite all existing system images. Are you sure [y|n]?
yUpgrading ControllerStopping System Director services ...Upgrading the current configuration ...Upgrade complete.
Broadcast message from root (pts/0) (Fri Mar 10 14:51:59 2004):
version Version of the system image to be used during upgrade.
force Force the upgrade. Required to upgrade to a current running version, such as when you need to revert an applied patch.
File Management Commands 51

Now rebooting system... The system is going down for reboot NOW!default#
Related Commands
upgrade apupgrade system
52 Meru Wireless LAN System Command Reference

upgrade system
Upgrades the controller and all access points.
Syntax upgrade system version
Command Mode
Global configuration
Default None
Usage Before you can upgrade a system image, you must transfer a compressed version of the image to the controller /images directory. Use the dir command to see the current controller directory.
Transfer the new image file by using the copy command. For example, to use FTP to transfer the file, enter the following:
mc1000# copy ftp://[email protected]/meru-3.2.tar .
If you have not configured a default FTP password using the ip ftp password command, you are prompted for a password.
To verify that the file was transferred properly, enter the following:
mc1000# show flash3.0
Examples The following command upgrades the controller and all access points to use the system image version 3.0:
mc1000# upgrade system 3.2This will overwrite all existing system images. Are you sure [y|n]?
yUpgrading APs 1 AP-1 | | Success
version Version of the system image to be used during upgrade.
Note: As part of the upgrade process, your system settings are copied to the file pre-upgrade.config and the system settings are reset to the default values. After the upgrade command completes, you can restore your system setting with the command copy pre-upgrade-config running-config.
File Management Commands 53
Upgrading ControllerStopping System Director services ...Upgrading the current configuration ...Upgrade complete.
Broadcast message from root (pts/0) (Fri Mar 10 14:51:59 2004):
Now rebooting system... The system is going down for reboot NOW!mc1000#
Related Commands
upgrade apupgrade controller
54 Meru Wireless LAN System Command Reference

Chapter 4System Management Commands
The commands in this chapter are used to manage system, such as running the setup script, setting up a high-availability system, setting the system clock and timezone, and obtaining system and networking information.
audit period
calendar set
clear statistics interfaces
date
diagnostics
high-availability initdead
high-availability peer
high-availability shared-ip
high-availability start
high-availability stop
license
management wireless
ntp
passwd
ping
poweroff controller
reload
reload-management
setup
show alarm
show calendar
show controller
show controller cpu-utilization
show controller file systems
show controller memory
show controller processes
show flash
show high-availability
show hostname
show license
show license-file
show log
show ntp-server
show syslog-file
show syslog-host
show syslog-table
show timezones
statistics period
syslog-host
telnet
timezone
traceroute
System Management Commands 55

audit period
Configures how often the controller collects information about access points.
Syntax audit period period
Command Mode
Global configuration
Default The default audit period is 60 seconds.
Usage Normally, you do not need to change the audit period. The audit period affects the data collected for the following commands:
show ap-assigned
show ap-siblings
show ap-discovered
show topoap
The audit period also controls how often rogue AP alarms are cleared.
Examples The following command sets the audit period to 120 seconds:
mc1000(config)# audit period 120mc1000(config)#
period Amount of time that elapses before the controller collects information about access points The valid value range is 5 through 65,535 seconds.
56 Meru Wireless LAN System Command Reference

calendar set
Sets the controller hardware and software clocks.
Syntax calendar set mm/dd/yyyy hh:mm:ss
Command Mode
Privileged EXEC
Default None
Usage Use the calendar set command to manually set the system date and time. After setting the date and time, you are prompted to allow the controller to reboot so the system clock can be reset to the newly configured time. You can check the time settings with the show calendar or date commands.
Examples The following command sets the system date and the hardware clock to the date of July 30, 2004 with a time of 6:25:35 p.m.:
mc1000# calendar set 07/30/2004 18:25:35mc1000#
Related Commands
show calendardate
mm/dd/yyyy Date in month/day/year format (for example 07/30/2004).
hh:mm:ss Time in hours (24-hour format), minutes, and seconds.
System Management Commands 57
clear statistics interfaces
Resets statistics counter for the interface.
Syntax clear statistics interfaces Dot11Radio ap_id
clear statistics interfaces FastEthernet {controller | ap [ap_id]}
Command Mode
Privileged EXEC
Default None
Usage Use the clear statistics interfaces commands to clear Dot11Radio or FastEthernet interface statistics. When clearing Dot11Radio statistics, an AP ID must be specified. When clearing FastEthernet statistics, you can specify the controller, all APs, or an AP by its ID.
Examples This command clears all FastEthernet statistics on all APs:
mc1000# clear statistics interfaces FastEthernet ap
This command clears all FastEthernet statistics on AP 5:
mc1000# clear statistics interfaces FastEthernet ap 5
Related Commands
58 Meru Wireless LAN System Command Reference

date
Displays the current date and time.
Syntax date
Command Mode
Privileged EXEC
Default None
Usage Use the date command to display the current date and time.
To set the system date and time, use the calendar set command.
Examples This command displays the system date and time.
mc1000# dateFri Jul 22 16:55:26 PDT 2005
Related Commands
calendar setshow calendar
System Management Commands 59
diagnostics
Gathers system diagnostic information and compresses it into a tar file.
Syntax diagnostics
Command Mode
Privileged EXEC
Default None
Usage Use the diagnostics command to get diagnostic information about the system in a tar file format. After the diagnostics command has finished running, a tar file with the naming convention meru-gather-year.month.day.hour:minute.tar.gz is created in the /images directory on the controller (for example, meru-gather-2004.05.14.15.01.tar.gz indicates the diagnostics command was run and a tar file created on May 14, 2004 at 3:01 p.m.). Use the copy command to transfer the tar file with FTP or SCP to another system.
Examples The following runs the diagnostics command:
mc1000# diagnostics Cleaning up previous gather dataGetting process information ...Getting system log information ...Getting kernel information ...Getting network information ...Getting software information ...Getting version information ...Getting disk information ...Getting System Director data ...Getting high availability information ...Data gathering phase complete/images/meru-gather-2004.12.10.11.42.tar.gz createdUse the ftp option of the cli command to move this file off the
machinemc1000#
Related Commands
copy
60 Meru Wireless LAN System Command Reference
high-availability initdead
Configures the maximum amount of time a controller searches for a peer controller.
Syntax high-availability initdead deadtime
Command Mode
Global configuration
Default By default, the initial deadtime is 60 seconds.
Usage By default, a controller searches for a peer controller for 60 seconds after the high-availability start command has been entered. Use the high-availability initdead command to change the amount of time a controller searches for a peer.
If a peer controller is not found within the deadtime interval, the controller that initiated the search for a peer automatically becomes the master controller, regardless of the default master controller assignment. The hostname specified in the high-availability shared-ip command is the default master controller.
Network services are not available while a controller is searching for a peer controller.
Examples The following command sets the deadtime interval for the controller named magnolia to 300 seconds (5 minutes):
magnolia(config)# high-availability initdead 300magnolia(config)#
Related Commands
high-availability shared-iphigh-availability startshow high-availability
deadtime Maximum amount of time a controller searches for a peer controller after the high-availability start command is entered. The valid value range is 30 through 600 seconds.
System Management Commands 61

high-availability peer
Configures the hostname and IP address of the peer controller in the high-availability system.
Syntax high-availability peer hostname ip-address
Command Mode
Global configuration
Default None
Usage The peer controller in the high-availability system can be a separate controller or another controller card in the same controller chassis. If you are using two controllers, they can be physically at the same location or in different locations at your site.
The peer controller must have a unique IP address. Both controllers must be in the same subnet.
For information about configuring high availability, see the Meru Wireless LAN System Configuration Guide.
Examples The following command sets the peer controller for magnolia with the hostname willow and IP address of 10.10.1.100:
magnolia(config)# high-availability peer willow 10.10.1.100Peer Host=willowPeer IP=10.10.1.100configuration modified
hostname Hostname of the peer controller.
ip-address IP address of the peer controller.
Note: If you change a hostname after high availability has been configured, you must reconfigure the peer controller information before running high availability again. You must reconfigure peer controller information even if the other controller’s hostname and IP address were not changed.
62 Meru Wireless LAN System Command Reference

Related Commands
high-availability shared-iphigh-availability starthigh-availability stopshow high-availability
System Management Commands 63

high-availability shared-ip
Configures the shared (virtual) hostname and IP address for the controller peers.
Syntax high-availability shared-ip hostname ip-address
Command Mode
Global configuration
Default None
Usage In the high-availability system, you must configure a third (virtual) IP address that is shared by the peer controllers. The shared hostname must match one of the hostnames of the peer controllers. The virtual hostname and IP address must be identical on both peer controllers.
The controller whose hostname matches the shared hostname becomes the master controller when high availability is started.
For information about configuring high availability, see the Meru Wireless LAN System Configuration Guide.
Examples The following command configures the shared hostname magnolia with IP address of 10.10.1.157:
magnolia(config)# high-availability shared-ip magnolia 10.10.1.157Shared Host=magnoliaShared IP=10.10.1.157
Related Commands
high-availability initdeadhigh-availability peerhigh-availability starthigh-availability stopshow high-availability
hostname Hostname of shared (virtual) host.
ip-address IP address of shared (virtual) IP address.
64 Meru Wireless LAN System Command Reference

high-availability start
Enables high availability.
Syntax high-availability start
Command Mode
Global configuration
Default None
Usage Before you can enable high availability with the high-availability start command, you must do the following:
1. Use the high-availability peer command to specify the peer controller.
2. Use the high-availability shared-ip command to configure the (virtual) shared IP address and hostname.
If the two controllers were previously in use and have different ESSIDs, Meru Networks recommends that you configure both controllers so that they have the same ESSID, which is the ESSID you want to use for your protected network.
For information about configuring high availability, see the Meru Wireless LAN System Configuration Guide.
Examples The following command enables high availability:
controller1(config)# high-availability startStartedcontroller1(config)#
Related Commands
high-availability stopshow high-availabilityhigh-availability peerhigh-availability shared-ip
System Management Commands 65

high-availability stop
Disables high availability.
Syntax high-availability stop
Command Mode
Global configuration
Default None
Usage If you disable high availability using the high-availability stop command, and both controllers are still active, access points can associate with either controller unless explicitly configured to associate to a specific controller. Access points associating with either controller could affect overall system coordination, as both controllers could “compete” with each other for access point association.
Meru Networks recommends that the backup controller be powered off before disabling high availability on the master controller.
Examples The following command disables high availability:
controller1(config)# high-availability stopStoppedcontroller1(config)#
Related Commands
high-availability startshow high-availability
66 Meru Wireless LAN System Command Reference

license
Performs system licensing.
Syntax license {ftp |scp |tftp | sftp}://host/filename {active | standby}
Command Mode
Global configuration mode
Default By default a license for 2 APs and a controller are configured.
Usage This command activates licenses for system hardware components. Licensing information is embedded within the controller firmware and is enabled with a Meru-generated license file. The license file is generated by Meru Networks and contains the needed keys to license system components, based on the options the customer purchases.
Component licensing includes keys for the master or standby controller, and the maximum number of APs the master or standby controller associates (based upon controller model).
Upon receiving the licensing key file from Meru, place in the in the FTP directory (if using FTP) or SCP location of your choice.
Use the no form to remove the specified feature set from the system.
Examples The following commands obtain the license file license17331.lic from the FTP server at 192.168.1.10 and activates licensing for an active MC3000 controller:
mc3000(config)# license ftp://admin:[email protected]/license17331.lic active
mc3000(config)# endmc3000# copy pre-upgrade-config running-config
Related Commands
copycopy running-config
host Specifies the hostname where the license file resides. host can be a hostname or IP address.
filename Specifies license file name.
System Management Commands 67
management wireless
Enables or disables wireless management access to the controller.
Syntax management wireless
no management wireless
Command Mode
Global Configuration mode
Default By default, wireless management to the controller is enabled.
Usage Use the management wireless command to allow wireless stations to enact configuration changes to the controller. If this presents a security problem for your site, you can disable the wireless access by using the no management wireless command; after which all packets except for VPN and Captive Portal that are sent by wireless clients are blocked.
You can check the status of the management access with the show controller command. The line at the bottom of the output, Management by wireless stations: will show either an on or off value.
Examples The following command disables controller configuration access to wireless stations:
mc1000# no management wireless
To re-enable access to wireless clients, use the management wireless command:
mc1000 (config)# management wireless
Related Commands
show controller
68 Meru Wireless LAN System Command Reference

ntp
Updates the system time by synchronizing the system clock with a specified Network Time Protocol (NTP) server.
Syntax ntp {sync | server server}
Command Mode
Privileged EXEC
Default None
Usage Use the ntp sync command to enable periodic synchronization of the system clock with the NTP server specified with the ntp server command. Enabling NTP or changing the NTP server takes effect after a system reboot. Information about public NTP servers can be found at www.ntp.org.
To manually set the system clock, use the calendar set command.
Use the date command to check the system date and time.
Use the show ntp-server command to check the IP address of the assigned NTP server.
Examples The following command performs NTP synchronization and specifies the NTP server with an IP address of 131.107.1.10:
mc1000# ntp syncmc1000# ntp server 131.107.1.10Setting NTP Server to 131.107.1.10. Change will only take effect
after reboot.
Related Commands
calendar setdateshow ntp-server
server IP address or hostname of the NTP server providing clock synchronization.
System Management Commands 69
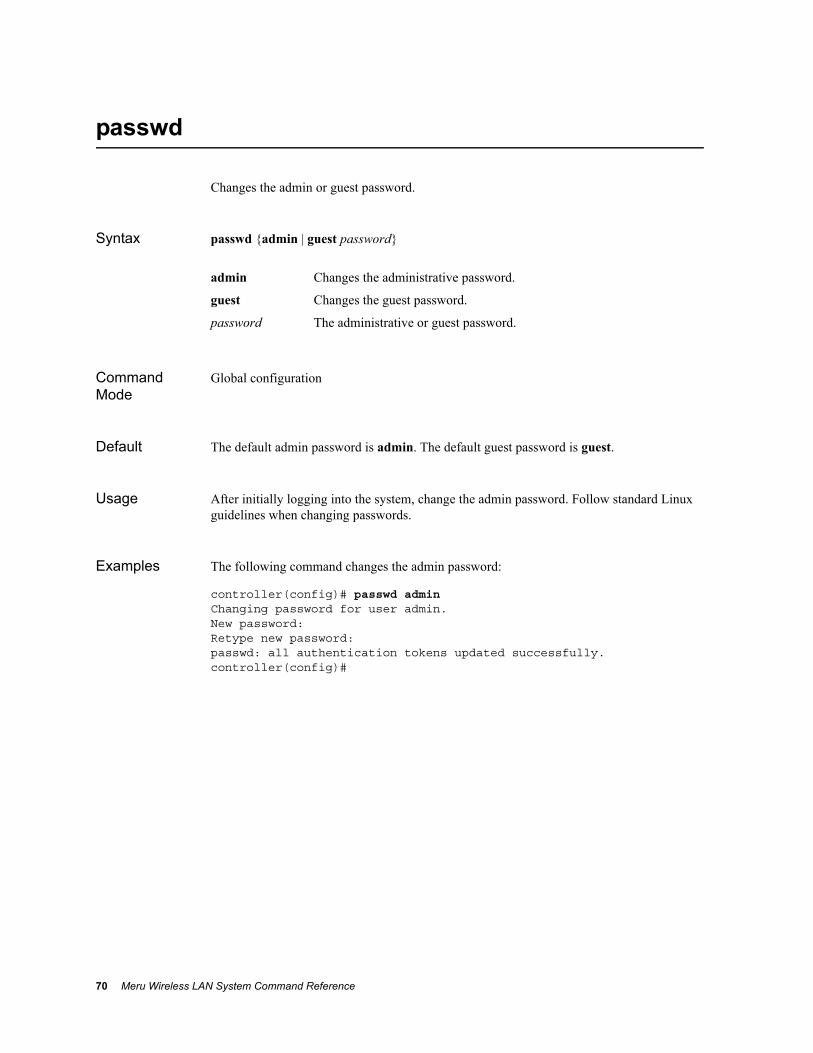
passwd
Changes the admin or guest password.
Syntax passwd {admin | guest password}
Command Mode
Global configuration
Default The default admin password is admin. The default guest password is guest.
Usage After initially logging into the system, change the admin password. Follow standard Linux guidelines when changing passwords.
Examples The following command changes the admin password:
controller(config)# passwd adminChanging password for user admin.New password: Retype new password:passwd: all authentication tokens updated successfully.controller(config)#
admin Changes the administrative password.
guest Changes the guest password.
password The administrative or guest password.
70 Meru Wireless LAN System Command Reference

ping
Tests network connectivity.
Syntax ping hostname
Command Mode
Privileged EXEC
Default None
Usage Use the ping command to test basic network connectivity to a device.
Examples The following command test the basic connectivity from the controller (10.3.1.2) to a device with an IP address of 10.3.4.5:
mc1000# ping 10.3.4.5PING 10.3.4.5 (10.3.4.5) from 10.3.1.2 : 56(84) bytes of data.64 bytes from 10.3.4.5: icmp_seq=1 ttl=255 time=0.334 ms64 bytes from 10.3.4.5: icmp_seq=2 ttl=255 time=0.294 ms64 bytes from 10.3.4.5: icmp_seq=3 ttl=255 time=0.276 ms64 bytes from 10.3.4.5: icmp_seq=4 ttl=255 time=0.234 ms64 bytes from 10.3.4.5: icmp_seq=5 ttl=255 time=0.311 ms
--- 10.3.4.5 ping statistics ---5 packets transmitted, 5 received, 0% loss, time 3996msrtt min/avg/max/mdev = 0.234/0.289/0.334/0.040 msmc1000#
hostname IP address of the device to ping.
System Management Commands 71

poweroff controller
Gracefully shuts down the controller.
Syntax poweroff controller
Command Mode
Privileged EXEC
Default None
Usage Use the poweroff controller command to gracefully shut down the controller.
Make sure you use the copy running-config startup-config command to save configuration changes to the startup configuration file before shutting down the controller if you want those changes to be available after you power on the controller.
Examples The following command shuts down the controller:
mc1000# poweroff controllerAre you sure you want to poweroff the controller [y|n]? y
Broadcast message from root (pts/0) (Fri May 14 21:51:31 2004):
The system is going down for system halt NOW!
The controller is now shut down.
72 Meru Wireless LAN System Command Reference

reload
Reboots the controller and access points.
Syntax reload {all | ap [node-id]| controller [force] | default}
Command Mode
Privileged EXEC
Default None
Usage In a high availability environment, use the reload all command when rebooting so that the master and backup controllers use the same configuration.
Examples The following command reboots the access point with the node ID of 2:
controller# reload ap 2
all Reboots the controller and all access points.
ap [node-id] Reboots all access points if no node ID is specified. Specify a node ID to reboot a specific access point.
controller [force] Reboots only the controller. With the optional force option, forces a controller reboot with the last saved startup configuration. The force option should only be used in situations when there is no response from the controller.
default Reboots the controller and restores the passwords and system configuration to the original factory settings. Additionally, the AP script files (in /ATS/scripts/*) are deleted.
System Management Commands 73
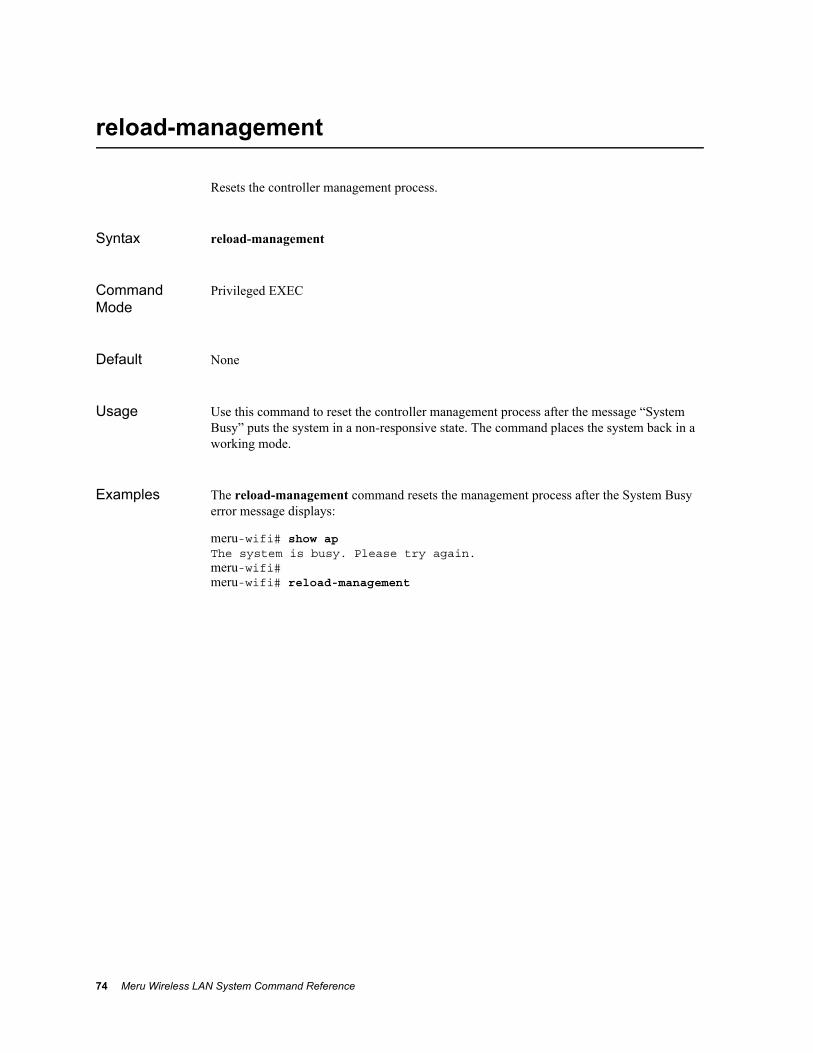
reload-management
Resets the controller management process.
Syntax reload-management
Command Mode
Privileged EXEC
Default None
Usage Use this command to reset the controller management process after the message “System Busy” puts the system in a non-responsive state. The command places the system back in a working mode.
Examples The reload-management command resets the management process after the System Busy error message displays:
meru-wifi# show ap The system is busy. Please try again. meru-wifi#meru-wifi# reload-management
74 Meru Wireless LAN System Command Reference

setup
Starts the basic system configuration setup script.
Syntax setup
Command Mode
Privileged EXEC
Default None
Usage Use the setup script to configure the basic parameters to get the system up and running. As the script runs, you are prompted for information that establishes the communication parameters for the controller.
If you specify that the controller IP address be assigned using DHCP, you need to provide the following information:
Hostname for the controller (the hostname cannot consist entirely of integers)
DHCP server IP address (used to assign controller IP address)
NTP server used to synchronize controller clock (optional)
To assign a static IP address, you need to provide the following information:
Hostname for the controller (cannot be in the form of an IP address)
IP address of the controller
Subnet mask for the controller
IP address of the controller’s default gateway
IP addresses for the local DNS servers
Name of the local domain
NTP server used to synchronize controller clock (optional)
A complete description of the setup script is provided in the Meru Wireless LAN System Getting Started Guide.
Examples To run the initial configuration script that steps you through basic system configuration, use the setup command (partial display follows):
default# setupBegin system configuration ...
System Management Commands 75

Country code configuration for this machine.
The country code is currently set to USWould you like to change it [yes/no/quit]?: ...
76 Meru Wireless LAN System Command Reference

show alarm
Displays uncleared alarms known to the controller.
Syntax show alarm
Command Mode
EXEC
Default None
Usage Displays pending and uncleared alarms known to the controller, including those for connected access points, showing the date and time of each alarm, its severity, and the originating node.
If there are no pending uncleared alarms, the following appears:
No entries.
Examples The following command displays the current pending alarms:
mc1000# show alarmAlarms Table
Alarm Type Severity Timestamp Content
AP Down Critical 2005/05/14 21:57:17 Access Point AP-1 (1)AP Down Critical 2005/05/14 21:57:14 Access Point AP-25 (25)
System Management Commands 77

The following table describes the fields of the show alarm output:
Related Commands
show certificate installed
Information Description
Alarm Type Alarm type. One of the following:
AP Down: The controller has lost contact with the access point. Either the Ethernet cable is not connected to the access point, or the access point is down.
Watchdog Failure: The watchdog process is hung. The system must be rebooted to clear this failure.
Rogue AP Detected: An unauthorized AP (and AP not in the Allowed list) has been detected.
Certificate expired: The the VPN certificate has either expired or has not been used yet. Check the certificate date by using the command show certificate install.
Severity The severity of the alarm (always Critical).
Timestamp Date and time of the alarm in UTC (year/month/day hh:mm:ss), where:
year=year
month= month number (01 - 12)
day= day number
hh = hour (00 - 23)
mm = minutes
ss = seconds
Content Details about the alarm. For rogue access point alarms, the content field lists the MAC address, BSSID, and channel that the station uses. For access points that are down, the content field lists the AP name and number.
78 Meru Wireless LAN System Command Reference
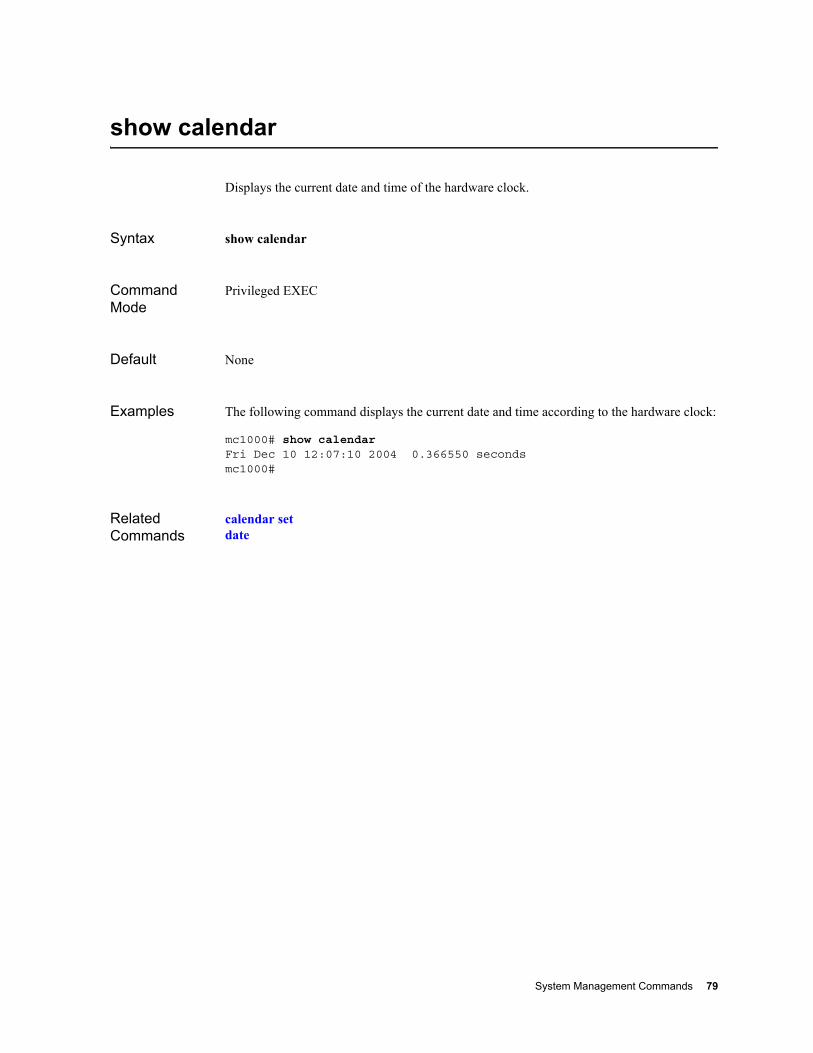
show calendar
Displays the current date and time of the hardware clock.
Syntax show calendar
Command Mode
Privileged EXEC
Default None
Examples The following command displays the current date and time according to the hardware clock:
mc1000# show calendarFri Dec 10 12:07:10 2004 0.366550 secondsmc1000#
Related Commands
calendar setdate
System Management Commands 79

show controller
Displays controller configuration information.
Syntax show controller
Command Mode
EXEC
Default None
Usage Use the show controller command to see global parameters for the controller.
The display provides the following information about the controller:
Parameter Description
Controller ID The identification number of the controller.
Description Optional text that identifies the controller.
Host Name The hostname of the controller.
Uptime The amount of time since the controller was booted.
Location Optional text to help identify the location of the controller.
Contact Option text to help identify the person or group to contact when this controller needs administration help.
Operational State Operational state of the controller. If the controller is operating, the state is enabled, if not, the state is disabled.
Availability Status Availability of this controller. The controller can be online or offline.
Alarm State The alarm state is always Critical.
Automatic AP Upgrade
On indicates that the controller will automatically upgrade the AP to the version of software running on the controller when the the AP associates with the controller. Off indicates this feature is inactive.
Virtual IP Address Virtual IP address assigned to the controller.
Virtual Netmask Virtual netmask assigned to the controller.
80 Meru Wireless LAN System Command Reference

Examples The following command displays controller configuration information:
mc1000# show controllerGlobal Controller Parameters
Controller ID : 1Description : meru-wifiHost Name : meru-wifiUptime :
00d:16h:19m:27sLocation : 2nd Floor
Switch roomContact : Sam AmOperational State : EnabledAvailability Status : Online
Default Gateway IP address of the default gateway.
DHCP Server If dynamic addressing is assigned to this controller, displays the IP address of the server that DHCP requests are being forwarded to.
Statistics Polling Period (seconds)
The amount of time that must elapse before the controller polls for information (for example, the number of packets passed or dropped).
Audit Polling Period (seconds)
The amount of time that must elapse before the controller collects information about access points.
Software Version The version of software running on the controller.
Network Device ID The serial number of the controller.
System ID The system identification of the controller.
Default AP Init Script The name of the default initialization script that is run for access points that have no script specified. The scripts must reside in the directory /ATS/scripts.
DHCP Relay Pass-Through
Indicates whether pass-through mode is enabled for the DHCP Relay server.
Encryption Module Status
Displays whether the optional encryption processing module is present in the controller. If installed, this parameter displays Online. If not installed, this parameter displays Not Installed.
Controller Model Lists the controller model.
Country Setting Displays the name of the country where the controller is located.
Manufacturing Serial # N/A
Management by wireless stations
If set to on, enables wireless management access to the controller; otherwise, if set to off, changes cannot be made wirelessly.
Parameter Description
System Management Commands 81

Alarm State : No AlarmAutomatic AP Upgrade : offVirtual IP Address : 192.168.10.2Virtual Netmask :
255.255.255.0Default Gateway : 192.168.10.1DHCP Server : 10.0.0.10Statistics Polling Period (seconds)/0 disable Polling : 300Audit Polling Period (seconds)/0 disable Polling : 300Software Version : 3.2-116Network Device Id :
00:90:0b:06:15:28System Id : A255B41E53F3Default AP Init Script : DHCP Relay Passthrough : offController Model : MC3000Country Setting : United
States Of AmericaManufacturing Serial # : N/AManagement by wireless stations : off
82 Meru Wireless LAN System Command Reference

show controller cpu-utilization
Show the controller CPU usage.
Syntax show controller cpu-utilization
Command Mode
Privileged EXEC
Default None
Usage Use the show controller cpu-utilization command to see CPU usage information for the controller. The display includes general usage information as well as a list of the top running processes that is updated in real time. Use a CTRL-C to return to the CLI prompt.
Examples The following command displays controller CPU utilization information:
mc1000# show controller cpu-utilization
System Management Commands 83

show controller file systems
Displays information about the file systems on the controller.
Syntax show controller file systems
Command Mode
Privileged EXEC
Default None
Usage This command displays information about the system directories and file systems. It provides the following information:
Examples The following command shows the controller file system information:
mc1000# show controller file systems
Filesystem 1k-blocks Used Available Use% Mounted on/dev/hdc 420453 145615 252426 37% /none 4880 40 4840 1% /dev/shmnone 9764 4820 4944 50% /var/runnone 9764 308 9456 4% /var/lognone 9764 0 9764 0% /tmpnone 9764 0 9764 0% /capture
mc1000#
Parameter Description
Filesystem Displays the file system name. If the item is a directory, it displays none.
1K blocks Shows the number of 1K byte blocks the file system or directory is configured to use.
Used Show the number of 1K byte blocks the file system or directory currently uses.
Available Show the number of 1K byte blocks the file system or directory has available to use (free space).
Use % Show the percentage of available blocks the file system or directory currently uses.
Mounted on Shows the mount point where the file system is mounted or lists the pathname of the directory.
84 Meru Wireless LAN System Command Reference

Related Commands
System Management Commands 85
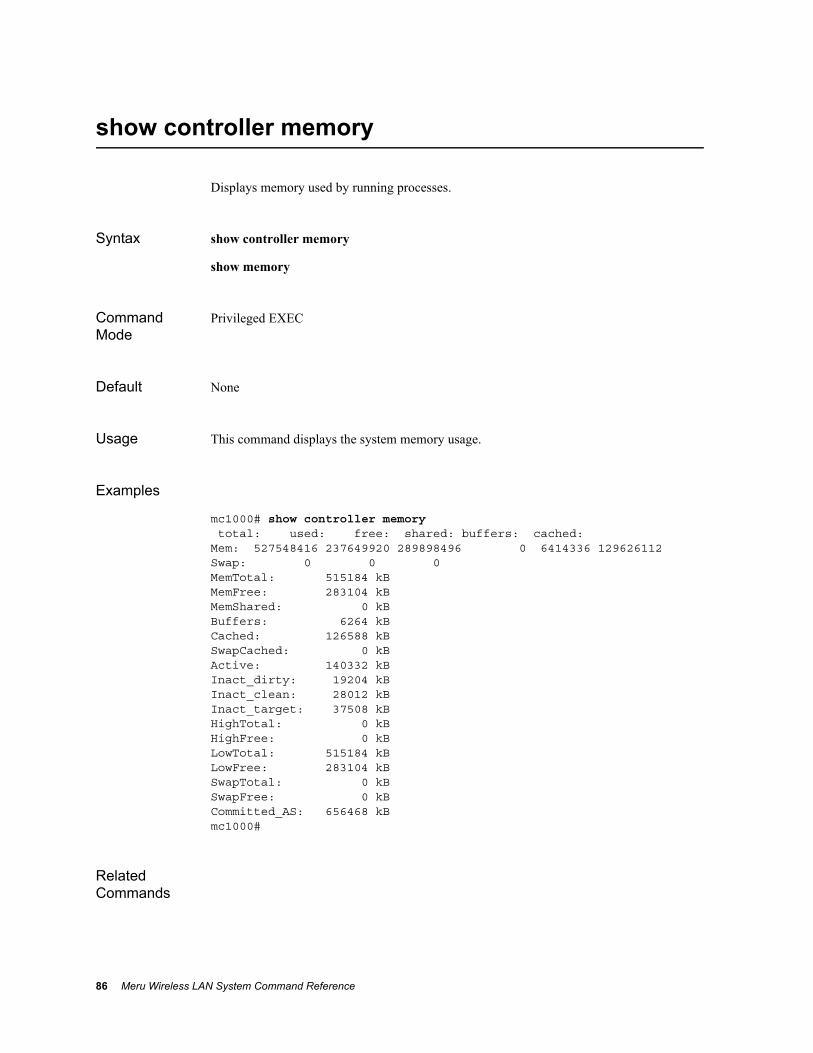
show controller memory
Displays memory used by running processes.
Syntax show controller memory
show memory
Command Mode
Privileged EXEC
Default None
Usage This command displays the system memory usage.
Examples
mc1000# show controller memory total: used: free: shared: buffers: cached:Mem: 527548416 237649920 289898496 0 6414336 129626112Swap: 0 0 0MemTotal: 515184 kBMemFree: 283104 kBMemShared: 0 kBBuffers: 6264 kBCached: 126588 kBSwapCached: 0 kBActive: 140332 kBInact_dirty: 19204 kBInact_clean: 28012 kBInact_target: 37508 kBHighTotal: 0 kBHighFree: 0 kBLowTotal: 515184 kBLowFree: 283104 kBSwapTotal: 0 kBSwapFree: 0 kBCommitted_AS: 656468 kBmc1000#
Related Commands
86 Meru Wireless LAN System Command Reference

show controller processes
Displays information about all running controller processes.
Syntax show controller processes
Command Mode
Privileged EXEC
Default None
Usage This command displays a list of the controller processes. For each process, it lists the following information:
Examples The following example shows a partial listing of the current system processes:
mc1000# show controller processesUID PID PPID C STIME TTY TIME CMDroot 1 0 0 Oct14 ? 00:00:05 initroot 2 1 0 Oct14 ? 00:00:00 [keventd]root 3 1 0 Oct14 ? 00:00:04 [ksoftirqd_CPU0]root 4 1 0 Oct14 ? 00:00:00 [kswapd]root 5 1 0 Oct14 ? 00:00:00 [bdflush]root 6 1 0 Oct14 ? 00:00:00 [kupdated]root 223 1 0 Oct14 ? 00:00:00 syslogd -m 0
Parameter Description
UID (User ID) Displays the name of the user owning the process.
PID (Process ID) Displays the ID number of the process.
PPID (Parent Process ID) Shows the process number of the parent to this process.
C
STIME Shows the system time when the process was started.
TTY Shows the terminal information where the process was started.
TIME Shows the amount of time the process has been running.
CMD Shows the name of the process.
System Management Commands 87

root 228 1 0 Oct14 ? 00:00:00 klogd -xroot 238 1 0 Oct14 ? 00:00:01 /usr/sbin/sshd
Related Commands
88 Meru Wireless LAN System Command Reference

show flash
Displays the system image filenames in flash memory.
Syntax show flash
Command Mode
Privileged EXEC
Default None
Usage Use the show flash command to display the system image filenames in flash memory.
Examples The following command lists the system images in flash memory:
mc1000# show flash3.2-1163.1-139mc1000#
System Management Commands 89
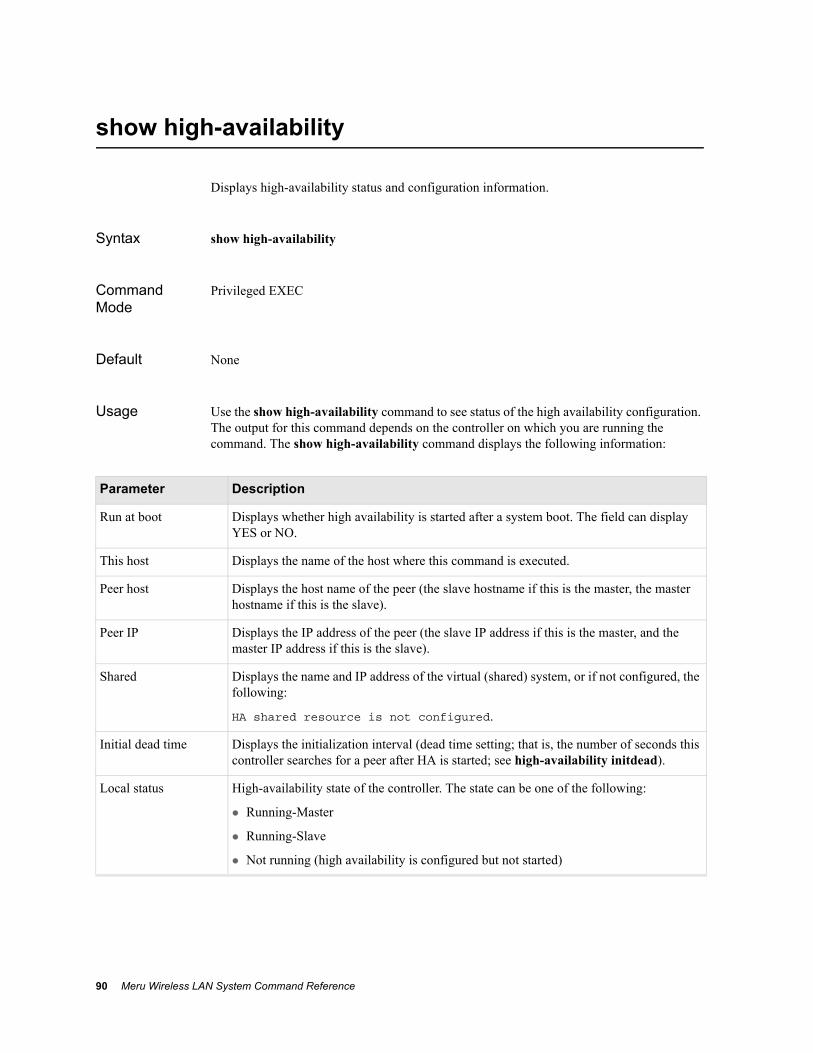
show high-availability
Displays high-availability status and configuration information.
Syntax show high-availability
Command Mode
Privileged EXEC
Default None
Usage Use the show high-availability command to see status of the high availability configuration. The output for this command depends on the controller on which you are running the command. The show high-availability command displays the following information:
Parameter Description
Run at boot Displays whether high availability is started after a system boot. The field can display YES or NO.
This host Displays the name of the host where this command is executed.
Peer host Displays the host name of the peer (the slave hostname if this is the master, the master hostname if this is the slave).
Peer IP Displays the IP address of the peer (the slave IP address if this is the master, and the master IP address if this is the slave).
Shared Displays the name and IP address of the virtual (shared) system, or if not configured, the following:
HA shared resource is not configured.
Initial dead time Displays the initialization interval (dead time setting; that is, the number of seconds this controller searches for a peer after HA is started; see high-availability initdead).
Local status High-availability state of the controller. The state can be one of the following:
Running-Master
Running-Slave
Not running (high availability is configured but not started)
90 Meru Wireless LAN System Command Reference

Examples The following examples illustrate a high-availability environment using a controller named oak with an IP address of 10.0.10.157, another controller named redwood with an IP address of 10.0.10.156, and a shared host named oak with an IP address of 10.0.10.157.
The following command, issued on oak, shows HA is configured but not running:
oak# show high-availabilityConfiguration:
-------------------------Run at boot : NOThis host : oakPeer host : redwoodPeer IP : 10.0.10.156Shared : oak 10.0.10.157Initial dead time : 60 sec-------------------------Local status : Not runningThe following commands, issued on oak, start HA and show HA inititalizing:
oak# configure terminal oak(config)# high-availability start
HA is running. To run it at boot save this configuration (copy running-config startup-config).oak(config)# exit
oak# show high-availability Configuration:
-------------------------Run at boot : NOThis host : oakPeer host : redwoodPeer IP : 10.0.10.156Shared : oak 10.0.10.157Initial dead time : 60 sec-------------------------Local status : Running-Slave redwood : init oak : upoak#
During the initialization interval (60 seconds), redwood is assumed to be starting and oak is waiting for it. No controller is servicing the network during the initialization interval.
The following command, issued on oak after the initialization interval has elapsed, shows oak has become master and that the peer, redwood could not be found:
oak# show high-availability Configuration:-------------------------Run at boot : NOThis host : oakPeer host : redwoodPeer IP : 10.0.10.156Shared : oak 10.0.10.157Initial dead time : 60 sec
System Management Commands 91

-------------------------Local status : Running-Master redwood : dead oak : activeoak#
Related Commands
high-availability peerhigh-availability shared-iphigh-availability starthigh-availability stop
92 Meru Wireless LAN System Command Reference

show hostname
Displays the hostname of the controller.
Syntax show hostname
Command Mode
Privileged EXEC
Default The default hostname is default.
Usage Use the show hostname command to display the hostname of the controller. If you did not change the hostname during setup configuration, the controller hostname is default.
Examples The following command displays the controller hostname, mc1000.
mc1000# show hostnamemc1000mc1000#
Related Commands
setup
System Management Commands 93

show license
Displays the system license.
Syntax show license
Command Mode
Privileged EXEC
Default Shows the system licenses.
Usage Use the show license command to display the status of system licensing for all WLAN controllers and APs. The command provides the following information:
Examples The following command displays a sample system license table.
meru-wifi# show license
Feature Name CtlrStatus LicenseType Expiry Date TotalCount InUse
controller active permanent - 1 1 ap active permanent - 150 0 License Table(2)
Parameter Description
Feature Name Displays the name of the feature being licensed (controller or AP).
CtrlStatus Shows the status of the controller entry, either the active controller, or the standby controller, if a High Availability configuration is implemented.
LicenseType Show the type of license in use: temporary or permanent.
Expiry Date Show the date a temporary license expires. The field contains ‘-’ if the license is permanent.
TotalCount Shows the total number of entities the license covers.
InUse Shows the number of licensed entities that are currently being used.
94 Meru Wireless LAN System Command Reference

Related Commands
copyhigh-availability startlicenseshow license-file
System Management Commands 95
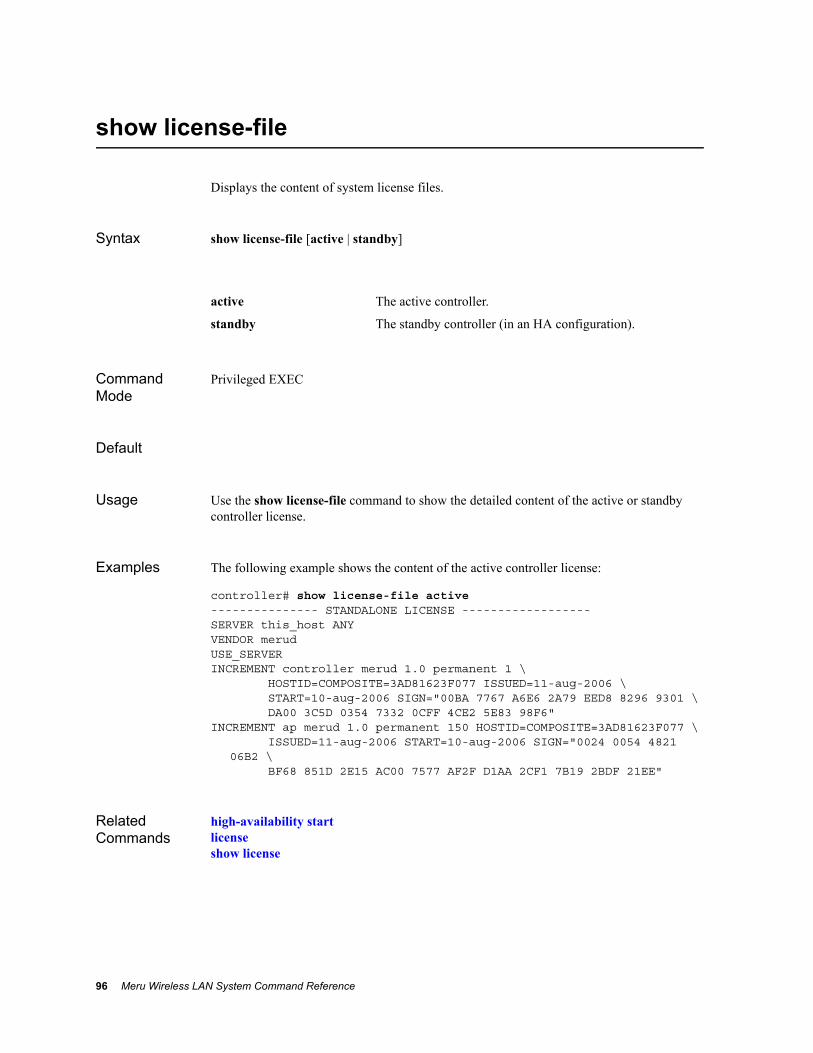
show license-file
Displays the content of system license files.
Syntax show license-file [active | standby]
Command Mode
Privileged EXEC
Default
Usage Use the show license-file command to show the detailed content of the active or standby controller license.
Examples The following example shows the content of the active controller license:
controller# show license-file active --------------- STANDALONE LICENSE ------------------SERVER this_host ANYVENDOR merudUSE_SERVERINCREMENT controller merud 1.0 permanent 1 \ HOSTID=COMPOSITE=3AD81623F077 ISSUED=11-aug-2006 \ START=10-aug-2006 SIGN="00BA 7767 A6E6 2A79 EED8 8296 9301 \ DA00 3C5D 0354 7332 0CFF 4CE2 5E83 98F6"INCREMENT ap merud 1.0 permanent 150 HOSTID=COMPOSITE=3AD81623F077 \ ISSUED=11-aug-2006 START=10-aug-2006 SIGN="0024 0054 4821
06B2 \ BF68 851D 2E15 AC00 7577 AF2F D1AA 2CF1 7B19 2BDF 21EE"
Related Commands
high-availability startlicenseshow license
active The active controller.
standby The standby controller (in an HA configuration).
96 Meru Wireless LAN System Command Reference
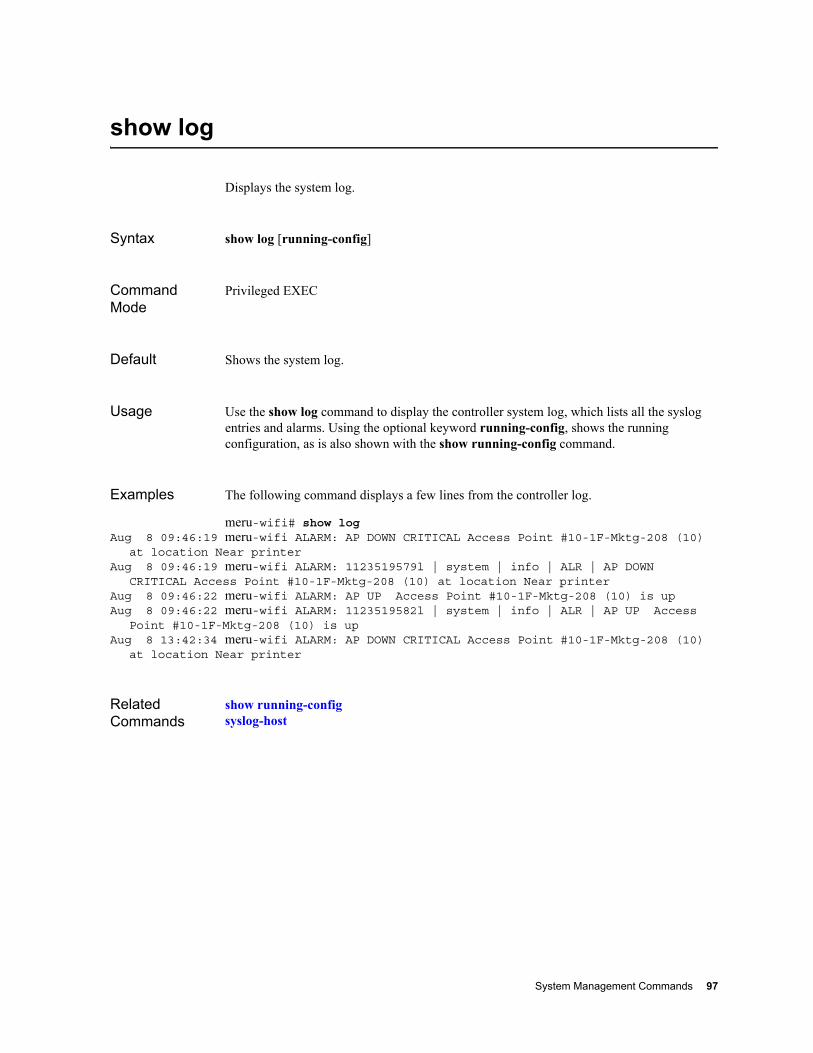
show log
Displays the system log.
Syntax show log [running-config]
Command Mode
Privileged EXEC
Default Shows the system log.
Usage Use the show log command to display the controller system log, which lists all the syslog entries and alarms. Using the optional keyword running-config, shows the running configuration, as is also shown with the show running-config command.
Examples The following command displays a few lines from the controller log.
meru-wifi# show logAug 8 09:46:19 meru-wifi ALARM: AP DOWN CRITICAL Access Point #10-1F-Mktg-208 (10)
at location Near printerAug 8 09:46:19 meru-wifi ALARM: 1123519579l | system | info | ALR | AP DOWN
CRITICAL Access Point #10-1F-Mktg-208 (10) at location Near printerAug 8 09:46:22 meru-wifi ALARM: AP UP Access Point #10-1F-Mktg-208 (10) is upAug 8 09:46:22 meru-wifi ALARM: 1123519582l | system | info | ALR | AP UP Access
Point #10-1F-Mktg-208 (10) is upAug 8 13:42:34 meru-wifi ALARM: AP DOWN CRITICAL Access Point #10-1F-Mktg-208 (10)
at location Near printer
Related Commands
show running-configsyslog-host
System Management Commands 97
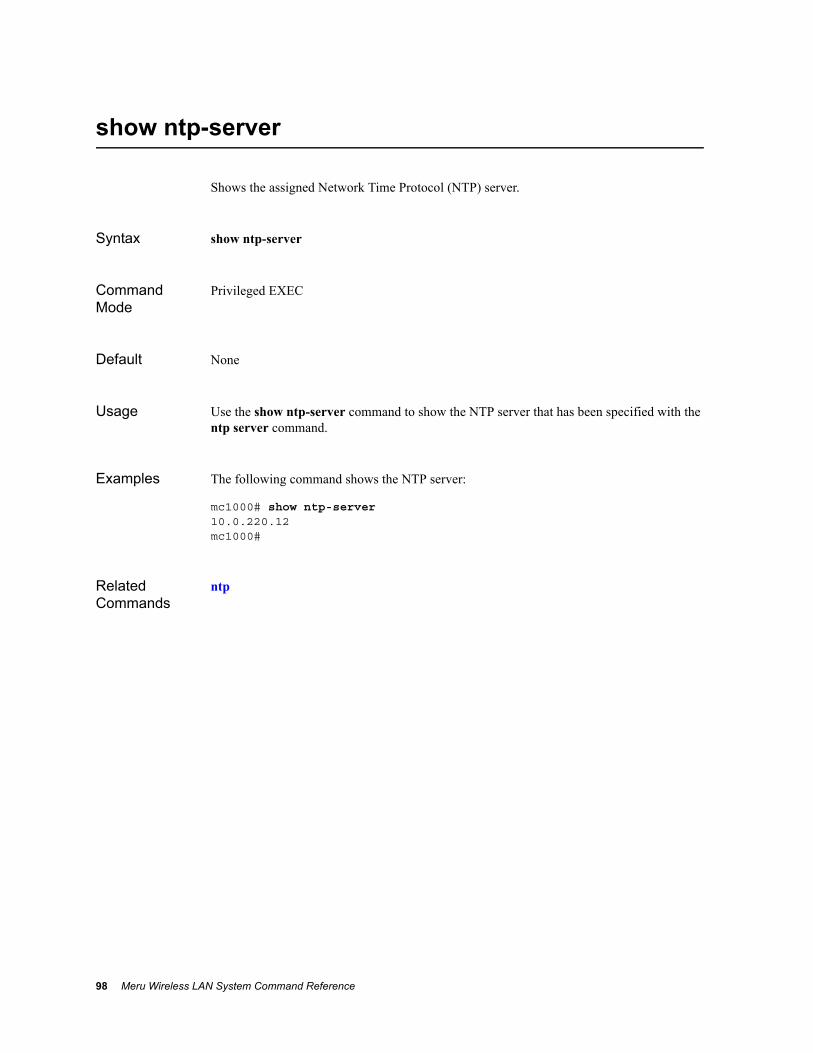
show ntp-server
Shows the assigned Network Time Protocol (NTP) server.
Syntax show ntp-server
Command Mode
Privileged EXEC
Default None
Usage Use the show ntp-server command to show the NTP server that has been specified with the ntp server command.
Examples The following command shows the NTP server:
mc1000# show ntp-server10.0.220.12mc1000#
Related Commands
ntp
98 Meru Wireless LAN System Command Reference

show syslog-file
Displays the external syslog file, if it exists.
Syntax show syslog-file [facility]
Command Mode
EXEC
Default None
Usage This command shows the contents of the external syslog file, if it exists. The optional facility parameter filters the output to show entries for that facility only.
By default, external logging is disabled. You can configure an external syslog host with the syslog-host command.
Examples The following command shows the syslog file has no entries, although it does exist:
mc1000(config)# show syslog-file SysLog(No entries)mc1000(config)#
Related Commands
syslog-host
facility Optional. Shows entries for the syslog facility, for example:
802.mobility
bulkupdate
nms
qos
security
system
System Management Commands 99

show syslog-host
Displays the external syslog host if it is configured.
Syntax show syslog-host
Command Mode
EXEC
Default None
Usage By default, external logging is disabled. You can configure an external syslog host with the syslog-host command.
Examples The following command shows the syslog host is 10.1.2.3:
mc1000(config)# show syslog-host10.1.2.3mc1000(config)#
Related Commands
syslog-host
100 Meru Wireless LAN System Command Reference
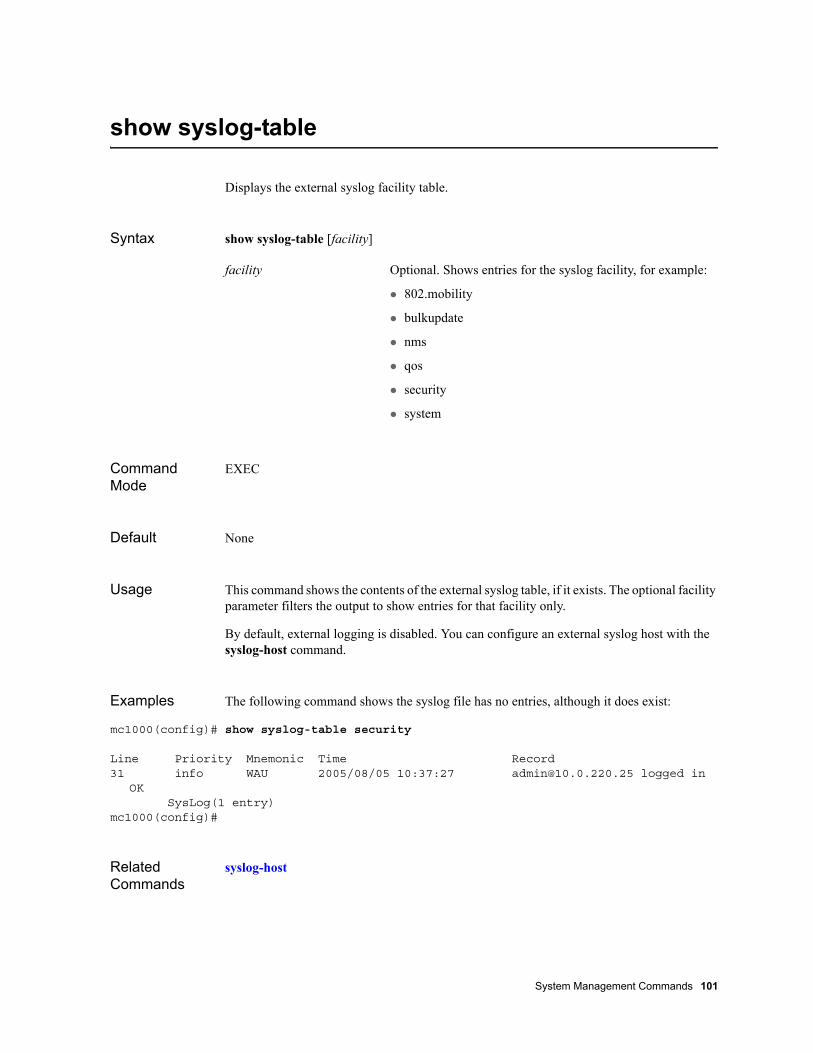
show syslog-table
Displays the external syslog facility table.
Syntax show syslog-table [facility]
Command Mode
EXEC
Default None
Usage This command shows the contents of the external syslog table, if it exists. The optional facility parameter filters the output to show entries for that facility only.
By default, external logging is disabled. You can configure an external syslog host with the syslog-host command.
Examples The following command shows the syslog file has no entries, although it does exist:
mc1000(config)# show syslog-table security
Line Priority Mnemonic Time Record 31 info WAU 2005/08/05 10:37:27 [email protected] logged in
OK SysLog(1 entry)mc1000(config)#
Related Commands
syslog-host
facility Optional. Shows entries for the syslog facility, for example:
802.mobility
bulkupdate
nms
qos
security
system
System Management Commands 101

show timezones
Displays timezones and related cities.
Syntax show timezones
Command Mode
Privileged EXEC
Default None
Usage This command shows a listing a major cities, categorized by timezone.
Examples The following shows a partial list of the command output:
mc1000(config)# show timezonesAfrica/AbidjanAfrica/AccraAfrica/Addis_AbabaAfrica/AlgiersAfrica/AsmeraAfrica/BamakoAfrica/BanguiAfrica/BanjulAfrica/BissauAfrica/BlantyreAfrica/BrazzavilleAfrica/BujumburaAfrica/CairoAfrica/Casablanca
Related Commands
timezone
102 Meru Wireless LAN System Command Reference

statistics period
Configures how often the controller polls for information.
Syntax statistics period period
Command Mode
Global configuration
Default The default statistics period is 60 seconds.
Usage Use the statistics period command to change the amount of time that elapses before the controller polls for information. For example, by default, the controller polls for information, such as the number of packets passed or dropped, every 60 seconds. Specifying a value of zero (0) disables polling. The statistics period affects the data collected for the following commands:
show statistics station-per-ap—Displays the list of station statistics per AP.
show statistics top10-ap-problem—Displays the list of APs having the most significant problems.
show statistics top10-ap-talker—Displays the list of APs handling the heaviest traffic (MAX Tx+Rx frames).
show statistics top10-station-problem—Displays the list of stations having the most significant problems.
show statistics top10-station-talker—Displays the list of stations generating the highest traffic.
Examples The following command sets the statistics period to 1,000 seconds:
mc1000(config)# statistics period 1000mc1000(config)#
Related Commands
period Amount of time that elapses before the controller polls for information. The valid value range is 5 through 65,535 seconds.
System Management Commands 103

syslog-host
Configures an external syslog host.
Syntax syslog-host hostname
no syslog-host
Command Mode
Global configuration
Default None
Usage This command configures a remote server to serve as the location where the syslog error logging file is maintained. By default, no host is specified.
To remove a configured syslog server, use the no syslog-host command.
Examples The following commands check the syslog host setting, set host 10.1.2.3 to the external syslog server, and then display the change:
mc1000(config)# do show syslog-hostExternal logging is disabledmc1000(config)# syslog-host 10.1.2.3mc1000(config)# do show syslog-host10.1.2.3
The following commands remove the syslog host setting and then display the change:
mc1000(config)# no syslog-hostmc1000(config)# do show syslog-hostExternal logging is disabled
Related Commands
show syslog-host
hostname Name or IP address, in dotted decimal notation, of the external syslog host.
Note: After configuring a syslog host, reboot the controller to activate the syslog functionality.
104 Meru Wireless LAN System Command Reference

telnet
Configure telnet connectivity.
Syntax telnet {enable | disable}
Command Mode
Global configuration mode
Default Telnet access is enabled.
Usage This command disables telnet access when telnet is enabled.
Examples The following command disables telnet access:
mc1000(config)# telnet disable
enable Enables telnet access when telnet is disabled.
disable Disables telnet access when telnet is enabled.
System Management Commands 105

timezone
Configures the timezone setting.
Syntax timezone {menu | set zone}
Command Mode
Privileged EXEC mode
Default None
Usage This command configures the timezone setting for the controller. The menu option allows a location to be selected through a series of menu selections. At the end of the selection questions, you are prompted to set the timezone, and notified of the zone setting. This zone setting can be used in subsequent timezone sessions, as an argument to the set option.
After the timezone is changed, the controller should be rebooted.
Examples The following shows how to set the timezone using the menu option:
mc1000(config)# timezone menu Please identify a location so that time zone rules can be set
correctly.Please select a continent or ocean. 1) Africa 2) Americas 3) Antarctica 4) Arctic Ocean 5) Asia 6) Atlantic Ocean 7) Australia 8) Europe 9) Indian Ocean10) Pacific Ocean11) none - I want to specify the time zone using the Posix TZ
format.#? 10Please select a country. 1) Chile 15) Northern Mariana Islands 2) Cook Islands 16) Palau
menu Displays a series of numbered lists of locations (continents and oceans) to help select a timezone setting.
set zone Directly sets the timezone to a specific setting.
106 Meru Wireless LAN System Command Reference

3) Ecuador 17) Papua New Guinea 4) Fiji 18) Pitcairn 5) French Polynesia 19) Samoa (American) 6) Guam 20) Samoa (Western) 7) Kiribati 21) Solomon Islands 8) Marshall Islands 22) Tokelau 9) Micronesia 23) Tonga10) Nauru 24) Tuvalu11) New Caledonia 25) US minor outlying islands12) New Zealand 26) United States13) Niue 27) Vanuatu14) Norfolk Island 28) Wallis & Futuna#? 26Please select one of the following time zone regions. 1) Eastern Time 2) Eastern Time - Michigan - most locations 3) Eastern Time - Kentucky - Louisville area 4) Eastern Time - Kentucky - Wayne County 5) Eastern Standard Time - Indiana - most locations 6) Eastern Standard Time - Indiana - Crawford County 7) Eastern Standard Time - Indiana - Starke County 8) Eastern Standard Time - Indiana - Switzerland County 9) Central Time10) Central Time - Michigan - Wisconsin border11) Central Time - North Dakota - Oliver County12) Mountain Time13) Mountain Time - south Idaho & east Oregon14) Mountain Time - Navajo15) Mountain Standard Time - Arizona16) Pacific Time17) Alaska Time18) Alaska Time - Alaska panhandle19) Alaska Time - Alaska panhandle neck20) Alaska Time - west Alaska21) Aleutian Islands22) Hawaii#? 16
The following information has been given:
United States Pacific Time
The name of the time zone is 'America/Los_Angeles'.Is the above information OK?1) Yes2) No#? 1
The following command is the alternative way of selecting the same time zone
timezone set America/Los_Angeles
The time zone is successfully set
System Management Commands 107

traceroute
Tests network connectivity.
Syntax traceroute hostname
Command Mode
Privileged EXEC
Default None
Usage This command displays the IP address and status for all routers between the controller and a specified remote destination. Instead of a hostname, you can alternatively specify a domain name instead of an IP address or a hostname.
Examples The following command displays the route to a destination whose hostname is Ourserver:
mc1000# traceroute Ourserver
traceroute to OurServer (10.0.13.1), 30 hops max, 38 byte packets 1 mc1000 (10.19.1.1) 2997.354 ms !H 2999.525 ms !H 2999.944 ms
!
Related Commands
ping
hostname Name or IP address, in dotted decimal notation, of the host host address to resolve.
108 Meru Wireless LAN System Command Reference

Chapter 5Interface and IP Commands
The commands contained in this chapter are used to configure and show information about network addressing:
ip address
ip address dhcp
ip default-gateway
ip dhcp-passthrough
ip dhcp-server
ip dns-server
ip domainname
ip ftp
ip scp
ip sftp
ip udp-broadcast
show interfaces FastEthernet ap
show interfaces FastEthernet controller
show interfaces FastEthernet statistics
show ip
Interface and IP Commands 109

ip address
Configures static IP address connectivity.
Syntax ip address address netmask
Command Mode
Global configuration, radius profile, AP connectivity, and VLAN configuration modes
Default None
Usage This command configures the IP address and netmask for a controller, RADIUS server, access point, or VLAN, depending on the submode in which this command is invoked.
When configuring the IP address of the AP, the AP is a Remote AP and you are configuring a static IP address. You can also configure the AP to use a dynamic IP address with the ip address dhcp command.
When configuring the IP address in the VLAN submode, the IP address specified for the VLAN must match the default gateway configured in the client.
Examples To assign a static IP address to the controller, use the ip address command with the IP address and subnet arguments, as follows:
mc1000(config)# ip address 10.0.0.19 255.0.0.0
To assign a static IP address to the AP, enter the AP connectivity submode. Then use the ip address command to configure the IP address 10.0.220.30 and netmask 255.255.255.0 for the Remote AP.
mc1000(config)# ap 1mc1000(config-ap)# l3-connectivity l3-preferredmc1000(config-ap-connectivity)# ip address 10.0.220.30 255.255.255.0mc1000(config-ap-connectivity)#
The following command specifies the IP address 10.1.2.3 and netmask 255.0.0.0 for a VLAN.
mc1000(config)# vlan qa tag 100mc1000(config-vlan)# ip 10.1.2.3 255.0.0.0
address Sets the IP address for address.
netmask Sets the IP address netmask to netmask
110 Meru Wireless LAN System Command Reference

Related Commands
ip address dhcpip default-gatewayip dns-servershow ap-connectivityshow controller
Interface and IP Commands 111

ip address dhcp
Configures DHCP connectivity.
Syntax ip address dhcp
Command Mode
Global configuration and AP connectivity configuration modes
Default None
Usage This command configures DHCP connectivity for a controller and access point, depending on the submode in which this command is invoked.
Examples To allow the controller to be assigned a dynamic IP address, use the ip address dhcp command, as follows:
mc1000(config)# ip address dhcp
To allow the AP to be assigned a dynamic IP address, enter the AP connectivity submode. Then use the ip address dhcp command to configure a dynamically assigned IP address for the Remote AP.
mc1000(config)# ap 1mc1000(config-ap)# l3-connectivity l3-preferredmc1000(config-ap-connectivity)# ip address dhcpmc1000(config-ap-connectivity)#
Related Commands
ip default-gatewayip dns-servershow controller
112 Meru Wireless LAN System Command Reference

ip default-gateway
Configures default gateway connectivity.
Syntax ip default-gateway address
Command Mode
Global configuration, AP connectivity configuration, and VLAN configuration modes
Default The default IP address of the default gateway is 0.0.0.0.
Usage Configures default gateway connectivity for the controller, access point, or VLAN, depending on the submode under which the command is invoked.
When configuring the default gateway for a VLAN, use the default gateway used by the controller to route traffic coming from wireless clients using the VLAN.
Use the default form to set the default gateway to its default value.
Examples To assign the default gateway IP address used by the controller, use the ip default-gateway command with the IP address, as follows:
mc1000(config)# ip default-gateway 10.0.0.1
To assign the default gateway IP address used by the AP, enter the AP connectivity submode. Then use the ip default-gateway command to configure the IP address for the Remote AP.
mc1000(config)# ap 1mc1000(config-ap)# l3-connectivity l3-preferredmc1000(config-ap-connectivity)# ip default-gateway 10.0.0.1
To assign the default gateway IP address used by the VLAN, for example:
mc1000(config)# vlan qa tag 100mc1000(config-vlan)# ip default-gateway 10.0.0.1
address IP address of the default gateway.
Interface and IP Commands 113

Related Commands
ip addressip address dhcpip dns-servershow ap-connectivityshow controller
114 Meru Wireless LAN System Command Reference

ip dhcp-passthrough
Enables or disables the DHCP pass-through.
Syntax ip dhcp-passthrough
no dhcp-passthrough
Command Mode
Global configuration and VLAN configuration modes
Default The default is DHCP pass-through enabled.
Usage127 This command enables or disables (using the no form) the DHCP pass-through service for the controller or the VLAN, depending on the submode under which the command is invoked. If enabled, and if the DHCP server IP is the default 127.0.0.1, DHCP packets pass through without modification (as in a bridge). The pass-through behavior eliminates the need for the DHCP relay in most installations, and puts the burden of relay on the routers, which is traditional.
Examples To enable DHCP pass-through for the controller, use the ip dhcp-passthrough command, as follows:
mc1000(config)# ip dhcp-passthrough
To enable DHCP pass-through for the VLAN, for example:
mc1000(config)# vlan qa tag 100mc1000(config-vlan)# ip dhcp-passthrough
Related Commands
ip dhcp-servershow controller
Interface and IP Commands 115

ip dhcp-server
Configures the DHCP relay server.
Syntax ip dhcp-server ip-address
no ip dhcp-server
Command Mode
Global configuration and VLAN configuration modes
Default The default IP address of the DHCP relay server is 127.0.0.1.
Usage This command configures the DHCP relay server for the controller and VLAN, depending on the submode under which the command is invoked.
If specified in VLAN submode, the specified DHCP server overrides the controller-assigned DHCP server configuration. Because of some interoperability configurations, the System Director also supports the use of the IP address 255.255.255.255 as a valid DHCP relay address.
Use the no form to remove the DHCP relay server.
Examples To configure a DHCP relay server for the controller, use the ip dhcp-server command, as follows:
mc1000(config)# ip dhcp-server 10.0.1.20
To configure a DHCP server for the VLAN, for example:
mc1000(config)# vlan qa tag 100mc1000(config-vlan)# ip dhcp-server 10.0.0.1
Related Commands
ip dhcp-passthroughshow controller
ip-address IP address of the DHCP relay server in dotted decimal notation (n.n.n.n).
116 Meru Wireless LAN System Command Reference

ip dns-server
Configures a DNS server’s IP address.
Syntax ip dns-server ip_addr
no ip dns-server
ip dns-server {primary |secondary} ip_addr (for AP connectivity sub-mode only)
Command Mode
Global configuration and AP connectivity configuration modes
Default None
Usage Use this command to add a DNS server by specifying its IP address. After the DNS servers have been added, when needed, the system will connect to the first DNS server if it is able to; otherwise, it will go on to the next one until it finds one that is working.
Use the no form to remove the DNS server.
Examples To assign a DNS server IP address used by the controller, use the ip dns-server command with the IP address, as follows:
mc1000(config)# ip dns-server 10.0.200.1
To assign a DNS server IP address used by the AP, enter the AP connectivity submode. Then use the ip dns-server primary or ip dns-server secondary command to configure the DNS server IP address used by the Remote AP:
mc1000(config)# ap 1mc1000(config-ap)# l3-connectivity l3-preferredmc1000(config-ap-connectivity)# ip dns-server primary 10.0.0.1
Related Commands
ip addressip address dhcpip default-gateway
ip_addr IP address of the DNS server in dotted decimal notation (n.n.n.n).
Interface and IP Commands 117

ip domainname
Configures the DNS domain name.
Syntax ip domainname name
no ip domainname
Command Mode
Global configuration
Default None
Usage Sets the domain name for use with DNS. Use the no command form to remove the configured domain name.
Examples To assign a domain name for use by DNS, type configure terminal to enter global configuration mode, and use the ip domainname command with the name, as follows:
mc1000(config)# ip domainname merunetworks.com
Related Commands
ip addressip address dhcpip default-gatewayip dns-server
name Specifies the domain using from 1 to 63 characters.
118 Meru Wireless LAN System Command Reference

ip ftp
Configures a username/password for FTP.
Syntax ip ftp {username username | password password}
Command Mode
Global configuration
Default None
Usage Sets the default username and password for an FTP session.
Examples To set the FTP username to suzanne for the session:
mc1000(config)# ip ftp username susanne
Related Commands
ip addressip address dhcpip default-gatewayip dns-server
username username Specifies the FTP username.
password password Specifies the FTP password.
Interface and IP Commands 119

ip scp
Configures the username/password for SCP.
Syntax ip scp {username username | password password}
Command Mode
Global configuration
Default None
Usage Sets the default username and password for an SCP session.
Examples To set the SFTP username to suzanne for the session:
mc1000(config)# ip scp username susanne
Related Commands
ip addressip address dhcpip default-gatewayip dns-server
username username Specifies the SCP username. The name can be a maximum of 32 characters.
password password Specifies the SCP password. The password can be a maximum of 32 characters.
120 Meru Wireless LAN System Command Reference

ip sftp
Configures the username/password for SFTP.
Syntax ip sftp {username username |password password}
Command Mode
Global configuration
Default None
Usage Sets the default username and password for an SFTP session.
Examples To set the SFTP username to suzanne for the session:
mc1000(config)# ip sftp username susanne
Related Commands
ip addressip address dhcpip default-gatewayip dns-server
username username Specifies the SFTP username.
password password Specifies the SFTP password.
Interface and IP Commands 121
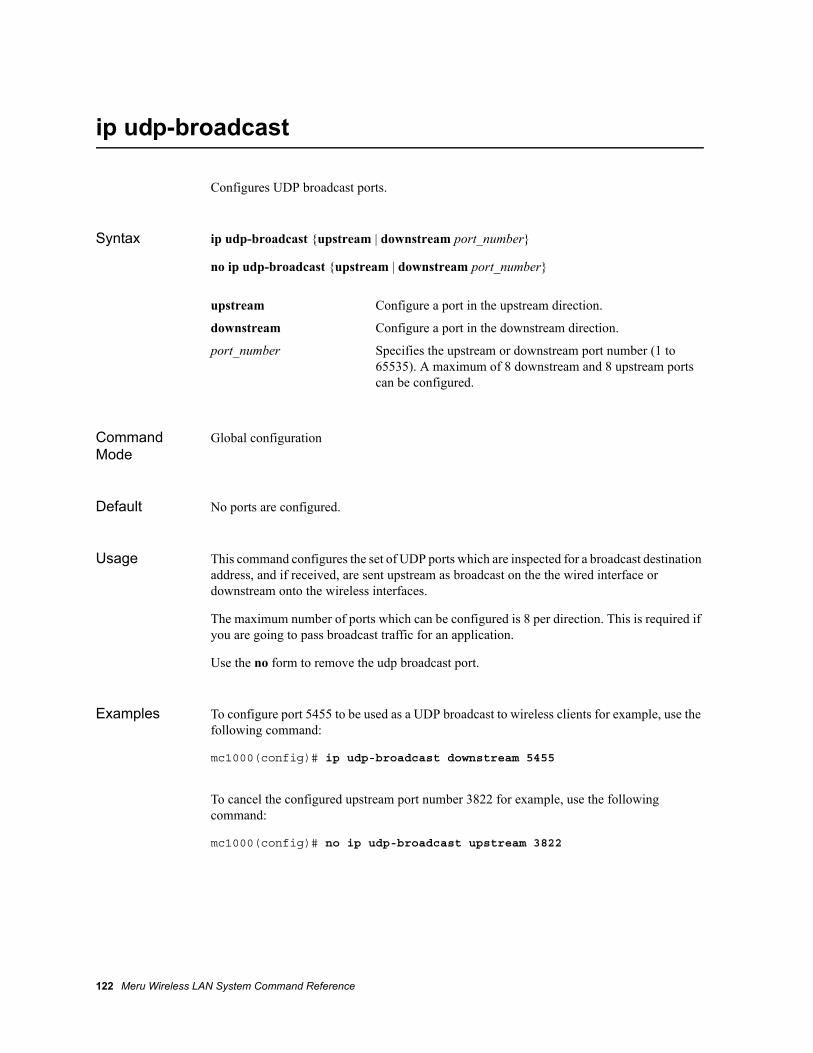
ip udp-broadcast
Configures UDP broadcast ports.
Syntax ip udp-broadcast {upstream | downstream port_number}
no ip udp-broadcast {upstream | downstream port_number}
Command Mode
Global configuration
Default No ports are configured.
Usage This command configures the set of UDP ports which are inspected for a broadcast destination address, and if received, are sent upstream as broadcast on the the wired interface or downstream onto the wireless interfaces.
The maximum number of ports which can be configured is 8 per direction. This is required if you are going to pass broadcast traffic for an application.
Use the no form to remove the udp broadcast port.
Examples To configure port 5455 to be used as a UDP broadcast to wireless clients for example, use the following command:
mc1000(config)# ip udp-broadcast downstream 5455
To cancel the configured upstream port number 3822 for example, use the following command:
mc1000(config)# no ip udp-broadcast upstream 3822
upstream Configure a port in the upstream direction.
downstream Configure a port in the downstream direction.
port_number Specifies the upstream or downstream port number (1 to 65535). A maximum of 8 downstream and 8 upstream ports can be configured.
122 Meru Wireless LAN System Command Reference

Related Commands
ip addressip address dhcpip default-gatewayip dns-server
Interface and IP Commands 123

show interfaces FastEthernet ap
Displays information related to the FastEthernet configuration for the access point.
Syntax show interfaces FastEthernet ap [ap-id]
Command Mode
Privileged EXEC mode
Default None
Usage This command displays FastEthernet Interface configuration information for all APs, or the specified access point. The following information is provided:
ap-id Specifies a unique identifier for the access point.
Parameter Description
Node Type The type of node, for example, access point.
Node ID The unique identifier for the access point.
Node Name The name assigned to the access point.
Interface Index The index for identifying this interface.
Description Shows a description of the interface.
MTU The Maximum Transmission Unit (MTU) for the interface.
Interface Speed (Mbits/sec) The configured speed for the interface.
Duplex Mode Indicates whether the interface is using full-duplex or half-duplex mode.
Physical Address The MAC address of the interface.
Operational State The status of the interface. Status can be Enabled or Disabled.
Last Changed The date the interface was changed last.
124 Meru Wireless LAN System Command Reference

Examples The following command displays FastEthernet configuration for all APs:
mc1000# show interfaces FastEthernet apType ID Name MTU MAC Address Op State Last Change
ap 41 Qa2ndFloor 1500 00:0c:e6:00:17:9f Enabled 2004/12/11 16:41:53 ap 40 Cs1stFloor 1500 00:0c:e6:00:00:e5 Enabled 2004/12/11 16:41:43 ap 39 Se1stFloor 1500 00:0c:e6:00:00:62 Enabled 2004/12/11 16:41:39 ap 38 Exec1stFloor 1500 00:00:00:00:00:00 Disabled 2004/12/11 16:41:22 ap 37 Hw2ndFloor 1500 00:0c:e6:00:05:5f Enabled 2004/12/11 16:41:43 ap 36 Mktg1stFloor 1500 00:0c:e6:00:9a:c5 Enabled 2004/12/11 16:41:51 ap 35 Sw2ndFloor 1500 00:0c:e6:00:03:1c Enabled 2004/12/11 16:41:39 Interface Table(7)
The following command displays FastEthernet configuration information for AP 1:
mc1000# show interfaces FastEthernet ap 1Interface Table
Node Type : apNode ID : 35Node Name : Sw2ndFloorInterface Index : 100Description : eth0-35-100MTU : 1500Interface Speed (Mbits/sec) : 100Duplex Mode : full-duplex
In Octets The number of octets received by this interface.
In Unicast Packets The number of unicast packets received by this interface.
In Non-Unicast Packets The number of non-unicast packets received by this interface.
In Discards The number of incoming packets discarded by this interface.
In Errors The number of incoming packets with errors on this interface.
In Unknown Protocols The number of packets with an unknown protocol received by this interface.
Out Octets The number of octets sent by this interface.
Out Unicast Packets The number of unicast packets sent by this interface.
Out Non-Unicast Packets The number of non-unicast packets sent by this interface.
Out Discards The number of outgoing packets discarded by this interface.
Out Errors The number of outgoing packets with errors on this interface.
Out Queue Length The number of packets in the outgoing packet queue.
Parameter Description
Interface and IP Commands 125

Physical Address : 00:0c:e6:00:03:1cOperational State : EnabledLast Changed : 2004/12/11 16:41:39Description : In Octets : 186535270In Unicast Packets : 1490991In Non-Unicast Packets : 1525In Discards : 0In Errors : 0In Unknown Protocols : 1476Out Octets : 30534764Out Unicast Packets : 223555Out Non-Unicast Packets : 49Out Discards : 0Out Errors : 0Out Queue Length : 0
Related Commands
126 Meru Wireless LAN System Command Reference

show interfaces FastEthernet controller
Displays information related to the FastEthernet configuration for the controller.
Syntax show interfaces FastEthernet controller
Command Mode
Privileged EXEC mode
Default None
Usage This command displays FastEthernet Interface configuration information for the controller. The following information is provided:
Parameter Description
Node Type The type of node, for example, controller.
Node ID The unique identifier for the controller.
Node Name The name assigned to the controller.
Interface Index The index for identifying this interface.
Description Shows a description of the interface.
MTU The Maximum Transmission Unit (MTU) for the interface.
Interface Speed (Mbits/sec) The configured speed for the interface.
Duplex Mode Indicates whether the interface is using full-duplex or half-duplex mode.
Physical Address The MAC address of the interface.
Operational State The status of the interface. Status can be Enabled or Disabled.
Last Changed The date the interface was changed last.
In Octets The number of octets received by this interface.
In Unicast Packets The number of unicast packets received by this interface.
Interface and IP Commands 127

Examples The following command displays FastEthernet configuration information for the controller:
mc1000# show interfaces FastEthernet controllerInterface Table
Node Type : controllerNode ID : 1Node Name : controller1Interface Index : 3Description : eth1MTU : 1500Interface Speed (Mbits/sec) : 100Duplex Mode : full-duplexPhysical Address : 00:02:b3:e6:d7:12Operational State : EnabledLast Changed : -Description : eth1In Octets : 272189914In Unicast Packets : 1638979In Non-Unicast Packets : 0In Discards : 0In Errors : 0In Unknown Protocols : 0Out Octets : 1467641108Out Unicast Packets : 9827811Out Non-Unicast Packets : 0Out Discards : 0Out Errors : 0
In Non-Unicast Packets The number of non-unicast packets received by this interface.
In Discards The number of incoming packets discarded by this interface.
In Errors The number of incoming packets with errors on this interface.
In Unknown Protocols The number of packets with an unknown protocol received by this interface.
Out Octets The number of octets sent by this interface.
Out Unicast Packets The number of unicast packets sent by this interface.
Out Non-Unicast Packets The number of non-unicast packets sent by this interface.
Out Discards The number of outgoing packets discarded by this interface.
Out Errors The number of outgoing packets with errors on this interface.
Out Queue Length The number of packets in the outgoing packet queue.
Parameter Description
128 Meru Wireless LAN System Command Reference

Related Commands
Interface and IP Commands 129
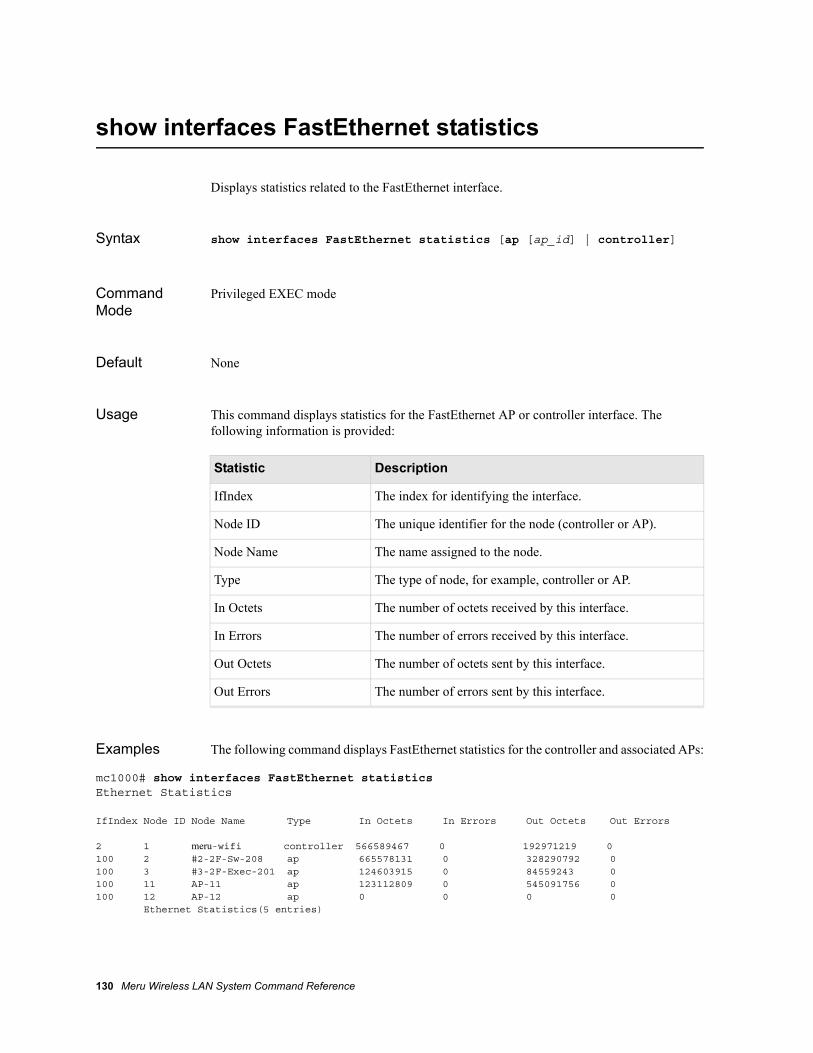
show interfaces FastEthernet statistics
Displays statistics related to the FastEthernet interface.
Syntax show interfaces FastEthernet statistics [ap [ap_id] | controller]
Command Mode
Privileged EXEC mode
Default None
Usage This command displays statistics for the FastEthernet AP or controller interface. The following information is provided:
Examples The following command displays FastEthernet statistics for the controller and associated APs:
mc1000# show interfaces FastEthernet statistics Ethernet Statistics
IfIndex Node ID Node Name Type In Octets In Errors Out Octets Out Errors
2 1 meru-wifi controller 566589467 0 192971219 0 100 2 #2-2F-Sw-208 ap 665578131 0 328290792 0 100 3 #3-2F-Exec-201 ap 124603915 0 84559243 0 100 11 AP-11 ap 123112809 0 545091756 0 100 12 AP-12 ap 0 0 0 0 Ethernet Statistics(5 entries)
Statistic Description
IfIndex The index for identifying the interface.
Node ID The unique identifier for the node (controller or AP).
Node Name The name assigned to the node.
Type The type of node, for example, controller or AP.
In Octets The number of octets received by this interface.
In Errors The number of errors received by this interface.
Out Octets The number of octets sent by this interface.
Out Errors The number of errors sent by this interface.
130 Meru Wireless LAN System Command Reference

show ip
Displays IP configuration information.
Syntax show ip [default-gateway | dhcp-server | dns-server | domainname]
Command Mode
Privileged EXEC mode
Default Shows IP address information for the controller.
Usage Use this command to obtain IP addresses assigned to the controller, default gateway, DHCP and DNS servers, and Domain Name.
Examples The following command displays IP addresses using the various keywords:
MC1000# show ip
ID IP Address NetMask Type
0 192.168.10.2 255.255.255.0 Static IP Addresses(1 entry)
MC1000# show ip default-gateway 192.168.10.1MC1000# show ip dhcp-server 10.0.0.10MC1000# show ip dns-server DNS Server
10.0.0.10 DNS Server Table(1 entry)
MC1000# show ip domainname merunetworks.com
Related Commands
Interface and IP Commands 131

ip addressip default-gatewayip dhcp-serverip dns-serverip domainname
132 Meru Wireless LAN System Command Reference

Chapter 6VLAN Commands
The commands for that are used to create and configure VLANs are:
ip address (linked to entry in previous chapter)
ip default-gateway (linked to entry in previous chapter)
ip dhcp-passthrough (linked to entry in previous chapter)
ip dhcp-server (linked to entry in previous chapter)
show vlan
vlan
VLAN Commands 133
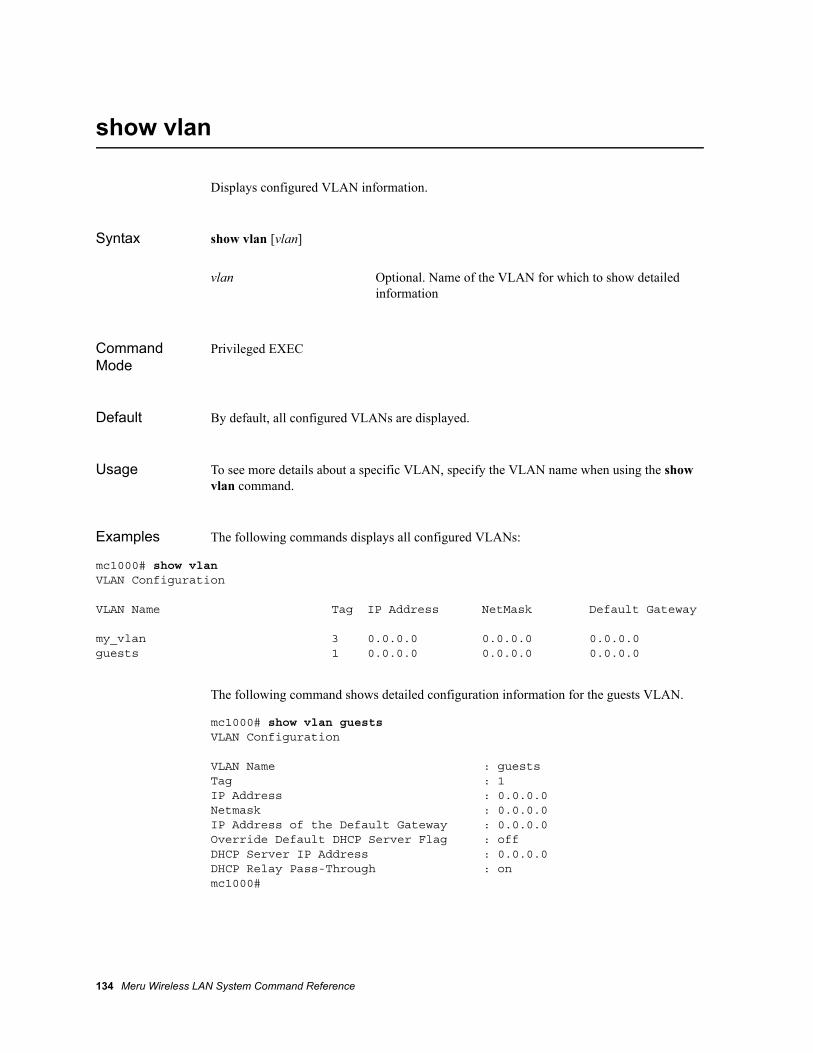
show vlan
Displays configured VLAN information.
Syntax show vlan [vlan]
Command Mode
Privileged EXEC
Default By default, all configured VLANs are displayed.
Usage To see more details about a specific VLAN, specify the VLAN name when using the show vlan command.
Examples The following commands displays all configured VLANs:
mc1000# show vlanVLAN Configuration
VLAN Name Tag IP Address NetMask Default Gateway
my_vlan 3 0.0.0.0 0.0.0.0 0.0.0.0 guests 1 0.0.0.0 0.0.0.0 0.0.0.0
The following command shows detailed configuration information for the guests VLAN.
mc1000# show vlan guestsVLAN Configuration
VLAN Name : guestsTag : 1IP Address : 0.0.0.0Netmask : 0.0.0.0IP Address of the Default Gateway : 0.0.0.0Override Default DHCP Server Flag : offDHCP Server IP Address : 0.0.0.0DHCP Relay Pass-Through : onmc1000#
vlan Optional. Name of the VLAN for which to show detailed information
134 Meru Wireless LAN System Command Reference

Related Commands
vlan
VLAN Commands 135

vlan
Creates a VLAN and enters VLAN configuration mode.
Syntax vlan name tag id
Command Mode
Global configuration
Default None
Usage You can create up to 512 VLANs for the Meru Wireless LAN System.
Examples The following commands assign the name engineering to a VLAN with a tag number of 42 and then shows help for the vlan configuration submode:
mc1000# vlan engineering tag 42mc1000(config-vlan)# ?default Set various parameters to the default value.do Executes an IOSCLI command.end Save changes, and return to privileged EXEC
mode.exit Save changes, and return to global
configuration mode.ip Configure IP address, gateway, and DHCP
server.no Disabling various parameters.show Displays various parameters.
Related Commands
show vlan
name String of up to 16 alphanumeric characters long. Do not use spaces.
tag id Tag number of the VLAN. Must be a value from 1 through 4,094.
136 Meru Wireless LAN System Command Reference

Chapter 7Security Commands
The commands contained in this chapter are used to configure and maintain the security profiles for the WLAN:
8021x-network-initiation
allowed-l2-modes
captive-portal
clear certificates extension-type
clear certificates name
description
encryption-modes ccmp
encryption-modes tkip
encryption-modes wep128
encryption-modes wep64
import certificate pem
import certificate pfx
ip-address
key
mac-delimiter
macfiltering
port
psk key
radius-profile
radius-server primary
radius-server secondary
reauth
rekey multicast-enable
rekey period
security-profile
shared-authentication
show aaa statistics
show certificate detail
show certificate installed
show radius-profile
show security-profile
show ssl-server
show web
ssl-server associate pem
ssl-server associate pfx
ssl-server port
ssl-server radius-profile
static-wep key
static-wep key-index
vlan
web login-page
Security Commands 137

8021x-network-initiation
.Allows 802.1X authentication to be initiated by the controller.
Syntax 8021x-network-initiation
no 8021x-network-initiation
Command Mode
Security profile configuration
Default By default, 802.1X network initiation is enabled.
Usage 802.1X network initiation is enabled by default, which allows the controller to initiate 802.1X authentication sessions. If you disable 802.1X network initiation, the controller cannot initiate any aspect of 802.1X network authentication.
When 802.1X initialization is enabled, the authenticator proactively sends an EAP-REQUEST packet to the client. When disabled, the client sends an EAP-START packet to the authenticator.
Examples The following command disables 802.1X network authentication:
mc1000(config-security)# no 8021x-network-initiationmc1000(config-security)#
Related Commands
allowed-l2-modesradius-profileradius-server primaryradius-server secondary
138 Meru Wireless LAN System Command Reference

allowed-l2-modes
Defines the Layer 2 authentication mode that is permitted.
Syntax allowed-l2-modes {802.1x | clear | wep | wpa | wpa-psk| wpa2 | wpa2-psk}
Command Mode
Security Profile configuration
Default The default permitted Layer 2 mode is clear, by which no authentication is enforced.
Usage This command determines the Layer 2 authentication mode that is assigned to a security profile. Use this command to add 802.1X, WEP, WPA2, WPA2-PSK, WPA, or WPA-PSK authentication modes.
WPA2-PSK or WPA-PSK can used as an alternate key establishment method if WPA or WPA2 cannot be implemented using the 802.1X RADIUS server configuration. The WPA[2]-PSK implementation is a weaker form of security, and as such, is more suited to very small-scale sites.
Examples The following command adds WPA2 as a permitted Layer 2 security mode:
mc1000(config-security)# allowed-l2-modes wpa2mc1000(config-security)#
802.1x Permits the IEEE 802.1X authentication mode.
clear Does not specify an authentication mode.
wep Permits the static WEP authentication mode.
wpa2 Permits the Wi-Fi Protected Access 2 (WPA2) security mode.
wpa2-psk Permits the WPA2 Pre-Shared Key (PSK) key establishment method.
wpa Permits the Wi-Fi Protected Access (WPA) security mode.
wpa-psk Permits the WPA Pre-Shared Key (PSK) key establishment method.
Note: Only one Layer 2 method can be defined in each security profile.
Security Commands 139

Related Commands
encryption-modes tkipencryption-modes wep128encryption-modes wep64radius-profile
140 Meru Wireless LAN System Command Reference
captive-portal
Enables the captive portal feature.
Syntax captive-portal {disabled | webauth}
no captive-portal
Command Mode
Security profile configuration
Default By default, captive portal is disabled.
Usage Use this command to enable the Captive Portal Webauth in a security profile. If captive portal is enabled, a station attempting to associate to the ESS is directed to a WebAuth login page (the captive portal).
If captive portal is enabled for Webauth, the HTTPS protocol and Secure Socket Layer (SSL) provide an encrypted login interchange until the client station authentication and authorization is completed. A RADIUS authentication server is used as a backend to determine user access. All traffic from the client except DHCP, ARP, and DNS packets are dropped until access is granted. If access is not granted, the station is unable to leave the captive portal. If access is granted, the user is released from the captive portal and can enter the WLAN.
Use no captive-portal or captive-portal disabled to disable the captive portal feature.
Examples The following commands enable a WebAuth captive portal for the security profile:
default# configure terminaldefault(config)# security-profile web_authdefault(config-security)# captive-portal webauthdefault(config-security)# radius-server primary main-authdefault(config-security)# exitdefault(config)# exit
Related Commands
radius-server primaryssl-server radius-profile
disabled Disables the Captive Portal feature.
webauth Enables WebAuth for the Captive Portal.
Security Commands 141

clear certificates extension-type
Removes unused PEM or PFX formatted certificate files.
Syntax clear certificates extension-type{ pem | pfx}
Command Mode
Privileged EXEC
Default None
Usage Use this command to remove PEM or PFX-formatted certificate files. This command may be useful to remove certificate files that may not be in use.
Examples The following command removes unused PEM certificate files.
mc1000# clear certificates extension-type pem
Related Commands
clear certificates nameshow certificate detailshow certificate installed
pem Specifies Privacy-Enhanced Mail (PEM)-formatted files.
pfx Specifies Personal Information Exchange (PFX)-formatted files.
142 Meru Wireless LAN System Command Reference

clear certificates name
Removes a named certificate file.
Syntax clear certificates name filename
Command Mode
Privileged EXEC
Default None
Usage Use this command to remove a named certificate file.
Examples The following command removes a certificate file named certificate2.pem.
mc1000# clear certificates name certificate2.pem
Related Commands
clear certificates extension-typeshow certificate installedshow certificate detail
filename Specifies the name of the certificate file.
Security Commands 143

description
Provides a description of the RADIUS profile server.
Syntax description text
Command Mode
RADIUS profile configuration
Default None
Usage Use this command to provide descriptive information about the RADIUS profile. Enclose the descriptive text within double quotation marks. A maximum of 128 characters can be used. View the description using the detailed show radius-profile command, that is, using the profile argument.
Examples controller(config-radius)# description “This server is located on the Second floor of building G in the NW server area.” controller(config-radius)# do show radius-profile RAD1
RADIUS Profile Table
RADIUS Profile Name :RAD1Description :This server is located on the Second floor
of building G in the NW server area.RADIUS IP :192.168.100.1RADIUS Secret :*****RADIUS Port :1812RADIUS VLAN Name :MAC Address Delimiter :none
Related Commands
radius-profileshow radius-profile
text Describes the RADIUS profile server. The text string can be a maximum of 128 characters and must be enclosed within double quotes.
144 Meru Wireless LAN System Command Reference

encryption-modes ccmp
Configures CCMP as the security profile cipher suite.
Syntax encryption-modes ccmp
no encryption-modes ccmp
Command Mode
Security Profile configuration
Default No cipher is configured.
Usage Use this command to set the cipher suite for a WPA2 security profile to CCMP, the encryption standard that is used with a WPA2 configuration.
Examples The following command sets the encryption mode to CCMP:
mc1000(config-security)# encryption-modes ccmpmc1000(config-security)#
Related Commands
8021x-network-initiationradius-profile
Security Commands 145
encryption-modes tkip
Configures TKIP as the security profile cipher suite.
Syntax encryption-modes tkip
no encryption-modes tkip
Command Mode
Security Profile configuration
Default No cipher is configured.
Usage Use this command to set the cipher suite for the security profile to Temporal Key Integrity Check (TKIP). As part of the Wi-Fi Protection Access (WPA) solution to address the weaknesses in WEP, TKIP expands the size of the encryption key, increases the number of keys in use, and creates a message integrity checking mechanism. The other part of the WPA solution that should be implemented to ensure increased over-the-air data protection is the access control and key rotation provided by 802.1X, using one of the standard Extensible Authentication Protocol types (see radius-profile for 802.1X setup).
TKIP is a Layer 2 encryption algorithm that uses a 128-bit key and a 64-bit Initialization Vector (IV). TKIP uses the RC4 algorithm along with a symmetrical key to produce encrypted text. The symmetrical key is used for encrypting and decrypting text, and can be automatically distributed to an AP or user station when the 802.1X EAP solution is also implemented. TKIP uses the Message Integrity Check (MIC) to make sure the content of the data packets have not been changed during packet transmission.
Examples The following command sets the encryption mode to TKIP:
mc1000(config-security)# encryption-modes tkipmc1000(config-security)#
Related Commands
8021x-network-initiationradius-profile
146 Meru Wireless LAN System Command Reference

encryption-modes wep128
Configures WEP-128 as the security profile cipher suite.
Syntax encryption-modes wep128
no encryption-modes wep128
Command Mode
Security Profile configuration
Default By default, no cipher suite is configured.
Usage Use this command to set the cipher suite for the security profile to WEP-128, also known as WEP2. WEP-128 is a Layer 2 encryption algorithm that uses a 104-bit key and a 24-bit Initialization Vector (IV). WEP2 uses the RC4 algorithm along with a symmetrical key to produce encrypted text. The symmetrical key is used for encrypting and decrypting text, and is manually distributed to an AP or user station, as opposed to being automatically generated. The key is in use until it is changed by the administrator. Alternately, you can configure the security profile to also use the 802.1X protocol to automatically generate the key, producing “Dynamic WEP,” a more secure form of WEP.
Examples The following command sets the encryption mode to WEP-128:
mc1000(config-security)# encryption-modes wep128mc1000(config-security)#
Related Commands
8021x-network-initiationallowed-l2-modesencryption-modes wep64rekey periodstatic-wep key
Security Commands 147
encryption-modes wep64
Configures WEP-64 as the security profile cipher suite.
Syntax encryption-modes wep64
no encryption-modes wep64
Command Mode
Security Profile configuration
Default By default, no cipher suite is configured.
Command Mode
Use this command to set the cipher suite for the security profile to WEP-64, a weaker form of encryption than WEP-128. WEP-64 (also known as WEP or WEP40) is a Layer 2 encryption algorithm that uses a 40-bit key and a 24-bit Initialization Vector (IV). WEP uses the RC4 algorithm along with a symmetrical key to produce encrypted text. The symmetrical key is used for encrypting and decrypting text, and is manually distributed to an AP or user station, as opposed to being automatically generated. The key is in use until it is changed by the administrator. Alternately, you can configure the security profile to also use the 802.1X protocol to automatically generate the key, producing “Dynamic WEP,” a more secure form of WEP.
Examples The following command sets the encryption mode to WEP-64:
mc1000(config-security)# encryption-modes wep64mc1000(config-security)#
Related Commands
8021x-network-initiationallowed-l2-modesencryption-modes wep128rekey periodstatic-wep key
148 Meru Wireless LAN System Command Reference

import certificate pem
Imports a PEM certificate file from the Certificate Server.
Syntax import certificate pem url [local-filename]
Command Mode
Privileged EXEC
Default None
Usage This command imports a Privacy-Enhanced Mail (PEM)-formatted certificate file from a valid Certificate Server for the controller. The certificate file is needed by the SSL server to ensure a secure connection. After importing the certificate file, it should be associated with the SSL server using the ssl-server associate pem command.
Examples The following command imports a file from the Certificate Server at www.CertsUnlimited.com to the local file certificate1.pem:
mc1000# import certificate pem www.CertsUnlimited.com certificate1.pem
Related Commands
ssl-server associate pemshow certificate installedshow certificate detail
url The URL of the Certificate Server where the certificate file will be imported from.
local-filename Optional. Specifies the name of the file where the certificate file will be downloaded to.
Security Commands 149
import certificate pfx
Imports a PFX certificate file from the Certificate Server.
Syntax import certificate pfx url [local-filename]
Command Mode
Privileged EXEC
Default None
Usage This command imports a Personal Information Exchange (PFX)-formatted certificate file from a valid Certificate Server for the controller. The certificate file is needed by the SSL server to ensure a secure connection. After importing the certificate file, it should be associated with the SSL server using the ssl-server associate pfx command.
Examples The following command imports a file from the Certificate Server at www.CertsUnlimited.com to the local file certificate1.pfx:
mc1000# import certificate pem www.CertsUnlimited.com certificate1.pfx
Related Commands
ssl-server associate pfxshow certificate installedshow certificate detail
url The URL of the Certificate Server where the certificate file will be imported from.
local-filename Optional. Specifies the name of the file where the certificate file will be downloaded to.
150 Meru Wireless LAN System Command Reference

ip-address
Sets the IP address for the profiled RADIUS server.
Syntax ip-address address
Command Mode
RADIUS server profile configuration mode.
Default
Usage This command sets the IP address of the server being configured for the RADIUS profile. The RADIUS server is a key component of 802.1X WLAN security, as it provides access management by checking an access list to authenticate a user that attempts to join the WLAN. Many sites configure a primary and secondary RADIUS server to ensure the continued availability of the authentication service, should the primary server become unavailable.
A RADIUS server IP address and passkey are required for configuration.
After the profile for the RADIUS server is configured, use the radius-profile primary and radius-profile secondary commands to enable the authentication service.
Examples mc1000(config-radius)# ip-address 10.2.2.2
Related Commands
keymac-delimiterradius-profileportradius-server primaryradius-server secondaryshow radius-profile
address The IP address of the profiled RADIUS server.
Security Commands 151

key
Configure the profiled RADIUS server secret key.
Syntax key secret
Command Mode
RADIUS server profile configuration mode.
Default No key is assigned.
Usage Use this command to set the secret key for the RADIUS server being configured in the RADIUS server profile.
Examples The following command sets the key for the profiled RADIUS server to mysecret:
mc1000(config-radius)# key mysecretmc1000(config-radius)#
Related Commands
radius-profile
secret Specifies the secret key used by the RADIUS server. A maximum of 64 characters is permitted.
152 Meru Wireless LAN System Command Reference

mac-delimiter
Sets the delimiter character for the RADIUS server profile.
Syntax mac-delimiter {colon | hyphen | none}
no mac-delimiter
Command Mode
RADIUS server profile configuration mode.
Default By default, no delimiter is assigned.
Usage This command sets the delimiter character for the RADIUS server profile. It specifies the delimiter that is used on the RADIUS server to separate records within the server database.
Examples mc1000(config-radius)# mac-delimiter colon
Related Commands
radius-profileip-addresskeyportradius-server primaryradius-server secondary
colon Specifies the delimiter to the colon character (:).
hyphen Specifies the delimiter to the hyphen character (-).
singlehyphen Specifies the delimiter as a single hyphen character (-) between each of 3 octets (e.g. abcdef-abcdef).
none Specifies that no delimiter is to be used (default).
Security Commands 153

macfiltering
Enables MAC filtering for a security profile.
Syntax macfiltering
no macfiltering
Command Mode
Security Profile configuration
Default By default, MAC filtering is enabled.
Usage This command allow you to enable and disable MAC filtering for a security profile. The command is useful to override the global MAC filtering setting for an ESS by using the no macfiltering command from within the security profile.
Examples The following command disables MAC filtering for the security profile.
mc1000(config-security)# no macfiltering
Related Commands
access-list permit
154 Meru Wireless LAN System Command Reference

port
Sets the port number for the RADIUS server profile.
Syntax port port
Command Mode
RADIUS server profile configuration mode.
Default By default, port 1812 is assigned.
Usage This command sets the port used for the RADIUS server profile. Usually this setting does not need to be changed unless the profile is used for a RADIUS accounting server, in which case it should be changed to 1813.
Examples mc1000(config-radius)# port 6600
Related Commands
ip-addresskeyradius-server primaryradius-server secondaryradius-profileportshow radius-profile
port Specifies the port to be used in the RADIUS Authentication server profile. Valid port numbers are from 1024 to 65535. By default, port 1812 is set. Port 1813 should be used for an Accounting RADIUS server.
Security Commands 155

psk key
Sets a WPA-Personal or WPA2-Personal Passphrase (or “preshared key”).
Syntax psk key key
no psk key
Command Mode
Security profile configuration mode.
Default No key is set.
Usage The Wi-Fi- Protected Access (WPA and WPA2) standard offers a more secure environment including improved and stronger authentication using 802.1X. If your site does not implement RADIUS servers, the WPA/WPA2 Passphrase is available as an improvement over the WEP64 and WEP128 shared key implementations.
The WPA-Personal and WPA2-Personal allow a longer shared secret key (256 bits) than that provided by WEP64 or WEP128. Assign 1 PSK per ESSID that uses this security profile. The key will be distributed to the ESSID APs. Clients joining the APs must have configured the same shared key prior to association.
Even though the Passphrase is more secure, managing the key is not automatic and presents some inconvenience because all client stations and APs in the WLAN need be updated each time the password changes. Passwords should be changed frequently to avoid detection.
WPA/WPA2 Passphrase can use keys containing either:
64 hexadecimal characters (that is, 0-9,a-f, A-F). Example: 0xa0a1a2a3a4a5a6a7a8a9aaabac or 0x12345678901234567890abcdef...)
8 to 63 ASCII characters (all keyboard characters). Example: m6o0secret79ckey
Use the no psk key command to disable static WPA/WPA2 Passphrases.
key A pre-shared key. The key can be from 8 to 63 ASCII characters or 64 hex characters. Hex keys must be prefixed with “ 0x” or the key will not work.
Note: If using a hexadecimal key, you must preface the key input with the 0x characters. The 0x characters notify the system that a hexadecimal key is being input.
156 Meru Wireless LAN System Command Reference

Examples The following command creates the WPA/WPA2 Passphrase:
mc1000(config-security)# psk key 012345678901234567890abcdef
Related Commands
allowed-l2-modes
Security Commands 157
radius-profile
Creates a profile for a RADIUS Server and enters RADIUS Server configuration mode.
Syntax radius-profile name
no radius-profile name
Command Mode
Global configuration mode
Default
Usage This command creates a profile for a RADIUS Server. The RADIUS Server is a key component of 802.1X WLAN security, as it provides access management by checking an access list to authenticate a user that attempts to join the WLAN. Many sites configure a primary and secondary RADIUS Server to ensure the continued availability of the authentication service, should the primary server become unavailable.
From within the profile configuration, a RADIUS server IP address and passkey are required using the ip-address and key commands. An optional description, port number, and record delimiter may also be specified using the description, port, and mac-delimiter commands.
After a RADIUS server profile is configured, use the radius-server primary or radius-server secondary command from within a security profile configuration to establish a relation to the newly configured profiles and determine the primary or secondary ranking of the server.
RADIUS profiles are also used for RADIUS accounting server configuration and MAC address ACLs (see the links in Related Commands section).
Use the no form to remove a profile for a RADIUS Server.
Examples mc1000(config)# radius-profile main-authmc1000(config-radius)# ?default Set radius profile parameters to default
value.description Specifies the radius node.do Executes an IOSCLI command.end Save changes, and return to privileged EXEC
mode.
name The name for the profiled RADIUS Server. The name can be a maximum of 16 characters
158 Meru Wireless LAN System Command Reference

exit Save changes, and return to global configuration mode.
ip-address Configures the IP address.key Configures the secret key.mac-delimiter Configures the MAC Delimiter.no Disabling radius profile parameters.port Configures port number.vlan Configures the VLAN.
Related Commands
descriptionip-addresskeymac-delimiterportvlanaccounting primary-radiusaccounting secondary-radiusradius-server primaryradius-server secondaryaccess-list radius-server
Security Commands 159
radius-server primary
Assigns and enables a primary RADIUS server specified in the profile.
Syntax radius-server primary profile
no radius-server primary
no radius-server all
Command Mode
Security Profile configuration
Usage This command assigns and enables the primary RADIUS server specified in the profile that has been been configured with the radius-profile command. Use this command as the last step in the RADIUS server configuration. The profile must exist before it can be assigned with this command.
Use the no radius-server all command to disable the primary and secondary RADIUS servers or the no radius-server primary command to disable the primary RADIUS server.
Examples The following command assigns the profile main-auth as the primary RADIUS server:
mc1000(config-security)# radius-server primary main-auth
Related Commands
radius-profileradius-server secondaryshow radius-profile
profile Specifies the name of the RADIUS server profile that was created with the radius-profile command.
Note: Ensure the profile for RADIUS server configuration uses the appropriate port: 1812—RADIUS Authentication Server default port.
160 Meru Wireless LAN System Command Reference

radius-server secondary
Assigns and enables the secondary RADIUS server specified in the profile
Syntax radius-server secondary profile
no radius-server secondary
Command Mode
Security Profile configuration
Usage This command assigns and enables the secondary RADIUS server specified in the profile that has been been configured with the radius-profile command. . Use the command as the last step in the RADIUS server setup. The profile must exist before it can be enabled with this command.
Use the command no radius-server secondary to disable the secondary RADIUS server.
Examples The following command assigns the backup-auth profile as the secondary RADIUS server:
mc1000(config-security)# radius-server secondary backup-auth
Related Commands
radius-profileradius-server primaryshow radius-profile
profile Specifies the name of the RADIUS server profile that was created with the radius-profile command.
Security Commands 161

reauth
Enables reauthentication.
Syntax reauth
no reauth
Command Mode
Security Profile configuration
Default By default, reauthentication is disabled.
Usage This command allow you to enable and disable reauthentication for a security profile.
Examples The following command enables reauthentication for the security profile.
mc1000(config-security)# reauth
Related Commands
162 Meru Wireless LAN System Command Reference
rekey multicast-enable
Enables multicast keying.
Syntax rekey multicast-enable
no rekey multicast-enable
Command Mode
Security Profile configuration
Default By default, multicast rekeying is disabled.
Usage WEP uses different keys for unicast traffic and broadcast traffic. The unicast key is used when a user logs on, is unique for the session, and can be changed depending on the rekey period value. A different key is used for multicast traffic. The multicast key must be the same for all users on a particular VLAN or subnet and radio because users sharing the same VLAN and radio see the same broadcasts. These keys should be rolled frequently—ideally every 15-30 minutes. Use the no rekey multicast-enable command to disable multicast keys.
Examples The following command enables multicast rekeying.
mc1000(config-security)# rekey multicast-enable
Related Commands
rekey period
Security Commands 163

rekey period
Sets the interval for 802.1X key regeneration.
Syntax rekey period seconds
no rekey period
Command Mode
Security Profile configuration
Default The default rekey period is 0.
Usage This command defines the interval that an 802.1X key is valid. After the amount of time specified by seconds has elasped, a new key is automatically generated. Frequently changing the key is recommended to prevent security breaches.
When 0 is specified, rekeying is disabled and the key is valid for the entire session, regardless of the session duration.
Use the no rekey period command to disable key regeneration.
Examples The following command changes the 802.1X key every 300 seconds (5 minutes):
mc1000(config-security)# rekey period 300
Related Commands
rekey multicast-enable
seconds Specifies the amount of time in seconds that an 802.1X key is valid. seconds can be a value between 0 and 65535.
164 Meru Wireless LAN System Command Reference
security-profile
Creates a security profile and enters security profile configuration mode.
Syntax security-profile name
no security-profile name
Command Mode
Global configuration
Default The default security profile is provided.
Usage The controller supports the ability to define multiple security profiles that can be assigned to different wireless LAN extended service sets (ESS) according to the level and type of security required. A security profile is a list of parameters that define how security is handled within an ESS. With security profiles, you can define the Layer 2 security method, including the cipher suite, primary and secondary RADIUS server, static WEP key entries and key index position, and other parameters. The various security profiles you create allow you to support multiple authentication and encryption methods within the same WLAN infrastructure.
By default, the Meru Wireless LAN System contains a security profile named default, which uses OPEN authentication, meaning that there is no authentication, and that any wireless client can connect to the controller. . The default profile is automatically associated with an ESSID when it is created.
Use the no form to delete a security profile. You can only delete a security profile if no ESSID specifies it. You cannot delete the default security profile.
Examples The following commands create a security profile called profile 1, enter security profile configuration mode, and list the available commands:
mc1000(config)# security-profile “profile 1”mc1000(config-security)#?8021x-network-initiation Enable 802.1x network initiation.
name Unique text string up to 32 alphanumeric characters long. To use spaces and special characters, enclose them in double quotation marks (“ ”).
Note: Only one Layer 2 method can be defined in each security profile, although the same WEP key index settings can be used in several security profiles.
Security Commands 165

allowed-l2-modes Configure permitted L2 authentication modes.captive-portal Enable captive portal.do Executes an IOSCLI command.encryption-modes Configure permitted cipher suites.end Save changes, and return to privileged EXEC
mode.exit Save changes, and return to global
configuration mode.macfiltering Enable MAC Filtering.no Configure authentication parameters.psk Configure the encryption WPA Pre-shared keyradius-server Configure RADIUS security.reauth Enable reauthentication.rekey Configure rekey period and related
parameters.shared-authentication Enable shared authentication.show Displays various parameters.static-wep Configure the static WEP key
Related Commands
essidsecurity-profileshow security-profile
166 Meru Wireless LAN System Command Reference

shared-authentication
Enables shared authentication.
Syntax shared-authentication enable
no shared-authentication
Command Mode
Security profile configuration
Default Shared authentication is off.
Usage Use this command to enable shared authentication.
For networks that do not use WiFi Protected Access (WPA), you can use open authentication with Wireless Encryption Protocol (WEP) encryption. Use the no shared-authentication command to disable shared authentication with WEP. This helps provide additional security for your wireless network and helps protect your wireless network from intrusions by malicious users. If you use a shared key instead of open authentication with WEP encryption, the malicious user can easily decrypt the shared key to obtain access to all the computers in your wireless network.
Examples
Related Commands
Security Commands 167

show aaa statistics
Displays detailed information about authentication statistics.
Syntax show aaa statistics
Command Mode
EXEC
Usage Use this command to view statistics about the 802.1X performance. The authentication statistics are reset when the controller is rebooted.
The aaa statistics are:
Examples The following command shows 802.1X statistics:
mc1000# show aaa statisticsAuthentication Statistics
802.1x Authentication Request Count : 519802.1x Authentication Success Count : 54802.1x Authentication Failure Count : 465802.1x Authentication Station Count : 481
Statistic Description
802.1x Authentication Request Count Total number of 802.1x authentication requests.
802.1x Authentication Success Count Number of successful authentication requests.
802.1x Authentication Failure Count Number of failed authentication requests.
802.1x Authentication Station Count Number of stations currently authenticated by 802.1x.
168 Meru Wireless LAN System Command Reference

show certificate detail
Displays detailed information about installed certificates.
Syntax show certificate detail [filename]
Command Mode
EXEC
Default By default, information on all installed certificates is shown.
Examples The following command shows certificate details:
mc1000# show certificate detailCertificate: Data: Version: 3 (0x2) Serial Number: 0 (0x0) Signature Algorithm: sha1WithRSAEncryption Issuer: CN=mmca.merunetworks.com, ST=California,
C=US/[email protected], O=Meru Networks, Inc. Validity Not Before: Feb 1 00:43:57 2004 GMT Not After : Jan 29 00:43:57 2014 GMT Subject: CN=Controller, ST=California,
C=US/[email protected], O=Meru Networks, Inc. Subject Public Key Info: Public Key Algorithm: rsaEncryption RSA Public Key: (1024 bit) Modulus (1024 bit): 00:bf:df:d0:1a:25:51:23:87:87:63:2b:8d:20:49: c8:96:fc:74:18:52:23:15:b8:68:3c:88:7a:3b:d5: 73:6d:9d:85:94:36:66:33:6b:c8:2c:e1:54:c4:94: 87:99:ac:d5:1a:18:73:b5:57:3d:a2:3f:79:6b:3e: 39:67:09:ca:82:49:47:7f:a3:45:1d:26:fb:5b:bb: 98:50:e9:25:68:da:66:db:06:a1:1a:75:fe:cb:b6: 93:91:d8:a2:6f:37:3d:6c:e7:90:4b:f2:4c:85:14: b6:82:93:da:2e:47:d4:93:a7:a6:3c:40:0b:4b:7a: aa:b2:fe:c2:41:89:b5:dc:a3 Exponent: 65537 (0x10001) X509v3 extensions: X509v3 Basic Constraints: CA:FALSE Signature Algorithm: sha1WithRSAEncryption
filename Optional. Names a specific certificate file.
Security Commands 169

3e:7f:29:57:34:29:10:c9:f6:bc:79:68:0c:57:83:d1:2c:3c: 4c:16:44:ed:73:43:9c:d8:e9:d8:12:77:be:f5:d9:17:80:ef: e6:7a:78:33:8a:16:eb:15:99:98:d1:1f:97:e5:d6:f2:fc:a3: 13:c3:e9:c3:bb:18:6c:5a:e9:65:08:5c:37:d7:8f:6d:88:de: 7a:24:db:2e:e4:bc:18:63:6d:c4:94:16:b8:c2:cb:79:15:81: 9d:2e:e8:3c:a7:ab:9d:50:b3:69:89:a6:0f:91:00:18:70:29: 86:30:c5:01:ca:35:d4:86:4e:14:7c:bc:ed:e8:ff:84:79:be: 6f:a7
Related Commands
show certificate installed
170 Meru Wireless LAN System Command Reference

show certificate installed
Displays the certificates installed on the controller.
Syntax show certificate installed
Command Mode
EXEC
Default None
Usage The command displays the following information:
Examples The following command displays the certificates installed on the controller:
mc1000# show certificate installedList of Certificates
File Name Issuer CN Subject CN Not Valid Before Not Valid After
controller.pem mmca.merunetworks.com Controller Feb 1 00:43:57 2004 GMT Jan 29 00:43:57 2014 GMT
List of Certificates(1 entry)
Related Commands
show certificate detail
File Name Name of the certificate file.
Issuer CN Common name (CN) of the certificate issuer.
Subject CN Certificate subject's common name.
Not Valid Before Date the certificate becomes valid.
Not Valid After Date the certificate becomes invalid.
Security Commands 171

show radius-profile
Displays the configured RADIUS profiles.
Syntax show radius-profile [name]
Command Mode
Privileged EXEC
Default By default, a list of all RADIUS profiles is shown.
Usage This command lists all RADIUS profiles that have been created with the radius-profile command, or with the optional argument, lists the details of the profile specified by name.
Examples The following command displays configured RADIUS profiles:
mc1000# show radius-profile
Profile Name RADIUS IP Port DelimiterMyRad 192.168.100.1 1812 none RADIUS Profile Table (1 entry)
The following command displays the MyRad RADIUS profile:
mc1000# show radius-profile MyRad
RADIUS Profile Table
RADIUS Profile Name :MyRadDescription :RADIUS IP :192.168.100.1RADIUS Secret :*****RADIUS Port :1812RADIUS VLAN Name :MAC Address Delimiter :none
Related Commands
radius-profile
name Optional. Specifies the name of the profile to display.
172 Meru Wireless LAN System Command Reference

show security-profile
Displays the configured security profiles.
Syntax show security-profile [name]
Command Mode
Privileged EXEC
Default By default, a list of all security profiles is shown.
Usage This command lists all security profiles that have been created with the security-profile command, or with the optional argument, lists the details of the profile specified by name.
Examples The following command displays configured security profiles:
mc1000# show security-profile
# sh security-profile
Profile Name L2 Mode Data Encrypt
default clear none captive-portal clear none wep wep wep64 802.1x 802.1x wep128 wpa wpa tkip wpapsk wpa-psk tkip wpa2 wpa2 ccmp wpa2psk wpa2-psk ccmp Security Profile Table(8)
mc1000# show security-profile wpapskSecurity Profile Table
Security Profile Name : wpa-pskL2 Modes Allowed : wpa-pskData Encrypt : tkipPrimary RADIUS Profile Name :
name Optional. Specifies the name of the profile to display.
Security Commands 173
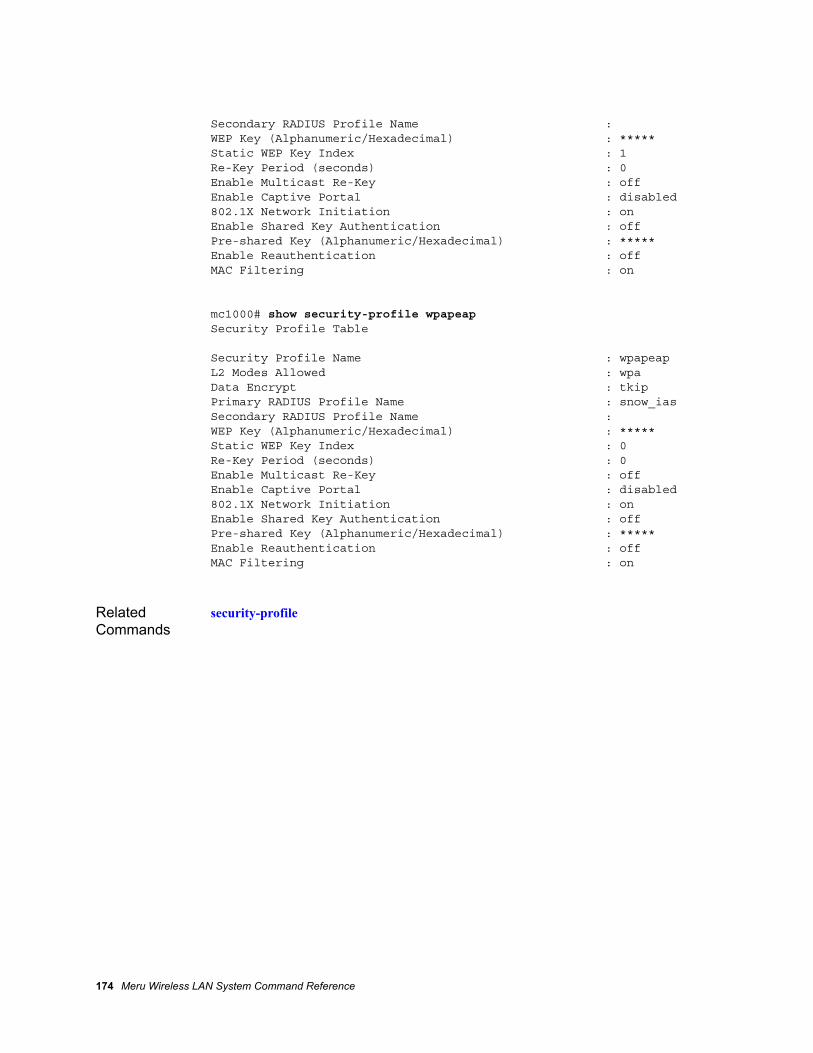
Secondary RADIUS Profile Name : WEP Key (Alphanumeric/Hexadecimal) : *****Static WEP Key Index : 1Re-Key Period (seconds) : 0Enable Multicast Re-Key : offEnable Captive Portal : disabled802.1X Network Initiation : onEnable Shared Key Authentication : offPre-shared Key (Alphanumeric/Hexadecimal) : *****Enable Reauthentication : offMAC Filtering : on
mc1000# show security-profile wpapeapSecurity Profile Table
Security Profile Name : wpapeapL2 Modes Allowed : wpaData Encrypt : tkipPrimary RADIUS Profile Name : snow_iasSecondary RADIUS Profile Name : WEP Key (Alphanumeric/Hexadecimal) : *****Static WEP Key Index : 0Re-Key Period (seconds) : 0Enable Multicast Re-Key : offEnable Captive Portal : disabled802.1X Network Initiation : onEnable Shared Key Authentication : offPre-shared Key (Alphanumeric/Hexadecimal) : *****Enable Reauthentication : offMAC Filtering : on
Related Commands
security-profile
174 Meru Wireless LAN System Command Reference

show ssl-server
Displays the configured SSL servers.
Syntax show ssl-server
Command Mode
Privileged EXEC
Default By default, a list of all SSL servers is shown.
Usage This command lists all SSL servers that are active.
Examples The following command displays configured SSL servers:
mc1000# show ssl-serverSSL Server
Name : cp-sslServer Port : 10101User Authentication Protocol : NoneServer Lifetime : 100Server IP : 192.168.10.2Certificate : controller.pemRADIUS Profile Name : cp-IASSecondary RADIUS Profile Name :
Related Commands
ssl-server radius-profilessl-server port
Security Commands 175

show web
Displays web server configuration information.
Syntax show web{ login-page | custom-area}
Command Mode
Privileged EXEC
Default
Usage Use the show web login-page to display the type of page that is displayed for Captive Portal and WebAuth at client login. If the default login page is in use, the command returns the word default.
Use the show web custom-area to list files that are used for a customized Captive Portal/WebAuth implementation. If the default login page is in use, the command lists the empty.html and empty.gif files.
Examples The following command shows the default Captive Portal/WebAuth login page is in use:
mc1000# show web login-pagedefault
The following command shows the default Captive Portal/WebAuth login page is in use:
mc1000# show web custom-areaHtml Filestotal 0-rwx------ 1 root root 0 Mar 7 21:55 empty.htmlImage Filestotal 0-rwx------ 1 root root 0 Mar 7 21:55 empty.gif
176 Meru Wireless LAN System Command Reference

ssl-server associate pem
Associates a certificate file with the SSL server.
Syntax ssl-server associate pem certificate
Command Mode
Global configuration
Default
Usage This command associates the Privacy-Enhanced Mail (PEM) formatted certificate file with the SSL server. The certificate file can be downloaded to the controller with the import certificate pem command so that it is local when it is associated. The certificate association must exist before an SSL connection to authenticate a username and password can be performed.
Examples The following command associates the certificate file controller.pem with the SSL server:
mc1000(config)# ssl-server associate pem controller.pem
Related Commands
import certificate pem
certificate Filename of the certificate, ending with a .pem extension. The filename cannot be longer than 128 alphanumeric characters long.
Security Commands 177

ssl-server associate pfx
Associates a certificate file with the SSL server.
Syntax ssl-server associate pfx certificate password
Command Mode
Global configuration
Default None
Usage This command associates the Personal Information Exchange (PFX)-formatted certificate file with the SSL server. The certificate file can be downloaded to the controller with the import certificate pfx command so that it is local when it is associated. The certificate association must exist before an SSL connection to authenticate a username and password can be performed.
Examples The following command associates the certificate file controller.pfx with the SSL server:
mc1000(config)# ssl-server associate pfx controller.pfx
Related Commands
import certificate pfx
certificate Filename of the certificate, ending with a .pem extension. The filename cannot be longer than 128 alphanumeric characters long.
password Password associated with the certificate. The password cannot be longer than 64 alphanumeric characters long.
178 Meru Wireless LAN System Command Reference
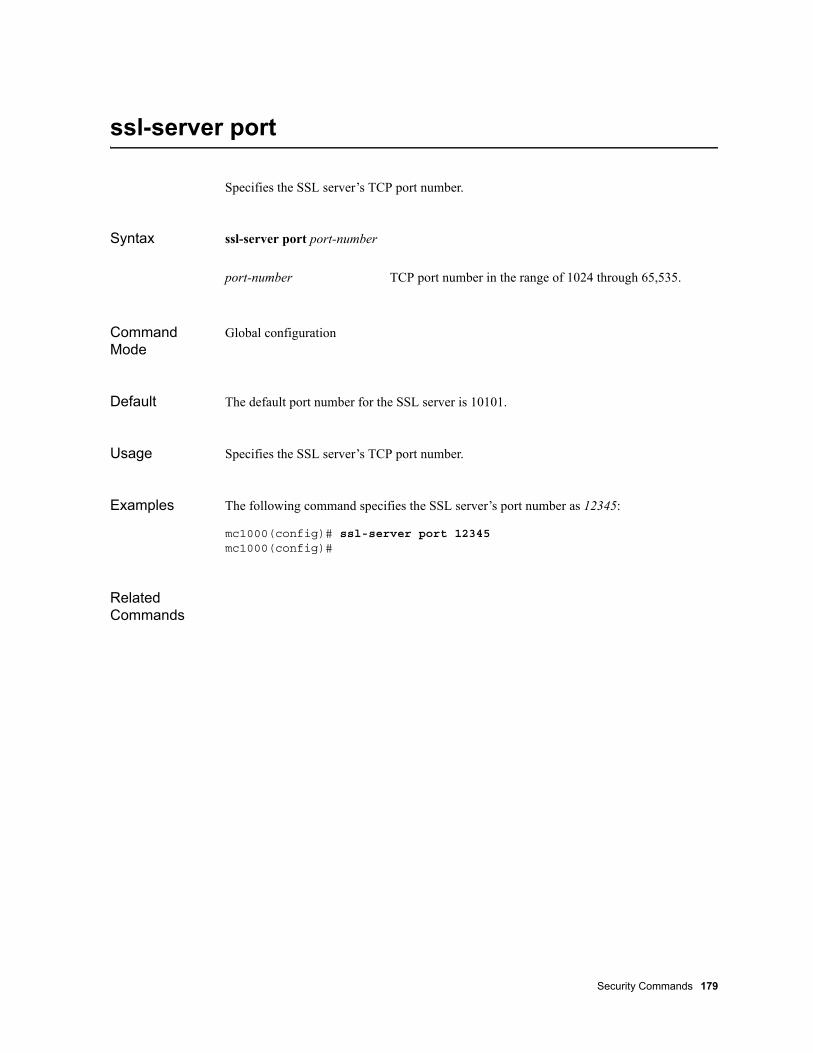
ssl-server port
Specifies the SSL server’s TCP port number.
Syntax ssl-server port port-number
Command Mode
Global configuration
Default The default port number for the SSL server is 10101.
Usage Specifies the SSL server’s TCP port number.
Examples The following command specifies the SSL server’s port number as 12345:
mc1000(config)# ssl-server port 12345mc1000(config)#
Related Commands
port-number TCP port number in the range of 1024 through 65,535.
Security Commands 179

ssl-server radius-profile
Sets the RADIUS profile name where the RADIUS server parameters are configured.
Syntax ssl-server radius-profile {primary | secondary} profile-name
ssl-server no-1st-radius
ssl-server no-2nd-radius
Command Mode
Global configuration
Default
Usage This command specifies the RADIUS profile name where the RADIUS server parameters for a primary or secondary RADIUS server are specified for use by the SSL server.
The ssl-server no-1st-radius command disables a previously configured primary RADIUS profile for use by the SSL server.
The ssl-server no-2nd-radius command disables a previously configured secondary RADIUS profile for use by the SSL server.
Examples The following command configures the SSL Server to use the primary RADIUS server settings profile main:
mc1000(config)# ssl-server radius-profile primary main mc1000(config)#
Related Commands
radius-profile
profile-name Names the file containing the RADIUS server configuration information. Text string of up to 32 alphanumeric characters. Do not use spaces.
180 Meru Wireless LAN System Command Reference

static-wep key
Configures a static WEP key.
Syntax static-wep key key
no static-wep key
Command Mode
Security profile configuration
Default None
Usage 802.11 WEP (wired equivalent privacy) uses MAC-level encryption of data between a mobile unit and an AP. Once the frame enters the wired side of the network, such as between access points, WEP no longer applies.
WEP64, also known as WEP40, is more widespread and uses keys containing either:
10 hexadecimal characters (that is, 0-9,a-f, A-F). Example: 0x0123456789
5 ASCII characters (all keyboard characters). Example: 01234 or mykey
WEP128 is more secure though not as widespread and uses keys containing either:
26 hexadecimal characters (that is, 0-9,a-f, A-F). Example: 0xa0a1a2a3a4a5a6a7a8a9aaabac or 0x12345678901234567890abcdef)
13 ASCII characters (all keyboard characters). Example: my-secret-key
Use the no static-wep key command to disable static WEP keys.
Examples The following command specifies a WEP key of wpass:
mc1000(config-security)# static-wep key wpassmc1000(config-security)#
key For WEP64, the key is a 5-character ASCII or 10-character hex key.
For WEP128, the key must be 13 ASCII characters or 26 hex digits.
Note: If using a hexadecimal key, you must preface the key input with the 0x characters. The 0x characters notify the system that a hexadecimal key is being input.
Security Commands 181

Related Commands
encryption-modes wep128encryption-modes wep64static-wep key-index
182 Meru Wireless LAN System Command Reference

static-wep key-index
Configures the index position of a static WEP key.
Syntax static-wep key-index position
Command Mode
Security profile configuration
Default
Usage This command specifies the use of one of the four possible static WEP keys that can be configured by the user station key management program. The key index feature provides interoperability if the user program can configure four key settings.
Examples The following command specifies that the third WEP key be used:
mc1000(config-security)# static-wep key-index 3mc1000(config-security)#
Related Commands
static-wep keyencryption-modes wep128encryption-modes wep64security-profile
position Static WEP key index position. position may be from 1 to 4.
Security Commands 183

vlan
Configures a VLAN for the primary RADIUS server.
Syntax vlan
no vlan name
Command Mode
RADIUS server profile configuration mode.
Default
Usage This command configures a VLAN for the RADIUS server profile. Use the command if the RADIUS server being profiled is located on a VLAN so that RADIUS requests are sent to the VLAN interface instead of default/untagged interface. Typing a ? after the command lists the available VLAN names that can be assigned.
Use the no form to delete a VLAN entry.
Examples The following command displays VLAN names that can be configured for the primary RADIUS server:
mc1000(config-radius)# vlan ?<vlan> Configures VLAN name for the primary RADIUS
server. drop_vlan guest meru-svp vlan100 vlan101 vlan_polycom
mc1000(config-radius)# vlan vlan100
Related Commands
radius-profile
name The name of the VLAN to assign.
184 Meru Wireless LAN System Command Reference

web login-page
Configures the Captive Portal/WebAuth login page.
Syntax web login-page {custom | default}
Command Mode
Global configuration mode.
Default Meru default login page.
Usage Use the command web login-page custom to activate a custom page that is displayed as the site’s Captive Portal/WebAuth login.
Use the web login-page default change to the default login page.
Note: You must use the Web UI to download the generic files, modify them, and then upload customized .html and .gif files for the custom option to work. From the Detailed>Maintenance>Captive Portal area, click the Customization link and the Get Files button to obtain the files. Once you have modified the generic files, use the Import Files link to upload the files. Then to activate the pages, use the command web login-page custom or go to the Customization link Step 2--Change the Mode and select the Customized radio button.
Security Commands 185

186 Meru Wireless LAN System Command Reference

Chapter 8ESSID Commands
The commands contained in this chapter are used to create and manage ESSIDs. Included are commands that enable/disable features such as RADIUS accounting, Remote APs, and VLANs. Also included are many commands that allow fine-tuning of the default broadcast settings for implementations with unique requirements.
accounting interim-interval
accounting primary-radius
accounting secondary-radius
ap-discovery join-ess
ap-discovery join-virtual-ap
base-tx-rates
beacon dtim-period
beacon period
calls-per-bss
ess-ap
essid
l2bridge ipv6
multicast-enable
publish-essid
remote-ap-enable
security-profile
show ess-ap
show essid
silent-client-enable
ssid
supported-tx-rates
vlan name
vlan support
ESSID Commands 187

accounting interim-interval
Specifies the amount of time that elapses before the controller sends an Interim-Update record to the RADIUS accounting server.
Syntax accounting interim-interval value
Command Mode
ESSID configuration
Default The default accounting interim interval value is 3,600 seconds.
Usage If RADIUS accounting is enabled, the controller sends an Accounting-Start record to the RADIUS accounting server after receiving an Access-Accept response from the RADIUS server. When the client session times out or the client is disassociated, the controller sends an Accounting-Stop record to the RADIUS server. If the Access-Accept response contained the Acct-Interim-Interval attribute, the controller sends Interim-Update records at the interval configured with the accounting interim-interval command for the duration of the client session.
Examples The following command sets the accounting interim interval to 1,800 seconds (30 minutes):
mc1000(config-essid)# accounting interim-interval 1800mc1000(config-essid)#
Related Commands
accounting primary-radiusaccounting secondary-radius
value Number of seconds that elapse before Interim-Update records are sent. The interval must be from 600 through 3,600 seconds (10 minutes through 1 hour).
188 Meru Wireless LAN System Command Reference

accounting primary-radius
Specifies the primary RADIUS Accounting server.
Syntax accounting primary-radius profile
no accounting-radius all
Command Mode
ESSID configuration
Default By default, communications between the controller and the primary RADIUS Accounting server are disabled.
Usage Use the accounting primary-radius command to set up and enable communications between the controller and the primary RADIUS Accounting server. When RADIUS Accounting is enabled, the controller sends accounting records to the RADIUS Accounting server for clients who authenticate using 802.1X. (To see a list of the accounting attributes that are tracked, see the “Configuring RADIUS Accounting‚” in Chapter 7, “Configuring Multiple ESSIDs,” in the Meru Wireless LAN System Configuration Guide.
RADIUS Accounting server configuration information, such as IP address, port (1813 is the standard port for accounting), and secret key, is specified using the radius-profile command.
Use the no accounting-radius all command to disable the accounting primary radius server.
Examples The following command sets the server information in the profile main-acct for the primary RADIUS accounting server:
mc1000(config-essid)# accounting primary-radius main-acctmc1000(config-essid)#
Related Commands
accounting interim-intervalradius-profileaccounting secondary-radius
profile Name of the RADIUS Accounting server profile, specified with the radius-profile command.
Note: Do not use the RADIUS Authentication Server for this configuration. The Authentication Server configuration will not work, as the RADIUS Accounting Server uses port 1813 instead of port 1812.
ESSID Commands 189

accounting secondary-radius
Specifies the secondary RADIUS accounting server.
Syntax accounting secondary-radius profile
no accounting-radius secondary
no accounting-radius all
Command Mode
ESSID configuration
Default By default, communications between the controller and the secondary RADIUS accounting server are disabled.
Usage You can specify a secondary RADIUS accounting server that the controller sends accounting records to if the primary RADIUS accounting server is offline. Use the accounting secondary-radius command to enable communications with the secondary RADIUS accounting server.
Use no accounting-radius secondary or no accounting-radius all to disable communication with the secondary RADIUS accounting server.
When RADIUS accounting is enabled, the controller sends accounting records to the RADIUS accounting server for clients who authenticate using 802.1X. (To see a list of the accounting attributes that are tracked, see the “Configuring RADIUS Accounting‚” in Chapter 7, “Configuring Multiple ESSIDs,” in the Meru Wireless LAN System Configuration Guide.
RADIUS accounting server configuration information, such as IP address, port (1813 is the standard port for accounting), and secret key, is specified using the radius-profile command.
Examples The following command sets the server information in the profile backup-acct for the secondary RADIUS accounting server:
mc1000(config-essid)# accounting secondary-radius backup-acctmc1000(config-essid)#
profile Name of the RADIUS server profile, specified with the radius-profile command.
190 Meru Wireless LAN System Command Reference

Related Commands
accounting interim-intervalradius-profileaccounting primary-radius
ESSID Commands 191

ap-discovery join-ess
Configures whether access points automatically join an ESSID and are configured with its parameters.
Syntax ap-discovery join-ess
no ap-discovery join-ess
Command Mode
ESSID configuration
Default Enabled
Usage By default, the join-ess-on-discovery command is enabled, which means that access points automatically join an ESSID and a BSS is automatically created. When a new access point is plugged into the WLAN, it goes through all the ESSIDs and joins all of them that have ap-discovery join-ess enabled. When creating an ESSID, access points join the new ESSID.
After you are satisfied with your WLAN configuration, you can disable ap-discovery join-ess so that new access points do not change your configuration. If you are adding a new ESS that you want to advertise on only a small subset of access points, it is easier to create the ESS with ap-discovery join-ess disabled and add the ESS-AP mappings manually.
Use the no form to prevent access points from automatically joining an ESSID. If the no form is used, a BSSID must be assigned manually.
Examples The following command disables ap-discovery join-ess, which prevents access points from automatically joining an ESSID:
mc1000(config-essid)# no ap-discovery join-essmc1000(config-essid)#
Related Commands
ssidshow essid
192 Meru Wireless LAN System Command Reference

ap-discovery join-virtual-ap
Enables access points on the same channel to share the same BSSID, forming a Virtual Cell.
Syntax ap-discovery join-virtual-ap
no ap-discovery join-virtual-ap
Command Mode
ESSID configuration
Default Enabled
Usage By default, the ap-discovery join-virtual-ap command is enabled when creating an ESSID. This allows the formation of a Virtual Cell, which is a group of access points on the same channel sharing the same BSSID. If the ap-discovery join-virtual-ap command is disabled, access points on the same channel cannot share the same BSSID, which prevents the formation of a Virtual Cell. When the ap-discovery join-virtual-ap command is disabled, each access point has its own unique BSSID.
Use the no form to disable access points on the same channel from sharing the same BSSID. Some examples of when you disable ap-discovery join-virtual-ap:
You do not want to create a Virtual Cell. (In other words, each access point has its own BSSID.)
You require access point recognition by BSSID.
Deployments with AP150 or RS4000 models.
Examples The following command disables ap-discovery join-virtual-ap, which prevents access points on the same channel to share the same BSSID:
Caution! This status of this command is only evaluated when new ESS-AP mappings are created. ESS-AP mappings are either created manually with the ess-ap command, or automatically when a new ESS is created, or a new access point is discovered.
Note: This command should not be used for AP150/RS4000 deployments. It is recommended that if you have a mixed network of AP200s and either RS4000/AP150s, that you create 2 ESS Profiles. The ESS Profile for the AP200s can contain the command ap-discovery join-virtual-ap and the ESS Profile for RS4000/AP150 should have the command no ap-discovery join-virtual-ap.
ESSID Commands 193

mc1000(config-essid)# no ap-discovery join-virtual-apmc1000(config-essid)#
Related Commands
ess-apshow essid
194 Meru Wireless LAN System Command Reference

base-tx-rates
Sets base transmit rates (Mbps).
Syntax base-tx-rates {802.11a rate | 802.11b rate | 802.11g rate | 802.11bg rate}
no base-tx-rates {802.11a rate | 802.11b rate | 802.11g rate | 802.11bg rate}
Command Mode
ESS configuration
Default
Limitations Not supported for the AP150 or RS4000 deployment; these configurations use a single default setting and ignore any settings configured with this command.
Usage Setting the base rate specifies the mandatory rates that all connecting clients must support when connecting to the access point. Except when the all argument is used, each base rate change (either when adding or deleting) must be implemented with a separate command; that is, you cannot configure several rates using one command (for example, base-tx-rate 802.11bg 1 2 11 is invalid).
Use the no form of the command to disable a specified base rate. Changing the base rate in an ESS profile will cause all clients on all ESSIDs to reassociate.
The supported data rates are the rates supported by the access points. The base data rates are a subset of the supported rates. The access point first tries to transmit at the highest data rate set to Basic. If there are problems encountered in the transmission, the access points steps down to the highest rate that allows data transmission.
Examples The following command sets the 802.11bg base transmit rate to 11
802.11a 6 | 9 | 12 | 18 | 24 | 36 | 48 | 54 | all
Enter the 802.11a protocol rate or all (which supports all rates) for the specified protocol
802.11b 1 | 2 | 5.5 | 11 | all Enter an 802.11b rate, or all (which supports all rates) for the specified protocol.
802.11bg 1|2|5.5|11|6 | 9|12|18|24|36|48|54|all
Enter an 802.11bg rate, or all (which supports all rates) for the specified protocol.
802.11g 6 | 9 | 12 | 18 | 24 | 36 | 48 | 54 | all
Enter an 802.11a rate, or all (which supports all rates) for the specified protocol.
ESSID Commands 195

default(config-essid)# base-tx-rate 802.11bg 11
The following command sets the 802.11a base transmit rate to support all rates (1, 2, 5.5, 11, 6, 9, 12, 18, 24, 36, 48, and 54 Mbps) :
default(config-essid)# base-tx-rate 802.11a all
Related Commands
supported-tx-rates
196 Meru Wireless LAN System Command Reference

beacon dtim-period
Sets the intervals at which beacons are sent.
Syntax beacon dtim-period period
Command Mode
ESS configuration
Default The default beacon DTIM period is 1.
Usage Setting the DTIM period to a higher value decreases the frequency of broadcasts sent by the access point. If power-save mode is enabled on clients that are connected to access points, clients “wake up” less if fewer broadcasts are sent, which conserves battery life for the clients.
Because broadcasts are generally wasteful of air resources, the Meru Wireless LAN System replaces broadcasts with more efficient, limited unicasts. Therefore, only the behavior of clients currently in power-save mode is affected by the DTIM period value.
Examples The following command changes the beacon DTIM period to 20:
default(config-essid)# beacon dtim-period 20default(config-essid)#
Related Commands
essidshow essid
period Number of beacon intervals that elapse before broadcast frames stored in buffers are sent. Value must be between 0 and 255.
ESSID Commands 197

beacon period
Sets the rate at which beacons are transmitted.
Syntax beacon period period
Command Mode
ESSID configuration
Default The default beacon period is 100 TUs.
Usage Setting the beacon period to a higher value decreases the frequency of unicasts and broadcasts sent by the access point. If power-save mode is enabled on clients that are connected to access points, clients “wake up” less if fewer unicasts and broadcasts are sent, which conserves battery life for the clients. The beacon period setting affects unicasts and broadcasts.
Examples The following command changes the beacon period to 200 TUs:
mc1000(config-essid)# beacon period 200mc1000(config-essid)#
Related Commands
show essid
period Number of TUs (1 TU=1.024 ms) between beacons. Value must be between 20 and 65,520 TUs and a multiple of 20.
198 Meru Wireless LAN System Command Reference
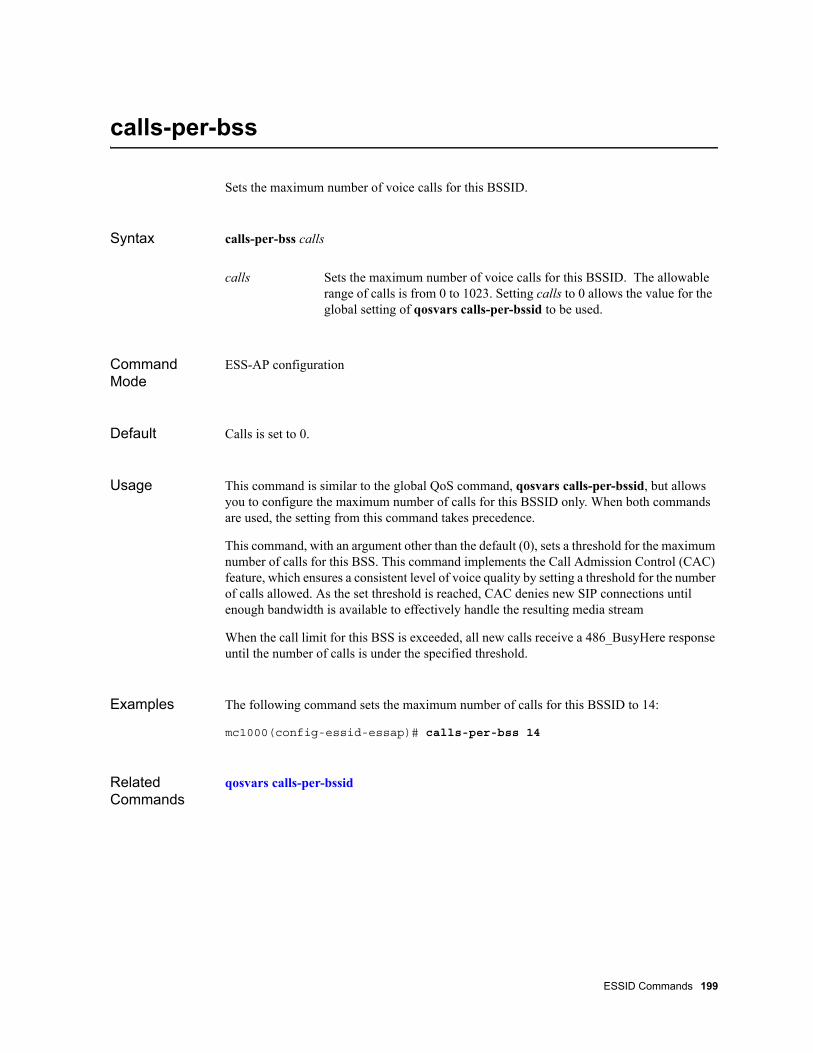
calls-per-bss
Sets the maximum number of voice calls for this BSSID.
Syntax calls-per-bss calls
Command Mode
ESS-AP configuration
Default Calls is set to 0.
Usage This command is similar to the global QoS command, qosvars calls-per-bssid, but allows you to configure the maximum number of calls for this BSSID only. When both commands are used, the setting from this command takes precedence.
This command, with an argument other than the default (0), sets a threshold for the maximum number of calls for this BSS. This command implements the Call Admission Control (CAC) feature, which ensures a consistent level of voice quality by setting a threshold for the number of calls allowed. As the set threshold is reached, CAC denies new SIP connections until enough bandwidth is available to effectively handle the resulting media stream
When the call limit for this BSS is exceeded, all new calls receive a 486_BusyHere response until the number of calls is under the specified threshold.
Examples The following command sets the maximum number of calls for this BSSID to 14:
mc1000(config-essid-essap)# calls-per-bss 14
Related Commands
qosvars calls-per-bssid
calls Sets the maximum number of voice calls for this BSSID. The allowable range of calls is from 0 to 1023. Setting calls to 0 allows the value for the global setting of qosvars calls-per-bssid to be used.
ESSID Commands 199

ess-ap
Assigns an access point to an ESS and enters ESS-AP configuration mode.
Syntax ess-ap {ap-id interface_index}
Command Mode
ESSID configuration
Default None
Usage Use this command to assign an access point to an ESS and enter ESS-AP configuration mode, where you can assign the BSSID for the channel for the access point.
Examples The following configures AP-3, index 1:
mc1000(config-essid)# ess-ap 3 1mc1000(config-essid-essap)#
Related Commands
show ess-ap
ap-id ID number of the AP to associate with the ESS.
interface_index The wireless interface index of the AP.
200 Meru Wireless LAN System Command Reference
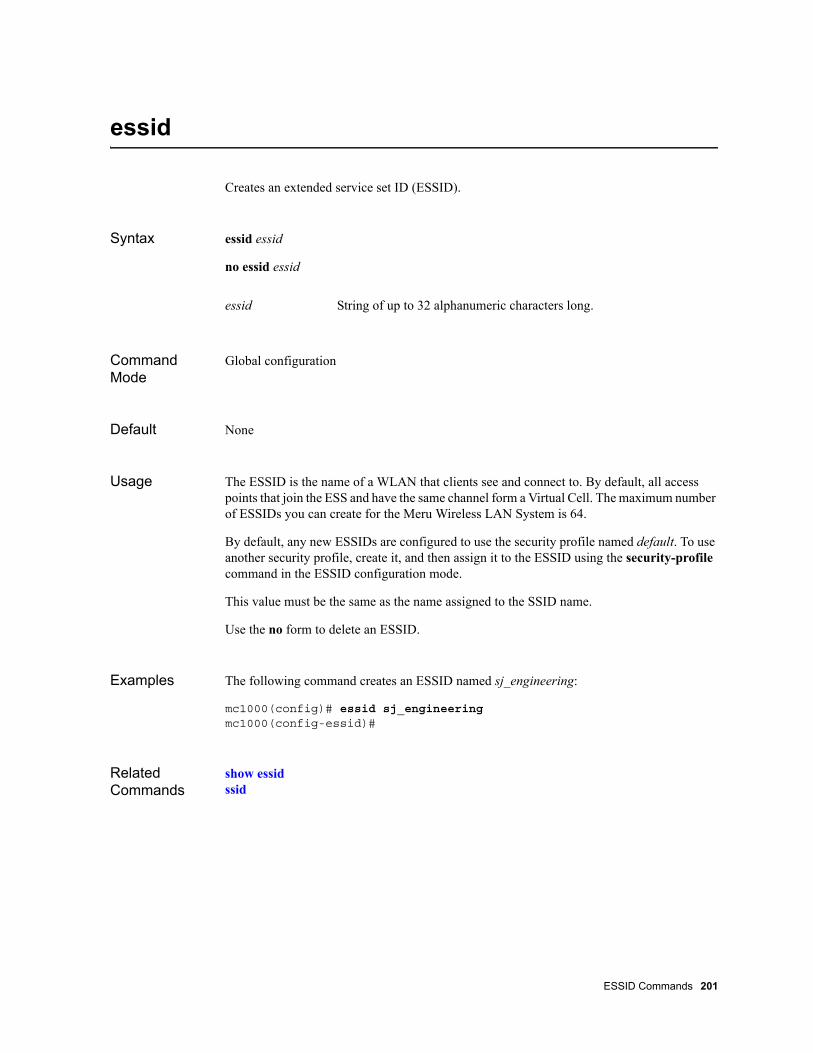
essid
Creates an extended service set ID (ESSID).
Syntax essid essid
no essid essid
Command Mode
Global configuration
Default None
Usage The ESSID is the name of a WLAN that clients see and connect to. By default, all access points that join the ESS and have the same channel form a Virtual Cell. The maximum number of ESSIDs you can create for the Meru Wireless LAN System is 64.
By default, any new ESSIDs are configured to use the security profile named default. To use another security profile, create it, and then assign it to the ESSID using the security-profile command in the ESSID configuration mode.
This value must be the same as the name assigned to the SSID name.
Use the no form to delete an ESSID.
Examples The following command creates an ESSID named sj_engineering:
mc1000(config)# essid sj_engineeringmc1000(config-essid)#
Related Commands
show essidssid
essid String of up to 32 alphanumeric characters long.
ESSID Commands 201

l2bridge ipv6
Enables IPv6 address display.
Syntax l2bridge ipv6
no l2bridge ipv6
Command Mode
ESSID configuration
Default By default, IPv6 address display is disabled.
Usage This command allows you to configure an ESSID to display IPv6 addressing.
Use the no form of the command to disable IPv6 addressing.
202 Meru Wireless LAN System Command Reference

multicast-enable
Enables multicasting.
Syntax multicast-enable
no multicast-enable
Command Mode
ESSID configuration
Default Multicasting is disabled by default.
Usage Use the multicast-enable command if you need to use a multicast application. Enabling multicasting causes all multicast packets on the air side to appear on the wired side and all multicast packets on the wired side to appear on the air side.
Use the no form to disable multicasting.
Examples The following command enables multicasting.
mc1000(config-essid)# multicast-enable
Related Commands
show essid
Caution! Multicasting is an advanced feature. Enabling multicasting in the WLAN can cause subtle changes in your network. Contact Meru Networks Customer Service before enabling multicasting.
Caution! Multicast is allowed only when the ESS has a one-to-one mapping with the default VLAN for this ESS. No other ESS can use the same VLAN.
ESSID Commands 203

publish-essid
Enables broadcasting of an ESSID.
Syntax publish-essid
no publish-essid
Command Mode
ESSID configuration
Default An ESSID is broadcast by default.
Usage When an ESSID is broadcast, it is included in the beacon that gets advertised. Clients using passive scanning listen for beacons transmitted by access points. If broadcasting an ESSID is disabled, clients listening for beacons cannot receive ESSID information.
Clients using active scanning send probe requests and wait for probe responses from access points. If broadcasting an ESSID is disabled, access points do not respond to probe requests, unless the probe request includes the ESSID.
Use the no form to prevent the ESSID from being broadcast.
Examples The following disables the broadcasting of the ESSID:
mc1000(config)# essid engmc1000(config-essid)# no publish-essidmc1000(config-essid)#
Related Commands
essid
204 Meru Wireless LAN System Command Reference

remote-ap-enable
Enables the Remote AP feature.
Syntax remote-ap-enable
no remote-ap-enable
Command Mode
ESSID configuration
Default Remote AP is disabled by default.
Usage Use the remote-ap-enable command to enable the Remote AP feature for this ESSID. The Remote AP feature allows APs to be installed and managed at locations separated from the controller by a WAN or ISP, such as at a satellite office or other type of remote location. The controller, through a configurable keep-alive signal, monitors the Remote APs.
Remote APs can exchange control information, including authentication and accounting information with the controller, but are unable to exchange data. The Remote APs can exchange data with other APs within their subnet. Because Remote APs cannot exchange data-plane traffic (including DHCP) with the controller, certain Meru Wireless LAN System features are not available for Remote AP configurations. These include Virtual Cell, VLAN, Captive Portal, L3 Mobility, QoS, and Security Profiles.
Use the dataplane-mode command in addition to this command to configure Remote AP.
Use the no form to disable Remote AP.
Examples The following command enables Remote AP:
mc1000(config-essid)# remote-ap-enable
Related Commands
dataplane-mode
ESSID Commands 205

security-profile
Assigns a security profile, which defines security parameters, to the ESS.
Syntax security-profile name
Command Mode
ESSID configuration
Default The default security profile associated with an ESS is default.
Usage Each ESS must be associated with a security profile. When you create an ESSID, it is automatically associated with a security profile named default. Use this command to assign a different security profile to an ESSID. Before assigning a security profile to an ESS, you must first create the security profile using the security-profile command in global configuration mode.
Examples The following command assigns the security profile nms-group to the ESSID named eng:
mc1000(config)# essid engmc1000(config-essid)# security-profile nms-groupmc1000(config-essid)#
Related Commands
essidsecurity-profile
name Name of an existing security profile to be assigned to the ESS.
206 Meru Wireless LAN System Command Reference

show ess-ap
Displays ESSIDs and their associated access points.
Syntax show ess-ap [ap ap_id| bssid | channel | essid]
Command Mode
Privileged EXEC and ESSID configuration modes
Default None
Usage The output for the show ess-ap command differs depending on the its arguments and the command mode from which the command is entered. In privileged EXEC mode, all ESSIDs and their associated access points are shown. In ESSID configuration mode, associated access points are shown for the ESSID being configured.
Examples In privileged EXEC mode, the following command displays all ESSIDs and their associated access points (the list is a partial display):
mc1000# show ess-ap ESS Profile AP ID AP Name IfIndex Channel Max Calls BSSID
mwf--1xtls 1 #1-2F-QA-208 2 161 0 00:0c:e6:69:4e:8c mwf--1xtls 1 #1-2F-QA-208 1 1 0 00:0c:e6:14:40:f7 mwf--1xtls 2 #2-2F-Sw-208 2 161 0 00:0c:e6:69:4e:8cmc1000#
Related Commands
ess-ap
ESSID Commands 207

show essid
Displays detailed ESSID information.
Syntax show essid [essid]
Command Mode
Privileged EXEC
Default By default, a list of all ESSIDs is shown.
Examples The following command displays the configured ESSIDs:
mc1000# show essid
ESS Profile NameSSID Remote AP Security Profile Broadcast VLAN Support
mwf-wpapeap mwf-wpapeap off wpapeap on none
mwf-wpapsk mwf-wpapsk off wpa-psk on none
mwf-guest mwf-guest off cp-clear off configured-vlan-only
mwf-1xpeap mwf-1xpeap off 801xpeap off none
mwf-voice mwf-voice off default off none
mwf-1xleap mwf-1xleap off 1x-leap_test1_test1 off none
mwf-wpaleap mwf-wpaleap off WPA-leap_test1_test1 off none
mwf-wep128 mwf-wep128 off WEP128_1-0-123 off none
mwf--1xtls mwf--1xtls off mwf-eaptls off none
mwf-wpatls mwf-wpatls off wpapeap off none
ESS Profile(10)
mc1000#
The following command displays information about the ESSID named mwf-wpapeap:
mc1000# show essid mwf-wpapeapESS Profile
ESS Profile Name : mwf-wpapeapSSID : mwf-wpapeapRemote AP : off
essid Name of the ESSID for which you want to see detailed information.
208 Meru Wireless LAN System Command Reference

Security Profile Name : wpapeapPrimary RADIUS Accounting Server : Secondary RADIUS Accounting Server : Accounting Interim Interval (seconds) : 3600Beacon Interval (msec) : 300SSID Broadcast : onNew AP's Join ESS : offVLAN Support : noneVLAN Name : Allow Multicast Flag : offNew AP's Join Virtual AP : onDTIM Period (number of beacons) : 2B Supported Transmit Rates (Mbps) : 1,2,5.5,11B Base Transmit Rates (Mbps) : 1,2,5.5,11A Supported Transmit Rates (Mbps) : 6,9,12,18,24,36,48,54A Base Transmit Rates (Mbps) : 6,12,24G Supported Transmit Rates (Mbps) : 6,9,12,18,24,36,48,54G Base Transmit Rates (Mbps) : 6,9,12,18,24,36,48,54BG Supported Transmit Rates (Mbps) :
1,2,5.5,11,6,9,12,18,24,36,48,54BG Base Transmit Rates (Mbps) : 1,2,5.5,11
Related Commands
essid
ESSID Commands 209

ssid
Sets the SSID that is published over the air.
Syntax ssid ssid
Command Mode
ESS configuration
Default None
Usage Use this command to set the SSID that is published over the air.
Examples
Related Commands
essidshow ess-ap
ssid Unique SSID.
Note: This value must be the same as the name assigned to the ESS profile name.
210 Meru Wireless LAN System Command Reference

silent-client-enable
Enables the silent client polling feature.
Syntax silent-client-enable
no silent-client-enable
Command Mode
ESS configuration
Default Disabled
Limitations This command is only applicable when the ESS is configured for Virtual AP mode, and therefore is not supported on the AP150 or RS4000.
Usage Use this command to enable silent client polling. Silent client polling is a feature used to overcome an inherent 802.11 performance weakness relating to how the phone clients behave after associating with AP is introduced in this release. Typically, phone clients are silent, that is, do not send data or 802.11 frames to an AP after associating and if a call is not in progress or while the phone is in power-save mode. If the person carrying the phone moves to a location serviced by another AP during the silent interval, the system may not know the new location of the silent client, and performance degradation and additional network activity is generated trying to determine the new location.
To alleviate this problem, silent client polling implements tracking information that is sent between the Controller and the APs and between the AP and the silent client to keep the system appraised of the silent client location.
Use the no silent-client-polling command to disable the feature.
Examples Use the following command to enable silent client polling:
default(config-essid)# silent-client-polling
ESSID Commands 211

supported-tx-rates
Sets supported transmit rates (Mbps).
Syntax supported-tx-rates {802.11a rate | 802.11b rate | 802.11g rate | 802.11bg rate}
no supported-tx-rates {802.11a rate | 802.11b rate | 802.11g rate | 802.11bg rate}
Command Mode
ESS configuration
Default
Limitations Not supported for the AP150 or RS4000 deployment; these configurations use a single default setting and ignore any settings configured with this command.
Usage Setting the supported rate specifies the rates at which clients can optionally connect, provided the clients and the access points support the rate. Use the no form of the command to disable specified supported rates.
The supported data rates are the rates supported by the access points. The basic data rates are a subset of the supported rates. The access point first tries to transmit at the highest data rate set to Basic. If there are problems encountered in the transmission, the access points steps down to the highest rate that allows data transmission.
Examples The following command sets the 802.11bg supported transmit rate to 11:
default(config-essid)# supported-tx-rate 802.11bg 11
The following command sets the 802.11a supported transmit rate to support all rates (6, 9, 12, 18, 24, 36, 48, and 54 Mbps):
802.11a 6 | 9 | 12 | 18 | 24 | 36 | 48 | 54 | all
Select the 802.11a protocol rate or all (which supports all rates) for the specified protocol
802.11b 1 | 2 | 5.5 | 11 | all Select an 802.11b rate, or all (which supports all rates) for the specified protocol.
802.11bg 1|2|5.5|11|6 | 9|12|18|24|36|48|54|all
Select an 802.11bg rate, or all (which supports all rates) for the specified protocol.
802.11g 6 | 9 | 12 | 18 | 24 | 36 | 48 | 54 | all
Select an 802.11a rate, or all (which supports all rates) for the specified protocol.
212 Meru Wireless LAN System Command Reference

default(config-essid)# supported-tx-rate 802.11a all
Related Commands
base-tx-rates
ESSID Commands 213

vlan name
Assigns a VLAN to an ESSID.
Syntax vlan name name
no vlan name
Command Mode
ESSID configuration
Default None
Usage When creating an ESSID, you can assign a VLAN to the ESSID. This allows you to isolate an ESSID to a specific part of your network. By default, ESSIDs do not have VLANs assigned to them. You must create a VLAN using the vlan command in global configuration mode before assigning the VLAN to an ESSID.
Use the no vlan name command to disable the VLAN assignment.
Examples The following command assigns the engineering VLAN to an ESSID:
mc1000(config-essid)# vlan name engineeringmc1000(config-essid)#
Related Commands
214 Meru Wireless LAN System Command Reference

vlan support
Determines how a VLAN is assigned to an ESSID.
Syntax vlan support {configured-vlan-only | radius-only | radius-and-configured-vlan | none}
Command Mode
ESSID configuration
Default None
Usage When assigning a VLAN to the ESSID, this command determines how the VLAN is associated with the ESSID.
For RADIUS-assigned VLANs, the following attributes should be configured on the RADIUS server:
Tunnel-Type=VLAN
Tunnel-Medium-Type=802
Tunnel-Private-Group-ID=VLAN_ID
If the RADIUS server has an entry for the tag field, the tag must be set to zero (0x00).
Captive Portal implementations do not support dynamic VLANs. When a Captive Portal is associated with an ESSID, define a VLAN and bind it to an ESSID with the configured-vlan-only option.
Use the parameter none to disable the VLAN association.
Examples The following command determines that the RADIUS server assigns VLANs to the ESSID:
mc1000(config-essid)# vlan support radius-onlymc1000(config-essid)#
configured-vlan-only Specifies that the VLAN can only be associated to this ESSID by the controller.
radius-only Specifies that the VLAN can only be associated to this ESSID by the RADIUS server.
radius-and-configured-vlan Specifies that the VLAN can be associated to this ESSID by the RADIUS server and by configuration by the controller.
none Disables VLAN support for the ESSID (similar to using a no form of the command).
ESSID Commands 215

Related Commands
vlan name
216 Meru Wireless LAN System Command Reference

Chapter 9Access Point and Radio Commands
The commands contained in this chapter are used to configure and manage the connection between the controller and APs, as well as the AP radio settings. For many sites, default radio settings are adequate, but included are many commands that allow fine-tuning of the default radio settings for implementations with unique requirements.
admin-mode
antenna-property
antenna-selection
ap
ap-redirect
auto-ap-upgrade
autochannel
boot-script
building
channel
connectivity
contact
controller domainname
controller hostname
controller ip
dataplane-mode
description
fixed-channel
floor
high-density-enable
hostname
interface Dot11Radio
ip address
ip address dhcp
ip default-gateway
ip dns-server
led
link-probing-duration
location
mac-address
mode
model
power local
preamble-short
protection-cts-mode
protection-mode
rf-mode
show ap
show ap-connectivity
show ap-discovered
show ap-redirect
show ap-siblings
show ap-swap
show ess-ap
show interfaces Dot11Radio
show interfaces Dot11Radio antenna-property
Access Point and Radio Commands 217

show interfaces Dot11Radio statistics
show statistics top10-ap-problem
show statistics top10-ap-talker
show topoap
show topoapap
swap
218 Meru Wireless LAN System Command Reference

admin-mode
Manages radio interfaces.
Syntax admin-mode {Up | Down}
Command Mode
Dot11Radio interface configuration
Default The interface is Up by default.
Usage This command allows control of whether an interface is enabled (Up) or disabled (Down). Setting the interface to Down makes the radio unavailable to client stations.
Throughput on dual-radio APs is slightly less than single radio APs due to the overhead of managing two radios. If the radio is not being used, it can be easily be temporarily disabled using this command to improve performance.
Examples controller(config-if-802)# admin-mode Down
Related Commands
Access Point and Radio Commands 219

antenna-property
Manages external wireless antenna interface properties.
Syntax antenna-property connector
Command Mode
Dot11Radio interface configuration
Default
Limitations This command is not supported on the AP150 or RS4000.
Usage This command enters a subcommand mode that allows you to fine tune antenna properties such as gain and RF Band (2.4GHz, 5GHz or dual) and type (point-to-point or point-to-multipoint).
Examples controller(config-if-802)# antenna-property 1
Related Commands
antenna-selectionpreamble-shortshow interfaces Dot11Radio antenna-property
connector Antenna connector ID; can be 1 (left antenna) or 2 (right antenna).
220 Meru Wireless LAN System Command Reference

antenna-selection
Configures the access point to use the left or right antenna.
Syntax antenna-selection {left | right | diversity}
Command Mode
Dot11Radio interface configuration
Default The default is for the system is to use the left antenna of an AP.
Limitations This command is not supported on the AP150 or RS4000.
Usage This command configures all access point models to use either the right or the left antenna. For the AP201 connected via 802.11b, diversity mode can be configured, which chooses the antenna receiving the stronger signal from the either the right or the left antenna.
Examples mc1000(config-if_802)# antenna-selection rightmc1000(config-if_802)#
Related Commands
antenna-property
left Configures the AP to use only the left antenna.
right Configures the AP to use only the right antenna.
diversity Configures an AP201 with 802.11b to use both antennas rather than just left or right. Using this feature allows the access point to receive from whichever antenna has the strongest signal.
The antenna must be set to “left” before using this command.
For proper functionality, the “short-preamble” feature must be off (default) to use the diversity mode.
Access Point and Radio Commands 221

ap
Enters access point configuration.
Syntax ap id
no ap id
Command Mode
Global configuration
Default None
Usage Use the ap command with an identifying number to enter the AP configuration submode to configure that particular access point. Use the no ap id command to remove a Controller-to-AP assignment.
Examples mc1000(config)# ap 1mc1000(config-ap)# ?boot-script Configure boot script for this AP.building Building location for this AP.connectivity Manage AP connectivity.contact Contact person for this AP.dataplane-mode Determine whether the data packets go through
the controller or not.default Reset to default valuesdescription Description of AP.do Executes an IOSCLI command.end Save changes, and return to privileged EXEC
mode.exit Save changes, and return to global
configuration mode.floor Floor location for this AP.high-density-enable Enable high density.led Configure LED settings.link-probing-duration Duration AP waits before rebooting when
controller link is down.location Location of this AP.mac-address Assign a new MAC address or pre-provision AP.model Assign AP HW type.no Disables various parameters.
id The unique identifier for the access point.
222 Meru Wireless LAN System Command Reference

show Displays various parameters related to this AP.
Related Commands
boot-scriptbuildingcontactconnectivitydataplane-modedescriptionfloorhigh-density-enableledlink-probing-durationlocationmac-address
Access Point and Radio Commands 223
ap-redirect
Redirects APs to another controller.
Syntax ap-redirect {ip-subnet ip_addr subnet_addr | mac-address mac_addr} controller_ip_addr
no ap-redirect
Command Mode
Global configuration
Default None
Usage This command allows you to specify APs (by MAC address or by IP subnet address) that are to be redirected to another controller (specified by its hostname or IP address). Redirection takes place after initial discovery. Each controller can have a redirect table that associates the AP’s MAC/IP subnet address to an IP address or hostname of a controller. A maximum of 5 hops (redirects) are allowed per AP.
Use the no form of the command to remove a redirection assignment.
Examples mc1000(config-ap)# ap-redirect mac-address 00:0c:e6:00:01:02 172.10.10.5
mc1000(config-ap)#
Related Commands
show ap-redirect
ip-subnet ip_addr subnet_addr
Specifies the IP or subnet address of one or more APs that are to be redirected.
mac-address mac_addr Specifies the MAC address of the AP to be redirected.
controller_ip_addr Specifies the Controller hostname or IP address where APs are to be redirected.
224 Meru Wireless LAN System Command Reference
auto-ap-upgrade
Allows AP firmware to be automatically upgraded by the controller.
Syntax auto-ap-upgrade {enable | disable}
Command Mode
Global configuration
Default The AP automatic upgrade feature is enabled by default.
Usage This command allows the firmware on an AP to be automatically upgraded by the controller when an AP joins the WLAN. An AP cannot be monitored (and consequently, be part of the WLAN) if its firmware is at a different level than that of the controller.
When an AP initiates its discovery phase, the controller checks the firmware version and performs an upgrade if the version is not at the same level as that of the controller. This feature simplifies the process of adding a group of APs to an existing WLAN.
When this feature is enabled, you can check the upgrade status of affected APs through syslog messages and SNMP traps that warn of an AP/controller software version mismatch. An alarm is dispatched to an SNMP manager if a mismatch exists, meaning the AP is unable to upgrade for some reason. Once the upgrade is performed, syslog and SNMP traps are sent notifying of the AP/controller software version match. Alarms must be cleared manually.
This feature does not interfere with a normal WLAN system upgrade when the upgrade command is used.
Examples mc1000(config)# auto-ap-upgrade enable
mc1000# show controllerGlobal Controller Parameters
Controller ID : 1Description : meru-wifiHost Name : meru-wifiUptime :
00d:02h:15m:36s
enable Activates the AP automatic upgrade feature. This is the default setting.
disable Deactivates the AP automatic upgrade feature.
Access Point and Radio Commands 225
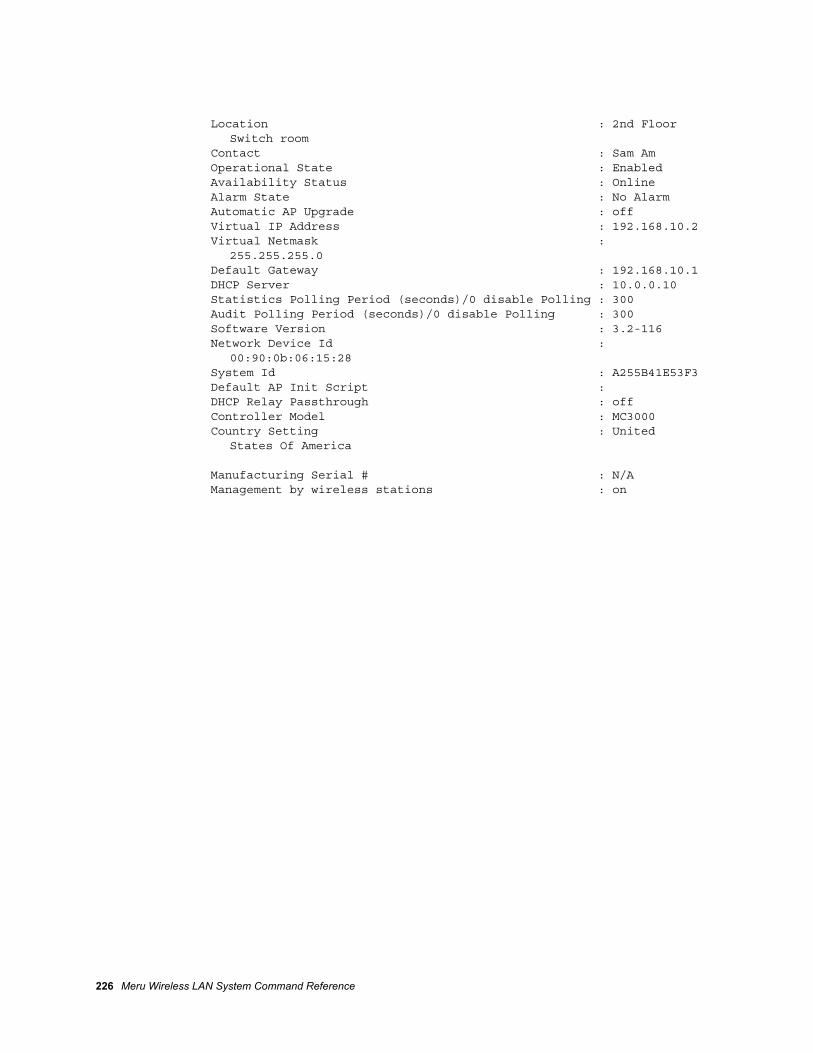
Location : 2nd Floor Switch room
Contact : Sam AmOperational State : EnabledAvailability Status : OnlineAlarm State : No AlarmAutomatic AP Upgrade : offVirtual IP Address : 192.168.10.2Virtual Netmask :
255.255.255.0Default Gateway : 192.168.10.1DHCP Server : 10.0.0.10Statistics Polling Period (seconds)/0 disable Polling : 300Audit Polling Period (seconds)/0 disable Polling : 300Software Version : 3.2-116Network Device Id :
00:90:0b:06:15:28System Id : A255B41E53F3Default AP Init Script : DHCP Relay Passthrough : offController Model : MC3000Country Setting : United
States Of America
Manufacturing Serial # : N/AManagement by wireless stations : on
226 Meru Wireless LAN System Command Reference

autochannel
Performs automatic channel configuration.
Syntax autochannel channel_list
Command Mode
Global configuration
Default None
Limitations This command is not supported on the AP150 or RS4000.
Usage This command automatically assigns channels to APs.
When autochannel runs, it checks that the channels specified as arguments are valid for the AP’s configured country code. If a channel is invalid, it displays an error message specifying the valid list of channels. The optimum channel is then selected and set for the specific AP interface (based on the RF band that is configured for that interface, b/g or a). The process takes approximately 2 minutes, during which time the APs are not operational.
To exclude an interface from an autochannel assignment, use the channel and fixed-channel commands.
Examples mc1000(config)# autochannel 2 3 4Pre-initialization: out of 44 APs, 3 are enabled
Related Commands
channelfixed-channel
channel_list A list of 802.11bg and/or 802.11a channels separated by white space. An appropriate channel for the type of wireless interface will automatically be applied.
Access Point and Radio Commands 227

boot-script
Runs a specified script when an access point boots.
Syntax boot-script script
no boot-script
Command Mode
Global configuration
Default None
Usage Use this command to boot the access point with a specific script. You can see a list of available scripts with the show ap scripts command from the privileged exec command mode.
Use the no form of the command to disable the default AP boot script.
Examples mc1000# show scriptsdefaultdebugclimc1000# configure terminalmc1000(config)# boot-script defaultmc1000(config)
Related Commands
boot-script
script Name of the script to run.
228 Meru Wireless LAN System Command Reference

building
Specifies the building in which an access point is located.
Syntax building building-name
Command Mode
Access point configuration
Default None
Usage Using the building command is optional and is only used for informational purposes.
Examples The following commands specify that an access point with a node ID of 2 is located in building 1:
controller# ap 2controller(config-ap)# building “building 1”controller(config-ap)# exit
Related Commands
floorlocation
building-name Name of the building in which the access point is located. The building name can be up to 64 alphanumeric characters long. To use spaces in the name, enclose the name in double quotation marks (“ ”).
Access Point and Radio Commands 229

channel
Sets the channel number for the wireless interface to use.
Syntax channel channel
Command Mode
Dot11Radio interface configuration
Default None
Usage Sets the wireless interface channel. Typing channel ? lists the available channels for the type of radio in use.
To ensure the channel set is not changed if the autochannel command is run, use the fixed-channel command.
Examples mc1000(config-if_802)# channel ?<channel> Enter the channel ID. 1 10 11 149 153 157 161 165 2 3 36 4 40 44 48 5 52 56 6 60 64 7 8
channel Channel ID
230 Meru Wireless LAN System Command Reference

mc1000(config-if_802)# channel 149
Related Commands
autochannelfixed-channel
Access Point and Radio Commands 231

connectivity
Manages AP connectivity and puts you into AP connectivity mode if using l2-preferred or l3-preferred.
Syntax connectivity { l2-only | l2-preferred | l3-preferred }
Command Mode
AP configuration
Default The default connectivity is Layer 2 preferred.
Usage This command is used to manage the connectivity of an AP to a controller. The AP and controller can be in the same subnet or they can be in different subnets, separated by one or more routers.
When an AP joins a WLAN, it searches for a controller to link to. By default, the AP uses Layer 2 MAC address broadcast discovery packets to allow it to be found by a controller. When the controller and AP are in the same subnet, the AP is discovered by the controller and configuration information is downloaded from the controller to the AP.
As the Layer 2 protocol does not allow the discovery packets outside of the subnet, if the controller is not in the same subnet as the AP, Layer 3 routing must be established. The default connectivity switches to Layer 3 discovery if a controller is not found within 16 seconds.
If the configuration uses a router between subnets, and the AP is in a different subnet than the controller, use the l3-preferred option to initiate Layer 3 connectivity to the controller. In this configuration, if a DNS server is set up to contain the default name of the controller, “wlan-controller,” with the controller IP address “default,” a connection between the AP and controller can automatically be established and the AP can receive its configuration information from the controller.
Choose l2-preferred or l3-preferred to enter into ap-connectivity mode. In this mode, a controller IP address, hostname, and domain name can be explicitly configured.
l2-only Uses Layer 2 only for AP discovery.
l2-preferred Uses Layer 2 as first attempt for AP discovery. If a controller is not found within 16 seconds, it then attempts Layer 3 discovery.
l3-preferred Uses Layer 3 as first attempt for AP discovery. If a controller is not found within 16 seconds, it then attempts Layer 2 discovery.
232 Meru Wireless LAN System Command Reference

Examples The following commands can be used to setup a Layer 3 configuration for an AP not in the same subnet as the controller. The first command enters connectivity mode, then configures the AP to obtain its IP address from DHCP (which then allows the AP to connect the DNS server and query for the IP address for the hostname “wlan-controller”):
mc1000(config-ap)# connectivity l3-preferredmc1000(config-ap-connectivity)#ip address dhcpmc1000(config-ap-connectivity)#controller hostname wlan-controller
Related Commands
controller domainnamecontroller hostnamecontroller ipip address dhcpip dns-servershow ap-connectivity
Note: If you have APs configured for L3 preferred discovery and you change the IP address of the controller, the configuration of all APs need to be updated with the new IP address of the controller, or the APs will not find the controller on reboot. If your AP cannot find the controller, you can reconfigure it by moving the AP onto the same L2 subnet as the controller and after several minutes of failed L3 discovery it will revert to L2 broadcast discovery, after which the IP of the controller can be reconfigured to the new value.
Access Point and Radio Commands 233

contact
Provides the contact person for the access point.
Syntax contact contact
Command Mode
AP configuration
Default None
Usage This command sets the contact person for the access point.
Examples mc1000(config-ap)# contact Bobmc1000(config-ap)#
Related Commands
location
contact Contact name
234 Meru Wireless LAN System Command Reference

controller domainname
Configures the controller domain name from where the access point is discovered.
Syntax controller domainname
Command Mode
AP connectivity configuration
Default None
Usage Configures the controller’s domain name.
Examples mc1000(config-ap-connectivity)# controller domainname acmemc1000(config-ap-connectivity)#
Related Commands
controller hostnamecontroller ip
Access Point and Radio Commands 235
controller hostname
Configures the controller hostname from where the access point is discovered.
Syntax controller hostname hostname
Command Mode
AP connectivity configuration
Default None
Usage Configures the controller’s IP hostname.
Examples mc1000(config-ap-connectivity)# controller hostname acmeCorpmc1000(config-ap-connectivity)#
Related Commands
controller domainnamecontroller ip
236 Meru Wireless LAN System Command Reference

controller ip
Configures the controller IP from where the access point is discovered.
Syntax controller ip address
Command Mode
AP connectivity configuration
Default None
Usage Configures the controller’s IP address.
Examples mc1000(config-ap-connectivity)# controller ip address 10.0.220.30mc1000(config-ap)#
Related Commands
controller domainnamecontroller hostname
address Sets the controller IP address
Access Point and Radio Commands 237

dataplane-mode
Determines whether Remote AP is active.
Syntax dataplane-mode {bridged | tunneled}
Command Mode
AP configuration
Default The default dataplane mode is for tunneled traffic.
Usage This command is used to determine what type of traffic is passed between the controller and an AP. It is used the configure the Remote AP feature (bridged mode) for the Controller and AP connection.
The Remote AP feature allows APs to be installed and managed at locations separated from the controller by a WAN or ISP, such as at a satellite office or other type of remote location. The controller, through a configurable keep-alive signal, monitors the Remote APs. Remote APs can exchange control information, including authentication and accounting information with the controller, but are unable to exchange data. The Remote APs can exchange data with other APs within their subnet. Because Remote APs cannot exchange data-plane traffic (including DHCP) with the controller, certain Meru Wireless LAN System features are not available for Remote AP configurations. These include Virtual Cell, VLAN, Captive Portal, L3 Mobility, and QoS. Use the remote-ap-enable command in addition to this command to configure Remote AP.
By default, a Controller and an AP are connected with a data tunnel so that data from a mobile station is tunneled to the controller from the AP and vise versa.
If the bridged option is used, the APs can be deployed in a remote location, separated from the controller by one or more routers and considered a Layer 3 Remote AP deployment. When the AP is in bridged mode, QoS rules and classification is not provided since that is performed only when the packets are tunneled through the Controller.
Examples mc1000(config-ap)# dataplane-mode tunneledmc1000(config-ap)#
bridged Specifies the data packets are not passed to the controller; only control plane packets are passed to the controller (Remote AP mode).
tunneled Specifies the default behavior for APs where data and control packets are passed to the controller.
238 Meru Wireless LAN System Command Reference

Related Commands
locationremote-ap-enable
Access Point and Radio Commands 239

description
A text description for the access point.
Syntax description description
Command Mode
AP configuration
Default None
Usage Describes the access point in text.
Examples mc1000(config-ap)# description servesQA+ITmc1000(config-ap)#
Related Commands
buildingfloorlocation
description Description of the access point. Descriptions longer than 64 characters may impact readability on the Web interface page.
240 Meru Wireless LAN System Command Reference
fixed-channel
Fixes the RF channel so it cannot be changed by autochannel configuration.
Syntax fixed-channel enable
no fixed-channel
Command Mode
Dot11Radio interface configuration
Default No fixed-channel
Limitations This command is not supported on the AP150 or RS4000.
Usage This command is used to prevent the autochannel assignment performed with the autochannel command. Use the enable keyword to activate fixed-channel functionality. Use the channel command to set the channel, prior to fixing the channel, with this command.
Use the no fixed-channel command to return to autochannel mode.
Examples mc1000(config-if_802)# fixed-channel enable
mc1000(config-if_802)#
Related Commands
autochannelchannel
enable Enables fixed-channel mode.
Access Point and Radio Commands 241

floor
Specifies the floor on which an access point is located.
Syntax floor floor-name
Command Mode
Privileged EXEC
Default None
Usage Using the floor command is optional and is only used for informational purposes.
Examples The following commands specify that an access point with the node ID of 2 is located on the second floor:
controller# ap 2controller(config-ap)# floor “second floor”controller(config-ap)#
Related Commands
buildinglocation
floor-name Name of the floor on which the access point is located. The floor name can be up to 64 alphanumeric characters long. To use spaces in the name, enclose the name in double quotation marks (“ ”).
242 Meru Wireless LAN System Command Reference

high-density-enable
Enables filtering of multiple access points, reducing overall “noise” during communications.
Syntax high-density-enable
no high-density-enable
Command Mode
AP configuration
Default By default, high-density enable is off.
Limitations This command is not supported on the AP150 or RS4000.
Usage High-density enable reduces extraneous noise during communications when many access points are communicating at once. Use the no form to return to the default.
Examples mc1000(config-ap)# high-density-enablemc1000(config-ap)#
Access Point and Radio Commands 243

hostname
Sets the access point hostname.
Syntax hostname hostname
Command Mode
AP connectivity configuration
Default None
Usage Sets the access point hostname.
Examples mc1000(config-ap)# hostname acmemc1000(config-ap)#
hostname Hostname from 1-37 characters.
244 Meru Wireless LAN System Command Reference

interface Dot11Radio
Selects AP radio interface for configuration and enters 802.11 configuration mode.
Syntax interface Dot11Radio node-id interface_ID
Command Mode
Global configuration
Default None
Usage Puts you in Dot11Radio mode for configuring individual access point interfaces.
Examples
mc1000(config)# interface Dot11Radio 1 1mc1000(config-if-802)# ?admin-mode Administrative Mode.antenna-property Manage external wireless interface antennas.antenna-selection Antenna configuration.channel Configure the channel ID.default Set various parameters to the default value.do Executes an IOSCLI command.end Save changes, and return to privileged EXEC mode.exit Save changes, and return to global configuration mode.fixed-channel Fix channel so it cannot be changed by auto-channel
configuration.interop-mode B/G protection mechanism.mode AP mode configuration.no Disables various parameters.power Transmit power in the format low,medium,high. For example,
20,20,20.preamble-short Enables short preamble.protection-mode bg protection mode.rf-mode Configure the Radio Frequency mode (802.11a, b, g, or bg).scanning-channels Configure the channels for scanning.show Displays various parameters related to this wireless
interface.tuning Tune wireless interface.
node-id Selects the access point to configure
interface_ID Specifies the first or the second radio interface, if two radios are present on the AP. interface_ID can be 1 or 2.
Access Point and Radio Commands 245

Related Commands
antenna-propertyantenna-selectionchannelfixed-channelprotection-cts-modepower localpreamble-short
246 Meru Wireless LAN System Command Reference

led
Specifies the blinking pattern of the LED Mode light.
Syntax led {blink | NodeId | Normal}
Command Mode
AP configuration
Default The default is blink (blinking).
Limitations This command is not supported on the AP150 or RS4000.
Usage Use this command to specify the blinking pattern of the LED Mode light.When there is no activity in either case, the LED is off/not illuminated.
Examples The following command changes the blinking pattern to Normal:
mc1000(config-ap)# led normal
blink LED Mode blinks two short blinks followed by four short blinks
NodeId The LED Mode light blinks short green blinks indicating the last digit of the AP ID. The number of short green lights is equal to the number of the AP ID modulo 10. Therefore, for AP IDs 4, 14, and 24, the NodeID mode blinks with a long yellow light followed by 4 short green lights. For AP IDs 7, 17, and 27, the NodeID mode blinks with a long yellow light followed by 7 green lights. Using this mode helps you identify the AP from other APs in the system.
Normal The LED blink pattern is controlled by the AP.
Access Point and Radio Commands 247

link-probing-duration
Specifies the duration an AP waits before rebooting when controller link is broken.
Syntax link-probing-duration duration
Command Mode
AP configuration
Default None
Usage Specifies the duration an AP waits before rebooting when the controller link is broken. This command is used in Remote AP configurations to prevent AP reboots when the connectivity to the remote controller is lost.
Examples mc1000(config-ap)# link-probing-duration 3200
Related Commands
duration Specifies the AP wait duration in minutes. duration can be from 1 to 3200.
248 Meru Wireless LAN System Command Reference

location
The location of the access point.
Syntax location location
Command Mode
AP configuration
Default None
Usage Describes the location of the access point.
Examples mc1000(config-ap)# location 10ft_from_west_window
Related Commands
contactdescription
location Location of the access point.
Access Point and Radio Commands 249

mac-address
The MAC address of the access point.
Syntax mac-address mac-address
Command Mode
AP configuration
Default None
Usage Configures the MAC address for the access point.
Examples mc1000(config-ap)# mac-address 00:E5:F0:B8:2A:3Fmc1000(config-ap)#
Related Commands
ap
mac-address MAC address of the access point in hexadecimal format.
250 Meru Wireless LAN System Command Reference

mode
Configures the AP radio mode to monitor-only or provide normal wireless service.
Syntax mode {normal | scanning}
Command Mode
Dot11Radio interface configuration
Default
Usage Configures the specified access point’s radio to provide the specified service type. For the AP200 with two radios installed, allows you to configure the functionality mode of each radio.
Examples mc1000(config-if_802)# mode scanningmc1000(config-if_802)#
normal Sets the AP radio to provide normal wireless services.
scanning Sets the AP radio to provide only continuous monitoring service.
Access Point and Radio Commands 251

model
Configures the AP model type.
Syntax model {type}
Command Mode
AP configuration
Default
Usage Configures the specified Access Point hardware model type.
Examples mc1000(config-ap)# model AP208mc1000(config-ap)#
type Sets the AP model type. type can be:
AP201 AP201
AP208 AP208
252 Meru Wireless LAN System Command Reference

power local
Configures the transmit power.
Syntax power local power-level
Command Mode
Dot11Radio interface configuration
Default 20,20,20
Usage Configures the low, medium and high transmit power settings. The power settings are used to manage contention between neighboring AccessPoints.
Examples mc1000(config-if_802)# power local power-level 21,21,21mc1000(config-if_802)#
power-level The transmit power level in dBms. power-level can be set between 5 and 21.
Note: At this time, all three levels should reflect the same value.
Access Point and Radio Commands 253

preamble-short
Indicates whether short preamble is used.
Syntax preamble-short
no preamble-short
Command Mode
Dot11Radio interface configuration
Default The short preamble is set by default.
Usage Use this command to set a preamble. Use the no feature to disable short and use a long preamble. This feature is either on or off.
Examples mc1000(config-if_802)# preamble-shortmc1000(config-if_802)#
Related Commands
254 Meru Wireless LAN System Command Reference
protection-cts-mode
Configures the radio interoperabilty mode.
Syntax protection-cts-mode {wmm-txop | 802.11-1999}
Command Mode
Dot11Radio interface configuration
Default The default mode is 802.11-1999.
Limitations Only the 802.11-1999 mode is supported on the AP150 or RS4000.
Usage Configures the access point’s interoperability mode. The wmm-txop option uses the WMM TXOP feature in an intelligent manner for data to provide performance gains.
Examples mc1000(config-if_802)# protection-cts-mode wmm-txop
wmm-txop WMM-style TXOP protection for 802.11g frames. Improves performance of 802.11g clients above typical throughput in a mixed 802.11b/802.11g environment.
802.11-1999 One frame protection for 802.11g frames.Provides standard 802.11 mixed 802.11b/802.11g performance.
Access Point and Radio Commands 255
protection-mode
Manages bg protection mode settings.
Syntax protection-mode {auto | off | on}
no protection-mode
Command Mode
Dot11Radio interface configuration
Default The protection mode auto setting is enabled.
Limitations This command is not supported on the AP150 or RS4000.
Usage Use this command to set the bg mixed-mode protection mechanism mode for the radio interface to on, off, or automatic. If auto is selected, 802.11bg Dual-Speed protection mechanism is enabled for the type of radio in use. For 802.11bg radios, optimal performance for 802.11g clients is achieved if 802.11b clients are present and the protection mode is enabled (on or auto). This option has no impact for 802.11b only or 802.11a radios.
Examples To disable the automatic protection mode settings:
mc1000(config-if_802)# protection-mode off
To enable the protection mode settings:
mc1000(config-if_802)# protection-mode on
To set the protection mode settings back to automatic:
mc1000(config-if_802)# protection-mode auto
auto Dual-speed protection mode is automatically enabled for the type of radio in use.
off Dual-speed protection mode is always disabled.
on Dual-speed protection mode is always enabled.
256 Meru Wireless LAN System Command Reference

Related Commands
rf-mode
Access Point and Radio Commands 257
rf-mode
Configures the radio frequency mode.
Syntax rf-mode mode
Command Mode
Dot11Radio interface configuration
Default
Usage Configures the access point’s radio frequency mode. This command allows you to choose the radio band. When the 802.11bg mode is selected, you can also configure the Meru Wireless LAN System proprietary protection mode, that improves performance for g clients in a bg mixed environment.
Examples On an AP 201, choose to implement the 802.11bg mixed mode with the command:
mc1000(config-if_802)# rf-mode 802.11bgmc1000(config-if_802)#
Related Commands
protection-mode
mode Specifies the radio frequency. mode can be:
802.11a—Specifies the 802.11a standard.
802.11b—Specifies the 802.11b standard.
802.11bg—Specifies the 802.11b/g interop mode.
802.11g—Specifies the 802.11g standard.
258 Meru Wireless LAN System Command Reference

show ap
Displays information about the access point
Syntax show ap [node-id]
Command Mode
EXEC
Default None
Usage Displays access point information, including AP ID and name, MAC address, operational state, availability status, runtime image version, connectivity layer, model type, and remote/local placement. Enter an optional ID to see detailed information about one access point. Do not enter any ID to see high-level information about all access points currently on the system.
Use the operational state and availability status to assess the state of the access point. The most common combinations and their meaning are:
Enabled and On-line: Access point is operating correctly.
Disabled and Off-line: Controller cannot communicate with the access point.
Disabled and On-line: Access point or network is not configured correctly.
The availability status is used to monitor is a piece of equipment has been pre-provisioned, discovered, or simply powered off. All possible values for this state are included in the following table:
node-id Optional. The identification number of the access point
Availability Status Description
Not Installed The network element has been pre-provisioned, but not yet discovered
PowerOff The network element is installed (has been discovered at least once), but it is not currently powered on.
Off-line The network element is powered-on, but it has been placed off-line by an administrative action.
On-line The network element is working properly.
Access Point and Radio Commands 259
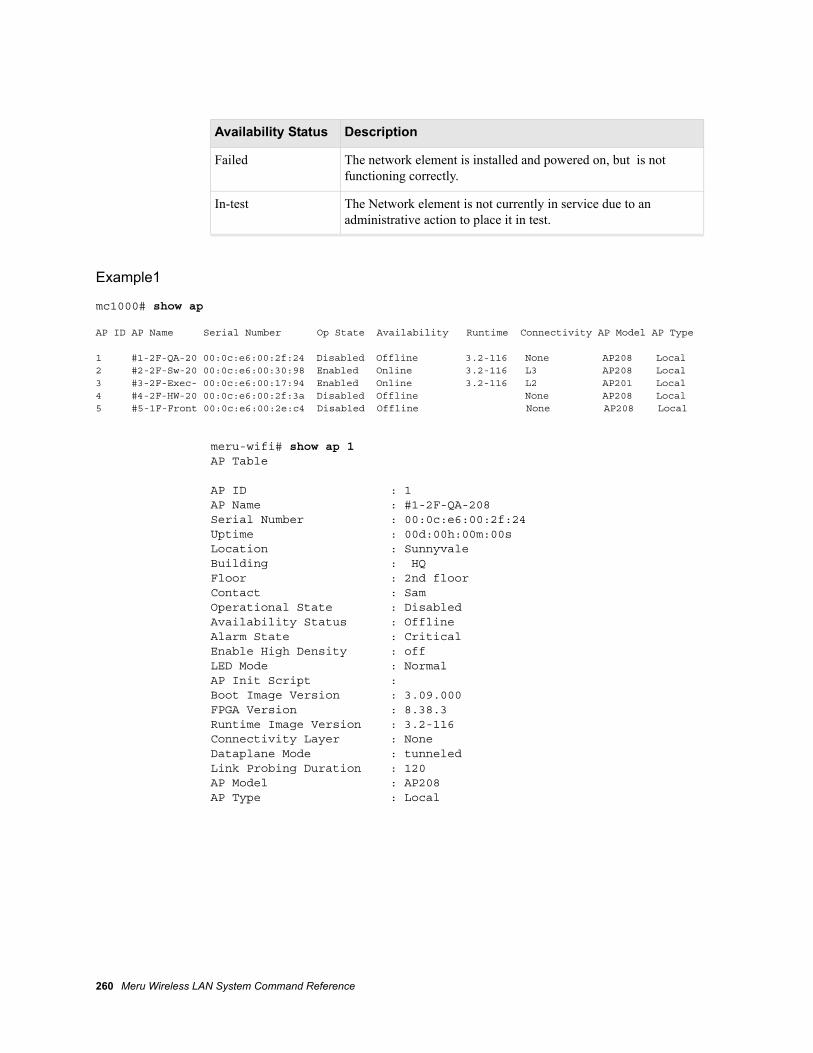
Example1
mc1000# show ap
AP ID AP Name Serial Number Op State Availability Runtime Connectivity AP Model AP Type
1 #1-2F-QA-20 00:0c:e6:00:2f:24 Disabled Offline 3.2-116 None AP208 Local 2 #2-2F-Sw-20 00:0c:e6:00:30:98 Enabled Online 3.2-116 L3 AP208 Local 3 #3-2F-Exec- 00:0c:e6:00:17:94 Enabled Online 3.2-116 L2 AP201 Local 4 #4-2F-HW-20 00:0c:e6:00:2f:3a Disabled Offline None AP208 Local 5 #5-1F-Front 00:0c:e6:00:2e:c4 Disabled Offline None AP208 Local
meru-wifi# show ap 1AP Table
AP ID : 1AP Name : #1-2F-QA-208Serial Number : 00:0c:e6:00:2f:24Uptime : 00d:00h:00m:00sLocation : SunnyvaleBuilding : HQFloor : 2nd floorContact : SamOperational State : DisabledAvailability Status : OfflineAlarm State : CriticalEnable High Density : offLED Mode : NormalAP Init Script : Boot Image Version : 3.09.000FPGA Version : 8.38.3Runtime Image Version : 3.2-116Connectivity Layer : NoneDataplane Mode : tunneledLink Probing Duration : 120AP Model : AP208AP Type : Local
Failed The network element is installed and powered on, but is not functioning correctly.
In-test The Network element is not currently in service due to an administrative action to place it in test.
Availability Status Description
260 Meru Wireless LAN System Command Reference

show ap-connectivity
Displays the access point connections.
Syntax show ap-connectivity
Command Mode
EXEC
Default None
Usage Displays access point connectivity information, including the type of configuration, the discovery protocol used, the connectivity layer, and the IP address.
Examples The following command displays access point connectivity information for all APs:
default# show ap-connectivity
AP ID AP Name IP Configuration Discovery Protocol Connectivity IP Address
1 #1-2F-QA-208 Static L3-preferred None 0.0.0.0 16 CustSup Static L3-preferred L3 192.168.9.11 18 Mktg Static L3-preferred L3 192.168.9.14 26 AP-26 DHCP L2-preferred L2 0.0.0.0 28 AP-28 Static L3-preferred L2 192.168.1.71 29 AP-29 Static L2-preferred L2 0.0.0.0 AP Network Connectivity configuration(6)
The following command displays detailed connectivity information for AP 1:
default# show ap-connectivity 1AP Network Connectivity configuration
AP ID : 1AP Name : #1-2F-QA-208IP Configuration : StaticStatic IP Address : 192.168.10.21Static IP Netmask : 255.255.255.0Static Default Gateway : 192.168.10.1Primary DNS Server : 10.0.0.10Secondary DNS Server : 10.0.0.40AP Host Name : Ap4-2F-QADiscovery Protocol : L3-preferredController Address : 192.168.10.2Controller Host Name :
Access Point and Radio Commands 261

Controller Domain Name : Connectivity Layer : NoneDomain Name : localdomainIP Address : 0.0.0.0NetMask : 0.0.0.0Gateway : 0.0.0.0DNS Server 1 : 0.0.0.0DNS Server 2 : 0.0.0.0DNS Server 3 : 0.0.0.0DNS Server 4 : 0.0.0.0DNS Server 5 : 0.0.0.0DNS Server 6 : 0.0.0.0DNS Server 7 : 0.0.0.0DNS Server 8 : 0.0.0.0
Related Commands
show apshow ap-discoveredshow ap-siblings
262 Meru Wireless LAN System Command Reference

show ap-discovered
Displays the list of discovered access points and stations.
Syntax show ap-discovered [MAC_address]
Command Mode
EXEC
Default None
Usage Displays the access points and stations discovered by the system.
Examples
mc1000# show ap-discovered
ID MAC Address Type Channel SSID BSSID Last Previous Current Pkts Rx RF Band Name
16 00:02:2d:66:e1:b0 STATION 6 00:0c:e6:07:32:c3 00d:00h:00m:20s 0 0 509 unknown CustSup
16 00:02:b3:d9:1f:54 STATION 6 00:0f:f7:02:b7:4e 00d:00h:00m:00s 14 13 8768 unknown CustSup
16 00:02:b3:d9:1f:64 STATION 6 00:0f:8f:ef:9e:7f 00d:00h:00m:18s 40 40 9 unknown CustSup
16 00:02:b3:e6:d7:12 STATION 6 00:40:96:a3:72:22 00d:00h:00m:01s 17 23 1124 unknown CustSup
16 00:03:2a:00:3c:58 STATION 6 00:00:00:00:00:00 00d:00h:00m:00s 0 0 3 802.11b CustSup
16 00:04:f2:00:3a:ae STATION 6 00:0c:e6:08:f0:8f 00d:00h:00m:03s 13 13 6 unknown CustSup
16 00:06:25:09:21:0b STATION 6 00:0c:e6:06:ad:11 00d:00h:00m:01s 9 10 410 802.11b CustSup
16 00:0c:85:76:35:ea STATION 6 00:0c:e6:02:5f:67 00d:00h:00m:00s 20 20 46298 unknown CustSup
16 00:0c:e6:01:04:ff AP 6 qa-func 00:0c:e6:01:04:ff 00d:00h:00m:00s 4 4 178772 802.11g CustSup
16 00:0c:e6:01:29:97 AP 6 meru-default 00:0c:e6:01:29:97 00d:00h:00m:00s 14 14 774781 802.11b CustSup
16 00:0c:e6:01:3c:5f AP 6 mwflx00:0c:e6:01:3c:5f 00d:00h:00m:00s 24
MAC_address Optional. Display specific information for this MAC address (station or AP).
Access Point and Radio Commands 263

Related Commands
show apshow ap-connectivityshow ap-siblings
264 Meru Wireless LAN System Command Reference
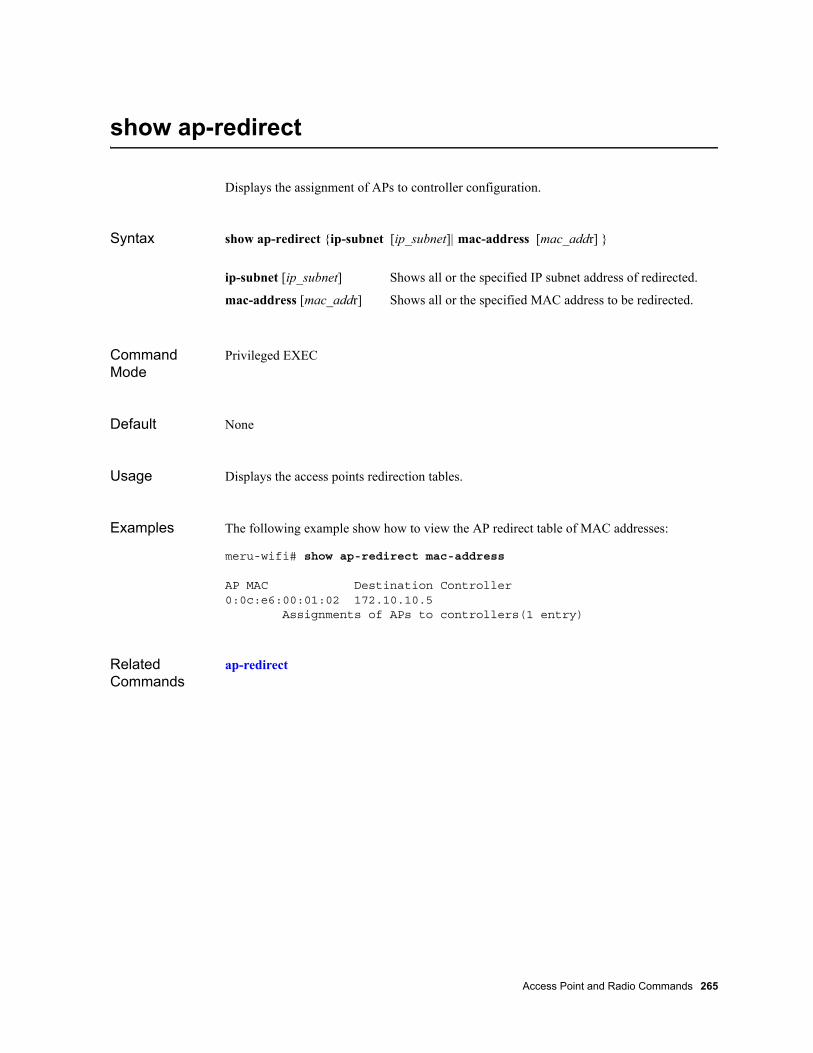
show ap-redirect
Displays the assignment of APs to controller configuration.
Syntax show ap-redirect {ip-subnet [ip_subnet]| mac-address [mac_addr] }
Command Mode
Privileged EXEC
Default None
Usage Displays the access points redirection tables.
Examples The following example show how to view the AP redirect table of MAC addresses:
meru-wifi# show ap-redirect mac-address
AP MAC Destination Controller 0:0c:e6:00:01:02 172.10.10.5 Assignments of APs to controllers(1 entry)
Related Commands
ap-redirect
ip-subnet [ip_subnet] Shows all or the specified IP subnet address of redirected.
mac-address [mac_addr] Shows all or the specified MAC address to be redirected.
Access Point and Radio Commands 265

show ap-siblings
Displays the access point siblings table.
Syntax show ap-siblings [MAC_address]
Command Mode
EXEC
Default None
Usage Displays access point sibling information including serial numbers, SSID, time, and usage parameters.
Examples
mc1000# show ap-siblingsAP ID Serial Number Channel Confirmed-Channel SSID
Last Previous Current AP Name
2 00:0c:e6:00:17:94 1 1 mwf-voice 00d:00h:00m:00s 174 174 #2-2F-Sw-208
2 00:0c:e6:00:2f:6c 161 161 00d:00h:00m:00s 179 179 #2-2F-Sw-208
2 00:0c:e6:00:30:98 161 161 00d:00h:00m:25s 238 238 #2-2F-Sw-208
2 00:0c:e6:00:30:98 161 161 mwf-wpapeap 00d:00h:00m:25s 231 231 #2-2F-Sw-208
2 00:0c:e6:00:30:98 161 161 mwf-wpapsk 00d:00h:00m:25s 238 238 #2-2F-Sw-208
3 00:0c:e6:00:17:bf 1 1 mwf-wpapeap 00d:00h:00m:00s 194 194 #3-2F-Exec-201
3 00:0c:e6:00:18:7d 1 1 mwf-wpapeap 00d:00h:00m:00s 176 176 #3-2F-Exec-201
3 00:0c:e6:00:30:98 1 1 00d:00h:00m:00s 176 175 #3-2F-Exec-201
6 00:0c:e6:00:17:94 1 1 mwf-wpapeap 00d:00h:00m:00s 178 177 #6-1F-CS-AP201
6 00:0c:e6:00:17:bf 1 1 mwf-wpapeap 00d:00h:00m:00s 217 217 #6-1F-CS-AP201
MAC_address Optional. Display specific information for this MAC address.
266 Meru Wireless LAN System Command Reference

10 00:0c:e6:00:17:94 1 1 mwf-wpapeap 00d:00h:00m:00s 195 195 #10-1F-Mktg-208
10 00:0c:e6:00:18:7d 2 1 mwf-wpapeap 00d:00h:00m:00s 216 216 #10-1F-Mktg-208
10 00:0c:e6:00:30:98 161 161 mwf-wpapeap 00d:00h:00m:06s 172 172 #10-1F-Mktg-208
10 00:0c:e6:00:30:98 161 161 mwf-wpapsk 00d:00h:00m:06s 172 172 #10-1F-Mktg-208
11 00:0c:e6:00:30:98 161 161 00d:00h:00m:00s 180 180 AP-11
AP Siblings(15 entries)mc1000#
mc1000# show ap-siblings 00:0c:e6:00:30:98 AP Siblings
AP ID : 3Serial Number : 00:0c:e6:00:30:98Channel : 1Confirmed-Channel : 1SSID : Last Activity : 00d:00h:00m:03sPrevious RSSI : 173Current RSSI : 174AP Name : #3-2F-Exec-201AP ID : 10Serial Number : 00:0c:e6:00:30:98Channel : 161Confirmed-Channel : 161SSID : mwf-wpapeapLast Activity : 00d:00h:00m:00sPrevious RSSI : 171Current RSSI : 171
Related Commands
show apshow ap-connectivityshow ap-discovered
Access Point and Radio Commands 267

show ap-swap
Displays the access point replacement table.
Syntax show ap-swap
Command Mode
EXEC
Default None
Usage Displays access point swap information in the AP Replacement Table. The AP Serial number is the MAC address of AP that is being replaced with the MAC address listed in the New AP Serial Number.
Examples mc1000# show ap-swapAP Serial Number New AP Serial Number00:0c:e6:00:05:02 00:0c:e6:00:30:98 AP Replacement Table (1 entry)mc1000#
Related Commands
swap
268 Meru Wireless LAN System Command Reference

show ess-ap
Displays the ESS-AP table for the access point.
Syntax show ess-ap ap
Command Mode
AP configuration
Default None
Usage Displays the ESS-AP table information including ESSID, access point name, and BSSID.
Examples
mc1000# show ess-ap ap 1
ESS Profile AP ID AP Name IfIndex Channel BSSID
mwflx 16 CustSup 1 6 00:0c:e6:02:5f:67 mwflx 18 Mktg 1 6 00:0c:e6:02:5f:67 mwflx 26 AP-26 1 6 00:0c:e6:01:3c:5f mwflx 28 AP-28 1 6 00:0c:e6:01:77:df mwflx 29 AP-29 1 6 00:0c:e6:01:3c:5fmc1000#
Access Point and Radio Commands 269

show interfaces Dot11Radio
Displays the configuration of AP wireless interfaces.
Syntax show interfaces Dot11Radio [ap_id [if_index]]
Command Mode
EXEC
Default None
Usage Displays the configuration of all AP wireless interfaces or optionally, for the specified AP. Enter the ID number to specify a particular access point.
Examples mc1000# show interfaces Dot11Radio
AP ID AP Name IfIndex Op State Channel Short Preamble AP Mode
16 CustSup 1 Enabled 6 on Normal 18 Mktg 1 Enabled 6 on Normal 26 AP-26 1 Enabled 6 on Normal 28 AP-28 1 Enabled 6 on Normal 29 AP-29 1 Enabled 6 on Normal Wireless Interface Configuration(5 entries)
meru-wifi# show interfaces Dot11Radio 10
AP ID AP Name IfIndex AP Model Admin State Op State Channel Short Preamble AP Mode
10 #10-1F-Mktg-208 2 AP208 Up Enabled 161 on Normal 10 #10-1F-Mktg-208 1 AP208 Up Enabled 1 on Normal Wireless Interface Configuration(2 entries)
meru-wifi# show interfaces Dot11Radio 10 1Wireless Interface Configuration
AP ID : 10AP Name : #10-1F-Mktg-208Interface Index : 1AP Model : AP208
ap_id Optional. The ID of the access point.
if_index Optional. The ID of the interface.
270 Meru Wireless LAN System Command Reference
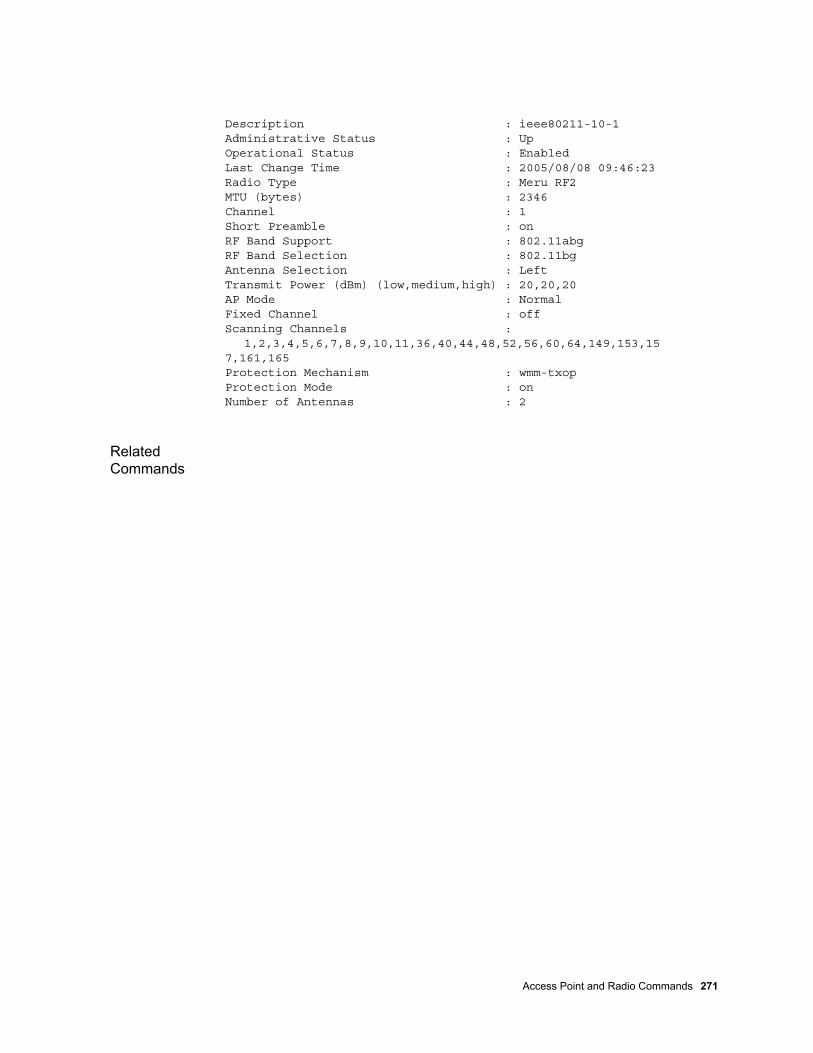
Description : ieee80211-10-1Administrative Status : UpOperational Status : EnabledLast Change Time : 2005/08/08 09:46:23Radio Type : Meru RF2MTU (bytes) : 2346Channel : 1Short Preamble : onRF Band Support : 802.11abgRF Band Selection : 802.11bgAntenna Selection : LeftTransmit Power (dBm) (low,medium,high) : 20,20,20AP Mode : NormalFixed Channel : offScanning Channels :
1,2,3,4,5,6,7,8,9,10,11,36,40,44,48,52,56,60,64,149,153,157,161,165Protection Mechanism : wmm-txopProtection Mode : onNumber of Antennas : 2
Related Commands
Access Point and Radio Commands 271

show interfaces Dot11Radio antenna-property
Displays the properties of the AP antennas.
Syntax show interfaces Dot11Radio antenna-property [[[ap_ID] ifindex] connector]
Command Mode
EXEC
Default None
Usage Use this command to display antenna properties. Without arguments, the display shows the properties for all APs. You can specify properties for a specific AP, interface index, or connector location. The properties that are displayed are APID, Interface Index, connector number (left=1, right=2), the RF band, gain, external or internal antenna type, and location.
Examples mc1000# show interfaces Dot11Radio antenna-property
AP ID IfIndex Connector RF Band Gain (dBm) Type Location
4 1 1 Dual 4 unknown Left 4 1 2 Dual 0 unknown Right 4 2 1 Dual 5 unknown Left 4 2 2 Dual 0 unknown Right 5 1 1 Dual 4 unknown Left 5 1 2 Dual 0 unknown Right 5 2 1 Dual 5 unknown Left 5 2 2 Dual 0 unknown Right 6 1 1 Dual 4 External Left 6 1 2 Dual 4 External Right 7 1 1 Dual 4 unknown Left 7 1 2 Dual 0 unknown Right 7 2 1 Dual 5 unknown Left 7 2 2 Dual 0 unknown Right 9 1 1 Dual 5 External Left 9 1 2 Dual 5 External Right
ap_ID Optional. Displays antenna control information of the specified AP.
ifindex Optional. Displays antenna control information of the specified AP wireless interface.
connector Optional. Displays detailed antenna control information of the specified connector.
272 Meru Wireless LAN System Command Reference

1 1 1 Dual 4 External Left 1 2 1 Dual 5 External Right 3 1 1 Dual 4 External Left 10 1 1 Dual 4 External Left 10 2 1 Dual 5 External Right 8 1 1 Dual 4 External Left 2 1 1 Dual 4 External Left 2 2 1 Dual 5 External Right Antenna Property(24)
The following display show the antenna properties for AP 5:
mc1000# # show interfaces Dot11Radio antenna-property 5
AP ID IfIndex Connector RF Band Gain (dBm) Type Location
5 2 2 Dual 0 unknown Right 5 2 1 Dual 5 unknown Left 5 1 2 Dual 0 unknown Right 5 1 1 Dual 4 unknown Left Antenna Property(4)
The following display show the antenna properties for AP 5, interface 1:
mc1000# show interfaces Dot11Radio antenna-property 5 1
AP ID IfIndex Connector RF Band Gain (dBm) Type Location
5 1 1 Dual 4 unknown Left 5 1 2 Dual 0 unknown Right Antenna Property(2)
The following display show the antenna properties for AP 5, interface 1, connector 1:
mc1000# show interfaces Dot11Radio antenna-property 5 1 1Antenna Property
AP ID : 5Interface Index : 1Connector : 1RF Band : DualAntenna Gain (dBm) : 4Link Type : Point-To-Multi-PointAntenna Type : unknownLocation : Left
Related Commands
antenna-property
Access Point and Radio Commands 273
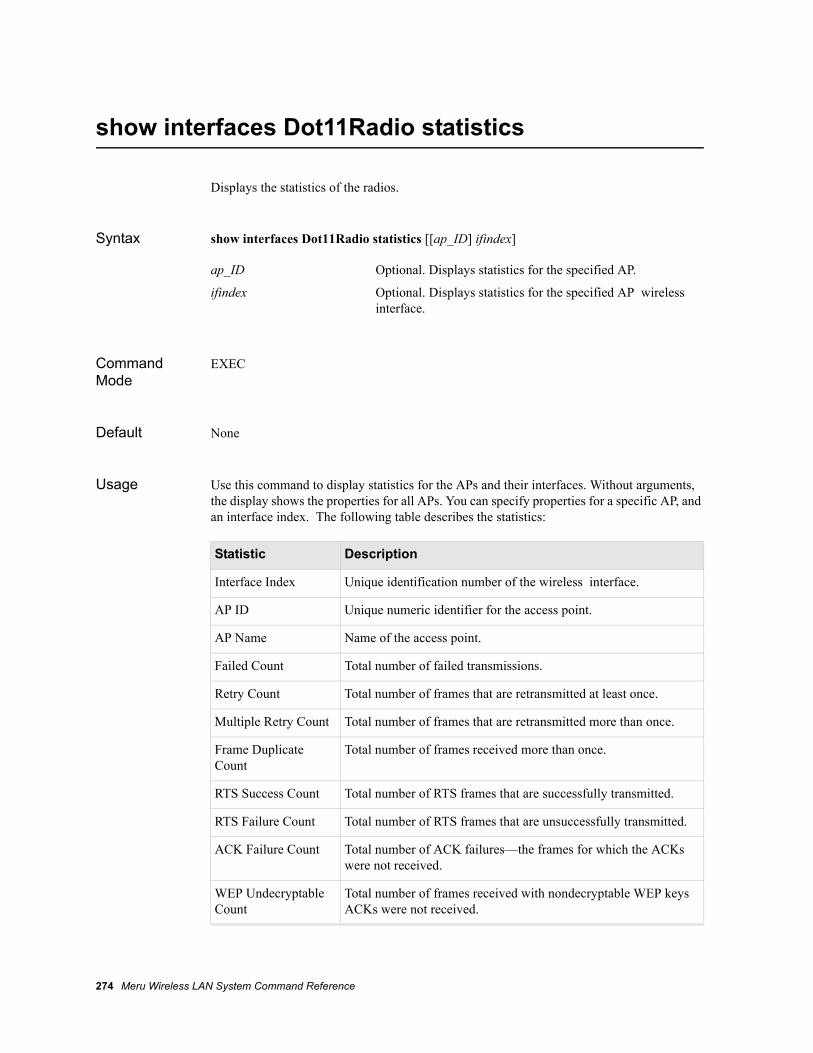
show interfaces Dot11Radio statistics
Displays the statistics of the radios.
Syntax show interfaces Dot11Radio statistics [[ap_ID] ifindex]
Command Mode
EXEC
Default None
Usage Use this command to display statistics for the APs and their interfaces. Without arguments, the display shows the properties for all APs. You can specify properties for a specific AP, and an interface index. The following table describes the statistics:
ap_ID Optional. Displays statistics for the specified AP.
ifindex Optional. Displays statistics for the specified AP wireless interface.
Statistic Description
Interface Index Unique identification number of the wireless interface.
AP ID Unique numeric identifier for the access point.
AP Name Name of the access point.
Failed Count Total number of failed transmissions.
Retry Count Total number of frames that are retransmitted at least once.
Multiple Retry Count Total number of frames that are retransmitted more than once.
Frame Duplicate Count
Total number of frames received more than once.
RTS Success Count Total number of RTS frames that are successfully transmitted.
RTS Failure Count Total number of RTS frames that are unsuccessfully transmitted.
ACK Failure Count Total number of ACK failures—the frames for which the ACKs were not received.
WEP Undecryptable Count
Total number of frames received with nondecryptable WEP keys ACKs were not received.
274 Meru Wireless LAN System Command Reference

Examples
mc1000# show interfaces Dot11Radio statistics
IfIndex AP-ID AP-Name Failed-Ct TX-Frms Mult-TX-Frms TX-Frag Mult-RX-Frms RX-Frag RX-Retry-Frms RX-Ucast-Frms Assign-Sta-Ct Assoc-Sta-Ct Discvd-Sta-ct Avg-thruput
1 2 #2-2F-Sw-208 18406 3075610 3061807 3075609 1091430 1173478 288956 82048 43 0 127 0
2 2 #2-2F-Sw-208 178236 52958741 2888802 52958717 604394 50453872 4084232 49849478 43 0 127 0
1 3 #3-2F-Exec-201 789047 4898562 3705673 4898562 2650275 3090773 136309 440498 14 12 60 0
1 6 #6-1F-CS-AP201 702111 2876537 1358377 2876537 3310601 3872927 121475 562326 10 9 97 0
1 10 #10-1F-Mktg-208 413928 2521041 1812965 2521041 2180643 2286533 120052 105890 5 1 153 0
FCS Error Count Total number of packets received which failed Frame Check Sequence validation due to packet corruption.
PLCP Error Count Number of CRC errors and invalid rate errors at the PLCP layer.
Transmit Frame Count Total number of whole frames transmitted, including unicast, broadcast, and multicast frames.
Multicast Transmit Frame Count
Total number of non-unicast fragments transmitted.
Transmit Fragment Count
Total number of unicast fragments transmitted.
Multicast Received Frame Count
Total number of non-unicast frames received.
Received Fragment Count
Total number of frames received that has the fragment bit set.
Received Retried Frame Count
Number of received frames that are not duplicates and have the retry bit set. Usually indicates a bad receive path.
Received Unicast Frame Count
Number of unicast frames received.
Assigned Station Count
Number of stations assigned to the AP by the controller.
Associated Station Count
Number of stations currently associated with the access point.
Discovered Station Count
Number of stations transmitting on the same channel as the access point.
Statistic Description
Access Point and Radio Commands 275

2 10 #10-1F-Mktg-208 168393 1329112 1106441 1329112 356397 477547 33956 121150 5 1 153 0
1 11 AP-11 9 816952 816141 816952 2544916 2559975 96832 15059 0 0 228 0
2 11 AP-11 1 818933 818920 818933 441101 467577 61521 26476 0 0 228 0
Wireless (802.11) Statistics(8 entries)
mc1000# show interfaces Dot11Radio statistics 10 1Wireless (802.11) Statistics
Interface Index : 1AP ID : 10AP Name : #10-1F-Mktg-208Failed Count : 415023Retry Count : 20402Multiple Retry Count : 2978Frame Duplicate Count : 6133466RTS Success Count : 0RTS Failure Count : 0ACK Failure Count : 436739WEP Undecryptable Count : 0FCS Error Count : 2802053PLCP Error Count : 890471Transmit Frame Count : 2524894Multicast Transmit Frame Count : 1814667Transmit Fragment Count : 2524894Multicast Received Frame Count : 2186170Received Fragment Count : 2292495Received Retried frame Count : 120360Received Unicast frame Count : 106325Assigned Station Count : 5Associated Station Count : 2Discovered Station Count : 163Average throughput : 0
276 Meru Wireless LAN System Command Reference

show regulatory-domain
Displays the regulatory information for the country.
Syntax show regulatory-domain
Command Mode
Privileged EXEC
Default None
Usage This command displays the regulatory information for the country the controller is configured for.
Examples mc1000# show regulatory-domain RF Regulatory Domain
Country Code : USACountry Name : United States Of AmericaDefault B/G Channel : 6Default A Channel : 40
Access Point and Radio Commands 277

show statistics top10-ap-problem
Displays a list of the top problem access points.
Syntax show statistics top10-ap-problem
Command Mode
User EXEC
Default None
Usage Use the show statistics top10-ap-problem command to display a list of the top problem access points. Ten access points with the highest number of packet retransmissions, with a minimum of 20% for transmissions. Only downlink packet transmissions are considered because uplink packet losses cannot be reliably computed in a multicell WLAN deployment.
Examples The following command displays the most top problem access points.
mc1000# show statistics top10-ap-problem AP AP Name If Tx Loss Percentage
2 #2-2F-Sw- 2 37 Top 10 problem AP statistics(1 entry)mc1000#
Table 4 describes the fields of the show statistics top10-ap-problem output.
Related Commands
show statistics top10-ap-talker
Table 4: Output for show statistics top10-ap-problem
Field Description
AP Unique ID number of the access point.
AP Name Name of the access point.
If Interface number of the AP.
Tx Loss Percentage Percentage of packets lost during transmission (no acknowledgement).
278 Meru Wireless LAN System Command Reference

show statistics top10-ap-talker
Displays the 10 most active access points, based on the sum of transmission and reception packet rates per minute during the last polling period.
Syntax show statistics top10-ap-talker
Command Mode
EXEC
Default None
Usage Use the show statistics top10-ap-talker command to display the 10 most active access points, based on the sum of transmission and reception packet rates per minute during the last polling period. The top talker access points table shows activity based on the number of frames per minute, not actual bytes transmitted or airtime consumed.
Examples The following command displays the most top active access points.
mc1000# show statistics top10-ap-talker AP AP Name If Rx Frames/min Tx Frames/min
2 #2-2F-Sw- 2 10625300 11452490 3 #3-2F-Exe 1 125023 1360549 6 #6-1F-CS- 1 195022 884976 2 #2-2F-Sw- 1 38201 909269 10 #10-1F-Mk 1 57274 714166 8 #8-1F-Dem 1 113896 325462 10 #10-1F-Mk 2 53540 383962 11 AP-11 2 9329 202435 11 AP-11 1 5860 201866 1 #1-2F-QA- 1 0 0 Top 10 talker AP statistics(10)mc1000#
Table 4 describes the fields of the show statistics top10-ap-talker output.
Table 5: Output for show statistics top10-ap-talker
Field Description
AP Unique ID number of the access point.
AP Name Name of the access point.
Access Point and Radio Commands 279

Related Commands
show statistics top10-ap-problem
If Interface number of the AP.
Rx Frames/min Number of frames received during the last polling period.
Tx Frames/min Number of frames transmitted during the last polling period.
Table 5: Output for show statistics top10-ap-talker
Field Description
280 Meru Wireless LAN System Command Reference

show topoap
Displays the APs seen by the system.
Syntax show topoap
Command Mode
Privileged EXEC
Default None
Usage Displays access point information including allocated resources, number of neighbors, number attached, and number assigned.
Examples
mc1000# show topoapAP ID AP Name RsRq RsAlloc Neighbor Attached Assigned
2 #2-2F-Sw-208 0 0 4 22 2 10 #10-1F-Mktg-208 0 0 5 23 11 3 #3-2F-Exec-201 0 0 5 22 7 11 AP-11 0 0 2 2 0 6 #6-1F-CS-AP201 0 0 4 23 6 8 #8-1F-DemoArea- 0 0 4 20 9 AP Wireless Resources(6 entries)
Related Commands
show topoapap
Access Point and Radio Commands 281

show topoapap
Displays the AP/AP edge records in the system.
Syntax show topoapap
Command Mode
Privileged EXEC
Default None
Usage This command lists APs that are able to hear one another, similar to the show ap-siblings output information. Regardless of what APs display in the output, all APs on the same BSSID are coordinated.
Examples mc1000# show topoapap RSSI between APs
Detecting AP ID Detecting AP Name Sibling AP ID Sibling AP Name
26 AP-26 16 CustSup 26 AP-26 18 Mktg 26 AP-26 28 AP-28 26 AP-26 29 AP-29 16 CustSup 26 AP-26 16 CustSup 18 Mktg 16 CustSup 28 AP-28 16 CustSup 29 AP-29 18 Mktg 26 AP-26 18 Mktg 16 CustSup 18 Mktg 28 AP-28 18 Mktg 29 AP-29 28 AP-28 26 AP-26 28 AP-28 16 CustSup 28 AP-28 18 Mktg 28 AP-28 29 AP-29 29 AP-29 26 AP-26 29 AP-29 16 CustSup 29 AP-29 18 Mktg 29 AP-29 28 AP-28 RSSI between APs(20)#
282 Meru Wireless LAN System Command Reference

Related Commands
show topoapshow ap-siblings
Access Point and Radio Commands 283

swap
Configures the MAC address of a replacement AP.
Syntax swap old_mac_address new_mac_address
no swap ap old_mac_address
Command Mode
Global configuration mode
Default
Limitations An AP150 or RS4000 can only be replaced with another AP150 or RS4000, respectively.
Usage This command updates settings associated an AP ID. Each AP has an ID and a serial number (its MAC address) that are used for tracking purposes. This command equates the serial number of an AP that you want to replace at your site with a serial number of a new AP. By linking the two serial to an AP ID number in a replacement table, the system can update the new AP with the configured features from an old AP. This saves you from having to re-enter settings for the replacement AP. The settings that are tracked are the Channel number, preamble, and power settings.
Use the no form of the command to remove an AP entry from the AP replacement table.
Run this command, physically replace the AP, and reboot the system. The replacement table is checked, and then the changes are implemented. Once the new AP is updated, its entry is removed from the replacement table.
Examples mc1000(config)# swap ap 00:0c:e6:bc:61:4e 00:11:11:11:11:01
mc1000(config)##show ap-swap
AP Serial Number New AP Serial Number
00:0c:e6:bc:61:4e 00:11:11:11:11:01 AP Replacement Table(1 entry)
old_mac_address Specifies the MAC address of an AP that is to be replaced.
new_mac_address Specifies the MAC address of the replacement AP.
284 Meru Wireless LAN System Command Reference

Related Commands
show ap-swap
Access Point and Radio Commands 285

286 Meru Wireless LAN System Command Reference
Chapter 10Rogue AP Detection Commands
The commands contained in this chapter are used for configuring and displaying information about Rogue AP detection:
rogue-ap acl
rogue-ap aging
rogue-ap assigned-aps
rogue-ap blocked
rogue-ap detection
rogue-ap mitigation
rogue-ap mitigation-frames
rogue-ap operational-time
rogue-ap scanning-channels
rogue-ap scanning-time
show rogue-ap acl
show rogue-ap blocked
show rogue-ap globals
show rogue-ap-list
Note: The commands in this chapter are not supported for the AP150 or RS4000 deployment.
Rogue AP Detection Commands 287
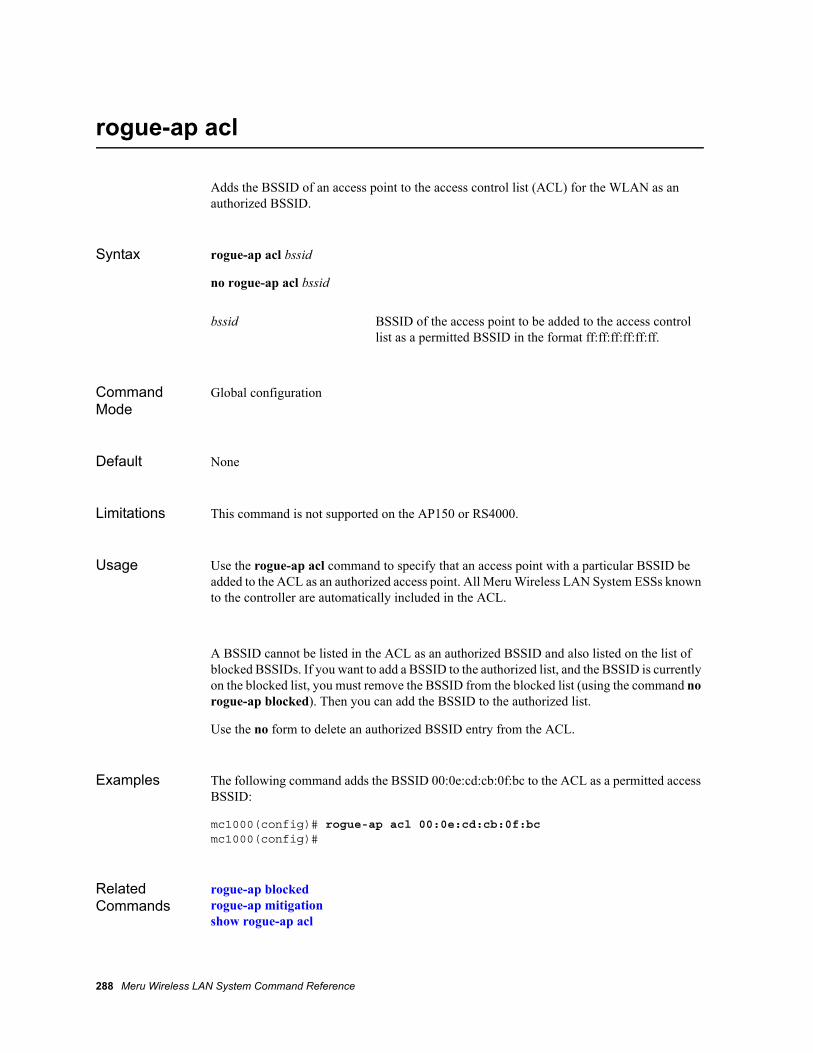
rogue-ap acl
Adds the BSSID of an access point to the access control list (ACL) for the WLAN as an authorized BSSID.
Syntax rogue-ap acl bssid
no rogue-ap acl bssid
Command Mode
Global configuration
Default None
Limitations This command is not supported on the AP150 or RS4000.
Usage Use the rogue-ap acl command to specify that an access point with a particular BSSID be added to the ACL as an authorized access point. All Meru Wireless LAN System ESSs known to the controller are automatically included in the ACL.
A BSSID cannot be listed in the ACL as an authorized BSSID and also listed on the list of blocked BSSIDs. If you want to add a BSSID to the authorized list, and the BSSID is currently on the blocked list, you must remove the BSSID from the blocked list (using the command no rogue-ap blocked). Then you can add the BSSID to the authorized list.
Use the no form to delete an authorized BSSID entry from the ACL.
Examples The following command adds the BSSID 00:0e:cd:cb:0f:bc to the ACL as a permitted access BSSID:
mc1000(config)# rogue-ap acl 00:0e:cd:cb:0f:bcmc1000(config)#
Related Commands
rogue-ap blockedrogue-ap mitigationshow rogue-ap acl
bssid BSSID of the access point to be added to the access control list as a permitted BSSID in the format ff:ff:ff:ff:ff:ff.
288 Meru Wireless LAN System Command Reference

rogue-ap aging
Configures the amount of time an undetected rogue AP alarm stays active.
Syntax rogue-ap aging aging-time
Command Mode
Global configuration
Default The default rogue AP alarm aging time is 60 seconds.
Limitations This command is not supported on the AP150 or RS4000.
Usage This command configures the amount of time an alarm for an unknown or blocked BSSID that is no longer detected remain active. After the aging-time elapses, any rogue AP that is no longer detected is automatically removed from the alarm list and its alarm is cleared.
Examples The following command sets the rogue AP alarm aging time to 300 seconds:
mc1000(config)# rogue-ap aging 300mc1000(config)#
Related Commands
rogue-ap mitigation
aging-time Amount of time an alarm for an unknown or blocked BSSID that is no longer detected remains active. Value can be from 60 through 86,400 seconds.
Rogue AP Detection Commands 289
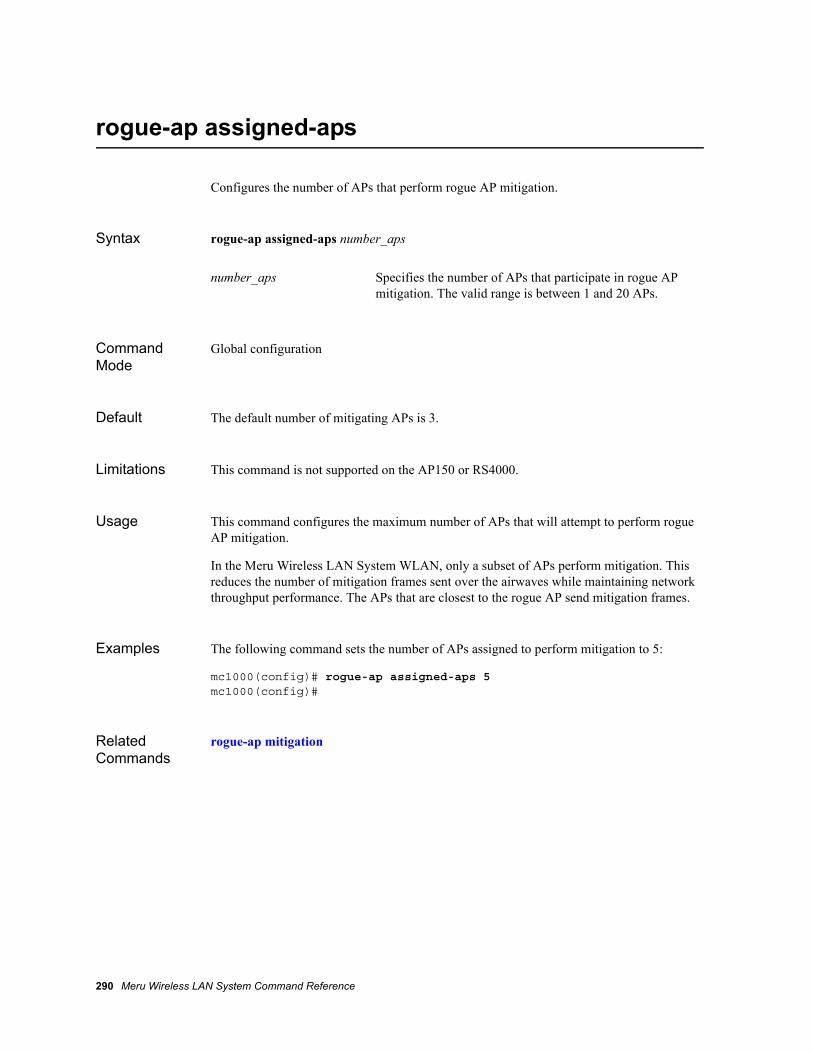
rogue-ap assigned-aps
Configures the number of APs that perform rogue AP mitigation.
Syntax rogue-ap assigned-aps number_aps
Command Mode
Global configuration
Default The default number of mitigating APs is 3.
Limitations This command is not supported on the AP150 or RS4000.
Usage This command configures the maximum number of APs that will attempt to perform rogue AP mitigation.
In the Meru Wireless LAN System WLAN, only a subset of APs perform mitigation. This reduces the number of mitigation frames sent over the airwaves while maintaining network throughput performance. The APs that are closest to the rogue AP send mitigation frames.
Examples The following command sets the number of APs assigned to perform mitigation to 5:
mc1000(config)# rogue-ap assigned-aps 5mc1000(config)#
Related Commands
rogue-ap mitigation
number_aps Specifies the number of APs that participate in rogue AP mitigation. The valid range is between 1 and 20 APs.
290 Meru Wireless LAN System Command Reference

rogue-ap blocked
Specifies the BSSID of an access point to be designated as an unauthorized access point in the WLAN.
Syntax rogue-ap blocked bssid
no rogue-ap blocked bssid
Command Mode
Global configuration
Default None
Limitations This command is not supported on the AP150 or RS4000.
Usage Use the rogue-ap blocked command to specify that an access point with a particular BSSID be added to the blocked list.
If the rogue AP mitigation mode is “selected” (using the command rogue-ap mitigation), then only rogue stations connecting to the BSSIDs in this list will be mitigated.
A BSSID cannot be listed in the ACL as an authorized BSSID and also listed on the list of blocked BSSIDs. If you want to add a BSSID to the blocked list, and the BSSID is currently on the authorized list, you must remove the BSSID from the authorized list (using the command no rogue-ap acl). Then you can add the BSSID to the blocked list.
Use the no form to delete a BSSID entry from the blocked list.
Examples The following command specifies the BSSID 00:02:2d:61:0a:2c as a blocked BSSID in the ACL:
mc1000(config)# rogue-ap blocked 00:02:2d:61:0a:2cmc1000(config)#
bssid BSSID of the access point to be designated as blocked in the ACL, which means the access point is considered unauthorized in the WLAN. Must be specified in hexadecimal format (xx:xx:xx:xx:xx:xx)
Rogue AP Detection Commands 291

Related Commands
no rogue-ap aclshow rogue-ap blocked
292 Meru Wireless LAN System Command Reference

rogue-ap detection
Enables rogue AP detection.
Syntax rogue-ap detection
no rogue-ap detection
Command Mode
Global configuration
Default Rogue AP detection is disabled by default.
Limitations This command is not supported on the AP150 or RS4000.
Usage When you enable rogue AP detection, the Meru Wireless LAN System scans for and detects access points. Access points that are discovered are compared to an access control list (ACL) that lists access points by their BSSIDs. Access points in the ACL are designated as authorized or blocked. Authorized access points are known access points that are allowed to operate in the WLAN. Blocked access points are considered unauthorized access points in the WLAN. All Meru Wireless LAN System ESSs are automatically added to the ACL.
Use the no form to disable rogue AP detection.
Examples The following command enables rogue AP detection:
mc1000(config)# rogue-ap detectionmc1000(config)#
Related Commands
rogue-ap aclrogue-ap blocked
Rogue AP Detection Commands 293
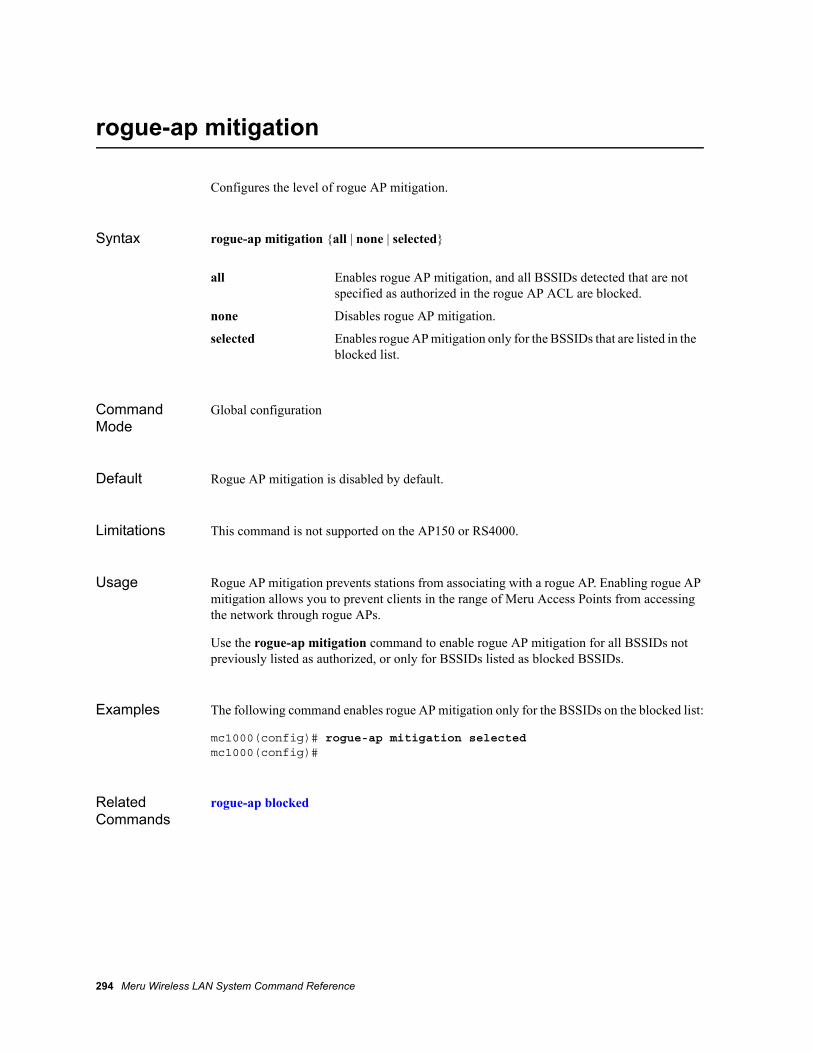
rogue-ap mitigation
Configures the level of rogue AP mitigation.
Syntax rogue-ap mitigation {all | none | selected}
Command Mode
Global configuration
Default Rogue AP mitigation is disabled by default.
Limitations This command is not supported on the AP150 or RS4000.
Usage Rogue AP mitigation prevents stations from associating with a rogue AP. Enabling rogue AP mitigation allows you to prevent clients in the range of Meru Access Points from accessing the network through rogue APs.
Use the rogue-ap mitigation command to enable rogue AP mitigation for all BSSIDs not previously listed as authorized, or only for BSSIDs listed as blocked BSSIDs.
Examples The following command enables rogue AP mitigation only for the BSSIDs on the blocked list:
mc1000(config)# rogue-ap mitigation selectedmc1000(config)#
Related Commands
rogue-ap blocked
all Enables rogue AP mitigation, and all BSSIDs detected that are not specified as authorized in the rogue AP ACL are blocked.
none Disables rogue AP mitigation.
selected Enables rogue AP mitigation only for the BSSIDs that are listed in the blocked list.
294 Meru Wireless LAN System Command Reference
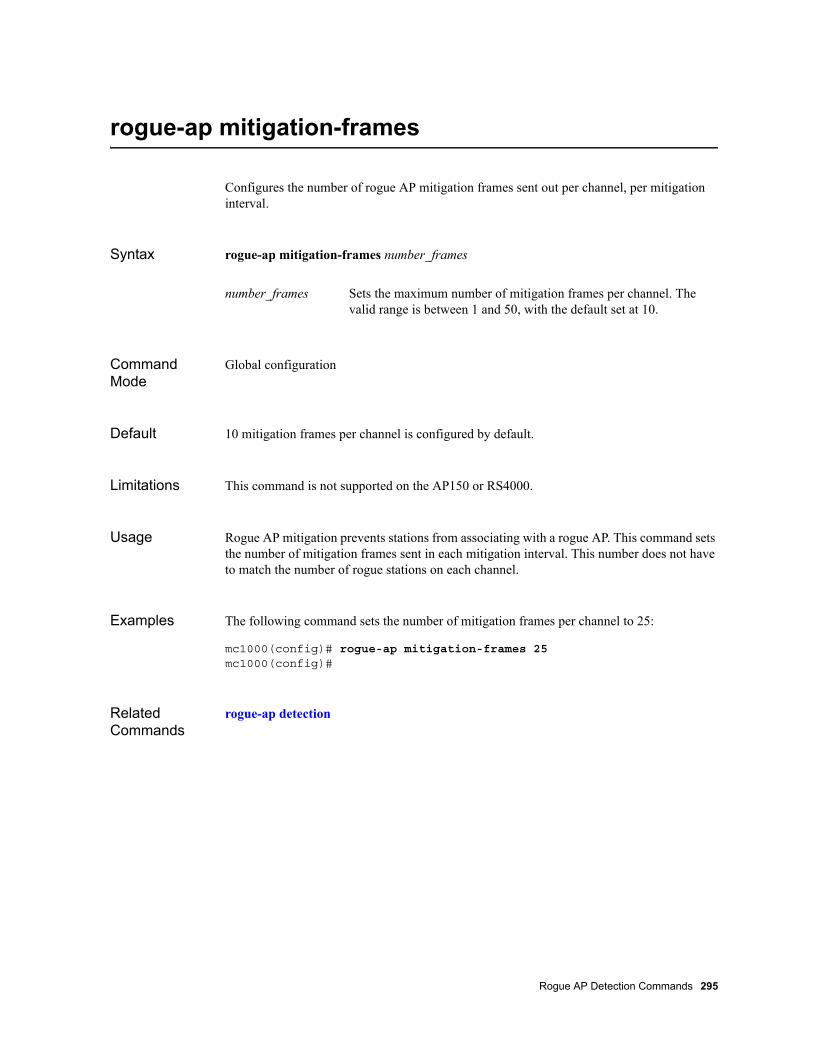
rogue-ap mitigation-frames
Configures the number of rogue AP mitigation frames sent out per channel, per mitigation interval.
Syntax rogue-ap mitigation-frames number_frames
Command Mode
Global configuration
Default 10 mitigation frames per channel is configured by default.
Limitations This command is not supported on the AP150 or RS4000.
Usage Rogue AP mitigation prevents stations from associating with a rogue AP. This command sets the number of mitigation frames sent in each mitigation interval. This number does not have to match the number of rogue stations on each channel.
Examples The following command sets the number of mitigation frames per channel to 25:
mc1000(config)# rogue-ap mitigation-frames 25mc1000(config)#
Related Commands
rogue-ap detection
number_frames Sets the maximum number of mitigation frames per channel. The valid range is between 1 and 50, with the default set at 10.
Rogue AP Detection Commands 295

rogue-ap operational-time
Configures the amount of time APs spend in operational mode on the home channel.
Syntax rogue-ap operational-time operational-time
Command Mode
Global configuration
Default The default setting is 400 milliseconds of operational time.
Limitations This command is not supported on the AP150 or RS4000.
Usage If scanning is enabled, this command sets the number of milliseconds that are spent in operational time, performing normal wireless services, on the home channel. This command is related to the rogue-ap scanning-time command. The channels that are scanned are determined by the rogue-ap scanning channels command.
When rogue AP scanning is enabled, for any given period, the AP spends part of the time scanning channels, and part of the time performing normal AP WLAN operations on the home channel. This cycle of scan/operate repeats so quickly that both tasks are performed without noticeable network operation degradation.
Scanning on non-home channels is performed by dedicated scanning APs (set with the mode command in the Dot11Radio interface configuration sub-mode) and by APs without associated stations.
Examples The following command sets the operational time to 2500 milliseconds:
mc1000(config)# rogue-ap operational-time 2500mc1000(config)#
Related Commands
rogue-ap mitigation
operational-time Sets the number milliseconds of operational time on the home channel. The valid range is from 100 to 5000 milliseconds. The default setting is 400 milliseconds.
296 Meru Wireless LAN System Command Reference

rogue-ap scanning-channels
Configures the channels that are scanned in scan mode.
Syntax rogue-ap scanning-channel channel-list
Command Mode
Global configuration
Default The complete set of default channels for the United States are 1,2,3,4,5,6,7,8,9,10,11,36,40,44,48,52,56,60,64,149,153,157,161,165
Limitations This command is not supported on the AP150 or RS4000.
Usage If scanning is enabled, this command specifies the set of channels that are scanned for rogue APs.
The channels that are scanned by a particular AP are determined by the model of AP. AP201 models scan all channels on the single interface; AP208 interface 1 scans all channels on the 802.11bg band; interface 2 scans all channels on the 802.11a band.
Scanning is performed by dedicated scanning APs (set with the mode command in the Dot11Radio interface configuration sub-mode) and by APs without associated stations.
When rogue AP scanning is enabled, for any given period, the AP spends part of the time scanning channels (determined by the rogue-ap scanning-time command), and part of the time performing normal AP WLAN operations on the home channel (determined by the rogue-ap operational-time command). This cycle of scan/operate repeats so quickly that both tasks are performed without noticeable network operation degradation.
Examples The following command sets the scanning channels to 1, 6, 11, 36, 44, 52, 60:
mc1000(config)# rogue-ap scanning-channels 1,6,11,36,44,52,60mc1000(config)#
channel-list Lists the set of channels that are to be scanned for rogue APs. Use a comma separated list from 0 to 256 characters.
Rogue AP Detection Commands 297

Related Commands
moderogue-ap detectionrogue-ap mitigationrogue-ap operational-timerogue-ap scanning-time
298 Meru Wireless LAN System Command Reference

rogue-ap scanning-time
Configures the amount of time APs spends scanning each channel other than the operational channel.
Syntax rogue-ap scanning-time scanning-time
Command Mode
Global configuration
Default The default setting is 100 milliseconds of scanning time.
Limitations This command is not supported on the AP150 or RS4000.
Usage If scanning is enabled, this command sets the number of milliseconds that are spent scanning each channel in the global list of channels. This command is related to the rogue-ap operational-time command. The channels that are scanned are determined by the rogue-ap scanning channels command.
When rogue AP scanning is enabled, for any given period, the AP spends part of the time scanning channels, and part of the time performing normal AP WLAN operations on the home channel.
Scanning on non-home channels is performed by dedicated scanning APs (set with the mode command in the Dot11Radio interface configuration sub-mode) and by APs without associated stations.
Examples The following command sets the scanning time to 200 milliseconds:
mc1000(config)# rogue-ap scanning-time 200mc1000(config)#
Related Commands
rogue-ap detectionrogue-ap mitigationrogue-ap operational-timerogue-ap scanning-channels
scanning-time Sets the number milliseconds of scanning time. The valid range is from 100 to 500 milliseconds. The default setting is 100 milliseconds.
Rogue AP Detection Commands 299

show rogue-ap acl
Displays the rogue AP ACL.
Syntax show rogue-ap acl
Command Mode
EXEC
Default None
Limitations This command is not supported on the AP150 or RS4000.
Examples The following command displays the list of access points (specified by BSSID) permitted to operate in the WLAN:
mc1000# show rogue-ap acl
BSSID
f4:3c:00:1f:f2:d3 00:0c:e6:cd:cd:cd00:0c:e6:c2:d5:b1 Allowed APs(3)
Related Commands
rogue-ap acl
300 Meru Wireless LAN System Command Reference
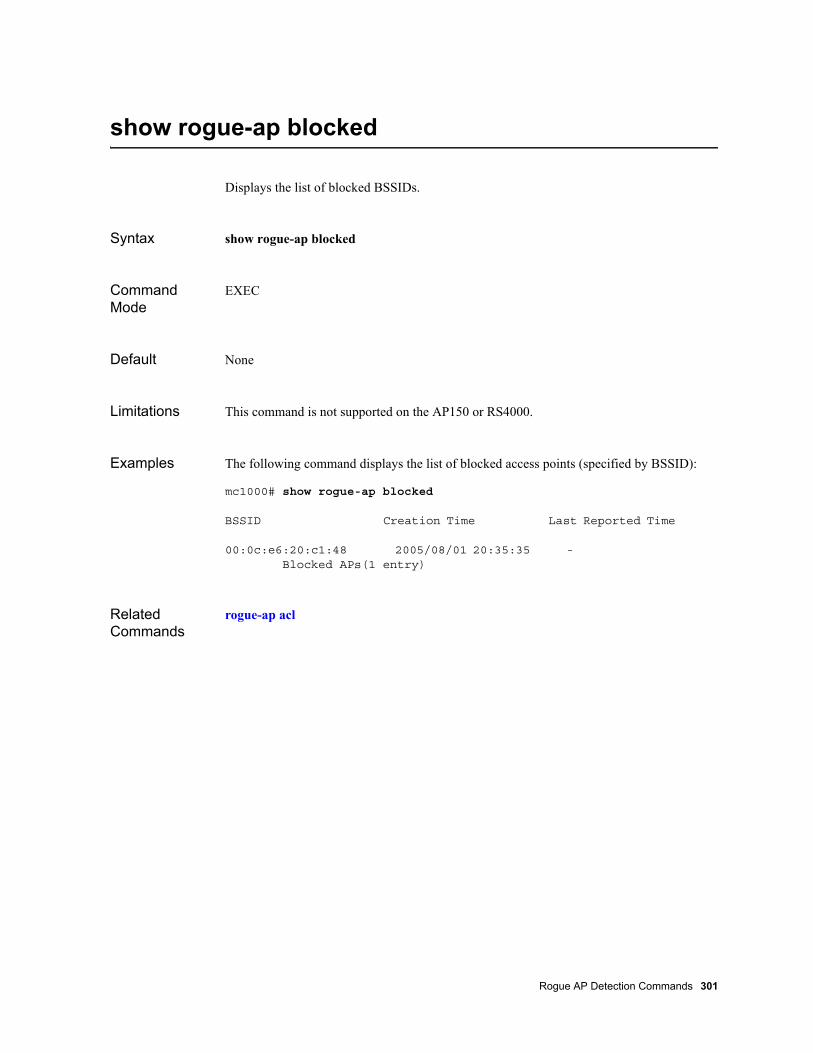
show rogue-ap blocked
Displays the list of blocked BSSIDs.
Syntax show rogue-ap blocked
Command Mode
EXEC
Default None
Limitations This command is not supported on the AP150 or RS4000.
Examples The following command displays the list of blocked access points (specified by BSSID):
mc1000# show rogue-ap blocked
BSSID Creation Time Last Reported Time
00:0c:e6:20:c1:48 2005/08/01 20:35:35 - Blocked APs(1 entry)
Related Commands
rogue-ap acl
Rogue AP Detection Commands 301

show rogue-ap globals
Displays current rogue AP parameter settings.
Syntax show rogue-ap globals
Command Mode
EXEC
Default None
Limitations This command is not supported on the AP150 or RS4000.
Examples The following command displays the current rogue AP parameter settings:
mc1000> show rogue-ap globalsGlobal Settings
Detection : offMitigation : noneRogue AP Aging (seconds) : 300mc1000>
Related Commands
rogue-ap agingrogue-ap detectionrogue-ap mitigationrogue-ap mitigation
302 Meru Wireless LAN System Command Reference
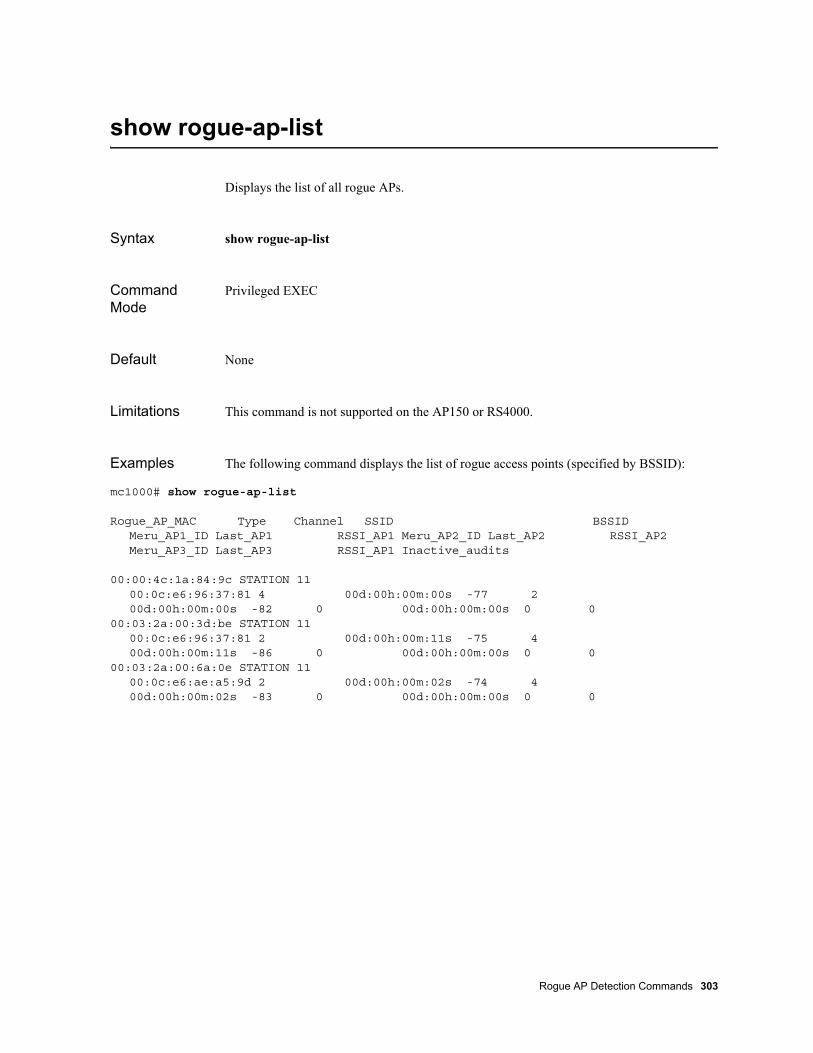
show rogue-ap-list
Displays the list of all rogue APs.
Syntax show rogue-ap-list
Command Mode
Privileged EXEC
Default None
Limitations This command is not supported on the AP150 or RS4000.
Examples The following command displays the list of rogue access points (specified by BSSID):
mc1000# show rogue-ap-list
Rogue_AP_MAC Type Channel SSID BSSID Meru_AP1_ID Last_AP1 RSSI_AP1 Meru_AP2_ID Last_AP2 RSSI_AP2 Meru_AP3_ID Last_AP3 RSSI_AP1 Inactive_audits
00:00:4c:1a:84:9c STATION 11 00:0c:e6:96:37:81 4 00d:00h:00m:00s -77 2 00d:00h:00m:00s -82 0 00d:00h:00m:00s 0 0
00:03:2a:00:3d:be STATION 11 00:0c:e6:96:37:81 2 00d:00h:00m:11s -75 4 00d:00h:00m:11s -86 0 00d:00h:00m:00s 0 0
00:03:2a:00:6a:0e STATION 11 00:0c:e6:ae:a5:9d 2 00d:00h:00m:02s -74 4 00d:00h:00m:02s -83 0 00d:00h:00m:00s 0 0
Rogue AP Detection Commands 303

304 Meru Wireless LAN System Command Reference

Chapter 11MAC Filtering Commands
The commands contained in this chapter are used to configure and display information about MAC filtering and access control lists:
access-list deny
access-list deny import
access-list permit
access-list permit import
access-list radius-server
access-list state
show access-list deny
show access-list permit
show access-list state
MAC Filtering Commands 305
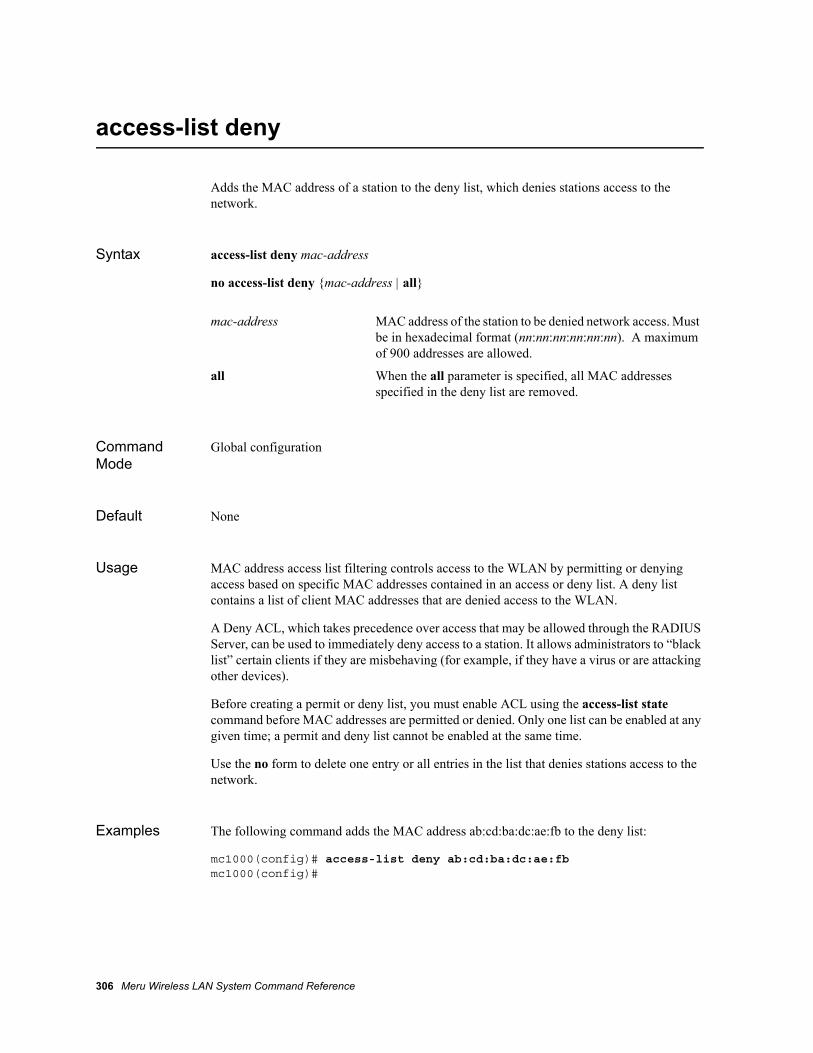
access-list deny
Adds the MAC address of a station to the deny list, which denies stations access to the network.
Syntax access-list deny mac-address
no access-list deny {mac-address | all}
Command Mode
Global configuration
Default None
Usage MAC address access list filtering controls access to the WLAN by permitting or denying access based on specific MAC addresses contained in an access or deny list. A deny list contains a list of client MAC addresses that are denied access to the WLAN.
A Deny ACL, which takes precedence over access that may be allowed through the RADIUS Server, can be used to immediately deny access to a station. It allows administrators to “black list” certain clients if they are misbehaving (for example, if they have a virus or are attacking other devices).
Before creating a permit or deny list, you must enable ACL using the access-list state command before MAC addresses are permitted or denied. Only one list can be enabled at any given time; a permit and deny list cannot be enabled at the same time.
Use the no form to delete one entry or all entries in the list that denies stations access to the network.
Examples The following command adds the MAC address ab:cd:ba:dc:ae:fb to the deny list:
mc1000(config)# access-list deny ab:cd:ba:dc:ae:fbmc1000(config)#
mac-address MAC address of the station to be denied network access. Must be in hexadecimal format (nn:nn:nn:nn:nn:nn). A maximum of 900 addresses are allowed.
all When the all parameter is specified, all MAC addresses specified in the deny list are removed.
306 Meru Wireless LAN System Command Reference

Related Commands
access-list stateaccess-list permitshow access-list deny
MAC Filtering Commands 307

access-list deny import
Imports a text file of MAC addresses to be added to the deny list.
Syntax access-list deny import file
Command Mode
Global configuration
Default None
Usage If you have a list of MAC addresses to add to the deny list, you can create a text file listing all the MAC addresses, and import the text file. Importing a file listing MAC addresses is an alternative to using the access-list deny command for each MAC address.
When creating the text file to be imported, only include one MAC address, in hexadecimal format (xx:xx:xx:xx:xx:xx), per line. For example, the contents of a text file to be imported might look like the following:
00:04:23:87:89:7100:06:25:a7:e9:1100:07:e9:15:69:4000:0c:30:be:f8:1900:0c:e6:09:46:6400:0c:e6:12:07:4100:0c:e6:bd:01:05
After creating a text file, you must transfer the file to the controller filesystem. From the CLI, use the copy command to transfer the file to the controller. Use the dir command to verify that the file is in the controller /images directory.
file Name of the file that contains the MAC addresses to add to the deny list. The filename must follow UNIX file naming conventions.
308 Meru Wireless LAN System Command Reference
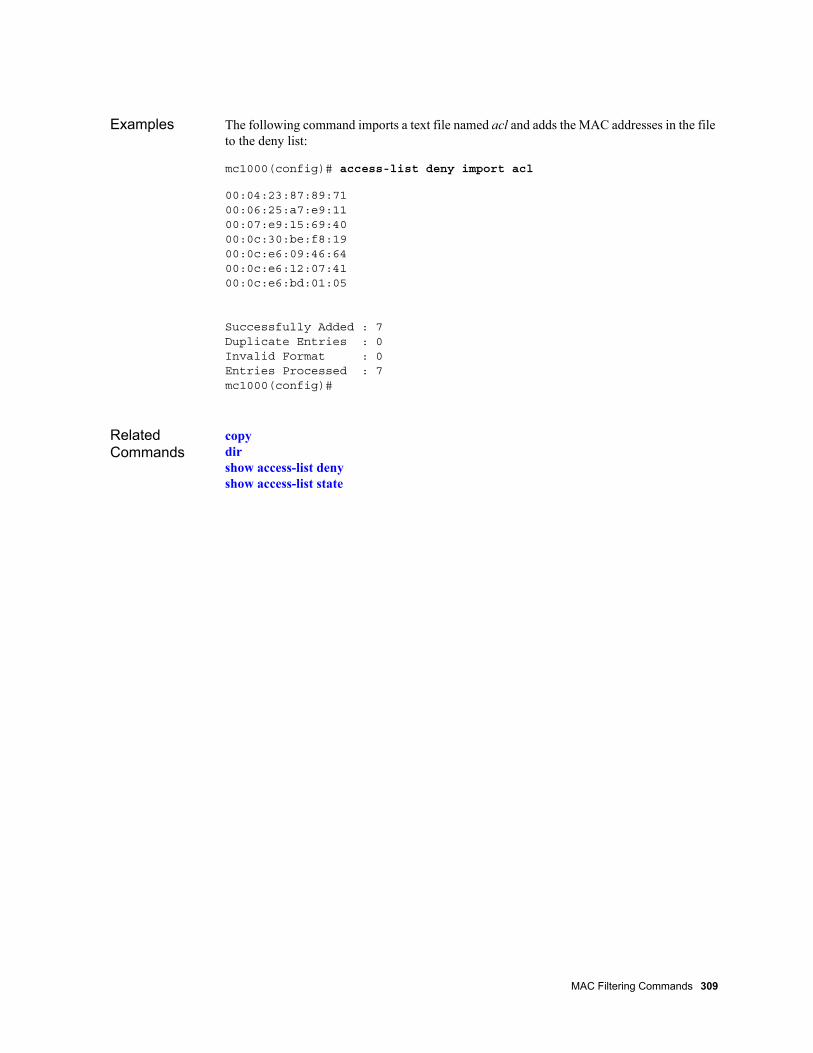
Examples The following command imports a text file named acl and adds the MAC addresses in the file to the deny list:
mc1000(config)# access-list deny import acl
00:04:23:87:89:7100:06:25:a7:e9:1100:07:e9:15:69:4000:0c:30:be:f8:1900:0c:e6:09:46:6400:0c:e6:12:07:4100:0c:e6:bd:01:05
Successfully Added : 7Duplicate Entries : 0Invalid Format : 0Entries Processed : 7mc1000(config)#
Related Commands
copydirshow access-list denyshow access-list state
MAC Filtering Commands 309

access-list permit
Adds the MAC address of a station to the permit list, which permits stations access to the network.
Syntax access-list permit mac-address
no access-list permit {mac-address | all}
Command Mode
Global configuration
Default None
Usage MAC filtering controls access to the WLAN by permitting or denying access based on specific MAC addresses. A permit list contains a list of MAC addresses that are permitted access to the WLAN. A deny list contains a list of MAC addresses that are denied access to the WLAN.
Before creating a permit or deny list, you must enable ACL by using the access-list state command before MAC addresses are permitted or denied. Only one list can be enabled at any given time; a permit and deny list cannot be enabled at the same time. You can create permit and deny lists and disable them, making MAC filtering inactive.
Use the no form to delete one entry or all entries in the list that permits stations access to the network.
Examples The following command adds the MAC address ab:cd:ba:dc:ae:fb to the permit list:
mc1000(config)# access-list permit ab:cd:ba:dc:ae:fbmc1000(config)#
Related Commands
access-list permit importaccess-list stateshow access-list stateshow access-list permit
mac-address MAC address of the station to be permitted network access. Must be in hexadecimal format (nn:nn:nn:nn:nn:nn). A maximum of 900 addresses are allowed.
all When the all parameter is specified, all MAC addresses specified in the permit list are removed.
310 Meru Wireless LAN System Command Reference

access-list permit import
Imports a text file of MAC addresses to be added to the permit list.
Syntax access-list permit import file
Command Mode
Global configuration
Default None
Usage If you have a list of MAC addresses to add to the permit list, you can create a text file listing all the MAC addresses, and import the text file. Importing a file listing MAC addresses is an alternative to using the access-list permit command for each MAC address.
When creating the text file to be imported, only include one MAC address, in hexadecimal format (xx:xx:xx:xx:xx:xx), per line. For example, the contents of a text file to be imported might look like the following:
00:04:23:87:89:7100:06:25:a7:e9:1100:07:e9:15:69:4000:0c:30:be:f8:1900:0c:e6:09:46:6400:0c:e6:12:07:4100:0c:e6:bd:01:05
After creating a text file, you must transfer the file to the controller /images directory. From the CLI, use the copy command to transfer the file to the controller. Use the dir command to verify that the file is in the controller filesystem.
Examples The following command imports a text file named permit_acl and adds the MAC addresses in the file to the permit list:
mc1000(config)# access-list permit import permit_acl00:30:ab:1f:d4:b600:40:96:52:27:5200:04:75:bb:94:4800:0c:e6:bd:04:0500:40:05:c5:ca:02
file Name of the file that contains the MAC addresses to add to the permit list. The filename must follow UNIX file naming conventions.
MAC Filtering Commands 311
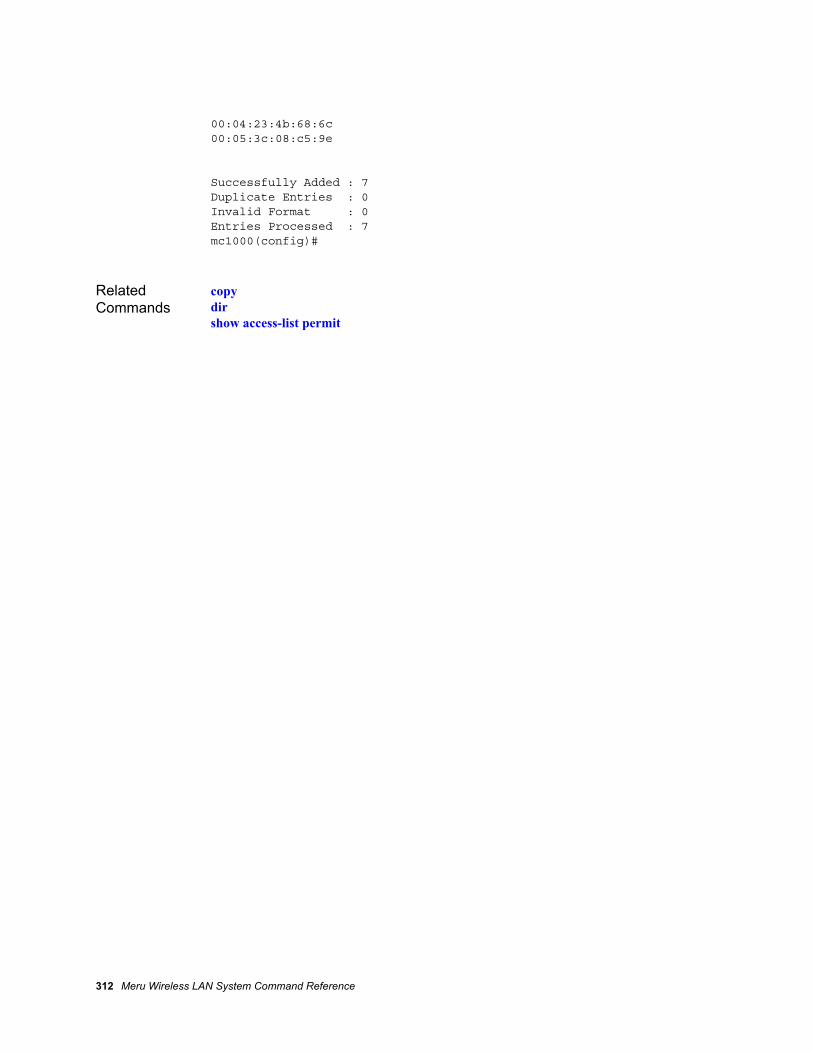
00:04:23:4b:68:6c00:05:3c:08:c5:9e
Successfully Added : 7Duplicate Entries : 0Invalid Format : 0Entries Processed : 7mc1000(config)#
Related Commands
copydirshow access-list permit
312 Meru Wireless LAN System Command Reference

access-list radius-server
Enables RADIUS server MAC filtering.
Syntax access-list radius-server profile
no access-list radius-server
Command Mode
Global configuration
Default RADIUS server disabled
Usage Use the access-list radius-server command to enable MAC filtering from the remote RADIUS Server specified in the profile. Use the no form of the command to disable the RADIUS Server MAC filtering.
RADIUS Server MAC filtering can be used in conjunction with an enabled controller-based Permit ACL and Deny ACL, and the precedence is shown in the following table:
When RADIUS Server MAC filtering is enabled, station MAC addresses are set up and managed by the RADIUS Server. When a new station attempts to join the WLAN, the Controller queries the RADIUS server with the MAC address to determine whether the client is permitted. If the RADIUS server does not respond, or responds that the client is not authorized, the client is blocked from entering the WLAN. If the MAC address is on the Controller Deny list, the station is denied access, even if an entry exists in the RADIUS server for the user.
profile Specifies the configuration details for the RADIUS server. The profile is created with the radius-profile command.
RADIUS Server Setting
disabled enabled
MAC
Filtering
disabled
no MAC filtering RADIUS MAC filtering
only
Permit ACL
enabled
allow client in Permit
list only
check Permit list first; if
not in Permit list, check
RADIUS server
Deny ACL
enabled
Deny list used only if not in Deny list, check
RADIUS server
MAC Filtering Commands 313
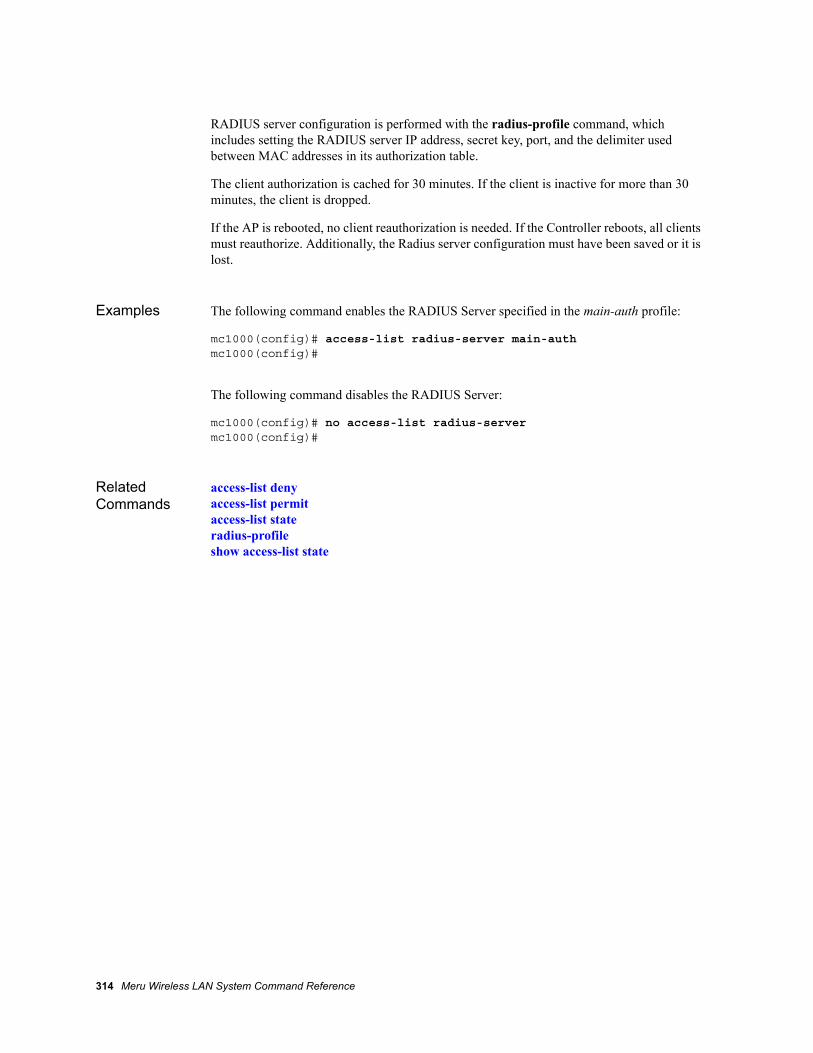
RADIUS server configuration is performed with the radius-profile command, which includes setting the RADIUS server IP address, secret key, port, and the delimiter used between MAC addresses in its authorization table.
The client authorization is cached for 30 minutes. If the client is inactive for more than 30 minutes, the client is dropped.
If the AP is rebooted, no client reauthorization is needed. If the Controller reboots, all clients must reauthorize. Additionally, the Radius server configuration must have been saved or it is lost.
Examples The following command enables the RADIUS Server specified in the main-auth profile:
mc1000(config)# access-list radius-server main-authmc1000(config)#
The following command disables the RADIUS Server:
mc1000(config)# no access-list radius-servermc1000(config)#
Related Commands
access-list denyaccess-list permitaccess-list stateradius-profileshow access-list state
314 Meru Wireless LAN System Command Reference

access-list state
Configures the ACL state.
Syntax access-list state {deny | disabled | permit}
Command Mode
Global configuration
Default Disabled
Usage Use the access-list state command to determine the state of the access list. By default, the ACL is disabled. This command should be used before adding MAC addresses with the access-list permit or access-list deny commands.
MAC addresses have been input with the access-list permit or access-list deny commands are inactive until either of the lists are enabled with this command, and then the system must be rebooted.
Examples The following command enables the permit list:
mc1000(config)# access-list state permitmc1000(config)#
The following command enables the deny list:
mc1000(config)# access-list state denymc1000(config)#
The following command disables ACL:
mc1000(config)# access-list state disablemc1000(config)#
deny Enable the deny ACL.
disabled Change the ACL state to disabled.
permit Enable the permit ACL.
MAC Filtering Commands 315

Related Commands
access-list denyaccess-list permitaccess-list radius-server
316 Meru Wireless LAN System Command Reference

show access-list deny
Displays the list of MAC addresses in the deny ACL.
Syntax show access-list deny
Command Mode
EXEC
Default None
Usage Use the show access-list deny command to see the deny list, which contains a list of MAC addresses that are denied access to the WLAN. In addition to creating a deny list, you must enable it before MAC addresses are denied. Only one list can be enabled at any given time; a permit and deny list cannot be enabled at the same time. You can create permit and deny lists and disable them, making MAC filtering inactive.
Examples The following command displays the MAC addresses in the deny list:
mc1000# show access-list denyMAC Address
00:0c:e6:bd:01:05 00:0c:e6:12:07:41 00:0c:e6:09:46:64 00:0c:30:be:f8:19 00:07:e9:15:69:40 00:06:25:a7:e9:11 00:04:23:87:89:71 Acl Deny Access Configuration (7 entriesmc1000#
Related Commands
access-list denyaccess-list deny importaccess-list state
MAC Filtering Commands 317

show access-list permit
Displays the list of MAC addresses in the permit ACL.
Syntax show access-list permit
Command Mode
EXEC
Default None
Usage Use the show access-list permit command to see the permit list, which contains a list of MAC addresses that are permitted access to the WLAN. You must enable it before MAC addresses are permitted. Only one MAC filtering list can be enabled at any given time; a permit and deny list cannot be enabled at the same time. You can create permit and deny lists and disable them, making MAC filtering inactive.
Examples The following command displays the list of MAC addresses in the permit list:
mc1000# show access-list permit
MAC Address
00:0c:e6:bd:01:05 00:0c:e6:12:07:41 00:0c:e6:09:46:64 00:0c:30:be:f8:19 00:07:e9:15:69:40 00:06:25:a7:e9:11 00:04:23:87:89:71 00:40:96:51:eb:2b Acl Allow Access Configuration (8 entries)mc1000#
Related Commands
access-list permitaccess-list permit importaccess-list state
318 Meru Wireless LAN System Command Reference

show access-list state
Displays the status of the ACL configuration.
Syntax show access-list state
Command Mode
EXEC
Default None
Usage This command shows whether MAC filtering is enabled or disabled (as set with the access-list state command) by showing whether the deny or the permit list is in use, and whether filtering using a RADIUS Server is active. If the ACL Environment State is enabled, only one MAC filtering list can be enabled at any given time: a permit and deny list cannot be enabled at the same time.
Examples The following command shows the MAC filtering list :
mc1000# show access-list stateAcl Configuration
ACL Environment State : denyRADIUS Profile Name : mc1000#
Related Commands
access-list denyaccess-list permitaccess-list radius-serveraccess-list state
MAC Filtering Commands 319

320 Meru Wireless LAN System Command Reference

Chapter 12Quality-of-Service Commands
The commands contained in this chapter are used to configure and display information about the Quality of Service settings:
action
avgpacketrate
droppolicy
dscp
dstip
dstmask
dstport
peakrate
priority
qoscodec
qosrule
qosvars admission
qosvars bwscaling
qosvars cac-deauth
qosvars calls-per-ap
qosvars calls-per-bssid
qosvars drop-policy
qosvars enable
qosvars load-balance-overflow
qosvars max-stations-per-ap
qosvars max-stations-per-bssid
qosvars no enable
qosvars sip-idle-timeout
qosvars station-assign-age
qosvars tcpttl
qosvars ttl
qosvars udpttl
rspecrate
rspecslack
srcip
srcmask
srcport
show phones
show phone-calls
show qoscodec
show qosflows
show qosrule
show qosstats
show qosvars
show statistics call-admission-control
tokenbucketrate
tokenbucketsize
trafficcontrol-enable
Quality-of-Service Commands 321

action
Specifies the action a QoS rule performs upon a packet.
Syntax action {capture | drop | forward}
Command Mode
Qosrule Configuration
Default The default action if a QoS rule is matched is to capture packets.
Usage This command specifies the action to take for packets matching QoS criteria.
Forward: A flow is given an explicit resource request, bypassing the QoS protocol detector and regardless of whether a QoS protocol was specified.
Capture: A flow is given an explicit resource request by the QoS protocol detector as specified by the QoS protocol setting. This is the recommended action for static QoS rules that are H323/SIP-based.
Drop: The flow is dropped.
Examples The following command sets the action performed on packets to dropped:
mc1000(config-qosrule)# action drop
Related Commands
qosruleshow qosrule
capture Capture the packet and send it up to the designated port. This is the default setting.
drop Drop the packets matching the rule criteria.
forward Forward the packets.
322 Meru Wireless LAN System Command Reference
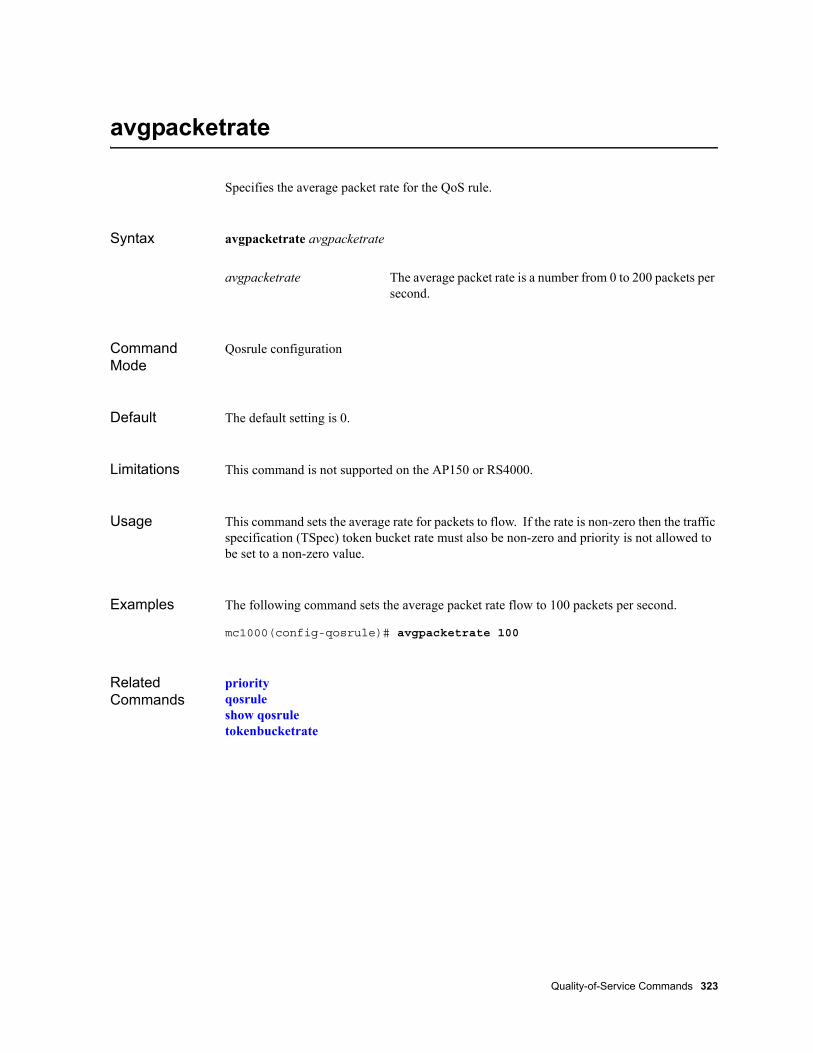
avgpacketrate
Specifies the average packet rate for the QoS rule.
Syntax avgpacketrate avgpacketrate
Command Mode
Qosrule configuration
Default The default setting is 0.
Limitations This command is not supported on the AP150 or RS4000.
Usage This command sets the average rate for packets to flow. If the rate is non-zero then the traffic specification (TSpec) token bucket rate must also be non-zero and priority is not allowed to be set to a non-zero value.
Examples The following command sets the average packet rate flow to 100 packets per second.
mc1000(config-qosrule)# avgpacketrate 100
Related Commands
priorityqosruleshow qosruletokenbucketrate
avgpacketrate The average packet rate is a number from 0 to 200 packets per second.
Quality-of-Service Commands 323

droppolicy
Specifies the packet drop policy for the QoS rule.
Syntax droppolicy {head | tail}
Command Mode
Qosrule configuration
Default The default for this command is tail.
Usage This command specifies whether packets are dropped from the head or the tail of the QoS packet queue.
Examples Use the following command to drop packets from the head end of the queue:
mc1000(config-qosrule)# droppolicy head
Related Commands
qosruleshow qosrule
head Specifies that new packets that arrive after the queue has reached its maximum length are allowed in the queue, and old information in the queue is replaced with the new information.
tail Specifies that new packets that arrive after the queue has reached its maximum length are dropped.
324 Meru Wireless LAN System Command Reference

dscp
Specifies the DiffServ codepoint class.
Syntax dscp class
Command Mode
Qosrule configuration
Default cs0 (best effort)
Usage This command specifies the per-hop forwarding behavior for packets in the flow. It is recommended that you be familiar with RFCs 2475 and 2597 before changing these values.
Examples The following command disables DSCP:
mc1000(config-qosrule)# dscp disabled
Related Commands
qosruleshow qosrule
class Specifies the codepoint class. The class must be specified as in RFCs 2474, 2475, and 2597.
Quality-of-Service Commands 325
dstip
Specifies the destination IP address for the QoS rule.
Syntax dstip destination-ip-address
Command Mode
Qosrule configuration
Default None
Usage This command specifies the destination IP address for the QoS rule. The destination IP address, in conjunction with a destination subnet mask, are used as criteria for matching the QoS rule.
Examples The following command sets the destination IP address:
mc1000(config-qosrule)# dstip 192.14.0.0
Related Commands
dstmaskdstportqosruleshow qosrule
destination-ip-address Specifies the destination IP address. The address must be specified as nnn.nnn.nnn.nnn.
326 Meru Wireless LAN System Command Reference

dstmask
Specifies the destination IP address netmask for the QoS rule.
Syntax dstmask destination-netmask
Command Mode
Qosrule configuration
Default None.
Usage This command specifies the subnet mask for the destination IP address for the QoS rule. The destination IP address, in conjunction with a destination subnet mask, are used as criteria for matching the QoS rule.
Examples The following command sets the destination netmask:
mc1000(config-qosrule)# dstmsk 255.0.0.0
Related Commands
dstipdstportqosruleshow qosrule
destination-netmask Specifies the subnet mask for the destination IP address. The netmask must be specified as nnn.nnn.nnn.nnn.
Quality-of-Service Commands 327

dstport
Specifies the destination TCP or UDP port for the QoS rule.
Syntax dstport destination-port
Command Mode
Qosrule configuration
Default The default port is 0 (specifies any port).
Usage This command specifies the destination TCP or UDP port used as criteria for matching the QoS rule (zero specifies any port).
The Meru Controller watches the traffic passing through it. When it sees packets from stations to servers on ports reserved for SIP or H.323 service, it tracks subsequent communication in that sequence and provisions the VoIP call with a level of service appropriate for a VoIP calls.
The port numbers watched are:
5060 for SIP service (UDP)
1720 for H.323 service (TCP)
These are the standard port numbers for these services. If your VoIP devices use these ports to communicate with their servers, you do not need to configure VoIP QoS rules on your system.
If your VoIP devices and servers are configured to use different ports, you will need to modify the QoS rules on the controller to match the ports your system uses.
Examples The following command sets the destination port to 1200:
mc1000(config-qosrule)# dstport 1200
Related Commands
dstipdstmaskqosruleshow qosrule
destination-port Specifies the destination TCP or UDP port. The port can be from 0 to 65535.
328 Meru Wireless LAN System Command Reference

peakrate
Specifies the traffic specification peak rate for a QoS Codec rule.
Syntax peakrate rate
Command Mode
QoS Codec configuration
Default The default traffic peak rate is 0.
Usage This command specifies the traffic specification (Tspec) peak rate for a QoS Codec rule.
Examples The following command sets the Tspec peak rate to 1000000:
mc1000(config-qoscodec)# peakrate 1000000
Related Commands
show qoscodec
rate Traffic peak rate. The valid value range is 0 to 1,000,000 bytes/second.
Quality-of-Service Commands 329
priority
Specifies the queue priority level for the QoS rule.
Syntax priority priority
Command Mode
Qosrule configuration
Default The default priority level is 0.
Usage This command specifies a priority level for the QoS rule. QoS is applied with reserved traffic being allocated the first portion of the AP packet transmittal total bandwidth, followed by each priority level (8 to 1), and finally by the best-effort (default) traffic class.
If you enable priority (specify a non-zero value), you cannot specify an average packet rate or token bucket rate.
Examples The following command sets the priority level to 5:
mc1000(config-qosrule)# priority 5
Related Commands
avgpacketrateqosruleshow qosruletokenbucketrate
priority Specifies the number (0-8) that determines the best effort priority queue. The default is 0. The highest priority is 8.
330 Meru Wireless LAN System Command Reference

qoscodec
Specifies a QoS Codec entry and enters QoS Codec configuration mode.
Syntax qoscodec id codec codec qosprotocol qosproto tokenbucketrate tokenbucketrate maxdatagramsize maxdatagramsize minpolicedunit minpolicedunit samplerate samplerate
no qoscodec id
Quality-of-Service Commands 331

id Unique numeric identifier for the QoS Codec rule. The valid value range is 0 through 6,000.
codec codec The following are valid entries for codec:
1016—1016 Audio: Payload Type 1, Bit Rate 16 Kbps
default—Contains the default TSpec/ RSpec for unknown codecs or codecs for which there is no entry in the codec translation table
dv14—DV14 Audio: Payload Type 5, Bit Rate 32 Kkbps
dv14.2— DV14.2 Audio: Payload Type 6, Bit Rate 64 Kbps
g711a—G711 Audio: Payload Type 8, G.711, A-law, Bit Rate 64 Kbps
g711u—G711 Audio: Payload Type 0, G.711, U-law, Bit Rate 64 Kbps
g721—G721 Audio: Payload Type 2, Bit Rate 32 Kbps
g722—Audio: Payload Type 9, Bit Rate 64 Kbps, 7 KHz
g7221—G7221 Audio: Payload Type *, Bit-Rate 24 Kbps, 16 KHz
g7221-32—G7221 Audio: Payload Type *, Bit-Rate 32 Kbps, 16 KHz
g723.1—G7231 Audio: Payload Type 4, G.723.1, Bit Rate 6.3 Kbps
g728—G728 Audio: Payload Type 15, Bit Rate 16 Kbps
g729—G729 Audio: Payload Type 16, Bit Rate 8 Kbps
g7red—Proprietary MSN Codec Audio: Payload Type *
gsm—GSM Audio: Payload Type 3, Bit Rate 13 Kbps
h261—H.261 Video
h263—H.263 Video
lpc—IPC Audio: Payload Type 7, Bit Rate 2.4kbps
mpa—MPA Audio: Payload Type 14, Bit Rate 32kbps
siren—Proprietary MSN Audio: Payload Type *, Bit Rate 16 Kbps, 16 KHz
332 Meru Wireless LAN System Command Reference

Command Mode
Global configuration
Default None
Usage This command creates a QoS Codec entry and enters QoS Codec configuration mode. As shipped, 22 codecs are provided, and each can be edited with this command, using the id number as the argument. Use the no form to delete an entry from the QoS Codec table. The supplied codecs entries can be viewed with show qoscodec, and are:
ID Codec Qos Protocol
22 h263 sip 21 h261 sip 20 siren sip 19 g729 sip 18 g7221-32 sip 17 g7221 sip 16 g711a sip 15 g723.1 sip 14 gsm sip 13 g711u sip 12 default sip 11 h263 h323 10 h261 h323 9 siren h323 8 g729 h323 7 g7221-32 h323 6 g7221 h323 5 g711a h323 4 g723.1 h323 3 gsm h323
qosprotocol qosprotocol Specifies the QoS protocol:
h323—H.323 (used mainly by Microsoft NetMeeting)
none—All other protocols
sip—Session Initiation Protocol (SIP)
tokenbucketrate tokenbucketrate
Token bucket rate. The valid value range is 0 to 1,000,000 bytes/second.
maxdatagramsize maxdatagramsize
Maximum packet size. The valid value range is 0 to 1,500 bytes.
minpolicedunit minpolicedunit
Minimum number of policed units. The valid value range is 0 to 1,500 bytes.
samplerate samplerate Packet rate. The valid value range is 0 to 200 packets/second.
Quality-of-Service Commands 333
2 g711u h323 1 default h323 QoS Codec Rules(22)
Examples The following command creates a QoS Codec rule 4 that specifies a default codec, no QoS protocol, a token bucket rate of 3333 bytes/ps, a maximum datagram size of 4 byes, a minimum policed unit of 45 bytes, and a sample rate of 34 packets per second:
mc1000(config)# qoscodec 4 codec default qosprotocol none tokenbucketrate 3333 maxdatagramsize 4 minpolicedunit 45 samplerate 34
mc1000(config-qoscodec)#
Related Commands
show qoscodec
334 Meru Wireless LAN System Command Reference

qosrule
Creates a QoS rule and enters qosrule configuration mode.
Syntax qosrule id netprotocol {6 | 17 | other} qosprotocol {h323 | none | sip}
no qosrule id
Command Mode
Global configuration
Default None
Usage Use this command to create a QoS rule and enter qosrule configuration mode. The controller is preconfigured to detect the bandwidth requirements for a SIP or H.323 call and make a bandwidth reservation. Once you specify the ID and the network and QoS protocol parameters, other parameters such as the port, average packet rate are automatically configured for the rule. Use the no form of the command to delete a QoS rule.
If you need to modify other of the QoS rule parameters, use the commands contained in the qosrule mode to fine tune those values.
You normally do not need to configure QoS rules in the controller unless you have special requirements in your configuration. For example:
You want to drop packets coming from certain ports or IP addresses.
id Specifies the ID for the QoS rule. The ID must be a unique number.
netprotocol {6 | 17 | other} Specifies the flow protocol for the QoS rule. The protocol must be 6 (TCP), 17 (UDP), or other. other can be any valid protocol number such as 119 for the SRP protocol, used with Spectralink phones. [Full listing at: http://www.iana.org/assignments/ protocol-numbers.]
qosprotocol {h323 | none | sip} Specifies the QoS protocol for the rule. Typically, none is appropriate in most environments. If you are also using a QoS protocol detector, you must match the network protocol with the type of QoS protocol. Use the following network protocol and QoS protocol matches:
UDP: SIP
TCP: H.323
Quality-of-Service Commands 335

You want to configure the controller to give priority to traffic other than H.323 or SIP traffic.
You can configure rules to provide priority-based or reserved QoS. QoS is applied with reserved traffic being allocated the first portion of total bandwidth, followed by each priority level, and finally by the best-effort (default) traffic class. For priority-based QoS, you can specify one of eight levels of priority using the priority parameter in the rule. You can configure reserved QoS for new applications using the average packet rate and token bucket rate parameters together as the traffic specification (also called TSpec in IETF IntServ RFCs).
Examples The following command creates rule 3 using the UDP and SIP as the network and QoS protocols, respectively:
mc1000(config)# qosrule 3 netprotocol 17 qosprotocol sip
The following command shows the QoS rules that are configured:
mc1000# show qosrule
ID Dst IP Dst Mask DPort Src IP Src Mask SPort Prot Qos Action Drop
1 0.0.0.0 0.0.0.0 1720 0.0.0.0 0.0.0.0 0 6 h323 capture head
2 0.0.0.0 0.0.0.0 0 0.0.0.0 0.0.0.0 1720 6 h323 capture head
3 0.0.0.0 0.0.0.0 5060 0.0.0.0 0.0.0.0 0 17 sip capture head
4 0.0.0.0 0.0.0.0 0 0.0.0.0 0.0.0.0 5060 17 sip capture head
5 0.0.0.1 0.0.0.0 9191 0.0.0.0 0.0.0.0 0 17 none capture head
6 0.0.0.0 0.0.0.0 0 0.0.0.0 0.0.0.0 0 119 none forward head
7 0.0.0.0 0.0.0.0 5200 0.0.0.0 0.0.0.0 0 17 none forward head
8 0.0.0.0 0.0.0.0 0 0.0.0.0 0.0.0.0 5200 17 none forward head
QoS Rules(8)
The first two preconfigured QoS rules give priority to H.323 traffic sent to and from TCP port 1720 respectively. The next two QoS rules give priority to SIP traffic sent to and from UDP port 5060 respectively.
Related Commands
actionavgpacketratedroppolicydstipdstmaskdstportpriority
336 Meru Wireless LAN System Command Reference

srcipsrcmasksrcportshow qosruletokenbucketratetrafficcontrol-enable
Quality-of-Service Commands 337
qosvars admission
Specifies QoS call admission policy.
Syntax qosvars admission {admitall|pending|reject}
Command Mode
Global configuration
Default By default, admission control is set to pending
Usage Bandwidth reservation is preformed based on the SIP call signaling (codecs/ports specified in the SDP body), taking into account the amount of bandwidth available at the APs taking the call and consideration for other active, reserved QoS flows on neighboring APs. This is calculated in time basis, taking into account the actual data rate (1/2/5.5/11 Mbps) of the client in the call, since the number of calls supported vary depending on the data rate and distance of each client.
The selected keyword (admitall, pending, or reject) specifies what happens to a QoS flow (for example, a newly established voice call) that requests air resources that are not available at that time.
Examples The following command changes the admission control policy to reject requests for resources, if bandwidth is not available:
admitall Specifies that all QoS flows are admitted to the QoS traffic class. If the aggregate reserved bandwidth exceeds the available bandwidth, degradation of the entire QoS traffic class results.
pending Specifies that if no bandwidth is available to reserve, new QoS flows are moved to the best-effort traffic class. When enough bandwidth is released from other QoS flows, the flows that were placed in the best-effort traffic class are upgraded to the QoS traffic class.
reject Specifies that if no bandwidth is available to reserve, requests for resources are rejected and not the flows themselves. QoS flows are permanently moved to the best-effort traffic class. If additional bandwidth is available at a later time, these QoS flows are not moved to the QoS traffic class.
338 Meru Wireless LAN System Command Reference

mc1000(config)# qosvars admission reject
Related Commands
show qosvars
Quality-of-Service Commands 339

qosvars bwscaling
Specifies bandwidth scaling for QoS flows.
Syntax qosvars bwscaling value
Command Mode
Global configuration
Default The default bandwidth scaling is set to 100%.
Usage This command specifies how bandwidth is scaled. A value under 100% reduces the amount of resources that can be reserved, allowing resources for best-effort traffic in a fully loaded environment. Specify a value over 100% when using applications that overestimate the amount of resources they use and is best used to account for applications that use silence suppression or vary the amount of traffic being sent. For example, if you specify a value of 110%, the system acts as if there 10% more real bandwidth available.
Examples The following command configures bandwidth scaling to 140%.
mc1000(config)# qosvars bwscaling 140
Related Commands
show qosvars
value Specify a value from 1% to 100,000%.
340 Meru Wireless LAN System Command Reference

qosvars cac-deauth
Configures optional 802.11 de-authentication.
Syntax qosvars cac-deauth {on | off}
Command Mode
Global configuration
Default The default setting for this command is off.
Usage This command controls the behaviour of the system when the originator of a call exceeds the available CAC (Call Admission Control) resources. When set to on, the system sends an 802.11 De-authentication frame to push the client to an alternate BSS. When set to off (default setting), the system sends a modified INVITE message to the SIP Server. When CAC is enabled, as the set call level threshold is neared for the AP or BSSID, the admin can configure actions to occur when the limit is reached, which can include one of the following actions:
For generic SIP servers, send a 486_BusyHere message to reject the call.
For some cases where needed, send a modified INVITE message to SIP server.
Other cases where needed, send a modified INVITE or a 486_BusyHere message to reject the call, which contains the X-CallAdmission SIP extension header.
Examples The following command enables the CAC De-authentication feature:
mc1000(config)# qosvars cac-deauth on
Related Commands
show qosvars
Quality-of-Service Commands 341

qosvars calls-per-ap
Configures maximum number of calls per AP.
Syntax qosvars calls-per-ap max_calls
Command Mode
Global configuration
Default The default setting for this command is 0.
Usage This command sets a threshold for the maximum number of calls per AP. This command implements the Call Admission Control (CAC) feature, which ensures a consistent level of voice quality by setting a threshold for the number of calls per AP. As an AP nears the set threshold, CAC denies new SIP connections until enough bandwidth is available to effectively handle the resulting media stream
When the call limit for the AP is exceeded, all new calls receive a 486_BusyHere response until the number of calls is less than the specified threshold. On handoff from one AP to another, if there are no resources available in the second AP, the call is classified as Pending/Best-effort until the needed resources are available.
Examples The following command sets the maximum number of calls per AP to12:
mc1000(config)# qosvars calls-per-ap 12
Related Commands
qosvars cac-deauthqosvars calls-per-bssidshow qosvarsshow statistics call-admission-control
max_calls Specifies the maximum number of simultaneous calls for APs. Valid values are from 0 to 256. By default, 0 is set, which allows no calls.
342 Meru Wireless LAN System Command Reference

qosvars calls-per-bssid
Configures maximum number of calls per BSSID.
Syntax qosvars calls-per-bssid max_calls
Command Mode
Global configuration
Default The default setting for this command is 0.
Usage This command, with an argument other than the default (0), sets a threshold for the maximum number of calls per BSS. This command implements the Call Admission Control (CAC) feature, which ensures a consistent level of voice quality by setting a threshold for the number of calls per BSS. As a BSS nears the set threshold, CAC denies new SIP connections until enough bandwidth is available to effectively handle the resulting media stream
When the call limit for the BSS is exceeded, all new calls receive a 486_BusyHere response until the number of calls is under the specified threshold. By default, max_calls is set to 0, meaning there is no limit for that BSSID and the per-AP limit applies. For CAC, both the qosvars calls-per-ap and the qosvars calls-per-bssid are validated.
Examples The following command sets the maximum number of calls to 14:
mc1000(config)# qosvars calls-per-bssid 14
Related Commands
qosvars cac-deauthqosvars calls-per-apshow qosvarsshow statistics call-admission-control
max_calls Specifies the maximum number of simultaneous calls for BSSIDs. The allowable range of calls is from 0 to 1023. By default, 0 is set, which allows all calls.
Quality-of-Service Commands 343

qosvars drop-policy
Specifies the QoS global drop policy.
Syntax qosvars drop-policy {head|tail}
Command Mode
Global configuration
Default By default, the drop policy is set to tail.
Usage This command specifies whether packets are dropped from the head or the tail of the QoS packet queue if packets overflow the queue.
Examples The following command sets the drop policy to head:
mc1000(config)# qosvars drop-policy head
Related Commands
show qosvars
head Specifies that if new packets arrive after the queue has reached its maximum length, they are allowed in the queue, and old information in the queue is replaced with the new information. Select this option for applications that use constant-rate real-time flows, such as voice applications, where minimizing delay is generally more important than reducing packet loss.
tail Specifies that if new packets arrive after the queue has reached its maximum length, they are dropped. Select this option if you are using applications with built-in flow control.
344 Meru Wireless LAN System Command Reference

qosvars enable
Enables QoS.
Syntax qosvars enable
Command Mode
Global configuration
Default QoS is enabled by default.
Usage This command enables QoS settings globally.
Examples The following command enables QoS settings globally:
default(config)# qosvars enabledefault(config)#
Related Commands
qosvars admissionqosvars bwscalingqosvars cac-deauthqosvars calls-per-apqosvars calls-per-bssidqosvars drop-policyqosvars load-balance-overflowqosvars max-stations-per-apqosvars max-stations-per-bssidqosvars no enableqosvars tcpttlqosvars ttlqosvars udpttlshow qosvars
Quality-of-Service Commands 345

qosvars load-balance-overflow
Enables or disables client load balancing across APs and BSSIDs.
Syntax qosvars load-balance-overflow {on | off}
Command Mode
Global configuration
Default The default setting for this command is off (disabled).
Usage This command is used to enable or disable client load balancing across BSSIDs and APs, ensuring a level of QoS for client call sessions. This command is used in conjunction with the commands qosvars max-stations-per-ap and qosvars max-stations-per-bssid. When the maximum number of stations is reached, new call associations are distributed among APs and BSSIDs in a round-robin fashion, evening out the distribution if this command is set to on.
Examples The following command enables client load balancing overflow protection:
mc1000(config)# qosvars load-balance-overflow on
Related Commands
qosvars max-stations-per-apqosvars max-stations-per-bssidshow qosvars
346 Meru Wireless LAN System Command Reference

qosvars max-stations-per-ap
Configures client load balancing across APs.
Syntax qosvars max-stations-per-ap max_stations
Command Mode
Global configuration
Default The default setting for this command is 128.
Usage This command is used to configure client load balancing across APs, ensuring a level of QoS for client call sessions. This command sets the maximum number of stations that can be assigned to an AP. When the maximum number of stations per AP is reached, new call associations can be distributed among APs and BSSIDs in a round-robin fashion, evening out the distribution if the qosvars load-balance overflow command is set to on.
Examples The following command sets the maximum number of stations per AP to 15:
mc1000(config)# qosvars max-stations-per-ap 15
Related Commands
qosvars load-balance-overflowqosvars max-stations-per-bssidshow qosvars
max_stations Specifies the maximum number of clients (stations) that can associate with an AP. By default, this is set to 128.
Quality-of-Service Commands 347

qosvars max-stations-per-bssid
Configures client load balancing across BSSIDs.
Syntax qosvars max-stations-per-bssid max_stations
Command Mode
Global configuration
Default The default setting for this command is 0, which basically disables client load balancing.
Usage This command is used to configure client load balancing across BSSIDs, ensuring a level of QoS for client call sessions. This command sets the maximum number of stations that can be assigned to an BSSID. When the maximum number of stations per BSSID is reached, new call associations can be distributed among BSSIDs in a round-robin fashion, evening out the distribution if the qosvars load-balance overflow command is set to on.
If you want to perform client load balancing across VirtualCells, then it is recommended that you set the value of max-stations-per-bssid to be the number of devices in the network divided by the number of VirtualCells (or BSSIDs). If you expect that at some times there may be additional devices beyond that joining the network, you should also set qosvars load-balance overflow to on so that once the maximum number of stations limit is reached, round-robin will be performed to balance new client assignments.
Examples The following command sets the maximum number of stations per BSSID to 30:
mc1000(config)# qosvars max-stations-per-bssid 30
Related Commands
qosvars max-stations-per-apqosvars load-balance-overflowshow qosvars
max_stations Specifies the maximum number of clients (stations) that can associate with a BSSID. By default, this is set to 0. A maximum of 1023 stations can be set.
348 Meru Wireless LAN System Command Reference
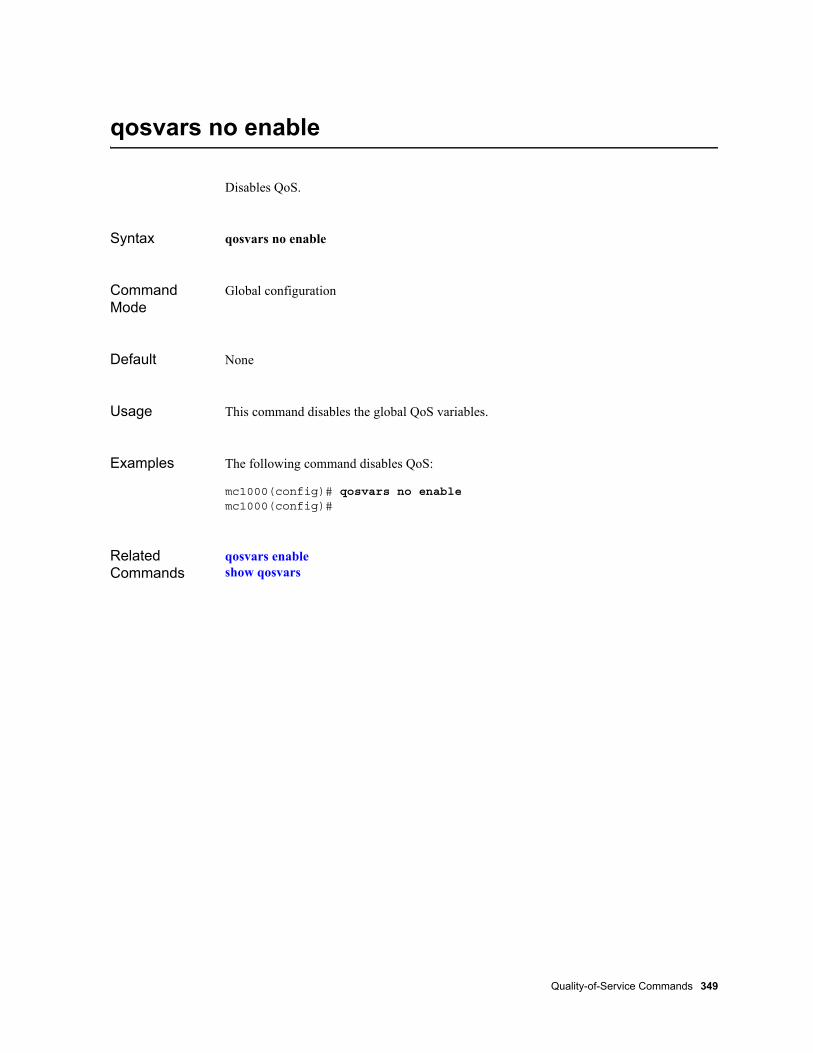
qosvars no enable
Disables QoS.
Syntax qosvars no enable
Command Mode
Global configuration
Default None
Usage This command disables the global QoS variables.
Examples The following command disables QoS:
mc1000(config)# qosvars no enablemc1000(config)#
Related Commands
qosvars enableshow qosvars
Quality-of-Service Commands 349

qosvars sip-idle-timeout
Configures SIP call timeout interval.
Syntax qosvars sip-idle-timeout seconds
Command Mode
Global configuration
Default The default setting for this command is 150 seconds.
Usage This command is used to configure the amount of time a call can idle before it must be answered (the setting is a part of CAC). The valid range is from 5 to 3600 seconds, with the default setting at 120 seconds.
Examples The following command sets the maximum idle interval to 1000 seconds:
mc1000(config)# qosvars sip-idle-timeout 1000
Related Commands
show qosvars
seconds Specifies the maximum amount of time in seconds a call can idle. The interval can be from 5 to 3600, with 150 seconds being the default.
350 Meru Wireless LAN System Command Reference

qosvars station-assign-age
Configures number of seconds allowed for station association.
Syntax qosvars stations-assign-age seconds
Command Mode
Global configuration
Default The default setting for this command is 30 seconds.
Usage This command is used to configure the amount of time an AP caches a client's state while waiting for a Probe or Authenticate request/response sequence with a BSS to complete. The default 30 seconds is adequate for most sites and should not be changed unless recommended by Meru Networks Customer Support.
Examples The following command sets the maximum association interval to 10 seconds:
mc1000(config)# qosvars stations-assign-age 10
Related Commands
show qosvars
seconds Specifies the maximum amount of time in seconds a station is allowed to associate. The interval can be from 5 to 2000, with 30 seconds being the default.
Quality-of-Service Commands 351

qosvars tcpttl
Specifies the TCP QoS time to live (TTL) value.
Syntax qosvars tcpttl value
Command Mode
Global configuration
Default The default TCP TTL is 0 seconds.
Usage This command specifies the amount of time in seconds the QoS TCP flow can be inactive before the flow is moved to the best-effort class.
Examples The following command sets the QoS TCP flow TTL to 65535:
controller(config)# qosvars tcpttl 65535
Related Commands
show qosvars
value The value can be between 0 to 65,535 seconds.
352 Meru Wireless LAN System Command Reference
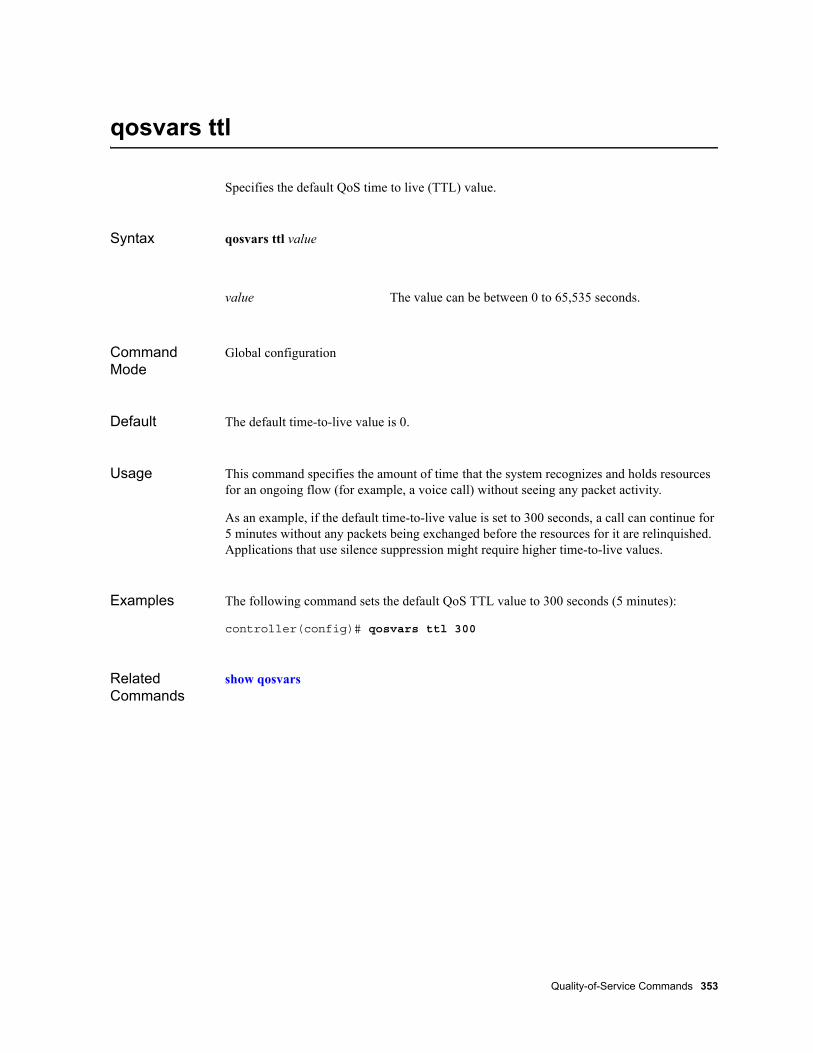
qosvars ttl
Specifies the default QoS time to live (TTL) value.
Syntax qosvars ttl value
Command Mode
Global configuration
Default The default time-to-live value is 0.
Usage This command specifies the amount of time that the system recognizes and holds resources for an ongoing flow (for example, a voice call) without seeing any packet activity.
As an example, if the default time-to-live value is set to 300 seconds, a call can continue for 5 minutes without any packets being exchanged before the resources for it are relinquished. Applications that use silence suppression might require higher time-to-live values.
Examples The following command sets the default QoS TTL value to 300 seconds (5 minutes):
controller(config)# qosvars ttl 300
Related Commands
show qosvars
value The value can be between 0 to 65,535 seconds.
Quality-of-Service Commands 353

qosvars udpttl
Specifies the UDP QoS time to live (TTL) value.
Syntax qosvars udpttl value
Command Mode
Global configuration
Default The default setting for this command is 0.
Usage This command specifies the amount of time in seconds the QoS UDP flow can be inactive before the flow is moved to the best-effort class.
Examples The following command sets the QoS UDP flow TTL to 65535:
controller(config)# qosvars udpttl 65535
Related Commands
show qosvars
value The value can be between 0 to 65,535 seconds.
354 Meru Wireless LAN System Command Reference

rspecrate
Specifies the reservation spec rate for a QoS Codec rule.
Syntax rspecrate rate
Command Mode
QoS Codec configuration
Default The default reservation spec rate is 0 bytes/second.
Usage This command specifies the reservation spec (Rspec) rate for a QoS Codec rule.
Examples The following command sets the Rspec rate to 1,000,000 bytes/second:
mc1000(config-qoscodec)# rspecrate 1000000
Related Commands
show qoscodec
rate Specifies the reservation spec rate. From 0 to 1,000,000 bytes/second.
Quality-of-Service Commands 355

rspecslack
Specifies the reservation spec slack for a QoS Codec rule.
Syntax rspecslack slack
Command Mode
QoS Codec configuration
Default The default reservation spec slack is 0 bytes/second.
Usage This command specifies the reservation spec (Rspec) slack for a QoS Codec rule.
Examples The following command sets the Rspec slack to 1000000:
mc1000(config-qoscodec)# rspecslack 1000000
Related Commands
show qoscodec
slack Specifies the reservation spec slack. From 0 to 1,000,000 bytes/second.
356 Meru Wireless LAN System Command Reference

srcip
Specifies the source IP address for the QoS rule.
Syntax srcip source-ip-address
Command Mode
Qosrule configuration
Default None
Usage This command specifies the source IP address for the QoS rule. The source IP address, in conjunction with a source subnet mask, are used as criteria for matching the QoS rule.
Examples The following command sets the source IP address:
mc1000(config-qosrule)# srcip 192.20.0.0
Related Commands
show qosrulesrcmasksrcportqosrule
source-ip-address Specifies the source IP address. The address must be specified as nnn.nnn.nnn.nnn.
Quality-of-Service Commands 357

srcmask
Specifies the source IP address netmask for the QoS rule.
Syntax srcmask source-netmask
Command Mode
Qosrule configuration
Default None.
Usage This command specifies the subnet mask for the source IP address for the QoS rule. The source IP address, in conjunction with a source subnet mask, are used as criteria for matching the QoS rule.
Examples The following command sets the source netmask:
mc1000(config-qosrule)# srcmsk 255.0.0.0
Related Commands
srcipsrcportqosruleshow qosrule
source-netmask Specifies the subnet mask for the source IP address. The netmask must be specified as nnn.nnn.nnn.nnn.
358 Meru Wireless LAN System Command Reference

srcport
Specifies the source TCP or UDP port for the QoS rule.
Syntax srcport source-port
Command Mode
Qosrule configuration
Default The default port is 0 (specifies any port).
Usage This command specifies the source TCP or UDP port used as criteria for matching the QoS rule (zero specifies any port).
The Meru Controller watches the traffic passing through it. When it sees packets from stations to servers on ports reserved for SIP or H.323 service, it tracks subsequent communication in that sequence and provisions the VoIP call with a level of service appropriate for a VoIP calls.
The port numbers watched are:
5060 for SIP service (UDP)
1720 for H.323 service (TCP)
These are the standard port numbers for these services. If your VoIP devices use these ports to communicate with their servers, you do not need to configure VoIP QoS rules on your system.
If your VoIP devices and servers are configured to use different ports, you will need to modify the QoS rules on the controller to match the ports your system uses.
Examples The following command sets the source port to 1200:
mc1000(config-qosrule)# srcport 1200
Related Commands
srcipsrcmaskqosruleshow qosrule
source-port Specifies the source TCP or UDP port. The port can be from 0 to 65535.
Quality-of-Service Commands 359

show phones
Shows all registered phones.
Syntax show phones
Command Mode
Privileged EXEC
Default None
Usage This command shows all phones on the system that have been registered. Information includes the MAC address and IP address of the client phone, the name of the AP it is associated with, the type of phone, the username associated with the phone, and the SIP server handling the call.
Examples The following command shows all phones that have registered with the system:
mc1000# show phones
MAC IP AP ID AP Name Type Username Server
00:0f:86:12:1d:7c 10.0.220.119 1 AP-1 sip 5381 10.6.6.103
Phone Table(1 entry)
mc1000#
Related Commands
show phone-calls
360 Meru Wireless LAN System Command Reference
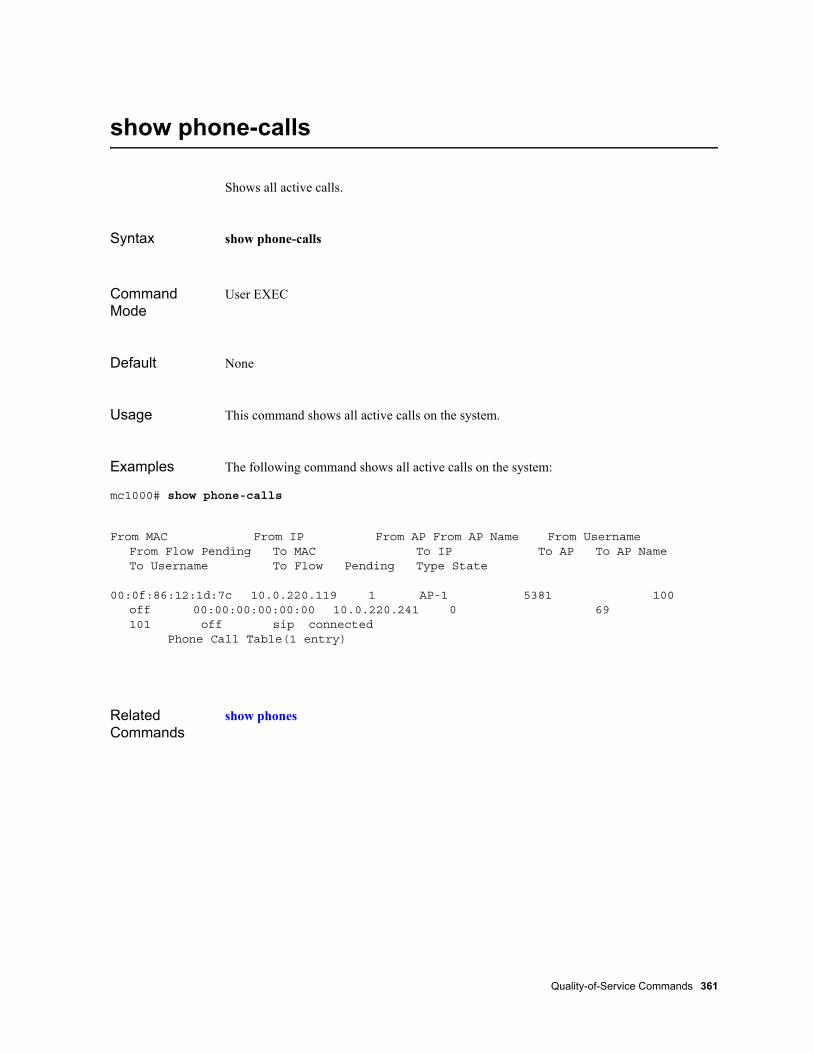
show phone-calls
Shows all active calls.
Syntax show phone-calls
Command Mode
User EXEC
Default None
Usage This command shows all active calls on the system.
Examples The following command shows all active calls on the system:
mc1000# show phone-calls
From MAC From IP From AP From AP Name From Username From Flow Pending To MAC To IP To AP To AP Name To Username To Flow Pending Type State
00:0f:86:12:1d:7c 10.0.220.119 1 AP-1 5381 100 off 00:00:00:00:00:00 10.0.220.241 0 69 101 off sip connected
Phone Call Table(1 entry)
Related Commands
show phones
Quality-of-Service Commands 361

show qoscodec
Displays a summary of the QoS Codec rules.
Syntax show qoscodec [id]
Command Mode
User EXEC
Default The default for this command is to show all configured QoS Codec rules.
Usage This command displays all QoS Codec rules, or displays a specific QoS Codec rule with the optional argument.
The detailed codec rule provides the following information:
id Optional. Specifies the number of the QoS Codec rule.
ID Unique numeric identifier for the QoS Codec rule.
Codec Specifies the Codec type.
Token Bucket Rate Specifies the token bucket rate.
Token Bucket Size Specifies the size of the token bucket.
Peak Rate Specifies the traffic specification peak rate.
Maximum Packet Size Specifies the maximum packet size.
Minimum Policed Unit Specifies the minimum policed unit size.
Reservation Rate Specifies the reservation rate.
Reservation Slack Specifies the reservation slack.
Packet Rate Specifies the flow packet rate.
QoS Protocol Specifies the QoS protocol:
SIP
H.323
362 Meru Wireless LAN System Command Reference

Examples The following command displays all configured QoS Codec rules:
mc1000> show qoscodecID Codec Qos Protocol
22 h263 sip 21 h261 sip 20 siren sip 19 g729 sip 18 g7221-32 sip 17 g7221 sip 16 g711a sip 15 g723.1 sip 14 gsm sip 13 g711u sip 12 default sip 11 h263 h323 10 h261 h323 9 siren h323 8 g729 h323 7 g7221-32 h323 6 g7221 h323 5 g711a h323 4 g723.1 h323 3 gsm h323 2 g711u h323 1 default h323 QoS Codec Rules(22)
The following command displays QoS Codec rule 4:
mc1000> show qoscodec 4QoS Codec Rules
ID : 4Codec : g723.1Token Bucket Rate (0-1,000,000 bytes/second) : 2100Token Bucket Size (0-16,000 bytes) : 128Peak Rate (0-1,000,000 bytes/second) : 2500Maximum Packet Size (0-1,500 bytes) : 64Minimum Policed Unit (0-1,500 bytes) : 0Reservation Rate (0-1,000,000 bytes/second) : 2100Reservation Slack (0-1,000,000 microseconds) : 10000Packet Rate (0-200 packets/second) : 33QoS Protocol : h323
Related Commands
peakrateqoscodecrspecraterspecslacktokenbucketsize
Quality-of-Service Commands 363
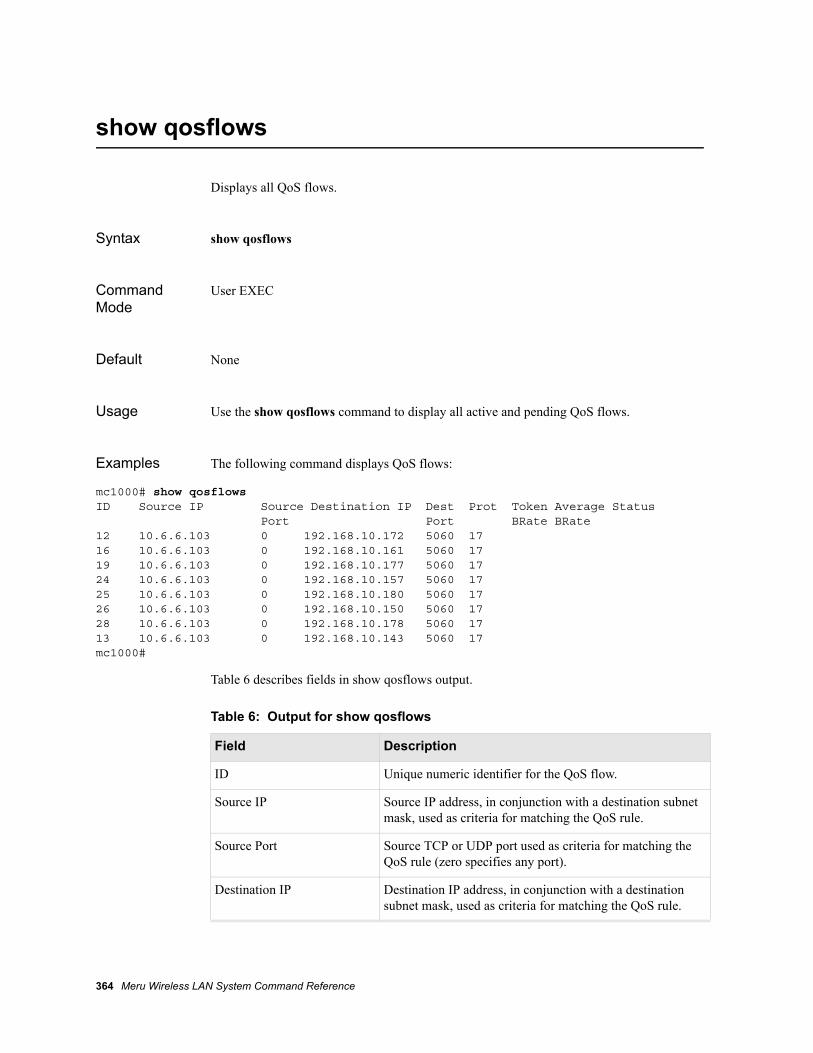
show qosflows
Displays all QoS flows.
Syntax show qosflows
Command Mode
User EXEC
Default None
Usage Use the show qosflows command to display all active and pending QoS flows.
Examples The following command displays QoS flows:
mc1000# show qosflowsID Source IP Source Destination IP Dest Prot Token Average Status Port Port BRate BRate 12 10.6.6.103 0 192.168.10.172 5060 17 16 10.6.6.103 0 192.168.10.161 5060 17 19 10.6.6.103 0 192.168.10.177 5060 17 24 10.6.6.103 0 192.168.10.157 5060 17 25 10.6.6.103 0 192.168.10.180 5060 17 26 10.6.6.103 0 192.168.10.150 5060 17 28 10.6.6.103 0 192.168.10.178 5060 17 13 10.6.6.103 0 192.168.10.143 5060 17mc1000#
Table 6 describes fields in show qosflows output.
Table 6: Output for show qosflows
Field Description
ID Unique numeric identifier for the QoS flow.
Source IP Source IP address, in conjunction with a destination subnet mask, used as criteria for matching the QoS rule.
Source Port Source TCP or UDP port used as criteria for matching the QoS rule (zero specifies any port).
Destination IP Destination IP address, in conjunction with a destination subnet mask, used as criteria for matching the QoS rule.
364 Meru Wireless LAN System Command Reference
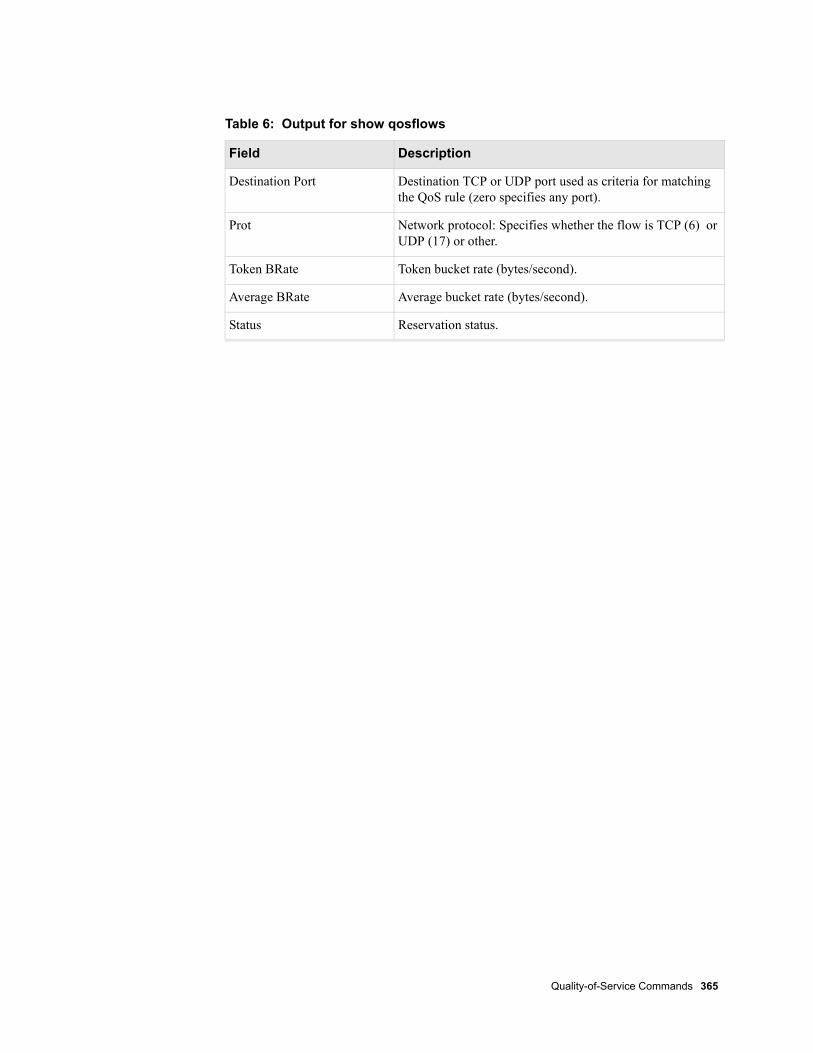
Destination Port Destination TCP or UDP port used as criteria for matching the QoS rule (zero specifies any port).
Prot Network protocol: Specifies whether the flow is TCP (6) or UDP (17) or other.
Token BRate Token bucket rate (bytes/second).
Average BRate Average bucket rate (bytes/second).
Status Reservation status.
Table 6: Output for show qosflows
Field Description
Quality-of-Service Commands 365

show qosrule
Displays the QoS rules that are configured for the system.
Syntax show qosrule [rule]
Command Mode
User EXEC
Default Shows all QoS rules that are configured.
Usage This command displays all QoS rules, or displays a specific QoS rule with the optional argument. When a rule is specified with the command, the additional information about the priority of the rule and traffic control setting is included.
The displays provides the following information:
rule Optional. Specifies the ID of a QoS rule.
ID Unique numeric identifier for the QoS rule.
Destination IP This IP address, in conjunction with a destination subnet mask, are used as criteria for matching the QoS rule.
Destination Netmask The subnet mask for the destination IP address.
Destination Port The destination TCP or UDP port used as criteria for matching the QoS rule (zero specifies any port).
Source IP The source IP address, in conjunction with the source subnet mask, are used as criteria for matching the QoS rule.
Source Netmask Subnet mask of the source IP address.
Source Port Source TCP or UDP port used as criteria for matching the QoS rule (zero specifies any port).
Network Protocol Shows whether the flow is TCP (6) or UDP (17) or other. If you are using a QoS protocol detector, the network protocol matches the type of QoS protocol:
UDP: SIP
TCP: H.323
366 Meru Wireless LAN System Command Reference
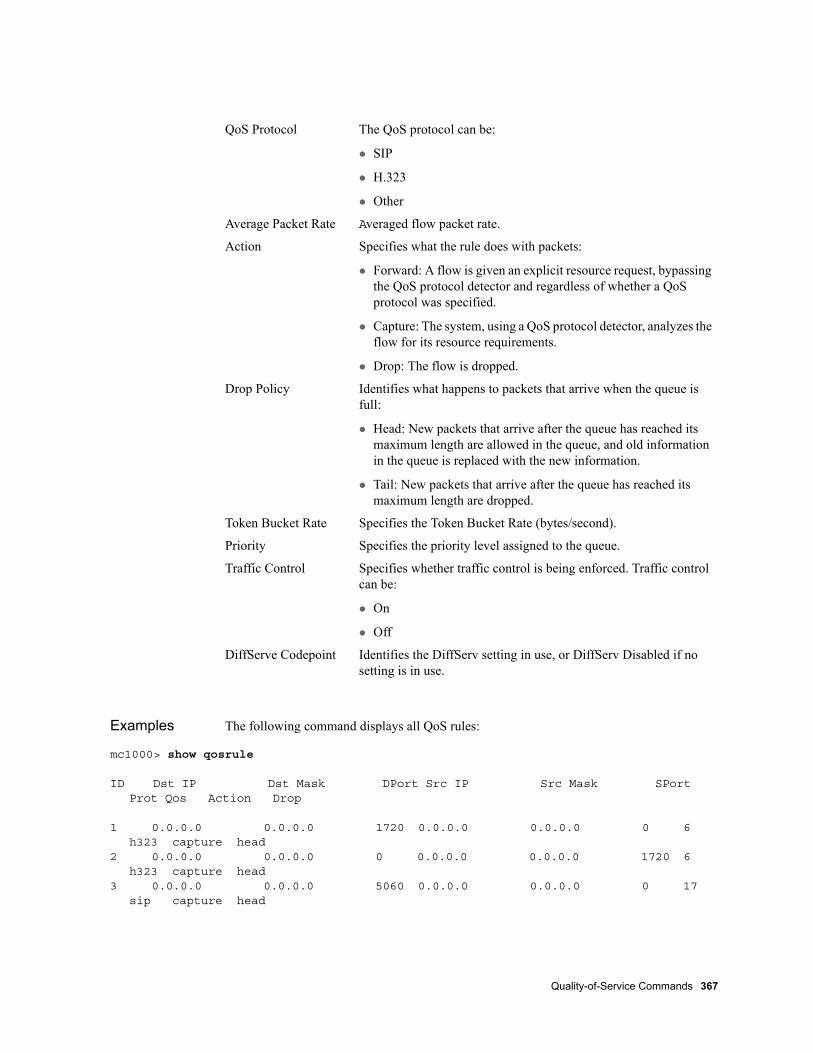
Examples The following command displays all QoS rules:
mc1000> show qosrule
ID Dst IP Dst Mask DPort Src IP Src Mask SPort Prot Qos Action Drop
1 0.0.0.0 0.0.0.0 1720 0.0.0.0 0.0.0.0 0 6 h323 capture head
2 0.0.0.0 0.0.0.0 0 0.0.0.0 0.0.0.0 1720 6 h323 capture head
3 0.0.0.0 0.0.0.0 5060 0.0.0.0 0.0.0.0 0 17 sip capture head
QoS Protocol The QoS protocol can be:
SIP
H.323
Other
Average Packet Rate Averaged flow packet rate.
Action Specifies what the rule does with packets:
Forward: A flow is given an explicit resource request, bypassing the QoS protocol detector and regardless of whether a QoS protocol was specified.
Capture: The system, using a QoS protocol detector, analyzes the flow for its resource requirements.
Drop: The flow is dropped.
Drop Policy Identifies what happens to packets that arrive when the queue is full:
Head: New packets that arrive after the queue has reached its maximum length are allowed in the queue, and old information in the queue is replaced with the new information.
Tail: New packets that arrive after the queue has reached its maximum length are dropped.
Token Bucket Rate Specifies the Token Bucket Rate (bytes/second).
Priority Specifies the priority level assigned to the queue.
Traffic Control Specifies whether traffic control is being enforced. Traffic control can be:
On
Off
DiffServe Codepoint Identifies the DiffServ setting in use, or DiffServ Disabled if no setting is in use.
Quality-of-Service Commands 367

4 0.0.0.0 0.0.0.0 0 0.0.0.0 0.0.0.0 5060 17 sip capture head
5 0.0.0.1 0.0.0.0 9191 0.0.0.0 0.0.0.0 0 17 none capture head
6 0.0.0.0 0.0.0.0 0 0.0.0.0 0.0.0.0 0 119 none forward head
7 0.0.0.0 0.0.0.0 5200 0.0.0.0 0.0.0.0 0 17 none forward head
8 0.0.0.0 0.0.0.0 0 0.0.0.0 0.0.0.0 5200 17 none forward head
10 0.0.0.0 0.0.0.0 9123 0.0.0.0 0.0.0.0 0 17 none forward tail
QoS Rules(10)
The following command displays QoS rule 1:
mc1000> show qosrule 1
QoS Rules
ID : 1Destination IP : 0.0.0.0Destination Netmask : 0.0.0.0Destination Port : 1720Source IP : 0.0.0.0Source Netmask : 0.0.0.0Source Port : 0Network Protocol : 6QoS Protocol : h323Average Packet Rate : 0Action : captureDrop Policy : headToken Bucket Rate : 0Priority : 0Traffic Control : offDiffServ Codepoint : cs0
Related Commands
avgpacketratedstipdstmaskdstportdroppolicypriorityqosrulesrcipsrcmasksrcporttokenbucketratetrafficcontrol-enable
368 Meru Wireless LAN System Command Reference

show qosstats
Displays QoS statistics.
Syntax show qosstats
Command Mode
User EXEC
Default None
Usage Displays the following QoS global statistics:
H.323, SIP and total session counts
H.323, SIP and total rejected counts
H.323, SIP and total pending counts
QoS active flow count
Qos pending flow count
Examples mc1000> show qosstatsGlobal Quality-of-Service Statistics
Session Count : 0H.323 Session Count : 0SIP Session Count : 0Rejected Session Count : 0Rejected H.323 Session Count : 0Rejected SIP Session Count : 0Pending Session Count : 0Pending H.323 Session Count : 0Pending SIP Session Count : 0Active Flows : 0Pending Flows : 0
The Active Flows and Pending Flows include the H.323/SIP flows as well as any flow configured in the QoS rules.
Quality-of-Service Commands 369
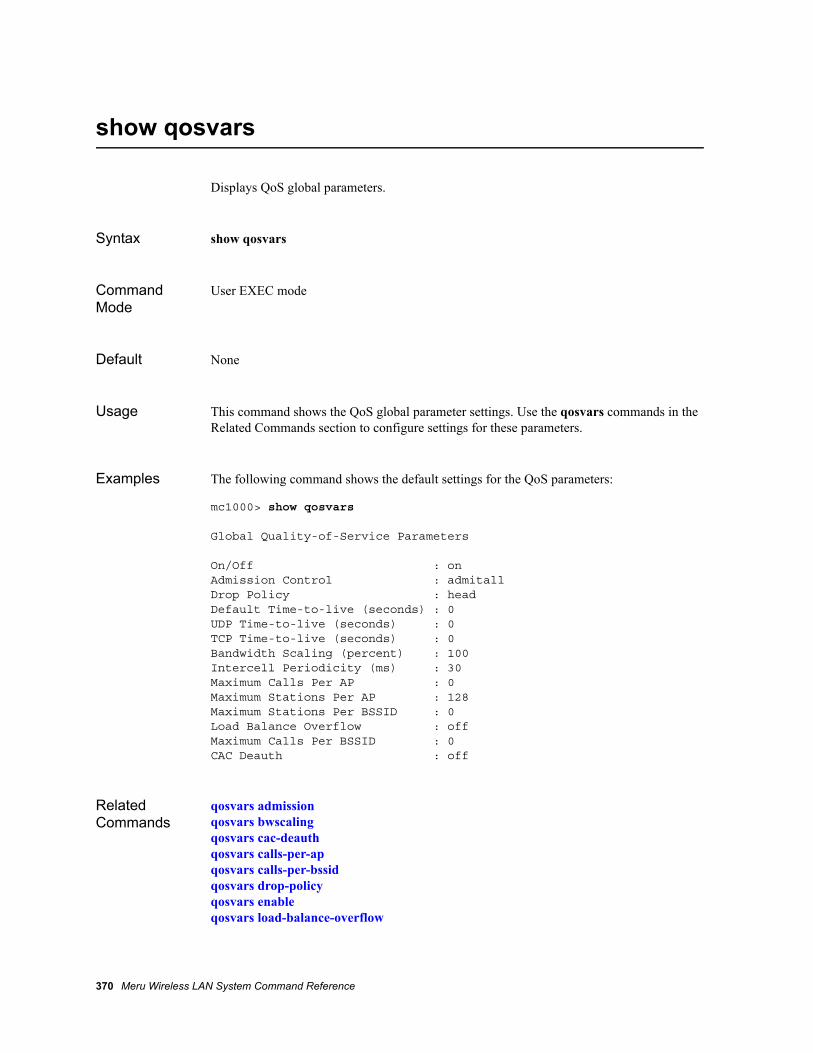
show qosvars
Displays QoS global parameters.
Syntax show qosvars
Command Mode
User EXEC mode
Default None
Usage This command shows the QoS global parameter settings. Use the qosvars commands in the Related Commands section to configure settings for these parameters.
Examples The following command shows the default settings for the QoS parameters:
mc1000> show qosvars
Global Quality-of-Service Parameters
On/Off : onAdmission Control : admitallDrop Policy : headDefault Time-to-live (seconds) : 0UDP Time-to-live (seconds) : 0TCP Time-to-live (seconds) : 0Bandwidth Scaling (percent) : 100Intercell Periodicity (ms) : 30Maximum Calls Per AP : 0Maximum Stations Per AP : 128Maximum Stations Per BSSID : 0Load Balance Overflow : offMaximum Calls Per BSSID : 0CAC Deauth : off
Related Commands
qosvars admissionqosvars bwscalingqosvars cac-deauthqosvars calls-per-apqosvars calls-per-bssidqosvars drop-policyqosvars enableqosvars load-balance-overflow
370 Meru Wireless LAN System Command Reference

qosvars max-stations-per-apqosvars max-stations-per-bssidqosvars no enableqosvars tcpttlqosvars ttlqosvars udpttl
Quality-of-Service Commands 371

show statistics call-admission-control
Displays Call Admission Control (CAC) statistics.
Syntax show statistics call-admission-control {ap | bss}
Command Mode
User EXEC mode
Default None
Usage This command shows the CAC statistics per AP or BSS. Specifically for either the AP or BSS, it show the current number of active calls as well as the cumulative number of calls that have been rejected as a result of reaching the Maximum Number of Calls setting. The cumulative number of rejected calls per BSS and AP are reset when the controller reboots and the AP reboots, respectively.
Use the qosvars commands in the Related Commands section to configure settings for these parameters.
Examples The following command shows the CAC statistics for APs:
mc1000> show statistics call-admission-control ap
AP ID Current Calls Cumulative Rejected Calls
1 0 0 Call Admission Control AP Statistics(1 entry)
The following command shows the CAC statistics for BSS:
mc1000> show statistics call-admission-control bss
BSSID Current Calls Cumulative Rejected Calls
00:12:f2:30:97:49 0 0 00:12:f2:4e:9b:ce 0 0 00:12:f2:de:ec:6f 0 0 Call Admission Control BSS Statistics(3 entries)
Related Commands
qosvars calls-per-apqosvars calls-per-bssid
372 Meru Wireless LAN System Command Reference
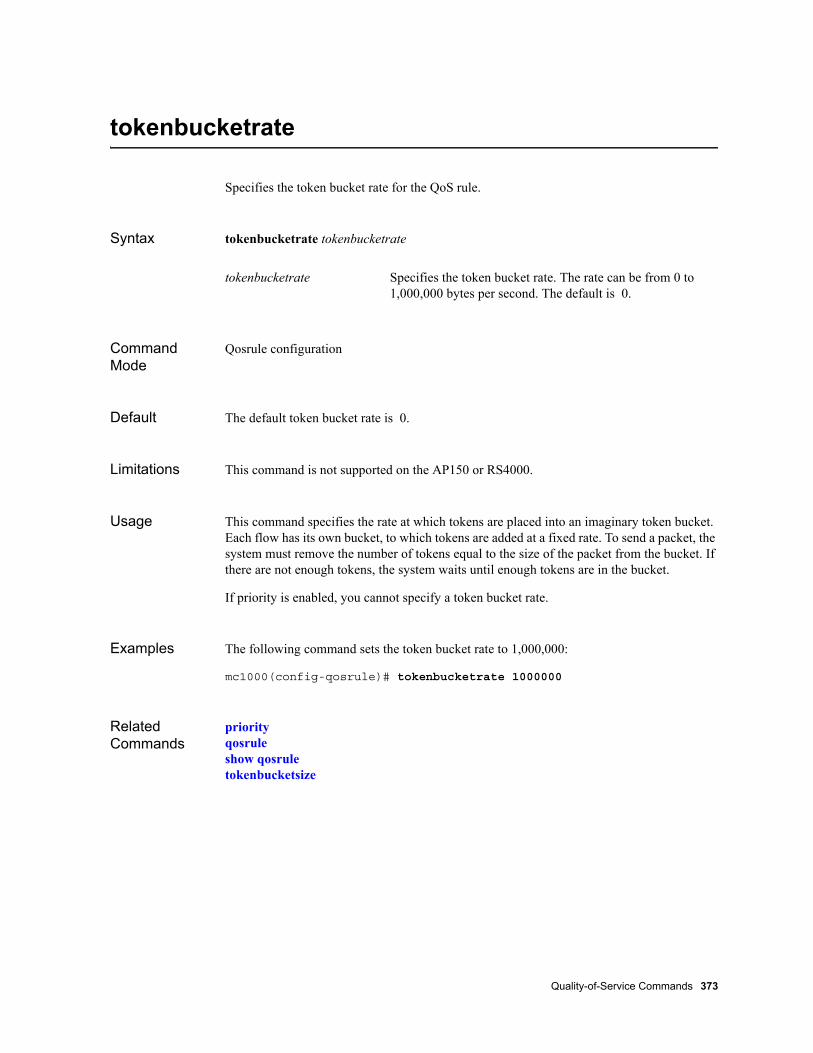
tokenbucketrate
Specifies the token bucket rate for the QoS rule.
Syntax tokenbucketrate tokenbucketrate
Command Mode
Qosrule configuration
Default The default token bucket rate is 0.
Limitations This command is not supported on the AP150 or RS4000.
Usage This command specifies the rate at which tokens are placed into an imaginary token bucket. Each flow has its own bucket, to which tokens are added at a fixed rate. To send a packet, the system must remove the number of tokens equal to the size of the packet from the bucket. If there are not enough tokens, the system waits until enough tokens are in the bucket.
If priority is enabled, you cannot specify a token bucket rate.
Examples The following command sets the token bucket rate to 1,000,000:
mc1000(config-qosrule)# tokenbucketrate 1000000
Related Commands
priorityqosruleshow qosruletokenbucketsize
tokenbucketrate Specifies the token bucket rate. The rate can be from 0 to 1,000,000 bytes per second. The default is 0.
Quality-of-Service Commands 373
tokenbucketsize
Specifies the token bucket size.
Syntax tokenbucketsize size
Command Mode
QoS Codec configuration
Default The default token bucket size is 8 bytes.
Usage This command specifies the size of the token bucket.
Examples The following command sets the token bucket size to 10,000 bytes.
mc1000(config-qoscodec)# tokenbucketsize 10000
Related Commands
qoscodectokenbucketrateshow qoscodec
size Specifies the token bucket size from 0 to 16,000 bytes.
374 Meru Wireless LAN System Command Reference

trafficcontrol-enable
Enables traffic control policy for the QoS rule. The no trafficcontrol command disables traffic control policy.
Syntax trafficcontrol-enable
no trafficcontrol
Command Mode
Qosrule configuration
Default The default is traffic control disabled.
Usage Use this command to enable traffic control. Enabling traffic control restricts the flow (explicit, detected, and best-effort) to the rate you specified with the avgpacketrate command. Packets above that rate are dropped.
Examples The following first enables traffic control, followed by the command to disable traffic control:
mc1000(config-qosrule)# trafficcontrol-enable mc1000(config-qosrule)# no trafficcontrol
Related Commands
avgpacketrateqosruleshow qosrule
Quality-of-Service Commands 375

376 Meru Wireless LAN System Command Reference

Chapter 13SNMP Commands
The commands contained in this chapter configure and show the system SNMP settings:
reload snmp
show snmp-community
show snmp-trap
snmp-server community
snmp-server contact
snmp-server description
snmp-server location
snmp-server trap
SNMP Commands 377

reload snmp
Restarts the SNMP process.
Syntax reload-snmp
Command Mode
Privileged EXEC
Default None
Usage Use this command to reload the SNMP process. The command can be used, for example, when SNMP does not respond to incoming SNMP packets.
Examples default# reload-snmp
378 Meru Wireless LAN System Command Reference

show snmp-community
Displays the IP address and privileges in this community.
Syntax show snmp-community
Command Mode
Privileged EXEC
Default None
Usage Use this command to display information about the SNMP community, including IP address and read/write privileges.
Examples default# show snmp-community
SNMP Community Client IP Privilege
public 0.0.0.0 read-only
SNMP Community Management(1 entry)
Related Commands
snmp-server community
SNMP Commands 379

show snmp-trap
Shows the SNMP trap community.
Syntax show snmp-trap
Command Mode
Privileged EXEC
Default None
Usage Use this command to view the IP address(es) in the trap community.
Examples mc1000# show snmp-trap SNMP Trap Management
Trap Community Destination IP 32 10.10.1.1
SNMP Trap Management(1 entry)mc1000#
Related Commands
snmp-server trap
380 Meru Wireless LAN System Command Reference

snmp-server community
Configures an SNMP community.
Syntax snmp-server community community-string client_IP_address {ro | rw}
no snmp-server community {public {client_IP_address | 0.0.0.0} | community-string }
Command Mode
Global configuration
Default None
Usage The SNMP community acts as a password to authenticate messages sent between the SNMP server and SNMP client. The SNMP community string is transmitted in clear text. Use the no form of the command to delete a community entry by client IP address or all servers (0.0.0.0).
Examples The following command configures a read-only community, using the string commstring1 as password, and allowing only the server with an IP address of 10.3.4.5:
mc1000(config)# snmp-server community commstring1 10.3.4.5 ro mc1000(config)#
Related Commands
show snmp-community
community-string Text string that can be up to 32 alphanumeric characters long. Do not use spaces or special characters.
client-ip-address IP address associated with the SNMP read/write community. To specify a wildcard and allow all servers access, use 0.0.0.0.
ro | rw Type ro to allow read-only access to the MIB, or type rw to allow read-write access to the MIB
SNMP Commands 381

snmp-server contact
Configures the contact person for the controller.
Syntax snmp-server contact contact
Command Mode
Global configuration
Default None
Usage Use this command to identify the contact person for the controller.
Examples mc1000(config)# snmp-server contact Joe mc1000(config)#
Related Commands
snmp-server descriptionsnmp-server location
contact Contact person from 1 to 255 characters.
382 Meru Wireless LAN System Command Reference

snmp-server description
Description of the controller.
Syntax snmp-server description descr
Command Mode
Global configuration
Default None
Usage Use this command to give the controller a description.
Examples mc1000(config)# snmp-server description corp_manager mc1000(config)#
Related Commands
snmp-server locationsnmp-server contact
descr Description of the SNMP server from 1 to 255 characters.
SNMP Commands 383
snmp-server location
Configures a description location for the controller.
Syntax snmp-server location location
Command Mode
Global configuration
Default None
Usage Use this command to describe the controller’s location.
Examples mc1000(config)# snmp-server location san_jose_californiamc1000(config)#
Related Commands
snmp-server contactsnmp-server description
location Text string that describes the location of the controller; from 1 to 255 characters.
384 Meru Wireless LAN System Command Reference

snmp-server trap
Configures an SNMP trap community.
Syntax snmp-server trap community-string client-ip-address
Command Mode
Global configuration
Default None
Usage Use the snmp-server trap command to create an SNMP trap community. You specify the SNMP trap receiver (using the client-IP-address) that listens for SNMP traps generated by the controller and the SNMP community. The SNMP community is transmitted in clear text.
Use the no form of the command to delete a snmp server trap community entry.
Examples The following command configures an SNMP trap community using commstring1 as the community string and specifying 10.3.4.5 as the trap receiver:
mc1000(config)# snmp-server trap commstring1 10.3.4.5 mc1000(config)#
Related Commands
show snmp-community
community-string Name of the SNMP community. The name can be up to 32 alphanumeric characters long. Do not include spaces or special characters in the name. The SNMP community acts as a password to authenticate messages sent between the SNMP server and SNMP client.
client-ip-address IP address of the SNMP trap receiver that is listening for SNMP traps generated by the controller. To disable this feature, and allow all servers, use 0.0.0.0.
SNMP Commands 385

386 Meru Wireless LAN System Command Reference

Chapter 14Station Commands
The commands contained in this chapter show information about station (client) connections:
no station
show ap-assigned
show dot11 associations
show dot11 statistics client-traffic
show station
show statistics station-per-ap
show statistics top10-station-problem
show statistics top10-station-talker
show topostaap
show topostation
Station Commands 387
no station
Deauths (deletes) the associated station from an access point.
Syntax no station [ MAC-address ]
Command Mode
Configuration mode
Default None
Usage Deletes an associated station from its access point by sending a de-auth message to the station, forcing it off the ESS. This command is helpful for debugging connectivity issues.
Most likely the client will associate again. To permanently remove a client from associating, use the MAC Filtering commands, as described in Chapter 11, “MAC Filtering Commands.”
Examples The following command shows station information for access points:
mc1000# no station 00:40:96:a3:b2:95
Related Commands
show stationaccess-list deny
388 Meru Wireless LAN System Command Reference

show ap-assigned
Displays assigned station information for one or more access points.
Syntax show ap-assigned [ MAC-address ]
Command Mode
EXEC
Default None
Usage Displays station information for access points, including ID, MAC address, ESSID, etc. Executing the command without an argument presents a list of MAC addresses. Executing the command with the optional MAC address arguments presents detailed station information for that station.
Examples The following command shows station information for access points:
mc1000# show ap-assignedAssigned Stations(4 entries)
AP ID Client MAC Type SSID State Encrypt Pkts Rx Pkts Tx Last Prev Curr RF Band AP Name
2 00:02:6f:20:9a:00 STATION mwf-wpapsk ASSOCIATED TKIP 34 19 00d:00h:02m:01s 188 188 802.11a #2-2F-Sw-208
2 00:02:6f:20:9a:01 STATION mwf-wpapsk ASSOCIATED TKIP 34 19 00d:00h:02m:01s 188 188 802.11a #2-2F-Sw-208
2 00:02:6f:20:9a:02 STATION mwf-wpapsk ASSOCIATED TKIP 35 17 00d:00h:02m:01s 188 188 802.11a #2-2F-Sw-208
2 00:02:6f:20:9a:03 STATION mwf-wpapsk ASSOCIATED TKIP 34 17 00d:00h:02m:01s 188 188 802.11a #2-2F-Sw-20
Assigned Stations(4 entries)
The following command show the station information for the specified MAC address:
meru-wifi# show ap-assigned 00:40:96:a3:b2:95Assigned Stations
AP ID : 3Client MAC : 00:40:96:a3:b2:95Type : STATIONESSID : mwflxpeapAssociation State : ASSOCIATEDKey Type : nonePackets Received : 555
Station Commands 389

Packets Sent : 304Last Activity : 0d:0h:0m:1sPrevious RSSI : 36Current RSSI : 30AP Name : QAAP ID : 7Client MAC : 00:40:96:a3:b2:95Type : STATIONESSID : Association State : PROBINGKey Type : nonePackets Received : 70Packets Sent : 0Last Activity : 0d:0h:2m:30sPrevious RSSI : 0Current RSSI : 0AP Name : MKTGAP ID : 10Client MAC : 00:40:96:a3:b2:95Type : STATIONESSID : Association State : PROBINGKey Type : nonePackets Received : 380Packets Sent : 19Last Activity : 0d:0h:0m:31sPrevious RSSI : 13Current RSSI : 13AP Name : AP-10
Related Commands
390 Meru Wireless LAN System Command Reference

show dot11 associations
Displays the stations seen by the system.
Syntax show dot11 associations
Command Mode
EXEC
Default None
Usage Displays various station information, including MAC Address, availability, access point name, L2 and L3 broadcast information.
Examples The following command displays the stations seen by the system:
default# show dot11 associations MAC Address Availability Client IP IP Address Type AP Name L2
Mode L3 Mode Authenticated User Name Tag
00:02:6f:20:00:00 Online 192.168.10.190 Discovered #2-2F-Sw-208 wpa-psk clear 0
00:02:6f:20:00:01 Online 192.168.10.191 Discovered #2-2F-Sw-208 wpa-psk clear 0
00:02:6f:20:00:02 Online 192.168.10.192 Discovered #2-2F-Sw-208 wpa-psk clear
Station Table(3 entries)default#
Related Commands
show dot11 statistics client-traffic
Station Commands 391

show dot11 statistics client-traffic
Displays station statistics.
Syntax show dot11 statistics client-traffic [MAC_address]
Command Mode
EXEC
Default None
Examples The following command displays station statistics.
mc1000# show dot11 statistics client-trafficStation Statistics
MAC Address DHCP Req AddrChg VolHandoff InvHandoff
00:0c:30:be:f7:c0 0 0 1 0 00:0c:85:76:35:ea 0 0 1 0 00:0c:85:e7:bf:20 0 0 4 0 00:20:a6:4c:40:1e 1 1 1 0 00:20:e0:98:10:92 0 1 2 0 00:40:96:40:ab:ae 0 1 4 0 00:40:96:49:40:ff 0 1 1 0 00:40:96:52:27:52 0 1 1 0 mc1000#
Table 8 describes fields in show dot11 statistics client-traffic output.
ap_MAC-address Specifies the station’s MAC address to display additional client traffic statistics.
Table 7: Output for show dot11 statistics client-traffic
Field Description
MAC Address Station MAC address.
DHCP Request Count Number of times a client requested an IP address while connected to the Meru Wireless LAN System WLAN.
Address Change Count Number of times a client IP address changed.
392 Meru Wireless LAN System Command Reference

The following command displays specific statistics for the station at MAC address 00:0e:35:09:5d:5e.
mc1000# show dot11 statistics client-traffic 00:0e:35:09:5d:5e
Station Statistics
MAC Address : 00:0e:35:09:5d:5eDHCP Request Count : 1Address Change Count : 1Voluntary Handoff Count : 12Involuntary Handoff Count : 0QoS Active Flow Count : 0QoS Pending Flow Count : 0SIP Video Reserved Bandwidth : 0SIP Video Bandwidth : 0SIP Video Flow Count : 0SIP Audio Reserved Bandwidth : 0SIP Audio Bandwidth : 0SIP Audio Flow Count : 0H.323 Video Reserved Bandwidth : 0H.323 Video Bandwidth : 0H.323 Video Flow Count : 0H.323 Audio Reserved Bandwidth : 0H.323 Audio Bandwidth : 0H.323 Audio Flow Count : 0
Voluntary Handoff Count Number of times the Meru Wireless LAN System WLAN has changed AP associations to improve the client connection.
Involuntary Handoff Count Number of times a client initiates an association to a different BSSID.
Table 7: Output for show dot11 statistics client-traffic
Field Description
Station Commands 393

show station
Displays stations associated with the system.
Syntax show station [mac-address mac-address] [details {ip-address addr | mac-address mac-address | user name}]
Command Mode
Privileged EXEC
Default By default, output for all stations is shown.
Usage Use the show station command to see a list of associated stations.
Table 8 describes the fields of the show station output.
mac-address MAC address of the station.
addr IP address of the station.
name User name associated with the station.
Table 8: Output for show station
Field Description
MAC Address MAC address of the station.
IP Type Method by which the IP address of the station is assigned:
Static IP address assigned: Station uses a static IP address. IPv6 IP addresses show as
Dynamic IP address assigned: Station uses a static IP address, which is learned from the traffic sent.
DHCP: Station uses an IP address assigned by DHCP.
AP Name Name of the access point.
L2 Mode Layer 2 authentication used.
L3 Mode Layer 3 authentication used.
Authenticated User Name Authenticated user name associated with station, if used.
394 Meru Wireless LAN System Command Reference

Using keywords with the show station command presents additional information and statistics.
Use the keyword mac-address with a station’s MAC address to see information about a particular station.
The IP address can appear as 0.0.0.0 in the following situations:
Client with static IP address: After a client has associated with an access point, but before the client has sent its first packet. After the first packet is sent, the client IP address and address type appears in show station output.
Client with IP address assigned by DHCP: After a client has sent a DHCP request, but before the DHCP server responds. After the DHCP server responds, the client IP address and address type appears in show station output.
Use the keywords details ip-address, details user, and mac-address to see detailed information about the station in the station table and assorted station statistics.
If a station remains inactive for 30 minutes, it is disconnected from the WLAN.
Examples The following command displays information for associated stations.
mc1000# show stationStation Table
MAC Address IP Type AP Name L2 Mode L3 Mode Authenticated User Name Tag Client IP 00:04:23:5a:b3:d0 DHCP 1-201-2F-SW clear clear 0
192.168.10.122 00:09:5b:c3:9f:32 Discovered 3-208-1F-Mktg clear clear 0
192.168.10.121 00:0d:93:7e:83:a7 DHCP 2-201-1F-CS wpa-psk clear 0
fe80:0000:0000:0000:020d:93ff:fe7e:83a7 00:0e:35:09:71:96 DHCP 9-208-2F-BoardR wpa-psk clear 0
192.168.10.157 00:0e:35:36:f1:f6 Discovered 3-208-1F-Mktg clear clear 0
192.168.10.164 00:0e:35:7f:1c:04 DHCP 1-201-2F-SW wpa-psk clear 0
192.168.10.117 00:0e:35:be:d9:dc Unknown 6-208-2F-Hw-HiG clear clear 0 0.0.0.0 00:0e:9b:6f:4a:c0 DHCP 9-208-2F-BoardR wpa clear merunet\joe 0 192.168.10.101 00:0e:9b:9a:0e:c7 Unknown 3-208-1F-Mktg clear clear 0 0.0.0.0 00:0e:9b:9a:0f:7b DHCP 6-208-2F-Hw-HiG wpa-psk clear 0
192.168.10.115 00:0e:9b:b3:25:b7 DHCP 9-208-2F-BoardR wpa-psk clear 0
192.168.10.125
Tag VLAN tag associated with the station, if it exists.
Client IP IP address assigned to the station. IPv6 addresses display similar to fe80:0000:0000:0000:020d:93ff:fe7e:83a7 instead of a normal 4-tuple IP address.
Table 8: Output for show station
Field Description
Station Commands 395

00:11:24:2c:e0:88 DHCP 2-201-1F-CS wpa-psk clear 0 fe80:0000:0000:0000:0211:24ff:fe2c:e088
00:11:24:96:6d:4b DHCP 2-201-1F-CS clear clear 0 fe80:0000:0000:0000:0211:24ff:fe96:6d4b
00:12:f0:54:a2:56 DHCP 3-208-1F-Mktg wpa-psk clear 0 192.168.10.126
00:12:f0:86:1b:d7 DHCP 1-201-2F-SW clear clear 0 192.168.10.160
00:13:ce:5d:12:31 DHCP 6-208-2F-Hw-HiG wpa clear rjones 0 192.168.10.133
00:14:a4:0a:e5:3e Discovered 2-201-1F-CS wpa-psk clear 0 192.168.10.143
00:40:96:a9:23:f0 DHCP 6-208-2F-Hw-HiG wpa2 clear ksampath 0 192.168.10.120
00:90:96:c5:26:a0 DHCP 2-201-1F-CS clear clear 0 192.168.10.112
Station Table(19 entries)
mc1000#
mc1000# show station mac-address 00:20:a6:4e:b5:9cStation Table
MAC Address : 00:20:a6:4e:b5:9cAvailability Status : OnlineDescription : Client IP : 192.168.10.140IP Address Type : DHCPAP ID : 8AP Name : #8-1F-DemoArea-201L2 Security State : wpa-pskL3 Security State : clearAuthenticated User Name : VLAN Name : Tag : 0RF Band : 802.11g
mc1000# show station details mac-address 00:20:a6:4e:b5:9c
Station Table
MAC Address Availability Client IP IP Address Type AP Name L2 Mode L3 Mode Authenticated User Name Tag
00:20:a6:4e:b5:9c Online 192.168.10.140 DHCP #8-1F-DemoArea- wpa-psk clear 0
Station Statistics
MAC Address DHCP Req AddrChg VolHandoff InvHandoff
00:20:a6:4e:b5:9c 0 0 4 0
Assigned AP Table for MAC address 00:20:a6:4e:b5:9c
AP ID Client MAC Type SSID State Encrypt Pkts Rx Pkts Tx Last Prev Curr RF Band AP Name
8 00:20:a6:4e:b5:9c STATION mwf-wpapsk ASSOCIATED TKIP 4377 4566 00d:00h:00m:00s 205 204 802.11g #8-1F-DemoArea-
396 Meru Wireless LAN System Command Reference

There are no QoS flows for MAC address 00:20:a6:4e:b5:9c (IP: 192.168.10.140)
Related Commands
Station Commands 397

show statistics station-per-ap
Displays station statistics per access point.
Syntax show statistics station-per-ap [ap-id]
Command Mode
EXEC
Default None
Usage Use the show statistics station-per-ap command to see station statistics on a per access-point basis. By default, all station statistics for all access points are shown. To see station statistics for one access point, specify the access point’s identification number when issuing the command.
Examples The following (abbreviated) command display shows the station statistics for all access points.
mc1000# show statistics station-per-ap AP AP-Name If Station-MAC Station-IP SSID Rx-packets Tx-packets
WEP-errors
2 #2-2F-Sw- 2 00:02:6f:20:00:33 0.0.0.0 mwf-wpapsk 1138 1134 0
2 #2-2F-Sw- 2 00:02:6f:20:00:32 0.0.0.0 mwf-wpapsk 996 988 0
2 #2-2F-Sw- 2 00:02:6f:20:00:31 0.0.0.0 mwf-wpapsk 1142 1132 0
mc1000#
ap-id Access point identification number.
Table 9: Output for show statistic station-per-ap
Field Description
AP Unique ID number of the access point to which the station is currently communicating.
AP-Name Name of the access point to which the station is currently communicating.
If AP interface number.
398 Meru Wireless LAN System Command Reference

Station-MAC MAC address of the station.
Station-IP IP address of the station.
SSID ESSID to which the station is associated.
Rx-packets Total number of packets received by the access point from the station.
Tx-packets Total number of packets transmitted to the station from the access point.
WEP-errors Number of WEP errors per minute. WEP errors are most likely to occur when stations have not executed the 802.1x protocol successfully during session initiation or rekey period.
Table 9: Output for show statistic station-per-ap
Field Description
Station Commands 399

show statistics top10-station-problem
Displays the top ten stations with the highest number of WEP errors per minute, with a minimum of 10 WEP errors per minute.
Syntax show statistics top10-station-problem
Command Mode
Privileged EXEC
Default None
Usage Use the show statistics top10-station-problem command to see the top ten stations with the highest number of WEP errors per minute, with a minimum of 10 WEP errors per minute. WEP errors are most likely to occur when stations have not executed the 802.1x protocol successfully during session initiation or rekey period.
Examples The following command displays the top ten stations with the highest number of WEP errors per minute.
mc1000# show statistics top10-station-problem
AP AP Name If Station MAC Station IP WEP Errors/min
Top 10 station problem statistics(No entries)
Table 10 describes the fields for the show statistics top10-station-problem command.
Table 10: Output for show statistics top10-station-problem
Field Description
AP Unique ID number of the access point.
AP Name Name of the access point to which the station is associated.
If Interface number of the AP.
Station MAC MAC address of the station.
400 Meru Wireless LAN System Command Reference

Related Commands
show statistics top10-station-talker
Station IP IP address of the station.
WEP Errors/Minute Number of WEP errors that occurred during the last minute.
Table 10: Output for show statistics top10-station-problem
Field Description
Station Commands 401

show statistics top10-station-talker
Displays the 10 most active stations, based on the sum of transmission and reception packet rates per minute during the last polling period.
Syntax show statistics top10-station-talker
Command Mode
Privileged EXEC
Default None
Usage Use the show statistics top10-station-talker command to display the 10 most active stations, based on the sum of transmission and reception packet rates per minute during the last polling period. The top talker stations table shows activity based on the number of frames per minute, not actual bytes transmitted or airtime consumed.
Examples The following command displays the most active stations.
mc1000# show statistics top10-station-talker
AP AP Name If Station MAC Station IP Rx Packets/min Tx Packets/min
10 #10-1F-Mk 1 00:0e:35:09:5d:5e 192.168.10.125 370 400 8 #8-1F-Dem 1 00:05:4e:40:6f:46 192.168.10.141 357 347 6 #6-1F-CS- 1 00:0e:35:5f:f0:29 0.0.0.0 359 328 10 #10-1F-Mk 1 00:12:f0:0f:23:cd 0.0.0.0 259 304 10 #10-1F-Mk 1 00:0e:35:5f:f0:29 0.0.0.0 300 244 10 #10-1F-Mk 2 00:09:5b:a3:c2:fd 192.168.10.130 246 237 2 #2-2F-Sw- 2 00:02:6f:20:00:16 0.0.0.0 227 227 2 #2-2F-Sw- 2 00:02:6f:20:00:33 0.0.0.0 227 226 2 #2-2F-Sw- 2 00:02:6f:20:00:31 0.0.0.0 228 226 2 #2-2F-Sw- 2 00:02:6f:20:00:3a 0.0.0.0 227 226 Top 10 station talker statistics request(10)mc1000#
Table 11 describes the fields of the show statistics top10-station-talker output.
402 Meru Wireless LAN System Command Reference

Related Commands
show statistics top10-station-problem
Table 11: Output for show statistics top10-station-talker
Field Description
AP Unique ID number of the access point.
AP Name Name of the access point to which the station is currently communicating.
If Interface number of the AP.
Station MAC MAC address of the station.
Station IP IP address of the station.
Rx Packets/min Number of packets received during the last polling period.
Tx packets/min Number of packets transmitted during the last polling period.
Station Commands 403

show topostaap
Displays the station/AP edge records in the system.
Syntax show topostaap
Command Mode
Privileged EXEC
Default None
Usage This command displays the station/AP edge records in the system.
Examples mc1000# show topostaap
Station MAC Address AP ID AP Name Assigned RSSI
00:0d:93:82:da:b3 1 AP-1 on 36 00:40:96:40:fa:eb 1 AP-1 on 28 00:40:96:51:c6:40 1 AP-1 on 0
Related Commands
404 Meru Wireless LAN System Command Reference
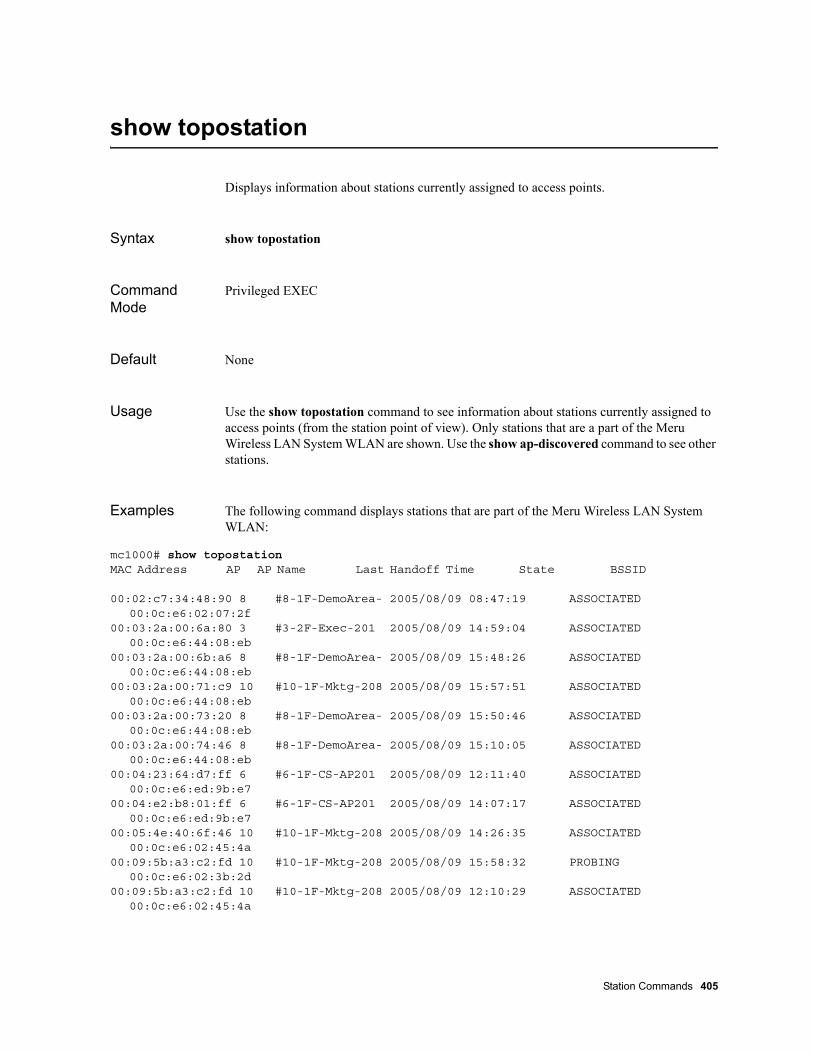
show topostation
Displays information about stations currently assigned to access points.
Syntax show topostation
Command Mode
Privileged EXEC
Default None
Usage Use the show topostation command to see information about stations currently assigned to access points (from the station point of view). Only stations that are a part of the Meru Wireless LAN System WLAN are shown. Use the show ap-discovered command to see other stations.
Examples The following command displays stations that are part of the Meru Wireless LAN System WLAN:
mc1000# show topostationMAC Address AP AP Name Last Handoff Time State BSSID
00:02:c7:34:48:90 8 #8-1F-DemoArea- 2005/08/09 08:47:19 ASSOCIATED 00:0c:e6:02:07:2f
00:03:2a:00:6a:80 3 #3-2F-Exec-201 2005/08/09 14:59:04 ASSOCIATED 00:0c:e6:44:08:eb
00:03:2a:00:6b:a6 8 #8-1F-DemoArea- 2005/08/09 15:48:26 ASSOCIATED 00:0c:e6:44:08:eb
00:03:2a:00:71:c9 10 #10-1F-Mktg-208 2005/08/09 15:57:51 ASSOCIATED 00:0c:e6:44:08:eb
00:03:2a:00:73:20 8 #8-1F-DemoArea- 2005/08/09 15:50:46 ASSOCIATED 00:0c:e6:44:08:eb
00:03:2a:00:74:46 8 #8-1F-DemoArea- 2005/08/09 15:10:05 ASSOCIATED 00:0c:e6:44:08:eb
00:04:23:64:d7:ff 6 #6-1F-CS-AP201 2005/08/09 12:11:40 ASSOCIATED 00:0c:e6:ed:9b:e7
00:04:e2:b8:01:ff 6 #6-1F-CS-AP201 2005/08/09 14:07:17 ASSOCIATED 00:0c:e6:ed:9b:e7
00:05:4e:40:6f:46 10 #10-1F-Mktg-208 2005/08/09 14:26:35 ASSOCIATED 00:0c:e6:02:45:4a
00:09:5b:a3:c2:fd 10 #10-1F-Mktg-208 2005/08/09 15:58:32 PROBING 00:0c:e6:02:3b:2d
00:09:5b:a3:c2:fd 10 #10-1F-Mktg-208 2005/08/09 12:10:29 ASSOCIATED 00:0c:e6:02:45:4a
Station Commands 405

00:0e:35:06:60:54 10 #10-1F-Mktg-208 2005/08/09 14:27:28 ASSOCIATED 00:0c:e6:ed:9b:e7
00:0e:35:09:5d:5e 10 #10-1F-Mktg-208 2005/08/09 15:26:03 ASSOCIATED 00:0c:e6:02:3b:2d
00:0e:35:36:f1:f6 3 #3-2F-Exec-201 2005/08/09 15:57:40 ASSOCIATED 00:0c:e6:ed:9b:e7
00:0e:35:3c:89:14 6 #6-1F-CS-AP201 2005/08/09 15:33:37 ASSOCIATED 00:0c:e6:02:d8:a2
00:0e:9b:6f:4a:c0 3 #3-2F-Exec-201 2005/08/09 15:31:14 ASSOCIATED 00:0c:e6:02:5e:3e
00:12:f0:29:61:d7 8 #8-1F-DemoArea- 2005/08/09 10:29:42 ASSOCIATED 00:0c:e6:02:07:2f
00:12:f0:54:b6:16 8 #8-1F-DemoArea- 2005/08/09 12:42:23 ASSOCIATED 00:0c:e6:02:07:2f
00:12:f0:69:9a:7c 6 #6-1F-CS-AP201 2005/08/09 14:46:53 ASSOCIATED 00:0c:e6:02:d8:a2
00:20:a6:4e:b5:9c 8 #8-1F-DemoArea- 2005/08/09 13:28:19 ASSOCIATED 00:0c:e6:02:07:2f
00:40:96:a3:5c:53 10 #10-1F-Mktg-208 2005/08/09 15:36:04 ASSOCIATED 00:0c:e6:02:45:4a
00:40:96:a3:92:06 2 #2-2F-Sw-208 2005/08/09 12:04:19 ASSOCIATED 00:0c:e6:01:ac:a8
00:40:96:a9:20:94 10 #10-1F-Mktg-208 2005/08/09 15:58:46 PROBING 00:0c:e6:02:3b:2d
00:40:96:a9:20:94 10 #10-1F-Mktg-208 2005/08/09 15:58:46 PROBING 00:0c:e6:02:45:4a
00:40:96:a9:20:94 3 #3-2F-Exec-201 2005/08/08 16:03:39 ASSOCIATED 00:0c:e6:02:5e:3e
00:40:96:a9:20:94 6 #6-1F-CS-AP201 2005/08/09 15:58:46 PROBING 00:0c:e6:02:d8:a2
Stations Topology(26 entries)mc1000#
Related Commands
show ap-discovered
406 Meru Wireless LAN System Command Reference

Chapter 15Troubleshooting Commands
The commands that help troubleshoot the WLAN are:
analyze-capture
capture-packets
debug controller
debug module
diagnostics
diagnostics-controller
remote-log
Troubleshooting Commands 407
analyze-capture
Analyzes wireless traffic.
Syntax analyze-capture snapshot
analyze-capture start filename ap ap-list bssid bssid-list
analyze-capture stop
Command Mode
Privileged EXEC
Default None
Usage The analyze-capture command captures 802.11 management and TCP session state statistics for all clients using any of the specified APs and BSSIDs. The type of information that is collected are client re-auths and re-associations and TCP session statistics.
The command can be started and run for long periods without consuming disk space. No output is produced until the snapshot or stop keywords are given.
Double quotes must be used to group a string of APs or BSSIDs.
Examples As an example, the following command creates the capture in file check.txt for APs 1-3 and BSSIDs 00:0c:e6:32:22:01 and 00:0c:e6:30:11:22.
mc1000# analyze-capture start check.txt ap “1 2 3” bssid “00:0c:e6:32:22:01 00:0c:e6:30:11:22”
mc1000#
Related Commands
408 Meru Wireless LAN System Command Reference
capture-packets
Captures packets, using Ethereal, on the controller’s interface or over the air from access points.
Syntax capture-packets [-c count][-i ap_id1[, ap_id2, ...]] {m,n,t}[-r infile] [-R filter]r|a|ad|d [-V] [-v frame] [-w savefile -a stop-condition] [-x]
-a stop-condition Stop criterion (e.g. -a filesize:1000)
-c count count specifies the default number of packets to read when capturing live data.
-f capture-filter filter expression.
-F file-format Format of the capture file (for example, -F netmon1).
-i ap_id1[, ap_id2, ...] Captures packets from an AP (specified by its number), followed by optionally, a list of additional APs.
-n Disables network object name resolution (such as hostname, TCP, and UDP port names).
-N {m,n,t} Enables name resolution for particular types of addresses and port numbers, with name resolving for other types of addresses and port numbers turned off. The argument is a string that can contain the letters m to enable MAC address resolution, n to enable network address resolution, and t to enable transport-layer port number resolution. This argument overrides the -n argument if both -N and -n are present.
-p Disables promiscuous mode for the interface.
-q Do not display count of packets captured.
-r infile Prints a summary of a previously captured file with an additional field (frame number) in the first column.
-R ‘display-filter’ Applies a custom or Ethereal filter before displaying captures. Build complex filters by enclosing filter names between single quotation marks (‘’) and joining with expression operators. Do not use spaces with complex filters, that is, those that use operators such as ==. See the table that follows for a list of custom filters you can use with this argument. For information about Ethereal filters, see http://www.ethereal.com/docs/man-pages/ethereal-filter.4.html.
-S Record Record/summarize with frame number for playback.
-s snaplen snaplen defines the default snapshot length of live data.
Troubleshooting Commands 409

Command Mode
Global configuration
Default None
Limitations The -i apid option is not supported on the AP150 or RS4000.
Usage Use the capture-packets command to capture network traffic. Use the capture-packets command with no arguments to capture packets on the controller’s interface. The capture-packets command can also capture packets from access points if you issue the debug ap command first. You can filter the packets so that you only see packets captured by access points. By default, you see packets from access points and the controller’s local interface. You can see the captures in realtime or save them to a file for future offline analysis. If you are using SSH to access the controller, consider filtering SSH traffic to reduce the amount of information that gets captured and displayed. (See “Examples” on page 413 for an example.)
To stop realtime packet capture, press Ctrl-C.
-t r|a|ad|d Defines the format of the packet timestamp displayed in the packet list window. The format can be one of r (relative), a (absolute), ad (absolute with date), or d (delta). The relative time is the time elapsed between the first packet and the current packet. The absolute time is the actual time the packet was captured, with no date displayed; the absolute with date is the time the packet was captured. The delta time is the time since the previous packet was captured. The default is relative.
-V Prints the protocol tree.
-v frame Play back with frame number.
-w savefile -a stop-condition
Writes capture information to a file and limits the file size. Meru Networks recommends that you use the -w and -a arguments together, using filesize:5000 as the stop-condition parameter, which limits the file size to 5 MB.
-x Displays packet capture in hexadecimal format.
-S record Record/summarize with frame number for playback
-v playback Frame playback “frame number”
410 Meru Wireless LAN System Command Reference
Packets captured by the access point include traffic from unknown access points and traffic between Meru Access Points. Use the -R argument to filter the packets captured. (See the following table for a list of custom filters.)
WEP-encrypted frames are encrypted when captured over the air. To capture unencrypted data frames, get captures from the controller’s local interface.If you use static WEP keys, frames can be decoded using the Windows version of Ethereal with the Meru plug-in.
Packets transmitted by an access point are different from packets received by an access point in the following ways:
There is one packet for every retry received by the access point. The retry bit is set as received over the air. Transmitted frames only appear once, regardless of the number of retransmissions. Use the controller.cap.tx.flags.retries field to see the number of times a frame was retried. The retry bit of the 802.11 MAC header is always set to zero for transmitted frames.
For received frames, the TSF field is the exact time the first bit a frame was received. For transmitted frames, the TSF field is the time immediately after the last transmission.
Received 802.11 acknowledgments are captured, but transmitted acknowledgments are not.
Captured frames that exceed the Ethernet MTU are fragmented. When looking at capture entries, the second entry for a fragmented frame appears as “M-Cap 802.11 Continuation Controller ATS Capture Fragment Continuation” as the summary.
The following lists the filters that can be used with the -R argument for the capture-packets command:
controller.cap Limits only packets captured by the access point and excludes packets from the controller’s local interface.
controller.cap.version Version of the tunnel.
controller.cap.outer.fraglen Length of the fragment.
controller.cap.frags Fragment field.
controller.cap.outer.fragmented Fragmented.
controller.cap.outer.morefrags More fragments.
controller.cap.outer.fragnumber Fragment number.
controller.cap.outer.seq Direction of captured frame (transmitted or received).
controller.cap.rx.flags Receive flags.
controller.cap.rx.flags.diversity Received with antenna diversity.
controller.cap.rx.flags.antenna_select Antenna frame received on.
controller.cap.rx.flags.shortpreamble Short preamble.
controller.cap.rx.flags.assigned Whether the sender is assigned to this AP.
controller.cap.rx.flags.fcs_failure Whether the checksum is valid.
controller.cap.rx.flags.frame_too_late Whether a frame was received too late from carrier sense to make sense.
Troubleshooting Commands 411
controller.cap.rx.silence Signal strength immediately before the packet.
controller.cap.rx.signal Signal strength during the packet.
controller.cap.rx.left_rssi RSSI from the left antenna.
controller.cap.rx.right_rssi RSSI from the right antenna.
controller.cap.rx.rate 802.11 packet rate (in 100 Kbps).
controller.cap.rx.cca_dclk Time from the CCA high to the first data bit (in microseconds).
controller.cap.rx.length Length of the received 802.11 frame.
controller.cap.rx.time Lower TSF time the frame.
controller.cap.rx.channel Channel the frame was received on.
controller.cap.rx.crc 802.11 FCS.
controller.cap.tx.flags Transmit flags.
controller.cap.tx.flags.success Whether an 802.11 acknowledgement was received.
controller.cap.tx.flags.initcts If an RTS was sent for the initial transmission, indicates whether a CTS was received.
controller.cap.tx.flags.retry1cts If an RTS was sent for the first retransmission, indicates whether a CTS was received.
controller.cap.tx.flags.retry2cts If an RTS was sent for the second retransmission, indicates whether a CTS was received.
controller.cap.tx.flags.retry3cts If an RTS was sent for the third retransmission, indicates whether a CTS was received.
controller.cap.tx.flags.retry4cts If an RTS was sent for the fourth retransmission, indicates whether a CTS was received.
controller.cap.tx.flags.retry5cts If an RTS was sent for the fifth retransmission, indicates whether a CTS was received.
controller.cap.tx.flags.retry6cts If an RTS was sent for the sixth retransmission, indicates whether a CTS was received.
controller.cap.tx.flags.retry7cts If an RTS was sent for the seventh retransmission, indicates whether a CTS was received.
controller.cap.tx.flags.ackps PS bit of acknowledgment (if any).
controller.cap.tx.flags.ackrssi RSSI of acknowledgment (if any).
controller.cap.tx.flags.retries Retransmissions attempted (zero if frame transmitted only once).
controller.cap.tx.flags.antenna Antenna frame transmitted on.
controller.cap.tx.flags.preamble Short preamble used to transmit the frame (or final frame if retried).
controller.cap.tx.time Lower TSF time the frame was transmitted (or final frame if retried).
controller.cap.tx.length Length of the 802.11 frame.
412 Meru Wireless LAN System Command Reference

Examples The following command captures only ICMP packets:
mc1000# capture-packets -R icmpCapturing on controller 30.434804 10.1.225.50 -> 10.1.250.15 ICMP Echo (ping) request 30.435000 10.1.250.15 -> 10.1.225.50 ICMP Echo (ping) reply 31.433751 10.1.225.50 -> 10.1.250.15 ICMP Echo (ping) request 31.433866 10.1.250.15 -> 10.1.225.50 ICMP Echo (ping) reply 32.432920 10.1.225.50 -> 10.1.250.15 ICMP Echo (ping) request 32.433042 10.1.250.15 -> 10.1.225.50 ICMP Echo (ping) reply 33.432088 10.1.225.50 -> 10.1.250.15 ICMP Echo (ping) request 33.432203 10.1.250.15 -> 10.1.225.50 ICMP Echo (ping) reply 34.431320 10.1.225.50 -> 10.1.250.15 ICMP Echo (ping) request 34.431434 10.1.250.15 -> 10.1.225.50 ICMP Echo (ping) reply 35.430419 10.1.225.50 -> 10.1.250.15 ICMP Echo (ping) request 35.430523 10.1.250.15 -> 10.1.225.50 ICMP Echo (ping) reply 36.429761 10.1.225.50 -> 10.1.250.15 ICMP Echo (ping) request 36.429860 10.1.250.15 -> 10.1.225.50 ICMP Echo (ping) reply
The following command filters SSH traffic:
mc1000# capture-packets -R ‘tcp.srcport!=22&&tcp.dstport!=22’
The following command captures packets to a file named capture-file with a maximum file size of 5 MB:
mc1000# capture-packets -w capture-file -a filesize:5000Capturing on controller559 mc1000#
The following command captures only RADIUS frames to and from the IP address 10.1.225.42:
mc1000# capture-packets -w capture_file -a filesize:5000 -R ‘ip.addr==10.1.225.42&&radius’
The following commands filter for DHCP frames, which are saved to a file named capture_file, and show the captured file:
mc1000# debug ap 1mc1000# capture-packets -w capture_file -a filesize:5000 -R bootp.dhcpmc1000# capture-packets -r capture_file 1 0.000000 10.0.220.49 -> 10.0.0.10 DHCP DHCP Request - Transaction ID
0x9a5e380e 2 0.002390 10.0.0.10 -> 10.0.220.49 DHCP DHCP ACK - Transaction ID
0x9a5e380e
controller.cap.tx.rate Rate used to transmit the frame (or final frame if retried).
controller.cap.tx.channel Channel the frame was transmitted on.
Troubleshooting Commands 413
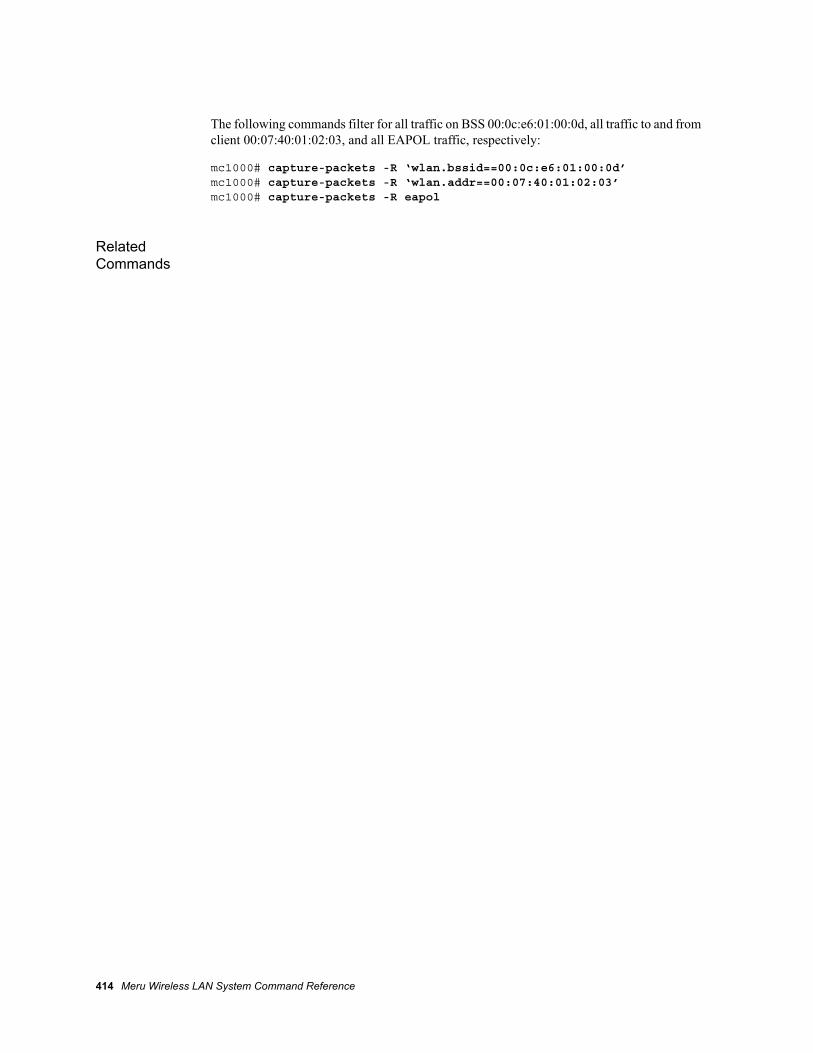
The following commands filter for all traffic on BSS 00:0c:e6:01:00:0d, all traffic to and from client 00:07:40:01:02:03, and all EAPOL traffic, respectively:
mc1000# capture-packets -R ‘wlan.bssid==00:0c:e6:01:00:0d’mc1000# capture-packets -R ‘wlan.addr==00:07:40:01:02:03’mc1000# capture-packets -R eapol
Related Commands
414 Meru Wireless LAN System Command Reference
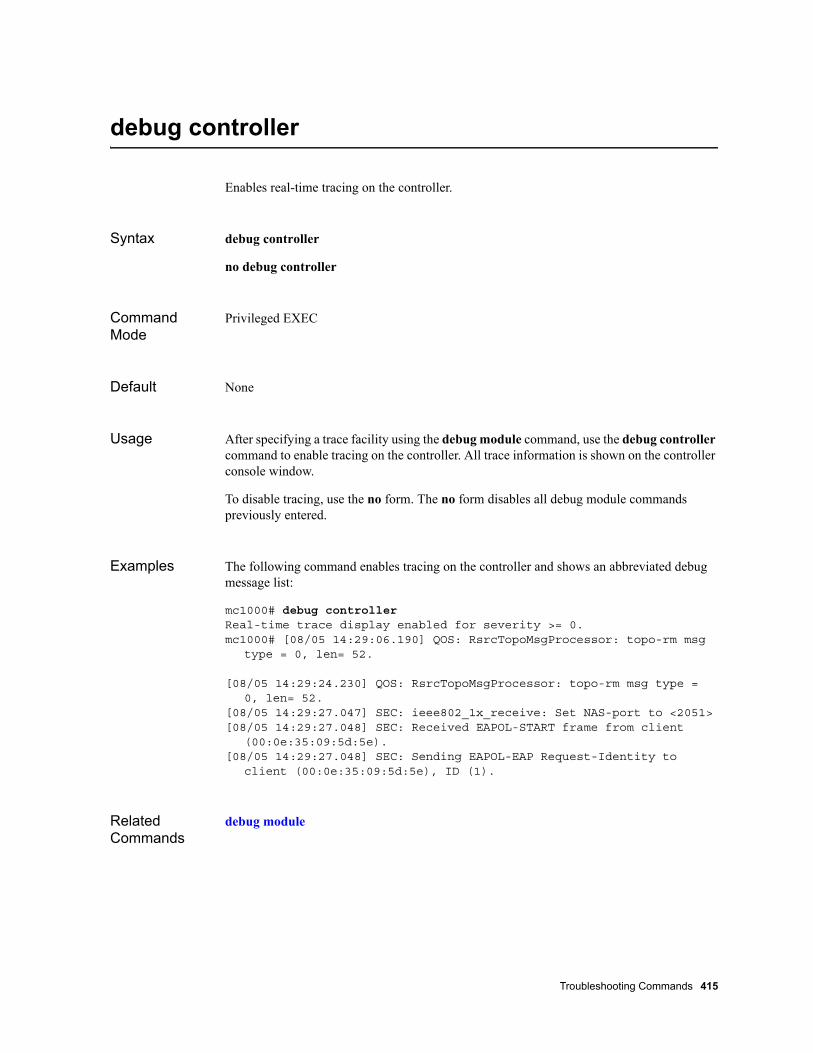
debug controller
Enables real-time tracing on the controller.
Syntax debug controller
no debug controller
Command Mode
Privileged EXEC
Default None
Usage After specifying a trace facility using the debug module command, use the debug controller command to enable tracing on the controller. All trace information is shown on the controller console window.
To disable tracing, use the no form. The no form disables all debug module commands previously entered.
Examples The following command enables tracing on the controller and shows an abbreviated debug message list:
mc1000# debug controllerReal-time trace display enabled for severity >= 0.mc1000# [08/05 14:29:06.190] QOS: RsrcTopoMsgProcessor: topo-rm msg
type = 0, len= 52.
[08/05 14:29:24.230] QOS: RsrcTopoMsgProcessor: topo-rm msg type = 0, len= 52.
[08/05 14:29:27.047] SEC: ieee802_1x_receive: Set NAS-port to <2051>[08/05 14:29:27.048] SEC: Received EAPOL-START frame from client
(00:0e:35:09:5d:5e).[08/05 14:29:27.048] SEC: Sending EAPOL-EAP Request-Identity to
client (00:0e:35:09:5d:5e), ID (1).
Related Commands
debug module
Troubleshooting Commands 415

debug module
Enables tracing for a specific facility.
Syntax debug module {ip | coord | sec}
no debug module
Command Mode
Privileged EXEC
Default None
Usage Use the debug module command to specify a facility to trace. You can issue the debug module command multiple times with a different facility keyword. After specifying a facility to trace, you enable tracing on the controller with the debug controller command to send trace information to the controller console.
Examples The following commands specify security and DHCP as the facilities to trace:
mc1000# debug module secmc1000# debug module ipmc1000#
Related Commands
debug controller
ip Specifies DHCP trace facility.
coord Specifies client-access point assignment trace facility.
sec Specifies security trace facility.
416 Meru Wireless LAN System Command Reference

diagnostics
Collects system diagnostics and outputs to log file.
Syntax diagnostics
Command Mode
Privileged EXEC
Default
Usage The diagnostics command gathers system information from the controller and all APs in the WLAN, and places the data into a log file that is compressed before it is saved. The compressed log file can be sent to Support as an aid in debugging system issues
In a WLAN with over 100 APs, this command can take over 10 minutes to complete.
The compressed file name integrates a datestamp that includes the year.month.day.hour.minutes (meru-gather-2006.09.24.20.59.tar.gz), and is saved in the images directory. You can later use the copy ftp command to move the file to a server where it can be sent to Support.
Examples mc1000# diagnosticsCleaning up previous gather dataGetting process information ...Getting system log information ...Getting kernel information ...Getting network information ...Getting software information ...Getting version information ...Getting disk information ...Getting Meru data ...Getting high availability information ...Data gathering phase complete
images/meru-gather-2006.09.24.20.59.tar.gz createdUse the ftp option of the cli command to move this file off the
machine
Related Commands
diagnostics-controller
Troubleshooting Commands 417

diagnostics-controller
Collects controller diagnostics and outputs to log file.
Syntax diagnostics-controller
Command Mode
Privileged EXEC
Default
Usage The diagnostics-controller command gathers information from the controller, and places the data into a log file that is compressed before it is saved. The compressed log file can be sent to Support as an aid in debugging system issues.
The compressed file name integrates a datestamp that includes the year.month.day.hour.minutes (meru-gather-2006.09.24.20.57.tar.gz), and is saved in the images directory. You can later use the copy ftp command to move the file to a server where it can be sent to Support.
This command is similar to the diagnostics command, but collects only controller information. As such, it will complete in less time than the diagnostics command.
Examples mc1000# diagnostics-controller Getting process information ...Getting system log information ...Getting kernel information ...Getting network information ...Getting software information ...Getting version information ...Getting disk information ...Getting Meru data ...Getting high availability information ...Data gathering phase complete
images/meru-gather-2006.09.24.20.57.tar.gz createdUse the ftp option of the cli command to move this file off the
machine
Related Commands
diagnostics
418 Meru Wireless LAN System Command Reference

remote-log
Configure a remote site for maintaining logs.
Syntax remote-log {start | stop} smb [mount-point] [workgroup] [username]
Command Mode
Privileged EXEC
Default None
Usage The remote-log command allows you to copy all system logs to a network shared disk. By default, log entries are stored on the controller flash card, which by its nature is limited. As a result, log entries are purged when a certain amount of space is consumed to allow for newer entries. By specifying a network share, the complete history of logged entries can be kept.
To establish remote logging, use the command remote-log start smb and add an optional network mount-point, workgroup, and username. You will be prompted for the username password. To stop the remote logging and unmount the share, use the same command parameters but use the stop keyword instead of the start keyword.
Be sure you have a reliable connection to the share. You will be prompted for your workgroup and username, if it is not supplied on the command line.
Examples The following commands allow the user admin in the engineering workgroup to create a remote log on the server maple using the shared disk IT:
mc1000# remote-log start smb //maple/IT engineering adminmc1000#
Related Commands
imount-point Specifies the mount point of the remote disk (//hostname/sharename).
workgroup Specifies the workgroup where the user has permission to create remote log configuration.
username Specifies the name of the user creating the remote log configuration.
Troubleshooting Commands 419

420 Meru Wireless LAN System Command Reference
Index of Commands
Symbols? 12
Numerics2bridge ipv6 2028021x-network-initiation 138
Aaccess-list deny 306access-list deny import 308access-list permit 310access-list permit import 311access-list radius-server 313access-list state 315accounting interim-interval 188accounting primary-radius 189accounting secondary-radius 190action 322admin-mode 219allowed-l2-modes 139analyze-capture snapshot 408analyze-capture start 408analyze-capture stop 408antenna property 220antenna-selection 221ap 222ap-discovery join-ess 192ap-discovery join-virtual-ap 193ap-redirect 224audit period 56auto-ap-upgrade 225autochannel 227avgpacketrate 323
Bbase-tx-rates 195beacon dtim-period 197beacon period 198boot-script 228
Ccalendar set 57calls-per-bss 199captive-portal enable 141capture-packets 409cd 28channel 230clear certificates extension-type 142clear certificates name 143clear statistics interfaces Dot11Radio 58clear statistics interfaces FastEthernet 58connectivity 232contact 234controller domainname 235controller hostname 236copy 29, 31copy running-config ftp 31copy running-config scp 31copy running-config startup-config 31copy running-config tftp 31
Ddataplane-mode 238date 59debug controller 415debug module 416delete 33description 144, 240diagnostics 60, 417diagnostics-controller 418dir 35disable 13do 14downgrade 36droppolicy 324dscp 325dstip 326dstmask 327dstport 328
Index of Commands 421
Eenable 15encryption-modes ccmp 145encryption-modes tkip 146encryption-modes wep128 147encryption-modes wep64 148end 16ess-ap 200essid 201exit 17
Ffixed-channel 241
Hhelp 18high-availability initdead 61high-availability peer 62high-availability shared-ip 64high-availability start 65high-availability stop 66high-density-enable 243hostname 244
Iimport certificate pem 149import certificate pfx 150interface Dot11Radio 245ip address 110ip address dhcp 112ip default-gateway 113ip dhcp-passthru 115ip dhcp-server 116ip dns-server 117ip dns-server primary 117ip dns-server secondary 117ip domainname 118ip ftp 119ip scp 120ip sftp 121ip udp-broadcast 122ip-address 151
Kkey 152
Llicense 67link-probing-duration 248
location 249
Mmac-address 250mac-delimiter 153macfiltering 154management 68mode 251model 252more 37multicast-enable 203
Nno 8021x-network-initiation 138no access-list deny 306no access-list permit 310no access-list radius-server 313no accounting-radius all 189, 190no accounting-radius secondary 190no ap 222no ap-discovery join-ess 192no ap-discovery join-virtual-ap 193no ap-redirect 224no base-tx-rates 195no boot-script 228no captive-portal 141no debug controller 415no debug module 416no dhcp-passthrough 115no encryption-modes ccmp 145no encryption-modes tkip 146no encryption-modes wep128 147no encryption-modes wep64 148no essid 201no fixed-channel 241no high-density-enable 243no ip dhcp-server 116no ip dns-server 117no ip domainname 118no ip udp-broadcast 122no key 152no l2bridge ipv6 202no mac-delimiter 153no macfiltering 154no management wireless 68no multicast-enable 203no preamble-short 254no protection-mode 256no psk key 156no publish-essid 204no qoscodec 331no qosrule 335no radius-profile 158
422 Meru Wireless LAN System Command Reference

no radius-server all 160no radius-server primary 160no radius-server secondary 161no reauth 162no rekey multicast-enable 163no rekey period 164no remote-ap-enable 205no rogue-ap acl 288no rogue-ap blocked 291no rogue-ap detection 293no security-profile 165no shared-authentication 167no silent-client-enable 211no snmp-server community 381no static-wep key 181no station 388no supported-tx-rates 212no swap 284no syslog-host 104no terminal history 23, 24no trafficcontrol 375no vlan 184, 185, 214ntp server 69ntp sync 69
Ppasswd 70peakrate 329ping 71port 155power local 253poweroff controller 72preamble-short 254priority 330prompt 19protection mode 256protection-cts-mode 255psk key 156publish-essid 204pwd 39
Qqoscodec 331qosrule 335qosvars admission 338qosvars bwscaling 340qosvars cac-deauth 341qosvars calls-per-ap 342qosvars calls-per-bssid 343qosvars drop-policy 344qosvars enable 345qosvars load-balance-overflow 346qosvars max-stations-per-ap 347
qosvars max-stations-per-bssid 348qosvars no enable 349qosvars stations-assign-age 350, 351qosvars tcpttl 352qosvars ttl 353qosvars udpttl 354quit 20
Rradius-profile 158radius-server primary 160radius-server secondary 161reauth 162rekey multicast-enable 163rekey period 164reload 40, 73reload all 73reload ap 73reload controller 73reload default 73reload-management 74reload-snmp 378remote-ap-enable 205remote-log 419rename 41rf-mode 258rogue-ap acl 288rogue-ap aging 289rogue-ap assigned-aps 290rogue-ap blocked 291rogue-ap detection 293rogue-ap mitigation 294rogue-ap mitigation-frames 295rogue-ap operational-time 296rogue-ap scanning-channel 297rogue-ap scanning-time 299rspecrate 355rspecslack 356run 42
Ssecurity-profile 165, 206setup 75shared-authentication 167show aaa 168show access-list deny 317show access-list permit 318show access-list state 319show alarm 77show antenna-property 272show ap 259show ap-assigned 389show ap-connectivity 261
Index of Commands 423

show ap-discovered 263show ap-redirect 265show ap-siblings 266show ap-swap 268show calendar 79show certificate detail 169show certificate installed 171show controller 80show controller cpu-utilization 83show controller file systems 43show controller memory 86show controller processes 87show dot11 associations 391show dot11 statistics client-traffic 392show ess-ap 207show ess-ap ap 269show essid 208show file systems 84show flash 45, 89show high-availability 90show history 21show hostname 93show interfaces Dot11Radio 270show interfaces Dot11Radio statistics 274show interfaces FastEthernet controller 127show interfaces FastEthernet statistics 130show ip 131show license 94show license-file 96show log 97show log running-config 46, 47show memory 86show ntp-server 98show phone-calls 361show phones 360show qoscodec 362show qosflows 364show qosrule 366show qosstats 369show qosvars 370show radius-profile 172show regulatory-domain 277show rogue-ap acl 300show rogue-ap blocked 301show rogue-ap globals 302show rogue-ap-list 303show running-config 46show scripts 48show security-profile 173show snmp-community 379show snmp-trap 380show ssl-server 175show startup-config 47show station 394show statistics call-admission-control 372
show statistics station-per-ap 398show statistics top10-ap-problem 278show statistics top10-ap-talker 279show statistics top10-station-problem 400show statistics top10-station-talker 402show syslog-file 99show syslog-host 100show syslog-table 101show terminal 22show timezones 102show topoap 281show topoapap 282show topostaap 404show topostation 405show vlan 134show web custom-area 176show web login-page 176silent-client-enable 211snmp-server community 381snmp-server contact 382snmp-server description 383snmp-server location 384snmp-server trap 385srcip 357srcmask 358srcport 359ssid 210ssl-server associate pem 177ssl-server associate pfx 178ssl-server no-1st-radius 180ssl-server no-2nd-radius 180ssl-server port 179ssl-server radius-profile primary 180ssl-server radius-profile secondary 180static-wep key 181static-wep key-index 183statistics period 103supported-tx-rates 212swap 284syslog-host 104
Ttelnet 105terminal history 23terminal history size 24terminal length 25terminal width 26timezone 106tokenbucketrate 373tokenbucketsize 374traceroute 108trafficcontrol-enable 375
424 Meru Wireless LAN System Command Reference

Uupgrade ap 49upgrade controller 51upgrade system 53
Vvlan 136, 184vlan name 214vlan support 215
Wweb login-page 185
Index of Commands 425

426 Meru Wireless LAN System Command Reference

Meru Networks, Inc.1309 South Mary AvenueSunnyvale, CA 94087408-215-5300www.merunetworks.com