Merchant on the Move Addendum for the TR’O 700W, 700WX
15
Merchant on the Move Addendum for TREO 700 1 Merchant on the Move Addendum for the TRĒO 700W, 700WX and HP6515 Introduction With the introduction of the TREO 700, Merchant on the Move has been enhanced to make use of its Windows Mobile 5 Operating System, QWERTY Keyboard, Wireless Communications, and Bluetooth capability. This addendum expands on the Merchant on the Move User Guide and Tutorial. We recommend that you use the Merchant on the Move User Guide and Tutorial for Pocket PC in order to become familiar with the many features that Merchant on the Move has to offer. In addition, while Merchant on the Move was designed to be to immediately work with your TREO 700 and Merchant on the GO Bluetooth Printer, we’ve also included detailed setup and trouble shooting information towards the end of this addendum, should you have changed the default Connection Settings on your TREO 700. Contents Merchant on the Move Installation.............................................................................................. 2 Test Your Data Connection .......................................................................................................... 2 Setting Up Merchant on the Go Step 1: Resetting your Merchant on the Go to allow pairing ...................................................... 3 Step 2: Pairing the Merchant on the Go with your Handheld TREO Device ............................. 3 Step 3: Setting the Bluetooth COM Port on your Handheld TREO Device ............................... 5 Step 4: Setting the COM Port in Merchant on the Move ............................................................ 6 TREO700 Keypad Controls Soft Buttons, Menu, and OK....................................................................................................... 8 Toggle Button ............................................................................................................................. 9 Detailed Information for setting up and using your Wireless Connection How to determine if you have a data plan with Verizon........................................................... 12 How to setup your data plan to work with Merchant on the Move ........................................... 13 Tips when establishing a connection and processing transactions ............................................ 16
Transcript of Merchant on the Move Addendum for the TR’O 700W, 700WX
Merchant on the Move Addendum for TREO 700 1
Merchant on the Move Addendum for the TRĒO 700W, 700WX and HP6515
Introduction With the introduction of the TREO 700, Merchant on the Move has been enhanced to make use of its Windows Mobile 5 Operating System, QWERTY Keyboard, Wireless Communications, and Bluetooth capability. This addendum expands on the Merchant on the Move User Guide and Tutorial. We recommend that you use the Merchant on the Move User Guide and Tutorial for Pocket PC in order to become familiar with the many features that Merchant on the Move has to offer. In addition, while Merchant on the Move was designed to be to immediately work with your TREO 700 and Merchant on the GO Bluetooth Printer, we’ve also included detailed setup and trouble shooting information towards the end of this addendum, should you have changed the default Connection Settings on your TREO 700. Contents Merchant on the Move Installation.............................................................................................. 2 Test Your Data Connection .......................................................................................................... 2 Setting Up Merchant on the Go
Step 1: Resetting your Merchant on the Go to allow pairing...................................................... 3 Step 2: Pairing the Merchant on the Go with your Handheld TREO Device ............................. 3 Step 3: Setting the Bluetooth COM Port on your Handheld TREO Device ............................... 5 Step 4: Setting the COM Port in Merchant on the Move ............................................................ 6
TREO700 Keypad Controls Soft Buttons, Menu, and OK....................................................................................................... 8 Toggle Button ............................................................................................................................. 9
Detailed Information for setting up and using your Wireless Connection How to determine if you have a data plan with Verizon........................................................... 12 How to setup your data plan to work with Merchant on the Move........................................... 13 Tips when establishing a connection and processing transactions............................................ 16
Merchant on the Move Addendum for TREO 700 2
Merchant on the Move Installation Please follow the installation information found in the Merchant on the Move User Guide and Tutorial. If you are asked to choose a location where to install the software please choose the default location (Device). You may also ignore any warnings that appear and select YES or INSTALL to continue. Merchant on the Move has been thoroughly tested with the TREO 700. Test Your Data Connection Did you get a Data Plan with Verizon Wireless? Merchant on the Move requires a data plan in order to process transactions. The easiest way to see if you have a data plan is to open up Internet Explorer and see if you can access the Internet (see page 54 of your Verizon Wireless Quick Reference Guide on how to do this). If you do not have a data plan from Verizon, go to your local Verizon dealer with your TREO 700. They will set everything up for you. Note: The default Wireless Network Connection is called My ISP. Your Verizon Dealer will set this up for you. Merchant on the Move uses the My ISP network start your connection and to process transactions. If you have changed your wireless connection to a different network, you must also change this in the Merchant on the Move software. For more information on how to do this, see the section: Detailed Information for setting up and using your Wireless Connection.
Merchant on the Move Addendum for TREO 700 3
Setting Up Merchant on the Go There are only four simple steps for setting up the Merchant on the Go to work with the Verizon TREO700. They are:
1. Resetting your Merchant on the Go to allow pairing 2. Pairing the Merchant on the Go with your Handheld TREO Device 3. Setting the Bluetooth COM Port on your Handheld TREO Device, and 4. Setting the COM Port in Merchant on the Move
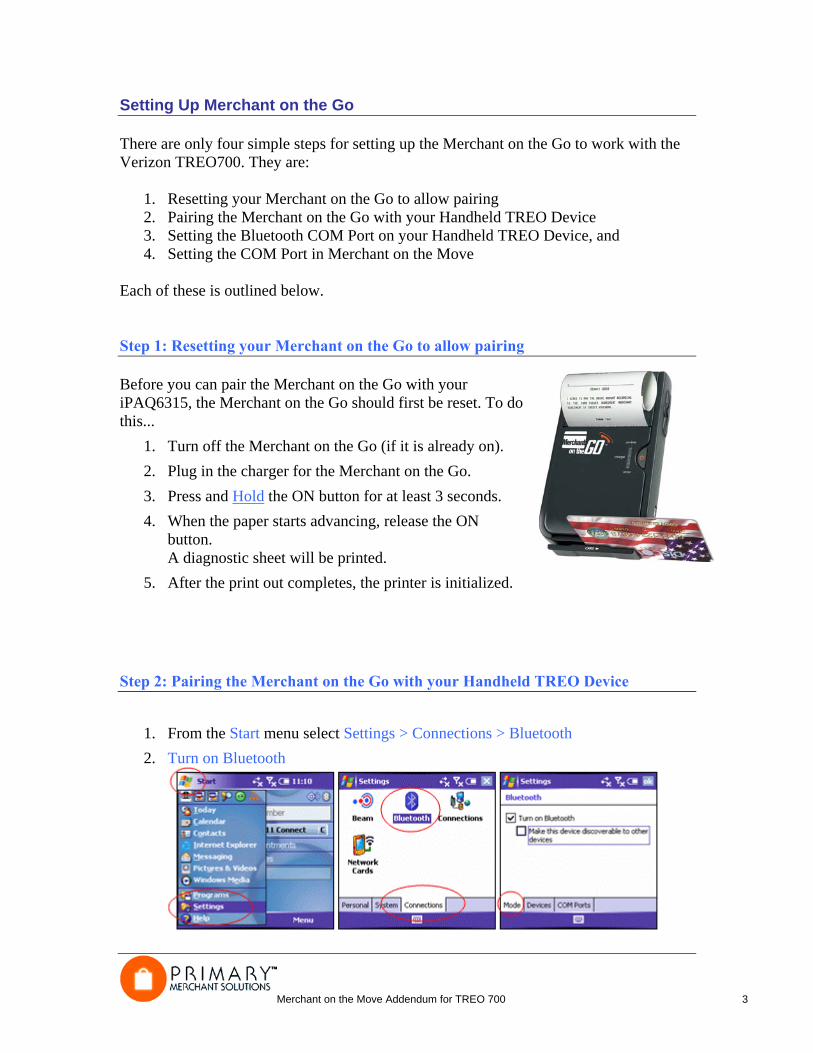
Each of these is outlined below. Step 1: Resetting your Merchant on the Go to allow pairing Before you can pair the Merchant on the Go with your iPAQ6315, the Merchant on the Go should first be reset. To do this...
1. Turn off the Merchant on the Go (if it is already on). 2. Plug in the charger for the Merchant on the Go. 3. Press and Hold the ON button for at least 3 seconds. 4. When the paper starts advancing, release the ON
button. A diagnostic sheet will be printed.
5. After the print out completes, the printer is initialized.
Step 2: Pairing the Merchant on the Go with your Handheld TREO Device
1. From the Start menu select Settings > Connections > Bluetooth 2. Turn on Bluetooth
Merchant on the Move Addendum for TREO 700 4
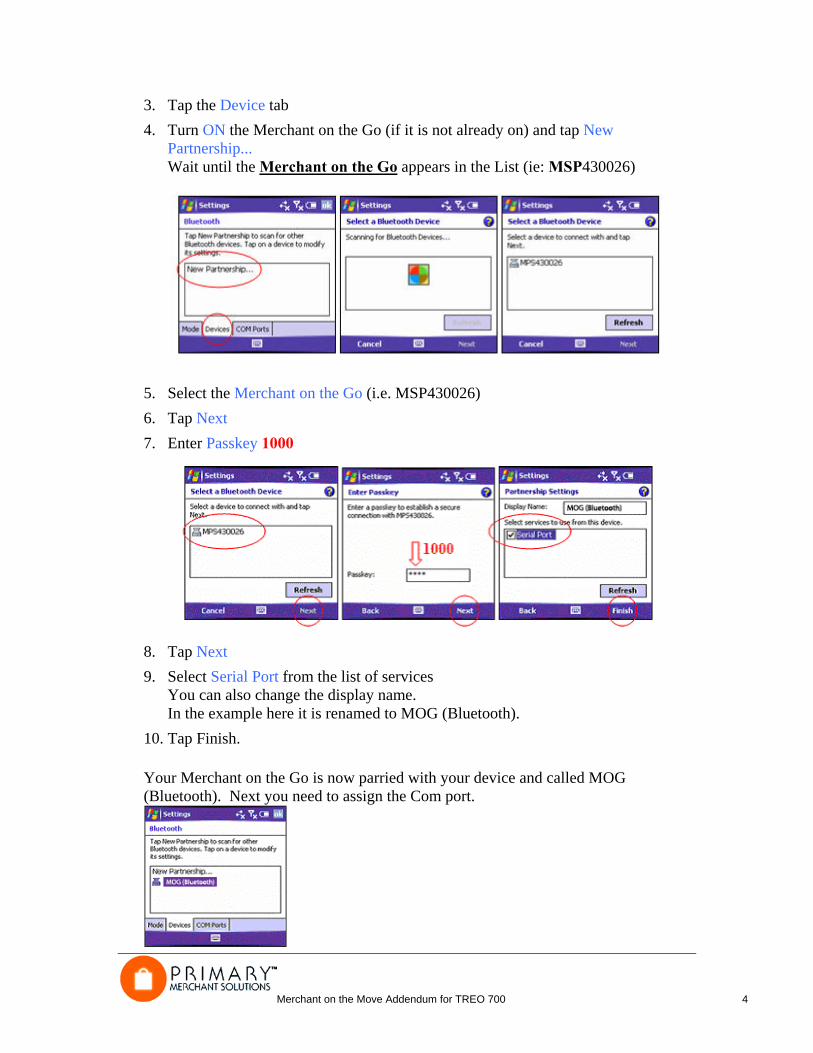
3. Tap the Device tab 4. Turn ON the Merchant on the Go (if it is not already on) and tap New
Partnership... Wait until the Merchant on the Go appears in the List (ie: MSP430026)
5. Select the Merchant on the Go (i.e. MSP430026) 6. Tap Next 7. Enter Passkey 1000
8. Tap Next 9. Select Serial Port from the list of services
You can also change the display name. In the example here it is renamed to MOG (Bluetooth).
10. Tap Finish. Your Merchant on the Go is now parried with your device and called MOG (Bluetooth). Next you need to assign the Com port.
Merchant on the Move Addendum for TREO 700 5
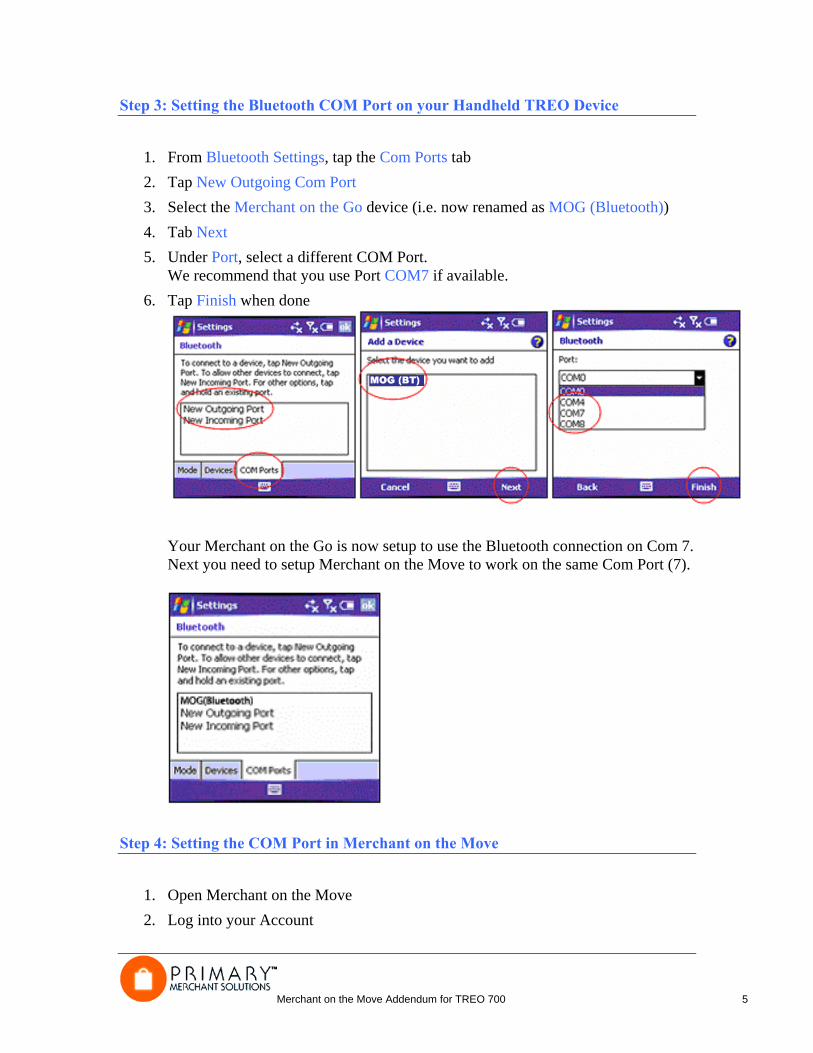
Step 3: Setting the Bluetooth COM Port on your Handheld TREO Device
1. From Bluetooth Settings, tap the Com Ports tab 2. Tap New Outgoing Com Port 3. Select the Merchant on the Go device (i.e. now renamed as MOG (Bluetooth)) 4. Tab Next 5. Under Port, select a different COM Port.
We recommend that you use Port COM7 if available. 6. Tap Finish when done
Your Merchant on the Go is now setup to use the Bluetooth connection on Com 7. Next you need to setup Merchant on the Move to work on the same Com Port (7).
Step 4: Setting the COM Port in Merchant on the Move
1. Open Merchant on the Move 2. Log into your Account
Merchant on the Move Addendum for TREO 700 6
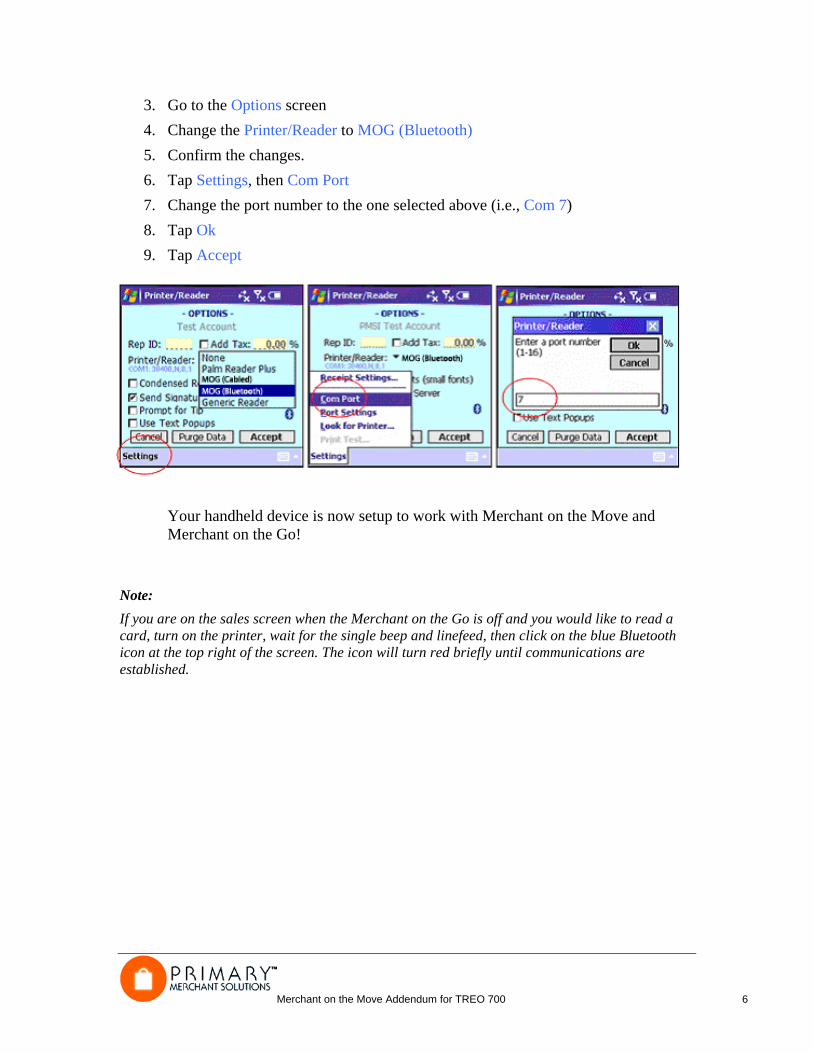
3. Go to the Options screen 4. Change the Printer/Reader to MOG (Bluetooth) 5. Confirm the changes. 6. Tap Settings, then Com Port 7. Change the port number to the one selected above (i.e., Com 7) 8. Tap Ok 9. Tap Accept
Your handheld device is now setup to work with Merchant on the Move and Merchant on the Go!
Note: If you are on the sales screen when the Merchant on the Go is off and you would like to read a card, turn on the printer, wait for the single beep and linefeed, then click on the blue Bluetooth icon at the top right of the screen. The icon will turn red briefly until communications are established.
Merchant on the Move Addendum for TREO 700 7
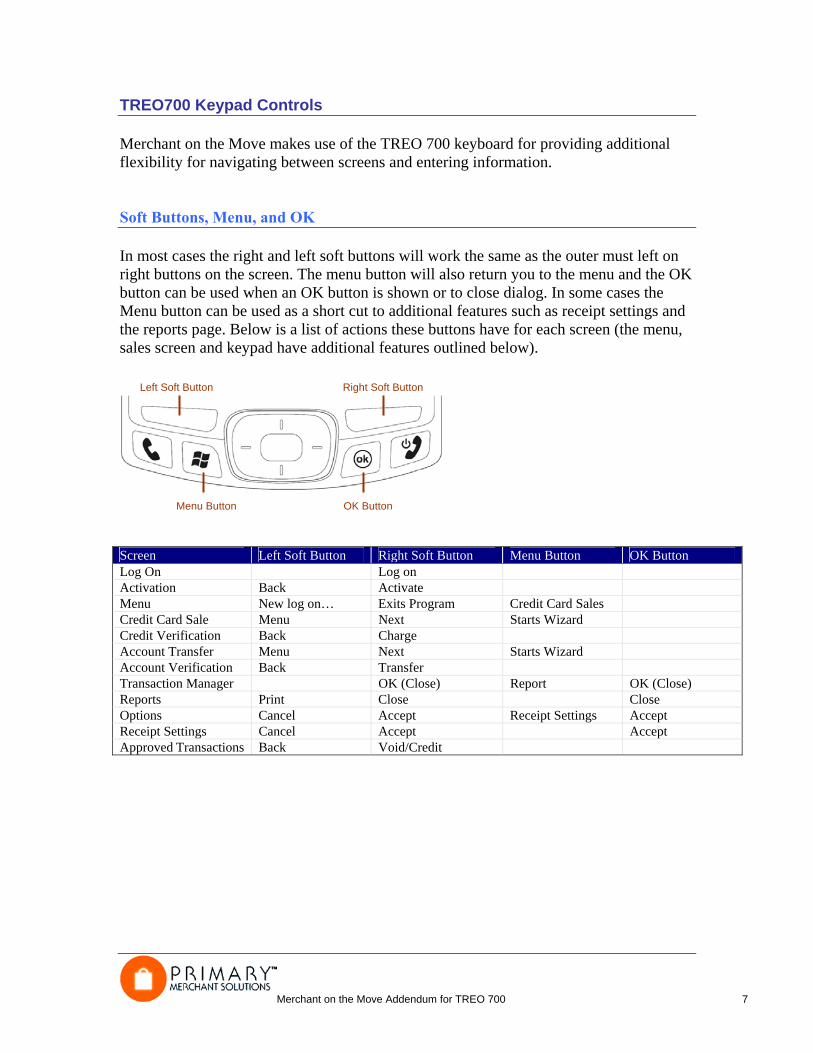
TREO700 Keypad Controls Merchant on the Move makes use of the TREO 700 keyboard for providing additional flexibility for navigating between screens and entering information. Soft Buttons, Menu, and OK In most cases the right and left soft buttons will work the same as the outer must left on right buttons on the screen. The menu button will also return you to the menu and the OK button can be used when an OK button is shown or to close dialog. In some cases the Menu button can be used as a short cut to additional features such as receipt settings and the reports page. Below is a list of actions these buttons have for each screen (the menu, sales screen and keypad have additional features outlined below).
Screen Left Soft Button Right Soft Button Menu Button OK Button Log On Log on Activation Back Activate Menu New log on… Exits Program Credit Card Sales Credit Card Sale Menu Next Starts Wizard Credit Verification Back Charge Account Transfer Menu Next Starts Wizard Account Verification Back Transfer Transaction Manager OK (Close) Report OK (Close) Reports Print Close Close Options Cancel Accept Receipt Settings Accept Receipt Settings Cancel Accept Accept Approved Transactions Back Void/Credit
Left Soft Button Right Soft Button
Menu Button OK Button
Merchant on the Move Addendum for TREO 700 8
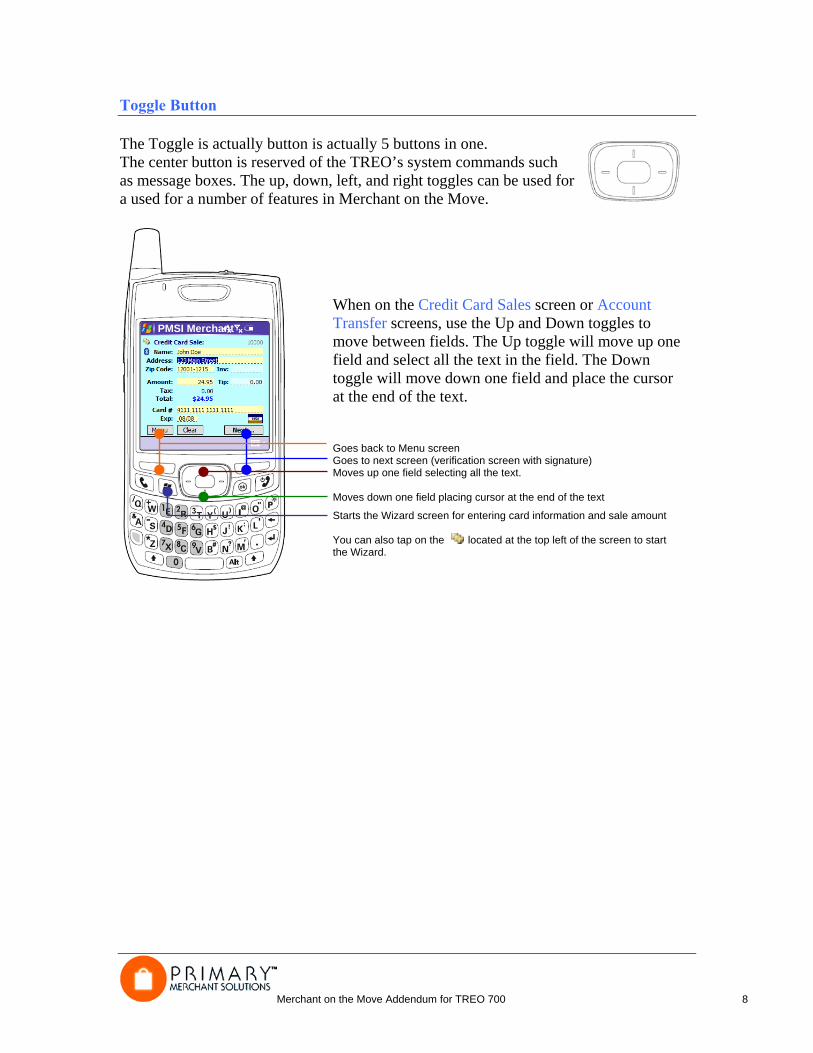
Toggle Button The Toggle is actually button is actually 5 buttons in one. The center button is reserved of the TREO’s system commands such as message boxes. The up, down, left, and right toggles can be used for a used for a number of features in Merchant on the Move.
When on the Credit Card Sales screen or Account Transfer screens, use the Up and Down toggles to move between fields. The Up toggle will move up one field and select all the text in the field. The Down toggle will move down one field and place the cursor at the end of the text. Goes back to Menu screen Goes to next screen (verification screen with signature) Moves up one field selecting all the text. Moves down one field placing cursor at the end of the text
Starts the Wizard screen for entering card information and sale amount You can also tap on the located at the top left of the screen to start the Wizard.
PMSI Merchant
Merchant on the Move Addendum for TREO 700 9
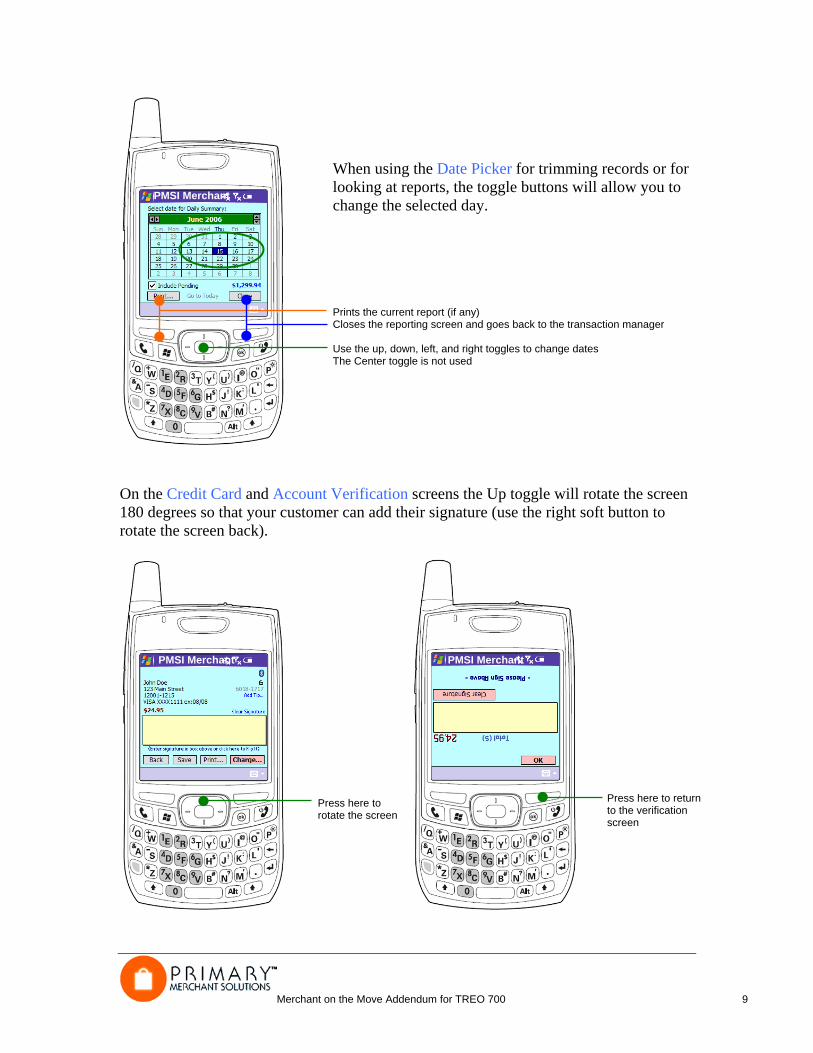
On the Credit Card and Account Verification screens the Up toggle will rotate the screen 180 degrees so that your customer can add their signature (use the right soft button to rotate the screen back).
When using the Date Picker for trimming records or for looking at reports, the toggle buttons will allow you to change the selected day. Prints the current report (if any) Closes the reporting screen and goes back to the transaction manager Use the up, down, left, and right toggles to change dates The Center toggle is not used
Press here to rotate the screen
Press here to return to the verification screen
PMSI Merchant
PMSI Merchant PMSI Merchant
Merchant on the Move Addendum for TREO 700 10
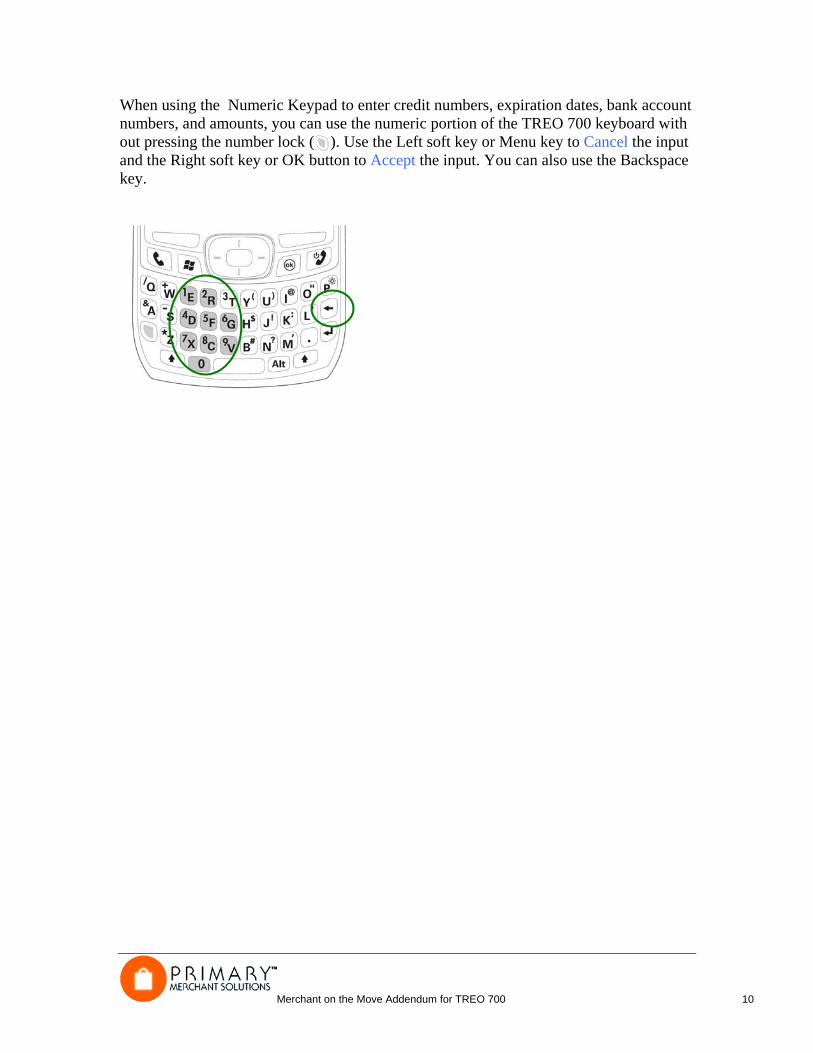
When using the Numeric Keypad to enter credit numbers, expiration dates, bank account numbers, and amounts, you can use the numeric portion of the TREO 700 keyboard with out pressing the number lock ( ). Use the Left soft key or Menu key to Cancel the input and the Right soft key or OK button to Accept the input. You can also use the Backspace key.

Merchant on the Move Addendum for TREO 700 11
Detailed Information for setting up and using your Wireless Connection Merchant on the Move uses your phone’s Wireless Internet Data connection to process transactions for real-time credit card approval and account transfer authentication. Thus, in order to use Merchant on the Move, you must have a data plan already setup with Verizon. The information below will help determine if your have a data plan and how to set it up to work with Merchant on the Move. Topics:
• How to determine if you have a data plan with Verizon • How to setup your data plan to work with Merchant on the Move • Important Tips when establishing a connection and processing transactions
How to determine if you have a data plan with Verizon The simplest way to see if you have a data plan already setup on your device is to start Internet Explorer and to perform a small test to see if you can access data securely over the Internet. To do this, follow the steps below.
1. Turn on your phone (do not have it connected to your computer). 2. From the Start menu select Internet Explorer. 3. Type in the web address: PMSIWS.com/treo 4. Tap the Go ( ) button.
The connection balloon should appear and start the connection. Once the connection is established the balloon will disappear. If the connection is successful you will see a WEB page with the current date and time.
If you are not able to connect, make sure that you are in an area that has at least a single bar next to the antenna icon. We also recommend that you become familiar with the Connectivity Icons that appear at the top of your Today Screen. They are also shown next. If you still cannot connect, contact your local Verizon dealer for assistance.
Merchant on the Move Addendum for TREO 700 12
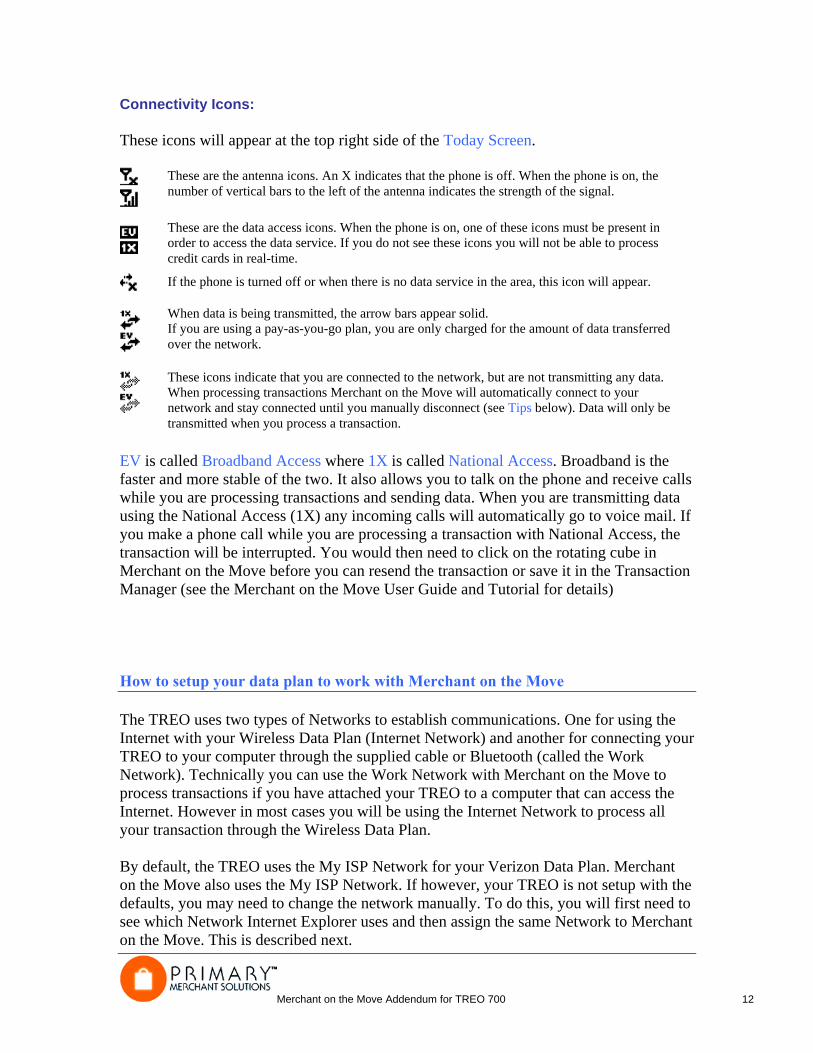
Connectivity Icons: These icons will appear at the top right side of the Today Screen.
EV is called Broadband Access where 1X is called National Access. Broadband is the faster and more stable of the two. It also allows you to talk on the phone and receive calls while you are processing transactions and sending data. When you are transmitting data using the National Access (1X) any incoming calls will automatically go to voice mail. If you make a phone call while you are processing a transaction with National Access, the transaction will be interrupted. You would then need to click on the rotating cube in Merchant on the Move before you can resend the transaction or save it in the Transaction Manager (see the Merchant on the Move User Guide and Tutorial for details) How to setup your data plan to work with Merchant on the Move The TREO uses two types of Networks to establish communications. One for using the Internet with your Wireless Data Plan (Internet Network) and another for connecting your TREO to your computer through the supplied cable or Bluetooth (called the Work Network). Technically you can use the Work Network with Merchant on the Move to process transactions if you have attached your TREO to a computer that can access the Internet. However in most cases you will be using the Internet Network to process all your transaction through the Wireless Data Plan. By default, the TREO uses the My ISP Network for your Verizon Data Plan. Merchant on the Move also uses the My ISP Network. If however, your TREO is not setup with the defaults, you may need to change the network manually. To do this, you will first need to see which Network Internet Explorer uses and then assign the same Network to Merchant on the Move. This is described next.
These are the antenna icons. An X indicates that the phone is off. When the phone is on, the number of vertical bars to the left of the antenna indicates the strength of the signal.
These are the data access icons. When the phone is on, one of these icons must be present in order to access the data service. If you do not see these icons you will not be able to process credit cards in real-time.
If the phone is turned off or when there is no data service in the area, this icon will appear.
When data is being transmitted, the arrow bars appear solid. If you are using a pay-as-you-go plan, you are only charged for the amount of data transferred over the network.
These icons indicate that you are connected to the network, but are not transmitting any data. When processing transactions Merchant on the Move will automatically connect to your network and stay connected until you manually disconnect (see Tips below). Data will only betransmitted when you process a transaction.
Merchant on the Move Addendum for TREO 700 13
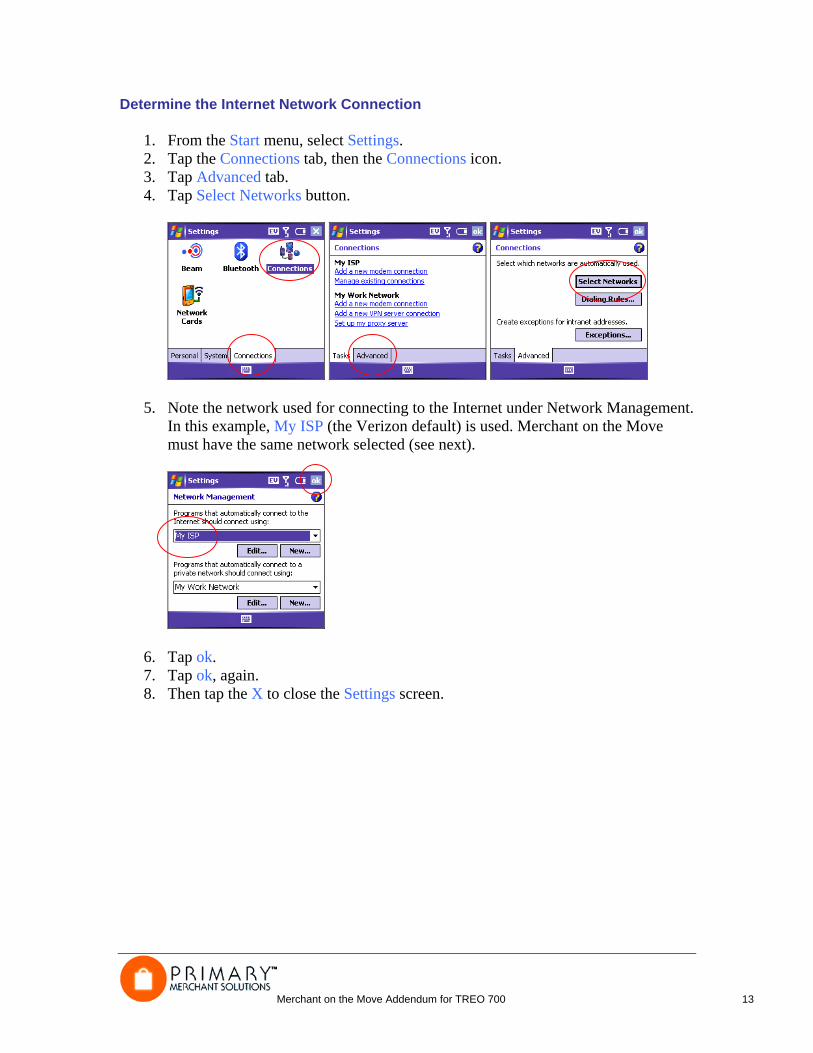
Determine the Internet Network Connection
1. From the Start menu, select Settings. 2. Tap the Connections tab, then the Connections icon. 3. Tap Advanced tab. 4. Tap Select Networks button.
5. Note the network used for connecting to the Internet under Network Management. In this example, My ISP (the Verizon default) is used. Merchant on the Move must have the same network selected (see next).
6. Tap ok. 7. Tap ok, again. 8. Then tap the X to close the Settings screen.
Merchant on the Move Addendum for TREO 700 14
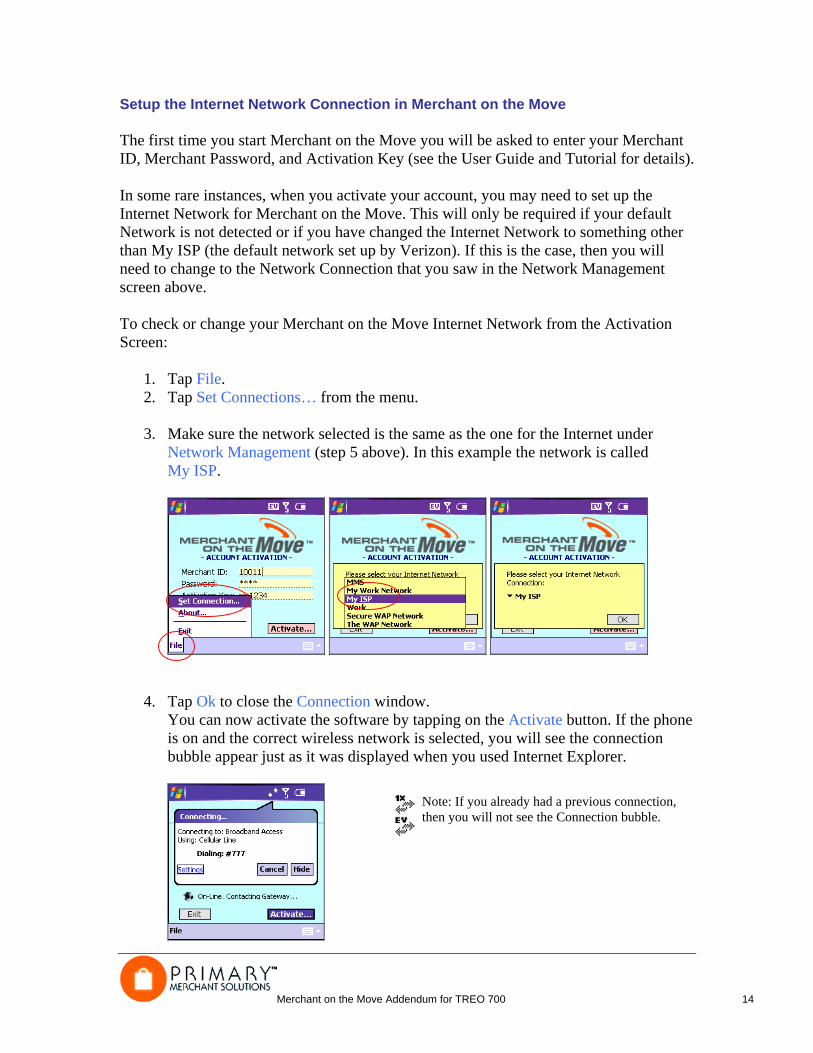
Setup the Internet Network Connection in Merchant on the Move The first time you start Merchant on the Move you will be asked to enter your Merchant ID, Merchant Password, and Activation Key (see the User Guide and Tutorial for details). In some rare instances, when you activate your account, you may need to set up the Internet Network for Merchant on the Move. This will only be required if your default Network is not detected or if you have changed the Internet Network to something other than My ISP (the default network set up by Verizon). If this is the case, then you will need to change to the Network Connection that you saw in the Network Management screen above. To check or change your Merchant on the Move Internet Network from the Activation Screen:
1. Tap File. 2. Tap Set Connections… from the menu.
3. Make sure the network selected is the same as the one for the Internet under
Network Management (step 5 above). In this example the network is called My ISP.
4. Tap Ok to close the Connection window. You can now activate the software by tapping on the Activate button. If the phone is on and the correct wireless network is selected, you will see the connection bubble appear just as it was displayed when you used Internet Explorer.
Note: If you already had a previous connection, then you will not see the Connection bubble.
Merchant on the Move Addendum for TREO 700 15
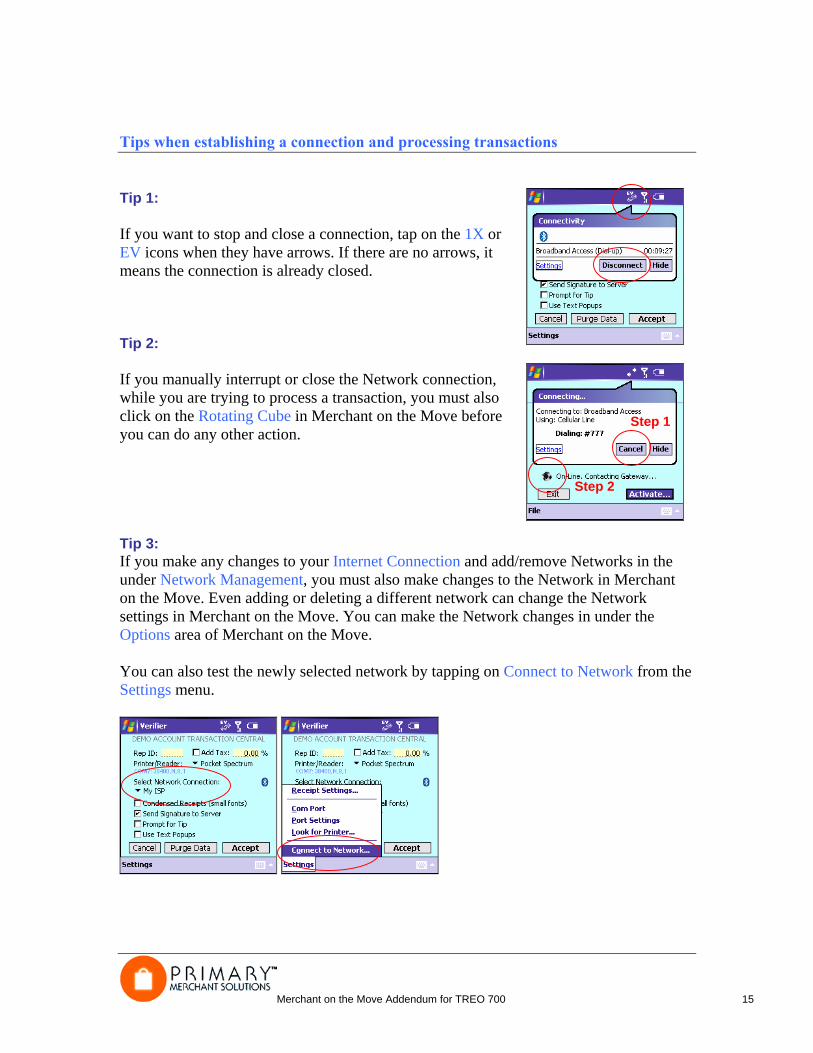
Tips when establishing a connection and processing transactions Tip 1: If you want to stop and close a connection, tap on the 1X or EV icons when they have arrows. If there are no arrows, it means the connection is already closed. Tip 2: If you manually interrupt or close the Network connection, while you are trying to process a transaction, you must also click on the Rotating Cube in Merchant on the Move before you can do any other action. Tip 3: If you make any changes to your Internet Connection and add/remove Networks in the under Network Management, you must also make changes to the Network in Merchant on the Move. Even adding or deleting a different network can change the Network settings in Merchant on the Move. You can make the Network changes in under the Options area of Merchant on the Move. You can also test the newly selected network by tapping on Connect to Network from the Settings menu.
Step 1
Step 2