Menu Customization and Add-Ins in JMP® 9
12
1 Menu Customization and Add-Ins in JMP® 9 Eric Hill, SAS Institute, Cary, NC ABSTRACT JMP 9 includes several new features to help you customize JMP® to make the time that you and your co-workers spend with JMP as productive as possible. JMP has included the ability to customize menus for several releases, but in JMP 9, menu customization has become a great deal more flexible and manageable. Add-Ins are a brand new JMP 9 feature allowing you to combine menu customization with custom JMP scripts (JSL) in order to add features to JMP that you or your organization needs. The distribution mechanism of JMP Add-Ins makes it easy to share add-ins with others and to easily disable or remove add-ins from your JMP installation that you no longer need. INTRODUCTION This paper discusses improvements made in JMP 9 for customizing JMP. Menu Customization allows you to: Hide built-in JMP menu items that you never use Rename built-in JMP menu items to names that are more meaningful to you Add your own menu items that run JMP scripts that you or others have written As an administrator, push down menu customizations to your users JMP Add-Ins go one step further. A JMP Add-In consists of JSL scripts plus auxiliary files such as data tables, images, SAS data sets, etc., usually along with a set of menu customizations that allows users of the add-in to invoke the scripts. A JMP Add-In can be packaged as a ZIP file (with the extension changed from .zip to .jmpaddin) for ease of distribution around your organization. CUSTOMIZING JMP MENUS The JMP Menu Editor, which is available only in the Windows version of JMP, is the tool to use to customize JMP’s menus. You can invoke it by selecting View > Customize > Menus and Toolbars.
Transcript of Menu Customization and Add-Ins in JMP® 9
1
Menu Customization and Add-Ins in JMP® 9
Eric Hill, SAS Institute, Cary, NC
ABSTRACT
JMP 9 includes several new features to help you customize JMP® to make the time that you and your co-workers spend with JMP as productive as possible. JMP has included the ability to customize menus for several releases, but in JMP 9, menu customization has become a great deal more flexible and manageable. Add-Ins are a brand new JMP 9 feature allowing you to combine menu customization with custom JMP scripts (JSL) in order to add features to JMP that you or your organization needs. The distribution mechanism of JMP Add-Ins makes it easy to share add-ins with others and to easily disable or remove add-ins from your JMP installation that you no longer need.
INTRODUCTION
This paper discusses improvements made in JMP 9 for customizing JMP. Menu Customization allows you to:
Hide built-in JMP menu items that you never use
Rename built-in JMP menu items to names that are more meaningful to you
Add your own menu items that run JMP scripts that you or others have written
As an administrator, push down menu customizations to your users
JMP Add-Ins go one step further. A JMP Add-In consists of JSL scripts plus auxiliary files such as data tables,
images, SAS data sets, etc., usually along with a set of menu customizations that allows users of the add-in to invoke the scripts. A JMP Add-In can be packaged as a ZIP file (with the extension changed from .zip to .jmpaddin) for ease of distribution around your organization.
CUSTOMIZING JMP MENUS
The JMP Menu Editor, which is available only in the Windows version of JMP, is the tool to use to customize JMP’s menus. You can invoke it by selecting View > Customize > Menus and Toolbars.
Menu Customization and Add-Ins in JMP® 9, continued
2
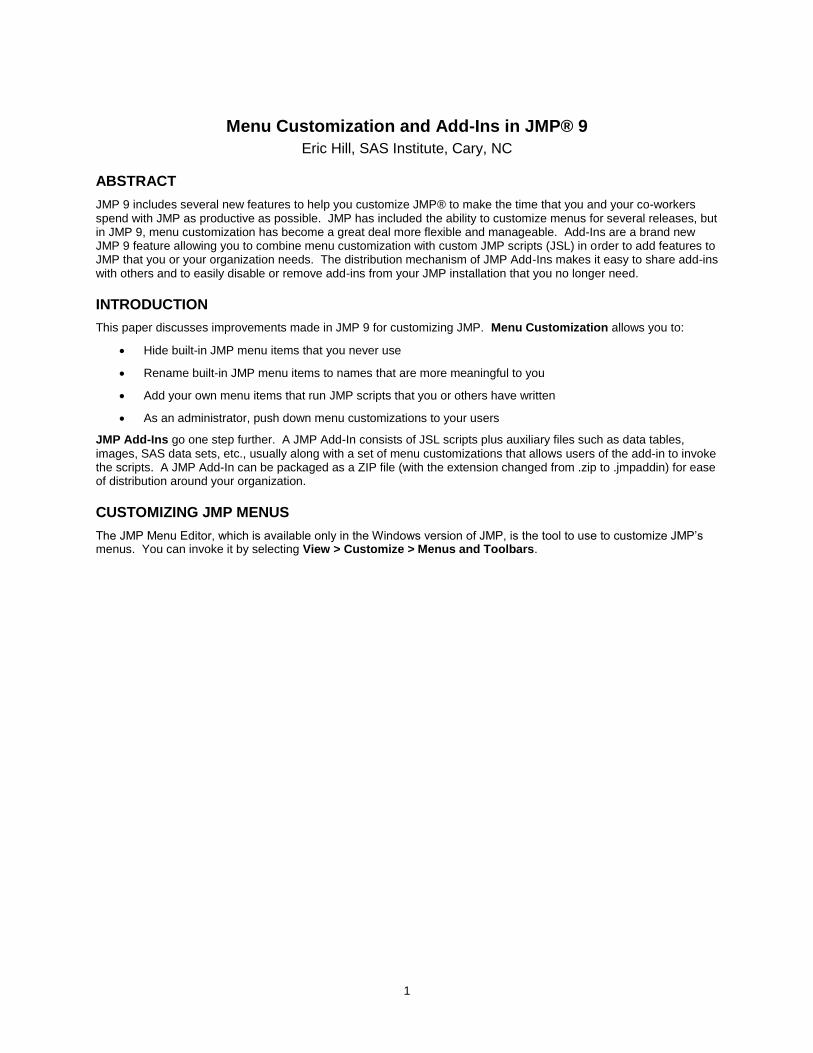
Figure 1. The JMP® Menu Editor
When you edit JMP’s menus using the Menu Editor, the results will be saved in a .jmpcust file in a location that
depends on the customization set you are editing. Notice at the top of the Menu Editor when you first bring it up you see Currently editing: Customizations for current user. The .jmpcust file for the current user’s customizations is named usercust.jmpcust, and it is saved under the current user’s user profile directory. The exact path depends on
the version of Microsoft Windows that you are running:
XP: C:\Documents and Settings\username\Local Settings\Application Data\SAS\JMP\9\usercust.jmpcust Vista and Windows 7: C:\users\username\AppData\Local\SAS\JMP\9\usercust.jmpcust
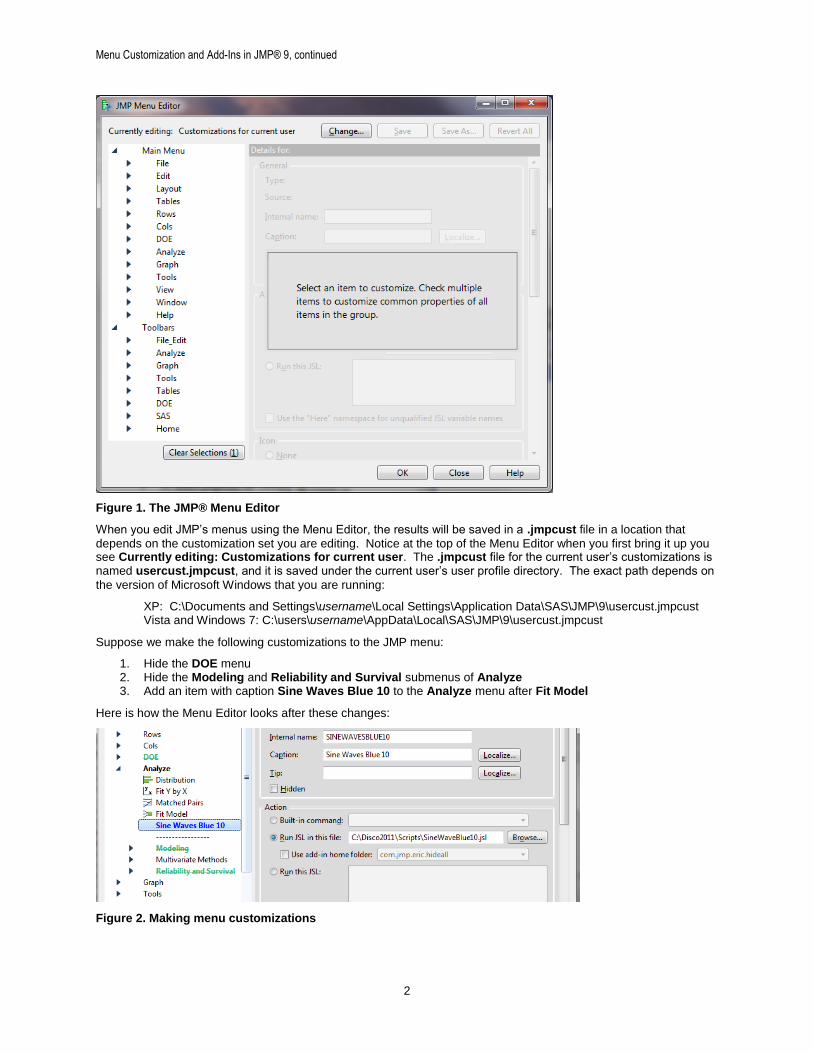
Suppose we make the following customizations to the JMP menu:
1. Hide the DOE menu 2. Hide the Modeling and Reliability and Survival submenus of Analyze 3. Add an item with caption Sine Waves Blue 10 to the Analyze menu after Fit Model
Here is how the Menu Editor looks after these changes:
Figure 2. Making menu customizations
Menu Customization and Add-Ins in JMP® 9, continued
3
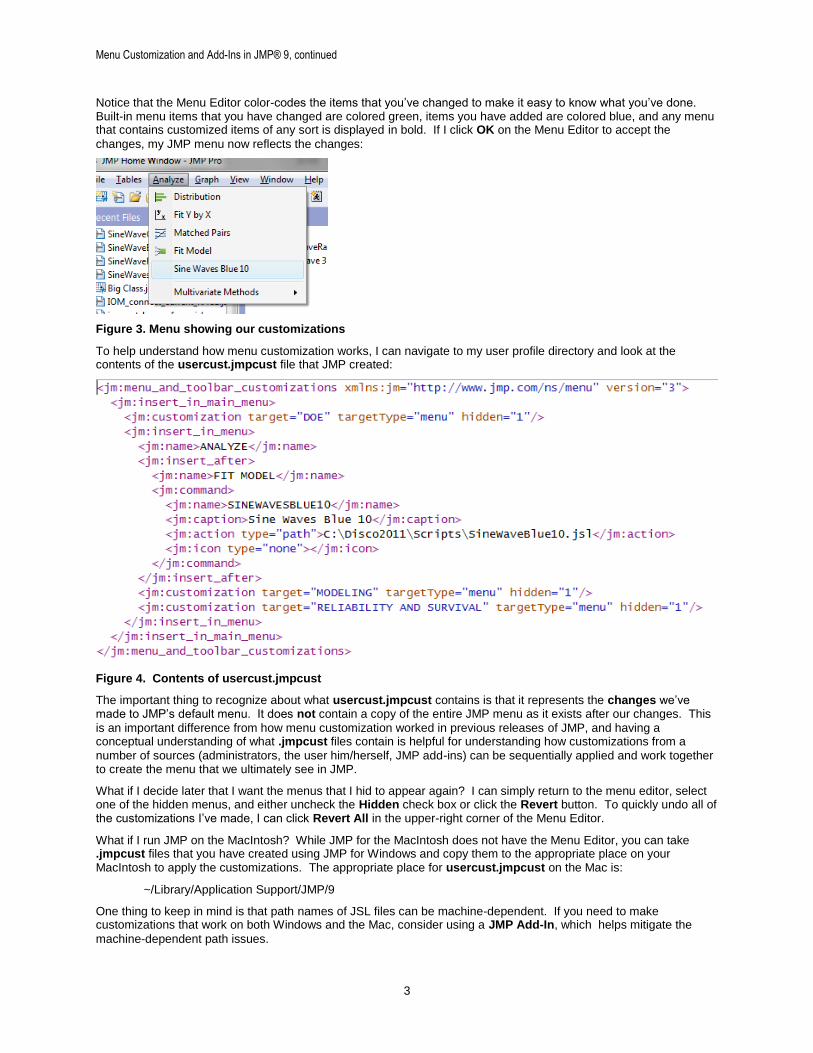
Notice that the Menu Editor color-codes the items that you’ve changed to make it easy to know what you’ve done. Built-in menu items that you have changed are colored green, items you have added are colored blue, and any menu that contains customized items of any sort is displayed in bold. If I click OK on the Menu Editor to accept the
changes, my JMP menu now reflects the changes:
Figure 3. Menu showing our customizations
To help understand how menu customization works, I can navigate to my user profile directory and look at the contents of the usercust.jmpcust file that JMP created:
Figure 4. Contents of usercust.jmpcust
The important thing to recognize about what usercust.jmpcust contains is that it represents the changes we’ve made to JMP’s default menu. It does not contain a copy of the entire JMP menu as it exists after our changes. This
is an important difference from how menu customization worked in previous releases of JMP, and having a conceptual understanding of what .jmpcust files contain is helpful for understanding how customizations from a
number of sources (administrators, the user him/herself, JMP add-ins) can be sequentially applied and work together to create the menu that we ultimately see in JMP.
What if I decide later that I want the menus that I hid to appear again? I can simply return to the menu editor, select one of the hidden menus, and either uncheck the Hidden check box or click the Revert button. To quickly undo all of the customizations I’ve made, I can click Revert All in the upper-right corner of the Menu Editor.
What if I run JMP on the MacIntosh? While JMP for the MacIntosh does not have the Menu Editor, you can take .jmpcust files that you have created using JMP for Windows and copy them to the appropriate place on your MacIntosh to apply the customizations. The appropriate place for usercust.jmpcust on the Mac is:
~/Library/Application Support/JMP/9
One thing to keep in mind is that path names of JSL files can be machine-dependent. If you need to make customizations that work on both Windows and the Mac, consider using a JMP Add-In, which helps mitigate the
machine-dependent path issues.
Menu Customization and Add-Ins in JMP® 9, continued
4
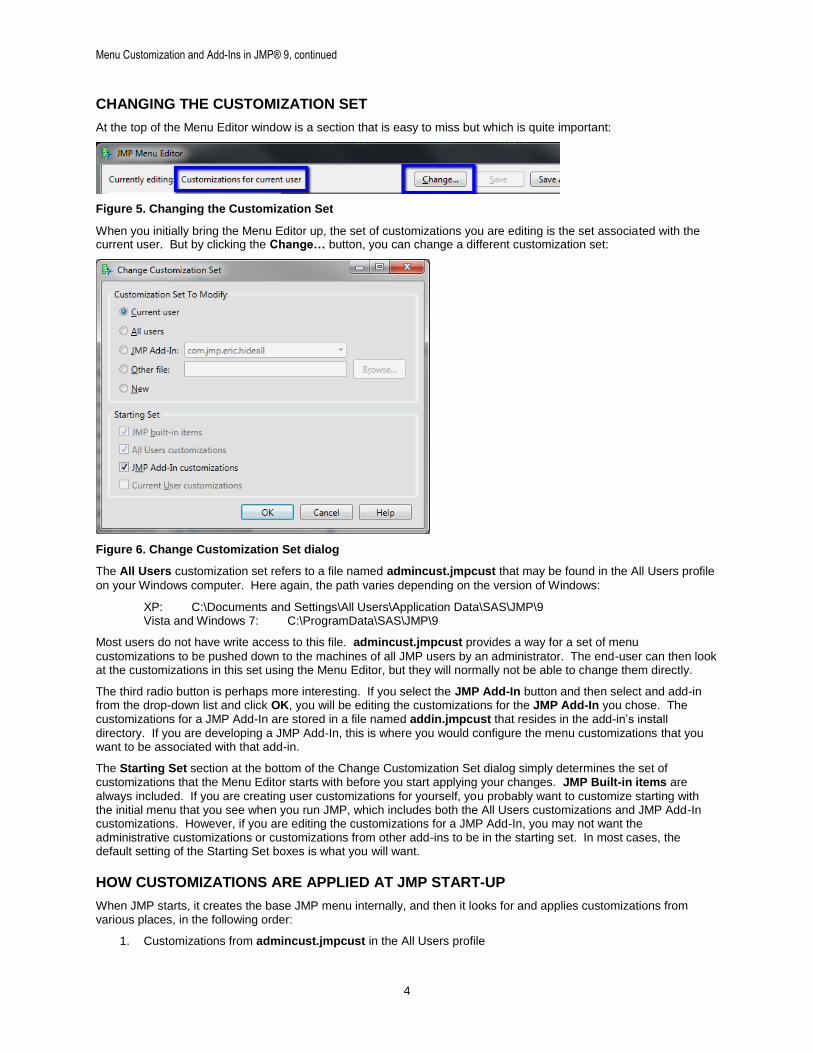
CHANGING THE CUSTOMIZATION SET
At the top of the Menu Editor window is a section that is easy to miss but which is quite important:
Figure 5. Changing the Customization Set
When you initially bring the Menu Editor up, the set of customizations you are editing is the set associated with the current user. But by clicking the Change… button, you can change a different customization set:
Figure 6. Change Customization Set dialog
The All Users customization set refers to a file named admincust.jmpcust that may be found in the All Users profile
on your Windows computer. Here again, the path varies depending on the version of Windows:
XP: C:\Documents and Settings\All Users\Application Data\SAS\JMP\9 Vista and Windows 7: C:\ProgramData\SAS\JMP\9
Most users do not have write access to this file. admincust.jmpcust provides a way for a set of menu
customizations to be pushed down to the machines of all JMP users by an administrator. The end-user can then look at the customizations in this set using the Menu Editor, but they will normally not be able to change them directly.
The third radio button is perhaps more interesting. If you select the JMP Add-In button and then select and add-in from the drop-down list and click OK, you will be editing the customizations for the JMP Add-In you chose. The customizations for a JMP Add-In are stored in a file named addin.jmpcust that resides in the add-in’s install
directory. If you are developing a JMP Add-In, this is where you would configure the menu customizations that you want to be associated with that add-in.
The Starting Set section at the bottom of the Change Customization Set dialog simply determines the set of customizations that the Menu Editor starts with before you start applying your changes. JMP Built-in items are
always included. If you are creating user customizations for yourself, you probably want to customize starting with the initial menu that you see when you run JMP, which includes both the All Users customizations and JMP Add-In customizations. However, if you are editing the customizations for a JMP Add-In, you may not want the administrative customizations or customizations from other add-ins to be in the starting set. In most cases, the default setting of the Starting Set boxes is what you will want.
HOW CUSTOMIZATIONS ARE APPLIED AT JMP START-UP
When JMP starts, it creates the base JMP menu internally, and then it looks for and applies customizations from various places, in the following order:
1. Customizations from admincust.jmpcust in the All Users profile

Menu Customization and Add-Ins in JMP® 9, continued
5
2. Customizations from any installed JMP Add-Ins that are enabled 3. Customizations from usercust.jmpcust in the current user’s profile
When you are looking at the JMP menu in the Menu Editor and you see an item that you are not sure where it came from, look at the Source property in the General section of the Details panel on the right side of the Menu Editor. It
will tell you where the item came from. Possible sources include:
JMP Built-In item
All Users – the item is from admincust.jmpcust in the All Users profile
Custom Item – this item was created in the customization set you are currently viewing
JMP Add-In – the item was created by a registered, enabled JMP Add-In
OVERRIDING CUSTOMIZATIONS MADE AT ANOTHER LEVEL
I mentioned earlier that admincust.jmpcust in the All Users profile provides a convenient way for administrators to
push down a set of customizations to all JMP users in an organization, and that end-users normally do not have write-access to this file, so they can’t change it. Does that mean that the end-user is stuck with the customizations made by administrators?
It turns out it does not. Here is a screenshot of the menu editor showing the Matched Pairs item from the Analyze
menu having been hidden at some level:
Figure 7. Somebody hid Matched Pairs
It might have been an add-in that hid the item, or it might have been hidden by admincust.jmpcust. We can tell that
it was not hidden at the user level (the customization set I am editing) because it displays in black and not bold. But there is nothing stopping me from unchecking the Hidden box at the user level. Doing so overrides the hiding that was done by a lower-level customization set, and now Matched Pairs shows up in the menu:
Figure 8. Matched Pairs restored
So no matter what customizations an administrator or an add-in author makes to the JMP menu, the end-user still has final say in how his/her menus look.
JMP ADD-INS
I have a JSL script that generates green sine waves in an attractive pattern. Here is what the output looks like:
Menu Customization and Add-Ins in JMP® 9, continued
6
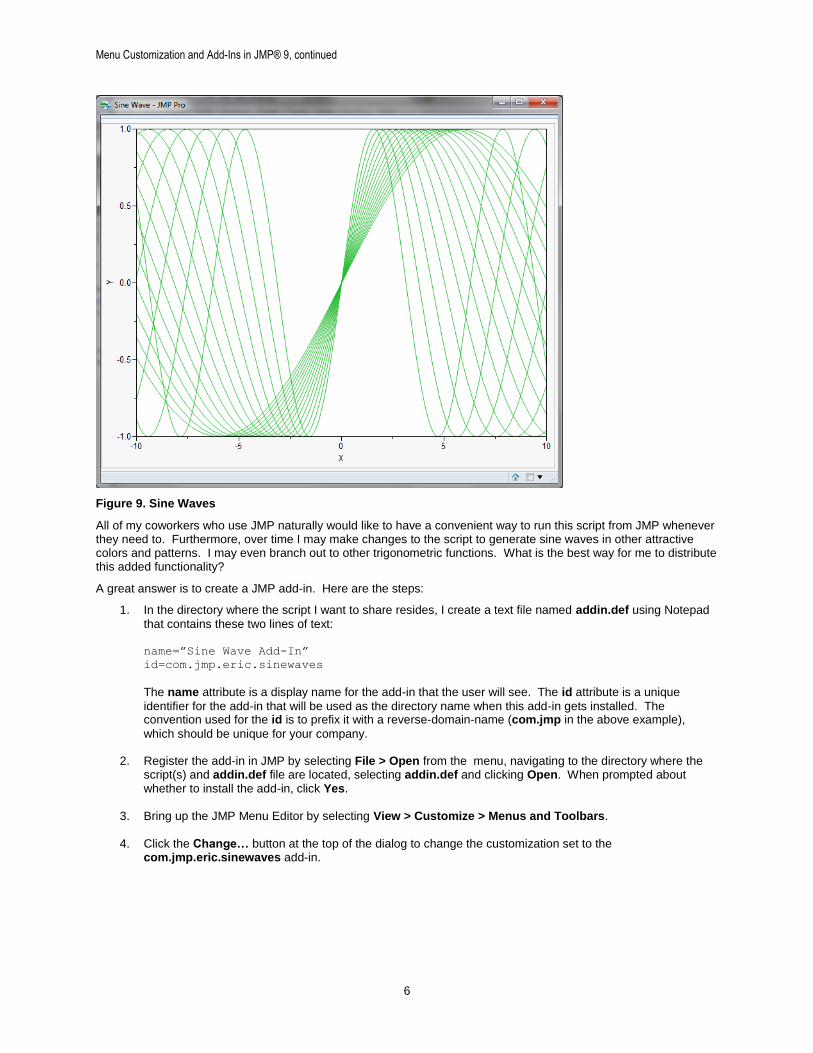
Figure 9. Sine Waves
All of my coworkers who use JMP naturally would like to have a convenient way to run this script from JMP whenever they need to. Furthermore, over time I may make changes to the script to generate sine waves in other attractive colors and patterns. I may even branch out to other trigonometric functions. What is the best way for me to distribute this added functionality?
A great answer is to create a JMP add-in. Here are the steps:
1. In the directory where the script I want to share resides, I create a text file named addin.def using Notepad
that contains these two lines of text: name=”Sine Wave Add-In”
id=com.jmp.eric.sinewaves
The name attribute is a display name for the add-in that the user will see. The id attribute is a unique
identifier for the add-in that will be used as the directory name when this add-in gets installed. The convention used for the id is to prefix it with a reverse-domain-name (com.jmp in the above example),
which should be unique for your company.
2. Register the add-in in JMP by selecting File > Open from the menu, navigating to the directory where the script(s) and addin.def file are located, selecting addin.def and clicking Open. When prompted about whether to install the add-in, click Yes.
3. Bring up the JMP Menu Editor by selecting View > Customize > Menus and Toolbars.
4. Click the Change… button at the top of the dialog to change the customization set to the
com.jmp.eric.sinewaves add-in.

Menu Customization and Add-Ins in JMP® 9, continued
7
5. In the left pane of the Menu Editor, expand Graph, right-click on Contour Plot, select Insert After, and then click OK to add a Command.
6. Set the following properties of the new menu item:
a. Set Caption to “Sine Waves Green 20”.
b. In the Action section, select the Run JSL in this file: radio button. Notice that the Use add-in
home folder box is checked and the ID of the add-in is selected in the drop-down list box:
c. Click the Browse… button. The Select JSL Script dialog box will appear and will be set to the directory containing the scripts associated with the com.jmp.eric.sinewaves add-in. Select the JSL script that this menu item should run (SineWaveGreen20.jsl) and click Open. Now the Action section looks like this:
Notice that instead of using an absolute path to the script, the Menu Editor used the $ADDIN_HOME path variable referencing the ID of the add-in, com.jmp.eric.sinewaves. By
referencing the script in this way, JMP will be able to find the script even if it is installed in different locations on different machines. $ADDIN_HOME(com.jmp.eric.sinewaves) tells JMP: Look for a registered add-in with ID com.jmp.eric.sinewaves, and look for the script in the directory where
that add-in is installed.
d. Click OK on the Menu Editor dialog to save the changes.
7. Take a look in the directory where original JSL script was located and where you created the addin.def file.
Menu Customization and Add-Ins in JMP® 9, continued
8
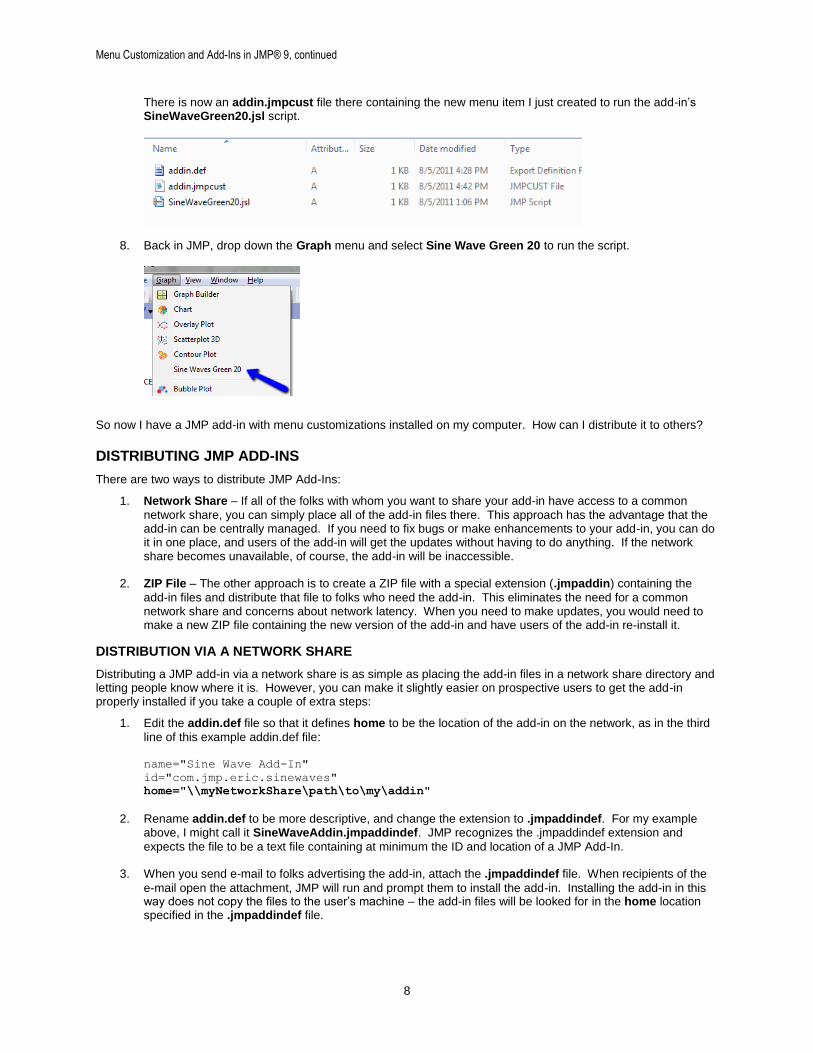
There is now an addin.jmpcust file there containing the new menu item I just created to run the add-in’s SineWaveGreen20.jsl script.
8. Back in JMP, drop down the Graph menu and select Sine Wave Green 20 to run the script.
So now I have a JMP add-in with menu customizations installed on my computer. How can I distribute it to others?
DISTRIBUTING JMP ADD-INS
There are two ways to distribute JMP Add-Ins:
1. Network Share – If all of the folks with whom you want to share your add-in have access to a common
network share, you can simply place all of the add-in files there. This approach has the advantage that the add-in can be centrally managed. If you need to fix bugs or make enhancements to your add-in, you can do it in one place, and users of the add-in will get the updates without having to do anything. If the network share becomes unavailable, of course, the add-in will be inaccessible.
2. ZIP File – The other approach is to create a ZIP file with a special extension (.jmpaddin) containing the
add-in files and distribute that file to folks who need the add-in. This eliminates the need for a common network share and concerns about network latency. When you need to make updates, you would need to make a new ZIP file containing the new version of the add-in and have users of the add-in re-install it.
DISTRIBUTION VIA A NETWORK SHARE
Distributing a JMP add-in via a network share is as simple as placing the add-in files in a network share directory and letting people know where it is. However, you can make it slightly easier on prospective users to get the add-in properly installed if you take a couple of extra steps:
1. Edit the addin.def file so that it defines home to be the location of the add-in on the network, as in the third
line of this example addin.def file: name="Sine Wave Add-In"
id="com.jmp.eric.sinewaves"
home="\\myNetworkShare\path\to\my\addin"
2. Rename addin.def to be more descriptive, and change the extension to .jmpaddindef. For my example
above, I might call it SineWaveAddin.jmpaddindef. JMP recognizes the .jmpaddindef extension and
expects the file to be a text file containing at minimum the ID and location of a JMP Add-In.
3. When you send e-mail to folks advertising the add-in, attach the .jmpaddindef file. When recipients of the
e-mail open the attachment, JMP will run and prompt them to install the add-in. Installing the add-in in this way does not copy the files to the user’s machine – the add-in files will be looked for in the home location specified in the .jmpaddindef file.
Menu Customization and Add-Ins in JMP® 9, continued
9
DISTRIBUTION VIA ZIP FILE
To distribute your add-in as a ZIP file, you will need to install the WinZip utility, which you can find on the Internet. Once you have WinZip, the steps are as follows:
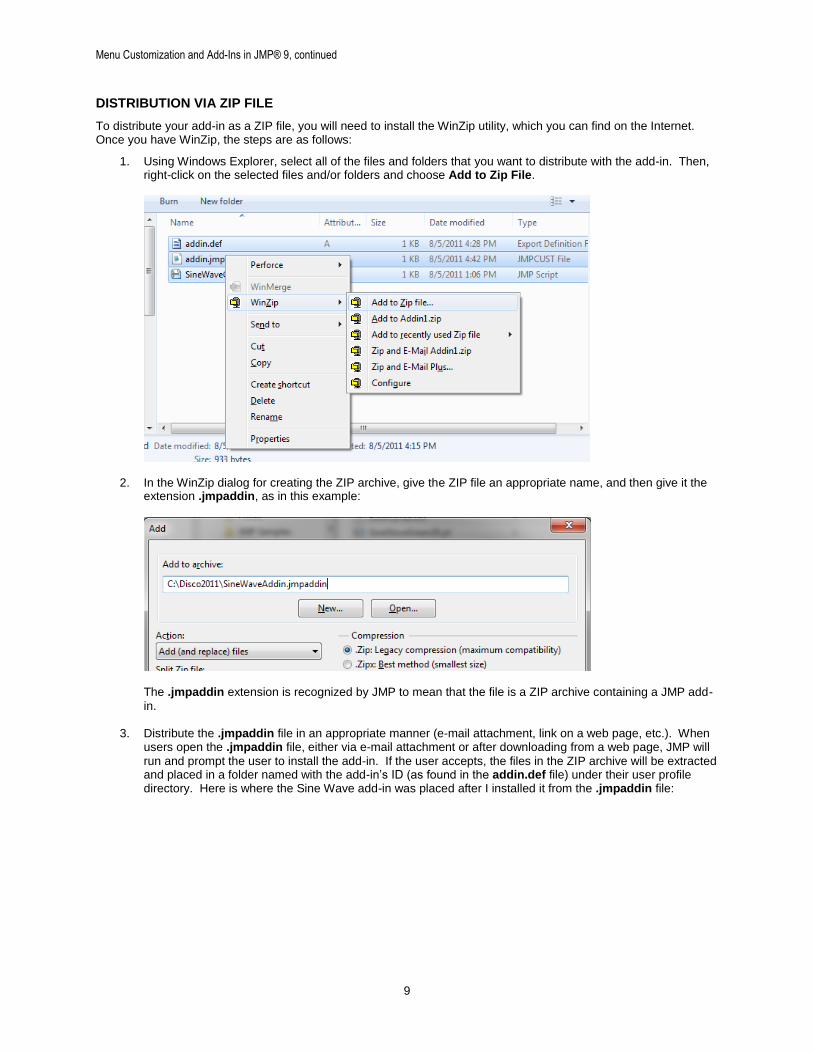
1. Using Windows Explorer, select all of the files and folders that you want to distribute with the add-in. Then, right-click on the selected files and/or folders and choose Add to Zip File.
2. In the WinZip dialog for creating the ZIP archive, give the ZIP file an appropriate name, and then give it the extension .jmpaddin, as in this example:
The .jmpaddin extension is recognized by JMP to mean that the file is a ZIP archive containing a JMP add-
in.
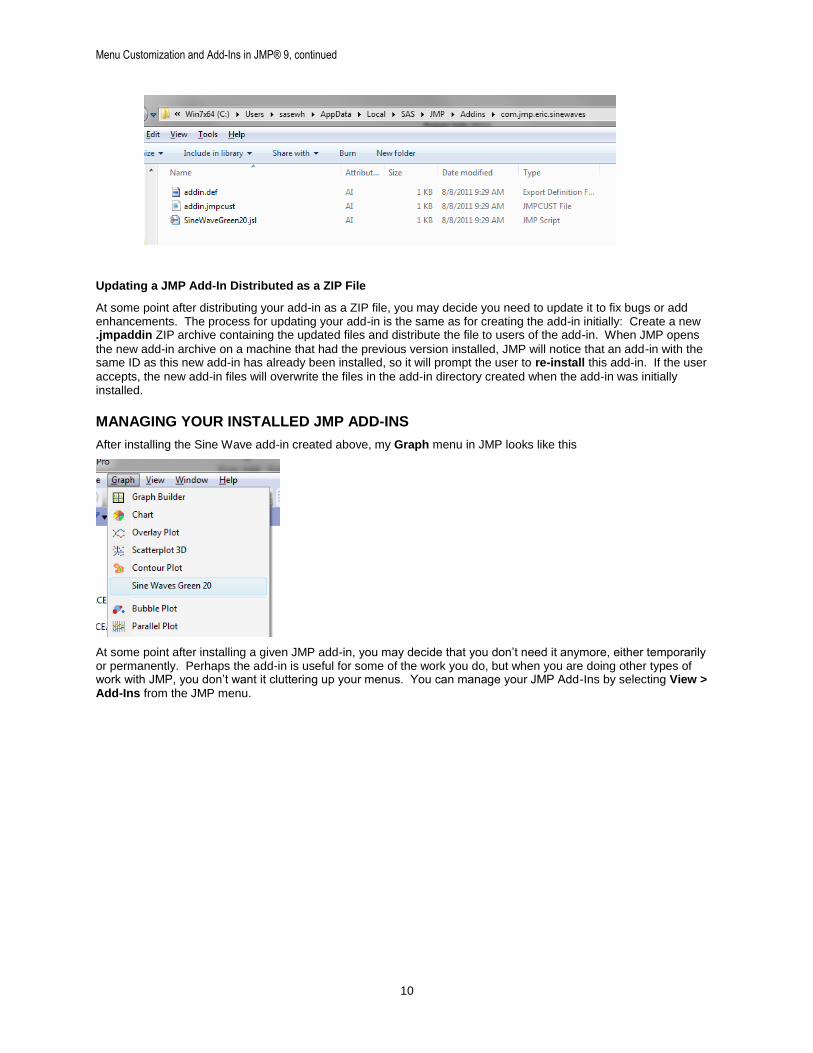
3. Distribute the .jmpaddin file in an appropriate manner (e-mail attachment, link on a web page, etc.). When users open the .jmpaddin file, either via e-mail attachment or after downloading from a web page, JMP will
run and prompt the user to install the add-in. If the user accepts, the files in the ZIP archive will be extracted and placed in a folder named with the add-in’s ID (as found in the addin.def file) under their user profile directory. Here is where the Sine Wave add-in was placed after I installed it from the .jmpaddin file:
Menu Customization and Add-Ins in JMP® 9, continued
10
Updating a JMP Add-In Distributed as a ZIP File
At some point after distributing your add-in as a ZIP file, you may decide you need to update it to fix bugs or add enhancements. The process for updating your add-in is the same as for creating the add-in initially: Create a new .jmpaddin ZIP archive containing the updated files and distribute the file to users of the add-in. When JMP opens
the new add-in archive on a machine that had the previous version installed, JMP will notice that an add-in with the same ID as this new add-in has already been installed, so it will prompt the user to re-install this add-in. If the user
accepts, the new add-in files will overwrite the files in the add-in directory created when the add-in was initially installed.
MANAGING YOUR INSTALLED JMP ADD-INS
After installing the Sine Wave add-in created above, my Graph menu in JMP looks like this
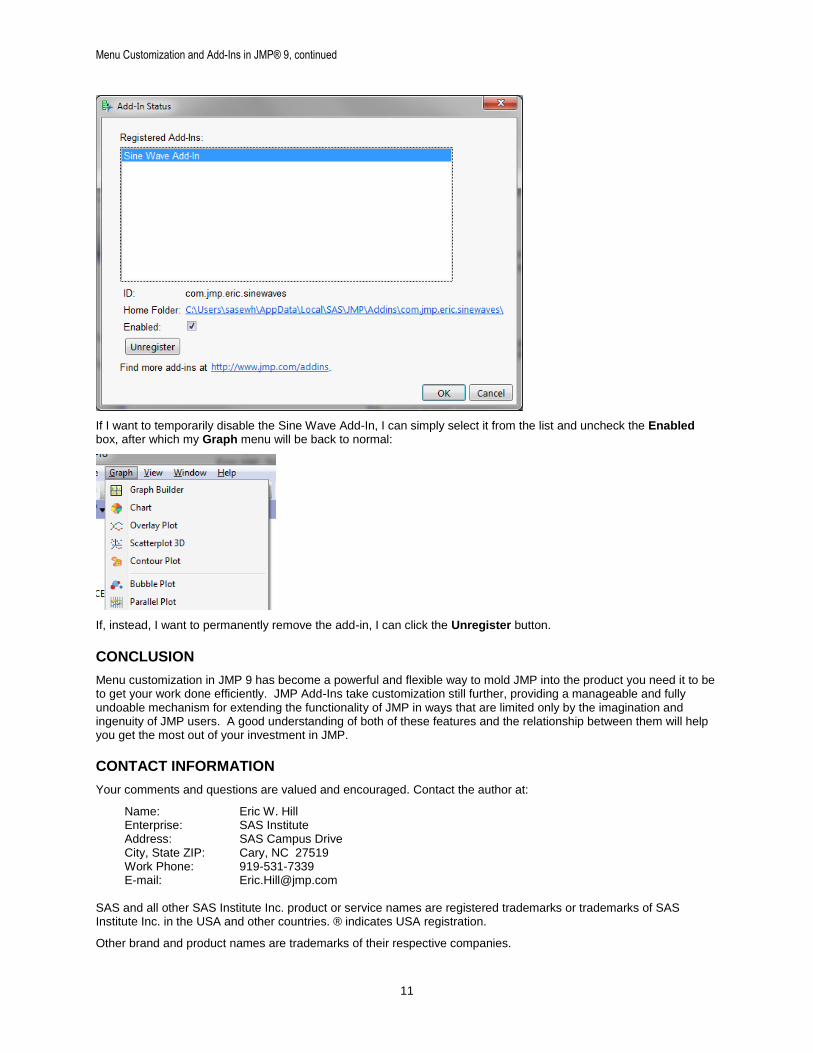
At some point after installing a given JMP add-in, you may decide that you don’t need it anymore, either temporarily or permanently. Perhaps the add-in is useful for some of the work you do, but when you are doing other types of work with JMP, you don’t want it cluttering up your menus. You can manage your JMP Add-Ins by selecting View > Add-Ins from the JMP menu.
Menu Customization and Add-Ins in JMP® 9, continued
11
If I want to temporarily disable the Sine Wave Add-In, I can simply select it from the list and uncheck the Enabled box, after which my Graph menu will be back to normal:
If, instead, I want to permanently remove the add-in, I can click the Unregister button.
CONCLUSION
Menu customization in JMP 9 has become a powerful and flexible way to mold JMP into the product you need it to be to get your work done efficiently. JMP Add-Ins take customization still further, providing a manageable and fully undoable mechanism for extending the functionality of JMP in ways that are limited only by the imagination and ingenuity of JMP users. A good understanding of both of these features and the relationship between them will help you get the most out of your investment in JMP.
CONTACT INFORMATION
Your comments and questions are valued and encouraged. Contact the author at:
Name: Eric W. Hill Enterprise: SAS Institute Address: SAS Campus Drive City, State ZIP: Cary, NC 27519 Work Phone: 919-531-7339 E-mail: [email protected]
SAS and all other SAS Institute Inc. product or service names are registered trademarks or trademarks of SAS Institute Inc. in the USA and other countries. ® indicates USA registration.
Other brand and product names are trademarks of their respective companies.

Menu Customization and Add-Ins in JMP® 9, continued
12