MELT Method - The Eyethe-eye.eu/public/concen.org/gsxrjunkie99 Compilation 39/Melt Method.pdf ·...
300
Transcript of MELT Method - The Eyethe-eye.eu/public/concen.org/gsxrjunkie99 Compilation 39/Melt Method.pdf ·...
TheMELTMethod
A Breakthrough Self-Treatment Systemto Eliminate Chronic Pain, Erase the Signs of Aging,
and Feel Fantastic in Just 10 Minutes a Day!
Sue Hitzmannwith Debbie Karch

Contents
Foreword Introduction
Part One1 What Really Causes Pain?2 The Power of Connective Tissue3 The Missing Link
Part Two4 Becoming a Hands-Off Bodyworker5 Reconnect6 Rebalance7 Rehydrate8 Release9 The Hand and Foot Treatment
Part Three10 Getting Started with Your MELT Practice11 Rehydrate the Upper and Lower Body12 Release the Neck and Low Back
Part Four13 MELT Maps14 MELT as Complementary Self-Care
Conclusion Index Acknowledgments About the Author Recommended Reading Credits Copyright Back Ad About the Publisher


Foreword
With the MELT Method, Sue Hitzmann introduces cutting-edge information andinnovative techniques that anyone can use to get out of and stay out of pain. MELTalso allows fitness and hands-on health professionals to give their clients tools toencourage proactive self-care. To my mind, this is the essence of Sue’s contribution tothe growing number of researchers currently studying human fascia, a long-neglectedyet critically important aspect of human anatomy. For years she has been combiningthis important information with practical tools that anyone can use to take care of theirown body in a new way. I admire any practice that helps people to help themselves.The MELT Method is just that.
Over the past decade I have watched Sue develop the MELT Method. Sue isrelentless in her quest for knowledge, and is willing to refine her perspective over andover again when she gets new information. She is also tireless in her effort tounderstand complex scientific information, and then transform it into somethingsimple and accessible. Sue pays attention to all the layers of the body, not just the onesthat have already been written about. She teaches you how to take care of the bodyyou actually have, as opposed to the “muscle body” upon which much of the fitnessindustry is focused. There is so much more to our bodies than just muscles, and Sue’sefforts represent a great stride in expanding our awareness of our whole body.
The folks who join me to study anatomy in the laboratory are a very small, self-selected group. They are people who are willing to stretch themselves and theirunderstanding well beyond their training. When Sue first joined me in the lab, she wasalready an established figure in the fitness world as well as an accomplishedbodyworker. She was a standout participant among the early adopters from the fitnessindustry. There are some people you meet, and you know on the spot that you willnever forget them. Sue was such a person. Much to my delight, I have been privilegedto know her ever since that first course she joined “way back when.” What Iremember of her from that first week we spent together in the lab was that she was onfire! Her bright eyes and intense curiosity demonstrated her complete engagement withthe experience, and her palpable excitement for her discoveries. This lady hadvolumes of energy for her work, a vibrant personality, and a genuine enthusiasm forthe process we were engaged in. She spoke to me as if she were on the brink ofdiscovery. She was also clearly blessed with all the drive it takes to see a complexinquiry through to the end.
The first time I got to see Sue share the MELT message with a group was at a largefitness conference in New York City. While hearing Sue teach, my respect for her
method grew. She systematically taught us how to self-assess our alignment, developour body awareness, and increase our consciousness of the fascial system and how itrelated to what we were feeling. Then she offered simple, “do-able” techniques withlittle balls and soft rollers so that we could gently and effectively initiate changes forthe better. She placed great emphasis on the gentleness required to effect positivechange in our body, tossing aside decades of that insidious “no pain, no gain” mantra.This alone does us all a great service.
A couple of years ago I went out for a walk with my son, who was twelve at thetime. We didn’t get a hundred yards down the street when he complained about painin his foot and ankle. We went back to the house and, thinking of Sue, I told my sonthat I was pretty sure I had a way to help him. I am trained in multiple hands-onhealing modalities, and surely could have done my son some good with a manualtherapy session. This time, though, I wanted him to know that he could take care ofhimself. I popped in Sue’s Hand and Foot Treatment DVD, handed him the balls, andleft him to it. I peeked in once or twice and saw him following Sue’s straightforwardinstructions. Afterward, I asked him how it went, and he was happy to announce thatthe pain was gone. What thrilled me most was not that he was out of pain, but that helearned he could do that for himself.
Another thing I love about Sue’s work is that she knows that the body is not amachine and that health requires more than merely fixing mechanical problems. Ourbodies have ultra-sophisticated chemical, electrical, and energetic communicationsystems that need to be supported as well. When we open these channels ofcommunication, we re-establish a baseline experience that feels good.
Sue’s method always maintains a healthy respect for your body’s own voice upfront. She would rather have us whisper good feelings to the delicate, fluid tissues ofthe body than shout at them with even more pain signals. Based on my own decades-long study of the body, that is a program I can get behind. The intelligence of thebody deserves our utmost consideration. Our bodies are not the enemy when we arein pain. Our bodies are on our side. Sue’s program aligns with that fact and takes fulladvantage of the wisdom and subtle communication systems of the body for our owngood.
The depth of Sue’s MELT Method comes in large part from the fact that it isgrounded in her own personal experience of self-healing. Sue is an enthusiasticexplorer of her own body, to which she listens attentively. The importance of herwork relies on careful attention to the needs of the body and its true structure,anatomy, and physiology. Translating cutting-edge science into a safe, practical,universally accessible application is no simple task, yet in the MELT Method, that’sexactly what Sue has done.

—Gil Hedley, PhD, creator of “Integral Anatomy”


Introduction
For as long as I can remember, I’ve had the ability to feel the subtle vibrations thatexist in all living things. When I touch a person, an animal, or a tree, if I focus myattention, I physically sense vibrations with my hands.
When I was a little girl, my father said this ability was weird and not to tell anyonebecause it would scare them. When I told my mom, she took me to the doctor’soffice. The doctor offered to cut some of the nerves in my hands to see if that wouldstop it from happening. Fortunately my mom thought that cutting into my hands tostop me from talking about it was a bit radical. She asked if it bothered me or got inthe way of doing anything, and when I said no, she told me to ignore it and maybe itwould go away.
My great-grandmother, however, told me that what might seem like a curse couldbecome a blessing if I could learn what it was. She told me to keep it to myself until Ifound someone who could tell me how to use it. So I kept it to myself for many,many years.
When I was little, I was frequently grounded and sent to my room, where the onlythings I had to occupy me were fairy tales and the Encyclopaedia Britannica. Ibecame fascinated with anatomy—I got the idea that it could give me the answer towhat I felt in my hands.
I was always full of questions. I remember asking my father why there was so littlein the encyclopedia about the nervous system. He answered, “How much do you needto know about the nervous system?” I didn’t tell him that I thought I had found what Iwas feeling in my hands—nerve impulses.
Not long after, we were at the library. My dad pointed at the card catalog and said,“If you want to know more, use your brain and find a book that will teach you.” (Canyou imagine a time before the instant information of the Internet?)
When I was around twelve years old, my mother took me to Spa Lady, the gym shebelonged to. The ladies there wore leotards and legwarmers. Seeing them dancing toloud music, smiling, and cheering each other on immediately enamored me.
My mom bought me Jane Fonda’s Workout Record , and I soon became obsessedwith the 20 Minute Workout and every morning aerobics show on PBS. I aspired tobe like the women I saw in movies like Perfect and Flashdance.
My first job was as an aerobics teacher at the local YMCA, when I was just sixteen.I became involved in every school sport possible. Once I was in college, I realized Icould make money as a competitive cyclist, and I paid for most of my undergraduatetuition with my winnings.
I thought my life’s path would be in film and theater, and I pursued a master’sdegree in film at New York University. When I lost my job as an assistant castingdirector, my dad sent me $200 and told me to go to the gym while looking for a newjob because I was always happiest there. Not long after, I started teaching groupexercise again, got certified as a personal trainer, and changed my master’s study toexercise science. I have to admit I looked like a bodybuilder, and I certainly exercisedlike one. The other trainers at the gym called me Diesel. I was in deep.
I quickly became a well-known fitness professional with a reputation for makingpeople suffer and sweat. At one point I was teaching twenty-eight classes—step andhigh-impact aerobics, body sculpting, boot camp, and indoor cycling—each week. Ibecame a host for CRUNCH TV on ESPN and was known for being the “smartest girlin fitness with a body to prove it.” I weighed 130 pounds, had 11 percent body fat,and was on the cover of Muscle & Fitness Magazine. I had one of the bestsellingfitness videos of all times, Crunch: Boot Camp Training, and was a regular presenterat national fitness conventions. By all measures, I was in perfect health and a success.I had made it.
At the same time, I was taking every fitness and rehabilitation workshop andcertification I had time for, in addition to my graduate coursework. I started askingmore people if they felt these mysterious vibrations under the skin. I felt like theyoung bird in the Dr. Seuss book asking anyone and everyone, “Are you my mother?”
I took a risk and asked my teacher of neuromuscular therapy, Leon Chaitow, aboutthe vibrations I could feel. He simply said, “There are many vibrations in the body.”
Then one morning I woke up with a pain in my right heel. I iced, stretched, andrested as much as I could. I strengthened. I did everything I knew to do. Nothinghelped! If anything, most of these things seemed to make it worse.
It got to the point where my foot hurt twenty-four hours a day. The pain was sointense that it woke me up at night and exhausted me during the day. I even rememberhaving to crawl to the bathroom in the middle of the night.
I asked every mentor, teacher, and colleague I knew what I could do to resolve mypain. I found no real answers. In fact, almost everyone told me they were in pain tooand had managed to live with it. Top New York City doctors didn’t have any answers.I was in pain and afraid that if it didn’t go away soon, my career would be at risk. Ibecame very depressed.
After a friend’s dog headbutted me in the face, leaving my upper lip completelynumb, another friend recommended that I see a craniosacral therapist. In a singlesession, not only did the numbness in my lip go away, but the pain in my foot alsoliterally vanished. I called the therapist the next day to find out what she had done.
In our conversation, I asked her if she felt vibrations when she touched people, and

she actually knew what I was talking about. She said, “Yes. Can you? If you do, thenyou should learn how to use this skill.”
So I did. I remember crying during my first craniosacral training. I was finallylearning a method of accessing, influencing, and rebalancing a vibrational rhythm. Forthe first time in my life, I didn’t feel strange because of what I could feel. That was it.I had found my calling in hands-on bodywork.
I opened a private practice in New York City, and I worked on anyone andeveryone to build my skill of manipulating these vibrations to help restore balance inthe body. For the next eight years, I studied, trained, and exchanged ideas with thecreators of multiple modalities and read every relevant research paper available. Ihoned my skills, working on hundreds of people: adults, teens, children, and infants.Now, twelve years later, I can confidently call myself an expert in hands-onbodywork. Sometimes I still surprise myself in what I can feel when I put my handson people.
I researched and learned multiple light touch techniques. Although each modalityfocused on sensing and manipulating the rhythm and vibration of specific parts of thebody, none of them identified the continuous whole body vibration I could sense eversince I was a little girl. As I continued to work on clients, I would begin my sessionsjust focusing on the whole body vibration I didn’t have a name for. I had noticed thatmy clients who had pain and other chronic issues had a vibration that seemed slowand interrupted, whereas my clients without these issues had a vibration that hadconsistent, whole body movement. I wondered if I could use the same light touch Ihad learned to influence the movement of this vibration and create positive change.When I tried this, I found that supporting the movement of this vibration helpedpeople feel better immediately and it improved many different issues, including—andmost noticeably—a reduction or elimination of pain. My clients would return statingthey had much less pain, and they noted many systemic changes. I knew I was on tosomething big. I made this discovery about four years into my manual therapypractice and I quickly became known for getting people out of pain, even whennothing else worked.
That same year, 2001, the World Trade Center towers were attacked. As I live inNew York City, many of my friends, clients, and neighbors were directly affected bythis event. It gave me an intense understanding of the effects of post-traumatic stressdisorder. It also gave me an understanding of the effects of stress on the nervoussystem and the body-wide vibration that I was starting to understand.
One day, a colleague said, “Do you know Gil Hedley?” Without knowing it, my lifewas about to take another dramatic turn. Gil is a theologian and Rolfer who hasbecome an anatomist. He developed his own human dissection method of removing

tissues layer by layer, from the skin to the organs and bones. His intention is toexamine the connections in the body rather than studying only the separate parts, asdissections are traditionally done.
I took his six-day dissection course, and on the first day, my entire knowledge ofanatomy and the human form were completely turned inside out. While dissecting theindividual layers of the body, I saw for the first time how all the parts connected. Gilintroduced me to the connective tissue system, and suddenly the vibrations I wasfeeling had a physical, tangible explanation.
Once I saw the connective tissue system, I had to know more! This relativelyunknown aspect of the human body intuitively made so much sense to me. It was themissing piece from my education in academia, fitness, and manual therapy, yet I hadbeen working on it for years.
I searched through my library of academic and manual therapy texts and trainingmanuals. I scoured the latest editions of standard medical references and scientificjournals. I asked my mentors and teachers for any written materials or research, but Icouldn’t find anything beyond some limited views of connective tissue’s relationshipto muscle or the long-held belief that this tissue was nothing more than a nonlivingpacking material.
Gil pointed me to research online that could better explain the vibration I wassensing. I was ecstatic. Although the scientific language used in the text was way overmy head, I had such a strong desire to learn that I persevered. I spent endless hoursreading complex scientific studies and research papers. At my side at all times were atleast two science books or journals, a dictionary, and the Internet so that I couldtranslate the scientific jargon. After I understood one research paper, I would look atother authors referenced in the bibliography and review their research too. UltimatelyI found the researchers who pioneered fascial science.
Looking back, I have to laugh at how bold and fearless I was. I called and wrote theresearchers directly to ask questions and, to my surprise, they answered. I believe thatthe biggest reason they gave me the time of day was that I could speak their languageand had enormous respect for their research. My ability to discuss the molecularcomponents such as myofibroblasts, glycoaminoglycans, and mechanoreceptors aswell as the theories of mechanotransduction and piezoelectricity seemed to catch theirattention. After talking for a while, they would invariably ask, “Who are you? What isyour background?”
My anatomy and physiology background helped me, yet most of what I waslearning and discussing was beyond my schooling or anything I had learnedprofessionally. It was so mentally stimulating to have the opportunity to talk with thepioneering researchers as they were finding ways to test their theories. I was at the
right place at the right time to enter the backdoor of this sanctum. I’m still amazed thatone of the top researchers, Robert Schleip, came to New York City from Germany forthe purpose of experiencing MELT and to talk with me about his research.
My background is not in research. I hold no PhD or medical license, yet my love ofhuman science and how it works has influenced me to spend over two decadeslearning anything and everything about the human body. I never wanted to sit behinda microscope all day long or study algorithms or work tirelessly to develop research.Yet I can’t help but read countless research papers, books, and journals and thenproceed to call the researchers (who are delightful, kind, amazing people more thanhappy to direct me to more research and more researchers!).
My independent study of neurological and fascial science and the enthusiasticembrace of the research community validated and fueled my hands-on work and thedevelopment of MELT. The existence of research that was directly related to what Iwas pursuing bolstered my confidence and motivated me to keep going.
As I made new observations in my classes and with my clients, I kept talking to theresearchers. Their work informed mine, and at times, mine even informed theirs.Participating in the emergence of this new field of human science has been the mostintellectually and creatively stimulating opportunity of my life.
The word spread to the point where I could not see all the people who wantedappointments with me. When I started to develop at-home techniques for my clients, itnot only had the unintended benefit of transitioning them out of my office quicker soI could see new clients, it also reduced the toll that my hands-on work took on me.
I decided that this technique needed a name, and I wanted a word that expressedwhat I was trying to achieve with the connective tissue. I thought melt was a perfectfit. In addition to evoking the feeling of relaxation, the definition of the word meltwas ideal: to change a solid into a liquid and blend or merge. Many techniques infitness have acronyms, so I thought I needed one too. I brainstormed a lot of differentcombinations and decided that M.E.L.T. would stand for Myofascial Energetic LengthTechnique. As MELT has evolved, the method has outgrown the acronym. For onething, it’s now clear that it affects the entire connective tissue system, not just thefascia around and inside muscles. Still today when people try it for the first time, theysay the name seems perfect.
Although I am no longer ripped with muscle and do not lift nearly the weight I oncedid, I still love to work out, teach indoor cycling, run, and lift weights. Thanks toMELT, I didn’t have to give up anything I loved to have a pain-free body—andneither do you.
When I started teaching MELT in fitness clubs, it was so exciting to be able to createthe same types of changes in a room full of people that I did one person at a time in

my office. And they could do it to themselves.Since then, I have trained hundreds of health and fitness professionals and together
we have helped tens of thousands with MELT’s Hands-Off Bodywork. I never set outto create a method. The organic unfolding that led to the creation of MELT can betraced back to the vibrations I felt with my hands when I was a little girl.
My great-grandmother was right. My curse has become my greatest blessing, and Iam grateful and honored to share it with you.


What Really Causes Pain?
Imagine this is your average day: you wake up in the morning after a great night’ssleep. You feel refreshed, alert, and ready for your day. You walk with a bounce inyour step, and your body feels light and vibrant. You smile. People mention howgreat you look and notice your boundless energy. The demands of your day don’toverwhelm you, and stress rolls off your shoulders. It’s effortless to connect with andbe generous to your loved ones—and even to strangers. You sit, stand, and move in arelaxed way. You are not nagged by thoughts about how your body feels. You live inthe present moment and easily say yes to new experiences.
Is this what your average day feels like? If you have pain, your answer is probablyno. Maybe you don’t call it pain. Maybe you call it discomfort, tension, or somethingthat doesn’t feel quite right. Being pain-free is a necessary component of good health.It’s much easier to live a good life when you feel good. You may attribute how youfeel to your lifestyle, age, or genetics. But now it’s time to look at the whole picture.
I am here to tell you that you can live pain-free.I don’t want you to have to waste another day or dollar on trying to figure out why
you have pain or discomfort. I’m going to teach you how to sense it, address it, andeliminate it. The solution is simple. I am going to share a new way of looking at thebody’s design and teach you how to use that information so you never have to lookfor another pain solution again. Even if you feel you have the right diet, water,supplements, exercise routine, meditation practice, mattress, massage therapist, andintegrative or holistic doctors—you haven’t tried this yet. I’ve got the secret to pain-free living, and it’s within you.
For all of the billions of dollars spent on trying to eliminate pain and discomfort,you would think that the mystery of pain would have been solved by now. But thestatistics show otherwise. The National Institutes of Health (NIH) reports that painaffects more Americans than diabetes, heart disease, and cancer do combined. It is themost common reason individuals seek medical care, costing Americans more than$100 billion each year. According to the American Pain Society, pain is the secondleading cause of medically related work absenteeism, resulting in more than 50 millionlost workdays each year. The NIH also reports that one in three Americans suffersfrom some type of chronic or lasting pain, and approximately two-thirds have beenliving with this pain for more than five years. That means that more than 100 millionpeople in the United States are living with chronic pain—and, based on my practiceand experience, I believe that this estimate is low.
Pain affects your quality of life on every level. One in three Americans loses more
than twenty hours of sleep each month because of pain, according to the NationalSleep Foundation. It’s not surprising that pain and discomfort can cause anxiety,worry, and mood swings. Ask your coworkers, friends, or family whether they havechronic pain. You’ll probably be amazed by the number of people you know whospend a lot of time and energy worrying about, managing, or trying to ignore pain.I’ve found that many people who make investments of time, energy, and money to doall the “right,” healthy things still experience daily pain and discomfort.
You Can Live Without Pain
Living a pain-free life is an amazing feeling. Ironically, it is hard to truly appreciatehow great it feels to be pain-free unless you’ve experienced an ongoing ache, pain, ordiscomfort. I know about enduring pain firsthand. Over a decade ago, I was at theheight of success in my career as an international fitness presenter and instructor andseemed to be in perfect health. Yet I had debilitating pain in my right foot. I had amaster’s degree in exercise science, multiple fitness certifications, advanced training inneuromuscular therapy, and experience as a research intern in kinesiology at NewYork–Presbyterian/Weill Cornell Medical Center. I thought I knew everything therewas to know about the human body and about how to stay fit, healthy, and active. YetI couldn’t get relief or answers from anyone, including New York City doctors.
I was only in my twenties. My fitness career was threatened, and my quality of lifewas in decline. I continually asked myself, my peers, and my teachers, “Why is thishappening? What is causing all this pain? Is my body failing me?” My search forunderstanding and my quest to heal my own pain led me to an unexpected answer: Mybody wasn’t failing me; it was desperately trying to get my attention. I did notrecognize what I now know to be easily recognizable signs. I knew so much about thehuman body, yet the solution to my pain had nothing to do with what I knew.
Ultimately, I found therapies that helped heal my pain, yet the methods wereunexplainable scientifically. I needed to understand what was creating the positivechanges in my body, so the search for the true cause of pain continued. I stumbledupon research that was just starting to answer my questions. It was a revelation to me.My questions had answers, and the answers were based on new science. It was as if Ihad cracked an egg I had been tapping for years. The discoveries and insights that ledto the resolution of my pain also changed my career and led me to a new, overridingquestion:
How do I live a healthy, active, pain-free lifestyle for my whole life?Sharing the answers to this question has become my purpose in life. When I

resolved my own pain, I felt a calling to help others do the same. I shifted my focusfrom training people to be fit to helping people feel better. I became a manualtherapist, which means that I use hands-on, physical interventions. In my privatepractice, I’ve treated pain associated with practically every disease, disorder, andchronic condition that has a name—as well as some that don’t. I can’t even count thenumber of people I’ve seen who are dealing with a less-than-full recovery from acutecircumstances such as injury, childbirth, or surgery.
Regardless of their age, body type, activity level, financial means, stress level,occupation, condition, or symptoms, all my clients had pain. What was surprising tome was that the simple solution I had discovered for pain also had a positive effect ontheir overall health. Regardless of their history, their bodies started to find their ownpath to healing. Instead of having to stop doing the activities they enjoyed, my clientscould return to doing the things they loved. This is one of the most rewarding aspectsof my work—helping people get their lives back.
The Real Secret
The secret to living the pain-free life you deserve is to directly address the real causeof your pain. I believe that the actual reason your physical pain started is a much moreimportant factor than what symptoms you’re feeling or how long your pain has lasted.Understanding the true reason for your pain will profoundly affect your ability toresolve your symptoms and live pain-free. This information—and a specialized softbody roller, small balls, and a little time—is your pathway to pain-free living.
The Big Ouch
Looking back, it’s easy for me to remember the events that caused me acute pain.When I burned my hand while making angel food cake with my grandmother, Iexperienced acute pain for the first, but not the last, time. There was the time I bashedmy finger with a hammer, when I smashed my nose into a sliding glass door, andwhen I broke my ankle falling out of a tree. When I was eighteen, I ran my truck intoa tree when I swerved to avoid hitting a deer. I totaled the truck and had quite a headinjury to prove it. I’ve broken numerous fingers and toes and have had more sportsinjuries than I can count. Most recently, I broke my toe when I accidentally kicked theleg of a coffee table. I’m sure you’ve experienced moments such as these, ones youwish you could take back because afterward you experienced acute pain.
The cause of acute pain is very simple. It involves a one-time event or trauma that
produces an acute injury with accompanying intense, sometimes excruciating, take-your-breath-away pain. Your nervous system uses this pain to get your attention inorder to avoid further injury. However, just because pain comes on suddenly doesn’tmean it’s acute pain. You can have excruciating pain without an actual traumaticevent.
When you have an acute injury, you should immediately call your doctor or go tothe emergency room. Following an acute injury, pain usually decreases and becomes amore subtle message that you need to protect and rest the injured area. Ideally theinjury heals, your body recovers, and the pain signal is no longer needed. However,when pain from an acute trauma isn’t fully resolved by the body’s own healingprocess, it becomes a chronic pain.
“Normal” Discomfort
The discomfort that seems to be the most pervasive yet mystifying for people ischronic pain. Before the pain becomes chronic, it usually starts as what most peoplewould describe as a “normal,” everyday discomfort. You’ve probably experiencedfeelings of stiffness, soreness, throbbing, heaviness, tenderness, and tightness onoccasion. When these sensations become a daily discomfort over a prolonged periodof time, you realize the pain isn’t going away. You now have chronic pain.
Although my first chronic pain was in my foot, I had experienced manydiscomforts. I was no stranger to stiffness in my knee, tightness in my shoulders,cramping in my hands, and aching in my low back. I assumed these day-to-daynuisances were all part of “being fit.” I had bought into the “no pain, no gain”message, believing that if I didn’t have some discomfort, I wasn’t working hardenough. I look back now and see just how much wasted effort I put into trying toignore or manage my pain.
What I thought were normal discomforts, I now identify as pre-pain symptoms.Have you had any pre-pain symptoms lately?
• When you woke up today, did your body feel stiff?
• Do you feel achy when you get out of a chair or after exercise?
• Does walking up a flight of stairs make you wish for an elevator?
• Do you find yourself adjusting, stretching, cracking, or rubbing your neck orback to try to relieve tension?
• Do you experience stiffness or swelling in your hands and feet?
• Do you have unexplainable aches or stiffness in multiple areas of your body?
These are just a few common pre-pain symptoms. What I’ve seen in every singleone of my clients who has chronic pain is that they also experience one or more otherpre-pain symptoms. See if you’ve ever experienced any of these for more than a weekat a time.
• Do you have difficulty falling asleep or staying asleep?
• Do you have gas or indigestion, no matter what you eat?
• Do you feel exhausted or have a mild headache in the afternoon?
• Do you find yourself exhausted by midday?
• Do you wake up with anxiety or have mood swings?
• Do you feel bloated or struggle with your weight?
Many people consider these symptoms to be normal. Yet, what happens when mildsymptoms occur regularly for weeks or months, or one pre-pain symptom turns intothree? Then what?
If you feel stiff and achy, have trouble sleeping, or feel bloated over weeks ormonths, or if you have more than one of these pre-pain symptoms, you might have anillness or disease. So it’s important to visit your doctor to have your symptomsevaluated and rule out whether or not these lingering symptoms are being caused byan underlying illness or disease. If illness and disease are ruled out, the standardmedical treatment for lingering symptoms is usually medication and the underlyingcause is not identified or addressed. With only this approach, chronic pain is almostalways inevitable, and pain medication or pain “management” solutions to decreasethe symptom of pain are the only medical option.
I have a better solution that treats the underlying cause of pre-pain symptoms. Inmy practice, I have seen many clients who have multiple symptoms that are seeminglyunrelated. Yet, in treating the underlying cause with MELT, I’ve helped them eliminatechronic pain and all their pre-pain symptoms.
The important point is: pain and discomfort are your body’s way of trying to getyour attention so you will take care of something. I’m going to help you discoverwhat your “something” is and show you how easy it is to take care of it. In otherwords, I’ll help you finally be free of your pain and discomfort! Whether your levelof pain is interfering with your life or you only have occasional aches or stiffness, Iam here to tell you that you don’t have to accept pain as a normal part of aging oractive living. MELT will help you resolve these pre-pain symptoms so you can livewithout chronic pain.
Acute Misunderstanding
Most people believe that any pain that starts with an intense, recognizable event isacute pain. However, in my practice, I have heard countless stories of sudden, intensepain not caused by an acute injury. In every story, the people could recall when thepain started and what they were doing at the time. Yet the activity in no way matchedthe intensity of the sudden pain. There you are: you tie your shoe, reach into yourtrunk for groceries, get out of bed, do an exercise or yoga pose you’ve done ahundred times before, climb the stairs, step out of the bathtub, stand up from yourdesk chair, or bend over to pick up a pencil, and all of a sudden you feel a pain thatmakes you freeze in your tracks. This is when my clients call me and say, “Sue, help!I don’t know what I did, but I can barely move my head/neck/arm/back/knee/foot. Iam in so much pain. I don’t know what to do!”
Although the pain came on suddenly, I don’t think these examples fall under thecategory of acute pain. In my view, this is a type of chronic pain that has been lurking,slowly building in the background, waiting to reveal itself. This is what I call suddenchronic pain, and it is far more common than acute pain. The reason it’s critical tomake the distinction between sudden chronic and acute pain is that sudden chronicpain will almost always become a full-blown chronic pain that will either come and goor come and stay. What’s tricky is that acute pain and sudden chronic pain can havethe same level of intensity. Yet picking up a pencil, climbing stairs, and getting out ofbed are not acute traumatic events. These everyday events are merely the tipping pointfor your overstressed body. So what is causing this sudden chronic pain?
The Real Cause
Whether a chronic ache or pain comes on suddenly or slowly, the source is the same—repetition. Don’t get me wrong. Repetition—or the idea of practice, practice,practice—can be a very good thing. Repetition is what has made me the best teacherand bodyworker I can be. As I continue to repeat these activities, I can improve myskills and be even better. Repetition is a normal, useful part of life, not something youcould or should try to eliminate. That said, the primary cause of chronic and suddenchronic pain is repetitive movements and postures, not aging or muscle tension, asmany people believe. But you don’t have to figure out how to eliminate yourrepetitive habits: by adding MELT, you can help undo repetition’s negative effects.
Think about it: what repetitive movements (such as typing or jogging) and repetitivepostures (such as sitting or standing) do you do regularly in your day or week? Howmany hours a day do you sit? The time spent sitting when you eat, drive your car,

work at your desk, watch TV, and read in bed really adds up. If sitting isn’t yourrepetition, what is? Is it standing at work all day? Carrying around your kids orchasing after them? Remember, I’m not asking you to give up anything in your life toget out of pain. I’m going to ask you to add ten minutes, three times a week.
The component in your body that supports you and keeps you stable is yourconnective tissue, scientifically known as fascia. The connective tissue surrounds andsupports all aspects of your body, including your muscles, bones, nerves, and organs.It’s a three-dimensional web that seamlessly connects everything from head to toe andskin to bones. There is more connective tissue in your body than anything else—it iseverywhere. The connective tissue creates a flexible framework thatcompartmentalizes, separates, and connects everything in your body. Collectively theconnective tissue is in fact a system that provides a seamless continuum throughoutyour body.
What is far more mind-blowing is that research is finding evidence that theconnective tissue system is intelligent and adaptable. We have only just begun tounderstand and define the many functions that this powerful system serves in thebody.
In my traditional schooling, I learned what everyone does: that connective tissue isa passive packing material in the body. The connective tissue has long been viewed ashaving the singular job of just passively protecting the important structures itsurrounds, like Styrofoam peanuts do. But the connective tissue system—not yourmuscles and bones, as many people think—provides the body its architecturalstability. This tissue is constantly morphing and adapting to your movements andpositions to support your joints, bones, and organs. The connective tissue can only doits job when it has an adequate amount of fluid.
The repetition of daily living causes connective tissue to become dehydrated fromexcessive compression, pull, and friction. Dehydration makes connective tissue lesssupportive, responsive, and adaptable, which causes strain in muscles, compression injoints, and a disconnect in the communication required for any bodily movement orposition, repetitive or not. This isn’t just about drinking water, it’s about getting thefluid moving in the tissues. Connective tissue dehydration is the underlying cause ofstrain and pain in the body as well as the catalyst for your pre-pain symptoms.
This may seem odd, but to the body, activity and inactivity are both dehydrating. Ifyou’re sitting at a desk for hours at a time, your own body weight is compressing anddehydrating your butt and thighs while your posture is pulling on and dehydrating thetissue from your head to your tailbone. If you’re training for a marathon, the repetitivemotion of running compresses and causes friction in your joints and pulls on tendons,ligaments, and lines of connective tissue. What creates this dehydration may be

different, but in both cases, connective tissue loses its vital fluid. The fact of thematter is: life is dehydrating.
This is not the bad news. It’s the good news. The remarkable new information thatI have to share with you about connective tissue is that the tissue itself is treatableand easily accessible. New research has shown that this tissue is not passive as oncebelieved; it plays an active, vital role in our health and overall well-being. The missinglink to living pain-free is to erase the negative effects of repetition by treating yourconnective tissue. I’m going to teach you how easy it is to restore the fluid state ofyour connective tissue with MELT. It’s this tissue that needs your attention whetheryou currently experience pain or pre-pain symptoms or you have no body issues andfeel great.
Regardless of whether you have chronic, sudden chronic, or acute pain, the way outof pain is the same—and it’s surprisingly simple. I’m going teach you how you cankeep your connective tissue hydrated and healthy in just ten minutes a day. Whetheryou want to resolve the pain you have or keep pain out of your life, you will now beable to access the underlying cause. The first time you try MELT, you will feel adifference. The control is now in your hands. Once you are living with more ease,you’ll wish you had known about the restorative capability of connective tissue a longtime ago. I know I did.
Connective Tissue and Your Nervous System
You probably don’t realize how much your whole body gets involved in everymovement you make. The amount of preparation, communication, and micro-adjustments that occur before, during, and after every movement you make is almostgreater than we can comprehend. The connective tissue system plays an essential rolein your ability to move or remain still. Every minute of every day, your connectivetissue is helping your body to do what you ask of it while also protecting your joints,bones, and organs.
Unlike muscle, connective tissue doesn’t receive input from the brain or nervoussystem in order to adapt to your movement. The connective tissue independently playsits active role in stabilizing your joints and supporting and protecting all parts of yourbody so movement doesn’t cause damage. This independent ability is part of why wehaven’t understood the connective tissue’s capabilities and purpose. However, theconnective tissue system does not do this alone. This system is inherently linked to aspecific component of the nervous system—the autonomic nervous system—andtogether they regulate posture, joint position, and mind-body communication. Theinterdependent relationship between the connective tissue system and the autonomic

nervous system is what allows proper muscle contraction to occur.Your nervous system relies on the fluid state of the connective tissue system for
proper communication. The part of the nervous system that relies on the healthy, fluidstate of your connective tissue the most is your sensory nerves. This is because themajority of your sensory nerve endings are found in the connective tissue system. Ifthe connective tissue system is dehydrated, it can alter sensory nerve transmission.These nerves play a vital role in creating accurate, seamless movement. The sensorynerves also transmit pain signals, including when your connective tissue is unable toadequately support your joints, nerves, muscles, and bones because of dehydration.
These discoveries about the connective tissue and nervous systems streamline theunderstanding of the cause and treatment of pain. When you have pain, you need totreat the connective tissue system as a whole. What has made the topic of pain seem socomplicated is all the money, time, and effort spent on pain “solutions” that don’tsolve the problem. Looking to medicine, rehabilitation, exercise, and ineffectivegimmicks and gadgets for the solution has been ineffective for so many people. Thefact that chronic pain is so prevalent means something is missing from how we carefor our bodies. Even the best exercise and nutritional habits can’t restore the fluid stateof the connective tissue system or rebalance your nervous system. But MELT can anddoes.
This new information about the human body turned my world upside down. Myeducation, profession, and belief system were challenged. I had to learn the hard waythat exercise, conventional medicine, and rehabilitation focused on treating thesymptoms instead of the cause. Furthermore, utilizing these conventional approachesallows the connective tissue to stay dehydrated and pain to become chronic. I had toshift my thinking about anatomy, exercise, medicine, pain, and health to learn andbenefit from the untapped potential of connective tissue. I want to provide you withthe benefit of my journey of discovery.
Reality Check: Medical Treatment of Pain
Because I’ve seen so many clients with pain caused by a variety of issues frommigraines to cancer, I’ve had a firsthand look at the wonders of modern medicine.Whether you’ve had a life-threatening injury or illness, or you’ve had a cut or minorinfection, doctors can offer proven cures. Unfortunately, chronic pain is in a categoryoutside of this curable realm. Yet pain of any kind is the number-one reason peopleconsult a physician. When there’s no immediate reason for pain, as there would bewith acute trauma or injury, a doctor will look to rule out illness or disease as theunderlying cause. When you break your wrist or are diagnosed with a tumor, there are
definitive options for medical treatment.Disease and acute trauma are at opposite ends of the medical spectrum. In between
these two ends of the spectrum is a huge gap of chronic issues, ailments, andsymptoms, including chronic pain. The treatment protocol for unexplainable painsymptoms that are in the “chronic gap” is frequently a guessing game ofpharmaceutical trial and error or exploratory surgical procedures. There is also a hugegap between the options of pain medication or surgery. Even if your doctor finds adiagnosable issue in an X-ray or MRI, it may not be the underlying cause of the pain.If you choose to go the route of surgery, you may still have ongoing pain afterrecovery and physical therapy. Then there is the frustration if your doctor findsnothing. Your pain or discomfort seems specific, but there is no explanation ormedical reason. This mysterious “nothing” can make you feel a little crazy. I wasbeside myself when doctors told me that my foot pain was “in my head” and that Ishould see a psychotherapist. I knew my physical pain was real, even if the doctorsdidn’t have an explanation for it. I was back at square one and very frustrated.
Medical science hasn’t found a way to cure chronic conditions—that’s why they arechronic. Pain medication can be necessary and useful for pain that is related to acutetrauma and disease, but when it is taken in an attempt to resolve pain that falls in thechronic gap of the medical spectrum, the results are usually minimal at best. Painmedication masks the problem temporarily and is almost always accompanied bynegative consequences like stomach issues or dependence on the medication whentaken long term. That’s why doctors prescribe pain medication for temporary reliefand not indefinitely.
In addition, taking pain medication for long periods of time can drain your body’sinternal resources, sap your energy, and slow your metabolism. Just as the TVcommercials tell you, many pharmaceuticals have unwanted side effects that oftencreate multiple new symptoms. Meanwhile, your body continues to send signals forhelp—except you can’t feel the pain signal anymore. Without the ability to experiencepain, you are at risk for greater damage to your joints from repetition and injury.Taking pain medication is like removing the battery out of your kitchen fire alarmwhen you know that your toaster might catch fire. Turning off the alarm doesn’t fixthe toaster! Removing the batteries or taking pain medication means your alert systemis not going to be able to signal you when you need it most. I have seen countlessclients who have chronic pain in their neck, low back, or joints but feel like they’vetried everything. After multiple pain medications, cortisone shots, and endless otherpain management interventions, they come to me, still in pain. You may have alreadylearned the hard way that trying to manage pain can be exhausting, expensive, timeconsuming, and ineffective. Yet, the common belief is that once discomfort and pain

become part of your daily life, “managing” it is the only option.There is no magic pill or shot to heal chronic pain. It’s true. Your doctor will likely
tell you the same. Medication can’t resolve chronic pain because it doesn’t address thecause—the repetition of daily living. I don’t believe science will ever find apharmaceutical drug or surgery that will cure the effects of repetition on yourconnective tissue system. Pain medication is simply the wrong tool for the job.
I understand how it feels when you have pain and all you want is to find someoneor something to fix it for you. Realizing that, I want you to think differently aboutpain as well as your ability to take back control and live pain-free. The MELT Methodresolves pain that falls in the chronic gap. If you are healthy and pain-free, MELT willhelp you stay that way—proactively. If you are recovering from an injury or receivingmedical or rehabilitative care, MELT complements this care, and in many cases,improves your results. Beyond pain medication, no matter what your health or level offitness, you have a new choice with MELT.
Reality Check: Exercise
I love being active, and I do some form of exercise every day. It is easy to grasp whybeing active is better than being sedentary when it comes to maintaining a healthy lifetoday and tomorrow. However, what I have learned is that exercise and rehabilitationprotocols don’t resolve pain and discomfort. That’s right, functional exercises,stretching, practicing yoga, or even massaging muscles may give you temporary relief,but these activities usually don’t provide resolution. That’s because the focus onstrengthening and stretching muscles is an effort to fix a false problem.
The myth is that if you have joint pain, it’s due to muscle imbalance and weakness.The concept is that making muscles stronger and longer will create better alignmentand eliminate pain. The truth is, when you have pain, it’s not because your musclesare weak. In fact, many of your muscles have to work so hard to compensate forskeletal misalignment that they become overworked and fatigued whether you’removing or not. The connective tissue system, not the muscle system, is responsible formisalignment, imbalance, chronic pain, and discomfort. Once you rehydrate yourconnective tissue, muscle compensation and imbalance improves and your musclesdon’t have to work overtime. Then you can exercise in a way that actually improvesoverall performance, balance, and movement.
If that doesn’t fully convince you, consider what I believe is the most closelyguarded secret in the fitness industry: almost all professionals in the fitness industryhave chronic pain. I first realized this fact when I was seeking a solution for my footpain. What I found was that most fitness professionals believed that pain was a price

you pay for looking great and working in the fitness industry. Once I realized theeffects of repetition on my body, it all began to make sense. At the time, I wasteaching twenty-eight fitness classes a week. I drank lots of water and ate healthyfood, yet I didn’t know I was dehydrating myself by neglecting my connective tissue.
Today, the need to care for the connective tissue system is still ignored ormisunderstood by most exercise and rehabilitation professionals. The one aspect ofthe connective tissue system that is sometimes addressed is the myofascia. This is thelayer of connective tissue around (and within) all muscles. Myofascial approachesfocus on knots, blood flow, and imbalance in muscles by using intense, directpressure. Although a skilled therapist can make notable changes in muscles usingmyofascial techniques, the connective tissue system is still not addressed. Without carefor the connective tissue as a continuous system, muscle imbalance, misalignment,and pain cannot be resolved.
The reason I can cycle, run, and lift weights on a regular basis without any pain ordiscomfort is because I MELT. In just minutes, I can undo the negative effects of myactive lifestyle so I get all of the positive results and none of the negative side effects.If you aren’t currently active because your body doesn’t feel good or you don’t feelable, MELT can help you turn that around. MELT will help you undo the negativeeffects of your repetitive positions so you feel better and your body is prepared foractivity. I hear again and again that being active is more effortless and enjoyable whenyou don’t have pain. If you are active, even if you are a professional athlete, MELTwill reduce the negative effects of your repetitive movements and also improve yourperformance in multiple ways.
From Problem to Solution
I’ve solved the puzzle of chronic pain, and I want to share with you what I know. Iwant you to have an understanding of the systems that are currently unaddressed bymedicine and fitness. I want you to understand why it is so important that you takecare of your connective tissue and nervous systems—not because I said so, butbecause it makes sense. When I first learned this information, it blew my mind. Iknow you will have epiphanies like I did as you learn what’s going on in your bodyand what’s been missing from all you’ve been told about how to care for yourself.
I’m going to teach you how to be your own pain resolution specialist and addressthe cause of your pain. MELT is the very first self-care program that rehydratesconnective tissue and rebalances the nervous system. This is what allows your body torelease long-held tension and discomfort caused by the repetitive postures andmovements of everyday living. MELT will also help you reduce accumulated stress in

the nervous system, which helps improve your overall health and wellness. When youactivate your body’s powerful healing mechanisms with MELT, you will experiencemore than just pain relief. You will open the door to a lifetime of improved health,energy, vitality, and longevity.
Far beyond weight loss and exercise, through a series of easy, precise techniques—using simple, specialized equipment like soft body rollers and small balls—thisgroundbreaking concept will soon become your missing link to better living. If youare ready to learn the wondrous power of your connective tissue system, take a deepbreath and get ready to MELT.


The Power of Connective Tissue
I hope you are as excited to learn about the healing and pain-relieving power ofconnective tissue as I was. I remember clearly the first time I became fully aware ofconnective tissue. I was at a six-day human cadaver dissection workshop led bytheologian, Rolfer, and anatomist Gil Hedley. We were exploring how the body’ssystems are connected by dissecting cadavers, layer by layer, instead of the traditionalway of studying the body’s parts separately. After spending three hours carefullyremoving most of the skin from the body in front of me, I sat back with a blank stare.
“What the heck is that?” I said to Gil.“It’s the superficial fascia,” Gil replied in a very matter-of-fact way.“What is it doing there?” I said with a bewildered look.“It’s the system that supports and protects us,” he replied with a mischievous smile.
“It’s the first layer of the three-dimensional network that gives us our shape andallows us to sense the world around us.”
“What do you mean system? It’s just a part of the skin, right? I mean ... it’s a tissue.Why are you calling it a system? The connective tissue isn’t a system, is it?”
Gil continued to smile. “Oh my, I think this experience is going to change your life,Sue. This tissue is a continuous, fluid system that connects all other systems of thebody and gives them individual space at the same time. In a cadaver we can identifymultiple connective tissue layers, but in a living body, this vibrant, fluid-filled tissuecreates a seamless, weblike matrix,” he said. “Welcome to my world.”
Could this fluid system be creating the movement under the skin that I could sensewith my hands? I had never heard anyone talk about what I could feel, and suddenlysomeone was describing it. On an intellectual level, I was blown away and totallyintrigued with this new explanation of the connective tissue system. But I have to behonest: emotionally, I was quite angry. How could I have studied the human body insuch detail and spent countless hours reading, writing, and even teaching aboutanatomy only to find that there was a vital system that I had never even heard of? Thiswas the first time I had ever seen the seamless superficial layer. In the manydissections I had done during school, the superficial fascia was tossed in the bucketwith the skin so we could study the “good stuff.” For a decade I had incorporatedwhat I thought were progressive ideas about myofascia and connective tissue—butonly in how it gave muscles their connection and helped in dynamic motion. No onehad ever called it a system before. I wanted a refund for all the money I had spent onmy higher education. I wanted to call my professors and tell them that what they wereteaching was wrong and a disservice to anyone wanting to work with living humans.
After I got over being angry, I needed to know everything about this tissue and howit could scientifically be defined as a system. I needed evidence to back up what Gilhad introduced to me in the dissection. I had a burning desire for tangible evidence ofwhy my hands-on techniques were able to yield such extraordinary changes. I wasnever comfortable with the idea that I had an unexplainable “gift.” Like many otherbodyworkers, I wanted proof, not just philosophy or belief alone. Suddenly a newdoor was open for me to learn what this system was and how it related to my hands-on skill.
From 2001 to 2004, I all but disappeared from the fitness education circuit as I doveinto the field of fascial research. Soon I had the privilege of meeting researcher RobertSchleip and was somehow welcomed into this budding field of science and research.What I found got me (and kept me) out of pain, changed my career, and put me onthe road to creating MELT. I developed new models to explain the connective tissuesystem. I’ve since taught hundreds of other fitness and healing professionals thescience of MELT, and I watched as this information changed their lives and careerstoo. The reports they’ve given me about the lives they’ve touched has made meprofoundly grateful for the gift I received all those years ago in Gil Hedley’sworkshop.
This information can change your life too. You are about to enter the fascinatingworld of fascia, where you will uncover your ability to influence your health in waysthat you never imagined.
The Fascia-nating World of Fascia
Connective tissue is found everywhere in the body. The particular type of connectivetissue I am referring to is scientifically called fascia. Fascia is made up of collagen,elastin, and other fibers that are bathed in cellular fluid. In your connective tissue,there are cells, scientifically referred to as fibroblasts, which are responsible forproducing all the fluid and fibrous components of the tissue. Many familiar parts ofyour body—tendons, ligaments, disks, cartilage, and even the membranes aroundyour brain and organs—are made of fascia. These parts seem separate, yet they are allphysically connected and part of the connective tissue system’s adaptable, supportivearchitecture.
Connective tissue surrounds every structure, including bones, organs, muscles, andnerves, and it makes up the fluid environment around every cell. Indeed, every cell inyour body relies on this “extra-cellular matrix” to function properly. This three-dimensional, interactive environment supports and informs cells about the mechanicaland biochemical changes around them. The connective tissue fluid permits the

transportation of oxygen, nutrients, and waste from cell to cell. It is also theenvironment in which most of your sensory nerves live and work.
This is a very new area of human science. In the year 2000, an Internet search usingthe keyword fascia yielded only 1,500 results. Today, that number is 43 million andrising rapidly. We know so much more today than we did only fifteen years ago, inpart because of the advances in microscopic technology but also because there isdedicated study of connective tissue. Yet there is so much more to be discovered andunderstood. If you’ve heard about fascia, you’ve probably heard about how fasciainteracts with muscle (myofascia), not about the health of the connective tissue systemas a whole.
In human dissection for medical and academic study, the connective tissue isdiscarded and disregarded—literally tossed aside with the skin like an irrelevant,accessory tissue covering what are considered the important structures—organs,nerves, muscles, and bones. The outdated view that connective tissue is a passivepacking material is still the standard in anatomical texts.
The advancements in fascial research and applications have largely occurred outsideof the medical and academic community. The pioneering connective tissue researchersemerged from an unlikely source: manual therapy. Many of them studied directlyunder Ida Rolf, the founder of the manual therapy technique known as Rolfing. Rolf’sdesire for her protégés to seek out the scientific explanation for the therapeutic resultsof her method drives much of the research going on today. Because of the efforts ofthese Rolfers-turned-researchers (including Fernando Bertolucci, John Cottingham,Steve Evanko, Tom Findley, Gil Hedley, Kai Hodeck, Eric Jacobsen, Tom Myers,Robert Schleip, and Adjo Zorn), we have many answers—and even more questions.
The work of these pioneers expanded and refined my understanding of theconnective tissue. Their research gave me a new understanding of its essentialproperties, multiple functions, and why it is now called a system. I’ve been able toshare their findings and have spent years simplifying this complex new science intomodels and language that anyone can understand and apply to their own body.
You don’t have to understand the molecular components and scientific propertiesof the connective tissue system in order to care for it. I want you to know the elementsof connective tissue that are the most relevant to your health and longevity. I am goingto show you how to influence the health and supportiveness of your connective tissuesystem by directly addressing these elements.
Hydration
How can a fluid system be supportive? Think of a sponge: when it’s dry, it’s stiff, but

when it’s moist, it’s flexible, adaptable, and resilient. You can twist, squeeze, orcompress a moist sponge, and it returns to its original shape. Your body’s connectivetissue is similar: when it’s hydrated, it’s buoyant and adaptable. But when it’sdehydrated, it gets stiff and inflexible.
Approximately three-quarters of the connective tissue is made up of fluid. The restis composed of repair cells, filaments, and fibers, such as collagen and elastin,suspended in this fluid. This tissue is the most abundant material in the body, and thehealth of this tissue relies on hydration. Connective tissue must have enough fluid forits many functions, including responding, adapting, and morphing to provide cushionin joints, space between every cell and organ, and an easy glide between muscles. Ofcourse, when I’m talking about maintaining adequate hydration for this essentialsystem to do its job, I’m not just saying that you need to drink more water. Drinkingenough water is an important aspect, but it’s just not enough.
Have you ever heard someone say that when they drink water, it goes right throughthem? This means that their body (like a dried-out sponge) cannot properly absorband use the water—they’ve become cellularly dehydrated. Every cell in the body is atrisk of becoming dehydrated due to the lack of fluid in the cell’s environment, theconnective tissue system. The kidneys can get overstressed from processing theexcess, unused fluid. The need to go to the bathroom frequently can deter a personfrom drinking a healthy amount of water, which in turn accelerates whole bodydehydration.
When your cells are chronically dehydrated, drinking all the water in the worldwon’t get that fluid back into your tissues. The dehydrated cells have learned that thesurrounding fluid is stagnant and murky, which is often referred to as toxicity in thehealth care field. Even though the cells desperately need fresh fluid, they’d rather staythirsty than drink what’s available to them. But when you stimulate the connectivetissue with MELT, the connective tissue cells can absorb and use the water you drinkto produce connective tissue fluid. The new fluid moving in the connective tissuesystem stimulates all cells of the body to take in the fresh fluid, which extends the lifeof the cells. What’s so amazing about the connective tissue is that you can transformdehydrated tissue into a healthy, hydrated state by using specific, manual techniques.MELT simulates these techniques, and you can do it on your own.
Dehydration
Dehydration of the connective tissue is caused by the repetitive stress and strain ofday-to-day living. Your habitual movements and postures—whatever you do mostduring any given day—create dehydration and joint compression. Repetitive stressors

range from sitting at a desk to running a marathon. Carrying children and heavy bagscreates stress and compression, as do your sleeping positions and the gentlest forms ofexercise. Medication, environmental toxins, poor diet, and sleep habits cause furtherdehydration in the connective tissue. Dehydration is part of living, so whether you’resedentary or active, young or old, it’s happening to you. Exercise, nutrition,meditation, and proper rest are not enough to keep this tissue hydrated over time.
The trouble really begins when dehydrated connective tissue in one area spreads toother areas. The more areas of dehydration there are, the less fluid absorption occursin the connective tissue system overall, causing dehydration to become a systemicproblem—and ultimately, causing body-wide cellular dehydration. Without adequatefluid, the connective tissue loses its ability to be adaptable, supportive, and strong,which affects your joints, muscles, nerves, organs, and every cell of your body.
The progression of dehydration from one area to the whole body can be understoodby looking at the connective tissue system like a river. Fluid flows throughout thebody at a constant rate and direction. Pockets of dehydration in joints or regions ofthe body, such as in your knee or low back, are like sediment in the body’s river.Water is diverted around the sediment, and over time, the dry area becomes larger,like a sandbar turning into a small island. I have seen this in cadavers even after all thefluid has been removed. These areas of dehydration cause a disruption of continuityand support in the connective tissue system. For example, if you have dehydration inyour thumbs from texting, over time that dehydration can spread to the wrist, up theforearm, and into the neck. When you MELT, you erase the negative effects ofrepetition from your daily activities.
The Ripple Effect of Dehydration
Dehydration in the river of connective tissue affects more than your joints.Remember, every organ, nerve, and cell is also surrounded and supported by thisfluid tissue. When chronic dehydration is present, your body has to work harder tomaintain the function of its organs and systems.
On a microscopic level, connective tissue dehydration triggers a protective responsein cells. Your cells form a seal around themselves to try to preserve the fluid insidewhen the fluid environment outside is stagnant or lacking. Unfortunately, this meansthat essential nutrients, minerals, and available fluids are blocked from getting into thecell. Without these necessary cellular building blocks, hormone and enzymeproduction, cell-to-cell communication, and metabolism are all hindered. This leads tobone and muscle loss, increased fat storage, and premature cell death, all of whichaccelerate the aging process.

Just as pain acts as a signal that connective tissue dehydration is putting stress onthe muscles, joints, and nerves, when your organs and cells lack adequate hydration,they send signals of distress. “Everyday” symptoms—like headaches, sugar cravings,poor sleep, irritability, digestive discomfort, difficulty focusing, or low energy—couldbe a sign that the connective tissue needs your attention.
The relationship between sleep, concentration, or digestion and the connectivetissue may not be obvious, because how symptoms manifest and their intensity varygreatly from person to person. However, when you improve the state of hydration inthe connective tissue environment, you may find that these seemingly unrelatedsymptoms subside. Your body is better able to heal itself when the environment ofconnective tissue is hydrated and in its optimal state.
We Are Not Robots
Many of us have accepted a very robotic, mechanical view of our body. By mistakingour muscles and bones as the body’s structural support system, we’ve confusedmuscular strength with structural stability. Our structure is stable because of thesophisticated, three-dimensional architecture that the connective tissue systemprovides. The connective tissue acts as adaptable, supportive scaffolding for all ourparts—protecting the muscles, bones, nerves, and organs so your body can moveefficiently without damage.
This aspect of the connective tissue system can be described as a tensegrity model.The word “tensegrity”—a combination of the words “tension” and “integrity”—wascoined by architect Buckminster Fuller to describe a structural, oppositionalrelationship in which an object has the ability to resist distortion of its shape whenmechanical stress is applied. Tensegrity structures use minimal energy to maintaintheir shape because they are stable in all directions, absorb force through all theelements inside their structure, and function independently of gravity.
In the human body, the three-dimensional, seamless network of the connectivetissue system is responsible for managing tension and compression in a balanced yetoppositional way. The body’s oppositional relationships allow us to remain uprightand balanced against gravity with minimal damage or friction to the joints and vitalorgans. Head-to-toe tensional relationships within the connective tissue dictate theposition of our bones and joints at rest and during movement. If the connective tissueis dehydrated, the body’s tensegrity declines. When you see rounded shoulders, knockknees, or a bunion, you are seeing outward signs of a lack of tensional integrity. Theapparent misalignment and imbalance in each of these examples never occurs inisolation. When one joint or region of the body is misaligned, another region shifts

out of alignment in the opposing direction so that your body can remain upright. Forexample, look at someone standing. If the head shifts forward, the ribs shiftbackward, the hips shift forward, and this pattern continues all the way down to thefeet. If this oppositional shifting didn’t occur, a forward head position would allowgravity to topple you over.
The ability of the connective tissue to adapt its architecture and temporarily adjust isa good thing and allows the body to maintain an upright position. When yourmovements are repetitive and these positions are habitual, however, temporaryadjustments become chronic misalignments. The body’s ability to stay stable and stillin one area as muscles move another area is only possible because of this supportivearchitectural scaffolding.
The extensible quality of connective tissue is an important element of this adaptable,supportive scaffolding. Not to be confused with flexibility, which has to do withmuscles, extensibility is a term I use to describe the pliable and elastic supportivenessof connective tissue. Although connective tissue does have elastic qualities, it is madeto resist stretch so it can manage the balance between tension and compression.Without this quality, muscles would tear and joints would excessively compress.However, muscles can’t stretch or contract properly if the surrounding connectivetissue has poor extensibility. Extensibility of connective tissue requires hydration.Without hydration, connective tissue loses its ability to support our joints, whichcauses a chain reaction throughout the entire body. Muscles become overworked andsometimes locked, bones misalign, and joints either compress or become too loosedepending on their location within the architecture. Nerve transmission becomesimpaired, blood flow becomes restricted, and joints become inflamed.
The connective tissue system will always support whatever position you place yourbody in with the least amount of effort for as long as it can. That’s why you can sit forhours in a slumped position in front of your computer with little effort or pain.However, when the tissue becomes chronically dehydrated in any area, the body’stensional integrity declines, muscle tension picks up the slack, and feelings ofdiscomfort arise.
You can’t stretch, strengthen, or will your way into better tensional integrity. Theonly way to restore the balance between tension and compression is to restore thesystem responsible for tensegrity architecture—the connective tissue! Rehydratingyour connective tissue system with MELT will enable your body to realign itself.When you restore the fluid state of connective tissue, all your joints benefit, yourmuscles relax, and your body becomes more efficient.
The Body’s Brain

Have you ever thought about why it is so easy to carry on a conversation whilewalking? You take it for granted that you don’t have to think about how to move—you just do. How does that work?
It’s a widely held belief that movement is created when the brain gives a commandthrough a nerve impulse that tells particular muscles to move a particular body part.But it’s just not that simple. There is far more to movement than the brain telling themuscles to move.
The latest studies about the connective tissue confirm that there is a massive amountof communication occurring within the body with little to no input from your centralnervous system or brain. Cell to cell, organ to organ, and joint to joint, thiscommunication is occurring on an electrical and vibrational level through the fluidsystem of the connective tissue.
At any given moment, there is more information being transmitted through theconnective tissue system than there is through the nervous system. Furthermore, thespeed of connective tissue communication is more complex and frequently faster.Information is taken in and transmitted through sensory receptors in the tissue, calledproprioceptors and mechanoreceptors. This is what I call Body Sense. When yourBody Sense is poor, you have to rely more heavily on your five common senses,which can be exhausting and cause you to feel uncoordinated. Proprioceptors detectchanges in position, compression, and tension within the body. Themechanoreceptors’ primary role is to sense pressure that is potentially harmful to yourbody. This pressure can be caused by your movements, which change joint and organpositions, or by forces outside your body, anything from a hug to dropping somethingon your foot. When you have chronic misalignment, the proprioceptors andmechanoreceptors alert the brain to potential damage through the sensory nerves andyou feel pain. These sensory receptors were believed to be exclusively in the musclesystem, yet new science has revealed that there are billions more in the connectivetissue system. These discoveries radically change how we view communication withinthe body and the origin of pain.
Another mind-blowing concept is that the connective tissue system receives moreinformation from outside the body than the brain does through the five commonsenses. Indeed, fascial researcher Robert Schleip calls the connective tissue the largestsensory organ in the body. Just as the receptors in the connective tissue pick upchanges in position, movement, weight, and pressure from inside the body, they alsotake in that information from outside the body. Your body is constantly using thisinformation without your conscious awareness to regulate joint position, posture, andstability. Consider what occurs when there’s a sudden change in the pavement beneathyou, or you unknowingly step from concrete to grass or from curb to street. If you

had to rely solely on your eyes to tell your brain to signal your muscles to remainupright, you would lose your balance and fall—all the time. Instead, informationabout the change underfoot is picked up by the sensory receptors in the connectivetissue before you ever step on your foot. The connective tissue system has alreadystarted to adjust and modify every single joint in your body in relationship to gravityso you don’t damage your organs or joints and you don’t fall. Your brain getsinvolved after this massive relay has already occurred.
Although the brain does direct muscles, it cannot do this properly without theinformation it receives about the musculoskeletal system from the sensory receptors inthe connection tissue. Before the brain signals your muscles to move, the connectivetissue system prepares your body by creating tensegrity to minimize friction andcompression in joints. In order to align and stabilize the joints, connective tissuecreates what’s called “pre-anticipatory tensional stress” between joints. This act ofbody-wide pre-stressing lets the brain know how much motor nerve impulse to sendso the muscles can create the proper leverage, contraction, and timing. This supportivetension is what allows your body to remain balanced as you perform any movement,from throwing a baseball to picking up a pen.
Consider the action of jumping. The connective tissue acts as a whole bodystabilizing system that regulates your body weight as you push off, float in the air, andthen land. The sensors in the connective tissue monitor and support every joint so youcan land on your feet without twisting your ankle or tearing a tendon. This protective,supportive response occurs without you having to think about it—so long as theconnective tissue system is adequately hydrated.
Every aspect of movement works better when the connective tissue is a hydrated,stable environment for the sensory nerves. Without adequate hydration, internal bodycommunication cannot travel with the necessary speed or accuracy, and sensory nervetransmission and reception becomes disrupted. Without precise information about thebody’s position, muscle contraction becomes delayed or inhibited—seemingly“weak”—and compensation develops as uninhibited muscles step up to take over. Theweakness is not a matter of muscle strength. Instead, it is caused by the lack ofaccurate neurological communication getting to the right muscle groups at the righttime. Movement becomes stiff, labored, and inefficient. Over time, these laboredmovements become chronic patterns, all of which can occur prior to any discomfortor pain.
It’s easy to blame these changes on aging. But in fact, getting older just meansyou’ve had more time to accumulate the results of chronic dehydration. Becauseconnective tissue dehydration, not aging, is the root cause of many of these negativeeffects, you can take action to reverse these symptoms. When you rehydrate your

connective tissue, your body’s communication, stability, and mobility instantlyimprove.
The Inflammation Problem
When you think about being inflamed, you may think about bumps and bruises, puffyeyes, or heat and redness on your skin. Although you might recognize thesesymptoms, do you know what inflammation is or why it happens?
Acute inflammation is an exquisitely complex and powerful aspect of the repair andhealing process. When trauma occurs to the body, your immune system dispatches anabundance of repair cells, chemicals, blood, and other fluids to protect and heal thedamaged tissue. The inflammation—redness, swelling, stiffness, and heat—is a by-product of this immediate immune response. You experience acute inflammationwhen you twist your ankle, bump your head, cut or burn yourself, or are stung by abee. You also experience inflammation when you drink too much alcohol or eat foodthat your body can’t adequately digest. This biological “take control and protect”reaction is a brilliant immune response.
However, there is a different type of inflammation that might be damaging yourjoints right now, without your even realizing it. This is chronic inflammation, and itcan affect you at any age regardless of your lifestyle. Unlike acute inflammation, theswelling, stiffness, and heat are so subtle that you don’t even realize they arehappening. This subtlety is why chronic inflammation is referred to as low-level orlow-grade inflammation. Chronic connective tissue dehydration, joint misalignment,and inflammation go hand in hand. When the connective tissue has regions ofdehydration, the tensional architecture is compromised and the joints becomechronically misaligned in order to keep you upright and stable. Misaligned joints losespace and their ability to absorb shock. This makes joints susceptible to excesscompression, friction, and tension whether you are moving or not. Like scratching ascab over and over, continued repetition doesn’t allow the connective tissue in andaround joints to rehydrate or repair. This causes a complex biomechanical andchemical chain reaction, one of the results of which is low-level, chronicinflammation. All of this occurs and you don’t even realize it. As I always say, this isthe blessing and the curse of your body’s brilliant design. Because you don’t noticethe multitude of misalignments, the negative effects of dehydration and inflammationoccur without you realizing it.
Eventually chronic inflammation and joint compression escalate and causenoticeable symptoms to arise. You feel stiffness, tenderness, swelling, aching, andeven pain. By the time you notice symptoms of chronic inflammation in one joint or
area of your body, there are other areas that have chronic joint misalignment,connective tissue dehydration, and inflammation. When you adjust your position, rubthe area, crack your joints, or stretch, it doesn’t provide long-term relief. As yourtensional architecture and posture decline, other parts of your body are affected andmore symptoms arise. Nerves are compressed, which can cause tingling, numbness,and pain. Muscles become fatigued, strained, and out of balance, which can causesoreness, inflexibility, and pain. Your risk of injury increases as connective tissuedehydration spreads and nerve transmission declines.
Studies such as those done at the Stanford University School of Medicine show thatchronic inflammation, not compression or wear and tear, is the primary cause of jointdamage. Chronically inflamed tissues in and around the joints are overheated, stiff,and swollen with stagnant chemicals and fluids. The accumulation of these stagnantfluids damages joints, bones, nerves, tendons, cartilage, and ligaments. I want you toknow about chronic inflammation because, according to the Centers for DiseaseControl and Prevention, 50 percent of people will develop degenerative joint disease,or osteoarthritis, during their lifetime. The CDC also reports that osteoarthritis is theleading cause of chronic disability in the United States. Current medical treatmentsdon’t address the root cause, and joint replacement becomes almost inevitable. Andchronic inflammation doesn’t just damage joints—it also wreaks havoc on yourimmune system and other aspects of your health, dramatically accelerating the agingprocess.
MELT helps stop chronic inflammation and can even reverse many of its effects!When you rehydrate connective tissue with MELT, you address connective tissuedehydration and inflammation. You don’t have to figure out where you have jointmisalignment or compression. When you treat the connective tissue as a system, thetensional architecture of your whole body naturally restores better alignment. Whenyour connective tissue system is hydrated, it can efficiently manage tension andcompression every day.
I have seen many people dramatically improve their arthritis symptoms and becomeactive again by using MELT. And if you don’t have chronic inflammation, MELTkeeps it from occurring. You can keep your joints free of inflammation and help yourbody’s natural healing capabilities stay in optimal condition at any age.
The Good News
Connective tissue dehydration—even chronic cellular dehydration and inflammation—doesn’t have to be permanent. The connective tissue is a remarkable, renewableresource. The hydration of the connective tissue can be restored to improve whole

body communication, rejuvenate buoyancy and adaptability, and realign joints andposture. New science shows that specific kinds of pressure and pull on connectivetissue can be used to create whole body rehydration. This means that rehydrating theconnective tissue system requires direct, manual intervention—or, in the case ofMELT, stimulation that simulates the effects and results of manual therapy. To wakeup the tissues and stimulate them to produce and absorb fresh fluid requires just theright touch. Like squeezing out a sponge so it can then draw in fresh fluid, you canrelieve joint compression by applying appropriate compression to the surroundingconnective tissue.
To achieve and maintain a healthy, hydrated body, the key is maintenance. Thetissue needs regular treatment using MELT or other bodywork as well as consistentwater intake. Drink small amounts throughout the day, starting right after you wakeup. As you begin to MELT and focus on the consistency of your water intake, youwill help the connective tissue to absorb this fluid and transport it to other cells. Byhydrating your connective tissue, you give yourself the capacity for healing and goodhealth—when the connective tissue is hydrated, the body functions at a more optimallevel. Your movements require less effort. You can easily hop up a flight of stairs, getinto and out of a chair, and get down to and up from the floor without a thought. Youcan breathe with ease and sleep well. You feel vibrant, energetic, and clear-headed.Digestion and elimination are easy. Your skin looks bright and supple. You are morelikely to experience youthful good health.
Rehydrating your connective tissue—that is, MELTing—can have a powerful effecton your entire body. After following the MELT plan for just a few weeks, you mayfeel better than you have felt in years—you may even feel better than you ever have.Following the MELT program puts the power to change your body and your life atyour fingertips.

The Missing Link
As my private practice became transformed by MELT, my clients were experiencingamazing results rehydrating their own connective tissue. They were excited andwanted to learn more. So in 2004, I brought my clients together in one room at a clubwhere I taught indoor cycling and strength classes.
I was so eager to share everything I had learned that I often spent more time talkingabout the science than teaching the technique. I even brought in strips of cow fasciafor show and tell. Word quickly spread that I was teaching how to successfully self-treat pain, and soon other people joined the class. I was ecstatic. I went from being thego-to girl for a sweat-filled, muscle-building workout to being a pioneer of pain-freeliving and longevity.
About a year later, one of the women in my class said, “Sue, I usually have a hardtime falling asleep, and I wake up in the middle of the night. Since I’ve been takingthis class, I go to sleep easier and stay asleep longer. Do you think MELT could behelping me sleep better?”
Before I could answer, another woman said, “You know, I’ve been sleeping bettertoo. I usually have to get up at night to go to the bathroom. Lately I’ve been sleepingthrough the night, and I haven’t been able to figure out why. Maybe this is it!”
A third woman said, “I have asthma, and I haven’t been using my inhaler nearly asmuch as usual. I definitely think it’s this class.”
I couldn’t stop thinking about what each woman said. I get results with these typesof chronic issues using hands-on neurological techniques in my private practice. Yetthose techniques are very different from what I was teaching here. The next day in adifferent class, I asked if anyone had seen benefits other than improvements in painand physical performance. Everybody started talking at once, sharing all of theseamazing improvements:
“I haven’t been getting heartburn as much.”
“I don’t feel like I need a nap in the afternoon.”
“My sinus headaches are gone.”
“My menstrual cramps have become almost nonexistent.”
“My husband said my mood is better and that I seem to be more relaxed.”

One woman even said, “MELT is changing my life.”
I was blown away. The list of things that people felt MELT was helping with wasstaggering. What was happening?
The techniques I was teaching focused on rehydrating the connective tissue system.Yet the common thread of the changes they described was improvement in the body’sefficiency, which is regulated by the nervous system. I could make these kinds ofchanges one-on-one, but that’s not what I was trying to do. Had I unknowinglycreated a technique that simulates the neurological changes I could make with myhands?
At the time I thought that the connective tissue system and the nervous system wereas separate as the digestive system and the skeletal system. There was no research thatconnected the two. How were these connective tissue techniques helping nervoussystem regulation? My first theory was that by rehydrating connective tissue, we wereimproving emotional postures as well as repetitive postures. Tension-filled emotions—such as fear, anger, and grief—give rise to certain visible postures, patterns, andmovements. When body language becomes chronic, it causes connective tissuedehydration in the same way that daily repetitive patterns do.
Students in my classes had become more upbeat, energetic, and open. Their facesand shoulders looked relaxed. They seemed to have more of a bounce in their step. Itwas apparent that their mood and body language were improving. However, erasingemotional postures did not explain how rehydrating connective tissue was improvingsleep, digestion, and asthma. There was clearly more going on. Their nervous systemswere doing a better job of regulating these functions.
Your Nervous System Simplified
Ask ten neuroscientists how the nervous system manages stress or regulates goodhealth and you’ll likely get ten different explanations. What recent science has shownis that the important aspects of the nervous system that influence stress accumulationand its effect on good health are operating outside of your brain’s control. Althoughyou can think about how well you slept last night, how fast your heart is beating,when you last had a bowel movement, or how sluggish your metabolism seems, youcan’t control these functions with your thoughts. It’s a good thing that you don’t haveto think about the five hundred functions of your liver, how often you need to blink,or when food is ready to move from your stomach to your intestines. This is morethan your thinking self could process. Instead, all involuntary or automatic functionsare regulated in the body by the autonomic nervous system through a sophisticated

chemical, electrical, and hormonal orchestration.There are three subsystems of the autonomic nervous system that are scientifically
referred to as the sympathetic, parasympathetic, and the more recently recognizedenteric nervous systems. I call this trio of regulators the stress, restore, and gutregulators. When one regulator is out of balance, it affects the other two and causessymptoms to arise. You can’t think your way into better function and out ofsymptoms. What you can do is influence the balance of the autonomic nervous systemregulators so your body functions more efficiently and chronic symptoms decrease—if you know how.
MELT is the tool to accomplish this. I want you to know the aspects of yournervous system that MELT is rebalancing so you know why it works. I havesimplified my scientific knowledge and empirical understanding of your body’sregulation system so you can learn why the MELT techniques can transform yourhealth beyond the elimination of chronic pain.
The stress and restore regulators operate like a seesaw. Together they help the bodymaintain internal balance by fine-tuning most of the body’s vital functions. This giveand take is happening all the time, without your awareness or control. Traditionally,the stress regulator is referred to as the fight, flight, or freeze response because thisregulator goes into overdrive during acute stress. If you needed to get out of the wayof an oncoming car, the stress regulator would sharply boost adrenaline and bodilyfunctions such as heart rate, perspiration, breathing, and pupil dilation. Once you aresafe, it’s the restore regulator that adjusts and normalizes these same functions to bringthe body back into balance.
I have come to realize that a broad range of circumstances can trigger the stressregulator—not just acute or traumatic stress. The stress regulator responds to anyincoming information, such as driving a car, exercising, walking up stairs, watchingTV, taking a bath, having a conversation, gardening, crossing the street, or learning.Each of these activities requires micro-adjustments to your internal systems. Thisseesaw effect occurs without your conscious control.
Although “stress” is often seen as something that should be alleviated or avoided,stress itself isn’t necessarily bad. Your body sees stress as information or movementthat requires a response. The restore regulator responds to the stress regulatoradjustments by bringing the body back into balance and initiating repair whennecessary. The stress and restore regulators are continuously responding and reactingby making countless micro-adjustments twenty-four hours a day. The stress regulatoris dominant primarily during your waking hours, and the restore regulator is dominantprimarily during sleep. In fact, most of your body’s healing and repair take placewhile you’re asleep, although the restore regulator also oversees repair and healing on

a smaller scale during your waking hours.One of the most important tools for a fresh, vibrant, youthful appearance and
energy is adequate sleep. During REM (rapid eye movement) sleep, the restoreregulator is busy monitoring organ healing, chemical and hormonal balance, andcellular repair.
The enteric nervous system—the third, lesser-known autonomic nervous systemregulator, which I call the gut regulator—directly manages every aspect of the gut anddigestion. The fact that your body can process whatever you put in it is remarkable.Digestion is a mechanical, chemical, and absorptive process that relies heavily onfluid. Fluid allows food to be digested, nutrients to be absorbed and transported intothe bloodstream, and waste to move through and leave the body. This highly intricatesystem has more parts than the transmission of a car. The gut regulator receives littleintervention from the brain. Instead, the connective tissue system provides a networkfor organ-to-organ communication. Like the brain, the gut has its ownneurotransmitters. In fact, there are more neurotransmitters in the gut than in thebrain. The gut also produces chemicals and hormones such as serotonin, adrenaline,and testosterone, which are used by all three regulators.
Regulation Efficiency
If your autonomic nervous system regulation is operating efficiently, all the regulatorsdo their jobs with minimal effort. Your regulators ebb and flow, each getting its timeto be dominant and to regulate your body’s functions as needed. The restore regulatorsupports your ability to fall asleep, stay asleep, and wake up rested. While sleeping,your body repairs itself. Your gut regulator manages your digestion, and as a resultyou can eliminate without difficulty. Your stress regulator responds appropriately toeach instance of incoming stress, and your restore regulator returns your body toequilibrium.
In this efficient state, the seesaw always returns to balance with minimal energy.Your energy is good throughout the day, and you can handle difficult situations withease. Further, your regulators constantly make adjustments to bring you back tobalance even when you challenge them by doing things like eating processed foods,drinking too much alcohol, experiencing a difficult situation, sitting all day, or notgetting enough sleep. If these challenges occur for a day or so, your regulators canefficiently bring you back to balance without signs, symptoms, or your consciousawareness. Wouldn’t it be nice to be in this state all the time?

Regulation Inefficiency
These challenges, over time, inhibit the regulators’ ability to efficiently bring you backto balance. You also challenge your regulators when you don’t allow each one its timeto be dominant. If you have a full stomach when you exercise or go to bed, or if youkeep working when you’re completely exhausted, none of your regulators can do theirjob well.
Consider some of the activities you do to relieve the stress of the day—consumingcaffeine, eating sugary foods or a heavy meal, drinking alcohol, using recreationaldrugs, and endlessly watching TV or surfing the Internet. When you do these activitiestoo close to bedtime, they keep your stress regulator active when you need it to bewinding down. While you are sleeping, light, noise, pets, kids, and other disturbanceskeep the restore regulator from its time to be dominant and oversee repair. Theregulators are so connected that when one is being constantly challenged, therelationship among all the regulators becomes imbalanced. If you don’t get a goodnight’s sleep, the restore regulator can’t do its job of repairing the complex gut system.This leads to gut distress day after day, which interferes with your ability to havesound, restorative sleep. A high-stress work and home environment or always“burning the candle at both ends” creates overactivity in the stress regulator, whichaffects your gut and the quality of your sleep.
It can’t be stated enough: restorative sleep is paramount. If the restore regulatordoesn’t have enough time or fluid to fully repair, replenish, and heal, you start thenext day with a backlog of accumulated stress. Over time the entire regulation systembecomes inefficient. Regulation inefficiency itself constantly activates the stressregulator, taking you further out of balance. This inefficient state requires more effortand energy, and your autonomic ability to adapt and respond declines. Your organs,muscles, brain, connective tissue, and regulators are working harder, even whenyou’re not doing anything. It’s like stepping on the gas when your car is in neutral.This slowly exhausts every system of your body and your body’s resources, all beforeyou even know it is happening. Your regulation system has to prioritize whichfunctions get attention and energy, and it opts to monitor your vital functions, such asheart rate and breathing, instead of hair growth and muscle repair. This makes youlook older and feel exhausted.
This prioritization is a protective mode to ensure that the regulators have enoughenergy and fluid to monitor and repair your vital functions. It’s like your computergiving you a message that it must operate in safety mode. Your computer doesn’t shutdown, it just runs slowly and you don’t have access to all of your programs. Unlikeyour computer, however, you don’t realize that this protective mode is occurring, and

initially there aren’t any warning signs or symptoms. Common occurrences such asuncontrollable yawning in the afternoon, gas or heartburn, cloudy-headedness, bloat,dry skin or hair, anxiety, and tired muscles when you exercise can all be signs ofregulation inefficiency. These are your subtle signals. If you rehydrate yourconnective tissue when you first notice these symptoms, you can turn them around ina short period of time.
We usually view these symptoms as normal and temporary inconveniences andmove on. Meanwhile, when your regulation is in protective mode, your gut isn’tprocessing food or eliminating efficiently, and your cellular repair is slow. Theseslowdowns cause excess waste to build up in the body. Your body must store thiswaste somewhere—and that “somewhere” is your connective tissue. As waste getsdumped into the connective tissue system, it collects like sediment, causing theconnective tissue to become stagnant and dehydrated.
Stuck Stress
I call this stagnation and dehydrated connective tissue stuck stress. Stuck stressaccumulates, which causes the fluid flow and supportive environment of theconnective tissue system to decline further. And just as inadequate fluid creates anegative chain reaction in the gut, rehydration of your connective tissue can restoreyour gut’s ability to efficiently work to fuel your body so you have the energy to dothe things you love. Rehydration can turn around your repair system as well. Havingenough fluid in your connective tissue is vital for both the quality of your sleep anddaily repair. Your capacity for repair and healing is completely reliant on all of yourcells’ ability to take in healthy fluid and nutrients and emit waste. When theenvironment around your cells is stagnant, cell walls seal themselves off and resistabsorption. This makes cell renewal impossible—instead of renewing, the cells die.
Cell renewal is what keeps you looking and feeling young. Without adequateabsorption of nutrients and fluid, cells can’t renew, and signs of aging such aswrinkles, age spots, and sagging skin occur. However, the damaging effects go farbeyond appearance. Slow cell renewal accelerates bone and muscle loss, impairsorgan function, impedes immune response, and slows metabolism. I have seenrehydration improve these circumstances in people of all ages and states of health.
What I have discovered is that the relationship between the regulators and theconnective tissue system is as closely linked as the relationship between the regulatorsthemselves. When the regulators are imbalanced, the connective tissue system isdehydrated, and the opposite is also true. It doesn’t matter which comes first—stuckstress or regulation inefficiency—they always coexist. Nor does it matter if the catalyst

was part of a healthy or unhealthy lifestyle, activity or inactivity. This happens toeveryone because we haven’t known that we could rebalance the regulators andrehydrate the connective tissue. I am going to show you easy, effective ways to doboth.
The cause of stuck stress accumulation is daily living. The contributing factors—repetitive movements, habitual and emotional postures, emotional and gut distress,and poor or inhibited body communication—are happening to all of us throughoutour lives.
If we don’t address the causes, our body’s inefficiency escalates and our stuckstress accumulates. Symptoms that used to come and go now become chronic or agreater annoyance. You may find yourself with symptoms like weight gain, lowlibido, chronic constipation, headaches, fatigue, low back pain, eczema, anxiety, andinsomnia. By the time you have these symptoms, there’s a significant underlyingproblem—but all you want is relief. You may find relief of individual symptomsthrough medication. But wouldn’t you know it—this temporary chemical alterationcauses further regulation imbalance and ultimately makes the problem worse. MELTaccesses the link between the connective tissue and nervous systems—what I havecome to call the neurofascial system. Now you can learn how to tap into theneurofascial system so that your regulators can return to a balanced state.
The Inflammation Problem, Again
Chronic symptoms usually indicate that the connective tissue system is in a chronicinflammatory state associated with tissue and cell damage. The commonly understoodview is that the gut is the primary source of chronic inflammation and should betreated through diet and supplementation. Terms like oxidative stress, free radicaldamage, and toxicity refer to inflammation in both the gut and the connective tissue.If the gut is inflamed, so is the connective tissue that affects all the systems of thebody.
In the same way that joint compression leads to chronic inflammation in theconnective tissue, so does gut inflammation. The dehydration and inflammation in theconnective tissue must be directly addressed to resolve joint or digestiveinflammation. In the inflammatory state, daily repair is greatly inhibited, which is partof why inflammation remains chronic. Most chronic symptoms are related to chronicinflammation in the connective tissue, which is a primary cause of decreased immunefunction and accelerated aging.
Better diet, more sleep, and “de-stressing” activities such as meditation, yoga,massage, exercise, talk therapy, and visualization can ease the burden on the regulators

and alleviate the inflammatory state. However, results are short-lived when stuckstress is unaddressed. These activities alone cannot rebalance the regulators, improvethe fluid state of connective tissue, or eliminate chronic inflammation. Stuck stressmust be addressed or these issues will return no matter how many otherimprovements you make.
The Solution
Why is MELT so effective in eliminating the body of stuck stress? It is my theory thatMELT rebalances the regulators by influencing your restore regulator to becomedominant while you are awake. Then, when you sleep, your restore regulator canwork more efficiently and do its job to repair and heal your body. Rebalancing thestress and restore regulators naturally brings the gut regulator back into balance andimproves overall regulation.
My clients were seeing their symptoms disappear because they were finallyaddressing the fundamental cause of their symptoms, not just trying to mask them. Byrehydrating the connective tissue, we helped to reduce the amount of stress in thenervous system overall, which improved the nervous system’s ability to regulate itself.That’s the brilliance of the body. When your body gets the support it needs, it healsitself. MELT rebalances the regulators and rehydrates the fluid environment that allbody systems rely on. And MELT will do this for you too.


Becoming a Hands-Off Bodyworker
Your life, and your body, is full of stress—stuck stress. You know this already,because you have seen firsthand how stress has manifested in your body. Theimpulse, when you understand this, is to try to reduce, eliminate, combat, or managestress in your life. But this doesn’t work—you know that. Now you are going to learnthat the key to getting rid of pain and fatigue lies in a different direction. At the core ofyour recovery is the ability to rid your body of stuck stress.
It doesn’t matter how or why the stuck stress got there. Repetitive movements andpostures, anxiety, poor sleep or diet, sedentary lifestyle, or life circumstances such asaging, trauma, pregnancy, and surgery all have the same effect on the neurofascialsystem: the accumulation of stuck stress. When stress accumulation occurs, yourneurofascial system gets knocked out of the efficiency zone, or what I call the EZZone, and your whole body becomes inefficient in seemingly undetectable ways. Overtime the daily repair and healing that occurs primarily while you sleep declines. Youmay have no idea that your body is operating inefficiently until you notice a symptom.
I have found that before pain, symptoms, or even whole body inefficiency occurs,there are four systemic effects of the accumulation of stuck stress in your neurofascialsystem.
Connective Tissue Dehydration: Pockets or areas of dehydration in joints or regionsof the body
Compression: A loss of joint space in the neck and/or low back
NeuroCore Imbalance: Imbalance in the mechanism I call the NeuroCore, which isresponsible for whole body stabilization and grounding and for the protection of vitalorgans
Faulty Body Sense: Inaccurate signaling in your involuntary body-widecommunication system, or what I call Body Sense, which is required for efficientmovement and balance.
These four effects make it impossible for your body to remain in the EZ Zone, andthey occur without you realizing it. The consequence is that your whole body becomesinefficient, which interferes with your body’s ability to repair, adjust, and heal on adaily basis. This inability to repair is what fundamentally causes symptoms to appear.

Symptoms may include:
• Stiffness and achiness upon rising
• Inflammation
• Trouble sleeping
• Constipation
• Extra weight
• Lack of energy
• Stress injuries
• Joint pain or swelling
• Headaches
• Bloating
• Poor digestion
• Wrinkles
• Cellulite
• Being prone to accidents
• Poor posture
• Poor balance
• Protruding low belly
• Uncoordinated movement
• Difficulty sitting for long periods
• Fidgetiness
• Leg cramps
• Restless legs
• Stiff, tight muscles
• Loose, hypermobile joints
• Brain fog
• Anxiety

• Depression
• Concentration issues
• Mood swings
If you recognize any of these symptoms, I want you to start looking at them in anew way. Your symptoms are a signal that stuck stress has accumulated, you are outof the EZ Zone, and your body is operating inefficiently. Symptoms that may seemunrelated—such as constipation, back pain, and headaches—are all connected by theirunderlying cause: stuck stress. When you address the accumulation of stuck stress,your symptoms will improve or go away.
You must be in the EZ Zone to eliminate symptoms and pain. You can’t justexercise, diet, supplement, meditate, surgically repair, or medicate yourself and thenbecome pain- or symptom-free. You can’t think your way out of stuck stress and backinto the EZ Zone (in case you were thinking you could). Focusing on masking yourpain or curing your symptoms provides only short-term relief, further exhausts yourbody, and causes more stuck stress to accumulate. I want you to shift your focus awayfrom pain and any other symptoms you’re experiencing. With MELT and yourunderstanding of your body’s desire to return to the EZ Zone, you will experienceimmediate changes in your body. Your body’s daily repair and healing mechanismswill be able to make long-term improvements to your chronic pain and othersymptoms in ways that were not possible before. One of the best things about MELTis that you will be able to sense the changes right away and every time you MELT.
The Four R’s
MELT directly addresses the four effects of stuck stress with the Four R’s: Reconnect,Rebalance, Rehydrate, and Release. The Four R’s are the MELT formula of self-treatment. Within each category, there are different techniques used to achieve thedesired result. The Four R’s are the recipe for the most immediate, lasting changes,which is why you will always use all Four R’s every time you MELT.
Reconnect techniques heighten Body Sense and the mind-body connection, which isa vital component of your body’s daily repair and healing function. You will learnhow to use your Body Sense, not your common senses, to self-assess stuck stress andinefficiency and to track your progress.
Rebalance techniques directly address the NeuroCore stabilizing mechanisms to

improve whole body balance, grounding, and organ support. Rebalance techniquesare subtle yet profound in the changes they create.
Rehydrate techniques restore the fluid state of the connective tissue system. Thesetechniques improve the environment for all your joints, muscles, organs, bones, andcells as well as the tensional integrity of the body. These techniques also decreaseinflammation in the joints and improve the fluid and nutrient absorption of every cell.
Release techniques decompress your neck, low back, and the joints of your spine,hands, and feet. Regaining and maintaining the space in your joints will keep youyouthful, mobile, and pain-free.
Each R of MELT addresses aspects of all four effects of stuck stress—connectivetissue dehydration, compression, NeuroCore imbalance, and faulty Body Sense. Youdon’t need to be an expert on the science of connective tissue and the nervous systemto MELT. You don’t even need to know what manual therapy is. You just need theFour R’s of MELT.
Because connective tissue is one seamless interconnected system that wraps aroundevery muscle, bone, joint, and organ, you can create changes in your whole body,regardless of which technique you are doing or the area you are self-treating. MELTdirectly affects the systems of the body that no self-care or medical-care modality isable to reach. Before MELT, these results were only available through ongoing, costlytherapies from multiple practitioners in a variety of fields, such as acupuncture,structural integration, massage, osteopathy, and craniosacral therapy. With MELT youare the one in charge of rehydrating your connective tissue and rebalancing yournervous system. This makes MELT different from anything previously available.
I have incorporated the multiple modalities that I use in my private practice into theMELT self-treatment techniques. Most of the MELT language, concepts, andphilosophies are born out of the traditions of manual therapy, or hands-on bodywork,including Leon Chaitow’s and Judith DeLany’s Neuromuscular Therapy, JohnUpledger’s CranioSacral Therapy, Ida Rolf’s Structural Integration, Bruno Chikly’sLymph Drainage Therapy, and Jean-Pierre Barral’s Visceral Manipulation. I am goingto teach you how to be your own Hands-Off Bodyworker. Now you are in control.Think of it—you can create immediate changes and feel better in only ten minutes aday. It’s that simple. You can unload the accumulated stress in your body so you canfeel better today and handle the stress that will inevitably crop up tomorrow. Thechanges that you will create in your body will radically change your view of howmuch you can do on your own to become healthy and pain-free. No longer will youhave to wait for a symptom or an ache to care for the imbalances and inefficiencies

that happen to all of us.I’m excited for you to sense powerful, immediate changes in your innate balance
and alignment. This is one of the first ways you’ll know that you are on your way tothe life-changing results that occur from incorporating MELT into your regularroutine. Here are some other changes you may notice in the first few days or weeks:
• Your body will be much more comfortable during your day-to-day activities.
• Movement will become more effortless and you will feel more stable andflexible.
• You will feel more grounded and clear-minded.
• You will fall asleep easier and sleep more soundly.
• You will wake up more rested and have more energy throughout your day.
• You will have fewer aches and less pain as well as a greater sense of overallwell-being.
As you continue to MELT, you’ll regain balance in the nervous system regulatorsand restore the fluid state of the connective tissue system. This is what will get youback to the EZ Zone so daily repair and healing can occur. This usually takes two tothree weeks, but for some people it may take as little as a few days, and for others ittakes months. It all depends on how much stuck stress your body needs to process. Iam going to ask you to try MELT for at least one month to allow your natural healingmechanism to come back online. I will outline your self-treatment plan in thefollowing chapters.
Regardless of your current state of health, MELT helps your body return to a betterplace. You can MELT every day, but don’t be impatient with your body’s healingprocess. If you try to rush it, you will put additional stress on your body, which worksagainst its ability to heal. Whether you MELT every day, every other day, or threetimes a week, you will be heightening your body’s daily repair and healing function.Once you wake up your body’s ability to heal, you will have less stuck stress and painto manage. Your daily repair function can then go to work on other symptoms. Howquickly symptoms subside varies for each individual because your collection ofsymptoms and your history are unique. The reduction in the intensity or frequency ofyour symptoms will be a gauge for how well your repair and healing function isoperating and how often you need to MELT.
MELT is not a cure for symptoms or illness. MELT supports your body’s ability toheal itself. The ultimate goal is for you to shift from reacting to your pain and otherissues toward proactively using MELT to live a healthy, active, pain-free life.

The Method of MELTing
The method of MELTing is simple—all you need to know is the language of Hands-Off Bodywork. The most basic element of MELTing is the MELT move. A moveapplies techniques from one of the Four R’s to a body part or area of the body using asoft roller. A sequence is a structured progression of MELT moves from two or moreof the Four R’s that yields a specific result. Before and after any MELT sequence, youwill Reconnect to self-assess your results. Reconnecting allows you and your body toidentify the immediate changes you’ve made from the Rebalance, Rehydrate, andRelease techniques and encourages you to keep MELTing. Reconnecting before andafter is integral to creating lasting changes with MELT.
MELT maps combine a series of sequences to create a complete self-treatment thatincludes all Four R’s: Reconnect, Rebalance, Rehydrate, and Release. This means thatevery time you MELT, you’re addressing all four effects of stuck stress so you can getin the EZ Zone. The MELT Hand and Foot Treatment is a global self-treatment. Itapplies techniques from all Four R’s to the hands and feet using a small ball. TheHand and Foot Treatment can be done on its own or as part of a MELT map.
In Chapters 5 through 9 you will learn the intention and techniques of each R aswell as the Hand and Foot Treatment. In each of these chapters, you will have theopportunity to try a few of the moves as you learn about Reconnecting, Rebalancing,Rehydrating, and Releasing. In the next part of the book you will begin your MELTpractice by learning the sequences one at a time. You are on your way to becoming aHands-Off Bodyworker, making lasting changes to your body with the Four R’s andgetting into the EZ Zone.


Reconnect
In this chapter you will learn how powerful it is to reconnect with your body,something you may have felt disconnected from for years. We will start with the RestAssess so you can experience Reconnecting with self-assessment for the first time.This is the same self-assessment you will be using whenever you MELT, and you willusually conduct it with your eyes closed. This first time, however, you can go throughit with your eyes open as you read the following instructions.
To do this assessment, you are going to use your body’s internal awareness, or whatI call Body Sense. Body Sense is the ability to sense your body’s position inrelationship to your surroundings without your conscious awareness. It is theoverlooked sixth sense that is as important, if not more so, than the other five. Whenyou do this assessment, use your Body Sense to get a sense of what you feel ratherthan touching your body, looking at yourself, fidgeting, or adjusting your body’sposition.
Rest Assess Lie on the floor with your arms and legs extended and relaxed, palms face up.
Breathe and allow your body to rest on the floor.
Notice that there are areas of your body that touch the floor and others thatdon’t. Sense how your body makes a wave formation, alternating between areasthat are weighted to the floor (like your head) and others that are off the floor(like your neck), all the way down to your feet. Your sense of this is heightenedwhen your eyes are closed and you only use your Body Sense.
Once you sense the areas of your body that are on and off the floor, I want you togain a sense of the right and left sides of your body. Imagine splitting yourselfinto a left and right half from head to toe. Notice if one side of your body feelsmore weighted on the floor or if you sense that one leg feels longer than the other.

Remember, don’t adjust your body position or look at yourself. By using yourinternal awareness, you will learn to heighten your Body Sense, which is requiredfor all MELT self-assessments. If you’re not sure what you feel, make a mentalnote of that. That’s not uncommon, and I will explain why later.
Now try sensing your body with your eyes closed. Remember, feel the waveformation of weighted and non-weighted regions of your body, and notice if oneside of your body feels heavier or longer than the other. If you feel like your bodyis uneven from left to right, you are gaining a sense of what it feels like when youhave inefficiency in your body’s stability system, or what I call the Autopilot.
The Autopilot is the link between your connective tissue and nervous systems, andit regulates and stabilizes all other systems of the body without your consciouscontrol. The Autopilot is a receptive, regulating system of support, protection,stability, and body communication. One of the functions that the Autopilot regulates isyour body’s balance and stability during movement and at rest. The Autopilot doesthis for you every second of every day without you having to think about it. Toregulate your body’s stability, the Autopilot works like a global positioning system, orGPS. A GPS tracking device uses radio wave signals sent from satellites to a groundcontrol station to determine its location. The GPS must have an unobstructed lock onmultiple satellite signals in order to provide you with accurate position information.
Like a GPS, your Autopilot is always trying to find your body’s center of gravity,which is in the center of your pelvis. The vibrational communication of Body Sense isthe radio wave signals. The joints of your body are the satellites. Ideally, there is acontinuous GPS-like signal relay from your feet, head, fingers, and every joint inbetween to your pelvis, so your body knows where it is in relationship to gravity. Thisallows your Autopilot to support and protect the organs, nerves, bones, and joints.This relay should be happening all the time whether you are moving, sitting, or evensleeping. If the satellite signals, or sensory nerves, have static, or a poor connection,from dehydration or inflammation in the connective tissue, your Autopilot mustcompensate to keep your body upright. This inefficient, protective mode occurswithout you realizing it.
Body Sense is not only relaying information to the Autopilot about what’s going oninside the body; it also plays a role in how we receive and respond to incominginformation from outside the body. The vibrational signals travel throughout yourentire body before you are even aware of the need to respond to incominginformation.
When you did the assessment, if you felt heavier on one side or if one leg feltlonger than the other, your Autopilot has lost its clear connection to your body’s

center of gravity. As a result, your Autopilot has to work to keep you in what itperceives to be a balanced position, even though you are at rest. This is very common.However, when your body is at rest, you shouldn’t have to be working at all. That’swhy we call it rest.
Most people find that they feel off-center when they do this Autopilot Assess forthe first time. If you’re not sure what you feel, that means you’re having a hard timeusing just your Body Sense to sense what you feel. And if you’re having trouble whenyou’re thinking about it, so is your Autopilot when you are not.
To better understand how your Body Sense and Autopilot work, I want you to tryanother self-assessment. Read the instructions first and then do the assessment.
Body Scan Assess Stand with your feet side by side and close your eyes.
Scan up your legs using your Body Sense. Are your thigh muscles engaged? Areyou squeezing your butt cheeks? See if you can release these muscles and stillremain upright.
If you sensed that your butt and thigh muscles were engaged, your Autopilot isoperating inefficiently, which is causing your body to work too hard during simpletasks. These muscles are meant for movement, not for standing. If these muscles haveto contract to keep you stable when you are still, imagine how hard they have to workwhen you move.
Here’s part two, the Toe Lift Assess. Again, read the instructions and then do theassessment.
Toe Lift Assess Still standing with your eyes closed, lift all ten toes off the ground. Keep your toes
lifted and take three full breaths.
Take a deep inhale, and on an exhale, drop all ten toes back to the floor. Noticewhat you feel.
When you dropped your toes back to the floor, did you notice your body weightdrift forward? If so, your Body Sense is lacking, and your Autopilot is unable tolocate your center of gravity. To compensate, the Autopilot moves your pelvisforward in order to pick up the signal of where your head, ribs, and pelvis are inrelationship to your feet.

When your Body Sense is weak, you may also find that your Autopilot has to relymore heavily on your senses of sight and touch. You may have to use the arm of achair to go from sitting to standing, look at the ground with every step you take, orhold on to a railing when you walk down a flight of stairs. This is a sign ofinefficiency and can be exhausting. Ultimately, your joints can misalign, musclecontraction can become delayed, and compensation can arise, leaving you susceptibleto injury.
Try the Toe Lift Assess again, this time with your eyes open.
With your feet side by side, lift all ten toes off the ground and pause for a coupleof breaths.
Take a deep inhale, and on an exhale, drop all ten toes back to the floor. Noticewhat you feel.
You may notice less of a drift, or none at all. This is because your Autopilot isusing your sense of sight for assistance. When you have to rely on your vision or yourAutopilot can’t find your center of gravity, your movements become delayed,unstable, stiff, and labored. (And as you may have noticed, your sense of visiondoesn’t get better as you get older.)
Stuck stress is the cause of poor reception in the Autopilot and the loss ofconnection between the body’s center of gravity and the joints. Stuck stress in theconnective tissue and nervous systems interrupts communication between your centerof gravity and the rest of your body. You don’t lose your ability to remain stable andupright, but you lose the ability to do so efficiently. This depletes your energy. Overtime, you can end up with neck and low back compression and misaligned joints.Symptoms such as joint pain, exhaustion, and anxiety are often the result. You mayfeel uncoordinated or even end up injured.
When the Autopilot must regulate stability in a perpetual state of compensation orstress, it affects the Autopilot’s ability to efficiently regulate all other systems of thebody. Structural misalignment and inefficiency of movement are often at the root ofseemingly unrelated issues, such as midday fatigue, slow metabolism, irritability,constant hunger, and lack of focus. When you support your Autopilot and help itreacquire its awareness of your precise center of gravity, bringing the satellites backonline, efficiency of movement and function of all bodily systems improve.
No physical exercise or method of thinking can return the Autopilot to efficiency. Itjust doesn’t work that way because it’s an involuntary system. What I am going toteach you is how to access the Autopilot in a way that gives it the opportunity toreclaim its connection to your center of gravity and improve its efficiency. I am also

going to teach you how to maintain that connection and heighten your Body Sensewithout putting added stress on the nervous system. Reconnecting with assessmenttechniques is an important part of the MELT Method and the doorway to theAutopilot. To understand why, I want to tell you the story of how MELT assessmentswere created before MELT was ever a method.
One day I was doing a bodywork session with a wonderfully inquisitive clientnamed Lynn, who had chronic neck pain and severe TMJ (jaw pain). During mystandard assessment process, I mentioned that her spine was very compressed. Sheasked, “How can you tell? Can you show me what you are feeling?”
I saw this as an opportunity and a challenge. Was there a way for her to feel orsense what was going on in her spine? If so, maybe she could recognize the rootcauses of her TMJ and chronic neck pain.
I had an idea. I asked Lynn to lie on the floor so her body would be resting on ahard surface. I wanted to see if she could feel the same misalignments in her posturethat I had identified. Could she sense the big arch in her back? Could she feel that oneshoulder was digging into the floor? Could Lynn notice that she was lopsided? Ipointed out these imbalances and used my hands to help her feel what I had assessed.Lynn could feel her own misalignments, and she could identify the misaligned areasof her body that were affecting her neck and jaw. For the first time, she understoodwhat I meant when I said that the root cause of her jaw pain was not in her jaw.
I had Lynn get back on my table again so I could do my usual hands-on treatments.When I was done, I asked her to return to the floor and see what she felt. She gaspedand said, “I feel the difference. Wow!” She could feel that her shoulder blade was in abetter position, her body was more balanced from side to side, and she was breathingmuch easier. Then she said, “Sue, what can I do on my own to make the changes lastlonger?”
That was the moment my obsession began. I wanted to find out if there was a wayfor my clients to perform techniques on themselves that could create the same kind ofresults that my hands-on bodywork would—without my hands. I poured all my focus,time, energy, and everything I had into this new idea. As I experimented on myself, Ineeded to know if anything was working. I knew how to assess my clients with myhands and eyes to identify if I had successfully rebalanced nervous system regulation,rehydrated connective tissue, or decompressed joints. There were no self-assessmentsfor these changes that could be repeated with any accuracy that I knew of. Mostassessments focused on the musculoskeletal system. Others required the use of amirror or photographs, which meant my perception could skew the result or my bodyposition could change when I reassessed. I had no idea how to assess repeatedly todetermine whether anything therapeutic was occurring to me.

After trying to modify many fitness assessments and physical and manual therapydiagnostics, I returned to the assessment I had unknowingly created with Lynn. Ilearned that I could easily and accurately assess my alignment by lying on the floor.The floor and how my body weighted to it gave me a static baseline from which Icould make an accurate comparison. It was a lightbulb moment. I sensed my body inrelationship to the floor using the reference point of anatomical zero. This is thereference point for ideal joint alignment in a human body and the foundation of allanatomical models.
No human being is ever in perfect anatomical alignment. Ideal alignment is just that—an idea of what ideal is. However, the more your posture is in chronicmisalignment, the more pain and chronic issues you will experience. By evaluatingimprovements in my alignment in a completely relaxed position, I could know if I wasmaking changes in the systems that are responsible for joint alignment, the connectivetissue and nervous systems.
Lying on the floor became my benchmark assessment. I would lie on the floor,assess my alignment, manipulate my body in different ways with various tools, and lieon the floor again to see if I felt changes. It worked! I was making the same types ofchanges that gave my clients relief and improved their health and function—onmyself. In addition to improvements in my alignment, I noticed I felt better overall. Ihad great energy, even after a full day of seeing clients. I was sleeping better, and Ineeded less recovery after working out. I felt younger, and people were commentingon how great I looked on a daily basis.
I was beyond amazed—I was stunned. I couldn’t believe that I might have createdsomething that had the potential to help people help themselves in a completely newway. I was as much in awe of my body’s healing capacity as I was unsure as to howthe changes were occurring. How would I explain it to people? What would they say?Even though I was filled with questions and self-doubt, I knew I couldn’t keep this tomyself. I cautiously showed Lynn and a few other clients some of the basic techniquesI had come up with to see if it worked on them. I wanted to see if they could sensewhat had shifted in their bodies, so I had them do the self-assessments too.
This presented me with a whole new set of challenges. I had spent years studyinganatomy and had learned even more by having my hands on hundreds of clients. Icould effortlessly use my knowledge of the human body to compare what I felt whenlying on the floor before and after self-treatment. Now I had to articulate this.
I tried to teach my clients anatomy so they could assess their own posture withanatomical landmarks. This did not go so well. Asking people to value their pelvicplacement and thoracic spine, or assess their cervical curve was a lot! Their eyesglazed over, and the assessment was taking over half of our appointment time. I asked
myself: How could I describe ideal alignment if my clients didn’t have anunderstanding of anatomical landmarks? How could I make the assessment simpleand consistent?
I decided to take a whole body approach. I noticed when I would lie on the floorthat my body felt like waves, alternating between areas that were heavy and light.Instead of describing anatomy, I starting describing the areas of the body that shouldbe weighted to the floor as “masses” and those that should be off the floor as“spaces.” I could simply describe ideal alignment using the “masses and spaces”model so my clients could compare what they felt in relationship to what I described.
It took me more than a year to refine the simple self-assessment that I now call theRest Assess. This is when the language of MELT began to emerge. During thisprocess, new discoveries about the Rest Assess came to light. I started compiling dataon what misalignments my clients felt, and I found there were common imbalances. Istarted describing these imbalances as part of the Rest Assess as an additionalcomparison in contrast to ideal alignment. I realized that by sensing the symmetry ofthe right and left half of my body, I could also evaluate whether my Autopilot couldsense my body’s true center of gravity. This may sound simple, but it was anextraordinary discovery. Evaluating the masses and spaces and the Autopilot withoutthe use of my hands or eyes became central to self-assessment. The process neededwas more internal and yet more objective at the same time. I started teaching people touse only their internal awareness, or Body Sense, to assess themselves.
When I started teaching MELT to groups, I began to realize how compelling theRest Assess truly was. At the end of class, I would look across the room at the dozensof people lying on the floor and see remarkable changes in alignment and body ease. Icould hardly believe what I was seeing. More incredibly, I was hearing from them thatthey sensed—and could articulate—these changes. What I was witnessing was beyondmy imagination. It’s difficult to describe the feelings of amazement, joy, excitement,and elation I felt when I first saw this. To my surprise, I still get the same charge at theend of every class. What is more exciting is that I can help people make changes ontheir own—without ever touching them!
Now it’s your turn to do the full Rest Assess.
Rest Assess Lie on the floor with your arms and legs extended and relaxed, palms face up.
Breathe and allow your body to relax into the floor.
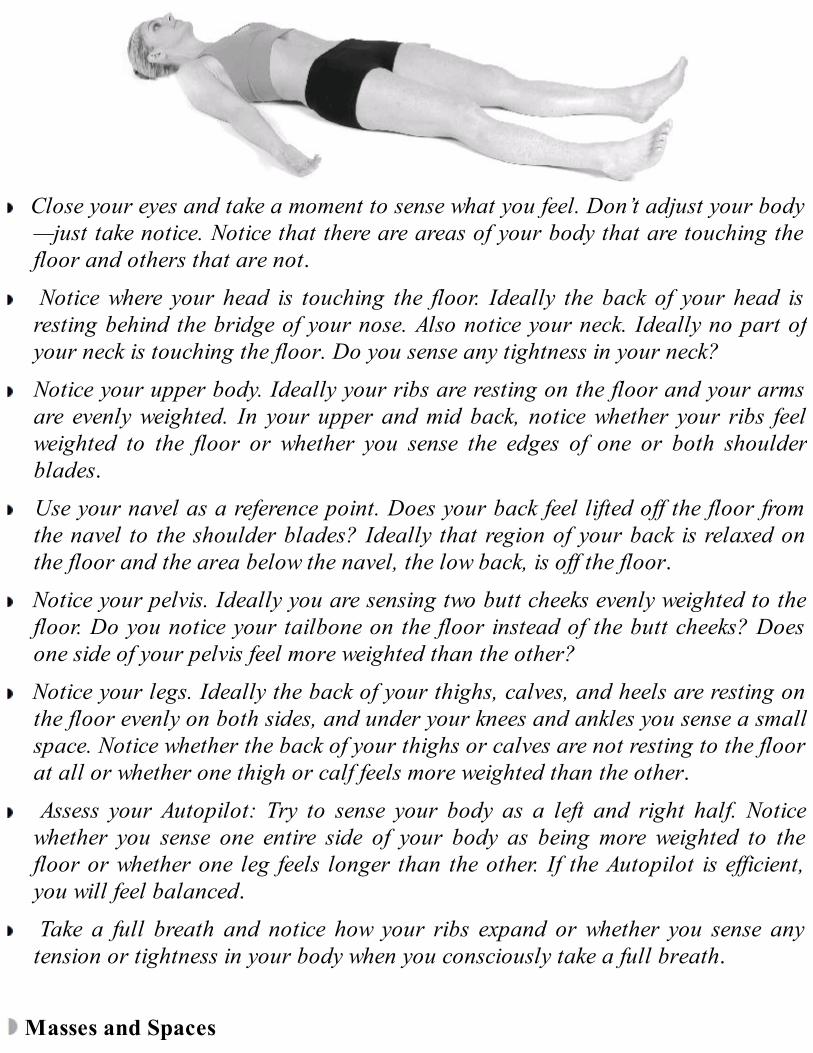
Close your eyes and take a moment to sense what you feel. Don’t adjust your body—just take notice. Notice that there are areas of your body that are touching thefloor and others that are not.
Notice where your head is touching the floor. Ideally the back of your head isresting behind the bridge of your nose. Also notice your neck. Ideally no part ofyour neck is touching the floor. Do you sense any tightness in your neck?
Notice your upper body. Ideally your ribs are resting on the floor and your armsare evenly weighted. In your upper and mid back, notice whether your ribs feelweighted to the floor or whether you sense the edges of one or both shoulderblades.
Use your navel as a reference point. Does your back feel lifted off the floor fromthe navel to the shoulder blades? Ideally that region of your back is relaxed onthe floor and the area below the navel, the low back, is off the floor.
Notice your pelvis. Ideally you are sensing two butt cheeks evenly weighted to thefloor. Do you notice your tailbone on the floor instead of the butt cheeks? Doesone side of your pelvis feel more weighted than the other?
Notice your legs. Ideally the back of your thighs, calves, and heels are resting onthe floor evenly on both sides, and under your knees and ankles you sense a smallspace. Notice whether the back of your thighs or calves are not resting to the floorat all or whether one thigh or calf feels more weighted than the other.
Assess your Autopilot: Try to sense your body as a left and right half. Noticewhether you sense one entire side of your body as being more weighted to thefloor or whether one leg feels longer than the other. If the Autopilot is efficient,you will feel balanced.
Take a full breath and notice how your ribs expand or whether you sense anytension or tightness in your body when you consciously take a full breath.
Masses and Spaces

To better understand what you just assessed, think of your body as a series of massesand spaces. The relationship between the two is what creates ideal alignment. Theprimary masses of the body are the head, rib cage, and pelvis. The primary spaces ofthe body are the neck and the belly/low back curve. (Although there are vital spacesbetween each rib, I define the rib cage area as a mass.) In your arms and legs, thebones—your thighs and upper arms, for instance—are considered masses, and thejoints—like the knees and wrists—are the spaces. Repetition and aging can cause youto lose space between the masses of your body, which creates compression andmisalignment. This puts strain on your joints and can cause pain and inflammation.
When your movements or postures cause any two masses to get too close together,the space between them is compressed while another space in the body’s architectureincreases. This happens all the time—when you side bend at your waist, your ribs getcloser to your pelvis on one side and farther apart on the other. The Autopilotregulates this balancing act to protect the organs and keep you upright, balancing andstabilizing each mass over each space in the most efficient way available.
Repetitive movements and postures lead to chronic compression of the spaces andmisalignment of the masses. When you carry a heavy bag over one shoulder, lean onone leg, or hold your body in a certain position to reduce pain, the spaces compress sothe masses can shift to allow your body to remain upright. Over time these temporarycompensations become a fixed part of how your Autopilot regulates your whole bodybalance and alignment. Compensation is at best a temporary fix, however. Over timeyour neck and low back curves adapt to your repetition, and ultimately, pain arisesdue to compression in the disks of your spine and other joints.
Think about how your body adapts to sitting at a computer. The pelvis tucks under,the ribs round back, the shoulders round forward, and the head tilts forward. Forhours at a time, your Autopilot has to support this posture. Then you stand up. You’reno longer sitting at your desk but your pelvis is still tucked, your back is hunchedover, and your shoulders are rounded. When you walk through a door, your headenters before your body does.
Every time you MELT, you’ll use the Rest Assess to sense how the masses andspaces rest. The masses and spaces are also used as reference points in all thetechniques to identify the proper body position and placement.
Reconnecting to the Autopilot and Ideal Alignment
Human science defines ideal alignment as “the point where all the joints align at theircenters.” The theory of ideal alignment is that if the joints align, they can move in theirfull, ideal range of motion, so the body can effortlessly maintain an upright position

with minimal compression, inflammation, and compensatory action for any givenmotion. The closer your body is to this reference point, the more easily tension andcompression are distributed throughout your body. Your Autopilot is always creatingwhat it perceives as the most efficient alignment possible. But over time yourrepetitive movements and postures cause your Autopilot to perceive a less-than-idealalignment as being normal.
The Rest Assess provides the opportunity to “check in” and evaluate your currentbody position in relationship to ideal alignment using the masses and spaces. The RestAssess lets you Reconnect with where your body is imbalanced or not ideally aligned.Your body wants to be balanced and efficient. This desire is innate within all of us.When you use your Body Sense to identify that you have misalignments andimbalances, your Autopilot pauses and gets a message to tune in, connect, and take alook around. Your Autopilot becomes aware of the ways in which it is chronicallycompensating in its perpetual attempt to regulate balance in your body. It checks all ofits gauges and does a sweep of the whole body and all of its systems. The Rebalance,Rehydrate, and Release techniques can then help you return to better alignment andregulation.
The Rest Assess also gives you the opportunity to identify and address subtle pre-pain signals so you can proactively return your body to balance before pain and othersymptoms arise. The ability to tap into and restore the Autopilot’s regulation of youralignment is a new discovery that has been missing from therapeutic interventions.
Common Imbalances
It’s not uncommon to have imbalances, but you’ll need to identify them to worktoward ideal alignment again. Use the following information to help you:


Before and After
The path to pain-free, balanced health begins with Reconnect because it’s what makesthe other three R’s of MELT work as well as they do. To create lasting changes inyour Autopilot and treat the four effects of stuck stress—connective tissuedehydration, compression, NeuroCore imbalance, and faulty Body Sense—you haveto assess your body’s current state before and after doing any series of MELT moves.This is the MELT protocol: Reconnect before and after every sequence. Remember, toknow which MELT moves to perform, you will follow a MELT map—a series ofsequences combined in a particular order to achieve a desired result. A MELT mapalways includes all Four R’s of MELT. In the following chapters, I will teach youmore techniques that correspond with specific MELT moves.
In any MELT map, you will Reconnect before and after each sequence. Initially,this is how you’ll know you are doing it right. You can inventory the changes you aremaking and track your progress. Any positive changes you experience are a sign that

your connective tissue and nervous systems are responding, stuck stress is releasing,and your regulators are rebalancing. However, assessment is more than a before andafter comparison. When you reassess and consciously connect with the changesyou’ve made, your Autopilot resets to a more efficient, balanced state and itsconnection with your center of gravity is more precise and integrated. Your nervoussystem is de-stressed and your mind-body communication and connection isheightened. It’s as if you have actively stepped in and allowed your Autopilot torecalibrate. Another profound result occurs: your restore regulator gets theopportunity to be dominant while you are awake—an extraordinary benefit to yourshort- and long-term health.
You don’t need a tape measure, mirror, or anything except your Body Sense and thesimple MELT assessments. You will use your Body Sense, or internal awareness, toassess your body’s current state and whether you have the common signs of the foureffects of stuck stress. Your Autopilot can’t keep you balanced and stable withoutgood Body Sense. By consciously using your Body Sense as your assessment tool,you improve its function when you’re not thinking about it at all. This is an importantpart of getting out and staying out of pain—and keeping your body healthy. With eachAssessment, you will learn your unique anatomical landscape, identify what needsyour attention, connect to your regulation system, track your progress, and heightenyour mind-body connection.
Remember, all systems of the body are connected, supported, monitored, andregulated by the Autopilot. Connecting to your Autopilot activates the healingmechanisms of your body while you’re awake. Make sure to always Reconnect as partof your MELT self-care routine. If you don’t, you will miss the opportunity to restorethe link between the autonomic nervous system and the connective tissue system andaddress the root cause of the four effects of stuck stress.
Assessing is also your tool to catch the pre-pain and pre-symptom signals. You nolonger need to be passive and simply respond to what is happening to your body. Youno longer need to wait for pain as the signal that it’s time to take action. Instead, youcan proactively care for yourself and your body, making positive changes before painever starts. This is an important part of becoming a Hands-Off Bodyworker: learningself-assessment and knowing how to make lasting changes to your body with the FourR’s.
I believe that self-assessment using Body Sense must be part of the protocol for anyneurofascial treatment. For now, to my knowledge, MELT offers the only Autopilotself-assessment techniques.
Why We Reconnect Before and After
My discovery about the importance of Reconnecting before and after each sequencehappened several years after that first assessment in my office with Lynn. Someone towhom I taught the MELT techniques came to me and said, “I think once you doMELT for a while, it doesn’t really work as well or last as long.”
I asked him, “What do you mean it’s not working? When you assess, don’t you feelthe changes?”
He replied, “Well, I already know what the benefits are, so I don’t really assessanymore.”
I didn’t really anticipate what would come out of my mouth next. “Well, how doyou know if it’s working if you don’t assess and then value the changes? It’s notabout you knowing or feeling the changes, it’s about your autonomic nervous systemrecognizing the changes. You want to connect with your non-thinking self tocommunicate your attempt to support it. If you don’t pause and let your Autopilotsense your body’s imbalances, how will your body know you are doing anything forit at all?”
I realized that I had never articulated this before. It made perfect sense to me. If youdon’t Reconnect before and after each sequence, you miss out on more than half ofthe results of MELT because your Autopilot doesn’t recognize that you are imbalancedand out of alignment, so it doesn’t get a chance to recalibrate. That’s when I realizedthat the assessment was actually a powerful part of MELT self-treatment. Assessmentbefore, during, and after each MELT sequence is necessary to create the most lastingchanges in the body. Reassessing gives the Autopilot the opportunity to reacquire itsGPS signal. That is why I call the first of the Four MELT R’s Reconnect.
It’s said that the mind can learn great things about the body through self-awareness.What I have found is that by pausing and becoming self-aware about the current stateof the Autopilot, you can change how the body communicates with the mind. Idiscovered a doorway into the deepest aspects of the nervous system and the bridgebetween the autonomic nervous system and the connective tissue system. You havethe ability to rebalance the regulators of your autonomic nervous system to helpimprove your alignment, reduce pain, support the regulation of your organs, andheighten the healing state of your body. The aspects of your body’s regulation that areconsidered involuntary and inaccessible are now within your control. This type oftreatment was previously only possible through a third party, such as a hands-ontherapist. Now this self-care treatment is in your own hands.


Rebalance
There are literally thousands of books promising to help you flatten your abs,improve your core stability, and rid yourself of back pain if only you will strengthenyour abs. But “core exercises” may not help you. Ironically, the very abdominalexercises many of us do to create a flat stomach and a stable spine could actuallyinhibit core stability and increase your chances of having a paunch.
Core and spinal stability and whole body balance are all regulated by the Autopilot.I think you’ll be amazed at how much is occurring to keep you upright and stablewithout your conscious awareness. Reflexes are involuntary responses to changes inyour body’s position or the ground underneath. Even as you are sitting and readingthis book, there is a whole body orchestration of reflexes so you can turn the page ortouch your screen with your hand while the rest of your body stays still.
NeuroCore Stability
I have identified a physiological system that the Autopilot uses to create thisinvoluntary, reflexive stabilization. This system has two mechanisms that includeconnective tissue, nerves, and muscle. Together, the Reflexive and Rooted Coremechanisms work to keep you stable and upright while protecting your spine and vitalorgans. Here’s how they work.

The Reflexive Core mechanism is an identifiable double layer of connective tissuethat creates a cylinder around the organs within your torso. This egg-shaped containeris strong yet pliable. Inside, a three-dimensional web of seamless connective tissuesupports the organs and connects the deep stabilizing muscles. The Reflexive Coremechanism’s purpose is to support and protect your vital organs and spine.

The Rooted Core mechanism is an identifiable channel of connective tissue, deepwithin your body, that runs from head to toe. This channel provides the compartmentsfor and connection between the bones, muscles, and organs that it surrounds andintersects. The Rooted Core channel shares the same connective tissue that creates thecore cylinder with the Reflexive Core. The Rooted Core mechanism grounds you andworks with gravity to lift you upward and keep your masses balanced over yourspaces. The purpose of the Rooted Core mechanism is to support and protect yourspine while it maintains a grounded connection to the earth.

These mechanisms coordinate with dedicated, deep stabilizing muscles to do theirjobs. These muscles are constantly responding to vibrational communication withinthe connective tissue system—not to your conscious thought. The connective tissue,nervous, and muscle system components of the Reflexive and Rooted Coremechanisms are all operating in response to an enormous amount of Body Senseinformation being transmitted within and between these two mechanisms. Themechanisms are always working and operate together as a system. I call this systemth e NeuroCore. The Autopilot regulates the NeuroCore system, and when it isworking properly, the relationship of your masses and spaces is optimal and you areable to move effortlessly without compensation, pain, or injury. If the NeuroCoresystem was made up of only muscles, it would be much easier to explain. Theconnective tissue and nervous system components of the NeuroCore are far morecomplex yet important to understand in order to achieve a pain-free, healthy life.
Let’s look at the Autopilot to make sense of how the NeuroCore creates uprightstability. The Autopilot is constantly tracking your body position through the

information it receives from the satellites, or receptors, in your joints. The Autopilottracks your center of gravity through the vibrational communication that is beingrelayed within and between the Reflexive and Rooted Core mechanisms.Simultaneously, the Autopilot is tracking your primary masses—your head, ribs, andpelvis—in relation to your feet and gravity. Each of these masses contains one ormore curved structures made of connective tissue.
I call these structures the “domes and arches” of your body. The Reflexive andRooted Core mechanisms rely upon seamless, vibrational communication from yourfeet to your head through the domes and arches. The domes and arches also play acritical role in providing buoyancy and shock absorption for the body duringmovement. Communication, shock absorption, and buoyancy of the domes andarches all rely on the healthy, fluid state of the connective tissue system.
The Diaphragm and Stability

While the act of breathing keeps you alive, diaphragmatic motion is essential toupright posture, dynamic movement, and vibrational communication. Thediaphragm’s ability to fully move is the foundation of Autopilot and NeuroCoreefficiency.
The respiratory diaphragm is the primary dome in your ribcage. Think of thediaphragm as the center of communication in your body: every time you take a breath—twenty-eight thousand times a day—the movement of the diaphragm createsvibrational communication with the rest of the body and initiates numerous responses.The diaphragm and its motion creates the link between the Reflexive and Rooted Coremechanisms and helps the Autopilot sustain its connection to your center of gravity.In order to maintain an accurate signal, the diaphragm must be able to move in itsthree-dimensional range.
Every time you inhale, the diaphragm contracts down and out, so your lungs fillwith air. When you exhale, the diaphragm relaxes and returns to its lifted, dome-likeposition. This motion stimulates the Rooted Core mechanism’s head-to-toe groundingcapabilities by sending vibrational information to the other domes and arches.Diaphragmatic motion signals the Reflexive Core mechanism to support the spine andbelly while allowing the organs to gently move and glide.
Muscles and Stability
To understand the muscle system’s role in creating stability, you need to know thatthere are two categories of muscle contraction. One type is a voluntary contractionthat creates movement. The other type is an involuntary muscle contraction thatstabilizes your joints and spine and protects your organs whether you’re sitting,running, or at rest. I call the muscles that do these two types of jobs movers andstabilizers.
The muscles found in the mechanisms of the NeuroCore are the most essentialstabilizers of your body and operate outside of your conscious control. TheNeuroCore is signaled by the Autopilot, not the brain. When the NeuroCore and theAutopilot are free of stuck stress and functioning efficiently, stabilization is efficient.However, when the stabilizing mechanisms are inefficient, your muscles that usuallymove you are called upon to aid in stabilization. This makes movement more difficultand taxing. If muscle movers are contracting to stabilize you, when you need thesemuscles to create movement they are less accurate and compensation or injury is theinevitable result.
Differentiation and Stability
To sustain the space of your joints, you must be able to move your masses withoutcompromising the spaces. I refer to the ability to isolate movement as differentiation.When the Autopilot and NeuroCore mechanisms are stabilizing you efficiently,differentiation naturally occurs. For example, when you reach for a glass from acabinet, ideally what you see is your arm move. If stuck stress interferes with thismovement, your shoulders and ribs must elevate to allow your arm to reach, and youdon’t even realize it. The joints of your neck and shoulder are compressed andcompromised, and over time you will feel discomfort in those areas.
Differentiated movement is acquired through the stabilizing muscles of theNeuroCore and is dictated by the Autopilot. Differentiation is essential in maintainingproper alignment. If the Autopilot and NeuroCore are chronically inefficient, you willeventually not be able to move without great effort or joint ache. Something as simpleas getting out of a chair can become an event when the necessary stability anddifferentiation are impaired. MELT will help you reacquire the ability to differentiateand reduce your risk of compressing your joints when you move.
NeuroCore Imbalance
Stuck stress in the connective tissues of the Reflexive and Rooted Core mechanismsand the diaphragm causes interruptions in the vibrational communication and the fluidstate of the NeuroCore. These interruptions cause imbalance in the NeuroCore, whichimpairs the Autopilot’s ability to find the body’s center of gravity. Over time, theinterruptions cause the Reflexive and Rooted Core mechanisms to becomeimbalanced.
You may have heard that your emotions are the cause of back pain. This idea isdirectly related to NeuroCore imbalance. In this case, the stuck stress that triggers theimbalance is emotional stress. Regardless of what type of stuck stress initiated theimbalance of the NeuroCore, you must rebalance the Reflexive and Rooted Coremechanisms directly to resolve stuck stress accumulation.
I have found that, for most people, the Reflexive Core mechanism isn’t functioningas it should. The Rooted Core mechanism has to work overtime to compensate, andthe Autopilot sends distress signals. The demand on the Rooted Core becomes sogreat that it becomes dehydrated and fatigued. Stability becomes quite complicated.Your brain receives the distress signals and calls upon your muscle movers to stabilizeyour spine and support your organs. When your body is being stabilized by musclemovers, your brain and the central nervous system are now involved. This makes you

mentally and physically exhausted—and you don’t even know why it’s happening.Muscle movers are not meant to be constantly active like muscle stabilizers. Over
time, compensating movers become tired, tight, and locked, which can lead toinflammation, spasm, and pain. When muscle movers compensate to stabilize you, itcan be seen in your posture and movements. This is one reason why muscleimbalance and weakness are usually cited as the cause of misalignment. However,muscle imbalance is a symptom of postural misalignment, not the cause. Posturalmisalignment is caused by NeuroCore imbalance and Autopilot inefficiency.
Over time, the Autopilot perceives your body’s chronic misalignment as being leveland balanced, and it constantly tries to return you to that state. The connective tissuethat surrounds and envelops the muscles becomes strained as it tries to sustain thetensional integrity in misalignment. The connective tissue system becomes dehydrated,joints lose space, shock absorption diminishes, and inflammation increases.
I believe NeuroCore imbalance is the number one cause of back injuries likebulging disks, hernias, and back spasms. Chronic pain and sudden chronic pain arefrequently the result of imbalance in your NeuroCore. A history of dehydration andcompensation has occurred before you ever feel the first twinge of pain. To avoidthis, you need to step in and Rebalance the mechanisms.
Is Your NeuroCore Imbalanced?
How do you know if your NeuroCore isn’t in optimal condition? If you frequentlyfeel neck or low back strain or pain, you can assume your NeuroCore isn’t workingefficiently. You may not even notice what came before the pain—a head that jutsforward, tucked pelvis, lower belly paunch, gut issues, and stiff or awkwardmovements are all signs of Reflexive and Rooted Core mechanisms that aren’tcommunicating well.
Even someone who appears to be very muscular may have a poorly functioningNeuroCore. This is why many bodybuilders and fitness fanatics have inflexibility andjoint damage in their spine and hips. They are unstable and don’t even know it. Thisused to be me.
Many people try to strengthen their abs to fix their alignment. When you train themuscle movers of the core to achieve a flat stomach, or six-pack, it can alter the deep,constant contraction of NeuroCore stabilization. Furthermore, exercising muscles tocorrect postural misalignment merely strengthens your body’s ability to compensateand perpetuates your misaligned state. Strengthening your muscles is a good thing, butit doesn’t improve NeuroCore stability.
People who practice breathing techniques, such as those done in yoga, Pilates,

meditation, and martial arts, can also have NeuroCore imbalance. Just because youwork with your breathing doesn’t mean your diaphragm can create the full range ofmovement required for accurate NeuroCore signaling to the Autopilot.
Although exercise and deep breathing techniques are beneficial, they are notdesigned to improve the functioning of the diaphragm and the NeuroCore. You haveto Rebalance and restore communication between the Reflexive and Rooted Coremechanisms so stability can return to being effortless.
I have discovered a way to tap in to the NeuroCore to Rebalance the Reflexive andRooted Core mechanisms and restore the Autopilot’s connection to your center ofgravity. Immediately, whole body communication and stability is improved, and yourentire body de-stresses. What’s exciting is that the NeuroCore Rebalancing techniquesare so simple and effective that anyone can do them and see immediate results. Youno longer have to wait for pain to arise to identify and resolve NeuroCore imbalance.
MELT Rebalance Techniques
MELT Rebalance techniques give you the tools to quiet your stress reflex and bringyour body back into balance. The Rebalance moves shown in the following MELTsequence expand the diaphragm’s three-dimensional range of movement andRebalance the NeuroCore system. This sequence improves balance, gut support, andspinal stability, which are an essential part of preventing or reducing any type of bodypain and maintaining optimal organ function.
The Rebalance, Rehydrate, and Release techniques of MELT require a MELT softbody roller, which can be purchased at www.meltmethod.com. If you don’t have oneyet, you can try these techniques by using rolled-up beach towels or a traditional, firmroller wrapped in a towel, blanket, or yoga mat. If you are currently under a doctor’scare or have any concerns about trying this or any other sequence, please consult yourdoctor.
Rebalance Sequence
This sequence is most effective when done in a quiet area so you are able to focusinward.Rest Assess 3-D BreathGentle Rocking Rest Reassess3-D Breath Breakdown

Rest Assess Lie on the floor, with your arms and legs straight and relaxed, palms face up.
Breathe and allow your body to relax into the floor. Close your eyes and take amoment to sense what you feel. Don’t adjust or touch your body—just take notice.
Notice your upper body. Ideally your ribs are resting on the floor and your armsare evenly weighted. In your upper and mid back, notice whether your ribs feelweighted to the floor or whether you sense the edges of one or both shoulderblades.
Use your navel as a reference point. Does your back feel lifted off the floor fromthe navel to the shoulder blades? Ideally that region of your back is relaxed onthe floor and the area below the navel, the low back, is off the floor.
Notice your pelvis. Ideally you sense two butt cheeks evenly weighted from left toright. Notice if you are sensing the tailbone on the floor instead of your buttcheeks or if one side feels more weighted than the other. Take note of what youfeel.
Assess your Autopilot. Imagine splitting yourself into a right and a left side.Notice if one side of your body feels more on the floor than the other. Does theright or left side feel heavier or longer, or do they feel even?
Finally, take a full breath and notice what areas of your torso expand when yourlungs fill with air. Does your belly move? Ribs? Both? Just sense what moves andwhat doesn’t.
This Rest Assess is a powerful tool that you will use throughout the book.Remember how to do the Rest Assess and come back to this section when you need topractice this method again.

Gentle Rocking Sit on one end of the roller with your feet flat on the floor, about hip-width apart,
your knees bent.
If you need additional support, place towels, pillows, or bolsters on either side ofthe roller.
Place your hands on the floor for support and then slowly roll yourself downalong the length of the roller.
Touch the top of your head to make sure it is fully supported on the roller. If it’snot, scoot your pelvis down toward your knees and make room for your head.Make sure your feet are firmly on the floor, hip-width apart.

Place your arms on the floor.
Every time you get on the roller, you’ll start by gently rocking your body fromside to side. As you gently rock from left to right, you want a sense of falling andcatching yourself on each side for about 30 seconds. This allows your Autopilotand NeuroCore to go into action to support, protect, and stabilize you.
Notice what you feel: Do you feel tremendously unsteady? Do you shift your bodyweight more easily to one side than to the other?
Return to a balanced center place on the roller.
3-D Breath Breakdown Imagine your torso is a six-sided box—front to back, side to side, and top to
bottom. Place one hand on your chest and the other on your belly, over yourbelly button.

Take 4–5 breaths into the area between the front and the back of your body,allowing the diaphragm to expand in two directions—front and back—as youinhale. These breaths don’t need to be the fullest breaths you can take. Instead,focus on expanding your diaphragm in only two directions.
Place your hands on the widest part of your rib cage, below your armpits. Take 4–5 breaths, allowing the diaphragm to expand between your hands. Find the widthof your breath. See if you can sense your hands and ribs moving apart on theinhale. The movement is subtle.
Place one hand on your collarbones, at the base of the throat, and the other onyour pubic bone, at the base of the belly. Take a couple of breaths between them,allowing your diaphragm to move downward toward your pelvis as your lungs fillto the top of your collarbone. The breath should go all the way down to yourpelvic floor and all the way up to the top of your lungs. Find the whole bodylength of your breath.
Notice if your body shifts or the roller rocks a little during any of these directionalbreaths. This is a good indication that your Autopilot is resetting and acquiring

its GPS signal to your center of gravity.
3-D Breath Place both hands on your belly and take a deep focused breath into all six sides of
your torso, expanding three-dimensionally. During the exhale, make a firm shhh,seee, or haaa sound to heighten your ability to sense the reflexive action in yourdeep abdomen. Sense the cylindrical contraction that subtly squeezes your spine,pelvic floor, and organs from all sides as you force the exhale.
Repeat 3–4 times. Then, without using the sound or forcing an exhale, see if youcan use your Body Sense to feel and follow that same reflexive action, startingwith your natural exhale and then consciously connecting to the more subtlesensation of engagement.
Slowly come off the roller by placing your hands on the floor, straightening outone leg, and sliding off that side—first with your pelvis, then your ribs and head.
Rest Reassess Lie on the floor with your arms and legs straight and relaxed, palms face up, as
you did before. Breathe and allow your body to relax into the floor. Close your

eyes and take a moment to reassess.
Use your Body Sense to notice if your upper body is more relaxed. Are your ribsheavier to the floor? Notice your pelvis. Are your butt cheeks more weighted to thefloor and more even from left to right?
Assess your Autopilot. Imagine splitting yourself into a right side and a left side.Do the right and left sides feel more even? Does it feel like there’s less of adistinction between your left and right halves?
Finally, take a full breath and notice what areas of your torso expand when yourlungs fill with air. Do you sense greater movement? Is it easier to take a deepbreath?
If you sense any of these changes, your NeuroCore is Rebalancing and yourAutopilot is reacquiring a stronger connection to your center of gravity.
Body Changes: After completing the Rebalance Sequence, you may notice thesespecific changes when you Reassess:
• Your upper body is more relaxed on the floor.
• Your breath feels fuller and more effortless.
• Your body feels more balanced from left to right.
The Power of Rebalance
After you identified your imbalances, you did some rocking, some shushing, and alittle focused breathing and, voilà, your body is in a new, more balanced place andyour Autopilot’s GPS signal is back online. Although it may seem like you didn’t domuch, the changes that your body made are profound.
I get excited every time I teach the Rebalance Sequence in a group environment.Watching an entire room of people transform their bodies to a balanced, settledposition right before my eyes never gets old. I never take for granted the power of thissimple sequence to restore essential elements of good health. It is a gift to me as muchas to my students. The fact that I found a way to access the Autopilot, without myhands, is almost as mind-blowing as how I figured it out in the first place.
One morning I woke up, and I have to admit, I was hung over. I had a few toomany cocktails at a friend’s fortieth birthday party the night before. I felt like I hadbeen run over by a bus. I immediately drank about a liter of water and instead ofgoing back to bed, decided to MELT a little to see if I could make myself feel better.
When I did the Rest Assess, I sensed that my entire body was weighted to one side.It felt as if the floor was slanted, but it wasn’t. I tried to readjust myself, but thefeeling remained. It felt very unusual. I had never felt so entirely out of balanceduring a Rest Assess.
It didn’t seem like a good idea to do the MELT Rehydrate techniques—I wasnauseated and my head was throbbing. So instead, I decided to try some standarddiaphragmatic release techniques while lying with my spine on the roller.
After breathing into each direction of my torso, it occurred to me to then breatheinto all three dimensions with a new intention. As I exhaled, I followed the naturaldeep contraction in my abdomen with the idea that it might help with the nausea. Ifocused my intent on the subtle, three-dimensional gathering that was occurring in thedeep layers of my abdomen. It felt like a gentle, internal hugging sensation. My focuswas not on the muscle contraction. I was focused on contacting the deepest layers ofmy core each time I exhaled. I knew from my manual therapy work that thiscontraction occurred involuntarily with every exhalation and could be improved witha variety of hands-on techniques. A wave of calm began to spread throughout mybody. My head started to clear, my breathing opened up, my nausea subsided, and myjaw relaxed. It was a little miracle.
I came off the roller and reassessed. The masses of my body were much moresettled into the floor. But what surprised me was that the feeling that I was leaning toone side was now totally gone. My postural alignment had radically changed just bylying on the roller and consciously connecting to what I now call the NeuroCore.
I couldn’t believe it. I felt remarkably better, and the feeling lasted for the rest of theday. I didn’t have to take any aspirin. I ate a good meal, drank lots of water, and evenfelt good enough to work out.
I wondered if this lopsided feeling was a merely a by-product of my hangover, or ifthis was something that my students would notice if they did this assessment. And ifthey experienced the same uneven feeling, could the instant improvement be repeated?
The next morning, after I did the usual Rest Assess at the beginning of class, Iasked my students whether they sensed that one entire side of their body was moreweighted to the floor or that one leg felt longer than the other. To my surprise, morethan half the students in the room raised their hands.
I had everyone lie on the roller and do a 3-D Breath Breakdown followed by a full3-D Breath. I had my students make a shhh sound to help them sense the subtle,

involuntary contraction. During the reassess I asked, “For those of you who felt offbalance from left to right before, how many of you feel more centered now?” Everysingle hand went up. I was shocked and excited.
They wanted to know what we had done. I couldn’t fully explain it to them. I wasjust beginning to make sense of it myself. I had a hypothesis: “It seems as if yournervous system can better find your center of gravity now.” I could see the difference,and they could feel it. Had I accidentally discovered a therapeutic technique that couldactually help people create changes in their own nervous system regulation? I realizedthat when you consciously connect to the involuntary contraction that supports yourspine and organs, your whole body alignment improves. Now I had to figure out howit improved whole body alignment. What was allowing the nervous system to regainbalance? What was making the body change so quickly in such a profound way?
These questions led me to an intense period of research and experimentation, therecounting of which could fill the pages of an entire book. The result is my model ofthe NeuroCore. This model offers a new understanding of how the body createsstability without our conscious control. These discoveries radically change your abilityto tap into and rebalance the reflexive, stabilizing mechanisms of your body. Whenyour body is stable, connected, and aligned, it can efficiently manage all types ofstress, so that stress doesn’t become stuck. When you Rebalance the NeuroCore youalso stimulate the body’s innate restorative healing mechanism. I now understand thatwhat seemed like such a simple, subtle technique when I was hungover was notsimple to the body. Here’s the rundown of what’s occurring:
Assess your Autopilot’s ability to sense your center of gravity: As you learned inthe Reconnect chapter, when you are at rest, you can assess your Autopilot efficiency.If your body feels heavier on one side or if one leg feels longer than the other, yourAutopilot is off-kilter and having a hard time locating your center of gravity. Theidentification of any off-centeredness is step one.
Lie on the roller along your spine: In this position, your brain is flooded withneurological information about your body’s position because you are stimulating thespine receptors directly with the gentle pressure of the soft roller. Unless someonedoes this to you with their hands, your spine never gets this type of positive, gentlecompression, even when you lie on the floor. This position opens up a powerfulcommunication channel between your hands, feet, spine, and brain.
Simultaneously, you are lying on an unstable surface, so your NeuroCore isstabilizing you while your spine is being stimulated. This heightens the Autopilot’sGPS signal to your center of gravity.

Do the 3-D Breath Breakdown on the roller: Experiencing diaphragmaticmovement through your awareness and your hands, with your spine supported by thesoft roller, enhances the diaphragm’s ability to move in its full range when you’re notthinking about it. This opens up the communication channels between your Reflexiveand Rooted Core mechanisms, which improves the Autopilot’s ability to find thecenter of gravity.
Do the 3-D Breath: When you inhale into all six sides, you experience thediaphragm’s more expansive range of motion. The greater purpose of the 3-D Breath,though, is to enhance the involuntary contraction of your NeuroCore during yourexhale. This is a reflexive contraction of both stabilizing muscles and connectivetissue.
When you make specific sounds, such as a shhh, during your exhale, it increasespressure and vibration in the abdomen. This heightens your ability to sense thereflexive, stabilizing core contraction and the gentle hugging around the organs. Thenwhen you exhale without sound and consciously use your Body Sense to feel andfollow that same involuntary contraction, you enhance its ability to occur even whenyou stop thinking about it.
Reassess: Identifying the change—your body resting more evenly on the floor—allows your awareness and your Autopilot to recognize your body’s true center ofgravity.
All five steps reset the Autopilot. When your Autopilot can find your center ofgravity, a rebalancing of the stress regulators occurs. That’s why people oftenexperience that immediate ahhhh feeling. Your muscle, organ, nervous, andconnective tissue systems experience that same type of relief.
You can’t think your way into a better center of gravity or a rebalancing of yourstress regulators. You have to go through the body. By using Body Sense andimproving vibrational communication, you can recalibrate the balance of yourNeuroCore mechanisms, thereby improving communication and ridding your body ofthe sensation of loss of balance. And doing so is an important step in your journey toa pain-free life.


Rehydrate
At the start, I was obsessed with rehydration. In particular, I wanted to teach myclients how to do it for themselves. My clients always reported feeling much betterafter a session, so how could I teach them to achieve that feeling Without me?
I became convinced that the answer could be found in the connective tissue. In myhands-on work, renewing the fluid state of this tissue system created the mostimmediate, lasting changes. I decided to experiment on myself. If I could figure outhow to self-treat this tissue, then I could offer my clients new solutions for stayingfree of pain and improving overall health. I quickly learned that using my own handsto self-treat my tissue with the same subtle, light touch I used on my clients did notyield the same result. It was just not possible to be both a transmitter and receiver ofthe specialized light touch vibration needed to improve the fluid state of theconnective tissue in a therapeutic way. Further, it was difficult to reach particular partsof my body, like my spine and shoulders, in order to treat them. I knew I had to use aprop. I never dreamed that one of the props I would ultimately use would be a roller.
I had never really been a fan of the foam roller.Hard foam rollers have been used to rub out kinks and knots in muscles for more
than half a century, a technique that in more recent years has been referred to as self-myofascial release. This is a method of rolling a hard foam roller back and forthunder a muscle group or area of the body. The motion is similar to ironing a shirt orvacuuming a rug, with the intention of releasing muscle tension by improving bloodflow. When you hit a painful spot, you roll directly over it or maintain pressure onthat spot until you basically can’t stand it anymore. Then you continue on with theback-and-forth motions until you find the next spot.
I was first introduced to foam rolling in my twenties. I had gone to a physicaltherapy office after I hurt my knee. Before my appointment, I was lying on the floorand stretching next to an athletic guy who was rolling back and forth on his outerthigh. As he grimaced and made all sorts of grunting sounds, I asked him what he wasdoing.
He said, “I’m getting the knots out of my IT band to help my knee.”I immediately grabbed one of the other white, hard rollers and did what he was
doing. It was really painful. “Is it supposed to hurt?”He replied, “That’s how you know it’s working. The more it hurts, the more it’s
working!”So I went ahead and rolled back and forth over my thighs. The next day, my thighs
hurt so bad I could barely feel my knees at all. The pain in my thighs was a distraction

from my knee pain, but my knees didn’t feel any better. Was I missing something?For a short time, I kept trying. Rolling on a white roller felt like I was rubbing a
bruise. I often felt more sore afterward than I did before. I never saw much of apositive change in my muscle issues, performance, or knee pain. Bottom line: I wastrying to get out of pain, and it hurt. I talked to other athletes who used the foam rollerand found out that it was supposed to hurt. And they loved the pain. I thought, whywould causing pain show you that something was working? I looked for someone toexplain that logic to me. No one did. So I stopped rolling.
Years later, as I learned more about connective tissue from the scientific researchersand my own work, I understood what I had intuitively felt when I first tried foamrolling. Inflicting pain on oneself isn’t a solution for pain. Remember, regardless ofthe underlying causes, pain is a symptom of dehydrated connective tissue. What Ihave found is that your connective tissue and nervous systems don’t respondpositively to intense, self-inflicted pressure on tissue that isn’t properly prepared orallowed time to adapt. Instead, connective tissue reacts to protect the underlyingnerves, blood vessels, and even muscles from being damaged by the heavycompression. The intense compression initiates a sensory nerve signal of pain to thebrain in order to alert you of potential trauma or damage, like an acute injury. Thiscauses unnecessary stress on the nervous system.
This type of fast, intense pressure can actually irritate the connective and muscletissues as well as the nerves and vessels. The pain signal is the nerves’ attempt toprotect themselves from harm. Although heavy compression and deep pressure maybe beneficial in particular circumstances, in my professional opinion, these techniquesare ideally administered by experienced professionals who know what they are doing.If you are going to do these types of intense pressure techniques on yourself, makesure that you first learn how from a well-trained professional and that your connectivetissue is hydrated. Most importantly, understand that inflicting pain should not be theultimate goal and that pain does not indicate benefit or proper application.
Going directly after tight muscles is also not the way to get out of pain or improveperformance, and it can often cause more problems. The superficial layer ofconnective tissue that sits above all the muscle (or myofascial) layers must be hydratedfor the muscles to receive clear neurological input. Connective tissue dehydrationcauses uncoordinated movement, muscle fatigue, and pain. Once the tissue isrehydrated, then stretching, massage, and other light- or medium-pressure modalitiescan feel good and help sustain a positive change. Remember, you don’t want to dothings to yourself that hurt.
One popular method of relieving muscle tension is massage. I’m a big fan ofmassage. It’s also a great way to relax the mind and body, and improve circulation. I
love that someone else does it to me. Of course, that means that it costs money. Theintention of a massage is different than MELT, as massage focuses on muscle andblood circulation. If you enjoy getting massages too, MELT will help the results ofyour massage last longer.
Finding the Right Tool
When I started to experiment with manipulating my connective tissue, I realized that Ihad to use a prop if I wanted to simulate my hands-on treatments. I tried everythingfrom fitness props and physical therapy tools to toys and kitchen items in order tofind something that would create an effect similar to that of my hands-on work. Oddlyenough, my search led me back to the foam roller, but I had to develop a much softerroller than what was available. I found that a soft roller was ideal for creatingcompression on the most sensitive areas of the body. The same tool could also beused for the support and gentle stimulation of the spine. Once I determined that thesoft body roller was the ideal tool, I developed every technique and position inrelationship to the circumference, shape, and density of that roller.
In the early years of MELT, people would assume I was using the foam roller forself-myofascial release, and I found this frustrating. I felt like I was always trying toexplain how MELT wasn’t like another technique or method and that the roller wasquite different. What I came to realize was that I had created a completely new use forthe roller.
Positive Compression
In my quest, I focused first on how I could manipulate the fluid state of myconnective tissue in and around a joint for the sole purpose of increasing joint space,mobility, and proper alignment, like I did in my private practice. I was doing whatmanual therapy would define as direct compression techniques—directly manipulatingthe tissue around a specific joint. I moved slowly, in small areas, with the intention ofcompressing the tissue while making sure to maintain tolerable pressure. I wassimulating Rolfing, deep tissue, and neuromuscular techniques without allowing thepressure to get to the point of pain.
If you think about it, pain-free compression and manipulation is most precise whenyou do it to yourself. Only you can sense when you are at the point of pain. Even thennot everyone’s Body Sense or pain gauge of what is tolerable is a match for what thebody needs, although this can be learned. Remember, pain heightens the stress

regulator and Autopilot’s protective response, which in turn causes inflammation andmore pain. As a hands-on therapist, I never intentionally inflict pain. I intuitivelyknew that with any technique I developed, I had to keep the notion of creating painout of the equation.
As I continued to assess, experiment with compression, reassess, and experimentsome more, I made some discoveries. The tolerable compression not only stimulatedan exchange of fresh, moving fluid in the joint I was focusing on, but the exchangewas also occurring in a much greater area than I was compressing. I remember itbeing such an odd yet good feeling the first time I sensed it when I was reassessing inthe Rest Assess position. It felt like my back was more open, vibrant, lighter, and yetmore grounded. This was beyond sensing improved blood flow. The fluid motion Ifelt was directly in the matrix of connective tissue.
Although my joints felt better and moved with greater ease initially, if all I did wasthe compression techniques in isolated regions, the good feeling didn’t last very long.An hour or two later, the area I had compressed would have minor swelling and myjoints would feel stiff. I don’t know if anyone else would have noticed it visually, butI felt it. This was the opposite effect of what I wanted to achieve.
I knew what was missing. In my hands-on work, after I stimulated an exchange offresh fluid in a joint, I would make sure that the fluid movement of the local tissuewas reintegrated with the movement of the greater connective tissue system. If I didthat, it yielded a greater result. It wasn’t enough to just pull the fluid into the joint; thefluid needed to move through the joint and beyond. Lasting change came fromintegrating the new fluid from the joint area into the directional fluid movement of theentire connective tissue system. Unfortunately, I had no idea how to replicate thisprocess without using my hands.
So I tried some reverse engineering. I completely put aside the way I did this withmy hands on my clients. The highly specific, light-touch vibration just couldn’t bedone on myself. With a few willing clients, I started using my hands and arms as ifthey were a roller. I would compress the joint area and then experiment with differenttechniques and pressures to try to reintegrate the fluid movement. I drew from what Ihad learned about the superficial layer of connective tissue from cadaver dissectionwith Gil Hedley and other scientific research about the uniqueness of this layer ofconnective tissue.
I intuitively knew that to integrate the fresh fluid exchange in the deep, fibrouslayers of the connective tissue and the joints with the whole body, I would need thehelp of the superficial layer right underneath the skin. Gil helped me better understandthis layer of tissue and encouraged me to continue to work with it to induce wholebody connection and integration. One day I was working on my client Bill, and it

came to me to try to create a continuous sweep of light pressure after I did thecompression. I used my palm and forearm to do a light sweeping motion on the areaaround the knee joint. I pushed the fluid in only one direction with the intention ofreintegrating the fluid from around the joint all the way to the superficial layer.
It worked! When I reassessed, I was able to sense improvement in the fluidmovement of the entire connective tissue system. Bill noticed a greater range ofmotion, ease of movement, and greater flexibility—and it lasted. This protocol ofcompression followed by light, directional sweeping with the roller created a lastingchange in and around the joint as well as throughout the entire connective tissuesystem.
I tried the same technique with the roller on myself and found similar results. Then,as always, I tried it out with other willing clients. As I experimented I found evenmore effective ways to explain how to get the greatest results. Today in MELT, we callthe technique of lightly sweeping the roller in one direction Rinsing.
My Little Secret
I wasn’t only trying to recreate manual therapy techniques I had learned; I was alsotrying to mirror some that I had developed on my own.
In my private practice, the layer of connective tissue beneath the skin, or thesuperficial layer, is the first thing I assess with my hands. I can sense a fluidlikevibration that moves just beneath this layer of the connective tissue. I didn’t learn thisor hear about it from any of my manual therapy training or higher education. It’ssomething I’ve been able to feel as long as I can remember. Once I became a hands-on therapist, I gained more experience and became even more aware of what I wassensing. One thing I discovered was that wherever the vibrational fluid in thesuperficial layer wasn’t moving in a cohesive, directional motion, those were the areasof the body that needed the most attention. When dehydrated, this outer layer could beimagined as a pair of jeans that are two sizes too small. It’s uncomfortable to walk,bend over, or sit. Everything underneath the tight jeans gets squished. It can bepainful.
Regardless of my clients’ primary complaints or seemingly greater issues, I foundthat if I addressed the superficial layer with specific, organized light touch, then myability to address areas of dehydration or stagnation in the joints, muscles, organs, anddeeper connective tissues was more effective and longer lasting.
A Multilayered Approach

As I continued to see greater results from self-treating the connective tissue, I wasmotivated to see what other manual therapy techniques could inform the techniques Iwas creating. Simultaneously, more scientific research was emerging about connectivetissue and why manual therapy techniques are so effective. Although intuitively Iunderstood what I felt, it was only once the science of connective tissue started toemerge that I was able to articulate just what it was I was trying to do.
The various types of receptors in the connective tissue and their responsiveness todifferent degrees of pressure had been discovered. Now I knew why the differenttypes of compression applied in various states of hydration worked. I knew that whenI compressed connective tissue with my hands, it was important to approachdehydrated tissue first and give it time to adapt. If I went too deep too fast, the tissuerepelled my touch and fluid exchange was not possible. This is what happens with afirm roller. So I tried to ease into the pressure with the soft roller. I got a better resultif I first moved gently on the roller to explore the tissue and introduce the pressure.This also allowed the layers of tissue to slowly adapt and be more receptive to thecompression. Today I call this technique Gliding.
During any hands-on tissue treatment, I always did more than one type ofcompression on any given area in order to create the most effective fluid exchange.With this in mind, I tried what seemed like endless variations of the amount of depthand duration when compressing different areas of the body. I developed differentways of compressing each mass of the body to get the most immediate and lastingchange. Today, these compression techniques are called Shearing, and there are twotypes: direct and indirect.
Direct and indirect Shearing are executed differently depending on which area ofthe body you are Shearing. I experimented with compression on every area of mybody to determine the areas that were effective and safe to Shear. I learned that it isbest not to compress the spaces of the body. Only a highly skilled professional shouldmanipulate your spaces (such as the abdomen, neck, throat, and low back) so that thenerves and organs that are exposed in these areas are not harmed or injured. I havesome war stories that include bruising my kidney, overstimulating nerves in mygluteal fold (ouch!), and causing a long-lasting “stitch” in my abdomen. In MELT, youwill learn techniques that effectively treat the spaces by working in the masses aboveand below them.
The Behavior of Connective Tissue
Compelling research articles started to appear. Scientists were conducting laboratorytests to see how connective tissue reacted to tension caused by mechanical pulling of

the tissue. What was remarkably different about this research was that it was focusednot on the muscle system but on the connective tissue and how tensional pull affectedits hydration, adaptability, and responsiveness.
The research showed that when tension was applied and the connective tissue waspulled taut, it decreased the amount of fluid in the tissue. The length of time and therate at which the tissue was pulled determined the amount and speed at which fluidreturned to the area when the tension was released. Scientific studies concluded thatthe longer this tissue is pulled or compressed, the more difficult it is for the cells tobring fluid back into the tissue on their own and for the collagen fibers to return totheir ideal length. Without adequate fluid, what’s left is dehydration—what we callstuck stress—and its many potential problems over time. Fortunately, the sameproperty that leads to connective tissue dehydration can lead to rehydration whendone for a short period of time. This manual therapy hypothesis had been around foryears and finally had a scientific explanation.
Compression Isn’t Enough
This new research inspired me to find a way to create the positive tensional pull onmyself that I had done on my clients with my hands. I wanted to be able to stimulateas many receptors and layers as possible to create the greatest hydration effect. When Ido this for clients, they are lying still, so I can create the pull on the connective tissuewithout getting their muscles involved. In order to do this to myself, I was going toneed to use my muscles. How was I going to create enough tensional pull on myconnective tissue without my muscles taking over? It was tricky. I explored differentpositions, contortions, props, and movements. Over time I discovered how to pull theconnective tissue to its end range without a muscle stretch interfering. The trick was tocreate two-directional pull between areas of the body by moving them in opposition.The roller gave me the leverage to make that possible.
Once I was in the right position, I had to move slowly to allow the connective tissueto adapt as it found its end range. Otherwise, the muscles I was using to create the pullbecame primary, and it turned into a muscle stretch. As with compression, I foundthat it is important to pause and wait for a few focused breaths as the fluid leaves theconnective tissue. Then when I released the pull, the rehydration effect occurred.Pulling the connective tissue in two directions initiated a powerful fluid exchange andimmediately improved the extensibility of the tissue.
The Two-Directional Lengthening techniques, as we call them today, are specificfor each area of the body. In the MELT maps in Chapter 13, you will learn how tolengthen the connective tissue in different areas of your body.
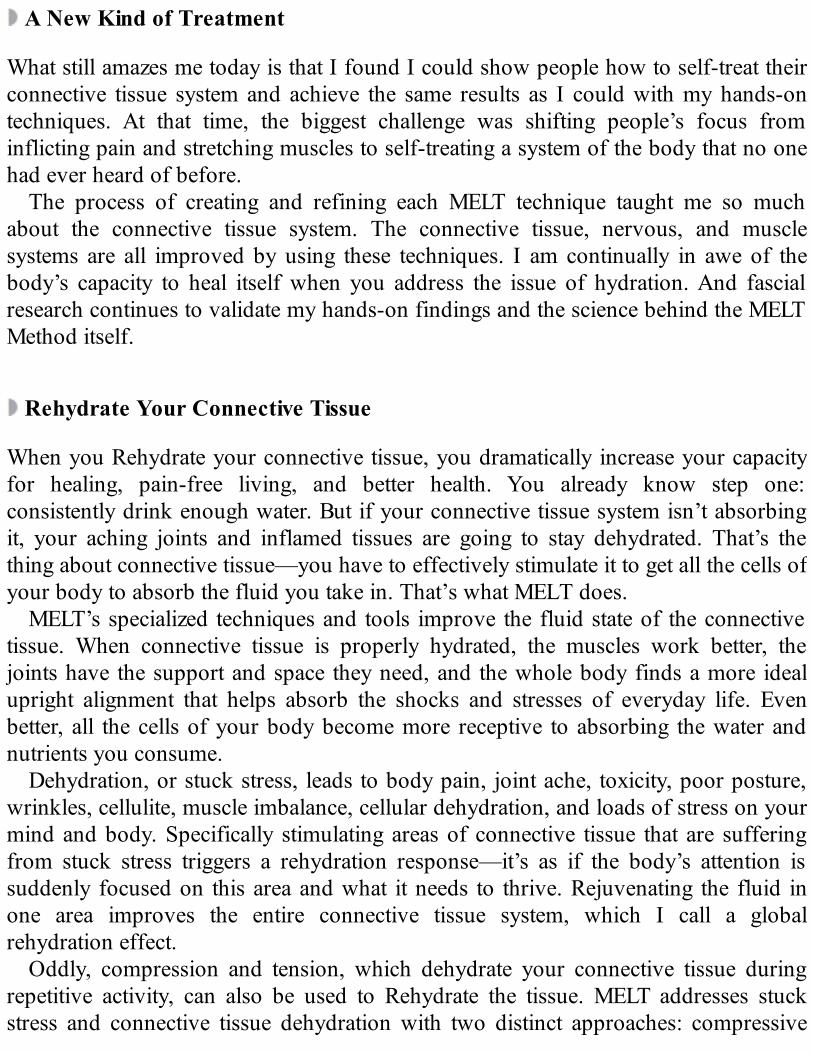
A New Kind of Treatment
What still amazes me today is that I found I could show people how to self-treat theirconnective tissue system and achieve the same results as I could with my hands-ontechniques. At that time, the biggest challenge was shifting people’s focus frominflicting pain and stretching muscles to self-treating a system of the body that no onehad ever heard of before.
The process of creating and refining each MELT technique taught me so muchabout the connective tissue system. The connective tissue, nervous, and musclesystems are all improved by using these techniques. I am continually in awe of thebody’s capacity to heal itself when you address the issue of hydration. And fascialresearch continues to validate my hands-on findings and the science behind the MELTMethod itself.
Rehydrate Your Connective Tissue
When you Rehydrate your connective tissue, you dramatically increase your capacityfor healing, pain-free living, and better health. You already know step one:consistently drink enough water. But if your connective tissue system isn’t absorbingit, your aching joints and inflamed tissues are going to stay dehydrated. That’s thething about connective tissue—you have to effectively stimulate it to get all the cells ofyour body to absorb the fluid you take in. That’s what MELT does.
MELT’s specialized techniques and tools improve the fluid state of the connectivetissue. When connective tissue is properly hydrated, the muscles work better, thejoints have the support and space they need, and the whole body finds a more idealupright alignment that helps absorb the shocks and stresses of everyday life. Evenbetter, all the cells of your body become more receptive to absorbing the water andnutrients you consume.
Dehydration, or stuck stress, leads to body pain, joint ache, toxicity, poor posture,wrinkles, cellulite, muscle imbalance, cellular dehydration, and loads of stress on yourmind and body. Specifically stimulating areas of connective tissue that are sufferingfrom stuck stress triggers a rehydration response—it’s as if the body’s attention issuddenly focused on this area and what it needs to thrive. Rejuvenating the fluid inone area improves the entire connective tissue system, which I call a globalrehydration effect.
Oddly, compression and tension, which dehydrate your connective tissue duringrepetitive activity, can also be used to Rehydrate the tissue. MELT addresses stuckstress and connective tissue dehydration with two distinct approaches: compressive

stimulation and two-directional lengthening. Here’s how it works.The connective tissue system is a three-dimensional web with definable layers and
structures. Each layer contains receptors that respond to precise mechanical pull aswell as light and medium, slow and fast mechanical pressure. When the receptors arepositively stimulated, the fluid-producing connective tissue cells create a rehydrationeffect, or fluid exchange. The result of the rehydration effect is that stuck stress andinflammation decrease and the environment of all of your cells and nerves improves.Manual therapists use their hands to create mechanical pressure or pull on the tissueand achieve the rehydration effect. As a Hands-Off Bodyworker, you are going to usethe MELT Rehydrate techniques, the MELT soft body roller, and your Body Sense torehydrate your connective tissue.
The MELT Rehydrate techniques include Two-Directional Lengthening techniquesand four types of compression—Gliding, direct and indirect Shearing, and Rinsing—to stimulate the different receptors and layers of the connective tissue. Thesetechniques create the same rehydration effect as hands-on therapy.
For MELT length techniques, the MELT soft body roller stabilizes, elevates, andgently supports your spine, ribs, or pelvis so you can attain the proper position. Forthe MELT compression techniques, the soft roller provides gentle, positivecompression for the part of your body that is on the roller without overstimulating orstressing the connective tissue and nervous systems.
Your Body Sense, or internal awareness, is as important as the techniques and theroller to achieve the rehydration effect. You will use your Body Sense to help youidentify the specific areas of your body that need extra attention. Your Body Sensewill also help you identify the amount of body weight and pressure needed to achievethe specific compression for each technique.
Too much pressure when performing any of the techniques actually decreases therehydration effect. How will you know you are applying too much pressure? YourBody Sense will send you a message: intense discomfort or pain. Pain indicates thattoo much pressure is being applied to positively stimulate the different connectivetissue layers and receptors. Pain also overexcites the stress regulator, whereas the goalof MELT is to do the opposite and heighten the restore regulator. No part of MELTshould hurt, just as I would never intentionally apply painful pressure with my handsto one of my clients. The pressure should always be tolerable, so it’s important tolisten to your body and make adjustments to the amount of weight you are putting onthe roller if you feel pain.
MELT Compression Techniques
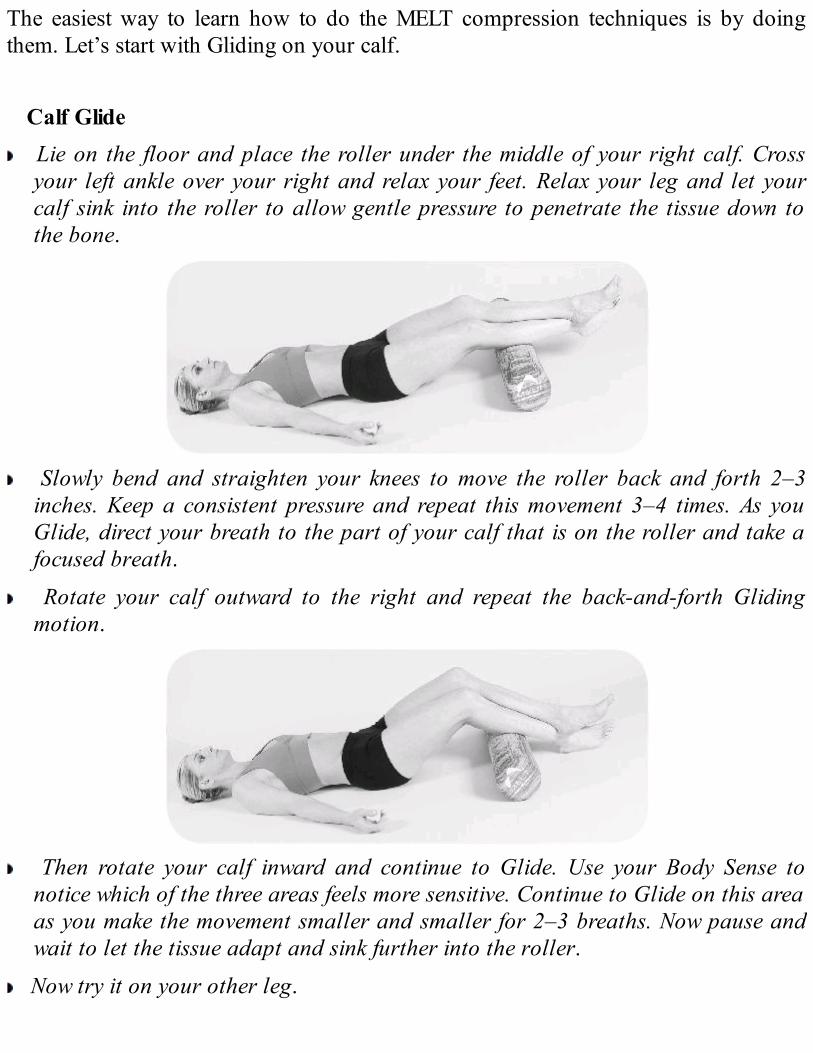
The easiest way to learn how to do the MELT compression techniques is by doingthem. Let’s start with Gliding on your calf.
Calf Glide Lie on the floor and place the roller under the middle of your right calf. Cross
your left ankle over your right and relax your feet. Relax your leg and let yourcalf sink into the roller to allow gentle pressure to penetrate the tissue down tothe bone.
Slowly bend and straighten your knees to move the roller back and forth 2–3inches. Keep a consistent pressure and repeat this movement 3–4 times. As youGlide, direct your breath to the part of your calf that is on the roller and take afocused breath.
Rotate your calf outward to the right and repeat the back-and-forth Glidingmotion.
Then rotate your calf inward and continue to Glide. Use your Body Sense tonotice which of the three areas feels more sensitive. Continue to Glide on this areaas you make the movement smaller and smaller for 2–3 breaths. Now pause andwait to let the tissue adapt and sink further into the roller.
Now try it on your other leg.

Glide
In the Gliding technique, the roller is moving in small, gentle, back-and-forthmovements under a small area of the body. If you compress an area of your body onthe roller and the roller is moving, you are Gliding. Gliding is used to introduce agentle exploratory pressure. Keep the movement small and slow with consistentpressure to allow the tissue time to adapt to the compression. Gliding is also youropportunity to explore the tissue to find the barriers, or tender areas, that you will thenShear.
Gliding—and all the other compression techniques—are done only on the body’smasses, like the shoulder blades, hips, and thighs—never the spaces, like the neck,low back, or behind the knees. The spaces benefit from work done above and belowthem rather than directly on them. Your body position and roller placement forGliding varies with which body part you are Gliding. The MELT maps in Chapter 13include simple, step-by-step instructions for the Rehydrate techniques.
Gliding and Connective Tissue
Gliding activates the rehydration effect by introducing light to moderate compressionto the part of your body that is on the roller. This lighter, softer, back-and-forthmotion allows the tissue from skin to bone to adapt and prepare for the more distinct,manipulative pressure of Shearing without overstimulating the tissue. As you Glide,you will notice certain significant areas that have intense sensation, tenderness, orpain. These “barriers” are areas of dehydrated connective tissue. This is what stuckstress feels like. The discomfort is your body’s signal that these areas require specialattention.
The more often you MELT, the fewer barriers you will find. Note that some areasof the body, such as near the outer hip and inner thigh, especially closer to the joints,have more dense layers of connective tissue. These regions of the body are frequentlystrained by our repetitive postures and hold more barriers, causing muscles to becomeinhibited. These areas can be extremely tender, which is your cue to ease off pressurein order to achieve the most beneficial result.
Remember, you always want to maintain tolerable pressure during any of thecompression techniques. Pain is your signal that the compression is too much.
Now let’s try Shearing.
Calf Shear Position your body and the roller in the same way as you did for Gliding on your

right calf. Remember which of the three areas felt more sensitive when you wereGliding, and Glide to the area again to find the spot.
Rest the tender area, or barrier, on top of the roller and take focused breaths intoyour calf. Maintain tolerable pressure and rotate your right leg in and out in asmall, controlled movement, 1–2 inches, directly on the tender spot 4–5 times.The roller remains stationary.
Now relax your leg, maintain compression of the tender spot on the roller, andmake circles with your right ankle 3–4 times in each direction. This stimulates thebarrier indirectly. If you feel any painful sensations, ease off the pressure on theroller by uncrossing your leg. Now pause and wait to let the tissue adapt and sinkfurther into the roller.
Move the roller down to your lower calf. First you will repeat the Gliding motions.Glide the lower calf by bending and straightening your knees 3–4 times. Rotateyour calf outward and Glide, and then inward. Notice which of the three areasfeels more tender. Make your Glide smaller and smaller on the significant areaand then pause and wait.
Shear the more tender area by rotating your right leg in and out, 4–5 times. Thenrelax your leg and create circles with your right ankle 3–4 times in each direction.Pause and wait to let the tissue adapt.
Now try it on your other leg.
Shear
Shearing is a more intense type of compression and stimulation and is alwayspreceded by Gliding. There are two different ways to Shear:
Direct Shearing: The body part you are Shearing is moving on top of the stationaryroller. When you rotate your leg in and out, you are directly Shearing the area of yourcalf. Direct Shearing stimulates the connective tissue from the outside in. Your bodymoves, but the roller doesn’t. Instead you are creating isolated, specific movements tointensify the compression in the part of your body that is on the roller. This allowsyou to mobilize and rehydrate the tissue layers. The smaller the region you Shear, thebetter the rehydration effect.
Indirect Shearing: The body part you are Shearing stays still on the stationary rollerwhile you move a nearby joint. You are indirectly Shearing your calf when you rotateyour ankle while keeping your calf still. Indirect Shearing stimulates the connectivetissue from the inside out. Moving a nearby joint while stabilizing the part of yourbody that is on the roller contracts and releases the muscles beneath the area you arecompressing. This stimulates and hydrates the deep connective tissue layers thatsurround your muscles and bones.
How, when, and where you will do direct versus indirect Shearing is all outlined inthe MELT maps in Chapter 13.
Shearing and Connective Tissue
Shearing stimulates the receptors found within the connective tissue to createhydration and improve the responsiveness of the tissue. Shearing effectivelystimulates all the layers from your skin to your bones. It also encourages thedehydrated tissue that makes up a barrier to admit fresh fluid, allowing properrehydration to occur. This improves connective tissue’s elastic and supportivequalities.
When you Shear, you are controlling the pressure you apply with your body weightby maintaining constant, focused pressure on the roller. The intention of thiscompression is to push out the fluid content (like squeezing a sponge), whichstimulates the connective tissue cells to produce and take in new fluid. When youpause and wait while sustaining compression, you are pushing out all the fluid. Thenwhen you decompress and move to the next spot, even more fluid than was therepreviously is pulled into the area and drawn into the cells. The tissue that was
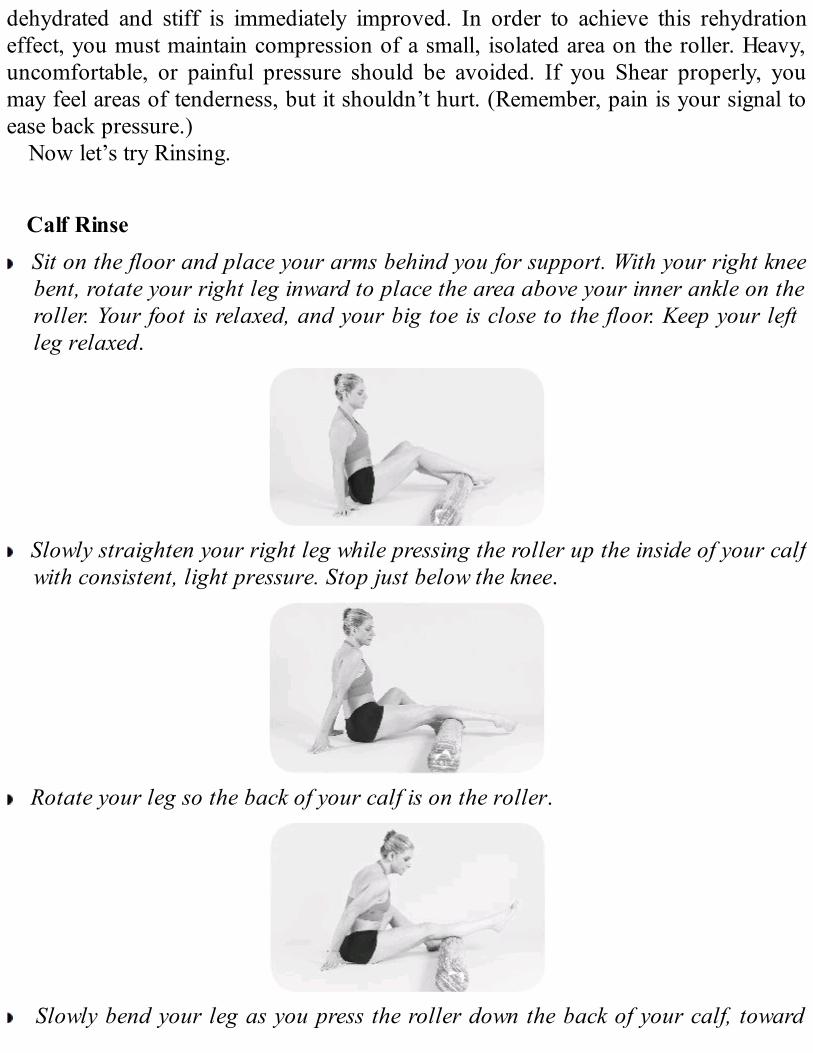
dehydrated and stiff is immediately improved. In order to achieve this rehydrationeffect, you must maintain compression of a small, isolated area on the roller. Heavy,uncomfortable, or painful pressure should be avoided. If you Shear properly, youmay feel areas of tenderness, but it shouldn’t hurt. (Remember, pain is your signal toease back pressure.)
Now let’s try Rinsing.
Calf Rinse Sit on the floor and place your arms behind you for support. With your right knee
bent, rotate your right leg inward to place the area above your inner ankle on theroller. Your foot is relaxed, and your big toe is close to the floor. Keep your leftleg relaxed.
Slowly straighten your right leg while pressing the roller up the inside of your calfwith consistent, light pressure. Stop just below the knee.
Rotate your leg so the back of your calf is on the roller.
Slowly bend your leg as you press the roller down the back of your calf, toward
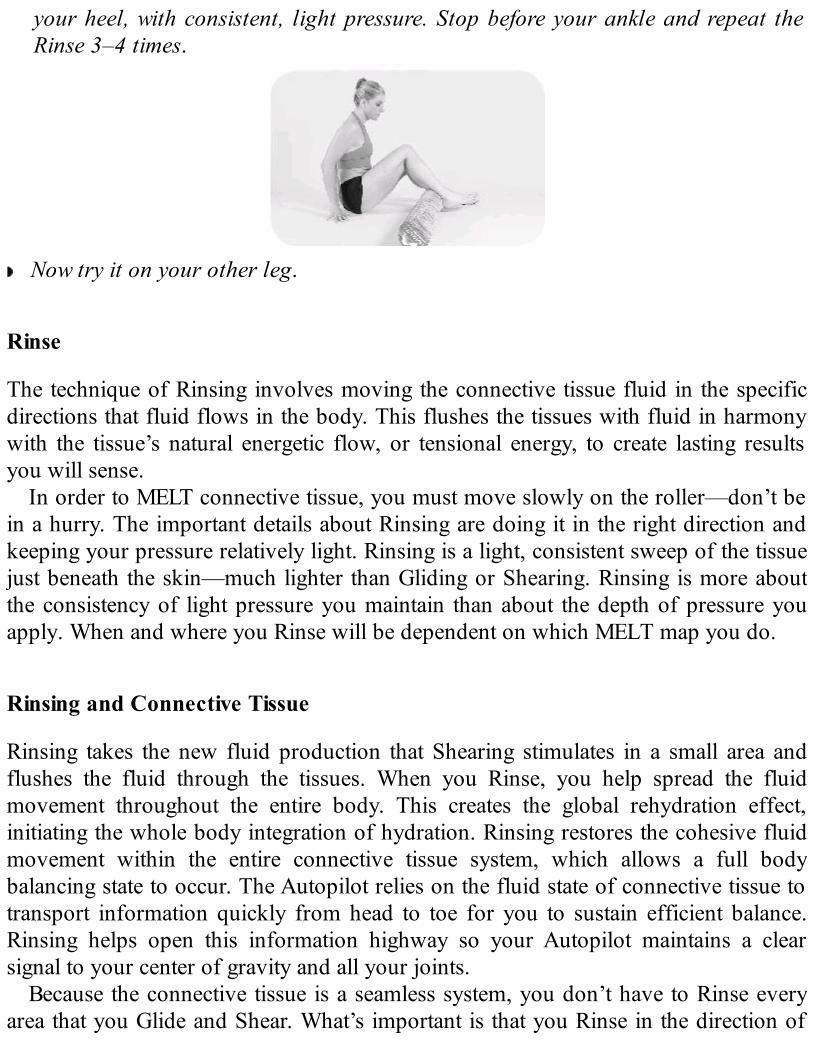
your heel, with consistent, light pressure. Stop before your ankle and repeat theRinse 3–4 times.
Now try it on your other leg.
Rinse
The technique of Rinsing involves moving the connective tissue fluid in the specificdirections that fluid flows in the body. This flushes the tissues with fluid in harmonywith the tissue’s natural energetic flow, or tensional energy, to create lasting resultsyou will sense.
In order to MELT connective tissue, you must move slowly on the roller—don’t bein a hurry. The important details about Rinsing are doing it in the right direction andkeeping your pressure relatively light. Rinsing is a light, consistent sweep of the tissuejust beneath the skin—much lighter than Gliding or Shearing. Rinsing is more aboutthe consistency of light pressure you maintain than about the depth of pressure youapply. When and where you Rinse will be dependent on which MELT map you do.
Rinsing and Connective Tissue
Rinsing takes the new fluid production that Shearing stimulates in a small area andflushes the fluid through the tissues. When you Rinse, you help spread the fluidmovement throughout the entire body. This creates the global rehydration effect,initiating the whole body integration of hydration. Rinsing restores the cohesive fluidmovement within the entire connective tissue system, which allows a full bodybalancing state to occur. The Autopilot relies on the fluid state of connective tissue totransport information quickly from head to toe for you to sustain efficient balance.Rinsing helps open this information highway so your Autopilot maintains a clearsignal to your center of gravity and all your joints.
Because the connective tissue is a seamless system, you don’t have to Rinse everyarea that you Glide and Shear. What’s important is that you Rinse in the direction of

the whole body flow in the connective tissue system. I call this directional fluid flowtensional energy.
Tensional Energy
Through my hands-on practice, I have identified that there is a directional, continuousenergetic life force in the body. I can feel this vibrational fluid movement with myhands. This energetic force moves in a constant flow, like a river, and hasmultidirectional current.
This perpetual, cyclical wave travels down the back side of the body and up thefront. It returns back down the sides of the body and travels up again through theinside of the legs and the center of the body. The motion continues downward in aspiral loop around the body in a helix pattern and then back up again through thecenter of the body. This energetic current functions in an oppositional, or tensional,relationship, which allows the body to work with and against gravity so you canremain upright and stay grounded. There is no starting or ending place. Thiscontinuous force is not just energetic; it is physiologic. The Autopilot relies upon thisconstant motion within the body to provide vibrational communication for its GPSsystem, but stuck stress interrupts, alters, and diverts tensional energy.
The tensional energy model informs and grounds many existing ancient andprogressive healing modalities and creates a template for the discovery of new ones.You can benefit from the understanding of this highly responsive system to improveyour own self-healing. The Gliding, Shearing, and Rinsing techniques and the MELTmaps all work in the direction of tensional energy.
MELT Compression Tips and Precautions
Stay Stable
You must keep your core engaged while you Rehydrate so you remain stable. Thisalso ensures that your arms, neck, shoulders, and legs aren’t overburdened when youmove your body over the roller and that you maintain the appropriate amount of bodyweight on the mass that is on the roller. This way, you will achieve the full benefits ofthe techniques. If you need additional support when doing the MELT Compressiontechniques, consider using a bolster or yoga blocks to help you keep your bodyweight over the roller.

Pain Tolerance
Remember, you want to “wake up a little something” in the tissue, not overstimulate itor the sensory nervous system. Overstimulation can create inflammation and reducethe benefits of your self-treatment—and MELT is designed to reduce pain andinflammation, not increase it. In order to get the full benefits of MELT, it is importantto listen to your body and make adjustments when (or ideally before) you feel pain.When you experience an intense sensation, pull back the amount of pressure you areapplying and Shear more if needed.
Less Is Always More
The connective tissue responds to a specific amount of pressure applied in a precisemanner. Applying too much pressure, moving too fast, and staying on an area toolong actually decrease the benefits of MELT.
Do Not MELT the Spaces
Never Glide, Shear, or Rinse directly on any area of the body described as a space(belly, neck, etc.), as there are exposed nerves and organs in these areas that shouldonly be treated by a specialist. Only MELT the masses—the spaces will benefit fromthe fluids you produce when you rehydrate the masses.
Use Your Breath
As you Rehydrate, focus your breathing into the body part that you are compressing.Taking a focused breath stimulates the vital connection between the diaphragm andyour nervous system to allow you to relax and ease into the compression. Thisfocused breath also aids in circulating freshly oxygenated blood and fluids throughoutthe entire body. This helps to alleviate excess tension in other areas of your body soyou can gain the maximum benefits of the compression techniques. Don’t hold yourbreath when you compress!
MELT Two-Directional Length Technique
Lengthening involves moving two specific masses of the body, such as your hip andyour heel, away from each other at the same pace to create tensional length in the

connective tissue between them. Think of pulling on a rubber band in two opposingdirections to make it taut. With your body, you are moving two bony masses inopposite directions and then holding that position and taking deep focused breathswhile the tissue adapts.
To achieve the greatest rehydration effect, take time to really sense the tensional pullbetween the two focused parts of the body. Setting up the proper position is the key.To lengthen connective tissue, you must use specific muscles to align your joints inthe proper position in order to get full contact with the tissue. Engaging your coremuscles will help you gain stability and maintain the proper position.
In order to create Two-Directional Length, the details of how you use the roller andwhich body parts you move in opposition are different for each area. Detailedinstructions are outlined in the MELT maps in Chapter 13.
MELT Length Tips and Precautions
Duration on Roller
The maximum amount of time you should lie lengthwise (along your spine) on theroller or have the roller on any mass—like the base of the skull or under the pelvis—is ten minutes. If you are pregnant, injured, or uncomfortable on the roller in anyposition, shorten the duration of compression to four minutes and build your time inone-minute increments every other time you MELT, until the maximum ten-minuteduration is met.
Three-Breath Rule
Remember, less is more—get in and get out. Only hold any MELT length position forthe amount of time equivalent to three deep, focused breaths. If you hold the positionlonger, you could cause your muscles to fatigue and send mixed messages from yourbody to your brain. You can always release the pull and repeat the technique a secondtime.
MELT Length
Let’s try lengthening the back of your leg from your hip to your heel.

Hip to Heel Press Lie on the floor, bend your knees, and put your feet flat on the floor, hip-width
apart. Place the roller on the floor underneath your knees. Push your feet into thefloor, lift up your hips, and position the roller under your pelvis (on the sacrum),just below the low back.
To check if the roller is in the right place, draw both knees toward your chest. Theroller should not feel like it’s going to slip out. If it does, move the roller towardyour low back. Nor should you feel like the roller is under your low back. If it does,move it down.
Place your right foot on the floor so your knee is in line with your right hip.Extend your left leg straight up toward the ceiling. Straighten your leg so it’sperpendicular to the floor.
Even if you are very flexible, don’t extend your leg beyond a ninety-degree angle. Ifyour leg is angled toward your nose, you will lose the ability to lengthen theconnective tissue on the back of your leg.

If you have difficulty straightening your leg at ninety degrees, position your leg asclose to ninety degrees as possible with a straight leg. If you cannot straighten yourleg, try to get as close to the position as possible.
Flex and point your ankle 2–3 times. Notice if you sense a tugging or stretchingsensation in the back of your calf. If so, you are sensing what it feels like when youstretch a muscle. I want you to have a comparison between what it feels like tostretch a muscle and what it feels like to lengthen connective tissue.
Keep your ankle flexed so your toes pull toward your shin and your heel extendstoward the ceiling. Slowly sink the back of your pelvis on the top of the roller.Take a focused breath as you feel the pulling sensation from your heel all the waydown to your hip.
Make sure your ribs are still heavy to the floor. If your ribs lift when you pressyour pelvis on top of the roller, you are creating too much movement. Keep itsubtle. This is what it feels like when you create positive tension, or length, in yourconnective tissue.
Take 2 more focused breaths while maintaining a flexed foot and a slightly tiltedpelvis.
Repeat on the other side. Notice how the muscular stretch when you flex and pointis in an isolated area and the connective tissue length is a long line of pull on theback of your leg.

Length and Connective Tissue
Unlike muscle, connective tissue is designed to resist stretch. The collagen fibers inthe tissue resist in a protective, supportive way to reduce the potential of tearing inboth muscles and connective tissue when you move—if the tissue is hydrated.Dehydration in the connective tissue causes poor extensibility and responsiveness ofthe tissue. It also hinders its role as the body’s tensegrity architectural support system.
When you intentionally lengthen connective tissue to its end range, two-directionally, you can create a rehydration effect and restore the extensibility of theconnective tissue. Lengthening pulls the fluid out of the connective tissue. When youlet go, the receptors in the connective tissue are triggered to generate more fluid in thearea.
Lengthening improves the resilience of the connective tissue and restores its elasticand supportive qualities. More space is created in the joints by rehydrating andlengthening the connective tissue, improving the integrity, stability, and alignment ofthe joints.
Use Your Body Sense
Although you will be using muscle to create the oppositional movement, your BodySense will be your most important tool to effectively achieve the two-directional pullof your connective tissue. Learning to sense tensional pull of connective tissue versusmuscular stretch takes practice and good Body Sense. Knowing the differencebetween the sensations is the key.
Two-directional tensional pull of connective tissue is felt in a longer line of thebody, such as the entire back of your leg, than a stretch of muscle is, such as in yourcalf. Unlike an isolated muscle stretch, the pull always extends across and beyond ajoint. With a muscular stretch, the pull is felt in a small region, usually close to and notbeyond a joint. Remember, muscles can only stretch as far as connective tissue allows.The best time to stretch is after you do your MELT map. You will find that when youlengthen and rehydrate connective tissue, muscular flexibility dramatically improves—immediately.
If you feel a muscular stretch, you have extended beyond the proper lengthposition, which inhibits your ability to stimulate connective tissue and achieve thehydration benefits. For example, lengthening the tissue on the entire back of the legshould not feel like a pull only in your calf. When this happens, reset your positionand move more slowly to create the two-directional movement to sense the light tug inthe connective tissue in a longer line down the back of the leg. Although the pull may

feel less intense than a muscle stretch, the benefits to the muscle and the connectivetissue are far greater and longer lasting. If you find you cannot reach the properposition, try doing the compression techniques in that area first. Then try the lengthposition again and see if you can achieve the two-directional length.
Lengthening takes practice. Soon you will find it easy to obtain and sense theproper position and create immediate results.
Comparing Length as an Assessment Technique
In a MELT map, sometimes you will use a MELT length technique to assessimbalances in a particular area of your body. To do this, do the same length techniquebefore and after doing the compression technique on the same area of the body andsee if you feel a difference. For example, you might do Rib Length, then Glide, Shear,and Rinse your Upper Back, and then repeat Rib Length. The second time youperform Rib Length, your ability to extend should improve.
As you perform each lengthening technique, also pay attention to whether one sideneeds more length or feels more restricted than the other. To address this imbalance,you can repeat the MELT length technique on that side. You may even want to repeatthe MELT compression techniques for that area of the body before repeating thelength technique.
Mass Stability and Differentiation
During upper body length techniques, you will be focusing on keeping your ribs andpelvis, or the primary masses, heavy and stable while creating the two-directionalmovements. During lower body length techniques, you will need to differentiatemovement of one mass while keeping the other stable. For example, to get the mostout of the Hip to Heel Press, you will keep your ribs heavy to the floor while you sinkyour pelvis on top of the roller.
Focused Breath
Take a focused breath by putting your intention on breathing into the area you arelengthening. When you take slow, focused breaths into the regions you are MELTing,your inhalation deepens the tensional pull. This allows you to gain the full benefit ofthe specific MELT length move.

Body Changes: After completing the MELT Rehydration techniques, you maynotice these specific changes when you Reassess:
• Your masses feel fuller and weighted to the floor.
• Fluid movement is restored in the entire body.
• Your body feels closer to the reference point of ideal alignment.

Release
One day, while trying to find a way to manipulate the base of my skull to release thejoints in my neck, I started experimenting with homemade tools to simulate whatworked with my clients. The tool that seemed to work best was a piece of PVC pipingwrapped in bubble wrap and a yoga mat, held together with duct tape. With the baseof my skull on the contraption, I slowly adjusted my body weight, the pressure andposition of my skull, and the location of this homemade roller to see what mightwork. I moved and adjusted my position as I would do to my clients with my hands.When I reassessed, my neck felt totally open and relaxed. It was easier to turn myhead from side to side, and I could breathe easier too. I couldn’t believe it. I hadactually decompressed my own neck. I felt amazing the entire day. The next day Itried it again and got the same effect. It seemed like a miracle that I could decompress,or release, the tension in my neck and my own cervical vertebrae and sense a notablechange the entire day. The movement and pressure I used were very subtle, replicatingwhat I do using my hands-on techniques.
I was excited to share my new trick with Lynn, my client with severe neck andTMJ. TMJ is a condition in which the jaw doesn’t align correctly. The jaw can becomeso stiff that it is difficult to open the mouth to a normal degree. TMJ can causeextreme jaw pain and headaches, as it did for Lynn. When I told her about my releasediscovery, she said, “Do you think it would help me?” Decompressing her neck withmy hands always gave her great relief in her jaw and progressively decreased her headand neck tension. I told her we could spend a little time and try the new releasetechnique at the end of the session.
When her session time was almost over, I had purposefully omitted decompressingher neck with my hands. I had her do the Rest Assess on the floor. I asked her to payparticular attention to how her neck and jaw felt. I handed her my PVC contraptionand talked her through what I had done to myself. When she reassessed, she took adeep breath, yawned, popped her eyes wide open, and said, “Holy cow! Did you seehow wide I just opened my jaw to yawn?! My jaw didn’t even click. I think it reallyworked, Sue!”
I sent her home with my little homemade tool and instructions to repeat thetechnique every day until our next appointment. Whenever I decompressed her neckwith my hands, her jaw pain usually went away for three to five days. This time, shecame back the following week saying, “My jaw is seriously better. I don’t want to sayit out loud because I’m afraid I might jinx it. My jaw still feels like it did when Iwalked out of your office last week.”

She went on, “I actually think it’s gotten a little better each day. It made my jaw feelbetter almost every time I did it, and I haven’t had one single headache, either. Theday before yesterday, I slept for eight hours straight for the first time in a long while,and I woke up feeling rested. I realized my jaw didn’t click when I ate breakfast thismorning. I think it may have been like that since earlier this week.”
Her face looked totally relaxed. I could see that she also looked younger and morevibrant, her skin and eyes looked clear, and her energy level appeared to be the best Ihad ever seen it.
“You are totally onto something here, Sue. Now if you can figure out a way to dothat same thing for my husband’s snoring and back pain, you might even save mymarriage!” Lynn said with a laugh and a smile.
I was amazed and excited. If Lynn could decompress her neck, so could my otherclients. But that wasn’t all. Now I had to figure out how to decompress my low backon my own. I had seen so many clients who needed this. According to the Universityof Arizona College of Medicine, 80 percent of adults experience low back pain in theirlifetime, and it is the most common type of chronic pain. Neck pain is number two.The reason is that as the two largest spaces of the body, the neck and low back are themost challenged during our day-to-day movement. As a result, the spine in these areasis the most susceptible to excess compression and torque. Chronic pain, inflammation,and joint damage follow. This creates a domino effect that begins with aches andstiffness and leads to common health issues such as headaches, insomnia, digestiveproblems, and injuries. Accelerated aging and chronic health problems can follow,leaving you with limited treatment options including medicine, surgery, and a moresedentary lifestyle—incomplete solutions that carry risks of their own.
As I developed more decompression techniques, I shared them with my clients overthe course of a year. The feedback I received was astounding. Even clients who hadother issues, like knee pain or digestive distress, started feeling as if these symptomslessened as they continued to decompress their own spine. It seemed I had created atechnique that I could teach people to do on their own to get out of pain and stay out.The decompression techniques created some of the most noticeable, powerful changesin all of MELT.
Initially, the MELT instructors and I only showed these techniques to our one-on-one clients.
I was reluctant to show people in a group fitness environment a subtle techniquethat, at the time, took at least a few minutes to explain and set up and then another fiveminutes to actually perform. I was still trying to make the concept of MELT seem likeit was solely working toward the primary fitness goal of improving performance.Getting out of pain was just a side effect that people were experiencing, not what I

was asserting that MELT might be able to do. That idea seemed far too therapeutic forthe fitness world I’d been a part of for so many years.
As I refined the other MELT techniques in group classes and people were seeingoverwhelming results, I could still see the need for decompression techniques. Withtime, practice, and patience along with getting to know my students who returned toclass week after week, I learned how to simplify the language and cueing ofdecompression, and I found the right recipe for Gliding and Shearing prior toreleasing. Ultimately, I learned how to teach room after room of people to understandand feel what it was like to decompress their own neck and low back spaces. As moreand more people filled the room, I would frequently find myself saying, “I get paid alot of money to decompress people’s neck and low back with my hands. What is farmore rewarding for me is to show someone how to do it for themselves so they canget out of pain and stay out. Now you can do it on your own too. You’re welcome.” Itwas then that I realized my private practice had grown far beyond the walls of myoffice space!
The Basics of Decompression
Decompressing your neck and low back, as well as the joints of your spine, hands,and feet, is essential for anyone to live pain-free. MELT gives you the tools to releasejoint compression.
Find Some Space
No one ever complains about getting taller as they get older. That’s because as youage, you shrink from the loss of space in the collective joints of your body. Repetitivemovements and postures, as well as gravity, take a toll on your body’s ability tomaintain the vital space within your joints. This doesn’t only affect people who aregetting along in years. If you’ve ever experienced neck or low back pain, difficultyturning your neck, or stiffness in your low back, you’ve experienced a loss of space.Along with the hands and the feet, the areas that are usually affected first are the neckand abdomen/low back space, or the “primary body spaces.” These spaces, like joints,are what allow you to bend, turn, and move without your masses damaging organsand nerves. Imagine if your ribs extended down to your pelvis—you wouldn’t be ableto bend over! The primary spaces are important.
Regardless of what causes the loss of space in your neck or low back, the result isthe same—the bones of your spine come closer together. When the vertebrae

compress, the disks in between and the nerves that emerge from the spinal columnalso become compressed. When nerves are compressed, pinched, and irritated, youfeel pain. Before now, pain was the first sign of chronic compression.
When you have pain caused by compression, that’s a sign that you also haveconnective tissue inflammation, which leads to joint damage. Pain and tinglingoriginating from the compressed nerves in the spine can be sensed in other areas ofthe body, which is known as referred pain. Sensory and motor communicationbecomes impaired and delayed, and the spine becomes more misaligned. YourAutopilot has to work harder just to maintain a misaligned posture.
When the spine is compressed, you lose some or all of the natural curve in yourneck and low back. With less curve, your spine loses the shock absorption andbuoyancy it needs to help you move with ease, without compression or compensation.In this less than ideal alignment, joints become fixed, and disk damage and injury canfollow. Misalignment spreads to the “secondary body spaces,” such as your shouldersand knees, and the cycle of compression, pain, inflammation, and joint damage startsall over again. Without regaining the integrity and stability in the curves and the spacein your neck and low back, misalignments and compression in these secondary spaceswill always return.
Whether the compression has been occurring for months, years, or decades, youcan regain lost space by regularly releasing compression in the neck and low backwith MELT decompression techniques. The first time you try the techniques, you willfeel immediate changes in your alignment, and you’ll be on your way to being pain-free.
MELT Decompression Techniques
In this section, you are going to learn how to decompress your neck. Always assessbefore you decompress your neck. You will then use the Shearing techniques to bringfresh fluid to the area for the greatest decompression effect. Keep your ribs stable andstill as you move the neck during the decompression techniques.
Neck Release SequenceNeck Turn Assess
Base of Skull ShearNeck Decompress
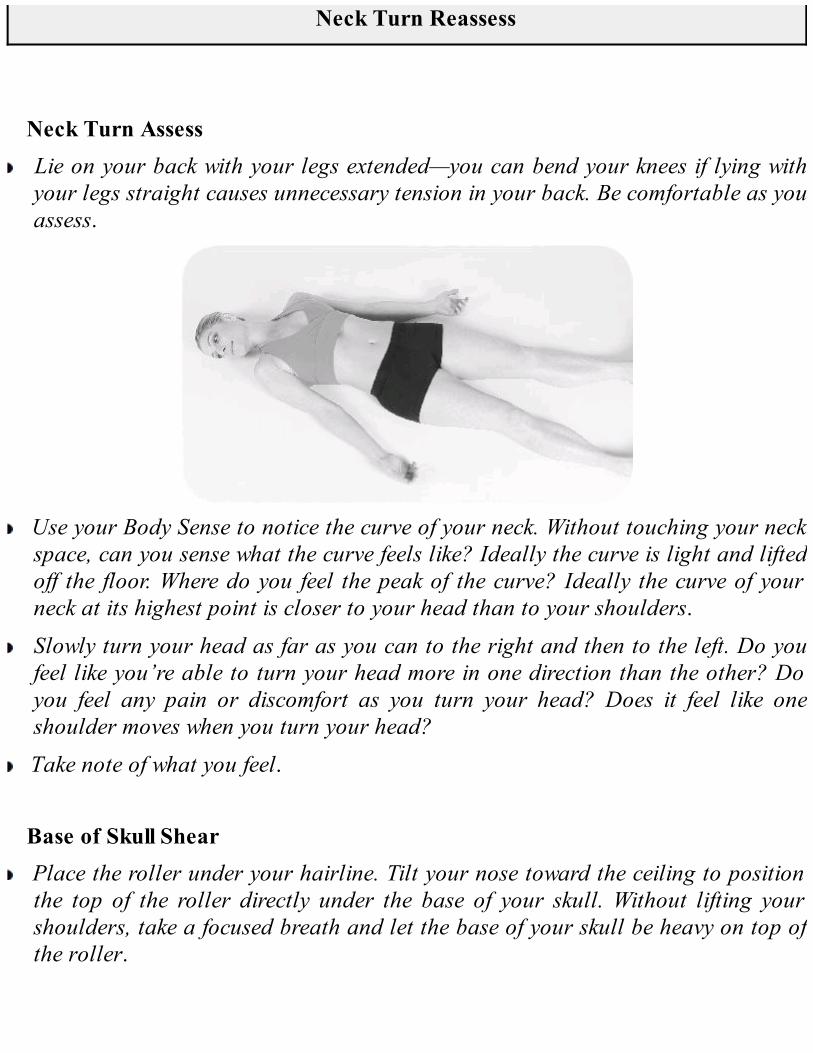
Neck Turn Reassess
Neck Turn Assess Lie on your back with your legs extended—you can bend your knees if lying with
your legs straight causes unnecessary tension in your back. Be comfortable as youassess.
Use your Body Sense to notice the curve of your neck. Without touching your neckspace, can you sense what the curve feels like? Ideally the curve is light and liftedoff the floor. Where do you feel the peak of the curve? Ideally the curve of yourneck at its highest point is closer to your head than to your shoulders.
Slowly turn your head as far as you can to the right and then to the left. Do youfeel like you’re able to turn your head more in one direction than the other? Doyou feel any pain or discomfort as you turn your head? Does it feel like oneshoulder moves when you turn your head?
Take note of what you feel.
Base of Skull Shear Place the roller under your hairline. Tilt your nose toward the ceiling to position
the top of the roller directly under the base of your skull. Without lifting yourshoulders, take a focused breath and let the base of your skull be heavy on top ofthe roller.
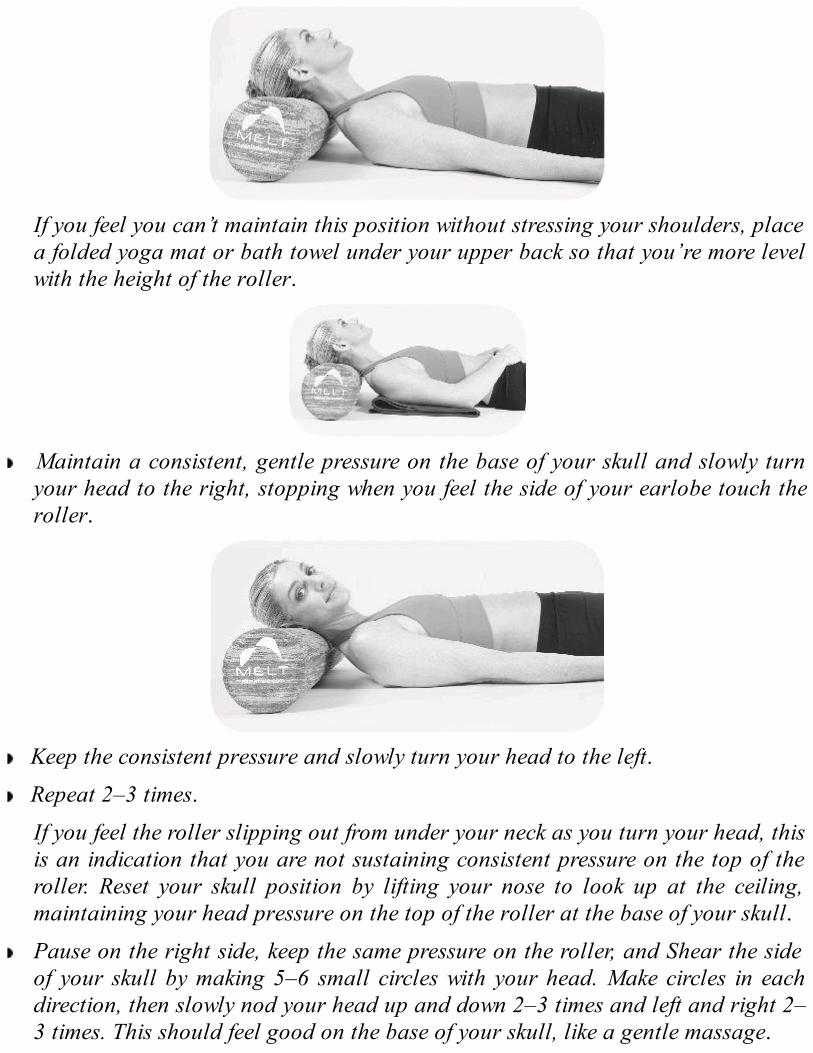
If you feel you can’t maintain this position without stressing your shoulders, placea folded yoga mat or bath towel under your upper back so that you’re more levelwith the height of the roller.
Maintain a consistent, gentle pressure on the base of your skull and slowly turnyour head to the right, stopping when you feel the side of your earlobe touch theroller.
Keep the consistent pressure and slowly turn your head to the left. Repeat 2–3 times.
If you feel the roller slipping out from under your neck as you turn your head, thisis an indication that you are not sustaining consistent pressure on the top of theroller. Reset your skull position by lifting your nose to look up at the ceiling,maintaining your head pressure on the top of the roller at the base of your skull.
Pause on the right side, keep the same pressure on the roller, and Shear the sideof your skull by making 5–6 small circles with your head. Make circles in eachdirection, then slowly nod your head up and down 2–3 times and left and right 2–3 times. This should feel good on the base of your skull, like a gentle massage.

If you have severe neck pain, herniations, or current disk issues, you can bendyour knees and turn on your side to give yourself extra support while you Shear.
Pause for a moment in that spot and take 2 focused breaths.
Repeat the Shear technique on the left side. If you sense that either side of yourskull is tender, you can repeat the Shear on the tender side a second time.
Come back to the center of the base of your skull and make small figure-eightmovements with your head 3–4 times to Shear this area. Maintain pressure at thecenter of the base of your skull and take 2 focused breaths.
Neck Decompress Move the roller from the base of your skull up about 1 inch to the middle of the
back of your skull. Tilt your nose toward the ceiling and apply gentle pressure ontop of the roller.
You should not feel the roller touching your neck at all when you do thedecompression technique, and it shouldn’t feel like the roller might slip out fromunderneath your head.
Keep consistent pressure on top of the roller and, on an exhale, slowly nod yourchin toward your chest 1–2 inches.

Inhale and, on an exhale, return your nose to pointing toward the ceiling.
You are not trying to touch your chin to your chest.The movement you create in the neck should be small and slow. Your shoulders
and upper back stay still and relaxed. The key is keeping consistent pressure as younod your head.
Repeat 8–10 times and then remove the roller from the back of your head andgently bring your head to the floor.
Neck Turn Reassess Assess your neck, as you did before. Sense the curve of your neck. Does it feel
lighter? Do you notice a more distinct curve just below the base of the skull? Ifso, your body has returned to a more ideal position.
Turn your head slowly from left to right. Do you have more range of motion? Isthere less pain or stiffness as you turn your head?
If you sense any of these changes, you have successfully decompressed your neck.

Body Changes: After completing the Neck Release Sequence, you may noticethese specific changes when you Reassess:
• Your neck curve feels more lifted near the skull.
• Neck turning has greater range with less effort and less pain.
• You may feel like you’re turning your head from higher in your neck.


The Hand and Foot Treatment
When word got out that I was helping all kinds of people leave their pain behind, mypractice suddenly went from nine or ten clients a week to forty. It was an amazingtime. In each session, I was doing a mix of hands-on therapy and teaching clients howto self-treat with MELT and the roller.
One morning, a shocking thing happened to me. I went to grab a glass from thecabinet, and it slipped out of my hand. When I went to pick it up, it happened again. Itried to make a fist and realized I had almost completely lost my grip. At first, I shookout my hands and assumed it would pass. I thought I must have slept on it wrong. Itdidn’t go away. I tried to massage my own hands, but I literally wasn’t able to. Usingyour hands to try to massage your hands when they’re not working ... well, doesn’twork. An hour passed with no change. I canceled all my clients for the day andimmediately went into my office to see what I could use to work on my hands withoutusing my hands. Unknowingly, this was the day I began developing the MELT Handand Foot Treatment.
I didn’t have the right size tools, so I went to a local toy store and bought differenttypes of balls. I bought Kadima balls, super balls, and jack balls. I even pulled a fewoval rocks from the potted plants on my balcony and started trying to simulate varioustechniques. I had learned the importance of assessment, so the first thing I did wasassess my grip by clenching a ball in my fist. My grip in both hands was pretty weak,even in my dominant hand. This is when I began to realize that the repetition ofworking on clients with my hands was affecting me in ways I hadn’t recognized.
I was very familiar with working on people’s hands. Usually it was because theyhad arthritis, carpal tunnel, tennis elbow, or disorders that directly affected theneurological control of their hands. I was surprised to realize that I needed the sametype of treatment. I started playing around with the balls to replicate the hands-ontechniques I use on my clients. Not all of the manual therapies I use on my clients arepossible with an inanimate object, so I started with the ones that were. I tried someGliding and Shearing, just like I would do with the roller. I experimented withdifferent ways to mobilize the joints in my hands and fingers using the concepts ofKerry J. D’Ambrogio’s manual therapy technique, Positional Release Therapy. When IRinsed, I instinctively pressed the ball all the way up my forearm. When I reassessedmy grip, it had noticeably improved and was more equal in both hands.
The next morning when I woke up, I was relieved to find that I still had a moresolid grip and only slight stiffness in my wrists. I immediately repeated what I haddone with the balls the day before. I felt ready to see clients again. As I worked on my

first client of the day, I could sense that something amazing was happening. My abilityto use my hands to assess and treat was better than ever. My Body Sense in my handswas heightened, and this continued throughout the day.
Self-treating my hands became part of my morning routine. I also began to noticethat my neck felt better at the end of a day, before I even got on the roller. This madecomplete sense as I had long seen the correlation between neck and hand issues in myclients. My face even started to look more relaxed. Over the following months, Itracked my progress as I used the balls in different ways. Because the hands have somany joints so close together, I knew it was important to find the best way to createpositive compression and yield the greatest change.
I was ready to show some clients this new technique, and I had many eagervolunteers. I quickly realized that it was better to start people off with only a soft ball,instead of sending them home with all the balls. My clients with arthritis and otherhand issues had little to no fluid available around their joints to begin with. We had tomove slowly and for less time to first generate fluid and then get the fluid moving.Without the fluid present, the firmer balls and compression could increase irritationand inflammation.
The results were rather staggering. Clients who had chronic hand or wrist pain wereseeing immediate results. They sensed greater ease of movement, increased gripstrength, and reduction of pain, swelling, and inflammation. Many said their necks feltbetter, just like mine had. Eventually, clients were asking me if their improvements insleep, headaches, migraines, and sinus issues could be attributed to the HandTreatment. Clients with lung and breathing issues, including asthma, wereexperiencing dramatic improvements in their chronic symptoms as well.
I was astounded by how this simple Hand Treatment was able to restore my clients’hope and well-being. I was accustomed to giving my clients homework that theyusually never did. I was always encouraging them to make simple lifestyle changesthat would make them feel better. Instead, they would rather come see me so I would“fix” them. However, these same clients were suddenly motivated and empowered totake care of themselves in ways I had never seen. They were improving their ownaging process, and they could tell. This made me want to share the Hand Treatmentwith more people.
My Final Discovery
As I was teaching people the Hand Treatment, I started experimenting with using theballs on my feet. I had many clients with foot issues such as bunions, chronic footpain and swelling, plantar fasciitis, and neuromas. I knew that if they could self-treat

their feet between our sessions, it could make a huge difference in their pain,inflammation, and swelling.
I was also excited by the idea that I might have a solution to one of my occupationalhazards—touching people’s feet. Not that I have anything against feet. Some of myclients have immaculately pedicured feet. However, many do not. Feet in New YorkCity are transportation, which means New Yorkers’ feet, mine included, get a workoutwhenever we leave home. This produces sweaty, stinky feet, and during summer flip-flop weather, they also get dirty. Add bunions, warts, athlete’s foot, fungal nails,calluses, and other foot issues and you can see why it’s not my favorite part of thejob.
The hands and the feet have a lot in common. They both have thousands ofproprioceptors and sensory nerve endings and an abundance of joints. Indeed,proprioceptors exist in the highest concentration closest to the joints. There are alsostructural similarities between the hands and the feet, so it made sense to start byapplying what worked on my hands to my feet. The results I experienced were morepowerful and immediate than any I had achieved before. At the time, I was MELTingwith the roller every day, so I was very surprised that the big changes I experiencedwere in my body when I was treating my feet.
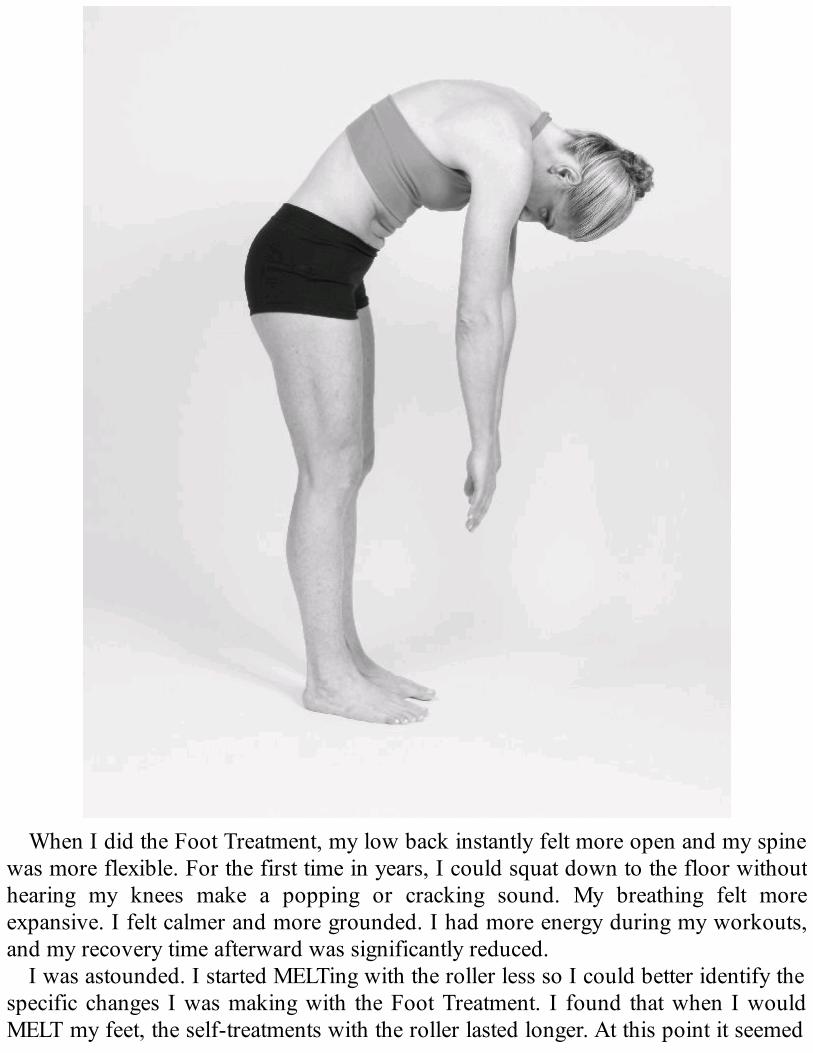
When I did the Foot Treatment, my low back instantly felt more open and my spinewas more flexible. For the first time in years, I could squat down to the floor withouthearing my knees make a popping or cracking sound. My breathing felt moreexpansive. I felt calmer and more grounded. I had more energy during my workouts,and my recovery time afterward was significantly reduced.
I was astounded. I started MELTing with the roller less so I could better identify thespecific changes I was making with the Foot Treatment. I found that when I wouldMELT my feet, the self-treatments with the roller lasted longer. At this point it seemed

insane that the feet weren’t one of the first areas of the body I had tried self-treatmenton. In my hands-on work, grounding the body through the feet was always a primaryfocus. In hindsight, it seems obvious: work on the feet to ground the body and helpthe Autopilot find the center of gravity before working anywhere else.
I tried doing all the techniques on one foot before doing the other so I couldcompare the changes in my body from side to side. After I did the Foot Treatment onone side, I reassessed by closing my eyes and using my Body Sense to feel anydifferences. The foot that I had done the treatment on felt cushioned and firmlygrounded on the floor. This is when I really started to get a sense of whatgroundedness felt like. It was as if I was standing on memory foam or sand instead ofa hard floor. The leg on that same side felt more cohesive, grounded, and yet lighter.
On the other leg, I noticed the joints and my leg felt heavier. My foot feltungrounded, as if it was just hovering on the ground. I began the Foot Treatment onthe opposite side the next time to see if the changes were similar and as obvious—andthey were. I began to document my results.
I started doing additional side-to-side comparative assessments. I did a spine flexassessment after treating one foot.
I compared my arm reach and noticed that the arm on the treated side of my bodywould reach longer—sometimes by inches. This indicated that stimulating my feet wasdriving the fluid through my spine all the way to my fingertips. When I bent over totouch my toes, I felt more flexible in my spine and legs on the side that I had treated.There was less tightness and tension. It felt like I had done a big stretching session onone leg when I had only done the MELT techniques with balls under my foot. Afterdoing the treatment on both feet, I could sense that my stride felt longer and lighterwhen I walked. I seemed to move with greater ease and felt less clunky. All thesechanges were even more pronounced if I drank water before I did the Foot Treatment.
When I started introducing the Foot Treatment to my clients, they saw the samechanges that I had—and even more. I learned more by being able to observe thechanges in my clients. It was becoming clear to me that the Foot Treatment wasenhancing the body’s system of effortless, upright stability. I observed that my clients’grounding, stability, balance, and flexibility improved.
I started having my clients do a standing Autopilot Assess before and after theytreated their feet. It was very clear that their Autopilot could more easily find theircenter of gravity after the Foot Treatment. I came to see that there was a system of thebody that was designed to stabilize the spine and keep the whole body upright, whichultimately helped me simplify and articulate the Rooted Core component of theNeuroCore model. I learned that the mechanism of the Rooted Core’s head-to-toestability system could be directly accessed through the feet just as the Reflexive Core

could be accessed through the diaphragm while the spine is stimulated by the roller.
The Perfect Combination of Techniques and Balls
I continued to refine the assessments, techniques, and sequences to yield the greatestresults. One of the techniques that I spent the most time thinking about andresearching was Position Point Pressing. Initially, my intention for including thistechnique was just to mobilize joints and rebalance the arches. When I shared the FootTreatment with my clients, I realized that stimulating these points was also creatingpositive changes in digestion, sleep, anxiety, and a host of chronic symptoms that theypreviously only felt relief from whenever they had a session with me.
I had my theories, but I wanted research that could explain what I was doing. Doreflexology, acupuncture, and acupressure use these same points? Were these positionpoints accessing the body’s meridians? In some cases yes, and in some no. I came torealize that the points I had determined to be the most beneficial were the “end points”of the fascial connections of Tom Myers’s myofascial meridian model. (Since then,studies have shown that the acupuncture meridians correlate with these connectivetissue meridians.) By stimulating these points, I was simultaneously mobilizing thejoints, rejuvenating hydration in the connective tissue, heightening Body Sense,stimulating the sensory nerve endings, and energizing the connective tissue meridians.Then Gliding, Shearing, and Rinsing were providing further rehydration.
Because your feet (and hands) are at the ends of your body, connective tissue fluidand blood tends to accumulate in these areas. So I added an additional techniquecalled Friction, which creates light stimulation to encourage any stagnant blood flowin connective tissue to be returned through the body in the lymphatic system.
The techniques of the Hand and Foot Treatment collectively Reconnect, Rebalance,Rehydrate, and Release to create change throughout the whole body. That’s why Irefer to this treatment as a global technique. Even though you are stimulating onlyyour hands and feet, you are making profound changes in your entire body.
Given that the Hand and Foot Treatment simulates what I do with my hands,fingers, and elbows as a hands-on practitioner, I had to spend a lot of time makingsure the equipment was just right. I chose to make three different balls—one large andsoft, one large and firm, and another small and firm. These sizes and densities arespecifically designed for the MELT Hand and Foot Treatment. Not only will you getthe best results using these balls, but you’ll also be guaranteed not to expose yourselfto toxic chemicals or dyes, latex, or phthalates.
(The MELT Hand and Foot Treatment Kit—including six balls, bunion band,illustrated guide, and sixty-minute DVD—is available at www.meltmethod.com.)

The soft ball is the most gentle and can be used for all of the Hand and FootTreatment techniques. You will use the soft ball to get started. If you want to use thesmall and large firm balls, refer to the instructions in the kit.
The MELT Hand and Foot Treatment
In just minutes, you can self-treat your hands or feet and achieve all Four R’s—Reconnect, Rebalance, Rehydrate, and Release. The Hand and Foot Treatment is aglobal technique that provides whole body rejuvenation.
The Hand and Foot Treatment techniques erase the negative effects of daily wearand tear on your hands and feet and improve your whole body’s overall alignment,connection, and flexibility by using specialized self-treatment balls. These quick self-care techniques can easily be done anywhere by anyone.
Everyday life is hard on your hands. The MELT Hand Treatment relieves thestiffness brought on by repetitive daily activities that’s felt as pain in your hands andwrists and, over time, as chronic neck, shoulder, and back aches. And every day, withevery step you take, your feet bear your entire body weight. The more active you are,the greater the impact on your feet. The MELT Foot Treatment relieves common footpain and problems, and alleviates tension in the low back and spine.
The MELT Hand and Foot Treatment helps to keep your hands and feet moreflexible and helps restore whole body mobility, balance, and stability. Many peoplereport an overall feeling of well-being and body ease after MELTing. Best of all, thebenefits you experience often continue long after you MELT.
MELT Hand and Foot Techniques
The MELT Hand and Foot Treatment uses five techniques to create whole bodychanges:
Position Point Pressing applies direct, tolerable pressure to specific points of thehands and feet to mobilize the joints and rejuvenate them with essential fluid. PositionPoint Pressing improves not only the mobility of the hands and feet but also theneurological connection between your extremities and every other system in yourbody.
Glide, Shear, and Rinse techniques are used to activate and restore the hydration ofyour connective tissue in your hands and feet, just as they do for your body. As anadded benefit, when you Rinse your hands and feet it helps to relieve tension in the

neck and low back.
Friction involves rubbing the ball in light, random directions to stimulate the mostsuperficial layer of connective tissue and encourage fluid movement in the lymphaticsystem. You can even do Friction on its own anytime during the day to stimulate yourlymph system. This helps to reduce inflammation in the hands and feet, so you alwayswant to end with this technique. Go for a light, superficial pressure. This techniquecreates the same effect as putting your joints next to hot tub jets. If the pressure is tooheavy, you won’t achieve the proper results.
As with the body, the MELT protocol of Reconnecting before and after eachsequence or treatment is important to achieving lasting change with the Hand and FootTreatment. Evaluating your body before and after your self-treatment will help you geta sense of the changes you’re creating and will assist you in maintaining the resultsyou achieve.
Hand and Foot Treatment Tips and Precautions
BreathingAs you MELT the hands and feet, focus your breath into the point you’re compressingwith the ball. This sends a message to the nervous system and triggers the rehydrationeffect. This will also heighten your Body Sense.
Pain ToleranceWhen you begin MELTing, you may be surprised at how tender your hands and feetare. If you find an area of discomfort, that’s your cue to ease back the pressure andbreathe. Pain is always a signal that you are overdoing it and decreasing the desiredeffect. Remember: the balls are inanimate objects, they cannot hurt you—only you canhurt yourself with the balls. Whatever the pressure you think you should use, the idealpressure will most likely be even lighter!
In this section, you are going to start with a Mini Soft Ball Hand and FootTreatment. The more you MELT your hands and feet, the easier it will be—and you’llexperience lasting results throughout your whole body.
ModificationsIf you have injuries or issues such as a stress fracture, plantar fasciitis, or neuromas,MELT around the injury to rehydrate the tissue so you support healing withoutcausing further irritation. You’ll know you’re ready to do the techniques directly onthe area of concern when you can put pressure on the ball Without pain. Pain is
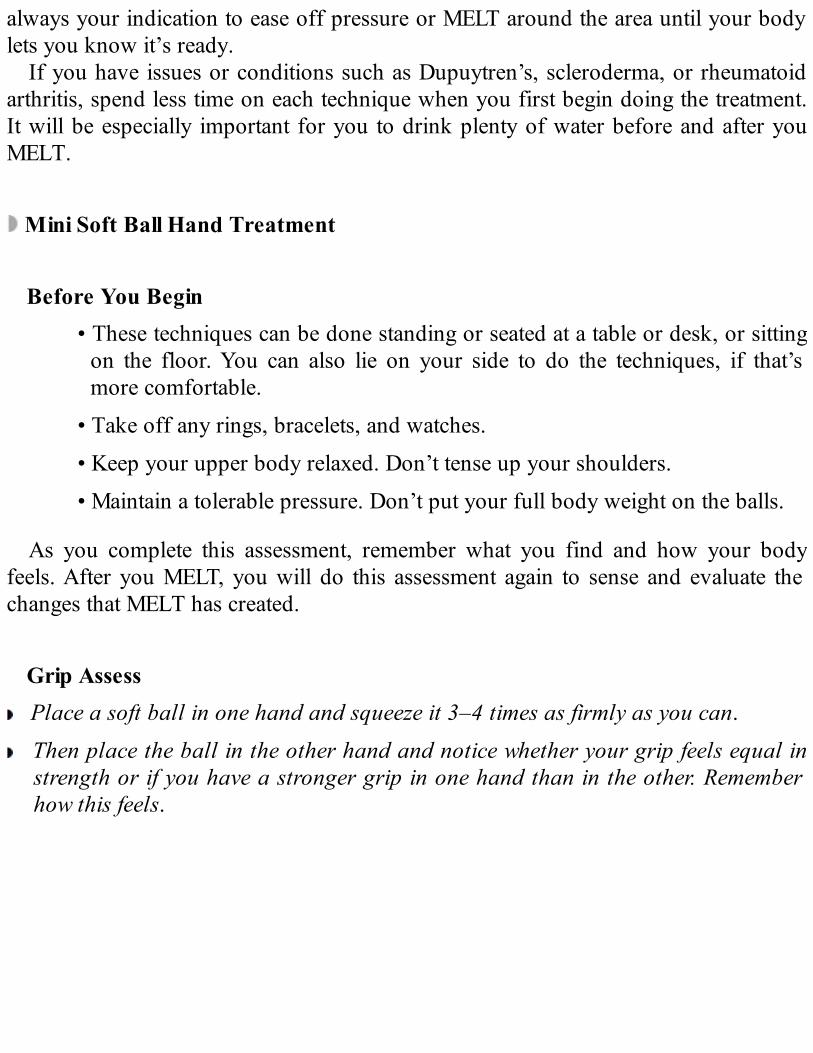
always your indication to ease off pressure or MELT around the area until your bodylets you know it’s ready.
If you have issues or conditions such as Dupuytren’s, scleroderma, or rheumatoidarthritis, spend less time on each technique when you first begin doing the treatment.It will be especially important for you to drink plenty of water before and after youMELT.
Mini Soft Ball Hand Treatment
Before You Begin• These techniques can be done standing or seated at a table or desk, or sitting
on the floor. You can also lie on your side to do the techniques, if that’smore comfortable.
• Take off any rings, bracelets, and watches.
• Keep your upper body relaxed. Don’t tense up your shoulders.
• Maintain a tolerable pressure. Don’t put your full body weight on the balls.
As you complete this assessment, remember what you find and how your bodyfeels. After you MELT, you will do this assessment again to sense and evaluate thechanges that MELT has created.
Grip Assess Place a soft ball in one hand and squeeze it 3–4 times as firmly as you can.
Then place the ball in the other hand and notice whether your grip feels equal instrength or if you have a stronger grip in one hand than in the other. Rememberhow this feels.

Glide Place the soft ball on a table or other flat surface.
On your right hand, with your palm down, Glide the ball from point 3 across thebase of the palm to point 5 and return to point 3 with consistent pressure. Keepthe tip of your middle finger on the table or floor as you create the Glide.Continue back and forth as you take 3–4 focused breaths.
Shear Place the soft ball under point 3, the thumb pad, on your right hand and create
small circles as you take 3–4 focused breaths. Move slowly and take your timewith Shearing the thumb pad, as this area often carries a lot of stuck stress.
Repeat the Glide and Shear on the left hand.

Finger Rinse Place your left hand flat on the floor or a table. Use the right hand to rub the soft
ball over the top of and in between each finger of the left hand in one direction,from the knuckle to the nail. (This also stimulates point 4 on the top hand,rehydrating the tissues of the wrist, reducing inflammation, and relieving wristpain.)
Repeat on the other hand.
Friction Using light, quick, random movements, rub one hand over the soft ball in a
scribble-like motion. Be sure to include your fingers and wrists.
Repeat on the other hand.
Grip Reassess Remember what your grip strength felt like when you began and repeat the Grip
Assessment. Place the soft ball in one hand and squeeze it 3–4 times as firmly asyou can. Repeat with the other hand. Can you now create a more powerful gripwith less effort? Does your grip feel more equal from left to right?
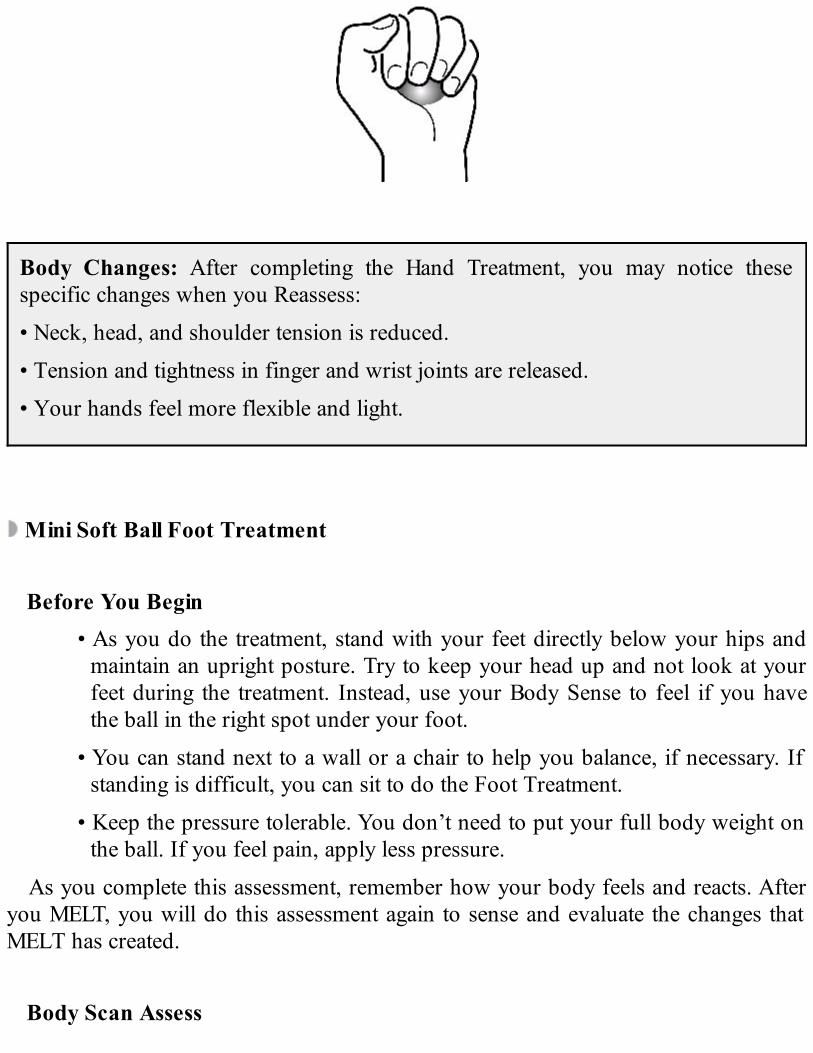
Body Changes: After completing the Hand Treatment, you may notice thesespecific changes when you Reassess:
• Neck, head, and shoulder tension is reduced.
• Tension and tightness in finger and wrist joints are released.
• Your hands feel more flexible and light.
Mini Soft Ball Foot Treatment
Before You Begin• As you do the treatment, stand with your feet directly below your hips and
maintain an upright posture. Try to keep your head up and not look at yourfeet during the treatment. Instead, use your Body Sense to feel if you havethe ball in the right spot under your foot.
• You can stand next to a wall or a chair to help you balance, if necessary. Ifstanding is difficult, you can sit to do the Foot Treatment.
• Keep the pressure tolerable. You don’t need to put your full body weight onthe ball. If you feel pain, apply less pressure.
As you complete this assessment, remember how your body feels and reacts. Afteryou MELT, you will do this assessment again to sense and evaluate the changes thatMELT has created.
Body Scan Assess
Stand with your feet side by side, hip-width apart (approximately 6 inches). Closeyour eyes and use your Body Sense to notice your feet. Does it feel like you havemore weight on your left or right side? Are you sensing that your weight isconcentrated on a particular region of your feet?
Use your Body Sense to scan up your legs. Notice the joints of your ankles, knees,and hips. Notice your muscles. Are your legs tense? Do you feel like you are usinga lot of muscles to stand? Are your thigh and butt muscles engaged? See if youcan relax these muscles and still remain comfortably standing. If so, this is howyou know you are working too hard to simply stand up.
Position Point Pressing Stand up straight with your feet hip-width apart. Place the soft ball on the floor in
front of you and step onto it with your right foot so it aligns with position point 1.
Put your feet side by side and gently shift some of your body weight onto the ballto create tolerable pressure. Then shift some of your weight off the ball.
Repeat this shifting 2–3 times to ease into tolerable compression while you takefocused breaths.
Step backward with the opposite foot and shift your weight to that foot. Place the ball under position point 5, in front of the heel bone. Apply tolerable
compression to that point as you take a focused breath.

Glide Place the ball on point 5, right in front of the heel. The ball of your foot and your
toes are on the floor. Your heel is off the ground.
Keeping the front of your foot on the floor, slowly move the ball from side to sidein front of the heel.
Continue Gliding the ball from side to side as you work your way to the back ofthe heel and then back to point 5.

Shear With the ball on point 5, use a slightly heavier compression to wiggle your foot
left to right. The ball should barely move.
Rinse Place the ball on point 2, directly under the big toe knuckle. Press the ball toward
your heel in a continuous motion with tolerable, consistent pressure. For thegreatest result, begin your Rinse with your foot slightly behind you so you caneasily create a smooth toe-to-heel Rinse.
Lift your foot and place the ball under the next knuckle and Rinse.

Only Rinse in one direction.
Repeat for all five knuckles.
Friction Using light, quick, random movements, rub your foot and toes over the ball in a
scribble-like motion.
Body Scan Reassess Close your eyes and use your Body Sense to notice the side of the body you just
self-treated. Notice your foot. Does it feel different than the other foot? (Not a bigsurprise—you’ve been rubbing your foot with a ball.)
Notice the joints of your leg. You may find that you don’t sense the leg as separateparts anymore, and instead your leg feels more cohesive. Notice if you feel moregrounded.
Now repeat all of the techniques on the other foot.
Final Body Scan Reassess Close your eyes and use your Body Sense to feel your feet on the floor. Notice your
joints. Do your legs feel more cohesive on both sides now? Do you feel more
evenly grounded?
Body Changes: After completing the Foot Treatment, you may notice thesespecific changes when you Reassess:
• Foot, knee, hip, and low back pain and tension are reduced.
• Feet and legs feel lighter and more flexible.
• Whole body balance and stability is improved as the Autopilot regains its GPSsignal to the center of gravity.
• Foot arches are rebalanced, and their buoyancy is enhanced.


Getting Started with Your MELT Practice
Your MELT self-treatment plan is a step-by-step guide to transforming your health.The first week, you will start with the Rebalance Sequence and the Hand and FootTreatment. These sequences will help heighten your Body Sense, Reconnect you toyour Autopilot, and Rebalance your NeuroCore. You will restore greater movement ofyour diaphragm, ground your body, and improve your body’s tensional energy. Irecommend starting by doing each sequence two to three times in the first week, butMELT is gentle enough that you can do any of these sequences every day. If you areor have recently been under a doctor’s care, pay special attention to Chapter 14 forguidelines.
Next you will add the Upper and Lower Body Rehydrate Sequences to directlyaddress stuck stress through rehydration of your connective tissue system. Then yourbody will be prepared to add the Release Sequences so you can create more space inyour neck and low back. You will continue to do the Hand and Foot Treatment a fewtimes each week.
At this point, you will be ready to combine the sequences into MELT maps thataddress the four systemic effects of stuck stress. You will be familiar with thesequences and be able to maintain the changes you’ve made with shorter, ten-minuteMELT sessions. There are also fifteen- to twenty-minute maps for when you havemore time, and you can always return to your Upper and Lower Body Map for a fullMELT session. I recommend doing this once a week (or more).
You are working your way toward MELTing for ten minutes, three times a week.Remember, you’ve never done Hands-Off Bodywork before. There will be a learningcurve as you add each new sequence, so give yourself time to learn the moves. This isone time when “more is better.” Once you become familiar with the moves andsequences, you will be able to MELT without even picking up this book!
Getting Started Self-Treatment Plan
Here’s an overview of your Getting Started Self-Treatment Plan: your first week ofMELTing you will be doing the Soft Ball Hand and Foot Treatment and the RebalanceSequence found in this chapter. These are the foundational components of MELT andthe best place for you to start your journey into self-treatment. You will continue to dothese when you learn the Upper and Lower Body Rehydrate Sequences in Chapter 11and the Neck and Low Back Release Sequences in Chapter 12. In four to five weeks,

you will have learned all of the basic MELT moves and be ready to do ten-, fifteen-,and twenty-minute MELT maps. The Hand Treatment, Foot Treatment, or theRebalance Sequence are a part of every MELT map.
Before You Begin
Here are pointers and precautions to keep in mind as you MELT for the first time.
When Should I MELT?
When you first begin, it’s best to MELT at the end of your day, up to an hour beforebedtime, especially if you have chronic pain. This way, you boost your body’s healingmechanism and restore regulator so your sleep is more restful. Your Autopilot gets anopportunity to recover and recharge, and you get more benefits from your MELTsession.
If you don’t have chronic pain and other symptoms, or if you are unable to MELTin the evening, you can MELT in the morning or before or after activities and exercise.What’s important is that you make time to learn the method and take time for yourself-care so you can have more energy and less pain—and enjoy doing the things youlove.
Always Reconnect
Remember the MELT protocol: Reconnect before and after each sequence. At thebeginning of each sequence, you will assess to Reconnect to your body’s current state.After you MELT, you’ll Reconnect again to notice the changes you are making. Thisallows your Autopilot to reset to a more efficient, balanced state and to recalibrate itsconnection with your center of gravity.
This is why you will always Reconnect as part of your MELT self-care routine. Ifyou don’t, you will miss the opportunity to restore the link between the autonomicnervous system and the connective tissue system, which is how you address the rootcause of the four effects of stuck stress. Initially, this is also how you’ll know you areMELTing correctly. You can inventory the changes you are making and track yourprogress.
Use Your Body Sense

Learning how to access your Body Sense can take practice. It is common to be unsureexactly what you feel in your body. This is because you haven’t had to access yourBody Sense before now. Tapping into your Body Sense is how you get good at usingit!
When you’re starting out, you may be tempted to touch your body to help youknow what you are feeling, but part of helping your Autopilot is learning to use yourBody Sense. So if you are not sure what you are feeling, let that be your assessment.Then, once you do the treatment, reassess.
When you’re MELTing, take the time to ask yourself, “What am I sensing?” If youranswer is, “I feel nothing,” it can’t hurt to go even slower and use less pressure. Whenwe don’t have keen Body Sense, we tend to think we need to press harder so we feelmore. If you feel tenderness or sensitivity, approach the area gently and remember to“get in and get out”—you don’t want to overstay your welcome.
Don’t Inflict Pain
In addition to using your Body Sense to notice positive changes as you MELT, youalso need to pay attention to pain. No part of MELT should ever hurt—not during orafter a MELT session. In fact, pain acts as a barometer: if you are overdoing it duringany MELT session, one of the ways your body will tell you this is with pain. Anincrease in pain is your signal that you may be moving too fast or applying too muchpressure, especially in the beginning. So slow down and ease up. If your painincreases after you MELT, that’s also a sign that you need to MELT for less time withless compression (or that your pain was caused by something completely unrelated toMELT).
Less Is More
No matter how good you get at MELT, ten minutes is the maximum time you shouldhave the roller compressing any mass at a time. Even if it “feels so good,” you’ve onlygot ten minutes. (If you haven’t finished a move or a sequence, you can always comeoff the roller, reassess, then get back on to finish up.) The connective tissue andnervous systems are quick to respond and adapt when you get in and get out. Taketoo long, and it’s as if they ignore your intervention.
Track Your Results

As you assess and reassess, you’ll start to notice that your body has some commonimbalances and that MELT helps you address them. Pay attention to what you feel—and how you feel after you MELT. Over time, you’ll likely notice that your self-treatment is making some larger changes in your body than just pain relief. You mightfind it empowering to track these changes.
Body Changes: Here are some of the changes you may notice when you addMELT to your routine:
• You sleep better.
• You have improved body ease.
• Your daily energy and mood improve.
• You have better balance and flexibility.
You may have a list of things you’d like to improve. Perhaps you have neck pain ordon’t sleep through the night. Maybe you have digestive trouble or weight issues.Take a moment and think about any changes you’d like to make. Keep track of theseas you move forward with MELT.
If you aren’t seeing any immediate changes, drink more water and keep MELTing.With patience and persistence, you should start to notice changes within two weeks.
Drink Water!
For the best and most lasting results, it’s important to drink water before andimmediately after you MELT. At least eight ounces of water before and after youMELT should do it. MELT pulls a lot of fluid into your tissues, so it’s vital that youhydrate your body if you want to rehydrate your connective tissue.
You can support the efficiency of your body by drinking small amounts of waterconsistently throughout the day. One quick way to calculate how much water youshould drink is to take your body weight in pounds and divide it in half to get thenumber of ounces you should drink. For example, a 160-pound man or womanshould drink eighty ounces of water per day. This is the minimum amount of wateryour body needs to restore you to a healthier, pain-free state. Also, eat water-filled,nutritious foods, such as fruits and vegetables. Try to stay away from sugary and

processed foods, as they increase inflammation and stress in your body. You mightfind it helpful to keep a food and activity journal to identify what does and doesn’tagree with your body.
I recommend that you not drink a lot of water while you’re eating. Instead, drinkwater an hour before and after you eat a meal. When you’re drinking small amountsof water consistently, you might find that what you thought were hunger painsbetween meals were just your body asking for more water.
Special Circumstances
If you are currently under a doctor’s care, you can still MELT with permission fromyour physician. MELT is an ideal complement to physical therapy and rehabilitation.Regardless of your circumstances, your first week will begin with the Hand and FootTreatment and Rebalance Sequence in this chapter. However, there are special self-treatment plans for your second week and beyond, including customized guidelines,modifications, and maps for the following circumstances:
• Pain due to trauma, injury, or surgery
• Diagnosed systemic conditions, disorders, and diseases
• Pregnancy and postpartum
For a more detailed list of special circumstances and the customized approachesassociated with them, see Chapter 14, “MELT as Complementary Self-care.”
Ready, Set, MELT!
To get started, try the following Rebalance Sequence and the Hand and/or FootTreatment in the evening, up to an hour before bedtime. It’s best to try the sequencesseparately at first, and then you can combine them as you become more familiar withthem. Do each sequence at least two to three times your first week. Remember, MELTis so gentle that you can do these sequences every day. This is the foundation of allMELT self-treatment plans.
Rebalance Sequence
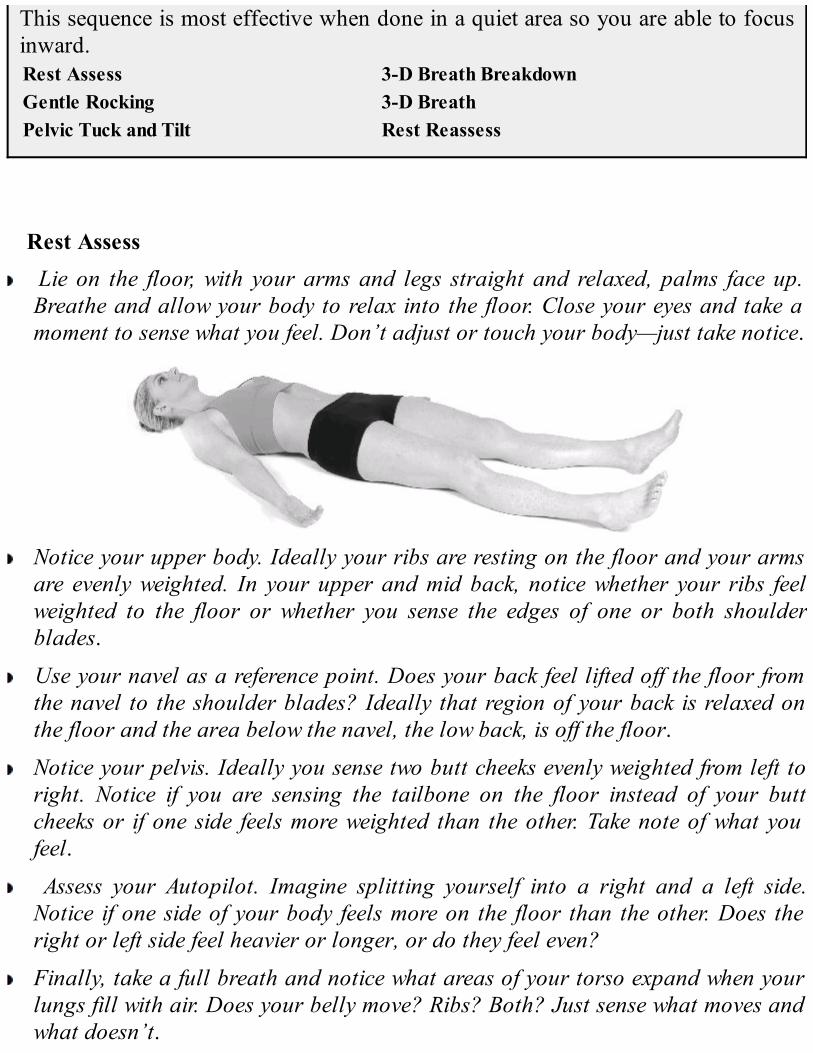
This sequence is most effective when done in a quiet area so you are able to focusinward.Rest Assess 3-D Breath BreakdownGentle Rocking 3-D BreathPelvic Tuck and Tilt Rest Reassess
Rest Assess Lie on the floor, with your arms and legs straight and relaxed, palms face up.
Breathe and allow your body to relax into the floor. Close your eyes and take amoment to sense what you feel. Don’t adjust or touch your body—just take notice.
Notice your upper body. Ideally your ribs are resting on the floor and your armsare evenly weighted. In your upper and mid back, notice whether your ribs feelweighted to the floor or whether you sense the edges of one or both shoulderblades.
Use your navel as a reference point. Does your back feel lifted off the floor fromthe navel to the shoulder blades? Ideally that region of your back is relaxed onthe floor and the area below the navel, the low back, is off the floor.
Notice your pelvis. Ideally you sense two butt cheeks evenly weighted from left toright. Notice if you are sensing the tailbone on the floor instead of your buttcheeks or if one side feels more weighted than the other. Take note of what youfeel.
Assess your Autopilot. Imagine splitting yourself into a right and a left side.Notice if one side of your body feels more on the floor than the other. Does theright or left side feel heavier or longer, or do they feel even?
Finally, take a full breath and notice what areas of your torso expand when yourlungs fill with air. Does your belly move? Ribs? Both? Just sense what moves andwhat doesn’t.

It may have been a while since you’ve gotten down on the floor. The good news isthat when you MELT, you only need to get down and up one time during eachsession. And because MELT improves your ease of movement, it gets easier everytime.
If the idea of getting on the floor still sounds a little daunting, you can stillMELT. Try standing with the roller against the wall to do the RebalanceSequence. By doing this modification and the Hand and Foot Treatment, you willbe preparing your body to do the Rebalance Sequence on the floor. Pay attentionto your body and move at your own pace. I know you will find that MELT is worthgetting on the floor for!
Gentle Rocking Sit on one end of the roller with your feet flat on the floor, about hip-width apart,
your knees bent.
If you need additional support, place towels, pillows, or bolsters on either side ofthe roller.
Place your hands on the floor for support and then slowly roll yourself downalong the length of the roller.
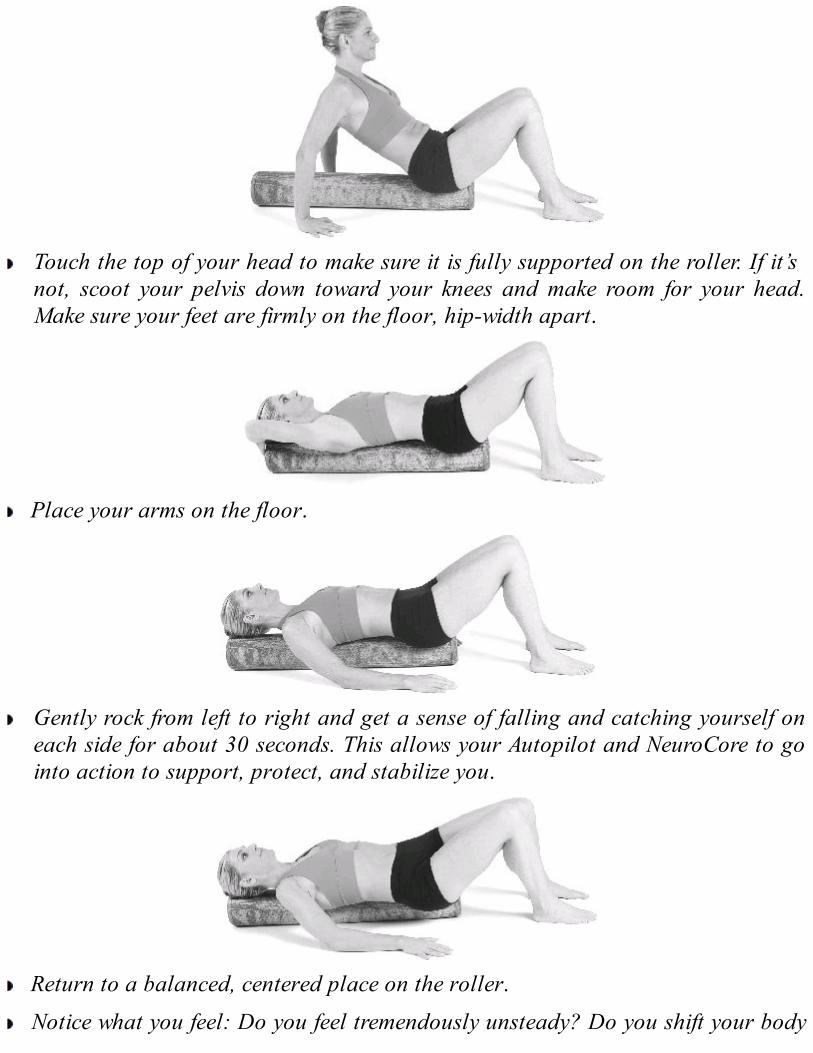
Touch the top of your head to make sure it is fully supported on the roller. If it’snot, scoot your pelvis down toward your knees and make room for your head.Make sure your feet are firmly on the floor, hip-width apart.
Place your arms on the floor.
Gently rock from left to right and get a sense of falling and catching yourself oneach side for about 30 seconds. This allows your Autopilot and NeuroCore to gointo action to support, protect, and stabilize you.
Return to a balanced, centered place on the roller.
Notice what you feel: Do you feel tremendously unsteady? Do you shift your body

weight more easily to one side than to the other?
Pelvic Tuck and Tilt Place your hands on your pelvis, with your fingertips on the pubis bone and the
heels of your hands on the front hip bones.
Slowly tuck your pelvis, keeping your ribs stable and your foot pressure constant.Feel your spine flatten on the roller, your pubic bone rise, and the heels of yourhands get heavy.
When you tilt, feel how your tailbone travels toward the roller, your low backarches, your pubic bone moves away from your belly button, and your fingertipsget heavy. Let your ribs remain stable as your low back lifts slightly.
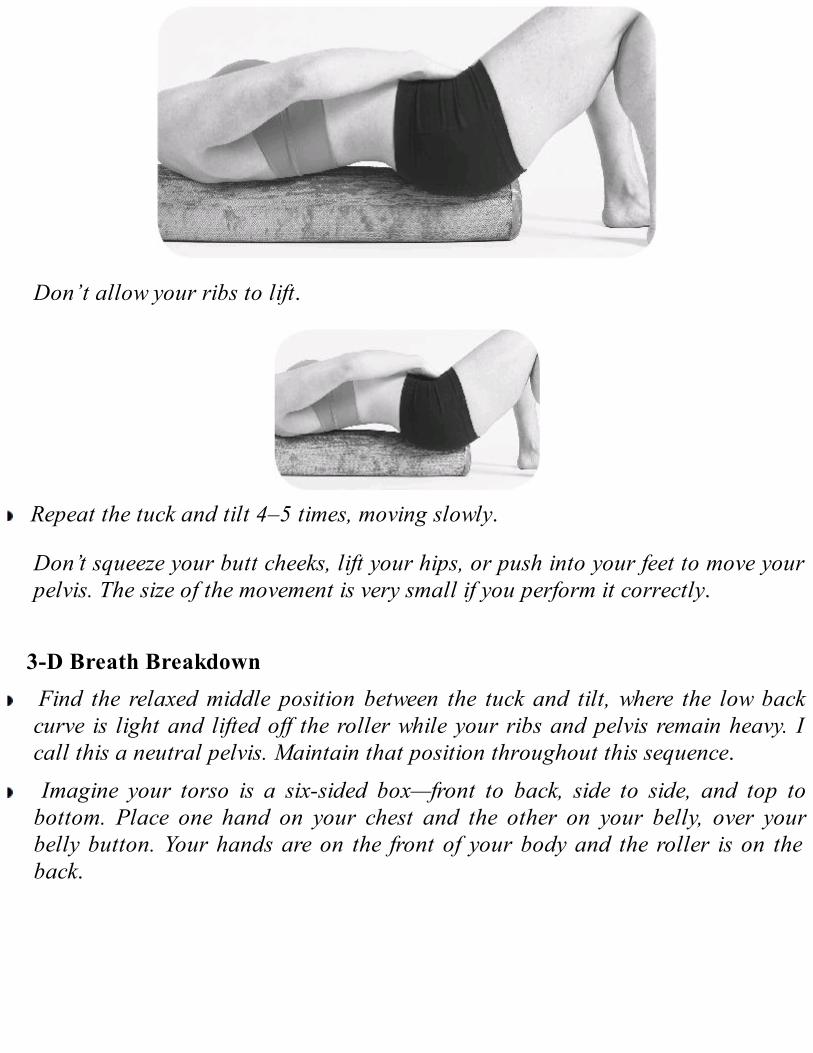
Don’t allow your ribs to lift.
Repeat the tuck and tilt 4–5 times, moving slowly.
Don’t squeeze your butt cheeks, lift your hips, or push into your feet to move yourpelvis. The size of the movement is very small if you perform it correctly.
3-D Breath Breakdown Find the relaxed middle position between the tuck and tilt, where the low back
curve is light and lifted off the roller while your ribs and pelvis remain heavy. Icall this a neutral pelvis. Maintain that position throughout this sequence.
Imagine your torso is a six-sided box—front to back, side to side, and top tobottom. Place one hand on your chest and the other on your belly, over yourbelly button. Your hands are on the front of your body and the roller is on theback.
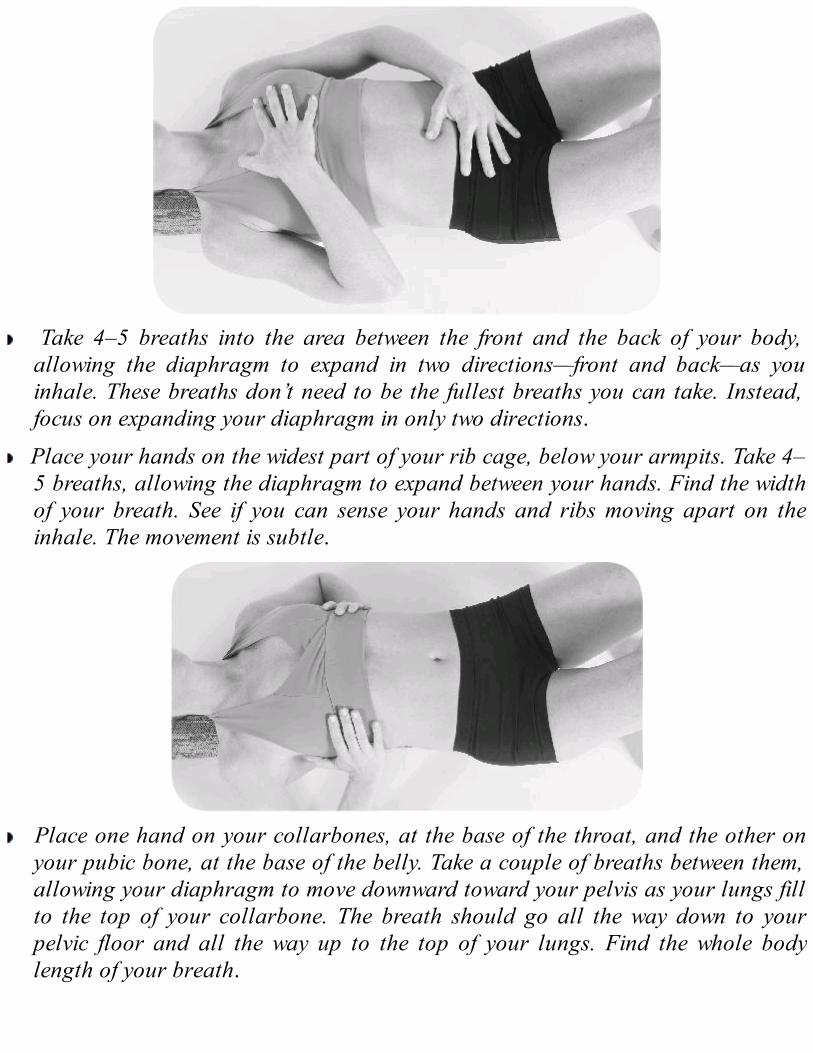
Take 4–5 breaths into the area between the front and the back of your body,allowing the diaphragm to expand in two directions—front and back—as youinhale. These breaths don’t need to be the fullest breaths you can take. Instead,focus on expanding your diaphragm in only two directions.
Place your hands on the widest part of your rib cage, below your armpits. Take 4–5 breaths, allowing the diaphragm to expand between your hands. Find the widthof your breath. See if you can sense your hands and ribs moving apart on theinhale. The movement is subtle.
Place one hand on your collarbones, at the base of the throat, and the other onyour pubic bone, at the base of the belly. Take a couple of breaths between them,allowing your diaphragm to move downward toward your pelvis as your lungs fillto the top of your collarbone. The breath should go all the way down to yourpelvic floor and all the way up to the top of your lungs. Find the whole bodylength of your breath.

Notice if your body shifts or the roller rocks a little during any of these directionalbreaths. This is a good indication that your Autopilot is resetting and acquiringits GPS signal to your center of gravity.
3-D Breath Place both hands on your belly and take a deep breath into all six sides of your
torso, expanding three-dimensionally. During the exhale, make a firm shhh, seee,or haaa sound to heighten your ability to sense the reflexive action in your deepabdomen. Sense the cylindrical contraction that subtly squeezes your spine, pelvicfloor, and organs from all sides as you force the exhale.
Repeat 3–4 times. Then continue your breathing without using the sound orforcing the exhale and see if you can use your Body Sense to feel and follow thatsame reflexive action, starting with your natural exhale and then consciouslyconnecting to the more subtle sensation of engagement.
Slowly come off the roller by placing your hands on the floor, straightening outone leg, and sliding off that side—first with your pelvis, and then your ribs and

head.
Rest Reassess Lie on the floor with your arms and legs straight and relaxed, palms face up, as
you did before. Breathe and allow your body to relax into the floor. Close youreyes and take a moment to reassess.
Use your Body Sense to notice if your upper body is more relaxed. Are your ribsheavier to the floor? Notice your pelvis. Are your butt cheeks more weighted to thefloor and more even from left to right?
Assess your Autopilot. Imagine splitting yourself into a right side and a left side.Do the right and left sides feel more even? Does it feel like there’s less of adistinction between your left and right halves?
Finally, take a full breath and notice what areas of your torso expand when yourlungs fill with air. Do you sense greater movement? Is it easier to take a deepbreath?
If you sense any of these changes, your body is Rebalancing.
Soft Ball Foot Treatment
Body Scan Assess RinseAutopilot Assess FrictionPosition Point Pressing Body Scan ReassessGlide Final Body Scan ReassessShear Autopilot Reassess
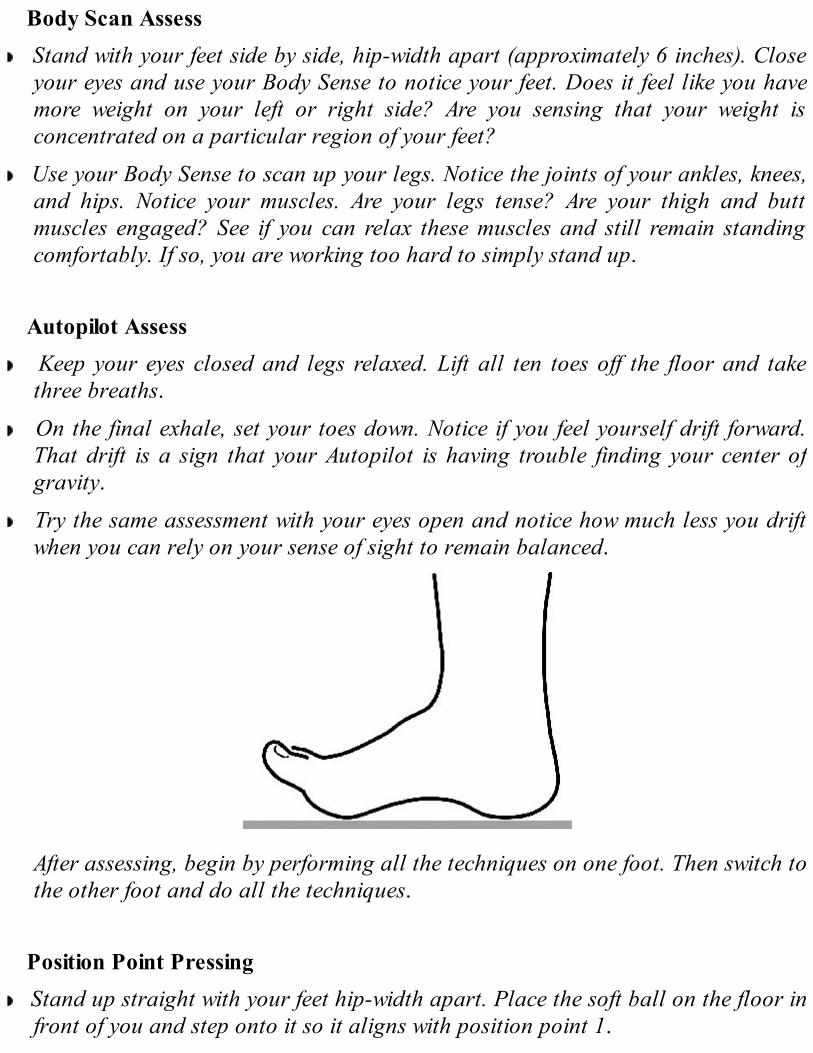
Body Scan Assess Stand with your feet side by side, hip-width apart (approximately 6 inches). Close
your eyes and use your Body Sense to notice your feet. Does it feel like you havemore weight on your left or right side? Are you sensing that your weight isconcentrated on a particular region of your feet?
Use your Body Sense to scan up your legs. Notice the joints of your ankles, knees,and hips. Notice your muscles. Are your legs tense? Are your thigh and buttmuscles engaged? See if you can relax these muscles and still remain standingcomfortably. If so, you are working too hard to simply stand up.
Autopilot Assess Keep your eyes closed and legs relaxed. Lift all ten toes off the floor and take
three breaths.
On the final exhale, set your toes down. Notice if you feel yourself drift forward.That drift is a sign that your Autopilot is having trouble finding your center ofgravity.
Try the same assessment with your eyes open and notice how much less you driftwhen you can rely on your sense of sight to remain balanced.
After assessing, begin by performing all the techniques on one foot. Then switch tothe other foot and do all the techniques.
Position Point Pressing Stand up straight with your feet hip-width apart. Place the soft ball on the floor in
front of you and step onto it so it aligns with position point 1.

Put your feet side by side and gently shift some of your body weight onto the ballto create tolerable pressure. Then shift some of your weight off the ball.
Repeat this shifting 2–3 times to ease into tolerable compression while you takefocused breaths.
Step backward with the opposite foot and shift your weight to that foot. Place the ball under position point 2, directly under the big toe knuckle. Gently
rock forward to apply tolerable compression to that point. Step on your back foot to decompress the ball as you move to the next knuckle.
Continue this rocking motion as you compress and decompress each point at thefront of the foot, and then move on to position point 3, 4, and 5.
Glide Place the ball on point 5, right in front of the heel. The ball of your foot and your
toes are on the floor. Your heel is off the ground.

Keeping the front of your foot on the floor, slowly move the ball from side to sidein front of the heel.
Continue Gliding the ball from side to side as you work your way to the back ofthe heel and then back to point 5.
Shear With the ball on point 5, use a slightly heavier compression to wiggle your foot
left to right. The ball should barely move.
Rinse Place the ball on point 2, directly under the big toe knuckle.
Keeping your heel on the floor, gently press the ball with consistent pressureacross the knuckles, toward the outside of the foot. Lift your foot to return to the

starting point and repeat 2 more times.
Remember, you only Rinse in one direction.
Place the ball on point 2 again, directly under the big toe knuckle. Press the balltoward your heel in a continuous motion with tolerable, consistent pressure. Forthe greatest result, begin your Rinse with your foot slightly behind you so you caneasily create a smooth toe-to-heel Rinse.
Lift your foot and place the ball under the next knuckle and Rinse.
Repeat for all five knuckles.

Friction Using light, quick, random movements, rub your foot and toes over the ball in a
scribble-like motion.
Body Scan Reassess Close your eyes and use your Body Sense to notice the side of the body you just
self-treated. Notice your foot. Does it feel different than the other foot? Notice the joints of your leg. You may find that you don’t sense the leg as separate
parts anymore, and instead your leg feels more cohesive. Notice if you feel moregrounded. If you have room, take a few steps and notice the difference betweenyour left and right sides.
Now repeat all of the techniques on the other foot.
Final Body Scan Reassess Close your eyes and use your Body Sense to feel your feet on the floor. Notice your
joints. Do your legs feel more cohesive on both sides now? Do you feel moreevenly grounded?
Autopilot Reassess Stand with your eyes closed and raise your toes again. When you set your toes
back down, do you drift less than you did before? The Soft Ball Foot Treatmentimproves your Autopilot’s connection to your body’s center of gravity.

Soft Ball Hand Treatment
Wrist Assess RinseGrip Assess Finger RinseFinger Compression FrictionPosition Point Pressing Wrist ReassessGlide Grip ReassessShear
Wrist Assess Bring your elbows and wrists together.
Open your hands so that your palms face the ceiling. Ideally, your hands shouldlook like the letter T. If your hands look more like a Y or you notice that yourpinky finger bends, that’s a sign that there’s dehydration and unnecessary tensionrunning from your hands all the way to your neck and shoulders, which may becontributing to pain, stiffness, and poor posture.
Grip Assess Place a soft ball in one hand and squeeze it 3–4 times as firmly as you can.
Then place the ball in the other hand and notice whether your grip feels equal instrength or if you have a stronger grip in one hand than in the other. Rememberhow this feels.

Finger Compression Hold the ball in the palm of one hand. Place the pad of your index finger of that
hand on top of the ball. If you have trouble keeping the ball in place, you can useyour other hand to help hold it.
Press down on the ball with the pad of your index finger.
Then decompress the ball and flex your index finger so your fingertip is touchingthe ball. Again, compress the ball with mild pressure.
Alternate between pressing the tip and the pad of your index finger against theball 4 times each.
Move the ball over a bit in your palm and place your middle finger on top of theball.
Repeat the pattern of flexion and extension 4 times per finger, including yourthumb.

Switch hands and repeat.If you find that you can’t make your fingers move one at a time, put two fingers onthe ball and see if that’s any better. You can even use your other hand to helpmove the joints when you first try this technique.
Position Point Pressing Place the ball on a table or other flat, hard surface. Press your hand into the soft
ball at each of the points on the diagram below, starting with point 1. Create atolerable amount of pressure and take a focused breath. You can use your otherhand to create gentle compression.
Then compress points 2 through 5, starting under your index finger. At each point,take a focused breath before lifting your hand and moving to the next point. Easeoff the pressure if you feel a strong sensation or pain. This is a very powerfultechnique, so take your time.
Once you’ve pressed into each point, repeat on the other hand.
Glide On your right hand, with your palm down, Glide the soft ball from point 3 across
the base of the palm to point 5 and return to point 3 with consistent pressure.Keep the tip of your middle finger on the table or floor as you create the Glide.Continue back and forth as you take 3–4 focused breaths.
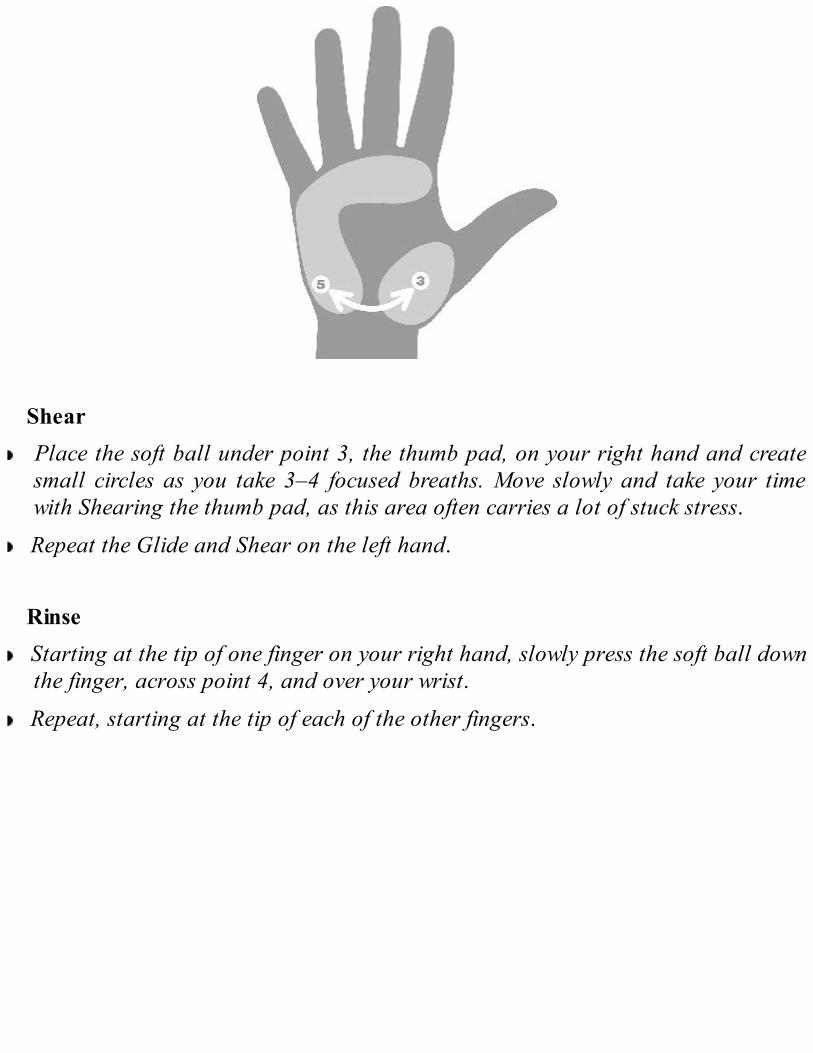
Shear Place the soft ball under point 3, the thumb pad, on your right hand and create
small circles as you take 3–4 focused breaths. Move slowly and take your timewith Shearing the thumb pad, as this area often carries a lot of stuck stress.
Repeat the Glide and Shear on the left hand.
Rinse Starting at the tip of one finger on your right hand, slowly press the soft ball down
the finger, across point 4, and over your wrist. Repeat, starting at the tip of each of the other fingers.

Switch hands and repeat. Next, start at the fingertip and slowly press the soft ball through your wrist and up
your forearm in a continuous motion until you reach the elbow.
Repeat, starting from each of the other fingers.
Switch hands and repeat.
Finger Rinse Place your left hand flat on the floor or a table. Use the right hand to rub the soft
ball over the top of and in between each finger of the left hand in one direction,from the knuckle to the nail. (This also stimulates point 4 on the top hand,rehydrating the tissues of the wrist, reducing inflammation, and relieving wristpain.)
Repeat on the other hand.

Friction Using light, quick, random movements, rub one hand over the soft ball in a
scribble-like motion. Be sure to include your fingers and wrist. Repeat on the other hand.
Wrist ReassessAs you know by now, assessing yourself is crucial.
Bring your elbows and wrists together. Open your hands so that your palms facethe ceiling. Do you feel a change in the flexibility of your wrists? Do you feel lesstension in your arms? Do your fingers extend more fully?

Grip Reassess Remember what your grip strength felt like when you began and repeat the Grip
Assess. Place a soft ball in one hand and squeeze it 3–4 times as firmly as youcan. Repeat with the other hand. Can you now create a more powerful grip withless effort? Does your grip feel more equal from left to right?

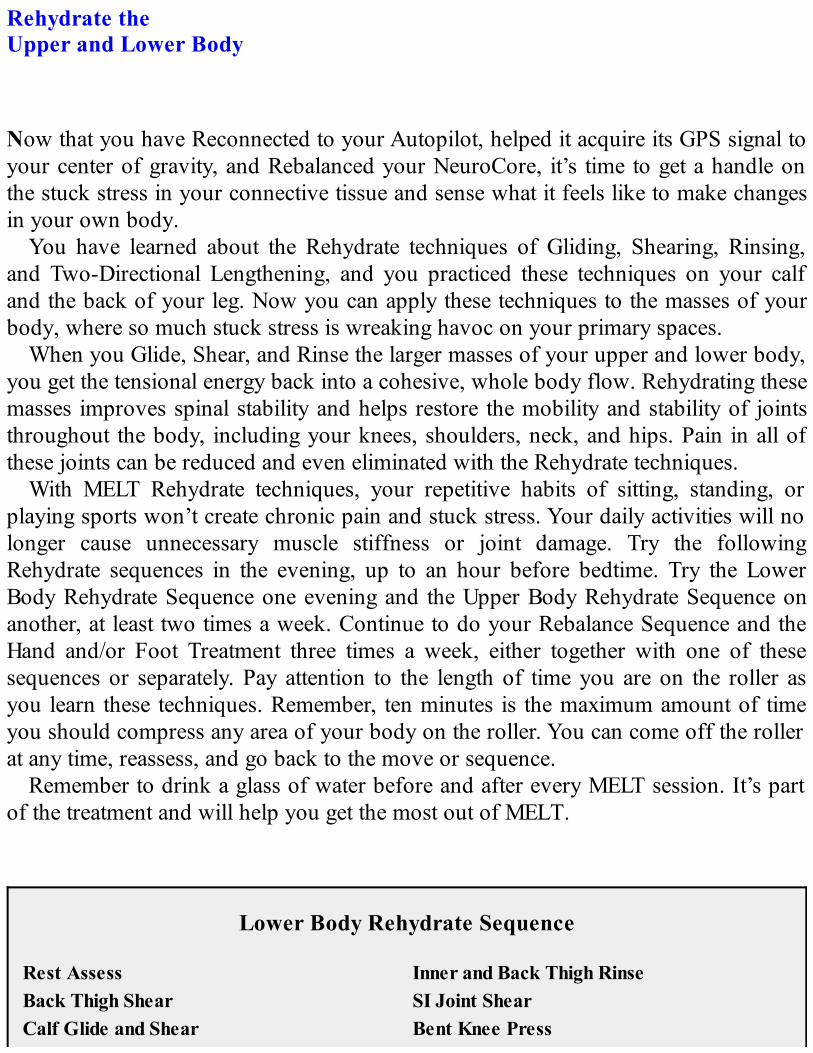
Rehydrate theUpper and Lower Body
Now that you have Reconnected to your Autopilot, helped it acquire its GPS signal toyour center of gravity, and Rebalanced your NeuroCore, it’s time to get a handle onthe stuck stress in your connective tissue and sense what it feels like to make changesin your own body.
You have learned about the Rehydrate techniques of Gliding, Shearing, Rinsing,and Two-Directional Lengthening, and you practiced these techniques on your calfand the back of your leg. Now you can apply these techniques to the masses of yourbody, where so much stuck stress is wreaking havoc on your primary spaces.
When you Glide, Shear, and Rinse the larger masses of your upper and lower body,you get the tensional energy back into a cohesive, whole body flow. Rehydrating thesemasses improves spinal stability and helps restore the mobility and stability of jointsthroughout the body, including your knees, shoulders, neck, and hips. Pain in all ofthese joints can be reduced and even eliminated with the Rehydrate techniques.
With MELT Rehydrate techniques, your repetitive habits of sitting, standing, orplaying sports won’t create chronic pain and stuck stress. Your daily activities will nolonger cause unnecessary muscle stiffness or joint damage. Try the followingRehydrate sequences in the evening, up to an hour before bedtime. Try the LowerBody Rehydrate Sequence one evening and the Upper Body Rehydrate Sequence onanother, at least two times a week. Continue to do your Rebalance Sequence and theHand and/or Foot Treatment three times a week, either together with one of thesesequences or separately. Pay attention to the length of time you are on the roller asyou learn these techniques. Remember, ten minutes is the maximum amount of timeyou should compress any area of your body on the roller. You can come off the rollerat any time, reassess, and go back to the move or sequence.
Remember to drink a glass of water before and after every MELT session. It’s partof the treatment and will help you get the most out of MELT.
Lower Body Rehydrate Sequence
Rest Assess Inner and Back Thigh RinseBack Thigh Shear SI Joint ShearCalf Glide and Shear Bent Knee Press

Inner Thigh Glide and Shear Hip to Heel PressCalf Rinse Rest Reassess
Rest Assess Lie on the floor with your arms and legs straight and relaxed, palms face up.
Use your Body Sense to notice the curve of your low back. Use your navel as areference point. Does your back feel lifted off the floor from the navel to theshoulder blades? Ideally that region of your back is relaxed on the floor and thearea below the navel, the low back, is off the floor. Take note of what you feel.
Notice your pelvis. Ideally you feel two butt cheeks evenly weighted on the floor.Notice if you sense your tailbone on the floor instead of your butt cheeks or if oneside of your pelvis feels more weighted than the other.
There’s a little pocket of space right below the pelvis, and then the thighs ideallytouch the floor evenly on both sides. How much of your thighs do you feel on thefloor? Does one thigh feel heavier to the floor than the other? You may not feelyour thighs touching the floor at all—just make a note of what you feel.
There’s a space behind both of your knees, and then the calves weight to the floor.Notice whether they weight evenly. The ankles are a space, and the heels rest onthe floor. Ideally, you’re resting on the outer third of your heels, with your toespointing toward where the walls meet the ceiling.
Notice your legs from hip to heel. Does the right or the left leg feel heavier orlonger, or do they feel even?
Finally, take a full breath and notice what areas of your torso move when yourlungs fill with air. Does your belly move? Ribs? Both? Just sense what moves andwhat doesn’t.
Take note of what you feel so you can compare after you Rehydrate your lowerbody.
Back Thigh Shear Lie on the floor and place the roller underneath the top of your thighs, below the
crease of your buttocks.

Let your upper body relax on the floor and keep your legs relaxed and straight.Your buttocks might lift slightly in this first position, but make sure your upperbody stays heavy.
Slowly begin to Shear the back of your thighs by moving your legs together andapart, like you’re slowly making a snow angel or doing jumping jacks. Maintainconsistent pressure on the top of the roller and take focused breaths as you repeatthis movement 4–5 times.
Bend one leg and relax it on the roller, and then drag the other leg out and in.
Think of twisting your flesh around the bone on the back of your thigh rather thansweeping the leg left to right.
Keep the compression tolerable and consistent as you drag your leg inward andoutward 4–5 times.
Repeat with the other thigh.
Straighten and relax your legs again, pause for 2 focused breaths, and allow yourupper thighs to sink further into the roller.

Move the roller toward your knees and find a spot halfway down the back of thethigh (where cellulite often appears) and repeat Shearing both legs with thejumping jack motions and then Shearing one leg at a time.
Return to straight legs. Pause, allow your leg weight to sink into the roller, andbreathe.
Move the roller down once more to right above your knees.
Repeat Shearing both legs together and then one leg at a time.
When you are done, pause, wait, and breathe.
Calf Glide and Shear Place the roller under the middle of your right calf and cross your left ankle over
your right. With your feet and leg relaxed, let your calf sink into the roller toallow gentle pressure to penetrate the tissue down to the bone.
Slowly bend and straighten your knees to move the roller back and forth 2–3inches. Keep your ankles and feet relaxed and maintain a consistent, tolerablepressure as you repeat this movement 3–4 times. Each time you Glide, take afocused breath into your calf.

Rotate your calf outward and repeat the back-and-forth Gliding motion.
Then rotate your calf inward and continue to Glide.
Use your Body Sense to notice which of the three areas feels more tender. Returnto that area and continue to Glide, making the movement smaller and smaller onthe significant area for 2–3 breaths.
Now pause and wait to let the tissue adapt and sink further into the roller as youtake 2 focused breaths into your calf. Maintain tolerable pressure and turn yourright leg in and out in a small, controlled movement, 1–2 inches, directly on thetender spot 4–5 times to directly Shear. The roller remains stationary.
Now, relax your leg, maintain compression of the tender spot on the roller, andindirectly Shear, making circles with your right ankle 3–4 times in each direction.This positively stimulates the area of stuck stress indirectly. If you feel any painfulsensations, ease off the pressure on the roller by uncrossing your leg.
Pause, wait, and take 2 focused breaths while you let the tissue adapt and sinkfurther into the roller.

Switch legs and repeat the entire sequence on the other calf. Move the roller down to the lower region of your calf. Repeat the same Glide and
Shear techniques in this region on both legs.
Notice if one calf is more tender than the other and if the upper or lower region ofthe calves is more tender.
Inner Thigh Glide and Shear Lie on your right side and place the roller in front of you. Let your head rest on
your lower arm, a pillow, or the floor. Place your left inner arch on top of theroller and slowly lower your calf and knee so the lower half of your left leg is ontop of the roller.
Let your body roll toward the roller so your knee is an inch beyond the roller.Then, straighten your left leg so it is perpendicular to your body.
The more perpendicular you can keep your leg to your body, the greater theresult. But if you cannot straighten your leg at ninety degrees from your body,straighten it as close to ninety degrees as possible and angle the roller so it isperpendicular to your left leg.

Create a short Gliding motion above your knee by allowing your body weight tofall slightly forward and then backward, moving the roller on a small region ofyour inner thigh 4–5 times.
Then turn your leg inward so your toes point down to the floor and continue yourGlide 4–5 times. When you find an area of stuck stress, make your Glide smallerand smaller on this area.
Take a focused breath and begin an indirect Shear by slowly bending andstraightening your knee. Keep the pressure consistent as you slowly bend andstraighten 3 times.
You can also try a direct Shear by rotating the bent leg so the heel rises and falls2–3 times. Keep breathing.
This area is often very tender when you first begin MELTing, so don’t be surprisedif it feels sensitive. Remember, use tolerable pressure. If it is painful, lighten up onthe roller.
Straighten your knee, pause, and take 2 focused breaths while you let your thighcompress and sink further into the roller.
Keep your leg on the roller and turn your body to face the floor, supporting yourupper body on your forearms and elbows.

Take a focused breath and slowly press the roller away from your knee and upyour inner thigh. Stop halfway.
You can rest your upper body entirely on the floor so you don’t have to work toohard or strain your neck. Again, Glide forward and back in a small area on themiddle of your thigh 4–5 times.
Repeat with your toes turned down toward the floor. Find an area of stuck stress,Glide in smaller movements, and pause on this tender spot to Shear.
Maintain tolerable pressure and repeat the indirect Shear by bending andstraightening your knee 3 times. Keeping your knee bent, lift and lower the leg,raising the heel toward the ceiling for the direct Shear.
Straighten your knee and allow the weight of your leg to rest on top of the rollerand take 2 focused breaths.
Repeat this sequence one more time, finding another spot further up the thigh.
When you’re done, pause and take 2 focused breaths.
Repeat the entire sequence on your right inner thigh.

Calf Rinse Sit on the floor and place your arms behind you for support. With your right knee
bent, rotate your right leg inward to place the area above your inner ankle on theroller. Your foot is relaxed, and your big toe is close to the floor. Keep your leftleg relaxed.
Slowly straighten your right leg while pressing the roller up the inside of your calfwith consistent, light pressure. Stop just below the knee.
Rotate your leg so the back of your calf is on the roller.
Slowly bend your leg as you press the roller down the back of your calf, towardyour heel, with consistent, light pressure. Stop before your ankle and repeat theRinse 3–4 times.

Repeat on the other leg.
Inner and Back Thigh Rinse Place your right inner thigh on the roller just above the knee, and straighten your
right leg. Bend your left knee and use that leg for support. Turn your upper bodyaway from the roller and place your hands on the floor for support.
Slowly Rinse up the inner thigh, applying consistent pressure to move the rollertoward your pelvis. When you reach the top of the inner thigh, place both handsbehind you, lean back, and rotate your leg so the back of your thigh is now on theroller.
Rinse down the back of your thigh with consistent pressure and stop right aboveyour knee.

Repeat this Rinsing pass, up the inside and down the backside of your thigh, 3–4times.
Repeat on the left thigh.
SI Joint Shear Lie on the floor, bend your knees, and put your feet flat on the floor, hip-width
apart. Place the roller on the floor below your knees. Push your feet into thefloor, lift up your hips, and position the roller under your pelvis (on the sacrum),just below the lower back.
If the roller feels like it’s going to slip out, it’s too close to your butt cheeks andyou need to move the roller higher.
Draw both knees toward your chest to check if the roller is in the right place.When you bring both knees into your chest, the roller should not slip out, norshould you feel like the roller is under your low back.

If you have a hard time getting your pelvis in the correct position, place a foldedtowel or yoga mat underneath your head and upper back. This is particularlyhelpful if you have difficulty lifting your hips or if you are under 5’5” tall.
Keep your knees fully bent and relax your lower legs and feet. Keep your coreengaged and your ribs heavy on the floor. Slowly move your knees away fromyour chest so your knees aim toward the ceiling, but stop before your thighs arefully perpendicular to the roller. This will help keep your low back relaxed.
Maintain a consistent pressure and slowly angle your knees slightly right and left

between the one and eleven o’clock positions to explore both sides of the SI joint.
Don’t angle your knees too far to either side. Your goal is for your weight to beon the back of the pelvis, the sacrum, not on your hips.
As you move, try not to arch your back or move your ribs. Learn how to moveyour pelvis without moving your ribs by keeping your core engaged.
Try to keep your knees together. Pause on the right side and Shear the right SIjoint by making small clockwise and counter-clockwise circles with your upperlegs 2–3 times in each direction.
Then try circling just the leg you’re leaning toward in slightly larger but slowercircles.
Also try moving your knees forward and back in a marching motion 2–3 timesslowly.
Once you’ve Sheared, pause for a moment, maintain pressure in the same placeon the roller, and take 2 focused breaths.
Repeat on the left side.
If you sensed a tender side, you can always repeat the moves on that side.
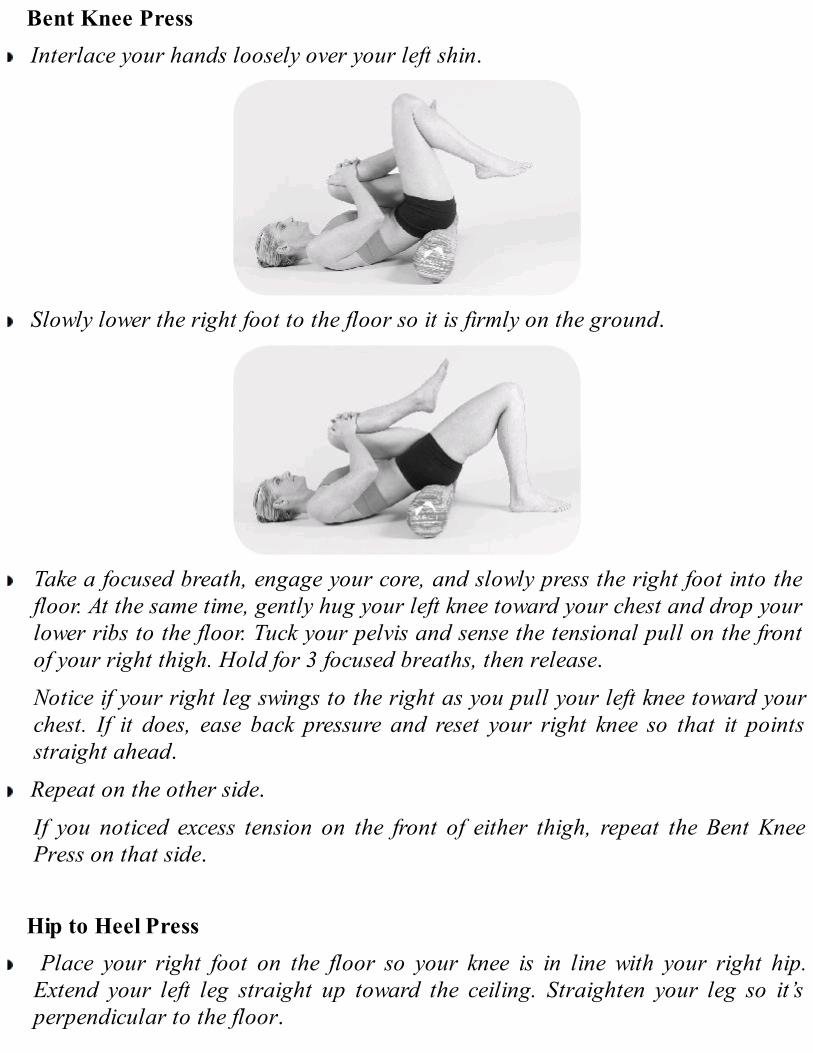
Bent Knee Press Interlace your hands loosely over your left shin.
Slowly lower the right foot to the floor so it is firmly on the ground.
Take a focused breath, engage your core, and slowly press the right foot into thefloor. At the same time, gently hug your left knee toward your chest and drop yourlower ribs to the floor. Tuck your pelvis and sense the tensional pull on the frontof your right thigh. Hold for 3 focused breaths, then release.
Notice if your right leg swings to the right as you pull your left knee toward yourchest. If it does, ease back pressure and reset your right knee so that it pointsstraight ahead.
Repeat on the other side.
If you noticed excess tension on the front of either thigh, repeat the Bent KneePress on that side.
Hip to Heel Press Place your right foot on the floor so your knee is in line with your right hip.
Extend your left leg straight up toward the ceiling. Straighten your leg so it’sperpendicular to the floor.
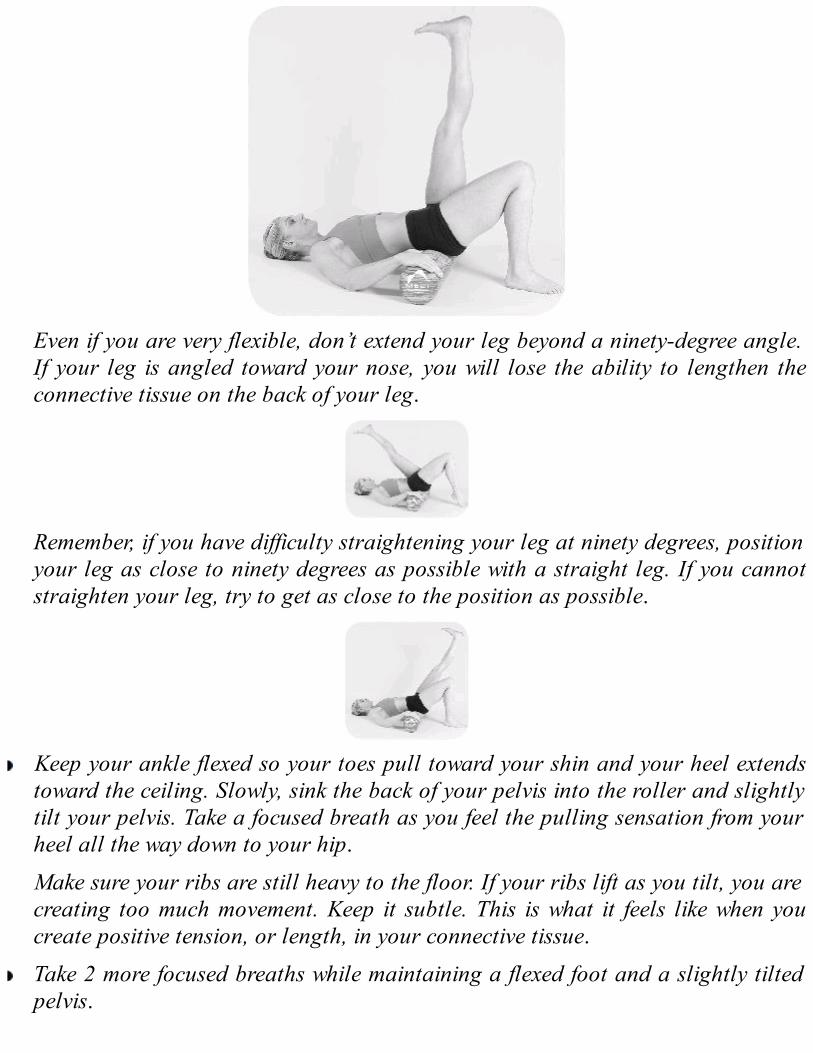
Even if you are very flexible, don’t extend your leg beyond a ninety-degree angle.If your leg is angled toward your nose, you will lose the ability to lengthen theconnective tissue on the back of your leg.
Remember, if you have difficulty straightening your leg at ninety degrees, positionyour leg as close to ninety degrees as possible with a straight leg. If you cannotstraighten your leg, try to get as close to the position as possible.
Keep your ankle flexed so your toes pull toward your shin and your heel extendstoward the ceiling. Slowly, sink the back of your pelvis into the roller and slightlytilt your pelvis. Take a focused breath as you feel the pulling sensation from yourheel all the way down to your hip.
Make sure your ribs are still heavy to the floor. If your ribs lift as you tilt, you arecreating too much movement. Keep it subtle. This is what it feels like when youcreate positive tension, or length, in your connective tissue.
Take 2 more focused breaths while maintaining a flexed foot and a slightly tiltedpelvis.

Repeat on the other side.
Rest Reassess Lie on the floor with your arms and legs straight and relaxed, palms face up.
Use your Body Sense to notice your pelvis. Are your butt cheeks more weighted tothe floor, and do they feel more even from left to right? If during your first RestAssess your tailbone was the most noticeable part of your pelvis on the floor,notice if you now sense your butt cheeks more.
Notice your legs. Are the backs of your thighs more settled on the floor? Are yourlegs weighted more evenly from left to right? Do the right and left sides feel moreeven? Are they more equally turned out?
Finally, take a full breath and notice what areas of your torso move when yourlungs fill with air. Do you sense greater movement? Is it easier to take a deepbreath?
If you sense any of these changes, your body has returned to a more idealposition.
These changes indicate that your body has enough hydration to respond to theself-treatment. You’ve pulled a lot of fluids into your tissues, so make sure youdrink a glass of water within the next twenty minutes.
Why Rehydrating Your Lower Body Is Important
Although walking seems as easy as putting one foot in front of the other, it’s actuallyvery complex. In fact, 80 percent of walking involves balancing on one leg at a timewithout your conscious awareness. Although your leg muscles move you forward, thefluid communication and stabilizing mechanisms in the connective tissue system arewhat allow you to stay upright without damaging the many intricate moving parts ofyour body.
When you have good fluid movement in your connective tissue system, movementof your legs is cohesive and effortless. Communication and vibration can travelclearly and quickly, which is essential to your body’s ability to appropriately distributeyour weight while making adjustments for changes underfoot, like an uneven surface.Your legs are flexible and stable, and your joints have ease of mobility.
When you have stuck stress in your legs, it interrupts whole body communication.This leads to joint compression, uncoordinated movement, stiffness, poor balance,

muscle tension, inflammation, cartilage breakdown, and pain. Furthermore, stuckstress in your lower body causes imbalance and instability in your Neurocore, as thelegs house the channel for communication from the ground to your pelvis, ribs, andhead.
The legs are a long region of the body, with the joints—ankles, knees, and hips—ata great distance from each other. Because of this, good tensional energy in theconnective tissue of the legs is all the more vital for stabilization. Without appropriatestability, compensation and joint damage occur. Dehydration in your legs alters theposition of your pelvis, ribs, and head and the tensional integrity of your whole body.Over time, spinal instability follows, which leads to low back and neck pain.
What causes stuck stress in your legs? The better question is, What doesn’t? Exceptwhen you’re lying in bed, your legs are supporting the majority of your upper bodyweight—whether you are moving, standing, or sitting—and this causes dehydration.Basically, living dehydrates your legs, but the greatest offender is sitting. When you sitfor long periods of time, you compress your whole backside with your body weight.All the water in your connective tissue “sponge” gets pressed out, and if theconnective tissue is not rehydrated, excessive tensional pull becomes a permanentstate.
Sitting is the norm in our technology-driven society, and it’s having a greaternegative impact than you may realize. Studies are finding that sitting for many hours aday causes life-shortening health issues. Sitting hinders cholesterol maintenance.Slowly the enzyme production and utilization that help break down fat drops nearly 90percent. Meanwhile, good cholesterol drops 20 percent, and insulin synthesis dropsnearly 25 percent. Over time your risk of diabetes, heart disease, and obesity increases—even if you live an otherwise healthy lifestyle.
When you sit all day, communication with the NeuroCore significantly decreasesand the regulators become chronically imbalanced. The cells within your connectivetissue that aid in repair, restoration, and immunity become inflamed and unavailablefor healing. Unfortunately, the antidote isn’t exercise. Studies show that exercising foran hour a day doesn’t counteract the detrimental effects of the eight or more hours ofsitting that most Americans do every day.
Cellulite and MoreThe proof of the physical damage that sitting does to your connective tissue is thelumpy, bumpy, cottage-cheese-like appearance of the skin where you sit. I’m talkingabout cellulite on people’s thighs, of course.
When the backs of your legs are chronically compressed, the tissue becomesdehydrated, and the collagen network in the tissue is damaged. The spongy superficial

layers become so dehydrated that fat cells get trapped between the collagen fibers.This further damages the connective tissue and creates a breakdown in the spongylayers, causing the fatty tissue to poke through, leading to the cottage-cheese effect.
Yes, the lumpy appearance of cellulite is caused by dehydrated connective tissue,which is why weight loss alone doesn’t solve the issue. Even when you lose weightand reduce body fat, the damaged tissue remains. Rehydrating the backs of your legswith MELT helps! MELT isn’t advertised as a cellulite-reduction technique, but maybeit should be. Consider cellulite reduction a wonderful side effect.
Beyond the reduction of cellulite, rehydration of the lower body can quickly yieldimprovements in flexibility, overall stability, body ease, breathing, and Body Sense.Over time, the agility, balance, and coordination that usually declines as you age canbe improved and maintained by rehydrating your legs. If you are an athlete,rehydration of your connective tissue can be your competitive edge, as it improvesperformance, decreases the risk of injury, and prolongs your career.
Restoring cohesive fluid movement, or tensional energy, to the legs can help yourestore low back mobility and spinal stability. Furthermore, rehydrating the legsdramatically improves the tensional energy of the entire connective tissue system,resulting in better alignment, movement, and function of your whole body.
Upper Body Rehydrate Sequence
Rest Assess Rib Length ReassessRib Length Assess Gentle RockingUpper Back Glide and Shear Shoulder Blade ReachShoulder Blade Glide and Shear Double Arm ReachUpper Back Rinse Rest Reassess
Rest Assess Lie on the floor with your arms and legs straight and relaxed, palms face up.
Use your Body Sense to notice where your head is touching the floor. Then sensethe lift of your neck. Does it feel curved or straight? Do you sense any tightness inyour neck?
Notice your upper body. Ideally your upper back is relaxed and resting on your

ribs, or mid back, and not your shoulder blades. Is one shoulder blade moreweighted to the floor than the other? Do you feel the edge of either shoulderblade? Are your bottom ribs on or off the floor? Notice your arms. Is the weight ofyour forearms and upper arms balanced from left to right?
Notice the curve of your low back. Does it feel like there’s a big curve up towardyour shoulder blades, or perhaps there is no curve at all.
Finally, take a full breath and notice what areas of your torso expand when yourlungs fill with air. Does your belly move? Ribs? Both? Just sense what moves andwhat doesn’t.
Take note of what you feel so you can compare after you Rehydrate your upperbody.
Rib Length Assess Rest your shoulder blades on the roller. Place your hands behind your head for
support and bend your knees.
To check your position, bring your arms in front of you and “punch” toward theceiling. If you are in the right place on the roller, you should feel your shoulderblades tap the top of the roller as you move your arms. Adjust if necessary.

Press your feet into the floor, lift your hips, tuck your pelvis, and return your hipsto the floor. As you create the following movement, your core, low back, and neckremain still and stable. Keep the lowest part of your rib cage stable and your coreengaged.
Breathe in and then on the exhale, allow only your ribs to extend over the rollerand open your breastbone toward the ceiling.
Take a focused breath into your ribs and notice the length you are able to createalong the front of your ribs.
Breathe in, and then on the exhale, curl your ribs back to the starting position.Your spine will press into the roller.
Repeat the movement 2–3 times. Are you able to move your ribs without movingyour low back or neck?When you perform this correctly, the low back and neck curves will remain in the

same position as you move your ribs. If you are extending your neck, hangingyour head back, or letting your bottom ribs pop up, slow down and make yourmovement smaller.
From the extended position, breathe in, and then on the exhale, slowly side bendyour ribs to the left to assess the feeling on the right side of the ribs. Inhale andnotice if your ability to take a full breath is inhibited.
Repeat on the other side. Notice if one or both sides feel tight or if you move moreto one side.
Repeat one more time on each side.
Upper Back Glide and Shear Rest your upper back on the roller. Place your hands behind your head for
support. Point your elbows at the ceiling. Engage your core and lift your hipstoward the ceiling to bring the roller to the top of your upper back.

Keep your back slightly curved to maintain the correct position. Focus on keepingyour body weight heavy on the top of the roller. Gently Glide the roller up anddown your spine over just one or two vertebrae (1–2 inches) at a time. The smallerthe Gliding movement, the greater the result.
Keeping your elbows pointed toward the ceiling, slowly side bend your upper bodyleft and right in small movements to Shear one small region of your spine, as ifyou are scratching your back against the roller.
Return to the center, pause, and take one focused breath, letting your spine sinkfurther into the roller.
Push into your feet to move the roller down your back 1–2 inches, curling yourribs forward so your spine stays directly on the top of the roller. Walk your feettoward your body to maintain good support.

Gently Glide up and down again and then Shear by side bending left to right. Move the roller down 1–2 inches more, making sure to stay above your lowest
ribs, and Glide and Shear. Keep your core engaged to support your spine andcurl your ribs slightly forward to keep your spine on the top of the roller.
Shoulder Blade Glide and Shear Rest your upper back on the roller with your hands behind your head. Keep your
core engaged so your hips do not rest on the floor. Turn your upper body towardyour right side so the roller is on the inner edge of your right shoulder blade, noton your spine.
Glide up and down on the edge of your shoulder blade. If you find a tender spot,make your movement smaller and smaller on the area of stuck stress.
To Shear, create small side bends on the area. Or set your hips on the floor,release your right arm from behind your head and slowly create small circles withyour arm.
Repeat this sequence on the other shoulder blade.

Upper Back Rinse Lift your hips to bring the roller back to the top of your upper back and take a
deep breath.
On the exhale, engage your core and slowly Rinse by pressing the roller downyour upper back with consistent, light pressure.
Curl your ribs forward as you move down your back, keeping your pressuredirectly on the top of the roller.
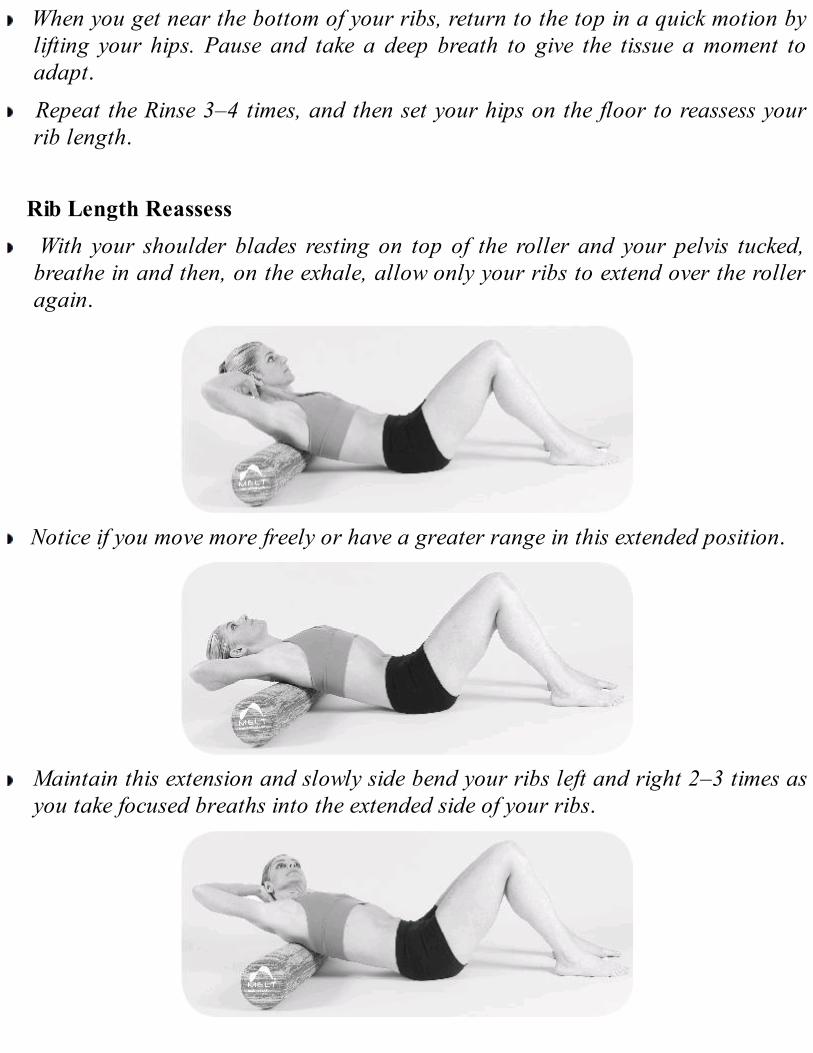
When you get near the bottom of your ribs, return to the top in a quick motion bylifting your hips. Pause and take a deep breath to give the tissue a moment toadapt.
Repeat the Rinse 3–4 times, and then set your hips on the floor to reassess yourrib length.
Rib Length Reassess With your shoulder blades resting on top of the roller and your pelvis tucked,
breathe in and then, on the exhale, allow only your ribs to extend over the rolleragain.
Notice if you move more freely or have a greater range in this extended position.
Maintain this extension and slowly side bend your ribs left and right 2–3 times asyou take focused breaths into the extended side of your ribs.

Notice if you have a greater range and can breathe more fully when you side bendnow than you did before MELTing.
Gentle Rocking Sit on one end of the roller with your feet flat on the floor, about hip-width apart,
your knees bent.
Place your hands on the floor for support and then slowly roll yourself downalong the length of the roller.
Touch the top of your head to make sure it is fully supported on the roller. If it’snot, scoot your pelvis down toward your knees and make room for your head.Make sure your feet are firmly on the floor, hip-width apart.

Place your arms on the floor.
Gently let your body rock from side to side, just off the spine to the left, just off thespine to the right. Continue to gently rock from left to right for about 30 seconds,alternating sides. You want to get a sense of falling and catching yourself. Thisallows your Autopilot and NeuroCore to go into action to support, protect, andstabilize you.
Notice what you feel: do you feel tremendously unsteady? Do you shift your bodyweight more easily to one side than to the other?
Shoulder Blade Reach Reach your hands toward the ceiling, palms facing in, as if you’re holding a box
the width of your shoulders. Breathe in, keep your arms straight and energized,and reach your fingertips toward the ceiling.

On the exhale, allow the weight of your arms to sink your shoulder blades aroundthe roller without bending your elbows.
Reach your arms up again without shrugging your shoulders. Create themovement using minimal muscle force.
Repeat this 5–10 times. Ideally the shoulder blades glide against the rib cagewithout making any sound or creating discomfort. Notice if there is any crunchingor cracking during shoulder motion or if one of your shoulder blades touches theroller more than the other one when you release them around the roller. Notice ifyou tend to shrug your shoulders or move your ribs as you create the movement.
Double Arm Reach Breathe in, and then on the exhale, slowly open your arms out to the sides of your
body, like you’re holding a giant beach ball so it does not touch your chest. Makesure your arms are out like a T rather than like a Y. Your shoulders must stay in aneutral position for maximum benefit, so notice if you are shrugging.
Your arms should be slightly above the level of your chest rather than touchingthe floor.
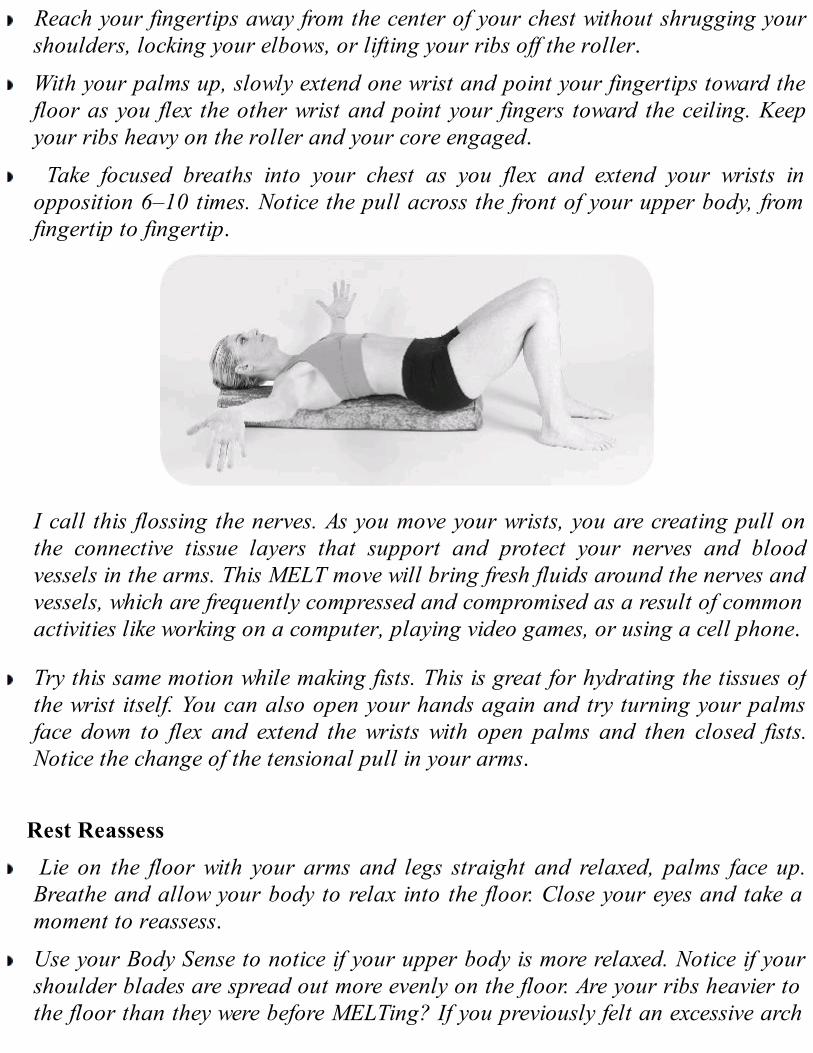
Reach your fingertips away from the center of your chest without shrugging yourshoulders, locking your elbows, or lifting your ribs off the roller.
With your palms up, slowly extend one wrist and point your fingertips toward thefloor as you flex the other wrist and point your fingers toward the ceiling. Keepyour ribs heavy on the roller and your core engaged.
Take focused breaths into your chest as you flex and extend your wrists inopposition 6–10 times. Notice the pull across the front of your upper body, fromfingertip to fingertip.
I call this flossing the nerves. As you move your wrists, you are creating pull onthe connective tissue layers that support and protect your nerves and bloodvessels in the arms. This MELT move will bring fresh fluids around the nerves andvessels, which are frequently compressed and compromised as a result of commonactivities like working on a computer, playing video games, or using a cell phone.
Try this same motion while making fists. This is great for hydrating the tissues ofthe wrist itself. You can also open your hands again and try turning your palmsface down to flex and extend the wrists with open palms and then closed fists.Notice the change of the tensional pull in your arms.
Rest Reassess Lie on the floor with your arms and legs straight and relaxed, palms face up.
Breathe and allow your body to relax into the floor. Close your eyes and take amoment to reassess.
Use your Body Sense to notice if your upper body is more relaxed. Notice if yourshoulder blades are spread out more evenly on the floor. Are your ribs heavier tothe floor than they were before MELTing? If you previously felt an excessive arch

in your mid back, notice if your rib cage feels more weighted.
Finally, take a full breath and notice what areas of your torso expand when yourlungs fill with air. Do you sense greater movement? Is it easier to take a deepbreath?
If you sense any of these changes, your body has returned to a more idealposition.
Why Rehydrating Your Upper Body Is Important
Ease of movement in your upper body, specifically your ribs and shoulders, isimportant whether you need to turn your head to look out your car window, reachyour arm up to a high shelf, bend over to pick up something, or take a walk. Withoutease of movement of your shoulder blades and the space in between each and everyrib, the areas above and below—your neck and low back—become compressed. Infact, stuck stress in the ribs is often the source of pain in these two spaces.
When you have pain in your neck or low back, you might stretch or massage thearea to try to relieve the tension and discomfort. However, as long as stuck stress andfixation remains in your upper and mid back, the compression in your neck and lowback cannot be fully resolved, no matter what you do.
What causes the loss of movement in your upper back? In addition to repetitivemovements and postures, circumstances such as asthma, heart conditions, pregnancy,large breasts, and chronic emotional states can cause stuck stress and fixation.
Restoring the fluid state around and within the ribs and shoulder girdle can helprelieve stuck stress in the neck, upper back, and low back. Indeed, rehydrating thisregion dramatically improves the tensional energy of your entire body, which resultsin better alignment, movement, and function. In addition to pain relief, improvementin lung volume, organ function, upper back strength, and low back and neck mobilitycan be achieved through self-treatment with MELT.
Your MELT Rehydrate Plan
Continue to do the Upper or Lower Body Rehydrate Sequences one to three times aweek in the evening to get your tensional energy back into a cohesive flow and toerase stuck stress. As you become proficient at Rehydrating, you will be able to dothese sequences more quickly and easily. But be sure not to rush. Remember, to createa rehydration effect, connective tissue needs gentle compression and slow

movements.And, of course, make sure to drink water before and after you MELT. These MELT
moves draw fresh fluid into the tissues that surround your muscles and joints—butthis can’t happen unless you drink enough water!
Continue to do your Rebalance Sequence and the Hand and/or Foot Treatment threetimes a week or more, either with the Upper or Lower Body Rehydrate Sequence orseparately. You are on your way toward MELTing ten minutes, three times a week.
With MELT, you are in charge of your self-treatment. How will you know when tomove on to the full MELT maps? Your self-assessments. When you reassess, do yousense any of the described body changes? You may notice immediate changes the firsttime you do the sequence, or it could take a few weeks. Once you notice thesechanges in your body, pay attention to how you feel the next day. Do you sensegreater body ease or flexibility? Do you notice a reduction in stiffness, discomfort, orpain? These lasting changes indicate that your Autopilot is responding to your self-treatment and becoming more efficient.
Once you can sense lasting change from the Rehydration sequences, you are readyto move on to the next step, Releasing your neck and low back.
Oh, and did I mention to keep drinking water?


Release the Neck and Low Back
You are becoming a Hands-Off Bodyworker and creating powerful changes in yourbody. Your joints are less stiff upon waking. You have less discomfort or pain. Youhave greater body ease and flexibility. Your sleep is more restful and restorative. Youmay have noticed an improvement in your overall energy and mood.
These changes mean that your body is responding to your self-treatment withMELT. These changes will last and will likely increase as you continue to take care ofyourself in this new way. If you have yet to experience any of these changes, keepMELTing and drinking water. The changes will come. Everyone’s body is different.Give your body time, and it will respond to your self-treatment.
At this point, your stuck stress is reduced, your Body Sense is heightened, and yourtensional energy is more cohesive. Perhaps most important, your Autopilot isoperating more efficiently—it can more easily find your center of gravity and yourjoints. Your reflexive grounding and core stabilizing mechanisms are in bettercommunication. Your body’s natural healing capabilities are heightened.
You created these changes on your own by Reconnecting, Rebalancing, andRehydrating. This shows that your body is adaptable—a key element in achieving andsustaining a more youthful, healthy body. It’s exciting. You are improving yourcurrent state of health and reducing the negative effects we associate with aging. Andit’s only the beginning.
Now you are ready to address the final systemic effect of the accumulation of stuckstress—the loss of joint space in your neck and/or low back. If you have neck or lowback pain and stiffness, you may be wondering why you haven’t addressed theseareas yet. The reality is, you have. The Hand and Foot Treatment and the Rebalanceand Rehydrate sequences have been restoring the fluid state of the connective tissue inyour neck and low back and improving the internal communication needed toeffectively self-treat these areas. This is what your neck and low back have beenmissing.
Try the following Release sequences in the evening, up to an hour before bedtime.Try the Neck Release Sequence one evening and the Low Back Release Sequence onanother. Do these sequences one or two times per week. When possible, do thecorresponding Rehydration sequences from the last chapter before doing the ReleaseSequence. For example, do the Upper Body Rehydrate and the Neck ReleaseSequence one evening and the Lower Body Rehydrate and the Low Back ReleaseSequence on another. Continue to do your Rebalance Sequence and Hand and/or FootTreatment one to three times a week.

Remember to drink water before and after you MELT, and don’t lie on the roller orkeep the roller under any body part for more than ten minutes.
You’ll know you’re ready to move on to trying the MELT maps—a series ofsequences—in the next chapter when you can do the Hand and/or Foot Treatment andRebalance, Upper Body Rehydrate, Lower Body Rehydrate, Neck Release, and LowBack Release Sequence without relying on the instructions. This might take you a fewweeks or a few months. There’s nothing to be gained by rushing, so take your time.The systems you are self-treating respond best to focused, gentle, slow movement.Track your progress and amaze yourself with the changes you can make in justminutes a day.
Neck Release Sequence
Neck Turn Assess Neck DecompressBase of Skull Shear Neck Turn Reassess
Neck Turn Assess Lie on your back with your legs extended—you can bend your knees if lying with
your legs straight causes unnecessary tension in your back. Be comfortable as youassess.
Use your Body Sense to notice the curve of your neck. Without touching your neckspace, can you sense what the curve feels like? Ideally the curve is light and liftedoff the floor. Where do you feel the peak of the curve? Ideally the highest point ofthe neck curve is closer to your head than to your shoulders.
Slowly turn your head as far as you can to the right and then to the left. Do youfeel like you’re able to turn your head more in either direction? Do you feel anypain or discomfort as you turn your head? Does it feel like your shoulders movewhen you turn your head?
Take note of what you feel so you can compare after you Release your neck.
Base of Skull Shear

Place the roller under your hairline. Tilt your nose toward the ceiling to positionthe roller directly under the base of your skull. Without lifting your shoulders,take a focused breath and let the base of your skull be heavy on top of the roller.
If you feel you can’t maintain this position without stressing your shoulders, placea folded yoga mat or bath towel under your upper back so that you’re more levelwith the height of the roller.
Maintain a consistent, gentle pressure on the base of your skull and slowly turnyour head to the right, stopping when you feel the side of your earlobe touch theroller.
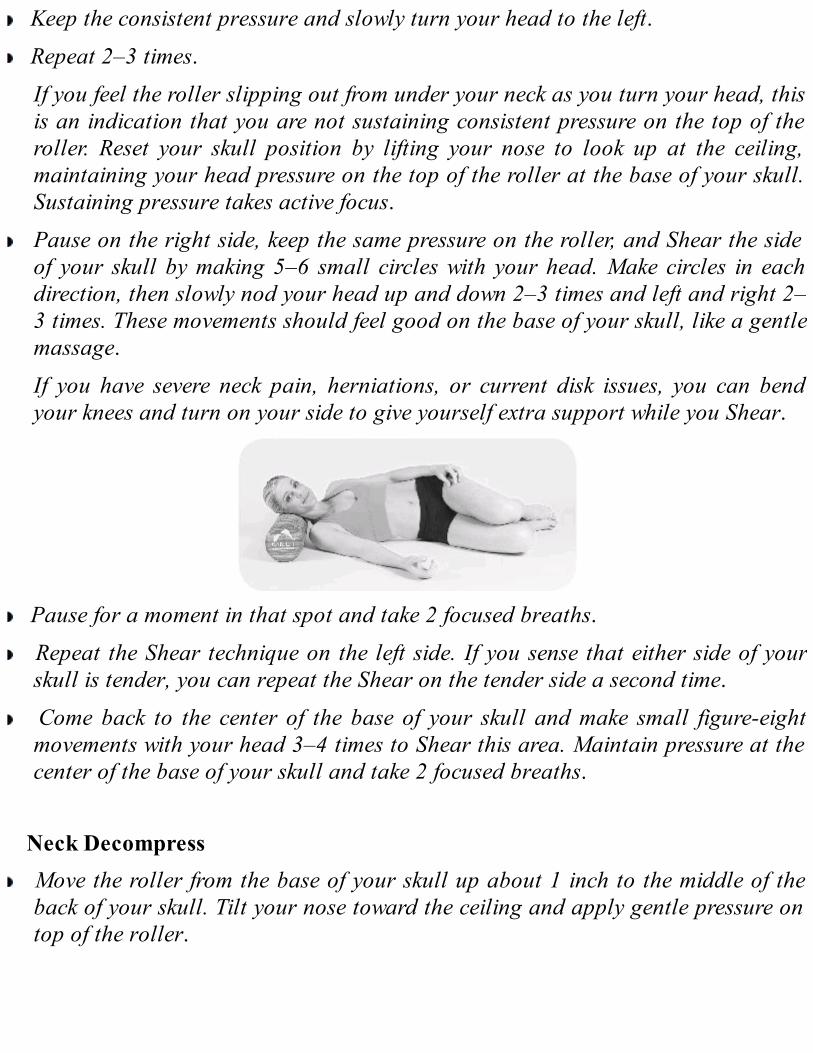
Keep the consistent pressure and slowly turn your head to the left. Repeat 2–3 times.
If you feel the roller slipping out from under your neck as you turn your head, thisis an indication that you are not sustaining consistent pressure on the top of theroller. Reset your skull position by lifting your nose to look up at the ceiling,maintaining your head pressure on the top of the roller at the base of your skull.Sustaining pressure takes active focus.
Pause on the right side, keep the same pressure on the roller, and Shear the sideof your skull by making 5–6 small circles with your head. Make circles in eachdirection, then slowly nod your head up and down 2–3 times and left and right 2–3 times. These movements should feel good on the base of your skull, like a gentlemassage.
If you have severe neck pain, herniations, or current disk issues, you can bendyour knees and turn on your side to give yourself extra support while you Shear.
Pause for a moment in that spot and take 2 focused breaths.
Repeat the Shear technique on the left side. If you sense that either side of yourskull is tender, you can repeat the Shear on the tender side a second time.
Come back to the center of the base of your skull and make small figure-eightmovements with your head 3–4 times to Shear this area. Maintain pressure at thecenter of the base of your skull and take 2 focused breaths.
Neck Decompress Move the roller from the base of your skull up about 1 inch to the middle of the
back of your skull. Tilt your nose toward the ceiling and apply gentle pressure ontop of the roller.

You should not feel the roller touching your neck at all when you do thedecompression technique, and it shouldn’t feel like the roller might slip out fromunderneath your head.
Keep consistent pressure from your head on the roller and, on an exhale, slowlynod your chin toward your chest 1–2 inches.
Inhale and, on the exhale, return your nose to pointing toward the ceiling.
You are not trying to touch your chin to your chest. The movement you create inthe neck should be small and slow. Your shoulders and upper back stay still andrelaxed. The key is keeping consistent pressure as you nod your head.
Repeat 8–10 times and then remove the roller from the back of your head andgently bring your head to the floor.

Neck Turn Reassess Sense the curve of your neck. Does it feel lighter? Do you notice a more distinct
curve just below the base of the skull? Turn your head slowly from left to right. Do you have more range of motion? Is
there less pain or stiffness as you turn your head? If you sense any of these changes, you have decompressed your neck.
Low Back Release Sequence
Rest Assess Low Back DecompressSI Joint Shear Rest ReassessPelvic Tuck and Tilt Challenge
Rest Assess Lie on the floor with your arms and legs straight and relaxed, palms face up.
Use your Body Sense to notice the curve of your low back. Where do you feel thepeak of the curve? Does it feel like it’s above or below your belly button? Areyour bottom ribs on or off the floor? Does it feel like there’s a big curve uptoward your shoulder blades, or perhaps there is no curve at all. Take note ofwhat you feel so you can compare after you Release your low back.
SI Joint Shear Engage your core, lift your hips, and place your pelvis on top of the roller.
Draw both knees toward your chest to check if the roller is in the right place.When you bring both knees into your chest, the roller should not slip out, norshould you feel like the roller is under your low back.
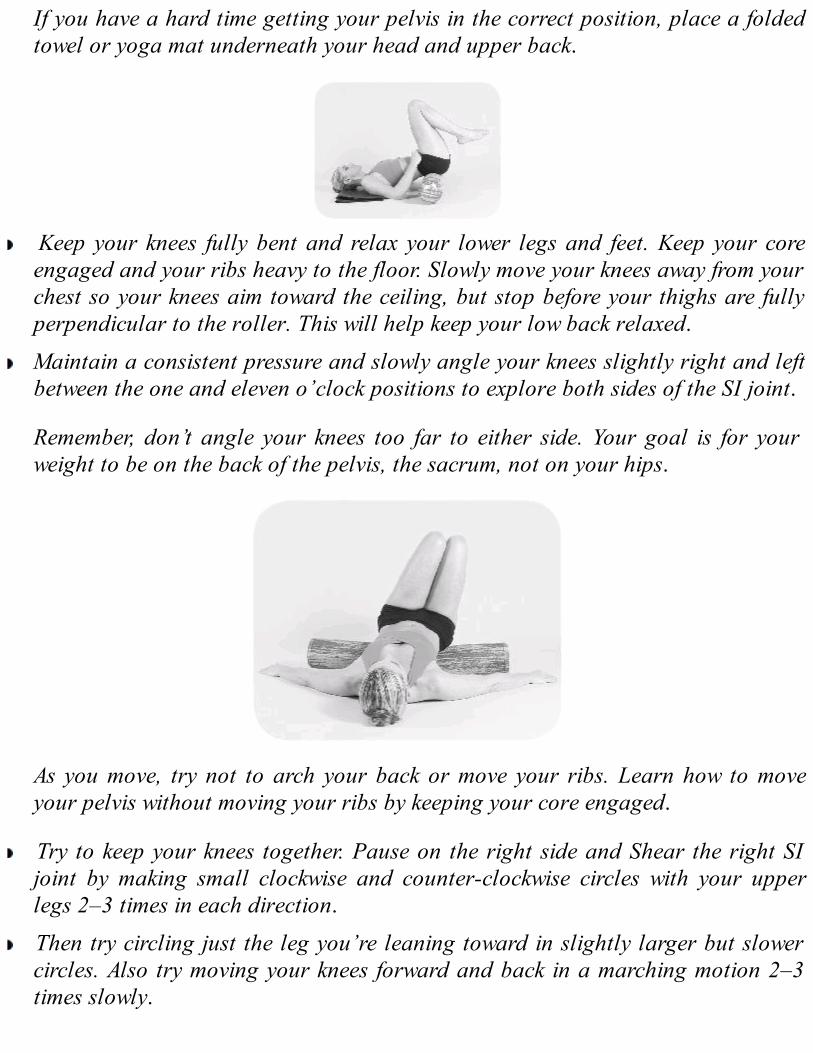
If you have a hard time getting your pelvis in the correct position, place a foldedtowel or yoga mat underneath your head and upper back.
Keep your knees fully bent and relax your lower legs and feet. Keep your coreengaged and your ribs heavy to the floor. Slowly move your knees away from yourchest so your knees aim toward the ceiling, but stop before your thighs are fullyperpendicular to the roller. This will help keep your low back relaxed.
Maintain a consistent pressure and slowly angle your knees slightly right and leftbetween the one and eleven o’clock positions to explore both sides of the SI joint.
Remember, don’t angle your knees too far to either side. Your goal is for yourweight to be on the back of the pelvis, the sacrum, not on your hips.
As you move, try not to arch your back or move your ribs. Learn how to moveyour pelvis without moving your ribs by keeping your core engaged.
Try to keep your knees together. Pause on the right side and Shear the right SIjoint by making small clockwise and counter-clockwise circles with your upperlegs 2–3 times in each direction.
Then try circling just the leg you’re leaning toward in slightly larger but slowercircles. Also try moving your knees forward and back in a marching motion 2–3times slowly.

Once you’ve Sheared, pause for a moment, maintain pressure in the same placeon the roller, and take 2 focused breaths. Repeat on the left side.
If you sensed a tender side, you can always repeat the moves on that side.
Pelvic Tuck and Tilt Challenge With your pelvis on the roller, place your fingertips over your knees so your palms
are touching the front of your thighs. Gently push your knees away from yourchest until your arms are straight. Throughout this technique, your arms staystraight. Your thighs are not quite perpendicular to the top of the roller. Makesure your legs are relaxed and your ribs are heavy to the floor. Keep yourshoulders relaxed.
Breathe in and, on the exhale, gently press your thighs into your hands as if youwere trying to bring your knees to your chest but your arms resist the pressure.Feel the subtle engagement deep within your abdomen.
Don’t let your elbows bend. Create constant tensional resistance by maintainingstrong, straight arms. You must sustain this gentle pressure throughout thetechnique.
Keep your ribs heavily weighted to the floor by keeping your core engaged.
Take a breath in and, on the exhale, try to tuck your pelvis so its weight becomesheavy on the side of the roller toward your low back. This movement will bringyour pubic bone toward the belly button. Keep the pressure of your knees againstyour hands. As you tuck, your knees should rise slightly toward the ceiling.

Inhale while sustaining the pressure of your thighs toward your hands, and thenon the exhale, slowly tilt your pelvis so the back of your pelvis (sacrum) is nowweighted on the top of the roller. Your ribs must remain stable, but your low backwill lift slightly, very close to your pelvis, as you tilt. It is important that yourthigh pressure remain consistent on your hands through both the tuck and thetilt!
Keeping the pressure constant, repeat the tuck and tilt 4–5 times, moving slowly.The size of the movement tends to be very subtle if you perform it correctly.
Low Back Decompress Maintain the tilted position of your pelvis, with your sacrum heavy on the top of
the roller. Breathe in and, on the exhale, sink the back of your ribs toward thefloor without losing the pressure against your hands or losing the tilt of your

pelvis on the top of the roller.
Notice how much abdominal engagement is created by maintaining all threepoints of pressure—thighs to hands, mid back toward the floor, and the back ofthe pelvis pressing down on top of the roller.
There is no visual movement throughout this part of the technique.
In order to create the decompression, your ribs should not lift off the ground.Instead, weight the back of your ribs toward the floor while maintaining the othertwo points of pressure.
On an exhale, make a loud shhh sound to initiate the reflexive action in yourabdomen. Inhale and subtly relax the pressure of your knees against your hands.When you exhale, re-engage the three points of pressure—knees to hands, ribs tofloor, sacrum to roller—without the shhh sound. Repeat 1–2 times.
If you feel fatigue in the front of your thighs or hips, you are working too hard.Tilt your knees slightly more toward your head and try the sequence again.
Come off the roller and lie down on the floor on your back with your legsextended.
Rest Reassess Once again, take a moment to assess. Are your ribs heavier to the floor? Do you
notice a more distinct curve just above the pelvis? If you sense any of these changes, you have successfully decompressed your low
back.


MELT Maps
Congratulations! You are now a Hands-Off Bodyworker. You have learned thelanguage of MELT and mastered the Four R’s. You have taken control of your healthand longevity in ways you may not have thought possible. Other healthy habits, suchas good nutrition, regular exercise, consistent water intake, and adequate sleep nowyield a greater benefit.
Here are some other changes you may have noticed since you started MELTing:
• Your body is more comfortable during your day-to-day activities.
• Movement is more effortless, and you feel more stable and flexible.
• You feel more grounded and clearheaded.
• You can breathe with greater ease.
• You fall asleep more easily and sleep more soundly.
• You wake up more rested and have more vibrant energy throughout yourday.
• You have fewer aches and pains, and a greater sense of overall well-being.
• You digest nutrients and eliminate waste easily.
• Your skin looks brighter and more supple.
• Your athletic endurance, performance, and recovery time has improved.
These are some of the most noticeable benefits of addressing your accumulatedstuck stress and body-wide cellular dehydration. As you continue to MELT, you willexperience more of these benefits and find that the improvements last longer. Yourbody will surprise you with its ability to renew itself.
These are very powerful, positive changes you are making. On a deeper level, a lotis going on to make this happen. By rehydrating your connective tissue and releasingstuck stress:
• You have transformed dehydrated tissue into healthy, hydrated tissue.
• You have restored the fluid state of the collagen matrix, which improves thetissue’s extensibility, or elastic supportiveness.
• Your connective tissue system is better able to efficiently manage dailytension and compression.

• Your muscles can relax, as they’re no longer responsible for “holding” yourposture.
• The environment of every system and cell in your body is better supported.
• Your reflexive stability systems are more responsive and in better balance.
• You’ve reduced accumulated stress on your nervous system.
• Your internal communication travels more quickly and clearly.
• You’ve decreased damaging inflammation.
• Your joints are more buoyant, resilient, and stable, and your whole body isin better alignment.
Welcome to the EZ Zone!
When you rehydrate your connective tissue and rebalance the stress and restoreregulators, your Autopilot begins to operate more efficiently. This means your wholebody starts to function at a more optimal level. You can do more while expending lessenergy. With energy to spare, your body can do more of the things you love again.
This more ideal state is what I call the Efficiency Zone, or the EZ Zone. The EZZone is the optimal range in which the Autopilot can effectively regulate and stabilizeall the other systems of the body, using minimal energy. When your Autopilot isoperating in the EZ Zone, the countless micro-adjustments it makes throughout yourday return your body to balance—no matter how stressful or demanding your daywas.
The EZ Zone is the environment necessary for daily repair and healing, whichmeans your body has less stuck stress and pain to manage. The repetitive stress andstrain of day-to-day living no longer accumulates, even on the days when you don’tMELT. This is how your body functioned when you were younger. MELT turns backthe clock for your body.
By addressing the four effects of stuck stress, you have helped your Autopilotreturn to the EZ Zone. When you MELT, you also give your restore regulator theopportunity to be dominant while you are awake. This boosts your body’s ability toheal itself and eliminate chronic pain and other symptoms.
MELT is also your tool to stay in the EZ Zone! In just ten minutes three times aweek, you can support your body’s ongoing maintenance and catch underlying issuesbefore pain and other symptoms arise. By getting back in the EZ Zone and stayingthere, you have opened the door to optimal health, energy, vitality, and longevity—

without pain.
Your Self-Treatment Plan
Now you are ready to take what you’ve learned and start to mix and match sequences.Now that you are familiar with the moves, the instructions for the sequences on thefollowing pages have been shortened for quick reference. The pictures will remindyou where your body should be in relationship to the roller or ball. For the fullinstructions, you can always refer to Chapters 10–12.
Mixing and matching sequences creates a MELT map. A map combines a series ofsequences to create a complete self-treatment that includes all Four R’s: Reconnect,Rebalance, Rehydrate, and Release. This means that every time you MELT, you’readdressing all four effects of stuck stress.
This chapter contains nine 10-minute maps and seven 15- to 20-minute maps. In thebeginning, it may take you longer than that amount of time to complete these maps.As you become more familiar with the sequences, you’ll be able to do these mapsmore quickly and easily. Be sure not to rush.
Remember, ten minutes is the maximum amount of time you should compress anyone area of your body on the roller. You can always come off the roller, reassess, andgo back to what you were doing.
To maintain the changes you’ve created, MELT three times a week for ten minutes.That’s the minimum. This method is so gentle, you can MELT every day if you like.
To get the best results and continue to make changes in your body, it’s important toincorporate variety into your weekly MELT routine. To do this, pick two or threedifferent maps to do every week, and don’t repeat the same map twice in a row.
Try all of these maps. You will find that some maps yield a greater result for youthan others—you’ll notice the difference both when you reassess and the next day. It’sgreat to identify what your favorite maps are and to do them more frequently. Goahead and pick a few and rotate them to get the best results and avoid falling into aself-treatment rut.
Until this point, I have asked you to MELT in the evening, if possible, to supportyour Autopilot. Now I want you to feel free to MELT at different times of the day tofind out what works best for you. Try MELTing upon rising, after work, beforeand/or after exercise, as long as it’s at least an hour before bedtime. See what worksbest for your body and your schedule.
Continue to drink a glass of water before and after every MELT map. And, just incase, keep a glass of water close by during your treatment.
To find more maps, videos, and an instructor or class near you, go to

www.meltmethod.com.
Maps
The MELT maps are outlined on the next two pages. Following the maps you will finda chart that will help you locate the instructions for the sequences within each map.

Sequence Guide
At-a-Glance Instructions Long InstructionsRebalance and Upper Body LengthSequence Rebalance Sequence Upper Body Rehydrate Sequence
Upper Body Compression Sequence Upper Body Rehydrate SequenceLower Body Compression Sequence Lower Body Rehydrate SequenceNeck Release Sequence Neck Release Sequence
Lower Body Length and Low Back Low Back Release Sequence and Lower Body RehydrateSequence
Soft Ball Foot Treatment Soft Ball Foot TreatmentSoft Ball Hand Treatment Soft Ball Hand TreatmentMini Soft Ball Foot Treatment Mini Soft Ball Foot TreatmentMini Soft Ball Hand Treatment Mini Soft Ball Hand Treatment
Sequence Instructions
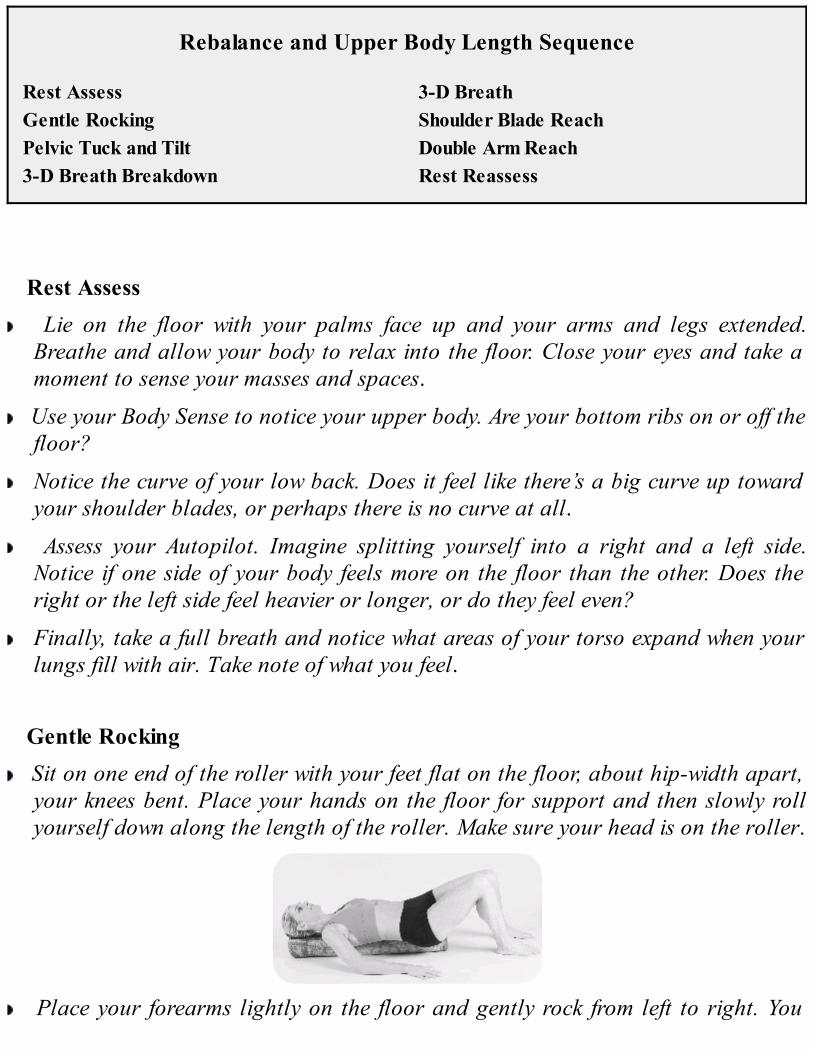
Rebalance and Upper Body Length Sequence
Rest Assess 3-D BreathGentle Rocking Shoulder Blade ReachPelvic Tuck and Tilt Double Arm Reach3-D Breath Breakdown Rest Reassess
Rest Assess Lie on the floor with your palms face up and your arms and legs extended.
Breathe and allow your body to relax into the floor. Close your eyes and take amoment to sense your masses and spaces.
Use your Body Sense to notice your upper body. Are your bottom ribs on or off thefloor?
Notice the curve of your low back. Does it feel like there’s a big curve up towardyour shoulder blades, or perhaps there is no curve at all.
Assess your Autopilot. Imagine splitting yourself into a right and a left side.Notice if one side of your body feels more on the floor than the other. Does theright or the left side feel heavier or longer, or do they feel even?
Finally, take a full breath and notice what areas of your torso expand when yourlungs fill with air. Take note of what you feel.
Gentle Rocking Sit on one end of the roller with your feet flat on the floor, about hip-width apart,
your knees bent. Place your hands on the floor for support and then slowly rollyourself down along the length of the roller. Make sure your head is on the roller.
Place your forearms lightly on the floor and gently rock from left to right. You
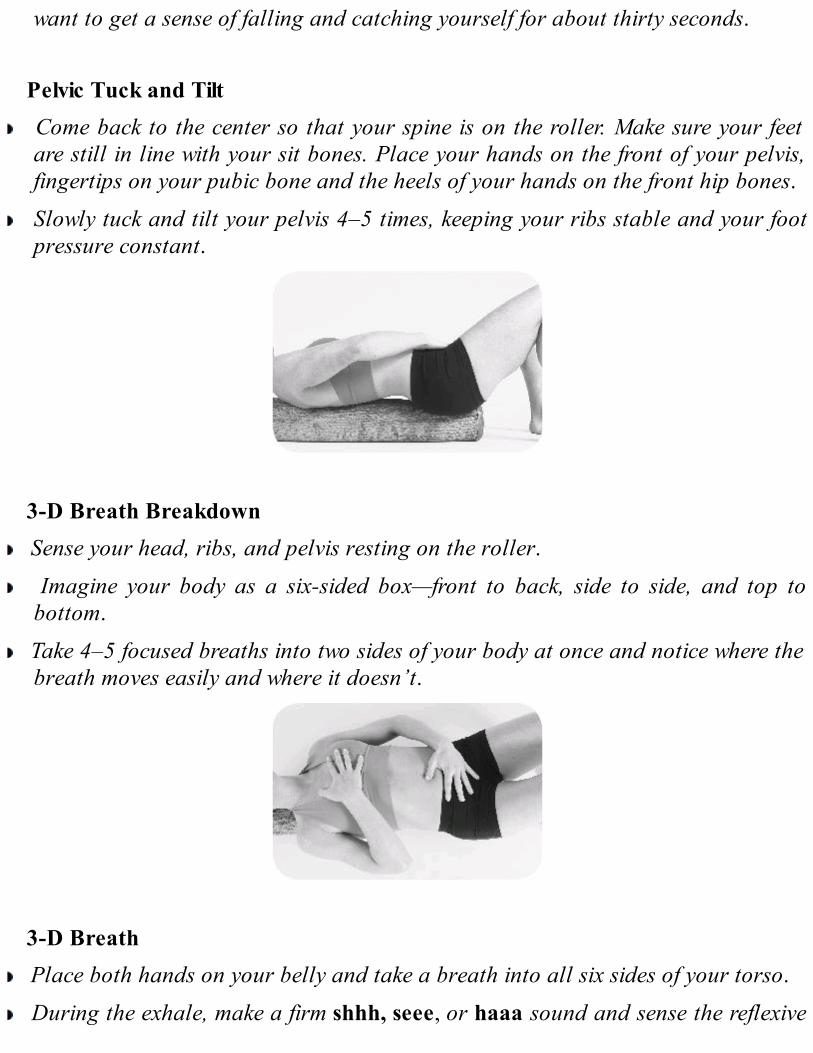
want to get a sense of falling and catching yourself for about thirty seconds.
Pelvic Tuck and Tilt Come back to the center so that your spine is on the roller. Make sure your feet
are still in line with your sit bones. Place your hands on the front of your pelvis,fingertips on your pubic bone and the heels of your hands on the front hip bones.
Slowly tuck and tilt your pelvis 4–5 times, keeping your ribs stable and your footpressure constant.
3-D Breath Breakdown Sense your head, ribs, and pelvis resting on the roller.
Imagine your body as a six-sided box—front to back, side to side, and top tobottom.
Take 4–5 focused breaths into two sides of your body at once and notice where thebreath moves easily and where it doesn’t.
3-D Breath Place both hands on your belly and take a breath into all six sides of your torso.
During the exhale, make a firm shhh, seee, or haaa sound and sense the reflexive
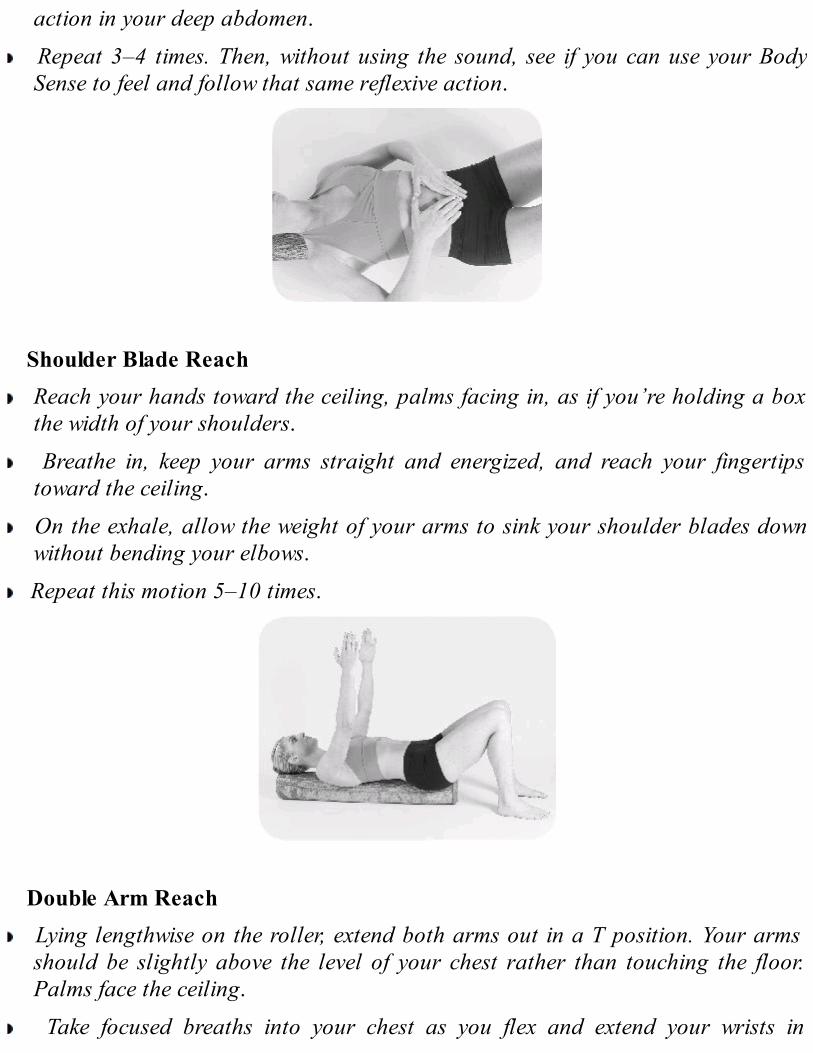
action in your deep abdomen.
Repeat 3–4 times. Then, without using the sound, see if you can use your BodySense to feel and follow that same reflexive action.
Shoulder Blade Reach Reach your hands toward the ceiling, palms facing in, as if you’re holding a box
the width of your shoulders.
Breathe in, keep your arms straight and energized, and reach your fingertipstoward the ceiling.
On the exhale, allow the weight of your arms to sink your shoulder blades downwithout bending your elbows.
Repeat this motion 5–10 times.
Double Arm Reach Lying lengthwise on the roller, extend both arms out in a T position. Your arms
should be slightly above the level of your chest rather than touching the floor.Palms face the ceiling.
Take focused breaths into your chest as you flex and extend your wrists in

opposition—one hand’s fingertips pointing toward the ceiling, the other towardthe floor—6–10 times. Notice the pull across the front of your upper body, fromfingertip to fingertip.
Rest Reassess Slowly come off the roller by straightening out one leg and sliding off that side,
first with your pelvis, and then your ribs and head.
Lie on the floor, close your eyes, and take a moment to sense the changes in theweight of your masses and the lift of your spaces.
Assess your Autopilot. Imagine splitting yourself into a right and a left side. Dothe right and left sides feel more even? Does it feel like there’s less of a distinctionbetween your left and right halves?
Finally, take a full breath and notice what areas of your torso expand when yourlungs fill with air. Do you sense greater movement? Is it easier to take a deepbreath?
Upper Body Compression Sequence
Rest Assess Shoulder Blade Glide and ShearRib Length Assess Upper Back RinseUpper Back Glide and Shear Rib Length Reassess
Rest Assess

Lie on the floor with your arms and legs straight and relaxed, palms facing up.
Use your Body Sense to notice your upper body. Ideally your upper back isrelaxed and resting on your ribs, or mid back, and not on your shoulder blades.Are your bottom ribs on or off the floor?
Notice the curve of your low back. Does it feel like there’s a big curve up towardyour shoulder blades or perhaps there is no curve at all. Take note of what youfeel.
Rib Length Assess Rest your shoulder blades on the roller. Place your hands behind your head for
support, bend your knees, and tuck your pelvis. As you create the followingmovement, your core, low back, and neck remain still and stable. Maintain atucked pelvis and keep the lowest part of your rib cage heavy to the roller.
Breathe in and, on the exhale, allow only your ribs to extend over the roller andopen your breastbone toward the ceiling.
Take a focused breath into your ribs and notice the length you are able to createalong the front of your ribs.
Repeat the movement 2–3 times.
With your breastbone open toward the ceiling, breathe in and, on an exhale,slowly side bend to the right to assess the feeling on the left side of the ribs.
Repeat on the other side. Notice if one side or both feels tight or if you move moreto one side.
Repeat one more time on each side.
Upper Back Glide and Shear Place your hands behind your head and point your elbows toward the ceiling.

Engage your core and lift your hips to bring the roller to the top of your upperback.
Gently Glide the roller up and down your spine over just 1–2 vertebrae at a time.
Keeping your elbows toward the ceiling, slowly side bend your upper body left andright in small movements to Shear one small region of your spine.
Return to the center, pause, and take 2 focused breaths, letting your spine sinkfurther into the roller.
Move the roller down your back 1–2 inches, curling your ribs forward so yourspine stays on the top of the roller, and repeat the techniques.
Move the roller down 1–2 inches more, making sure to stay above your lowestribs, and repeat 1 more time.
Shoulder Blade Glide and Shear Rest your upper back on the roller with your hands behind your head. Keep your
core engaged so your hips do not rest on the floor. Turn your upper body towardyour right side so the roller is on the inner edge of your right shoulder blade, noton your spine.
Glide up and down on the edge of your shoulder blade. If you find a tender spot,make your movement smaller and smaller on the area of stuck stress.
To Shear, create small side bends on the area. Or set your hips on the floor,release your right arm from behind your head and slowly create small circles withyour arm.

Repeat this sequence on the other shoulder blade.
Upper Back Rinse Bring the roller back to the top of your upper back and take a deep breath.
On the exhale, engage your core and slowly Rinse by pressing the roller downyour upper back with consistent, light pressure.
Curl your ribs forward as you move down your back, keeping your pressuredirectly on the top of the roller.
When you get near the bottom of your ribs, return to the top in a quick motion.
Pause and take a deep breath to give the tissue a moment to adapt. Repeat the Rinse 3–4 times, and then rest your hips on the floor.
Rib Length Reassess With your shoulder blades resting on the top of the roller, breathe in and, on the
exhale, allow only your ribs to extend over the roller again. Notice if you movemore freely or have a greater range in this extended position.
With your breastbone toward the ceiling, slowly side bend your ribs left and right2–3 times and take focused breaths into the sides of your ribs. Notice if you have agreater range when you side bend.
Lower Body Compression Sequence
Rest Assess Calf RinseBack Thigh Shear Inner and Back Thigh Rinse

Calf Glide and Shear SI Joint ShearInner Thigh Glide and Shear Rest Reassess
Rest Assess Lie on the floor with your arms and legs straight and relaxed, palms face up.
Use your Body Sense to notice the curve of your low back. Notice your pelvis.Ideally you feel two butt cheeks evenly weighted on the floor.
Feel whether your thighs are touching the floor and whether they feel equal.Notice your legs. Does the right or left leg feel heavier or longer than the other,or do they feel even?
Back Thigh Shear Place the roller under your upper thighs. Your legs are relaxed and straight. Slowly drag your legs together and apart like jumping jacks to Shear the back of
the thighs 4–5 times.
Bend one leg and relax it on the roller, and then drag the other leg in and out 4–5 times. Repeat on the other thigh.
Straighten and relax your legs again.
Pause, wait, and take 2 focused breaths while you let the tissue adapt. Move the roller halfway down your thighs and repeat the techniques, and then
move it just above your knees and repeat.
Calf Glide and Shear Place the roller under the largest part of your calves. Cross one ankle over the
other and Glide on the bottom leg by bending and straightening the knees.

When you find an area of stuck stress, create circles with your ankle to Shear thatspot indirectly, or rotate the leg in and out in a small controlled movement 4–5times.
Pause, wait, and take 2 focused breaths while you let the tissue adapt. Move the roller down to the lower region of your calf. Repeat the techniques on this area of the calf. Switch legs and repeat.
Inner Thigh Glide and Shear Lie on your left side and place the roller in front of you.
Extend your top leg to be perpendicular to your body and Glide just above yourknee.
To Shear, slowly bend and straighten the leg.
With the leg bent, lift and lower the foot 2–3 times.
Pause, wait, and take 2 focused breaths while you let the tissue adapt. Keep your leg on the roller and turn your body to face the floor.
Slowly press the roller up your thigh and stop halfway up your inner thigh.
Repeat all of the techniques on this area.
Move the roller up closer to your pelvis and repeat. Switch sides and repeat.

Calf Rinse Sit on the floor and place your arms behind you for support. With your right knee
bent, rotate your right leg inward so that the area above your inner ankle is onthe roller.
Slowly straighten your right leg while pressing the roller up the inside of your legwith consistent, light pressure. Stop just below the knee.
Rotate your leg so the back of your calf is on the roller. Slowly bend your leg asyou press the roller down the back of your calf, toward your heel, with consistent,light pressure.
Stop before your ankle and repeat this Rinsing technique 3–4 times.
Switch sides and repeat.
Inner and Back Thigh Rinse Place your right inner thigh on the roller just above the knee and straighten your
right leg. Bend your left knee and use that leg for support. Turn your upper bodyaway from the roller and place your hands on the floor for support.
Slowly Rinse up the inner thigh with consistent pressure.
When you reach the top of the inner thigh, place both hands behind you, lean

back, and rotate your leg so the back of your thigh is on the roller.
Rinse down the back of your thigh and stop right above your knee.
Continue Rinsing up the inside and down the backside of your thigh 3–4 times.
Switch sides and repeat.
SI Joint Shear Lying on the floor, position the roller under your pelvis, and then bring your
knees toward your chest. Point your knees toward the ceiling, but stop before yourthighs are fully perpendicular to the roller.
Maintain a consistent pressure and slowly angle your knees slightly right and leftto explore both sides of the SI joint. Try to keep your knees together.
Pause on the right side and Shear the right SI joint by making small circles withyour upper legs 2–3 times in each direction, clockwise and counter-clockwise.
You can also try circling just the lower leg in larger but slower circles and trymoving your knees forward and back in a marching motion, 2–3 times slowly.
Once you Shear, pause for a moment, maintain the pressure, and take 2 focusedbreaths.
Switch sides and repeat.
Rest Reassess Lie on the floor, close your eyes, and take a moment to sense if your butt cheeks
and legs are more settled to the floor and evenly weighted.
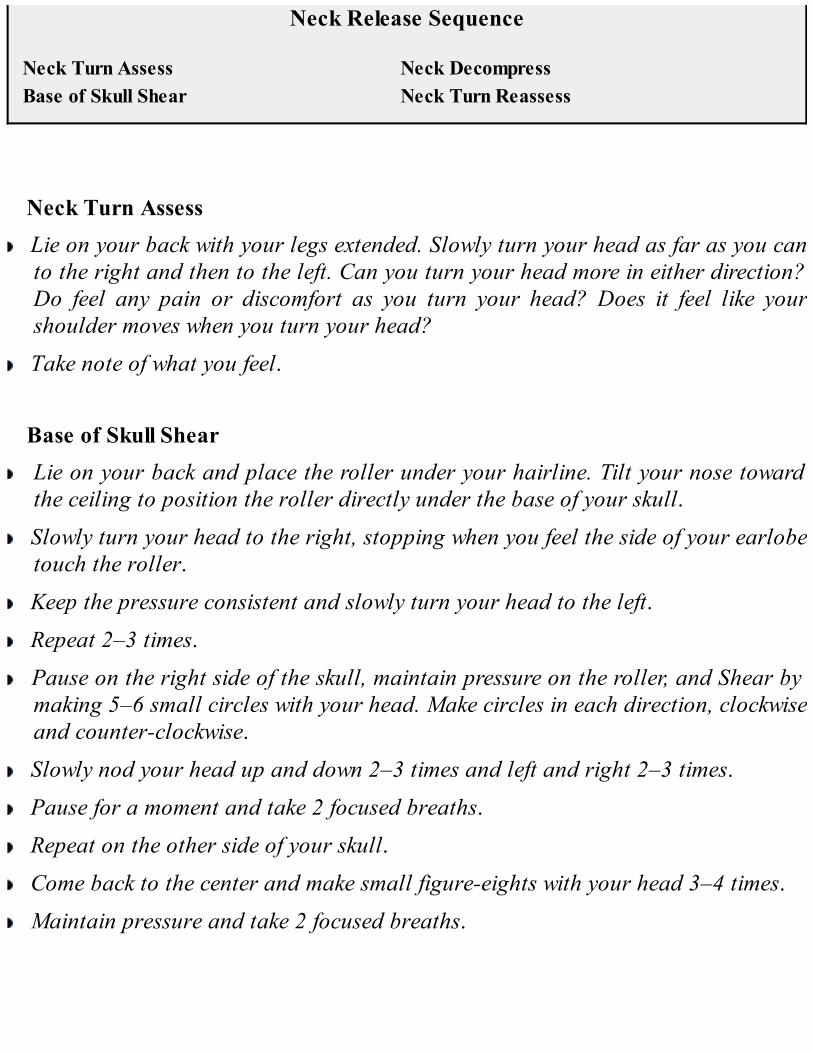
Neck Release Sequence
Neck Turn Assess Neck DecompressBase of Skull Shear Neck Turn Reassess
Neck Turn Assess Lie on your back with your legs extended. Slowly turn your head as far as you can
to the right and then to the left. Can you turn your head more in either direction?Do feel any pain or discomfort as you turn your head? Does it feel like yourshoulder moves when you turn your head?
Take note of what you feel.
Base of Skull Shear Lie on your back and place the roller under your hairline. Tilt your nose toward
the ceiling to position the roller directly under the base of your skull. Slowly turn your head to the right, stopping when you feel the side of your earlobe
touch the roller.
Keep the pressure consistent and slowly turn your head to the left. Repeat 2–3 times.
Pause on the right side of the skull, maintain pressure on the roller, and Shear bymaking 5–6 small circles with your head. Make circles in each direction, clockwiseand counter-clockwise.
Slowly nod your head up and down 2–3 times and left and right 2–3 times.
Pause for a moment and take 2 focused breaths.
Repeat on the other side of your skull. Come back to the center and make small figure-eights with your head 3–4 times.
Maintain pressure and take 2 focused breaths.

Neck Decompress Move the roller from the base of your skull up about 1 inch to the middle of the
back of your skull. Keep consistent pressure on the roller and, on an exhale, slowly nod your chin
toward your chest 1–2 inches. Inhale and, on an exhale, return your nose towardthe ceiling. Make the movement small and slow.
Repeat 8–10 times and then remove the roller and gently bring your head to thefloor.
Neck Turn Reassess Reassess your neck’s range of motion.
Sense the curve of your neck. Does it feel lighter? Do you notice a more distinctcurve just below the base of the skull?
Turn your head slowly from left to right. Do you have more range of motion? Isthere less pain or stiffness as you turn your head?
Lower Body Length and Low Back Release Sequence
Rest Assess Pelvic Tuck and Tilt ChallengeSI Joint Shear Low Back DecompressBent Knee Press Rest Reassess

Hip to Heel Press
Rest Assess Lie on the floor with your arms and legs straight and relaxed, palms face up.
Use your Body Sense to notice the curve of your low back. Where do you feel thepeak of the curve? Does it feel like it’s above or below your belly button? Areyour bottom ribs on or off the floor? Does it feel like there’s a big curve uptoward your shoulder blades, or perhaps there is no curve at all. Take note ofwhat you feel.
SI Joint Shear Lying on the floor, position the roller under your pelvis, and then bring your
knees toward your chest. Point your knees toward the ceiling, but stop before yourthighs are fully perpendicular to the roller.
Maintain a consistent pressure and slowly angle your knees slightly right and leftto explore both sides of the SI joint. Try to keep your knees together.
Pause on the right side and Shear the right SI joint by making small circles withyour upper legs 2–3 times in each direction, clockwise and counter-clockwise.
You can also try circling just the lower leg in larger but slower circles.
Also try moving your knees forward and back in a marching motion, 2–3 timesslowly.
Once you Shear, pause for a moment, maintain the pressure, and take 2 focusedbreaths.
Switch sides and repeat.
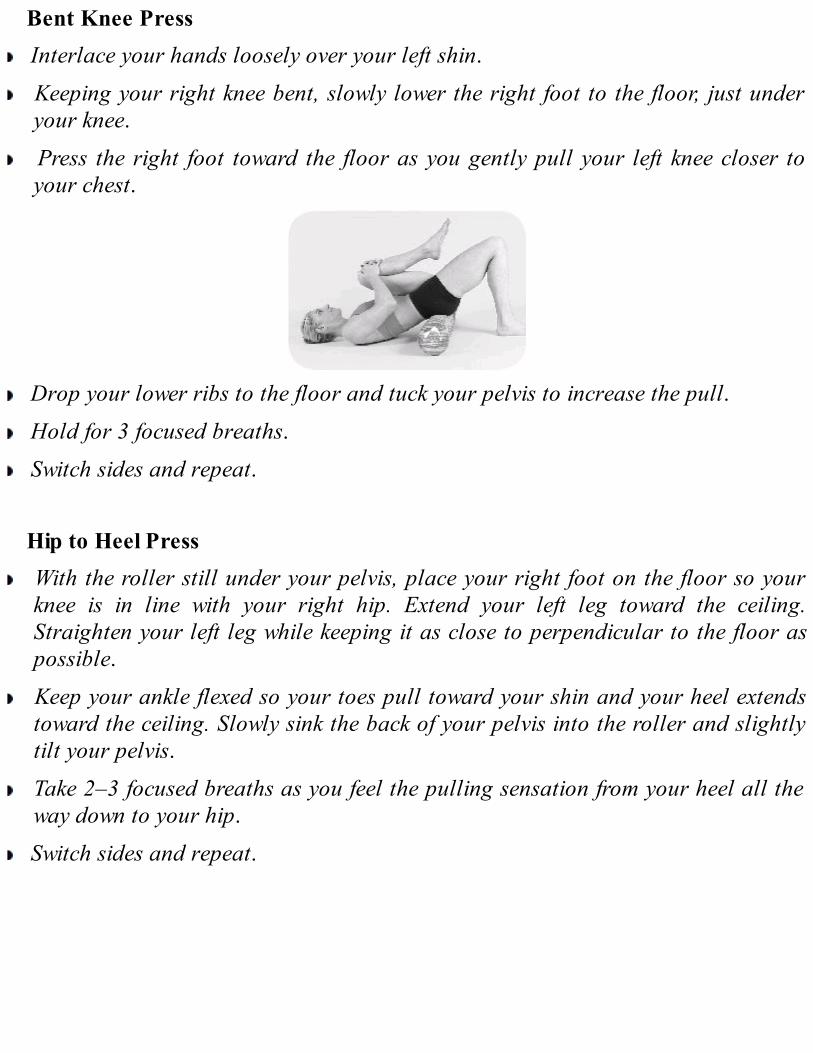
Bent Knee Press Interlace your hands loosely over your left shin.
Keeping your right knee bent, slowly lower the right foot to the floor, just underyour knee.
Press the right foot toward the floor as you gently pull your left knee closer toyour chest.
Drop your lower ribs to the floor and tuck your pelvis to increase the pull. Hold for 3 focused breaths.
Switch sides and repeat.
Hip to Heel Press With the roller still under your pelvis, place your right foot on the floor so your
knee is in line with your right hip. Extend your left leg toward the ceiling.Straighten your left leg while keeping it as close to perpendicular to the floor aspossible.
Keep your ankle flexed so your toes pull toward your shin and your heel extendstoward the ceiling. Slowly sink the back of your pelvis into the roller and slightlytilt your pelvis.
Take 2–3 focused breaths as you feel the pulling sensation from your heel all theway down to your hip.
Switch sides and repeat.
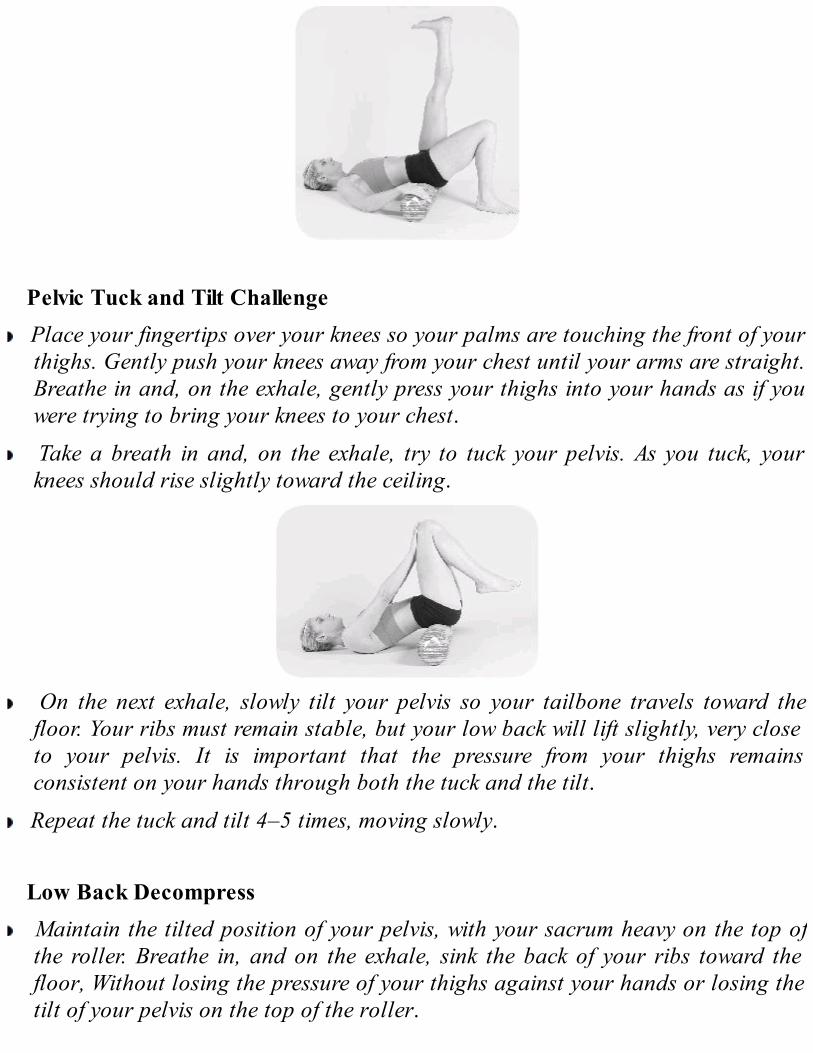
Pelvic Tuck and Tilt Challenge Place your fingertips over your knees so your palms are touching the front of your
thighs. Gently push your knees away from your chest until your arms are straight.Breathe in and, on the exhale, gently press your thighs into your hands as if youwere trying to bring your knees to your chest.
Take a breath in and, on the exhale, try to tuck your pelvis. As you tuck, yourknees should rise slightly toward the ceiling.
On the next exhale, slowly tilt your pelvis so your tailbone travels toward thefloor. Your ribs must remain stable, but your low back will lift slightly, very closeto your pelvis. It is important that the pressure from your thighs remainsconsistent on your hands through both the tuck and the tilt.
Repeat the tuck and tilt 4–5 times, moving slowly.
Low Back Decompress Maintain the tilted position of your pelvis, with your sacrum heavy on the top of
the roller. Breathe in, and on the exhale, sink the back of your ribs toward thefloor, Without losing the pressure of your thighs against your hands or losing thetilt of your pelvis on the top of the roller.

On the next exhale, make a loud shhh sound and notice your abdomen contract.
Inhale and subtly relax the pressure of your knees against your hands. When youexhale, re-engage the three points of pressure—knees to hands, ribs to floor,sacrum to roller—and make the shhh sound.
After 2–3 repetitions, come off the roller and lie down on the floor to reassess.
Rest Reassess Lie on the floor with your arms and legs straight and relaxed, palms face up. Are
your ribs heavier to the floor? Do you notice a more distinct curve just above thepelvis? If you find that your low back curve is no longer behind the ribs and isnow closer to the pelvis, you have successfully decompressed your own low back!
Notice your legs. Are the backs of your thighs more settled on the floor? Are yourlegs weighted more evenly from left to right?
Soft Ball Foot Treatment
Body Scan Assess RinseAutopilot Assess FrictionPosition Point Pressing Body Scan ReassessGlide Final Body Scan ReassessShear Autopilot Reassess
Body Scan Assess Stand with your feet side by side, hip-width apart. Close your eyes and use your
Body Sense to notice your feet. Use your Body Sense to scan up your legs. Notice

the joints of your ankles, knees, and hips. Notice your muscles.
Autopilot Assess Keep your eyes closed and legs relaxed. Lift all ten toes off the floor and take
three breaths. On the final exhale, set your toes down. Notice if you felt yourselfdrift forward. Try the same assessment with your eyes open and notice how muchless you drift when you can rely on your sense of sight to remain balanced.
Position Point Pressing Stand up straight with your feet hip-width apart. Place the soft ball on the floor in
front of you and step onto it so it aligns with position point 1.
Put your feet side by side and gently shift some of your body weight onto the ballto create tolerable pressure.
Then shift some of your weight off the ball. Repeat this shifting 2–3 times to easeinto tolerable compression while you take focused breaths.
Before you move to the next point, step backward with the opposite foot and shiftyour weight to that foot.
Place the ball under position point 2, directly under the big toe knuckle.
Gently rock forward to apply tolerable compression to that point. Step on your back foot to decompress the ball as you move to the next point. Continue this rocking motion as you compress and decompress each point.
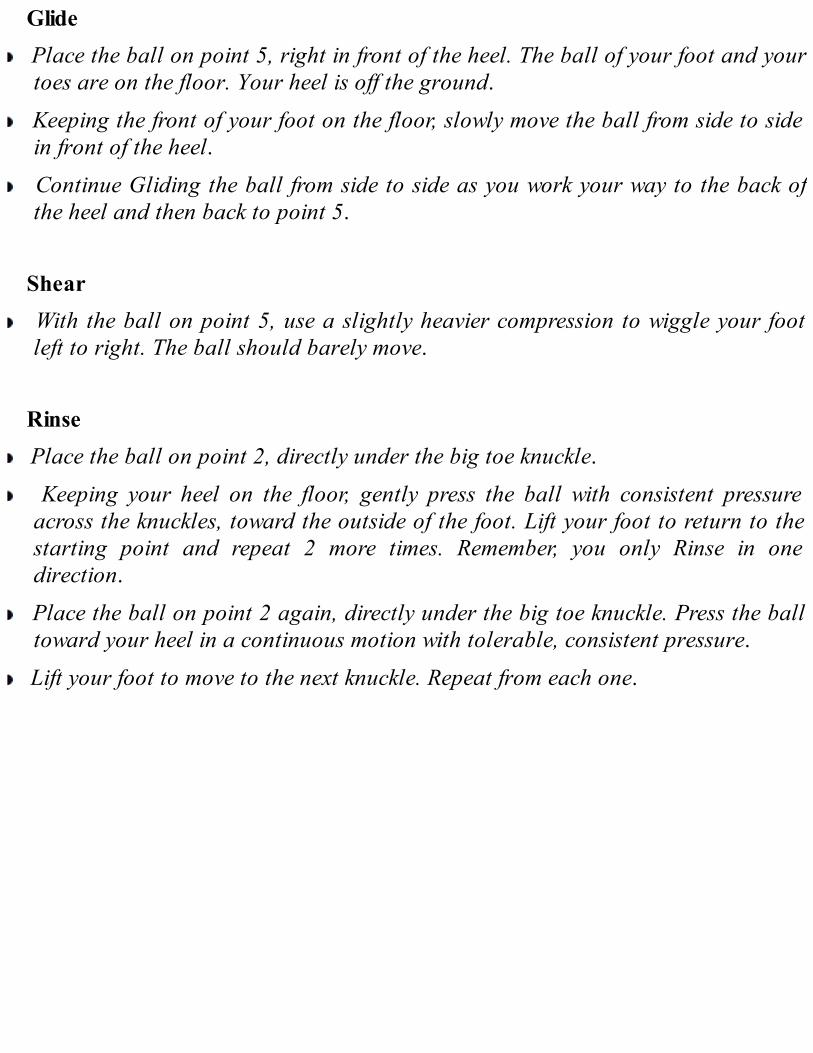
Glide Place the ball on point 5, right in front of the heel. The ball of your foot and your
toes are on the floor. Your heel is off the ground.
Keeping the front of your foot on the floor, slowly move the ball from side to sidein front of the heel.
Continue Gliding the ball from side to side as you work your way to the back ofthe heel and then back to point 5.
Shear With the ball on point 5, use a slightly heavier compression to wiggle your foot
left to right. The ball should barely move.
Rinse Place the ball on point 2, directly under the big toe knuckle.
Keeping your heel on the floor, gently press the ball with consistent pressureacross the knuckles, toward the outside of the foot. Lift your foot to return to thestarting point and repeat 2 more times. Remember, you only Rinse in onedirection.
Place the ball on point 2 again, directly under the big toe knuckle. Press the balltoward your heel in a continuous motion with tolerable, consistent pressure.
Lift your foot to move to the next knuckle. Repeat from each one.
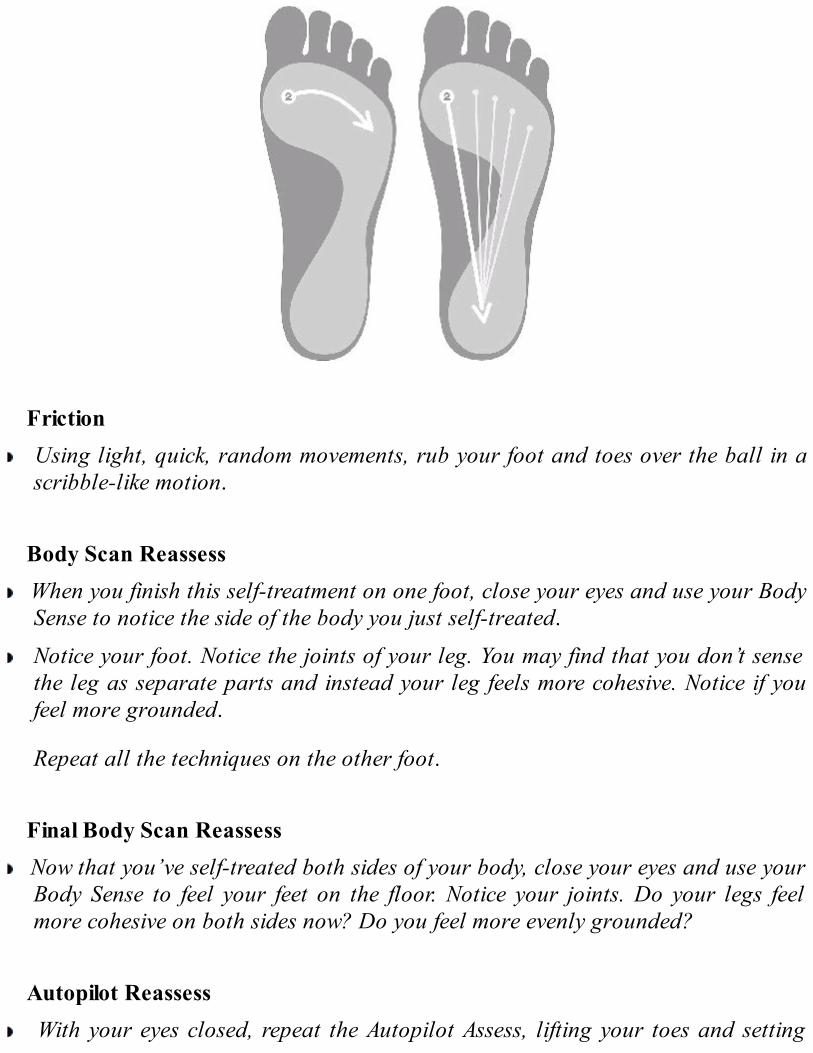
Friction Using light, quick, random movements, rub your foot and toes over the ball in a
scribble-like motion.
Body Scan Reassess When you finish this self-treatment on one foot, close your eyes and use your Body
Sense to notice the side of the body you just self-treated.
Notice your foot. Notice the joints of your leg. You may find that you don’t sensethe leg as separate parts and instead your leg feels more cohesive. Notice if youfeel more grounded.
Repeat all the techniques on the other foot.
Final Body Scan Reassess Now that you’ve self-treated both sides of your body, close your eyes and use your
Body Sense to feel your feet on the floor. Notice your joints. Do your legs feelmore cohesive on both sides now? Do you feel more evenly grounded?
Autopilot Reassess With your eyes closed, repeat the Autopilot Assess, lifting your toes and setting

them back down. Do you drift less when you set your toes back down than you didbefore you did the Soft Ball Foot Treatment?
Soft Ball Hand Treatment
Wrist Assess RinseGrip Assess Finger RinseFinger Compression FrictionPosition Point Pressing Wrist ReassessGlide Grip ReassessShear
Wrist Assess Bring your elbows and wrists together.
Open your hands so that your palms face the ceiling. Ideally, your hands shouldlook like the letter T. Notice if your hands look more like a Y or if your pinkyfinger bends.
Grip Assess Place a soft ball in one hand and squeeze it 3–4 times as firmly as you can.
Then place the ball in the other hand and notice whether your grip feels equal instrength or if you have a stronger grip in one hand than in the other.
Finger Compression Press down on the ball with your index finger.
Then decompress the ball and flex your index finger so your fingertip is touchingthe ball. Alternate between pressing the tip and the pad of your index finger 4times. Repeat this motion with your other fingers and thumb.
Switch hands and repeat.

Position Point Pressing Press your hand into the soft ball at each of the position points on the diagram,
starting with point 1. Create a tolerable amount of pressure. You can use yourother hand to create gentle compression.
Then compress points 2–5. At each point, take a focused breath before lifting yourhand and moving to the next point. Ease off pressure if you feel a strong sensationor pain. Take your time.
Once you’ve pressed into each point, repeat on the other hand.
Glide On your right hand, Glide the soft ball from point 3, across the base of the palm
to point 5, and return to point 3 with consistent pressure. Keep the tip of yourmiddle finger on the table or floor as you create the Glide.
Continue back and forth as you take 3–4 focused breaths.
Repeat on the left hand.
Shear Place the soft ball under point 3, the thumb pad, on your right hand and create

small circles as you take 3–4 focused breaths. Move slowly and take your timewith Shearing the thumb pad, as this area often carries a lot of stuck stress.
Repeat on the left hand.
Rinse Starting at the tip of one finger on your right hand, slowly press the soft ball down
the finger and across point 4 and over your wrist. Repeat, starting from each of the other fingers.
Switch hands and repeat. Next, start at the fingertip and slowly press the soft ball through your wrist and up
your forearm in a continuous motion until you reach the elbow.
Repeat, starting from each of the other fingers.
Switch hands and repeat.
Finger Rinse Place your left hand flat on the floor or a table. Use the right hand to rub the soft
ball over the top of and in between each finger of the left hand in one direction,from the knuckle to the nail. (This also stimulates point 4 on the top hand.)
Repeat on the other hand.
Friction Using light, quick, random movements, rub one hand over the soft ball in a
scribble-like motion. Be sure to include your fingers and wrists.
Repeat on the other hand.

Wrist Reassess Bring your elbows and wrists together.
Open your hands so that your palms face the ceiling. Do you feel a change in theflexibility of your wrists? Do you feel less tension in your arms? Do your fingersextend more fully?
Grip Reassess Remember what your grip strength felt like when you began and repeat the Grip
Assess by squeezing the soft ball as firmly as you can 3–4 times in each hand. Canyou create a more powerful grip with less effort? Does your grip feel more equalfrom left to right?
Mini Soft Ball Foot Treatment
Body Scan Assess RinsePosition Point Pressing FrictionGlide Body Scan ReassessShear Final Body Scan Reassess
Body Scan Assess Stand with your feet side by side, hip-width apart. Close your eyes and use your
Body Sense to notice your feet. Use your Body Sense to scan up your legs. Noticethe joints of your ankles, knees, and hips. Notice if you have any tension in yourlegs.
Position Point Pressing Stand up straight with your feet hip-width apart. Place the soft ball on the floor in
front of you and step onto it so it aligns with position point 1.
Put your feet side by side and gently shift some of your body weight onto the ballto create tolerable pressure.
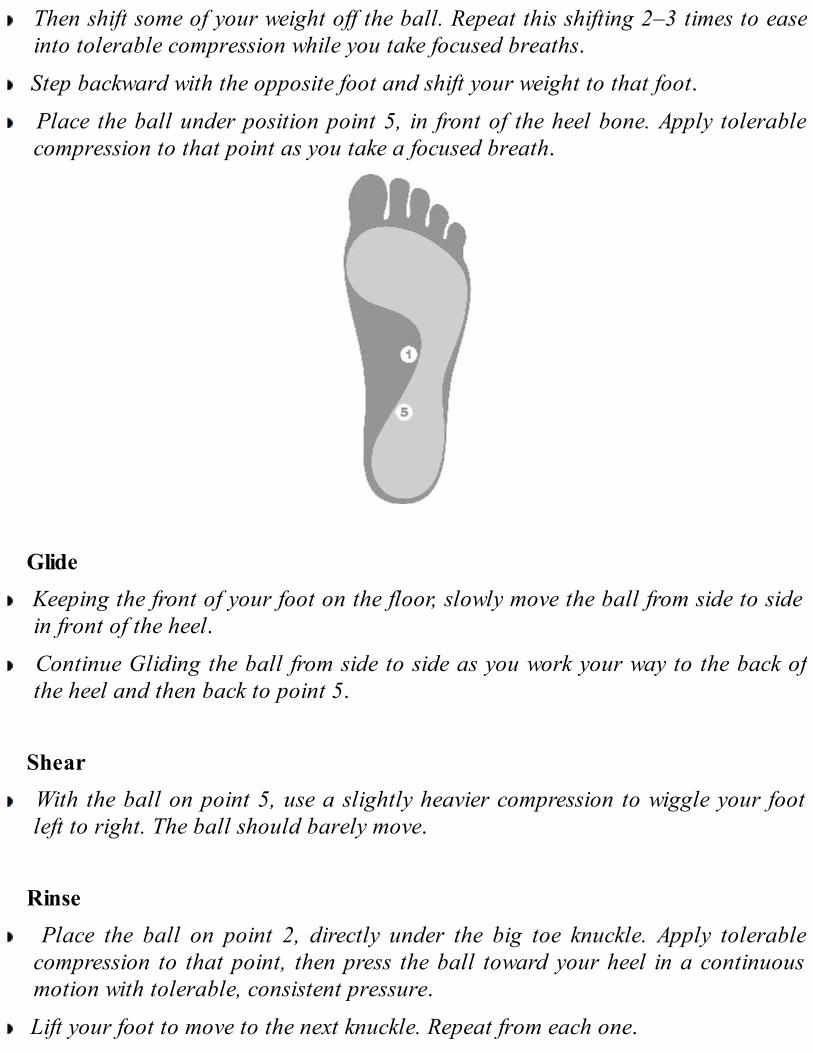
Then shift some of your weight off the ball. Repeat this shifting 2–3 times to easeinto tolerable compression while you take focused breaths.
Step backward with the opposite foot and shift your weight to that foot. Place the ball under position point 5, in front of the heel bone. Apply tolerable
compression to that point as you take a focused breath.
Glide Keeping the front of your foot on the floor, slowly move the ball from side to side
in front of the heel. Continue Gliding the ball from side to side as you work your way to the back of
the heel and then back to point 5.
Shear With the ball on point 5, use a slightly heavier compression to wiggle your foot
left to right. The ball should barely move.
Rinse Place the ball on point 2, directly under the big toe knuckle. Apply tolerable
compression to that point, then press the ball toward your heel in a continuousmotion with tolerable, consistent pressure.
Lift your foot to move to the next knuckle. Repeat from each one.
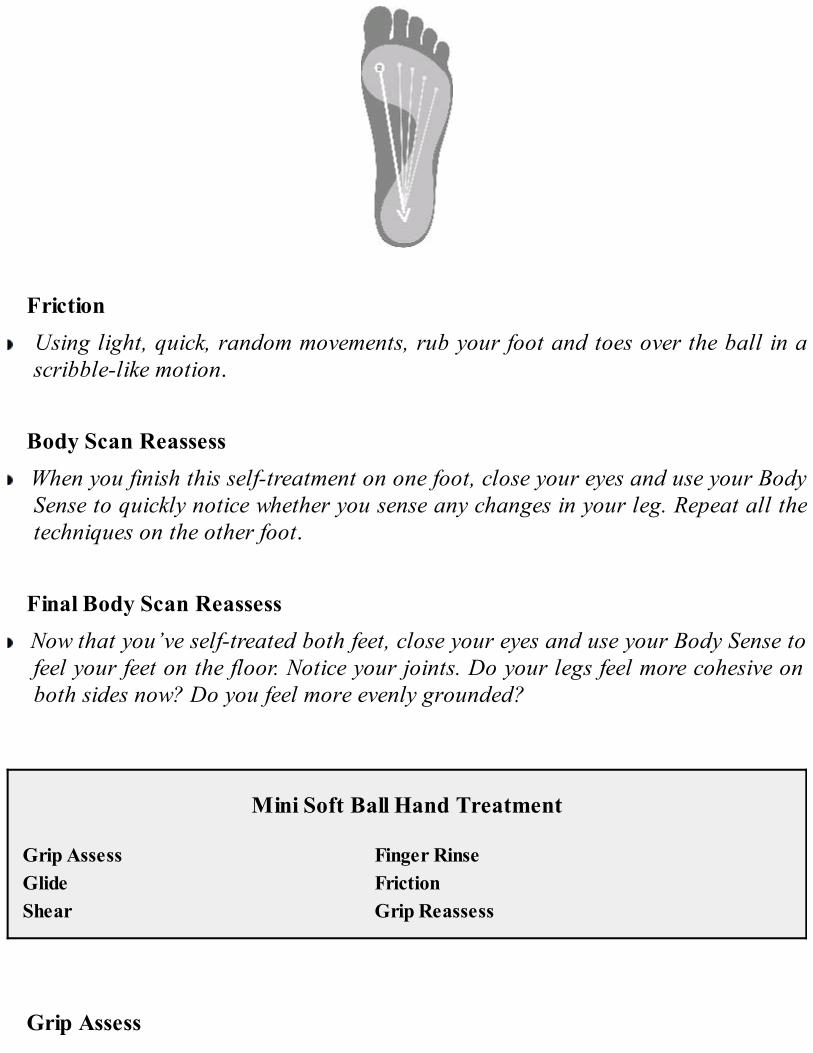
Friction Using light, quick, random movements, rub your foot and toes over the ball in a
scribble-like motion.
Body Scan Reassess When you finish this self-treatment on one foot, close your eyes and use your Body
Sense to quickly notice whether you sense any changes in your leg. Repeat all thetechniques on the other foot.
Final Body Scan Reassess Now that you’ve self-treated both feet, close your eyes and use your Body Sense to
feel your feet on the floor. Notice your joints. Do your legs feel more cohesive onboth sides now? Do you feel more evenly grounded?
Mini Soft Ball Hand Treatment
Grip Assess Finger RinseGlide FrictionShear Grip Reassess
Grip Assess

Place a soft ball in one hand and squeeze it 3–4 times as firmly as you can.
Then place the ball in the other hand and notice whether your grip feels equal instrength or if you have a stronger grip in one hand than in the other.
Glide Place the soft ball between your hands at the base of your palms.
Glide the ball from point 3 across the base of the palm to point 5 and return topoint 3 with consistent pressure.
Continue back and forth as you take 3–4 focused breaths.
Shear Shear by making small circles at the base of your thumb pad, point 3, as you take
3–4 focused breaths. Move slowly and take your time with Shearing, as the thumbpad often carries a lot of stuck stress.
Switch hands and repeat.
Finger Rinse Place your left hand flat on the floor or a table. Use the right hand to rub the soft
ball over the top of and in between each finger of the left hand in one direction,from the knuckle to the nail. (This also stimulates point 4 on the top hand.)
Repeat on the other hand.
Friction

Place the ball between your hands and rub lightly in a scribble-like motion. Besure to include your fingers and wrists.
Grip Reassess Remember what your grip strength felt like when you began and repeat the Grip
Assess by squeezing the soft ball as firmly as you can 3–4 times in each hand. Canyou create a more powerful grip with less effort? Does your grip feel more equalfrom left to right?

MELT as Complementary Self-Care
Whether you have acute or chronic pain caused by an injury or surgery, have beendiagnosed with a disorder or disease, or are pregnant or have recently had a baby, youare probably wondering whether MELT can help and if it is safe. The answers are yesand yes.
Regardless of what you are currently experiencing, MELT will help improve yourbody’s healing potential and reduce the accumulated stress that occurs when yourbody endures any of these circumstances and the related medical treatments.Furthermore, MELT complements all forms of medical, pharmaceutical, andalternative care, and is not a replacement for or alternative to these directinterventions.
Because stuck stress accumulates in everyone, every day, imagine what your bodyhas to manage when you add the stress of trauma, disease, or pregnancy. YourAutopilot has to manage incoming demands on top of an internal environment that isunder chronic, sometimes extreme duress. Pain—your body’s warning sign that itneeds help—is inevitable, and symptoms become chronic. Increasing inflammationcauses further accumulation of stuck stress in the nervous and connective tissuesystems, which exacerbates symptoms and hinders your body’s ability to repair itself.
Your body’s energy is depleted from constantly trying to deal with the barrage ofunavoidable internal and external stressors. This leaves little to no energy for healingwhen you need it most.
This is where MELT comes in. MELT is going to help you reduce the accumulatedstress, inflammation, and resulting energy drain. This creates a rebalancing effect inyour immune response and your Autopilot regulation, two things that get so out ofwhack when connective tissue inflammation becomes chronic. MELT improves yourbody’s efficiency and ability to repair and heal itself so pain and other symptoms canbe addressed and often eliminated.
You’re already off to a good start. You’ve been doing the Rebalance Sequence andthe Hand and Foot Treatment to support your Autopilot’s return to efficiency. Howyou proceed with the Rehydrate and Release techniques is important so that you cangain positive, lasting changes without causing unnecessary stress on your connectivetissue or nervous systems.
To reduce and eliminate symptoms from these chronic conditions, you will MELTmore frequently during the week but for shorter periods of time. Initially, ten minuteswill be the maximum amount of time you MELT during any session, and in somecases less than this—even if it feels good. You can always MELT again later to boost

your body’s healing and to support positive change. As you continue to MELT, you’lladd new sequences and more time to achieve the desired effect. Within a fairly shortperiod of time you will be able to transition into a maintenance phase, when you’ll beable to MELT less frequently to sustain the results.
How long will it take for you to notice changes? As a Hands-Off Bodyworker,sensing change and improvement is part of the self-treatment process. The changes tolook for first are those that you assess during your MELT sessions. When your bodystarts responding to your self-treatment, this shows that it is adaptable and that other,longer-lasting changes are right around the corner.
Next, look for improvements in day-to-day Autopilot regulation. One sign to lookfor is sleep improvement—you fall asleep and stay asleep more easily and wake upfeeling more refreshed than you did before. Another sign is that your energyimproves, especially in the afternoon. These changes indicate that your body’sregulation, stability, and repair systems will be able to begin addressing the underlyingcause of your pain and other symptoms.
The specific changes and their timing will depend on the intensity and duration ofyour circumstances, current state of efficiency, health history, and age. Consider howlong you’ve had chronic pain and other symptoms. Give your body the time andattention it needs to get better. Now, instead of spending so much energy feelingfrustrated about your pain and symptoms, I want you to shift your energy andthoughts toward eliminating these issues. Tell your body every day that you are goingto help it and that you’re not a victim.
Be patient and stick with it, and your body’s healing capacity will amaze you.Remember, MELT isn’t a cure for anything and can’t “fix” you. MELT supports yourbody’s natural healing process so your body can heal itself and get you out of pain.
Use Your Sense
In addition to using your Body Sense to notice positive changes as you MELT, youalso need to pay attention to pain. Remember, no part of MELT should ever hurt, sopain is your barometer for when you are moving too fast or applying too muchpressure.
You may not realize that you are pressing too hard because chronic pain dulls yourBody Sense. If you sense discomfort, it may even seem like a good thing, like you’refinally getting at the thing that’s been hurting you. It’s a very human instinct to want tocause pain to the thing that’s been causing you pain, but that’s not how MELT works.Remember, MELT gets results by gently stimulating the connective tissue and nervoussystems, not by overstressing them or initiating a pain response.
Healing Transitions
In this chapter there are issue-specific, step-by-step self-treatment plans based on whathas worked for my clients, students, and instructors. There are a few considerations tobe aware of as you begin your healing process.
It’s important to follow the guidelines outlined for your particular circumstance soyou don’t trigger an unwanted immune response. If your body does launch thisimmune response, it releases an abundance of stored toxins and waste into yourconnective tissue and bloodstream, but your body can’t eliminate it quickly enough.The result is that you can feel exhausted, have more pain and other symptoms, or feeltired and achy like you’re coming down with the flu. Although you can usuallyrecover from it fairly quickly, it depletes your energy and internal resources.
You may have heard this referred to as a healing crisis or crash, but I prefer to callit a healing transition. It is a sign that although you are making positive changes, youare going too fast for your body. This is your cue to slow down and be more gentlewith your body.
If you experience such symptoms, this is not a sign that MELT isn’t good for you.Instead, what I have found over and over again is that it shows that you have beendoing too many moves in one session or applying too much compression on theroller.
It may seem counterintuitive, but if you experience a healing transition, MELT cansupport you in decreasing symptoms, including pain. MELT will support yourAutopilot’s ability to eliminate the toxins that are flooding your system. Your body isworking hard to repair and continuing to MELT will help you transition more quickly.Remember to drink small amounts of water consistently and to rest—your connectivetissue system and bloodstream will be able to process and eliminate the toxins moreefficiently.
When you first start MELTing, you also need to be aware that you mighttemporarily experience a greater sense of pain. This is because your mind-bodycommunication and connection has been heightened, which is necessary for healingand health. Better communication also means that your brain can now pick up thepain signals that have been going off nonstop in your body. These unaddressed painalerts are part of what caused your mind-body disconnect in the first place.
If a pain increase occurs when you start MELTing, shorten your MELT sessions,use gentle pressure, and tell your body that you are giving it the care it needs. KeepMELTing and know that any increase of pain symptoms usually lasts for only a fewdays. Focus your intention on the fact that you have found a real solution that hasworked for thousands of people with circumstances similar to yours. Your hope and

commitment can support your body’s healing process. Soon your brain and body willexperience less pain than you have experienced in a long time.
Your Complementary Self-Treatment Plan
The MELT self-treatment plans for complementary care fall under the following threemain categories:
Pain due to trauma, injury, or surgery
Diagnosed systemic conditions, disorders, and diseases
Pregnancy and postpartum
Regardless of which category you identify with, you can do every technique in thisbook. However, the frequency and amount of time you spend MELTing and the orderand pace at which you add the Rehydrate and Release techniques vary bycircumstance.
It may seem as if these guidelines are meant to merely direct you with caution.They’re not. Instead they are the protocols that I have found most effective in guidingyou back to your body’s ability to heal itself and get you out of pain in the shortestperiod of time. Follow the plan and give your body the time and attention it needs soyou can live a healthier, pain-free life.
At-a-Glance Instructions Long InstructionsRebalance and Upper Body LengthSequence Rebalance Sequence Upper Body Rehydrate Sequence
Upper Body Compression Sequence Upper Body Rehydrate SequenceLower Body Compression Sequence Lower Body Rehydrate SequenceNeck Release Sequence Neck Release Sequence
Lower Body Length and Low Back Low Back Release Sequence and Lower Body RehydrateSequence
Soft Ball Foot Treatment Soft Ball Foot TreatmentSoft Ball Hand Treatment Soft Ball Hand TreatmentMini Soft Ball Foot Treatment Mini Soft Ball Foot TreatmentMini Soft Ball Hand Treatment Mini Soft Ball Hand Treatment
Pain Due to Trauma, Injury, or Surgery
Goals:
• Boost healing and reduce pain and stiffness
• Increase the amount of time you are able to sit, move, and rest without pain
• Improve joint and spinal integrity and flexibility
• Reduce swelling and inflammation in joints to improve the healing process
• Increase soft tissue, joint, disk, and spinal support
• Improve your overall balance, stability, and body ease
• Decrease unnecessary adhesion and scarring from surgery
• Support your sleep cycle
• Support physical therapy treatments
• Reduce recovery time and get back to being active faster
In order to achieve these goals in your area of concern, you will MELT the rest ofyour body first. Although you may want to immediately go after where it hurts,especially if pain has been present for a long time, I need you to wait. Here’s why: ifyou start on the area of concern, you may get some immediate pain relief but it won’tlast and it could make matters worse. Without enough fluid, you can irritate thealready inflamed or damaged tissue and actually increase pain.
Your self-treatment plan will guide you so you achieve lasting results quickly. Justfollow the treatment plan for your area of concern, and you will be on your way tofeeling better. There are five self-treatment plans for pain due to trauma, injury, orsurgery, divided by spine and non-spine areas of concern. For spinal diseases anddisorders, see Spinal Diseases and Disorders.
Spine
• Chronic neck pain self-treatment plan
• Chronic low back pain self-treatment plan
Non-Spine
• Upper body pain self-treatment plan
• Lower body pain self-treatment plan

• Pelvis or hip pain self-treatment plan
Chronic Neck Pain Self-Treatment Plan
This self-treatment plan is for those who have chronic neck pain from trauma orissues related to (but not limited to) herniations, bulging or slipped disks, spinalfusions, discectomies, laminectomies, pinched nerves, vertebral fractures, backspasms, or whiplash. For the best results, MELT at least three times a week, choosingfrom the maps listed. Remember, it’s best to MELT at the end of your day, up to anhour before bedtime. Once you have been in the maintenance phase for one month,you may try the MELT maps in Chapter 13.
Week 1
Soft Ball Hand or Foot TreatmentRebalance Sequence
Week 2
Soft Ball Hand TreatmentRebalance SequenceUpper Body Rehydrate Sequence
Weeks 3 to 4
Map 1Soft Ball Foot TreatmentLower Body Rehydrate SequenceRebalance and Upper Body Length SequenceUpper Body Compression SequenceLow Back Release Sequence
Map 2Soft Ball Hand TreatmentUpper Body Compression SequenceRebalance and Upper Body Length SequenceLower Body Rehydrate Sequence
Low Back Release Sequence
Maintenance Maps
Map 1Mini Soft Ball Hand TreatmentUpper Body Compression SequenceRebalance and Upper Body Length SequenceNeck Release Sequence
Map 2Mini Soft Ball Hand or Mini Soft Ball Foot TreatmentUpper Body Compression SequenceLower Body Length and Low Back Release SequenceRebalance and Upper Body Length Sequence
Chronic Low Back Pain Self-Treatment Plan
This self-treatment plan is for people who have chronic low back pain from trauma orissues related to (but not limited to) herniations, bulging or slipped disks, spinalfusions, discectomies, laminectomies, pinched nerves, vertebral fractures, or backspasms. For the best results, MELT at least three times a week, choosing from themaps listed. Remember, it’s best to MELT at the end of your day, up to an hour beforebedtime. Once you have been in the maintenance phase for one month, you may trythe MELT maps in Chapter 13.
Week 1
Soft Ball Hand or Foot TreatmentRebalance Sequence
Week 2
Soft Ball Foot TreatmentLower Body Rehydrate SequenceRebalance Sequence

Weeks 3 to 4
Map 1Mini Soft Ball Foot TreatmentLower Body Rehydrate SequenceRebalance SequenceNeck Release Sequence
Map 2Mini Soft Ball Foot TreatmentUpper Body Rehydrate SequenceRebalance SequenceNeck Release Sequence
Maintenance Maps
Map 1Mini Soft Ball Foot TreatmentUpper Body Compression SequenceLower Body Length and Low Back Release Sequence
Map 2Mini Soft Ball Hand or Mini Soft Ball Foot TreatmentLower Body Compression SequenceLower Body Length and Low Back Release SequenceAdd the Rebalance Sequence 1–2 times per week with a map or on its own.
Continue to follow either map from weeks 5 to 6 once a week.
Upper Body Pain Self-Treatment Plan
This self-treatment plan is for people who have experienced upper body trauma orissues related to (but not limited to) broken or bruised ribs; broken collarbone or arm;torn shoulder labrum, rotator cuff, or bicep tendon; frozen shoulder; tennis elbow;lung or heart surgery; or upper body osteoarthritic conditions. (For neck pain, followthe Chronic Neck Pain Self-Treatment Plan.) For the best results, MELT at least threetimes a week, choosing from the maps listed. Remember, it’s best to MELT at the endof your day, up to an hour before bedtime. Once you have been in the maintenancephase for one month, you may try the MELT maps in Chapter 13.
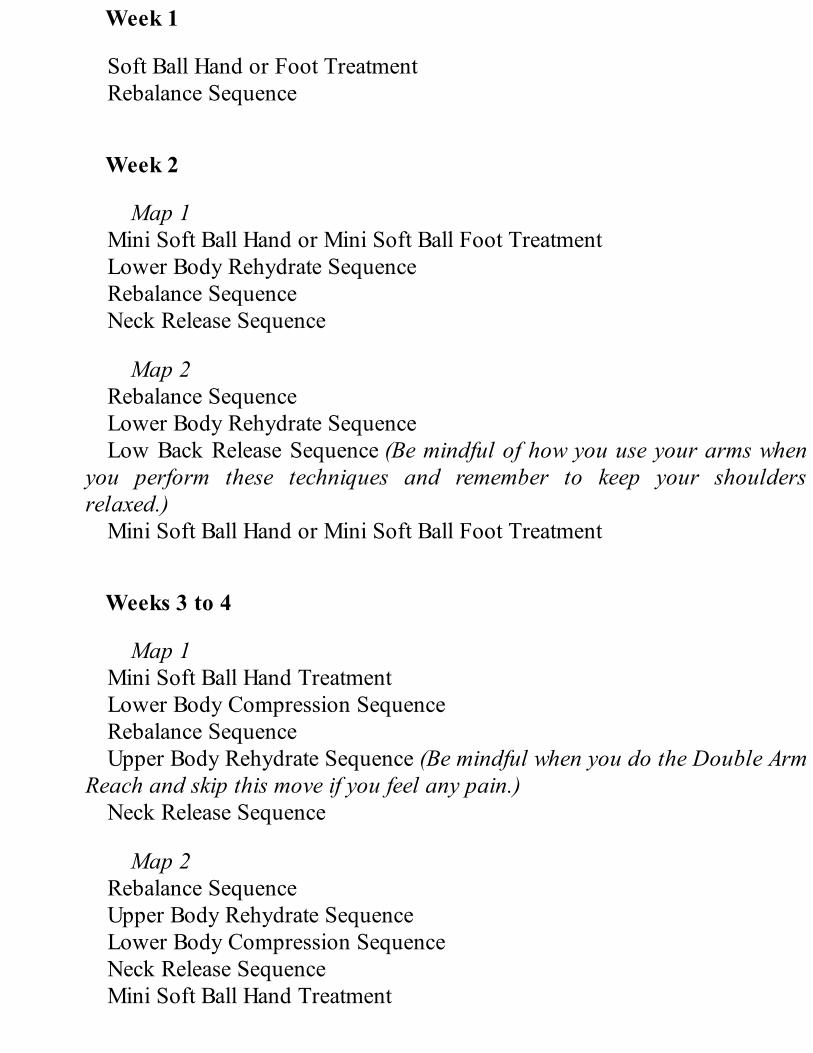
Week 1
Soft Ball Hand or Foot TreatmentRebalance Sequence
Week 2
Map 1Mini Soft Ball Hand or Mini Soft Ball Foot TreatmentLower Body Rehydrate SequenceRebalance SequenceNeck Release Sequence
Map 2Rebalance SequenceLower Body Rehydrate SequenceLow Back Release Sequence (Be mindful of how you use your arms when
you perform these techniques and remember to keep your shouldersrelaxed.)
Mini Soft Ball Hand or Mini Soft Ball Foot Treatment
Weeks 3 to 4
Map 1Mini Soft Ball Hand TreatmentLower Body Compression SequenceRebalance SequenceUpper Body Rehydrate Sequence (Be mindful when you do the Double Arm
Reach and skip this move if you feel any pain.)Neck Release Sequence
Map 2Rebalance SequenceUpper Body Rehydrate SequenceLower Body Compression SequenceNeck Release SequenceMini Soft Ball Hand Treatment

Maintenance Maps
Map 1Mini Soft Ball Hand TreatmentUpper Body Compression SequenceRebalance and Upper Body Length SequenceNeck Release Sequence
Map 2Upper Body Compression SequenceLower Body Length and Low Back Release SequenceRebalance and Upper Body Length SequenceNeck Release SequenceAdd the Soft Ball Foot Treatment or Mini Soft Ball Foot Treatment 1–2
times per week with a map or on its own. Continue to follow either map fromweeks 5 to 6 once a week.
Lower Body Pain Self-Treatment Plan
This self-treatment plan is for people who have experienced lower body trauma orissues related to (but not limited to) a torn Achilles’ tendon or meniscus, ACL, orother knee ligament; tendonitis; broken leg; strained leg muscles; IT band syndrome;restless leg syndrome; compartment syndrome; knee replacement; or lower bodyosteoarthritic conditions. (For low back pain, follow the Chronic Low Back Pain Self-Treatment Plan.) For the best results, MELT at least three times a week, choosing fromthe maps listed. Remember, it’s best to MELT at the end of your day, up to an hourbefore bedtime. Once you have been in the maintenance phase for one month, youmay try the MELT maps in Chapter 13.
Week 1
Soft Ball Hand or Foot TreatmentRebalance Sequence
Week 2
Soft Ball Hand or Foot Treatment

Upper Body Rehydrate SequenceRebalance Sequence
Weeks 3 to 4
Map 1Mini Soft Ball Foot TreatmentRebalance and Upper Body Length SequenceUpper Body Compression SequenceLow Back Release Sequence
Map 2Mini Soft Ball Foot TreatmentUpper Body Compression SequenceLower Body Length and Low Back Release SequenceRebalance and Upper Body Length Sequence
Maintenance Maps
Map 1Mini Soft Ball Foot TreatmentLower Body Compression SequenceLower Body Length and Low Back Release SequenceNeck Release Sequence
Map 2Rebalance Sequence and Upper Body Length SequenceUpper Body Compression SequenceLower Body Compression SequenceLower Body Length and Low Back Release Sequence
Pelvis or Hip Pain Self-Treatment Plan
This self-treatment plan is for people who have experienced lower body trauma orissues related to (but not limited to) pelvic pain, torn labrum (hip joint), hipreplacements or resurfacing, sciatica, SI dysfunction, fractured tailbone, incontinence,hysterectomy, tumor or cyst removal from the pelvic region, or fibroid removal. (For
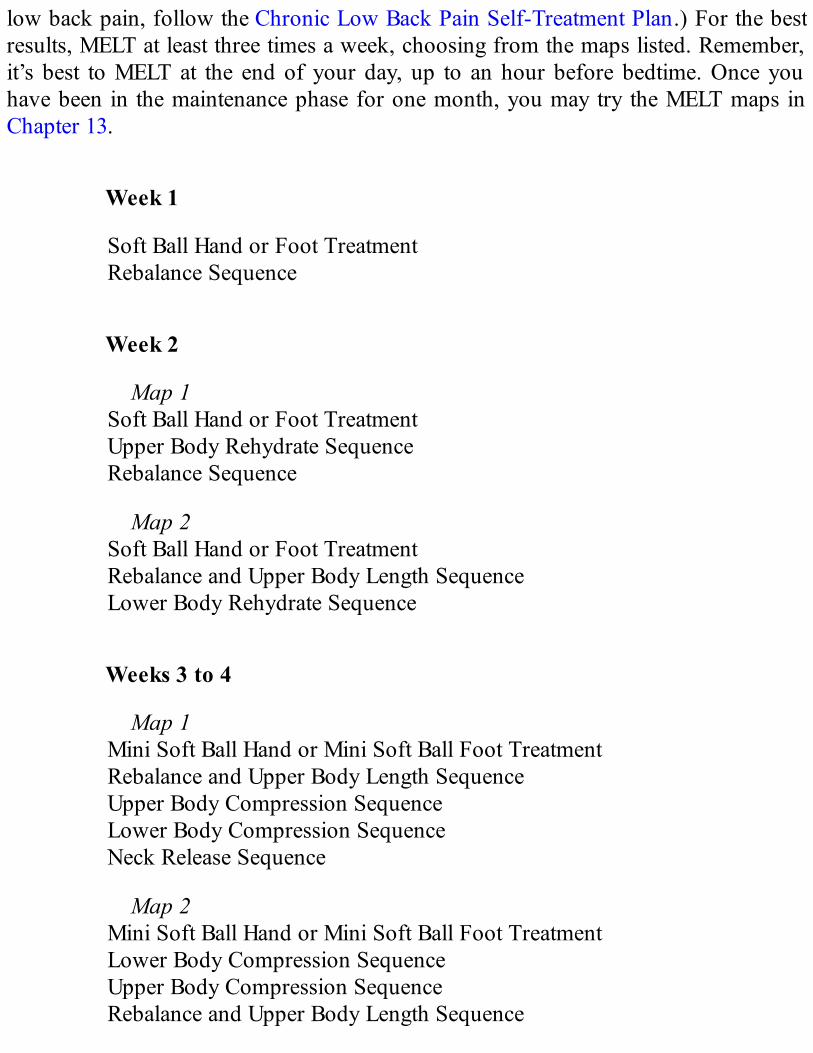
low back pain, follow the Chronic Low Back Pain Self-Treatment Plan.) For the bestresults, MELT at least three times a week, choosing from the maps listed. Remember,it’s best to MELT at the end of your day, up to an hour before bedtime. Once youhave been in the maintenance phase for one month, you may try the MELT maps inChapter 13.
Week 1
Soft Ball Hand or Foot TreatmentRebalance Sequence
Week 2
Map 1Soft Ball Hand or Foot TreatmentUpper Body Rehydrate SequenceRebalance Sequence
Map 2Soft Ball Hand or Foot TreatmentRebalance and Upper Body Length SequenceLower Body Rehydrate Sequence
Weeks 3 to 4
Map 1Mini Soft Ball Hand or Mini Soft Ball Foot TreatmentRebalance and Upper Body Length SequenceUpper Body Compression SequenceLower Body Compression SequenceNeck Release Sequence
Map 2Mini Soft Ball Hand or Mini Soft Ball Foot TreatmentLower Body Compression SequenceUpper Body Compression SequenceRebalance and Upper Body Length Sequence

Neck Release Sequence
Maintenance Maps
Map 1Rebalance and Upper Body Length SequenceUpper Body Compression SequenceLower Body Length and Low Back Release SequenceNeck Release Sequence
Map 2Mini Soft Ball Foot TreatmentUpper Body Compression SequenceLower Body Compression SequenceLower Body Length and Low Back Release Sequence
Diagnosed Systemic Conditions, Disorders, or Diseases
These self-treatment plans are for people who have been diagnosed with cancer,multiple sclerosis (MS), Parkinson’s, chronic fatigue, fibromyalgia, dystonia, lupus,Bell’s palsy, diabetes, metabolic disorders, osteoporosis, scoliosis, rheumatoidarthritis, and other systemic conditions, disorders, and diseases.
Goals:
• Support your nervous system
• Reduce the negative effects of medication
• Improve your sleep cycle
• Support your organ function
• Improve waste elimination
• Reduce the frequency of “bad days” or “crashing”
• Improve your balance, so you can sustain your independence
• Walk with greater ease
• Improve your daily energy

• Reduce the overall stiffness of your joints
There are three self-treatment plans for diagnosed systemic conditions, disorders, ordiseases:
• Neurological or immune disorders and cancer self-treatment plan
• Connective tissue disorders and related diseases self-treatment plan
• Spinal diseases and disorders self-treatment plan
Neurological or Immune Disorders and Cancer Self-Treatment Plan
If you are on chemo, radiation, or any medications, you are at a much higher risk ofexperiencing a healing transition. If it happens, just know it’s not a “bad thing.” It’syour cue that your cells need more time to reboot and your connective tissue needsmore time to adapt.
In the case of active cancer, you can certainly still MELT. Simply follow theinstructions listed here and do not use compression techniques on areas where thetumors are located or you are prone to side effects of cancer treatment such aslymphedema or lipomas.
If you have MS or cancer with lesions on the spine, do the Rebalance Sequence,skipping it only if it is uncomfortable. You can place a soft towel over the roller forextra cushion. These techniques are not contraindicated for these issues. You may,however, need to limit these techniques to five minutes. Use a timer to see if you canmanage five minutes on the roller.
I recommend limiting your MELT sessions to ten minutes a day at least an hourprior to bedtime to start. Then, if you have no crash or unwanted reactions, you canadd an additional ten minutes of MELTing in the morning.
For systemic issues like those you’re dealing with, it’s best to break up sequencesfor the first three to four weeks and monitor how your body reacts twenty-four hoursafterward. If you feel fine, add sequences but still limit your time MELTing. Youmight do only fifteen minutes at a time for the first six months. For the best results,MELT at least three times a week, choosing from the maps listed. Once you have beenin the maintenance phase for one month, you may try the MELT maps in Chapter 13.
Week 1
Map 1

Soft Ball Hand or Foot Treatment
Map 2Rebalance Sequence
Week 2
Map 1Mini Soft Ball Hand TreatmentRebalance Sequence
Map 2Mini Soft Ball Foot TreatmentRebalance Sequence
Week 3
Map 1Soft Ball Foot Treatment or Mini Soft Ball Foot TreatmentRebalance and Upper Body Length Sequence
Map 2Soft Ball Hand Treatment or Mini Soft Ball Hand TreatmentRebalance and Upper Body Length Sequence
Week 4
Map 1Mini Soft Ball Hand TreatmentRebalance and Upper Body Length SequenceNeck Release Sequence
Map 2Mini Soft Ball Foot TreatmentRebalance and Upper Body Length SequenceLow Back Release Sequence

Weeks 5 to 6
If you are feeling good and experiencing no healing transition, you areready to try adding compression techniques. Your sessions will nowincrease in duration by five minutes. Now fifteen minutes is yourmaximum MELTing time.
Map 1Mini Soft Ball Hand TreatmentUpper Body Rehydrate SequenceRebalance and Upper Body Length SequenceNeck Release Sequence
Map 2Mini Soft Ball Foot TreatmentRebalance and Upper Body Length SequenceLower Body Rehydrate SequenceLow Back Release Sequence
If you are sensing positive changes, you can continue to work with these twoMELT maps. If you are experiencing symptoms from a healing transition, goback to the maps from week 4 for two weeks and then try again. If your bodyis managing the compression techniques (Lower and Upper Body RehydrateSequences) with no added symptoms, you can even bring your MELTingsessions up to twenty minutes and move on to the maintenance maps.
Maintenance Maps
Map 1Mini Soft Ball Hand TreatmentRebalance and Upper Body Length SequenceUpper Body Compression SequenceNeck ReleaseLower Body Length and Low Back Release Sequence
Map 2Mini Soft Ball Foot TreatmentLower Body Compression SequenceLower Body Length and Low Back Release Sequence

Rebalance and Upper Body Length SequenceNeck Release Sequence
Connective Tissue Disorders and Related Diseases Self-Treatment Plan
More than two hundred disorders impact connective tissue, including chronic fatigue,fibromyalgia, Ehlers-Danlos syndrome, Marfan syndrome, scleroderma, lipomas, andDupuytren’s contracture. For the best results, MELT at least three times a week,choosing from the maps listed. Remember, it’s best to MELT at the end of your day,up to an hour before bedtime. Once you have been in the maintenance phase for onemonth, you may try the MELT maps in Chapter 13.
For chronic fatigue or fibromyalgia or any other connective tissue disorders, theproblem is widespread connective tissue damage, neurological distress, and pain. Youmust not overdo any self-treatment, whether it’s MELT or any other technique. If you“crash,” even ten minutes is too much just yet. MELT for five minutes once or twice aday for a week and then try a ten-minute session again.
Weeks 1 to 2
Every day, pick one of the three sequences below.No more than ten minutes per day. Only one sequence per day!
Map 1Soft Ball Foot Treatment
Map 2Soft Ball Hand Treatment
Map 3Rebalance and Upper Body Length Sequence
Week 3
Mini Soft Ball Hand or Mini Soft Ball Foot TreatmentRebalance and Upper Body Length Sequence
Week 4
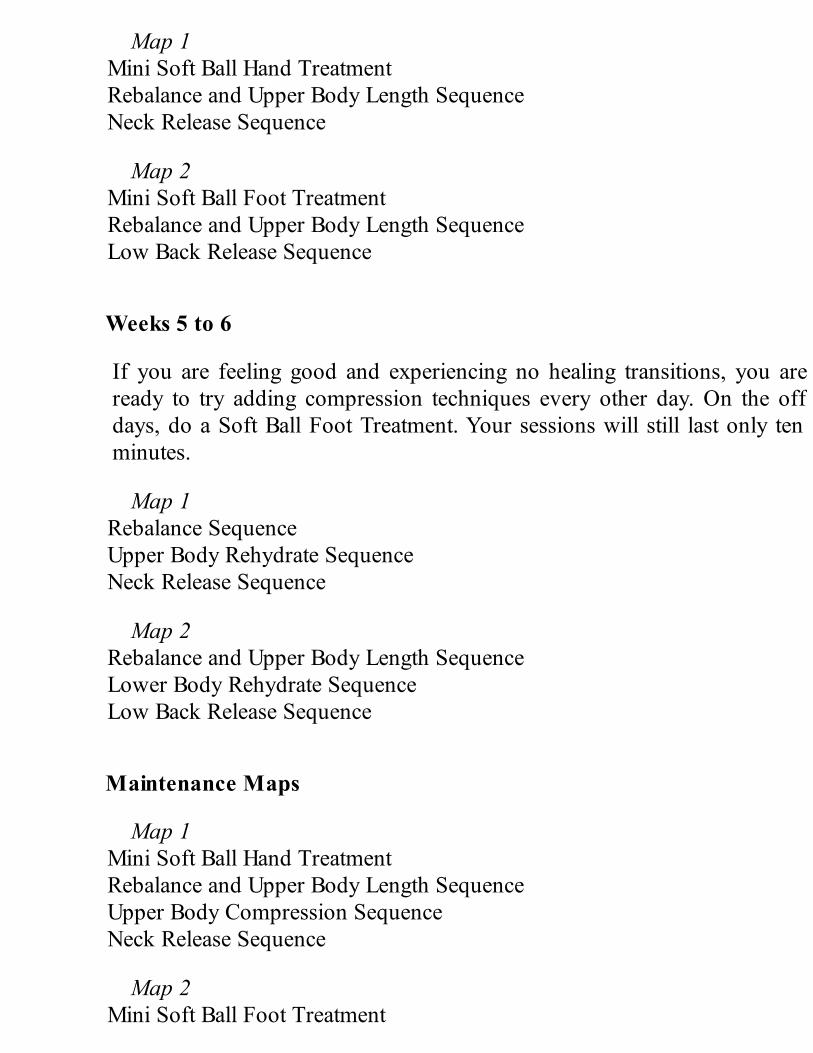
Map 1Mini Soft Ball Hand TreatmentRebalance and Upper Body Length SequenceNeck Release Sequence
Map 2Mini Soft Ball Foot TreatmentRebalance and Upper Body Length SequenceLow Back Release Sequence
Weeks 5 to 6
If you are feeling good and experiencing no healing transitions, you areready to try adding compression techniques every other day. On the offdays, do a Soft Ball Foot Treatment. Your sessions will still last only tenminutes.
Map 1Rebalance SequenceUpper Body Rehydrate SequenceNeck Release Sequence
Map 2Rebalance and Upper Body Length SequenceLower Body Rehydrate SequenceLow Back Release Sequence
Maintenance Maps
Map 1Mini Soft Ball Hand TreatmentRebalance and Upper Body Length SequenceUpper Body Compression SequenceNeck Release Sequence
Map 2Mini Soft Ball Foot Treatment

Lower Body Compression SequenceLower Body Length and Low Back Release SequenceRebalance and Upper Body Length Sequence
Spinal Diseases and Disorders Self-Treatment Plan
This self-treatment plan is for people who have been diagnosed with spinal diseasesand disorders, including (but not limited to) osteoporosis, spinal stenosis, diseases ofthe spine (including osteoarthritis, osteoporosis, or degenerative disk disease),paralysis, scoliosis, osteomyelitis, spondylolisthesis, and spinal cord injuries. For thebest results, MELT at least three times a week, choosing from the maps listed.Remember, it’s best to MELT at the end of your day, up to an hour before bedtime.Once you have been in the maintenance phase for one month, you may try the MELTmaps in Chapter 13.
If you have a spinal disorder or disease, limit your time on the roller to the ten-minute maps for the first four weeks. You may need to limit the duration of theRebalance Sequence to five minutes over the first two weeks. If you feeluncomfortable, you can use pillows or bolsters along the sides of the roller forsupport and place a soft towel over the roller for added cushion. Use a timer to see ifyou can manage five minutes on the roller.
Week 1
Soft Ball Hand or Foot TreatmentRebalance Sequence
Weeks 2 to 3
Map 1Soft Ball Foot Treatment or Mini Soft Ball Foot TreatmentRebalance and Upper Body Length Sequence
Map 2Soft Ball Hand Treatment or Mini Soft Ball Hand TreatmentRebalance and Upper Body Length Sequence
Map 3

Lower Body Rehydrate SequenceRebalance and Upper Body Length Sequence
Maintenance Maps
Map 1Mini Soft Ball Hand TreatmentRebalance and Upper Body Length SequenceUpper Body Rehydrate SequenceNeck Release Sequence
Map 2Mini Soft Ball Foot TreatmentRebalance and Upper Body Length SequenceLower Body Compression SequenceLower Body Length and Low Back Release Sequence
Pregnancy and Postpartum
The changes a woman’s body experiences during forty weeks of pregnancy and whatmy clients call the long fourth trimester, postpartum, come with challenges. The dailystructural changes and fluctuation of hormones affects your organs, joints, posture,sleep, digestion, and mental state. MELT will support your body to better navigatethese changes, give you energy, and keep you grounded. If you take a little time toMELT, you will give yourself and your baby a lot of support.
Pregnancy Self-Treatment Plan
The self-treatment plan for pregnancy is laid out by trimester. If you’re in your firsttrimester, start at week one and follow the plan throughout your pregnancy. If you’restarting MELT in your second trimester, begin at week one and omit Rib Length fromthe Upper Body Rehydrate and Compression Sequences. If you’re starting in yourthird trimester, repeat the options for week one for the remainder of your pregnancy.
Goals:
• Prepare your body for the many changes you will experience in each
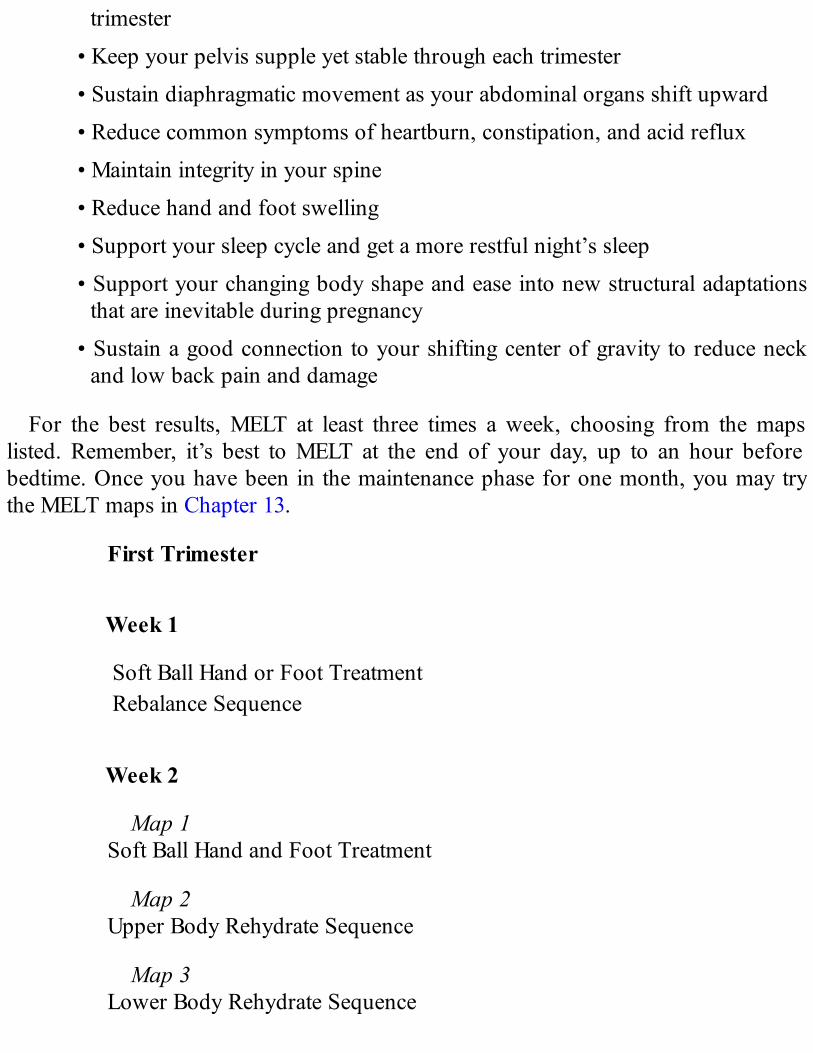
trimester
• Keep your pelvis supple yet stable through each trimester
• Sustain diaphragmatic movement as your abdominal organs shift upward
• Reduce common symptoms of heartburn, constipation, and acid reflux
• Maintain integrity in your spine
• Reduce hand and foot swelling
• Support your sleep cycle and get a more restful night’s sleep
• Support your changing body shape and ease into new structural adaptationsthat are inevitable during pregnancy
• Sustain a good connection to your shifting center of gravity to reduce neckand low back pain and damage
For the best results, MELT at least three times a week, choosing from the mapslisted. Remember, it’s best to MELT at the end of your day, up to an hour beforebedtime. Once you have been in the maintenance phase for one month, you may trythe MELT maps in Chapter 13.
First Trimester
Week 1
Soft Ball Hand or Foot TreatmentRebalance Sequence
Week 2
Map 1Soft Ball Hand and Foot Treatment
Map 2Upper Body Rehydrate Sequence
Map 3Lower Body Rehydrate Sequence

Week 3 Until the End of Your First Trimester
Map 1Soft Ball Foot TreatmentLower Body Compression SequenceLow Back Release SequenceRebalance and Upper Body Length Sequence
Map 2Rebalance and Upper Body Length SequenceUpper Body Compression SequenceNeck Release SequenceSoft Ball Hand Treatment
Second Trimester
Note that the Rib Length move in the Upper Body Compression Sequencehas been removed in the second trimester.
Map 1Mini Soft Ball Foot TreatmentUpper Body Compression Sequence (no Rib Length)Rebalance and Upper Body Length SequenceLower Body Rehydrate SequenceLower Body Length and Low Back Release SequenceNeck Release Sequence
Map 2Soft Ball Foot TreatmentLower Body Compression SequenceLower Body Length and Low Back Release SequenceRebalance and Upper Body Length Sequence
Map 3Rebalance and Upper Body Length SequenceUpper Body Compression Sequence (without Rib Length move)Neck Release SequenceSoft Ball Hand Treatment

Third Trimester
Try this sequence in your third trimester, as the baby begins to occupymore space and the weight of your body increases. Note that there is noLower Body Length and Low Back Release Sequence.
Map 1Mini Soft Ball Foot or Mini Soft Ball Hand TreatmentLower Body Compression SequenceUpper Body Compression Sequence (without Rib Length move)Rebalance and Upper Body Length Sequence (Limit your time on the rollerif you are uncomfortable lying on the roller in the third trimester. Unlikelying on the floor, this is safe.)Neck Release Sequence
Map 2Mini Soft Ball Hand or Mini Soft Ball Foot TreatmentUpper Body Compression Sequence (without Rib Length move)Neck Release Sequence
Postpartum Self-Treatment Plan
The days and weeks following delivery are a great time to start (or continue) yourMELT journey. Many women have found that MELT helps their body recover morequickly from pregnancy and birth. Because MELT is so gentle, even before yourdoctor gives you the okay to return to full activity, you can add MELT to your day.You will find that MELT helps you get out of postpartum pain and get your pre-babybody back faster.
If you’ve been MELTing throughout your pregnancy, you can continue with norestrictions. The Soft Ball Hand and Foot Treatment is a great place to start. Listen toyour body to know when you are ready to get on the floor and back on the roller. Ifyou are new to MELT or didn’t MELT during your pregnancy, begin with the GettingStarted Self-Treatment Plan in Chapter 10.
Goals:
• Help heal soft tissue damage
• Support realignment and restoration of pelvic stability and positioning

• Restore organ placement and good function, including digestive andelimination processes
• Support natural weight loss
• Reduce repetitive neck and shoulder strain from breastfeeding and holding ababy
• Improve the quality of your unavoidably shortened sleep hours

Conclusion
Congratulations! Look how far you’ve come since you started reading this book.Regardless of why you decided to learn about MELT—to get out of pain; improveyour health; or look, feel, or perform better—you’ve started a new relationship withyour body. You’ve probably already experienced some of the immediate benefits ofMELT: less pain, better sleep, more energy, greater ease of movement, increasedmental clarity, and a greater sense of well-being. Your body is thanking you for givingit the care it needs.
You’ve accomplished a lot. You’ve learned the language and techniques of MELT.You’ve tried the maps. And now that you know how to MELT, you can fit it into yourlife with less time and effort. More changes will come just by continuing to MELT forten minutes, three or more times a week. And you won’t have to wonder whether it’sworking or if you’re doing it right. You can see and feel the changes.
When you tell people who haven’t tried MELT about your results, they may find ithard to believe that something so simple can make such a difference. You may evensurprise yourself with the changes you make. When you feel good, it’s easier to bemotivated, and change occurs organically. You may find yourself effortlessly makingpositive choices in other aspects of your life and establishing new, healthy habits.Find and do what works for you.
I’ve seen people make remarkable changes in their bodies and lives. I’ve heard theterm life-changing time and again. You can be one of these success stories just bycontinuing to care for yourself in this new way. You can change your body and yourlife.
If you feel MELT has helped you already and you want to tell me, please email meat [email protected]. I’d love to hear your story and how MELT has made adifference for you.
Although you have come to the end of this book, our journey together is justbeginning. I know you are going to have questions, and I have more to share withyou. A great place to continue learning is the MELT Method website,www.meltmethod.com. There you will find information, guidance, resources,products, downloadable videos, classes, instructors, training, and a community ofHands-Off Bodyworkers. If you have any questions about MELT, please send anemail to [email protected]. Please also join us on Facebook, as I regularly postinformation about MELT, news of when I am coming to your area, and helpful tips.The more ways we remain connected, the more success you will have with MELT!
I thank you for learning how to help yourself feel better with MELT and I look

forward to reading your personal success story. Until then, stay healthy, happy, andhydrated—and keep MELTing!

Index
The pagination of this electronic edition does not match the edition from which it wascreated. To locate a specific passage, please use your e-book reader’s search tools.
alignment, 20–21, 29–30, 62, 67. See also ideal alignment; misalignmentarthritis, 34, 128, 135. See also rheumatoid arthritis self-careassessment: comparing length as, 115; origin of MELT, 61–64; purpose of, 67, 70–72.
See also Autopilot Assess and Reassess; Body Scan Assess and Reassess; FinalBody Scan Reassess; Grip Assess and Reassess; Neck Turn Assess and Reassess;Reconnect; Rest Assess and Reassess; Rib Length Assess and Reassess; Wrist Assessand Reassess
Autopilot, 58–61, 76, 78, 91–92; inefficiency, 59–61, 67, 79–80; Rebalance and, 73–92;Reconnect and, 59–62, 67; tensional energy and, 109. See also center of gravity;connective tissue system; EZ Zone; “GPS” for the body; nervous system
Autopilot Assess, 160, 245; Autopilot Reassess, 164, 248
back: pain and compression in low, 120–21, 205. See also low back; upper body painself-treatment plan
Back Thigh Shear, 174–75, 236Base of Skull Shear, 123–24, 209–11, 240Bell’s palsy self-care, 271–274Bent Knee Press, 186, 242body changes, 37–38, 51, 53–54, 148, 206, 221–22; Hand and Foot Treatment, 138, 142;
Neck Release Sequence, 126; Rebalance, 88; Reconnect, 70–71; Rehydrate, 116.Body Scan Assess, 59–60, 139, 160, 245, 252;
Body Scan Reassess, 142, 163, 247, 253Body Sense, 31, 50, 57, 147; faulty, 50; Rebalance and, 76, 91–92; Reconnect and, 52,
55, 57–61, 67, 70–72; Rehydrate and, 102, 114–15brain-muscle communication, 30–31, 32breathing: compression and, 110; focused, 110, 111, 116, 135; Hand and Foot Treatment
and, 135; issues, 129; length technique and, 111, 116; techniques vs. diaphragmtechniques, 81. See also diaphragm, Rebalance, 3-D Breath, 3-D Breath Breakdown
Calf: Glide, 103–4; Glide and Shear, 176–77, 236; Rinse, 107–8, 181, 237; Shear, 105–6cancer self-treatment plan, 270–74cells: cellular dehydration, 26–27, 28; slow renewal of, 43

cellulite, 50, 190center of gravity, 58–61; vibrational communication and, 76, 78; finding your, 91–92chronic fatigue self-care, 274–276chronic low back pain self-treatment plan, 264–65chronic neck pain self-treatment plan, 263–64chronic pain: causes and symptoms of, 12–17, 20–21, 118–19; fitness industry and
widespread, 21; inability of medical science to cure, 19. See also pain; suddenchronic pain
collagen, 25, 26, 99, 114, 190complementary self-care: diagnosed systemic conditions, disorders, or diseases, 270–
77; instructions for, 261; pain due to trauma, injury, or surgery, 262–70; pregnancyand postpartum, 278–81; specific changes, 258–59. See also cancer self-treatmentplan; chronic low back pain self-treatment plan; chronic neck pain self-treatmentplan; connective tissue disorders and related diseases self-treatment plan; gettingstarted self-treatment plan; hip pain self-treatment plan; healing crisis/transitions;immune disorders self-treatment plan; lower body pain self-treatment plan; MELTmaps; neurological disorders self-treatment plan; pelvis pain self-treatment plan;pregnancy self-treatment plan; postpartum self-treatment plan; spinal diseases anddisorders self-treatment plan; upper body pain self-treatment plan; specialcircumstances
compression, 50; causes of, 16, 27, 29–30; how the Four R’s address, 52–54;inflammation and, 33–34; positive, 96–97; varying depths of, 98. See alsodecompression
compression techniques: development of, 96–99; for fingers, 166, 249; introduction tofour types of, 99–101, 102–9; tips and precautions for, 109–10. See also Glide;Rinse; Shear
connective tissue, 16–17, 25; Glide and, 104–5; inflammation, 120–21; length and, 114;Rinse and, 108; Shear and, 107
connective tissue dehydration, 49; causes and effects of, 16, 18, 27–28, 32–44; cellular,27; how the Four R’s address, 52–54; inflammation and, 33–34, 44; pain and, 28,94, 101. See also cells; Rehydrate
connective tissue disorders and related diseases self-treatment plan, 274–76connective tissue system: communication and, 30–32; components and functions of, 4–
5, 6, 16–24; extensibility and, 30, 114; hydration and, 26–28. See also fasciacraniosacral therapy, 3, 53
decompression, 120–21. See also compression; Releasedegenerative disk disease self-care, 276–77

dehydration. See cells; connective tissue dehydrationdiabetes self-care, 274–276diaphragm, 78; stuck stress and, 79; three-dimensional movement of, 81, 91. See also
breathingdifferentiated movement, 79, 115direct Shearing, 99, 102, 106discomfort vs. pain, 12–14domes and arches, 77, 78Double Arm Reach, 203–4, 231Dupuytren’s contracture self-care, 135, 274–276dystonia self-care, 271–274
Ehlers-Danlos syndrome self-care, 274–276emotional postures, 38, 43extensibility of connective tissue, 30, 114EZ Zone, 49–51, 53–55, 222–23. See also Autopilot
fascia, 16; increasing interest and research on, 25–26; myofascia, 21, 24, 25, 95, 132;superficial fascia, 23, 24, 95, 97. See also connective tissue system
faulty Body Sense, 50; how the Four R’s address, 52fibromyalgia self-care, 274–276Final Body Scan Reassess, 142, 164, 248, 253foam rolling, 93–95. See also rollersFoot Treatment: body changes after, 142; Mini Soft Ball Foot Treatment, 139–42, 252–
53; Soft Ball Foot Treatment, 159–64, 245–48. See also Hand and Foot TreatmentFour R’s: introduction to, 52–54; how MELT addresses, 54–55. See also individual
Four R’sFriction, 133, 134; for feet, 142, 163, 247, 253; for hands, 138, 169, 251, 255
Gentle Rocking, 84–85, 152–53, 200–1, 229getting started self-treatment plan: tips and precautions, 146–49; drinking water, 149;
special circumstances to consider, 149–50. See also self-treatment plansGlide, 99, 104, 134; connective tissue and, 104–5; for hands, 137,167–168, 250, 254; for
feet, 140, 161, 246, 253; tensional energy and, 109. See also compression techniques“GPS” for the body, 58–59, 91. See also AutopilotGrip Assess, 136, 165, 249, 254; Grip Reassess, 138, 170, 251, 255gut inflammation, 44gut regulator, 39, 40, 41

Hand and Foot Treatment, 54–55, 133–34; origin of, 127–132; techniques, 54–55, 34;tips and precautions for, 135. See also Hand Treatment; Foot Treatment
Hand Treatment: body changes after, 138; Mini Soft Ball Hand Treatment, 136–38, 254–55; Soft Ball Hand Treatment, 165–70, 248–51. See also Hand and Foot Treatment;upper body
Hands-Off Bodywork: the Four R’s and, 52–54, 55; becoming an expert in, 49–51, 71healing crisis/transitions, 259–60health benefits of MELT, 37–38, 43–44, 51, 53–54, 148, 221–22Hedley, Gil, 4, 23, 26, 97hip pain self-treatment plan, 269–70Hip to Heel Press, 112–13, 187, 243human dissection, 4, 23–24, 25, 97hydration, 16, 26–27, 30, 32, 34–35, 42–44. See also Rehydrate; water
ideal alignment, 62–64, 66, ideal alignment vs. common imbalances, 67–69imbalance: ideal alignment vs. common imbalances, 67–69; misunderstanding of
muscle, 20–21. See also misalignment; NeuroCore system; Rebalance; regulationimmune disorders self-treatment plan, 271–74; for lupus, 271–274indirect Shearing, 99, 102, 106inflammation, 33–34, 44; compression and joint, 33–34, 120–21; gut, 44. See also
compression; connective tissue; connective tissue dehydration; regulationInner and Back Thigh Rinse, 182, 238Inner Thigh Glide and Shear, 178–80, 237
joints: chronic inflammation damage to, 33–34, 120–21; Hand and Foot Treatment of,128–32, 134; misalignment and compression of, 20–21, 27, 29–30, 33–34, 50;stabilization of, 31–32
lipomas self-care, 274–276; 272length techniques. See Two-Directional Length techniquesLow Back Decompress, 217–18, 244Low Back Release Sequence, 214–18Lower Body Compression Sequence, 235–39Lower Body Length and Low Back Release Sequence, 241–44lower body pain self-treatment plan, 267–69Lower Body Rehydrate Sequence, 172–88
manual therapy: inspiration for MELT techniques, 27, 35, 96–100, 102; modalitiesincorporated into MELT, 53, 128; practice, 4, 11; Rolfing, 25–26, 96

Marfan syndrome self-care, 274–276“masses” of the body, 66–69; Autopilot and, 76; length techniques and, 111, 115; origin
of, 63–64; tip for compressing, 110massage, 95medical treatment: limitations for pain, 14, 18–20, 34, 43; cures, 18–19; using MELT
with, 257MELT: author’s creation of, 1–6, 22, 23–24, 37–38, 61–64, 89–92, 93–101, 117–19,
127–32; the Four R’s and, 52–54; healing transitions and, 259–60. See also bodychanges; health benefits of MELT; manual therapy
MELT maps, 54, 70, 146, 223–24; Fifteen- to Twenty-Minute Maps, 226; SequenceGuide, 227; Ten-Minute Maps, 225. See also complementary self-care; moves;sequences
metabolic disorders self-care, 274–276Mini Soft Ball Foot Treatment, 139–42, 252–53; Mini Soft Ball Hand Treatment, 136–
38, 254–55misalignment, 20–21, 29–30, 33, 66, 80, 121. See also alignment; ideal alignment;
imbalancemovement: connective tissue system role in, 30–32; differentiation of, 79, 115; how
adequate hydration improves, 32. See also repetitive movements/posturesmoves, 54, 70, 146multiple sclerosis self-care, 271–274muscles: brain communication with, 30–31, 32; connective tissue and, 20–21, 29–30;
how dehydration negatively affects, 30; imbalance and, 20–21; stability and, 78–79Myers, Tom, 26, 132myofascia, 21, 24, 25; hydrating, 95; Myers’s model of lines, 132
Neck Decompress, 125, 212–13, 240Neck Release Sequence, 121–26, 208–13, 239–41; body changes
after, 126Neck Turn Assess, 122, 209, 239; Neck Turn Reassess, 126, 213, 241nervous system: connective tissue interaction with, 17–18, 38; simplified understanding
of, 39–40; regulators of, 39–44. See also Autopilot; regulation; sensory nervesNeuroCore system: imbalance of, 50, 52, 79–81; restoring balance to, 52, 90–92;
stability, 73–79neurofascial system, 43–44, 49–51. See also Autopilot, connective tissue, nervous
systemneurological disorders self-treatment plan, 271–74
osteoarthritis/osteoporosis self-care, 276–77

osteomyelitis self-care, 276–77
pain: author’s, 2–3, 10–11; believing you can live without, 10–11; compression causing,94, 120–21; listening to your body to avoid, 147–48, 259; “normal” discomfort of,12–14; signaling connective tissue dehydration, 28, 101; types of, 12, 14–15, 17, 19;understanding the causes of, 9–10. See also chronic pain; hip pain self-treatmentplan; lower body pain self-treatment plan; pelvis pain self-treatment plan; upperbody pain self-treatment plan
pain-free lifestyle, 10–12, 17, 54pain management: chronic need for, 19; massage for, 95; medication used for, 14, 18–
20pain tolerance, 110, 135paralysis self-care, 276–77Parkinson’s self-care, 271–274pelvis pain self-treatment plan, 269–70Pelvic Tuck and Tilt, 154–55, 229; Pelvic Tuck and Tilt Challenge, 216–17, 243Position Point Pressing, 134; for feet, 140, 161, 245–46, 252; for hands, 167, 249postpartum self-treatment plan, 281pregnancy self-treatment plan, 278–80pre-pain symptoms, 13–14, 16–17, 67, 71
Rebalance: benefits of, 52, 55, 89–92; body changes after, 88; origin of, 89–92. See alsoimbalance; NeuroCore
Rebalance and Upper Body Length Sequence, 228–31Rebalance Sequence, 82–88, 91, 150–59Reconnect: before and after each sequence, 71–72, 147; benefits of, 52, 55, 70–72;
origin of, 61–64; purpose of, 67; masses and spaces model and, 66. See alsoassessment
Reflexive Core mechanism, 73–74, 75–81, 91regulation: connective tissue and imbalance of, 43; inflammation and, 44; efficiency,
40–41; inefficiency, 41–42. See also restore regulator; stress regulatorRehydrate: body changes after, 116; 96–101, 102–9; benefits of, 52, 55, 101–2; origin
of, 93–101; restoring connective tissue with, 99–100, 101–16. See also connectivetissue dehydration; hydration; Rehydrate techniques
Rehydrate techniques. See Glide; Rinse; Shear; Two-Directional Length techniquesRelease: benefits of, 52, 55, 117–19; body changes after, 126; origin of, 117–119. See
also decompressionrepetitive movements/postures, 15, 16, 66; dehydration and, 27; MELT for undoing
negative effects of, 21, 28; stuck stress due to, 43, 49; chronic/sudden chronic pain

caused by, 15–17, 21. See also emotional postures; movementRest Assess, 57–59, 64–65, 82–83, 91, 151–52, 173, 191, 214, 228, 232, 235, 241;
importance of, 67; Rest Reassess, 88, 91, 159, 188, 204, 218, 231, 239, 244;importance of, 70–72
restore regulator, 39, 40, 41, 44, 45. See also nervous system; regulationrheumatoid arthritis self-care, 135, 274–276Rib Length Assess, 192–94, 232–33; Rib Length Reassess, 199, 235Rinse, 97, 108; 134; connective tissue and, 108–9; for feet, 141, 162–63, 247, 253; for
fingers, 137, 169, 251, 255; for hands, 168, 250; tensional energy and, 109. See alsocompression techniques
Rolf, Ida, 25–26, 53Rolfing technique, 25–26, 96rollers: pain from using hard, 93–95; benefits of softer, 95–97, 98–99; duration on, 111,
148Rooted Core mechanism, 73, 75–81, 91, 132
Schleip, Robert, 5, 24, 26scoliosis self-care, 276–77scleroderma self-care, 135, 274–276Self-myofascial release, 93, 96self-treatment plans, 54–55; MELT maps for, 223–26; Reconnect before and after
sequences, 71–72, 147; special circumstances to consider, 149–50. See alsocomplementary self-care; getting started self-treatment plan; sequences
sequences, 54; Reconnect before and after each, 71–72, 147; Sequence Guide for, 227,261. See also Foot Treatment; Hand Treatment; Low Back Release Sequence; LowerBody Compression Sequence; Lower Body Length and Low Back ReleaseSequence; Lower Body Rehydrate Sequence; MELT maps; Neck Release Sequence;Rebalance Sequence; Rebalance and Upper Body Length Sequence; Upper BodyCompression Sequence; Upper Body Rehydrate Sequence
sensory nerves, 18, 31, 32. See also nervous systemShear, 99, 106, 134; connective tissue and, 107; for feet, 141, 162, 246, 253; for hands,
137, 168, 250, 254; tensional energy and, 109. See also compression techniquesShoulder Blade Glide and Shear, 197, 234; Shoulder Blade Reach, 202, 230SI Joint Shear, 183–85, 214–15, 238–39, 242sleep: MELT and improved, 37, 44, 146; problems related to, 10, 13, 14, 28; regulation
of, 40–42Soft Ball Foot Treatment, 159–64, 245–48; Soft Ball Hand Treatment, 165–70, 248–51“spaces” of the body, 63–64, 66; decompression of, 120–21; “secondary,” 121;

precaution against compressing, 99, 104, 110special circumstances, 149–50spinal cord injuries self-care, 276–77spinal diseases/disorders self-treatment plan, 276–77spinal stenosis self-care, 276–77spondylolisthesis self-care, 276–77stability: diaphragm and, 78; differentiated movement and, 79, 115; MELT compression
tip for, 109–10; muscles and, 78–79; NeuroCore system, 73–79, 81. See alsoAutopilot
stress regulator, 39–40, 41, 44–45. See also nervous system; regulationstuck stress, 42–44, 49–51; MELT solutions for, 44–45, 51. See also compression;
dehydration; repetitive movements/posturessudden chronic pain, 15–17. See also chronic pain; repetitive movements/posturessuperficial fascia/layer, 23, 24, 95, 97, 98
Tensional integrity, 29, 30, 52, 80, 189; body architecture and, 33–34; tensegrity modelof, 29; tensional energy and, 108–9, 189, 190, 205
3-D Breath, 87, 91, 158, 230; 3-D Breath Breakdown, 86, 91, 156–57, 229tips and precautions: for compression techniques, 109–10; for Hand and Foot
Treatment, 135; for length techniques, 111; for getting started self-treatment plan,146–49
Two-Directional Length techniques, 100, 111; assessment using, 115; Body Sense rolein, 114–15; connective tissue and, 114; tips and precautions for, 111
Upper Back Glide and Shear, 195–96, 233; Upper Back Rinse, 198, 234Upper Body Compression Sequence, 232–35upper body pain self-treatment plan, 266–67Upper Body Rehydrate Sequence, 191–204
vibration: communication and, 31, 58–59, 76, 78, 109; discovery of whole body 1–6, 98
water: difficulty absorbing, 26–27; drinking before and after MELT, 135, 149, 206, 224;importance of drinking, 101, 149; benefits of consistently drinking small amounts,35
Wrist Assess, 165, 248; Wrist Reassess, 169, 251

Acknowledgments
I would like to dedicate this book to my mentors, clients, and students, who havebeen my teachers and allowed me to become one. I have not traveled down this roadalone. I have so many people to thank for their unending belief, trust, guidance, andteaching.
Thank you to my writing partner and collaborator in all things MELT, DebbieKarch. Although many of the ideas and techniques in this book were developed overa decade ago, the most challenging task was simplifying the concepts and refining thelanguage. What began as a simple project of writing an FAQ brochure six years agoturned into the full-blown coauthoring of this book. The depth of Debbie’s skills andbackground in training and development has been an invaluable asset in bringing thismethod to everyone. Debbie has helped make it possible for people to learn complexinformation from me even if they don’t have a background in human science. Heryears of dedicated work and friendship are why this book exists in a format usable byanyone.
I am also very blessed and utterly grateful for the support of the growing fascialcommunity that has arisen over the past twenty years. This international communitywith its pioneering “Rolfers turned researchers” includes some of my greatest allies.
Although I wasn’t a researcher or clinician, the key players in the world of fasciaand progressive human science have welcomed me and informed, challenged, andguided my work. Very special thanks to Thomas Findley, MD, PhD; Gil Hedley, PhD;Tom Myers; Robert Schleip, PhD; Jean Claude Guimberteau, MD; Jean Pierre Barral,DO; and Diane Lee. I feel privileged to learn this information as you are making thediscoveries—long before it will ever be taught in school. Your kindness to me andyour contribution to my work can never be repaid.
This community has taken a huge leap because of the vision and drive of ThomasFindley, who has gathered fascial scientists and clinicians from around the world toshare the latest and best research on human fascia.
A very special thank you to renegade somanaut Gil Hedley. Without your skill oflistening and teaching, I am not sure where I would be today. As I have seen youblaze your own path in pursuit of what connects us beneath the surface, I have beeninspired to look for the answer to my own question—how do I live an active, healthy,pain-free life? Thank you for teaching me that simple models work best. Your beliefin me has propelled me and my work in profound ways. The gratitude I have for youand our friendship is without measure.
Thanks to the dozens of researchers and scientists who have dedicated their lives to

expanding the boundaries of traditional research, including Carla and Antonio Stecco,Helen Langevin, Candace Perth, James Oschman, and Gerald Pollack. You have eachhelped me enrich my education through your books, papers, journals, and articles,and given me tangible evidence to validate what I have observed over the past dozenyears.
I also want to thank each person who allowed me to share my hands-on and hands-off techniques. I have great love and respect for you. Your trust and belief in me ispart of the strong foundation MELT is built upon. You teach and inspire me everyday.
Thank you to the hundreds of MELT instructors who have spent their time learningand practicing my work with open hearts and minds. You have all been a blessing tome and the tens of thousands of people you have helped. I am so grateful, proud, andhumbled by your support and love of this method.
Thank you to the staff and members of the JCC in Manhattan, where the MELTMethod was launched. In 2004, when I came up with the idea of teaching MELT topeople in groups, most fitness clubs were not ready for it. But Caroline Kohles, seniordirector of health and wellness, said yes without hesitation. For this and her continuedsupport I am forever grateful. Today this facility is the primary MELT destination inNew York City, with MELT classes happening every day.
Thank you to IDEA International, for your ongoing support, and specifically thanksto Aprile Peishel, director of programming, for giving me the platform to bring thisgroundbreaking selfcare technique back to the health and fitness arena.
A special thanks to Sara Bethell, who has been an invaluable asset as a wise secondset of eyes for this book. Debbie and I are grateful for your perfect package ofwordsmith and MELT instructor. Thank you for stepping in to help with thedevelopment of this book while also managing the website, communicating withconsumers and instructors, and teaching MELT weekly!
To the rest of my team, Gene Clark, Kelly Kamm, Amanda Cizek, MichelleDiDonato, and Kristen Sundberg for their help in building the foundation of theMELT universe. Your talents and support of the business have made it possible forme to be able to focus more of my energy on doing what I love and for MELT toreach a wider audience.
Thanks to Elaine de Beauport and Aura Sofia Diaz for taking the time to talk abouthow MELT influences nervous system regulation. Debbie and I still recall yourinsistence that we stop worrying about what other people think and “just write thebook.” The three of you help me feel safe!
This book would not exist if it weren’t for Mark Tauber, senior vice president andpublisher, Nancy Hancock, executive editor, and Elsa Dixon, associate editor, at

HarperOne; Doris S. Michaels, president, and Delia Berrigan Fakis, formerly theexecutive literary agent, at DSM Literary Agency, Inc.; and Heidi Krupp-Lisiten,owner of Krupp Kommunications. Thank you for sharing my vision that MELT canbe a force in changing how people care for themselves and live a pain-free life.
I am grateful to the many practitioners who have cared for my body and mind,helped me heal injuries and recover from crazy business travel, and made it possiblefor me to have the energy and grounding to do trainings, teach classes, and have aprivate practice, all while writing this book. A special thanks to Barbara Chang, TerryWilliams, Alec Helner, Debbie Parsons, Jenise Parris, Jamie Compton, JohnGuarneselli, and James Lindenberg. You continue to teach me with your hands,needles, knowledge, and mad skills.
Thank you to Phil Widlanski, who made it possible for me to have an office wheremy private practice flourished and MELT was developed. Thank you for making mepart of your family. I am forever grateful for your generosity and my office door isalways open to you.
I would not be where I am without my lifelong friends Brian Leighton and DarrenLisiten, who somehow are always there to advise me so I don’t have to “learn thingsthe hard way.” My business and personal life wouldn’t be the same without theircontinued mentoring and love. Their unconditional support keeps me on solid groundand reminds me that the path my life travels is the right one.
I am so appreciative for the support of my mom, family, and closest friends whohave always unconditionally encouraged my passion and pursuits. I am a betterperson because of your belief and love.

About the Author
Sue Hitzmann, M.S., C.S.T., N.M.T., is a nationally recognized somatic-movementeducator and manual therapist. Her decades of practice, research, and study ofanatomical science and alternative therapies have culminated in the creation of theMELT Method®, a revolutionary approach to pain-free fitness and longevity. Shelives in New York City.
Vi s i t www.AuthorTracker.com for exclusive information on your favoriteHarperCollins authors.

Recommended Reading
Books and Articles
Banes, A. J., M. E. Wall, J. Garvin, and J. Archambault. “Cytomechanics: Signaling toMechanical Load in Connective Tissue Cells and Role in Tissue Engineering.” InFunctional Tissue Engineering, edited by F. Guilak, D. L. Butler, S. A. Goldstein, andD. J. Mooney, 318–334. New York: Springer-Verlag, 2003.
Biel, Andrew. Trail Guide to the Body: How to Locate Muscles, Bones, and More .3rd ed. Boulder, CO: Books of Discovery, 2005.
Chaitow, Leon, ND, DO. Soft Tissue Manipulation: A Practitioner’s Guide to theDiagnosis and Treatment of Soft Tissue Dysfunction and Reflex Activity . Rochester,VT: Healing Arts Press, 1988.
Chaitow, L., D. Bradley, and C. Gilbert. Multidisciplinary Approaches to BreathingPattern Disorders. New York: Churchill Livingstone, 2002.
Findley, T., and R. Schleip. Fascia Research: Basic Science and Implications forConventional and Complementary Health Care. Munich: Elsevier GmbH, 2007.
Franklin, Eric, Dynamic Alignment Through Imagery. Champaign, IL: HumanKinetics, 2012.
Greenman, Philip E. Principles of Manual Medicine. 2nd ed. Baltimore, MD:Lippincott, Williams & Wilkins, 1996.
Kapandji, I. A. The Physiology of the Joints. New York: Churchill Livingstone, 1971.
Kendall, F. P., E. K. McCreary, and P. G. Provance. Muscles: Testing and Function .4th ed. Baltimore, MD: Lippincott, Williams & Wilkins, 1993.
Lindsay, Mark. Fascia: Clinical Applications for Health and Human Performance.Independence, KY: Delmar Cengage Learning, 2008.
Madore, A., and J. R. Kahn. “Therapeutic Massage in Integrative Pain Management.”I n Integrative Pain Medicine: The Science and Practice of Complementary andAlternative Medicine in Pain Management, edited by J. Audette and A. Bailey, 353–

378. New York: Humana Press, 2008.
Myers, Thomas W. Anatomy Trains: Myofascial Meridians for Manual andMovement Therapists. Edinburgh: Elsevier, 2001, 2009.
Upledger, John E., DO, OMM. Craniosacral Therapy: Touchstone for NaturalHealing. Seattle: Eastland Press, 1999.
Weintraub, William. Tendon and Ligament Healing: A New Approach ThroughManual Therapy. Berkeley, CA: North Atlantic Books, 1999.
Yoo, H., D. R. Baker, C. M. Pirie, B. Hovakeemian, and G. H. Pollack.“Characteristics of Water Adjacent to Hydrophilic Interfaces.” In Water: TheForgotten Biological Molecule, edited by D. LeBihan and H. Fukuyama, 123–136.Singapore: Pan Stanford, 2011.
Research Papers and Abstracts
Aukland, K., and R. K. Reed. “Interstitial-Lymphatic Mechanisms in the control ofExtracellular Fluid Volume.” Physiological Reviews 73, no. 1 (1993): 1–78.
Banes, A., A. J. Banes, J. Qi, J. Dmochowski, D. Bynum, M. Schramme, and M.Patterson. “Tenomodulin Is Down-Regulated in Wounded and Strained BioartificialEquine Tendons In Vitro.” Paper presented at the 57th Annual Meeting of theOrthopaedic Research Society, Long Beach, CA, January 2011.
Borgini, E., A. Stecco, J. A. Day, and C. Stecco. “How Much Time Is Required toModify a Fascial Fibrosis?” Journal of Bodywork and Movement Therapies 14, no. 4(2010): 318–325.
Bouffard, N.A., K. R. Cutroneo, G. J. Badger, S. L. White, T. R. Buttolph, H. P.Ehrlich, D. Stevens-Tuttle, and H. M. Langevin. “Tissue Stretch Decreases SolubleTGF-Beta1 and Type-1 Procollagen in Mouse Subcutaneous Connective Tissue:Evidence from Ex Vivo and In Vivo Models.” Journal of Cellular Physiology 214,no. 2 (2008): 389–395.
Bove, G. M. “Focal Nerve Inflammation Induces Neuronal Signs Consistent withSymptoms of Early Complex Regional Pain Syndromes.” Experimental Neurology219, no. 1 (2009): 223–227.

Bove, G. M., W. Weissner, and M. F. Barbe. “Long Lasting Recruitment of ImmuneCells and Altered Epi-Perineurial Thickness in Focal Nerve Inflammation Induced byComplete Freund’s Adjuvant.” Journal of Neuroimmunology 213 (2009): 26–30.
Chaitow, L. “Chronic Pelvic Pain: Pelvic Floor Problems, Sacroiliac Dysfunction andthe Trigger Point Connection.” Journal of Bodywork and Movement Therapies 11(2007): 327–339.
Chaudhry, H., Z. Ji, N. Shenoy, and T. Findley. “Viscoelastic Stresses on AnisotropicAnnulus Fibrosus of Lumbar Disk under Compression, Rotation, and Flexion inManual Treatment.” Journal of Bodywork and Movement Therapies 13, no. 2 (2009):182–191.
Day, J. A., C. Stecco, and A. Stecco. “Application of Fascial Manipulation Techniquein Chronic Shoulder Pain—Anatomical Basis and Clinical Implications.” Journal ofBodywork and Movement Therapies 13, no. 2 (2009): 128–135.
Dilley, A, and G. M. Bove. “Resolution of Inflammation Induced Axonal MechanicalSensitivity and Conduction Slowing in C-Fiber Nociceptors.” Journal of Pain 9, no. 2(2008): 185–192.
Falla, D., G. Jull, T. Russell, B. Vicenzino, and P. Hodges. “Effect of Neck Exercise onSitting Posture in Patients with Chronic Neck Pain.” Physical Therapy 87, no. 4(2007): 408–417.
Ferreira, M. L., P. H. Ferreira, and P. W. Hodges. “Changes in Postural Activity of theTrunk Muscles Following Spinal Manipulative Therapy.” Manual Therapy 12, no. 3(2007): 240–248.
Gabbiani, G. “Evolution and Clinical Implications of the Myofibroblast Concept.”Cardiovascular Research 38, no. 3 (1998): 545–548.
Holm, S., A. Indahl, and M. Solomonow. “Sensorimotor Control of the Spine.”Journal of Electromyography and Kinesiology 12, no. 3 (2002): 219–234.
James, H., L. Castaneda, M. E. Miller, and T. Findley. “Rolfing Structural IntegrationTreatment of Cervical Spine Dysfunction.” Journal of Bodywork and MovementTherapies 13, no. 3 (2009): 229–238.
Langevin, H. M. “Connective Tissue: A Body-Wide Signaling Network?” Medical

Hypotheses 66, no. 6 (2006): 1074–1077.
Langevin, H. M., C. J. Cornbrooks, and D. J. Taatjes. “Fibroblasts Form a Body-WideCellular Network.” Histochemistry and Cell Biology 122, no. 1 (2004): 7–15.
Lee, D. G., L. J. Lee, and L. McLaughlin. “Stability, Continence, and Breathing: TheRole of Fascia Following Pregnancy and Delivery.” Journal of Bodywork andMovement Therapies 12, no. 4 (2008): 333–348.
Lee, D. G., and A. Vleeming. “Impaired Load Transfer through the Pelvic Girdle—ANew Model of Altered Neutral Zone Function.” Paper presented at the 3rdInterdisciplinary World Congress on Low Back and Pelvic Pain, Vienna, Austria,1998.
Leusen, I., “Regulation of Cerebrospinal Fluid Composition with Reference toBreathing.” Physiology Review 52 (1972): 1–56.
Liebsch, D. “Fascia Is Able to Actively Contract and Thereby to InfluenceMusculoskeletal Mechanics.” Paper presented at the 5th World Congress ofBiomechanics, Munich, Germany, July–August, 2006.
O’Rourke, C., I. Klyuzhin, J. S. Park, and G. H. Pollack. “Unexpected Water FlowThrough Nafion-Tube Punctures.” Physical Review E: Statistical, Nonlinear, andSoft Matter Physics 83, no. 5 (2011).
Pollack, G. H. “Water, Energy and Life: Fresh Views from the Water’s Edge.”International Journal of Design & Nature and Ecodynamics 5, no. 1 (2010): 27–29.
Qi, J., L. Chi, D. Bynum, and A. J. Banes. “Gap Junctions in IL-1beta-Mediated CellSurvival Response to Strain.” Journal of Applied Physiology 110, no. 5 (2011): 1425–1431.
Reed, R. K., A. Lidén, and K. Rubin. “Edema and Fluid Dynamics in ConnectiveTissue Remodelling.” Journal of Molecular and Cellular Cardiology 48, no. 3(2010): 518–523.
Schleip, R. “Fascial Plasticity—A New Neurobiological Explanation: Part 1.” Journalof Bodywork and Movement Therapies 7, no. 1 (2003): 11–19.
———. “Fascial Plasticity—A New Neurobiological Explanation: Part 2.” Journal of

Bodywork and Movement Therapies 7, no. 2 (2003): 104–116.
Schleip, R., W. Klingler, and F. Lehmann-Horn. “Active Fascial Contractility: FasciaMay Be Able to Contract in a Smooth Muscle-Like Manner and Thereby InfluenceMusculoskeletal Dynamics.” Medical Hypotheses 65, no. 2 (2005): 273–277.
Schleip, R., I. L. Naylor, D. Ursu, W. Melzer, A. Zorn, H. J. Wilke, F. Lehmann-Horn,and W. Klingler. “Passive Muscle Stiffness May Be Influenced by Active Contractilityof Intramuscular Connective Tissue.” Medical Hypotheses 66, no. 1 (2006): 66–71.
Shah, J. P., J. V. Danoff, M. J. Desai, S. Parikh, Y. Nakamura, T. M. Phillips, and L.H. Gerber. “Biochemicals Associated with Pain and Inflammation Are Elevated inSites Near to and Remote from Active Myofascial Trigger Points.” Archives ofPhysical Medicine and Rehabilitation 89, no. 1 (2008): 16–23.
Sikdar, S., R. Ortiz, T. Gebreab, L. H. Gerber, and J. P. Shah. “Understanding theVascular Environment of Myofascial Trigger Points Using Ultrasonic Imaging andComputational Modeling.” Paper presented at the 32nd Annual InternationalConference of the Institute of Electrical and Electronics Engineers, Engineering inMedicine and Biology Society, Buenos Aires, Argentina, August–September 2010.
Sikdar, S., J. P. Shah, E. Gilliams, T. Gebreab, and L. H. Gerber. “Assessment ofMyofascial Trigger Points (Mtrps): A New Application of Ultrasound Imaging andVibration Sonoelastography.” Paper presented at the 32nd Annual InternationalConference of the Institute of Electrical and Electronics Engineers, Engineering inMedicine and Biology Society, Vancouver, Canada, August 2008.
Stecco, C., V. Macchi, A. Porzionato, A. Morra, A. Parenti, A. Stecco, V. Delmas, andR. De Caro. “The Ankle Retinacula: Morphological Evidence of the ProprioceptiveRole of the Fascial System.” Cells, Tissues, Organs 192, no. 3 (2010): 200–201.
Stecco, A., V. Macchi, C. Stecco, A. Porzionato, J. Ann Day, V. Delmas, and R. DeCaro. “Anatomical Study of Myofascial Continuity in the Anterior Region of theUpper Limb.” Journal of Bodywork and Movement Therapies 13, no. 1 (2009): 53–62.
DVDs
Guimberteau, Jean-Claude, MD. Strolling Under the Skin (Promenade sous la peau):Images of Living Matter Architectures DVD. Directed by Jean-Claude Guimberteau.

Amsterdam: Elsevier, 2004.
Hedley, Gil. Integral Anatomy Series. DVD series. Beverly Hills, FL: IntegralAnatomy Productions, n.d.
WebsitesAnatomy Trains, Thomas Myers, www.anatomytrains.com
Fascia Research, Robert Schleip, www.fasciaresearch.com
J. C. Guimberteau, www.guimberteau-jc-md.com/en
Integral Anatomy, Gil Hedley, www.integralanatomy.com
Diane Lee, www.dianelee.com
Other research papers, abstracts, and posters regarding fascial contractility,responsiveness, hydration, and other compelling concepts and studies can be found atwww.fasciaresearch.com and www.fasciacongress.org.

Credits
Photographs by Brian Leighton. Used by permission.Illustrations by Gene Clark. Used by permission.

Copyright
This book contains advice and information relating to health care. It is not intended toreplace medical advice and should be used to supplement rather than replace regularcare by your doctor. It is recommended that you seek your physician’s advice beforeembarking on any medical program or treatment. All efforts have been made to assurethe accuracy of the information contained in this book as of the date of publication.The publisher and the author disclaim liability for any medical outcomes that mayoccur as a result of applying the methods suggested in this book.
Products, pictures, trademarks, and trademark names are used throughout this book todescribe and inform the reader about various proprietary products that are owned bythird parties. No endorsement of the information contained in this book is given bythe owners of such products and trademarks and no endorsement is implied by theinclusion of products, pictures, or trademarks in this book.
THE MELT METHOD: A Breakthrough Self-Treatment System to Eliminate Chronic Pain,Erase the Signs of Aging, and Feel Fantastic in Just 10 Minutes a Day! Copyright ©2013 by Susan Hitzmann. All rights reserved under International and Pan-AmericanCopyright Conventions. By payment of the required fees, you have been granted thenonexclusive, nontransferable right to access and read the text of this e-book on-screen. No part of this text may be reproduced, transmitted, downloaded, decompiled,reverse-engineered, or stored in or introduced into any information storage andretrieval system, in any form or by any means, whether electronic or mechanical, nowknown or hereinafter invented, without the express written permission ofHarperCollins e-books.
EPub Edition © December 2012 ISBN: 9780062065377
HarperCollins books may be purchased for educational, business, or salespromotional use. For information, please e-mail the Special Markets Department [email protected].
HarperCollins website: http://www.harpercollins.com
HarperCollins®, ®, and HarperOne™ are trademarks of HarperCollins Publishers.
FIRST EDITION
Hitzmann, Sue.The melt method : a breakthrough self-treatment system to eliminate chronic pain,erase the signs of aging, and feel fantastic in just 10 minutes a day! / by SueHitzmann.
p. cm.ISBN 978-0-06-206535-31. Chronic pain—Treatment—Popular works. 2. Stretching exercises—Popularworks. 3. Self-care, Health—Popular works. I. Title.
RB127.H58 2012616’.0472—dc23
2012023457
12 13 14 15 16 RRD (H) 10 9 8 7 6 5 4 3 2 1

Back Ad

About the Publisher
AustraliaHarperCollins Publishers (Australia) Pty. Ltd.Level 13, 201 Elizabeth StreetSydney, NSW 2000, Australiahttp://www.harpercollins.com.au
CanadaHarperCollins Canada2 Bloor Street East - 20th FloorToronto, ON, M4W, 1A8, Canadahttp://www.harpercollins.ca
New ZealandHarperCollins Publishers (New Zealand) LimitedP.O. Box 1Auckland, New Zealandhttp://www.harpercollins.co.nz
United KingdomHarperCollins Publishers Ltd.77-85 Fulham Palace RoadLondon, W6 8JB, UKhttp://www.harpercollins.co.uk
United StatesHarperCollins Publishers Inc.10 East 53rd StreetNew York, NY 10022http://www.harpercollins.com