Mega 105wr Easy Start Guide Version 1.0
36
Mega 105WR ADSL 2+ Router - Easy Start
-
Upload
brucemacmillan -
Category
Documents
-
view
217 -
download
3
Transcript of Mega 105wr Easy Start Guide Version 1.0
Mega 105WR ADSL 2+ Router - Easy Start
Mega 105WR ADSL2+ Router - Easy Start Guide
1
Chapter 1 – Introduction
Thank you for purchasing a Mega 105WR Router. This Easy start guide is a complete guide to configuring your Mega 105WR. It includes setup configurations for most operating systems. If you are setting your Mega 105WR up with a PC running Microsoft Windows operating system, it is suggested that you follow the much quicker “Quick Start Guide“ that was supplied in printed form with your Router. (It is also available in soft copy on your Router CD.)
The Mega 105WR Router can be connected to any computer/notebook with a 10/100 Base-T Ethernet card, USB port or IEEE 802.11b/g Wireless adapter. The Ethernet ports have the Auto MDI/MDIX feature which allows both cross and straight UTP cable to be utilized. The Mega 105WR has an in-built IEEE802.11g Wireless LAN Access Point for wireless connectivity.
1.1 Minimum Requirements
• Pentium® MMX 233MHz
• A CD-ROM Drive
• At least one of the following, depending on how you wish to connect to the Router
• For Ethernet connectivity - Ethernet card with TCP/IP Protocol installed
• For Wireless connectivity - IEEE 802.11b/g Wireless adapter
• For USB connectivity - USB port
- One of the following operating systems +Windows® 98 Second Edition
+Windows® Me
+Windows® 2000
+Windows® XP
+Windows® XP x64 Edition
+Macintosh OS 10.2 & above
• Web Browser - Microsoft Internet Explorer 4.0 (or later versions)
Or
- Netscape® Navigator 3.02 (or later versions)
Mega 105WR ADSL2+ Router - Easy Start Guide
2
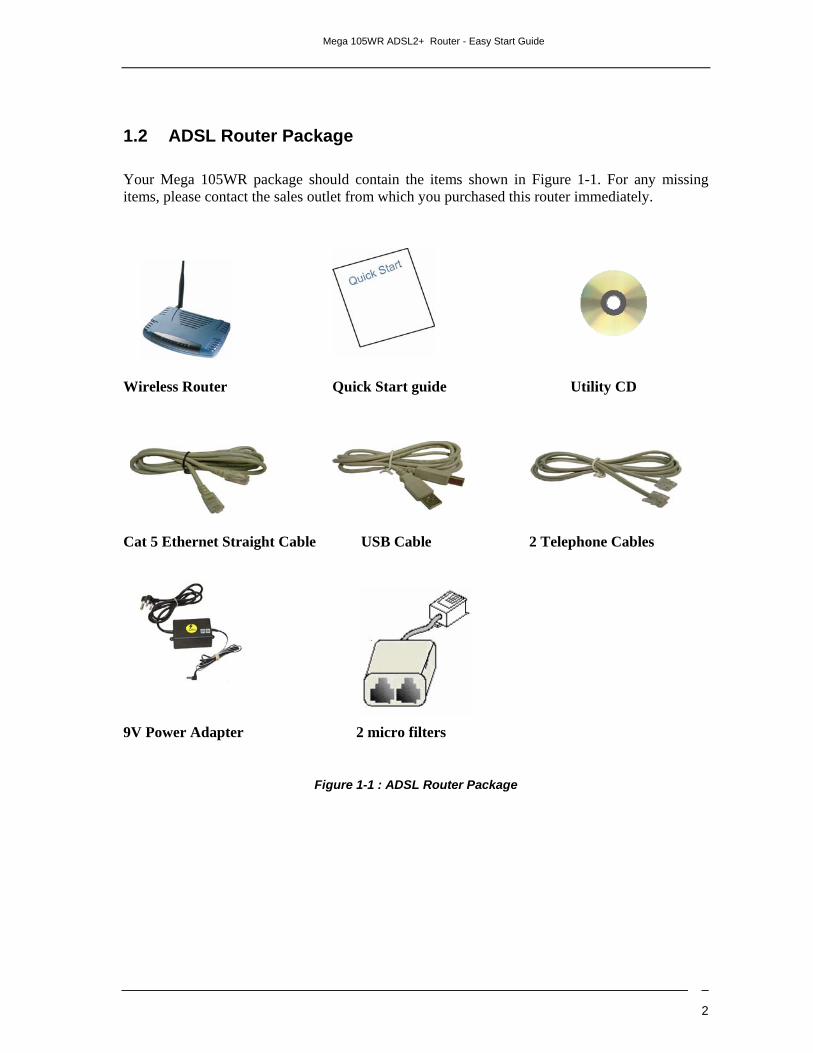
1.2 ADSL Router Package Your Mega 105WR package should contain the items shown in Figure 1-1. For any missing items, please contact the sales outlet from which you purchased this router immediately.
Wireless Router Quick Start guide Utility CD
Cat 5 Ethernet Straight Cable USB Cable 2 Telephone Cables
9V Power Adapter 2 micro filters
Figure 1-1 : ADSL Router Package
Mega 105WR ADSL2+ Router - Easy Start Guide
3
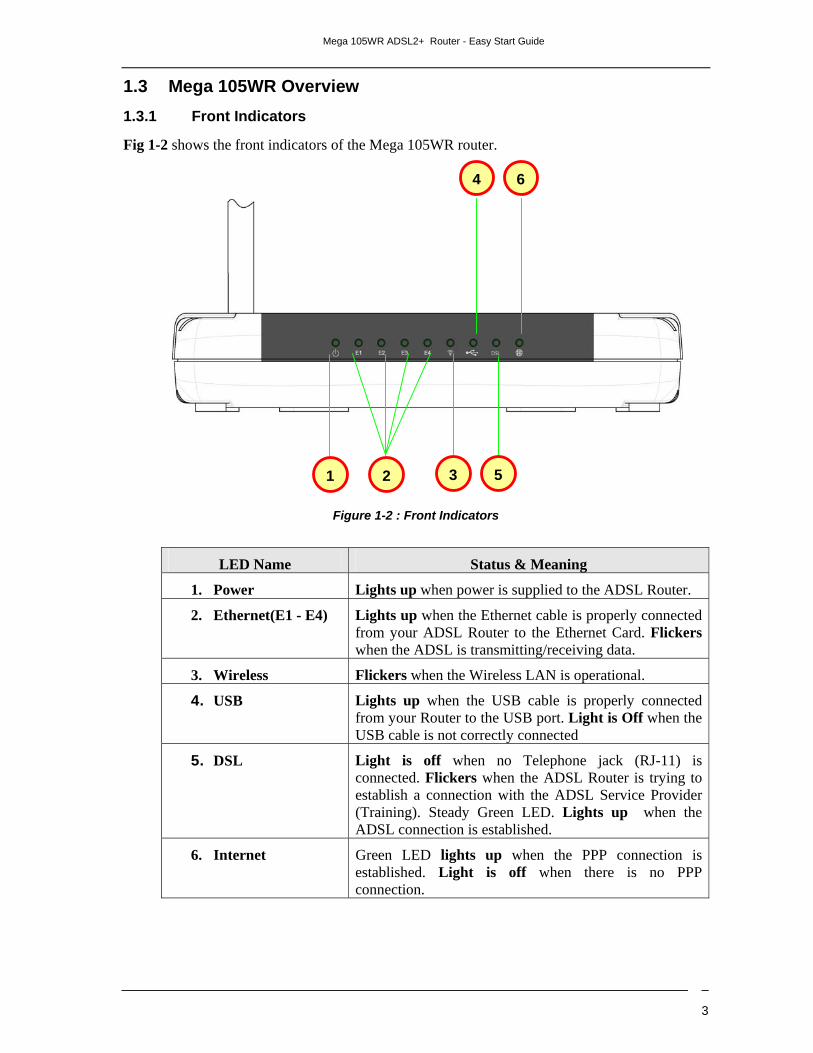
1.3 Mega 105WR Overview 1.3.1 Front Indicators
Fig 1-2 shows the front indicators of the Mega 105WR router.
Figure 1-2 : Front Indicators
LED Name Status & Meaning
1. Power Lights up when power is supplied to the ADSL Router.
2. Ethernet(E1 - E4) Lights up when the Ethernet cable is properly connected from your ADSL Router to the Ethernet Card. Flickers when the ADSL is transmitting/receiving data.
3. Wireless Flickers when the Wireless LAN is operational.
4. USB Lights up when the USB cable is properly connected from your Router to the USB port. Light is Off when the USB cable is not correctly connected
5. DSL Light is off when no Telephone jack (RJ-11) is connected. Flickers when the ADSL Router is trying to establish a connection with the ADSL Service Provider (Training). Steady Green LED. Lights up when the ADSL connection is established.
6. Internet Green LED lights up when the PPP connection is established. Light is off when there is no PPP connection.
1 2 3 5
4 6
Mega 105WR ADSL2+ Router - Easy Start Guide
4
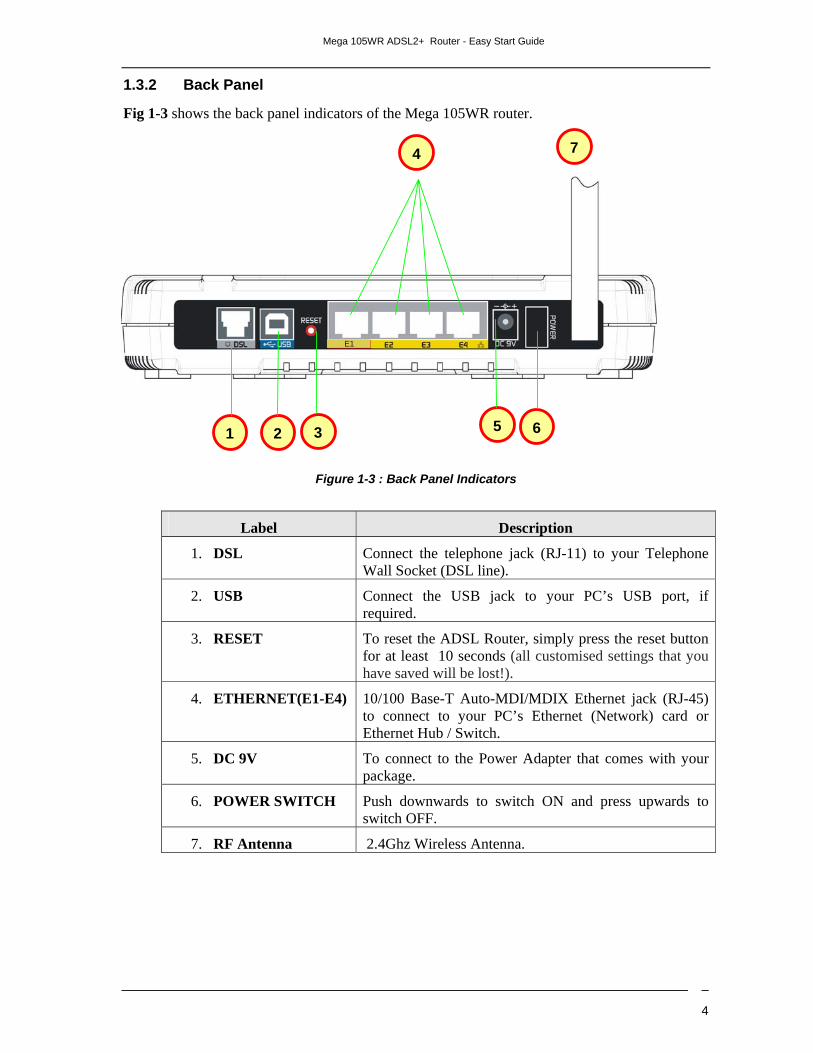
1.3.2 Back Panel
Fig 1-3 shows the back panel indicators of the Mega 105WR router.
Figure 1-3 : Back Panel Indicators
Label Description
1. DSL Connect the telephone jack (RJ-11) to your Telephone Wall Socket (DSL line).
2. USB Connect the USB jack to your PC’s USB port, if required.
3. RESET To reset the ADSL Router, simply press the reset button for at least 10 seconds (all customised settings that you have saved will be lost!).
4. ETHERNET(E1-E4) 10/100 Base-T Auto-MDI/MDIX Ethernet jack (RJ-45) to connect to your PC’s Ethernet (Network) card or Ethernet Hub / Switch.
5. DC 9V To connect to the Power Adapter that comes with your package.
6. POWER SWITCH Push downwards to switch ON and press upwards to switch OFF.
7. RF Antenna 2.4Ghz Wireless Antenna.
E1
1 2 3 5 6
4 7
Mega 105WR ADSL2+ Router - Easy Start Guide
5
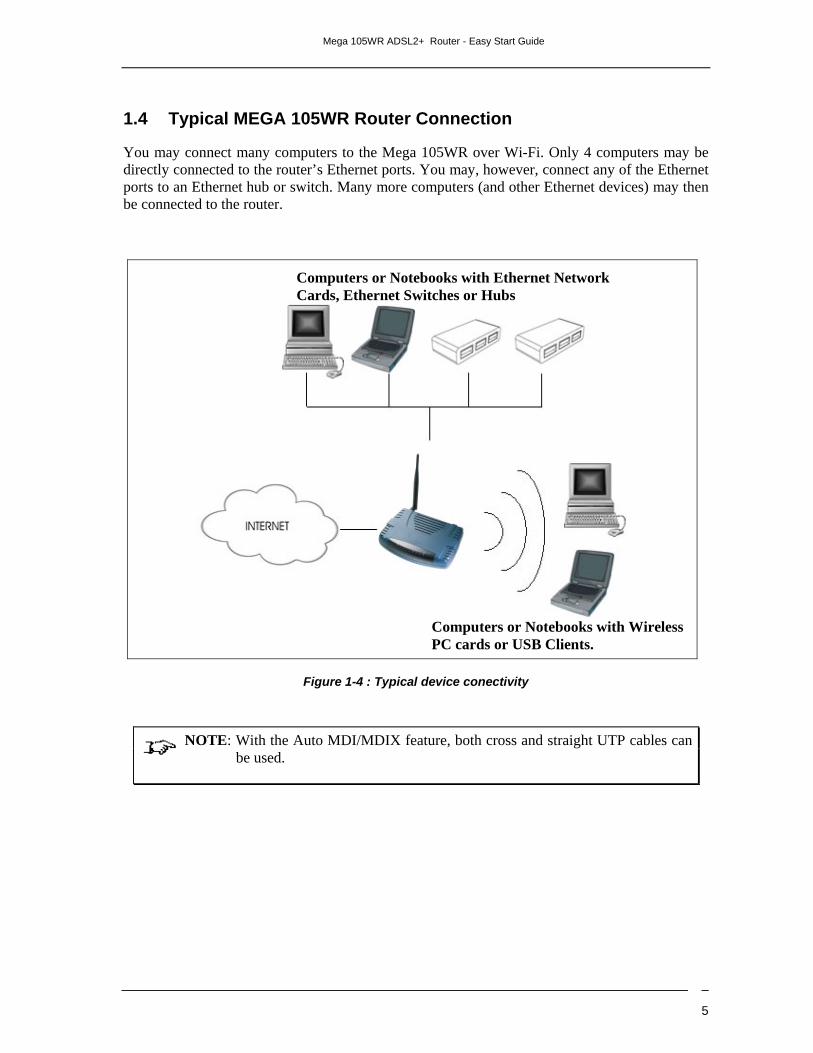
1.4 Typical MEGA 105WR Router Connection
You may connect many computers to the Mega 105WR over Wi-Fi. Only 4 computers may be directly connected to the router’s Ethernet ports. You may, however, connect any of the Ethernet ports to an Ethernet hub or switch. Many more computers (and other Ethernet devices) may then be connected to the router.
Figure 1-4 : Typical device conectivity
NOTE: With the Auto MDI/MDIX feature, both cross and straight UTP cables can be used.
Computers or Notebooks with Ethernet Network Cards, Ethernet Switches or Hubs
Computers or Notebooks with Wireless PC cards or USB Clients.
Mega 105WR ADSL2+ Router - Easy Start Guide
6
Chapter 2 - Setup overview
The following chapters describe how to connect your Mega 105WR. As there are many different combinations of operating systems and connection types, what follows may seem rather complicated, so here is a summery of the steps to be taken:
• Telephone line is connected to the Mega 105WR
• Power supply is connected to the Mega 105WR
• Mega 105WR is connected to your computer using USB or Ethernet (Wi-Fi is not recommended for initial setup )
• Mega 105WR is switched on
• USB drivers are installed ( if necessary)
• Ethernet port is configured ( if necessary)
• Web browser is configured for connection (if necessary)
• Mega 105WR is configured for internet connection
• Your Telkom internet account is verified
The easiest way to configure your Mega 105WR is by using the installation utility on of the Windows operating systems.
To configure your Mega 105WR using a particular Operating system, perform the steps in the listed chapters in the correct order. Operating system Chapters Microsoft Windows (using installation utility )
Chapter 3 Chapter 5 (During chapter 5, you will be prompted to follow chapter 4 )
Mac OS Chapter 3 Chapter 6 Chapter 8
Windows XP x64 (if connecting via USB) Chapter 3 Chapter 4 Chapter 7 Chapter 5
Other operating systems and Window without using installation utility
Chapter 3 Chapter 4 Chapter 9
Mega 105WR ADSL2+ Router - Easy Start Guide
7
Chapter 3 - Telephone and power connections
3.1 Connecting the Telephone Line
There are various ways to connect your Mega 105WR to your ADSL enabled telephone line.
• Directly (Without a telephone connected to the same outlet)
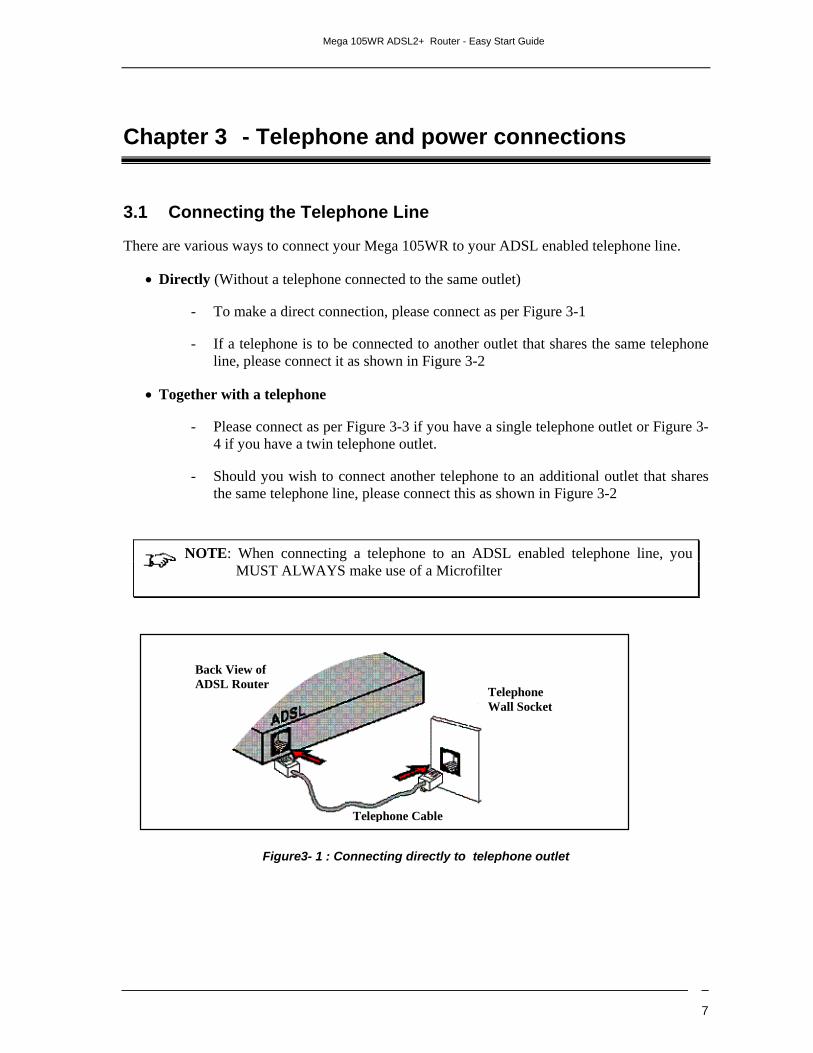
- To make a direct connection, please connect as per Figure 3-1
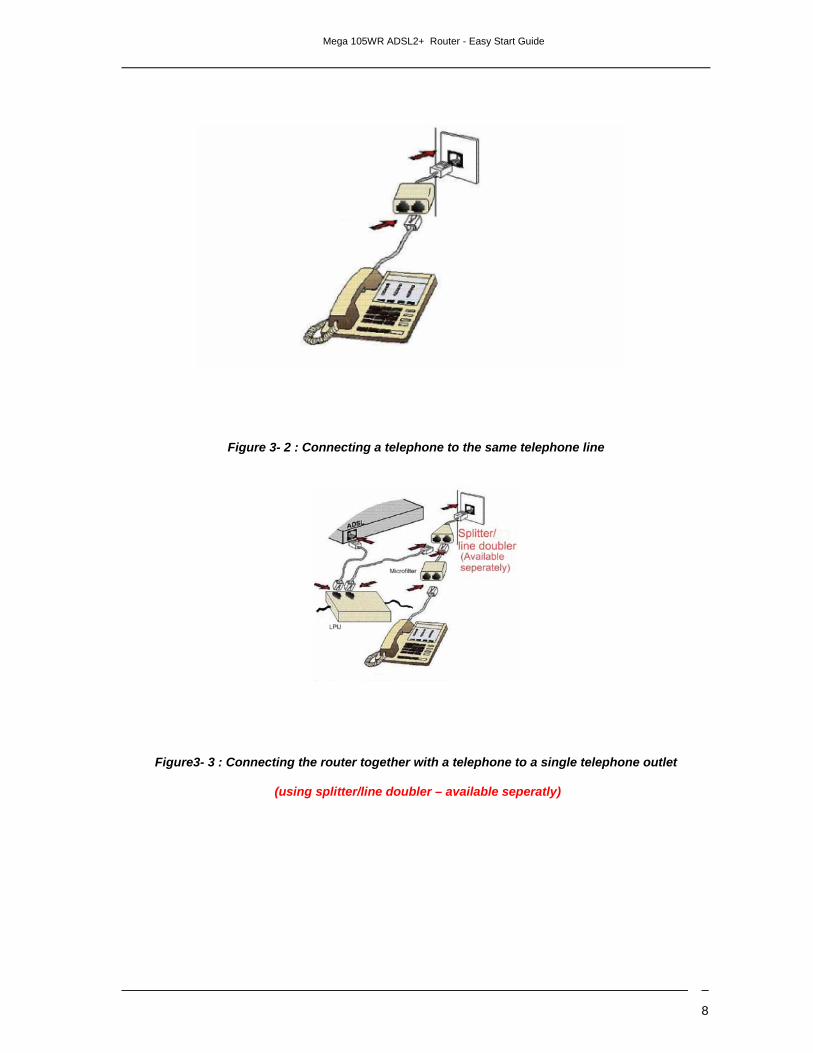
- If a telephone is to be connected to another outlet that shares the same telephone line, please connect it as shown in Figure 3-2
• Together with a telephone
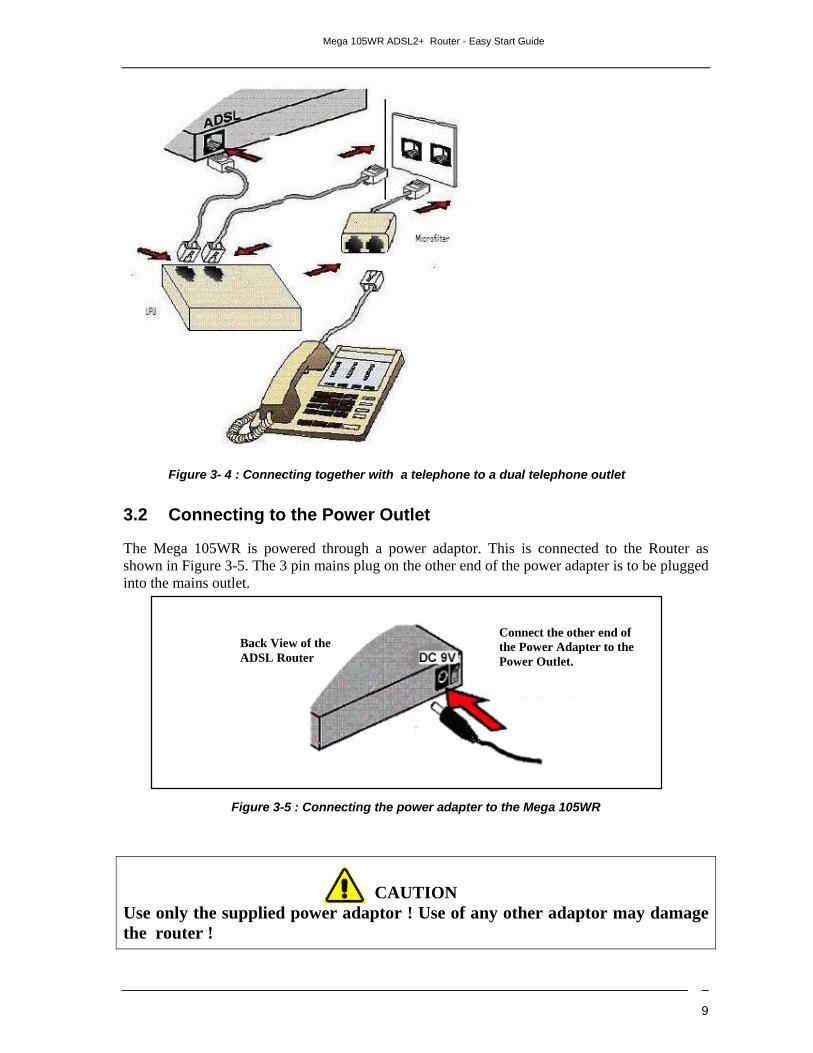
- Please connect as per Figure 3-3 if you have a single telephone outlet or Figure 3-4 if you have a twin telephone outlet.
- Should you wish to connect another telephone to an additional outlet that shares the same telephone line, please connect this as shown in Figure 3-2
NOTE: When connecting a telephone to an ADSL enabled telephone line, you MUST ALWAYS make use of a Microfilter
Figure3- 1 : Connecting directly to telephone outlet
Back View of ADSL Router
Telephone Cable
Telephone Wall Socket
Mega 105WR ADSL2+ Router - Easy Start Guide
8
Figure 3- 2 : Connecting a telephone to the same telephone line
Figure3- 3 : Connecting the router together with a telephone to a single telephone outlet
(using splitter/line doubler – available seperatly)
Mega 105WR ADSL2+ Router - Easy Start Guide
9
Figure 3- 4 : Connecting together with a telephone to a dual telephone outlet
3.2 Connecting to the Power Outlet
The Mega 105WR is powered through a power adaptor. This is connected to the Router as shown in Figure 3-5. The 3 pin mains plug on the other end of the power adapter is to be plugged into the mains outlet.
Figure 3-5 : Connecting the power adapter to the Mega 105WR
CAUTION
Use only the supplied power adaptor ! Use of any other adaptor may damage the router !
Back View of the ADSL Router
Connect the other end of the Power Adapter to the Power Outlet.
Mega 105WR ADSL2+ Router - Easy Start Guide
10
Chapter 4 - Connecting your computer
Your computer can be connected to the Mega 105WR in one of three ways
• Ethernet
• USB
• Wi-Fi
It is recommended that you initially connect to the router using a USB or Ethernet connection, in order to do the initial setup. Thereafter, you may connect using Wi-Fi if necessary.
NOTE: Do EITHER section 4.1 OR section 4.2 as needed, not both !
4.1 Connecting the computer using a Ethernet connection
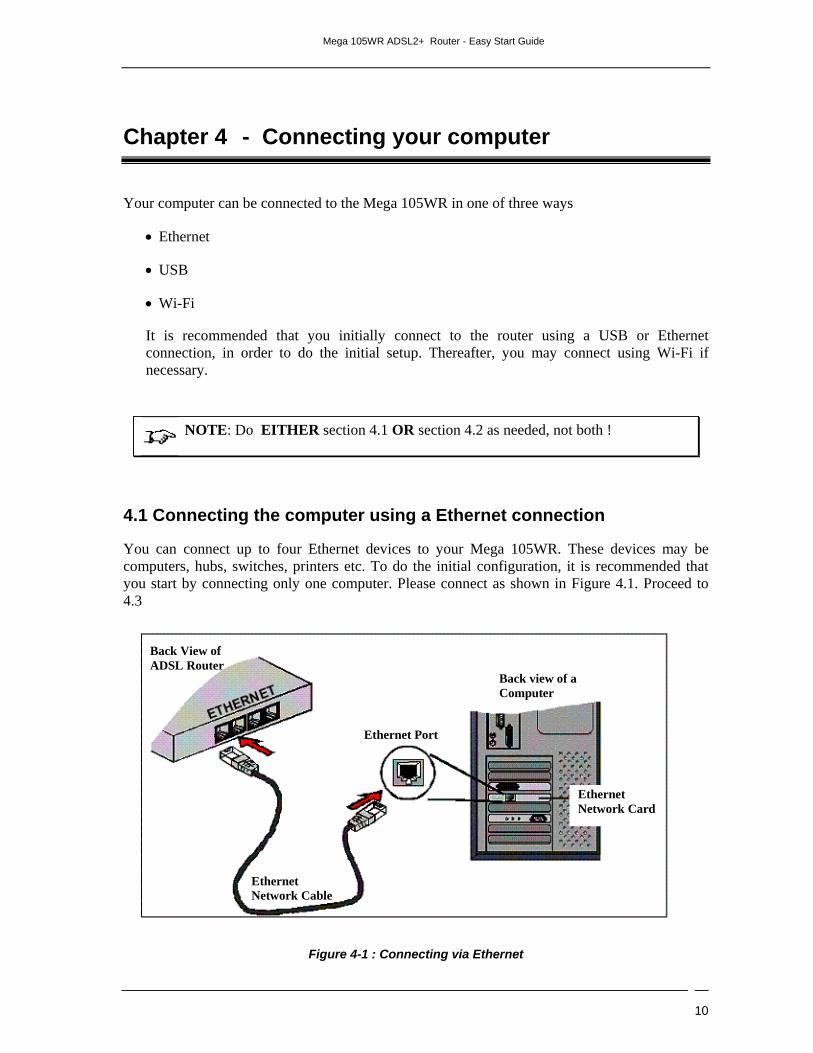
You can connect up to four Ethernet devices to your Mega 105WR. These devices may be computers, hubs, switches, printers etc. To do the initial configuration, it is recommended that you start by connecting only one computer. Please connect as shown in Figure 4.1. Proceed to 4.3
Figure 4-1 : Connecting via Ethernet
Back View of ADSL Router
Ethernet Port
Ethernet Network Cable
Back view of a Computer
Ethernet Network Card
Mega 105WR ADSL2+ Router - Easy Start Guide
11
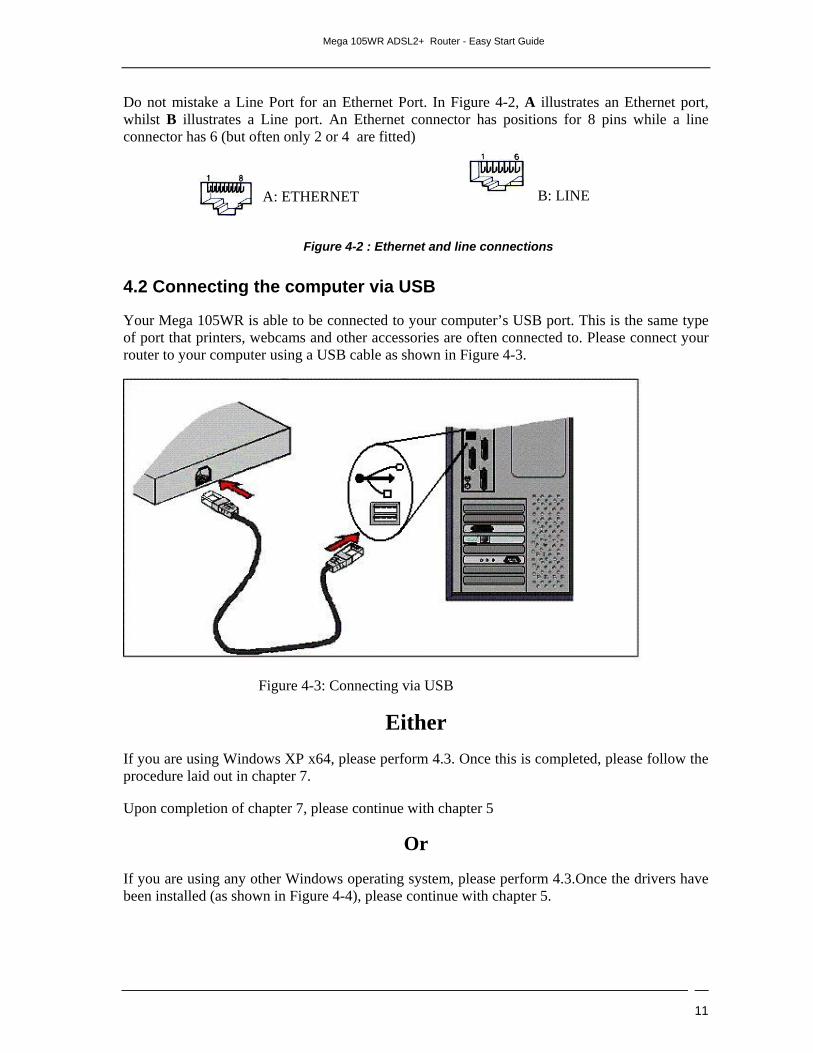
Do not mistake a Line Port for an Ethernet Port. In Figure 4-2, A illustrates an Ethernet port, whilst B illustrates a Line port. An Ethernet connector has positions for 8 pins while a line connector has 6 (but often only 2 or 4 are fitted)
Figure 4-2 : Ethernet and line connections
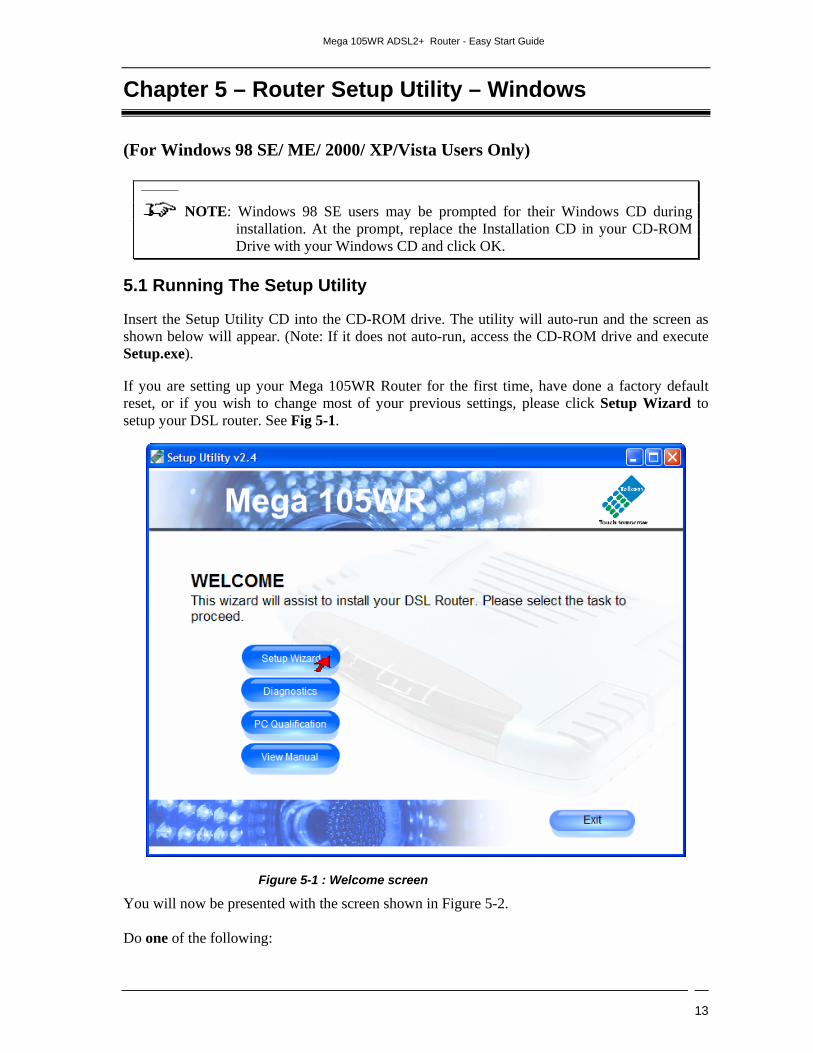
4.2 Connecting the computer via USB
Your Mega 105WR is able to be connected to your computer’s USB port. This is the same type of port that printers, webcams and other accessories are often connected to. Please connect your router to your computer using a USB cable as shown in Figure 4-3.
Figure 4-3: Connecting via USB
Either If you are using Windows XP x64, please perform 4.3. Once this is completed, please follow the procedure laid out in chapter 7.
Upon completion of chapter 7, please continue with chapter 5
Or
If you are using any other Windows operating system, please perform 4.3.Once the drivers have been installed (as shown in Figure 4-4), please continue with chapter 5.
A: ETHERNET B: LINE

Mega 105WR ADSL2+ Router - Easy Start Guide
12
Figure 4-4: Installation utility installing drivers.
4.3 Powering ON
• Make sure that the power outlet that your router’s power adaptor is connected to is turned ON
• Turn your Router’s power switch ON.
Mega 105WR ADSL2+ Router - Easy Start Guide
13
Chapter 5 – Router Setup Utility – Windows
(For Windows 98 SE/ ME/ 2000/ XP/Vista Users Only)
NOTE: Windows 98 SE users may be prompted for their Windows CD during
installation. At the prompt, replace the Installation CD in your CD-ROM Drive with your Windows CD and click OK.
5.1 Running The Setup Utility
Insert the Setup Utility CD into the CD-ROM drive. The utility will auto-run and the screen as shown below will appear. (Note: If it does not auto-run, access the CD-ROM drive and execute Setup.exe).
If you are setting up your Mega 105WR Router for the first time, have done a factory default reset, or if you wish to change most of your previous settings, please click Setup Wizard to setup your DSL router. See Fig 5-1.
Figure 5-1 : Welcome screen
You will now be presented with the screen shown in Figure 5-2. Do one of the following:

Mega 105WR ADSL2+ Router - Easy Start Guide
14
If you are using an Ethernet connection, you should now return to chapter 4 and do sections 4.1 and 4.3 only. You can then click on Continue
OR If you are using a USB connection, click on Continue without plugging in any cables.
Figure 5-2 : Important Note
When presented with the screen shown in Figure 5-3, do one of the following:

Mega 105WR ADSL2+ Router - Easy Start Guide
15
Figure 5-3 : USB driver instalation
If you are using an Ethernet connection, you should click “Cancel”.
OR If you are using a USB connection, you should now return to chapter 4 and do sections 4.2 and 4.3 only. The installation utility will install the USB drivers once it detects that the cable is correctly plugged in, and the router has been switched on.
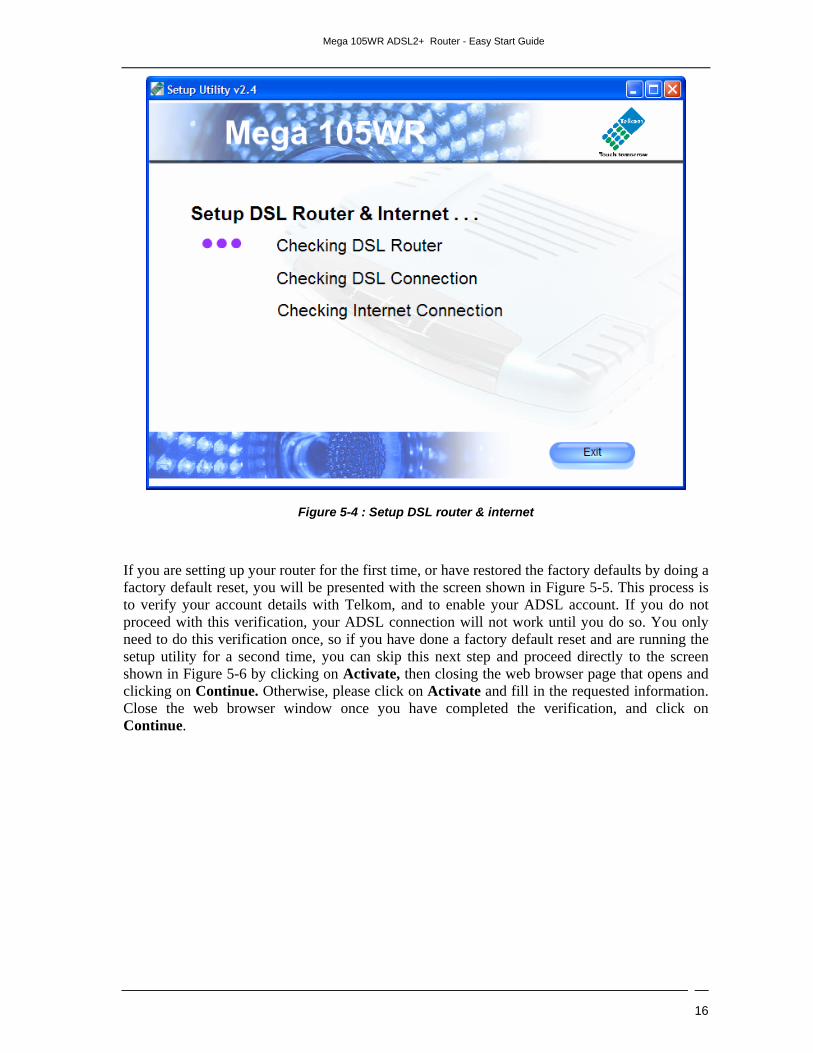
The Installation utility will now begin to check your router and DSL connection. You will see the screen shown in Figure 5-4. As the various tests are performed, you will see a progress bar to the left of the list. Once the tests have passed, this will be replaced by a green tick mark. If for some reason any of the tests fail, the utility will present you with a series of help screens in order to correct your problem.
Mega 105WR ADSL2+ Router - Easy Start Guide
16
Figure 5-4 : Setup DSL router & internet
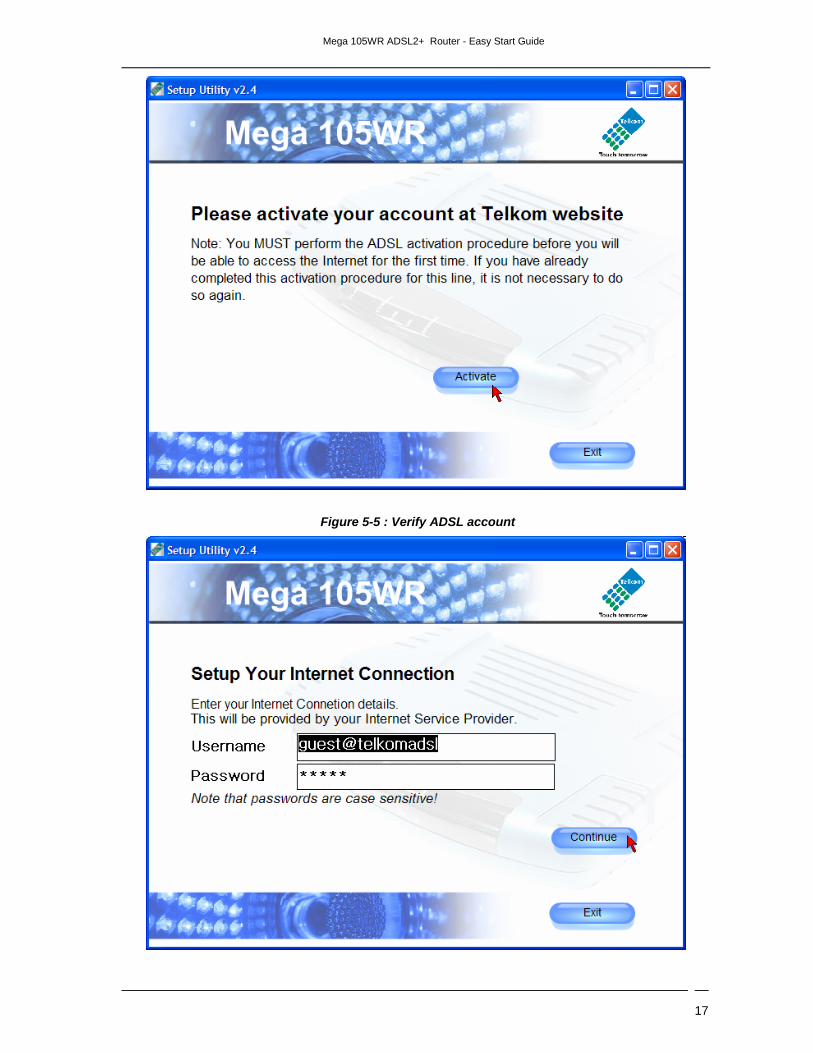
If you are setting up your router for the first time, or have restored the factory defaults by doing a factory default reset, you will be presented with the screen shown in Figure 5-5. This process is to verify your account details with Telkom, and to enable your ADSL account. If you do not proceed with this verification, your ADSL connection will not work until you do so. You only need to do this verification once, so if you have done a factory default reset and are running the setup utility for a second time, you can skip this next step and proceed directly to the screen shown in Figure 5-6 by clicking on Activate, then closing the web browser page that opens and clicking on Continue. Otherwise, please click on Activate and fill in the requested information. Close the web browser window once you have completed the verification, and click on Continue.
Mega 105WR ADSL2+ Router - Easy Start Guide
17
Figure 5-5 : Verify ADSL account
Mega 105WR ADSL2+ Router - Easy Start Guide
18
Figure 5-6: Internet Connection Setup
Once the installation utility has confirmed that everything is correctly set up, and that a connection to the internet is possible, you will be prompted for your internet account details – your Username and Password - which your ISP has provided. The guest account details that are shown are programmed into the router by default, and are used to test the connection. This account is designed to only access parts of the Telkom website. You will need to replace these details with your own account’s information. Enter these details on the screen shown in Figure 5-6 and click Continue to proceed.
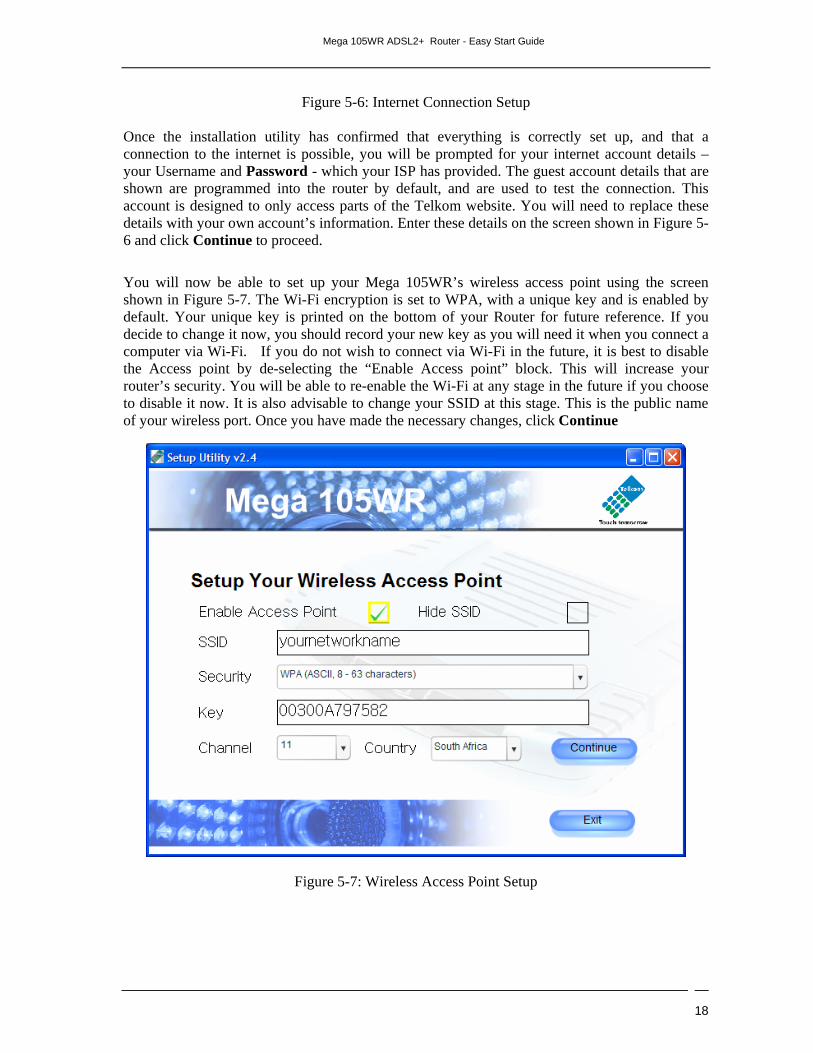
You will now be able to set up your Mega 105WR’s wireless access point using the screen shown in Figure 5-7. The Wi-Fi encryption is set to WPA, with a unique key and is enabled by default. Your unique key is printed on the bottom of your Router for future reference. If you decide to change it now, you should record your new key as you will need it when you connect a computer via Wi-Fi. If you do not wish to connect via Wi-Fi in the future, it is best to disable the Access point by de-selecting the “Enable Access point” block. This will increase your router’s security. You will be able to re-enable the Wi-Fi at any stage in the future if you choose to disable it now. It is also advisable to change your SSID at this stage. This is the public name of your wireless port. Once you have made the necessary changes, click Continue
Figure 5-7: Wireless Access Point Setup
Mega 105WR ADSL2+ Router - Easy Start Guide
19
NOTE: For better security, you may choose to hide the SSID of your Mega 105WR
router to prevent it from identifying its self to any computer with Wi –Fi. However, you must then manually set your wireless client with the same SSID.
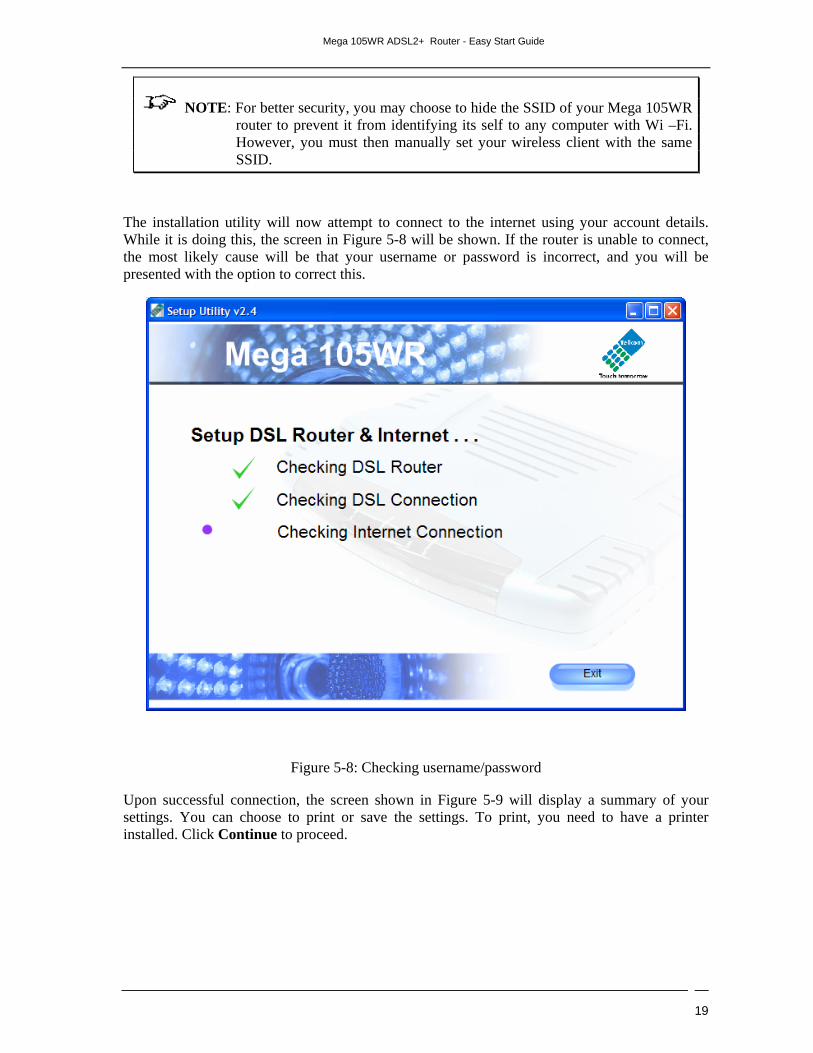
The installation utility will now attempt to connect to the internet using your account details. While it is doing this, the screen in Figure 5-8 will be shown. If the router is unable to connect, the most likely cause will be that your username or password is incorrect, and you will be presented with the option to correct this.
Figure 5-8: Checking username/password
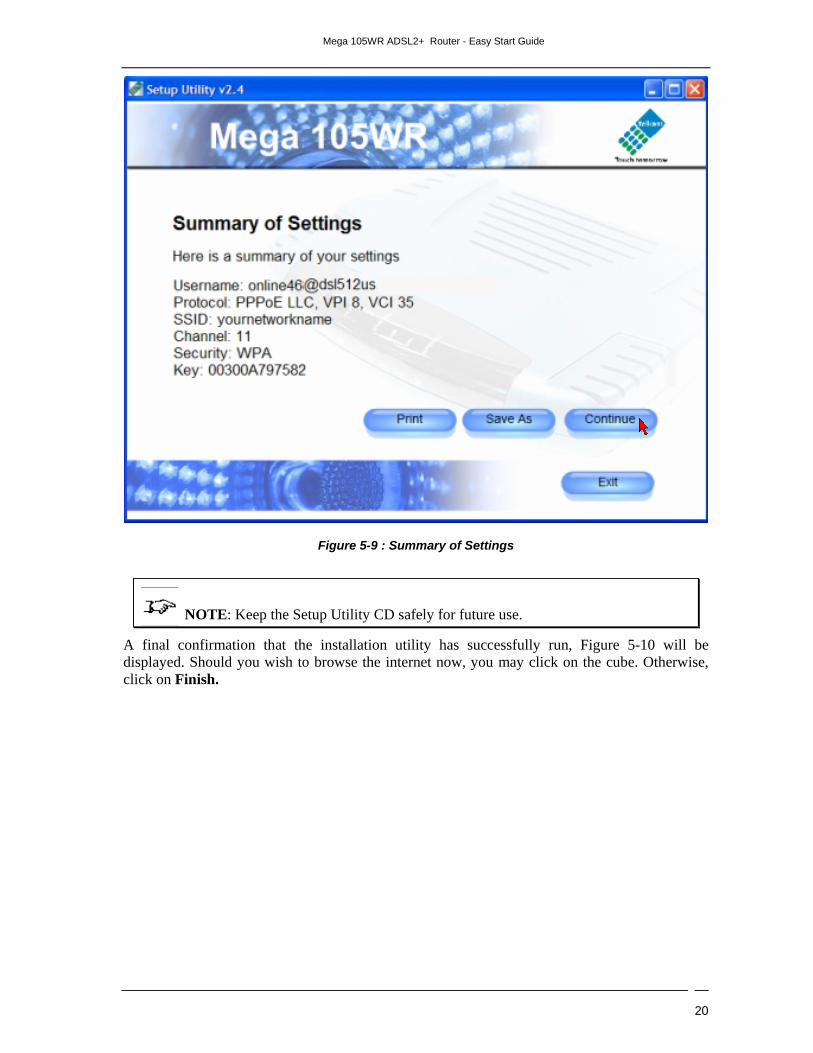
Upon successful connection, the screen shown in Figure 5-9 will display a summary of your settings. You can choose to print or save the settings. To print, you need to have a printer installed. Click Continue to proceed.
Mega 105WR ADSL2+ Router - Easy Start Guide
20
Figure 5-9 : Summary of Settings
NOTE: Keep the Setup Utility CD safely for future use.
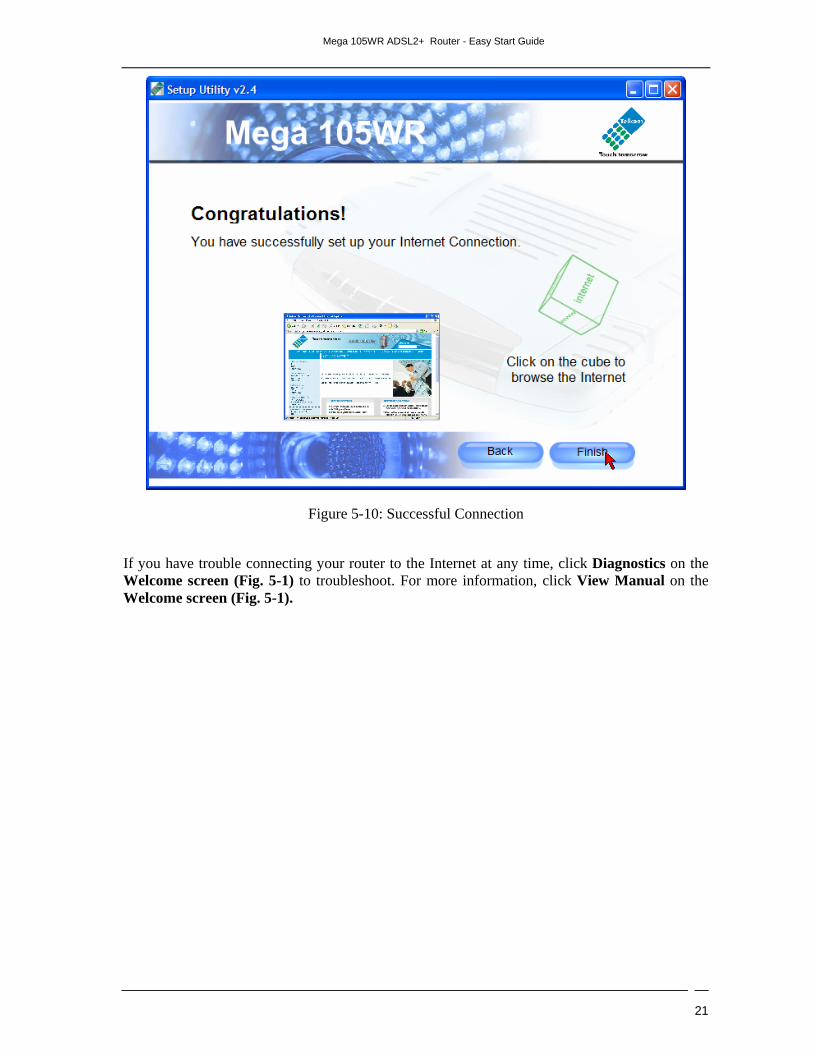
A final confirmation that the installation utility has successfully run, Figure 5-10 will be displayed. Should you wish to browse the internet now, you may click on the cube. Otherwise, click on Finish.
Mega 105WR ADSL2+ Router - Easy Start Guide
21
Figure 5-10: Successful Connection
If you have trouble connecting your router to the Internet at any time, click Diagnostics on the Welcome screen (Fig. 5-1) to troubleshoot. For more information, click View Manual on the Welcome screen (Fig. 5-1).
Mega 105WR ADSL2+ Router - Easy Start Guide
22
Chapter 6 – Router Setup Utility – MAC OS
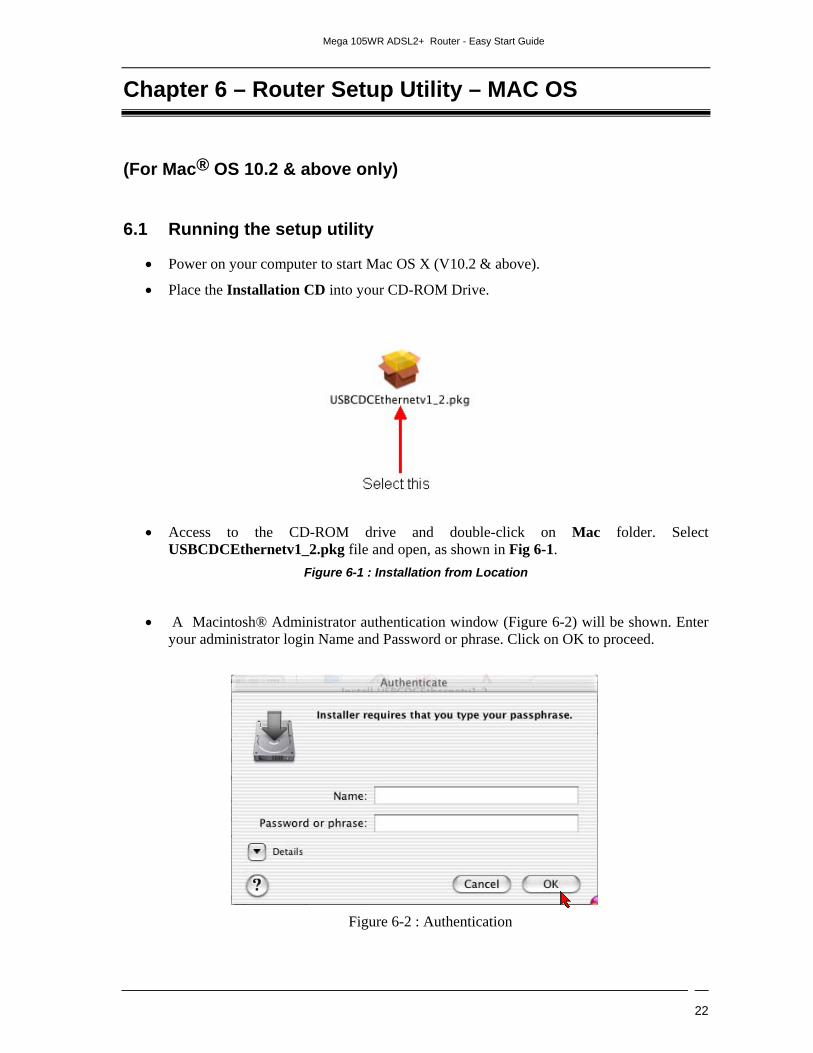
(For Mac® OS 10.2 & above only)
6.1 Running the setup utility
• Power on your computer to start Mac OS X (V10.2 & above).
• Place the Installation CD into your CD-ROM Drive.
• Access to the CD-ROM drive and double-click on Mac folder. Select USBCDCEthernetv1_2.pkg file and open, as shown in Fig 6-1.
Figure 6-1 : Installation from Location
• A Macintosh® Administrator authentication window (Figure 6-2) will be shown. Enter your administrator login Name and Password or phrase. Click on OK to proceed.
Figure 6-2 : Authentication

Mega 105WR ADSL2+ Router - Easy Start Guide
23
• Installation program will start. On the screen shown in Figure 6-3, click Continue to
proceed with the installation.
Figure 6-3 : Installation program
• On the screen shown in Figure 6-4, select a destination disk to install the software. Click
Continue to proceed with the installation.
Figure 6-4 : Select destination disk
Mega 105WR ADSL2+ Router - Easy Start Guide
24
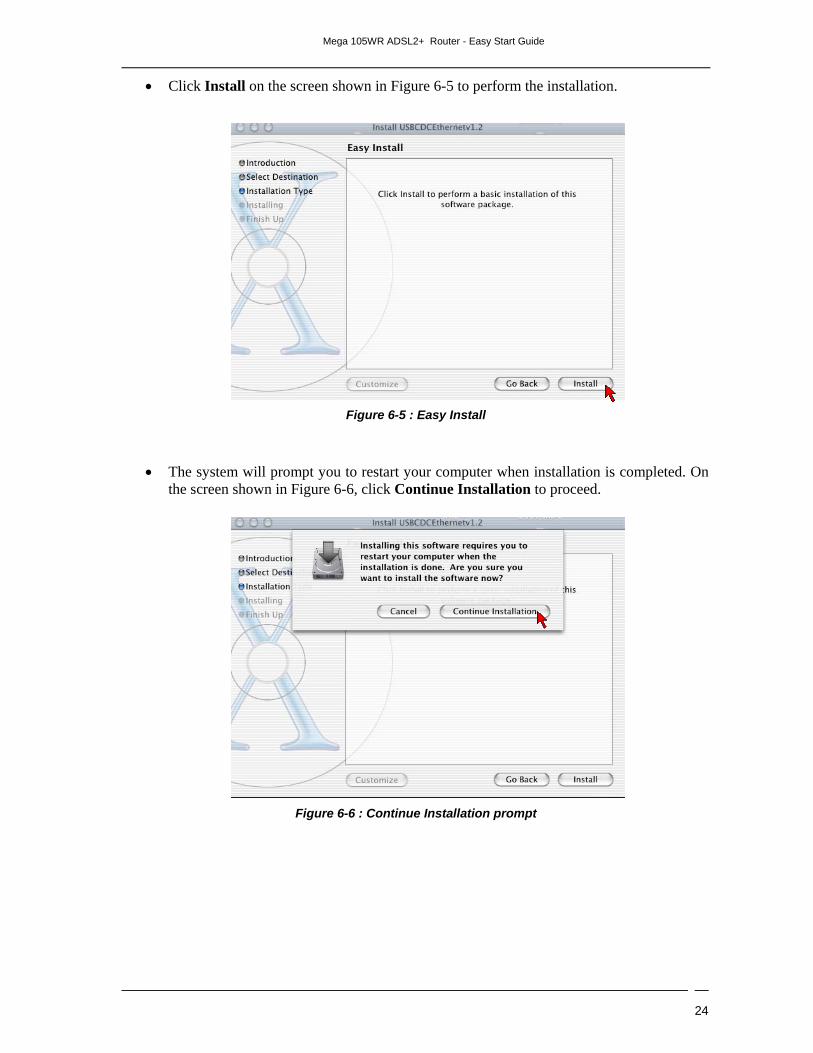
• Click Install on the screen shown in Figure 6-5 to perform the installation.
Figure 6-5 : Easy Install
• The system will prompt you to restart your computer when installation is completed. On the screen shown in Figure 6-6, click Continue Installation to proceed.
Figure 6-6 : Continue Installation prompt
Mega 105WR ADSL2+ Router - Easy Start Guide
25
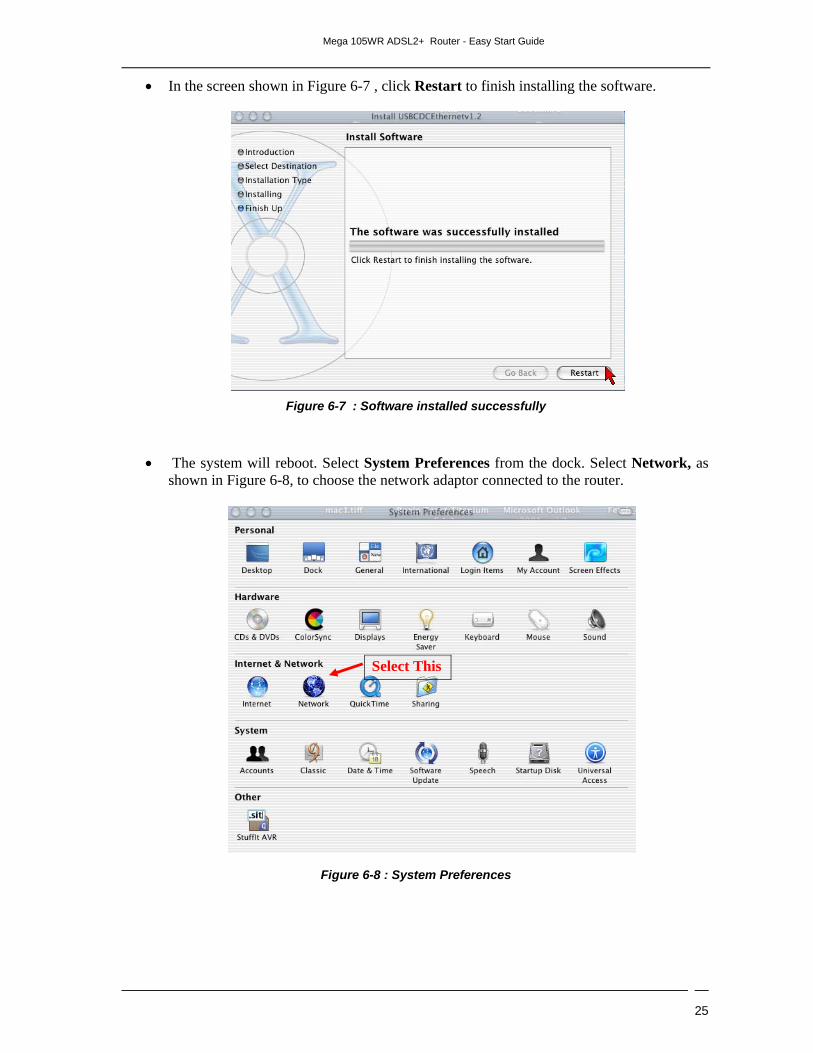
• In the screen shown in Figure 6-7 , click Restart to finish installing the software.
Figure 6-7 : Software installed successfully
• The system will reboot. Select System Preferences from the dock. Select Network, as shown in Figure 6-8, to choose the network adaptor connected to the router.
Figure 6-8 : System Preferences
Select This
Mega 105WR ADSL2+ Router - Easy Start Guide
26
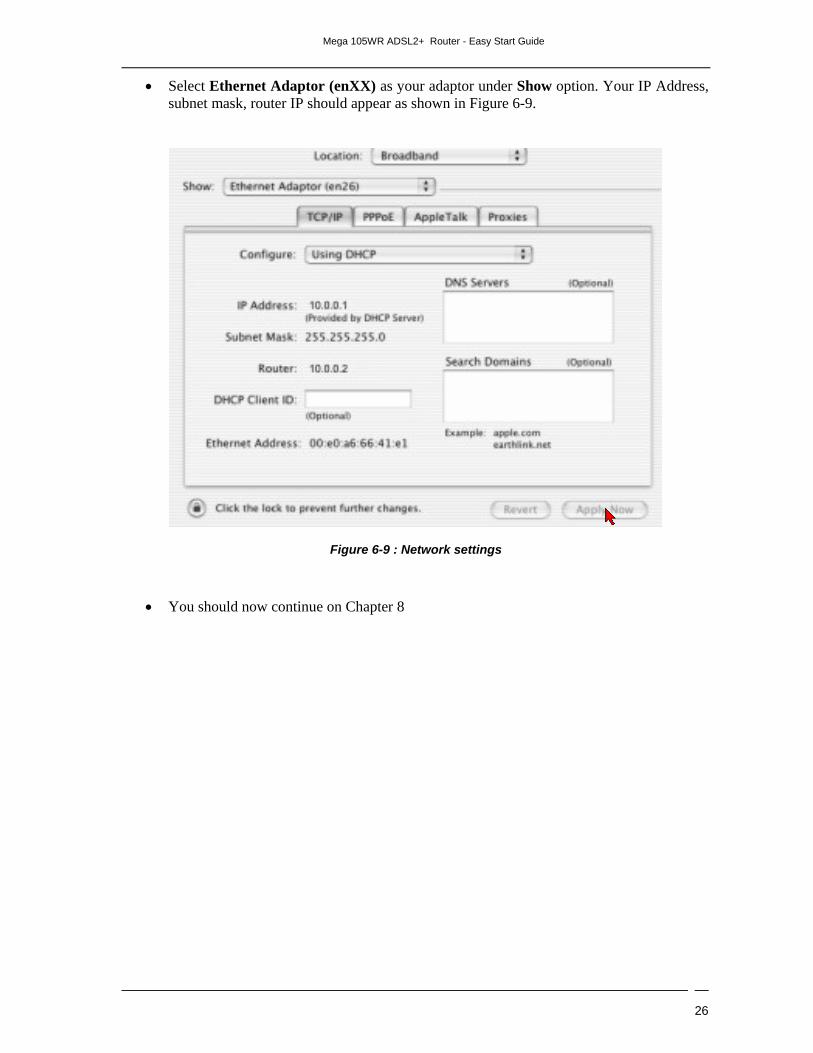
• Select Ethernet Adaptor (enXX) as your adaptor under Show option. Your IP Address, subnet mask, router IP should appear as shown in Figure 6-9.
Figure 6-9 : Network settings
• You should now continue on Chapter 8
Mega 105WR ADSL2+ Router - Easy Start Guide
27
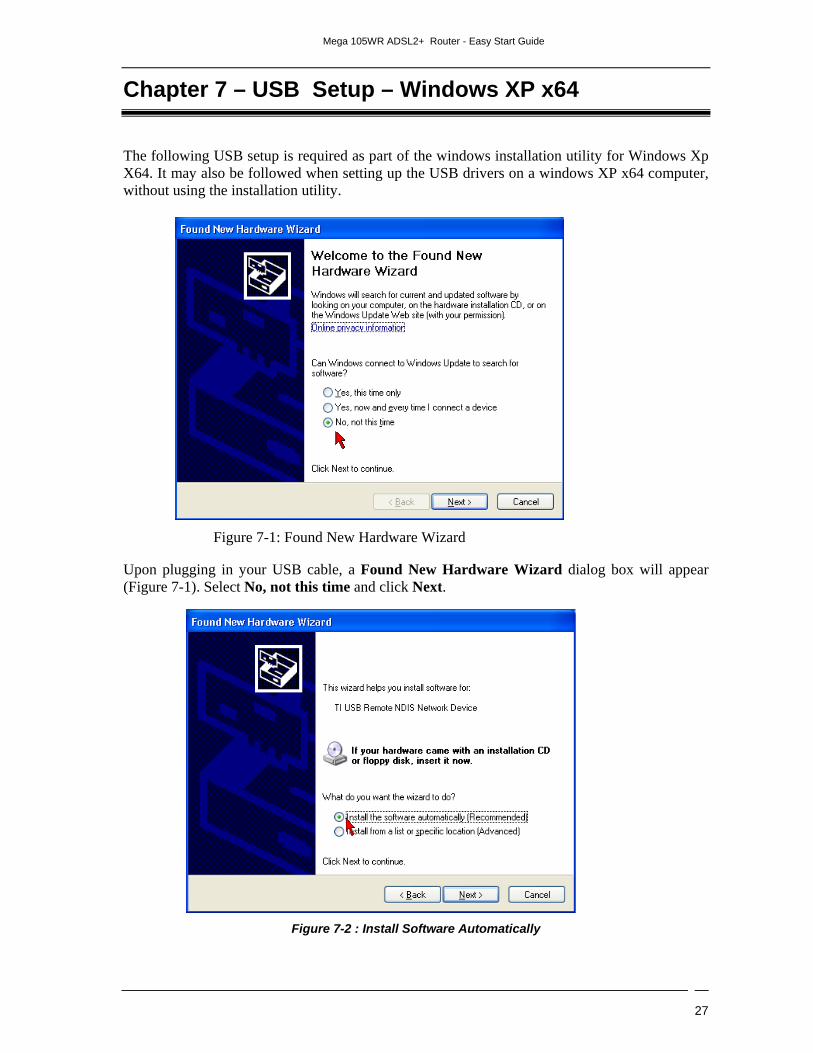
Chapter 7 – USB Setup – Windows XP x64
The following USB setup is required as part of the windows installation utility for Windows Xp X64. It may also be followed when setting up the USB drivers on a windows XP x64 computer, without using the installation utility.
Figure 7-1: Found New Hardware Wizard
Upon plugging in your USB cable, a Found New Hardware Wizard dialog box will appear (Figure 7-1). Select No, not this time and click Next.
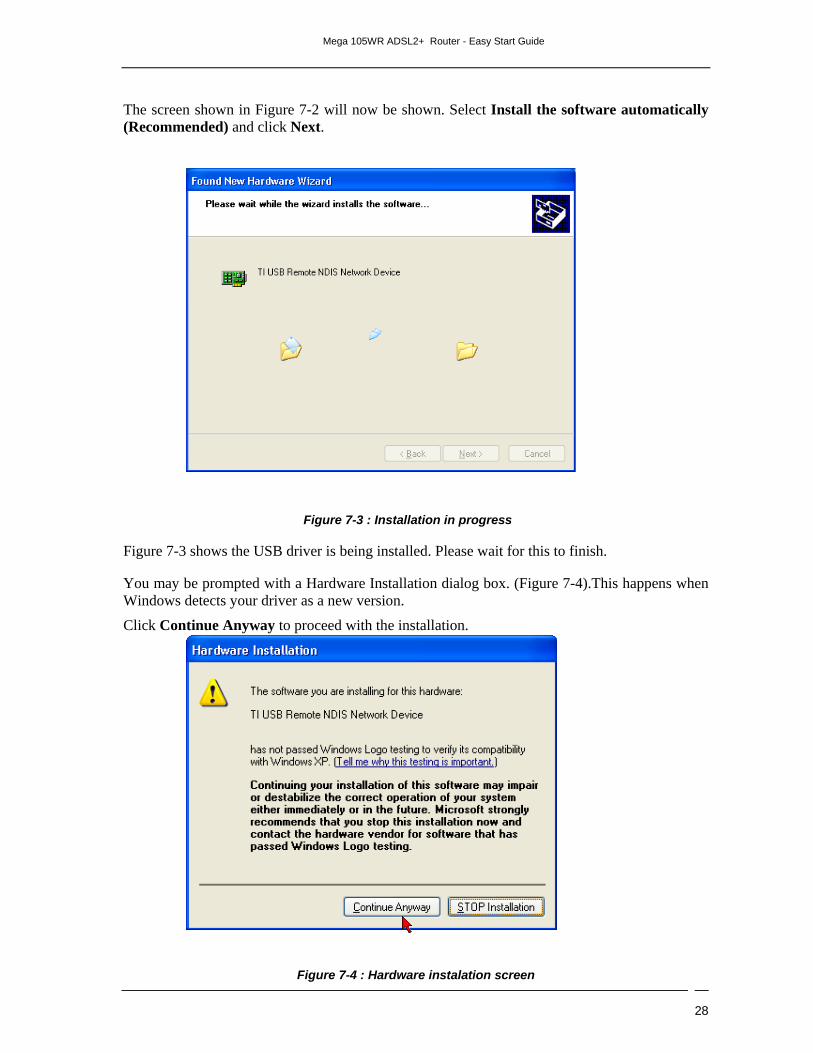
Figure 7-2 : Install Software Automatically
Mega 105WR ADSL2+ Router - Easy Start Guide
28
The screen shown in Figure 7-2 will now be shown. Select Install the software automatically (Recommended) and click Next.
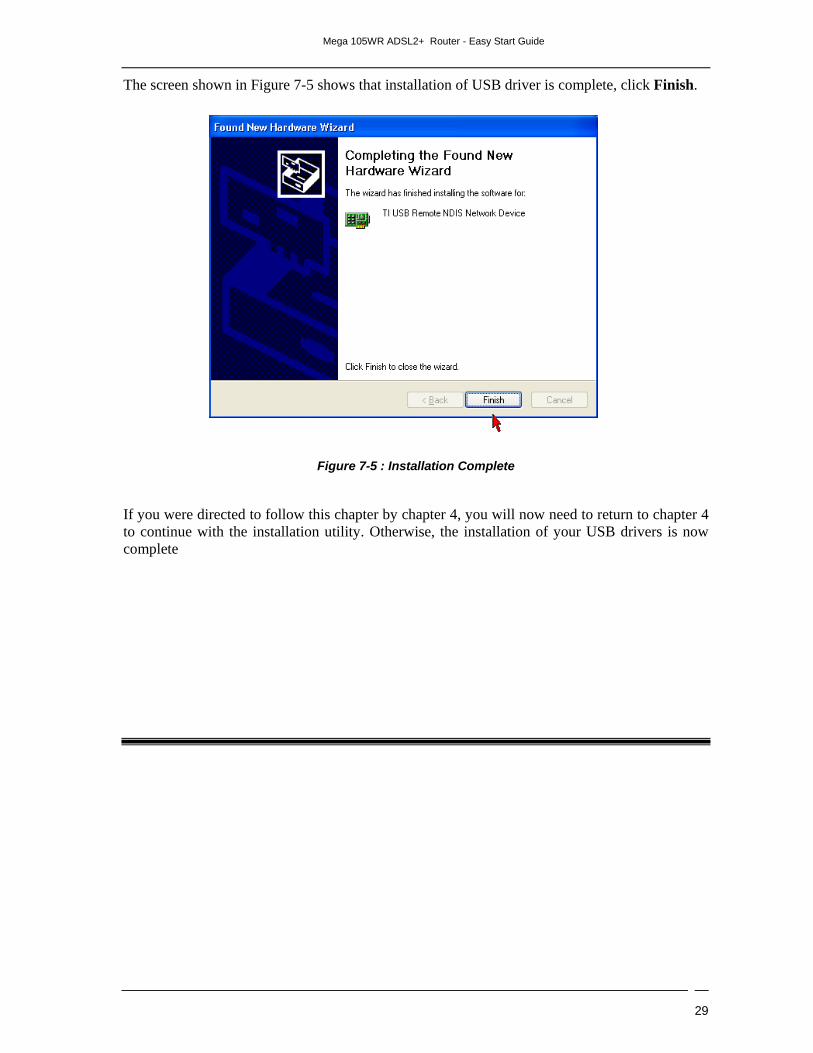
Figure 7-3 : Installation in progress
Figure 7-3 shows the USB driver is being installed. Please wait for this to finish.
You may be prompted with a Hardware Installation dialog box. (Figure 7-4).This happens when Windows detects your driver as a new version.
Click Continue Anyway to proceed with the installation.
Figure 7-4 : Hardware instalation screen
Mega 105WR ADSL2+ Router - Easy Start Guide
29
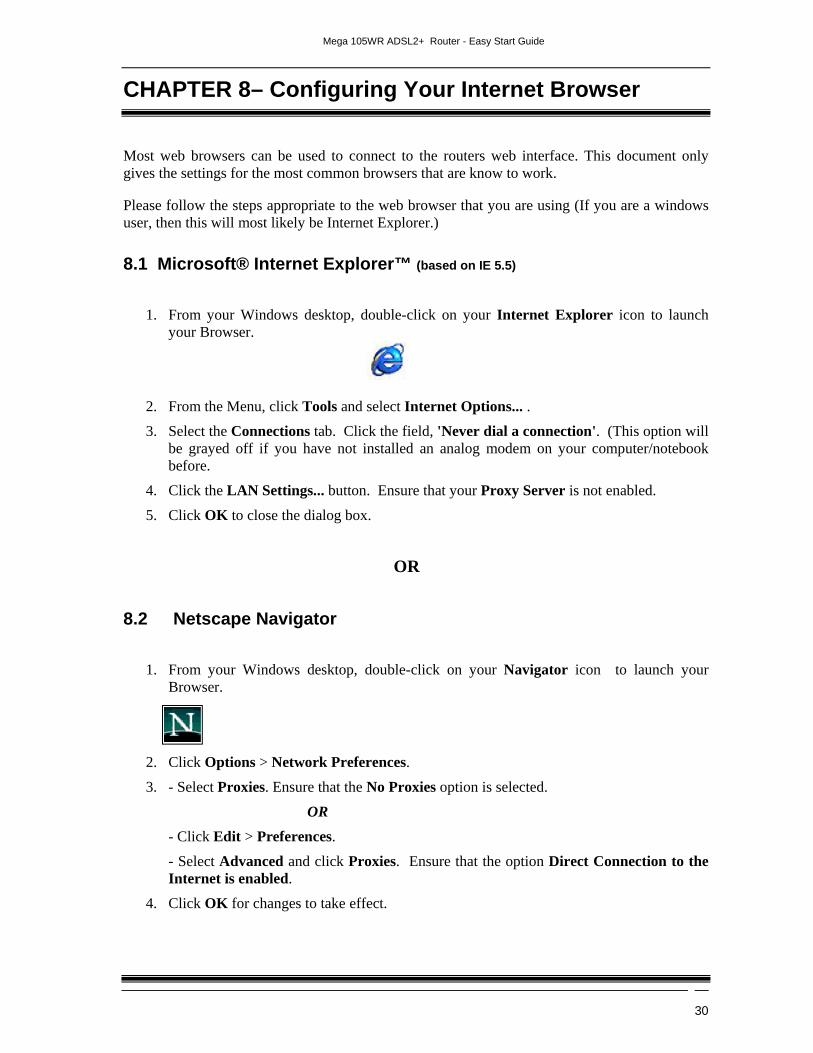
The screen shown in Figure 7-5 shows that installation of USB driver is complete, click Finish.
Figure 7-5 : Installation Complete
If you were directed to follow this chapter by chapter 4, you will now need to return to chapter 4 to continue with the installation utility. Otherwise, the installation of your USB drivers is now complete
Mega 105WR ADSL2+ Router - Easy Start Guide
30
CHAPTER 8– Configuring Your Internet Browser
Most web browsers can be used to connect to the routers web interface. This document only gives the settings for the most common browsers that are know to work.
Please follow the steps appropriate to the web browser that you are using (If you are a windows user, then this will most likely be Internet Explorer.)
8.1 Microsoft® Internet Explorer™ (based on IE 5.5)
1. From your Windows desktop, double-click on your Internet Explorer icon to launch your Browser.
2. From the Menu, click Tools and select Internet Options... .
3. Select the Connections tab. Click the field, 'Never dial a connection'. (This option will be grayed off if you have not installed an analog modem on your computer/notebook before.
4. Click the LAN Settings... button. Ensure that your Proxy Server is not enabled.
5. Click OK to close the dialog box.
OR
8.2 Netscape Navigator
1. From your Windows desktop, double-click on your Navigator icon to launch your Browser.
2. Click Options > Network Preferences.
3. - Select Proxies. Ensure that the No Proxies option is selected.
OR
- Click Edit > Preferences.
- Select Advanced and click Proxies. Ensure that the option Direct Connection to the Internet is enabled.
4. Click OK for changes to take effect.
Mega 105WR ADSL2+ Router - Easy Start Guide
31
CHAPTER 9– Using the Web setup sequence to configure your router.
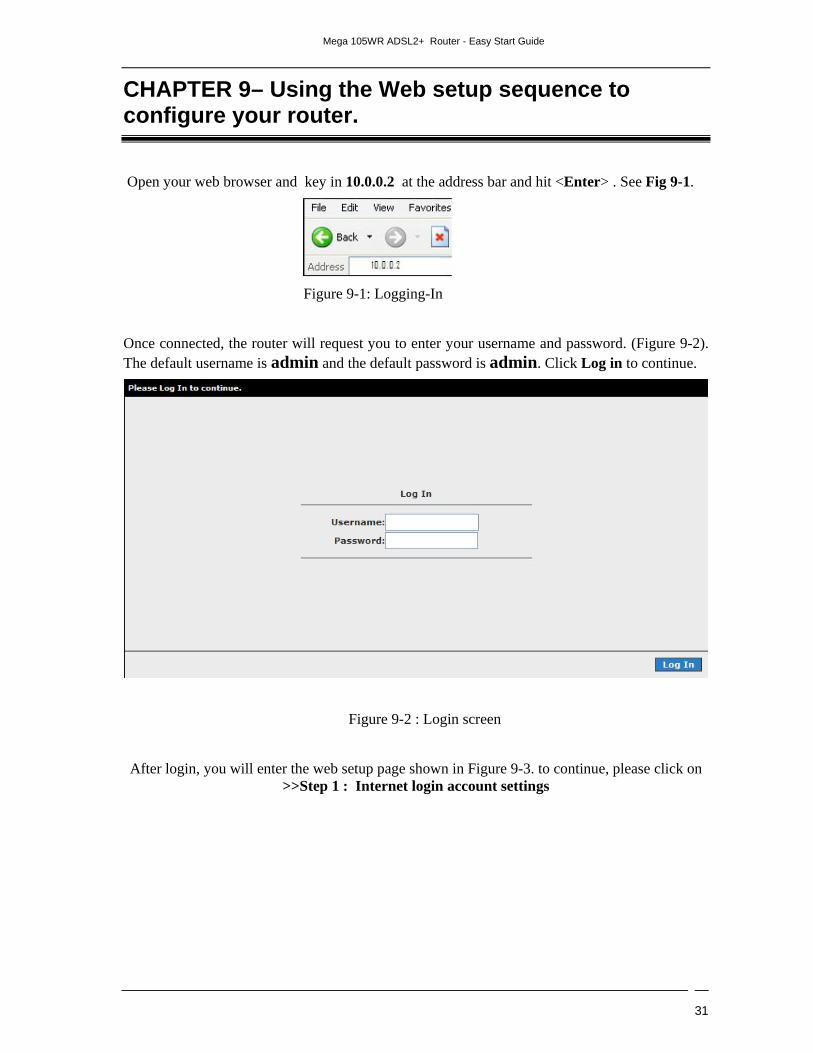
Open your web browser and key in 10.0.0.2 at the address bar and hit <Enter> . See Fig 9-1.
Figure 9-1: Logging-In
Once connected, the router will request you to enter your username and password. (Figure 9-2). The default username is admin and the default password is admin. Click Log in to continue.
Figure 9-2 : Login screen
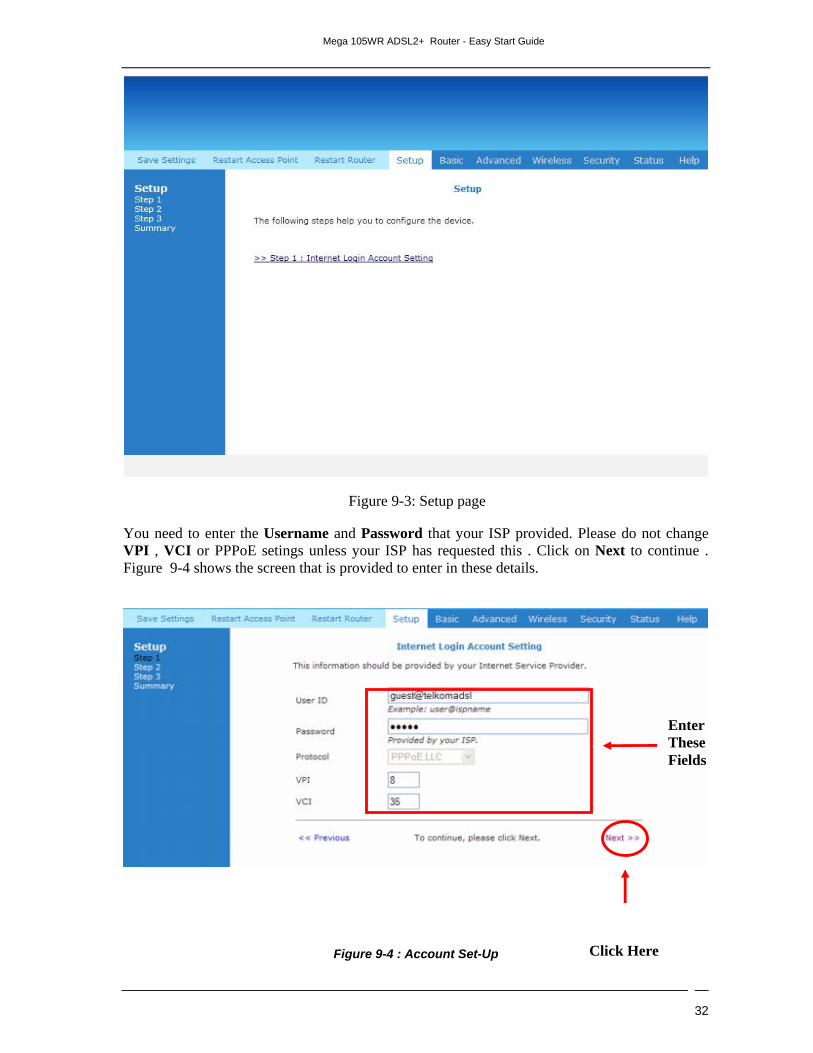
After login, you will enter the web setup page shown in Figure 9-3. to continue, please click on >>Step 1 : Internet login account settings
Mega 105WR ADSL2+ Router - Easy Start Guide
32
Figure 9-3: Setup page
You need to enter the Username and Password that your ISP provided. Please do not change VPI , VCI or PPPoE setings unless your ISP has requested this . Click on Next to continue . Figure 9-4 shows the screen that is provided to enter in these details.
Figure 9-4 : Account Set-Up
Enter These Fields
Click Here
Mega 105WR ADSL2+ Router - Easy Start Guide
33
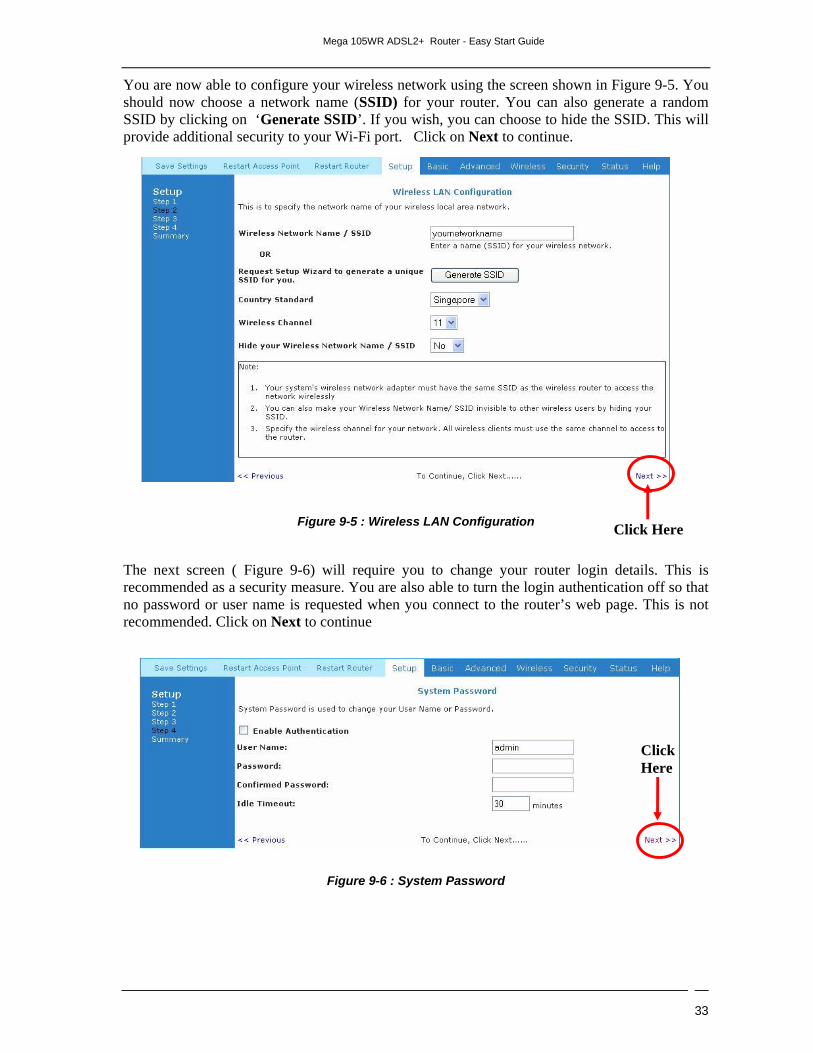
You are now able to configure your wireless network using the screen shown in Figure 9-5. You should now choose a network name (SSID) for your router. You can also generate a random SSID by clicking on ‘Generate SSID’. If you wish, you can choose to hide the SSID. This will provide additional security to your Wi-Fi port. Click on Next to continue.
Figure 9-5 : Wireless LAN Configuration
The next screen ( Figure 9-6) will require you to change your router login details. This is recommended as a security measure. You are also able to turn the login authentication off so that no password or user name is requested when you connect to the router’s web page. This is not recommended. Click on Next to continue
Figure 9-6 : System Password
Click Here
Click Here
Mega 105WR ADSL2+ Router - Easy Start Guide
34
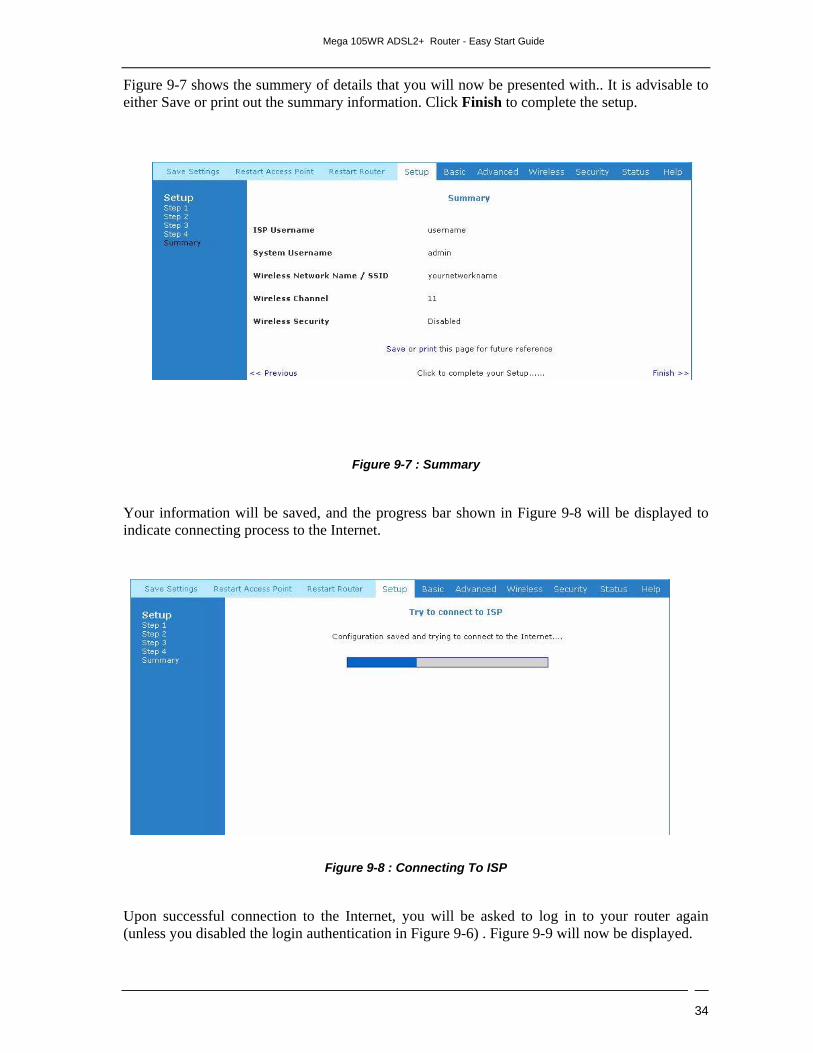
Figure 9-7 shows the summery of details that you will now be presented with.. It is advisable to either Save or print out the summary information. Click Finish to complete the setup.
Figure 9-7 : Summary
Your information will be saved, and the progress bar shown in Figure 9-8 will be displayed to indicate connecting process to the Internet.
Figure 9-8 : Connecting To ISP
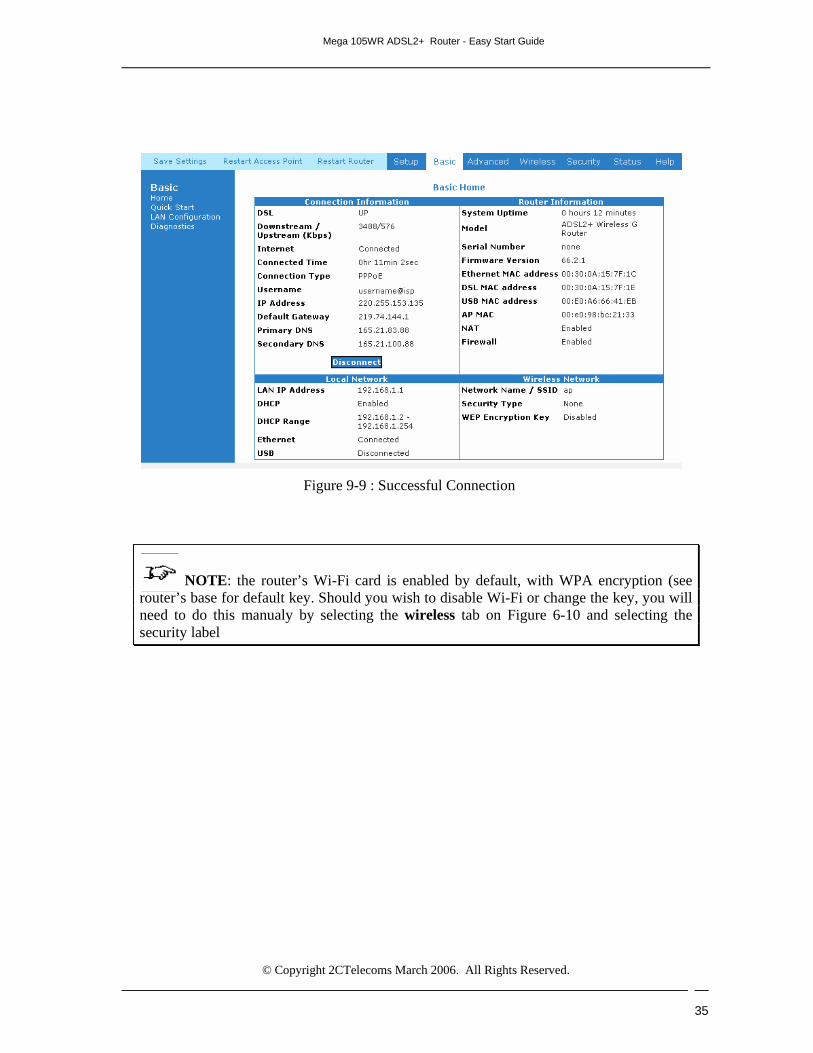
Upon successful connection to the Internet, you will be asked to log in to your router again (unless you disabled the login authentication in Figure 9-6) . Figure 9-9 will now be displayed.
Save and Print Option
Click Here
Mega 105WR ADSL2+ Router - Easy Start Guide
35
Figure 9-9 : Successful Connection
NOTE: the router’s Wi-Fi card is enabled by default, with WPA encryption (see router’s base for default key. Should you wish to disable Wi-Fi or change the key, you will need to do this manualy by selecting the wireless tab on Figure 6-10 and selecting the security label
© Copyright 2CTelecoms March 2006. All Rights Reserved.
User@Ispname