Meeting Control Panel and Meeting Display - · PDF fileMEETING CONTROL PANEL AND MEETING...
27
MEETING CONTROL PANEL AND MEETING DISPLAY 1 Meeting Control Panel and Meeting Display Running Meeting Display and Recording Voting with BoardDocs For quick reference, see the index at the end of this document. The BoardDocs Meeting Control Panel (MCP) allows you to do several things during and/or after the meeting. • Control the display of the meeting for the meeting audience via the ScoreBoard • Add notes to agenda items for inclusion in the minutes if you choose to use the Minutes Generator feature of BoardDocs • Record votes taken manually (by voice) during a meeting either during or after the meeting • Easily initiate and record voting through BoardDocs using online voting • Edit agenda items as needed during a meeting The BoardDocs Meeting Control Panel (MCP) can be launched from the Document Publisher software or accessed directly from a web browser. The MCP can only be run by the person set as the Moderator. Moderator In order to use the BoardDocs MCP, you must be set as the moderator. The moderator is a role that is assigned in BoardDocs Options to the person that will use the MCP during the meeting to drive the meeting display, record comments for the minutes and record voting. The person chosen to run the MCP as the moderator should review this documentation prior to the meeting so that they are familiar with the operation of the MCP. Best Practice: Set the Document Publisher, or other person that will operate the Meeting Control Panel, as the Moderator in the BoardDocs Options. This person must already be a BoardDocs user with a BoardDocs user name and password. This person will only see the levels of information that they have access to view. Without the appropriate level of access and role, a person’s name will not be available for selection as moderator. To select the moderator, follow these steps:
-
Upload
truongxuyen -
Category
Documents
-
view
215 -
download
1
Transcript of Meeting Control Panel and Meeting Display - · PDF fileMEETING CONTROL PANEL AND MEETING...

M E E T I N G C O N T R O L P A N E L A N D M E E T I N G D I S P L A Y
1
Meeting Control Panel and Meeting Display Running Meeting Display and Recording Voting with BoardDocs For quick reference, see the index at the end of this document.
The BoardDocs Meeting Control Panel (MCP) allows you to do several things during and/or after the meeting.
• Control the display of the meeting for the meeting audience via the ScoreBoard
• Add notes to agenda items for inclusion in the minutes if you choose to use the Minutes Generator feature of BoardDocs
• Record votes taken manually (by voice) during a meeting either during or after the meeting
• Easily initiate and record voting through BoardDocs using online voting
• Edit agenda items as needed during a meeting
The BoardDocs Meeting Control Panel (MCP) can be launched from the Document Publisher software or accessed directly from a web browser. The MCP can only be run by the person set as the Moderator.
Moderator In order to use the BoardDocs MCP, you must be set as the moderator.
The moderator is a role that is assigned in BoardDocs Options to the person that will use the MCP during the meeting to drive the meeting display, record comments for the minutes and record voting.
The person chosen to run the MCP as the moderator should review this documentation prior to the meeting so that they are familiar with the operation of the MCP.
Best Practice: Set the Document Publisher, or other person that will operate the Meeting Control Panel, as the Moderator in the BoardDocs Options. This person must already be a BoardDocs user with a BoardDocs user name and password. This person will only see the levels of information that they have access to view. Without the appropriate level of access and role, a person’s name will not be available for selection as moderator. To select the moderator, follow these steps:
M E E T I N G C O N T R O L P A N E L A N D M E E T I N G D I S P L A Y
2
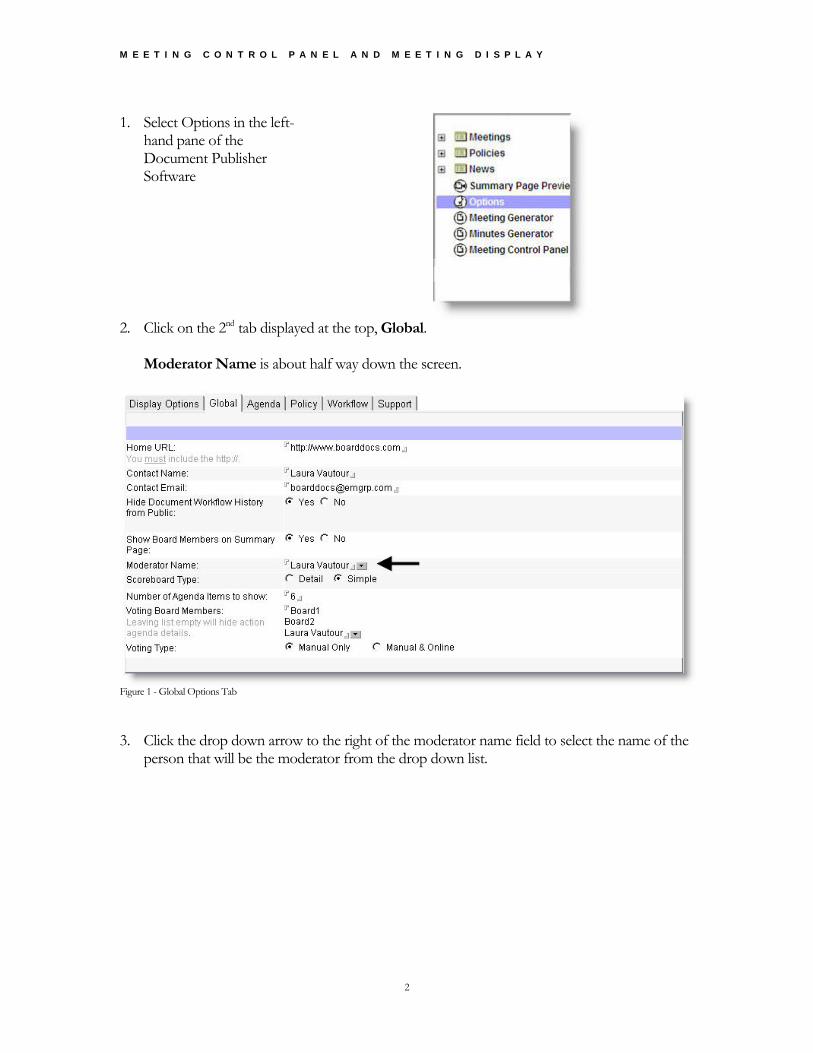
1. Select Options in the left-
hand pane of the Document Publisher Software
2. Click on the 2nd tab displayed at the top, Global.
Moderator Name is about half way down the screen.
Figure 1 - Global Options Tab
3. Click the drop down arrow to the right of the moderator name field to select the name of the
person that will be the moderator from the drop down list.
M E E T I N G C O N T R O L P A N E L A N D M E E T I N G D I S P L A Y
3
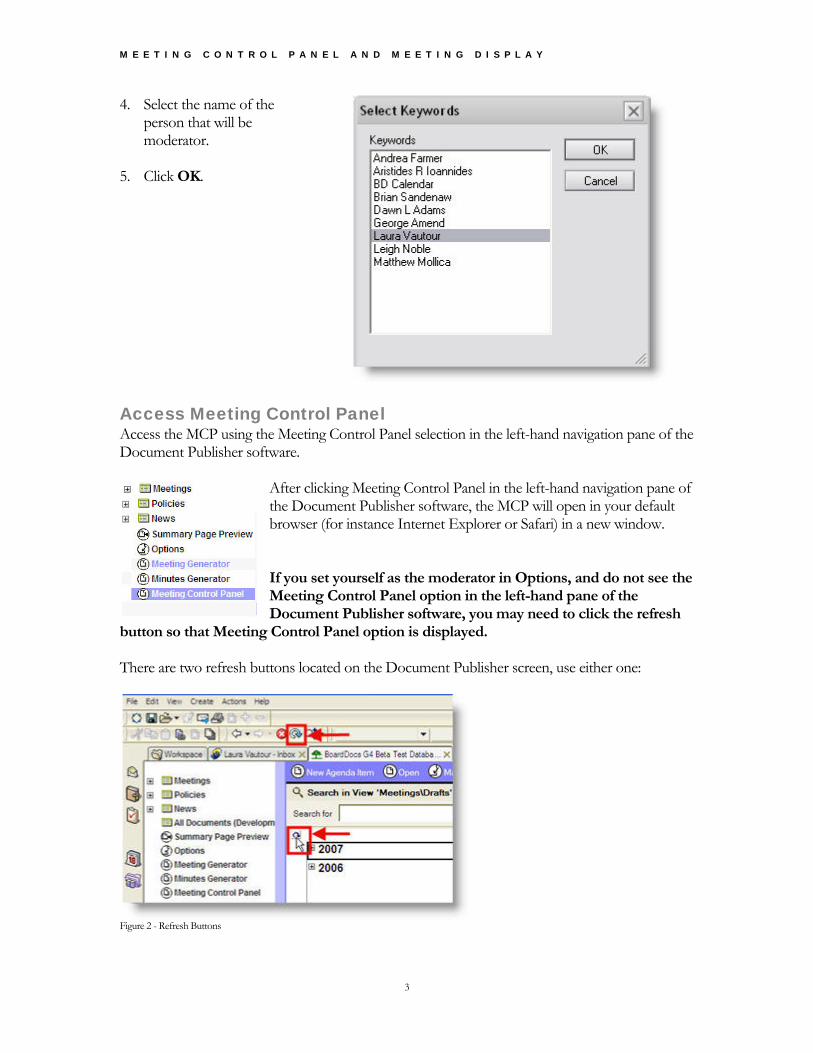
4. Select the name of the person that will be moderator.
5. Click OK.
Access Meeting Control Panel Access the MCP using the Meeting Control Panel selection in the left-hand navigation pane of the Document Publisher software.
After clicking Meeting Control Panel in the left-hand navigation pane of the Document Publisher software, the MCP will open in your default browser (for instance Internet Explorer or Safari) in a new window. If you set yourself as the moderator in Options, and do not see the Meeting Control Panel option in the left-hand pane of the Document Publisher software, you may need to click the refresh
button so that Meeting Control Panel option is displayed. There are two refresh buttons located on the Document Publisher screen, use either one:
Figure 2 - Refresh Buttons
M E E T I N G C O N T R O L P A N E L A N D M E E T I N G D I S P L A Y
4
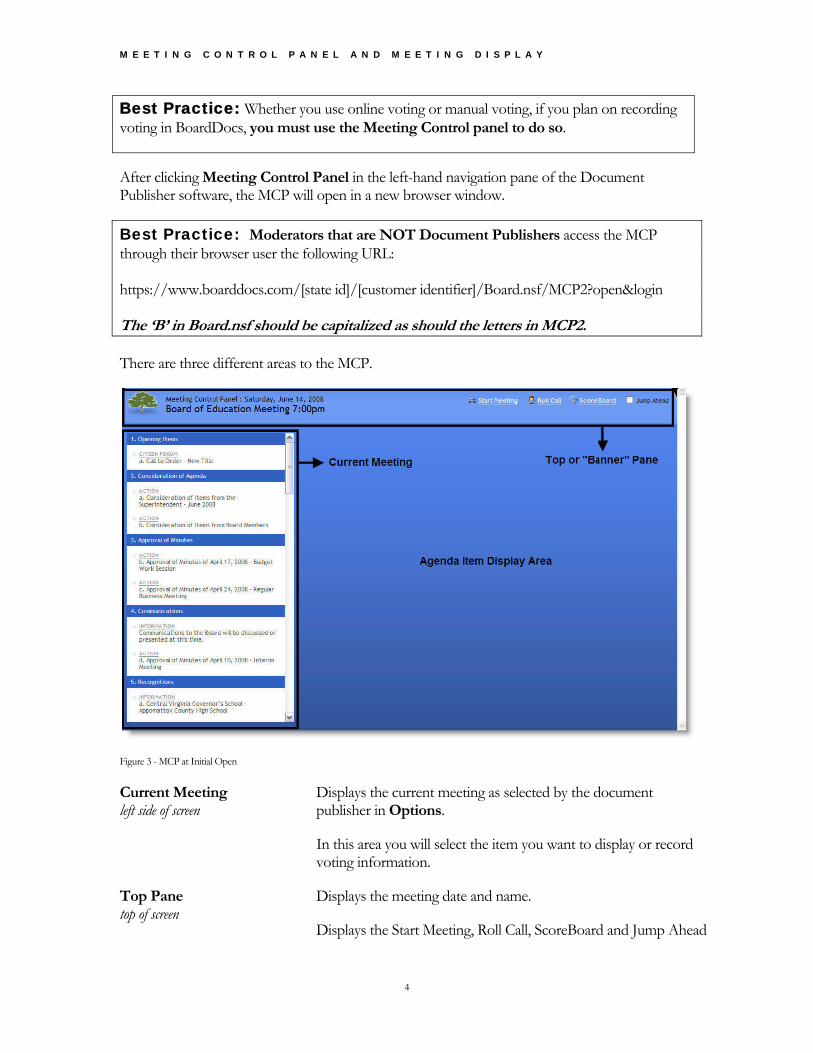
Best Practice: Whether you use online voting or manual voting, if you plan on recording voting in BoardDocs, you must use the Meeting Control panel to do so.
After clicking Meeting Control Panel in the left-hand navigation pane of the Document Publisher software, the MCP will open in a new browser window.
Best Practice: Moderators that are NOT Document Publishers access the MCP through their browser user the following URL: https://www.boarddocs.com/[state id]/[customer identifier]/Board.nsf/MCP2?open&login The ‘B’ in Board.nsf should be capitalized as should the letters in MCP2. There are three different areas to the MCP.
Figure 3 - MCP at Initial Open
Current Meeting left side of screen
Displays the current meeting as selected by the document publisher in Options.
In this area you will select the item you want to display or record voting information.
Top Pane top of screen
Displays the meeting date and name.
Displays the Start Meeting, Roll Call, ScoreBoard and Jump Ahead
M E E T I N G C O N T R O L P A N E L A N D M E E T I N G D I S P L A Y
5
links.
Agenda Item Display Area right side of screen
Displays the item selected for display from the current meeting.
Top Pane Links
Start meeting/Stop Meeting Use the Start Meeting link at the beginning of the meeting if you will be recording voting in real time during the meeting or if you will use online voting (more on that later). When selected, Start Meeting will record the time the meeting began based on the time as set on your computer.
Start Meeting will change to be Stop Meeting once it is clicked.
Use Stop Meeting at the end of the meeting to close all MCP files.
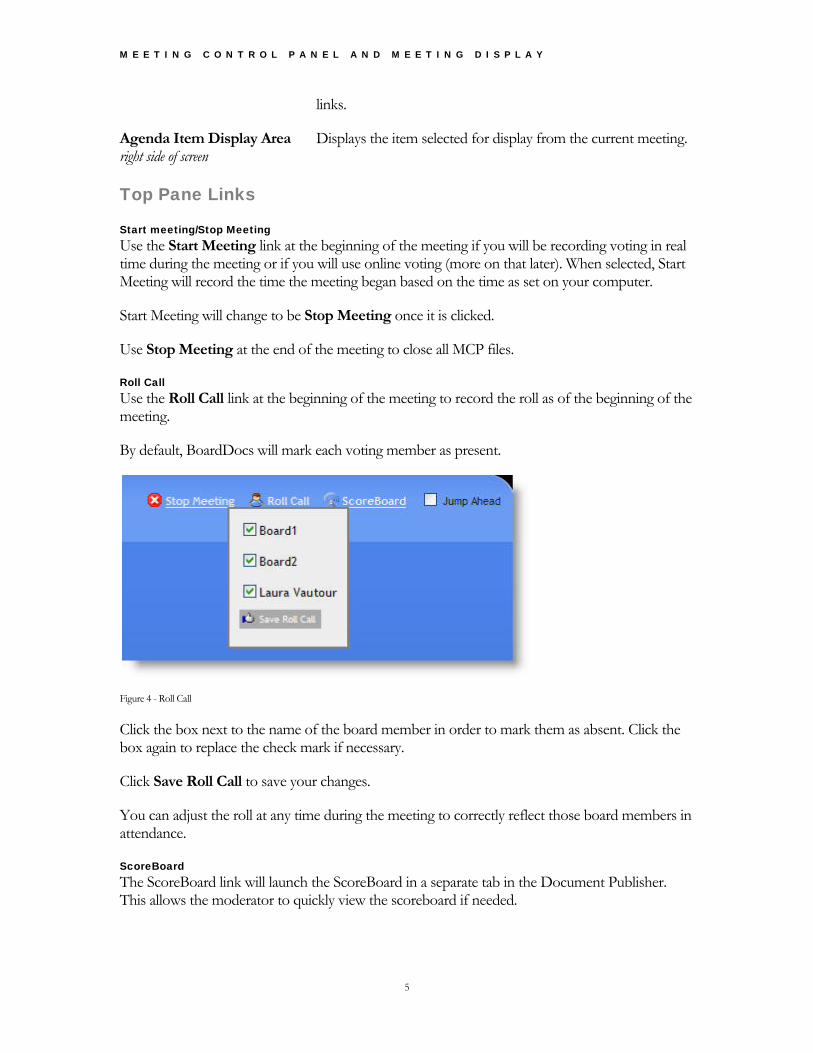
Roll Call Use the Roll Call link at the beginning of the meeting to record the roll as of the beginning of the meeting.
By default, BoardDocs will mark each voting member as present.
Figure 4 - Roll Call
Click the box next to the name of the board member in order to mark them as absent. Click the box again to replace the check mark if necessary.
Click Save Roll Call to save your changes.
You can adjust the roll at any time during the meeting to correctly reflect those board members in attendance.
ScoreBoard The ScoreBoard link will launch the ScoreBoard in a separate tab in the Document Publisher. This allows the moderator to quickly view the scoreboard if needed.

M E E T I N G C O N T R O L P A N E L A N D M E E T I N G D I S P L A Y
6
Jump Ahead Jump Ahead allows the moderator to stop “driving” the ScoreBoard display and Current Item link for authenticated users.
Left-hand Frame The left-hand frame of the MCP displays the current meeting as selected in Options. Initially, the MCP opens and no particular item is selected for display.
Display an agenda item in the right-hand side of the MCP and the scoreboard by single-clicking on the item in the left-hand pane.
The ScoreBoard begins displaying the agenda items once you have clicked on an agenda item in the MCP.
Agenda Item Display Area The Agenda Item Display Area of the MCP displays the item selected in the Current Meeting frame on the left.
Single-click on and agenda item on the left-hand side of the screen to display it and make changes to summary information, take minutes notes and record voting (during or after the meeting).
Figure 5 – Information Agenda Item Displayed
All information for the agenda item is displayed and accessed using the tabs at the top of the agenda item.
Action and Action (Consent) Items will have four (4) tabs to allow for voting information, while all other agenda item types (Information, Discussion, Report, etc) will have two (2) tabs.
Click on the tabs to look at each different part of the agenda item.
M E E T I N G C O N T R O L P A N E L A N D M E E T I N G D I S P L A Y
7
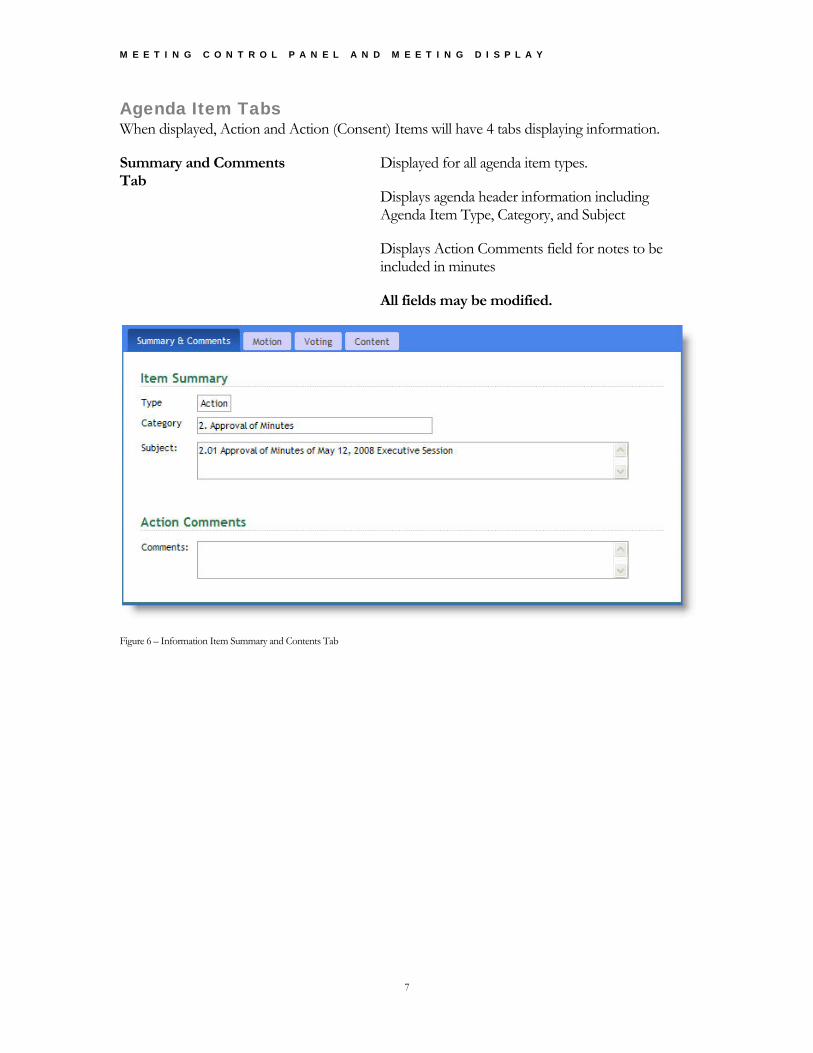
Agenda Item Tabs When displayed, Action and Action (Consent) Items will have 4 tabs displaying information.
Summary and Comments Tab
Displayed for all agenda item types.
Displays agenda header information including Agenda Item Type, Category, and Subject
Displays Action Comments field for notes to be included in minutes
All fields may be modified.
Figure 6 – Information Item Summary and Contents Tab
M E E T I N G C O N T R O L P A N E L A N D M E E T I N G D I S P L A Y
8
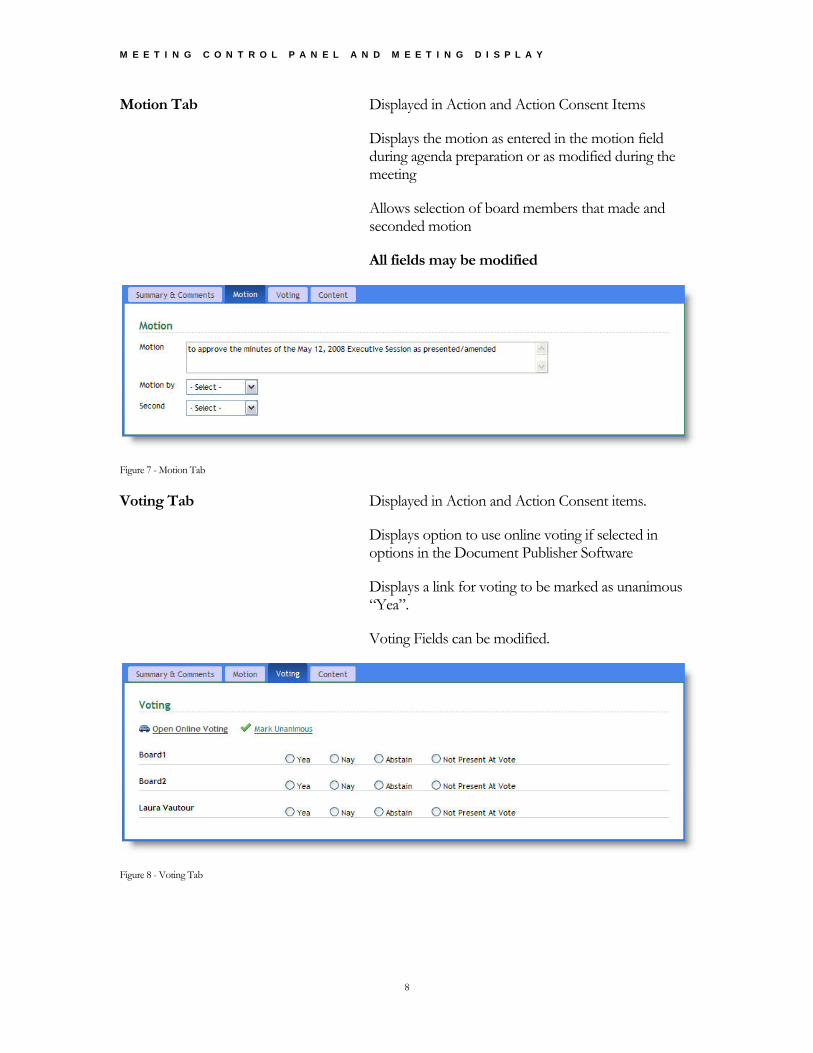
Motion Tab Displayed in Action and Action Consent Items
Displays the motion as entered in the motion field during agenda preparation or as modified during the meeting
Allows selection of board members that made and seconded motion
All fields may be modified
Figure 7 - Motion Tab
Voting Tab Displayed in Action and Action Consent items.
Displays option to use online voting if selected in options in the Document Publisher Software
Displays a link for voting to be marked as unanimous “Yea”.
Voting Fields can be modified.
Figure 8 - Voting Tab

M E E T I N G C O N T R O L P A N E L A N D M E E T I N G D I S P L A Y
9
Content Tab Displays the three content areas of agenda items as determined by the moderator’s BoardDocs access level.
Content fields cannot be modified from the MCP.
All content additions, modifications and/or deletions must be done in the Document Publisher software.
Figure 9 - Content Tab
If the ScoreBoard is being used, any agenda item that is selected by the moderator by single-clicking will be displayed on the ScoreBoard.
Editing Information in Agenda Items Most fields in the agenda item can be selected or modified from the MCP.
When you click in a field to edit it and begin typing, the field will turn yellow to signal that you are editing the field.
The field returns to white once you have saved your changes.
M E E T I N G C O N T R O L P A N E L A N D M E E T I N G D I S P L A Y
10
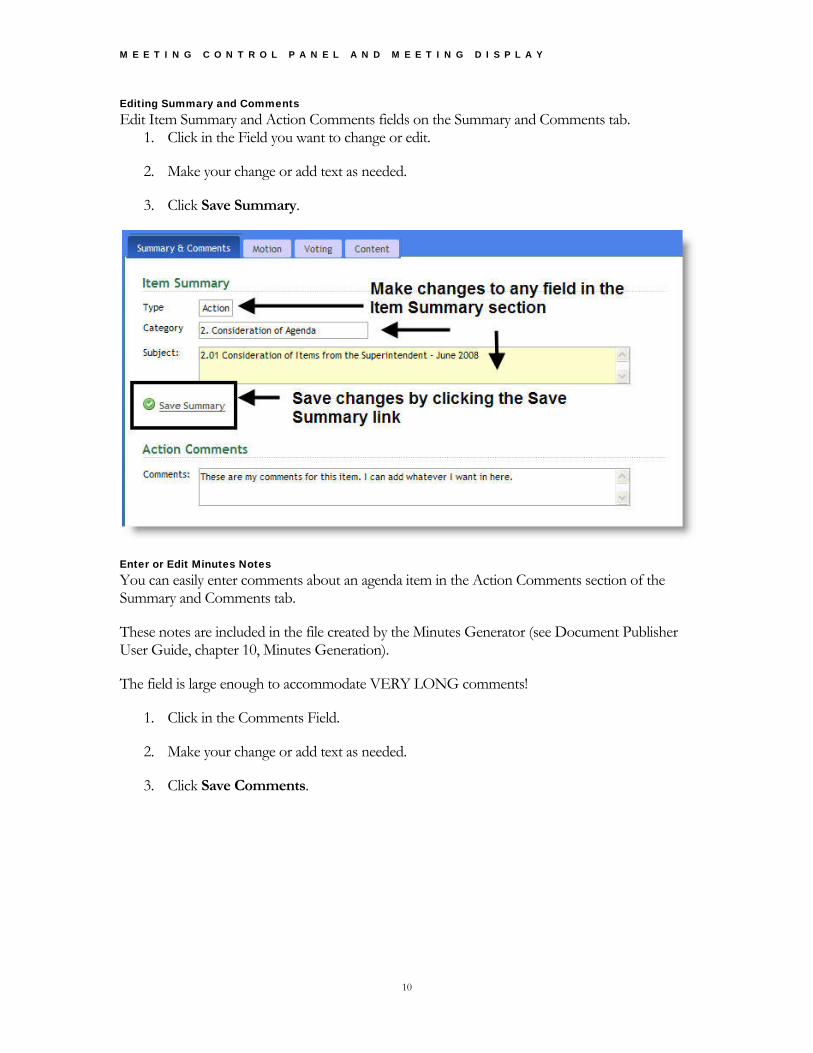
Editing Summary and Comments Edit Item Summary and Action Comments fields on the Summary and Comments tab.
1. Click in the Field you want to change or edit.
2. Make your change or add text as needed.
3. Click Save Summary.
Enter or Edit Minutes Notes You can easily enter comments about an agenda item in the Action Comments section of the Summary and Comments tab.
These notes are included in the file created by the Minutes Generator (see Document Publisher User Guide, chapter 10, Minutes Generation).
The field is large enough to accommodate VERY LONG comments!
1. Click in the Comments Field.
2. Make your change or add text as needed.
3. Click Save Comments.

M E E T I N G C O N T R O L P A N E L A N D M E E T I N G D I S P L A Y
11
The next two tabs, found in action and consent items, are used to record voting.
Recording Voting Depending on the options you choose, you can record votes manually or have Board Members vote interactively online during the meeting.
If you plan on using the Meeting Generator to create your minutes after the meeting, you will want to record voting.
The choice is yours. Either way, voting information can be quickly and accurately recorded in the BoardDocs Document Publisher software using the MCP.
The Voting tab is where you will record voting. Imagine that.
Manual Voting - Recording the Motion For action and consent items, the second tab is the Motion tab.
Use the Motion Field to record the motion put forth for the agenda item.
If you choose to use the BoardDocs option to “Show Motion Prior to Action”, then this field will be displayed to users as Recommended Action before a vote result is recorded for the agenda item.
This allows you to enter a recommended motion for voting members reference. It in no way locks members into only making the motion as listed. See Document Publisher User Guide, chapter 4, BoardDocs Options for additional information on this feature.
If you plan to use the Minutes Generator feature of BoardDocs, consider wording the motion like the following example so that when the minutes are automatically generated, the motion is reflected in grammatically correct English.
M E E T I N G C O N T R O L P A N E L A N D M E E T I N G D I S P L A Y
12
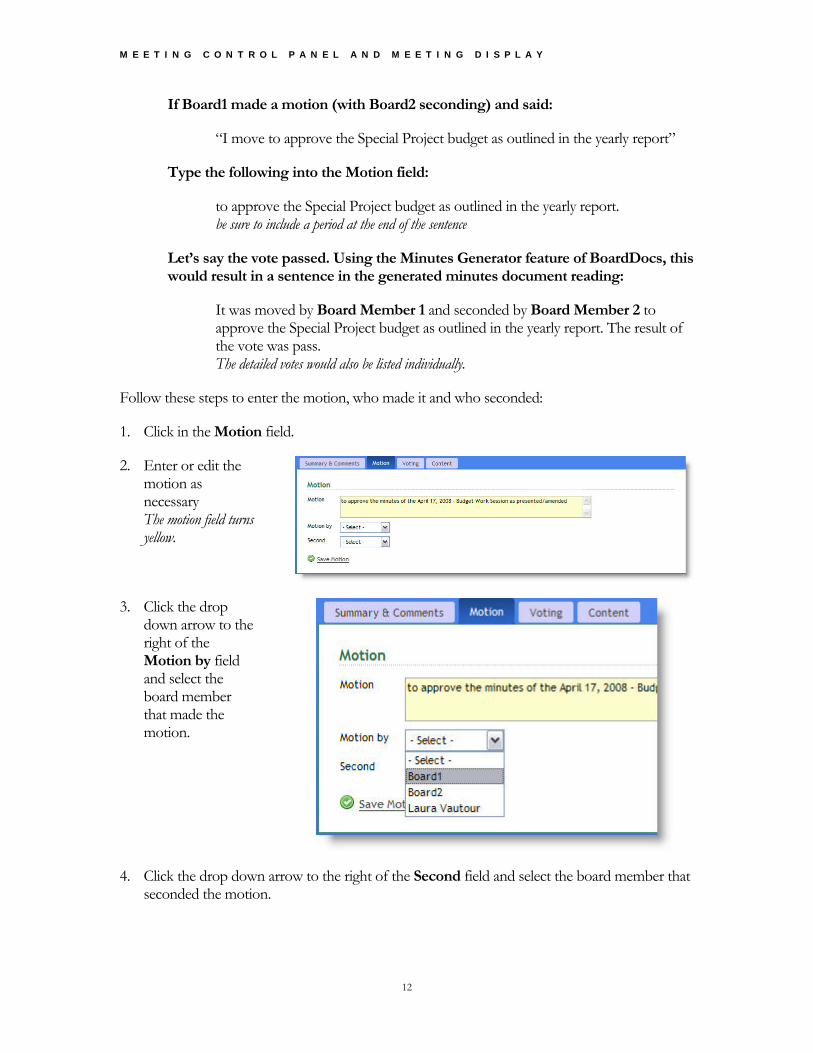
If Board1 made a motion (with Board2 seconding) and said:
“I move to approve the Special Project budget as outlined in the yearly report”
Type the following into the Motion field:
to approve the Special Project budget as outlined in the yearly report. be sure to include a period at the end of the sentence
Let’s say the vote passed. Using the Minutes Generator feature of BoardDocs, this would result in a sentence in the generated minutes document reading:
It was moved by Board Member 1 and seconded by Board Member 2 to approve the Special Project budget as outlined in the yearly report. The result of the vote was pass. The detailed votes would also be listed individually.
Follow these steps to enter the motion, who made it and who seconded:
1. Click in the Motion field.
2. Enter or edit the motion as necessary The motion field turns yellow.
3. Click the drop down arrow to the right of the Motion by field and select the board member that made the motion.
4. Click the drop down arrow to the right of the Second field and select the board member that seconded the motion.
M E E T I N G C O N T R O L P A N E L A N D M E E T I N G D I S P L A Y
13
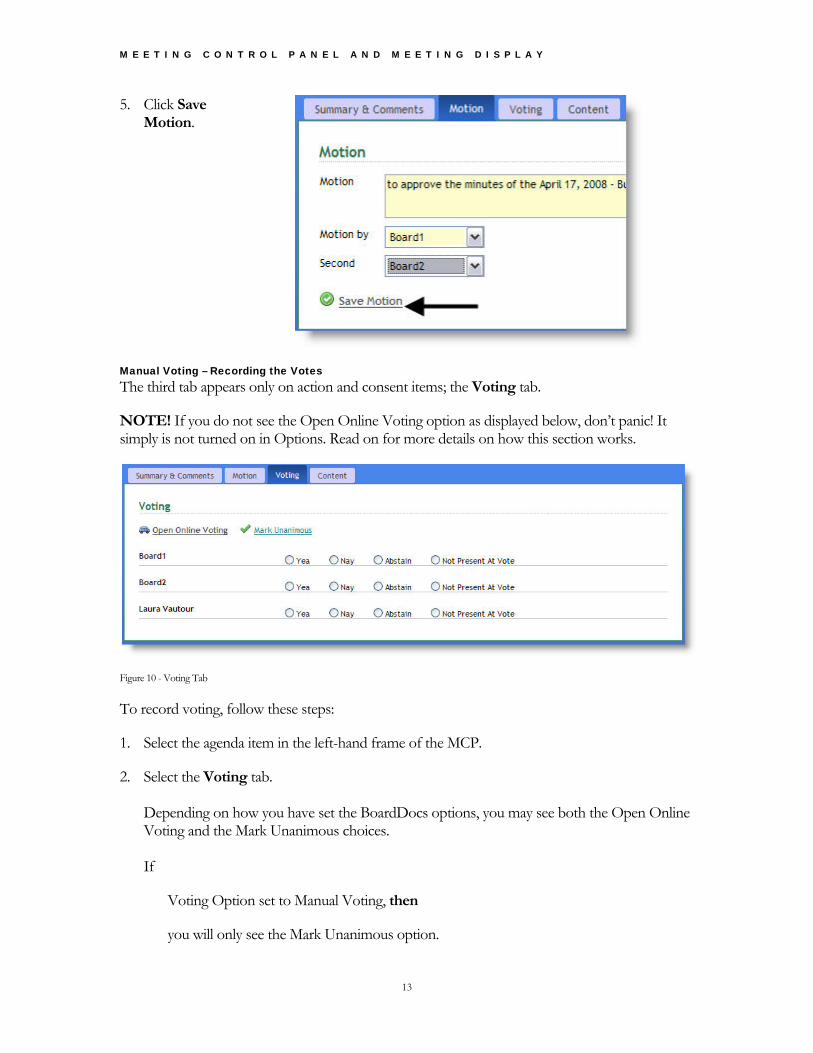
5. Click Save Motion.
Manual Voting – Recording the Votes The third tab appears only on action and consent items; the Voting tab.
NOTE! If you do not see the Open Online Voting option as displayed below, don’t panic! It simply is not turned on in Options. Read on for more details on how this section works.
Figure 10 - Voting Tab
To record voting, follow these steps:
1. Select the agenda item in the left-hand frame of the MCP.
2. Select the Voting tab. Depending on how you have set the BoardDocs options, you may see both the Open Online Voting and the Mark Unanimous choices. If
Voting Option set to Manual Voting, then
you will only see the Mark Unanimous option.

M E E T I N G C O N T R O L P A N E L A N D M E E T I N G D I S P L A Y
14
If
Voting Option set to Online and Manual Voting, then
you will see both the Open Online Voting and the Mark Unanimous options.
Note that you can choose to enter the recommended motion in the motion field prior to the meeting, for instance when the agenda item is created initially.
3. If the vote was unanimously yea, click Mark Unanimous. A vote of “Yea” is recorded for all Board Members marked present.
4. OR if the vote is not unanimous, abstained, or if members were not present at the time of the vote for some reason, single-click in the bubble next to the appropriate choice for each Board Member.
5. Single-click Save Vote.
6. To change the motion after you have entered and saved it, click the Motion tab and adjust the motion as necessary.
7. If you made an error when recording the voting, you may also adjust the voting as necessary and save your changes by single-clicking Save Vote.
Voting Record Names The list of names for the voting record comes from the list of voting board members as setup in BoardDocs options on the Global tab. See Document Publisher User Guide, chapter 4, BoardDocs Options, for additional information regarding this option.
Consent Voting
Regardless of whether you list all of your consent items together in one category, or if you choose to list them throughout the agenda in different categories; if you do a single consent vote for all action (consent) items, BoardDocs gives you the ability to record the motion and result of the consent vote all at once and have the result appear in each consent item included in the vote.
BoardDocs looks through the agenda and applies the voting information to each item that has an agenda item type of Action (Consent).
It is because of this that there can only be one (1) consent vote taken and recorded using the consent function of BoardDocs voting.

M E E T I N G C O N T R O L P A N E L A N D M E E T I N G D I S P L A Y
15
Recording Consent Voting Start the MCP. When you select an Action (Consent) item on the left-hand side of the MCP, voting options for consent voting will automatically be displayed in the bottom of that agenda item. From the MCP, do the following to record your consent vote:
1. Select one of the consent items.
2. Click on the Motion tab.
3. If you haven’t already done so, enter the motion.
4. Select who made and seconded the motion.
5. Click Save Motion.

M E E T I N G C O N T R O L P A N E L A N D M E E T I N G D I S P L A Y
16
6. After clicking Save Motion, BoardDocs will ask you to confirm that you are recording the Consent Motion. Click OK to confirm. The Motion information is saved and the Voting tab is displayed.
7. Click Mark Unanimous or select the votes for each board member.
8. Click Save Vote.
9. After clicking Save Vote, BoardDocs will ask you to confirm that you are recording consent voting. Click OK to confirm. Voting information is saved.
10. The vote is saved and reflected in all items with the type of Action (Consent).

M E E T I N G C O N T R O L P A N E L A N D M E E T I N G D I S P L A Y
17
Best Practice: You will only record voting in one Action (Consent) agenda item.
It doesn’t matter which item you record the vote in, it will always work the same. The voting information will be recorded in ALL items with a type of action (consent).
Even if you have 50 consent items, you will only need to record the vote one time!
Using Jump Ahead Use Jump Ahead if you need to work on an agenda item and you do not want the ScoreBoard to display the item you are viewing or modifying.
To use Jump Ahead , do the following:
1. Click in the Jump Ahead box in the top pane of the MCP window to place a check mark in it.
2. Click on the agenda item you need to edit or view on the left-hand side of the MCP. The item is now displayed in the right-hand frame of the MCP.
3. Make additions and modifications as needed and save them.
4. Click in the Jump Ahead box again to remove the check mark and return to driving the meeting display again.
5. Click the agenda item you would like to display and the ScoreBoard will display the item. The ScoreBoard once again displays the items as you click on them in the MCP.
Voting Online
Online voting offers organizations the ability to allow board members to vote directly in BoardDocs during the meeting. Voting information is recorded and the voting result is displayed on the ScoreBoard for the audience.
To use online voting, the online voting option for Manual and Online Voting must be selected and meeting moderator must be selected in Options, on the Global tab. See Document Publisher User Guide, chapter 4, BoardDocs Options for detailed information about setting this option.
Just like manual voting, the Voting portion of each agenda item is displayed in the MCP as it guides the meeting moderator through recording the motion, who put forth the motion, who seconded the motion and the voting result for each board member present.
Once the motion is recorded, the meeting moderator opens the voting for board members. During the time that the vote is open, board members can vote, change their mind and revote, and even revote again. Once voting is closed, the board members can no longer change their vote.
M E E T I N G C O N T R O L P A N E L A N D M E E T I N G D I S P L A Y
18
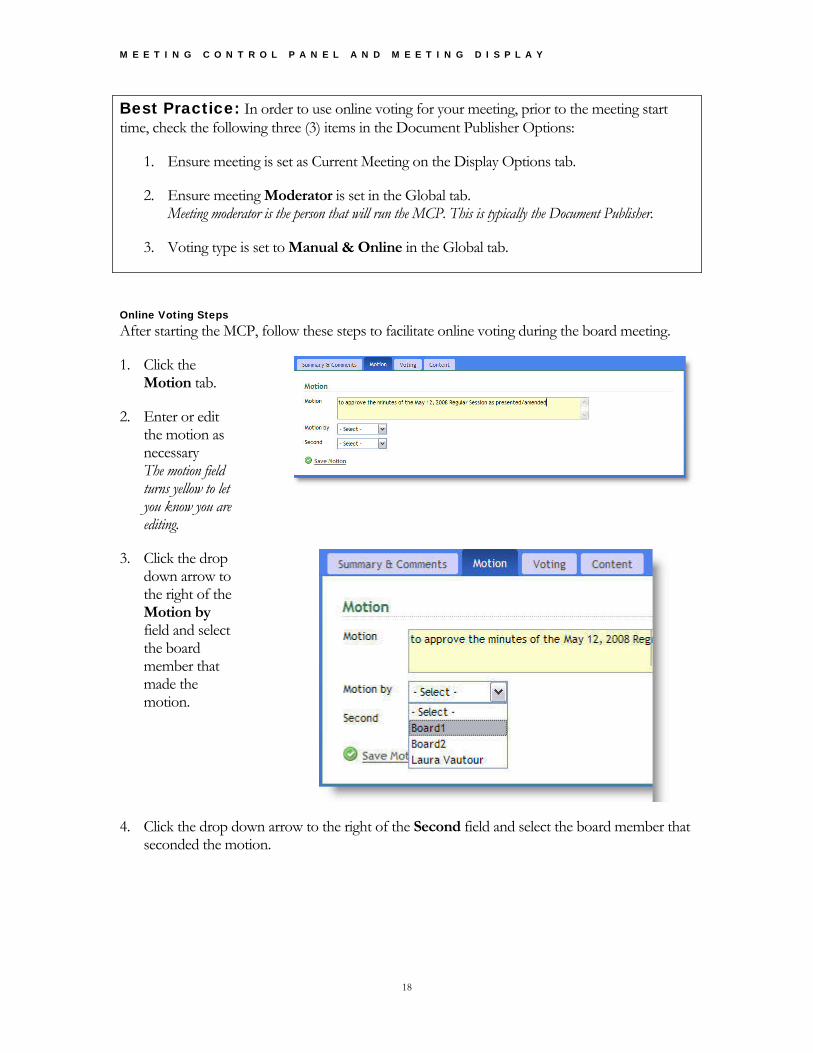
Best Practice: In order to use online voting for your meeting, prior to the meeting start time, check the following three (3) items in the Document Publisher Options:
1. Ensure meeting is set as Current Meeting on the Display Options tab.
2. Ensure meeting Moderator is set in the Global tab. Meeting moderator is the person that will run the MCP. This is typically the Document Publisher.
3. Voting type is set to Manual & Online in the Global tab.
Online Voting Steps After starting the MCP, follow these steps to facilitate online voting during the board meeting.
1. Click the Motion tab.
2. Enter or edit the motion as necessary The motion field turns yellow to let you know you are editing.
3. Click the drop down arrow to the right of the Motion by field and select the board member that made the motion.
4. Click the drop down arrow to the right of the Second field and select the board member that seconded the motion.
M E E T I N G C O N T R O L P A N E L A N D M E E T I N G D I S P L A Y
19
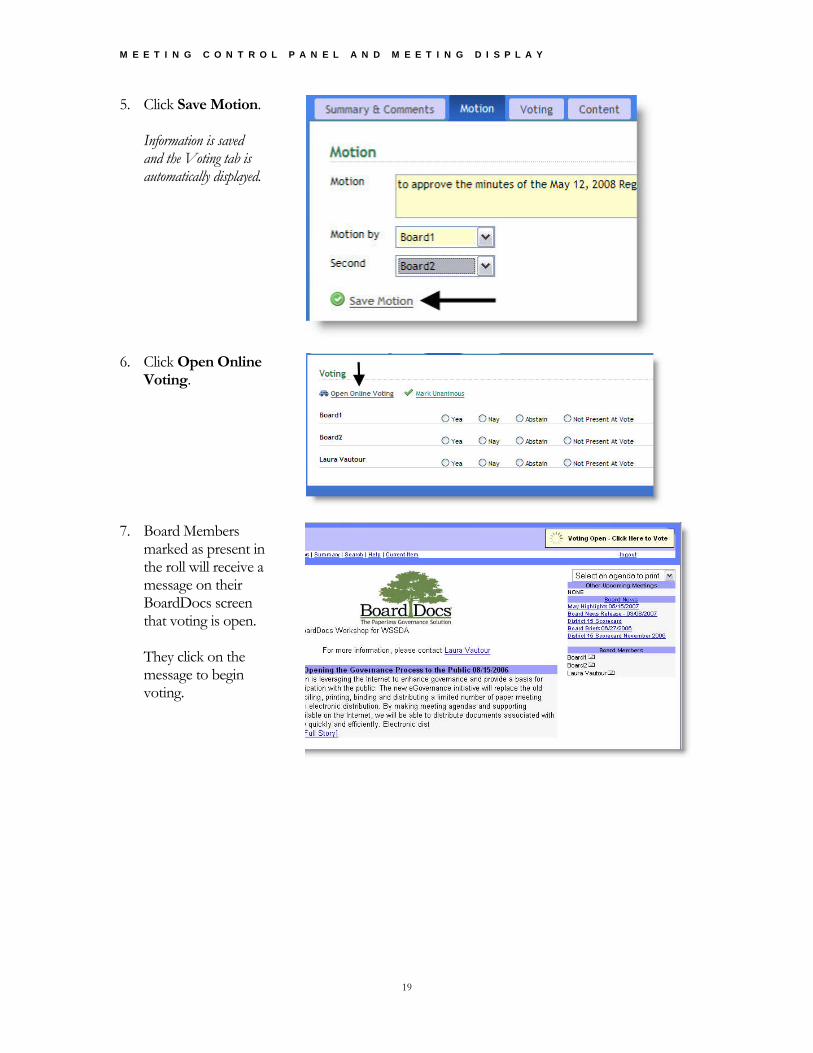
5. Click Save Motion. Information is saved and the Voting tab is automatically displayed.
6. Click Open Online Voting.
7. Board Members marked as present in the roll will receive a message on their BoardDocs screen that voting is open. They click on the message to begin voting.

M E E T I N G C O N T R O L P A N E L A N D M E E T I N G D I S P L A Y
20
8. Board members choose their vote by single-clicking on their choice.
9. Board members can change their vote at any time while voting is open by clicking on the voting box in the upper right-hand corner of their BoardDocs screen.
10. The MCP highlights in yellow the names of Board Members that have voted. This allows the moderator to know when voting can be Saved.
M E E T I N G C O N T R O L P A N E L A N D M E E T I N G D I S P L A Y
21
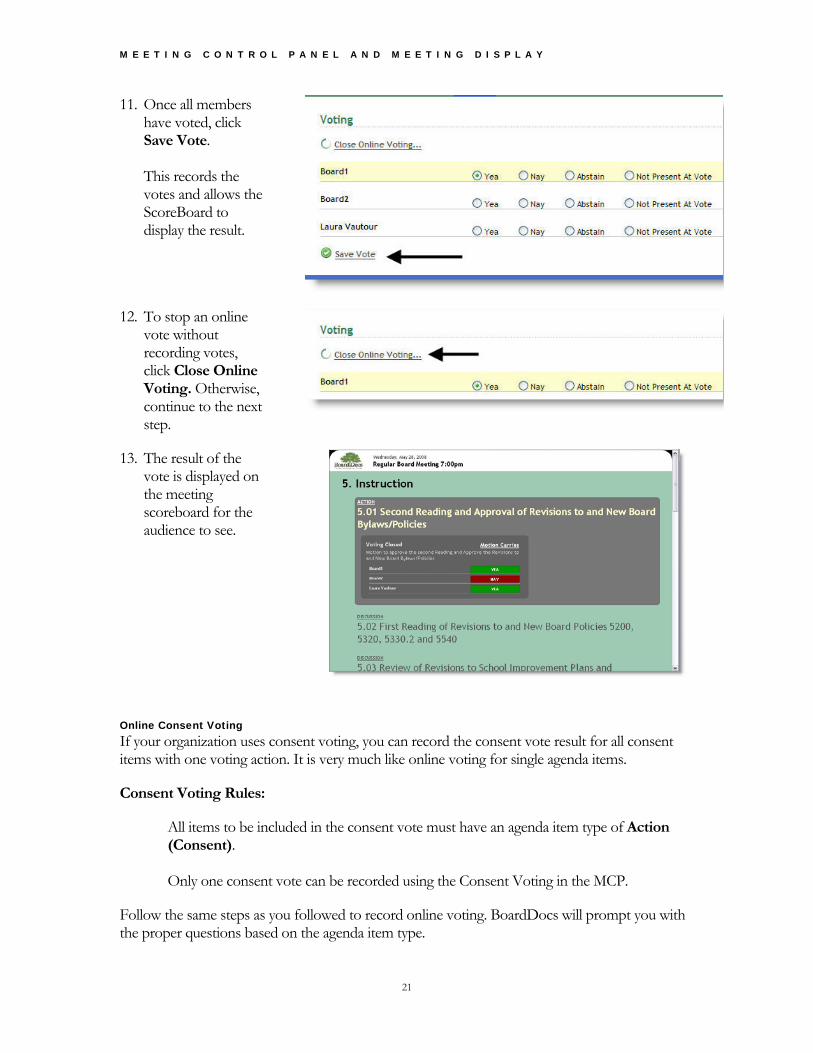
11. Once all members have voted, click Save Vote. This records the votes and allows the ScoreBoard to display the result.
12. To stop an online vote without recording votes, click Close Online Voting. Otherwise, continue to the next step.
13. The result of the vote is displayed on the meeting scoreboard for the audience to see.
Online Consent Voting If your organization uses consent voting, you can record the consent vote result for all consent items with one voting action. It is very much like online voting for single agenda items.
Consent Voting Rules:
All items to be included in the consent vote must have an agenda item type of Action (Consent). Only one consent vote can be recorded using the Consent Voting in the MCP.
Follow the same steps as you followed to record online voting. BoardDocs will prompt you with the proper questions based on the agenda item type.
M E E T I N G C O N T R O L P A N E L A N D M E E T I N G D I S P L A Y
22
Minutes and Action Comments Even with a laptop readily available for use during meetings, many of our customers prefer to continue to record their minutes the way they always have because they feel most comfortable that way.
Some use a recorded transcript of the meeting the day after to construct their minutes, while others are whizzes with shorthand and prefer to take their minutes that way during the meeting.
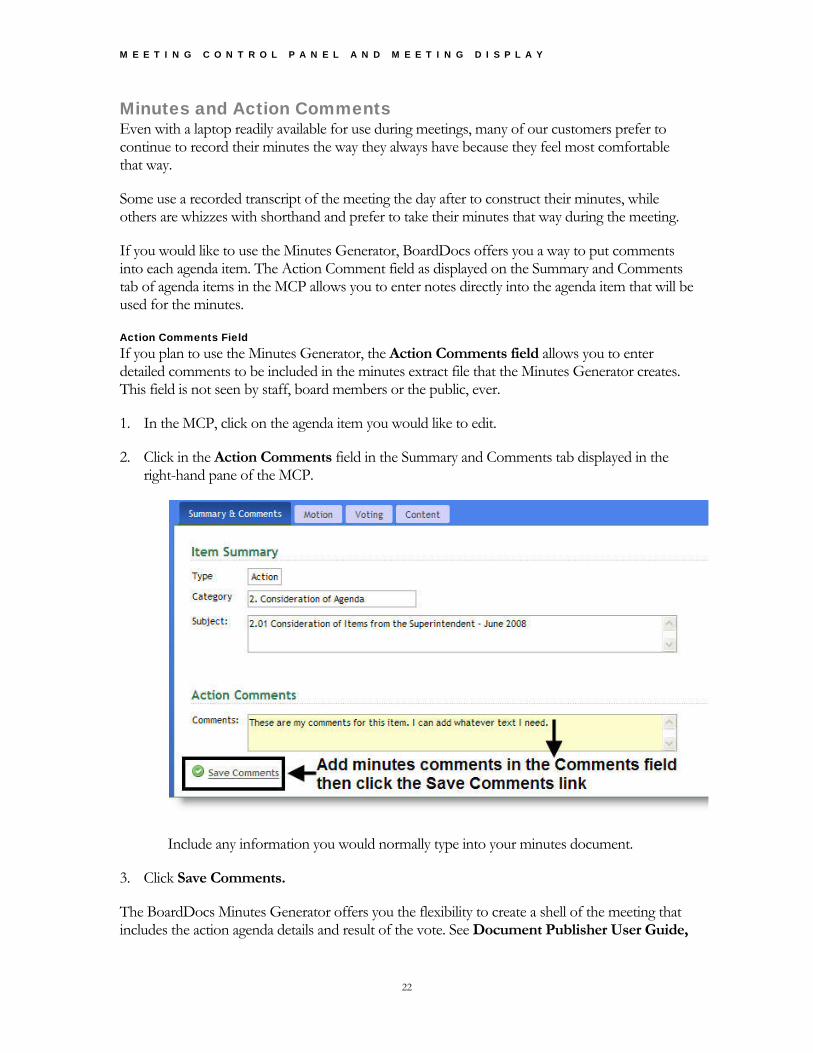
If you would like to use the Minutes Generator, BoardDocs offers you a way to put comments into each agenda item. The Action Comment field as displayed on the Summary and Comments tab of agenda items in the MCP allows you to enter notes directly into the agenda item that will be used for the minutes.
Action Comments Field If you plan to use the Minutes Generator, the Action Comments field allows you to enter detailed comments to be included in the minutes extract file that the Minutes Generator creates. This field is not seen by staff, board members or the public, ever.
1. In the MCP, click on the agenda item you would like to edit.
2. Click in the Action Comments field in the Summary and Comments tab displayed in the right-hand pane of the MCP.
Include any information you would normally type into your minutes document.
3. Click Save Comments.
The BoardDocs Minutes Generator offers you the flexibility to create a shell of the meeting that includes the action agenda details and result of the vote. See Document Publisher User Guide,
M E E T I N G C O N T R O L P A N E L A N D M E E T I N G D I S P L A Y
23
chapter 10, Minutes Generator for more detailed information about how to use the BoardDocs Minutes Generator.
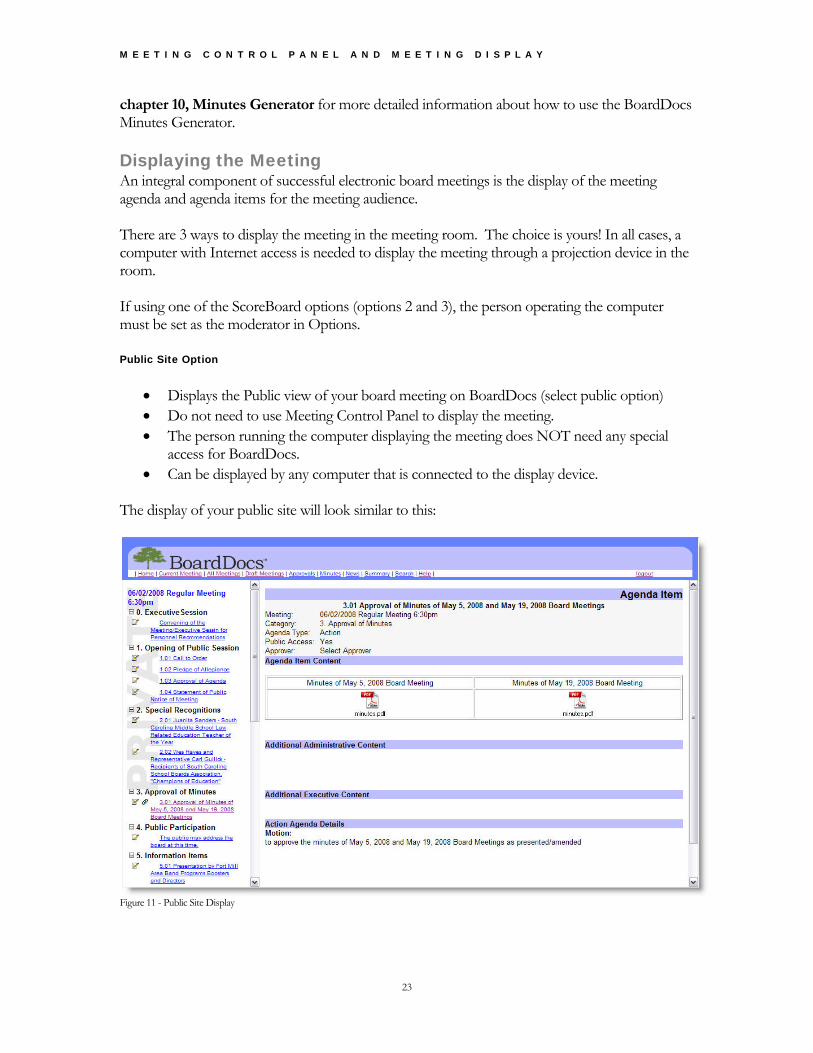
Displaying the Meeting An integral component of successful electronic board meetings is the display of the meeting agenda and agenda items for the meeting audience. There are 3 ways to display the meeting in the meeting room. The choice is yours! In all cases, a computer with Internet access is needed to display the meeting through a projection device in the room. If using one of the ScoreBoard options (options 2 and 3), the person operating the computer must be set as the moderator in Options. Public Site Option
• Displays the Public view of your board meeting on BoardDocs (select public option) • Do not need to use Meeting Control Panel to display the meeting. • The person running the computer displaying the meeting does NOT need any special
access for BoardDocs. • Can be displayed by any computer that is connected to the display device.
The display of your public site will look similar to this:
Figure 11 - Public Site Display
M E E T I N G C O N T R O L P A N E L A N D M E E T I N G D I S P L A Y
24
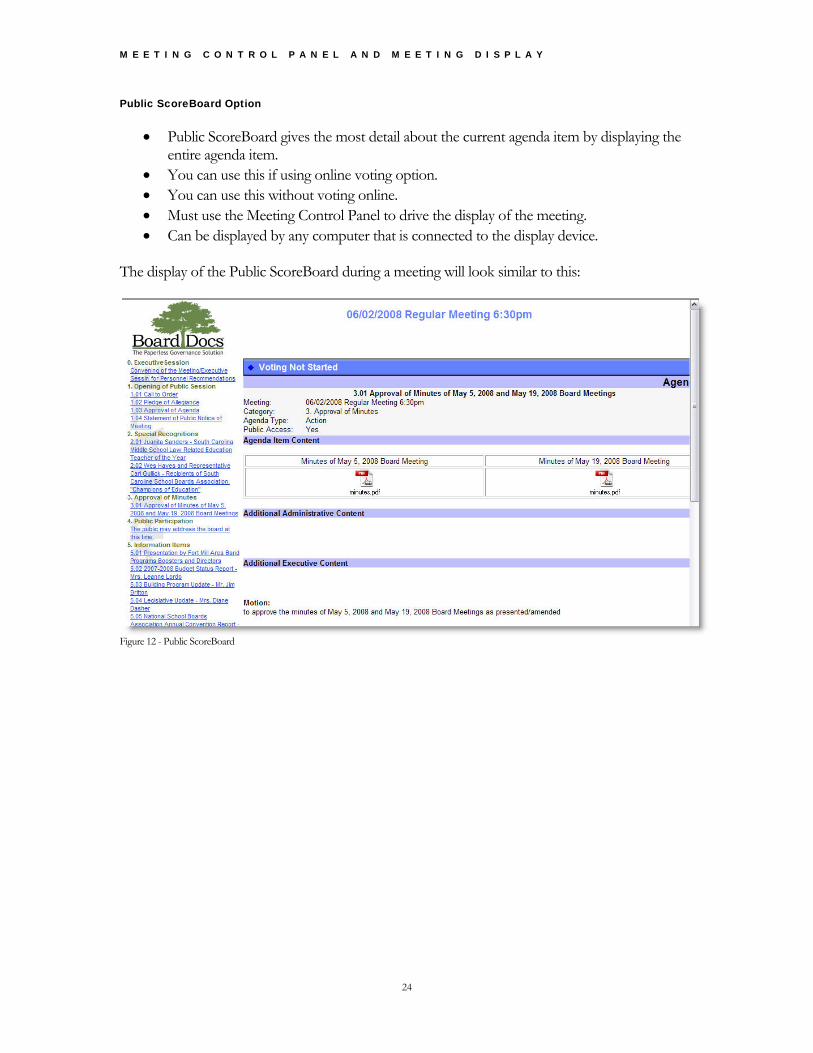
Public ScoreBoard Option
• Public ScoreBoard gives the most detail about the current agenda item by displaying the entire agenda item.
• You can use this if using online voting option. • You can use this without voting online. • Must use the Meeting Control Panel to drive the display of the meeting. • Can be displayed by any computer that is connected to the display device.
The display of the Public ScoreBoard during a meeting will look similar to this:
Figure 12 - Public ScoreBoard
M E E T I N G C O N T R O L P A N E L A N D M E E T I N G D I S P L A Y
25
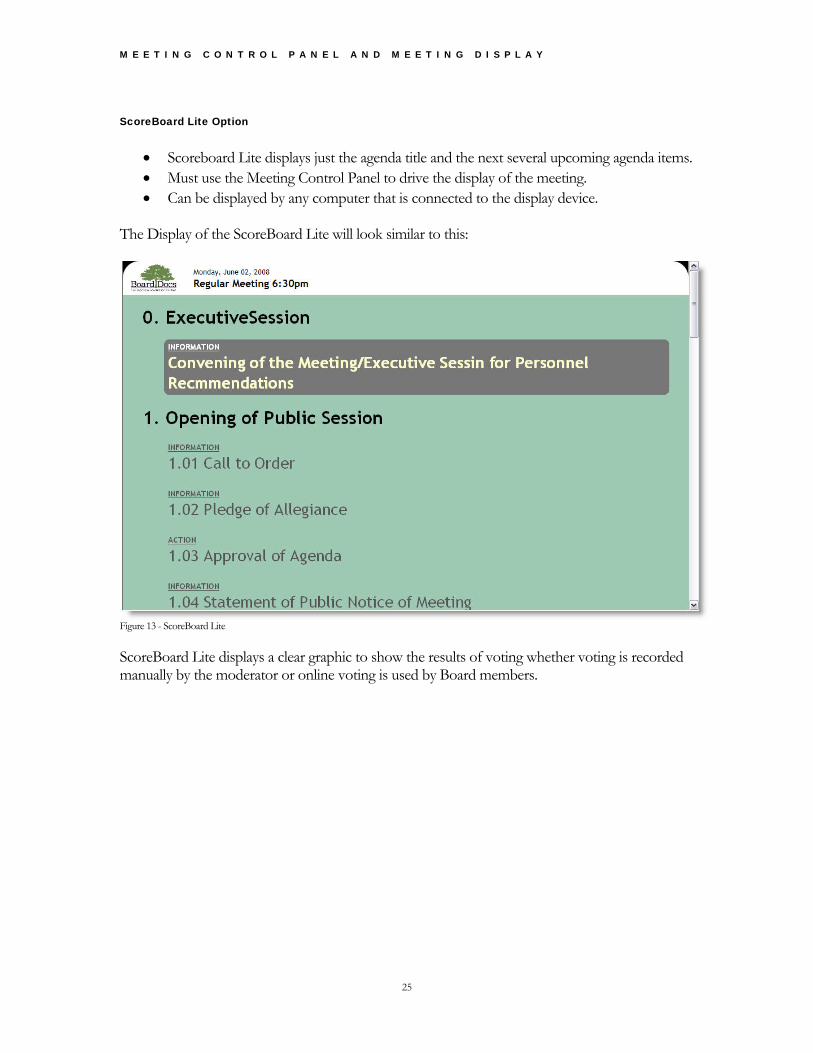
ScoreBoard Lite Option
• Scoreboard Lite displays just the agenda title and the next several upcoming agenda items. • Must use the Meeting Control Panel to drive the display of the meeting. • Can be displayed by any computer that is connected to the display device.
The Display of the ScoreBoard Lite will look similar to this:
Figure 13 - ScoreBoard Lite
ScoreBoard Lite displays a clear graphic to show the results of voting whether voting is recorded manually by the moderator or online voting is used by Board members.

M E E T I N G C O N T R O L P A N E L A N D M E E T I N G D I S P L A Y
26
Figure 14 - ScoreBoard Lite Displaying Voting
Your implementation specialist or the BoardDocs Support Line can help you determine the best choice for your organization to successfully project your meeting. Best Practice: Additional important information regarding using the Meeting Control Panel to display the meeting agenda in the meeting room:
Typically, the Meeting Moderator does not display the ScoreBoard from their computer during the meeting; it can be displayed from another computer in the meeting room. Usually, this computer is the one that is already being used for presentations.
Use the following URL to display the Public ScoreBoard: http://www.BoardDocs.com/[state]/[customer identifier]/Board.nsf/PublicScoreBoard Use the following URL to display the ScoreBoard Lite:
http://www.BoardDocs.com/[state]/[customer identifier]/Board.nsf/SBL2 To ensure optimal performance, please be sure to capitalize the last part of the URL – SBL2
Both ScoreBoard versions will display voting results if you choose to record voting during the meeting.
Contact technical support for the specifics for YOUR ScoreBoard URL if you need the information
M E E T I N G C O N T R O L P A N E L A N D M E E T I N G D I S P L A Y
27
Index
Displaying the Meeting .............................................................. 23 Public ScoreBoard Display ................................................... 24 Public Site Display .................................................................. 23 ScoreBoard Lite Display ........................................................ 25
Meeting Control Panel ............................................................ 1–23 /Editing Summary And Comments ........................................ 10 Accessing ......................................................................................... 3 Action Comments ...................................................................... 10 Action Comments Field ......................................................... 22 Agenda Item Display Area ........................................................... 6 Agenda Item Tabs ......................................................................... 7 Content Tab ................................................................................... 9 Displaying the Meeting .............................................................. 23 Editing Agenda Item Information .............................................. 9 Jump Ahead Link........................................................................... 6 Jump Ahead, using ..................................................................... 17 Left-hand Frame ............................................................................ 6 Manual Voting ............................................................................. 11 Moderator ....................................................................................... 1 Moderator NOT A Document Publisher .................................. 4 Motion Tab ..................................................................................... 8 Online Consent Voting ............................................................. 21 Online Voting ............................................................................. 17
Online Voting Steps ................................................................... 18 Recording Consent Voting ........................................................ 14 Recording Voting Manually ....................................................... 11 Roll Call .......................................................................................... 5 ScoreBoard Link ............................................................................ 5 Start Meeting/Stop Meeting ........................................................ 5 Summary and Comments Tab .................................................... 7 Top Pane Links ............................................................................. 5 URL for Browser Access to ........................................................ 4 Uses of ............................................................................................ 1 Voting Record Names ................................................................ 14 Voting Tab ..................................................................................... 8
Minutes Relationship to Action Comments Field ................................. 22
Moderator .......................................................................................... 1 Voting
Consent Voting Online .............................................................. 21 Consent Voting Rules ................................................................ 21 Consent Voting, Manually Recording of ................................. 14 Manual Voting ............................................................................. 11 Online Voting .............................................................................. 17 Online Voting Steps ................................................................... 18 Voting Record Names ................................................................ 14


![CHAP04. PLASMA DISPLAY PANEL - …121C771E4C273B84482… · PLASMA DISPLAY PANEL ... ¾역학적: 전자기력의발생[MHD 발전, plasma propulsion] ¾화학적: ... PDP의효율의개선방향](https://static.fdocuments.net/doc/165x107/5b8e444b09d3f2a0138d3e3c/chap04-plasma-display-panel-121c771e4c273b84482-plasma-display-panel-.jpg)