MediClear Operator Guide - Personal banking including ...€¦ · The MediClear operator guide...
47
MediClear Operator Guide Version 3.0
Transcript of MediClear Operator Guide - Personal banking including ...€¦ · The MediClear operator guide...
MediClear Operator Guide Version 3.0
ADB3240 011109.indd 1 6/1/10 10:10:06 AM

1
INTRODUCTION 2
A. GETTING STARTED 3
THE MEDICLEAR NETWORK 3
YOUR MEDICLEAR TERMINAL 4
IMPORTANT NOTES 5
Patient payments 5 Credit cards 5 Optional fields 5 Receipts 5 System unavailable 6 Timeouts and retries 6 Different services – different 6 claims Requested and self-deemed 6 services – different claims Processing Medicare benefits 6 on multi-merchant (multi-doctor) terminals Updating details for providers 7 and MBS item numbers Updating details on replacement 7 terminals Customising claim types 7 Non-standard referral periods 7 Bulk bill payments on the 7 provider’s bank statement Reconciling bulk bill claims 8 and payments Offline vouchers 8 Medicare acceptance and 8 approval of claims
TERMINAL ADMINISTRATION FUNCTIONS 9
Changing user entry timeout 9 Changing session based 10 times for XPOS User ID
TERMINAL OPERATOR IDs 12
Entering a new username and ID 12 Modifying a username and ID 13 Removing an operator 13 Printing an operator list 14
MEDICLEAR ADMINISTRATION FUNCTIONS 15
Adding and removing practitioners 15 Creating lists 17 Changing MBS item prices 19 Customising the claim 20 type menu Printing duplicate Medicare receipts 22
B. PROCESSING PATIENT CLAIMS 23
PROCESSING MEDICLEAR TRANSACTIONS – PATIENT CLAIMS 23
C. PROCESSING BULK BILL CLAIMS 32
PROCESSING MEDICLEAR TRANSACTIONS – BULK BILL CLAIMS 32
D. CONTACT US /APPENDICES 41
WHERE TO GET HELP 41
APPENDIX A – MEDICLEAR RECEIPTS 43
Contents
ADB3240 011109.indd 1 6/1/10 10:10:06 AM

2
The Commonwealth Bank, in conjunction with Medicare Australia, has developed MediClear – a service that allows medical practitioners to process Medicare claims electronically using the EFTPOS network. Medicare’s new claiming channel is called Medicare Easyclaim.
General practitioners, specialists, allied health professionals, dentists, diagnostic and pathology clinics alike will benefit from this service, which will reduce the time and effort spent on completing Medicare claim forms, and allow faster transfers of funds for bulk billed claims into your nominated bank accounts. Bulk bill claiming using MediClear is also entirely paperless – you no longer need to collate, batch and archive your bulk bill claim forms (see “Retention of Records” below).
Your patients will also benefit. With MediClear they can now have their Medicare benefits deposited directly into their bank account using an EFTPOS card, so no more queuing at Medicare branches to receive their benefit payments.
The MediClear operator guide provides instructions on how to use your MediClear enabled terminal. This guide replicates the screens from an EFTPOS PLUS terminal. Some screens may vary if you are using a different terminal type or version.
Please check the Commonwealth Bank’s website at www.commbank.com.au/mediclear for updates to this guide and other useful information.
Retention of Records
Although archiving and retention of your bulk bill claim forms is not necessary when claimed via MediClear, Medicare Australia recommends that practices keep all records associated with benefits paid by Medicare Australia for at least 2 years. These records may include electronic billing information, notes in practice software, appointment records and assignment of benefit forms. In the event of audit, this information will help service providers to validate to Medicare Australia that claims have been correctly paid. Medicare Australia cannot comment on other record keeping requirements that may affect these records (such as Medical Registration Board and State Government requirements).
Introduction
ADB3240 011109.indd 2 6/1/10 10:10:06 AM

3
The MediClear network is a robust infrastructure that allows medical practitioners to process Medicare claims electronically using Medicare’s Easyclaim system. The MediClear host runs separately from the Bank’s host to provide fast, efficient processing of your Medicare claim transactions without affecting the EFTPOS network.
A. Getting StartedThe MediClear Network
PSTN dial-up
MediClear system
Processes Medicare claims
Medicare Australia Medicare Australia assesses the claim and determines the benefit to be paid
Processes Medicare benefit payments
EFTPOS terminal
OR
Communication network
Dedicated data services
Commonwealth Bank EFTPOS system
ADB3240 011109.indd 3 6/1/10 10:10:06 AM

4
The MediClear network runs on a standard Commonwealth Bank EFTPOS terminal. The Bank uses several types of terminal, but basic terminal operation for both EFTPOS and MediClear is the same. Please refer to the EFTPOS Operator Guide that accompanied your terminal for a detailed description of the terminal and the function of keys on the keypad.
Helpful tips for using your MediClear terminal:
Yellow options buttons – these buttons, located under the terminal display, •are used to select options displayed on the screen. There may be three or four depending on the type of terminal you use. When using MediClear, the outer yellow buttons allow you to ‘scroll’ through lists that extend over more than one screen.
Page Down – the ‘0’ (zero) key acts as a ‘Page Down’ key for lists that extend for •more than one screen page.
Alphanumeric keys – these keys are used to input monetary amounts and to •select options when using the terminal. The alpha keys are also used for entering details for practitioners, MBS items, passwords and PINs. In some screens, letters are entered by pressing the corresponding numeric key until the letter appears. For example, to enter “C”, press the “2” key four times. To enter a space, press the “0” key twice. Take care when entering double digits – if the key is pressed too quickly a letter or a space will be entered, so leave a one-second pause between the double digit key presses.
Your MediClear terminal
ADB3240 011109.indd 4 6/1/10 10:10:06 AM

5
The MediClear system is designed to process Medicare patient and bulk bill claims. Please remember the following points when using MediClear.
Patient payments
For services that are not bulk billed, once you complete a patient consultation, you generate an invoice and the patient pays you as they normally would – cash, cheque, credit card or EFTPOS. This is a separate process completed before you lodge a Medicare claim using MediClear.
Credit cards
A claimant may use their credit card to pay for all or part of the service fee incurred but the MediClear system does not permit Medicare benefit payments to be paid to credit card accounts. Only debit (EFTPOS) cards should be used to process a Medicare benefit. A claimant may swipe their credit card to receive a Medicare benefit provided that the credit card is linked to a cheque or savings account. In this case the claimant will only have the option of choosing between cheque and savings when prompted to select an account by the terminal.
Optional fields
In certain circumstances, you may be asked to enter additional information to allow Medicare to assess the service and process the claim. If you omit this information, the claim may be rejected or Medicare may contact you for clarification.
Receipts
The terminal will produce a Medicare Australia receipt for all patient and bulk bill claim transactions (including cancelled claims) that are submitted to and receive a response from Medicare. Receipts must be provided to claimants/patients for all transactions.
Sample receipts are contained in Appendix A of this guide.
Important notes
ADB3240 011109.indd 5 6/1/10 10:10:07 AM

6
Important notes
System unavailable
If the MediClear network becomes unavailable, the terminal will display or print an error number between 3001 and 3999 when you attempt to process a claim. In this event, you must provide the claimant an account/statement and advise them to lodge their claim through an alternative channel, such as a Medicare Australia office. Bulk bill claims could be completed using paper forms according to existing processes.
Timeouts and retries
If the claimant waits too long to enter their PIN after their EFTPOS card has been swiped (approximately 30 seconds), a timeout may occur, the claim will be cancelled and the terminal will return to the MediClear ready screen. If a timeout does occur you will need to restart the transaction from the beginning.
Different services – different claims
Where a patient receives medical services of different types (for example, general practitioner and diagnostic) in the same visit, a separate claim (whether private patient or bulk bill) must be made for each different type.
Requested and self-deemed services – different claims
Where a patient receives both requested and self-deemed services in the same visit, each group of services must be entered as separate claim (be they private patient or bulk bill) — the requested services in one claim containing the requesting provider details, and the self-deemed services in a separate claim with no requesting details, and selecting 1 SELF-DEEMED from the menu when prompted for the request override type. All items in this claim will then be marked as ‘self-deemed’.
Processing Medicare benefits on multi-merchant (multi-doctor) terminals
On a multi-merchant terminal (multiple doctors using one terminal to receive payment from patients) when the Medicare benefit payment component of the claim is being completed the terminal may prompt you to select a merchant. If it does, always press 0 (zero) to select ‘Generic Merchant’.
If you select an actual merchant at this point, the MediClear benefit value paid to the patient will be accumulated under the REFUND heading in the terminal settlement report. This does not affect the provider’s bank account. When balancing bank accounts using the terminal settlement report, ignore any MediClear REFUND values.
ADB3240 011109.indd 6 6/1/10 10:10:07 AM

7
Updating details for providers and MBS item numbers
If you need to alter the details of a provider (doctor) or a MBS item number in the list stored in the terminal, go to the appropriate administration menu and select the ‘ADD’ function. Key the entry as though you are adding that item for the first time. The entry will replace any existing entry that has the same provider number or MBS item number. You do not need to delete the item first.
Updating details on replacement terminals
If your MediClear terminal is replaced, to retrieve the lists you set up in your previous terminal, go to the MediClear Setup menu in the new terminal, select each list in turn and then select the “PRINT LIST” option for each list. This will prompt the terminal to download the previously set up list so that you do not have to create it again.
Customising claim types
You can customise the claim types presented at the start of each claim (General Practice, Spec/AH/Dental, Diagnostic, Pathology) using the MediClear Setup, Setup Services menu so that only the claim types that your practice uses will be shown.
Non-standard referral periods
Referred services that involve a non-standard referral period cannot be claimed via MediClear. These must continue to be claimed using the existing claim process used by the patient or practitioner (in the case of bulk bill). This is because these claims also require a referral period, which is not yet available.
Please refer to the Medicare Easyclaim website or contact Medicare Australia, for information regarding services that may not be able to be claimed using MediClear.
Bulk bill payments on the provider’s bank statement
All bulk bill claims submitted will be combined into a single daily deposit to the payee provider’s bank account or into a single cheque to the provider if Medicare Australia does not hold the provider’s bank account details.
Important notes
ADB3240 011109.indd 7 6/1/10 10:10:07 AM
8
Important notes
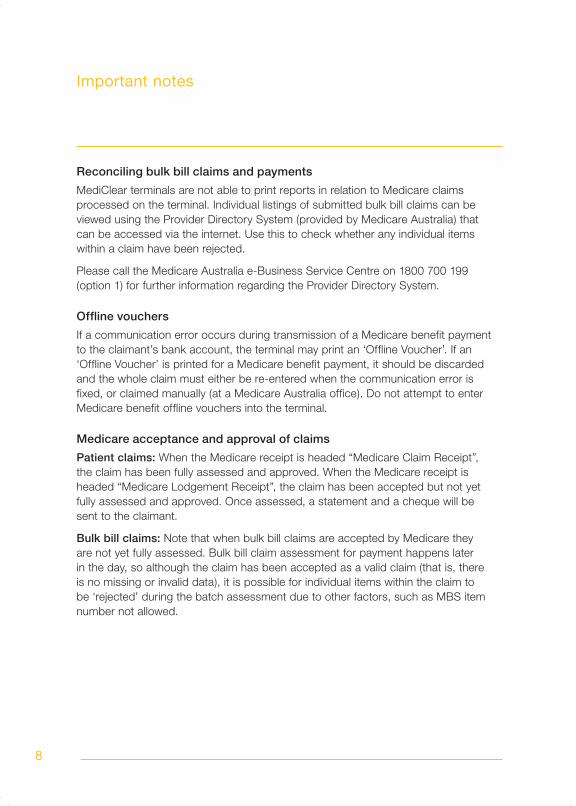
Reconciling bulk bill claims and payments
MediClear terminals are not able to print reports in relation to Medicare claims processed on the terminal. Individual listings of submitted bulk bill claims can be viewed using the Provider Directory System (provided by Medicare Australia) that can be accessed via the internet. Use this to check whether any individual items within a claim have been rejected.
Please call the Medicare Australia e-Business Service Centre on 1800 700 199 (option 1) for further information regarding the Provider Directory System.
Offline vouchers
If a communication error occurs during transmission of a Medicare benefit payment to the claimant’s bank account, the terminal may print an ‘Offline Voucher’. If an ‘Offline Voucher’ is printed for a Medicare benefit payment, it should be discarded and the whole claim must either be re-entered when the communication error is fixed, or claimed manually (at a Medicare Australia office). Do not attempt to enter Medicare benefit offline vouchers into the terminal.
Medicare acceptance and approval of claims
Patient claims: When the Medicare receipt is headed “Medicare Claim Receipt”, the claim has been fully assessed and approved. When the Medicare receipt is headed “Medicare Lodgement Receipt”, the claim has been accepted but not yet fully assessed and approved. Once assessed, a statement and a cheque will be sent to the claimant.
Bulk bill claims: Note that when bulk bill claims are accepted by Medicare they are not yet fully assessed. Bulk bill claim assessment for payment happens later in the day, so although the claim has been accepted as a valid claim (that is, there is no missing or invalid data), it is possible for individual items within the claim to be ‘rejected’ during the batch assessment due to other factors, such as MBS item number not allowed.
ADB3240 011109.indd 8 6/1/10 10:10:07 AM

9
Changing user entry timeout
Each terminal contains an inbuilt security precaution that will end the creation of a claim if you wait too long between entering details. To change the time that the terminal waits before ending a claim, follow these steps:
Step Screen Action
1 COMMONWEALTHBANK EFTPOS
READYXPOS
Press the corresponding yellow OPTION button to select XPOS.
2 1 MEDICLEAR9 ADMIN.
Select either 1 MEDICLEAR or 9 ADMIN.
3 XPOSUser Id?
Press the blue FUNCTION button instead of entering your XPOS User ID or selecting an item from the list if this screen is not displayed.
4 XPOS1 END SESSION2 BARCODE PRINTING3 TERMINAL UPDATES4 MERCHANT SETTING5 SYSTEM ADMIN
Select 4 MERCHANT SETTING.
5 MERCHANT SETTINGS
Master User Id?
Enter the master terminal User ID 467263.
6 MERCHANT SETTINGS1 OPERATOR ADMIN2 SECURITY MODE3 TIMERS4 REVERSAL
Select 3 TIMERS.
7 TIMERS1 USER INPUT TIMER2 ERROR TIMER3 TXN RESULT TIMER4 SESSION TIMER
Select 1 USER INPUT TIMER.
Terminal administration functions
ADB3240 011109.indd 9 6/1/10 10:10:07 AM

10
Terminal administration functions
Step Screen Action
8 USER INPUT TIMERCURRENT:[NN]TIMER (SECONDS)?
Enter the new timeout period in seconds (maximum 99) then press OK.
9 TIMERS1 USER INPUT TIMER2 ERROR TIMER3 TXN RESULT TIMER4 SESSIONS TIMER
Press the red CANCEL button to return to the ready screen.
Changing session based times for XPOS User ID
Each terminal will also by default ask you to enter your XPOS User ID each time you perform a transaction. This can be changed so that you only have to enter it once per session. To change the terminal settings so that you only need to enter your XPOS User ID once per session, follow the steps below. Note that if you change this setting, all staff will operate under the same User ID.
Step Screen Action
1 COMMONWEALTHBANK EFTPOS
READYXPOS
Press the corresponding yellow OPTION button to select XPOS.
2 1 MEDICLEAR9 ADMIN.
Select either 1 MEDICLEAR or 9 ADMIN.
3 XPOSUser Id?
Press the blue FUNCTION button instead of entering your XPOS User ID or selecting an item from the list if this screen is not displayed.
4 XPOS1 END SESSION2 BARCODE PRINTING3 TERMINAL UPDATES4 MERCHANT SETTING5 SYSTEM ADMIN6 INSTALL SETTINGS7 MASTER ID RECOVER
Select 4 MERCHANT SETTING.
ADB3240 011109.indd 10 6/1/10 10:10:07 AM

11
Terminal administration functions
Step Screen Action
5 MERCHANT SETTINGSMaster User id?
Enter the master terminal User ID 467263.
6 MERCHANT SETTINGS1 OPERATOR ADMIN2 SECURITY MODE3 TIMERS4 REVERSAL
Select 2 SECURITY MODE.
7 SECURITY MODE1 EVERY TRANSACTION2 ONCE PER SESSION
Select 2 ONCE PER SESSION.
8 SECURITY MODE
ONCE PER SESSION PRESS OK TO ACCEPT
Press OK to confirm the change.
The default setting for a session’s duration is 720 minutes (12 hours). The session timer can be changed by following steps 1 to 5 for “Changing session based times for XPOS User ID”, then:
Step Screen Action
6 MERCHANT SETTINGS1 OPERATOR ADMIN2 SECURITY MODE3 TIMERS4 REVERSAL
Select 3 TIMERS.
7 TIMERS1 USER INPUT TIMER2 ERROR TIMER3 TXN RESULT TIMER4 SESSION TIMER
Select 4 SESSION TIMER.
8 SESSION TIMERCURRENT:[NN]TIMER (MINUTES)?
Enter the new timeout period in minutes then press OK.
ADB3240 011109.indd 11 6/1/10 10:10:08 AM
12
Terminal operator IDs
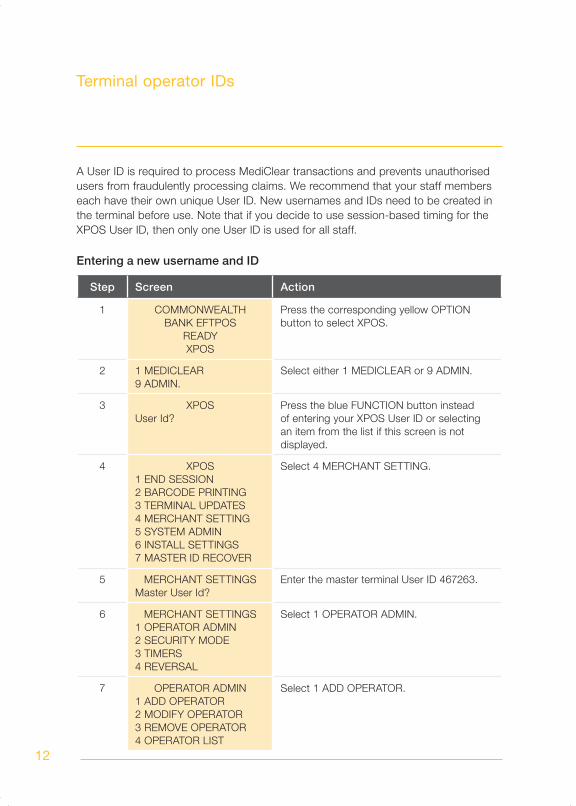
A User ID is required to process MediClear transactions and prevents unauthorised users from fraudulently processing claims. We recommend that your staff members each have their own unique User ID. New usernames and IDs need to be created in the terminal before use. Note that if you decide to use session-based timing for the XPOS User ID, then only one User ID is used for all staff.
Entering a new username and ID
Step Screen Action
1 COMMONWEALTHBANK EFTPOS
READYXPOS
Press the corresponding yellow OPTION button to select XPOS.
2 1 MEDICLEAR9 ADMIN.
Select either 1 MEDICLEAR or 9 ADMIN.
3 XPOSUser Id?
Press the blue FUNCTION button instead of entering your XPOS User ID or selecting an item from the list if this screen is not displayed.
4 XPOS1 END SESSION2 BARCODE PRINTING3 TERMINAL UPDATES4 MERCHANT SETTING5 SYSTEM ADMIN6 INSTALL SETTINGS7 MASTER ID RECOVER
Select 4 MERCHANT SETTING.
5 MERCHANT SETTINGSMaster User Id?
Enter the master terminal User ID 467263.
6 MERCHANT SETTINGS1 OPERATOR ADMIN2 SECURITY MODE3 TIMERS4 REVERSAL
Select 1 OPERATOR ADMIN.
7 OPERATOR ADMIN1 ADD OPERATOR2 MODIFY OPERATOR3 REMOVE OPERATOR4 OPERATOR LIST
Select 1 ADD OPERATOR.
ADB3240 011109.indd 12 6/1/10 10:10:08 AM
13
Terminal operator IDs
Step Screen Action
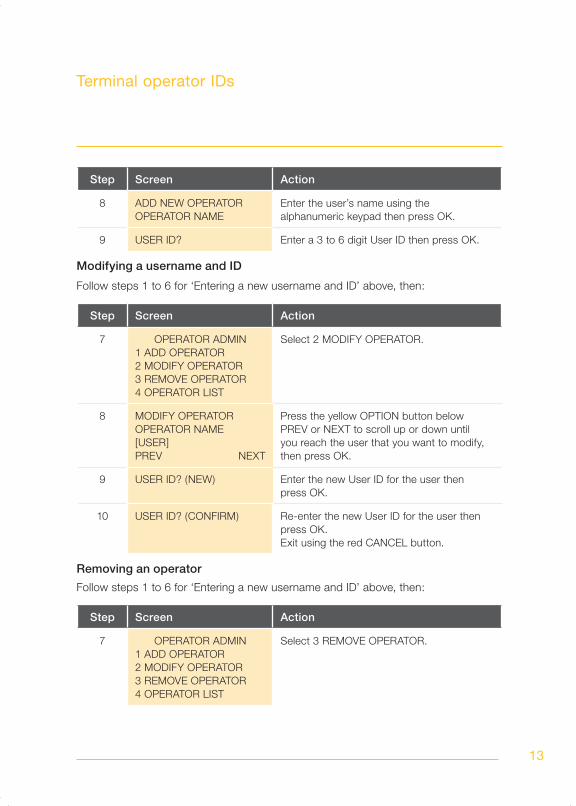
8 ADD NEW OPERATOROPERATOR NAME
Enter the user’s name using the alphanumeric keypad then press OK.
9 USER ID? Enter a 3 to 6 digit User ID then press OK.
Modifying a username and ID
Follow steps 1 to 6 for ‘Entering a new username and ID’ above, then:
Step Screen Action
7 OPERATOR ADMIN1 ADD OPERATOR2 MODIFY OPERATOR3 REMOVE OPERATOR4 OPERATOR LIST
Select 2 MODIFY OPERATOR.
8 MODIFY OPERATOROPERATOR NAME[USER]PREV NEXT
Press the yellow OPTION button below PREV or NEXT to scroll up or down until you reach the user that you want to modify, then press OK.
9 USER ID? (NEW) Enter the new User ID for the user then press OK.
10 USER ID? (CONFIRM) Re-enter the new User ID for the user then press OK.Exit using the red CANCEL button.
Removing an operator
Follow steps 1 to 6 for ‘Entering a new username and ID’ above, then:
Step Screen Action
7 OPERATOR ADMIN1 ADD OPERATOR2 MODIFY OPERATOR3 REMOVE OPERATOR4 OPERATOR LIST
Select 3 REMOVE OPERATOR.
ADB3240 011109.indd 13 6/1/10 10:10:08 AM
14
Terminal operator IDs
Step Screen Action
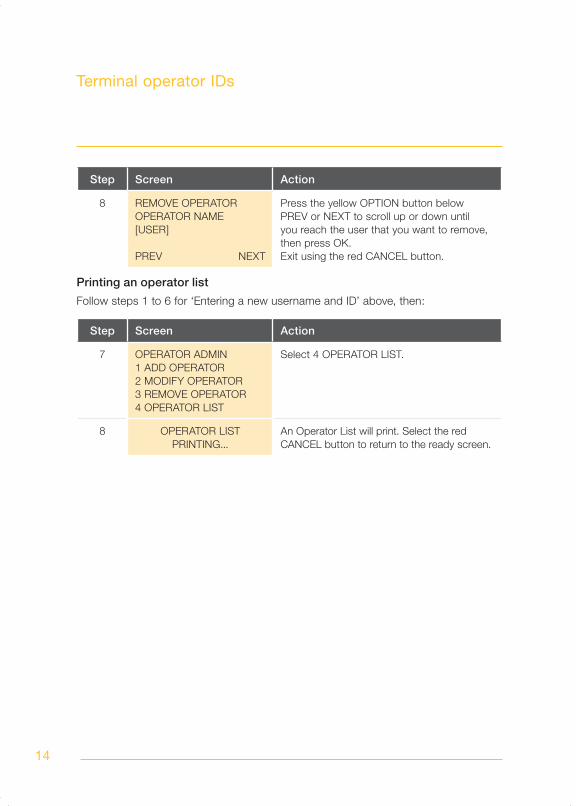
8 REMOVE OPERATOROPERATOR NAME[USER]
PREV NEXT
Press the yellow OPTION button below PREV or NEXT to scroll up or down until you reach the user that you want to remove, then press OK.Exit using the red CANCEL button.
Printing an operator list
Follow steps 1 to 6 for ‘Entering a new username and ID’ above, then:
Step Screen Action
7 OPERATOR ADMIN1 ADD OPERATOR2 MODIFY OPERATOR3 REMOVE OPERATOR4 OPERATOR LIST
Select 4 OPERATOR LIST.
8 OPERATOR LIST PRINTING...
An Operator List will print. Select the red CANCEL button to return to the ready screen.
ADB3240 011109.indd 14 6/1/10 10:10:08 AM
15
MediClear administration functions
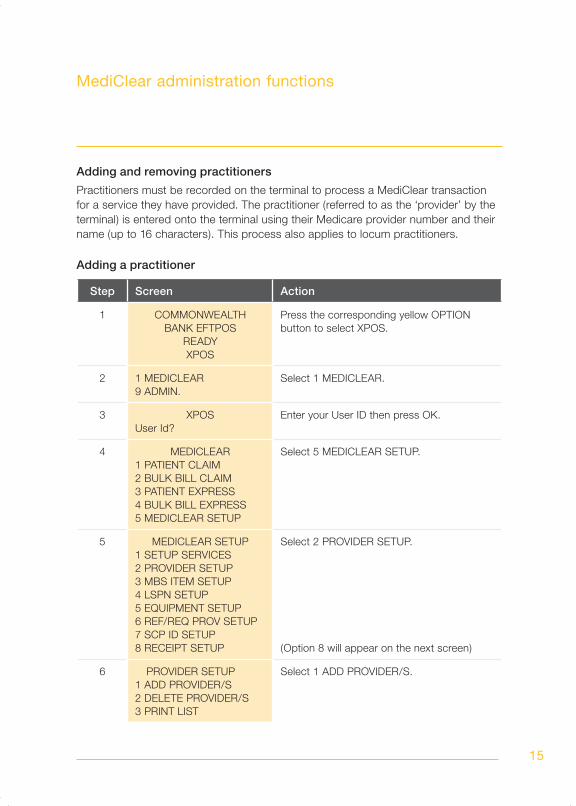
Adding and removing practitioners
Practitioners must be recorded on the terminal to process a MediClear transaction for a service they have provided. The practitioner (referred to as the ‘provider’ by the terminal) is entered onto the terminal using their Medicare provider number and their name (up to 16 characters). This process also applies to locum practitioners.
Adding a practitioner
Step Screen Action
1 COMMONWEALTHBANK EFTPOS
READYXPOS
Press the corresponding yellow OPTION button to select XPOS.
2 1 MEDICLEAR9 ADMIN.
Select 1 MEDICLEAR.
3 XPOSUser Id?
Enter your User ID then press OK.
4 MEDICLEAR1 PATIENT CLAIM2 BULK BILL CLAIM3 PATIENT EXPRESS4 BULK BILL EXPRESS5 MEDICLEAR SETUP
Select 5 MEDICLEAR SETUP.
5 MEDICLEAR SETUP1 SETUP SERVICES2 PROVIDER SETUP3 MBS ITEM SETUP4 LSPN SETUP5 EQUIPMENT SETUP6 REF/REQ PROV SETUP7 SCP ID SETUP8 RECEIPT SETUP
Select 2 PROVIDER SETUP.
(Option 8 will appear on the next screen)
6 PROVIDER SETUP1 ADD PROVIDER/S2 DELETE PROVIDER/S3 PRINT LIST
Select 1 ADD PROVIDER/S.
ADB3240 011109.indd 15 6/1/10 10:10:08 AM
16
MediClear administration functions
Step Screen Action
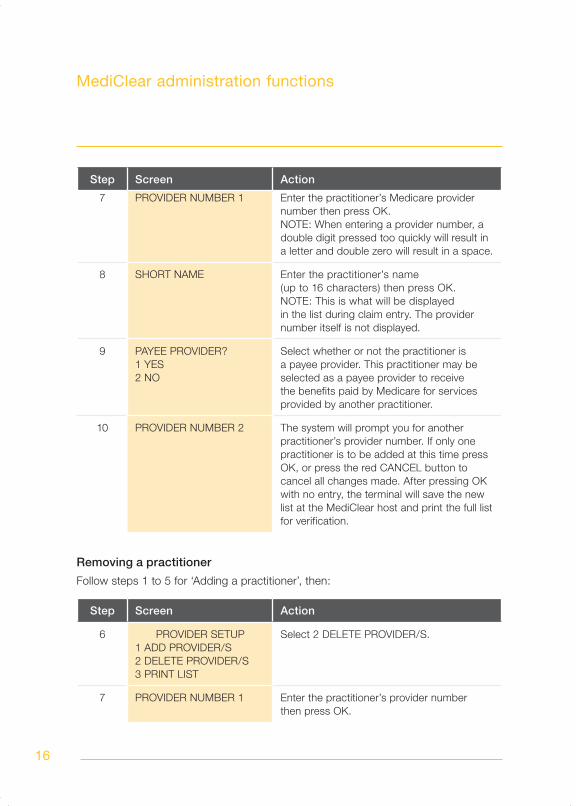
7 PROVIDER NUMBER 1 Enter the practitioner’s Medicare provider number then press OK.NOTE: When entering a provider number, a double digit pressed too quickly will result in a letter and double zero will result in a space.
8 SHORT NAME Enter the practitioner’s name (up to 16 characters) then press OK.NOTE: This is what will be displayed in the list during claim entry. The provider number itself is not displayed.
9 PAYEE PROVIDER?1 YES2 NO
Select whether or not the practitioner is a payee provider. This practitioner may be selected as a payee provider to receive the benefits paid by Medicare for services provided by another practitioner.
10 PROVIDER NUMBER 2 The system will prompt you for another practitioner’s provider number. If only one practitioner is to be added at this time press OK, or press the red CANCEL button to cancel all changes made. After pressing OK with no entry, the terminal will save the new list at the MediClear host and print the full list for verification.
Removing a practitioner
Follow steps 1 to 5 for ‘Adding a practitioner’, then:
Step Screen Action
6 PROVIDER SETUP1 ADD PROVIDER/S2 DELETE PROVIDER/S3 PRINT LIST
Select 2 DELETE PROVIDER/S.
7 PROVIDER NUMBER 1 Enter the practitioner’s provider number then press OK.
ADB3240 011109.indd 16 6/1/10 10:10:09 AM

17
MediClear administration functions
Step Screen Action
8 PROVIDER NUMBER 2 The system will prompt you for another practitioner’s provider number. If only one practitioner is to be removed at this time press OK, or press the red CANCEL button to cancel all changes made. After pressing OK with no entry, the terminal will save the new list at the MediClear host and print the full list for verification.
In each case, upon completion the terminal will send the new practitioner details to the MediClear host system and print a Service Provider List Report. The terminal will automatically contact the host system to retrieve a refreshed list of practitioners. This may take a minute or two and is a prerequisite to the new practitioner data becoming available on the terminal.
IMPORTANT NOTE: A practitioner does not need to be a Commonwealth Bank merchant in order to be set up as a service provider or payee provider on the MediClear terminal for the purposes of processing paid patient and bulk bill claims, including fully paid patient claims where a Medicare Benefit is to be paid via the EFTPOS terminal. However, only those practitioners with Commonwealth Bank merchant facilities would be able to receive account payments from their patients using the MediClear terminal.
Creating lists
Steps in a MediClear transaction that may be common across large numbers of patients, such as entering an MBS item number, may be stored in a list that is displayed each time that particular entry is required. For example, to create a list of frequently used MBS item numbers:
Step Screen Action
1 COMMONWEALTHBANK EFTPOS
READYXPOS
Press the corresponding yellow OPTION button to select XPOS.
2 1 MEDICLEAR9 ADMIN.
Select 1 MEDICLEAR.
ADB3240 011109.indd 17 6/1/10 10:10:09 AM

18
MediClear administration functions
Step Screen Action
3 XPOSUser Id?
Enter your User ID then press OK.
4 MEDICLEAR1 PATIENT CLAIM2 BULK BILL CLAIM3 PATIENT EXPRESS4 BULK BILL EXPRESS5 MEDICLEAR SETUP
Select 5 MEDICLEAR SETUP.
5 MEDICLEAR SETUP1 SETUP SERVICES2 PROVIDER SETUP3 MBS ITEM SETUP4 LSPN SETUP5 EQUIPMENT SETUP6 REF/REQ PROV SETUP7 SCP ID SETUP8 RECEIPT SETUP
Select 3 MBS ITEM SETUP.
(Option 8 will appear on the next screen)
6 MBS ITEM SETUP1 ADD MBS ITEM/S2 DELETE MBS ITEM/S3 PRINT LIST4 CHANGE ITEM PRICES
Select 1 ADD MBS ITEM.
7 SERVICE TYPE1 GENERAL PRACTICE2 SPEC/AH/DENTAL3 DIAGNOSTIC4 PATHOLOGY
Select the appropriate service type.
NOTE: Specialists, allied health professionals and dentists will use the SPEC/AH/DENTAL service type.
8 MBS ITEM NUMBER 1 Enter the MBS item number then press OK.
9 SHORT NAME Enter a name (up to 16 characters) for the service then press OK.
NOTE: This name is displayed in the list during claim entry. The number itself is not displayed. If you want to see the MBS item number in the list during a claim, then enter the MBS item number again as part of the Short Name, e.g. “23 STD CONSULT”.
ADB3240 011109.indd 18 6/1/10 10:10:09 AM

19
MediClear administration functions
Step Screen Action
10 CHARGE AMOUNT$0.00
Enter the amount (dollars and cents) you charge your patients for the service (without the decimal point) then press OK. If you only perform bulk bill claims, just press OK to skip entering the amount.
11 MBS ITEM NUMBER 2 The system will prompt you for another MBS item number. If only one Item is to be added at this time press OK, or press the red CANCEL button to cancel all changes made. After pressing OK with no entry, the terminal will save the new list at the MediClear host and print the full list for verification.
Once you create a list for an item, when you are next required to enter that item during a claim, the list you have created will be displayed for you to choose from. To enter an item that is not in your list (such as an unusual MBS item number), you must select ‘99’ from the list.
Changing MBS item prices
When your pricing for providing medical services changes, use the Change Item Prices function to change your prices without having to re-enter all the MBS item details.
Follow steps 1 to 5 for ‘Creating lists’ above, then:
Step Screen Action
6 MBS ITEM SETUP1 ADD MBS ITEM/S2 DELETE MBS ITEM/S3 PRINT LIST4 CHANGE ITEM PRICES
Select 4 CHANGE ITEM PRICES.
7 SERVICE TYPE1 GENERAL PRACTICE2 SPEC/AH/DENTAL3 DIAGNOSTIC4 PATHOLOGY
Select the appropriate service type.
NOTE: Specialists, allied health professionals and dentists will use the SPEC/AH/DENTAL service type.
ADB3240 011109.indd 19 6/1/10 10:10:09 AM

20
MediClear administration functions
Step Screen Action
8 MBS ITEM NUMBER 12 [ITEM NUMBER 1]3 [ITEM NUMBER 2]4 [ITEM NUMBER 3]5 [ITEM NUMBER 4]6 [ITEM NUMBER 5]
Press the number keys corresponding to the item number you wish to change. Use the yellow OPTION buttons to scroll to the next or previous pages.NOTE: Press the ‘0’ key to ‘Page Down’.
9 CHARGE AMOUNT
$45.00
The existing charge amount for the MBS item is displayed. Use the CLEAR key to backspace and then enter the amount (dollars and cents) you charge your patients for the service (without the decimal point) then press OK.
10 MBS ITEM NUMBER 21 NO MORE2 [ITEM NUMBER 1]3 [ITEM NUMBER 2]4 [ITEM NUMBER 3]5 [ITEM NUMBER 4]
Select the next MBS item number to change, or select 1 NO MORE to finish, or press the red CANCEL button to cancel all changes made. After selecting 1 NO MORE, the terminal will save the new list at the MediClear host and print the full list for verification.
Upon confirming the changes the terminal will send the new MBS item number details to the MediClear host system and will print an MBS Item List Report.
Customising the claim type menu
If you wish to alter the claim type menu so that it displays only those claim types (General Practice, Spec/AH/Dental, Diagnostic and Pathology) that you require, use the following steps:
Step Screen Action
1 COMMONWEALTHBANK EFTPOS
READYXPOS
Press the corresponding yellow OPTION button to select XPOS.
2 1 MEDICLEAR9 ADMIN.
Select 1 MEDICLEAR.
ADB3240 011109.indd 20 6/1/10 10:10:09 AM
21
MediClear administration functions
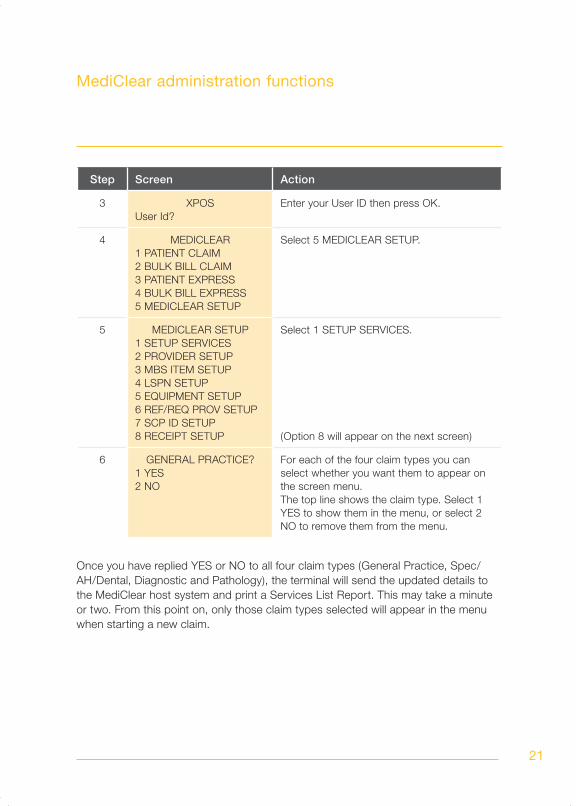
Step Screen Action
3 XPOSUser Id?
Enter your User ID then press OK.
4 MEDICLEAR1 PATIENT CLAIM2 BULK BILL CLAIM3 PATIENT EXPRESS4 BULK BILL EXPRESS5 MEDICLEAR SETUP
Select 5 MEDICLEAR SETUP.
5 MEDICLEAR SETUP1 SETUP SERVICES2 PROVIDER SETUP3 MBS ITEM SETUP4 LSPN SETUP5 EQUIPMENT SETUP6 REF/REQ PROV SETUP7 SCP ID SETUP8 RECEIPT SETUP
Select 1 SETUP SERVICES.
(Option 8 will appear on the next screen)
6 GENERAL PRACTICE?1 YES2 NO
For each of the four claim types you can select whether you want them to appear on the screen menu.The top line shows the claim type. Select 1 YES to show them in the menu, or select 2 NO to remove them from the menu.
Once you have replied YES or NO to all four claim types (General Practice, Spec/AH/Dental, Diagnostic and Pathology), the terminal will send the updated details to the MediClear host system and print a Services List Report. This may take a minute or two. From this point on, only those claim types selected will appear in the menu when starting a new claim.
ADB3240 011109.indd 21 6/1/10 10:10:10 AM

22
MediClear administration functions
Printing duplicate Medicare receipts
The Medicare receipt is always provided to the patient or claimant. If you wish to retain a copy of the Medicare receipts for your records you can use the following setup options to automatically print a duplicate.
Follow steps 1 to 4 for ‘Customising the claim type menu’ above, then:
Step Screen Action
5 MEDICLEAR SETUP1 SETUP SERVICES2 PROVIDER SETUP3 MBS ITEM SETUP4 LSPN SETUP5 EQUIPMENT SETUP6 REF/REQ PROV SETUP7 SCP ID SETUP8 RECEIPT SETUP
Select 8 RECEIPT SETUP or press the leftmost yellow option button to scroll forward to the next menu page.
6 PATIENT CLAIMS1 SINGLE RECEIPT2 DUPLICATE RECEIPT
Select 1 for a single (customer) copy of the unpaid/partially paid patient claim receipt.Select 2 for a duplicate (practitioner) copy to be printed as well.NOTE: Duplicate copies of fully paid patient claim receipts are not available.
7 BULK BILL CLAIMS1 SINGLE RECEIPT2 DUPLICATE RECEIPT
Select 1 for a single (customer) copy of the bulk bill claim receipt.Select 2 for a duplicate (practitioner) copy to be printed as well.
Once you have selected the number of receipts required, the terminal will send the updated details to the MediClear host system and print a Receipt Options Report. This may take a minute or two. From this point on, the selected claim types will print one or two Medicare receipts as selected. Reject and failure receipts will continue to print once.
IMPORTANT NOTE: Duplicate receipts can only be printed at same the time as the original receipt. They cannot be printed after the claim has completed.
ADB3240 011109.indd 22 6/1/10 10:10:10 AM
23
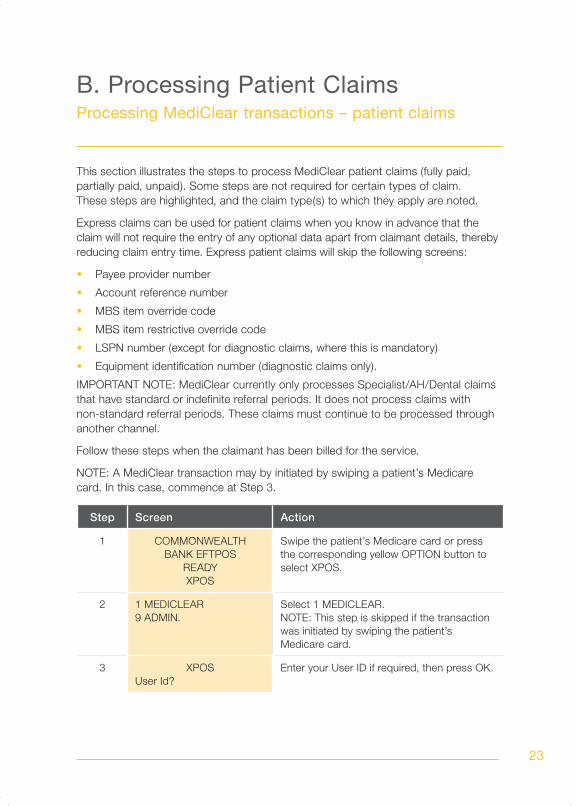
This section illustrates the steps to process MediClear patient claims (fully paid, partially paid, unpaid). Some steps are not required for certain types of claim. These steps are highlighted, and the claim type(s) to which they apply are noted.
Express claims can be used for patient claims when you know in advance that the claim will not require the entry of any optional data apart from claimant details, thereby reducing claim entry time. Express patient claims will skip the following screens:
Payee provider number•
Account reference number•
MBS item override code•
MBS item restrictive override code•
LSPN number (except for diagnostic claims, where this is mandatory)•
Equipment identification number (diagnostic claims only).•
IMPORTANT NOTE: MediClear currently only processes Specialist/AH/Dental claims that have standard or indefinite referral periods. It does not process claims with non-standard referral periods. These claims must continue to be processed through another channel.
Follow these steps when the claimant has been billed for the service.
NOTE: A MediClear transaction may by initiated by swiping a patient’s Medicare card. In this case, commence at Step 3.
Step Screen Action
1 COMMONWEALTHBANK EFTPOS
READYXPOS
Swipe the patient’s Medicare card or press the corresponding yellow OPTION button to select XPOS.
2 1 MEDICLEAR9 ADMIN.
Select 1 MEDICLEAR.NOTE: This step is skipped if the transaction was initiated by swiping the patient’s Medicare card.
3 XPOSUser Id?
Enter your User ID if required, then press OK.
B. Processing Patient ClaimsProcessing MediClear transactions – patient claims
ADB3240 011109.indd 23 6/1/10 10:10:10 AM
24
Processing MediClear transactions – patient claims
Step Screen Action
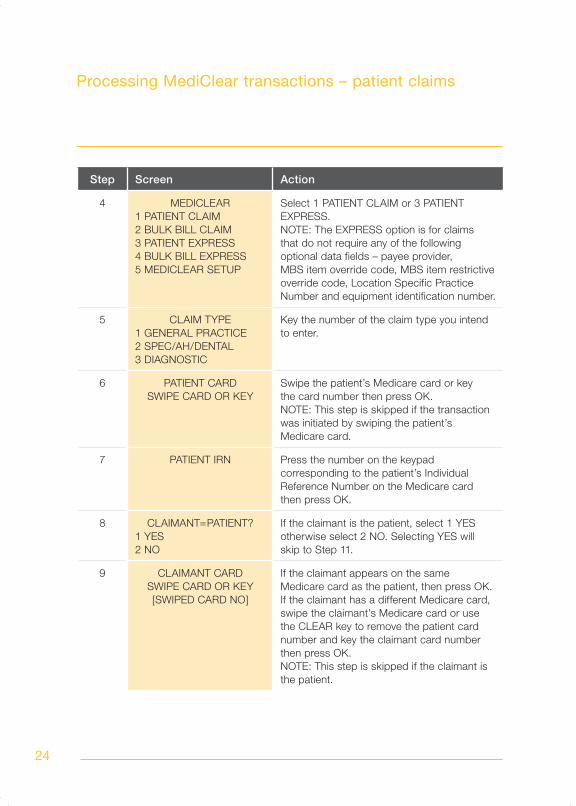
4 MEDICLEAR1 PATIENT CLAIM2 BULK BILL CLAIM3 PATIENT EXPRESS4 BULK BILL EXPRESS5 MEDICLEAR SETUP
Select 1 PATIENT CLAIM or 3 PATIENT EXPRESS.NOTE: The EXPRESS option is for claims that do not require any of the following optional data fields – payee provider, MBS item override code, MBS item restrictive override code, Location Specific Practice Number and equipment identification number.
5 CLAIM TYPE1 GENERAL PRACTICE2 SPEC/AH/DENTAL3 DIAGNOSTIC
Key the number of the claim type you intend to enter.
6 PATIENT CARDSWIPE CARD OR KEY
Swipe the patient’s Medicare card or key the card number then press OK.NOTE: This step is skipped if the transaction was initiated by swiping the patient’s Medicare card.
7 PATIENT IRN Press the number on the keypad corresponding to the patient’s Individual Reference Number on the Medicare card then press OK.
8 CLAIMANT=PATIENT?1 YES2 NO
If the claimant is the patient, select 1 YES otherwise select 2 NO. Selecting YES will skip to Step 11.
9 CLAIMANT CARDSWIPE CARD OR KEY[SWIPED CARD NO]
If the claimant appears on the same Medicare card as the patient, then press OK. If the claimant has a different Medicare card, swipe the claimant’s Medicare card or use the CLEAR key to remove the patient card number and key the claimant card number then press OK.NOTE: This step is skipped if the claimant is the patient.
ADB3240 011109.indd 24 6/1/10 10:10:10 AM
25
Step Screen Action
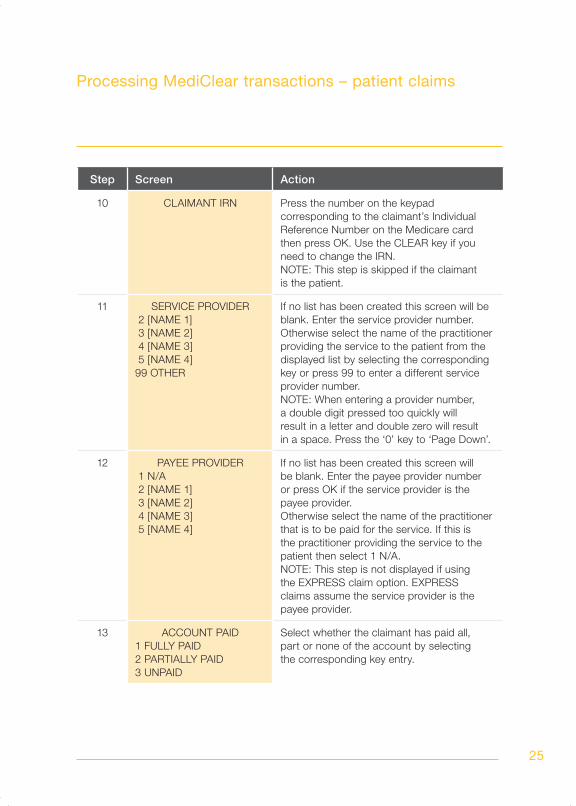
10 CLAIMANT IRN Press the number on the keypad corresponding to the claimant’s Individual Reference Number on the Medicare card then press OK. Use the CLEAR key if you need to change the IRN.NOTE: This step is skipped if the claimant is the patient.
11 SERVICE PROVIDER 2 [NAME 1] 3 [NAME 2] 4 [NAME 3] 5 [NAME 4]99 OTHER
If no list has been created this screen will be blank. Enter the service provider number.Otherwise select the name of the practitioner providing the service to the patient from the displayed list by selecting the corresponding key or press 99 to enter a different service provider number.NOTE: When entering a provider number, a double digit pressed too quickly will result in a letter and double zero will result in a space. Press the ‘0’ key to ‘Page Down’.
12 PAYEE PROVIDER 1 N/A 2 [NAME 1] 3 [NAME 2] 4 [NAME 3] 5 [NAME 4]
If no list has been created this screen will be blank. Enter the payee provider number or press OK if the service provider is the payee provider.Otherwise select the name of the practitioner that is to be paid for the service. If this is the practitioner providing the service to the patient then select 1 N/A.NOTE: This step is not displayed if using the EXPRESS claim option. EXPRESS claims assume the service provider is the payee provider.
13 ACCOUNT PAID1 FULLY PAID2 PARTIALLY PAID3 UNPAID
Select whether the claimant has paid all, part or none of the account by selecting the corresponding key entry.
Processing MediClear transactions – patient claims
ADB3240 011109.indd 25 6/1/10 10:10:10 AM
26
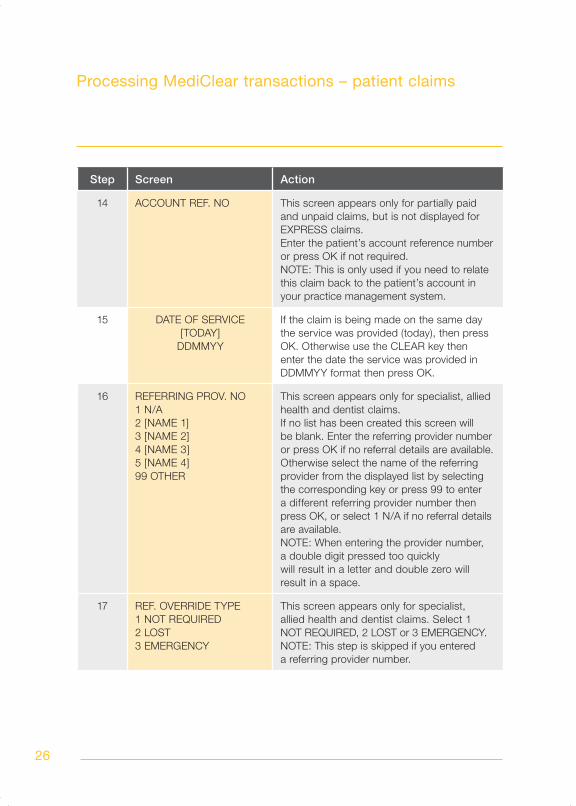
Step Screen Action
14 ACCOUNT REF. NO This screen appears only for partially paid and unpaid claims, but is not displayed for EXPRESS claims.Enter the patient’s account reference number or press OK if not required.NOTE: This is only used if you need to relate this claim back to the patient’s account in your practice management system.
15 DATE OF SERVICE[TODAY]
DDMMYY
If the claim is being made on the same day the service was provided (today), then press OK. Otherwise use the CLEAR key then enter the date the service was provided in DDMMYY format then press OK.
16 REFERRING PROV. NO1 N/A2 [NAME 1]3 [NAME 2]4 [NAME 3] 5 [NAME 4]99 OTHER
This screen appears only for specialist, allied health and dentist claims.If no list has been created this screen will be blank. Enter the referring provider number or press OK if no referral details are available.Otherwise select the name of the referring provider from the displayed list by selecting the corresponding key or press 99 to enter a different referring provider number then press OK, or select 1 N/A if no referral details are available.NOTE: When entering the provider number, a double digit pressed too quickly will result in a letter and double zero will result in a space.
17 REF. OVERRIDE TYPE1 NOT REQUIRED2 LOST3 EMERGENCY
This screen appears only for specialist, allied health and dentist claims. Select 1 NOT REQUIRED, 2 LOST or 3 EMERGENCY.NOTE: This step is skipped if you entered a referring provider number.
Processing MediClear transactions – patient claims
ADB3240 011109.indd 26 6/1/10 10:10:10 AM
27
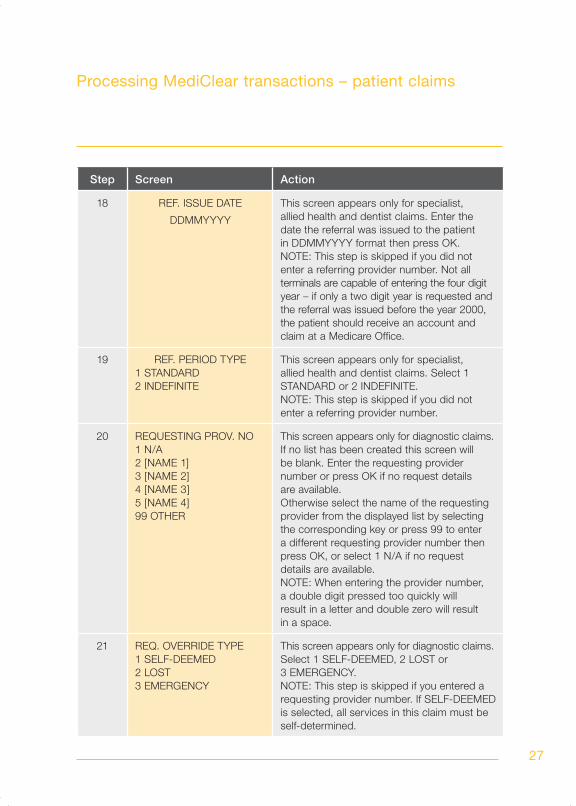
Step Screen Action
18 REF. ISSUE DATE
DDMMYYYY
This screen appears only for specialist, allied health and dentist claims. Enter the date the referral was issued to the patient in DDMMYYYY format then press OK.NOTE: This step is skipped if you did not enter a referring provider number. Not all terminals are capable of entering the four digit year – if only a two digit year is requested and the referral was issued before the year 2000, the patient should receive an account and claim at a Medicare Office.
19 REF. PERIOD TYPE1 STANDARD2 INDEFINITE
This screen appears only for specialist, allied health and dentist claims. Select 1 STANDARD or 2 INDEFINITE.NOTE: This step is skipped if you did not enter a referring provider number.
20 REQUESTING PROV. NO1 N/A2 [NAME 1]3 [NAME 2]4 [NAME 3]5 [NAME 4]99 OTHER
This screen appears only for diagnostic claims.If no list has been created this screen will be blank. Enter the requesting provider number or press OK if no request details are available.Otherwise select the name of the requesting provider from the displayed list by selecting the corresponding key or press 99 to enter a different requesting provider number then press OK, or select 1 N/A if no request details are available.NOTE: When entering the provider number, a double digit pressed too quickly will result in a letter and double zero will result in a space.
21 REQ. OVERRIDE TYPE1 SELF-DEEMED2 LOST3 EMERGENCY
This screen appears only for diagnostic claims.Select 1 SELF-DEEMED, 2 LOST or 3 EMERGENCY.NOTE: This step is skipped if you entered a requesting provider number. If SELF-DEEMED is selected, all services in this claim must be self-determined.
Processing MediClear transactions – patient claims
ADB3240 011109.indd 27 6/1/10 10:10:11 AM
28
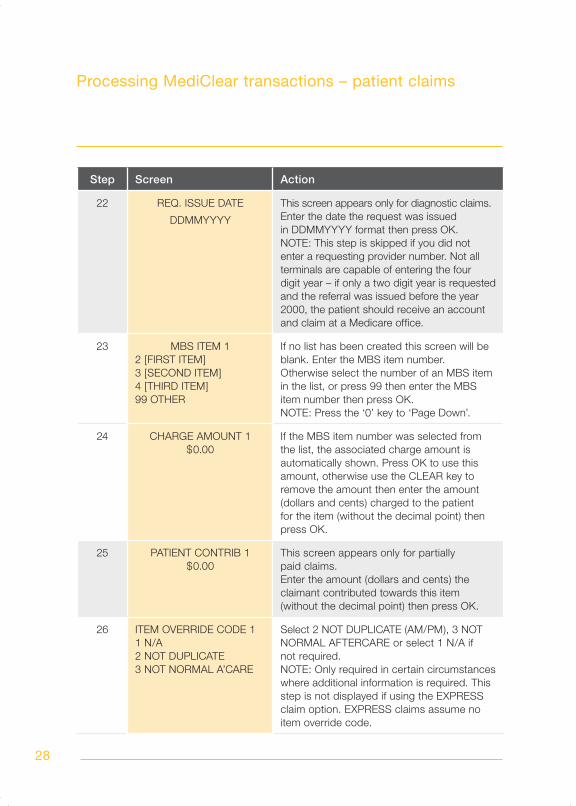
Step Screen Action
22 REQ. ISSUE DATE
DDMMYYYY
This screen appears only for diagnostic claims.Enter the date the request was issued in DDMMYYYY format then press OK.NOTE: This step is skipped if you did not enter a requesting provider number. Not all terminals are capable of entering the four digit year – if only a two digit year is requested and the referral was issued before the year 2000, the patient should receive an account and claim at a Medicare office.
23 MBS ITEM 12 [FIRST ITEM]3 [SECOND ITEM]4 [THIRD ITEM]99 OTHER
If no list has been created this screen will be blank. Enter the MBS item number.Otherwise select the number of an MBS item in the list, or press 99 then enter the MBS item number then press OK. NOTE: Press the ‘0’ key to ‘Page Down’.
24 CHARGE AMOUNT 1$0.00
If the MBS item number was selected from the list, the associated charge amount is automatically shown. Press OK to use this amount, otherwise use the CLEAR key to remove the amount then enter the amount (dollars and cents) charged to the patient for the item (without the decimal point) then press OK.
25 PATIENT CONTRIB 1$0.00
This screen appears only for partially paid claims.Enter the amount (dollars and cents) the claimant contributed towards this item (without the decimal point) then press OK.
26 ITEM OVERRIDE CODE 11 N/A2 NOT DUPLICATE3 NOT NORMAL A’CARE
Select 2 NOT DUPLICATE (AM/PM), 3 NOT NORMAL AFTERCARE or select 1 N/A if not required.NOTE: Only required in certain circumstances where additional information is required. This step is not displayed if using the EXPRESS claim option. EXPRESS claims assume no item override code.
Processing MediClear transactions – patient claims
ADB3240 011109.indd 28 6/1/10 10:10:11 AM

29
Step Screen Action
27 RESTR. O’RIDE CODE 11 N/A2 SEPARATE SITES3 NOT RELATED4 NOT FOR COMPARISON
Select 2 SEPARATE SITES, 3 NOT RELATED (CARE PLANS), 4 NOT FOR COMPARISON or select 1 N/A if not required.NOTE: Only required in certain circumstances where additional information is required. This step is not presented if using the EXPRESS claim option. EXPRESS claims assume no restrictive override code.
28 LSPN 11 N/A2 [FIRST CODE]3 [SECOND CODE]4 [THIRD CODE]99 OTHER
If no list has been created this screen will be blank. Enter the Location Specific Practice Number or press OK if a LSPN is not required.Otherwise select the LSPN for the item from the displayed list by selecting the corresponding key or press 99 to enter a different number then press OK, or select 1 N/A if one is not required.NOTE: Usually only required for diagnostic claims for which this is a mandatory field. This step is not displayed for non-diagnostic claims if using the EXPRESS claim option. EXPRESS claims assume no LSPN.
29 SUBSTITUTED SERVICE1 NO2 YES
This screen appears only for diagnostic claims.Select 1 NO or 2 YES depending on whether the service was substituted.NOTE: You will be prompted to complete this step if you entered a requesting provider number.
Processing MediClear transactions – patient claims
ADB3240 011109.indd 29 6/1/10 10:10:11 AM
30
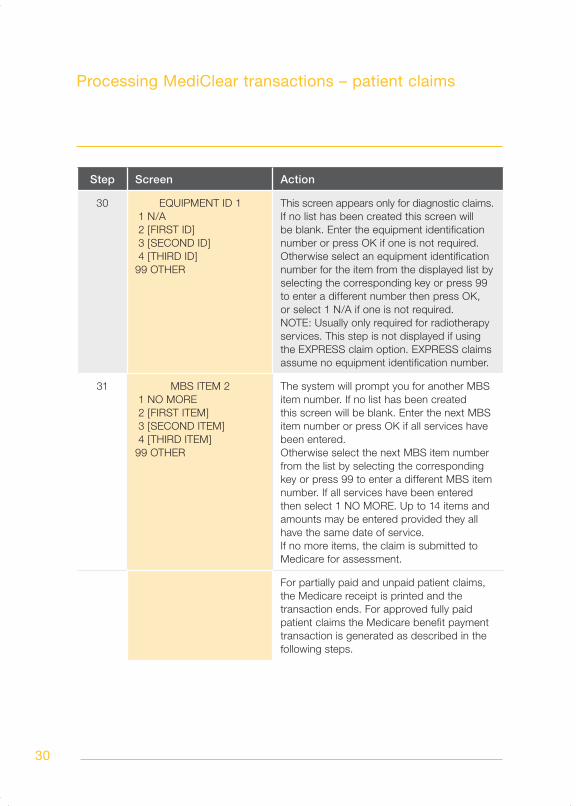
Step Screen Action
30 EQUIPMENT ID 1 1 N/A 2 [FIRST ID] 3 [SECOND ID] 4 [THIRD ID]99 OTHER
This screen appears only for diagnostic claims.If no list has been created this screen will be blank. Enter the equipment identification number or press OK if one is not required.Otherwise select an equipment identification number for the item from the displayed list by selecting the corresponding key or press 99 to enter a different number then press OK, or select 1 N/A if one is not required.NOTE: Usually only required for radiotherapy services. This step is not displayed if using the EXPRESS claim option. EXPRESS claims assume no equipment identification number.
31 MBS ITEM 2 1 NO MORE 2 [FIRST ITEM] 3 [SECOND ITEM] 4 [THIRD ITEM]99 OTHER
The system will prompt you for another MBS item number. If no list has been created this screen will be blank. Enter the next MBS item number or press OK if all services have been entered.Otherwise select the next MBS item number from the list by selecting the corresponding key or press 99 to enter a different MBS item number. If all services have been entered then select 1 NO MORE. Up to 14 items and amounts may be entered provided they all have the same date of service.If no more items, the claim is submitted to Medicare for assessment.
For partially paid and unpaid patient claims, the Medicare receipt is printed and the transaction ends. For approved fully paid patient claims the Medicare benefit payment transaction is generated as described in the following steps.
Processing MediClear transactions – patient claims
ADB3240 011109.indd 30 6/1/10 10:10:11 AM

31
Step Screen Action
32 XPOS PAYMENTTOTAL $[AMOUNT]
OK TO CONTINUE
The Medicare benefit applicable is displayed. Press OK to continue the transaction.
33 Swipe Card A successful response from Medicare will prompt you to swipe the claimant’s EFTPOS card to process the Medicare benefit.
34 DEPOSITTOT $[AMOUNT]Select AccountCHQ SAV
Ask the claimant to use the yellow OPTION buttons to select the account they wish to have the Medicare benefit paid into.
35 DEPOSIT SAV$[AMOUNT]
Enter PIN
Ask the claimant to enter their PIN number and press OK.
36 EFTPOS Processing
This confirmation screen will be displayed.
If the payment transaction is successful, provide the Medicare and EFTPOS receipts to the claimant. If a duplicate copy of the receipt is printed (unpaid and partially paid claims only), this is retained by the medical practice (see the section on ‘Printing duplicate Medicare receipts’). If the payment transaction is declined, you may ask the claimant if they wish to try another EFTPOS card. If the payment transaction cannot be completed successfully, cancel the claim and provide the claimant with the cancelled claim receipt and your account/statement for lodgement by alternative means.
Processing MediClear transactions – patient claims
ADB3240 011109.indd 31 6/1/10 10:10:11 AM

32
This section illustrates the steps to process MediClear bulk bill claims. Some steps are not required for certain types of claim. These steps are highlighted, and the claim type(s) to which they apply are noted.
Express claims can be used for bulk bill claims when you know in advance that the claim will not require the entry of any optional data apart from claimant details, thereby reducing claim entry time. Express bulk bill claims will skip the following screens:
Payee provider number•
MBS item override code•
MBS item restrictive override code•
LSPN number (except for diagnostic claims, where this is mandatory)•
Equipment identification number (diagnostic claims only).•
IMPORTANT NOTE: MediClear currently only processes Specialist/AH/Dental claims that have standard or indefinite referral periods. It does not process claims with non-standard referral periods. These claims must continue to be processed through another channel.
Follow these steps when the service is being bulk billed.
NOTE: A MediClear transaction may by initiated by swiping a patient’s Medicare card. In this case, commence at Step 3.
Step Screen Action
1 COMMONWEALTHBANK EFTPOS
READYXPOS
Swipe the patient’s Medicare card or press the corresponding yellow OPTION button to select XPOS.
2 1 MEDICLEAR9 ADMIN.
Select 1 MEDICLEAR.NOTE: This step is skipped if the transaction was initiated by swiping the patient’s Medicare card.
3 XPOSUser Id?
Enter your User ID if required, then press OK.
C. Processing Bulk Bill ClaimsProcessing MediClear transactions – bulk bill claims
ADB3240 011109.indd 32 6/1/10 10:10:12 AM
33
Step Screen Action
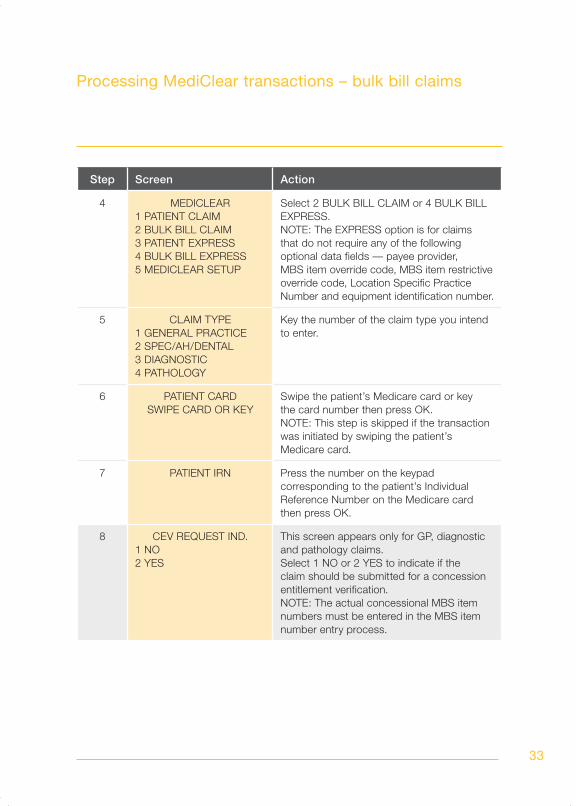
4 MEDICLEAR1 PATIENT CLAIM2 BULK BILL CLAIM3 PATIENT EXPRESS4 BULK BILL EXPRESS5 MEDICLEAR SETUP
Select 2 BULK BILL CLAIM or 4 BULK BILL EXPRESS.NOTE: The EXPRESS option is for claims that do not require any of the following optional data fields — payee provider, MBS item override code, MBS item restrictive override code, Location Specific Practice Number and equipment identification number.
5 CLAIM TYPE1 GENERAL PRACTICE2 SPEC/AH/DENTAL3 DIAGNOSTIC4 PATHOLOGY
Key the number of the claim type you intend to enter.
6 PATIENT CARDSWIPE CARD OR KEY
Swipe the patient’s Medicare card or key the card number then press OK.NOTE: This step is skipped if the transaction was initiated by swiping the patient’s Medicare card.
7 PATIENT IRN Press the number on the keypad corresponding to the patient’s Individual Reference Number on the Medicare card then press OK.
8 CEV REQUEST IND.1 NO2 YES
This screen appears only for GP, diagnostic and pathology claims.Select 1 NO or 2 YES to indicate if the claim should be submitted for a concession entitlement verification. NOTE: The actual concessional MBS item numbers must be entered in the MBS item number entry process.
Processing MediClear transactions – bulk bill claims
ADB3240 011109.indd 33 6/1/10 10:10:12 AM

34
Step Screen Action
9 SERVICE PROVIDER 2 [NAME 1] 3 [NAME 2] 4 [NAME 3] 5 [NAME 4]99 OTHER
If no list has been created this screen will be blank. Enter the service provider number.Otherwise select the name of the practitioner providing the service to the patient from the displayed list by selecting the corresponding key or press 99 to enter a different service provider number.NOTE: When entering a provider number, a double digit pressed too quickly will result in a letter and double zero will result in a space. Press the ‘0’ key to ‘Page Down’.
10 PAYEE PROVIDER 1 N/A 2 [NAME 1] 3 [NAME 2] 4 [NAME 3] 5 [NAME 4]
If no list has been created this screen will be blank. Enter the payee provider number or press OK if the service provider is the payee provider.Otherwise select the name of the practitioner that is to be paid for the service. If this is the practitioner providing the service to the patient then select 1 N/A.NOTE: This step is not displayed if using the EXPRESS claim option. EXPRESS claims assume the service provider is the payee provider.
11 DATE OF SERVICE[TODAY]DDMMYY
If the claim is being made on the same day the service was provided (today), then press OK. Otherwise use the CLEAR key then enter the date the service was provided in DDMMYY format then press OK.
Processing MediClear transactions – bulk bill claims
ADB3240 011109.indd 34 6/1/10 10:10:12 AM

35
Step Screen Action
12 REFERRING PROV. NO 1 N/A 2 [NAME 1] 3 [NAME 2] 4 [NAME 3] 5 [NAME 4]99 OTHER
This screen appears only for specialist, allied health and dentist claims.If no list has been created this screen will be blank. Enter the referring provider number or press OK if no referral details are available.Otherwise select the name of the referring provider from the displayed list by selecting the corresponding key or press 99 to enter a different referring provider number then press OK, or select 1 N/A if no referral details are available.NOTE: When entering the provider number, a double digit pressed too quickly will result in a letter and double zero will result in a space.
13 REF. OVERRIDE TYPE1 NOT REQUIRED2 LOST3 EMERGENCY
This screen appears only for specialist, allied health and dentist claims.Select 1 NOT REQUIRED, 2 LOST or 3 EMERGENCY.NOTE: This step is skipped if you entered a referring provider number.
14 REF. ISSUE DATE
DDMMYYYY
This screen appears only for specialist, allied health and dentist claims.Enter the date the referral was issued to the patient in DDMMYYYY format then press OK.NOTE: This step is skipped if you did not enter a referring provider number. Not all terminals are capable of entering the four digit year – if only a two digit year is requested and the referral was issued before the year 2000, the claim should be submitted by another method.
15 REF. PERIOD TYPE1 STANDARD2 INDEFINITE
This screen appears only for specialist, allied health and dentist claims.Select 1 STANDARD or 2 INDEFINITE.NOTE: This step is skipped if you did not enter a referring provider number.
Processing MediClear transactions – bulk bill claims
ADB3240 011109.indd 35 6/1/10 10:10:12 AM

36
Step Screen Action
16 REQUESTING PROV. NO 1 N/A 2 [NAME 1] 3 [NAME 2] 4 [NAME 3] 5 [NAME 4]99 OTHER
This screen appears only for diagnostic and pathology claims.If no list has been created this screen will be blank. Enter the requesting provider number or press OK if no request details are available.Otherwise select the name of the requesting provider from the displayed list by selecting the corresponding key or press 99 to enter a different requesting provider number then press OK, or select 1 N/A if no request details are available.NOTE: When entering the provider number, a double digit pressed too quickly will result in a letter and double zero will result in a space.
17 REQ. OVERRIDE TYPE1 SELF-DEEMED2 LOST3 EMERGENCY
This screen appears only for diagnostic and pathology claims.Select 1 SELF-DEEMED, 2 LOST or 3 EMERGENCY.NOTE: This step is skipped if you entered a requesting provider number. If choosing SELF-DEEMED, all services in this claim must be self-determined.
18 REQ. ISSUE DATE
DDMMYYYY
This screen appears only for diagnostic and pathology claims.Enter the date the request was issued in DDMMYYYY format then press OK.NOTE: This step is skipped if you did not enter a requesting provider number. Not all terminals are capable of entering the four digit year – if only a two digit year is requested and the referral was issued before the year 2000, the claim should be submitted by another method.
Processing MediClear transactions – bulk bill claims
ADB3240 011109.indd 36 6/1/10 10:10:12 AM

37
Step Screen Action
19 MBS ITEM 1 2 [FIRST ITEM] 3 [SECOND ITEM] 4 [THIRD ITEM]99 OTHER
If no list has been created this screen will be blank. Enter the MBS item number.Otherwise select the number of an MBS item in the list, or press 99 then enter the MBS item number then press OK. NOTE: Press the ‘0’ key to ‘Page Down’.
20 ITEM OVERRIDE CODE 11 N/A2 NOT DUPLICATE3 NOT NORMAL A’CARE
Select 2 NOT DUPLICATE (AM/PM), 3 NOT NORMAL AFTERCARE or select 1 N/A if not required.NOTE: Only required in certain circumstances where additional information is required. This step is not displayed if using the EXPRESS claim option. EXPRESS claims assume no item override code.
21 RESTR. O’RIDE CODE 11 N/A2 SEPARATE SITES3 NOT RELATED4 NOT FOR COMPARISON
This screen appears only for GP, specialist, allied health, dentist and diagnostic claims.Select 2 SEPARATE SITES, 3 NOT RELATED (CARE PLANS), 4 NOT FOR COMPARISON or select 1 N/A if not required.NOTE: Only required in certain circumstances where additional information is required. This step is not presented if using the EXPRESS claim option. EXPRESS claims assume no restrictive override code.
22 LSPN 1 1 N/A 2 [FIRST CODE] 3 [SECOND CODE] 4 [THIRD CODE]99 OTHER
This screen appears only for GP, specialist, allied health, dentist and diagnostic claims.If no list has been created this screen will be blank. Enter the Location Specific Practice Number or press OK if a LSPN is not required.Otherwise select the LSPN for the item from the displayed list by selecting the corresponding key or press 99 to enter a different number then press OK, or select 1 N/A if one is not required.NOTE: Usually only required for diagnostic claims for which this is a mandatory field. This step is not displayed for non-diagnostic claims if using the EXPRESS claim option. EXPRESS claims assume no LSPN.
Processing MediClear transactions – bulk bill claims
ADB3240 011109.indd 37 6/1/10 10:10:13 AM

38
Step Screen Action
23 SUBSTITUTED SERVICE1 NO2 YES
This screen appears only for diagnostic claims.Select 1 or 2 depending on whether the service was substituted.NOTE: This step is displayed if you entered a requesting provider number.
24 EQUIPMENT ID 1 1 N/A 2 [FIRST ID] 3 [SECOND ID] 4 [THIRD ID]99 OTHER
This screen appears only for diagnostic claims.If no list has been created this screen will be blank. Enter the equipment identification number or press OK if one is not required.Otherwise select an equipment identification number for the item from the displayed list by selecting the corresponding key or press 99 to enter a different number then press OK, or select 1 N/A if one is not required.NOTE: Usually only required for radiotherapy services. This step is not displayed if using the EXPRESS claim option. EXPRESS claims assume no equipment identification number.
25 MBS ITEM 2 1 NO MORE 2 [FIRST ITEM] 3 [SECOND ITEM] 4 [THIRD ITEM]99 OTHER
The system will prompt you for another MBS item number. If no list has been created this screen will be blank. Enter the next MBS item number or press OK if all services have been entered.Otherwise select the next MBS item number from the list by selecting the corresponding key or press 99 to enter a different MBS item number. If all services have been entered then select 1 NO MORE. Up to 14 items may be entered provided they all have the same date of service.
Processing MediClear transactions – bulk bill claims
ADB3240 011109.indd 38 6/1/10 10:10:13 AM

39
Step Screen Action
26 SCP ID 2 [FIRST SCP] 3 [SECOND SCP] 4 [THIRD SCP]99 OTHER
This screen appears only for pathology claims.If no list has been created this screen will be blank. Enter the Specimen Collection Point ID.Otherwise select a SCP ID from the displayed list by selecting the corresponding key or press 99 to enter a different SCP ID number then press OK.The claim is submitted to Medicare for verification.
27 NO CONCESSION ENTITL1 OVERRIDE2 DECLINE
CONCESSION ENTITL OK1 ACCEPT2 DECLINE
This screen only appears if a concessional entitlement verification was requested at Step 8 and the patient was not eligible.The first line indicates whether the claim is eligible for a concessional entitlement or not. Select either to 1 OVERRIDE (continue) with the claim or 2 DECLINE (cancel) the claim.
This screen appears if a concessional entitlement verification was requested at Step 8 and the patient was eligible.Select either to 1 ACCEPT (continue) with the claim or 2 DECLINE (cancel) the claim.
28 ASSIGN BENEFIT1 OK, ASSIGN BENEFIT2 NO, DO NOT ASSIGN
The patient must view the partially printed receipt and then agree to assign the benefit payment to the practitioner by pressing 1 OK, ASSIGN BENEFIT. The complete receipt will then be printed. Where the patient declines to assign the benefit payment to the practitioner, they must press 2 NO, DO NOT ASSIGN.
If the claim is successful the complete Bulk Bill Assignment Advice must be provided to the patient. If a duplicate copy of the receipt is printed, this is retained by the medical practice (see the section on ‘Printing duplicate Medicare receipts’). If the claim is unable to be completed successfully, process the bulk bill claim by alternative means.
Processing MediClear transactions – bulk bill claims
ADB3240 011109.indd 39 6/1/10 10:10:13 AM
40
The receipt indicates that Medicare Australia has accepted the claim as valid (that is, there is no missing or invalid data), but the claim has not yet been assessed for payment. This is why the receipt shows the benefit estimate for the item, and not the actual benefit value that will be paid by Medicare Australia.
Medicare Australia will assess the claim for payment later in the day. During assessment it is possible that individual items may be rejected. Practitioners should verify claim payment details using Medicare Australia’s online Provider Directory Service.
Processing MediClear transactions – bulk bill claims
ADB3240 011109.indd 40 6/1/10 10:10:13 AM

41
D. Contact Us /AppendicesWhere to get help
IMPORTANT NOTE: If a claimant believes they have not received their Medicare benefit processed via MediClear, they should contact the financial institution that issued the EFTPOS card used in the transaction, quoting the reference number provided on their EFTPOS receipt.
If a claimant asks you to provide them with an alternative contact to discuss the matter further, refer them to the Medicare Consumer Line number below.
Commonwealth Bank MediClear Helpdesk
24 hours, 7 days 1300 883 258
To report MediClear faults and for instructions on how to process MediClear transactions.
Commonwealth Bank Technical Helpdesk
24 hours, 7 days Freecall* 1800 022 966
To report terminal hardware faults.
Medicare Australia Provider Line
24 hours, 7 days 132 150
For practitioner enquiries regarding claim assessment or other enquiries relating to Medicare systems. Further information is available at www.medicareaustralia.gov.au
Medicare Australia Consumer Line
24 hours, 7 days 132 011
For patient or claimant enquiries regarding claim assessment or other general Medicare enquiries.
ADB3240 011109.indd 41 6/1/10 10:10:13 AM

42
Where to get help
Commonwealth Bank Merchant Enquiries
24 hours, 7 days Freecall* 1800 230 177
For general merchant enquiries, EFTPOS transaction errors, merchant statement enquiries, charge card acceptance, change of address notification, the collection of unused equipment, business closure and the adding or deleting of terminal functionality.
Please assist us by having your merchant number and terminal number available when contacting any of the Helpdesks.
Further information is available at www.commbank.com.au/mediclear
Medicare Australia e-Business Service Centre
24 hours, 7 days Freecall* 1800 700 199 (select option 1) for information regarding:
Medicare Easyclaim•
Accessing your bulk bill processing and payment reports through the Provider •Directory System
Changing your contact / practice details•
Registration and amendments to banking details for providers•
Organising an on-site visit by a Medicare Australia Business Development Officer •to discuss any of the above issues.
Further information is available at www.medicareaustralia.gov.au
* Calls to Freecall numbers are free unless made from a mobile phone, which will be charged at the applicable rate.
ADB3240 011109.indd 42 6/1/10 10:10:13 AM

43
Appendix A – MediClear Receipts
This is an example of a Medicare Australia Claim Receipt for paid and assessed for payment claims.
The receipt lists the Medicare Australia Card Number: 123456789 1, followed by a S indicating that the card was swiped through the terminal (a M would indicate that the card number was manually keyed), and a 1 referring to the patient’s position on the card.
The practitioner’s name and Medicare provider number are recorded, followed by the date of service and detail of services provided during the consultation.
The receipt also contains the Medicare Transaction ID – this is Medicare Australia’s reference number for the transaction.
MEDICARE CLAIM RECEIPTEFTPOS
PLEASE RETAIN FOR TAXATIONPURPOSES
CARD: 123456789 1 (S) 1PATIENT NAME: JOHN CITIZENPROVIDER NAME: DAVID LIVINGSTONE(1234567A)
DATE OF SERVICE: 27/12/2007
CHARGE SCH FEE BENEFIT EXPMBS ITEM 2340.00 32.10 32.10 0MBS ITEM 3665.00 60.95 60.95 0
TOTAL CHARGES: $105.00TOTAL BENEFIT: $93.05
EXPLANATION Of CODES
Should you have an enquiry regarding a missing Medicare benefit payment, please contact the bank that issued
the card used in the transaction, quoting the reference number on the EFTPOS
receipt. For all other Medicare related enquiries, please contact Medicare
Australia on 132 011
ISSUED: 27/1/2007 09:30TERMINAL ID: 12345678MEDICARE Transaction ID:
12345678901234567890123A
XPOS Transaction ID: 123456789
ADB3240 011109.indd 43 6/1/10 10:10:14 AM

44
Appendix A – MediClear Receipts
This is an example of a Medicare Australia Lodgement Receipt for an unpaid, partially paid or pended patient claim.
The receipt contains the same information as a fully paid claim. The key difference is the inclusion of one of the two statements below, depending on the claim type:
Statement A – Unpaid/Part Paid Claim
Where Medicare benefits are assessed as payable for this claim, a statement and/or cheque in the Medical Practitioner’s name will be forwarded to the claimant’s address recorded by Medicare.
Where no benefit is assessed as payable, a statement only will be forwarded to the claimant’s address recorded by Medicare.
Statement B – Pended Claim
On assessment of your claim, Medicare Australia will issue a statement and, where a benefit is payable, a cheque will be mailed to the claimant’s address recorded by Medicare.
MEDICARE LODGEMENT RECEIPTTHIS CLAIM HAS BEEN LODGED WITHMEDICARE AUSTRALIA FOR ASSESSMENT
CARD: 123456789 1 (S) 2PATIENT NAME: JANE CITIZENPROVIDER NAME: DAVID LIVINGSTONE(1234567A)
CLAIMANT CARD: 123456789 1CLAIMANT NAME: JOHN CITIZEN
DATE OF SERVICE: 27/01/2007
MBS ITEM CHARGE PATIENT CONTRIB105 40.00 20.00
TOTAL CHARGES: $40.00PATIENT CONTRIB: $20.00
Where Medicare benefits are assessed as payable for this claim, a statement and/or cheque in the Medical Practitioner’s name will be forwarded to the claimant’s address recorded by Medicare.
Where no benefit is assessed as payable, a statement only will be forwarded to the claimant’s address recorded by Medicare.
For all Medicare related enquiries, please contact Medicare
Australia on 132 011
ISSUED: 27/1/2007 09:30TERMINAL ID: 12345678MEDICARE Transaction ID:
12345678901234567890123A
XPOS Transaction ID: 123456789
ADB3240 011109.indd 44 6/1/10 10:10:14 AM

45
Appendix A – MediClear Receipts
This is an example of a Medicare Australia Claim Receipt for a bulk bill claim.
The receipt contains the same information as a fully paid claim plus additional details such as a referring/requesting provider details, LSPN, Equipment ID, self-deemed code and SCP ID. The key difference is the inclusion of a statement indicating that the patient has assigned their right to the Medicare benefit to the practitioner.
When completing the claim, the patient must view the partially printed receipt (left) and then agree to assign the benefit payment to the practitioner by pressing the corresponding key on the terminal when prompted.
The complete receipt will then be printed, as seen below.
Notes: The receipt indicates that Medicare Australia has accepted the claim as valid (that is, there is no missing or invalid data), but the claim has not yet been assessed for payment. This is why the receipt shows the Benefit Estimate for the item, and not the actual benefit value that will be paid by Medicare Australia.
Medicare Australia will assess the claim for payment later in the day. During assessment it is possible that individual items may be rejected. Practitioners should verify claim payment details using Medicare Australia’s online Provider Directory Service.
BULK BILL ASSIGNMENT ADVICEBULK BILL CLAIM FOR ASSESSMENT BY
MEDICARE AUSTRALIAPATIENT COPY: PLEASE RETAIN FOR
YOUR RECORDS
CARD: 123456789 1 (S) 1PATIENT NAME: JANE CITIZENPROVIDER NAME: DAVID LIVINGSTONE(1234567A)
DATE OF SERVICE: 27/01/2007
MBS ITEM BENEFIT ESTIMATE
23 32.10
TOTAL: $32.10
On assessment of your claim, Medicare Australia may adjust the benefit payable in accordance with the rules set out in the Medicare Benefits Schedule
I have assigned my right to benefits to the practitioner who rendered the
services.
ISSUED: 27 Jan 2007 09:30:00
TERMINAL ID: 12345678
MEDICARE Transaction ID:12345678901234567890123A
XPOS Transaction ID: 123456789
BULK BILL ASSIGNMENT ADVICE BULK BILL CLAIM FOR ASSESSMENT BY
MEDICARE AUSTRALIA PATIENT COPY: PLEASE RETAIN FOR
YOUR RECORDS
CARD: 123456789 1 (S) 1
PATIENT NAME: JANE CITIZEN
PROVIDER NAME: DAVID LIVINGSTONE
(1234567A)
DATE OF SERVICE: 27/01/2007
MBS ITEM BENEFIT ESTIMATE
23 32.10
TOTAL 32.10
On assessment of your claim, Medicare Australia may adjust the benefit payable in accordance with the rules set out in the Medicare Benefits Schedule
ADB3240 011109.indd 45 6/1/10 10:10:14 AM

ADB3240 011109
ADB3240 011109.indd 46 6/1/10 10:10:14 AM