media.readthedocs.org · Contents 1 Introduction 3 1.1 About. . . . . . . . . . . . . . . . . . . ....
197
NREC end user documentation Documentation NREC team May 18, 2020
Transcript of media.readthedocs.org · Contents 1 Introduction 3 1.1 About. . . . . . . . . . . . . . . . . . . ....

NREC end user documentationDocumentation
NREC team
May 18, 2020


Contents
1 Introduction 31.1 About . . . . . . . . . . . . . . . . . . . . . . . . . . . . . . . . . . . . . . . . . . . . . . 31.2 Who can use the NREC cloud? . . . . . . . . . . . . . . . . . . . . . . . . . . . . . . . . 41.3 What can you do with the NREC cloud? . . . . . . . . . . . . . . . . . . . . . . . . . . . . 41.4 Concepts . . . . . . . . . . . . . . . . . . . . . . . . . . . . . . . . . . . . . . . . . . . . 51.5 Conventions . . . . . . . . . . . . . . . . . . . . . . . . . . . . . . . . . . . . . . . . . . 7
2 Project application 92.1 Demo projects . . . . . . . . . . . . . . . . . . . . . . . . . . . . . . . . . . . . . . . . . 92.2 Standard projects . . . . . . . . . . . . . . . . . . . . . . . . . . . . . . . . . . . . . . . . 10
3 Logging in 113.1 First time login . . . . . . . . . . . . . . . . . . . . . . . . . . . . . . . . . . . . . . . . . 113.2 Subsequent logins . . . . . . . . . . . . . . . . . . . . . . . . . . . . . . . . . . . . . . . 14
4 The dashboard 174.1 Overview . . . . . . . . . . . . . . . . . . . . . . . . . . . . . . . . . . . . . . . . . . . . 174.2 Choosing Region . . . . . . . . . . . . . . . . . . . . . . . . . . . . . . . . . . . . . . . . 184.3 Project tab . . . . . . . . . . . . . . . . . . . . . . . . . . . . . . . . . . . . . . . . . . . 184.4 Identity tab . . . . . . . . . . . . . . . . . . . . . . . . . . . . . . . . . . . . . . . . . . . 19
5 Create a Linux virtual machine 215.1 Setting up a keypair . . . . . . . . . . . . . . . . . . . . . . . . . . . . . . . . . . . . . . 215.2 Create a virtual machine . . . . . . . . . . . . . . . . . . . . . . . . . . . . . . . . . . . . 255.3 Allowing SSH and ICMP access . . . . . . . . . . . . . . . . . . . . . . . . . . . . . . . . 315.4 Accessing the virtual machine . . . . . . . . . . . . . . . . . . . . . . . . . . . . . . . . . 345.5 Doing the same with CLI . . . . . . . . . . . . . . . . . . . . . . . . . . . . . . . . . . . 35
6 Create a Windows virtual machine 416.1 Setting up a keypair . . . . . . . . . . . . . . . . . . . . . . . . . . . . . . . . . . . . . . 426.2 Create a virtual machine . . . . . . . . . . . . . . . . . . . . . . . . . . . . . . . . . . . . 426.3 Allowing RDP access . . . . . . . . . . . . . . . . . . . . . . . . . . . . . . . . . . . . . 456.4 Retrieve Admin password . . . . . . . . . . . . . . . . . . . . . . . . . . . . . . . . . . . 49
i

6.5 Launch Remote Desktop . . . . . . . . . . . . . . . . . . . . . . . . . . . . . . . . . . . . 52
7 Create and manage volumes 557.1 Create a volume . . . . . . . . . . . . . . . . . . . . . . . . . . . . . . . . . . . . . . . . 557.2 Attach a volume to a virtual machine . . . . . . . . . . . . . . . . . . . . . . . . . . . . . 577.3 Detach a volume from a virtual machine . . . . . . . . . . . . . . . . . . . . . . . . . . . . 597.4 Delete a volume . . . . . . . . . . . . . . . . . . . . . . . . . . . . . . . . . . . . . . . . 617.5 Doing the same with CLI . . . . . . . . . . . . . . . . . . . . . . . . . . . . . . . . . . . 62
8 Create and manage snapshots 658.1 Create a snapshot . . . . . . . . . . . . . . . . . . . . . . . . . . . . . . . . . . . . . . . . 658.2 Launch a snapshot . . . . . . . . . . . . . . . . . . . . . . . . . . . . . . . . . . . . . . . 678.3 Doing the same with CLI . . . . . . . . . . . . . . . . . . . . . . . . . . . . . . . . . . . 67
9 Upload and manage images 719.1 Upload an image . . . . . . . . . . . . . . . . . . . . . . . . . . . . . . . . . . . . . . . . 719.2 Doing the same with CLI . . . . . . . . . . . . . . . . . . . . . . . . . . . . . . . . . . . 72
10 Instance console 7310.1 Accessing the console . . . . . . . . . . . . . . . . . . . . . . . . . . . . . . . . . . . . . 7310.2 Console limitations . . . . . . . . . . . . . . . . . . . . . . . . . . . . . . . . . . . . . . . 7410.3 Example remote protocols . . . . . . . . . . . . . . . . . . . . . . . . . . . . . . . . . . . 74
11 (BETA) High-Performance Computing (HPC) 7711.1 What’s different . . . . . . . . . . . . . . . . . . . . . . . . . . . . . . . . . . . . . . . . 7711.2 Getting Access . . . . . . . . . . . . . . . . . . . . . . . . . . . . . . . . . . . . . . . . . 7811.3 Policies . . . . . . . . . . . . . . . . . . . . . . . . . . . . . . . . . . . . . . . . . . . . . 7911.4 Hardware . . . . . . . . . . . . . . . . . . . . . . . . . . . . . . . . . . . . . . . . . . . . 7911.5 Flavors . . . . . . . . . . . . . . . . . . . . . . . . . . . . . . . . . . . . . . . . . . . . . 79
12 The NREC DNS service 8112.1 When to use the DNS service . . . . . . . . . . . . . . . . . . . . . . . . . . . . . . . . . 8212.2 Accessing the DNS zones GUI panel . . . . . . . . . . . . . . . . . . . . . . . . . . . . . 8312.3 Creating a new zone . . . . . . . . . . . . . . . . . . . . . . . . . . . . . . . . . . . . . . 8312.4 Adding an A record . . . . . . . . . . . . . . . . . . . . . . . . . . . . . . . . . . . . . . 8512.5 Adding an AAAA record . . . . . . . . . . . . . . . . . . . . . . . . . . . . . . . . . . . . 8712.6 Adding a CNAME record . . . . . . . . . . . . . . . . . . . . . . . . . . . . . . . . . . . 8712.7 Listing your DNS records . . . . . . . . . . . . . . . . . . . . . . . . . . . . . . . . . . . 8812.8 Testing your records . . . . . . . . . . . . . . . . . . . . . . . . . . . . . . . . . . . . . . 8912.9 Deleting records . . . . . . . . . . . . . . . . . . . . . . . . . . . . . . . . . . . . . . . . 9012.10 Deleting a zone . . . . . . . . . . . . . . . . . . . . . . . . . . . . . . . . . . . . . . . . . 9012.11 Doing the same with CLI . . . . . . . . . . . . . . . . . . . . . . . . . . . . . . . . . . . 90
13 OpenStack API 9513.1 OpenStack Command Line Interface (CLI) . . . . . . . . . . . . . . . . . . . . . . . . . . 95
14 Terraform and NREC: Part I - Basics 9914.1 Prerequisites . . . . . . . . . . . . . . . . . . . . . . . . . . . . . . . . . . . . . . . . . . 9914.2 Basic Terraform usage . . . . . . . . . . . . . . . . . . . . . . . . . . . . . . . . . . . . . 100
ii

14.3 Running Terraform . . . . . . . . . . . . . . . . . . . . . . . . . . . . . . . . . . . . . . . 101
15 Terraform and NREC: Part II - Additional resources 10915.1 Image ID . . . . . . . . . . . . . . . . . . . . . . . . . . . . . . . . . . . . . . . . . . . . 10915.2 Multiple instances . . . . . . . . . . . . . . . . . . . . . . . . . . . . . . . . . . . . . . . 11115.3 Key pairs . . . . . . . . . . . . . . . . . . . . . . . . . . . . . . . . . . . . . . . . . . . . 11215.4 Security groups . . . . . . . . . . . . . . . . . . . . . . . . . . . . . . . . . . . . . . . . . 11315.5 Volumes . . . . . . . . . . . . . . . . . . . . . . . . . . . . . . . . . . . . . . . . . . . . 11615.6 Complete example . . . . . . . . . . . . . . . . . . . . . . . . . . . . . . . . . . . . . . . 116
16 Terraform and NREC: Part III - Dynamics 11916.1 Variables file . . . . . . . . . . . . . . . . . . . . . . . . . . . . . . . . . . . . . . . . . . 12016.2 Local variables file . . . . . . . . . . . . . . . . . . . . . . . . . . . . . . . . . . . . . . . 12216.3 Using variables . . . . . . . . . . . . . . . . . . . . . . . . . . . . . . . . . . . . . . . . . 12316.4 Making changes . . . . . . . . . . . . . . . . . . . . . . . . . . . . . . . . . . . . . . . . 12916.5 Complete example . . . . . . . . . . . . . . . . . . . . . . . . . . . . . . . . . . . . . . . 130
17 Terraform and NREC: Part IV - Pairing with Ansible 13717.1 Installing Ansible . . . . . . . . . . . . . . . . . . . . . . . . . . . . . . . . . . . . . . . . 13817.2 Ansible inventory from Terraform state . . . . . . . . . . . . . . . . . . . . . . . . . . . . 13817.3 Configuring Ansible connectivity . . . . . . . . . . . . . . . . . . . . . . . . . . . . . . . 13917.4 Using Ansible . . . . . . . . . . . . . . . . . . . . . . . . . . . . . . . . . . . . . . . . . 14117.5 Complete example . . . . . . . . . . . . . . . . . . . . . . . . . . . . . . . . . . . . . . . 144
18 Terraform and NREC: Part V - DNS Management 15318.1 Creating a DNS zone . . . . . . . . . . . . . . . . . . . . . . . . . . . . . . . . . . . . . . 15418.2 Creating DNS records . . . . . . . . . . . . . . . . . . . . . . . . . . . . . . . . . . . . . 15418.3 Apply and check . . . . . . . . . . . . . . . . . . . . . . . . . . . . . . . . . . . . . . . . 15518.4 Dynamically add DNS records . . . . . . . . . . . . . . . . . . . . . . . . . . . . . . . . . 15618.5 Complete example . . . . . . . . . . . . . . . . . . . . . . . . . . . . . . . . . . . . . . . 158
19 Networking considerations 16119.1 Background . . . . . . . . . . . . . . . . . . . . . . . . . . . . . . . . . . . . . . . . . . . 16119.2 Implications . . . . . . . . . . . . . . . . . . . . . . . . . . . . . . . . . . . . . . . . . . 163
20 Support 16520.1 Informal chat . . . . . . . . . . . . . . . . . . . . . . . . . . . . . . . . . . . . . . . . . . 16520.2 Support requests . . . . . . . . . . . . . . . . . . . . . . . . . . . . . . . . . . . . . . . . 16520.3 Reporting bugs and issues . . . . . . . . . . . . . . . . . . . . . . . . . . . . . . . . . . . 165
21 Known Issues 16721.1 API access . . . . . . . . . . . . . . . . . . . . . . . . . . . . . . . . . . . . . . . . . . . 16821.2 Console considerations . . . . . . . . . . . . . . . . . . . . . . . . . . . . . . . . . . . . . 16821.3 Console doesn’t appear . . . . . . . . . . . . . . . . . . . . . . . . . . . . . . . . . . . . . 16821.4 SSH keys different in API and dashboard . . . . . . . . . . . . . . . . . . . . . . . . . . . 16821.5 Booting instance from a volume . . . . . . . . . . . . . . . . . . . . . . . . . . . . . . . . 16821.6 Maximum number of volume attachments to an instance . . . . . . . . . . . . . . . . . . . 16821.7 Network availability . . . . . . . . . . . . . . . . . . . . . . . . . . . . . . . . . . . . . . 16921.8 No access after changed email address . . . . . . . . . . . . . . . . . . . . . . . . . . . . 169
iii

21.9 Outdated size . . . . . . . . . . . . . . . . . . . . . . . . . . . . . . . . . . . . . . . . . . 16921.10 Missing network when provisioning from snapshot . . . . . . . . . . . . . . . . . . . . . . 16921.11 Cannot delete DNS zones or records in dashboard . . . . . . . . . . . . . . . . . . . . . . 17121.12 Intance name . . . . . . . . . . . . . . . . . . . . . . . . . . . . . . . . . . . . . . . . . . 17121.13 Security Groups caution . . . . . . . . . . . . . . . . . . . . . . . . . . . . . . . . . . . . 171
22 NREC Terms of Service 17322.1 Signing up . . . . . . . . . . . . . . . . . . . . . . . . . . . . . . . . . . . . . . . . . . . 17322.2 Our services . . . . . . . . . . . . . . . . . . . . . . . . . . . . . . . . . . . . . . . . . . 17422.3 Security . . . . . . . . . . . . . . . . . . . . . . . . . . . . . . . . . . . . . . . . . . . . . 17422.4 Availability . . . . . . . . . . . . . . . . . . . . . . . . . . . . . . . . . . . . . . . . . . . 17522.5 Content . . . . . . . . . . . . . . . . . . . . . . . . . . . . . . . . . . . . . . . . . . . . . 17522.6 Privacy Policy . . . . . . . . . . . . . . . . . . . . . . . . . . . . . . . . . . . . . . . . . 175
23 Speculative Execution Attacks 17723.1 Background Information . . . . . . . . . . . . . . . . . . . . . . . . . . . . . . . . . . . . 17823.2 Updating your Instances . . . . . . . . . . . . . . . . . . . . . . . . . . . . . . . . . . . . 17823.3 Additional References . . . . . . . . . . . . . . . . . . . . . . . . . . . . . . . . . . . . . 180
24 Frequently asked questions (FAQ) 18324.1 Project quotas vs. flavors . . . . . . . . . . . . . . . . . . . . . . . . . . . . . . . . . . . . 18324.2 Capacity planning and scaling . . . . . . . . . . . . . . . . . . . . . . . . . . . . . . . . . 18424.3 HTTP 401 Unauthorized Error from the OpenStack API . . . . . . . . . . . . . . . . . . . 18424.4 Transferring a volume . . . . . . . . . . . . . . . . . . . . . . . . . . . . . . . . . . . . . 18424.5 Resizing an instance . . . . . . . . . . . . . . . . . . . . . . . . . . . . . . . . . . . . . . 18424.6 How to regenerate your public SSH key . . . . . . . . . . . . . . . . . . . . . . . . . . . . 18524.7 How to rebuild an instance, but preserve the IP addresses . . . . . . . . . . . . . . . . . . . 18524.8 How to acknowledge the use of NREC . . . . . . . . . . . . . . . . . . . . . . . . . . . . 185
25 Changelog 18725.1 2019-02-26 . . . . . . . . . . . . . . . . . . . . . . . . . . . . . . . . . . . . . . . . . . . 18725.2 2019-02-06 . . . . . . . . . . . . . . . . . . . . . . . . . . . . . . . . . . . . . . . . . . . 18725.3 2019-01-17 . . . . . . . . . . . . . . . . . . . . . . . . . . . . . . . . . . . . . . . . . . . 18825.4 2018-11-13 . . . . . . . . . . . . . . . . . . . . . . . . . . . . . . . . . . . . . . . . . . . 18825.5 2018-10-31 . . . . . . . . . . . . . . . . . . . . . . . . . . . . . . . . . . . . . . . . . . . 18825.6 2018-10-17 . . . . . . . . . . . . . . . . . . . . . . . . . . . . . . . . . . . . . . . . . . . 18825.7 2018-08-13 . . . . . . . . . . . . . . . . . . . . . . . . . . . . . . . . . . . . . . . . . . . 18825.8 2018-07-19 . . . . . . . . . . . . . . . . . . . . . . . . . . . . . . . . . . . . . . . . . . . 18925.9 2018-02-28 . . . . . . . . . . . . . . . . . . . . . . . . . . . . . . . . . . . . . . . . . . . 18925.10 2018-02-26 . . . . . . . . . . . . . . . . . . . . . . . . . . . . . . . . . . . . . . . . . . . 18925.11 2018-01-24 . . . . . . . . . . . . . . . . . . . . . . . . . . . . . . . . . . . . . . . . . . . 18925.12 2017-12-01 . . . . . . . . . . . . . . . . . . . . . . . . . . . . . . . . . . . . . . . . . . . 18925.13 2017-10-12 . . . . . . . . . . . . . . . . . . . . . . . . . . . . . . . . . . . . . . . . . . . 190
26 Indices and tables 191
iv

NREC end user documentation Documentation
Norwegian Research and Education Cloud
Contents:
Contents 1

NREC end user documentation Documentation
2 Contents

CHAPTER 1
Introduction
Last changed: 2020-05-18
Contents
• Introduction
– About
– Who can use the NREC cloud?
– What can you do with the NREC cloud?
– Concepts
* Overview
* OpenStack components
* Glossary
– Conventions
* Notices
* Command prompts
1.1 About
The NREC cloud is based on OpenStack, which is a large framework of software components used to deliveran Infrastructure-as-a-Service consisting of compute, networking and storage resources.
3

NREC end user documentation Documentation
This document is aimed at the end user. We’ll borrow a lot from the OpenStack End User Guide, includinglinking to this guide where appropriate.
NREC is a collaboration project between the University of Bergen and the University of Oslo, with addi-tional sponsorships from NeIC (Nordic e-Infrastructure Collaboration) and Uninett. We’ve been in produc-tion since 2016 and are currently providing cloud infrastructure for several high profile academic projects,including CERN’s ALICE and ATLAS experiments. Our hardware is located exclusively on-premise, ourservices are developed locally and we are almost entirely based on Open Source Software and open stan-dards, making us a more transparent alternative to commercial cloud providers.
We are a community cloud aiming to provide a modern, flexible and secure IT infrastucture, tailored to theneeds of the research and higher education sector.
1.2 Who can use the NREC cloud?
Important: Before using this cloud service, you should familiarize yourself with our Terms of Service.
All users at educational institutions that are allegeable for access can use the NREC cloud. All you need isan account any of these universities or colleges.
University / College / Organization Type of accessThe Arctic University of Norway (UiT) Limited testingNorwegian University of Life Sciences (NMBU) Limited testingUNINETT Limited testingUniversity of Bergen (UiB) Full AccessUniversity of Oslo (UiO) Full Access
Before using the service, you must register with the authentication mechanism and the service itself. This isexplained in detail in Logging in.
1.3 What can you do with the NREC cloud?
As an OpenStack cloud end user, you can provision your own resources within the limits set by cloudadministrators.
The examples in this guide show you how to perform tasks by using the following methods:
• OpenStack dashboard. Use this web-based graphical interface to view, create, and manage resources.
• OpenStack command-line clients. Each core OpenStack project has a command-line client that youcan use to run simple commands to view, create, and manage resources in a cloud and automate tasksby using scripts.
You can modify these examples for your specific use cases.
4 Chapter 1. Introduction

NREC end user documentation Documentation
In addition to these ways of interacting with a cloud, you can access the OpenStack APIs directly or indi-rectly through cURL commands or open SDKs. You can automate access or build tools to manage resourcesand services by using the native OpenStack APIs.
To use the OpenStack APIs, it helps to be familiar with HTTP/1.1, RESTful web services, the OpenStackservices, and JSON or XML data serialization formats.
1.4 Concepts
1.4.1 Overview
According to standard definitions of cloud computing, there are three layers:
The NREC cloud provides
• Self service via a web portal to create, manage and delete virtual machines.
• Programmable through command line tools and programming language libraries.
• Elasticity, in that you can create virtual machines (up to your quota) and delete them when they areno longer needed.
• Efficiency by consolidating small virtual machines onto physical hardware.
1.4. Concepts 5

NREC end user documentation Documentation
OpenStack is an open source cloud computing software, which provides an efficient pooling of on-demand,self-managed virtual infrastructure, consumed as a service.
1.4.2 OpenStack components
OpenStack is a large framework that consists of an increasingly growing number of components. Thefollowing components are installed in the NREC cloud. Each of the components have a general descriptionand a code name. The latter is mostly used in development, but both terms are used interchangeably.
Compo-nent
Description
Com-pute(Nova)
Manages the lifecycle of compute instances in an OpenStack environment. Responsibilitiesinclude spawning, scheduling and decomissioning of machines on demand.
BlockStorage(Cinder)
Provides persistent block storage to running instances. Its pluggable driver architecture facil-itates the creation and management of block storage devices.
Identityservice(Key-stone)
Provides an authentication and authorization service for other OpenStack services. Providesa catalog of endpoints for all OpenStack services.
Imageservice(Glance)
Stores and retrieves virtual machine disk images. OpenStack Compute makes use of thisduring instance provisioning.
Dash-board(Hori-zon)
Provides a web-based self-service portal to interact with underlying OpenStack services, suchas launching an instance, assigning IP addresses and configuring access controls.
Net-working(Neu-tron)
Enables network connectivity as a service for other OpenStack services, such as OpenStackCompute. Provides an API for users to define networks and the attachments into them. Hasa pluggable architecture that supports many popular networking vendors and technologies.
6 Chapter 1. Introduction

NREC end user documentation Documentation
1.4.3 Glossary
BGO The OpenStack infrastructure located at the University of Bergen (UiB).
OSL The OpenStack infrastructure located at the University of Oslo (UiO).
Project A container used to group a set of resources such as virtual machines, volumes and images withthe same access rights and quota.
Quota A per-project limit such as the total number of cores or RAM permitted for a set of virtual machines.
Flavor A Flavor is the definition of the size of a virtual machine and its characteristics (such as 2 corevirtual machine with 8 GB of RAM).
Image A virtual machine image is a single file that contains a virtual disk that has a bootable operatingsystem installed on it. Images are used to create virtual machine instances within the cloud.
Volume Volumes are block storage devices that you attach to instances to enable persistent storage. Youcan attach a volume to a running instance or detach a volume and attach it to another instance at anytime. You can also create a snapshot from or delete a volume.
Snapshot A snapshot provides a copy of a currently running VM or volume which can be stored into anexternal service such as Glance.
1.5 Conventions
1.5.1 Notices
You may encounter the following notices:
Note: A regular note, usually to explain something in more detail.
Important: An important notice, something you need to be aware of.
Tip: A practical tip, shortcuts etc.
Caution: Tread carefully, easy to make mistakes..
Warning: Warns about something potentially dangerous or destructive.
1.5. Conventions 7

NREC end user documentation Documentation
1.5.2 Command prompts
A lot of OpenStack interaction is possible by utilizing the command prompt. When describing somethingthat should be done on the command line, this text will use the following convention:
$ commandSome command output
If the command should be run by the root user, the prompt will instead be the following:
# commandSome command output
8 Chapter 1. Introduction

CHAPTER 2
Project application
2.1 Demo projects
You will be allocated a demo project the first time you logon . This project is personal and for testingpurposes. There is a limited quota for this demo project. If you need additional resources or a project inwhich you wish to collaborate with other users, please apply for a standard project using this web form.
Demo projects use excess resources that are usually available under normal operation, however, if there isa shortage of resources please note that we may terminate some or all instances running in demo projectswithout prior notice.
Quotas are set by region. Projects that haven’t been given a quota in their respective region will be automat-ically given a default quota.
Quota Name DefaultInstances instances 2vCPU cores 2Memory ram 2048 MBNumber of volumes volumes 1Volume size gigabytes 20 GBVolume snapshots snapshots 3
Instances The total number of instances possible to create in a project.
vCPU The number of processors (vCPU) available to an instance.
Memory The amount of memory availble to an instance.
Number of volumes In NREC, block storage is called volume. The number indicates how many volumesare available in a project.
9

NREC end user documentation Documentation
Volume size The total size of all volumes in a project.
Volume snapshots The total number of snapshots of all volumes in a project.
2.2 Standard projects
You can apply for a standard project (i.e. not demo) by using this web form. In this form, you need to givesome information about the project. Most importantly, we separate between personal and shared projects:
Personal Personal projects are used by only one user. Only you will have access to your personal project.
Shared Shared projects can have multiple users. Users can be added or removed at any time, but accesscontrol is done by contacting NREC support. In order to add a user, the user must have logged in toNREC at least once, else the user isn’t known in the system.
10 Chapter 2. Project application

CHAPTER 3
Logging in
Last changed: 2020-05-18
Contents
• Logging in
– First time login
– Subsequent logins
3.1 First time login
Note: This step is only required if you’ve never previously logged in. For normal login procedure, skip thisstep and go directly to Subsequent logins.
In order to successfully log in, you first need to provision yourself as a user with an appropriate group andproject. This is accomplished by following the steps below.
To provision yourself as a user, visit the following URL:
https://access.nrec.no/
The following window will appear:
11

NREC end user documentation Documentation
Click Sign up:
Here, you need to select your login provider. You should find your university or college in the list. Simplyselect it and the following appears:
12 Chapter 3. Logging in

NREC end user documentation Documentation
In order to use this service, and to authenticate using Dataporten, you need to accept that the service storessome information about you. Click Yes, I accept to continue.
This finishes the initial login and provision procedure.
3.1. First time login 13

NREC end user documentation Documentation
Important: Copy and save the API password
The password for API access is generated and shown here. This is the only time that the API password isgenerated and shown to you. If you misplace or forget the API password and need another one, you have toreset it usimg the Reset API password link on the Access login page. Alternatively contact our support.
In order to continue to the dashboard, click Fortsett til NREC.
3.2 Subsequent logins
To log in to the NREC dashboard, point your browser to:
https://dashboard.nrec.no/
You’ll be presented with the following:
There are two methods for logging in. The method labelled “Dataporten” is correct for regular users. The“Local user” method is reserved for administrator and testing purposes. Dataporten is an external authen-tication service provided by UNINETT. To log in, choose “Dataporten” as authentication mechanism, thenclick “Connect”. You’ll be redirected to this page:
14 Chapter 3. Logging in

NREC end user documentation Documentation
Select the correct educational institution, by clicking on it. You’ll then reach this page:
Type in your regular user name and password, and click “Sign up”. You should then be redirected back tothe NREC dashboard:
3.2. Subsequent logins 15

NREC end user documentation Documentation
You are now logged in, and can proceed with using OpenStack.
16 Chapter 3. Logging in

CHAPTER 4
The dashboard
Last changed: 2020-05-18
Contents
• The dashboard
– Overview
– Choosing Region
– Project tab
* Compute tab
– Identity tab
The dashboard is the common web user interface for OpenStack. It is a simple web GUI where you canperform regular tasks, including provision instances, set up access control, provision volumes etc.
4.1 Overview
When logging in, you will be presented with an overview of your instances and other resource usage:
17

NREC end user documentation Documentation
4.2 Choosing Region
Regions in OpenStack are a way to have different clusters in different geographical regions that share thesame user database and federated authentication. In our case, there are two regions: BGO and OSL. Theseare located at the Universities of Bergen and Oslo, respectively. You may provision VMs (instances) anduse other resources in both regions, whichever suits your needs.
In order to select a region, or to simply see which region (and project) you are currently working with, clickon your username and a menu appears as shown in the picture above.
4.3 Project tab
Projects are organizational units in the cloud, and are also known as tenants or accounts. Each user is amember of one or more projects. Within a project, a user creates and manages instances.
18 Chapter 4. The dashboard

NREC end user documentation Documentation
From the Project tab, you can view and manage the resources in a selected project, including instances andimages. You can select the project from the drop down menu at the top left.
From the Project tab, you can access the following categories:
4.3.1 Compute tab
• Overview: View reports for the project.
• Instances: View, launch, create a snapshot from, stop, pause, or reboot instances, or connect to themthrough VNC.
• Volumes: Use the following tabs to complete these tasks:
– Volumes: View, create, edit, and delete volumes.
– Volume Snapshots: View, create, edit, and delete volume snapshots.
• Images: View images and instance snapshots created by project users, plus any images that are pub-licly available. Create, edit, and delete images, and launch instances from images and snapshots.
• Access & Security: Use the following tabs to complete these tasks:
– Security Groups: View, create, edit, and delete security groups and security group rules.
– Key Pairs: View, create, edit, import, and delete key pairs.
– Floating IPs: Allocate an IP address to or release it from a project.
– API Access: View API endpoints.
Note: Even though the Floating IPs tab is present under “Access & Security”, this feature is not used inthe NREC cloud.
4.4 Identity tab
As a regular user, you can view any project that you’re a member of.
4.4. Identity tab 19

NREC end user documentation Documentation
20 Chapter 4. The dashboard

CHAPTER 5
Create a Linux virtual machine
Last changed: 2020-05-18
Contents
• Create a Linux virtual machine
– Setting up a keypair
* Importing an existing key
* Letting OpenStack create a keypair
– Create a virtual machine
– Allowing SSH and ICMP access
– Accessing the virtual machine
– Doing the same with CLI
5.1 Setting up a keypair
Virtual machines in NREC are accessed using SSH keypairs. There are numerous ways to achieve this,depending on the OS on your local computer.
21

NREC end user documentation Documentation
5.1.1 Importing an existing key
If the local computer is Linux, any BSD variant such as FreeBSD, or MacOSX, the easiest way is to createa keypair locally if you don’t already have one:
$ ssh-keygenGenerating public/private rsa key pair.Enter file in which to save the key (/home/username/.ssh/id_rsa):Enter passphrase (empty for no passphrase):Enter same passphrase again:Your identification has been saved in /home/username/.ssh/id_rsa.Your public key has been saved in /home/username/.ssh/id_rsa.pub.The key fingerprint is:SHA256:UrFhPtth14+S9f8BzMHsy+KbAZJMoC1s+8nHh9UDIc4 [email protected] key's randomart image is:+---[RSA 2048]----+| . .+. || . o +o.+. o. || = . E=.o .+o || . o o..=oo+o.+ || . .+So.oo=. o|| o o.+ . o.o .|| + + . o o ..|| . . . + o|| +. .|+----[SHA256]-----+
Another option is to let OpenStack create a keypair for you, more about that later. To import your existingkeypair into OpenStack, go to the Key Pairs tab under Project and select “Key Pairs”:
Click the button labeled “Import Key Pair”. Give the keypair a name, and enter the contents of theid_rsa.pub file in the “Public Key” field:
22 Chapter 5. Create a Linux virtual machine

NREC end user documentation Documentation
Click “Import Key Pair” and the key is saved:
5.1.2 Letting OpenStack create a keypair
You can let OpenStack create a keypair for you, if you don’t wish to use an existing one. Go to the KeyPairs tab under Project and select “Key Pairs”:
5.1. Setting up a keypair 23

NREC end user documentation Documentation
Click on “Create Key Pair”:
Choose a name for you keypair and click “Create Key Pair”. The newly created private key will be down-loaded by the browser automatically:
24 Chapter 5. Create a Linux virtual machine

NREC end user documentation Documentation
The name of the downloaded file is based on the name you provided earlier. In this example the file is called“test.pem” as “test” was provided as the keypair name. Remember to restrict the access to the private key,as SSH will refuse to use unless it’s properly protected:
$ chmod 0600 test.pem
In order to use the downloaded private key, use the -i option to ssh, like this (example for “test.pem” above):
$ ssh -i test.pem -l <username> <virtual-machine>
Replace “<virtual-machine>” with the name or IP of the virtual machine that this keypair is assigned to, and“<username>” with the username for which the SSH key is added to authorized_keys. For more info, seeAccessing the virtual machine.
5.2 Create a virtual machine
Once you have an SSH keypair defined, you can proceed with creating a virtual machine (instance). In theProject tab, select Instances:
5.2. Create a virtual machine 25

NREC end user documentation Documentation
Click “Launch Instance”. The following window will appear:
In this window, enter the following values:
Instance Name: Select a name for your new virtual machine
Availability Zone: You can choose between <region>-default-1 and <region>-legacy-1. default uses acentralized storage, which means that instances will not need to be rebooted while doing maintenance work.On the other hand, legacy uses a local storage, which will then require reboot in the case of maintenancework.
Instance Count: How many virtual machines to create (usually only 1)
When finished with this tab, select the next, “Source”:
26 Chapter 5. Create a Linux virtual machine

NREC end user documentation Documentation
Select Boot Source should be left at “Image”, which is the default. In this case, the virtual machine willboot from a standard cloud image. When selecting this option, you can choose from a list of images. In ourexample, we have selected “Fedora 24”.
When finished with this tab, select the next, “Flavor”:
5.2. Create a virtual machine 27

NREC end user documentation Documentation
This is where you select the flavor for the virtual machine, i.e. a pre-defined set of compute resources. Inour example, we’ve selected the “Small” flavor, which is just enough to run our Fedora instance.
When finished with this tab, select the next, “Networks”:
28 Chapter 5. Create a Linux virtual machine

NREC end user documentation Documentation
In NREC, there are two networks to choose from, “dualStack” and “IPv6”. Both networks provide a publicIPv6 address, so the difference lays in IPv4. “IPv6” provides a “private” IPv4 address (RFC 1918), whichgives the instance outbound IPv4 connectivity through NAT, while “dualStack” provides a public IPv4 ad-dress as well.
IPv6 is the future of internet IP addressing, but unfortunately, not all devices support IPv6 yet. Please checkyour IPv6 connectivity before choosing “IPv6”.
You should also note that you only can choose either “dualStack” or “IPv6”, choosing both networks at thesame time will result in networking issues.
When finished with this tab, select the “Security Groups” tab:
Here, select any “Security Groups” you want to add to the virtual machine. In our example, we haven’tcreated any security groups yet, and select only the “Default” security group. For more info, see the sectionAllowing SSH and ICMP access below.
When finished with this tab, select the “Key Pairs” tab:
5.2. Create a virtual machine 29

NREC end user documentation Documentation
Here, choose which SSH keypair you want to assign to this virtual machine.
When satisfied, clik “Launch” to create your virtual machine.
After a few moments, the virtual machine is up and running. If you chose a public IPv4 address the virtualmachine is accessible from the Internet, but you need to manage security groups in order to reach it. Bydefault, all network access is denied.
30 Chapter 5. Create a Linux virtual machine

NREC end user documentation Documentation
5.3 Allowing SSH and ICMP access
In order to allow traffic to the virtual machine, you need to create a new security group which allows it,and attach that security group to the virtual machine. Alternatively, you can modify an existing rule suchas “default”. To create a new security group, go to the Network tab under Project and select “SecurityGroups”:
Click on “Create Security Group”:
Fill in a name for the new security group, and optionally a description. Then click “Create Security Group”:
5.3. Allowing SSH and ICMP access 31

NREC end user documentation Documentation
Next, click “Manage Rules” for the “SSH and ICMP” security group:
You want to add a couple of rules. Click “Add Rule”:
Select “ALL ICMP” from the drop-down menu under “Rule”. Leave the rest at its default and click “Add”.Repeat the process and select “SSH” from the “Rule” drop-down menu, and the result should be:
32 Chapter 5. Create a Linux virtual machine

NREC end user documentation Documentation
Go back to the Instances tab under Compute, and use the drop-down menu to the right of your newly createdvirtual machine. Select “Edit Security Groups”:
The following will appear:
5.3. Allowing SSH and ICMP access 33

NREC end user documentation Documentation
Add the “SSH and ICMP” security group and click “Save”.
5.4 Accessing the virtual machine
With a proper security group in place, the virtual machine is now reachable from the Internet:
$ ping 158.39.77.101PING 158.39.77.101 (158.39.77.101) 56(84) bytes of data.64 bytes from 158.39.77.101: icmp_seq=1 ttl=55 time=6.15 ms64 bytes from 158.39.77.101: icmp_seq=2 ttl=55 time=6.05 ms64 bytes from 158.39.77.101: icmp_seq=3 ttl=55 time=6.01 ms
You can log in to the virtual machine using the SSH key assigned to the virtual machine. In case you letOpenStack create the keypair for you (example with “test.pem” above):
$ ssh -i test.pem [email protected][fedora@test ~]$ uname -srLinux 4.5.5-300.fc24.x86_64[fedora@test ~]$ sudo -i[fedora@test ~]# whoamiroot
Each image has its own default user, for which the SSH public key is added to it’s SSH authorized_keys file.This varies with each image, at the discretion of the image vendor. The most common are:
34 Chapter 5. Create a Linux virtual machine

NREC end user documentation Documentation
Image UserCentOS centosFedora fedoraUbuntu ubuntuDebian debianCirrOS cirros
This is a non-exhaustive list. For images not listed here, consult the image vendor’s documentation.
5.5 Doing the same with CLI
For information on how to install the command line tools, check the section Installing the CLI tools.
1. Listing any existing servers, keypairs and security groups:
$ openstack server list
$ openstack keypair list
$ openstack security group list+--------------------------------------+---------+-----------------------→˓-+----------------------------------+| ID | Name | Description→˓ | Project |+--------------------------------------+---------+-----------------------→˓-+----------------------------------+| 5c87d72e-2186-4878-94cd-27a784019988 | default | Default security→˓group | dd21945e2e094a4dad277ed7846b3cf0 |+--------------------------------------+---------+-----------------------→˓-+----------------------------------+
In this example, we have no servers and keypairs, and our copy of the default security group.
2. Uploading an SSH key:
$ openstack keypair create --public-key ~/.ssh/id_rsa.pub mykey+-------------+-------------------------------------------------+| Field | Value |+-------------+-------------------------------------------------+| fingerprint | e2:2e:26:7f:5d:98:9e:8f:5e:fd:c7:d5:d0:6b:44:e7 || name | mykey || user_id | 6bb8dbcdc9b94fff89258094bc56a49f |+-------------+-------------------------------------------------+
3. Creating a security group:
$ openstack security group create --description "Allow incoming SSH and→˓ICMP" SSH_and_ICMP+-------------+----------------------------------------------------------→˓-----------------------+
(continues on next page)
5.5. Doing the same with CLI 35

NREC end user documentation Documentation
(continued from previous page)
| Field | Value→˓ |+-------------+----------------------------------------------------------→˓-----------------------+| description | Allow incoming SSH and ICMP→˓ || headers |→˓ || id | 0da85d7a-bd96-4d4d-a77b-e7e2d78c8d0a→˓ || name | SSH_and_ICMP→˓ || project_id | dd21945e2e094a4dad277ed7846b3cf0→˓ || rules | direction='egress', ethertype='IPv4', id='b04b0cfc-1f2e-→˓44b5-acc2-7102d57fe941' || | direction='egress', ethertype='IPv6', id='2d72e9f9-70c1-→˓4c33-816c-83b5e3c649df' |+-------------+----------------------------------------------------------→˓-----------------------+
4. Adding rules to the security group:
$ openstack security group rule create --src-ip 0.0.0.0/0 (for IPv4) or→˓::/0 (for IPv6) --dst-port 22 --protocol tcp --ingress SSH_and_ICMP+-------------------+--------------------------------------+| Field | Value |+-------------------+--------------------------------------+| description | || direction | ingress || ethertype | IPv4 || headers | || id | 8c10f0a3-c284-4b92-a234-7ceda998d356 || port_range_max | 22 || port_range_min | 22 || project_id | dd21945e2e094a4dad277ed7846b3cf0 || protocol | tcp || remote_group_id | None || remote_ip_prefix | 0.0.0.0/0 || security_group_id | 0da85d7a-bd96-4d4d-a77b-e7e2d78c8d0a |+-------------------+--------------------------------------+
$ openstack security group rule create --src-ip 0.0.0.0/0 (for IPv4) or→˓::/0 (for IPv6) --protocol icmp --ingress SSH_and_ICMP+-------------------+--------------------------------------+| Field | Value |+-------------------+--------------------------------------+| description | || direction | ingress || ethertype | IPv4 || headers | || id | d741564d-886d-4019-915d-b1eecb936100 |
(continues on next page)
36 Chapter 5. Create a Linux virtual machine

NREC end user documentation Documentation
(continued from previous page)
| port_range_max | None || port_range_min | None || project_id | dd21945e2e094a4dad277ed7846b3cf0 || protocol | icmp || remote_group_id | None || remote_ip_prefix | 0.0.0.0/0 || security_group_id | 0da85d7a-bd96-4d4d-a77b-e7e2d78c8d0a |+-------------------+--------------------------------------+
5. Listing available images:
$ openstack image list+--------------------------------------+---------------------+-----------→˓--+| ID | Name | Status→˓ |+--------------------------------------+---------------------+-----------→˓--+| 2120eb31-09b6-4945-a904-7579ac579aed | Ubuntu server 16.04 | active→˓ || cbd76177-c79b-490f-9a7f-59f9eed3412e | Debian Jessie 8 | active→˓ || d175564a-156e-41c7-b2a3-fd8b018e9e11 | Outdated (Ubuntu) |→˓deactivated || 484e5754-f4f7-409c-8ba1-454e422816b4 | Outdated (Ubuntu) |→˓deactivated || fecf1f4d-e36d-44fe-94de-4eae707b40aa | Outdated (Ubuntu) |→˓deactivated || 6f24613b-4f98-4caa-9bc6-0294f4c67fac | Outdated (Ubuntu) |→˓deactivated || 1ae6303e-5d08-454e-94e6-083d05559998 | Fedora 24 | active→˓ || ceb6ff80-24de-460a-9ecc-85f3283aa98e | Outdated (Debian) |→˓deactivated || d241a2b5-cd1d-4812-8d59-2ccfb1acbf88 | CentOS 7 | active→˓ |+--------------------------------------+---------------------+-----------→˓--+
6. Listing available flavors:
$ openstack flavor list+--------------------------------------+------------+-------+------+-----→˓------+-------+-----------+| ID | Name | RAM | Disk |→˓Ephemeral | VCPUs | Is Public |+--------------------------------------+------------+-------+------+-----→˓------+-------+-----------+| 1 | m1.tiny | 512 | 1 |→˓ 0 | 1 | True || 34532829-2bb7-42f6-aae1-9654908a521e | m1.large | 8192 | 20 |→˓ 0 | 4 | True |
(continues on next page)
5.5. Doing the same with CLI 37

NREC end user documentation Documentation
(continued from previous page)
| 47d7f445-db26-4f1d-bf58-e79de7394f97 | m1.medium | 4096 | 20 |→˓ 0 | 2 | True || 922bfed4-42e5-4baa-8ea4-9e164839ca41 | m1.windows | 8192 | 50 |→˓ 0 | 4 | True || b128b802-3d12-401d-bf51-878122c0e908 | m1.small | 2048 | 10 |→˓ 0 | 1 | True || ff6e88a4-3da9-4cbe-9c5d-a47d51f9c37a | m1.xlarge | 16384 | 20 |→˓ 0 | 8 | True |+--------------------------------------+------------+-------+------+-----→˓------+-------+-----------+
7. Listing available networks:
$ openstack network list+--------------------------------------+------------+--------------------→˓------------------+| ID | Name | Subnets→˓ |+--------------------------------------+------------+--------------------→˓------------------+| c97fa886-592e-4ad1-a995-6d55651bed78 | osl-public | c4f1c0aa-6b02-4870-→˓a743-3403d0740082 |+--------------------------------------+------------+--------------------→˓------------------+
8. Creating a server (instance):
$ openstack server create --image "Fedora 24" --flavor m1.small \--security-group SSH_and_ICMP --security-group default \--key-name mykey --nic net-id=osl-public myserver
+--------------------------------------+---------------------------------→˓--------------------+| Field | Value→˓ |+--------------------------------------+---------------------------------→˓--------------------+| OS-DCF:diskConfig | MANUAL→˓ || OS-EXT-AZ:availability_zone |→˓ || OS-EXT-STS:power_state | NOSTATE→˓ || OS-EXT-STS:task_state | scheduling→˓ || OS-EXT-STS:vm_state | building→˓ || OS-SRV-USG:launched_at | None→˓ || OS-SRV-USG:terminated_at | None→˓ || accessIPv4 |→˓ |
(continues on next page)
38 Chapter 5. Create a Linux virtual machine

NREC end user documentation Documentation
(continued from previous page)
| accessIPv6 |→˓ || addresses |→˓ || adminPass | P7QpJ7gQzdva→˓ || config_drive |→˓ || created | 2016-11-14T12:12:07Z→˓ || flavor | m1.small (b128b802-3d12-401d-→˓bf51-878122c0e908) || hostId |→˓ || id | 132c186a-03a2-4449-b8d0-→˓04b85a37e21a || image | Fedora 24 (1ae6303e-5d08-454e-→˓94e6-083d05559998) || key_name | mykey→˓ || name | myserver→˓ || os-extended-volumes:volumes_attached | []→˓ || progress | 0→˓ || project_id |→˓dd21945e2e094a4dad277ed7846b3cf0 || properties |→˓ || security_groups | [{u'name': u'SSH_and_ICMP'}, {u→˓'name': u'default'}] || status | BUILD→˓ || updated | 2016-11-14T12:12:07Z→˓ || user_id |→˓6bb8dbcdc9b94fff89258094bc56a49f |+--------------------------------------+---------------------------------→˓--------------------+
9. Listing servers:
$ openstack server list+--------------------------------------+----------+--------+-------------→˓------------+------------+| ID | Name | Status | Networks→˓ | Image Name |+--------------------------------------+----------+--------+-------------→˓------------+------------+| 132c186a-03a2-4449-b8d0-04b85a37e21a | myserver | ACTIVE | osl-→˓public=158.37.63.62 | Fedora 24 |
(continues on next page)
5.5. Doing the same with CLI 39

NREC end user documentation Documentation
(continued from previous page)
+--------------------------------------+----------+--------+-------------→˓------------+------------+
40 Chapter 5. Create a Linux virtual machine

CHAPTER 6
Create a Windows virtual machine
Last changed: 2020-05-18
Contents
• Create a Windows virtual machine
– Setting up a keypair
– Create a virtual machine
– Allowing RDP access
– Retrieve Admin password
– Launch Remote Desktop
Important: Because of Windows’ rather steep resource demands, a demo project will have insufficientdisk quota to launch windows instances. In other words, you will need another project with higher quotas inorder to run Windows. Ask for access to the “win” flavor.
Tip: Starting with Windows Server 2019, a SSH server is automatically configured and started in yourWindows Instance. It takes some time from the instance appears configured until it is actually finished. Bepatient if you want to start a SSH session to your Windows instance.
Note: When launching Windows instances in the BGO region, these will automatically be activated. How-ever, for licensing reasons, this will not as yet happen in the OSL region, and the Windows instances there
41

NREC end user documentation Documentation
will run unactivated.
6.1 Setting up a keypair
For Windows instances SSH keys may be used to retreive a random generated password, or, for WindowsServer 2019 or newer, to create a SSH session to the instance. Either way you will need a SSH keypair togo with your Windows instance. Refer to Create a Linux virtual machine for more information on how tocreate a SSH keypair.
6.2 Create a virtual machine
Once you have an SSH keypair defined, you can proceed with creating a virtual machine (instance). In theProject tab, select Instances:
Click “Launch Instance”. The following window will appear:
42 Chapter 6. Create a Windows virtual machine

NREC end user documentation Documentation
In this window, enter the following values:
• Instance Name: Select a name for your new virtual machine
• Availability Zone: bgo-default-1 or osl-default-1 (based on region)
• Instance Count: How many virtual machines to create (usually only 1)
When finished with this tab, select the next, “Source”:
Select Boot Source should be left at “Image”, which is the default. In this case, the virtual machine willboot from a standard cloud image. When selecting this option, you can choose from a list of images. In our
6.2. Create a virtual machine 43

NREC end user documentation Documentation
example, we have selected “GOLD Windows Server 2016 Standard”.
When finished with this tab, select the next, “Flavor”:
This is where you select the flavor for the virtual machine, i.e. a pre-defined set of compute resources. Inour example, we’ve selected the “win.small” flavor, which is just enough to run our Windows instance. Bydefault, you don’t have access to this flavor. Ask in your project request, or post a support case.
When finished with this tab, select the next, “Networks”:
44 Chapter 6. Create a Windows virtual machine

NREC end user documentation Documentation
In the NREC cloud, there are two networks to choose from, “dualStack” and “IPv6”. Both networks pro-vides a public IPv6 address, so the difference lays in IPv4. “dualStack” provides a public IPv4 address aswell, while “IPv6” provides a “private” IPv4 address (rfc 1918) which gives the instance outbound IPv4connectivity through NAT. IPv6 is the future of internet addressing, but unfortunately not all computers areIPv6 enabled as yet. Check your IPv6 connectivity before choosing “IPv6”.
When finished with this tab, you can optionally add security groups. In our example, we skip this stage (wewill create and add security group later)
Select the “Key Pair” tab:
Here, choose a SSH keypair you want to assign to this virtual machine for password retrieval. In thisexample, we have created a new key pair, and we have downloaded the .pem-file to our local computer.
When satisfied, clik “Launch Instance” to create your virtual machine.
6.3 Allowing RDP access
Tip: Starting with Windows Server 2019, a SSH server is automatically configured and started in yourWindows Instance. You will have to create a security group that opens for port 22 in order to access theservice. Unlike on linux instances, the username is “Admin”. When you ssh into your Windows instance,
6.3. Allowing RDP access 45

NREC end user documentation Documentation
you will start in a CMD shell. If you want powershell instead, just type “powershell”
While we wait for our virtual machine to be created and configured, we can create a security group for theRemote Desktop protocol in order to grant ourselves access to the new virtual machine:
Select the “Access & Security” tab and select “Create Security Group”:
Here, enter a name and optionally a description, then click “Create Security Group”. Click “Manage Rules”on your newly created security group, then “Add Rule”:
46 Chapter 6. Create a Windows virtual machine

NREC end user documentation Documentation
“RDP” is pre-defined in the system, so select that from the menu. In this example we limit access to a CIDRmask corresponding to the campus network for The University of Bergen. If you instead enter 0.0.0.0/0 or::/0, that will translate to the entire Internet, granting global access. Click “Add”.
Important: Unlike linux instances, the Windows instances have both an internal “Windows Firewall” andexternal security groups. By default the internal “Windows Firewall” has the ports for RDP and SSH (onWindows Server 2019 and later) open, but you still have to create the proper security groups and associatethem with the instance in order to consume the services.
If the instance is ready, we can now assign our new rule to the virtual machine. Click on your instance in“Instances” tab, then select “Edit Security Groups”:
6.3. Allowing RDP access 47

NREC end user documentation Documentation
Click on the plus sign associated with our new rule, so that the rule moves to the right hand box, “InstanceSecurity Groups”, then click “Save”:
48 Chapter 6. Create a Windows virtual machine

NREC end user documentation Documentation
Optionally, you can also add a rule for ICMP access, so that you can ping the instance. This is described inthe previous chapter, “Create a Linux virtual machine”
6.4 Retrieve Admin password
Important: The local “Administrator” account is disabled by the system a short while after your instanceis spawned. “Admin” is the only account available for logon.
We are now almost ready to log on to our new Windows virtual machine, but first we must retrieve apassword. Select “Retrieve Password” from the drop down menu:
6.4. Retrieve Admin password 49

NREC end user documentation Documentation
Important: It takes a while until the password retrieval feature is ready in a newly launched instance -please be patient. Until the system is ready, the Retrieve Instance Password will tell you “Instance Passwordis not set or is not yet available”
When the system is ready to decrypt your password, you will be asked for your private key. In this case weclick “Choose File” and point to the .pem file we downloaded when we created the key pair:
50 Chapter 6. Create a Windows virtual machine

NREC end user documentation Documentation
When you click “Decrypt Password”, the password will be shown in the “Password” field.
Tip: You can retrieve the passord from the command line, using the “nova” client. The openstack clienthas not yet implemented this feature. Every instance has a name and ID:
$ openstack server list+--------------------------------------+-----------------+--------+-----------→˓-----------+-----------------------------------+| ID | Name | Status | Networks→˓ | Image Name |+--------------------------------------+-----------------+--------+-----------→˓-----------+-----------------------------------+| e88b1380-65a5-4975-9338-7213d8df47f2 | windows-machine | ACTIVE |→˓public=158.37.63.197 | GOLD Windows Server 2016 Standard |
(continues on next page)
6.4. Retrieve Admin password 51

NREC end user documentation Documentation
(continued from previous page)
+--------------------------------------+-----------------+--------+-----------→˓-----------+-----------------------------------+
Now you can use the name or ID to retrieve your password:
$ nova get-password e88b1380-65a5-4975-9338-7213d8df47f2 /home/user/winkey.pemceq26oGb2xw8RQR3Gcdn
If your private key is password protected, you will be asked for the password. If the system is not yet readyto give you the password, you will receive no output at all. Wait a while and try again.
Important: If you have a password protected private key, you must use the nova command line client, asthis feature is unavailable in the dashboard.
6.5 Launch Remote Desktop
When you have retrieved the password, you are ready to log on. For example, from a linux client:
$ rdesktop -g 1280x1024 -k no -u Admin -p ceq26oGb2xw8RQR3Gcdn 158.→˓37.63.197
This will create a session with a fixed size (the “-g” option), and Norwegian keyboard layout with the user“Admin”, which is an account that is automatically created in the virtual machine. From a windows machine,you can launch “Remote Desktop Connection”:
52 Chapter 6. Create a Windows virtual machine

NREC end user documentation Documentation
Congratulations! You now have a virtual machine running Windows. You can now proceed to create andmount volumes and install software:
6.5. Launch Remote Desktop 53

NREC end user documentation Documentation
54 Chapter 6. Create a Windows virtual machine

CHAPTER 7
Create and manage volumes
Last changed: 2020-05-18
Contents
• Create and manage volumes
– Create a volume
– Attach a volume to a virtual machine
– Detach a volume from a virtual machine
– Delete a volume
– Doing the same with CLI
Volumes are block storage devices that you attach to instances to enable persistent storage. You can attach avolume to a running instance or detach a volume and attach it to another instance at any time. You can alsocreate a snapshot from or delete a volume.
7.1 Create a volume
In the dashboard, select Volumes in the Volumes tab:
55

NREC end user documentation Documentation
Click on Create Volume, and the following window appears:
Fill in the form:
• Volume Name: A name for the volume, which you will recognize (Required)
• Description: An optional description
• Volume Source: Either no source, i.e. an empty volume, or create a volume from an image
56 Chapter 7. Create and manage volumes

NREC end user documentation Documentation
• Type: You can leave this empty
• Size: The size of the volume, in GB
• Availability Zone: Choose “nova”
Then click Create Volume. The volume will be instantly created and available:
You can also Create Snapshot of the volume. The snapshot of the volume will be located underVolumes tab:
7.2 Attach a volume to a virtual machine
After creating one or more volumes, you can attach them to virtual machines (instances). A volume is ablock storage device, and can only be attached to one virtual machine at a time. In the Volumes tab underVolumes, select Manage Attachments from the dropdown menu:
7.2. Attach a volume to a virtual machine 57

NREC end user documentation Documentation
Select the virtual machine (instance) that you wish to attach this volume to. You usually don’t need tochange the device name. Then click on Attach Volume.
The volume is now attached to the virtual machine.
58 Chapter 7. Create and manage volumes

NREC end user documentation Documentation
The volume can now be used as a regular block device from within the virtual machine (example):
If this is the first time using this volume, you need to create a file system→˓on it.Check if there is already an available block device:# lsblkNAME MAJ:MIN RM SIZE RO TYPE MOUNTPOINTvda 253:0 0 1G 0 disk`-vda1 253:1 0 1011.9M 0 part /vdb 253:16 0 10G 0 disk
If there are not any file systems, you need to create one:# mkfs.ext4 /dev/vdb[...]
Create a folder and mount the volume on it:# mkdir /persistent01 && mount /dev/vdb /persistent01
Check the amount of disk space available on the file system, and start→˓storing data:# df -h /persistent01Filesystem Size Used Available Use% Mounted on/dev/vdb 9.8G 150.5M 9.2G 2% /persistent01
Note that in order for the volume to be mounted automatically after a reboot, you will have to add an entryto /etc/fstab.
7.3 Detach a volume from a virtual machine
In order to detach a volume from a virtual machine (instance), select Manage Attachments from the drop-down menu in the Volumes:
7.3. Detach a volume from a virtual machine 59

NREC end user documentation Documentation
Select the attachment and click on Detach Volume:
You will have to confirm this action. Click Detach Volume in the confirmation dialog that appears:
60 Chapter 7. Create and manage volumes

NREC end user documentation Documentation
The volume is now detached.
7.4 Delete a volume
Deleting a volume is pretty straightforward. In the Volumes, select the appropriate check boxes for thevolumes that you want to delete, and click Delete Volumes:
Then confirm your choice, click Delete Volumes:
The volume is then deleted.
7.4. Delete a volume 61

NREC end user documentation Documentation
7.5 Doing the same with CLI
1. Creating the volume:
$ openstack volume create --size 10 --description "A test volume"→˓mytestvolume+---------------------+--------------------------------------+| Field | Value |+---------------------+--------------------------------------+| attachments | [] || availability_zone | nova || bootable | false || consistencygroup_id | None || created_at | 2016-11-11T15:41:00.171512 || description | A test volume || encrypted | False || id | a7234dda-a97a-44c3-aa93-9b2952fd2bcf || multiattach | False || name | mytestvolume || properties | || replication_status | disabled || size | 10 || snapshot_id | None || source_volid | None || status | creating || type | None || updated_at | None || user_id | 6bb8dbcdc9b94fff89258094bc56a49f |+---------------------+--------------------------------------+
2. Listing the servers and volumes:
$ openstack volume list+--------------------------------------+--------------+-----------+------→˓+-------------+| ID | Display Name | Status | Size→˓| Attached to |+--------------------------------------+--------------+-----------+------→˓+-------------+| a7234dda-a97a-44c3-aa93-9b2952fd2bcf | mytestvolume | available | 10→˓| |+--------------------------------------+--------------+-----------+------→˓+-------------+
$ openstack server list+--------------------------------------+----------+--------+-------------→˓---------+------------+| ID | Name | Status | Networks→˓ | Image Name |+--------------------------------------+----------+--------+-------------→˓---------+------------+| 5a102c14-83fd-4788-939e-bb2e635e49de | myserver | ACTIVE | public=158.→˓39.77.147 | Fedora 24 |
(continues on next page)
62 Chapter 7. Create and manage volumes

NREC end user documentation Documentation
(continued from previous page)
+--------------------------------------+----------+--------+-------------→˓---------+------------+
3. Attaching the volume to the server:
$ openstack server add volume myserver mytestvolume
You may also use the IDs of the server and volume instead of the names.
4. Confirming that the volume is attached:
$ openstack volume list+--------------------------------------+--------------+--------+------+--→˓---------------------------------+| ID | Display Name | Status | Size |→˓Attached to |+--------------------------------------+--------------+--------+------+--→˓---------------------------------+| a7234dda-a97a-44c3-aa93-9b2952fd2bcf | mytestvolume | in-use | 10 |→˓Attached to myserver on /dev/vdb |+--------------------------------------+--------------+--------+------+--→˓---------------------------------+
5. Detaching the volume:
$ openstack server remove volume myserver mytestvolume
6. Deleting the volume:
$ openstack volume delete mytestvolume
7. Confirming that the volume is deleted:
$ openstack volume list
7.5. Doing the same with CLI 63

NREC end user documentation Documentation
64 Chapter 7. Create and manage volumes

CHAPTER 8
Create and manage snapshots
Last changed: 2020-05-18
Contents
• Create and manage snapshots
– Create a snapshot
– Launch a snapshot
– Doing the same with CLI
You can create a snapshot and use it as the base for your new instances.
8.1 Create a snapshot
Note: Make sure that the instance is turned off, before creating a snapshot.
In the dashboard, select Instances in the Compute tab:
65

NREC end user documentation Documentation
Click on Create Snapshot, and the following window appears:
Fill in the Snapshot Name and click on Create Snapshot. The snapshot will be created and locatedunder Images in the Compute tab:
Once the snapshot is created, you can start up a new instance using this image.
66 Chapter 8. Create and manage snapshots

NREC end user documentation Documentation
8.2 Launch a snapshot
Select Images in the Compute tab:
Choose the snapshot, and click on Launch, and further steps are described under create virtual machine.
The new instance contains now the expected customizations made earlier in your previous instance.
8.3 Doing the same with CLI
Listing any existing servers:
$ openstack server list+--------------------------------------+--------------+--------+--------------→˓-------------------------+-----------------------+| ID | Name | Status | Networks→˓ | Image Name |+--------------------------------------+--------------+--------+--------------→˓-------------------------+-----------------------+| d281daef-e6b2-4dc5-979b-9c4fcec19b82 | DemoInstance | SHUTOFF|→˓IPv6=2000:200:2:2000::200a, 10.2.0.02 | GOLD Ubuntu 16.04 LTS |+--------------------------------------+--------------+--------+--------------→˓-------------------------+-----------------------+
8.2. Launch a snapshot 67

NREC end user documentation Documentation
Creating snapshot of an existing server:
$ openstack server image create --name DemoInstanceSnapshot DemoInstance+------------------+----------------------------------------------------------→˓-------------------------------------------------------------+| Field | Value→˓ |+------------------+----------------------------------------------------------→˓-------------------------------------------------------------+| checksum | None→˓ || container_format | None→˓ || created_at | 2017-12-20T10:00:23Z→˓ || disk_format | None→˓ || file | /v2/images/f7495bf2-23c3-4b07-b0c4-6da26a0e6b81/file→˓ || id | f7495bf2-23c3-4b07-b0c4-6da26a0e6b81→˓ || min_disk | 10→˓ || min_ram | 768→˓ || name | DemoInstanceSnapshot→˓ || owner | 1b123d89493123e7937123d91e912304→˓ || properties | base_image_ref='de540652-bb5f-4827-8abc-6a17cfc37790',→˓hw_disk_bus='scsi', hw_scsi_model='virtio-scsi', || | image_type='snapshot', instance_uuid='d281daef-e6b2-4dc5-→˓979b-9c4fcec19b82', locations='[]', || | user_id='57c5e7b739614845811d123227a6d596'→˓ || protected | False→˓ || schema | /v2/schemas/image→˓ || size | None→˓ || status | queued→˓ || tags |→˓ || updated_at | 2017-12-20T10:00:23Z→˓ || virtual_size | None→˓ || visibility | private→˓ |+------------------+----------------------------------------------------------→˓-------------------------------------------------------------+
68 Chapter 8. Create and manage snapshots

NREC end user documentation Documentation
Listing available images:
$ openstack image list+--------------------------------------+-----------------------------------+--→˓-----------+| ID | Name |→˓Status |+--------------------------------------+-----------------------------------+--→˓-----------+| 20cc80f4-1567-4082-ac6f-68c9ae2040ff | myInstanceSnapshot |→˓active |+--------------------------------------+-----------------------------------+--→˓-----------+
8.3. Doing the same with CLI 69

NREC end user documentation Documentation
70 Chapter 8. Create and manage snapshots

CHAPTER 9
Upload and manage images
Last changed: 2020-05-18
Contents
• Upload and manage images
– Upload an image
– Doing the same with CLI
You can create an image and use it as the base for your instances.
9.1 Upload an image
1. Log in to the dashboard
2. Select the appropriate project from the drop down menu at the top left
3. On the Project tab -> Compute tab -> Images category
4. Click Create Image
5. The Create An Image dialog box appears
6. Enter the following values:
+-------------------+----------------------------------------------------→˓------------------+| Image Name | Enter a name for the image→˓ |
(continues on next page)
71

NREC end user documentation Documentation
(continued from previous page)
| Image Description | Enter a description of the image→˓ || Image Source | Browse the image source→˓ || Format | Select the image format (E.g. QCOW2) for the image→˓ || Architecture | Specify the architecture. E.g. i386 for a 32-bit/→˓x86_64 for a 64-bit || Minimum Disk (GB) | Leave this field empty→˓ || Minimum RAM (MB) | Leave this field empty→˓ || Protected | Select if only users with permissions can delete→˓the image - Yes/No |+-------------------+----------------------------------------------------→˓------------------+
9.2 Doing the same with CLI
The simplest way to obtain a virtual machine image that works with OpenStack is to download one of officalimages. We recommend using the images in qcow2 format.
$ openstack image create --disk-format qcow2 --public --file ./cirros-x86_64-→˓disk.img DemoImage
$ openstack image list+--------------------------------------+---------------------+-------------+| ID | Name | Status |+--------------------------------------+---------------------+-------------+| 6520eb21-09b6-4745-d905-7779ac579af8 | DemoImage | active || cbd76177-c79b-490f-9a7f-59f9eed3412e | Debian Jessie 8 | active || d175564a-156e-41c7-b2a3-fd8b018e9e11 | Outdated (Ubuntu) | deactivated || 484e5754-f4f7-409c-8ba1-454e422816b4 | Outdated (Ubuntu) | deactivated || fecf1f4d-e36d-44fe-94de-4eae707b40aa | Outdated (Ubuntu) | deactivated || 6f24613b-4f98-4caa-9bc6-0294f4c67fac | Outdated (Fedora) | deactivated || ceb6ff80-24de-460a-9ecc-85f3283aa98e | Outdated (Debian) | deactivated || d241a2b5-cd1d-4812-8d59-2ccfb1acbf88 | CentOS 7 | active |+--------------------------------------+---------------------+-------------+
72 Chapter 9. Upload and manage images

CHAPTER 10
Instance console
Last changed: 2020-05-18
Contents
• Instance console
– Accessing the console
– Console limitations
– Example remote protocols
10.1 Accessing the console
You can access a graphical console for your instances from the Console tab in the Instances panel. For thisto be meaningful, you must configure a user and a password in your instance, as most images come withunconfigured passwords, relying on ssh keys for authentication.
73

NREC end user documentation Documentation
10.2 Console limitations
The web based console offered in the dashboard is to be considered as a last resort, and is not suited for anykind of productional use. Instead, we recommend that you use standard remote protocols for accessing theinstances. depending on the operating system running on your instance.
10.3 Example remote protocols
Depending on use case and operating systems used, here are some suggestions you may consider for access-ing your instances:
74 Chapter 10. Instance console

NREC end user documentation Documentation
Protocol DescriptionSecureshell (ssh)
Secure shell is always available by default in linux based instances. It’s command based,and does not offer a graphical console. Authenication is key based.
VirtualNetworkComputer(vnc)
VNC is a platform independent method to access a remote machine with graphical con-sole. Clients and servers are available on most operating systems. This protocol is used byubuntu’s remote desktop function.
x2go(x2go)
X2Go gives remote access to the Linux graphical user interface. It’s very easy to configure,as it runs over the SSH protocol. In fact, it works out of the box after installation. It’ssession based, so you can resume your work after a disconnect. Clients are available on alloperating systems.
TeamViewer(teamviewer)
Team Viewer is proprietary protocol offering remote control of a remote machine. Clientsand servers are available for many operating systems
RemoteDesktopProtocol(rdp)
RDP is a proprietary protocol from Microsoft, and while clients are available for most sys-tems the server is exclusivly Windows based.
Please note that all the above mentioned protocols requires you to modify or create security groups. Inaddition, linux based cloud images will not have a graphical console installed by default. If you want to usea graphical console, you need to install the appropriate packages.
Advanced topics:
10.3. Example remote protocols 75

NREC end user documentation Documentation
76 Chapter 10. Instance console

CHAPTER 11
(BETA) High-Performance Computing (HPC)
Last changed: 2020-05-18
Contents
• (BETA) High-Performance Computing (HPC)
– What’s different
– Getting Access
– Policies
– Hardware
– Flavors
This document describes the High-performance computing (HPC) service offering in NREC.
Important: The HPC service in NREC is in a beta stage. The stability in this service may be lackingcompared to the standard NREC services. Things such as flavors and policies may change.
11.1 What’s different
The HPC service offering in NREC differs from the normal services in a number of key ways. This is partlydue to the fact that HPC workloads differ from normal workloads:
• HPC workloads tend to actively use the resources (e.g. CPU and memory) that they are given. Normalworkloads are mostly idle.
77

NREC end user documentation Documentation
• HPC often needs large instances with lots of CPU and memory, while smaller instances is the normfor other workloads.
• HPC workloads have stricter requirements for CPU instruction sets, while normal workloads don’tcare about such details.
• Continuous uptime is not as important for HPC workloads, as they tend to run for a limited timeperiod.
To satisfy the difference in requirements of HPC workloads the NREC infrastructure for HPC is different inboth hardware and setup:
HPC NormalAMD EPYC processors. Details are listed below. Various model and generation Intel proces-
sors.No overcommit of CPU or memory. Resources such as CPU and memory are
overcommitted, as workloads usually don’tuse more than a fraction of the given re-sources.
Dedicated CPU cores. The instance is given a numberof CPU cores that is dedicated to that instance. No otherinstances will use the same cores.
No dedicated CPU cores.
Non-uniform memory access (NUMA) awareness. Thehypervisor makes sure that the allotted resources for theinstance are all within as few NUMA nodes as possible.
No NUMA awareness.
Hugepage memory. The memory for instances is allo-cated in a hugepage memory pool to speed up memoryaccess.
Normal memory mapping.
Because of the various steps taken to ensure consistency and as little performance overhead as possible forHPC workloads, live migration of instances between compute hosts is not possible. Unlike normal instances,HPC instances will be subject to downtime due to planned and unplanned maintenance.
Warning: Continuous uptime can not be expected for HPC instances. Any instances running on aparticular compute host will experience downtime when the compute host is down for maintenance.
Please note that, there will be scheduled maintenance on the second Tuesday of every month.
11.2 Getting Access
Please use the normal form to apply for an HPC project, for access to the HPC infrastructure. If you haveany questions, please use the normal support channels as described on our support page.
78 Chapter 11. (BETA) High-Performance Computing (HPC)

NREC end user documentation Documentation
11.3 Policies
The following are the preliminary policies that are in effect for access and use of the HPC infrastructure.The main purpose of the policies is to ensure that resources aren’t wasted. The policies may change in thefuture:
• We want “pure” HPC projects for easier resource control. To use the HPC infrastructure, apply for anHPC project.
• HPC projects must have an end date.
• The HPC resources must be used. Having instances running idle is not acceptable in the HPC infras-tructure.
Note that the nature of HPC workloads does not allow overcommit of CPU and memory resources. TheHPC instances are consuming their CPU and memory resources even when idle. As a result HPC instancesare much more expensive than normal instances. Please make sure to actually use the resources given toan instance whenever the instance is running. Delete the instance when it’s no longer needed.
11.4 Hardware
The hardware used for HPC is listed below.
For generic HPC workloads:
• 4 x compute hosts (hypervisors) with:
– 2 x AMD EPYC 7551 32-Core Processor
– 512 GiB memory
For CERN ATLAS workloads:
• 10 x compute hosts (hypervisors) with:
– 2 x AMD EPYC 7551 32-Core Processor
– 512 GiB memory
• 12 x compute hosts (hypervisors) with:
– 2 x AMD EPYC 7552 48-Core Processor
– 512 GiB memory
11.5 Flavors
We currently have the following flavors for use with HPC:
11.3. Policies 79

NREC end user documentation Documentation
Flavor name Virtual CPUs Memory NUMA architecturehpc.m1a.2xlarge 8 30 GiB Nohpc.m1a.4xlarge 16 60 GiB Nohpc.m1a.8xlarge 32 120 GiB Yeshpc.m1a.16xlarge 64 240 GiB Yes
Note that due to hardware constraints in the AMD EPYC CPU architecture, instances that use a flavor withmore than 16 CPUs will have Non-uniform memory access (NUMA). The operating system and/or theapplication may need to take that into account.
80 Chapter 11. (BETA) High-Performance Computing (HPC)

CHAPTER 12
The NREC DNS service
Last changed: 2020-05-18
Contents
• The NREC DNS service
– When to use the DNS service
* Special case for UiO users
– Accessing the DNS zones GUI panel
– Creating a new zone
– Adding an A record
– Adding an AAAA record
– Adding a CNAME record
– Listing your DNS records
– Testing your records
– Deleting records
– Deleting a zone
– Doing the same with CLI
* Installing the CLI extension
* Creating a new zone
81

NREC end user documentation Documentation
* Adding an A record
* Adding an AAAA record
* Adding a CNAME record
* Listing your DNS records
* Deleting records
* Deleting a zone
The NREC DNS (Domain Name System) service is based on an OpenStack component named Designate.With this, you can create DNS zones (domain names) and DNS records within your zones. Read more aboutDNS in this Wikipedia article.
12.1 When to use the DNS service
The NREC DNS service allows for the registration and management of DNS zones using the OpenStackGUI, API and command line interface (CLI). Any zone can be registered and managed, providing it is usinga legal top-level domain (TLD). You don’t have to own the zone in question, but registering and managing anunowned zone doesn’t make sense unless for testing purposes. DNS is a global namespace, and in order touse this service properly, the global DNS namespace needs to know which name servers are authoritative foryour zone. The following lists the requirements for using the NREC DNS service for production purposes:
1. You need to own a zone or have it delegated. There are a number of DNS vendors from which youcan purchase DNS zones.
2. Instruct the DNS vendor, or the entity that is delegating this zone to you, that the authoritative DNSservers for the zone should be:
• ns1.nrec.no (IPv4 address: 158.37.63.251, IPv6 address: 2001:700:2:82ff::251)
• ns2.nrec.no (IPv4 address: 158.39.77.251, IPv6 address: 2001:700:2:83ff::251)
You can verify that this change has been made by the vendor, by querying DNS (example):
$ host -t ns mytestzone.commytestzone.com name server ns1.nrec.no.mytestzone.com name server ns2.nrec.no.
When these requirements are in place, you can manage the zone and its records completely using the NRECDNS service.
12.1.1 Special case for UiO users
UiO has acquired the DNS zone uiocloud.no, and can delegate subzones to projects using NREC. In orderto have a subzone of uiocloud.no delegated, contact [email protected]
82 Chapter 12. The NREC DNS service

NREC end user documentation Documentation
12.2 Accessing the DNS zones GUI panel
In the menu to the left in the dashboard, click on DNS and then Zones:
You will then see the zones window, which looks like this if there are no currently configured DNS zones inthe project:
12.3 Creating a new zone
In order to create a new zone, click on Create Zone. You will presented with the following form:
12.2. Accessing the DNS zones GUI panel 83

NREC end user documentation Documentation
Here, you need to fill in:
• The name of the zone, ending with a dot (“.”). In the example, we’ve chosen mytestzone.com..
• Email address, which will be presented to the world as the point of contact for this DNS zone.
The rest is optional or has default values that you usually don’t need to adjust unless you know what you’redoing. When you’re satisfied, click Submit and the zone will be created:
84 Chapter 12. The NREC DNS service

NREC end user documentation Documentation
12.4 Adding an A record
An A record is perhaps the most basic of DNS records. It creates a mapping between an IPv4 address and aname in DNS.
In your zones summary, click on Create Record Set:
The following form will appear:
12.4. Adding an A record 85

NREC end user documentation Documentation
You need to fill out the following:
• The type of record. In this case A - Address Record, which is the default.
• The name of the record, which includes your zone name and ending in a dot (“.”). In the example,we’ve chosen test01.mytestzone.com..
• The record, which is the IPv4 address that you want the name to point to in DNS. In the example:10.0.0.1.
When you’re satisfied, click Submit and the record will be created.
86 Chapter 12. The NREC DNS service

NREC end user documentation Documentation
12.5 Adding an AAAA record
An AAAA record is exactly the same as an A record, except that it applies to IPv6 addresses instead of IPv4.
Follow the guide for Adding an A record above, but:
• In the type selection, select AAAA - IPv6 address record
• For the record, enter an IPv6 address. In our example, we’ve chosen fd32:100:200:300::12.
12.6 Adding a CNAME record
A CNAME record is an alias to another DNS record. In our example, we wish to create an alias www.mytestzone.com that points to test01.mytestzone.com.
Click on Create Record Set as before. In the form, select CNAME - Canonical name record as the type.Here, the name is the alias and the record is the DNS entry which it points to:
12.5. Adding an AAAA record 87

NREC end user documentation Documentation
12.7 Listing your DNS records
In order to list the records for a given zone, click on the zone name in the zones listing, and select RecordSets:
88 Chapter 12. The NREC DNS service

NREC end user documentation Documentation
12.8 Testing your records
In order to test your record, you can query the NREC name servers, which are authoritative for all zonescreated via the NREC DNS service. Example:
$ host test01.mytestzone.com ns1.nrec.noUsing domain server:Name: ns1.nrec.noAddress: 2001:700:2:82ff::251#53Aliases:
test01.mytestzone.com has address 10.0.0.1test01.mytestzone.com has IPv6 address fd32:100:200:300::12
$ host www.mytestzone.com ns2.nrec.noUsing domain server:Name: ns2.nrec.noAddress: 2001:700:2:83ff::251#53Aliases:
www.mytestzone.com is an alias for test01.mytestzone.com.test01.mytestzone.com has address 10.0.0.1test01.mytestzone.com has IPv6 address fd32:100:200:300::12
12.8. Testing your records 89

NREC end user documentation Documentation
You can test against either ns1.nrec.no or ns2.nrec.no, it doesn’t matter. Both are authoritative name serversin the NREC infrastructure, and does not resolve other domains than they serve themselves.
12.9 Deleting records
Deleting records is currently not possible due to a bug in the GUI component of the DNS service. Pleasesee below for how to do this with command line.
12.10 Deleting a zone
Deleting zones is currently not possible due to a bug in the GUI component of the DNS service. Please seebelow for how to do this with command line.
12.11 Doing the same with CLI
12.11.1 Installing the CLI extension
In order to use the command line interface to work with the DNS service, you need to install the extension.On RHEL/CentOS and Fedora, you can install this extension via the package manager:
• For RHEL7 and CentOS7:
# yum install python-designateclient
• For RHEL8, CentOS8 and Fedora:
# yum install python3-designateclient
12.11.2 Creating a new zone
Creating the zone via openstack zone create:
$ openstack zone create --email [email protected] mytestzone.com.+----------------+--------------------------------------+| Field | Value |+----------------+--------------------------------------+| action | CREATE || attributes | || created_at | 2019-01-22T14:32:57.000000 || description | None || email | [email protected] || id | ffdba4fd-0e04-4edb-8756-e4944c148d0a || masters | |
(continues on next page)
90 Chapter 12. The NREC DNS service

NREC end user documentation Documentation
(continued from previous page)
| name | mytestzone.com. || pool_id | 794ccc2c-d751-44fe-b57f-8894c9f5c842 || project_id | a56e80c7c777419585b13ebafe024330 || serial | 1548167577 || status | PENDING || transferred_at | None || ttl | 3600 || type | PRIMARY || updated_at | None || version | 1 |+----------------+--------------------------------------+
List your zones:
$ openstack zone list+--------------------------------------+-----------------+---------+----------→˓--+--------+--------+| id | name | type |→˓serial | status | action |+--------------------------------------+-----------------+---------+----------→˓--+--------+--------+| ffdba4fd-0e04-4edb-8756-e4944c148d0a | mytestzone.com. | PRIMARY |→˓1548167577 | ACTIVE | NONE |+--------------------------------------+-----------------+---------+----------→˓--+--------+--------+
12.11.3 Adding an A record
Creating an A record (IPv4 pointer), i.e. a DNS entry for test01.mytestzone.com that points to theIPv4 address 10.0.0.1:
$ openstack recordset create mytestzone.com. test01 --type A --records 10.0.0.→˓1+-------------+--------------------------------------+| Field | Value |+-------------+--------------------------------------+| action | CREATE || created_at | 2019-01-22T14:36:04.000000 || description | None || id | 6910a762-d1aa-4e48-b14e-d9c44ecb81a3 || name | test01.mytestzone.com. || project_id | a56e80c7c777419585b13ebafe024330 || records | 10.0.0.1 || status | PENDING || ttl | None || type | A || updated_at | None || version | 1 || zone_id | ffdba4fd-0e04-4edb-8756-e4944c148d0a |
(continues on next page)
12.11. Doing the same with CLI 91

NREC end user documentation Documentation
(continued from previous page)
| zone_name | mytestzone.com. |+-------------+--------------------------------------+
12.11.4 Adding an AAAA record
Creating a AAAA record (IPv6 pointer), i.e. a DNS entry for test01.mytestzone.com that points tothe IPv6 address fd32:100:200:300::12:
$ openstack recordset create mytestzone.com. test01 --type AAAA --records→˓fd32:100:200:300::12+-------------+--------------------------------------+| Field | Value |+-------------+--------------------------------------+| action | CREATE || created_at | 2019-01-22T14:37:38.000000 || description | None || id | aead6644-b5e7-4f67-be23-f3ce3423c0e7 || name | test01.mytestzone.com. || project_id | a56e80c7c777419585b13ebafe024330 || records | fd32:100:200:300::12 || status | PENDING || ttl | None || type | AAAA || updated_at | None || version | 1 || zone_id | ffdba4fd-0e04-4edb-8756-e4944c148d0a || zone_name | mytestzone.com. |+-------------+--------------------------------------+
12.11.5 Adding a CNAME record
Creating a CNAME record, i.e. an alias for another DNS entry:
$ openstack recordset create mytestzone.com. www --type CNAME --records→˓test01.mytestzone.com.+-------------+--------------------------------------+| Field | Value |+-------------+--------------------------------------+| action | CREATE || created_at | 2019-01-22T14:45:30.000000 || description | None || id | da6708fd-4023-48a0-adb6-5c3373605e37 || name | www.mytestzone.com. || project_id | a56e80c7c777419585b13ebafe024330 || records | test01.mytestzone.com. || status | PENDING || ttl | None || type | CNAME |
(continues on next page)
92 Chapter 12. The NREC DNS service

NREC end user documentation Documentation
(continued from previous page)
| updated_at | None || version | 1 || zone_id | ffdba4fd-0e04-4edb-8756-e4944c148d0a || zone_name | mytestzone.com. |+-------------+--------------------------------------+
12.11.6 Listing your DNS records
Listing your DNS records for mytestzone.com:
$ openstack recordset list mytestzone.com.+--------------------------------------+------------------------+-------+-----→˓--------------------------------------------------------+--------+--------+| id | name | type |→˓records | status |→˓action |+--------------------------------------+------------------------+-------+-----→˓--------------------------------------------------------+--------+--------+| 2cddfc55-00d5-49fd-bd0d-ead0650efa19 | mytestzone.com. | SOA | ns2.→˓nrec.no. foo.bar.com. 1548168330 3519 600 86400 3600 | ACTIVE | NONE || bc9a8f9e-73ad-4604-a292-0612629a51af | mytestzone.com. | NS | ns1.→˓nrec.no. | ACTIVE | NONE || | | | ns2.→˓nrec.no. | | || 6910a762-d1aa-4e48-b14e-d9c44ecb81a3 | test01.mytestzone.com. | A | 10.→˓0.0.1 | ACTIVE | NONE || aead6644-b5e7-4f67-be23-f3ce3423c0e7 | test01.mytestzone.com. | AAAA |→˓fd32:100:200:300::12 | ACTIVE | NONE→˓ || da6708fd-4023-48a0-adb6-5c3373605e37 | www.mytestzone.com. | CNAME |→˓test01.mytestzone.com. | ACTIVE | NONE→˓ |+--------------------------------------+------------------------+-------+-----→˓--------------------------------------------------------+--------+--------+
12.11.7 Deleting records
A record (recordset) can be deleted using the following command:
openstack recordset delete <zone_id> <id>
Example:
$ openstack recordset delete mytestzone.com. test08.mytestzone.com.+-------------+--------------------------------------+| Field | Value |+-------------+--------------------------------------+| action | DELETE |
(continues on next page)
12.11. Doing the same with CLI 93

NREC end user documentation Documentation
(continued from previous page)
| created_at | 2019-03-07T14:56:10.000000 || description | None || id | 988ae646-a1ce-4b60-b235-60c1d1d01199 || name | test08.mytestzone.com. || project_id | a56e80c7c777419585b13ebafe024330 || records | 10.0.0.8 || status | PENDING || ttl | None || type | A || updated_at | 2019-03-15T11:17:07.000000 || version | 2 || zone_id | ffdba4fd-0e04-4edb-8756-e4944c148d0a || zone_name | mytestzone.com. |+-------------+--------------------------------------+
You can also use the ID of the zone and the recordset, respectively.
12.11.8 Deleting a zone
A zone (and all it contains) can be deleted using the following command:
openstack zone delete <id>
Example:
$ openstack zone delete mytestzone.com.+----------------+--------------------------------------+| Field | Value |+----------------+--------------------------------------+| action | DELETE || attributes | || created_at | 2019-01-22T12:38:57.000000 || description | None || email | [email protected] || id | ffdba4fd-0e04-4edb-8756-e4944c148d0a || masters | || name | mytestzone.com. || pool_id | 794ccc2c-d751-44fe-b57f-8894c9f5c842 || project_id | a56e80c7c777419585b13ebafe024330 || serial | 1548164918 || status | PENDING || transferred_at | None || ttl | 3600 || type | PRIMARY || updated_at | 2019-03-15T11:21:06.000000 || version | 5 |+----------------+--------------------------------------+
Note that deleting a zone also deletes all records within that zone.
94 Chapter 12. The NREC DNS service

CHAPTER 13
OpenStack API
Last changed: 2020-05-18
Contents
• OpenStack API
– OpenStack Command Line Interface (CLI)
* Installing the CLI tools
* Using the CLI tools
You will get a password when you do the initial first login (see Logging in). Please make sure you write thisdown for later use.
If you were an early adopter or forgot your password, you can reset your password by clicking on “ResetAPI password” on access page.
13.1 OpenStack Command Line Interface (CLI)
13.1.1 Installing the CLI tools
Before using the command line tools, they need to be installed. A relatively recent version of the commandline tools are available natively on some Linux distributions.
Fedora Linux Installing on Fedora is simple, using the native package manager:
95

NREC end user documentation Documentation
# dnf install python3-openstackclient
In order to use the DNS service you also need the designate client package:
# dnf install python3-designateclient
RHEL7 or RHEL8 at UiO In order to install the CLI tools on RHEL7 or RHEL8, you need to enable theproper repository using subscription-manager:
• For RHEL8:
# subscription-manager repos --enable=openstack-16-tools-for-rhel-8-→˓x86_64-rpms
• For RHEL7 Workstation:
# subscription-manager repos --enable=rhel-7-workstation-openstack-→˓14-tools-rpms
• For RHEL7 Server:
# subscription-manager repos --enable=rhel-7-server-openstack-14-→˓tools-rpms
Then, install the CLI tools using yum:
• For RHEL8:
# yum install python3-openstackclient
• For RHEL7:
# yum install python-openstackclient
In order to use the DNS service you also need the designate client package:
• For RHEL8:
# yum install python3-designateclient
• For RHEL7:
# yum install python-designateclient
Other Linux, Apple MacOS and Microsoft Windows Follow this guide: Installing the Openstackcommand-line clients
13.1.2 Using the CLI tools
After you receive your password for API access you can use the OpenStack command line interface (Open-Stack CLI) to test the access.
96 Chapter 13. OpenStack API

NREC end user documentation Documentation
Create a keystone_rc.sh file:
export OS_USERNAME=<feide-id>export OS_PROJECT_NAME=<project>export OS_PASSWORD=<password>export OS_AUTH_URL=https://api.nrec.no:5000/v3export OS_IDENTITY_API_VERSION=3export OS_USER_DOMAIN_NAME=dataportenexport OS_PROJECT_DOMAIN_NAME=dataportenexport OS_REGION_NAME=<region>export OS_INTERFACE=publicexport OS_NO_CACHE=1
The above is a template. Replace the following:
• Replace <feide-id> with your FEIDE identity, e.g. “[email protected]”
• Replace <project> with the project name, e.g. “DEMO-username.uio.no”
• Replace <password> with the API password that you got when first logging in. See First time login
• Replace <region> with either “osl” or “bgo”, whichever you want to use.
This file keystone_rc.sh contains your API password, and should be protected. At a minimum, makesure that you are the only one with read and write access:
$ chmod 0600 keystone_rc.sh
When this file has been created, you should be able to source it and run openstack commands:
$ source keystone_rc.sh$ openstack server list+--------------------------------------+------+--------+----------------------→˓+------------+| ID | Name | Status | Networks→˓| Image Name |+--------------------------------------+------+--------+----------------------→˓+------------+| 5a102c14-83fd-4788-939e-bb2e635e49de | test | ACTIVE | public=158.39.77.147→˓| Fedora 24 |+--------------------------------------+------+--------+----------------------→˓+------------+
Read more about the OpenStack CLI at http://docs.openstack.org/cli-reference/
13.1. OpenStack Command Line Interface (CLI) 97

NREC end user documentation Documentation
98 Chapter 13. OpenStack API

CHAPTER 14
Terraform and NREC: Part I - Basics
Last changed: 2020-05-18
Contents
• Terraform and NREC: Part I - Basics
– Prerequisites
– Basic Terraform usage
– Running Terraform
This document describes how to create and manage instances (virtual machines) using Terraform. This isan introduction to Terraform and shows how to use Terraform in its simplest and most basic form.
The example file can be downloaded here: basic.tf.
14.1 Prerequisites
You need to download and install Terraform (example):
$ unzip ~/Downloads/terraform_0.12.17_linux_amd64.zip$ ./terraform --versionTerraform v0.12.17
Install the terraform binary into ~/.local/bin (e.g. your home directory):
$ mv ./terraform ~/.local/bin/
99

NREC end user documentation Documentation
Usually, this directory should be in your shell path. If it isn’t, you can add it (for bash):
$ export PATH=$PATH:~/.local/bin
You also need to have the OpenStack CLI tools installed.
14.2 Basic Terraform usage
Here is a Terraform file that works with NREC, in its simplest possible form:
Listing 1: basic.tf (minimal)
1 provider "openstack" {}2
3 resource "openstack_compute_instance_v2" "instance" {4 name = "test"5 image_name = "GOLD CentOS 7"6 flavor_name = "m1.small"7
8 network {9 name = "IPv6"
10 }11 }
As an absolute minimum, you need to specify the name, image, flavor and network of the instance that youwant Terraform to create.
Warning: We are using image_name here. This is usually not a good idea, unless for testing purposes.The “GOLD” images provided in NREC are renewed (e.g. replaced) each month, and Terraform usesthe image ID in its state. If using Terraform as a oneshot utility to spin up instances, this isn’t a problem.But if you rely on Terraform to maintain your virtual infrastructure over time, switching to image_idis encouraged. An example using image_id is provided in Part 2.
The instance isn’t very usable unless you also provide an SSH key pair and a security group that allowsaccess via SSH to the instance. We’ll add these, but first we’ll use the CLI to list which are available:
$ openstack keypair list+-------+-------------------------------------------------+| Name | Fingerprint |+-------+-------------------------------------------------+| mykey | e2:2e:26:7f:5d:98:9e:8f:5e:fd:c7:d5:d0:6b:44:e7 |+-------+-------------------------------------------------+
$ openstack security group list -c ID -c Name+--------------------------------------+--------------+| ID | Name |+--------------------------------------+--------------+| 14f30f2b-7198-4b60-943d-cd1dc67b2ac8 | RDP |
(continues on next page)
100 Chapter 14. Terraform and NREC: Part I - Basics

NREC end user documentation Documentation
(continued from previous page)
| 57f8deaa-5d74-4fb2-941f-f3324806f1f5 | SSH and ICMP || f6c0499c-0a3c-4756-8527-9cb58e0501b1 | default |+--------------------------------------+--------------+
In this example, we already have a key pair named “mykey”, and we have two security groups named “SSHand ICMP” and “RDP” in addition to the default security group. If you don’t have a key pair you will needto add that, and the same with security groups.
Note: The SSH key pair is one of the very few elements that are tied to the user and not the project. Sincewe use technically different users for the dashboard and API, any keys that are added in the dashboard arenot available via API, and vice versa.
Having established which key pairs and security groups we wish to use, we can add those to our Terraformfile:
Listing 2: basic.tf
1 provider "openstack" {}2
3 resource "openstack_compute_instance_v2" "instance" {4 name = "test"5 image_name = "GOLD CentOS 7"6 flavor_name = "m1.small"7
8 key_pair = "mykey"9 security_groups = [ "default", "SSH and ICMP" ]
10
11 network {12 name = "IPv6"13 }14 }
We now have a Terraform execution file that is ready to be used. If you decide to use this file, you’ll probablywant to change at least the two emphasized lines.
14.3 Running Terraform
While it is possible to enter the project name, credentials such as user ID and password etc. in the Terraformfile, this is discouraged. Terraform will use the shell environment variables defined in your API credentialsfile. Before continuing, source this file:
$ source ~/keystone_rc.sh
Terraform manages its own state in the directory in which it is run. Therefore, it is always a good ideato maintain the Terraform files and run Terraform within a specified directory. We’ll start with creating adirectory which we’ll call tf-project:
14.3. Running Terraform 101

NREC end user documentation Documentation
$ mkdir ~/tf-project
We then create the initial Terraform basic.tf file as outlined in the previous section. The name “basic.tf” isarbitrary, Terraform will search for any files with a “.tf” ending. This file can be downloaded here. OurTerraform directory should now contain only this file:
$ cd ~/tf-project$ ls -a. .. basic.tf
Next we need to initialise Terraform:
$ terraform init
Initializing the backend...
Initializing provider plugins...- Checking for available provider plugins...- Downloading plugin for provider "openstack" (terraform-providers/openstack)→˓1.24.0...
The following providers do not have any version constraints in configuration,so the latest version was installed.
To prevent automatic upgrades to new major versions that may contain breakingchanges, it is recommended to add version = "..." constraints to thecorresponding provider blocks in configuration, with the constraint stringssuggested below.
* provider.openstack: version = "~> 1.24"
Terraform has been successfully initialized!
You may now begin working with Terraform. Try running "terraform plan" to seeany changes that are required for your infrastructure. All Terraform commandsshould now work.
If you ever set or change modules or backend configuration for Terraform,rerun this command to reinitialize your working directory. If you forget,→˓othercommands will detect it and remind you to do so if necessary.
We can then run terraform plan to see what actions Terraform will perform in a subsequent run:
$ terraform planRefreshing Terraform state in-memory prior to plan...The refreshed state will be used to calculate this plan, but will not bepersisted to local or remote state storage.
------------------------------------------------------------------------
(continues on next page)
102 Chapter 14. Terraform and NREC: Part I - Basics

NREC end user documentation Documentation
(continued from previous page)
An execution plan has been generated and is shown below.Resource actions are indicated with the following symbols:
+ create
Terraform will perform the following actions:
# openstack_compute_instance_v2.instance will be created+ resource "openstack_compute_instance_v2" "instance" {
+ access_ip_v4 = (known after apply)+ access_ip_v6 = (known after apply)+ all_metadata = (known after apply)+ all_tags = (known after apply)+ availability_zone = (known after apply)+ flavor_id = (known after apply)+ flavor_name = "m1.small"+ force_delete = false+ id = (known after apply)+ image_id = (known after apply)+ image_name = "GOLD CentOS 7"+ key_pair = "mykey"+ name = "test"+ power_state = "active"+ region = (known after apply)+ security_groups = [
+ "SSH and ICMP",+ "default",
]+ stop_before_destroy = false
+ network {+ access_network = false+ fixed_ip_v4 = (known after apply)+ fixed_ip_v6 = (known after apply)+ floating_ip = (known after apply)+ mac = (known after apply)+ name = "IPv6"+ port = (known after apply)+ uuid = (known after apply)
}}
Plan: 1 to add, 0 to change, 0 to destroy.
------------------------------------------------------------------------
Note: You didn't specify an "-out" parameter to save this plan, so Terraformcan't guarantee that exactly these actions will be performed if"terraform apply" is subsequently run.
The next step will be to actually run Terraform:
14.3. Running Terraform 103

NREC end user documentation Documentation
$ terraform apply
An execution plan has been generated and is shown below.Resource actions are indicated with the following symbols:
+ create
Terraform will perform the following actions:
# openstack_compute_instance_v2.instance will be created+ resource "openstack_compute_instance_v2" "instance" {
+ access_ip_v4 = (known after apply)+ access_ip_v6 = (known after apply)+ all_metadata = (known after apply)+ all_tags = (known after apply)+ availability_zone = (known after apply)+ flavor_id = (known after apply)+ flavor_name = "m1.small"+ force_delete = false+ id = (known after apply)+ image_id = (known after apply)+ image_name = "GOLD CentOS 7"+ key_pair = "mykey"+ name = "test"+ power_state = "active"+ region = (known after apply)+ security_groups = [
+ "SSH and ICMP",+ "default",
]+ stop_before_destroy = false
+ network {+ access_network = false+ fixed_ip_v4 = (known after apply)+ fixed_ip_v6 = (known after apply)+ floating_ip = (known after apply)+ mac = (known after apply)+ name = "IPv6"+ port = (known after apply)+ uuid = (known after apply)
}}
Plan: 1 to add, 0 to change, 0 to destroy.
Do you want to perform these actions?Terraform will perform the actions described above.Only 'yes' will be accepted to approve.
Enter a value: yes
openstack_compute_instance_v2.instance: Creating...
(continues on next page)
104 Chapter 14. Terraform and NREC: Part I - Basics

NREC end user documentation Documentation
(continued from previous page)
openstack_compute_instance_v2.instance: Still creating... [10s elapsed]openstack_compute_instance_v2.instance: Still creating... [20s elapsed]openstack_compute_instance_v2.instance: Creation complete after 26s→˓[id=fa854163-2440-43b2-9971-437ed490e386]
Apply complete! Resources: 1 added, 0 changed, 0 destroyed.
And we can use the Openstack CLI to verify that the instance has been created:
$ openstack server list+--------------------------------------+------+--------+----------------------→˓-----------------+---------------+----------+| ID | Name | Status | Networks→˓ | Image | Flavor |+--------------------------------------+------+--------+----------------------→˓-----------------+---------------+----------+| e1df5188-fa7d-4752-8819-9a9b7e781141 | test | ACTIVE |→˓IPv6=2001:700:2:8201::1029, 10.2.0.57 | GOLD CentOS 7 | m1.small |+--------------------------------------+------+--------+----------------------→˓-----------------+---------------+----------+
The host should be pingable and accessible via SSH. Let’s test that:
$ ping6 -c3 2001:700:2:8201::1029PING 2001:700:2:8201::1029(2001:700:2:8201::1029) 56 data bytes64 bytes from 2001:700:2:8201::1029: icmp_seq=1 ttl=56 time=0.652 ms64 bytes from 2001:700:2:8201::1029: icmp_seq=2 ttl=56 time=0.510 ms64 bytes from 2001:700:2:8201::1029: icmp_seq=3 ttl=56 time=0.486 ms
--- 2001:700:2:8201::1029 ping statistics ---3 packets transmitted, 3 received, 0% packet loss, time 2000msrtt min/avg/max/mdev = 0.486/0.549/0.652/0.075 ms
$ ssh centos@2001:700:2:8201::1029The authenticity of host '2001:700:2:8201::1029 (2001:700:2:8201::1029)' can→˓'t be established.ECDSA key fingerprint is SHA256:H2gmupThy7A0qFTQWTFl/1VmT75G7vuITSOCMHhUzLs.ECDSA key fingerprint is MD5:68:a7:94:9b:32:4e:98:8d:8e:26:f8:8c:03:7e:1b:d5.Are you sure you want to continue connecting (yes/no)? yesWarning: Permanently added '2001:700:2:8201::1029' (ECDSA) to the list of→˓known hosts.Last login: Wed Mar 27 19:05:40 2019 from 158.37.63.253
As stated earlier, Terraform maintains its state in the local directory, so we can use Terraform to destroy theresources it has previously created:
$ terraform destroyopenstack_compute_instance_v2.instance: Refreshing state... [id=fa854163-2440-→˓43b2-9971-437ed490e386]
An execution plan has been generated and is shown below.
(continues on next page)
14.3. Running Terraform 105

NREC end user documentation Documentation
(continued from previous page)
Resource actions are indicated with the following symbols:- destroy
Terraform will perform the following actions:
# openstack_compute_instance_v2.instance will be destroyed- resource "openstack_compute_instance_v2" "instance" {
- access_ip_v4 = "10.1.0.204" -> null- access_ip_v6 = "[2001:700:2:8301::112d]" -> null- all_metadata = {} -> null- all_tags = [] -> null- availability_zone = "bgo-default-1" -> null- flavor_id = "b7d00d03-3bbc-44ab-88b4-0b6a20f9a1a8" -> null- flavor_name = "m1.small" -> null- force_delete = false -> null- id = "fa854163-2440-43b2-9971-437ed490e386" -> null- image_id = "1a38633c-5fd1-4c01-b447-b1128ed3bb3f" -> null- image_name = "GOLD CentOS 7" -> null- key_pair = "mykey" -> null- name = "test" -> null- power_state = "active" -> null- region = "bgo" -> null- security_groups = [
- "SSH and ICMP",- "default",
] -> null- stop_before_destroy = false -> null- tags = [] -> null
- network {- access_network = false -> null- fixed_ip_v4 = "10.1.0.204" -> null- fixed_ip_v6 = "[2001:700:2:8301::112d]" -> null- mac = "fa:16:3e:9d:58:10" -> null- name = "IPv6" -> null- uuid = "339cb0e4-ca57-478f-ac46-200185b017fc" -> null
}}
Plan: 0 to add, 0 to change, 1 to destroy.
Do you really want to destroy all resources?Terraform will destroy all your managed infrastructure, as shown above.There is no undo. Only 'yes' will be accepted to confirm.
Enter a value: yes
openstack_compute_instance_v2.instance: Destroying... [id=fa854163-2440-43b2-→˓9971-437ed490e386]openstack_compute_instance_v2.instance: Still destroying... [id=fa854163-2440-→˓43b2-9971-437ed490e386, 10s elapsed]openstack_compute_instance_v2.instance: Destruction complete after 11s
(continues on next page)
106 Chapter 14. Terraform and NREC: Part I - Basics

NREC end user documentation Documentation
(continued from previous page)
Destroy complete! Resources: 1 destroyed.
And the instance is gone.
14.3. Running Terraform 107

NREC end user documentation Documentation
108 Chapter 14. Terraform and NREC: Part I - Basics

CHAPTER 15
Terraform and NREC: Part II - Additional resources
Last changed: 2020-05-18
Contents
• Terraform and NREC: Part II - Additional resources
– Image ID
– Multiple instances
– Key pairs
– Security groups
– Volumes
– Complete example
This document describes how to create and manage several instances (virtual machines) using Terraform.This document builds on Terraform and NREC: Part I - Basics. While part 1 relied on preexisting resourcessuch as SSH key pairs and security groups, in this example we create everything from scratch.
The example file can be downloaded here: advanced.tf.
15.1 Image ID
In Part 1 we used image_name to specify our preferred image. This is usually not a good idea, unlessfor testing purposes. The “GOLD” images provided in NREC are renewed (e.g. replaced) each month, andTerraform uses the image ID in its state. If using Terraform as a oneshot utility to spin up instances, this
109

NREC end user documentation Documentation
isn’t a problem. But if you rely on Terraform to maintain your virtual infrastructure over time, switching toimage_id is encouraged.
The consequence of using image_name to specify the image is that Terraform’s own state becomes out-dated. When using Terraform at a later time to make changes in the virtual infrastructure, it will destroy allrunning instances and create new ones, in order to comply with the configuration. This is probably not whatyou want. Running terraform plan in this scenario would output:
image_name: "Outdated (CentOS)" => "GOLD CentOS 7" (forces new resource)
We find the correct image_id by using the Openstack CLI:
$ openstack image list --status active+--------------------------------------+-----------------------------------+--→˓------+| ID | Name |→˓Status |+--------------------------------------+-----------------------------------+--→˓------+| 90527faa-43bd-40b3-9292-c5901452055d | GOLD CentOS 6 |→˓active || 1a38633c-5fd1-4c01-b447-b1128ed3bb3f | GOLD CentOS 7 |→˓active || 9be728f1-dc74-4246-80cb-211dc027d18a | GOLD Debian 10 |→˓active || 0f400132-4469-409f-94fe-455131434ff2 | GOLD Debian 9 |→˓active || 8dc9ba4f-1334-48e5-87a1-b60adee8b9e4 | GOLD Fedora 30 |→˓active || c5428d6e-9611-4629-852a-2a54a98241fc | GOLD Fedora 31 |→˓active || 39ae12d9-e847-43ac-a56d-f8c5f0adec06 | GOLD Ubuntu 16.04 LTS |→˓active || 46884c15-fad5-49dd-b85c-5303cd41ab17 | GOLD Ubuntu 18.04 LTS |→˓active || 60e2d020-2b42-4e5f-a6b8-2fe8bf9a9aed | GOLD Ubuntu 19.04 |→˓active || 843456b8-805e-4b7f-aa8b-224c5c8318fa | GOLD Windows Server 2016 Standard |→˓active || 79b1868e-8190-474b-9c52-41c0c758ad05 | GOLD Windows Server 2019 Core |→˓active || 88f10ed4-da1c-459e-89c0-4fbea8bed848 | GOLD Windows Server 2019 Standard |→˓active |+--------------------------------------+-----------------------------------+--→˓------+
Instead of specifying image_name as in Part 1:
Listing 1: basic.tf
1 image_name = "GOLD CentOS 7"
We use the image_id for the “GOLD CentOS 7” image found using Openstack CLI above:
110 Chapter 15. Terraform and NREC: Part II - Additional resources

NREC end user documentation Documentation
Listing 2: advanced.tf
1 image_id = "4756b700-9489-4d59-bfd6-24d3b8b4167b"
15.2 Multiple instances
Building on the basic.tf file discussed in Part 1:
Listing 3: basic.tf
1 provider "openstack" {}2
3 resource "openstack_compute_instance_v2" "instance" {4 name = "test"5 image_name = "GOLD CentOS 7"6 flavor_name = "m1.small"7
8 key_pair = "mykey"9 security_groups = [ "default", "SSH and ICMP" ]
10
11 network {12 name = "IPv6"13 }14 }
This file provisions a single instance. We can add a count directive to specify how many we want to pro-vision. When doing so, we should also make sure that the instances have unique names, and we accomplishthat by using the count when specifying the instance name:
1 provider "openstack" {}2
3 # Instances4 resource "openstack_compute_instance_v2" "instance" {5 count = 56 name = "test-${count.index}"7 image_id = "4756b700-9489-4d59-bfd6-24d3b8b4167b"8 flavor_name = "m1.small"9
10 key_pair = "my-terraform-key"11 security_groups = [ "default", "ssh-and-icmp" ]12
13 network {14 name = "IPv6"15 }16 }
When running this file with terraform apply, a total of 5 instances are created, as expected:
15.2. Multiple instances 111

NREC end user documentation Documentation
$ openstack server list -c Name -c Networks -c Image -c Flavor+--------+---------------------------------------+---------------+----------+| Name | Networks | Image | Flavor |+--------+---------------------------------------+---------------+----------+| test-4 | IPv6=2001:700:2:8201::1033, 10.2.0.51 | GOLD CentOS 7 | m1.small || test-0 | IPv6=2001:700:2:8201::1029, 10.2.0.68 | GOLD CentOS 7 | m1.small || test-2 | IPv6=2001:700:2:8201::1009, 10.2.0.62 | GOLD CentOS 7 | m1.small || test-3 | IPv6=2001:700:2:8201::1027, 10.2.0.36 | GOLD CentOS 7 | m1.small || test-1 | IPv6=2001:700:2:8201::101a, 10.2.0.21 | GOLD CentOS 7 | m1.small |+--------+---------------------------------------+---------------+----------+
15.3 Key pairs
We can have Terraform automatically create a key pair for us, instead of relying on a preexisting key pair.This is accomplished by creating a resource block for a key pair:
1 # SSH key2 resource "openstack_compute_keypair_v2" "keypair" {3 name = "my-terraform-key"4 public_key = file("~/.ssh/id_rsa.pub")5 }6
7 # Instances8 resource "openstack_compute_instance_v2" "instance" {9 count = 5
10 name = "test-${count.index}"11 image_id = "4756b700-9489-4d59-bfd6-24d3b8b4167b"12 flavor_name = "m1.small"13
14 key_pair = "my-terraform-key"15 security_groups = [ "default", "ssh-and-icmp" ]16
17 network {18 name = "IPv6"19 }20 }
After running Terraform, we can verify that the key has been created:
$ openstack keypair list+------------------+-------------------------------------------------+| Name | Fingerprint |+------------------+-------------------------------------------------+| my-terraform-key | e2:2e:26:7f:5d:98:9e:8f:5e:fd:c7:d5:d0:6b:44:e7 || mykey | e2:2e:26:7f:5d:98:9e:8f:5e:fd:c7:d5:d0:6b:44:e7 |+------------------+-------------------------------------------------+
112 Chapter 15. Terraform and NREC: Part II - Additional resources

NREC end user documentation Documentation
15.4 Security groups
In all the previous examples, we use existing security groups when provisioning instances. We can useTerraform to create security groups on the fly for us to use:
1 # Security group2 resource "openstack_networking_secgroup_v2" "instance_access" {3 name = "ssh-and-icmp"4 description = "Security group for allowing SSH and ICMP access"5 }6
7 # Allow ssh from IPv4 net8 resource "openstack_networking_secgroup_rule_v2" "rule_ssh_access_ipv4" {9 direction = "ingress"
10 ethertype = "IPv4"11 protocol = "tcp"12 port_range_min = 2213 port_range_max = 2214 remote_ip_prefix = "129.240.0.0/16"15 security_group_id = openstack_networking_secgroup_v2.instance_access.id16 }17
18 # Allow ssh from IPv6 net19 resource "openstack_networking_secgroup_rule_v2" "rule_ssh_access_ipv6" {20 direction = "ingress"21 ethertype = "IPv6"22 protocol = "tcp"23 port_range_min = 2224 port_range_max = 2225 remote_ip_prefix = "2001:700:100::/40"26 security_group_id = openstack_networking_secgroup_v2.instance_access.id27 }28
29 # Allow icmp from IPv4 net30 resource "openstack_networking_secgroup_rule_v2" "rule_icmp_access_ipv4" {31 direction = "ingress"32 ethertype = "IPv4"33 protocol = "icmp"34 remote_ip_prefix = "129.240.0.0/16"35 security_group_id = openstack_networking_secgroup_v2.instance_access.id36 }37
38 # Allow icmp from IPv6 net39 resource "openstack_networking_secgroup_rule_v2" "rule_icmp_access_ipv6" {40 direction = "ingress"41 ethertype = "IPv6"42 protocol = "icmp"43 remote_ip_prefix = "2001:700:100::/40"44 security_group_id = openstack_networking_secgroup_v2.instance_access.id45 }46
47 # Instances
(continues on next page)
15.4. Security groups 113

NREC end user documentation Documentation
(continued from previous page)
48 resource "openstack_compute_instance_v2" "instance" {49 count = 550 name = "test-${count.index}"51 image_id = "4756b700-9489-4d59-bfd6-24d3b8b4167b"52 flavor_name = "m1.small"53
54 key_pair = "my-terraform-key"55 security_groups = [ "default", "ssh-and-icmp" ]56
57 network {58 name = "IPv6"59 }60 }
There is a lot of new stuff here:
1. Line 3-5 contains a resource for a security group. This is pretty straightforward and only contains aname and description
2. Line 9-47 contains 4 security group rules. They are all ingress rules (e.g. incoming traffic) and allowsfor SSH and ICMP from the UiO IPv4 and IPv6 networks.
3. The security_group_id is a required field which specifies the security group where the ruleshall be applied, and we use the Terraform object notation to specify the security group we createdearlier.
As before, 5 instances are created. In addition a new security group is created, with the name and descriptionas specified in the Terraform file:
$ openstack security group list -c Name -c Description+--------------+-------------------------------------------------+| Name | Description |+--------------+-------------------------------------------------+| RDP | || ssh-and-icmp | Security group for allowing SSH and ICMP access || SSH and ICMP | || default | Default security group |+--------------+-------------------------------------------------+
We can also inspect the security group ssh-and-icmp that we created, to verify that the specified rulesare present:
$ openstack security group show ssh-and-icmp+-----------------+-----------------------------------------------------------→˓----------------------------------------------------------------------------→˓----------------------------------------------------------------------------→˓-------------------------------------+| Field | Value→˓
→˓
→˓ |+-----------------+-----------------------------------------------------------→˓----------------------------------------------------------------------------→˓----------------------------------------------------------------------------→˓-------------------------------------+
(continues on next page)
114 Chapter 15. Terraform and NREC: Part II - Additional resources

NREC end user documentation Documentation
(continued from previous page)
| created_at | 2019-04-24T12:24:35Z→˓
→˓
→˓ || description | Security group for allowing SSH and ICMP access→˓
→˓
→˓ || id | 43863c7f-d105-47a5-afe2-22d74f7a4623→˓
→˓
→˓ || name | ssh-and-icmp→˓
→˓
→˓ || project_id | b56e80c7c777419585b13ebafe024330→˓
→˓
→˓ || revision_number | 6→˓
→˓
→˓ || rules | created_at='2019-04-24T12:24:35Z', direction='egress',→˓ethertype='IPv6', id='53bfef03-fea6-4504-a996-69c12f5c00bd', updated_at=→˓'2019-04-24T12:24:35Z'→˓ || | created_at='2019-04-24T12:24:35Z', direction='egress',→˓ethertype='IPv4', id='7565bdf1-827a-4736-ba1c-dab822037c4b', updated_at=→˓'2019-04-24T12:24:35Z'→˓ || | created_at='2019-04-24T12:24:36Z', direction='ingress',→˓ethertype='IPv4', id='93458178-15b1-4ae5-bee0-225ae56aeeef', port_range_max=→˓'22', port_range_min='22', protocol='tcp', remote_ip_prefix='129.240.0.0/16→˓', updated_at='2019-04-24T12:24:36Z' || | created_at='2019-04-24T12:24:36Z', direction='ingress',→˓ethertype='IPv4', id='9d1724ae-c375-4b64-98ec-43d0f6b58383', protocol='icmp→˓', remote_ip_prefix='129.240.0.0/16', updated_at='2019-04-24T12:24:36Z'→˓ || | created_at='2019-04-24T12:24:36Z', direction='ingress',→˓ethertype='IPv6', id='b0d110ad-8e43-4493-a178-a3ef56854c20', protocol='icmp→˓', remote_ip_prefix='2001:700:100::/40', updated_at='2019-04-24T12:24:36Z'→˓ || | created_at='2019-04-24T12:24:37Z', direction='ingress',→˓ethertype='IPv6', id='e7131d6e-9a56-43ca-819d-bd3428013b44', port_range_max=→˓'22', port_range_min='22', protocol='tcp', remote_ip_prefix='2001:700:100::/→˓40', updated_at='2019-04-24T12:24:37Z' || updated_at | 2019-04-24T12:24:37Z→˓
→˓
→˓ |(continues on next page)
15.4. Security groups 115

NREC end user documentation Documentation
(continued from previous page)
+-----------------+-----------------------------------------------------------→˓----------------------------------------------------------------------------→˓----------------------------------------------------------------------------→˓-------------------------------------+
15.5 Volumes
Creating volumes is often required, and Terraform can do that as well. In order to create a volume you willdefine the resource:
1 # Volume2 resource "openstack_blockstorage_volume_v2" "volume" {3 name = "my-volume"4 size = "10"5 }
Here, we create a volume named “my-volume” with a size of 10 GB. We also want to attach the volume toone of our instances:
1 # Attach volume2 resource "openstack_compute_volume_attach_v2" "volumes" {3 instance_id = openstack_compute_instance_v2.instance.0.id4 volume_id = openstack_blockstorage_volume_v2.volume.id5 }
In this example, we choose to attach the volume to instance number 0, which is the instance named “test-0”.We can inspect using Openstack CLI:
$ openstack volume list+--------------------------------------+-----------+--------+------+----------→˓-----------------------+| ID | Name | Status | Size | Attached→˓to |+--------------------------------------+-----------+--------+------+----------→˓-----------------------+| b75b654e-bd74-4796-9405-27ca2e056e96 | my-volume | in-use | 10 | Attached→˓to test-0 on /dev/sdb |+--------------------------------------+-----------+--------+------+----------→˓-----------------------+
15.6 Complete example
A complete listing of the example file advanced.tf used in this document is provided below.
116 Chapter 15. Terraform and NREC: Part II - Additional resources
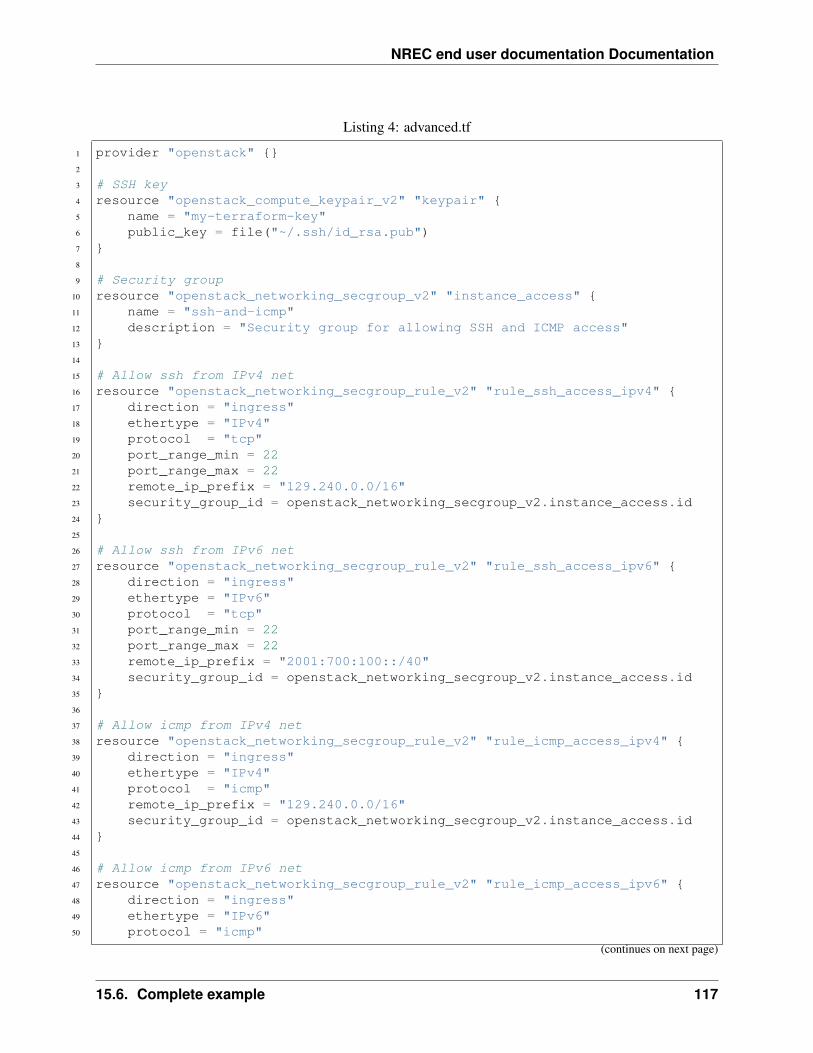
NREC end user documentation Documentation
Listing 4: advanced.tf
1 provider "openstack" {}2
3 # SSH key4 resource "openstack_compute_keypair_v2" "keypair" {5 name = "my-terraform-key"6 public_key = file("~/.ssh/id_rsa.pub")7 }8
9 # Security group10 resource "openstack_networking_secgroup_v2" "instance_access" {11 name = "ssh-and-icmp"12 description = "Security group for allowing SSH and ICMP access"13 }14
15 # Allow ssh from IPv4 net16 resource "openstack_networking_secgroup_rule_v2" "rule_ssh_access_ipv4" {17 direction = "ingress"18 ethertype = "IPv4"19 protocol = "tcp"20 port_range_min = 2221 port_range_max = 2222 remote_ip_prefix = "129.240.0.0/16"23 security_group_id = openstack_networking_secgroup_v2.instance_access.id24 }25
26 # Allow ssh from IPv6 net27 resource "openstack_networking_secgroup_rule_v2" "rule_ssh_access_ipv6" {28 direction = "ingress"29 ethertype = "IPv6"30 protocol = "tcp"31 port_range_min = 2232 port_range_max = 2233 remote_ip_prefix = "2001:700:100::/40"34 security_group_id = openstack_networking_secgroup_v2.instance_access.id35 }36
37 # Allow icmp from IPv4 net38 resource "openstack_networking_secgroup_rule_v2" "rule_icmp_access_ipv4" {39 direction = "ingress"40 ethertype = "IPv4"41 protocol = "icmp"42 remote_ip_prefix = "129.240.0.0/16"43 security_group_id = openstack_networking_secgroup_v2.instance_access.id44 }45
46 # Allow icmp from IPv6 net47 resource "openstack_networking_secgroup_rule_v2" "rule_icmp_access_ipv6" {48 direction = "ingress"49 ethertype = "IPv6"50 protocol = "icmp"
(continues on next page)
15.6. Complete example 117

NREC end user documentation Documentation
(continued from previous page)
51 remote_ip_prefix = "2001:700:100::/40"52 security_group_id = openstack_networking_secgroup_v2.instance_access.id53 }54
55 # Instances56 resource "openstack_compute_instance_v2" "instance" {57 count = 558 name = "test-${count.index}"59 image_id = "4756b700-9489-4d59-bfd6-24d3b8b4167b"60 flavor_name = "m1.small"61
62 key_pair = "my-terraform-key"63 security_groups = [ "default", "ssh-and-icmp" ]64
65 network {66 name = "IPv6"67 }68 }69
70 # Volume71 resource "openstack_blockstorage_volume_v2" "volume" {72 name = "my-volume"73 size = "10"74 }75
76 # Attach volume77 resource "openstack_compute_volume_attach_v2" "volumes" {78 instance_id = openstack_compute_instance_v2.instance.0.id79 volume_id = openstack_blockstorage_volume_v2.volume.id80 }
118 Chapter 15. Terraform and NREC: Part II - Additional resources

CHAPTER 16
Terraform and NREC: Part III - Dynamics
Last changed: 2020-05-18
Contents
• Terraform and NREC: Part III - Dynamics
– Variables file
– Local variables file
– Using variables
– Making changes
– Complete example
This document builds on Terraform Part 1 and Part 2, and extends the code base to make it more dynamic.We also make use of more advanced functionality in Terraform such as output handling and local variables.
The goal with this document is to show how Terraform can be used to set up a real environment on NREC.We will create:
• An SSH key pair
• Four web servers running CentOS
• One database server running Ubuntu
• A volume that is attached to the database server
• Security groups that allow access to the different servers, as well as allowing the web servers to accessthe database server
119

NREC end user documentation Documentation
The files used in this document can be downloaded:
• main.tf
• secgroup.tf
• variables.tf
• terraform.tfvars
16.1 Variables file
In order to keep the management of the Terraform infrastructure easy and intuitive, it is a good idea toconsolidate definitions and variables into a single file or a small set of files. Terraform supports a conceptof default values for variables, which can be overridden. In our example, we are opting for a single file thatcontains all variables, with default values, used throughout the code:
Listing 1: variables.tf
1 # Variables2 variable "region" {3 }4
5 variable "name" {6 default = "myproject"7 }8
9 variable "ssh_public_key" {10 default = "~/.ssh/id_rsa.pub"11 }12
13 variable "network" {14 default = "IPv6"15 }16
17 variable "volume_size" {18 default = 2019 }20
21 # Security group defaults22 variable "allow_ssh_from_v6" {23 type = list(string)24 default = []25 }26
27 variable "allow_ssh_from_v4" {28 type = list(string)29 default = []30 }31
32 variable "allow_http_from_v6" {33 type = list(string)
(continues on next page)
120 Chapter 16. Terraform and NREC: Part III - Dynamics

NREC end user documentation Documentation
(continued from previous page)
34 default = []35 }36
37 variable "allow_http_from_v4" {38 type = list(string)39 default = []40 }41
42 variable "allow_mysql_from_v6" {43 type = list(string)44 default = []45 }46
47 variable "allow_mysql_from_v4" {48 type = list(string)49 default = []50 }51
52 # Mapping between role and image53 variable "role_image" {54 type = map(string)55 default = {56 "web" = "1a38633c-5fd1-4c01-b447-b1128ed3bb3f" # GOLD CentOS 757 "db" = "46884c15-fad5-49dd-b85c-5303cd41ab17" # GOLD Ubuntu 18.04 LTS58 }59 }60
61 # Mapping between role and flavor62 variable "role_flavor" {63 type = map(string)64 default = {65 "web" = "m1.small"66 "db" = "m1.medium"67 }68 }69
70 # Mapping between role and number of instances (count)71 variable "role_count" {72 type = map(string)73 default = {74 "web" = 475 "db" = 176 }77 }
Notice that the region variable (highlighted) is empty and doesn’t have a default value. For this reason, theregion must always be specified in some way when running Terraform:
$ ~/terraform planvar.region
Enter a value:
16.1. Variables file 121

NREC end user documentation Documentation
As shown above, when a default value isn’t specified in the code Terraform will ask for it interactively.
Also note that the allow_ssh_from_v6, allow_ssh_from_v4 etc. (highlighted) variables are empty lists. Itis expected that we specify these in the terraform.tfvars file, explained in the next section.
16.2 Local variables file
Terraform supports specification of local variables that completes or overrides the variable set given invariables.tf . We can do this on command line:
terraform -var 'region=bgo'
This does not scale, however. Terraform has an option -var-file that takes one argument, a variablesfile:
terraform -var-file <file>
An example file terraform.tfvars that complements our variables.tf could look like this:
Listing 2: terraform.tfvars
1 # Region2 region = "bgo"3
4 # This is needed to access the instance over ssh5 allow_ssh_from_v6 = [6 "2001:700:100:202::202:12/128",7 "2001:700:100:118::67/128"8 ]9 allow_ssh_from_v4 = [
10 "129.240.202.12/32",11 "129.240.118.67/32"12 ]13
14 # This is needed to access the instance over http15 allow_http_from_v6 = [16 "2001:700:100::/40"17 ]18 allow_http_from_v4 = [19 "129.240.0.0/16"20 ]21
22 # This is needed to access the instance over the mysql port23 allow_mysql_from_v6 = [24 "2001:700:100:202::202:12/128"25 ]26 allow_mysql_from_v4 = [27 "129.240.202.12/32"28 ]
Here, we specify the region and the addresses to be used for the security group. Since this file is named
122 Chapter 16. Terraform and NREC: Part III - Dynamics

NREC end user documentation Documentation
terraform.tfvars it will be automatically included when running terraform commands. If we were to nameit as e.g. production.tfvars, we would need to specify which file to use on the command line, like this:
$ terraform plan -var-file production.tfvars$ terraform apply -var-file production.tfvars
Read more about variables here: Terraform variables
16.3 Using variables
Terraform supports a variety of different variable types, and should be familiar to anyone who has usedmodern programming languages. We’re using string, list (array) and map (hash) variables. In this example,we have divided our original one-file setup into 3 files, in addition to the local variables file:
main.tf Our main file.secgroup.tf Since the security group definitions are rather verbose, we have separated these from
the main file.variables.tf Variable definitions with default values.ter-raform.tfvars
Local variables.
We’ll take a look at main.tf . The first part, containing the SSH key pair resource, is as before but usingvariables:
Listing 3: main.tf
1 provider "openstack" {2 }3
4 # SSH key5 resource "openstack_compute_keypair_v2" "keypair" {6 region = var.region7 name = "${terraform.workspace}-${var.name}"8 public_key = file(var.ssh_public_key)9 }
Next, we’ll look at our security groups in secgroup.tf . We now have three of them:
Listing 4: secgroup.tf
1 # Security group SSH + ICMP2 resource "openstack_networking_secgroup_v2" "instance_ssh_access" {3 region = var.region4 name = "${terraform.workspace}-${var.name}-ssh"5 description = "Security group for allowing SSH and ICMP access"6 }7
8 # Security group HTTP9 resource "openstack_networking_secgroup_v2" "instance_web_access" {
(continues on next page)
16.3. Using variables 123

NREC end user documentation Documentation
(continued from previous page)
10 region = var.region11 name = "${terraform.workspace}-${var.name}-web"12 description = "Security group for allowing HTTP access"13 }14
15 # Security group MySQL16 resource "openstack_networking_secgroup_v2" "instance_db_access" {17 region = var.region18 name = "${terraform.workspace}-${var.name}-db"19 description = "Security group for allowing MySQL access"20 }
Since these are web and database serves, we create a security group for allowing HTTP for the web serversand port 3306 for the database server, in addition to allowing SSH and ICMP. The security group rules forSSH and ICMP are pretty much the same as before, but using variables:
Listing 5: secgroup.tf
1 # Allow ssh from IPv4 net2 resource "openstack_networking_secgroup_rule_v2" "rule_ssh_access_ipv4" {3 region = var.region4 count = length(var.allow_ssh_from_v4)5 direction = "ingress"6 ethertype = "IPv4"7 protocol = "tcp"8 port_range_min = 229 port_range_max = 22
10 remote_ip_prefix = var.allow_ssh_from_v4[count.index]11 security_group_id = openstack_networking_secgroup_v2.instance_ssh_access.id12 }13
14 # Allow ssh from IPv6 net15 resource "openstack_networking_secgroup_rule_v2" "rule_ssh_access_ipv6" {16 region = var.region17 count = length(var.allow_ssh_from_v6)18 direction = "ingress"19 ethertype = "IPv6"20 protocol = "tcp"21 port_range_min = 2222 port_range_max = 2223 remote_ip_prefix = var.allow_ssh_from_v6[count.index]24 security_group_id = openstack_networking_secgroup_v2.instance_ssh_access.id25 }26
27 # Allow icmp from IPv4 net28 resource "openstack_networking_secgroup_rule_v2" "rule_icmp_access_ipv4" {29 region = var.region30 count = length(var.allow_ssh_from_v4)31 direction = "ingress"32 ethertype = "IPv4"33 protocol = "icmp"
(continues on next page)
124 Chapter 16. Terraform and NREC: Part III - Dynamics

NREC end user documentation Documentation
(continued from previous page)
34 remote_ip_prefix = var.allow_ssh_from_v4[count.index]35 security_group_id = openstack_networking_secgroup_v2.instance_ssh_access.id36 }37
38 # Allow icmp from IPv6 net39 resource "openstack_networking_secgroup_rule_v2" "rule_icmp_access_ipv6" {40 region = var.region41 count = length(var.allow_ssh_from_v6)42 direction = "ingress"43 ethertype = "IPv6"44 protocol = "icmp"45 remote_ip_prefix = var.allow_ssh_from_v6[count.index]46 security_group_id = openstack_networking_secgroup_v2.instance_ssh_access.id47 }
Notice that we now use implicit iteration over the number of entries listed in the “allow_from” variables,which are empty lists in variables.tf but are properly defined in terraform.tfvars.
Let’s take a look at the security group rules defined for HTTP and MySQL access:
Listing 6: secgroup.tf
1 # Allow HTTP from IPv4 net2 resource "openstack_networking_secgroup_rule_v2" "rule_http_access_ipv4" {3 region = var.region4 count = length(var.allow_http_from_v4)5 direction = "ingress"6 ethertype = "IPv4"7 protocol = "tcp"8 port_range_min = 809 port_range_max = 80
10 remote_ip_prefix = var.allow_http_from_v4[count.index]11 security_group_id = openstack_networking_secgroup_v2.instance_web_access.id12 }13
14 # Allow HTTP from IPv6 net15 resource "openstack_networking_secgroup_rule_v2" "rule_http_access_ipv6" {16 region = var.region17 count = length(var.allow_http_from_v6)18 direction = "ingress"19 ethertype = "IPv6"20 protocol = "tcp"21 port_range_min = 8022 port_range_max = 8023 remote_ip_prefix = var.allow_http_from_v6[count.index]24 security_group_id = openstack_networking_secgroup_v2.instance_web_access.id25 }26
27 # Allow MySQL from IPv4 net28 resource "openstack_networking_secgroup_rule_v2" "rule_mysql_access_ipv4" {29 region = var.region30 count = length(var.allow_mysql_from_v4)
(continues on next page)
16.3. Using variables 125

NREC end user documentation Documentation
(continued from previous page)
31 direction = "ingress"32 ethertype = "IPv4"33 protocol = "tcp"34 port_range_min = 330635 port_range_max = 330636 remote_ip_prefix = var.allow_mysql_from_v4[count.index]37 security_group_id = openstack_networking_secgroup_v2.instance_db_access.id38 }39
40 # Allow MYSQL from IPv6 net41 resource "openstack_networking_secgroup_rule_v2" "rule_mysql_access_ipv6" {42 region = var.region43 count = length(var.allow_mysql_from_v6)44 direction = "ingress"45 ethertype = "IPv6"46 protocol = "tcp"47 port_range_min = 330648 port_range_max = 330649 remote_ip_prefix = var.allow_mysql_from_v6[count.index]50 security_group_id = openstack_networking_secgroup_v2.instance_db_access.id51 }
The resource definition for the HTTP access, as well as the first two resource definitions for MySQL access,follows the same logic as that of the SSH and ICMP rules. The last two MySQL rules are different:
Listing 7: secgroup.tf
1 # Allow MYSQL from web servers (IPv4)2 resource "openstack_networking_secgroup_rule_v2" "rule_mysql_from_web_access_
→˓ipv4" {3 region = var.region4 count = 15 direction = "ingress"6 ethertype = "IPv4"7 protocol = "tcp"8 port_range_min = 33069 port_range_max = 3306
10 remote_group_id = openstack_networking_secgroup_v2.instance_web_access.id11 security_group_id = openstack_networking_secgroup_v2.instance_db_access.id12 }13
14 # Allow MYSQL from web servers (IPv6)15 resource "openstack_networking_secgroup_rule_v2" "rule_mysql_from_web_access_
→˓ipv6" {16 region = var.region17 count = 118 direction = "ingress"19 ethertype = "IPv6"20 protocol = "tcp"21 port_range_min = 330622 port_range_max = 3306
(continues on next page)
126 Chapter 16. Terraform and NREC: Part III - Dynamics

NREC end user documentation Documentation
(continued from previous page)
23 remote_group_id = openstack_networking_secgroup_v2.instance_web_access.id24 security_group_id = openstack_networking_secgroup_v2.instance_db_access.id25 }
Here, we use rather advanced functionality for security groups in Openstack. We can allow IP ad-dresses from other security groups (source groups) access by specifying remote_group_id rather thanremote_ip_prefix. It is possible to achieve the same using remote_ip_prefix, however it is lesselegant1.
We’ll circle back to main.tf :1 An alternative way to dynamically add access for the web servers, by using remote_ip_prefix, would be to make use of
the computed value for the instance IPv4 and IPv6 addresses given to the web servers when provisioned:
Listing 8: secgroup alternative
1 # Allow MYSQL from web servers (IPv4)2 resource "openstack_networking_secgroup_rule_v2" "rule2_mysql_access_ipv4" {3 region = var.region4 count = lookup(var.role_count, "web", 0)5 direction = "ingress"6 ethertype = "IPv4"7 protocol = "tcp"8 port_range_min = 33069 port_range_max = 3306
10 remote_ip_prefix = "${element(11 openstack_compute_instance_v2.web_instance.*.access_ip_v4,12 count.index,13 )}/32"14 security_group_id = openstack_networking_secgroup_v2.instance_db_access.id15 depends_on = [openstack_compute_instance_v2.web_instance]16 }17
18 # Allow MYSQL from web servers (IPv6)19 resource "openstack_networking_secgroup_rule_v2" "rule2_mysql_access_ipv6" {20 region = var.region21 count = lookup(var.role_count, "web", 0)22 direction = "ingress"23 ethertype = "IPv6"24 protocol = "tcp"25 port_range_min = 330626 port_range_max = 330627 remote_ip_prefix = "${replace(28 element(29 openstack_compute_instance_v2.web_instance.*.access_ip_v6,30 count.index,31 ),32 "/[\\[\\]]/",33 "",34 )}/128"35 security_group_id = openstack_networking_secgroup_v2.instance_db_access.id36 depends_on = [openstack_compute_instance_v2.web_instance]37 }
16.3. Using variables 127

NREC end user documentation Documentation
Listing 9: main.tf
1 # Web servers2 resource "openstack_compute_instance_v2" "web_instance" {3 region = var.region4 count = lookup(var.role_count, "web", 0)5 name = "${var.region}-web-${count.index}"6 image_id = lookup(var.role_image, "web", "unknown")7 flavor_name = lookup(var.role_flavor, "web", "unknown")8
9 key_pair = "${terraform.workspace}-${var.name}"10 security_groups = [11 "default",12 "${terraform.workspace}-${var.name}-ssh",13 "${terraform.workspace}-${var.name}-web",14 ]15
16 network {17 name = "IPv6"18 }19
20 depends_on = [21 openstack_networking_secgroup_v2.instance_ssh_access,22 openstack_networking_secgroup_v2.instance_web_access,23 ]24 }25
26 # Database servers27 resource "openstack_compute_instance_v2" "db_instance" {28 region = var.region29 count = lookup(var.role_count, "db", 0)30 name = "${var.region}-db-${count.index}"31 image_id = lookup(var.role_image, "db", "unknown")32 flavor_name = lookup(var.role_flavor, "db", "unknown")33
34 key_pair = "${terraform.workspace}-${var.name}"35 security_groups = [36 "default",37 "${terraform.workspace}-${var.name}-ssh",38 "${terraform.workspace}-${var.name}-db",39 ]40
41 network {42 name = "IPv6"43 }44
45 depends_on = [46 openstack_networking_secgroup_v2.instance_ssh_access,47 openstack_networking_secgroup_v2.instance_db_access,48 ]49 }
We now define two different instance resources. One for web servers and one for the database server. They
128 Chapter 16. Terraform and NREC: Part III - Dynamics

NREC end user documentation Documentation
use different values defined in variables.tf for image, flavor etc. Lastly, we define a volume resource andattach this volume to the database server:
Listing 10: main.tf
1 # Volume2 resource "openstack_blockstorage_volume_v2" "volume" {3 name = "database"4 size = var.volume_size5 }6
7 # Attach volume8 resource "openstack_compute_volume_attach_v2" "attach_vol" {9 instance_id = openstack_compute_instance_v2.db_instance[0].id
10 volume_id = openstack_blockstorage_volume_v2.volume.id11 }
16.4 Making changes
Terraform maintains the state of the infrastructure it manages in the workspace directory. It is possible tomake simple changes just by updating and applying the code. If we wanted to scale down the number ofweb servers from 4 to 2, we would change this line in variables.tf :
Listing 11: variables.tf
1 # Mapping between role and number of instances (count)2 variable "role_count" {3 type = map(string)4 default = {5 "web" = 46 "db" = 17 }8 }
After changing the count from 4 to 2 here (the highlighted line), we can run terraform plan:
$ terraform plan...Terraform will perform the following actions:
- openstack_compute_instance_v2.web_instance[2]
- openstack_compute_instance_v2.web_instance[3]
Plan: 0 to add, 0 to change, 2 to destroy....
Applying this with terraform apply will then destroy two of the web servers. Similarly, if we were toincrease the web server count from 4 to 5, Terraform would add a new web server.
16.4. Making changes 129

NREC end user documentation Documentation
16.5 Complete example
A complete listing of the example files used in this document is provided below.
Listing 12: main.tf
1 provider "openstack" {2 }3
4 # SSH key5 resource "openstack_compute_keypair_v2" "keypair" {6 region = var.region7 name = "${terraform.workspace}-${var.name}"8 public_key = file(var.ssh_public_key)9 }
10
11 # Web servers12 resource "openstack_compute_instance_v2" "web_instance" {13 region = var.region14 count = lookup(var.role_count, "web", 0)15 name = "${var.region}-web-${count.index}"16 image_id = lookup(var.role_image, "web", "unknown")17 flavor_name = lookup(var.role_flavor, "web", "unknown")18
19 key_pair = "${terraform.workspace}-${var.name}"20 security_groups = [21 "default",22 "${terraform.workspace}-${var.name}-ssh",23 "${terraform.workspace}-${var.name}-web",24 ]25
26 network {27 name = "IPv6"28 }29
30 depends_on = [31 openstack_networking_secgroup_v2.instance_ssh_access,32 openstack_networking_secgroup_v2.instance_web_access,33 ]34 }35
36 # Database servers37 resource "openstack_compute_instance_v2" "db_instance" {38 region = var.region39 count = lookup(var.role_count, "db", 0)40 name = "${var.region}-db-${count.index}"41 image_id = lookup(var.role_image, "db", "unknown")42 flavor_name = lookup(var.role_flavor, "db", "unknown")43
44 key_pair = "${terraform.workspace}-${var.name}"45 security_groups = [46 "default",
(continues on next page)
130 Chapter 16. Terraform and NREC: Part III - Dynamics

NREC end user documentation Documentation
(continued from previous page)
47 "${terraform.workspace}-${var.name}-ssh",48 "${terraform.workspace}-${var.name}-db",49 ]50
51 network {52 name = "IPv6"53 }54
55 depends_on = [56 openstack_networking_secgroup_v2.instance_ssh_access,57 openstack_networking_secgroup_v2.instance_db_access,58 ]59 }60
61 # Volume62 resource "openstack_blockstorage_volume_v2" "volume" {63 name = "database"64 size = var.volume_size65 }66
67 # Attach volume68 resource "openstack_compute_volume_attach_v2" "attach_vol" {69 instance_id = openstack_compute_instance_v2.db_instance[0].id70 volume_id = openstack_blockstorage_volume_v2.volume.id71 }
Listing 13: secgroup.tf
1 # Security group SSH + ICMP2 resource "openstack_networking_secgroup_v2" "instance_ssh_access" {3 region = var.region4 name = "${terraform.workspace}-${var.name}-ssh"5 description = "Security group for allowing SSH and ICMP access"6 }7
8 # Security group HTTP9 resource "openstack_networking_secgroup_v2" "instance_web_access" {
10 region = var.region11 name = "${terraform.workspace}-${var.name}-web"12 description = "Security group for allowing HTTP access"13 }14
15 # Security group MySQL16 resource "openstack_networking_secgroup_v2" "instance_db_access" {17 region = var.region18 name = "${terraform.workspace}-${var.name}-db"19 description = "Security group for allowing MySQL access"20 }21
22 # Allow ssh from IPv4 net23 resource "openstack_networking_secgroup_rule_v2" "rule_ssh_access_ipv4" {
(continues on next page)
16.5. Complete example 131

NREC end user documentation Documentation
(continued from previous page)
24 region = var.region25 count = length(var.allow_ssh_from_v4)26 direction = "ingress"27 ethertype = "IPv4"28 protocol = "tcp"29 port_range_min = 2230 port_range_max = 2231 remote_ip_prefix = var.allow_ssh_from_v4[count.index]32 security_group_id = openstack_networking_secgroup_v2.instance_ssh_access.id33 }34
35 # Allow ssh from IPv6 net36 resource "openstack_networking_secgroup_rule_v2" "rule_ssh_access_ipv6" {37 region = var.region38 count = length(var.allow_ssh_from_v6)39 direction = "ingress"40 ethertype = "IPv6"41 protocol = "tcp"42 port_range_min = 2243 port_range_max = 2244 remote_ip_prefix = var.allow_ssh_from_v6[count.index]45 security_group_id = openstack_networking_secgroup_v2.instance_ssh_access.id46 }47
48 # Allow icmp from IPv4 net49 resource "openstack_networking_secgroup_rule_v2" "rule_icmp_access_ipv4" {50 region = var.region51 count = length(var.allow_ssh_from_v4)52 direction = "ingress"53 ethertype = "IPv4"54 protocol = "icmp"55 remote_ip_prefix = var.allow_ssh_from_v4[count.index]56 security_group_id = openstack_networking_secgroup_v2.instance_ssh_access.id57 }58
59 # Allow icmp from IPv6 net60 resource "openstack_networking_secgroup_rule_v2" "rule_icmp_access_ipv6" {61 region = var.region62 count = length(var.allow_ssh_from_v6)63 direction = "ingress"64 ethertype = "IPv6"65 protocol = "icmp"66 remote_ip_prefix = var.allow_ssh_from_v6[count.index]67 security_group_id = openstack_networking_secgroup_v2.instance_ssh_access.id68 }69
70 # Allow HTTP from IPv4 net71 resource "openstack_networking_secgroup_rule_v2" "rule_http_access_ipv4" {72 region = var.region73 count = length(var.allow_http_from_v4)74 direction = "ingress"75 ethertype = "IPv4"
(continues on next page)
132 Chapter 16. Terraform and NREC: Part III - Dynamics

NREC end user documentation Documentation
(continued from previous page)
76 protocol = "tcp"77 port_range_min = 8078 port_range_max = 8079 remote_ip_prefix = var.allow_http_from_v4[count.index]80 security_group_id = openstack_networking_secgroup_v2.instance_web_access.id81 }82
83 # Allow HTTP from IPv6 net84 resource "openstack_networking_secgroup_rule_v2" "rule_http_access_ipv6" {85 region = var.region86 count = length(var.allow_http_from_v6)87 direction = "ingress"88 ethertype = "IPv6"89 protocol = "tcp"90 port_range_min = 8091 port_range_max = 8092 remote_ip_prefix = var.allow_http_from_v6[count.index]93 security_group_id = openstack_networking_secgroup_v2.instance_web_access.id94 }95
96 # Allow MySQL from IPv4 net97 resource "openstack_networking_secgroup_rule_v2" "rule_mysql_access_ipv4" {98 region = var.region99 count = length(var.allow_mysql_from_v4)
100 direction = "ingress"101 ethertype = "IPv4"102 protocol = "tcp"103 port_range_min = 3306104 port_range_max = 3306105 remote_ip_prefix = var.allow_mysql_from_v4[count.index]106 security_group_id = openstack_networking_secgroup_v2.instance_db_access.id107 }108
109 # Allow MYSQL from IPv6 net110 resource "openstack_networking_secgroup_rule_v2" "rule_mysql_access_ipv6" {111 region = var.region112 count = length(var.allow_mysql_from_v6)113 direction = "ingress"114 ethertype = "IPv6"115 protocol = "tcp"116 port_range_min = 3306117 port_range_max = 3306118 remote_ip_prefix = var.allow_mysql_from_v6[count.index]119 security_group_id = openstack_networking_secgroup_v2.instance_db_access.id120 }121
122 # Allow MYSQL from web servers (IPv4)123 resource "openstack_networking_secgroup_rule_v2" "rule_mysql_from_web_access_
→˓ipv4" {124 region = var.region125 count = 1126 direction = "ingress"
(continues on next page)
16.5. Complete example 133

NREC end user documentation Documentation
(continued from previous page)
127 ethertype = "IPv4"128 protocol = "tcp"129 port_range_min = 3306130 port_range_max = 3306131 remote_group_id = openstack_networking_secgroup_v2.instance_web_access.id132 security_group_id = openstack_networking_secgroup_v2.instance_db_access.id133 }134
135 # Allow MYSQL from web servers (IPv6)136 resource "openstack_networking_secgroup_rule_v2" "rule_mysql_from_web_access_
→˓ipv6" {137 region = var.region138 count = 1139 direction = "ingress"140 ethertype = "IPv6"141 protocol = "tcp"142 port_range_min = 3306143 port_range_max = 3306144 remote_group_id = openstack_networking_secgroup_v2.instance_web_access.id145 security_group_id = openstack_networking_secgroup_v2.instance_db_access.id146 }
Listing 14: variables.tf
1 # Variables2 variable "region" {3 }4
5 variable "name" {6 default = "myproject"7 }8
9 variable "ssh_public_key" {10 default = "~/.ssh/id_rsa.pub"11 }12
13 variable "network" {14 default = "IPv6"15 }16
17 variable "volume_size" {18 default = 2019 }20
21 # Security group defaults22 variable "allow_ssh_from_v6" {23 type = list(string)24 default = []25 }26
27 variable "allow_ssh_from_v4" {
(continues on next page)
134 Chapter 16. Terraform and NREC: Part III - Dynamics

NREC end user documentation Documentation
(continued from previous page)
28 type = list(string)29 default = []30 }31
32 variable "allow_http_from_v6" {33 type = list(string)34 default = []35 }36
37 variable "allow_http_from_v4" {38 type = list(string)39 default = []40 }41
42 variable "allow_mysql_from_v6" {43 type = list(string)44 default = []45 }46
47 variable "allow_mysql_from_v4" {48 type = list(string)49 default = []50 }51
52 # Mapping between role and image53 variable "role_image" {54 type = map(string)55 default = {56 "web" = "1a38633c-5fd1-4c01-b447-b1128ed3bb3f" # GOLD CentOS 757 "db" = "46884c15-fad5-49dd-b85c-5303cd41ab17" # GOLD Ubuntu 18.04 LTS58 }59 }60
61 # Mapping between role and flavor62 variable "role_flavor" {63 type = map(string)64 default = {65 "web" = "m1.small"66 "db" = "m1.medium"67 }68 }69
70 # Mapping between role and number of instances (count)71 variable "role_count" {72 type = map(string)73 default = {74 "web" = 475 "db" = 176 }77 }
16.5. Complete example 135

NREC end user documentation Documentation
136 Chapter 16. Terraform and NREC: Part III - Dynamics

CHAPTER 17
Terraform and NREC: Part IV - Pairing with Ansible
Last changed: 2020-05-18
Contents
• Terraform and NREC: Part IV - Pairing with Ansible
– Installing Ansible
– Ansible inventory from Terraform state
– Configuring Ansible connectivity
– Using Ansible
– Complete example
This document builds on Terraform Part 1, Part 2 and Part 3. In Part 3 we built an environment in NRECconsisting of 4 frontend web servers and 1 backend database server, as well as security groups and an SSHkey pair for access. However, we didn’t do anything inside the operating systems of our instances to makethem act as web servers or database servers. Terraform only interacts with the Openstack API, and doesn’tdo anything inside the instances. Here is where Ansible comes into play. Using Ansible, we’ll configure theweb servers and the database server to make a real service.
This is not an introduction to Ansible. It is assumed that the reader has some knowledge and experience inusing Ansible.
The files used in this document can be downloaded:
• terraform.py
• main.tf
137

NREC end user documentation Documentation
• secgroup.tf
• variables.tf
• terraform.tfvars
• web.yaml
• db.yaml
17.1 Installing Ansible
Ansible is available in most Linux distributions. If possible, use the Ansible version availble from thedistribution. For Fedora, and for RHEL or CentOS with EPEL enabled, simply install using yum:
# yum install ansible
For Debian and Ubuntu:
# apt-get install ansible
When using Ansible with NREC and instances created with Terraform, we’ll often create and destroy in-stances multiple times. This depends on your workflow. It may be beneficial to add the following configu-ration to your ~/.ansible.cfg to prevent Ansible from halting on unknown SSH host keys:
[defaults]host_key_checking = False
17.2 Ansible inventory from Terraform state
Terraform maintains a state in the working directory, and is also able to update its local state against the realresources in NREC. The local state is stored in terraform.tfstate, and we’re using a Python scriptthat reads this file and produces an Ansible inventory dynamically.
To use the Python script we need to install and set it up:
• Download terraform.py
• Put it in ~/.local/bin and make sure it is executable:
$ mv ~/Downloads/terraform.py ~/.local/bin/$ chmod a+x ~/.local/bin/terraform.py
This installs the Python script terraform.py into ~/.local/bin (e.g. your home directory). Usually,this directory should be in your shell path. If it isn’t, you can add it (for bash):
export PATH=$PATH:~/.local/bin
In your Terraform working directory, create a directory called “inventory”, and create a symbolic link “hosts”that points to the terraform.py script:
138 Chapter 17. Terraform and NREC: Part IV - Pairing with Ansible

NREC end user documentation Documentation
$ mkdir inventory$ ln -s ~/.local/bin/terraform.py inventory/hosts
You can then run ansible from within your Terraform working directory to verify that dynamic inventoryworks:
$ ansible all -i inventory --list-hostshosts (5):
bgo-db-0bgo-web-0bgo-web-1bgo-web-2bgo-web-3
This only lists the hosts and verifies that the dynamic inventory works. Having Ansible actually connect tothe hosts requires additional configuration as described in the next section.
17.3 Configuring Ansible connectivity
In order for Ansible to function correctly we need to tell Ansible additional information about the instances.First, we add a map in variables.tf to address the SSH user. Ansible needs to know which SSH userto connect as:
Listing 1: variables.tf
1 # Mapping between role and SSH user2 variable "role_ssh_user" {3 type = map(string)4 default = {5 "web" = "centos"6 "db" = "ubuntu"7 }8 }
Next, we need to use those variables and add a metadata directive in the compute instance resource. Thescript terraform.py will use this metadata to correctly create inventory for Ansible. For the web servers(CentOS 7):
Listing 2: main.tf
1 metadata = {2 ssh_user = lookup(var.role_ssh_user, "web", "unknown")3 prefer_ipv6 = true4 my_server_role = "web"5 }
And for the database server (Ubuntu 18.04 LTS):
17.3. Configuring Ansible connectivity 139

NREC end user documentation Documentation
Listing 3: main.tf
1 metadata = {2 ssh_user = lookup(var.role_ssh_user, "db", "unknown")3 prefer_ipv6 = true4 python_bin = "/usr/bin/python3"5 my_server_role = "database"6 }
We have added this metadata:
• ssh_user: Using the map variable created in variables.tf (see above).
• prefer_ipv6: This tells terraform.py that we want Ansible to use the IPv6 address of the instance.This is needed in our case as we’re using the IPv6 network type in NREC. When using the dualStacknetwork, this is usually not needed.
• python_bin: This is only used on the database server (Ubuntu). Ansible needs a working Pythonbinary to function, and in Ubuntu’s case there isn’t a /usr/bin/python and Ansible needs to beexplicitly told which binary to use on the instance.
• my_server_role: We use this to control how to identify the web servers and database servers inthe Ansible inventory.
With these in place, having applied the configuration with terraform apply, we can run terraform.pyto view our inventory:
$ terraform.py --root . --hostfile## begin hosts generated by terraform.py ##2001:700:2:8301::113b bgo-db-02001:700:2:8301::113f bgo-web-02001:700:2:8301::100a bgo-web-12001:700:2:8301::100b bgo-web-22001:700:2:8301::1129 bgo-web-3## end hosts generated by terraform.py ##
And we run ansible to verify that it is able to reach the instances over the network:
$ ansible all -i inventory -m pingbgo-web-3 | SUCCESS => {
"changed": false,"ping": "pong"
}bgo-web-1 | SUCCESS => {
"changed": false,"ping": "pong"
}bgo-db-0 | SUCCESS => {
"changed": false,"ping": "pong"
}bgo-web-2 | SUCCESS => {
"changed": false,(continues on next page)
140 Chapter 17. Terraform and NREC: Part IV - Pairing with Ansible

NREC end user documentation Documentation
(continued from previous page)
"ping": "pong"}bgo-web-0 | SUCCESS => {
"changed": false,"ping": "pong"
}
We can also run a command on the instances to verify that SSH connection is working:
$ ansible all -i inventory -m shell -a 'uname -sr'bgo-web-3 | CHANGED | rc=0 >>Linux 3.10.0-1062.4.3.el7.x86_64
bgo-web-1 | CHANGED | rc=0 >>Linux 3.10.0-1062.4.3.el7.x86_64
bgo-web-2 | CHANGED | rc=0 >>Linux 3.10.0-1062.4.3.el7.x86_64
bgo-web-0 | CHANGED | rc=0 >>Linux 3.10.0-1062.4.3.el7.x86_64
bgo-db-0 | CHANGED | rc=0 >>Linux 4.15.0-70-generic
We have verified that Ansible and dynamic inventory from Terraform state works, and are ready to proceed.
17.4 Using Ansible
Important: This section includes simple playbooks to show how Ansible can be used for configuring theOS and services. In order to make this into a real service for production use, a lot more work needs to bedone.
I order to configure the web and database servers, we have created two playbooks. They are named web.yaml and db.yaml, respectively. We’ll take a look at web.yaml first:
Listing 4: web.yaml
1 ---2 - hosts: os_metadata_my_server_role=web3 become: true4
5 tasks:6 - name: Install Apache7 yum:8 name: httpd9
(continues on next page)
17.4. Using Ansible 141

NREC end user documentation Documentation
(continued from previous page)
10 - name: Install php11 yum:12 name: php13
14 - name: Install php-mysql15 yum:16 name: php-mysql17
18 - name: Set httpd_can_network_connect_db SELinux boolean19 seboolean:20 name: httpd_can_network_connect_db21 state: yes22 persistent: yes23
24 - name: Make sure Apache is running and enabled25 systemd:26 name: httpd27 state: started28 enabled: yes
In this playbook, we do the following:
• Install the Apache web server, PHP and the PHP MySQL bindings
• Make sure that SELinux allows Apache to connect to the database
• Make sure that the web service is enabled and running.
Next, lets take a look at db.yaml which we use to configure the database server:
Listing 5: db.yaml
1 ---2 - hosts: os_metadata_my_server_role=database3 become: true4
5 tasks:6 - name: Create XFS filesystem on /dev/sdb7 filesystem:8 fstype: xfs9 dev: /dev/sdb
10
11 - name: Mount volume12 mount:13 path: /var/lib/mysql14 src: /dev/sdb15 fstype: xfs16 state: mounted17
18 - name: Install MariaDB, also starts the service19 apt:20 name: mariadb-server21
(continues on next page)
142 Chapter 17. Terraform and NREC: Part IV - Pairing with Ansible

NREC end user documentation Documentation
(continued from previous page)
22 - name: Set MariaDB bind-address23 ini_file:24 path: /etc/mysql/mariadb.conf.d/90-server.cnf25 section: mysqld26 option: bind-address27 value: "{{ ansible_default_ipv4.address }}"28 backup: yes29 notify:30 - restart MariaDB31
32 - name: Make sure MariaDB is running and enabled33 systemd:34 name: mariadb35 state: started36 enabled: yes37
38 - name: Install PyMySQL, needed by Ansible MySQL module39 apt:40 name: python3-pymysql41
42
43 handlers:44 - name: restart MariaDB45 systemd:46 name: "mariadb"47 state: restarted
In this playbook, we do the following:
• Create a filesystem on our volume, available as the /dev/sdb device, and mount it as /var/lib/mysql
• Install MariaDB (i.e. MySQL)
• Set the MariaDB bind address, i.e. the IP address that we want the database server to listen to. Weuse the internal, private IPv4 address for this. When using the IPv6 network in NREC, instances alsoget a private IPv4 address. We can use this address for communication between instances, which inour case will be communication between the web servers and the database.
• Make sure that the database service is enabled and running.
• Install the MySQL bindings for Python. This is needed if we want to use Ansible to communicatewith the database server, e.g. for creating databases.
The db.yaml also includes a handler for restarting MariaDB if we have done configuration changes whichrequire a restart to take effect.
The Ansible playbooks above would be run like this, from the Terraform workspace directory:
$ ansible-playbook -i inventory db.yaml$ ansible-playbook -i inventory web.yaml
17.4. Using Ansible 143

NREC end user documentation Documentation
17.5 Complete example
A complete listing of the example files used in this document is provided below.
Listing 6: main.tf
1 provider "openstack" {2 }3
4 # SSH key5 resource "openstack_compute_keypair_v2" "keypair" {6 region = var.region7 name = "${terraform.workspace}-${var.name}"8 public_key = file(var.ssh_public_key)9 }
10
11 # Web servers12 resource "openstack_compute_instance_v2" "web_instance" {13 region = var.region14 count = lookup(var.role_count, "web", 0)15 name = "${var.region}-web-${count.index}"16 image_id = lookup(var.role_image, "web", "unknown")17 flavor_name = lookup(var.role_flavor, "web", "unknown")18
19 key_pair = "${terraform.workspace}-${var.name}"20 security_groups = [21 "default",22 "${terraform.workspace}-${var.name}-ssh",23 "${terraform.workspace}-${var.name}-web",24 ]25
26 network {27 name = "IPv6"28 }29
30 metadata = {31 ssh_user = lookup(var.role_ssh_user, "web", "unknown")32 prefer_ipv6 = true33 my_server_role = "web"34 }35
36 depends_on = [37 openstack_networking_secgroup_v2.instance_ssh_access,38 openstack_networking_secgroup_v2.instance_web_access,39 ]40 }41
42 # Database servers43 resource "openstack_compute_instance_v2" "db_instance" {44 region = var.region45 count = lookup(var.role_count, "db", 0)46 name = "${var.region}-db-${count.index}"
(continues on next page)
144 Chapter 17. Terraform and NREC: Part IV - Pairing with Ansible

NREC end user documentation Documentation
(continued from previous page)
47 image_id = lookup(var.role_image, "db", "unknown")48 flavor_name = lookup(var.role_flavor, "db", "unknown")49
50 key_pair = "${terraform.workspace}-${var.name}"51 security_groups = [52 "default",53 "${terraform.workspace}-${var.name}-ssh",54 "${terraform.workspace}-${var.name}-db",55 ]56
57 network {58 name = "IPv6"59 }60
61 metadata = {62 ssh_user = lookup(var.role_ssh_user, "db", "unknown")63 prefer_ipv6 = true64 python_bin = "/usr/bin/python3"65 my_server_role = "database"66 }67
68 depends_on = [69 openstack_networking_secgroup_v2.instance_ssh_access,70 openstack_networking_secgroup_v2.instance_db_access,71 ]72 }73
74 # Volume75 resource "openstack_blockstorage_volume_v2" "volume" {76 name = "database"77 size = var.volume_size78 }79
80 # Attach volume81 resource "openstack_compute_volume_attach_v2" "attach_vol" {82 instance_id = openstack_compute_instance_v2.db_instance[0].id83 volume_id = openstack_blockstorage_volume_v2.volume.id84 }
Listing 7: secgroup.tf
1 # Security group SSH + ICMP2 resource "openstack_networking_secgroup_v2" "instance_ssh_access" {3 region = var.region4 name = "${terraform.workspace}-${var.name}-ssh"5 description = "Security group for allowing SSH and ICMP access"6 }7
8 # Security group HTTP9 resource "openstack_networking_secgroup_v2" "instance_web_access" {
10 region = var.region
(continues on next page)
17.5. Complete example 145

NREC end user documentation Documentation
(continued from previous page)
11 name = "${terraform.workspace}-${var.name}-web"12 description = "Security group for allowing HTTP access"13 }14
15 # Security group MySQL16 resource "openstack_networking_secgroup_v2" "instance_db_access" {17 region = var.region18 name = "${terraform.workspace}-${var.name}-db"19 description = "Security group for allowing MySQL access"20 }21
22 # Allow ssh from IPv4 net23 resource "openstack_networking_secgroup_rule_v2" "rule_ssh_access_ipv4" {24 region = var.region25 count = length(var.allow_ssh_from_v4)26 direction = "ingress"27 ethertype = "IPv4"28 protocol = "tcp"29 port_range_min = 2230 port_range_max = 2231 remote_ip_prefix = var.allow_ssh_from_v4[count.index]32 security_group_id = openstack_networking_secgroup_v2.instance_ssh_access.id33 }34
35 # Allow ssh from IPv6 net36 resource "openstack_networking_secgroup_rule_v2" "rule_ssh_access_ipv6" {37 region = var.region38 count = length(var.allow_ssh_from_v6)39 direction = "ingress"40 ethertype = "IPv6"41 protocol = "tcp"42 port_range_min = 2243 port_range_max = 2244 remote_ip_prefix = var.allow_ssh_from_v6[count.index]45 security_group_id = openstack_networking_secgroup_v2.instance_ssh_access.id46 }47
48 # Allow icmp from IPv4 net49 resource "openstack_networking_secgroup_rule_v2" "rule_icmp_access_ipv4" {50 region = var.region51 count = length(var.allow_ssh_from_v4)52 direction = "ingress"53 ethertype = "IPv4"54 protocol = "icmp"55 remote_ip_prefix = var.allow_ssh_from_v4[count.index]56 security_group_id = openstack_networking_secgroup_v2.instance_ssh_access.id57 }58
59 # Allow icmp from IPv6 net60 resource "openstack_networking_secgroup_rule_v2" "rule_icmp_access_ipv6" {61 region = var.region62 count = length(var.allow_ssh_from_v6)
(continues on next page)
146 Chapter 17. Terraform and NREC: Part IV - Pairing with Ansible

NREC end user documentation Documentation
(continued from previous page)
63 direction = "ingress"64 ethertype = "IPv6"65 protocol = "icmp"66 remote_ip_prefix = var.allow_ssh_from_v6[count.index]67 security_group_id = openstack_networking_secgroup_v2.instance_ssh_access.id68 }69
70 # Allow HTTP from IPv4 net71 resource "openstack_networking_secgroup_rule_v2" "rule_http_access_ipv4" {72 region = var.region73 count = length(var.allow_http_from_v4)74 direction = "ingress"75 ethertype = "IPv4"76 protocol = "tcp"77 port_range_min = 8078 port_range_max = 8079 remote_ip_prefix = var.allow_http_from_v4[count.index]80 security_group_id = openstack_networking_secgroup_v2.instance_web_access.id81 }82
83 # Allow HTTP from IPv6 net84 resource "openstack_networking_secgroup_rule_v2" "rule_http_access_ipv6" {85 region = var.region86 count = length(var.allow_http_from_v6)87 direction = "ingress"88 ethertype = "IPv6"89 protocol = "tcp"90 port_range_min = 8091 port_range_max = 8092 remote_ip_prefix = var.allow_http_from_v6[count.index]93 security_group_id = openstack_networking_secgroup_v2.instance_web_access.id94 }95
96 # Allow MySQL from IPv4 net97 resource "openstack_networking_secgroup_rule_v2" "rule_mysql_access_ipv4" {98 region = var.region99 count = length(var.allow_mysql_from_v4)
100 direction = "ingress"101 ethertype = "IPv4"102 protocol = "tcp"103 port_range_min = 3306104 port_range_max = 3306105 remote_ip_prefix = var.allow_mysql_from_v4[count.index]106 security_group_id = openstack_networking_secgroup_v2.instance_db_access.id107 }108
109 # Allow MYSQL from IPv6 net110 resource "openstack_networking_secgroup_rule_v2" "rule_mysql_access_ipv6" {111 region = var.region112 count = length(var.allow_mysql_from_v6)113 direction = "ingress"114 ethertype = "IPv6"
(continues on next page)
17.5. Complete example 147

NREC end user documentation Documentation
(continued from previous page)
115 protocol = "tcp"116 port_range_min = 3306117 port_range_max = 3306118 remote_ip_prefix = var.allow_mysql_from_v6[count.index]119 security_group_id = openstack_networking_secgroup_v2.instance_db_access.id120 }121
122 # Allow MYSQL from web servers (IPv4)123 resource "openstack_networking_secgroup_rule_v2" "rule_mysql_from_web_access_
→˓ipv4" {124 region = var.region125 count = 1126 direction = "ingress"127 ethertype = "IPv4"128 protocol = "tcp"129 port_range_min = 3306130 port_range_max = 3306131 remote_group_id = openstack_networking_secgroup_v2.instance_web_access.id132 security_group_id = openstack_networking_secgroup_v2.instance_db_access.id133 }134
135 # Allow MYSQL from web servers (IPv6)136 resource "openstack_networking_secgroup_rule_v2" "rule_mysql_from_web_access_
→˓ipv6" {137 region = var.region138 count = 1139 direction = "ingress"140 ethertype = "IPv6"141 protocol = "tcp"142 port_range_min = 3306143 port_range_max = 3306144 remote_group_id = openstack_networking_secgroup_v2.instance_web_access.id145 security_group_id = openstack_networking_secgroup_v2.instance_db_access.id146 }
Listing 8: variables.tf
1 # Variables2 variable "region" {3 }4
5 variable "name" {6 default = "myproject"7 }8
9 variable "ssh_public_key" {10 default = "~/.ssh/id_rsa.pub"11 }12
13 variable "network" {14 default = "IPv6"
(continues on next page)
148 Chapter 17. Terraform and NREC: Part IV - Pairing with Ansible

NREC end user documentation Documentation
(continued from previous page)
15 }16
17 variable "volume_size" {18 default = 2019 }20
21 variable "metadata" {22 type = list(string)23 default = []24 }25
26 # Security group defaults27 variable "allow_ssh_from_v6" {28 type = list(string)29 default = []30 }31
32 variable "allow_ssh_from_v4" {33 type = list(string)34 default = []35 }36
37 variable "allow_http_from_v6" {38 type = list(string)39 default = []40 }41
42 variable "allow_http_from_v4" {43 type = list(string)44 default = []45 }46
47 variable "allow_mysql_from_v6" {48 type = list(string)49 default = []50 }51
52 variable "allow_mysql_from_v4" {53 type = list(string)54 default = []55 }56
57 # Mapping between role and image58 variable "role_image" {59 type = map(string)60 default = {61 "web" = "1a38633c-5fd1-4c01-b447-b1128ed3bb3f" # GOLD CentOS 762 "db" = "46884c15-fad5-49dd-b85c-5303cd41ab17" # GOLD Ubuntu 18.04 LTS63 }64 }65
66 # Mapping between role and flavor(continues on next page)
17.5. Complete example 149

NREC end user documentation Documentation
(continued from previous page)
67 variable "role_flavor" {68 type = map(string)69 default = {70 "web" = "m1.small"71 "db" = "m1.medium"72 }73 }74
75 # Mapping between role and number of instances (count)76 variable "role_count" {77 type = map(string)78 default = {79 "web" = 480 "db" = 181 }82 }83
84 # Mapping between role and SSH user85 variable "role_ssh_user" {86 type = map(string)87 default = {88 "web" = "centos"89 "db" = "ubuntu"90 }91 }
Listing 9: terraform.tfvars
1 # Region2 region = "bgo"3
4 # This is needed to access the instance over ssh5 allow_ssh_from_v6 = [6 "2001:700:100:202::202:12/128",7 "2001:700:100:118::67/128"8 ]9 allow_ssh_from_v4 = [
10 "129.240.202.12/32",11 "129.240.118.67/32"12 ]13
14 # This is needed to access the instance over http15 allow_http_from_v6 = [16 "2001:700:100::/40"17 ]18 allow_http_from_v4 = [19 "129.240.0.0/16"20 ]21
22 # This is needed to access the instance over the mysql port23 allow_mysql_from_v6 = [
(continues on next page)
150 Chapter 17. Terraform and NREC: Part IV - Pairing with Ansible

NREC end user documentation Documentation
(continued from previous page)
24 "2001:700:100:202::202:12/128"25 ]26 allow_mysql_from_v4 = [27 "129.240.202.12/32"28 ]
Listing 10: web.yaml
1 ---2 - hosts: os_metadata_my_server_role=web3 become: true4
5 tasks:6 - name: Install Apache7 yum:8 name: httpd9
10 - name: Install php11 yum:12 name: php13
14 - name: Install php-mysql15 yum:16 name: php-mysql17
18 - name: Set httpd_can_network_connect_db SELinux boolean19 seboolean:20 name: httpd_can_network_connect_db21 state: yes22 persistent: yes23
24 - name: Make sure Apache is running and enabled25 systemd:26 name: httpd27 state: started28 enabled: yes
Listing 11: db.yaml
1 ---2 - hosts: os_metadata_my_server_role=database3 become: true4
5 tasks:6 - name: Create XFS filesystem on /dev/sdb7 filesystem:8 fstype: xfs9 dev: /dev/sdb
10
11 - name: Mount volume12 mount:
(continues on next page)
17.5. Complete example 151

NREC end user documentation Documentation
(continued from previous page)
13 path: /var/lib/mysql14 src: /dev/sdb15 fstype: xfs16 state: mounted17
18 - name: Install MariaDB, also starts the service19 apt:20 name: mariadb-server21
22 - name: Set MariaDB bind-address23 ini_file:24 path: /etc/mysql/mariadb.conf.d/90-server.cnf25 section: mysqld26 option: bind-address27 value: "{{ ansible_default_ipv4.address }}"28 backup: yes29 notify:30 - restart MariaDB31
32 - name: Make sure MariaDB is running and enabled33 systemd:34 name: mariadb35 state: started36 enabled: yes37
38 - name: Install PyMySQL, needed by Ansible MySQL module39 apt:40 name: python3-pymysql41
42
43 handlers:44 - name: restart MariaDB45 systemd:46 name: "mariadb"47 state: restarted
152 Chapter 17. Terraform and NREC: Part IV - Pairing with Ansible

CHAPTER 18
Terraform and NREC: Part V - DNS Management
Last changed: 2020-05-18
Contents
• Terraform and NREC: Part V - DNS Management
– Creating a DNS zone
– Creating DNS records
– Apply and check
– Dynamically add DNS records
– Complete example
This document is an introduction on how to create a DNS zone and DNS records in Openstack using Ter-raform.
The files used in this document can be downloaded:
• zone.tf
• recordset.tf
• dynamic.tf
153

NREC end user documentation Documentation
18.1 Creating a DNS zone
It is quite easy to create a DNS zone using Terraform. Consider zone-tf below. It is a single resourcedeclaration needed to create a zone.
Important: The DNS service expects the zone name to be a fully qualified domain name, which meansthat the name of the zone provided in the resource declaration must end with a dot “.”. Omitting the trailingdot will result in an error.
This is correct:
name = "test.com."
This is incorrect and will not work:
name = "test.com"
In this example we create a zone “test.com”:
Listing 1: zone.tf
1 provider "openstack" {2 }3
4 resource "openstack_dns_zone_v2" "test_com" {5 name = "test.com."6 email = "[email protected]"7 description = "An example zone"8 }
This is all that is needed. You may add additional parameters, most commonly TTL, if you need to set aTTL value other than the default (3600).
18.2 Creating DNS records
In this example we create 3 records in the “test.com” zone:
1. An A record which poinst to a single IPv4 address for “test01.test.com”
2. An AAAA record which points to a single IPv6 address for “test01.test.com”
3. A CNAME record (alias) “www” which points to “test01.test.com”
The record resources are specified in the recordset-tf file below:
Listing 2: recordset.tf
1 resource "openstack_dns_recordset_v2" "A_test01_test_com" {2 zone_id = openstack_dns_zone_v2.test_com.id3 name = "test01.test.com."
(continues on next page)
154 Chapter 18. Terraform and NREC: Part V - DNS Management

NREC end user documentation Documentation
(continued from previous page)
4 description = "An example record set"5 type = "A"6 records = ["10.0.0.1"]7 }8
9 resource "openstack_dns_recordset_v2" "AAAA_test01_test_com" {10 zone_id = openstack_dns_zone_v2.test_com.id11 name = "test01.test.com."12 description = "An example record set"13 type = "AAAA"14 records = ["2001:700:2:8200::226c"]15 }16
17 resource "openstack_dns_recordset_v2" "CNAME_www_test_com" {18 zone_id = openstack_dns_zone_v2.test_com.id19 name = "www.test.com."20 description = "An example record set"21 type = "CNAME"22 records = ["test01.test.com."]23 }
Important: The DNS service expects the record name to be a fully qualified domain name, which meansthat the name of the record provided in the resource declaration must end with a dot “.”. Omitting the trailingdot will result in an error. This is correct:
name = "app-01.test.com."
This is incorrect and will not work:
name = "app-01.test.com"
This also applies to the records list in case of a CNAME, as show in the example above.
18.3 Apply and check
Running terraform apply creates the zone, as well as the three records we specified:
$ terraform apply...Apply complete! Resources: 4 added, 0 changed, 0 destroyed.
We can check that the authoritative name servers have our zone and records by querying one of them themdirectly:
$ host www.test.com. ns1.nrec.noUsing domain server:Name: ns1.nrec.noAddress: 158.37.63.251#53
(continues on next page)
18.3. Apply and check 155

NREC end user documentation Documentation
(continued from previous page)
Aliases:
www.test.com is an alias for test01.test.com.test01.test.com has address 10.0.0.1test01.test.com has IPv6 address 2001:700:2:8200::226c
As always, you can use terraform destroy to remove the created resources:
$ terraform destroy...Destroy complete! Resources: 4 destroyed.
18.4 Dynamically add DNS records
The previous examples show how to add a zone and create records within that zone. What if the zone alreadyexists, and how do we automatically add a DNS record for an instance when the instance is created? We’llanswer those questions here.
First, let’s consider how to add records to an already existing zone. The problem here is that we need toknow the ID of the zone. We can manually fetch the ID from the output of openstack zone list andhard code the ID into our Terraform config, but there is a more dynamic and flexible way to do this. In orderto fetch the needed metadata for our zone we use a data directive in Terraform:
Listing 3: dynamic.tf
1 # DNS zone2 variable "zone_name" {3 default = "mytestzone.com"4 }5
6 # Find zone info7 data "openstack_dns_zone_v2" "myzone" {8 name = "${var.zone_name}."9 }
In this example, we have a resource declaration for instances that creates an arbitrary number of instances.In our example, we create 2 instances:
Listing 4: dynamic.tf
1 # How many instances to create2 variable "node_count" {3 default = "2"4 }5
6 # Create instances7 resource "openstack_compute_instance_v2" "testserver" {8 region = var.region
(continues on next page)
156 Chapter 18. Terraform and NREC: Part V - DNS Management

NREC end user documentation Documentation
(continued from previous page)
9 count = var.node_count10 name = "${var.region}-test-${count.index}"11 image_name = "GOLD CentOS 7"12 flavor_name = "m1.small"13
14 key_pair = "mykey"15 security_groups = [ "default" ]16
17 network {18 name = "dualStack"19 }20 }
Finally, in order to create DNS records for our instances we need to reference the name and IP of theinstances. Notice the usage of the data variable to reference the zone ID (highlighted):
Listing 5: dynamic.tf
1 # Create records for A (IPv4)2 resource "openstack_dns_recordset_v2" "a_record" {3 zone_id = data.openstack_dns_zone_v2.myzone.id4 count = var.node_count5 name = "${openstack_compute_instance_v2.testserver[count.index].name}
→˓.${var.zone_name}."6 type = "A"7 records = [ "${openstack_compute_instance_v2.testserver[count.index].
→˓access_ip_v4}" ]8 }9
10 # Create records for AAAA (IPv6)11 resource "openstack_dns_recordset_v2" "aaaa_record" {12 zone_id = data.openstack_dns_zone_v2.myzone.id13 count = var.node_count14 name = "${openstack_compute_instance_v2.testserver[count.index].name}
→˓.${var.zone_name}."15 type = "AAAA"16 records = [ "${openstack_compute_instance_v2.testserver[count.index].
→˓access_ip_v6}" ]17 }
In this example, we create both A (IPv4) and AAAA (IPv6) records for our instances, since we specified the“dualStack” network for the instance resources.
After running terraform apply we can use the CLI command openstack recordset list toverify that the DNS records have been created:
$ openstack recordset list mytestzone.com. -c name -c type -c records+----------------------------+-------+----------------------------------------→˓---------------------+| name | type | records→˓ |
(continues on next page)
18.4. Dynamically add DNS records 157

NREC end user documentation Documentation
(continued from previous page)
+----------------------------+-------+----------------------------------------→˓---------------------+| mytestzone.com. | SOA | ns2.nrec.no. foo.bar.com. 1575885141→˓3519 600 86400 3600 || mytestzone.com. | NS | ns1.nrec.no.→˓ || | | ns2.nrec.no.→˓ || bgo-test-1.mytestzone.com. | A | 158.39.74.137→˓ || bgo-test-0.mytestzone.com. | AAAA | 2001:700:2:8300::21d3→˓ || bgo-test-1.mytestzone.com. | AAAA | 2001:700:2:8300::207e→˓ || bgo-test-0.mytestzone.com. | A | 158.39.77.244→˓ |+----------------------------+-------+----------------------------------------→˓---------------------+
And we can check that they exist in DNS by querying the authoritative name servers:
$ host bgo-test-1.mytestzone.com. ns1.nrec.noUsing domain server:Name: ns1.nrec.noAddress: 158.37.63.251#53Aliases:
bgo-test-1.mytestzone.com has address 158.39.74.137bgo-test-1.mytestzone.com has IPv6 address 2001:700:2:8300::207e
18.5 Complete example
A complete listing of the example files used in this document is provided below.
Listing 6: zone.tf
1 provider "openstack" {2 }3
4 resource "openstack_dns_zone_v2" "test_com" {5 name = "test.com."6 email = "[email protected]"7 description = "An example zone"8 }
Listing 7: recordset.tf
1 resource "openstack_dns_recordset_v2" "A_test01_test_com" {2 zone_id = openstack_dns_zone_v2.test_com.id
(continues on next page)
158 Chapter 18. Terraform and NREC: Part V - DNS Management
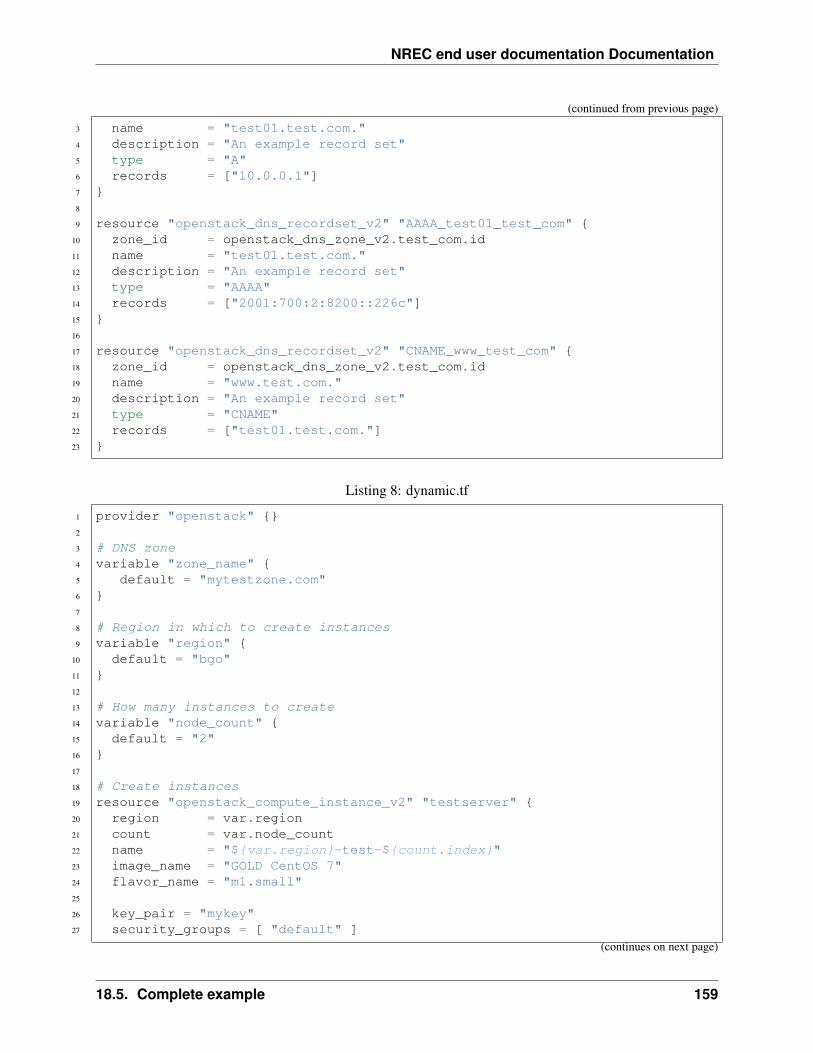
NREC end user documentation Documentation
(continued from previous page)
3 name = "test01.test.com."4 description = "An example record set"5 type = "A"6 records = ["10.0.0.1"]7 }8
9 resource "openstack_dns_recordset_v2" "AAAA_test01_test_com" {10 zone_id = openstack_dns_zone_v2.test_com.id11 name = "test01.test.com."12 description = "An example record set"13 type = "AAAA"14 records = ["2001:700:2:8200::226c"]15 }16
17 resource "openstack_dns_recordset_v2" "CNAME_www_test_com" {18 zone_id = openstack_dns_zone_v2.test_com.id19 name = "www.test.com."20 description = "An example record set"21 type = "CNAME"22 records = ["test01.test.com."]23 }
Listing 8: dynamic.tf
1 provider "openstack" {}2
3 # DNS zone4 variable "zone_name" {5 default = "mytestzone.com"6 }7
8 # Region in which to create instances9 variable "region" {
10 default = "bgo"11 }12
13 # How many instances to create14 variable "node_count" {15 default = "2"16 }17
18 # Create instances19 resource "openstack_compute_instance_v2" "testserver" {20 region = var.region21 count = var.node_count22 name = "${var.region}-test-${count.index}"23 image_name = "GOLD CentOS 7"24 flavor_name = "m1.small"25
26 key_pair = "mykey"27 security_groups = [ "default" ]
(continues on next page)
18.5. Complete example 159

NREC end user documentation Documentation
(continued from previous page)
28
29 network {30 name = "dualStack"31 }32 }33
34 # Find zone info35 data "openstack_dns_zone_v2" "myzone" {36 name = "${var.zone_name}."37 }38
39 # Create records for A (IPv4)40 resource "openstack_dns_recordset_v2" "a_record" {41 zone_id = data.openstack_dns_zone_v2.myzone.id42 count = var.node_count43 name = "${openstack_compute_instance_v2.testserver[count.index].name}
→˓.${var.zone_name}."44 type = "A"45 records = [ "${openstack_compute_instance_v2.testserver[count.index].
→˓access_ip_v4}" ]46 }47
48 # Create records for AAAA (IPv6)49 resource "openstack_dns_recordset_v2" "aaaa_record" {50 zone_id = data.openstack_dns_zone_v2.myzone.id51 count = var.node_count52 name = "${openstack_compute_instance_v2.testserver[count.index].name}
→˓.${var.zone_name}."53 type = "AAAA"54 records = [ "${openstack_compute_instance_v2.testserver[count.index].
→˓access_ip_v6}" ]55 }
Other:
160 Chapter 18. Terraform and NREC: Part V - DNS Management

CHAPTER 19
Networking considerations
Last changed: 2020-05-18
Contents
• Networking considerations
– Background
* Simplicity
* Less state
* Performance
* Scalability
* Cost
– Implications
19.1 Background
A common networking model in infrastructure clouds is virtualization of Layer 2 domains, meaning that thetenants/projects are given one or more private networks, available only for them. Then, public IP addressesare connected to virtual routers and DNATed to the target instance. For the end user, this presents greatflexibility and enables them to create rather complex network designs inside the cloud. However, it alsocreates a great deal of complexity and overhead. In this model, all traffic is NATed, and Layer 2 domainsspan entire data centers and beyond, adding encapsulation cost. To achieve this, linux kernel IP namespacingis employed to isolate the tenant networks. In addition, all traffic passes through dedicated servers acting
161

NREC end user documentation Documentation
as network nodes, adding infrastructure cost. Another problem with this model is that it is very stateful,so whenever something goes wrong, there’s a lot of labor involved in fixing the system back to it’s desiredstate. All this complexity also comes at the price of performance.
In NREC we have chosen another, much simpler, model. This model is based on the project calico open-stack neutron core plugin, which provides a pure Layer 3 model for the instance IP traffic. Our hypervisorsare connected together with a higly redundant Layer 2 network utilizing the modern linux teaming driver inan active/active 802.3ad configuration (LACP) with 10gbit interconnects. Then, all hypervisors, which arerunning on linux, employes a BGP router (bird), BGP in short being the protocol that runs the Internet. Thehypervisors are connected to hardware routers in a leaf-spine topology, the spines acting as route reflectorsfor the hypervisor’s routers. So, when an instance is spawned, a host route to a TAP device on the hyper-visor is created locally (ip-address/32), then reflected to all routers, including those running on the otherhypervisors. The instances themselves, where the TAP device appears as a network adapter, are isolated intheir own Layer 2 domain, neighboring only a virtual device answering ARP requests with arbitrary MACaddresses. All security group rules are implemented on the TAP device by the networking system.
Our chosen networking model provides a host of benefits:
162 Chapter 19. Networking considerations

NREC end user documentation Documentation
19.1.1 Simplicity
Layer 2 domains are kept small, and only a single IP name space is used on each host. Therefore, all trafficis easily visible. This makes troubleshooting a lot easier, hopefully saving us a lot of headaches.
19.1.2 Less state
As our cloud network is mostly stateless, recovering after some sort of failure or outage should be mucheasier, saving still a lot of headaches for both end users and engineers.
19.1.3 Performance
Without the need for NAT, DNAT and dedicated servers pushing network traffic, both throughput and latencyshows great performance, with each hypervisor able to push and receive traffic near line speed.
19.1.4 Scalability
With BGP running the internet, it proves to be able to also scale in the data center while keeping our failuredomains rather small
19.1.5 Cost
Our routers and switches are running linux on the control plane, running on commodity switch hardware,avoiding vendor lock-in or proprietary control systems. Because we configure our networking equipmentthe same way we configure our servers, management overhead and hardware cost is reduced.
19.2 Implications
While our chosen networking model in most cases is invisible for the end user, there are some use caseswhere popular and traditional methodologies won’t work. In short, every system that needs Layer 2 visi-bility from instance to instance will not work. While there are not many systems which need this Layer 2connectivity, there are exceptions, the most popular these days being the deployment of container clusters.Container cluster networking itself is not trivial, but trying to deploy it on top of our networking modelis a challenge. While it can be done, failover mechanisms would require a load balancer outside the IaaSinfrastructure. Still, a single host deployment should be rather trivial. In short, we strongly encourage youto contact the NREC team if you run into problems caused by the networking model. Often your problemscan be solved in other ways than you originally envisioned.
So, in short, for now, we don’t offer Load-balancing as a Service, or other networking features requiringhost to host Layer 2 connectivity. Thus, private networking is unavailable. You must secure your instanceswith security groups and/or other mechanisms.
19.2. Implications 163

NREC end user documentation Documentation
164 Chapter 19. Networking considerations

CHAPTER 20
Support
20.1 Informal chat
We have a public chat room:
https://uhps.slack.com
Use this for quick questions and informal chat.
20.2 Support requests
If you need assistance or have special requests (e.g. increased quota), please contact us via our supportemail:
20.3 Reporting bugs and issues
Bugs and issues should be reported via the GitHub project norcams/iaas:
https://github.com/norcams/iaas/issues
165

NREC end user documentation Documentation
166 Chapter 20. Support

CHAPTER 21
Known Issues
Last changed: 2020-05-18
Contents
• Known Issues
– API access
– Console considerations
– Console doesn’t appear
– SSH keys different in API and dashboard
– Booting instance from a volume
– Maximum number of volume attachments to an instance
– Network availability
– No access after changed email address
– Outdated size
– Missing network when provisioning from snapshot
* Debian 9, 10
* Fedora 30
* CentOS 7
– Cannot delete DNS zones or records in dashboard
167

NREC end user documentation Documentation
– Intance name
– Security Groups caution
21.1 API access
All new users will get a pass phrase to use against the API when they provision a personal project (seeLogging in). There are no means of retrieving this pass phrase at the moment. Please contact us in case it islost.
21.2 Console considerations
The instance web console is configured for EN keymapping. This may be an issue for users with otherlocales, like NO. If you experience problems with keymapping (for instance, special characters may map tounexpected keys, or not at all), change keymapping for your local browser to EN. This is done differently indifferent operating systems. Please refer to the operating system documentation.
21.3 Console doesn’t appear
We’ve recently made some changes to the console which requires you to reboot your instance. Note thatyou’ll have to power cycle from within Openstack, soft rebooting doesn’t help. We’ve made a short guideon how to do that here
21.4 SSH keys different in API and dashboard
For now, when uploading SSH keys through the dashboard, those keys are not accessable from the API (andvice versa). Work around this issue by uploading the SSH keys both via dashboard and via the API.
21.5 Booting instance from a volume
Booting instances from volumes is an experimental feature. Several features do not work when the instanceis bootet from a volume: If you create a snapshot of the instance, the snapshot will not be bootable. Youcan, however, turn off the instance and create a volume snapshot of the bootdisk. Also, it is not possible toattach another volume to the instance. These constrains should be fixed in future upgrades.
21.6 Maximum number of volume attachments to an instance
Currently a bug in the upstream software stack used in our service prevents more than six volume attach-ments to a single instance. When a user try to attach more volumes than six, the attempt will silently fail.
168 Chapter 21. Known Issues

NREC end user documentation Documentation
21.7 Network availability
To use the access web page you are required to use a computer at your educational institution. Currentlythis usually implies the wired network only at the universities and colleges that are authorized for access.
21.8 No access after changed email address
Sometimes a user’s primary email address changes. This is an issue due to how Dataporten uses this emailaddress as the user ID, and thus the user ID and demo/personal projects in NREC is the same as this address.The issue might arise when users e.g. changes their status from student to employee or vice versa. If thissituation applies, then please send an email to [email protected] which includes your current and previousprimary email addresses. You will then receive further instructions on how to proceed.
21.9 Outdated size
As we have updated flavors, the users that have had access to the larger machines may now notice new sizestatus “Outdated” on the Horizon dashboard. Those flavors are not available anymore, but it will not affectthe running instances.
21.10 Missing network when provisioning from snapshot
21.10.1 Debian 9, 10
IPv6 is broken in an instance started from a snapshot, and this can also affect the original instance. Ifthe resolver addresses is configured using their IPv6 addresses, even IPv4 is affected. This issue appearsregardless of which network is selected for the instance. Here is a workaround:
1. Log in to the instance as the debian user
2. Remove the IPv6 dhclient leases file:
rm /var/lib/dhcp/dhclient6.eth0.leases
3. Log out and shut down the system
4. Create a snapshot
5. The original instance might be restarted at this point
You should now be able to create new machines based upon this snapshot and get fully functional networks.
21.10.2 Fedora 30
IPv6 is broken in an instance started from a snapshot, and this can also affect the original instance. Thisissue appears regardless of which network is selected for the instance. Here is a workaround:
21.7. Network availability 169

NREC end user documentation Documentation
1. Log in to the instance as the fedora user
2. Remove the IPv6 dhclient leases file:
rm /var/lib/NetworkManager/dhclient6-*-eth0.lease
3. Log out and shut down the system
4. Create a snapshot
5. The original instance might be restarted at this point
You should now be able to create new machines based upon this snapshot and get fully functional networks.
21.10.3 CentOS 7
Note: This issue only affects CentOS 7 instances provisioned from our GOLD image before 2019-01-01.As of January 1, 2019 the GOLD image for CentOS 7 is upgraded to CentOS 7.6, and the networking setuphas been fixed.
There is an issue with CentOS and provisioning instances from a snapshot. This is due to a local workaroundwe have added to mitigate a bug in the CentOS cloud-init package. This bug is fixed in CentOS 7.6 onwards.However, for instances originally provisioned with CentOS 7.5 or older this is a problem. Here is how to fixthis:
1. Log in to your instance as the centos user
2. Make sure that the instance is fully updated:
sudo yum upgrade -y
3. Make sure that the instance is running at least CentOS 7.6 (example):
[centos@centos ~]$ cat /etc/centos-releaseCentOS Linux release 7.6.1810 (Core)
4. Install the NetworkManager package:
sudo yum -y install NetworkManager
5. Enable the NetworkManager service:
sudo systemctl enable NetworkManager
6. Remove the file /etc/cloud/cloud.cfg.d/99-disable-network-config.cfg:
sudo rm /etc/cloud/cloud.cfg.d/99-disable-network-config.cfg
7. Create a file /etc/cloud/cloud.cfg.d/custom-networking.cfg with the followingcontents:
170 Chapter 21. Known Issues

NREC end user documentation Documentation
network:version: 2ethernets:
eth0:dhcp4: truedhcp6: true
After this change, you should be able to take a snapshot from the instance, and use that snapshot to provisionother instances. Networking should just work. Note that we have introduced a significant change to theoriginal instance. This instance should be rebooted after the changes, if possible.
21.11 Cannot delete DNS zones or records in dashboard
Currently, the GUI module for the DNS service has a Javascript bug which prevents deletion of zones andrecords from the GUI. Preliminary testing suggests that thus bug is fixed in the next release of Openstack(the “Rocky” release). An upgrade to the “Rocky” release is planned later this year. For now, zones andrecords can be deleted using the API, for example via the command line (CLI):
• Deleting records in CLI
• Deleting a zone in CLI
21.12 Intance name
We recommend you to name your instances only with [a-zA-Z0-9] characters to avoid any maintenanceissues.
21.13 Security Groups caution
When creating security groups via the API (e.g. Terraform), be as explicit as possible when setting param-eters. In one case we discovered that opening a port range for all IPs without explicitly setting 0.0.0.0/0for the remote-ip parameter (which is default) opened all ports for all IPs. We routinely report bugs toOpenstack developers, however, this is how to work around the problem for now.
Security group rules created in the dashboard are not affected by this bug, however, make sure your CIDRnotation is correct and make sense to avoid having Openstack correcting it by guessing what your intentionsare. Use a CIDR calculator if you’re unsure.
Users are always advised to ensure their security group rules work as intended in regards to both IP and portfiltering.
21.11. Cannot delete DNS zones or records in dashboard 171

NREC end user documentation Documentation
172 Chapter 21. Known Issues

CHAPTER 22
NREC Terms of Service
Last changed: 2020-05-18
Contents
• NREC Terms of Service
– Signing up
– Our services
– Security
– Availability
– Content
– Privacy Policy
Important: About this document You should know what you’re getting when you sign up for NREC, andwhat we expect from you in return. We’ve tried to keep the legalese to a minimum.
22.1 Signing up
• In order to use the NREC infrastructure service, you first need to provision yourself here.
• You must have a valid user account at an educational institution in Norway that has signed up forusing NREC.
173

NREC end user documentation Documentation
• You must provide your username, a valid email address, and any other information requested in orderto complete the signup process.
• After you successfully signing up, you will get your API password. Make sure to note the password.
• Please carefully guard the security of your account and monitor use of your API password. You areresponsible for all use of the services under your account, whether or not authorized, including anyuse of your API password.
• When you first log in, you are granted with a demo project. This project is personal and only fortesting purposes.
22.2 Our services
• We will make the NREC services available to you in accordance with our agreement with your par-ticipating educational organization. Subject to these Terms, we grant you a non-exclusive, revocablelicense and right to:
– Create and manage virtual machines within your quota limit.
– Create and manage firewalls and SSH keys for use with your virtual machines.
– Create and manage storage volumes for use with your virtual machines.
• You may only use the services for non-commercial purposes, for research purposes and educationalpurposes without charge.
• If you want to make use of the services outside this description, such as for commercial purposes,please contact us.
• If you need more resources (number of virtual machines, storage etc.) than your quota allows, pleasecontact us.
• If you want to use NREC for critical services, or services that require high availability, please contactus.
• Please make sure to free up resources that you no longer use or need, such as terminating obsoletevirtual machines.
22.3 Security
• We will strive to maintain a set of “Golden Images” for popular Linux distributions that are updatedon a monthly basis. These images will be easily recognizable, as they contain the word “GOLD” todistinguish them from images uploaded by users.
• Once you create a virtual machine from an image, the virtual machine becomes your responsibility.At a minimum, you should make sure that:
– The operating system running on your virtual machine is updated regularly with security patches
– The virtual machines are rebooted regularly for new patches to take effect
174 Chapter 22. NREC Terms of Service

NREC end user documentation Documentation
• Please adjust your firewalls (security groups) carefully, and allowing only necessary traffic to andfrom your virtual machines.
22.4 Availability
• We do not guarantee a specific availability percentage at this time. We will try to keep things up andrunning, but this is done on a best effort basis.
• There will be regular, scheduled maintenance downtime every 4 weeks. Downtime may require thatrunning virtual machines are rebooted.
• For dedicated hardware, there will be scheduled maintenance on the second Tuesday of every month.Downtime will require that running virtual machines are rebooted.
• Whenever scheduled downtime affects running virtual machines, the owner of the virtual machineswill be notified at least 5 days in advance.
• A period of unavailability is excluded from the service level guarantee, if:
– the unavailability is due to scheduled maintenance, provided we notify you at least 5 days inadvance;
– you are in breach of our terms of service, or your services agreement with us, as applicable(including your payment obligations to us), or the unavailability is otherwise due to your actions;
– the unavailability is caused by factors outside of our reasonable control, including a force ma-jeure event; internet access problems; blocking, filtering, or censorship of our services by agovernment or other third parties; or other problems beyond our services.
• We reserve the right to terminate instances in your demo project without notice, if a situation shouldarise in which we need the compute resources elsewhere.
22.5 Content
• Your content is your content. You retain ownership of all content that you place in NREC. Note thatwe may delete content in your demo project without notice.
• Your associated educational institution may exercise ownership of content according to Norwegianlaw.
• There are no backups. Deleted data is gone forever. Important data should be backed up outside ofNREC.
• Content that needs to be persistent across reinstalls should be placed on volumes. The OS disks areephemeral.
22.6 Privacy Policy
22.4. Availability 175

NREC end user documentation Documentation
Your NREC project is closely related to your email account. We collect your email address viaDataporten as we need this information for authentication and notification purposes. We keep youremail in our database as long as you are an active user of our services. If you change your email, youare responsible for notifying us so that we can update it, otherwise, you may risk losing your projectand data.
• Instances (virtual machines)
We do not monitor the content of instances, but may collect metrics (uptime, patch level and kernelversion) for security reasons. You should make sure that your activities are in accordance with yourlocal IT policy. You are responsible for all data you store on your own instances.
• Termination
When you are no longer registered as an active student or no longer working at any educationalinstitutions, your project will be terminated and deleted from our system after 90 days without priornotice.
• Withdrawal
If you for any reasons want to stop using our services, you should notify us by sending an email. Wewill then delete your project and all your data from our system. You are welcome to rejoin the NRECcloud whenever you want.
• Cookies
The cookies are only used for logging in and NREC related tasks. No data from these will ever beshared with any third parties.
176 Chapter 22. NREC Terms of Service

CHAPTER 23
Speculative Execution Attacks
Last changed: 2018-01-10
Important: UPDATE 2018-01-10 Kernel patches for Ubuntu 16.04 LTS and 17.10 are now available. Seeinstructions below. New instances will have the updated kernel.
UPDATE 2018-01-09 Contrary to what’s been said in this security advisory earlier, a kernel patch forUbuntu is not yet available, however, it is expected by January 9, 2018. We’re sorry to have providedmisleading information and will notitfy our users when a patch is available.
Contents
• Speculative Execution Attacks
– Background Information
– Updating your Instances
* CentOS
* Fedora
* Debian
* Ubuntu
– Additional References
177

NREC end user documentation Documentation
23.1 Background Information
In January 2018, multiple microarchitectural (hardware) implementation issues surfaced, affecting manymodern microprocessors. These issues require updates to the operating system (e.g. Linux/Windows kernel)and/or in combination with a microcode update. An unprivileged attacker can use these flaws to bypassconventional memory security restrictions in order to gain read access to privileged memory that wouldotherwise be inaccessible. There are 3 known CVEs related to this issue in combination with Intel, AMD,and ARM architectures.
With an infrastructure-as-a-service cloud like NREC, the customer is responsible for the security of theinstances running in his/her project. As the service provider, we will make available updated images inwhich these speculative execution issues are mitigated. However, the customer still needs to take actioneither by reprovisioning the instances using the updated images, or by updating any running instances usingthe appropriate tools for the operating system.
For more information regarding these security issues, refer to Additional References.
23.2 Updating your Instances
This paragraph describes in detail how to update any of the standard Linux distributions offered in NREC.
23.2.1 CentOS
In order to update an instance running CentOS, perform the following:
1. Log in as user “centos”:
$ ssh centos@<instance-ip-address>
2. Run “yum upgrade” using sudo:
$ sudo yum upgrade
3. Reboot the instance:
$ sudo reboot
4. Check that the running kernel has been updated:
$ ssh centos@<instance-ip-address> 'uname -sr'Linux 3.10.0-693.11.6.el7.x86_64
The output above shows the latest kernel for CentOS 7 as of January 8, 2018.
23.2.2 Fedora
In order to update an instance running Fedora, perform the following:
1. Log in as user “fedora”:
$ ssh fedora@<instance-ip-address>
178 Chapter 23. Speculative Execution Attacks

NREC end user documentation Documentation
2. Run “dnf upgrade” using sudo:
$ sudo dnf upgrade --refresh
3. Reboot the instance:
$ sudo reboot
4. Check that the running kernel has been updated:
$ ssh fedora@<instance-ip-address> 'uname -sr'Linux 4.14.11-300.fc27.x86_64
The output above shows the latest kernel for Fedora 27 as of January 8, 2018.
23.2.3 Debian
In order to update an instance running Debian, perform the following:
1. Log in as user “debian”:
$ ssh debian@<instance-ip-address>
2. Update and upgrade using sudo:
$ sudo apt-get update && sudo apt-get -y dist-upgrade
3. Reboot the instance:
$ sudo reboot
4. Check that the running kernel has been updated:
$ ssh debian@<instance-ip-address> 'uname -srv'Linux 4.9.0-5-amd64 #1 SMP Debian 4.9.65-3+deb9u2 (2018-01-04)
The output above shows the latest kernel for Debian 9 as of January 8, 2018.
23.2.4 Ubuntu
Ubuntu Cloud images are preinstalled with Unattended Upgrades meaning security updates will be automa-cially installed when they’re available. However, you need to reboot your instances in order to actually runthe updated kernel.
1. Check your kernel version
$ ssh ubuntu@<instance-ip-address> 'uname -srv'
You should get the following output if you have the updated kernel in 16.04 LTS:
Linux 4.4.0-108-generic #131-Ubuntu SMP Sun Jan 7 14:34:49 UTC 2018
or in Ubuntu 17.10:
Linux 4.13.0-25-generic #29-Ubuntu SMP Mon Jan 8 21:14:41 UTC 2018
23.2. Updating your Instances 179

NREC end user documentation Documentation
2. If the output shows something else, check the unattended upgrades log:
$ ssh ubuntu@<instance-ip-address>$ less /var/log/unattended-upgrades/unattended-upgrades.log
and look for a line similar to this:
2018-01-10 09:25:25,440 INFO Packages that will be upgraded: linux-→˓headers-generic linux-headers-virtual linux-image-virtual linux-virtual
3. If you have something that looks like the above, reboot your instance and check your kernel versionagain
$ sudo reboot
4. If you don’t, or if you’ve disabled or uninstalled Unattended Upgrades for some reason, proceed withmanual updating shown bellow.
In order to manually update an instance running Ubuntu, perform the following:
1. Log in as user “ubuntu”:
$ ssh ubuntu@<instance-ip-address>
2. Update and upgrade using sudo:
$ sudo apt-get update && sudo apt-get -y dist-upgrade
3. Reboot the instance:
$ sudo reboot
4. Check that the running kernel has been updated:
$ ssh ubuntu@<instance-ip-address> 'uname -srv'Linux 4.4.0-108-generic #131-Ubuntu SMP Sun Jan 7 14:34:49 UTC 2018
if you’re running 16.04 LTS or
$ ssh ubuntu@<instance-ip-address> 'uname -srv'Linux 4.13.0-25-generic #29-Ubuntu SMP Mon Jan 8 21:14:41 UTC 2018
if you’re running 17.10.
The output above shows the latest kernel for Ubuntu 16.04 LTS and 17.10 as of January 10, 2018.
23.3 Additional References
• [Red Hat] Kernel Side-Channel Attacks - CVE-2017-5754 CVE-2017-5753 CVE-2017-5715
• [Google Project Zero] Reading privileged memory with a side-channel
• [Red Hat] Speculative Execution Exploit Performance Impacts
• [Red Hat] Controlling the Performance Impact of Microcode and Security Patches for CVE-2017-5754 CVE-2017-5715 and CVE-2017-5753 using Red Hat Enterprise Linux Tunables
180 Chapter 23. Speculative Execution Attacks

NREC end user documentation Documentation
• [Microsoft] Understanding the performance impact of Spectre and Meltdown mitigations on WindowsSystems
• Meltdown and Spectre main site
23.3. Additional References 181

NREC end user documentation Documentation
182 Chapter 23. Speculative Execution Attacks

CHAPTER 24
Frequently asked questions (FAQ)
Last changed: 2020-05-18
Contents
• Frequently asked questions (FAQ)
– Project quotas vs. flavors
– Capacity planning and scaling
– HTTP 401 Unauthorized Error from the OpenStack API
– Transferring a volume
– Resizing an instance
– How to regenerate your public SSH key
– How to rebuild an instance, but preserve the IP addresses
– How to acknowledge the use of NREC
24.1 Project quotas vs. flavors
Quotas are operational limits. For example, the number of gigabytes allowed for each project can be con-trolled so that cloud resources are optimized. Using the Overview tab on Dashboard will show you thequotas for existing projects.
Flavors define the compute, memory, and storage capacity of computing instances. It is the size of a virtualmachine/instance that can be launched.
183

NREC end user documentation Documentation
24.2 Capacity planning and scaling
Cloud-based applications typically request more discrete hardware (horizontal scaling) as opposed to tradi-tional applications, which require larger hardware to scale (vertical scaling).
OpenStack is designed to be horizontally scalable. Rather than switching to larger servers, you procure moreservers and simply install identically configured services.
• Scalability: possibility to add more virtual machines/instances as needed.
• Flexibility: easier to install, implement and debug.
• Better performance: uptime and live migration.
24.3 HTTP 401 Unauthorized Error from the OpenStack API
The request you have made requires authentication. (HTTP 401) (Request-ID:→˓req-xxxx-xxxx-xxxx-xxxx-xxxx)
To get access to OpenStack services, you need to have an authentication token. A token represents theauthenticated identity of your username, password, project, domain, etc.
Each API-request includes a spesific authentication token. To access multiple services, you need to havea valid token for each service. A token can become invalid for different reasons. E.g. if you have wrongusername, password, domain, user role, or lacking proper access to a project. Administrative services suchas openstack user, project, group, domain, etc. will also give you an unauthorized error.
24.4 Transferring a volume
To transfer a volume from one project to another, both projects have to be within the same region. Pleasealso note that the projects cannot use the same volume simultaneously.
You will experience Unable to accept volume transfer error if you try to transfer a volume toa project which is located in another region, or if the project recipient does not have enough quota to acceptthe volume request.
24.5 Resizing an instance
Resizing an instance is not an available option in the dropdown menu for now. If you try to resize an instancevia API, you will get an HTTP 403 Forbidden error. As a workaround, you can create a snapshot ofthe instance, then edit and resize the snapshot and launch a new instance based on that.
184 Chapter 24. Frequently asked questions (FAQ)

NREC end user documentation Documentation
24.6 How to regenerate your public SSH key
If your public SSH keys have been mistakenly deleted or disappeared from the dashboard, and you haven’tgot local copies, it is trivial to regenerate and readd them.
Run the following command in your terminal:
ssh-keygen -y -f <path to your private key>
This will output the public key to stdout which may be stored in a new file or copied to the clipboard.
To readd a key, go to the NREC Dashboard and click on on Key Pairs -> Import Public Key
24.7 How to rebuild an instance, but preserve the IP addresses
By using openstack rebuild function, you can start an instance from a new image while maintaining the sameIP addresses, amongst other metadata.
$ openstack server rebuild --image <image> <server>
24.8 How to acknowledge the use of NREC
If you have used our infrastructure services for computing or other needs, we appreciate if you include thisin your acknowledgment.
An example of an acknowledgement of having used NREC is:
The computations were performed on the Norwegian Research and EducationCloud (NREC), using resources provided by the University ofBergen and the University of Oslo. http://www.nrec.no/
24.6. How to regenerate your public SSH key 185

NREC end user documentation Documentation
186 Chapter 24. Frequently asked questions (FAQ)

CHAPTER 25
Changelog
All major changes to UH-IaaS will be listed on this page.
25.1 2019-02-26
The support for Windows workloads has been reworked, and we have added several new features. First,we’ve added support for Windows Server 2019 Standard and Windows Server 2019 Core in addition to theexisting support for Windows Server 2016 Standard. On the new 2019 images a SSH server is automaticallyinstalled and configured. Also, when launching Windows instances in the BGO region, those instanceswill be automatically activated. The activation feature is not yet available in the OSL region for licensingreasons. Furthermore, several fixes and improvements have been implemented in the images, includingautomatic disabling of the Administrator account. New Windows images with the latest cumulative updatesfrom Microsoft will be automatically created every month, and will be available for UH-IaaS users a fewdays after “Microsoft Patch Tuesday”. See our updated Windows documentation for more details: Create aWindows virtual machine
25.2 2019-02-06
We’ve upgraded all the services to the Queens version which includes Compute (Nova), Network (Neutron),Volume (Cinder) and Image (Glance). If you would like more details, please refer to the Queens release notesavailable here: https://releases.openstack.org/queens/index.html If you run into any problems you suspectare caused by the upgrade, please let us know.
187

NREC end user documentation Documentation
25.3 2019-01-17
We’ve launched a new logo for UH-IaaS.
25.4 2018-11-13
We’ve upgraded all the remaining services to the Pike version which includes Compute (Nova), Network(Neutron), Volume (Cinder) and Image (Glance). Some of you may have noticed that we ran into a fewproblems the following day, but all those should be resolved now. If you would like more details, pleaserefer to the Pike release notes available here: https://releases.openstack.org/pike/index.html If you run intoany problems you suspect are caused by the upgrade, please let us know.
25.5 2018-10-31
Dashboard (Horizon) has been upgraded to the Pike version. There are small changes in the GUI, but noneof them are very intrusive. If you run into any problems, please let us know.
25.6 2018-10-17
Identity (Keystone) has been upgraded to the Pike version.
25.7 2018-08-13
25.7.1 Several issues fixed
The APIs for all UH-IaaS services are now open from everywhere. Earlier there were limitations as fromwhere the APIs were available without the use of VPN or similar services. The registration web page is stilllimited, though. This will be fixed in the near future.
It is now possible to create a volume from an image source.
Creating a snapshot from a running instance no longer breaks network connectivity. It is still highly recom-mended to turn off the instance before creating a snapshot.
As an experimental feature it is now possible to boot an instance from a volume, and create a new instanceon a volume from image. For now, however, there are several constraints. Read more in Known Issues.
188 Chapter 25. Changelog

NREC end user documentation Documentation
25.8 2018-07-19
25.8.1 UH-IaaS are now running OpenStack Ocata
We’ve upgraded OpenStack to Ocata, which is the 15th release of the software UH-IaaS is built on. For endusers the most obvious change is the look of OpenStack’s dashboard Horizon. If you run into any problemsyou suspect are caused by the upgrade, please let us know.
25.9 2018-02-28
25.9.1 Updated Horizon dashboard login page
We have updated the Horizon dashboard with links to UH-IaaS documentation and first-time login page.
25.10 2018-02-26
25.10.1 Updated flavors for instances
Flavors that define the RAM, CPU and disk capacity of instances have now been updated.
More details can be found in this documentation: http://iaas.readthedocs.io/en/latest/customer/flavors.html
25.11 2018-01-24
25.11.1 Updated storage for instances
The default storage used for instances (the disk where the operating system is running, short OS-disk) hasbeen updated to use a centralized storage.
This change allows us to do live migrations of instances, which means that we no longer need to rebootinstances when doing maintenance work. New instances in the availability zone (AZ) <region>-default-1will now use centralized storage.
We have manually moved all existing instances to a new availability zone (AZ) called <region>-legacy-1.This AZ will still be an available option when starting new instances. All instances in this AZ will continueto have scheduled maintenance.
25.12 2017-12-01
25.12.1 Changed
Debian 9 (Stretch) and Fedora 27 are now available again with support for IPv6.
25.8. 2018-07-19 189

NREC end user documentation Documentation
25.13 2017-10-12
25.13.1 Changed
The networks in UH-IaaS (both regions) that was named “public” are now named “dualStack” - networkIDs are the same.
190 Chapter 25. Changelog

CHAPTER 26
Indices and tables
• genindex
• search
191