Mastercycler ep - University of...
49
Mastercycler ® ep Bedienungsanleitung · Operating instructions · Mode d’emploi Istruzioni d’impiego · Manual de Instrucciones
Transcript of Mastercycler ep - University of...

Mastercycler
®
ep
Bedienungsanleitung · Operating instructions · Mode d’emploiIstruzioni d’impiego · Manual de Instrucciones
Titel_Rueck.fm Seite 1 Montag, 12. Juni 2006 2:55 14

53
1 Safety precautions
.......................................................................................................................................... 55
2 Installation
....................................................................................................................................................... 562.1 Delivery package .............................................................................................................................................. 562.2 Setting up the device........................................................................................................................................ 562.2.1 Removing the transport securing device on devices with a motorized lid........................................................572.2.2 Transport securing device for manual lids.........................................................................................................582.3 Functional units ................................................................................................................................................ 592.3.1 Mastercycler ep .................................................................................................................................................592.3.2 ESP (electronic sample protection) Heated lid ..................................................................................................602.3.3 Control Panel .....................................................................................................................................................602.4 Starting up the device ...................................................................................................................................... 612.4.1 Connecting a Mastercycler ep to a control panel..............................................................................................612.4.2 Connection of several Mastercycler ep to one control panel ............................................................................612.4.3 Networking of up to 30 Mastercycler ep ...........................................................................................................632.4.4 Connection of additional components (printer / mouse) ...................................................................................632.4.4.1 Printer ................................................................................................................................................................632.4.4.2 PS/2 mouse .......................................................................................................................................................63
3 Operation
......................................................................................................................................................... 643.1 Control Panel keys............................................................................................................................................ 643.2 Navigation tree.................................................................................................................................................. 663.3 First start-up / Administrator settings............................................................................................................... 663.3.1 Logging in as administrator ...............................................................................................................................673.3.2 Setting up new users.........................................................................................................................................673.3.3 Deleting users....................................................................................................................................................683.4 System nodes
.................................................................................................................................................. 683.4.1 Logfile ................................................................................................................................................................683.4.2 LCD Contrast.....................................................................................................................................................683.4.3 Date + Time .......................................................................................................................................................693.4.4 Country settings ................................................................................................................................................693.4.5 Beeper ...............................................................................................................................................................693.4.6 PIN .....................................................................................................................................................................693.4.7 DebugLog ..........................................................................................................................................................693.4.8 UserLog .............................................................................................................................................................693.5 Cycler nodes .....................................................................................................................................................703.6 MultiMediaCard
TM
............................................................................................................................................713.7 Operation in the navigation tree .......................................................................................................................713.7.1 Login..................................................................................................................................................................713.7.2 User change ......................................................................................................................................................723.7.3 Creating folders .................................................................................................................................................733.7.4 Creating programs.............................................................................................................................................743.7.5 Copying programs and folders ..........................................................................................................................743.7.5.1 Copying programs and folders to/from the MultiMediaCard
TM
........................................................................753.7.6 Deleting programs and folders ..........................................................................................................................763.7.7 Properties ..........................................................................................................................................................76
4 Programming
..................................................................................................................................................774.1 Program editor ..................................................................................................................................................774.1.1 Function keys in the editor ................................................................................................................................774.2 Program steps ..................................................................................................................................................784.2.1 TEMP – Temperature .........................................................................................................................................784.2.2 Cycle .................................................................................................................................................................804.2.3 Hold ..................................................................................................................................................................804.2.4 Pause ................................................................................................................................................................804.2.5 Sound ...............................................................................................................................................................814.2.6 End ...................................................................................................................................................................814.3 Create program .................................................................................................................................................814.3.1 Header settings .................................................................................................................................................814.3.2 Create program with program template ............................................................................................................834.3.3 Create program without template......................................................................................................................84
Table of contents
Table of contents
T
03_Masterc_ep_en.fm Seite 53 Montag, 12. Juni 2006 3:02 15

54
4.4 Transfer program ..............................................................................................................................................874.4.1 Transfer program from Mastercycler / Mastercycler gradient to the Mastercycler ep .....................................87
5 PCR run / operation
........................................................................................................................................885.1 Preparation .......................................................................................................................................................885.1.1 Sample loading..................................................................................................................................................885.1.2 Sample volume..................................................................................................................................................885.2 Start program ...................................................................................................................................................885.3 Status display ...................................................................................................................................................905.3.1 Exit the status display........................................................................................................................................905.3.2 Calling up the status display .............................................................................................................................905.4 Functions in the status display .........................................................................................................................915.4.1 Interruption under a running program ...............................................................................................................915.4.2 Opening and closing the ESP heated lid ...........................................................................................................915.4.3 Continue program..............................................................................................................................................915.4.4 Abort program ...................................................................................................................................................915.5 Protocol ............................................................................................................................................................925.6 Remove from operation ....................................................................................................................................92
6 Maintenance
....................................................................................................................................................936.1 Cleaning ............................................................................................................................................................936.2 Emergency unlocking of the heated lid .............................................................................................................94
7 Troubleshooting
...............................................................................................................................................95
8 Short instructions
...........................................................................................................................................968.1 Login .................................................................................................................................................................968.2 Creating folders and programs .........................................................................................................................968.3 Copying of files and programs .........................................................................................................................968.4 Deleting programs and folders .........................................................................................................................978.5 Creating a program ...........................................................................................................................................978.6 Starting the program .........................................................................................................................................988.7 Program run ......................................................................................................................................................988.8 Calling up the status display ............................................................................................................................998.9 Switching off the device ...................................................................................................................................99
9 Technical data
...............................................................................................................................................1009.1 Mastercycler ep ...............................................................................................................................................1009.2 Control Panel ...................................................................................................................................................100
10 Ordering information
....................................................................................................................................101
11 Ordering information for USA and Canada
................................................................................................103
Table of contents
Tabl
e of
con
tent
s
T
03_Masterc_ep_en.fm Seite 54 Montag, 12. Juni 2006 3:02 15

55
Please read the operating insructions carefully before using the Mastercycler ep. The Mastercycler ep may only be used to carry out PCR and related methods by qualified specialists in the research lab.
The following instructions must be unconditionally observed:
The safety regulations valid for the lab are to be constantly observed when working with the device.
In order to avoid damage through condensation, the device may first be switched on 12 hours after being set up. This is also the case when the location of the device is changed.
The mains voltage must coincide with the information on the identification plate.The device must be connected to a grounded socket.The device must be switched off and the plug pulled before maintenance work, and cleaning are carried out. Wait for the block to cool.A flow of compensating current can occur when several Mastercycler ep are networked incorrectly. The connections must be checked prior to commissioning.
The Mastercycler ep must stand completely on the stable work surface.There must be enough space available to avoid blocking the front and rear ventilation slots. It should also be possible for cooling air to find its way beneath the device.The distance between the rear air slots and the wall should be at least 10 cm.It should be ascertained that the air slots remain free and that the exhaust slots are not blocked.There should be no paper or other objects under the device that might lead to the blocking of the ventilation.
It should be ascertained that the control panel is held securely in the holding clamp.The control panel may not be placed on the device or the lid.The control panel may not be separated from a switched on Mastercycler ep.
If the lid is in the cleaning position, components with sharp edges are exposed. Extra caution should be exercised when cleaning the heated lid (particularly with respect to the sharp edged rollflex cable).
Don’t place the fingers between the lid and the housing of the device when opening or closing the lid or when cleaning. The fingers could otherwise be caught between them. Don’t reach underneath the heated lid.
Sample material may not be filled directly into the Thermoblock.
Damage to the block and the heated lid can result from using sample tubes other than those recommended. Unsuitable tubes can be damaged to such an extent that sample material may escape. This is especially important to remember when working with infectious materials.
It should be ascertained that the PCR plates are correctly situated in the block. Damage to the block and the lid, or escape of sample material may otherwise result.
If tubes are heated in the block without using the heated lid, these can burst when the temperature is too high, potentially causing the escape of sample material.
The Thermoblock, the inner side of the heated lid and micro test tubes / PCR plates can reach temperatures of over 50 °C very quickly. There is a risk of burns!The heated lid should be kept closed until temperatures of around 30 °C or less are reached. Do not use materials (tubes, PCR plates, caps, foils, mats) that are not sufficiently temperature resistant (to 120 °C).
Symbol on the Thermoblock:Warns of a potentially hot Thermoblock (
▼
) or a hot inner side of the heated lid (
▲
). shows, that gradient operation can result in the temperature being hotter on the right side than on the left side.
Explosive, flammable and volatile materials may not be heated in the Mastercycler ep. The device may not be operated in rooms at risk of explosion.
The appropriate safety regulations should be observed when working with pathogenic material, radioactive materials or other health-damaging materials.
It should be ascertained that no liquids penetrate into the device.
Caution: Hot Surface
Safety precautions
1 Safety precautions
1
04_Masterc_ep_en.fm Seite 55 Montag, 12. Juni 2006 3:05 15

56
Repairs should only be carried out by an Eppendorf AG authorized specialist. The authorization can only be obtained through participation in a certified course of training.
Transfer
If the device is passed on to someone else, please include the instruction manual.
Disposal
In case the product is to be disposed of, the relevant legal regulations are to be observed.
Information on the disposal of electrical and electronic devices in the European Community
The disposal of electrical devices is regulated within the European Community by national regulations based on EU Directive 2002/96/EC on waste electrical and electronic equipment (WEEE).According to these regulations, any devices supplied after 13.08.05 in the business-to-business sphere, to which this product is assigned, may no longer be disposed of in municipal or domestic waste. They are marked with the following symbol to indicate this.
As disposal regulations within the EU may vary from country to country, please contact your supplier if necessary.
The following parts are included in the delivery package:
1 Mastercycler ep gradient / Mastercycler ep gradient S / Mastercycler ep 3841 power cable1 operating insructions1 Certificate of Conformity1 pouch of PCR tubes 0.2 ml2 PCR plates twin.tec skirted / semi-skirted1 pouch sealing material 2 tools for emergency unlocking of lid
In order to avoid damage caused by condensation, the device may first be switched on 12 hours after setting up. This also applies to a change of location.
The Mastercycler ep must stand completely stable on the work surface.
There must be sufficient space that the front and rear air slots are not covered and that cooling air can reach below the device.
The distance between the air slots and the wall must be at least 10 cm.
It should be ensured that the air slots are free, and that the supply and exhaust air paths are not blocked. There should be no paper under the device. This can block the ventilation path.
The mains voltage must agree with the information on the name plate.
The device must be connected to a grounded socket.
The delivery carton should be kept in order to be able to ship the device in case repairs are necessary.
Space requirement: Width: 26.0 cmDepth: 41.0 cmHeight: 30.5 cm
Mains connection: An earthed wall socket for the Mastercycler ep. The control panel is also supplied through the mains connection of the Mastercycler ep.
2.1 Delivery package
2.2 Setting up the device
1 Safety precautions / 2 Installation
Safe
ty p
reca
utio
ns /
Ins
talla
tion
1/2
04_Masterc_ep_en.fm Seite 56 Montag, 12. Juni 2006 3:05 15

57
2.2.1 Removing the transport securing device on devices with a motorized lid
Before the Mastercycler ep is started up, the transport securing device must be removed!
The transport securing devices should be retained and replaced at the intended point for any transport operation in order to avoid transport damage!
On devices with a motorized lid, the transport securing device attached behind the lid is removed as follows and replaced in reverse sequence if needed:
In order to be able to use the transport safety device, the block must be loaded with empty tubes and the lid closed under the Cycler node in the LID menu (see Ch. 3.5). As soon as the lid is in the front position, the device can be switched off at the mains power switch and the transport safety device inserted into the guide rail.
Warning! Any time the device is transported, the transport securing device must be replaced in this position!
To remove the
transport securing device under the heated lid
, the above-described transport securing device must first be removed on a device with a motorized lid.
– Then connect the mains cable to the mains supply and the mains connection socket (see Chapter 2.3.1, Fig. 2). Switch on the device at the mains switch.
– Once the device has been switched on, the heated lid automatically moves into the rear position.
– As soon as the lid is in the rear position, switch the device off again and pull out the mains plug.
Proceed as follows to remove the transport securing device.
– Open lid upwards
– Remove the transport securing device by slowly pulling the red tab in the direction of the arrow (see illustration).Hold the lid steady in the upright position during this process.
The transport securing devices must be retained in case the device requires shipping.
Warning! Any time the device is transported, the transport securing device must be replaced in this position!
Installation
2 Installation
2
04_Masterc_ep_en.fm Seite 57 Montag, 12. Juni 2006 3:05 15

58
2.2.2 Transport securing device for manual lids
The transport safety device must be removed prior to starting up the Mastercycler ep!
Proceed as follows to remove the transport safety device:
– Push the lid of the Mastercycler ep into the rear position and open upwards.
– Remove the transport securing device by slowly pulling the red tab in the direction of the arrow (see illustration). Hold the lid steady in the upright position during this process.
The transport securing device must be retained in case the device requires shipping.
Warning! Any time the device is transported, the transport securing device must be replaced in this position!
2 Installation
Inst
alla
tion
2
04_Masterc_ep_en.fm Seite 58 Montag, 12. Juni 2006 3:05 15

59
2.3.1 Mastercycler ep
Only devices meeting the IEC 950/EN 60950 (UL1950) norms may be connected to the interfaces.
2.3 Functional units
1
2
3
4
5
Fig. 1: Front view
1 ESP Heated lid (opened)2 Status display 3 Thermoblock4 Holding clamp for control panel5 Opening for emergency
unlocking of lid6 Identification plate
6
Fig. 2: Rear view
1 ESP Heated lid (closed)2 Opening for emergency
unlocking of lid3 Air slots4 Mains connection socket5 Mains switch 0 = off / I = on6 Terminal block (see Fig. 3)
1
2
3
45
6
1 2 3 4 5 6 7
Fig. 3: Terminal block
1 Printer: parallel interface2 RS232: serial interface3 Control Panel:
Connection Control Panel4 CAN_out5 CAN_in6 Term: Terminal resistance7 Address: Rotary switch address
Installation
2 Installation
2
04_Masterc_ep_en.fm Seite 59 Montag, 12. Juni 2006 3:05 15

60
2.3.2 ESP (electronic sample protection) Heated lid
All variants of the Mastercycler ep are equipped with a novel ESP heated lid technology. With this technology, the lowering point and the loading pressure of the ESP heated lid are entirely electronically controlled. The optimal pressure is applied for all sample tubes and PCR plates, effectively minimizing evaporation. Due to the controlled lowering point of the ESP heated lid, the samples are thermally protected during the heating-up procedure.
There are two variants of the ESP heated lid, one for manual closing and a motorized heated lid.
The manual heated lid is simply drawn forward over the inserted tubes following sample loading prior to starting a program.
The motorized heated lid is also processible and need not be drawn over the inserted sample tubes. This solution is especially suited for use in automated systems.
2.3.3 Control Panel
The control panel can be suspended in the holding clamp of the Mastercycler ep or placed separately on a planar surface.
Only devices meeting the IEC 950/EN 60950 (UL1950) norms may be connected to the interfaces.
When opening and closing the lid, or when popping up into the cleaning position, avoid placing the fingers between the cover and the housing of the device.
Do not reach beneath the lid when the heated lid is open.
Fig. 4: Control panel
1 Display2 Serial interface3 Connection for PS/2
mouse4 Receptacle for
MultiMediaCard™
2
3
4
1
Inst
alla
tion
2 Installation
2
04_Masterc_ep_en.fm Seite 60 Montag, 12. Juni 2006 3:05 15
61
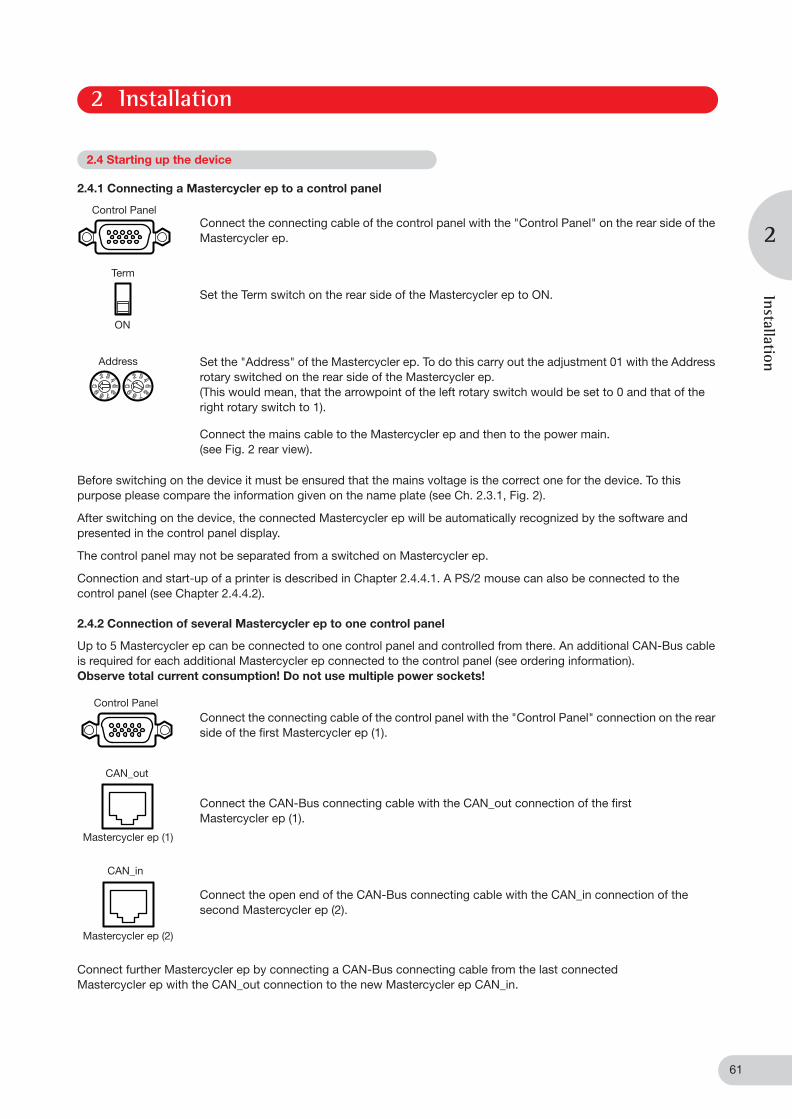
2.4.1 Connecting a Mastercycler ep to a control panel
Before switching on the device it must be ensured that the mains voltage is the correct one for the device. To this purpose please compare the information given on the name plate (see Ch. 2.3.1, Fig. 2).
After switching on the device, the connected Mastercycler ep will be automatically recognized by the software and presented in the control panel display.
The control panel may not be separated from a switched on Mastercycler ep.
Connection and start-up of a printer is described in Chapter 2.4.4.1. A PS/2 mouse can also be connected to the control panel (see Chapter 2.4.4.2).
2.4.2 Connection of several Mastercycler ep to one control panel
Connect the connecting cable of the control panel with the "Control Panel" on the rear side of the Mastercycler ep.
Set the Term switch on the rear side of the Mastercycler ep to ON.
Set the "Address" of the Mastercycler ep. To do this carry out the adjustment 01 with the Address rotary switched on the rear side of the Mastercycler ep. (This would mean, that the arrowpoint of the left rotary switch would be set to 0 and that of the right rotary switch to 1).
Connect the mains cable to the Mastercycler ep and then to the power main. (see Fig. 2 rear view).
Up to 5 Mastercycler ep can be connected to one control panel and controlled from there. An additional CAN-Bus cable is required for each additional Mastercycler ep connected to the control panel (see ordering information).
Observe total current consumption! Do not use multiple power sockets!
Connect the connecting cable of the control panel with the "Control Panel" connection on the rear side of the first Mastercycler ep (1).
Connect the CAN-Bus connecting cable with the CAN_out connection of the first Mastercycler ep (1).
Connect the open end of the CAN-Bus connecting cable with the CAN_in connection of the second Mastercycler ep (2).
Connect further Mastercycler ep by connecting a CAN-Bus connecting cable from the last connected Mastercycler ep with the CAN_out connection to the new Mastercycler ep CAN_in.
2.4 Starting up the device
Control Panel
Term
ON
Address
Control Panel
Mastercycler ep (1)
CAN_out
Mastercycler ep (2)
CAN_in
2 Installation
Installation
2
04_Masterc_ep_en.fm Seite 61 Montag, 12. Juni 2006 3:05 15

62
Set the Term switch in the terminal blocks of the Mastercycler ep: the first and last Mastercycler ep connected from the control panel to TERM ON (see Fig. 6 Mastercycler ep, 1 + 3).
Set all TERMs between the first Mastercycler with the Control Panel and the last Mastercycler ep to OFF (see Fig. 6 Mastercycler ep, 2). (If two Mastercycler ep are networked, both devices must be set to TERM ON).
Set the addresses with the rotary switches in the terminal block. The Mastercycler ep connected to the control panel (1) must be assigned the address 01. The other connected Mastercycler ep can receive addresses between 02 and 05.
Note:
It should thereby be ascertained that the same address hasn’t been assigned twice.
Once the devices are switched on, all connected Mastercycler ep will be automatically recognized by the software and represented in the Control Panel display.
The control panel may not be separated from a switched on Mastercycler ep.
3 2 1
Control Panel
Fig. 5: Mastercycler ep with CAN-Bus connecting cables
Term
ON
ON
Term
Fig. 6: Enlargement of the terminal blocks of 3 connected Mastercycler ep
Term AddressCAN_OUT CAN_IN
Mastercycler ep (3)
Mastercycler ep (2)
Mastercycler ep (1)
Inst
alla
tion
2 Installation
2
04_Masterc_ep_en.fm Seite 62 Montag, 12. Juni 2006 3:05 15
63
2.4.3 Networking of up to 30 Mastercycler ep
A computer and the Mastercycler ep CycleManager networking software will be necessary for the networking of up to 30 Mastercycler ep (see ordering information).
2.4.4 Connection of additional components (printer / mouse)2.4.4.1 Printer
If required, one printer per Mastercycler ep can be connected in order to print out protocols and programs.
Note:
If the formatting of the printout is not satisfactory, the necessary settings (character set, line spacing, characters per line, etc.) must be carried out on the printer. For this purpose please read the operating instructions for the printer.
2.4.4.2 PS/2 mouse
If required, a PS/2 mouse can be connected to a control panel for navigation and programming.
A mouse pointer appears in the display when the Mastercycler ep is switched on.
Connect printer with a Centronics cable (not a standard accessory) in the terminal block Mastercycler ep with the printer connection and switch on the printer.
Connect the mouse plug with the control panel connection. (See Ch. 2.3.3, Fig. 4)
2 Installation
Installation
2
04_Masterc_ep_en.fm Seite 63 Montag, 12. Juni 2006 3:05 15

64
Start a selected program on a connected Mastercycler ep.
Stop a running program on a connected Mastercycler ep.
Select functions. The function of the key changes with the represented monitor display. The current function of the key will be displayed above the relevant key in the display.
Move a marking in the graphic display. Move the cursor within an alphanumerical input field.
Move the cursor into the next input field.
Delete characters in the input fields
that are to the right of the cursor
. A marked entry can be completely deleted with the DELETE key.Delete folders or programs in own index.
Confirm input.Open selection lists.
Enter a decimal point in the numerical input fields.
3.1 Control Panel keys
NewUser
Ope
ration
3 Operation
3
04_Masterc_ep_en.fm Seite 64 Montag, 12. Juni 2006 3:05 15

65
Input of alphanumerical characters in the input fields. In the case of numerical input fields (e.g. temperature and time entries) the keys only represent numbers. Alphanumerical input fields have keys with multiple functions. By pushing several times on the individual keys it is possible to select the desired letter or numeral. The entry of "pcr 3", for example, is carried out by pressing the following keys:
An alternative for entering alphanumerical characters is carried out through the software over a keyboard in the display:
Select character in the display.
Insert the selected character.
Delete the character to the left of the cursor.
Delete the entire field.
Confirm the entered name.
Cancel the input.
to
→ p
→ c
→ r
→ (space)
→ 3
Backsp
Clear
Ok
Cancel
3 Operation
Operation
3
04_Masterc_ep_en.fm Seite 65 Montag, 12. Juni 2006 3:05 15

66
In the course of the first startup a window will first appear in which the current date and time can be set.
The start screen of the software shows a navigation tree, in which all users and all Mastercycler ep connected to the operation component are listed. Nodes for system settings and other functions are also present. Various areas and levels are identified by symbols in the navigation tree.
Move dark highlighted marking in the navigation tree.
Opens nodes. The created folders and programs are then visible below the individual users. When opening a cycler node, setting options and information about the device are displayed there. Or press the key.
Closes nodes.
Depending upon the level of the navigation tree at which the marking is found, the function of the function keys changes in the lowest lines of the display.
Enter the numbers with the number keys on the control panel.
Go to the next input field.
Selects am/pm.
Confirms input.
Exits screen.
3.2 Navigation tree
1
2
345
1
8
67
5 Program level6 Cycler level7 Closed node8 Open node
1 Level display2 Top level3 User level4 Folder level
3.3 First start-up / Administrator settings
to
Set
Ok
Ope
ration
3 Operation
3
04_Masterc_ep_en.fm Seite 66 Montag, 12. Juni 2006 3:05 15

67
3.3.1 Logging in as administrator
3.3.2 Setting up new users
A dialogue will first appear, in which the administrator must enter his PIN (personal identification number). This number must consist of at least four digits and may not contain any spaces.
Input of the administrator PIN.
Move the marking into the next field.
Repetition of the input of the administrator PIN in the Confirmation field.
Confirm the input. Or .
If required, this dialogue can be accessed to change the Administrator PIN with the function key Prop. under the System node (see Ch. 3.4).
The start screen will appear following the log-on of the administrator. New users can be configured here.
Press the NEW USER function key.
Enter name. Letters can also be entered over .
Go to the PIN field.
Enter desired PIN.
Switch to the Confirmation field.
Enter PIN again.
Note:
If a user forgets his PIN, the logged-on administrator can assign him a new PIN. The administrator cannot view user PINs.
Next field.
Enter comments where necessary. Letters can also be entered over .
Confirm entry with OK.
The screen changes back to the start screen and the newly set up user is displayed.
to
to
Ok
NewUser
to Keybd
or
to
or
to
or
toKeybd
Ok
3 Operation
Operation
3
04_Masterc_ep_en.fm Seite 67 Montag, 12. Juni 2006 3:05 15

68
3.3.3 Deleting users
Users can only be deleted by the administrator. To do this he must log on as described in Ch. 3.3.1.
Further higher settings can be carried out under the system nodes. These are partly only accessible to the Administrator.
3.4.1 Logfile
All executed activities are documented in the Logfile.
3.4.2 LCD Contrast
The display contrast can be set under this function.
Move marking to the user to be deleted.
Press DELETE key.
Confirm with YES.
Display of the current system specific and change the Administrator PIN .
Log-off of the current user.
Shutdown of the software to switch off.
View the Logfile.
Save the last 20 entries of the Logfile on the MultiMediaCard
TM
.
Save the Logfile on the MultiMediaCard
TM
.
Less contrast.
5 times less contrast.
More contrast.
5 times more contrast.
Yes
3.4 System nodes
Prop.
Logout
Shutdown
Show
Export 20
Export
– – – –
– – – – 5
+ + +
+ + + 5
Ope
ration
3 Operation
3
04_Masterc_ep_en.fm Seite 68 Montag, 12. Juni 2006 3:05 15

69
3.4.3 Date + Time
Setting the date and time of day can be carried out as described in chapter 3.3 under Date + Time. The administrator has to be logged on for this setting.
3.4.4 Country settings
3.4.5 Beeper
Switches the alarms on and off.
3.4.6 PIN
Setting for the usage of personal identification numbers (PIN) by the Administrator.
3.4.7 DebugLog
Additional function which can be switched on in certain servicing situations.
3.4.8 UserLog
The UserLog records all the actions performed on the Control Panel. All Login/Logout processes and any actions which involve saving data are saved on a user-specific basis, as are all program interactions like Start, Pause or Cancel.
Select country-specific display of time and date.The administrator has to be logged on for this setting.
Deactivation of the user-specific log-on.The Login dialogue is no longer displayed when the machine is switched on. There is no longer any access control and all users have access to the administrator settings.
Activation of the user specific log-on.Each user has his own PIN-protected area.
Views the UserLog.
Exports the UserLog to the MMC
TM
, the UserLog is then deleted.
Exports the UserLog to the MMC
TM
.
Unselect
Select
Show
ExptClear
Export
3 Operation
Operation
3
04_Masterc_ep_en.fm Seite 69 Montag, 12. Juni 2006 3:05 15

70
Under the cycler nodes it is possible to view and set various properties related to the Thermoblock.
Display of device properties.
Bring Thermoblock to a settable temperature.
Bring ESP heated lid to an settable temperature.
Go to the status display while PCR program is running.
Displays the protocol of the last PCR program processed which contains records of temperature progression.Each time a new program is started on the Cycler, the previous protocol is overwritten.
System can be selected after opening the Cycle node.
Display of block properties.
When activating the auto-restart time, a time can be entered, within which a running program should be continued in event of a power outage.In the event of a longer power failure the program will be ended.
View the current sensor temperatures.
Testing of the device temperature with help of a temperature sensor. The sensor is a component of the temperature validation system.
For the adjustment of the device temperature with the help of a temperature sensor.The sensor is a component of the temperature validation system.
The temperature validation system (see ordering information) is required for the Validate and Calibrate function. A detailed operation description is found in the operating instructions of the temperature validation system.
3.5 Cycler nodes
Prop.
Incubate
Lid
Status
Protocol
Block
Restart
Sensors
Validation
Calibration
Ope
ration
3 Operation
3
04_Masterc_ep_en.fm Seite 70 Montag, 12. Juni 2006 3:05 15

71
3.7.1 Login
In order to be able to work with the Mastercycler ep, one must log in as a user.
The logged-in user now has all reading and writing rights in his directory for all files and programs and can start all programs on the connected Thermocyclers.
The MultimediaCard
TM
provides the opportunity to save all programs of the control device on the exchangeable data carrier. Marking the MultiMediaCard
TM
in the navigation tree enables the following functions:
Save all data and settings, including the programs and user structure of the control panel on the MultiMediaCard
TM
.
Recovery of the Control Panel with the data saved on the MultiMediaCard
TM
. This function is only available to the administrator. The programs and settings saved on the Control Panel are overwritten during this process.
Calls up a dialogue to perform software updates for the Control Panel and the Thermocycler.
Shuts down the software for switching off the device.
Switch on the Mastercycler ep.
Open User selection list.
Select User.
Confirm the User.
Next field.
Enter PIN where necessary.
Confirm with OK.
3.6 MultiMediaCard™
Backup
Restore
Soft.updat
Shutdown
3.7 Operation in the navigation tree
or
to
Ok
3 Operation
Operation
3
04_Masterc_ep_en.fm Seite 71 Montag, 12. Juni 2006 3:05 15
72
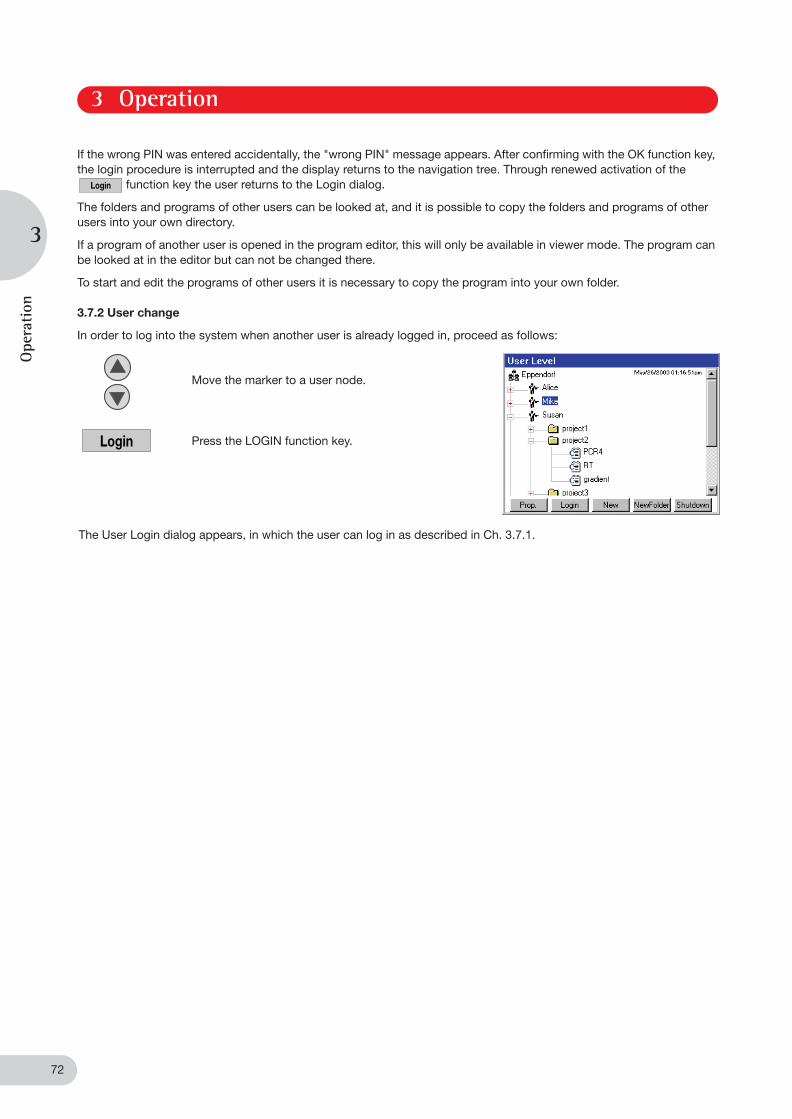
If the wrong PIN was entered accidentally, the "wrong PIN" message appears. After confirming with the OK function key, the login procedure is interrupted and the display returns to the navigation tree. Through renewed activation of the
function key the user returns to the Login dialog.
The folders and programs of other users can be looked at, and it is possible to copy the folders and programs of other users into your own directory.
If a program of another user is opened in the program editor, this will only be available in viewer mode. The program can be looked at in the editor but can not be changed there.
To start and edit the programs of other users it is necessary to copy the program into your own folder.
3.7.2 User change
In order to log into the system when another user is already logged in, proceed as follows:
Move the marker to a user node.
Press the LOGIN function key.
The User Login dialog appears, in which the user can log in as described in Ch. 3.7.1.
Login
Login
Ope
ration
3 Operation
3
04_Masterc_ep_en.fm Seite 72 Montag, 12. Juni 2006 3:05 15
73
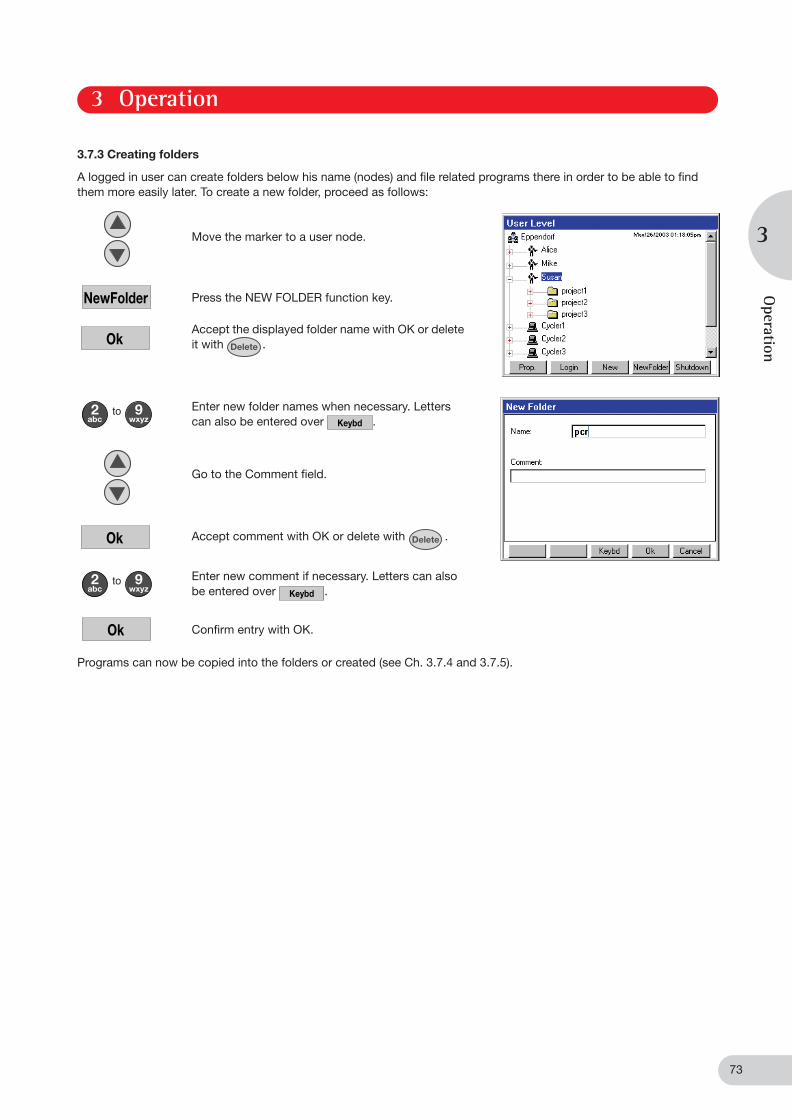
3.7.3 Creating folders
A logged in user can create folders below his name (nodes) and file related programs there in order to be able to find them more easily later. To create a new folder, proceed as follows:
Programs can now be copied into the folders or created (see Ch. 3.7.4 and 3.7.5).
Move the marker to a user node.
Press the NEW FOLDER function key.
Accept the displayed folder name with OK or delete it with .
Enter new folder names when necessary. Letters can also be entered over .
Go to the Comment field.
Accept comment with OK or delete with .
Enter new comment if necessary. Letters can also be entered over .
Confirm entry with OK.
NewFolder
Ok
toKeybd
Ok
toKeybd
Ok
3 Operation
Operation
3
04_Masterc_ep_en.fm Seite 73 Montag, 12. Juni 2006 3:05 15

74
3.7.4 Creating programs
A logged in user can create programs underneath his nodes or in one of his folders. The editing functions for these programs are only accessible to the logged in user. Other users may only look at these programs and copy them.
Proceed as follows to create a new program:
3.7.5 Copying programs and folders
All programs and folders of other users can be copied into your own directory and started or edited there.
Proceed as follows to copy a program or an entire folder:
Mark the user or a folder.
Press NEW PROG function key.
Accept displayed program names with OK or delete with .
Enter new program names if necessary. Letters can also be entered over .
Go to the Comment field.
Enter new comment if necessary. Letters can also be entered over .
Confirm entries with OK.
Move the marking to the folder or program to be copied.
Press COPY function key.
Dialog: Folder / Confirm "Program copied into clipboard" with OK.
NewProg
Ok
toKeybd
toKeybd
Ok
Copy
Ok
Ope
ration
3 Operation
3
04_Masterc_ep_en.fm Seite 74 Montag, 12. Juni 2006 3:05 15

75
Note: It should thereby be noted that a folder can only be inserted under a user. Conversely, a program can be inserted either under a user or in a folder.
The copied folder / program appears in the navigation tree and can be processed in the program editor or started directly on a connected Mastercycler ep.
3.7.5.1 Copying programs and folders to/from the MultiMediaCardTM
A MultiMediaCard can be used to store programs. To use a card to store programs, a backup needs to be performed first so that the user nodes are transferred to the card.
The administrator can see and edit all the user nodes on the MMC. A logged-on user has access only to his own user node on the MMC.The programs can be saved to the MMC and transferred from the MMC to the Control Panel using the Copy and Paste functions.
Note: programs cannot be started directly from the MMC but must first be copied to a user node on the Control Panel.
Move marking to own user or to target folder.
Insert folder or program with the PASTE function key.
Dialog: Confirm "Folder / Program pasted" with OK.
Plug an MMC into the Control Panel.
Perform a backup.
Open the MMC node, display users.
Paste
Ok
Backup
3 Operation
Operation
3
04_Masterc_ep_en.fm Seite 75 Montag, 12. Juni 2006 3:05 15

76
3.7.6 Deleting programs and folders
A program or folder can be removed from one’s own user nodes in the navigation tree.
3.7.7 Properties
The function key "Properties" enables the display and changing of properties levels at which the marking is currently found.
Move marking to the appropriate folders / program.
Press DELETE key.
Confirm enquiry with YES.
User Properties
A logged-in user or the administrator can change the name, the PIN and the comment.The user PIN is not visible to the Administrator.
Folder Properties
Under "Folder properties" it is possible to change the name and the comment of the folder concerned.
Program Properties
Under "Program properties" it is possible to change the name and the comment. The time of the last change is displayed. By activating the checkbox "Read only", it is possible to write-protect the relevant program.
Yes
Ope
ration
3 Operation
3
04_Masterc_ep_en.fm Seite 76 Montag, 12. Juni 2006 3:05 15

77
Graphic programming is simple in the program editor. The most important information is presented clearly and immediately in the graphic and can be directly edited. Additional settings of the program steps can be carried out in a dialog. Various program steps can be inserted into and removed from the graphic.
4.1.1 Function keys in the editor
Program header; settings for control strategy and heated lid behavior (see Ch. 4.3.1).
Expanded setting options of a temperature step (see Ch. 4.2.1).
Insert a new program step (see Ch. 4.3.3).
Deletion of the entire editor (see Ch. 4.3.3).
Activation of the hidden function keys.
Print the program in list form on a connected printer.
Save the edited program (see Ch. 4.3.2 and 4.3.3).
Leave the program editor.
4.1 Program editor
1 Number of the program step 2 Temperature 3 Holding time 4 Marking of a step
5 Marked input field 6 Set gradient 7 Median temperature of the
gradients 8 Additional settings for the
temperature step 9 Number of cycles
1
2
3
4
5
67
8
9
Header
Options
Insert
Clear all
>> <<
Save
Exit
4 Programming
Programm
ing
4
04_Masterc_ep_en.fm Seite 77 Montag, 12. Juni 2006 3:05 15

78
The various program steps available for programming are explained in the following along with their parameters.
4.2.1 TEMP - Temperature
The temperatures of the individual columns can be viewed with the function key. The maximum spread of the gradients depends upon the Mastercycler ep used. A homogenous temperature distribution is maintained over the entire block when the gradient function is switched off.
Temperature step, which can be inserted at any point in the program. The main parameters of the temperature step, temperature and holding time, are represented in the editor graphic and can be directly edited there.
TEMP Allowable values:Input steps:Time:Allowable values:Input steps:
Nominal temperature in Celsius4.0 to 99.0 °C0.1 °CHolding time in minutes and seconds00:01 to 99:59 mm:ss1 s
Additional functions of the temperature step can be accessed over the function key .
Temp Incr - Temperature increment: Increase / decrease of the temperature of the programmed temperature step to the next cycle by this amount.
Standard setting:Allowable values: Input steps:Temperature increase: Temperature decrease:
0.0 °C0.0 to 10.0 °C0.1 °C+–
Gradient:When using the gradient function, each column of the Thermoblock is set to a different temperature. If the marking is found on the check box, this can be activated by pressing the key. As soon as this is activated, the temperature fields from / to will be released and the Temp and Temp Incr fields will be simultaneously deactivated.
Standard setting:from Temp:Standard setting: Allowable values: Input steps:
to temp: Standard setting: Allowable values: Input steps:
deactivatedTemperature of the left block side 40.0 °C30.0 °C to 99.0 °C 0.1 °C
Temperature of the right block side 60.0 °C30.0 °C to 99.0 °C 0.1 °C
4.2 Program steps
Options
ShowGrad
Prog
ram
min
g
4 Programming
4
04_Masterc_ep_en.fm Seite 78 Montag, 12. Juni 2006 3:05 15

79
For procedures involving slow heating or cooling, various values can be given for the ramp. The current value will then be diplayed in the input field. The heating and cooling rates depend upon the Mastercycler ep used.
Time Incr. – Time increment: Increase / decrease of the holding time of the programmed temperature step to the next cycle by this amount.
Standard setting: Allowable values: Input steps: Time increase: Time decrease:
00:0000:00 to 01:001 s+–
Ramp – Heating and cooling rates:Speed at which the set temperature of the programmed step is achieved.
Standard setting:Allowable values: Input steps:
100 %1 to 75 % and 100 %1 %
4 Programming
Programm
ing
4
04_Masterc_ep_en.fm Seite 79 Montag, 12. Juni 2006 3:05 15

80
4.2.2 Cycle
The Cycle command contains temperature steps, which are repeated according to the number entered.
Number of Temp - number of repetitions with which the temperature commands are to be run through.Standard setting:Allowable values: Input steps:
301 to 991
4.2.3 Hold
The program maintains the temperature at the entered value until the key is pressed.
Standard setting:Allowable values:Input steps:
4.0 °C4.0 °C to 99.0 °C0.1 °C
4.2.4 Pause
The program is stopped and the temperature remains at the last value of the last temperature command. The program continues after the key is pressed.
Prog
ram
min
g
4 Programming
4
04_Masterc_ep_en.fm Seite 80 Montag, 12. Juni 2006 3:05 15

81
4.3.1 Header settings
4.2.5 Sound
It is possible to issue an acoustic signal to announce a programmed pause or the end of the program.
SoundStandard setting:Allowable values: Input steps:
31 to 9 (number of signals)1
4.2.6 End
The end mark appears automatically at the end of the program. All other program steps can be inserted before this point.
The header settings form the program header, in which the control strategy and the behavior of the heated lid are set with reference to the program. The Header dialog is accessed with the function key in the program editor.
Lidtemp. heated lid temperature. When 0 °C to 36 °C is entered, the heated lid remains switched off. An entry of more than 110 °C will be reset to 110 °C.
Allowable input values: 37 °C to 110 °CInput steps: 1 °C
4.3 Create program
Header
4 Programming
Programm
ing
4
04_Masterc_ep_en.fm Seite 81 Montag, 12. Juni 2006 3:05 15

82
ESP heated lid Depending upon the input, the program will start either prior to or after reaching the entered lid temperature.
The heated lid is first lowered and the program started after reaching the set temperature.
The lid descends automatically following the program start.
Switch off lid at low Block temp.
Depending upon the input, the heated lid will be switched off at low block temperatures.
If block temperatures of less than 37 °C are maintained for more than 5 minutes, the heated lid will shut off automatically.
The lid heater is first switched off at the end of a program.Remark: If the last command in a program is a hold step, the heated lid remains switched on until the key is pressed.
Mastercycler ep Selection of the Mastercycler ep. Here you can select from the Mastercycler ep gradient, ep gradient S and ep 384 devices.
All Mastercycler ep are distinguished by their heating and cooling rates and partly by their gradient spreads. ANY can be set if no particular block has been planned for the program.(Standard setting: ANY)
NOTE: If a program is started on a block type other than that set in the header, a message will appear on the display, bringing it to your attention that the program was created for a particular block, and that some settings may deviate on the basis of different block characteristics (gradient spreads, heating and cooling rates).
Control The type of regulation of the block temperature control is established with this command.
The temperature on the Thermoblock is measured and the nominal temperature then set. (Standard setting) The temperature of the Thermoblock is adjusted to the temperature of the tubes and the sample volume by the software depending upon the tube type.
Simulate Mastercycler Enables the simulation of the temperature characteristics of the Mastercycler / Mastercycler gradient, in order to guarantee simple transferability of already established programs.
With this setting it is possible to simulate the temperature control behavior of a Mastercycler / Mastercycler gradient and thus to establish protocols from the Mastercycler in general without further optimization on the Mastercycler ep.
Protocols taken over from the Mastercycler may need to be optimized again, because the temperature characteristics vary and may influence the PCR results.
Pulse On Mastercycler ep gradient devices, it is possible to accelerate initial heating up once more using the Pulse function.
Prog
ram
min
g
4 Programming
4
04_Masterc_ep_en.fm Seite 82 Montag, 12. Juni 2006 3:05 15
83
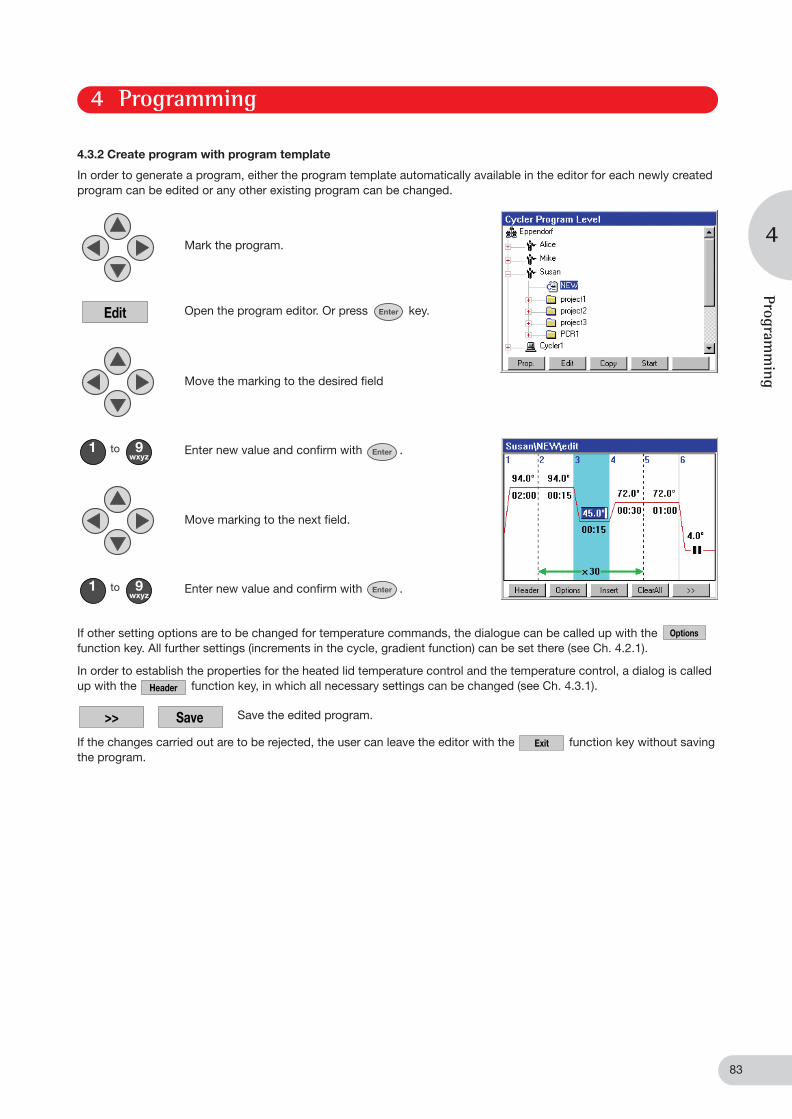
4.3.2 Create program with program template
In order to generate a program, either the program template automatically available in the editor for each newly created program can be edited or any other existing program can be changed.
Mark the program.
Open the program editor. Or press key.
Move the marking to the desired field
Enter new value and confirm with .
Move marking to the next field.
Enter new value and confirm with .
If other setting options are to be changed for temperature commands, the dialogue can be called up with the function key. All further settings (increments in the cycle, gradient function) can be set there (see Ch. 4.2.1).
In order to establish the properties for the heated lid temperature control and the temperature control, a dialog is called up with the function key, in which all necessary settings can be changed (see Ch. 4.3.1).
Save the edited program.
If the changes carried out are to be rejected, the user can leave the editor with the function key without saving the program.
Edit
to
to
Options
Header
>> Save
Exit
4 Programming
Programm
ing
4
04_Masterc_ep_en.fm Seite 83 Montag, 12. Juni 2006 3:05 15

84
4.3.3 Create program without template
In order to create a program without a program template, the complete program can be deleted to the final mark from the editor with the function key and an new program created.
Open the selection window.
Select the program step.
Insert the selected step to the left of the mark.
Confirm input of the desired temperature with Enter.
Change to the input field for hold time.
Input desired hold time and confirm with Enter.
Move the mark.
Open the selection window.
Select the program step.
Insert the selected step to the left of the mark.
Clear all
Insert
Insertor
Insert
Insertor
Prog
ram
min
g
4 Programming
4
04_Masterc_ep_en.fm Seite 84 Montag, 12. Juni 2006 3:05 15

85
Confirm input of the desired temperature with Enter.
Change to the input field for hold time.
Input desired hold time and confirm with Enter.
Change to the input field for number of cycles.
Confirm input of the desired number of cycles with Enter.
Change to the next temperature step.
Confirm input of desired temperature with Enter.
Change to the input field for hold time.
Confirm input of desired hold time with Enter.
Move the mark.
Open the selection window.
Select the program step.
Insert the selected step to the left of the mark.
Insert
Insertor
4 Programming
Programm
ing
4
04_Masterc_ep_en.fm Seite 85 Montag, 12. Juni 2006 3:05 15

86
Confirm input of cycle number with Enter.
Invoke the header.
Enter the desired lid temperature.
Move the mark and switch off the function. Switch off lid at low block temperatures.
Move the mark and open the selection window for the block type.
Select the block type and confirm with Enter.
Accept the header settings.
Change the function key assignment.
Save the program.
Exit the editor.
Header
Ok
>>
Save
Exit
Prog
ram
min
g
4 Programming
4
04_Masterc_ep_en.fm Seite 86 Montag, 12. Juni 2006 3:05 15
87
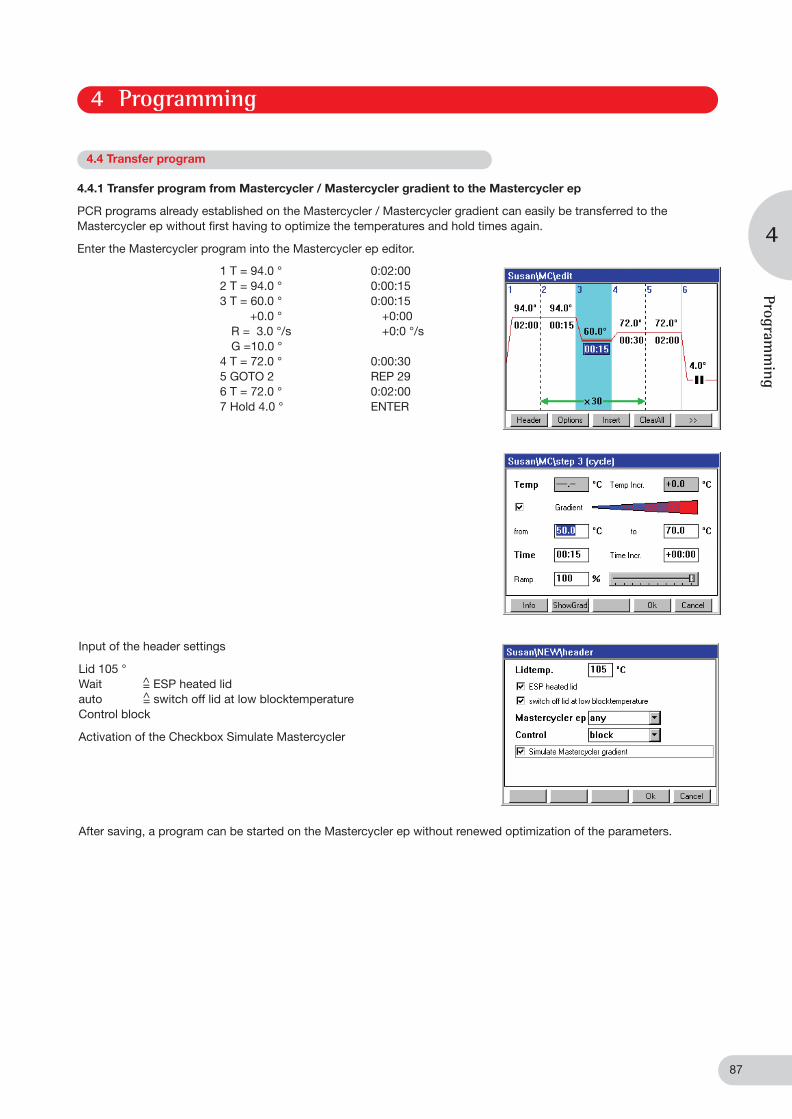
4.4.1 Transfer program from Mastercycler / Mastercycler gradient to the Mastercycler ep
PCR programs already established on the Mastercycler / Mastercycler gradient can easily be transferred to the Mastercycler ep without first having to optimize the temperatures and hold times again.
Enter the Mastercycler program into the Mastercycler ep editor.
1 T = 94.0 ° 0:02:002 T = 94.0 ° 0:00:153 T = 60.0 ° 0:00:15
+0.0 ° +0:00R = 3.0 °/s +0:0 °/sG =10.0 °
4 T = 72.0 ° 0:00:305 GOTO 2 REP 296 T = 72.0 ° 0:02:007 Hold 4.0 ° ENTER
Input of the header settings
Lid 105 °Wait ESP heated lidauto switch off lid at low blocktemperatureControl block
Activation of the Checkbox Simulate Mastercycler
After saving, a program can be started on the Mastercycler ep without renewed optimization of the parameters.
4.4 Transfer program
=̂=̂
4 Programming
Programm
ing
4
04_Masterc_ep_en.fm Seite 87 Montag, 12. Juni 2006 3:05 15

88
5.1.1 Sample loading
In order to achieve an optimum temperature transition, it should be ensured that the tubes sit correctly in the Thermoblock and do not wobble. Tubes that are not sufficiently temperature resistant (to app. 120 °C) may not be used.
This generally also applies for foils for sealing PCR plates. Due to the controllable lid heating it is also possible to use foil that melts at over 100 °C. The lid heating could be set to 95 °C for example.
The Mastercycler ep gradient and Mastercycler ep gradient S can be loaded with up to 96 PCR tubes (0.2 ml) or one 96-well PCR plate. In order to guarantee even pressure of the heated lid when using tubes, we recommend positioning a tube in each corner of the Thermoblock. Additional tubes should be evenly distributed in the block.
The Mastercycler ep 384 can be loaded with a 384-well PCR plate.
5.1.2 Sample volume
The temperature control can be set to the Thermoblock or to the tubes and sample quantities used. In the program header of each PCR program it is possible to choose between the temperature modes Block, sim Tube and active Tube under the menu point Control (see also Ch. 4.3.1). The adjustment to the tubes and sample volumes takes place at the start of the program. The sample quantity should then be
A logged-on user can start a created PCR program in a variety of ways.
0.2 ml PCR tubes and 96-well PCR plates between 10 µl and 100 µl
384-well PCR plates between 5 µl and 25 µl.
From the editor:
Save the generated program.
Insert the sample tube.
Draw the ESP heated lid forwards over the samples (only necessary for manual operation).
Start the program.
In order to attain optimally distributed pressure when using only a few sample tubes, these should be inserted in the middle and empty tubes in the four corners of the Thermoblock,
5.1 Preparation
5.2 Start program
Save
5 PCR run / operation
PCR
run
/ op
erat
ion
5
04_Masterc_ep_en.fm Seite 88 Montag, 12. Juni 2006 3:05 15

89
In the navigation tree:
Move mark to the program.
Insert sample tube.
Draw the ESP heated lid forwards over the samples (only necessary for manual operation).
Start the program.
The following input should be made after the program is started:
Select a connected Thermocycler (only with several connected devices).
Select of the tube type used
Input of the filling volume (only for Control: sim Tube).
The program starts and the status display appears after this input is made.
or
Start
Ok
Ok
to
Ok
PCR run / operation
5 PCR run / operation
5
04_Masterc_ep_en.fm Seite 89 Montag, 12. Juni 2006 3:05 15

90
The status display appears immediately following the start of a program. The progress of a running program can be followed in the status display. Current program information is shown. The presently active step is recognized as a blinking line in the graphic display. In addition to the graphic display, program-specific information is shown in two information boxes.
5.3.1 Exit the status display
5.3.2 Calling up the status display
The status display can be left with Exit.
Mark the desired Mastercycler ep.
Call up the status display.
5.3 Status display
2
34
5
1
6
7
8
9
10
1 Program path and cycler 2 Program step 3 Remaining run time 4 Start time and end of the program 5 Current block and heated lid temperature 6 Status of the device 7 Cycle number 8 Nominal temperature 9 Remaining holding time10 Information of the current program step
Exit
Status
5 PCR run / operation
PCR
run
/ op
erat
ion
5
04_Masterc_ep_en.fm Seite 90 Montag, 12. Juni 2006 3:05 15

91
The following functions in the status display are possible while a program is running:
5.4.1 Interruption under a running program
The program can be interrupted, for instance, in order to add reagent.
5.4.2 Opening and closing the ESP heated lid
The heated lid can be opened as follows while the program is running.
5.4.3 Continue program
A stopped program can be continued at any time.
5.4.4 Abort program
A running program can be aborted at any time.
Interruption of the running program.
The current temperature of the block and the lid is maintained and the colored status display changes to yellow and shows paused.
Push the Stop key on the Control Panel.
The ESP heated lid is unlocked and can be pushed to the rear position. The motorized ESP heated lid moves to the rear position on its own. The running program maintains the current temperature.
If the program is then resumed, the ESP heated lid is again pulled forward over the samples.
The ESP heated lid is closed again. The motorized ESP heated lid moves to the front position on its own and is then closed automatically.
Continuing the program.
The program is continued at the point of interruption and the colored status display changes to green again and shows running.
Abort the program.
Program "idle" appears in the display.
5.4 Functions in the status display
or
Stop
or
Stop
OpenLid
CloseLid
Resume
Abort
PCR run / operation
5 PCR run / operation
5
04_Masterc_ep_en.fm Seite 91 Montag, 12. Juni 2006 3:05 15

92
For purposes of documentation following the run of a PCR program, the affiliated protocol can be saved either on the MMC™ or printed on a connected printer.
Note: The next start of a program on the Mastercycler ep results in the deletion of the protocol and the creation of a new one.
The system must be shut down in order to switch off the Mastercycler ep.
Move mark to the desired program under the Mastercycler ep.
Invoke the protocol.
Print out on a connected printer.
Save the protocol on a MMC™.
Move mark to the Eppendorf System or Card node.
Shut down the system.
Following the shutdown it is possible to switch off all connected Mastercycler ep with the power switch.
5.5 Protocol
Protocol
Export
5.6 Remove from operation
Shutdown
5 PCR run / operation
PCR
run
/ op
erat
ion
5
04_Masterc_ep_en.fm Seite 92 Montag, 12. Juni 2006 3:05 15

93
The device may only be opened by a qualified specialist. The device guarantee becomes defunct with unauthorized work on the device!
The device must be switched off and the mains plug pulled before maintenance or cleaning is carried out.
Thermoblock, inner side of the heated lid and micro test tubes / PCR plates reach temperatures of more than 50 °C very quickly. There is a danger of burns!Keep heated lid closed until the temperature reaches 30 °C or less.
It should be ascertained that no liquid penetrates into the device.
The device should be protected from organic solvents and aggressive chemicals. Make sure that no liquid penetrates into the interior of the device. For reasons of safety the device must always be shut off and the plug pulled when cleaning the device. The surface of the Mastercycler ep and the Control Panels can be wiped off with a damp cloth or with mild lab cleaner.
The heated lid can be popped up for purposes of cleaning. To do this the heated lid must be pushed into the rear position. The heated lid can then be popped up into a vertical position.
Be careful of sharp edges when cleaning the heated lid (e.g. rollflex cable).
When opening and closing the lid or when popping it up into the cleaning position, be careful not to let the fingers come between the lid and the housing of the device, where they can be pinched or caught.
Impurities on the heated lid can be removed with water or a mild lab cleaner.
6.1 Cleaning
Rollflex cable
Maintenance
6 Maintenance
6
04_Masterc_ep_en.fm Seite 93 Montag, 12. Juni 2006 3:05 15

94
In the event of a power failure, it is possible to open the heated lid by an emergency unlocking method.The two tools for emergency lid unlocking are required for this.
Before the emergency unlocking operation is performed, the device must be switched off and the mains plug removed.
Turn the device round so that the rear is visible.
Remove to the two plastic plugs in the heated lid.
Position the tools at right-angles in the holes provided as shown in the illustration..
– Turn Tool 1 approx. 30° in the direction of rotation shown by the arrow and hold in this position.
– Move Tool 2 at right-angles to this in the direction shown by the arrow until unlocking is clearly heard, then remove Tool 2.
– Continue to move Tool 1 in the direction of rotation and slowly and evenly push the lid back by hand, then remove Tool 1.
After the lid has been unlocked by the emergency method, the lid should be engaged again.
– To do this, connect the device with the mains cable and switch it on. The lid automatically moves back into its initial position and engages.
6.2 Emergency unlocking of the heated lid
11
2 2
Rear viewRear view
6 Maintenance
Mai
nten
ance
6
04_Masterc_ep_en.fm Seite 94 Montag, 12. Juni 2006 3:05 15

95
It is possible to eliminate faults in programming or in the handling of the device by correcting the cause of such faults which is shown in the display.
Technical faults may be triggered by faults such as a power failure or power fluctuations. In most cases it is therefore sufficient simply to switch the device off and back on again after about 10 seconds. If the fault occurs again, please note the fault code (e.g. 0x0B04) shown in the display and inform Eppendorf Service.
Troubleshooting
7 Troubleshooting
7
04_Masterc_ep_en.fm Seite 95 Montag, 12. Juni 2006 3:05 15

96
The Login dialog first appears when the device is switched on. The Login dialog can be reached from the navigation tree through the Login key when the marking stands on a user.
Open the selection list.
Select user and confirm.
Enter PIN.
Confirm the entry.
Select user or file.
Create new program or new folder.
Enter names and comments. Letters can alternatively be entered over the .
Conform the entry.
Select folder or program.
Copy folder/ program into the clipboard.
Move marking to target folder or user.
Paste the folder or program.
8.1 Login
to
Ok
8.2 Creating folders and programs
New
NewFolder
or
toKeybd
Ok
8.3 Copying of files and programs
Ok
Copy
Ok
Paste
8 Short instructions
Shor
t in
stru
ctio
ns
8
04_Masterc_ep_en.fm Seite 96 Montag, 12. Juni 2006 3:05 15

97
Select folder or program.
Delete the folder or program.
Select program.
Open program editor.
Set the lid temperature,lid functions and control mode.
Confirm the header settings and return to the program editor.
Move the marking in the graphical interface.
Enter the temperatures, hold times and number of cycles directly in the graphical interface.
Expanded setting options for temperature steps: Gradient setting, increment entries and ramp setting.
Insert program steps to the left of the marking.
Delete the entire program editor.
Save the changed program.
Exit the editor.
8.4 Deleting programs and folders
Ok
8.5 Creating a program
Edit
Header
Ok
to
Options
Insert
Clear all
Save
Exit
Short instructions
8 Short instructions
8
04_Masterc_ep_en.fm Seite 97 Montag, 12. Juni 2006 3:05 15

98
Move the marking onto the program.
Start the selected program.
Insert the sample tubes into the Thermoblock, pull the heated lid forwards over the tubes (only manual variants).
Selects a connected Thermocycler (only if several devices are connected).
Selects the tube type used.
Enters filling volume (only for Control: sim tube).
Stop the running program.
Continue a stopped program.
Interrupt a running or stopped program.
Leave the status display.
8.6 Starting the program
or
Start
Ok
Ok
to
Ok
8.7 Program run
or
Stop
Resume
Abort
Exit
8 Short instructions
Shor
t in
stru
ctio
ns
8
04_Masterc_ep_en.fm Seite 98 Montag, 12. Juni 2006 3:05 15

99
Mark the program in the cycler nodes.
Call up the status display.
Move mark to the Eppendorf System or Card node.
Shut down the system.
Switch off device using the mains switch.
8.8 Calling up the status display
Status
8.9 Switching off the device
Shutdown
Short instructions
8 Short instructions
8
04_Masterc_ep_en.fm Seite 99 Montag, 12. Juni 2006 3:05 15
100
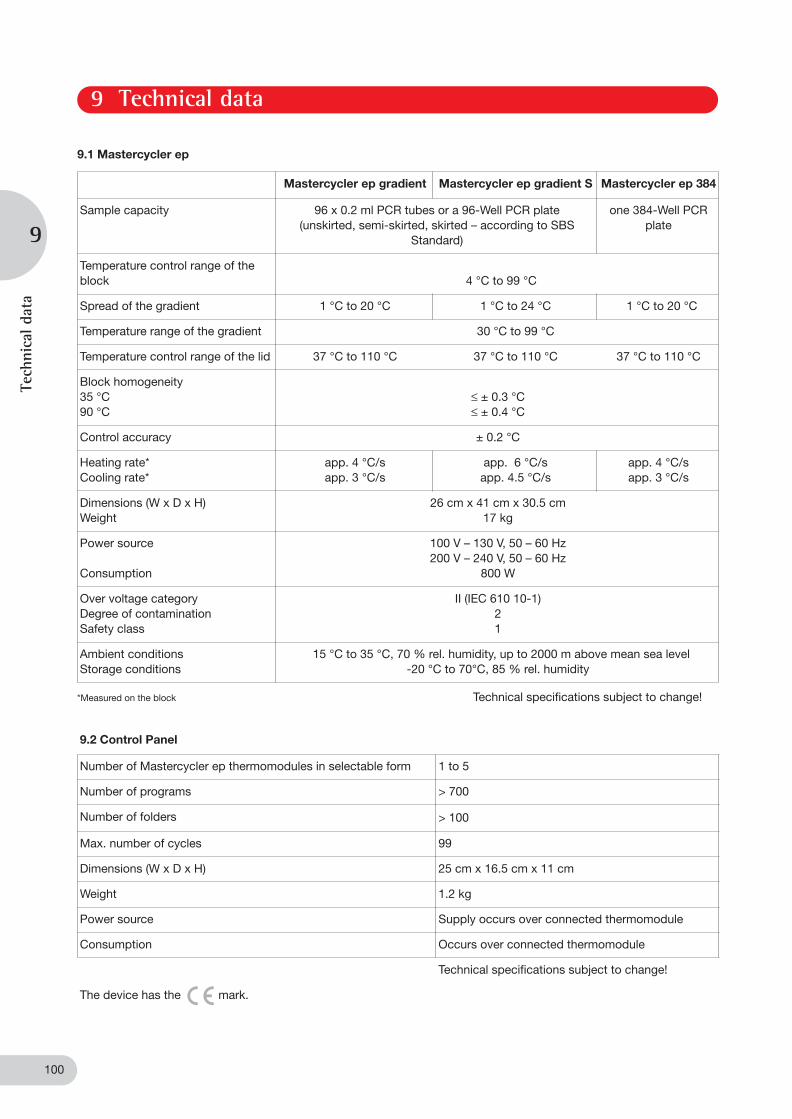
9.1 Mastercycler ep
*Measured on the block Technical specifications subject to change!
Mastercycler ep gradient Mastercycler ep gradient S Mastercycler ep 384
Sample capacity 96 x 0.2 ml PCR tubes or a 96-Well PCR plate(unskirted, semi-skirted, skirted – according to SBS
Standard)
one 384-Well PCR plate
Temperature control range of the block 4 °C to 99 °C
Spread of the gradient 1 °C to 20 °C 1 °C to 24 °C 1 °C to 20 °C
Temperature range of the gradient 30 °C to 99 °C
Temperature control range of the lid 37 °C to 110 °C 37 °C to 110 °C 37 °C to 110 °C
Block homogeneity 35 °C90 °C
≤ ± 0.3 °C≤ ± 0.4 °C
Control accuracy ± 0.2 °C
Heating rate*Cooling rate*
app. 4 °C/sapp. 3 °C/s
app. 6 °C/sapp. 4.5 °C/s
app. 4 °C/sapp. 3 °C/s
Dimensions (W x D x H)Weight
26 cm x 41 cm x 30.5 cm17 kg
Power source
Consumption
100 V – 130 V, 50 – 60 Hz200 V – 240 V, 50 – 60 Hz
800 W
Over voltage categoryDegree of contaminationSafety class
II (IEC 610 10-1)21
Ambient conditionsStorage conditions
15 °C to 35 °C, 70 % rel. humidity, up to 2000 m above mean sea level-20 °C to 70°C, 85 % rel. humidity
9.2 Control Panel
Number of Mastercycler ep thermomodules in selectable form 1 to 5
Number of programs > 700
Number of folders > 100
Max. number of cycles 99
Dimensions (W x D x H) 25 cm x 16.5 cm x 11 cm
Weight 1.2 kg
Power source Supply occurs over connected thermomodule
Consumption Occurs over connected thermomodule
Technical specifications subject to change!
The device has the mark.
9 Technical data
Tech
nica
l dat
a
9
04_Masterc_ep_en.fm Seite 100 Montag, 12. Juni 2006 3:05 15


![· 0Jeuow ep Josedsa ep sop ep uqse]dwoo ep odoo sonoqoz uoo sopouêllô] OZIOOW OllYPOl ep sau0410A9J uoo 'DJepow ep sopn6!A ep …](https://static.fdocuments.net/doc/165x107/5b97016309d3f27e758c2ada/-0jeuow-ep-josedsa-ep-sop-ep-uqsedwoo-ep-odoo-sonoqoz-uoo-sopouello-ozioow.jpg)