
Master Signal Controller Manual - Center for Biological...
84
MSC MASTER SIGNAL CONTROLLER By The Signaling Solution W. S. Ataras Engineering, Inc. PO Box 25 West Terre Haute, IN 47885 Rev. B, 5/8/2003
Transcript of Master Signal Controller Manual - Center for Biological...

MSC MASTER SIGNAL CONTROLLER
By
The Signaling SolutionW. S. Ataras Engineering, Inc.
PO Box 25West Terre Haute, IN 47885
Rev. B, 5/8/2003
Copyright 1998-2003

TSSI MSC MANUAL
W. S. Ataras Engineering, Inc.All Rights Reserved
2

TSSI MSC MANUAL
TABLE OF CONTENTS
1 INTRODUCTION..................................................................................................................................7
2 MSC OPERATIONAL FEATURES....................................................................................................8
3 PLANNING YOUR SIGNALING SYSTEM.......................................................................................9
4 INSTALLING YOUR MSC................................................................................................................10
4.1 Physical Installation of the MSC Board.........................................................................................10
4.2 Connecting to the Block Detectors..................................................................................................13
4.3 Getting Turnout Position.................................................................................................................14
4.4 Connecting to the Signals.................................................................................................................15
4.5 Connecting to a CTC Panel.............................................................................................................16
5 CUSTOMER SUPPORT.....................................................................................................................17
5.1 Technical Support............................................................................................................................17
5.2 Limited Warranty............................................................................................................................17
3

TSSI MSC MANUAL
LIST OF FIGURES
Figure 4-1 MSC Physical Installation............................................................................................................11
Figure 4-2 Group Mounting of PC Boards.....................................................................................................13
Figure 4-3 Block Detector Wiring to MSC....................................................................................................14
Figure 4-4 Isolated Block Detector Wiring to MSC......................................................................................14
Figure 4-5 Turnout Position Contact..............................................................................................................15
Figure 4-6 Turnout Position Contact on Stall Motor......................................................................................15
Figure 4-7 Turnout Contact for High Current Stall Motor.............................................................................15
Figure 4-8 Dispatcher's Panel Input Connections..........................................................................................16
4

TSSI MSC MANUAL
APPENDICES
APPENDICE I BLOCK AND CONTROL SIGNALING……………...…………………………….....18
1) Automatic Block Signaling..............................................................................................................19
2) Absolute Permissive Block Signaling..............................................................................................20
3) Centralized Traffic Control Signaling............................................................................................21
4) CTC at Interlocking Plants..............................................................................................................22
APPENDICE II SIGNALING SYSTEM …………………..…………...…………………………….....24
1) Standard Nomenclature...................................................................................................................24
2) Block Signaling.................................................................................................................................24
2.1) One Direction Traffic.......................................................................................................................25
2.2) Two Direction Traffic.......................................................................................................................32
3) Passing Track Signaling...................................................................................................................36
3.1) One Direction Traffic........................................................................................................................36
3.2) Two Direction Traffic.......................................................................................................................38
3.3) Shared Passing Track......................................................................................................................45
4) Crossing Signaling............................................................................................................................48
4.1) APB Crossing.....................................................................................................................................48
4.2) CTC Crossing....................................................................................................................................49
5) Detection Routing by Turnouts.......................................................................................................51
APPENDICE III CONNECTING TO SIGNALS……………………...…………………………….....53
1) Color Light Signals..........................................................................................................................53
2) Position Light Signals......................................................................................................................56
3) Color Position Light Signals...........................................................................................................58
4) Searchlight Signals...........................................................................................................................58
5) Semaphore Signals...........................................................................................................................60
5

TSSI MSC MANUAL
LIST OF FIGURES
Figure 1 Automatic Block Signaling..............................................................................................................19
Figure 2 Absolute Permissive Block Signaling..............................................................................................20
Figure 3 Centralized Traffic Control..............................................................................................................21
Figure 4 Four Sequential Blocks....................................................................................................................25
Figure 5 Mode 0 Jumper Configuration.........................................................................................................26
Figure 6 Three Sequential Blocks + 1............................................................................................................26
Figure 7 Mode 1 Jumper Configuration.........................................................................................................27
Figure 8 Pair of Two Sequential Blocks.........................................................................................................28
Figure 9 Mode 2 Jumper Configuration.........................................................................................................29
Figure 10 Two Sequential Blocks + 1 + 1......................................................................................................29
Figure 11 Mode 3 Jumper Configuration.......................................................................................................30
Figure 12 Four Separate Blocks.....................................................................................................................31
Figure 13 Mode 4 Jumper Configuration.......................................................................................................32
Figure 14 Tumbledown and SIGCOM Connections......................................................................................33
Figure 15 Two Sequential APB Blocks..........................................................................................................33
Figure 16 Mode 5 Jumper Configuration.......................................................................................................34
Figure 17 Two Individual APB Blocks..........................................................................................................35
Figure 18 Mode 6 Jumper Configuration.......................................................................................................36
Figure 19 ABS/CTC Passing Track...............................................................................................................37
Figure 20 Mode 9 Jumper Configuration.......................................................................................................37
Figure 21 APB Approach to Passing Track...................................................................................................38
Figure 22 Mode 7 Jumper Configuration.......................................................................................................39
Figure 23 APB Block Between Passing Tracks.............................................................................................40
Figure 24 Mode 8 Jumper Configuration.......................................................................................................40
Figure 25 ABS Passing Track Approach/Exit................................................................................................41
Figure 26 Mode 10 Jumper Configuration.....................................................................................................42
Figure 27 CTC Passing Track Approach/Exit................................................................................................42
Figure 28 Mode 11 (PT) Jumper Configuration.............................................................................................43
Figure 29 CTC Junction Approach/Exit.........................................................................................................44
Figure 30 Mode 11 (JCT) Jumper Configuration...........................................................................................44
Figure 31 ABS Shared Passing Track Type 1................................................................................................45
Figure 32 Mode 12 Jumper Configuration.....................................................................................................46
Figure 33 Shared Passing Track Type 2.........................................................................................................47
Figure 34 Mode 13 Jumper Configuration.....................................................................................................48
Figure 35 APB Crossing.................................................................................................................................48
6

TSSI MSC MANUAL
Figure 36 Mode 14 (ABS) Jumper Configuration..........................................................................................49
Figure 37 CTC Crossing.................................................................................................................................50
Figure 38 Mode 14 (CTC) Jumper Configuration..........................................................................................50
Figure 39 Detection Routing by Turnouts......................................................................................................51
Figure 40 Mode 15 Jumper Configuration.....................................................................................................52
Figure 41 Signal Type Jumpers for Common Anode Color Light Signals....................................................53
Figure 42 Wiring Common Anode Color Light Signals................................................................................54
Figure 43 Signal Type Jumpers for Common Cathode Color Light Signals.................................................54
Figure 44 Wiring Common Cathode Color Light Signals..............................................................................55
Figure 45 Wiring a Color Light Signal with Bulbs........................................................................................56
Figure 46 Wiring Position Light LED Signals...............................................................................................56
Figure 47 Wiring Position Light LED Signals for Approach Lighting..........................................................57
Figure 48 Wiring Position Light LED Signals with Common Cathodes.......................................................57
Figure 49 Searchlight Signal with 2-Pin LED................................................................................................58
Figure 50 Searchlight Signal with 2-Pin Two Color LED.............................................................................59
Figure 51 Wiring of a 3-Pin Common Cathode Searchlight Signal...............................................................59
Figure 52 Searchlight Signal with 3-Pin Common Cathode LED.................................................................59
Figure 53 Wiring of a 3-Pin Common Anode Searchlight Signal..................................................................60
Figure 54 Searchlight Signal with 3-Pin Common Anode LED....................................................................60
7

TSSI MSC MANUAL
1. INTRODUCTION
The MSC Master Signal Controller is the latest product available for helping you to implement various
forms of layout signaling. It provides all of the logic needed to merge block occupancy status with turnout
positions and generate prototypical signal aspects on all types of signals: color light, position light, color
position light, searchlight and semaphore.
If you have ever thought seriously about installing a signaling system on your layout, you have
probably already thought about the logic needed to operate your signals. We, at The Signaling Solution,
certainly have. In early 1998, we developed two custom logic boards for a customer. These boards were
full of digital logic chips and each only handled one very specific signaling situation.
The MSC design grew out of those developments. While the MSC has fewer parts, it will handle 18
different layout signaling situations which we all have on our layouts. It will combine block occupancy
status, turnout positions and, in some cases, a dispatcher’s CTC panel commands to generate three or more
signal aspects on as many as four signal masts.
A “signaling situation” is a specific layout track arrangement that requires special logic. Typical
signaling situations are sequential blocks signaled for Automatic Block Signaling (ABS) or Absolute
Permissive Block signaling (APB), entrances to and exits from passing tracks, CTC control points, and
crossings. Each such situation will normally have three or four signal masts, with 1 or more signal heads
per mast. Logic within the MSC will generate the signal aspects for each such situation. In addition, the
MSC has built-in logic that allows you to connect adjacent MSC boards to provide continuity from place to
place around your layout.
Paragraphs in this manual will give you all the information you need. Go a step at a time, and
everything will work out just fine. You’ll have a signaling system that will add greatly to both your
operating sessions and the appearance of your layout!
8

TSSI MSC MANUAL
2. MSC OPERATIONAL FEATURES
The Master Signal Controller is used to combine turnout positions with block occupancy status and
control three aspect signals. It provides the following features:
18 pre-programmed track configurations to providing Automatic Block, Absolute Permissive Block,
and Centralized Traffic Control signaling.
Track configurations include both one and two direction signaling of mainlines, passing tracks,
junctions and crossings.
Operates searchlight, color light, position light and semaphore signals
Approach lighting can be turned on or off.
Controls from four single head masts up to three two head masts, providing typical AAR aspects in
each case.
Use our line of BD boards, or equivalent devices, for train detection.
Provided completely assembled and tested, with power supply, mounting hardware and manual.
9

TSSI MSC MANUAL
3. PLANNING YOUR SIGNALING SYSTEM
While the MSC may appear to be complex, in reality, it’s very simple to use.
1) First, on a diagram of your layout, identify the locations of the signals you need. This will generally be
based on the type of prototype signaling you are modeling. In Appendice I, we have given you some
basic “AAR Standard” ideas for signal placement. Naturally, if you are following a specific prototype,
you will want to gather information describing how they signaled their railroad. The AAR standards
are only recommendations, and most railroads added to or modified them to suit their own situations.
2) Install three jumper plugs on the board to select the type of signal heads you are using, and another
jumper plug to select approach lighting, if desired.
3) Then, find the MSC operational mode which handles each of your signaling situations. Install four
push-on jumper plugs as shown in the mode configuration drawing. This prepares an MSC to handle
each specific signaling situation.
4) Identify the block occupancy detectors and turnout position detectors you need to signal the situation.
This information is found in each mode diagram that illustrates the signaling situations.
5) Finally, install, wire and test each MSC, using the connections shown in the connector diagram for the
operational mode.
Appendice II describes each operational situation, or mode, that the MSC can support. Look through
the paragraphs explained to find all of the information you need for each mode.
10

TSSI MSC MANUAL
4. INSTALLING YOUR MSC
Having completed the planning of your installation, it’s now time to install your MSC. If you have a
large number of boards, or you want them all installed in a central location, check Figure 4-2 for one
possible approach. Otherwise, use the single board installation approach shown in Figure 4-1.
Bear in mind that the MSC will require electrical connections to the ‘occupied’ outputs of block
detectors, and probably to contacts on turnout position switches. Wiring these will be easier if you can
group related boards together.
Note: Make sure that you will have sufficient light and physical comfort when wiring the various
items together. There is no sense in making the process any more difficult than it really is.
4.1 PHYSICAL INSTALLATION OF THE MSC BOARD
Installation of your MSC is very simple. Very little wiring is required, and the instructions below
should provide everything needed to get a normal system working perfectly.
There are a few electrical connections to make. Use a small soldering iron, no more than 40 watts. A
25-watt iron would be ideal. Remember that you only have to connect one end of one wire at a time. Do
that enough times, and the installation is done! Even the pros that wire the space shuttle do it that way.
Figure 4-1 MSC Physical Installation below shows how your MSC and related items will look when
ready for installation. For your reference, the major items are identified individually. The mode plug and
its jumpers (item 4), the board activity indicators LED (item 2), and the yellow tint control (item 3), are the
only board mounted parts of interest to you. The on-board voltage regulator U8 will normally get warm
during operations, especially if your signals use a lot of LED’s.
Prior to installation, you will want to prepare the card edge connector (item 5) and the mounting
hardware. We envision that you will mount the board to a flat surface, such as a piece of plywood or a 1x6,
attached beneath your bench work.
11

TSSI MSC MANUAL
Figure 4-1 MSC Physical Installation
Make note of the following items.
Item 2: Board activity indicator LED
Item 3: Yellow tint control for searchlight signals R49
Item 4: Mode and output type selection header J1
Item 6: Stainless steel #4 hex nut (2)
Item 7: Stainless steel #4 internal tooth lock washer (2),
Item 8: Stainless steel #4 flat washer (4),
Item 9: Pan-head #4-40 Stainless steel machine screws (2)
Item 11: Angle brackets (2),
Item 12: Connector pins “1” on top and “A” on bottom
Pins 1 through 4 on J1 are used to select the operating mode; pins 4 through 7 are used to select the
type of signal heads you are using. Pin 8 in used to enable or disable approach lighting. The installation of
these plug-on jumpers is shown in figures that accompany each mode diagram and connection list.
The R49 Yellow tint control is provided so you can set get the best possible yellow from your
red/green two color LED’s. Typically, this adjustment only needs to be made once. Use a small
screwdriver, and turn the control gently clockwise or counter-clockwise until you are satisfied with the
yellow color. This control has no effect except when using 2-color LED’s to get a yellow color.
The board activity indicator is a LED that blinks about 2 times per second whenever power is applied
to the MSC. If the LED is out completely, the power supply is either not connected, or the 5-volt supply on
the board is shorted to ground by a connection to pin T. If it is on, but not flashing, then the processor is
not functioning. Turn off the power to the board by unplugging the AC adapter provided for about 5
12

TSSI MSC MANUAL
seconds. Then plug it back in. If the LED still does not blink, the board may not be working. Please
contact us for help in troubleshooting or to arrange for a repair.
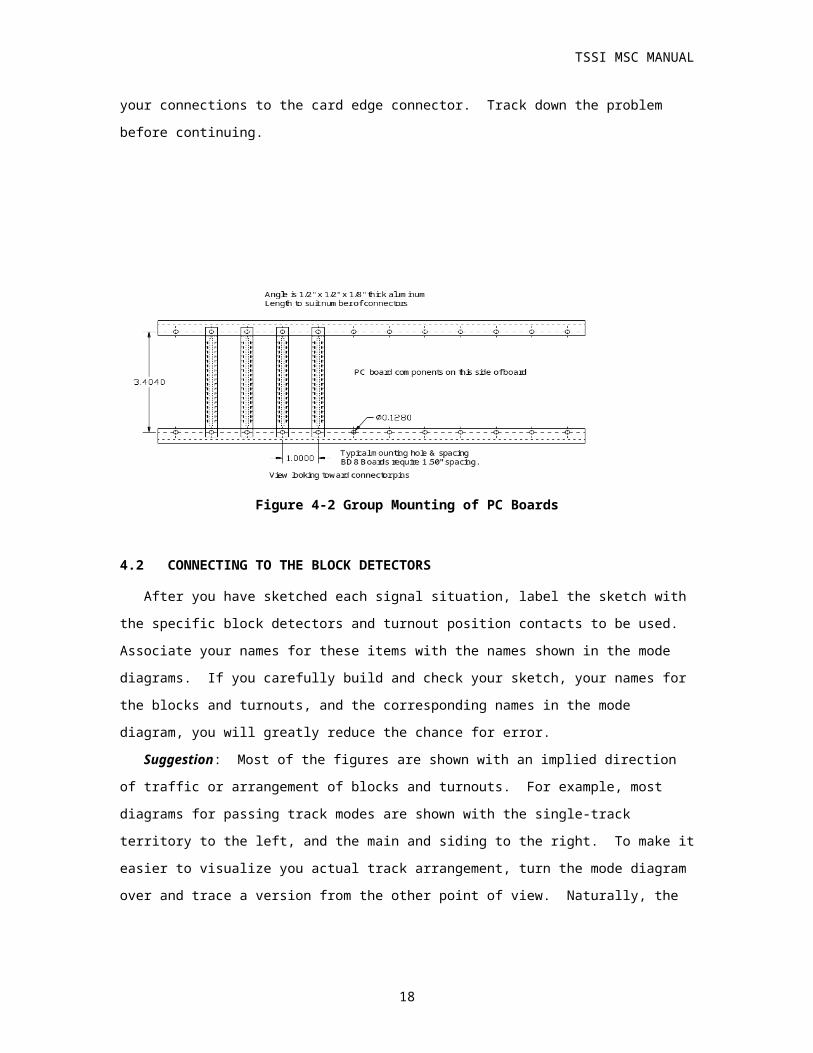
If you have a lot of MSC’s in your layout, you may find it more convenient, when installing and wiring
them, to mount the in a group so that all of the connector pins are readily visible and easy to reach. One
way to do this is to prepare a pair of aluminum angles, ½” x ½” by whatever length you need to mount the
group of MSC’s. Figure 4-2 shows one way to mount a group of our boards. Our MSC, BD8, GCC and
GCX boards all use the same connector, and can be mounted as shown. The end holes in the angles are
used to mount the angles to bench legs or some other type of support frame. When mounted this way, the
PC boards should be in a vertical plane to allow for better cooling. Note that, because of a heat sink, a BD8
mounted in such a group needs a 1.5” spacing on the component side of the board.
A good practice, when mounting boards in this fashion, is to use as many different colors of wire as
possible, with standard colors assigned for similar purposes. For example, try using red for the red LED’s,
green for green LED’s, yellow for yellow LED’s, black for SIGCOM connections, white for +5 volts, blue
for tumble down west wires, gray for tumble down east wires, tan for turnout position contacts, etc. Write
down whatever colors you choose, and be sure to use the stick to your standard. It will make later
troubleshooting or modifications much easier to deal with.
Also, it is much easier to work with such an assembly if you don’t route the wires randomly from point
to point. If this frame is mounted below your layout, route the wires to the layout up between rows of
connectors and out to the layout. Route connections between connectors down below the connectors,
horizontally, and then up to the proper pin. Be neat and orderly, and, except for train running circuits with
a detector board such as our BD8 or BD16, use small wires. For LED’s and typical incandescent bulbs, 24
to 30 gauge wire is fine for reasonable lengths, say less than 100-200 feet.
Recommendation: that you use stranded wire for connections out to the layout, since those wires are
likely to be flexed and moved. For wires simply connecting from connector to connector, especially if you
are using a group frame as shown below, solid wire is recommended. It tends to hold its shape, and can be
routed neatly from point to point. When all the wiring is done, use tie wraps or cable lacing twine to
bundle the wires and provide a strain relief.
Then connect the power supply provided with the MSC to the card edge connector. The power supply
has a cord with a low voltage DC output. As you receive the power supply, there is a plug attached to the
end of the cable. Cut off the plug as close to the end of the cable as you can. Split the two wires back from
the end for about 1 ½ inches, strip about ¼ inch of insulation from each wire and attached them to the card
edge connector. The wire with the white stripe gets connected to pin 18, the positive power input. Connect
the other wire in the power cord to pin V.
To see if all is well, plug in the wall module. The MSC board activity LED, item 2 in Figure 4-1,
should blink about 2 times per second. If it doesn’t, there are a couple of possible problems. First, the
socket you plugged into must be on. Second, the wires to pins 18 and V may be reversed. Finally, there
13

TSSI MSC MANUAL
may be a short circuit on one of your connections to the card edge connector. Track down the problem
before continuing.
Figure 4-2 Group Mounting of PC Boards
4.2 CONNECTING TO THE BLOCK DETECTORS
After you have sketched each signal situation, label the sketch with the specific block detectors and
turnout position contacts to be used. Associate your names for these items with the names shown in the
mode diagrams. If you carefully build and check your sketch, your names for the blocks and turnouts, and
the corresponding names in the mode diagram, you will greatly reduce the chance for error.
Suggestion: Most of the figures are shown with an implied direction of traffic or arrangement of
blocks and turnouts. For example, most diagrams for passing track modes are shown with the single-track
territory to the left, and the main and siding to the right. To make it easier to visualize you actual track
arrangement, turn the mode diagram over and trace a version from the other point of view. Naturally, the
labels will all remain associated with the same switches and blocks. But it may be easier for you to
visualize things more clearly.
In some cases, you may want to provide optical isolation between the block detector output and the
inputs to the MSC. This is necessary if your layout is not wired with a single, layout wide common rail
connection. While DC layouts frequently are wired with a single layout common, some brands of DCC,
because of the booster design, prefer or require not having different booster outputs connected together.
You can certainly wire your own isolator circuits, or you can use our ISO8 Eight Channel Optical
Isolator. This simple board will help you isolate your detectors. In includes 8 isolators and the necessary
14

TSSI MSC MANUAL
current limiting resistors. The output is appropriate for passing logic signals to our MSC or TC4 boards, as
well as to computers or other circuitry.
If your layout does use common rail wiring, connect ‘SIGCOM’ (Pin V) from each MSC to the layout
common. Naturally, your block detectors will be connected in the same way. Once this is done, simply
connect your block detector occupied output to the proper input pins on your MSC boards. For this, just
follow your layout sketch and connect the detectors as shown in the MSC mode connection lists.
The next figure shows the typical non-isolated connections between block detectors and MSC block
input pins.
Figure 4-3 Block Detector Wiring to MSC
Figure 4-4 shows the use of an opto-isolator to avoid making connections between the layout running
circuit common and the signaling system common.
Figure 4-4 Isolated Block Detector Wiring to MSC
4.3 GETTING TURNOUT POSITION
Many of the modes require turnout position inputs for proper operation. This is simply an SPST
normally open contact that is closes when the turnout is in the reversed position. Such contacts are often
present in twin-coil and stall motor switch machines (e.g., Tortoise). For each such turnout, connect the
switch position contact as shown below.
15

TSSI MSC MANUAL
Figure 4-5 Turnout Position Contact
Of course, you may be using a stall motor that does not have any electrical contacts, or, perhaps, all of
the contacts are already in use for frog wiring or other purposes. There is a simple, reliable way to add a
“contact” to such switch machines.
Figure 4-6 Turnout Position Contact on Stall Motor
This circuit will work very well. If your stall motor has too high a current for this circuit, you can
modify the circuit as shown in Figure 4-7
Figure 4-7 Turnout Contact for High Current Stall Motor
4.4 CONNECTING TO THE SIGNALS
So far, we have been connecting your MSC’s to the blocks and turnouts that control the aspects
displayed. Now it is time to connect to the signals themselves. As you can see, the MSC can handle every
type of signal in common use: color light, position light, color position light, searchlight and semaphore.
The next few paragraphs will show you how to connect to the signals of your choice.
Please refer to Appendice III for further information on how to connect to the signals
16

TSSI MSC MANUAL
4.5 CONNECTING TO A CTC PANEL
Several of the MSC modes are CTC modes, and provisions are made to connect the MSC to the
direction clearance switch on the dispatcher’s panel. The diagram below shows exactly how to do this.
Figure 4-8 Dispatcher's Panel Input Connections
17
TSSI MSC MANUAL
5 CUSTOMER SUPPORT
5.1 TECHNICAL SUPPORTWe are available to provide reasonable assistance to help you get the greatest possible benefit from the
MSC Master Signal Controller. Feel free to write, email, fax or phone us with any questions or comments
you may have. Please enclose a large SASE if you are expecting a reply. We will do our best to clear up
any issues you may raise about the use of the MSC.
We welcome any suggestions you may have for improvements to the MSC, or for any related products
you would like to see made available. All such recommendations will be considered as we plan our future
product offerings.
You can write to us at:
W. S. Ataras Engineering, Inc.PO Box 25West Terre Haute, IN 47885VOICE: 812-533-1345 (9-4 CST)FAX: 708-570-6140
5.2 LIMITED WARRANTY
Your satisfaction with your new MSC is our primary concern. The MSC Master Signal Controller is
warranted free of defects in materials and workmanship for a period of 90 days from date of purchase. This
does not cover damage due to misuse-use, improper installation, or connection to excessive voltages or
currents. We will, at our option, repair or replace any defective unit.
The MSC Master Signal Controller is further warranted for 30 days to perform in a satisfactory manner
when connected as described in this manual. Should you feel that your MSC is not performing as you
would expect, simply write to us, describing your difficulty. Tell us what you expect of the MSC, and how
it appears to fall short. If we cannot clear up any problems you have, we will refund your full purchase
price upon return of your MSC in good working order.
We are not be responsible for units that have been damaged by misuse-use, improper installation or
connection.
18

TSSI MSC MANUAL
APPENDICE I
GENERAL INFORMATION
BLOCK AND CONTROL SIGNALING
This section will explain the basics of the most common signaling systems used on North American
prototype railroads. The information is “AAR Standard” because their standards are the starting point for
prototype signaling. Naturally, the “Standard” varied over the years, based on developments in signaling
and operational techniques.
Please consider these thoughts as a starting point for your signaling system. If you are building a free-
lance railroad, you may be able to use these suggestions as is; if you are following a specific prototype, in a
specific era, you will want to add information from other sources to keep the “rivet counters” in their place.
Over the years, the railroads have developed different systems for keeping their trains from running
into each other. At first, they used manual systems, augmented by telegraph communications. In 1870, the
first automatic track circuit was developed, enabling the railroads to reduce costs and improve safety.
Trackside signals were installed, giving the engineer information about the condition of the track ahead.
That would allow him to bring his train to a safe, controlled stop when necessary.
The foundation of train dispatching was the timetable and the rulebook, with temporary changes made
by dispatcher issued train orders. The timetable was the authority for the movement of regularly scheduled
trains. Also included in the timetable were the scheduled meets and passes.
Spelled out in the timetable were rules defining train superiority. When a meet was scheduled, the
inferior train took the siding and cleared the switches so the superior train could pass without interference.
Trains could be given ‘superiority by right’ if the dispatcher issued orders giving such superiority.
Otherwise, superiority was specified in the timetable, with ‘superiority by class’ and ‘superiority by
direction’.
The timetable defined the various train ‘classes’, such as first class trains are superior to second class
trains, second class trains are superior to third class trains, etc. When trains of the same class meet, the
timetable specified which was superior because of direction. In this way, everyone knew what needed to be
done.
Signals were installed because things can go wrong. An air hose may break, causing a train to be late
for a meet, or perhaps late in leaving a station. In either case, it would not arrive on time for a meet, or may
not be as far ahead of following traffic as expected. The signals would sort this out, allowing all trains to
move safely.
Two basic types of automatic signaling systems were developed: Automatic Block Signaling (ABS)
and Absolute Permissive Block Signaling (APB). They are explained in detail below. In any case, with
19

TSSI MSC MANUAL
these systems, the dispatcher acted only when needed to resolve temporary problems. He issued train
orders to change meeting points, to schedule extra trains, and to work around breakdowns in equipment or
facilities.
Later, Centralized Traffic Control was developed. Using this system, the timetable no longer
functioned as an authorizing document. Every train movement, whether regularly scheduled or extra, was
handled explicitly by the dispatcher in real time. And train superiority rules were cancelled in CTC
territory. More on this topic appears below.
1) Automatic Block Signaling
This type if signaling is used for track with train movements in only one direction. Typically, each
track of a double track main line is signaled using ABS for movements in opposite directions. Should it
become necessary to ‘run opposed’, the dispatcher would issue orders to the affected trains.
Figure 8 Automatic Block Signaling
` In the ABS system, block lengths and signal aspects are chosen so that an engineer has adequate
warning before he has to stop his train. As train speeds and sizes increased, the railroads were forced to
either lengthen the blocks or add additional signal aspects. But longer blocks didn’t always help because
the engineer couldn’t respond to a signal until he could see it. Also, since a only a single train can occupy a
block, longer blocks meant that trains had to run farther apart. This reduced the volume of traffic a line
could handle.
As a rule, then, the railroads dealt with this by adding aspects to the signals. Instead of two aspect
signaling (Red = stop, Green = proceed), they created another aspect (Yellow = approach) to tell the
engineer to “proceed prepared to stop at the next signal”. Additional aspects were added, which helped to
engineer to bring his train to a safe stop by telling him to reduce his speed in steps. Typical values for the
speed steps are:
Normal = maximum authorized speed (timetable)
Limited = 45 MPH for passenger trains, 40 MPH for freight trains
Medium = 30 MPH
Slow = 15 MPH
Restricted = prepared to stop within one-half the range of vision, short of a train, obstruction or switch
improperly aligned.
20

TSSI MSC MANUAL
For block signaling, the MSC can provide three aspects: proceed, approach, and stop. For junctions,
passing tracks and CTC control points, the MSC can provide many additional aspects. With ABS, the stop
aspect is permissive. This allows a train to stop at a red signal, and then proceed at restricted speed.
The MSC has nine operating modes that support ABS signaling.
2) Absolute Permissive Block Signaling
APB signaling was developed to allow a single track to support train movements in both directions.
This is the typical form of signaling on single-track main lines, even today.
Following movements are signaled the same as with ABS signaling. However, for opposing
movements, the entire series of blocks between successive passing tracks are signaled as if they were one
long block. When a train moves out of a passing track area (from either the main or the siding) and enters
the single-track area, relays connected to the track circuits set the direction of the single track to be the
same as the direction of the train movement. All of the opposing signals up to the next passing track
‘tumble down’ to display ‘stop’. The opposing signal at the next passing track is an absolute signal,
meaning that opposing trains are not permitted to enter the single-track section.
Other than the addition of the absolute stop aspect, the aspects and speed limits for APB are the same
as for ABS.
Figure 9 Absolute Permissive Block Signaling
When you are out chasing prototype trains, you can easily recognize APB signals when you are at a
passing track. There will be two single head signals, facing in opposite directions, near the points of the
siding switches. Essentially, the signal facing the siding protects the entrance to the single-track territory,
and is an absolute signal. Trains on either the main or the siding cannot pass an absolute stop signal.
Note also that there will probably be a phone in the immediate area. This gives an engineer a chance
to call for information if he encounters an unexpected absolute stop signal. Today, with the wide use of
radio communications, the line-side phone boxes are disappearing. The MSC has five operating modes that
support APB signaling.
21

TSSI MSC MANUAL
3) Centralized Traffic Control Signaling
A later signaling development was CTC. The use of CTC will supercede the timetable as the authority
for running a train. The dispatcher controls every train movement using signal aspects and remotely
controlled turnouts.
But the dispatcher doesn’t control all signals. He will only have control of the signals at ‘control
points’. These will typically be the ends of passing tracks and route entrances at interlocking plants. The
dispatcher sets these signals from his panel, and the engineers are expected to respond accordingly.
Between the control points, either ABS or APB circuits are used to provide absolute protection for both
following and/or opposing train movements.
And, of great importance from a safety standpoint, the dispatcher can only ‘request’ turnouts to change
position, or signals to display aspects less restrictive than stop. The track and signaling circuits in the field,
called ‘vital circuits’, take precedence, preventing the dispatcher from throwing a switch under a train, or
from giving an unsafe clear aspect.
For CTC controlled territory, you will normally see three signals at each end of a passing track. A
two-head signal will control entry onto the main with the upper head, and the siding using the lower head.
Separate exit signals will be provided for both main and siding near the fouling point of the turnout. These
latter two signals individually control whether a train can move out onto the single-track territory.
Figure 3 Centralized Traffic Control
Depending on railroad and era, the siding departure signal may be a full mast one-head signal, a full
mast two-head signal with ‘stop’ always displayed by the top head, or even a dwarf. The main departure
signal will normally be a full mast one-head signal.
Recall that the direction of single track main lines is set by APB signaling systems when a train leaves
the passing track area. With CTC, the dispatcher first sets the switch to allow departure of the desired train.
22

TSSI MSC MANUAL
Then he clears the signal for that train, setting the direction of the single-track section by signal aspect.
Only then can the designated train depart.
The tumble down circuits are still in operation, preventing signals to clear opposing trains on the
single-track territory.
Another feature of CTC is that the control point signals normally display the ‘stop’ aspect. Only when
cleared by the dispatcher, and permitted to clear by the vital circuits will the signal display a less restrictive
aspect. The turnout or other track at a control point has its own track circuit. As soon as a train moves past
a clear signal and is detected by the track circuit, all of the signals at the control point are set to ‘stop’.
Thus, the dispatcher must act to clear each individual train through the control point. While this is typically
true, some railroads, in very high traffic areas, allowed multiple trains to move through a cleared route, one
after the other, without explicitly clearing the signal for each.
This specially detected piece of track is called an ’OS’ section, meaning ‘on switch’, since the most
common type of OS track is a switch. The OS detector also prevents the dispatcher from throwing the
switch while a train is on the switch, and will set the route entrance signal to ‘stop’ as soon as the train
enters the route. The MSC has three operating modes that support CTC signaling.
4) CTC at Interlocking Plants
CTC systems are also used to control interlocking plants, although a different person may actually be
operating an interlocking plant. Again, the operation is similar to what was described above. In this case,
interlocking signals are used to protect the entrance to routes through the interlocking plant. Beginning at
any given point, several routes may be possible.
Typically, the signal, called a ‘home’ signal, protecting the entrance to one or more routes will have
three signal heads. The top head will govern any normal speed route, the middle head will govern any
medium speed route, and the lower head will govern any slow speed route. If there is no route of a
particular speed, the corresponding signal head will be present and will always display ‘stop’. Any
exceptions to these guidelines will be described in the timetable and/or rulebook.
All signals governing the plant will normally be displaying absolute stop: red over red over red. The
operator will prepare the plant for a movement by setting the various turnouts needed by the route, by
locking them, and then by clearing the signal at the entrance to the route to permit a train to enter. OS
circuits protect all of the switches, and a timer protects the entire route as well.
Once the signal is cleared for a route, none of the switches can be changed until the operator first sets
the route signals to stop. And this doesn’t unlock the turnouts. It only starts a timer holding the turnouts
set for the route until any possible approaching train has had a chance to stop. If an approaching train does
not have time to stop, it will run into the route while the switches are still properly aligned, and the OS
circuits will prevent them from being changed until the train moves out of the route.
Route locking is also provided. With route locking, once a train has entered a route, all parts ahead of
the train are locked to permit the train to proceed. As the train moves through the plant, signals are
23

TSSI MSC MANUAL
returned to the stop aspect. Track and switches no longer needed by the train, because they’re behind the
train, are unlocked. This allows the operator to begin setting up the next route needed.
The MSC can support many interlocking plant configurations simply by using various combinations of
its other operating modes. However, because each interlocking plant is normally a unique arrangement of
track and routes, expect to do special things for your interlocking plants.
The Signaling Solution can provide custom designed circuit modules, based on the MSC, and
programmed to handle your specific interlocking plants. Contact us to discuss how we can help you signal
your special situations.
24

TSSI MSC MANUAL
APPENDICE II
SIGNALING SYSTEM
1) STANDARD NOMENCLATURE
Each of the figures shows an arrangement of blocks, block detectors, industrial spur switches and
signals. The various items are labeled using the block number as a reference. For example, “BD-3” is the
block occupancy detector for “Block 3”, “SW-3” is the industrial spur in “Block 3”, and “Sig-3” is the
signal protecting the entrance to “Block 3”. If the block is signaled for two directions of traffic, there will
be two signals labeled “Sig-3E” and “Sig-3W”, with the former protecting the eastbound entrance to
“Block 3” and the latter protecting the westbound entrance.
The signals are also shown so that they indicate the direction the signal is facing. A signal above the
track is facing to the right, visible to trains approaching from the right (westbound). A signal below the
track is facing to the left, and is visible to trains approaching from the left (eastbound).
If an MSC input is not needed for a particular situation, don’t connect anything to the input. For
example, if a block does not have an industrial spur, or you don’t want to connect it to the signaling circuit
for the block, simply connect nothing to the “SW-?” input.
Your signaling system will have an electrical connection that provides a voltage reference for all of the
circuits. This connection is called “SIGCOM”, or signaling common. It is thought of as having a voltage
of zero volts; many people will call it “ground”, although it is not an electrical safety ground. All of the
signaling circuits and the power supplies that power them must have a connection to SIGCOM. For the
MSC, SIGCOM is pin V on the card edge connector.
All inputs are what are normally called “active-low inputs”, meaning that the input is active when the
connected output is conducting current to SIGCOM. More information about such the actual connections
will be provided in Section 4 INSTALLING YOUR MSC.
Each MSC mode diagram includes a connection table. The table shows the connections for inputs
from the layout, and for outputs to the signals and other logic signals.
2) BLOCK SIGNALING
The paragraphs in this section describe the operational modes of the MSC used to operate block
signals. Some of the modes handle various arrangements of blocks signaled for one direction of traffic;
others handle blocks signaled for two directions of traffic.
For industrial spurs off the main line, the prototype will protect the main line by connecting both the
switch and derail positions into the main line signaling circuits. In this way, if either the switch or derail
are in unsafe positions, the main line signals will show a ‘stop’ aspect. Most of these MSC modes have
25

TSSI MSC MANUAL
input connections available for switches and derails. Also, the main line block signal circuit is routed
through the switch so that any rolling stock that moves closer to the switch than the fouling point, or any
breaks in the rails, will also activate the ‘stop’ aspect. As you can see, the prototype railroads place a
maximum emphasis on safety.
2.1) One Direction Traffic
These next five paragraphs describe the MSC modes for various arrangements of blocks signaled for
one direction of traffic.
Four ABS Sequential Blocks
This mode of operation is used to operate three aspect signals for one direction of traffic. There are
four sequential blocks to be signaled. To allow for approach lighting and three aspects, the occupancy
status for six blocks is required. By grouping them this way, most of the electrical interconnections from
block to block are handled internally by the MSC. You have about 1/3 as many wires to connect.
Along with the basic operation of three aspect signals, each of the blocks may have one or more
industrial spurs. Whenever the spurs are not aligned for the main, the associated block signal shows ‘stop’,
and the block signal ahead of it shows ‘approach’. This exactly duplicates the operation of prototype ABS
signaling.
Contacts on the switch motors for the spurs are wired into the MSC. You may also have contacts on
the “derails”, just as the prototype does, for a little extra interest in you operating sessions.
Figure 4 Four Sequential Blocks
MSC MODE 0INPUT CONNECTIONS OUTPUT CONNECTIONS
Pin Function Pin FunctionA Block 0 occupied 1 Signal 1 REDB Block 1 occupied 2 Signal 1 YELLOWC Block 2 occupied 3 Signal 1 GREEND Block 3 occupied 4 Signal 2 REDE Block 4 occupied 5 Signal 2 YELLOWF Block 5 occupied 6 Signal 2 GREENH Block 1 spur and derail 7 Signal 3 REDJ Block 2 spur and derail 8 Signal 3 YELLOWK Block 3 spur and derail 9 Signal 3 GREENL Block 4 spur and derail 10 Signal 4 RED
26

TSSI MSC MANUAL
M Block 5 spur and derail 11 Signal 4 YELLOWN 12 Signal 4 GREENP 13R 14S 15T + 5 Volts DC for LED’s 16U Vprotect (Use only with output relays) 17V SIGCOM, Negative from power supply 18 Positive from power supply (+9VDC)
Install or remove the mode jumpers from J1 pins 1-4 as shown below.
Figure 5 Mode 0 Jumper Configuration
Three Sequential Blocks Plus 1
You may have an area with only three sequential blocks. By using this mode, the three blocks can be
handled as a group, and the hardware resources within the MSC can still handle any one additional single
block.
Figure 6 Three Sequential Blocks + 1
27

TSSI MSC MANUAL
MSC MODE 1INPUT CONNECTIONS OUTPUT CONNECTIONS
Pin Function Pin FunctionA Block 0 occupied 1 Signal 1 REDB Block 1 occupied 2 Signal 1 YELLOWC Block 2 occupied 3 Signal 1 GREEND Block 3 occupied 4 Signal 2 REDE Block 4 occupied 5 Signal 2 YELLOWF Block 5 occupied 6 Signal 2 GREENH Block 6 occupied 7 Signal 3 REDJ Block 7 occupied 8 Signal 3 YELLOWK Block 1 spur and derail 9 Signal 3 GREENL Block 2 spur and derail 10 Signal 4 REDM Block 3 spur and derail 11 Signal 4 YELLOWN Block 4 spur and derail 12 Signal 4 GREENP Block 6 spur and derail 13R Block 7 spur and derail 14S 15T + 5 Volts DC for LED’s 16U Vprotect (Use only with output relays) 17V SIGCOM, Negative from power supply 18 Positive from power supply (+9VDC)
Install or remove the mode jumpers from J1 pins 1-4 as shown below.
Figure 7 Mode 1 Jumper Configuration
Pair of Two Sequential Blocks
More than likely, you will have a double track main line, each with two consecutive blocks to be
signaled for one direction of travel. Mode 2 will handle this very nicely. While the figure shows both
groups of blocks with traffic flow to the ‘left’, consider the traffic flow as relative to the blocks. In other
words, on one main, the blocks are number 0, 1, 2 and 3 moving west; on the other, they are numbered 4, 5,
6 and 7 moving east.
28

TSSI MSC MANUAL
Figure 8 Pair of Two Sequential Blocks
MSC MODE 2INPUT CONNECTIONS OUTPUT CONNECTIONS
Pin Function Pin FunctionA Block 0 occupied 1 Signal 1 REDB Block 1 occupied 2 Signal 1 YELLOWC Block 2 occupied 3 Signal 1 GREEND Block 3 occupied 4 Signal 2 REDE Block 4 occupied 5 Signal 2 YELLOWF Block 5 occupied 6 Signal 2 GREENH Block 6 occupied 7 Signal 3 REDJ Block 7 occupied 8 Signal 3 YELLOWK Block 1 spur and derail 9 Signal 3 GREENL Block 2 spur and derail 10 Signal 4 REDM Block 3 spur and derail 11 Signal 4 YELLOWN Block 5 spur and derail 12 Signal 4 GREENP Block 6 spur and derail 13R Block 7 spur and derail 14S 15T + 5 Volts DC for LED’s 16U Vprotect (Use only with output relays) 17V SIGCOM, Negative from power supply 18 Positive from power supply (+9VDC)
29

TSSI MSC MANUAL
Install or remove the mode jumpers from J1 pins 1-4 as shown below.
Figure 9 Mode 2 Jumper Configuration
Two Sequential Blocks Plus 1 and 1
Mode 3 has one pair of consecutive blocks and two individual blocks as well.
Figure 10 Two Sequential Blocks + 1 + 1
30

TSSI MSC MANUAL
MSC MODE 3INPUT CONNECTIONS OUTPUT CONNECTIONS
Pin Function Pin FunctionA Block 0 occupied 1 Signal 1 REDB Block 1 occupied 2 Signal 1 YELLOWC Block 2 occupied 3 Signal 1 GREEND Block 3 occupied 4 Signal 2 REDE Block 4 occupied 5 Signal 2 YELLOWF Block 5 occupied 6 Signal 2 GREENH Block 6 occupied 7 Signal 3 REDJ Block 7 occupied 8 Signal 3 YELLOWK Block 8 occupied 9 Signal 3 GREENL Block 9 occupied 10 Signal 4 REDM Block 4 spur and derail 11 Signal 4 YELLOWN Block 5 spur and derail 12 Signal 4 GREENP Block 7 spur and derail 13R Block 8 spur and derail 14S Block 9 spur and derail 15T + 5 Volts DC for LED’s 16U Vprotect (Use only with output relays) 17V SIGCOM, Negative from power supply 18 Positive from power supply (+9VDC)
Install or remove the mode jumpers from J1 pins 1-4 as shown below.
Figure 11 Mode 3 Jumper Configuration
Four Separate Blocks
This mode can be used for most of your ABS situations, including all of the previous modes. In it, the
approach, home and distant blocks are explicitly available for each signal.
This mode does have other uses, however. Should you have a track situation with doesn’t fit one of
the build-in MSC modes, say a complex interlocking for example, and you can use this mode to let the
MSC operate the signal heads. Use external logic as needed for the track arrangement, and pass the block
occupied information in for each of the signals directly. The MSC will operate the signals properly,
especially searchlight heads.
31

TSSI MSC MANUAL
Figure 12 Four Separate Blocks
32

TSSI MSC MANUAL
MSC MODE 4INPUT CONNECTIONS OUTPUT CONNECTIONS
Pin Function Pin FunctionA Block 0 occupied 1 Signal 1 REDB Block 1 occupied 2 Signal 1 YELLOWC Block 2 occupied 3 Signal 1 GREEND Block 3 occupied 4 Signal 2 REDE Block 4 occupied 5 Signal 2 YELLOWF Block 5 occupied 6 Signal 2 GREENH Block 6 occupied 7 Signal 3 REDJ Block 7 occupied 8 Signal 3 YELLOWK Block 8 occupied 9 Signal 3 GREENL Block 9 occupied 10 Signal 4 REDM Block 10 occupied 11 Signal 4 YELLOWN Block 11 occupied 12 Signal 4 GREENP Block 7 spur and derail 13R Block 10 spur and derail 14S Block 11 spur and derail 15T + 5 Volts DC for LED’s 16U Vprotect (Use only with output relays) 17V SIGCOM, Negative from power supply 18 Positive from power supply (+9VDC)
Install or remove the mode jumpers from J1 pins 1-4 as shown below.
Figure 13 Mode 4 Jumper Configuration
2.2) Two Direction Traffic
The next two paragraphs show the mode diagrams for blocks signaled for two-direction traffic flow.
This type of signaling is called Absolute Permissive Block signaling. One key feature of this type of
signaling is the use of tumbledown circuits to set opposing signals to the ‘stop’ aspect from the front of a
train running in single track territory to the next passing track. These figures will show these electrical
connections with the labels “TDWI” and “TDEI” for the westbound and eastbound inputs, respectively.
The corresponding outputs will be labeled “TDWO” and “TDEO”.
When making these connections, a tumble down west output from an MSC will be connected to the
tumbledown west input of the MSC immediately to the west, and vice versa. In general, the tumbledown
connections will appear as shown in Figure .
33

TSSI MSC MANUAL
Figure 14 Tumbledown and SIGCOM Connections
Similar tumbledown connections are used with all of the MSC modes that handle signaling for two
directions of traffic flow.
Two Sequential Blocks
This APB mode is used if you have two sequential blocks to signal. Because of the internal routing of
electrical signals, your wiring is much simpler than it otherwise would be.
There are tumbledown connections in both directions. When using this mode, expect to have a mode 7
MSC on either side to control the blocks just outside the passing tracks. For example, if you had four
blocks between passing tracks, you would use 3 MSC’s as follows: mode 7 – mode 5 – mode 7.
If you have only one APB block between passing tracks, use MSC mode 8 to signal that block and the
entrances to the two passing tracks.
Figure 15 Two Sequential APB Blocks
34

TSSI MSC MANUAL
MSC MODE 5INPUT CONNECTIONS OUTPUT CONNECTIONS
Pin Function Pin FunctionA Block 0 occupied 1 Signal 1W REDB Block 1 occupied 2 Signal 1W YELLOWC Block 2 occupied 3 Signal 1W GREEND Block 3 occupied 4 Signal 1E REDE Tumbledown West Input 1 5 Signal 1E YELLOWF Tumbledown East Input 2 6 Signal 1E GREENH Block 0 spur and derail 7 Signal 2W REDJ Block 1 spur and derail 8 Signal 2W YELLOWK Block 2 spur and derail 9 Signal 2W GREENL Block 3 spur and derail 10 Signal 2E REDM 11 Signal 2E YELLOWN 12 Signal 2E GREENP 13 Tumbledown East Out Block 1R 14 Tumbledown West Out Block 2S 15T + 5 Volts DC for LED’s 16U Vprotect (Use only with output relays) 17V SIGCOM, Negative from power supply 18 Positive from power supply (+9VDC)
Install or remove the mode jumpers from J1 pins 1-4 as shown below.
Figure 16 Mode 5 Jumper Configuration
Two Separate Blocks
This mode handles two individual APB blocks, and has tumbledown connections in both directions to
adjacent MSC’s. If you have three blocks between successive passing tracks, you can use three MSC’s as
follows: Mode 7 – Mode 6 (1/2 of a board) – Mode 7. The mode 6 MSC board would have one APB block
available for another location on your layout.
35

TSSI MSC MANUAL
Figure 17 Two Individual APB Blocks
MSC MODE 6INPUT CONNECTIONS OUTPUT CONNECTIONS
Pin Function Pin FunctionA Block 0 occupied 1 Signal 1W REDB Block 1 occupied 2 Signal 1W YELLOWC Block 2 occupied 3 Signal 1W GREEND Block 3 occupied 4 Signal 1E REDE Block 4 occupied 5 Signal 1E YELLOWF Block 5 occupied 6 Signal 1E GREENH Tumbledown West Input 1 7 Signal 2W REDJ Tumbledown East Input 1 8 Signal 2W YELLOWK Tumbledown West Input 2 9 Signal 2W GREENL Tumbledown East Input 2 10 Signal 2E REDM Block 0 spur and derail 11 Signal 2E YELLOWN Block 1 spur and derail 12 Signal 2E GREENP Block 2 spur and derail 13 Tumbledown East Out Block 1R Block 3 spur and derail 14 Tumbledown West Out Block 1S Block 4 spur and derail 15 Tumbledown East Out Block 2T + 5 Volts DC for LED’s 16 Tumbledown West Out Block 2U Vprotect (Use only with output relays) 17V SIGCOM, Negative from power supply 18 Positive from power supply (+9VDC)
36

TSSI MSC MANUAL
Install or remove the mode jumpers from J1 pins 1-4 as shown below.
Figure 18 Mode 6 Jumper Configuration
3) PASSING TRACK SIGNALING
Passing tracks can be signaled in several different ways, depending on the type of signaling being used
in the territory: ABS, APB or CTC. Also, passing tracks may be shared by two main lines. Typically, the
railroad would locate a passing track between the two main lines. This arrangement would normally be
used to permit faster traffic to overtake slower traffic.
The next several paragraphs illustrate the passing track configurations supported by the MSC.
3.1) One Direction Traffic
Sometimes passing tracks are located on double track main lines. The primary reason is to allow faster
traffic to pass slower traffic without interfering with traffic flow in the opposite direction. Naturally, these
sidings are protected with signals. Quite often, the dispatcher controls the switches from his CTC panel.
Since the signals only apply to one direction of traffic, the dispatcher would not have a three-position (W-
S-E) direction setting switch on his panel. He would only have switches and code buttons to set turnout
positions. The signals would operate automatically based on turnout positions as set by the dispatcher and
block occupancy.
ABS/CTC Passing Track
An ABS/CTC passing track that is signaled for one direction of traffic flow has several possible signal
configurations, depending on the specific prototype you are following. The MSC can control the signal
heads shown in Figure , quite often, signals 3MW and 3PW will each have only a single three-aspect signal
head. If this is your prototypes’ practice, simply don’t install or connect the lower head on signal 3MW
and the upper head on signal 3PW.
This MSC mode also has an extra output called BOCCX-0. The signal protecting the westbound
entrance to block 0 needs to now the block occupancy status of the either block 1 or block 2, depending on
the position of turnout 1. BOCC-0 has this status information. Simply connect it to the MSC controlling
the block 0 signal as if it were coming from a block detector on the block after block 0.
37

TSSI MSC MANUAL
Figure 19 ABS/CTC Passing Track
MSC MODE 9INPUT CONNECTIONS OUTPUT CONNECTIONS
Pin Function Pin FunctionA Block 0 occupied 1 Signal 1W Top REDB Block 1 occupied 2 Signal 1W Top YELLOWC Block 2 occupied 3 Signal 1W Top GREEND Block 3 occupied 4 Signal 1E Bottom REDE Block 4 occupied 5 Signal 1E Bottom YELLOWF Turnout 1 Reversed 6 Signal 1E Bottom GREENH Turnout 2 Reversed 7 Signal 3MW Top REDJ Block 1 spur and derail 8 Signal 3MW Top YELLOWK Block 2 spur and derail 9 Signal 3MW Top GREENL Block 3 spur and derail 10 Signal 3MW Bottom REDM Block 4 spur and derail 11 Signal 3PW Top REDN 12 Signal 3PW Bottom REDP 13 Signal 3PW Bottom YELLOWR 14 Signal 3PW Bottom GREENS 15 BOCC Block after 0T + 5 Volts DC for LED’s 16U Vprotect (Use only with output relays) 17V SIGCOM, Negative from power supply 18 Positive from power supply (+9VDC)
Install or remove the mode jumpers from J1 pins 1-4 as shown below.
Figure 20 Mode 9 Jumper Configuration
38

TSSI MSC MANUAL
3.2) Two Direction Traffic
There are several possible ways for passing tracks to be signaled for two directions of traffic. The first
and earliest system is Absolute Permissive Block signaling. For this type of signaling, the train crew
knows whether to take the siding or main based on the timetables’ rules of train superiority. The dispatcher
can write train orders that take precedence over the timetable when circumstances require.
The MSC has two modes available for handling APB signaled passing tracks. One mode is used if
there are two or more blocks between the successive passing tracks; the other is used if there is only one
block between two passing tracks.
APB Approach to Passing Track
Use this mode to control APB signals if there are two or more blocks between passing tracks. If
there are only two blocks, then you will use one MSC for each of the blocks, controlling a total of 6 signal
heads. If there are more than two blocks, you will still have a mode 7 MSC at each passing track; signal
the additional blocks using MSC boards with either mode 5 or mode 6, as appropriate.
Figure 21 APB Approach to Passing Track
39

TSSI MSC MANUAL
MSC MODE 7INPUT CONNECTIONS OUTPUT CONNECTIONS
Pin Function Pin FunctionA Block 0 occupied 1 Signal 3W REDB Block 1 occupied 2 Signal 3W YELLOWC Block 2 occupied 3 Signal 3W GREEND Block 3 occupied 4 Signal 1E REDE Block 4 occupied 5 Signal 1E YELLOWF Tumbledown West In Block 0 6 Signal 1E GREENH Tumbledown East In Block 3 7 Signal 3E REDJ Turnout 1 Reversed 8 Signal 3E YELLOWK Turnout 2 Reversed 9 Signal 3E GREENL Block 0 spur and derail 10 Tumbledown East Out Block 0M Block 1 spur and derail 11 Tumbledown West Out Block 3N Block 2 spur and derail 12P Block 3 spur and derail 13R Block 4 spur and derail 14S 15T + 5 Volts DC for LED’s 16U Vprotect (Use only with output relays) 17V SIGCOM, Negative from power supply 18 Positive from power supply (+9VDC)
Install or remove the mode jumpers from J1 pins 1-4 as shown below.
Figure 22 Mode 7 Jumper Configuration
APB Block between Passing Tracks
Mode 8 is specifically designed to handle four signal heads for situations where there is only one APB
block between two passing tracks.
40

TSSI MSC MANUAL
Figure 23 APB Block Between Passing Tracks
MSC MODE 8INPUT CONNECTIONS OUTPUT CONNECTIONS
Pin Function Pin FunctionA Block 0 occupied 1 Signal 3W REDB Block 1 occupied 2 Signal 3W YELLOWC Block 2 occupied 3 Signal 3W GREEND Block 3 occupied 4 Signal 1E REDE Block 4 occupied 5 Signal 1E YELLOWF Block 5 occupied 6 Signal 1E GREENH Block 6 occupied 7 Signal 4W REDJ Tumbledown West In Block 0 8 Signal 4W YELLOWK Tumbledown East In Block 6 9 Signal 4W GREENL Turnout 1 Reversed 10 Signal 3E REDM Turnout 2 Reversed 11 Signal 3E YELLOWN Turnout 3 Reversed 12 Signal 3E GREENP Turnout 4 Reversed 13 Tumbledown East Out Block 0R Block 3 spur and derail 14 Tumbledown West Out Block 6S 15T + 5 Volts DC for LED’s 16U Vprotect (Use only with output relays) 17V SIGCOM, Negative from power supply 18 Positive from power supply (+9VDC)
Install or remove the mode jumpers from J1 pins 1-4 as shown below.
Figure 24 Mode 8 Jumper Configuration
41

TSSI MSC MANUAL
ABS Passing Track Approach/Exit
You can use this mode to provide ABS signaling of one end of a passing track. These signals are
typical of what you would use if you had a CTC installation; however, in this mode, the dispatcher
clearance eastbound or westbound is ‘automatic’ based on turnout position. While not totally prototypical,
you could have the appearance of CTC signaling without building a full CTC panel.
The single-track blocks outside the passing track area, if signaled at all, would be signaled using
MSC’s operating in modes 5 and 6.
Figure 25 ABS Passing Track Approach/Exit
MSC MODE 10INPUT CONNECTIONS OUTPUT CONNECTIONS
Pin Function Pin FunctionA Block 0 occupied 1 Signal 3PW Top REDB Block 1 occupied 2 Signal 3PW Bottom REDC Block 2 occupied 3 Signal 3PW Bottom YELLOWD Block 3 occupied 4 Signal 3PW Bottom GREENE Block 4 occupied 5 Signal 3MW Top REDF Tumbledown West In Passing Track 6 Signal 3MW Top YELLOWH Tumbledown East In Block 3 7 Signal 3MW Top GREENJ Turnout 1 Reversed 8 Signal 3MW Bottom REDK Turnout 2 Reversed 9 Signal 1E Top REDL Block 0 spur and derail 10 Signal 1E Top YELLOWM Block 1 spur and derail 11 Signal 1E Top GREENN Block 2 spur and derail 12 Signal 1E Bottom REDP Block 3 spur and derail 13 Signal 1E Bottom YELLOWR Block 4 spur and derail 14 Signal 1E Bottom GREENS 15 Tumbledown East Out Passing TrackT + 5 Volts DC for LED’s 16 Tumbledown West Out Block 3U Vprotect (Use only with output relays) 17 BOCC Block East of Block 3V SIGCOM, Negative from power supply 18 Positive from power supply (+9VDC)
42

TSSI MSC MANUAL
Install or remove the mode jumpers from J1 pins 1-4 as shown below.
Figure 26 Mode 10 Jumper Configuration
CTC Passing Track Approach/Exit
This mode gives you full CTC control over the entrance to a passing track. Your dispatcher would
have a turnout and a direction switch on his panel. In normal operation, he would first select the turnout
position and press his code button. This would align the turnout for either the main or siding. Then he
would turn the direction switch to clear either a westbound or an eastbound movement, and press the code
button again.
The MSC, operating in mode 11 to handle a passing track, will handle the signals accordingly. The
blocks in between passing tracks would be signaled using other MSC’s in modes 5 and 6. The tumbledown
connections will make sure that opposing trains are not cleared into the single-track territory at the same
time.
Figure 27 CTC Passing Track Approach/Exit
43

TSSI MSC MANUAL
MSC MODE 11 – Passing TrackINPUT CONNECTIONS OUTPUT CONNECTIONS
Pin Function Pin FunctionA Block OS occupied 1 Signal 1E Top REDB Block 0 occupied 2 Signal 1E Top YELLOWC Block 1 occupied 3 Signal 1E Top GREEND Block 2 occupied 4 Signal 1E Bottom REDE Block 3 occupied 5 Signal 1E Bottom YELLOWF Block 4 occupied 6 Signal 1E Bottom GREENH Tumbledown West In Block 1 7 Signal 1MW Top REDJ Tumbledown East In Block 1 8 Signal 1MW Top YELLOWK Turnout 1 Reversed 9 Signal 1MW Top GREENL Turnout 2 Reversed 10 Signal 1MW Bottom REDM 11 Signal 1PW Top REDN Dispatcher Set Clear Eastbound 12 Signal 1PW Bottom REDP Dispatcher Set Stop 13 Signal 1PW Bottom YELLOWR Dispatcher Set Clear Westbound 14 Signal 1PW Bottom GREENS Configuration Select (No connection) 15 Tumbledown East Out Block 1T + 5 Volts DC for LED’s 16 Tumbledown West Out Block 3U Vprotect (Use only with output relays) 17 BOCC Block East of Block 1V SIGCOM, Negative from power supply 18 Positive from power supply (+9VDC)
Install or remove the mode jumpers from J1 pins 1-4 as shown below.
Figure 28 Mode 11 (PT) Jumper Configuration
CTC Junction Approach/Exit
Mode 11 can also be used to signal a simple CTC junction. This would normally be used where a
branch line was joining a single-track main line. The other blocks on the main would be signaled using
separate MSC’s in modes 5 and 6, for example. The branch line may be signaled, or be ‘dark territory’, as
you wish.
Tumbledown connections are provided so you can handle the single-track territory properly.
44

TSSI MSC MANUAL
Figure 29 CTC Junction Approach/Exit
MSC MODE 11 – JunctionINPUT CONNECTIONS OUTPUT CONNECTIONS
Pin Function Pin FunctionA Block OS occupied 1 Signal 1E Top REDB Block 0 occupied 2 Signal 1E Top YELLOWC Block 1 occupied 3 Signal 1E Top GREEND Block 2 occupied 4 Signal 1E Bottom REDE Block 3 occupied 5 Signal 1E Bottom YELLOWF Block 4 occupied 6 Signal 1E Bottom GREENH Block 5 occupied 7 Signal 1MW Top REDJ Tumbledown East In Block 1 8 Signal 1MW Top YELLOWK Turnout 1 Reversed 9 Signal 1MW Top GREENL 10 Signal 1MW Bottom REDM 11 Signal 1PW Top REDN Dispatcher Set Clear Eastbound 12 Signal 1PW Bottom REDP Dispatcher Set Stop 13 Signal 1PW Bottom YELLOWR Dispatcher Set Clear Westbound 14 Signal 1PW Bottom GREENS Configuration Select to SIGCOM 15 Tumbledown East Out Block 1T + 5 Volts DC for LED’s 16 Tumbledown West Out Block 1U Vprotect (Use only with output relays) 17 BOCC Block East of Block 1V SIGCOM, Negative from power supply 18 Positive from power supply (+9VDC)
Install or remove the mode jumpers from J1 pins 1-4 as shown below.
Figure 30 Mode 11 (JCT) Jumper Configuration
45

TSSI MSC MANUAL
3.3) Shared Passing Track
Support for two styles of shared passing tracks is built into an MSC. A shared passing track is used by
the prototype if the amount of traffic does not justify either a four-track main line, or a separate passing
track for each direction. You will need an MSC to handle the signals at each end of the shared passing
track.
Under normal circumstances, the dispatcher would control the turnouts and signals at each end of the
siding. However, because the mains are signaled for a single direction of traffic, the MSC does not need
direct connections to the dispatcher’s panel. It only needs to know block status and turnout positions.
ABS Without Direction Preference
Mode 12 handles the classic shared passing configuration. Either main can use the siding as needed
and as controlled by the dispatcher. The signals will indicate the availability of a route through the plant,
based on turnout positions and block status. You can, if you want, use the siding to cross over to the other
main and run opposed to normal traffic. Be sure that train orders have been prepared and signed for!
Figure 31 ABS Shared Passing Track Type 1
46

TSSI MSC MANUAL
MSC MODE 12INPUT CONNECTIONS OUTPUT CONNECTIONS
Pin Function Pin FunctionA Block 0 occupied 1 Signal 2MW Top REDB Block 1 occupied 2 Signal 2MW Top YELLOWC Block 2 occupied 3 Signal 2MW Top GREEND Block 3 occupied 4 Signal 2MW Bottom REDE Block 4 occupied 5 Signal 2PW Top REDF Block 5 occupied 6 Signal 2PW Bottom REDH Block 6 occupied 7 Signal 2PW Bottom YELLOWJ Block 7 occupied 8 Signal 2PW Bottom GREENK Block 8 occupied 9 Signal 6E Top REDL Turnout 1 Reversed 10 Signal 6E Top YELLOWM Turnout 2 Reversed 11 Signal 6E Top GREENN Turnout 3 Reversed 12 Signal 6E Bottom REDP Turnout 4 Reversed 13 Signal 6E Bottom YELLOWR Turnout 5 Reversed 14 Signal 6E Bottom GREENS Turnout 6 Reversed 15 BOCC Block East of Block 7T + 5 Volts DC for LED’s 16U Vprotect (Use only with output relays) 17V SIGCOM, Negative from power supply 18 Positive from power supply (+9VDC)
Install or remove the mode jumpers from J1 pins 1-4 as shown below.
Figure 32 Mode 12 Jumper Configuration
ABS With Direction Preference
In some cases, based on the volume of traffic, a railroad will use the following arrangement to provide
passing tracks for both mains. Obviously, the westbound main has more favorable access to the passing
track because it can use the siding without affecting the eastbound main.
47

TSSI MSC MANUAL
Figure 33 Shared Passing Track Type 2
MSC MODE 13INPUT CONNECTIONS OUTPUT CONNECTIONS
Pin Function Pin FunctionA Block 0 occupied 1 Signal 3PW Top REDB Block 1 occupied 2 Signal 3PW Bottom REDC Block 2 occupied 3 Signal 3PW Bottom YELLOWD Block 3 occupied 4 Signal 3PW Bottom GREENE Block 4 occupied 5 Signal 3MW Top REDF Block 5 occupied 6 Signal 3MW Top YELLOWH Block 6 occupied 7 Signal 3MW Top GREENJ Block 7 occupied 8 Signal 3MW Bottom REDK Block 8 occupied 9 Signal 3MW Bottom YELLOWL Turnout 1 Reversed 10 Signal 3MW Bottom GREENM Turnout 2 Reversed 11 Signal 6E Top REDN Turnout 3 Reversed 12 Signal 6E Top YELLOWP Turnout 4 Reversed 13 Signal 6E Top GREENR Turnout 5 Reversed 14 Signal 6E Bottom REDS Turnout 6 Reversed 15 Signal 6E Bottom YELLOWT + 5 Volts DC for LED’s 16 Signal 6E Bottom GREENU Vprotect (Use only with output relays) 17 BOCC Block East of Block 7V SIGCOM, Negative from power supply 18 Positive from power supply (+9VDC)
48

TSSI MSC MANUAL
Install or remove the mode jumpers from J1 pins 1-4 as shown below.
Figure 34 Mode 13 Jumper Configuration
4) CROSSING SIGNALING
Crossings are used when two tracks cross at grade. The MSC has two modes for signaling crossings.
One is used for automatic operating, where the first train to arrive sets signals for the crossing route to
‘stop’. The second is a CTC installation, giving the dispatcher responsibility for clearing trains through the
crossing. To fully signal a crossing, you will need one MSC for each track. Each MSC controls four
signals per track for two directions of traffic: the signals that protect the crossing itself, and the signals that
protect the blocks approaching the crossing from either direction.
Tumbledown connections are also provided to merge these blocks into the surrounding single-track
territory. Each track through the crossing has an OS section. From a signaling standpoint, the OS section
is part of block 2 for westbound traffic, and part of block 1 for eastbound traffic. Block detector BD-4
detects trains in the OS section for the crossing track.
4.1) APB Crossing
Mode 14 can be used to signal a crossing automatically as shown in Figure 35 below. Each track
operates as if it were a normal single-track main line. When a train enters its OS section, the signals for the
crossing route are automatically set to ‘stop’.
Figure 35 APB Crossing
49

TSSI MSC MANUAL
MSC MODE 14 - ABSINPUT CONNECTIONS OUTPUT CONNECTIONS
Pin Function Pin FunctionA Block OS occupied 1 Signal 1W REDB Block 0 occupied 2 Signal 1W YELLOWC Block 1 occupied 3 Signal 1W GREEND Block 2 occupied 4 Signal 2W REDE Block 3 occupied 5 Signal 2W YELLOWF Block 4 occupied 6 Signal 2W GREENH Tumbledown East In Block 2 7 Signal 1E REDJ Tumbledown West In Block 1 8 Signal 1E YELLOWK 9 Signal 1E GREENL 10 Signal 2E REDM 11 Signal 2E YELLOWN 12 Signal 2E GREENP 13 Tumbledown East Out Block 1R 14 Tumbledown West Out Block 2S Configuration Select (No connection) 15T + 5 Volts DC for LED’s 16U Vprotect (Use only with output relays) 17V SIGCOM, Negative from power supply 18 Positive from power supply (+9VDC)
Install or remove the mode jumpers from J1 pins 1-4 as shown below.
Figure 36 Mode 14 (ABS) Jumper Configuration
4.2) CTC Crossing
Mode 14 also has a CTC option available. Use this if you want the dispatcher to clear traffic through
the crossing manually. As with the automatic operation above, as soon as a train enters its OS section, the
signals for the crossing route are set to display ‘stop’. But, at the same time, the signal cleared by the
dispatcher is returned to ‘stop’ as well. This requires the dispatcher to clear following movements one at a
time.
50

TSSI MSC MANUAL
Figure 37 CTC Crossing
MSC MODE 14 - CTCINPUT CONNECTIONS OUTPUT CONNECTIONS
Pin Function Pin FunctionA Block OS occupied 1 Signal 1W REDB Block 0 occupied 2 Signal 1W YELLOWC Block 1 occupied 3 Signal 1W GREEND Block 2 occupied 4 Signal 2W REDE Block 3 occupied 5 Signal 2W YELLOWF Block 4 occupied 6 Signal 2W GREENH Tumbledown East In Block 2 7 Signal 1E REDJ Tumbledown West In Block 1 8 Signal 1E YELLOWK 9 Signal 1E GREENL 10 Signal 2E REDM 11 Signal 2E YELLOWN Dispatcher Set Clear Eastbound 12 Signal 2E GREENP Dispatcher Set Stop 13 Dispatcher Panel Clear East BoundR Dispatcher Set Clear Westbound 14 Dispatcher Panel StopS Configuration Select to SIGCOM 15 Dispatcher Panel Clear West BoundT + 5 Volts DC for LED’s 16 Tumbledown East Out Block 1U Vprotect (Use only with output relays) 17 Tumbledown West Out Block 2V SIGCOM, Negative from power supply 18 Positive from power supply (+9VDC)
Install or remove the mode jumpers from J1 pins 1-4 as shown below.
Figure 38 Mode 14 (CTC) Jumper Configuration
51

TSSI MSC MANUAL
5) DETECTION ROUTING BY TURNOUTS
In is most basic form, a signal displays an aspect based on the condition of the blocks ahead. When a
turnout provides route selection, the next block changes based on the position of the turnout. From the
point side of a switch, the next block will be either along the normal or the reversed route.
From the frog side of a switch, the next block will be the point side block, if the switch is aligned for
the frog track. If not aligned for the track, the ‘next’ block is conceptually not present, since a route to it
does not exist. In other words, it’s as if the next block were occupied.
This last MSC mode is used to perform this block status routing for three separate turnouts. You can
use any combination of these three turnout switches to create block status routing for any junction or yard
throat. In each case, the route will see the status of the next block along the route, or a forced occupied
state. When presented to a signal head, using mode 4 for example, the signal will display ‘stop’ if the route
is not available for any reason.
Figure 39 Detection Routing by Turnouts
52

TSSI MSC MANUAL
MSC MODE 15INPUT CONNECTIONS OUTPUT CONNECTIONS
Pin Function Pin FunctionA Block 0 occupied 1 Block Occupied West of Block 0B Block 1 occupied 2 Block Occupied West of Block 1C Block 2 occupied 3 Block Occupied East of Block 2D Block 3 occupied 4 Block Occupied West of Block 3E Block 4 occupied 5 Block Occupied West of Block 4F Block 5 occupied 6 Block Occupied East of Block 5H Block 6 occupied 7 Block Occupied West of Block 6J Block 7 occupied 8 Block Occupied West of Block 7K Block 8 occupied 9 Block Occupied East of Block 8L Turnout 1 Reversed 10M Turnout 2 Reversed 11N Turnout 3 Reversed 12P 13R 14S 15T + 5 Volts DC for LED’s 16U Vprotect (Use only with output relays) 17V SIGCOM, Negative from power supply 18 Positive from power supply (+9VDC)
Install or remove the mode jumpers from J1 pins 1-4 as shown below.
Figure 40 Mode 15 Jumper Configuration
53

TSSI MSC MANUAL
APPENDICE III
CONNECTING TO SIGNALS
1) COLOR LIGHT SIGNALS
Color light signals are the one LED or bulb per aspect signal that were traditionally used by many
roads, such as the D&RGW and NYC. Whether the three lens per head were stacked vertically or in a
triangular shape, they are wired the same way. And the MSC will operate both LED and bulb based signals
of this type.
The built-in 5-volt power supply will work fine for LED’s; you must use an external power supply for
incandescent bulbs.
LED Signal Heads
LED based signals are the easiest to use. The power supply is included with the MSC, and only a
single resistor per LED is needed. Each of the three colors has a separate output that controls one of the
three LED’s. However, different signal manufacturers wire their LED’s differently. Some will use
common anode wiring (e.g., TOMAR), while others will use common cathode (e.g., ISS). While the MSC
can handle either, the most efficient for the MSC is the common anode wiring. Check with your signal
manufacturer to see how he wires his signals. Some will wire the signals in whatever way you specify. In
such cases, ask for common anode wiring.
If you have common anode signals, set the output programming jumpers as shown in Figure 41. This
jumper configuration can be used for color light signals using bulbs, also. Then, wire each signal head as
shown in Figure 42.
Figure 41 Signal Type Jumpers for Common Anode Color Light Signals
54

TSSI MSC MANUAL
Figure 42 Wiring Common Anode Color Light Signals
As you probably know, red LED’s are typically brighter than either yellow or green LED’s. What
many people do is to use different resistor values for the three different colors. A higher value will allow
less current to flow, and the LED will not be as bright. This is a subjective process, and trial and error may
be the best way to get the results you want. Once you know the values for the specific signals you use, you
just use the same values everywhere.
First, pick starting values for each resistor. Your LED’s will have specifications, probably included
with the signals that will tell you the voltage drop across the LED when it is conducting a specific current.
Use these values to calculate the resistors. The voltage drop across LED’s will typically be from 1.7 to 2.6
volts, and the maximum current rating will be in the range of 10 to 30 milliamps. Using the numbers for
your LED’s, calculate the resistor value using:
R = ( 5 – V )/I
Where V is the forward voltage drop and I is the maximum LED current limit. Typically, the lowest
resistor value will be 160 ohms.
Do this calculation for each of the 3 LED’s in your color light signal, and hook up the signal on your
bench with all three LED’s on. Compare the brightness of the three LED’s, and increase the resistance of
the brighter LED’s until they match the brightness of the dimmest. Then, note the values and use these
same values wherever you use signals of the same type. As long as the LED voltage is greater than 1.5
volts, and the resistor value is greater than 100 ohms, a 1/8 watt rating is just fine if the supply is 5 volts.
If your signal manufacturer only provides signals wired using the common cathode method, simply
change the jumpers to be as shown in Figure 43. You can use the same method as described above to select
the resistor values. The wiring to the signal is slightly different, as shown in .
Figure 43 Signal Type Jumpers for Common Cathode Color Light Signals
55

TSSI MSC MANUAL
Figure 44 Wiring Common Cathode Color Light Signals
Incandescent Bulb Heads
The MSC can operate incandescent bulbs, but two things have to be done first. As you probably know,
an incandescent bulb, when first turned on, has a very low filament resistance. This causes a brief, but very
high current to flow while the filament warms up. This high current surge can be as high as 10 or 20 times
as much as the ‘normal’ bulb current.
If you are using low voltage bulbs, you may be tempted to operate them from the 5-volt MSC supply.
The current surge, however, can easily exceed the capacity of the MSC power supply for a fraction of a
second. This would cause the MSC processor to reset, restart, activate the bulb, and reset again repeatedly.
It would appear as if it’s not working, but the problem is simply the bulb turn-on current. So, if you want
to use bulbs, you must use an external DC power supply of no more than 12 volts.
Second, the current surge could be enough to damage the MSC output transistors. To prevent this,
install a surge-limiting resistor in series with the bulbs. If you are powering 12-volt bulbs from a 12-volt
supply, use a resistor value of 47 ohms. This value will limit the surge, and reduce the voltage to the bulb
about 10%, thereby significantly increasing the life of the bulb.
If you are powering low voltage bulbs from a 12-volt supply, you will need a large resistor in any case.
The value of this dropping resistor will be sufficiently high to provide the necessary current limiting. For
example, if you are using a 1.5-volt, 15-milliamp bulb, you will be using a dropping resistor of about 820
ohms, and perhaps more. This, by itself, provides all the protection the MSC output transistors will need.
While using the MSC with bulbs, use the common anode jumper configuration shown in Figure 42.
Wire the bulbs as shown in Figure 45.
56
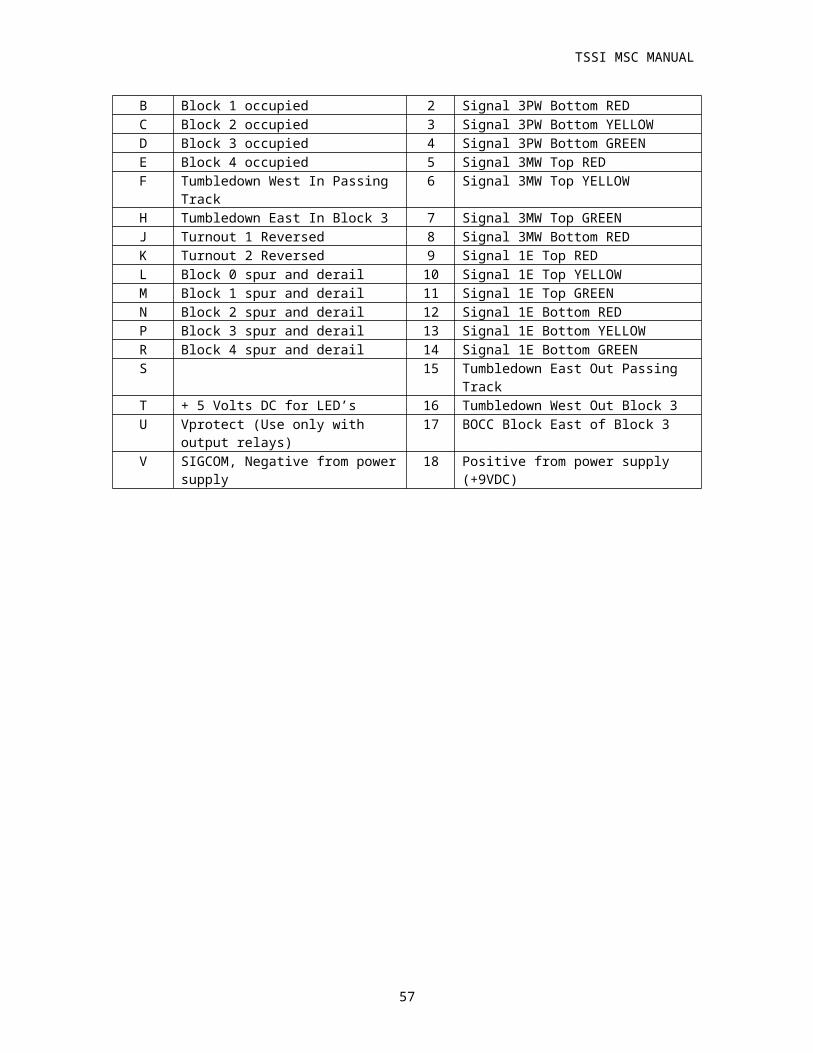
TSSI MSC MANUAL
Figure 45 Wiring a Color Light Signal with Bulbs
2) POSITION LIGHT SIGNALS
Position light signals were used by the Pennsylvania Railroad, and are still in use today. With these
signals, a full signal head is a round disk with 6 or 8 fog penetrating yellow bulbs around the perimeter, and
a similar bulb in the center. Naturally, model signals can be built with either yellow LED’s or incandescent
bulbs. The next two paragraphs show how to connect such signals to your MSC.
LED Signal Heads
As with color light signals, position light signals can be wired with LED’s in either a common anode
or common cathode configuration. Figure 46 shows the wiring of position light signals built with LED’s
wired with their anodes in common. Also, this wiring will not work if you are using approach lighting,
because, when wired as shown, the center light will always be lit.
In the figures below, the LED’s labeled ‘H’ are the two horizontal LED’s used to display the ‘stop’
aspect; the ‘D’ LED’s are the diagonal LED’s used to display the ‘approach’ aspect; the ‘V’ LED’s are the
two vertical LED’s used to display the ‘proceed’ aspect.
Figure 46 Wiring Position Light LED Signals
A slightly different circuit is used if you want to have approach lighting. Incidentally, you can use this
next circuit with or without approach lighting. It will work either way, but requires the addition of a few
diodes. The diodes are not expensive, and type 1N4001 diode is perfectly ok. The resistor used with the
center LED may have to be somewhat lower in value because of the additional voltage drop caused by the
57

TSSI MSC MANUAL
1N4001 diodes. This drop will be 0.7 volts added to the forward drop of the center LED itself. If the
center LED is obviously dimmer than the others, select a lower value for its resistor. Be careful not to go
too low in value and allow too high a current to flow through the LED.
Figure 47 Wiring Position Light LED Signals for Approach Lighting
For either of the above circuits, set the output type jumpers for the common anode configuration, as
shown in Figure 41.
While the circuit below can be used with signals wired with common cathodes, the additional
complexity is obvious. Recommendation: Purchase signals wired with common anodes. Also, using
these signals with approach lighting is really not at all practical.
Figure 48 Wiring Position Light LED Signals with Common Cathodes
Incandescent Bulb Heads
The MSC will handle position light signals equipped with bulbs, as long as they are wired with
common anodes. They are wired in the same way as the LED signal shown in Figure 47. Simply substitute
bulbs for the LED’s, and select current limiting resistors as described earlier.
58

TSSI MSC MANUAL
3) COLOR POSITION LIGHT SIGNALS
Color position light signals are wired the same as position light signals. The only change is that the
center LED or bulb is eliminated. Follow the appropriate wiring diagram shown above, making this one
alteration.
4) SEARCHLIGHT SIGNALS
Searchlight signals are a very interesting and popular signal with many prototype roads. We can build
working searchlight signals very simply by using LED’s which output two colors: red and green. There are
two different types of such LED’s, and the MSC will operate both types equally well.
One type is built with red and green LED’s wired with opposite polarities to the two external
connection pins. For such 2-pin LED’s, the polarity of the current will control the color displayed. With
one polarity, the LED will shine red; reverse the polarity and the LED will shine green. If you alternate the
polarity fast enough, and properly control the percent of the time that the each LED is on, you can get what
appears to be a yellow color from the LED.
Another way used to implement two color LED’s is to put red and green LED’s in the same case,
connect their cathodes together, and bring out three pins: the common cathode, and the separate red and
green anodes. By grounding the common cathode and causing current to flow through one of the other two
leads, you can get either a red or green color emitted. Yellow is also possible with this type of two color
LED. The MSC will activate the green side of the LED, and then pulse the red on and off at a high speed,
blending the two colors to get yellow.
An adjustment is available on the board so you can adjust the yellow tint to get the most acceptable
results. This potentiometer is shown as ‘R49’ in Figure 4-1.
Two Pin LED’s
The figure below shows how to wire a searchlight signal built with a 2-pin LED. Choose the resistor
values as described above. The signal type jumpers for this type of signal head are shown in Figure 50.
Figure 49 Searchlight Signal with 2-Pin LED
59

TSSI MSC MANUAL
Figure 50 Searchlight Signal with 2-Pin Two Color LED
Three Pin LED’s
Searchlight signals are also built with 3-pin LED’s. In this case, the two cathodes are common and
connected to SIGCOM. To get a yellow aspect, the MSC will turn on the green side and pulse the red side
at high speed. You can use R49 to adjust the color blend to get a satisfactory yellow.
Set the signal jumpers as shown in Figure 5 to enable use of this type of signal.
Figure 51 Wiring of a 3-Pin Common Cathode Searchlight Signal
Figure 52 Searchlight Signal with 3-Pin Common Cathode LED
The MSC will also control searchlight signal heads built with 3-pin LED’s having the anodes wired in
common. The next two figures show the wiring and output signal type jumper configuration.
60

TSSI MSC MANUAL
Figure 53 Wiring of a 3-Pin Common Anode Searchlight Signal
Figure 54 Searchlight Signal with 3-Pin Common Anode LED
5) SEMAPHORE SIGNALS
The MSC will, of course, control semaphore signals. In particular, it works very well with the
TOMAR searchlight signals. These signals use a stall motor and three position electrical contact to allow
the motor to stall in either the red or green position, or to seek a neutral position between red and green to
position the arm in the approach position.
Set the output type jumpers to the common anode color light mode shown in Figure . Then, simply
wire the motor drive as shown in the TOMAR instructions.
The motor drive operates from an external 12-volt DC power supply. Use the same supply with a
suitable dropping resistor to light the bulb.
61

TSSI MSC MANUAL
OTHER SIGNALINGAND LAYOUT CONTROLPRODUCTS WE SUPPLY
BD16 Block Occupancy Detector for 16 blocksBD8 Block Occupancy Detector for 8 blocksTC4 Three Color Signal ControllerMSC Master Signal ControllerGCC Grade Crossing ControllerGCX Grade Crossing ExpanderDetectable Wheel SetsSignal Mounting AdaptersTOMAR Signals, switch stands, crossing gates and flashing cross bucksSunrise signals for N-scale and HO-scaleOregon Rail Supply signals and signal kits
And our new CLICS™ System
COMPLETE LAYOUT INTEGRATED CONTROL SYSTEM
62


