Maptaskr Installation and Configuration Guide
15
1 Maptaskr Installation and Configuration Guide Version: 2.0.0.0
Transcript of Maptaskr Installation and Configuration Guide

1
Maptaskr
Installation and Configuration Guide
Version: 2.0.0.0

2
Registration 1. Import Maptaskr to the Solution store by navigating to Settings -> Solution or from the
AppSource
2. Once installed, click on the Maptaskr solution within the Solutions page
3. Click on ‘Configuration’ in the left navigation
Figure 1: Configuration
4. Fill in the Registration details, select the Terms & Conditions and click the ‘Register Trial’
button. You will receive the license key in your email provided.
Figure 2: Registration

3
5. Once you received the license key in your inbox, copy and paste the license and click
‘Activate’
Figure 3: License Activation
Upon license activation, the license details are reflected:
Figure 4: License Details

4
License Click on the ‘Users’ tab and click on the ‘Assign License’ button
Figure 7: Assign License
6. Assign Maptaskr license type to user or group
Figure 8: License Assignment
Advanced Settings Additional options can be set in the Advanced tab.
Under Advanced Settings -
a. Base Map: Select a different Base Map
b. Base Map Type: Select a Base Map type
c. Base Map Key: Insert Bing Map Key
Note: temporary Bing Map key is provided in the solution which may have expired.
New Bing Map key can be acquired from the Bing Maps Portal for test or
production purposes.
d. Change Geocoding type: Bing is used as default Geocoding service, to change to
Google, select Google and enter Google map key.
Google Maps key can be acquired from the Google Maps Platform. The key needs
to include Geocoding API enabled.
e. Default View: Select a default view of the map.
f. Distance: Select distance type.

5
Under Map Settings -
a. Display Pin’s Label: Choose Yes/No
b. Load Default Query: Choose Yes/No
c. Load Custom Icon: Choose Yes/No
Note: on selection of No, user will get colour picker option instead of icons.
d. Cluster Level: Put a number
Note: level to determine how close the cluster will be showing.
Under Search Settings -
a. Default Set Location Within: Put a number
b. Show Quick Search: Choose Yes/No
c. Show Annotations Tab: Choose Yes/No
d. Show Library Tab: Choose Yes/No
Figure 9: Base Map Settings
Data Tab Actions: Maptaskr displays data in map and data table format. The actions in the data tab include the ability
to take mass actions. The actions can be turned on/off.

6
Figure 10: Data Tab Actions
Additional Configurations Maptaskr comes with some default configurations which can be altered or added, if required.
Entities displayed on the map, include properties and actions are configurable. Data Sources defines
which entities are searchable and viewable in Maptaskr.
Data Sources Upon installation and configuring Maptaskr, Accounts, Contacts and Leads entities are mapped by
default. To add additional entities, please follow steps as described below.
1. Navigate to Settings ➔ Maptaskr ➔ Data Sources
Figure 11: Maptaskr settings menu items
2. To add a new entity, click on NEW and fill the required field mappings. As you start
typing autosuggest will show suggestions.

7
Figure 12: Data source – autosuggestion
The following table list the attributes for data source:
Field Description
Entity Name Internal name of the entity.
Display Name The name which will be displayed in Maptaskr
Title Field Name When the entity will be displayed in infobox,
the field value will be displayed (highlighted
below)

8
Has Address If the entity doesn’t have an address field
select yes. If yes then you need to specify a
related entity which has address field. For
example, you want to search appointments
based on contact’s location – so you would
select ‘Has Address’ false and in ‘
Related Entity with address If the entity doesn’t have address then a
related entity with address required. For
example, you add a data source for
appointment which doesn’t have address but
‘related entity with address’ might be ‘contact’
which has address.
Is Address Required If yes you need to provide address fields
mapping, otherwise just longitude and latitude
field required for address mapping
Enabled Whether the data source is enabled or disabled
Show on Dashboard Whether the entity will appear in searchable
entity dropdown.
Allow Relationship If yes then the data source will appear in the
relationship list tab in other entities
Relationship List When an entity is displayed in Maptaskr, related entities can be can be accessed as well, if mapped
in the ‘Relation List’. The related entities can be shows as list or can be mapped based on the option
selection

9
Infobox Actions Actions available in Infobox is customisable. You can create new action as well as edit default
actions.
Figure 13: Data source – Relationship list
Entity Properties Entity properties are the fields visible in detail section of One Click actions. The properties
can be specific to entities.
Figure 12: Data source – Entity Properties
1. To create a property, click the “Add New” button and fill in the details
Figure 13: Add Entity Properties
2. Once added, click on the “Save” button.
3. To edit/delete the action, click on the buttons next to the property.
4. If a property is Boolean type, icon can be displayed instead of property value.

10
Views
To control what views are available for users, enable the required view and applicable security
group.
Figure 14: Views
Data Tab Fields Data Tab includes fields visible in data tab in the Maptaskr search section. The fields are
specific to the data source.
Figure 15: Data Tab Fields
Icons Maptaskr includes default Icons for displaying entities and attributes on the map. They are
categorised into:
1. Push Pins: used in search selection and results. Search selection is available under
‘Search’ in the left navigation bar.

11
Figure 14: Push Pins
2. Entity Properties: are icons that can be assigned to Boolean properties and are
displayed as icons with ‘One Click’ actions. Below screen shows the icons for the
property set with the Data Source. (Refer to Data Sources -> Entity Properties)
Figure 15: Entity Properties Icon
3. Object Library: used for annotations. Object Library is available under ‘Annotations’
in the left navigation bar.

12
Figure 16: Object Library
Custom icons can be added to Maptaskr to indicate the above types.
1. Navigate to ‘Settings’ -> ‘Maptaskr Icons’
2. Click on ‘New’ in the ribbon
3. Enter Name, Icon Type (Push Pin, Object Library or Entity Property)
4. Save the record
5. Click on the Notes field
6. Click on the Attach button and upload an image representing the icon type.
Figure 17: Maptaskr Icons
Geocoding Maptaskr supports Bing Maps and Google Maps for geocoding. Bing is used as default and can be
changed to Google in Maptaskr settings (refer to the Installation section above).
Geocoding is triggered automatically for Accounts, Contacts and Leads. Any time a record is created
or edited, Maptaskr validates and geocodes the address.
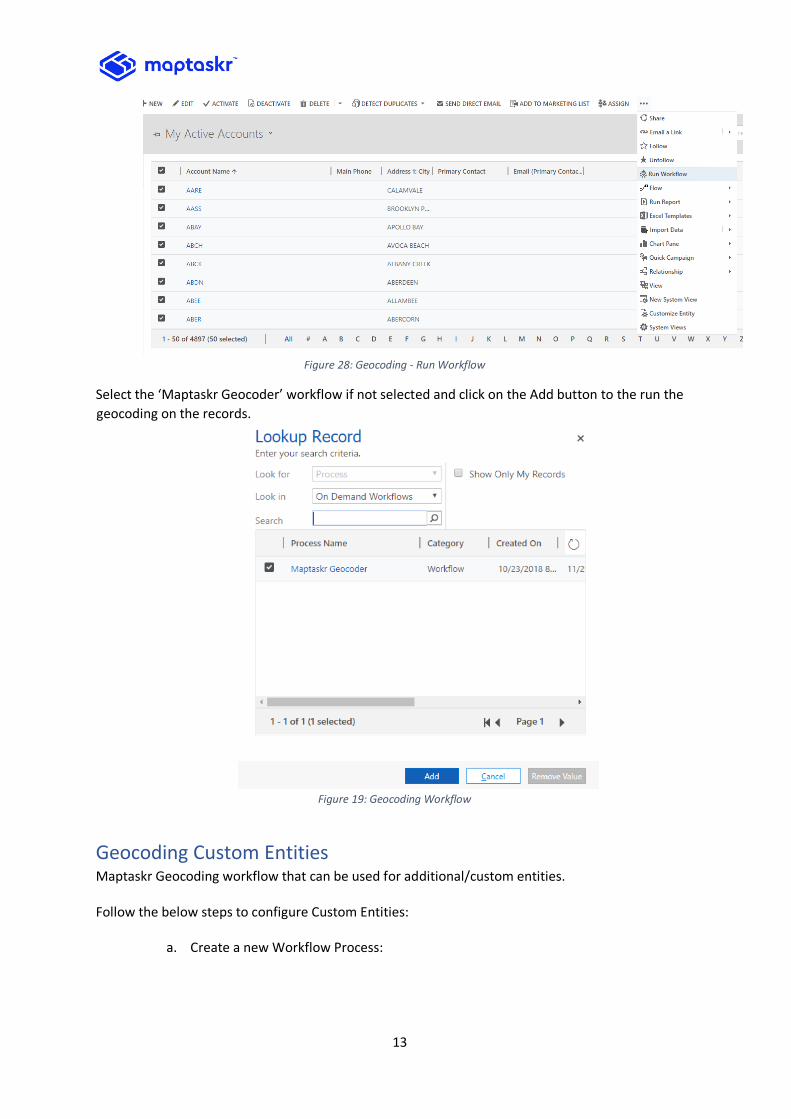
To run geocoding on existing addresses, navigate to the Entity, select one or more records, click on
‘More Commands’ and ‘Run Workflow’
13
Figure 28: Geocoding - Run Workflow
Select the ‘Maptaskr Geocoder’ workflow if not selected and click on the Add button to the run the
geocoding on the records.
Figure 19: Geocoding Workflow
Geocoding Custom Entities Maptaskr Geocoding workflow that can be used for additional/custom entities.
Follow the below steps to configure Custom Entities:
a. Create a new Workflow Process:

14
Navigate to → Settings → Processes and click on the New button or by creating a new empty Solution and then navigating to Processes.
b. Enter the process name, select category as Workflow, and select the Entity you wish
to design workflow and click OK.
Figure 3: Create Process
c. Set the Properties: Set the Scope as an organization and in Start when: select “Record is created” and “Record fields change” For the “Record fields change” option, select all of the address fields that require geocoding when any of the address fields are changed:
Click on Add Step and select the Maptaskr.Plugins (1.0.0.0) → Maptaskr.Plugins.GecodeActivity
Figure 4: Select Process
d. Set the address parameter by clicking on Set Properties for the workflow and save and close the window.

15
Figure 5: Select Properties
e. Click on Add Step and add Update Record.
f. As per the entity that the workflow is being configured, click on Set Properties. Set the Latitude and Longitude to the output parameters returned by the workflow, save and close the window.
Figure 6: Set Outputs
Once the workflow is activated, the geocoding workflow will trigger on creation and update of address fields.