MapSource for Beginners – A Complete Step By Step … If you have a problem opening an existing...
28
MapSource for Beginners – A Complete Step By Step Guide - Version 1.1 www.motorcycle-navigation.net www.multitudo.be www.bestbikingroads.com Copyright David Robertson 2007 ( www.Motorcycle-Navigation.net ) If you find a mistake in this document or would like to suggest an improvement please contact [email protected] Free for use and copying provided this footer is included Version 1.1, 11 th November 2007 - Page 1 MapSource for Beginners – A Complete Step By Step Guide Introduction This document is intended as a complete step-by-step guide for beginners using MapSource MapSource is the software that is supplied with most Garmin Handsets* MapSource is the software that is installed on your PC, not to be confused with the Unit Firmware, which is installed on the GPS unit itself (you should not need to do anything with the Unit Firmware by default as it should be ready configured for you to use out of the box) The figures used in this guide are from Windows Vista, therefore the appearance of text styles and font types may differ from that of Windows XP, do not be alarmed by this, the MapSource software is exactly the same otherwise. *NOTE: if you are using a Garmin 60c or non-automotive unit, your MapSource may be slightly different than that shown here, this tutorial uses the automotive version of the MapSource software in the screenshots and examples. Legal Disclaimer The author is not in any way responsible for any damage to you or your GPS arising as a result of using this document. This document is provided to you freely as help for MapSource, it is not approved by Garmin at this time and therefore there is no additional support offered. Audience This document is intended to help those not familiar with MapSource get up and running and familiar with the main features of the application and a few additional items. It is not intended as a comprehensive reference guide as it only brushes over many of the finer MapSource options. Configuring MapSource for use with a GPS handset MapSource is a piece of software that allows you to amongst other things, view maps, find places, plan routes, use waypoints and view tracks and upload or download this information to and from your GPS handset. Both MapSource and Unit Firmware updates are available to you from the Garmin website at www.garmin.com it is usually a good idea to check for the latest version of MapSource periodically from the site (or if you prefer, you can use the Garmin Web Updater utility also available from www.garmin.com ). It is the author’s opinion that it is not necessarily always a good idea to check directly for new Firmware updates to the unit (particularly for beginners) as it may result in the GPS unit becoming unusable before you begin if a mistake is made when installing a new version of Firmware. Let’s start at the beginning, with an explanation of the terms used by MapSource: Waypoint: A point that is saved on a map, this may or may not also have a category assigned to it. Route: A line between two or more waypoints
-
Upload
truongnhan -
Category
Documents
-
view
222 -
download
1
Transcript of MapSource for Beginners – A Complete Step By Step … If you have a problem opening an existing...

MapSource for Beginners – A Complete Step By Step Guide - Version 1.1
www.motorcycle-navigation.net www.multitudo.be www.bestbikingroads.com
Copyright David Robertson 2007 ( www.Motorcycle-Navigation.net )
If you find a mistake in this document or would like to suggest an improvement please contact [email protected] Free for use and copying provided this footer is included
Version 1.1, 11th
November 2007 - Page 1
MapSource for Beginners – A Complete Step By Step Guide
Introduction
This document is intended as a complete step-by-step guide for beginners using MapSource
MapSource is the software that is supplied with most Garmin Handsets* MapSource is the software
that is installed on your PC, not to be confused with the Unit Firmware, which is installed on the GPS
unit itself (you should not need to do anything with the Unit Firmware by default as it should be
ready configured for you to use out of the box)
The figures used in this guide are from Windows Vista, therefore the appearance of text styles and
font types may differ from that of Windows XP, do not be alarmed by this, the MapSource software
is exactly the same otherwise.
*NOTE: if you are using a Garmin 60c or non-automotive unit, your MapSource may be slightly different than that shown here, this tutorial
uses the automotive version of the MapSource software in the screenshots and examples.
Legal Disclaimer
The author is not in any way responsible for any damage to you or your GPS arising as a result of
using this document. This document is provided to you freely as help for MapSource, it is not
approved by Garmin at this time and therefore there is no additional support offered.
Audience
This document is intended to help those not familiar with MapSource get up and running and
familiar with the main features of the application and a few additional items. It is not intended as a
comprehensive reference guide as it only brushes over many of the finer MapSource options.
Configuring MapSource for use with a GPS handset
MapSource is a piece of software that allows you to amongst other things, view maps, find places,
plan routes, use waypoints and view tracks and upload or download this information to and from
your GPS handset.
Both MapSource and Unit Firmware updates are available to you from the Garmin website at
www.garmin.com it is usually a good idea to check for the latest version of MapSource periodically
from the site (or if you prefer, you can use the Garmin Web Updater utility also available from
www.garmin.com ). It is the author’s opinion that it is not necessarily always a good idea to check
directly for new Firmware updates to the unit (particularly for beginners) as it may result in the GPS
unit becoming unusable before you begin if a mistake is made when installing a new version of
Firmware.
Let’s start at the beginning, with an explanation of the terms used by MapSource:
Waypoint: A point that is saved on a map, this may or may not also have a category assigned to it.
Route: A line between two or more waypoints

MapSource for Beginners – A Complete Step By Step Guide - Version 1.1
www.motorcycle-navigation.net www.multitudo.be www.bestbikingroads.com
Copyright David Robertson 2007 ( www.Motorcycle-Navigation.net )
If you find a mistake in this document or would like to suggest an improvement please contact [email protected] Free for use and copying provided this footer is included
Version 1.1, 11th
November 2007 - Page 2
Track: A recorded log of where your GPS has been and when.
Map: The detailed electronic picture used in the MapSource application itself. MapSource itself can
handle several map products being loaded into it.
About MapSource
At the time of writing, the current latest version of MapSource is 6.13.4 (released 26th
September
2007). To check whether you have a map product installed see the drop down list box in Fig. 1.When
MapSource is purchased there is usually a map which is either included in the price of the GPS unit,
or in some cases, sold separately, this tutorial will use City Navigator Europe v9, which is the current
latest European Map version at time of writing. More than one map can be used on the same
MapSource Application at the same time and can be switched between during the session as
required.
Note : If you have not purchased at least one map product for the MapSource software you will not be able to use the GPS
unit to it’s full ability
From the MapSource application, you can see which version of MapSource you have installed by
clicking on ‘Help’ -> ‘About MapSource’
Fig. 1 – The Help Drop Down Menu in MapSource
MapSource for Beginners – A Complete Step By Step Guide - Version 1.1
www.motorcycle-navigation.net www.multitudo.be www.bestbikingroads.com
Copyright David Robertson 2007 ( www.Motorcycle-Navigation.net )
If you find a mistake in this document or would like to suggest an improvement please contact [email protected] Free for use and copying provided this footer is included
Version 1.1, 11th
November 2007 - Page 3
Fig. 2 – The About Box providing MapSource version information
You can also see which maps are available to you from the drop down list box on the left hand side
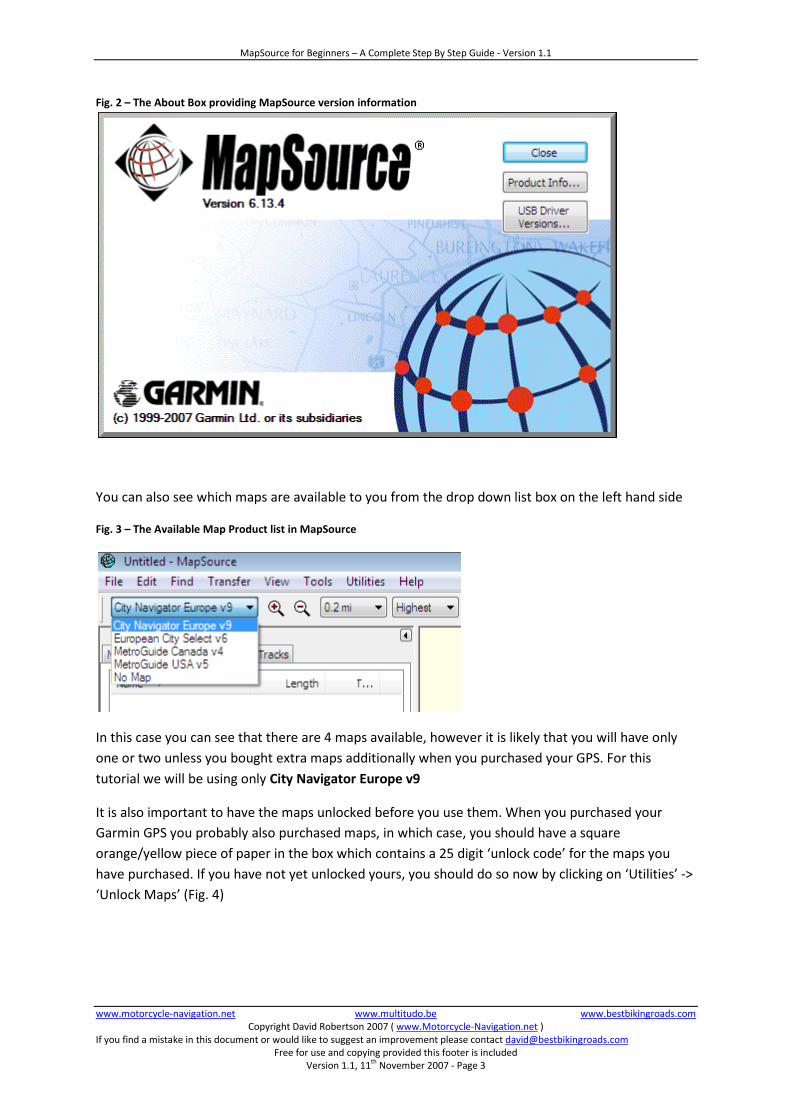
Fig. 3 – The Available Map Product list in MapSource
In this case you can see that there are 4 maps available, however it is likely that you will have only
one or two unless you bought extra maps additionally when you purchased your GPS. For this
tutorial we will be using only City Navigator Europe v9
It is also important to have the maps unlocked before you use them. When you purchased your
Garmin GPS you probably also purchased maps, in which case, you should have a square
orange/yellow piece of paper in the box which contains a 25 digit ‘unlock code’ for the maps you
have purchased. If you have not yet unlocked yours, you should do so now by clicking on ‘Utilities’ ->
‘Unlock Maps’ (Fig. 4)

MapSource for Beginners – A Complete Step By Step Guide - Version 1.1
www.motorcycle-navigation.net www.multitudo.be www.bestbikingroads.com
Copyright David Robertson 2007 ( www.Motorcycle-Navigation.net )
If you find a mistake in this document or would like to suggest an improvement please contact [email protected] Free for use and copying provided this footer is included
Version 1.1, 11th
November 2007 - Page 4
Fig. 4 – The Utilities Drop Down Menu showing the Unlock Maps option
Follow the steps given by the wizard and be aware that if you choose to register the code, you will
need to be connected to the internet. (at the time of writing, registering was not mandatory, simply
select not register at this time if you have no internet connection or prefer not to)
Once you have done this, you are ready to use your MapSource product.
MapSource Concepts: MapSource Sessions and Documents
MapSource uses documents or sessions, rather like Microsoft Word. In Microsoft Word when the
application starts, there is the option to either automatically create a new document or open an
existing document. Think of MapSource like this. When you start the MapSource Application, a new
MapSource session (or document if you prefer) is opened, this session can then be used but nothing
is actually saved until you choose to save the session and give it a name. MapSource files have a .gdb
file extension, so that they may be readily identified on the file system.
Note: If you have a problem opening an existing .gdb file sent to you by someone, this can very often be resolved by
downloading a newer version of MapSource from www.Garmin.com
MapSource Concepts: Understanding the MapSource Interface
First select the MapSource product you want to use from the Available Map Products drop down list
(see Fig. 5) then select the appropriate level of map detail that you would like to use from the Map
Detail level drop down list box. If you select a very high level of detail, be aware that the redrawing
of the map may be slow as you zoom and pan around in your session
MapSource for Beginners – A Complete Step By Step Guide - Version 1.1
www.motorcycle-navigation.net www.multitudo.be www.bestbikingroads.com
Copyright David Robertson 2007 ( www.Motorcycle-Navigation.net )
If you find a mistake in this document or would like to suggest an improvement please contact [email protected] Free for use and copying provided this footer is included
Version 1.1, 11th
November 2007 - Page 5
Explanation of the MapSource User Interface
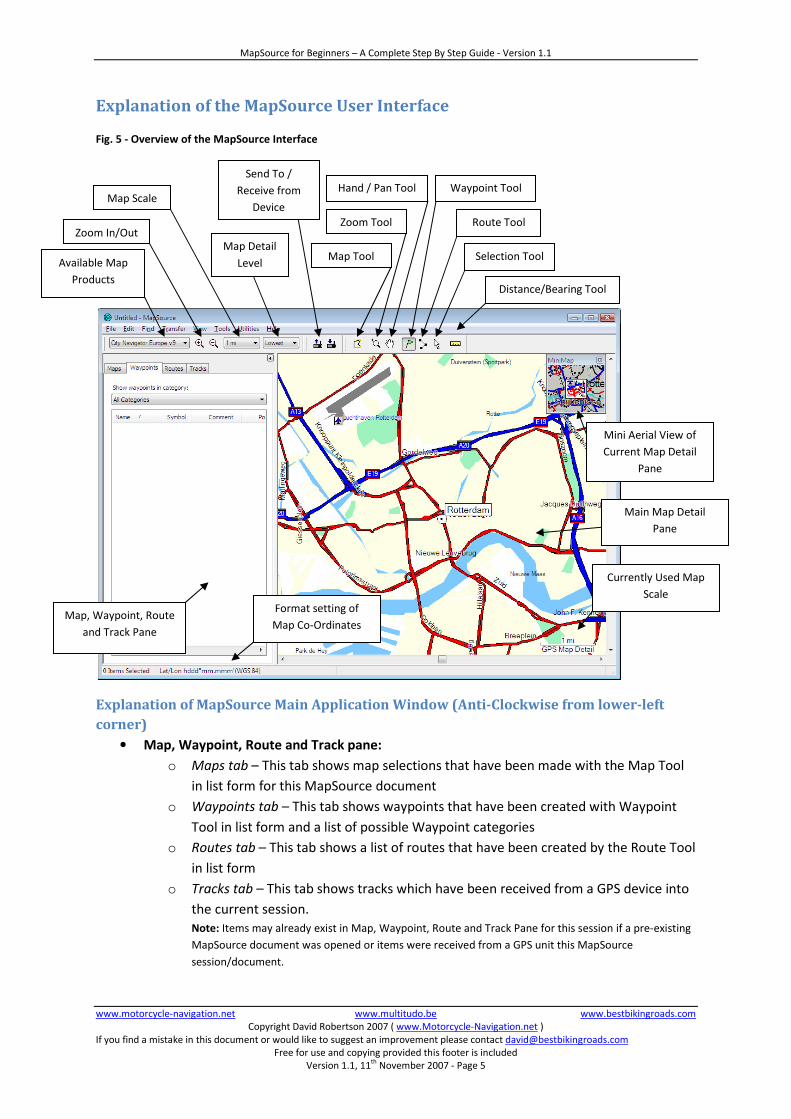
Fig. 5 - Overview of the MapSource Interface
Explanation of MapSource Main Application Window (Anti-Clockwise from lower-left
corner)
• Map, Waypoint, Route and Track pane:
o Maps tab – This tab shows map selections that have been made with the Map Tool
in list form for this MapSource document
o Waypoints tab – This tab shows waypoints that have been created with Waypoint
Tool in list form and a list of possible Waypoint categories
o Routes tab – This tab shows a list of routes that have been created by the Route Tool
in list form
o Tracks tab – This tab shows tracks which have been received from a GPS device into
the current session.
Note: Items may already exist in Map, Waypoint, Route and Track Pane for this session if a pre-existing
MapSource document was opened or items were received from a GPS unit this MapSource
session/document.
Format setting of
Map Co-Ordinates Map, Waypoint, Route
and Track Pane
Distance/Bearing Tool
Selection Tool
Route Tool
Waypoint Tool Hand / Pan Tool
Zoom Tool
Map Tool
Send To /
Receive from
Device
Zoom In/Out
Map Scale
Available Map
Products
Map Detail
Level
Currently Used Map
Scale
Mini Aerial View of
Current Map Detail
Pane
Main Map Detail
Pane
MapSource for Beginners – A Complete Step By Step Guide - Version 1.1
www.motorcycle-navigation.net www.multitudo.be www.bestbikingroads.com
Copyright David Robertson 2007 ( www.Motorcycle-Navigation.net )
If you find a mistake in this document or would like to suggest an improvement please contact [email protected] Free for use and copying provided this footer is included
Version 1.1, 11th
November 2007 - Page 6
Useful Tip: It’s possible to copy and paste items from one MapSource session to another using
standard Windows Copy and Paste Functionality (for this a second MapSource needs to be open)
• Format setting of Map Co-ordinates: Displayed here is the current format of the Co-
ordinates for this MapSource session.
Note: This may additionally show the co-ordinates of the current active cursor when it is placed on the Main Map
Detail Pane
• Current Map Scale: Shows the scale of the map currently being shown in the Map Detail
Pane
• Map Detail Pane: Shows the current Active map according to Map Product, Selected Level
of Map Detail and Zoom Level
• Mini Aerial View of Current Map Detail Pane: This gives a smaller scale overview of the
Main Map Detail Pane.
Useful Tip: It’s possible pan around in the Mini Aerial View by holding down the left mouse button and moving
the mouse around in the Mini Pane, this allows fast and easy Navigation of Larger distances.
• Distance / Bearing Tool: Can be used to draw or measure a bearing and distance in the
current session
• Selection Tool: Allows you to select items on the map
• Route Tool: Select this and then click on the map to start creating a route
• Waypoint Tool: Select this then click on the map to create a new waypoint
• Hand / Pan Tool: Select this and then click the mouse on the map and move to move the
map in the current session
• Zoom Tool: Click on this then draw a rectangle around an area you wish to enlarge in the
Map Detail Pane
• Map Tool: This allows selections of Map Detail sections that can be sent to a GPS unit (if
required)
Note: The main use of this is to send sections of map to a GPS unit where the memory on your GPS is limited,
hence if you have for example a Zumo 550 you may hardly ever need to use this at all as a large selection of
detail maps are already pre- loaded onto the unit)
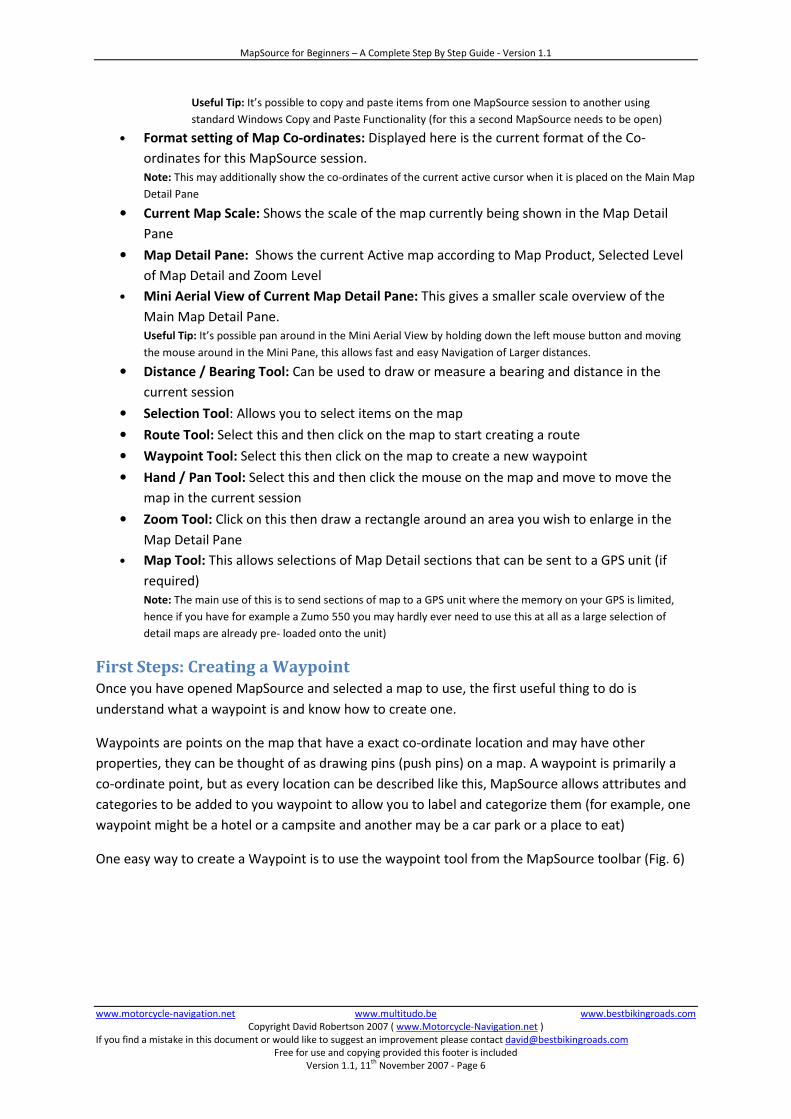
First Steps: Creating a Waypoint
Once you have opened MapSource and selected a map to use, the first useful thing to do is
understand what a waypoint is and know how to create one.
Waypoints are points on the map that have a exact co-ordinate location and may have other
properties, they can be thought of as drawing pins (push pins) on a map. A waypoint is primarily a
co-ordinate point, but as every location can be described like this, MapSource allows attributes and
categories to be added to you waypoint to allow you to label and categorize them (for example, one
waypoint might be a hotel or a campsite and another may be a car park or a place to eat)
One easy way to create a Waypoint is to use the waypoint tool from the MapSource toolbar (Fig. 6)

MapSource for Beginners – A Complete Step By Step Guide - Version 1.1
www.motorcycle-navigation.net www.multitudo.be www.bestbikingroads.com
Copyright David Robertson 2007 ( www.Motorcycle-Navigation.net )
If you find a mistake in this document or would like to suggest an improvement please contact [email protected] Free for use and copying provided this footer is included
Version 1.1, 11th
November 2007 - Page 7
Fig. 6 – Waypoint Tool Button
Simply click on this and then choose a point on the map, this will create a waypoint on the map. Now
name the waypoint something, for example ‘My first Waypoint’ and click ‘Ok’, your waypoint has
now been created and should be shown on the left hand pane under the tab waypoints for the
current session.
Fig. 7 – Creating a Waypoint in the current MapSource Session
Optionally you can now create a second Waypoint if you want to then create a route.
Fig 7 shows the basic details of a waypoint, however if you want to explore the features of
waypoints in more detail you can click on the ‘More Details’ button here (Fig. 7)
MapSource for Beginners – A Complete Step By Step Guide - Version 1.1
www.motorcycle-navigation.net www.multitudo.be www.bestbikingroads.com
Copyright David Robertson 2007 ( www.Motorcycle-Navigation.net )
If you find a mistake in this document or would like to suggest an improvement please contact [email protected] Free for use and copying provided this footer is included
Version 1.1, 11th
November 2007 - Page 8
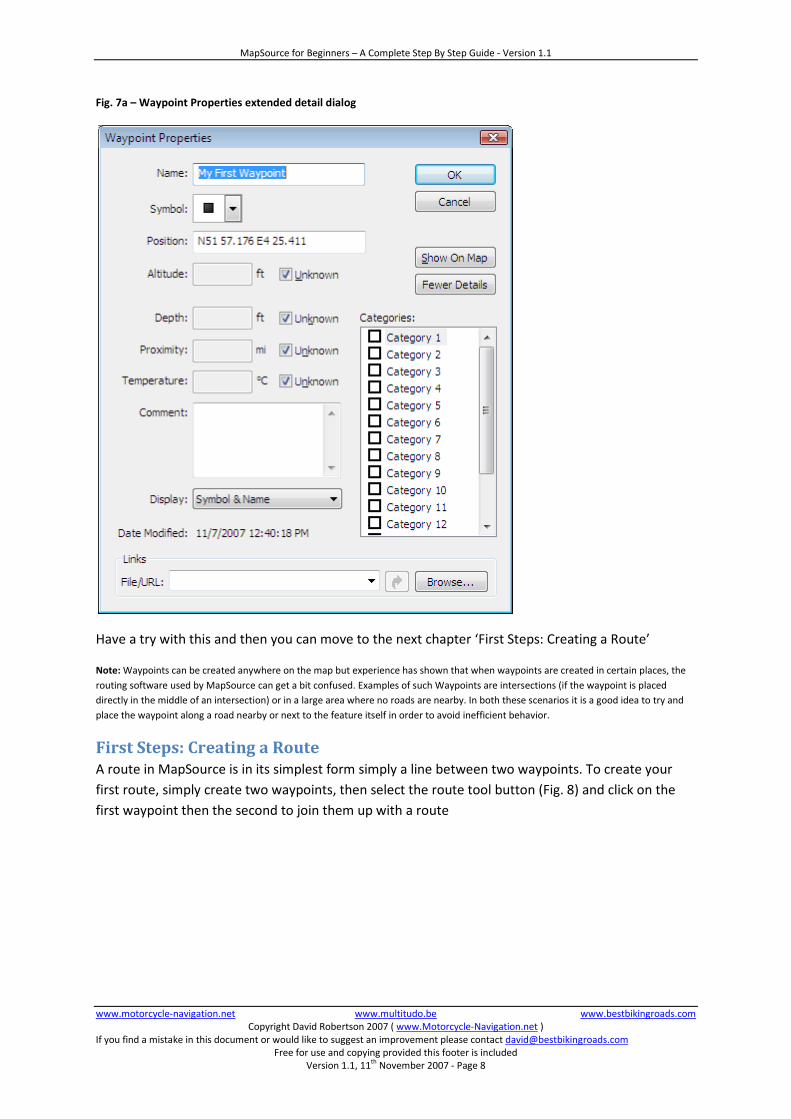
Fig. 7a – Waypoint Properties extended detail dialog
Have a try with this and then you can move to the next chapter ‘First Steps: Creating a Route’
Note: Waypoints can be created anywhere on the map but experience has shown that when waypoints are created in certain places, the
routing software used by MapSource can get a bit confused. Examples of such Waypoints are intersections (if the waypoint is placed
directly in the middle of an intersection) or in a large area where no roads are nearby. In both these scenarios it is a good idea to try and
place the waypoint along a road nearby or next to the feature itself in order to avoid inefficient behavior.
First Steps: Creating a Route
A route in MapSource is in its simplest form simply a line between two waypoints. To create your
first route, simply create two waypoints, then select the route tool button (Fig. 8) and click on the
first waypoint then the second to join them up with a route

MapSource for Beginners – A Complete Step By Step Guide - Version 1.1
www.motorcycle-navigation.net www.multitudo.be www.bestbikingroads.com
Copyright David Robertson 2007 ( www.Motorcycle-Navigation.net )
If you find a mistake in this document or would like to suggest an improvement please contact [email protected] Free for use and copying provided this footer is included
Version 1.1, 11th
November 2007 - Page 9
Fig. 8 – Route Tool Button
Fig. 9a – Simple route Creation, using the route tool between two Waypoints
Once you click on the second Waypoint, MapSource will automatically snap the route to a road and
be shown in Magenta (purple), the new route will then be available for you in the routes tab, if you
then click to select the newly created route from the routes tab in the Map, Waypoint, Route and
Track pane, the route is then shown in yellow with a direction arrow showing the direction of travel
(Fig. 9b).
MapSource for Beginners – A Complete Step By Step Guide - Version 1.1
www.motorcycle-navigation.net www.multitudo.be www.bestbikingroads.com
Copyright David Robertson 2007 ( www.Motorcycle-Navigation.net )
If you find a mistake in this document or would like to suggest an improvement please contact [email protected] Free for use and copying provided this footer is included
Version 1.1, 11th
November 2007 - Page 10
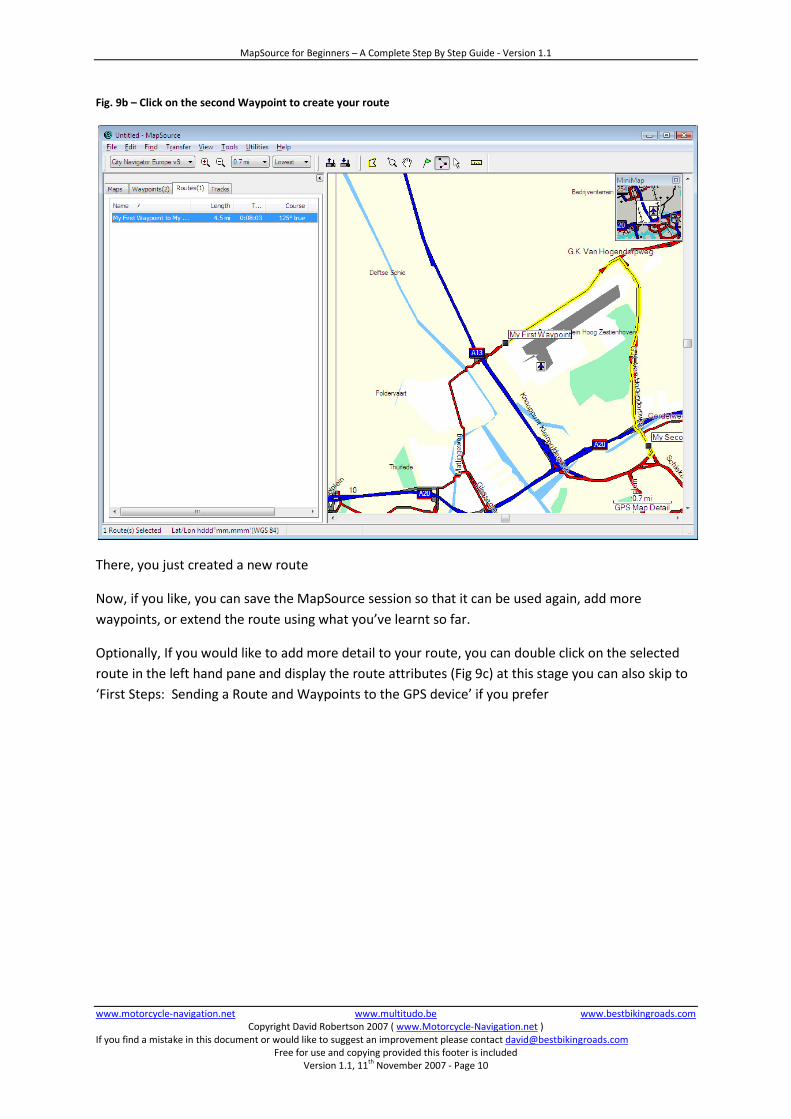
Fig. 9b – Click on the second Waypoint to create your route
There, you just created a new route
Now, if you like, you can save the MapSource session so that it can be used again, add more
waypoints, or extend the route using what you’ve learnt so far.
Optionally, If you would like to add more detail to your route, you can double click on the selected
route in the left hand pane and display the route attributes (Fig 9c) at this stage you can also skip to
‘First Steps: Sending a Route and Waypoints to the GPS device’ if you prefer

MapSource for Beginners – A Complete Step By Step Guide - Version 1.1
www.motorcycle-navigation.net www.multitudo.be www.bestbikingroads.com
Copyright David Robertson 2007 ( www.Motorcycle-Navigation.net )
If you find a mistake in this document or would like to suggest an improvement please contact [email protected] Free for use and copying provided this footer is included
Version 1.1, 11th
November 2007 - Page 11
Fig 9c – Route Properties
Here you can start to see the capabilities of MapSource, it’s possible to add more waypoints on you
route, reverse your route, etc. Additionally by clicking on the ‘Directions’ tab you can see a list of
directions as text.
More Waypoints can be inserted into your route and if you click for example on the Binoculars icon
here, you can insert a waypoint that is an address into your route. To find an address you would do
the following:
From the route properties dialog (Fig. 9c) click on the binoculars icon (Fig. 9d)
Fig. 9d – Binoculars icon
The ‘Find and Insert Place’ dialog box is then displayed (Fig 9e)

MapSource for Beginners – A Complete Step By Step Guide - Version 1.1
www.motorcycle-navigation.net www.multitudo.be www.bestbikingroads.com
Copyright David Robertson 2007 ( www.Motorcycle-Navigation.net )
If you find a mistake in this document or would like to suggest an improvement please contact [email protected] Free for use and copying provided this footer is included
Version 1.1, 11th
November 2007 - Page 12
Fig. 9e - Find and insert place dialog
Here you have several choices of what kind of search you would like to conduct:
• City – From the city tab, you can search for a City, Town or Village and a point in the centre
of that location will be chosen
• Feature – If you’re looking for a particular Interesting feature (e.g. the Eiffel Tower) you can
enter the name here
• Address – Probably the most commonly used is the address tab, here simply enter the city
name and then select a street name and number from that city by clicking the ‘select’ button
• Intersection – Similarly, you can select the intersection of two roads as a point to be added
• Waypoint – Here you can select an existing waypoint to be added to the route
Once you’ve made a selection from these options, you can click ‘Add to Route’ and the new point
will form part of your route.
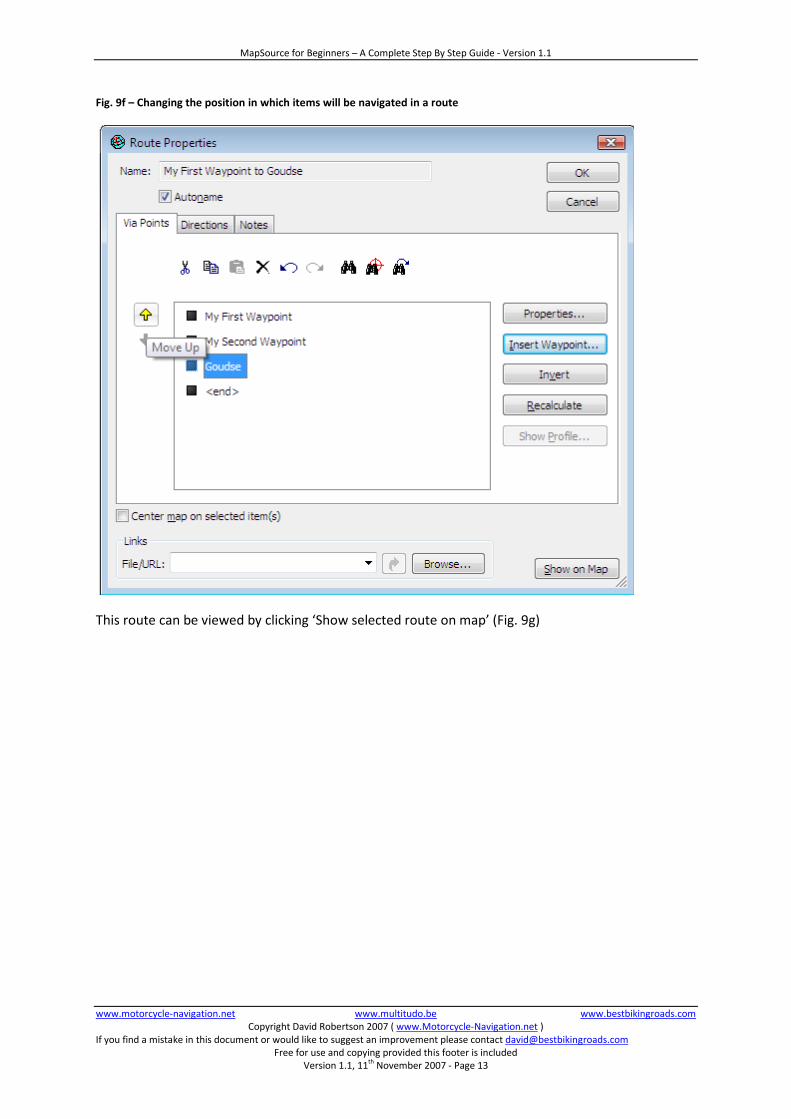
Fig. 9f Shows how once items have been added to the route, their order can be rearranged.
The order in which the items appear in this list is the order in which they will be navigated to once
loaded onto the GPS
MapSource for Beginners – A Complete Step By Step Guide - Version 1.1
www.motorcycle-navigation.net www.multitudo.be www.bestbikingroads.com
Copyright David Robertson 2007 ( www.Motorcycle-Navigation.net )
If you find a mistake in this document or would like to suggest an improvement please contact [email protected] Free for use and copying provided this footer is included
Version 1.1, 11th
November 2007 - Page 13
Fig. 9f – Changing the position in which items will be navigated in a route
This route can be viewed by clicking ‘Show selected route on map’ (Fig. 9g)
MapSource for Beginners – A Complete Step By Step Guide - Version 1.1
www.motorcycle-navigation.net www.multitudo.be www.bestbikingroads.com
Copyright David Robertson 2007 ( www.Motorcycle-Navigation.net )
If you find a mistake in this document or would like to suggest an improvement please contact [email protected] Free for use and copying provided this footer is included
Version 1.1, 11th
November 2007 - Page 14
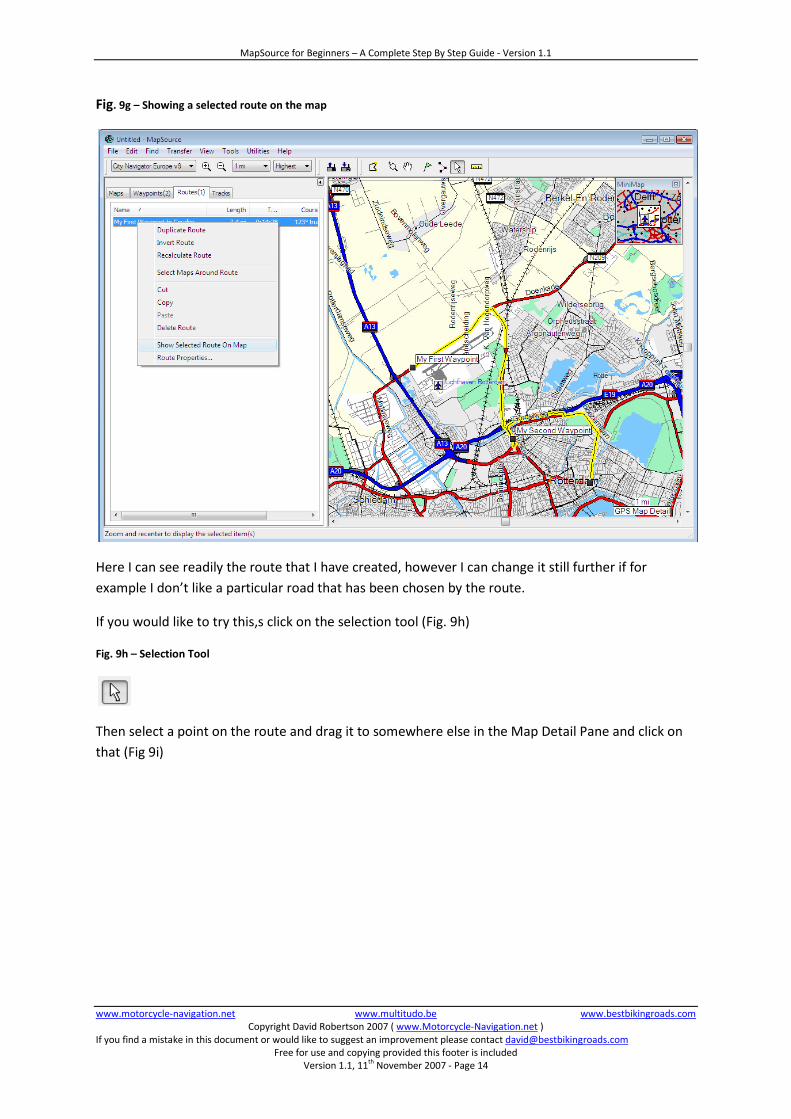
Fig. 9g – Showing a selected route on the map
Here I can see readily the route that I have created, however I can change it still further if for
example I don’t like a particular road that has been chosen by the route.
If you would like to try this,s click on the selection tool (Fig. 9h)
Fig. 9h – Selection Tool
Then select a point on the route and drag it to somewhere else in the Map Detail Pane and click on
that (Fig 9i)

MapSource for Beginners – A Complete Step By Step Guide - Version 1.1
www.motorcycle-navigation.net www.multitudo.be www.bestbikingroads.com
Copyright David Robertson 2007 ( www.Motorcycle-Navigation.net )
If you find a mistake in this document or would like to suggest an improvement please contact [email protected] Free for use and copying provided this footer is included
Version 1.1, 11th
November 2007 - Page 15
Fig. 9i Changing a route using the selection tool

MapSource for Beginners – A Complete Step By Step Guide - Version 1.1
www.motorcycle-navigation.net www.multitudo.be www.bestbikingroads.com
Copyright David Robertson 2007 ( www.Motorcycle-Navigation.net )
If you find a mistake in this document or would like to suggest an improvement please contact [email protected] Free for use and copying provided this footer is included
Version 1.1, 11th
November 2007 - Page 16
Now the route has been completely altered, this is just an example but you can imagine that there
are many real life applications of this idea.
If my route is a one way trip and I would now like to make the route home, I can simply select the
route from the left hand pane, right click ‘duplicate route’ ( or ‘copy’ then ‘paste’ it back into the list)
then click ‘reverse route’ on the copied version.
Next we’ll send this route to a GPS
First Steps: Sending a Route and Waypoints to the GPS device
For this exercise we’ll use the ‘Send to Device’ button from the Top Main Menu (Fig. 10)
Fig 10 – Send to Device Button
Connect the GPS device to the PC via the provided USB cable and switch on the GPS. Wait for about
10 seconds, and then click on the ‘Send to device’ button. This should display the following window:
Fig. 11 – The Send to Device Window
Here you can see the name of the Device which is connected (in this case a Garmin Zumo 500), the
unique id of the GPS unit, and a table of checkboxes which enable the various types of information
currently held in your MapSource session to be sent to the device.
Here you will also probably have noticed that The Maps and Tracks checkboxes are greyed out, this
is because in this example, no maps have been selected and no tracks exist (note the numbers on
the tabs of Fig. 9b, there are no numbers on the tabs for either the maps or tracks, this tells us that
there are no items in the current MapSource session), if there were either Maps or Tracks in this
MapSource session, these options would be ungreyed and could also be optionally sent to the GPS
Click on the ‘send’ button, all being well you should then see the following dialog box

MapSource for Beginners – A Complete Step By Step Guide - Version 1.1
www.motorcycle-navigation.net www.multitudo.be www.bestbikingroads.com
Copyright David Robertson 2007 ( www.Motorcycle-Navigation.net )
If you find a mistake in this document or would like to suggest an improvement please contact [email protected] Free for use and copying provided this footer is included
Version 1.1, 11th
November 2007 - Page 17
Fig. 12 – Transfer Complete Dialog Box
The New route is now available from the GPS, so the GPS can now be unplugged and the route used
on the road!
Note: If there is a problem connecting MapSource to the GPS, you may see the following message:
Fig. 13 – Problem communicating with device
Note - When this occurs, it is a good idea to save the current session of MapSource using File -> Save as from the main
menu. Then close MapSource, switch the GPS off for a few seconds, then switch the GPS back on again and restart
MapSource (MapSource may start automatically when you switch on the connected device) and then open your previous
session from the file menu using File -> Open
Summary
You can now create Waypoints, basic routes and send them to the GPS, In this example, one route
and two Waypoints were sent to the GPS, but many can be sent at one time (try it for yourself)
First Steps: Selecting Maps and Sending them to the GPS Note: If your GPS Unit has a lot of maps preloaded, you may need to do this rarely (examples of units with many maps
preloaded are 278 or Zumo 550, etc)
If you want to ride in a region for which you do not currently have maps loaded onto your GPS, or
you have an updated map versions for example it may be necessary to select the detail map regions
and send them to your device. This next section describes how to do this:
MapSource for Beginners – A Complete Step By Step Guide - Version 1.1
www.motorcycle-navigation.net www.multitudo.be www.bestbikingroads.com
Copyright David Robertson 2007 ( www.Motorcycle-Navigation.net )
If you find a mistake in this document or would like to suggest an improvement please contact [email protected] Free for use and copying provided this footer is included
Version 1.1, 11th
November 2007 - Page 18
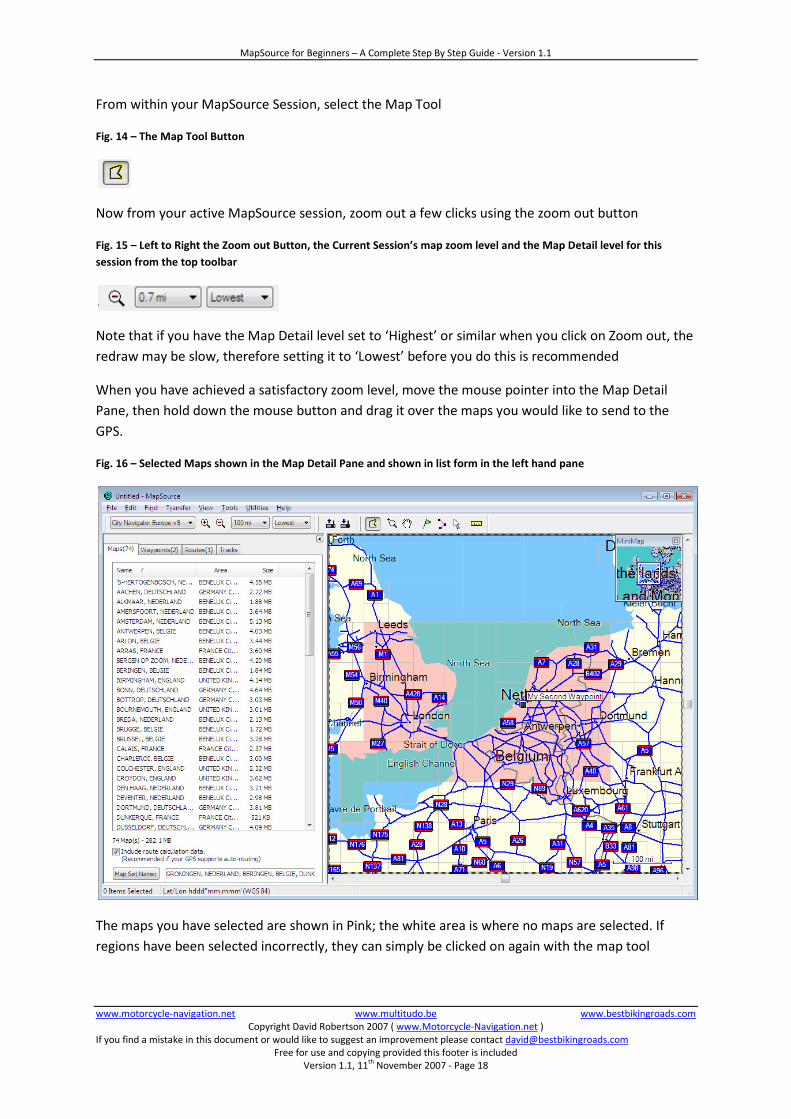
From within your MapSource Session, select the Map Tool
Fig. 14 – The Map Tool Button
Now from your active MapSource session, zoom out a few clicks using the zoom out button
Fig. 15 – Left to Right the Zoom out Button, the Current Session’s map zoom level and the Map Detail level for this
session from the top toolbar
Note that if you have the Map Detail level set to ‘Highest’ or similar when you click on Zoom out, the
redraw may be slow, therefore setting it to ‘Lowest’ before you do this is recommended
When you have achieved a satisfactory zoom level, move the mouse pointer into the Map Detail
Pane, then hold down the mouse button and drag it over the maps you would like to send to the
GPS.
Fig. 16 – Selected Maps shown in the Map Detail Pane and shown in list form in the left hand pane
The maps you have selected are shown in Pink; the white area is where no maps are selected. If
regions have been selected incorrectly, they can simply be clicked on again with the map tool
MapSource for Beginners – A Complete Step By Step Guide - Version 1.1
www.motorcycle-navigation.net www.multitudo.be www.bestbikingroads.com
Copyright David Robertson 2007 ( www.Motorcycle-Navigation.net )
If you find a mistake in this document or would like to suggest an improvement please contact [email protected] Free for use and copying provided this footer is included
Version 1.1, 11th
November 2007 - Page 19
selected to remove them from the current selection (they can also be deleted singly or as multiples
from the list in the left hand pane)
In this example you can see there are 74 map blocks selected (shown on the Maps tab in the left
hand pane, as well as at the bottom of the list in the left hand pane), the total size of the maps is
282.1 megabytes in this example, so if you want to send this map set to your device, this is required
amount of memory storage (so in this example it would be too many maps for say a Quest or a 276C
with a 256MB card)
You can send the maps to the GPS now by clicking on the ‘Send To Device’ button as per the
previous example, this time be sure that the maps checkbox is selected in the ‘What to Send’ area of
the ‘Send to Device’ dialog (see Fig. 11) (optionally you can send Maps, Waypoints and Tracks also at
this time if you want to)
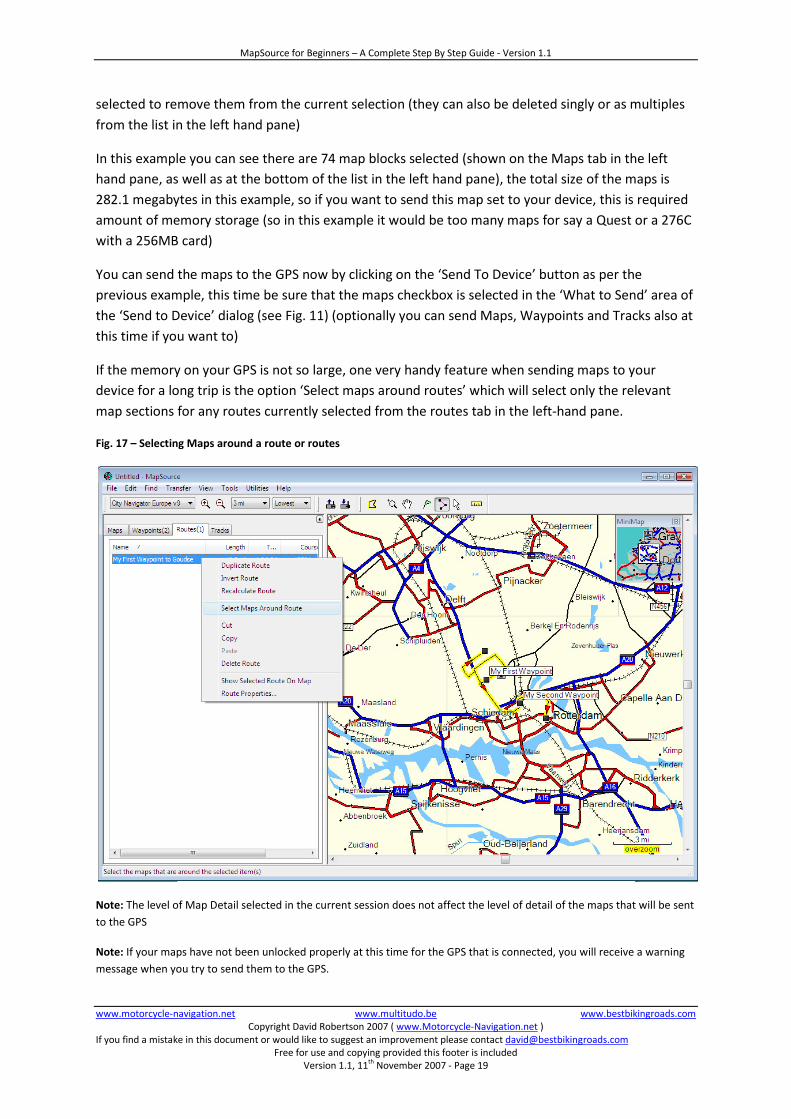
If the memory on your GPS is not so large, one very handy feature when sending maps to your
device for a long trip is the option ‘Select maps around routes’ which will select only the relevant
map sections for any routes currently selected from the routes tab in the left-hand pane.
Fig. 17 – Selecting Maps around a route or routes
Note: The level of Map Detail selected in the current session does not affect the level of detail of the maps that will be sent
to the GPS
Note: If your maps have not been unlocked properly at this time for the GPS that is connected, you will receive a warning
message when you try to send them to the GPS.

MapSource for Beginners – A Complete Step By Step Guide - Version 1.1
www.motorcycle-navigation.net www.multitudo.be www.bestbikingroads.com
Copyright David Robertson 2007 ( www.Motorcycle-Navigation.net )
If you find a mistake in this document or would like to suggest an improvement please contact [email protected] Free for use and copying provided this footer is included
Version 1.1, 11th
November 2007 - Page 20
Note: If you have a GPS which uses SD cards (such as a Zumo or 60C) you can do a faster map transfer by copying the maps
onto the SD card directly, however, this procedure is not explained in this beginners document
The maps are now available for use on the GPS unit
First Steps: Track Logs
Track Logs are files which are recorded by your GPS if it has a Track log function (check your unit
owners manual). The Track log is a running log of time, location, speed and distance of where the
GPS has been, this can be uploaded from the unit into MapSource for use. The track will only record
while the unit is switched on.
To upload a track log, simply turn on the GPS unit, connect it once again via the USB cable and select
the Tracks option from the upload dialog (Fig. 18)
Fig. 18 – Receive from Device Dialog
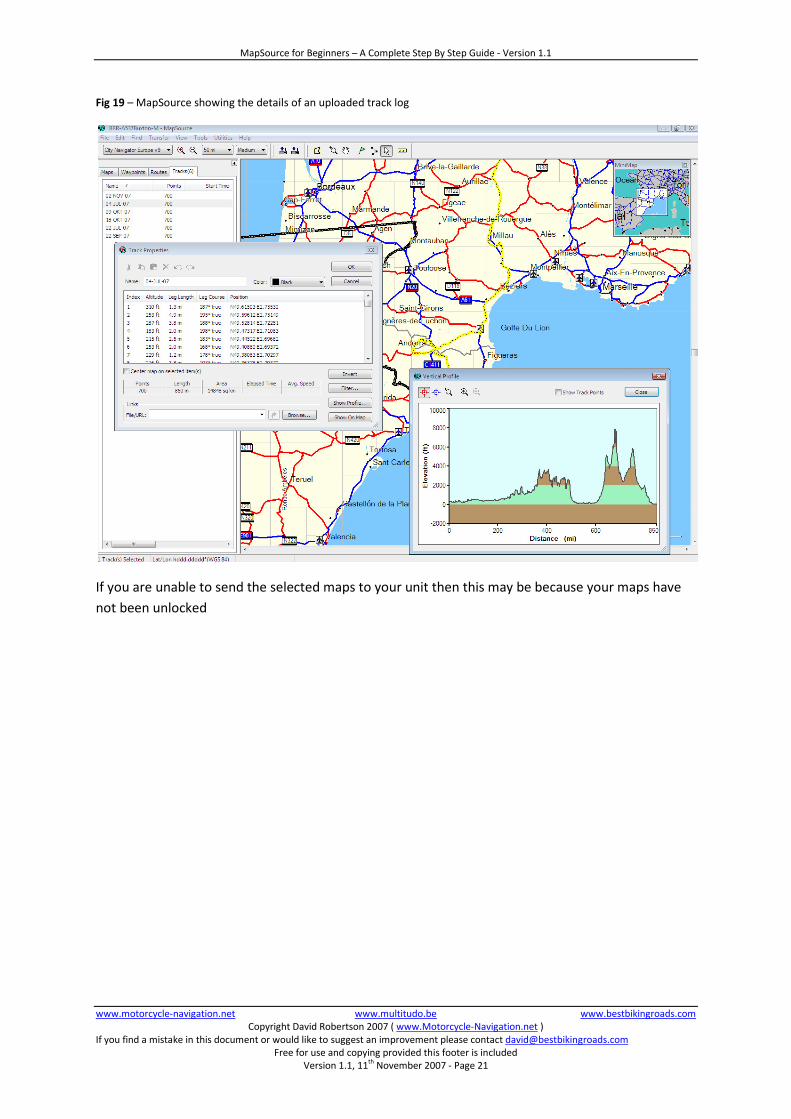
Viewing a Track Log
Track logs can give you all kinds of detailed information about where you’ve been and when,
including information about elevation, time, speed and distance.
Note: Some Garmin units have more track options than others. The 276C, 278, Quest and 60C have quite a lot, the
StreetPilot and Zumo have fewer.
MapSource for Beginners – A Complete Step By Step Guide - Version 1.1
www.motorcycle-navigation.net www.multitudo.be www.bestbikingroads.com
Copyright David Robertson 2007 ( www.Motorcycle-Navigation.net )
If you find a mistake in this document or would like to suggest an improvement please contact [email protected] Free for use and copying provided this footer is included
Version 1.1, 11th
November 2007 - Page 21
Fig 19 – MapSource showing the details of an uploaded track log
If you are unable to send the selected maps to your unit then this may be because your maps have
not been unlocked
MapSource for Beginners – A Complete Step By Step Guide - Version 1.1
www.motorcycle-navigation.net www.multitudo.be www.bestbikingroads.com
Copyright David Robertson 2007 ( www.Motorcycle-Navigation.net )
If you find a mistake in this document or would like to suggest an improvement please contact [email protected] Free for use and copying provided this footer is included
Version 1.1, 11th
November 2007 - Page 22
Tips and Extra Stuff
Add-ons and Advanced Features:
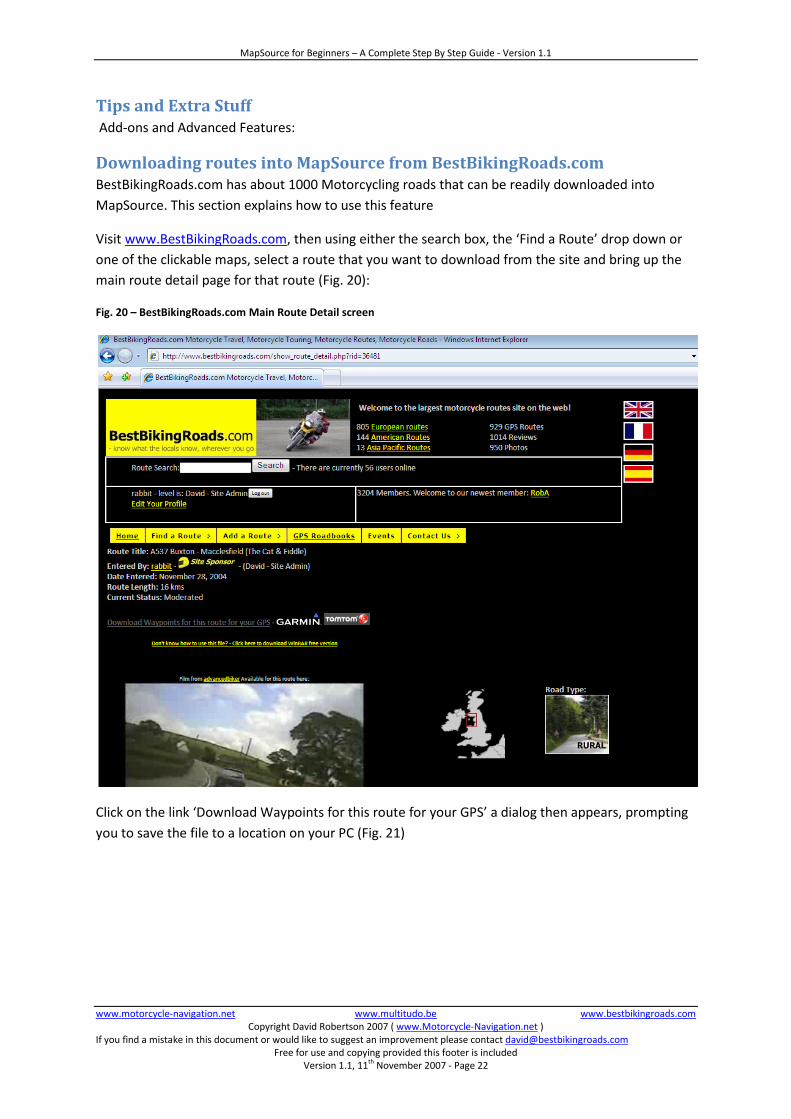
Downloading routes into MapSource from BestBikingRoads.com
BestBikingRoads.com has about 1000 Motorcycling roads that can be readily downloaded into
MapSource. This section explains how to use this feature
Visit www.BestBikingRoads.com, then using either the search box, the ‘Find a Route’ drop down or
one of the clickable maps, select a route that you want to download from the site and bring up the
main route detail page for that route (Fig. 20):
Fig. 20 – BestBikingRoads.com Main Route Detail screen
Click on the link ‘Download Waypoints for this route for your GPS’ a dialog then appears, prompting
you to save the file to a location on your PC (Fig. 21)

MapSource for Beginners – A Complete Step By Step Guide - Version 1.1
www.motorcycle-navigation.net www.multitudo.be www.bestbikingroads.com
Copyright David Robertson 2007 ( www.Motorcycle-Navigation.net )
If you find a mistake in this document or would like to suggest an improvement please contact [email protected] Free for use and copying provided this footer is included
Version 1.1, 11th
November 2007 - Page 23
Fig. 21– Saving the file from BestBikingRoads.com to your PC
Once the file has been downloaded, you need to unzip it.
(Download a free tool such as WinRAR from http://www.rarlab.com/rar/wrar362.exe )
Extract the file to a location on you PC then open MapSource and click ‘File’ -> ‘Open’ from the main
menu (Fig. 22)
Fig 22 – File->Open Menu
Browse to the location where you just extracted the file

MapSource for Beginners – A Complete Step By Step Guide - Version 1.1
www.motorcycle-navigation.net www.multitudo.be www.bestbikingroads.com
Copyright David Robertson 2007 ( www.Motorcycle-Navigation.net )
If you find a mistake in this document or would like to suggest an improvement please contact [email protected] Free for use and copying provided this footer is included
Version 1.1, 11th
November 2007 - Page 24
Fig 23 – Select the GPX file
Click to open.
Now from MapSource, the Start and end of the route are marked as Waypoints:

MapSource for Beginners – A Complete Step By Step Guide - Version 1.1
www.motorcycle-navigation.net www.multitudo.be www.bestbikingroads.com
Copyright David Robertson 2007 ( www.Motorcycle-Navigation.net )
If you find a mistake in this document or would like to suggest an improvement please contact [email protected] Free for use and copying provided this footer is included
Version 1.1, 11th
November 2007 - Page 25
Fig. 24 – BestBikingRoads.com route is initially loaded as start and end waypoints only
Click on the route tool and join the two waypoints and complete the route (Fig. 25)

MapSource for Beginners – A Complete Step By Step Guide - Version 1.1
www.motorcycle-navigation.net www.multitudo.be www.bestbikingroads.com
Copyright David Robertson 2007 ( www.Motorcycle-Navigation.net )
If you find a mistake in this document or would like to suggest an improvement please contact [email protected] Free for use and copying provided this footer is included
Version 1.1, 11th
November 2007 - Page 26
Fig. 25 – Two Joined waypoints make a route
Your route is now ready to be downloaded to the GPS
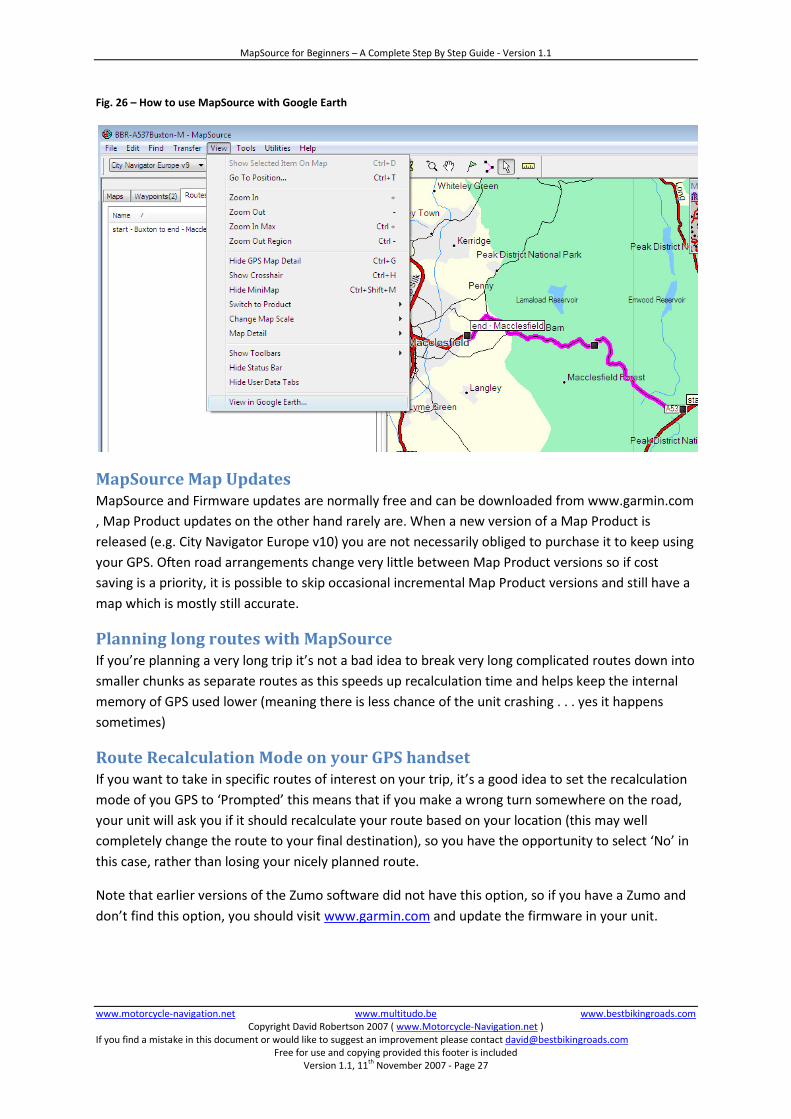
Viewing your MapSource Routes with Google Earth
In the more recent versions of MapSource, there is a feature which allows you to view your
MapSource routes via Google Earth which can be fun
MapSource for Beginners – A Complete Step By Step Guide - Version 1.1
www.motorcycle-navigation.net www.multitudo.be www.bestbikingroads.com
Copyright David Robertson 2007 ( www.Motorcycle-Navigation.net )
If you find a mistake in this document or would like to suggest an improvement please contact [email protected] Free for use and copying provided this footer is included
Version 1.1, 11th
November 2007 - Page 27
Fig. 26 – How to use MapSource with Google Earth
MapSource Map Updates
MapSource and Firmware updates are normally free and can be downloaded from www.garmin.com
, Map Product updates on the other hand rarely are. When a new version of a Map Product is
released (e.g. City Navigator Europe v10) you are not necessarily obliged to purchase it to keep using
your GPS. Often road arrangements change very little between Map Product versions so if cost
saving is a priority, it is possible to skip occasional incremental Map Product versions and still have a
map which is mostly still accurate.
Planning long routes with MapSource
If you’re planning a very long trip it’s not a bad idea to break very long complicated routes down into
smaller chunks as separate routes as this speeds up recalculation time and helps keep the internal
memory of GPS used lower (meaning there is less chance of the unit crashing . . . yes it happens
sometimes)
Route Recalculation Mode on your GPS handset
If you want to take in specific routes of interest on your trip, it’s a good idea to set the recalculation
mode of you GPS to ‘Prompted’ this means that if you make a wrong turn somewhere on the road,
your unit will ask you if it should recalculate your route based on your location (this may well
completely change the route to your final destination), so you have the opportunity to select ‘No’ in
this case, rather than losing your nicely planned route.
Note that earlier versions of the Zumo software did not have this option, so if you have a Zumo and
don’t find this option, you should visit www.garmin.com and update the firmware in your unit.

MapSource for Beginners – A Complete Step By Step Guide - Version 1.1
www.motorcycle-navigation.net www.multitudo.be www.bestbikingroads.com
Copyright David Robertson 2007 ( www.Motorcycle-Navigation.net )
If you find a mistake in this document or would like to suggest an improvement please contact [email protected] Free for use and copying provided this footer is included
Version 1.1, 11th
November 2007 - Page 28
Changing the format of co-ordinates
Sometimes when using waypoints and routes from other sources (e.g. if you download routes from
say www.BestBikingRoads.com or some camping or hotel guides), you may find that the co-
ordinates shown use a different format, this can be changed in the preferences
The current MapSource setting of Map co-ordinates can be viewed from ‘Format setting of Map Co-
ordinates’ from Fig. 5. In order to change the current co-ordinates from with MapSource, click on
Edit -> Preferences, then from the Position tab select the desired option from the drop down list box