MAPS™ LTE S1 and Mobile IP Core(ETH101) Quick Verification · MAPS™ LTE S1 and Mobile IP...
4
Page 1 MAPS™ LTE S1 and Mobile IP Core(ETH101) Quick Verification If this is your First-Time-Use of MAPS™ LTE S1 application, then we recommend you follow all the steps explained in MAPS-LTE-S1-Quick-Install-Guide to install MAPS™ LTE S1 application before proceeding with the steps below. Verification Functional verification of MAPS-LTES1 application requires a system with 2 NIC cards for testing. MAPS-LTES1 is configured as MME (Mobile Management Entity) on one NIC and as eNodeB (Evolved Node B) on the other. Note down the IP address of NIC1 and NIC2, in this example the IP addresses used and configured are: ➢ NIC1 IP address is 192.xx.xx.120, and configured as eNodeB ➢ NIC2 IP address is 192.xx.xx.122, and configured as MME *Note: In this test scenario, we have configured MAPS™ LTES1 as eNodeB generating calls and MME to receive calls. First MAPS™ LTE S1 (GUI) – (MME) • Right-click on the MAPS-LTES1 application using shortcut icon created on the desktop and select ‘Run as Administrator’. This instance of MAPS™ is configured for Call Reception. • While invoking the first MAPS-LTES1 instance, verify the following in the Protocol Selection window - ➢ Protocol Standard is set to LTE S1 ➢ Protocol Version to 3GPP RELEASE 9 ➢ Select Node as MME. Click Ok • By default, Testbed Setup window is displayed, loaded with TestBedDefault and check for the parameter default values as listed below: ➢ The Display Adapter Info option from the Help menu displays all the network adapters available in the system. Choose and set the Adapter Index value displayed against the IP address in use. ➢ Set MME IP Address to 192.xx.xx.122 (NIC2 IP address) ➢ Set eNodeB IP Address to 192.xx.xx.120 (NIC 1IP address) ➢ By default, eNodeB Port is set to 36412 ➢ By default, MME Port is set to 36412 ➢ Traffic = Enabled ➢ Click Save button and overwrite the TestBedDefault configuration file.
Transcript of MAPS™ LTE S1 and Mobile IP Core(ETH101) Quick Verification · MAPS™ LTE S1 and Mobile IP...

Page 1
MAPS™ LTE S1 and Mobile IP Core(ETH101) Quick Verification
If this is your First-Time-Use of MAPS™ LTE S1 application, then we recommend you follow all the steps explained in
MAPS-LTE-S1-Quick-Install-Guide to install MAPS™ LTE S1 application before proceeding with the steps below.
Verification
Functional verification of MAPS-LTES1 application requires a system with 2 NIC cards for testing. MAPS-LTES1 is configured as
MME (Mobile Management Entity) on one NIC and as eNodeB (Evolved Node B) on the other.
Note down the IP address of NIC1 and NIC2, in this example the IP addresses used and configured are:
➢ NIC1 IP address is 192.xx.xx.120, and configured as eNodeB
➢ NIC2 IP address is 192.xx.xx.122, and configured as MME
*Note: In this test scenario, we have configured MAPS™ LTES1 as eNodeB generating calls and MME to receive calls.
First MAPS™ LTE S1 (GUI) – (MME)
• Right-click on the MAPS-LTES1 application using shortcut icon created on the desktop and
select ‘Run as Administrator’. This instance of MAPS™ is configured for Call Reception.
• While invoking the first MAPS-LTES1 instance, verify the following in the Protocol
Selection window -
➢ Protocol Standard is set to LTE S1
➢ Protocol Version to 3GPP RELEASE 9
➢ Select Node as MME. Click Ok
• By default, Testbed Setup window is displayed, loaded with
TestBedDefault and check for the parameter default values as listed below:
➢ The Display Adapter Info option from the Help menu displays all the
network adapters available in the system. Choose and set the Adapter
Index value displayed against the IP address in use.
➢ Set MME IP Address to 192.xx.xx.122 (NIC2 IP address)
➢ Set eNodeB IP Address to 192.xx.xx.120 (NIC 1IP address)
➢ By default, eNodeB Port is set to 36412
➢ By default, MME Port is set to 36412
➢ Traffic = Enabled
➢ Click Save button and overwrite the TestBedDefault configuration
file.
Page 2
MAPS™ LTE S1 and Mobile IP Core(ETH101) Quick Verification
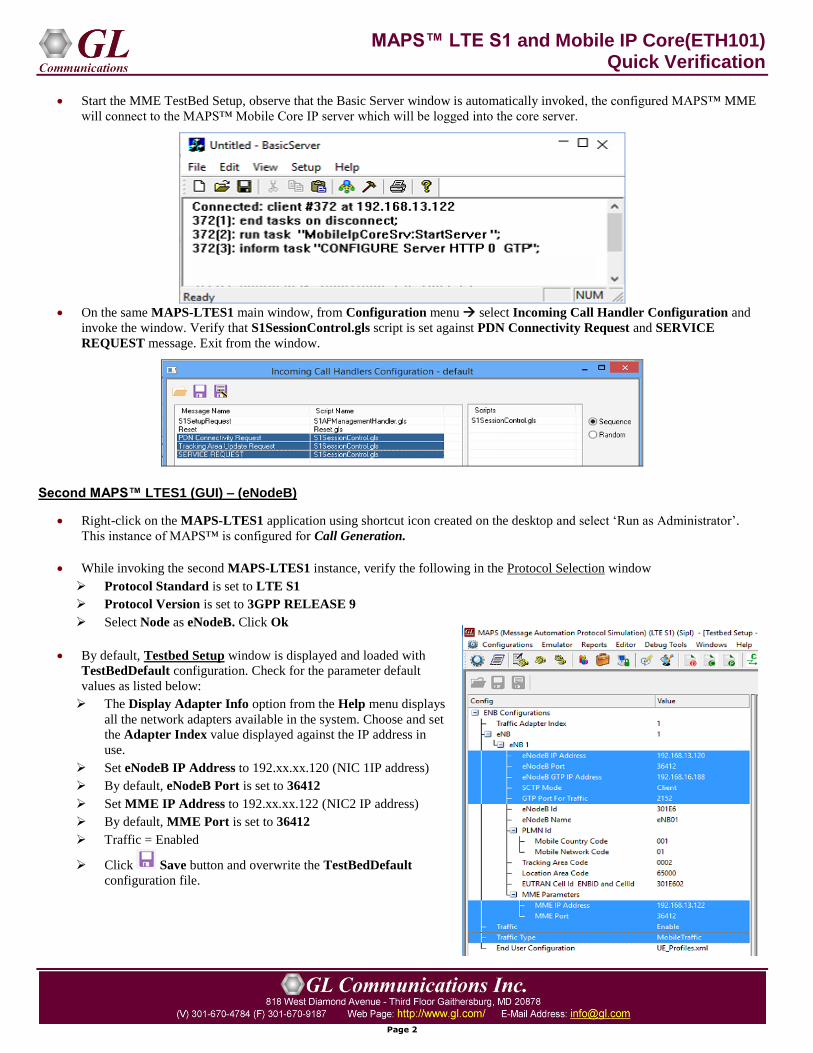
• Start the MME TestBed Setup, observe that the Basic Server window is automatically invoked, the configured MAPS™ MME
will connect to the MAPS™ Mobile Core IP server which will be logged into the core server.
• On the same MAPS-LTES1 main window, from Configuration menu select Incoming Call Handler Configuration and
invoke the window. Verify that S1SessionControl.gls script is set against PDN Connectivity Request and SERVICE
REQUEST message. Exit from the window.
Second MAPS™ LTES1 (GUI) – (eNodeB)
• Right-click on the MAPS-LTES1 application using shortcut icon created on the desktop and select ‘Run as Administrator’.
This instance of MAPS™ is configured for Call Generation.
• While invoking the second MAPS-LTES1 instance, verify the following in the Protocol Selection window
➢ Protocol Standard is set to LTE S1
➢ Protocol Version is set to 3GPP RELEASE 9
➢ Select Node as eNodeB. Click Ok
• By default, Testbed Setup window is displayed and loaded with
TestBedDefault configuration. Check for the parameter default
values as listed below:
➢ The Display Adapter Info option from the Help menu displays
all the network adapters available in the system. Choose and set
the Adapter Index value displayed against the IP address in
use.
➢ Set eNodeB IP Address to 192.xx.xx.120 (NIC 1IP address)
➢ By default, eNodeB Port is set to 36412
➢ Set MME IP Address to 192.xx.xx.122 (NIC2 IP address)
➢ By default, MME Port is set to 36412
➢ Traffic = Enabled
➢ Click Save button and overwrite the TestBedDefault
configuration file.

Page 3
MAPS™ LTE S1 and Mobile IP Core(ETH101) Quick Verification
• Start the eNodeB TestBed Setup, observe that the Basic Server window is automatically invoked the configured MAPS™
SGSN will connect to the MAPS™ Mobile Core IP server which will be logged into the client.
• On both the MAPS instances main window, from Reports menu select Link Status option to verify the link status. Verify
that the SCTP Link Status is UP (indicated in Green color) before placing the call.
• Note: Fails to start SCTP Services and associated SCTP Link status is Down, then Turn OFF Windows Firewall (navigate
to Control Panel Systems & Security Windows Firewall, click Turn Off Windows Firewall for all networks).
• On both instances of MAPS-LTES1 (eNodeB and MME) main window, click Call Reception icon and observe that the
Check_SCTP_Status.gls script is activated.
• In the second MAPS-LTES1 (eNodeB) instance, click the Call Generation icon on main window, and invoke the Call
Generation window.
• By default, you will observe multiple call instances loaded with S1SessionControl.gls scripts and UEProfile00** profiles.
• Select the call instance loaded with S1SessionControl.gls script and UEProfile0001 profile in the Call Generation window, and
click button to initiate the call generation.
• Wait for the calls to terminate, and verify the call flow under the Message Sequence tab at both generation and reception end.
• Select any message in the ladder diagram and observe the respective decode message on the right pane for the respective
message.

Page 4
MAPS™ LTE S1 and Mobile IP Core(ETH101) Quick Verification
• Observe the traffic log in the client log window.
• Return to first instance of MAPS-LTES1 (MME), in the Call Reception window, observe that the calls are automatically
received running the Rx script.