
Manual Scope v146
17
C. Zeitnitz 03/2015 Manual for the sound card oscilloscope V1.46 C. Zeitnitz english translation by P. van Gemmeren, K. Grady and C. Zeitnitz This Software and all p revious versions are NO Freeware! The use of the softw are and of the documentation i s granted free of charge for private and non - commercial use in educational institutions. Support the further development of the program by obtaining a private donation license! An y c om mer ci al u sag e req ui res a co rr esp onding license. LabView and all its com ponents © 2014 National Instrum ents Corpor ation. All Rights Reserved. Details about the li censing terms can be found in the fil e license_ NI .txt in the inst allation directory For retail versions contact the author. © C. Zeitnitz 2005-2015 Web-page: http://www.zeitnitz.eu/scope_en The sound card osci lloscope is a digital oscillos cope with an integrated signal generator, frequency analysi s (FF T) and wave file recor der 1 Requirements • Windows 2000 , XP, Vista, Windows 7 (x64), Windows 8 • A PC with a sound card installed. • 50MB of disk space 2 Installation Unpack the ZIP file in any directory and run setup.exe. The program can be started thereafter through the program menu of the Windows operating system. 3 Description This software can be used for the display and analysis of sound waves. The data can be recorded both directly from the sound card (with a microphone or LINE input), or from a source such as a CD or Mediaplayer. The input to the oscilloscope is defined by the Windows sound mixer (see below). The software obtains its input data for the sound card via the Windows interface. It does not communicate directly with the sound card. Therefore sound card problems should be troubleshot at the operating system level. The user interface is arranged li ke a conventional oscilloscope. However, in the program window, additional XY display, frequency analysis, and settings are provided. 3.1 Oscilloscope The software shows the left and right channel of the sound card in the oscilloscope window. The left channel is represented as a green line and the right channel as a red line. In the user interface window there are knobs and input windows for the following three functions: Amplitude, Time, and Trigger. 1
-
Upload
alfonso-zamudio -
Category
Documents
-
view
217 -
download
0
Transcript of Manual Scope v146

7/24/2019 Manual Scope v146
http://slidepdf.com/reader/full/manual-scope-v146 1/17
C. Zeitnitz 03/2015
Manual for the sound card oscilloscope V1.46C. Zeitnitz
english translation by P. van Gemmeren, K. Grady and C. Zeitnitz
This Software and all p revious versions are NO Freeware!
The use of the software and of the documentation i s granted free of charge for private and non-commercial use in educational institutions.
Support the further development of the program by obtaining a private donation license!
Any commercial usage requi res a corresponding license.
LabView and all its components© 2014 National Instruments Corporation. All Rights Reserved.
Details about the li censing terms can be found in the fil e license_NI.txt in the installation directory
For retail versions contact the author.
© C. Zeitnitz 2005-2015
Web-page: http://www.zeitnitz.eu/scope_en
The sound card osci lloscope is a digital oscilloscope with an integrated signalgenerator, frequency analysis (FFT) and wave file recorder
1 Requirements
• Windows 2000 , XP, Vista, Windows 7 (x64), Windows 8
• A PC with a sound card installed.• 50MB of disk space
2 Installation
Unpack the ZIP file in any directory and run setup.exe. The program can be started thereafter through theprogram menu of the Windows operating system.
3 Description
This software can be used for the display and analysis of sound waves. The data can be recorded bothdirectly from the sound card (with a microphone or LINE input), or from a source such as a CD orMediaplayer. The input to the oscilloscope is defined by the Windows sound mixer (see below). The softwareobtains its input data for the sound card via the Windows interface. It does not communicate directly with thesound card. Therefore sound card problems should be troubleshot at the operating system level.
The user interface is arranged like a conventional oscilloscope. However, in the program window, additionalXY display, frequency analysis, and settings are provided.
3.1 Oscilloscope
The software shows the left and right channel of the sound card in the oscilloscope window. The left channelis represented as a green line and the right channel as a red line. In the user interface window there are
knobs and input windows for the following three functions: Amplitude, Time, and Trigger.
1

7/24/2019 Manual Scope v146
http://slidepdf.com/reader/full/manual-scope-v146 2/17
C. Zeitnitz 03/2015
Figure 1: Soundcard oscilloscope
3.1.1 Ampli tude settings
The amplitude scale of the two channels can be set independently as well as synchronized. The latter isenabled at program start-up and can be disabled by un-checking “Sync CH 1&2” on the front panel. In thecase of independent channel control, the active channel has to be selected by the button “Select CH” (seeFigure 2).
Figure 2: Amplitude settings and channel offsets
The amplitude values are given in units per division of the oscilloscope screen and are displayed for bothchannels above this screen. The amplitude value corresponds to the digitized sound level divided by 32768.This represents the 16Bit resolution of the data, which are taken with the sound card. Due to the differentsettings of the volume in Windows the absolute sound level cannot be determined directly! Therefore thepresented values are to be understood in arbitrary units. The amplitude setting refers both to theoscilloscope window and to the XY graph. An offset can be assigned to each channel individually via theappropriate input window; thereby the two traces can be separated from each other. A click into one of theoffset fields will result in two horizontal cursors to show up in the oscilloscopes screen. The offset can nowbe changed by moving these cursors with the mouse, or by entering a value into one of the fields. If the
2

7/24/2019 Manual Scope v146
http://slidepdf.com/reader/full/manual-scope-v146 3/17
C. Zeitnitz 03/2015
signal of the channel is outside the visible window of the screen, the cursor is shown at the upper or loweredge of the screen (dependent where the actual signal is located). The cursors will automatically disappearfrom the screen after a few seconds without a change of an offset.
Figure 3: Offset cursors visible on screen
3.1.2 Timebase
The Time setting refers to the entire represented range and NOT to the value per unit as with a normaloscilloscope! The range goes from 1ms to 10,000ms. The larger the range, the smaller is the used scanningrate. This is unavoidable because of the extent of computer cpu use. In the trigger setting "single" the
scanning rate is increased again, since computer utilization is less important here.
3.1.3 Trigger
The trigger setting modes are "off", "auto", "normal" and "single". These correspond to the standard modesof oscilloscopes. The trigger threshold can be adjusted either in the input window of the trigger selection, orby shifting the yellow cross in the oscilloscope window using the mouse. The trigger time can only beadjusted by shifting the cross with the mouse.In the single SHOT mode of the trigger the RUN/stop switch is deactivated automatically and must bepressed again for a new data-taking run.The button “Auto set” triggers the program to estimate the optimal time base and trigger level. The mainfrequency found in the trigger channel is used to obtain the time base. The threshold is taken from the signalamplitude. If the amplitude is too small, the button has no effect. Below approx. 20Hz the result is not reliable
due to the limited time window used for the analysis.
3.1.4 Channel Mode
By default, two channels are shown in the oscilloscope window. With the mode selection switch at thebottom of the program window, the sum, difference or product of the channels can be chosen.
3

7/24/2019 Manual Scope v146
http://slidepdf.com/reader/full/manual-scope-v146 4/17
C. Zeitnitz 03/2015
3.1.5 Data Analys is
The “measure” selector below the scope window allows to enable a real time analysis (frequency andamplitude (RMS and peak-to-peak value). The corresponding check boxes are visible, when “Hz and Volts”is selected.
Figure 4: Automatic measurement of frequency and amplitude of signals
3.1.6 Logging Data
The measured values, which are displayed on the screen, can be written simultaneously to a log file (in CSV
format). This feature is enabled by checking the “log to file” box. This will trigger a file dialog to appear inorder to define the file name of the log file. The update rate of the log file is defined by the rate on the screen,which can be defined in the “Settings” tab of the scope.The logging will only terminate, when the “log to file” box is unchecked, or when no values are displayed onthe screen.
Please note: The measured values are only written to the log file, when the values are actually visible to theuser. Switching to the XY-mode or frequency analysis will pause the logging of the data!
3.1.7 Measure Signal Propert ies
The amplitude or Time/frequency can be measured with the help of cursors in the oscilloscope window. Toscan the values of the channels, right click into the screen, when the acquisition has been stopped via theRun/Stop button. You can grab the cursor with the mouse, or left click to move it to the position of themouse. A fine adjustment of the cursor can be achieved by the left and right cursor keys of the keyboard. Additional cursors to measure the signal properties in more details can be activated through the selector boxunderneath the window. The cursors can be shifted with the mouse.In the amplitude mode the values for the two cursors as well as the amplitude difference is displayed.
4

7/24/2019 Manual Scope v146
http://slidepdf.com/reader/full/manual-scope-v146 5/17
C. Zeitnitz 03/2015
Figure 5: Amplitude analysis with the cursors. The shown values correspond to channel 1.
For the time mode the time difference and the appropriate frequency are shown directly. The data can alsobe examined in more detail by using the zoom (only when the data acquisition is stopped). The detail aroundthe position of the orange cursor line is increased. By shifting the cursor the range can be changed. Whenthe cursor is getting close to the edge of the window, the window is shifted automatically in thecorresponding direction. The speed of the shift depends on the distance to the edge. Amplitude and voltage cursors can be enabled simultaneously.
Figure 6: Zoom of the wave around the orange cursor with time and amplitude values displayed
The time position of the orange cursor and the corresponding amplitude values (green and red) are
displayed in the screen as well.
5
7/24/2019 Manual Scope v146
http://slidepdf.com/reader/full/manual-scope-v146 6/17
C. Zeitnitz 03/2015
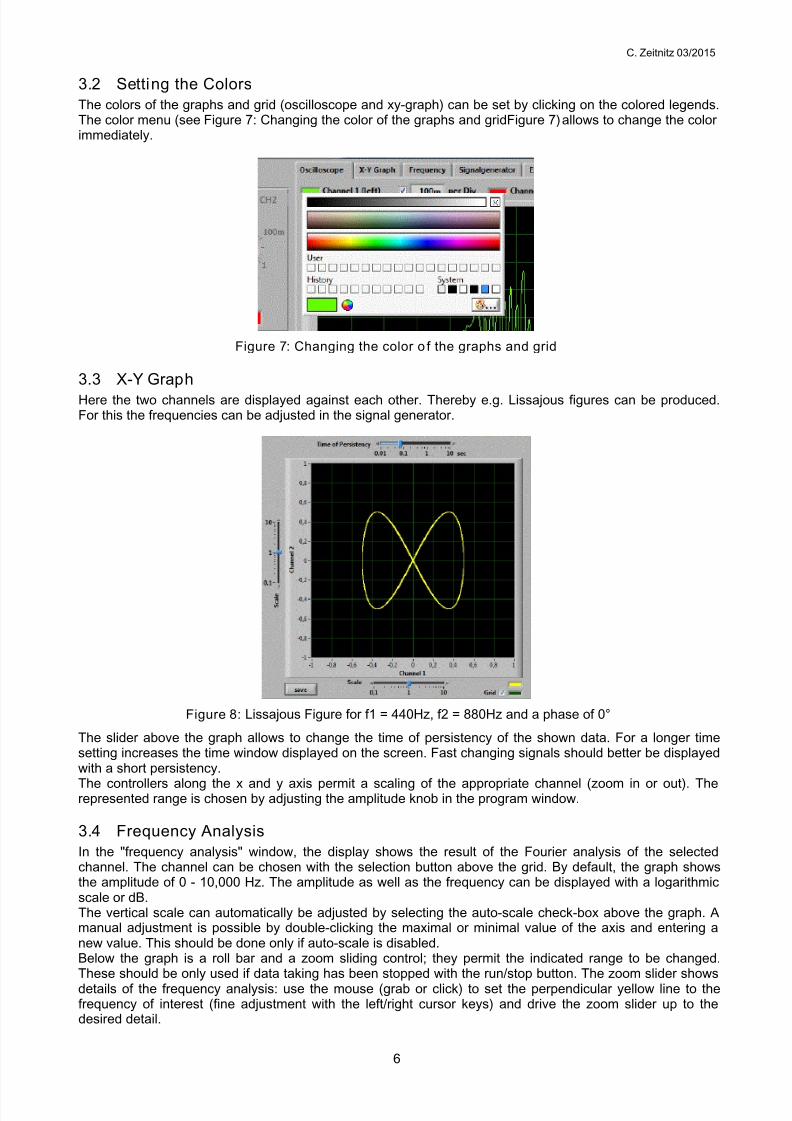
3.2 Setting the Colors
The colors of the graphs and grid (oscilloscope and xy-graph) can be set by clicking on the colored legends.The color menu (see Figure 7: Changing the color of the graphs and gridFigure 7) allows to change the colorimmediately.
Figure 7: Changing the color o f the graphs and grid
3.3 X-Y Graph
Here the two channels are displayed against each other. Thereby e.g. Lissajous figures can be produced.For this the frequencies can be adjusted in the signal generator.
Figure 8: Lissajous Figure for f1 = 440Hz, f2 = 880Hz and a phase of 0°
The slider above the graph allows to change the time of persistency of the shown data. For a longer timesetting increases the time window displayed on the screen. Fast changing signals should better be displayedwith a short persistency.
The controllers along the x and y axis permit a scaling of the appropriate channel (zoom in or out). Therepresented range is chosen by adjusting the amplitude knob in the program window.
3.4 Frequency Analysis
In the "frequency analysis" window, the display shows the result of the Fourier analysis of the selectedchannel. The channel can be chosen with the selection button above the grid. By default, the graph showsthe amplitude of 0 - 10,000 Hz. The amplitude as well as the frequency can be displayed with a logarithmicscale or dB.The vertical scale can automatically be adjusted by selecting the auto-scale check-box above the graph. Amanual adjustment is possible by double-clicking the maximal or minimal value of the axis and entering anew value. This should be done only if auto-scale is disabled.Below the graph is a roll bar and a zoom sliding control; they permit the indicated range to be changed.These should be only used if data taking has been stopped with the run/stop button. The zoom slider showsdetails of the frequency analysis: use the mouse (grab or click) to set the perpendicular yellow line to thefrequency of interest (fine adjustment with the left/right cursor keys) and drive the zoom slider up to thedesired detail.
6

7/24/2019 Manual Scope v146
http://slidepdf.com/reader/full/manual-scope-v146 7/17
C. Zeitnitz 03/2015
When the data acquisition is stopped via Run/Stop the magnitude at the cursor position will be shown on thescreen.
Figure 9: Frequency analysis of a 440Hz signal
The two output values underneath the sliders show the frequency at the cursor position and the value of thestrongest frequency found from a harmonious analysis of the data. Note that the Fourier analysis is alwaysbased on data with the full sampling rate of 44.1kHz. Therefore, the time controller automatically jumps to apre-defined value when this window is active.
Selecting “peak hold” allows to store the maximal amplitude values of the Fourier analysis. This allows todisplay the transfer function, when using the white noise generator.
Figure 10: Transfer function utilizing the peak hold function with the white noise generator
Under the frequency analysis an adjustable frequency-selective filter (Besselfilter 10th order) is alsoprovided. Four kinds of filter can be selected: Low-pass, high-pass, band-pass and stop band filter. Thecritical frequencies can be adjusted with the sliding controls accordingly. Above the frequency-selective filter is a button to open filter control in a separate window. This function
allows one to observe the effect of the filter directly in the oscilloscope window. Double-clicking on the buttonor closing the window re-establishes the original settings.
7

7/24/2019 Manual Scope v146
http://slidepdf.com/reader/full/manual-scope-v146 8/17
C. Zeitnitz 03/2015
3.5 Transfer Function
In addition to the frequency analysis of an individual channel it is possible to measure the transfer function.This measurement uses the ratio of Channel 1 and Channel 2 to determine the frequency dependency of thetransfer characteristic. In order to obtain the transfer function one should select a noise signal or are squarewave in the signal generator in order to cover the full frequency spectrum in a single measurement. Alternatively a frequency sweep can be utilized. Channel 1 should contain the original signal and theChannel 2 the filtered one.
3.6 Waterfallgraph
A waterfall graph displays the frequency analysis as function of time. For this the Fourier analysis is done bydefault every 120msec. The amplitude of each frequency is displayed as a color code (black: lowestamplitude, red: highest amplitude). Figure 11 shows the waterfall graph of channel 1. The period ofsubsequent frequency analyses can be adjusted with the parameter FourierPeriod in settings.ini. Be aware,that a small value leads to substantial increase of the load on the computer. The sensitivity of the display canbe increased with the slider above the screen.
Figure 11: Waterfall graph of channel 1
3.7 Storing Display Data
The graphics visible on the display (oscilloscope screen, frequency analysis, xy-graph) can be stored, whenthe data acquisition has been stopped by the “RUN/STOP” button. A “save” button is displayed within thegraphs area. After pressing the button a file selector box is displayed to select a file name and the preferredgraphics format (BMP, JPG or PNG). Automatically the graph is saved in color and in black-white. In additiona text file (extension CSV) containing the actual data is stored with the same name. This contains the dataas a Comma-separated-value list, which can be imported into Excel. Be aware, that the output to the CSVfile is localized and the decimal separator (comma or dot) is selected depending on your local settings.Importing these data into Excel might lead to wrong results, if a different decimal separator is used.
3.8 Signal Generator
A 2-channel signal generator is integrated into the program. The generator can be released from theprogram window by pushing the button above the panel. A second click on the button will embed thegenerator again.
8

7/24/2019 Manual Scope v146
http://slidepdf.com/reader/full/manual-scope-v146 9/17
C. Zeitnitz 03/2015
Figure 12: Signal Generator
The generator outputs sine, rectangle, triangle, and saw tooth waves with variable amplitude and frequency. A white noise generator is included as well. The phase of the signal can be adjusted.The “Sweep mode” allows to sweep the frequency from the main frequency to f(end) continuously within the
specified time window.
Figure 13: Automatic frequency sweep
Upon opening the signal generator, both channels are deactivated and must be switched on by a button atthe bottom of the window. The frequency can be changed in steps of 0.5Hz. The generator signal can besent directly to the sound card. This must be activated in the sound mixer of the Windows operating system(usually designated as "Wave Out"). If in addition the recording of the "Wave" source is activated, the signalsare visible in the oscilloscope and can be displayed (e.g. to produce Lissajous figures).The “Send to scope” selection buttons will add the generator signals to the corresponding scope channel.This is independent of the selected recording source of the scope.
9

7/24/2019 Manual Scope v146
http://slidepdf.com/reader/full/manual-scope-v146 10/17
C. Zeitnitz 03/2015
Define Signal by Formula
Selecting “Formula” from the pull down menu, will activate aninput field for a mathematical formula. This formula will beevaluated by muParser to generate the signal.The parameters of the generator are accessible via thefollowing predefined variables:
t time of the current samplea selected amplitudef selected frequencyw calculated ω=2πfwt pre-calculated product of ω and time tphi phase between the two channels (rad)fs sampling rate of the signal z.B. 44100Hzns number of the current sample
Enter has to be pressed to activate the evalution of the formula. If a syntax error is present, the wholeformula will be marked red and has to be corrected.
Available funct ions : sin, cos, tan, asin, acos, atan, sinh, cosh, tanh, asinh, acosh, atanh, log2, log (log10),
ln, exp, sqrt, sign, abs, min, max, mod
Operators: +, -, *, /, ^
Defined constant: pi
Noise
rand() random distribution of the signal amplitude within ±1white() white noise within ±1pink() pink noise (1/f) within ±1brown() Brownian noise (1/f²) within ±1
For the white, pink and Brownian noise, the amplitudes follow a Gaussian distribution with a RMS of
approximately 0.25. Hence the amplitudes cover ±4σ
.
Special Signals
square(t,f,d) square wave with frequency f and duty cycle d (in %), with amplitude 1triangle(t,f) triangular wave with frequency f and amplitude 1sawtooth(t,f) sawtooth wave with frequency f and amplitude 1pulse(t,b,T) series of pulses with width b, distance T between the pulses and amplitude 1
Examples 1. Sine wave: a*sin(w*t) oder a*sin(wt) oder a*sin(2*pi*f*t) 2. Sine wave with noise: a*sin(wt)+white()*a/2 3. Repeating damped sine wave: a*sin(wt)*exp(-f*mod(t,10/f)). The damping is achieved by an
exponential function, which is reset every 10 periods.
4. Lissajou-Figure: channel 1: a*sin(3*wt)*sin(4*wt) and channel 2: a*sin(4*wt)
Figure 14: Signals from examples 2, 3 and 4 (XY)
10

7/24/2019 Manual Scope v146
http://slidepdf.com/reader/full/manual-scope-v146 11/17
C. Zeitnitz 03/2015
3.9 Settings
In this window, there are some settings for the Windows audio devices. On the right side are the audiodevices for sound input and output. If several sound systems are present, the equipment used can beselected here. Checking the “auto enable” option will unmute the selected device automatically as well assetting the volume to the given value in percent.
Figure 15: The settings tab contains the windows sound settings and general settings of the program
On the left side are buttons to start the Windows audio controls. Note that Windows XP/2K will open a smallmixer window for each push of the button. In case of newer Windows Versions, only a single windows can beopen at a given time.The shown sampling rate and the bits per sample is given for information only. In order to change thesampling rate, refer to the expert section below.Some attributes of the scope can be controlled by changing three values under “Scope Parameters”. Theupdate period will change the time between consecutive on-screen values (frequency and/or amplitudevalues). At the same time the averaging time to calculate the on-screen value is changed as well. The latterhappens for the calculation of the strongest frequency on the frequency analysis screen, when changing thesecond value. Calibrating the actual amplitude of the scope can be achieved by means of a sine signal with
a known amplitude (measured in volts) and dividing this value by the measured amplitude.The language of the program can be with the corresponding button. The change of the language will beapplied at the next startup of the program
Figure 16: Language selection window At the bottom of the settings window the settings of the program can be saved to a XML file, restored orreset to default values.
11

7/24/2019 Manual Scope v146
http://slidepdf.com/reader/full/manual-scope-v146 12/17
C. Zeitnitz 03/2015
3.9.1 Loopback devices
A special case of listed sound devices are loopback devices. These capture the data played by an output(e.g. speaker) device. This is useful to capture the sound played by a media player. Be aware, that DRMprotected sound (e.g. from a protected DVD) is NOT captured.
3.10 For Experts: changing the configuration
The behavior of the scope can be changed by modifying or adding parameters in the file settings.ini. The file
is located in the path %appdata%\scope, which usually is C:\Users\<username>\Appdata\Roaming\scope. Ifthis does not exist, after the first start of the program, check the path %userprofile%\scope.The first option in the file should be enabled (ExpertMode=TRUE) in order to have a fast access to this filevia a button on the settings tab of the program. In addition this will enable the change of the sampling rateand bits sample within the program.
The standard settings for the soundcard are 44.1kHz with 16Bit resolution per sample. Higher sampling ratesand sample resolutions can be set by setting the corresponding parameters “SamplingRate” and “Bits”, or inexpert mode within the program. Most current soundcards (even onboard versions) support up to 100kHzand 16Bit and higher. If the soundcard does not support the sampling rate and/or bit resolution, a differentdevice, or the internal loopback, will be selected by the program. If only parameters supported by thehardware of the sound card should be used, the option “AcceptRate” should be set to the value “DEVICE”.The Windows mixer provides a wider selection of sampling rates and bits per sample, but might resample theaudio stream. If the mixer support is wanted, set “AcceptRate” to “MIXER”. An additional parameter in the file settings.ini is the “MaxFrequency”, which determines the maximal valuefor the displayed frequency in the Fourier analysis. The default value is half the sampling rate.The length of data which is analyzed by the Fourier analysis is by default 120 ms long. This allows toobserve frequencies down to approximately 20Hz. If you want to measure lower frequencies you can add theoption “FourierTimeWindow=500” into the settings.ini file. The number gives the sample length inmilliseconds. The frequency resolution is approximately given by the inverse of the length of the analyzedtime window. Be aware, that a large number slows down the update of the Fourier analysis substantially andrequires more CPU cycles.Some sound cards invert the input signals before the digitization. This can be corrected by adding the option“InvertSignalCH1=true” and “InvertSignalCH2=true” in the settings.ini file.In order to have a reasonable screen resolution when zooming in by a large factor, the resolution can beincreased by setting MaxSamplesScale to a value up to 100. This will increase the load on the system-
Addi tion in fo rmation :
The list of available devices contains only devices, which support the selected sampling rate andbits/sample.
Here an example for a settings.ini file:Expert_Mode=TRUESamplingRate=100000Bits=16 AcceptRate=mixerMaxFrequency=20000InvertSignal=TRUEFourierTimeWindow=200MaxSamplesScale=50.0
3.10.1 Signal Sources for the Oscilloscope
The following inputs are usually available:
• Line-In Port on the PC
• Microphone Port on the PC, or internal (e.g. Laptop) – often only mono
• Wave Out internal sound, e.g. MP3 player, Media-Player; signal generator
• CD Player Music directly from a CD
• Loopback of output devices signal from playback devices (e.g. media player)
• Scope Loopback Pseudo device, which directly couples the generator output to the scope.The equipment to appear on the oscilloscope must be selected from the inputs mentioned above.
The simplest case is the “Scope Loopback” device (in- and output). The signals of the generator are directlydisplayed on the scope screen. With some sound cards, several sources can be selected at the same time.The volume of the equipment can also be adjusted here. This has a direct effect on the amplitude of the
12

7/24/2019 Manual Scope v146
http://slidepdf.com/reader/full/manual-scope-v146 13/17
C. Zeitnitz 03/2015
oscilloscope! In Windows Vista/7 at least a single recording device has to be active. A green check markappears for these devices in the sound control panel. If no recording device can be found, the scope willswitch to the internal “Scope Loopback” device.
Figure 17: Windows XP - Selection of inputs in Windows Audio Mixer
Figure 18: Windows 7 – a microphone is active (green check mark). Inactive devices are not visible, but canbe included in the list by checking the corresponding context menu entry (right mouse button)
3.10.2 Signal Output via Sound Card
In order to define which sound is sent to the sound card output, the appropriate equipment must be selectedin the Windows Audio Mixer. Frequently several sources are merged at the same time here.
Figure 19: Selectable outputs
13
7/24/2019 Manual Scope v146
http://slidepdf.com/reader/full/manual-scope-v146 14/17
C. Zeitnitz 03/2015
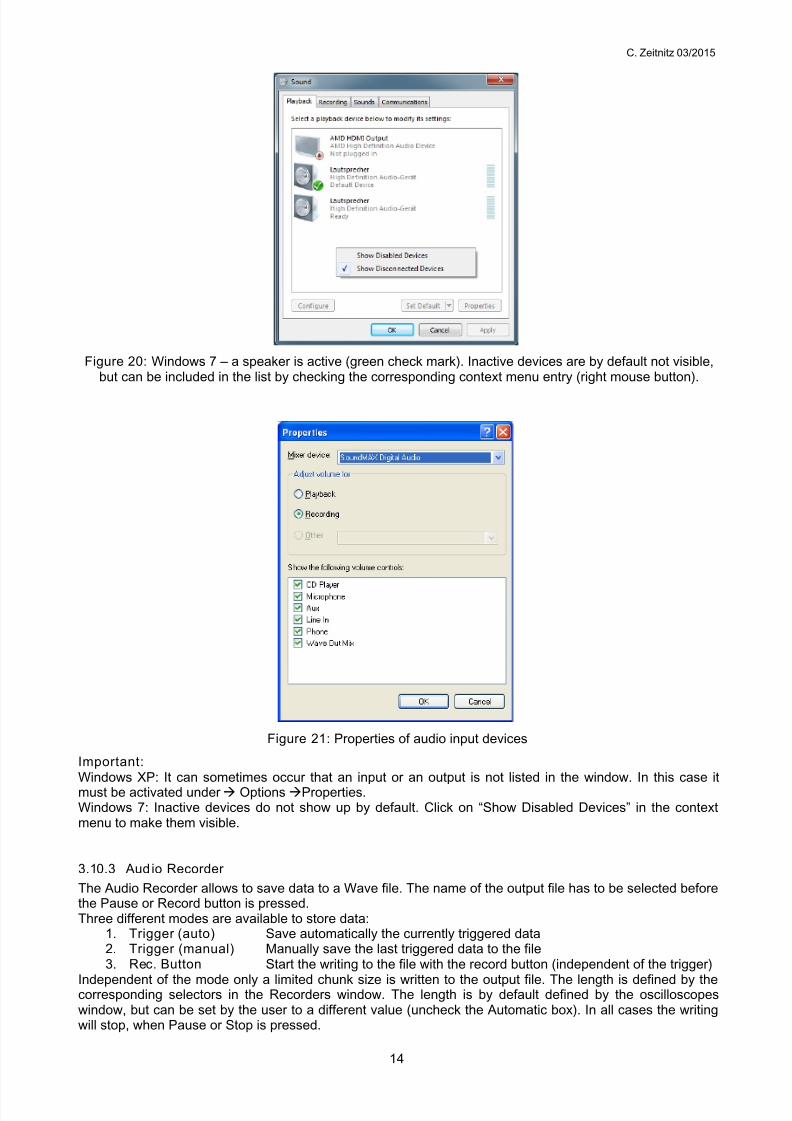
Figure 20: Windows 7 – a speaker is active (green check mark). Inactive devices are by default not visible,but can be included in the list by checking the corresponding context menu entry (right mouse button).
Figure 21: Properties of audio input devices
Important:
Windows XP: It can sometimes occur that an input or an output is not listed in the window. In this case itmust be activated under OptionsProperties.Windows 7: Inactive devices do not show up by default. Click on “Show Disabled Devices” in the contextmenu to make them visible.
3.10.3 Aud io Recorder
The Audio Recorder allows to save data to a Wave file. The name of the output file has to be selected beforethe Pause or Record button is pressed.Three different modes are available to store data:
1. Trigger (auto) Save automatically the currently triggered data2. Trigger (manual) Manually save the last triggered data to the file3. Rec. Button Start the writing to the file with the record button (independent of the trigger)
Independent of the mode only a limited chunk size is written to the output file. The length is defined by thecorresponding selectors in the Recorders window. The length is by default defined by the oscilloscopeswindow, but can be set by the user to a different value (uncheck the Automatic box). In all cases the writingwill stop, when Pause or Stop is pressed.
14

7/24/2019 Manual Scope v146
http://slidepdf.com/reader/full/manual-scope-v146 15/17
C. Zeitnitz 03/2015
Be aware, that the selected file will be overwritten WITHOUT any warning! Since the current file will beclosed after the Stop button has been pressed, define a new output file BEFORE pressing Pause or Record!The resulting Wave file will contain 100 samples of silence between the recorded data chunks. Cue points atthe beginning of the Wave file mark the start of each written chunk.
Figure 22: Audio Recorder window
4 Licensing the Program
The use of the software and of the documentation is granted free of charge for private and non-commercialuse in educational institutions.
4.1 Commercial Usage
A commercial usage of the program is only allowed, if a corresponding license has been obtained. Such alicense is available from http://www.shareit.com/product.html?productid=300341159 . More informations areavailable on the products web-page http://www.zeitnitz.de/Christian/scope_de .
4.2 Private Donation License
A private donation licence is available at http://www.shareit.com/product.html?productid=300341154 . Bypurchasing such a license you can support the further development of the soundcard scope..
After obtaining a license, you will find the license key on the web-page as well as in the e-Mail you willreceive. In order to license the program, follow these steps:
• Re-start the program
• On the windows with the copyright message press the button „License Program“
15

7/24/2019 Manual Scope v146
http://slidepdf.com/reader/full/manual-scope-v146 16/17
C. Zeitnitz 03/2015
Figure 23: Press the button „License Program“
• The next window allows to enter the license codeo copy-paste either directly from the e-mail oro select the file which contains the license code
Figure 24: Either paste the license code into the first fiels, or select the file with the code
• After the license process is complete the program will start regularly
After the program has been licensed, the screen with the copyright message will no longer appear whenstarting the program
The license can only be removed by deleting the file „ license.txt“ from the settings directoryC:\Users\<username>\Appdata\Roaming\scope. This path is the standard path for Windows 7/8.
5 ConclusionI hope you will have a lot of fun with this program. If something goes wrong and you discovered a bug,please send mail to [email protected] you use the program for a project at and university or school I would like to know about it.
This program can be used and passed on for use within the school and private sector freely.For planned commercial use please contact [email protected].
16

7/24/2019 Manual Scope v146
http://slidepdf.com/reader/full/manual-scope-v146 17/17
C. Zeitnitz 03/2015
6 Trouble ShootingCertainly this program might still have some errors, however some standard problems are caused by thesound card and/or Windows.
An error message is shown when start ing the program
The error message, that the installed LabView Run-Time engine (version 7.1) is incompatible with the
required one (version 7.1.1), is caused by a previously installed LabView Run-Time engine. In order to getthe program running, uninstall the Run-Time engine (Control panel Add/Remove Program NationalInstruments ) prior to a re-installing this software.
No soundcard is found
Check in the hardware manager, that Windows actually has a soundcard correctly installed. Somesoundcards recognize if speakers or a microphone is installed. This is the default behaviour under WindowsVista/Win7. In this case you have to check, that at least one input/output device is enabled in the soundsettings (green check mark). If no output device is enabled, the program will complain about it and terminateimmediately.
The oscilloscope shows no signal and the display is frozen
Unfortunately it sometimes happens that communication with Windows breaks down. Here only terminatingand re-starting the program helps!
No signal on the oscilloscope
If the signal generator is used and a channel is also SWITCHED ON, the user must select "Wave Out" forthe audio mixer equipment .
No sound audible
In order that a signal on the speaker is audible, the appropriate equipment must not be deactivated. In thiscase check the audio mixer and enable the appropriate device. When using the signal generator, "Wave"must be selected.
Strange jumps in the signal A large signal can overdrive the input. The maximum possible value should actually be sent to the output.With some sound cards, however, this leads to an overflow and instead of a large positive value, a largenegative value is sent, which leads to a complete distortion of the signal. If such jumps are observed, theinput signal should be attenuated
Program reacts very slowly
The CPU load on a slow computer (less than 1GHz) can go up to 100%, especially in the frequency analysismode. The program will only react slowly. A solution is to reduce the amount data to be processed bychanging the sampling rate in the file settings.ini. For this uncomment the line with the key wordSamplingRate and put in a value of 22050. This corresponds to a reduction of the amount of data by a factorof 4.
In the XY-view the persistence setting has a strong impact on the system load. You might have to reduce thepersistence time to obtain again a more responsive system.
Where to f ind settings.ini ?
The default path on Windows 7/8 is C: \ User s\ <user name>\ Appdat a\ Roami ng\ scope
To verify the path on your machine, either type in a cmd window di r %appdat a%\ scope, or type
%appdat a%\ scope into the header line of the Windows Explorer. In both cases the content of the directory
is displayed, if existing. If the above path does not exist, try %user pr of i l e%\ scope instead.
Changes to settings.ini has no effect
Only the configuration file settings.ini in the directory C: \ User s\ <user name>\ Appdat a\ Roami ng\ scopeis actually used by the program. Delete the folder in order to reset to the files in the installation directory ofthe scope.
17


