Manual Fresh-Breeze-Tandem Trike „XCitor“ · 2008-11-10 · things outside the trike. 4. Take...
37
Flughandbuch XCitor - 1 - Manual Fresh-Breeze-Tandem Trike „XCitor“ Version 1.1 Edition 30.06.2005 Call Sign: _________ Production No.: Registration No.: Producer: Fresh Breeze LangerAcker 11 D-30900 Wedemark Tel.: 05130-3769922 Fax :05130-3769944 Owner: This Paratrike must be used within the limits and according to the instructions in this manual. The manual must be on board during flying.
Transcript of Manual Fresh-Breeze-Tandem Trike „XCitor“ · 2008-11-10 · things outside the trike. 4. Take...

Flughandbuch XCitor - 1 -
Manual
Fresh-Breeze-Tandem Trike
„XCitor“
Version 1.1 Edition 30.06.2005
Call Sign: _________
Production No.:
Registration No.:
Producer: Fresh Breeze LangerAcker 11 D-30900 Wedemark Tel.: 05130-3769922 Fax :05130-3769944
Owner:
This Paratrike must be used within the limits and according to the instructions in this manual. The manual must be on board during flying.

Flughandbuch XCitor - 2 -
CONTENT CONTENT.................................................................................................................2 GENERAL INFORMATION.......................................................................................4
1.1 INTRODUCTION ........................................................................................4 1.2 CERTIFICATION ........................................................................................4 1.3 WARNING, SAFETY MEASURES.............................................................4
2 DESCRIPTION ..................................................................................................5 2.1 FEATURES:................................................................................................5 2.2 TECHNICAL DATA.....................................................................................5 2.3 3-SIDE-VIEW..............................................................................................5
3 OPERATION LIMITS .........................................................................................6 3.1 INTRODUCTION ........................................................................................6 3.2 AIR SPEED.................................................................................................6
4 ENGINE .............................................................................................................6 4.1 FUEL...........................................................................................................6 4.2 ENGINE OPERATION:...............................................................................6 4.3 ENGINE INSTRUMENTATION ..................................................................7
5 WEIGHT, CENTER OF GRAVITY.....................................................................7 6 PERMITTED MANEUVERS ..............................................................................7 7 STANDARD PROCEDURES.............................................................................7
7.1 INTRODUCTION ........................................................................................7 7.2 SET UP AND TEAR DOWN FOR TRANSPORTATION AND FLYING .....8 7.3 DAILY INSPECTION ..................................................................................8 7.4 MAINTENANCE AND CARE......................................................................9 7.5 PERIODICAL CHECKS:.............................................................................9
7.5.1 EVERY 25 HOURS .............................................................................9 7.5.2 EVERY 100 HOURS .........................................................................10 7.5.3 EVERY 2 JEARS...............................................................................10
7.6 OBLIGATION OF REGULAR CHECKS ...................................................10 7.7 STANDARD PROCEDURES, CHECKLISTS, ENGINE START..............10 7.8 FLIGHTS UNDER SPECIAL CONDITIONS.............................................13 7.9 SPECIAL REMARKS................................................................................14
8 EMERGENCY PROCEDURES .......................................................................15 8.1 INTRODUCTION ......................................................................................15 8.2 ENGINE FAILURE....................................................................................15 8.3 ENGINE START DURING FLIGHT..........................................................15 8.4 SMOKE OR FIRE ON BOARD.................................................................15 8.5 FLYING WITH THE ENGINE SHUT OFF ................................................15 8.6 FORCED LANDINGS ...............................................................................16 8.7 LOSS OF DIRECTIONAL CONTROL ......................................................16
9 XWING – THE WING OF YOUR XCITOR.......................................................16 9.1 DISCLAIMER AND EXCLUSION OF LIABILITY......................................16 9.2 FOR YOUR SAFETY................................................................................17 9.3 FEATURES OF THE XWING...................................................................18
9.3.1 DESCRIPTION OF THE XWING ......................................................18 9.3.2 DESCRIPTION OF THE SUSPENSION SYSTEM...........................18
9.4 SETTING UP THE XWING AND TEST-FLYING .....................................19 9.4.1 LAYING OUT THE PARAGLIDER AND PRE-FLIGHT CHECK .......19 9.4.2 6- POINT CHECK..............................................................................19
9.5 THE FIRST FLIGHT .................................................................................20 9.5.1 ADJUSTING THE MAIN BRAKE LINES ...........................................20 9.5.2 USE OF THE TRIM SYSTEM ...........................................................21 9.5.3 TAKE OFF, CRUISE AND LANDING: ..............................................22 9.5.4 RAPID DESCENTS...........................................................................23 9.5.5 NORMAL FLIGHT .............................................................................24 9.5.6 INSTRUCTIONS FOR EXTREME FLYING AND DANGEROUS SITUATIONS ...................................................................................................24
9.6 MAINTENANCE AND CARE....................................................................27 9.6.1 TRANSPORTING AND STORING THE PARAGLIDER ...................27

Flughandbuch XCitor - 3 -
9.6.2 CHECKING THE LINES....................................................................27 9.6.3 CLEANING AND REPAIRING THE PARAGLIDER..........................28
9.7 INSPECTIONS .........................................................................................28 9.7.1 LINE-LAYOUT XWING:.....................................................................29
9.8 INTERNET – PRODUCT INFORMATION AND SAFETY NOTES ..........30 10 PERFORMANCE .........................................................................................31
10.1 PERFORMANCE DATA .......................................................................31 11 WEIGHT AND BALANCE ............................................................................32
11.1 PROCEDURE .......................................................................................32 12 WEIGHT AND BALANCE SHEET ...............................................................33 13 EQUIPMENT LIST .......................................................................................34 14 MAINTANANCE OVERVIEW.......................................................................35 15 REPAIRS......................................................................................................36 16 LOCATION OF SIGNBOARDS AND FRAME NUMBER.............................36 17 FOR YOUR OWN NOTES ...........................................................................37

Flughandbuch XCitor - 4 -
GENERAL INFORMATION
1.1 INTRODUCTION This manual was written in order to provide information to pilots as well as to instructors for a safe and efficient use of this paratrike. In addition to some legal issues we added some important operation informations. In order to fly this paratrike the pilot needs a valid license. There may be additonal licenses required if a passenger is on board. Depending on your national regulations the trike may only be operated from certified airfields. Flights within controlled air space usually needs a permission which is often given by radio. Additional requirements like a valid 3rd party insurance must be fulfilled. Fresh Breeze delivers the Xcitor according to the German Certification. The legal use in any othe countrie must be checked by the pilot. He is fully responsible for any legal issues. Prior to flight the pilot must make himself familiar with all the features and characteristics of the Xcitor. It is a must to read this handbook properly and to study the Xcitor trike carefully on the ground.
1.2 CERTIFICATION The XCitor paratrike is designed and certified according to the German Air Law. It has the Certification No. 586/05-7 1 handed out from the DULV (German Ultralight Association). Noise tests were passed according to the actual legal regulations.
1.3 WARNING, SAFETY MEASURES The following definitions will be used in this handbook for warnings, safety measures and remarks. They mean: WARNING: means that not paying attention to it will lead to a significiant loss of flight safety. ATTENTION: means that not paying attention may cause a significiant loss of flight safety over a longer time period. REMARK / HINT : leads the attention to certain circumstances which will not influence flight safety directly but are unusal or important. SAFETY MEASURES - Read safety messages in publications like aviation magazines or Aeronautical Information Publication, VFR-Bulletin etc. - Don’t fly under thermal or turbulent conditions. Any paraglider will keep ist shape du to the inner pressure. This pressure can only stay built up under usual air flow conditions. - Use additional caution if there is any tendency of a thunderstorm. Never fly to close to the front. You can be pulled up into the clouds! Better is to make a safety landing!
- Inform yourself about about low level flight areas. Stay clean of them. ATTENTION: No smoking on board permitted due to fire protection!

Flughandbuch XCitor - 5 -
2 DESCRIPTION
2.1 FEATURES: - Paratrike with steerable front wheel - Frame made of T.I.G. welded aluminium tube - Tandem seater - Springy landing gear, 150 mm travel, cable operated front brake - Two stroke in-line engine Hirth 3503 with electric ignition, motor
management and electronic injection system - Four-blade propeller 1665 mm, Type HTC CCQW-3B-166,5-CG 4 Blade - Paraglider: XWing, 28 m2, wing span 10 m
2.2 TECHNICAL DATA Length 3,17m Height 2,00m Width 1,91m Empty weight 168kg Payload 200 kg Takeoff-weight (max.) 368 kg Fuel capacity 28 L
2.3 3-SIDE-VIEW

Flughandbuch XCitor - 6 -
3 OPERATION LIMITS
3.1 INTRODUCTION This chapter contains information about the operational limits for the safe use of the XCitor. These data are the result of flight tests as well as of theoretical calculations. There are explanations of the instrumentation. The XCitor is – as any other ultralight airplane – not certified for aerobatics. Roll angles of more than 60° are not permitted. Flying under icing conditions are not permitted. No flying under squally wind conditions or at high wind speeds of more than 20 km/h (=5,6 m/sec), or if rain comes up.
3.2 AIR SPEED The given values are standing for the Indicated Air Speed (IAS), referring to the air speed sensor located in the front section of the trike. Max. allowed speed 73 km/h Max. travel speed 70 km/h Maneuver speed 65 km/h Min. recommended approach speed 40 km/h Minimum speed 35 km/h The maximum allowed speed must not be exceeded. Full brake use is only permitted until the maximum maneuver speed. If you are faster don’t apply the brake too fast or completely.
4 ENGINE Manufacturer Hirth Type 3503 Takeoff power 70 PS @ 6200 U-1 Constant power 65 PS @ 6000 U-1 Cylinder head temperature max. 110°C Propeller HTC CCQW-3B-166,5-CGt Blade angle 24° bei 75% (= 625mm radius) WARNING Don’t use the engine without propeller with more than idle speed. Otherwise the engine might be destroyed due to too high rpm.
4.1 FUEL The engine is operated with 2-stroke-mix 1:50. The engine maker recommends unleaded 95 ROZ or more. For a short time AVGAS 100LL or MOGAS can be used as well. Under very hot conditions the use of AVGAS is better as the risk of steam bubbles is less. The 2-stroke-oil should be a high-quality synthetic oil (at least API: TC res. Jaso FC or ISO EGD). As an alternative BlueMax-2stroke oil 1:100 may be used as well. WARNING: Never use fuel without oil! Use fresh, clean and waterfree fuel.
4.2 ENGINE OPERATION: Engine start procedure: Move the main switch to the upper „on“ position. Now the
Flughandbuch XCitor - 7 -
fuel pump is running. Start the engine by pressing the red push button or by using the pull starter on the right side of the engine. If the engine is cold the injection system can by activated (you can hear it for ca. 0.5 sec) with the gas pedal. Also if the engine is cold the gas pedal should be pressed down a little bit (but not that much that the injection system is running again). Shutdown: Just move the main switch to the lower “off” position. The 2-stroke engine needs no warm up – once if it running full power may be applied at any time.
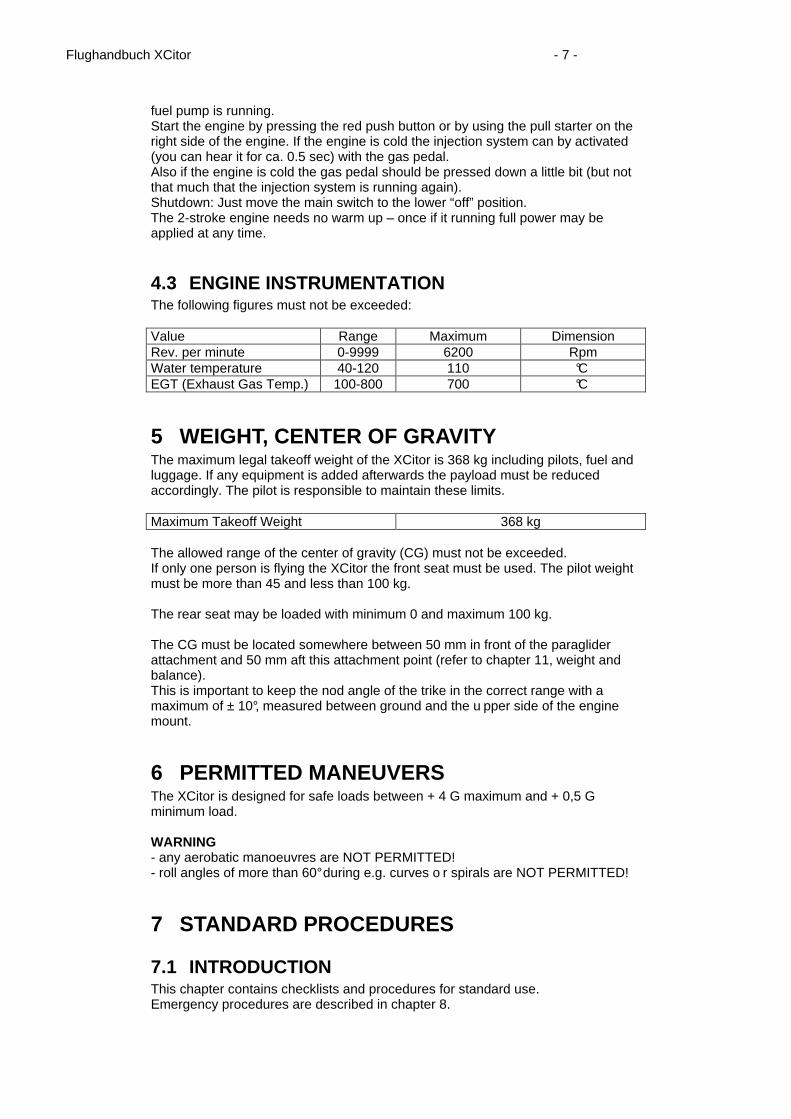
4.3 ENGINE INSTRUMENTATION The following figures must not be exceeded: Value Range Maximum Dimension Rev. per minute 0-9999 6200 Rpm Water temperature 40-120 110 °C EGT (Exhaust Gas Temp.) 100-800 700 °C
5 WEIGHT, CENTER OF GRAVITY The maximum legal takeoff weight of the XCitor is 368 kg including pilots, fuel and luggage. If any equipment is added afterwards the payload must be reduced accordingly. The pilot is responsible to maintain these limits. Maximum Takeoff Weight 368 kg The allowed range of the center of gravity (CG) must not be exceeded. If only one person is flying the XCitor the front seat must be used. The pilot weight must be more than 45 and less than 100 kg. The rear seat may be loaded with minimum 0 and maximum 100 kg. The CG must be located somewhere between 50 mm in front of the paraglider attachment and 50 mm aft this attachment point (refer to chapter 11, weight and balance). This is important to keep the nod angle of the trike in the correct range with a maximum of ± 10°, measured between ground and the u pper side of the engine mount.
6 PERMITTED MANEUVERS The XCitor is designed for safe loads between + 4 G maximum and + 0,5 G minimum load. WARNING - any aerobatic manoeuvres are NOT PERMITTED! - roll angles of more than 60° during e.g. curves o r spirals are NOT PERMITTED!
7 STANDARD PROCEDURES
7.1 INTRODUCTION This chapter contains checklists and procedures for standard use. Emergency procedures are described in chapter 8.

Flughandbuch XCitor - 8 -
7.2 SET UP AND TEAR DOWN FOR TRANSPORTATION AND FLYING
This is how to prepare the XCitor for flying, if it was hauled to the airfield: 1. Remove the cable tree from the car and take the XCitor of the trailer clutch 2. Remove tarpaulin and propeller protectors. 3. Remove the cable tree from the XCitor, remove the light bar, stow both
things outside the trike. 4. Take the wing out of the trike, put it beside it, take it out of its stuff bag. 5. Lay it as usually behind the trike, upside down, trailing edge showing to the
XCitor. 6. Check the way of all lines from the attachment point at the trike to the wing
Put the lines between prop cage and cable binder. Pull the trike forward to straighten and tighten the lines (never drive with speed into the canopy).
7. Move the trim levers into a vertical position, don’t start in an accelerated configuration. Trim levers should therefore never be in their rear position!
Tear down happens in the opposite order. You are not allowed to trailer the trike faster than 80 km/h. The towing vehicle must have a minimum permissible drawbar load of 25 kg. Road transportation is only permitted with tarpaulin and propeller protectors.
7.3 DAILY INSPECTION We want to point out that nearly all technical defects can be recognized early enough during a conscientious and precise preflight-check. Therefor we ask you to do the check in a correct manner in your own interest. Flight safety depends mainly on correct checks and maintenance procedures. 1. Engine: Check for any leakage, loose screws, cracks etc. 2. Propeller: Check correct sit, tight screws and for damage. 3. Check oil and cooling agent level. The oil level of the gear box must be in
height of the little gauge glas. Use gear oil SAE 80 GL 4 or GL5. Cooling agent must be visible in the transparent expansion bottle.
4. Check the gear box, the cooling system and the fuel system for any leakage. Especially check the tube connections.
5. Check the electrical connectors, the spark plug socket, the gas cables and the bowden cable distributor for a tight sit and mechanical integrity.
6. If your XCitor is equipped with an additional gas pedal for teaching purpose. Make sure that this gas pedal is not locked and at its idle position.
REMARK : It is not possible to crank the engine via the propeller as there is a centrifugal clutch in between. If the motor shall be turned by hand use the pull starter. ATTENTION The main switch must be shut off. A trained person must be in the pilot seat. 7. Check the paraglider: No dangled or damaged lines.
No visible damages at the canopy, no tears or stretched areas. 8. The attachment points of the wing should be firmly clamped to the bent
main tubes of the XCitor frame. 9. Check the suspension system and the wheels for any damage, especially
the bungee cords for abrasion and any cuts. 10. Check of the front brake 11. Check both trim levers: They must be moveable with a given friction
resistance (5-7 kg). 12. Pedals and bowden cables freely movable. 13. Does the gas pedal return to ist idle position, when unloaded? Therefore
you make check the gap between the idle setting screw and the bowden cable segment under the left side of the longitudinal engine mount.

Flughandbuch XCitor - 9 -
14. Check the seat board and the belts for tightness, correct sit and damage 15. Tires: Check for damage and correct air pressure
(1,8-2,5 bar rear, 1,2 – 1,6 bar front) 16. Main gear: Check rubber bearings, screws, alu fittings for wear and tear 17. Lift off the front wheel, check if it can be turned freely CHECK PRIOR TO FLIGHT Prior to any flight the responsible pilot has to carry out a visual inspection. The pilot learns the necessary knowledge during his flight training and during a special briefing for the XCitor, done by the dealer or flight school who sells the trike. Check especially the following points: ENGINE - Propeller for correct sit, tight screws and any damage - manual engine cranking via pull starter, check for free movement and unusual noise - muffler and exhaust system, connection springs for tight sit - Cooling agent must be visible in the transparent expansion bottle. ATTENTION When the motor is turned by hand for check purpose the main switch must be switched off! A trained person should be in the pilot seat of the XCitor. If nobody else is available: Double check very carefully the correct stop position (lower position) of the main switch! Put your left leg in front of the right rear wheel so that the trike cannot start to roll when pulling the starter rope!
7.4 MAINTENANCE AND CARE Keep the XCitor and ist wing clean and dry. Don’t use any aggressive solvents. Use grease or engine oil wherever metal slides over metal (rear suspension struts). Never use grease or oil between metal and plastic (front struts): The plastic will swell! Use there silicone based lubricants instead. Never use grease or oil or something similar on the upper bearing of the trim levers. The bearing screw must be tightened so much that 5-7 kg must be applied until the lever starts to move.
7.5 PERIODICAL CHECKS:
7.5.1 EVERY 25 HOURS - visible inspection of all screws - Check the play and the free movement of any moveable parts like wheels, suspension system, trim levers etc.
- Lubrication of those parts: Metal to Metal: grease or engine oil, - Metal to plastic: Silicone spray
- Check the friction force in the trim lever bearing: The correct force to move the lever should be 5-7 kg at the handle. - Check of the front brake - Check of the gear oil level (glass gauge) - Check of all bowden cables - Check of all belts, belt buckles, guide rollers - Optical check of all weld seams for any cracks - Check of all rubber-metal-joints for cracks - Check of the cooling agent level - Tension check of the water pump tension - Tightness check of the cooling system (leakage, water loss)

Flughandbuch XCitor - 10 -
7.5.2 EVERY 100 HOURS Same as 25h-Check, plus: - spark plug change (Denso W24FSR or equal) - Gear oil change, gear oil according to SAE 80 API GL4 or 5
7.5.3 EVERY 2 JEARS Same as 100h-check, plus: - Cooling agent change, water with cooling additive (protection against freezing and corrosion) - Change of the water pump belt if there is visible tear or damage - Replacement of all damaged or torn parts The Hirth-2-stroke-engine requires no oil change (beside the gear). Every 600 hours we recommend a general overhaul at its maker Hirth. The ballistic recovery system requires a special maintenance according to the additional manual.
7.6 OBLIGATION OF REGULAR CHECKS In Germany this trike must be checked once a year. This check must be carried out by a class 5 inspector. A list of certified inspectors can be retrieved from the “DULV e.V.” (German Ultralight Association). The canopy is subject of this check as well. The inspector may decide if the wing has to be checked by its manufacturer or not (typically every 2 years)
7.7 STANDARD PROCEDURES, CHECKLISTS, ENGINE START
Whenever the engine is started somebody has to be in the front seat, being able to operate the cockpit. The picture below shows the position and the purpose for the individual elements of the cockpit.

Flughandbuch XCitor - 11 -
This table describes the functions of these elements: On the panel: (Equipment my vary depending on the version) Name Number Positions Purpose Main Switch 1 ON OFF Main switch for the
electrical system including ignition
Interkom 2 Refer to its separate manual
For communication and radio
Water temperature 4 Between 80 and 105°C
Water temperature monitoring
RPM 5 In cruise between 4200 and 5000 rpm
Display of motor rpm
Start switch 6 Un- /pressed Press to start engine Charging check light 7 Red light When electrical system
on and red light off then battery will be charged
correctly Beside the panel: Name Positions Purpose Gas pedal Up / down Giving gas with the right foot Brake pedal Up / down Braking of the front wheel with
the left foot Trim lever Fore / aft Works like the brake line: In
order to fly faster pull both levers aft, for curve flying push inner
lever fore Cruise gas lever Fore / aft Used for gas setting during
cruise. With the gas pedal only more gas than set with the cruise gas can be applied, never less!
Control (brake) lines (not) pulled down Used to steer the canopy especially during take off, landing
and under turbulent conditions The amount of remaining fuel can be easily judged in flight due to the transparent fuel tank wall . ENGINE START PROCEDURE Main Switch ON. Charge light on Gas pedal Cold engine: kick pedal 50&down until
fuel is injected for ca. ½ sec. Can be heard. Then don’t give any gas at all.
Warm engine: Kick pedal slightly down, ca. 10%.
Cruise gas lever During engine start this lever MUST be at IDLE.
Propeller Danger zone free. Brake pedal Kick down and hold. Electric starter Press starter push button until the
engine starts gets alive. If necessary give a little bit gas.
ROLLING ON THE GROUND Get used to the XCitor’s ground behaviour by roll tests on the ground. Do that in any case before attempting to fly. Ground control is achieved via the foot steerable front wheel. In the air it is controlled via the canopy, either with the trim levers or

Flughandbuch XCitor - 12 -
the brake lines. During take off the XCitor steering and the XWing steering must be properly coordinated. TAKE OFF AND CLIMB Whenever it is possible take off directly against the wind. The maximum permitted side wind vector is 8 km/h. Lay the Xwing behind the XCitor, upside down, trailing edge towards the trike. Put the lines into the holders (cable binders) beside the cage. Check all lines for any tangles and knots and being parallel. Get into the XCitor, fasten seat belts, tighten them. ATTENTION: The rear seat has 3 belt buckles! All 3 must be closed prior to start! Not closing the buckles on both sides will cause the front seat to move forward when the front belt is loaded! So the front belt cannot hold without the rear buckles being closed! Move the trim levers into a vertical position. Check their bearing for beeing not to loose (the friction force to move the handles – measured at the handles) must be between 5-8 kg!). Check wind direction and that the glider is laying correctly behind the XCitor. Take the brake lines into your hands. Start the engine (see the corresponding chapter). Open the foot brake. Increase rpm until the glider can be pulled up (depending on the wind: ca. 50% of the maximum power) Keep the rolling direction with your feet. As soon as the canopy comes up steer it active with the brake lines and keep it centred behind and above the XCitor. Prevent the XWing from shooting over by applying some brake. Stabilize the glider above the trike. Keep on rolling. Check the position of the canopy. If necessary steer the XCitor to the side and drive under the canopy, if the wing is pulling too much to the side. If the glider is centred over the trike and everything under control apply more gas (full, if flying tandem). The XCitor will very soon take off. Flying solo control the power carefully and reduce gas slightly after the take off: Attention: The XCitor has much excessive power for solo flights and may push you into a quite steep flight position, which you may not be used to! CRUISE Even during climb you may trim the XCitor to a straight flight with the trim levers. Just push the lever on the side you want to move to slightly forward. Remember, the brake lavers act like a brake line – pushing them forward makes the XCitor move into that direction. Vice versa the other lever may be pulled back. Under normal flight conditions the brake lines may be just set free so that the trim levers can be operated easily. The trike can be accelerated by pulling both trim levers back at the same time. This is like opening the brake lines. If due to the torque of the propeller the trike flies a curve just push he right lever fore until the XCitor flies straight (the left side is loaded more then the right, causing the right trike side hanging down slightly more than the left: therefore the trike wants to fly to the left side). Cruise speed is between 45 and 75 km/h depending on the rpm setting between 4200 and 5000 and on the trim setting and the total weight. The most economical speed is roughly 65 km/h depending on the load. The maximum allowed speed (VNE) is 73 km/h and must never be exceeded. Under turbulent conditions the XCitor is not allowed to fly faster than 65km/h (manoeuvre speed VA). The fuel consumption is somewhere between 8l/h at low speeds (55 km/h) up to roughly 10l/h at 70 km/h. LANDING
Flughandbuch XCitor - 13 -
Any landing has to be made against the wind. Reduce power and push both trim levers into a slow position (vertical or a little bit slower). Take both brake lines into the hands, but don’t brake yet. Start to tighten the brake lines in 5-8 m height. Flare out, starting at 1-2m, with continuously applying more brake. If you made a perfect landing you should just apply full brake if you touch the ground. If you flared out being too high support the descent with gas. Being on the ground you may open the brake lines again, wind them 1-2 times around your hand, and brake again to make the glider falling down behind the trike. If it is windy you may repeat this procedure. If the wind is quite strong apply the front brake carefully, so that the glider can move with the wind backwards and fall down. ENGINE SHUT OFF Gas pedal up to idle. Main switch off. Leave the trike only after the propeller has come to a complete stop as it may run longer than the engine due to the centrifugal clutch. CHECKLIST PRIOR TO START: - Canopy laid out properly? - lines straight and in parallel? - lines clipped into the cable binder at the cage side? - trim levers in a vertical position, and clamped tight enough (5-7 kg)? - cruise gas lever (and the teacher gas pedal, if any) at idle position? - enough fuel on board? - seat belts fastened? - helmet? - prop free? - wind not too strong and from ahead? - brake lines close at hand?
7.8 FLIGHTS UNDER SPECIAL CONDITIONS RAIN: Basically each conscientiously done flight planning contains a weather check. So in principle no flights under rainy conditions should become necessary. Anyway, every pilot may get into unforeseeable worse weather conditions. If the rain is only very light, the flight may be continued for a certain time. But the wet canopy will get heavier. Therefore flight speed will increase, causing a higher stall speed as well. With a wet wing fly carefully, avoid sudden manoeuvres, and don’t be too slow when landing. If the rain gets stronger land! No flights in strong rain! Never stow a wet canopy away. It will deteriorate. A wet canopy will also come up during take off much slower and worse. WIND: In general every take off and every landing has to be made against the wind. Move always the XWing into the wind. If the XCitor has to be rolled against the wind at an angle, the leeward brake should be pulled slightly to keep the wing on course. If under strong wind conditions has to b landed apply after touch down the front brake so that the XCitor will not roll back. Prior to landing you should wind up the brake lines around your hands so that you have enough travel to make the glider fall down behind the trike. If the brake travel is not sufficient you may release the brake and wind it up around your hands one or two turns more. Repeat until the glider is down.

Flughandbuch XCitor - 14 -
It may help if the brake is slightly released so that the XCitor rolls back with the wind in a controlled manner. IN FLIGHT TURBULENCES Don’t fly under thermal conditions with maximum speed. This will cause high wing loads and also a small angle of attack. This will cause the canopy to fold in easier, if suddenly wind comes from above. The best choice is a vertical position for the trim lever. FLIGHTS IN SNOWY CONDITIONS: They are not permitted at all. In case ist starts to snow during flight the flight must be cancelled. EXTREME TEMPERATURES: There are mo „normal“ temperatures (between –10 and +40° C) where limitations occur. But you have to make sure that the cooling agent is mixed accordingly to the manufacturers instruction. At high temperatures keep watching the water temperature carefully. In addition the required power and the required flight speed increases, so that the take off distance gets longer than in winter. This is similar to flights in high altitudes.
7.9 SPECIAL REMARKS The XCitor has a unique trim system providing a fully operational backup system for steering via the brake lines. Only for take off and landing the brake lines should be used as they provide more feedback and a quicker response. Due to the clockwise running propeller the XCitor will bank slightly to the left and therefore fly a wide left curve. Pushing the trim lever on the right side into a more fore position than the one on the left side will counteract that. But even narrow curves are possible just with the trim system. Due to the propeller torque curves to the left side will be narrower than curves to the side (as long as you fly with engine power). ATTENTION: Don’t steer with the brake to the same side as you do already with the trim system! Both inputs will be added causing steep curves with bank angles outside the limit of 60°. They can be controlled and finished – that was proven in flight tests – but this may be difficult for inexperienced pilots. Also high G loads will occur during such narrow curves. If you try to push just the (outer) trim lever forward this may be very difficult due to the high wing loads. In this case use the brake lines to stop the curve. Then – if still desired – the trim levers can be moved as usual. REMARK Make sure that during the start check the correct friction force of the trim levers was checked (5-8 kg!). If the move significantly easier they may be pulled back during high G manoeuvres into the fast position. When flying in a narrow curve anyway (via the brake line) this may cause an unexpected narrowing of the curve radius, increasing speed at the same time. This curve must be finished with the brake line as it may require much force to move the trim lever forward again. CONCLUSION: Avoid to fly curves with the trim system in addition to the brake lines into the same direction. If one trim lever moves back due to too light movement and high G loads counteract the resulting curve with the brake line.

Flughandbuch XCitor - 15 -
8 EMERGENCY PROCEDURES
8.1 INTRODUCTION As already mentioned in chapter 1.2, engines for ultralight airplanes don’t have to be certified accordingly to aeronautical standards due to cost reasons. Therefore you have to be aware that such an engine may quit at any time. Please keep that always in mind! ATTENTION: Fly only having always a plan in mind where to land in case of a forced landing. Train flying and landing with the engine shut off. Get familiar with the glide ratio of your XCitor. Only if you do so you you will never get into a situation which will surprise and overextend you.
8.2 ENGINE FAILURE If the engine quits suddenly and unexpected we recommend the following procedures: During take off roll, not airborne yet: Keep direction, and brake the XCitor At take off, in the air: Straight landing Being higher than 80 m: If necessary make a flat curve to land
against the wind. In flight, being higher than 100m: Search for a suitable landing field, watch
wind direction and speed. Try to land against the wind or up the hill.
Over trees or high grass etc.: Land as if the surface of the plants would be the runway. Land as slow as possible.
Rough running engine, power loss May indicate an iced carburettor. Watch rpm, emergency landing
REMARK Fresh Breeze could never notice any case of carburettor icing even at typical icing conditions (0 - 4°C, high humidity) due to the inje ction system. But this is no warranty at all!
8.3 ENGINE START DURING FLIGHT Engine start during flight can be easily done. Switch the main switch on and press the starter button. Everything else as described in chapter 4.2.
8.4 SMOKE OR FIRE ON BOARD In case of smoke or fire on board we recommend the following procedures: Fire at the engine on the ground: Leave the trike as soon as possible. Fire at the engine during take off: Emergency landing, leave the trike as
soon as possible. Fire at the engine during flight: Emergency landing, leave the trike as
soon as possible.
8.5 FLYING WITH THE ENGINE SHUT OFF The speed of the best glide ratio is somewhere between 55 and 65 km/h depending on the wing load. The glide ratio without running engine is roughly 1:4, at idle speed 1:5. The best glide ratio is achieved if the trim levers are in a slow position (vertical or

Flughandbuch XCitor - 16 -
even more forward).
8.6 FORCED LANDINGS There are emergency landings in case of e.g. an engine failure and safety landings in case of e.g. an upcoming thunderstorm. Landings without running engine are easier if the trim system is set to “slow” (vertical or more forward). In case of a tire failure (pressure loss) try to touch down as slow as possible, using the front wheel for direction control. Flaring as usual, in case it may be helpful to wind the brake lines around your hand to increase the travel of the brake line.
8.7 LOSS OF DIRECTIONAL CONTROL As the XCitor can be controlled either via the conventional brake lines or the newly developed trim system it is very unlikely that both systems will fail completely. If the ability to steer is reduced try to make flat and wide curves. If the brake lines fail flare out using the trim system, supported with some gas.
9 XWING – THE WING OF YOUR XCITOR This chapter is about the XWing, the wing of the XCitor trike. As we believe that you got at least a basic knowledge about paragliding during your flight school we will focus here on the specialties of the canopy and its suspension system. The XWing was designed as a part of the XCitor system together with the newly designed trim system, all components were carefully adjusted for maximum performance and safety. Therefore the glider man only be flown on the XCitor and the XCitor is not allowed to be used with any other wing as long as Fresh Breeze does not provide any other information. If there are any questions left which are not covered by this manual please contact your local dealer. The check of the XWing (at least every 2 years) is carried out via Fresh Breeze by Swing, Tel.+49 8141 3 27 78 88, www.swing.de.
9.1 DISCLAIMER AND EXCLUSION OF LIABILITY Use of this paraglider is solely at the USER'S OWN RISK. THE CERTIFICATION AND THE WARRANTY SHALL BE RENDERED INVALID if changes of any kind (including changes to the brake lines) or improper repairs are made to this paraglider or if any inspections are missed (annual and 2-yearly check). Pilots are responsible for their own safety. Before every flight, the pilot must check the glider's air-worthiness and must launch only if it is fit to fly. The pilot must check the weather forecast and only fly if both current and forecasted conditions guarantee a safe flight. The glider may only be used with a pilot's licence which is valid for the area or under the supervision of an approved flying instructor. There shall be no liability on the part of third parties, in particular the manufacturer and distributor. In terms of the warranty and guarantee conditions, the paraglider may not be flown if any of the following situations apply:

Flughandbuch XCitor - 17 -
1. the inspection period has expired, you have carried out the inspection yourself, or the inspection has been carried out by an unauthorised inspector;
2. the take-off weight does not fall within the permissible overall take-off weight range;
3. the glider is flown in rain or cloud or when there is fog or snow; 4. there are turbulent weather conditions or wind speeds higher than 20 km/h; 5. the glider is used for aerobatics / extreme flying or flight manoeuvres at an
angle greater than 60°; 6. the pilot has insufficient experience or training; 7. the wrong equipment or inadequate equipment (reserve, helmet etc) is
used; 8. the glider is used for winch launching; 9. modifications have been made to the canopy, lines or risers which have
not been approved; 10. the glider is opened in free fall - this is not a parachute.
9.2 FOR YOUR SAFETY The use of paragliders is subject to various regulations. They may not be flown without a valid certification. Any attempt to fly without proper training is highly dangerous.
• This manual does not replace the need to attend a flying school.
• The paraglider may only be used for the purpose for which it is designed. Never use it as a parachute.
• Use of the paraglider is at your own risk. The manufacturer is not legally
responsible for any personal injury or material damage which occurs in connection with the XCitor and its components like the XWing.
• A specialist must test-fly the paraglider. The test-flight must be recorded on
the paraglider information label.
• Do not under any circumstances tow the XWing with a car, motorboat, a winch or any similar device.
• Aerobatics are prohibited in Germany. The XCitor is not designed for any
aerobatics including banking angles of more then 60°.
• Flying with a wet canopy or when it is raining or snowing is prohibited; it may cause the glider to stall.
• Do not under any circumstances alter the construction of your paraglider.
If you do so, any claims under the warranty will not be accepted and the certification will lapse.
• When you fly for the first time, fly under the supervision of a flight instructor
and in a well known area.
• Only fly if the wind speed, direction and weather conditions guarantee a safe flight.
This manual contains additional information concerning your safety. This information is indicated by two phrases:

Flughandbuch XCitor - 18 -
9.3 FEATURES OF THE XWING
9.3.1 DESCRIPTION OF THE XWING The XWing is a paraglider which was especially designed ti fit the XCitor trike. Together with the newly designed suspension system it was tested and certified within the limits as described in the technical data section (chapter 2.2) by the German Ultralight Association (DULV e. V.) The XWing is either controlled as usual using brake lines or by a newly developed trim system, which can be used as well to compensate the propeller-induced torque. Shifting the connection point between trike and paraglider fore and aft the complete system can be adjusted in a wide range according to different load and equipment states (refer to chapter 5 and 11, weight and balance).
9.3.2 DESCRIPTION OF THE SUSPENSION SYSTEM Important safety hint Possible canopy collapses in turbulent air will become more dynamic as the wing load is increased. Decreasing the canopy’s angle of attack by opening the trimmers (fast flight) will intensify this effect. Due to this reason the XWing is not allowed to be steered simultaneously by the brake lines and the trim system into the same direction if the trim levers are set to a fast flight position (which more aft than vertical). This would be possible if e.g. the trim levers are set to a narrow curve, and then additional brake input is applied to make the curve even narrower. If the brake lines are just for steering the trim levers should only be used to compensate the engine torque and for general speed settings, not for an additional steering. In general the inputs of the trim system and of the brake lines will be added to each other. Hint! It is crucial to ensure that changes to the brakes do not cause them to be activated when you don't want them to be. The paraglider should first be pulled up and brought under control whenever the brake line was modified. The trim system is helpful to set the trim speed (cruise speed) and do counteract the engine torque. During take off and landing the trim levers should be in a slow (=vertical) position. The paraglider is connected with the suspension bows using four 6mm-carabiners. The suspension bows have four holes close to their upper edge where these carabiners go through. The first (most forward) carabiner takes the A-lines, the last one (most aft) the D-lines etc. The left bow is connected with the left side of the canopy, the right bow with its right side. Both bows are connected with a rotatable joint which keeps them also in the correct distance to each other. For easier transportation this joint can be taken apart, it is just stuck together. The lower end of the suspension bows is connected with a 3-ton-belt (30 mm polyester belt) to a bigger carabiner which is the main joint between wing and trike. This carabiner is used to separate the wing from the XCitor if necessary. Check that it is correctly closed prior to each flight (as all the other carabiners). The XCitor has another polyester belt loop around its top tube (roll over tube) which goes into this carabiner as well. This loop cannot move forward or aft as it is tied to

Flughandbuch XCitor - 19 -
an aluminium clamp around the main tube with a 5mm-Polyester rope. Moving this clamp fore or aft changes the flying angle of the XCitor and is used to adjust it to different weight and equipment states (see chapter 5 and 11, weight and balance) The connection rod between both suspension bows lays on top of the XCitor prior to start, one can say, on it’s roof.
9.4 SETTING UP THE XWING AND TEST-FLYING
9.4.1 LAYING OUT THE PARAGLIDER AND PRE-FLIGHT CHECK
LAYING OUT THE PARAGLIDER
• Place the paraglider with the upper surface against the ground and spread it out so that the leading edge is slightly curved and the trailing edge is showing towards the XCitor.
• Carefully separate all the rigging-lines and take care that no lines are
underneath the canopy, tangled or caught up in any way. PRE-FLIGHT CHECK Before launching, always check the following points:
• Are there any tears in the glider or other damage?
• Are all lines been untangled and in parallel?
• Are the brake lines clear and tightly connected to the handle?
• Is the handle connected to the magnetic holder strapped around the “roll over tube” close to the trim levers?
• Are the brake lines properly adjusted?
• Are all carabiners fastened securely to the lines and to the suspension
bows?
• Is the canopy dry?
• Are the risers and seams in good condition?
• Is the handle of the ballistic recovery system un-secured?
• Are all lines hold with the cable binder at the side of the prop protection cage?
9.4.2 6- POINT CHECK We recommend that you carry out the following 6-point check immediately before launching: 1. Is the canopy arranged in a half moon shape and are all the air-entrances
open?
Flughandbuch XCitor - 20 -
2. Are all the lines untangled? Are there any lines under the canopy? 3. Check your equipment: safety belts (the rear seat has 3!!), carabiners,
recovery system, ? 4. Are both trim levers vertical, and are the brake handles at hand? 5. Do the wind-direction and strength ensure a safe flight? 6. Are the airspace and launch area clear?
9.5 THE FIRST FLIGHT Hint! Carry out your first few flights only when the weather is stable, and in a familiar area. In the beginning you should steer gently and carefully so that you can get used to the reactions of the paraglider while you are not in a stressful situation. Caution! Accident risk! Do not overestimate yourself! Don't let a paraglider that can easily be manoeuvred or the behaviour of other pilots make you careless.
9.5.1 ADJUSTING THE MAIN BRAKE LINES Hint! The main brake lines must be checked by an expert before the test-flight. CORRECT ADJUSTMENT Correctly adjusted brake lines have nearly no idle displacement. This means that the brake lines must not be pulled very much down before the trailing edge of the canopy starts to move downwards and the glider starts to react. The manufacturer has pre-set the brakes in this way, which means you are able to steer and land the glider with nearly no delay. TOO LONG BRAKE LINES If the brake lines are too long, the paraglider reacts slowly and is difficult to land. However during the flight you can wrap the brake lines around your hands to minimise this problem. Adjust the brake lines to a suitable length after the landing. Recommendation: We recommend this technique prior to a landing as well. Doing so the potential brake travel can be increased. This makes it easier especially under windy conditions to make the glider come down straight behind the trike. Don’t fly too slow and don’t wrap the brake more than 1x around the hand as long as you are in the air so that no stall might occur during the flight. Caution! Accident risk!

Flughandbuch XCitor - 21 -
If the brake lines are too short, the following risks could arise:
• the risk of an unexpected early stall.
• the paraglider does not launch well and there is a risk of full-stall.
• the behaviour of the paraglider in extreme flight conditions may be dangerous.
9.5.2 USE OF THE TRIM SYSTEM Caution! Accident risk! Disturbances (e.g. collapses) are much more dramatic with increased speed than when the glider is set to a slower cruise speed. Because of the increased risk of collapsing, we strongly recommend that you do not set the trim system to high speeds when flying under turbulent conditions or close to the ground. The trim system consists of 2 trim levers, which can be moved fore and aft against a certain friction force (5-7 kg at the handles). The friction force can be adjusted with the centre screw of the trim levers. Hint! Never use grease or oil etc. at the bearing of the trim lever! The trim levers are connected via a rope with the end of the suspension bows. This systems causes the wing to twist, but it works like a brake line: Pushing the lever forward to a slow position causes the trailing edge of the glider to go down, increasing the angle of attack and making this side slower. If one lever is more forward than the other the glider will steer to this side. If both levers are pulled back tha glider will accelerate and fly with a higher speed. Vice versa the XCitor will fly slower of both levers are pushed forward. Hint! The connection rope from the trim levers to the suspension arcs goes 3 times around a roll. This roll can move freely only into one direction, the other is locked. Pushing the lever forward will cause the roll to rotate. If the lever is released the glider tries to pull the lever back. But as the roll cannot turn it the rope is pulling itself tight around the roll. The more the glider pulls the tighter the rope will be! Only if the lever is pulled back by hand then the rope is “pushed” towards the roll, causing an immediate release. So the rope can slide around the locked roll. In order to make it impossible for the glider to pull the trim lever back when it is released there must always be the required friction force at the trim lever! Make yourself familiar with this system under calm conditions. Move both trim levers from their vertical start position roughly 5 cm back to you. The trailing edge will come up and the XCitor will fly faster. Try to fly wide, then steeper curves just with the trim levers. Don’t forget to push the trim levers back to their vertical position prior to landing! Then you will be not too fast, but fast enough to flare out during touch down. Hint! Extreme wing loads and an insufficient brake performance of the trim levers could cause the brake levers being pulled back by the wing from the slow to the fast position. If this happens not symmetrically the XCitor starts to fly a curve. This curve can be easily compensated during its beginning with the brake lines. But if the pilot waits until the curve gets steeper and becomes a spiral it takes much force to steer against it. Also much force is required to push the trim lever forward into its

Flughandbuch XCitor - 22 -
slow position again. In this case it would be easier if the other trim handle is pulled back from slow to fast like the other. Then the XCitor stops its spiral flight. This can be supported by the brake lines. After the G forces are normal again the trim levers can be pushed back easily into a slow position. This is just an emergency procedure in case several mistakes were done:
- The movement of the trim levers is too easy, this was not correctly checked prior to take off,
- The wing load is far beyond the permitted limits (2 G or 60° roll angle), - Too late or no reaction in case the trim lever is being pulled back by
the glider.
9.5.3 TAKE OFF, CRUISE AND LANDING: Refer to chapter 7.7, standard procedures: There you find a description of all typical procedures. Here you will find some additional remarks. If the wing pulls too much to the side during take off, the pilot has to brake the opposite side of the wing and he must steer the trike into the same direction the wing is pulling. If this isn’t sufficient the take off must be cancelled. This is much better than to try to take off anyway, maybe in a steep curve, and to land very hard immediately afterwards, or to roll over with the complete XCitor. Though this happens not easily as the centre of gravity is as low as possible and the wheel base wide. If the glider collapses already during take off (if that happens, then most likely in the outer area of the wing) then you may continue with the start. But don’t take off, use the brake lines instead to open the canopy fully again. Then give full gas and take off only with a fully opened and cantered canopy. Pilots with good skills are able to drive full circles with the glider in the air with less than 50 m in diameter. FLYING UNDER TURBULENT CONDITIONS Hint! Take care crossing your own vortexes! Though the tendency to collapse is significantly reduced due to the high wing load of the XCitor, in turbulent air you should fly it with the trim system set to slow. The stabilizing effect of the increased pressure inside the wing at higher speeds is more than counteracted by the smaller angle of attack. Use both brake lines in turbulent air and keep them slightly pulled down (20%), and keep the canopy above you and centred with active work at the brake lines. This reduces the risk of a collapse. If the canopy collapses anyway on one side, keep the direction with the brake lines (and, if necessary, fly away from any obstacles). Only if you fly stable “pump” the brake on the collapsed side to re-open the wing quicker. You may have to do it forcefully due to the high wing load. If you fly into very thermal conditions fly slowly but don’t pull the brake too much to stay away from a dynamic stall. If you leave such a thermal area pull the brake lines to avoid a forward shooting canopy and the potential risk of a front collapse. You may give more gas as well to increase the angle of attack.

Flughandbuch XCitor - 23 -
Hint! If the canopy collapses on one side brake the other side until the XCitor is flying straight forward. But better use less than too much brake input! LANDING WITH ENGINE SHUT OFF In principle landing with the engine shut off is the same as if it is still running – always facing the wind. But the speed should be kept up high enough for a proper flaring. So hold the brake lines up until you are roughly 2 m high. You should wind them 1x around your hand to have more brake travel. In 2m altitude start to apply brake continuously. Just at touch down the brake lines should be completely pulled down. If due to wind the canopy doesn’t fall down behind the trike you may release the brake for a moment, wind them 1x more around the hand and pull it again. You may repeat this procedure until the glider comes down. If the canopy pulls too much to the side the trike may finally roll over. Therefore keep the canopy centered as good as possible behind the trike. If the wind is quite strong at may help to get the canopy down by not braking too much with the front wheel. Then the trike may roll back with the wind a little bit. LANDING WITH THE HELP OF THE ENGINE As the wing load of the XCitor is quite high compared with a backpack motor, the XWing should not be flown too slow prior to touch down. We recommend to keep the brake wide open until you reach roughly 2 m, and then pull it continuously down until you touch the ground. At this time the brake should be fully applied. Please make sure that the brake line is perfectly adjusted to your XCitor so you don’t loose brake travel when landing. You may use the engine to adjust the descent rate. Control altitude and speed with brake lines and gas. Caution! Accident risk! Being close to the ground watch your air speed carefully, don’t fly too slow: Always much faster than your stall speed!
9.5.4 RAPID DESCENTS There are many situations when you need to lose altitude rapidly to avoid potential dangers e.g. pulled up from a cumulus cloud, an approaching cold front, a storm front etc. Below we explain various ways to make a rapid descent which can be carried out safely with the XCitor if the pilot has the necessary knowledge and if they are correctly executed. Hint! With all rapid descent methods, the trim system should be completely set to slow and the rpm's reduced to idle. All of the manoeuvres are more dynamic than when you fly with a backpack system or even without a motor due too the high wing load. SPIRAL DIVES
Flughandbuch XCitor - 24 -
The spiral dive is the classic method for making a rapid descent with a sink rate of up to 14 m/s in normal flight situations, and up to 20 m/s in extreme flight situations. It is particularly suitable where there is a high ascent rate and little wind. Spiral dives with a sink rate above 14 m/s are not tested on certification; this exceeds the manufacturer's limits. STARTING THE MANOEUVRE Whilst flying at full speed, start to apply the brake on one side. This will steer the paraglider into a turn with a strong bank. You can tell that you are in a spiral dive if you are being pressed hard against your seat (high centrifugal force). When you are in a spiral dive, you should steer very carefully because the paraglider will react immediately. Banking and rate of turn increase if braking efficiency increases. Look down before and during a spiral dive so that you always know how far you are away from the ground! RECOVERY Recover from the spiral dive slowly and carefully. If you release the brakes too quickly, the increased speed can cause the wing to climb, become unsettled, or partly collapse. Due to the reduced possibility when flying in a trike to use weight-shifting, you must always recover actively from the spiral dive with the outside brake. Caution! Accident risk!
• Very high turn speeds can be reached with spiral dives, with high G-loads. So be careful when you try this!
• Do not continue the spiral dive too long; you could lose consciousness.
• Never attempt this with less than 150 to 200 meters ground-clearance.
• Spiral dives combined with other methods like B-stall or "big ears" are not
possible with the XCitor without any changes and are not allowed at all.
9.5.5 NORMAL FLIGHT The best glide ratio is achieved in calm wind conditions without using the brakes, and the trim system set to slow (vertical levers). The smallest rate of descent is achieved if 20 to 30% brake is applied, at the slowest setting of the trim system (levers completely forward). If more brake is applied the sink rate will increase again. This is helpful during the final approach. With flat turns in thermal conditions, both brakes should be applied and the radius of the circle corrected using the outer brake. As we said, the technique described above is suitable for flat turns. However, to enter a thermal area or to achieve greater banking angles, brake on one side only. Even though the XWing has no negative tendency, this should always be done carefully. The steering of the XWing is still possible using the trim system if you are unable to steer using the brake lines. In the test flights, we were not able to force a stable deep stall.
9.5.6 INSTRUCTIONS FOR EXTREME FLYING AND

Flughandbuch XCitor - 25 -
DANGEROUS SITUATIONS DANGEROUS SITUATIONS Extreme flying with a motor trike and full gas are extremely dangerous and therefore cannot be tested. They must be avoided at all costs. Problems do not arise during a normal flight. However, pilot error during the flight or extreme wind conditions may force the wing into an unusual flying position. This may require the pilot to make corrections during flight to which he may not be used to. In this section we explain how to correct extreme situations if they do arise. The manoeuvres described below are based on the legal -take-off weight as described in the technical data section. Hint! These instructions do not replace safety training or specialised literature. We recommend that you undertake special safety training which will prepare you for extreme situations. Always keep within the recommended limits. Do not perform aerobatics or extreme flying manoeuvres. This will prevent accidents caused by over-loading the glider. DEEP STALL Various things can cause a paraglider to deep stall, e.g. shrinkage of the C and D lines as a result of dampness or flying in the rain. The airflow from the front of the glider gradually breaks away towards the back and the canopy sags, with the glider remaining upright. Paragliders are particularly susceptible to deep stalls if the wing loading is too low. C and D lines which are too short, for example, can often be recognised because launch behaviour deteriorates. You can recognise a deep stall because there is less flight noise than normal. In addition, your sink rate will increase (6-8 m/s). Recovery The XWing couldn’t be deep-stalled at all during our test flights. The usual recovery procedure would be to decrease the angle of attack be shortening the A- nd B-lines. But this would require huge forces at the XCitor. Better would be to decrease the angle of attack be pulling both trim levers back. Caution! Accident risk! A wet canopy or flying in the rain increases the weight of the canopy and may cause a stall. You are not allowed to fly under these circumstances. FRONT STALL Strong turbulence can cause part or all of the leading edge of the glider to fold or tuck under. Normally the XWing will immediately recover into its normal flight position. RECOVERY If the XWing does not immediately recover from a frontal tuck, brake quickly and

Flughandbuch XCitor - 26 -
strongly with both steering-lines (brake lines) to re-inflate the glider. Any weather condition which causes a front stall is much outside the allowed and safe weather conditions. If you get into such weather land as soon as possible and continue not before the weather got quieter! ASYMMETRICAL TUCKS In turbulent air, one side of the paraglider may collapse. Some of the cells deflate and the paraglider may collapse or spin. During test flights the XWing self-recovered on release of the A-risers which were pulled down to initiate the collapse. It turned less than 90° and stabilised itself. Recovery
• Counter-brake slightly on the side of the paraglider that is still inflated to stop it turning away and to stabilise it.
• Counter-brake just enough that the paraglider continues to fly straight
ahead.
• If the wing has not yet self-recovered, pump with the brake on the side that has collapsed in order to open it, making use of the full brake travel.
Caution! Accident risk! Counter-braking too strongly can result in a stall on the inflated side. FULL STALL A full stall could occur if full brake is applied during the flight. The paraglider slows down, surges backwards and deflates. If the brakes are held down, the canopy comes up over the pilot again. The result is an almost vertical descent with a sink rate of about 8-12m/s. Recovery Fully release the brakes within 3 seconds. If you release the brakes too slowly, the paraglider may spin. The spin stops automatically when the brakes are released completely. Caution! Accident risk! If the canopy has gone backwards, you must hold the brakes down, or the canopy can surge forward and, in an extreme case, end up underneath the pilot. Hold the brakes down until the canopy is above you again. SPIN Spins occur when one side of the canopy stalls. The other side still continues to fly forward, while the stalled side turns in the opposite direction. RECOVERY Quickly release the brakes. Hint! If the spin does not stop: 1. Check whether you have released the brakes fully. 2. Is the spin still doesn’t stop, use your recovery system.

Flughandbuch XCitor - 27 -
Caution! Accident risk! In strong turbulence, always keep far enough away from rock faces and other obstacles. You need time and enough height to recover from extreme situations.
9.6 MAINTENANCE AND CARE
9.6.1 TRANSPORTING AND STORING THE PARAGLIDER TRANSPORTATION Always transport your paragliding equipment in the special quick pack bag and/or in the thin walled Nylon protection bag. STORAGE Store all of your paragliding equipment away from UV light in a dry room which is well-aired and has a constant temperature. Open the backpack and/or inner bag and the belt a little so that air can get in. Hint! Sunlight, warmth and humidity can damage your equipment. Temperatures lower than -10°C and higher than +50°C can make the wing unfit to fly. The manufacturer's warranty will not applicable if the paraglider is not stored at the correct temperature. Never store a paraglider which was packed up while still wet. If the paraglider gets wet, spread it out so that air reaches all parts of it. Since the fibres absorb water, it can take several days until it is completely dry. If a paraglider is stored wet, it can become unsuitable for flying after a short time.
9.6.2 CHECKING THE LINES Measuring the length of the lines is part of the regular inspection. The lines must be measured with a load of 5kg to get comparable results. Have your paraglider checked every two years by the manufacturer. During the annual inspection of the XCitor trike the inspector may decide that the wing must be inspected even before the 2 years are over depending on the status of the glider. Hint! We recommend an inspection every 50 to 100 flight hours or once a year.

Flughandbuch XCitor - 28 -
9.6.3 CLEANING AND REPAIRING THE PARAGLIDER Cleaning Only clean the paraglider with a soft sponge and clean water. Harsh chemical substances, high-pressure cleaners or steamers will destroy the surface layer. Clean the paraglider only if it is absolutely necessary. Repairs Repairs should only be carried out by the manufacturer or a specialist recommended by the manufacturer. You can repair small tears in the wing yourself (not at the seams) using the material recommended by the manufacturer, as long as they are in areas which do not bear heavy loads and they are not bigger than 3 cm. Hint! Always replace lines that are damaged. If you need to replace damaged or worn-out parts, use only original parts or parts that have been authorised by the manufacturer.
9.7 INSPECTIONS GENERAL Failure to observe the inspection periods will invalidate the warranty and certification. A properly completed logbook will help you to comply with the periods. INSPECTION PERIODS The XWing glider must be inspected as follows: A) Gliders used by schools and commercially used gliders must be inspected (as for the 2-yearly check) every 12 months from the purchase date. B) Gliders for personal use (not used commercially) must be inspected at least every 2 years from the purchase date. C) The paraglider must be inspected after 150 hours of use (including ground handling) if this occurs prior to the periods in A and B above. D) During the annual check of the complete XCitor the inspector may decide that the XWing must be by the manufacturer even if the 2 years aren’t over. Ground handling time must be at least doubled when working out the total hours of use because of the increased wear and tear on the glider. VALIDITY OF INSPECTION If Fresh Breeze is to accept guaranty and warranty claims, all inspections must be carried out by Fresh Breeze, by SWING, or another inspection agent authorised by Fresh Breeze. The documentation and the result of the inspection must be clearly identifiable by the inspector (date and place / name of inspector) and be entered near the glider information/certification sticker.

Flughandbuch XCitor - 29 -
9.7.1 LINE-LAYOUT XWING: Use this template in case you have to order spare lines.

Flughandbuch XCitor - 30 -
9.8 INTERNET – PRODUCT INFORMATION AND SAFETY NOTES
www.fresh-breeze.de Fresh Breeze sends relevant product and safety information by e-mail to all registered customers. If you would like to receive this, please register your name by sending an email to us: [email protected] In order to put you onto our mailing list we need your email-address when you buy an XCitor trike. We will not provide your e-mail address to any third parties. There are also data and safety information on the DULV website: www.dulv.de.

Flughandbuch XCitor - 31 -
10 PERFORMANCE
10.1 PERFORMANCE DATA The following figures were achieved in flight tests. They are based on a good general shape of the trike, the wing and the engine and that the pilot has an average skills. They are valid under standard conditions (mean sea level, standard pressure, 15°C, no wind, maximum take off weight 365 kg, even runway with short grass in a good shape). Higher altitude, higher temperatures and lower air pressure reduce those performance figures. AIR SPEED Minimum speed 30 km/h Manoeuvre speed 65 km/h Permitted maximum speed 73 km/h TAKE-OFF DISTANCE Take off distance 20-150 m (depends on load
and wind speed) Take off distance about a 15m obstacle 200m LANDING DISTANCE Landing distance 10 - 30 m with brakes Landing distance about a 15m obstacle 150 m Climb rate single 4,0 m/sec tandem 2,5 m/sec ADDITIONAL DATA: RANGE The range is depending on the fuel consumption, which is much higher at higher air speeds. The best consumption can be achieved flying slightly faster than the best gliding speed. This gives a range of ca. 200 km at an air speed of 65 km/h. CROSS WIND The maximum allowed cross wind component during take off and landing is 8 km/h. NOISE The XCitor fulfills the German noise requirements for ultralight pararikes which means that it is quieter than 60 dB(A) flying in 150 m altitude. TIRE PRESSURE Rear wheels 2,0Bar Front wheel 1,5 Bar MAXIMUM ALTITUDE The maximum altitude depends on the load and temperature. It is defined by a climb rate smaller than 0.5 m/sec. This height is roughly 3000 m. SCREW TIGHTENING TORQUE Propeller HTC CCQW-3B-166,5-CG 4-Blade 24 Nm for M8

Flughandbuch XCitor - 32 -
11 WEIGHT AND BALANCE
11.1 PROCEDURE The trike must be ready to fly with all equipment as described in the equipment list, but with no fuel on board, no pilot and no payload. If there is fuel left in the tank it must be taken into account within the calculation. As displayed in the picture the trike must be standing on three scales horizontally. The upper side of the engine mount is used as a horizontal reference. Then the C.G. calculation can be done as following: Weight at front wheel Fv Weight at rear wheel on the right side Fhr Weight at rear wheel on the left side Flr Distance between glider attachment point and front wheel
Lv
Distance between glider attachment point and rear wheels (only longitudinal component)
Lh
Distance between CG and glider attachment point (positive, if CG is behind the attachment point)
∆s
∆s can be calculated as following: This distance must be smaller than ± 50 mm. Otherwise the glider attachment points must be relocated until the XCitor will hang nearly horizontally. This can be achieved by loosing the 2 M6-screws on each side, moving the clamps until they have the correct position and tightening the screws again. The correct position must be confirmed with another measurement of the wheel loads and / or with a hang test.
vvhrhlh
hrhlv
FL)FF(*L
FFFs
−+++=∆

Flughandbuch XCitor - 33 -
12 WEIGHT AND BALANCE SHEET Type: XCitor -No.: Call sign: _________ Production date:
Loads: Torques:
Fv _______kg x Lv __
Fhr ______ kg x Lh __
Flr ______ kg x Lh __
kgmm
kgmm
kgmm
vvhrhlh
hrhlv
FL)FF(*L
FFFs
−+++
=∆
This distance must be smaller than ± 50 mm! The empty weight is measured including equipment according to the equipment list from ________________ including cooling agent and _______ l fuel.
Location, Date Stamp/ Signature of Inspector

Flughandbuch XCitor - 34 -
13 EQUIPMENT LIST
Type: XCitor Prod.-No: ___________
Engine Hirth 3503, No.:
1. Speed indicator,
2. Altimeter
3. Compass
4. Radio
5. _______________
6. _______________
7. _______________
8. _______________
9. _______________
10. _______________
11. _______________
12. _______________
13. _______________
14. _______________
15. _______________
modify list if required
Call Sign.:______
Propeller:_______
Remarks:_
Location, date
Stamp, Signature

Flughandbuch XCitor - 35 -
14 MAINTANANCE OVERVIEW Operation time [h]
Check Date Inspector Remarks
25 25-h-Check 50 25-h-Check 75 25-h-Check 100 100-h-Check 125 25-h-Check 150 25-h-Check 175 25-h-Check 200 100-h-Check 225 25-h-Check 250 25-h-Check 275 25-h-Check 300 100-h-Check 325 25-h-Check 350 25-h-Check 375 25-h-Check 400 100-h-Check 425 25-h-Check 450 25-h-Check 475 25-h-Check 500 100-h-Check 525 25-h-Check 550 25-h-Check 575 25-h-Check 600 100-h-Check 625 25-h-Check 650 25-h-Check 675 25-h-Check 700 100-h-Check 725 25-h-Check 750 25-h-Check 775 25-h-Check 800 100-h-Check 825 25-h-Check 850 25-h-Check 875 25-h-Check 900 100-h-Check 925 25-h-Check 950 25-h-Check 975 25-h-Check 1000 100-h-Check

Flughandbuch XCitor - 36 -
15 REPAIRS Every repair exceeding the above described maintenance procedures should be carried out only by Fresh Breeze or by people authorized by Fresh Breeze. Otherwise there will be no warranty.
16 LOCATION OF SIGNBOARDS AND FRAME NUMBER
The Fresh Breeze-XCitor signboard is located close to the frame number on the rear side of the main frame close to the fork. Unit number of the rocket and the recovery chute are on the recovery system itself. The expiry date of the recovery system is there as well.

Flughandbuch XCitor - 37 -
17 FOR YOUR OWN NOTES