
Manual for Training of Trainers - JICA - 国際協力機構 for Training of Trainers Effective...
161
Manual for Training of Trainers Effective Training Management and Training Delivery Techniques Training of Trainers Course for Sierra Leone and Liberia Civil Service Training Centre, Ghana February, 2013 This cover page will be replaced by designed one.
-
Upload
vuongkhuong -
Category
Documents
-
view
233 -
download
1
Transcript of Manual for Training of Trainers - JICA - 国際協力機構 for Training of Trainers Effective...
Manual for Training of Trainers
Effective Training Management and Training Delivery Techniques
Training of Trainers Course for Sierra Leone and Liberia
Civil Service Training Centre, Ghana
February, 2013
This cover page will be
replaced by designed one.
2
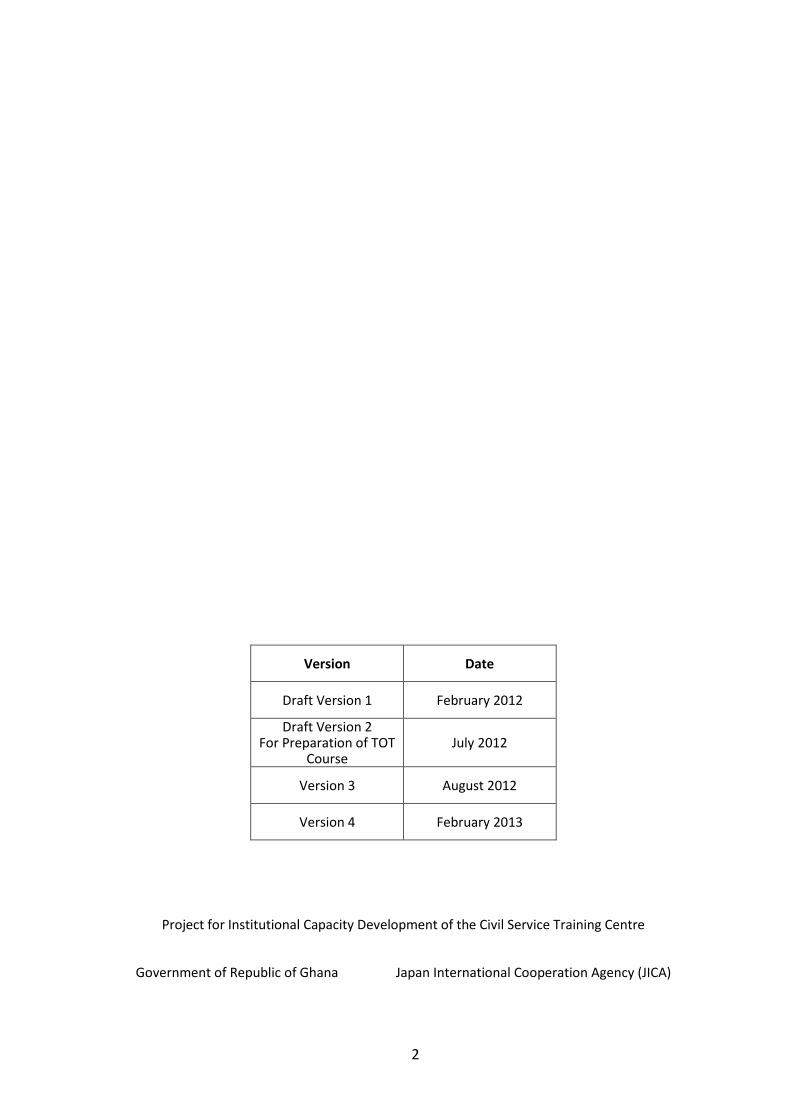
Version Date
Draft Version 1 February 2012
Draft Version 2 For Preparation of TOT
Course July 2012
Version 3 August 2012
Version 4 February 2013
Project for Institutional Capacity Development of the Civil Service Training Centre
Government of Republic of Ghana Japan International Cooperation Agency (JICA)

3
Table of Contents
List of Appendices .................................................................................................................................. 5
Introduction ............................................................................................................................................. 6
Module-1 Human Resource Development (HRD) Framework ...................................................... 8
1.1 HRD and HRM ....................................................................................................................... 8
1.2 Training and Human Resource Development (HRD) ......................................................... 10
1.3 HRD Paradigm .................................................................................................................... 11
1.4 Competencies for HRD Profession ..................................................................................... 13
1.5 Summary ............................................................................................................................. 15
Module-2 ADDIE Process Model ................................................................................................. 16
2.1 What is ADDIE Process Model? ...................................................................................... 16
2.2 What is the Benefit of ADDIE? ........................................................................................ 17
2.3 Phase-1: Training Needs Analysis (TNA) Phase ............................................................ 18
2.4 Phase-2: Training Design Phase ..................................................................................... 20
2.5 Phase-3: Training Resource Development Phase .......................................................... 20
2.6 Phase-4: Training Implementation Phase ....................................................................... 21
2.7 Phase-5: Training Evaluation Phase ............................................................................... 21
2.8 Summary.......................................................................................................................... 22
Module-3 Phase-1: Training Needs Analysis .............................................................................. 24
3.1 Step-1: Performance Gap Identification .......................................................................... 25
3.2 Step-2: Justification of Training ....................................................................................... 28
3.3 Step-3: Target Analysis ................................................................................................... 29
3.4 Step-4: Training Outline Setting ...................................................................................... 29
3.5 Step-5: Cost Analysis ...................................................................................................... 30
3.6 Step-6: Proposal Summary ............................................................................................. 30
3.7 TNA Methods ................................................................................................................... 31
3.8 Summary.......................................................................................................................... 35
Module-4 Instructional Design Basics.......................................................................................... 37
4.1 Andragogy ....................................................................................................................... 38
4.2 Experiential Learning Model ............................................................................................ 39
4.3 PIE Rule ........................................................................................................................... 41
4.4 ARCS Model .................................................................................................................... 43
4.5 Other Tips ........................................................................................................................ 45
4.6 Summary.......................................................................................................................... 48
Module-5 Phase-2: Training Programme Design -Curriculum Design ..................................... 51
5.1 What is Training Design? .................................................................................................... 52
5.2 Step-1: Set Learning Objectives ......................................................................................... 52
5.3 Step-2: Organise Learning Objectives ................................................................................ 55
5.4 Step-3: Design Motivation ................................................................................................... 57
5.5 Summary ............................................................................................................................. 62
Module-6 Phase-2: Training Program Design --Lesson Plan Development............................. 65
6.1 What is Lesson Plan? .......................................................................................................... 66
6.2 Understanding Training Course and Participants ............................................................... 66
6.3 Setting Session Objectives .................................................................................................. 68
6.4 Listing Up Learning Topics .................................................................................................. 69
4
6.5 Determining Participant’s Assignments............................................................................... 69
6.6 Selecting Teaching Methods ............................................................................................... 70
6.7 Determining Assessment Strategy ...................................................................................... 71
6.8 Planning Time Line .............................................................................................................. 72
6.9 Listing Up Necessary Items and Environments .................................................................. 75
6.10 Filling Out Lesson Plan Form .......................................................................................... 75
6.11 Summarizing Programme Design ................................................................................... 76
6.12 Summary.......................................................................................................................... 76
Module-7 Phase-3: Training Resource Development ................................................................. 78
7.1 Types of Learning Resources ............................................................................................. 79
7.2 Steps for Learner’s Guide Development ............................................................................. 81
7.3 Effective PowerPoint Slides ................................................................................................ 94
7.4 How to Develop Effective PowerPoint Slides ...................................................................... 97
7.5 Effective Support Materials ............................................................................................... 105
7.6 Other Resources for Presentation ..................................................................................... 111
7.7 Summary ........................................................................................................................... 114
Module-8 Phase-4: Training Implementation --Training Delivery .............................................. 116
8.1 Creating a Positive Learning Environment ........................................................................ 116
8.2 Classroom Set Up ............................................................................................................. 118
8.3 Check List for The Course Delivery Administration .......................................................... 120
8.4 Pre-Session Assignments ................................................................................................. 121
8.5 Summary ........................................................................................................................... 122
Module-9 Phase-4: Training Implementation --Classroom Facilitation ..................................... 124
9.1 Facilitation.......................................................................................................................... 125
9.2 Assessing Participants ...................................................................................................... 126
9.3 Basic Presentation and Facilitation Skills ......................................................................... 128
9.4 Maximizing Participation .................................................................................................... 130
9.5 Questioning Techniques .................................................................................................... 132
9.6 Effective Use of Icebreakers and Energizers .................................................................... 134
9.7 Effective Use of Exercises ................................................................................................. 136
9.8 Wrap up ............................................................................................................................. 137
9.9 Tips for Facilitation ............................................................................................................ 138
9.10 Competencies for Facilitators ........................................................................................ 141
9.11 Summary........................................................................................................................ 143
Module-10 Phase-5: Training Evaluation .................................................................................... 147
10.1 Objectives of Evaluation ................................................................................................ 148
10.2 Evaluation Methods ....................................................................................................... 148
10.3 How to Evaluate Participants’ Readiness (Level-0) ...................................................... 150
10.4 How to Evaluate Participants’ Reaction (Level-1) ......................................................... 151
10.5 How to Evaluate Participants’ Learning (level-2) .......................................................... 154
10.6 How to Evaluate Participants’ Behaviour (Level-3) ....................................................... 156
10.7 How to Evaluate The Results (Level-4) ......................................................................... 157
10.8 Accept Feedback from Participants ............................................................................... 158
10.9 Contribute to Evaluation Meeting .................................................................................. 159
10.10 Summary........................................................................................................................ 159
5
List of Appendices
Module-3 Phase-1: Training Needs Analysis (TNA)
Appendix 3-1: Training Outline Setting Forms Appendix 3-2: Sample Training Proposal Appendix 3-3: How to Develop Data Collection Table Appendix 3-4: How to Develop Questionnaire Appendix 3-5: How to Organise Quantitative Data
Module-5 Phase-2: Training Programme Design –Curriculum Design
Appendix 5-1: List of Action Verbs Appendix 5-2: Curriculum Example
Module-7 Phase-3: Training Resource Development
Appendix 7-1: EL/QPI Course Learner’s Workbook Appendix 7-2: EL/QPI Course Facilitator’s Guide Appendix 7-3: Sample of Standard Formant of Leaner’s Guide Appendix 7-4: Activity Catalogue Appendix 7-5: Case Study Samples
Module-8 Phase-4: Training Implementation –Training Delivery
Appendix 8-1: Terms of Reference (TOR) of Administrative Support Staff (EL/QPI) Appendix 8-2: Terms of Reference (TOR) of Course Coordinator (EL/QPI) Appendix 8-3: Session Preparation Check Sheet Appendix 8-4: Classroom Check List Appendix 8-5: Instructions for facilitators (EL/QPI) Appendix 8-6: Pre-Course Evaluation Form (EL/QPI) Appendix 8-7: Action Plan Form (EL/QPI)
Module-9 Phase-4 Training Implementation –Classroom Facilitation Appendix 9-1: List of Icebreakers Appendix 9-2: List of Energizers Appendix 9-3: Wrap Up Examples
Module-10 Phase-5: Training Evaluation
Appendix 10-1: In-Course Evaluation Form (EL/QPI) Appendix 10-2: End-Course Evaluation Form (EL/QPI) Appendix 10-3: Facilitator’s Report Form (EL/QPI) Appendix 10-4: Pre and Post Questionnaire Samples Appendix 10-5: Monitoring Sheet for Action Plan (EL/QPI) Appendix 10-6: Interview Guideline for Impact Survey (EL/QPI)
6
Introduction
This manual provides Facilitators of the Ethical Leadership for Quality Productivity
Improvement Course with fundamental training skills and know-how for an effective course
delivery. It explains basics of Instructional Design (ID) as systematic training management
and techniques of training delivery that are common to any training course. This is
especially important for new facilitators to obtain basic skills for preparing and facilitating
sessions of the course as well as new training mangers for managing training courses. This
is also useful for experienced facilitators and managers because this part will enable them to
review the experiences of facilitation and management in a systematic manner and improve
their skills.
It includes many appendices to support application of knowledge to actual context.

7
Effective Training Management and Training Delivery Techniques
List of modules
Module-1: Human Resource Development (HRD) Framework
Module-2: ADDIE Process Model
Module-3: Phase-1: Training Needs Analysis
Module-4: Instructional Design Basics
Module-5: Phse-2: Training Programme Design -Curriculum Design
Module-6: Phse-2: Training Programme Design -Lesson Plan Development
Module-7: Phase-3: Training Resource Development
Module-8: Phase-4: Training Implementation -Training Delivery
Module-9: Phase-4: Training Implementation -Classroom Facilitation
Module-10: Phase-5: Training Evaluation
This manual provides facilitators and training managers with information on how to
develop, deliver and manage training activities in an effective manner, using the
instructional design approaches. The modules are in accordance with the ADDIE
Process, i.e. 1) Training Needs Analysis, 2) Design, 3) Resource Development, 4)
Implementation and 5) Evaluation with introductory module of Human Resource
Development framework
You will learn what training is in reference to the HRD framework, the outline of
ADDIE Process Model and how to apply it to actual training programmes in each
phase of the ADDIE process. These are the common knowledge and skills required
for quality training. By learning these, you will be able to manage training as well
as design and facilitate your session(s) in an effective manner based on the ID
approaches.
Learning point
8
Module-1 Human Resource Development (HRD) Framework
Module-1 Human Resource Development (HRD) Framework
Module-2 ADDIE Process Model
Module-3 Phase-1: Training Needs Analysis (TNA)
Module-4 Instructional Design Basics
Module-5 Phase-2: Training Programme Design –Curriculum Design
Module-6 Phase-2: Training Programme Design –Lesson Plan Development
Module-7 Phase-3: Training Resource Development
Module-8 Phase-4: Training Implementation –Training Delivery
Module-9 Phase-4 Training Implementation –Classroom Facilitation
Module-10 Phase-5: Training Evaluation
List of contents of this module:
1.1 HRD and HRM
1.2 Training and Human Resource Development (HRD)
1.3 HRD Paradigm
1.4 for HRD Profession
1.5 Summary
1.1 HRD and HRM
HRM is widely understood as a process of managing human talents to achieve organisation’s
objective where as, HRD is understood as a series of organised activities conducted within a
You are here
In this module, you will be introduced to the Human Resource Development (HRD)
framework within a bigger framework of Human Resource Management (HRM), based
on which training and development activities are developed. Similarly this module will
explain training within the context of HRD to enable you understand that training as a
single factor does not lead to positive results but also requires a favourable
environment that supports the training towards a positive impact on improving
organizational performance.
At the end of this module, you will be able to
Explain what training is within the context of HRD and HRM
List key concepts for HRD paradigm shift
Learning Point of This Module
9
specified time and designed to produce behavioural change. The table below summarizes a
comparison between HRM and HRD.
Table: Comparison of HRM and HRD HRM HRD
Definition: HRM is a process of managing human talents to achieve organisation’s objective
Definition: HRD is a series of organised activities conducted within a specified time and designed to produce behavioural change
Process: 1. Recruitment and selection 2. Compensation and benefits 3. Labour and industrial relations 4. Safety & health management
Activities: 1. Training and development 2. Performance appraisals management 3. Career planning and development 4. Change management
Source: “Evolving terms of human resource management and development “, Hashida A., 2009.
HRD supports HRM
There are two ways of explaining the relationship between HRD and HRM. One is that HRD is
a component of HRM and HRD supports HRM, which was proposed by Guest, 1987. HRD consists
of four components, namely; 1) training and development, 2) performance appraisals and
management, 3) career planning and development and 4) change management. These four
components are included in the HRM framework. This is described as the “HRM’s Wheel” as
shown below.
Figure: HRM’s Wheel
Source: “Evolving terms of human resource management and development “, Hashida A., 2009.
HRD supplements HRM
However, another explanation describes HRD as supplementing HRM rather than supporting it.
10
McGoldrick & Stewart (1996) posited that HRM and HRD are parallel pathways of HRM and HRD by
saying that HRM has the function of recruitment, selection, motivating and rewarding. Whilst,
HRD’s function is to provide learning, education and training to the human resources selected
and recruited. This concept is described in the chart below .
1.2 Training and Human Resource Development (HRD)
As stated earlier, HRD is a series of organised activities conducted within a specified time and
designed to produce behavioural change. HRD is defined and interpreted in many ways by many
scholars and academicians. Swanson and Holten (2001) defined HRD as “A process for developing
and unleashing human experience through organisation development and personal training and
development for the purpose of improving performance.” Mclean & Mclean (2001) defined HRD
as “Human resource development is any process or activity that, either initially or over the long
term, has the potential to develop adults’ work-based knowledge, expertise, productivity, and
satisfaction, whether for personal or group/team gain, or for the benefit of an organisation,
community, nation or ultimately, the whole community.” M. J. Arul (1989) defined HRD as “HRD is
a set of inter-related activities, by which human potentialities are assessed, selectively upgraded
and appropriately deployed for achievement of envisioned goals that foster human dignity.” The
American Society for Training and Development (ASTD) simply defines HRD as "HRD is the
integrated use of training and development, organisational development, and career
development to improve individual, group and organisational effectiveness." In all these
different definitions, training is identified as an important element of HRD. ASTD identified 3
elements of HRD namely;
1) Training and development
2) Organisational development
3) Career development
Training and Development
Garavan, Costine, and Heraty (1995) identified that training and development (T&D) include
three main activities, namely 1) training, 2) education, and 3) development. These activities are
often considered to be synonymous. However, to practitioners, they encompass three separate,
although interrelated, activities as outlined below:
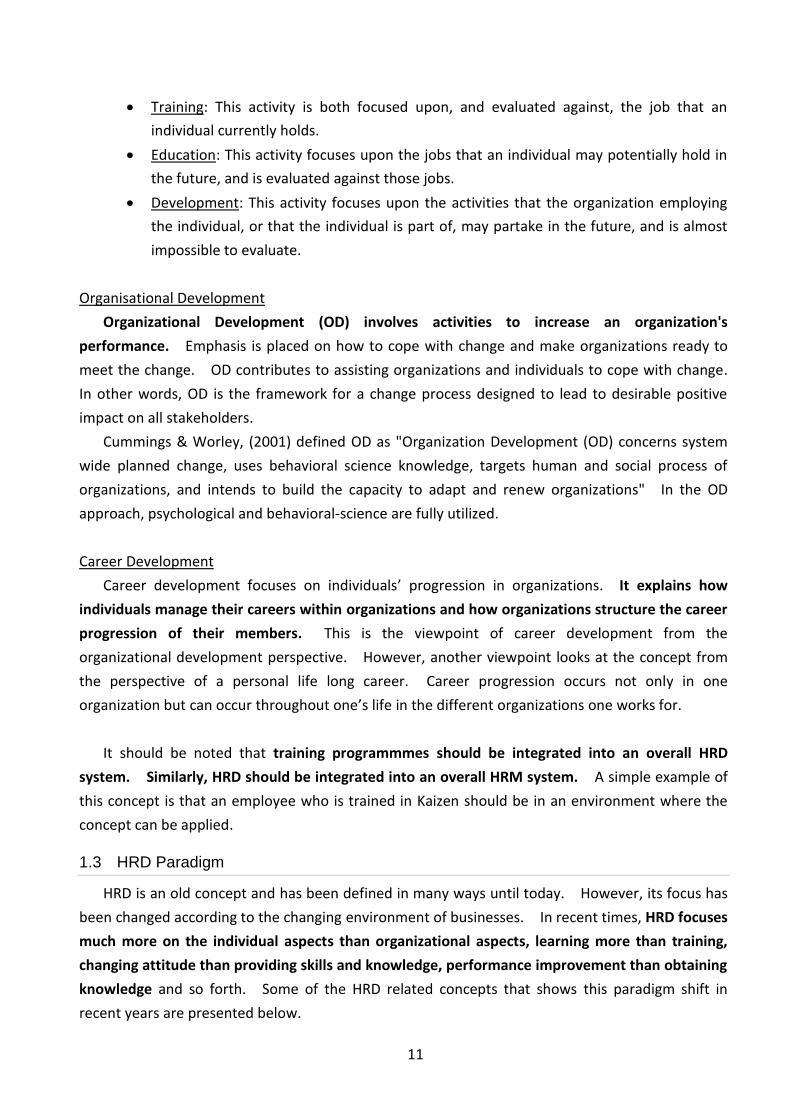
11
Training: This activity is both focused upon, and evaluated against, the job that an
individual currently holds.
Education: This activity focuses upon the jobs that an individual may potentially hold in
the future, and is evaluated against those jobs.
Development: This activity focuses upon the activities that the organization employing
the individual, or that the individual is part of, may partake in the future, and is almost
impossible to evaluate.
Organisational Development
Organizational Development (OD) involves activities to increase an organization's
performance. Emphasis is placed on how to cope with change and make organizations ready to
meet the change. OD contributes to assisting organizations and individuals to cope with change.
In other words, OD is the framework for a change process designed to lead to desirable positive
impact on all stakeholders.
Cummings & Worley, (2001) defined OD as "Organization Development (OD) concerns system
wide planned change, uses behavioral science knowledge, targets human and social process of
organizations, and intends to build the capacity to adapt and renew organizations" In the OD
approach, psychological and behavioral-science are fully utilized.
Career Development
Career development focuses on individuals’ progression in organizations. It explains how
individuals manage their careers within organizations and how organizations structure the career
progression of their members. This is the viewpoint of career development from the
organizational development perspective. However, another viewpoint looks at the concept from
the perspective of a personal life long career. Career progression occurs not only in one
organization but can occur throughout one’s life in the different organizations one works for.
It should be noted that training programmmes should be integrated into an overall HRD
system. Similarly, HRD should be integrated into an overall HRM system. A simple example of
this concept is that an employee who is trained in Kaizen should be in an environment where the
concept can be applied.
1.3 HRD Paradigm
HRD is an old concept and has been defined in many ways until today. However, its focus has
been changed according to the changing environment of businesses. In recent times, HRD focuses
much more on the individual aspects than organizational aspects, learning more than training,
changing attitude than providing skills and knowledge, performance improvement than obtaining
knowledge and so forth. Some of the HRD related concepts that shows this paradigm shift in
recent years are presented below.
12
Human Capital Management and Development
Human Capital Management and Development was advocated as an advanced concept of HRM
and HRD in the late 1950s and has become popular since early 2000s. There are two key
principles in it. The first principles states people are assets whose value can be enhanced
through investment. This means the organizational value can be enhanced by increasing the
value of members of the organization. The second principle states that organization’s human
capital policies must be aligned to support the organization’s shared vision. This paradigm shift
from employees have been seen as costs to be cut to assets to be valued. The value of the
organization is dependent on the value of its people.
From Training to Learning
Finland achieved a top score in the Programme for International Student Assessment in 2006.
Finland reformed its education system in 1994 by changing the essence of education from teaching
to learning. It focuses on educating children to make them think and learn themselves for an
independent personality. This competency contributes to shaping careers in a changing society.
Similarly, the training field in industries also went through this paradigm shift from training to
learning. Due to the fast changing environment of businesses, companies/organizations cannot
obtain the necessary competencies by simply providing training to its employees through transfer
of knowledge, skills and attitude on the spot. Rather, companies/organizations need to create
environments where employees can learn anytime when the need arises. In a sophisticated and
fast changing society, companies/organizations cannot afford to plan and conduct appropriate
training to all the employees who have different roles and background. Contrary, employees take
initiative to acquire the necessary competencies while the company/organization supports and
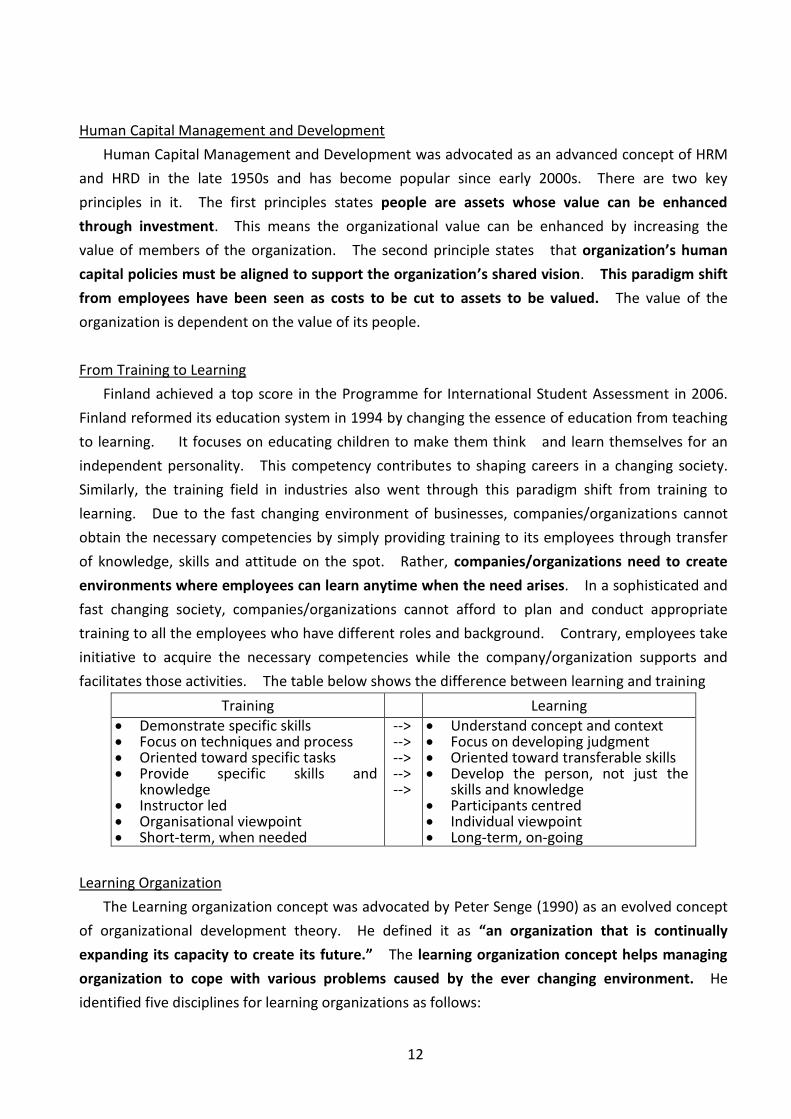
facilitates those activities. The table below shows the difference between learning and training
Training Learning Demonstrate specific skills Focus on techniques and process Oriented toward specific tasks Provide specific skills and
knowledge Instructor led Organisational viewpoint Short-term, when needed
--> --> --> --> -->
Understand concept and context Focus on developing judgment Oriented toward transferable skills Develop the person, not just the
skills and knowledge Participants centred Individual viewpoint Long-term, on-going
Learning Organization
The Learning organization concept was advocated by Peter Senge (1990) as an evolved concept
of organizational development theory. He defined it as “an organization that is continually
expanding its capacity to create its future.” The learning organization concept helps managing
organization to cope with various problems caused by the ever changing environment. He
identified five disciplines for learning organizations as follows:
13
Personal mastery --- It is the discipline of continually clarifying and deepening our
personal vision, of focusing our energies, of developing patience, and of seeing reality
objectively. Developing such personal mastery in every member in the organization is
essential.
Mental models --- It is deeply ingrained assumptions, generalizations, or even pictures
of images that influence how we understand the world and how we take action.
Challenging or clarifying such mental models and encouraging people to reframe them is
essential.
Building shared vision --- It is a practice of unearthing shared pictures of the future that
foster genuine commitment and enrollment rather than compliance.
Team learning --- It starts with dialogue, the capacity of members of a team to suspend
assumptions and enter into genuine thinking together.
Systems thinking --- It is a framework for seeing inter-relationships that underlie
complex situations and interactions rather than simplistic linear cause-effect chains. This
should contribute to integrating the four disciplines above for effective implementation
of a learning organization.
Workplace Learning (WPL)
How to facilitate learning within workplaces (that is learning at and through work) has become a
central concern in the HRD professionals recently. This is because companies and organizations
are more conscious about making clear the direct impact of training on work performance.
Traditionally, training was divided into two categories, namely On the Job and Off the Job Training.
WPL facilitates Off the job training in workplaces by making direct linkages between training and
the each one’s job so that On and Off the job are integrated. This impacts on job performance at
the workplace. In addition, WPL involves various organizational activities to support the job such
as mentoring, coaching, staff communication, knowledge management, etc. Rothwell & Sredl
(2000) defined it as “integrated approach of learning and other interventions for the sake of
improving performance of an organization and its members.”
WPL provides a paradigm shift in the sense that it looks at the job as offering a training
opportunity. Training is not given for doing the job better but doing the job is considered training.
Thus, WPL focuses on both formal and informal learning happening at the workplace.
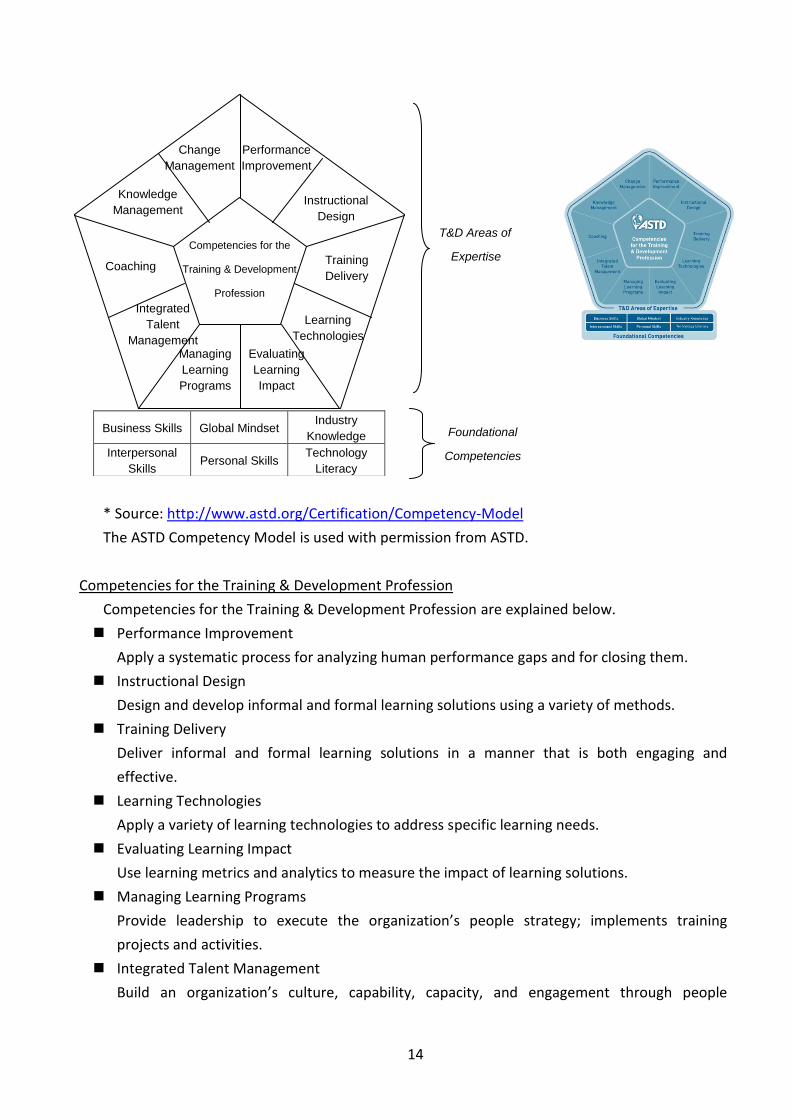
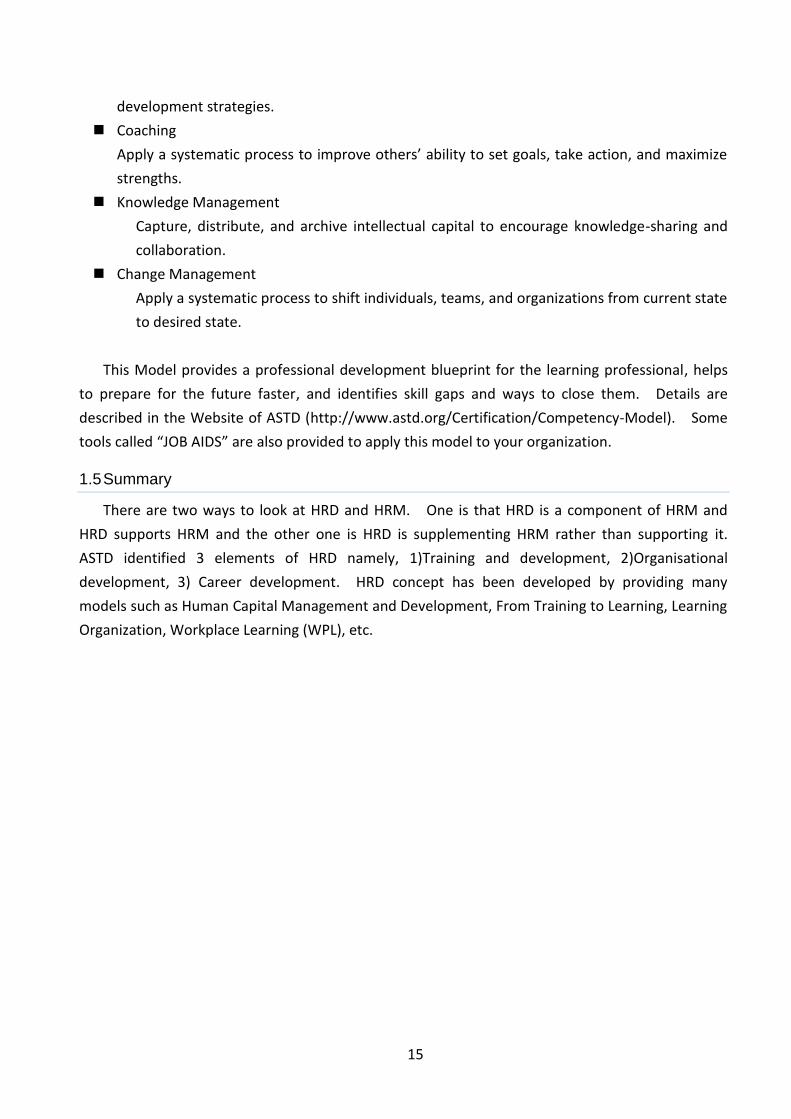
1.4 Competencies for HRD Profession
The American Society for Training & Development (ASTD) recently developed a new
competency model called “The ASTD Competency Model, which redefines the skills and knowledge
required for HRD professionals. As a professional in the HRD field, this model can be a guide to
develop yourself. The chart below describes this model.
14
* Source: http://www.astd.org/Certification/Competency-Model
The ASTD Competency Model is used with permission from ASTD.
Competencies for the Training & Development Profession
Competencies for the Training & Development Profession are explained below.
Performance Improvement
Apply a systematic process for analyzing human performance gaps and for closing them.
Instructional Design
Design and develop informal and formal learning solutions using a variety of methods.
Training Delivery
Deliver informal and formal learning solutions in a manner that is both engaging and
effective.
Learning Technologies
Apply a variety of learning technologies to address specific learning needs.
Evaluating Learning Impact
Use learning metrics and analytics to measure the impact of learning solutions.
Managing Learning Programs
Provide leadership to execute the organization’s people strategy; implements training
projects and activities.
Integrated Talent Management
Build an organization’s culture, capability, capacity, and engagement through people
Business Skills Global Mindset Industry
Knowledge
Interpersonal
Skills Personal Skills
Technology
Literacy
Performance
Improvement
Instructional
Design
Training
Delivery
Learning
Technologies
Evaluating
Learning
Impact
Managing
Learning
Programs
Integrated
Talent
Management
Coaching
Knowledge
Management
Change
Management
Competencies for the
Training & Development
Profession
T&D Areas of
Expertise
Foundational
Competencies
15
development strategies.
Coaching
Apply a systematic process to improve others’ ability to set goals, take action, and maximize
strengths.
Knowledge Management
Capture, distribute, and archive intellectual capital to encourage knowledge-sharing and
collaboration.
Change Management
Apply a systematic process to shift individuals, teams, and organizations from current state
to desired state.
This Model provides a professional development blueprint for the learning professional, helps
to prepare for the future faster, and identifies skill gaps and ways to close them. Details are
described in the Website of ASTD (http://www.astd.org/Certification/Competency-Model). Some
tools called “JOB AIDS” are also provided to apply this model to your organization.
1.5 Summary
There are two ways to look at HRD and HRM. One is that HRD is a component of HRM and
HRD supports HRM and the other one is HRD is supplementing HRM rather than supporting it.
ASTD identified 3 elements of HRD namely, 1)Training and development, 2)Organisational
development, 3) Career development. HRD concept has been developed by providing many
models such as Human Capital Management and Development, From Training to Learning, Learning
Organization, Workplace Learning (WPL), etc.
16
Module-2 ADDIE Process Model
Module-1 Human Resource Development (HRD) Framework
Module-2 ADDIE Process Model
Module-3 Phase-1: Training Needs Analysis (TNA)
Module-4 Instructional Design Basics
Module-5 Phase-2: Training Programme Design –Curriculum Design
Module-6 Phase-2: Training Programme Design –Lesson Plan Development
Module-7 Phase-3: Training Resource Development
Module-8 Phase-4: Training Implementation –Training Delivery
Module-9 Phase-4 Training Implementation –Classroom Facilitation
Module-10 Phase-5: Training Evaluation
List of contents of this module:
2.1 What is ADDIE Process Model?
2.2 What is the Benefit of ADDIE?
2.3 Phase-1: Training Needs Analysis (TNA) Phase
2.4 Phase-2: Training Design Phase
2.5 Phase-3: Training Resource Development Phase
2.6 Phase-4: Training Implementation Phase
2.7 Phase-5: Training Evaluation Phase
2.8 Summary
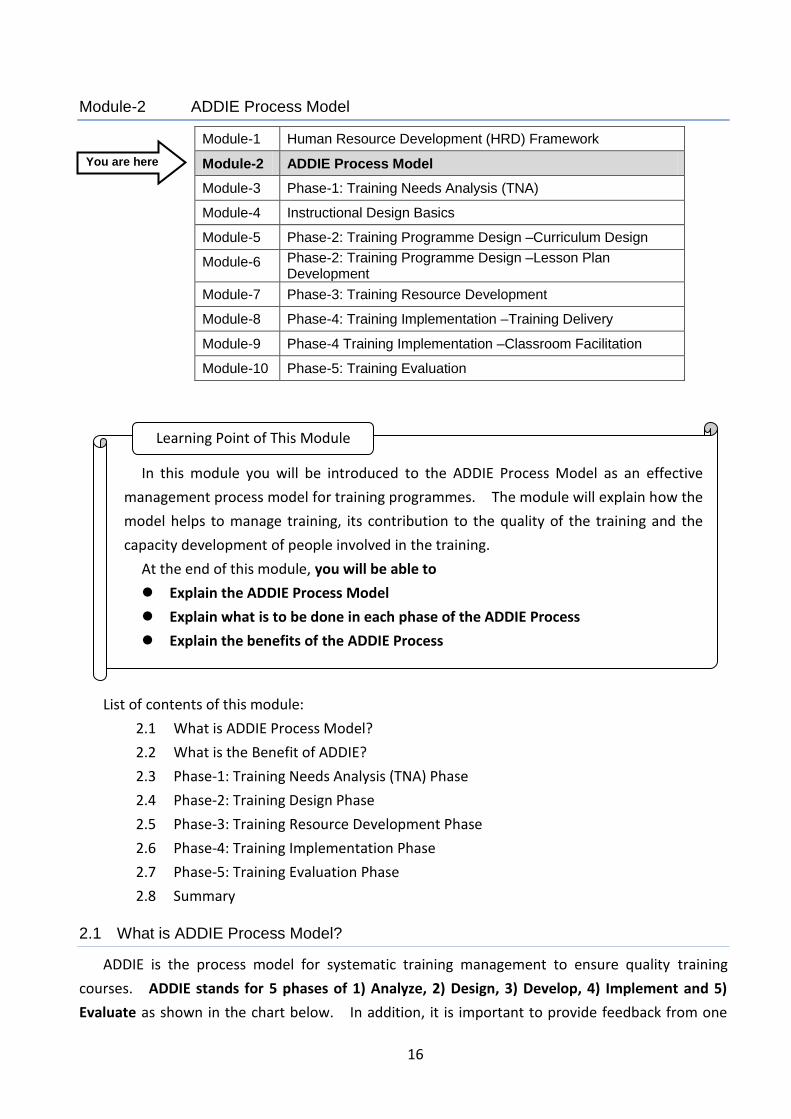
2.1 What is ADDIE Process Model?
ADDIE is the process model for systematic training management to ensure quality training
courses. ADDIE stands for 5 phases of 1) Analyze, 2) Design, 3) Develop, 4) Implement and 5)
Evaluate as shown in the chart below. In addition, it is important to provide feedback from one
In this module you will be introduced to the ADDIE Process Model as an effective
management process model for training programmes. The module will explain how the
model helps to manage training, its contribution to the quality of the training and the
capacity development of people involved in the training.
At the end of this module, you will be able to
Explain the ADDIE Process Model
Explain what is to be done in each phase of the ADDIE Process
Explain the benefits of the ADDIE Process
Learning Point of This Module
You are here
17
Feedback and on-going modification
phase to other phases so that every phase is effectively coordinated and integrated as one process
of the training management.
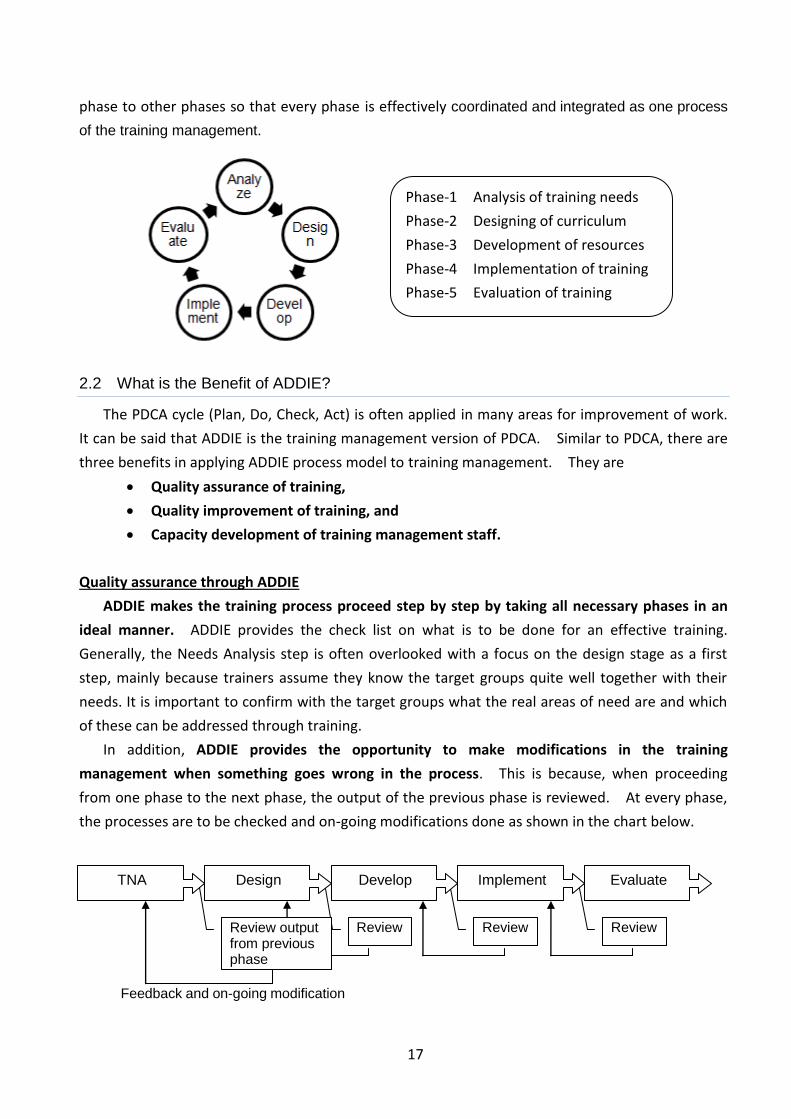
2.2 What is the Benefit of ADDIE?
The PDCA cycle (Plan, Do, Check, Act) is often applied in many areas for improvement of work.
It can be said that ADDIE is the training management version of PDCA. Similar to PDCA, there are
three benefits in applying ADDIE process model to training management. They are
Quality assurance of training,
Quality improvement of training, and
Capacity development of training management staff.
Quality assurance through ADDIE
ADDIE makes the training process proceed step by step by taking all necessary phases in an
ideal manner. ADDIE provides the check list on what is to be done for an effective training.
Generally, the Needs Analysis step is often overlooked with a focus on the design stage as a first
step, mainly because trainers assume they know the target groups quite well together with their
needs. It is important to confirm with the target groups what the real areas of need are and which
of these can be addressed through training.
In addition, ADDIE provides the opportunity to make modifications in the training
management when something goes wrong in the process. This is because, when proceeding
from one phase to the next phase, the output of the previous phase is reviewed. At every phase,
the processes are to be checked and on-going modifications done as shown in the chart below.
Review Review Review
Phase-1 Analysis of training needs
Phase-2 Designing of curriculum
Phase-3 Development of resources
Phase-4 Implementation of training
Phase-5 Evaluation of training
TNA Design Develop Implement Evaluate
Review output from previous phase
18
Quality improvement by ADDIE
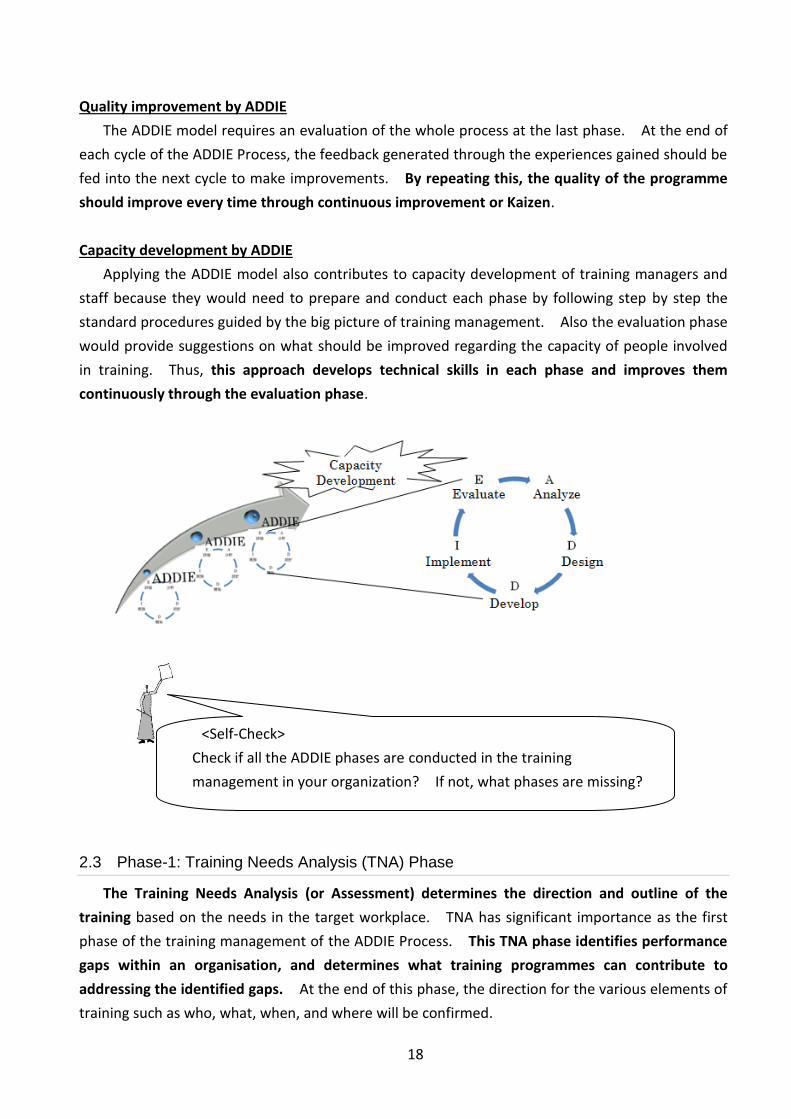
The ADDIE model requires an evaluation of the whole process at the last phase. At the end of
each cycle of the ADDIE Process, the feedback generated through the experiences gained should be
fed into the next cycle to make improvements. By repeating this, the quality of the programme
should improve every time through continuous improvement or Kaizen.
Capacity development by ADDIE
Applying the ADDIE model also contributes to capacity development of training managers and
staff because they would need to prepare and conduct each phase by following step by step the
standard procedures guided by the big picture of training management. Also the evaluation phase
would provide suggestions on what should be improved regarding the capacity of people involved
in training. Thus, this approach develops technical skills in each phase and improves them
continuously through the evaluation phase.
2.3 Phase-1: Training Needs Analysis (TNA) Phase
The Training Needs Analysis (or Assessment) determines the direction and outline of the
training based on the needs in the target workplace. TNA has significant importance as the first
phase of the training management of the ADDIE Process. This TNA phase identifies performance
gaps within an organisation, and determines what training programmes can contribute to
addressing the identified gaps. At the end of this phase, the direction for the various elements of
training such as who, what, when, and where will be confirmed.
<Self-Check>
Check if all the ADDIE phases are conducted in the training
management in your organization? If not, what phases are missing?
19
The key questions asked in TNA are;
What are the performance gaps for optimum operation of an organisation in order to
achieve its goals?
Is training the best solution for the identified gaps?
How can training support the organisation to achieve its goals effectively?
Who are the target participants and their specific areas of training?
What are the relevant training courses for the target organisation?
What methods of trainings are appropriate for the target?
Are training courses feasible in terms of cost and other resources?
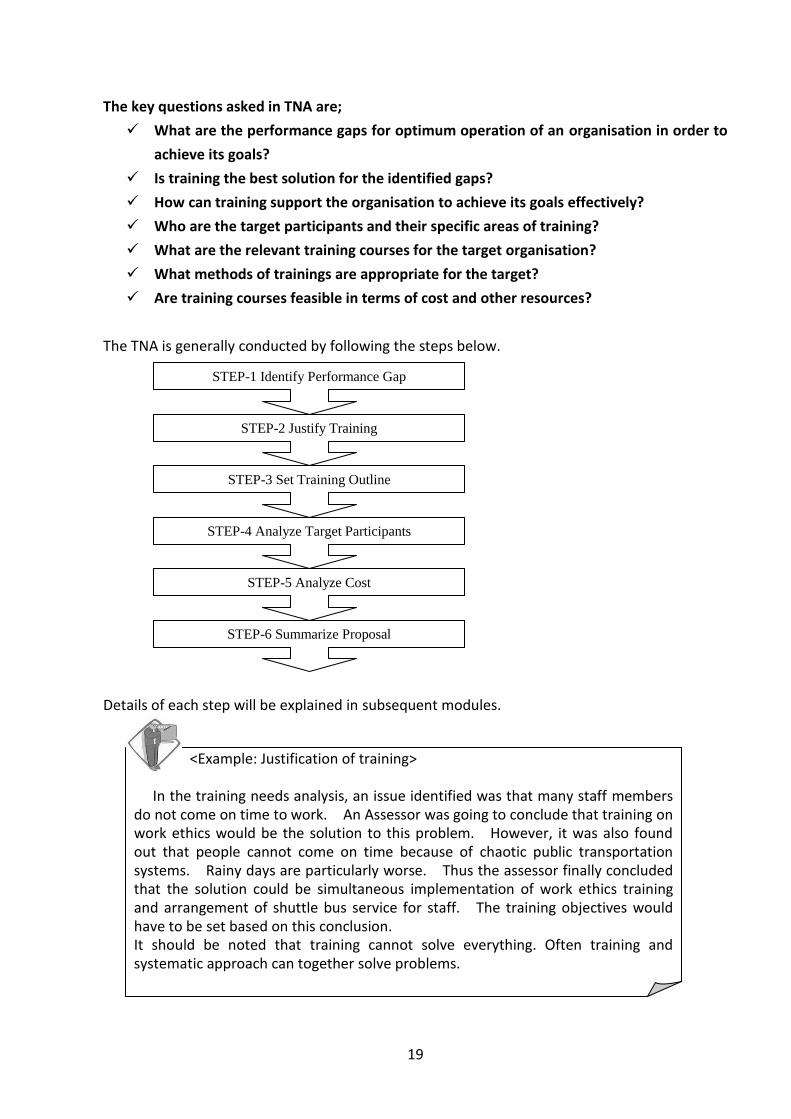
The TNA is generally conducted by following the steps below.
Details of each step will be explained in subsequent modules.
<Example: Justification of training>
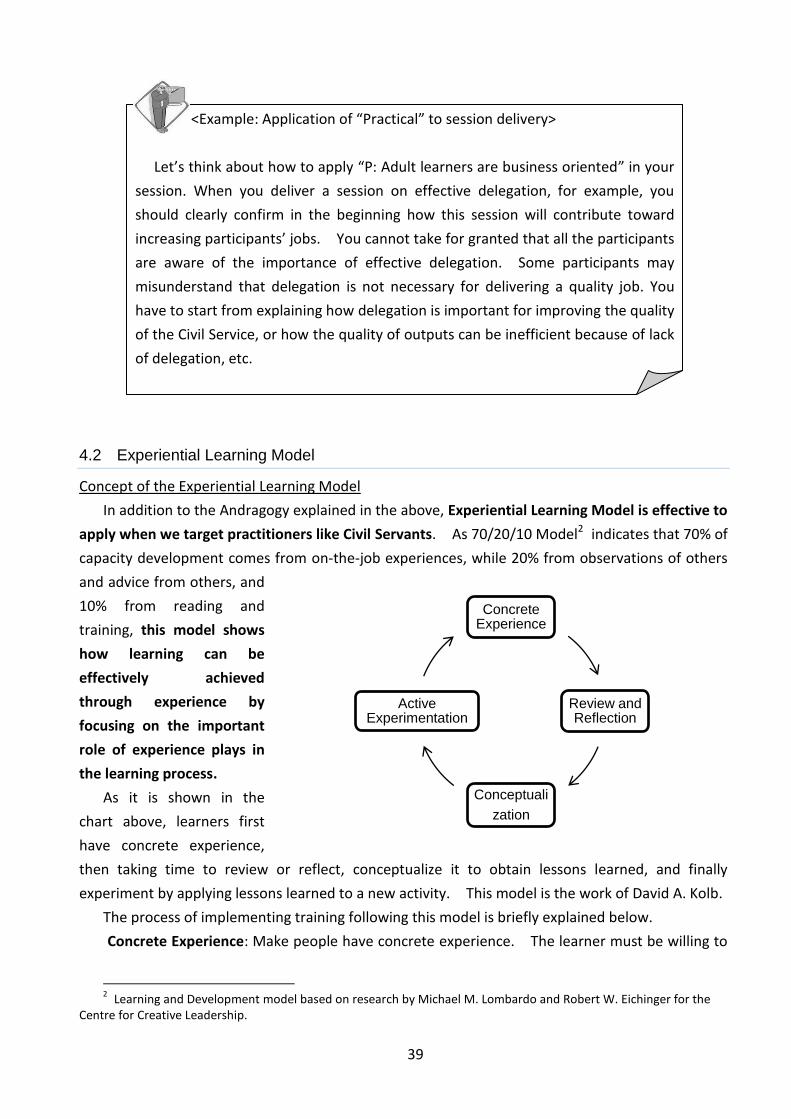
In the training needs analysis, an issue identified was that many staff members do not come on time to work. An Assessor was going to conclude that training on work ethics would be the solution to this problem. However, it was also found out that people cannot come on time because of chaotic public transportation systems. Rainy days are particularly worse. Thus the assessor finally concluded that the solution could be simultaneous implementation of work ethics training and arrangement of shuttle bus service for staff. The training objectives would have to be set based on this conclusion. It should be noted that training cannot solve everything. Often training and systematic approach can together solve problems.
STEP-1 Identify Performance Gap
STEP-2 Justify Training
STEP-3 Set Training Outline
STEP-4 Analyze Target Participants
STEP-5 Analyze Cost
STEP-6 Summarize Proposal
20
2.4 Phase-2: Training Design Phase
Based on the programme outline formulated in the first phase of ADDIE, details of the training
course will be designed in this phase. The design will impact on efficiency and effectiveness of the
training process. The programme should be designed in such a way that objectives will be
achieved most efficiently.
The key questions asked in this phase are;
What approach should be adopted to achieve efficiently the course objectives?
What learning method is appropriate for the target participants?
How to motivate participants to keep on learning?
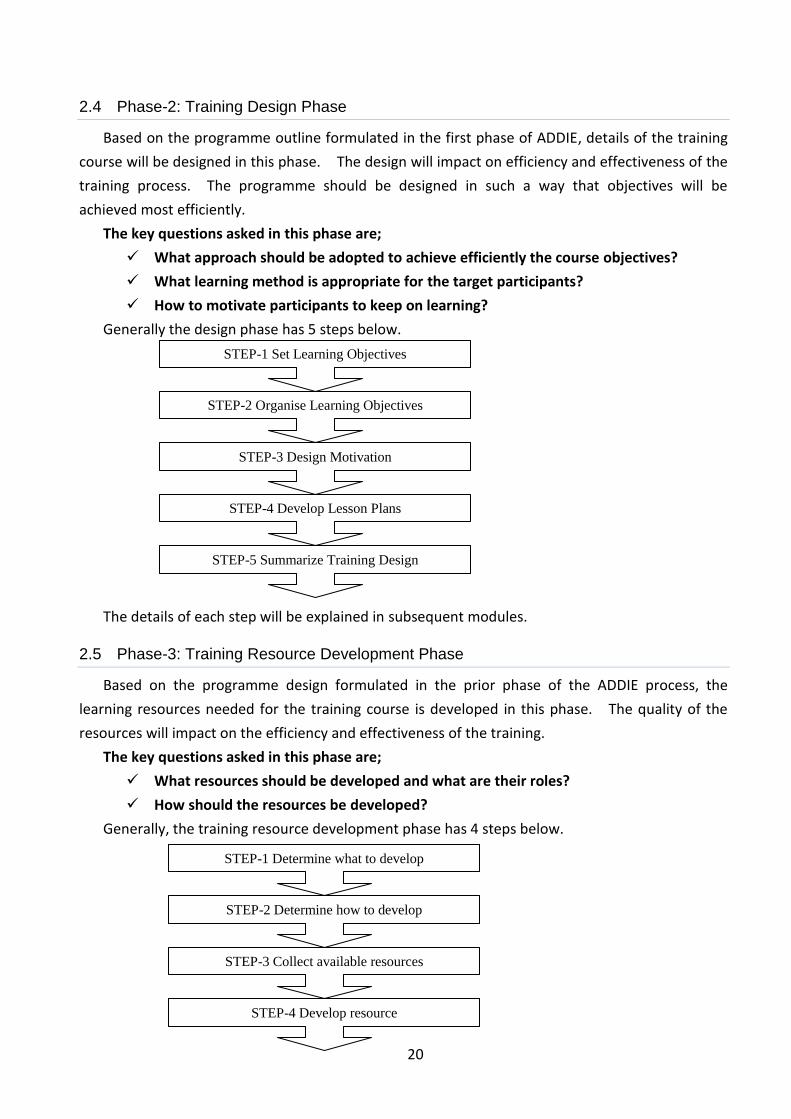
Generally the design phase has 5 steps below.
The details of each step will be explained in subsequent modules.
2.5 Phase-3: Training Resource Development Phase
Based on the programme design formulated in the prior phase of the ADDIE process, the
learning resources needed for the training course is developed in this phase. The quality of the
resources will impact on the efficiency and effectiveness of the training.
The key questions asked in this phase are;
What resources should be developed and what are their roles?
How should the resources be developed?
Generally, the training resource development phase has 4 steps below.
STEP-1 Set Learning Objectives
STEP-2 Organise Learning Objectives
STEP-3 Design Motivation
STEP-4 Develop Lesson Plans
STEP-5 Summarize Training Design
STEP-1 Determine what to develop
STEP-2 Determine how to develop
STEP-3 Collect available resources
STEP-4 Develop resource

21
The determination of what to develop is critical. In order to deliver designed programme,
several materials would need to be developed. Learning resources can be categorized into 5 as
listed below.
Learner’s guide (Learner’s manual, Textbook)
Learner’s Workbook
Supporting resources
Presentation resources
Facilitator’s guide
It is not necessary to develop all 5 kinds of resources for every training course. The resources
to be developed are based on the course objectives, course structure, target participants, time
duration, cost, etc.
Details of each step will be explained in subsequent modules.
2.6 Phase-4: Training Implementation Phase
This phase focuses on delivery of the programme. Utilizing all the resources developed, the
course is delivered in accordance with the programme design. Course coordinators play a critical
role in administration and facilitators play a critical role in session delivery.
The key questions asked in this phase are;
How should sessions be facilitated to achieve objectives?
How should the course be coordinated to achieve objectives?
Generally, the implementation phase has 3 steps below.
Details of each step will be explained in subsequent modules.
2.7 Phase-5: Training Evaluation Phase
After implementing training, an evaluation would have to be conducted. The evaluation phase
is a critical point in the sense that results of the training should be reviewed and suggestions
summarized for future implementation. The main focus of evaluation is the Implementation
phase. However, the previous phases to implementation such as TNA, Design, and
Development phases should be taken into account. In other words, the full ADDIE process
should also be reviewed to provide support information in subsequent training courses.
STEP-1 Recruit Participants
STEP-2 Prepare the course
STEP-3 Deliver the course
22
The key questions asked in this phase are;
To what extent has the course objectives been achieved?
To what extent has the problem identified been solved by the training?
What should be improved in subsequent training courses?
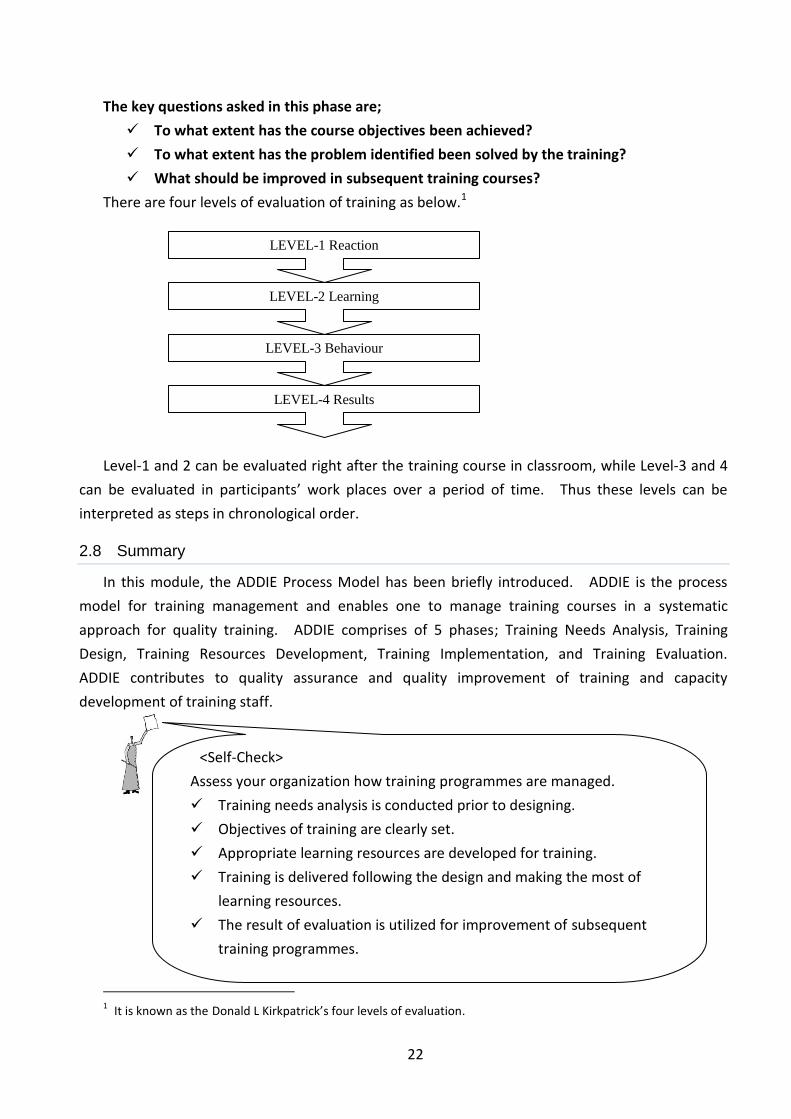
There are four levels of evaluation of training as below.1
Level-1 and 2 can be evaluated right after the training course in classroom, while Level-3 and 4
can be evaluated in participants’ work places over a period of time. Thus these levels can be
interpreted as steps in chronological order.
2.8 Summary
In this module, the ADDIE Process Model has been briefly introduced. ADDIE is the process
model for training management and enables one to manage training courses in a systematic
approach for quality training. ADDIE comprises of 5 phases; Training Needs Analysis, Training
Design, Training Resources Development, Training Implementation, and Training Evaluation.
ADDIE contributes to quality assurance and quality improvement of training and capacity
development of training staff.
1 It is known as the Donald L Kirkpatrick’s four levels of evaluation.
LEVEL-1 Reaction
LEVEL-2 Learning
LEVEL-3 Behaviour
LEVEL-4 Results
<Self-Check>
Assess your organization how training programmes are managed.
Training needs analysis is conducted prior to designing.
Objectives of training are clearly set.
Appropriate learning resources are developed for training.
Training is delivered following the design and making the most of
learning resources.
The result of evaluation is utilized for improvement of subsequent
training programmes.
23
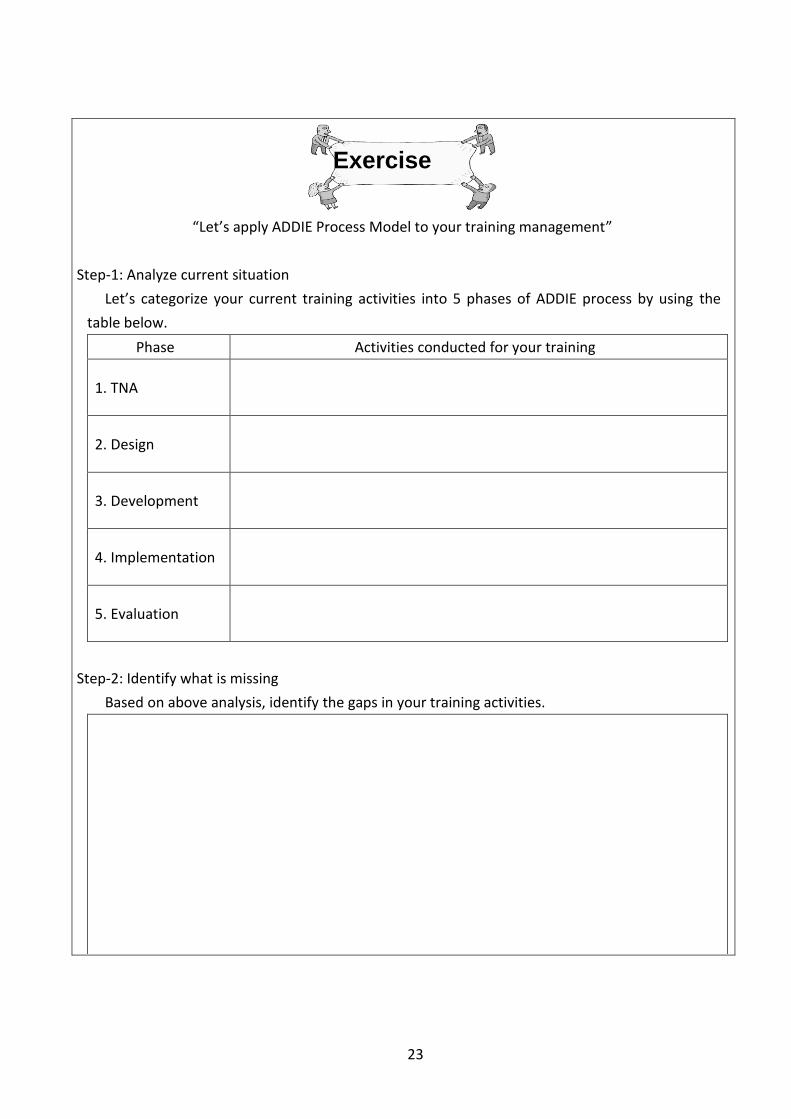
“Let’s apply ADDIE Process Model to your training management”
Step-1: Analyze current situation
Let’s categorize your current training activities into 5 phases of ADDIE process by using the
table below.
Phase Activities conducted for your training
1. TNA
2. Design
3. Development
4. Implementation
5. Evaluation
Step-2: Identify what is missing
Based on above analysis, identify the gaps in your training activities.
Exercise
24
Module-3 Phase-1: Training Needs Analysis
Module-1 Human Resource Development (HRD) Framework
Module-2 ADDIE Process Model
Module-3 Phase-1: Training Needs Analysis (TNA)
Module-4 Instructional Design Basics
Module-5 Phase-2: Training Programme Design –Curriculum Design
Module-6 Phase-2: Training Programme Design –Lesson Plan Development
Module-7 Phase-3: Training Resource Development
Module-8 Phase-4: Training Implementation –Training Delivery
Module-9 Phase-4 Training Implementation –Classroom Facilitation
Module-10 Phase-5: Training Evaluation
List of contents of this module:
3.1 Step-1: Performance Gap Identification
3.2 Step-2: Justification of Training
3.3 Step-3: Target Analysis
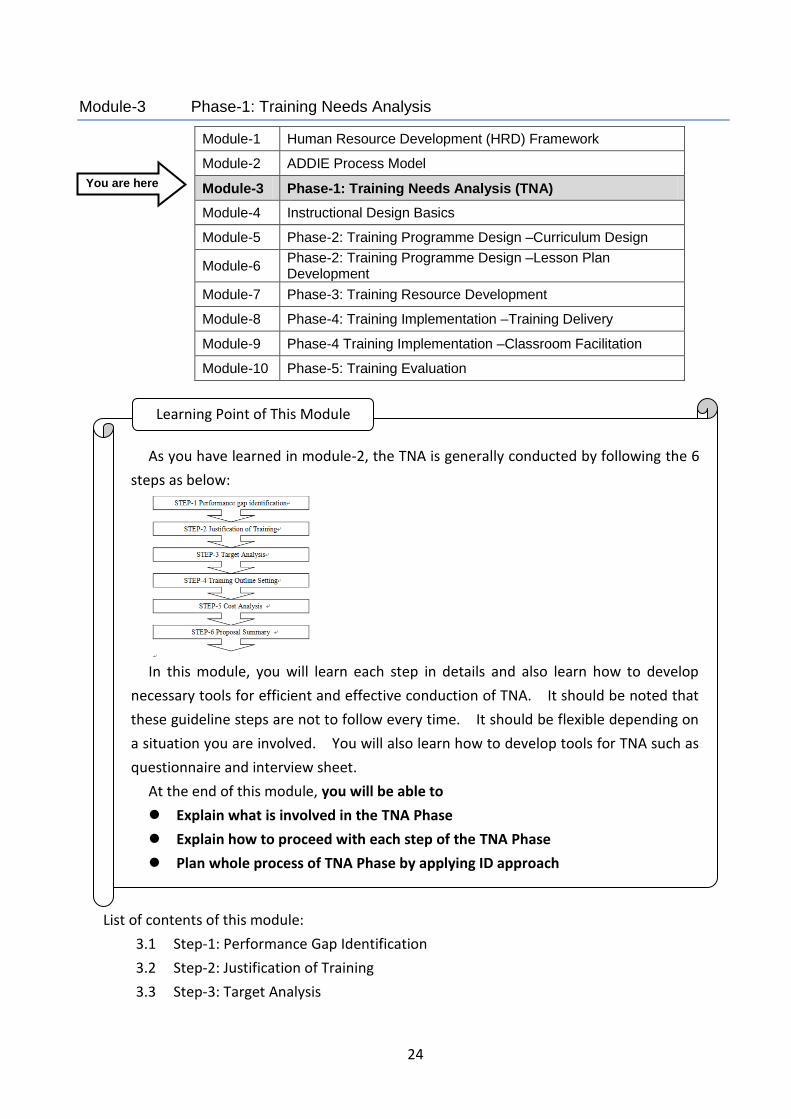
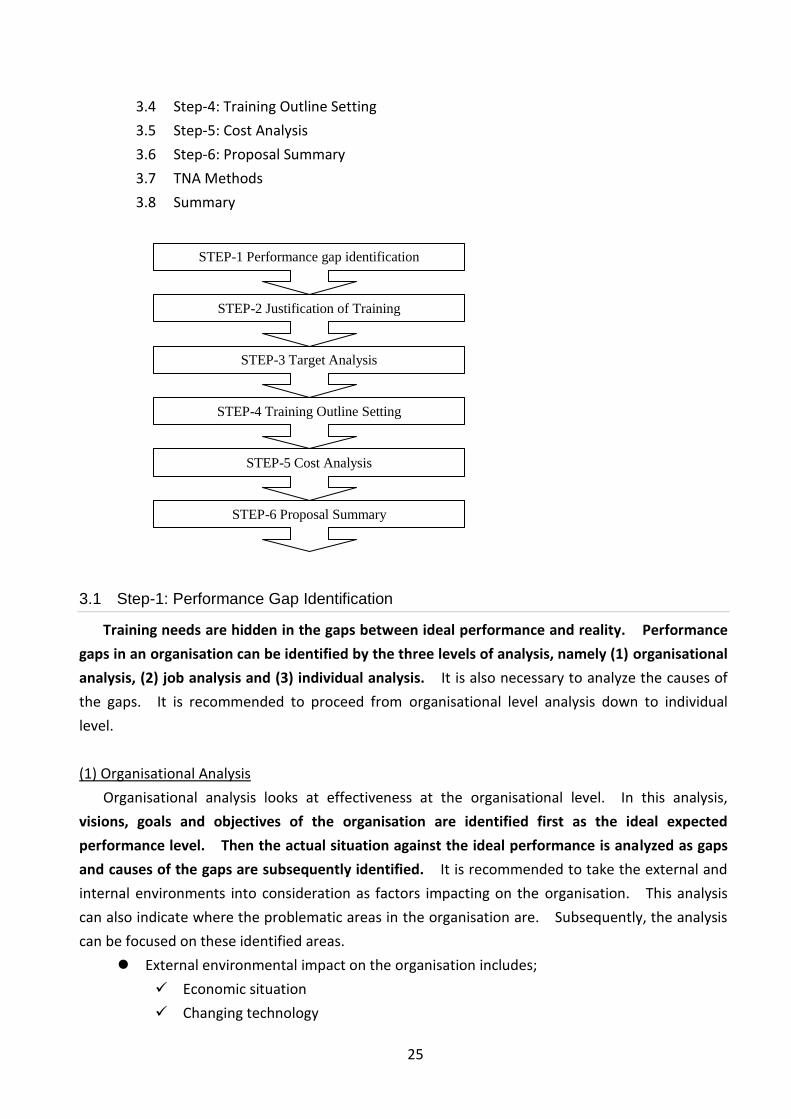
As you have learned in module-2, the TNA is generally conducted by following the 6
steps as below:
In this module, you will learn each step in details and also learn how to develop
necessary tools for efficient and effective conduction of TNA. It should be noted that
these guideline steps are not to follow every time. It should be flexible depending on
a situation you are involved. You will also learn how to develop tools for TNA such as
questionnaire and interview sheet.
At the end of this module, you will be able to
Explain what is involved in the TNA Phase
Explain how to proceed with each step of the TNA Phase
Plan whole process of TNA Phase by applying ID approach
Learning Point of This Module
You are here
25
3.4 Step-4: Training Outline Setting
3.5 Step-5: Cost Analysis
3.6 Step-6: Proposal Summary
3.7 TNA Methods
3.8 Summary
3.1 Step-1: Performance Gap Identification
Training needs are hidden in the gaps between ideal performance and reality. Performance
gaps in an organisation can be identified by the three levels of analysis, namely (1) organisational
analysis, (2) job analysis and (3) individual analysis. It is also necessary to analyze the causes of
the gaps. It is recommended to proceed from organisational level analysis down to individual
level.
(1) Organisational Analysis
Organisational analysis looks at effectiveness at the organisational level. In this analysis,
visions, goals and objectives of the organisation are identified first as the ideal expected
performance level. Then the actual situation against the ideal performance is analyzed as gaps
and causes of the gaps are subsequently identified. It is recommended to take the external and
internal environments into consideration as factors impacting on the organisation. This analysis
can also indicate where the problematic areas in the organisation are. Subsequently, the analysis
can be focused on these identified areas.
External environmental impact on the organisation includes;
Economic situation
Changing technology
STEP-1 Performance gap identification
STEP-2 Justification of Training
STEP-3 Target Analysis
STEP-4 Training Outline Setting
STEP-5 Cost Analysis
STEP-6 Proposal Summary
26
Labour market
New laws
Political trends
Socio-cultural trends such as sexual harassment and workplace violence.
Globalization
Internal environmental impacts on the organisation includes;
Effectiveness of the organisation in meeting its goals
Available resources (money, human capital, facilities, materials)
Communication and decision making system
Financial management system
Human resource management system
Support for training (top management support, employee willingness to participate,
etc.).
Key questions to be asked for this analysis are as follows:
What are the visions, goals, roles and functions of the organisation?
What are the performance gaps at the organisational level?
(2) Job Analysis
In the job analysis, data is gathered on jobs or groups of jobs. In this analysis, the knowledge,
skills, attitudes and competencies needed to achieve optimum performance to fulfill the jobs are
identified. This analysis can be conducted by targeting specific jobs or groups of jobs if
organisational analysis had identified focus areas to be analyzed.
Data can be gathered from the documents and methods below:
Job description
Literature about the job
Performance standards
KSA analysis (i.e. analyzing required capability using three viewpoints- Knowledge, Skill,
Attitude)
<Example: Background survey of TNA>
When conducting performance gap identification, it is recommended to start
from the organizational analysis in order to identify issues in the organization level
and determine the focus areas. In the JICA-CSTC Project, the Background Survey
was conducted prior to the TNA in order to understand the general situation of the
Civil Service in the target countries. This survey was viewed as the organizational
analysis and found out some critical problem areas that the TNA can focus on.
27
Observation of the job/ Work samples (Observing products and services produced)
Job inventory questionnaire
Asking questions about the job
Analysis of operating problems
Key questions to be asked for this analysis are as follows:
What are the necessary abilities and competencies for fulfilling the job?
(3) Individual Analysis
In the individual analysis, the current level of knowledge, skill, attitude and competencies of
organisational members is analyzed, and the performance gaps against expected levels, which
can be identified by job analysis and causes of the gaps, are subsequently identified. It is also
effective to ask their personal specific training needs. This analysis can be conducted by targeting
specific members if organisational analysis had identified focus areas to be analyzed.
Data can be gathered from the documents and methods below:
Performance evaluation (Evaluating strengths and weaknesses)
Performance problems’ analysis (Analyzing the problems that occur)
Observation of workplace (Observing both behaviour and results of that behaviour)
Checking what training is needed /by managers, supervisors and individuals
Attitude surveys (Measuring morale, motivation, satisfaction)
Work samples (Observing products and services produced)
Individuals training experience
Key questions to be asked for this analysis are as follows:
What are the current competencies and abilities possessed by the members?
What performance gaps exist at the individual level?
(4) Integration of Three Levels of Analysis
After the three levels of analysis, all the analyses are integrated and the performance gaps and
causes are identified. In addition to the above, the review of current training methods provides
important information.
Key questions to be asked for this analysis are as follows:
What performance gaps are critical for the sake of achieving organisational goals?
What are the reasons behind these performance gaps?
Why are members not able to perform as expected?
Is the expected performance level of the organisation clear to the members?

28
3.2 Step-2: Justification of Training
The next step is to analyze how to solve the gaps. This step justifies (or finds out if) whether
the training can fill the identified gaps and determines where training is needed and under what
conditions it will be conducted effectively. It is important to analyze which of the gaps can be
fulfilled by training. Often gaps can be better solved by other means. Training is not always the
most effective way to solve a problem. Hence the analysis to determine whether training is the best
way is needed.
It should be noted that the current training scheme and programmes in the organisation should
be taken into consideration. The suggested training should be situated within this overall
framework to contribute to the medium to long term strategy of the organisation.
Key questions to be asked for this step are as follows:
What effective measures have been taken to solve the performance gaps?
Can this gap be solved by training or other means?
What are the specific training areas and how can training contribute towards bridging
the performance gaps?
What are the expected outcomes of the training?
Under what circumstances will the training be most effective?
<Example: Flexible steps of TNA>
To identify general training needs for the Civil Service as a whole, it is
recommended to follow all the process mentioned in this manual from the
organizational analysis down to the individual analysis. Then you can identify the
needs across the Civil Service and prioritize them.
However, when thematic area (e.g. customer care), is predetermined by some
reasons, the approach can be different. You should focus on identifying
performance gaps in the area (e.g. customer care) from the beginning.
29
3.3 Step-3: Target Analysis
This step identifies the teaching methods by analyzing the target participants. There are two
factors to analyze:
Current level of the target participants
Learning style that is appropriate for the target participants
The current level of the target participants is analyzed in knowledge, skill, and attitude in
order to identify prerequisites of the training. Then the working modality, learning habit etc. of the
target participants are analyzed in order to identify their favourite ways of learning and learning
conditions such as how much time they can spend, when is the best time to learn, etc.
3.4 Step-4: Training Outline Setting
This step makes outline of the training clearer by describing the ideal situation of the respective
members’ performance, which is the target behaviours. These target behaviours should be
determined in such a way that they can be measured by assessment. If the result is not measurable,
you cannot tell if the target is achieved.
It is recommended to describe outline of the training through the points below.
Title of the training course
Target participants
Training objective
Target behaviours
System of implementation
Training objective includes what is expected to be achieved, what problems are to be solved,
and the level participants need to achieve. The target behaviours are broken down of the training
objective and described in small tasks or elements. You can describe target behaviours as “Enable
participants to xxxxxxxxxxxx”. System of implementation describes how proposed training will be
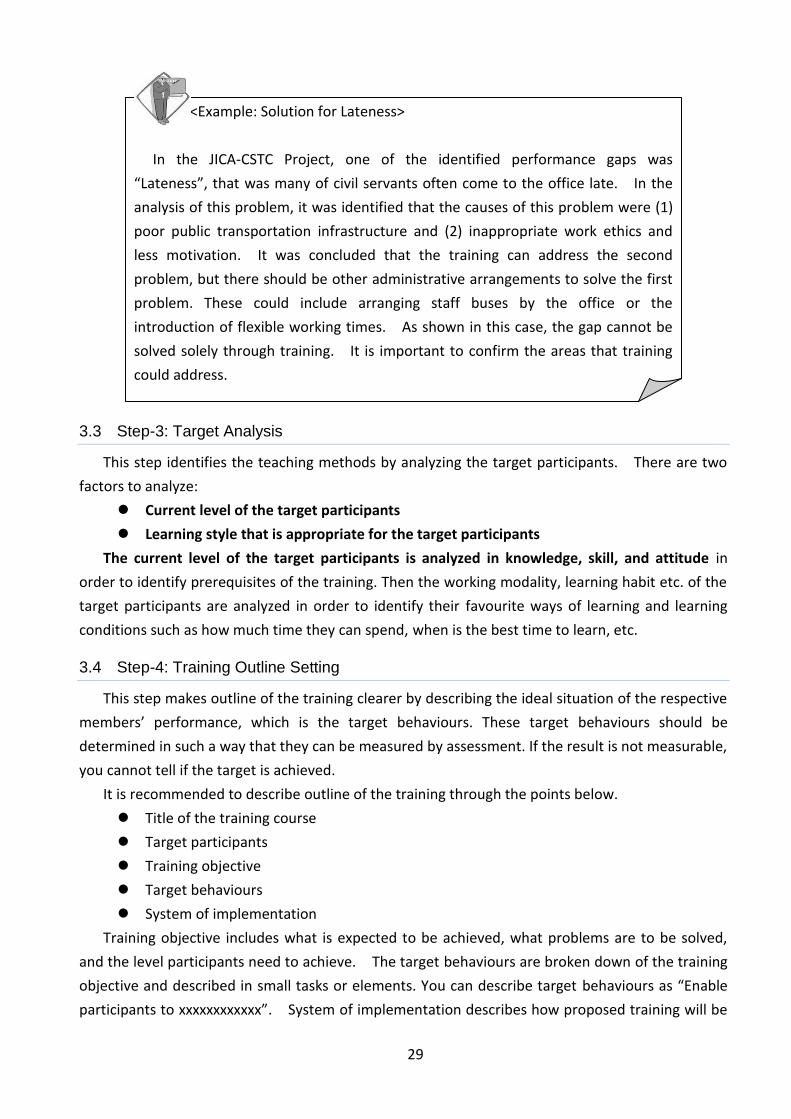
<Example: Solution for Lateness>
In the JICA-CSTC Project, one of the identified performance gaps was
“Lateness”, that was many of civil servants often come to the office late. In the
analysis of this problem, it was identified that the causes of this problem were (1)
poor public transportation infrastructure and (2) inappropriate work ethics and
less motivation. It was concluded that the training can address the second
problem, but there should be other administrative arrangements to solve the first
problem. These could include arranging staff buses by the office or the
introduction of flexible working times. As shown in this case, the gap cannot be
solved solely through training. It is important to confirm the areas that training
could address.
30
implemented. This involves timing of implementation, recruitment of participants, relationships
with existing HRM system and other training courses.
Key questions to be asked for this step are as follows:
What knowledge, skills and attitudes are expected to be acquired after the training?
What level of performance is expected after the training?
How is the training organised?
3.5 Step-5: Cost Analysis
This step makes clear the cost necessary to develop, implement, and evaluate the training.
There are four points below to consider.
Cost for designing of curriculum
Cost for development of materials
Cost for operation (implementation)
Cost for evaluation
Cost for the participants
First, the cost for development of the training, such as curriculum designing and learning
resources development, is analyzed. The cost of the subject matter experts needs to be
considered here. Cost for operation involves operational costs, which includes cost of logistics,
printing of material, etc. The cost for evaluating the course should not be overlooked. Finally,
the cost for the participants, in the form of money, time, and work, will be analyzed.
With all these calculations, feasibility for the training will be determined. When it is obvious
that training is not feasible in a given condition, it is recommendable to go back to the previous
steps and review the training outline to make it feasible.
3.6 Step-6: Proposal Summary
All the data gathered and analyzed is to be summarized into a training proposal. The training
proposal should include the content below:
1. Analysis of performance gaps and current issues in the organisation
2. Justification of training (how to solve the gaps by training, which areas are to be
addressed by training)
3. Outline of the proposed training
4. Suggestions and issues to be considered for design and development of the proposed
training course
Appendix 3-1: Training Outline Setting Forms
Appendix 3-2: Sample Training Proposal
31
3.7 TNA Methods
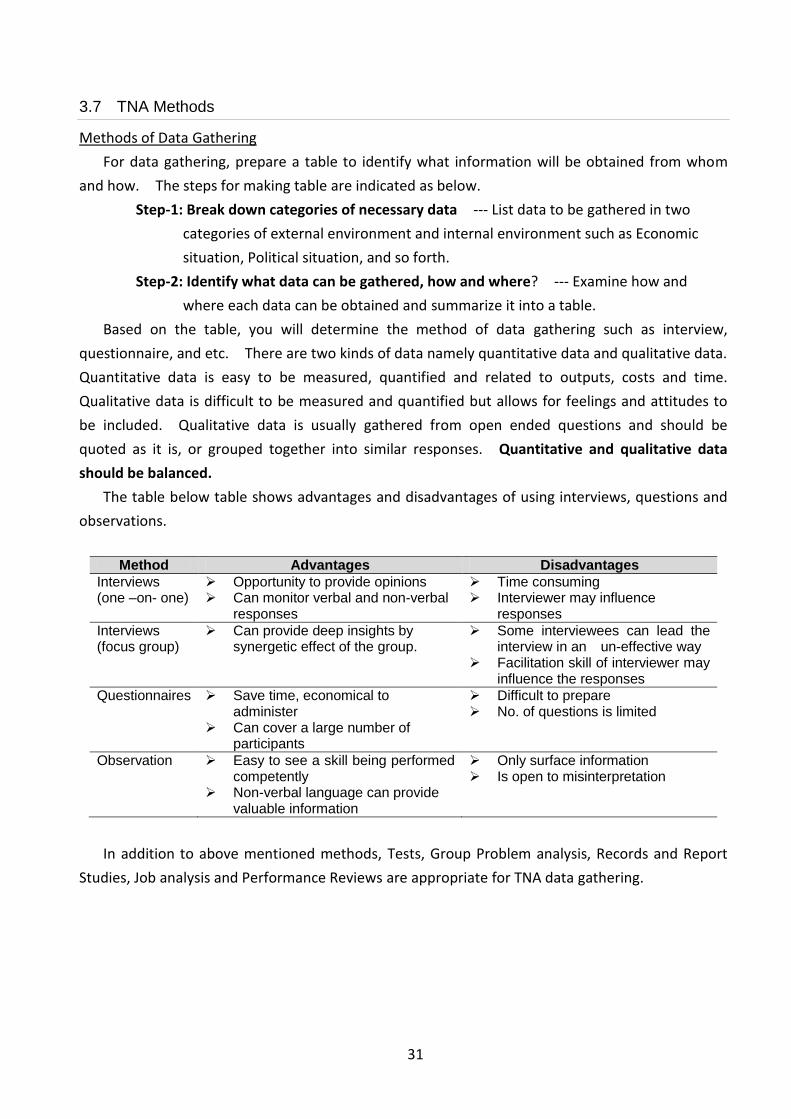
Methods of Data Gathering
For data gathering, prepare a table to identify what information will be obtained from whom
and how. The steps for making table are indicated as below.
Step-1: Break down categories of necessary data --- List data to be gathered in two
categories of external environment and internal environment such as Economic
situation, Political situation, and so forth.
Step-2: Identify what data can be gathered, how and where? --- Examine how and
where each data can be obtained and summarize it into a table.
Based on the table, you will determine the method of data gathering such as interview,
questionnaire, and etc. There are two kinds of data namely quantitative data and qualitative data.
Quantitative data is easy to be measured, quantified and related to outputs, costs and time.
Qualitative data is difficult to be measured and quantified but allows for feelings and attitudes to
be included. Qualitative data is usually gathered from open ended questions and should be
quoted as it is, or grouped together into similar responses. Quantitative and qualitative data
should be balanced.
The table below table shows advantages and disadvantages of using interviews, questions and
observations.
Method Advantages Disadvantages
Interviews (one –on- one)
Opportunity to provide opinions Can monitor verbal and non-verbal
responses
Time consuming Interviewer may influence
responses
Interviews (focus group)
Can provide deep insights by synergetic effect of the group.
Some interviewees can lead the interview in an un-effective way
Facilitation skill of interviewer may influence the responses
Questionnaires Save time, economical to administer
Can cover a large number of participants
Difficult to prepare No. of questions is limited
Observation Easy to see a skill being performed competently
Non-verbal language can provide valuable information
Only surface information Is open to misinterpretation
In addition to above mentioned methods, Tests, Group Problem analysis, Records and Report
Studies, Job analysis and Performance Reviews are appropriate for TNA data gathering.
32
Sampling Strategy
When it is not possible to cover all the members in target population in the survey, it is
necessary to determine the samples. You must determine the samples in such a way that samples
represent similar characteristics of target population of survey. Random sampling should be
employed to pick samples without any biases. Unintentional contingencies such as recruiting
volunteers for interview survey by e-mail can result in picking those who have higher computer
literacy, etc. should be avoided.
Interviews
Michalak and Yager (1979) assert that in order to use the interview technique most effectively,
the interviewer must plan the interview. The authors suggest beginning with the end in mind.
Ask yourself “At the end of the interview, what information will I need so that I can conduct an
effective training course?”
Some examples of the problem
The exact nature in the problem
The areas affected in the organisation
The number of people involved
What is level of the performance deficiency
What the employees are not doing that they should be doing
What the employees are doing that they should not be doing
Conducting Interview
Physical Setting: The physical setting or the environment in which the interview is
conducted is as important as the interview itself. The environment should be conducive
<Example: Steps by step approach of survey>
Interview is effective for searching for general information, while questionnaire
is effective when focus research area has been confirmed. In the JICA-CSTC
Project, in order to gather various kinds of data and information related to any of
the Civil Service activities in the target countries, the first Background Survey
mainly employed semi-structured interview. Then, it was followed by the TNA
Survey which mainly employed questionnaire. In the process of developing
questionnaire, the result of the Background Survey was utilized.
Appendix 3-3: How to develop Data Collection Table

33
to have a conversation. Ideally, the physical setting is free of distractions, the noise
level is minimum, and lighting is adequate. A neutral environment like a meeting room
is preferred.
The interview Questions: These are prepared beforehand. Use a semi-structured
format that is have some questions ready, but be prepared to probe further as and when
issues emerged during the interviews.
Recording Data: Taking down extensive notes. Pen and paper is preferred. Keying in
directly into a personal computer is convenient but it distracts both the interviewer and
the interviewee. Furthermore, the personal computer acts as a barrier too. Another
alternative to recording data is to have it taped recorded. There are some advantages
and disadvantages to this method. The main advantage is all that was said was
recorded and can be transcribed. The main disadvantage is that some interviewees may
be intimidated and less candid when they know that they are being recorded. This can
be overcome by informing the interviewee that no one else will hear the tapes.
Establishing Rapport: Establishing rapport with the interviewee is important to enable
the interviewee to feel relaxed and engaged in the conversation. Otherwise, the
interviewee may feel that he or she is under interrogation.
Resource Consuming: Interviews consume a lot of resources in terms of time and energy
on both the interviewer and interviewee’s part. The interview may not be feasible or
practical if there are a lot of participants involved in the training course.
Questionnaires
Questionnaires are used when the number of people from whom information is required is
too large and unwieldy for the interview method. Some advantages of using questionnaires for a
training needs analysis are:
Questionnaires can reach many people in a short period of time, and at relatively low
cost.
They can take different forms, from paper-based to electronic versions.
They give people a chance to express themselves without fear of embarrassment.
The data can be easily summarized and reported.
Tests
Tests are valuable in helping to determine training needs. The usual tests used are those
designed to measure performance of one kind or another. Achievement levels of individuals and
Appendix 3-4: How to develop questionnaire
34
groups can be identified through testing. Entry-level skills can be easily measured. After a
person has been on the job for some time, periodic appraisal may show a real need for cognitive,
affective, and even psycho-motor updating. Commercial pilots are a good example. They have
to take their qualifying tests regularly.
Some advantages of using tests are that as a diagnostic tool, they help identify specific areas
of deficiency, and they are relatively easy and quick to administer. Some disadvantages of using
tests are, they are limited to specific situations and skills and may not be transferable to other
situations. The rule of thumb when it comes to using tests is to be certain you know what the
tests measure, and what are its limitations.
Group Problem analysis
Group problem analysis is similar to focus group meetings. The advantages of a group
problem analysis are it allows synthesis of several points of views, offered by the group members,
it often promotes general understanding and agreement, and it can build support for needed
training. In itself, a group problem analysis can serve as a form of training.
The disadvantages of a group problem analysis are it is time consuming, and the participants
may be too busy to participate.
Group problem analysis can be used to supplement the questionnaire method by verifying the
findings of the questionnaire with the participants.
Records and Report Studies
Records and report studies are secondary sources of data that already exists in the organisation.
These can be used to supplement the findings of the questionnaire. Productivity, sales and
operating ratios are some of the items that may be compared to pinpoint an individual need.
Records and report studies are historical in nature, and may not reflect the current situation.
They should be only used as checks and clues in combination with other methods of needs
assessment.
Job analysis and Performance Reviews
Generally, job analysis develops precise information about an actual job; on-the-job
performance is covered in the performance reviews. Jobs can be broken down into manageable
segments for the purposes of both training and appraisal.
The challenge of this method is that these techniques are time consuming and difficult for
people who are not trained in job analysis techniques. Many supervisors dislike reviewing their
employees’ inadequacies with them personally, and the individual training needs that surface are
sometimes difficult to translate into organisational needs.
35
Methods of Data Analysis
Quantitative data is effectively analyzed by generating charts and graphs. Qualitative data
helps analyze quantitative data and should be quoted as it is, or grouped together into similar
responses. Care must be taken not to interpret the response without empirical foundation. You
should allow readers of the report to have the opportunity to draw their own conclusions.
3.8 Summary
The TNA phase starts with identifying performance gaps by organisational analysis, job analysis,
and individual analysis. Data can be gathered by interview, questionnaire, test, group problem
analysis, records and reports studies, job analysis and performance reviews, etc. Then justify
training for the solution of the gaps identified. Since training cannot solve every problems, it is
important to make clear that what aspect training can contribute to solve the problem. Target
participants should be analyzed, as well as cost and training outline should be set. Finally, all the
findings should be summarized as training proposal. Preparation of data collection table would
make data gathering efficient.
Appendix 3-5: How to Organise Quantitative Data

36
“Let’s Plan Training Needs Analysis for your organisation”
STEP-1:
Let’s identify current situation based on your knowledge for each gap level indicated in below
table, and identify what can be solved by training.
Gap Level Current Situation by your
perception (Gaps between ideal and actual)
What can be solved by training
1. Performance gap in
your organisation
2. Performance gap in
your department
3. Performance gap in
your staff
STEP-2:
Let’s plan TNA activities for validate above summarized idea.
Identified Gaps Level Information to be
gathered Target and method
To gather information
1. [ ]Organisation
[ ]Department
[ ]Staff
2. [ ]Organisation
[ ]Department
[ ]Staff
3. [ ]Organisation
[ ]Department
[ ]Staff
4. [ ]Organisation
[ ]Department
[ ]Staff
5. [ ]Organisation
[ ]Department
[ ]Staff
Exercise
37
Module-4 Instructional Design Basics
Module-1 Human Resource Development (HRD) Framework
Module-2 ADDIE Process Model
Module-3 Phase-1: Training Needs Analysis (TNA)
Module-4 Instructional Design Basics
Module-5 Phase-2: Training Programme Design –Curriculum Design
Module-6 Phase-2: Training Programme Design –Lesson Plan Development
Module-7 Phase-3: Training Resource Development
Module-8 Phase-4: Training Implementation –Training Delivery
Module-9 Phase-4 Training Implementation –Classroom Facilitation
Module-10 Phase-5: Training Evaluation
List of contents of this module:
4.1 Andragogy
4.2 Experiential Learning Model
4.3 PIE Rule
4.4 ARCS Model
4.5 Other Tips
The purpose of any training programme is to deliver the result. Instructional Design
(ID) provides you a map of how to reach this goal. ID is a systematic and
learner-centred approach of effective and efficient teaching and learning to guide
developing effective programme and implementing it by leading participants to a
desired goal.
ID provides various models for effective learning and teaching. You will learn some
of the well-known models such as Andragogy, Experiential Learning Model, PIE Rule,
and ARCS Model, etc. and think of how to apply these models to your sessions.
Combination of effective learning approach mentioned above and systematic design
approach that is ADDIE Process Model would make the best training programme.
At the end of this module, you will be able to
Explain Andragogy, Experiential Learning Model, PIE Rule, and ARCS model
Apply such ID models to training design and delivery
Explain some tips for effective training delivery
Learning Point of This Module
You are here
38
4.6 Summary
4.1 Andragogy
Our participants are the civil servants who are dealing with public services of the country.
They are not students at school. They are adults and have their own job targets and
responsibilities. They participate in the training course in order to develop their capacities and
their sponsors expect improvement in their service quality as a result of the training. We do not
teach and control them in one way but we help them learn, develop their capacities, and solve
their problems themselves. Our approach should not be the same as school teachers. The
Andragogy provides us a lot of advice on our training activities within this context.
The term “Andragogy” was first introduced by Alexander Kapp in 1833 as learning strategies
focused on adults. In his book titled, “The Modern Practice of Adult Education: From Pedagogy to
Andragogy”, it is stated that Andragogy is the art and science of helping adult learning, while
Pedagogy describes how to teach at schools. Its application has been developed by Malcolm
Knowles, USA as the P-MARGE model. P-MARGE describes the difference between teaching
adults who are learning for practical output in their workplaces and teaching students at schools.
P: Adult learners are business oriented. When he/she confirms the benefit to learn, he/she
starts to learn. For example, when an adult feels the need to learn in order to solve
his/her problem, he/she starts to learn.
M: When teaching adults, facilitators should consider all these factors as motivation for
learners.
A: Adult learners want to manage themselves. They prefer to learn in their own style and
time lines. Hence, support should be provided in such a way to support this style.
R: Adult learners start learning from something related to their life or current concern.
G: Adults learn to achieve goals or to solve problems. Hence, the curriculum should include
many problem solving subjects.
E: Adult has his own experience in his life. Such past experiences should be considered.
In our training course, this Andragogy concept should be well considered to make training more
effective.
P: Learners are Practical
M: Learner needs Motivation
A: Learners are Autonomous
R: Learner needs Relevancy
G: Learners are Goal-oriented
E: Learner has life Experience
39
4.2 Experiential Learning Model
Concept of the Experiential Learning Model
In addition to the Andragogy explained in the above, Experiential Learning Model is effective to
apply when we target practitioners like Civil Servants. As 70/20/10 Model2 indicates that 70% of
capacity development comes from on-the-job experiences, while 20% from observations of others
and advice from others, and
10% from reading and
training, this model shows
how learning can be
effectively achieved
through experience by
focusing on the important
role of experience plays in
the learning process.
As it is shown in the
chart above, learners first
have concrete experience,
then taking time to review or reflect, conceptualize it to obtain lessons learned, and finally
experiment by applying lessons learned to a new activity. This model is the work of David A. Kolb.
The process of implementing training following this model is briefly explained below.
Concrete Experience: Make people have concrete experience. The learner must be willing to
2 Learning and Development model based on research by Michael M. Lombardo and Robert W. Eichinger for the
Centre for Creative Leadership.
<Example: Application of “Practical” to session delivery>
Let’s think about how to apply “P: Adult learners are business oriented” in your
session. When you deliver a session on effective delegation, for example, you
should clearly confirm in the beginning how this session will contribute toward
increasing participants’ jobs. You cannot take for granted that all the participants
are aware of the importance of effective delegation. Some participants may
misunderstand that delegation is not necessary for delivering a quality job. You
have to start from explaining how delegation is important for improving the quality
of the Civil Service, or how the quality of outputs can be inefficient because of lack
of delegation, etc.
Concrete Experience
Review and Reflection
Conceptuali
zation
Active Experimentation
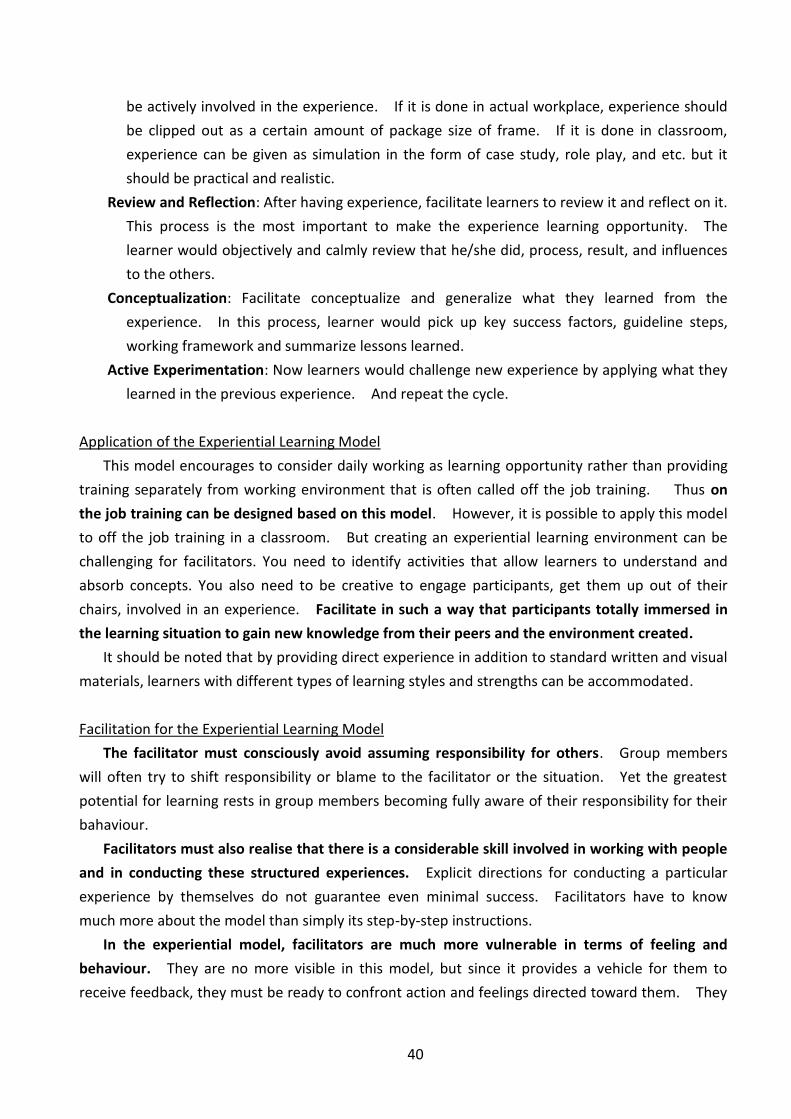
40
be actively involved in the experience. If it is done in actual workplace, experience should
be clipped out as a certain amount of package size of frame. If it is done in classroom,
experience can be given as simulation in the form of case study, role play, and etc. but it
should be practical and realistic.
Review and Reflection: After having experience, facilitate learners to review it and reflect on it.
This process is the most important to make the experience learning opportunity. The
learner would objectively and calmly review that he/she did, process, result, and influences
to the others.
Conceptualization: Facilitate conceptualize and generalize what they learned from the
experience. In this process, learner would pick up key success factors, guideline steps,
working framework and summarize lessons learned.
Active Experimentation: Now learners would challenge new experience by applying what they
learned in the previous experience. And repeat the cycle.
Application of the Experiential Learning Model
This model encourages to consider daily working as learning opportunity rather than providing
training separately from working environment that is often called off the job training. Thus on
the job training can be designed based on this model. However, it is possible to apply this model
to off the job training in a classroom. But creating an experiential learning environment can be
challenging for facilitators. You need to identify activities that allow learners to understand and
absorb concepts. You also need to be creative to engage participants, get them up out of their
chairs, involved in an experience. Facilitate in such a way that participants totally immersed in
the learning situation to gain new knowledge from their peers and the environment created.
It should be noted that by providing direct experience in addition to standard written and visual
materials, learners with different types of learning styles and strengths can be accommodated.
Facilitation for the Experiential Learning Model
The facilitator must consciously avoid assuming responsibility for others. Group members
will often try to shift responsibility or blame to the facilitator or the situation. Yet the greatest
potential for learning rests in group members becoming fully aware of their responsibility for their
bahaviour.
Facilitators must also realise that there is a considerable skill involved in working with people
and in conducting these structured experiences. Explicit directions for conducting a particular
experience by themselves do not guarantee even minimal success. Facilitators have to know
much more about the model than simply its step-by-step instructions.
In the experiential model, facilitators are much more vulnerable in terms of feeling and
behaviour. They are no more visible in this model, but since it provides a vehicle for them to
receive feedback, they must be ready to confront action and feelings directed toward them. They
41
may be unaccustomed to dealing with these behaviours. Facilitators should remember that the
use of the experiential model takes time. They should take care not to crowd the experience,
leaving sufficient time for discussion and summarizing. Effectiveness depends on through
planning.
If facilitators understand the basic components of the experiential model, the most important
skills they can bring to the situation are their ability to be sensitive to people; to know where they
are what they expect, fear, or anticipate; and to select the appropriate leadership style, experience,
content presentation, and timing sequence to fit the diverse needs of the situation.
4.3 PIE Rule
Adults cannot be forced to sit and learn. Even though adults can sit and listen quietly in their
chairs for 1hour or 2 hours, they cannot really learn and understand concepts to the level that they
can apply what they learned. Facilitators must make sessions dynamic and touch the heart of
<Example: Application of Experiential Learning Model to course level>
During the classroom training, facilitate to review participants’ work experience
and conceptualize them every opportunity in relation to each topic instead of one
way lecture. After the training, put the framework to implement what
participants learned in the training to their workplace. Action plan is the best
framework. These participants will be gathered again as the follow up session
after action plan implementation for review & reflection and conceptualization
that is to repeat the Experiential Learning cycle. This is a beautiful
implementation of Experiential Learning Model to a training course.
<Example: Application of Experiential Learning Model to a classroom session>
You can apply this model by including activities such as case study, role play,
hands on exercise, group work, etc. in a session. In case of ethics session, after
explaining ethical principles and guidelines, you can give a short mini case study of
ethical challenges and let them think about it individually. They would apply
instructed knowledge and come up with a conclusion respectively. When each
participant has come up the conclusion, facilitate to review and reflect how each
participant came up with that conclusion. Further facilitate to conceptualize
what happened in the process of decision and summarize so that participants
would obtain lessons learned from his/her own experience of mini case study
discussion. After this process, you can give another case study and let
participants think about it by small groups as active experimentation process.
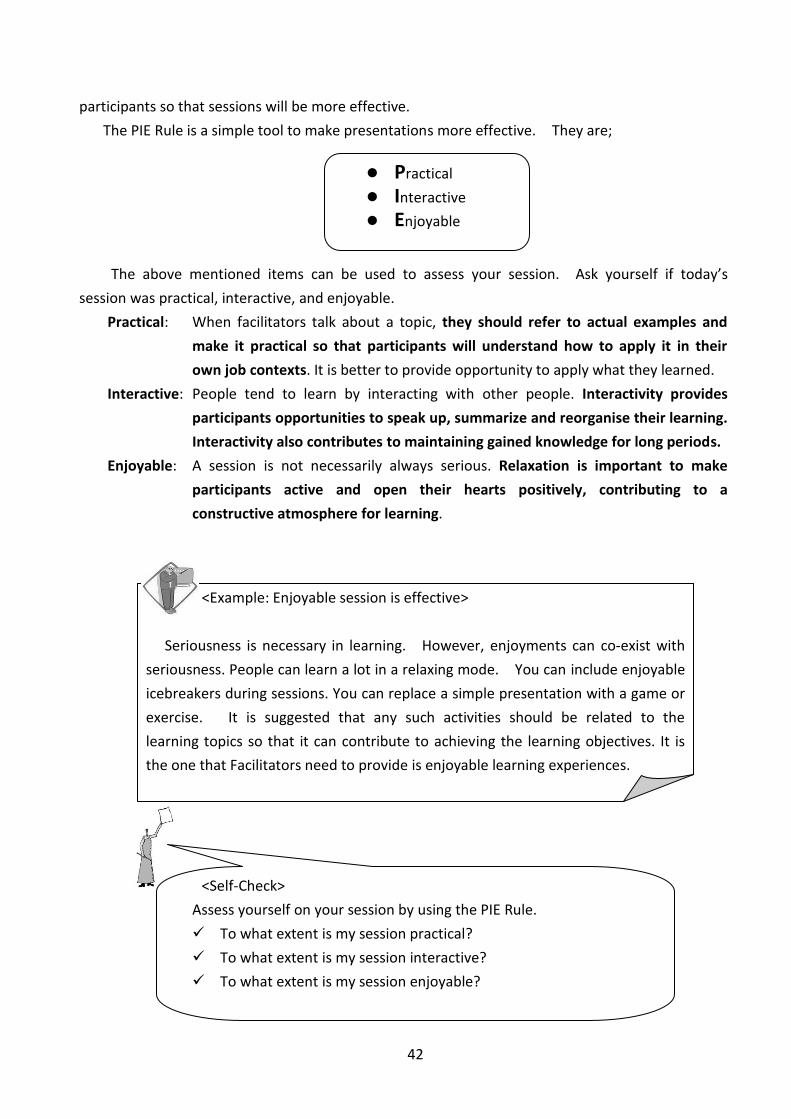
42
participants so that sessions will be more effective.
The PIE Rule is a simple tool to make presentations more effective. They are;
The above mentioned items can be used to assess your session. Ask yourself if today’s
session was practical, interactive, and enjoyable.
Practical: When facilitators talk about a topic, they should refer to actual examples and
make it practical so that participants will understand how to apply it in their
own job contexts. It is better to provide opportunity to apply what they learned.
Interactive: People tend to learn by interacting with other people. Interactivity provides
participants opportunities to speak up, summarize and reorganise their learning.
Interactivity also contributes to maintaining gained knowledge for long periods.
Enjoyable: A session is not necessarily always serious. Relaxation is important to make
participants active and open their hearts positively, contributing to a
constructive atmosphere for learning.
<Self-Check>
Assess yourself on your session by using the PIE Rule.
To what extent is my session practical?
To what extent is my session interactive?
To what extent is my session enjoyable?
<Example: Enjoyable session is effective>
Seriousness is necessary in learning. However, enjoyments can co-exist with
seriousness. People can learn a lot in a relaxing mode. You can include enjoyable
icebreakers during sessions. You can replace a simple presentation with a game or
exercise. It is suggested that any such activities should be related to the
learning topics so that it can contribute to achieving the learning objectives. It is
the one that Facilitators need to provide is enjoyable learning experiences.
Practical
Interactive
Enjoyable
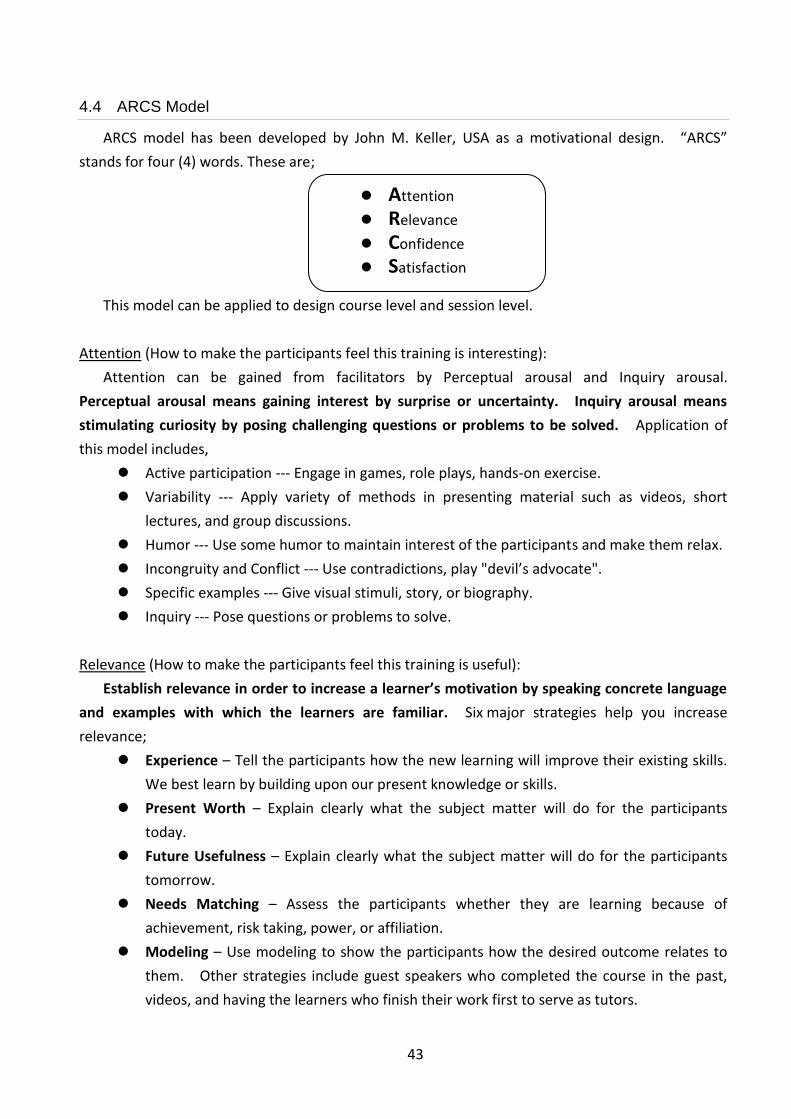
43
4.4 ARCS Model
ARCS model has been developed by John M. Keller, USA as a motivational design. “ARCS”
stands for four (4) words. These are;
This model can be applied to design course level and session level.
Attention (How to make the participants feel this training is interesting):
Attention can be gained from facilitators by Perceptual arousal and Inquiry arousal.
Perceptual arousal means gaining interest by surprise or uncertainty. Inquiry arousal means
stimulating curiosity by posing challenging questions or problems to be solved. Application of
this model includes,
Active participation --- Engage in games, role plays, hands-on exercise.
Variability --- Apply variety of methods in presenting material such as videos, short
lectures, and group discussions.
Humor --- Use some humor to maintain interest of the participants and make them relax.
Incongruity and Conflict --- Use contradictions, play "devil’s advocate".
Specific examples --- Give visual stimuli, story, or biography.
Inquiry --- Pose questions or problems to solve.
Relevance (How to make the participants feel this training is useful):
Establish relevance in order to increase a learner’s motivation by speaking concrete language
and examples with which the learners are familiar. Six major strategies help you increase
relevance;
Experience – Tell the participants how the new learning will improve their existing skills.
We best learn by building upon our present knowledge or skills.
Present Worth – Explain clearly what the subject matter will do for the participants
today.
Future Usefulness – Explain clearly what the subject matter will do for the participants
tomorrow.
Needs Matching – Assess the participants whether they are learning because of
achievement, risk taking, power, or affiliation.
Modeling – Use modeling to show the participants how the desired outcome relates to
them. Other strategies include guest speakers who completed the course in the past,
videos, and having the learners who finish their work first to serve as tutors.
Attention
Relevance
Confidence
Satisfaction
44
Choice – Allow the participants to use different methods to pursue their work or allow
choice in how they organise it.
Confidence (How to support the participants to be successful):
Give the participants confidence that they can achieve the goal set. Four major strategies help you
increase confidence:
Provide objectives & prerequisites --- Help the participants estimate the probability of
success by presenting performance requirements and evaluation criteria. Ensure the
participants are aware of performance requirements and evaluative criteria.
Increase levels of difficulty --- Allow the participants small steps of growth during the
learning process by increasing levels of difficulty step by step. Be careful not to make
things too difficult. No one will want to continue. Small successes along with
increasing levels of difficulty will build learner confidence and keep the learners engaged.
Provide feedback --- Help the participants clearly understand what information they
understand and where they may need additional learning.
Learner control --- Make the participants understand that there is a direct correlation
between the amount of effort made and the amount of skill and knowledge gained from
that experience.
Satisfaction (How to make the participants satisfied and motivated to continue to learn):
Satisfy the participants by providing some type of rewards such as a sense of achievement, or
praise from others. Three main strategies help you promote satisfaction:
Natural Consequences --- Provide the participants with a realistic environment in which
they will apply what they learned and the skills acquired. Methods include case studies,
role-plays, simulations, and games.
Positive consequences --- Provide the participants with rewards or feedback that will
encourage them to continue to achieve the target. Positive comments, prizes,
certificates, even cash can be an effective positive consequences. However, do not
patronize the learner by over-rewarding easy tasks.
Equity --- Maintain consistent standards and consequences for success.
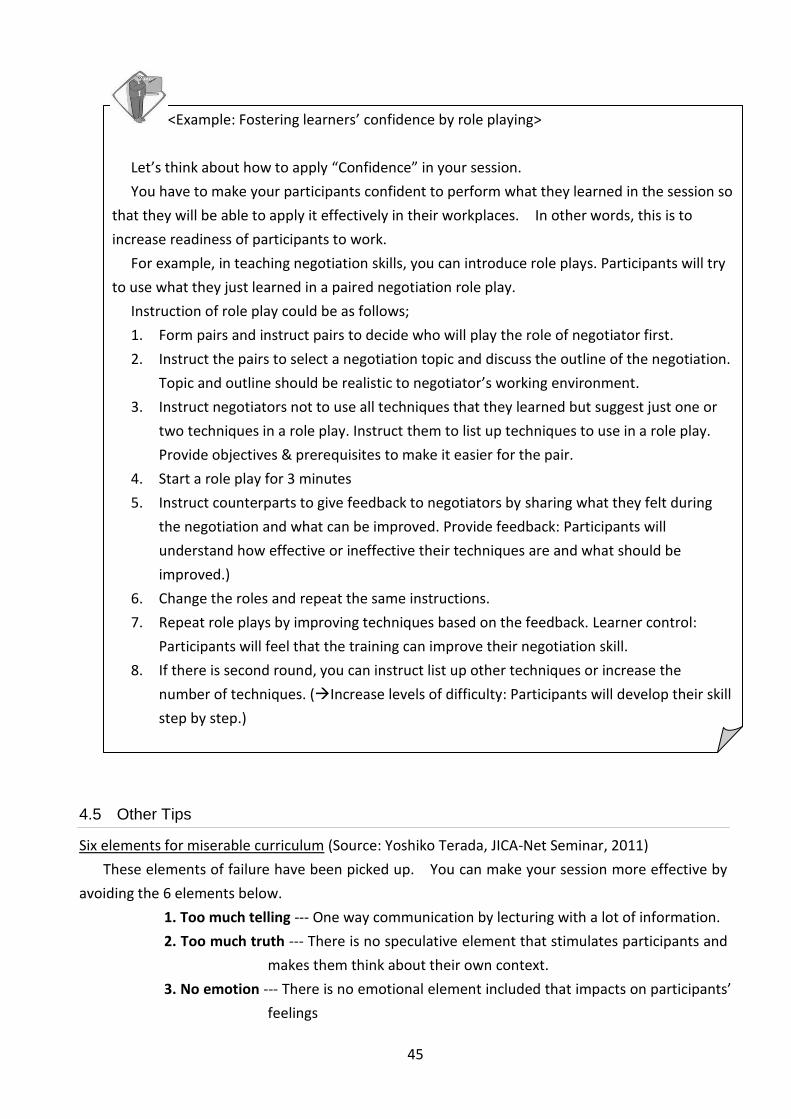
45
4.5 Other Tips
Six elements for miserable curriculum (Source: Yoshiko Terada, JICA-Net Seminar, 2011)
These elements of failure have been picked up. You can make your session more effective by
avoiding the 6 elements below.
1. Too much telling --- One way communication by lecturing with a lot of information.
2. Too much truth --- There is no speculative element that stimulates participants and
makes them think about their own context.
3. No emotion --- There is no emotional element included that impacts on participants’
feelings
<Example: Fostering learners’ confidence by role playing>
Let’s think about how to apply “Confidence” in your session.
You have to make your participants confident to perform what they learned in the session so
that they will be able to apply it effectively in their workplaces. In other words, this is to
increase readiness of participants to work.
For example, in teaching negotiation skills, you can introduce role plays. Participants will try
to use what they just learned in a paired negotiation role play.
Instruction of role play could be as follows;
1. Form pairs and instruct pairs to decide who will play the role of negotiator first.
2. Instruct the pairs to select a negotiation topic and discuss the outline of the negotiation.
Topic and outline should be realistic to negotiator’s working environment.
3. Instruct negotiators not to use all techniques that they learned but suggest just one or
two techniques in a role play. Instruct them to list up techniques to use in a role play.
Provide objectives & prerequisites to make it easier for the pair.
4. Start a role play for 3 minutes
5. Instruct counterparts to give feedback to negotiators by sharing what they felt during
the negotiation and what can be improved. Provide feedback: Participants will
understand how effective or ineffective their techniques are and what should be
improved.)
6. Change the roles and repeat the same instructions.
7. Repeat role plays by improving techniques based on the feedback. Learner control:
Participants will feel that the training can improve their negotiation skill.
8. If there is second round, you can instruct list up other techniques or increase the
number of techniques. (Increase levels of difficulty: Participants will develop their skill
step by step.)

46
4. No doing --- Participants are not given opportunities to try what they have learned.5.
No failure --- There is no chance to make mistakes by trying what they
have learned.
6. No time --- Enough time has not been allocated and so participants would be
frustrated with activities that are rushed.
Three domains for learning: KSA Model
Learning is divided into 3 categories below:
Knowledge (Cognitive Domain): What participants will be able to understand?
Facilitators will ask themselves what areas of knowledge they want participants to
understand at the end of a session.
Skill (Psychomotor Domain): What participants will be able to do? Facilitators will ask
themselves what skills they want participants to actually exhibit at the end of a session.
Attitude (Affective Domain): What participants will be able to feel? Facilitators will ask
themselves what feelings they want participants to have at the end of a session.
It is important to design the programme or session with these three domains in mind. Your
strategy towards ensuring that participants have acquired new knowledge, skills and attitude has to
be clearly spelt out.
Ability
Skill
Knowldege
Attitude
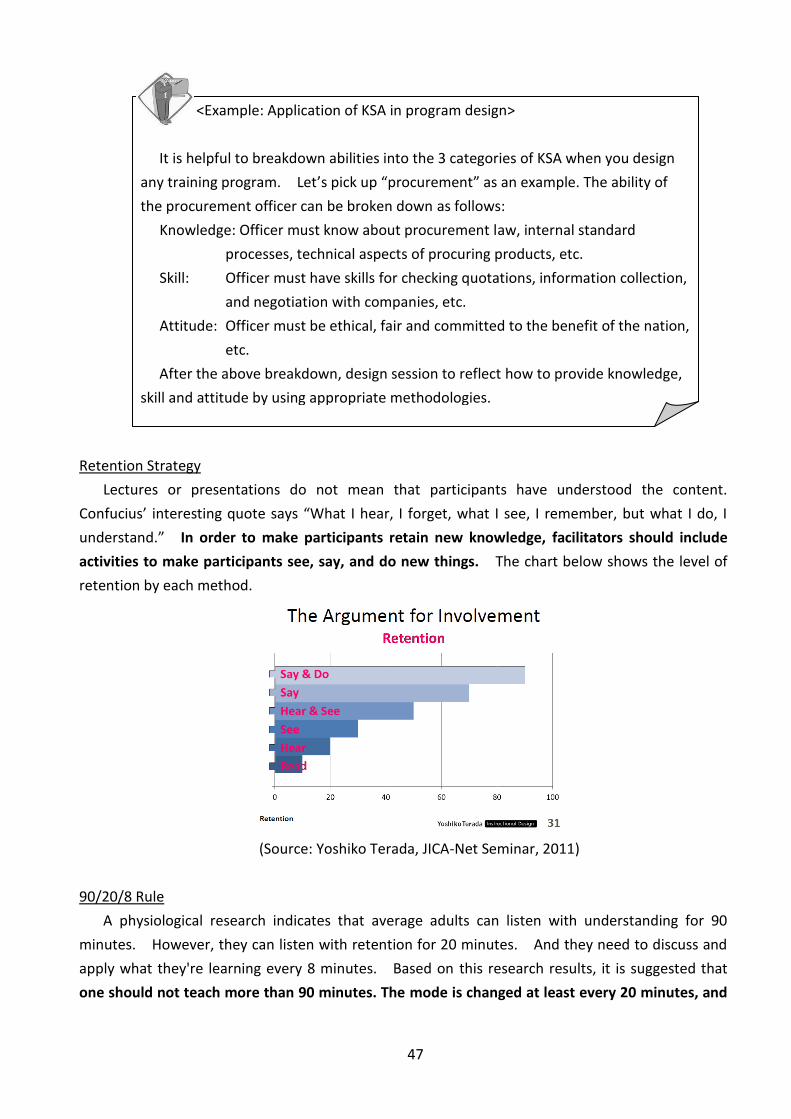
47
Retention Strategy
Lectures or presentations do not mean that participants have understood the content.
Confucius’ interesting quote says “What I hear, I forget, what I see, I remember, but what I do, I
understand.” In order to make participants retain new knowledge, facilitators should include
activities to make participants see, say, and do new things. The chart below shows the level of
retention by each method.
(Source: Yoshiko Terada, JICA-Net Seminar, 2011)
90/20/8 Rule
A physiological research indicates that average adults can listen with understanding for 90
minutes. However, they can listen with retention for 20 minutes. And they need to discuss and
apply what they're learning every 8 minutes. Based on this research results, it is suggested that
one should not teach more than 90 minutes. The mode is changed at least every 20 minutes, and
<Example: Application of KSA in program design>
It is helpful to breakdown abilities into the 3 categories of KSA when you design
any training program. Let’s pick up “procurement” as an example. The ability of
the procurement officer can be broken down as follows:
Knowledge: Officer must know about procurement law, internal standard
processes, technical aspects of procuring products, etc.
Skill: Officer must have skills for checking quotations, information collection,
and negotiation with companies, etc.
Attitude: Officer must be ethical, fair and committed to the benefit of the nation,
etc.
After the above breakdown, design session to reflect how to provide knowledge,
skill and attitude by using appropriate methodologies.
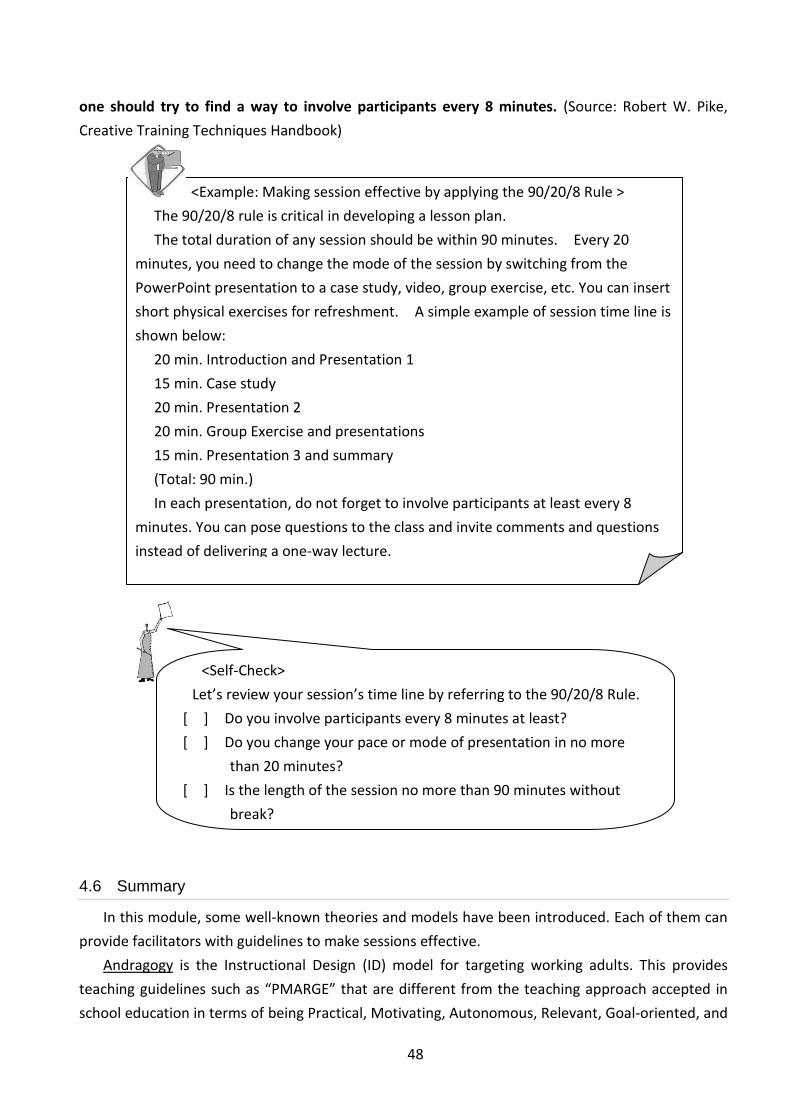
48
one should try to find a way to involve participants every 8 minutes. (Source: Robert W. Pike,
Creative Training Techniques Handbook)
4.6 Summary
In this module, some well-known theories and models have been introduced. Each of them can
provide facilitators with guidelines to make sessions effective.
Andragogy is the Instructional Design (ID) model for targeting working adults. This provides
teaching guidelines such as “PMARGE” that are different from the teaching approach accepted in
school education in terms of being Practical, Motivating, Autonomous, Relevant, Goal-oriented, and
<Self-Check>
Let’s review your session’s time line by referring to the 90/20/8 Rule.
[ ] Do you involve participants every 8 minutes at least?
[ ] Do you change your pace or mode of presentation in no more
than 20 minutes?
[ ] Is the length of the session no more than 90 minutes without
break?
<Example: Making session effective by applying the 90/20/8 Rule >
The 90/20/8 rule is critical in developing a lesson plan.
The total duration of any session should be within 90 minutes. Every 20
minutes, you need to change the mode of the session by switching from the
PowerPoint presentation to a case study, video, group exercise, etc. You can insert
short physical exercises for refreshment. A simple example of session time line is
shown below:
20 min. Introduction and Presentation 1
15 min. Case study
20 min. Presentation 2
20 min. Group Exercise and presentations
15 min. Presentation 3 and summary
(Total: 90 min.)
In each presentation, do not forget to involve participants at least every 8
minutes. You can pose questions to the class and invite comments and questions
instead of delivering a one-way lecture.
49
sharing life experiences.
Experiential Learning Model is focusing on the concrete experience and reviews it for obtaining
lessons learned and applies them. There are 4 elements of this model that are Concrete
Experience, Review and Reflection, Conceptualization, and Active Experimentation.
PIE Rule is the simple check list to make session effective. They are Practical,
Interesting/Interactive, and Enjoyable.
ARCS Model is the one of the representing one among Instructional Design models. This ARCS
model suggests that sessions can be made effective by considering four points namely; Attention,
Relevance, Confidence, and Satisfaction.
Other ID tips include the 6 elements for miserable curriculum, KSA Model, Retention strategy,
and 90/20/8 Rule.
Facilitators should apply these models when they plan and deliver their sessions in order to
improve them.
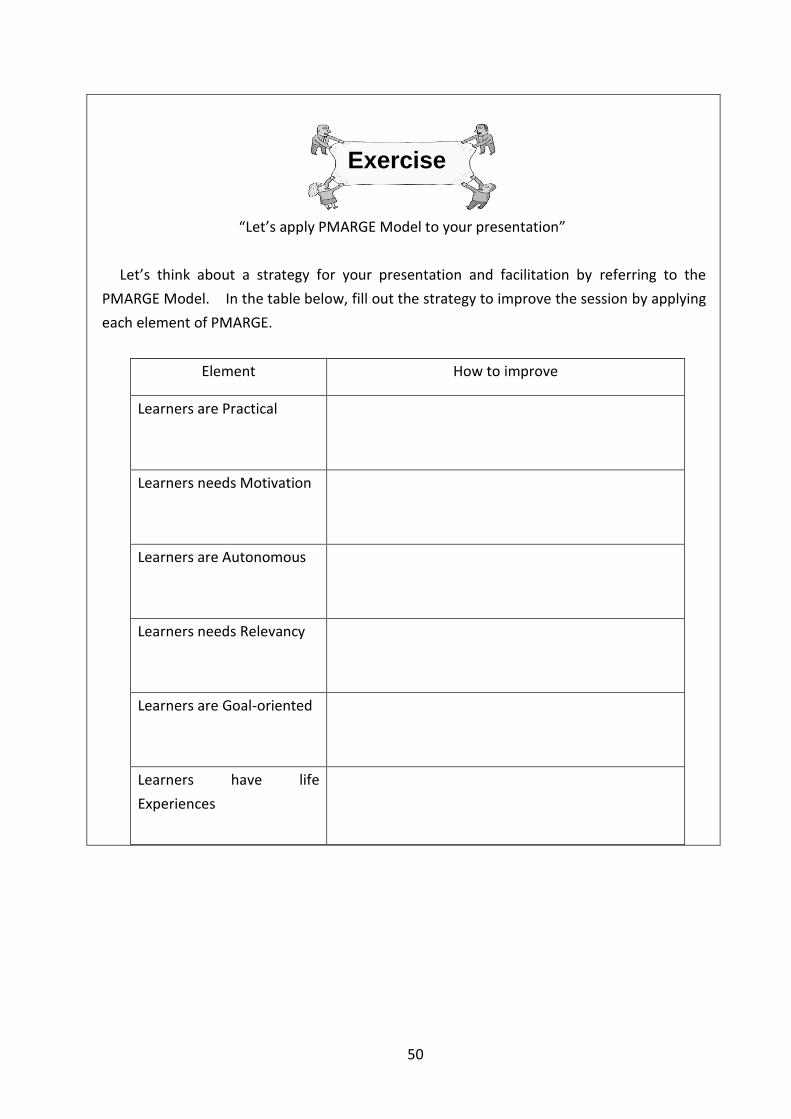
50
“Let’s apply PMARGE Model to your presentation”
Let’s think about a strategy for your presentation and facilitation by referring to the
PMARGE Model. In the table below, fill out the strategy to improve the session by applying
each element of PMARGE.
Element How to improve
Learners are Practical
Learners needs Motivation
Learners are Autonomous
Learners needs Relevancy
Learners are Goal-oriented
Learners have life
Experiences
Exercise
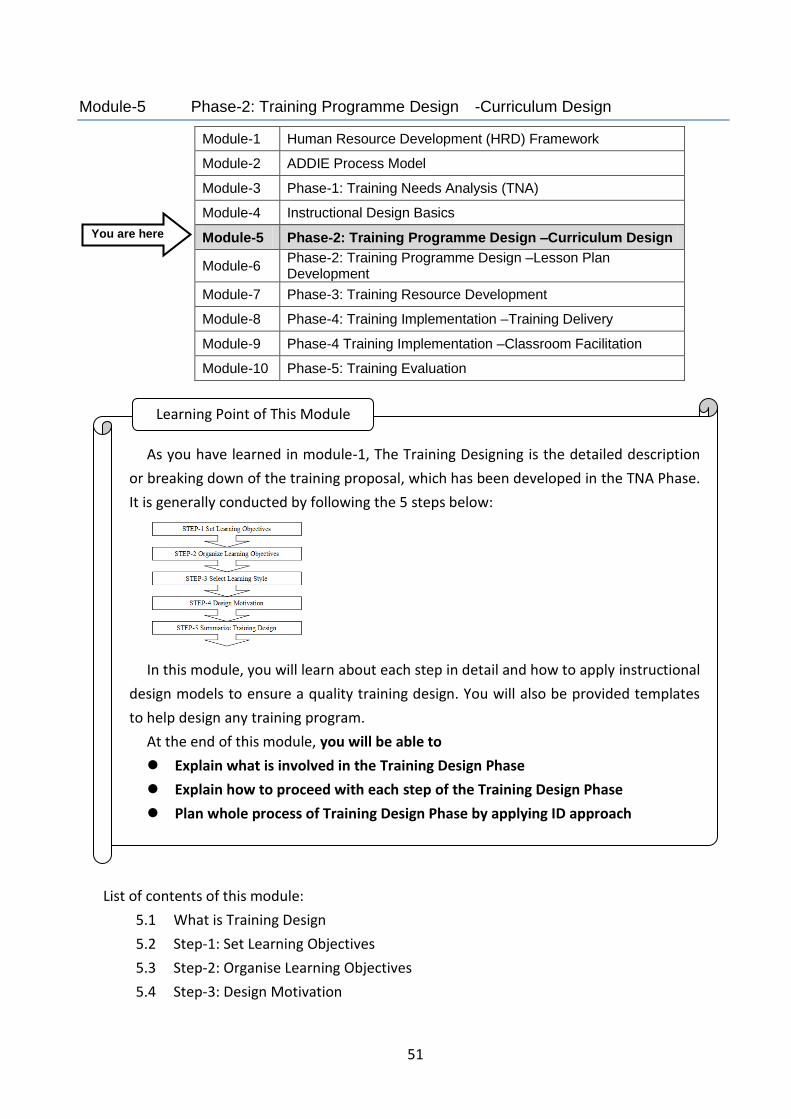
51
Module-5 Phase-2: Training Programme Design -Curriculum Design
Module-1 Human Resource Development (HRD) Framework
Module-2 ADDIE Process Model
Module-3 Phase-1: Training Needs Analysis (TNA)
Module-4 Instructional Design Basics
Module-5 Phase-2: Training Programme Design –Curriculum Design
Module-6 Phase-2: Training Programme Design –Lesson Plan Development
Module-7 Phase-3: Training Resource Development
Module-8 Phase-4: Training Implementation –Training Delivery
Module-9 Phase-4 Training Implementation –Classroom Facilitation
Module-10 Phase-5: Training Evaluation
List of contents of this module:
5.1 What is Training Design
5.2 Step-1: Set Learning Objectives
5.3 Step-2: Organise Learning Objectives
5.4 Step-3: Design Motivation
As you have learned in module-1, The Training Designing is the detailed description
or breaking down of the training proposal, which has been developed in the TNA Phase.
It is generally conducted by following the 5 steps below:
In this module, you will learn about each step in detail and how to apply instructional
design models to ensure a quality training design. You will also be provided templates
to help design any training program.
At the end of this module, you will be able to
Explain what is involved in the Training Design Phase
Explain how to proceed with each step of the Training Design Phase
Plan whole process of Training Design Phase by applying ID approach
Learning Point of This Module
You are here

52
5.5 Summary
5.1 What is Training Design?
The training course is designed based on the training proposal which has been developed in the
prior phase of the Training Needs Analysis. The results of the training needs analysis should be
utilized for an effective programme. In instances where there appears to be some missing
information, it is recommended that the training needs analysis phase is revisited and more
research for additional information carried out. This phase generally has 5 steps outlined below.
From Step-1 to Step-3 is explained in the module-4 “Phase-2: Training Programme Design
–Curriculum Design”, and from Step-4 to Step-5 is explained in the Module-5 “Phase-2: Training
Programme Design –Lesson Plan Development”.
5.2 Step-1: Set Learning Objectives
What are learning objectives
The overall goal of the training is what is to be achieved at the end of the training course. On the
other hand, learning objectives of the course (Course Objectives) are the immediate outputs of the
training. Learning objectives describe participants’ state right after the training. This covers
three areas of competency namely; Knowledge, Skill, and Attitude (KSA). It describes what
participants will be able to know/understand, do, and feel. Simillary, it is also called the three
domains of learning objectives namely Cognitive domain, Affective domain, and Psychomotor
domain. The cognitive domain is the knowledge that learners are to acquire, the affective domain
describe the attitudes and feelings that learners are expected to develop, and the Psychomotor
domain is the skills that learners are to master. Objectives often starts by a sentence such as “At
the end of the course, participants will be able to”.
Here are some samples of learning objectives;
At the end of the course, participants will be able to list three benefits of instructional
design to the effectivenss of training
Curriculum Design
STEP-1 Set Learning Objectives
STEP-2 Organise Learning Objectives
STEP-3 Design Motivation
STEP-4 Develop Lesson Plans
STEP-5 Summarize Training Design
Lesson Plan Development
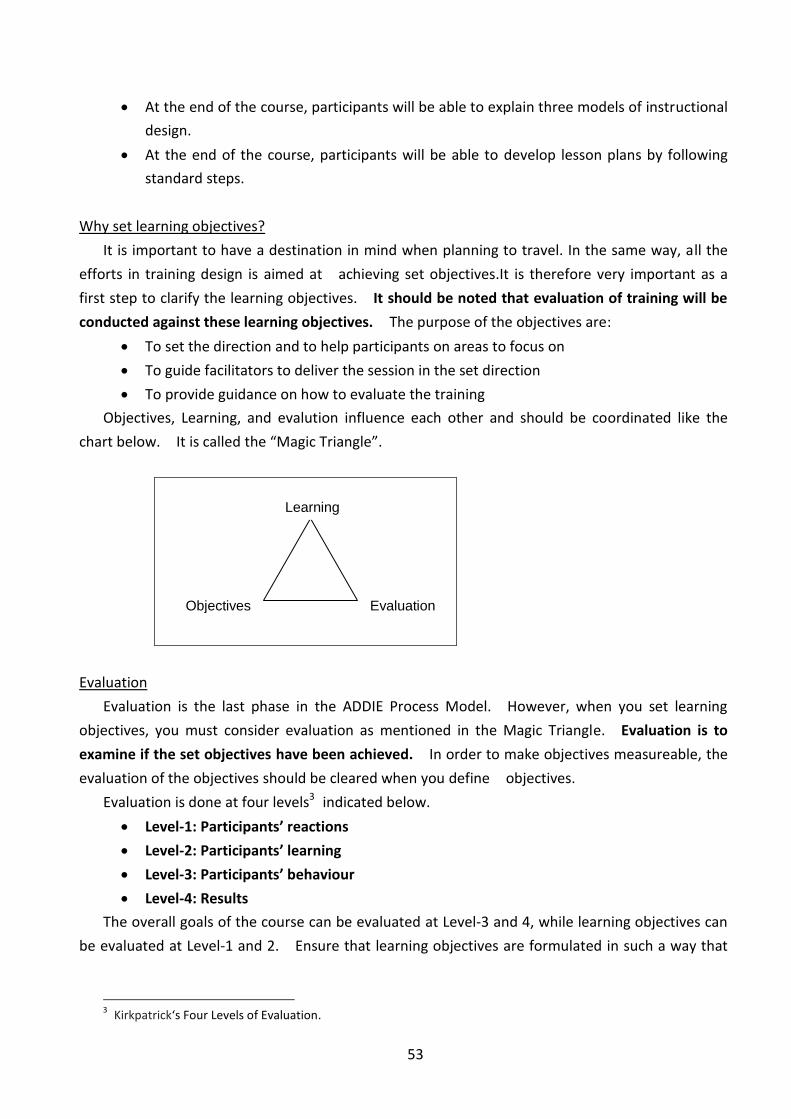
53
At the end of the course, participants will be able to explain three models of instructional
design.
At the end of the course, participants will be able to develop lesson plans by following
standard steps.
Why set learning objectives?
It is important to have a destination in mind when planning to travel. In the same way, all the
efforts in training design is aimed at achieving set objectives.It is therefore very important as a
first step to clarify the learning objectives. It should be noted that evaluation of training will be
conducted against these learning objectives. The purpose of the objectives are:
To set the direction and to help participants on areas to focus on
To guide facilitators to deliver the session in the set direction
To provide guidance on how to evaluate the training
Objectives, Learning, and evalution influence each other and should be coordinated like the
chart below. It is called the “Magic Triangle”.
Evaluation
Evaluation is the last phase in the ADDIE Process Model. However, when you set learning
objectives, you must consider evaluation as mentioned in the Magic Triangle. Evaluation is to
examine if the set objectives have been achieved. In order to make objectives measureable, the
evaluation of the objectives should be cleared when you define objectives.
Evaluation is done at four levels3 indicated below.
Level-1: Participants’ reactions
Level-2: Participants’ learning
Level-3: Participants’ behaviour
Level-4: Results
The overall goals of the course can be evaluated at Level-3 and 4, while learning objectives can
be evaluated at Level-1 and 2. Ensure that learning objectives are formulated in such a way that
3 Kirkpatrick‘s Four Levels of Evaluation.
Learning
Evaluation Objectives
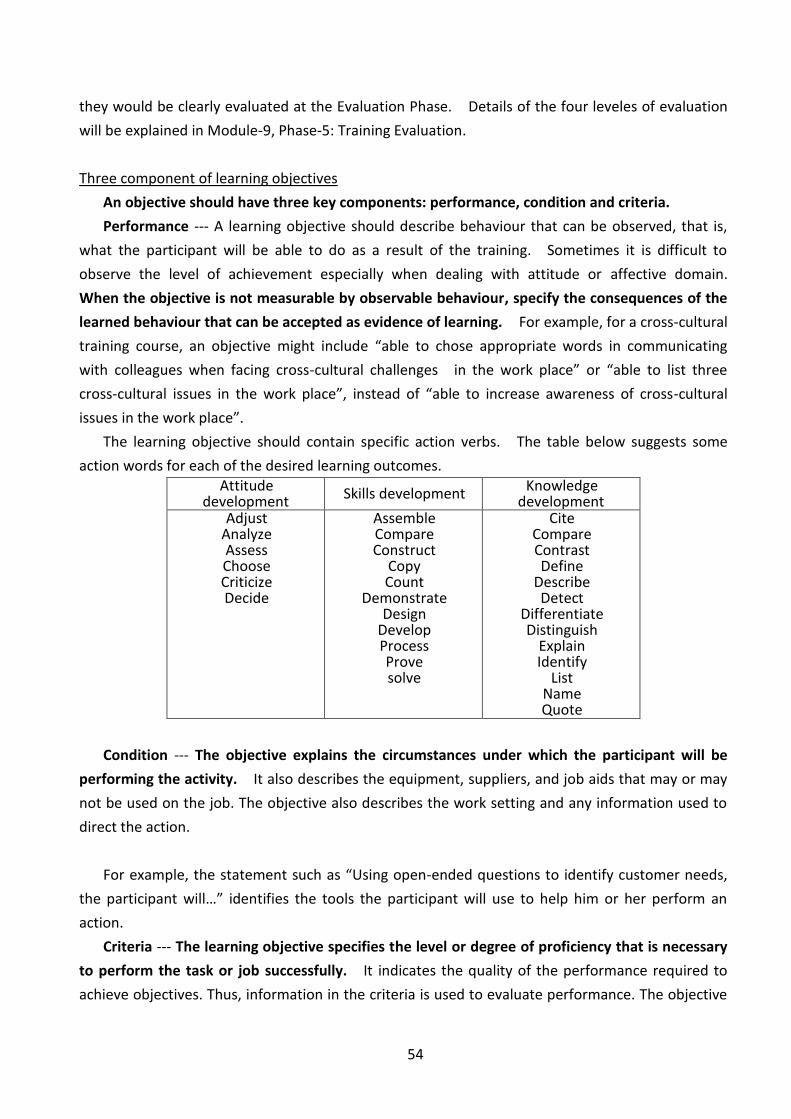
54
they would be clearly evaluated at the Evaluation Phase. Details of the four leveles of evaluation
will be explained in Module-9, Phase-5: Training Evaluation.
Three component of learning objectives
An objective should have three key components: performance, condition and criteria.
Performance --- A learning objective should describe behaviour that can be observed, that is,
what the participant will be able to do as a result of the training. Sometimes it is difficult to
observe the level of achievement especially when dealing with attitude or affective domain.
When the objective is not measurable by observable behaviour, specify the consequences of the
learned behaviour that can be accepted as evidence of learning. For example, for a cross-cultural
training course, an objective might include “able to chose appropriate words in communicating
with colleagues when facing cross-cultural challenges in the work place” or “able to list three
cross-cultural issues in the work place”, instead of “able to increase awareness of cross-cultural
issues in the work place”.
The learning objective should contain specific action verbs. The table below suggests some
action words for each of the desired learning outcomes. Attitude
development Skills development Knowledge development
Adjust Analyze Assess Choose Criticize Decide
Assemble Compare Construct
Copy Count
Demonstrate Design
Develop Process Prove solve
Cite Compare Contrast Define
Describe Detect
Differentiate Distinguish
Explain Identify
List Name Quote
Condition --- The objective explains the circumstances under which the participant will be
performing the activity. It also describes the equipment, suppliers, and job aids that may or may
not be used on the job. The objective also describes the work setting and any information used to
direct the action.
For example, the statement such as “Using open-ended questions to identify customer needs,
the participant will…” identifies the tools the participant will use to help him or her perform an
action.
Criteria --- The learning objective specifies the level or degree of proficiency that is necessary
to perform the task or job successfully. It indicates the quality of the performance required to
achieve objectives. Thus, information in the criteria is used to evaluate performance. The objective
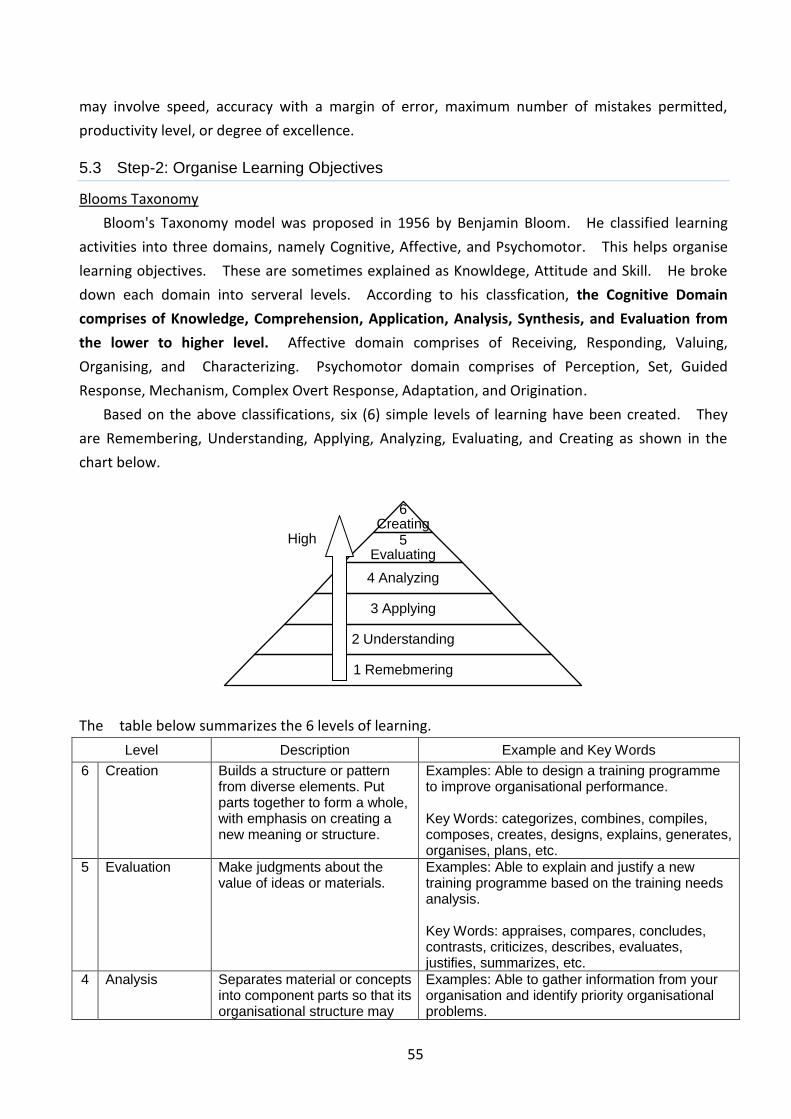
55
may involve speed, accuracy with a margin of error, maximum number of mistakes permitted,
productivity level, or degree of excellence.
5.3 Step-2: Organise Learning Objectives
Blooms Taxonomy
Bloom's Taxonomy model was proposed in 1956 by Benjamin Bloom. He classified learning
activities into three domains, namely Cognitive, Affective, and Psychomotor. This helps organise
learning objectives. These are sometimes explained as Knowldege, Attitude and Skill. He broke
down each domain into serveral levels. According to his classfication, the Cognitive Domain
comprises of Knowledge, Comprehension, Application, Analysis, Synthesis, and Evaluation from
the lower to higher level. Affective domain comprises of Receiving, Responding, Valuing,
Organising, and Characterizing. Psychomotor domain comprises of Perception, Set, Guided
Response, Mechanism, Complex Overt Response, Adaptation, and Origination.
Based on the above classifications, six (6) simple levels of learning have been created. They
are Remembering, Understanding, Applying, Analyzing, Evaluating, and Creating as shown in the
chart below.
The table below summarizes the 6 levels of learning.
Level Description Example and Key Words
6 Creation Builds a structure or pattern from diverse elements. Put parts together to form a whole, with emphasis on creating a new meaning or structure.
Examples: Able to design a training programme to improve organisational performance. Key Words: categorizes, combines, compiles, composes, creates, designs, explains, generates, organises, plans, etc.
5 Evaluation Make judgments about the value of ideas or materials.
Examples: Able to explain and justify a new training programme based on the training needs analysis. Key Words: appraises, compares, concludes, contrasts, criticizes, describes, evaluates, justifies, summarizes, etc.
4 Analysis Separates material or concepts into component parts so that its organisational structure may
Examples: Able to gather information from your organisation and identify priority organisational problems.
6 Creating
5 Evaluating
4 Analyzing
3 Applying
2 Understanding
1 Remebmering
High
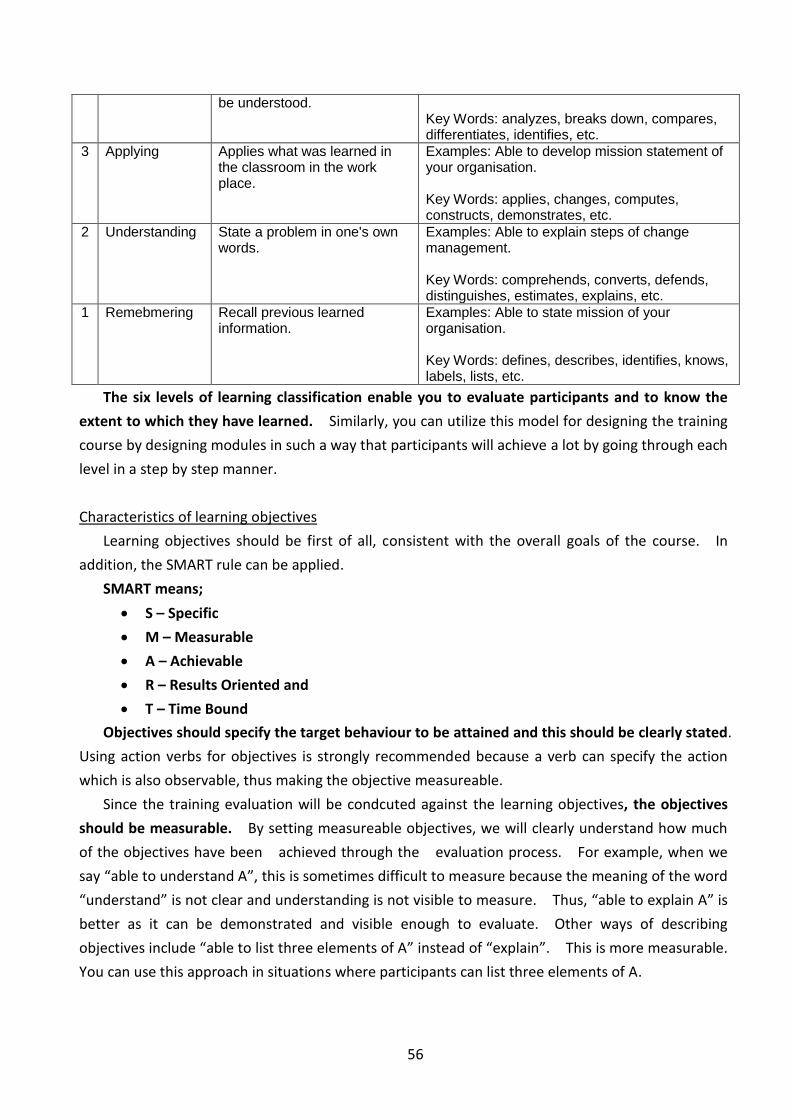
56
be understood. Key Words: analyzes, breaks down, compares, differentiates, identifies, etc.
3 Applying Applies what was learned in the classroom in the work place.
Examples: Able to develop mission statement of your organisation. Key Words: applies, changes, computes, constructs, demonstrates, etc.
2 Understanding State a problem in one's own words.
Examples: Able to explain steps of change management. Key Words: comprehends, converts, defends, distinguishes, estimates, explains, etc.
1 Remebmering
Recall previous learned information.
Examples: Able to state mission of your organisation. Key Words: defines, describes, identifies, knows, labels, lists, etc.
The six levels of learning classification enable you to evaluate participants and to know the
extent to which they have learned. Similarly, you can utilize this model for designing the training
course by designing modules in such a way that participants will achieve a lot by going through each
level in a step by step manner.
Characteristics of learning objectives
Learning objectives should be first of all, consistent with the overall goals of the course. In
addition, the SMART rule can be applied.
SMART means;
S – Specific
M – Measurable
A – Achievable
R – Results Oriented and
T – Time Bound
Objectives should specify the target behaviour to be attained and this should be clearly stated.
Using action verbs for objectives is strongly recommended because a verb can specify the action
which is also observable, thus making the objective measureable.
Since the training evaluation will be condcuted against the learning objectives, the objectives
should be measurable. By setting measureable objectives, we will clearly understand how much
of the objectives have been achieved through the evaluation process. For example, when we
say “able to understand A”, this is sometimes difficult to measure because the meaning of the word
“understand” is not clear and understanding is not visible to measure. Thus, “able to explain A” is
better as it can be demonstrated and visible enough to evaluate. Other ways of describing
objectives include “able to list three elements of A” instead of “explain”. This is more measurable.
You can use this approach in situations where participants can list three elements of A.
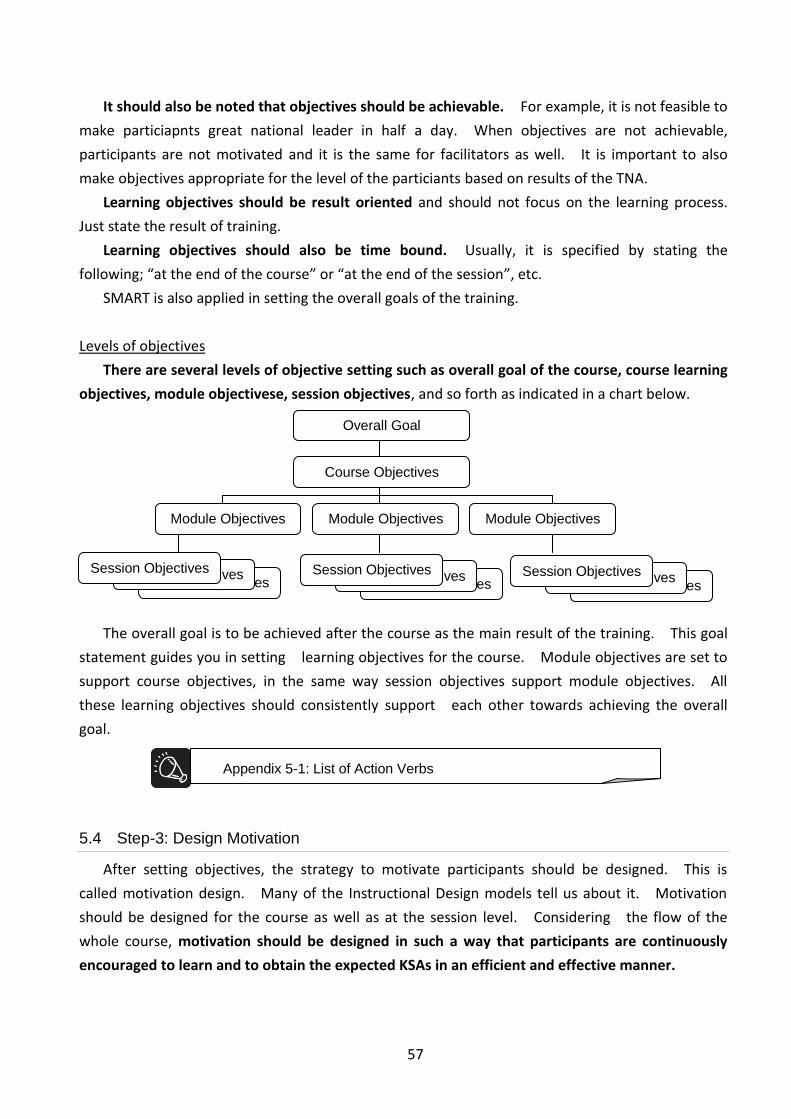
57
It should also be noted that objectives should be achievable. For example, it is not feasible to
make particiapnts great national leader in half a day. When objectives are not achievable,
participants are not motivated and it is the same for facilitators as well. It is important to also
make objectives appropriate for the level of the particiants based on results of the TNA.
Learning objectives should be result oriented and should not focus on the learning process.
Just state the result of training.
Learning objectives should also be time bound. Usually, it is specified by stating the
following; “at the end of the course” or “at the end of the session”, etc.
SMART is also applied in setting the overall goals of the training.
Levels of objectives
There are several levels of objective setting such as overall goal of the course, course learning
objectives, module objectivese, session objectives, and so forth as indicated in a chart below.
The overall goal is to be achieved after the course as the main result of the training. This goal
statement guides you in setting learning objectives for the course. Module objectives are set to
support course objectives, in the same way session objectives support module objectives. All
these learning objectives should consistently support each other towards achieving the overall
goal.
5.4 Step-3: Design Motivation
After setting objectives, the strategy to motivate participants should be designed. This is
called motivation design. Many of the Instructional Design models tell us about it. Motivation
should be designed for the course as well as at the session level. Considering the flow of the
whole course, motivation should be designed in such a way that participants are continuously
encouraged to learn and to obtain the expected KSAs in an efficient and effective manner.
Session Objectives Session Objectives
Overall Goal
Course Objectives
Module Objectives Module Objectives Module Objectives
Session Objectives Session Objectives
Session Objectives Session Objectives Session Objectives
Session Objectives Session Objectives
Appendix 5-1: List of Action Verbs
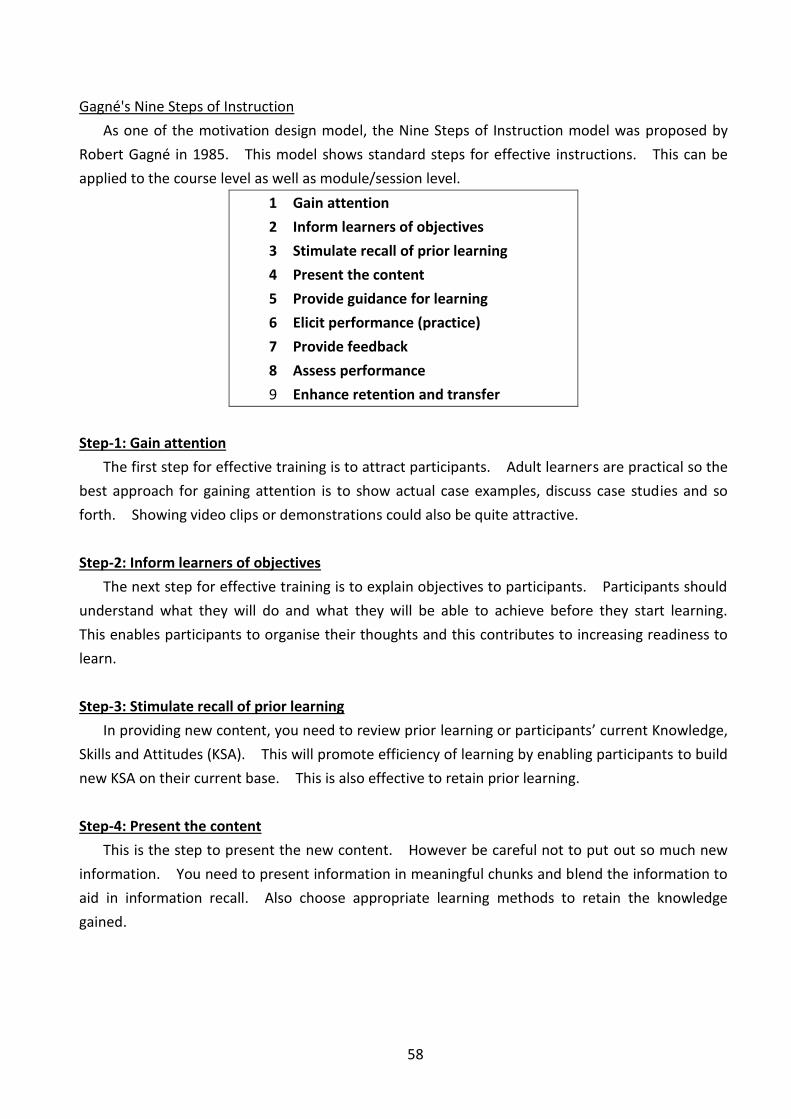
58
Gagné's Nine Steps of Instruction
As one of the motivation design model, the Nine Steps of Instruction model was proposed by
Robert Gagné in 1985. This model shows standard steps for effective instructions. This can be
applied to the course level as well as module/session level.
1 Gain attention
2 Inform learners of objectives
3 Stimulate recall of prior learning
4 Present the content
5 Provide guidance for learning
6 Elicit performance (practice)
7 Provide feedback
8 Assess performance
9 Enhance retention and transfer
Step-1: Gain attention
The first step for effective training is to attract participants. Adult learners are practical so the
best approach for gaining attention is to show actual case examples, discuss case studies and so
forth. Showing video clips or demonstrations could also be quite attractive.
Step-2: Inform learners of objectives
The next step for effective training is to explain objectives to participants. Participants should
understand what they will do and what they will be able to achieve before they start learning.
This enables participants to organise their thoughts and this contributes to increasing readiness to
learn.
Step-3: Stimulate recall of prior learning
In providing new content, you need to review prior learning or participants’ current Knowledge,
Skills and Attitudes (KSA). This will promote efficiency of learning by enabling participants to build
new KSA on their current base. This is also effective to retain prior learning.
Step-4: Present the content
This is the step to present the new content. However be careful not to put out so much new
information. You need to present information in meaningful chunks and blend the information to
aid in information recall. Also choose appropriate learning methods to retain the knowledge
gained.
59
Step-5: Provide guidance for learning
In addition to the content, you need to provide guidance on how to learn to participants.
Effective communication between facilitators and participants is critical in this step. Using visual
aids, actual examples, etc. can provide effective guidance.
Step-6: Elicit performance (practice)
After providing the contents and guidance, it is important to create the opportunity for
participants to practice by utilizing the newly acquired KSA. Participants would have to be helped
apply the knowledge gained to their own contexts.
Step-7: Provide feedback
Provide feedback on the performance of participants to make them appreciate the extent to
which they have learned. Feedback can be through tests, quizzes or verbal comments. Feedback
should be specific in such a way that participants can clearly identify what should be changed to
improve their performance. “You were doing well” is not specific, but “Your communication to Mr.
X was not clear enough because you didn’t mention Y” is the right feedback so that participants can
understand the specific action to be taken.
Step-8: Assess performance
At the end of the programme/module/session, you need to assess performance of participants
in order to evaluate whether the learning objectives have been achieved. Assessments could be in
the form of knowledge tests, demonstration tests, questionnaires, etc. Results should be given to
participants for them to appreciate how well they have performed.
Step-9: Enhance retention and transfer
In order to retain what has been learned, additional practice at a later time should be
encouraged. Before concluding the training course, it is important to help participants apply what
they learned to their actual work while thinking through ways through which the KSA acquired can
be shared with others.
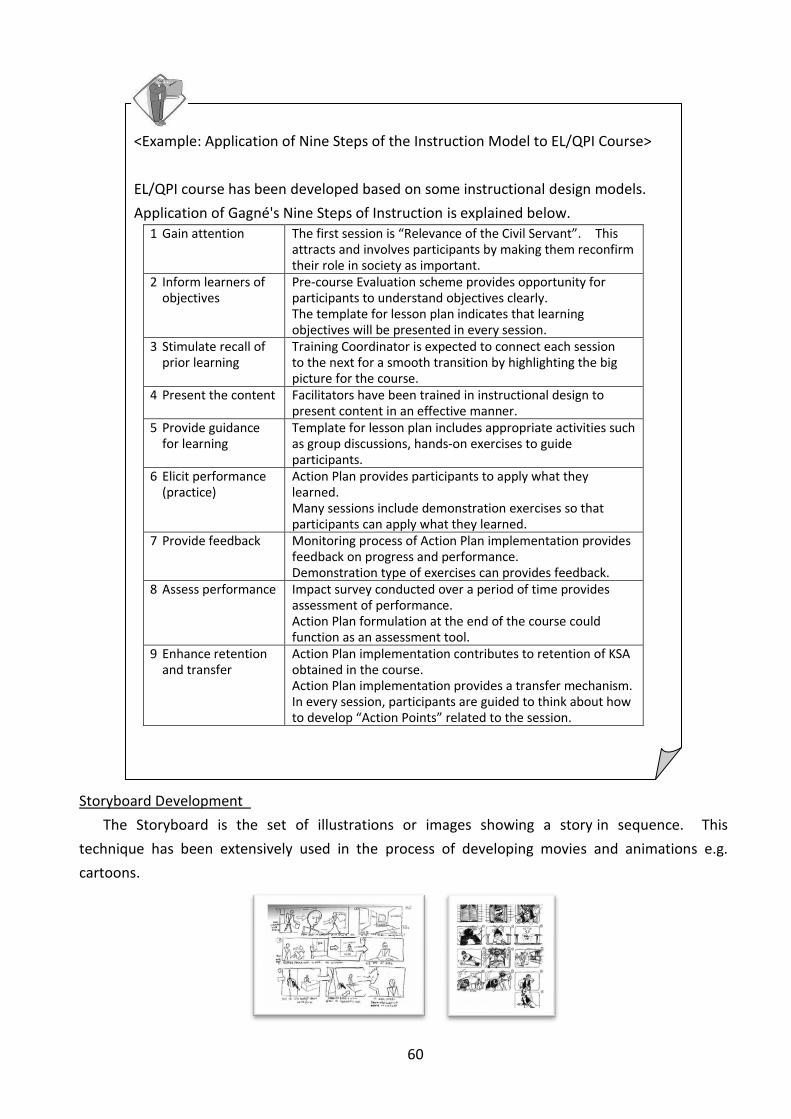
60
Storyboard Development
The Storyboard is the set of illustrations or images showing a story in sequence. This
technique has been extensively used in the process of developing movies and animations e.g.
cartoons.
<Example: Application of Nine Steps of the Instruction Model to EL/QPI Course>
EL/QPI course has been developed based on some instructional design models.
Application of Gagné's Nine Steps of Instruction is explained below. 1 Gain attention The first session is “Relevance of the Civil Servant”. This
attracts and involves participants by making them reconfirm their role in society as important.
2 Inform learners of objectives
Pre-course Evaluation scheme provides opportunity for participants to understand objectives clearly. The template for lesson plan indicates that learning objectives will be presented in every session.
3 Stimulate recall of prior learning
Training Coordinator is expected to connect each session to the next for a smooth transition by highlighting the big picture for the course.
4 Present the content Facilitators have been trained in instructional design to present content in an effective manner.
5 Provide guidance for learning
Template for lesson plan includes appropriate activities such as group discussions, hands-on exercises to guide participants.
6 Elicit performance (practice)
Action Plan provides participants to apply what they learned. Many sessions include demonstration exercises so that participants can apply what they learned.
7 Provide feedback Monitoring process of Action Plan implementation provides feedback on progress and performance. Demonstration type of exercises can provides feedback.
8 Assess performance Impact survey conducted over a period of time provides assessment of performance. Action Plan formulation at the end of the course could function as an assessment tool.
9 Enhance retention and transfer
Action Plan implementation contributes to retention of KSA obtained in the course. Action Plan implementation provides a transfer mechanism. In every session, participants are guided to think about how to develop “Action Points” related to the session.

61
This technique can also be applied to designing training course with consideration of the Nine
Steps of Instruction model. It enables instructional designer to organise the flow of the course in
an efficient manner by focusing on the learning process towards achieving the set objectives.
Generally, storyboard development has 3 steps shown below.
Step-1: Break down learning objectives into topic list
Once learning objectives of the course are set, the objectives are broken down into a list of
topics. In this process, the topics should not be so detailed. For example, if the programme is a
5 day course, the number of topics can be 10 to 20, or one topic would be the content that can be
learned in a few hours that is usually equivalent to a session.
Step-2: Develop storyboard
The storyboard can be developed with reference to the list of topics. A description using
words for the story is sufficient. A nice story can be developed using the topics rather than just
putting topics in a sequence.
Bad storyboard for “Leadership Development”
God storyboard for “Leadership Development”
STEP-1 Break Down Learning Objectives
STEP-2 Develop Storyboard
STEP-3 Develop Curriculum
Leadership is required to manage a project effectively
Leadership Communication Teamwork
Delegation Performance management
What are the elements of leadership?
Communication skill is most important for leaders
How to improve communication?
Leaders need to develop teams and work in teams
How to develop teams and improve teamwork?
Leaders motivate members and develop capacity by delegating work
How to delegate effectively?
After delegating, leaders need to manage member’s performance
How to conduct performance management?
62
Organise topics in a fluent story towards the learning objectives of the course, taking into
account the results of the TNA and motivation design. Missing topics in this step, could be
added.
Step-3: Develop Curriculum
Transfer the storyboard developed into a form of curriculum, which includes module/session
title, module/session objectives, duration, list of topics, etc. In this step, the length of time to be
allocated for each chunk of learning should be well examined. The module or session framework
is then developed based on this and learning objectives at this level should be set. This becomes a
core of the programme design.
5.5 Summary
In this module, effective programme design focusing on how to design curriculums has been
explained. Setting learning objectives is the first and important step in the process. Objectives
should be described for each KSA area using action verbs. The evaluation criteria should be
considered in setting the objectives. This module introduced two design models such as Blooms
Taxonomy and Gagné's Nine Steps of Instruction. Blooms Taxonomy indicates 6 levels of learning
namely; Level-6:Creation, Level-5:Evaluation, Level-4:Analysis, Level-3:Applying,
Level-2:Understanding, Level-1:Remebmering and help organise learning objectives. Gagné's Nine
Steps of Instruction recommends 9 steps for effective instruction such as; Gain attention, Inform
learners of objectives, Stimulate recall of prior learning, Present the content, Provide guidance for
learning, Elicit performance (practice), Provide feedback, Assess performance, Enhance retention
and transfer and help design motivation. Storyboard technique is effective to create flow of
training course.
Appendix 5-2: Curriculum Example

63
“Let’s improve description of learning objectives”
1. Editing learning objectives
Let’s examine each of the following objectives from a leadership programme and
decide if it is a well-stated learning objective. If not, change it so that it is acceptable,
noting what components (condition, behaviour, criteria) needs to be changed.
1. Develop an understanding of the leader’s role.
2. Know the difference between authority of rank and authority of respect.
3. Understand the theories of motivation.
4. Know the characteristics of a leader.
5. Know the role of the manager in a team environment.
6. Appreciate the advantages and disadvantages involved in group problem-solving and
decision-making.
7. Identify ways to motive employees.
2. Writing your own objectives
Choose a particular topic from your own situation and write three learning objectives
that include all three components. Use the Workshop Objectives Worksheet below. In the
space to the right of each item, write the specific pieces of information that will be used
to satisfy that component.
Workshop Objectives Worksheet
Subject: _____________________
Condition What the participant will be given Tools, supplies, equipment Use of notes, simulated situation
Behaviour/action What the participant will be doing Emphasis on verb What can be observed
Criteria What standard apply Time limits Degree of accuracy Level of performance
Exercise
64
For example, the objective is “Participants will know the characteristics of a leader” is
not specific enough. In this example, the trainer will be giving the participants “results
from several recent studies on leadership” (condition). Having given that information, the
trainer then expects the participants to be able to “identify” (behaviour) “six
characteristics of effective leaders in a team environment” (criteria).
As you can see, the worksheet can help you identify the components more easily. You
can then put these components together to create a useful and meaningful learning
objective: “Using the results of several recent studies on leadership, participants will
identify the six characteristics of effective leaders in a team environment”.
At first, the writing of learning objectives may seem difficult, tedious, and
time-consuming. With practice, though, it will become easy. After you have determined
the learning outcomes, you are ready to design your training course.
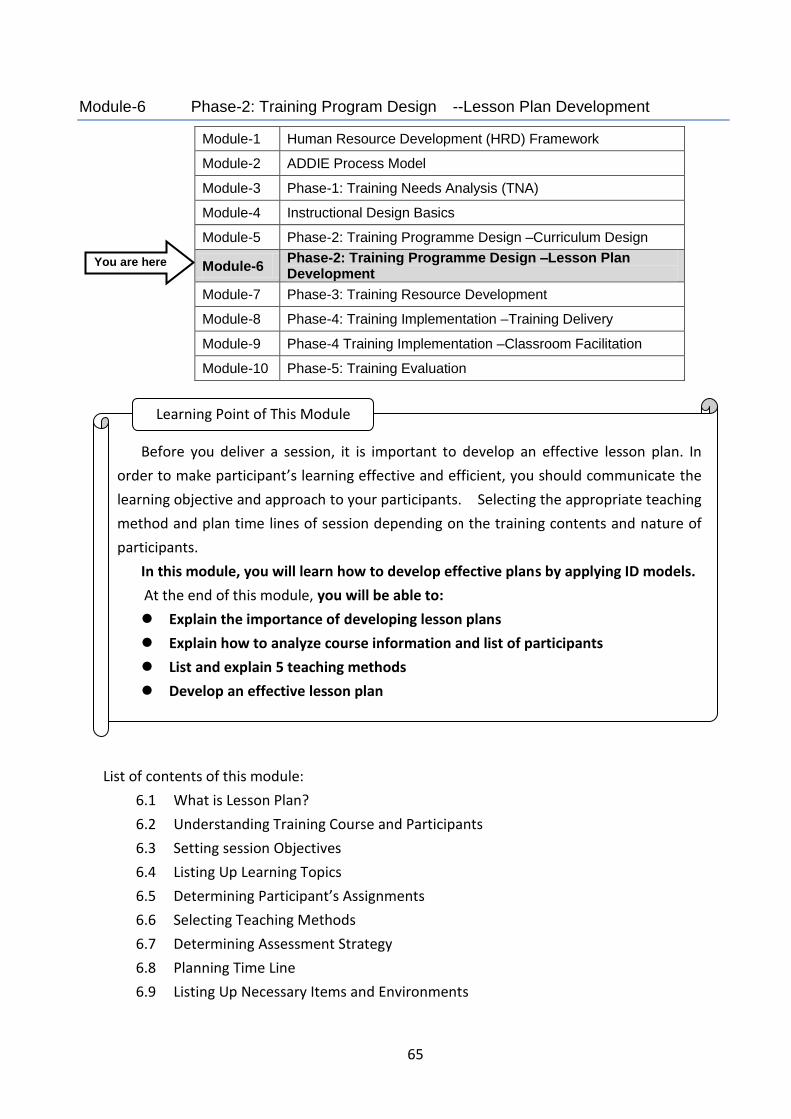
65
Module-6 Phase-2: Training Program Design --Lesson Plan Development
Module-1 Human Resource Development (HRD) Framework
Module-2 ADDIE Process Model
Module-3 Phase-1: Training Needs Analysis (TNA)
Module-4 Instructional Design Basics
Module-5 Phase-2: Training Programme Design –Curriculum Design
Module-6 Phase-2: Training Programme Design –Lesson Plan Development
Module-7 Phase-3: Training Resource Development
Module-8 Phase-4: Training Implementation –Training Delivery
Module-9 Phase-4 Training Implementation –Classroom Facilitation
Module-10 Phase-5: Training Evaluation
List of contents of this module:
6.1 What is Lesson Plan?
6.2 Understanding Training Course and Participants
6.3 Setting session Objectives
6.4 Listing Up Learning Topics
6.5 Determining Participant’s Assignments
6.6 Selecting Teaching Methods
6.7 Determining Assessment Strategy
6.8 Planning Time Line
6.9 Listing Up Necessary Items and Environments
Before you deliver a session, it is important to develop an effective lesson plan. In
order to make participant’s learning effective and efficient, you should communicate the
learning objective and approach to your participants. Selecting the appropriate teaching
method and plan time lines of session depending on the training contents and nature of
participants.
In this module, you will learn how to develop effective plans by applying ID models.
At the end of this module, you will be able to:
Explain the importance of developing lesson plans
Explain how to analyze course information and list of participants
List and explain 5 teaching methods
Develop an effective lesson plan
Learning Point of This Module
You are here
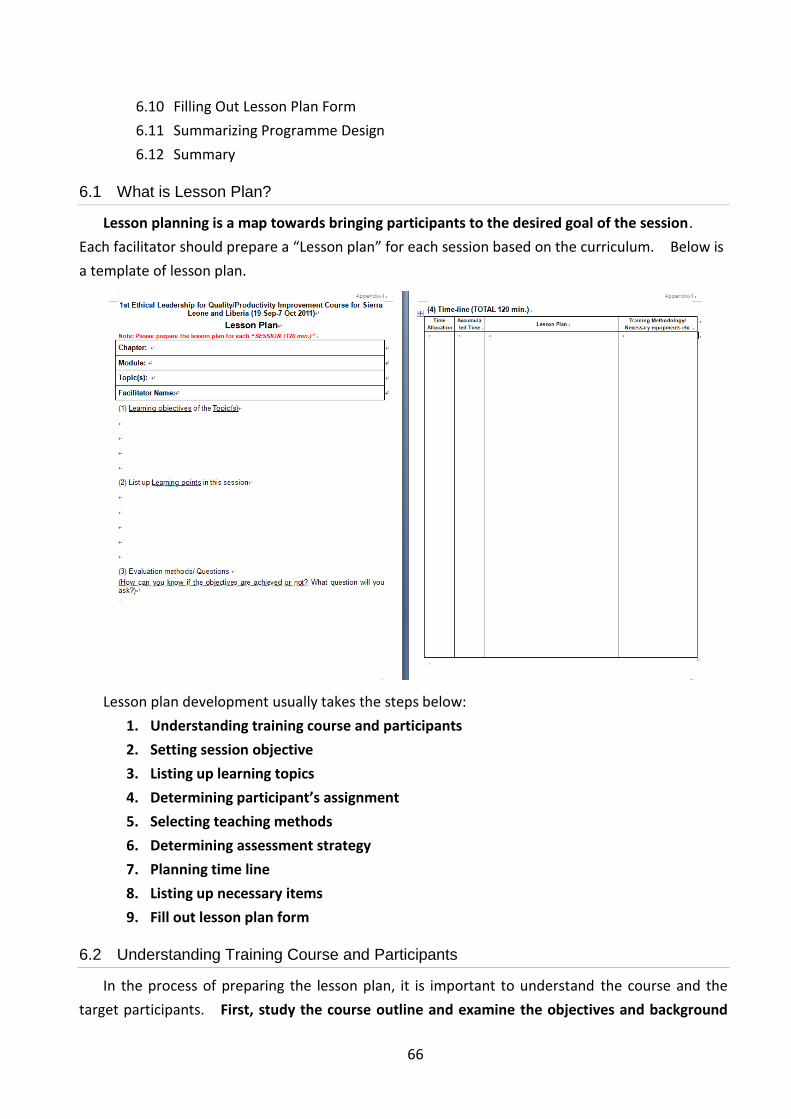
66
6.10 Filling Out Lesson Plan Form
6.11 Summarizing Programme Design
6.12 Summary
6.1 What is Lesson Plan?
Lesson planning is a map towards bringing participants to the desired goal of the session.
Each facilitator should prepare a “Lesson plan” for each session based on the curriculum. Below is
a template of lesson plan.
Lesson plan development usually takes the steps below:
1. Understanding training course and participants
2. Setting session objective
3. Listing up learning topics
4. Determining participant’s assignment
5. Selecting teaching methods
6. Determining assessment strategy
7. Planning time line
8. Listing up necessary items
9. Fill out lesson plan form
6.2 Understanding Training Course and Participants
In the process of preparing the lesson plan, it is important to understand the course and the
target participants. First, study the course outline and examine the objectives and background
67
for it. It is important to listen to those concerned about the background of the course.
Sometimes facilitators can obtain unofficial information related to the course or participants’
selection. When the list of participants is confirmed, study it and identify their affiliations, titles,
experiences, their motivations for participation and so forth. However, when the list is not
confirmed, obtain as much information as possible from the administration staff or course
coordinator. It is necessary to check their level and mindsets on the topics. This information
should be considered when facilitators design the session strategy.
The TNA Report on Liberia and Sierra Leone will provide information such as the general
situation of the Civil Service and the mindsets of the Civil Servants in these countries.
From training course information, facilitators can obtain information such as;
Objective of training (Framework of training such as how it will contribute to
organisation’s goal, what problems will be solved, etc.)
Overall schedule of training
Screening process of participants
From list of participants, facilitators can obtain information (depending on a form such as);
Age
Sex
Year of service in the current organisation and job
Current job
Education background
When pre-training report is submitted, facilitators can obtain more detailed information
(depending on a form) such as;
Role and responsibility of current job
Number of staff including number of colleague and subordinates
Working environment
Issues in organisation
Issues in current job
Based on analysis of above information, facilitators can plan strategy of session.

68
6.3 Setting Session Objectives
Firstly, facilitators need to set a goal or objectives for their sessions. The module objective is
already provided in the Curriculum. When in charge of a part of a module, the module objectives
must be broken down into session objectives that cover the topics in your session.
The learning objective is to be set by the three dimensions of KSA namely; 1) Knowledge, 2)
<Self-Check>
Let’s check what information you usually check in advance.
[ ] Course outline
[ ] Training time table
[ ] List of participants
[ ] Pre-course evaluation summary
[ ] Trainee’s manual
[ ] Evaluation of past courses
[ ] Other background information (communicate with organisers)
[ ] Others
<Example: Reading information for effective course delivery>
When you examine training course information, list of participants and
pre-training report, you can estimate their abilities and motivations. Examples of
analysis are as follows;
If the training course information indicates that participants are
automatically selected when they are promoted to department manager,
you can estimate that they will be highly motivated and have some worry
about change of their roles in organization.
If the list of participants indicates that most participants are not young but
years of service in current organization is short e.g. less than one year, you
can estimate that their basic human skill is high but they do not have
sufficient technical knowledge required for the job.
If pre-training reports indicates that most participants focus on lack of
resources (uncontrollable factors) in their organization to perform their
roles, you can project that they are frustrated with current situation and
less motivated.
69
Skill, and 3) Attitude (see 3.5 above). With knowledge, facilitators ask themselves what areas of
knowledge they want participants to understand at the end of a session. For skill, facilitators ask
themselves what skills they want participants to actually exhibit at the end of a session. With
Attitude, facilitators ask themselves what feelings they want participants to have at the end of a
session. All these should be determined when considering training course objectives. A session
forms a part of the overall goal of the training course.
6.4 Listing Up Learning Topics
Facilitators have to list up learning topics covered in a session from the Trainee’s Manual.
Facilitators select topics from trainee’s manuals in such a way that the session objective will be
fulfilled. Priority can be given to topics that are centred on hot issues, relevant to the
participants and their organisations.
It is also useful to introduce current trends relating to the topics. When facilitators find that
the Trainee’s Manual does not have enough topics to achieve its objectives, they can consult the
organisers of the training course and introduce additional topics when agreed. In order to identify
current issues, Robert W. Pike suggests three (3) actions in his book entitled “Creative Training
Techniques Handbook”. They are;
What articles on the topics have appeared in publications in the past 12 – 24 months?
What books have been published on the subject in the past years?
What topics appear again and again on conference programmes?
The TNA Report will help facilitators prioritize the topics. With these selected topics, provide a
map to the session goal.
6.5 Determining Participant’s Assignments
Facilitators determine what participants will submit at the end of the session or after the
session. It is effective to get participants to create something and submit it as a summary of their
learning. This is not necessary for all the session. By announcing the outputs expected from the
participants, facilitators will be able to make clearer the session goal and provide the appropriate
pressure and trigger the involvement of participants. Just instructing participants to summarize
what they learn in the session by writing a few sentences will be effective to keep participants’
concentration to pick up something important from the session.
<Example: Fine tuning of training by participants background>
When participants have many years of service in their current job, you can
estimate that they have already enough knowledge and skills. Then you can focus
on how to solve their current problems by applying learning topics rather than
presenting theories.

70
When facilitators give assignment, they should gather, check, and give feedback. Making
participants write reports and do nothing on it will disappoint participants and discourage for the
rest of training.
6.6 Selecting Teaching Methods
In order to achieve a session goal, facilitators should select the most efficient and effective
method of teaching.
Remember Confucius said “What I hear, I forget, what I see, I remember, but what I do, I
understand.” The most effective method is making participants do something. Thus, doing
something such as exercises involving participants should not be forgotten.
It is not effective to use only one method throughout your session because participants get
bored soon.
List of teaching methods and their characteristics are summarized in the table below. Method Advantages Disadvantages
Lecture Efficient for providing knowledge and concepts
Provision of knowledge does not always means that recipients understand it
Demonstration Effective to attract interest Effective to motivate to learn by
showing the result of learning
Difficult to create an environment for demonstration
Requires facilitator’s skill
<Example:
Apply what participants learn by giving assignment>
In order to confirm applications of what participants learned to their work
places, it is important to give an assignment report to make them describe what is
to be done in their work places. Below is an example of assignment instruction.
<Assignment Instruction>
Write a one page report on how to apply what you learned in
today’s session in your work place. Please consider these factors
when you write this report.
Focus on just one or two skills, which you acquired in the
session.
Describe realistic steps to apply them and mention rough time
line for it.
List challenges in applying them.
List possible solutions
List bosses, subordinates and colleagues who needed to be
communicated.

71
Practical exercise (Individual or small group)
Effective to help understand how to apply acquired knowledge and to retain it
Needs personal care to monitor the processes
Speed varies with participants Case study Effective for training in problem
solving capability Offers a dynamic process of
learning
Difficult to create a case Requires facilitator’s skill to lead
participants
Project Effective to develop total capability on the topics
Time consuming Needs follow up
Business Game/Simulation
Effective to help understand participant’s personal character
Effective to create teamwork when it is done by group
Difficult to create a game Needs personal monitoring and
feedback
Small Group discussion Effective to understand and retain the topic
Sometimes, not all the members equally participate
Role Playing Effective to help understand how to apply acquired knowledge and retain it
Facilitator can check the learning level
Requires facilitator’s skill for effective feedback
The curriculum provides a rough idea of the session by specifying timelines and methodologies.
Facilitators can follow it and determine their plans in detail.
6.7 Determining Assessment Strategy
Facilitators should assess level of learning or progress made by participants in order to
confirm achievement of the session objectives. A simple way is to occasionally pose
questions/quiz to the class. If facilitators need a detailed and precise assessment, they can ask
for a test on paper at the end. It is a good idea to ask each participant to say one word regarding
what they learned at the end of the session. Facilitators can assess the achievement of
<Example: Effective teaching methods for adults>
Let’s check some teaching methods based on the view point of Andgragogy
–PMERGE (see 3.1 above).
A case study is one of the favourite methods of adult learning. This is because
case studies fulfill most of PMERGE requirements. Cases are Practical and realistic
stories. This method allows participants to speak up in an independent manner.
Participants can contribute to solving problems in the case study by utilizing their
own real life experiences.
Practical exercises also fulfill most of PMERGE requirements. An exercise is a
Practical work. Doing something is usually Motivating than just listening, Exercise
is an Autonomous activity controlled by participants themselves. Exercise has
usually clear Goal as output.
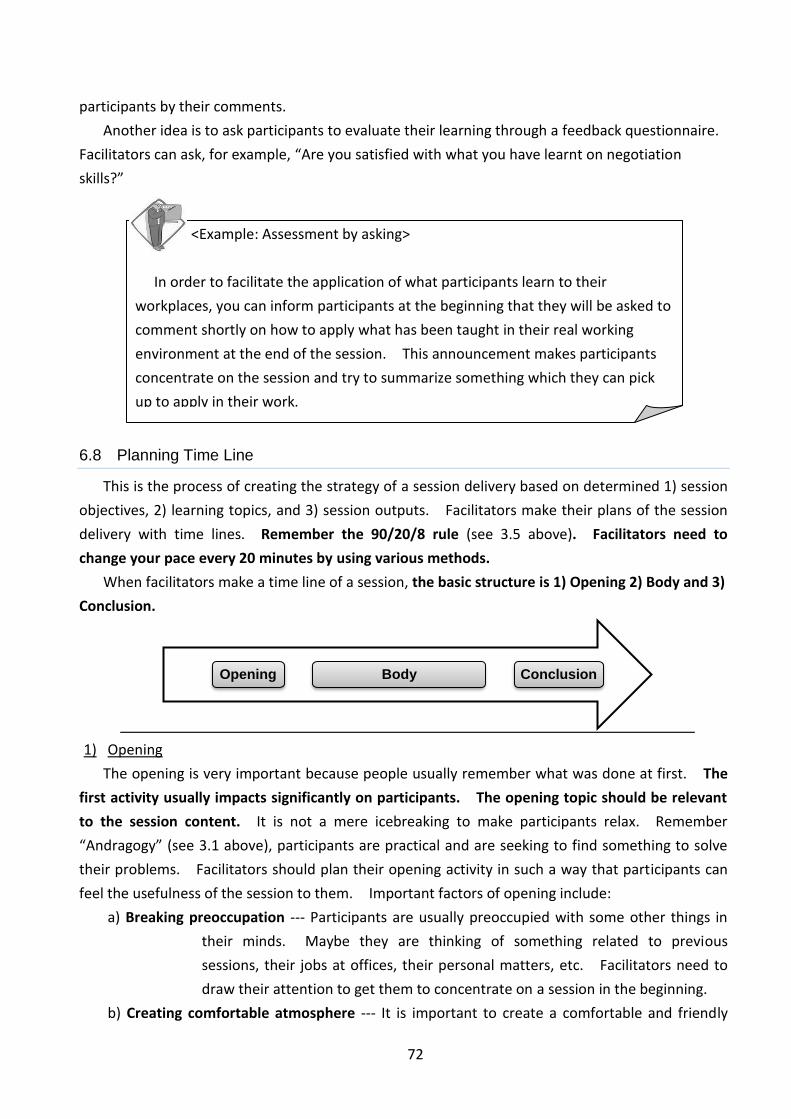
72
participants by their comments.
Another idea is to ask participants to evaluate their learning through a feedback questionnaire.
Facilitators can ask, for example, “Are you satisfied with what you have learnt on negotiation
skills?”
6.8 Planning Time Line
This is the process of creating the strategy of a session delivery based on determined 1) session
objectives, 2) learning topics, and 3) session outputs. Facilitators make their plans of the session
delivery with time lines. Remember the 90/20/8 rule (see 3.5 above). Facilitators need to
change your pace every 20 minutes by using various methods.
When facilitators make a time line of a session, the basic structure is 1) Opening 2) Body and 3)
Conclusion.
1) Opening
The opening is very important because people usually remember what was done at first. The
first activity usually impacts significantly on participants. The opening topic should be relevant
to the session content. It is not a mere icebreaking to make participants relax. Remember
“Andragogy” (see 3.1 above), participants are practical and are seeking to find something to solve
their problems. Facilitators should plan their opening activity in such a way that participants can
feel the usefulness of the session to them. Important factors of opening include:
a) Breaking preoccupation --- Participants are usually preoccupied with some other things in
their minds. Maybe they are thinking of something related to previous
sessions, their jobs at offices, their personal matters, etc. Facilitators need to
draw their attention to get them to concentrate on a session in the beginning.
b) Creating comfortable atmosphere --- It is important to create a comfortable and friendly
Opening Body Conclusion
<Example: Assessment by asking>
In order to facilitate the application of what participants learn to their
workplaces, you can inform participants at the beginning that they will be asked to
comment shortly on how to apply what has been taught in their real working
environment at the end of the session. This announcement makes participants
concentrate on the session and try to summarize something which they can pick
up to apply in their work.
73
atmosphere in a classroom between facilitator and participants and among
participants.
c) Getting attention to a session --- It is recommendable to provide fun activity. Funny
elements are not always needed. However, it can increase participants’
interest by making them realise that this is not going to be another boring
presentation.
2) Body
Facilitators should deliver the selected topics with appropriate methods based on a strategy
so that participants are always motivated and devoted to learn. Remember the P-MARGE of
Andragogy, PIE Rules ARCS model, etc. Also remember the old saying “What I hear, I forget, what
I see, I remember, but what I do, I understand.” All of the activities should be following the
concept of these instructional design models so that session will be effective. Also remember to
apply the 90/20/8 Rule and change pace every 20 minutes by using various methods of teaching
and involve participants in some ways every 8 minutes.
In developing a plan, it is recommended that relevant small stories are introduced. Such
small stories can be facilitators’ own experiences, current trends, or issues relevant to the topics.
It is important to touch on facilitators’ own experiences to elaborate on the topics. Personal
stories will be persuasive and more attractive to participants. Remember the P of the PIE Rule,
which is Practical.
It is important that facilitators always ask participants how they intend to apply what they
learnt in their working places. Remember that the purpose of any training course is to deliver
results. Facilitators should keep coming back to the training objectives and to reconfirm the role
of a session in the whole training course.
3) Conclusion
Facilitators summarize the session and assess the level to which the session objective(s) has
been achieved by participants. Reconfirm participants how they intend to apply what they
learnt in their working places. Finally, express appreciation to participants and motivate them to
keep on learning.
After you develop your plan, it is strongly recommended to rehearse to check the time line and
adjust it when necessary. Rehearsing from the through beginning to end will provide an idea of
the effectiveness of the session plan.
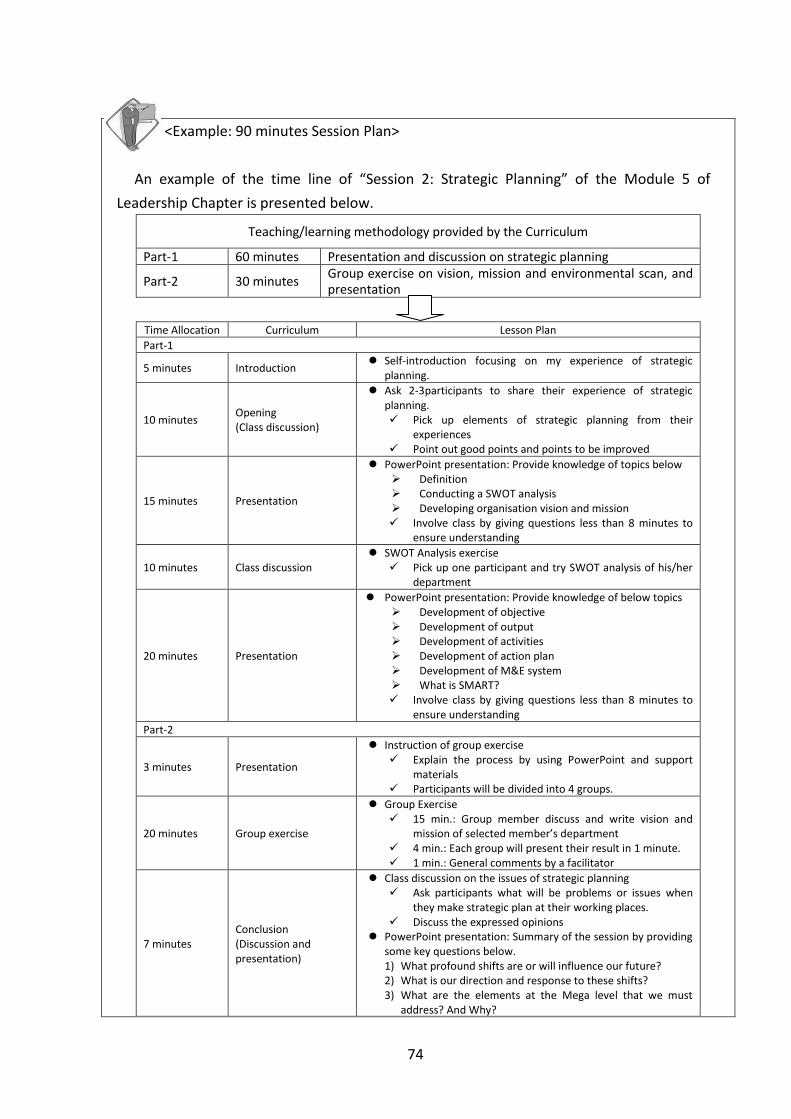
74
<Example: 90 minutes Session Plan>
An example of the time line of “Session 2: Strategic Planning” of the Module 5 of
Leadership Chapter is presented below.
Teaching/learning methodology provided by the Curriculum
Part-1 60 minutes Presentation and discussion on strategic planning
Part-2 30 minutes Group exercise on vision, mission and environmental scan, and presentation
Time Allocation Curriculum Lesson Plan
Part-1
5 minutes Introduction Self-introduction focusing on my experience of strategic
planning.
10 minutes Opening (Class discussion)
Ask 2-3participants to share their experience of strategic planning. Pick up elements of strategic planning from their
experiences Point out good points and points to be improved
15 minutes Presentation
PowerPoint presentation: Provide knowledge of topics below Definition Conducting a SWOT analysis Developing organisation vision and mission Involve class by giving questions less than 8 minutes to
ensure understanding
10 minutes Class discussion SWOT Analysis exercise
Pick up one participant and try SWOT analysis of his/her department
20 minutes Presentation
PowerPoint presentation: Provide knowledge of below topics Development of objective Development of output Development of activities Development of action plan Development of M&E system What is SMART? Involve class by giving questions less than 8 minutes to
ensure understanding
Part-2
3 minutes Presentation
Instruction of group exercise Explain the process by using PowerPoint and support
materials Participants will be divided into 4 groups.
20 minutes Group exercise
Group Exercise 15 min.: Group member discuss and write vision and
mission of selected member’s department 4 min.: Each group will present their result in 1 minute. 1 min.: General comments by a facilitator
7 minutes Conclusion (Discussion and presentation)
Class discussion on the issues of strategic planning Ask participants what will be problems or issues when
they make strategic plan at their working places. Discuss the expressed opinions
PowerPoint presentation: Summary of the session by providing some key questions below. 1) What profound shifts are or will influence our future? 2) What is our direction and response to these shifts? 3) What are the elements at the Mega level that we must
address? And Why?

75
4) How will we describe our desired results in measurable terms?
5) What are the best ways and means to get there? 6) How will we measure progress? 7) How will we measure success? 8) How will we revise the strategy as required?
*Total 90 minutes.
6.9 Listing Up Necessary Items and Environments
Now facilitators would have list up all the necessary items for a session such as learning
materials, stationery, and equipment (PC, Projector, whiteboard). It is better to specify in
details. For example, if 3 colours of whiteboard markers are needed, facilitators should specify the
colours such as black, blue, and red. Classroom environment such as layout also should be
determined. When group exercise is included, sometimes special items and classroom
environments are necessary.
Usually, preparation is done by the training coordinator and not by facilitators themselves.
Thus this memo is useful for them to contribute towards increasing the efficiency of training
delivery.
6.10 Filling Out Lesson Plan Form
After all the above-mentioned details have been confirmed, facilitators would have to fill out a
Lesson Plan form. This form would be used by the training coordinator as instructions for
preparation and classroom management, as well as by the facilitator himself/herself. This also
contributes to quality assurance of the training delivery. Training institutions can assure quality
by checking lesson plans. Facilitators can improve their sessions by improving lesson plans.
Delivery should be flexible because sometimes the plan and actual delivery could be different.
Here, it is very important to revise plans based on experience and feedback from participants.
When these lesson plans are well maintained, the PDCA 4 cycle can be implemented and
continuous improvement is enhanced.
A compilation of lesson plans can be utilized as manual for other facilitators when they deliver
4 PDCA Cycle: Management method of improving processes. PDCA stands for Plan, Do, Check and Act.
<Example: PC speakers are sometimes forgotten>
These days, classrooms are usually equipped with PC, projector and screen.
However, speakers are not often connected. Sometimes it is observed that the
coordinator is running around to find speakers asked by the facilitator just before
the session. More facilitators use sound effect in their PowerPoint presentation
or show video recently. With detailed lesson plan, this chaos can be avoided.
76
new sessions. In other words, preparing lesson plans is a visualization of training delivery and
makes it possible to share facilitator’s personal know-how with others concerned. Thus
preparing and maintaining lesson plans support quality assurance and improvement of training
courses.
6.11 Summarizing Programme Design
After developing lesson plans for all the sessions, summarize topics and the methodologies
including the lesson plans into a document. This document should include the elements indicated
below.
Course title
Duration
Target Participants
Background of the course
Overall goal
Course learning bjectives
List of topics
Course time Table
Session objectives for each session
List of topics for each session
Learning method for each session
Lesson Plans for each session
Description of each session
6.12 Summary
It is clear that preparation by developing lesson plan is the success factor of every training
delivery and practice makes perfect. The lesson plan is prepared by understanding the training
course and participants, setting session objectives, listing up learning topics, determining
participant’s assignments, selecting teaching methods, determining assessment strategy, planning
time line, listing up necessary items and environments, and filling out a form. Preparing lesson
plan is a planning strategy on how to facilitate to achieve the goal of the training course by
considering the background of participants following the Instructional Design approach. It should
also be noted that maintaining lesson plans is important for quality assurance and improvement of
training courses.
77
“Let’s make a lesson plan!”
Let’s make your lesson plan. If you have the experience of teaching before, pick up one
of your sessions and make a lesson plan by applying what you learned in this module. If
you have not taught before, you can pick up one of your favourite topics and make an ideal
lesson plan.
Lesson plan should include at least items below.
Session Title
Session objectives
Topics included
Evaluation methods
Training methods and topics with time line
Items to prepare
You can refer to “5.1 What is Lesson Plan?” as a form but you can revise it for your
convenience. After completing your plan, share with other facilitators and provide each
other comment.
Exercise
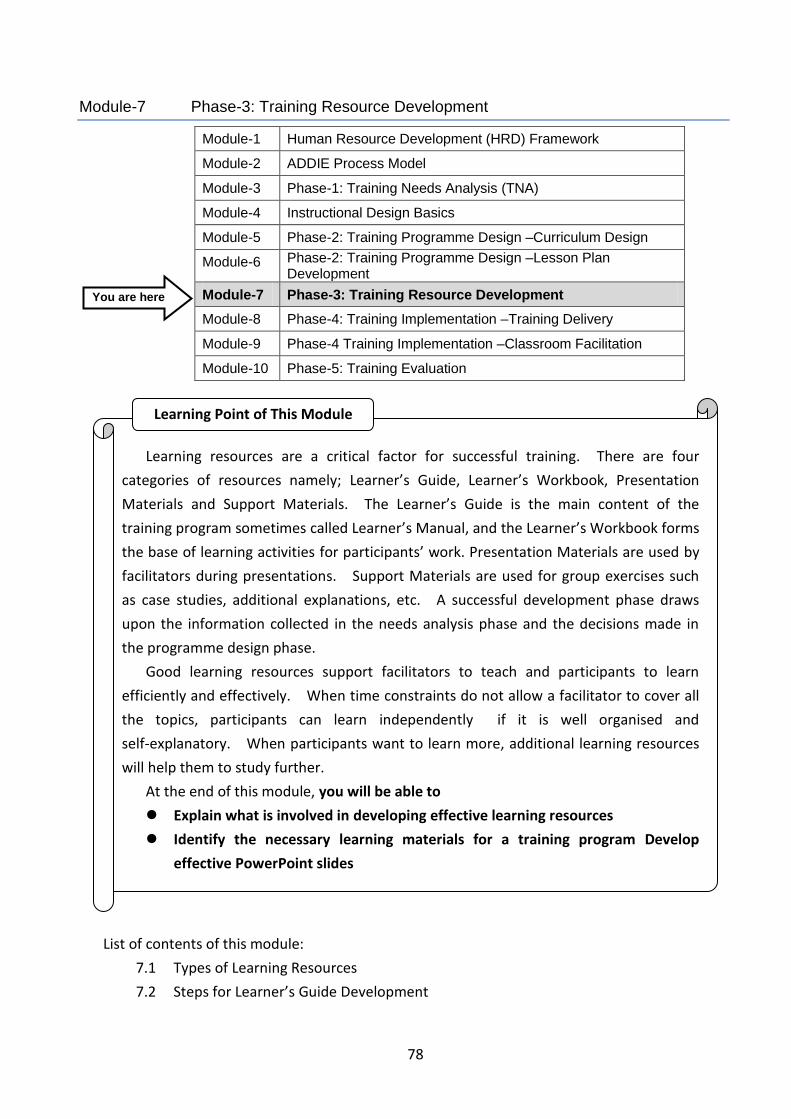
78
Module-7 Phase-3: Training Resource Development
Module-1 Human Resource Development (HRD) Framework
Module-2 ADDIE Process Model
Module-3 Phase-1: Training Needs Analysis (TNA)
Module-4 Instructional Design Basics
Module-5 Phase-2: Training Programme Design –Curriculum Design
Module-6 Phase-2: Training Programme Design –Lesson Plan Development
Module-7 Phase-3: Training Resource Development
Module-8 Phase-4: Training Implementation –Training Delivery
Module-9 Phase-4 Training Implementation –Classroom Facilitation
Module-10 Phase-5: Training Evaluation
List of contents of this module:
7.1 Types of Learning Resources
7.2 Steps for Learner’s Guide Development
Learning resources are a critical factor for successful training. There are four
categories of resources namely; Learner’s Guide, Learner’s Workbook, Presentation
Materials and Support Materials. The Learner’s Guide is the main content of the
training program sometimes called Learner’s Manual, and the Learner’s Workbook forms
the base of learning activities for participants’ work. Presentation Materials are used by
facilitators during presentations. Support Materials are used for group exercises such
as case studies, additional explanations, etc. A successful development phase draws
upon the information collected in the needs analysis phase and the decisions made in
the programme design phase.
Good learning resources support facilitators to teach and participants to learn
efficiently and effectively. When time constraints do not allow a facilitator to cover all
the topics, participants can learn independently if it is well organised and
self-explanatory. When participants want to learn more, additional learning resources
will help them to study further.
At the end of this module, you will be able to
Explain what is involved in developing effective learning resources
Identify the necessary learning materials for a training program Develop
effective PowerPoint slides
Learning Point of This Module
You are here
79
7.3 Effective PowerPoint Slides
7.4 How to Develop Effective PowerPoint Slides
7.5 Effective Support Materials
7.6 Other Resources for Presentation
7.7 Summary
7.1 Types of Learning Resources
Learner’s Guide
It is also known as the learner’s manual which explains the content of the course by including
the full content and describes details of each topic for the course. It is designed to support and
maximize the learner’s learning. It contains sections of chapters and related reading resources
that have been put together as a skill-focused learning package.
The purpose of the Learner’s Guide (LG) is to help the learner acquire specific understanding
on the subject taught during the training session.
Learner’s Workbook
The Learner’s Workbook consists of the learning resources that participants will follow in the
trainingroom. It provides a summary of the content and activities such as exercises related to the
topic under discussion. For courses that are skills-focused, the workbook can provide practical
aspect such as hands-on experiences. Ideally, the workbook should be self-explanatory to enable
learners to learn independently. There are various types of workbooks. The simple end type for
example only includes the title of the topic and questions to check the level of understanding of
participants, so that they are not totally dependent on the workbook alone. This type of
workbook is used in a classroom under a trainer’s facilitation. On the other hand, the detail end
type includes the full content of the course with exercises, quizzes, check tests, etc. in a self
explanatory manner so that participants can learn without any facilitation. In this case it can be
called a Learner’s Guide or Learner’s Manual.
Support material
The Support material on the other hand, helps participants to carry out activities through
instructions on what to do. It is used to substantiate the content and activities of the course.
Examples of this type of support materials are instruction sheets for group work, handouts,
templates, checklists, case studies, etc. It adds additional information related to the topic. Also,
when necessary, facilitators can prepare support materials which provide additional information
on what the Learner’s Manual does not provide.
Appendix 7-1: EL/QPI Course Learner’s Workbook
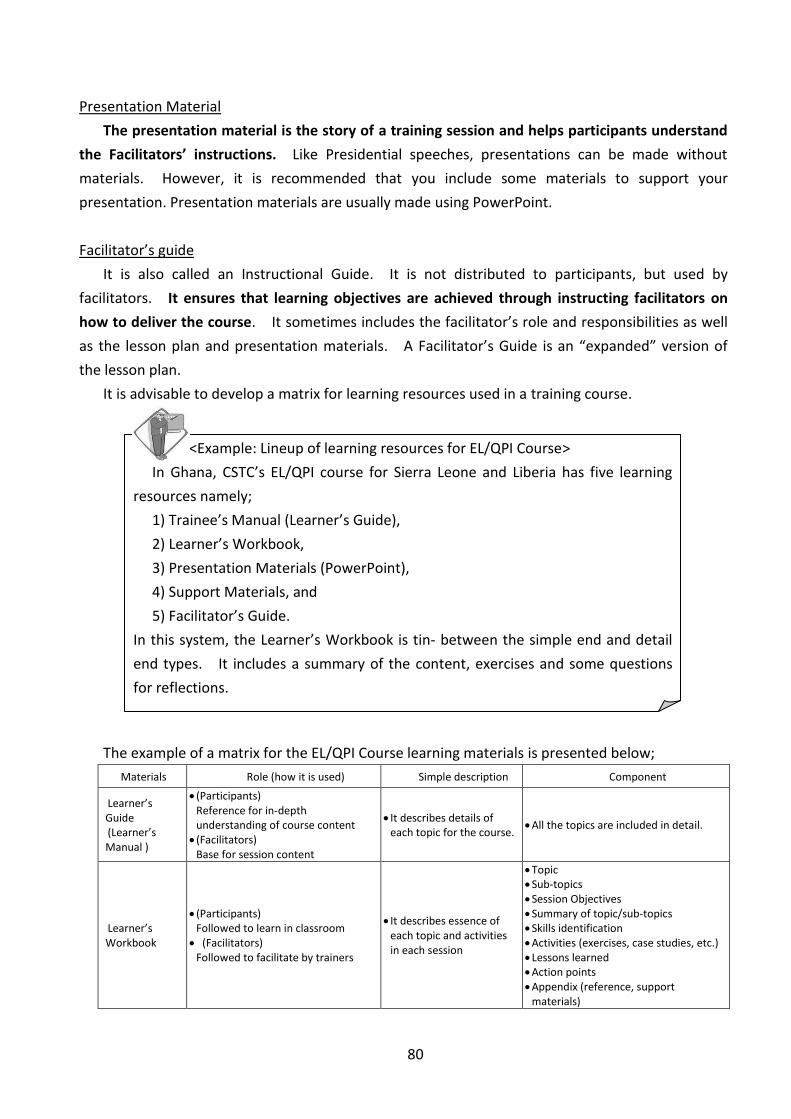
80
Presentation Material
The presentation material is the story of a training session and helps participants understand
the Facilitators’ instructions. Like Presidential speeches, presentations can be made without
materials. However, it is recommended that you include some materials to support your
presentation. Presentation materials are usually made using PowerPoint.
Facilitator’s guide
It is also called an Instructional Guide. It is not distributed to participants, but used by
facilitators. It ensures that learning objectives are achieved through instructing facilitators on
how to deliver the course. It sometimes includes the facilitator’s role and responsibilities as well
as the lesson plan and presentation materials. A Facilitator’s Guide is an “expanded” version of
the lesson plan.
It is advisable to develop a matrix for learning resources used in a training course.
The example of a matrix for the EL/QPI Course learning materials is presented below;
Materials Role (how it is used) Simple description Component
Learner’s Guide (Learner’s Manual )
(Participants) Reference for in-depth understanding of course content
(Facilitators) Base for session content
It describes details of each topic for the course.
All the topics are included in detail.
Learner’s Workbook
(Participants) Followed to learn in classroom
(Facilitators) Followed to facilitate by trainers
It describes essence of each topic and activities in each session
Topic Sub-topics Session Objectives Summary of topic/sub-topics Skills identification Activities (exercises, case studies, etc.) Lessons learned Action points Appendix (reference, support
materials)
<Example: Lineup of learning resources for EL/QPI Course>
In Ghana, CSTC’s EL/QPI course for Sierra Leone and Liberia has five learning
resources namely;
1) Trainee’s Manual (Learner’s Guide),
2) Learner’s Workbook,
3) Presentation Materials (PowerPoint),
4) Support Materials, and
5) Facilitator’s Guide.
In this system, the Learner’s Workbook is tin- between the simple end and detail
end types. It includes a summary of the content, exercises and some questions
for reflections.
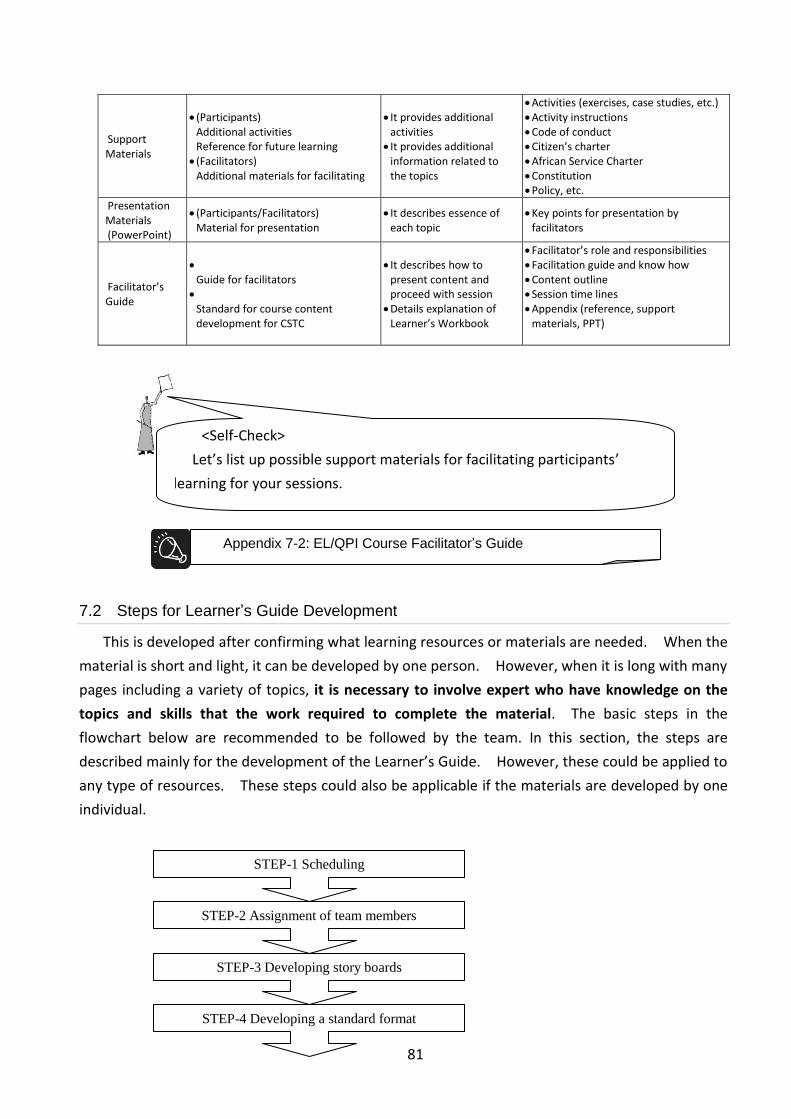
81
Support Materials
(Participants) Additional activities Reference for future learning
(Facilitators) Additional materials for facilitating
It provides additional activities
It provides additional information related to the topics
Activities (exercises, case studies, etc.) Activity instructions Code of conduct Citizen’s charter African Service Charter Constitution Policy, etc.
Presentation Materials (PowerPoint)
(Participants/Facilitators) Material for presentation
It describes essence of each topic
Key points for presentation by facilitators
Facilitator’s Guide
Guide for facilitators
Standard for course content development for CSTC
It describes how to present content and proceed with session
Details explanation of Learner’s Workbook
Facilitator’s role and responsibilities Facilitation guide and know how Content outline Session time lines Appendix (reference, support
materials, PPT)
7.2 Steps for Learner’s Guide Development
This is developed after confirming what learning resources or materials are needed. When the
material is short and light, it can be developed by one person. However, when it is long with many
pages including a variety of topics, it is necessary to involve expert who have knowledge on the
topics and skills that the work required to complete the material. The basic steps in the
flowchart below are recommended to be followed by the team. In this section, the steps are
described mainly for the development of the Learner’s Guide. However, these could be applied to
any type of resources. These steps could also be applicable if the materials are developed by one
individual.
<Self-Check>
Let’s list up possible support materials for facilitating participants’
learning for your sessions.
Appendix 7-2: EL/QPI Course Facilitator’s Guide
STEP-1 Scheduling
STEP-2 Assignment of team members
STEP-3 Developing story boards
STEP-4 Developing a standard format
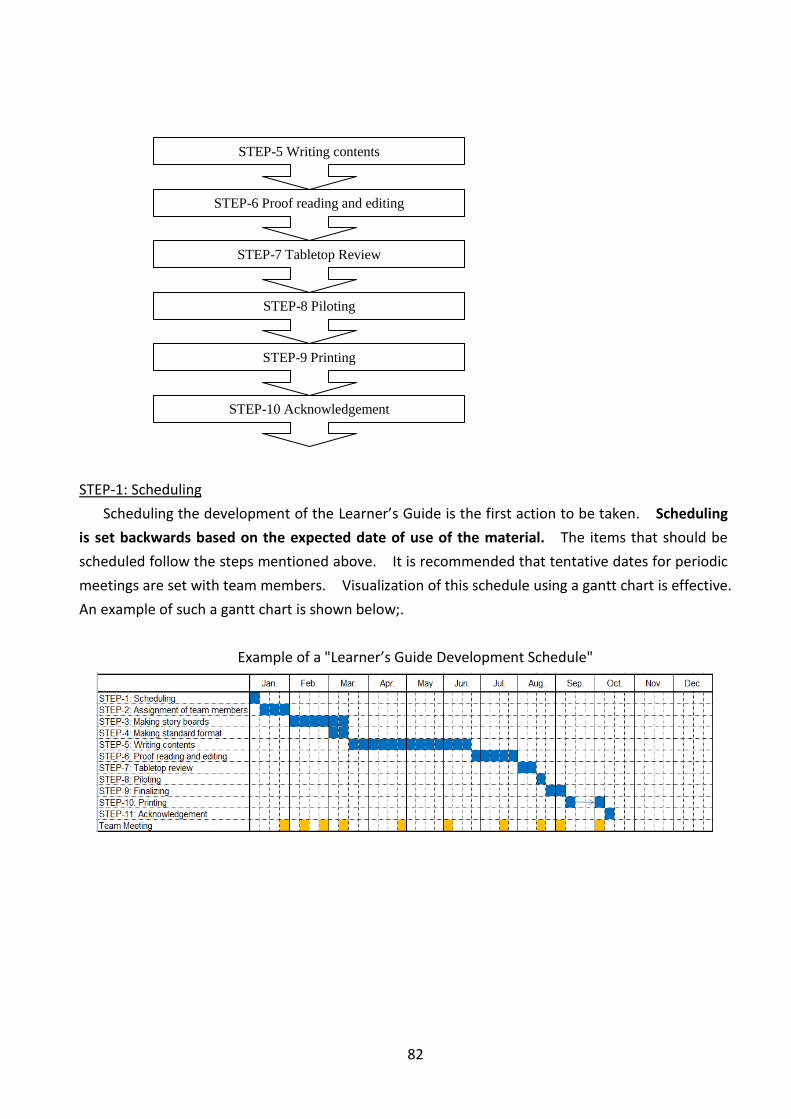
82
STEP-1: Scheduling
Scheduling the development of the Learner’s Guide is the first action to be taken. Scheduling
is set backwards based on the expected date of use of the material. The items that should be
scheduled follow the steps mentioned above. It is recommended that tentative dates for periodic
meetings are set with team members. Visualization of this schedule using a gantt chart is effective.
An example of such a gantt chart is shown below;.
Example of a "Learner’s Guide Development Schedule"
STEP-5 Writing contents
STEP-6 Proof reading and editing
STEP-7 Tabletop Review
STEP-8 Piloting
STEP-9 Printing
STEP-10 Acknowledgement

83
STEP-2 Assignment of team members
(1) Necessary expertise
Learner’s Guide development requires expertise in the subject matter areas, instructional
design, writing and editing. In addition, someone who can do some administrative work as an
assistant should be involved. The expected roles of each team member are outlined below.
Coordinator (Team Leader) --- The Team Leader or Project Manager is expected to take
overall responsibility for the process of developing the Learner’s Guide. He/she does
not need to hold all the expertise but needs to have basic knowledge on each expertise.
The most important expertise for him/her is instructional design. Thus often the
coordinator’s role is taken by an instructional designer. In addition, project
management expertise is also critical for the successful development of the guide.
Subject Matter Expert (SME) ---The Subject Matter Expert is expected to provide content
information as well as insights, current trends etc. related to the topics in the training
material. This expert must have subject expertise in the Civil Service context. The
number of SMEs can be more than one and from various backgrounds to enrich the
contents of the material. When the training course covers wider areas, it would be
necessary to engage the numbers of SMEs that would cover all the specific areas.
Instruction design expert (Instructional Designer) --- An Instructional Designer is
expected to design the content such that it is easy to understand, effective to retain its
contents, and encouraging to learn, . The flow or story of the content of the guide is
designed by this expert.
Writing expert (Writer) --- It is expected that the contents is written in a skilful manner,
with simple and clear sentences. This work directly contributes to the quality of the
Learner’s Guide.
Editing expert (Editor) --- It is expected that all the chapters and sections would be
proof read and edited. Usually the contents are written by different writers, and so
editing is important to make the whole content flow consistently. This step could be
outsource to some professional companies. However, these companies may be limited
<Self-Check>
[ ] Time is adequate to develop good quality manuals.
[ ] Holidays and busy periods have been considered.
[ ] Dead line for final printing is well in advance of the actual dead line.
84
in knowledge in the subject area and may not be in the position to thoroughly edit the
contents.
Assistant (administrator) --- There would be a lot of administrative work to support this
phase of training material development. For instance, preparation of the necessary
documents, issuing appointing letters, arranging series of meetings, making meeting
minutes, circulating meeting minutes, payments, etc. Also gathering information for the
content can be done by this person.
When this process is done by one person, basically all above mentioned roles are to be
played by him/her.
(2) Building up a team
In reality unfortunately, it is not possible to assign all the necessary experts as explained in
the previous section. Thus the coordinator has to come up with relevant team members through
maximum utilization of the expertise available. Some sets of expertise can be provided by one
person. In general, persons with the expertise of editing and instructional design have the
expertise of writers. Sometimes writers can play the role of instructional designers because
simple logical writing skill is part of instructional design. Sometimes the subject matter expert
can play the role of a writer. It is also possible for the coordinator to play the role of an
instructional designer. The editor’s role should “not” be played by writers. This is because
editing should be carried out using a third person’s eye in order to check the contents in an
objective manner.
With the above consideration as a guide, the coordinator would have to identify candidates
for the expertise required. It is important for the coordinator to evaluate the capacity of each
candidate and to estimate the work schedule and workload when checking the availability of
the candidates.
Finally the coordinator assigns the most suitable members to cover all the necessary
expertise needed and forms a team. It is essential that all the members should agree on and
clearly understand their respective roles. It is recommended that the coordinator arranges to
issue official assignment letters to the team members from a higher authority so that members
can easily adjust their schedule and work smoothly.

85
Examples of teams are shown below.
Example 1 Example 2
Member Roles Member Roles
Ms. A Coordinator Ms. A Coordinator and Instructional Designer
Mr. B SME-1 Mr. B SME-1 and Writer-1
Mr. C SME-2 and Writer-1 Mr. C SME-2, Writer-2
Ms. D SME-3 and Instructional Designer
Ms. D Assistant and Editor
Ms. E Writer-2 and Editor
Mr. F Assistant
(3) Coordinating a team
After forming a team, the coordinator would have to manage the team to facilitate
communication among members for maximum performance. The chart below illustrates the
image of coordination. The coordinator is the bridge between the project manager and the team
responsible for developing the Learner’s Guide.
Coordintor
SMEs
Instructional designers
Writers Editors
Assistants
(Admini-stration)
Client Project
Manager
86
STEP-3: Developing story boards
Before starting to write the content, develop a curriculum including the story board of each
section and agree on it with all the members. This step can be divided into 2 sub-steps below:
(1) Reviewing TNA result and program design
(2) Developing story boards
(1) Reviewing TNA result and program design
It is important to review the results of the TNA and the program design with all members
to ensure a well-coordinated and consistent strategy for the development of the Learner’s
Guide. If the TNA has not been conducted, any research to reconfirm the intention of the
training course can be sufficient. Consultations with the client could be a useful means of
confirming the background for the proposed course.
Reviewing the program design, which includes the course objectives, duration, curriculum
and any other information is also necessary. At least, the design should touch on the curriculum
up to module level. The extent of detail presented can be on a case by case basis.
(2) Developing story boards
After reviewing previous phases, it is then time to develop story boards. Story boards show
how to explain the module and the topics in it. The story should be easy to follow and be
understood, while ensuring effective learning. Collaboration between SMEs and instructional
designers are critical for making good story boards. The Instructional designer can contribute a
lot to enrich the content by applying Andragogical models such as ARCS model and P-MARGE .
Story boards should include 1) title, 2) length (no. of pages), and 3) content outline and
illustrate logical flow of the course. When the training material is long/heavy/thick, it is advisable
to develop two levels of story boards namely; the module and section levels. The module level
story board is a break down of a module into sections and the section level story board is a
further break down of the section.
<Self-Check>
[ ] All the roles of SME, instructional designer, writer, editor, assistant have
been gathered.
[ ] Each member clearly understands own role.
[ ] Skill levels of each member in assigned role are sufficient .
[ ] Schedule and workload have been agreed to by all the members.
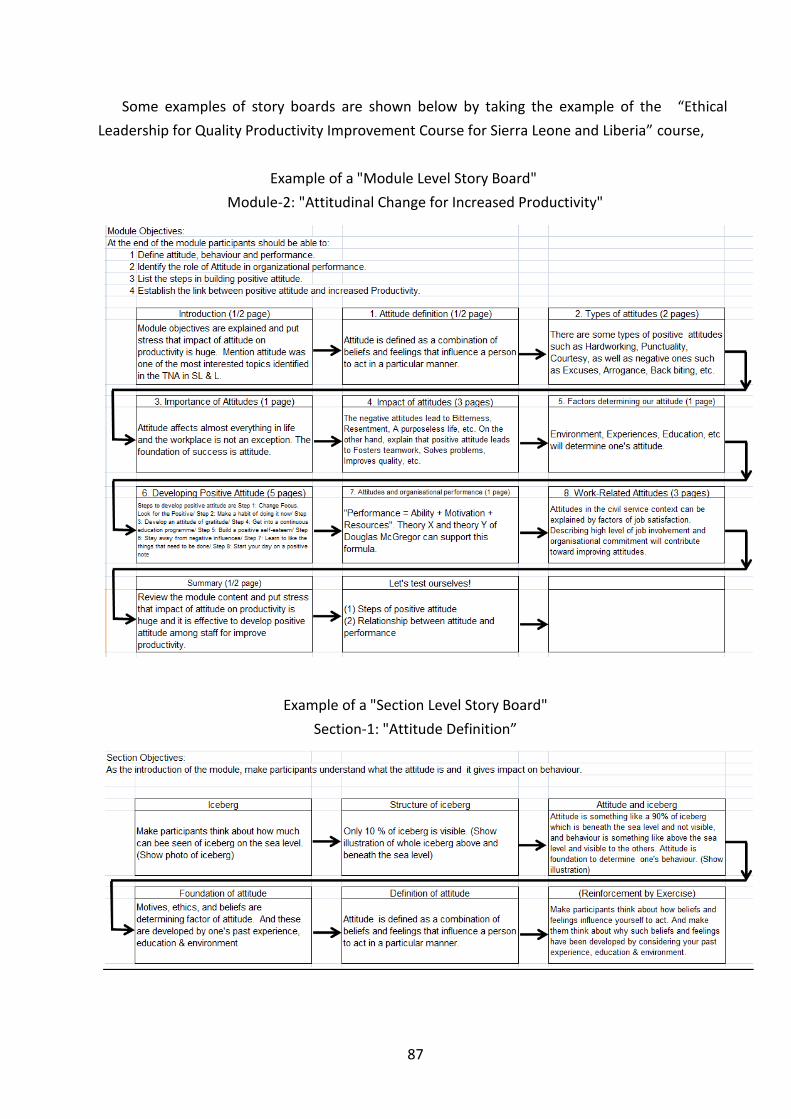
87
Some examples of story boards are shown below by taking the example of the “Ethical
Leadership for Quality Productivity Improvement Course for Sierra Leone and Liberia” course,
Example of a "Module Level Story Board"
Module-2: "Attitudinal Change for Increased Productivity"
Example of a "Section Level Story Board"
Section-1: "Attitude Definition”

88
In this step, the critical role of the coordinator is to check if the story board is appropriate for
the training objectives and target participants.
STEP-4 Developing a standard format
It is better to agree on the standard format of the Learner’s Guide as far as possible before
writing the contents. When the content writing is done by several members, this decreases the
editing burden in the later stages. A sample format of a few pages will help writers to share the
image of the final output.
The items that should be standardized are as follows:
Content structure
Tense
Active and passive voice
Wording
Use of technical terms
Format of references
Page layout
Font size and type
Use of bold, italic, capital, quotations, etc.
Use of bullet points
Use of photos, charts, tables, etc.
File management rules
Others
<Self-Check>
[ ] TNA result and program design have been reviewed and objectives of
training course has been clearly understood by all the members.
[ ] SMEs and instructional designers have been effectively involved in
developing story boards.
[ ] ARCS model has been effectively applied in developing story boards.
[ ] Story boards have been agreed to by all members.
[ ] Story boards are attractive and easy to understand for target readers.
[ ] Story boards are appropriate for training objectives and target
participants
89
STEP-5 Writing Contents
This step is conducted in 3 sub-steps below.
1. Agree on schedule
2. Take care of and monitor writers
3. Collect writings
Based on the story boards and standard format, which have been agreed on in the previous
steps, writers would then write the contents of the Learner’s Guide. At the beginning of this step,
it is important that all writers agree on a given schedule with the coordinator.
The next step is conducted individually by the writers and progress is monitored by the
coordinator . There are situations where an SME also plays the role of a writer. Other writers
would have to work closely with the SMEs and the coordinator would have to create a conducive
environment for them to work together effectively. It is strongly recommended that monitoring
meetings are held while the writers are writing. These series of meetings is effective to ensure
consistency in the contents of each writer. When it is difficult to organise such meetings, the
coordinator should at least monitor each writer’s content closely and coordinate among other
writers to ensure quality. When one of the writers comes up with a problem, the coordinator
should help him/her to solve it. This problem and solution should be shared with all writers so
that they can head in the same direction. This coordination contributes toward reducing work
involved in editing the Learner’s Guide, which is the next step.
<Tips for good writing>
Instructional Design Models:
ARCS Model --- Attention, Relevance, Confidence, and Satisfaction
ETQ Model ---Experience, Theory, and Awareness
3C Model – Correct, Concise, and Clear
<Self-Check>
[ ] Standard format was agreed by all members.
[ ] Standard format is user friendly and easy to read.
Appendix 7-3: Sample of Standard Format of Learner’s Guide
90
Concise sentence:
Write concise sentences. A sentence should not contain unnecessary words. For example: “He
wrote the biography of his life” should be written as “He wrote his biography”.
Clear sentence:
Put the main point first ---When writing a sentence, the main point you are trying to put across
should preferably be in the beginning. Good example: “It was a beautiful garden with well-kept
flower beds, immaculately trimmed hedges, and plenty of trees.”
“It was a beautiful garden” is the main idea of your sentence, the rest is extra information.
Immediately upon reading the sentence, the reader knows what you are saying.
Paragraph:
The first sentence of a paragraph should be a topic sentence, introducing the main idea of the
paragraph.
Arrange sentences in a logical order.
Relate all sentences to each other.
Form parallel grammatical structures.
Others:
Use less uncertain expressions such as “I think”, “I feel”, “It seems that”, “I can be”, “Probably”,
etc.
Be careful to use trendy words and expressions which can disappear soon.
<Self-Check>
[ ] All writers have agreed on story boards.
[ ] Writers fully understood tips for good writing.
[ ] Monitoring meetings have been organised while writers were writing
[ ] Coordinator has been closely monitoring each writer and shares problems
and solutions with all writers.

91
When the coordinator collects drafts from writers, the drafts should be read through. Details
such as grammar, terminology, etc. can be checked by editors in the next step but the contents of
the Learner’s Guide should be well examined. Points for this assessment are listed below.
Are there any errors relating to logic?
Are the contents appropriate for the target readers?
When the coordinator identifies critical issues, these need to be solved in consultation with the
writers before going into the next step.
STEP-6 Proof Reading and Editing
After collecting all the draft materials from writers, they need to go through the process of
proof reading and editing to check the contents, correct mistakes, and make improvements to suit
the Learner’s Guide. This step is a really tough job because the editor must be meticulous. The
main role of editors is to check and correct the following:
Grammatical mistakes
Consistency of all parts (especially when drafts were done by more than one writer)
Unclear sentences and paragraphs (including logical errors)
Matching headers and their contents
Matching list of contents
Page numbers
Sequential numbers in list of contents
Layout
In terms of consistency, editors should check the following items below:
Content structure
Tense
Active and passive voice
Wording
Usage of technical terms
Format for references
Page layout
Font
Use of bold, italic, capital, quotations, etc.
Bullet point format
Use of photos, charts, tables, etc.

92
These items are already determined in Step-3 (developing standard format of the manual).
Editors would have to check the consistency of all these items and improve on them when
necessary. When more than one writer is engaged, the editors’ work would normally be heavy.
When editors find unclear sentences and paragraphs, these should be improved by rewriting
them. The role of editors is to check the contents with a third person’s view point. Since this
step directly affects the quality of manuals, the coordinator should work closely with the editor and
monitor the process. Where necessary, the coordinator should coordinate with instructional
designers, SMEs, and writers to discuss the issues in the editing work.
After all the editing work has been completed, adjustment of the layout remains . The layout
should be adjusted to make the manual reader friendly. Page breaks in particular should be
checked to ensure smooth reading.
STEP-7 Tabletop Review
After the first draft has been completed, all the members get together to examine it by checking if
there are any critical problems from various viewpoints such as the flow, logic, topics, layout
design, etc.. At the point, the proof reading and editing would hopefully had been done so well
that the check points proposed in STEP-6 will not be reviewed again. Come back to the course
objectives and check the draft if it matches objectives.
STEP-8 Piloting
The best way to make the draft perfect is to pilot it. Conducting a pilot session using the draft
Learner’s Guide and getting feedback from participants is the best approach. It is recommended
that feedback is received from participants who were not directly involved in the development
work. In instances where conducting a pilot session is difficult, other members of the team who
would be using the draft materials could review the drafts. Feedback collected through piloting
should be filtered and sorted out in order to pick up critical comments to act on.
<Self-Check>
[ ] Contents developed follow the story boards.
[ ] Contents developed follow the standard format.
[ ] Contents are appropriate for the target readers.
[ ] It is easy to read and user friendly.
[ ] Layout such as font size, line space, page break, etc is okay and consistent.
93
Step-9 Printing
Printing is the last step of the process of development. Usually printing is done by a printing
company. Thus communication with the company is critical. The coordinator should clearly
communicate with the printing company to convey ideas and share the image of the final output.
In order to shorten lead time, it is recommended that a very good printing company is selected and
communicated with early enough before drafts are ready. When communication is done by an
administrator, the coordinator should also closely monitor and follow up on the process.
The date of delivery should be set early enough before the use of the manuals. This is because
it is often observed that delivery is later than the scheduled date and there needs to be adequate
time to correct mistakes if they occur. In determining the number of books to be printed, the
number of people who should receive completed versions in addition to the number of participants
of the training course, should be taken into account.
A the point of giving out the soft copies of the Learner’s Guide to the printing company, the
following points should be communicated and agreed on with the company.
Quality of printing (copy)
Printing colour (for word, for photos, for charts and graph)
Paper (colour, thickness, quality)
Format of binding (perfect binding, ring binding, etc.)
Designs of cover, flyleaf, spine.
Date and time of handing out sof copies
Date and time of delivery
Number of books to deliver
Cost
Payment schedule
When the manuals are delivered from the printing company, the coordinator should carefully
check and confirm that every instruction was fulfilled and there are no mistakes. The check points
are the same as in the check list above.
<Self-Check>
[ ] Contents are suitable to achieve the course objectives.
[ ] Contents are appropriate for the target readers.
[ ] It is easy to read, clear and user friendly.

94
STEP-10 Acknowledgement
After completing the Learner’s Guide, the coordinator should not forget to acknowledge the
efforts and cooperation by team members and other people involved. Send copies of the
Learner’s Guide to members if possible as a token to show appreciation. Sending out messages
is also a good idea. Team members are interested in the output of their work. Completed
Learner’s Guide are a reflection of their work and their contributions. Also this action is effective
to maintain their interest and membership for working together again to revise and update the
Learner’s Guide in the future if it becomes necessary.
7.3 Effective PowerPoint Slides
Today PowerPoint is the de facto standard for presentation materials. However not many
people can prepare effective PowerPoint slides. Some people prepare PowerPoint slides as
presentation manuscripts and just read it. This can be boring.
PowerPoint slides should only describe the points facilitators want to convey. Do not write
long sentences but short expressions and bullet points. Introducing visuals makes slides
attractive and effective. Advantages of visualizations are summarized into 4 points below:
Helps get attention from audience
Promotes understanding
Promotes retention of knowledge
Saves time
<Self-Check>
[ ] All team members have been acknowledged.
[ ] Copies of the manual have been sent to each team member
[ ] Copies of the manual have been sent to other relevant stakeholders
<Self-Check>
[ ] Image of the final output has been shared with printing company.
[ ] Printing company was effectively communicated with during the processes.
[ ] Manuals delivered have been carefully checked.
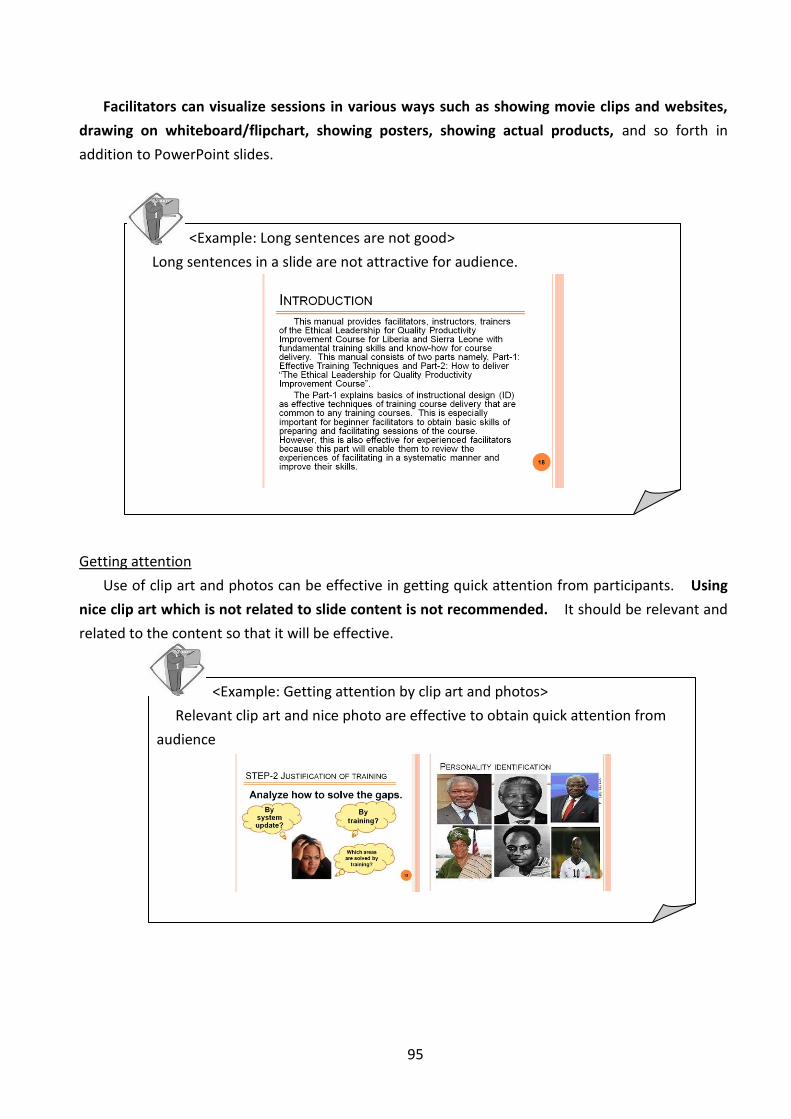
95
Facilitators can visualize sessions in various ways such as showing movie clips and websites,
drawing on whiteboard/flipchart, showing posters, showing actual products, and so forth in
addition to PowerPoint slides.
Getting attention
Use of clip art and photos can be effective in getting quick attention from participants. Using
nice clip art which is not related to slide content is not recommended. It should be relevant and
related to the content so that it will be effective.
<Example: Getting attention by clip art and photos>
Relevant clip art and nice photo are effective to obtain quick attention from
audience
<Example: Long sentences are not good>
Long sentences in a slide are not attractive for audience.
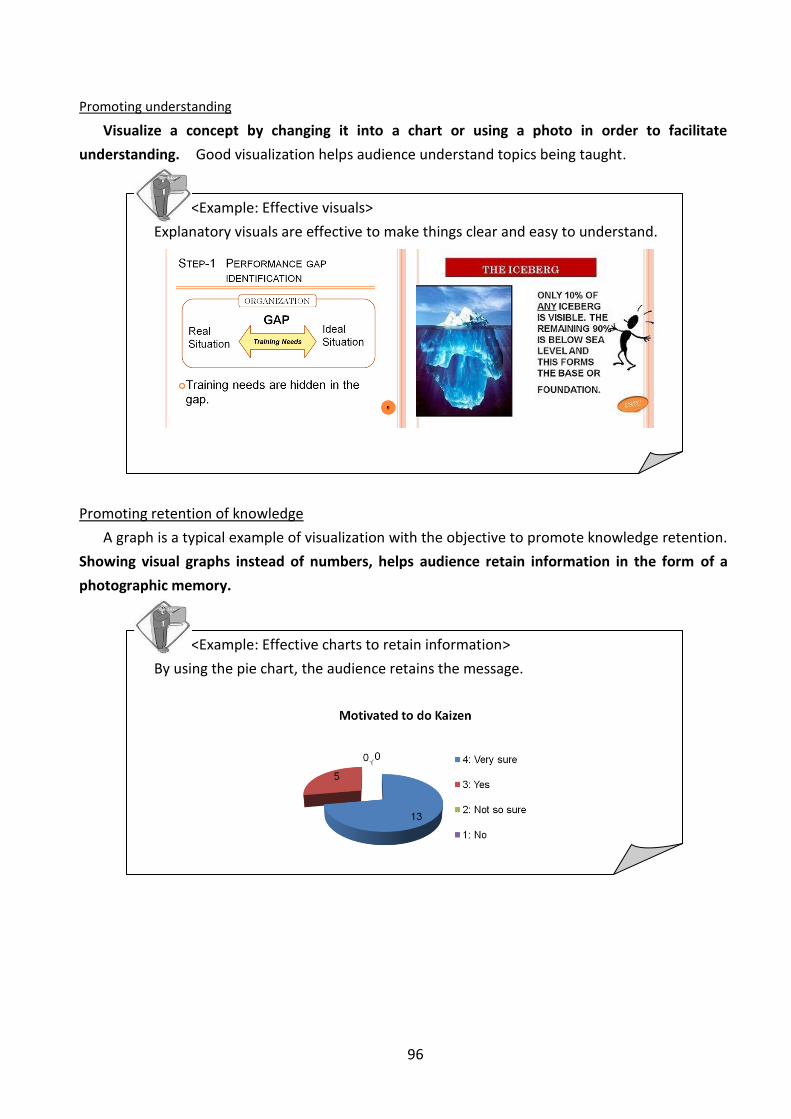
96
Promoting understanding
Visualize a concept by changing it into a chart or using a photo in order to facilitate
understanding. Good visualization helps audience understand topics being taught.
Promoting retention of knowledge
A graph is a typical example of visualization with the objective to promote knowledge retention.
Showing visual graphs instead of numbers, helps audience retain information in the form of a
photographic memory.
<Example: Effective charts to retain information>
By using the pie chart, the audience retains the message.
<Example: Effective visuals>
Explanatory visuals are effective to make things clear and easy to understand.
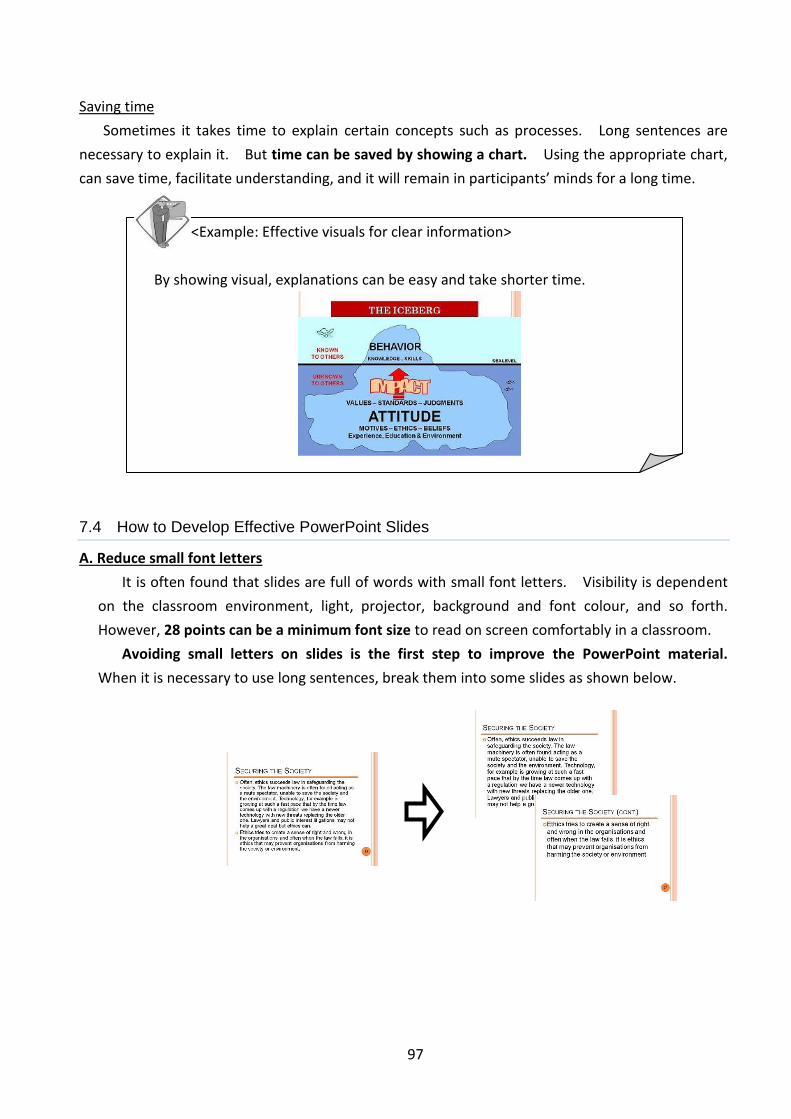
97
Saving time
Sometimes it takes time to explain certain concepts such as processes. Long sentences are
necessary to explain it. But time can be saved by showing a chart. Using the appropriate chart,
can save time, facilitate understanding, and it will remain in participants’ minds for a long time.
7.4 How to Develop Effective PowerPoint Slides
A. Reduce small font letters
It is often found that slides are full of words with small font letters. Visibility is dependent
on the classroom environment, light, projector, background and font colour, and so forth.
However, 28 points can be a minimum font size to read on screen comfortably in a classroom.
Avoiding small letters on slides is the first step to improve the PowerPoint material.
When it is necessary to use long sentences, break them into some slides as shown below.
<Example: Effective visuals for clear information>
By showing visual, explanations can be easy and take shorter time.
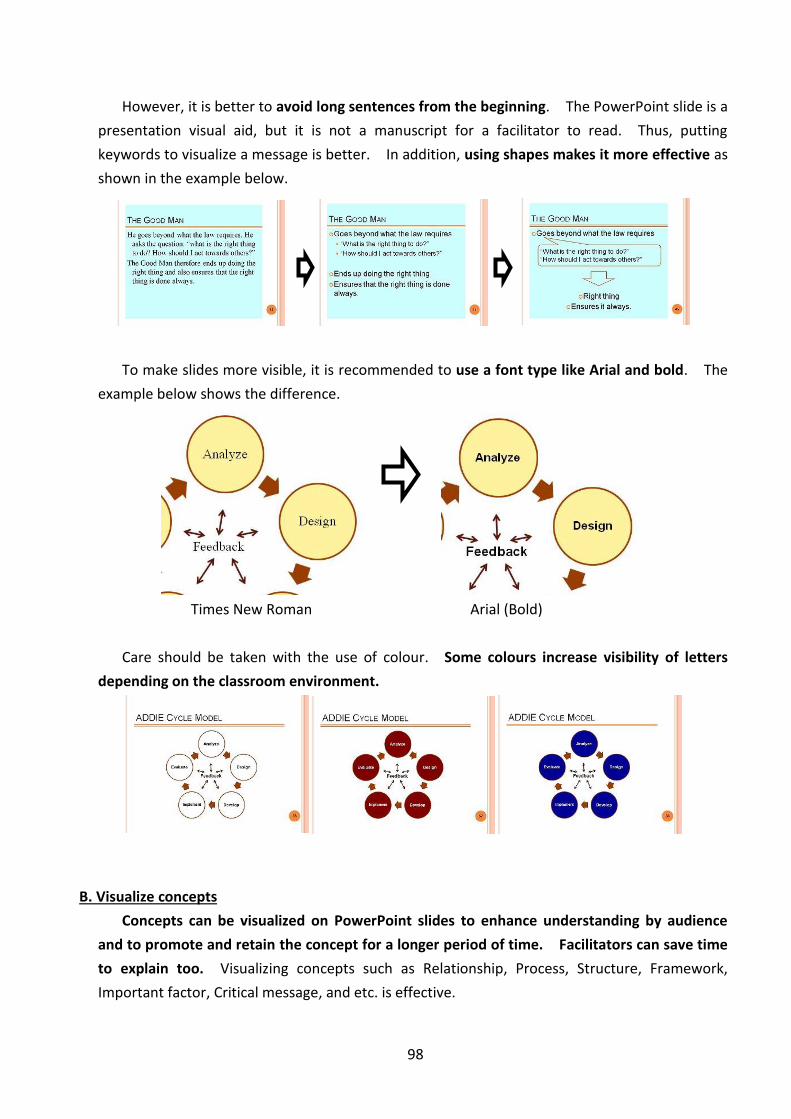
98
However, it is better to avoid long sentences from the beginning. The PowerPoint slide is a
presentation visual aid, but it is not a manuscript for a facilitator to read. Thus, putting
keywords to visualize a message is better. In addition, using shapes makes it more effective as
shown in the example below.
To make slides more visible, it is recommended to use a font type like Arial and bold. The
example below shows the difference.
Times New Roman Arial (Bold)
Care should be taken with the use of colour. Some colours increase visibility of letters
depending on the classroom environment.
B. Visualize concepts
Concepts can be visualized on PowerPoint slides to enhance understanding by audience
and to promote and retain the concept for a longer period of time. Facilitators can save time
to explain too. Visualizing concepts such as Relationship, Process, Structure, Framework,
Important factor, Critical message, and etc. is effective.

99
The concept of relationships can be visualized effectively in some examples below.
Processes are easy to be understood when it is visualized in examples below.
Structures and frameworks are easy to understand through visuals. For example,
complicated structures which are difficult to explain with words can be visualized and easy to
understand. Some examples are shown below.

100
Emphasis on an important factor in a framework can be visualized effectively. Below is an
example that shows emphasis on Learning Ability as important for leadership development.
In other words, visualization makes communication more effectively. For example, you
can visualize the critical message in the examples below that developing quality of facilitators,
learning resources, and training management leads to a Global Standard for a Centre Of
Excellence.
Here are steps for visualization of a concept to help facilitators. It can be done through 4
steps as indicated below.
Step-1: Pick up keywords
Step-2: Relate each keyword
Step-3: Design overall structure
Step-4: Put keywords
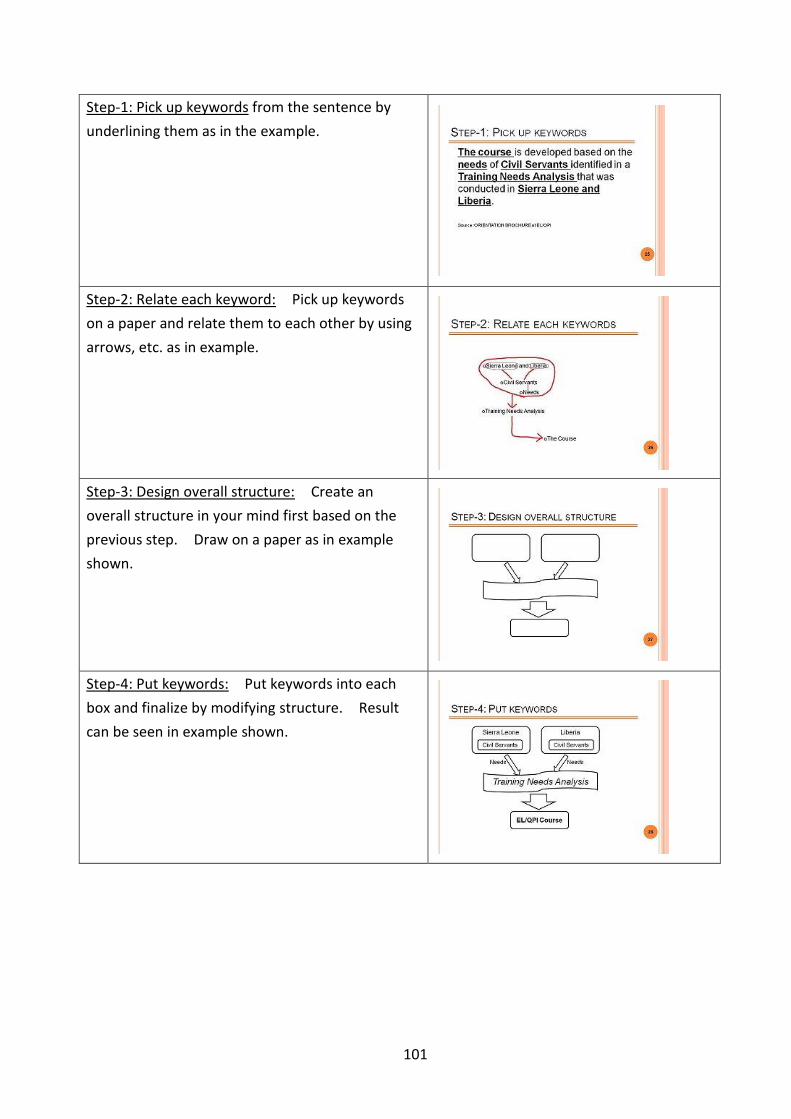
101
Step-1: Pick up keywords from the sentence by
underlining them as in the example.
Step-2: Relate each keyword: Pick up keywords
on a paper and relate them to each other by using
arrows, etc. as in example.
Step-3: Design overall structure: Create an
overall structure in your mind first based on the
previous step. Draw on a paper as in example
shown.
Step-4: Put keywords: Put keywords into each
box and finalize by modifying structure. Result
can be seen in example shown.

102
Using the “Shapes” and “SmartArt” function of PowerPoint is strongly recommended to
make visualization easy and efficient.
Insert -> Shapes Insert - > SmartArt
C. Use of clip art
Showing clip art such as illustrations and photos are sometimes effective to draw the
attention of the audience. For example, you can use clip art instead of an arrow as shown
below. What is the difference in impact between the two?
Just Arrow Clip Art
Be careful with copyrights. Clip art should be copyright free. PowerPoint has a wonderful
function of Clip Art, which is convenient to use and is copyright free. Various kinds of
illustrations and photos are shown on a screen in a separate window by clicking “Insert” and
“Clip Art” as indicated below.

103
Click “Organise Clip”, and another window appears. Organise your favourite clip arts as
shown below. What will appear will depend on your computer configuration.
Clicking “Clip art on Office Online, can access Microsoft Office homepage to search for
copyright free clip arts if your computer is connected to the internet. There are many clip arts
stored that can be downloaded. Search by inputting keywords such as “teacher”, “point”,
“caution”, etc. There is access to it through the URL below too.
http://office.microsoft.com/en-us/images/
In addition to various kinds of templates from URL below, most templates are also visual slides.
http://office.microsoft.com/en-us/templates/
D. ID Model applications
When presentation materials such as PowerPoint slides are being developed, the
story/scenario is more important than just making slides attractive in appearance. Lesson
plans indicate how facilitators proceed with sessions but this does not specify details.
For example, when a facilitator explains the importance of Time Management, he/she can
choose from some options. He/she can begin using statements such as (1) “Time Management
is very important”, or (2) “If you don’t care about time management, what happens?”, or (3) “Is
time management really important?”, etc. Depending on the story/scenario, the slides will be
different. In applying the “PIE Rule” (see 3.3 above), the story is made Practical by referring to
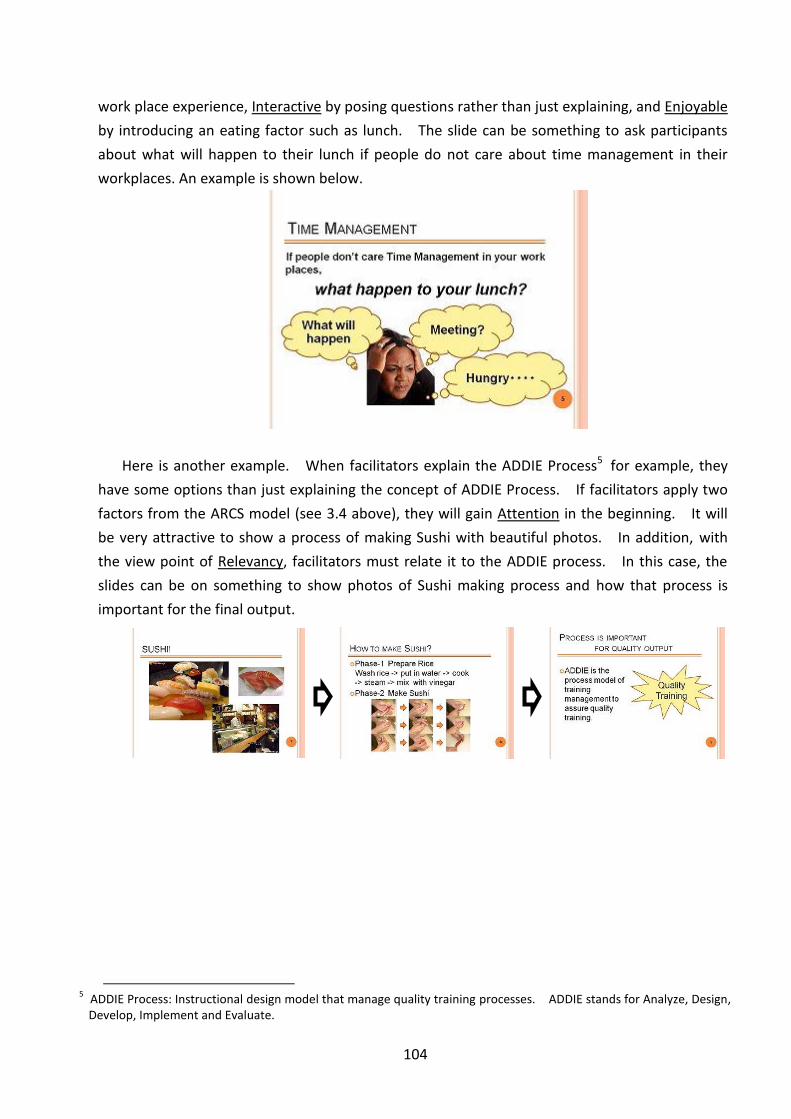
104
work place experience, Interactive by posing questions rather than just explaining, and Enjoyable
by introducing an eating factor such as lunch. The slide can be something to ask participants
about what will happen to their lunch if people do not care about time management in their
workplaces. An example is shown below.
Here is another example. When facilitators explain the ADDIE Process5 for example, they
have some options than just explaining the concept of ADDIE Process. If facilitators apply two
factors from the ARCS model (see 3.4 above), they will gain Attention in the beginning. It will
be very attractive to show a process of making Sushi with beautiful photos. In addition, with
the view point of Relevancy, facilitators must relate it to the ADDIE process. In this case, the
slides can be on something to show photos of Sushi making process and how that process is
important for the final output.
5 ADDIE Process: Instructional design model that manage quality training processes. ADDIE stands for Analyze, Design, Develop, Implement and Evaluate.
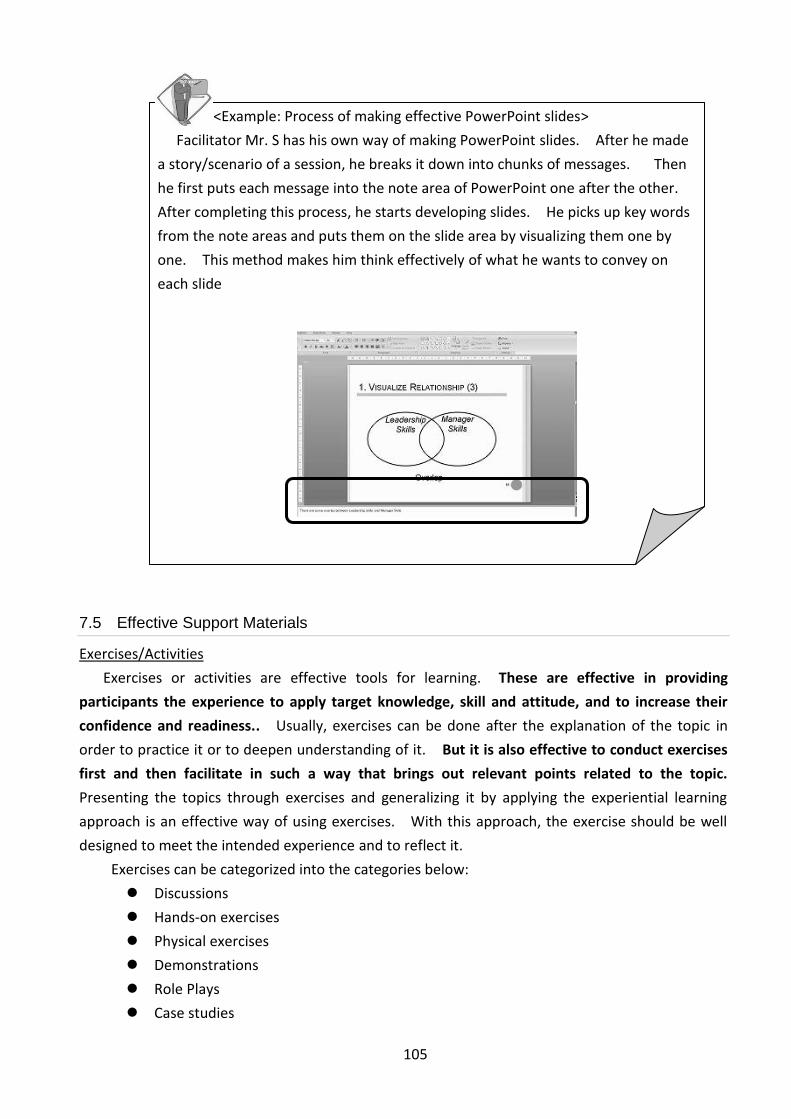
105
7.5 Effective Support Materials
Exercises/Activities
Exercises or activities are effective tools for learning. These are effective in providing
participants the experience to apply target knowledge, skill and attitude, and to increase their
confidence and readiness.. Usually, exercises can be done after the explanation of the topic in
order to practice it or to deepen understanding of it. But it is also effective to conduct exercises
first and then facilitate in such a way that brings out relevant points related to the topic.
Presenting the topics through exercises and generalizing it by applying the experiential learning
approach is an effective way of using exercises. With this approach, the exercise should be well
designed to meet the intended experience and to reflect it.
Exercises can be categorized into the categories below:
Discussions
Hands-on exercises
Physical exercises
Demonstrations
Role Plays
Case studies
<Example: Process of making effective PowerPoint slides>
Facilitator Mr. S has his own way of making PowerPoint slides. After he made
a story/scenario of a session, he breaks it down into chunks of messages. Then
he first puts each message into the note area of PowerPoint one after the other.
After completing this process, he starts developing slides. He picks up key words
from the note areas and puts them on the slide area by visualizing them one by
one. This method makes him think effectively of what he wants to convey on
each slide

106
The options available when using exercises include working at the individual level or in groups
and getting participants to present the results of the exercises. The use of exercises is dependent
on the domains of learning. For knowledge, exercises contribute to retaining knowledge. For
skills, exercises enable participants to apply knowledge and to practice. For attitude, exercises
enable participants to have a feel of the topic under discussion. Exercises enable participants to
integrate KSA and facilitate their learning. The effectiveness of exercises impact on the
achievement of objectives set for the session. In the skill focused session, exercises should be
focused on using and demonstrating targeted skills. Exercises and case studies are the most
important content for a skill-focused program. Thus, the course content should include them as
much as possible.
(1) How to develop exercises/activities
There are many types of exercises such as quizzes, games, self-check, role play,
demonstration, case study and so forth. The simple way to develop exercises is to
convert content to a quiz, game, or check list. Exercises conducted in groups as a way of
competition becomes a game. A typical example of a game is “Telephone Whispering”, in
which one person whispers a message to another following a certain order. This game can
be utilized in order to make participants experience that communication can easily be faulty.
Popular games can be utilized in many ways by modifying and setting different objectives .
<Example: Quiz>
Here is an example of a quiz meant to retain knowledge of the ADDIE cycle
model.
Fill the blanks below.
A for Analysis
D for Design
D for [ ]
I for Implementation
E for [ ]

107
It is not easy to create your own original exercise , but you can start by modifying an existing
one. This becomes your own exercise.
Reference URLs for developing exercises.
Trainers Activities
http://www.mtalearning.com/
Free Training Resources, Games, Role plays, Exercises & Downloads
http://www.skillsconverged.com/FreeDownload/tabid/258/Default.aspx
(2) How to develop case studies
There are many kinds of case studies. There are four types of case studies: illustrative
(descriptive of events), exploratory (investigative), cumulative (collective information
comparisons) and critical (examine particular subject with cause and effect outcomes).
You should choose the appropriate type depending on what you want to achieve with the
case study.
Case studies consist of two part, namely, 1) Case story, and 2) Questions. It is
important to design questions as well. Long academic case studies such as Harvard
<Example: Quiz>
In order to reinforce attitude toward change and create a consciousness
concerning the mindset participants, self-checks could be utilized. After
participants complete check sheets, feedback and reflection is important.
Mindset Check Sheet
Check Yes or No to below questions
I am comfortable in an environment where every day is the same. [Y / N]
I don’t like to change the way I do my work. [Y / N]
I sometimes feel bad when my boss proposes new things [Y / N]
( additional questions could be added………)
Total number of Yes:
Appendix 7-4: Activity Catalogue
108
Business Cases require a lot of work on interviewing and data collection. An explanation of
how to develop a simple and short case study is presented below;
Steps to create a simple case study:
Step-1: Determine what the case is meant to achieve
Step-2: Review sample case studies that are similar in style and scope
Step-3: Choose a case site such as location, organization, company or individual who is
dealing with issues of interest.
Step-4: Collect information by documentation, review and interviewing.
Step-5: Organise information collected and write the case.
Step-6: Develop questions that will lead participants to achieve the objectives of the
case.
Step-7: Pilot it by asking third persons to check the content.
<Example: Case study development>
The steps taken by Mr. S when he developed his original short case study on customer
service are presented below.
Step-1: Determine what will be achieved with the case
As an introduction customer service orientation, Mr. S set the following objective:
“to understand that customer’s viewpoints and officer’s view points can be
different”.
Step-2: Review sample case studies that are similar in style and scope
Mr. S searched text materials for CSTC training courses and found some case
studies on customer service but they are different from his intention. So he
searched the Internet by using the key word “customer service case study” and
found some case stories but many of them are for service industries such as
restaurants and shops. However, by reading these cases, he pointed out that
“understanding customer view point and feeling” is an important common
element. Next, he added the key word “public service” but did not find any
case. He also tried the key word “Public service case study”. However, he
found project reports of public sector reform etc. After searching for some
time, he decided that he would modify the cases he found to the public service
context.
Finally, he picked up one similar case for a restaurant which was not short.
109
Step-3: Choose a case site such as location, organization, company or individual who is
dealing with issues of interest.
In order to make the case study realistic, he made up his mind to select his
familiar working environment, that is CSTC . He decided to take the location to
be the reception of CSTC, that receives telephone calls for enquiries on
participating in training courses.
Step-4: Collect information by documentation, review and interview.
In addition to his current knowledge, he interviewed the receptionist who takes
care of telephone calls . He asked questions related to:
Roles and responsibility.
Steps taken when the receptionist receives a call
Difficulties in the work
From this interview, Mr. S could indentify an interesting and difficult call. He
gathered more information about this case.
Step-5: Organise information collected and write a case.
After collecting the information, Mr. S organised the data and created rough
sketch of the story including the following:
1) Description of the job and how the receptionist receives a call from potential
customer.
2) Description of the difficult call that was collected through the interview.
Step-6: Develop questions that will lead participants to the objectives of the case .
Mr. S developed two questions to help participants think about what the
customer expected when he called and what was wrong in the response.
Step-7: Pilot it by asking third persons to check the content.
After completing the case, Mr. K asked his colleague to read it thoroughly for
feedback and editorials. He asked two colleagues to answer the two questions
to check if they would give the expected answers. By this check, he identified
that one of the questions can be misleading so he fine-tuned it.
Another simple way to create an effective case study is to apply metaphors and create
metaphorical case. In order to make participants think about unfamiliar things, you can
use an environment, which is more familiar to participants.
For example, for a case study on Training Needs Analysis, which is not familiar to
participants, you can use a metaphor similar to diagnosis by a doctor in a hospital, which is
familiar to participants. The case explains what happened to the patient when the doctor
made a mistake in diagnosis before starting treatment. By this case you can make
participants aware of the fact that TNA is important before you design any program. This
example is enclosed in Appendix 7-5: Case Study Samples, SAMPLE-4: Mini Case Study on
110
Training Needs Analysis.
By changing questions, the same case could be utilized to meet other objectives. It is
also effective to use newspaper articles and to make participants discuss and come to
certain conclusions. Privacy and copyright should be respected and well taken care of.
Exercise Instructions
Instructions for exercises are important to effectively conduct them. When facilitators
conduct an exercise, they need to create instructions and the forms to be used. Facilitators can
instruct orally, however, it is recommended to create an instruction material and forms so that it
will be clearer for participants. Providing a dummy would provide a clear image to participants of
what is expected and helps to avoid misleading them.
You can include the information below in the exercise instruction.
Objective
Output image (Dummy)
Steps
Members (if it is group work)
Time allocation
Presentation instruction
Additional Information (Reference materials)
Additional information can be provided in the form of support material. The role of support
materials is to provide information for participants to learn further after the session. Facilitators
can develop support materials in order to 1) provide detailed information on topics delivered and
2) provide related topics to topics delivered. They include reference book list, reference URL list,
copies of newspaper and magazine articles, training resources used in similar topic on training
courses, etc. in addition to original materials they develop. New trends on topics and latest relevant
news are especially attractive to participants and facilitate learning. Additional information is
appreciated especially when participants are varied in background and their wide varieties of
needs are not fulfilled by the limited time of the session. Support materials contribute towards
increasing overall satisfaction.
Appendix 7-5: Case Study Samples
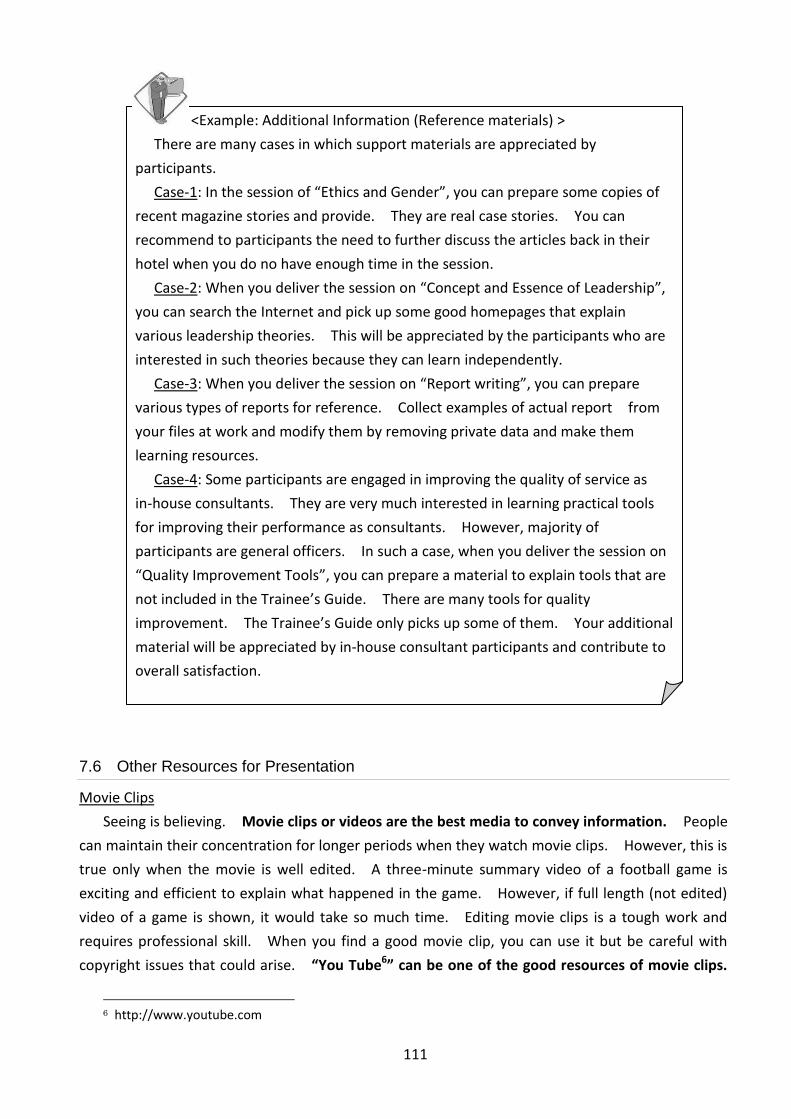
111
7.6 Other Resources for Presentation
Movie Clips
Seeing is believing. Movie clips or videos are the best media to convey information. People
can maintain their concentration for longer periods when they watch movie clips. However, this is
true only when the movie is well edited. A three-minute summary video of a football game is
exciting and efficient to explain what happened in the game. However, if full length (not edited)
video of a game is shown, it would take so much time. Editing movie clips is a tough work and
requires professional skill. When you find a good movie clip, you can use it but be careful with
copyright issues that could arise. “You Tube6” can be one of the good resources of movie clips.
6 http://www.youtube.com
<Example: Additional Information (Reference materials) >
There are many cases in which support materials are appreciated by
participants.
Case-1: In the session of “Ethics and Gender”, you can prepare some copies of
recent magazine stories and provide. They are real case stories. You can
recommend to participants the need to further discuss the articles back in their
hotel when you do no have enough time in the session.
Case-2: When you deliver the session on “Concept and Essence of Leadership”,
you can search the Internet and pick up some good homepages that explain
various leadership theories. This will be appreciated by the participants who are
interested in such theories because they can learn independently.
Case-3: When you deliver the session on “Report writing”, you can prepare
various types of reports for reference. Collect examples of actual report from
your files at work and modify them by removing private data and make them
learning resources.
Case-4: Some participants are engaged in improving the quality of service as
in-house consultants. They are very much interested in learning practical tools
for improving their performance as consultants. However, majority of
participants are general officers. In such a case, when you deliver the session on
“Quality Improvement Tools”, you can prepare a material to explain tools that are
not included in the Trainee’s Guide. There are many tools for quality
improvement. The Trainee’s Guide only picks up some of them. Your additional
material will be appreciated by in-house consultant participants and contribute to
overall satisfaction.

112
There are often many educational clips uploaded.
Whiteboard/flipchart
Whiteboards and flipcharts are the traditional tools for teaching. These are still valid and
effective when in use in the right way. As everyone uses PowerPoint today, sometimes hand
writing and drawing can draw attention than electronic tools. Facilitators can draw charts during
presentation as well as write down points to catch participants’ attention and to promote
retention of their knowledge. The audience would be curious to know what the facilitator is
going to draw and so would maintain their concentration on a presentation.
The advantage of using the flipchart is that you can come back to any sheet when necessary.
On the other hand the disadvantage is the small size of the sheet. The advantage of using the
whiteboard is that its big size allows facilitators to draw big charts. However, its disadvantage is
that they need to erase when the space is not enough and they cannot refer to it later.
Products
Showing actual products is the best way to explain things. When facilitators show the actual
product, participants will pay more attention to it than just explaining. Facilitators can impact
participants’ more and they retain the knowledge shared longer. For example, showing a book
<Example: Effective usage of movie clip>
Facilitator Mrs. D utilizes a movie clip with music for the session on “Customer
identification and customer care”. In the beginning, she shows a 90 seconds
movie clip with high tempo music. This contributes to waking up participants.
And after the video, Mrs. D asks participants “what did you see?” Usually,
participants do not concentrate on the story so she plays the video a second time.
Then she poses the same question. The story of the video is related to the
session content. By this process, she can gradually go into the topic for the
session with sufficient readiness of participants.

113
facilitators want to recommend to participants in their hands can create more impact than just
showing the information about the book such as title, author, publisher etc. on presentation
material. However, when the product is large or dangerous, showing a movie clip or photo is an
option.
Website
If a computer is available and connected to the internet, showing websites is sometimes an
effective way to visualize what is being said. An advantage of showing websites is that it allows
facilitators to be flexible. When facilitators project any website on the screen in the classroom,
they need to be careful enough such that everyone can clearly see and read.
<Self-Check>
Let’s list up possible additional materials that can help to make your
session more effective.
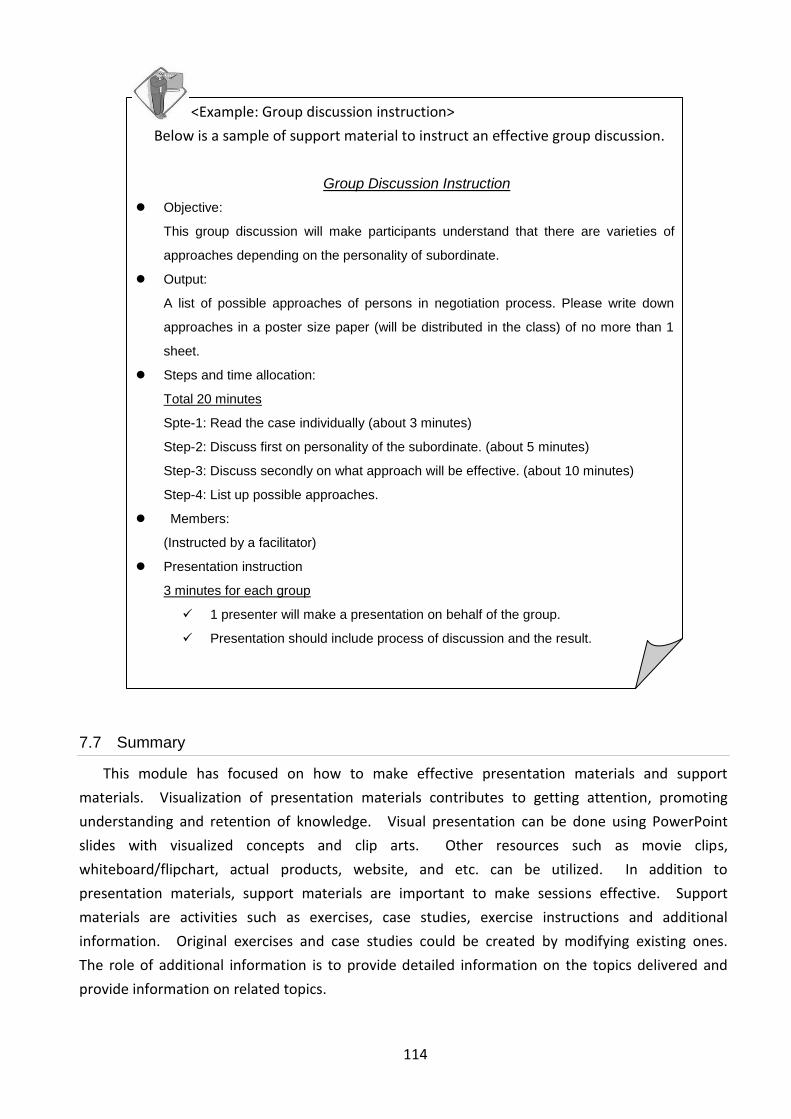
114
7.7 Summary
This module has focused on how to make effective presentation materials and support
materials. Visualization of presentation materials contributes to getting attention, promoting
understanding and retention of knowledge. Visual presentation can be done using PowerPoint
slides with visualized concepts and clip arts. Other resources such as movie clips,
whiteboard/flipchart, actual products, website, and etc. can be utilized. In addition to
presentation materials, support materials are important to make sessions effective. Support
materials are activities such as exercises, case studies, exercise instructions and additional
information. Original exercises and case studies could be created by modifying existing ones.
The role of additional information is to provide detailed information on the topics delivered and
provide information on related topics.
<Example: Group discussion instruction>
Below is a sample of support material to instruct an effective group discussion.
Group Discussion Instruction
Objective:
This group discussion will make participants understand that there are varieties of
approaches depending on the personality of subordinate.
Output:
A list of possible approaches of persons in negotiation process. Please write down
approaches in a poster size paper (will be distributed in the class) of no more than 1
sheet.
Steps and time allocation:
Total 20 minutes
Spte-1: Read the case individually (about 3 minutes)
Step-2: Discuss first on personality of the subordinate. (about 5 minutes)
Step-3: Discuss secondly on what approach will be effective. (about 10 minutes)
Step-4: List up possible approaches.
Members:
(Instructed by a facilitator)
Presentation instruction
3 minutes for each group
1 presenter will make a presentation on behalf of the group.
Presentation should include process of discussion and the result.
115
“Let’s improve your past PowerPoint slides”
Let’s revise and improve your PowerPoint presentation slides. Pick up some slides that
contain a lot of words and which is difficult to understand. Apply the skills acquired in this
module and improve your slides by reducing the number of words and applying visual
concepts. After completing your work, share with other facilitators and ask for comments
on the original and revised one.
Exercise
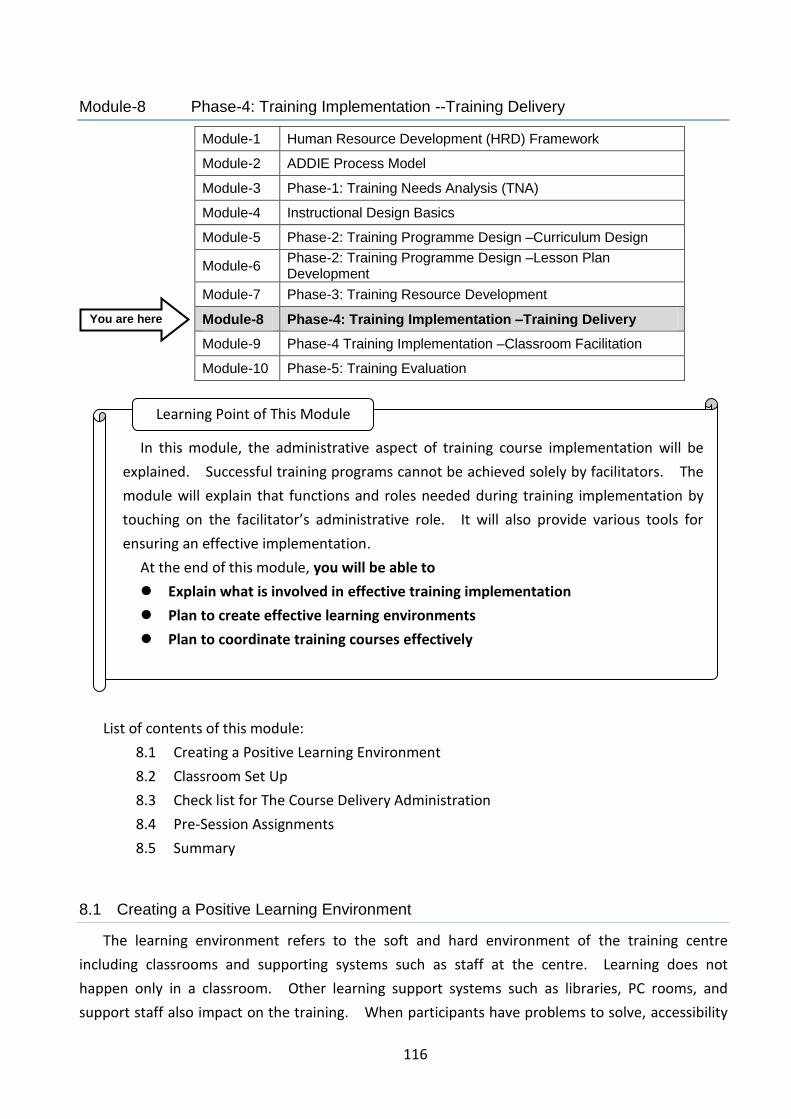
116
Module-8 Phase-4: Training Implementation --Training Delivery
Module-1 Human Resource Development (HRD) Framework
Module-2 ADDIE Process Model
Module-3 Phase-1: Training Needs Analysis (TNA)
Module-4 Instructional Design Basics
Module-5 Phase-2: Training Programme Design –Curriculum Design
Module-6 Phase-2: Training Programme Design –Lesson Plan Development
Module-7 Phase-3: Training Resource Development
Module-8 Phase-4: Training Implementation –Training Delivery
Module-9 Phase-4 Training Implementation –Classroom Facilitation
Module-10 Phase-5: Training Evaluation
List of contents of this module:
8.1 Creating a Positive Learning Environment
8.2 Classroom Set Up
8.3 Check list for The Course Delivery Administration
8.4 Pre-Session Assignments
8.5 Summary
8.1 Creating a Positive Learning Environment
The learning environment refers to the soft and hard environment of the training centre
including classrooms and supporting systems such as staff at the centre. Learning does not
happen only in a classroom. Other learning support systems such as libraries, PC rooms, and
support staff also impact on the training. When participants have problems to solve, accessibility
In this module, the administrative aspect of training course implementation will be
explained. Successful training programs cannot be achieved solely by facilitators. The
module will explain that functions and roles needed during training implementation by
touching on the facilitator’s administrative role. It will also provide various tools for
ensuring an effective implementation.
At the end of this module, you will be able to
Explain what is involved in effective training implementation
Plan to create effective learning environments
Plan to coordinate training courses effectively
Learning Point of This Module
You are here
117
to supporting staff and their effectiveness affects their learning motivation. The course
coordinator particularly plays an important role because he/she is the interface with participants.
Thus teamwork at the training institution is necessary.
The physical environment of classrooms has direct impact on the effectiveness of learning.
It is important to make the environment comfortable enough so that participants would not be
disturbed and can concentrate on the session. Here are some factors to check in the classroom:
Acoustic condition
Noise
Room lighting
Sunshine
Room temperature
Flow of the air-condition air
Utility space in the classroom
Space on table for each participant
Space between the participants
Sitting postures on chairs
Visibility of whiteboard and projector screen
Eye contact between facilitator and participants
Eye contact among participants
In instances where activities such as group exercises or discussions are included in a session,
syndicate rooms of appropriate size and table arrangements different from the classroom setup.
It must be planned in such a way that rearranging tables or moving to another room would not
disturb the flow of the session. Finally safety (such as electricity, cables not entangled, anything
sharp at the end, heavy thins to fall down, etc) should be well considered in classrooms. Effective
class room set up will be explained in the next section.
It is recommended that the role of the course coordinator is clearly defined for a smooth
delivery process.
Appendix 8-1: Terms of Reference (TOR) of Administrative Support Staff (EL/QPI) Appendix 8-2: Terms of Reference (TOR) of Course Coordinator (EL/QPI)
<Self-Check>
Is a training coordinator assigned when you conduct training
programs in your organization? If so, what are the expected roles?

118
8.2 Classroom Set Up
Physical classroom arrangement such as layout of tables, chairs, whiteboard, projector and
screen is an important factor to make a session successful. It will impact on the psychology of
participants and influence the output of a session. Do not forget that participants usually do not
know each other and they can be nervous and sensitive in the beginning. Effective layout
contributes towards increasing involvement of participants and this will lead to a better output.
Entrance
It is recommended to arrange the classroom in such a way that the entrance door is located at
the back of the room so that people who come in late do not disturb the class. This is also
convenient for training coordinators who need to come in and out.
Whiteboard, projector and screen
These should be in front or in the front corner of the classroom. Be careful with the angle of
the whiteboard and screen so that every participant can see clearly. If the entrance door is
located in front of classrooms, it is recommended to position equipment which attracts
participants’ attention such as flipchart at the opposite side of the door. Check reflections from
windows and also from room lights. Lights will affect visibility of whiteboard and screen.
CSTC Lecture room
Tables and chairs
Arrangement of tables and chairs is important because it affects participants’ involvement.
Eye contact between facilitators and participants and among participants themselves should be
considered when designing the setup. When facilitators have better eye contact with
participants, facilitators can involve them better. When participants have better eye contact with
each other, they feel more responsibility and sense of unity. There are several standard types of
classroom arrangements used in training such as 1) Classroom type, 2) Chevron type, 3) U shape
type, 4) Double U shape type, and 5) Islands type. If you think about eye contact, you understand
that Chevron type is better than class room type in terms of eye contact among participants. The
U shape arrangement is better than the Chevron type. The Island type is good for small group
White
Board
Door

119
work activities; however, this is effective even when group work is not conducted because
participants at each table feel a sense of belongingness. The charts below show various types of
classroom arrangements. You can try other forms of arrangements depending on the number of
participants and the method of teaching.
Class room type Chevron Type
U shape type
U shape type (b)
Double U shape type Islands type
Similarly, there are various types of set up for small group activities. Generally, it is necessary
to have close contact among group members during group discussions or exercises. It is effective
to put tables and chairs closely together depending on the type of work and relationship among
group members. For example, during group discussions, the Type-A set up below can be
comfortable for the participants. While, hands-on exercises like the “Bridge Building Exercise”
would be require the Type-B set up to keep an appropriate working space.
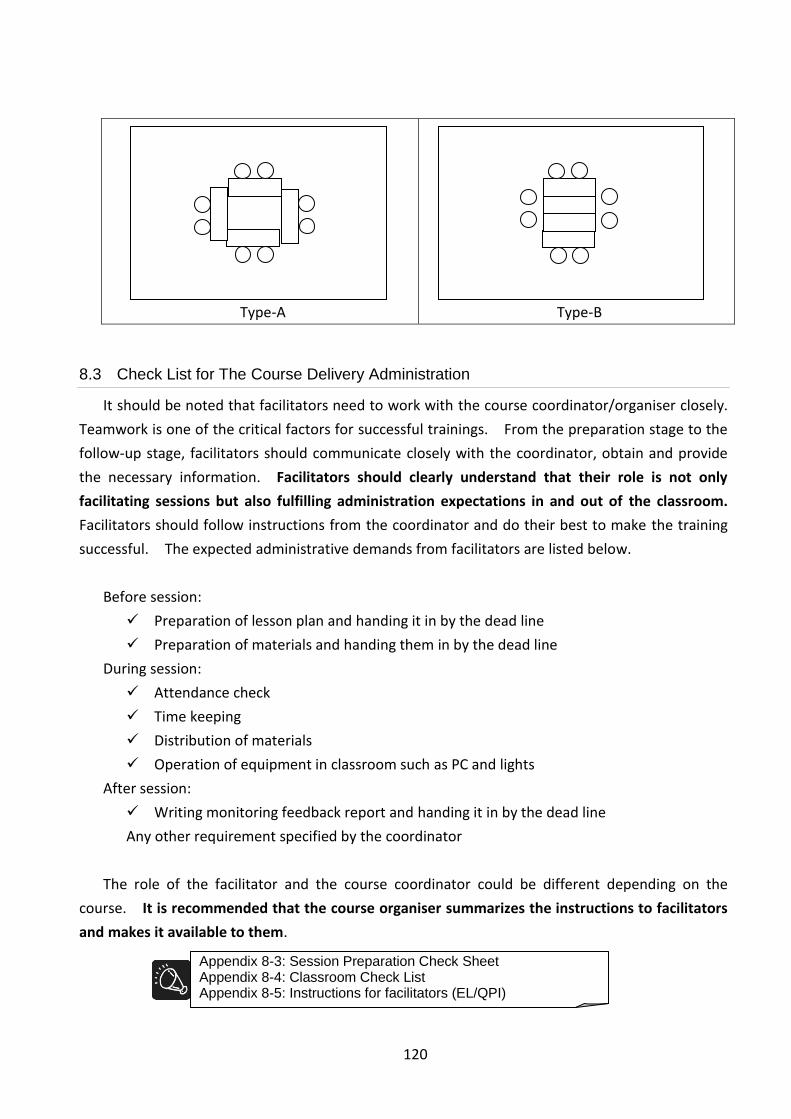
120
Type-A Type-B
8.3 Check List for The Course Delivery Administration
It should be noted that facilitators need to work with the course coordinator/organiser closely.
Teamwork is one of the critical factors for successful trainings. From the preparation stage to the
follow-up stage, facilitators should communicate closely with the coordinator, obtain and provide
the necessary information. Facilitators should clearly understand that their role is not only
facilitating sessions but also fulfilling administration expectations in and out of the classroom.
Facilitators should follow instructions from the coordinator and do their best to make the training
successful. The expected administrative demands from facilitators are listed below.
Before session:
Preparation of lesson plan and handing it in by the dead line
Preparation of materials and handing them in by the dead line
During session:
Attendance check
Time keeping
Distribution of materials
Operation of equipment in classroom such as PC and lights
After session:
Writing monitoring feedback report and handing it in by the dead line
Any other requirement specified by the coordinator
The role of the facilitator and the course coordinator could be different depending on the
course. It is recommended that the course organiser summarizes the instructions to facilitators
and makes it available to them.
Appendix 8-3: Session Preparation Check Sheet Appendix 8-4: Classroom Check List Appendix 8-5: Instructions for facilitators (EL/QPI)
121
8.4 Pre-Session Assignments
Session level assignments
In order to maximize the session duration, an option is to give assignments prior to the
session or after the session. For example, the facilitator can provide a case study and instruct
participants to read before the session so that reading time in the session can be eliminated and
more time spent on discussions. It is even possible to instruct participants to read the case study
and discuss in small groups. This enables the discussion in the class to start from a higher level.
This assignment should be given at least one day earlier, considering participants’ situation. In the
case of international training courses, it is advisable not to task participants with any assignment on
the first day of the programme as they would be acclimatizing to their new environment. The
course coordinator and facilitator need to communicate to decide on this.
Here are some ideas for giving assignments:
Reading materials such as case stories
Reading materials and reflecting on certain questions
Reading materials and holding discussions on certain questions in small groups
Summarize current situation at the workplace related to the topics
On the other hand, it is also effective to provide assignments at the end of sessions. After
each session, facilitators could ask participants to fill out forms to review their learning or to reflect
on what they have learned. In instances where facilitators are unable to complete some parts of
their sessions, they could ask participants to note these areas for further reading. It is strongly
recommended that the facilitator or coordinator collects completed assignments and provide
feedback. This is to ensure that participants take these assignments seriously.
Here are some ideas for post assignments:
Summarizing lessons learned
Relating lessons learned to current work
Planning actions for workplace
Course level assignments
It is possible to integrate pre-assignments into the course design. In such cases, participants
should be made to bring the assignments to the course.
Sometimes assignments are given to be implemented once participants are back at the
workplace. Implementing Action Plans is one of the tools used in post course monitoring of
participants implementation of what they have learnt. However, it does not work sometimes when
it is not closely monitored and followed up. Thus it is strongly recommended that this is built into
the course framework to ensure maximum levels of implementation.
Course level assignments are the training organiser’s decision to make. Once it is built in the
course, it should be well communicated to facilitators and coordinated in such a way that each
session is facilitated with this in mind.
122
8.5 Summary
A successful training is not made possible only by facilitators, but requires teamwork among all
the staff in the training institution, involving course coordinators, administrators, supporting staff
and so forth. The course coordinator is important as a bridge between participants and the
training organisers.
The classroom environment is the most influential among the factors for learning. The layout
should be arranged in such a way that participants can be comfortable and can concentrate on
activities. A lot of effort goes into training delivery. The use of checklists and forms standardizes
the work and makes it easy and smooth. The strategic inclusion of Pre and Post Assignments in
sessions and in the overall course contributes to the effectiveness of the training.
<Example: Pre and Post Assignments for the EL/QPI Courses>
Pre-Training Evaluation is included in the EL/QPI course as a pre-assignment.
Participants have to fill out the form by discussing with their bosses based on
which a draft plan of actions to be implemented after the course is developed.
The completed assignments should be sent to CSTC Ghana before the course
starts. This system enables participants to be ready for learning during the
course, ensures action plan implementation, and also provides background
information to CSTC to guide facilitators in their sessions.
Action Planning is built in the EL/QPI as a post assignment. Participants are
requested to implement action plans developed during the course once they are
back to their workplaces. CSTC will monitor, follow up and conduct impact
surveys to evaluate the impact of the training. Implementing the Action Plans is
hard work but it ensures application of what they have learned and its impact on
performance in the workplace.
Appendix 8-6: Pre-Training Evaluation Form (EL/QPI)
Appendix 8-7: Action Plan Form (EL/QPI)
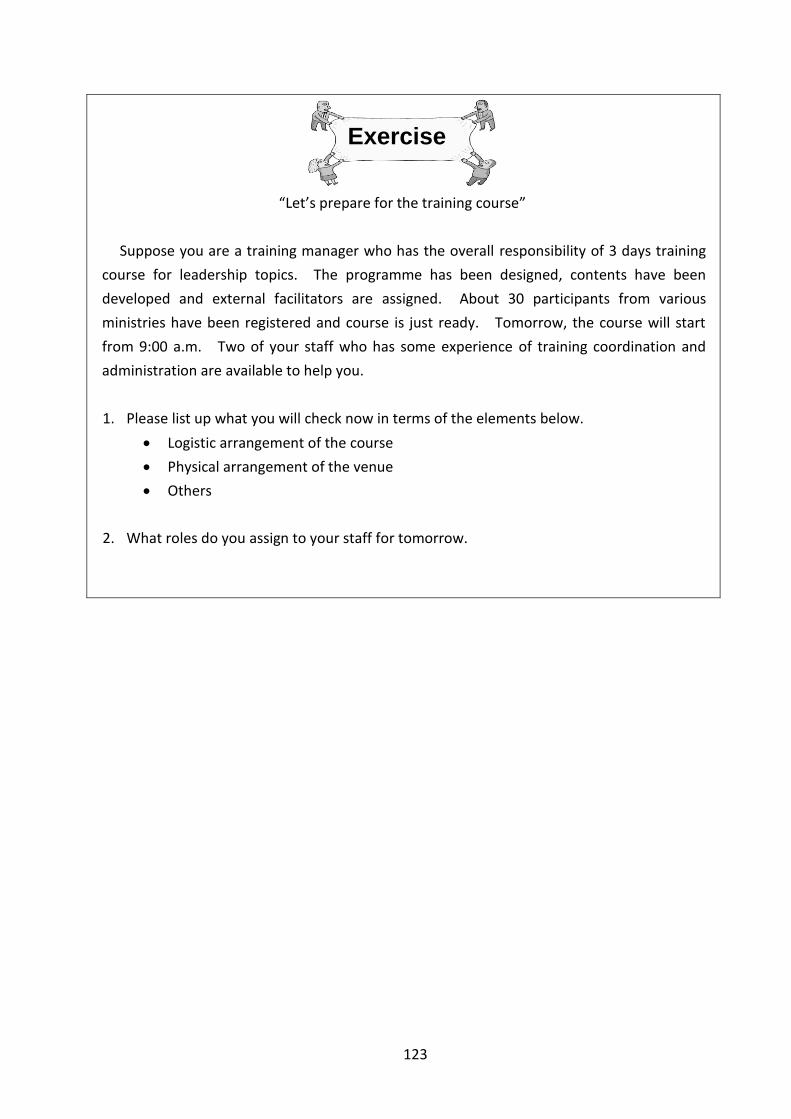
123
“Let’s prepare for the training course”
Suppose you are a training manager who has the overall responsibility of 3 days training
course for leadership topics. The programme has been designed, contents have been
developed and external facilitators are assigned. About 30 participants from various
ministries have been registered and course is just ready. Tomorrow, the course will start
from 9:00 a.m. Two of your staff who has some experience of training coordination and
administration are available to help you.
1. Please list up what you will check now in terms of the elements below.
Logistic arrangement of the course
Physical arrangement of the venue
Others
2. What roles do you assign to your staff for tomorrow.
Exercise
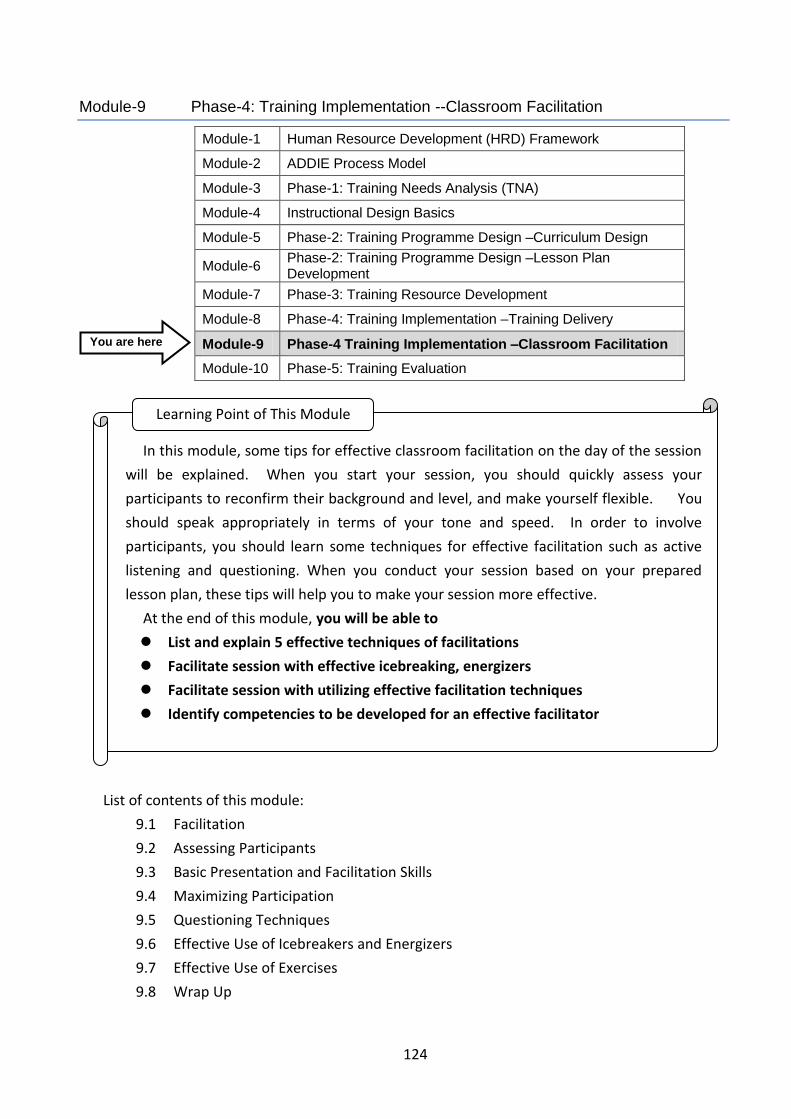
124
Module-9 Phase-4: Training Implementation --Classroom Facilitation
Module-1 Human Resource Development (HRD) Framework
Module-2 ADDIE Process Model
Module-3 Phase-1: Training Needs Analysis (TNA)
Module-4 Instructional Design Basics
Module-5 Phase-2: Training Programme Design –Curriculum Design
Module-6 Phase-2: Training Programme Design –Lesson Plan Development
Module-7 Phase-3: Training Resource Development
Module-8 Phase-4: Training Implementation –Training Delivery
Module-9 Phase-4 Training Implementation –Classroom Facilitation
Module-10 Phase-5: Training Evaluation
List of contents of this module:
9.1 Facilitation
9.2 Assessing Participants
9.3 Basic Presentation and Facilitation Skills
9.4 Maximizing Participation
9.5 Questioning Techniques
9.6 Effective Use of Icebreakers and Energizers
9.7 Effective Use of Exercises
9.8 Wrap Up
In this module, some tips for effective classroom facilitation on the day of the session
will be explained. When you start your session, you should quickly assess your
participants to reconfirm their background and level, and make yourself flexible. You
should speak appropriately in terms of your tone and speed. In order to involve
participants, you should learn some techniques for effective facilitation such as active
listening and questioning. When you conduct your session based on your prepared
lesson plan, these tips will help you to make your session more effective.
At the end of this module, you will be able to
List and explain 5 effective techniques of facilitations
Facilitate session with effective icebreaking, energizers
Facilitate session with utilizing effective facilitation techniques
Identify competencies to be developed for an effective facilitator
Learning Point of This Module
You are here
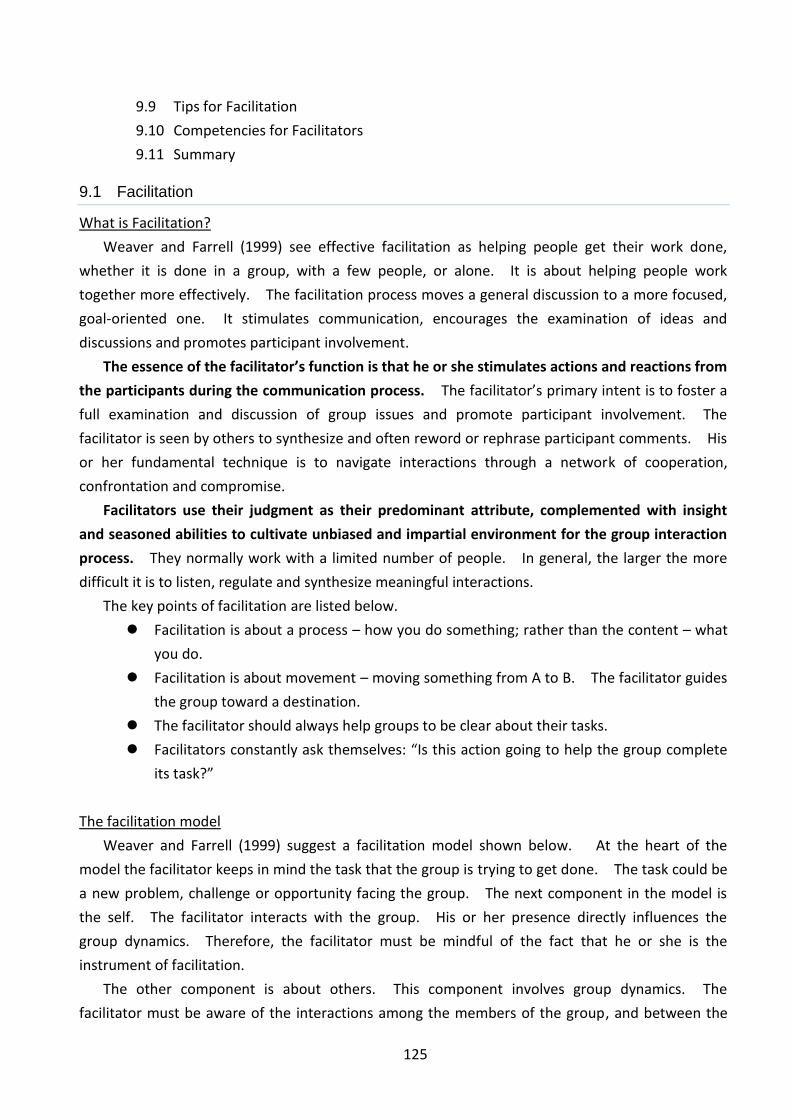
125
9.9 Tips for Facilitation
9.10 Competencies for Facilitators
9.11 Summary
9.1 Facilitation
What is Facilitation?
Weaver and Farrell (1999) see effective facilitation as helping people get their work done,
whether it is done in a group, with a few people, or alone. It is about helping people work
together more effectively. The facilitation process moves a general discussion to a more focused,
goal-oriented one. It stimulates communication, encourages the examination of ideas and
discussions and promotes participant involvement.
The essence of the facilitator’s function is that he or she stimulates actions and reactions from
the participants during the communication process. The facilitator’s primary intent is to foster a
full examination and discussion of group issues and promote participant involvement. The
facilitator is seen by others to synthesize and often reword or rephrase participant comments. His
or her fundamental technique is to navigate interactions through a network of cooperation,
confrontation and compromise.
Facilitators use their judgment as their predominant attribute, complemented with insight
and seasoned abilities to cultivate unbiased and impartial environment for the group interaction
process. They normally work with a limited number of people. In general, the larger the more
difficult it is to listen, regulate and synthesize meaningful interactions.
The key points of facilitation are listed below.
Facilitation is about a process – how you do something; rather than the content – what
you do.
Facilitation is about movement – moving something from A to B. The facilitator guides
the group toward a destination.
The facilitator should always help groups to be clear about their tasks.
Facilitators constantly ask themselves: “Is this action going to help the group complete
its task?”
The facilitation model
Weaver and Farrell (1999) suggest a facilitation model shown below. At the heart of the
model the facilitator keeps in mind the task that the group is trying to get done. The task could be
a new problem, challenge or opportunity facing the group. The next component in the model is
the self. The facilitator interacts with the group. His or her presence directly influences the
group dynamics. Therefore, the facilitator must be mindful of the fact that he or she is the
instrument of facilitation.
The other component is about others. This component involves group dynamics. The
facilitator must be aware of the interactions among the members of the group, and between the
126
group and himself or herself. The facilitator needs to balance the contributions and participation
among the group members such that no one person dominates the group or imposes his or her
view on the rest.
In order to achieve this balance, the facilitator relies on processes and tools. The facilitator is
mindful of the task at hand, that is, to guide the group from a new problem or challenge on to
arriving at a decision point that is supported by members of the group. The process the
facilitators uses will involve divergent thinking and convergent thinking techniques. In divergent
thinking, the facilitator draws out alternative views and opinions from the group. A diversity of
views is strongly encouraged. From this diversity of views, the facilitator needs to guide the group
to identify and select the most useful one to arrive at the desired destination.
The Facilitation Model is described in the chart below.
(Source: Adapted from Weaver, R.G. & Farrell, J.D., Manager As Facilitators, 1999))
9.2 Assessing Participants
Facilitators need to know participants. Facilitators deliver sessions based on the preparation
described in their lesson plans. However, facilitators should be flexible to modify predetermined
approaches and deal with various types of participants in appropriate ways to satisfy their
expectations. In the preparation process, facilitators need to check the participants’ list to have a
fair assessment of them. Robert W. Pike suggests in his book “Creative Training Techniques
Handbook” that facilitators should assess participants in terms of level of 1) knowledge, 2)
interest, 3) language, and 4) influence. Facilitators can assess these factors through
conversations, asking questions, conducting pre-tests, and so forth.
It is recommended that the facilitator goes to the classroom early and to have casual
conversations with participants before the session starts. When facilitators assess participants in
the beginning of session, the typical way is to ask each participant to introduce him/herself briefly.
Facilitators can also instruct participants to share their expectations from the training so that
facilitators can understand their level of interest. Facilitators can determine their level of skill,
TASK
PROCESS
SELF
GROUP
127
influence and their experience in their fields of expertise through these introductions. Depending
on what the facilitator wants to assess, short questionnaires could also be used.
Level of knowledge and skill
Facilitators should assess the level of knowledge and skill of participants on the topics they
would be delivering. This level can be identified with respect to their awareness level,
competence level, and level of mastery.
When facilitators find some participants who already have enough knowledge and skill on the
subject area, facilitators can ask them to support through demonstrations in the classroom, etc.
Level of interest
Participants’ level of interest can be identified in 4 levels namely; 1) Prisoner, 2) Vacationer, 3)
Socializer, and 4) Learner. The Prisoners are sent by their bosses and do not want to be there.
They feel that attendance is a punishment. The Vacationers feel that attendance is a good way to
escape from work. The Socializers are enjoying attendance as an opportunity to have a good time
and meet people. The learners are there to gain new skills and knowledge.
In order to deal with participants other than learners, facilitators should catch their attention
and explain how the session will be beneficial to them from the beginning. Remember P-MARGE
of Andragogy (see 3.1 above).
<Self-Check>
Let’s think of the percentage composition of 1) Prisoner, 2)
Vacationer, 3) Socializer, and 4) Learner in your past training
experiences.
<Example: How to deal with overqualified participants>
Facilitator, Mr. S found one of the participants of the instructional design
session had knowledge and experience. The content of the session would not
seem to be satisfactory to her. Thus Mr. S asked her to help him to share
experiences and support participants to learn. She was happy to do that and
contributed a lot by providing effective inputs.

128
Level of language
Since facilitators are dealing with foreign participants from Liberia and Sierra Leone, assessing
their level of sophistication in English is important. This should guide facilitators in selecting
appropriate words to use. Avoid using jargons in training sessions.
Level of influence
Facilitators have to assess what kind of influence each participant has back in their
workplaces. Facilitators need to check participants’ levels of authority to initiate new things such
as implementation of their Action Plans. Based on this, facilitators could anticipate what kind of
support they are likely to need in the application of what they learned. Facilitators should
consider their levels of influence and take the appropriate approach.
9.3 Basic Presentation and Facilitation Skills
Speak with clear and loud voice with appropriate speed
The facilitators’ voice is an important element in catching the attention of participants.
Facilitators should speak in clear and loud voices so that every participant can hear them well. In
addition, it is effective to speak in an energetic and enthusiastic manner but not too fast. If
facilitators speak with a low and not clear voice, facilitators will lose participants’ concentration and
they may even think facilitators are not confident in what they are speaking about. Relax and
start speaking slowly in the beginning, then you can increase your pace over time.
<Example: Checking the level of interest of participants>
In the beginning of the session on “Sexual Harassment”, a facilitator poses the
question “What is sexual harassment?” or “Where is the borderline with Sexual
Harassment?” By listening to answers from participants, the facilitator can
understand participants’ level of knowledge and awareness of the topic.
Another example is about the session on “Quality Management”. The
facilitator asks participants this question; “How much of your work can be
improved by introducing quality management?” If you receive many negative
responses, it means that participants do not have interest in the topic. You must
start from increasing their level of interest.
129
Use both verbal and non-verbal language
When facilitators speak to participants, they use both verbal and non-verbal language. Use
body actions, facial expressions, and so forth to show your intention. People tend to believe what
they see rather than hear. Using both verbal and non-verbal language will make your
presentation more persuasive.
From wide to narrow
It is recommendable to guide the discussion from a wide scope to narrow issues. Facilitators
should guide the discussion towards understanding the macro level picture based on which parts of
this picture can be discussed to deepen the discussion and the learning points.
Make participants think
It is very effective to ask questions occasionally. In order to catch the attention of participants,
facilitators must make them think about the topics under discussion. Facilitators should not
explain everything from the beginning to the end. But facilitators should stop occasionally and
pose questions to the class. Participants will start thinking and take ownership of the topics.
For example, facilitators can ask “Why do you think this happened?” before explaining it. If
facilitators feel there is a risk that they will receive unexpected answers, they can immediately
answer it themselves. This simple provision of questions is effective to also involve participants.
Remember the 90/20/8 Rule.
<Example: Changing pace of speech for effective facilitation>
Some facilitators speak in an energetic way and with a strong voice. It is true
that participants are attracted by this and it increases their concentration.
However, if the facilitator continues in the same manner throughout a session,
participants get tired of the high tension in the classroom. They would need
some rest. In this case, it would be necessary to introduce icebreakers such as
group work. Remember Andragogy and the 90/20/8 rule. Even though the
facilitation skill is high and the session is participatory, not changing tones will
make participants tired easily. A good lesson plan is important.
<Self-Check>
Did you ever hear or watch your presentation recording? If not, you
can just record your speaking voice for a minute and listen to it. Ask
yourself if your tone and speed of voice is comfortable to listen to.
130
9.4 Maximizing Participation
In addition to providing information through presentations, facilitators can involve the whole
class by holding discussions and making them think, to deepen their understanding and to retain
the knowledge being shared. The facilitation skill for discussions (class and small groups) is one of
the most important skills needed by facilitators to involve participants. Here are some tips for
effective facilitation in discussion sessions.
Attitude for facilitation
There are three (3) types of attitudes required as a facilitator. These are 1) honesty and
openness, 2) neutrality, and 3) objectivity. First of all, facilitators should be honest and open to
other opinions so that facilitators can gain trust from participants. With this attitude, the group
will also become honest and open in discussions. This will enhance the discussions and contribute
to deepening their understanding. The facilitators’ attitude creates a strong influence than you
would think. Secondly, facilitators need to be neutral to any ideas in the classroom. Thirdly,
facilitators should be objective by monitoring the discussion and helping promote and deepen the
discussion. Facilitators should not influence decision making of the group. This will decrease
ownership of the decision or discussion.
Introduction of facilitator
Facilitators must introduce themselves and explain their role when the session starts. This is
important to establish trust between the class and the facilitator and is the starting point of
involving the whole class in the session. Avoid over reliance on yourself.
Explain the goal and objective
Facilitators should make the goal and objective of the discussion clear to participants. This
way, the discussion will be focused on the issues and would be easy to come up with conclusions.
This will contribute towards decreasing the frustration of participants.
Encourage participants who do not speak
The facilitator is to encourage all participants to speak. Always pay attention and avoid the
situation where only few participants control the discussion.
Group Work
When you facilitate group work, carefully observe and provide assistance. Sometimes group
members are frustrated because they cannot make progress. When you observe this kind of
situation, stimulate confidence and encourage them by providing appropriate words.
Sometimes you can recommend that the group takes a break to be refreshed.

131
Active Listening
Facilitation is not a one-way communication to providing knowledge. Facilitators are in the
position to support participants to learn. In order to support participants, facilitators should
accept and understand them. This way, participants will accept the facilitator’s support. In
order to make participants feel that they are accepted by facilitators, facilitators must listen to
them carefully. Here are some active listening techniques that help facilitators listen to
participants effectively.
Pacing --- Speak the same way as participants. When your participants speak slowly,
you have to speak slowly. When your participants speak with anger, you also respond
with a feeling of anger for participants to sympathize with the issues.
Repeating --- Repeat what participants say. When any of your
participants speak, repeat what he/she said in a short form using
same words. This makes participants comfortable because they
feel accepted. Even though, your opinion may be different from
participants, first accept what he/she says by repeating.
Discussions will then be smooth.
Non-verbal language --- Use non-verbal language when you listen. Participants will
feel that you are really listening.
Do not evaluate when you are listening. --- You should not evaluate if an opinion is
good or bad. Criticizing participants is the worst thing to do as a facilitator. When
you do not evaluate opinions, participants will feel comfortable to provide their
opinions and the group will be encouraged to go on.
Do not be afraid of silence --- After you pose a question, give enough time to
participants to think about your question. Sometimes, facilitators hurry to elaborate
or answer too quickly. This will disturb participants. Some participants may be in deep
thought. Waiting for about 10 seconds is a good strategy. Do not be afraid of
silence.
Recording opinions
The facilitator should record opinions during the discussion and make them visible. Otherwise
participants will discuss similar things again and miss some important opinions. Facilitators should
<Example: Effective involvement of whole class>
A facilitator Mr. W often poses questions during his presentation. When
someone responds, he always reacts by saying “Very good” or “That is an
interesting opinion”. By responding this way, the whole class is very much
encouraged to speak up.
132
not take notes by writing whole sentences. Facilitators can just write down points or key words
so that they can come back to them. When facilitators do not clearly understand what
participants say, clarify with him/her. This will avoid misinterpretation and the participant will be
satisfied that his/her opinions have been accepted as it is. This also promotes maximum
participation in the session.
Some techniques for recording are listed below.
Print in large letters, preferably in a combination of capitals and lower case (Tips: Use
your whole arm when writing, which will make the letters larger.)’
Use lighter colours for highlighting words or phrases;
Use as few words as possible;
Use bullet points or another indicator (dash, star, arrow, etc.) to indicate where each
new idea begins;
Do not crowd the page;
Use paper with faint lines on it to help write straighter; and
Stand to the side of the easel when writing.
9.5 Questioning Techniques
Questions for effective facilitation
Facilitators can control the discussion by asking questions. Asking questions
can motivate participants than just giving instructions. There are two types of
questions namely; 1) Open-ended and 2) Closed-ended questions. Open-ended
questions start with the 5W 1H concept. The answers can be flexible. These
types of questions are effective in making participants think about ideas, opinions, etc.
Closed-ended questions can be answered with “Yes” or “No”. These types of questions are
effective in controlling discussions to a certain direction or to confirm something. Here are some
questioning techniques, which can encourage participants to keep on learning.
Asking about the future --- Facilitators can encourage participants by asking about the
future instead of asking about the past.
(Not good) What are the causes of failure?
(Good) How can you make it successful?
Positive questioning --- When discussions becomes negative, facilitators can change the
atmosphere by asking positive questions
(Not good) Why can’t you do that?
(Good) How can you make it possible?
When participants rely on facilitators and ask for help by questioning them,
facilitators can turn the question around to members.
(Good) That is a good question. Let’s ask other members.
Questioning to widen scope --- When discussion stops without new development.
133
(Good) What factors have influenced this happening?
(Good) What is the reason behind this happening?
(Good) Are there any different opinions?
Questions to sort out --- During the discussion, facilitators sort out opinions from
participants.
(Good) These opinions are similar. What do you think?
(Good) There are so many opinions. What are the common points?
Questions that facilitate learning
Here are some questions that facilitate learning:
At the start of the Processing/Analysis of contributions;
What impact or effect did that event have on you?
What are your reactions when X did it that way?
How did you account for that?
What does that mean for you?
How might it have been different?
Do you see something else operating there?
What does that suggest to you about yourself and your group?
What do you better understand about yourself and your group?
From Processing to Generalizing:
What was our intention by that action?
Did you get the result?
What might we pull or draw from that?
What did you learn or re-learn?
Does that remind you of anything?
What principle or pattern do you see operating here?
What is the deeper theme?
How does this relate to other experiences in your work setting?
Generalizing leads into applying
How could you apply or transfer that to your work setting?
What would you like to do with that?
What are the options?
What might you do to help yourself?
How could you make it better?
What are the consequences of doing or not doing that?
134
Consolidating
How was this for you?
What were the pluses and minuses?
How might it have been more meaningful?
What changes would you make?
What would you start doing, stop doing, and continue doing?
9.6 Effective Use of Icebreakers and Energizers
Icebreakers and energizers are effective for involving participants and keeping their
concentration during sessions. They are usually conducted within short periods of time to help
participants relax and to refresh themselves. Activities to refresh participants are valuable;
however they should be related to the topic being discussed to have maximum effect. For
example, when an energizer in the communication session is related to something about
communication, it will refresh participants as well as deepen their understanding in the topic.
Icebreakers
The objective of icebreakers is to create an active and positive atmosphere in a classroom and
to enable a smooth kick-start. They are used at the beginning of sessions. It is especially
necessary at the beginning of the very first session of a course or in an opening orientation. The
purpose of the icebreakers is to deal with the anxiety felt by participants when they find themselves
in new environments and with unfamiliar people. Successful icebreakers promote communication
among participants and the facilitator and their readiness to learn. Icebreakers help:
To get participants to feel comfortable
To get participants to know each other
To get participants to know the facilitator
To get participants ready to learn
To get participants to concentrate on the session
The types of icebreakers are listed below:
Physical exercise
Group exercise
Story telling by facilitator
Quiz
Self-introduction on certain topics
One example of an icebreaker is to ask participants at the beginning of the session, to introduce
themselves in order of their birthdays. This little idea could be very effective in promoting a positive
environment for the session. The selection of icebreakers should be guided by the relationship
among participants and the facilitator. Additionally, when the icebreaker is related to the subject
area it contributes to the smooth start of the session.
135
You can check the appropriateness of icebreakers using the following guidelines.
Time consumption
Threat potential
Possible group dissatisfaction
Fun, excitement
Creative quality
Information about others
Relaxation potential
Ease of implementation
Do’s and Don’ts
Do it at the beginning of the programme.
Be sensitive to age, cultural and gender differences.
Remember the 4S – short, safe, simple and synergistic.
Don’t reinvent the wheel – innovate and modify.
Reference URLs
Free Icebreakers
http://www.businesstrainingworks.com/Train-the-Trainer/Icebreakers-Free.html
40 Ice Breakers
http://www.training-games.com/pdf/40FreeIceBreakers.pdf
Ice Breakers, Energizers, and Activities
http://humanresources.about.com/od/icebreakers/Ice_Breakers_Energizers_and_Activities.htm
Icebreakers and Introductions
http://www.reproline.jhu.edu/english/5tools/5icebreak/icebreak2.htm
Icebreakers, Warm-up, Review, and Motivator Activities
http://www.nwlink.com/~donclark/leader/icebreak.html
Top 10 Active Ice Breakers
http://adulted.about.com/od/icebreakers/tp/toptenkinetic.htm
Energizers
Energizers are conducted during the session, while icebreakers are usually at the beginning.
The objective of energizers is to refresh participants and to keep their concentration. Thus the
focus is more on refreshing than on promoting communication. According to the 90/20/8 rule,
facilitators need to change their pace every 20 minutes. In instances where the same pace of
presentation needs to continue more than 20 minutes, an energizer can be integrated. Also in
changing the pace or an activity, an energizer is effective for a smooth transition. Energizers
should contribute to deepening the understanding on the topics. It is better to strategically
relate the energizer to the subject content than just to do a physical exercise.
136
Reference URLs.
Free Training Resources, Games, Role plays, Exercises & Downloads
http://www.skillsconverged.com/FreeDownload/tabid/258/Default.aspx
Multiple Intelligences: Icebreakers and Energizers
http://www.managetrainlearn.com/page/multiple-intelligence-exercises
Icebreakers, Team Building Activities, and Energizers
http://www.lionsclubs.org/EN/common/pdfs/icebreakers.pdf
Training Guide and Techniques
http://unesdoc.unesco.org/images/0013/001356/135603e.pdf
Collection of Free Energizers
http://www.thetrainingworld.com/cgi-bin/library/jump.cgi?ID=12511
Energizers: a lot of sense in nonsense.
http://www.thetrainingworld.com/cgi-bin/library/jump.cgi?ID=12514
ICEBREAKERS & ENERGIZERS
http://www.thetrainingworld.com/cgi-bin/library/jump.cgi?ID=12513
9.7 Effective Use of Exercises
Exercises are effective to deepen the understand of participants on the topics and to obtain
skills and attitudes. When exercise is included in a session, reconfirm the role and objective of it
and conduct it in such a way that participants will achieve the objective. Facilitators should
relate exercise and session objectives so that exercise can play an effective role.
Usually, exercises can be done after the explanation of the topic to practice it or to deepen
understanding of it. It is also effective to conduct exercises first and then facilitate in such a way
that brings out relevant points related to the topic. Presenting the topics through exercises and
generalizing it by applying the experiential learning approach is an effective way of using exercises.
<Example: Effective energizers for change management session>
A facilitator Mr. M sometimes conducts the energizer “Small fish & big fish” in
the “Change Management” session. The step is below.
1. Facilitator instructs participants stand up 2. Facilitator instructs that participants will open arms to show big fish when they
say “small fish”. And close arms to show small fish when they say “big fish”. Participants should take opposite action of what they say.
3. Facilitator starts from the end of table in order of seat. 4. When participant make mistake, that participant should sit down. And resume. 5. When most of participants sit down, facilitator will finish. By this short exercise, Mr. M makes participants refresh and feel that changing
something used to it is difficult.
Appendix 9-1: List of Icebreakers Appendix 9-2: List of Energizers
137
At the end of the exercise, providing feedback is important. It can be mutual feedback
among members or from the facilitator. By reflecting on the exercise, participants can deepen
their understanding and practice targeted skills.
9.8 Wrap up
Wrap-up is an important element of facilitation. Facilitators should have good wrap up skills.
Wrap up can be conducted during or at the end of the session or day or week or whole course.
It allows participants to reflects on the session or course. There are four objectives in wrap up
sessions indicated below:
Helps participants to reflect on what they learned.
Helps participants to recall key messages and insights.
Helps participants to consider the applications of the concepts in their workplaces
Makes participants commit to next actions
Sometimes the wrap-up is called Debrief, Recap, Reflection, Retrospection, Feedback, Q&A,
Assignment, Grand Finale, Primacy, Recency, Consolidate, Focus, and Direction. Wrap up can be
conducted basically in four categories indicated below:
Individual writing
Individual thinking
Group writing
Group/pair speaking
There are many ways to conduct a wrap up session. Here are some examples.
Have students and facilitators note their comments and concerns throughout the
session for wrap up. (This is a good suggestion for facilitators even if it isn't used for
wrap up.)
Make session feedback a part of the participants’ independent study and start the
session with feedback from the previous session.
Ask the participants to keep a journal about ideas concerning how the group is
functioning and periodically discuss their entries at wrap up or privately.
Appendix 9-3: Wrap Up Examples

138
9.9 Tips for Facilitation
Here are some tips for effective facilitation.
Why use a flip-chart?
Encourages people to comment;
Portable;
Can be created on the spot;
Focuses everyone on one spot in the room;
Ensures that all ideas are captured;
Objectifies the ideas (on the chart, the ideas are not associated with a specific person);
Serves as references during future discussions or activities;
Can be used to document the group’s actions and discussions; and
Several sheets can be posted and viewed at once.
How to capture ideas
Use key words to capture an idea or thought;
Use the speaker’s actual words (so the meaning is not changed);
Check with speaker to be sure ideas are captured accurately;
Capture all ideas, indicating duplicate ideas in some way;
Use abbreviations to save time;
Use symbols in place of words;
Ask for help with spelling;
< Example: Individual Reflection in the leadership training program >
This is an example of a reflection activity in the self-leadership type
identification course in Japan. It requires participants to frequently reflect on
their findings on their type of leadership during the session. They then integrate all
the findings and conclusions into action plans for becoming better leaders. Each
participant is provided with a “Learning Journal”, which is a blank notebook at the
beginning of the course. The Facilitator instructs participants to take notes of any
findings about themselves. Participants are instructed to take notes in two ways
of expressions.
“I learned XXXXXXXX”
“I learned that I was XXXXXXXXX”
During the session, facilitators sometimes give a few minutes to the class to
open their notebook and to take notes.
139
Ask group to slow down if falling behind; and
Include activities that allow participants to write on the charts.
How to form small groups
Put number from 1 to N, which the number you want to make to each participant.
Instruct to hold arms and divide into two groups depending on whether right or left arm
top.
Form groups depending on the month of birth
Form groups depending on the birth place
Form groups depending on the height
Form groups depending on the colour of cloth
Form groups depending on the favourite food
Best and Worst Facilitator Practices
Some of the best facilitator practices include:
carefully assessing the needs of the members
probing sensitively into people’s feelings
creating an open and trusting atmosphere
helping people understand why they’re there
viewing yourself as servant of the group’s needs
making members the centre of attention
speaking in simple and direct language
working hard to stay neutral
displaying energy and appropriate levels of assertiveness
championing ideas not personally favoured
treating all participants as equals
staying flexible and ready to change direction if necessary
making notes that reflect what participants mean
listening intently to understand totally what is being said
periodically summarizing a complex array of ideas so that they form a coherent
summary
knowing how to use a wide range of discussion tools
making sure every session ends with clear steps for the next meeting
ensuring that participants feel ownership for what has been achieved
ending on a positive optimistic note
Some of the worst things that facilitators do include:
remaining oblivious to what the group thinks or needs

140
never checking group concerns
not listening carefully to what’s being said
losing track of key ideas
taking poor flip char notes or change the meaning of what’s said
trying to be centre of attention
getting defensive
getting into personality battles
putting down people
unassertively managing conflicts
letting a few people or the leader dominate
never checking how the meeting is going
being overly passive on process
pushing ahead on an irrelevant agenda
having no alternative approaches
letting discussions get badly sidetracked
let discussion ramble without proper closure
not knowing when to stop
being insensitive to cultural diversity issues
using inappropriate humor
Tips for handling difficult participants
What they do What you would do
Talks too Much Thank him for his inputs, summarize and move on.
Invite others for their comments.
Doesn’t talk at all Do not assume he is not interested or bored. Test Assumptions.
Draw the person out by asking him directly (i.e. calling his name)
for his comments.
Alternatively, introduce group discussions and observe his
participation rate.
Definitely wrong Do not belittle his response.
Comment by saying “That’s interesting. How did you arrive at
that conclusion?”
Hostile Maintain your composure. Do not take it personally.
Seek Clarification. Suggest you take the issue with him “off-line”.
Do not let him push his agenda over yours.
Side conversations Move closer to the persons, i.e. using body language as a Hint for
them to stop talking.
Alternatively, ask if everything is ok with them.
141
Mobile phone
Conversations
Establish ground rules at the start of the workshop.
If they need to answer a call, suggest that they do it outside
classroom.
9.10 Competencies for Facilitators
Facilitators should be competent in four areas, namely 1) Self-management and Awareness,
2) Communication and Human Relations, 3) Leadership, 4) Subject-Matter Knowledge, and 5)
Facilitation Skills.
Competency Area 1: Self Management and Awareness
The facilitator is comfortable with his or her background and experienced and is capable of
training and coaching new facilitators. He or she;
Is aware of his or her own strengths and weaknesses;
Seeks help, opinions, and advice from others when needed;
Is aware of his or her own needs in a training/consulting relationship. Approaches issues
with an open mind;
Is not insecure when others express a different opinion; Encourages other perspectives
and questions;
Is open to learning from others in the groups he or she works with; manages his or her
own time and work load effectively; and is willing to take risks for the sake of positive
change.
Competency Area 2: Communication and Human Relations
Effective facilitators are able to communicate openly and fairly with a variety of people. They
apply facilitation skills when communicating one-on-one or in groups. The competent facilitator
also:
Treats people with respect;
Is capable of working through miscommunication and conflict toward a productive
outcome;
Strives to accurately understand other’s needs, values, and opinions.
Works to keep communication channels open (e.g.’ returns phone calls promptly, keeps
others informed, even when difficulties arise, etc.); and
Listens attentively regardless of feelings toward the speaker.
Competency Area 3: Leadership
The competent facilitator:
Comfortably takes initiative and leadership when appropriate; Successfully solicits the

142
cooperation and commitment of others;
Builds relationships and credibility before seeking alliances; Encourages others to take
the lead when appropriate;
Operates effectively within organisations; and
Understands how to accomplish things in a particular organisational culture.
Competency Area 4: Subject-Matter Knowledge
The facilitator has a good understanding of facilitation, the role of a facilitator, and the
application of facilitation in groups and organisations. He or she also:
Knows the basic premises behind facilitation and can explain the benefits of facilitation
to others;
Demonstrates ability to facilitate meetings and workshops successfully;
Keeps up-to-date on resources and literature about facilitation;
Strives continually to learn about facilitation, facilitator methods, and the application of
facilitation in a variety of situations; and
Understands the differences among presenting, teaching and facilitating and can explain
them to others.
Competency Area 5: Facilitation Skills
The facilitator demonstrates the ability to use a variety of facilitation skills and methods when
working with groups and is able to guide groups to productive outcomes. Specifically, he or she:
Draws out and balances participation;
Uses recording techniques to record “group memory” and uses it to help the group be
productive;
Understands consensus and knows various methods for helping a group reach
consensus;
Is skilled at designing results-oriented, interactive meetings;
Is competent at coordinating pre- and post-meeting logistics and administration;
Demonstrates ability to facilitate a productive meeting : manages time well, deals
effectively with latecomers, keeps the group focused, help the group reach closure,
records ideas and decisions, etc.;
Keeps the group focused on its meeting objectives;
Helps the group stay focused by paraphrasing clarifying and summarizing;
Opens and closes a meeting effectively;
Uses appropriate activities, tools and methods during the meeting to help the group be
productive;
“Reads the group” and adjusts meeting activities accordingly;
Listens well and summarizes people’s inputs and/or group discussions;
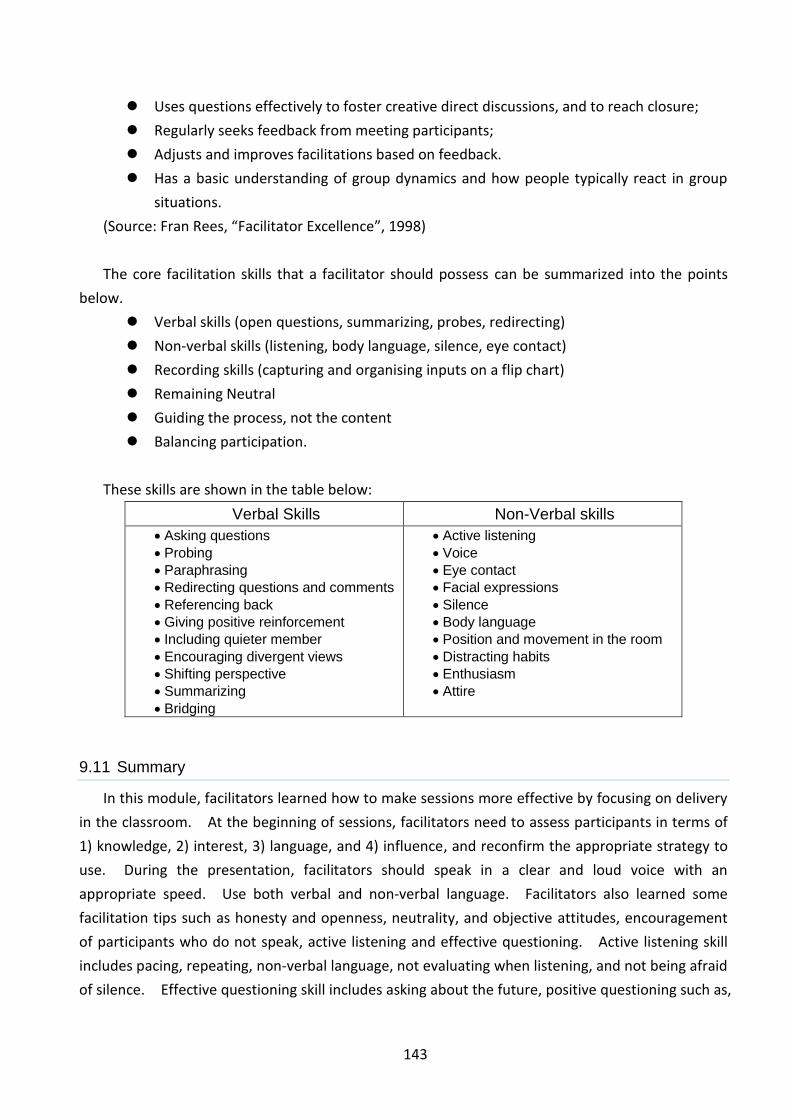
143
Uses questions effectively to foster creative direct discussions, and to reach closure;
Regularly seeks feedback from meeting participants;
Adjusts and improves facilitations based on feedback.
Has a basic understanding of group dynamics and how people typically react in group
situations.
(Source: Fran Rees, “Facilitator Excellence”, 1998)
The core facilitation skills that a facilitator should possess can be summarized into the points
below.
Verbal skills (open questions, summarizing, probes, redirecting)
Non-verbal skills (listening, body language, silence, eye contact)
Recording skills (capturing and organising inputs on a flip chart)
Remaining Neutral
Guiding the process, not the content
Balancing participation.
These skills are shown in the table below:
Verbal Skills Non-Verbal skills
Asking questions
Probing
Paraphrasing
Redirecting questions and comments
Referencing back
Giving positive reinforcement
Including quieter member
Encouraging divergent views
Shifting perspective
Summarizing
Bridging
Active listening
Voice
Eye contact
Facial expressions
Silence
Body language
Position and movement in the room
Distracting habits
Enthusiasm
Attire
9.11 Summary
In this module, facilitators learned how to make sessions more effective by focusing on delivery
in the classroom. At the beginning of sessions, facilitators need to assess participants in terms of
1) knowledge, 2) interest, 3) language, and 4) influence, and reconfirm the appropriate strategy to
use. During the presentation, facilitators should speak in a clear and loud voice with an
appropriate speed. Use both verbal and non-verbal language. Facilitators also learned some
facilitation tips such as honesty and openness, neutrality, and objective attitudes, encouragement
of participants who do not speak, active listening and effective questioning. Active listening skill
includes pacing, repeating, non-verbal language, not evaluating when listening, and not being afraid
of silence. Effective questioning skill includes asking about the future, positive questioning such as,

144
turning the question around to members, questioning to widen scope, etc. Also icebreakers and
energizers are effective to keep the concentration of participants. Competencies needed for
facilitators are 1) Self-management and Awareness, 2) Communication and Human Relations, 3)
Leadership, 4) Subject-Matter Knowledge, and 5) Facilitation Skills.

145
“Let’s practice how to make presentations”
Let’s have a role play exercise.
Form a pair and present your favourite content as a facilitator to your counterpart for
about 5 minutes. The counterpart plays the role of a participant and asks questions etc.
After your presentation, you can ask your counterpart to provide feedback. Then change
roles and do the same thing. Before you make a presentation, pick up some aspects of
facilitation skills that you want to sharpen from list below. The counterpart should play
his/her role in such a way that the facilitator can achieve this objective.
Focus areas can be:
Speaking with a clear and loud voice with appropriate speed
Using both verbal and non-verbal language
Making participants think
Attitude for facilitation (honest and open, neutral, and objective)
Introduction of facilitator
Explaining the goal and objective
Explaining whole picture and then narrowing down
Encouraging participants who do not speak
Active listening
Questioning
Recording opinions from participants
Exercise
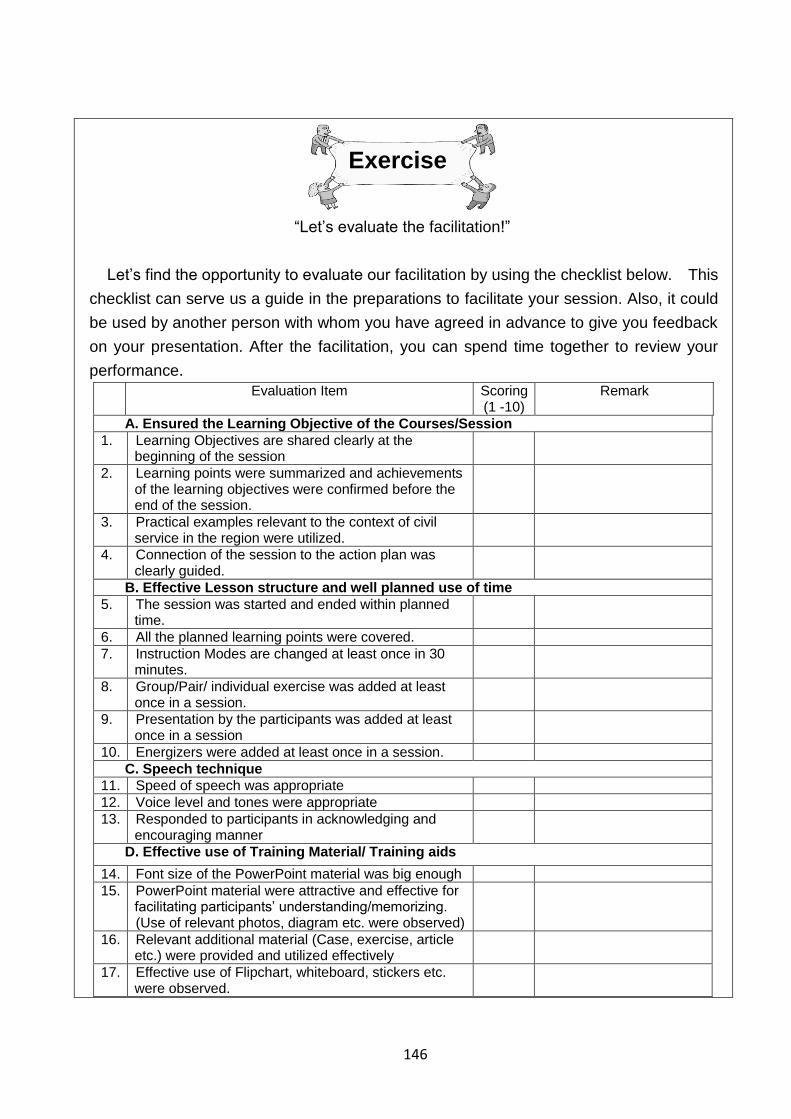
146
“Let’s evaluate the facilitation!”
Let’s find the opportunity to evaluate our facilitation by using the checklist below. This
checklist can serve us a guide in the preparations to facilitate your session. Also, it could
be used by another person with whom you have agreed in advance to give you feedback
on your presentation. After the facilitation, you can spend time together to review your
performance.
Evaluation Item Scoring (1 -10)
Remark
A. Ensured the Learning Objective of the Courses/Session
1. Learning Objectives are shared clearly at the beginning of the session
2. Learning points were summarized and achievements of the learning objectives were confirmed before the end of the session.
3. Practical examples relevant to the context of civil service in the region were utilized.
4. Connection of the session to the action plan was clearly guided.
B. Effective Lesson structure and well planned use of time
5. The session was started and ended within planned time.
6. All the planned learning points were covered.
7. Instruction Modes are changed at least once in 30 minutes.
8. Group/Pair/ individual exercise was added at least once in a session.
9. Presentation by the participants was added at least once in a session
10. Energizers were added at least once in a session.
C. Speech technique
11. Speed of speech was appropriate
12. Voice level and tones were appropriate
13. Responded to participants in acknowledging and encouraging manner
D. Effective use of Training Material/ Training aids
14. Font size of the PowerPoint material was big enough
15. PowerPoint material were attractive and effective for facilitating participants’ understanding/memorizing. (Use of relevant photos, diagram etc. were observed)
16. Relevant additional material (Case, exercise, article etc.) were provided and utilized effectively
17. Effective use of Flipchart, whiteboard, stickers etc. were observed.
Exercise
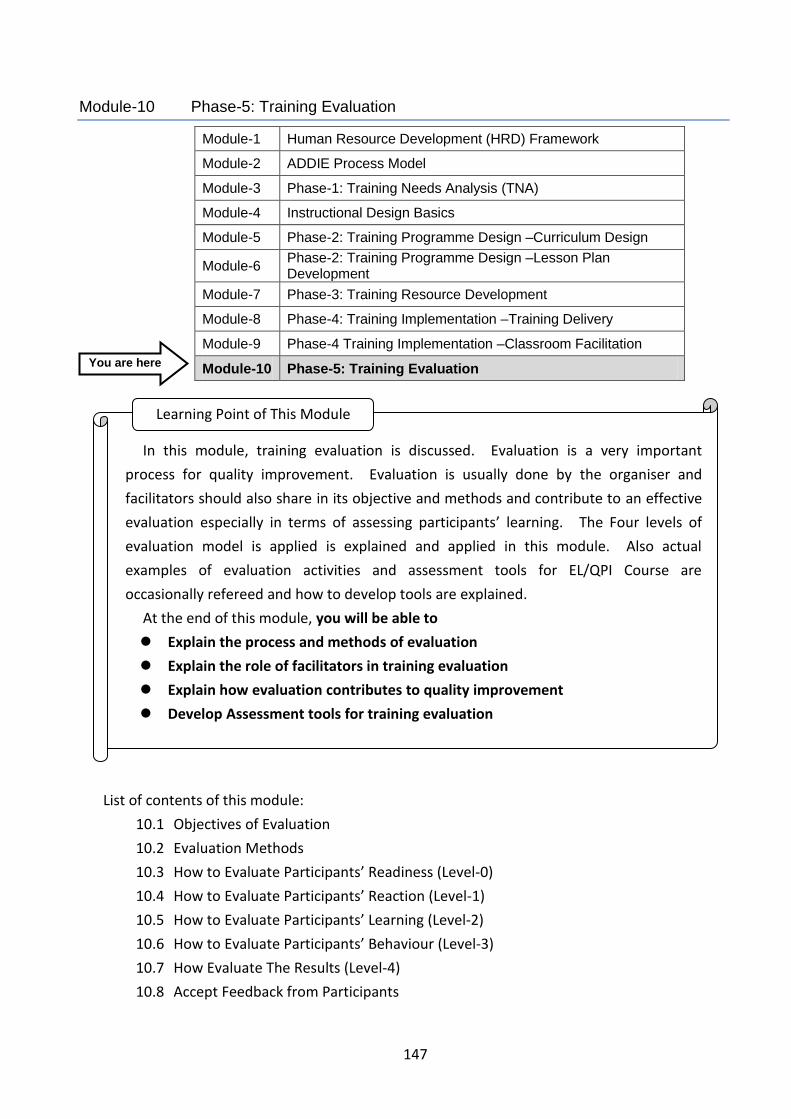
147
Module-10 Phase-5: Training Evaluation
Module-1 Human Resource Development (HRD) Framework
Module-2 ADDIE Process Model
Module-3 Phase-1: Training Needs Analysis (TNA)
Module-4 Instructional Design Basics
Module-5 Phase-2: Training Programme Design –Curriculum Design
Module-6 Phase-2: Training Programme Design –Lesson Plan Development
Module-7 Phase-3: Training Resource Development
Module-8 Phase-4: Training Implementation –Training Delivery
Module-9 Phase-4 Training Implementation –Classroom Facilitation
Module-10 Phase-5: Training Evaluation
List of contents of this module:
10.1 Objectives of Evaluation
10.2 Evaluation Methods
10.3 How to Evaluate Participants’ Readiness (Level-0)
10.4 How to Evaluate Participants’ Reaction (Level-1)
10.5 How to Evaluate Participants’ Learning (Level-2)
10.6 How to Evaluate Participants’ Behaviour (Level-3)
10.7 How Evaluate The Results (Level-4)
10.8 Accept Feedback from Participants
In this module, training evaluation is discussed. Evaluation is a very important
process for quality improvement. Evaluation is usually done by the organiser and
facilitators should also share in its objective and methods and contribute to an effective
evaluation especially in terms of assessing participants’ learning. The Four levels of
evaluation model is applied is explained and applied in this module. Also actual
examples of evaluation activities and assessment tools for EL/QPI Course are
occasionally refereed and how to develop tools are explained.
At the end of this module, you will be able to
Explain the process and methods of evaluation
Explain the role of facilitators in training evaluation
Explain how evaluation contributes to quality improvement
Develop Assessment tools for training evaluation
Learning Point of This Module
You are here
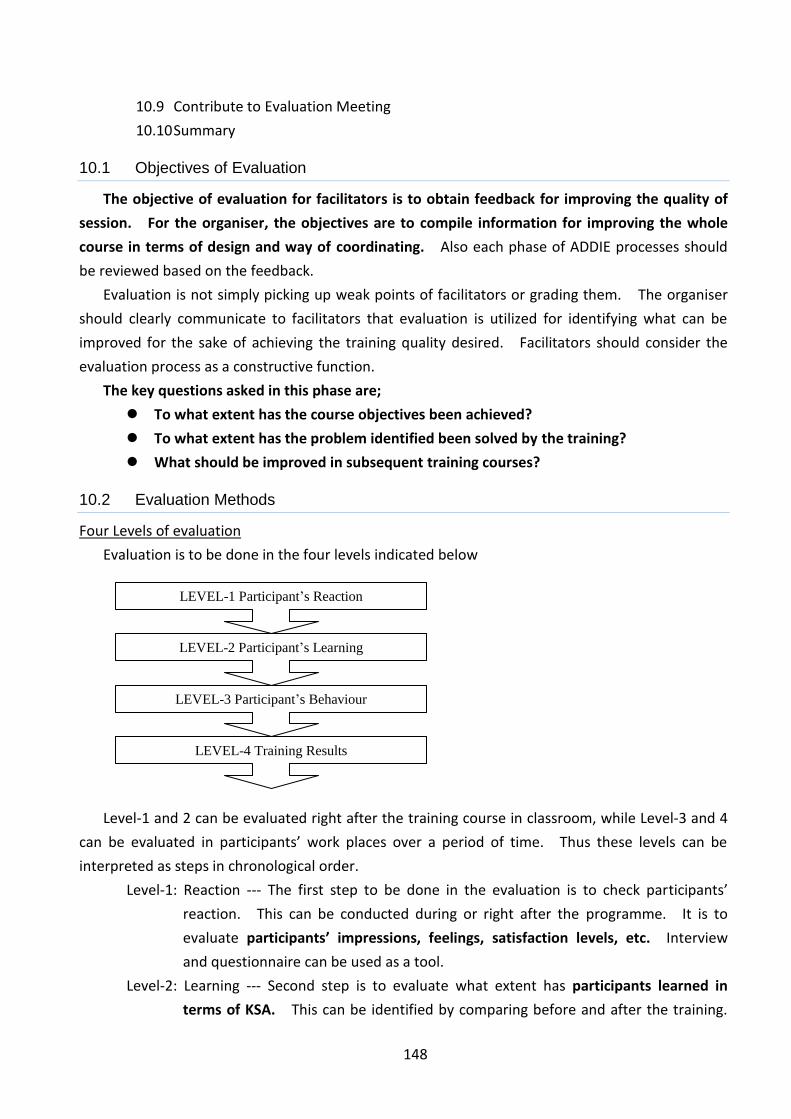
148
10.9 Contribute to Evaluation Meeting
10.10 Summary
10.1 Objectives of Evaluation
The objective of evaluation for facilitators is to obtain feedback for improving the quality of
session. For the organiser, the objectives are to compile information for improving the whole
course in terms of design and way of coordinating. Also each phase of ADDIE processes should
be reviewed based on the feedback.
Evaluation is not simply picking up weak points of facilitators or grading them. The organiser
should clearly communicate to facilitators that evaluation is utilized for identifying what can be
improved for the sake of achieving the training quality desired. Facilitators should consider the
evaluation process as a constructive function.
The key questions asked in this phase are;
To what extent has the course objectives been achieved?
To what extent has the problem identified been solved by the training?
What should be improved in subsequent training courses?
10.2 Evaluation Methods
Four Levels of evaluation
Evaluation is to be done in the four levels indicated below
Level-1 and 2 can be evaluated right after the training course in classroom, while Level-3 and 4
can be evaluated in participants’ work places over a period of time. Thus these levels can be
interpreted as steps in chronological order.
Level-1: Reaction --- The first step to be done in the evaluation is to check participants’
reaction. This can be conducted during or right after the programme. It is to
evaluate participants’ impressions, feelings, satisfaction levels, etc. Interview
and questionnaire can be used as a tool.
Level-2: Learning --- Second step is to evaluate what extent has participants learned in
terms of KSA. This can be identified by comparing before and after the training.
LEVEL-1 Participant’s Reaction
LEVEL-2 Participant’s Learning
LEVEL-3 Participant’s Behaviour
LEVEL-4 Training Results
149
Test, questionnaire can be used as a tool.
Level-3: Behaviour --- The third step is to evaluate what extent has participants’ behaviour
changed. This can be evaluated at their workplaces. It is to evaluate how much
training gave impact on participants’ performances in real situations. Self-check,
interview, questionnaire, observation can be used as a tool.
Level-4: Result --- The last step is to evaluate what extent has training given impact on
workplace as a final output. It should make clear profit to the workplace such as
increase of sales, productivity and so forth including intangible benefit. It should
be evaluated some time after the training. Data analysis, interview, questionnaire
can be used as a tool.
Timing of evaluation
Evaluation can be categorized into 4 in the view point of timing as below.
Pre-course evaluation
In-course evaluation
End-course evaluation
Impact survey
Pre-course evaluation --- It evaluates participants’ performances before the training for the
sake of comparing the performances after the training. This also contributes to
provide participants’ current levels to facilitators.
In-course evaluation --- It evaluate level 1 and 2 during the course. This contributes to
on-going modification and brings the course to right track. It can be conducted
every day or one time during the course as mid-term evaluation.
End-course evaluation --- It evaluate level 1 and 2 right after the course. Usually it is
conducted at the last day of the course.
Impact Survey --- It evaluate level 3 and 4 at some time after the course. For Level 4
evaluation, it should be more than three months. However, when duration is
getting long, it becomes difficult to relate result identified and training.
<Self-Check>
Let’s check what evaluations are conducted in the training programs
in your organization.
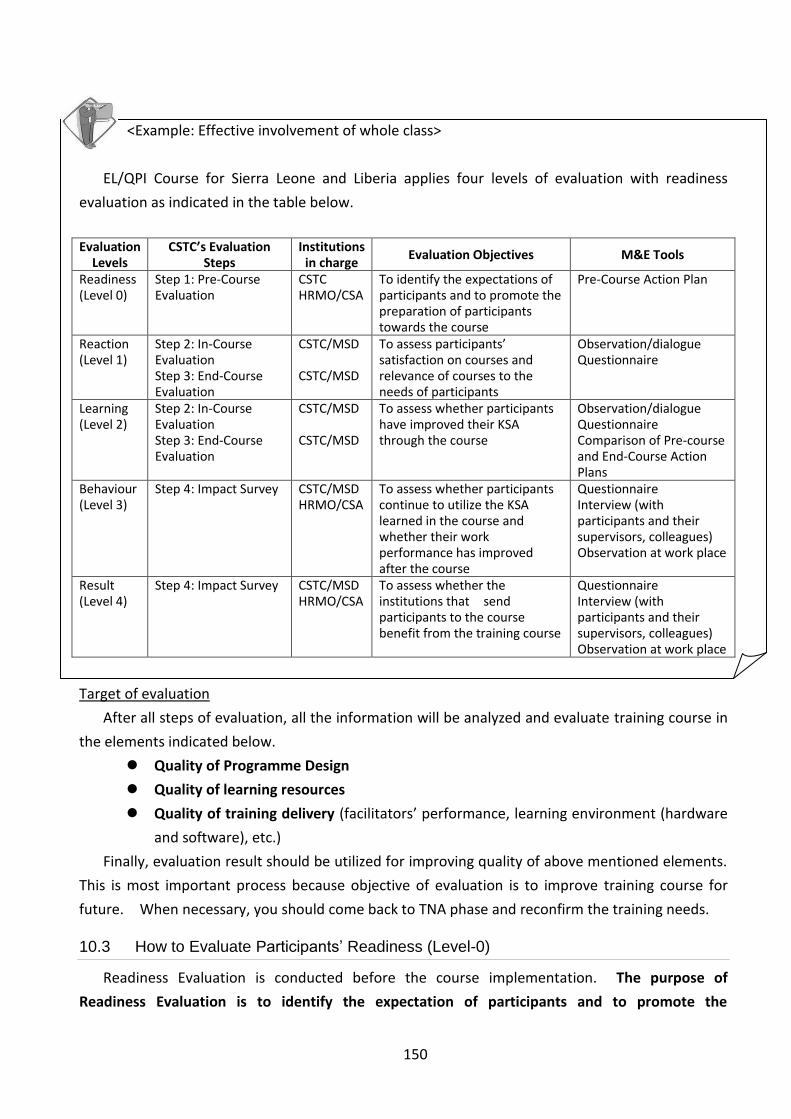
150
<Example: Effective involvement of whole class>
EL/QPI Course for Sierra Leone and Liberia applies four levels of evaluation with readiness
evaluation as indicated in the table below.
Evaluation
Levels CSTC’s Evaluation
Steps Institutions
in charge Evaluation Objectives M&E Tools
Readiness (Level 0)
Step 1: Pre-Course Evaluation
CSTC HRMO/CSA
To identify the expectations of participants and to promote the preparation of participants towards the course
Pre-Course Action Plan
Reaction (Level 1)
Step 2: In-Course Evaluation Step 3: End-Course Evaluation
CSTC/MSD CSTC/MSD
To assess participants’ satisfaction on courses and relevance of courses to the needs of participants
Observation/dialogue Questionnaire
Learning (Level 2)
Step 2: In-Course Evaluation Step 3: End-Course Evaluation
CSTC/MSD CSTC/MSD
To assess whether participants have improved their KSA through the course
Observation/dialogue Questionnaire Comparison of Pre-course and End-Course Action Plans
Behaviour (Level 3)
Step 4: Impact Survey CSTC/MSD HRMO/CSA
To assess whether participants continue to utilize the KSA learned in the course and whether their work performance has improved after the course
Questionnaire Interview (with participants and their supervisors, colleagues) Observation at work place
Result (Level 4)
Step 4: Impact Survey CSTC/MSD HRMO/CSA
To assess whether the institutions that send participants to the course benefit from the training course
Questionnaire Interview (with participants and their supervisors, colleagues) Observation at work place
Target of evaluation
After all steps of evaluation, all the information will be analyzed and evaluate training course in
the elements indicated below.
Quality of Programme Design
Quality of learning resources
Quality of training delivery (facilitators’ performance, learning environment (hardware
and software), etc.)
Finally, evaluation result should be utilized for improving quality of above mentioned elements.
This is most important process because objective of evaluation is to improve training course for
future. When necessary, you should come back to TNA phase and reconfirm the training needs.
10.3 How to Evaluate Participants’ Readiness (Level-0)
Readiness Evaluation is conducted before the course implementation. The purpose of
Readiness Evaluation is to identify the expectation of participants and to promote the
151
preparation of participants towards the course. This level of evaluation can be conducted
through the Pre-Course Evaluation. The evaluation results are shared in the facilitators’ meeting or
related meeting and utilized by facilitators to modify the sessions to suit participants’ levels and
interests.
The key questions to be asked in this step are below.
What do the participants expect of the course?
What is the current level of KSA of the participants?
10.4 How to Evaluate Participants’ Reaction (Level-1)
Reaction Evaluation is conducted during and at the end of the course (In-Course Evaluation and
End-Course Evaluation). The purpose of Reaction evaluation is to assess participants’
satisfaction on courses and relevance of courses to the needs of participants. The evaluation
results are shared at the course facilitators’ meeting or related meeting which is held within a
month after the course to discuss how to improve the next course
The key questions to be asked in this step are below.
Are the participants satisfied with the course?
How relevant is the course to the participants’ needs, considering their work and
responsibilities?
Information for evaluation can be gathered in some ways as indicated below.
Class discussion
Focus group interview
Individual interview
<Example: Pre-Course Evaluation in the EL/QPI Course>
In the EL/QPI Course, Pre-Course Evaluation Form is used. Steps are indicated
as below.
1) Distribute the Pre-Course Evaluation Form through Human Resource
Management Office (HRMO) and Civil Service Agency (CSA) at the time of
nomination. Candidates are requested to fill the form for application.
2) The Course Coordinator reviews the form and identifies the interests of
participants and current KSA (Pre-Course Evaluation).
3) The Course Coordinator shares the findings at the facilitators meeting or
related meetings
4) Facilitators reconsider their facilitation based on the evaluation results to suit
the needs of participants.
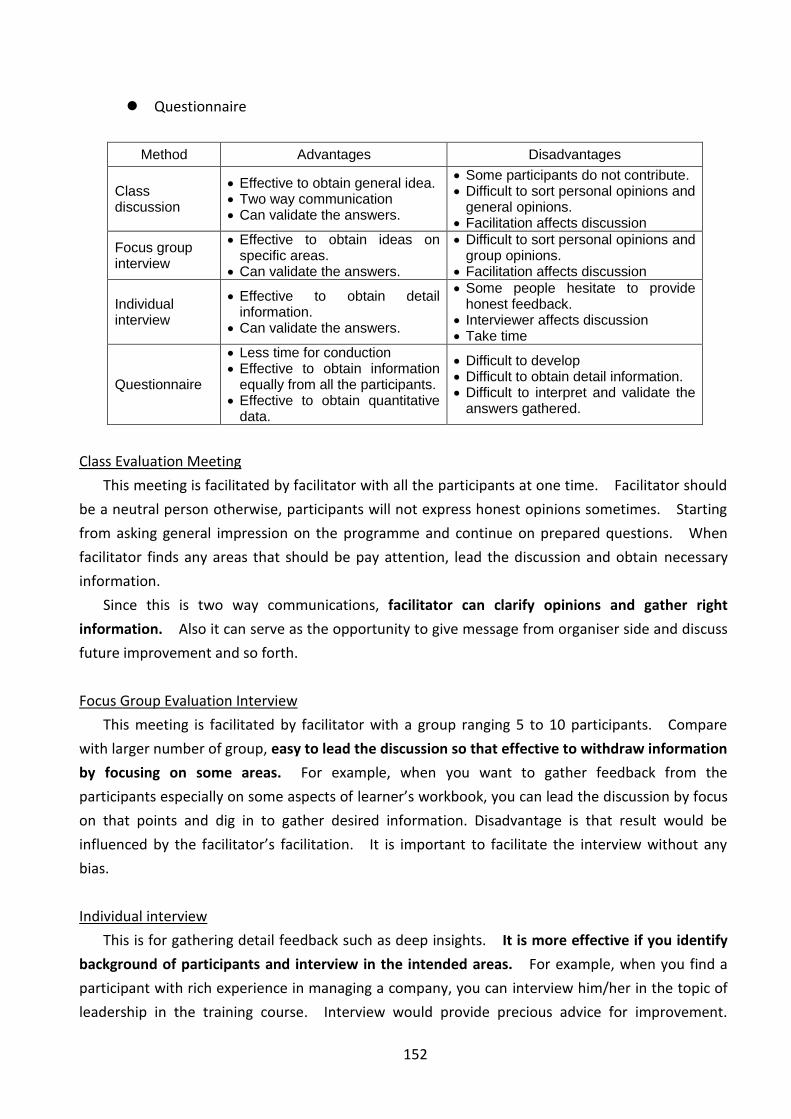
152
Questionnaire
Method Advantages Disadvantages
Class discussion
Effective to obtain general idea. Two way communication Can validate the answers.
Some participants do not contribute. Difficult to sort personal opinions and
general opinions. Facilitation affects discussion
Focus group interview
Effective to obtain ideas on specific areas.
Can validate the answers.
Difficult to sort personal opinions and group opinions.
Facilitation affects discussion
Individual interview
Effective to obtain detail information.
Can validate the answers.
Some people hesitate to provide honest feedback.
Interviewer affects discussion Take time
Questionnaire
Less time for conduction Effective to obtain information
equally from all the participants. Effective to obtain quantitative
data.
Difficult to develop Difficult to obtain detail information. Difficult to interpret and validate the
answers gathered.
Class Evaluation Meeting
This meeting is facilitated by facilitator with all the participants at one time. Facilitator should
be a neutral person otherwise, participants will not express honest opinions sometimes. Starting
from asking general impression on the programme and continue on prepared questions. When
facilitator finds any areas that should be pay attention, lead the discussion and obtain necessary
information.
Since this is two way communications, facilitator can clarify opinions and gather right
information. Also it can serve as the opportunity to give message from organiser side and discuss
future improvement and so forth.
Focus Group Evaluation Interview
This meeting is facilitated by facilitator with a group ranging 5 to 10 participants. Compare
with larger number of group, easy to lead the discussion so that effective to withdraw information
by focusing on some areas. For example, when you want to gather feedback from the
participants especially on some aspects of learner’s workbook, you can lead the discussion by focus
on that points and dig in to gather desired information. Disadvantage is that result would be
influenced by the facilitator’s facilitation. It is important to facilitate the interview without any
bias.
Individual interview
This is for gathering detail feedback such as deep insights. It is more effective if you identify
background of participants and interview in the intended areas. For example, when you find a
participant with rich experience in managing a company, you can interview him/her in the topic of
leadership in the training course. Interview would provide precious advice for improvement.
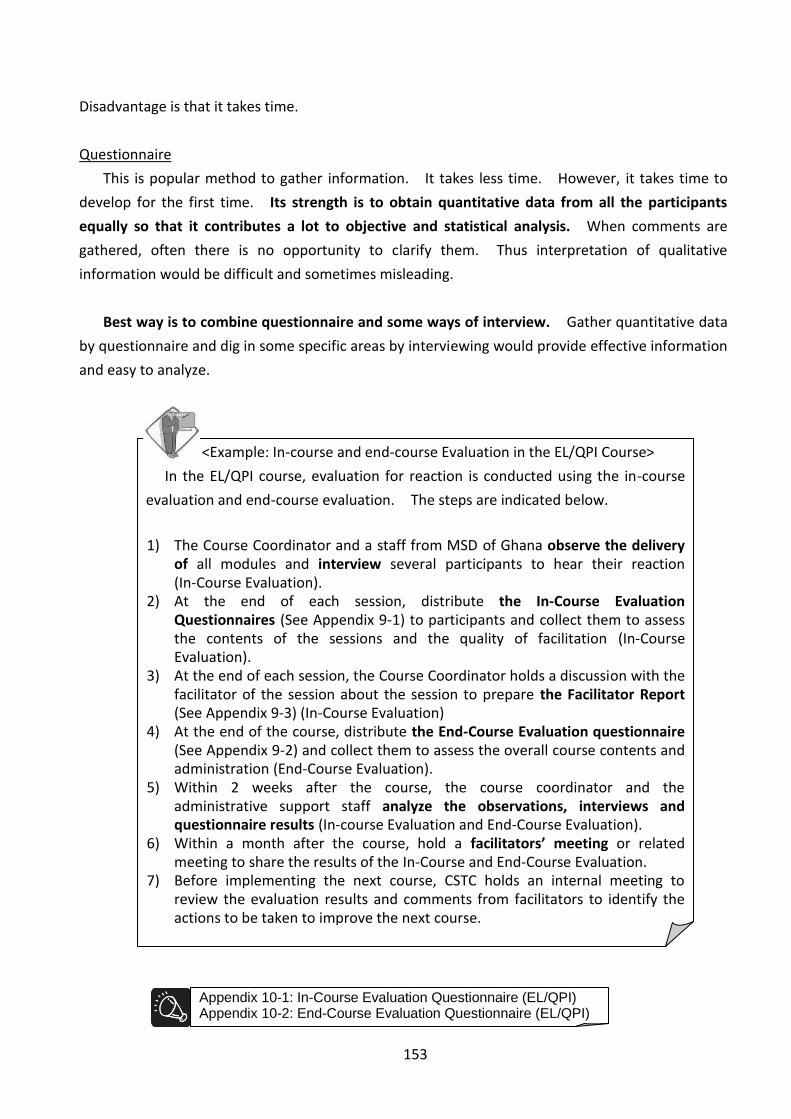
153
Disadvantage is that it takes time.
Questionnaire
This is popular method to gather information. It takes less time. However, it takes time to
develop for the first time. Its strength is to obtain quantitative data from all the participants
equally so that it contributes a lot to objective and statistical analysis. When comments are
gathered, often there is no opportunity to clarify them. Thus interpretation of qualitative
information would be difficult and sometimes misleading.
Best way is to combine questionnaire and some ways of interview. Gather quantitative data
by questionnaire and dig in some specific areas by interviewing would provide effective information
and easy to analyze.
<Example: In-course and end-course Evaluation in the EL/QPI Course>
In the EL/QPI course, evaluation for reaction is conducted using the in-course
evaluation and end-course evaluation. The steps are indicated below.
1) The Course Coordinator and a staff from MSD of Ghana observe the delivery of all modules and interview several participants to hear their reaction (In-Course Evaluation).
2) At the end of each session, distribute the In-Course Evaluation Questionnaires (See Appendix 9-1) to participants and collect them to assess the contents of the sessions and the quality of facilitation (In-Course Evaluation).
3) At the end of each session, the Course Coordinator holds a discussion with the facilitator of the session about the session to prepare the Facilitator Report (See Appendix 9-3) (In-Course Evaluation)
4) At the end of the course, distribute the End-Course Evaluation questionnaire (See Appendix 9-2) and collect them to assess the overall course contents and administration (End-Course Evaluation).
5) Within 2 weeks after the course, the course coordinator and the administrative support staff analyze the observations, interviews and questionnaire results (In-course Evaluation and End-Course Evaluation).
6) Within a month after the course, hold a facilitators’ meeting or related meeting to share the results of the In-Course and End-Course Evaluation.
7) Before implementing the next course, CSTC holds an internal meeting to review the evaluation results and comments from facilitators to identify the actions to be taken to improve the next course.
Appendix 10-1: In-Course Evaluation Questionnaire (EL/QPI) Appendix 10-2: End-Course Evaluation Questionnaire (EL/QPI)
154
10.5 How to Evaluate Participants’ Learning (level-2)
Learning Evaluation is conducted during and at the end of the course (In-Course Evaluation and
End-Course Evaluation). The purpose of the Learning Evaluation is to assess whether
participants have improved their KSA through the course. The evaluation results are shared at
the facilitators meeting or related meeting which is held within a month after the course
implementation to discuss how to improve the next course implementation.
The key questions to be asked in this step are below.
What Knowledge is acquired?
What Skills are developed or improved?
What Attitudes have changed?
Pre-test, Post-test
This is a simple way to evaluate learning by comparing the levels of participants before and
after the training. This method is provides the opportunity to gather quantitative data so that it
can clearly show the results. To check the level of knowledge, you can give the same test before
and after the training and compare the results.
Questions
Questions are posed by facilitators occasionally or at the end of the session in order to
identify the level of understanding by participants. After every topic facilitators can pose
questions to check participants’ understand. Usually, time does not allow facilitators to ask
questions to all the participants frequently, they can randomly pick up some participants every time.
The question “Do you have any questions?” does not work well in evaluation of learning. You
should ask questions like “What are the three components of A?” or “Please summarize the
function of B.” etc.
It is strongly recommended that the facilitator should instruct all the participants to state the
summary of their learning at the end of the session. Facilitators could invite each participant to
say a few words to summarize the session or what he/she has learned. By listening to them, the
facilitators can evaluate their level of learning. It should be noted that information you obtain
from this is qualitative and relative.
Demonstrations
For evaluating skills obtained in the session, demonstrations are the best way. Facilitators can
instruct and demonstrate what they learned in a role play or any other format. Considering time
limitation, individual demonstrates are not feasible. Picking up some participants as
representatives of the class could be adequate.
155
To solve time limitation problems, facilitators could instruct participants to pair up or form
small groups to evaluate demonstrations of each other by using a check sheet. The evaluation
criteria should be clearly indicated and applied so that the result would be fair to every participant
though facilitators are not involved in the process.
There is an option that other staff other than the facilitator conducts this in an official manner
by taking time at the end of the course to undertake an interview examination. This would
provide more precise evaluation information. This is usually employed in the skill based vocation
training area.
Questionnaires
Questionnaires that ask about the level of knowledge to participants themselves are also
effective. Here are some examples of questions that could identify the levels.
Topic Answer
Topic A [ ] 3: I have heard about
[ ] 2: I can explain
[ ] 1: I can teach others
Likart scale can be applied in examples below.
Question Answer
I can explain topic A [ ]4: Yes very much [ ]3:Yes [ ]2: A little [ ]1: No
The advantage of this method is that you can gather quantitative data. The disadvantage
however is that the response would not be 100% trusted because it is self-checked by
participants themselves.
You can employ this type of questionnaire in Pre-test and Post-test evaluations.
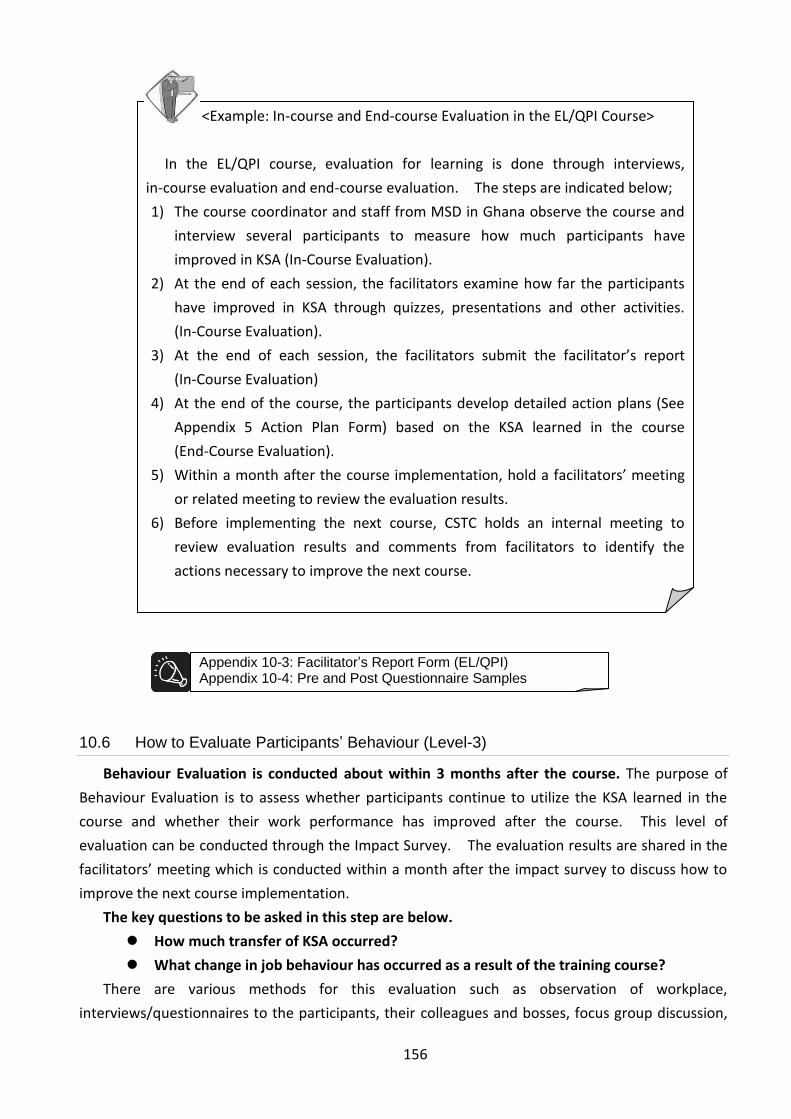
156
10.6 How to Evaluate Participants’ Behaviour (Level-3)
Behaviour Evaluation is conducted about within 3 months after the course. The purpose of
Behaviour Evaluation is to assess whether participants continue to utilize the KSA learned in the
course and whether their work performance has improved after the course. This level of
evaluation can be conducted through the Impact Survey. The evaluation results are shared in the
facilitators’ meeting which is conducted within a month after the impact survey to discuss how to
improve the next course implementation.
The key questions to be asked in this step are below.
How much transfer of KSA occurred?
What change in job behaviour has occurred as a result of the training course?
There are various methods for this evaluation such as observation of workplace,
interviews/questionnaires to the participants, their colleagues and bosses, focus group discussion,
<Example: In-course and End-course Evaluation in the EL/QPI Course>
In the EL/QPI course, evaluation for learning is done through interviews,
in-course evaluation and end-course evaluation. The steps are indicated below;
1) The course coordinator and staff from MSD in Ghana observe the course and
interview several participants to measure how much participants have
improved in KSA (In-Course Evaluation).
2) At the end of each session, the facilitators examine how far the participants
have improved in KSA through quizzes, presentations and other activities.
(In-Course Evaluation).
3) At the end of each session, the facilitators submit the facilitator’s report
(In-Course Evaluation)
4) At the end of the course, the participants develop detailed action plans (See
Appendix 5 Action Plan Form) based on the KSA learned in the course
(End-Course Evaluation).
5) Within a month after the course implementation, hold a facilitators’ meeting
or related meeting to review the evaluation results.
6) Before implementing the next course, CSTC holds an internal meeting to
review evaluation results and comments from facilitators to identify the
actions necessary to improve the next course.
Appendix 10-3: Facilitator’s Report Form (EL/QPI) Appendix 10-4: Pre and Post Questionnaire Samples
157
etc. Performance appraisal data can be a good resource.
10.7 How to Evaluate The Results (Level-4)
Result Evaluation is conducted 3 to 6 month after the course. The purpose of Result
<Example: In-course and end-course Evaluation in the EL/QPI Course>
In the EL/QPI course, evaluation for behaviour is done using the Impact Survey
by focusing on the implementation levels of Action Plans. The steps are indicated
below;
1) Within a week after the course, send a letter from the Head of Civil Service to
HRMO/CSA to request for support for the participants to implement their
Action Plans. The HRMO/CSA offices are subsequently required to contact the
respective institutions of participants with a request to assist them in their
Action Plan implementation. A month after the course, hold an action plan
monitoring videoconference to promote action plan implementation and to
share the experiences among participants.
2) HRMO/CSA monitor the progress of action plans of participants based on the
Monitoring Form once in a month after the course.
3) Three (3) months after course implementation, conduct the Impact Survey
with CSTC, HRMO and CSA to evaluate the behaviour change of participants in
their work places in Sierra Leone and Liberia. The impact survey team
conducts the survey.
4) During the impact survey, conduct focus group meetings with ex-participants
and conduct site visits of two cases of best and worst practices.
5) At the end of the impact survey trips in Sierra Leone and Liberia, feedback the
tentative evaluation results to HRMO/CSA before leaving the countries. This is
done by CSTC Ghana.
6) Within a month after the impact survey, hold a facilitators’ meeting or related
meeting to review the evaluation results and come up with suggestions to
improve.
7) Before implementing the next course, hold an internal meeting to review the
evaluation results and comments from facilitators to identify the actions
necessary to improve the next course.
Appendix 10-5: Monitoring Sheet for Action Plan (EL/QPI) Appendix 10-6: Interview Guideline for Impact Survey (EL/QPI)
158
Evaluation is to assess whether the institutions which sends participants to the course benefit from
the training course. The evaluation results are shared in the facilitators’ meeting which is
conducted within a month after the impact survey to discuss how to improve the next course
implementation.
The key questions to be asked in this step are below.
To what extent did the institution’s quality improve as a result of the training course?
To what extent did the institution’s productivity improve as a result of the training
course?
To what extent did the training affect the institution?
10.8 Accept Feedback from Participants
Evaluation is important for upgrading facilitators’ skills and for improving the training course as
a whole. After the course, facilitators receive feedback from the participants. Accept both
positive and negative feedback. Facilitators reconfirm their strength by positive feedback and
understand points to be improved by negative feedback. Do not be afraid of receiving negative
feedback but consider them as precious advice to improve yourself. The evaluation is not the
performance appraisal to determine your salary, but its objective is to improve training course by
upgrading your skills.
<Example: In-course and end-course Evaluation in the EL/QPI Course>
In the EL/QPI course, evaluation for the results is done through the Impact
Survey by focusing on the implementation levels of Action Plans. During the
impact survey, evaluators conduct focus group meetings with ex-participants and
conduct site visits to two cases of best and worst practices. In this evaluation,
the effects of implementation of the action plans on participants’ institutions are
also assessed. Thus evaluators place emphasis on interviews with supervisors or
higher level officers for this assessment. At the end of the impact survey trips in
Sierra Leone and Liberia, MSD in Ghana provides tentative evaluation results to
MSD in HRMO/CSA.

159
10.9 Contribute to Evaluation Meeting
A facilitators’ meeting for evaluating the course is organised after the course. Facilitators
should participate as a first priority. The valuation meeting is the best opportunity to share
experiences among facilitators and learn from each other. Facilitators are expected to be
honest and open and to disclose failures during the sessions so that others can learn from their
experience. The meeting should create an atmosphere where facilitators can open up. The
information provided in this meeting will be used only for the sake of improving the course and
should not be used for other purposes such as the facilitator’s performance appraisal.
10.10 Summary
In this module, the evaluation of training course has been explained by applying the Four Levels
of Evaluation Model that comprises of Level-1:Reaction, Level-2:Learning, Level-3:Behaviour,
Level-4:Results. Level 3 and 4 should be conducted some time after the completion of training.
Methodologies are interview, focus group interview, demonstration, questioning, questionnaire,
observation, etc. Facilitators should contribute to Level-2 evaluation by checking participants’
understanding during the sessions. The most important thing here is that the result of the
evaluation should be used to improve the training course and the ADDIE process. All the people
involved in the training process should participate in the evaluation process and receive feedback
for further improvement.
<Example: Grading up skills by feedback from participants>
Facilitator Mrs. A obtained rather negative feedback on her style of
presentation that the session was participatory and interesting but it was difficult
to maintain the concentration of participants until the end. She revised her
lesson plan by inserting some small group work and energizers and delivered
following the new plan. The new version of the presentation was highly
appreciated by participants and obtained a lot of positive comments.
160
“Let’s Create End-Course Evaluation Questionnaire!”
Let’s create a questionnaire for obtaining feedback on your facilitation as part of the
End-course Evaluation Questionnaire using the following steps.
Step-1: Select a topic for the session.
Step-2: Think about the skills/techniques that you would like to develop in your facilitation.
Step-3: Create some questions sentences to obtain feedback to identify current level of
selected skills/techniques.
In this step, apply the Likert 3 scale for Pre-coded types of questions by using the
template below. (3:Good, 2:Soso, 1:Not good)
*Refer to the Appendix 3-4: How to Develop Questionnaires.
Questionnaire Template
Session Topic:
Skills/techniques that you would like to develop:
Questions Feedback
Question-1 5 3 1
Question-2 5 3 1
Question-3 5 3 1
Question-4 5 3 1
Question-5 5 3 1
[end]
Exercise

161


![ASIA OSS Training Program [Training the Trainers ]](https://static.fdocuments.net/doc/165x107/547ce50cb47959ac508b4795/asia-oss-training-program-training-the-trainers-.jpg)
