
Manual Eclipse CDT Windows 7...
22
UNVIERSITY OF VICTORIA Manual Eclipse CDT Windows 7 Manual Installation & Demonstration Guide Przemek Lach 9/3/2013 This guide shows how to use install Eclipse and C-Compiler and how to test the setup by creating a simple ‘hello world’ program. NOTE: This guide is based on Windows 7 (64Bit) and Eclipse Kepler (4.2).
Transcript of Manual Eclipse CDT Windows 7...

UNVIERSITY OF VICTORIA
Manual Eclipse CDT Windows 7 Manual Installation & Demonstration Guide
Przemek Lach
9/3/2013
This guide shows how to use install Eclipse and C-Compiler and how to test the setup by creating a simple ‘hello world’ program. NOTE: This guide is based on Windows 7 (64Bit) and Eclipse Kepler (4.2).

CSC 111 Fall 2013 University of Victoria
Installation Three main pieces of software are required to do C development on your Windows Machine:
Eclipse IDE, Java (needed to run Eclipse IDE) and C compiler (MinGW).
Compiler 1. Navigate to the http://moodle.uvic.ca/file.php/25885/manuals/mingw-get-inst-
20120426.exe to download the installer. This link is available on the Moodle website under Resources/CSC 111 Eclipse CDT Manuals.
2. Double click on the exe you just downloaded and follow the wizard. A dialogue will
appear, click ‘Run’ followed by ‘Next’
3. With the exception of accepting the license agreement leave all default values. The
installer will download files and install them. This will take several minutes. Once
complete a dialogue box will display telling you that installation is complete. Uncheck the
option to show the log and click ‘Finish’.

CSC 111 Fall 2013 University of Victoria
4. Finally we need to setup the environment variable. In the windows start menu type ‘advanced system settings’ and hit ‘enter’. Click on the ‘Environment Variables’ button.

CSC 111 Fall 2013 University of Victoria
5. In the ‘System variables’ section scroll down until you find the ‘Path’ variable. Click on it once to select it and press ‘Edit’

CSC 111 Fall 2013 University of Victoria
6. In the ‘Variable value’ section scroll the cursor as far right as possible. **Make sure to be all the way on the right**. Add the following line ‘;C:\MinGW\bin’
7. Click ‘Ok’ as many times as required to close all the windows; should be three Ok’s. 8. Log out and back in for environment variable changes to take effect.
Java Before we can install Eclipse we need to make sure you have a 32Bit version of the Java Runtime Environment (JRE) installed. Open a command prompt and type ‘java-version’. If you get an error message saying that the java command is not found then you need to install the JRE. If you don’t get an error but you have the 64Bit version installed then need to install the 32Bit version of the JRE. If either of these is true proceed to section ‘JRE Install’; else, proceed to section ‘Eclipse’

CSC 111 Fall 2013 University of Victoria

CSC 111 Fall 2013 University of Victoria
JRE Install 1. Navigate to the Java website:
http://www.oracle.com/technetwork/java/javase/downloads/java-se-jre-7-download-432155.html and download the 32Bit JRE: ‘Windows x86 Offline’.
2. Once the download is complete simply run the installer. An install wizard will launch and
guide you through the install. Leave all default settings. 3. Close all programs and restart your computer to complete the installation.
CSC 111 Fall 2013 University of Victoria
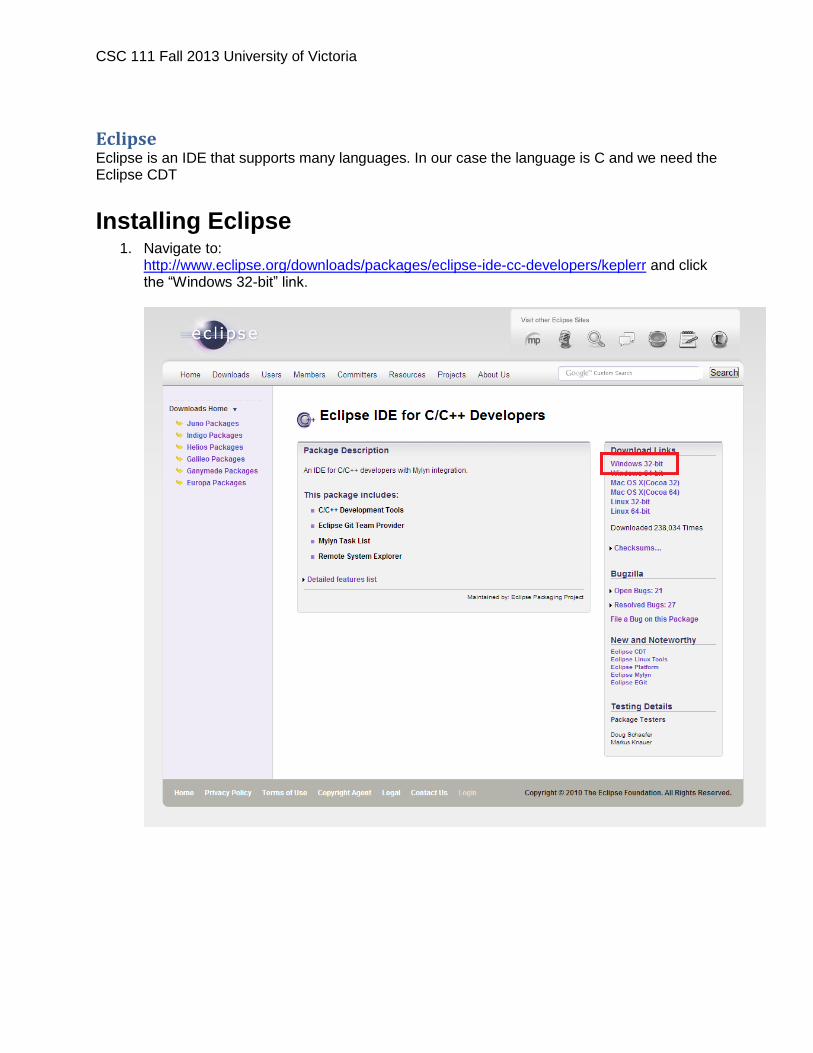
Eclipse Eclipse is an IDE that supports many languages. In our case the language is C and we need the Eclipse CDT
Installing Eclipse 1. Navigate to:
http://www.eclipse.org/downloads/packages/eclipse-ide-cc-developers/keplerr and click the “Windows 32-bit” link.

CSC 111 Fall 2013 University of Victoria
2. Right click on the file you just downloaded and extract/unzip the contents to the current
directory.

CSC 111 Fall 2013 University of Victoria
3. You will now see a folder called ‘eclipse-cpp-kepler-R-win32’ and inside that folder you
will find an ‘eclipse’ folder. You have now successfully installed eclipse. It is
recommended that you move the eclipse to a more appropriate location; although, you
don’t have to. The recommended directory is C:\Program Files (x86).

CSC 111 Fall 2013 University of Victoria
4. When you open the eclipse folder you will see the ‘eclipse.exe’. It is recommended that
you create a short-cut on your Desktop to this exe so that you don’t have to always go
searching for it.
5. You have now successfully installed Eclipse CDT.

CSC 111 Fall 2013 University of Victoria
Running in Eclipse To make sure everything is setup correctly you need to do a simple test. We will start Eclipse,
create a hello world program using a template, compile it and run the exe.
1. Start Eclipse. You will be prompted about where you want your workspace to be. Leave
the default location and click ‘Ok’ NOTE: This is the location where all your projects that
you create using Eclipse will be stored.

CSC 111 Fall 2013 University of Victoria
2. You will be presented with the Eclipse welcome page. Please close it by clicking ‘X’ in on
the left hand side.

CSC 111 Fall 2013 University of Victoria
3. Go to File/New/C Project. In the wizard the pops up type in a project name (any name
you want but no space allowed), select the ‘Empty Project’ and click ‘Finish’. NOTE: you
may have other tool chains listed. Ensure you choose MinGW GCC.

CSC 111 Fall 2013 University of Victoria
4. On the left hand side right click on your project name and add a new source file to your
project.

CSC 111 Fall 2013 University of Victoria
5. Give your file a name, ‘main.c’ and click ‘Finish’

CSC 111 Fall 2013 University of Victoria
6. Enter the code as shown below, save it by clicking the ‘diskette’ icon and then compile it
by clicking the ‘hammer’ icon.

CSC 111 Fall 2013 University of Victoria
7. If you entered your program correctly there should be no errors at the bottom and you
should have a ‘Binaries’ directory on the left hand side. Ensure you select the ‘Console’
tab at the bottom to view compilation output.

CSC 111 Fall 2013 University of Victoria
8. To run your program right click on your project and select Run As/1 Local C/C++
Application. NOTE. You will only have to go through this menu the first time. After you’ve
run your application once you can simply click the play button in the toolbar at the top.
Your output will be seen in the ‘Console’ tab at the bottom.

CSC 111 Fall 2013 University of Victoria

CSC 111 Fall 2013 University of Victoria
Running on the Command Line 1. Open Notepad and type the code below.
2. Save the file to your Desktop as ‘main.c’. Ensure that you change the ‘Save as
type’ to ‘All Files’.

CSC 111 Fall 2013 University of Victoria
3. From the start menu type ‘cmd’ and hit enter. The command prompt should
appear. Navigate to the desktop.
4. Type ‘gcc main.c’ to compile your code. If you entered your program correctly
you should get no errors and the command prompt should look as follows.
5. Finally to run your program type ‘a.exe’. You should see your welcome message
as shown below.


