
Manual de usuario (2) User Guide (21) adaptador SNT1020 dispone de dos conectores RP-SMA para el uso...
39
Manual de usuario (2) User Guide (21)
Transcript of Manual de usuario (2) User Guide (21) adaptador SNT1020 dispone de dos conectores RP-SMA para el uso...

Manual de usuario (2)User Guide (21)

SNT1022 Manual de usuario
Índice1. Bienvenido2. Características3. Requisitos del sistema4. Especificaciones técnicas5. Contenido6. Hardware7. Instalación del driver en el PC8. Conexión del dispositivo
8.1 Configuración de la utilizad RaUI9. Conexión a una red
9.1 Conexión a una red usando WZC9.2 Conexión a una red usando RaUI 9.3 Conexión en modo AP-Mode (Ad Hoc)9.4 Conexión en frecuencia de 5Ghz
10. Panel software RaUI10.1 Network10.2 Profile10.3 Advance10.4 Statistics10.5 WMM10.6 SSO10.7 CCX10.8 Radio On/Off10.9 About
11. Especificaciones de dirección MACInformacion de interés

SNT1022 Manual de usuario
Índice1. Bienvenido2. Características3. Requisitos del sistema4. Especificaciones técnicas5. Contenido6. Hardware7. Instalación del driver en el PC8. Conexión del dispositivo
8.1 Configuración de la utilizad RaUI9. Conexión a una red
9.1 Conexión a una red usando WZC9.2 Conexión a una red usando RaUI 9.3 Conexión en modo AP-Mode (Ad Hoc)9.4 Conexión en frecuencia de 5Ghz
10. Panel software RaUI10.1 Network10.2 Profile10.3 Advance10.4 Statistics10.5 WMM10.6 SSO10.7 CCX10.8 Radio On/Off10.9 About
11. Especificaciones de dirección MACInformación de interés
3Español
1. BienvenidoGracias por elegir SNT1022, el adaptador WiFi USB 11n de doble banda 2,4/5Ghz de Sveon para conectar en red de forma
inalámbrica su portátil o PC. El adaptador SNT1020 dispone de dos conectores RP-SMA para el uso e intercambio de an-
tenas RP-SMA Hembra para una mayor recepción de la señal de red.
A través de este manual le mostramos cómo instalar correctamente el dispositivo para conseguir el máximo rendimiento.
2. CaracterísticasEl adaptador SNT1022 de Sveon le permitirá aprovechar toda la potencia de su red WiFi gracias a su conexión de alta
velocidad de hasta 300Mbps y a su Doble Banda, con la que podrá conectarse a redes que trabajan tanto en la frecuen-
cia de 2,4Ghz así como a las de 5Ghz. Conéctese rápido y sin fisuras gracias al software propio de Ralink y a la encrip-
tación de seguridad WPA2. Soporta encriptación de datos WEP/64/128, WPA and WPS.
La tecnología WiFi utiliza dos bandas de frecuencia: 2,4Ghz en la que operan los protocolos 802.11b, 802.11g y 802.11n
y la de 5Ghz para los protocolos 802.11a y 802.11n. SNT1022 puede recibir las señales Wireless 11n tanto de la banda
de 2,4Ghz como en la de 5Ghz. La banda de 5Ghz posee un mayor número de canales y hay menos dispositivos que
operen en ella por lo que evitará interferencias con otras redes o dispositivos WiFi*.
*Es necesario contar con un modem router que trabaje en la banda de 5Ghz.
3. Requisitos del sistema- Ordenador de sobremesa ó portátil con puerto USB 2.0 disponible.*
- Sistema operativo XP con “Service pack 2”, 2000, Vista, Win7.
- Unidad de CD/DVD.
- Procesador 300MHZ con 64mb de RAM.
- Modem/Router inalambrico 802.11b/g o 802.11n.
- Modem/Router inalámbrico que trabaje en la banda de 5Ghz en caso de que quiera conectarse en la banda de 5Ghz.
* Si se conecta a través de un puerto USB 1.1 la velocidad y el nivel de señal se verán notablemente reducidos.
4. Especificaciones técnicas- Modulación: OFDM/CCK/16-QAM/64-QAM
- Estándar: IEEE 802.11n, 802.11g, IEEE802.11b, IEEE802.11a
- Interfaz: USB 2.0
- Frecuencia: 2.4 ~ 2.4835
- Espectro: DSSS
- Distancia de transmisión: 100m (interior), 300m (exterior, limitado al ámbito de uso)
- Tasa de datos:
11n: 300 / 150 /108 / 81 / 54 / 27 Mbps
11b: 1, 2, 5.5, 11 Mbps
11g: 6, 9, 12, 24, 36, 48, 54 Mbps
- Potencia de transmisión:
2,4Ghz: 11n: 15dbm / 11g: 15dbm / 11b: 18dbm
5Ghz: 11a: 14 dbm / 11n: 13dbm
- Seguridad de datos: 64,128, 152 WEP, WPA/WPA2, WPA-PSK/WPA2-PSK (TKIP/AES)
- LED indicador
- Sensibilidad de receptor:
-135M/270M/300M: -65dbm@10%
- 54M/108M: - 68 dBm@10%
-11M: - 85 dBm@10%
- 6M: - 88 dBm@10%
-1M: - 90 dBm@8%
- Entorno de uso:
· Temperatura de funcionamiento: 0ºC~40ºC
· Temperatura de almacenamiento: -40ºC ~ 70ºC
· Humedad relativa: 10% ~ 90% (sin condensación)
· Humedad de almacenamiento: 5% ~ 95% (sin condensación)
5. Contenido- Adaptador SNT1022 con dos conectores RP-SMA (cuerpo Hembra/ pin Macho).
- Dos antenas 2dBi omnidireccionales con conector RP-SMA.
- CD driver.
- Manual de usuario (incluido en el CD del producto).
- Tarjeta de garantía.
- Guía de Instalación Rápida
6. Hardware1. Adaptador SNT1022
2. Puerto USB
3. Doble atena RP-SMA
4. LED indicador de estado
5. Conector antena RP-SMA

Español 4
SNT1022 Manual de usuario
Índice1. Bienvenido2. Características3. Requisitos del sistema4. Especificaciones técnicas5. Contenido6. Hardware7. Instalación del driver en el PC8. Conexión del dispositivo
8.1 Configuración de la utilizad RaUI9. Conexión a una red
9.1 Conexión a una red usando WZC9.2 Conexión a una red usando RaUI 9.3 Conexión en modo AP-Mode (Ad Hoc)9.4 Conexión en frecuencia de 5Ghz
10. Panel software RaUI10.1 Network10.2 Profile10.3 Advance10.4 Statistics10.5 WMM10.6 SSO10.7 CCX10.8 Radio On/Off10.9 About
11. Especificaciones de dirección MACInformación de interés7. Instalación del driver en el PC
1. Inserte el CD de instalación en la unidad de CD ROM
de su PC, aparecerá automáticamente el menú de insta-
lación. En caso contrario vaya a “Mi PC”, haga clic sobre
la unidad CD/DVD y ejecute el archivo “autorun.exe”.
2. Seleccione la opción “Driver SNT1022” para empezar
la instalación del driver.
3. A continuación aparecerá la ventana inicial de instala-
ción. Lea detenidamente los términos de licencia y haga
clic en “Aceptar” si está de acuerdo. Haga clic en “NEXT”
para continuar.
4. En la siguiente pantalla haga clic en:
- “Install driver and Ralink WLAN utility” si desea instalar
los drivers de la tarjeta y el software de redes
- “Install driver only” para instalar solamente los drivers
y usar el entorno de Windows para conectarse a través
de la red.
A continuación pulse en “Next” para continuar con la ins-
talación.
5. Si en la anterior opción seleccionó “Install driver and
Ralink WLAN utility”, en la siguiente pantalla podrá esco-
ger el software para conectar con las redes inalámbricas
“Ralink Configuration tool” o “Microsoft Zero Configura-
tion Tool”.
Haga clic en “Next” para continuar con la instalación.
51
2
3
4

SNT1022 Manual de usuario
Índice1. Bienvenido2. Características3. Requisitos del sistema4. Especificaciones técnicas5. Contenido6. Hardware7. Instalación del driver en el PC8. Conexión del dispositivo
8.1 Configuración de la utilizad RaUI9. Conexión a una red
9.1 Conexión a una red usando WZC9.2 Conexión a una red usando RaUI 9.3 Conexión en modo AP-Mode (Ad Hoc)9.4 Conexión en frecuencia de 5Ghz
10. Panel software RaUI10.1 Network10.2 Profile10.3 Advance10.4 Statistics10.5 WMM10.6 SSO10.7 CCX10.8 Radio On/Off10.9 About
11. Especificaciones de dirección MACInformación de interés
5Español
6. Si desea modificar algunas de las opciones anterior-
mente seleccionada pulse “Back”.
Para continuar con la instalación haga clic en “Install”.
Nota: En los sistemas operativos Windows Vista y W7,este último paso no aparece.
7. Una vez terminada la instalación haga clic en “Finish”.
8. Conexión del dispositivo1. Conecte el adaptador o la base USB a un puerto USB libre de su PC. Será reconocido e instalado por el asistente de
instalación de Windows de forma automática.
2. Acceda a través del menú Inicio “Ralink Wíreless Utility” o en el icono de la barra de Windows.
- Sistema operativo WIndows XP
- Sistema operativo Windows Vista
- Sistema operativo WIndows 7
Dependiendo del estado del adaptador SNT1022, el icono aparecerá en los siguientes colores:
Indica que la unidad no está conectada a ninguna red.
Indica que la unidad está conectada y que el nivel de recepción de señal es bueno.
Indica que la unidad está conectada y que el nivel de recepción de señal es normal.
Indica que la unidad está conectada y que el nivel de recepción de señal es regular.
Indica que no se ha detectado el dispositivo SNT1022.

SNT1022 Manual de usuario
Índice1. Bienvenido2. Características3. Requisitos del sistema4. Especificaciones técnicas5. Contenido6. Hardware7. Instalación del driver en el PC8. Conexión del dispositivo
8.1 Configuración de la utilizad RaUI9. Conexión a una red
9.1 Conexión a una red usando WZC9.2 Conexión a una red usando RaUI 9.3 Conexión en modo AP-Mode (Ad Hoc)9.4 Conexión en frecuencia de 5Ghz
10. Panel software RaUI10.1 Network10.2 Profile10.3 Advance10.4 Statistics10.5 WMM10.6 SSO10.7 CCX10.8 Radio On/Off10.9 About
11. Especificaciones de dirección MACInformación de interés
8.1 Configuración de la utilidad RaUILa utilidad RaUI es una aplicación que le ayudará a configurar el adaptador inalámbrico SNT1022, monitorizando el es-
tado de la red durante el proceso de configuración. Este adaptador se conectará automáticamente a la red inalámbrica
con mejor señal y sin seguridad activada.
En Windows XP, provee una utilidad llamada “Windows Zero Configuracion” la cual provee la configuración mas básica
y propia de Windows para establecer conexiones. RaUI puede trabajar conjuntamente a con WZC (Windows zero confi-
guration) mostrando solo funciones de monitorización y no interfiere en la configuración de WZC.
Para activar WZC pulse con el botón derecho del ratón sobre el icono RaUI como muestra la imagen.
Nota: Cuando se activa WZC, algunas opciones de RaUI no se podrán usar.
La siguiente imagen muestra como WZC trabaja con RaUI de forma conjunta.
6Español

Para usar RaUI para configurar sus conexiones, vuelva a pulsar con el botón derecho del ratón sobre el icono RaUI
9. Conexión a una red9.1 Conexión a un red usando WZCSi utiliza WZC para configurar la conexión a la red inalámbrica nos mostrara la siguiente imagen.
Pulse sobre el icono 1 para “Ver
redes Inalámbricas disponibles”
Aparecerá la siguiente ventana:
Si su Red Inalámbrica esta protegida, la
red aparecerá con la imagen de un can-
dado.
Para conectar a su red, púlsela
- A continuación haga clic en conectar.
7Español
SNT1022 Manual de usuario
Índice1. Bienvenido2. Características3. Requisitos del sistema4. Especificaciones técnicas5. Contenido6. Hardware7. Instalación del driver en el PC8. Conexión del dispositivo
8.1 Configuración de la utilizad RaUI9. Conexión a una red
9.1 Conexión a una red usando WZC9.2 Conexión a una red usando RaUI 9.3 Conexión en modo AP-Mode (Ad Hoc)9.4 Conexión en frecuencia de 5Ghz
10. Panel software RaUI10.1 Network10.2 Profile10.3 Advance10.4 Statistics10.5 WMM10.6 SSO10.7 CCX10.8 Radio On/Off10.9 About
11. Especificaciones de dirección MACInformación de interés

Aparecerá una ventana solicitando la clave de su red inalámbrica.
Si la conexión se ha realizado correctamente, en WZC aparece la imagen siguiente y en RaUI aparece el símbolo de fle-
cha azul apuntando la red activa.
9.2 Conexión a una red usando RaUICuando se ejecuta la aplicación RaUI en el sistema, se conectará a la conexión inalámbrica con la mejor señal o en el
caso que tenga configurado un perfil (Profile), se conectará al perfil adecuado.
La lista incluye los campos más usados, SSID, canal, tipo de red, seguridad y porcentaje de la señal. El icono de la fle-
cha indica la conexión al cual se esta conectado en ese momento.
1. Acceda a través del menú Inicio “Ralink Wíreless Utility” o pulsando en el icono de la barra de herramientas de
Windows
2. A continuación se muestran las redes disponibles.
3. Pulse sobre la red a la que desee conectarse “SSID(nombre de la red)”, pulse “Connect” e introduzca la clave de red
que tiene establecida en el Modem/Router en el apartado “Preshared key” o “Wep Key” dependiendo su encriptación.
4. Una vez introducida la clave pulse “OK”.
8Español
SNT1022 Manual de usuario
Índice1. Bienvenido2. Características3. Requisitos del sistema4. Especificaciones técnicas5. Contenido6. Hardware7. Instalación del driver en el PC8. Conexión del dispositivo
8.1 Configuración de la utilizad RaUI9. Conexión a una red
9.1 Conexión a una red usando WZC9.2 Conexión a una red usando RaUI 9.3 Conexión en modo AP-Mode (Ad Hoc)9.4 Conexión en frecuencia de 5Ghz
10. Panel software RaUI10.1 Network10.2 Profile10.3 Advance10.4 Statistics10.5 WMM10.6 SSO10.7 CCX10.8 Radio On/Off10.9 About
11. Especificaciones de dirección MACInformación de interés

Español
5. Si se ha establecido correctamente la conexión, el Modem/Router nos proporcionará los datos de configuración.
Si su Router/Modem es “N” se mostrará tal y como se muestra en la imagen.
Nota: La información IP 192.168.1.100 puede variar dependiendo de la configuración del modem o router .
9.3 Conexión en modo AP-Mode (Ad Hoc)La función AP-Mode permite emular un Router Wireless con nuestro adaptador SNT1022 y poder montar una red in-
alámbrica con 2 adaptadores.
AP-Mode en Windows XP1. Pulse con el botón derecho del ratón sobre el icono en la barra de tareas y seleccione “Switch to AP Mode”.
2. Una vez seleccionado “Switch AP Mode” mostrará la siguiente pantalla.
9
SNT1022 Manual de usuario
Índice1. Bienvenido2. Características3. Requisitos del sistema4. Especificaciones técnicas5. Contenido6. Hardware7. Instalación del driver en el PC8. Conexión del dispositivo
8.1 Configuración de la utilizad RaUI9. Conexión a una red
9.1 Conexión a una red usando WZC9.2 Conexión a una red usando RaUI 9.3 Conexión en modo AP-Mode (Ad Hoc)9.4 Conexión en frecuencia de 5Ghz
10. Panel software RaUI10.1 Network10.2 Profile10.3 Advance10.4 Statistics10.5 WMM10.6 SSO10.7 CCX10.8 Radio On/Off10.9 About
11. Especificaciones de dirección MACInformación de interés
10Español
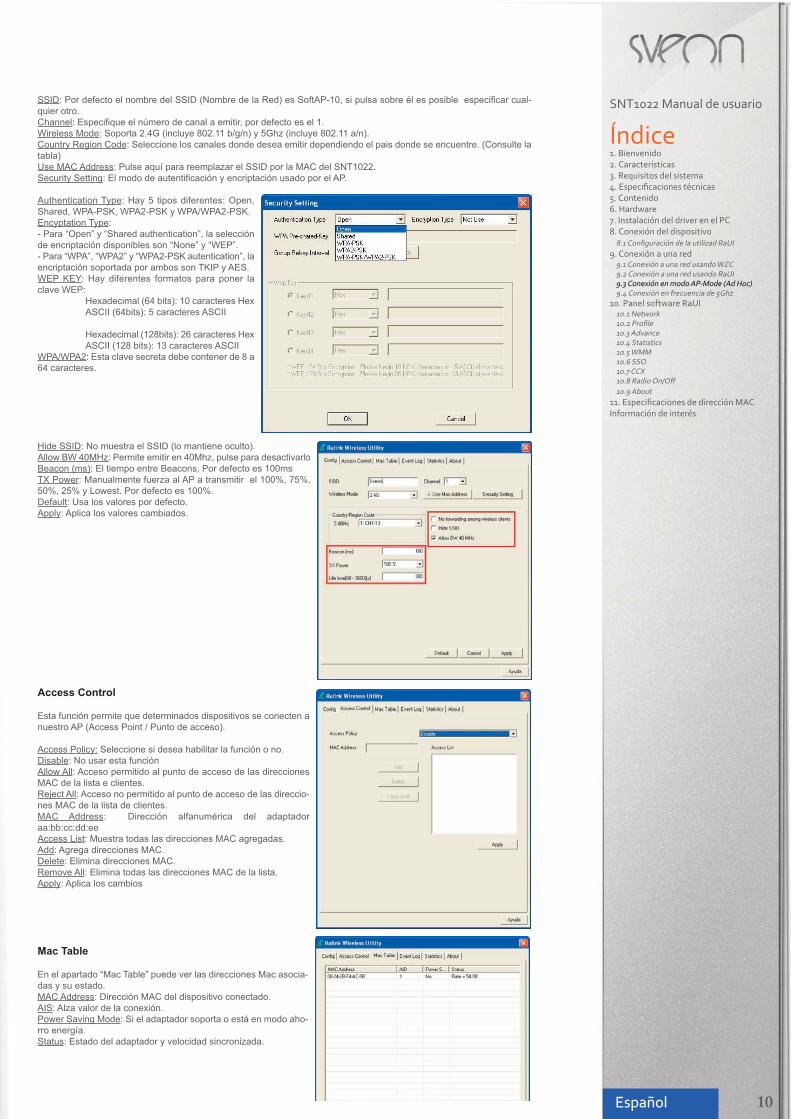
SSID: Por defecto el nombre del SSID (Nombre de la Red) es SoftAP-10, si pulsa sobre él es posible especificar cual-
quier otro.
Channel: Especifique el número de canal a emitir, por defecto es el 1.
Wireless Mode: Soporta 2.4G (incluye 802.11 b/g/n) y 5Ghz (incluye 802.11 a/n).
Country Region Code: Seleccione los canales donde desea emitir dependiendo el pais donde se encuentre. (Consulte la
tabla)
Use MAC Address: Pulse aquí para reemplazar el SSID por la MAC del SNT1022.
Security Setting: El modo de autentificación y encriptación usado por el AP.
Authentication Type: Hay 5 tipos diferentes: Open,
Shared, WPA-PSK, WPA2-PSK y WPA/WPA2-PSK.
Encyptation Type:
- Para “Open” y “Shared authentication”, la selección
de encriptación disponibles son “None” y “WEP”.
- Para “WPA”, “WPA2” y “WPA2-PSK autentication”, la
encriptación soportada por ambos son TKIP y AES.
WEP KEY: Hay diferentes formatos para poner la
clave WEP:
Hexadecimal (64 bits): 10 caracteres Hex
ASCII (64bits): 5 caracteres ASCII
Hexadecimal (128bits): 26 caracteres Hex
ASCII (128 bits): 13 caracteres ASCII
WPA/WPA2: Esta clave secreta debe contener de 8 a
64 caracteres.
Hide SSID: No muestra el SSID (lo mantiene oculto).
Allow BW 40MHz: Permite emitir en 40Mhz, pulse para desactivarlo
Beacon (ms): El tiempo entre Beacons, Por defecto es 100ms
TX Power: Manualmente fuerza al AP a transmitir el 100%, 75%,
50%, 25% y Lowest. Por defecto es 100%.
Default: Usa los valores por defecto.
Apply: Aplica los valores cambiados.
Access Control
Esta función permite que determinados dispositivos se conecten a
nuestro AP (Access Point / Punto de acceso).
Access Policy: Seleccione si desea habilitar la función o no.
Disable: No usar esta función
Allow All: Acceso permitido al punto de acceso de las direcciones
MAC de la lista e clientes.
Reject All: Acceso no permitido al punto de acceso de las direccio-
nes MAC de la lista de clientes.
MAC Address: Dirección alfanumérica del adaptador
aa:bb:cc:dd:ee
Access List: Muestra todas las direcciones MAC agregadas.
Add: Agrega direcciones MAC.
Delete: Elimina direcciones MAC.
Remove All: Elimina todas las direcciones MAC de la lista.
Apply: Aplica los cambios
Mac Table
En el apartado “Mac Table” puede ver las direcciones Mac asocia-
das y su estado.
MAC Address: Dirección MAC del dispositivo conectado.
AIS: Alza valor de la conexión.
Power Saving Mode: Si el adaptador soporta o está en modo aho-
rro energía.
Status: Estado del adaptador y velocidad sincronizada.
SNT1022 Manual de usuario
Índice1. Bienvenido2. Características3. Requisitos del sistema4. Especificaciones técnicas5. Contenido6. Hardware7. Instalación del driver en el PC8. Conexión del dispositivo
8.1 Configuración de la utilizad RaUI9. Conexión a una red
9.1 Conexión a una red usando WZC9.2 Conexión a una red usando RaUI 9.3 Conexión en modo AP-Mode (Ad Hoc)9.4 Conexión en frecuencia de 5Ghz
10. Panel software RaUI10.1 Network10.2 Profile10.3 Advance10.4 Statistics10.5 WMM10.6 SSO10.7 CCX10.8 Radio On/Off10.9 About
11. Especificaciones de dirección MACInformación de interés

Español
Event Log
En el apartado “Event log” puede consultar la fecha, hora, direc-
ción MAC y estado del dispositivo que conecta.
Statistics
En el apartado “Statistics (estadísticas)” podemos ver los datos
transmitidos y recibidos de nuestro AP (Punto de acceso).
About
Este apartado muestra la información y version del adaptador
SNT1022.
11
SNT1022 Manual de usuario
Índice1. Bienvenido2. Características3. Requisitos del sistema4. Especificaciones técnicas5. Contenido6. Hardware7. Instalación del driver en el PC8. Conexión del dispositivo
8.1 Configuración de la utilizad RaUI9. Conexión a una red
9.1 Conexión a una red usando WZC9.2 Conexión a una red usando RaUI 9.3 Conexión en modo AP-Mode (Ad Hoc)9.4 Conexión en frecuencia de 5Ghz
10. Panel software RaUI10.1 Network10.2 Profile10.3 Advance10.4 Statistics10.5 WMM10.6 SSO10.7 CCX10.8 Radio On/Off10.9 About
11. Especificaciones de dirección MACInformación de interés

12Español
SNT1022 Manual de usuario
Índice1. Bienvenido2. Características3. Requisitos del sistema4. Especificaciones técnicas5. Contenido6. Hardware7. Instalación del driver en el PC8. Conexión del dispositivo
8.1 Configuración de la utilizad RaUI9. Conexión a una red
9.1 Conexión a una red usando WZC9.2 Conexión a una red usando RaUI 9.3 Conexión en modo AP-Mode (Ad Hoc)9.4 Conexión en frecuencia de 5Ghz
10. Panel software RaUI10.1 Network10.2 Profile10.3 Advance10.4 Statistics10.5 WMM10.6 SSO10.7 CCX10.8 Radio On/Off10.9 About
11. Especificaciones de dirección MACInformación de interés
9.4 Conexión en frecuencia de 5GhzPara conectar a una red que trabaja en la frecuencia de 5Ghz debe disponer de un modem router que trabaje en dicha
frecuencia. Para ello asegúrese de que cuando conecta su SNT1022 en el panel de control aparece que admite el pro-
tocolo 11”a” y que puede seleccionar la opción de 5Ghz.
10. Panel software RaUIA continuación le mostramos las diferentes opciones del software Ralink RaUI de la SNT1022.
Una vez instalado el driver y conectado el SNT1022, en la barra de inicio, mostrará el icono
(junto al reloj del sistema), si pulsamos sobre este símbolo aparecerá la siguiente pantalla.

13Español
10.1 Network1. SSID: Nombre de la red Wireless.
2. Channel: Canal usado para recibir la señal.
3: Estándares en que emite el Modem/Router
11Mbps
54/108Mbps
150/300Mbps
4. Protección: Un icono de una llave indica que la red está protegida con contraseña.
5. Señal:Indica la intensidad con la que recibimos la red.
Si pulsa sobre la red a la que desea conectarse y, a continuación, en la flecha del desplegable “Pulse aquí” aparecerán
los siguientes datos:
1. El nombre de la red.
2. Dirección MAC del Router.
3. Encriptación de la red.
4. Canal donde esta emitiendo la red nuestro Modem/Router.
5. Modo de Conexión.
6. Beacon Interval* (intervalo de asociación).
Beacon Interval*. El Beacon Interval puede ayudar con los problemas de asociación. Si tiene problemas de caída de co-
nexión permanentemente teniendo buena señal de cobertura, ajuste el “Beacon Interval” a 50 en su Modem/Router (con-
sulte el manual de su Modem/Router).
Una vez conectado a su Red, mostrará los datos de conexión.
1. El nombre y MAC del Modem/Router inalámbrico.
2. Intensidad de la Red
3. Canal conectado
4. Tipo de clave de encriptación que emite el Modem/Router
5. Datos de IP proporcionado por el Modem/Router.
SNT1022 Manual de usuario
Índice1. Bienvenido2. Características3. Requisitos del sistema4. Especificaciones técnicas5. Contenido6. Hardware7. Instalación del driver en el PC8. Conexión del dispositivo
8.1 Configuración de la utilizad RaUI9. Conexión a una red
9.1 Conexión a una red usando WZC9.2 Conexión a una red usando RaUI 9.3 Conexión en modo AP-Mode (Ad Hoc)9.4 Conexión en frecuencia de 5Ghz
10. Panel software RaUI10.1 Network10.2 Profile10.3 Advance10.4 Statistics10.5 WMM10.6 SSO10.7 CCX10.8 Radio On/Off10.9 About
11. Especificaciones de dirección MACInformación de interés

Español
10.2 ProfileEn esta sección puede guardar las configuraciones de sus conexiones favoritas. Puede guardar la conexión de casa, la
casa de la playa o de lugares públicos. Configure múltiples perfiles y active el correcto cuando lo desee. Con la SNT1022,
puede añadir los perfiles (profiles) insertando todos los datos de conexión o desde el panel “Network” al realizar la cone-
xión.
Añadir Perfiles manualmente1. Haga clic en “Profile” y sobre la pestaña “Add”
2. En “Profile name” especifique el nombre o recor-
datorio para este perfil (por ejemplo “casa de la
playa”).
3. Haga clic sobre el desplegable SSID y elija su
Red.
4. Haga clic sobre la pestaña Auth.\ Encry
5. Elija el modo de “AutThentication” y escoja el
modo de encriptación de su Modem
/Router.
6. Introduzca la clave de su Red
7. Pulse OK
8. Para Activarla pulse en la pestaña “Activate”.
SNT1022 Manual de usuario
Índice1. Bienvenido2. Características3. Requisitos del sistema4. Especificaciones técnicas5. Contenido6. Hardware7. Instalación del driver en el PC8. Conexión del dispositivo
8.1 Configuración de la utilizad RaUI9. Conexión a una red
9.1 Conexión a una red usando WZC9.2 Conexión a una red usando RaUI 9.3 Conexión en modo AP-Mode (Ad Hoc)9.4 Conexión en frecuencia de 5Ghz
10. Panel software RaUI10.1 Network10.2 Profile10.3 Advance10.4 Statistics10.5 WMM10.6 SSO10.7 CCX10.8 Radio On/Off10.9 About
11. Especificaciones de dirección MACInformación de interés
14

Español
Añadir Perfiles desde NetworkPara añadir perfiles desde “Network”, siga los siguientes pasos.
1. Pulse sobre la red que desea
conectar y a continuación la pes-
taña "Add to profile".
2. Especifique el nombre del per-
fil
3. Pulse sobre la pestaña “Auth.\ Ecry.”
4. Introduzca la contraseña de su Red inalám-
brica y pulse “OK”
5. Para activarla pulse sobre el perfil “Mi casa …”
y actívela pulsando “Activate”.
6. Si se han realizado los pasos correctamente
aparecerá la siguiente información
Nota. Los datos proporcionados por elModem/Router pueden variar dependiendo suconfiguración y/o modelo.
SNT1022 Manual de usuario
Índice1. Bienvenido2. Características3. Requisitos del sistema4. Especificaciones técnicas5. Contenido6. Hardware7. Instalación del driver en el PC8. Conexión del dispositivo
8.1 Configuración de la utilizad RaUI9. Conexión a una red
9.1 Conexión a una red usando WZC9.2 Conexión a una red usando RaUI 9.3 Conexión en modo AP-Mode (Ad Hoc)9.4 Conexión en frecuencia de 5Ghz
10. Panel software RaUI10.1 Network10.2 Profile10.3 Advance10.4 Statistics10.5 WMM10.6 SSO10.7 CCX10.8 Radio On/Off10.9 About
11. Especificaciones de dirección MACInformación de interés
15

Español
Definición de cada campo:
Profile Name: Nombre del perfil.
SSID: Nombre de la red inalámbrica.
Network Type: Tipo de red, incluye infraestructura y Ad-Hoc.
Authentication: Modo de Autenticación.
Encryption: Tipo de Encriptación.
Use 802.1x: Si usa o no la característica 802.1x
Channel: Canal que esta siendo usado.
Power Save Mode: Escoge entre CAM (Constantly Awake Mode) o Power Saving Mode.
TX Power: Potencia en la que el receptor usa para mandar la señal
10.3 AdvanceEn el apartado “Advance” es posible configurar las siguientes opciones.
1. Wireless mode: Bandas de emisión 2,4Ghz y 5Ghz (para emisión en la banda 5Ghz el Modem/Router debe estar pre-
parado para esta emisión).
2. Select your country Region: Los canales disponibles dependen del pais en que se encuentre (por ejemplo en EUA son
canales 1-11, Europa 1-13) .Si se encuentra en un pais diferente a los mencionados, ajuste los canales para estar den-
tro de lo que se regula en el país.
3. En el apartado 3 encontramos las siguientes opciones;
- Enable Tx Burts: Esta función activa el adaptador para que tenga un mejor rendimiento durante un periodo de tiempo,
solo funciona cuando se activa en un Modem/Router que soporte esta función
- Enable TCP Window Size: Seleccione para aumentar la calidad de transmisión entre las ventanas TCP.
- Fast Roaming: Ajuste el nivel de Fast Roaming
Show Authentication status dialog: Cuando se conecta a un Modem/Router con protección, seleccione si desea que se
muestre el diálogo de autenticación o no.
10.4 StatisticsEn las opciones “Statistics” puede consultar la información detallada en los contadores 802.11 MIB. Esta apartado traduce
los contadores MIB a un formato más fácil de entender.
Transmit- Frames Trasmitted Successfully: Frames mandados exitosamente.
- Frames Retransmitted Successfully: Transmisión exitosa de número de frames
- Frames Fail To Receive ACK After Retries: Frames que fallaron en llegar
- Reset Counter: Resetear el contador a cero
SNT1022 Manual de usuario
Índice1. Bienvenido2. Características3. Requisitos del sistema4. Especificaciones técnicas5. Contenido6. Hardware7. Instalación del driver en el PC8. Conexión del dispositivo
8.1 Configuración de la utilizad RaUI9. Conexión a una red
9.1 Conexión a una red usando WZC9.2 Conexión a una red usando RaUI 9.3 Conexión en modo AP-Mode (Ad Hoc)9.4 Conexión en frecuencia de 5Ghz
10. Panel software RaUI10.1 Network10.2 Profile10.3 Advance10.4 Statistics10.5 WMM10.6 SSO10.7 CCX10.8 Radio On/Off10.9 About
11. Especificaciones de dirección MACInformación de interés
16

Español
Receive- Frames Receive Successfully: Frames recibidos.
- Frames Received With CRC Error: Frames recibidos con CRC error.
- Frames Dropped Due To Out-Of-Resource: Frames dejados.
- Duplicate Frames Received: Frames duplicados.
- Reset Counter: Resetear el contador a cero
10.5 WMMEl WMM es un conjunto de características para
las redes WI-FI que mejoran las aplicaciones de
audio, video y aplicaciones VoIP.
- WMM: Activa el Wi-Fi Multi-media
- WMM-Power Save Enable: Activa el ahorro de
energía en WMM
- Direct Link Setup Enable: Activa el DSL (Direct
Link Setup)
WMM Enable
- Pulse “WMM Enable”
- Cambia a “Network”. Agrega el SSID
(nombre de la Red) que soporta WMM
y pulse “ADD to Profile”
- El resultado es el siguiente.
SNT1022 Manual de usuario
Índice1. Bienvenido2. Características3. Requisitos del sistema4. Especificaciones técnicas5. Contenido6. Hardware7. Instalación del driver en el PC8. Conexión del dispositivo
8.1 Configuración de la utilizad RaUI9. Conexión a una red
9.1 Conexión a una red usando WZC9.2 Conexión a una red usando RaUI 9.3 Conexión en modo AP-Mode (Ad Hoc)9.4 Conexión en frecuencia de 5Ghz
10. Panel software RaUI10.1 Network10.2 Profile10.3 Advance10.4 Statistics10.5 WMM
10.6 SSO10.7 CCX10.8 Radio On/Off10.9 About
11. Especificaciones de dirección MACInformación de interés
17

Español
WMM Power save enable
- Active WMM-Power Save Enable
- Seleccione que categorías desea activar (AC_BKm, AC_BE, AC_VI, AC_VO)
Direct Link Setup Enable- Active Direct Link Setup Enable
- Rellene los espacios del Direct Link con la MAC del oto cliente.
- Pulse Apply
Nota: El otro cliente debe estar conectado al mismo Modem/Router que soporte las funciones DLS.
10.6 SSOEn el apartado SSO puede configurar el inicio de un perfile en el arranque del Sistema operativo.
SNT1022 Manual de usuario
Índice1. Bienvenido2. Características3. Requisitos del sistema4. Especificaciones técnicas5. Contenido6. Hardware7. Instalación del driver en el PC8. Conexión del dispositivo
8.1 Configuración de la utilizad RaUI9. Conexión a una red
9.1 Conexión a una red usando WZC9.2 Conexión a una red usando RaUI 9.3 Conexión en modo AP-Mode (Ad Hoc)9.4 Conexión en frecuencia de 5Ghz
10. Panel software RaUI10.1 Network10.2 Profile10.3 Advance10.4 Statistics10.5 WMM10.6 SSO10.7 CCX10.8 Radio On/Off10.9 About
11. Especificaciones de dirección MACInformación de interés
18
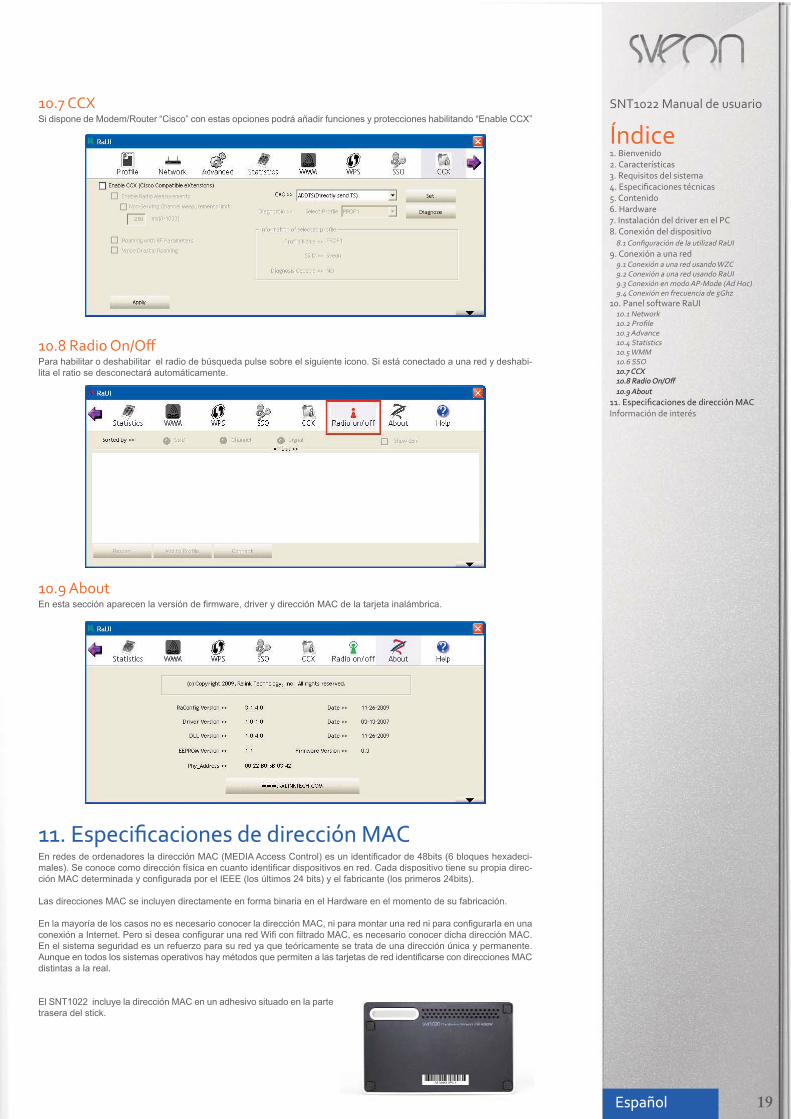
10.7 CCXSi dispone de Modem/Router “Cisco” con estas opciones podrá añadir funciones y protecciones habilitando “Enable CCX”
10.8 Radio On/OffPara habilitar o deshabilitar el radio de búsqueda pulse sobre el siguiente icono. Si está conectado a una red y deshabi-
lita el ratio se desconectará automáticamente.
10.9 AboutEn esta sección aparecen la versión de firmware, driver y dirección MAC de la tarjeta inalámbrica.
11. Especificaciones de dirección MACEn redes de ordenadores la dirección MAC (MEDIA Access Control) es un identificador de 48bits (6 bloques hexadeci-
males). Se conoce como dirección física en cuanto identificar dispositivos en red. Cada dispositivo tiene su propia direc-
ción MAC determinada y configurada por el IEEE (los últimos 24 bits) y el fabricante (los primeros 24bits).
Las direcciones MAC se incluyen directamente en forma binaria en el Hardware en el momento de su fabricación.
En la mayoría de los casos no es necesario conocer la dirección MAC, ni para montar una red ni para configurarla en una
conexión a Internet. Pero si desea configurar una red Wifi con filtrado MAC, es necesario conocer dicha dirección MAC.
En el sistema seguridad es un refuerzo para su red ya que teóricamente se trata de una dirección única y permanente.
Aunque en todos los sistemas operativos hay métodos que permiten a las tarjetas de red identificarse con direcciones MAC
distintas a la real.
El SNT1022 incluye la dirección MAC en un adhesivo situado en la parte
trasera del stick.
Español
SNT1022 Manual de usuario
Índice1. Bienvenido2. Características3. Requisitos del sistema4. Especificaciones técnicas5. Contenido6. Hardware7. Instalación del driver en el PC8. Conexión del dispositivo
8.1 Configuración de la utilizad RaUI9. Conexión a una red
9.1 Conexión a una red usando WZC9.2 Conexión a una red usando RaUI 9.3 Conexión en modo AP-Mode (Ad Hoc)9.4 Conexión en frecuencia de 5Ghz
10. Panel software RaUI10.1 Network10.2 Profile10.3 Advance10.4 Statistics10.5 WMM10.6 SSO10.7 CCX10.8 Radio On/Off10.9 About
11. Especificaciones de dirección MACInformación de interés
19

Español
Información de interés
Declaración de conformidad CESveon declara que su modelo SNT1022 cumple con los requisitos esenciales y cualesquiera otras disposiciones aplica-
bles o exigibles de la Directiva 1999/5/CE.
Restricciones
AvisoEste símbolo en el producto o sus baterías significa que ni este producto ni sus ba-
terías deben desecharse junto con el resto de la basura doméstica.
En este caso, es su responsabilidad llevarlo a un punto de recogida adecuado para
el reciclaje de baterías y equipos eléctricos y electrónicos. la recogida selectiva y el
reciclaje ayudarán a conservar los recursos naturales y a evitar posibles consecuen-
cias negativas para la salud del hombre y el medioambiente debidas a la posible pre-
sencia de sustancias peligrosas en baterías y equipos eléctricos y electrónicos
desechados de forma inadecuada.
Para obtener más información acerca de dónde desechar baterías y equipos eléctricos o electrónicos, póngase en con-
tacto con la oficina local de su ciudad/municipio.
SNT1022 Manual de usuario
Índice1. Bienvenido2. Características3. Requisitos del sistema4. Especificaciones técnicas5. Contenido6. Hardware7. Instalación del driver en el PC8. Conexión del dispositivo
8.1 Configuración de la utilizad RaUI9. Conexión a una red
9.1 Conexión a una red usando WZC9.2 Conexión a una red usando RaUI 9.3 Conexión en modo AP-Mode (Ad Hoc)9.4 Conexión en frecuencia de 5Ghz
10. Panel software RaUI10.1 Network10.2 Profile10.3 Advance10.4 Statistics10.5 WMM10.6 SSO10.7 CCX10.8 Radio On/Off10.9 About
11. Especificaciones de dirección MACInformación de interés
20

SNT1022 User Manual
Index1. Welcome2. Features3. System requirements4. Technical specifications5. Content6. Hardware7. Driver installation on PC8. Device connectiontivo
8.1 RaUI setup9. Network connection
9.1 Network connection using WZC9.2 Network connection using RaUI utility9.3 Network connection in AP-Mode (Ad Hoc)9.4 Network connection in 5Ghz frequency
10. RaUI software control panel10.1 Network10.2 Profile10.3 Advance10.4 Statistics10.5 WMM10.6 SSO10.7 CCX10.8 Radio On/Off10.9 About
11. MAC address specificationsImportant information

SNT1022 User Manual
Index1. Welcome2. Features3. System requirements4. Technical specifications5. Content6. Hardware7. Driver installation on PC8. Device connection
8.1 RaUI setup9. Network connection
9.1 Network connection using WZC9.2 Network connection using RaUI utility9.3 Network connection in AP-Mode (Ad Hoc)9.4 Network connection in 5Ghz frequency
10. RaUI software control panel10.1 Network10.2 Profile10.3 Advance10.4 Statistics10.5 WMM
10.6 SSO10.7 CCX10.8 Radio On/Off10.9 About
11. MAC address specificationsImportant information
English
1. WelcomeThanks for choosing SNT1022, a WiFi dual band 2,4/5Ghz USB 11n adapter from Sveon to connect your laptop or com-
puter through a network in a wireless mode. This adapter includes two RP-SMA female antennas which you can move or
replace to get a better coverage.
Through this user guide we will show you how to connect and use the device to get the best performance.
2. FeaturesSNT1022 from Sveon will allow you to get the maximum performance of your WiFi network thanks to its high speed trans-
fer rate up to 300Mbps and its Dual Band which will allow you to connect to WiFi networks working on 2,4Ghz besides 5Ghz
frequencies. Connect your PC or laptop in a very fast and easy way, thanks to Ralink advanced software and thanks to
WPA2 security. The device supports the data encryptation WEP/64/128, WPA and WPA2.
WiFi technology uses two bands of frequency: 2,4Ghz already working with 802.11b, 802.11g and 802.11n protocols and
5Ghz for 802.11a and 802.11n protocols. SNT1022 can receive wireless 11n signals in both 2,4Ghz and 5Ghz. 5Ghz band
has a wider number of available channels and there are less devices working on it so you will get a clearer connection with
less interferences with other WiFi networks and devices.
* You need to have a modem router working on 5Ghz band frequency.
3. System requirements- PC or laptop with an available USB 2.0 port*
- OS: XP with Service Pack 2, 2000, Vista, W7, Linux, Mac (10.6)
- CD/DVD ROM unit
- Processor 300MHZ with 64mb of RAM.
- Wireless Modem/Router 802.11b/g o 802.11n
- Wireless Modem/Router working on 5Ghz if want to connect to 5Ghz band frequency.
* If you use an USB 1.1 connection the speed and signal level may be reduced.
4. Technical Specifications- Modulation Type: OFDM/CCK/16-QAM/64-QAM
- Standard: IEEE 802.11n, 802.11g, IEEE802.11b, IEEE802.11a
- Interface: USB 2.0
- Frequency: 2.4 ~ 2.4835
- Spread Spectrum: DSSS
- Transmission distance: 100m (indoor), 300m (outdoor, it depends on the usage environment)
- Data Rate:
11n: 300 / 150 /108 / 81 / 54 / 27 Mbps
11b: 1, 2, 5.5, 11 Mbps
11g: 6, 9, 12, 24, 36, 48, 54 Mbps
- Transmit power:
2,4Ghz: 11n: 15dbm / 11g: 15dbm / 11b: 18dbm
5Ghz: 11a: 14 dbm / 11n: 13dbm
- Data secourity: 64,128, 152 WEP, WPA/WPA2, WPA-PSK/WPA2-PSK (TKIP/AES)
- Indicator LED
- Receiver sensitivity:
-135M/270M/300M: -65dbm@10%
- 54M/108M: - 68 dBm@10%
-11M: - 85 dBm@10%
- 6M: - 88 dBm@10%
-1M: - 90 dBm@8%
- Environment:
· Operating Temperature: 0ºC~40ºC
· Storage Temperature: -40ºC ~ 70ºC
· Relative Humidity: 10% ~ 90% (non-condensing)
· Storage Humidity: 5% ~ 95% (non-condensing)
5. Content- SNT1022 adaptor with RP-SMA connector (female connector / Male pin).
- Double 2dBi omnidirectional antennas with RP-SMA connector
- CD Driver
- Digital user guide (included in CD Driver)
- Guarantee card
- Quick Installation Guide
6. Hardware1. SNT1020 adaptor
2. USB port
3. Double RP-SMA antenna
4 Status indicator LED
5. RP-SMA antenna connector
22

English
7. Driver installation on PC1. Insert the installation CD on the CD ROM unit of your computer and the starter screen will appear. If it doesn´t appear,
double click over the CD/DVD ROM unit and run the file
“autorun.exe”.
2. Select the option “Driver SNT1022” to start the insta-
llation.
3. Please read carefully the License Terms. If you agree,
accept them and click on “Next” to continue.
4. Click on “Install driver and Ralink WLAN utility” if you
want to install the device drivers and the network soft-
ware. Select “Install driver only” if you only want to install
the device drivers and to use Windows menus to setup
the network.
Then click on “Next” to continue.
5. If you selected “Install driver and Ralink WLAN utility”
in the previous menu, you will be able to choose the soft-
ware for wireless network connection: “Ralink Configura-
tion Tool” or “Microsoft Zero Configuration Tool”. Select
one of them and click on “Next” to continue.
23
51
2
3
4
SNT1022 User Manual
Index1. Welcome2. Features3. System requirements4. Technical specifications5. Content6. Hardware7. Driver installation on PC8. Device connection
8.1 RaUI setup9. Network connection
9.1 Network connection using WZC9.2 Network connection using RaUI utility9.3 Network connection in AP-Mode (Ad Hoc)9.4 Network connection in 5Ghz frequency
10. RaUI software control panel10.1 Network10.2 Profile10.3 Advance10.4 Statistics10.5 WMM
10.6 SSO10.7 CCX10.8 Radio On/Off10.9 About
11. MAC address specificationsImportant information
English
6. If you want to modify the previously selected options,
press “Back”. If not, press “Install” to install all the selec-
ted options.
Note: This last step doesnçt appear under Windows Vistaor W7
7. Once the installation finishes, click on “Finish”.
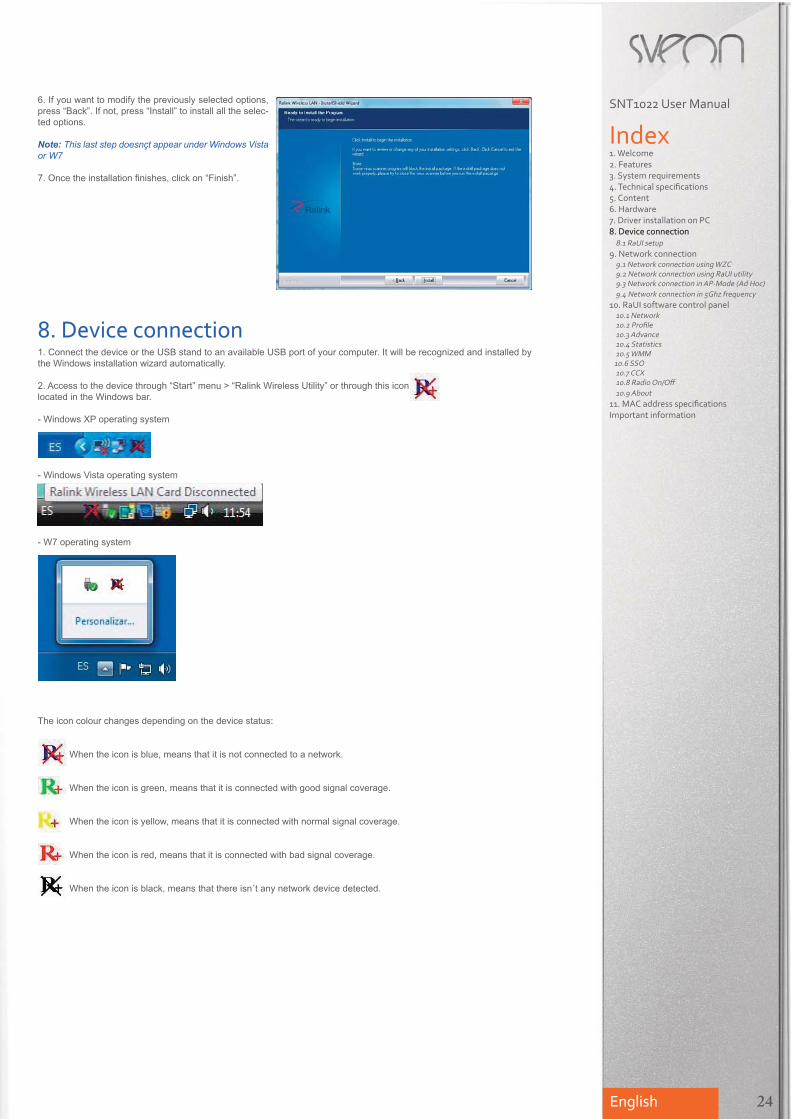
8. Device connection1. Connect the device or the USB stand to an available USB port of your computer. It will be recognized and installed by
the Windows installation wizard automatically.
2. Access to the device through “Start” menu > “Ralink Wireless Utility” or through this icon
located in the Windows bar.
- Windows XP operating system
- Windows Vista operating system
- W7 operating system
The icon colour changes depending on the device status:
When the icon is blue, means that it is not connected to a network.
When the icon is green, means that it is connected with good signal coverage.
When the icon is yellow, means that it is connected with normal signal coverage.
When the icon is red, means that it is connected with bad signal coverage.
When the icon is black, means that there isn´t any network device detected.
24
SNT1022 User Manual
Index1. Welcome2. Features3. System requirements4. Technical specifications5. Content6. Hardware7. Driver installation on PC8. Device connection
8.1 RaUI setup9. Network connection
9.1 Network connection using WZC9.2 Network connection using RaUI utility9.3 Network connection in AP-Mode (Ad Hoc)9.4 Network connection in 5Ghz frequency
10. RaUI software control panel10.1 Network10.2 Profile10.3 Advance10.4 Statistics10.5 WMM
10.6 SSO10.7 CCX10.8 Radio On/Off10.9 About
11. MAC address specificationsImportant information

25
8.1 RaUI Utility SetupThe RaUI utility is an application which will help you to setup the wireless adapter. This utility shows you the network sta-
tus during setup process. The device will be connected automatically to the wireless network with better signal power and
without password enabled.
The RaUI provides another utility for Windows XP OS called “Windows Zero Configuration” which allows you to connect
the device using the basic setup of Windows. The RaUI application can work together with WZC system (Windows Zero
Configuration) showing only monitoring functions; doesn´t affect to WZC setup.
If you want to enable WZC utility, right click over RaUI icon as shwon in the picture.
Note. When WZC is enabled, some functions of RaUI utility are not available.
The next window shows how WZC utility works together with RaUI application.
SNT1022 User Manual
Index1. Welcome2. Features3. System requirements4. Technical specifications5. Content6. Hardware7. Driver installation on PC8. Device connection
8.1 RaUI setup9. Network connection
9.1 Network connection using WZC9.2 Network connection using RaUI utility9.3 Network connection in AP-Mode (Ad Hoc)9.4 Network connection in 5Ghz frequency
10. RaUI software control panel10.1 Network10.2 Profile10.3 Advance10.4 Statistics10.5 WMM
10.6 SSO10.7 CCX10.8 Radio On/Off10.9 About
11. MAC address specificationsImportant information
English

English
If you want to use RaUI application to setup your wireless network, right click over the RaUI icon again.
9. Network connection9.1 Network connection using WZC (Windows Zero Connection)- If you decided to use WZC to setup your wireless network connection, the following picture is shown:
- Press over the icon “1” to see
the available wireless networks.
- The following picture appears:
If your wireless network is protected
using a password, the following icon ap-
pears.
Select this network to connect.
- Click on “Connect”.
26
SNT1022 User Manual
Index1. Welcome2. Features3. System requirements4. Technical specifications5. Content6. Hardware7. Driver installation on PC8. Device connection
8.1 RaUI setup9. Network connection
9.1 Network connection using WZC9.2 Network connection using RaUI utility9.3 Network connection in AP-Mode (Ad Hoc)9.4 Network connection in 5Ghz frequency
10. RaUI software control panel10.1 Network10.2 Profile10.3 Advance10.4 Statistics10.5 WMM
10.6 SSO10.7 CCX10.8 Radio On/Off10.9 About
11. MAC address specificationsImportant information

English
- A window will appear to enter the network password:
If the connection is properly done, appears the following window: under WZC connection the network appears as “Con-
nected”; under RaUI application, the network is pointed with a blue arrow icon.
9.2 Network connection using RaUI utilityWhen the RaUI utility is enabled, the system is connected automatically through the wireless network with the best cove-
rage. If there is a setup profile, the system is connected to this profile.
The network list includes the most used fields: SSID, channel, kind of network, security and signal percent. The blue
arrow icon indicates the enabled network.
1. Go to “Ralink Wireless Utility” menu or press this icon in the Windows Bar.
2. The available network list is shown.
3. Select the network which you want to connect in the field “SSID (network name)” and press “Connect”. Enter the net-
work password of Router or modem in the field “Preshared key” or “Wep Key” depending on the encryptation.
4. Press “Ok”.
27
SNT1022 User Manual
Index1. Welcome2. Features3. System requirements4. Technical specifications5. Content6. Hardware7. Driver installation on PC8. Device connection
8.1 RaUI setup9. Network connection
9.1 Network connection using WZC9.2 Network connection using RaUI utility9.3 Network connection in AP-Mode (Ad Hoc)9.4 Network connection in 5Ghz frequency
10. RaUI software control panel10.1 Network10.2 Profile10.3 Advance10.4 Statistics10.5 WMM
10.6 SSO10.7 CCX10.8 Radio On/Off10.9 About
11. MAC address specificationsImportant information

English
5. If the connection is propperly done, the Modem o router will assign the setup data:
If your Modem or router is “N”, this icon appears
Note: IP data IP 192.168.1.100 may change depending on the setup and the Modem/Router model.
9.3 AP-Mode Connection (Ad Hoc)The AP-Mode function allows you to use your SNT1022 adaptor as a Router o Modem and setup a wireless network using
two adaptors.
AP-Mode connection under Windows XP1. Right click over the following icon located in the Windows bar and select the option “Switch to AP Mode”.
2. This window appears:
28
SNT1022 User Manual
Index1. Welcome2. Features3. System requirements4. Technical specifications5. Content6. Hardware7. Driver installation on PC8. Device connection
8.1 RaUI setup9. Network connection
9.1 Network connection using WZC9.2 Network connection using RaUI utility9.3 Network connection in AP-Mode (Ad Hoc)9.4 Network connection in 5Ghz frequency
10. RaUI software control panel10.1 Network10.2 Profile10.3 Advance10.4 Statistics10.5 WMM
10.6 SSO10.7 CCX10.8 Radio On/Off10.9 About
11. MAC address specificationsImportant information

English
SSID: The SSID is the network name. The value by default is “SoftAP-10” but you can change it.
Channel: Choose the channel number where you want to send the signal. The value by default is the channel 1.
Wireless Mode: It supports 2.4G (includes 802.11 b/g/n) and 5Ghz (includes 802.11 a/n).
Country Region Code: Select the channels where you want to send the signal, depending on your country.
Use MAC Address:Press here to replace the SSID with the MAC of the device.
Security Setting: Select the authentication and encryptation mode used by AP.
Authentication Type: There are five different modes:
Open, Shared, WPA-PSK, WPA2-PSK and
WPA/WPA2-PSK.
Encryptation Type: For Open and Shared authenti-
cation, the available encryptation modes are “None”
and “WEP”. For WPA, WPA2 and WPA2-PSK au-
thentication, the supported encryption are “TKIP” and
“AES”.
WEP KEY: There are different formats to assign a
WEP password:
Hex (64 bits): 10 characters Hex
ASCII (64bits): 5 characters ASCII
Hex (128bits): 26 characters Hex
ASCII (128 bits): 13 characters ASCII
WPA/WPA2: This password must includes from 8 to
64 characters.
Hide SSID: Select to hide or show the SSID (network name).
Allow BW 40MHz: Allow the emission in 40Mhz. Press to disable.
Beacon (ms): Time between Beacons. The value by default is
100ms.
TX Power: Manually it forces the AP to transmit: 100%, 75%, 50%,
25% and Lowest. The value by default is 100%.
Default: Select to apply the default values.
Apply: Select to apply the new values.
Access ControlThis function allows you to connect devices to our AP.
Access Policy: Select if you want to enable/disable this option.
Disable: Not to use this option.
Allow All: Allow to all the Mac Addresses to access to the AP.
Reject All: Doesn´t allow to all the Mac Addresses to access to the
AP.
MAC Address: Adaptor alphanumeric address aa:bb:cc:dd:ee
Access List: Displays all the added MAC addresses.
Add: Adds a Mac Address.
Delete: Deletes a Mac Address.
Remove All: Select to delete all the Mac Addresses of the list.
Apply: Select to apply the changes.
Mac TableIn this section you can check the added Mac addresses and their
status:
MAC Address: This is the Mac address of the connecte device.
AIS: Connection value.
Power Saving Mode: Shows if the adapter supports or is in
standby mode.
Status: Displays the adapter status and the syncronization speed.
29
SNT1022 User Manual
Index1. Welcome2. Features3. System requirements4. Technical specifications5. Content6. Hardware7. Driver installation on PC8. Device connection
8.1 RaUI setup9. Network connection
9.1 Network connection using WZC9.2 Network connection using RaUI utility9.3 Network connection in AP-Mode (Ad Hoc)9.4 Network connection in 5Ghz frequency
10. RaUI software control panel10.1 Network10.2 Profile10.3 Advance10.4 Statistics10.5 WMM
10.6 SSO10.7 CCX10.8 Radio On/Off10.9 About
11. MAC address specificationsImportant information
English
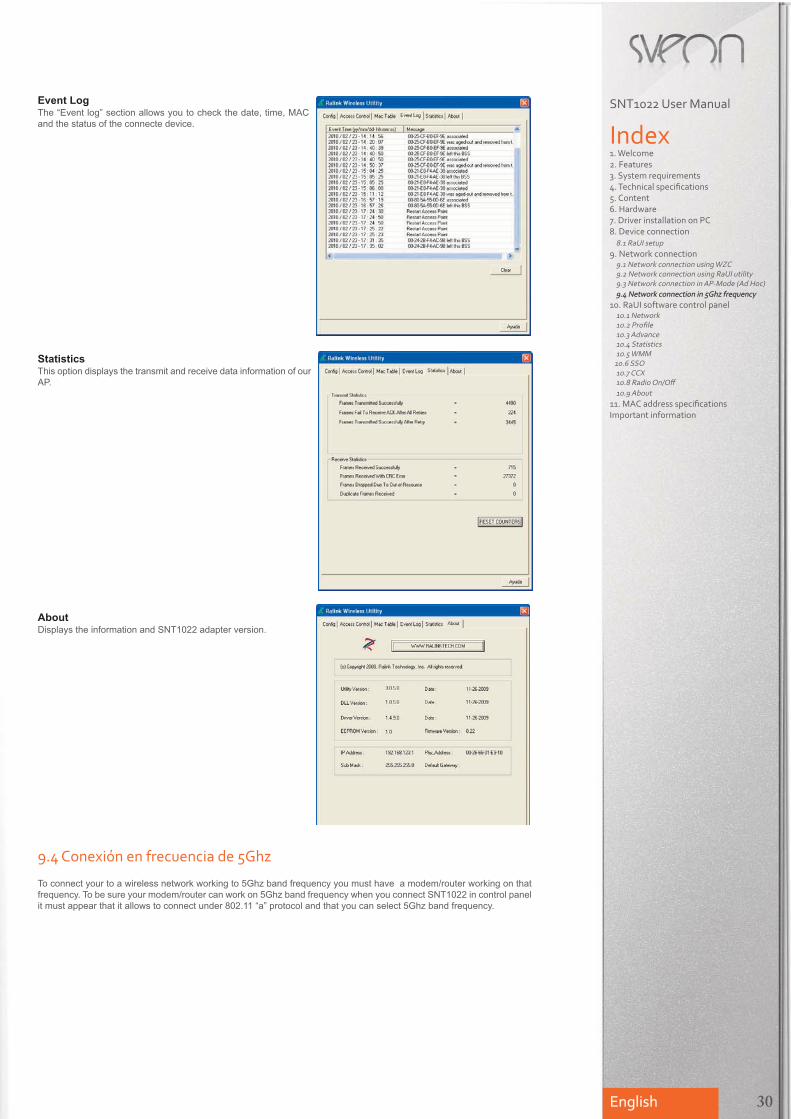
Event LogThe “Event log” section allows you to check the date, time, MAC
and the status of the connecte device.
StatisticsThis option displays the transmit and receive data information of our
AP.
AboutDisplays the information and SNT1022 adapter version.
9.4 Conexión en frecuencia de 5Ghz
To connect your to a wireless network working to 5Ghz band frequency you must have a modem/router working on that
frequency. To be sure your modem/router can work on 5Ghz band frequency when you connect SNT1022 in control panel
it must appear that it allows to connect under 802.11 “a” protocol and that you can select 5Ghz band frequency.
30
SNT1022 User Manual
Index1. Welcome2. Features3. System requirements4. Technical specifications5. Content6. Hardware7. Driver installation on PC8. Device connection
8.1 RaUI setup9. Network connection
9.1 Network connection using WZC9.2 Network connection using RaUI utility9.3 Network connection in AP-Mode (Ad Hoc)9.4 Network connection in 5Ghz frequency
10. RaUI software control panel10.1 Network10.2 Profile10.3 Advance10.4 Statistics10.5 WMM
10.6 SSO10.7 CCX10.8 Radio On/Off10.9 About
11. MAC address specificationsImportant information

English
10. RaUI software control panelCheck the different available options in the Ralink RaUI software of SNT1022 adapter.
Once the driver is completely installed and the device is properly connected, the Windows bar displays the following icon
(close the system clock).
Click over this icon to display the following window:
31
SNT1022 User Manual
Index1. Welcome2. Features3. System requirements4. Technical specifications5. Content6. Hardware7. Driver installation on PC8. Device connection
8.1 RaUI setup9. Network connection
9.1 Network connection using WZC9.2 Network connection using RaUI utility9.3 Network connection in AP-Mode (Ad Hoc)9.4 Network connection in 5Ghz frequency
10. RaUI software control panel10.1 Network10.2 Profile10.3 Advance10.4 Statistics10.5 WMM
10.6 SSO10.7 CCX10.8 Radio On/Off10.9 About
11. MAC address specificationsImportant information

English
10.1 Network1. SSID: Wireless network name
2. Channel: The channel you are using
3.: Modem or router standards:
11Mbps
54/108Mbps
150/300Mbps
4. Protection: Displays if the network is protected with password (appears a key icon).
5. Signal: Shows the network signal power.
Select the network you want to connect and click on the arrow “Pres here” to display the following information:
1. SSID / Network name
2. Router Mac address
3. Red encryptation
4. Channel used for your router/modem. to send the signal
5. Connection mode
6. Beacon Interval*
*Beacon Interval. This value may help you in the asociation problems. If the connection fails when the signal power is
good, try to adjust this value to 50 in your Modem or router (check also the user guide of your Modem or router).
Once the connection is finished, the connection data will appear:
1. Name and MAC address of your wireless router/modem.
2. Network signal power
3. Channel
4. Type of encryption password of your router/modem.
5. IP address of your router/modem.
32
SNT1022 User Manual
Index1. Welcome2. Features3. System requirements4. Technical specifications5. Content6. Hardware7. Driver installation on PC8. Device connection
8.1 RaUI setup9. Network connection
9.1 Network connection using WZC9.2 Network connection using RaUI utility9.3 Network connection in AP-Mode (Ad Hoc)9.4 Network connection in 5Ghz frequency
10. RaUI software control panel10.1 Network10.2 Profile10.3 Advance10.4 Statistics10.5 WMM
10.6 SSO10.7 CCX10.8 Radio On/Off10.9 About
11. MAC address specificationsImportant information

English
10.2 ProfileThis section allows you to save different setting profiles and to activate them when you need it. For example, you can save
the network settings of your home or of your office and activate them when you are at home or at office without the nee-
ding to configure everything again.
SNT1022 allows you to add add different network profiles entering all the information in “Profiles” menu or from “Network
panel”
Add profiles in a manual way1. Press “Profile” and select “Add”.
2. In “Profile name” enter the name of the profile (For
example: “Office”).
3. Press over “SSID” menu and choose your wire-
less network.
4. Press over the option “Auth.\ Encry”
5. Choose the Authentication mode and choose the
encryptation mode used by your Modem or router.
6. Enter your network password.
7. Press OK.
8. Select “Activate” to enable the profile.
33
SNT1022 User Manual
Index1. Welcome2. Features3. System requirements4. Technical specifications5. Content6. Hardware7. Driver installation on PC8. Device connection
8.1 RaUI setup9. Network connection
9.1 Network connection using WZC9.2 Network connection using RaUI utility9.3 Network connection in AP-Mode (Ad Hoc)9.4 Network connection in 5Ghz frequency
10. RaUI software control panel10.1 Network10.2 Profile10.3 Advance10.4 Statistics10.5 WMM
10.6 SSO10.7 CCX10.8 Radio On/Off10.9 About
11. MAC address specificationsImportant information

English
Add profiles from Network menuPlease follow these steps to add new profiles from “Network” menu:
1. Press over the network you
want to connect and then select
“Add profile”.
2. Select the profile name.
3. Click over the option “Auth.\ Ecry.”
4. Enter the network password and press “Ok”.
5. To active the profile select it and press “Acti-
vate”.
6. If the profile activation has been finished su-
cessfully, the following window will appear:
Note: The information provided by your modemor router may be different depending on the setupand the model.
34
SNT1022 User Manual
Index1. Welcome2. Features3. System requirements4. Technical specifications5. Content6. Hardware7. Driver installation on PC8. Device connection
8.1 RaUI setup9. Network connection
9.1 Network connection using WZC9.2 Network connection using RaUI utility9.3 Network connection in AP-Mode (Ad Hoc)9.4 Network connection in 5Ghz frequency
10. RaUI software control panel10.1 Network10.2 Profile10.3 Advance10.4 Statistics10.5 WMM
10.6 SSO10.7 CCX10.8 Radio On/Off10.9 About
11. MAC address specificationsImportant information

English
Fields description:
Profile Name: Profile name assigned
SSID: Wireless network name
Network Type: Network type, it includes Infraestructure mode and Ad Hoc mode
Authentication: Authentication mode
Encryption: Encryption type
Use 802.1x: Indicates if you use or not the 802.1x feature
Channel: Indicates the channel used to send the signal
Power Save Mode: You can choose between: CAM (Constantly Awake mode) or Power Saving mode.
TX Power: Power of signal reception
10.3 AdvanceIn this menu you can setup the following options:
1. Wireless mode: Choose between 2.4Ghz and 5Ghz (for 5Ghz emission, the modem or router should be ready for this
option).
2. Select your country: The availble channels depend on the country. Adjust the channels to your country specifications
(Europe from 1 to 13).
3. In this section you can setup the following options:
- Enable Tx Burts: This function enables the adapter to get a better performance during an interval of time. This option only
works when the modem or router supports this function.
- Enable TCP Window Size: Select to enlarge the transmission qualty between the TCP windows.
- Fast Roaming: Select to adjust the Fast Roaming level.
- Show Authentication status dialog: When you connect to a modem or router with protection, select if you want to display
the authentication dialog or not.
10.4 StatisticsIn “Statistics” options you can check detailed information of 802.11 MIB (Management Information Base) devices. This sec-
tion makes easier the MIB devices usage.
Transmit- Frames Trasmitted Successfully
- Frames Retransmitted Successfully
- Frames Fail To Receive ACK After Retries
- Reset Counter
35
SNT1022 User Manual
Index1. Welcome2. Features3. System requirements4. Technical specifications5. Content6. Hardware7. Driver installation on PC8. Device connection
8.1 RaUI setup9. Network connection
9.1 Network connection using WZC9.2 Network connection using RaUI utility9.3 Network connection in AP-Mode (Ad Hoc)9.4 Network connection in 5Ghz frequency
10. RaUI software control panel10.1 Network10.2 Profile10.3 Advance10.4 Statistics10.5 WMM
10.6 SSO10.7 CCX10.8 Radio On/Off10.9 About
11. MAC address specificationsImportant information

English
Receive- Frames Receive Successfully
- Frames Received With CRC Error
- Frames Dropped Due To Out-Of-Resource
- Duplicate Frames Received
- Reset Counter
10.5 WMMThe WMM are different features for WiFi networks which improve audio, video and VoIP applications.
- WMM: Enables WiFi Multi-media
- WMM-Power Save Enable: Enables standby
mode in WMM.
- Direct Link Setup Enable: Enables DSL (Direct
Link Setup)
WMM Enable
- Press “WMM Enable”
- Select “Network”. Add the SSID (net-
work name) which supports WMM and
press “Add to profile”.
36
SNT1022 User Manual
Index1. Welcome2. Features3. System requirements4. Technical specifications5. Content6. Hardware7. Driver installation on PC8. Device connection
8.1 RaUI setup9. Network connection
9.1 Network connection using WZC9.2 Network connection using RaUI utility9.3 Network connection in AP-Mode (Ad Hoc)9.4 Network connection in 5Ghz frequency
10. RaUI software control panel10.1 Network10.2 Profile10.3 Advance10.4 Statistics10.5 WMM
10.6 SSO10.7 CCX10.8 Radio On/Off10.9 About
11. MAC address specificationsImportant information

English
- This is the result:
WMM Power save enable
- Active WMM-Power Save Enable
- Select the category you want to enable (AC_BKm, AC_BE, AC_VI, AC_VO)
Direct Link Setup Enable- Active Direct Link Setup Enable
- Enter the Mac address of the other client in the Direct Link fields.
- Click on “Apply”
Note: The other client must be connected to the same modem or router which supports DLS function.
10.6 SSOThis section allows you to setup the profile start in the OS start process.
37
SNT1022 User Manual
Index1. Welcome2. Features3. System requirements4. Technical specifications5. Content6. Hardware7. Driver installation on PC8. Device connection
8.1 RaUI setup9. Network connection
9.1 Network connection using WZC9.2 Network connection using RaUI utility9.3 Network connection in AP-Mode (Ad Hoc)9.4 Network connection in 5Ghz frequency
10. RaUI software control panel10.1 Network10.2 Profile10.3 Advance10.4 Statistics10.5 WMM
10.6 SSO10.7 CCX10.8 Radio On/Off10.9 About
11. MAC address specificationsImportant information
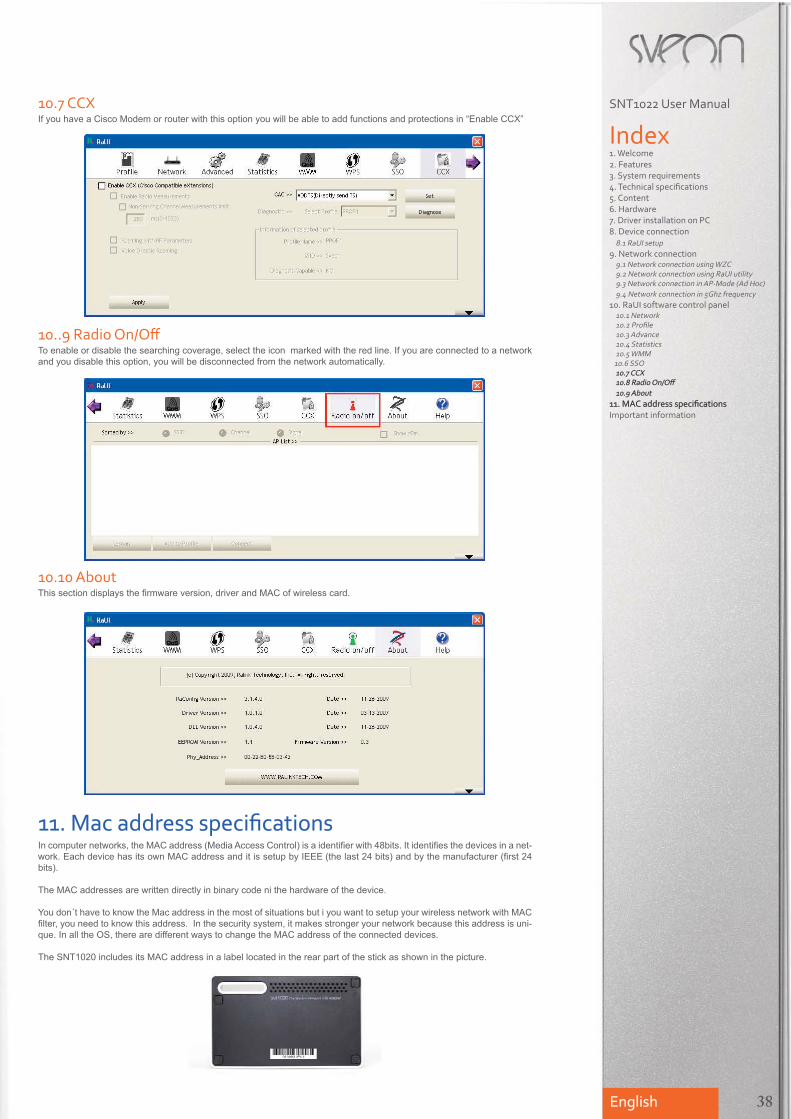
10.7 CCXIf you have a Cisco Modem or router with this option you will be able to add functions and protections in “Enable CCX”
10..9 Radio On/OffTo enable or disable the searching coverage, select the icon marked with the red line. If you are connected to a network
and you disable this option, you will be disconnected from the network automatically.
10.10 AboutThis section displays the firmware version, driver and MAC of wireless card.
11. Mac address specificationsIn computer networks, the MAC address (Media Access Control) is a identifier with 48bits. It identifies the devices in a net-
work. Each device has its own MAC address and it is setup by IEEE (the last 24 bits) and by the manufacturer (first 24
bits).
The MAC addresses are written directly in binary code ni the hardware of the device.
You don´t have to know the Mac address in the most of situations but i you want to setup your wireless network with MAC
filter, you need to know this address. In the security system, it makes stronger your network because this address is uni-
que. In all the OS, there are different ways to change the MAC address of the connected devices.
The SNT1020 includes its MAC address in a label located in the rear part of the stick as shown in the picture.
English 38
SNT1022 User Manual
Index1. Welcome2. Features3. System requirements4. Technical specifications5. Content6. Hardware7. Driver installation on PC8. Device connection
8.1 RaUI setup9. Network connection
9.1 Network connection using WZC9.2 Network connection using RaUI utility9.3 Network connection in AP-Mode (Ad Hoc)9.4 Network connection in 5Ghz frequency
10. RaUI software control panel10.1 Network10.2 Profile10.3 Advance10.4 Statistics10.5 WMM
10.6 SSO10.7 CCX10.8 Radio On/Off10.9 About
11. MAC address specificationsImportant information

English
Important Information
CE Declaration of ConformitySveon declares that his product SNT1022 is in compliance with the essential requirements and other relevant provisions
of Directive 1999/5/EC
Restrictions
Warning messageThis symbol on the product or its batteries or its packaging means that this product and
any batteries it contains must not be disposed of with your household waste.
Instead, it is your responsability to hand this over to an applicable collection point for
the recycling of batteries and electrical and electronic equipment. This separate co-
llection and recycling will help to conserve natural resources and prevent potential ne-
gative consequences for human health and the environment due to the possible
presence of hazardous substances in batteries and electrical and electronic equip-
ment, which could be caused by inappropriate disposal.
For more information about where to drop off your batteries and electronic waste, please contact your local city/munici-
pality office, your household waste disposal service or the shopw where you purchased the product.
39
SNT1022 User Manual
Index1. Welcome2. Features3. System requirements4. Technical specifications5. Content6. Hardware7. Driver installation on PC8. Device connection
8.1 RaUI setup9. Network connection
9.1 Network connection using WZC9.2 Network connection using RaUI utility9.3 Network connection in AP-Mode (Ad Hoc)9.4 Network connection in 5Ghz frequency
10. RaUI software control panel10.1 Network10.2 Profile10.3 Advance10.4 Statistics10.5 WMM
10.6 SSO10.7 CCX10.8 Radio On/Off10.9 About
11. MAC address specificationsImportant information


