Manual de taxímetro GOBOX - WordPress.com · Peajes se utilizan si el taxi ha pasado por una vía...
80
Transcript of Manual de taxímetro GOBOX - WordPress.com · Peajes se utilizan si el taxi ha pasado por una vía...

INTERFACOM, S.A.
Gobox_Es_V7.docx 1
MANUAL DE USUARIO

INTERFACOM, S.A.
Gobox_Es_V7.docx 2
Index
1 DESCRIPCION DEL EQUIPO ................................................................................................................. 3
1.1 CARACTERÍSTICAS TÉCNICAS PRINCIPALES ......................................................................... 3
1.2 DISPLAY DEL TAXÍMETRO .......................................................................................................... 3
1.3 INTERFACE GESTIÓN DE FLOTA ............................................................................................... 4
1.4 LECTOR DE TARJETA ................................................................................................................. 4
2 PANTALLA TURNO CERRADO .............................................................................................................. 5
3 SERVICIO DE TAXÍMETRO .................................................................................................................... 6
3.1 SERVICIO DE TAXÍMETRO .......................................................................................................... 6
3.2 SUPLEMENTOS ............................................................................................................................ 7
4 FUNCIONES AUXILIARES DEL TAXÍMETRO........................................................................................ 8
4.1 RELOJ-CALENDARIO ................................................................................................................... 8
4.2 DATOS DEL ÚLTIMO SERVICIO .................................................................................................. 8
4.3 TOTALIZADORES ......................................................................................................................... 9
4.4 VER DATOS DE CONTROL ........................................................................................................ 10
4.5 MENSAJES DE ERROR DE TAXÍMETRO ................................................................................. 11
5 MENÚ DE PAGO ................................................................................................................................... 12
5.1 MENÚ DE IMPORTES ................................................................................................................. 12
5.2 MÉTODOS DE PAGO ................................................................................................................. 12
5.2.1 PAGO CON TARJETA DE CRÉDITO .......................................................................... 13
5.2.2 PAGO DE ABONADO .................................................................................................. 13
6 FUNCIONES DE RADIO TAXI............................................................................................................... 14
6.1 UBICACIÓN ................................................................................................................................. 14
6.2 SERVICIOS PENDIENTES ......................................................................................................... 15
6.3 CONSULTA DE UBICACIÓN ...................................................................................................... 16
6.3.1 INFORMACIÓN DETALLADA DE ZONA ..................................................................... 17
6.4 RECEPCIÓN DE DESPACHO .................................................................................................... 18
6.5 INFORMACIÓN DE DESPACHO ................................................................................................ 19
6.6 DIAGRAMA DE TRABAJO .......................................................................................................... 20
7 FUNCIONES GENERALES ................................................................................................................... 21
7.1 SYSTEM ...................................................................................................................................... 21
7.2 CONFIGURACIÓN....................................................................................................................... 22
7.3 TURNOS ...................................................................................................................................... 22
8 LLAMADAS ............................................................................................................................................ 23
9 MESSAGES ........................................................................................................................................... 23
10 NAVEGADOR ........................................................................................................................................ 24
10.1 CONFIGURACIÓN ................................................................................................................. 24
10.2 NAVEGAR A UN DESTINO .................................................................................................... 25
10.3 INTERFACE DE NAVEGACIÓN ............................................................................................ 26

INTERFACOM, S.A.
Gobox_Es_V7.docx 3
1 DESCRIPCION DEL EQUIPO
1.1 CARACTERÍSTICAS TÉCNICAS PRINCIPALES
Longitud Anchura Altura Peso TC60 174 mm 140 mm 45 mm 520 g TV60C 178 mm 70 mm 100 mm 630 g El TC60 y TV60 están diseñados para funcionar en un entorno de clase electromagnética E3 (instrumentos alimentados por la batería de un vehículo) y en un entorno de clase mecánica M3 (nivel de vibraciones alto, correspondiente a un vehículo). La alimentación es de 10,5 a 30 V. Operan dentro de un vehículo, en un rango de temperatura de -25ºC / 70ºC sin condensación.
1.2 DISPLAY DEL TAXÍMETRO
Display de TARIFA (1)
Muestra la tarifa utilizada
Display de ESTADO (4)
Muestra el estado del taxímetro
Display de IMPORTE (2)
Muestra el importe a pagar
Display de SUPLEMENTOS (3)
Muestra los suplementos
Indicador Tiempo / Distancia (5):
Indica si el taxímetro está contando por: - Distancia (indicador OFF) - Tiempo (indicador ON)
Algunas funciones de Taxímetro, como los suplementos, activan una ventana pop-up sobre el área de Terminal (6)

INTERFACOM, S.A.
Gobox_Es_V7.docx 4
1.3 INTERFACE GESTIÓN DE FLOTA
En el TC60 conviven el taxímetro y la función de gestión de flota, que no es metrológica. Las funciones no metrológicas se muestran en un área bajo el taxímetro.
PESTAÑAS
Las funciones de gestión de flota del equipo se distribuyen en 5 pestañas. Estas pestañas están justo debajo del área del taxímetro. El interface de usuario de la pestaña activa utiliza el resto del área de la pantalla.
Servicios
Funciones
Llamadas
Mensajes
Navegador
Funcionalidad de servicios de taxi
Configuración Información
Tickets especiales
Gestión de llamadas
Mensajes entre la
central y el taxi
Navegador integrado (opcional)
BARRA DE ESTADO
El área inferior del display conforma una barra de estado que muestra información sobre:
Ubicación
Llamadas
Mensajes
Coberturas
Hora
Información sobre
la ubicación
Estado de llamadas
Mensajes no leídos
Estado de conexión
y cobertura de GPS / GSM / GPRS
hh:mm
1.4 LECTOR DE TARJETA
El lector de tarjetas está en la parte superior del terminal. Se debe deslizar la tarjeta de izquierda a derecha, con la banda magnética hacia la parte posterior.

INTERFACOM, S.A.
Gobox_Es_V7.docx 5
2 PANTALLA TURNO CERRADO
Cuando está en OFF o STANDBY, pulse en cualquier punto de la pantalla para pasar a ON.
El terminal pasa a ON y en estado de TURNO CERRADO
Las funciones disponibles en TURNO CERRADO son:
Pasar a STANDBY para una pausa corta.
Tras algún tiempo en este estado, el equipo se apagará automáticamente
Pasar a OFF
Inicio sin central. Inicia una sesión de trabajo, permitiendo trabajar como un taxímetro Off-line. No hay conexión con el Radiotaxi para recibir servicios. En la pantalla de identificación del usuario, dependiendo de la configuración, es necesario introducir o bien un código de conductor, o bien un usuario y password.
Inicio con central. Inicia una sesión de trabajo, activando la funcionalidad completa del TC60/TV60. En la pantalla de identificación del usuario, dependiendo de la configuración, es necesario introducir o bien un código de conductor, o bien un usuario y password.

INTERFACOM, S.A.
Gobox_Es_V7.docx 6
3 SERVICIO DE TAXÍMETRO
3.1 SERVICIO DE TAXÍMETRO
Iniciar un servicio
Cuando está en LIBRE, pulse sobre el área de Tarifa para iniciar un servicio. En el menú pop-up, seleccione la tarifa deseada. El taxímetro pasará a OCUPADO Cuando está en Ocupado, pulse en el área de Tarifa para cambiar a otra tarifa. En el menú pop-up se mostrarán las tarifas seleccionables. Seleccione la tarifa deseada.
Paso A Pagar
En Ocupado, pulse el área de Estado para pasar a A PAGAR
Paso a Libre
En A PAGAR, pulse el área de Estado. Esto iniciará el paso a Libre. La zona de gestión mostrará el menú de Pago. Para más detalles lea el punto “MENÚ DE PAGO”.
INTERFACOM, S.A.
Gobox_Es_V7.docx 7
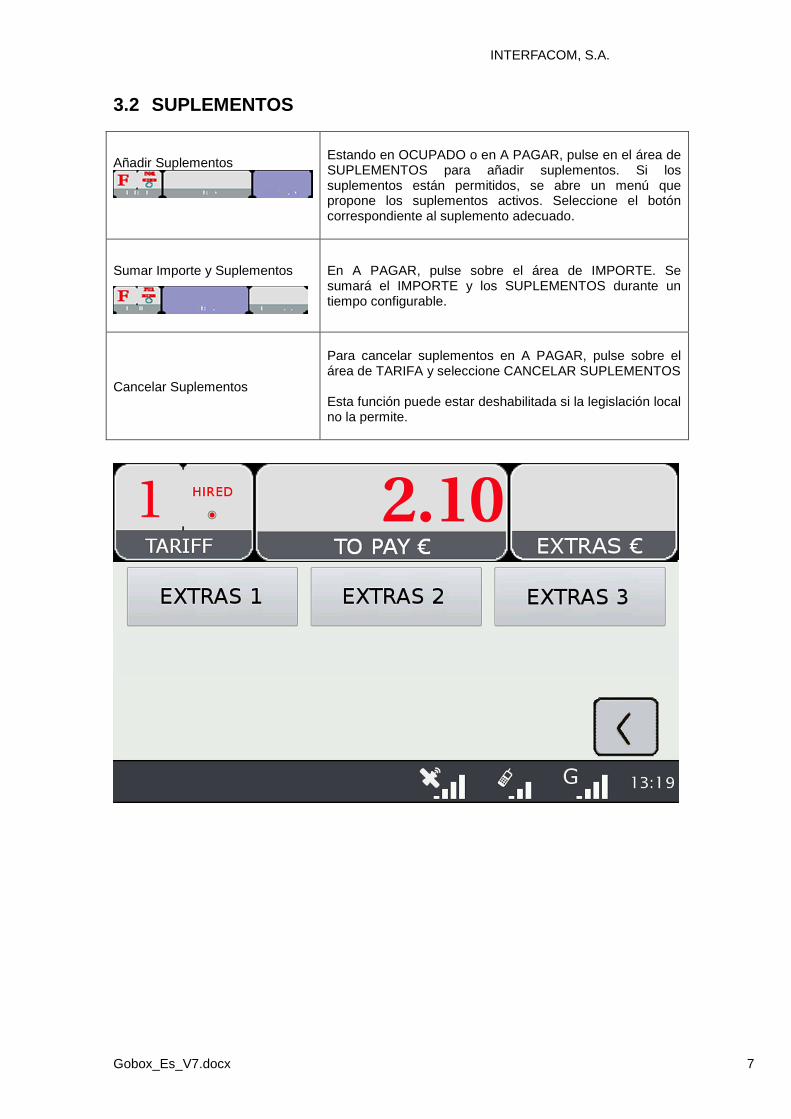
3.2 SUPLEMENTOS
Añadir Suplementos
Estando en OCUPADO o en A PAGAR, pulse en el área de SUPLEMENTOS para añadir suplementos. Si los suplementos están permitidos, se abre un menú que propone los suplementos activos. Seleccione el botón correspondiente al suplemento adecuado.
Sumar Importe y Suplementos
En A PAGAR, pulse sobre el área de IMPORTE. Se sumará el IMPORTE y los SUPLEMENTOS durante un tiempo configurable.
Cancelar Suplementos
Para cancelar suplementos en A PAGAR, pulse sobre el área de TARIFA y seleccione CANCELAR SUPLEMENTOS Esta función puede estar deshabilitada si la legislación local no la permite.

INTERFACOM, S.A.
Gobox_Es_V7.docx 8
4 FUNCIONES AUXILIARES DEL TAXÍMETRO
En LIBRE el taxímetro puede mostrar información complementaria. Estas funciones se cierran tras un tiempo, o si el vehículo se desplaza.
La mayoría de estas funciones son accesibles pulsando sobre el área de Suplementos mientras el taxímetro está en Libre. Se abre un menú contextual.
4.1 RELOJ-CALENDARIO
En LIBRE, pulse sobre el área de IMPORTE. Pulse varias veces para avanzar por los datos de fecha/hora. Los datos que se muestran son: Display de
operación Datos en el display de Importe
Datos en el display de Suplementos
Paso 1 HO Hora Paso 2 DA Día del mes Día de la semana Paso 3 YE Año
4.2 DATOS DEL ÚLTIMO SERVICIO
En LIBRE, pulse sobre el área de SUPLEMENTOS. En el menú seleccione “ÚLTIMO SERVICIO”.

INTERFACOM, S.A.
Gobox_Es_V7.docx 9
4.3 TOTALIZADORES
En LIBRE, pulse sobre el área de SUPLEMENTOS. En el menú seleccione “TOTALIZADORES” Se muestran los Totalizadores Acumulados. Haga Scroll hacia abajo para mostrar los Totalizadores Parciales. Los totalizadores que se pueden mostrar son: Unidades Acumulativos Parciales Número de servicios o o Importe Moneda o o Suplementos Moneda o o Importe total Moneda o o Distancia total km o o Distancia en Ocupado km o o Distancia en Libre km o o Distancia en Libre con pasajero (*) km o o Tiempo en Ocupado h o o Tiempo en ON h o o Num de desconexiones de batería o o Tiempo desde la última desconexión h o o Número de veces que se han borrado los totalizadores parciales
o
(*) El totalizador “Distancia en Libre con pasajero” es operativo sólo si hay conectado un Sensor de Pasajero (opcional)
BORRAR LOS TOTALIZADORES PARCIALES
Mientras se muestran los totalizadores, pulse sobre el icono “X” para borrar los totalizadores parciales. Es necesario entrar un password.
• Si el password no es correcto, se cierra la ventana sin borrar los valores • Si el password es correcto, se borran los totalizadores parciales
INTERFACOM, S.A.
Gobox_Es_V7.docx 10
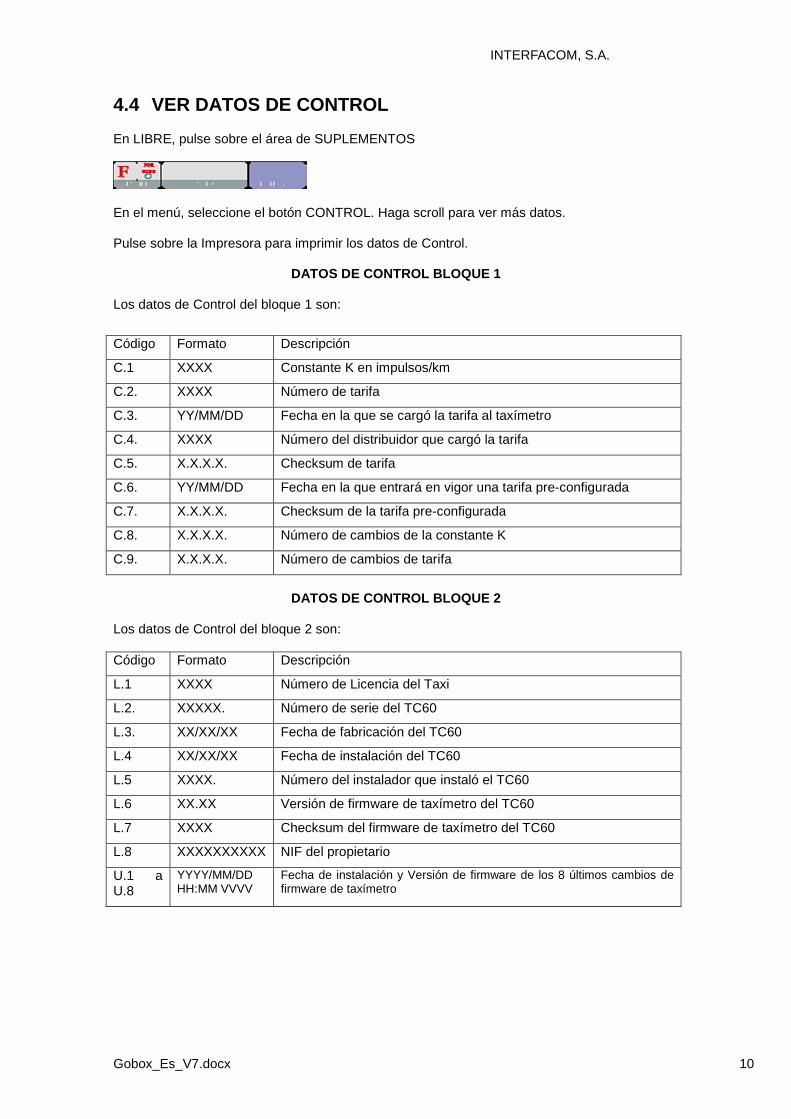
4.4 VER DATOS DE CONTROL
En LIBRE, pulse sobre el área de SUPLEMENTOS
En el menú, seleccione el botón CONTROL. Haga scroll para ver más datos. Pulse sobre la Impresora para imprimir los datos de Control.
DATOS DE CONTROL BLOQUE 1
Los datos de Control del bloque 1 son:
Código Formato Descripción
C.1 XXXX Constante K en impulsos/km
C.2. XXXX Número de tarifa
C.3. YY/MM/DD Fecha en la que se cargó la tarifa al taxímetro
C.4. XXXX Número del distribuidor que cargó la tarifa
C.5. X.X.X.X. Checksum de tarifa
C.6. YY/MM/DD Fecha en la que entrará en vigor una tarifa pre-configurada
C.7. X.X.X.X. Checksum de la tarifa pre-configurada
C.8. X.X.X.X. Número de cambios de la constante K
C.9. X.X.X.X. Número de cambios de tarifa
DATOS DE CONTROL BLOQUE 2
Los datos de Control del bloque 2 son: Código Formato Descripción
L.1 XXXX Número de Licencia del Taxi
L.2. XXXXX. Número de serie del TC60
L.3. XX/XX/XX Fecha de fabricación del TC60
L.4 XX/XX/XX Fecha de instalación del TC60
L.5 XXXX. Número del instalador que instaló el TC60
L.6 XX.XX Versión de firmware de taxímetro del TC60
L.7 XXXX Checksum del firmware de taxímetro del TC60
L.8 XXXXXXXXXX NIF del propietario
U.1 a U.8
YYYY/MM/DD HH:MM VVVV
Fecha de instalación y Versión de firmware de los 8 últimos cambios de firmware de taxímetro

INTERFACOM, S.A.
Gobox_Es_V7.docx 11
DATOS DE CONTROL BLOQUE 3 Los datos de Control del bloque 3 son: Código Formato Descripción
I. XX ID de tarifa
b. XXXXX Importe inicial
M. XXXXX Metros primer salto
S. XXXXX Segundos primer salto
d. XXXXX Tarifa por distancia (€/km)
S. XXXXX Tarifa horaria (€/hour)
P. XX Tarifa usada en A PAGAR
E. XXXXX Suplementos de la tarifa
4.5 MENSAJES DE ERROR DE TAXÍMETRO
Cuando hay un error que afecta a la funcionalidad de taxímetro, puede mostrar un código de error. Los códigos de error disponibles son: Código Descripción
E-2 Fallo del luminoso
E-3 Error de la señal de distancia
E-4 Error de reloj
E-5 El taxímetro está fuera del período de revisión configurado
E-6 Exceso de velocidad
E-7 Turno de trabajo excedido
E-8 Error en los parámetros de tarifación
E-9 Error del firmware de taxímetro
E-10 Error de impresora

INTERFACOM, S.A.
Gobox_Es_V7.docx 12
5 MENÚ DE PAGO
Las funcionalidades de gestión incluyen un menú de Pagos, para poder realizar el pago del servicio con diferentes métodos. Cuando el terminal está en modo de Pago, es posible que el taxímetro tenga el paso a Libre restringido hasta que haya finalizado el pago.
5.1 MENÚ DE IMPORTES
El menú de Importes en el software de gestión muestra los conceptos que forman el importe total, y la suma de los mismos. Los conceptos de Importes son: Importe de Taxímetro Siempre. No editable Importe de Suplementos Si se ha entrado en el Taxímetro. No editable Propinas Opcional Peajes Opcional Total Suma de todos los conceptos Propinas y Peajes son configurables, dependiendo de las reglamentaciones locales. Los Peajes se utilizan si el taxi ha pasado por una vía de Peaje (autopista, túnel, etc) y si tiene que ser pagados por el pasajero.
REINICIAR SERVICIO
En algunos casos, si el taxi está en el menú de Importes para un servicio de la central que se ha iniciado demasiado pronto, el taxista puede opcionalmente volver a iniciar el servicio de central.
Esto cambia el estado de la aplicación de Gestión de Flotas a Despachado, y permite al taxista reiniciar el servicio. Esto no afecta al taxímetro, que siempre incluye cualquier servicio realizado en sus Totalizadores. Pero sí que puede contemplarse en la información de Turnos, en la cual este servicio se puede marcar como Reiniciado. Esta función puede estar habilitada o deshabilita dependiendo de la configuración.
5.2 MÉTODOS DE PAGO
Tras el menú de importes, se pasa al menú de métodos de pago. Dependiendo de la configuración, se pueden mostrar los siguientes métodos:
Pago al Contado Si la reglamentación local lo requiere, se puede imprimir recibo automáticamente
Pago con Tarjeta de Crédito
Pago de Abonado
Imprimir Recibo

INTERFACOM, S.A.
Gobox_Es_V7.docx 13
5.2.1 PAGO CON TARJETA DE CRÉDITO
Dependiendo del procesador de pago electrónico con el cual opere, se pueden utilizar tarjetas como Visa, MasterCard, American Express. Consulte con su Radiotaxi o distribuidor local para la información de los tipos de tarjetas activas.
En el momento de escribir este manual, el pago con tarjeta magnética está siendo obsoletado por los procesadores. Por este motivo, sólo se explica el pago con tarjeta EMV. Pulse el botón PAGO CON TARJETA. El Terminal envía el importe al PIN-Pad. Siga las instrucciones en pantalla del PIN-Pad para continuar con el pago. Dependiendo del tipo de tarjeta, el cliente puede tener que introducir su código PIN. En tal caso, pase el PIN-Pad al pasajero para que pueda introducir el PIN.
TRANSACCIÓN AUTORIZADA Si el pago es Autorizado, se imprime la copia del ticket de pago con tarjeta para el Conductor. Verifique si es necesaria la firma, dado que en algunos tipos de tarjeta, aunque sean EMV, es necesaria la firma. Si se ha impreso el cajetín de firma, entonces la firma es necesaria. Pulse el botón de Copia para imprimir la copia para el Cliente.
TRANSACCIÓN DENEGADA Si el pago no se autoriza, dependiendo del procesador de tarjeta, se mostrará un mensaje de error en pantalla. El mensaje puede cambiar dependiendo del tipo de error. Puede reintentar el pago, o bien escoger otro método de pago.
CANCELAR UN PAGO CON TARJETA
Tras un pago correctamente procesado, cuando el Terminal ya ha pasado a Libre, es posible cancelar el último pago con tarjeta. Seleccione la opción CANCELAR PAGO CON TARJETA.
5.2.2 PAGO DE ABONADO
Si el despacho se envió desde el Radiotaxi como de Abonado, el pago se inicia por defecto como de Abonado. Los menús en pantalla pueden cambiar dependiendo del despacho o las propiedades del usuario abonado.
Si las propiedades del Abonado requieren validación de Tarjeta de Abonado, es necesario deslizar la tarjeta del Abonado por el lector de tarjeta magnética integrado en el TV60, o por el lector magnético del PIN-Pad si está conectado. En función de propiedades del Abonado, puede tener que introducir un código de Autorización. Si el pago es autorizado, se imprimen los tickets de Pago de Abonado. Si el pago de Abonado es rechazado, es posible escoger otro método de pago.

INTERFACOM, S.A.
Gobox_Es_V7.docx 14
6 FUNCIONES DE RADIO TAXI
6.1 UBICACIÓN
Al iniciar sesión de trabajo con central, el equipo calcula la zona en la que está situado, basado en la localización GPS. La información se envía automáticamente a la central. Si la posición está dentro de una zona de trabajo, el estado cambia de LIBRE a UBICADO EN ZONA. Cuando el taxi se ubica en una zona, se muestra la ubicación en la Barra de Estado. Tipo de ubicación
Nombre de la Zona Orden en la Zona
• Parada • Zona • Ocupado
Muestra el nombre de la zona en la que el taxi está ubicado
El orden en la zona se muestra durante un tiempo configurable.
ACTUALIZAR ORDEN UBICACIÓN Actualiza la información del orden de ubicación
DESACTIVAR UBICACIÓN Cuando el conductor no quiere recibir servicios de central durante un período
ACTIVAR UBICACIÓN Cuando la Ubicación está Desactivada, y desea volver a estar disponible para recibir servicios otra vez
UBICAR EN PARADA Está disponible cuando el taxi está dentro de la zona de influencia de la Parada de Taxi. De lo contrario, se dará un aviso acústico de error.
DESUBICAR DE PARADA Para salir de una Parada y pasar Ubicación en la Zona
CONSULTA DE UBICACIÓN Cuando el taxi está ubicado, la Consulta de Ubicación está disponible.
SERVICIOS PENDIENTES Cuando está ubicado, da acceso a la lista de servicios que la central no ha adjudicado automáticamente, probablemente porque no había taxis en la zona adecuada.
INTERFACOM, S.A.
Gobox_Es_V7.docx 15
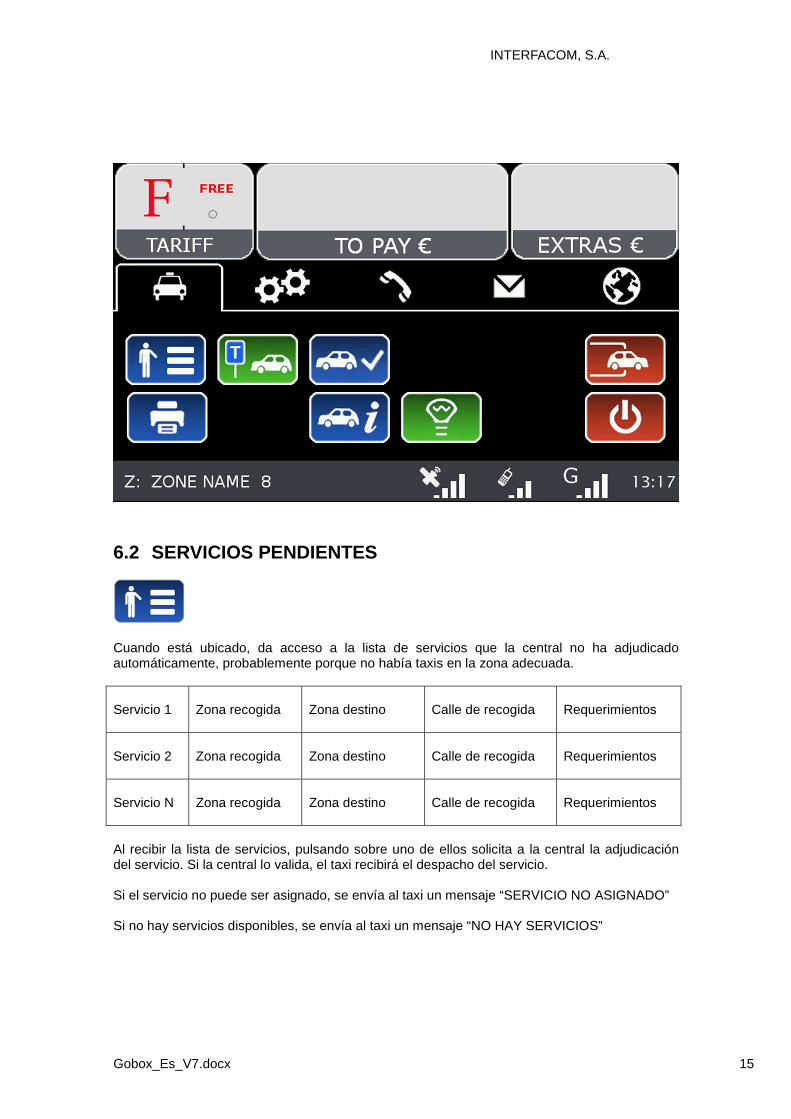
6.2 SERVICIOS PENDIENTES
Cuando está ubicado, da acceso a la lista de servicios que la central no ha adjudicado automáticamente, probablemente porque no había taxis en la zona adecuada. Servicio 1
Zona recogida
Zona destino
Calle de recogida
Requerimientos
Servicio 2
Zona recogida
Zona destino
Calle de recogida
Requerimientos
Servicio N
Zona recogida
Zona destino
Calle de recogida
Requerimientos
Al recibir la lista de servicios, pulsando sobre uno de ellos solicita a la central la adjudicación del servicio. Si la central lo valida, el taxi recibirá el despacho del servicio. Si el servicio no puede ser asignado, se envía al taxi un mensaje “SERVICIO NO ASIGNADO” Si no hay servicios disponibles, se envía al taxi un mensaje “NO HAY SERVICIOS”

INTERFACOM, S.A.
Gobox_Es_V7.docx 16
6.3 CONSULTA DE UBICACIÓN
La Consulta de Ubicación permite recibir la información relativa a la distribución de trabajo en las zonas.
Taxis en la Parada de la Zona
Taxis Ubicados
en la Zona
Taxis Ocupados
finalizando servicio en la Zona
Clientes
esperando taxi
Zona 1..N
Verde
Amarillo
Rojo
Blanco
Dependiendo de la configuración del Radiotaxi, si esta pantalla se mantiene abierta, la información de las zonas se actualizará a medida que el taxi se desplaza, actualizando el menú para que siempre incluya la zona en la cual está ubicado el taxi. Una vez se usa Scroll, los menús dejan de seguir los cambios de zona del Taxi, hasta que se cierre la pantalla y se vuelva a abrir. Esto permite consultar la información de otra zona de su interés, sin que la información cambie mientras está leyendo. La información de los Taxis en la Zona es acumulada con los taxis en Parada, ya que normalmente los Taxis en Parada tienen más prioridad que los que están en Zona. Lo mismo se aplica a los taxis en Ocupado finalizando servicio en la Zona: Esta información es acumulada con los taxis en la Parada y los taxis en la Zona. Esto permite saber de forma sencilla, y sin tener que hacer cálculos mentales, el orden de prioridad en la zona que tendrá un taxi que se ubique en una zona, en cualquiera de los tres tipos de ubicación.

INTERFACOM, S.A.
Gobox_Es_V7.docx 17
Las acciones en esta pantalla son:
Scroll arriba
Scroll abajo
Cerrar la Consulta de Ubicación
Volver un nivel atrás a las Macrozonas
Las Macrozonas son áreas de trabajo que contienen varias Zonas. La información en las Macrozonas es equivalente a la información de las Zonas, acumulando todas las Zonas que contiene.
6.3.1 INFORMACIÓN DETALLADA DE ZONA
Detalle de Taxis en la Zona proporciona información detallada de los taxis en la zona
Nombre de la Zona
Taxis en la Parada
Taxis en la Parada Taxis finalizando
Número de orden
Taxis ubicados en Parada, con su hora de ubicación.
Taxis ubicados en la Zona
Taxis finalizando servicio en la Zona
Detalle de Servicios en la Zona proporciona información detallada de los servicios en la zona
Nombre de la Zona
Servicios en la Zona
Requerimientos
Número de orden
Hora de Recogida del Servicio Requerimientos del Servicio
Estas funciones pueden estar activadas o desactivadas dependiendo de la configuración del Radiotaxi.

INTERFACOM, S.A.
Gobox_Es_V7.docx 18
6.4 RECEPCIÓN DE DESPACHO
Cuando el taxi recibe un Despacho, se muestra la siguiente información:
Hora de inicio Zona de recogida Requerimientos del Servicio Tiene un nuevo despacho Dirección de recogida Lo acepta?
Parte de esta información es opcional, dependiendo de la configuración del Radiotaxi se muestra o no. Si se excede un tiempo máximo para aceptar el servicio, se rechaza automáticamente. Las opciones disponibles tras aceptar el despacho son:
INFORMACIÓN DEL DESPACHO Una vez aceptado el despacho, se muestra la información completa del servicio. En la pantalla de Servicios, se puede volver a ver la información con este botón.
AVISO EN PUERTA Si el cliente ha solicitado ser avisado de la llegada del taxi, el botón AVISO EN PUERTA se activa. Al seleccionarlo, el cliente recibirá la notificación.
NO HAY CLIENTE Si al llegar a la dirección de recogida el cliente no está, seleccione NO HAY CLIENTE. La Central gestionará la incidencia y proporcionará instrucciones.
SI HAY CLIENTE Si el cliente llega tras haber utilizado, NO HAY CLIENTE, notifíquelo a la central con SI HAY CLIENTE. De esta forma la central no perderá el tiempo buscando al cliente, que ya está en el taxi.
DEVOLVER SERVICIO Utilícelo si ha aceptado un servicio pero es necesario devolverlo a la central. En algunos radiotaxis, devolver servicios puede ser motivo de sanción, de modo que infórmese sobre la política de su flota antes de usar esta función.
DESACTIVAR LUMINOSO Cuando el taxi tiene un despacho, se puede desactivar la luz de Libre. Esto evita confusión al resto de clientes en la calle, que intentan parar al taxi porque ven la luz de Libre, pero el taxi realmente no está disponible. Esta función es configurable, puede estar desactivada en caso de que no esté permitida por la reglamentación local.
INTERFACOM, S.A.
Gobox_Es_V7.docx 19
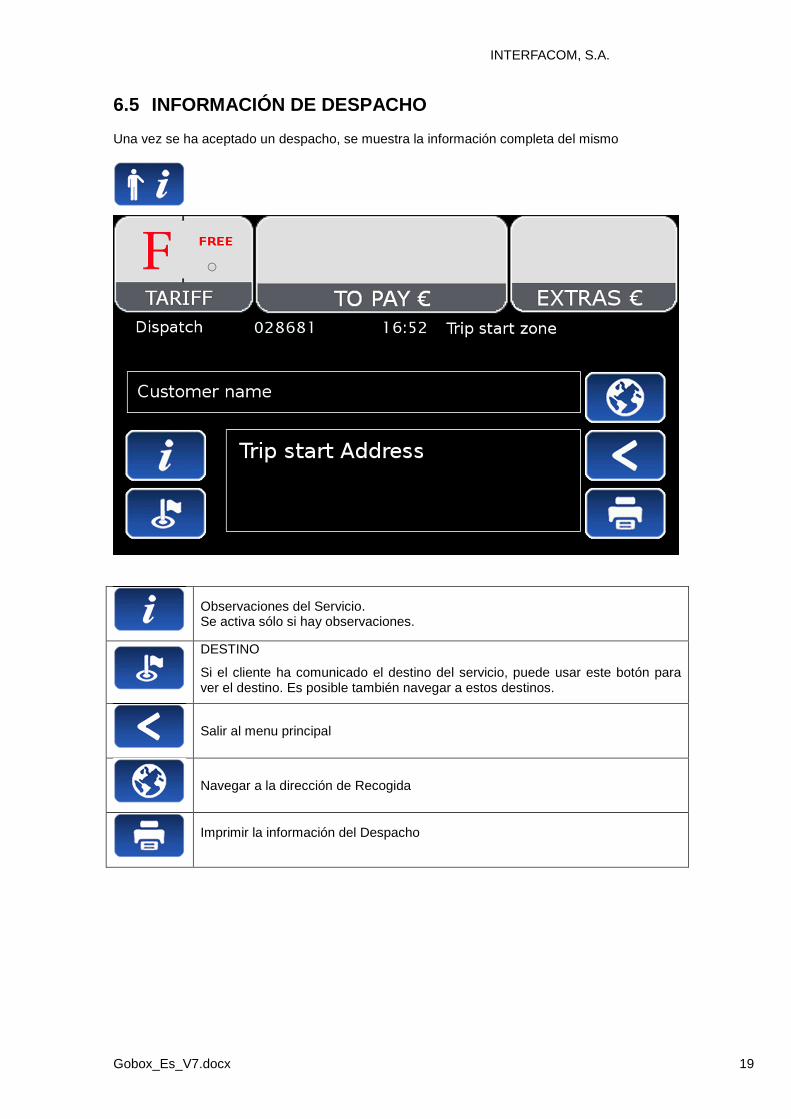
6.5 INFORMACIÓN DE DESPACHO
Una vez se ha aceptado un despacho, se muestra la información completa del mismo
Observaciones del Servicio. Se activa sólo si hay observaciones.
DESTINO
Si el cliente ha comunicado el destino del servicio, puede usar este botón para ver el destino. Es posible también navegar a estos destinos.
Salir al menu principal
Navegar a la dirección de Recogida
Imprimir la información del Despacho

INTERFACOM, S.A.
Gobox_Es_V7.docx 20
6.6 DIAGRAMA DE TRABAJO
Este diagrama muestra el flujo de trabajo de un Servicio Despachado
Libre
Ubicado
Despachado
Ocupado
Pago
Turno Cerrado
OFF
A Pagar

INTERFACOM, S.A.
Gobox_Es_V7.docx 21
7 FUNCIONES GENERALES
Avance de papel
Imprimir una copia del último ticket de pago con tarjeta. Activo sólo tras un pago con tarjeta.
Información del equipo y configuración del sistema
Parámetros de configuración de la aplicación de Radiotaxi
Funcionalidades relativas a la información de turnos de trabajo
7.1 SYSTEM
Fecha y Hora actual
Información de estado del receptor GPS
Información del estado de los módulos GSM / GPRS. Tanto cobertura como dirección IP.
Atención: En ocasiones el equipo tiene tanto cobertura como dirección IP, pero el operador GPRS no tiene recursos suficientes para gestionar las transmisiones entre sus diversas infraestructuras.
Información sobre la versión de software y configuración
Ajuste de volumen del altavoz
Información de la batería recargable interna, y de la batería del vehículo
Permite ajustar los parámetros de brillo del display
Brillo mínimo, Brillo máximo, Sensibilidad del sensor de luminosidad

INTERFACOM, S.A.
Gobox_Es_V7.docx 22
7.2 CONFIGURACIÓN
Activa / Desactiva la impresión automática de la información del despacho
Configurar un número de teléfono al cual el Terminal hará una llamada telefónica cuando reciba un despacho. Sirve para avisar al taxista si está fuera del taxi en una Parada. Es necesario tener las llamadas de voz activadas.
Configura un PIN que filtra el acceso a las llamadas telefónicas.
Cambiar idioma.
Activa la locución de los importes del Taxímetro durante un servicio.
7.3 TURNOS
PARCIALES: Imprime la información de los ingresos acumulados desde el último cierre, permitiendo una gestión básica de los ingresos. La información se descompone en Contado, Crédito y Abonado.
CIERRES: Imprime la información de los ingresos acumulados desde el último cierre, resetea los valores a cero e incrementa el número de cierre
Imprime un ticket de Turnos, permitiendo escoger de una lista el turno a imprimir.
Configuración de la aplicación de Turnos
Activa / desactiva la impresión de la información de cada servicio en los tickets de Turno.
Activa / desactiva la impresión de las direcciones de inicio/final de servicio en los tickets de turno. Necesita que la Cartografía opcional esté operativa.
Activa / desactiva el Cierre Automático al cerrar la sesión de trabajo.

INTERFACOM, S.A.
Gobox_Es_V7.docx 23
8 LLAMADAS
Llamada mediante marcación del número
Ajustar el volumen de altavoz en las llamadas
Agenda de teléfonos
Nuevo contacto
Borrar contacto
Petición de voz con Central. El operador llamará al taxi cuando esté disponible
Una vez realizada Petición de Voz, es posible cancelarla
9 MESSAGES
Lista de mensajes recibidos
Imprimir un mensaje
Borrar un mensaje de la lista
Solicitar una Información a la central. Abre un menú con las opciones de información disponibles.
Solicita una asistencia o servicio por parte de la central. Abre un menú con las opciones de Asistencia/Servicios disponibles
INTERFACOM, S.A.
Gobox_Es_V7.docx 24
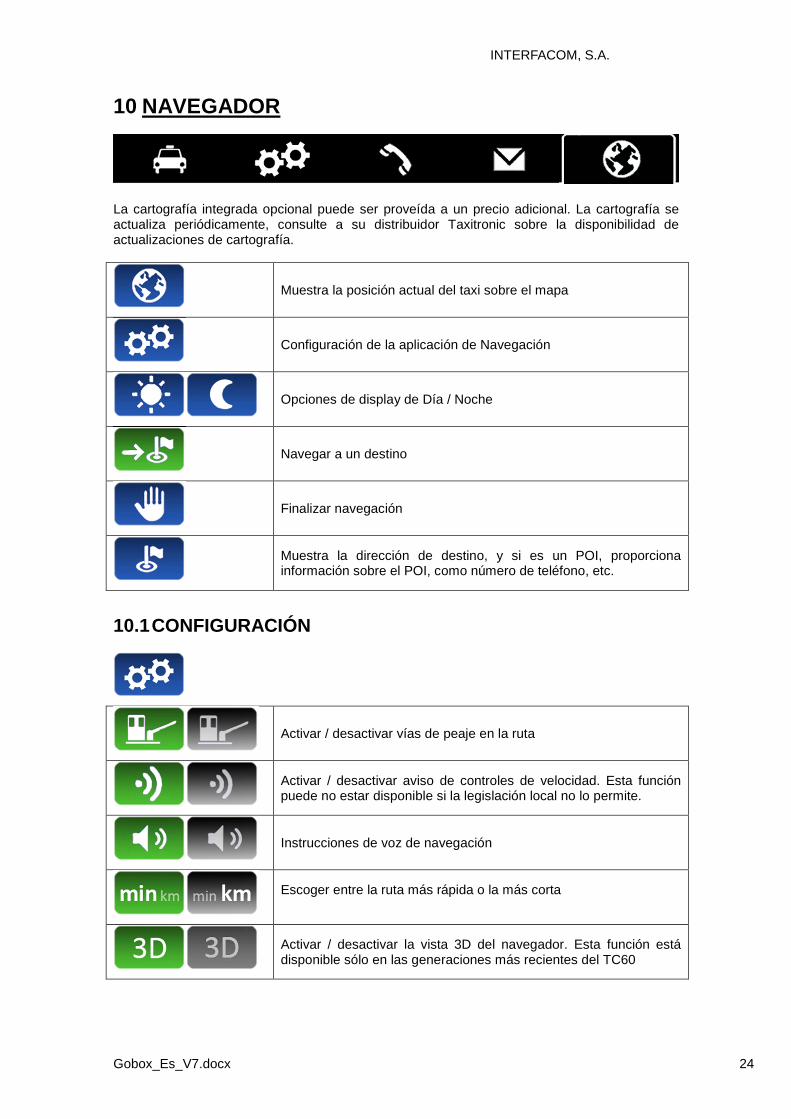
10 NAVEGADOR
La cartografía integrada opcional puede ser proveída a un precio adicional. La cartografía se actualiza periódicamente, consulte a su distribuidor Taxitronic sobre la disponibilidad de actualizaciones de cartografía.
Muestra la posición actual del taxi sobre el mapa
Configuración de la aplicación de Navegación
Opciones de display de Día / Noche
Navegar a un destino
Finalizar navegación
Muestra la dirección de destino, y si es un POI, proporciona información sobre el POI, como número de teléfono, etc.
10.1 CONFIGURACIÓN
Activar / desactivar vías de peaje en la ruta
Activar / desactivar aviso de controles de velocidad. Esta función puede no estar disponible si la legislación local no lo permite.
Instrucciones de voz de navegación
Escoger entre la ruta más rápida o la más corta
Activar / desactivar la vista 3D del navegador. Esta función está disponible sólo en las generaciones más recientes del TC60

INTERFACOM, S.A.
Gobox_Es_V7.docx 25
10.2 NAVEGAR A UN DESTINO
Antes de iniciar la navegación por primera vez, y en ocasiones después de una actualización del software, es necesario configurar el país.
- Seleccionar el botón “País” - Se muestra la lista de países disponibles en la navegación - Seleccionar el país deseado - Después de seleccionar el país, se pueden usar varios métodos para la navegación
Navegar a Dirección. Entre los datos del destino: - Ciudad - Calle - Número
Navegar a Cruce de calles. Entre los datos del destino: - Ciudad - Calle A - Calle B
Navegar a Punto de Interés (POI). Entre los datos: - Ciudad - Categoría de POI’s - Nombre del POI
Entre las coordenadas del destino en uno de los siguientes formatos: GG:MM:SS Grados: minutos : segundos GG.gggg Grados.decimales de grado
Destinos recientes.
Navegación a Favoritos .
Añadir un Favorito Entre el destino con cualquiera de los métodos excepto POI. A continuación, pulse el botón Añadir Favorito
Eliminar un Favorito Abra el menú, y seleccione el favorito a eliminar. El favorito sera eliminado.

INTERFACOM, S.A.
Gobox_Es_V7.docx 26
10.3 INTERFACE DE NAVEGACIÓN
La barra vertical a la derecha tiene las siguientes funciones:
Zoom acercar
Salir
Zoom alejar
Mostrar el mapa centrado en el destino
Enviar el Aviso en Puerta al cliente. Activo si despachado.

INTERFACOM, S.A.
Gobox_En_V7.docx 1
USERS MANUAL

INTERFACOM, S.A.
Gobox_En_V7.docx 2
Index
1 DESCRIPTION OF THE DEVICE ............................................................................................................ 3
1.1 MAIN TECHNICAL CHARACTERISTICS ..................................................................................... 3
1.2 TAXIMETER DISPLAY .................................................................................................................. 3
1.3 FLEET MANAGEMENT INTERFACE............................................................................................ 4
1.4 CARD READER ............................................................................................................................. 4
2 CLOSED SHIFT SCREEN ....................................................................................................................... 5
3 TAXIMETER TRIP ................................................................................................................................... 6
3.1 TAXIMETER TRIP ......................................................................................................................... 6
3.2 EXTRAS ......................................................................................................................................... 7
4 TAXIMETER AUXILIARY FUNCTIONS ................................................................................................... 8
4.1 CALENDAR-CLOCK ...................................................................................................................... 8
4.2 LAST TRIP DATA .......................................................................................................................... 8
4.3 TOTALIZERS ................................................................................................................................. 9
4.4 VIEWING CONTROL DATA ........................................................................................................ 10
4.5 TAXIMETER ERROR MESSAGES ............................................................................................. 11
5 PAYMENT MENU .................................................................................................................................. 12
5.1 AMOUNTS MENU........................................................................................................................ 12
5.2 PAYMENT SYSTEMS ................................................................................................................. 12
5.2.1 CREDIT CARD PAYMENT ........................................................................................... 13
5.2.2 SUBSCRIBER PAYMENT ............................................................................................ 13
6 RADIO TAXI FUNCTIONS ..................................................................................................................... 14
6.1 LOCATIONS ................................................................................................................................ 14
6.2 AVAILABLE TRIPS ...................................................................................................................... 15
6.3 LOCATION INFORMATION ........................................................................................................ 16
6.3.1 ZONE DETAILED INFO ................................................................................................ 17
6.4 DISPATCH RECEPTION ............................................................................................................. 18
6.5 DISPATCH INFO ......................................................................................................................... 19
6.6 WORKFLOW DIAGRAM .............................................................................................................. 20
7 GENERAL FUNCTIONS ........................................................................................................................ 21
7.1 SYSTEM ...................................................................................................................................... 21
7.2 CONFIGURATION ....................................................................................................................... 22
7.3 SHIFTS ........................................................................................................................................ 22
8 CALLS .................................................................................................................................................... 23
9 MESSAGES ........................................................................................................................................... 23
10 NAVIGATOR .......................................................................................................................................... 24
10.1 CONFIGURATION .................................................................................................................. 24
10.2 NAVIGATE TO A DESTINATION ........................................................................................... 25
10.3 NAVIGATION INTERFACE .................................................................................................... 26

INTERFACOM, S.A.
Gobox_En_V7.docx 3
1 DESCRIPTION OF THE DEVICE
1.1 MAIN TECHNICAL CHARACTERISTICS
Length Width Heigth Weight TC60 174 mm 140 mm 45 mm 520 g TV60C 178 mm 70 mm 100 mm 630 g TC60 and TV60 are designed to operate in an environment of electromagnetic class E3 (instruments powered by a vehicle battery) and in a mechanical environment class M3 (high and very high vibration level, as in a vehicle). Power supply is from 10,5 to 30 V. They operate inside a vehicle, in a temperature range of -25ºC / 70ºC without condensation
1.2 TAXIMETER DISPLAY
TARIFF display (1)
Displays the tariff position of the taximeter
STATUS display (4)
Displays the operative status of the taximeter
FARE display (2)
Displays the amount to be paid
EXTRAS display (3)
Displays the extras.
Time / Distance indication (5):
It indicates if the taximeter is counting by - Distance (indication OFF) - Time (indication ON)
Some Taximeter functions, like Extras, activate a pop-up window over the Terminal area (6)
INTERFACOM, S.A.
Gobox_En_V7.docx 4
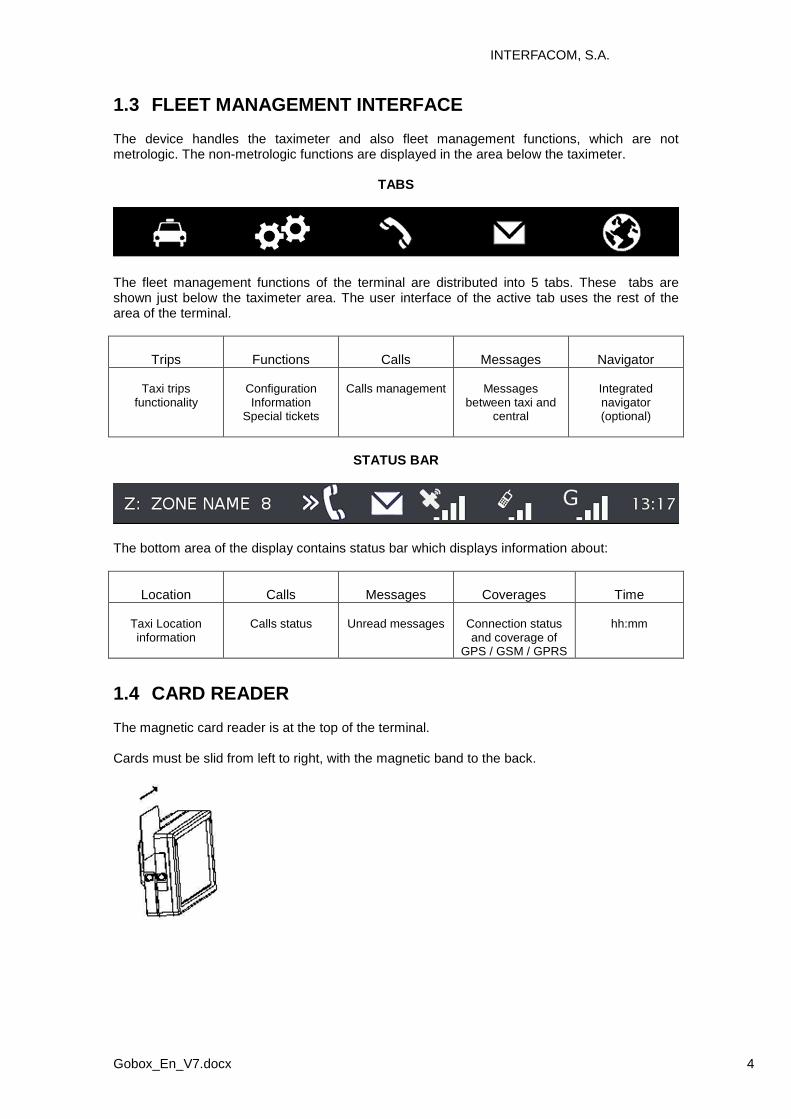
1.3 FLEET MANAGEMENT INTERFACE
The device handles the taximeter and also fleet management functions, which are not metrologic. The non-metrologic functions are displayed in the area below the taximeter.
TABS
The fleet management functions of the terminal are distributed into 5 tabs. These tabs are shown just below the taximeter area. The user interface of the active tab uses the rest of the area of the terminal.
Trips
Functions
Calls
Messages
Navigator
Taxi trips
functionality
Configuration Information
Special tickets
Calls management
Messages
between taxi and central
Integrated navigator (optional)
STATUS BAR
The bottom area of the display contains status bar which displays information about:
Location
Calls
Messages
Coverages
Time
Taxi Location information
Calls status
Unread messages
Connection status and coverage of
GPS / GSM / GPRS
hh:mm
1.4 CARD READER
The magnetic card reader is at the top of the terminal. Cards must be slid from left to right, with the magnetic band to the back.
INTERFACOM, S.A.
Gobox_En_V7.docx 5
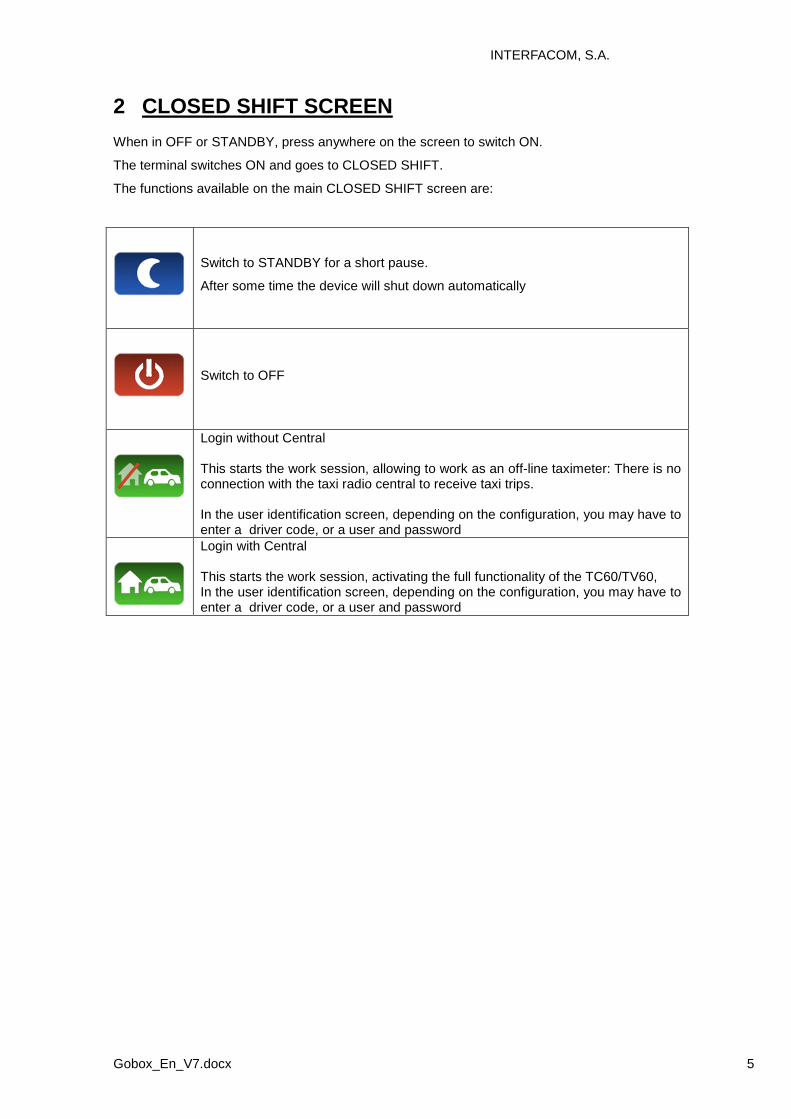
2 CLOSED SHIFT SCREEN
When in OFF or STANDBY, press anywhere on the screen to switch ON.
The terminal switches ON and goes to CLOSED SHIFT.
The functions available on the main CLOSED SHIFT screen are:
Switch to STANDBY for a short pause.
After some time the device will shut down automatically
Switch to OFF
Login without Central This starts the work session, allowing to work as an off-line taximeter: There is no connection with the taxi radio central to receive taxi trips. In the user identification screen, depending on the configuration, you may have to enter a driver code, or a user and password
Login with Central This starts the work session, activating the full functionality of the TC60/TV60, In the user identification screen, depending on the configuration, you may have to enter a driver code, or a user and password

INTERFACOM, S.A.
Gobox_En_V7.docx 6
3 TAXIMETER TRIP
3.1 TAXIMETER TRIP
Start a trip
When in FOR HIRE, press on the Tariff Area to start a trip. On the pop-up menu, select the desired tariff. The taximeter will switch to HIRED.
When in HIRED, press on the Tariff Area to change to another tariff. A pop up menu will display the tariffs which are currently selectable. Select the desired tariff.
Switch to Stopped
While in HIRED, press on the Status Area to switch to STOPPED.
Switch to For Hire
While in STOPPED, press on the Status Area. This will switch to FOR HIRE. The fleet management zone will display the Payment menu. See point PAYMENT MENU for details
INTERFACOM, S.A.
Gobox_En_V7.docx 7
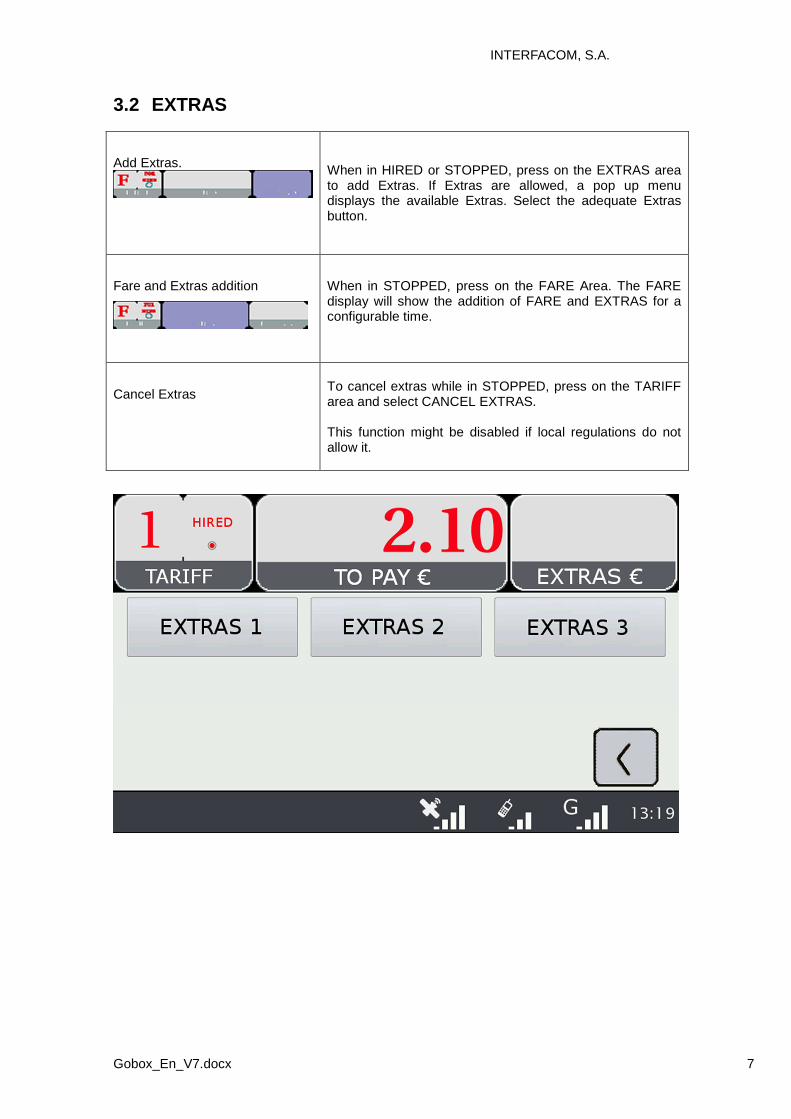
3.2 EXTRAS
Add Extras.
When in HIRED or STOPPED, press on the EXTRAS area to add Extras. If Extras are allowed, a pop up menu displays the available Extras. Select the adequate Extras button.
Fare and Extras addition
When in STOPPED, press on the FARE Area. The FARE display will show the addition of FARE and EXTRAS for a configurable time.
Cancel Extras
To cancel extras while in STOPPED, press on the TARIFF area and select CANCEL EXTRAS. This function might be disabled if local regulations do not allow it.
INTERFACOM, S.A.
Gobox_En_V7.docx 8
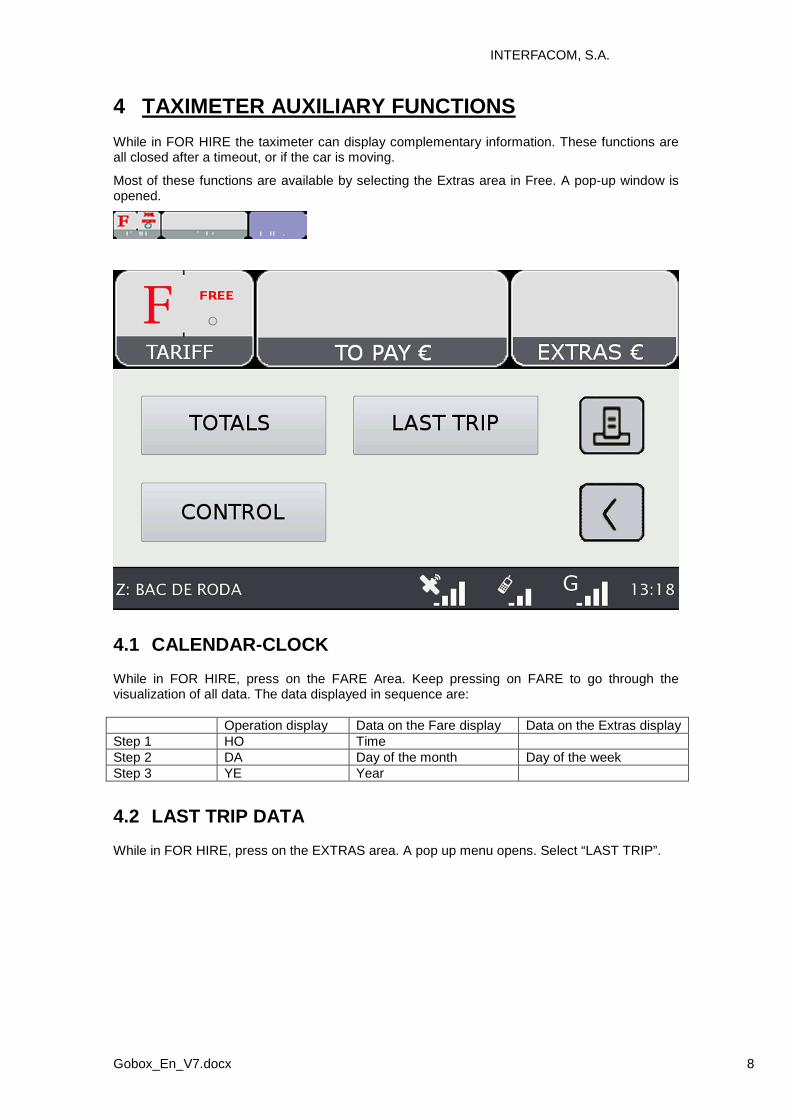
4 TAXIMETER AUXILIARY FUNCTIONS
While in FOR HIRE the taximeter can display complementary information. These functions are all closed after a timeout, or if the car is moving.
Most of these functions are available by selecting the Extras area in Free. A pop-up window is opened.
4.1 CALENDAR-CLOCK
While in FOR HIRE, press on the FARE Area. Keep pressing on FARE to go through the visualization of all data. The data displayed in sequence are: Operation display Data on the Fare display Data on the Extras display Step 1 HO Time Step 2 DA Day of the month Day of the week Step 3 YE Year
4.2 LAST TRIP DATA
While in FOR HIRE, press on the EXTRAS area. A pop up menu opens. Select “LAST TRIP”.

INTERFACOM, S.A.
Gobox_En_V7.docx 9
4.3 TOTALIZERS
While in FOR HIRE, press on the EXTRAS Area. A pop up menu opens. Select “TOTALS” The Accumulative Totalizers are displayed. Scroll down to see the Partial totalizers. The Totalizers that can be displayed are: Units Accumulative Partial Number of trips o o Fare amount Currency o o Extras amount Currency o o Total amount Currency o o Total Distance km o o Distance in Hired km o o Distance in For Hire km o o Distance in For Hire with passenger (*) km o o Time in Hired h o o Time in ON h o o Num of battery disconnexions o o Time since last disconnexion h o o Number of times Partial totalizers have been resetted
o
(*) The totalizer “Distance in For Hire with passenger” is operative only if there is a connected optional Passenger Sensor.
RESETTING PARTIAL TOTALIZERS
While the totals are being displayed, press on the “X” button to reset the partial totalizers. It is necessary to enter a password.
• If the password is not correct, the window is closed without resetting the values • If the password is correct, the partial totalizers are resetted
INTERFACOM, S.A.
Gobox_En_V7.docx 10
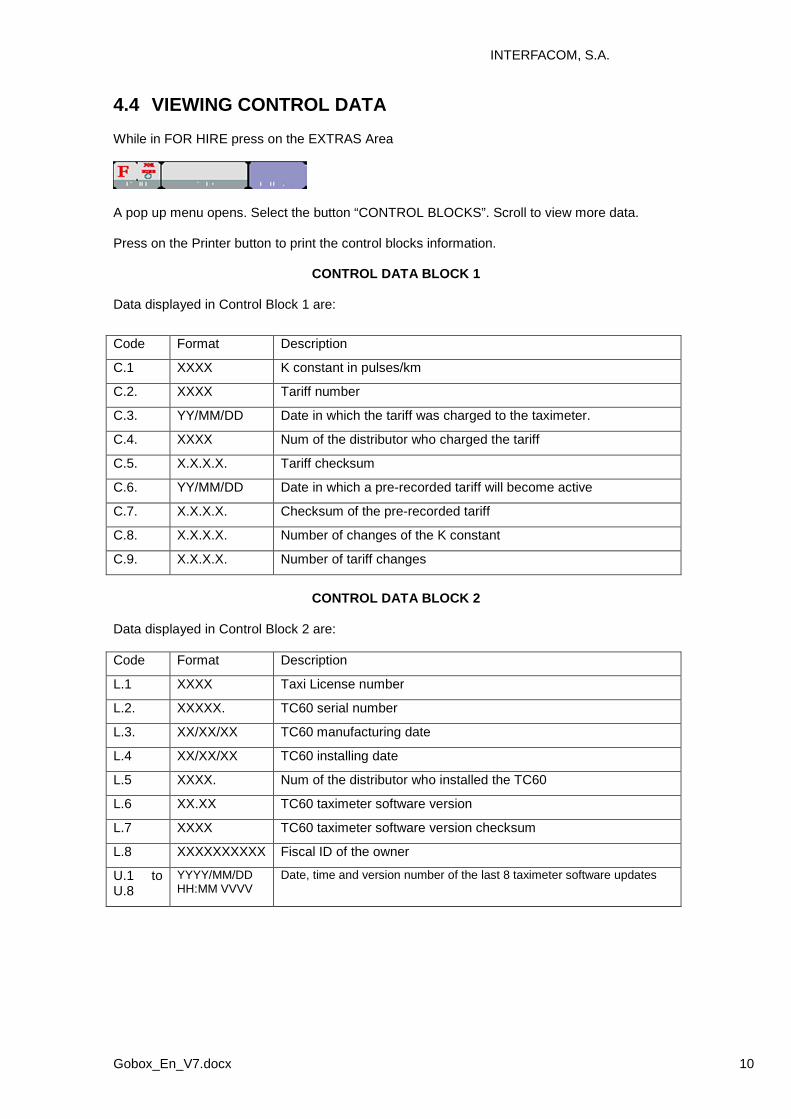
4.4 VIEWING CONTROL DATA
While in FOR HIRE press on the EXTRAS Area
A pop up menu opens. Select the button “CONTROL BLOCKS”. Scroll to view more data. Press on the Printer button to print the control blocks information.
CONTROL DATA BLOCK 1
Data displayed in Control Block 1 are:
Code Format Description
C.1 XXXX K constant in pulses/km
C.2. XXXX Tariff number
C.3. YY/MM/DD Date in which the tariff was charged to the taximeter.
C.4. XXXX Num of the distributor who charged the tariff
C.5. X.X.X.X. Tariff checksum
C.6. YY/MM/DD Date in which a pre-recorded tariff will become active
C.7. X.X.X.X. Checksum of the pre-recorded tariff
C.8. X.X.X.X. Number of changes of the K constant
C.9. X.X.X.X. Number of tariff changes
CONTROL DATA BLOCK 2
Data displayed in Control Block 2 are: Code Format Description
L.1 XXXX Taxi License number
L.2. XXXXX. TC60 serial number
L.3. XX/XX/XX TC60 manufacturing date
L.4 XX/XX/XX TC60 installing date
L.5 XXXX. Num of the distributor who installed the TC60
L.6 XX.XX TC60 taximeter software version
L.7 XXXX TC60 taximeter software version checksum
L.8 XXXXXXXXXX Fiscal ID of the owner
U.1 to U.8
YYYY/MM/DD HH:MM VVVV
Date, time and version number of the last 8 taximeter software updates

INTERFACOM, S.A.
Gobox_En_V7.docx 11
CONTROL DATA BLOCK 3 Data displayed in Control Block 3 are: Code Format Description
I. XX Tariff ID
b. XXXXX Initial amount, flag drop
M. XXXXX Meters first drop
S. XXXXX Seconds first drop
d. XXXXX Distance tariff (€/km)
S. XXXXX Time tariff (€/hour)
P. XX Tariff position in FARE
E. XXXXX Extras of the tariff
4.5 TAXIMETER ERROR MESSAGES
When there is a functional error affecting the taximeter function, it will display the error code. The available error codes are: Code Description
E-2 Rooflights failure
E-3 Distance signal error
E-4 Clock error
E-5 The taximeter is out of the configured revision period
E-6 Excess speeding
E-7 Working time max exceeded
E-8 Error in the tariff parameters
E-9 Taximeter software error
E-10 Printer failure

INTERFACOM, S.A.
Gobox_En_V7.docx 12
5 PAYMENT MENU
The Terminal functions include a Payment menus, in order to perform the trip payment with different available payment methods. While the Terminal is in Payment mode, it is possible that the Taximeter is not able to pass to For Hire until the Payment has been finished.
5.1 AMOUNTS MENU
The Amounts menu on the Terminal software displays the concepts that form the total amount, plus the addition. The concepts on the Amounts menu are: Taximeter Amount Always. Not editable Taximeter Extras If entered in the taximeter. Not editable Tips Optional Tolls Optional Total Addition of all amount concepts Tips or Tolls are configurable, depending on local regulations. Tolls are used in case the taxi has gone through a Toll (highway, tunnels, etc) and if they have to be paid by the passenger.
RESTART TRIP
In some cases, if the taxi is in the Amounts menu for a trip dispatched from the central which was started too soon, the taxi driver is optionally allowed to restart the Central trip.
This will switch the Fleet Management application back to Dispatched, and will allow the driver to re-start the taximeter trip. The Taximeter trip is always included in the Totalizers, but in the Shifts information it might be marked as Restarted. This might be enabled or disabled depending on the configuration of the Radio Taxi.
5.2 PAYMENT SYSTEMS
The Terminal goes into the Payment Systems screen. Depending on the configuration, it is possible that the following options are proposed:
Cash payment. The ticket may be printed automatically if required by the local legislation
Credit Card payment
Subscriber payment
Prints a trip ticket

INTERFACOM, S.A.
Gobox_En_V7.docx 13
5.2.1 CREDIT CARD PAYMENT
Depending on the electronic payment processor center, credit and debit cards, such as Visa, Master Card, American Express, may be used for payment. Consult your Radio Taxi or local distributor to know which cards are active.
At the time of writing this manual, magnetic credit card payment is being obsoleted, therefore only EMV card payment is explained. Press the CREDIT CARD PAYMENT button. The Terminal sends the amount to the PIN-Pad. Follow the instructions on the PIN-Pad screen to continue with the payment. Depending on the type of card, the customer might have to enter the PIN code. In this case, hand the PIN-Pad to the passenger so they can enter the PIN.
TRANSACTION AUTHORISED If the payment is Authorised, the credit ticket Driver copy is printed. Check if signature is required, as in some markets it is required instead or even additionally to the PIN. If the Signature frame has been printed, then Signature is required. Press the Customer Copy button to print the copy for the Customer.
TRANSACTION DENIED If the payment is not authorised, depending on the card processor, an Error Message will be shown onscreen. The message will vary, depending on the type of error that has occurred. You may retry the paymen if necessary, or choose a different payment method.
CANCELLING A CREDIT CARD PAYMENT
After a correctly processed payment, when the Terminal has switched to Free, it is possible to cancel the last credit card payment. Select the CANCEL CREDIT CARD PAYMENT option.
5.2.2 SUBSCRIBER PAYMENT
If the dispatch was sent from the Radiotaxi as Subscriber trip, the payment is first started as Subscriber. The screen menus may vary slightly, depending on the dispatch or user properties.
If the Subscriber properties demand for Subscriber card validation, you have to slide the Subscriber card through the TV60 built-in magnetic card reader, or the magnetic card reader of the EMV PIN-Pad if connected. Depending on the properties of the Subscriber, you might have to enter an Authorisation code. If the payment is authorised, the Subscriber Payment tickets are printed. If the Subscriber payment is not authorised, you may choose another payment method.

INTERFACOM, S.A.
Gobox_En_V7.docx 14
6 RADIO TAXI FUNCTIONS
6.1 LOCATIONS
At the start of the connexion to the radiotaxi, the device will start calculating the zone in which it is, based on the GPS location. The zone information is automatically sent to the central. No user intervention is necessary. If the location is inside a working zone, the status is changed from FREE to LOCATED IN ZONE. When the taxi locates into a zone, on the Status Bar the location will be displayed, in the following format:
Type of location
Zone name Order in the zone
• Taxi Rank • Zone • Hired
This field displays the name of the zone in which the taxi is located
The order of the taxi in the zone is displayed for a configurable time
The order of the taxi in the zone is displayed for a configurable time.
LOCATION REFRESH updates information on the Order in the Zone
DEACTIVATE LOCATION when the driver does not want to receive trips from the central for a period
ACTIVATE LOCATION when Location is Deactivated, and you want to be active to receive trips again
LOCATE INTO TAXI RANK when you want to log into a rank. Available only when the taxi is inside of the Taxi Rank area. Otherwise you will get an error sound
DELOCATE FROM TAXI RANK to go out from a Taxi Rank and come back to Zone Location
LOCATION INFO When the taxi is located, Location Information is activated
AVAILABLE TRIPS When Located, it is possible to receive the list of trips the central has not assigned automatically, probably because there were no taxis in the adequate zone.

INTERFACOM, S.A.
Gobox_En_V7.docx 15
6.2 AVAILABLE TRIPS
When Located, it is possible to receive the list of trips the central has not assigned automatically, probably because there were no taxis in the adequate zone. Trip 1
Zone of trip start
Zone of trip end
Street of trip start
Trip requirements
Trip 2
Zone of trip start
Zone of trip end
Street of trip start
Trip requirements
Trip N
Zone of trip start
Zone of trip end
Street of trip start
Trip requirements
You can request a trip from the list. If the central validates, the taxi will receive the trip. If the trip can not be assigned, a message “CANNOT ASSIGN TRIP” is received. If no trips are available, a message “NO AVAILABLE TRIPS” will be received.

INTERFACOM, S.A.
Gobox_En_V7.docx 16
6.3 LOCATION INFORMATION
By selecting the Location information, you can consult the following information, which is related to the distribution of work in the zones.
Taxis in the Taxi Rank of the zone
Taxis in the
Zone
Hired taxis finishing
trip in the Zone
Customers
waiting for a taxi
Zone 1..N
Green
Yellow
Red
White
Depending on the configuration of your Radio Taxi, if this screen is kept opened, the information on the zones will be updated as the taxi moves around the area, updating the menu to always include the zone in which the taxi is located. Once you use Scroll, the menu stops following the your Taxi next locations, until you close the Location Info window and open it again. This is in order to let you consult the information on another zone of your interest, without the information changing while you are reading. The information on the Taxis in a Zone is accumulated with the taxis in a Taxi Rank, as the taxis in the Taxi Rank have more priority to those in the zone. The same is valid for the Taxis in Hired finishing trip in a Zone: This information is accumulated with the Taxis in the Rank and the taxis in the Zone.

INTERFACOM, S.A.
Gobox_En_V7.docx 17
The possible actions in this screen are:
Scroll up.
Scroll down
Close the Location information
Go one level up to Macrozones
Macrozones are areas which contain several Zones. The information on the Macrozones is equivalent to the information on the Zones, adding up all the Zones in the Macrozone.
6.3.1 ZONE DETAILED INFO
Zone Taxis Detail provides detailed information about the taxis in a zone
Zone Name
Taxis in the Rank Taxis in the Zone Taxis in Hired
Order number
Taxis located in Rank. Including the time they located
Taxis located in the Zone
Taxis finishing trips in the Zone
Zone Customers Detail provides detailed information about the customers in a zone
Zone Name
Trips in the Zone Requirements
Order number
Time the trip was reserved for Special requirements of the trip
These functions may be activated/deactivated depending on your Radio Taxi configuration

INTERFACOM, S.A.
Gobox_En_V7.docx 18
6.4 DISPATCH RECEPTION
When the taxi receives a Dispatch, the following information is displayed.
Time for trip start Zone of trip start Requirements of the trip You have a new dispatch Address of trip start Do you accept it?
Some of this information is optional, so it might be displayed or not, depending on the configuration of your Radio Taxi central. There is a maximum time to accept the trip. If it is exceeded, it’s automatically rejected. Trip options available after accepting a dispatch are:
DISPATCH INFO Once a dispatch is accepted, the complete trip information is displayed. In the Trips screen, the Dispatch Info button opens this info again.
If the customer has requested a notification of arrival of the taxi, the AT DOOR button activates. Select it, and the customer will receive the notification
If you arrive at the pick-up point and the customer is not there, select NO SHOW. The Radio Taxi central will handle the situation and give instructions
If the customer arrives, after you had already notified NO CUSTOMER, let the central know with CUSTOMER ARRIVED.
RETURN if the taxi has accepted a dispatch but needs to send it back In some Radio Taxis, returning dispatches to central may be a reason for a temporary sanction, so find out the politic of your fleet before using this option.
When the taxi has a dispatch, the rooflight Free sign may be deactivated. This avoids confusion for the rest of customers on the street, who try to hail the taxi because they see the Free light, but the taxi is not available. This function is configurable in case it’s not allowed by local regulations
INTERFACOM, S.A.
Gobox_En_V7.docx 19
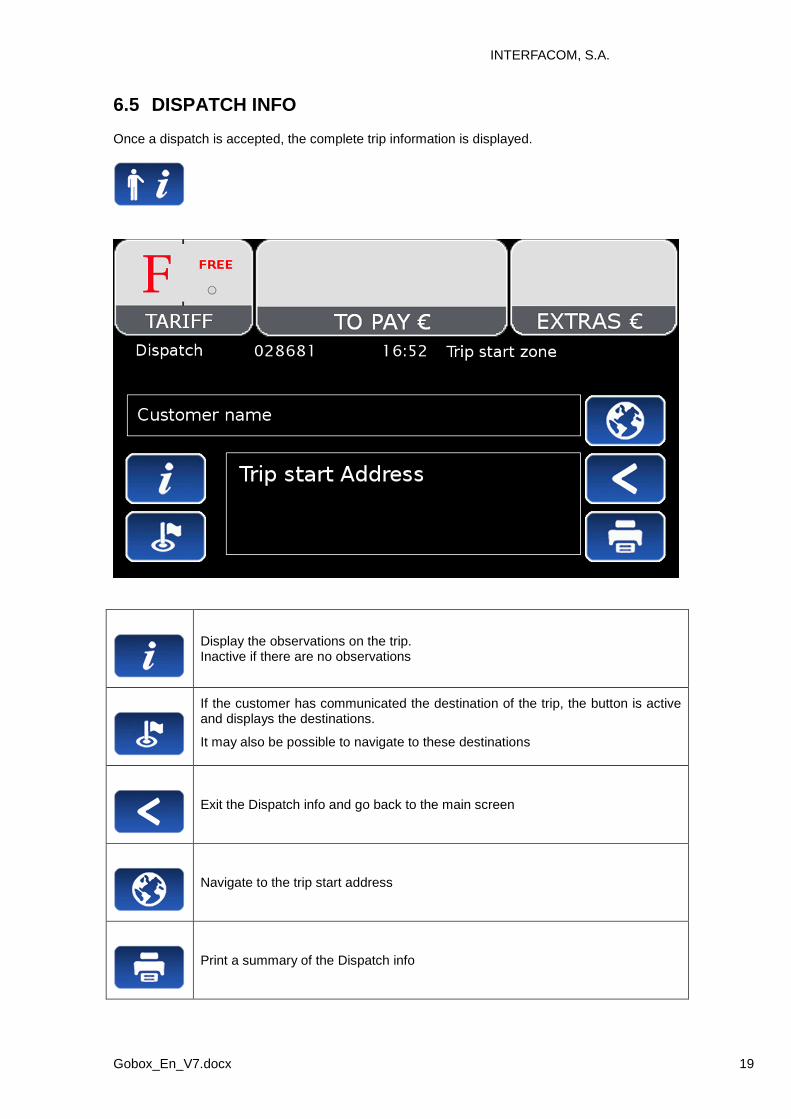
6.5 DISPATCH INFO
Once a dispatch is accepted, the complete trip information is displayed.
Display the observations on the trip. Inactive if there are no observations
If the customer has communicated the destination of the trip, the button is active and displays the destinations.
It may also be possible to navigate to these destinations
Exit the Dispatch info and go back to the main screen
Navigate to the trip start address
Print a summary of the Dispatch info

INTERFACOM, S.A.
Gobox_En_V7.docx 20
6.6 WORKFLOW DIAGRAM
As a summary of the main Radio Taxi and Taximeter functions, this diagram explains the flow of a Dispatched trip.
Free
Located
Dispatched
Hired
Payment
Shift Closed
OFF
Stopped
INTERFACOM, S.A.
Gobox_En_V7.docx 21
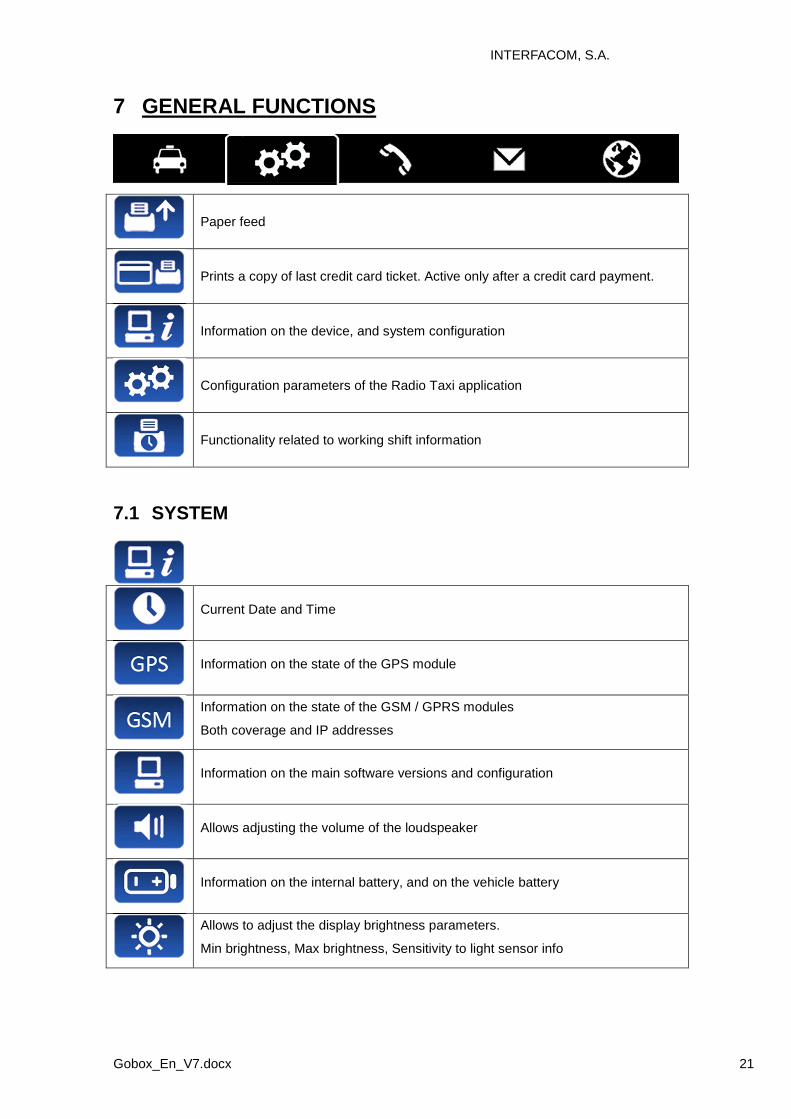
7 GENERAL FUNCTIONS
Paper feed
Prints a copy of last credit card ticket. Active only after a credit card payment.
Information on the device, and system configuration
Configuration parameters of the Radio Taxi application
Functionality related to working shift information
7.1 SYSTEM
Current Date and Time
Information on the state of the GPS module
Information on the state of the GSM / GPRS modules
Both coverage and IP addresses
Information on the main software versions and configuration
Allows adjusting the volume of the loudspeaker
Information on the internal battery, and on the vehicle battery
Allows to adjust the display brightness parameters.
Min brightness, Max brightness, Sensitivity to light sensor info

INTERFACOM, S.A.
Gobox_En_V7.docx 22
7.2 CONFIGURATION
When the taxi receives a Dispatch, activate or deactivate the automatic printing of the dispatch info.
Enter a phone number to which the Terminal will make a phone call when it receives a Dispatch. This is to warn the driver if outside the car while in a Taxi Rank.
Configures a PIN that filters access to the phone calls.
Change language of the device to user preference
Activates or deactivates the function that provides a voice informing of the Taximeter amounts during a trip. Available only in some markets.
7.3 SHIFTS
Income Partials: Prints the information on the trips income accumulated since last closing, allowing for a basic income management The information is broken down into Cash, Credit, and Subscriber payments
Income Closing: Prints the information on the trips income accumulated since last closing, allowing for a basic income management It also resets all values to zero and increases the closing number
Prints a Shift ticket, after a selection of the shift number to be printed.
Configuration of the Shifts application
Activates or deactivates printing information of each individual trip in Shift tickets
Activates or deactivates printing start trip and end trip addresses in the Shift tickets
Activates or deactivates automatic Income Closing when the user closes the working shift
INTERFACOM, S.A.
Gobox_En_V7.docx 23
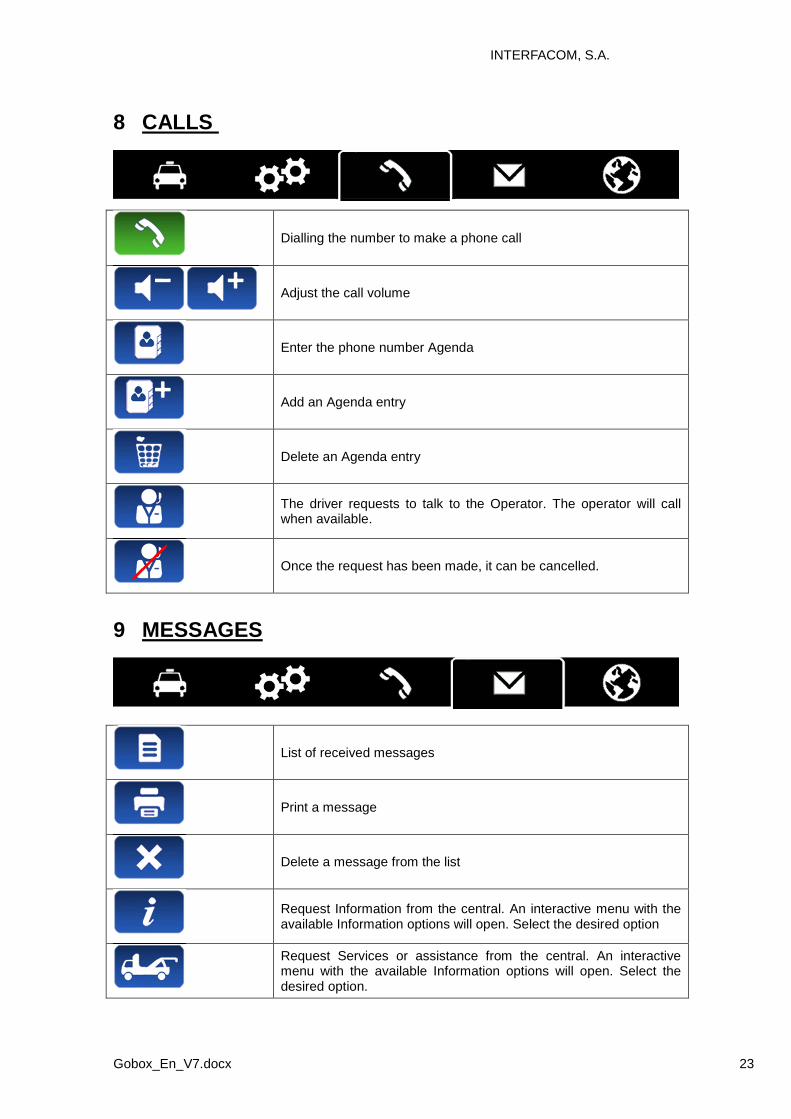
8 CALLS
Dialling the number to make a phone call
Adjust the call volume
Enter the phone number Agenda
Add an Agenda entry
Delete an Agenda entry
The driver requests to talk to the Operator. The operator will call when available.
Once the request has been made, it can be cancelled.
9 MESSAGES
List of received messages
Print a message
Delete a message from the list
Request Information from the central. An interactive menu with the available Information options will open. Select the desired option
Request Services or assistance from the central. An interactive menu with the available Information options will open. Select the desired option.

INTERFACOM, S.A.
Gobox_En_V7.docx 24
10 NAVIGATOR
Optional integrated navigation may be provided at an additional price. Cartography is updated periodically, consult your Taxitronic distributor for the availability of cartography updates.
Displays the current position of the car on the map
Configuration of the Navigator application
Day and night display options
Navigate to a destination
Finish a navigation
Display the destination address. If it’s a POI, it can display detailed information about the POI, like telephone number, etc.
10.1 CONFIGURATION
Roads with Tolls in the navigation route, enable/disable
Speed traps warning enable/disable. This function might not be active where it is not allowed by the local legislation
Enable/disable the navigator voice instructions
Choose between fastest / shortest route
Enable/disable the navigator 3D view. Only available on newest generations of TC60

INTERFACOM, S.A.
Gobox_En_V7.docx 25
10.2 NAVIGATE TO A DESTINATION
Before starting the first navigation, the country must be entered. The procedure is:
- Select the “Country” button. - The list of countries present in the SD Card is opened - Select the desired country - After this, you can choose different methods for entering the destination
Navigate to Address. Enter the destination data: - City name - Street name - Street number
Navigate to Street Crossing. Enter the destination data: - City name - Street A - Street B
Navigate to Point of Interest (POI). Enter the destination data: - City name - POI category - POI name
Enter the destination coordinates, in one of the following formats: GG:MM:SS Degrees:minutes:seconds GG.gggg Degrees.decimals of degree
Recent destinations. Open the menu and select the destination from the Recents list.
Navigation to Favourites. Open the menu and select the destination from the Favourites list.
Add a Favourite. Enter the destination with any of the methods except POI. Then, press the Add Favourite button, and the favourite will be added.
Delete a Favourite. Open the menu, select a favourite, and it will be erased.
INTERFACOM, S.A.
Gobox_En_V7.docx 26
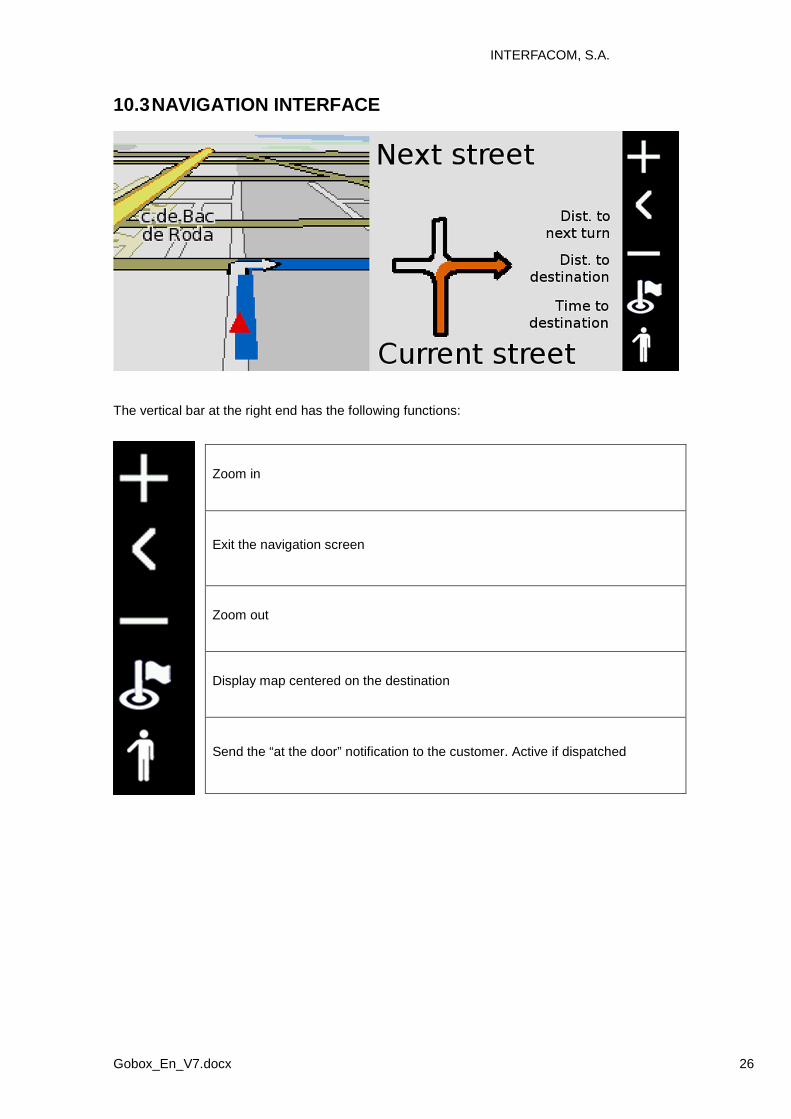
10.3 NAVIGATION INTERFACE
The vertical bar at the right end has the following functions:
Zoom in
Exit the navigation screen
Zoom out
Display map centered on the destination
Send the “at the door” notification to the customer. Active if dispatched

INTERFACOM, S.A.
Gobox_Sweden_V7.docx 1
USERS MANUAL SWEDEN

INTERFACOM, S.A.
Gobox_Sweden_V7.docx 2
Index
1 DESCRIPTION OF THE DEVICE ............................................................................................................ 3
1.1 MAIN TECHNICAL CHARACTERISTICS ..................................................................................... 3
1.2 TAXIMETER DISPLAY .................................................................................................................. 3
1.3 FLEET MANAGEMENT INTERFACE............................................................................................ 4
1.4 CARD READER ............................................................................................................................. 4
2 CLOSED SHIFT SCREEN ....................................................................................................................... 5
3 TAXIMETER TRIP ................................................................................................................................... 6
3.1 TAXIMETER TRIP ......................................................................................................................... 6
3.2 EXTRAS ......................................................................................................................................... 6
4 TAXIMETER AUXILIARY FUNCTIONS ................................................................................................... 8
4.1 CALENDAR-CLOCK ...................................................................................................................... 8
4.2 LAST TRIP DATA .......................................................................................................................... 8
4.3 TOTALIZERS ................................................................................................................................. 9
4.4 VIEWING CONTROL DATA ........................................................................................................ 10
4.5 TAXIMETER ERROR MESSAGES ............................................................................................. 11
5 PAYMENT MENU .................................................................................................................................. 12
5.1 AMOUNTS MENU........................................................................................................................ 12
5.2 PAYMENT SYSTEMS ................................................................................................................. 12
5.2.1 CREDIT CARD PAYMENT ........................................................................................... 13
5.2.2 SUBSCRIBER PAYMENT ............................................................................................ 13
6 RADIO TAXI FUNCTIONS ..................................................................................................................... 14
6.1 LOCATIONS ................................................................................................................................ 14
6.2 LOCATION INFORMATION ........................................................................................................ 15
6.2.1 ZONE DETAILED INFO ................................................................................................ 17
6.3 AVAILABLE TRIPS ...................................................................................................................... 15
6.4 DISPATCH RECEPTION ............................................................................................................. 18
6.5 DISPATCH INFO ......................................................................................................................... 19
6.6 WORKFLOW DIAGRAM .............................................................................................................. 20
7 GENERAL FUNCTIONS ........................................................................................................................ 21
7.1 SWEDEN SPECIFIC FUNCTIONS.............................................................................................. 21
7.2 SYSTEM ...................................................................................................................................... 22
7.3 CONFIGURATION ....................................................................................................................... 22
7.4 SHIFTS ........................................................................................................................................ 23
8 CALLS .................................................................................................................................................... 24
9 MESSAGES ........................................................................................................................................... 24
10 NAVIGATOR .......................................................................................................................................... 25
10.1 CONFIGURATION .................................................................................................................. 25
10.2 NAVIGATE TO A DESTINATION ........................................................................................... 26
10.3 NAVIGATION INTERFACE .................................................................................................... 27

INTERFACOM, S.A.
Gobox_Sweden_V7.docx 3
1 DESCRIPTION OF THE DEVICE
1.1 MAIN TECHNICAL CHARACTERISTICS
Length Width Heigth Weight TC60 174 mm 140 mm 45 mm 520 g TV60C 178 mm 70 mm 100 mm 630 g TC60 and TV60 are designed to operate in an environment of electromagnetic class E3 (instruments powered by a vehicle battery) and in a mechanical environment class M3 (high and very high vibration level, as in a vehicle). Power supply is from 10,5 to 30 V. They operate inside a vehicle, in a temperature range of -25ºC / 70ºC without condensation
1.2 TAXIMETER DISPLAY
TARIFF display (1)
Displays the tariff position of the taximeter
STATUS display (4)
Displays the operative status of the taximeter
FARE display (2)
Displays the amount to be paid
EXTRAS display (3)
Displays the extras.
Time / Distance indication (5):
It indicates if the taximeter is counting by - Distance (indication OFF) - Time (indication ON)
Some Taximeter functions, like Extras, activate a pop-up window over the Terminal area (6)

INTERFACOM, S.A.
Gobox_Sweden_V7.docx 4
1.3 FLEET MANAGEMENT INTERFACE
The device handles the taximeter and also fleet management functions, which are not metrologic. The non-metrologic functions are displayed in the area below the taximeter.
TABS
The fleet management functions of the terminal are distributed into 5 tabs. These tabs are shown just below the taximeter area. The user interface of the active tab uses the rest of the area of the terminal.
Trips
Functions
Calls
Messages
Navigator
Taxi trips
functionality
Configuration Information
Special tickets
Calls management
Messages
between taxi and central
Integrated navigator (optional)
STATUS BAR
The bottom area of the display contains status bar which displays information about:
Location
Calls
Messages
Coverages
Time
Taxi Location information
Calls status
Unread messages
Connection status and coverage of
GPS / GSM / GPRS
hh:mm
1.4 CARD READER
The magnetic card reader is at the top of the terminal. Cards must be slid from left to right, with the magnetic band to the back.

INTERFACOM, S.A.
Gobox_Sweden_V7.docx 5
2 CLOSED SHIFT SCREEN
When in OFF or STANDBY, press anywhere on the screen to switch ON.
The terminal switches ON and goes to CLOSED SHIFT.
The functions available on the main CLOSED SHIFT screen are:
Switch to STANDBY for a short pause.
After some time the device will shut down automatically.
Switch to OFF.
Login without Central This starts the work session, allowing to work as an off-line taximeter: There is no connection with the taxi radio central to receive taxi trips. In the user identification screen, depending on the configuration, you may have to enter a driver code, or a user and password
Login with Central This starts the work session, activating the full functionality of the TC60/TV60, In the user identification screen, depending on the configuration, you may have to enter a driver code, or a user and password

INTERFACOM, S.A.
Gobox_Sweden_V7.docx 6
3 TAXIMETER TRIP
3.1 TAXIMETER TRIP
Start a trip
When in FOR HIRE, press on the Tariff Area to start a trip. On the pop-up menu, select the desired tariff. The taximeter will switch to HIRED.
When in HIRED, press on the Tariff Area to change to another tariff. A pop up menu will display the tariffs which are currently selectable. Select the desired tariff.
Switch to Stopped
While in HIRED, press on the Status Area to switch to STOPPED.
Switch to For Hire
While in STOPPED, press on the Status Area. This will switch to FOR HIRE. The fleet management zone will display the Payment menu. See point PAYMENT MENU for details

INTERFACOM, S.A.
Gobox_Sweden_V7.docx 7
3.2 EXTRAS
Add Extras.
When in HIRED or STOPPED, press on the EXTRAS area to add Extras. If Extras are allowed, a pop up menu displays the available Extras. Select the adequate Extras button.
Fare and Extras addition
When in STOPPED, press on the FARE Area. The FARE display will show the addition of FARE and EXTRAS for a configurable time.
Cancel Extras
To cancel extras while in STOPPED, press on the TARIFF area and select CANCEL EXTRAS. This function might be disabled if local regulations do not allow it.

INTERFACOM, S.A.
Gobox_Sweden_V7.docx 8
4 TAXIMETER AUXILIARY FUNCTIONS
While in FOR HIRE the taximeter can display complementary information. These functions are all closed after a timeout, or if the car is moving.
Most of these functions are available by selecting the Extras area in Free. A pop-up window is opened.
4.1 CALENDAR-CLOCK
While in FOR HIRE, press on the FARE Area. Keep pressing on FARE to go through the visualization of all data. The data displayed in sequence are: Operation display Data on the Fare display Data on the Extras display Step 1 HO Time Step 2 DA Day of the month Day of the week Step 3 YE Year
4.2 LAST TRIP DATA
While in FOR HIRE, press on the EXTRAS area. A pop up menu opens. Select “LAST TRIP”.

INTERFACOM, S.A.
Gobox_Sweden_V7.docx 9
4.3 TOTALIZERS
While in FOR HIRE, press on the EXTRAS Area. A pop up menu opens. Select “TOTALS” The Accumulative Totalizers are displayed. Scroll down to see the Partial totalizers. The Totalizers that can be displayed are: Units Accumulative Partial Number of trips o o Fare amount Currency o o Extras amount Currency o o Total amount Currency o o Total Distance km o o Distance in Hired km o o Distance in For Hire km o o Distance in For Hire with passenger (*) km o o Time in Hired h o o Time in ON h o o Num of battery disconnexions o o Time since last disconnexion h o o Number of times Partial totalizers have been resetted
o
(*) The totalizer “Distance in For Hire with passenger” is operative only if there is a connected optional Passenger Sensor.
RESETTING PARTIAL TOTALIZERS
While the totals are being displayed, press on the “X” button to reset the partial totalizers. It is necessary to enter a password.
• If the password is not correct, the window is closed without resetting the values • If the password is correct, the partial totalizers are resetted

INTERFACOM, S.A.
Gobox_Sweden_V7.docx 10
4.4 VIEWING CONTROL DATA
While in FOR HIRE press on the EXTRAS Area
A pop up menu opens. Select the button “CONTROL BLOCKS”. Scroll to view more data. Press on the Printer button to print the control blocks information.
CONTROL DATA BLOCK 1
Data displayed in Control Block 1 are:
Code Format Description
C.1 XXXX K constant in pulses/km
C.2. XXXX Tariff number
C.3. YY/MM/DD Date in which the tariff was charged to the taximeter.
C.4. XXXX Num of the distributor who charged the tariff
C.5. X.X.X.X. Tariff checksum
C.6. YY/MM/DD Date in which a pre-recorded tariff will become active
C.7. X.X.X.X. Checksum of the pre-recorded tariff
C.8. X.X.X.X. Number of changes of the K constant
C.9. X.X.X.X. Number of tariff changes
CONTROL DATA BLOCK 2
Data displayed in Control Block 2 are: Code Format Description
L.1 XXXX Taxi License number
L.2. XXXXX. TC60 serial number
L.3. XX/XX/XX TC60 manufacturing date
L.4 XX/XX/XX TC60 installing date
L.5 XXXX. Num of the distributor who installed the TC60
L.6 XX.XX TC60 taximeter software version
L.7 XXXX TC60 taximeter software version checksum
L.8 XXXXXXXXXX Fiscal ID of the owner
U.1 to U.8
YYYY/MM/DD HH:MM VVVV
Date, time and version number of the last 8 taximeter software updates
INTERFACOM, S.A.
Gobox_Sweden_V7.docx 11
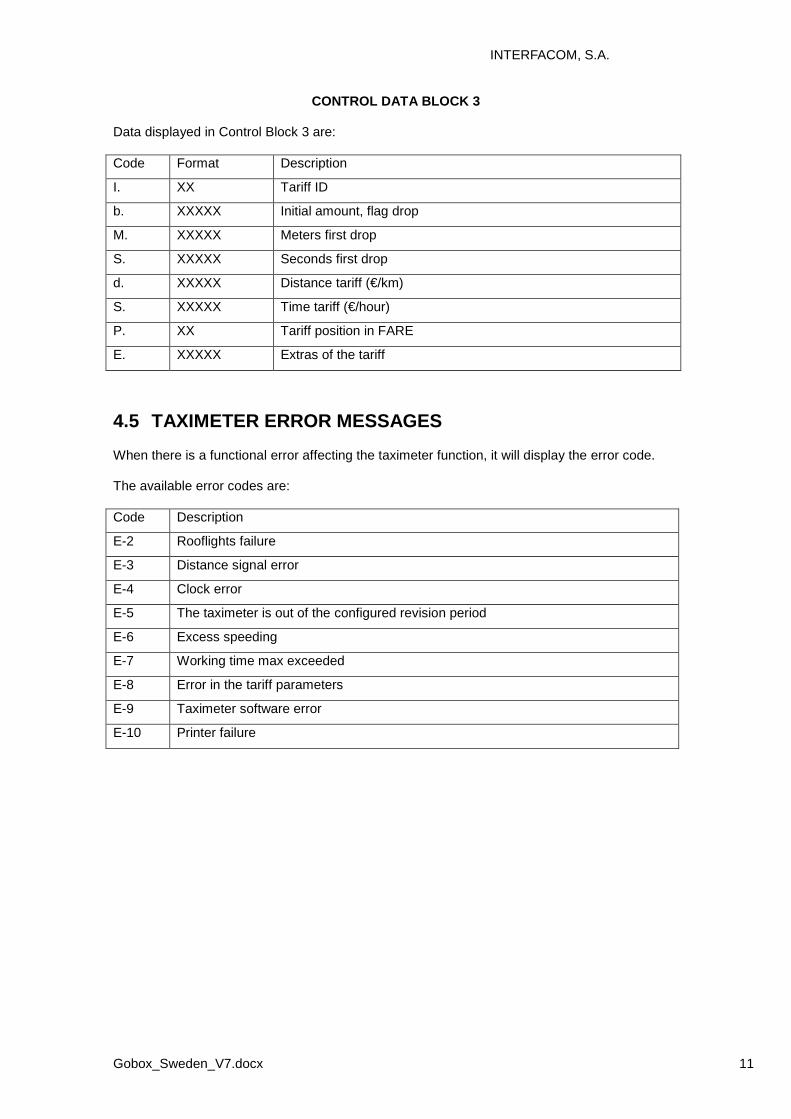
CONTROL DATA BLOCK 3 Data displayed in Control Block 3 are: Code Format Description
I. XX Tariff ID
b. XXXXX Initial amount, flag drop
M. XXXXX Meters first drop
S. XXXXX Seconds first drop
d. XXXXX Distance tariff (€/km)
S. XXXXX Time tariff (€/hour)
P. XX Tariff position in FARE
E. XXXXX Extras of the tariff
4.5 TAXIMETER ERROR MESSAGES
When there is a functional error affecting the taximeter function, it will display the error code. The available error codes are: Code Description
E-2 Rooflights failure
E-3 Distance signal error
E-4 Clock error
E-5 The taximeter is out of the configured revision period
E-6 Excess speeding
E-7 Working time max exceeded
E-8 Error in the tariff parameters
E-9 Taximeter software error
E-10 Printer failure

INTERFACOM, S.A.
Gobox_Sweden_V7.docx 12
5 PAYMENT MENU
The Terminal functions include a Payment menus, in order to perform the trip payment with different available payment methods. While the Terminal is in Payment mode, it is possible that the Taximeter is not able to pass to For Hire until the Payment has been finished.
5.1 AMOUNTS MENU
The Amounts menu on the Terminal software displays the concepts that form the total amount, plus the addition. The concepts on the Amounts menu are: Taximeter Amount Always. Not editable Taximeter Extras If entered in the taximeter. Not editable Tips Optional Tolls Optional Total Addition of all amount concepts Tips or Tolls are configurable, depending on local regulations. Tolls are used in case the taxi has gone through a Toll (highway, tunnels, etc) and if they have to be paid by the passenger.
RESTART TRIP
In some cases, if the taxi is in the Amounts menu for a trip dispatched from the central which was started too soon, the taxi driver is optionally allowed to restart the Central trip.
This will switch the Fleet Management application back to Dispatched, and will allow the driver to re-start the taximeter trip. The Taximeter trip is always included in the Totalizers, but in the Shifts information it might be marked as Restarted. This might be enabled or disabled depending on the configuration of the Radio Taxi.
5.2 PAYMENT SYSTEMS
The Terminal goes into the Payment Systems screen. Depending on the configuration, it is possible that the following options are proposed:
Cash payment. The ticket may be printed automatically if required by the local legislation
Credit Card payment
Subscriber payment
Prints a trip ticket
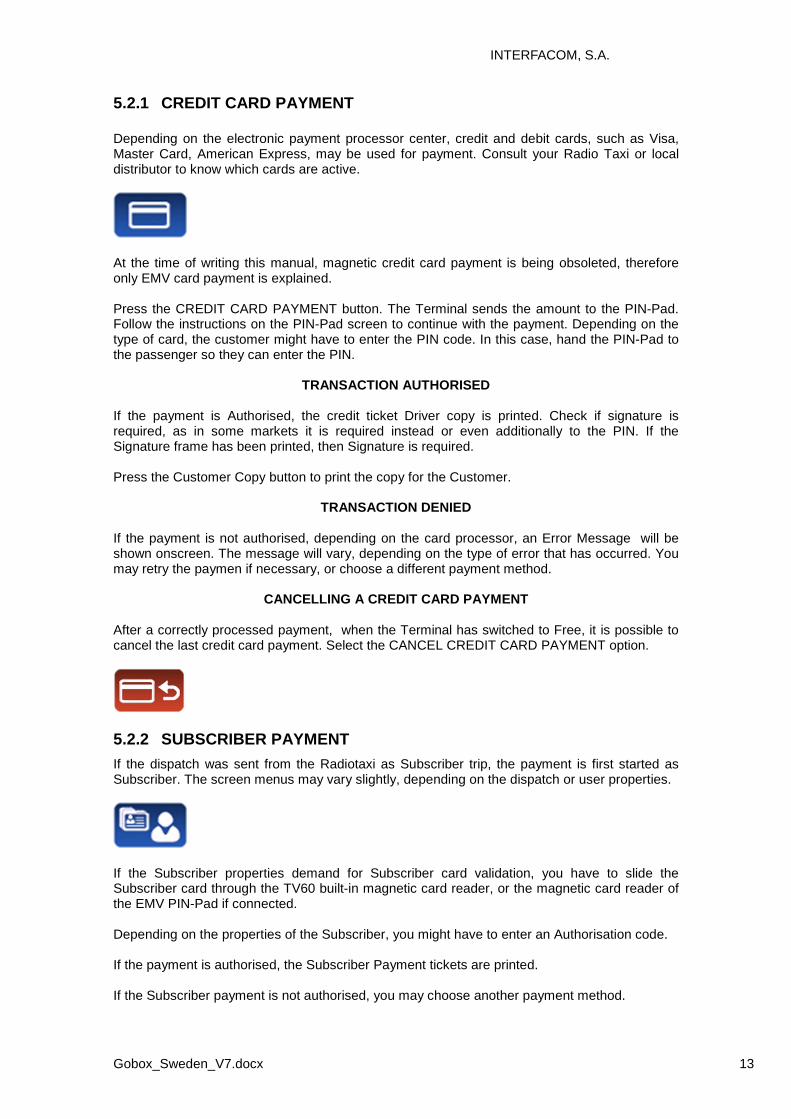
INTERFACOM, S.A.
Gobox_Sweden_V7.docx 13
5.2.1 CREDIT CARD PAYMENT
Depending on the electronic payment processor center, credit and debit cards, such as Visa, Master Card, American Express, may be used for payment. Consult your Radio Taxi or local distributor to know which cards are active.
At the time of writing this manual, magnetic credit card payment is being obsoleted, therefore only EMV card payment is explained. Press the CREDIT CARD PAYMENT button. The Terminal sends the amount to the PIN-Pad. Follow the instructions on the PIN-Pad screen to continue with the payment. Depending on the type of card, the customer might have to enter the PIN code. In this case, hand the PIN-Pad to the passenger so they can enter the PIN.
TRANSACTION AUTHORISED If the payment is Authorised, the credit ticket Driver copy is printed. Check if signature is required, as in some markets it is required instead or even additionally to the PIN. If the Signature frame has been printed, then Signature is required. Press the Customer Copy button to print the copy for the Customer.
TRANSACTION DENIED If the payment is not authorised, depending on the card processor, an Error Message will be shown onscreen. The message will vary, depending on the type of error that has occurred. You may retry the paymen if necessary, or choose a different payment method.
CANCELLING A CREDIT CARD PAYMENT
After a correctly processed payment, when the Terminal has switched to Free, it is possible to cancel the last credit card payment. Select the CANCEL CREDIT CARD PAYMENT option.
5.2.2 SUBSCRIBER PAYMENT
If the dispatch was sent from the Radiotaxi as Subscriber trip, the payment is first started as Subscriber. The screen menus may vary slightly, depending on the dispatch or user properties.
If the Subscriber properties demand for Subscriber card validation, you have to slide the Subscriber card through the TV60 built-in magnetic card reader, or the magnetic card reader of the EMV PIN-Pad if connected. Depending on the properties of the Subscriber, you might have to enter an Authorisation code. If the payment is authorised, the Subscriber Payment tickets are printed. If the Subscriber payment is not authorised, you may choose another payment method.
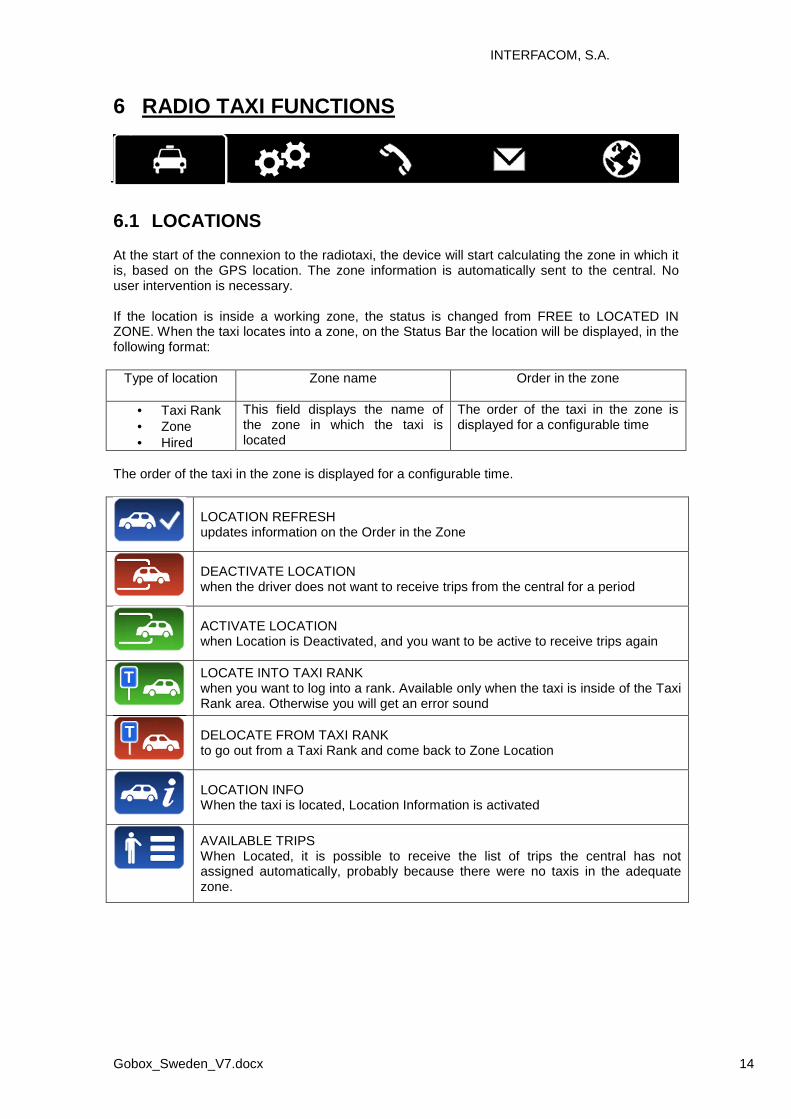
INTERFACOM, S.A.
Gobox_Sweden_V7.docx 14
6 RADIO TAXI FUNCTIONS
6.1 LOCATIONS
At the start of the connexion to the radiotaxi, the device will start calculating the zone in which it is, based on the GPS location. The zone information is automatically sent to the central. No user intervention is necessary. If the location is inside a working zone, the status is changed from FREE to LOCATED IN ZONE. When the taxi locates into a zone, on the Status Bar the location will be displayed, in the following format:
Type of location
Zone name Order in the zone
• Taxi Rank • Zone • Hired
This field displays the name of the zone in which the taxi is located
The order of the taxi in the zone is displayed for a configurable time
The order of the taxi in the zone is displayed for a configurable time.
LOCATION REFRESH updates information on the Order in the Zone
DEACTIVATE LOCATION when the driver does not want to receive trips from the central for a period
ACTIVATE LOCATION when Location is Deactivated, and you want to be active to receive trips again
LOCATE INTO TAXI RANK when you want to log into a rank. Available only when the taxi is inside of the Taxi Rank area. Otherwise you will get an error sound
DELOCATE FROM TAXI RANK to go out from a Taxi Rank and come back to Zone Location
LOCATION INFO When the taxi is located, Location Information is activated
AVAILABLE TRIPS When Located, it is possible to receive the list of trips the central has not assigned automatically, probably because there were no taxis in the adequate zone.

INTERFACOM, S.A.
Gobox_Sweden_V7.docx 15
6.2 AVAILABLE TRIPS
When Located, it is possible to receive the list of trips the central has not assigned automatically, probably because there were no taxis in the adequate zone. Trip 1
Zone of trip start
Zone of trip end
Street of trip start
Trip requirements
Trip 2
Zone of trip start
Zone of trip end
Street of trip start
Trip requirements
Trip N
Zone of trip start
Zone of trip end
Street of trip start
Trip requirements
You can request a trip from the list. If the central validates, the taxi will receive the trip. If the trip can not be assigned, a message “CANNOT ASSIGN TRIP” is received. If no trips are available, a message “NO AVAILABLE TRIPS” will be received.

INTERFACOM, S.A.
Gobox_Sweden_V7.docx 16
6.3 LOCATION INFORMATION
By selecting the Location information, you can consult the following information, which is related to the distribution of work in the zones.
Taxis in the Taxi Rank of the zone
Taxis in the
Zone
Hired taxis finishing
trip in the Zone
Customers
waiting for a taxi
Zone 1..N
Green
Yellow
Red
White
Depending on the configuration of your Radio Taxi, if this screen is kept opened, the information on the zones will be updated as the taxi moves around the area, updating the menu to always include the zone in which the taxi is located. Once you use Scroll, the menu stops following the your Taxi next locations, until you close the Location Info window and open it again. This is in order to let you consult the information on another zone of your interest, without the information changing while you are reading. The information on the Taxis in a Zone is accumulated with the taxis in a Taxi Rank, as the taxis in the Taxi Rank have more priority to those in the zone. The same is valid for the Taxis in Hired finishing trip in a Zone: This information is accumulated with the Taxis in the Rank and the taxis in the Zone.

INTERFACOM, S.A.
Gobox_Sweden_V7.docx 17
The possible actions in this screen are:
Scroll up.
Scroll down
Close the Location information
Go one level up to Macrozones
Macrozones are areas which contain several Zones. The information on the Macrozones is equivalent to the information on the Zones, adding up all the Zones in the Macrozone.
6.3.1 ZONE DETAILED INFO
Zone Taxis Detail provides detailed information about the taxis in a zone
Zone Name
Taxis in the Rank
Taxis in the Zone Taxis in Hired
Order number
Taxis located in Rank. Including the time they located
Taxis located in the Zone
Taxis finishing trips in the Zone
Zone Customers Detail provides detailed information about the customers in a zone
Zone Name
Trips in the Zone
Requirements
Order number
Time the trip was reserved for Special requirements of the trip
These functions may be activated/deactivated depending on your Radio Taxi configuration

INTERFACOM, S.A.
Gobox_Sweden_V7.docx 18
6.4 DISPATCH RECEPTION
When the taxi receives a Dispatch, the following information is displayed.
Time for trip start Zone of trip start Requirements of the trip You have a new dispatch Address of trip start Do you accept it?
Some of this information is optional, so it might be displayed or not, depending on the configuration of your Radio Taxi central. There is a maximum time to accept the trip. If it is exceeded, it’s automatically rejected. Trip options available after accepting a dispatch are:
DISPATCH INFO Once a dispatch is accepted, the complete trip information is displayed. In the Trips screen, the Dispatch Info button opens this info again.
If the customer has requested a notification of arrival of the taxi, the AT DOOR button activates. Select it, and the customer will receive the notification
If you arrive at the pick-up point and the customer is not there, select NO SHOW. The Radio Taxi central will handle the situation and give instructions
If the customer arrives, after you had already notified NO CUSTOMER, let the central know with CUSTOMER ARRIVED.
RETURN if the taxi has accepted a dispatch but needs to send it back In some Radio Taxis, returning dispatches to central may be a reason for a temporary sanction, so find out the politic of your fleet before using this option.
When the taxi has a dispatch, the rooflight Free sign may be deactivated. This avoids confusion for the rest of customers on the street, who try to hail the taxi because they see the Free light, but the taxi is not available. This function is configurable in case it’s not allowed by local regulations

INTERFACOM, S.A.
Gobox_Sweden_V7.docx 19
6.5 DISPATCH INFO
Once a dispatch is accepted, the complete trip information is displayed.
Display the observations on the trip. Inactive if there are no observations
If the customer has communicated the destination of the trip, the button is active and displays the destinations.
It may also be possible to navigate to these destinations
Exit the Dispatch info and go back to the main screen
Navigate to the trip start address
Print a summary of the Dispatch info

INTERFACOM, S.A.
Gobox_Sweden_V7.docx 20
6.6 WORKFLOW DIAGRAM
As a summary of the main Radio Taxi and Taximeter functions, this diagram explains the flow of a Dispatched trip.
Free
Located
Dispatched
Hired
Payment
Shift Closed
OFF
Stopped
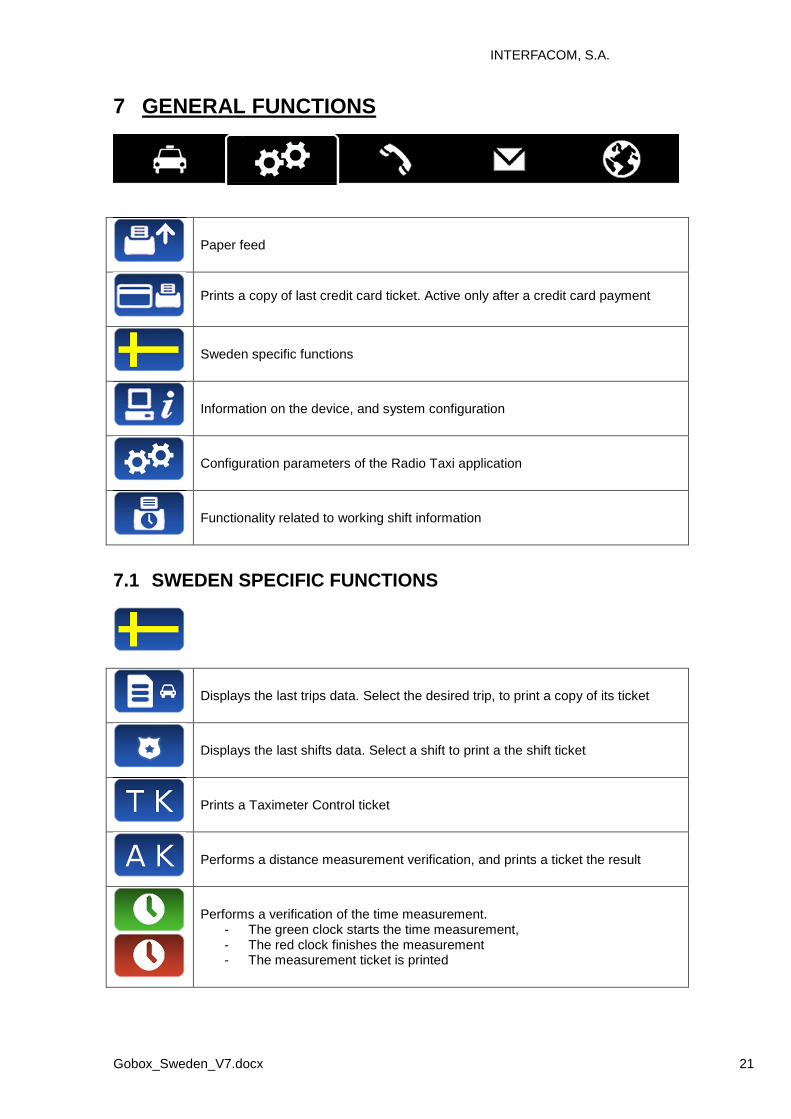
INTERFACOM, S.A.
Gobox_Sweden_V7.docx 21
7 GENERAL FUNCTIONS
Paper feed
Prints a copy of last credit card ticket. Active only after a credit card payment
Sweden specific functions
Information on the device, and system configuration
Configuration parameters of the Radio Taxi application
Functionality related to working shift information
7.1 SWEDEN SPECIFIC FUNCTIONS
Displays the last trips data. Select the desired trip, to print a copy of its ticket
Displays the last shifts data. Select a shift to print a the shift ticket
Prints a Taximeter Control ticket
Performs a distance measurement verification, and prints a ticket the result
Performs a verification of the time measurement. - The green clock starts the time measurement, - The red clock finishes the measurement - The measurement ticket is printed

INTERFACOM, S.A.
Gobox_Sweden_V7.docx 22
7.2 SYSTEM
Current Date and Time
Information on the state of the GPS module
Information on the state of the GSM / GPRS modules
Both coverage and IP addresses
Information on the main software versions and configuration
Allows adjusting the volume of the loudspeaker
Information on the internal battery, and on the vehicle battery
Allows to adjust the display brightness parameters.
Min brightness, Max brightness, Sensitivity to light sensor info
7.3 CONFIGURATION
When the taxi receives a Dispatch, activate or deactivate the automatic printing of the dispatch info.
Enter a phone number to which the Terminal will make a phone call when it receives a Dispatch. This is to warn the driver if outside the car while in a Taxi Rank.
Configures a PIN that filters access to the phone calls.
Change language of the device to user preference
Activates or deactivates the function that provides a voice informing of the Taximeter amounts during a trip. Available only in some markets.

INTERFACOM, S.A.
Gobox_Sweden_V7.docx 23
7.4 SHIFTS
Income Partials: Prints the information on the trips income accumulated since last closing, allowing for a basic income management The information is broken down into Cash, Credit, and Subscriber payments
Income Closing: Prints the information on the trips income accumulated since last closing, allowing for a basic income management It also resets all values to zero and increases the closing number
Prints a Shift ticket, after a selection of the shift number to be printed.
Configuration of the Shifts application
Activates or deactivates printing information of each individual trip in Shift tickets
Activates or deactivates printing start trip and end trip addresses in the Shift tickets
Activates or deactivates automatic Income Closing when the user closes the working shift

INTERFACOM, S.A.
Gobox_Sweden_V7.docx 24
8 CALLS
Dialling the number to make a phone call
Adjust the call volume
Enter the phone number Agenda
Add an Agenda entry
Delete an Agenda entry
The driver requests to talk to the Operator. The operator will call when available.
Once the request has been made, it can be cancelled.
9 MESSAGES
List of received messages.
Print a message
Delete a message from the list
Request Information from the central. An interactive menu with the available Information options will open. Select the desired option
Request Services or assistance from the central. An interactive menu with the available Information options will open. Select the desired option.

INTERFACOM, S.A.
Gobox_Sweden_V7.docx 25
10 NAVIGATOR
Optional integrated navigation may be provided at an additional price. Cartography is updated periodically, consult your Taxitronic distributor for the availability of cartography updates.
Displays the current position of the car on the map
Configuration of the Navigator application
Day and night display options
Navigate to a destination
Finish a navigation
Display the destination address. If it’s a POI, it can display detailed information about the POI, like telephone number, etc.
10.1 CONFIGURATION
Roads with Tolls in the navigation route, enable/disable
Speed traps warning enable/disable. This function might not be active where it is not allowed by the local legislation
Enable/disable the navigator voice instructions
Choose between fastest / shortest route
Enable/disable the navigator 3D view. Only available on newest generations of TC60

INTERFACOM, S.A.
Gobox_Sweden_V7.docx 26
10.2 NAVIGATE TO A DESTINATION
Before starting the first navigation, the country must be entered. The procedure is:
- Select the “Country” button. - The list of countries present in the SD Card is opened - Select the desired country - After this, you can choose different methods for entering the destination
Navigate to Address. Enter the destination data: - City name - Street name - Street number
Navigate to Street Crossing. Enter the destination data: - City name - Street A - Street B
Navigate to Point of Interest (POI). Enter the destination data: - City name - POI category - POI name
Enter the destination coordinates, in one of the following formats: GG:MM:SS Degrees:minutes:seconds GG.gggg Degrees.decimals of degree
Recent destinations. Open the menu and select the destination from the Recents list.
Navigation to Favourites. Open the menu and select the destination from the Favourites list.
Add a Favourite. Enter the destination with any of the methods except POI. Then, press the Add Favourite button, and the favourite will be added.
Delete a Favourite. Open the menu, select a favourite, and it will be erased.

INTERFACOM, S.A.
Gobox_Sweden_V7.docx 27
10.3 NAVIGATION INTERFACE
The vertical bar at the right end has the following functions:
Zoom in
Exit the navigation screen
Zoom out
Display map centered on the destination
Send the “at the door” notification to the customer. Active if dispatched