MANUAL DE MONTAGEM ASSEMBLY INSTRUCTIONS … · Read this manual and follow the steps for the...
20
1 V : 02 COD BR: 26400 COD US: 25000 MANUAL DE MONTAGEM ASSEMBLY INSTRUCTIONS INSTRUCCIONES DE MONTAJE
Transcript of MANUAL DE MONTAGEM ASSEMBLY INSTRUCTIONS … · Read this manual and follow the steps for the...
1V : 02
COD BR: 26400COD US: 25000
MANUAL DE MONTAGEMASSEMBLY INSTRUCTIONS
INSTRUCCIONES DE MONTAJE

2V : 02
Introdução
IntroducciónIntroduction
Leia atentamente este manual e siga os passos indicados para uma perfeita montagem.
Lea este manual y siga los pasos para el ajuste perfecto.Read this manual and follow the steps for the perfect fit.
Sumário
ResumenSummary
2
3
4
4
3
5Montagem do móvelFurniture assemblyMontaje de la mueble
IntroduçãoIntroductionIntroducción
Antes de começarBefore startingAntes de comenzar
Identificação das peçasIdentifying partsIdentificación de las piezas
Evite acidentesAvoid accidentsEvitar accidentes
Dimensões e ferramentas Dimensions and tools Dimensiones y herramientas
3V : 02
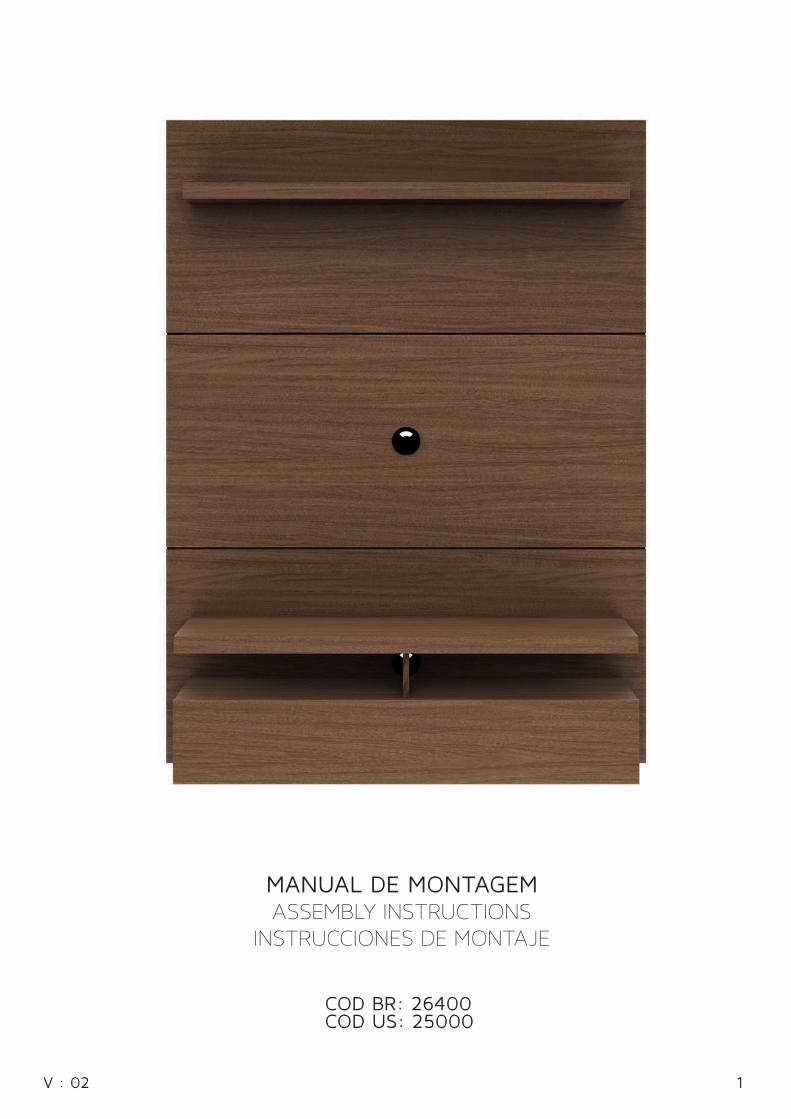
Evite acidentes
Prevenir accidentesAvoid accidents
X
Forre a área de montagem com um cobertor ou tapete. Assim, você evita avarias nas peças durante o processo de montagem.
Cubrir la zona de ensamble con una manta o alfombra. De este modo, se evitan daños en las piezas durante el proceso de montaje.
Cover the assembly area with a blanket or carpetto avoid damages on the parts during the assembly process.
Antes de começar
Antes de comenzarBefore starting
Antes de começar a montagem prepare o ambiente, deixando-o completamente limpo e com bom espaço para iniciar o trabalho.
Antes de comenzar el montaje preparar el ambiente, dejándolo completamente limpio ycon bueno espacio para comenzar el trabajo.
Prepare the room before starting the assembly, leaving it completely clean and the area ingood condition to start the work.
Utilize o papelão da própria embalagem, bem como a isomanta de proteção para separar e apoiar as peças retiradas das caixas.
Utilice el cartón de la embalaje y la espuma protectora para separar y apoyan las piezas desmontadas de las cajas.
Use the cardboard of the packaging and the foam sheets protection to separate and support the parts removed from the boxes.
No se suba ni se apoye en el movel.Do not climb or lean on the furniture.
Não escale ou se apoie no móvel.
4V : 02
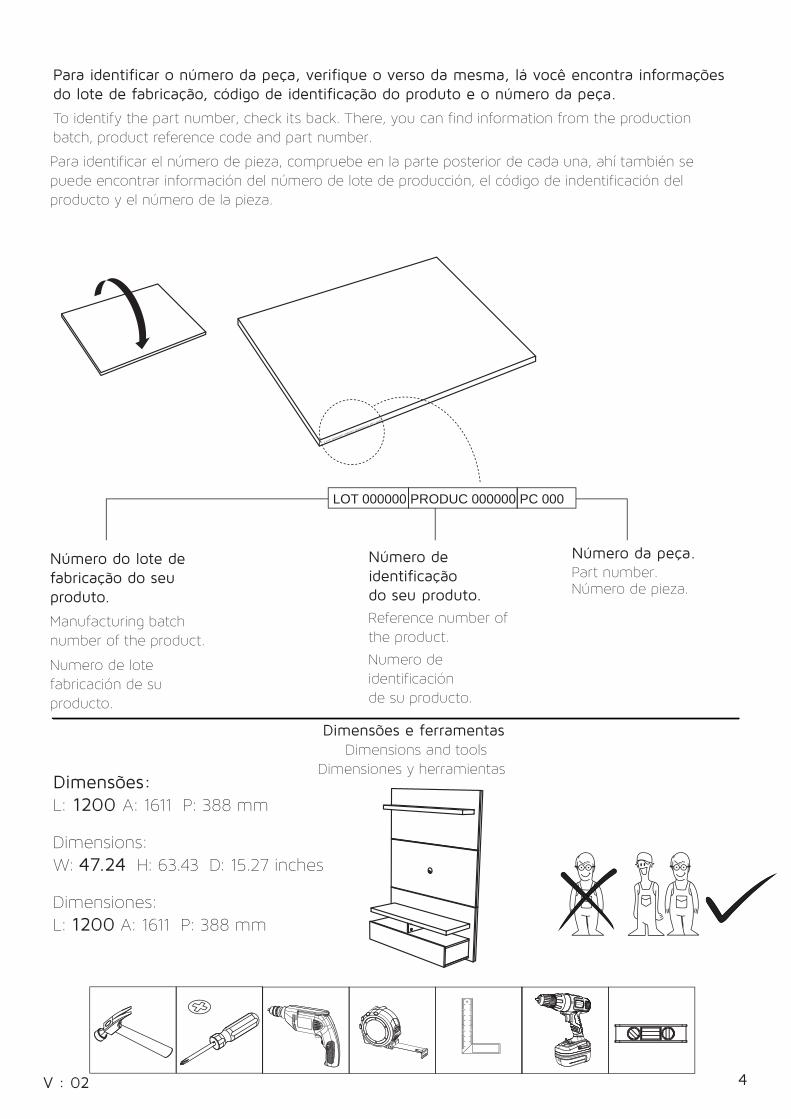
Dimensões e ferramentas Dimensions and tools
Dimensiones y herramientas Dimensões:L: 1200 A: 1611 P: 388 mm
Dimensiones:L: 1200 A: 1611 P: 388 mm
Dimensions:W: 47.24 H: 63.43 D: 15.27 inches
Número do lote de fabricação do seu produto.
Numero de lote fabricación de su producto.
Manufacturing batch number of the product.
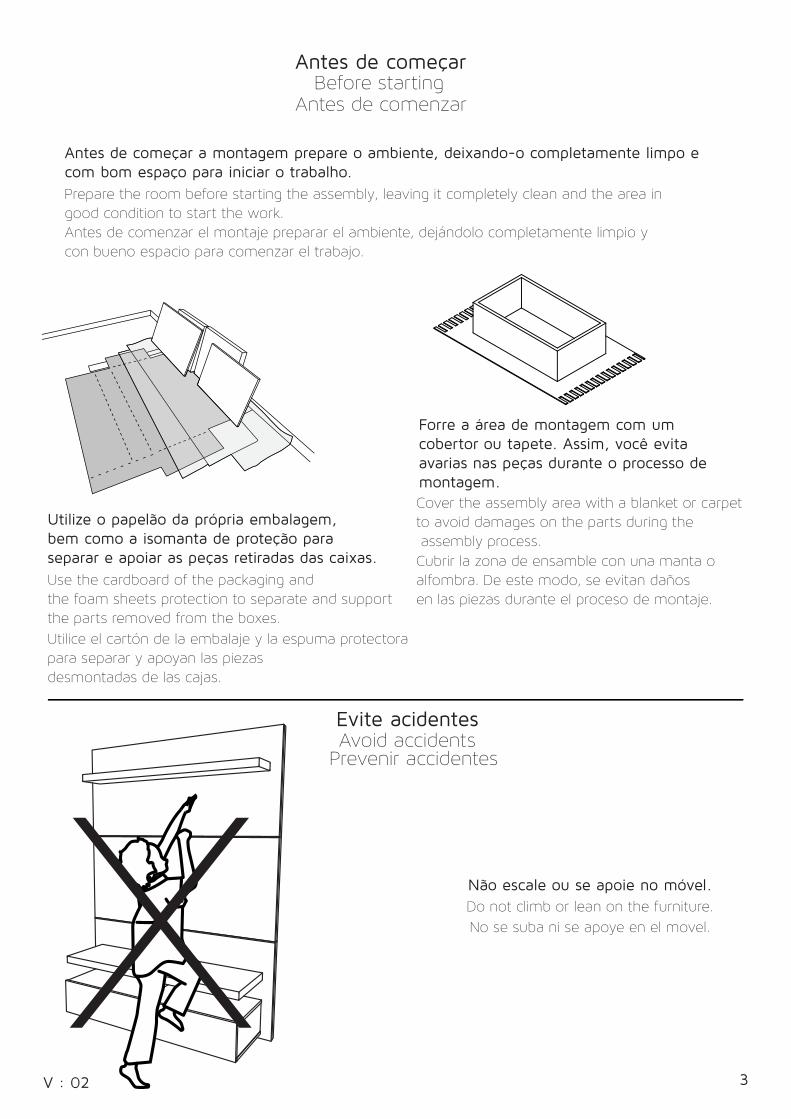
Para identificar o número da peça, verifique o verso da mesma, lá você encontra informações do lote de fabricação, código de identificação do produto e o número da peça.
Para identificar el número de pieza, compruebe en la parte posterior de cada una, ahí también se puede encontrar información del número de lote de producción, el código de indentificación del producto y el número de la pieza.
To identify the part number, check its back. There, you can find information from the production batch, product reference code and part number.
LOT 00000 PROD 000000 PC 000
Número de identificaçãodo seu produto.
Numero de identificación de su producto.
Reference number of the product.
Número da peça.
LOT 000000 PRODUC 000000 PC 000
Número de pieza.Part number.

5V : 02
003
010
011
013
022
023
024
025
026
027
028
032
033
034
PRATELEIRA
PAINEL SUPERIOR
PAINEL INFERIOR
SARRAFO LATERAL
TAMPO SUPERIOR
TAMPO CENTRAL
TAMPO INFERIOR
DIVISÓRIA SUPERIOR
DIVISÓRIA INFERIOR
LATERAL ESQUERDA
LATERAL DIREITA
PORTA
PAINEL TRASEIRO
SARRAFO
003
010
011
013
022
023
024
025
026
027
028
032
033
034
003
010
011
013
022
023
024
025
026
027
028
032
033
034
SHELF
TOP PANEL
BOTTOM PANEL
SIDE BATTEN
UPPER BOARD
CENTRAL BOARD
BOTTOM BOARD
UPPER DIVIDER
BOTTOM DIVIDER
LEFT SIDE
RIGTH SIDE
DOOR
BACK PANEL
BATTEN
PEÇA DESCRIÇÃO QUANT. CAIXA
1
1
1
2
1
1
1
1
1
1
1
1
1
2
1
1
1
2
1
1
1
1
1
1
1
1
1
2
1
1
1
2
1
1
1
1
1
1
1
1
1
2
1
1
1
1
1
1
1
1
1
1
1
1
1
1
1
1
1
1
1
1
1
1
1
1
1
1
1
1
1
1
1
1
1
1
1
1
1
1
1
1
1
1
PART DESCRIPTION QTY BOX
ESTANTE
PANEL SUPERIOR
PANEL INFERIOR
SOPORTE LATERAL
CUBIERTA SUPERIOR
CUBIERTA CENTRAL
CUBIERTA INFERIOR
DIVISION SUPERIOR
DIVISION INFERIOR
LATERAL IZQUIERDA
LATERAL DERECHA
PUERTA
PANEL TRASERO
SOPORTE
PIEZA DESCRIPCIÓN CANTIDAD CAJA
03
10
3334
34
11
22
2325
24
32
2827
26
13 13
COD BR: 26400COD US: 25000

6V : 02
ADESIVOSTICKER
ADHESIVO
x10 x2
0599 x 82511 x 3
0348 x 3
0494 x 8
2088 x 14 4462 x 3
1668 x 21
PASSA FIO
PASAJE DE ALAMBRE
WIRE CHANNEL
0160 x 14
7519 x 12
9069 x 12
3527 x 14 4762 x 103706 x 18
4157 x 79070 x 6
4505 x 2
3557 x 18
ACESSÓRIOS INCLUÍDOS NA CAIXA 01 - HARDWARE INCLUDED IN BOX 01 - ACCESORIOS INCLUÍDOS EN LA CAJA 01

7V : 02
BA
A
=30KG - 66LB =05KG - 11LB
B
B
B B
10
PAINEL SUPERIOR / TOP PANEL / PANEL SUPERIOR
9070
3557
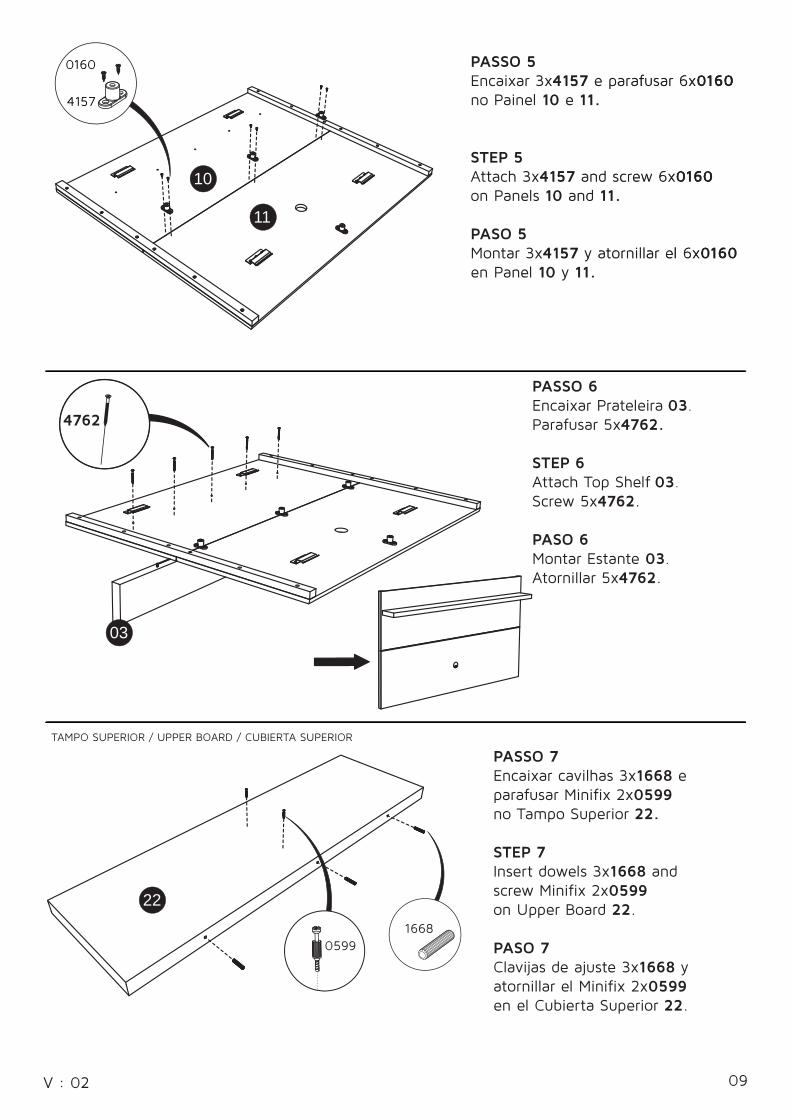
PASSO 1Encaixar 2x9070 e parafusar 6x3557no Painel 10.
STEP 1Attach 2x9070 and screw 6x3557on Panel 10.
PASO 1Montar 2x9070 y atornillar el 6x3557 en Panel 10.

8V : 02
PASSO 2Encaixar 1x4157 e parafusar 2x0160.Encaixar 2x9070 e parafusar 6x3557no Painel 11.
STEP 2Attach 1x4157 and screw 2x0160. Attach 2x9070 and screw 6x3557on Panel 11.
PASO 2Montar 1x4157 y atornillar el 2x0160.Montar 2x9070 y atornillar el 6x3557en Panel 11.
9070
3557
11
03
10
11
13
13
1668
PASSO 3Encaixar cavilhas 3x1668na Prateleira 03.
STEP 3Insert dowels 3x1668into the holes of Shelf 03.
PASO 3Clavijas de ajuste 3x1668en Estante 03.
Utilize a cola PVA antes de aparafusar.Use the PVA glue before screwing.El uso de pegamento PVA antes de atornillar.
0348
PASSO 4Passar cola 0348 e parafusar 12x3706 fixando os sarrafos 13 nos Painéis 10e 11.
STEP 4Apply glue 0348 and screw 12x3706 to fix Batten 13 on Panels 10and 11.
PASO 4Aplicar cola 0348 y atornillar 12x3706 fijando el Soportes 13 in Panels 10y 11.
SARRAFO / BATTEN / SOPORTE.
PRATELEIRA / SHELF / ESTANTE
PAINEL / PANEL / PANEL
4157
0160
09V : 02
03
22
PASSO 6Encaixar Prateleira 03.
Parafusar 5x4762.
STEP 6Attach Top Shelf 03.
Screw 5x4762.
PASO 6Montar Estante 03.
Atornillar 5x4762.
4762
16680599
PASSO 7Encaixar cavilhas 3x1668 e parafusar Minifix 2x0599no Tampo Superior 22.
STEP 7Insert dowels 3x1668 and screw Minifix 2x0599on Upper Board 22.
PASO 7Clavijas de ajuste 3x1668 y atornillar el Minifix 2x0599en el Cubierta Superior 22.
TAMPO SUPERIOR / UPPER BOARD / CUBIERTA SUPERIOR
4157
0160 PASSO 5Encaixar 3x4157 e parafusar 6x0160no Painel 10 e 11.
STEP 5Attach 3x4157 and screw 6x0160on Panels 10 and 11.
PASO 5Montar 3x4157 y atornillar el 6x0160en Panel 10 y 11.
10
11

10V : 02
23
24
26
1668
1668
PASSO 10Encaixar cavilhas 4x1668na Divisoria Inferior 26.
STEP 10Insert dowels 4x1668on Bottom Divider 26.
PASO 10Clavijas de ajuste 4x1668en Division Inferior 26.
0599
PASSO 8Parafusar minifix 4x0599no Tampo Central 23.
STEP 8Screw Minifix 4x0599on Central Board 23.
PASO 8Atornillar el minifix 4x0599en el Cubierta Central 23.
TAMPO CENTRAL / CENTRAL BOARD / CUBIERTA CENTRAL
TAMPO INFERIOR / BOTTOM BOARD / CUBIERTA INFERIOR
DIVISÓRIA INFERIOR / BOTTON DIVIDER / DIVISION INFERIOR
7519
4462
PASSO 9Encaixar cavilhas 3x1668. Parafusar 6x7519 fixando os calços 3x4462 no Tampo Inferior 24.
STEP 9Insert dowels 3x1668.Screw 6x7519 to fix Hinge Mounting Plate 3x4462 on Bottom Board 24.
PASO 9Encajar clavijas de ajuste 3x1668.Atornillar 6x7519 fijando la base de la bisagra 3x4462 en la Cubierta inferior 24.

11V : 02
27
28
32
1668
1668
PASSO 11Encaixar cavilhas 4x1668na Lateral Esquerda 27.
STEP 11Insert dowels 4x1668on Left Side 27.
PASO 11Clavijas de ajuste 4x1668en Lateral Izquierda 27.
LATERAL ESQUERDA / LEFT SIDE / LATERAL IZQUIERDA
LATERAL DIREITA / RIGTH SIDE / LATERAL DERECHA
PORTA / DOOR / PUERTA
PASSO 12Encaixar cavilhas 4x1668na Lateral Direita 28.
STEP 12Insert dowels 4x1668on Rigth Side 28.
PASO 12Clavijas de ajuste 4x1668en Lateral Derecha 28.
7519
2511
PASSO 13Encaixar Dobradiças 3x2511 e parafusar 6x7519 na Porta 32.
STEP 13Attach Hinges 3x2511 and screw 6x7519on Door 32.
PASO 13Montar Bisagras 3x2511 y atornillar el 6x7519 en la Puerta 32.

12V : 02
33
24
23
26 2728
PAINEL TRASEIRO / BACK PANEL / PANEL TRASERO
PASSO 14Encaixar 3x4157 e parafusar 6x0160.Encaixar 2x9070 e parafusar 6x3557no Painel 33.
STEP 14Attach 3x4157 and screw 6x0160. Attach 2x9070 and screw 6x3557on Panel 33.
PASO 14Montar 3x4157 y atornillar el 6x0160.Montar 2x9070 y atornillar el 6x3557en Panel 33.
3557
0160
9070
4157
PASSO 15Encaixar Divisória 26 e Laterais 27 e 28 no Tampo Inferior 24, parafusar 6x3527.
STEP 15Attach Divider 26 and Sides 27 and 28 to the Bottom Board 24, screw 6x3527.
PASO 15Montar las Division 26 y las Laterales 27 y 28 en la Cubierta Inferior 24,atornillar 6x3527.
3527
3527
PASSO 16Encaixar Tampo Central 23.Parafusar 2x3527.Parafusar castanhas 4x0494e colar 4 adesivos.
STEP 16Attach Center Board 23 screw 2x3527.Screw nuts 4x0494 and place4 stickers.
PASO 16Montar el Cubierta Central 23.Atornillar 2x3527.Atornillar las tuercas 4x0494y pegar 4 adhesivos.
0494
ADESIVOSTICKER
ADHESIVO
13V : 02
23
25
22
PASSO 19Encaixar Tampo Superior 22.Parafusar castanhas 2x0494e colar 2 adesivos.
STEP 19Attach Upper Board 22.Screw nuts 2x0494 and place2 stickers.
PASO 19Montar el Cubierta Superior 22.Atornillar las tuercas 2x0494y pegar 2 adhesivos.
PASSO 18Encaixar Divisória Superior 25.Parafusar castanhas 2x0494e colar 2 adesivos.
STEP 18Attach Upper Divider 25.Screw nuts 2x0494 and place 2 stickers.
PASO 18Montar el Division Superior 25.Atornillar las tuercas 2x0494y pegar 2 adhesivos.
0494
0494
0599
PASSO 17Parafusar Minifix 2x0599no Tampo Central 23.
STEP 17Screw Minifix 2x0599on Central Board 23.
PASO 17Atornillar el Minifix 2x0599en el Cubierta Central 23.
ADESIVOSTICKER
ADHESIVO
ADESIVOSTICKER
ADHESIVO

14V : 02
33
PASSO 20Encaixar Painel Traseiro 33.Parafusar 5x4762.
STEP 20Attach Back Panel 33.Screw 5x4762.
PASO 20Montar el Panel Trasero 33.Atornillar 5x4762.
3527
34
3334
SARRAFO / BATTEN / SOPORTE
PASSO 22Passar cola 0348 e posicionaro Sarrafo 34, parafusar 6x3706.
STEP 22Apply glue 0348 and attachBatten 34, screw 6x3706.
PASO 22Aplicar cola 0348 y montar el soporte 34, atornillar 6x3706.
Utilize a cola PVA antes de aparafusar.Use the PVA glue before screwing.El uso de pegamento PVA antes de atornillar.
0348
3706
4762
PASSO 21Parafusar 6x3527 no Painel Traseiro 33.
STEP 21Screw 6x4762 on the Back Panel 33.
PASO 21Atornillar 6x4762 en el Panel Trasero 33
15V : 02
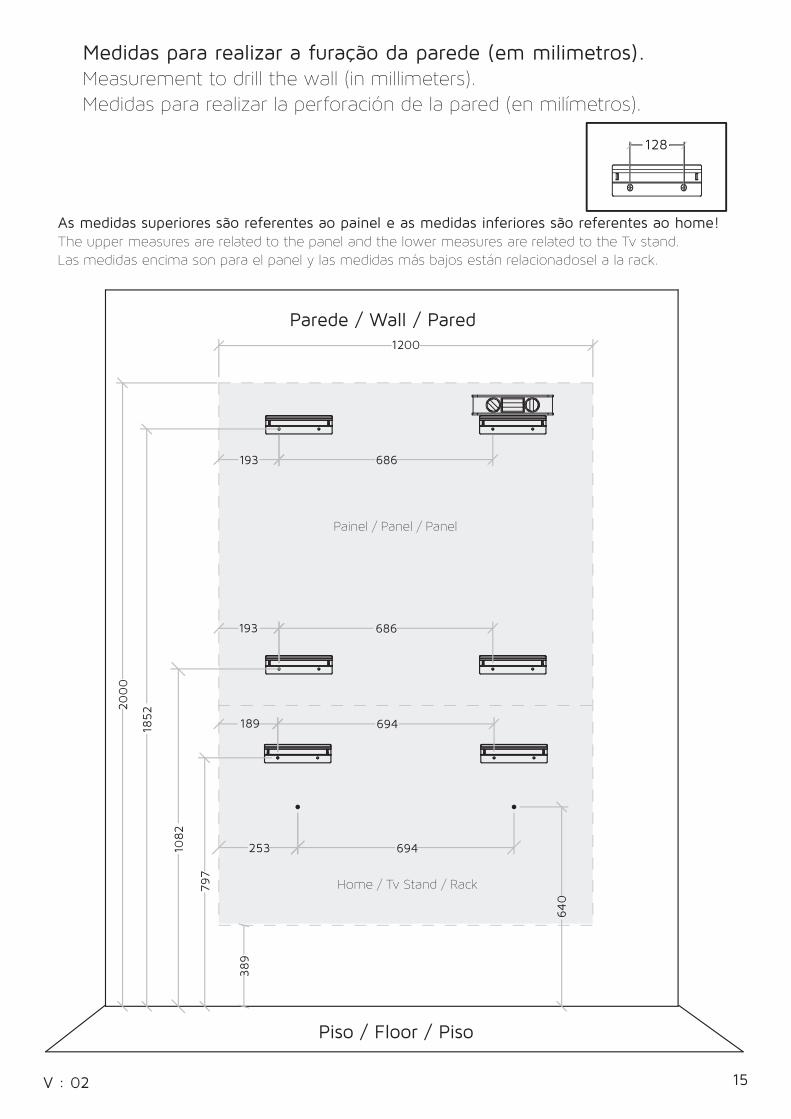
As medidas superiores são referentes ao painel e as medidas inferiores são referentes ao home!The upper measures are related to the panel and the lower measures are related to the Tv stand.Las medidas encima son para el panel y las medidas más bajos están relacionadosel a la rack.
1200
193
253
189
193
2000
797
389
1852
694
686
686
694
640
1082
Parede / Wall / Pared
Piso / Floor / Piso
128
Painel / Panel / Panel
Home / Tv Stand / Rack
Medidas para realizar a furação da parede (em milimetros).Measurement to drill the wall (in millimeters).Medidas para realizar la perforación de la pared (en milímetros).

16V : 02
Parede / Wall / Pared
Piso / Floor / Piso
5.04
47.24
7.60
9.96
7.44
7.60
78.7
4
31.
38
72.9
2
Painel / Panel / Panel
Home / Tv Stand / Rack
27.32
27.01
27.01
27.32
25.18
42.6
0
15.3
1
As medidas superiores são referentes ao painel e as medidas inferiores são referentes ao home!The upper measures are related to the panel and the lower measures are related to the Tv stand.Las medidas encima son para el panel y las medidas más bajos están relacionadosel a la rack.
Medidas para realizar a furação da parede (em polegadas).Measurement to drill the wall (in inches).Medidas para realizar la perforación de la pared (en pulgadas).
17V : 02
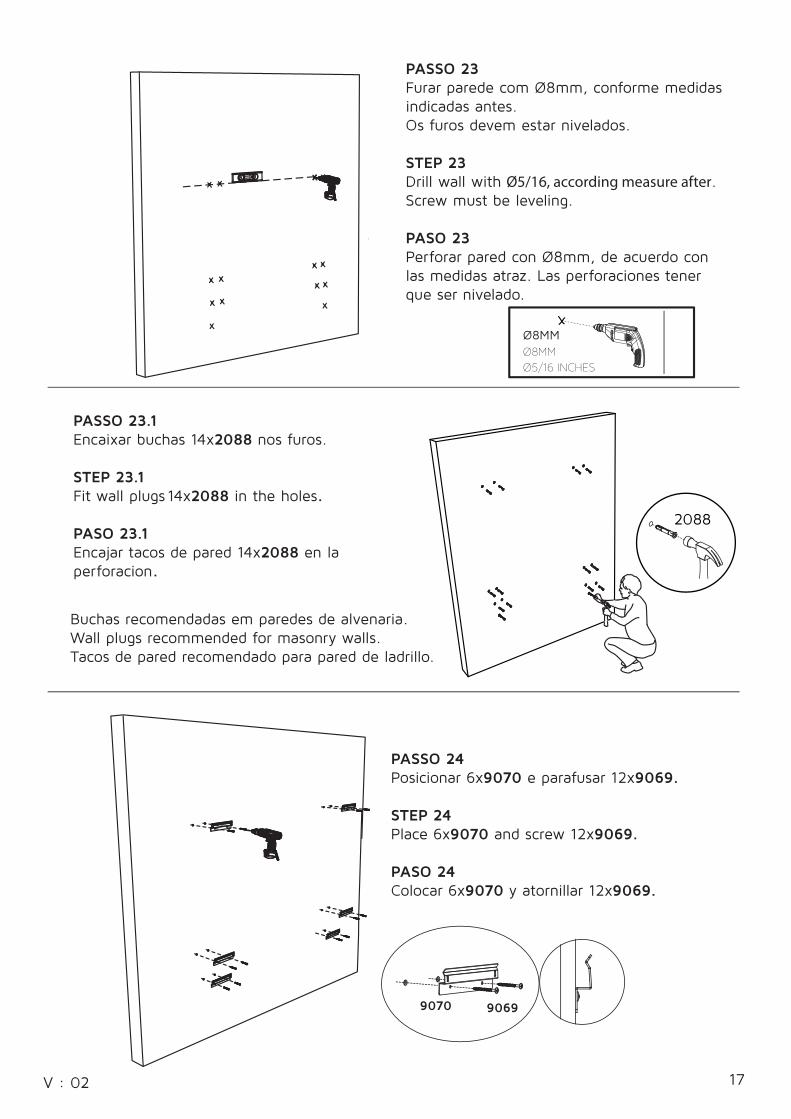
PASSO 23.1Encaixar buchas 14x2088 nos furos.
STEP 23.1Fit wall plugs 14x2088 in the holes.
PASO 23.1Encajar tacos de pared 14x2088 en laperforacion.
2088
PASSO 24Posicionar 6x9070 e parafusar 12x9069.
STEP 24Place 6x9070 and screw 12x9069.
PASO 24Colocar 6x9070 y atornillar 12x9069.
Buchas recomendadas em paredes de alvenaria.Wall plugs recommended for masonry walls.Tacos de pared recomendado para pared de ladrillo.
Ø8MMØ8MM
Ø5/16 INCHES
PASSO 23Furar parede com Ø8mm, conforme medidasindicadas antes.Os furos devem estar nivelados.
STEP 23Drill wall with Ø5/16, according measure after.Screw must be leveling.
PASO 23Perforar pared con Ø8mm, de acuerdo con las medidas atraz. Las perforaciones tener que ser nivelado.
9070 9069

18V : 02
PASSO 25Encaixe Rack na Parede.
STEP 25Attach stand to the wall.
PASO 25Enganchar el Rack en la pared.
ADESIVO STICKER
ADHESIVO
4505
Pass the cables through the back before following step 26.Lleve el cables antes atornillar paso 26.
Passar cabos antes de aparafusar passo 26.
Atenção / Attention / Atención
PASSO 26Parafusar 2x4505e colar 2 adesivos.
STEP 26Screw 2x4505and place 2 stickers.
PASO 26Atornillar 2x4505y pegar 2 adhesivos.
CLICK
1 2

19V : 02
PASSO 28.Encaixe 2x8717.
STEP 28.Place 2x8717.
PASO 28.Enganchar 2x8717.
PASSO 27Encaixe Painel na Parede.
STEP 27Hang panel on the wall.
PASO 27Enganchar el Panel en la pared.
Pass the cables through the back before following step 27.Lleve el cables antes de encajar el panel, paso 27.
Passar cabos antes de encaixar Painel, passo 27.
Atenção / Attention / Atención
8717
CLICK
1 2

20V : 02
04030201
32
PASSO 29Encaixar Portas 32.
STEP 29Insert Door 32.
PASO 29Encajar Puertas 32.
9469