_Manual CHDK español versión 1.0
132
Page 1 CHDK Características Adicionales ® Para Canon Las cámaras De usuario Guía de inicio rápido Page 2 CHDK ® Canon Hack Development Kit De usuario Guía de inicio rápido 2009 V.1.6.7 ® Para Cámaras Canon con CHDK cargada y operativa Para las instrucciones de instalación ir a: http://chdk.wikia.com/wiki/CHDK Page 3 Contenidos Agradecimientos ... ... ... .... 2 CHDK Introducción ... ... ... ... ... 3 Usando CHDK ... ... ... ... ... ... ... ... 4 OSD diagrama de visualización ... ... ... .. 7 Menú Principal ... ... ... ... ... ... ... ... .. 8
Transcript of _Manual CHDK español versión 1.0

Page 1
CHDK
Características Adicionales
®
Para Canon Las cámaras
De usuario Guía de inicio rápido Page 2
CHDK
®
Canon Hack Development Kit
De usuario Guía de inicio rápido
2009
V.1.6.7
®
Para Cámaras Canon con CHDK
cargada y operativa
Para las instrucciones de instalación ir a:
http://chdk.wikia.com/wiki/CHDK Page 3
Contenidos
Agradecimientos ... ... ... .... 2
CHDK Introducción ... ... ... ... ... 3
Usando CHDK ... ... ... ... ... ... ... ... 4
OSD diagrama de visualización ... ... ... .. 7
Menú Principal ... ... ... ... ... ... ... ... .. 8

Extra Photo Operaciones
... ... ....
8
Parámetros de vídeo
... ... ... ... ... ..
15
Parámetros de RAW
... ... ... ... ... ...
16
Superposición Edge
... ... ... ... ... ... ... ...
19
Las curvas de
... ... ... ... ... ... ...
20
Parámetros de histograma ... ... .... 21
Parámetros de Zebra ... ... ... .... .... 24
Parámetros de OSD
... ... ... ... ... ....
26
Ajustes de Visual
... ... ... ... ... ... ...
35
Secuencias de comandos parámetros ... ... ... .. 36
Diversos cosas ... ... ... ... 38.
Historia de CHDK ... ... ... ... ... 47

Stereo Maker de datos ... ... ... ... 48.
KaP ... ... ... ... ... .. ... ... ... ... ... 49.
Notas Bracketing ... ... ... .. .... 49
Notas RAW ... ... ... ... ... ... ... ... 50
USB Remote Notas ... .... ... .. 50
Toma nota de Grids ... ... ... ... ... ... ... 51.
Toma nota de las curvas ... ... ... ... ... ... 52.
Notas de secuencias de comandos ... ... ... ... ... .. 52
Bad Notas pixel ... ... ... ... ... 55.
Notas de Flash ... ... ... ... ... .. ... .. 56
Ejemplos ... ... ... ... ... .. ... ... .. 57
Preguntas frecuentes y datos ... ... ... .. ... .. 60
Enlaces ... ... ... ... ... .. ... .... ... ... 63.
Notas Legales ... ... .. ... ... .. ... .. 64.
INDEX ... ... ... ... ... .. ... .. ... ... ... 65
1 Page 4
Agradecimientos
CHDK tiene que ser una de las mejoras más innovadoras a cualquier cámara que ha salido a lo
largo ya el comienzo de la fotografía. Iniciado por algunas personas que sólo querían RAW de sus
primeras cámaras de lisiados, ahora se ha convertido en uno de los más adaptables, flexibles, y
con todas las características de funcionamiento de los sistemas de cámaras de cualquier hecho
nunca. Estamos todos muy agradecidos por la labor que todo el mundo ha puesto en este campo
de descubrimiento, la aplicación, la codificación, el intercambio, la prueba de la cámara,
(especialmente con lo desconocido,
y posiblemente de alto riesgo), y los que proporcionan toda la información en las páginas Wiki (y
en otros lugares de del mundo). Aquellos que han contribuido a este gran paso en el mundo de la
fotografía se merecen un gran voto de agradecimiento.
Muchas gracias a la vitalyb los desarrolladores originales, y Grand, owenjm, Harvester, jeff666,

[mr.anon], MX3, Fingalo, ewavr, Allbest, CHDKLover, BarneyFife, también a Jucifer y PhyrePhox,
a cosmograph el logotipo CHDK excelente, ya todos los demás mencionados o no, en Historia de la
CHDK en la página 47
Otros contribuyentes incluyen, acseven (el foro), auj, BG, bperrybap, brabl2, frenos, Cail, chdkj,
Comisión de Derechos Humanos, Cormac, cyril42e, danielmewes, DataGhost, diablo, elecktro255,
fantomas4o, fboesch,
fbonomi, fe50, fishpepper, fudgey, Grin, Hacki, hiker_jon, IAX, image13, m2tk, ma_jk,
Microfunguy, mkmenuts, mproko, MrSpoon, MSL, mweerden, Nimrod, nirschi, Novex, pev69,
pixeldoc2000, PlasmaHH, Quietschi, reyalp, Sharky, SNC, Thorwak, toinech, TPC, uvvv, Velo,
capricho, quien, wontolla, Yarvieh, y más por venir ... ....
Muchas gracias.
Gracias a Graystar para la Allbest 50 manual, y para los escritores de la línea Morebest manual,
(estas
las páginas se basan en los), y todos los demás que han contribuido por pequeño o grande para
CHDK
y las páginas Wiki.
2 Page 5
CHDK Introducción
Bienvenido a CHDK, para los usuarios de Canon
®
Las cámaras
P. ¿Qué hace el programa CHDK hacer?
Un
.
CHDK mejora las capacidades de su cámara en un no-destructiva, de manera no permanente.
Después de la carga del programa CHDK de la cámara tendrá la funcionalidad adicional siguiente:

•
De prioridad de obturación (Tv) la exposición - a través del obturador función de valor de
reemplazo
•
Prioridad de apertura (Av) la exposición - a través de la apertura función de valor de reemplazo
•
Disparamos en RAW, con RAW media, RAW Suma, y RAW Desarrollar las características del
•
Histograma (RGB, de mezcla, de luminancia y para cada canal RGB)
•
Modo Zebra (una vista de encima y debajo de las áreas expuestas de la imagen)
•
Profundidad de campo (DOF) - Calculadora, hiperfocal-calculadora con Hiperfocal inmediata y
Enfoque infinito-set, y más
•
Indicador de batería
•
RAW y el espacio de video restantes indicadores con la costumbre de bajo límite de alertas
•
USB cable de disparo a distancia de disparo
•
Activar la detección de movimiento - se dispara automáticamente la cámara en la detección de
movimiento. (Lo suficientemente rápido para
la captura de los rayos.)
•
Personalizable de alta velocidad continuo (ruptura) del obturador basado en (TV), basado en la
apertura (Av) y la

ISO-bracketing de exposición en base (inyecciones ilimitadas)
•
Soporte del foco (inyecciones ilimitadas)
•
99 bit-rate constante y el 10 de constante los niveles de calidad de compresión de vídeo
•
Eliminación de vídeo de 1 GB de tamaño límite de
• Zoom durante la función de vídeo (para las cámaras sin esta característica)
• Obturación, la apertura y la ISO solapada
• Velocidades Ultra-largas de obturador - hasta 64 segundos (más tiempo si es compatible con la
cámara)
• Ultra-rápidas velocidades de obturación - hasta 1 / 10, 000 "y superior (más rápido en algunas
cámaras)
• De alta velocidad de sincronización del flash a todas las velocidades de hasta 1 / 64, 000 de
segundo,
• De usuario personalizadas editable Grids visible para enmarcar, de cultivo, y la alineación
• Archivo desde el navegador
• Lector de texto
• Calendario
• Juegos
• CHDK pantalla totalmente personalizable, la colocación de información, el usuario los colores, las
fuentes en los menús, etc
• menú CHDK personalizable de usuario (una recuperación instantánea de hasta 10 funciones
favoritas)
• La ejecución de secuencias de comandos - incluyendo entre paréntesis la exposición, soporte del
foco, intervalómetro, etc
• Y otras características demasiado numerosos para mencionarlos aquí.
3 Page 6

Funcionan estas características en todos los modelos de cámara con el apoyo de CHDK. La cámara
no tiene que tener
"relacionados" o "inherente" a las características ya presentes - CHDK añadirá la funcionalidad
requerida. Nuevas características se accede a través de CHDK menús específicos, en lugar de los
menús por defecto de la cámara.
Como CHDK está en continua evolución, las nuevas características se agregan a menudo. Esto
significa que algunas de las características enumeradas dependen de usted utilizando una versión
de CHDK que tiene esas características.
Echa un vistazo a la página de descargas para encontrar información sobre el derecho de construir
para sus necesidades.
Ir a: --
http://chdk.wikia.com/wiki/Downloads
-------------------------------------------------- --------------------------------------------
Usando CHDK
Para iniciar
--
Dryos cámaras de carga automática en el inicio.
- Para las cámaras VWorks .. ...
1. Consulta la cámara en el modo Reproducción
2. Prensa
Menú
, A continuación, pulse
Arriba una vez
3. Una opción para actualizar el firmware aparece,
Seleccione esa opción.
4. Confirmar la actualización, (
OK

-prensa
FUNC
.
SET
)
Véase: --
http://chdk.wikia.com/wiki/
FAQ # Q._There27s_no_PS.FIR_file_in_the_CHDK_download_for_my_camera._What_do_I_do3F
para obtener instrucciones para hacer la tarjeta de memoria de arranque.
Noticias de última hora! Desde enero de 2009 las cámaras Dryos también puede utilizar el método
de actualización de firmware. De Foro:
Great job folks,
- No bloqueo de la tarjeta, no hay tarjeta de formato complicado procedimiento, uniformidad
entre los diferentes SO's: mucho más fáciles de documentar y usar.
La pantalla de bienvenida CHDK aparecerá durante unos 2 segundos, confirmando que CHDK está
ejecutando ahora en su cámara.
(La pantalla de inicio se puede desactivar en el menú principal> Diversos cosas)
4 Page 7
CHDK ahora se ejecuta en segundo plano. Algunas funciones están activadas por defecto, por
ejemplo, de la batería y los indicadores de la memoria. Sin embargo, la mayoría de funciones están
desactivados por defecto.
Para realizar cambios en la forma CHDK funciona, se inicia mediante la introducción
<ALT>
modo.
Modo <ALT>
Cuando el modo de <ALT> está habilitada la función de ciertos botones de la cámara se

el cambio, lo que le permite comenzar a tener acceso a características CHDK. Por ejemplo, al
pulsar el SET botón se mostrará el menú de CHDK de secuencias de comandos, en lugar de la
función habitual asociada con
SET.
Hay diferentes maneras de entrar
<ALT>
modo, en función del estilo de la cámara.
Serie A - Pulse el botón de impresión directa (Una breve pulsación momentánea)
Serie G - Pulse el botón de acceso directo *
Serie S - Pulse el botón de acceso directo de *
SD Series - Pulse el botón de impresión directa *
Véase la nota en la página 6 sobre la tecla de acceso directo.
Además, mientras que en
<ALT>
los botones del modo siguiente se vuelven a asignar:
Una serie / Exposición Erase (+/-) - Cambia el modo de captura RAW
Serie G Marco AF Selector / Borrar - Cambia el modo de captura RAW
Serie S
FUNC.SET
- Cambia el modo de captura RAW
Serie SD
DISP
- Cambia el modo de captura RAW
SX10 Marco AF Selector / Borrar - Cambia el modo de captura RAW
Común a la mayoría de las cámaras
• MENÚ

- Muestra el menú principal CHDK
• FUNC.SET
- Mostrar el menú Script
• PANTALLA
Button - Volver al menú anterior
• Lleno de prensa Shutter - Ejecuta la secuencia de comandos seleccionada, o se detiene la
secuencia de comandos ejecuta
Las siguientes funciones están disponibles a cualquier hora CHDK está cargado.
Común a la mayoría de las cámaras
• La mitad de obturación + Izquierda - Toggle Zebra on / off
• La mitad de obturación + Up - Toggle histograma on / off (en versiones recientes de disparar
mitad + abajo).
• La mitad de obturación + Derecha - Toggle OSD on / off
... (Se continua P6)
5 Page 8
Más teclas y atajos de teclado:
En el modo de enfoque manual - (con el
<ALT>
)
Up - Set
MF
hasta el infinito
Down - para establecer
MF
la distancia a la distancia hiperfocal (basado en el f / stop y zoom de distancia focal).

Izquierda - Disminución de factor de valor,
Derecho - Factor de aumento del valor.
En el
IXUS
la serie
DISP.
botón se utiliza para establecer de inmediato
MF
(enfoque manual) de distancia hasta el infinito.
Véase: - Extra Photo Operaciones Page 9.
En el editor de diseño OSD --
Pantalla - Cambia el número de píxeles de la OSD (visualización en pantalla) se mueven por los
elementos.
En el Explorador de archivos --
Derecho
--
hacer la selección
Izquierda - Abrir el menú de contexto.
Zoom in / Zoom-out - Vaya por página en el Explorador de archivos y modos de archivos Reader.
La mitad de disparar - Vaya una página hacia adelante en modo File Reader.
SX10
--
Para encender la cámara directamente en modo de grabación, mantenga botón de encendido
durante 1 segundo.
Cuando se enciende, presionar el botón del obturador, totales o parciales pasará a modo de
registro
desde el modo de reproducción.

*
Cámaras con acceso directo
botón se puede configurar para utilizar, - acceso directo, Flash, temporizador, ISO,
o los botones de vídeo a entrar en
<ALT>
el modo de
,
el botón de acceso directo es el predeterminado. (> Diversos cosas)
Al entrar en
<ALT>
el modo, el indicador "
<ALT>
"Aparecerá en la parte central inferior de la OSD. En
<ALT>
modo que ahora puede usar CHDK secuencias de comandos, y también entrar en el Menú
principal CHDK. Cuando usted tiene
terminado de personalizar la forma CHDK opera, y / o la utilización de scripts, pulse el
<ALT>
botón de modo para salir de
<ALT>
modo. Ahora puede usar la cámara para tomar fotos o vídeo, y su operación será cambiado por
las opciones definidas en el CHDK.
6 Page 9
On-Screen Display (OSD) Mapa
9
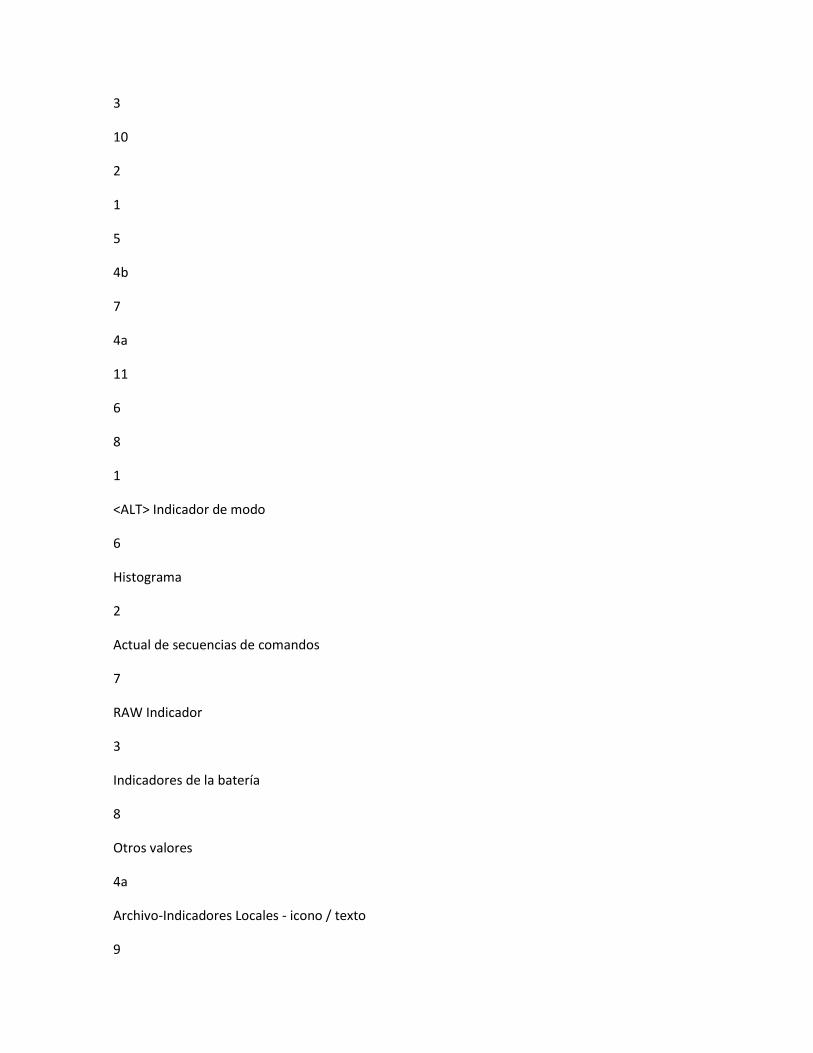
3
10
2
1
5
4b
7
4a
11
6
8
1
<ALT> Indicador de modo
6
Histograma
2
Actual de secuencias de comandos
7
RAW Indicador
3
Indicadores de la batería
8
Otros valores
4a
Archivo-Indicadores Locales - icono / texto
9

Extra Photo Operaciones
4b
Archivo-Space Indicador - barra vertical
10
Indicador de temperatura
5
Reloj
11
Switch Fast EV Indicador
7 Página 10
Menú Principal
El menú principal es el menú de nivel superior de la que
CHDK todas las funciones están activadas y personalizada.
Para acceder al menú principal, configurar la cámara para
<ALT>
modo y presione el botón Menú.
Al igual que los menús de Canon, al pulsar el
Func. / Set
botón, se selecciona la
opción de menú resaltada. Presionando
el botón de pantalla se moverá de nuevo
de un nivel de menú. Pulsando el menú
botón salir de la operación actual.
Extra Photo Operaciones
<Menú Principal

Invalida Desactivar
Permite el uso de un medio de prensa
+
ABAJO
Pulse el botón de forma rápida
cambiar cualquier reemplazar la configuración en y fuera. El estado de su
reemplaza aparecerá en la configuración anular normales
aparece en el menú en pantalla, pero en el color de alerta elegido.
(Vea "Ajustes de Visual")
• Off --
Apaga el "Deshabilitar Invalida" opción de acceso directo.
• On --
Comienza con la configuración anular MINUSVALIDOS. En la pantalla aparecerá "NO
Invalida "
• Desactivar --
Comienza con la configuración anular habilitado.
El "
ON "
y "
Personas de movilidad reducida
"Opciones le permiten utilizar esta función en su menú de usuario
(
http://chdk.wikia.com/wiki/User_menu
) Como palanca rápida en lugar de reemplazar
utilizar cualquier tecla de acceso directo. Algunas cámaras no tienen la característica de acceso
directo disponibles.

• Incluir AutoISO y Bracketing
Habilitar *•+ / Desactivar *+
Incluye AutoISO y los ajustes entre paréntesis en la
"Desactivar Reemplazar"
ajustes. Si no está activado entonces
tu
AutoISO
y
Bracketing
la configuración no se activan o desactivan por el
"Desactivar Reemplazar"
botón de acceso directo.
En <Alt> prensa modo de botón de la cámara de menú.
Usar
para navegar por menús.
8 Página 11
Anular la velocidad de obturación
[0 - 100]
<Foto Extra Operaciones <Menú Principal
TV en el menú OSD. Esta característica le permite anular la velocidad del obturador de la cámara
en todos los automóviles y la
modos manuales con la velocidad que usted seleccione. Esta característica permite velocidades de
obturación, mientras 64
segundos, (o más si su cámara tiene CHDK extra largas apoyo de la exposición) y lo más breve
1 / 100, 000

o
de segundo, en 1 / 3
RD
EV. Este valor se ve afectado por el "factor de valor" y el
"Enum Velocidad de obturación tipo de ajustes de abajo. Tenga en cuenta que las velocidades
reales disponibles son
depende de la cámara utilizada y otras condiciones tales como el ajuste de abertura.
•
Factor de valor
[Off, 1,10,100] o [Off, 1/100k - 100]
Permite la velocidad de obturación de reemplazo y fija el factor de valor, se describe el uso de los
cuales
por debajo de.
• tipo de enumeración Shutterspeed
[EV, Factor]
Seleccione el método de determinación de la velocidad de disparo de anulación.
EV en pasos de
- El método de la mayoría de nosotros va a usar. Permite que el primer conjunto de opciones
anteriores.
La velocidad de obturación Reemplazar se muestra en segundos. Seleccione la velocidad de
obturación y la
establecer el factor de valor a 1 para habilitar la función de anulación.
Factor
- Este método permitirá que el segundo grupo de opciones anteriores.
La velocidad de obturación se determina multiplicando el factor de valor seleccionado con el
seleccione la velocidad de obturación. Este método es útil en el análisis y la investigación
la fotografía.

Estado del filtro ND
(Para las cámaras con un filtro ND)
Cuando la cámara detecta una escena muy brillante, girará el filtro ND en línea con el objetivo
y el sensor. Esto hace que la escena parezca más oscuro y afectará a la exposición (pero no la
profundidad de campo
como una apertura real / iris se). Con el filtro ND en, la cámara puede seleccionar una de
obturación más lenta
velocidad sin sobreexponer la escena entera. Además, con el filtro ND se balanceaba en la cámara
capturar una imagen con una abertura de f / 8 - Este es un valor de abertura artificial provocada
por la ND
mm con filtro volvió CHDK, usted puede optar por mantener el filtro ND fuera, y sólo tienes que
seleccionar una más rápida
la velocidad del obturador para compensar. Para ello, utilice:
Menú Principal> Extra Photo Operations> Estado filtro ND
Seleccione una de las opciones de:
[Off / In / Out]
▪
'Off'
significa que la cámara automáticamente el control del estado del filtro ND.
▪
'En'
significa que el filtro ND se balancea pulg
▪ "
Out '
significa que el filtro ND se mantiene fuera.
Override Aperture
[Off, 2,77 a 16,00]

<Foto Extra Operaciones <Menú Principal
AV en el OSD. Esta característica le permite reemplazar la configuración de apertura de la cámara.
Simplemente seleccionar el ajuste de abertura deseada y la cámara se utiliza en todos los que la
creación automática y manual modos de transporte. Tenga en cuenta que los valores de apertura
real disponibles dependen de la cámara.
Reemplazar Subj. Dist. Valu
[0-65535]
SD en el OSD. Esta característica le permite especificar, al milímetro, la distancia de enfoque
manual.
Esta función sólo está permitido durante el modo de enfoque manual. Para enfocar la cámara en
el reemplazo
distancia que media-debe presionar el obturador.
9 Página 12
• Factor de Valor (mm)
[Off, 1, 10, 100, 1000]
Factor en el OSD. El factor de valor se utiliza para permitir que el Sujeto "Override. Dist. Valu "
(OSDV), y también para establecer rápidamente la distancia de enfoque. Cuando la actualización
de la " Reemplazar Subj. Dist.
Valu
"Con la izquierda / derecha, el valor será cambiado por el importe establecido en el"
Valor
factor
". Así que" 1 "cambia la OSDV de 1 mm," 10 "cambia por 10 mm, y así sucesivamente. De esta
manera,
el OSDV se pueden actualizar más rápido que tratar de cambiar el reemplazo de 1 a 450 mm
pulsando
el rockero 449 veces.
Reemplace el valor ISO

[0 - (máximo de ISO para la cámara)]
ISO en el menú OSD. Esta característica le permite anular ajuste ISO de la cámara. Seleccione el
Ajuste de ISO y la cámara que la creación de empleo en todos los modos automático y manual.
• Factor de Valor
[Off, 1, 10, 100]
El factor se utiliza para permitir el reemplazo de ISO, y para establecer un coeficiente multiplicador
en contra de la ISO "Override
valor "mencionado. Así que si desea utilizar un ISO de 1200, que establecerá el valor "Reemplazar
ISO"
a 12, y el "factor de valor" a 100. Esta disposición existe para acelerar la creación de una
costumbre
ISO.
10 Página 13
Bracketing en modo continuo <
Extra Photo Operaciones <Menú Principal
Bracketing es la práctica de hacer varias exposiciones de una escena, con cada uno de
la exposición difiere de la siguiente por pasos predeterminados en la exposición o el foco
ajustes. Poner entre paréntesis se utiliza para capturar fácilmente una serie de exposiciones para
que el
mejor exposición se puede seleccionar en un momento posterior. Bracketing también se utiliza
para crear
una serie de exposiciones que se combinará con métodos tales como HDR
transformación.
Las características entre paréntesis están permitidas cuando el modo de unidad de cámara
se establece en continuo, y el temporizador personalizado con algunos modelos.
Uso Consejo: Si desea disparar cuadros individuales y todavía tienen

entre paréntesis para cada uno, después de la primera a la ligera tregua en la
botón del obturador a la mitad la posición de la prensa. La prensa próxima completo se
darle otra oportunidad entre corchetes. Este proceso puede repetirse
como para muchos pasos entre paréntesis como usted necesita. Dándole más fino
el control sobre el número de exposiciones entre corchetes que pueda necesitar.
Set Custom temporizador en la cámara Canon
®
Menú
Ver Notas Bracketing : Página 49.
• TV bracketing valor *Off, 1 / 3 - 4 eV]
Establezca este valor en el soporte a través de tiempo de exposición. Un valor de 1
doble o la mitad el tiempo de exposición para las siguientes exposiciones.
• AV valor entre corchetes *Off, 1 / 3 - 4 eV]
Establezca este valor en el soporte a través de la apertura. Un valor de 1 se abrirá o se
cerca de la abertura de 1 parada para las siguientes exposiciones.
• Subj. Dist. Soporte valor *0 - 100]
Establezca este valor para que soporte del foco. Esta función sólo está
activado durante el modo de enfoque manual. Esta característica le permite especificar la
distancia de enfoque manual
en milímetros. Este valor se multiplica por el factor de valor de abajo para llegar al valor final.
11 Página 14
• Factor de Valor (mm)
[Off, 1, 10, 100, 1000]
Se utiliza como un multiplicador de distancia entre paréntesis valor.
• ISO valor entre paréntesis [0 - 100]

Establezca este valor en el soporte a través de la ISO. Este valor se multiplica por el factor de valor
de abajo para llegar a
el valor ISO final que será utilizado para poner entre paréntesis. Un valor de 2, con un factor de
valor de 10, se
aumento o disminución de la ISO por 20 en los siguientes exposiciones.
• Factor de Valor
[Off, 1, 10, 100]
Usado como un multiplicador para el valor ISO entre paréntesis.
• Tipo de Bracketing
[+/-, -, +]
Soporte en el OSD. Con todos los tipos de paréntesis de la primera exposición utiliza la exposición
actual de
ajustes de la cámara. En las exposiciones siguientes los ajustes de exposición se adaptan, como se
describe
por debajo de.
+ / --
Este tipo de horquillado, alternativamente, se aplicará el valor entre paréntesis, en primer lugar a
continuación, restando
agregando. La secuencia es la siguiente ...
0 EV,-1EV, +1 EV,-2EV, +2 EV,-3EV, +3 EV, etc Bracketing continuará hasta que suelte el
del obturador. Así, por ejemplo, digamos que usted ajuste el televisor entre paréntesis a "2 EV", y
cuando un medio de prensa -
el obturador se observa un tiempo de exposición de 1 segundo. Cuando se suelte totalmente el
obturador se
obtener las exposiciones en estos tiempos: 1 seg, ¼ seg, 4 seg, 1 / 15 seg, 15 seg, 1 / 60 seg, 15
seg, 1 / 250 seg, 15
s, etc
--

Este tipo de obras entre paréntesis que el anterior, pero sólo se reducirá el valor de la exposición.
Uso de la anterior
ejemplo, el tiempo de exposición será de 1 sec, sec ¼, 1 / 15 seg, 1 / 60 seg, 1 / 250 seg, etc
+
Este tipo de obras entre paréntesis que el anterior, pero sólo se incrementará el valor de la
exposición. Uso de la anterior
ejemplo, el tiempo de exposición será de 1 seg, 4 seg, 15 seg. Una vez que se supera el límite de la
cámara,
exposiciones subsiguientes tendrán lugar en el máximo (o mínimo) de ajuste.
• Borrar Bracket Valores en Inicio
Habilitar *•+ / Desactivar *+
Active esta opción para desactivar el paréntesis cuando la cámara está apagada.
• Añadir primas sufijo -
Habilitar *•+ / Desactivar *+
En el modo de bracketing ahora tiene la opción de añadir un sufijo al nombre del archivo en bruto,
de modo que más tarde se
pueden identificar fácilmente el RAW que se crearon durante la puesta entre paréntesis, que está
deshabilitado en forma predeterminada.
Custom Auto ISO
<Foto Extra Operaciones <Menú Principal
Esta característica tiene 2 propósitos: permitir al usuario definir los límites exactos de la norma ISO
utilizados en
AutoISO
y
Auto-HI
. Como un ejemplo: Ampliar el
AutoISO
rango de 80-200 a 50-400.

Dar información adicional a la cámara para que pueda seleccionar la velocidad de obturación
óptima (para evitar la
desenfoque o conseguir la exposición artística a la derecha) y la ISO en lugar de algunos sub-
óptimo por defecto ...
12 Page 15
Como un ejemplo: Utilice una de obturación más rápida y de ISO más alto cuando los deportes de
tiro, pero ir a un ritmo más lento
ISO de obturación y la mínima al grabar paisajes) Método: La cámara se trate de
mantener bajo la norma ISO, siempre que la velocidad del obturador es de no más lento que el
definido por el usuario (más abajo).
Costumbre
AutoISO
se iniciará en cuando
ISO HI / AutoISO
es elegido. Esto permite que un manual rápido
reemplazar por la elección de un valor ISO específicas.
Ejemplo: cámara en ISO 100 a 1/8s. AutoISO configurado para ISO50-400 en
1/15s:
AutoISO
se desplazará a ISO200 para mantener 1/15s velocidad de obturación.
Esta característica está disponible en todos los modos excepto para la prioridad de obturación
(Tv). También es
con discapacidad en punto de ayudar a prevenir con una configuración diferente para cada parte
del panorama.
•
Habilitar Custom Auto ISO
Habilitar *•+ / Desactivar *+

Este es el interruptor principal para esta función.
• Mínimo de velocidad de obturación
[Auto 1 / 8-etc]
Aquí tienes básicamente dos opciones:
1. Auto - Esto es para el uso al fotografiar bodegones,
los paisajes, etc utilizará los siguientes factores para prevenir
movimiento de la cámara, sino que asumirá el tema tiene todavía.
2. Configuración numérica - pista a la cámara lo que la velocidad de obturación óptima para el
tema que usted
estás fotografiando.
La cámara se intenta utilizar este valor o una más rápida como sea posible (para evitar la
distorsión),
por ejemplo,
1/8s - 1/30s - Slow sujetos en movimiento.
1/60s - 1/125s - niños, mascotas, el movimiento general
1/250s - 1/1000s - Deportes, acción rápida
• Factor de usuario
(1/FL/factor)
Este ajuste de cuentas de la capacidad del usuario para mantener la cámara estable. Se basa en la
vieja regla
de que su velocidad de obturación no debe ser inferior a 1/focal-length. Comience por dividir la
efectiva coordinación
de longitud de la lente de la distancia focal real. La respuesta es generalmente menos del 6.
Entonces
aumentar o reducir esta cantidad por una autoevaluación de valor de su firmeza. Si usted piensa
que su
las manos son más firmes que el promedio luego disminuir en un 20%. Si usted piensa que está
débil luego aumentar

un 20%.
• es el factor
(Tv * factor)
Para determinar el ajuste ISO, la eficacia del sistema es tener en cuenta.
Utilice un valor de 4 si el IS es lo suficientemente eficaz como para darle una parada de dos
reducción de obturación
velocidad. Utilice un valor de 2 si la IS no es muy efectivo, o de 8 si la IS es muy eficaz.
• Max ISO HI
(x10)
Establece la cantidad máxima "HI" ISO que la cámara puede seleccionar.
• Número máximo de ISO Auto
(x10)
Establece el máximo de "Auto" ISO que la cámara puede seleccionar.
• Min ISO (x10)
Establece el mínimo "Auto" ISO que la cámara puede seleccionar.
Borrar anulan los valores @ inicio
Habilitar *•+ / Desactivar []
Extra Photo anula Operaciones será despejado para la próxima vez que la cámara se inicia.
13 Página 16
Habilitar Fast EV Switch?
Habilitar *•+ / Desactivar *+
Advertencia
: Esta función no está correctamente viable en todas las cámaras todavía.
Ver: http://chdk.setepontos.com/index.php/topic, 2595.msg24211.html # msg24211
y: http://chdk.setepontos.com/index.php/topic, 2501.msg23321.html # msg23321

Da vuelta a su
UP
y
ABAJO
botones en rápida
EV
botones de la indemnización. Ya no tiene que
presione su
FUNC.
/
SET
o
MENU
botones para ajustar su
EV
mientras que los ajustes de disparo. Pulsando
❶
UP
o
ABAJO
los botones de la EV aumenta o disminuye. También hay una pantalla de visualización
mostrando su elegido
EV
ajustes de compensación por cualquier paso de tamaño que ha elegido (véase
❷
Tamaño de paso (1EV)?)

más abajo). Es aconsejable mover el
OSD EV
reemplazar mostrar en el
cámara propia para evitar confusiones.
U sted verá un verdadero cambio de hora en su EVF / LCD a medida que cambia sus valores EV con
este corto
cortar. También funciona mientras se dedica el modo de Zebra. Usted puede ajustar la alerta de
Zebra sólo por
presionando el
UP
y
ABAJO
botones con la mitad de disparar.
Cuando se utiliza junto con las curvas de "Auto" DR "modo que nunca debe perder otro
soplado destacar o sombra cayó de nuevo.
Un inconveniente: si va a usar botones arriba y abajo durante una media de prensa para ver a su
Zebra
alertas al cambiar la configuración de EV, que cambiará su "Deshabilitar Invalida" dentro y fuera
de si
tienen esa característica comprometidos así. Un pequeño precio a pagar por la posibilidad de
tener estos increíbles
características. Una solución temporal, establecer su EV en pasos de tamaño a 1 / 2 lo que
normalmente se utilizan, entonces el
"Desactivar Invalida" acceso directo siempre variará de nuevo a su original ON (u OFF) en cada 2
EV + / - prensa, restablecer de manera eficaz en el lugar que quería en primer lugar.
También tenga en cuenta: Este cambio no se guarda entre el poder de la cámara-bajos. Si siempre
quiere
comenzar con un pequeño valor negativo EV preestablecidos para evitar las altas luces quemadas,
a continuación, utilizar la propia Canon

De compensación EV configuración de su valor de inicio EV. Este conmutador Fast VE reflejará que
el valor
en el inicio.
❶: Activado cuando está activado el Fast EV Switch.
❷: Utilizar parámetros de OSD> editor de diseño de OSD para mover la pantalla.
•
Tamaño de paso (1EV)?
[1 / 6 EV, 1 / 3 EV, 1 / 2 EV, 2 / 3 EV, 5 / 6 EV, 1eV, y -]
Al utilizar la función de acceso directo EV rápida puede ajustar la cantidad que desea cambiar su
EV
de compensación con cada pulsación de tecla ARRIBA o ABAJO. Paso tamaño se incrementa. Una
mejora importante
encima de los niveles de ajuste y medidas en el firmware original.
Flash Manual de la Fuerza
Habilitar *•+ / Desactivar *+
Para el control de Facultativo sobre la salida de la cámara de flash, con el uso de potencia del flash
[0, 1, 2] para que no den
de salida o 2 pasos por separado en poder de la potencia del flash.
• Potencia de flash
[0, 1, 2]
Utilizado con el flash de la Fuerza manual para ajustar la potencia del flash.
Más información en: - Flash notas en la página
56
14 Page 17
Parámetros de vídeo
<Menú Principal

Modo de vídeo
[Bitrate o Calidad]
Los modos de compresión de vídeo.
Bitrate
--
dicta una tasa de datos constante.
La compresión de vídeo (y, por tanto, la calidad de vídeo) se expande o
los contratos que sea necesario para mantener la tasa de datos constante.
Calidad --
Establece un nivel de compresión constante, garantizando un nivel determinado de calidad,
independientemente de
la cantidad de datos que el nivel requiere.
Video Bitrate
[0,25, 0,5, 0,75, 1, 1,25, 1,5, 1,75, 2, 2,5, 3]
El factor de compresión para la compresión de Calidad. 0,25 es el más comprimido / menos la
calidad y la
3 es la menos comprimido / la mejor calidad.
Calidad de vídeo
[1 - 99]
<Parámetros de vídeo <Menú Principal
El factor de compresión para la compresión de calidad. 1 es el más comprimido / calidad, como
mínimo y 99
es el menos comprimido / la mejor calidad.
Clear Video Parámetros de Inicio?
Habilitar *•+ / Desactivar *+
Cuando se activa este claro todo lo que los ajustes personalizados de compresión de vídeo de
nuevo a la cámara de

propios valores por defecto en el arranque.
Fast Video Control
Habilitar *•+ / Desactivar *+
<Parámetros de vídeo
Sólo unas pocas cámaras son compatibles. Pausa de vídeo y volver a activar pulsando
IZQUIERDA / DERECHA
mientras
la grabación. Nota: Al utilizar esta función, el vídeo restantes cálculo en tiempo récord se
restablece,
así que el cambio se muestra inmediatamente en el menú OSD.
Video de Control de Calidad?
Habilitar *•+ / Desactivar *+
Cuando se activa, usando la
UP / DOWN
botón aumentar o disminuir la calidad de vídeo o
tasa de bits (depende de que uno está habilitada en anular el modo de video) - Mientras se está
la grabación.
Activar Zoom óptico
Habilitar *•+ / Desactivar *+
<Parámetros de vídeo
Esta característica le permite usar la cámara con zoom óptico durante las grabaciones de vídeo.
Silencio durante el zoom
Habilitar *•+ / Desactivar *+
Para eliminar el ruido del mecanismo de enfoque. Tenga en cuenta que el zoom de sonido
mecanismo es muy fuerte en el
de vídeo, que probablemente es por eso que se ha desactivado por el fabricante.

Tecla AF
<Parámetros de vídeo <Menú Principal
(Botón de disparo - un medio de prensa, o de
SET
botón) Durante la grabación de vídeo: cámara hace una sola
enfoque automático de exploración.
Mostrar Videotime restante
[No, hh: mm: ss, KB / s, ambos]
<Parámetros de vídeo
Muestra un elemento de posicionamiento OSD para mostrar la tasa de bits de vídeo, y el resto de
vídeo
la grabación en tiempo, en su tarjeta SD, ...
15 Page 18
• No
- No aparece nada de tiempo restante de grabación y / o datos de vídeo-rate.
• hh: mm: ss
- Mostrar un reloj de tiempo restante de grabación de vídeo a la izquierda.
• KB / s
- Display de ancho de banda de grabación de vídeo (tasa de datos) en kilobytes por segundo.
• Ambos
- Pantalla de vídeo de tiempo de grabación restante tanto en horas / minutos / segundos, y el
vídeo
la tasa de datos en kilobytes por segundo.
• Frecuencia de actualización (segundos)
<Parámetros de vídeo <Menú Principal

Debido a la naturaleza de la variable de bits de vídeo de tipo y los métodos de compresión, con
sujeción a su cargo,
la opción "Mostrar restante Videotime" tiene que ser actualizada periódicamente por volver a la
tarjeta de votación de espacio
y la tasa de bits para calcular un tiempo bastante precisa estimación restantes. Elija, en segundos,
la frecuencia con que desea que este tiempo de grabación de vídeo-pendientes de actualización.
Períodos más cortos
de tiempo son menos exactos de cada uno en la pantalla de actualización a la siguiente.
Parámetros de RAW
<Menú Principal
Guardar en bruto
Habilitar *•+ / Desactivar *+
Permite el ahorro de los archivos RAW. Habilitación de RAW no
disable JPEG, se guardan ambos.
Excepciones
<Parámetros primas <Menú Principal
• Desactivar @ Video Record?
Habilitar *•+ / Desactivar *+
Algunas cámaras, la S-Series, en particular, contará con un "Video botón de grabación donde se
puede
participar y que también disparar individuales aún fotogramas durante la grabación de vídeo. Se
encontró que
De archivo RAW de ahorro pueden interferir en este proceso. Activar esta opción se asegurará de
que usted no
se pierda ninguna fotografía o el vídeo.
• Deshabilitar RAW @ Deportes
Habilitar *•+ / Desactivar *+

Desactivar ahorro de RAW cuando el modo de marcado se activa a modo de deportes. Esto
asegura que la acción rápida
secuencias no se pierda debido a archivo RAW-ahorrando tiempo, cuando el olvido para
desenganchar el RAW
característica.
• Deshabilitar RAW @ Burst
Habilitar *•+ / Desactivar *+
Deshabilitar archivo RAW de ahorro al utilizar el modo ráfaga. Una vez más, una invalidación a
mano para cuando RAW no es
necesarios durante el estallido rápida secuencia de disparos (RAW sin duda permitió aumentar el
tiempo entre el
vacunas)
• Deshabilitar RAW @ Timer
Habilitar *•+ / Desactivar *+
Deshabilitar archivo RAW de ahorro al utilizar personal de la cámara el modo de temporizador
(similar a la de la seguridad
característica para el modo de ráfaga).
16 Page 19
• Deshabilitar RAW @ EV Bracketing
Habilitar *•+ / Desactivar *+
Deshabilitar archivos RAW de ahorro cuando se utiliza cualquiera de las características de alta
velocidad entre paréntesis.
• Deshabilitar RAW @ Edgeoverlay
Habilitar *•+ / Desactivar *+
Deshabilitar el ahorro al utilizar RAW Edgeoverlay.
• Deshabilitar RAW @ Auto
Habilitar *•+ / Desactivar *+

Deshabilitar el ahorro al utilizar RAW modo de disparo automático.
• Avisar al excepción?
Habilitar *•+ / Desactivar *+
Muestra de advertencia OSD "crudo personas de movilidad reducida" en un color seleccionable
cuando cualquiera de los archivos RAW
Salvo excepción se cumplen y de archivo RAW de ahorro se encuentra activada.
Dark Frame Resta
<Parámetros primas <Menú Principal
Controles de la aplicación de la función de fotograma oscuro resta de su cámara en el RAW
archivo. Dark Frame resta es una función utilizada para reducir el ruido del sensor cuando el
tiempo de exposición
es de 1,3 segundos o más.
• Auto - Realiza una exposición de DFS en 1,3 segundos o más.
• Off - No realiza una DFS.
• On - siempre realiza un DFS.
Sólo prima de primera en la serie
Habilitar *•+ / Desactivar *+
Al disparar en modo continuo, esto sólo va a crear un RAW
la captura de la primera imagen. Imágenes posteriores no se han
Captura en formato RAW. Esto permite disparo continuo rápido.
De archivo RAW con JPEG en Dir
Habilitar *•+ / Desactivar *+
Guarda los archivos RAW en la misma carpeta que los archivos JPEG. Si está desactivado
a continuación, los archivos RAW siempre se guardan en la carpeta 100CANON.
Prefijo de archivo RAW
[CRW_, SND_, IMG_]

<Parámetros primas <Menú Principal
CHDK le permite nombrar a sus archivos en bruto con cualquier combinación de los prefijos
estándar IMG_,
CRW_, SND. Si se va a procesar los archivos RAW con DNG4PS-2 a continuación, establecer un
prefijo de
IMG_ permitirá DNG4PS-2 para recuperar los datos EXIF de los JPEG de acompañamiento.
Extensión de archivo RAW
[. CRW,. CR2,. THM,. WAV,. JPG]
Establecer la extensión que se utilizará en los archivos RAW. para que los archivos son visibles
cuando se conecte la cámara
a través de USB.
RAW restar extensión
[. CRW,. CR2,. THM,. WAV,. JPG]
Uso de más de una prórroga con el mismo prefijo puede causar un problema con la lista de USB.
Véase: --
http://chdk.setepontos.com/index.php/topic, 2045.msg18862.html # msg18862 Gracias reyalp.
17 Página 20
RAW desarrollar
<Parámetros primas <Menú Principal
Esta función puede procesar un archivo RAW y crear un archivo JPEG de la misma. Cuando se
selecciona, un explorador de archivos
Se muestra la ventana. Seleccione un archivo RAW y pulse SET. Pulse Set de nuevo para borrar el
mensaje, entonces
pulse la
<ALT>
botón para salir

<ALT>
modo. Por último, pulse el obturador. El archivo RAW luego
será transformada en un archivo JPEG. El aspecto interesante de esta función es que la
transformación se producirá
con la configuración actual de la cámara. Así que usted puede utilizar la configuración MyColors
para crear intensos y la
Sepia versiones de la misma imagen, o simplemente ajustar la nitidez o el contraste.
Normalmente,
que tendría que establecer MyColors antes de sacar la foto, y se obtendría una sola imagen.
La eliminación de píxeles Bad
[Off, Promedio, RAWconv]
<Parámetros primas <Menú Principal
Para quitar píxeles defectuosos en una imagen DNG. Una vez que haya generado una lista con
todos los "malos"
pixels for your camera, CHDK can remove them automatically.
See:- Bad pixel Notes on page:
55.
and also:- Badpixel removal at
http://chdk.wikia.com/wiki/Badpixel_removal
DNG format
Enable *•+ / Disable * +
Automatic conversion of RAW image in the DNG format, in the camera. This format can be read
by many image editing programs. Also includes meta data like EXIF and whitebalance / color
matrix information. For this feature to be activated, the CHDK file directory badpixel.bin is
required, it can be generated either on a Windows PC (see Badpixel_removal for more
information), or directly in the camera with a script. This file contains specific information on
camera-pixel errors. The DNG files created have the same file extension as described in RAW,

and can be reset manually to DNG. There is also an automatic function to rename for most
cámaras.
'DNG' file extension
Enable *•+ / Disable * +
To distinguish DNG from RAW files. The DNG RAW image files will be stored as
<filename>.DNG with this option enabled, otherwise the extension from the "RAW file
extension" menu entry is used.
RAW buffer cached
Enable *•+ / Disable * +
When enabled, saves the DNG file using the RAW buffer, which is a quicker method.
More about RAW
To get the RAW files onto your computer you must use a flash card
lector. The most versatile way to work with RAW is to first convert
the RAW files to the Adobe DNG format (Adobe D igital N e G ative.)
This conversion can now be done in camera. See DNG format above.
Once the RAW files are converted, the resulting DNG files can be
processed with Photoshop® or any other popular photo processing
de software.
See also:- Raw notes on page
50
18 Página 21
Edge Overlay
< Main Menu
During shoot mode half or full press this feature adds an
overlay based on the image edges, additionally a grid that
matches the Canon grid is added.
Use the left, right, up or down buttons to shift the overlay
(use it in
<ALT>
mode to avoid changing the camera options).
The edge overlay is frozen when taking a shot. The frozen
edges are displayed from then on when the shutter gets half-
pressed,
FROZEN
is shown in the OSD.
When you shoot again it goes back to the original behavior: showing the edges of the current
image on half-press. This behavior is useful when shooting stereo pairs. For panoramas you
would want to freeze the edges after every full press.
Zebra mode should be disabled when using the Edge Overlay.
Enable edge overlay
Enable *•+ / Disable * +
Creates and overlays a high-contrast outline of the edges in the last half-press or shot that you
took. Valuable for those that want to align features for panorama stitching or for doing stop-
frame animations. Similar to an "onion-skinning" mode in animation software.
Save Edge Overlay
< Edge Overlay < Main Menu
After creating an overlay, navigate to this menu item and Press
Func./Set
to save.
Load+Set Zoom
Enable *•+ / Disable * +

< Edge Overlay < Main Menu
When this function is activated, the zoom position is stored to the current edge-overlay loaded .
Lock Edge Overlay
Enable *•+ / Disable * +
Enable this to ensure the edge-overlay you loaded or just created is not overwritten in the
OSD at half-press. Note:- This checkbox is overwritten on each camera startup.
Edge overlay threshold
[ 0 - 255 ]
< Edge Overlay < Main Menu
Set the edge-overlay sensitivity. Lower values create edges along lower contrast / lower-
brightness edges. Higher values only create edges on the highest contrast / brightest boundaries,
and therefore fewer, finer, and more well defined lines. Adjust to suit your preference.
Edge overlay color
< Edge Overlay < Main Menu
When selected press
SET
to display the standard color selection palette, to choose your edge-
overlay highlighting color. Choose your color then press
SET
again to register that color with
this function.
Enable in Play
Enable *•+ / Disable * +
< Edge Overlay < Main Menu
Enables edge-overlay to be displayed in playback mode
.

Free internal Memory
< Edge Overlay < Main Menu
Clears the items saved in the Save Edge Overlay menu.
Load Edge Overlay
< Edge Overlay < Main Menu
Prensa
Func./Set
takes you to Edge folder, choose an edge overlay to load.
19 Page 22
Custom Curves
< Main Menu
Enables the use of custom "curve" profiles to adjust the exposure of
your RAW and JPG images.
Difference between CV and CVF curves:
CV curves are the standard RGB curves.
CVF curves are special versions of the curves which intends to
avoid color shift side effect of the RGB curves. They are an
approximation of the luminance curves.
Except the SYSCURVES.CVF file it is recommended to put the curves files in the
\curves directory.
See:-
http://chdk.setepontos.com/index.php/topic,932.0.html
Enable Curve
[ None, Custom, +1EV, +2Ev, Auto DR]
• None - No curve profile is applied.

• Custom - Your custom curve profile is applied as-is.
The following three options require that you have a SYSCURVES.CVF file in your /CHDK
folder, this file is included in the "complete" CHDK packages. It is also contained in a file at
http://chdk.setepontos.com/index.php?action=dlattach;topic=932.0;attach=1816
which also
contains the editor.
Due to the limitation to short 8.3 file names in the file browser of current DryOS-based
cameras the file "SYSCURVES.CVF" should be placed on the memory card by a card reader;
in the CHDK file browser the file name is shown in shortened format as "SYSCUR1.CVF".
• +1EV - Increases shadow detail by
1EV
step.
• +2EV - Increases shadow detail by
2EV
pasos.
• Auto DR (auto dynamic range):
Auto DR with Zebra is intended to be used for the direct application of the curves to the shot
- and not for post processing (the feature is just mimic of the Fuji S100 +200, +400 Dynamic
Range). The flow is:
1. - Activate Zebra display
2. - Activate Auto DR
3. Use the camera EV negative compensation to reduce the Zebra overblown highlights
shown on screen. You can use the (+/-) button on the back of the camera.
4. Take the shot. You will directly get the JPG without post processing. The luminance of the
darker areas will be raised while the highlight is compressed.
During the RAW develop process, you need to set the EV comp. to the value that you used to

reduce the highlight blown out when you took the RAW. Care should be taken with in camera
develop since it is a tricky art there (for White Balance issues in particular).
If the scene does not require you to reduce exposure to avoid blown highlights, the Auto DR
feature does not do anything.
Load Curve Profile
Load your desired curve profile from your \CHDK\CURVES folder. All curve profile files except
para
SYSCURVES.CVF
should be in this folder.
See also:- Curves on page 52.
20 Page 23
Histogram parameters
< Main Menu
Enables and customizes the Live Histogram feature.
Histogram Anatomy
The horizontal component of a histogram runs from 0 to 255. ¿Qué es
important to understand is the “0” and “255” are not values…they are
labels representing a color value. When you see a line in the middle
of the histogram (label “127”) it's saying “this is how many '127's there
are in the image.”
The vertical component of a histogram is the count of pixels at a given level. The bottom is zero
and the
top represents the largest count of values for a label. So if you have a 7MP image and every color
is
“127”, then the top of the histogram represents 7 million pixels.

RGB Histogram
RGB histograms simply count pixels at each level. The RGB histogram of an image of three boxes
(red,
green, and blue) where every color has a value of 127 would be a single line in the middle of the
histogram (at label “127”.)
Luminance (Y) Histogram
Luminance histograms attempt to factor in the perceived brightness of colors. A luminance
histogram of
an image of three boxes (red, green, and blue) where every color has a value of 127 will show
three lines
at labels “38” (red- x 0.3), “75” (green x 0.59), and “14” (blue x .11).
Show live histogram
*Donʼt, Always, Shoot+
< Histogram parameters < Main Menu
• Donʼt –
Don't show histogram on LCD.
• Always – Always show the histogram on the LCD.
• Shoot – Only show the histogram when shutter is half-pressed.
Histogram layout
[RGB, Y, RGB Y, RGB, RGB all, Y all, Blend, Blend Y]
• RGB –
Displays the RGB histogram only.
• Y –
Displays the luminance histogram only.
• RGB Y –
Displays RGB above luminance.
• RGB –

Displays three histograms, one for each color.
• RGB all –
Displays all 5 variations of histograms with RGB on top.
• Y all –
Displays all 5 variations of histograms with luminance on top.
Blend – Combines the three histogram of the RGB display into one.
Blend Y – Same as Blend but with the addition of luminance below.
21 Page 24
Histogram Screenshots
RGB
RGB Y
RGB Y
RGB
RGB all
Y all
Mezcla
Blend Y
• Histogram mode *
Linear, Log
]
< Histogram parameters < Main Menu
Determines how the Y-axis (vertical) of the histogram will be scaled. Log is useful for
scenes with a large amount of a single color, such as an overcast sky (lots of gray.)
22 Página 25

A 10 MP camera might have its Y-axis scaled like this...
Lineales
Registrarse
10,000,000 pixels
7,500,000 “
6,250,000 “
5,000,000 “
3,750,000 “
2,500,000 “
1,250,000 “
1 “
10,000,000 pixels
1.000.000
"
100,000 “
10,000 “
1,000 “
100 “
10 “
1 “
Show histogram over/under EXP
Enable *•+ / Disable * +
EXP in on-screen display. If parts of a scene are over or under exposed, then this setting will
display “EXP” above the histogram, and a red dot at the end that is exceeding exposure limits.
Ignore boundary peaks [

0 – 32
]
Another tool for controlling the scaling of the histogram. If you know that your scene will
contain large amounts of black or white (eg a moon shot) you can set how many levels from the
left or right edges of the histogram to ignore, if those levels peak in the histogram. Esto
increase the visibility of the smaller portion of the histogram.
Auto magnify
Enable *•+ / Disable * +
N.NNx in on-screen display. Another tool for controlling the scaling of the histogram. Esto
option will magnify the Y-axis (vertical) if less than 20% of the histogram area is filled. El
purpose of this function is to make the histogram easier to read when there are very tall peaks.
This function lies somewhere between the Linear and Log options above. A red dot over a peak
indicates that it's been clipped due to the magnification. The amount of magnification applied is
displayed over the histogram.
No Magnification
With Magnification
In this example the image is both over and
under exposed (the scene has a very wide
dynamic range)
23 Page 26
Show Histo Ev Grid
Enable *•+ / Disable * +
< Histogram parameters < Main Menu
Adds 4 or 5 vertical lines to the histogram dividing the histogram by full stops.
EV Grid Enabled

Zebra parameters
< Main Menu
Zebra is a feature that indicates over and under
exposed areas of the scene. When the shutter is half-
pressed, the areas of the scene that are under or over
exposed will turn red. The zebra effect can also be
applied to existing images by half-pressing the shutter
during playback mode.
Draw Zebra
Enable [
•
] / Disable [ ]
Enables the drawing of over/under exposure indicators.
Zebra mode
[Blink 1, Blink 2, Blink 3, Solid, Zebra 1, Zebra 2]
Determines how the over/under exposed areas will be indicated.
• Blink 1 – Solid coverage, blinks every ½ second.
• Blink 2 – Solid coverage, blinks every second.
• Blink 3 – Solid coverage, blinks every two seconds.
• Solid – Solid coverage, no blinking.
• Zebra 1 – Striped coverage, thin diagonal lines.
• Zebra 2 – Striped coverage, thick diagonal lines.
Zebra Solid
Zebra 1
Zebra 2
24 Page 27

UnderExposure threshold
[0 – 32]
Controls the sensitivity of exposure indication. 0 is less sensitive and 32 is very sensitive.
OverExposure threshold
[0 – 32]
Controls the sensitivity of exposure indication. 0 is less sensitive and 32 is very sensitive.
Restore original screen
Enable [
•
] / Disable [ ]
This option only applies to Zebra Blink modes.
When exposure indicators are visible, all of the original Canon indicators are erased. Cuando esto
option is enabled, the original Canon screen items (such as exposure) are redrawn between
blinks.
Restore OSD
Enable [
•
] / Disable [ ]
This option only applies to Zebra Blink modes.
When exposure indicators are visible, all of the CHDK half-shutter indicators are erased. Cuándo
this option is enabled, the CHDK half-shutter indicators (such as DOF calculator) are redrawn
between blinks.
Draw over zebra
[Histo, OSD, Nothing]
This option applies to all Zebra modes.

When exposure indicators are visible, nothing else is displayed on the screen. This option
specifies which additional indicators will be drawn.
Histo – Only the live histogram is drawn with the exposure indicators.
OSD – The entire CHDK OSD is drawn with the exposure indicators.
Nothing – Nothing else is drawn with the exposure indicators.
RGB zebra
(overexp. Only)
Enable [
•
] / Disable [ ]
Overexposed areas are indicated by the color of the channel that is overexposed. Underexposed
areas are ignored.
Black – All channels are overexposed.
Red – Red channel is overexposed.
Green – Green channel is overexposed.
Blue – Blue channel is overexposed.
Cyan – Green and blue channels are overexposed.
Magenta – Red and blue channels are overexposed.
Yellow – Red and green channels are overexposed.
Solid
Zebra
25 Page 28
OSD Parameters
< Main Menu
Show OSD

Enable * • + / Disable * +
The CHDK On Screen Display.
• Hide OSD?
* Donʼt, In Play, On Display, both +
• Don't -
always shows the OSD icons/elements
• In Play -
hides them in playback
• On Display
- hides them when you toggle the CANON icons on/off with the display button
(does not work for the evf)
• both -
hides OSD in both playback and by "display button cycling", Helpful to those who
were bothered by seeing the battery and other indicators in their playback screens.
Center Menu
Enable * • + / Disable * +
A cosmetic adjustment to your CHDK Menu screens to evenly place them on the screen.
Auto Select 1st Entry @ Menu
Enable * • + / Disable * +
Quickly position your menu-selection cursor on the first entry in any CHDK menu. Instead of
having to press
ABAJO
once to enter the menu options it will now start out already on the first
menu option.
Enable Symbols
Enable *•+ / Disable * +

To display Menu Symbols
With Symbols
Without Symbols
26 Page 29
Menú del Usuario
< OSD parameters < Main Menu
Add frequently used menu items to make a custom easy access
menú.
User Menu Enable
< OSD parameters < Main Menu
[ Off, On, On Direct, Edit ]
• Off -
Disables use of the User Menu
• On -
Enables the User Menu when in
<ALT>
mode and pressing [HALF-PRESS] +
MENU
.
• On Direct -
When entering
<ALT>
mode your User Menu will be automatically displayed
without having to press the
MENU

botón. You may reach the main menu by scrolling to the
bottom or using a [HALF-PRESS] +
MENU
shortcut keys.
• Edit -
Enters the editing mode for your User Menu.
To copy other menu-items to build your custom User Menu (Up to 10 entries)...
Still in OSD parameters, select
User Menu Enable [ Edit]
, now browse to any menu and
select the item you want to add to the User Menu, then press +/- button or the equivalent
button on your camera. The item has now been added to your User Menu. Each new item is
added as the lowest on the menu. To delete an item, in Edit mode, select the item and press
+ / --
button (or equivalent). When editing is complete remember to set the User Menu Enable
option back from "Edit" to either "On" or "On Direct".
Customizing hint / reminder: Some CHDK features require 2 or more options that work
juntos. An example, "Override Shutter Speed" might also need its associated "Value Factor"
selection and the "Shutter Speed Enum Type" if you frequently change that too. Asegúrese de
copy any related menu items together so they are still available where you need them in your
custom menu.
See also:-
http://chdk.wikia.com/wiki/CHDK_firmware_usage/AllBest#User_Menu
User Menu as Root
Enable * • + / Disable * + < OSD parameters < Main Menu
Toggles the behavior of the Menus when the User Menu is turned ON. When this option is set

then the User Menu will be the first one to be seen, and the main menu may be reached by using
the [
HALF-PRESS
]
+ MENU
shortcut keys, or just selecting the top entry “Main Menu”.
Show State Displays
Enable * • + / Disable * +
< OSD parameters < Main Menu
Displays your Override, Bracketing, and Override Disabled settings in their own positionable
information area.
Show Temperature
< OSD parameters < Main Menu
• Off - No display of camera component temperatures.
• Optical - Displays the temperature of your optical elements (most assume this is used for the
IS mechanism and Zoom/Focus motors). When the camera is first turned on this will most
accurately reflect the environmental temperature.
27 Página 30
• CCD - Display the temperature of the CCD. Let's you know when it might be getting too
warm. Or when it's cold enough to take lower-noise images.
• Battery - Displays the temperature of the battery compartment.
NOTE: 3rd party LI-ION battery packs may always report a constant temperature, eg
25°C or 28°C.
• all
- Displays all 3 values.

in Fahrenheit -
Enable *•+ / Disable * +
Default is Centigrade, check this for Fahrenheit.
Note: Not all models have a separate temperature sensor for each component, and due to
differences in design, values reported by different models may not be directly comparable.
OSD layout editor
< OSD parameters < Main Menu
The OSD items can be rearranged to suit personal preferences and to avoid the Canon items on
la pantalla.
Enter Layout Editor
Histogram selected
DOF calculator selected
When a feature is selected you can use the rocker switch to move it around. A red highlight
displays giving the name of the feature being moved and its position in X, Y format.
• Func./Set
botón
- Switch between display features.
• 4-Direction switch/rocker
– moves the selected feature.
• Display
botón
– Toggles between 1 pixel per move or 10 pixels per move.
28 Page 31
Grid
< OSD parameters < Main Menu

Opens the Grid Lines menu. This menu allows you to select and display a custom defined grid.
See the grid tutorial in the
CHDK Wiki
.
Show grid lines
Enable * • + / Disable * +
Enables the display of custom grids.
Load grid from file…
Displays the file selection screen. Use the directional
controls to select a grid file and press Set to select it.
Rulers Grid
…………...Current grid.…………….
The name of the currently loaded grid.
Override grid colors
Enable * • + / Disable * +
This setting will override the grid colors defined in the grid file. It will not override the
grid colors of the grid selected from the Canon menu.
Line color
Select a color for the grid lines
Fill color
Press the Set key to bring up the color selection table.
Press the Set key to select a color.
Also see:- Grids notes on page
51.
Miscellaneous Values
< OSD parameters < Main Menu

Show misc values
[Don't, Always, Shoot]
• Donʼt – Don't show misc values on LCD.
• Always – Always show the misc values on the LCD.
• Shoot – Only show the misc values when shutter is half-pressed.
Show values in video
Enable * • + / Disable * +
Displays the Miscellaneous values when the camera is in video mode.
Show Zoom
Enable * • + / Disable * +
Z:n/n.nx in Micscellaneous Values. Displays the current Zoom position of the lens.
Z:n = zoom position, from 1 to 14
• Show Zoom value as *X, FL, EFL+
Method of displaying the Zoom position of the lens
X – as a multiple of the shortest focal length, as in 6X.
FL – as the actual focal length of the lens, as in 34.8mm.
EFL – as the effective 35mm FL, as in 210mm.
29 Page 32
Adaptor Lens Scale, 100=1x [0 – 1000]
Adjusts the zoom value above by a multiplier, which is based on the converter lens that is
installed on the camera. For a 0.7x wide converter use 70. For a 1.75x tele converter use
175.
Show 'real' Aperture
Enable * • + / Disable * +
Av in Miscellaneous Values. This is the actual aperture setting after any override aperture

adjustments have been applied.
Show 'real' ISO
Enable * • + / Disable * +
IR in Miscellaneous Values. Displays the actual ISO value after overrides or bracketing have
been applied.
Show 'market' ISO
Enable * • + / Disable * +
IM in Miscellaneous Values. Displays Canon's ISO value, which is not always the same as
the actual ISO value.
• Show ISO only in Autoiso mode
Enable * • + / Disable * +
Display the ISO value only when the camera is in Auto ISO mode.
Show Set Exposure Ev (Tv+Av)
Enable * • + / Disable * +
Evs in Miscellaneous Values.
Show camera exposure value based on the values of shutter speed and aperture.
Show Measured Ev (Bv+Sv)
Enable * • + / Disable * +
(brightness value + scene sensitivity set in a camera)
Show Set Bv (Brightness Value)
Enable * • + / Disable * +
Bvs in Miscellaneous Values.
Internal-brightness scenes through recalculation of the parameters established in the camera.
Justo
Av-Sv + Tv.
Show Measured Bv

Enable * • + / Disable * +
Displays the measured brightness value, as written in the Exif data.
Show Overexp. Value (No Flash!)
Enable * • + / Disable * +
Indicates a calculated overexposure value. Av-Bv-Sv + Tv
Show Canon overexp. Valor
Enable * • + / Disable [ ]
Indicates the overexposure value calculated by the camera.
Show Scene luminance (cd/m2)
Enable * • + / Disable * +
B in Miscellaneous Values.
Run average in standard illumination scenes candelas per square meter… calculated from a ratio
to Bv = 12.5.
30 Page 33
DOF Calculator
< OSD parameters < Main Menu
The Depth Of Field Calculator displays 5 distances in meters…
• S / SD –
Distance to the subject (Near Limit + DOF*0.33). Also called the Focal Plane.
• R1/ NL –
Near Limit. The distance where acceptable sharpness begins.
• R2 / FL –
Far Limit. The distance where acceptable sharpness ends.
• DOF –
the Distance between the Near Limit and the Far Limit.

• Show DOF calculator
[Don't, Separat, In Misc]
• Donʼt
– Disables display of the DOF calculator
• Separate
– Displays the DOF values apart from the Misc values.
• In Misc
– Displays the DOF values with the Misc values.
Canon Subj. Dist. as Near Limit
Enable * • + / Disable * +
Enabling this value affects the way the subject distance is calculated.
Use EXIF subj. Dist. (PC65)
Enable * • + / Disable * +
Enabling this value affects the way the subject distance is calculated.
The following settings will determine which DOF values will appear. When the “Show DOF
calculator” is set to “Separat”, all 5 values are always displayed. When it is set to “In Misc”
then only the enabled values below are displayed as part of the Miscellaneous Values
.
Show Subj. Dist. in Misc.
Enable * • + / Disable * +
Enable to show in Miscellaneous values on OSD.
Show Near Limit in Misc.
Enable * • + / Disable * +
Enable to show in Miscellaneous values on OSD.
Show Far Limit in Misc.
Enable * • + / Disable * +

Enable to show in Miscellaneous values on OSD.
Show Hyperfocal Dist. in Misc.
Enable * • + / Disable * +
Enable to show in Miscellaneous values on OSD.
Show Depth of Field in Misc.
Enable * • + / Disable * +
Enable to show in Miscellaneous values on OSD.
Subject distance from lens
Enable * • + / Disable * +
When enabled, distances displayed are measured from the front of the lens rather than the
sensor. This is useful for macro photography.
31 Page 34
Crudo
< OSD parameters < Main Menu
Show RAW state
Enable * • + / Disable * +
“RAW” in OSD. Enables the display of the RAW indicator.
Show RAW shoot remain
Enable * • + / Disable * +
Calculates how many RAW captures will fit in the current free memory and displays that
number next to the RAW indicator.
Warning threshold [0 – 200]
Turns the RAW indicator red when the number of RAW shots remaining drops below the
threshold value.
Batería

< OSD parameters < Main Menu
Hooray for the battery indicator!!
Controls the display of the battery indicators on the LCD
Change Battery Min.
& Max. Voltios
Set Show Battery
Porcentaje
Showing Yellow
Battery Icon
Set the maximum and minimum voltages to match fully charged and discharged batteries,
the battery icon fill color will reduce as voltage lowers and will change to red color close
to minimum voltage.
Filespace
< OSD parameters < Main Menu
Show Filespace Icon
Enable * • + / Disable * +
Displays a small SD card shaped icon on your screen to show how much filespace is left on your
SD card. Opaque means remaining free space. Transparent means that space has been used. Usar
the OSD Layout Editor to position the icon anywhere on your screen.
32 Page 35
Show Space Bar
* Donʼt, Horizon, Vertical +
< Filespace < OSD parameters
Displays a thin SD capacity remaining "fuel-gauge" icon on your screen. Location is
positionable in your OSD Layout Editor.

• Don't - Turn off this feature.
• Horizon - Displays the bar-graph gauge in a horizontal orientation.
• Vertical - Displays the bar-graph gauge in a vertical orientation.
• Size on Screen
< Filespace < OSD parameters
Changes the display size of your "Space Bar" SD-capacity gauge.
1/4 - the bar-graph only goes 1/4th the width or height of your EVF/LCD display.
1/2 - the bar-graph goes 1/2 the width or height of your EVF/LCD display.
1 - the bar-graph goes the full width or height of your EVF/LCD display.
• Width/Height
< Filespace < OSD parameters
Change the width (for vertical space-bar) or height (for horizontal space-bar) in 1-pixel
incrementos.
Show Filespace in Percent
Enable * • + / Disable * +
Display your SD card space left in percentage of its total capacity. (Toggles between this and
the MB option.) OSD display element positionable in your OSD Layout Editor.
Sh
ow
Filespace in MB
Enable * • + / Disable * +
Displays your SD-card space-remaining in Megabytes. Toggles between this and the
percentage option. (véase más arriba).
Warning Unit
< Filespace < OSD parameters
Don't - Don't display a warning when your free SD-card space is getting low.

Percent - Change your space remaining display to the warning color when the percentage
reaches or goes below your selected "% Threshold" (see below).
MB - Change your space remaining display to the warning color when the Megabytes reaches
or goes below your selected "MB Threshold (see below).
• % Threshold
< Filespace < OSD parameters
Setting used in conjunction with above "Warning Unit" feature. Set the amount of SD-card
space percentage remaining when you want that OSD element to turn to your chosen warning
color.
• MB Threshold
< Filespace < OSD parameters
Setting used in conjunction with the above "Warning Unit" feature. Set this to how many
megabytes when your space remaining feature turns to your chosen warning color.
Note: may be used in conjunction with a handy script if you need to ration the amount of
photos you take on a long vacation.
Ver esto:
http://chdk.wikia.com/wiki/UBASIC/Scripts:_Photo_Rations script.
33 Page 36
Reloj
< OSD parameters < Main Menu
•
Show Clock
Displays an OSD real-time clock.
• Don't - No clock display.
• Normal - Displays HH:MM

• Seconds - Displays HH:MM:SS
• Clock Format
12-hour or 24-hour format toggle. When 12-hour format is used then
the chosen 12-Hour Clock AM/PM indicators are enabled.
Also influences the temperature format. 12h - Fahrenheit.
• 12h Clock Indicator
• PM - Displays AM or PM suffix on the OSD Clock
• P - Shorthand version of A or P for AM and PM on the OSD Clock (to save real-estate space).
Ultra-shorthand version of AM or PM. Displays a simple "." after the time to indicate PM,
no character is displayed for AM. Examples: 10:30 = 10:30 AM, 11:15. = 11:15 PM
(note the small period after the 15).
• @ Shutter Half-press Show
Shows your OSD clock during a half-press of your shutter button.....
• Don't - No clock display on a half-press.
• Full - Shows full clock time during half-press.
• Seconds - Only counts off the seconds in the clock display during a half-press. Helpful when
doing manual timings between consecutive shots without having to quickly call up some
intervalometer script.
Show OSD in Review Mode
< OSD parameters < Main Menu
Displays your OSD when in
REVIEW
modo. Do not confuse this with Playback mode. Revisar
mode is when your last taken photo is temporarily being displayed as you hold down the shutter-
button (and press SET to lock it into Review Mode) or when you have your Canon's Menu
"Review" options turned on. This allows you to keep your on-screen grid and other settings

visible when reviewing the photo to see if you got the framing or other settings as you had
previsto.
34 Page 37
Visual Settings
< Main Menu
Use this menu to make changes to the appearance of all menus,
texts, backgrounds, etc., choose font types, sizes, colors, etc.
Idioma
Lets you choose another language if you have the
appropriate .lng -file in the CHDK/LANG/ folder of
your SD card.
OSD codepage
Choose the Codepage. [ Win1250 - 1257 ]
Menu RBF font
Choose another font ( RBF format ) for the CHDK menus. If you have chosen a RBF font but
want to switch back to the original built-in font, just choose an "illegal" RBF font (Try to load a
uBASIC script as a RBF font, for example).
……………………....
.
Colores
……………………....
Change any of the display colors for all your text and icons. Si
you don't change them they will remain as their defaults.
There are opaque colors and transparent colors, and also some
"special effect" colors. Note that record mode and playback

mode use different color tables. So it may happen that you pick
a nice color in playback mode, and in record mode it will look
totally different. But there are also colors which will stay the
same in both modes. Some examples for A-series cams:
0x11(white), 0xFF(black), 0x22(red), 0x55(green), 0x44 (transparent light grey).
Green Cursor Background
Pink Menu Background
Green Menu Text
35 Page 38
Scripting Parameters
< Main Menu
Load Script from File...
Prensa
Func./Set
to go to SCRIPTS Folder, select the script
CHDK normally saves your last user-selected script
parameters from one session to the next, to use, press
Func./
Establecer
to load the script. New scripts can be added to the
SCRIPTS folder as they become available.
Script shoot delay (.1s)
After an image is captured, indicates how long to delay the execution of the next script
comando. A value of 0 executes immediately. A value of 10 executes the next script command
one second after capture.

Mainly used to minimize camera movement before script starts.
Script Autostart
[Off, On, Once]
When enabled, the script listed under “current script” will execute when the camera is turned on.
Remote Parameters
• Enable Remote
Enable * • + / Disable * +
Toggles your remote USB cable detection state, both scripted and scriptless.
When this is enabled you may use your camera normally without any script and still use your
USB-Remote cable to trigger the shutter. Have your camera in normal record mode and not
en
<ALT>
modo. This is the same as if you pressed the shutter manually in all normal camera
operaciones.
Note on scriptless usage: You may first perform a half-press to auto-focus and set exposure
with a short press of your USB-Remote trigger, The second press will then perform a full
shutter-press. If you want to trigger a full shutter-press immediately just hold down your
USB-Remote button a little longer. Or more precisely explained by the author of this: "... if
USB remote is enabled, pressing / releasing remote button is equivalent to pressing / releasing
the shutter halfway. To take a shot, do a "reversed click", ie momentarily release and again
depress the remote button within 0.5s, which will "push" the shutter all the way.
Note: On some cameras the scriptless USB Remote trigger may be used to advance (in
reverse order) from frame to frame in Playback mode. Now when giving a slide-show lecture
you can stand away from the camera and just click the photo change button. :)
36 Page 39

...................................
synchable remote
........................................
• Enable Synchable Remote
Enable * • + / Disable * +
Enables synchable scriptless remote code originally used in Stereo Data Maker.
• Enable Synch
Enable * • + / Disable * +
Used to synchronize 2 or more cameras when all hooked to the same USB-Remote signal.
•
Enable Synch Delay
Enable * • + / Disable * +
Allows you to fine-tune your USB-Remote triggering speed to
match that of other cameras when using more than 1 camera. (Para
stereo imagery, multi-frame stop-action matrix effects, etc.) Rate
of delay is adjusted with the settings below.
• Sync Delay 0.1ms
USB-Remote Sync delay in 0.1ms increments (1/1000th of a second).
• Sync Delay 0.1s
USB-Remote Sync delay in 0.1s increments (1/10th of a second).
• Enable Remote Zoom
Enable * • + / Disable * +
To enable the zoom by remote control function.
• Zoom Time-out 0.1s
[ 2 - 10 ]
Set a value for time-out, 0.1sx 2 up to 10.

Load Default Param Values
CHDK normally saves your last user-selected script parameters from one session to the next.
Prensa
Func./Set
when your menu cursor is on this option resets them to the default parameters as
programmed into the script when first ran. A simple way to go back to a script's defaults after
you've gotten hopelessly lost in many changes or just need a quick way to return to base settings.
Parameters Set
Allows for the selection of 0 to 9 (ten) optional parameter sets for each script. If you select a
new Parameter Set and then change your user-setting script parameters, CHDK will now
remember your settings for each set. (The script parameter sets are saved in a CHDK/DATA/
directory named by the script in use at the time.) Now you can have up to 10 favorite settings for
any one script. The next time you load the same script your favorite defaults can be called-up by
just selecting numbers 0 to 9.
Save params
Enable * • + / Disable * +
Save current parameter settings.
See USB R emote notes , page
50.
37 Página 40
.......................................
Default Script
.................................................. .
• Times to Repeat
[ 5 ]

Set a number for times for script to repeat.
• Display Delay
[ 3]
In seconds
More at: Scripting Notes, page
52 and How do I use scripts? page
61.
Miscellaneous stuff
< Main Menu
File browser
Usar
to navigate
Browse files in the various CHDK folders.
Usar
Up /Down
key to highlight,
Func./Set
to select a folder,
Derecho
key to select file,
Left
key for pop up menu for Cut, Copy, Delete,
Select Inverse, RAW sum, RAW average, Purge RAW, Sub from marked,
DNG -> CHDK RAW.
• RAW Merge
When selecting (highlighting) files in the file browser mode, by using your

DERECHO
navigational
button, you now have 2 functions available on the
IZQUIERDA
navigational button menu.
If after using either of these features and you would like to see the resulting image without
having to load them into a computer and using RAW viewing software, use the "RAW Develop"
feature on the "RAW Parameters" menu to create a JPG file for playback in the camera.
When using either of these options the resulting new RAW file will use whatever last filename
was selected for merging as the prefix to the new RAW filename, and a WAV suffix will be
added to it so you know which last-of-a-sequence files were used for merging. This also
circumvents any confusion later when using utilities like DNG4PS with trying to merge
corresponding JPG EXIF data with the original RAW data, where filenames could get drastically
out of order by creating new JPG filename numbers.
38 Page 41
• RAW Sum
Using the selected RAW files, this will combine them into one file. Working on an additive
principio. Meaning, if you take five 65-second exposures, then RAW Sum them together, the
resulting image will be equivalent to the brightness level of a 5 minute, 25 second exposure.
• RAW Average
This RAW Merge feature will, as it says, average all the frames together. Very convenient if
taking several identical frames at high ISOs at high shutter speeds. This will merge them
together, effectively obliterating any noise, as the noise gets averaged out. The more frames
used, the less noise visible.
• Purge RAW

< File Browser < Miscellaneous Stuff
With this function the RAW files can be deleted in 3 different ways...
The 3 options for the Purge RAW function and erase the
corresponding RAW files:
1) Delete all RAW files in DCIM folder including
subfolders
Useful when:
You keep a separate folder for RAW files.
You set up the camera to create a new folder everyday
(several days trek, holidays etc).
You want to erase the occasional mischievous RAW file stored in a different folder.
Go to CHDK File Browser, select DCIM folder, push the left button to display the popup menu
and select "Purge RAW" (See image above). A warning will ask you to confirm (See image next
page ) and voila! You have regained some SD space.
This feature will search through all the folders in DCIM looking for a RAW file (CRW/CR2
prefix or file extension) and if it finds one then will look for its JPG partner anywhere inside
DCIM (comparing the 4 digit number assigned by the camera). If it is not found, the RAW file is
erased.
Caution ! Erasing files in the camera is an irreversible operation !
Backup important images first, the data on your SD card may get damaged or
deleted !
The first step is to delete the JPG outtakes in playback mode (using Canon's
interface).
39 Page 42
2.) Delete all RAW files in a selected folder

Useful when:- You keep RAW files in the same folder as JPG
files, You only want to get rid of some RAW files. (Very
important shots in some other folder). You know which folder
has a lot of out-takes. Go to CHDK File Browser and inside
DCIM folder select the folder you want (Eg "102CANON")
and push the left button to display the popup menu. Seleccione
"Purge RAW". A warning will ask you to confirm and all the
RAW files in ONLY that folder will be erased. This option
works like the previous one but only on the selected Canon folder, the rest are untouched.
3.) Delete some or all RAW files in a list.
Useful when You want to protect specific RAW files (to use them later for HDR)
Go to CHDK File Browser, enter DCIM folder, enter a sub folder (Eg "102CANON") push the
left button to display the popup menu. Select "Purge RAW" . A warning will ask you to confirm
and all the RAW files will be gone.
Now the useful thing of this option is that you can mark the RAW files you DON'T want to erase
(protect files). The Purge RAW function will erase the rest of the RAW files ignoring the marked
queridos.
See:-
http://chdk.setepontos.com/index.php/topic,557.msg4454.html#
Calendario
< Miscellaneous Stuff
Yes , a calendar!
Select Year - Up / Down
Select Month - Left / Right
40 Page 43

Text file reader
< Miscellaneous Stuff
This utility can be used to read a text file stored on the SD
tarjeta. (Very convenient!, you can keep onboard instructions.)
• Open new file…
Displays a file browser window, opened to the CHDK/
BOOKS directory. You can select a txt file to view. Prensa
Func./Set
to open the file.
• Open last opened file
Will display the most recent text file that was viewed.
• Select RBF font
Open the file browser in the CHDK/FONTS directory. Allows you to select a different font for
displaying text.
• Codepage *Win1251, DOS+
Select the text file format.
Change Font
Change Color
Yellow Text Color
As with other menus, fonts and colours can be changed to suit all preferences.
• Wrap by words
Enable * • + / Disable * +
Enables word-wrap.
• Enable autoscroll
Enable * • + / Disable * +
When enabled the text file will scroll automatically.

• Autoscroll delay (sec) * 0 – 60 ]
Determines how long the system waits before scrolling the text file.
41 Page 44
Juegos
< Miscellaneous Stuff
Yes , games!
Choose your favourite!
Arrow buttons - move
Func./Set - choose level (Moves counter should be 0).
Erase / +/- – restart current level
Display - show 'about' info
Zoom rocker - undo / redo moves
Sokoban
Reversi
Connect 4
Mastermind
If colours are not displayed properly, try entering and exiting Canon menus before entering <ALT>
mode.
Flash-light
For Cameras with fold out LCD. Turns the LCD panel into a flashlight! When in Record Mode
and the LCD panel is swiveled facing forward, the LCD display turns all-white so you can see
your way around in the dark, or to illuminate some close object while setting up to take a
photograph.
Show splash screen on load
Enable * • + / Disable * +

Mostly personal preference, shows build info,
also indicates CHDK is loading.
Startup sound
Enable * • + / Disable * +
Might be handy to know if someone else is using your camera.
Use zoom buttons for MF
Enable * • + / Disable * +
For a more precise adjustment of manual focus.
Disable LCD
[
No, Script, Alt
]
No
: LCD disabled,
Script
: LCD on during script execution,
Alt
: LCD on
42 Page 45
<ALT>
modo. For long intervals you should disable the Power Saving options of your camera.
This can be done in the
<ALT>
menú. In the Miscellaneous Stuff menu item set the Disable
LCD Off value to Script

,
so the display won't turn off while in
<ALT>
mode or while a script
is running.
Draw palette
Prensa
Func./Set
to select draw color, press
MENU
to exit.
Show build info
Displays the current version of CHDK in use, ie: 0.9.7 - 725, date Mar 19 2009.
Show memory info
Displays free memory card space available, also space used by CHDK.
Make card bootable...
Option to enable auto load of CHDK at startup.
Swap partitions
For cameras with multi partition support. To access each partition on a multi partition
memory card, (in computer OS's that only read one partition) Press
SET
to change to the
currently inactive partition. Also see:- Page 45 "Create card with two partitions"
Reset options to default…
Reset all functions and displays back to CHDK default values.
Note:-

By this operation you will lose all your personal settings.
Debug Parameters
< Miscellaneous Stuff
In this menu internal data on the functioning of CHDK is available.
•
Debug data display
< Debug parameters < Miscellaneous Stuff
Shows debug data on the OSD, values are: [None, Props, Params, Tasks]
Mostrar
http://chdk.wikia.com/wiki/PropertyCase
variables
The values are generally shown unsigned - that's because the propcase viewer doesn't
know whether a value is supposed to be signed or unsigned, and treats everything as
unsigned. "65152" is just the same value as "-384" when considered as an unsigned
short rather than a signed short.
Shows the task list, only on VxWorks cameras.
•
PropCase / ParamsData page
< Debug parameters < Miscellaneous Stuff
[ 0 -128 ]
Search pages, each page shows 10 values
Property cases (PropertyCase or PropCase) are basically variables in the camera's RAM
that we can read and write from CHDK by using uBasic commands get_prop and set_prop .
"Under the hood" some other uBasic commands work by changing propcases, making it
possible to use them in a portable way. Some propcases are read only. Often writing to a
propcase will have a different effect than pressing the corresponding buttons on the camera's

43 Page 46
interfaz de usuario. Typically this means that while you may change something like the shutter
speed and your change will be effective in your photo, it may not be updated to the camera's
on-screen display.
To find out which Property case a function changes see:
http://chdk.setepontos.com/index.php/topic,2666.new.html#new
Property cases are different for Digic II and Digic III cameras.
EXAMPLE: A570IS ISO is at #149, not #21 like on the S3IS, and the white
balance control is #268, not #206. Furthermore, some Digic III cameras (G7,
SD800IS, SD900) use the Digic II property set.
You are advised to confirm that these properties are appropriate for your
camera before you attempt to change them.
• Task list start
< Debug parameters < Miscellaneous Stuff
Where to display from. If you set this to more than there are tasks running on the camera,
it will show the last twelve, adjusting on the fly as tasks get created and then deleted.
• Show misc values
Enable * • + / Disable * +
Displays various values for service and programming purposes.
• Memory browser
< Debug parameters < Miscellaneous Stuff
Similar role as previous.
• Benchmark
< Debug parameters < Miscellaneous Stuff
Test write and read speed of the camera and SD cards. To compare memory cards.

Since this function during the first pass provides inaccurate values a 2nd run should always
be carried out, only the values of this 2nd run are meaningful.
Example next page...
44 Page 47
A720IS
Memory Card Benchmarks Example
(Guide only, many variables to be considered)
Speed (Kb/s)
SD-card model, size
Escribir
(RAW)
Escribir
(Mem)
Escribir
(64k)
Leer
(64k)
Canon, 16MB (bundled)
2254
1859
1754 3508
A-DATA Speedy, 2GB (FAT16)
2254
3164
2532 5572

Kingston, 2GB Ultimate
2254
10326
7692 6742
Transcend, SD 4GB, Standard (FAT16 fresh format)
2254
3980
3623 5930
Transcend, SD 2GB, 80x
2254
7629
5505 6476
Transcend, microSD 2GB, Standard speed, MLC
2254
5358
5468 9153
ByteStor, SD 1GB, 50x
2254
8060
6132 7021
SanDisk, SD 1GB, Ultra II 60x
2254
8840
5591 6606
SanDisk, SD 2GB, Ultra II 60x (fresh format)
2254

9600
7123 8445
SanDisk, SDHC 4GB, Ultra II 60x (FAT16 fresh)
2254
8718
5627 6715
Sandisk, SD 2GB, Extreme III 133x (fresh format)
2254
10686
7594 8316
EMTEC, SD 2GB, 60x (FAT16 fresh)
2254
8073
7407 8672
• Create card with two partitions
This option creates a 2 MB FAT partition on the SD card, that's fixed on the code for now. Copy the
CHDK firmware extensions to this partition and load them, (The DISKBOOT.BIN and PS.FI2 files).
Then select "Make card bootable" in "
Main Menu > Miscellaneous stuff
", so it does not complain when
you write-protect the card.
Next step is to select "
Swap partitions
" in "
Main Menu > Miscellaneous stuff
", this will hide this small

partition and make the larger FAT32 one visible. We need to format it, and copy CHDK files
DISKBOOT.BIN and PS.FI2 to it too, so we can perform "swap partitions" again. So format it in
FAT32,
copy CHDK, insert it on the camera and load CHDK using "Firmware Update", Select "Swap
partitions"
and "Make card bootable", write-protect the SD card, (lock with slider on side of SD card) and
power-
cycle the camera. It should now load CHDK from the small 2 MB partition, but have access to the
larger
FAT32 partition to store pictures, video and the CHDK folders.
BEWARE: This may DELETE ALL data on the card !
This feature is used with SDHC cards larger than 4GB, on supported cameras (needs
multi partition support) it will create a small FAT16 partition with a size of 2MB for CHDK
and a larger partition formatted as FAT32 to store the images. On such a prepared card
the camera boots up CHDK from the small partition, then the partitions are automatically
swapped, this way the full capacity of the FAT32 partition can be used. The partitions are not
shown correctly under MS Windows, only one of the two partitions is shown, to access the other
partition without a special system driver, the partitions should be swapped with "Swap partitions"
45 Page 48
The size of the 1st partition is fixed to 2MB in the code (not changeable in the CHDK menu),
but you can change it there and compile your own build, if you know how.
Normally the creation of a partition deletes all data on the card, the swap command should not
delete any data, but you should test this first!
The partitions can also be created manually with a card reader on a computer, the 1st partition
must be less than 4GB and formatted with FAT16. Note: as the CHDK download files grow in
size with later versions it may be necessary to partition with a computer anyway - to make the

1st partition larger than 2MB to accommodate the larger file size.
There is now (March2009) an Applescript to load CHDK and make an
SD card bootable for Apple Macintosh computer users, this should make what
was a daunting task for some, now a breeze to do, similar to (but not as
powerful as) how Cardtricks from whim makes it so easy for Windows
los usuarios. Many thanks from the Mac community to [email protected]
Go to: http://chdk.wikia.com/wiki/FAQ/Mac
• ALT +/- debug action
< Debug parameters < Miscellaneous Stuff
Action for the +/- key (on
IXUS
serie
DISP
is used instead)values are [None],
[Dmp RAM] -> a complete memory (RAM) dump will be written to the SD card
[Page] in this mode the page shown in the propcase viewer can be changed (double-press
changes the paging direction (up/down))
• Show saving time
< Debug parameters < Miscellaneous Stuff
Remote parameters
< Miscellaneous stuff
See Page 36
DNG visible via USB
Enable *•+ / Disable * +
This feature enables the display of DNG files on your computer, via USB connection.
46 Page 49

History of CHDK
From Stereo Data Maker site:-
http://stereo.jpn.org/eng/sdm/chdk.htm :
http://stereo.jpn.org/eng/index.html
During the second half of 2006, programmer ' VitalyB ' studied a disassembly of the firmware
update for an
IXUS camera in order to understand the Canon
®
firmware-update procedure.
With that knowledge, he was able to write his own program that installed itself and then
downloaded a
copy of the Canon
®
firmware by blinking an LED.
The program was installed in playback mode via the standard 'Firmware Update' option.
The hack copies the original initialization firmware and modifies it so that less ram is available to
the OS.
A custom process is then run in an area of ram that is not accessible to the OS.
After studying the camera firmware, he developed the "RAW enabler" that allowed A610 users to
save
uncompressed 10-bit RAW images as well as the JPG images.
Adam Dunkel's uBASIC interpreter was included to allow support for scripting and Pablo d'Angelo
improved the parser to replace line-numbers with labels.
The initial builds provided a 'live' histogram, scripting, three-exposure-bracketing and, to the
irritation of
many users, displayed "hello world" on the screen.

Support for A620, A630 and A710is quickly followed.
Log/linear histograms were added followed by RGB histograms and a layout editor for the on-
screen
displays (OSD) allowed the user to move them to the most convenient locations.
Future development would rely on cameras and their firmware dumps being available.
It was published on a Russian website and when 'discovered' in mid December, a poster on DP
Review
forum 'Canon Talk' said "sounds very interesting. surprised no interest in it."
That would soon change ... in February 2007 'DP Review' reported another programmer 'GrAnd'
had
added display of miscellaneous values (focal distance, zoom step and factor, hyper-focal distance)
and a
battery meter.
Users were initially wary that this 'hack' may damage their cameras but after others had tested it
they
became enthusiastic about each new feature.
GrAnd added shadow and highlight-clipping warnings to the histogram, a DOF calculator (based on
the
real aperture-value) displayed on shutter half-press and percentage-capacity indication for the
battery
with adjustable min/max voltage.
A file-browser and text-reader followed together with 'flash-light', choice of prefix, extension and
save-
location for RAW files.
Instead of loading each time the camera was turned-on, CHDK was next made auto-loading by
using a
'locked' SD card containing a DISKBOOT.BIN file.
After booting, the file DISKBOOT.BIN is 'hidden' so that the camera is not in a permanent boot-
state.

A calendar and clock were added together with text-reader auto-scroll, support of RBF fonts and
initial
support for the S3IS.
The DOF calculator for the S3IS was based on interpolation of the lens focal-lengths.
By request, GrAnd started an English-language WIKI and also provided a very convenient, ready-to-
use
Windows environment for would-be CHDK developers.
GrAnd also developed all the essential tools and functions that we now regard as the basic CHDK.
This major innovation made it possible for relatively inexperienced programmers to develop their
own
specialized builds.
The first was SDM in June 2007, followed in September by MX3 's motion-detection and then
Fingalo 's
enhanced uBasic scripting commands.
Other people provided downloads of firmware and ports of the basic CHDK to additional camera
models.
The A640, A700, A710, G7, IXUS700, A570 (by Rossig/MX3 ) and IXUS800 were soon supported and
new video features added.
47 Página 50
Tv bracketing in continuous-shooting mode, long-exposure feature by Fingalo and A560 support
seguido.
The first cameras to be supported were all based on the Canon
®
Digic II
®
processor using the VxWorks

®
sistema operativo.
Later 'hacks' included Digic III
®
cameras with VxWorks
®
or DRYOS
®
sistema operativo.
Richard Lemieux investigated the limited accuracy of the camera's distance reading.
ewavr (aka 'Zosim') had already discovered how to read the memory-mapped hardware registers
that the
camera's keys, SD card status and USB-connection status were connected to.
On certain cameras, it was then possible for the software to prevent the camera going into
download
mode when a voltage (+3 to +5V) was applied to the USB connection (by plugging into the PC, for
ejemplo). The USB status could be read like any key on the camera.
This feature was included in the SDM and Fingalo builds and this release of SDM takes the concept
further by allowing two cameras to be highly synchronized for stereo photography.
New cameras were ported, the original WIKI transferred to the current one and in November 2007
a
CHDK forum opened to continue discussion outside of 'DP Review'.
At the end of December 2007, discussion transferred to the 'CHDK Forum'.
Stereo Data Maker
(SDM) -
http://stereo.jpn.org/eng/sdm/index.htm
A customized CHDK with features designed for making 3D-Stereo images. (As well as numerous

features for 2D photography). It provides on-screen (EVF/LCD) stereo information and can save
the
accompanying stereo-image's data to different file-types. See:-
http://stereo.jpn.org/eng/index.html
for a
myriad of support programs for creating and displaying stereo images made with SDM-CHDK
(Stereo
Data Maker CHDK). MX3's Motion Detection feature (see below) is also included together with
script
commands for controlling the LEDs, all of Fingalo ' s build 124 features, Zosim' s Video
Compression and
USB 'cable release'. A560, A570,G7, IXUS700 (SD500) and IXUS800 (SD700) builds are also
provided.
all the features of Fingalo 128 and selected features from AllBest builds.
The website includes a design for electronics that enables full-speed continuous-mode
synchronized
stereo shooting with external flash at shutter speeds up to 1/1000 sec.
Other features are :-
Drift-free synchronization at up to 1/20,000 sec with twinned-cameras for virtually no additional
cost.
No hardwiring required and no vulnerable external equipment.
Single-shot, delayed single-shot and full-speed continuous-mode synchronized-shooting with
external
flash at shutter-speeds up to 1/1000 sec.
Synchronizing of any number of multiple cameras with fixed or progressive flash-delay.
Overriding of shutter-speed to provide values from 65 seconds to 1/40,000 sec in 1/3EV
increments.
On-screen-display options include two 'Rangefinder' modes that allow you to set the near and far-
point

distance by using the lens telephoto setting as a rangefinder.
The resulting scene-deviation is then displayed as a horizontal bar-graph .. coloured red if it
exceeds your
maximum-permissible deviation and required-aperture is indicated.
<ALT>
+ <FuncSet> then moves lens to calculated optimum-focus for the subject-range.
'Get image-stack' in continuous-shooting mode acquires images at varying focus positions for
creating
extended depth-of-field images. 'Show SDM Configuration' for quick overview of settings.
On-screen displays individually enabled and all enabled displays toggled on/off by shutter half-
press +
key_right.
48 Page 51
You can get the official release at :-
http://stereo.jpn.org/eng/sdm/index.htm
También hay una
Yahoo StereoData Maker Group :
--
http://tech.groups.yahoo.com/group/StereoDataMaker
Thanks to David - Microfunguy
KAP
Kite aerial photography (KAP)
is a hobby and a type of photography. A camera is lifted using a
kite and is triggered either remotely or automatically to take aerial photographs. The camera rigs
can
range from the extremely simple, consisting of a trigger mechanism with a disposable camera, to

complex apparatuses using radio control and digital cameras. On some occasions it can be a good
alternative to other forms of aerial photography. (From Wikipedia -
http://en.wikipedia.org/wiki/
Main_Page
)
-------------------------------------------------- --------------------------------------------
Bracketing notes
"Bracketing" is the taking of a series of shots with an incremental, usually subtle change in a
variable
between each one. Bracketing can be done with changes in shutter speed, ISO, aperture value,
focus, etc,
and though a bit challenging, several variables can be bracketed in combination, as well.
Normalmente
bracketing is done in order to cover a range of the variable values in an effort to capture the best
of
several shots. In such cases, bracketing can be done hand held, "on the fly" so to speak, and is
most likely
done in "Continuous shooting" mode, also in Custom Timer mode if the camera can take multiple
shots in
that mode. Usually, the photos are viewed after download side by side as thumbnails (or further
scrutinized in a browser), the "pick(s) of the bunch" is kept, and the rest are discarded.
(Note: When using Custom Timer mode for bracketing, the shutter button requires just one press,
not
held down as in Continuous mode)
Focus Bracketing is the taking of a series of photographs where the point of focus is moved
incrementally
between each shot. This is usually applied to macro applications where depth of field is
notoriously
shallow. But there's something much more fun we can do with a handful of focus bracketed shots!

"DoF Stacking" (Depth of Field Stacking) is where we combine a selection of focus bracketed
photos in a
similar manner to the way that three or more images are combined to make single HDR photos.
Presumably, the term "stacking" most likely comes from the physical stacking of different
negatives to
obtain a desired effect of a photo during processing in a darkroom. (-Anybody remember those?)
The
resulting image from DoF stacking can have usually paradoxical qualities; the superb detail of a
macro
shot with the depth of field of a landscape shot. CHDK makes it possible.
Ver:
http://chdk.wikia.com/wiki/DoF_Stacking
-------------------------------------------------- --------------------------------------------
49 Page 52
RAW notes
Raw Develop
Main Menu > RAW Parameters > RAW Develop
Another feature from EWAVR . This allows you to select any RAW file on your SD card and then
process
it into a JPG file so that you may view it in your camera. Exceptionally handy after using any of the
RAW Merge features so you can see the result without the need of a computer and extra RAW
processing
de software.
Choose "RAW Develop" and you will be presented with a file-browser display. Navigate to the
RAW file
that you want to process into a JPG file. After pressing
SET

to select your file, you will be asked to
"Switch Camera to Record Mode and take one shot." Prensa
SET
again to back out of this menu, then use
tu
<ALT>
toggle button to exit
<ALT>
modo. Press the shutter button.
Instead of taking an image, it will take that selected RAW file and now make a JPG file from it. Será
named according to whatever last JPG filename is in that folder and increment it by 1.
Keep in mind that the EXIF data on this new JPG file will not reflect the original RAW file. It will use
whatever camera settings were available at the time that you take the RAW Developing Shot for
the
resulting EXIF data.
Note : RAW file-saving must be turned ON for this feature to work. If RAW is not turned on, or you
select
a JPG file for "developing", then no action will take place.
-------------------------------------------------- --------------------------------------------
USB Remote Notes
Enable built-in CHDK remote suppor t
First, ensure you are running a reasonably up-to-date CHDK build. Some early builds did not
support
remote shutter release control via USB.
Now enable remote support via the CHDK menu:
Main Menu > Miscellaneous Stuff > Remote
Parameters > Enable Remote

Nota. If you enable the "Sync Delay" then the shutter will release after you stop the voltage to the
USB
puerto. This was done because it was found they could sync the shutters on 2 cameras for stereo
imagery
much better as the voltage dropped. (It can also be useful if your switch uses poor-quality
contacts, in
which case the rise in voltage when it closes may not occur quickly enough to trigger CHDK's
remote
function.) Under most single-camera circumstances, however, you won't need this unless you
need to
sync the shutter release more accurately to your voltage trigger signal for specialized reasons.
USB Remote Cable
Using a USB cable, a low voltage power supply, and a push button switch, you can construct a
device
that will allow you to remotely trigger the shutter of your CHDK-enabled camera. Remote triggers
are
most often used in low-light situations when pressing the shutter button on the camera could
introduce
picture spoiling camera shake, but may also be useful in other circumstances - for instance if you
wish to
trigger the shutter with your foot, or with an electronic signal from another device.
In order to trigger your CHDK camera remotely, you will need to: connect a suitable triggering
device to
the USB socket of your camera; ensure "Enable remote" to have been selected in CHDK; run a
suitable
script; place your camera in shoot mode (ie not playback mode, movie mode, alt mode, etc) with
CHDK
still running; operate the trigger!
50 Page 53

Triggering devices
Your triggering device should incorporate a power supply - a battery, for instance - that has its
negative
(or ground) terminal connected to pin 4 of a mini-USB cable and its positive terminal connected to
pin 1
of a mini-USB cable via a momentary push-to-make switch. The power supply should provide a
voltage
that is no greater than 5V (or you may damage your camera), but which must be greater than or
equal to
the minimum voltage specified on the Camera-Features page,
See :-
http://chdk.wikia.com/wiki/CameraFeatures
Homemade USB remote cable
A popular method for remotely triggering CHDK-enabled cameras involves constructing a simple
triggering device from a 3V CR2032 coin battery, a USB extension cable, and a push switch. El
camera's USB cable is then attached to the camera at one end and to the triggering device by the
other
final. Below is a circuit diagram of such a switch.
If you are cutting up a commercially-made USB extension cable,
then wires 1 and 4 are red and black, respectively, according to
the USB standard. It seems that even cheaply made USB cables
follow this standard.
Note that the 3V CR2032 battery might not be enough to trigger
your camera; if not, you may need to use a different power
source, eg three 1.5V AAA cells connected in series.
-------------------------------------------------- --------------------------------------------
Grids Notes

Grids are an overlay for your EVF/LCD display that can help you with composition, cropping,
subject /
image alignment, and other novel things. Normally most cameras only offer you one simple
option, a
"Rule of Thirds" composition grid, but with CHDK the sky is now the limit on what you want
displayed
on your viewfinder for these handy photographer's tools.
You may Load and run your Grid files from the CHDK
<ALT>
+ Menu path of: "
OSD Parameters" >
"Grid" > "Load Grid from File...
" When not in
<ALT>
mode you may quickly turn your Grid Overlay (and
all other CHDK OSD elements) on or off with a simple Half-Shutter-Press + Right-Navigation button
combinación.
Or put the "
Grid" > "Show Grid Lines
" menu toggle on your fast-access Custom User-Menu if not wishing
to turn off all of CHDK displays.
http://chdk.wikia.com/wiki/CHDK_firmware_usage/MoreBes t
See also: Grids Pics - Page
59.
51 Page 54
Curves Notes

Custom Curves
Enables the use of custom "curve" profiles to adjust the exposure of your RAW and JPG images.
Por favor
read this long thread - Custom processing for JPEG (Tone curve, CA ...) :-
http://chdk.setepontos.com/index.php/topic,932.0.html
at the CHDK Forum, for its full functions and use.
As well as downloading a custom-curve editor (PC) to create your own profiles. (You may have to
login
there to download any attachments in the posts.) For those of you new to curve adjustments to
exposures
there's a nice little overview to what they do and how they might affect an image in this Curve
Anthology:
http://www.curvemeister.com/support/curvemeister2/help/Articles/CurveMoves.htm
Difference between CV and CVF curves: CV curves are the standard RGB curves. CVF curves are
special versions of the curves which intends to avoid color shift side effect of the RGB curves. Son
an approximation of the luminance curves. Except the SYSCURVES.CVF file, it is recommended to
put
the curves files in the \curves directory.
-------------------------------------------------- --------------------------------------------
Scripting Notes
Well! where do we start, it is well known that Scripts and Scripting deserves a manual of it's own,
but
for this limited size User Guide we will have to be content with a very brief overview.
Definition of a Script: A simple program in a utility language, another term for macro or batch file.
In computer programming, a computer script is a list of commands, or instructions, that are
executed by a certain program or scripting engine. They are usually just text documents that
contain
instructions written in a certain scripting language (ie: uBASIC, Lua). This means most scripts can

be opened and edited using a basic text editor. However, when opened by the appropriate
scripting
engine, the commands within the script are executed.
In CHDK, scripts are used to automate a command or multiple commands to the camera in order
to
have the camera perform certain actions, ie: to hold the shutter open for a particular length of
time,
or to force a particular Av or ISO setting, (and many more actions). Nearly anything you can do by
pressing buttons on your camera with your own fingers, you can also do automatically with these
script commands
.
Note also that many scripts are universal for all relevant cameras, while others
are camera model specific.
Inventive script programmers, the experienced, and the not so experienced, have been active
from
the beginning of CHDK, with many short and simple, and also the more complex scripts being
made freely available to the CHDK community. Scripts such as: motion detect, time lapse, USB
a distancia.
52 Page 55
Example Scripts:
UltraIntervalometer (Time Lapse)
Script Code (save as "ult_intrvl.bas" to your /SCRIPTS/ folder)
-----------------------------------------------------------------------------------------------------------------------------------
-----------------
rem Author - Keoeeit
rem Written for S-Series

rem Should be okay on others
rem Use Endless mode with caution
rem See documentation for important info
@title Ultra Intervalometer
@param a Delay 1st Shot (Mins)
@default a 0
@param b Delay 1st Shot (Secs)
@default b 0
@param c Number of Shots
@default c 5
@param d Interval (Minutes)
@default d 0
@param e Interval (Seconds)
@default e 0
@param f Interval (10th Seconds)
@default f 5
@param g Endless? No=0 Yes=1
@default g 0
p=a*60000+b*1000
t=d*60000+e*1000+f*100
if c<1 then let c=5
if t<100 then let t=100
if g<0 then let g=0
if g>1 then let g=1
if p<0 then let p=0
z=t*c

y=p+z
print "1 Cycle Time:", y/60000; "min", y%60000/1000; "sec"
goto "interval"
:interval
if p>0 then gosub "pause"
print "Shot 1 of", c
disparar
if c=1 then end
for n=2 to c
sleep t
print "Shot", n, "of", c
disparar
next n
if g=1 then goto "interval" else end
:pause
n=(a*60)+b
for m=1 to n
53 Page 56
q=nm
print "Intvl Begins:", q/60; "min", q%60; "sec"
sleep 930
next m
volver
-----------------------------------------------------------------------------------------------------------------------------------
-----------------

http://chdk.wikia.com/wiki/UBASIC/Scripts:_Ultra_Intervalometer
___________________________________________________________________________
UBASIC/Scripts: Lightning script -- Fudgey
Written for/on: Powershot S5 IS
Also works on: A540, A550, A590 so far.
Doesn't work on: A720 IS and some others.
This is basically a very fast and responsive motion detection script. This will definitely solve your
problems if you want to catch lightning, (thus the title) or anything fast, however some objects will
blur
when the light conditions are insufficient. Enjoy this script!
Script Code
(save as "Lightning script.bas" to your /CHDK/SCRIPTS/ folder)
-----------------------------------------------------------------------------------------------------------------------------------
-----------------
rem Author: fudgey - based on BarneyFife's MD Lightning6 and MLuna's Motion Detect
scripts
rem Tested on A570IS, Allbest build 16
rem For bursts, set the camera in continuous shooting mode and set j>0
rem If j>0 in single shot mode, you will see your shot for j seconds on screen.
@title Fast MD with Burst/Preview 080205
@param a Columns
@default a 6
@param b Rows
@default b 4
@param c Threshold (0-255)
@default c 10

@param d Compare Interval (ms)
@default d 1
@param e Trigger Delay (0.1 sec)
@default e 42
@param f Rows to Exclude
@default f 0
@param g Pix-Step(speed/accuracy adj)
@default g 8
@param h Reg Mode(0-no,1-incl,2-excl)
@default h 0
@param i Measure Mode (1-Y,0-U,2-V)
@default i 1
@param j Burst/Preview (sec,0=off)
@default j 0
if a<1 then a=1
if b<1 then b=1
if c<0 then c=0
if g<1 then g=1
if f<1 then f=1
if j<0 then j=0
e=e*100
54 Page 57
j=j*1000
print ">[";a;",";b;"] threshold: ";c
x=30000

if j>0 then goto "md_burst"
:md_singleshot
press "shoot_half"
t = 0
hacer
md_detect_motion a, b, i, x, d, c, 1, t, h, 1, 1, a, f, 0, g, e
until t>0
click "shoot_full"
goto "md_singleshot"
:md_burst
press "shoot_half"
t = 0
hacer
md_detect_motion a, b, i, x, d, c, 1, t, h, 1, 1, a, f, 0, g, e
until t>0
press "shoot_full"
let X=get_tick_count
:contloop
let U=get_tick_count
let V=(UX)
if V<j then goto "contloop"
release "shoot_full"
goto "md_burst"
-----------------------------------------------------------------------------------------------------------------------------------
-----------------
http://chdk.wikia.com/wiki/UBASIC/Scripts:Lightning_script_--_Fudgey

Also see:- FAQ-How do I use scripts? Page 61
and:- Scripting Tutorial Page -
http://chdk.wikia.com/wiki/UBASIC/TutorialScratchpad
also:-
http://chdk.wikia.com/wiki/UBASIC/Scripts
(Excellent)
Tip : For using intervalometer, and long exposure scripts - to save battery and LCD use a piece of ⅛
round plastic in the camera video transfer port and LCD will be off, although not as much saving as
when
display is turned off (Which may not be possible with some other settings).
-------------------------------------------------- --------------------------------------------
Bad pixel Notes
Bad, or hot pixels affect DNG images especially for long exposures. New in the RAW parameters
menu (Main Menu) is “Bad pixel removal”. Once you have generated a list with all the "bad" pixels
for
your camera
*
, CHDK can remove them automatically. To receive this list of hot-pixel coordinates you
need to capture a "dark frame" by shooting an image with your lens completely capped. For
shutter
speeds longer than 1 to 10 seconds, it's wise to keep a collection of dark-frames on hand for each
exposure length that you will be using in the future, as more warm and hot-pixels show up with
extended
shutter speeds. After that you can use this program: http://ewavr.nm.ru/chdk/show_bad.zip
Contd…
55 Page 58

*
Q. When I select the script with Func./Set, nothing happens, How do I run it?
A. From fe50 - Thanks fe50
Ok, then follow me...
- power your camera on, half-press the shutter, to go to record mode
- press PRINT, then press FUNC/SET
- select "Load script from file", go 2 steps down to the TEST/ folder, press FUNC/SET
- select "BADPIXEL.LUA", press FUNC/SET
- start the script with the SHUTTER !
- wait until you see "press SET to save....."
- press FUNC/SET to store the badpixel.bin automatically in the right place
- press PRINT to leave the
<ALT>
mode, press PRINT again to enter
<ALT>
el modo de
- press MENU, go to the "RAW parameters", enter it with FUNC/SET
- enable the settings "Save RAW" , "DNG format" and "DNG file extension"
- press PRINT to leave the
<ALT>
mode again
Now RAW saving in DNG format is enabled, transfer the DNG files with a card reader...
See:-
http://chdk.wikia.com/wiki/Badpixel_removal
and:-
http://chdk.wikia.com/wiki/CHDK_firmware_usage/AllBest#Hot-Pixel_Removal_.

28Build_100-16_and_later.29
-------------------------------------------------- --------------------------------------------
Flash Notes
Notes on Force flash: From PhyrePhoX , for strobists: an option to manually override flash (for all
cameras). even for
IXUS
cams. no need for a script anymore. Important: when enabled, this will not
only override flash power, but also enable the CHECK if flash is needed. in other words: your
camera will
use flash even in bright sunlight and even if you disabled the flash. of course the flash will not fire
on
cameras with popup flashes when the flash is not popped up. there are three values for the flash
to be set:
low, middle and POWERFUL. be careful, don't flash at home, kids. For cameras with dedicated
movie
buttons, there is an extra menu item: force flash only in moviemode. when this is checked, the
flash will
be forced only when recording a video……
Example ...maybe for those situations when you are in a church or a museum where flash is
absolutely
forbidden… feature more or less created by ewavr , thanks.
Note: It appears that there is another advantage by using force flash - On cameras with adjustable
flash
intensity there will not be a pre-flash when the intensity is set manually , which will help greatly
when
using slave flashes.
See:–
http://chdk.setepontos.com/index.php/topic,1365.msg39384.html#msg39384
See:- Force flash pics. page

59
-------------------------------------------------- --------------------------------------------
56 Page 59
Ejemplos
HDR
HDR from a single RAW
Note: The examples above are copyright ©, they remain the property of their respective owners
and
are not for commercial use. Thanks to the owners for use in this User Guide.
See:-
http://www.flickr.com/groups/hdr/pool/
HDR (High Dynamic Range) is a popular branch of photography gaining acceptance over the
last few years particularly. CHDK has made this much easier for the low end because of RAW
capture (HDR from a single RAW), and bracketing (Multiple shots with stepped Av, etc).
®
There are now many applications that have been written for HDR processing, and Photoshop
can process HDR as well.
57 Page 60
HDR Panorama
The British Columbia Parliament Buildings in Victoria, BC -
located at 48°25′13.4″N, 123°22′11.1″W++
This file is licensed under Creative Commons A ttribution 2.5 License
In short: you are free to distribute and modify the file as long as you attribute it's author(s) or
licensor(s).

Attribute to Ryan Bushby
Fuente:
http://commons.wikimedia.org/wiki/Image:British_Columbia_Parliament_Buildings_-_Pano_-
_HDR.jpg
This image was created by stitching together 20 sets of HDRI images each created from 3
exposures.
This makes for a total of 60 photographs used to create this image. I used CHDK to allow for the
taking
of several bracketed shutter speed exposures without re-metering in between.
The final image is 35 mega-pixels. The whole process is described here:-
http://wiki.highinbc.yi.org/index.php/OffTopic:Photography/BC_Parliament_Buildings_HDR_mosa
ic
Motion Detect
Fast Shutter
From GrAnd
Courtesy of kittenmoon
58 Page 61
Grids pics
Golden Ratio
Gobernantes
Diagonal Method
Stereo Data Maker
Photos courtesy of Stereo Data Maker http://stereo.jpn.org/eng/sdm/index.htm
Force flash pics
Gracias a
walqas

Manual flash: low power (0)
Manual flash: medium power (1)
Manual flash: high power (2)
Manual flash: Camera
59 Page 62
KAP
(Kite Aerial Photography)
Courtesy Tom Benedict
-------------------------------------------------- -------------------------
FAQs and Facts
Q. Can CHDK damage your camera ?
A. Short answer : It is unlikely, but theoretically possible. CHDK comes with no warranty for any
use; you use it at your own risk. CHDK is created by reverse engineering an undocumented system
that directly controls hardware. Because of this, it is impossible to be certain that it is completely
seguro.
Long answer : It is very unlikely that CHDK will permanently harm your camera. There have been
no
reports of CHDK damaging a camera, and both the original firmware and the CHDK developers do
their best to avoid situations where this could happen. There are at least two ways in which CHDK
could theoretically do damage:-
By commanding physical hardware to do something it was not designed to do. Por ejemplo, es
possible to command the lens hardware to move when the lens is closed. (1) It is also possible to
move
lens hardware beyond limits allowed by Canons firmware, using scripts or overrides. See UBASIC/
Scripts:_Tele-Macro-Mode (2) and Talk:UBASIC/Scripts#Tele-Super-Macro_Mode_Comments (3).

It's worth noting that neither of these cases have resulted in actual damage, and both required
direct
input from the user.
By overwriting the internal flash ROM where the Canon
®
firmware is kept, rendering the camera un-
bootable. Since CHDK does not ever intentionally write to internal flash, it would take an
extremely
unlikely sequence of events to make this happen.
If you are concerned about this, you can minimize your risk by avoiding untested development
builds
(such as the autobuilds, or test builds posted on the forum) and being careful about what scripts
you
correr.
1.
http://chdk.setepontos.com/index.php/topic,2335.0.htm
l
2.
http://chdk.wikia.com/wiki/UBASIC/Scripts:_Tele-Macro-Mode
3.
http://chdk.wikia.com/wiki/Talk:UBASIC/Scripts#Tele-Super-
Ver:
http://chdk.wikia.com/wiki/FAQ
60 Page 63
Q. When I switch off my camera and then switch it on again, the CHDK program does not work,
¿Qué pasa?

A. When you update your camera with CHDK, it doesn't actually change the firmware. Because it is
just
a memory-resident program, it only remains in the camera's memory until the camera is turned all
the
way off. So, if something goes wrong and camera does not respond, you can always switch the
camera off (or remove the battery, and perhaps delete it from the memory card) to return to the
original firmware.
See:-
http://chdk.wikia.com/wiki/FAQ
Q. Does using the CHDK program void your warranty?
A. Please bear in mind that CHDK comes with no warranty for any use; you use it at your own risk.
What follows is just a few thoughts, and is not a legal opinion. Many believe that using the CHDK
does not harm your warranty, since it is said to be loaded into the memory only temporarily (turn
off
the cam and it's gone completely) and that it leaves the original camera firmware untouched.
Canon
®
Tech Support *says: "Unfortunately, any upgrades to the software of the camera not
performed by an authorized Canon Repair Facility, would void the warranty." ... and ... In further
discussion with Canon
®
about this specific hack, their response is: "If it is not Canon
®
firmware the
warranty would be void."
Is it an "upgrade" of the camera firmware when the firmware remains untouched? It's up to you to

decide. Don't use it if you are not willing to take the slightest chance. Many many people have
used
CHDK on their cameras (including some very experimental versions) and there is no report of any
permanent malfunction. Thus, CHDK appears to be quite safe to use as long as you make sure that
it's
the CHDK and not a real firmware update (A real firmware update which is not an official Canon
®
update could alter or completely screw up the camera and will void the warranty). Addressing
their
second comment (ie "if it is not Canon
®
firmware"): CHDK is NOT firmware. By very definition,
FIRMware is software that remains in the memory of the device when it is not using any power
fuente.
However, this is not a legal opinion and the user accepts all risk of using it. And as a practical
matter, if
you send your camera in for warranty service, and Canon
®
says your warranty is void because they
found evidence of CHDK on your memory card, there is not much you can really do (what are you
going to do? Spend thousands of dollars suing them to get your camera repaired?) However, you
can
just wipe or remove the card. ;)
See:-
http://forums.dpreview.com/forums/readflat.asp?forum=1010&thread=23168653&page=2
More at: -
http://chdk.wikia.com/wiki/FAQ

Q. How do I use scripts?
A. CHDK allows you to automate your camera by running "scripts", small and simple programs
written in a short-hand version of BASIC. You can use some pre-made scripts like bracketing,
intervalometer etc., or write your own scripts using the scripting language. To use a script, you
have
to do this:
1 - Put the script you want to use into the CHDK/SCRIPTS-folder on your SD card
2 - Load the script (main menu>scripting parameters>load script from file) and adjust script
parameters as needed...
3 - To run the script, press the shutter button while in
<ALT>
modo. You can also stop it by pressing the
shutter button again.
61 Page 64
If your script does not work properly, try to increase the "script shoot delay" parameter, which is a
small time-delay after a shot is taken, before the next line of the script is executed. Some scripts
also
may require certain camera settings. For example the generic bracketing script: go to
menu>review
and switch it to "off". Use P, Tv, Av or M mode and activate the camera function where you want
to
have bracketing. For example: Activate the focus slider when you want to have focus bracketing.
Activate the exposure compensation slider in P mode when you want to have exposure bracketing,
and
etc. For more, go to:-
Scripting notes

Page 52,
y
http://chdk.wikia.com/wiki/UBASIC/TutorialScratchpad
Q. May I suggest a new feature?
A. Yes you certainly can, although not every wish can be fulfilled. Please note that the CHDK is not
able to change any standard behaviour of the camera, because it does not modify the original
firmware. CHDK can just "extend" current functionality .
Q. What's the future for CHDK ?
A. There's no doubt that clever people will continue to develop more features, scripts, etc., and
more
cameras will be ported, CHDK will be refined, until it is released as v1.0, and perhaps beyond,
which
seems to be very close, so the future looks good for CHDK. This User Guide has been written up to
v0.9.7, Revision #725. For further revisions refer to the changelog.
See ;-
http://chdk.wikia.com/wiki/Changelog
Want to have a say? , then go to :-
http://chdk.wikia.com/wiki/Talk:CHDK
(Discussion at the CHDK
wiki, or go to :-
http://chdk.setepontos.com /
(The official CHDK forum).
62 Page 65
Enlaces
Preguntas frecuentes

http://chdk.wikia.com/wiki/FAQ
CHDK for Dummies The Very First
Pasos
http://chdk.wikia.com/wiki/CHDK_for_Dummies
Guía
http://chdk.setepontos.com/index.php/topic,1167.0.htmlß
Hi-Speed Shutter & Flash-Sync
http://chdk.wikia.com/wiki/Samples:_High-Speed_Shutter_
%26_Flash-Sync
"DoF Stacking" using CHDK Focus
Bracketing
http://chdk.wikia.com/wiki/DoF_Stacking
Grids
http://chdk.wikia.com/wiki/Grids
Software Overview / Link list
http://chdk.wikia.com/wiki/Software
UBASIC
http://chdk.wikia.com/wiki/UBASIC
Download page for latest builds etc
http://chdk.wikia.com/wiki/Downloads
How To Test Your Camera
http://chdk.wikia.com/wiki/CameraFeatures
ALTMENGD.ZIP Text files
instructions for in camera
http://chdk.setepontos.com/index.php?
action=dlattach;topic=1214.0;attach=2819

Curve Anthology
http://www.curvemeister.com/support/curvemeister2/help/
Articles/CurveMoves.htm
USB Remote Cable
http://chdk.wikia.com/wiki/USB_Remote_Cable
Sample photos, videos, etc.
http://wikia.com/wiki/Samples:_HDR
GPL License
http://www.gnu.org/copyleft/gpl.html
DOF Calculator
http://chdk.wikia.com/wiki/CHDK_firmware_usage/
AllBest# Quick-Set_Hyperfocal_.
26_Infinite_Manual_Focus_Distances
RAW Samples
http://chdk.wikia.com/wiki/Samples:_RAW
Image processing & other software
http://chdk.wikia.com/wiki/Software#CHDK_related
CHDK on Flickr
http://www.flickr.com/groups/chdk/pool/
Cardtricks (Memory card formatting)
http://chdk.setepontos.com/index.php/topic,964.0.html
63 Page 66
Legal Notes
This User Guide is Copyright
©

under the terms of the GNU General Public License,
Free Documentation License, as published by the Free Software Foundation.
This User Guide is not for resale, it is a free distribution.
GPL:
* This file is part of CHDK.
* Copyright
©
2008 The CHDK Team
* CHDK - CHDK Wiki
* This program is free software; you can redistribute it and/or modify
* it under the terms of the GNU General Public License as published by
* the Free Software Foundation; either version 2 of the License, or
* (at your option) any later version.
* This program is distributed in the hope that it will be useful,
* but WITHOUT ANY WARRANTY; without even the implied warranty of
* MERCHANTABILITY or FITNESS FOR A PARTICULAR PURPOSE. Véase el
* GNU General Public License for more details.
* You should have received a copy of the GNU General Public License
* along with this program; if not, write to the Free Software
* Foundation, Inc., 51 Franklin Street, Fifth Floor, Boston, MA,
02110-1301 USA
Canon is a registered ® ™ Trademark of Canon Inc.
PowerShot is a ® ™Trademark of Canon Inc.
Mac, Macintosh, and Mac logo are registered
®
™ Trademark of Apple Computer Inc.

registered in the US and other countries.
Windows is a registered
®
™Trademark of Microsoft Corp.
64 Page 67
ÍNDICE
Un
Agradecimientos
2
Adaptor lens scale
30
AF Key
15
<ALT>
el modo de
5, 6, 7, 8, 18, 19, 27, 36, 42, 48, 50, 51, 56, 62
ALT +/- debug action
46
Aperture
9, 11, 30, 47, 48, 49
Auto magnify
23
Auto select 1st entry @ menu
26
Autoscroll delay

41
Av.
9, 11, 30, 52, 62
B
Bad pixel notes
55
Bad pixel removal
18, 55
Indicador de batería
7, 26, 32
Benchmark
44, 45
Bracketing in continuous mode
11, 48
Bracketing notes
49
Bv
30
C
Calendario
40
Canon overexp. valor
30
Clear override values at start
13
Clear video params at start

15
Reloj
34, (7, 16, 47)
Colores
18, 21, 29, 35
Create card with 2 partitions
45
Current Script
7, 36
Custom Auto ISO
12, 13
Custom curves
20
Custom timer
11, 17
Curves notes
52
D
Dark frame subtraction
17
Debug parameters
43
Defaults
15, 35, 37
Disable LCD
42

Disable Overrides
8, 14
Display button
5, 8, 26, 28
DNG
18, 38, 46, 55, 56
DOF calculator
25, 28, 31, 47, 63
Draw palette
43
65 Page 68
E
Edge overlay
19
Extra Photo Operations
8, 13
Ev
9, 14, 17, 20, 24, 30, 48
Ejemplos
57
-Fast shutter
58
-Force flash
59
-Grids

59
-HDR
57
-KAP
59
-Motion detect
58
-SDM
59
Extra Long Exposure
9
F
Fast EV Switch
7, 14
Fast Video Control
15
Preguntas frecuentes
60
File browser
38, (6, 18. 20, 40, 41)
Filespace
32, 33
Fill color
29
Linterna
42

Flash notes
56
Force manual flash
14
Force flash pics
59
Free internal memory
19
G
Juegos
42
Grid
19, 29, 34, 51, 59, 63
Grids notes
51
Grids pics 59
H
Histogram illustrations
22, 23, 24
Histogram parameters
21
History of CHDK
47
I
Introducción
3

ISO
8, 10, 12, 13, 30, 52
J
JPEG
17, 18, 52
K
KAP (Kite Aerial Photography)
49, 60
66 Page 69
L
Idioma
35
Legal notes
64
Line color
29
Enlaces
63
Load curve profile
20
Load grid from file
29, 51
M
Main menu
8

Make card bootable
43, 45
Menu in OSD
26
Memory browser
44
Memory (Filespace) indicators
7
Memory info-show
43
MF
6, 42
Miscellaneous stuff
38
Miscellaneous values
7, 29, 31, 47
Mute during zooming
15
N
ND filter state
9
Notas
49
Ruido
17, 28, 39
O

Optical zoom
15
OSD (On Screen Display)
7
OSD in review mode
34
OSD layout editor
28, (6, 14, 28, 32, 33)
OSD parameters
26, (14, 51)
Overexp. valor
30
Override aperture
9, 30
Override shutter speed
9, 27
P
Power of flash
14
Pause Video
15
Purge RAW
38, 39, 40
R
RAW indicator
7, 32

RAW average
38, (39)
RAW develop
18, 20, 38, 50
RAW merge
38, 39, 50
RAW notes
50
RAW parameters
16, 38, 55
RAW sum
39, (38)
RBF font
35, 41, 47
Remote parameters
36
Remote zoom
37
Reset options to default
43
67 Page 70
S
Save RAW
16
Scene luminance

30
Scripting notes
52
Scripting parameters
36
SD card
15, 32, 33, 35, 39, 40, 43, 44, 45, 46, 61
SDM (Stereo Data Maker)
48, 59
Show misc values
29, 44
Show OSD
26, 34
Velocidad de obturación
9, 12, 13, 30, 39, 49, 55, 58
Shortcut button(s)
5, 6, 8
Splash screen
4, 42
Subj. dist.
9, 11, 31
Swap partitions
43, 45
Símbolos
26
T

Text file reader
41
Tv
9, 11, 12, 13, 30, 62
U
USB remote
36, 50, 52
USB remote notes
50
User menu
27, (8)
Using CHDK
4
V
Value factor
6, 9, 10, 12, 27
Video parameters
15
-Video bitrate
15
-Video quality
15
Video Quality Control
15
Visual settings
35

Volts max.
32
Volts min.
32
W
Warning threshold
32
Z
Zebra parameters
24
Zoom
6, 15, 19, 29, 30, 37
Zoom value
29, 30
68 Page 71
✎
Notas Page 72
CHDK
®
Canon Hack Development Kit
User Quick Start Guide
2009
V.1.6.7

©
CHDK User Quick Start Guide 25th October. 2009 by An0n