
Manual: cDNA Synthesis Kit, ZAP-cDNA Synthesis … Synthesis Kit, ZAP-cDNA Synthesis Kit, and...
59
cDNA Synthesis Kit, ZAP-cDNA Synthesis Kit, and ZAP-cDNA Gigapack III Gold Cloning Kit Instruction Manual Catalog #200400 (ZAP-cDNA Synthesis Kit), #200401 (cDNA Synthesis Kit), and #200450 (ZAP-cDNA Gigapack III Gold Cloning Kit) Revision D Research Use Only. Not for Use in Diagnostic Procedures. 200401-12
Transcript of Manual: cDNA Synthesis Kit, ZAP-cDNA Synthesis … Synthesis Kit, ZAP-cDNA Synthesis Kit, and...

cDNA Synthesis Kit, ZAP-cDNA Synthesis Kit, and ZAP-cDNA Gigapack III Gold Cloning Kit
Instruction Manual
Catalog #200400 (ZAP-cDNA Synthesis Kit), #200401 (cDNA Synthesis Kit), and #200450 (ZAP-cDNA Gigapack III Gold Cloning Kit) Revision D
Research Use Only. Not for Use in Diagnostic Procedures. 200401-12
LIMITED PRODUCT WARRANTY This warranty limits our liability to replacement of this product. No other warranties of any kind, express or implied, including without limitation, implied warranties of merchantability or fitness for a particular purpose, are provided by Agilent. Agilent shall have no liability for any direct, indirect, consequential, or incidental damages arising out of the use, the results of use, or the inability to use this product.
ORDERING INFORMATION AND TECHNICAL SERVICES Email [email protected]
World Wide Web
www.genomics.agilent.com
Telephone Location Telephone
United States and Canada 800 227 9770 Austria 01 25125 6800 Benelux 02 404 92 22 Denmark 45 70 13 00 30 Finland 010 802 220 France 0810 446 446 Germany 0800 603 1000 Italy 800 012575 Netherlands 020 547 2600 Spain 901 11 68 90 Sweden 08 506 4 8960 Switzerland 0848 8035 60 UK/Ireland 0845 712 5292 All Other Countries Please visit www.genomics.agilent.com and click Contact Us

cDNA Synthesis Kit, ZAP-cDNA Synthesis Kit, and ZAP-cDNA Gigapack III Gold Cloning Kit
CONTENTS Materials Provided .............................................................................................................................. 1
Reagents and Labware Provided with the cDNA Synthesis Kit ............................................ 2
Storage Conditions .............................................................................................................................. 3 Additional Materials Required .......................................................................................................... 3
Reagents and Solutions.......................................................................................................... 3
Equipment ............................................................................................................................. 3
Notice to Purchaser ............................................................................................................................. 3 Background .......................................................................................................................................... 4 Introduction ......................................................................................................................................... 4 cDNA Synthesis ................................................................................................................................... 5 General Vector Description ................................................................................................................ 8
Overview of the Uni-ZAP XR Vector System ...................................................................... 8
Uni-ZAP XR Vector Map ..................................................................................................... 8
pBluescript SK(–) Vector Map .............................................................................................. 9
Bacterial Host Strains ....................................................................................................................... 10 Host Strain Genotypes ......................................................................................................... 10
XL1-Blue MRF’ Bacterial Strain Description ..................................................................... 10
Recommended Media .......................................................................................................... 11
Establishing an Agar Plate Bacterial Stock ......................................................................... 11
Preparing a –80°C Bacterial Glycerol Stock ....................................................................... 12
Growth of Cells for Plating Phage ....................................................................................... 12
Determining Background by Color Selection with IPTG and X-gal ................................... 12
Helper Phage ..................................................................................................................................... 13 Storing the Helper Phage ..................................................................................................... 13
Titering the Helper Phage .................................................................................................... 13
Amplifying the Helper Phage .............................................................................................. 14
The ZAP-cDNA Synthesis Protocol ................................................................................................. 15 Protocol Guidelines ............................................................................................................. 15
Synthesizing First-Strand cDNA ......................................................................................... 15
Synthesizing Second-Strand cDNA .................................................................................... 16
Blunting the cDNA Termini ................................................................................................ 17
Ligating the EcoR I Adapters .............................................................................................. 19
Phosphorylating the EcoR I Ends ........................................................................................ 19
Digesting with Xho I ............................................................................................................ 19
Size Fractionating ................................................................................................................ 20
Ligating the cDNA Insert ................................................................................................................. 26 Packaging Reaction ........................................................................................................................... 27
General Information ............................................................................................................ 27
Packaging Instructions ......................................................................................................... 28
Titering the Packaging Reaction ......................................................................................... 29
Testing the Efficiency of the Gigapack III Packaging Extract with the Wild-Type Lambda
Control DNA (Optional) .............................................................................................. 30
Determining Background by Blue-White Color Selection ............................................................ 31 Amplifying the Library ..................................................................................................................... 32 Performing Plaque Lifts ................................................................................................................... 33 Hybridizing and Screening ............................................................................................................... 34 Antibody Screening ........................................................................................................................... 35 In Vivo Excision of the pBluescript Phagemid from the Uni-ZAP XR Vector ........................... 35 In Vivo Excision Protocols Using ExAssist Helper Phage with SOLR Strain ............................. 36
Single-Clone Excision Protocol .......................................................................................... 36
Mass Excision Protocol ....................................................................................................... 38
Appendix I: Recovery of Single-Stranded DNA from Cells Containing pBluescript Phagemids40 Single-Stranded Rescue Protocol ........................................................................................ 41
Appendix II: Purifying and Quantifying RNA ............................................................................... 42 Purifying RNA .................................................................................................................... 42
Quantifying RNA ................................................................................................................ 42
Formaldehyde RNA Gel Protocol ....................................................................................... 43
Appendix III: Treating RNA with Methylmercury Hydroxide .................................................... 44
Appendix IV: Alkaline Agarose Gels .............................................................................................. 45 The Slide Technique ............................................................................................................ 45
The Vertical Alkaline Agarose Technique .......................................................................... 46
Conventional Submerged Gels ............................................................................................ 46
Protocol ............................................................................................................................... 47
Appendix V: Ethidium Bromide Plate Assay— Quantitating the cDNA ..................................... 48 Preparing the Ethidium Bromide Plates .............................................................................. 48
Preparing the Standards ....................................................................................................... 48
Plate Assay for Determination of DNA Concentration ....................................................... 48
Troubleshooting ................................................................................................................................ 49 Preparation of Media and Reagents ................................................................................................ 51 References .......................................................................................................................................... 54
Additional References ......................................................................................................... 54
Endnotes ............................................................................................................................................. 54 MSDS Information ............................................................................................................................ 54
ZAP-cDNA Synthesis Kit 1
cDNA Synthesis Kit, ZAP-cDNA Synthesis Kit, and ZAP-cDNA Gigapack III Gold Cloning Kit
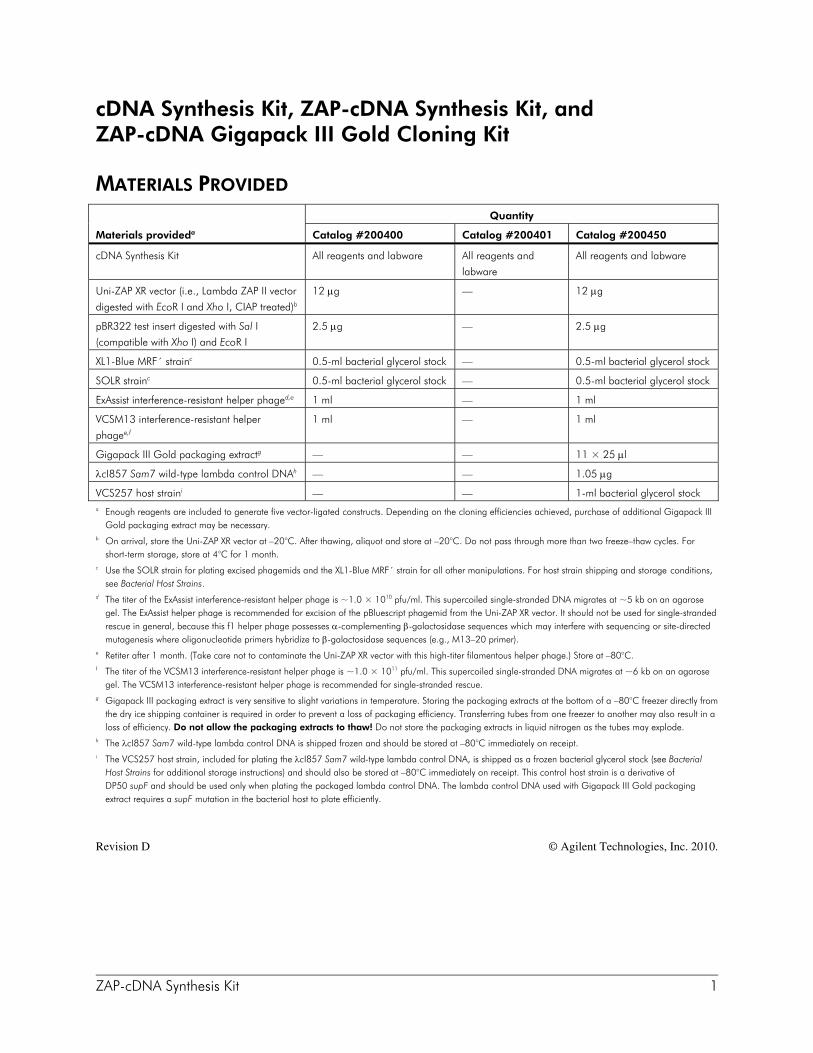
MATERIALS PROVIDED Quantity
Materials provideda Catalog #200400 Catalog #200401 Catalog #200450
cDNA Synthesis Kit All reagents and labware All reagents and
labware
All reagents and labware
Uni-ZAP XR vector (i.e., Lambda ZAP II vector
digested with EcoR I and Xho I, CIAP treated)b
12 μg — 12 μg
pBR322 test insert digested with Sal I (compatible with Xho I) and EcoR I
2.5 μg — 2.5 μg
XL1-Blue MRF´ strainc 0.5-ml bacterial glycerol stock — 0.5-ml bacterial glycerol stock
SOLR strainc 0.5-ml bacterial glycerol stock — 0.5-ml bacterial glycerol stock
ExAssist interference-resistant helper phaged,e 1 ml — 1 ml
VCSM13 interference-resistant helper
phagee,f
1 ml — 1 ml
Gigapack III Gold packaging extractg — — 11 × 25 μl
λcI857 Sam7 wild-type lambda control DNAh — — 1.05 μg
VCS257 host straini — — 1-ml bacterial glycerol stock a Enough reagents are included to generate five vector-ligated constructs. Depending on the cloning efficiencies achieved, purchase of additional Gigapack III
Gold packaging extract may be necessary. b On arrival, store the Uni-ZAP XR vector at –20°C. After thawing, aliquot and store at –20°C. Do not pass through more than two freeze–thaw cycles. For
short-term storage, store at 4°C for 1 month. c Use the SOLR strain for plating excised phagemids and the XL1-Blue MRF´ strain for all other manipulations. For host strain shipping and storage conditions,
see Bacterial Host Strains. d The titer of the ExAssist interference-resistant helper phage is ~1.0 × 10¹⁰ pfu/ml. This supercoiled single-stranded DNA migrates at ~5 kb on an agarose
gel. The ExAssist helper phage is recommended for excision of the pBluescript phagemid from the Uni-ZAP XR vector. It should not be used for single-stranded rescue in general, because this f1 helper phage possesses α-complementing β-galactosidase sequences which may interfere with sequencing or site-directed mutagenesis where oligonucleotide primers hybridize to β-galactosidase sequences (e.g., M13–20 primer).
e Retiter after 1 month. (Take care not to contaminate the Uni-ZAP XR vector with this high-titer filamentous helper phage.) Store at –80°C. f The titer of the VCSM13 interference-resistant helper phage is ~1.0 × 10¹¹ pfu/ml. This supercoiled single-stranded DNA migrates at ~6 kb on an agarose
gel. The VCSM13 interference-resistant helper phage is recommended for single-stranded rescue. g Gigapack III packaging extract is very sensitive to slight variations in temperature. Storing the packaging extracts at the bottom of a –80°C freezer directly from
the dry ice shipping container is required in order to prevent a loss of packaging efficiency. Transferring tubes from one freezer to another may also result in a loss of efficiency. Do not allow the packaging extracts to thaw! Do not store the packaging extracts in liquid nitrogen as the tubes may explode.
h The λcI857 Sam7 wild-type lambda control DNA is shipped frozen and should be stored at –80°C immediately on receipt. i The VCS257 host strain, included for plating the λcI857 Sam7 wild-type lambda control DNA, is shipped as a frozen bacterial glycerol stock (see Bacterial
Host Strains for additional storage instructions) and should also be stored at –80°C immediately on receipt. This control host strain is a derivative of DP50 supF and should be used only when plating the packaged lambda control DNA. The lambda control DNA used with Gigapack III Gold packaging extract requires a supF mutation in the bacterial host to plate efficiently.
Revision D © Agilent Technologies, Inc. 2010.
2 ZAP-cDNA Synthesis Kit
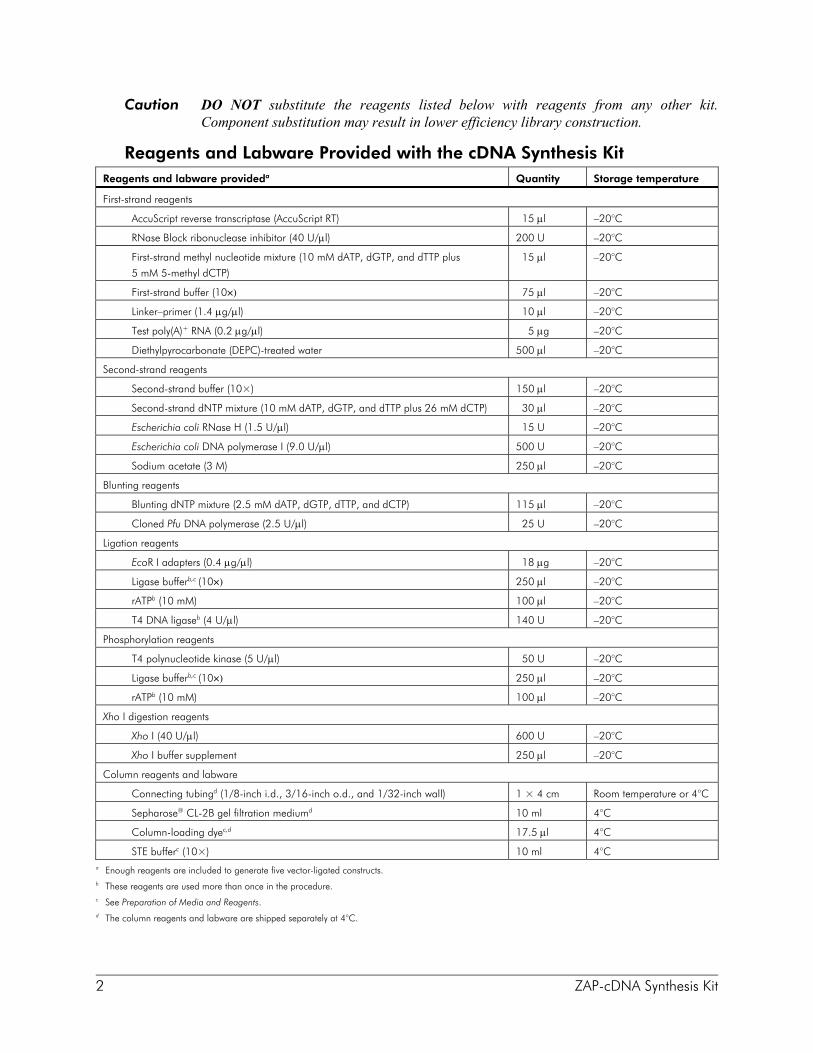
Caution DO NOT substitute the reagents listed below with reagents from any other kit. Component substitution may result in lower efficiency library construction.
Reagents and Labware Provided with the cDNA Synthesis Kit Reagents and labware provideda Quantity Storage temperature
First-strand reagents
AccuScript reverse transcriptase (AccuScript RT) 15 μl –20°C
RNase Block ribonuclease inhibitor (40 U/μl) 200 U –20°C
First-strand methyl nucleotide mixture (10 mM dATP, dGTP, and dTTP plus
5 mM 5-methyl dCTP)
15 μl –20°C
First-strand buffer (10×) 75 μl –20°C
Linker–primer (1.4 μg/μl) 10 μl –20°C
Test poly(A)+ RNA (0.2 μg/μl) 5 μg –20°C
Diethylpyrocarbonate (DEPC)-treated water 500 μl –20°C
Second-strand reagents
Second-strand buffer (10×) 150 μl –20°C
Second-strand dNTP mixture (10 mM dATP, dGTP, and dTTP plus 26 mM dCTP) 30 μl –20°C
Escherichia coli RNase H (1.5 U/μl) 15 U –20°C
Escherichia coli DNA polymerase I (9.0 U/μl) 500 U –20°C
Sodium acetate (3 M) 250 μl –20°C
Blunting reagents
Blunting dNTP mixture (2.5 mM dATP, dGTP, dTTP, and dCTP) 115 μl –20°C
Cloned Pfu DNA polymerase (2.5 U/μl) 25 U –20°C
Ligation reagents
EcoR I adapters (0.4 μg/μl) 18 μg –20°C
Ligase bufferb,c (10×) 250 μl –20°C
rATPb (10 mM) 100 μl –20°C
T4 DNA ligaseb (4 U/μl) 140 U –20°C
Phosphorylation reagents
T4 polynucleotide kinase (5 U/μl) 50 U –20°C
Ligase bufferb,c (10×) 250 μl –20°C
rATPb (10 mM) 100 μl –20°C
Xho I digestion reagents
Xho I (40 U/μl) 600 U –20°C
Xho I buffer supplement 250 μl –20°C
Column reagents and labware
Connecting tubingd (1/8-inch i.d., 3/16-inch o.d., and 1/32-inch wall) 1 × 4 cm Room temperature or 4°C
Sepharose® CL-2B gel filtration mediumd 10 ml 4°C
Column-loading dyec,d 17.5 μl 4°C
STE bufferc (10×) 10 ml 4°C a Enough reagents are included to generate five vector-ligated constructs. b These reagents are used more than once in the procedure. c See Preparation of Media and Reagents. d The column reagents and labware are shipped separately at 4°C.
ZAP-cDNA Synthesis Kit 3
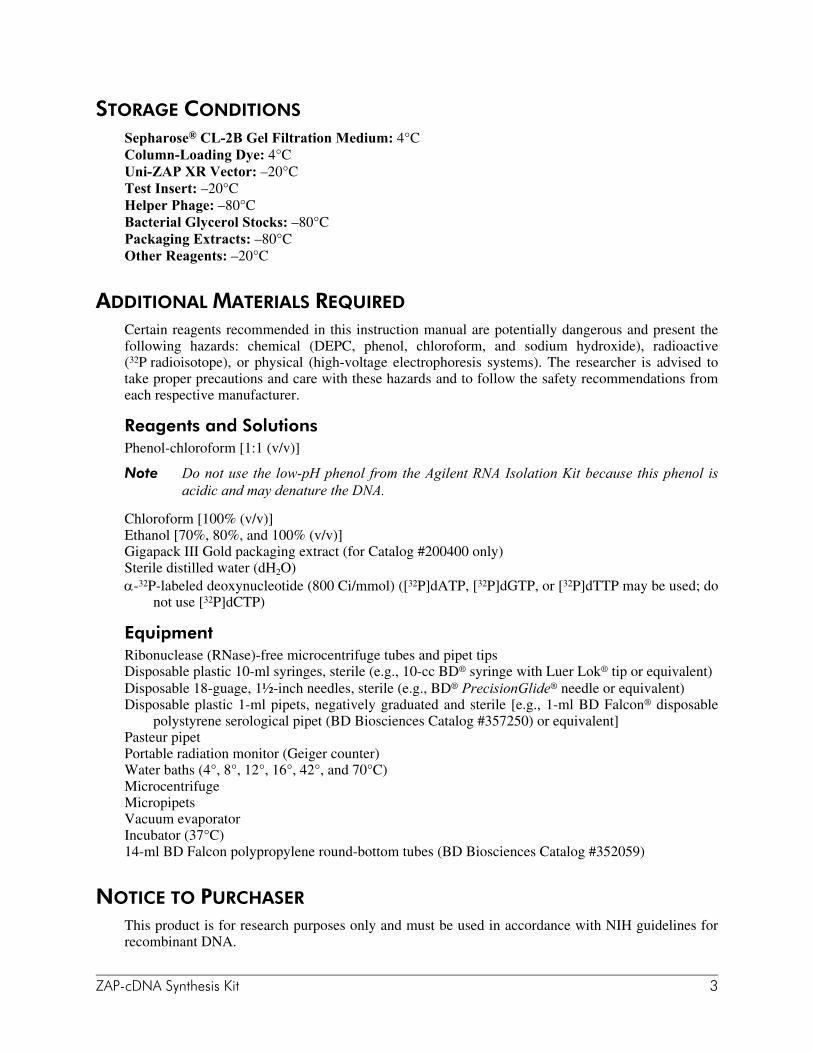
STORAGE CONDITIONS Sepharose® CL-2B Gel Filtration Medium: 4°C Column-Loading Dye: 4°C Uni-ZAP XR Vector: –20°C Test Insert: –20°C Helper Phage: –80°C Bacterial Glycerol Stocks: –80°C Packaging Extracts: –80°C Other Reagents: –20°C
ADDITIONAL MATERIALS REQUIRED Certain reagents recommended in this instruction manual are potentially dangerous and present the following hazards: chemical (DEPC, phenol, chloroform, and sodium hydroxide), radioactive (32P radioisotope), or physical (high-voltage electrophoresis systems). The researcher is advised to take proper precautions and care with these hazards and to follow the safety recommendations from each respective manufacturer.
Reagents and Solutions Phenol-chloroform [1:1 (v/v)]
Note Do not use the low-pH phenol from the Agilent RNA Isolation Kit because this phenol is acidic and may denature the DNA.
Chloroform [100% (v/v)] Ethanol [70%, 80%, and 100% (v/v)] Gigapack III Gold packaging extract (for Catalog #200400 only) Sterile distilled water (dH2O) α-32P-labeled deoxynucleotide (800 Ci/mmol) ([32P]dATP, [32P]dGTP, or [32P]dTTP may be used; do
not use [32P]dCTP)
Equipment Ribonuclease (RNase)-free microcentrifuge tubes and pipet tips Disposable plastic 10-ml syringes, sterile (e.g., 10-cc BD® syringe with Luer Lok® tip or equivalent) Disposable 18-guage, 1½-inch needles, sterile (e.g., BD® PrecisionGlide® needle or equivalent) Disposable plastic 1-ml pipets, negatively graduated and sterile [e.g., 1-ml BD Falcon® disposable
polystyrene serological pipet (BD Biosciences Catalog #357250) or equivalent] Pasteur pipet Portable radiation monitor (Geiger counter) Water baths (4°, 8°, 12°, 16°, 42°, and 70°C) Microcentrifuge Micropipets Vacuum evaporator Incubator (37°C) 14-ml BD Falcon polypropylene round-bottom tubes (BD Biosciences Catalog #352059)
NOTICE TO PURCHASER This product is for research purposes only and must be used in accordance with NIH guidelines for recombinant DNA.
4 ZAP-cDNA Synthesis Kit
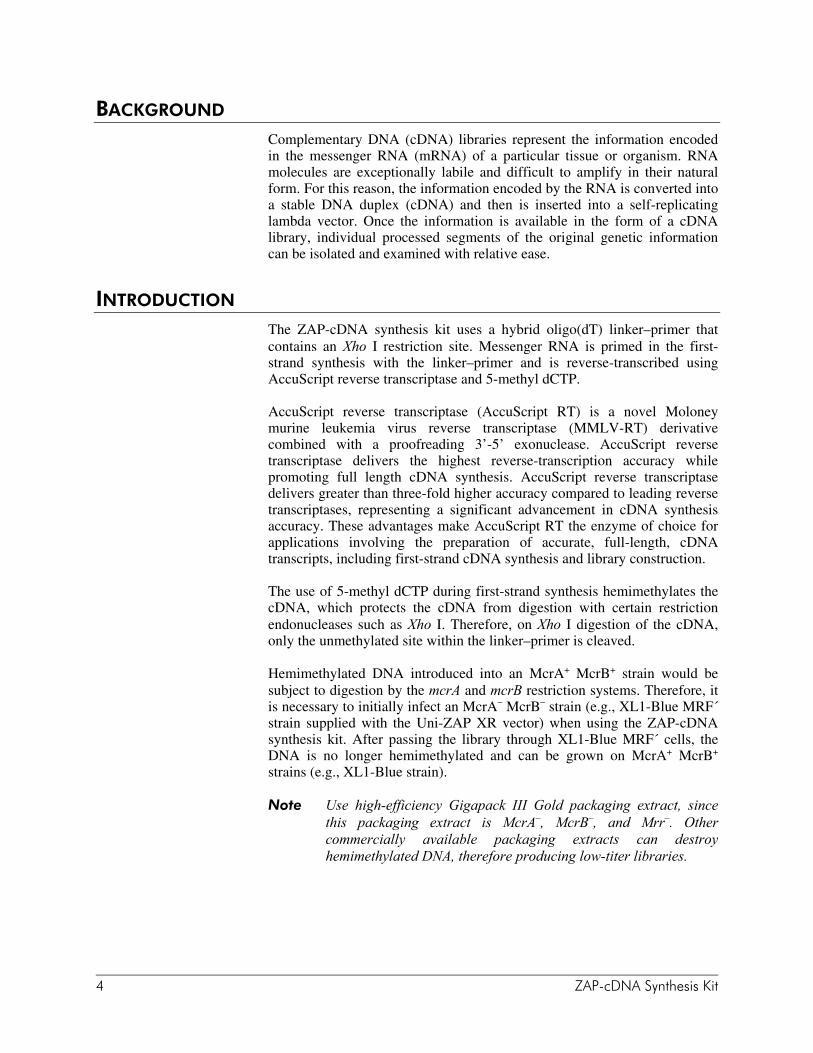
BACKGROUND Complementary DNA (cDNA) libraries represent the information encoded in the messenger RNA (mRNA) of a particular tissue or organism. RNA molecules are exceptionally labile and difficult to amplify in their natural form. For this reason, the information encoded by the RNA is converted into a stable DNA duplex (cDNA) and then is inserted into a self-replicating lambda vector. Once the information is available in the form of a cDNA library, individual processed segments of the original genetic information can be isolated and examined with relative ease.
INTRODUCTION The ZAP-cDNA synthesis kit uses a hybrid oligo(dT) linker–primer that contains an Xho I restriction site. Messenger RNA is primed in the first-strand synthesis with the linker–primer and is reverse-transcribed using AccuScript reverse transcriptase and 5-methyl dCTP. AccuScript reverse transcriptase (AccuScript RT) is a novel Moloney murine leukemia virus reverse transcriptase (MMLV-RT) derivative combined with a proofreading 3’-5’ exonuclease. AccuScript reverse transcriptase delivers the highest reverse-transcription accuracy while promoting full length cDNA synthesis. AccuScript reverse transcriptase delivers greater than three-fold higher accuracy compared to leading reverse transcriptases, representing a significant advancement in cDNA synthesis accuracy. These advantages make AccuScript RT the enzyme of choice for applications involving the preparation of accurate, full-length, cDNA transcripts, including first-strand cDNA synthesis and library construction. The use of 5-methyl dCTP during first-strand synthesis hemimethylates the cDNA, which protects the cDNA from digestion with certain restriction endonucleases such as Xho I. Therefore, on Xho I digestion of the cDNA, only the unmethylated site within the linker–primer is cleaved. Hemimethylated DNA introduced into an McrA+ McrB+ strain would be subject to digestion by the mcrA and mcrB restriction systems. Therefore, it is necessary to initially infect an McrA– McrB– strain (e.g., XL1-Blue MRF´ strain supplied with the Uni-ZAP XR vector) when using the ZAP-cDNA synthesis kit. After passing the library through XL1-Blue MRF´ cells, the DNA is no longer hemimethylated and can be grown on McrA+ McrB+ strains (e.g., XL1-Blue strain).
Note Use high-efficiency Gigapack III Gold packaging extract, since this packaging extract is McrA–, McrB–, and Mrr–. Other commercially available packaging extracts can destroy hemimethylated DNA, therefore producing low-titer libraries.

ZAP-cDNA Synthesis Kit 5
cDNA SYNTHESIS The yield, length, and accuracy of cDNA transcripts is enhanced with the use of AccuScript RT, an engineered version of the Moloney murine leukemia virus reverse transcriptase combined with a proofreading 3’-5’ exonuclease. First-strand cDNA synthesis begins when AccuScript RT, in the presence of nucleotides and buffer, finds a template and a primer. The template is mRNA and the primer is a 50-base oligonucleotide with the following sequence:
5´-GAGAGAGAGAGAGAGAGAGAACTAGTCTCGAGTTTTTTTTTTTTTTTTTT-3´ "GAGA" Sequence Xho poly(dT)
This oligonucleotide was designed with a "GAGA" sequence to protect the Xho I restriction enzyme recognition site and an 18-base poly(dT) sequence. The restriction site allows the finished cDNA to be inserted into the Uni-ZAP XR vector1 in a sense orientation (EcoR I-Xho I) with respect to the lacZ promoter. The poly(dT) region binds to the 3´ poly(A) region of the mRNA template, and AccuScript RT begins synthesis of first-strand cDNA. The nucleotide mixture for the first strand contains normal dATP, dGTP, and dTTP plus the analog 5-methyl dCTP. The complete first strand will have a methyl group on each cytosine base, which will protect the cDNA from restriction enzymes used in subsequent cloning steps. During second-strand synthesis, RNase H nicks the RNA bound to the first-strand cDNA to produce a multitude of fragments, which serve as primers for DNA polymerase I. DNA polymerase I "nick-translates" these RNA fragments into second-strand cDNA. The second-strand nucleotide mixture has been supplemented with dCTP to reduce the probability of 5-methyl dCTP incorporation into the second strand. This ensures that the restriction sites in the linker–primer will be susceptible to restriction digestion. The uneven termini of the double-stranded cDNA are nibbled back or filled in with cloned Pfu DNA polymerase, and EcoR I adapters, with the sequence shown below, are ligated to the blunt ends.
5´-OH-AATTCGGCACGAGG-3´ 3´-GCCGTGCTCCp-5´
These adapters are composed of 10- and 14-mer oligonucleotides, which are complementary to each other with an EcoR I cohesive end. The 10-mer oligonucleotide is phosphorylated, which allows it to ligate to other blunt termini available in the form of cDNA and other adapters. The 14-mer oligonucleotide is kept dephosphorylated to prevent it from ligating to other cohesive ends. After adapter ligation is complete and the ligase has been heat inactivated, the 14-mer oligonucleotide is phosphorylated to enable its ligation to the dephosphorylated vector arms. The Xho I digestion releases the EcoR I adapter and residual linker–primer from the 3´ end of the cDNA. These two fragments are separated on a drip column containing Sepharose® CL-2B gel filtration medium. The size-fractionated cDNA is then precipitated and ligated to the Uni-ZAP XR vector.
6 ZAP-cDNA Synthesis Kit
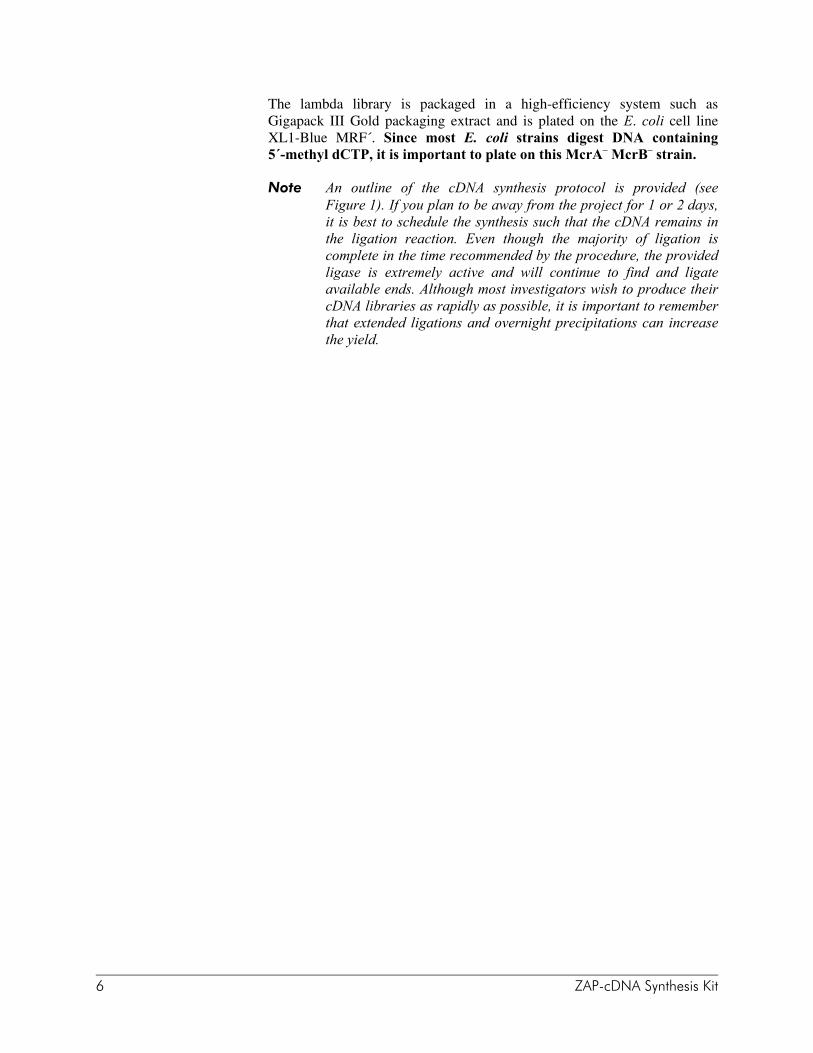
The lambda library is packaged in a high-efficiency system such as Gigapack III Gold packaging extract and is plated on the E. coli cell line XL1-Blue MRF´. Since most E. coli strains digest DNA containing 5´-methyl dCTP, it is important to plate on this McrA– McrB– strain.
Note An outline of the cDNA synthesis protocol is provided (see Figure 1). If you plan to be away from the project for 1 or 2 days, it is best to schedule the synthesis such that the cDNA remains in the ligation reaction. Even though the majority of ligation is complete in the time recommended by the procedure, the provided ligase is extremely active and will continue to find and ligate available ends. Although most investigators wish to produce their cDNA libraries as rapidly as possible, it is important to remember that extended ligations and overnight precipitations can increase the yield.

ZAP-cDNA Synthesis Kit 7
FIGURE 1 cDNA synthesis flow chart.
mRNA
RNA
Reverse transcriptase5-methyl dCTPdATP, dGTP, dTTP
RNase HDNA polymerase IdNTPs
EcoR I adaptersT4 DNA ligase
Xho I restriction enzyme
Completed unidirectional cDNA
Messenger RNA template
First-strand synthesis
Second-strand synthesis
Adapter addition
Xho I digestion
8 ZAP-cDNA Synthesis Kit
GENERAL VECTOR DESCRIPTION
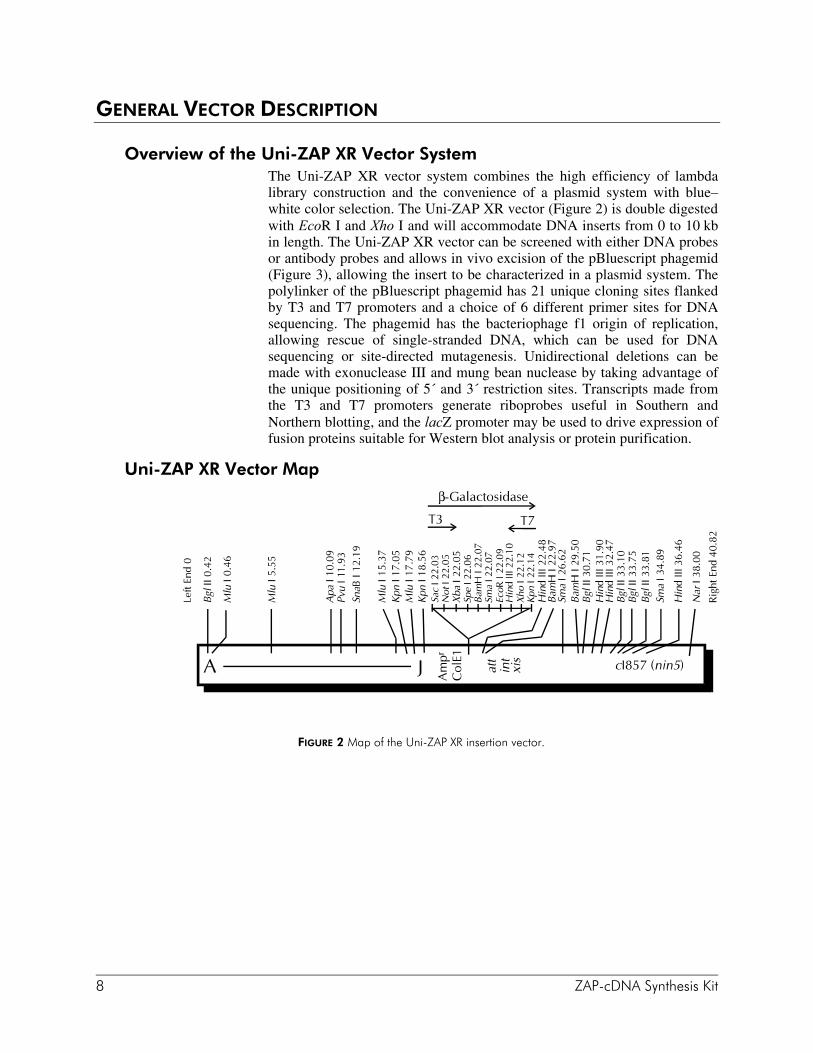
Overview of the Uni-ZAP XR Vector System The Uni-ZAP XR vector system combines the high efficiency of lambda library construction and the convenience of a plasmid system with blue–white color selection. The Uni-ZAP XR vector (Figure 2) is double digested with EcoR I and Xho I and will accommodate DNA inserts from 0 to 10 kb in length. The Uni-ZAP XR vector can be screened with either DNA probes or antibody probes and allows in vivo excision of the pBluescript phagemid (Figure 3), allowing the insert to be characterized in a plasmid system. The polylinker of the pBluescript phagemid has 21 unique cloning sites flanked by T3 and T7 promoters and a choice of 6 different primer sites for DNA sequencing. The phagemid has the bacteriophage f1 origin of replication, allowing rescue of single-stranded DNA, which can be used for DNA sequencing or site-directed mutagenesis. Unidirectional deletions can be made with exonuclease III and mung bean nuclease by taking advantage of the unique positioning of 5´ and 3´ restriction sites. Transcripts made from the T3 and T7 promoters generate riboprobes useful in Southern and Northern blotting, and the lacZ promoter may be used to drive expression of fusion proteins suitable for Western blot analysis or protein purification.
Uni-ZAP XR Vector Map
FIGURE 2 Map of the Uni-ZAP XR insertion vector.
ZAP-cDNA Synthesis Kit 9
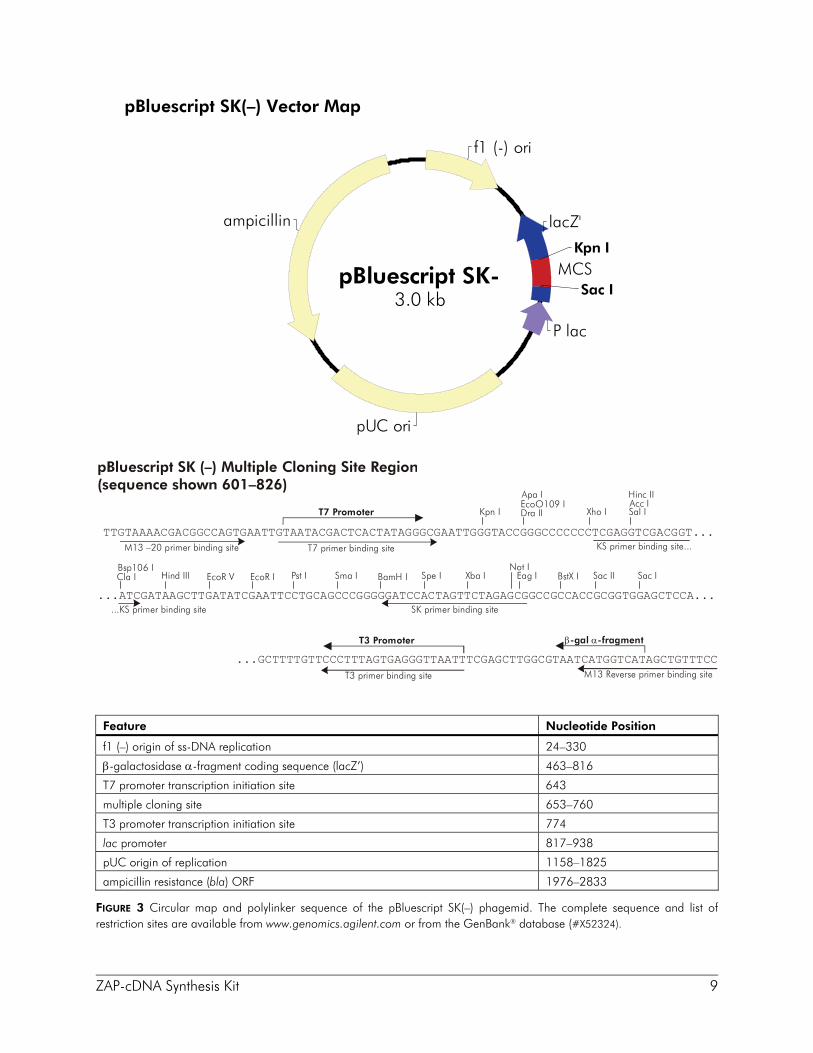
pBluescript SK(–) Vector Map
Feature Nucleotide Position
f1 (–) origin of ss-DNA replication 24–330
β-galactosidase α-fragment coding sequence (lacZ’) 463–816
T7 promoter transcription initiation site 643
multiple cloning site 653–760
T3 promoter transcription initiation site 774
lac promoter 817–938
pUC origin of replication 1158–1825
ampicillin resistance (bla) ORF 1976–2833
FIGURE 3 Circular map and polylinker sequence of the pBluescript SK(–) phagemid. The complete sequence and list of restriction sites are available from www.genomics.agilent.com or from the GenBank® database (#X52324).
pBluescript SK (–) Multiple Cloning Site Region(sequence shown 601–826)
M13 Reverse primer binding site
β α-gal -fragment
...GCTTTTGTTCCCTTTAGTGAGGGTTAATTTCGAGCTTGGCGTAATCATGGTCATAGCTGTTTCC
T3 Promoter
T3 primer binding site
T7 Promoter
T7 primer binding siteM13 –20 primer binding site KS primer binding site...TTGTAAAACGACGGCCAGTGAATTGTAATACGACTCACTATAGGGCGAATTGGGTACCGGGCCCCCCCTCGAGGTCGACGGT...
Kpn I
SK primer binding site...KS primer binding site...ATCGATAAGCTTGATATCGAATTCCTGCAGCCCGGGGGATCCACTAGTTCTAGAGCGGCCGCCACCGCGGTGGAGCTCCA...
Xho I
Sac IBstX IEcoR IEcoR V Sac IISpe ISma I Xba IPst IHind IIIBsp106 ICla I BamH I
Not IEag I
EcoO109 IDra II
Apa IAcc IHinc II
Sal I
f1 (-) ori
lacZ'
MCS
P lac
pUC ori
ampicillin
Kpn I
Sac IpBluescript SK-
3.0 kb

10 ZAP-cDNA Synthesis Kit
BACTERIAL HOST STRAINS
Host Strain Genotypes Host strain Genotype
SOLR straina e14–(McrA–) Δ(mcrCB-hsdSMR-mrr)171 sbcC recB recJ uvrC umuC::Tn5 (Kanr) lac gyrA96 relA1 thi-1 endA1 λR [F´ proAB lacIqZΔM15] Su– (nonsuppressing)
XL1-Blue MRF´ strain Δ(mcrA)183 Δ(mcrCB-hsdSMR-mrr)173 endA1 supE44 thi-1 recA1 gyrA96 relA1 lac [F´ proAB lacIqZΔM15 Tn10 (Tetr)]
a Use the SOLR strain for excision only.
XL1-Blue MRF’ Bacterial Strain Description The RecA– E. coli host strain XL1-Blue MRF´ is supplied with the Uni-ZAP XR vector kit. Because the Uni-ZAP XR vector does not require a supF genotype, the amplified library grows very efficiently on the XL1-Blue MRF´ strain. In addition, use of the correct host strain is important when working with the Uni-ZAP XR vector as the F´ episome present in the XL1-Blue MRF´ strain serves three purposes. First, the ΔM15 lacZ gene present on the F´ episome is required for the β-galactosidase-based nonrecombinant selection strategy. When cDNA is present in the polylinker, expression from the lacZ gene is disrupted and white plaques are produced. In contrast, without insert in the polylinker, the amino terminus of β-galactosidase is expressed and nonrecombinants can be scored visually by the presence of blue plaques. To produce an enzymatically active β-galactosidase protein, two domains are required: the α-region expressed by the vector and the ΔM15 lacZ domain expressed by the F´ episome. These two domains fold to form a functional protein, the α-region complementing the missing amino acids resulting from the ΔM15 mutation. Therefore, in order to utilize the nonrecombinant selection strategy, the correct host strain must be used to produce a functional β-galactosidase protein. Second, the F´ episome expresses the genes forming the F´ pili found on the surface of the bacteria. Without pili formation, filamentous phage (i.e., M13 or f1) infection could not occur. Because the conversion of a recombinant Uni-ZAP XR clone to a pBluescript phagemid requires superinfection with a filamentous helper phage, the F´ episome is required for in vivo excision (see In Vivo Excision of the pBluescript Phagemid from the Uni-ZAP XR Vector).

ZAP-cDNA Synthesis Kit 11
Third, the F´ episome contains the lac repressor (lacIq gene), which blocks transcription from the lacZ promoter in the absence of the inducer isopropyl-1-thio-β-D-galactopyranoside (IPTG). This repressor is important for controlling expression of fusion proteins which may be toxic to the E. coli. Because the presence of the lacIq repressor in the E. coli host strain can potentially increase the representation or completeness of the library, XL1-Blue MRF´ is useful for screening the amplified library.
Note The strains used for the Lambda gt11 vector (i.e., Y1088, Y1089, and Y1090) are not suitable for use with the Uni-ZAP XR vector because these strains contain the plasmid pMC9, a pBR322 derivative, which contains many of the same sequences as those found in the phagemid portion of the Uni-ZAP XR vector. Using these strains with the Uni-ZAP XR vector could result in recombination between the homologous sequences.
Recommended Media Host strain
Agar plates and liquid medium for bacterial streak and glycerol stock
Liquid medium for bacterial cultures prior to phage attachment
Agar plates and top agar for plaque formation
Agar plates for excision protocol
SOLR strain LB-kanamycina LB broth with supplementsa-c — LB-ampicillina
VCS257 straind LBa LB broth with supplementsa-c NZYa —
XL1-Blue MRF´ strain LB-tetracyclinea LB broth with supplementsa-c NZYa — a See Preparation of Media and Reagents. b LB broth with 0.2% (w/v) maltose and 10 mM MgSO4. c Maltose and magnesium supplements are required for optimal lambda phage receptor expression on the surface of the XL1-Blue MRF’ host cell. The media supplements are not required for helper phage infection, but are included in both protocols for simplified media preparation. d For use with Gigapack III Gold packaging extract and wild-type control only. Supplied with Gigapack III Gold packaging extract.
Establishing an Agar Plate Bacterial Stock The bacterial host strains are shipped as bacterial glycerol stocks. On arrival, prepare the following plates from the bacterial glycerol stocks.
Note The host strains may thaw during shipment. The vials should be stored immediately at –20° or –80°C, but most strains remain viable longer if stored at –80°C. It is best to avoid repeated thawing of the host strains in order to maintain extended viability.
1. Revive the stored cells by scraping off splinters of solid ice with a sterile wire loop.
2. Streak the splinters onto an LB agar plate containing the appropriate antibiotic (see Recommended Media), if one is necessary.
3. Incubate the plate overnight at 37°C.

12 ZAP-cDNA Synthesis Kit
4. Seal the plate with Parafilm® laboratory film and store the plate at 4°C for up to 1 week.
5. Restreak the cells onto a fresh plate every week.
Preparing a –80°C Bacterial Glycerol Stock
1. In a sterile 50-ml conical tube, inoculate 10 ml of LB broth with the appropriate antibiotic (see Recommended Media) with one colony from the plate. Grow the cells to late log phase.
2. Add 4.5 ml of a sterile glycerol-liquid medium solution (prepared by mixing 5 ml of glycerol + 5 ml of the appropriate medium) to the bacterial culture from step 1. Mix well.
3. Aliquot into sterile centrifuge tubes (1 ml/tube). This preparation may be stored at –20°C for 1–2 years or at –80°C for more than 2 years.
Growth of Cells for Plating Phage Bacterial cultures for plating phage should be started from a fresh plate using a single colony and should be grown overnight with vigorous shaking at 30°C in 50 ml of LB broth supplemented with 0.2% (w/v) maltose and 10 mM MgSO4. (Do not use tetracycline in the presence of magnesium.) The lower temperature ensures that the cells will not overgrow. The cells should be spun at 1000 × g for 10 minutes then gently resuspended in 10 ml of 10 mM MgSO4. Before use, dilute cells to an OD600 of 0.5 with 10 mM MgSO4. Bacterial cells prepared in this manner can be used for all phage manipulations described within the manual. Highest efficiencies are obtained from freshly prepared cells.
Determining Background by Color Selection with IPTG and X-gal The color selection by α-complementation with the Uni-ZAP XR vector requires higher amounts of IPTG and X-gal for generation of the blue color. Transcription and translation of the fusion protein are normal, but the large polylinker present within the pBluescript phagemid, which is present in the Uni-ZAP XR vector, is partly responsible for the reduced activity of the β-galactosidase protein—not the promoter. As would be expected, the copy number of the Uni-ZAP XR vector is much less per cell than the copy number of pBluescript phagemids. However, it is important to note that the color assay is used only for determining the ratio of recombinants to nonrecombinants within a newly constructed library and is not used for any other manipulations.
ZAP-cDNA Synthesis Kit 13
HELPER PHAGE Two different helper phages are provided with the ZAP-cDNA synthesis kit: (1) the ExAssist interference-resistant helper phage (for use with the SOLR strain) and (2) the VCSM13 helper phage. The ExAssist interference-resistant helper phage, when used with the SOLR strain, allows efficient in vivo excision of the pBluescript phagemid from the Uni-ZAP XR vector while preventing the problems that can be associated with helper phage co-infection. The ExAssist helper phage contains an amber mutation that prevents replication of the phage genome in a nonsuppressing E. coli strain (e.g., SOLR cells). Only the excised phagemid can replicate in the host, removing the possibility of co-infection from the ExAssist helper phage. The ExAssist helper phage cannot be used for single-stranded rescue due to its inability to replicate in the SOLR strain. The other helper phage, VCSM13 helper phage, is recommended for single-stranded rescue procedures from the excised pBluescript phagemids (see Appendix I: Recovery of Single-Stranded DNA from Cells Containing pBluescript Phagemids).
Storing the Helper Phage The ExAssist helper phage and the VCSM13 helper phage are supplied in 7% dimethylsulfoxide (DMSO) and should be stored at –80°C. The helper phage may be stored for short periods of time at –20°C or 4°C. It is important to titer the helper phage prior to each use. Expect titers of approximately 1010 pfu/ml for the ExAssist helper phage or 1011 pfu/ml for the VCSM13 helper phage. If the titer drops over time, prepare a fresh high-titer stock of the helper phage as outlined in Amplifying the Helper Phage.
Titering the Helper Phage
1. Transfer a colony of XL1-Blue MRF´ cells into 10 ml of LB broth with supplements in a 50-ml conical tube. Incubate the conical tube with shaking at 37°C until growth reaches an OD600 of 1.0.
2. Dilute the phage (10–4–10–7) in SM buffer (See Preparation of Media and Reagents) and combine 1 μl of each dilution with 200 μl of XL1-Blue MRF´ cells (OD600 = 1.0).
3. Incubate the helper phage and the XL1-Blue MRF´ cells for 15 minutes at 37°C to allow the phage to attach to the cells.
4. Add 3 ml of NZY top agar, melted and cooled to ~48°C, and plate immediately onto dry, prewarmed NZY agar plates. Allow the plates to set for 10 minutes.
5. Invert the plates and incubate overnight at 37°C.
Note ExAssist and VCSM13 plaques will have a cloudier appearance than lambda phage plaques.

14 ZAP-cDNA Synthesis Kit
6. To determine the titer [in plaque-forming units per milliliter (pfu/ml)], use the following formula:
( )( )
Number of plaques pfu dilution factor
Volume plated l 1000 l / ml
×⎡
⎣⎢
⎤
⎦⎥ ×
μμ
where the volume plated (in microliters) refers to the volume of the helper phage solution added to the cells.
Amplifying the Helper Phage
1. Transfer a colony of XL1-Blue MRF´ cells into 10 ml of LB broth with supplements in a 50-ml conical tube. Incubate the conical tube with shaking at 37°C until growth reaches an OD600 of 0.3.
Note An OD600 of 0.3 corresponds to 2.5 × 10⁸ cells/ml.
2. Add the helper phage at a multiplicity of infection (MOI) of 20:1 (phage-to-cells ratio).
3. Incubate the conical tube at 37°C for 15 minutes to allow the phage to attach to the cells.
4. Incubate the conical tube with shaking at 37°C for 8 hours.
Note When amplifying VCSM13 helper phage, add kanamycin to a final concentration of 25 μg/ml after 30 minutes of growth.
5. Heat the conical tube at 65°C for 15 minutes.
6. Spin down the cell debris and transfer the supernatant to a fresh conical tube.
7. The titer of the supernatant should be between 7.5 × 10¹⁰ and 1.0 × 10¹² pfu/ml for ExAssist helper phage or between 1.0 × 10¹¹ and 1.0 × 10¹² pfu/ml for VCSM13 helper phage.
Note ExAssist and VCSM13 plaques will have a cloudier appearance than lambda phage plaques.
8. Add dimethylsulfoxide (DMSO) to a final concentration of 7% (v/v) and store at –80°C.
9. For further details about helper phage titering or amplification, please see Titering the Helper Phage or Reference 2.

ZAP-cDNA Synthesis Kit 15
THE ZAP-cDNA SYNTHESIS PROTOCOL
Notes DO NOT substitute the reagents in this kit with reagents from any other kit. Component substitution may result in lower efficiency library construction.
The following protocol is optimized for 5 μg of poly(A)+ RNA.
Protocol Guidelines
♦ The quality and quantity of the mRNA used is of fundamental importance to the construction of a large, representative cDNA library (see Appendix II: Purifying and Quantifying RNA). The Agilent RNA Isolation Kit uses the guanidine isothiocyanate (GITC)-phenol-chloroform extraction method,3 which quickly produces large amounts of undegraded RNA. To relax secondary structure, treatment with methylmercury hydroxide (CH3HgOH) is recommended (see Appendix III: Treating RNA with Methylmercury Hydroxide).
♦ It is imperative to protect the RNA from any contaminating RNases until the first-strand cDNA synthesis is complete. Wear fresh gloves, use newly autoclaved pipet tips, and avoid using pipet tips or microcentrifuge tubes that have been handled without gloves. Ribonuclease A cannot be destroyed by normal autoclaving alone. Baking or DEPC treatment is recommended.
♦ When removing aliquots of any of the enzymes used in the ZAP-cDNA synthesis protocol, flick the bottom of the tube to thoroughly mix the enzyme solution. Do not vortex the enzyme stock tubes.
Synthesizing First-Strand cDNA
1. Preheat a 42°C water bath.
2. Thaw the radioactive [α-32P]dNTP (do not use [32P]dCTP) and all nonenzymatic first-strand components. Keep the radioactive dNTP on ice for use in step 6 and in the second-strand synthesis. Briefly vortex and spin down the contents of the nonenzymatic tubes. Place the tubes on ice.
Note AccuScript RT is temperature sensitive and should remain at –20°C until the last moment.
3. The final volume of the first-strand synthesis reaction is 50 μl. The volume of added reagents and enzymes is 14 μl, thus the mRNA template and DEPC-treated water should be added in a combined volume of 36 μl. For the control reaction, prepare the following annealing reaction with 25 μl (5 μg) of test RNA and 11 μl of DEPC-treated water.
16 ZAP-cDNA Synthesis Kit
4. In an RNase-free microcentrifuge tube, add the following reagents in order:
5 μl of 10× first-strand buffer 3 μl of first-strand methyl nucleotide mixture 2 μl of linker–primer (1.4 μg/μl) X μl of DEPC-treated water 1 μl of RNase Block Ribonuclease Inhibitor (40 U/μl)
5. Mix the reaction and then add X μl of poly(A)+ RNA (5 μg). Mix gently.
6. Allow the primer to anneal to the template for 10 minutes at room temperature. During the incubation, aliquot 0.5 μl of the [α-32P]dNTP (800 Ci/mmol) into a separate tube for the control.
7. Add 3 μl of AccuScript RT to the first-strand synthesis reaction. The final volume of the first-strand synthesis reaction should now be 50 μl.
8. Mix the sample gently and spin down the contents in a microcentrifuge.
9. Transfer 5 μl of the first-strand synthesis reaction to the separate tube containing 0.5 μl of [α-32P]dNTP (800 Ci/mmol). This radioactive sample is the first-strand synthesis control reaction.
10. Incubate the first-strand synthesis reactions, including the control reaction, at 42°C for one hour.
11. Prepare a 16°C water bath for second-strand synthesis. If a water bath with a cooling unit is not available, use a large Styrofoam® container with a lid. Fill the container three-quarters full with water and adjust the temperature to 16°C with ice. Cover the container with a lid.
12. After 1 hour, remove the first-strand synthesis reactions from the 42°C water bath. Place the nonradioactive first-strand synthesis reaction on ice. Store the radioactive first-strand synthesis control reaction at –20°C until ready to resolve by electrophoresis on an alkaline agarose gel (see Appendix IV: Alkaline Agarose Gels). On this gel, run the radioactive first-strand reaction alongside the second-strand reaction after blunting and resuspension of the second-strand reaction (see step 17 in Blunting the cDNA Termini).
Synthesizing Second-Strand cDNA
1. Thaw all nonenzymatic second-strand components. Briefly vortex and spin in a microcentrifuge before placing the tubes on ice.
Note It is important that all reagents be <16°C when the DNA polymerase I is added.

ZAP-cDNA Synthesis Kit 17
2. Add the following components in order to the 45-μl nonradioactive, first-strand synthesis reaction on ice:
20 μl of 10× second-strand buffer 6 μl of second-strand dNTP mixture 114 μl of sterile distilled water (DEPC-treated water is not required) 2 μl of [α-32P]dNTP (800 Ci/mmol)
3. Add the following enzymes to the second-strand synthesis reaction:
2 μl of RNase H (1.5 U/μl) 11 μl of DNA polymerase I (9.0 U/μl)
4. Gently vortex the contents of the tube, spin the reaction in a microcentrifuge, and incubate for 2.5 hours at 16°C. Check the water bath occasionally to ensure that the temperature does not rise above 16°C. Temperatures above 16°C can cause the formation of hairpin structures, which are unclonable and interfere with the efficient insertion of correctly synthesized cDNA into the prepared vector.
5. After second-strand synthesis for 2.5 hours at 16°C, immediately place the reaction tube on ice.
Blunting the cDNA Termini
1. Add the following to the second-strand synthesis reaction: 23 μl of blunting dNTP mix 2 μl of cloned Pfu DNA polymerase (2.5 U/μl)
2. Quickly vortex the reaction and spin in a microcentrifuge. Incubate the reaction at 72°C for 30 minutes. Do not exceed 30 minutes!!
3. Thaw the 3 M sodium acetate.
Note Since radioactivity can leak out between the lid and body of some microcentrifuge tubes during the vortexing and precipitation steps, wrap a small piece of Parafilm laboratory film around the rim of the microcentrifuge tube to prevent leakage.
4. Remove the reaction from incubation at 72°C, then add 200 μl of phenol–chloroform [1:1 (v/v)] and vortex the mixture.
Note Do not use the low-pH phenol from the Agilent RNA Isolation Kit because this phenol is acidic and may denature the DNA. The phenol must be equilibrated to pH 7–8.
18 ZAP-cDNA Synthesis Kit
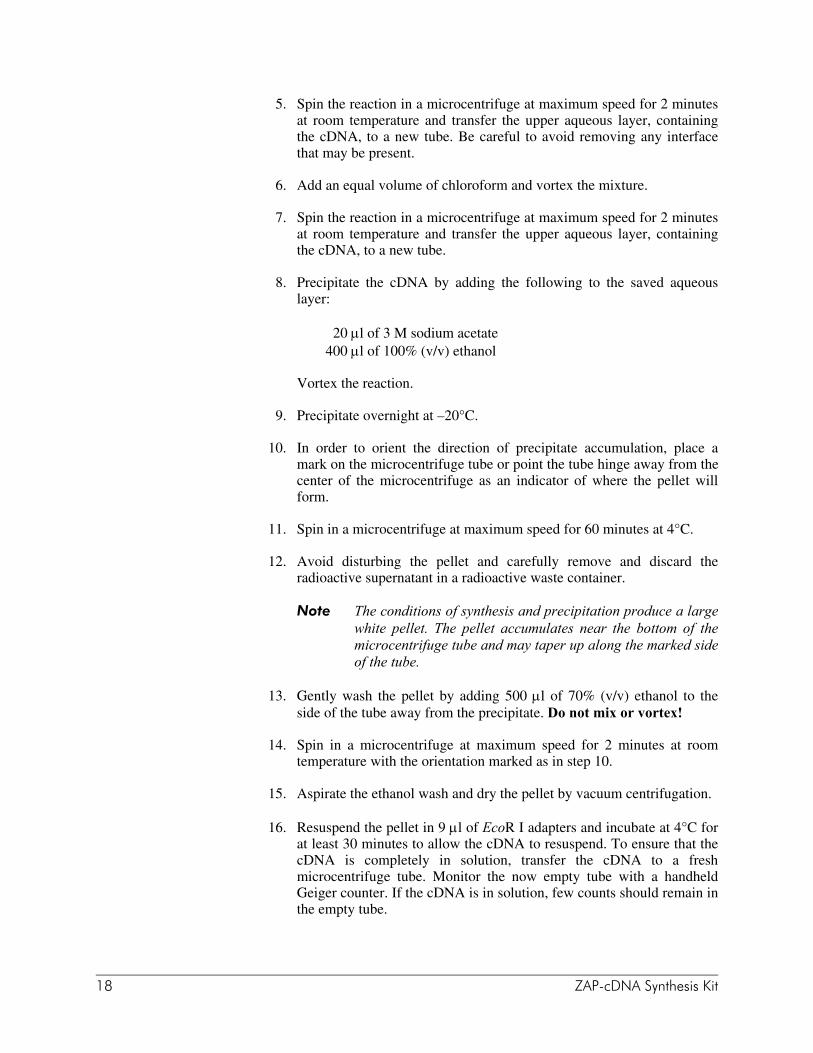
5. Spin the reaction in a microcentrifuge at maximum speed for 2 minutes at room temperature and transfer the upper aqueous layer, containing the cDNA, to a new tube. Be careful to avoid removing any interface that may be present.
6. Add an equal volume of chloroform and vortex the mixture.
7. Spin the reaction in a microcentrifuge at maximum speed for 2 minutes at room temperature and transfer the upper aqueous layer, containing the cDNA, to a new tube.
8. Precipitate the cDNA by adding the following to the saved aqueous layer:
20 μl of 3 M sodium acetate 400 μl of 100% (v/v) ethanol
Vortex the reaction.
9. Precipitate overnight at –20°C.
10. In order to orient the direction of precipitate accumulation, place a mark on the microcentrifuge tube or point the tube hinge away from the center of the microcentrifuge as an indicator of where the pellet will form.
11. Spin in a microcentrifuge at maximum speed for 60 minutes at 4°C.
12. Avoid disturbing the pellet and carefully remove and discard the radioactive supernatant in a radioactive waste container.
Note The conditions of synthesis and precipitation produce a large white pellet. The pellet accumulates near the bottom of the microcentrifuge tube and may taper up along the marked side of the tube.
13. Gently wash the pellet by adding 500 μl of 70% (v/v) ethanol to the side of the tube away from the precipitate. Do not mix or vortex!
14. Spin in a microcentrifuge at maximum speed for 2 minutes at room temperature with the orientation marked as in step 10.
15. Aspirate the ethanol wash and dry the pellet by vacuum centrifugation.
16. Resuspend the pellet in 9 μl of EcoR I adapters and incubate at 4°C for at least 30 minutes to allow the cDNA to resuspend. To ensure that the cDNA is completely in solution, transfer the cDNA to a fresh microcentrifuge tube. Monitor the now empty tube with a handheld Geiger counter. If the cDNA is in solution, few counts should remain in the empty tube.
ZAP-cDNA Synthesis Kit 19
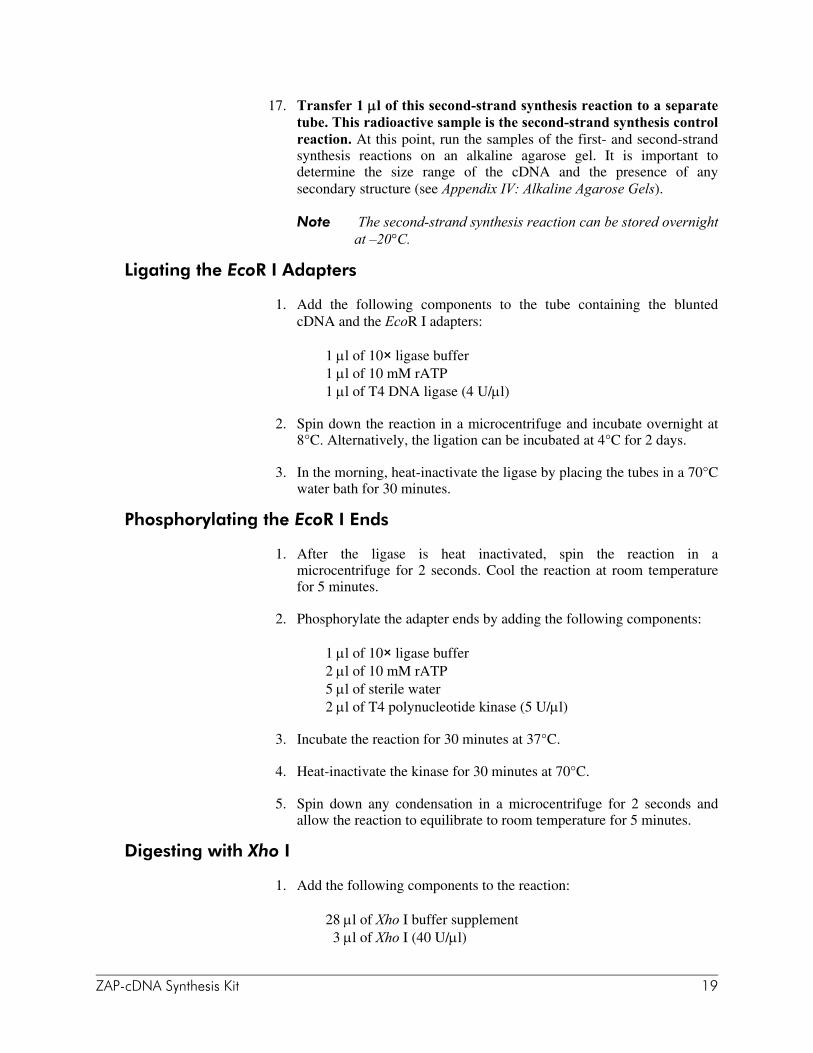
17. Transfer 1 μl of this second-strand synthesis reaction to a separate tube. This radioactive sample is the second-strand synthesis control reaction. At this point, run the samples of the first- and second-strand synthesis reactions on an alkaline agarose gel. It is important to determine the size range of the cDNA and the presence of any secondary structure (see Appendix IV: Alkaline Agarose Gels).
Note The second-strand synthesis reaction can be stored overnight at –20°C.
Ligating the EcoR I Adapters
1. Add the following components to the tube containing the blunted cDNA and the EcoR I adapters:
1 μl of 10× ligase buffer 1 μl of 10 mM rATP 1 μl of T4 DNA ligase (4 U/μl)
2. Spin down the reaction in a microcentrifuge and incubate overnight at 8°C. Alternatively, the ligation can be incubated at 4°C for 2 days.
3. In the morning, heat-inactivate the ligase by placing the tubes in a 70°C water bath for 30 minutes.
Phosphorylating the EcoR I Ends
1. After the ligase is heat inactivated, spin the reaction in a microcentrifuge for 2 seconds. Cool the reaction at room temperature for 5 minutes.
2. Phosphorylate the adapter ends by adding the following components:
1 μl of 10× ligase buffer 2 μl of 10 mM rATP 5 μl of sterile water 2 μl of T4 polynucleotide kinase (5 U/μl)
3. Incubate the reaction for 30 minutes at 37°C.
4. Heat-inactivate the kinase for 30 minutes at 70°C.
5. Spin down any condensation in a microcentrifuge for 2 seconds and allow the reaction to equilibrate to room temperature for 5 minutes.
Digesting with Xho I
1. Add the following components to the reaction:
28 μl of Xho I buffer supplement 3 μl of Xho I (40 U/μl)
20 ZAP-cDNA Synthesis Kit
2. Incubate the reaction for 1.5 hours at 37°C.
3. Add 5 μl of 10× STE buffer and 125 μl of 100% (v/v) ethanol to the microcentrifuge tube.
4. Precipitate the reaction overnight at –20°C.
5. Following precipitation, spin the reaction in a microcentrifuge at maximum speed for 60 minutes at 4°C.
6. Discard the supernatant, dry the pellet completely, and resuspend the pellet in 14 μl of 1× STE buffer.
7. Add 3.5 μl of the column loading dye to each sample. The sample is now ready to be run through a drip column containing Sepharose CL-2B gel filtration medium (see Size Fractionating).
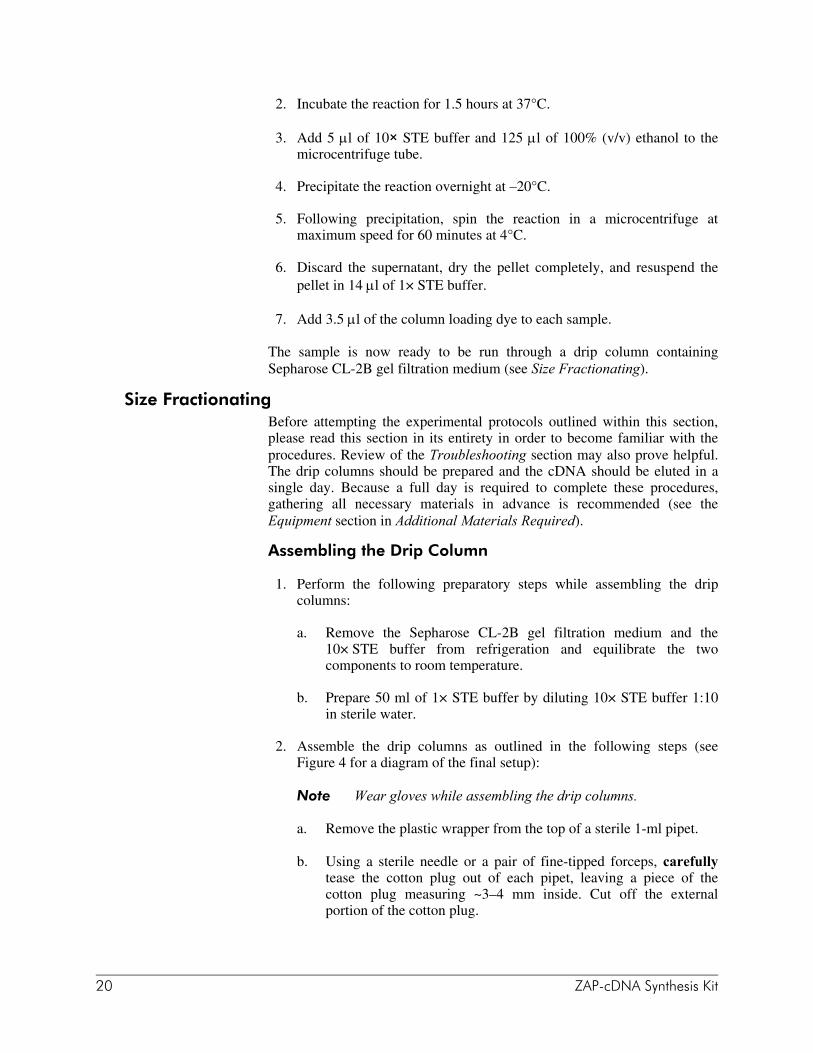
Size Fractionating Before attempting the experimental protocols outlined within this section, please read this section in its entirety in order to become familiar with the procedures. Review of the Troubleshooting section may also prove helpful. The drip columns should be prepared and the cDNA should be eluted in a single day. Because a full day is required to complete these procedures, gathering all necessary materials in advance is recommended (see the Equipment section in Additional Materials Required).
Assembling the Drip Column
1. Perform the following preparatory steps while assembling the drip columns:
a. Remove the Sepharose CL-2B gel filtration medium and the 10× STE buffer from refrigeration and equilibrate the two components to room temperature.
b. Prepare 50 ml of 1× STE buffer by diluting 10× STE buffer 1:10 in sterile water.
2. Assemble the drip columns as outlined in the following steps (see Figure 4 for a diagram of the final setup):
Note Wear gloves while assembling the drip columns.
a. Remove the plastic wrapper from the top of a sterile 1-ml pipet.
b. Using a sterile needle or a pair of fine-tipped forceps, carefully tease the cotton plug out of each pipet, leaving a piece of the cotton plug measuring ~3–4 mm inside. Cut off the external portion of the cotton plug.
ZAP-cDNA Synthesis Kit 21
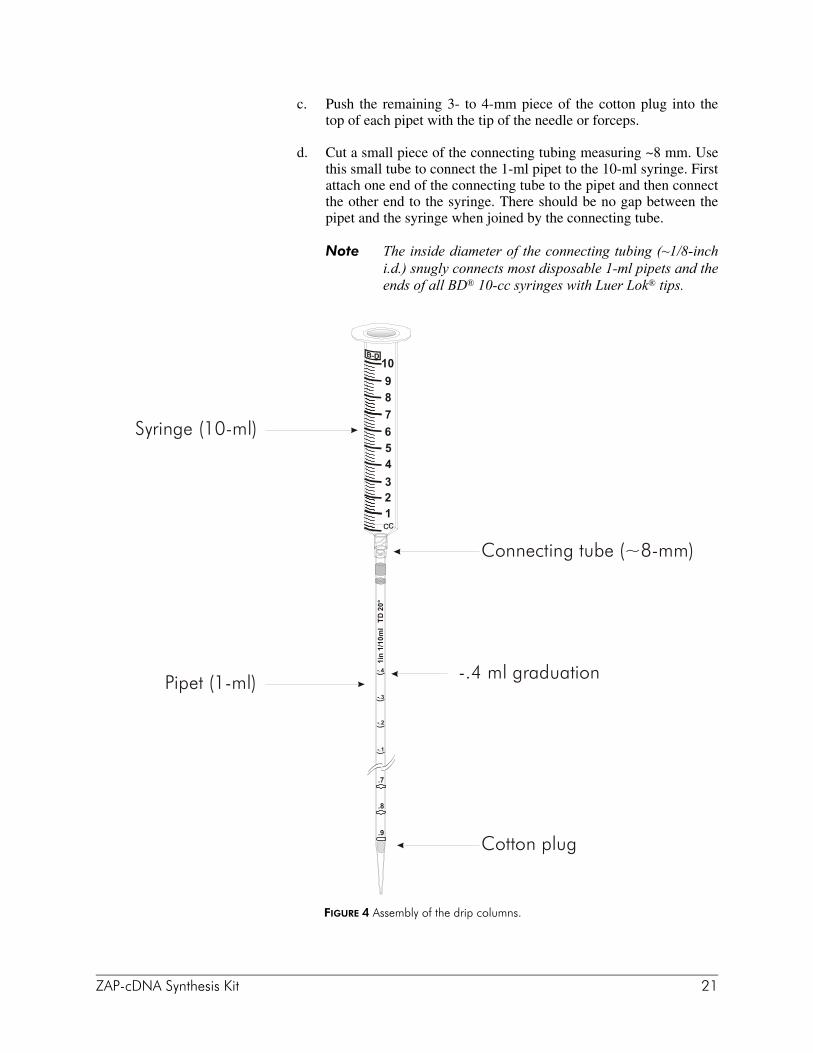
c. Push the remaining 3- to 4-mm piece of the cotton plug into the top of each pipet with the tip of the needle or forceps.
d. Cut a small piece of the connecting tubing measuring ~8 mm. Use this small tube to connect the 1-ml pipet to the 10-ml syringe. First attach one end of the connecting tube to the pipet and then connect the other end to the syringe. There should be no gap between the pipet and the syringe when joined by the connecting tube.
Note The inside diameter of the connecting tubing (~1/8-inch i.d.) snugly connects most disposable 1-ml pipets and the ends of all BD® 10-cc syringes with Luer Lok® tips.
FIGURE 4 Assembly of the drip columns.
Syringe (10-ml)
Pipet (1-ml)
Cotton plug
Connecting tube (~8-mm)
123456789
10
cc
1in
1/10
ml
TD
20°
-.3
-.2
-.1
-.4
.7
.8
.9
-.4 ml graduation

22 ZAP-cDNA Synthesis Kit
e. Rapidly and forcefully push the plunger into the syringe to thrust the cotton plug down into the tip of the pipet.
Note It may take several attempts to drive the cotton all the way down into the tip of the pipet. However, pushing the cotton plug as far down into the pipet tip as possible is important in order to achieve optimal separation of the cDNA fractions.
f. Remove the plunger from the syringe. Because the syringe functions as a buffer reservoir for the drip column, leave the syringe firmly attached to the pipet throughout the remainder of the size fractionation procedure.
3. Locate a support for the assembled drip column. Butterfly clamps or a three-fingered clamp on a ring stand can be used.
Loading the Drip Column
1. Load the drip column with a uniform suspension of Sepharose CL-2B gel filtration medium as outlined in the following steps:
a. Immediately prior to loading the drip column, gently mix the Sepharose CL-2B gel filtration medium by inversion until the resin is uniformly suspended.
b. Place the column in the ring stand. Fill a glass Pasteur pipet with ~2 ml of 1× STE buffer. Insert the pipet as far into the drip column as possible and fill the column with the buffer.
Notes If the 1× STE buffer flows too quickly through the column, stem the flow by affixing a yellow pipet tip to the end of the column. Make sure to remove the pipet tip prior to loading the column with the Sepharose CL-2B gel filtration medium.
If bubbles or pockets of air become trapped in the STE buffer while filling the column, remove the trapped air prior to packing the column with the resin. To remove the bubbles or air, re-insert the Pasteur pipet into the top of the column and gently pipet the STE buffer in and out of the pipet until the trapped air escapes through the top of the column.
ZAP-cDNA Synthesis Kit 23
c. Immediately add a uniform suspension of Sepharose CL-2B gel filtration medium to the column with a Pasteur pipet by inserting the pipet as far into the column as possible. As the resin settles, continue adding the Sepharose CL-2B gel filtration medium. Stop adding the resin when the surface of the packed bed is ¼ inch below the “lip of the pipet.” The lip of the pipet is defined as the point where the pipet and the syringe are joined.
Notes If air bubbles form as the resin packs, use a Pasteur pipet as described in step 1b to remove the blockage. Failure to remove bubbles can impede the flow of the column and result in a loss of the cDNA.
If the preparation of Sepharose CL-2B gel filtration medium settles and becomes too viscous to transfer from the stock tube to the column, add a small volume (~1–5 ml) of 1× STE buffer to resuspend the resin.
2. Wash the drip column by filling the buffer reservoir (i.e., the syringe) with a minimum of 10 ml of 1× STE buffer. As the column washes, the buffer should flow through the drip column at a steady rate; however, it may take at least 2 hours to complete the entire wash step. After washing, do not allow the drip column to dry out, because the resin could be damaged and cause sample loss. If this occurs, pour another column.
Note If a free flow of buffer is not observed, then bubbles or pockets of air have become trapped in the drip column. In this case, the column must be repacked. If cDNA is loaded onto a column on which a free flow of buffer is not observed, the sample could become irretrievably lost.
3. When ~50 μl of the STE buffer remains above the surface of the resin, immediately load the cDNA sample using a pipettor. Gently release the sample onto the surface of the column bed, but avoid disturbing the resin as this may affect cDNA separation.
4. Once the sample enters the Sepharose CL-2B gel filtration medium, fill the connecting tube with buffer using a pipettor.
Note Do not disturb the bed while filling the connecting tube with buffer.
Gently add 3 ml of 1× STE buffer to the buffer reservoir by trickling the buffer down the inside wall of the syringe. Do not squirt the buffer into the reservoir because this will disturb the resin, resulting in loss of the sample.
5. As the cDNA sample elutes through the column, the dye will gradually diffuse as it migrates through the resin. Because the dye is used to gauge when the sample elutes from the column, monitor the progress of the dye, or the cDNA sample could be irretrievably lost.

24 ZAP-cDNA Synthesis Kit
Collecting the Sample Fractions The drip column containing the Sepharose CL-2B gel filtration medium separates molecules on the basis of size. Large cDNA molecules elute first followed by smaller cDNA and finally unincorporated nucleotides. Using a handheld monitor, two peaks of radioactivity can generally be detected during the course of elution. The first peak to elute from the column represents the cDNA. Due to the conditions of label incorporation during second-strand synthesis, the cDNA is not extremely radioactive; therefore, the counts per second may be barely above background levels. In contrast, the second peak to elute from the column is highly radioactive as this is the unincorporated radioactive nucleotides. Although this material elutes from the column in parallel with the dye, unincorporated nucleotides are usually not collected because the cDNA has already eluted from the column. For standard cDNA size fractionation (>400 bp), collect ~12 fractions using the procedure described in this section. The progression of the leading edge of the dye through the column will be used as a guideline to monitor collection; however, the drops collected from the column should be monitored for radioactivity using a handheld Geiger counter. Until the fractions have been assessed for the presence of cDNA on a 5% nondenaturing acrylamide gel (see Preparation of Media and Reagents), do not discard any fractions based on the quantity of radioactivity detected.
1. Using a fresh microcentrifuge tube to collect each fraction, begin collecting three drops per fraction when the leading edge of the dye reaches the –.4 ml graduation on the pipet (see Figure 4).
2. Continue to collect fractions until the trailing edge of the dye reaches the .3 ml graduation. A minimum of 12 fractions, each containing ~100 μl (i.e., three drops), should be collected. Alternatively, fractions can be collected until the radioactive-free nucleotides begin to elute. In either case, monitor the fractions for the presence of radioactivity to determine whether the cDNA has eluted successfully. If no counts are detected, continue collecting the fractions until the peak of unincorporated nucleotides is recovered.
3. Before processing the fractions and recovering the size-fractionated cDNA, remove 8 μl of each collected fraction and save for later analysis. These aliquots will be electrophoresed on a 5% nondenaturing acrylamide gel to assess the effectiveness of the size fractionation and to determine which fractions will be used for ligation.
Processing the cDNA Fractions In this section of the size fractionation procedure, the fractions collected from the drip column are extracted with phenol–chloroform and are precipitated with ethanol to recover the size-selected cDNA. The purpose of the organic extractions is to remove contaminating proteins; of particular concern is kinase, which can be carried over from previous steps in the synthesis. Because kinase often retains activity following heat treatment, it is necessary to follow the extraction procedures.
ZAP-cDNA Synthesis Kit 25
1. Begin extracting the remainder of the collected fractions by adding an equal volume of phenol–chloroform [1:1 (v/v)].
2. Vortex and spin in a microcentrifuge at maximum speed for 2 minutes at room temperature. Transfer the upper aqueous layer to a fresh microcentrifuge tube.
3. Add an equal volume of chloroform.
4. Vortex and spin in a microcentrifuge at maximum speed for 2 minutes at room temperature. Transfer the upper aqueous layer to a fresh microcentrifuge tube.
5. To each extracted sample, add a volume of 100% (v/v) ethanol that is equal to twice the individual sample volume.
Note The 1× STE buffer contains sufficient NaCl for precipitation.
6. Precipitate overnight at –20°C.
7. Spin the sample in the microcentrifuge at maximum speed for 60 minutes at 4°C. Transfer the supernatant to another tube. To ensure that the cDNA has been recovered, use a handheld Geiger counter to check the level of radioactivity present in the pellet. If the majority of the radiation is detected in the supernatant, repeat the centrifugation step; otherwise, discard the supernatant.
8. Carefully wash the pellet with 200 μl of 80% (v/v) ethanol, ensuring that the pellet remains undisturbed. Do not mix or vortex! Spin the sample in a microcentrifuge at maximum speed for 2 minutes at room temperature. Remove the ethanol and verify that the pellet has been recovered by visual inspection or with the handheld Geiger counter. Vacuum evaporate the pellet for ~5 minutes or until dry. Do not dry the pellet beyond the point of initial dryness or the cDNA may be difficult to solubilize.
9. Using a handheld Geiger counter, verify that the cDNA has been recovered and record the number of counts per second (cps) that is detected for each fraction.
10. If <30 cps is detected, resuspend each cDNA pellet in 3.5 μl of sterile water. If the value is >30 cps, resuspend the cDNA in 5 μl of sterile water. Mix by pipetting up and down.
To help ensure ligation success, quantitate the cDNA before proceeding (see Appendix V: Ethidium Bromide Plate Assay—Quantitating the cDNA). Best results are usually obtained by ligating 100 ng of cDNA/1 μg of vector. Place the remaining cDNA at –20°C for short term storage only. The cDNA is most stable after ligation into vector arms and may be damaged during long-term storage.
26 ZAP-cDNA Synthesis Kit
LIGATING THE cDNA INSERT
Note Use the ligase buffer provided with the cDNA Synthesis Kit. Polyethylene glycol, which is present in some ligase buffers, can inhibit packaging.
The Uni-ZAP XR vector arms are shipped in 10 mM Tris-HCl (pH 7.0) and 0.1 mM EDTA and can be stored up to 1 month at 4°C or frozen in aliquots at –20°C for longer storage. The pBR322 test insert should be stored at –20°C. However, do not put samples through multiple freeze-thaw cycles.
1. Set up a control ligation to ligate the test insert into the Uni-ZAP XR vector as follows:
1.0 μl of the predigested Uni-ZAP XR vector (1 μg) 1.6 μl of the test insert (0.4 μg) 0.5 μl of 10× ligase buffer 0.5 μl of 10 mM rATP (pH 7.5) 0.9 μl of water
Then add
0.5 μl of T4 DNA ligase (4 U/μl)
2. Prepare the sample ligation in a separate tube as follows:
X μl of resuspended cDNA (~100 ng) 0.5 μl of 10× ligase buffer 0.5 μl of 10 mM rATP (pH 7.5) 1.0 μl of the predigested Uni-ZAP XR vector (1 μg) X μl of water for a final volume of 4.5 μl
Then add
0.5 μl of T4 DNA ligase (4 U/μl)
3. Incubate the reaction tubes overnight at 12°C or for up to 2 days at 4°C.
4. If the library is to be packaged the following day, start a 50-ml culture of XL1-Blue MRF´ cells from a colony isolated on a tetracycline agar plate. At the same time, start a 50-ml culture of VCS257 cells for plating the wild-type lambda control DNA used to test the Gigapack III Gold packaging extract. See the table in Recommended Media for appropriate growth media.
Note XL1-Blue MRF´ cells are RecA– and consequently grow slowly.
ZAP-cDNA Synthesis Kit 27
After ligation is complete, package 1 μl of each ligation, including the control ligation, using Gigapack III Gold packaging extract according to the packaging instructions outlined in Packaging Reaction. A good representational primary library size consists of ~1 × 10⁶ clones. If a low number of plaque-forming units results from packaging the 1-μl ligation, try packaging 2–3 μl of the remaining ligation mixture in one packaging reaction.
Note For optimal results, use high-efficiency Gigapack III Gold packaging extract since this packaging extract is McrA–, McrB–, and Mrr–. Other commercially available packaging extracts can restrict hemimethylated DNA, therefore producing low-titer libraries.
PACKAGING REACTION General Information
Packaging extracts are used to package recombinant lambda phage with high efficiency. The single-tube format of Gigapack III packaging extract simplifies the packaging procedure and increases the efficiency and representation of libraries constructed from highly methylated DNA. Each packaging extract is restriction minus (HsdR– McrA– McrBC– McrF– Mrr–) to optimize packaging efficiency and library representation. When used in conjunction with restriction-deficient plating cultures, Gigapack III packaging extract improves the quality of DNA libraries constructed from methylated DNA.4, 5, 6, 7 Optimal packaging efficiencies are obtained with lambda DNAs that are concatemeric. Ligations should be carried out at DNA concentrations of 0.2 μg/μl or greater, which favors concatemers and not circular DNA molecules that only contain one cos site. DNA to be packaged should be relatively free from contaminants. Polyethylene glycol (PEG), which is contained in some ligase buffers, can inhibit packaging. The volume of DNA added to each extract should be between 1 and 4 μl. To obtain the highest packaging efficiency [i.e., the number of plaque-forming units per microgram (pfu/μg) of DNA], package 1 μl of the ligation reaction and never more than 4 μl. Increased volume (i.e., >4 μl) yields more plaque-forming units per packaging reaction, but fewer plaque-forming units per microgram of DNA. DNA that is digested with restriction enzymes and religated packages less efficiently (by a factor of 10–100) than uncut lambda DNA. For example, uncut wild-type lambda DNA packages with efficiencies exceeding 1 × 10⁹ pfu/μg of vector when using a Gigapack III packaging extract. However, predigested vector, when ligated to a test insert, yield ~5 × 10⁶–1 × 10⁷ recombinant plaques/μg of vector.

28 ZAP-cDNA Synthesis Kit
Packaging Instructions For optimal packaging efficiency, package 1 μl of the ligation and never more than 4 μl. For further selection of large inserts, use Gigapack III XL packaging extract, a size-selective packaging extract.
Packaging Protocol
Note DNA to be packaged in this protocol must be produced by ligation using the ligase buffer provided with the cDNA Synthesis Kit (see Ligating the cDNA Insert). Polyethylene glycol, which is present in some ligase buffers, can inhibit packaging.
1. Remove the appropriate number of packaging extracts from a –80°C freezer and place the extracts on dry ice.
2. Quickly thaw the packaging extract by holding the tube between your fingers until the contents of the tube just begins to thaw.
3. Add the experimental DNA immediately (1–4 μl containing 0.1–1.0 μg of ligated DNA) to the packaging extract.
4. Stir the tube with a pipet tip to mix well. Gentle pipetting is allowable provided that air bubbles are not introduced.
5. Spin the tube quickly (for 3–5 seconds), if desired, to ensure that all contents are at the bottom of the tube.
6. Incubate the tube at room temperature (22°C) for 2 hours.
7. Add 500 μl of SM buffer to the tube.
8. Add 20 μl of chloroform and mix the contents of the tube gently.
9. Spin the tube briefly to sediment the debris and transfer the supernatant to a fresh tube.
10. The supernatant containing the phage is ready for titering. The supernatant may be stored at 4°C for up to 1 month.
ZAP-cDNA Synthesis Kit 29
Titering the Packaging Reaction
Preparing the Host Bacteria
Note The VCS257 strain is for use with the Gigapack III Gold packaging extract and the positive wild-type lambda DNA control only.
1. Streak the XL1-Blue MRF’ and VCS257 cells onto LB agar plates containing the appropriate antibiotic (See Recommended Media). Incubate the plates overnight at 37°C.
Note Do not add antibiotic to the medium in the following step. The antibiotic will bind to the bacterial cell wall and will inhibit the ability of the phage to infect the cell.
2. Prepare separate 50-ml cultures of XL1-Blue MRF’ and VCS257 cells in LB broth with supplements.
3. Incubate with shaking at 37°C for 4–6 hours (do not grow past an OD600 of 1.0). Alternatively, grow overnight at 30°C, shaking at 200 rpm.
Note The lower temperature keeps the bacteria from overgrowing, thus reducing the number of nonviable cells. Phage can adhere to nonviable cells resulting in a decreased titer.
4. Pellet the bacteria at 1000 × g for 10 minutes.
5. Gently resuspend each cell pellet in 25 ml sterile 10 mM MgSO4.
Note For later use, store the cells at 4°C overnight in 10 mM MgSO4.
Titering Protocol
1. Dilute the XL1-Blue MRF’ cells (from step 5 of Preparing the Host Bacteria in Titering the Packaging Reaction) to an OD600 of 0.5 with sterile 10 mM MgSO4.
Note The bacteria should be used immediately following dilution.
2. To determine the titer of the packaged ligation product, mix the following components:
1 μl of the final packaged reaction 200 μl of XL1-Blue MRF’ cells at an OD600 of 0.5
and
1 μl of a 1:10 dilution of the final packaged reaction 200 μl of XL1-Blue MRF’ cells at an OD600 of 0.5
30 ZAP-cDNA Synthesis Kit
3. Incubate the phage and the bacteria at 37°C for 15 minutes to allow the phage to attach to the cells.
4. Add 3 ml of NZY top agar, melted and cooled to ~48°C, and plate immediately onto dry, prewarmed NZY agar plates. Allow the plates to set for 10 minutes. Invert the plates and incubate at 37°C.
5. Plaques should be visible after 12 hours. Count the plaques and determine the titer in plaque-forming units per milliliter (pfu/ml).
Testing the Efficiency of the Gigapack III Packaging Extract with the Wild-Type Lambda Control DNA (Optional)
Use the following procedure to test the efficiency of the Gigapack III packaging extract with the λcI857 Sam7 wild-type lambda control DNA:
1. Thaw the frozen wild-type lambda control DNA on ice and gently mix after thawing.
2. Using 1 μl of the wild-type lambda control DNA (~0.2 μg), proceed with steps 1–10 in the Packaging Instructions.
Note Because of the high titer achieved with the wild-type lambda control DNA, stop the control packaging reaction with 1 ml of SM buffer. This should make the plaques easier to count.
3. Prepare two consecutive 10–2 dilutions in SM buffer of the packaging reaction from step 10 of the Packaging Protocol. (The final dilution is 10–4.)
4. Dilute the VCS257 cells (from step 5 of Preparing the Host Bacteria in Titering the Packaging Reaction) to an OD600 of 0.5 with sterile 10 mM MgSO4.
Note The bacteria should be used immediately following dilution.
5. Add 10 μl of the 10–4 packaging reaction dilution from step 3 to 200 μl of the VCS257 host strain from step 4. (The VCS257 strain is recommended for plating the wild-type lambda control DNA only.)
6. Incubate at 37°C for 15 minutes to allow the phage to attach to the cells.
7. Add 3 ml of NZY top agar, melted and cooled to ~48°C, and plate immediately onto dry, prewarmed NZY agar plates. Allow the plates to set for 10 minutes. Invert the plates and incubate at 37°C.

ZAP-cDNA Synthesis Kit 31
8. Plaques should be visible after 12 hours. Count the plaques. Approximately 400 plaques should be obtained on the 10–4 dilution plate when the reaction is stopped with 1 ml of SM buffer. Calculate the efficiency using the following equation:
Number of plaques dilution factor total packaging volume
Total number of micrograms packaged number of microliters plated
× ××
DETERMINING BACKGROUND BY BLUE-WHITE COLOR SELECTION A background test can be completed by plating several hundred plaques on a plate (see Determining Background by Color Selection with IPTG and X-gal). Add 15 μl of 0.5 M IPTG (in water) and 50 μl of 250 mg/ml X-gal [in dimethylformamide (DMF)] to 2–3 ml of NZY top agar, melted and cooled to ~48°C. The higher concentrations of IPTG and X-gal used in the plating often result in the formation of a precipitate, which disappears after incubation. To minimize the formation of this precipitate, the IPTG and X-gal should be added separately, with mixing in between additions, to the NZY top agar. Plate immediately on NZY agar plates. Plaques are visible after incubation for 12 hours at 37°C, although color detection requires overnight incubation. Background plaques are blue, while recombinant plaques are white. 1. To plate the packaged ligation product, mix the following components:
1 μl of the final packaged reaction 200 μl of XL1-Blue MRF´ cells at an OD600 of 0.5
and
1 μl of a 1:10 dilution of the final packaged reaction 200 μl of XL1-Blue MRF´ cells at an OD600 of 0.5
Note Use of any other cell line may result in a dramatically reduced titer. XL1-Blue MRF´ is a RecA– McrA– and McrCB– Mrr– strain and does not restrict methylated DNA.
2. Incubate the phage and the bacteria at 37°C for 15 minutes to allow the phage to attach to the cells.
3. Add the following components:
2–3 ml of NZY top agar (melted and cooled to ~48°C) 15 μl of 0.5 M IPTG (in water) 50 μl of X-gal [250 mg/ml (in DMF)]
4. Plate immediately onto dry, prewarmed NZY agar plates and allow the plates to set for 10 minutes. Invert the plates and incubate at 37°C.
32 ZAP-cDNA Synthesis Kit
5. Plaques should be visible after 12 hours, although color detection requires overnight incubation. Background plaques are blue and should be <1 × 10⁵ pfu/μg of arms, while recombinant plaques will be white (clear) and should be 10- to 100-fold above the background.
Note Primary libraries can be unstable; therefore, amplification of the libraries is recommended immediately.
AMPLIFYING THE LIBRARY It is usually desirable to amplify libraries prepared in lambda vectors to make a large, stable quantity of a high-titer stock of the library. However, more than one round of amplification is not recommended, since slower growing clones may be significantly underrepresented. The following protocol is recommended for amplifying the Uni-ZAP XR library:
Day 1
1. Grow a 50-ml overnight culture of XL1-Blue MRF’ cells in LB broth with supplements at 30°C with shaking.
Day 2
2. Gently spin down the XL1-Blue MRF’ cells (1000 × g). Resuspend the cell pellet in 25 ml of 10 mM MgSO4. Measure the OD600 of the cell suspension, then dilute the cells to an OD600 of 0.5 in 10 mM MgSO4.
3. Combine aliquots of the packaged mixture or library suspension containing ~5 × 10⁴ pfu of bacteriophage with 600 μl of XL1-Blue MRF’ cells at an OD600 of 0.5 in 14-ml BD Falcon polypropylene round-bottom tubes. To amplify 1 × 10⁶ plaques, use a total of 20 aliquots (each aliquot contains 5 × 10⁴ plaques/150-mm plate).
Note Do not add more than 300 μl of phage/600 μl of cells.
4. Incubate the tubes containing the phage and host cells for 15 minutes at 37°C to allow the phage to attach to the cells.
5. Mix 6.5 ml of NZY top agar, melted and cooled to ~48°C, with each aliquot of infected bacteria and spread evenly onto a freshly poured 150-mm NZY agar plate. Allow the plates to set for 10 minutes.
6. Invert the plates and incubate at 37°C for 6–8 hours. Do not allow the plaques to get larger than 1–2 mm. On completion, the plaques should be touching.
7. Overlay the plates with ~8–10 ml of SM buffer. Store the plates at 4°C overnight (with gentle rocking if possible). This allows the phage to diffuse into the SM buffer.
ZAP-cDNA Synthesis Kit 33
Day 3
8. Recover the bacteriophage suspension from each plate and pool it into a sterile polypropylene container. Rinse the plates with an additional 2 ml of SM buffer and pool. Add chloroform to a 5% (v/v) final concentration. Mix well and incubate for 15 minutes at room temperature.
9. Remove the cell debris by centrifugation for 10 minutes at 500 × g.
10. Recover the supernatant and transfer it to a sterile polypropylene container. If the supernatant appears cloudy or has a high amount of cell debris, repeat steps 8 and 9. If the supernatant is clear, add chloroform to a 0.3% (v/v) final concentration and store at 4°C. Store aliquots of the amplified library in 7% (v/v) DMSO at –80°C.
11. Check the titer of the amplified library using host cells and serial dilutions of the library. (Assume ~109–1011 pfu/ml.)
Note Briefly spin the lambda phage stock to ensure that the chloroform is separated completely before removing the aliquot for titering.
PERFORMING PLAQUE LIFTS
1. Titer the amplified mixture or library suspension to determine the concentration using XL1-Blue MRF’ cells.
2. Combine the equivalent of 5 × 10⁴ pfu/plate and 600 μl of freshly prepared XL1-Blue MRF’ cells at an OD600 of 0.5.
3. Incubate the bacteria and phage mixture at 37°C for 15 minutes to allow the phage to attach to the cells.
4. Add 6.5 ml of NZY top agar (~48°C) to the bacteria and phage mixture.
5. Quickly pour the plating culture onto a dry, prewarmed 150-mm NZY agar plate, which is at least 2 days old. Carefully swirl the plate to distribute the cells evenly. Allow the plates to set for 10 minutes. (Use 20 plates to screen 1 × 10⁶ pfu.)
6. Invert the plates and incubate at 37°C for ~8 hours.
7. Chill the plates for 2 hours at 4°C to prevent the top agar from sticking to the nitrocellulose membrane.
Note Use forceps and wear gloves for the following steps.
34 ZAP-cDNA Synthesis Kit
8. Place a nitrocellulose membrane onto each NZY agar plate for 2 minutes to allow the transfer of the phage particles to the membrane. Use a needle to prick through the membrane and agar for orientation. (If desired, waterproof ink in a syringe needle may be used.)
Notes If making duplicate nitrocellulose membranes, allow the second membrane to transfer for ~4 minutes.
Pyrex® dishes are convenient for the following steps. All solutions should be at room temperature.
a. Denature the nitrocellulose-bound DNA after lifting by submerging the membrane in a 1.5 M NaCl and 0.5 M NaOH denaturation solution for 2 minutes.
Note If using charged nylon, wash with gloved fingertips to remove the excess top agar.
b. Neutralize the nitrocellulose membrane for 5 minutes by submerging the membrane in a 1.5 M NaCl and 0.5 M Tris-HCl (pH 8.0) neutralization solution.
c. Rinse the nitrocellulose membrane for no more than 30 seconds by submerging the membrane in a 0.2 M Tris-HCl (pH 7.5) and 2× SSC buffer solution (see Preparation of Media and Reagents).
9. Blot briefly on a Whatman® 3MM paper.
10. Crosslink the DNA to the membranes using the autocrosslink setting on the Stratalinker UV crosslinker (120,000 μJ of UV energy) for ~30 seconds. Alternatively, oven-bake at 80°C for ~1.5–2 hours.
11. Store the stock agar plates of the transfers at 4°C to use after screening.
HYBRIDIZING AND SCREENING Following the preparation of the membranes for hybridization, perform prehybridization, probe preparation, hybridization, and washes for either oligonucleotide probes or double-stranded probes and then expose the membranes to film as outlined in standard methodology texts.2, 8 Following these procedures, perform secondary and tertiary screenings also as outlined in the standard methodology texts.2, 8 When using the Uni-ZAP XR vector, perform in vivo excision on the isolates to obtain the insert-containing pBluescript phagemid. (See In vivo Excision of the pBluescript Phagemid from the Uni-ZAP XR Vector.) For clones that are toxic after excision and cannot be propagated as high-copy number plasmids, an alternative is to isolate DNA from the clone as recombinant lambda DNA. In this case, after the phage isolate is obtained, prepare phage DNA using the Agilent Lambda DNA Purification Kit (Catalog #200391) or using protocols provided in Reference 8.

ZAP-cDNA Synthesis Kit 35
ANTIBODY SCREENING A complete instruction manual for immunoscreening is supplied with the Agilent picoBlue immunoscreening kit. This kit is available with goat anti-rabbit antibodies or goat anti-mouse antibodies [Catalog #200371 (goat anti-rabbit) and #200372 (goat anti-mouse)].
In Vivo EXCISION OF THE pBLUESCRIPT PHAGEMID FROM THE UNI-ZAP XR VECTOR
The Uni-ZAP XR vector is designed to allow simple, efficient in vivo excision and recircularization of any cloned insert contained within the lambda vector to form a phagemid containing the cloned insert. This in vivo excision depends on the placement of the DNA sequences within the lambda phage genome and on the presence of a variety of proteins, including f1 bacteriophage-derived proteins. The f1 phage proteins recognize a region of DNA normally serving as the f1 bacteriophage origin of replication. This origin of replication can be divided into two overlying parts: (1) the site of initiation and (2) the site of termination for DNA synthesis.9 These two regions are subcloned separately into the Uni-ZAP XR vector. The lambda phage (target) is made accessible to the f1-derived proteins by simultaneously infecting a strain of E. coli with both the lambda vector and the f1 bacteriophage. Inside E. coli, the "helper" proteins (i.e., proteins from f1 or M13 phage) recognize the initiator DNA that is within the lambda vector. One of these proteins then nicks one of the two DNA strands. At the site of this nick, new DNA synthesis begins and duplicates whatever DNA exists in the lambda vector "downstream" (3´) of the nicking site. DNA synthesis of a new single strand of DNA continues through the cloned insert until a termination signal, positioned 3´ of the initiator signal, is encountered within the constructed lambda vector. The single-stranded DNA molecule is circularized by the gene II product from the f1 phage, forming a circular DNA molecule containing the DNA between the initiator and terminator. In the case of the Uni-ZAP XR vector, this includes all sequences of the pBluescript SK(–) phagemid and the insert, if one is present. This conversion is the "subcloning" step, since all sequences associated with normal lambda vectors are positioned outside of the initiator and terminator signals and are not contained within the circularized DNA. In addition, the circularizing of the DNA automatically recreates a functional f1 origin as found in f1 bacteriophage or phagemids.
36 ZAP-cDNA Synthesis Kit
In Vivo EXCISION PROTOCOLS USING EXASSIST HELPER PHAGE WITH SOLR STRAIN
The ExAssist helper phage with SOLR strain is designed to allow efficient excision of the pBluescript phagemid from the Uni-ZAP XR vector, while eliminating problems associated with helper phage co-infection. The ExAssist helper phage contains an amber mutation that prevents replication of the phage genome in a nonsuppressing E. coli strain such as SOLR cells. This allows only the excised phagemid to replicate in the host, removing the possibility of co-infection from the ExAssist helper phage. Since the ExAssist helper phage cannot replicate in the SOLR strain, single-stranded rescue cannot be performed in this strain using this helper phage. Mass excision can be used to generate subtraction libraries and subtracted DNA probes.
Single-Clone Excision Protocol
Day 1
1. Core the plaque of interest from the agar plate and transfer the plaque to a sterile microcentrifuge tube containing 500 μl of SM buffer and 20 μl of chloroform. Vortex the microcentrifuge tube to release the phage particles into the SM buffer. Incubate the microcentrifuge tube for 1–2 hours at room temperature or overnight at 4°C. (This phage stock is stable for up to 6 months at 4°C.)
2. Grow separate 50-ml overnight cultures of XL1-Blue MRF´ and SOLR cells in LB broth with supplements at 30°C.
Day 2
3. Gently spin down the XL1-Blue MRF´ and SOLR cells (1000 × g). Resuspend each of the cell pellets in 25 ml of 10 mM MgSO4. Measure the OD600 of the cell suspensions, then adjust the concentration of the cells to an OD600 of 1.0 (8 × 10⁸ cells/ml) in 10 mM MgSO4.
4. Combine the following components in a 14-ml BD Falcon polypropylene round-bottom tube:
200 μl of XL1-Blue MRF´ cells at an OD600 of 1.0 250 μl of phage stock (containing >1 × 10⁵ phage particles) 1 μl of the ExAssist helper phage (>1 × 10⁶ pfu/μl)
Note Briefly spin the lambda phage stock to ensure that the chloroform is separated completely before removing the aliquot used in the excision reaction.
5. Incubate the BD Falcon polypropylene tube at 37°C for 15 minutes to allow the phage to attach to the cells.

ZAP-cDNA Synthesis Kit 37
6. Add 3 ml of LB broth with supplements and incubate the BD Falcon polypropylene tube for 2.5–3 hours at 37°C with shaking. Because clonal representation is not relevant, single-clone excision reactions can be safely performed overnight.
Note The turbidity of the media is not indicative of the success of the excision.
7. Heat the BD Falcon polypropylene tube at 65–70°C for 20 minutes to lyse the lambda phage particles and the cells. Spin the tube at 1000 × g for 15 minutes to pellet the cell debris.
8. Decant the supernatant into a sterile 14-ml BD Falcon polypropylene round-bottom tube. This stock contains the excised pBluescript phagemid packaged as filamentous phage particles. (This stock may be stored at 4°C for 1–2 months.)
9. To plate the excised phagemids, add 200 μl of freshly grown SOLR cells from step 3 (OD600 = 1.0) to two 1.5-ml microcentrifuge tubes. Add 100 μl of the phage supernatant (from step 8 above) to one microcentrifuge tube and 10 μl of the phage supernatant to the other microcentrifuge tube.
10. Incubate the microcentrifuge tubes at 37°C for 15 minutes.
11. Plate 200 μl of the cell mixture from each microcentrifuge tube on LB-ampicillin agar plates (100 μg/ml) and incubate the plates overnight at 37°C.
Due to the high-efficiency of the excision process, it may be necessary to titrate the supernatant to achieve single-colony isolation. Colonies appearing on the plate contain the pBluescript double-stranded phagemid with the cloned DNA insert. Helper phage will not grow, since helper phage is unable to replicate in the Su– (nonsuppressing) SOLR strain and does not contain ampicillin-resistance genes. SOLR cells are also resistant to lambda phage infection, thus preventing lambda phage contamination after excision. To maintain the pBluescript phagemid, streak the colony on a new LB-ampicillin agar plate. For long-term storage, prepare a bacterial glycerol stock and store at –80°C. VCSM13 helper phage is recommended for the single-stranded rescue procedure. The single-stranded rescue procedure can be found in Appendix: Recovery of Single-Stranded DNA from Cells Containing pBluescript Phagemids.
38 ZAP-cDNA Synthesis Kit
Mass Excision Protocol
Day 1
1. Grow separate 50-ml overnight cultures of XL1-Blue MRF´ and SOLR cells in LB broth with supplements at 30°C.
Day 2
2. Gently spin down the XL1-Blue MRF´ and SOLR cells (1000 × g). Resuspend each of the cell pellets in 25 ml of 10 mM MgSO4. Measure the OD600 of the cell suspensions, then adjust the concentration of the cells to an OD600 of 1.0 (8 × 10⁸ cells/ml) in 10 mM MgSO4.
3. In a 50-ml conical tube, combine a portion of the amplified lambda bacteriophage library with XL1-Blue MRF´ cells at a MOI of 1:10 lambda phage-to-cell ratio. Excise 10- to 100-fold more lambda phage than the size of the primary library to ensure statistical representation of the excised clones. Add ExAssist helper phage at a 10:1 helper phage-to-cells ratio to ensure that every cell is co-infected with lambda phage and helper phage.
For example, use
107 pfu of the lambda phage (i.e., 10- to 100-fold above the primary library size) 108 XL1-Blue MRF´ cells (1:10 lambda phage-to-cell ratio, noting that an OD600 of 1.0 corresponds to 8 × 10⁸ cells/ml) 109 pfu of ExAssist helper phage (10:1 helper phage-to-cells ratio)
Note Briefly spin the lambda phage stock to ensure that the chloroform is separated completely before removing the aliquot used in the excision reaction.
4. Incubate the conical tube at 37°C for 15 minutes to allow the phage to attach to the cells.
5. Add 20 ml of LB broth with supplements and incubate the conical tube for 2.5–3 hours at 37°C with shaking.
Notes Incubation times for mass excision in excess of 3 hours may alter the clonal representation.
The turbidity of the media is not indicative of the success of the excision.
6. Heat the conical tube at 65–70°C for 20 minutes to lyse the lambda phage particles and the cells.
7. Spin the conical tube at 1000 × g for 10 minutes to pellet the cell debris and then decant the supernatant into a sterile conical tube.
ZAP-cDNA Synthesis Kit 39
8. To titer the excised phagemids, combine 1 μl of this supernatant with 200 μl of SOLR cells from step 2 in a 1.5-ml microcentrifuge tube.
9. Incubate the microcentrifuge tube at 37°C for 15 minutes.
10. Plate 100 μl of the cell mixture onto LB–ampicillin agar plates (100 μg/ml) and incubate the plates overnight at 37°C.
Note It may be necessary to further dilute the cell mixture to achieve single-colony isolation.
At this stage, colonies may be selected for plasmid preps, or the cell mixture may be plated directly onto filters for colony screening.
40 ZAP-cDNA Synthesis Kit
APPENDIX I: RECOVERY OF SINGLE-STRANDED DNA FROM CELLS CONTAINING PBLUESCRIPT PHAGEMIDS
pBluescript is a phagemid that can be secreted as single-stranded DNA in the presence of M13 helper phage. These phagemids contain the intergenic (IG) region of a filamentous f1 phage. This region encodes all of the cis-acting functions of the phage required for packaging and replication. In E. coli with the F+ phenotype (containing an F´ episome), pBluescript phagemids will be secreted as single-stranded f1 "packaged" phage when the bacteria has been infected by a helper phage. Since these filamentous helper phages (M13, f1) will not infect E. coli without an F´ episome coding for pili, it is essential to use XL1-Blue MRF´ or a similar strain containing the F´ episome.10, 11 Agilent offers helper phages that preferentially package pBluescript phagemids. Typically, 30–50 pBluescript molecules are packaged/helper phage DNA molecule. pBluescript phagemids are offered with the IG region in either of two orientations: pBluescript (+) is replicated such that the sense strand of the β-galactosidase gene is secreted within the phage particles; pBluescript (–) is replicated such that the antisense strand of the β-galactosidase gene is secreted in the phage particles. Yields of single-stranded (ss)DNA depend on the specific insert sequence. For most inserts, over 1 μg of ssDNA can be obtained from a 1.5-ml miniprep if grown in XL1-Blue MRF´. A faint single-strand helper phage band may appear on a gel at ~6 kb for VCSM13. This DNA mixture can be sequenced with primers that are specific for pBluescript and do not hybridize to the helper phage genome. Site-specific mutagenesis is also possible using standard techniques. The advantages of using pBluescript phagemids for either purpose are as follows: (1) pBluescript phagemids do not replicate via the M13 cycle, lessening the tendency to delete DNA inserts, therefore it is unlikely that even 10-kb inserts will be deleted. (2) "Packaging" of pBluescript phagemids containing inserts is efficient since the pBluescript vector is significantly smaller than wild-type M13. (3) Oligonucleotide mutagenesis in pBluescript vectors is advantageous because the mutagenized insert is located between the T3 and T7 promoters. The resultant mutant transcripts can be synthesized in vitro without further subcloning. VCSM13 (single-strand size ~6 kb), is efficient at single-stranded DNA rescue and provides good yields of single-stranded phagemid; however it can revert to wild-type (more frequently than R408 helper phage, for example). This difficulty can be addressed by periodically propagating VCSM13 in the presence of kanamycin. [VCSM13 (a derivative of M13KO7) has a kanamycin gene inserted into the intergenic region.]
ZAP-cDNA Synthesis Kit 41
Single-Stranded Rescue Protocol
1. Inoculate a single colony into 5 ml of 2× YT broth (See Preparation of Media and Reagents) containing 100 μg/ml ampicillin and VCSM13 helper phage at 107–108 pfu/ml (MOI ~10).
2. Grow the culture at 37°C with vigorous aeration for 1–2 hours
3. Add kanamycin to 70 μg/ml to select for infected cells.
4. Continue growth at 37°C with vigorous aeration for 16–24 hours, or until growth has reached saturation.
5. Centrifuge 1.5 ml of the cell culture for 5 minutes in a microcentrifuge.
6. Remove 1 ml of the supernatant to a fresh tube, then add 150 μl of a solution containing 20% PEG8000 and 2.5 M NaCl. Allow phage particles to precipitate on ice for 15 minutes.
Note For increased yield, perform the PEG precipitation overnight at 4°C.
7. Centrifuge for 5 minutes in a microcentrifuge. (A pellet should be obvious.)
8. Remove supernatant. Centrifuge the PEG pellets a few seconds more to collect residual liquid, then remove and discard the residual liquid.
9. Resuspend the pellet in 400 μl of 0.3 M sodium acetate (pH 6.0) and 1 mM EDTA by vortexing vigorously.
10. Extract with 1 volume phenol–chloroform and centrifuge for 1–2 minutes to separate phases.
11. Transfer the aqueous phase to a fresh tube and add 1 ml of ethanol. Centrifuge for 5 minutes.
12. Remove ethanol and dry the DNA pellet.
13. Dissolve the pellet in 25 μl of TE buffer.
14. Analyze 1–2 μl on an agarose gel.
42 ZAP-cDNA Synthesis Kit
APPENDIX II: PURIFYING AND QUANTIFYING RNA
Purifying RNA We highly recommends using the RNA Isolation Kit or the GITC–phenol–chloroform extraction method3 to isolate total RNA. This method is rapid, yet it produces large amounts of high-quality, undegraded RNA. Although AccuScript RT is not inhibited by ribosomal RNA (rRNA) and transfer RNA (tRNA) contamination, it is advisable to select the poly(A)+ fraction. The amounts of rRNA and tRNA vastly outnumber the mRNA and will decrease the efficiency of the system. Poly(A)+ RNA is selected on oligo(dT) cellulose columns.12 Some protocols call for the addition of SDS in the purification steps. Sodium dodecyl sulfate is a powerful enzyme inhibitor and helps prevent degradation of the RNA by RNases, but its presence can also inhibit the enzymes required for cDNA synthesis. If the mRNA intended for use with this kit is suspended in an SDS solution, the RNA must be phenol extracted and ethanol precipitated. Ribonucleases A and T1 are widely used in almost all molecular biology labs and are nearly indestructible. Ribonucleases are produced by microbes and have also been found in the oils of the skin. Make an effort to use tubes and micropipet tips which have been handled only with gloves. Use freshly autoclaved and baked tips and tubes. Usually these precautions are sufficient, but to be absolutely certain that microcentrifuge tubes and other components intended for use with RNA are not contaminated, the components can be treated with DEPC. Diethylpyrocarbonate is extremely toxic and should be handled with care. Submerge the microcentrifuge tubes in a 0.1% (v/v) DEPC-treated water solution. Leave the beaker of submerged tubes in a fume hood overnight and then dispose of the DEPC-treated water. Autoclave the microcentrifuge tubes for at least 30 minutes. Even though the tubes may still have a sweet DEPC odor, the DEPC is completely inactivated by this procedure. Place the tubes in a drying oven overnight. Equipment which cannot be treated by DEPC can be rinsed in a freshly mixed 3% (v/v) hydrogen peroxide solution, followed by a methanol rinse. Remember, once the RNA is converted to first-strand cDNA, RNases are no longer a concern. Caution should still be exercised in maintaining a sterile, DNase-free environment.
Quantifying RNA RNA can be quantified by measuring the optical density of a dilute RNA solution. The conversion factor for RNA at the wavelength of 260 nm is 40 μg/ml/OD unit as shown in the example below. Two microliters of a poly(A)+ RNA sample is added to 498 μl of water (e.g., OD260 = 0.1). Therefore,
0.1 OD unit 500
2 dilution factor 40 g of RNA / ml = 1000 g of RNA / ml or 1 g of RNA / l×
⎛⎝⎜
⎞⎠⎟
× μ μ μ μ
ZAP-cDNA Synthesis Kit 43
If a sample has significant rRNA contamination, the actual amount of mRNA available for cDNA conversion will be overestimated by this procedure. If the amount of poly(A)+ RNA is below 1.5 μg/synthesis reaction, the RT may synthesize unclonable hairpin structures. If the amount of poly(A)+ RNA is above 7 μg, the percentage of cDNAs which are full length may decrease. The ZAP-cDNA synthesis kit is optimized for 5 μg of poly(A)+ RNA, but successful libraries have been generated using the minimums and maximums described here. Some cDNA procedures recommend heating RNA prior to synthesis to remove any inhibiting secondary structures. Tests conducted with the provided test RNA and several different heterogeneous mRNA samples indicate that a preheating step does not improve cDNA synthesis. If the RNA contains even a minute amount of RNase, its activity will increase by several orders of magnitude with the increased temperature and significantly degrade the RNA. Secondary structure may be a problem with certain RNAs, particularly plant and tumor mRNAs. These samples can be treated with methylmercury hydroxide (see Appendix II: Treating with Methylmercury Hydroxide).13 This chemical is extremely toxic and should be used with caution in a fume hood.
Formaldehyde RNA Gel Protocol
Additional Reagents Required 10× MOPS buffer§ 37% formaldehyde solution Agarose Formaldehyde gel loading buffer§ Size standards RNA size standards work best DNA size standards can be used to approximate sizes If rRNA is present, its intact bands can indicate size and intactness of the sample
Agarose gels [1% (w/v)] usually work well for mixed populations of RNA. If a smaller population of RNA is anticipated, 1.5% (w/v) agarose gels are recommended.
The following procedure is for minigels:
1. Melt 1 g of agarose in a solution made with the following:
10 ml of 10× MOPS buffer 85 ml of sterile water
2. Allow the melted agarose solution to cool to ~50°C. § See Preparation of Media and Reagents.
44 ZAP-cDNA Synthesis Kit
3. In a fume hood or in a well-ventilated area, add 5.4 ml of 37% (v/v) formaldehyde.
4. Mix the agarose solution by swirling and pour the solution into the gel mold. While the gel is solidifying, dry the RNA samples >2 μl in volume in a vacuum evaporator. Dilute an appropriate amount of 10× MOPS buffer to 1× to be used as running buffer. When the gel is submerged in 1× MOPS running buffer and everything is completely ready, resuspend the dry samples (or RNA in a volume of <2 μl) in 10 μl of formaldehyde gel loading buffer. Heat the sample for 5–10 minutes at 65°C and then load the gel.
5. Run the gel at 5 V/cm. The ethidium bromide (EtBr) will migrate to the negative electrode and the bromophenol blue (BPB) will travel to the positive electrode.
Usually when BPB has run half the distance of the gel, the RNA has migrated sufficiently to allow the examination of the size distribution relative to the standards. Examine the gel under ultraviolet (UV) illumination. Typical eukaryotic RNA has a majority of its size distribution between 400 and 2000 bases. Northern blots can easily be produced by soaking the gels in two changes of 10× SSC buffer (for 20 minutes each time) to remove the formaldehyde from the gel and then by blotting the gel either conventionally8 or by pressure blotting with the PosiBlot 30–30 pressure blotter and Pressure Control Station. The RNA is permanently bound to the nitrocellulose or nylon membrane by conventional baking in an 80°C vacuum oven for 2 hours or by crosslinking for 30 seconds in a Stratalinker UV crosslinker. The blot is probed using conventional methods.8
APPENDIX III: TREATING RNA WITH METHYLMERCURY HYDROXIDE
Warning Methylmercury hydroxide is an extremely toxic chemical. Wear gloves and use with caution in a fume hood.
1. Resuspend the mRNA in 20 μl of DEPC-treated water.
2. Incubate at 65°C for 5 minutes.
3. Cool to room temperature.
4. Add 2 μl of 100 mM CH3HgOH.
5. Incubate at room temperature for 1 minute.
6. Add 4 μl of 700 mM β-mercaptoethanol (see Preparation of Media and Reagents).
7. Incubate at room temperature for 5 minutes.
ZAP-cDNA Synthesis Kit 45
APPENDIX IV: ALKALINE AGAROSE GELS Alkaline agarose gels cause DNA to denature and can be used to identify the presence of a secondary structure called hairpinning. Hairpinning can occur in either the first- or second-strand reactions when the newly polymerized strand "snaps back" on itself and forms an antiparallel double helix. Denaturing gels such as alkaline agarose gels can reveal this secondary structure and can demonstrate the size range of the first- and second-strand cDNA.
Note The test cDNA sample will run as a tight band at 1.8 kb and will show distinctly different intensity between the first and second strands. This is due to the relative ratio of α-32P to the amount of NTP in the first- or second-strand reaction. Normally the second strand will be only 1/10 to 1/20 the intensity of the first-strand band.
Alkaline agarose gels differ from conventional gels in the following ways:
1. The absence of any buffering capacity in the "buffer" reduces the speed at which the sample can be run.
2. The thickness of the typical undried agarose gel causes the radioactive emissions to be scattered to a degree which makes a clear autoradiograph difficult to interpret.
The following alternative methods help avoid these complications.
The Slide Technique The easiest and least expensive method is to use a 5- × 7.5-cm glass slide, position a minigel comb over it with high tension clips and add 10 ml of molten alkaline agarose near the upper center of the slide. The surface tension of the solution will prevent overflow and produce a small, thin gel which can be exposed without further drying. Do not allow the teeth of the comb to overlap the edge of the plate or the surface tension may be broken. To improve the resolution, pat the gel dry with several changes of Whatman 3MM paper after electrophoresis is complete. To prevent radioactive contamination of film cassettes, seal the wet gels in airtight hybridization bags. Be careful not to trap any air in the hybridization bag which could lift the film away from the gel and cause blurring.
46 ZAP-cDNA Synthesis Kit
The Vertical Alkaline Agarose Technique Vertical alkaline agarose gels can be produced using a vertical gel apparatus with 1.5-mm spacers. Since the alkaline agarose gels do not have sufficient friction to remain bound to ordinary glass, a frosted glass plate or gel bond must be used with the vertical apparatus. The combs normally used for acrylamide can be used with this apparatus, if the outside teeth are wrapped in tape to prevent the comb from sinking more than 1.2 cm into the agarose. The 55°C agarose will solidify almost immediately on contact with the cold glass plates, so it is essential to load the mold rapidly with a 60-ml syringe. The comb should already be in the mold, and if it is necessary to reposition the comb, do it immediately after the gel is poured. In order to reduce the possibility of destroying the wells when pulling out the comb, place the solidified gel in a -20°C freezer for 5 minutes immediately prior to removing the comb. When pulling out the comb, it is essential to avoid a vacuum between the teeth and the well. Vacuum can be detected when the well distorts from its normal square shape. When a vacuum occurs, push the comb to separate the glass plates and break the vacuum. After the samples have been run and the glass plates are ready to be opened, slide the unfrosted glass plate off of the alkaline agarose gel instead of prying the plate away from the gel. Pat the gel dry several times using several pieces of Whatman 3MM paper.
Note To prevent radioactive contamination of film cassettes, seal the wet gels in airtight hybridization bags. Be careful not to trap any air in the hybridization bag which could lift the film away from the gel and cause blurring.
Conventional Submerged Gels These gels will require drying either by blotting or through the use of a gel dryer.
Caution Even when multiple layers of absorbent paper are placed under the gel, free nucleotides can easily contaminate the drying apparatus. These gels should be poured as thin as possible and should be dried without heat, if time permits, and should never be dried above 40°C.
ZAP-cDNA Synthesis Kit 47
Protocol
Additional Reagents Required Agarose Alkaline buffer (10×)§ Alkaline agarose 2× loading buffer§
The following formula makes 80 ml of 1% (w/v) alkaline agarose for cDNAs in the 1- to 3-kb size range. Melt 0.8 g of agarose in 72 ml of water. Allow the agarose to cool to 55°C. During this time, assemble the gel apparatus. Add 8 ml of 10× alkaline buffer to the cooled agarose, swirl to mix, and pour the agarose immediately. If buffer is added before the correct temperature is reached, the agarose may not solidify. Load the sample in an equal volume of alkaline agarose 2× loading buffer. Run the gel with 1× alkaline buffer at 100 mA and monitor the system for heat. If the apparatus becomes warmer than 37°C, the amperage should be reduced. The migration of the BPB in alkaline agarose is similar to the migration in regular agarose and should be run to at least one-half or three-quarters distance of the gel.
Note The alkali condition causes the blue dye to fade. § See Preparation of Media and Reagents.
48 ZAP-cDNA Synthesis Kit
APPENDIX V: ETHIDIUM BROMIDE PLATE ASSAY— QUANTITATING THE cDNA
An accurate quantitation of DNA can be obtained by UV visualization of samples spotted on EtBr agarose plates. DNA samples of known concentration are prepared for use as comparative standards in this assay.
Preparing the Ethidium Bromide Plates
Note Prepare the EtBr plates under a fume hood.
Prepare 100 ml of 0.8% (w/v) agarose using Tris-acetate (TAE) buffer (See Preparation of Media and Reagents). Cool the molten agarose to 50°C and then add 10 μl of EtBr stock solution (10 mg/ml). The EtBr stock solution is prepared in dH2O and is stored in the dark at 4°C. Swirl to mix the EtBr stock solution and pour the solution into 100-mm petri dishes using ~10 ml/plate. Allow the plates to harden and incubate the plates at 37°C to dry, if necessary. These plates may be stored in the dark at 4°C for up to 1 month.
Preparing the Standards Using a DNA sample of known concentration, make seven serial dilutions in 100 mM EDTA to cover the range from 200 to 10 ng/μl. These standards may be stored at –20°C for 3 months.
Plate Assay for Determination of DNA Concentration Using a marker, label the petri dish to indicate where the sample and the standards (200, 150, 100, 75, 50, 25, and 10 ng/μl) will be spotted. Thaw the standards and carefully spot 0.5 μl of each standard onto the surface of a prepared EtBr plate. Be careful not to dig into the surface of the plate. Let capillary action pull the small volume from the pipet tip to the plate surface and do not allow a bubble to form. Change pipet tips between each standard. After spotting all of the standards, immediately spot 0.5 μl of the cDNA sample onto the plate adjacent to the line of standards. Allow all spots to absorb into the plate for 10–15 minutes at room temperature. Remove the lid and photograph the plate using a UV lightbox. Compare the spotted sample of unknown concentration with the standards. Do not reuse the plates. Standards and unknowns must be spotted within 10 minutes of each other.

ZAP-cDNA Synthesis Kit 49
TROUBLESHOOTING Observations Suggestions
Poor first-strand synthesis Ensure the reaction components are mixed and soluble. Always mix and spin the enzymes in a microcentrifuge immediately before use. Vortex the buffers vigorously until no precipitate is visible.
Minute amounts of SDS or lithium in the RNA will inhibit the first-strand synthesis reaction. Do not use these in the RNA preparations. Multiple phenol–chloroform extractions will sometimes remove the inhibitors.
The reaction may not contain sufficient mRNA. Optical density readings may be obscured by contaminating rRNA or DNA and may give a false indication of the amount of mRNA used in the synthesis. Repeat the mRNA preparation.
The reaction may contain degraded [α-32P]dNTP. Protect the [α-32P]dNTP from heat and leave at room temperature for the minimum time required. In addition, ensure that the [α-32P]dNTP is not contaminated with unlabeled dNTPs, causing poor label incorporation into cDNA, and falsely indicating poor cDNA synthesis.
Poor second-strand synthesis Confirm the interpretation of the gel results. Control RNA will show distinctly different intensity between the first and second strand. This is due to the relative amounts of α-32P to the amount of NTP in the first- or second-strand reaction. Normally, the second strand band will have only 1/10 to 1/20 the intensity of the first-strand band.
Ensure the reaction components are mixed and soluble. Always mix and spin the enzymes in a microcentrifuge immediately before use. Vortex the buffers vigorously until no precipitate is visible.
Poor first strand synthesis will affect second-strand synthesis. See the previous suggestions for Poor first-strand synthesis.
No first-strand synthesis, but good second-strand synthesis
Ensure that there is no DNA contamination within the RNA preparation.
Hairpinning This can result when incubation temperatures are higher than 16°C. Add second-strand synthesis reaction components to the first-strand reaction mix on ice and then transfer the reaction mixture directly to 16°C for incubation. After incubation, place the samples on ice immediately.
The reaction may not contain sufficient mRNA. Optical density readings may be obscured by contaminating rRNA or DNA and may give a false indication of the amount of mRNA used in the synthesis. Repeat the mRNA preparation.
The RNA may have to be treated with methylmercury hydroxide to relax the secondary structure (see Appendix II: Treating with Methylmercury Hydroxide) to reduce the secondary structure present in some sources of RNA.
Ensure that the appropriate amount of DNA polymerase is used. Use a calibrated pipet to measure the enzyme. Do not submerge the pipet tip completely in the enzyme solution as additional enzyme will adhere to the outside of the pipet tip.
(table continues on the next page)
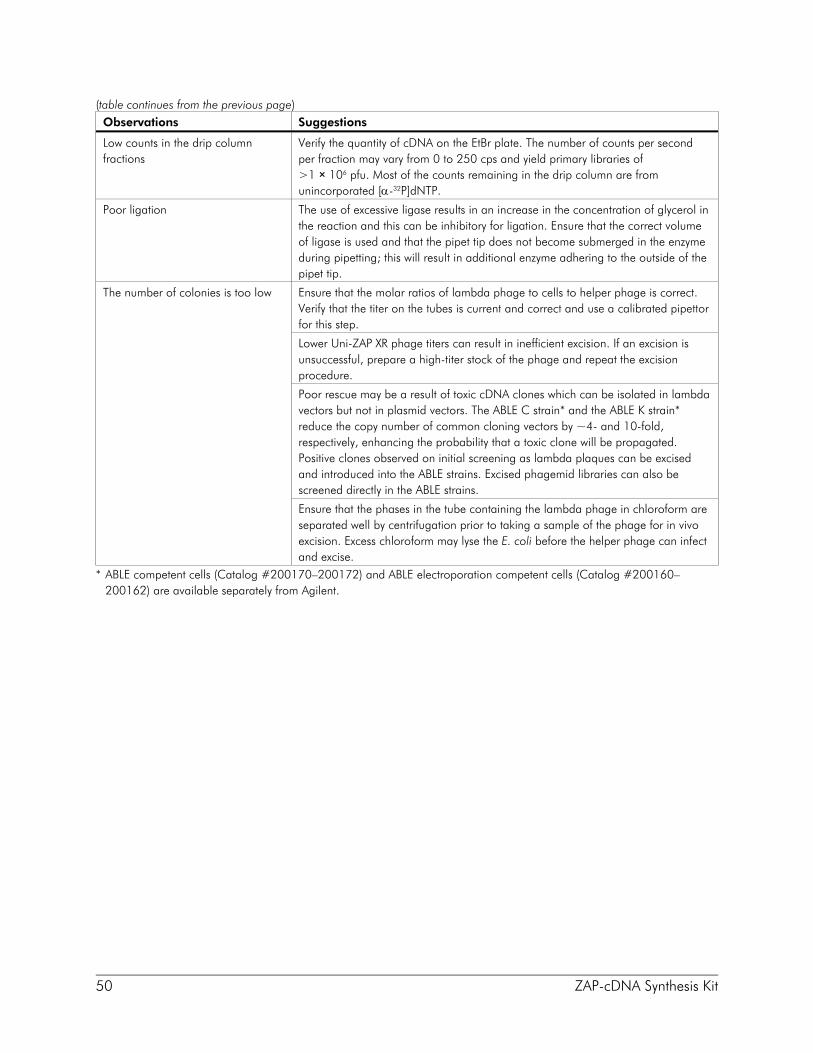
50 ZAP-cDNA Synthesis Kit
(table continues from the previous page) Observations Suggestions
Low counts in the drip column fractions
Verify the quantity of cDNA on the EtBr plate. The number of counts per second per fraction may vary from 0 to 250 cps and yield primary libraries of >1 × 10⁶ pfu. Most of the counts remaining in the drip column are from unincorporated [α-32P]dNTP.
Poor ligation The use of excessive ligase results in an increase in the concentration of glycerol in the reaction and this can be inhibitory for ligation. Ensure that the correct volume of ligase is used and that the pipet tip does not become submerged in the enzyme during pipetting; this will result in additional enzyme adhering to the outside of the pipet tip.
The number of colonies is too low Ensure that the molar ratios of lambda phage to cells to helper phage is correct. Verify that the titer on the tubes is current and correct and use a calibrated pipettor for this step.
Lower Uni-ZAP XR phage titers can result in inefficient excision. If an excision is unsuccessful, prepare a high-titer stock of the phage and repeat the excision procedure.
Poor rescue may be a result of toxic cDNA clones which can be isolated in lambda vectors but not in plasmid vectors. The ABLE C strain* and the ABLE K strain* reduce the copy number of common cloning vectors by ~4- and 10-fold, respectively, enhancing the probability that a toxic clone will be propagated. Positive clones observed on initial screening as lambda plaques can be excised and introduced into the ABLE strains. Excised phagemid libraries can also be screened directly in the ABLE strains.
Ensure that the phases in the tube containing the lambda phage in chloroform are separated well by centrifugation prior to taking a sample of the phage for in vivo excision. Excess chloroform may lyse the E. coli before the helper phage can infect and excise.
* ABLE competent cells (Catalog #200170–200172) and ABLE electroporation competent cells (Catalog #200160–200162) are available separately from Agilent.

ZAP-cDNA Synthesis Kit 51
PREPARATION OF MEDIA AND REAGENTS
Alkaline Agarose 2× Loading Buffer
200 μl of glycerol 750 μl of water 46 μl of saturated BPBll 5 μl of 5 M NaOH
10× Alkaline Buffer (per 50 ml) 3 ml of 5.0 M NaOH 2 ml of 0.5 M EDTA 45 ml of deionized H2O
700 mM β-Mercaptoethanol 5 μl of 14 M β-mercaptoethanol 95 μl of DEPC-treated water
Column-Loading Dye 50% (v/v) glycerol 10% (v/v) 10× STE buffer 40% (w/v) saturated BPBll
Formaldehyde Gel Loading Buffer 720 μl of formamide 160 μl of 10× MOPS buffer 260 μl of 37% formaldehyde 100 μl of sterile water 100 μl of EtBr (10 mg/ml) 80 μl of sterile glycerol 80 μl of saturated BPBll in sterile water
Note The formaldehyde gel loading buffer is not stable and should be made fresh on the day of use
LB Agar (per Liter) 10 g of NaCl 10 g of tryptone 5 g of yeast extract 20 g of agar Add deionized H2O to a final volume of
1 liter Adjust pH to 7.0 with 5 N NaOH Autoclave Pour into petri dishes (~25 ml/100-mm
plate)
LB Broth (per Liter) 10 g of NaCl 10 g of tryptone 5 g of yeast extract Add deionized H2O to a final volume of
1 liter Adjust to pH 7.0 with 5 N NaOH Autoclave
LB–Kanamycin Agar (per Liter) Prepare 1 liter of LB agar Autoclave Cool to 55°C Add 6.6 ml of 7.5 mg/ml filter-sterilized
kanamycin Pour into petri dishes (~25 ml/100-mm
plate) ll To make saturated BPB, add a small amount of bromophenol blue crystals to water and vortex. Centrifuge the sample
briefly and look for the presence of an orange pellet. If a pellet is seen, the solution is saturated. If not, add more crystals and repeat the procedure.

52 ZAP-cDNA Synthesis Kit
LB–Kanamycin Broth (per Liter) Prepare 1 liter of LB broth Autoclave Cool to 55°C Add 6.6 ml of 7.5 mg/ml filter-sterilized
kanamycin
LB–Tetracycline Agar (per Liter) Prepare 1 liter of LB agar Autoclave Cool to 55°C Add 1.5 ml of 10 mg/ml filter-sterilized
tetracycline Pour into petri dishes (~25 ml/100-mm
plate) Store plates in a dark, cool place or cover
plates with foil if left out at room temperature for extended time periods as tetracycline is light-sensitive
LB–Ampicillin Agar (per Liter) 1 liter of LB agar, autoclaved Cool to 55°C Add 10 ml of 10-mg/ml filter-sterilized
ampicillin Pour into petri dishes
(~25 ml/100-mm plate)
LB–Tetracycline Broth (per Liter) Prepare 1 liter of LB broth Autoclave Cool to 55°C Add 1.5 ml of 10 mg/ml filter-sterilized
tetracycline Store broth in a dark, cool place as
tetracycline is light-sensitive
LB Broth with Supplements Prepare 1 liter of LB broth Autoclave Add the following filter-sterilized
supplements prior to use 10 ml of 1 M MgSO4 3 ml of a 2 M maltose solution or 10
ml of 20% (w/v) maltose
1× TAE Buffer 40 mM Tris-acetate 1 mM EDTA
10× Ligase Buffer 500 mM Tris-HCl (pH 7.5) 70 mM MgCl2
10 mM dithiothreitol (DTT)
10× MOPS Buffer 200 mM 3-[N-morpholino]propane-sulfonic
acid (MOPS) 50 mM sodium acetate 10 mM EDTA Adjust to a final pH of 6.5–7.0 with NaOH Do not autoclave
Nondenaturing Acrylamide Gel (5%)
Mix the following in a vacuum flask
5 ml of 10× TBE buffer 8.33 ml of a 29:1 acrylamide–bis-
acrylamide solution 36.67 ml of sterile deionized H2O
De-gas this mixture under vacuum for several minutes
Add the following reagents 25 μl of TEMED 250 μl of 10% ammonium persulfate
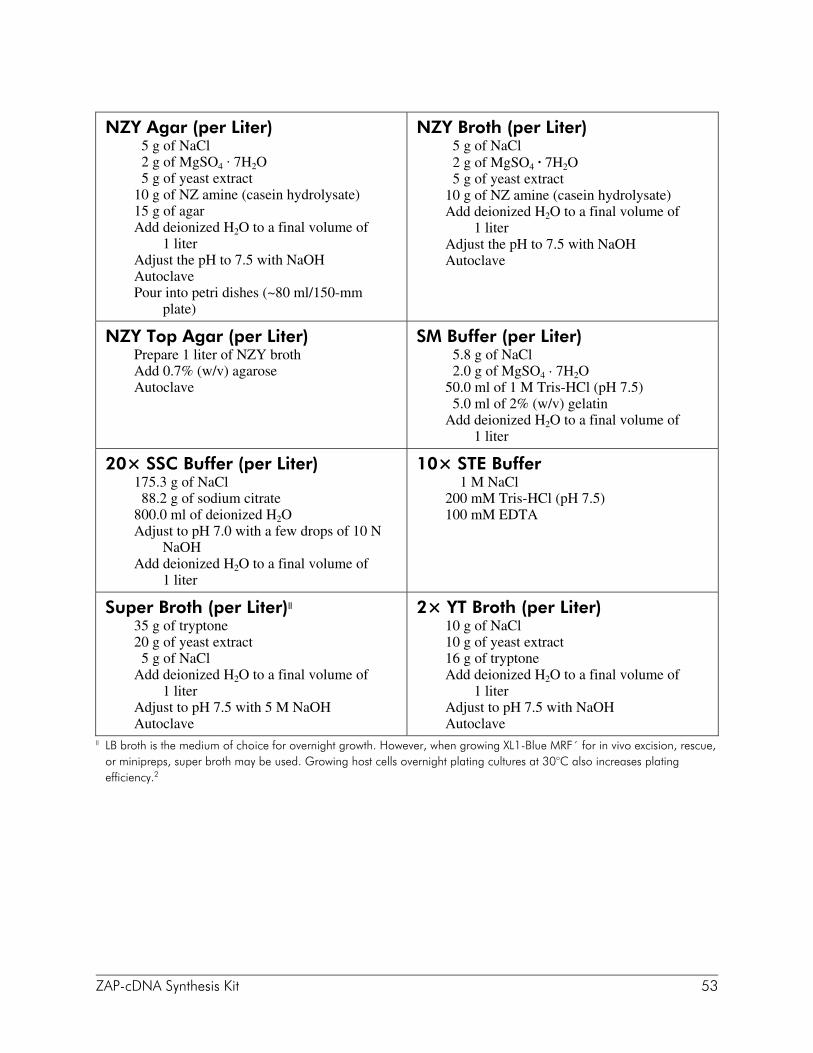
ZAP-cDNA Synthesis Kit 53
NZY Agar (per Liter) 5 g of NaCl 2 g of MgSO4 . 7H2O 5 g of yeast extract 10 g of NZ amine (casein hydrolysate) 15 g of agar Add deionized H2O to a final volume of
1 liter Adjust the pH to 7.5 with NaOH Autoclave Pour into petri dishes (~80 ml/150-mm
plate)
NZY Broth (per Liter) 5 g of NaCl 2 g of MgSO4 . 7H2O 5 g of yeast extract 10 g of NZ amine (casein hydrolysate) Add deionized H2O to a final volume of
1 liter Adjust the pH to 7.5 with NaOH Autoclave
NZY Top Agar (per Liter) Prepare 1 liter of NZY broth Add 0.7% (w/v) agarose Autoclave
SM Buffer (per Liter) 5.8 g of NaCl 2.0 g of MgSO4 · 7H2O 50.0 ml of 1 M Tris-HCl (pH 7.5) 5.0 ml of 2% (w/v) gelatin Add deionized H2O to a final volume of
1 liter
20× SSC Buffer (per Liter) 175.3 g of NaCl 88.2 g of sodium citrate 800.0 ml of deionized H2O Adjust to pH 7.0 with a few drops of 10 N
NaOH Add deionized H2O to a final volume of
1 liter
10× STE Buffer 1 M NaCl 200 mM Tris-HCl (pH 7.5) 100 mM EDTA
Super Broth (per Liter)ll 35 g of tryptone 20 g of yeast extract 5 g of NaCl Add deionized H2O to a final volume of
1 liter Adjust to pH 7.5 with 5 M NaOH Autoclave
2× YT Broth (per Liter) 10 g of NaCl 10 g of yeast extract 16 g of tryptone Add deionized H2O to a final volume of
1 liter Adjust to pH 7.5 with NaOH Autoclave
ll LB broth is the medium of choice for overnight growth. However, when growing XL1-Blue MRF´ for in vivo excision, rescue, or minipreps, super broth may be used. Growing host cells overnight plating cultures at 30°C also increases plating efficiency.2
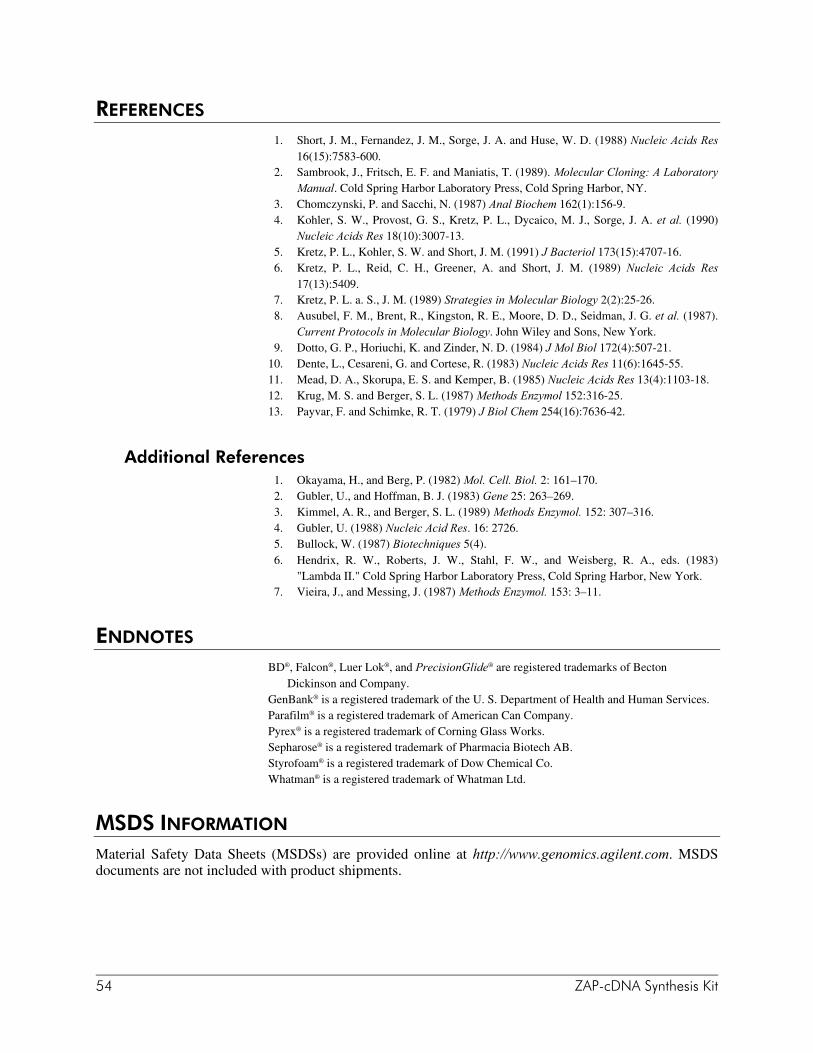
54 ZAP-cDNA Synthesis Kit
REFERENCES 1. Short, J. M., Fernandez, J. M., Sorge, J. A. and Huse, W. D. (1988) Nucleic Acids Res
16(15):7583-600. 2. Sambrook, J., Fritsch, E. F. and Maniatis, T. (1989). Molecular Cloning: A Laboratory
Manual. Cold Spring Harbor Laboratory Press, Cold Spring Harbor, NY. 3. Chomczynski, P. and Sacchi, N. (1987) Anal Biochem 162(1):156-9. 4. Kohler, S. W., Provost, G. S., Kretz, P. L., Dycaico, M. J., Sorge, J. A. et al. (1990)
Nucleic Acids Res 18(10):3007-13. 5. Kretz, P. L., Kohler, S. W. and Short, J. M. (1991) J Bacteriol 173(15):4707-16. 6. Kretz, P. L., Reid, C. H., Greener, A. and Short, J. M. (1989) Nucleic Acids Res
17(13):5409. 7. Kretz, P. L. a. S., J. M. (1989) Strategies in Molecular Biology 2(2):25-26. 8. Ausubel, F. M., Brent, R., Kingston, R. E., Moore, D. D., Seidman, J. G. et al. (1987).
Current Protocols in Molecular Biology. John Wiley and Sons, New York. 9. Dotto, G. P., Horiuchi, K. and Zinder, N. D. (1984) J Mol Biol 172(4):507-21. 10. Dente, L., Cesareni, G. and Cortese, R. (1983) Nucleic Acids Res 11(6):1645-55. 11. Mead, D. A., Skorupa, E. S. and Kemper, B. (1985) Nucleic Acids Res 13(4):1103-18. 12. Krug, M. S. and Berger, S. L. (1987) Methods Enzymol 152:316-25. 13. Payvar, F. and Schimke, R. T. (1979) J Biol Chem 254(16):7636-42.
Additional References 1. Okayama, H., and Berg, P. (1982) Mol. Cell. Biol. 2: 161–170. 2. Gubler, U., and Hoffman, B. J. (1983) Gene 25: 263–269. 3. Kimmel, A. R., and Berger, S. L. (1989) Methods Enzymol. 152: 307–316. 4. Gubler, U. (1988) Nucleic Acid Res. 16: 2726. 5. Bullock, W. (1987) Biotechniques 5(4). 6. Hendrix, R. W., Roberts, J. W., Stahl, F. W., and Weisberg, R. A., eds. (1983)
"Lambda II." Cold Spring Harbor Laboratory Press, Cold Spring Harbor, New York. 7. Vieira, J., and Messing, J. (1987) Methods Enzymol. 153: 3–11.
ENDNOTES BD®, Falcon®, Luer Lok®, and PrecisionGlide® are registered trademarks of Becton
Dickinson and Company. GenBank® is a registered trademark of the U. S. Department of Health and Human Services. Parafilm® is a registered trademark of American Can Company. Pyrex® is a registered trademark of Corning Glass Works. Sepharose® is a registered trademark of Pharmacia Biotech AB. Styrofoam® is a registered trademark of Dow Chemical Co. Whatman® is a registered trademark of Whatman Ltd.
MSDS INFORMATION Material Safety Data Sheets (MSDSs) are provided online at http://www.genomics.agilent.com. MSDS documents are not included with product shipments.


