Mann Palladium Alliance International, USA Palladium Alliance International, USA Mark B. Mann is...
17
Mann Palladium Alliance International, USA Mark B. Mann is technical consultant to Palladium Alliance International, Inc. assisting with palladium design, manufacturing methods, techniques and procedures. He is the co-founder and president of Mann Design Group, Inc., a company specializing in the development of technical content focusing on the study and application of emerging jewelry industry technologies, product testing and research and presents this information in a reader friendly format accompanied by detailed images to convey the concepts. Mark’s articles are published exclusively in print in JCK magazine. Over the last decade, MDG’s visually formatted submissions have also appeared in Professional Jeweler. On the web, the content can be found at many industry sites including the JCK, Professional Jeweler and the Ganoksin libraries and archives. Mark was formerly the director of certification and trade programs at Jewelers of America where he developed national skill standards through a multi-level professional certification program for manufacturing and retail store personnel. He also conceived and produced a variety of compelling bench presentations in collaboration with national trade organizations, most notably “Masters in Motion”, a series of live bench demonstrations featuring certified Master Bench Jewelers from across the U.S. In 1997, Mark wrote “The Guide to Fine Jewelry Craftsmanship”, a compilation of a series of articles that appeared monthly in Professional Jeweler magazine for 8 years. Drawing from his own expertise and collaborating with subject experts throughout the industry, Mark designed a unique ‘counter book’ format for the
-
Upload
truongtuyen -
Category
Documents
-
view
239 -
download
0
Transcript of Mann Palladium Alliance International, USA Palladium Alliance International, USA Mark B. Mann is...

MannPalladium Alliance International, USA
Mark B. Mann is technical consultant to Palladium Alliance International, Inc. assisting with palladium design, manufacturing methods, techniques and procedures. He is the co-founder and president of Mann Design Group, Inc., a company specializing in the development of technical content focusing on the study and application of emerging jewelry industry technologies, product testing and research and presents this information in a reader friendly format accompanied by detailed images to convey the concepts.
Mark’s articles are published exclusively in print in JCK magazine. Over the last decade, MDG’s visually formatted submissions have also appeared in Professional Jeweler. On the web, the content can be found at many industry sites including the JCK, Professional Jeweler and the Ganoksin libraries and archives.
Mark was formerly the director of certification and trade programs at Jewelers of America where he developed national skill standards through a multi-level professional certification program for manufacturing and retail store personnel. He also conceived and produced a variety of compelling bench presentations in collaboration with national trade organizations, most notably “Masters in Motion”, a series of live bench demonstrations featuring certified Master Bench Jewelers from across the U.S.
In 1997, Mark wrote “The Guide to Fine Jewelry Craftsmanship”, a compilation of a series of articles that appeared monthly in Professional Jeweler magazine for 8 years. Drawing from his own expertise and collaborating with subject experts throughout the industry, Mark designed a unique ‘counter book’ format for the
January 2008 Gennaio �
Abstract:The increased use of palladium (alloys) for fine jewelry has prompted the need to understand its unique working properties. This paper explores the working characteristics of palladium as related to general jewelry manufacturing work offered in the industry, including servicing and repair (ring sizing, cleaning & polishing), setting, assembly of components and hand fabrication of custom jewelry. Palladium influences on manufacturing techniques such as soldering, assembly, torch and laser welding, pre-finishing, polishing and gemstone setting are reviewed and illustrated via topic specific projects. Featured projects provide an overview of efficient working procedures for palladium and palladium in combination with other alloys.
Introduction:
Figure 001 – Bracelet by Brenda Warburton
Palladium(atomic symbol Pd) is a platinum group metal (PGM). It is the lightest (least dense) and has the lowest melting point of the group. Palladium is naturally white, not requiring rhodium plating for use with jewelry. It is malleable, ductile and hard in its pure form, but too soft for jewelry unless alloyed.
Palladium alloys for jewelry.
publication. Retail jewelers around the nation use the guide and its beautifully illustrated images to describe to their customers the level of quality work their manufacturing staff is capable of producing.
Prior to JA, he was the director of manufacturing arts at GIA. While there, he was also the technical liaison and headed a performance team for the re-development of GIA’s successful interactive Graduate Jeweler resident program.
Including the time working with JA and GIA, Mark has worked at the bench for over �0 years, performing repair, design and custom manufacturing for his family’s store, retailers and customers. His hand’s-on approach to jewelry design and manufacturing combined with his teaching, writing and speaking experience has made him a highly sought after speaker at industry events. He has developed, organized and given presentations at the AGS conclave, the Santa Fe Symposium, the JCK, MJSA and JA trade shows and at several notable venues at the annual Gem show convention in Tucson, AZ.

� Jewelry Technology Forum
As an alloy (containing only 5 parts of other metals for jewelry purposes), palladium is more hypoallergenic and more “pure” than white gold alloys used for jewelry. It is durable and strong as cast and its hardness significantly increases as it is processed and cold worked making it ideal for jewelry. Palladium is used in several other industries such as dentistry, watch making, aircraft, electrical, automobile and in the production of surgical instruments. It resists oxidation at ordinary temperatures. One of its characteristics that cause it to be sensitive to certain jewelry manufacturing procedures is its ability to absorb considerable amounts of hydrogen, oxygen and other gases especially when molten. Palladium wears similarly to platinum. Unlike platinum, palladium will discolor at soldering temperatures, become brittle with careless, repeated heating and cooling cycles, and react with strong acids.
Purity - Palladium alloys for jewelry manufacturing are pure, like platinum alloys used for the same purpose. They are primarily alloyed with other platinum group metals (PGM) and other metals for a wide variety of manufacturing methods.
Wearability - The specific gravity of palladium is similar to white gold and almost half that of platinum. Palladium is comparable in weight by volume to 1�-karat gold making it very comfortable to wear even larger pieces.
Workability - Palladium is malleable and ductile making it easy to bend, form and manipulate and has little or no memory, a characteristic conducive to the setting process of gemstones, machine forming and hand fabrication.Permanent Whiteness - Palladium is naturally white and does not require repeated rhodium plating to keep the finished piece white during normal wear.
Detection of Palladium
Figure 002
Palladium’s color is very similar to platinum, high nickel white gold and rhodium plated metals and it is impossible to accurately detect the difference based solely on visual observation of color. This image provides an example of a palladium ring in the center with a non-rhodium plated palladium white gold ring to its left and a platinum sample to its right. The lighting conditions are ideal and it is easy to see the differences between the white gold and palladium sample but not the difference between the palladium and platinum sample.

January 2008 Gennaio 5
Figure 003 – Ring by Novell
For non-destructive testing, Iodine can be used to detect palladium, platinum and white gold. In this image, a drop of iodine was placed on the cleaned surface of the unknown white metal. As the iodine dried, its original amber color turned to black—indicating palladium. Common reactions to the iodine test are listed as follows:
Alloy Reaction
Palladium Iodine turns black (as shown in example)
Platinum Iodine turns near colorless
1�- and 18-karat white gold * Iodine turns brownish
*Important: rhodium plating was removed from a small area prior to testing. Iodine turns near colorless on heavily rhodium plated gold.
As a secondary non-destructive test, feel the heft of the jewelry. The specific gravity of platinum is markedly greater than that of palladium or white gold. If the iodine dries near colorless and the jewelry object feels heavy, it is likely that the sample is a platinum alloy. If the iodine dries black and the weight feels comparable to gold, it is probably palladium. Additional tests may be performed, but not without more destructive means. The following are examples:1. Apply heat to the unknown object (this may not be feasible if the piece holds gemstones). If it loses its polished luster or takes on a blue-violet surface oxide, the alloy is palladium. If it remains colorless and does not lose its polished luster, it is likely platinum. A rhodium plated surface will not allow for accurate heat testing.2. Submerge the piece in concentrated nitric acid. A palladium alloy will turn it an orange/brown color. Platinum alloy will not be affected. Nickel alloys will turn the solution a greenish color.
Working CharacteristicsAnnealing
Figure 004
When annealing palladium a high-heat soldering block is used. The examples show the use of a natural gas and oxygen torch. The flame is adjusted to quickly but moderately bring the wire up to annealing temperature. The torch flame is directed over the top of the wire and moved slowly back and forth along its length. The pieces are

� Jewelry Technology Forum
brought to a bright orange color, briefly held at this temperature, and then allowed to air cool. For annealing palladium, protective eyewear is mandatory. The palladium being annealed should not be firecoated. Over-annealing can cause excessive grain growth ultimately affecting forming and finishing operations, and with palladium, it can also lead to brittleness. Pre-polished palladium wire will lose its polished luster, turning a dull white. A lustrous surface is easily restored by re-polishing. Submerging palladium in standard pickling solution has no deoxidizing or brightening affect.
ContaminationContamination of palladium can occur through a variety of careless work habits. Problems arise when gold, silver or other metals become attached to palladium and when soldered, the lower melting point metals become permanently embedded in the palladium. Since most bench jeweler generalists and artisans process multiple metals at their workstations, metal transfer can occur if the bench is not cleaned prior to a palladium project. A dedicated bench is not essential for palladium jewelry making but good cleaning and work habits are.
Figure 005
Essential when working with palladium is the use of dedicated files, abrasive materials, polishing wheels and clean storage. This practice keeps dissimilar metals away from palladium minimizing the potential for contamination. It also increases return when refining abrasive debris, filings and scrap.
Soldering
Figure 006
Eye Protection – Filtered eye protection is mandatory for soldering, welding and casting. The temperatures required for soldering palladium can exceed 1250° C. When casting, the temperatures range between 1�50 and 1�80° C. The white light generated at these temperatures is intense and hazardous to the unprotected eye. Filters are known as welding lenses and they shield out degrees of harmful white light. Welding lenses are available in a variety of ratings. The lowest rating recommended for soldering is a No. 5 welding lens (A). A No. 5 lens will allow the operator to visualize more of the work and placement of parts during soldering operations. A No. 7 lens is better for prolonged periods of soldering and annealing. A No. 10 lens is recommended for casting or other prolonged intense palladium melting and handling situations.

January 2008 Gennaio 7
Figure 007
Torch Soldering - Palladium solder is used for soldering palladium alloys. It is provided in ‘hard’, ‘medium’ and ‘easy’. The general flow temperatures for them are:Hard – 1,29�°CMedium – 1,210°CEasy – 1,09�°C
Lower melting point platinum solders can be used with palladium too, since the ingredients are similar. Melt and flow points for 1,000 and 1,100 platinum solder are equivalent to easy palladium solder, 1,200 platinum solder is equivalent to medium palladium solder and 1,�00 platinum solder is equivalent to hard palladium solder. When soldering palladium, flux and firecoating solutions are not used. The joint must be completely flush with no gaps or irregularities. Palladium solder will not bridge gaps.
Figure 008
When soldering, use a No. 5 rated or darker welding lens for eye protection. Palladium loses its polished luster during the soldering process, in much the same way as karat gold. When using higher melting point solders, palladium will take on a surface oxidation that ranges in color but is mostly blue-violet.
Figure 009
Surface oxidation can be eliminated by passing a neutral flame (equal parts of gas and oxygen) over the area for a few seconds until it disappears. After the oxidation was removed on this ring sample, note that it did not lose its polished luster.
Figure 010
A darker visible line where the joint was soldered may be apparent after re-polishing the shank. This image shows an extreme close-up which makes the line more apparent. It is less noticeable to the unaided eye. To remove traces of the darker line, the joint can be burnished and re-polished.

8 Jewelry Technology Forum
Figure 011
Assembly of Palladium Stock Findings - These parts are palladium die-struck shanks and settings for 1.00 carat size gemstones. The shanks are finger size 7. This sequence highlights the fitting, assembly and soldering of these solitaire rings. The parts precisely fit as supplied and little or no alteration is required.
Figure 013
This image provides an example of the soldering process as viewed through a No. 5 welding lens. A torch tip with no vents and an opening of about 1.2 millimeters is used to heat the joint. The torch is positioned so the hottest part of the flame (the area about a 1/� inch beyond the blue cone) directly heats the joints. The torch is moved slowly from side to side bringing both joints up to soldering temperatures simultaneously. Because of the low thermo conductivity of palladium, the heat is concentrated in this specific area. The ring is heated and the solder flows down each joint. The torch is pulled away as soon as the solder has flown to avoid overheating, pitting or melting. The white arrows indicate a small amount of excess solder on each side of the junction of the setting and shank confirming complete solder joints.
Figure 015
The same procedure is used when soldering this palladium �-prong setting and shank. There is good metal-to-metal contact between each joint and a clipping of easy palladium solder is placed on each side. When heating, it is not necessary to direct the torch heat beyond the area marked by the white lines on this image.
Figure 016
Ring Sizing Overview for a Heavy Palladium Gent’s Ring - Preparation procedures for sizing palladium rings are accomplished much like those for gold or platinum rings. In this image, a heavy palladium gent’s ring is being sized up 1.5 sizes. A piece of palladium sizing stock
January 2008 Gennaio 9
(square wire) was fit and placed into the ring to expand its size. The joints between the sizing stock and the ring are flush and even. The ring is placed on a platinum high-heat soldering block with the solder joints facing upward. Small clippings of 950 palladium hard solder were placed over each joint. A No. 5 rated welding lens was used to protect the eyes during the soldering process. With a large vented torch tip, the ring shank was directly and evenly heated from side to side. Palladium has low thermo conductivity so the heat stays concentrated where the torch is directed. The solder reached its melt and flow point as the ring was heated and the soldering procedure completed.
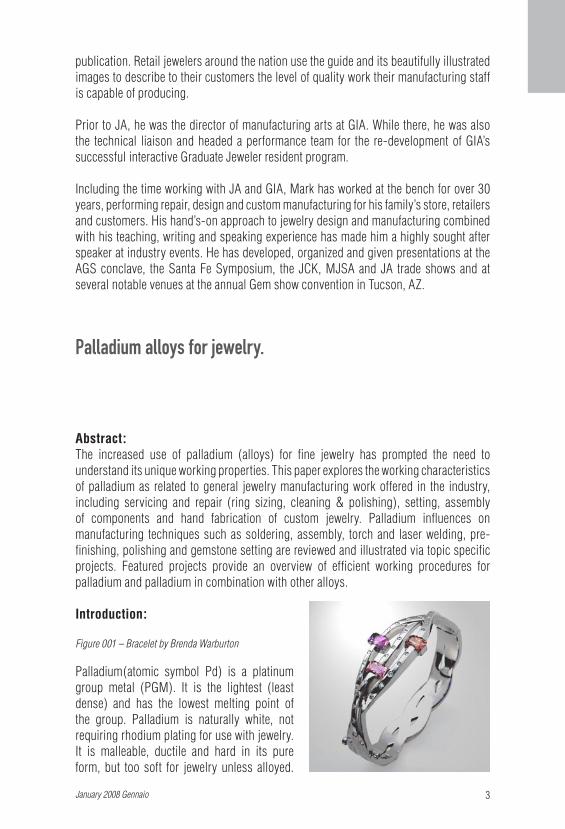
Figure 017
The surface discoloration is removed by using a neutral flame (equal parts of gas and oxygen). After allowing it to cool to room temperature without quenching, this ring is ready for pre-finishing and polishing.
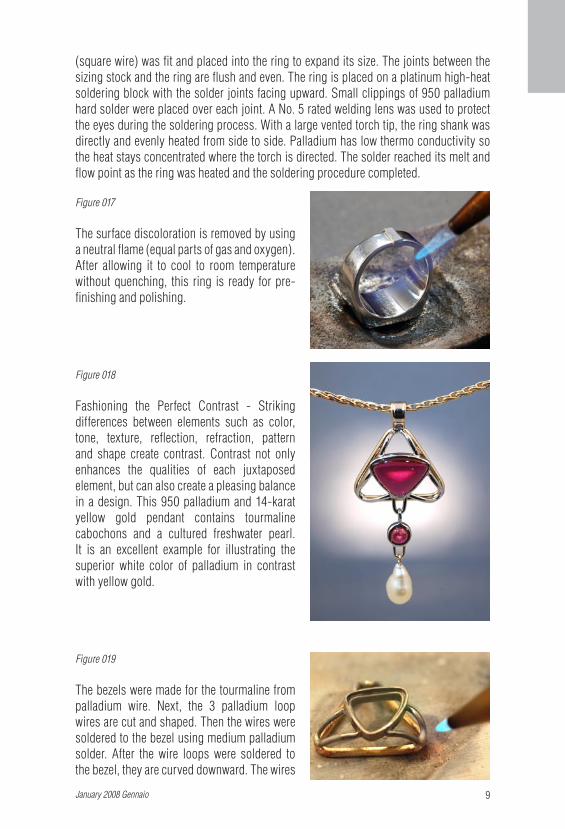
Figure 018
Fashioning the Perfect Contrast - Striking differences between elements such as color, tone, texture, reflection, refraction, pattern and shape create contrast. Contrast not only enhances the qualities of each juxtaposed element, but can also create a pleasing balance in a design. This 950 palladium and 1�-karat yellow gold pendant contains tourmaline cabochons and a cultured freshwater pearl. It is an excellent example for illustrating the superior white color of palladium in contrast with yellow gold.
Figure 019
The bezels were made for the tourmaline from palladium wire. Next, the � palladium loop wires are cut and shaped. Then the wires were soldered to the bezel using medium palladium solder. After the wire loops were soldered to the bezel, they are curved downward. The wires
10 Jewelry Technology Forum
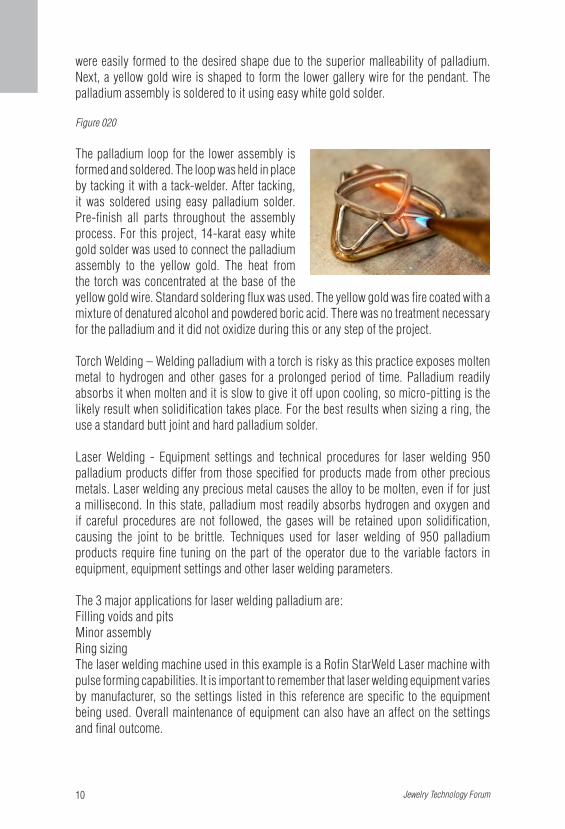
were easily formed to the desired shape due to the superior malleability of palladium. Next, a yellow gold wire is shaped to form the lower gallery wire for the pendant. The palladium assembly is soldered to it using easy white gold solder.
Figure 020
The palladium loop for the lower assembly is formed and soldered. The loop was held in place by tacking it with a tack-welder. After tacking, it was soldered using easy palladium solder. Pre-finish all parts throughout the assembly process. For this project, 1�-karat easy white gold solder was used to connect the palladium assembly to the yellow gold. The heat from the torch was concentrated at the base of the yellow gold wire. Standard soldering flux was used. The yellow gold was fire coated with a mixture of denatured alcohol and powdered boric acid. There was no treatment necessary for the palladium and it did not oxidize during this or any step of the project.
Torch Welding – Welding palladium with a torch is risky as this practice exposes molten metal to hydrogen and other gases for a prolonged period of time. Palladium readily absorbs it when molten and it is slow to give it off upon cooling, so micro-pitting is the likely result when solidification takes place. For the best results when sizing a ring, the use a standard butt joint and hard palladium solder.
Laser Welding - Equipment settings and technical procedures for laser welding 950 palladium products differ from those specified for products made from other precious metals. Laser welding any precious metal causes the alloy to be molten, even if for just a millisecond. In this state, palladium most readily absorbs hydrogen and oxygen and if careful procedures are not followed, the gases will be retained upon solidification, causing the joint to be brittle. Techniques used for laser welding of 950 palladium products require fine tuning on the part of the operator due to the variable factors in equipment, equipment settings and other laser welding parameters.
The � major applications for laser welding palladium are: Filling voids and pitsMinor assemblyRing sizingThe laser welding machine used in this example is a Rofin StarWeld Laser machine with pulse forming capabilities. It is important to remember that laser welding equipment varies by manufacturer, so the settings listed in this reference are specific to the equipment being used. Overall maintenance of equipment can also have an affect on the settings and final outcome.

January 2008 Gennaio 11
Figure 023
1. Laser Filling Voids and Pits - Voids and pits can result in cast pieces and they sometimes appear in milled, machined or die struck stock products with all jewelry alloys, including palladium. In this image the laser operator uses �0 gauge dead soft round palladium wire as filler wire. The following procedures were used to obtain the best results for laser-filling voids.
Figure 024 Photo by Craig Warburton
The equipment settings were 250 Volts, 5 to 10 ms, 1.�HZ with a beam or focus of 5 to 15. (The variables depend upon the size and depth of the void.)99% pure argon was used. When filling pits with a laser, start by directing pulses of energy directly into the void. This will melt the bottom, exposing fresh metal from which to build upon. The tip of the wire was held in direct contact with the palladium piece, within the void as a pulse of energy melted palladium from the wire into the void. Each void was overfilled with palladium and then filed even with the surface of the ring for finishing. 2. Minor Assembly - For assembly of palladium pieces, the most efficient manner is to tack the parts using a laser. This procedure is then followed by torch soldering to complete the process. The following settings and techniques were used to obtain the best results for laser tacking prior to torch soldering and final assembly. The equipment settings were 250 Volts, 5 to 10 ms, 1.�HZ with a beam or focus of 5 to 15. (The variables depend upon the size of the components being joined.) 99% pure argon was used. When tacking only, it is not necessary to use weld-filling wire. This procedure included pulse shaping. According to resources at the Rofin website, laser welding success with any alloy depends both on material properties like temperature dependent reflectivity, heat conductivity or viscosity as well as specific laser parameters like pulse energy, spot diameter or temporal pulse intensity. Pulse shaping calls for a series of settings used in progressive pulses. Each setting factors both the duration of the pulse of energy and the total amount of energy used, for optimal control. The pulse shaping technique can be used to avoid over-heating of the material, because the series begins with high laser intensity, and then incrementally reduces laser power, once the melting point has been reached. Pulse shaping can also reduce cracking in the metal which can occur during quick cooling of a weld. Pulse shaping for palladium alloys used for this research included � incremental steps.

12 Jewelry Technology Forum
Reference X (Pulse Duration) Y(Total Energy)
1 0 90%
2 20% 100%
� �0% 100%
� 50% 70%
5 80% �0%
� 100% 20%
Figure 025
�. Ring SizingWhen heat sensitive gemstones are part of the design, it is not always safe to solder palladium rings with a torch for sizing purposes. Here are the steps used for sizing this palladium ring with a laser. The equipment settings were 290 volts, 10ms, 1.�HZ with a beam or focus of 15. 99% pure argon was used with its dispenser about 1 centimeter away from ring. An angled groove was filed around each side of the joint. A small piece of the palladium from the ring was rolled out to 0.10mm and wedged into the joint. Pulse shaping techniques were used. The ring was polished and inspected using 10X magnification. There were no visible cracks, pits or other irregularities found. The MS setting was set high to spread the energy throughout the metal so it would not get excessively hot in a small concentrated area, which would make the metal brittle. Use of the pulse shaping technique caused the metal to appear brighter and it was more fluid. During the process, the ring became hot to hold. Laser welding karat gold to palladium works extremely well and the process is not as sensitive as it is for palladium-only jobs.
Figure 026
Tack-Welding - Tack-welding can be used to pre-position palladium parts prior to soldering. In this example, the lower gallery wire was notched where the prongs will be tacked in place. Using a tack-welding unit, the prongs were tacked in position. If any prongs were misaligned during the tacking procedure, they can be easily removed and re-tacked.
Figure 027
Once all of the prongs are properly aligned, the unit is ready for soldering. Solder is placed at each of the joints (no flux or firecoating) and then soldered using easy palladium solder.

January 2008 Gennaio 1�
Forging, Shaping and FormingThe hand fabrication project that follows serves to illustrate palladium’s desirable forging, shaping and forming capabilities and provides additional technique for soldering.
Figure 028
This design provides a project example for procedures used to hand fabricate palladium earrings using forging, shaping, forming and palladium soldering techniques. These custom designed earrings feature cultured Mabe´ pearls and pink sapphires set into hand formed and fabricated palladium.
Figure 030
All bezel wire components were rounded, trued, assembled and soldered. The wires for each side of the bezel assemblies were annealed then hand formed. A ring mandrel provided a suitable forming tool.
Figure 031
The wires are formed, pre-finished and soldered. The bare wires are placed on the platinum soldering block and small pieces of easy flowing solder are placed along the top portion of the joint. The bezels were then soldered into the earring framework.
Figure 032
To make the small domed shapes for the tops of the earrings, small discs were cut from 2� gauge sheet. Next, they were formed in a dapping block using dapping punches. To get the desired shape, three progressively sized punches were used to form the disc in 5

1� Jewelry Technology Forum
progressively sized cups in the block. The final shaped form is indicated by the arrow. The pieces were assembled and soldered. The last component included was an earring post is soldered securely to the cross bar.
Figure 033
Holes were marked and drilled in the top portion of each earring unit to allow for free movement on the jump ring. The pieces were pre-finished, polished and set. The earring components were assembled. The polishing was quick and efficiently accomplished because the work was pre-finished as it was assembled.
Hand Engraving
Figure 034 - Photograph and ring by Novell
While hand engraving is an art unto itself, graver work in some form is used at every level in jewelry making, including:Preparation, bead raising, cleaning and bright cutting of pave, threadwork and bead setting. Prong setting (leveling seats, adjusting prongs for uneven pavilions, shaping prongs, cleaning). Flush, channel and bezel setting. Removing metal flashing after burring. Adding definition or cleaning after repair work. Cleaning castings.
Figure 035
This ring was relief engraved. The layout of the initials was fit to the top of the ring and then the design was transferred onto it. Next the letters were isolated using a square graver. In this image, the engraver begins the removal of metal between the lettering by making a set of parallel cuts in one direction and then crossing those with another set of parallel cuts in the opposing direction. He will later finish the metal removal and smooth the recessed area with a narrow flat bottom graver. When completed, the letters will be raised and the recessed background will have a fine stipple finish. The relief engraving was completed and the engraver is now applying the fine stipple finish to the deeply recessed portion with a pointed tungsten carbide tip mounted in his graver.

January 2008 Gennaio 15
Figure 036
After the engraving was completed, the top was re-finished with Lapping Film and lightly re-polished. The letters fit the top shape of the ring and the stipple finish provides a nice contrast to the polished monogram. Engraving palladium was similar to engraving platinum. One notable difference was that the palladium flaked away and did not clog up graver tips. Even though this was a cast ring, the metal was uniform and smooth making removal more consistent.
FinishingPre-finishing Techniques - Pre-finishing is the reduction of coarse surfaces and the removal of sharp edges and other imperfections irregular to the desired shape and the refinement of a piece in preparation of polishing and buffing. Palladium is most efficiently polished when pre-finishing is done to fine levels of detail. Casting palladium requires high-heat casting materials and equipment that are the same for casting platinum. The surface of palladium castings are characteristically coarser than that of gold due to the different nature of the materials used in the process. The process of preparing palladium for polishing and buffing is enhanced by the organization of materials and clean work areas.
Here are a few pre-finishing tips. • Progressive abrasives are best stored in separate containers or sorting trays
and labeled according to grit.• Hand files should be kept clean and free of build up and stored so their surfaces
do not come in contact with one another.• Materials should be organized and grouped by procedure. For example,
abrasive tools should be stored separately from polishing materials.• The following project provides a general overview of finishing palladium.
Figure 037
Extensive gating to the inside of the ring shank called for metal removal with a rotary bur and by filing with a number 2 cut half-round file. After the coarse metal removal, medium abrasives were then used to further reduce tool marks.

1� Jewelry Technology Forum
Figure 039
To begin the process inside the shank, sanding drums were made using drum mandrels with an overlay of lapping film. Lapping film can be used wet or dry and features micro grain particles of high grade aluminum oxide. As a result of using a few grits inside the ring, the finish is nearly polished without the use of buffing or polishing materials.
Figure 040
The same progressive procedure will be used with lapping film on the sides. The film is cut to fit a standard sanding stick, the PSA backing protection removed and the film is then applied to the stick. With palladium (and most alloys) use of cross sanding techniques are more efficient and provide flatter more even surfaces.
Figure 041
Pre-finishing of the central flat portion begins with burnish filing. A fine cut file (a No. � barrette in this case) was used with forward and backward motion. Usually, filing is done only in the forward direction to cut and remove metal. By dragging the file backwards, the metal is burnished making it smoother. A few grits of lapping film was used next and then polished with a small hard felt wheel charged with white rouge. After the band was pre-finished, it was cleaned and then polished with a stitched yellow treated polishing wheel and flat hard felt wheels charged white rouge. Then it was buffed with a muslin buff charged with 8,000 grit white rouge to produce its final white brilliant luster.
Figure 042
Magnetic Finishing - Centrifugal magnetic finishing is an automated tumbling like process which aids in the clean-up, burnishing and polishing of intricate and detailed parts. With media as small as .010 in diameter and .250 in length, these stainless steel pins are able to work in areas such as undercuts, recesses, slots and other tight areas.
January 2008 Gennaio 17
With palladium, the pre-finishing cycle can be as low as 20 minutes. It should be noted that on large, smooth or flat surfaces the finish will appear frosted and a slight buffing is recommended. And, depending upon the alloy and the structure of the design, there may be slight percussion marks evident which are easily removed through rouge polishing. This image shows the process in action on the left and the burnishing compound on the right.
Figure 043
This is a palladium ring after 20 minutes of magnetic finishing. The pins easily accessed between the inner and outer shank surfaces. Notice the very faint percussion marks on the surface of the palladium. They were easily polished away using white rouge.
Buffing and Polishing - Polishing includes the use of a wide variety of wheels and abrasive compounds to reduce and improve the general finish of the surface. Buffing finally produces the final bright, high luster finish. For palladium, these procedures require a total of 2 or � steps (one, possibly two for polishing and one for buffing) assuming pre-finishing is done to a fine, smooth level. Buffing with 8,000 grit white rouge will produce an unmistakable white, bright high luster typical of very fine jewelry. Use dedicated polishing and buffing wheels for palladium.
Here is a �-step process for polishing and buffing palladium:Polishing Step 1: (If the item is finely pre-finished, this step is not required.) Use hard felt or treated and stitched wheels charged with platinum Tripoli to reduce the surface and blend tool marks. Clean.
Polishing Step 2: (Start here if the piece if pre-finished with abrasive grits of 1,000 or finer.) Use a hard felt or treated and stitched wheels charged with general purpose white rouge to polish the item. Clean.
Polishing Step �: Use a loose stitched muslin buff charged with 8,000 grit white rouge to bring out the high luster and bright white color of palladium. Setting
Figure 045
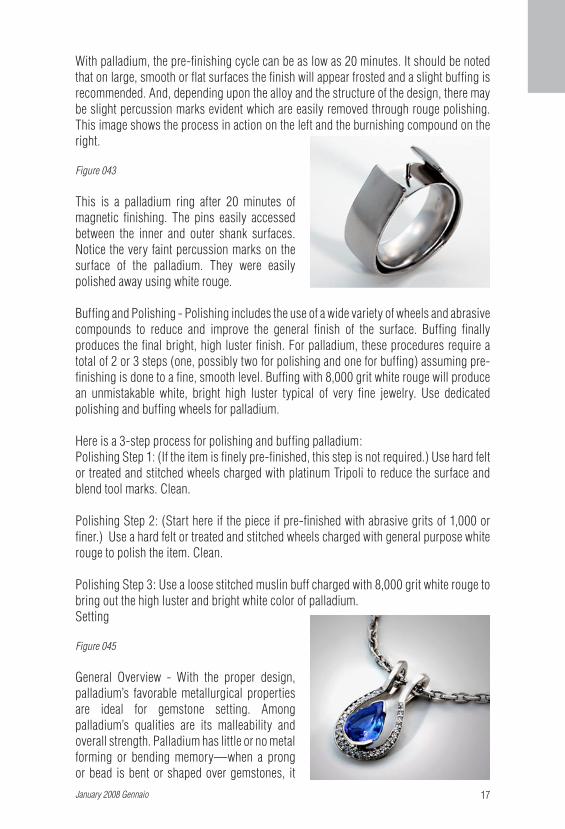
General Overview - With the proper design, palladium’s favorable metallurgical properties are ideal for gemstone setting. Among palladium’s qualities are its malleability and overall strength. Palladium has little or no metal forming or bending memory—when a prong or bead is bent or shaped over gemstones, it

18 Jewelry Technology Forum
does not spring back onto itself. As in the case with this palladium pendant, bending and shaping the shared prongs over the small diamonds was a favorable task as was the partial bezel forming over the tanzanite. Because of palladium’s favorable attributes, designs using settings with lower profiles and stouter prongs, bezels and solid structure will hold up better during normal wear as opposed to thin prongs with tall profiles and no gallery wire supports. The latter lack adequate support structure and will bend, turn and become misshapen during normal wear.
Figure 048
Setting a 5-Stone Palladium Ring – Palladium is a tough metal that is not difficult to bend and is not springy. It is malleable and workable for ease in forming. The metal is easy to cut with standard gemstone setting burs and gravers of all shapes. Palladium alloy can be shaped or moved without springing back. Because of its desirable malleability, prongs should be heavier than when made in white gold in order to fare well and retain their shape during normal wear.
AcknowledgementsI wish to thank the following for technical support, design and casting services of research projects and loan provision of palladium materials for research and publication:Palladium Alliance International, Billings, MTDr. Jörg Fischer-Bühner, Legor and InduthermB. J. Williams and Neill Swan, Johnson MattheyTeresa Frye ,́ TechForm Advanced Casting Technology, Portland, ORStewart Grice, Hoover & Strong, Richmond, VALainie Mann, Mann Design Group, Inc., Corvallis, MTBrenda Warburton, Austin & Warburton, Ann Arbor, MITom McLaughlin, Lennon’s Jewelers, Syracuse, NYDippal Manchanda, Birmingham Assay Office, EnglandSteece Hermanson, Heirloom Hand Engraving, Sumter, SC
References 1. Earnest A. Smith, Working in Precious Metals, First published in 19�� and Facsimile reprint 1978. (N.A.G. Press Ltd)
2. Dave Brown, Pulse Shaping, Energy / Time, http://www.rofin.com
�. Robert McGrawth, Johnson Matthey Noble Metals http://www.platinummetalsreview.com/dynamic/question/view/11805