
Financial Information Student Financial Planning Student Accounts
Managing Student Accounts
(Corporate) User Guide
CampusVue User Guide: Managing Student Accounts (Corporate) 2
Campus Management Corporation
Web Site http://www.campusmanagement.com/
E-mail Information: E-mail Form on Web Site
Support: [email protected]
Phone Sales/Support: 561.999.9904
Toll Free: 800.483.9106
Facsimile: 561.999.0096
Address Campus Management Corp.
777 Yamato Road
Boca Raton, FL 33431 USA
Trademark Attributions Campus Management and Campus Management Logo are trademarks, service marks, or
registered trademarks of Campus Management Corp.
Microsoft, Windows, Win32, and Windows NT are either registered trademarks or
trademarks of Microsoft Corporation.
Adobe and Acrobat are registered trademarks of Adobe Systems Incorporated.
All other product, service, and company names are trademarks or registered trademarks
of their respective owners.
Copyright This document is covered by the terms and conditions of the license agreement and/or the
non-disclosure agreement, and may not be reproduced according to the terms of that
agreement, or without written consent from Campus Management Corporation.
© June 2008 by Campus Management Corp. All rights reserved.
CampusVue User Guide: Managing Student Accounts (Corporate) 3
Contents
Preface
Related References.................................................................................................4
Document Conventions ..........................................................................................4
Introduction
Accounting Processes
Revenue Recognition .............................................................................................5
Reverse Revenue Recognition .............................................................................10
Release to General Ledger ...................................................................................12
Student Accounts Maintenance Functions
Adding a Transaction Code..................................................................................14
Adding a Bank......................................................................................................16
Adding a Refund Policy .......................................................................................18
Adding a Billing Method......................................................................................21
Adding an Earnings Method ................................................................................26
Program Version Billing ......................................................................................28
Student Accounts Reports
Accessing Reports................................................................................................31
Report Preview.....................................................................................................32
General Features of CampusVue Reports ............................................................33
Report Viewer Controls .......................................................................................34
Report........................................................................................................................ 34
Mail Merge................................................................................................................ 35
Excel.......................................................................................................................... 36
Navigation Tools ....................................................................................................... 36
Report Printing .....................................................................................................37
Cube Reports........................................................................................................37
Index
CampusVue User Guide: Managing Student Accounts (Corporate) 4
Preface
This document contains information about how to manage tasks involving student
accounts transactions.
This document assumes that the reader knows the Windows environment, has used the
CampusVue product, and understands basic school administration terminology.
Related References
Refer to the following references for more information about topics frequently discussed
in this document.
Related Reference Description
Help System Describes how to use the CampusVue
product.
Document Conventions
The following conventions are used throughout the documentation to help guide the
reader in finding information quickly.
Convention Use
BOLD Names of files, keys, forms, paths, and program components
Italics Titles, hyperlinks, and special terms
> Symbol used in paths to signify a shift to the next level of options
Note: Important information
CampusVue User Guide: Managing Student Accounts (Corporate) 5
Introduction
The Student Accounts module is your accounts receivable system for all students. Each
student has a Ledger Card folder, as well as folders for creating and maintaining
schedules for that student’s payments to your school or for stipend payments made to the
student. All charges, payments, and adjustments are recorded in detail and linked to
terms. There is also a folder for monitoring the earned revenue for the student and a
folder in which you can perform a refund calculation for a student whose training is
interrupted. Selected transactions can be performed on single students or in batch mode,
where the same transactions can be posted to many students’ ledger cards at once.
Student Accounts also provides procedures that are not student-specific, such as
preparing bank deposits and posting miscellaneous cash receipts.
In many schools, all CampusVue student accounting processes are performed at the
school level. In other institutions, these processes may be shared between a local campus
and a corporate entity. This user guide focuses on those accounting processes likely to be
performed at the corporate level. A companion user guide, Student Accounts (Campus),
covers the campus-level Student Accounts tasks.
Accounting Processes
In the Student Accounts module of CampusVue, you can perform various accounting
processes to record transactions both student-related and miscellaneous. In this topic you
will learn how to perform the Revenue Recognition and Reverse Revenue Recognition
processes within CampusVue.
Revenue Recognition
Revenue Recognition is an accounting process used to transfer tuition fee and other
revenue from deferred income accounts to earned income accounts on a regular basis.
This matches the income earned with the services provided to the student by the school.
To run Revenue Recognition:
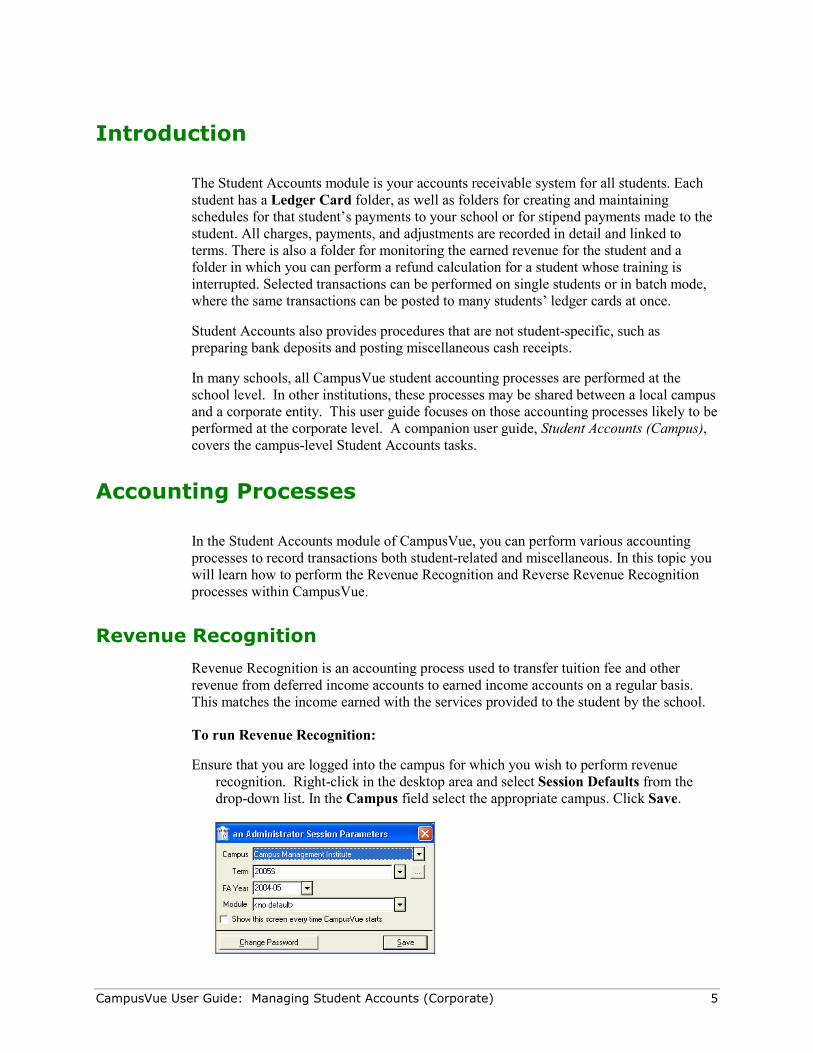
Ensure that you are logged into the campus for which you wish to perform revenue
recognition. Right-click in the desktop area and select Session Defaults from the
drop-down list. In the Campus field select the appropriate campus. Click Save.
Accounting Processes
CampusVue User Guide: Managing Student Accounts (Corporate) 6
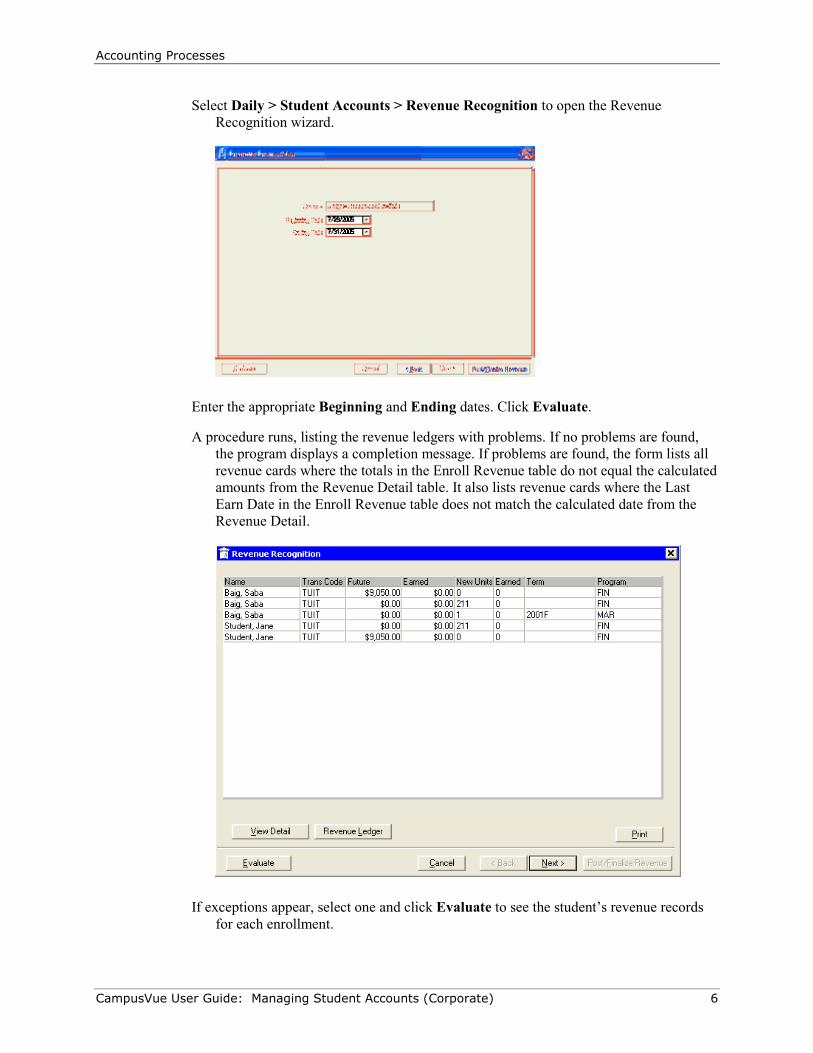
Select Daily > Student Accounts > Revenue Recognition to open the Revenue
Recognition wizard.
Enter the appropriate Beginning and Ending dates. Click Evaluate.
A procedure runs, listing the revenue ledgers with problems. If no problems are found,
the program displays a completion message. If problems are found, the form lists all
revenue cards where the totals in the Enroll Revenue table do not equal the calculated
amounts from the Revenue Detail table. It also lists revenue cards where the Last
Earn Date in the Enroll Revenue table does not match the calculated date from the
Revenue Detail.
If exceptions appear, select one and click Evaluate to see the student’s revenue records
for each enrollment.
Accounting Processes
CampusVue User Guide: Managing Student Accounts (Corporate) 7
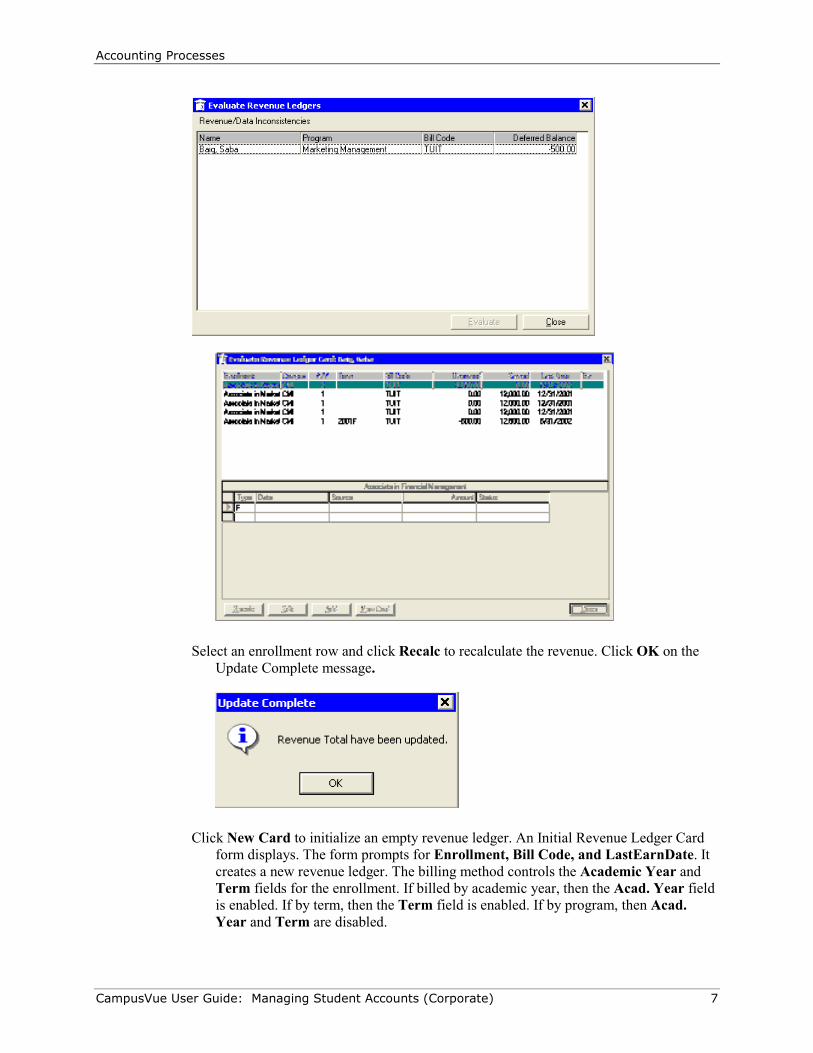
Select an enrollment row and click Recalc to recalculate the revenue. Click OK on the
Update Complete message.
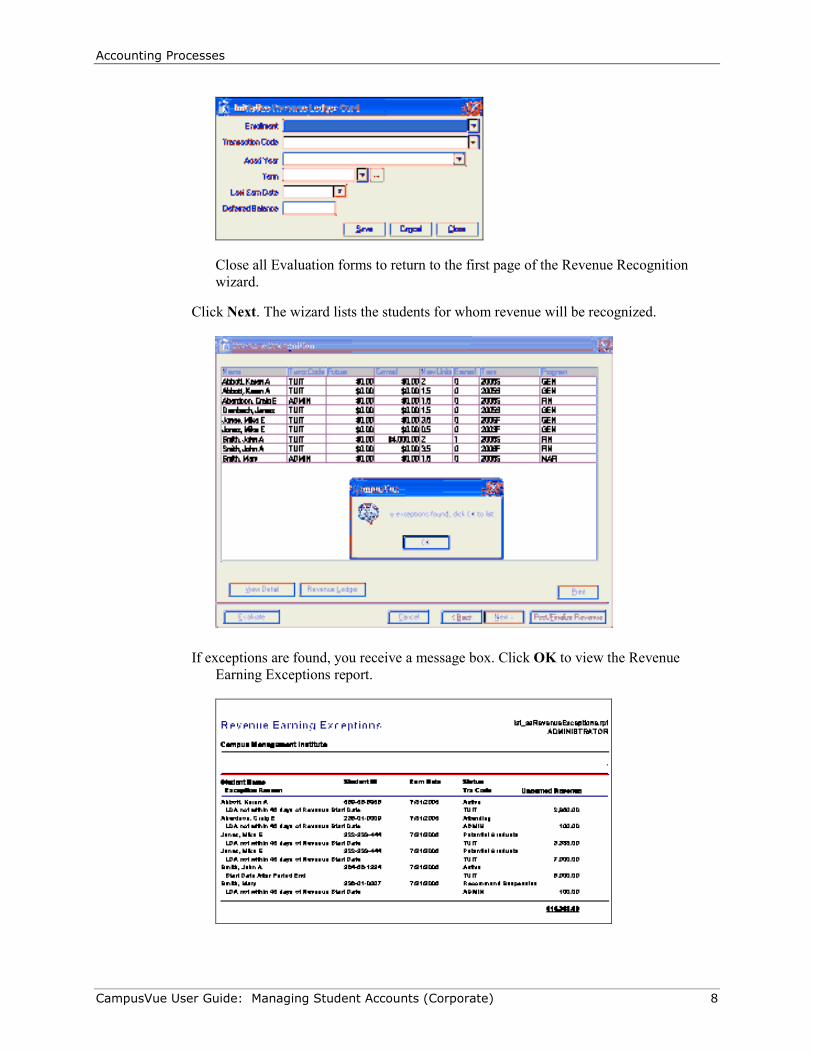
Click New Card to initialize an empty revenue ledger. An Initial Revenue Ledger Card
form displays. The form prompts for Enrollment, Bill Code, and LastEarnDate. It
creates a new revenue ledger. The billing method controls the Academic Year and
Term fields for the enrollment. If billed by academic year, then the Acad. Year field
is enabled. If by term, then the Term field is enabled. If by program, then Acad.
Year and Term are disabled.
Accounting Processes
CampusVue User Guide: Managing Student Accounts (Corporate) 8
Close all Evaluation forms to return to the first page of the Revenue Recognition
wizard.
Click Next. The wizard lists the students for whom revenue will be recognized.
If exceptions are found, you receive a message box. Click OK to view the Revenue
Earning Exceptions report.
Accounting Processes
CampusVue User Guide: Managing Student Accounts (Corporate) 9
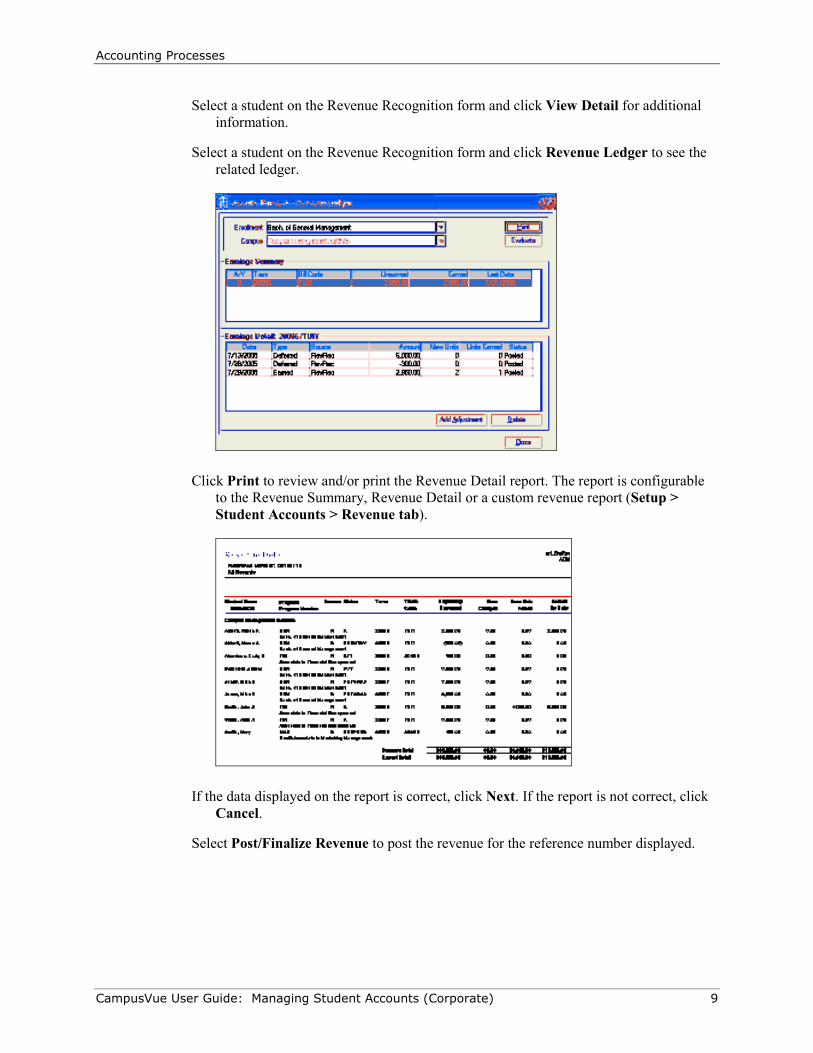
Select a student on the Revenue Recognition form and click View Detail for additional
information.
Select a student on the Revenue Recognition form and click Revenue Ledger to see the
related ledger.
Click Print to review and/or print the Revenue Detail report. The report is configurable
to the Revenue Summary, Revenue Detail or a custom revenue report (Setup >
Student Accounts > Revenue tab).
If the data displayed on the report is correct, click Next. If the report is not correct, click
Cancel.
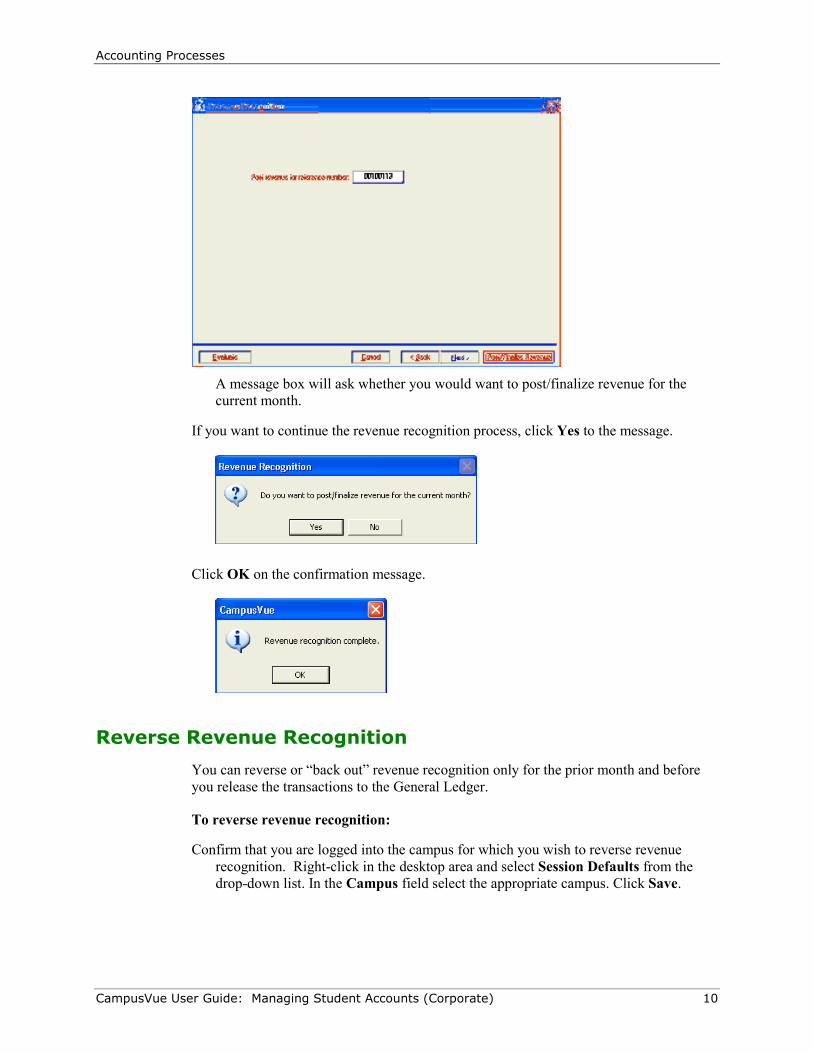
Select Post/Finalize Revenue to post the revenue for the reference number displayed.
Accounting Processes
CampusVue User Guide: Managing Student Accounts (Corporate) 10
A message box will ask whether you would want to post/finalize revenue for the
current month.
If you want to continue the revenue recognition process, click Yes to the message.
Click OK on the confirmation message.
Reverse Revenue Recognition
You can reverse or “back out” revenue recognition only for the prior month and before
you release the transactions to the General Ledger.
To reverse revenue recognition:
Confirm that you are logged into the campus for which you wish to reverse revenue
recognition. Right-click in the desktop area and select Session Defaults from the
drop-down list. In the Campus field select the appropriate campus. Click Save.
Accounting Processes
CampusVue User Guide: Managing Student Accounts (Corporate) 11
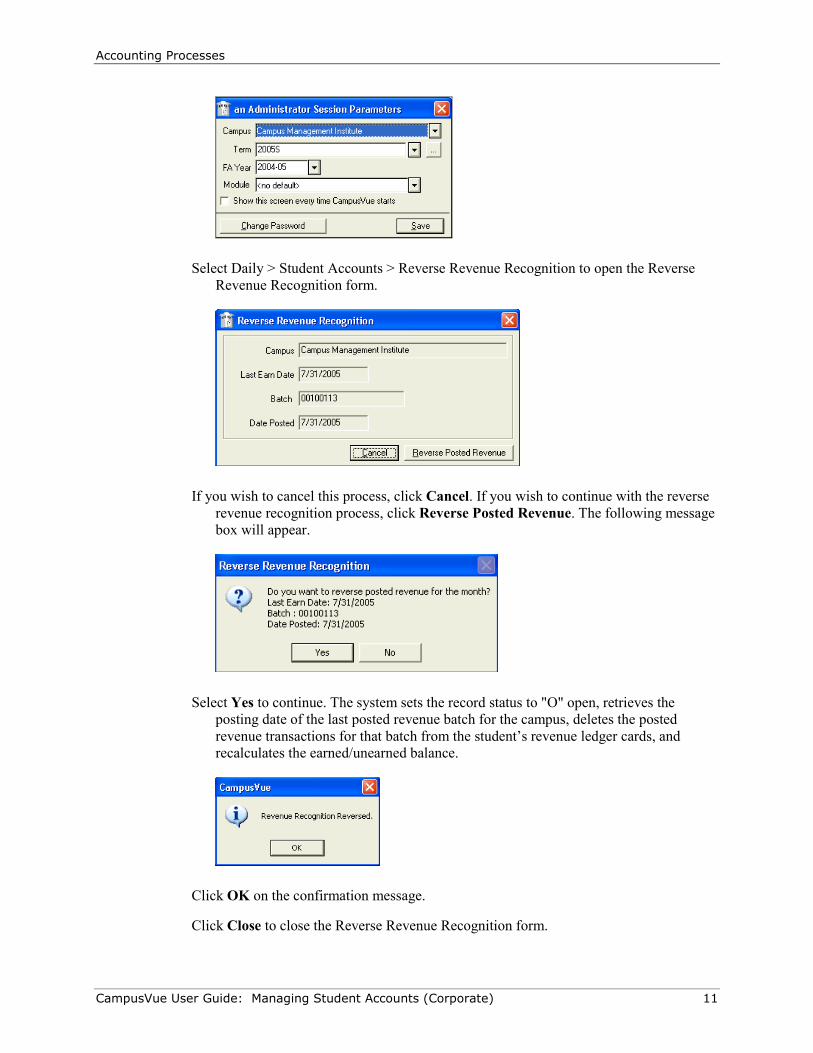
Select Daily > Student Accounts > Reverse Revenue Recognition to open the Reverse
Revenue Recognition form.
If you wish to cancel this process, click Cancel. If you wish to continue with the reverse
revenue recognition process, click Reverse Posted Revenue. The following message
box will appear.
Select Yes to continue. The system sets the record status to "O" open, retrieves the
posting date of the last posted revenue batch for the campus, deletes the posted
revenue transactions for that batch from the student’s revenue ledger cards, and
recalculates the earned/unearned balance.
Click OK on the confirmation message.
Click Close to close the Reverse Revenue Recognition form.
Accounting Processes
CampusVue User Guide: Managing Student Accounts (Corporate) 12
Release to General Ledger
The Release to General Ledger process exports batches of summarized ledger cards and
revenue transactions, along with their associated G/L account numbers, to your general
ledger system. The process must include transactions that are related to a subsidiary and
the subsequent payments that are made to a subsidiary. The posting of revenue
transactions to the G/L produces both a summary and a detail report. You can export the
transactions to a text file or to an HTML document.
To release to the General Ledger:
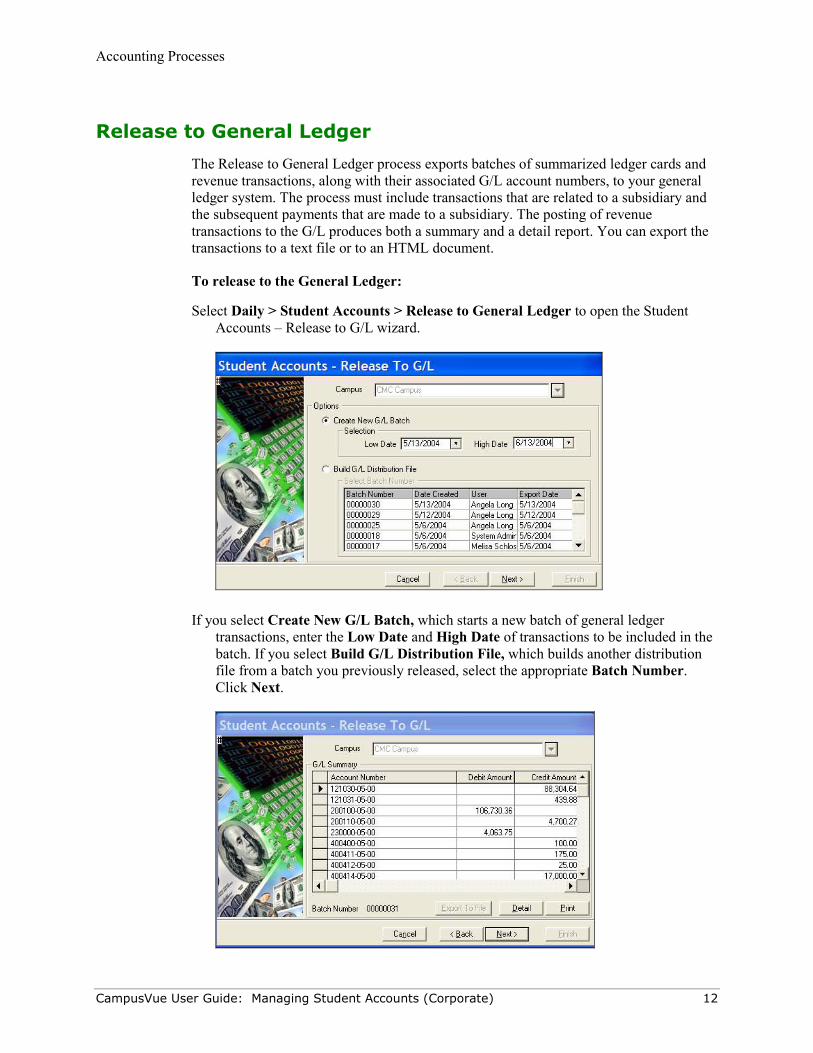
Select Daily > Student Accounts > Release to General Ledger to open the Student
Accounts – Release to G/L wizard.
If you select Create New G/L Batch, which starts a new batch of general ledger
transactions, enter the Low Date and High Date of transactions to be included in the
batch. If you select Build G/L Distribution File, which builds another distribution
file from a batch you previously released, select the appropriate Batch Number.
Click Next.
Accounting Processes
CampusVue User Guide: Managing Student Accounts (Corporate) 13
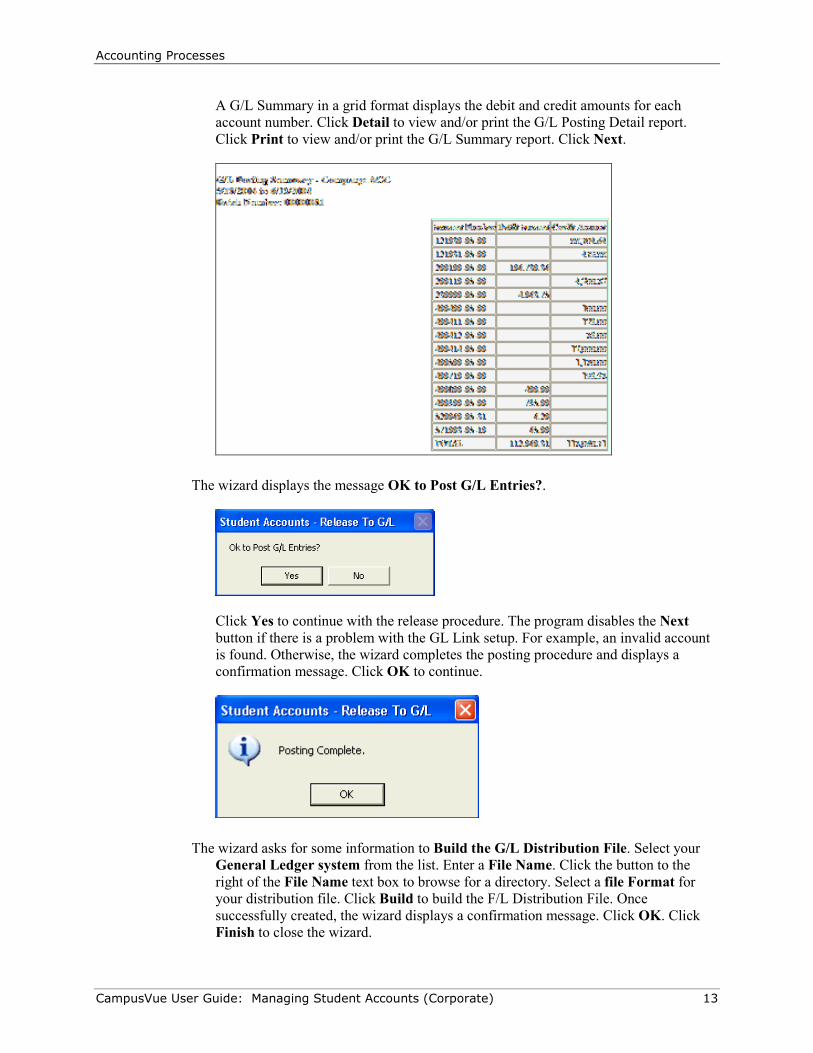
A G/L Summary in a grid format displays the debit and credit amounts for each
account number. Click Detail to view and/or print the G/L Posting Detail report.
Click Print to view and/or print the G/L Summary report. Click Next.
The wizard displays the message OK to Post G/L Entries?.
Click Yes to continue with the release procedure. The program disables the Next
button if there is a problem with the GL Link setup. For example, an invalid account
is found. Otherwise, the wizard completes the posting procedure and displays a
confirmation message. Click OK to continue.
The wizard asks for some information to Build the G/L Distribution File. Select your
General Ledger system from the list. Enter a File Name. Click the button to the
right of the File Name text box to browse for a directory. Select a file Format for
your distribution file. Click Build to build the F/L Distribution File. Once
successfully created, the wizard displays a confirmation message. Click OK. Click
Finish to close the wizard.

Student Accounts Maintenance Functions
CampusVue User Guide: Managing Student Accounts (Corporate) 14
Student Accounts Maintenance Functions
This section details how to perform as-needed maintenance tasks, such as adding
Transaction Codes, Bank Accounts, Billing Methods, Earnings Methods, and Program
Versions.
Adding a Transaction Code
The Transaction Codes list defines the transactions that affect the student ledger and the
posting of related entries in the General Ledger.
To add a new Transaction Code:
Select Lists > Student Accounts > Transaction Codes.
Click Add to open the Transactions Codes Code Setup form.
Enter a unique Code and Description.
Check that the Active check box is automatically selected if you plan to use the code you
are adding.
Student Accounts Maintenance Functions
CampusVue User Guide: Managing Student Accounts (Corporate) 15
Select the Bill Type (Student, Misc Receipts, or Both).
Select the Options by checking the appropriate boxes.
� Defer Earnings: If checked, the procedures for deferring earnings will apply to
this type of transaction.
� Include in Title IV Institutional Charges: If checked, this charge is included in
Title IV refund institutional charges calculation.
� Always allow Title IV to pay charge?: Check this box for transaction codes
such as tuition and fees which do not require a waiver from students or parents
for Title IV disbursement. Clear this box for transaction codes such as books
and supplies which require a waiver from students or parents for Title IV
disbursements to pay the charge.
� Override Required Term Code?: If checked, you can post a transaction
without a term code.
� Allow Edit Misc Cash G/L Account: If checked, users can specify a General
Ledger account when posting miscellaneous cash receipts.
� Include Bill Code on 1098-T Calculations: If checked, this code is an eligible
1098-T expense. Examples are tuition and books.
� Include as School Activities Revenue in 90/10: Only available if the Bill Type is
Misc Receipts or Both. Check this box to indicate that you wish to include this
income from eligible school activities in the 90/10 calculation.
� Accept Deposits: Your school can post charges to a subsidiary ledger using this
transaction code. Subsidiary ledgers are used for student services handled
outside the student's ledger card account balance. Examples of charges to a
subsidiary ledger are housing, meal plans, parking, etc.
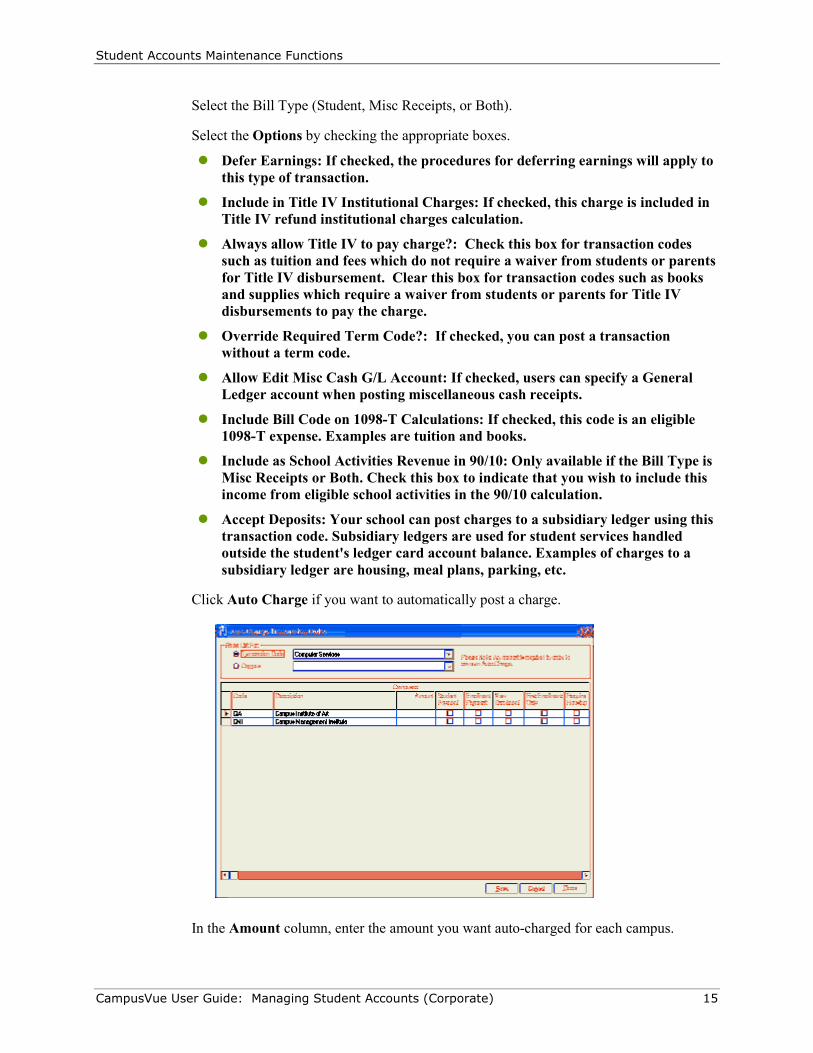
Click Auto Charge if you want to automatically post a charge.
In the Amount column, enter the amount you want auto-charged for each campus.
Student Accounts Maintenance Functions
CampusVue User Guide: Managing Student Accounts (Corporate) 16
Select the type of auto-charge. For example, if you select Returned Check Fee auto-
charge, when you adjust a check entry on the ledger card as a Returned Check then
this charge is automatically entered on the student’s ledger card.
You can either select Student or Enrollment Payment (checking one will clear the
other). You can select New Enrollment in conjunction with either Student or
Enrollment Payment.
� Student Payment: Used when a student payment is made prior to enrollment.
� Enrollment Payment: Used when a student payment is made following
enrollment.
� New Enrollment: Used when student enrollment is completed.
� First Enrollment Only: Used during the student's first enrollment, generally
once. Typically used for enrollment and application fees that is not charged
again if a student enrolls in another program.
� Require Housing: Used for a housing deposit when housing is required for a
student.
� Returned Check Fee: Used to configure an automatic charge if a bank returns
a student payment check for non-sufficient funds (NSF).
Click Save then Close.
Select the Campuses.
Click Save and Close to close the form.
The system requires the following transaction codes:
BOOK: Books
EXAMR: Exam Retake Fee
EXTCRSE: Course Extension Fee
EXTLSN: Lesson Extension Fee
INT: Interest
LESSONR: Lesson Retake Fee
REG: Registration Fee
TUIT: Tuition
Adding a Bank
The Bank Codes list is used to identify the banks with which your school does business
and the accounts within each bank. You can set up multiple accounts in each bank. Each
bank account is related to a general ledger account number for posting transaction
activity. You can also print a list of your banks and the accounts in each bank.
To add a new Bank:
Select Lists > Student Accounts > Bank Code tab.
Click Add to open the Bank Codes Code Setup form.

Student Accounts Maintenance Functions
CampusVue User Guide: Managing Student Accounts (Corporate) 17
Enter a Code and Description.
Leave the Active box selected if this is an active account.
Enter the Address, Phone, Email, Contact and Routing information.
Select the Campus.
Click Save.
Click Accounts to open the Account Setup form.
Click Add (which enables the fields on the right of the form).

Student Accounts Maintenance Functions
CampusVue User Guide: Managing Student Accounts (Corporate) 18
Enter the Description, Account Number, GL Debit Account number, and GL Credit
Account number.
Enter a Fractional Number. The Fractional Routing Number identifies the paying bank
and has the following format: 12-345/6789. Typically this number appears in the
upper right corner of a check.
Select the Great Plains Checkbook, if this feature was set up (Setup > Student Accounts).
Enable the box, Use Great Plains for Next Check #, if you set up the bank account to
get the next check number from Great Plains.
Leave the Active box check marked to indicate this is an active account.
Enable Default Bank Account if this is where normal deposits are made. If a deposit
must go to a different account, you can change it at the time you prepare the deposit.
Select the Default Type. Select a type of payment or select All Types.
Click Save.
Adding a Refund Policy
The U.S. Department of Education, your state's department of education, and your
school's administration may have different policies and procedures for refunding money
to students when they leave school before completing their program of study. Typically,
you must select the refund policy that is most advantageous to the student at the time the
calculation is made. Refund calculations for a given student are triggered under View >
Student Accounts > Refund Calculation.
The Refund Calculation form contains a grid which displays a list of previous refund
calculations for the student. The grid includes the description, type, status, date of the
calculation, and the name of the user who did the calculation. The Expected Refund
Process Date field shows the deadline for processing refunds for a highlighted
calculation.
Clicking Add in the Refund Calculation form opens the Refund Calculation Summary
form to initiate a new refund calculation. To edit a previously calculated refund, select
the calculation in the grid and click Edit. To see the details of the previous refund
Student Accounts Maintenance Functions
CampusVue User Guide: Managing Student Accounts (Corporate) 19
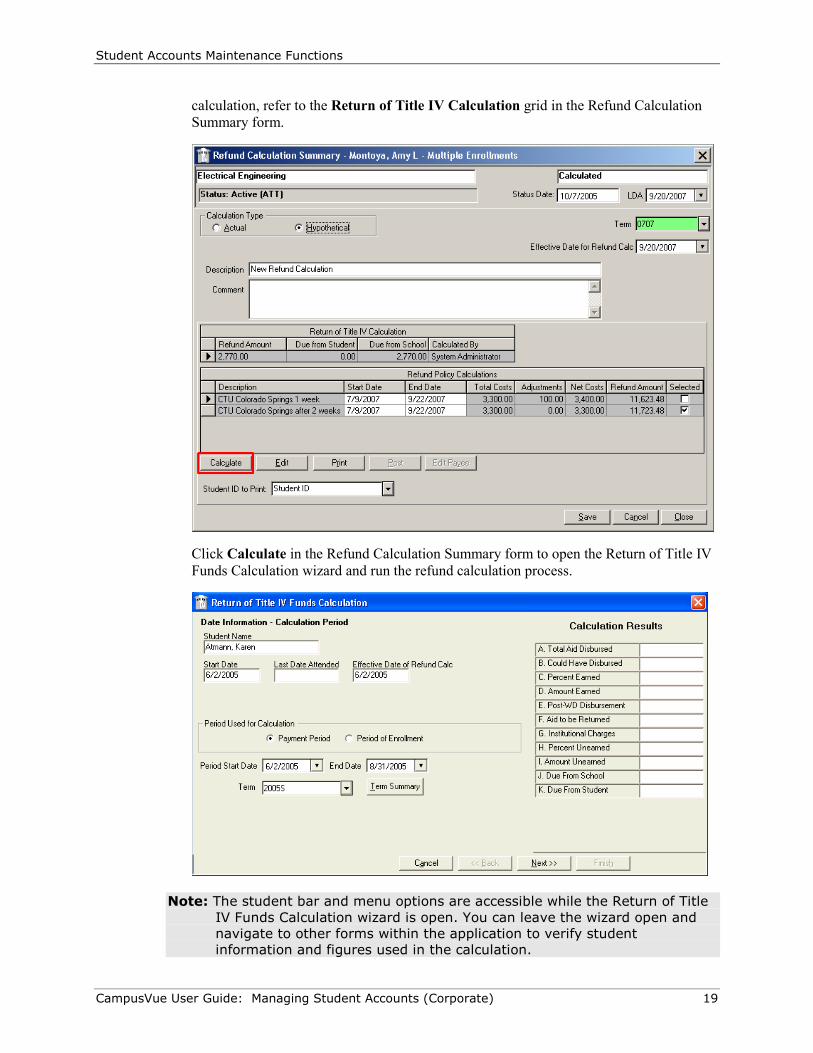
calculation, refer to the Return of Title IV Calculation grid in the Refund Calculation
Summary form.
Click Calculate in the Refund Calculation Summary form to open the Return of Title IV
Funds Calculation wizard and run the refund calculation process.
Note: The student bar and menu options are accessible while the Return of Title
IV Funds Calculation wizard is open. You can leave the wizard open and
navigate to other forms within the application to verify student
information and figures used in the calculation.
Student Accounts Maintenance Functions
CampusVue User Guide: Managing Student Accounts (Corporate) 20
If you navigate to any other form and change any data that affects the current
calculation, your changes will be reflected in the Return of Title IV Funds
Calculation wizard.
The refund calculation in CampusVue supports straight pro-rata refund policies.
The refund policy allows the length conditions to be based on different units than the
policy itself. Many refund policies have an initial condition that is based on withdrawing
in the first week of class; the remaining conditions are based on scheduled hours.
You may wish to set up different refund policies for different circumstances.
To add a new Refund Policy:
Select Lists > Student Accounts > Refund Policies tab.
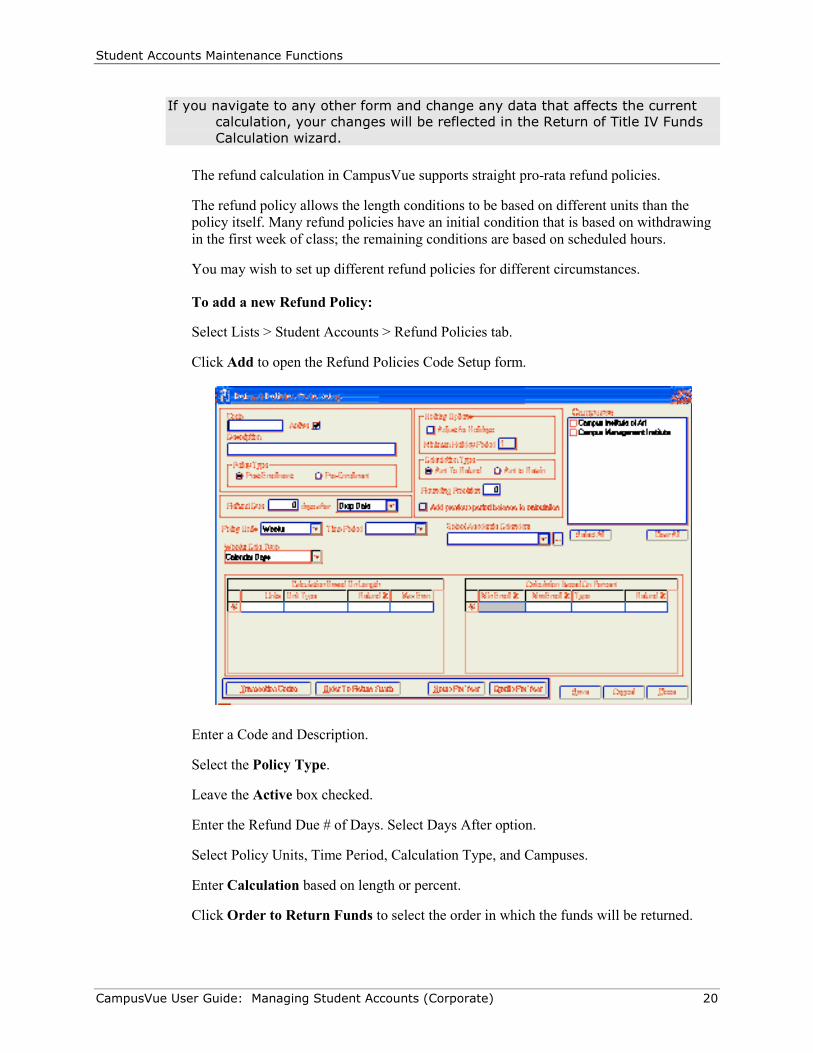
Click Add to open the Refund Policies Code Setup form.
Enter a Code and Description.
Select the Policy Type.
Leave the Active box checked.
Enter the Refund Due # of Days. Select Days After option.
Select Policy Units, Time Period, Calculation Type, and Campuses.
Enter Calculation based on length or percent.
Click Order to Return Funds to select the order in which the funds will be returned.
Student Accounts Maintenance Functions
CampusVue User Guide: Managing Student Accounts (Corporate) 21
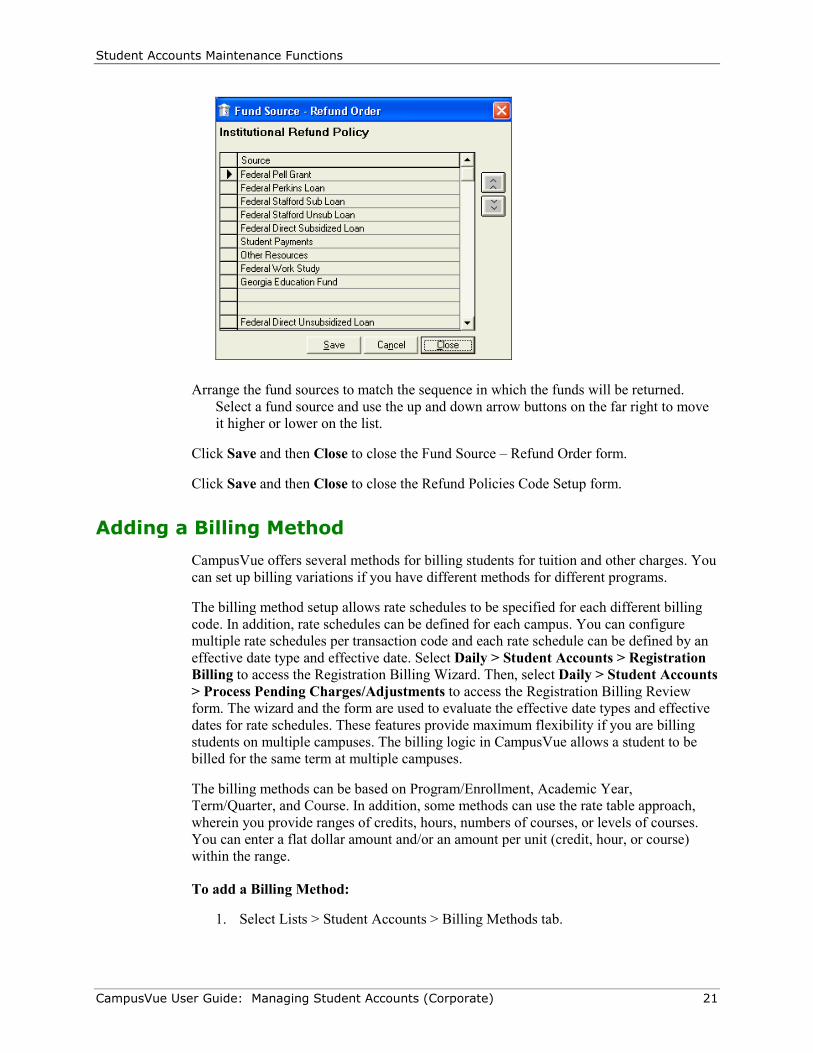
Arrange the fund sources to match the sequence in which the funds will be returned.
Select a fund source and use the up and down arrow buttons on the far right to move
it higher or lower on the list.
Click Save and then Close to close the Fund Source – Refund Order form.
Click Save and then Close to close the Refund Policies Code Setup form.
Adding a Billing Method
CampusVue offers several methods for billing students for tuition and other charges. You
can set up billing variations if you have different methods for different programs.
The billing method setup allows rate schedules to be specified for each different billing
code. In addition, rate schedules can be defined for each campus. You can configure
multiple rate schedules per transaction code and each rate schedule can be defined by an
effective date type and effective date. Select Daily > Student Accounts > Registration
Billing to access the Registration Billing Wizard. Then, select Daily > Student Accounts
> Process Pending Charges/Adjustments to access the Registration Billing Review
form. The wizard and the form are used to evaluate the effective date types and effective
dates for rate schedules. These features provide maximum flexibility if you are billing
students on multiple campuses. The billing logic in CampusVue allows a student to be
billed for the same term at multiple campuses.
The billing methods can be based on Program/Enrollment, Academic Year,
Term/Quarter, and Course. In addition, some methods can use the rate table approach,
wherein you provide ranges of credits, hours, numbers of courses, or levels of courses.
You can enter a flat dollar amount and/or an amount per unit (credit, hour, or course)
within the range.
To add a Billing Method:
1. Select Lists > Student Accounts > Billing Methods tab.
Student Accounts Maintenance Functions
CampusVue User Guide: Managing Student Accounts (Corporate) 22
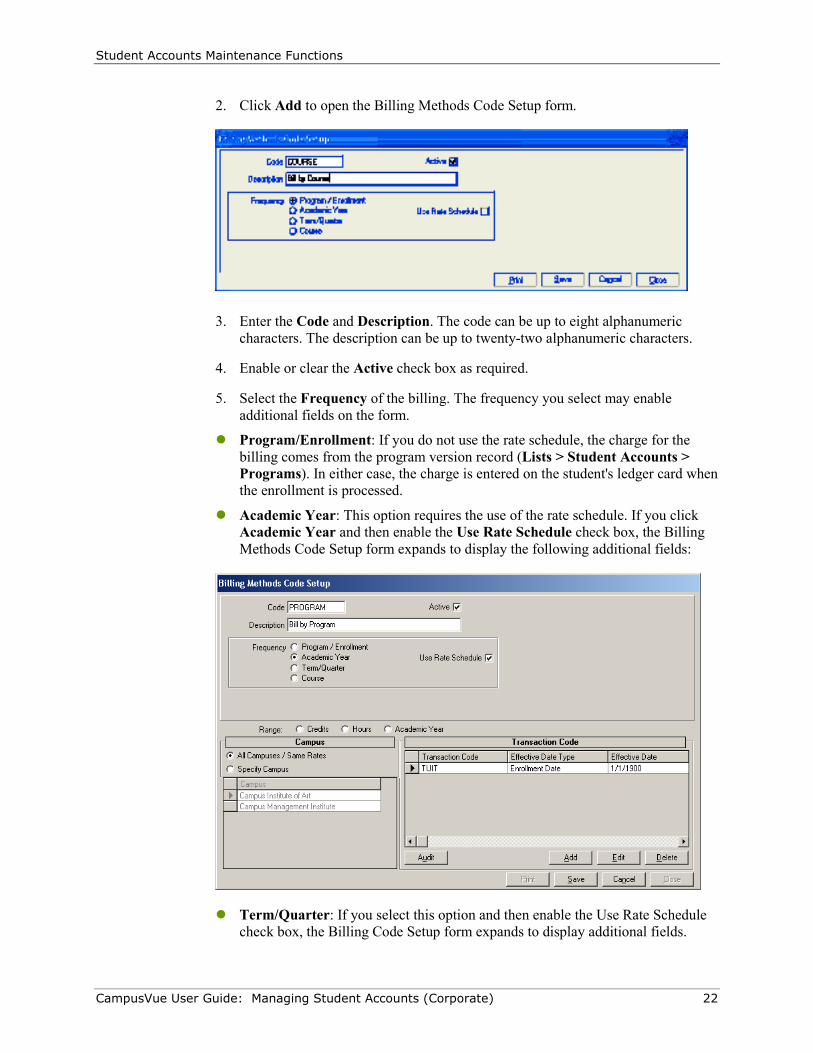
2. Click Add to open the Billing Methods Code Setup form.
3. Enter the Code and Description. The code can be up to eight alphanumeric
characters. The description can be up to twenty-two alphanumeric characters.
4. Enable or clear the Active check box as required.
5. Select the Frequency of the billing. The frequency you select may enable
additional fields on the form.
� Program/Enrollment: If you do not use the rate schedule, the charge for the
billing comes from the program version record (Lists > Student Accounts >
Programs). In either case, the charge is entered on the student's ledger card when
the enrollment is processed.
� Academic Year: This option requires the use of the rate schedule. If you click
Academic Year and then enable the Use Rate Schedule check box, the Billing
Methods Code Setup form expands to display the following additional fields:
� Term/Quarter: If you select this option and then enable the Use Rate Schedule
check box, the Billing Code Setup form expands to display additional fields.
Student Accounts Maintenance Functions
CampusVue User Guide: Managing Student Accounts (Corporate) 23
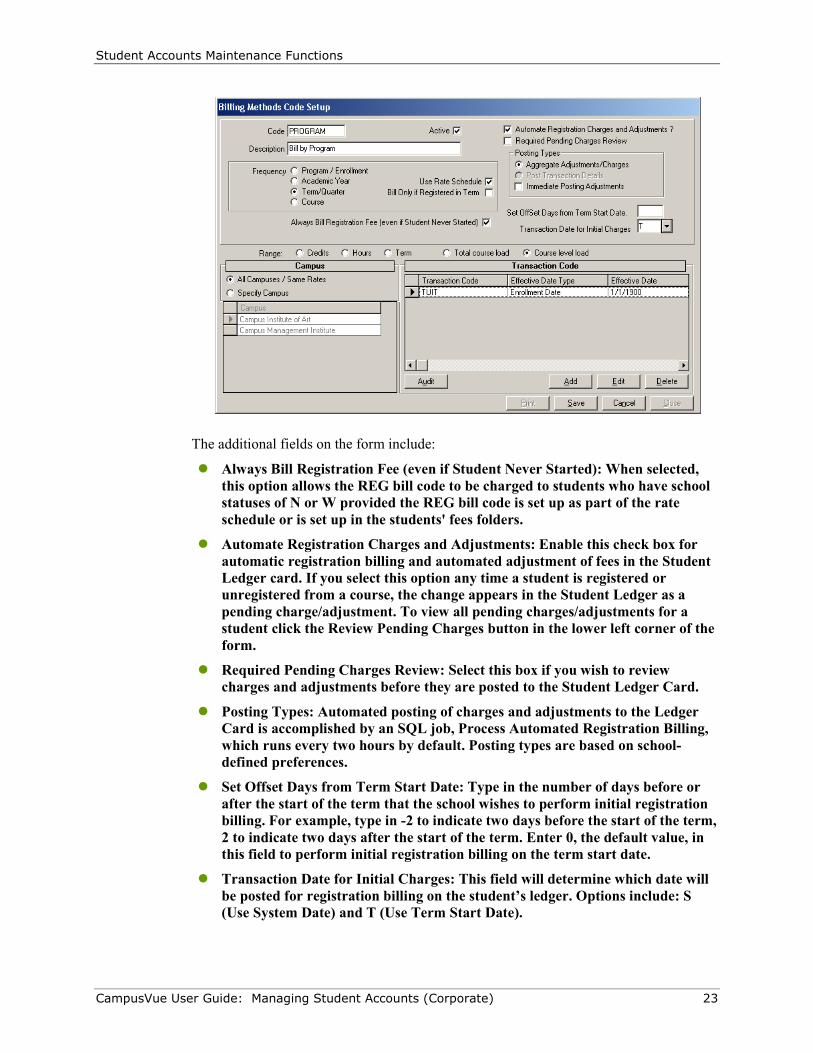
The additional fields on the form include:
� Always Bill Registration Fee (even if Student Never Started): When selected,
this option allows the REG bill code to be charged to students who have school
statuses of N or W provided the REG bill code is set up as part of the rate
schedule or is set up in the students' fees folders.
� Automate Registration Charges and Adjustments: Enable this check box for
automatic registration billing and automated adjustment of fees in the Student
Ledger card. If you select this option any time a student is registered or
unregistered from a course, the change appears in the Student Ledger as a
pending charge/adjustment. To view all pending charges/adjustments for a
student click the Review Pending Charges button in the lower left corner of the
form.
� Required Pending Charges Review: Select this box if you wish to review
charges and adjustments before they are posted to the Student Ledger Card.
� Posting Types: Automated posting of charges and adjustments to the Ledger
Card is accomplished by an SQL job, Process Automated Registration Billing,
which runs every two hours by default. Posting types are based on school-
defined preferences.
� Set Offset Days from Term Start Date: Type in the number of days before or
after the start of the term that the school wishes to perform initial registration
billing. For example, type in -2 to indicate two days before the start of the term,
2 to indicate two days after the start of the term. Enter 0, the default value, in
this field to perform initial registration billing on the term start date.
� Transaction Date for Initial Charges: This field will determine which date will
be posted for registration billing on the student’s ledger. Options include: S
(Use System Date) and T (Use Term Start Date).
Student Accounts Maintenance Functions
CampusVue User Guide: Managing Student Accounts (Corporate) 24
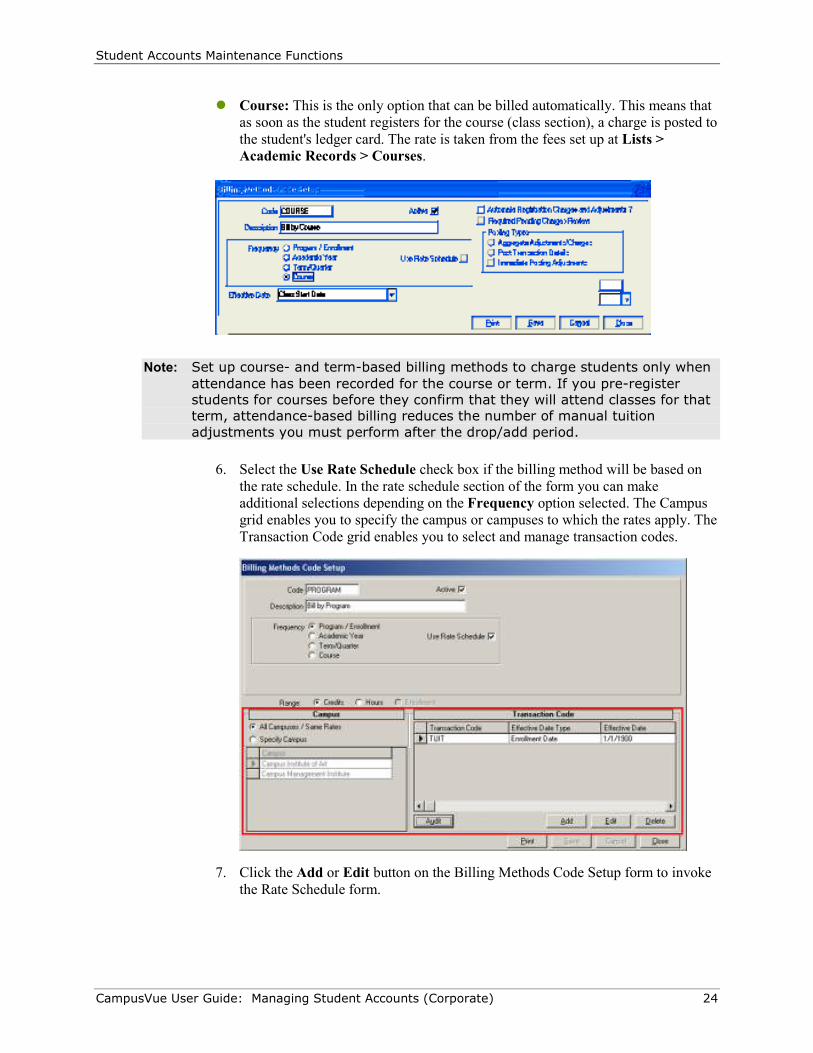
� Course: This is the only option that can be billed automatically. This means that
as soon as the student registers for the course (class section), a charge is posted to
the student's ledger card. The rate is taken from the fees set up at Lists >
Academic Records > Courses.
Note: Set up course- and term-based billing methods to charge students only when
attendance has been recorded for the course or term. If you pre-register
students for courses before they confirm that they will attend classes for that
term, attendance-based billing reduces the number of manual tuition
adjustments you must perform after the drop/add period.
6. Select the Use Rate Schedule check box if the billing method will be based on
the rate schedule. In the rate schedule section of the form you can make
additional selections depending on the Frequency option selected. The Campus
grid enables you to specify the campus or campuses to which the rates apply. The
Transaction Code grid enables you to select and manage transaction codes.
7. Click the Add or Edit button on the Billing Methods Code Setup form to invoke
the Rate Schedule form.
Student Accounts Maintenance Functions
CampusVue User Guide: Managing Student Accounts (Corporate) 25
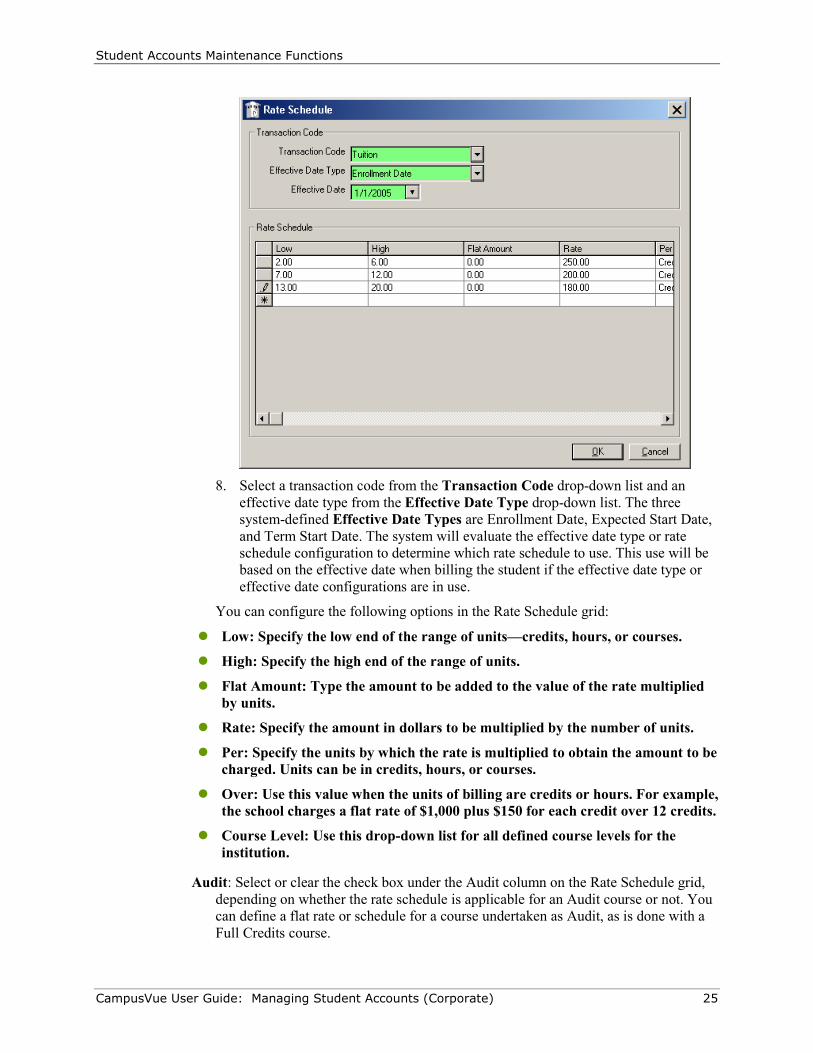
8. Select a transaction code from the Transaction Code drop-down list and an
effective date type from the Effective Date Type drop-down list. The three
system-defined Effective Date Types are Enrollment Date, Expected Start Date,
and Term Start Date. The system will evaluate the effective date type or rate
schedule configuration to determine which rate schedule to use. This use will be
based on the effective date when billing the student if the effective date type or
effective date configurations are in use.
You can configure the following options in the Rate Schedule grid:
� Low: Specify the low end of the range of units—credits, hours, or courses.
� High: Specify the high end of the range of units.
� Flat Amount: Type the amount to be added to the value of the rate multiplied
by units.
� Rate: Specify the amount in dollars to be multiplied by the number of units.
� Per: Specify the units by which the rate is multiplied to obtain the amount to be
charged. Units can be in credits, hours, or courses.
� Over: Use this value when the units of billing are credits or hours. For example,
the school charges a flat rate of $1,000 plus $150 for each credit over 12 credits.
� Course Level: Use this drop-down list for all defined course levels for the
institution.
Audit: Select or clear the check box under the Audit column on the Rate Schedule grid,
depending on whether the rate schedule is applicable for an Audit course or not. You
can define a flat rate or schedule for a course undertaken as Audit, as is done with a
Full Credits course.
Student Accounts Maintenance Functions
CampusVue User Guide: Managing Student Accounts (Corporate) 26
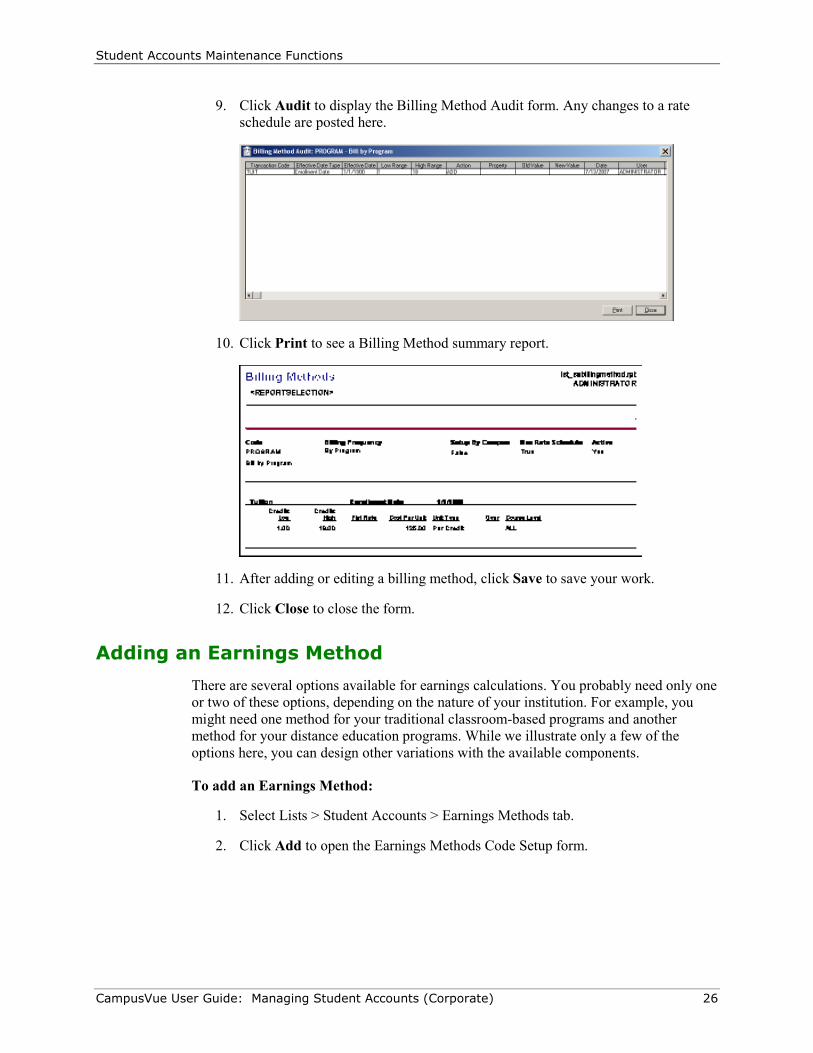
9. Click Audit to display the Billing Method Audit form. Any changes to a rate
schedule are posted here.
10. Click Print to see a Billing Method summary report.
11. After adding or editing a billing method, click Save to save your work.
12. Click Close to close the form.
Adding an Earnings Method
There are several options available for earnings calculations. You probably need only one
or two of these options, depending on the nature of your institution. For example, you
might need one method for your traditional classroom-based programs and another
method for your distance education programs. While we illustrate only a few of the
options here, you can design other variations with the available components.
To add an Earnings Method:
1. Select Lists > Student Accounts > Earnings Methods tab.
2. Click Add to open the Earnings Methods Code Setup form.
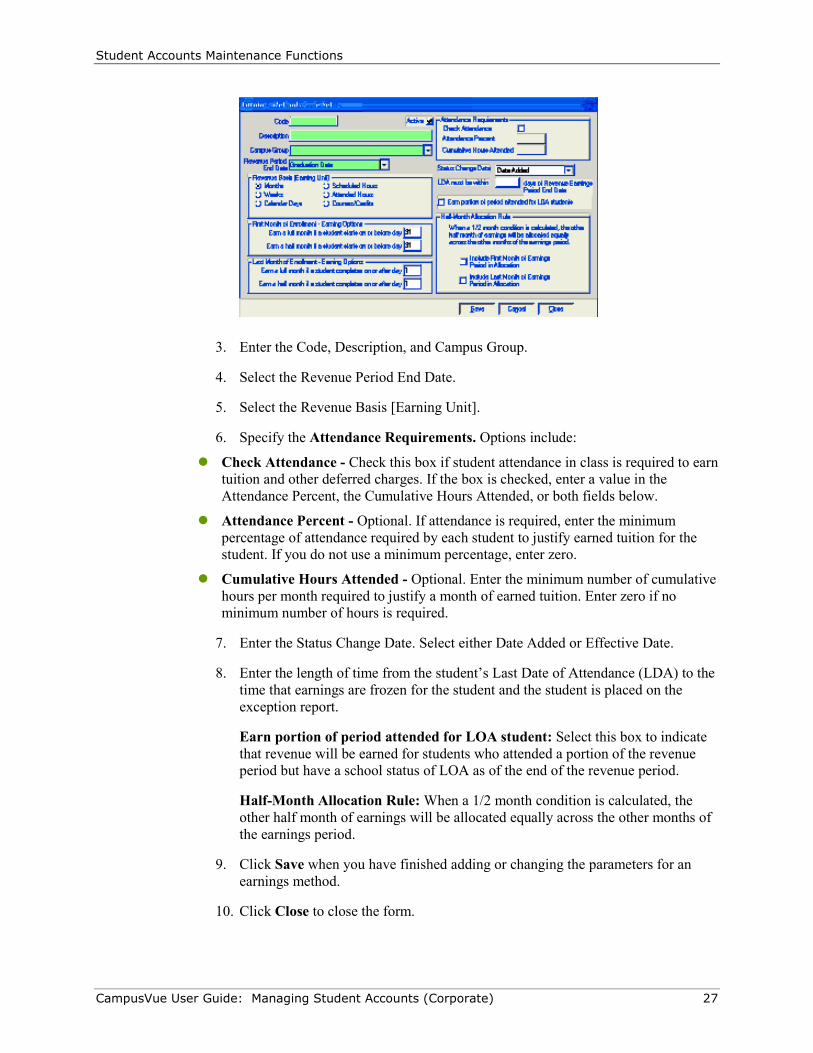
Student Accounts Maintenance Functions
CampusVue User Guide: Managing Student Accounts (Corporate) 27
3. Enter the Code, Description, and Campus Group.
4. Select the Revenue Period End Date.
5. Select the Revenue Basis [Earning Unit].
6. Specify the Attendance Requirements. Options include:
� Check Attendance - Check this box if student attendance in class is required to earn
tuition and other deferred charges. If the box is checked, enter a value in the
Attendance Percent, the Cumulative Hours Attended, or both fields below.
� Attendance Percent - Optional. If attendance is required, enter the minimum
percentage of attendance required by each student to justify earned tuition for the
student. If you do not use a minimum percentage, enter zero.
� Cumulative Hours Attended - Optional. Enter the minimum number of cumulative
hours per month required to justify a month of earned tuition. Enter zero if no
minimum number of hours is required.
7. Enter the Status Change Date. Select either Date Added or Effective Date.
8. Enter the length of time from the student’s Last Date of Attendance (LDA) to the
time that earnings are frozen for the student and the student is placed on the
exception report.
Earn portion of period attended for LOA student: Select this box to indicate
that revenue will be earned for students who attended a portion of the revenue
period but have a school status of LOA as of the end of the revenue period.
Half-Month Allocation Rule: When a 1/2 month condition is calculated, the
other half month of earnings will be allocated equally across the other months of
the earnings period.
9. Click Save when you have finished adding or changing the parameters for an
earnings method.
10. Click Close to close the form.
Student Accounts Maintenance Functions
CampusVue User Guide: Managing Student Accounts (Corporate) 28
11. Click Print on the Setup Student Accounts Lists form to get a list of your
earnings methods.
Program Version Billing
When you click on the Programs tab, you will see a list of all programs offered by your
school. You need to set up program costs for each version of each program on the list.
To add the Billing and Earnings Methods to a program version:
1. Select Lists > Student Accounts > Programs tab.
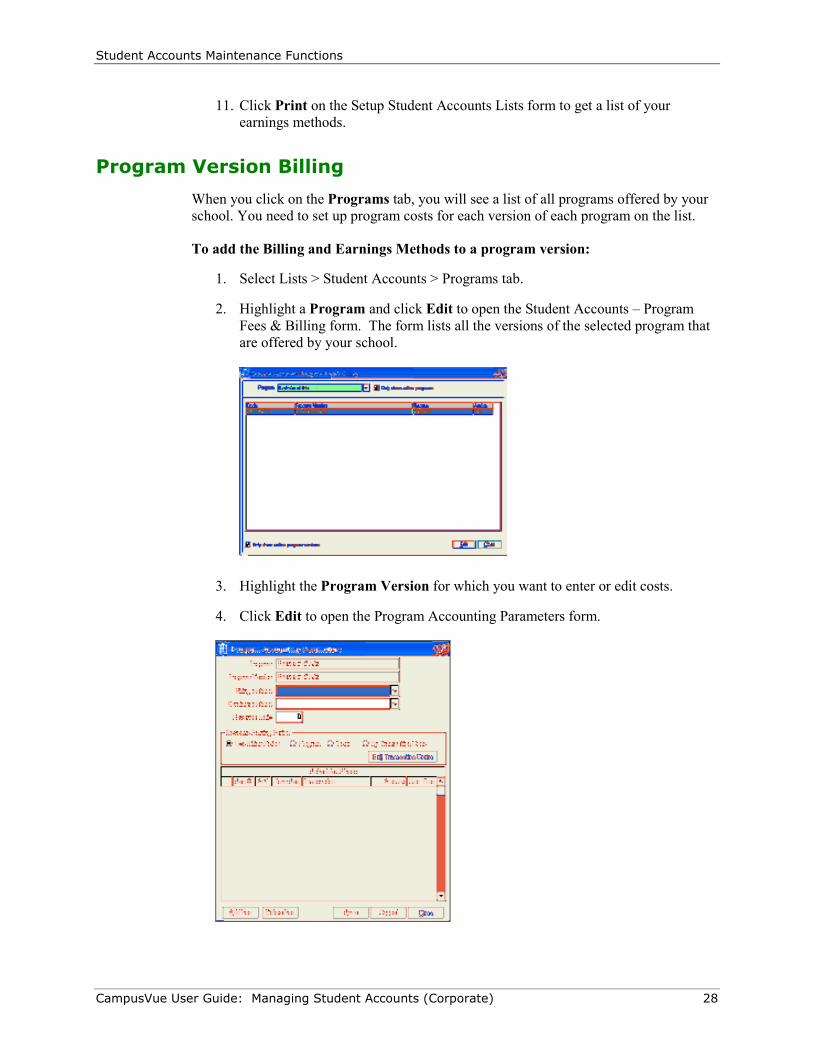
2. Highlight a Program and click Edit to open the Student Accounts – Program
Fees & Billing form. The form lists all the versions of the selected program that
are offered by your school.
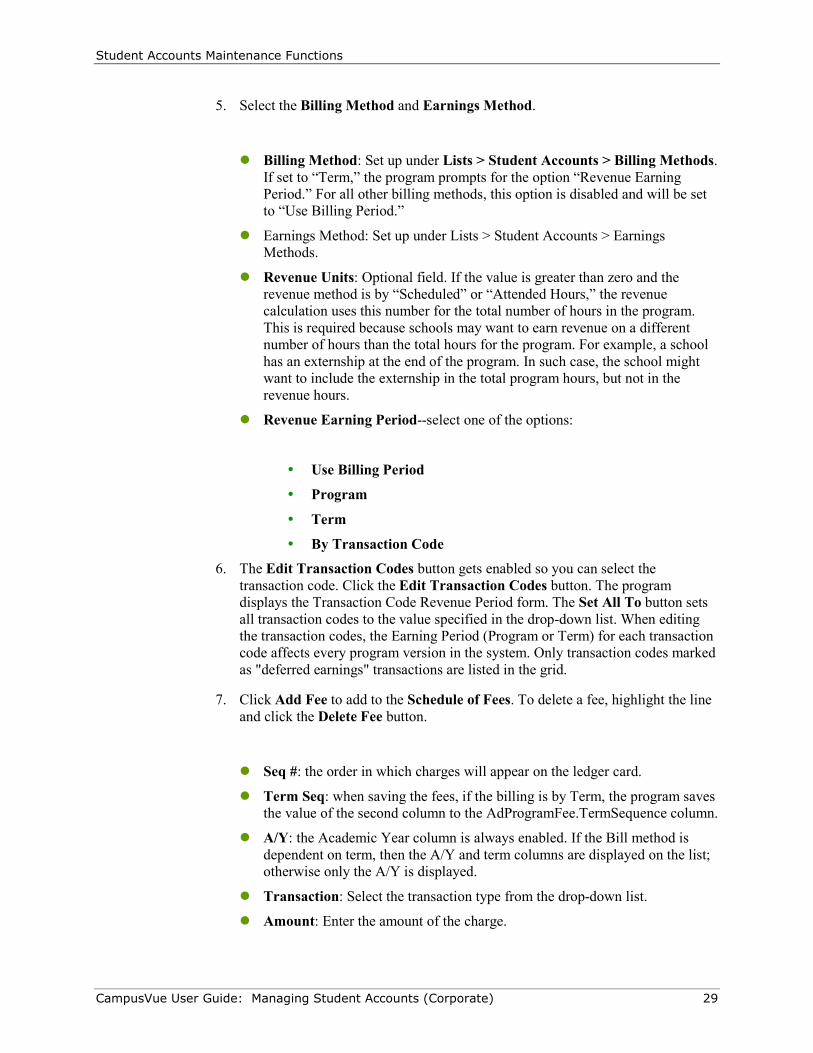
3. Highlight the Program Version for which you want to enter or edit costs.
4. Click Edit to open the Program Accounting Parameters form.
Student Accounts Maintenance Functions
CampusVue User Guide: Managing Student Accounts (Corporate) 29
5. Select the Billing Method and Earnings Method.
� Billing Method: Set up under Lists > Student Accounts > Billing Methods.
If set to “Term,” the program prompts for the option “Revenue Earning
Period.” For all other billing methods, this option is disabled and will be set
to “Use Billing Period.”
� Earnings Method: Set up under Lists > Student Accounts > Earnings
Methods.
� Revenue Units: Optional field. If the value is greater than zero and the
revenue method is by “Scheduled” or “Attended Hours,” the revenue
calculation uses this number for the total number of hours in the program.
This is required because schools may want to earn revenue on a different
number of hours than the total hours for the program. For example, a school
has an externship at the end of the program. In such case, the school might
want to include the externship in the total program hours, but not in the
revenue hours.
� Revenue Earning Period--select one of the options:
� Use Billing Period
� Program
� Term
� By Transaction Code
6. The Edit Transaction Codes button gets enabled so you can select the
transaction code. Click the Edit Transaction Codes button. The program
displays the Transaction Code Revenue Period form. The Set All To button sets
all transaction codes to the value specified in the drop-down list. When editing
the transaction codes, the Earning Period (Program or Term) for each transaction
code affects every program version in the system. Only transaction codes marked
as "deferred earnings" transactions are listed in the grid.
7. Click Add Fee to add to the Schedule of Fees. To delete a fee, highlight the line
and click the Delete Fee button.
� Seq #: the order in which charges will appear on the ledger card.
� Term Seq: when saving the fees, if the billing is by Term, the program saves
the value of the second column to the AdProgramFee.TermSequence column.
� A/Y: the Academic Year column is always enabled. If the Bill method is
dependent on term, then the A/Y and term columns are displayed on the list;
otherwise only the A/Y is displayed.
� Transaction: Select the transaction type from the drop-down list.
� Amount: Enter the amount of the charge.
Student Accounts Maintenance Functions
CampusVue User Guide: Managing Student Accounts (Corporate) 30
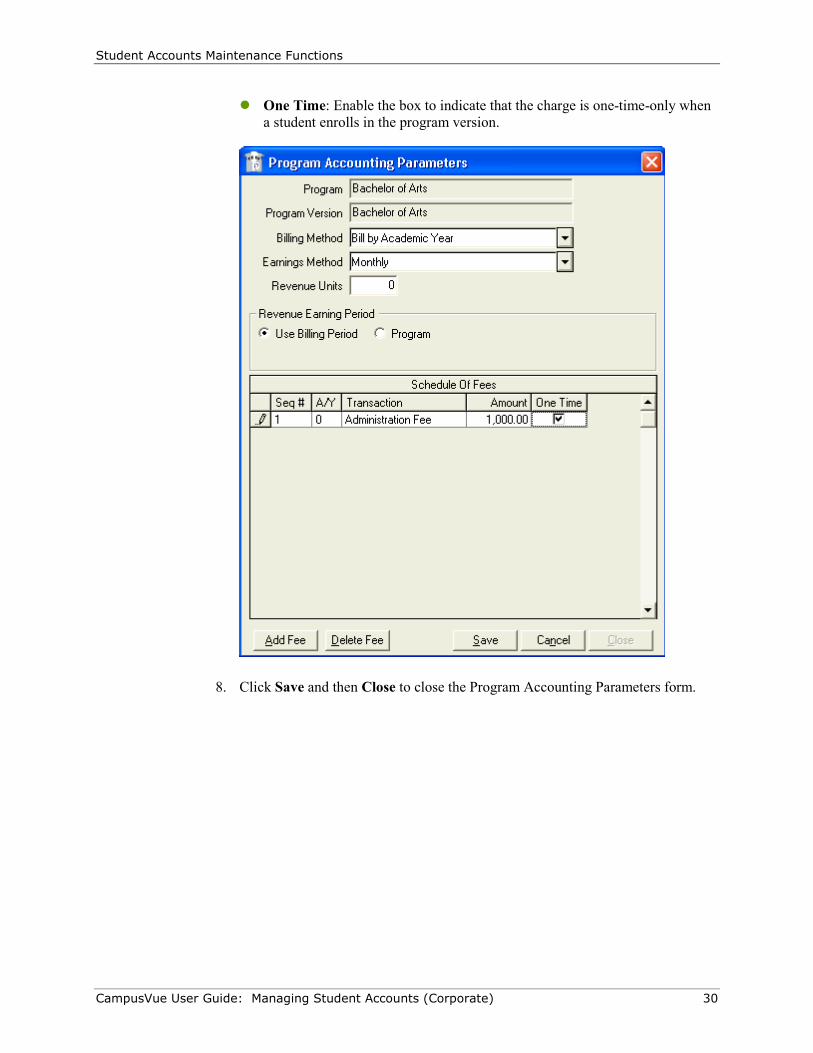
� One Time: Enable the box to indicate that the charge is one-time-only when
a student enrolls in the program version.
8. Click Save and then Close to close the Program Accounting Parameters form.
Student Accounts Reports
CampusVue User Guide: Managing Student Accounts (Corporate) 31
Student Accounts Reports
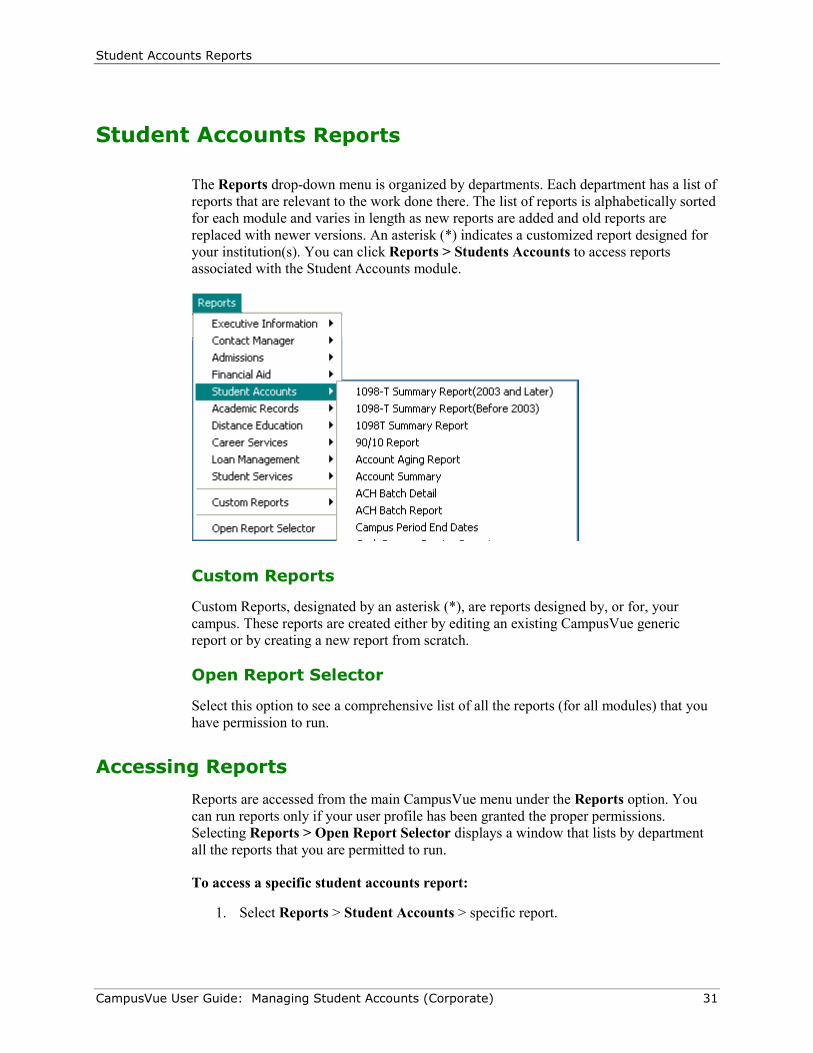
The Reports drop-down menu is organized by departments. Each department has a list of
reports that are relevant to the work done there. The list of reports is alphabetically sorted
for each module and varies in length as new reports are added and old reports are
replaced with newer versions. An asterisk (*) indicates a customized report designed for
your institution(s). You can click Reports > Students Accounts to access reports
associated with the Student Accounts module.
Custom Reports
Custom Reports, designated by an asterisk (*), are reports designed by, or for, your
campus. These reports are created either by editing an existing CampusVue generic
report or by creating a new report from scratch.
Open Report Selector
Select this option to see a comprehensive list of all the reports (for all modules) that you
have permission to run.
Accessing Reports
Reports are accessed from the main CampusVue menu under the Reports option. You
can run reports only if your user profile has been granted the proper permissions.
Selecting Reports > Open Report Selector displays a window that lists by department
all the reports that you are permitted to run.
To access a specific student accounts report:
1. Select Reports > Student Accounts > specific report.
Student Accounts Reports
CampusVue User Guide: Managing Student Accounts (Corporate) 32
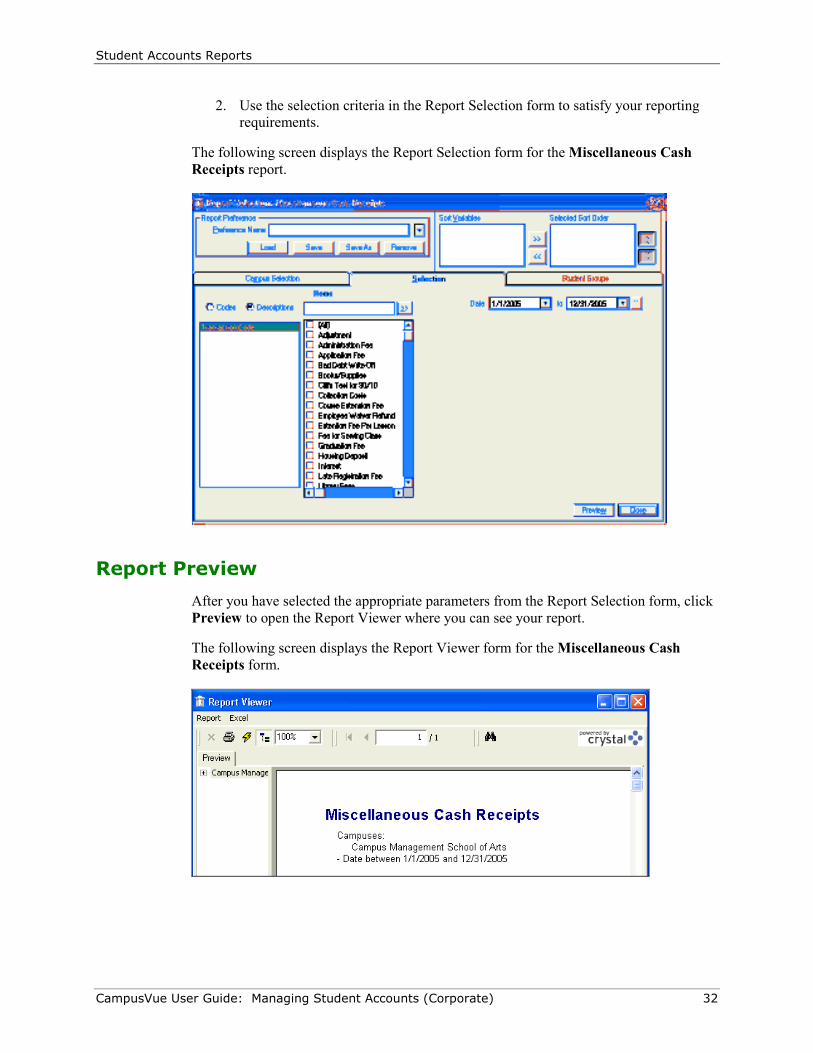
2. Use the selection criteria in the Report Selection form to satisfy your reporting
requirements.
The following screen displays the Report Selection form for the Miscellaneous Cash
Receipts report.
Report Preview
After you have selected the appropriate parameters from the Report Selection form, click
Preview to open the Report Viewer where you can see your report.
The following screen displays the Report Viewer form for the Miscellaneous Cash
Receipts form.
Student Accounts Reports
CampusVue User Guide: Managing Student Accounts (Corporate) 33
General Features of CampusVue Reports
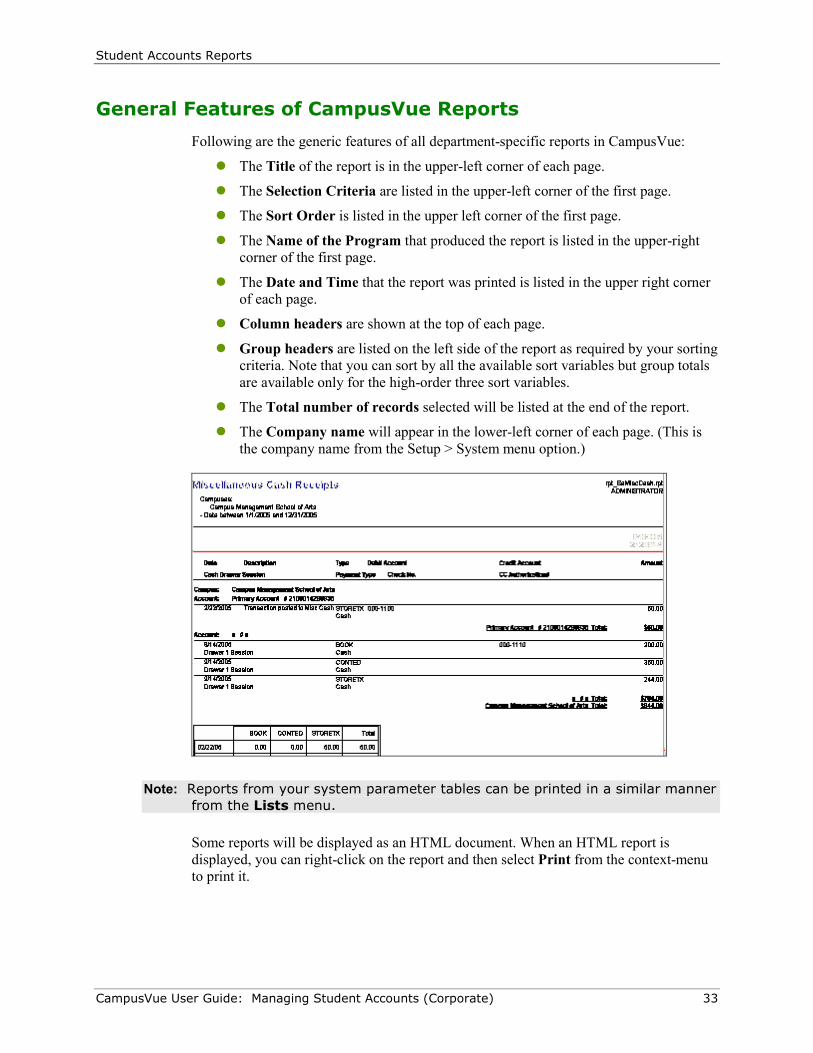
Following are the generic features of all department-specific reports in CampusVue:
� The Title of the report is in the upper-left corner of each page.
� The Selection Criteria are listed in the upper-left corner of the first page.
� The Sort Order is listed in the upper left corner of the first page.
� The Name of the Program that produced the report is listed in the upper-right
corner of the first page.
� The Date and Time that the report was printed is listed in the upper right corner
of each page.
� Column headers are shown at the top of each page.
� Group headers are listed on the left side of the report as required by your sorting
criteria. Note that you can sort by all the available sort variables but group totals
are available only for the high-order three sort variables.
� The Total number of records selected will be listed at the end of the report.
� The Company name will appear in the lower-left corner of each page. (This is
the company name from the Setup > System menu option.)
Note: Reports from your system parameter tables can be printed in a similar manner
from the Lists menu.
Some reports will be displayed as an HTML document. When an HTML report is
displayed, you can right-click on the report and then select Print from the context-menu
to print it.
Student Accounts Reports
CampusVue User Guide: Managing Student Accounts (Corporate) 34
Report Viewer Controls
Report
The Report menu on the Report Viewer form provides for printing the report, printer
setup, exporting the report to other applications such as Excel, and closing the viewer
window. The following options are available on the Reports menu:
� Print: You can select this option when you are ready to print the report. A Print
icon is also provided at the top of the Report Viewer form.
� Print Setup: This option calls the typical Windows printer setup form from
which you can select a printer, set the number of copies to be printed, and access
other reporting functions.
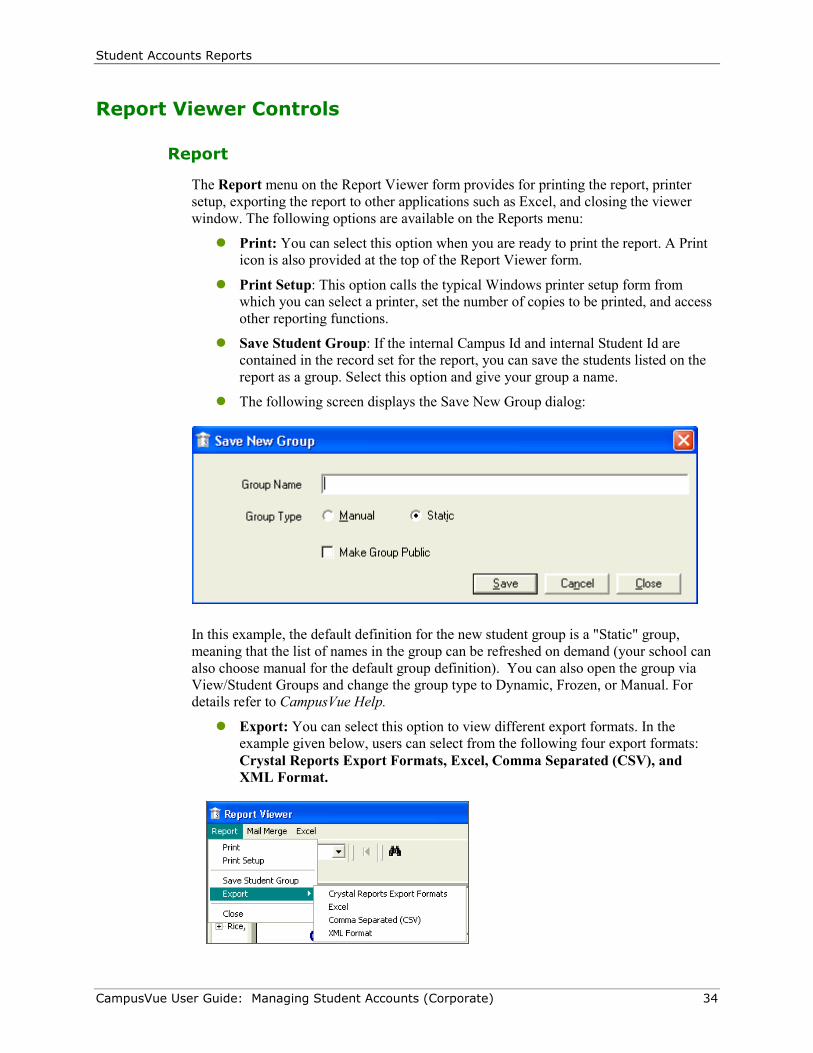
� Save Student Group: If the internal Campus Id and internal Student Id are
contained in the record set for the report, you can save the students listed on the
report as a group. Select this option and give your group a name.
� The following screen displays the Save New Group dialog:
In this example, the default definition for the new student group is a "Static" group,
meaning that the list of names in the group can be refreshed on demand (your school can
also choose manual for the default group definition). You can also open the group via
View/Student Groups and change the group type to Dynamic, Frozen, or Manual. For
details refer to CampusVue Help.
� Export: You can select this option to view different export formats. In the
example given below, users can select from the following four export formats:
Crystal Reports Export Formats, Excel, Comma Separated (CSV), and
XML Format.
Student Accounts Reports
CampusVue User Guide: Managing Student Accounts (Corporate) 35
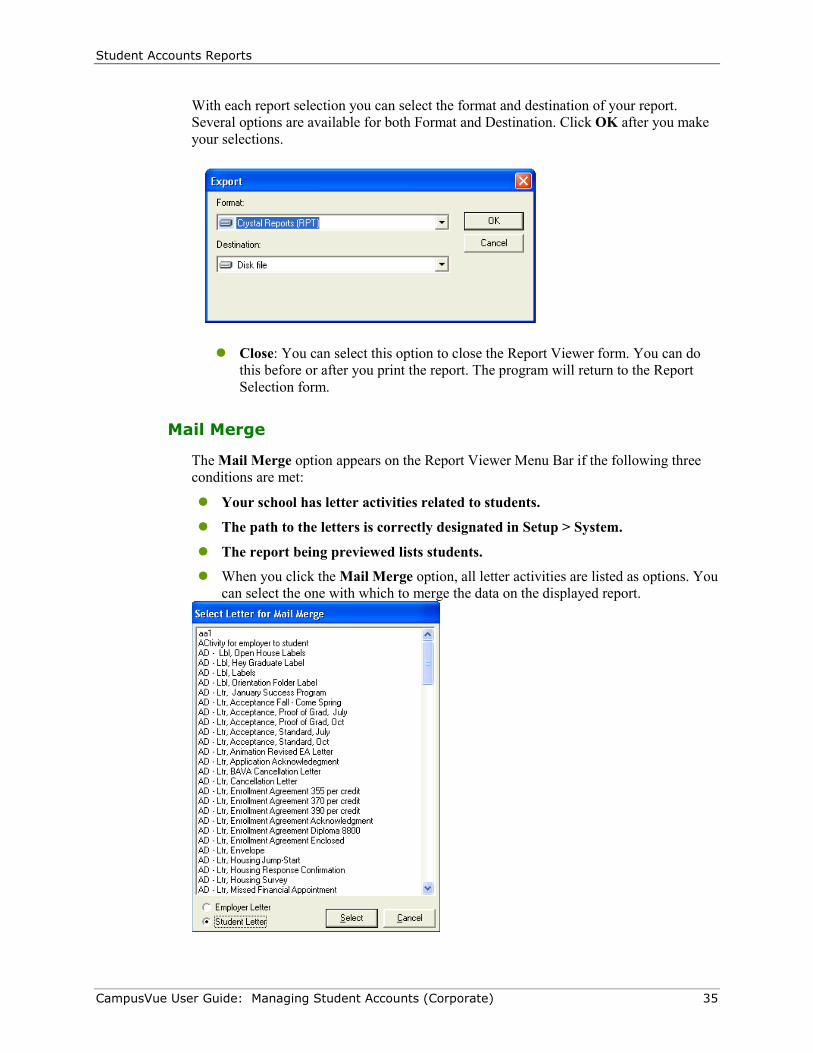
With each report selection you can select the format and destination of your report.
Several options are available for both Format and Destination. Click OK after you make
your selections.
� Close: You can select this option to close the Report Viewer form. You can do
this before or after you print the report. The program will return to the Report
Selection form.
Mail Merge
The Mail Merge option appears on the Report Viewer Menu Bar if the following three
conditions are met:
� Your school has letter activities related to students.
� The path to the letters is correctly designated in Setup > System.
� The report being previewed lists students.
� When you click the Mail Merge option, all letter activities are listed as options. You
can select the one with which to merge the data on the displayed report.
Student Accounts Reports
CampusVue User Guide: Managing Student Accounts (Corporate) 36
When you select to use the Mail Merge feature, you will be able to run the selected
report, use the Merge tool to combine and print letters, and update the student's activity
record after processing the letter. The system will prompt you with a dialog box asking if
you would like to update the Contact History. If you select 'Yes', then the student's
Contact History will be updated after the Mail Merge is completed.
Excel
This option exports the data on the report to an Excel spreadsheet. This feature appears
on every report. The export procedure uses column names for headings. A maximum of
65,000 rows can be exported. However, Sub reports are not exported.
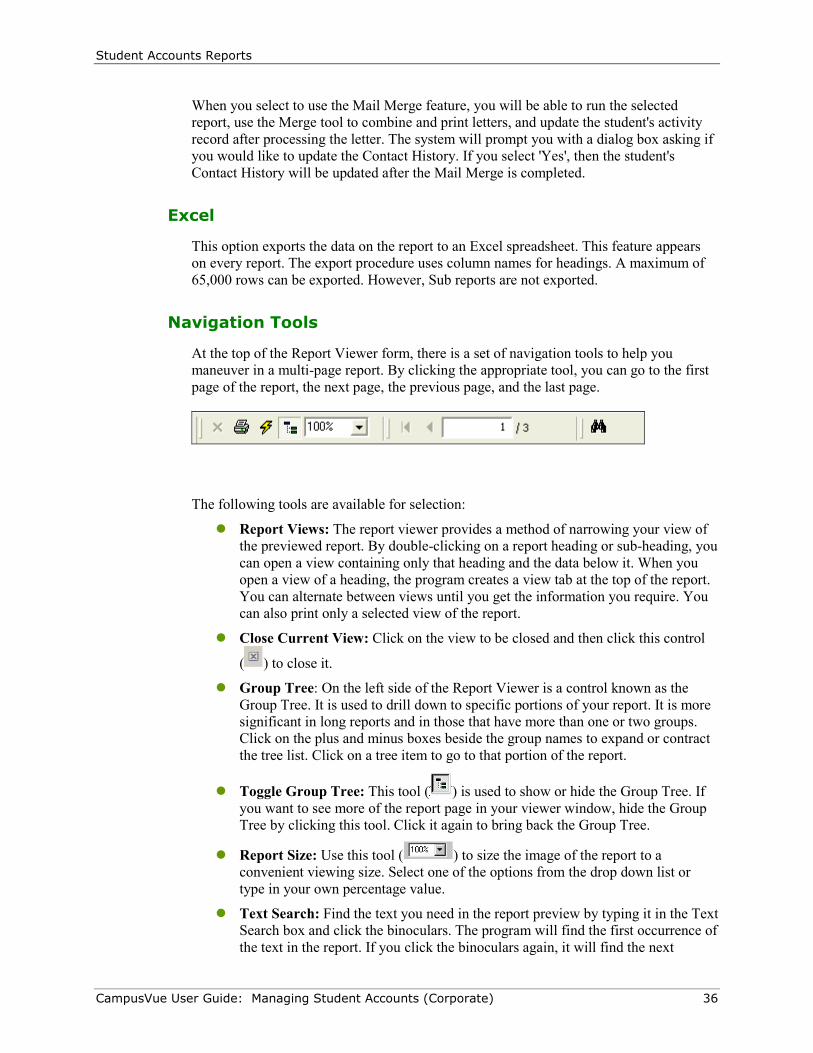
Navigation Tools
At the top of the Report Viewer form, there is a set of navigation tools to help you
maneuver in a multi-page report. By clicking the appropriate tool, you can go to the first
page of the report, the next page, the previous page, and the last page.
The following tools are available for selection:
� Report Views: The report viewer provides a method of narrowing your view of
the previewed report. By double-clicking on a report heading or sub-heading, you
can open a view containing only that heading and the data below it. When you
open a view of a heading, the program creates a view tab at the top of the report.
You can alternate between views until you get the information you require. You
can also print only a selected view of the report.
� Close Current View: Click on the view to be closed and then click this control
( ) to close it.
� Group Tree: On the left side of the Report Viewer is a control known as the
Group Tree. It is used to drill down to specific portions of your report. It is more
significant in long reports and in those that have more than one or two groups.
Click on the plus and minus boxes beside the group names to expand or contract
the tree list. Click on a tree item to go to that portion of the report.
� Toggle Group Tree: This tool ( ) is used to show or hide the Group Tree. If
you want to see more of the report page in your viewer window, hide the Group
Tree by clicking this tool. Click it again to bring back the Group Tree.
� Report Size: Use this tool ( ) to size the image of the report to a
convenient viewing size. Select one of the options from the drop down list or
type in your own percentage value.
� Text Search: Find the text you need in the report preview by typing it in the Text
Search box and click the binoculars. The program will find the first occurrence of
the text in the report. If you click the binoculars again, it will find the next
Student Accounts Reports
CampusVue User Guide: Managing Student Accounts (Corporate) 37
occurrence, and so on. Your search text entries are saved in a list so that you can
go back to them by clicking the arrow beside the text box. When you close the
report, your search entries are discarded. Text search works only in a forward
direction.
Report Printing
Report Printing is performed from the Report Viewer window after you have selected the
various filtering criteria and clicked Preview in the Report Selection window.
To print a report in CampusVue:
1. In the Report Viewer window, click the Print icon at the top to open the
Print dialog box. You can choose to print the entire report or selected pages.
Indicate the number of copies of the report to be printed. Click OK to send the
report to the printer.
Alternatively, select Print from the Report menu at the top of the Preview
window. The report will be sent to your designated printer. If you want to change
the destination printer, select a printer from the Print Setup dialog.
2. From the Report menu, select Close to close the Report Viewer window after the
report is printed. You will return to the Report Selection window.
3. In the Report Selection window, you can choose to print another variation of the
report by selecting different parameters. You can also save your previous
selection of parameters by giving them a Preference Name and saving your
preference for a later rerun.
4. Click Close on the Report Selection window to return to the CampusVue main
window.
Cube Reports
The term "Cube Report" refers to a multidimensional, spreadsheet-style report that you
can manipulate for the purpose of extracting data from the CampusVue database. An
ordinary spreadsheet is two-dimensional in nature. As the term implies, a cube report can
accommodate three or more (possibly hundreds of) dimensions in a report presentation.
Each of the CampusVue modules has one or more cube reports associated with it. Data
elements for the various cube reports are provided by the program in a form that you can
readily use or not use as desired for a particular view. Flexibility is the key characteristic
of cube reports. You can move data around on the report, adding or removing horizontal
and vertical data elements to achieve the precise combination of rows and columns you
need to present the results in the proper format.
The program gathers data for a cube report each time the report is opened. The data is
stored in a temporary file while the cube is open. For large databases, this data gathering
effort can take a while.
Output can be generated from cube reports in four forms:
Student Accounts Reports
CampusVue User Guide: Managing Student Accounts (Corporate) 38
� On-screen displays in which rows and columns can be rearranged to suit your
needs
� Printed spreadsheets with optional horizontal and vertical cross footed totals
� Charts and graphs
� Export files to Excel
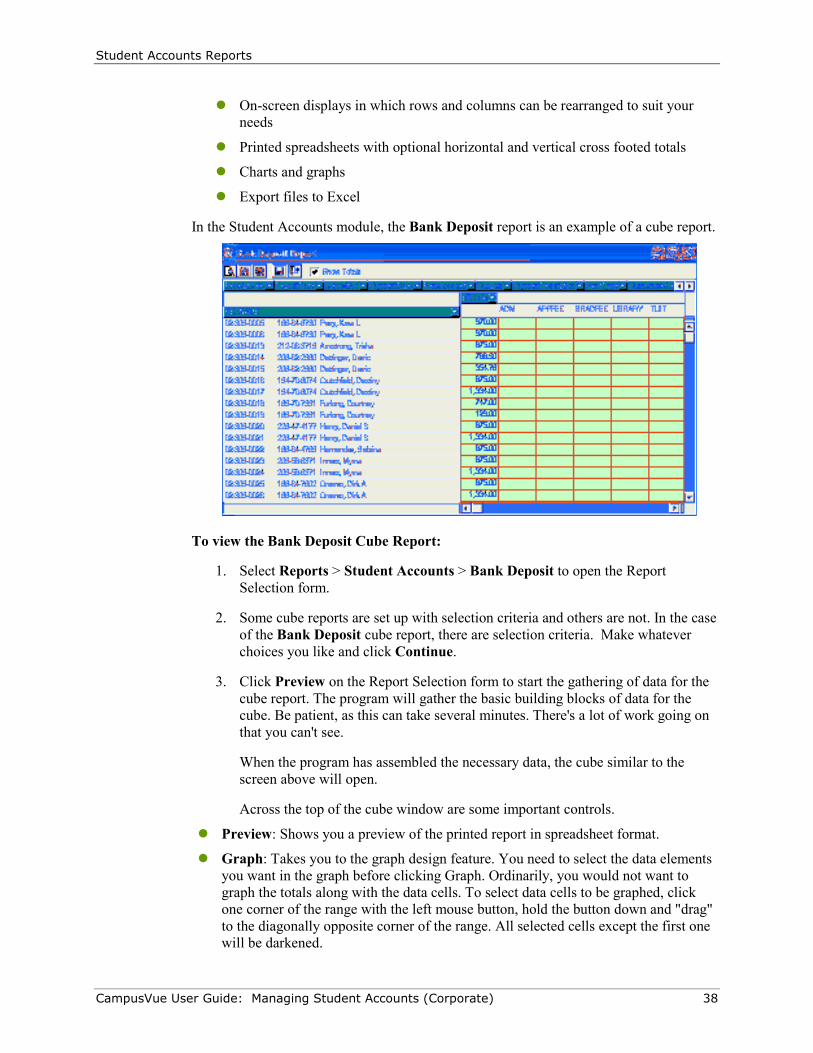
In the Student Accounts module, the Bank Deposit report is an example of a cube report.
To view the Bank Deposit Cube Report:
1. Select Reports > Student Accounts > Bank Deposit to open the Report
Selection form.
2. Some cube reports are set up with selection criteria and others are not. In the case
of the Bank Deposit cube report, there are selection criteria. Make whatever
choices you like and click Continue.
3. Click Preview on the Report Selection form to start the gathering of data for the
cube report. The program will gather the basic building blocks of data for the
cube. Be patient, as this can take several minutes. There's a lot of work going on
that you can't see.
When the program has assembled the necessary data, the cube similar to the
screen above will open.
Across the top of the cube window are some important controls.
� Preview: Shows you a preview of the printed report in spreadsheet format.
� Graph: Takes you to the graph design feature. You need to select the data elements
you want in the graph before clicking Graph. Ordinarily, you would not want to
graph the totals along with the data cells. To select data cells to be graphed, click
one corner of the range with the left mouse button, hold the button down and "drag"
to the diagonally opposite corner of the range. All selected cells except the first one
will be darkened.
Student Accounts Reports
CampusVue User Guide: Managing Student Accounts (Corporate) 39
� Excel: Exports the cube report to an Excel spreadsheet. You can also select the parts
of the report you want to export before clicking Excel. You will also export the
totals unless you take action to do otherwise.
� Exit: Closes the report and returns to the CampusVue work area.
� Show Totals: You can elect to show or not show the totals on the report. If you
want to export the data, you may not want to export the totals along with the data
cells.
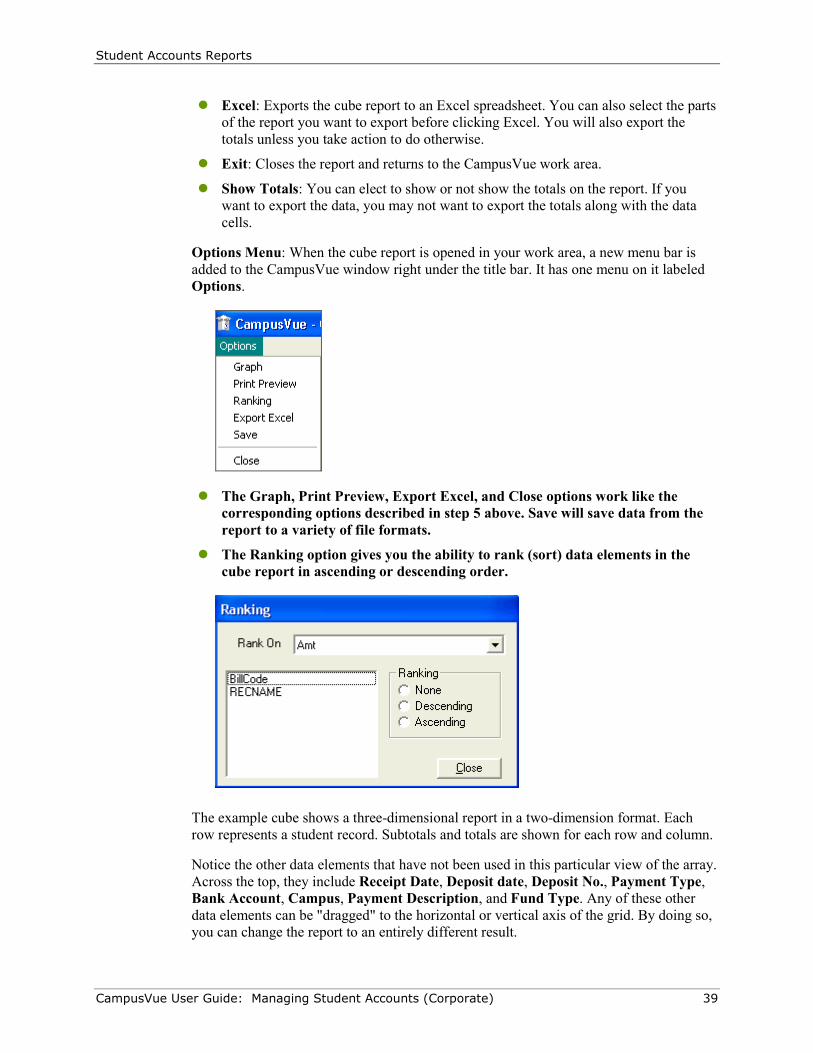
Options Menu: When the cube report is opened in your work area, a new menu bar is
added to the CampusVue window right under the title bar. It has one menu on it labeled
Options.
� The Graph, Print Preview, Export Excel, and Close options work like the
corresponding options described in step 5 above. Save will save data from the
report to a variety of file formats.
� The Ranking option gives you the ability to rank (sort) data elements in the
cube report in ascending or descending order.
The example cube shows a three-dimensional report in a two-dimension format. Each
row represents a student record. Subtotals and totals are shown for each row and column.
Notice the other data elements that have not been used in this particular view of the array.
Across the top, they include Receipt Date, Deposit date, Deposit No., Payment Type,
Bank Account, Campus, Payment Description, and Fund Type. Any of these other
data elements can be "dragged" to the horizontal or vertical axis of the grid. By doing so,
you can change the report to an entirely different result.

Student Accounts Reports
CampusVue User Guide: Managing Student Accounts (Corporate) 40
Another technique that you can use to tailor the cube is to select only portions of any one
data element. For example, as we have done here, you can select only a few out of many
Receipt Dates.
Click on the arrow beside the data element name. The list of codes, names, and so on,
will be dropped down for your selection. Click the box beside each desired code or name.
Those with X in the box will be used in your report. Those with blank boxes will not be
used. To select all choices or to deselect all choices hold the Ctrl (Control) key down
while selecting.
Right Click Options: If you right-click anywhere in the data area of the cube report, a
menu appears with some important features listed.
� Normal: Causes the cube data to be displayed in its normal format. In the case of
our example, it is contribution to the bank deposit sorted by student.
� % of Row: Changes the data format to be a percentage of the row total.
� % of Col: Changes the data format to be a percentage of the column total.
� Number Format: Allows you to change the format of the numbers in the data cells.
� Amt: In this example, Amt is the only option for data display. In other cubes, there
may be more options listed here.
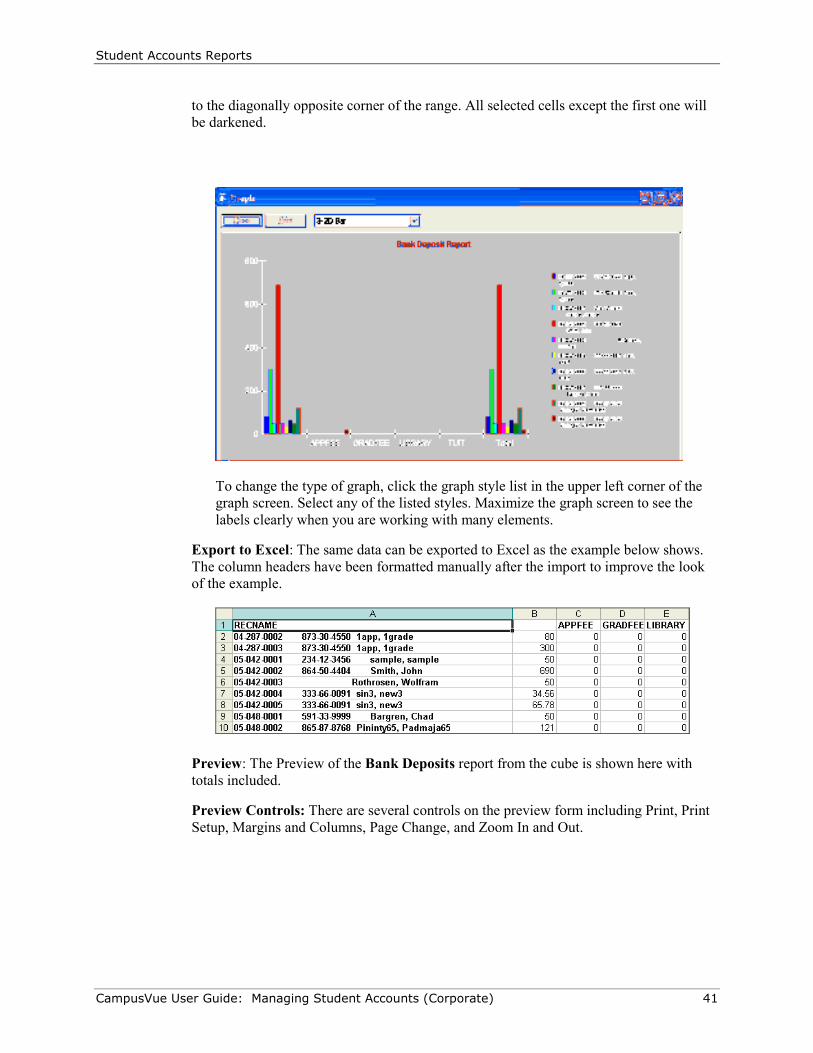
Graphing Data: For our example, we have chosen to create a three-dimensional bar
graph. The illustrations show the selected data from the cube (totals have been turned off
to facilitate the data selection) and the resulting graph. To select data cells to be graphed,
click one corner of the range with the left mouse button, hold the button down and "drag"
Student Accounts Reports
CampusVue User Guide: Managing Student Accounts (Corporate) 41
to the diagonally opposite corner of the range. All selected cells except the first one will
be darkened.
To change the type of graph, click the graph style list in the upper left corner of the
graph screen. Select any of the listed styles. Maximize the graph screen to see the
labels clearly when you are working with many elements.
Export to Excel: The same data can be exported to Excel as the example below shows.
The column headers have been formatted manually after the import to improve the look
of the example.
Preview: The Preview of the Bank Deposits report from the cube is shown here with
totals included.
Preview Controls: There are several controls on the preview form including Print, Print
Setup, Margins and Columns, Page Change, and Zoom In and Out.
CampusVue User Guide: Managing Student Accounts (Corporate) 42
Index
A Adding Banks, 20
B Bank Code, 20
Billing Method, 30
Billing Methods, 23
C CampusVue Reports
Features, 34
CampuVue Reports
Printing, 38
Cube Reports, 39
E Earning Methods, 27
Earnings Method, 30
M Maintenance Functions, 17
O Open Report Selector, 32
P Program Version Billing, 28
R Refund Policy
Adding, 22
Release to General Accounts Wizard, 14
Release to General Ledger, 14
Report Preview, 33
Report Viewer Controls, 35
Revenue Detail Report, 10
Revenue Earning Exceptions Report, 9
Revenue Recognition, 5
Reverse Revenue Recognition, 12
S Student Accounts, 5
Student Accounts Reports
Accessing, 32
T Transaction Code
Adding, 17
Transaction Codes, 30


![Accounts Payable r11i Student Guide[1]](https://static.fdocuments.net/doc/165x107/54e890144a7959b17a8b483c/accounts-payable-r11i-student-guide1.jpg)