Managing Music with Windows Media Player - PC … 1 Managing Music with Windows Media Player 1.9...
20
1.1 1 Managing Music with Windows Media Player Microsoft Windows XP includes everything you need to turn your computer into a digital jukebox. You can play CDs directly, using your computer’s sound card and speakers for playback. You can also copy songs from your CD collection to a local disk drive and down load tunes from the Web. Using Windows Media Player, you can mix and match tunes to play disk jockey, creating custom playlists and even burning your favorite tunes to custom CDs that you can play back in a CD player in your home or car. In this lesson, you’ll learn the ins and outs of Windows Media Player, with a special emphasis on its musical capabilities. Windows Media Player at a Glance Windows Media Player does an amazing number of things. Most people learn all they need to know by clicking on various buttons and watching what happens. If you feel like explor ing, go ahead. To open Windows Media Player, click its icon on the Quick Launch toolbar, just to the right of the Start button; if the Quick Launch toolbar is hidden, you’ll find the Windows Media Player shortcut by clicking Start, clicking All Programs, and then choos ing Accessories and Entertainment. Note These lessons use Windows Media Player version 9, which is included with Windows XP and is not available for any earlier Windows versions. If you have Windows Media Player version 8, it will look and act much like version 9, although you might discover some features that work differently from those
Transcript of Managing Music with Windows Media Player - PC … 1 Managing Music with Windows Media Player 1.9...
1.1
1Managing Music withWindows Media Player
Microsoft Windows XP includes everything you need to turn your computer into a digitaljukebox. You can play CDs directly, using your computer’s sound card and speakers forplayback. You can also copy songs from your CD collection to a local disk drive and down
-
load tunes from the Web. Using Windows Media Player, you can mix and match tunes toplay disk jockey, creating custom playlists and even burning your favorite tunes to customCDs that you can play back in a CD player in your home or car.
In this lesson, you’ll learn the ins and outs of Windows Media Player, with a specialemphasis on its musical capabilities.
Windows Media Player at a GlanceWindows Media Player does an amazing number of things. Most people learn all they needto know by clicking on various buttons and watching what happens. If you feel like explor
-
ing, go ahead. To open Windows Media Player, click its icon on the Quick Launch toolbar,just to the right of the Start button; if the Quick Launch toolbar is hidden, you’ll find theWindows Media Player shortcut by clicking Start, clicking All Programs, and then choos
-
ing Accessories and Entertainment.
Note These lessons use Windows Media Player version 9, which is includedwith Windows XP and is not available for any earlier Windows versions. If youhave Windows Media Player version 8, it will look and act much like version 9,although you might discover some features that work differently from those
1.2 Digital Media Fundamentals
described here. You can find out which version you’re using by choosingAbout Windows Media Player from the Help menu.
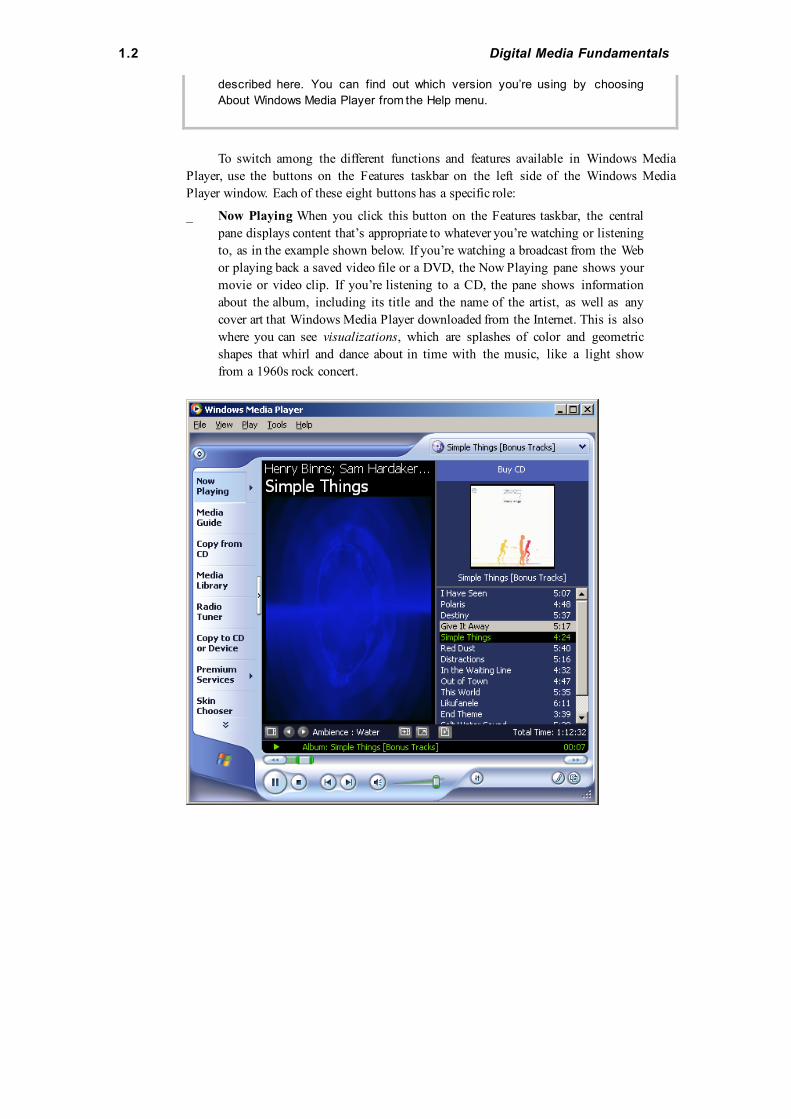
To switch among the different functions and features available in Windows MediaPlayer, use the buttons on the Features taskbar on the left side of the Windows MediaPlayer window. Each of these eight buttons has a specific role:
_ Now Playing When you click this button on the Features taskbar, the centralpane displays content that’s appropriate to whatever you’re watching or listeningto, as in the example shown below. If you’re watching a broadcast from the Webor playing back a saved video file or a DVD, the Now Playing pane shows yourmovie or video clip. If you’re listening to a CD, the pane shows informationabout the album, including its title and the name of the artist, as well as anycover art that Windows Media Player downloaded from the Internet. This is alsowhere you can see visualizations, which are splashes of color and geometricshapes that whirl and dance about in time with the music, like a light showfrom a 1960s rock concert.

Lesson 1 Managing Music with Windows Media Player 1.3
Tip To view a visualization, right click the radio icon in the left corner of thescreen, choose Visualizations from the drop down menu, and then select anyentry from the long list of available visualizations. If you get tired of the built-in visualizations, choose No Visualizations or Download Visualizations fromthe same menu.
1.4 Digital Media Fundamentals
_ Media Guide This link turns the main window into a Web browser that dis
-
plays content from Microsoft’s WindowsMedia.com. You’ll find music andvideo downloads, links to movie previews, and much more here, all updatedregularly.
_ Copy From CD Use this button to transfer songs from a CD to digital musicfiles on your computer. You will learn exactly how to do this in the upcomingsection called “Copying CDs”.
_ Media Library All your downloaded music files and songs you copy from CDare organized neatly here, along with custom playlists you can create by mixingand matching tracks from the collection. You will learn how to use this part ofWindows Media Player in the section called “Organizing Your Music Collec
-
tion.”
_ Radio Tuner No antenna required! Instead, click the links here to find radiostations that “broadcast” their signals over the Internet. The Featured Stationslist includes links to stations picked by WindowsMedia.com. You can also usethe links and Search box in the Find More Stations list to scroll through hun
-
dreds of stations, ranging from news and talk to world music and alternativerock. After you select a station, click the Play link to begin listening. If youlike it, click the Add To My Stations link, as shown below, to add it to yourMy Stations list, which appears just below the Featured Stations list after youclick the link.
_ Copy To CD Or Device Click this button to begin transferring songs from aCD to your local disk drive, or to copy songs you’ve already recorded onto acustom CD or a portable music player. More details on this are in the later sec
-
tion, “Creating Your Own CDs.”
_ Premium Services Using the subscription services listed on this pageyou can get digital media delivered to you. To subscribe, click on any of thelinks listed. This feature is not available on Windows Media version 8.
Lesson 1 Managing Music with Windows Media Player 1.5
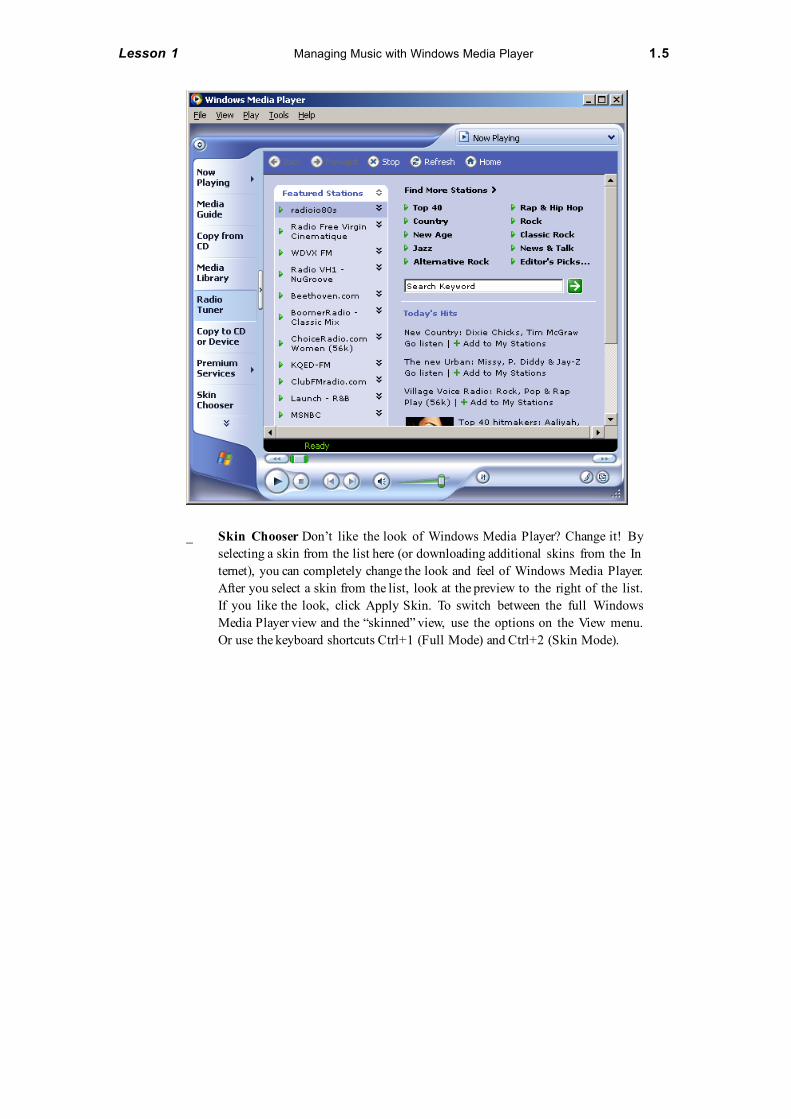
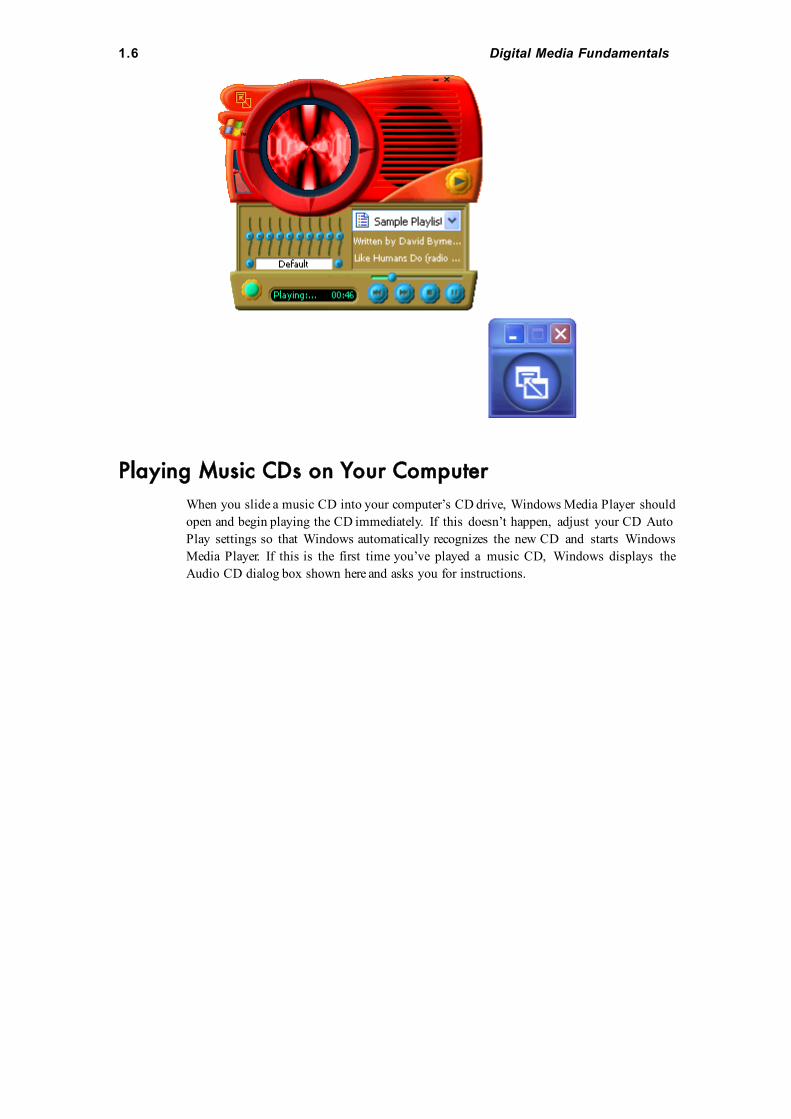
_ Skin Chooser Don’t like the look of Windows Media Player? Change it! Byselecting a skin from the list here (or downloading additional skins from the In
-
ternet), you can completely change the look and feel of Windows Media Player.After you select a skin from the list, look at the preview to the right of the list.If you like the look, click Apply Skin. To switch between the full WindowsMedia Player view and the “skinned” view, use the options on the View menu.Or use the keyboard shortcuts Ctrl+1 (Full Mode) and Ctrl+2 (Skin Mode).
1.6 Digital Media Fundamentals
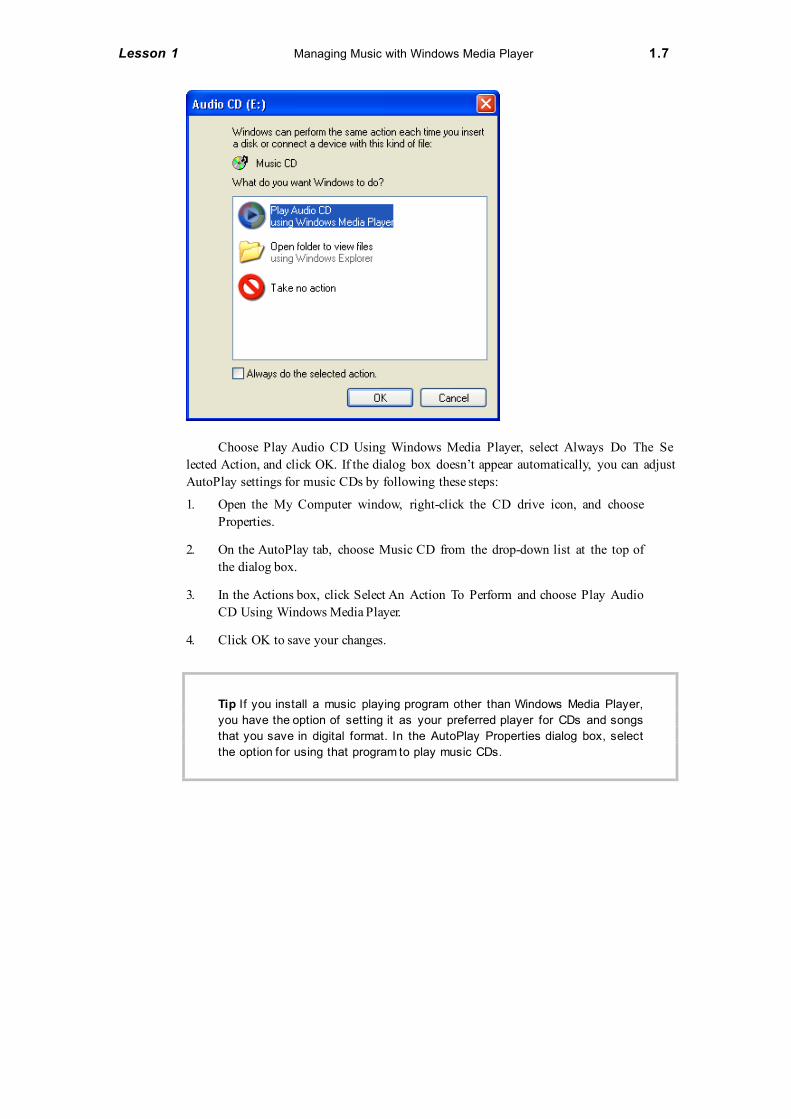
Playing Music CDs on Your ComputerWhen you slide a music CD into your computer’s CD drive, Windows Media Player shouldopen and begin playing the CD immediately. If this doesn’t happen, adjust your CD Auto
-
Play settings so that Windows automatically recognizes the new CD and starts WindowsMedia Player. If this is the first time you’ve played a music CD, Windows displays theAudio CD dialog box shown here and asks you for instructions.
Lesson 1 Managing Music with Windows Media Player 1.7
Choose Play Audio CD Using Windows Media Player, select Always Do The Se
-
lected Action, and click OK. If the dialog box doesn’t appear automatically, you can adjustAutoPlay settings for music CDs by following these steps:
1. Open the My Computer window, right-click the CD drive icon, and chooseProperties.
2. On the AutoPlay tab, choose Music CD from the drop-down list at the top ofthe dialog box.
3. In the Actions box, click Select An Action To Perform and choose Play AudioCD Using Windows Media Player.
4. Click OK to save your changes.
Tip If you install a music playing program other than Windows Media Player,you have the option of setting it as your preferred player for CDs and songsthat you save in digital format. In the AutoPlay Properties dialog box, selectthe option for using that program to play music CDs.
1.8 Digital Media Fundamentals
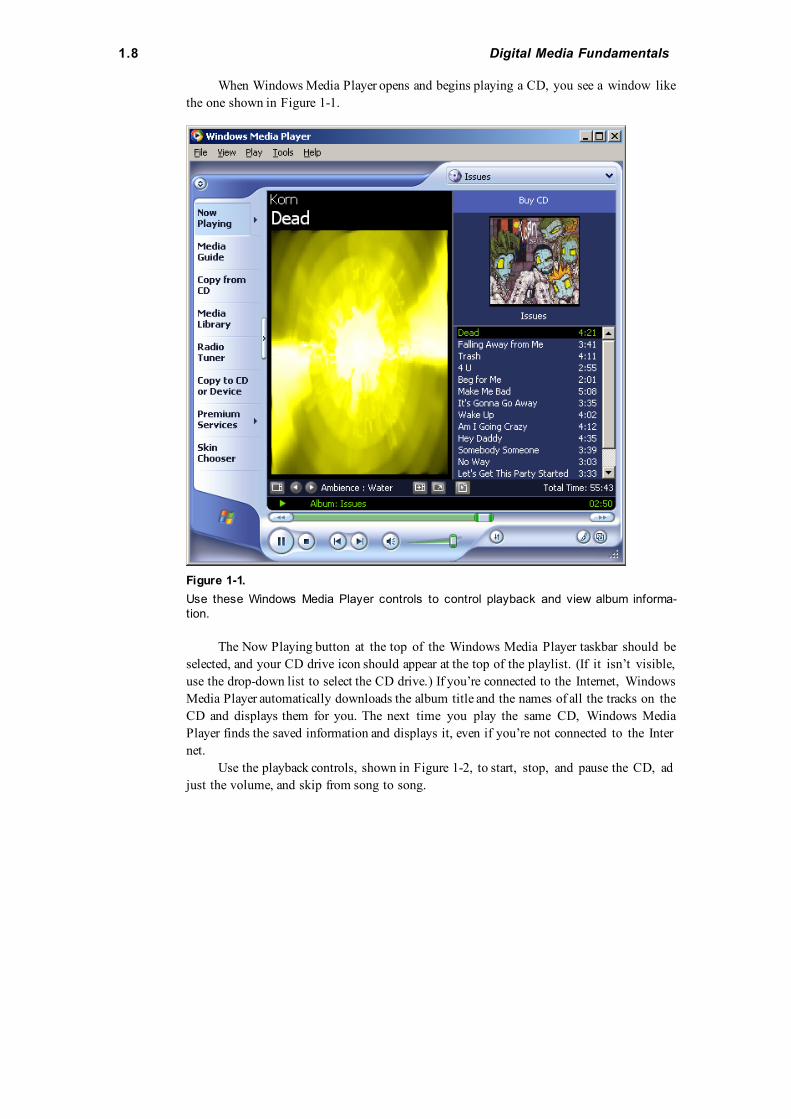
When Windows Media Player opens and begins playing a CD, you see a window likethe one shown in Figure 1-1.
Figure 1-1.
Use these Windows Media Player controls to control playback and view album informa-tion.
The Now Playing button at the top of the Windows Media Player taskbar should beselected, and your CD drive icon should appear at the top of the playlist. (If it isn’t visible,use the drop-down list to select the CD drive.) If you’re connected to the Internet, WindowsMedia Player automatically downloads the album title and the names of all the tracks on theCD and displays them for you. The next time you play the same CD, Windows MediaPlayer finds the saved information and displays it, even if you’re not connected to the Inter
-
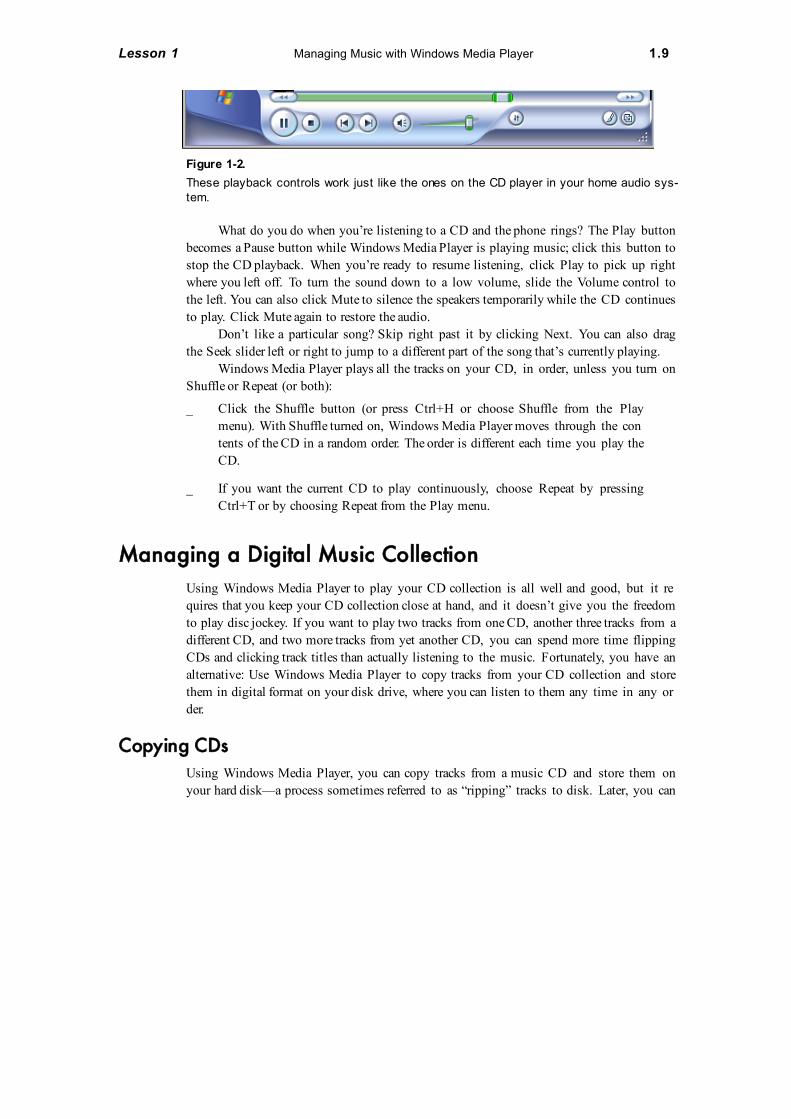
net.Use the playback controls, shown in Figure 1-2, to start, stop, and pause the CD, ad
-
just the volume, and skip from song to song.
Lesson 1 Managing Music with Windows Media Player 1.9
Figure 1-2.
These playback controls work just like the ones on the CD player in your home audio sys-tem.
What do you do when you’re listening to a CD and the phone rings? The Play buttonbecomes a Pause button while Windows Media Player is playing music; click this button tostop the CD playback. When you’re ready to resume listening, click Play to pick up rightwhere you left off. To turn the sound down to a low volume, slide the Volume control tothe left. You can also click Mute to silence the speakers temporarily while the CD continuesto play. Click Mute again to restore the audio.
Don’t like a particular song? Skip right past it by clicking Next. You can also dragthe Seek slider left or right to jump to a different part of the song that’s currently playing.
Windows Media Player plays all the tracks on your CD, in order, unless you turn onShuffle or Repeat (or both):
_ Click the Shuffle button (or press Ctrl+H or choose Shuffle from the Playmenu). With Shuffle turned on, Windows Media Player moves through the con
-
tents of the CD in a random order. The order is different each time you play theCD.
_ If you want the current CD to play continuously, choose Repeat by pressingCtrl+T or by choosing Repeat from the Play menu.
Managing a Digital Music CollectionUsing Windows Media Player to play your CD collection is all well and good, but it re
-
quires that you keep your CD collection close at hand, and it doesn’t give you the freedomto play disc jockey. If you want to play two tracks from one CD, another three tracks from adifferent CD, and two more tracks from yet another CD, you can spend more time flippingCDs and clicking track titles than actually listening to the music. Fortunately, you have analternative: Use Windows Media Player to copy tracks from your CD collection and storethem in digital format on your disk drive, where you can listen to them any time in any or
-
der.
Copying CDsUsing Windows Media Player, you can copy tracks from a music CD and store them onyour hard disk—a process sometimes referred to as “ripping” tracks to disk. Later, you can
1.10 Digital Media Fundamentals
listen to the saved tracks, download them to a portable music player, or create a customplaylist and burn your own CD. To copy one or more CD tracks to your hard disk, insertthe music CD into your computer’s CD drive and then choose Copy From CD on thetaskbar in Windows Media Player.
Note Did Windows Media Player start playing your CD as soon as you in-serted it? No problem; you can play and copy a CD at the same time.
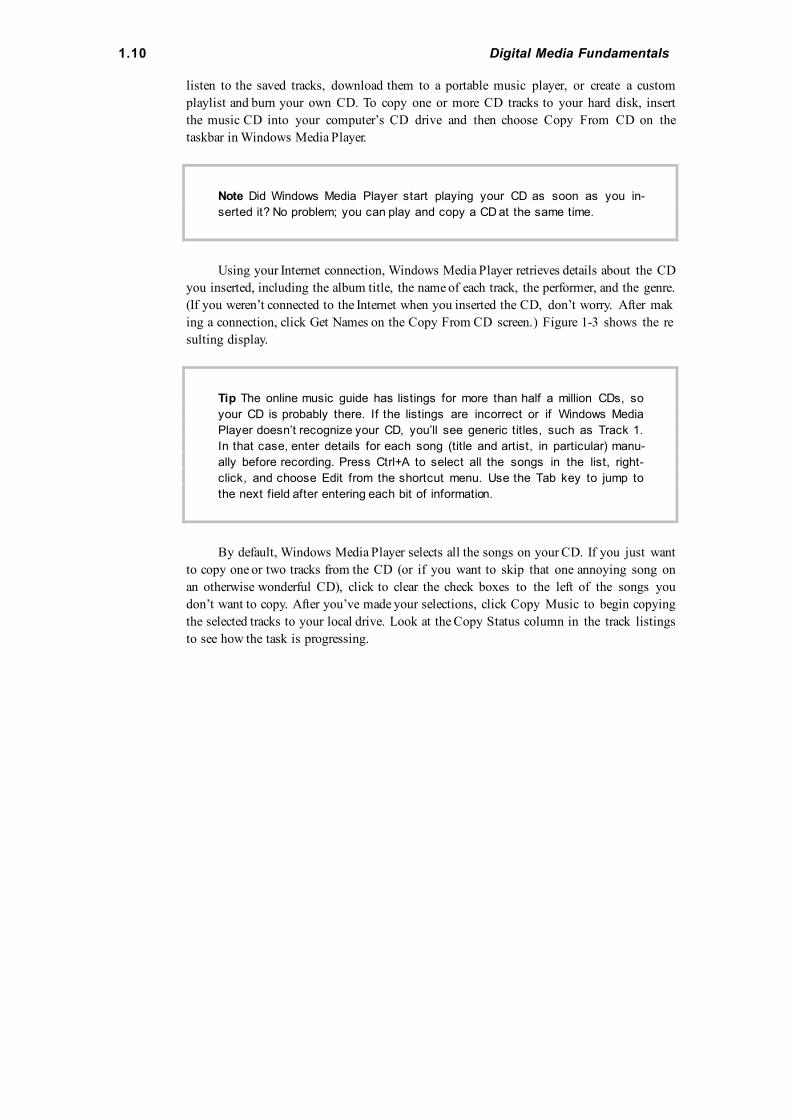
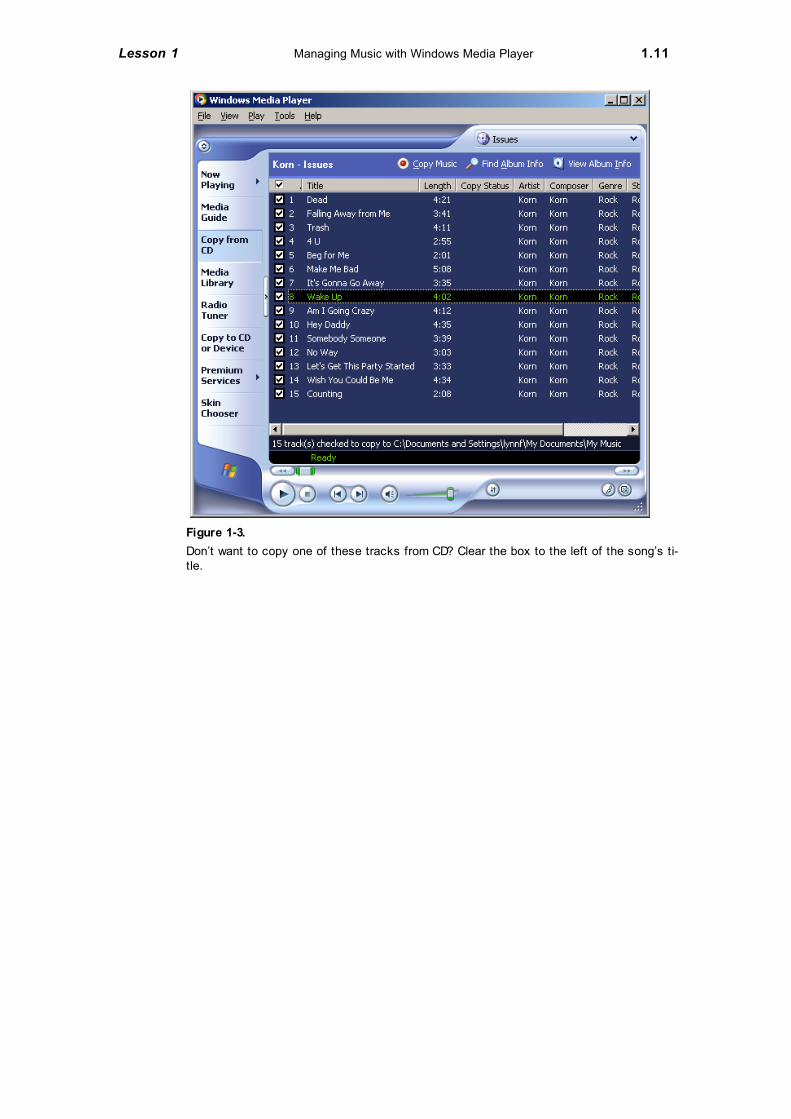
Using your Internet connection, Windows Media Player retrieves details about the CDyou inserted, including the album title, the name of each track, the performer, and the genre.(If you weren’t connected to the Internet when you inserted the CD, don’t worry. After mak
-
ing a connection, click Get Names on the Copy From CD screen.) Figure 1-3 shows the re
-
sulting display.
Tip The online music guide has listings for more than half a million CDs, soyour CD is probably there. If the listings are incorrect or if Windows MediaPlayer doesn’t recognize your CD, you’ll see generic titles, such as Track 1.In that case, enter details for each song (title and artist, in particular) manu-ally before recording. Press Ctrl+A to select all the songs in the list, right-click, and choose Edit from the shortcut menu. Use the Tab key to jump tothe next field after entering each bit of information.
By default, Windows Media Player selects all the songs on your CD. If you just wantto copy one or two tracks from the CD (or if you want to skip that one annoying song onan otherwise wonderful CD), click to clear the check boxes to the left of the songs youdon’t want to copy. After you’ve made your selections, click Copy Music to begin copyingthe selected tracks to your local drive. Look at the Copy Status column in the track listingsto see how the task is progressing.
Lesson 1 Managing Music with Windows Media Player 1.11
Figure 1-3.
Don’t want to copy one of these tracks from CD? Clear the box to the left of the song’s ti-tle.
1.12 Digital Media Fundamentals
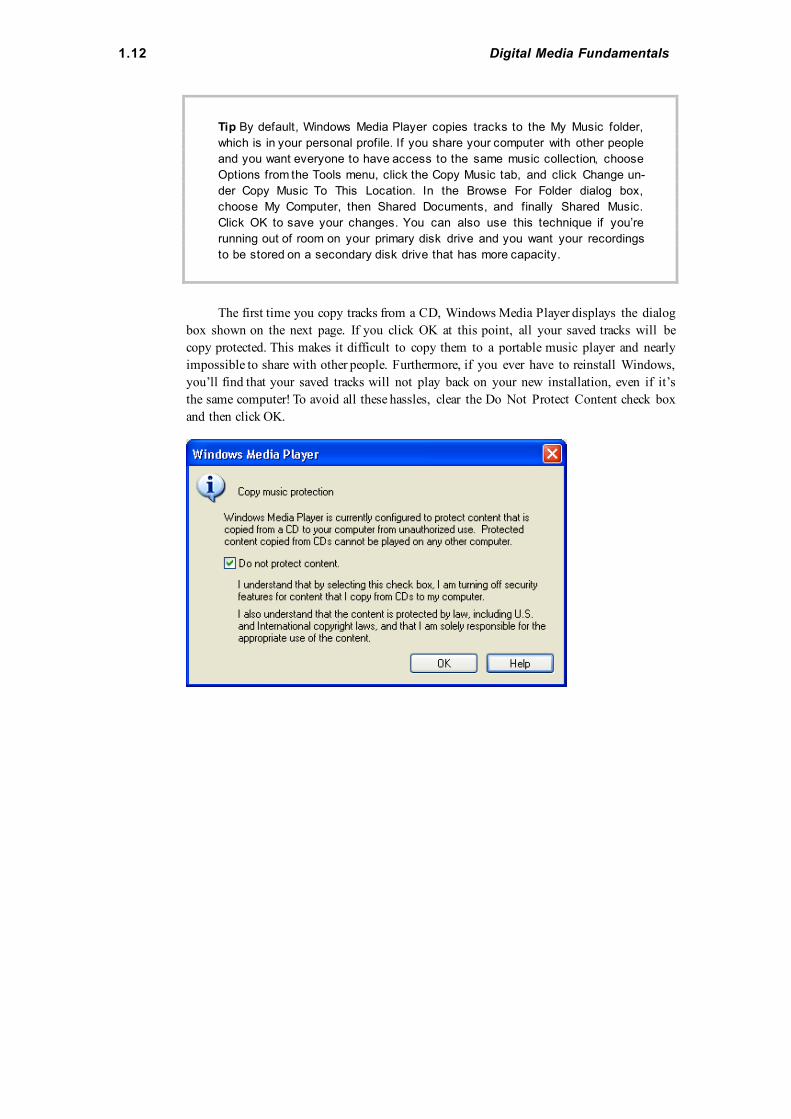
Tip By default, Windows Media Player copies tracks to the My Music folder,which is in your personal profile. If you share your computer with other peopleand you want everyone to have access to the same music collection, chooseOptions from the Tools menu, click the Copy Music tab, and click Change un-der Copy Music To This Location. In the Browse For Folder dialog box,choose My Computer, then Shared Documents, and finally Shared Music.Click OK to save your changes. You can also use this technique if you’rerunning out of room on your primary disk drive and you want your recordingsto be stored on a secondary disk drive that has more capacity.
The first time you copy tracks from a CD, Windows Media Player displays the dialogbox shown on the next page. If you click OK at this point, all your saved tracks will becopy protected. This makes it difficult to copy them to a portable music player and nearlyimpossible to share with other people. Furthermore, if you ever have to reinstall Windows,you’ll find that your saved tracks will not play back on your new installation, even if it’sthe same computer! To avoid all these hassles, clear the Do Not Protect Content check boxand then click OK.
Lesson 1 Managing Music with Windows Media Player 1.13
Choosing a Music FormatWhen you copy CD tracks using Windows Media Player, the saved files are stored using theWindows Media Audio (WMA) format at 64 kilobits per second (Kbps). Although Win
-
dows Media Player refers to this setting as CD quality, most audio aficionados would dis
-
agree. The 64 Kbps setting is efficient, and it sounds good enough on the small speakersthat most people attach to their computers or the headphones used with a portable audioplayer. However, if your PC audio components are better than average, or if you want toburn your recorded tracks to a CD and play it back on a high-quality home audio system,you’ll want to increase the quality level. Just keep the tradeoffs of quality versus storage inmind: Higher bit rates equal higher audio quality, but they also require more room on yourdisk drive.
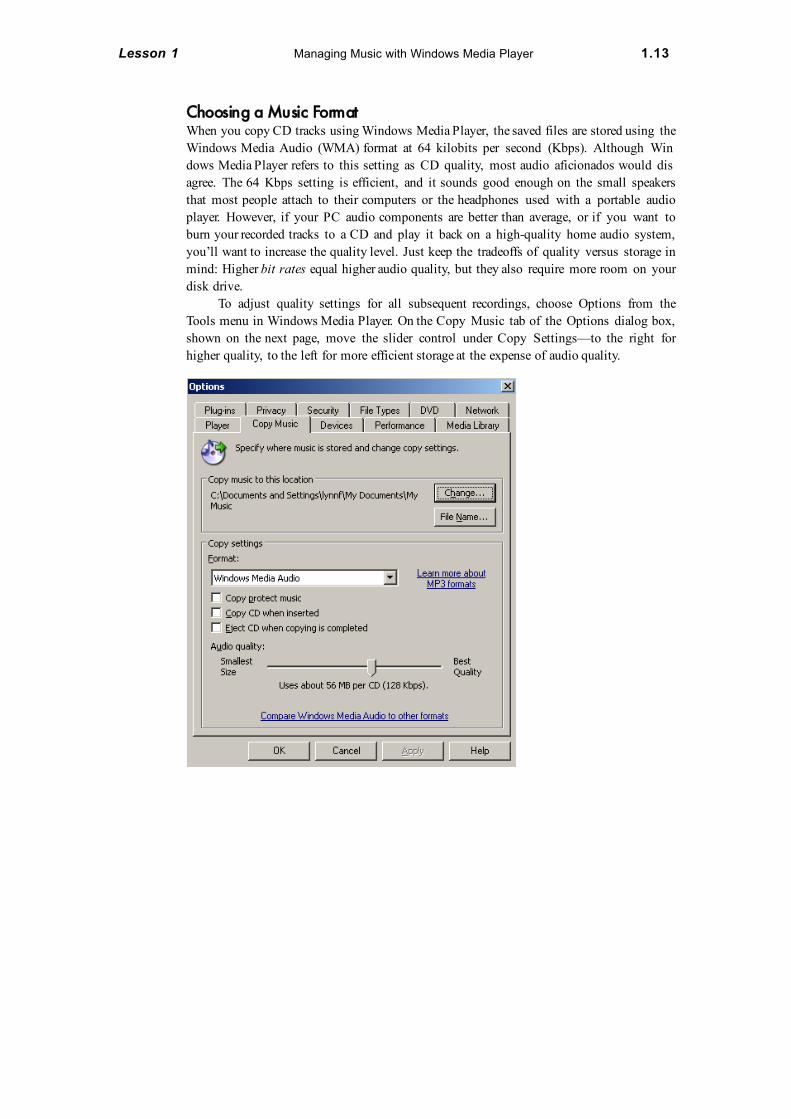
To adjust quality settings for all subsequent recordings, choose Options from theTools menu in Windows Media Player. On the Copy Music tab of the Options dialog box,shown on the next page, move the slider control under Copy Settings—to the right forhigher quality, to the left for more efficient storage at the expense of audio quality.
1.14 Digital Media Fundamentals
What if you prefer the MP3 audio format? Microsoft’s goal in developing the Win
-
dows Media Audio format was to devise a way to store music that sounds great withoutconsuming your entire disk drive. As a result, the WMA format is more efficient than theMP3 format. If you want to use Windows Media Player to record tracks using MP3 format(so you can share them with devices or programs that don’t recognize WMA format), you’llneed to purchase an audio plug-in for this purpose. On the Copy Music tab of the Optionsdialog box, click the Learn More About MP3 Formats link to visit a Web site where youcan learn more details.
Changing Song Title FormatsWhen you rip tracks from a music CD using the default settings in Windows Media Player,the saved tracks appear in your My Music folder. Each artist gets a subfolder, and each al
-
bum gets a subfolder within the artist’s folder. Each recorded track file is saved using thetrack number, followed by a space and the song title (which might also include one or morespaces), as downloaded from the Internet. Normally, this level of detail is fine. In fact, addi
-
tional details about each track are stored within the saved file itself, and you can view thesedetails any time by opening Windows Explorer and looking at the contents of the folderthat contains your songs.
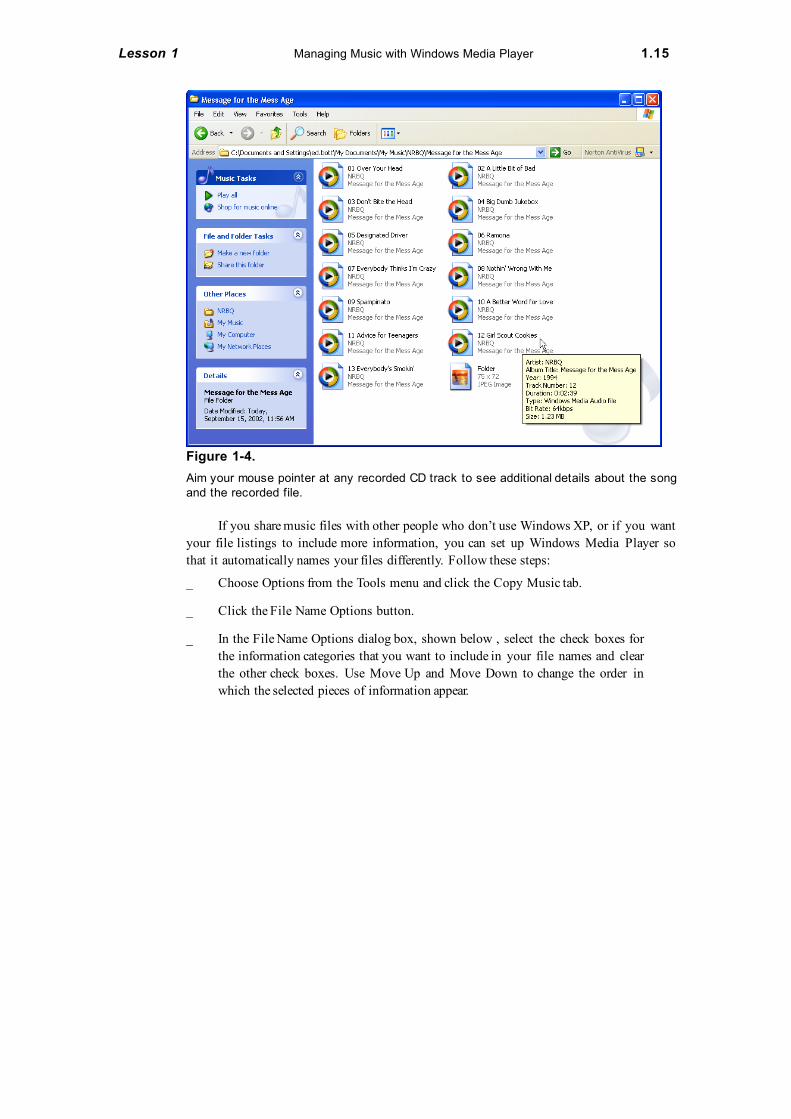
As Figure 1-4 shows, the contents of subfolders in the My Music folder appear inTiles view by default. This lets you see the artist and album name beneath the name of eachtrack. If that’s not enough detail, aim the mouse pointer at a track icon and wait for a ScreenTip to appear, with even more details about the track, including the bit rate at which it wasrecorded.
Lesson 1 Managing Music with Windows Media Player 1.15
Figure 1-4.
Aim your mouse pointer at any recorded CD track to see additional details about the songand the recorded file.
If you share music files with other people who don’t use Windows XP, or if you wantyour file listings to include more information, you can set up Windows Media Player sothat it automatically names your files differently. Follow these steps:
_ Choose Options from the Tools menu and click the Copy Music tab.
_ Click the File Name Options button.
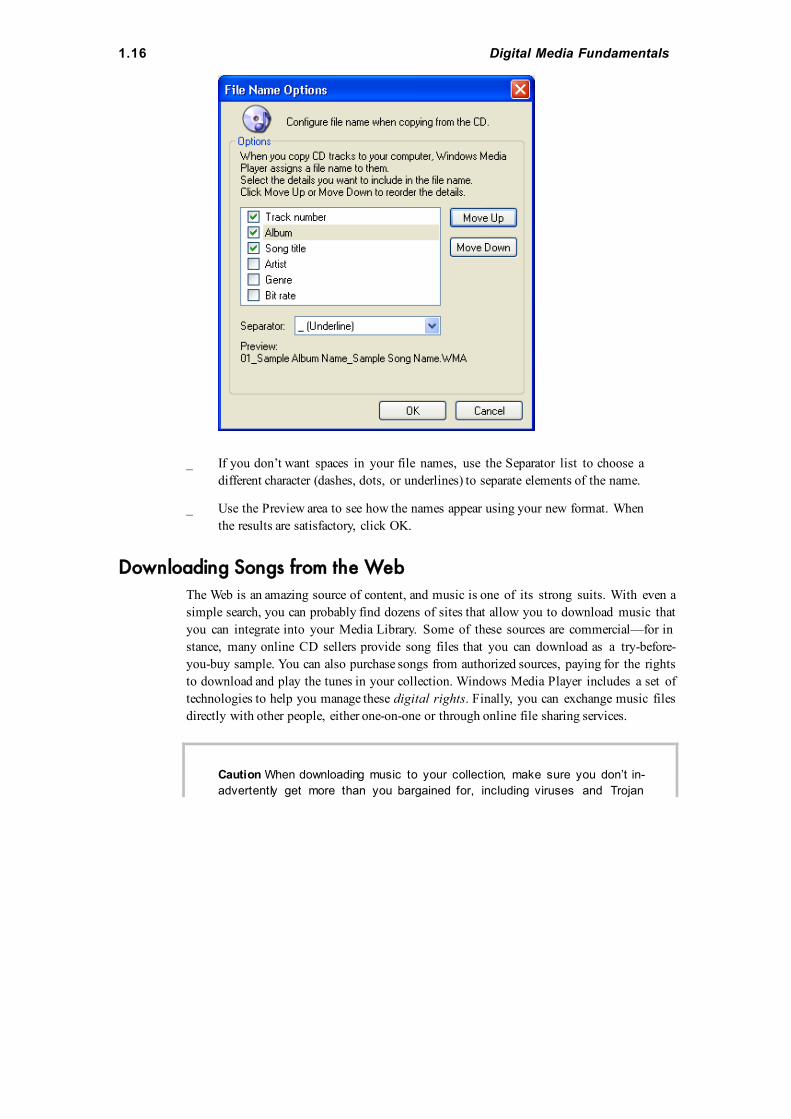
_ In the File Name Options dialog box, shown below , select the check boxes forthe information categories that you want to include in your file names and clearthe other check boxes. Use Move Up and Move Down to change the order inwhich the selected pieces of information appear.
1.16 Digital Media Fundamentals
_ If you don’t want spaces in your file names, use the Separator list to choose adifferent character (dashes, dots, or underlines) to separate elements of the name.
_ Use the Preview area to see how the names appear using your new format. Whenthe results are satisfactory, click OK.
Downloading Songs from the WebThe Web is an amazing source of content, and music is one of its strong suits. With even asimple search, you can probably find dozens of sites that allow you to download music thatyou can integrate into your Media Library. Some of these sources are commercial—for in
-
stance, many online CD sellers provide song files that you can download as a try-before-you-buy sample. You can also purchase songs from authorized sources, paying for the rightsto download and play the tunes in your collection. Windows Media Player includes a set oftechnologies to help you manage these digital rights. Finally, you can exchange music filesdirectly with other people, either one-on-one or through online file sharing services.
Caution When downloading music to your collection, make sure you don’t in-advertently get more than you bargained for, including viruses and Trojan
Lesson 1 Managing Music with Windows Media Player 1.17
horse programs. You should be especially suspicious of underground file-sharing services, because no central authority has the responsibility forscanning and checking the files available through these channels to makesure they’re safe. It’s especially important to use an up-to-date virus scannerwhen using services such as these.
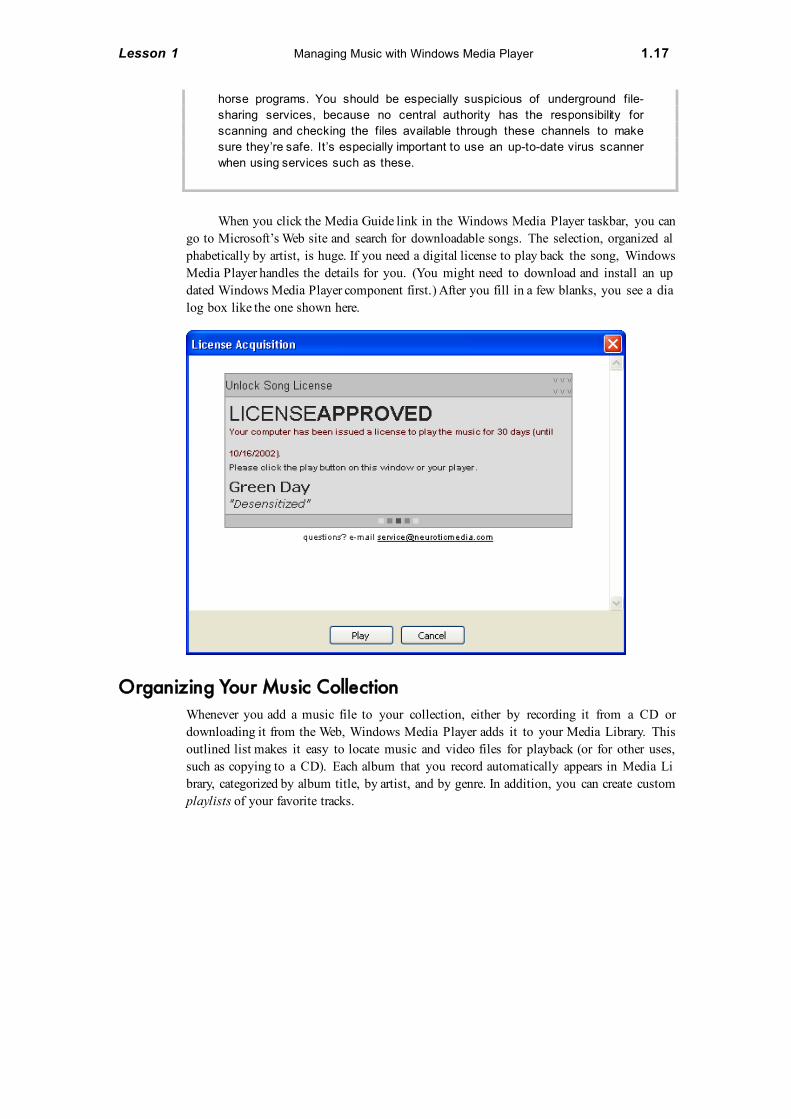
When you click the Media Guide link in the Windows Media Player taskbar, you cango to Microsoft’s Web site and search for downloadable songs. The selection, organized al
-
phabetically by artist, is huge. If you need a digital license to play back the song, WindowsMedia Player handles the details for you. (You might need to download and install an up
-
dated Windows Media Player component first.) After you fill in a few blanks, you see a dia
-
log box like the one shown here.
Organizing Your Music CollectionWhenever you add a music file to your collection, either by recording it from a CD ordownloading it from the Web, Windows Media Player adds it to your Media Library. Thisoutlined list makes it easy to locate music and video files for playback (or for other uses,such as copying to a CD). Each album that you record automatically appears in Media Li
-
brary, categorized by album title, by artist, and by genre. In addition, you can create customplaylists of your favorite tracks.
1.18 Digital Media Fundamentals
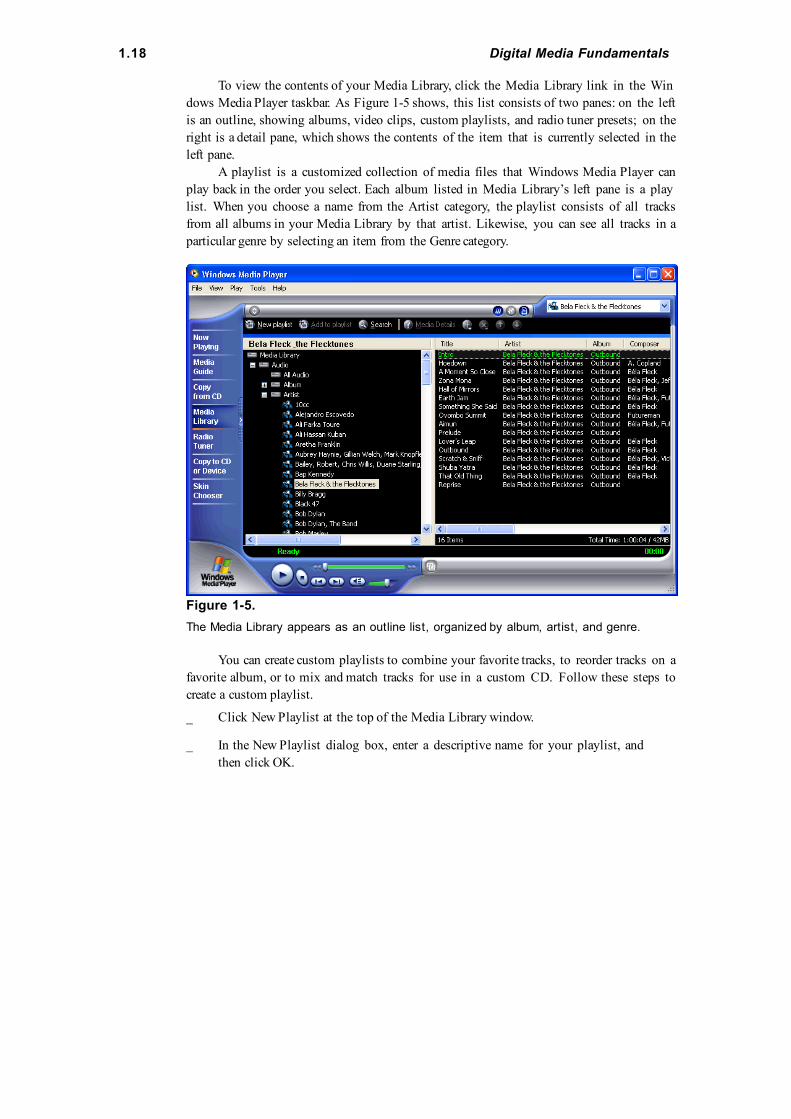
To view the contents of your Media Library, click the Media Library link in the Win
-
dows Media Player taskbar. As Figure 1-5 shows, this list consists of two panes: on the leftis an outline, showing albums, video clips, custom playlists, and radio tuner presets; on theright is a detail pane, which shows the contents of the item that is currently selected in theleft pane.
A playlist is a customized collection of media files that Windows Media Player canplay back in the order you select. Each album listed in Media Library’s left pane is a play
-
list. When you choose a name from the Artist category, the playlist consists of all tracksfrom all albums in your Media Library by that artist. Likewise, you can see all tracks in aparticular genre by selecting an item from the Genre category.
Figure 1-5.
The Media Library appears as an outline list, organized by album, artist, and genre.
You can create custom playlists to combine your favorite tracks, to reorder tracks on afavorite album, or to mix and match tracks for use in a custom CD. Follow these steps tocreate a custom playlist.
_ Click New Playlist at the top of the Media Library window.
_ In the New Playlist dialog box, enter a descriptive name for your playlist, andthen click OK.
Lesson 1 Managing Music with Windows Media Player 1.19
_ Select one or more tracks from the right pane of the library and drag them to thenew playlist entry in the left pane.
Playing DVDsWindows Media Player can play back more than music. It can also turn your PC
screen into a personal theater capable of playing movies from DVD disks—but only if youhave a DVD drive and a decoder. If you purchased your PC with a DVD drive and WindowsXP already installed, you might already have both of these pieces. If you upgraded an oldercomputer to Windows XP, however, you might need to download and install a software de
-
coder from the Internet. Does your PC have what it takes? For starters, make sure you havea DVD drive. You can’t always tell just by looking at the drive itself, because CDs andDVDs are identical in size and shape. To make sure, look for a DVD label on the drive iconin the My Computer window, or inspect its Properties from the Device Manager window.To find out whether you have a decoder installed, pop a DVD disk into the drive. If the de
-
coder is missing, Windows Media Player displays an error message with a link to its DVDTroubleshooter. Follow this link to locate a list of compatible decoders.
Playing a DVD movie in Windows Media Player is similar to playing a music CD.Your DVD movie should start playing automatically as soon as you insert the disk. If itdoesn’t, start Windows Media Player, choose DVD Or CD Audio from the Play menu, andchoose your DVD drive from the submenu.
Creating Your Own CDsIf you’ve created a custom playlist from music tracks saved on your computer, you can burnthe songs to a CD using Windows Media Player. Naturally, you need a CD-R or CD-RWdrive that is compatible with Windows XP to do this, and you’ll need a blank CD as well.You don’t need any additional software or hardware.
Should you use Windows Media Player to make CDs? Although this method is con
-
venient, it might not be the best choice, especially if you have a third-party CD burningprogram that has more capabilities. Ask these questions before you begin burning:
_ Do you want to make an exact copy of a CD? If so, use your third-party soft
-
ware instead. Using Windows Media Player converts the file twice, first intoWMA format and then back into the format used on music CDs, causing a lossin quality. Most third-party programs can copy a CD more quickly, without anyloss of quality.
_ Do you mind a two-second gap between songs? Windows Media Player auto
-
matically adds this gap between tracks, and this setting cannot be changed.Most third-party programs allow you to eliminate this gap.
1.20 Digital Media Fundamentals
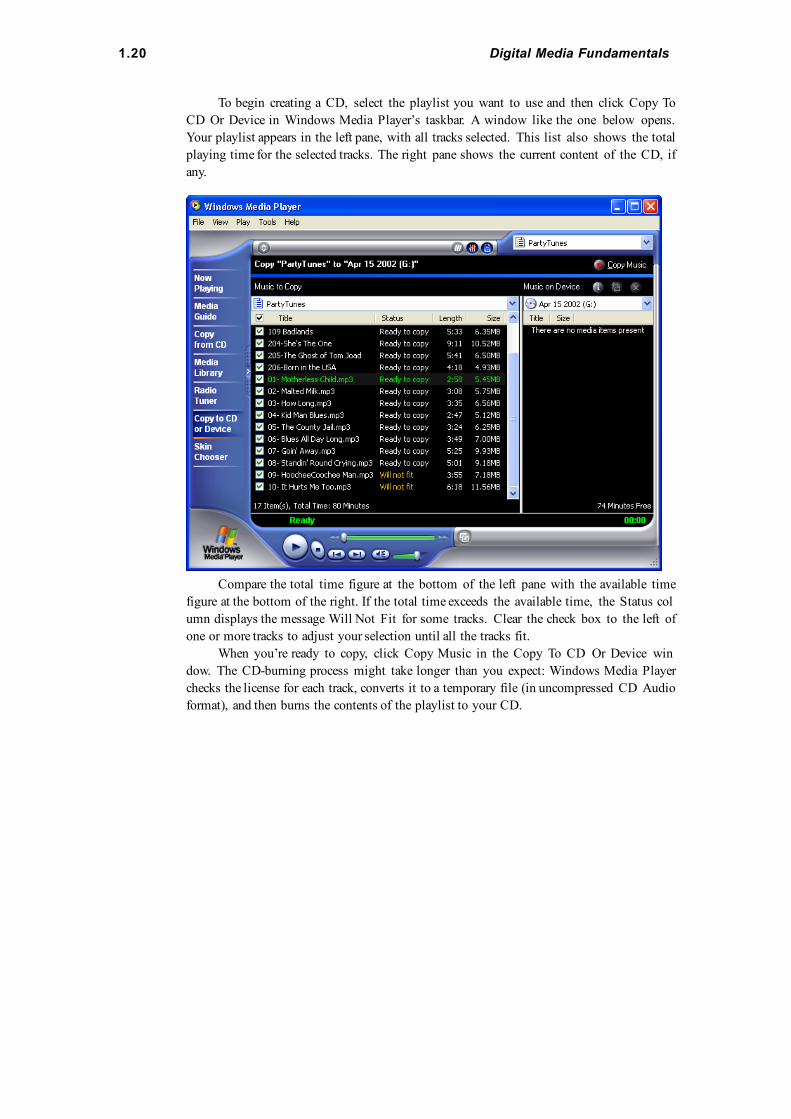
To begin creating a CD, select the playlist you want to use and then click Copy ToCD Or Device in Windows Media Player’s taskbar. A window like the one below opens.Your playlist appears in the left pane, with all tracks selected. This list also shows the totalplaying time for the selected tracks. The right pane shows the current content of the CD, ifany.
Compare the total time figure at the bottom of the left pane with the available timefigure at the bottom of the right. If the total time exceeds the available time, the Status col
-
umn displays the message Will Not Fit for some tracks. Clear the check box to the left ofone or more tracks to adjust your selection until all the tracks fit.
When you’re ready to copy, click Copy Music in the Copy To CD Or Device win
-
dow. The CD-burning process might take longer than you expect: Windows Media Playerchecks the license for each track, converts it to a temporary file (in uncompressed CD Audioformat), and then burns the contents of the playlist to your CD.