MAN SINT S304-MR 305manualRev6.4 300512
28
^ϯϬϰ ĂŶĚ ^ϯϬϱ ƵƐƚ ŵŝƐƐŝŽŶ DŽŶŝƚŽƌƐ User Manual Version 6.4 30/5/2012 EASTERN ENERGY SERVICES PTE LTD. 60 Kaki Bukit Place #02-19 Eunos Tech Park Singapore, SG 415979 Singapore Telephone: +65-6748 6911 Fax: +65-6748 6912 Email: [email protected] Website: www.eesgroup.com
Transcript of MAN SINT S304-MR 305manualRev6.4 300512

User ManualVersion 6.430/5/2012
EASTERN ENERGY SERVICES PTE LTD.60 Kaki Bukit Place #02-19 Eunos Tech Park Singapore, SG 415979 SingaporeTelephone: +65-6748 6911 Fax: +65-6748 6912Email: [email protected] Website: www.eesgroup.com
2
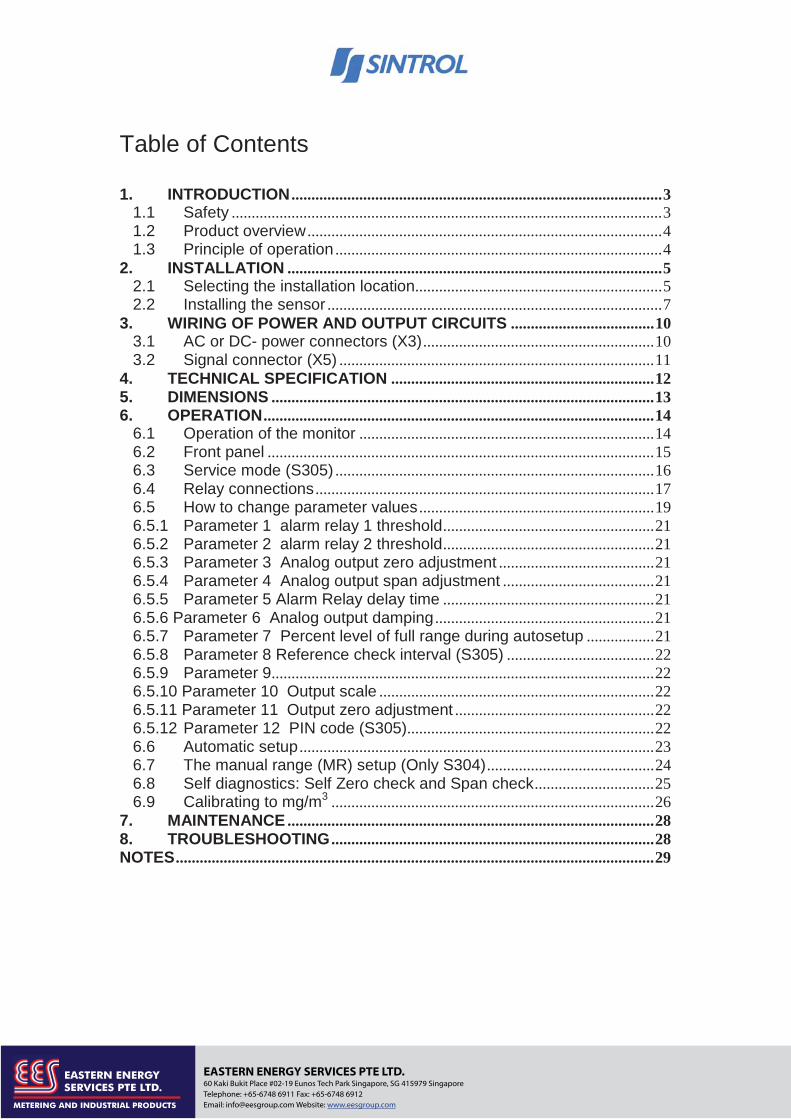
Table of Contents
1. INTRODUCTION ............................................................................................. 31.1 Safety ............................................................................................................ 31.2 Product overview ......................................................................................... 41.3 Principle of operation .................................................................................. 4
2. INSTALLATION .............................................................................................. 52.1 Selecting the installation location.............................................................. 52.2 Installing the sensor .................................................................................... 7
3. WIRING OF POWER AND OUTPUT CIRCUITS .................................... 103.1 AC or DC- power connectors (X3) .......................................................... 103.2 Signal connector (X5) ............................................................................... 11
4. TECHNICAL SPECIFICATION .................................................................. 125. DIMENSIONS ................................................................................................ 136. OPERATION .................................................................................................. 14
6.1 Operation of the monitor .......................................................................... 146.2 Front panel ................................................................................................. 156.3 Service mode (S305) ................................................................................ 166.4 Relay connections ..................................................................................... 176.5 How to change parameter values ........................................................... 196.5.1 Parameter 1 alarm relay 1 threshold ..................................................... 216.5.2 Parameter 2 alarm relay 2 threshold ..................................................... 216.5.3 Parameter 3 Analog output zero adjustment ....................................... 216.5.4 Parameter 4 Analog output span adjustment ...................................... 216.5.5 Parameter 5 Alarm Relay delay time ..................................................... 216.5.6 Parameter 6 Analog output damping ....................................................... 216.5.7 Parameter 7 Percent level of full range during autosetup ................. 216.5.8 Parameter 8 Reference check interval (S305) ..................................... 226.5.9 Parameter 9 ................................................................................................ 226.5.10 Parameter 10 Output scale ..................................................................... 226.5.11 Parameter 11 Output zero adjustment .................................................. 226.5.12 Parameter 12 PIN code (S305).............................................................. 226.6 Automatic setup ......................................................................................... 236.7 The manual range (MR) setup (Only S304) .......................................... 246.8 Self diagnostics: Self Zero check and Span check .............................. 256.9 Calibrating to mg/m3 ................................................................................. 26
7. MAINTENANCE ............................................................................................ 288. TROUBLESHOOTING ................................................................................. 28NOTES ........................................................................................................................ 29
EASTERN ENERGY SERVICES PTE LTD.60 Kaki Bukit Place #02-19 Eunos Tech Park Singapore, SG 415979 SingaporeTelephone: +65-6748 6911 Fax: +65-6748 6912Email: [email protected] Website: www.eesgroup.com

3
1. INTRODUCTION
This manual describes how to install and use SINTROL digital triboelectric dust emission monitors S304 and S305.
Sintrol shall not be held liable for any loss or damage whatsoever arising from omissions or errors in this manual, or any misuse of the product.
1.1 Safety
Model LV requires a 115 VAC, 50/60 Hz power supply and model HV a 230 VAC, 50/60 Hz power supply. In both cases, the power supply must be considered as potentially lethal and all suitable precautions must be taken whenever the cover of the unit is removed. S300 Series dust monitors are virtually maintenance free. Under no circumstances should the user attempt to replace any components or the PC board. If, for some reason the monitor fails to operate, contact your local distributor or the manufacturer.
Take appropriate precautions when installing the monitor: Unless the process conditions are known to be entirely safe, suitable precautions must be taken before any entry is made into the duct for installation or maintenance purposes.
• The unit may be installed in ducting, containing particulate, hazardous to health.
• The particulate may be inflammable, explosive or toxic • The gas can be hot and pressurised
The S300 Series dust monitors do not have an internal circuit breaker. The customer has to install a separate circuit breaker to the power cable to ensure that the power can be isolated. Electrical installations must be carried out in a manner to satisfy all applicable, local regulations.
It is essential that the unit is correctly grounded! (see section 3.1)
EASTERN ENERGY SERVICES PTE LTD.60 Kaki Bukit Place #02-19 Eunos Tech Park Singapore, SG 415979 SingaporeTelephone: +65-6748 6911 Fax: +65-6748 6912Email: [email protected] Website: www.eesgroup.com

4
1.2 Product overview
Models S304/S305 are linear emission monitors. They are microprocessor-based, self-adjusting devices equipped with two alarm relays, one 4-20 mA signal output and RS422 Serial communication. Their main use is for dust emission monitoring. The units are compact with the sensor and control units built into an IP65 enclosure, which has been specifically designed for easy installation and operation. The standard model is designed for applications at up to 2 bar and 300 °C . A high-temperature (HT) model is available for temperatures up to 700 °C.
1.3 Principle of operation
The models S304/S305 use proven and reliable triboelectric technology where the interaction of particles with the sensor rod causes a small electrical charge to pass between the particulate and sensor. It is this small electric charge that provides the signal monitored by the electronics, the signal generated is proportional to the dust level even if particles accumulate on the sensor. Experience has shown that this method of monitoring dust level in gasses, offers accurate results with minimum maintenance.
EASTERN ENERGY SERVICES PTE LTD.60 Kaki Bukit Place #02-19 Eunos Tech Park Singapore, SG 415979 SingaporeTelephone: +65-6748 6911 Fax: +65-6748 6912Email: [email protected] Website: www.eesgroup.com

5
2. INSTALLATION
2.1 Selecting the installation location
The best location for installation of the units of the S300 Series is in a section of duct where the particulate has an even distribution and the flow is laminar. This is to ensure that the sensor rod comes into contact with a representative flow of particles. The ideal position would be in a section of duct that has no bends, valves, dampers or other obstructions for a distance equal to at least three duct diameters downstream or upstream (preferable 5 x duct diameter).
Figure 1. Recommended distances to duct bends
In some applications, a compromise must be made and the sensor will have to be fitted in a position that satisfies the majority of above requirements. The units of the S300 Series must be attached to metal ductwork so that they will be electrically shielded from interference and be provided with a ground reference. For non-metal ducts, a section of the duct, approximately five diameters in length, should be covered with a metal foil or fine-mesh outside of the duct.
The units must not be installed in direct sunlight or in areas where the ambient temperature is above 45oC. Please contact your local distributor or Sintrol if you require further advice.
EASTERN ENERGY SERVICES PTE LTD.60 Kaki Bukit Place #02-19 Eunos Tech Park Singapore, SG 415979 SingaporeTelephone: +65-6748 6911 Fax: +65-6748 6912Email: [email protected] Website: www.eesgroup.com

6
Figure 2. S305 Emission Monitor
The unit shall be installed in a position, where the gas flow passes the sensor rod in a 90° angel.
In round cross-section ducts, the unit can be installed in any position above the horizontal axis (between 9 o’clock and 3 o’clock).
For square cross-section ducts, the unit must be positioned in the middle of the top or in the middle of one of the sides. In all cases, the tip of the sensor rod must extend at least 1/3 of the diameter of the duct. Depending on the dust concentration, the probe length could vary from 1/3 to 2/3 of the duct diameter. As a rule of thumb: the lower the dust concentration the longer the probe.
If possible the unit shall be installed in a position where the duct pressure is negative.
If installed downstream an electrostatic precipitator (ESP), the distance from the ESP should be at least 20 m. Although the sensor (lengths less than 1m) is not affected by vibration, very high vibration levels should be avoided.
Figure 2a. Round cross-section duct Figure 2b. Square cross-section duct
mounting socket in the middle of the side or top
above horizontal axis
EASTERN ENERGY SERVICES PTE LTD.60 Kaki Bukit Place #02-19 Eunos Tech Park Singapore, SG 415979 SingaporeTelephone: +65-6748 6911 Fax: +65-6748 6912Email: [email protected] Website: www.eesgroup.com
7
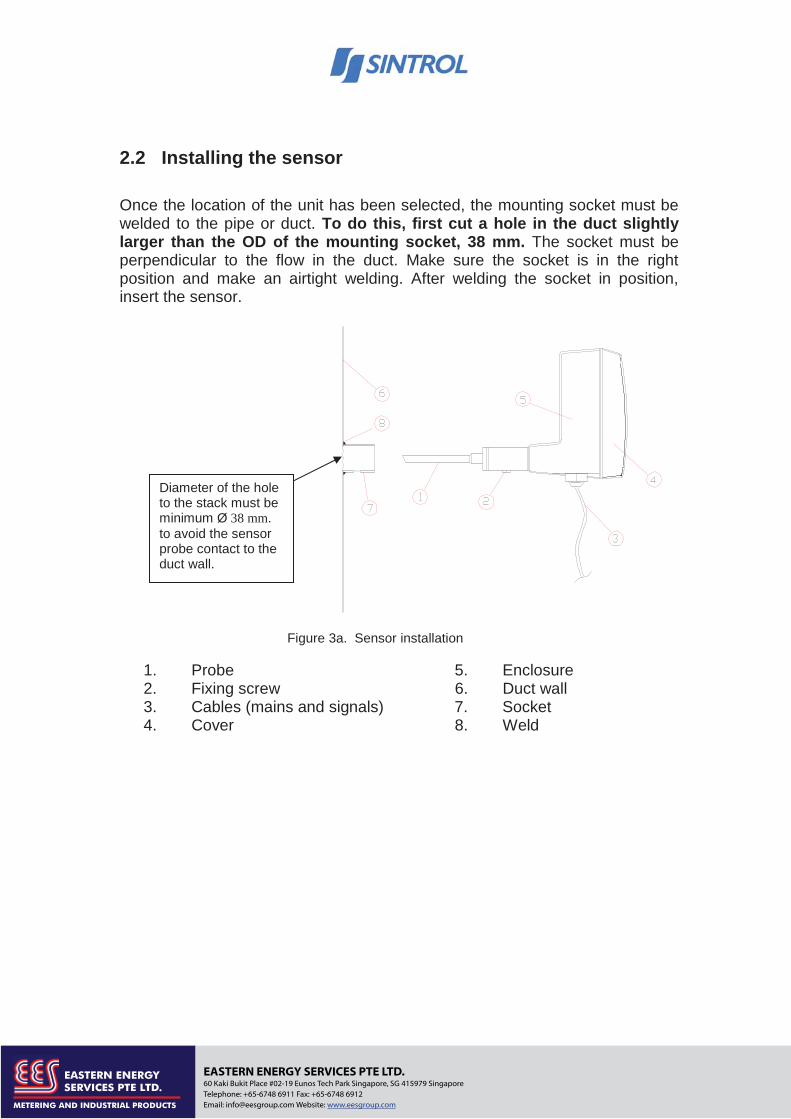
2.2 Installing the sensor
Once the location of the unit has been selected, the mounting socket must be welded to the pipe or duct. To do this, first cut a hole in the duct slightly larger than the OD of the mounting socket, 38 mm. The socket must be perpendicular to the flow in the duct. Make sure the socket is in the right position and make an airtight welding. After welding the socket in position, insert the sensor.
Figure 3a. Sensor installation
1. Probe 5. Enclosure 2. Fixing screw 6. Duct wall 3. Cables (mains and signals) 7. Socket 4. Cover 8. Weld
Diameter of the hole to the stack must be minimum Ø 38 mm. to avoid the sensor probe contact to the duct wall.
EASTERN ENERGY SERVICES PTE LTD.60 Kaki Bukit Place #02-19 Eunos Tech Park Singapore, SG 415979 SingaporeTelephone: +65-6748 6911 Fax: +65-6748 6912Email: [email protected] Website: www.eesgroup.com

8
When installing HT/MP sensor it is important to take care that the ambient temperature will not increase above 45 degree. The electronics inside of enclosure is sensitive for temperature. To do the installation, first cut a hole in the duct slightly larger than the OD of the mounting socket, 90 mm. The socket must be perpendicular to the flow in the duct. Make sure the socket is in the right position and make an airtight welding. After welding the socket in position, insert the HT/MP sensor.
Figure 3b. Monitor installation with HT/MP sensor
1. Probe 5. Enclosure 2. Fixing screw 6. Duct 3. Air socket 7. Socket 4. Cover 8. Weld
EASTERN ENERGY SERVICES PTE LTD.60 Kaki Bukit Place #02-19 Eunos Tech Park Singapore, SG 415979 SingaporeTelephone: +65-6748 6911 Fax: +65-6748 6912Email: [email protected] Website: www.eesgroup.com

9
38 mm
WRONG SOCKET INSTALLATION
Figure 4. Wrong socket installation, THE DIAMETER OF THE HOLE MUST BE MINIMUM 38 MM
IMPORTANT !!
Hole diameter must be at least 38 mm
EASTERN ENERGY SERVICES PTE LTD.60 Kaki Bukit Place #02-19 Eunos Tech Park Singapore, SG 415979 SingaporeTelephone: +65-6748 6911 Fax: +65-6748 6912Email: [email protected] Website: www.eesgroup.com
10
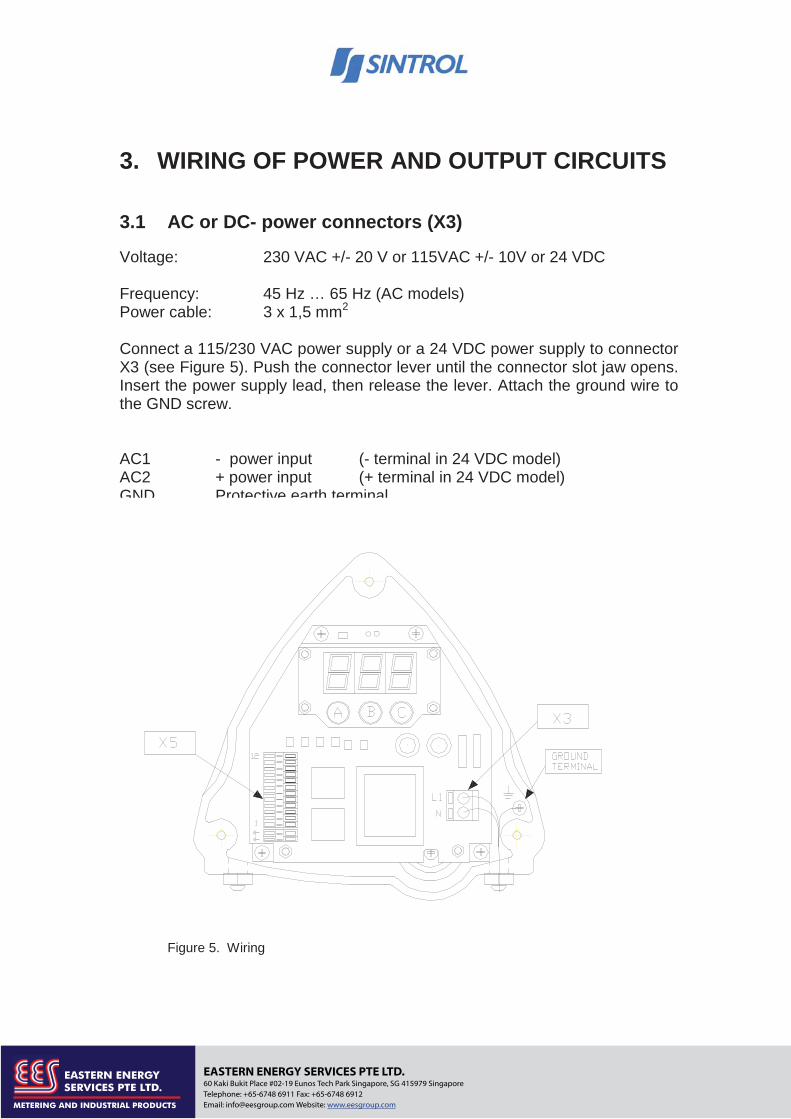
3. WIRING OF POWER AND OUTPUT CIRCUITS
3.1 AC or DC- power connectors (X3)
Voltage: 230 VAC +/- 20 V or 115VAC +/- 10V or 24 VDC
Frequency: 45 Hz … 65 Hz (AC models) Power cable: 3 x 1,5 mm2
Connect a 115/230 VAC power supply or a 24 VDC power supply to connector X3 (see Figure 5). Push the connector lever until the connector slot jaw opens. Insert the power supply lead, then release the lever. Attach the ground wire to the GND screw.
AC1 - power input (- terminal in 24 VDC model) AC2 + power input (+ terminal in 24 VDC model) GND Protective earth terminal.
Figure 5. Wiring
EASTERN ENERGY SERVICES PTE LTD.60 Kaki Bukit Place #02-19 Eunos Tech Park Singapore, SG 415979 SingaporeTelephone: +65-6748 6911 Fax: +65-6748 6912Email: [email protected] Website: www.eesgroup.com

11
3.2 Signal connector (X5)
One or more of the following functions are available, depending of the product model:
Relay output 1: Volt free SPDT contact, max. load 5 A @24 V AC/DC Relay output 2: Volt free SPDT contact, max. load 5 A @24 V AC/DC
Analogue output: 4-20 mA, active,isolated. Isolation Voltage 500 V.
Serial communication: RS-485 isolation Voltage 500 V.
Connect the signal wires to connector X5 (see Figure 5a and 5b). Push the connector lever with a screw driver, until the connector slot jaw opens, insert or remove the wire, then release the lever.
Slot 1 Relay1 normally closed (NC) terminal. Slot 2 Relay1 common (C) terminal. Slot 3 Relay1 normally open (NO) terminal. Slot 4 Relay2 normally closed (NC) terminal. Slot 5 Relay2 common (C) terminal. Slot 6 Relay2 normally open (NO) terminal. Slot 7 4-20 mA (+) more positive terminal, active output. Slot 8 4-20 mA (-) more negative terminal, active output. Slot 9 RS 485 output (+) terminal Slot 10 RS 485 output (-) terminal Slot 11 RS 485 input (+) terminal (D+/TX+) Slot 12 RS 485 input (-) terminal (D-/TX-)
Figure 5a. Signal connector Figure 5b. Signal connector X5 wiring
X5 Signal connector terminal
SERIAL
mA
RELAY 2
RELAY 1
NOT IN USE
EASTERN ENERGY SERVICES PTE LTD.60 Kaki Bukit Place #02-19 Eunos Tech Park Singapore, SG 415979 SingaporeTelephone: +65-6748 6911 Fax: +65-6748 6912Email: [email protected] Website: www.eesgroup.com

12
4. TECHNICAL SPECIFICATION
Measured objects: Solid particles (dust) in a gas stream Particle size: 0.3 µm or larger Measurement range: 0.1 mg/m3 to 1 kg/m3
Process Conditions: Temperature: Max. 100°C (standard) / 200-700°C (optional) Pressure: Max. 200 kPa Gas velocity: Min. 4 m/s Humidity: 95 % RH or less (non-condensing) Input surge voltage: Max. 100 V Measurement principle: Electrostatic charge detection Output damping time: 10 to 180 seconds Output signals: Isolated 4-20 mA Relay 5 A , 24 V AC or DC Ambient conditions: Temperature: -20 to + 45oC
Humidity: 95% RH (non-condensing) Vibration: 5 m/s2 or less Materials: Probe: SS 316L Insulation of sensor: PEEK (300 oC), Teflon (100 oC)
Enclosure: Aluminium alloy Power Supply: 115 VAC or 230 VAC or 24 VDC Power consumption: 8 W AC models, 3 W 24 VDC model Wiring connections: DIN PG11 port for power cables DIN PG11 port for signal cable Weight: 2.3 kg Protection class: IP 65
Range setup options: Normal measuring range: -automatic, based on average measured
dust flow Extended measuring range: - (option) set at factory Alarm threshold: Adjustable via internal keys or via serial port.
Zero point offset trim: Automatic
This instrument conforms to the following standards EN 61010-1:2001 Safety, LVD IEC 61326-1:2005 (First Edition) Electromagnetic Compatibility EMCMechanical tests: IEC 60068-2-6, TEST Fc(1995-03), IEC 60068-2-29, TEST Eb
EASTERN ENERGY SERVICES PTE LTD.60 Kaki Bukit Place #02-19 Eunos Tech Park Singapore, SG 415979 SingaporeTelephone: +65-6748 6911 Fax: +65-6748 6912Email: [email protected] Website: www.eesgroup.com

13
5. DIMENSIONS
Figure 6. Dimensions and construction of the S300 series Dust Monitor
EASTERN ENERGY SERVICES PTE LTD.60 Kaki Bukit Place #02-19 Eunos Tech Park Singapore, SG 415979 SingaporeTelephone: +65-6748 6911 Fax: +65-6748 6912Email: [email protected] Website: www.eesgroup.com

14
6. OPERATION
6.1 Operation of the monitor
The S304 Emission Monitor measures the dust level in a gas stream by monitoring electrostatic discharge when charged dust particles hit or pass by the probe.
The signal generated by the electrostatic loaded particles is low-pass filtered with a user selectable time constant to remove the effect of short variations, and then converted into a current loop output signal. The user can trim the output of the 4…20 mA signal can be calibrated.
The S304/S305 models include two independent alarm relays. The alarms are arranged such that Alarm 1 is a low alarm, Alarm 2 is a high alarm. The alarms can be delayed by means of a common time delay. The time is user selectable in the range 0 to 180 seconds in 10 seconds increments.
The alarm threshold for each of the two alarms, are adjustable between 1 to 99% of the measuring range.
The relay output(s) change their state when the measured value for the dust flow exceeds a user selected alarm trigger level. The relay output(s) are also protected from the effect of short variations in the input signal with a user selectable time constant common for both relays. Further the relays can also be used to indicate internal errors during monitoring or to indicate when the unit is in the service mode.
All the user selectable parameters are factory set to default values shown in table 2. page 17.
EASTERN ENERGY SERVICES PTE LTD.60 Kaki Bukit Place #02-19 Eunos Tech Park Singapore, SG 415979 SingaporeTelephone: +65-6748 6911 Fax: +65-6748 6912Email: [email protected] Website: www.eesgroup.com
15
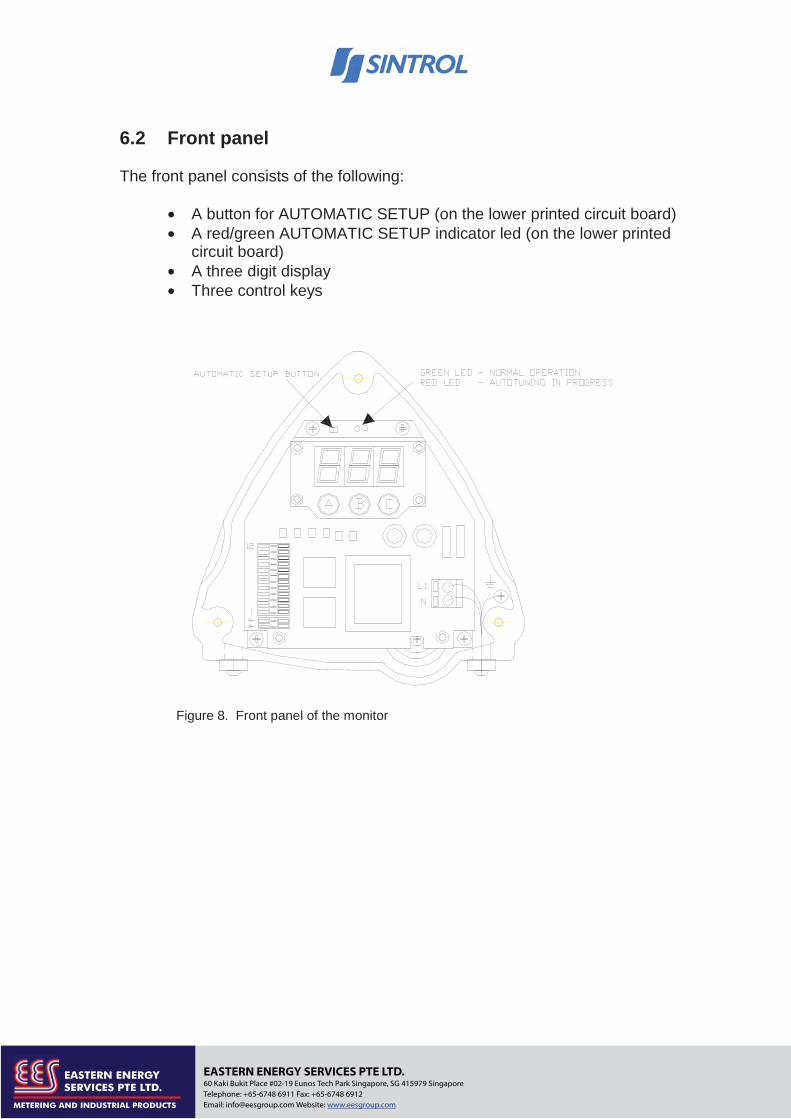
6.2 Front panel
The front panel consists of the following:
• A button for AUTOMATIC SETUP (on the lower printed circuit board) • A red/green AUTOMATIC SETUP indicator led (on the lower printed
circuit board) • A three digit display • Three control keys
Figure 8. Front panel of the monitor
EASTERN ENERGY SERVICES PTE LTD.60 Kaki Bukit Place #02-19 Eunos Tech Park Singapore, SG 415979 SingaporeTelephone: +65-6748 6911 Fax: +65-6748 6912Email: [email protected] Website: www.eesgroup.com

16
6.3 Service mode (S305)
Before servicing the model S305 monitor or changing any parameters it is needed to enter the service mode. To access service mode right PIN code is required. In service mode the alarm relays will indicate that the measurement is invalid and shall be ignored by the reporting system.
Selecting the right PIN code to access service mode:
5. Press button A and select first PIN code digit 0..9 6. Press button B and select second PIN code digit 0..9 7. Press button C and select third PIN code digit 0..9
Factory default for PIN code is 1. 1. 1.
There are four different setup configurations depending on how the relays are connected. After the right PIN code is selected to enter the service mode simultaneously press and hold down buttons B and C for one second. The dot in the corner of the right-hand digit on the display panel indicates when unit is in the service mode. To exit the service mode simultaneously press and hold down buttons B and C for one second.
EASTERN ENERGY SERVICES PTE LTD.60 Kaki Bukit Place #02-19 Eunos Tech Park Singapore, SG 415979 SingaporeTelephone: +65-6748 6911 Fax: +65-6748 6912Email: [email protected] Website: www.eesgroup.com

17
6.4 Relay connections
Light bulb indication is ON when relay contact spring is closed.
Light bulb indication is OFF when relay contact spring is open.
Low alarm level and High alarm level are dust levels where relays change their state.
Setup configuration 1:
Both relays connected to Normally Open (NO) Service mode (S305) : Relay 1 contact is open and Relay 2 contact is close.
Relay 2 High alarm level
Relay 1 Low alarm level
Relay 1 (NO) Relay 2 (NO)
Close Close
Close Open
Open Open
Service mode Open Close
Setup configuration 2: Relay 1 Normally Open (NO), Relay 2 Normally Close (NC), Service mode (S305) : Relay 1 and Relay 2 contacts are open.
Relay 2 High alarm level
Relay 1 Low alarm level
Relay 1 (NO) Relay 2 (NC)
Close Open
Close Close
Open Close Service mode Open Open
Dust concentration
Dust concentration
Normal operation
Normal operation
EASTERN ENERGY SERVICES PTE LTD.60 Kaki Bukit Place #02-19 Eunos Tech Park Singapore, SG 415979 SingaporeTelephone: +65-6748 6911 Fax: +65-6748 6912Email: [email protected] Website: www.eesgroup.com

18
Setup configuration 3: Relay 1 Normally Close (NC), Relay 2 Normally Open (NO), Service mode (S305) : Relay 1 and Relay 2 contacts are close.
Relay 2 High alarm level
Relay 1 Low alarm level
Relay 1 (NC) Relay 2 (NO)
Open Close
Open Open
Close Open
Service mode Close Close
Setup configuration 4: Both relays connected to Normally Close (NC) Service mode (S305) : Relay 1 contact is close and Relay 2 contact is open.
Relay 2 High alarm level
Relay 1 Low alarm level
Relay 1 (NC) Relay 2 (NC)
Open Open
Open Close
Close Close Service mode Close Open
Dust concentration
Normal operation
Dust concentration
Normal operation
EASTERN ENERGY SERVICES PTE LTD.60 Kaki Bukit Place #02-19 Eunos Tech Park Singapore, SG 415979 SingaporeTelephone: +65-6748 6911 Fax: +65-6748 6912Email: [email protected] Website: www.eesgroup.com

19
6.5 How to change parameter values
Remove the cover of the monitor. You will see the front panel, display unit and three parameter adjustment keys. (A, B and C, figure 9). Model S305 it is needed to feed PIN code before you can change parameters (see chapter 6.2). Model S304 PIN code is not required.
Figure 9. S300 series Dust Monitor front panel
Press the left key (A), below the display, until the left digit indicates the number of the parameter you wish to change, 1 … 9, tenth parameter left digit indicator is 0. eleventh 10. and twelfth is first digit of PIN code = 1. if factory default PIN code value. The last parameter, – SP (save parameters), saves all the changes you have made. (See Table 2).
The two rightmost display digits now show the parameter values. By pressing the middle key (B) and right key (C), the value for each parameter can be altered as indicated in table 2.
Parameter change buttons A, B and C
Automatic setup button (white) to start autotuning
Indicator leds: Green: normal operation Red: Autotuning in progress
EASTERN ENERGY SERVICES PTE LTD.60 Kaki Bukit Place #02-19 Eunos Tech Park Singapore, SG 415979 SingaporeTelephone: +65-6748 6911 Fax: +65-6748 6912Email: [email protected] Website: www.eesgroup.com

20
When parameters have been changed as required, press the left key (A) again until the display digit shows –SP (Save parameters). Press any of the other keys (B or C) to save all the parameters into the EEPROM.
NOTE: Change all the required parameters before saving them. If you decide not to save the parameters you have changed, push the left key (A) again.
PARAMETER CHANGE TABLE
PARAMETER DISPLAY LEFT NUMBER
RANGE KEY
EFFECT KEY B
KEY EFFECT KEY C
FACTORY DEFAULT
Relay 1 threshold 1 1…99% add 10% add 1% 5%
Relay 2 threshold 2 1…99% add 10% add 1% 60%
4 mA adjustment 3 - increase current
decrease current set to 4 mA
20 mA adjustment 4 - increase
current decrease current set to 20 mA
Alarm delay time 5 0…180s add 10s - 0
Analog output filter
time constant 6 0…300s add 10s - 0
Percent level of full range during
autosetup 7 10-50 % increase 10
% decrease 10 % 20 %
Reference checkinterval 8 0-99 hour increase decrease 0
Reference checkalarm setup 9 0-8min or
continuous increase decrease 0
Output scale 0. 1-100 % increase decrease 20 %
Output zero point adjustment 10. 1-99 % increase decrease 0 %
*PIN code/Manual Range( S304)
1. 000-999 increase decrease 1.1.1 (S305)
Save parameters - SP save all Save all
*) If you have the model 304, please see also the chapter about the manual range set up option.
Table 2. Parameter change table
EASTERN ENERGY SERVICES PTE LTD.60 Kaki Bukit Place #02-19 Eunos Tech Park Singapore, SG 415979 SingaporeTelephone: +65-6748 6911 Fax: +65-6748 6912Email: [email protected] Website: www.eesgroup.com

21
6.5.1 Parameter 1 alarm relay 1 threshold
Threshold for alarm relay 1 can be selected as a percentage of the output range.
6.5.2 Parameter 2 alarm relay 2 threshold
Threshold for alarm relay 2 can be selected as a percentage of the output range.
6.5.3 Parameter 3 Analog output zero adjustment
If needed, output zero can be adjusted to 4 mA. Allow 30 minutes warm up time before trimming the mA output.
6.5.4 Parameter 4 Analog output span adjustment
If needed, output span can be adjusted to 20 mA. Allow 30 minutes warm up time before trimming the mA output.
6.5.5 Parameter 5 Alarm Relay delay time
Time delay for the two alarm relays can be set between 0 and 180 seconds with 10 seconds increment. The time set is common for both alarm relays
6.5.6 Parameter 6 Analog output damping
If the dust reading is oscillating , the analog mA output can be averaged by the filter time constant, the filter time can be set between 0 and 300 seconds with 10 seconds increment
6.5.7 Parameter 7 Percent level of full range during autosetup
Parameter 7 should always be 20 % (factory default) in models S304 and S305.
EASTERN ENERGY SERVICES PTE LTD.60 Kaki Bukit Place #02-19 Eunos Tech Park Singapore, SG 415979 SingaporeTelephone: +65-6748 6911 Fax: +65-6748 6912Email: [email protected] Website: www.eesgroup.com

22
6.5.8 Parameter 8 Reference check interval (S305)
Reference check does periodic self diagnostics for the monitor. Parameter 8 sets the time period for the reference check (described in section 6.18). The period can be from 0 to 99 hours (value 0 means: No reference check).
6.5.9 Parameter 9
Parameter 9 sets the alarm delay time if the reference check indicates an internal error in the unit. The parameter is the time the alarm is active in case of a fault found in the reference check. The alarm time can be from 0 to 8 minutes (parameter 9 is set to a value of from 0 to 8). If parameter 9 is set to value 0 then no alarm signal will be given even if there is an error. If parameter 9 is set to value 9 then an alarm is given continuously until the operator resets it.
6.5.10 Parameter 10 Output scale
Parameter 10 (left digit = 0.) adjusts output scale from 1-100 %. After automatic setup procedure output scale is automatically set to 20 %. When scale is 20 % the maximum range is 5 times higher than concentration during autosetup. Output scale can adjusted from 1-100 % . Parameter 10 is set 5 % = > range maximum = 20 x concentration during autosetup. Parameter 10 is set 100 % = > range maximum = concentration during autosetup.
6.5.11 Parameter 11 Output zero adjustment
Parameter 11 is (left digit = 1, middle digit 0.) used to adjust output zero point if there is background signal when no dust is present. Zero point percentage decrement of full scale is 0-99 %.
6.5.12 Parameter 12 PIN code (S305)
Parameter 12 shows PIN code. PIN code prevents unauthorized person to change parameters. PIN code is required to go to service mode in model S305.
EASTERN ENERGY SERVICES PTE LTD.60 Kaki Bukit Place #02-19 Eunos Tech Park Singapore, SG 415979 SingaporeTelephone: +65-6748 6911 Fax: +65-6748 6912Email: [email protected] Website: www.eesgroup.com

23
6.6 Automatic setup
To be able to detect variations in dust flow, and to set the alarm so that it will go off if there is excessive dust flow, you must determine the typical dust flow in the application when the process is operating normally.
The unit has an AUTOMATIC SETUP function. With this, you can set the measuring range of the dust monitor so that a typical dust flow in the application corresponds to 20% of the emission monitor output full scale. The 4…20 mA output at the typical dust flow rate will then be 4 mA + 20% of 16 mA (20 mA– 4 mA) which equals to 7.2 mA. If the dust flow rate is 5 times the typical value or higher, the output will be 20 mA, and if the dust flow rate is zero, the output will be 4 mA.
For AUTOMATIC SETUP you need to know that the process is running with anormal dust flow rate. Then remove the cover of the unit, and initiate AUTOMATIC SETUP by pressing the small button near the indicator lamp, on the lower printed circuit board (see Figure 9). NOTE: the indicator lamp must be green before you press the key.
The unit starts collecting dust flow data. This takes from about one hour (typically 40-60 minutes). The three digit display counts down to zero, and the indicator lamp remains red as long as data are being collected. To avoid interference from background electrical noise, you should replace the cover of the unit after having initiated the AUTOMATIC SETUP. After an hour, the setup is ready and the unit returns to normal operation. If your environment is not electrically noisy, you may check the indicator lamp. It will turn to green, when setup is ready.
NOTE ! MODEL S305: Automatic setup procedure can be started only in service mode. PIN code required.
MODEL S304: Automatic setup procedure can be started by pressing auto setup button. PIN code is not required. See also chapter about manual range setup.
EASTERN ENERGY SERVICES PTE LTD.60 Kaki Bukit Place #02-19 Eunos Tech Park Singapore, SG 415979 SingaporeTelephone: +65-6748 6911 Fax: +65-6748 6912Email: [email protected] Website: www.eesgroup.com

24
AUTOMATIC SETUP
1. Ensure that the process is in normal conditions. 2. Make sure that the monitor has been powered for at least 15 minutes in
order to warm up and stabilise. 3. Go to service mode if S305. S304 service mode is not needed 4. Press the AUTOMATIC SETUP BUTTON (the white button on lower
printed circuit board) 5. Make sure that green LED indicator turns red 6. Mount the cover of enclosure and tighten it and wait for about 45
minutes until the LED turns green indicating that the Automatic Setup sequence has finished
7. The unit is ready to use
6.7 The manual range (MR) setup (Only S304)
The manual range is only for models 304. The manual range parameter set up is found in parameter table in 304 models just before saving the parameters (-SP). The MR parameter value is displayed in left digit as 1.. The MR parameter is not in use as factory setup, but it can be activated by using other than 00 value and by saving the change with –SP command. The MR setup is used if the process is not stabile and the automatic set up can not be made or if the auto setup 100% range is not big enough to monitor the dust concentration range in the process.
Parameter value 1. Gain Dust level Autosetup
00 Dynamic 5x all Auto setup Is needed to do
01 x1 (widest range)
Very high dust concentration NOT NEEDED
02 x10 High d.c. NOT NEEDED03 x100 Moderate d.c. NOT NEEDED04 x1000 Low d.c. NOT NEEDED
05 x10000 (=smallest range) Very low d.c. NOT NEEDED
EASTERN ENERGY SERVICES PTE LTD.60 Kaki Bukit Place #02-19 Eunos Tech Park Singapore, SG 415979 SingaporeTelephone: +65-6748 6911 Fax: +65-6748 6912Email: [email protected] Website: www.eesgroup.com

25
6.8 Self diagnostics: Self Zero check and Span check
The unit can check zero output and span repeatedly and do the self diagnostics. The interval for zero and span check can be set with parameters 8 and 9 (see Table 2. Parameter Change Table).
Parameter 8 sets the time period for the reference check. The period can be from 0 to 99 hours (value 0 means: No reference check).
Parameter 8 : Reference check Interval (hours) -> from 0 to 99 hour
Parameter 9 sets the alarm time if the reference check indicates an internal error in the unit. The alarm time can be from 0 to 8 minutes (parameter 9 is set to a value of from 0 to 8). If parameter 9 is set to value 0 then no alarm signal will be given even if there is an error. If parameter 9 is set to value 9 then an alarm is given continuously until the operator resets it.
If there is some internal error in the unit the reference check gives an alarm. The alarm is given by setting mA output signal to 2 mA the period of time depending on parameter 9 (0 - 8 minutes, or continuously until reset). The unit compares the zero and the span values with the expected reference values and gives an alarm if there is more than 2 % deviation compared to the full scale. During self zero check and span check the relays are set to the service mode. (Chapter 6.2)
Parameter 9: Alarm time if reference check gives an alarm -> from 0 to 8 minutes or continuously.
EASTERN ENERGY SERVICES PTE LTD.60 Kaki Bukit Place #02-19 Eunos Tech Park Singapore, SG 415979 SingaporeTelephone: +65-6748 6911 Fax: +65-6748 6912Email: [email protected] Website: www.eesgroup.com

26
6.9 Calibrating to mg/m3
Dust Monitor S305 can be calibrated to show concentration in mg/m3. Calibration is based on manual gravimetric method (standard EN13284-Part1-April 2002). The European Standard, EN13284-1, describes a reference method for the measurement of low dust content, concentrations below 50 mg/m3 in standard conditions, in gases.
When process conditions (gas velocity, particle type, characteristics and size distribution) remain relatively constant, the unit’s output signal is directly proportional to dust concentration. If the conditions changes more than ± 20 % the compensation of changes is recommended to maintain accuracy. After gravimetric sampling, the instrument reading can be directly related to dust concentration expressed in mg/m3. The minimum time for the gravimetric dust sampling is one hour. A longer period will increase the accuracy of collected data. There is no maximum time limit for collecting data.
6.9.1 Calibration to mg/m3 procedure:
1. Ensure that the Automatic setup procedure is carried out in normal process conditions in the duct/stack.
2. Start the gravimetric sampling (iso-kinetic sampling) 3. Go to service mode if model S305, not needed when S304 4. Press and hold down button C, and then press AUTOMATIC SETUP
BUTTON (the white button on the lower printed circuit board) 5. Make sure that the green LED indicator turns red 6. Replace the cover. The monitor is now collecting measurements to be
used later for setting the relation to the gravimetric samples. 7. When the gravimetric sampling is done, press button A (left button) to
stop data sampling. 8. The LED indicator will turn green. 9. NOTE! Do NOT change monitor parameters before you get the result
from the gravimetric sampling [mg/m3]. 10. When a gravimetric comparison measurement result is determined you
can change unit’s output accordingly.
EASTERN ENERGY SERVICES PTE LTD.60 Kaki Bukit Place #02-19 Eunos Tech Park Singapore, SG 415979 SingaporeTelephone: +65-6748 6911 Fax: +65-6748 6912Email: [email protected] Website: www.eesgroup.com

27
6.9.2 Changing monitor’s output range:
1. Use the gravimetric measurement result and compare it to required range (use the calibration formula below)
2. Go to parameter 0.: output scale (see Table 2. Parameter change table)
3. Change parameter to the result calculated using the formula 1. given below.
4. Go to the Save parameters (-SP) parameter and press button B or C to save the changes.
CALCULATION OF VALUE FOR OUTPUT SCALE PARAMETER:
Formula 1. Output scale parameter
A = Result of gravimetric comparison measurement [mg/m3] B = Maximum required range [mg/m3] C = Desired full scale of the analog output i.e. 0 to 50 mg/m3 For example:
Result from gravimetric comparison measurement is A = 12 mg/m3
Required maximum range for the unit is B = 50 mg/m3
Output scale parameter:
Set the tenth parameter to correspond the output scale parameter (display left digit indicator for parameter 10 is 0, see table 2.)
Figure 10. Changing the output scale parameter
100×=BAC
241005012 =×=C
EASTERN ENERGY SERVICES PTE LTD.60 Kaki Bukit Place #02-19 Eunos Tech Park Singapore, SG 415979 SingaporeTelephone: +65-6748 6911 Fax: +65-6748 6912Email: [email protected] Website: www.eesgroup.com

28
7. MAINTENANCE
S304/305 Dust Monitors needs very little maintenance. To achieve maximum reliable operation the recommended maintenance interval is 2 months.
Maintenance is done by removing the unit from the socket and cleaning the probe to prevent signal leakage to ground.
If the particles in the gas are sticky and tend to build up, use air purge adaptor and compressed clean and dry process air to keep the sensor base clean.
Inside enclosure maintenance is not needed.
8. TROUBLESHOOTING
The Monitor is not giving output signal
1. Check the power and signal wiring is right connected.
2. Check there is power on and three digit display is showing measurement readings and it is possible to change and save parameters.
3. Check the parameter settings
If the monitor is not giving any output signal after checks 1,2 and 3 contact your local distributor.
The Monitor is giving 4mA or 20mA continuously after autosetup procedure.
1. Check that there is normal process going on and during autosetup there are normal operation conditions. Check that the dust concentration really is not the zero or over the range.
2. Check the power and signal wiring is right connected
3. Check the signal is not leaking to ground. - Contact between sensor probe and duct wall is not allowed. - The gas should not be condensing - Check the sticky dust does not build up to the base of the sensor and does not make the bridge between sensor probe and duct wall. If the dust is bridging, the air purge is needed.
4. Check the parameter settings and check the monitor is not in the service mode
EASTERN ENERGY SERVICES PTE LTD.60 Kaki Bukit Place #02-19 Eunos Tech Park Singapore, SG 415979 SingaporeTelephone: +65-6748 6911 Fax: +65-6748 6912Email: [email protected] Website: www.eesgroup.com