Rhode Island Fishing Guide By: Daniel Iannucci and Alyssa Marinaccio.
Upload
mauroof-ibrahimCategory
view
334download
0description

The Making of a Fishing Island
by: Mauroof Ibrahim, A271025, Semester 4, BA (Hons) Animation, Limkokwing University, JUL-DEC 2009

DESIGN CONCEPT Made a 2D painting of the Environment ( A Fishing Island )
by: Mauroof Ibrahim, A271025, Semester 4, BA (Hons) Animation, Limkokwing University, JUL-DEC 2009

STEP 1: TOP VIEW SKETCH To get a rough idea on how I am going to place the 3d objects based on the 2d
environment, I made sketch but in a simpler manner. Numbered the objects so I can estimate how many types of objects need to model Re-drew a cleaner top view to place it on a scene once all the objects are done.
by: Mauroof Ibrahim, A271025, Semester 4, BA (Hons) Animation, Limkokwing University, JUL-DEC 2009

STEP 2: MAKING FOLIAGE Since there are palms, banana trees, various shrubs and beach grasses, I
concentrated making the foliage first because it will take time to make them look realistic.
Getting good materials for coconut palms and banana tree was hard.
by: Mauroof Ibrahim, A271025, Semester 4, BA (Hons) Animation, Limkokwing University, JUL-DEC 2009
1. Date Palms

STEP 2: MAKING FOLIAGE Added details like fruits and adjusted the trunk material and smoothed out the leaf.
by: Mauroof Ibrahim, A271025, Semester 4, BA (Hons) Animation, Limkokwing University, JUL-DEC 2009

STEP 2: MAKING FOLIAGE Trunk was made using a line and a circle then applied loft on the line Planes were bent and smoothed out and placed according to how a coconut palm would
look like. Textured, applied UVW unwrap and on the planes, later put specular to add life to leaves and
fruits and used bump to raise the trunk texture too.
by: Mauroof Ibrahim, A271025, Semester 4, BA (Hons) Animation, Limkokwing University, JUL-DEC 2009
2. Coconut Palms

STEP 2: MAKING FOLIAGE Fixed texture on trunk using UVW Map as cylindrical and made variations to length of the
trunk using edit poly.
by: Mauroof Ibrahim, A271025, Semester 4, BA (Hons) Animation, Limkokwing University, JUL-DEC 2009

STEP 2: MAKING FOLIAGE Tested out if it looks good on different angles, if need be.
by: Mauroof Ibrahim, A271025, Semester 4, BA (Hons) Animation, Limkokwing University, JUL-DEC 2009

STEP 2: MAKING FOLIAGE Trunk was made using loft again and then placed randomly and then duplicated over and
over again. Planes were slightly bent, and repeated to cover the trunk surface. Applied leaf texture with alpha as an opacity. Made copies of one shrub and then scaled it to form different shapes. Added various textures to differentiated between themselves.
by: Mauroof Ibrahim, A271025, Semester 4, BA (Hons) Animation, Limkokwing University, JUL-DEC 2009
2. Shrubs

STEP 2: MAKING FOLIAGE Made more shrubs, this time with different leaf planes and also made planes for flowers.
by: Mauroof Ibrahim, A271025, Semester 4, BA (Hons) Animation, Limkokwing University, JUL-DEC 2009

STEP 2: MAKING FOLIAGE Edited a sphere to make the base. Here again, some planes made, copied and rotated and round center point Got a texture of single grass strand and did the same texturing method as others. Varied the colors of the lower grasses to give them aged look.
by: Mauroof Ibrahim, A271025, Semester 4, BA (Hons) Animation, Limkokwing University, JUL-DEC 2009
3. Grass

STEP 2: MAKING FOLIAGE Simply made from edited planes. Textured and then scaled the leafs, rotated. Mirrored the leaves on x-axis as on picture on right. Made a sphere and cut it to half, then applied the flower texture with alpha opacity on the
sphere. Added a bud made from sphere next to the blossomed flower.
by: Mauroof Ibrahim, A271025, Semester 4, BA (Hons) Animation, Limkokwing University, JUL-DEC 2009
4. Grass type two

STEP 2: MAKING FOLIAGE Again edited planes, textured with banana leaf. Edited cylinder polygons for trunk then added material with alpha opacity.
by: Mauroof Ibrahim, A271025, Semester 4, BA (Hons) Animation, Limkokwing University, JUL-DEC 2009
4. Banana Tree

STEP 3: MAKING PROPS These objects fill up the scene and translates the to the understanding of environment.
Without them, the environment lacks story. Fishing islands, usually have barrels, crates, oil drums, fishing poles boats and nets out at
open. The next part was to deal with these objects one by one. Crates were made using simple box, then UVW mapped (box) on wood material.
by: Mauroof Ibrahim, A271025, Semester 4, BA (Hons) Animation, Limkokwing University, JUL-DEC 2009
1. Crates
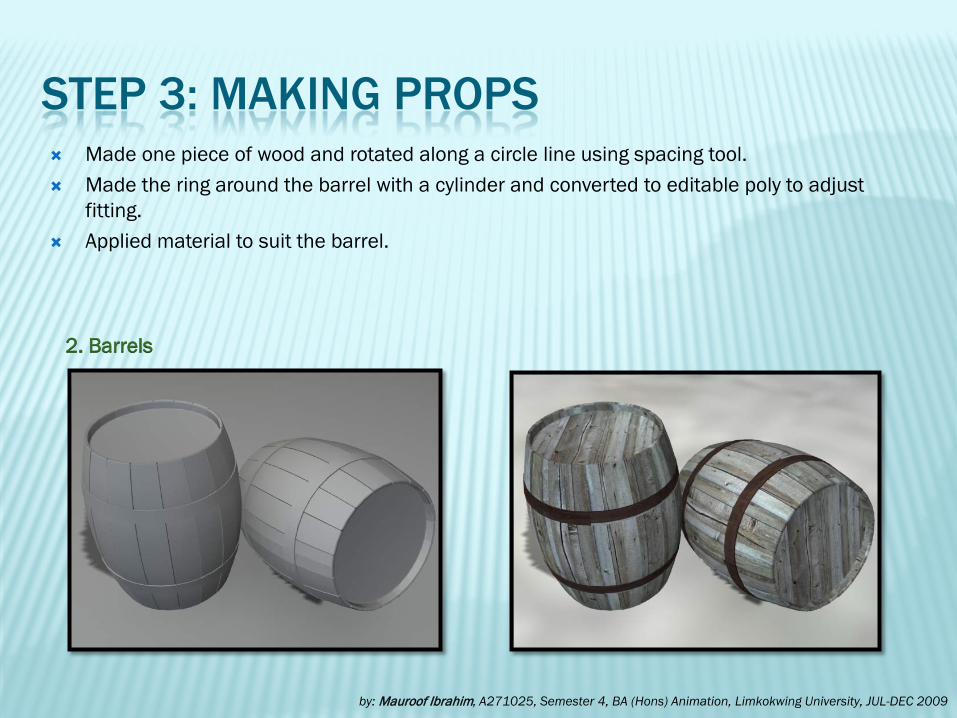
STEP 3: MAKING PROPS Made one piece of wood and rotated along a circle line using spacing tool. Made the ring around the barrel with a cylinder and converted to editable poly to adjust
fitting. Applied material to suit the barrel.
by: Mauroof Ibrahim, A271025, Semester 4, BA (Hons) Animation, Limkokwing University, JUL-DEC 2009
2. Barrels

STEP 3: MAKING PROPS Plane, edited using soft selection on vertexes, Put material of tiled net texture along with an alpha map for opacity. Added some bamboo rods to hold the net for drying.
by: Mauroof Ibrahim, A271025, Semester 4, BA (Hons) Animation, Limkokwing University, JUL-DEC 2009
3. Drying Net

STEP 3: MAKING PROPS Edited a cylinder to make this. Make circle cuts for caps. Extruded the lines at equal distances to give form and applied rusted metal material and a
bit of specular.
by: Mauroof Ibrahim, A271025, Semester 4, BA (Hons) Animation, Limkokwing University, JUL-DEC 2009
4. Oil Drums

STEP 3: MAKING PROPS Edited vertexes on box randomly, and relaxed the vertexes to make it look smoother. Applied mesh smooth on some stones to further smoothen them. Texture of sand was applied with UVW Map with spherical option as the lecturer suggested.
by: Mauroof Ibrahim, A271025, Semester 4, BA (Hons) Animation, Limkokwing University, JUL-DEC 2009
5. Stones and Cobbles
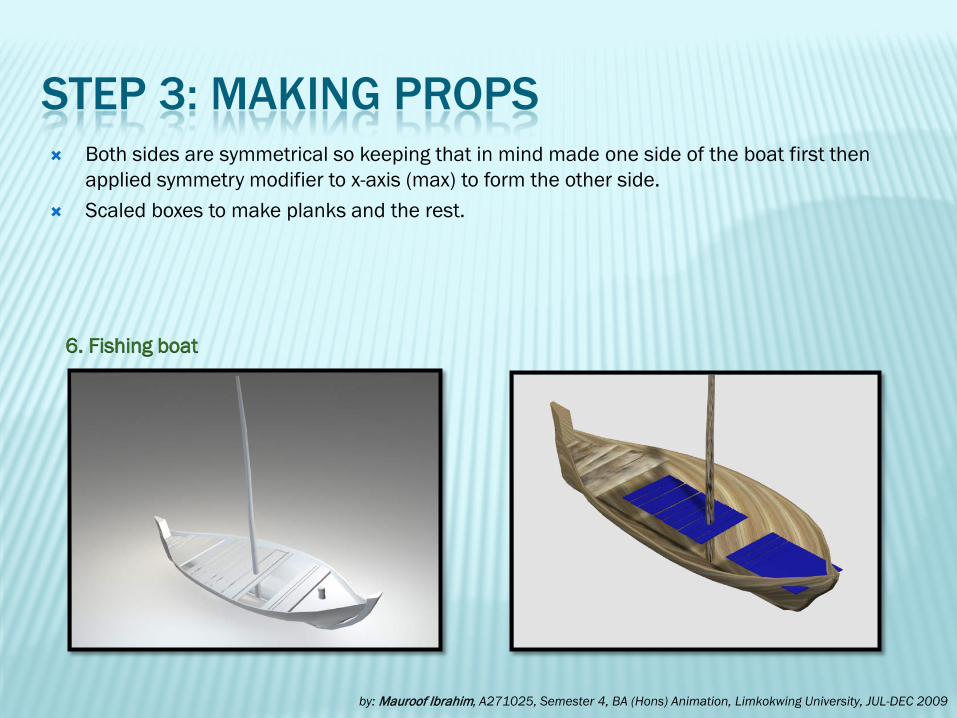
STEP 3: MAKING PROPS Both sides are symmetrical so keeping that in mind made one side of the boat first then
applied symmetry modifier to x-axis (max) to form the other side. Scaled boxes to make planks and the rest.
by: Mauroof Ibrahim, A271025, Semester 4, BA (Hons) Animation, Limkokwing University, JUL-DEC 2009
6. Fishing boat

STEP 3: MAKING PROPS Applied decayed wood texture on the mast, plants and rotated the map tiling on the hull.
by: Mauroof Ibrahim, A271025, Semester 4, BA (Hons) Animation, Limkokwing University, JUL-DEC 2009

STEP 3: MAKING PROPS Lastly added reflection on wood to make it look as if its varnished and wet due to water.
by: Mauroof Ibrahim, A271025, Semester 4, BA (Hons) Animation, Limkokwing University, JUL-DEC 2009

STEP 3: MAKING PROPS Did some lighting and shading passes to test the composition.
by: Mauroof Ibrahim, A271025, Semester 4, BA (Hons) Animation, Limkokwing University, JUL-DEC 2009

STEP 3: MAKING PROPS Perspective renders
by: Mauroof Ibrahim, A271025, Semester 4, BA (Hons) Animation, Limkokwing University, JUL-DEC 2009

STEP 4: MAKING JETTY AND BENCH The planks are repeated boxes and varied in size and a position slightly Support pillars are cylinders chamfered and edited to give age. Rope was made with helix line and circle on loft and placed around the pillar.
by: Mauroof Ibrahim, A271025, Semester 4, BA (Hons) Animation, Limkokwing University, JUL-DEC 2009
1. Jetty
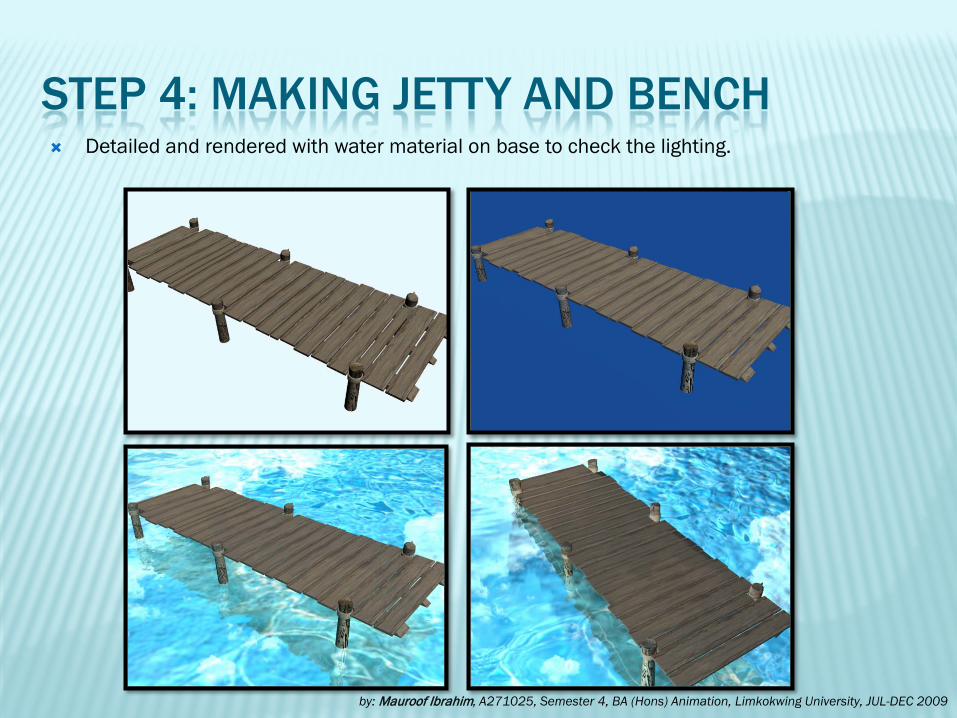
STEP 4: MAKING JETTY AND BENCH Detailed and rendered with water material on base to check the lighting.
by: Mauroof Ibrahim, A271025, Semester 4, BA (Hons) Animation, Limkokwing University, JUL-DEC 2009

STEP 4: MAKING JETTY AND BENCH Likewise, a bench was made, but this involved cylinder shapes and edited vertexes. Extruded the lengths of the cylinder and varied in size. Arranged them and put material of bamboo wood.
by: Mauroof Ibrahim, A271025, Semester 4, BA (Hons) Animation, Limkokwing University, JUL-DEC 2009
2. Bench ( for drying fish )

STEP 4: MAKING JETTY AND BENCH Varied the size of the supports and placed them to the bench.
by: Mauroof Ibrahim, A271025, Semester 4, BA (Hons) Animation, Limkokwing University, JUL-DEC 2009

STEP 5: MAKING HUT Edited a box and then made supports on the top. Made planes for roof material. Applied UVW Map box for texture of limestone on walls.
by: Mauroof Ibrahim, A271025, Semester 4, BA (Hons) Animation, Limkokwing University, JUL-DEC 2009
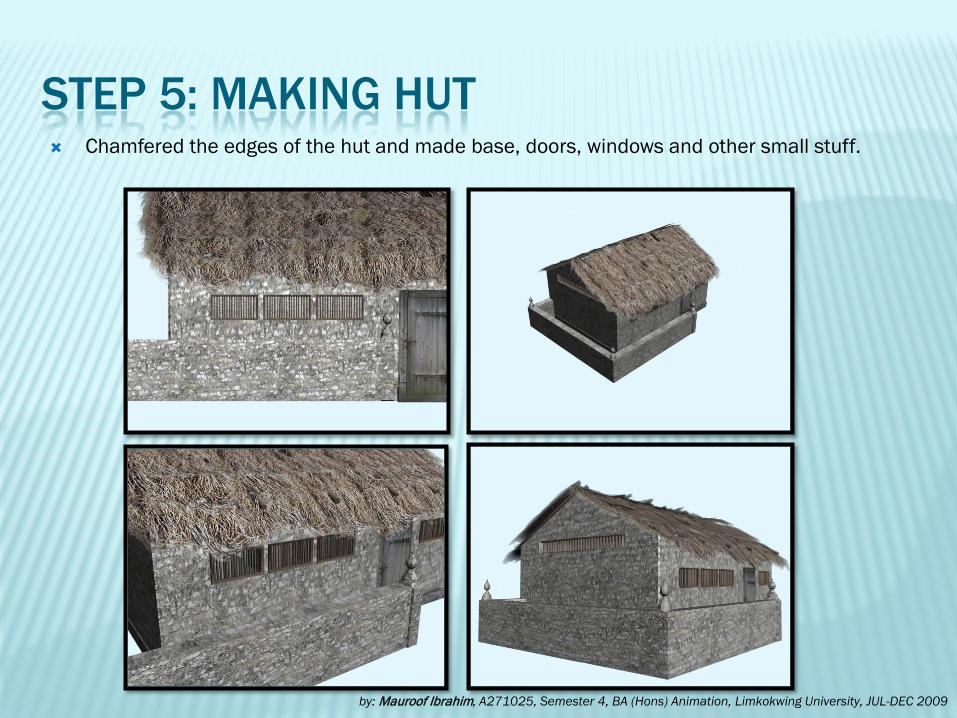
STEP 5: MAKING HUT Chamfered the edges of the hut and made base, doors, windows and other small stuff.
by: Mauroof Ibrahim, A271025, Semester 4, BA (Hons) Animation, Limkokwing University, JUL-DEC 2009

STEP 6: SETTING UP THE SCENE Used the sketch drawn before on plane material and slowly started merging all objects
into the scene.
by: Mauroof Ibrahim, A271025, Semester 4, BA (Hons) Animation, Limkokwing University, JUL-DEC 2009

STEP 6: SETTING UP THE SCENE It was a slow and painstaking process.
by: Mauroof Ibrahim, A271025, Semester 4, BA (Hons) Animation, Limkokwing University, JUL-DEC 2009

STEP 6: SETTING UP THE SCENE It was a slow and painstaking process.
by: Mauroof Ibrahim, A271025, Semester 4, BA (Hons) Animation, Limkokwing University, JUL-DEC 2009

STEP 7: LIGHTING AND PARTICLES I placed three point light, two in the front and one at the back, all Omni and adjusted the intensity. Then
had a problem with sky accepting the shadows. I also played with water material at this point because it is easier to adjust material to lights.
by: Mauroof Ibrahim, A271025, Semester 4, BA (Hons) Animation, Limkokwing University, JUL-DEC 2009
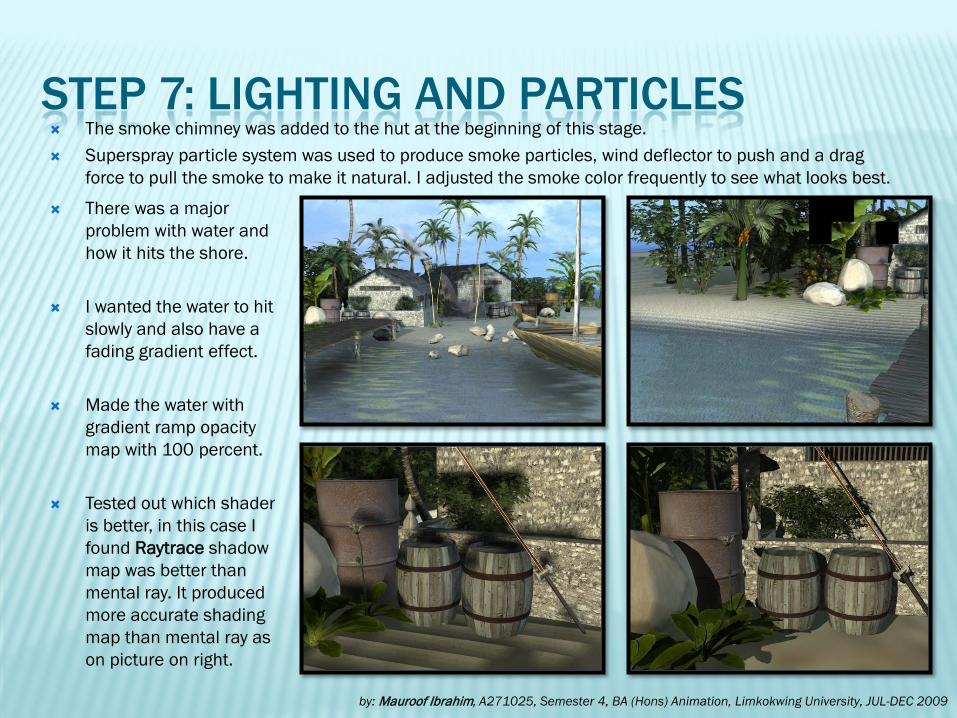
STEP 7: LIGHTING AND PARTICLES The smoke chimney was added to the hut at the beginning of this stage. Superspray particle system was used to produce smoke particles, wind deflector to push and a drag
force to pull the smoke to make it natural. I adjusted the smoke color frequently to see what looks best.
by: Mauroof Ibrahim, A271025, Semester 4, BA (Hons) Animation, Limkokwing University, JUL-DEC 2009
There was a major problem with water and how it hits the shore.
I wanted the water to hit slowly and also have a fading gradient effect.
Made the water with gradient ramp opacity map with 100 percent.
Tested out which shaderis better, in this case I found Raytrace shadow map was better than mental ray. It produced more accurate shading map than mental ray as on picture on right.

STEP 7: LIGHTING AND PARTICLES This was so annoying. The gradient opacity just kept cutting at a certain point.
by: Mauroof Ibrahim, A271025, Semester 4, BA (Hons) Animation, Limkokwing University, JUL-DEC 2009
I thought it was lighting problem so turned on the lights and on, one by one. (BUT IT WASN’T), it was a problem of landscape clashing with water at an abrupt position and gradient didn’t translate that on render.
Played with the opacity maps a lot and then found the solution (turned it 270 degrees)
Lastly finalized the scene with adjusting sea water color a little bit and increasing its reflective amount.

STEP 8: CAMERA Set-upped a target camera on the smoke chimney and rendered it mental ray shadow
map first and then later checked with Raytrace shadow map.
by: Mauroof Ibrahim, A271025, Semester 4, BA (Hons) Animation, Limkokwing University, JUL-DEC 2009

STEP 9: AO PASS The tress came out as planes as the lecturer expected. Time was running low so..didn’t do
a whole animation pass on A/O. So troublesome!!
by: Mauroof Ibrahim, A271025, Semester 4, BA (Hons) Animation, Limkokwing University, JUL-DEC 2009

STEP 10: Z-DEPTH PASS To give depth and definition, I did render a Z-depth pass.
by: Mauroof Ibrahim, A271025, Semester 4, BA (Hons) Animation, Limkokwing University, JUL-DEC 2009

Hope you enjoyed!
by: Mauroof Ibrahim, A271025, Semester 4, BA (Hons) Animation, Limkokwing University, JUL-DEC 2009
THANK YOU
ACKNOWLEDMENT
The LecturersMiss Gianne Yap
Sir Eric Loo
My classmates
Ting…for her suggestionsStef…for monkeying around
Thao…for her placeJade…How are you?Nigel…for inspiration
Robin…for killing our troublesLogan…for not giving upFitri…for the CIRA forms
Ernie…for the cakesThiyagu…for mobile connection
Allan…for asking questionsAmanda…for always trying
&
My friends and family.