Making A Mini comic book
1
CREATING AND SELF-PUBLISHING YOUR MINICOMICS by mac mccool (from the National Association of Comics Art Educators , www.teachingcomics.org ) Materials: a few sheets of paper (letter size for this demo); a marker; a stapler; scissors or knife MAKING THE MINICOMICS PAGE- TEMPLATE 1. Fold a sheet of paper twice (see graph) 2. With the sheet folded, number the pages inside with your marker. Once done, when you open up the sheet, your numbering and number orientation should match the design. You have just figured out where each page will go. LAYING OUT THE COMICS 3. Draw 8 panels of comics. Their dimension should be proportional with the width and height of the final size of your book. 4. If needed, scale up or down your panels by printing or photocopying them. Paste each panel according to the position and up/down orientation of the minicomics page template created before. MAKING COPIES 5. Reproduce your minicomics (by printing or photocopying on both sides of a sheet). 6. Fold the sheet with your reproduced design. 7. Saddle-staple (like a magazine) on the fold of the spine with one or two staples. If you have a large minicomics, you may need a large (or long-arm) stapler. 8. With scissors or a knife cut apart the pages. 9. Check the sequence of pages. If your pages are in the correct order and right orientation, repeat steps 5 through 8, to make more minis to share with your friends and family!
-
Upload
api-3762790 -
Category
Documents
-
view
348 -
download
2
Transcript of Making A Mini comic book
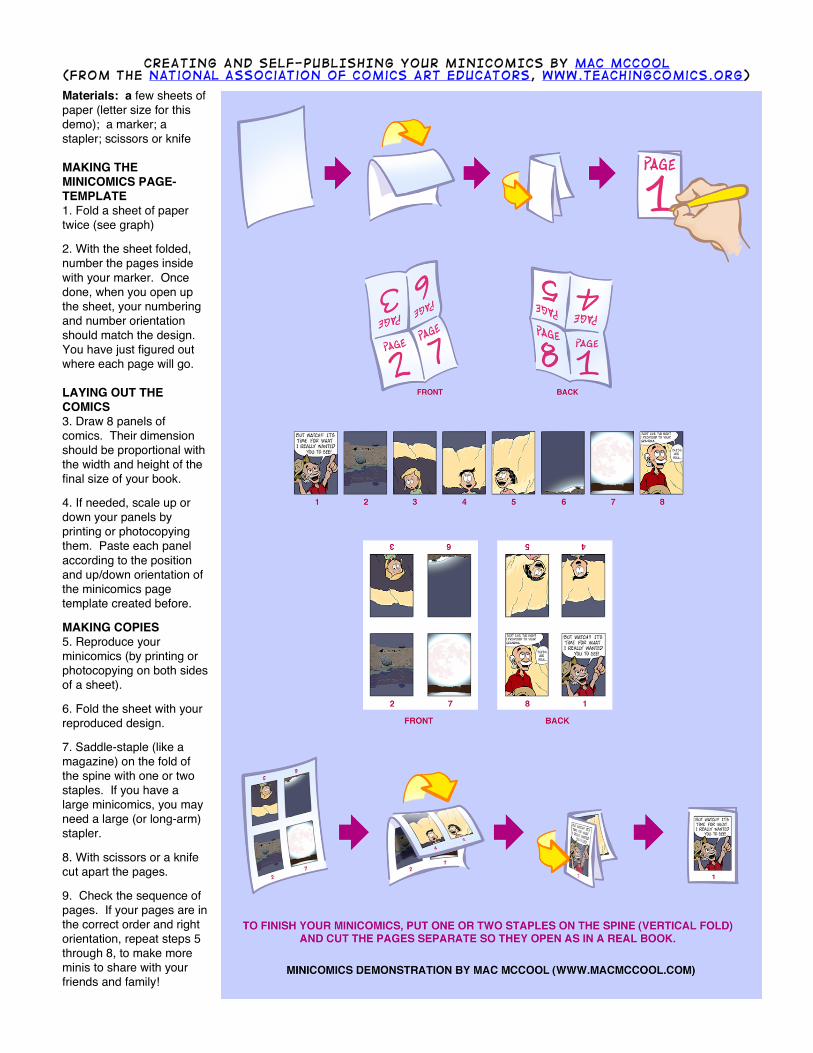
CREATING AND SELF-PUBLISHING YOUR MINICOMICS by mac mccool (from the National Association of Comics Art Educators, www.teachingcomics.org)
Materials: a few sheets of paper (letter size for this demo); a marker; a stapler; scissors or knife MAKING THE MINICOMICS PAGE-TEMPLATE 1. Fold a sheet of paper twice (see graph) 2. With the sheet folded, number the pages inside with your marker. Once done, when you open up the sheet, your numbering and number orientation should match the design. You have just figured out where each page will go. LAYING OUT THE COMICS 3. Draw 8 panels of comics. Their dimension should be proportional with the width and height of the final size of your book. 4. If needed, scale up or down your panels by printing or photocopying them. Paste each panel according to the position and up/down orientation of the minicomics page template created before. MAKING COPIES 5. Reproduce your minicomics (by printing or photocopying on both sides of a sheet). 6. Fold the sheet with your reproduced design. 7. Saddle-staple (like a magazine) on the fold of the spine with one or two staples. If you have a large minicomics, you may need a large (or long-arm) stapler. 8. With scissors or a knife cut apart the pages. 9. Check the sequence of pages. If your pages are in the correct order and right orientation, repeat steps 5 through 8, to make more minis to share with your friends and family!