Making a DVD With Your Digital Kit
19
Making a DVD With Your Digital Kit This guide will take you through the process of putting your digital masterclass video on to a DVD disc and your PDF choreography notes on to your tablet so that you can view both simultaneously. This guide has been created using a computer running Windows 7 and uses a tablet running Android 3.2. The functionality of the Android tablet for the purposes of this guide remains the same for previous and future versions of Android devices. Required software: AVStoDVD Imgburn Both of these are completely free to download and install with no ongoing costs. Other required items: 1 Blank DVD Disc for each Masterclass you want to put on to disc. Examples: o Imation 10 Pack DVD-R - $11.46 ($1.15 per disc) http://www.officeworks.com.au/shop/officeworks/p/imation-eco-16x-dvd-r-discs-4- 7gb-10-pack-imdvdr10pk o Imation 50 Pack DVD-R - $25.00 ($0.50 per disc) http://www.officeworks.com.au/shop/officeworks/p/imation-dvd-r-discs-inkjet- printable-white-50-pack-imdvdijh50 This guide assumes that the Digital Music Kit has been downloaded on to the computer already.
Transcript of Making a DVD With Your Digital Kit

Making a DVD With Your Digital Kit
This guide will take you through the process of putting your digital masterclass video on to a DVD
disc and your PDF choreography notes on to your tablet so that you can view both simultaneously.
This guide has been created using a computer running Windows 7 and uses a tablet running Android
3.2. The functionality of the Android tablet for the purposes of this guide remains the same for
previous and future versions of Android devices.
Required software:
AVStoDVD
Imgburn
Both of these are completely free to download and install with no ongoing costs.
Other required items:
1 Blank DVD Disc for each Masterclass you want to put on to disc. Examples:
o Imation 10 Pack DVD-R - $11.46 ($1.15 per disc)
http://www.officeworks.com.au/shop/officeworks/p/imation-eco-16x-dvd-r-discs-4-
7gb-10-pack-imdvdr10pk
o Imation 50 Pack DVD-R - $25.00 ($0.50 per disc)
http://www.officeworks.com.au/shop/officeworks/p/imation-dvd-r-discs-inkjet-
printable-white-50-pack-imdvdijh50
This guide assumes that the Digital Music Kit has been downloaded on to the computer already.

Downloading, installing, and running AVStoDVD
1. Download the free software AVStoDVD from the official website:
https://sites.google.com/site/avstodvdmain/
You will see many options to download as shown below. Click on Installer Package as shown in
the image.
2. Once the file has downloaded successfully, open Windows Explorer by clicking on the yellow
folder icon on the bottom left-hand side of your screen, as shown in the below image.

3. Navigate to your Downloads folder and find the downloaded file. It will be called
AVStoDVD_283_Install.exe. To install this, right-click this file and select Run as Administrator.
4. If a security warning pops up, select Run. Follow the prompts by clicking the Next buttons,
accepting the terms and conditions by ticking the checkbox and clicking Next to confirm.

5. Select all components to install as per the below image and click Next. Keep clicking Next to
progress through the installation process and it will begin installing.
6. Once installed, you can run the program. You can find the icon on your desktop by pressing on
your keyboard Windows + D. You will then see the screen below as the program runs for the
first time. Make sure you have the same options selected as this image then click OK.

7. You will be taken to the main screen for the program as shown below. Click the Add Title button
as shown in the image.

8. This will open up a new window where you can find the location of your video files. Left-click on
the video file and click Open.
9. You will receive the following dialog box. Click Yes to continue.
10. You will then receive the following dialog box. Place a tick in the two boxes as shown below.
Click the X on the top right hand side of the box to confirm. Doing this will allow you to turn on
and off presenters voices on the DVD.

11. Your file will now appear in the Source Titles box in AVStoDVD Studio. Now you need to select
the size of the DVD you wish to create. Click the Downward-facing Arrow next to the DVD Size
icon as shown in the image below. A regular DVD is DVD-5 (4.7 GB). The bullet-point next to it
indicates it is the selected option, which is what you want.
12. Click the Downward-facing Arrow next to the Outputicon as shown below. Select DVD Folder
Structure.

13. By default, your video will be saved in your Videos folder. If you wish to change where it is
saved, under the Output Folder header you will see a folder icon with a magnifying glass. Click
this to choose a new location if required. Now to begin the process, click the Start icon on the
bottom right-hand side of the window.
14. A dialog box will pop up that looks similar to the image below. You can confirm this and begin
the process by clicking OK.
15. Many windows may pop-up while the program works. Do not close any of them until the process
is completed. You will see a screen similar to the image below when it is complete.

16. Click Close and navigate to your Videos folder by accessing Windows Explorer and selecting the
Videos folder from the left-hand side of the window. You might have a folder called DVD which
will have two other folders called VIDEO_TS and AUDIO_TS. You are now ready to create the
DVD with Imgburn.

Installing and using ImgBurn
1. Visit http://www.imgburn.com in your web browser. Click Download as shown in the below
image.
2. On this list, select Mirror 7 – Provided by ImgBurn. This will begin the download process.

3. Once the download has completed, navigate to the Download folder in Windows Explorer and
find the file SetupImgBurn_2.5.8.0.exe. Right-click and choose Run as Administrator.
4. Click Next to proceed through the installation process. When you get to the screen shown in the
below image, select the options as shown and click Next.
5. When you get to the screen asking you to install Search My Window click on Custom
Installation (advanced) and make sure the box next to Install Search My Window is not ticked.
Click Next.
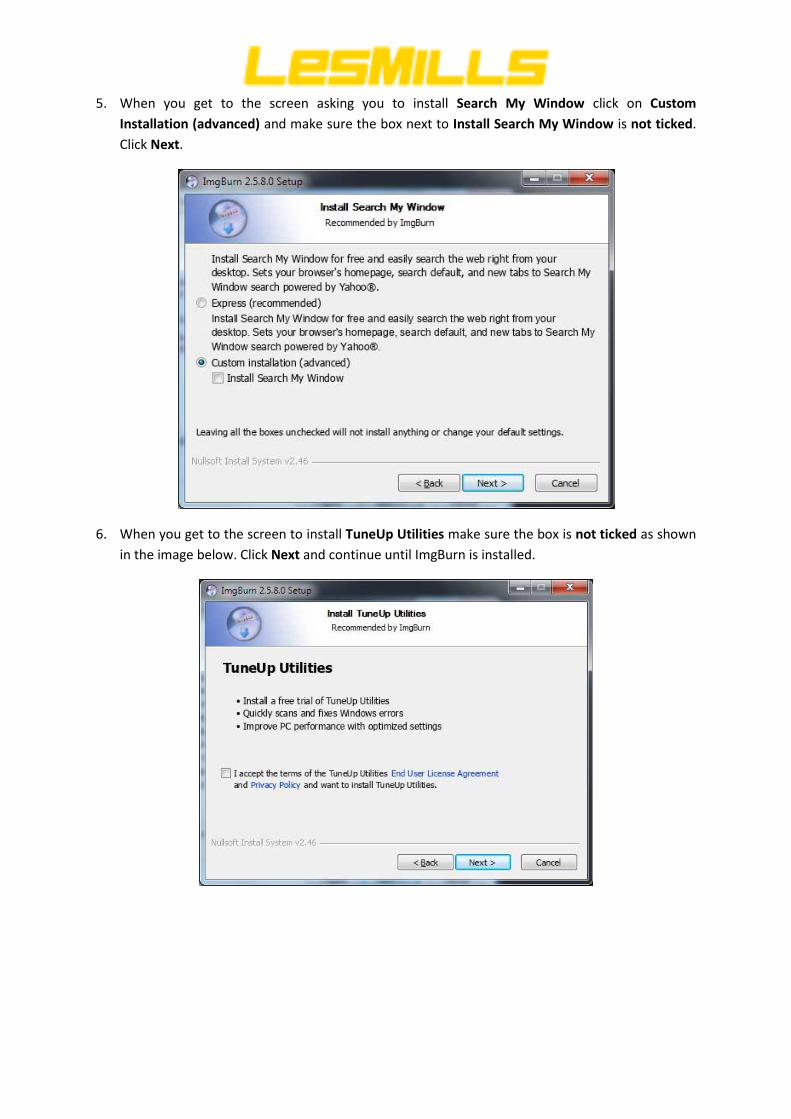
6. When you get to the screen to install TuneUp Utilities make sure the box is not ticked as shown
in the image below. Click Next and continue until ImgBurn is installed.

7. Once ImgBurn has installed successfully, open it by double-clicking the icon on the desktop. You
will see a screen similar to the below image. Click on the icon labeled Write files/folders to disc.
8. The screen will change to be similar to the image below. Click the icon of t he folder with the
magnifying glass.

9. Locate the folder you created earlier with AVStoDVD inside your Videos folder in the dialog box
that pops up. Left-click once on the folder to highlight it and click Select Folder to choose it, as
shown in the below image.
10. Your folder will now show up in the list as shown below. Insert a blank DVD disc into your DVD
drive on the computer and click the button outlined in the image below to begin the burning
process.

11. If you get a pop-up that looks like the image below, click Yes to continue.
12. ImgBurn will now begin burning your DVD. Once it is completed, you will see a screen like the
image below. Click OK to have your computer eject the disc. You can now play this disc using
your DVD player.

Transferring Your Choreography Notes to a Tablet or Smartphone Device
1. Connect your Tablet to your Computer using the USB Cable. A window might pop up like the one
below. If you do, click on Open device to view files and go to Step 4.
2. If nothing popped up, open Windows Explorer by clicking on the yellow folder icon on the
bottom left-hand side of your screen, as shown in the below image.

3. Navigate to Computer as shown by 1 in the image below. Then look for your device. In this case,
it shows up under the heading Portable Devices as marked by 2. Sometimes it can also show up
under Hard Disk Drives. Double-click on your device to use it’s storage
4. In this case, I only have the Internal Storage option. In some cases, you may see Memory Card
or another option. For this purpose we are going to double-click on Internal Storage. This should
also work for you.

5. You will be shown the list of files and folders that are currently on your device. Right-click on the
blank white space to bring up the menu shown below. Click on New Folder (or if you don’t see
this option, hover over New then choose Folder). Call this folder Choreography Notes. Double-
click this newly created folder to open it.
6. You can now copy your choreography notes from your computer to this folder on your device.
Once it is on your device, remove your device from your computer and you will be able to read
the choreography notes on your device. If your device does not have an app that can open and
read .PDF files, you can download one from the Google Play store. Some free and great
examples are below:
Adobe Acrobat Reader -
https://play.google.com/store/apps/details?id=com.adobe.reader&hl=en
Google PDF Viewer –
https://play.google.com/store/apps/details?id=com.google.android.apps.pdfviewer&hl=en
Amazon Kindle -
https://play.google.com/store/apps/details?id=com.amazon.kindle&hl=en
In order to open your choreography notes on your device you may need to download a File Manager
app, if your tablet does not already have one. Some free and great apps are below:
ASTRO File Manager -
https://play.google.com/store/apps/details?id=com.metago.astro&hl=en
OI File Manager -
https://play.google.com/store/apps/details?id=org.openintents.filemanager&hl=en

Using the File Manager app, find the Choreography Notes folder you created on your computer
earlier and open the choreography notes you wish to view.