Makerbot Training Manual
14
0 Makerbot 3D Printers Training Manual Table of Contents INTRODUCTION ...................................................................................................................... 0 Why 3D Print? ............................................................................................................................................................................. 0 Why Use Makerbots? ................................................................................................................................................................ 1 SAFETY ................................................................................................................................... 1 WARNING:..................................................................................................................................................................................... 1 RISK OF INJURY: ......................................................................................................................................................................... 1 CAUTION: ...................................................................................................................................................................................... 1 GETTING STARTED .................................................................................................................. 1 Specifications & Capabilities ................................................................................................................................................. 2 Do You Have to Know How to Design Pieces to Use a Makerbot? ........................................................................ 2 What Software Do You Need? ............................................................................................................................................... 3 PREPARE YOUR DESIGN .......................................................................................................... 3 CUSTOM SETTINGS ................................................................................................................................................................... 6 EXPORT YOUR DESIGN ............................................................................................................ 7 MAKERBOT REPLICATOR 2/2X MAINTENANCE ........................................................................ 7 Materials ........................................................................................................................................................................................ 7 Filament Quantity ...................................................................................................................................................................... 8 Loading/Changing Filament ................................................................................................................................................. 8 Leveling the Build Plate ....................................................................................................................................................... 10 Print from SD Card ................................................................................................................................................................. 11 Removing Your Build and Clean Up ................................................................................................................................ 11 TROUBLESHOOTING.............................................................................................................. 12 EXTERNAL LINKS FOR MORE INFO ......................................................................................... 13 INTRODUCTION Why 3D Print? Three dimensional printing allows you to quickly iterate prototypes of your product when you want to see what a design would look like. Printing a device or a part is useful when simpler methods such as plastic bending does not suit your design.
Transcript of Makerbot Training Manual

0
Makerbot 3D Printers
Training Manual
Table of Contents INTRODUCTION ...................................................................................................................... 0 Why 3D Print? ............................................................................................................................................................................. 0 Why Use Makerbots? ................................................................................................................................................................ 1
SAFETY ................................................................................................................................... 1 WARNING: ..................................................................................................................................................................................... 1 RISK OF INJURY: ......................................................................................................................................................................... 1 CAUTION: ...................................................................................................................................................................................... 1
GETTING STARTED .................................................................................................................. 1 Specifications & Capabilities ................................................................................................................................................. 2 Do You Have to Know How to Design Pieces to Use a Makerbot? ........................................................................ 2 What Software Do You Need? ............................................................................................................................................... 3
PREPARE YOUR DESIGN .......................................................................................................... 3 CUSTOM SETTINGS ................................................................................................................................................................... 6
EXPORT YOUR DESIGN ............................................................................................................ 7
MAKERBOT REPLICATOR 2/2X MAINTENANCE ........................................................................ 7 Materials ........................................................................................................................................................................................ 7 Filament Quantity ...................................................................................................................................................................... 8 Loading/Changing Filament ................................................................................................................................................. 8 Leveling the Build Plate ....................................................................................................................................................... 10 Print from SD Card ................................................................................................................................................................. 11 Removing Your Build and Clean Up ................................................................................................................................ 11
TROUBLESHOOTING .............................................................................................................. 12
EXTERNAL LINKS FOR MORE INFO ......................................................................................... 13
INTRODUCTION
Why 3D Print? Three dimensional printing allows you to quickly iterate prototypes of your product when you want to see what a design would look like. Printing a device or a part is useful when simpler methods such as plastic bending does not suit your design.

1
Most 3D printers use a process called additive printing, where the 3D printed object is achieved using additive layers until the entire object is generated. Each layer is a thinly sliced cross-section of the final product.
Keep this in mind when designing your pieces, as this can affect the resolution of the product and the finishing process of your design.
Why Use Makerbots? Makerbots are a quick way to prototype your design before going to a much more expensive, fancier printer. They are also better for situations where you simply need a 3D printed object, and your part is not constrained by needs for flexibility, autoclavability, biocompatibility, and if the materials in use are sufficient for your purposes. Another advantage is that it is inexpensive to make many of your pieces, relative to other printing options. Therefore, the Makerbot is a great tool to print your design and to check if your design functions correctly for your purposes.
SAFETY
WARNING: Melting ABS plastic may create fumes. Make sure to keep the Replicator 2X covered. The MakerBot Replicator 2 and 2X Experimental 3D Printers generate HIGH TEMPERATURES, and include moving parts that can result in injury.
Never reach inside the device while it is in operation. Always allow it to cool down before reaching inside.
RISK OF INJURY: Injury can occur from interaction with the device as detailed above, or during the process of removing the piece from the build plate. Use caution when removing pieces, and when using tools to this end.
CAUTION: In case of emergency, disconnect power supply from the wall socket.
GETTING STARTED

2
Specifications & Capabilities The two types of Makerbots that we have in Design Studio West are the Makerbot Replicator 2 and Replicator 2X. Below we have a table detailing the different specifications for these printers.
Be mindful of the build sizes of the printers and the materials they use. These printers are mostly the same, but they also have different capabilities!
Do You Have to Know How to Design Pieces to Use a Makerbot? No, you can download ready-to-use designs from places like Thingiverse.com. Just remember to resize them as needed for printing, which will be discussed below.

3
What Software Do You Need? You’re definitely going to need 3D modeling software(if you’re not downloading an STL file)., such as SolidWorks, Creo, Inventor, Rhino, etc. Be aware that Solidworks, Creo, and Inventor are solid modeling programs and convert to STL files correctly. Rhino, SketchupPro, and Alias are surface modeling programs which can cause unexpected results.
You’ll also need Makerbot Desktop, Makerbot’s software that allows you to prepare your print for the printer. Fortunately, all the software you need is installed on the laptops available in Design Studio West. You can also download it for free here.
Additionally, if you want to use SolidWorks on your own laptop, you can download SolidWorks through the Whiting School of Engineering’s software website and get a license sent to you via email.
Link: WSE Software Downloads: SolidWorks 2015 SP05 64-bit
Link: Makerbot Desktop
PREPARE YOUR DESIGN
Once you have a 3D design ready to print, you must save in a compatible file type (.stl, .thing, or .obj). The most common format is the STL file.
Open Makerbot Desktop and select the printer that you are planning to use for your build. Files exported for the Replicator 2 will not work on the Replicator 2X (and vice versa).
Add your file by clicking “ADD FILE” to add the design to your virtual build platform.

4
Once you add your file, you may to need to scale your design to make sure it fits within the Makerbot’s printing size. If it’s too big or too small, you can resize it to fit within the print space. Or if you want it to be the size you specified, select “Keep to size.”
Next, by clicking on the icons on the left, you can change the view, position, rotation and dimensions of your part. Some quick tips:
● Change your view of the build platform with left click and drag (only in view menu) ● ALWAYS click “On Platform” and “Lay Flat” to make sure your build is on the plate ● Easily resize your part with the “Scale To: ___%” function

5
For the Replicator 2X, there will be a fifth icon to select which extruder(s) you want to use. To choose one, select your part, go to the information menu and select left or right from the drop down menu. Your part should turn the appropriate color.
Once you have your print in Makerbot Desktop, make sure to rotate your design if necessary. The Makerbots print supporting material for the build as it prints (see below for more). These supports are removable but you want to minimize the amount of support being printed and filament wasted. Below is an example where the orientation shown on the right is the proper orientation because it does not unnecessarily add supports.
The Makerbot may create a “raft,” a bottom layer designed to be removed underneath your design. Rafts help give parts more stability, especially for parts that are taller than they are wide. Rafts may also help prevent the edges of your part from warping upwards.
Once you have placed your design correctly, check your settings (quick settings tab).
● Resolution ○ Most builds only need low quality resolution. You may have parts that need
standard/high resolution. Increasing resolution will increase print time. ● Rafts
○ Use for parts that are taller than wide

6
○ Improve stability and adherence to build plate ○ Decrease warping
● Supports ○ Use for parts with overhangs and long bridges ○ Not needed if your print does not have unsupported areas
● Material ○ Replicator 2 ONLY uses PLA ○ Replicator 2X uses ABS (primarily) and PLA
Use PREVIEW (next to Export) to see how your part will print, how long it will take and how much material it will use.
CUSTOM SETTINGS
While most parts will not require custom settings, they are explained below.
Layer Height
● Set the thickness of the individual layers of your printed object. A lower layer height will result in a smoother surface. An object with a higher layer height will print more quickly.
Infill Layer Height
● Set your infill to print at a different layer height than the Layer Height set in the Model Properties section. This allows you to speed up your print without sacrificing surface quality. Infill Layer Height should always be set to a multiple of Layer Height.
Infill Density
● Set the density of your printed object’s internal support structure. A higher percentage will result in a heavier, stronger object.
● Shells
● Set the number of outlines the extruder prints on each layer before printing the infill. More shells make an object stronger and heavier and increase print times.

7
Extruder Temperatures
● Set the temperature to which the extruder will be heated during your prints. Different materials or print speeds will call for different print temperatures.
● If you have a MakerBot 3D printer with dual extruders connected, or selected as your type of device, you will see temperature fields for both the right and left extruders.
Extrusion Speeds
● In the Speed section, you can edit the print speeds for different sections of your printed object. Faster travel speeds mean that there will be a faster print time but runs the risk of the filament not fully melting.
EXPORT YOUR DESIGN
Finally, click “Export Print File” to save your file. Load your file onto SD cards located between the Makerbots in Design Studio West. Do not use an SD card larger than 4GB. Save your exported (it will be an X3G file) onto the SD card, and you are now ready to print!
MAKERBOT REPLICATOR 2/2X MAINTENANCE
Materials Materials can be found in the Design Studio in the blue containers under the Makerbots.

8
Replicator 2: PLA ONLY
Replicator 2X: ABS (primary) and PLA
Make sure to read the labels on the side of the spool to make sure you’re using the correct filament or you can risk damaging this device.
Filament Quantity Make sure there is enough filament to print your design before your start your build! Look at your design and keep in mind that your design is not solid. The infill density that you choose can affect the amount of material needed to print your design. The Replicator 2X has two filament spools.
If you run out of filament, you can replace the empty filament in the middle of a print, but this may affect the quality of your build at the break point.
Loading/Changing Filament
Spool Setup
You will want to replace the filament if there isn’t enough for your build, or if you want to print in a different color filament. Make sure that the new filament spool you are placing onto the bot is not tangled. If it is tangled, unspool it and wind it back up until it looks even. The filament must be coming off of the spool from UNDERNEATH in order to function properly.
Raise or Lower the Build Plate

9
Before loading a new filament, the build plate needs to be at least 1 inch from the extruder tip. If the build plate was just leveled, it may be very close to the extruder. Use arrows to scroll through the menu options (M is the enter button).
Go to Utilities > Jog Mode > hit the right button until you reach the Z options. Press the down button to move the build plate down at least 1 inch from the extruder tip.
Hit M to return to the utilities section, and then navigate using arrows to the Change Filament option (M for enter). Choose the load option (M for enter).
The Makerbot will turn a small motor in the extruder head. Gently feed a small piece of filament sticking out of the clear guide tube into the hole at the top of the extruder head, until the motor catches and begins pulling it down. If the motor does not catch, find a TA or get assistance from a supervisor - do not force the filament in*. If you are changing colors, you may want to let the extruder purge a few seconds until you have your pure desired color coming out of the extruder.
*Quick Troubleshoot: A common problem is ripped/ragged end of filament, use a cutting tool to create a clean cut and try again, without forcing.

10
Press M to stop the flow of filament. Wait a few seconds for the filament to cool and solidify. Pull out any excess filament to clear the extruder.
Leveling the Build Plate It is your responsibility to ensure that the build plate is level for your print job - every time.
There are 3 knobs to adjust
● Turning knobs to the RIGHT moves the build plate AWAY from the extruder ● Turning knobs to the LEFT moves the build plate TOWARD the extruder ● The distance between the extruder nozzle and build plate should be the same for ALL points and
is done based on the resolution you chose for your print job ○ High resolution - use a single sheet of paper (recommended) ○ Standard resolution - use two sheets of paper ○ Low resolution - use 3 sheets of paper
First, make sure the build plate is clear and clean. Navigate to the Utilities section (as described above in the loading/changing filament section), click the M, and navigate using the arrows to the Level Build Plate option. The instructions will guide you to tighten the three knobs under the build plate, checking each point with a piece of paper.
You will be prompted to adjust each knob individually. You will know it is properly level when you feel friction on the paper but can still pass the paper under the extruder nozzle without damaging the paper. You want this to feel the same under every point. If you have trouble, ask a TA or experienced classmate for assistance in getting the ‘feel’ for it.
It will prompt you to adjust each knob a second time for fine tuning. This time, the paper should slide with a bit more friction. Lastly it will move to the center of the plate to check one last time that the paper slides in and that you feel moderate friction.
11
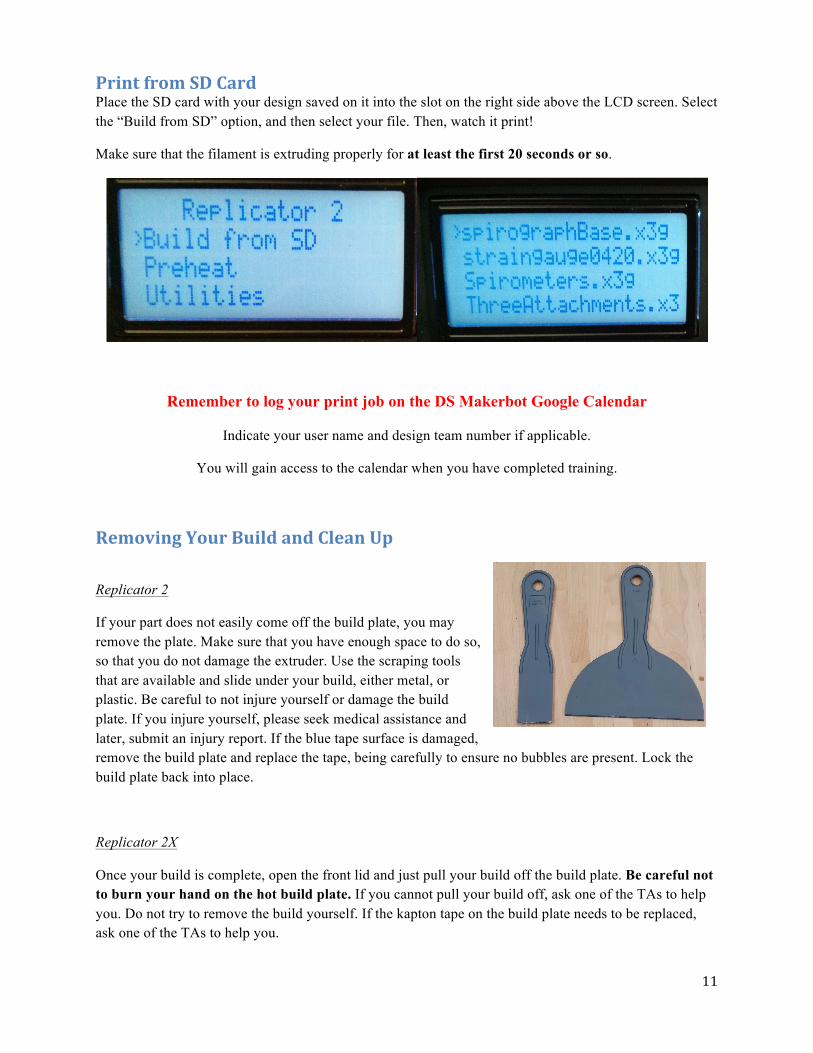
Print from SD Card Place the SD card with your design saved on it into the slot on the right side above the LCD screen. Select the “Build from SD” option, and then select your file. Then, watch it print!
Make sure that the filament is extruding properly for at least the first 20 seconds or so.
Remember to log your print job on the DS Makerbot Google Calendar
Indicate your user name and design team number if applicable.
You will gain access to the calendar when you have completed training.
Removing Your Build and Clean Up
Replicator 2
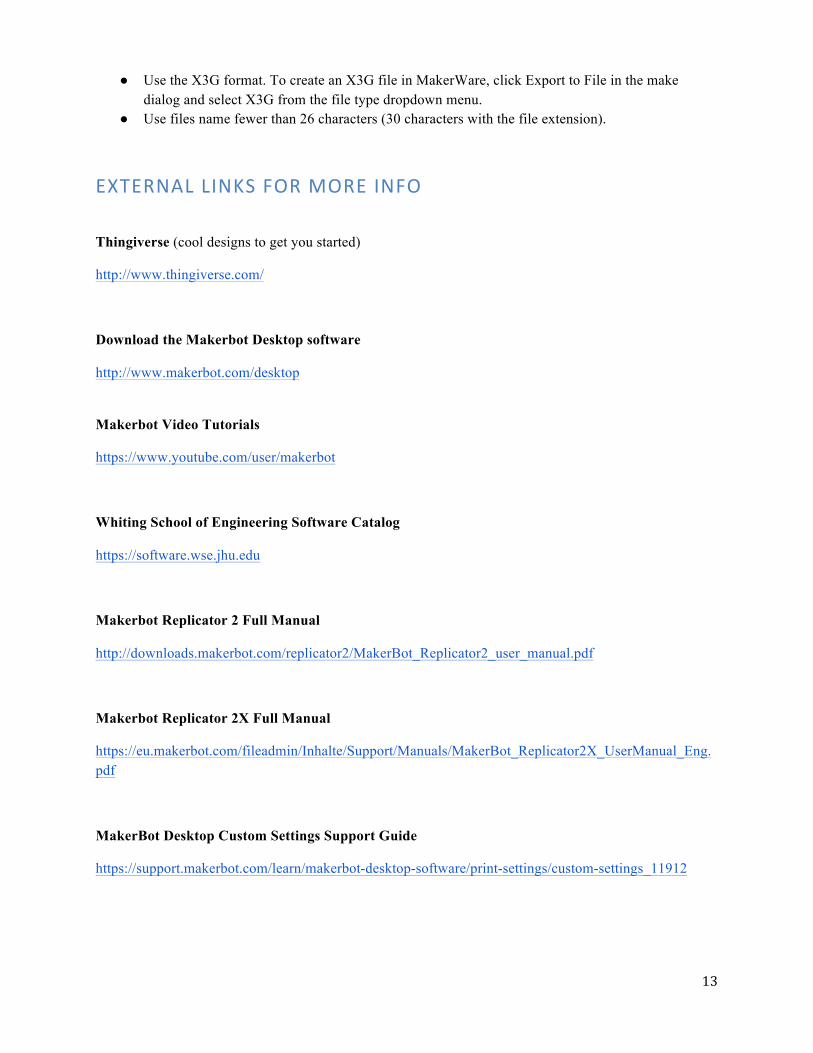
If your part does not easily come off the build plate, you may remove the plate. Make sure that you have enough space to do so, so that you do not damage the extruder. Use the scraping tools that are available and slide under your build, either metal, or plastic. Be careful to not injure yourself or damage the build plate. If you injure yourself, please seek medical assistance and later, submit an injury report. If the blue tape surface is damaged, remove the build plate and replace the tape, being carefully to ensure no bubbles are present. Lock the build plate back into place.
Replicator 2X
Once your build is complete, open the front lid and just pull your build off the build plate. Be careful not to burn your hand on the hot build plate. If you cannot pull your build off, ask one of the TAs to help you. Do not try to remove the build yourself. If the kapton tape on the build plate needs to be replaced, ask one of the TAs to help you.

12
TROUBLESHOOTING
Extrusion stops during a build:
● Re-level your build plate. Your build plate might be so close to the extruder that it is preventing plastic from coming out of the nozzle.
● Extrusion could also stop if your filament has been heated for too long. Unload the filament, cut a fresh edge, and load the filament again.
Cannot load filament into the extruder:
● Make a fresh cut at the end of the filament. Cut the filament at an angle—a narrow tip will help with loading. It is also important that the filament is not bent.
Extruder makes a clicking noise when loading filament:
● A piece of filament may be stuck in your extruder. See the section on loading/changing filament. Any filament stuck in the lower portion of the extruder can be pulled from the heated extruder using a pair of pliers.
● The extruder may be clogged. Contact a TA or supervisor for help.
Object does not stick to build plate:
● Re-level your build plate. Inconsistent plate height will lead to inconsistent adhesion. If any one part of your object does not adhere well to the build plate, the whole object might peel off of the plate.
● Ensure that the plate is clean. Tears, dust and debris can prevent objects from sticking to the plate. Wipe down the build plate with a clean, lint-free cloth.
● Add a raft to your build. It will increase adherence to the build plate.
Object is stuck to build plate:
● Wait for the object to cool down. Objects will detach more easily after they have cooled. ● If the object is still stuck, take a thin metal craft spatula and carefully work the blade under the
edge of the object. When the blade is most of the way under the object, twist the handle slightly. The object should come free.
Makerbot does not see files on the SD Card:
● Make sure you selected the correct printer type when exporting your file.
13
● Use the X3G format. To create an X3G file in MakerWare, click Export to File in the make dialog and select X3G from the file type dropdown menu.
● Use files name fewer than 26 characters (30 characters with the file extension).
EXTERNAL LINKS FOR MORE INFO
Thingiverse (cool designs to get you started)
http://www.thingiverse.com/
Download the Makerbot Desktop software
http://www.makerbot.com/desktop
Makerbot Video Tutorials
https://www.youtube.com/user/makerbot
Whiting School of Engineering Software Catalog
https://software.wse.jhu.edu
Makerbot Replicator 2 Full Manual
http://downloads.makerbot.com/replicator2/MakerBot_Replicator2_user_manual.pdf
Makerbot Replicator 2X Full Manual
https://eu.makerbot.com/fileadmin/Inhalte/Support/Manuals/MakerBot_Replicator2X_UserManual_Eng.pdf
MakerBot Desktop Custom Settings Support Guide
https://support.makerbot.com/learn/makerbot-desktop-software/print-settings/custom-settings_11912