Israel · Israel Forever Don’t Click. Israel forever. Israel forever
MAKE YOUR GEAR LAST
FOREVER
Backpacker's Ultimate Fix-It Guide
by: Annette McGivney, Illustrations by Supercorn
We should all hope to have camping equipment that requires regular TLC. It means
we're hiking a lot, because even the very best gear gets worn–even broken–with hard
use. To make your stuff go the extra mile, tear out our illustrated guide to the 55 most
common repairs and maintenance musts. You'll get expert advice for preventive care,
proper storage, and lots of inexpensive fixes. We guarantee you'll save money and
upgrade well-loved gear–and you'll never have to abort a trip due to a balky stove or
leaky tent.
TENTS
Stuck zipper
Accumulated dirt and grime causes zippers to snag. In the field, brush them off
before pulling the slider. At home, clean the teeth with water and a toothbrush, or a
vacuum cleaner. Don't apply any lubricant to zippers–it will only attract more grit.
Occasionally the looped wires form the zipper tracks will bend or separate under
duress. Bob Upton, owner of Rainy Pass Repair, says you can simply straighten the
damaged coils with a knife or needle.
No More Mold
"Have you ever pulled a tent out of the stuff sack and it smells like vomit?" asks MSR
product manager Terry Breaux. "That's the smell of moisture breaking down the
waterproof coating." Even a few drops of condensation can cause mildew to grow, so
never store a wet tent. After a rainy or humid night, drape the fly over a tree and turn
the tent on its side to let the sun dry the bottom. At home, hang the tent on a
clothesline or shower rod. Once it's dry, store it loosely in a cotton pillowcase or
mesh storage sack.
Eliminate mildew (Online Bonus)
Kill black-spotted mildew with this cleaning regimen, which will remove the mold,
though not the stain.
• Mix one cup of Lysol household cleaner into one gallon of hot water (1:16
solution). Pitch the tent and clean it inside and out. Do not rinse–let it dry.
• Cleanse the fabric by mixing one-cup table salt and one-cup lemon juice
(concentrate is okay) into one gallon of hot water. Scrub the tent inside and
out with this solution, then rinse the entire tent with a garden hose.
Remove pine sap
Scrub off sticky stuff with a sponge soaked in mineral oil, then rinse the spot
thoroughly with hot water to remove the residue.
Restoring the floor (Online Bonus)
Just as seam tape will eventually crack and peel, so will the waterproof coating on
your tent floor. You can restore the floor and get a few more seasons' use out of it by
using a pot scrubber to rub off as many loose flakes as possible. Then sponge off the
floor so it is completely clean and allow it to dry. Using a foam brush apply McNett
Tent Sure or some other DWR product that is designed specifically for restoring tent
floor waterproof coatings (available at most outdoor stores).
Maintain a waterproof barrier
Invest in a footprint designed for your tent, or build your own using Tyvek or painter's
plastic. Even a thin barrier will extend the life of the tent floor and prevent ground
soaking during heavy rain, says NOLS gear manager Kevin McGowan, who has
been in charge of issuing and repairing NOLS trip equipment for more than two
decades. In addition, keep DEET-based bug dope away from the tent fabric.
Exposure to that solvent will eat away at the nylon's waterproof coating.
Fact or Myth?
Q: Rolling is better than stuffing.
A: Fact! "Stuffing is bad practice," insists Mountain Hardwear product manager Chris
Hilliard "Repeatedly cramming a tent into a stuffsack creates a lot of small radius
bends in the fabric. These small edges end up being subjected to far more abrasion
and moisture than the coating would be if the tent were folded." The traditional
argument against folding has been that permanent creases weakened the fabric, but
Hilliard says this is preposterous. "It would be impossible to fold the tent in the exact
same place every single time," he claims. MSR's Terry Breaux, a 20-year veteran of

tent design and repair, agrees with Hilliard that rolling is the best
option, because it eliminates micro-creases and segregates the dirty
floor from the rest of the tent. Now make like the entire BACKPACKER
staff and scurry to your gear closet to re-pack your tent.
Ripped mosquito netting
For holes or tears smaller than 2 to 3 inches in diameter, an adhesive mesh patch
(see "Products") provides a quick fix. Or put a swatch of adhesive nylon repair tape
over the gash for a less aesthetic but equally quick, permanent repair. For larger rips
up to 12 inches long, Backpacker field editors prefer to sew the mesh back together
using nylon thread and apply adhesive tape reinforcements as needed. If the mesh
shredded completely or separated at the seams, salvage what you can and return
the tent to the manufacturer or a repair shop (see "Resources").
Torn tent fabric (Online Bonus)
For rips 2 inches or smaller in the rainfly or canopy, there's no need to sew. In fact,
sewing may encourage leaks and stress-related tears. Choose from a variety of
adhesive repair products or the "liquid stitcher" Seam Grip. Plug tiny holes–caused
by embers from a campfire–with a dab of Seam Grip. Allow at least 8 hours for the
glue to dry before packing the tent or laying inside it.
Torn tent fabric (Online Bonus)
Small holes "If you want to do your own repair, an adhesive tape or patch is the best
and by far the easiest option," says Julie Parker, manager of Rainy Pass Repair. You
can repair a small gash in a tent quickly and permanently with ripstop repair tape like
Kenyon's adhesive Nylon Repair Tape, or with a number of pre-cut peel-and-stick
patches.
• Wipe the damaged area clean with water and/or an alcohol prep pad from your
first aid kit. Let it dry. (1)
• Cut a piece of tape to create a round patch that extends approximately one-
quarter inch beyond the tear. Rounded edges eliminate corner that can fray.
(2)
• Place the material on a hard surface like a book or cutting board.
• With one hand, pull the torn tent fabric back together as closely as possible.
Use the other hand to apply the repair tape. Press from the middle toward the
edges, smoothing any ripples. (3)
• If the floor or rainfly is torn, repeat the taping process on the opposite side of
the patch for extra security. The glue backing the adhesive is as waterproof
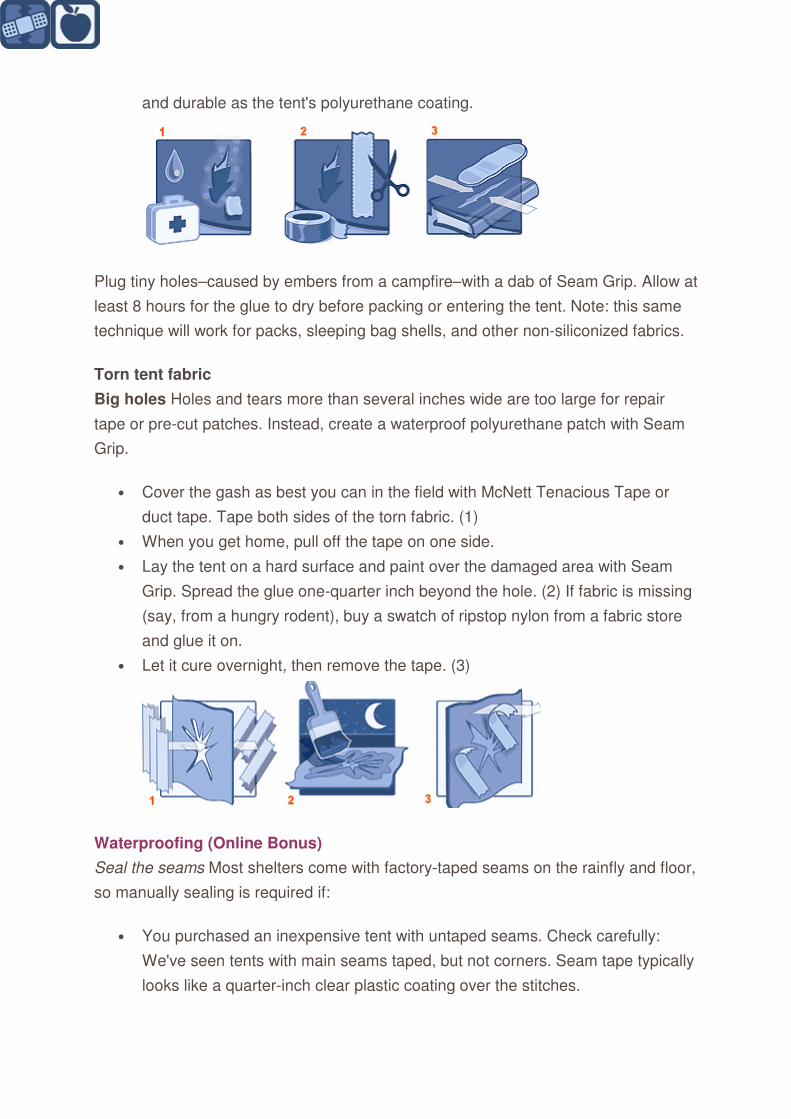
and durable as the tent's polyurethane coating.
Plug tiny holes–caused by embers from a campfire–with a dab of Seam Grip. Allow at
least 8 hours for the glue to dry before packing or entering the tent. Note: this same
technique will work for packs, sleeping bag shells, and other non-siliconized fabrics.
Torn tent fabric
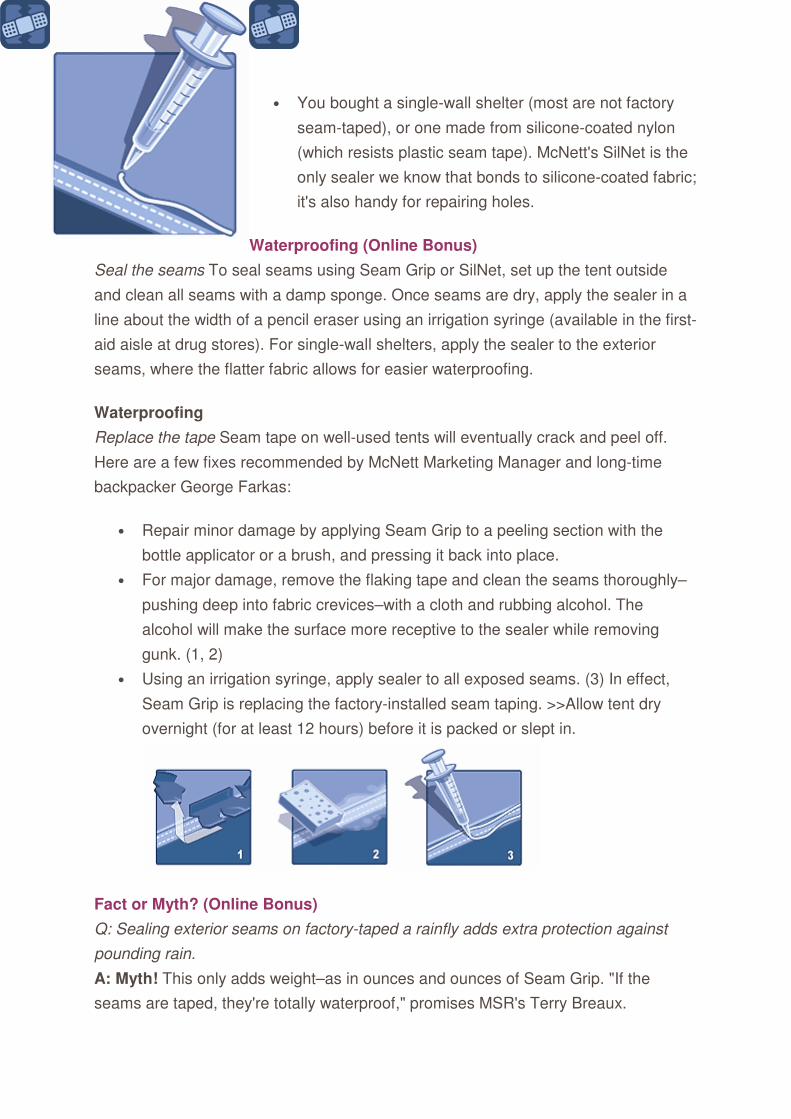
Big holes Holes and tears more than several inches wide are too large for repair
tape or pre-cut patches. Instead, create a waterproof polyurethane patch with Seam
Grip.
• Cover the gash as best you can in the field with McNett Tenacious Tape or
duct tape. Tape both sides of the torn fabric. (1)
• When you get home, pull off the tape on one side.
• Lay the tent on a hard surface and paint over the damaged area with Seam
Grip. Spread the glue one-quarter inch beyond the hole. (2) If fabric is missing
(say, from a hungry rodent), buy a swatch of ripstop nylon from a fabric store
and glue it on.
• Let it cure overnight, then remove the tape. (3)
Waterproofing (Online Bonus)
Seal the seams Most shelters come with factory-taped seams on the rainfly and floor,
so manually sealing is required if:
• You purchased an inexpensive tent with untaped seams. Check carefully:
We've seen tents with main seams taped, but not corners. Seam tape typically
looks like a quarter-inch clear plastic coating over the stitches.
• You bought a single-wall shelter (most are not factory
seam-taped), or one made from silicone-coated nylon
(which resists plastic seam tape). McNett's SilNet is the
only sealer we know that bonds to silicone-coated fabric;
it's also handy for repairing holes.
Waterproofing (Online Bonus)
Seal the seams To seal seams using Seam Grip or SilNet, set up the tent outside
and clean all seams with a damp sponge. Once seams are dry, apply the sealer in a
line about the width of a pencil eraser using an irrigation syringe (available in the first-
aid aisle at drug stores). For single-wall shelters, apply the sealer to the exterior
seams, where the flatter fabric allows for easier waterproofing.
Waterproofing
Replace the tape Seam tape on well-used tents will eventually crack and peel off.
Here are a few fixes recommended by McNett Marketing Manager and long-time
backpacker George Farkas:
• Repair minor damage by applying Seam Grip to a peeling section with the
bottle applicator or a brush, and pressing it back into place.
• For major damage, remove the flaking tape and clean the seams thoroughly–
pushing deep into fabric crevices–with a cloth and rubbing alcohol. The
alcohol will make the surface more receptive to the sealer while removing
gunk. (1, 2)
• Using an irrigation syringe, apply sealer to all exposed seams. (3) In effect,
Seam Grip is replacing the factory-installed seam taping. >>Allow tent dry
overnight (for at least 12 hours) before it is packed or slept in.
Fact or Myth? (Online Bonus)
Q: Sealing exterior seams on factory-taped a rainfly adds extra protection against
pounding rain.
A: Myth! This only adds weight–as in ounces and ounces of Seam Grip. "If the
seams are taped, they're totally waterproof," promises MSR's Terry Breaux.

Block UV damage (Online
Bonus)
Sunlight will degrade
tent fabric just like it
burns your skin. Plus, UV
damage can't be undone. Protect your tent by pitching it in the shade, striking it as
soon as it's dry, and not leaving it up in the yard for weeks at a time. If you anticipate
lots of tanning time for your tent, treat it with a UV protectant (see "Products").
Pole problems (Online Bonus)
Broken shaft You can avoid most malfunctions by gently setting up and taking down
tents cautions McGowan. "Operator error is the cause of 99 percent of our tent
failures." When a break occurs, repair broken and cracked poles promptly to prevent
the rough edges from severing the elastic cord. Split the broken pole by sliding an
aluminum pole sleeve over the damaged area and taping both ends in place.
(Sleeves are 4-inch tubes included with most new tents; you can also purchase them
separately.) Back home, contact the manufacturer for a replacement section or mail-
in repair.
Pole problems
Loose cord Cold weather and repeated yanking can cause a shock cord to lose its
elasticity. If that happens, pry off the cap from one end using a multi-tool, cut off
about 5 inches of slack cord, re-knot the end, and replace the cap. Incurable
limpness or severing requires manufacturer attention.
Wash out a tent
Never put your tent in the washing machine or dry-clean it. Both will destroy its
waterproofing. Instead, clean it manually during and after each trip. Before you take
down a freestanding tent in the field, turn it upside down shake out dirt. At home,
wash the floor with warm water (soap can degrade coatings). Hose down muddy
sidewalls, taking special care to flush out zippers and power wash the floor. Air-dry
the tent completely before storing it in a cotton sack.
Kill the stink (Online Bonus)
If your tent is the victim of an extraordinarily foul event–skunk spray, baby poop, late-
night vomit–dunk the suffering shelter in a tub of warm water and odor-eating McNett
Mirazyme (see "Products").

Build your own tent footprint (Online Bonus)
Many tents these days come with an option to buy a
footprint that fits in the pole grommets where the fly
attaches. If you're only interested in using the footprint
as a ground cloth (rather than a lightweight shelter
option), save yourself $50 or more and follow these steps to make your own.
• Supplies: Choose a material that is lightweight, pliable and waterproof. Some
of the best options include plastic Tyvek, painter's plastic, nylon tarps. You'll
also need a grommet kit (available at most hardware and outdoor stores for
about $12, which includes metal grommets along with a hole punch, cutting
board and die.
• Place the fabric on the ground and set up your tent on top of it. Using a
marker, trace around the perimeter of the tent and also trace the grommet
holes where the rainfly attaches. (1)
• Following the instructions on the grommet kit, attach metal grommets to the
fabric on the circles you marked where the fly hooks onto the tent. You want
the finished ground cloth to be held in place underneath the tent by looping the
grommets onto the tent poles, just as the fly attaches over the tent.(2)
• Cut along the tracing line in the corners where the grommets are located. For
the rest of the ground cloth, cut two inches inside the line marking the tent
perimeter. This is to keep rain water from channeling and puddling underneath
the tent floor. (3)
PACKS
Loose zipper (Online Bonus)
A worn slider can loose traction, resulting in a tent door or pack lid that won't stay
shut. You can fix the problem in the field with multitool pliers. Open the zipper all the
way to the bottom and gradually apply pressure to both sides of the slider. Repeat
until the slider grips the track securely. Warning: Over-tightening the slider could
permanently warp the coils. At home, replace the slider using the Mountain Hardwear

Zipper Repair Clamp (see
"Products"), or send it to a
professional repair shop (see
"Resources").
Torn mesh side pocket
To fix ripped mesh or webbing, sew it back together with a large needle and #46 or
#69 bonded nylon thread (dental floss and medical suture also work). Use the first
few stitches to close the tear–if it's large and the edges are frayed, run the stitches
from the outer edges of the pocket, where thread will hold securely. Sew horizontally
over the gap, then repeat with vertical stitching to create a grid-like patch.
Keep it clean (Online Bonus)
Any properly used pack should spend most of its field time in the dirt, but excessive
mud and grit–especially when it's left on post-trip–will take a toll on pack
performance. Caked-on dirt will eventually degrade the pack fabric's DWR coating
and grit in zippers will wear out the sliders. Brush your pack off periodically in the field
and give it a bath at home at least once a season (see "Cleaning" below). Also,
double bag any liquids–especially hard-to-clean items like olive oil and DEET-based
repellents–to prevent any leaking onto pack fabric.
Pamper your pack
Tossing your pack around like a gym bag will shorten its lifespan. "Always lift it by the
haul loop just below the top lid," says Mountain Hardwear pack designer Eric
Hamerschlag. "That's what the loop is there for." If your pack is too heavy, get help
from a hiking partner or prop it on a truck tailgate or log. Or lift it using a simple
method that protects both your pack and your spine: Bend one leg into a shallow
lunge; pick up the pack by the haul loop and place it on your front, bent thigh, making
sure the shoulder straps are facing you. With one hand still on the haul loop, twist
your torso and slide one arm through the far shoulder strap; then bend forward to
shift the weight onto your back and slide the other arm through the strap.
Stop abrasion (Online Bonus)
The quest for ultralight packs means thinner fabrics that are more prone to abrasion.
Backpacker editors have found that, generally, pack exteriors made from 70 denier
Cordura or less will be too flimsy for rough trips like slot canyoneering, tight
scrambling, bushwhacking. Bring your thrasher pack on those trips, and save your
ultra-light hauler for the open country.
Fact or Myth (Online Bonus)
Q: The safest place for an empty pack is zipped up inside your tent.
A: Myth! Empty packs can retain food odors, crumbs, and sweat-soaked pack straps
prized by sharp-nosed rodents. Hang your pack from a tree branch or keep it off the
ground at night, and when you're absent from camp during the day.
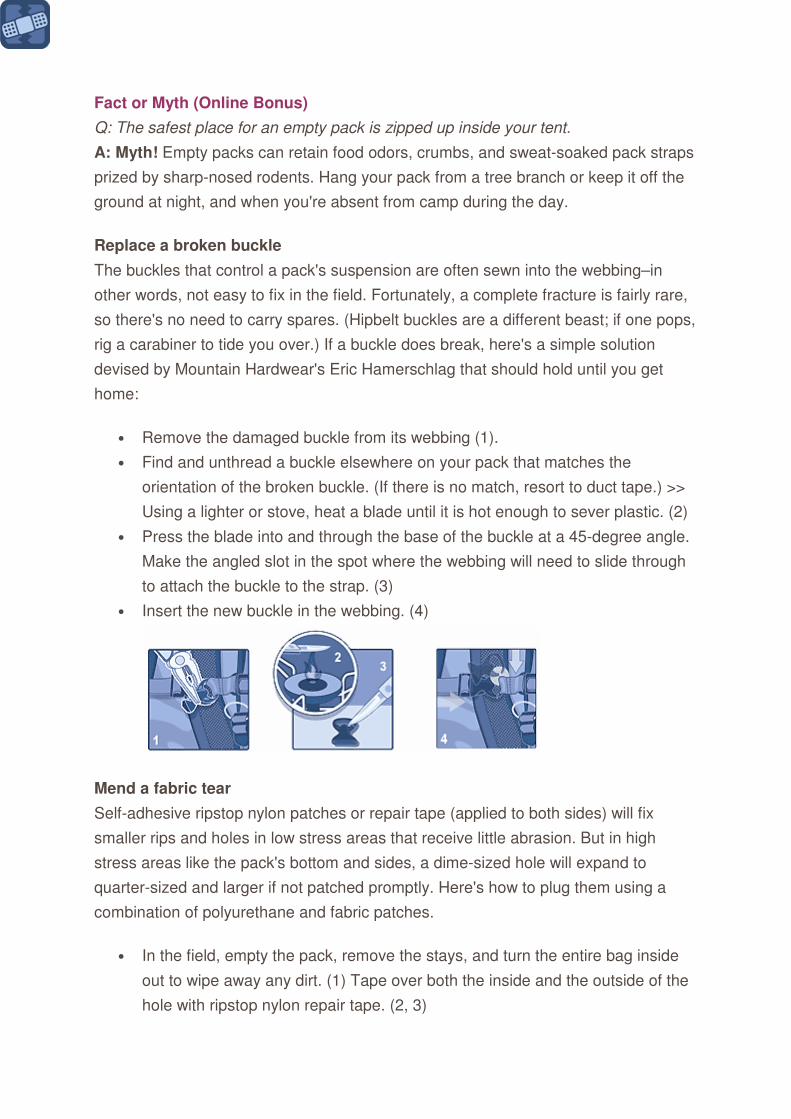
Replace a broken buckle
The buckles that control a pack's suspension are often sewn into the webbing–in
other words, not easy to fix in the field. Fortunately, a complete fracture is fairly rare,
so there's no need to carry spares. (Hipbelt buckles are a different beast; if one pops,
rig a carabiner to tide you over.) If a buckle does break, here's a simple solution
devised by Mountain Hardwear's Eric Hamerschlag that should hold until you get
home:
• Remove the damaged buckle from its webbing (1).
• Find and unthread a buckle elsewhere on your pack that matches the
orientation of the broken buckle. (If there is no match, resort to duct tape.) >>
Using a lighter or stove, heat a blade until it is hot enough to sever plastic. (2)
• Press the blade into and through the base of the buckle at a 45-degree angle.
Make the angled slot in the spot where the webbing will need to slide through
to attach the buckle to the strap. (3)
• Insert the new buckle in the webbing. (4)
Mend a fabric tear
Self-adhesive ripstop nylon patches or repair tape (applied to both sides) will fix
smaller rips and holes in low stress areas that receive little abrasion. But in high
stress areas like the pack's bottom and sides, a dime-sized hole will expand to
quarter-sized and larger if not patched promptly. Here's how to plug them using a
combination of polyurethane and fabric patches.
• In the field, empty the pack, remove the stays, and turn the entire bag inside
out to wipe away any dirt. (1) Tape over both the inside and the outside of the
hole with ripstop nylon repair tape. (2, 3)
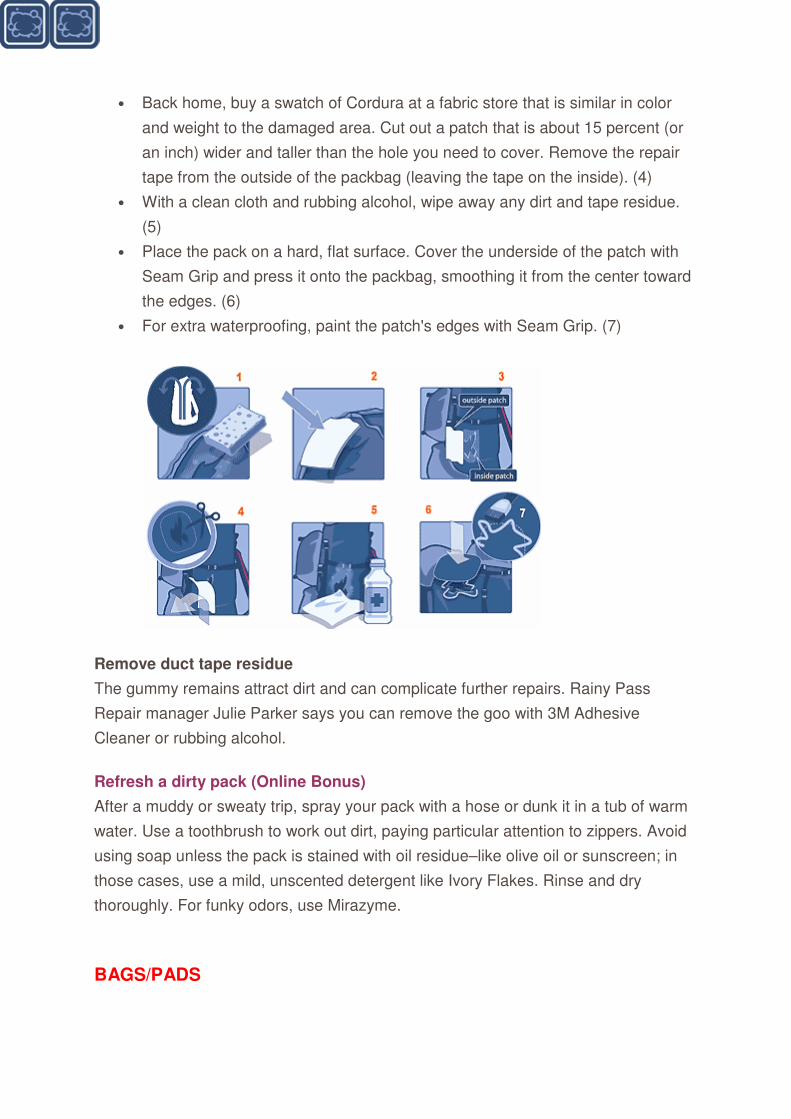
• Back home, buy a swatch of Cordura at a fabric store that is similar in color
and weight to the damaged area. Cut out a patch that is about 15 percent (or
an inch) wider and taller than the hole you need to cover. Remove the repair
tape from the outside of the packbag (leaving the tape on the inside). (4)
• With a clean cloth and rubbing alcohol, wipe away any dirt and tape residue.
(5)
• Place the pack on a hard, flat surface. Cover the underside of the patch with
Seam Grip and press it onto the packbag, smoothing it from the center toward
the edges. (6)
• For extra waterproofing, paint the patch's edges with Seam Grip. (7)
Remove duct tape residue
The gummy remains attract dirt and can complicate further repairs. Rainy Pass
Repair manager Julie Parker says you can remove the goo with 3M Adhesive
Cleaner or rubbing alcohol.
Refresh a dirty pack (Online Bonus)
After a muddy or sweaty trip, spray your pack with a hose or dunk it in a tub of warm
water. Use a toothbrush to work out dirt, paying particular attention to zippers. Avoid
using soap unless the pack is stained with oil residue–like olive oil or sunscreen; in
those cases, use a mild, unscented detergent like Ivory Flakes. Rinse and dry
thoroughly. For funky odors, use Mirazyme.
BAGS/PADS
Protect the inside insulation (Online Bonus)
In addition to adding up to 10°F of warmth and
about four ounces, a silk or polypro sleeping bag liner
will help preserve the loft of a down bag according to
Mountain Hardwear Product Manager Chris Hilliard. The liner absorbs moisture and
body oils, protecting the feathers and inner lining. The result is a bag that's drier for
stuffing in the morning–and one that needs less washing.
Prolong a bag's life
Preserve the bag's insulation by stuffing it as evenly as possible. First, pull the zipper
down to six inches from the bottom to allow the bag to vent. Then grab the bottom of
the bag, and push it into the stuff sack, rotating the sack as you cram the rest of the
bag in. Leverage your strength by sitting cross-legged and holding the sack against
your thigh (this is also a good way to warm up on a cold morning).
Suspend a sleeping bag
Hang sacks loosely in a dry location. Use a ceiling hook in your gear closet, or string
a wire cable to hang multiple bags from separate carabiners. Make sure the bag
doesn't touch the floor. If you lack space to hang your bag, store it in a large,
breathable cotton or mesh storage sack. Never leave a down or synthetic bag in its
stuff sack for extended periods.
Store pads flat (Online Bonus)
Doug Jacot, product manager for Therm-a-Rest advises putting away inflatable pads
unrolled with the valve open–under a bed is perfect. This prevents mildew from any
residual moisture and keeps the foam resilient. Air mattresses insulated with down or
other batting (like Exped models) should also be stored unrolled so that the insulation
is not compressed. Use a toothbrush to clean grit from the valve.
Stop the melt
Never leave sleeping bags or pads in your car on a hot summer day, when
temperatures can exceed 160°F. That's hot enough flatten a closed-cell foam pad.
Self-inflating pads are slightly more heat-tolerant, but extreme temps can delaminate
glue around the seams and valve.
Clean your pad (Online Bonus)
If you sleep directly on your self-inflating pad on a hot summer night, Jacot says you
should clean it when you get home. Body oils and sweat penetrate the pad over time
and destroy the exterior polyurethane coating. They can also cause the outer fabric
to delaminate from the foam. Give your pad an occasional scrub in the tub using mild
soap and a vegetable brush.
Wash synthetics sparingly (Online Bonus)
Putting a down bag in a top-load washing machine can restore its loft, but synthetic
fills can lose insulating ability after repeated launderings. The agitation can create
small–particular in continuous filament insulations such as Polarguard 3D and
Climashield–that cannot be repaired.
Shell with holes (Online Bonus)
Ripstop patches or repair tape work for small tears according to Rainy Pass' Julie
Parker. Pinprick holes can also be plugged with a dab of Seam Grip–just make sure
the bag dries for at least eight hours before you cram it in the stuffsack.
Stop feather flight
If you see a quill poking through the sleeping bag shell, Mountain Hardwear's Chris
Hilliard says to push it back inside. Pulling it out will create a bigger hole in the
delicate material.
Hole in a sleeping pad
If your self-inflating pad goes flat, fix it with the repair kit provided by the
manufacturer (always carry in the bottom of the pad stuff sack). The patch material
and glue are designed to match the fabric in the pad. Effective substitutes include
bicycle tire patch kits or Seam Grip, which can also seal a leaky valve joint.
Make your own sleeping bag liner with pillow pocket (Online Bonus)
There are many excellent mummy bag liners on the market made from silk, wicking
Coolmax or cotton that cost anywhere from $20 to $80. While the fabric may seem
fancy, the design of a liner is simple–basically a sheet folded in half and stitched
together. If you have the time and desire to save money, follow these steps to make
your own liner:
• Supplies Go to a fabric store and pick out the liner fabric that best suits your
needs. Weight and comfort should be your two main variables. While you're
there, pick up 8-10 tab snaps (inch-long pieces of fabric with snaps on the
end) that will be used to attach the liner to the bag. Or you could opt for a yard
or two of ribbon. You'll also need a roll of packing paper or newsprint for
tracing a pattern.
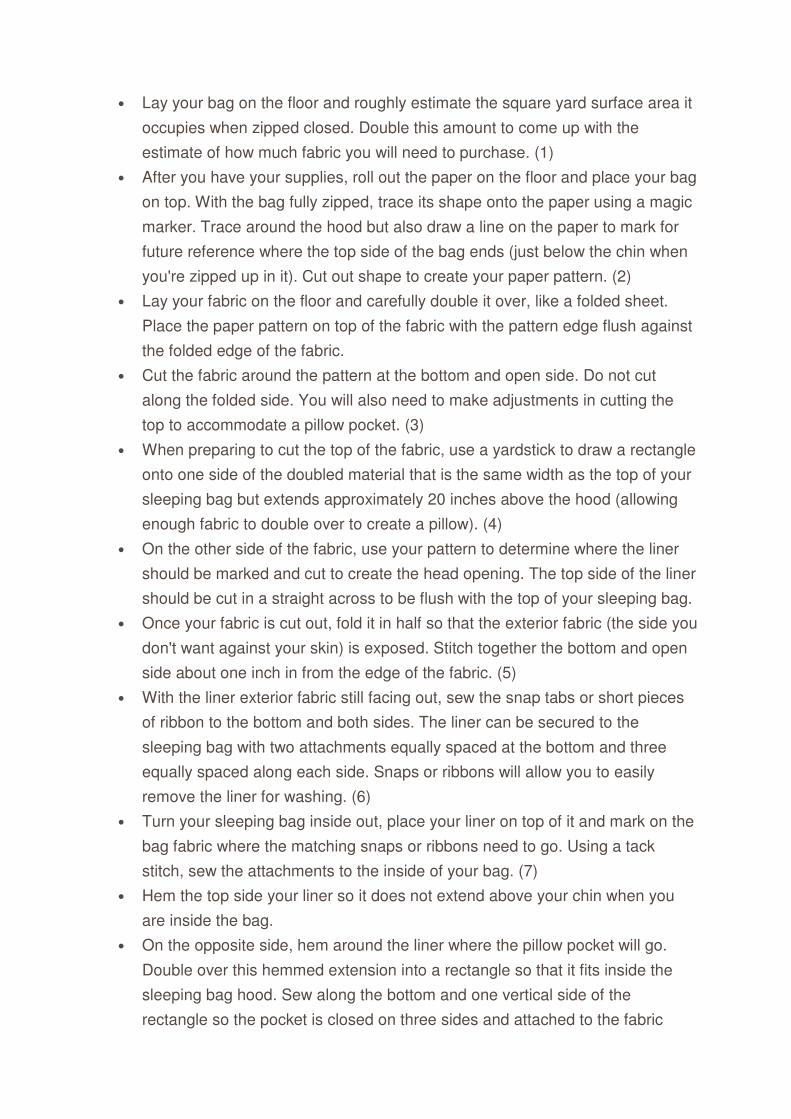
• Lay your bag on the floor and roughly estimate the square yard surface area it
occupies when zipped closed. Double this amount to come up with the
estimate of how much fabric you will need to purchase. (1)
• After you have your supplies, roll out the paper on the floor and place your bag
on top. With the bag fully zipped, trace its shape onto the paper using a magic
marker. Trace around the hood but also draw a line on the paper to mark for
future reference where the top side of the bag ends (just below the chin when
you're zipped up in it). Cut out shape to create your paper pattern. (2)
• Lay your fabric on the floor and carefully double it over, like a folded sheet.
Place the paper pattern on top of the fabric with the pattern edge flush against
the folded edge of the fabric.
• Cut the fabric around the pattern at the bottom and open side. Do not cut
along the folded side. You will also need to make adjustments in cutting the
top to accommodate a pillow pocket. (3)
• When preparing to cut the top of the fabric, use a yardstick to draw a rectangle
onto one side of the doubled material that is the same width as the top of your
sleeping bag but extends approximately 20 inches above the hood (allowing
enough fabric to double over to create a pillow). (4)
• On the other side of the fabric, use your pattern to determine where the liner
should be marked and cut to create the head opening. The top side of the liner
should be cut in a straight across to be flush with the top of your sleeping bag.
• Once your fabric is cut out, fold it in half so that the exterior fabric (the side you
don't want against your skin) is exposed. Stitch together the bottom and open
side about one inch in from the edge of the fabric. (5)
• With the liner exterior fabric still facing out, sew the snap tabs or short pieces
of ribbon to the bottom and both sides. The liner can be secured to the
sleeping bag with two attachments equally spaced at the bottom and three
equally spaced along each side. Snaps or ribbons will allow you to easily
remove the liner for washing. (6)
• Turn your sleeping bag inside out, place your liner on top of it and mark on the
bag fabric where the matching snaps or ribbons need to go. Using a tack
stitch, sew the attachments to the inside of your bag. (7)
• Hem the top side your liner so it does not extend above your chin when you
are inside the bag.
• On the opposite side, hem around the liner where the pillow pocket will go.
Double over this hemmed extension into a rectangle so that it fits inside the
sleeping bag hood. Sew along the bottom and one vertical side of the
rectangle so the pocket is closed on three sides and attached to the fabric
underneath. This will leave the other vertical side open for stuffing a fleece or
puffy jacket to create a removable pillow. (8)
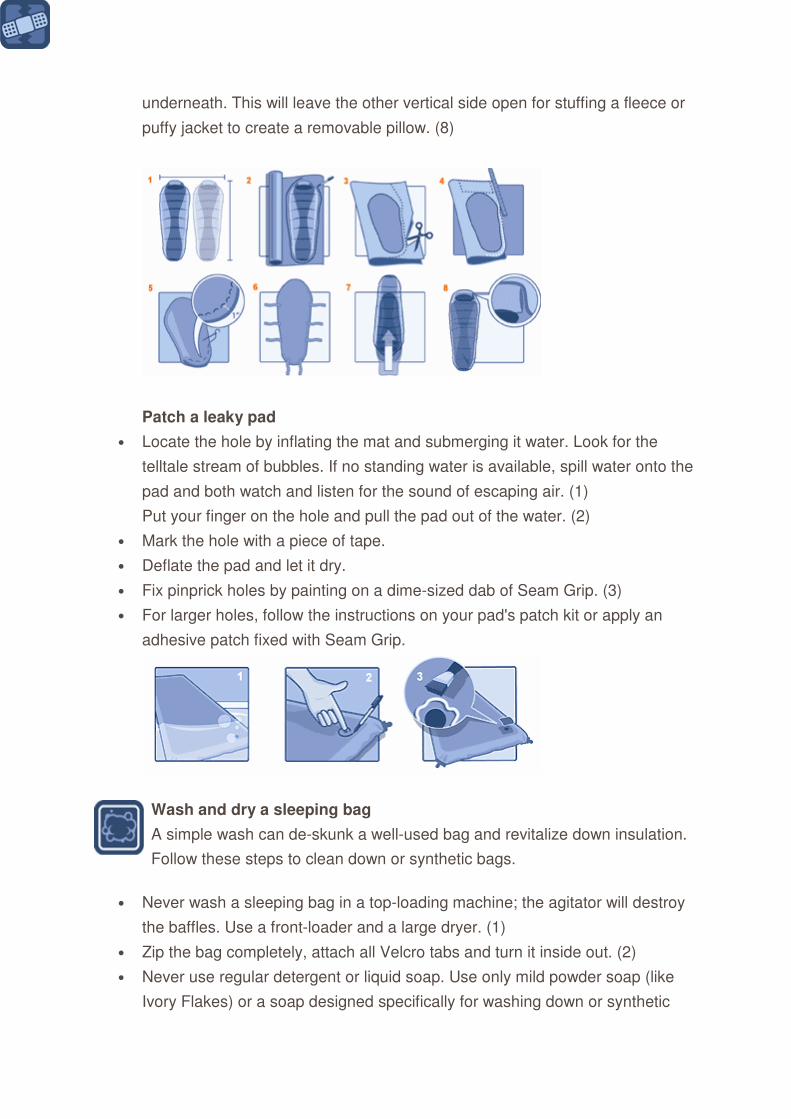
Patch a leaky pad
• Locate the hole by inflating the mat and submerging it water. Look for the
telltale stream of bubbles. If no standing water is available, spill water onto the
pad and both watch and listen for the sound of escaping air. (1)
Put your finger on the hole and pull the pad out of the water. (2)
• Mark the hole with a piece of tape.
• Deflate the pad and let it dry.
• Fix pinprick holes by painting on a dime-sized dab of Seam Grip. (3)
• For larger holes, follow the instructions on your pad's patch kit or apply an
adhesive patch fixed with Seam Grip.
Wash and dry a sleeping bag
A simple wash can de-skunk a well-used bag and revitalize down insulation.
Follow these steps to clean down or synthetic bags.
• Never wash a sleeping bag in a top-loading machine; the agitator will destroy
the baffles. Use a front-loader and a large dryer. (1)
• Zip the bag completely, attach all Velcro tabs and turn it inside out. (2)
• Never use regular detergent or liquid soap. Use only mild powder soap (like
Ivory Flakes) or a soap designed specifically for washing down or synthetic
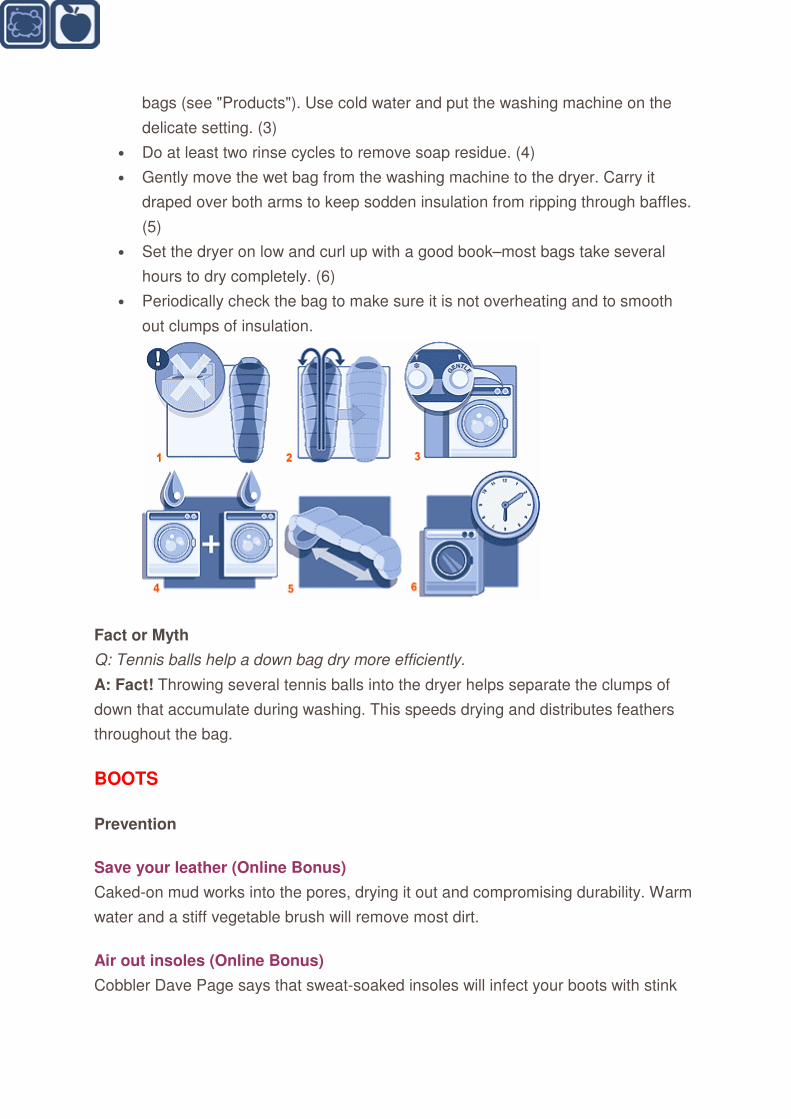
bags (see "Products"). Use cold water and put the washing machine on the
delicate setting. (3)
• Do at least two rinse cycles to remove soap residue. (4)
• Gently move the wet bag from the washing machine to the dryer. Carry it
draped over both arms to keep sodden insulation from ripping through baffles.
(5)
• Set the dryer on low and curl up with a good book–most bags take several
hours to dry completely. (6)
• Periodically check the bag to make sure it is not overheating and to smooth
out clumps of insulation.
Fact or Myth
Q: Tennis balls help a down bag dry more efficiently.
A: Fact! Throwing several tennis balls into the dryer helps separate the clumps of
down that accumulate during washing. This speeds drying and distributes feathers
throughout the bag.
BOOTS
Prevention
Save your leather (Online Bonus)
Caked-on mud works into the pores, drying it out and compromising durability. Warm
water and a stiff vegetable brush will remove most dirt.
Air out insoles (Online Bonus)
Cobbler Dave Page says that sweat-soaked insoles will infect your boots with stink
and mildew. When you take off your boots at the end of the day, remove the insoles,
too, and let them air dry sticking out of your open, unlaced boots.
Keep away from heat
Never dry wet boots next to a campfire, stove, or space heater, or use a hair dryer.
High heat will crack and shrink the leather and cause the soles to delaminate.
Minimize plastic bag time
Bagging muddy boots for a few hours is okay. But if you leave them wrapped in
plastic for a few days–especially in warm temperatures–they might crawl away on
their own. Use a paper or cloth bag for transporting muddy boots to avoid spawning
mildew and other eager biotics.
Fact or Myth?
Q: Mink oil is bad for leather boots.
A: Fact! Most hiking boots made in the last 20 years should only be treated with wax
or silicone-based waterproofing and leather conditioning products. Dave Page says
oil-based treatments (including mink oil) over-soften chromium-tanned leather.
Modern, glued-on boot soles can also delaminate when penetrated by certain oils.
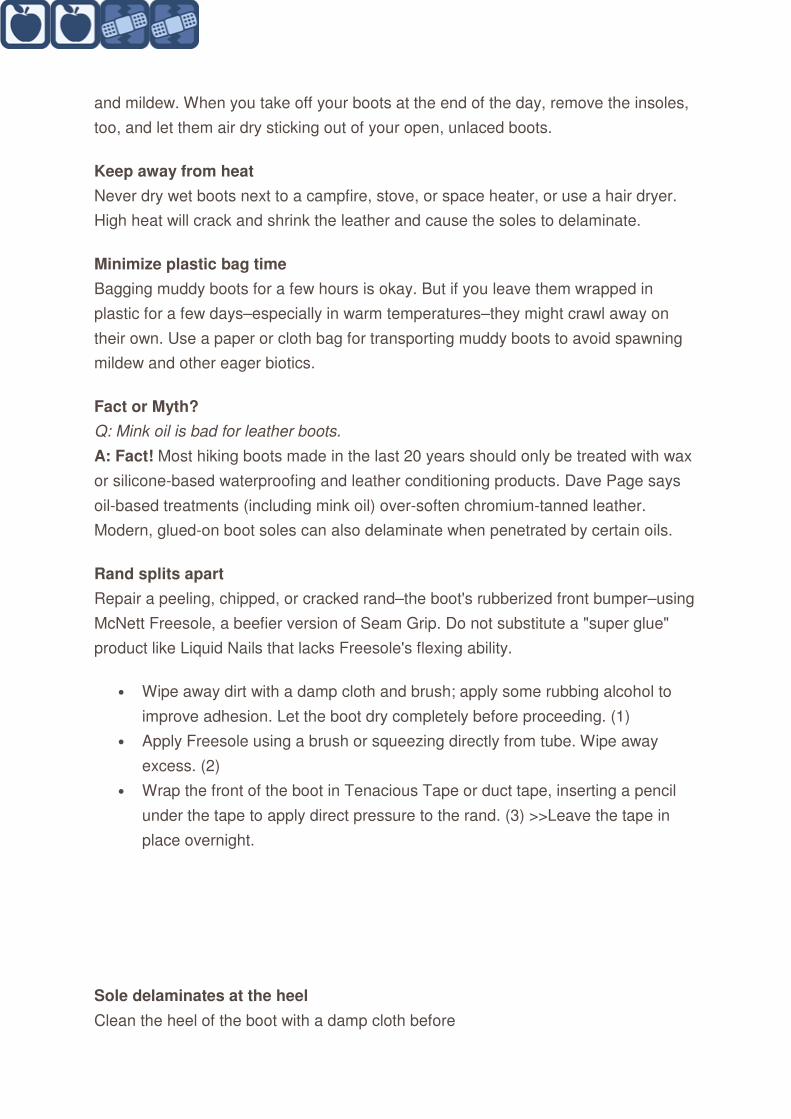
Rand splits apart
Repair a peeling, chipped, or cracked rand–the boot's rubberized front bumper–using
McNett Freesole, a beefier version of Seam Grip. Do not substitute a "super glue"
product like Liquid Nails that lacks Freesole's flexing ability.
• Wipe away dirt with a damp cloth and brush; apply some rubbing alcohol to
improve adhesion. Let the boot dry completely before proceeding. (1)
• Apply Freesole using a brush or squeezing directly from tube. Wipe away
excess. (2)
• Wrap the front of the boot in Tenacious Tape or duct tape, inserting a pencil
under the tape to apply direct pressure to the rand. (3) >>Leave the tape in
place overnight.
Sole delaminates at the heel
Clean the heel of the boot with a damp cloth before

brushing it with rubbing alcohol. Let the boot dry overnight. Peel back the sole and
squeeze a quarter-sized dab of Freesole into the split. Press down firmly and wipe
away any excess. Place a filled water bottle upright in the boot to keep constant
pressure on the re-glued joint; dry overnight.
Worn-down heel (Online Bonus)
If your stride wears down one side faster than the other, restore a level surface by
applying a foundation of Freesole.
• Smooth the worn section with sandpaper. (1)
• Buff with a rag dipped in rubbing alcohol. (2)
• Apply duct tape to make a dam that is at least one-inch tall around the back of
heel.
• Holding the boot upside down and level, fill in the missing heel area with
Freesole. (3)
• Stabilize the upside-down boot and let dry.
Leaky boots (Online Bonus)
NOLS gear manager McGowan has found even waterproof/breathable boots can be
enhanced by after-market sealants that keep rain or snow from saturating the
exterior. The drawback: Extra waterproofing may reduce breathability. Products
designed for waterproof/breathable boots can also be effective on boots without
Gore-Tex or similar membranes. If you know you'll face deep snow or very wet trails,
you may want to seal the exterior seams of your boots with Seam Grip. (See the
"Products" sidebar for more options from Grangers, McNett, and Nickwax.)
Lost sole (Online Bonus)
All boot soles eventually wear out. If the uppers are still in decent condition, give your
boots new life by sending them to a repair facility to be re-soled for $60. See
"Resources" below.
Stinky boots
The drier your boots, the less odor they will produce. At home, get rid of moisture by
stuffing them with newspaper. For odors that reach WMD status, spray the interior
and the removed insoles with Lysol. If the smell persists, apply Mirazyme and place
the insoles in the freezer overnight. This will chill-kill whatever biotics remain.
Boots/Make it
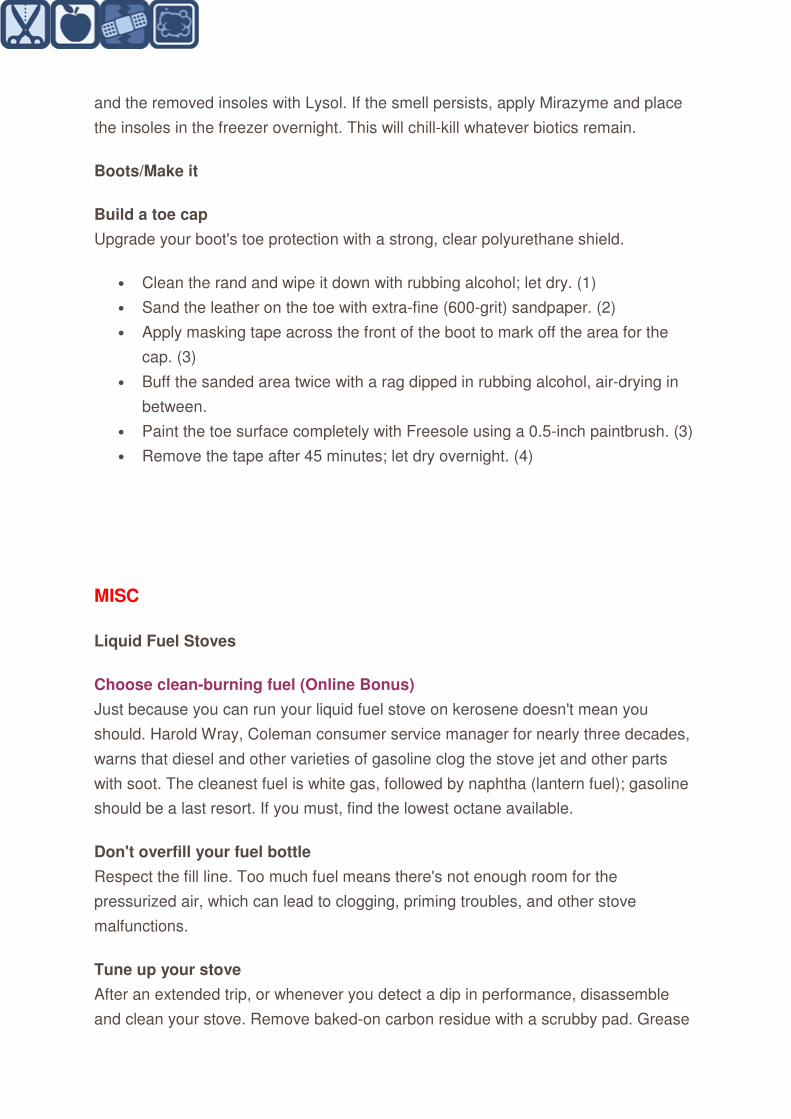
Build a toe cap
Upgrade your boot's toe protection with a strong, clear polyurethane shield.
• Clean the rand and wipe it down with rubbing alcohol; let dry. (1)
• Sand the leather on the toe with extra-fine (600-grit) sandpaper. (2)
• Apply masking tape across the front of the boot to mark off the area for the
cap. (3)
• Buff the sanded area twice with a rag dipped in rubbing alcohol, air-drying in
between.
• Paint the toe surface completely with Freesole using a 0.5-inch paintbrush. (3)
• Remove the tape after 45 minutes; let dry overnight. (4)
MISC
Liquid Fuel Stoves
Choose clean-burning fuel (Online Bonus)
Just because you can run your liquid fuel stove on kerosene doesn't mean you
should. Harold Wray, Coleman consumer service manager for nearly three decades,
warns that diesel and other varieties of gasoline clog the stove jet and other parts
with soot. The cleanest fuel is white gas, followed by naphtha (lantern fuel); gasoline
should be a last resort. If you must, find the lowest octane available.
Don't overfill your fuel bottle
Respect the fill line. Too much fuel means there's not enough room for the
pressurized air, which can lead to clogging, priming troubles, and other stove
malfunctions.
Tune up your stove
After an extended trip, or whenever you detect a dip in performance, disassemble
and clean your stove. Remove baked-on carbon residue with a scrubby pad. Grease
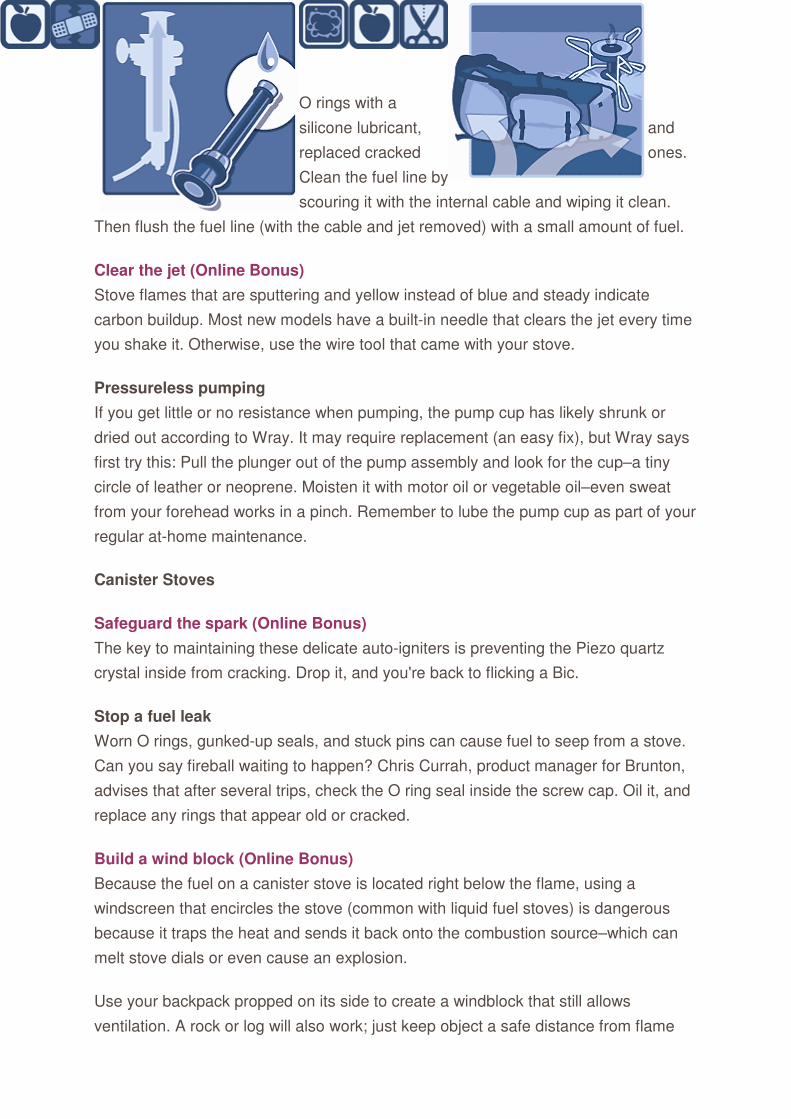
O rings with a
silicone lubricant, and
replaced cracked ones.
Clean the fuel line by
scouring it with the internal cable and wiping it clean.
Then flush the fuel line (with the cable and jet removed) with a small amount of fuel.
Clear the jet (Online Bonus)
Stove flames that are sputtering and yellow instead of blue and steady indicate
carbon buildup. Most new models have a built-in needle that clears the jet every time
you shake it. Otherwise, use the wire tool that came with your stove.
Pressureless pumping
If you get little or no resistance when pumping, the pump cup has likely shrunk or
dried out according to Wray. It may require replacement (an easy fix), but Wray says
first try this: Pull the plunger out of the pump assembly and look for the cup–a tiny
circle of leather or neoprene. Moisten it with motor oil or vegetable oil–even sweat
from your forehead works in a pinch. Remember to lube the pump cup as part of your
regular at-home maintenance.
Canister Stoves
Safeguard the spark (Online Bonus)
The key to maintaining these delicate auto-igniters is preventing the Piezo quartz
crystal inside from cracking. Drop it, and you're back to flicking a Bic.
Stop a fuel leak
Worn O rings, gunked-up seals, and stuck pins can cause fuel to seep from a stove.
Can you say fireball waiting to happen? Chris Currah, product manager for Brunton,
advises that after several trips, check the O ring seal inside the screw cap. Oil it, and
replace any rings that appear old or cracked.
Build a wind block (Online Bonus)
Because the fuel on a canister stove is located right below the flame, using a
windscreen that encircles the stove (common with liquid fuel stoves) is dangerous
because it traps the heat and sends it back onto the combustion source–which can
melt stove dials or even cause an explosion.
Use your backpack propped on its side to create a windblock that still allows
ventilation. A rock or log will also work; just keep object a safe distance from flame
and make sure air can still circulate around stove
even though big wind gusts are blocked.
Poor cold-weather performance
The main drawback to canister stoves is their poor performance in sub-freezing
temps. Backpacker editors have had good luck boosting performance by taping a
handwarmer to the bottom of the canister or placing it in a bowl with an inch of
lukewarm water. In the winter, store canisters overnight in a stuff sack at the bottom
of your sleeping bag.
Fact or myth? (Online Bonus)
Q: Spent fuel canisters cannot be recycled.
A: Myth! After burning the fuel off, just puncture them and shake out any residual
gas. Then you're good. Aluminum canisters are easier to puncture (Coleman's
Powermax containers with a puncture tool and crush easily). Steel canisters can also
be ruptured manually (with a nail and rock, for example), but don't do anything that
would cause a spark (like using a drill). Check with your local public works
department to find out whether to put them out with your recycling or take them to a
designated facility.
Hydration
Leaky hydration system
Busted seams can be glued with Seam Grip, as can small punctures. Cracked or
dripping silicone bite valves can be repaired with SilNet. Make sure the hydration
system is empty and dry first, and afterwards give the glue 24 hours to cure so that
the adhesive is rendered inert and safe to drink from.
Defunk a hydration reservouir
A bleach solution can quickly evict mildew and gunk from bladders and bottles. Pour
in no more than a half-teaspoon of bleach with warm water, then shake. Loosen the
cap to douse the threads; with bladders, squeeze the bite valve (while holding the
bladder high) to flush the hose. Remove the bleach taste with a baking soda rinse
(one teaspoon of baking soda per liter of water) and flush once more with water.
Camelbak also sells a bleach-free kit (see "Products"). Extra mildew-proofing: Store
your bladder in the freezer.
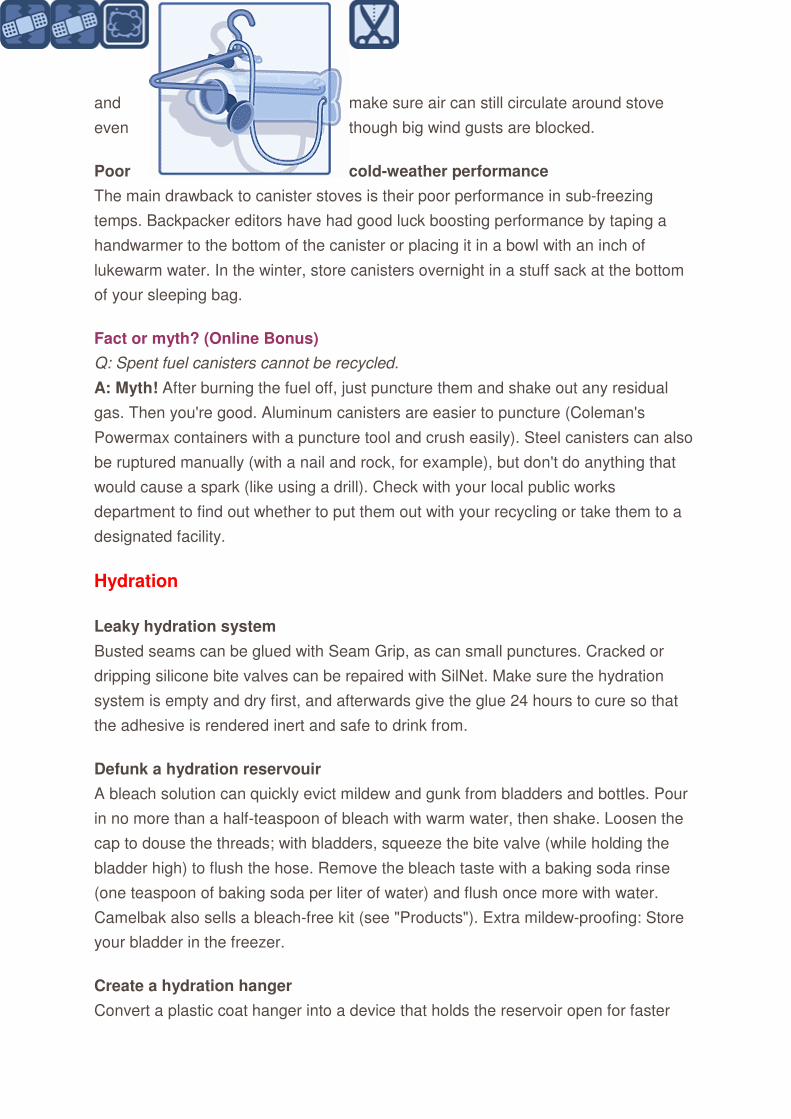
Create a hydration hanger
Convert a plastic coat hanger into a device that holds the reservoir open for faster
and more complete drying. Saw off one arm and wrap the rough edges in duct tape.
Feed the other arm into the reservoir; drape the hose over the top and hang it up to
dry.
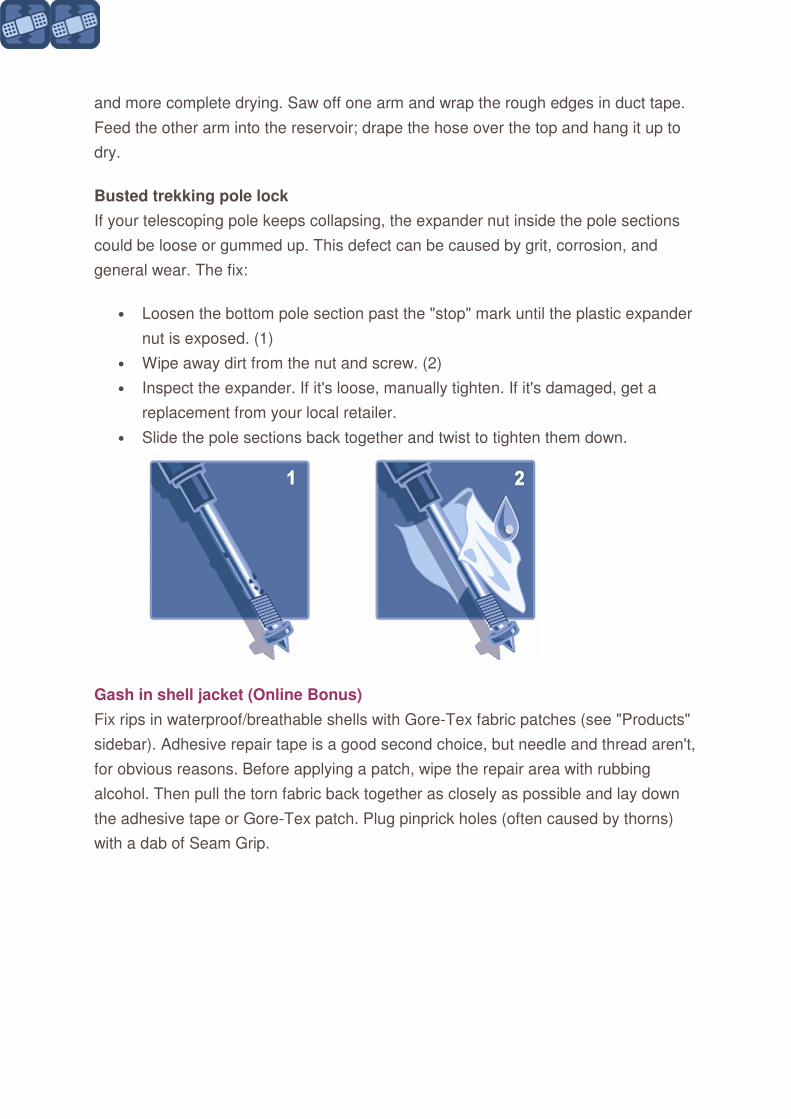
Busted trekking pole lock
If your telescoping pole keeps collapsing, the expander nut inside the pole sections
could be loose or gummed up. This defect can be caused by grit, corrosion, and
general wear. The fix:
• Loosen the bottom pole section past the "stop" mark until the plastic expander
nut is exposed. (1)
• Wipe away dirt from the nut and screw. (2)
• Inspect the expander. If it's loose, manually tighten. If it's damaged, get a
replacement from your local retailer.
• Slide the pole sections back together and twist to tighten them down.
Gash in shell jacket (Online Bonus)
Fix rips in waterproof/breathable shells with Gore-Tex fabric patches (see "Products"
sidebar). Adhesive repair tape is a good second choice, but needle and thread aren't,
for obvious reasons. Before applying a patch, wipe the repair area with rubbing
alcohol. Then pull the torn fabric back together as closely as possible and lay down
the adhesive tape or Gore-Tex patch. Plug pinprick holes (often caused by thorns)
with a dab of Seam Grip.