
Make the Most out of SugarCRM & Talkdesk · Make the Most out of SugarCRM & Talkdesk talkdesk ...
56
Transcript of Make the Most out of SugarCRM & Talkdesk · Make the Most out of SugarCRM & Talkdesk talkdesk ...


Make the Most out of SugarCRM & Talkdesk
// 2talkdesk © www.talkdesk.com
//
// table of contents //
Talkdesk Guide for Agents
// 2talkdesk © www.talkdesk.com
//
01 // Getting Started // 05 // Choosing Your Password // 06
// Setting Up Your Browser to Work With Talkdesk // 08
// Enabling Desktop Notifications // 09 // Set Your Availability // 10
// Logging Into Your Talkdesk Account // 12 // Logging Out of Your Talkdesk Account // 13
02 // Recent Calls // 14 03 // Voicemails // 17
04 // Contacts // 20 // Searching Contacts // 22 // Searching for Contacts by Tag // 23
// Contact Activity // 25
// Contact Profile // 28
// Managing Contact Tags // 29
// Creating a New Contact // 30
// Deleting a Contact From Talkdesk // 30

Make the Most out of SugarCRM & Talkdesk
// 3talkdesk © www.talkdesk.com
// Talkdesk Guide for Agents
// 3talkdesk © www.talkdesk.com
//
05 // Make & Receive Calls // 31 // Using the Browser // 32 // Receiving Calls // 32
// Calling an Existing Contact // 34
// Calling a New Contact // 35
// Using Your Cell Phone or Landline // 37
// Call Workflow // 39
// Selecting the Outbound Caller ID // 39
// Using Call Control Function // 41
// Mutting the Call // 42 // Placing a Customer on Hold // 42 // Call Transfer // 42 // Call Conferencing // 46 // Merging a Call With Another Contact // 47 // Call Dispositions and Notes // 48 // Adding Notes on a Call // 49
06 // Reporting // 51 // Real Time Statistics // 52
// Waiting Queue Status // 54
// table of contents //

// 4talkdesk © www.talkdesk.com
// Introduction
// Welcome to Talkdesk! //
talkdesk was built with the agent in mind. We made sure that everything you should know about each customer pops up in your computer screen, when they call. Talkdesk makes it easy for you to answer and to make calls, to edit customer information and to write notes about your calls.
This manual will help get you acquainted with the Talkdesk integration, will provide more information about the functions and will give you tips on how to implement the most popular automated tasks.
We really hope Talkdesk makes your job easier and that you love it as much as we do! Do more talking and less logging to revolutionize your customers experience.
If you run into any problems, have questions or just want to offer some helpful feedback, feel free to contact us at [email protected].

Make the Most out of SugarCRM & Talkdesk
// 5talkdesk © www.talkdesk.com
//
Getting Started
1

// 6talkdesk © www.talkdesk.com
// Getting Started | Choosing Your Password
At this point, your manager has already set up the Talkdesk and sent you an email invitation.
Before you open the email, make sure you are using google chrome as your browser. Talkdesk works best on Google Chrome.
1.1 // Choosing Your Password Open the email entitled “[talkdesk] invitation instructions” and click on the link that says “accept invitation”.

// 7talkdesk © www.talkdesk.com
// Getting Started | Choosing Your Password
After you click on the link, you will be asked to choose a password.
https://yourcompany.mytalkdesk.com is your login URL - Make sure to bookmark this link.

// 8talkdesk © www.talkdesk.com
// Getting Started | Setting Up Your Browser to Work With Talkdesk
1.2 // Setting Up Your Browser to Work With Talkdesk Once you select a password, you will be inside your new Talkdesk and you will see this screen:
Click the “allow” button at the top of your screen next to the prompt that says “https://yourcompany.mytalkdesk.com/ wants to use your microphone”. This will allow you to use your computer to make and receive calls. It will also allow you to speak with people using your computer microphone or headset. Talkdesk will not work properly unless you click this “allow” button.
// 9talkdesk © www.talkdesk.com
// Getting Started | Enabling Desktop Notifications
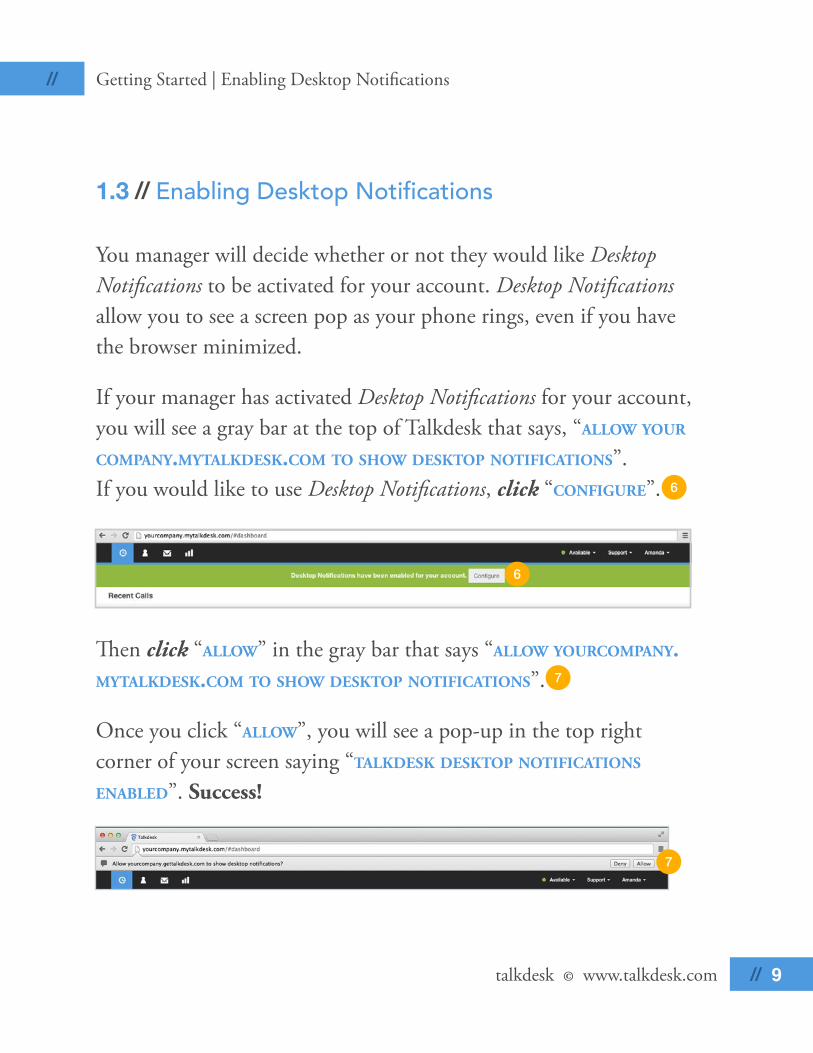
1.3 // Enabling Desktop Notifications You manager will decide whether or not they would like Desktop Notifications to be activated for your account. Desktop Notifications allow you to see a screen pop as your phone rings, even if you have the browser minimized.
If your manager has activated Desktop Notifications for your account, you will see a gray bar at the top of Talkdesk that says, “allow your company.mytalkdesk.com to show desktop notifications”. If you would like to use Desktop Notifications, click “configure”.
Then click “allow” in the gray bar that says “allow yourcompany.mytalkdesk.com to show desktop notifications”.
Once you click “allow”, you will see a pop-up in the top right corner of your screen saying “talkdesk desktop notifications enabled”. Success!

// 10talkdesk © www.talkdesk.com
// Getting Started | Set Your Availability
1.4 // Set Your Availability Agent Status is a helpful way to show your entire team what you are up to and whether or not you are free to take a call.
It is also a way for Talkdesk to know whether or not we should send calls your way, or whether you are too busy to receive calls and we should send them to another agent or voicemail.
Available › you are logged into Talkdesk and are free to take calls
On a Call › you are logged into Talkdesk and busy speaking with a customer
After Call Work › your status will automatically change to “after call work” after you end a call, for a predefined amount of time or while you are taking notes about the call; during this time, you can wrap up the call; you won’t receive calls while in this status
Away › you are logged into Talkdesk but are away from your computer and unable to take calls
Offline › you are not able to take calls

// 11talkdesk © www.talkdesk.com
// Getting Started | Set Your Availability
Your administrator can modify of add more status options (for example, lunch break) so there may be more status options that the default ones already in your account.
You can change your status at any time from the first dropdown menu on the top right corner. Talkdesk will also change your status for you automatically when you are on a call, away from your desk or logged out.
When your status changes, everyone signed into Talkdesk will know what you’re up to. They can see your status in the reporting tab, when they are transferring calls and when they are starting a conference call.
If your status is red, orange or gray, you can’t receive calls. If your status is green, calls can be routed to you.

// 12talkdesk © www.talkdesk.com
// Getting Started | Logging Into Your Talkdesk Account
1.5 // Logging Into Your Talkdesk Account To log into Talkdesk, please visit https://yourcompany. mytalkdesk.com. NOTE: yourcompany is the name of the company you work for. This link was sent to you in the welcome email from Talkdesk entitled: “[talkdesk] invitation instructions”. You will then be asked to insert your email and password in order to login to your account.

// 13talkdesk © www.talkdesk.com
// Getting Started | Logging Out of Your Talkdesk Account
1.6 // Logging Out of Your Talkdesk Account When you are finished with making and receiving calls, updating information, etc. it is important that you logout of Talkdesk so we don’t route calls to you. To do so, click on your name at the top right corner and select “logout”.

Make the Most out of SugarCRM & Talkdesk
// 14talkdesk © www.talkdesk.com
//
2Recent Calls

// 15talkdesk © www.talkdesk.com
// Recent Calls
When you login to your Talkdesk, you will first see the Recent Calls list:
The Recent Calls list allows you to see a list of all the people who have contacted your company or team, listed in chronological order.
The icon on the left indicates whether the call was made (arrow pointing up) or received (arrow pointing down) by your company and the color of the arrow indicates whether the call was an outbound (green), inbound (blue) or it was missed (red).
Outbound Call Missed CallInbound Call
CALL TYPE
// 16talkdesk © www.talkdesk.com
// Recent Calls
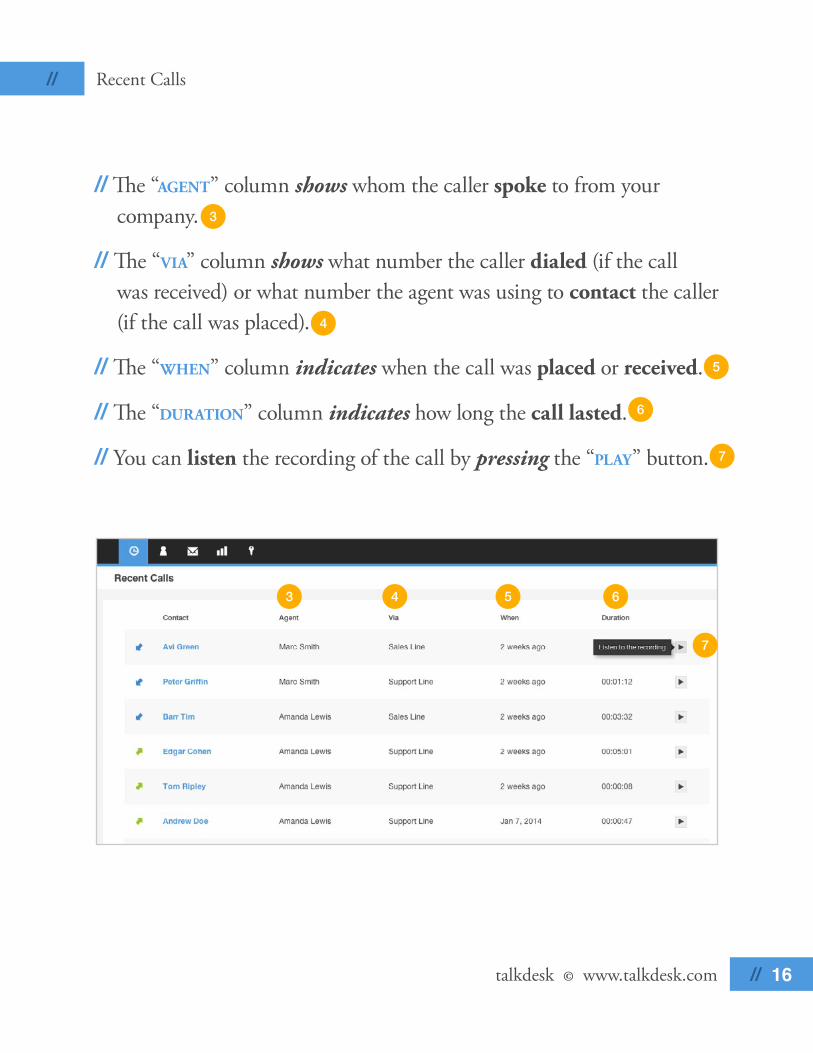
// The “agent” column shows whom the caller spoke to from your company.
// The “via” column shows what number the caller dialed (if the call was received) or what number the agent was using to contact the caller (if the call was placed).
// The “when” column indicates when the call was placed or received.
// The “duration” column indicates how long the call lasted.
// You can listen the recording of the call by pressing the “play” button.

Make the Most out of SugarCRM & Talkdesk
// 17talkdesk © www.talkdesk.com
//
3Voicemails

// 18talkdesk © www.talkdesk.com
// Voicemails
The Voicemails section is where you can see a list of all recent voicemails that your company or team has received, in chronological order. When you click on the “voicemails” tab, your screen will look like this:
The number on the “voicemail” icon indicates the number of voicemails left in your mailbox.

// 19talkdesk © www.talkdesk.com
// Voicemails
// The “contact” column shows the name of the person who left the voicemail (or their phone number if they are a new contact). If you click on the contact name or phone number (if the caller is a new contact), you will see more detailed information about the caller who left the voicemail: profile information of that person as well as the previous calls, voicemails and other interactions your company had with him.
// You can check the status of the voicemail in the “status” column (i.e. new, read).
// The “via” column shows what number the caller dialed.
// The “when” column indicates when the voicemail was received.
// The “duration” column indicates the length of the voicemail.
// You can listen to the voicemail recording by pressing the “play” button.

Make the Most out of SugarCRM & Talkdesk
// 20talkdesk © www.talkdesk.com
//
4Contacts

// 21talkdesk © www.talkdesk.com
// Contacts
In the Contacts tab you can search for contacts, edit existing contacts, create new ones and delete existing contacts. Below is information about how you can optimize the use of the contacts tab.

// 22talkdesk © www.talkdesk.com
// Contacts | Searching Contacts
You can search for contacts (and sort contact lists) by the contact’s first or last name (“name”), the contact’s email (“email”), the company the contact works for (“company”) or the phone number the contact dialled when calling your company (“number”).
First, choose how you would like to sort the contact list from the dropdown menu, then type in the information you are looking for and press “enter”, the calls will be sorted as per your selection.
4.1 // Searching Contacts
By default your contacts list displays a set of contacts ordered alphabetically by name (the name is replaced by the phone number in case it does not exist).

// 23talkdesk © www.talkdesk.com
// Contacts | Searching for Contacts by Tag
4.2 // Searching for Contacts by Tag
You can also search for contacts by “tag”. A “tag” is a label that is applied to the contact for identification purposes. For example, you can apply a tag called “vip” to your best customers and then search the contact lists for all customers with the “vip” tag.
To do this, there is a separate dropdown menu. Just select the “tag” that you would like to sort the list by and the result will be a list of all contacts that have that tag.

// 24talkdesk © www.talkdesk.com
// Contacts | Searching for Contacts by Tag
By default, only 25 contacts are displayed at a time. If you click on the arrows at the bottom of the page, you will see the next 25 contacts.
This is helpful for viewing and compiling lists of all partners, leads, qualified leads, unresponsive contacts etc.

// 25talkdesk © www.talkdesk.com
// Contacts | Contact Activity
4.3 // Contact Activity
To open a contact, click on their Name or Phone number on the “recent calls”, “voicemails”, “contacts” section, call bar or in any other place on Talkdesk.
Talkdesk stores every interaction that a customer has with your company in one place: the contact’s “activity” tab.

// 26talkdesk © www.talkdesk.com
// Contacts | Contact Activity
You will see inbound and outbound calls, voicemails, chat transcripts, tickets, cases, notes, etc. from this contact. Talkdesk also pulls information from other business tools you are using (i.e. Salesforce, Zendesk, Olark, SugarCRM, ZoHo, Highrise, Desk.com, etc.) and puts this information in the “activity” tab.
Voice interactions can have notes and a record associated that you can review:
// View more information about each interaction just by clicking on the “+” button.
// Open the interaction in the origin system by clicking on “link” button.

// 27talkdesk © www.talkdesk.com
// Contacts | Contact Activity
Interactions displayed from an external system can have several options associated:
// View more information about each interaction just by clicking on the “+” button.
// Open the interaction in the origin system by clicking on “link” button.
// Edit, update or execute other actions on this interaction in the origin system (this option may not be available).
// 28talkdesk © www.talkdesk.com
// Contacts | Contact Profile
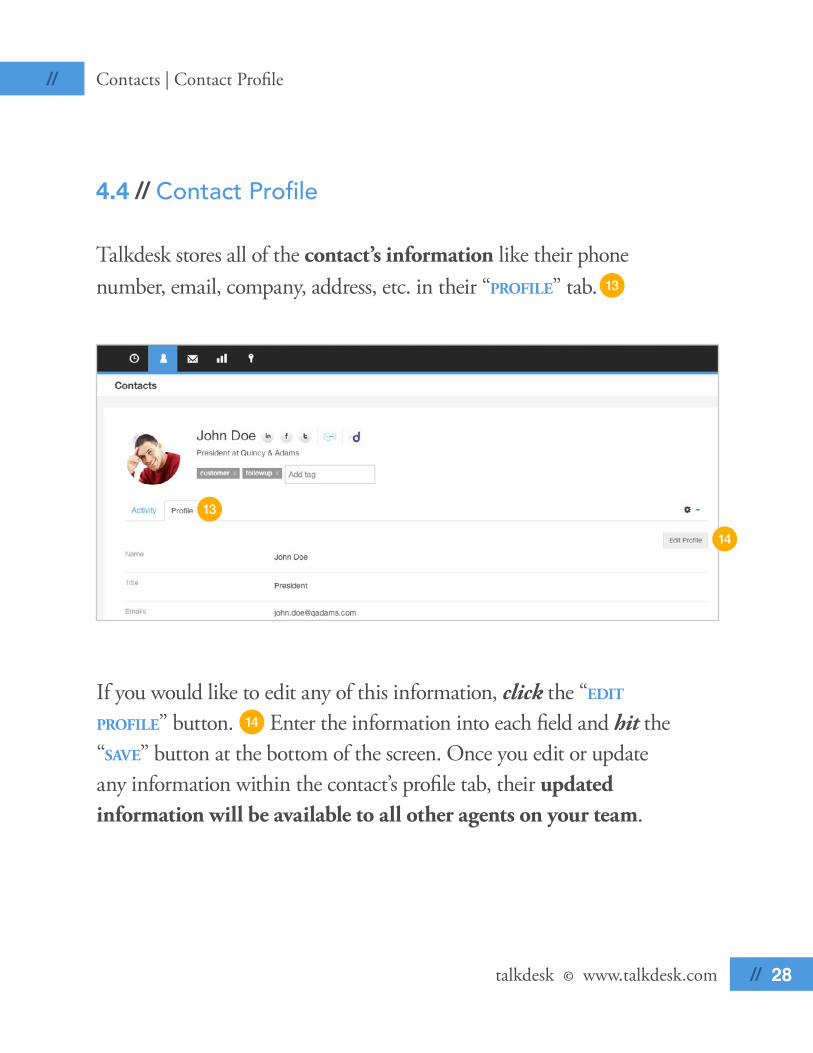
4.4 // Contact Profile Talkdesk stores all of the contact’s information like their phone number, email, company, address, etc. in their “profile” tab.
If you would like to edit any of this information, click the “edit profile” button. Enter the information into each field and hit the “save” button at the bottom of the screen. Once you edit or update any information within the contact’s profile tab, their updated information will be available to all other agents on your team.

// 29talkdesk © www.talkdesk.com
// Contacts | Managing Contact Tags | Removing a Tag From the Contact
4.5 // Managing Contact Tags If you would like to add a disposition code (i.e. “hot lead”, “prospect”, “vip customer”, etc.) or summary code (“requested callback”, “interested in t-shirts”, etc.) to the contact, open the
4.6 // Removing a Tag From the Contact To remove a tag from the contact, open the contact and click on the “x” on the tag box.
contact profile and type in the tag into the box labeled “add tag”.
Once you hit enter, the tag will be added next to that box.

// 30talkdesk © www.talkdesk.com
// Contacts | Creating a New Contact | Deleting a Contact From Talkdesk
4.7 // Creating a New Contact To create a new contact within Talkdesk, click on the “contacts” tab on the top bar. Next, click on the “new contact” button. Then fill out all of the contact’s information and, click “save”. Once you click “save”, all of the contact’s information will be up to date in Talkdesk.
4.8 // Deleting a Contact From Talkdesk To delete a contact from Talkdesk, find the contact by searching for it in the “contacts” tab. Open the contact by clicking on their contact information (either name or phone number). Then, click on the “settings” button and select “delete contact”.

// 31talkdesk © www.talkdesk.com
//
5Make & Receive Calls
// 32talkdesk © www.talkdesk.com
// Make & Receive Calls | Using the Browser | Receiving Calls
// Now that you have had a general overview of how Talkdesk works, below is information on how to make and receive calls. //
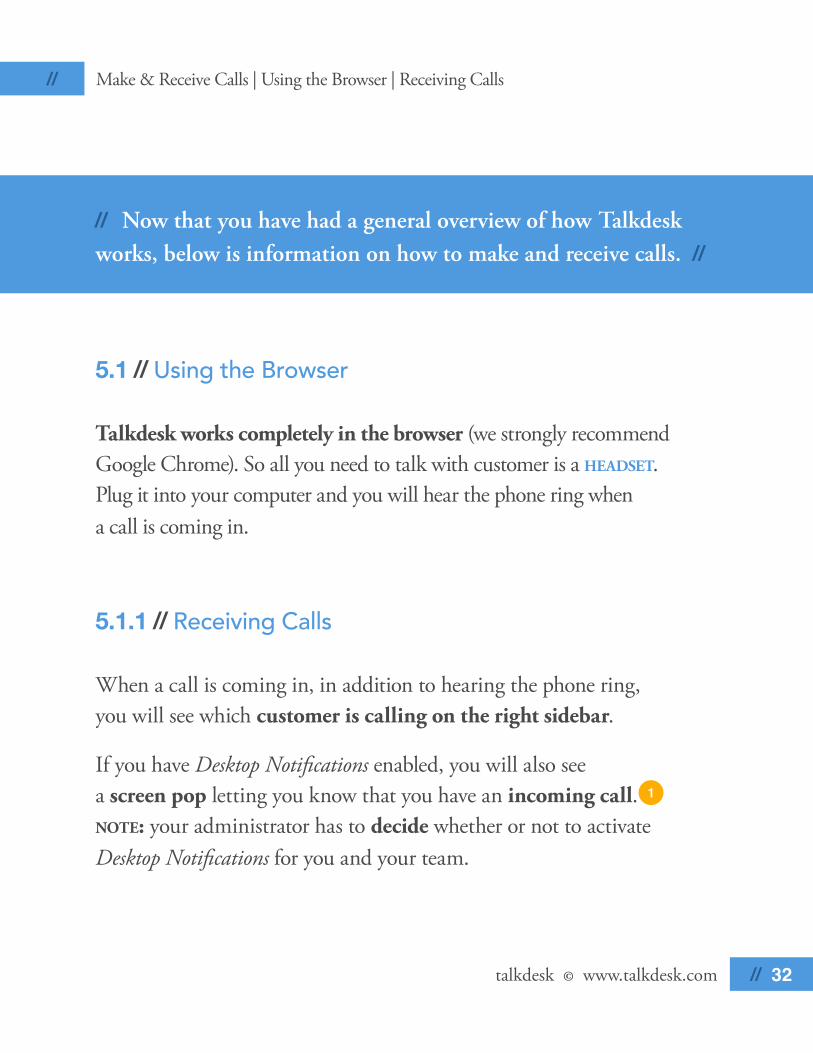
5.1 // Using the Browser Talkdesk works completely in the browser (we strongly recommend Google Chrome). So all you need to talk with customer is a headset. Plug it into your computer and you will hear the phone ring when a call is coming in.
5.1.1 // Receiving Calls When a call is coming in, in addition to hearing the phone ring, you will see which customer is calling on the right sidebar.
If you have Desktop Notifications enabled, you will also see a screen pop letting you know that you have an incoming call. note: your administrator has to decide whether or not to activate Desktop Notifications for you and your team.

// 33talkdesk © www.talkdesk.com
// Make & Receive Calls | Receiving Calls
If you would like to take the call, click on the “accept” button on the right hand side bar. If you are busy and cannot take the call, click on the “reject” button.
Your administrator will configure your voicemail and routing settings, so you don’t have to worry about where the call goes if you decline it.
It can go to other agents if there are any available or it can go to voicemail.
Once you have finished the call, Talkdesk will automatically add the call details from that call to the Contact’s profile. If the caller was sent to voicemail, the voicemail recording will also be added to their call activity tab within their profile.

// 34talkdesk © www.talkdesk.com
// Make & Receive Calls | Calling an Existing Contact
5.1.2 // Calling an Existing Contact To call a contact that exists within Talkdesk you can click on any phone number or contact name within Talkdesk to open the contact’s profile. Once you click on the contact, their phone numbers will show on the right hand call bar. Click “call” next to the phone number you would like to call and you will immediately hear their phone ringing and the call control functions will appear.
To finish the call, hit the “end call” red button. Once you have finished the call, Talkdesk will automatically add the call details (as well as the record if it is enabled for your account) to the contact’s activity tab within their profile.

// 35talkdesk © www.talkdesk.com
// Make & Receive Calls | Calling a New Contact
You can either type in the phone number here or copy the number and paste it in the text box. Once you have entered the number, click “call”. The keypad will be replaced with the call control functions. To finish the call, hit the “end call” red button.
If you want to call a new contact, you can click on the “keypad” button on the right hand side of your Talkdesk. Once you click the “keypad” button, you will see a telephone keypad.
5.1.3 // Calling a New Contact

// 36talkdesk © www.talkdesk.com
// Make & Receive Calls | Calling a New Contact
Once you have finished the call, Talkdesk will automatically add the details of the call to the call log.
// 37talkdesk © www.talkdesk.com
// Make & Receive Calls | Using Your Cell Phone or Landline
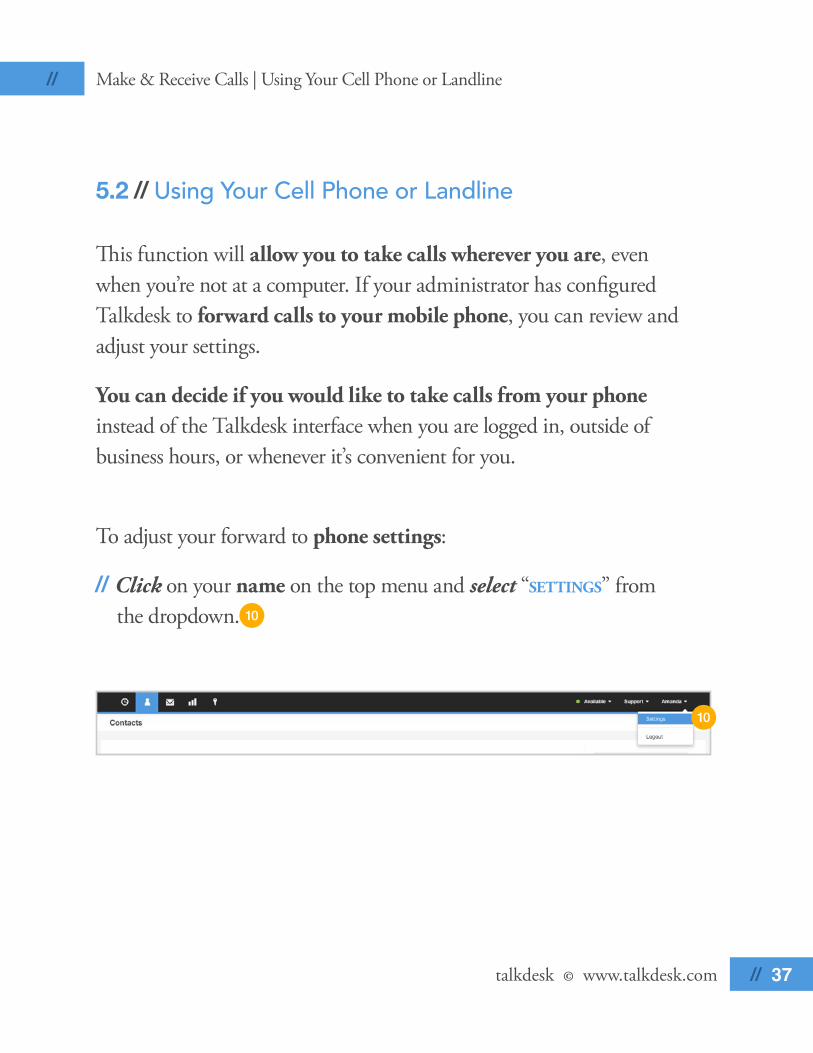
5.2 // Using Your Cell Phone or Landline This function will allow you to take calls wherever you are, even when you’re not at a computer. If your administrator has configured Talkdesk to forward calls to your mobile phone, you can review and adjust your settings.
You can decide if you would like to take calls from your phone instead of the Talkdesk interface when you are logged in, outside of business hours, or whenever it’s convenient for you.
To adjust your forward to phone settings:
// Click on your name on the top menu and select “settings” from the dropdown.

// 38talkdesk © www.talkdesk.com
// Make & Receive Calls | Using Your Cell Phone or Landline
// Type in your mobile phone number in the “external phone number” box. You might add extension line if you use your work phone number.
By default calls are being forwarded to your external phone (mobile phone or landline) as per your administrator configuration. You may want to override these settings, but please do it carefully.

// 39talkdesk © www.talkdesk.com
// Make & Receive Calls | Call Workflow | Selecting the Outbound Caller ID
// In the Routing Settings section, select “yes” if you want to Override Account Settings. This will allow you to override the settings defined by your administrator and change your routing settings.
// Adjust the option for “receive calls on external phone” as you wish (we would recommend “outside of business hours” if you are in charge of the company’s hotline or if you are expecting calls).
5.3.1 // Selecting the Outbound Caller ID With Talkdesk, if your administrator has enabled the custom outbound caller ID, you can choose which phone number to display as the caller ID of the person you are calling.
Once the custom caller ID has been enabled, a dropdown menu will appear in the call bar.
5.3 // Call Workflow

// 40talkdesk © www.talkdesk.com
// Make & Receive Calls | Selecting the Outbound Caller ID
To choose your outbound caller ID, simply choose the number from this dropdown menu.
Once a phone number has been selected, it will be used for all outbound calls until the outbound caller ID phone number is
changed or the “default” option is selected (in this case Talkdesk automatically determines the best number to use based on the phone number you are calling).

// 41talkdesk © www.talkdesk.com
// Make & Receive Calls | Using Call Control Functions
5.3.2 // Using Call Control Functions As soon as you place a call, you will see this call control panel:
// Contact name or phone number
// Contact image
// Duration of the call
// The phone number you are calling from
// The phone number you are calling to
// Mute the call
// Place the call on hold
// Transfer the caller to another agent or manager
// Add a caller, agent or manager
// Open the keypad
// End the call

// 42talkdesk © www.talkdesk.com
// Make & Receive Calls | Mutting the Call | Placing a Customer on Hold | Call Transfer
Below are some of the things you can do while the caller is on the phone, using these call control functions.
5.3.3 // Mutting the Call If you would like to mute the caller, click the “mute” button. When a call is on mute, the caller cannot hear you but you can hear them.
5.3.4 // Placing a Customer on Hold You can place a call on hold by clicking the “hold” button. When a call is on hold, the caller cannot hear you and you cannot hear the caller.
5.3.5 // Call Transfer If you would like to transfer a caller to another agent or your manager, click on the “transfer” button.
You will then see the two possible options for call transfers and a screen that will show you each agent on your team and whether or not they can receive calls.

// 43talkdesk © www.talkdesk.com
// Make & Receive Calls | Call Transfer
// Agents that are logged in and are available to receive calls will have a green dot next to their name.
// Agents who have forward-to-phone enabled will have a gray dot next to their name. They may or may not be free to answer the call.
// Agents who are busy, not logged in or cannot receive calls will not be listed.
First of all, decide how you would like to transfer the call. There are two possible options, blind and warm transfers (details below).
Then, decide which agent to transfer the call to and click on the arrow next to their name. You can also type in a phone number to transfer the call to in the box labeled “external number”. After you enter the phone number, click the “transfer to phone” button.

// 44talkdesk © www.talkdesk.com
//
// Warm Transfer A warm transfer is when you speak with the new agent before the call is transferred. You can tell the destination agent about the caller’s issue and give any background information before transferring the call (without the caller hearing).
Make & Receive Calls | Blind Transfer | Warm Transfer
// Blind Transfer A blind transfer is when you transfer the caller to another agent without speaking to the new agent first. Follow the steps above to transfer a call to an agent, and then once the new agent accepts the call, the call will be dropped on your end. Using this option, once you click the arrow, the agent that you selected will hear their phone ring and can accept the transfer.

// 45talkdesk © www.talkdesk.com
// Make & Receive Calls | Warm Transfer
Then all three parties (you, the other agent and the caller) can speak together.
Once you click the arrow or enter the phone number of the agent you are transferring the call to, the agent that you selected will hear their phone ring and can accept the transfer.
// Once you reach the new agent, you can speak with them for as long as you would like, without the caller hearing.
// Once you are ready to transfer the caller to the new agent, click on the “add customer to call” button and you will now be in a three-way conference call with the new agent, the caller and yourself.
// You can introduce the caller, speak with both the caller and the new agent and then when you would like to hang up from the conference call, hit the “end call and complete transfer” button. The caller will then be on the line with the new agent.

// 46talkdesk © www.talkdesk.com
// Make & Receive Calls | Call Conferencing
5.3.6 // Call Conferencing Call conferencing allows you to add guests to a call. A guest can be another agent, a customer/prospect/lead or a manger.
If you would like to add one or more guests to the call for a conference call, click the “add guest” button with the caller on the line. Your keypad will then look like this:
You can add an agent or manager to the call by clicking on the “+” next to their name. You can also add a person who is not an agent by typing in their phone number in the box below “external number” and clicking “add external user”. If you added an external phone number to the call, their phone will ring and when they answer, they will join the call automatically.

// 47talkdesk © www.talkdesk.com
// Make & Receive Calls | Merging a Call With Another Contact
5.3.7 // Merging a Call With Another Contact When you are speaking with a contact who is in your system but has called from a different phone number or does not have a phone number associated with the Talkdesk profile, you can merge this new information with their contact information that is already in Talkdesk.
While they are on the phone, search for the contact that you would like to merge (you can do it from the contacts section). Open this new contact and then click on the “merge in-progress call” button.
Talkdesk will automatically merge the call that is in progress with the contact you selected.

// 48talkdesk © www.talkdesk.com
// Make & Receive Calls | Call Disposition and Notes
5.3.8 // Call Dispositions and Notes After a call has finished there will be a popup on the screen that will allow you to select a call summary in the dropdown menu predefined for your account by your administrator. For example, you may select “left voicemail”, “wrong number”, “follow up immediately”, “disconnected number”, etc.
You can also add a note about the call on this screen. This information will be displayed on the call summary under the “activity” tab in the contact’s profile. It will keep your entire team on the same page and allows for a quick overview of previous conversations when you are on the phone with the customer.

// 49talkdesk © www.talkdesk.com
//
5.3.9 // Adding Notes on a Call Adding a note to a caller’s interaction history is an easy way to keep your entire team informed about something important. They are also helpful when transferring calls, as the next agent will have relevant information about the caller, before they answer the phone.
Make & Receive Calls | Adding Notes on a Call
To add a note while the caller is on the phone, click the “create a note” button.

// 50talkdesk © www.talkdesk.com
// Make & Receive Calls | Adding Notes on a Call
As soon as you hit the “create a note” button, the note will be added to the “activity” tab in the contact’s profile. You can see the details of the note by clicking on the “+” icon next to the note.
You can edit or delete the note by clicking on the pencil icon next to the note. Change the content of the note and then click the “save note” button.
Depending on the systems you have connected with your Talkdesk account, you can also add interactions (notes, cases, tickets) on external systems directly from the Talkdesk interface.

Make the Most out of SugarCRM & Talkdesk
// 51talkdesk © www.talkdesk.com
//
6Reporting

// 52talkdesk © www.talkdesk.com
// Reporting | Real Time Statistics
The “reporting” tab has all of the information you need to know about how you and your team are performing.
6.1 // Real Time Statistics You can have an overview of calls and the most recent metrics, as well as agent information (how many agents are answering calls).

// 53talkdesk © www.talkdesk.com
// Reporting | Real Time Statistics
Waiting Queue › this displays the current number of callers in the waiting queue.
Longest Waiting Time › this is the length of time that the longest waiting caller has been in the queue.
Average Abandonment Time › this is how long it takes, on average, for customers to hang up in the waiting queue (and not reach an agent).
Average Waiting Time › this is how long customer are waiting, on average, to speak with an agent.
Inbound Service Level › this is the percentage of calls answered within a certain time frame.
Agent Status › this tells you how many agents on your team are available to take a call, busy, away from Talkdesk or offline.
By clicking on the ‘i’ icon, you can see which agents are available, busy, away and offline.

// 54talkdesk © www.talkdesk.com
// Reporting | Waiting Queues Status
6.2 // Waiting Queues Status Another thing you can see in the Reporting section is the queue status for the queues you belong to. For each queue you can see how many callers are waiting, this way you can adapt your conversations according to your call center activity.

Make the Most out of SugarCRM & Talkdesk
// 55talkdesk © www.talkdesk.com
//
Feel free to contact us at [email protected] if you have any issues, suggestions or just want to say hi!
Thanks and we hope you love using Talkdesk as much as we do!
Share This Guide
Talkdesk is as powerful as an enterprise call center software with the simplicity and price of a business phone.

Make the Most out of SugarCRM & Talkdesk
// 56talkdesk © www.talkdesk.com
//


