
Sage Accpac ERP Technology - Sage | Small and Midsize Business

Alchemex (Pty) Ltd Monday, July 13, 2009
Make the most of your
Sage Accpac Intelligence Version 2.1 2009-06-13

Alchemex (Pty) Ltd Monday, July 13, 2009
Contents Creating and linking a report ................................................................................................................... 3
Copy and Pasting Sage Accpac Intelligence Reports ............................................................................ 6
Importing and exporting Sage Accpac Intelligence Reports ............................................................... 8
Note: This function will not be available in the FREE version of Sage Accpac Intelligence. ....... 8
Automatically distribute Sage Accpac Intelligence Reports to the web or intranet .................... 12
Auto e-mailing Sage Accpac Intelligence Reports .............................................................................. 15
Hiding and Showing Sage Accpac Intelligence Reports ...................................................................... 18
Scheduling Sage Accpac Intelligence Reports ..................................................................................... 19
Note: This function will not be available in the FREE version of Sage Accpac Intelligence. ..... 19
Quick Navigating between the Report Manager and Connector ...................................................... 22
Automatically Running Macros ............................................................................................................... 26
Using aggregate functions in the Sage Accpac Intelligence Report Manager ................................ 29
Create a run time version of a Sage Accpac Intelligence report and run it from your desktop 31
Viewing the SQL code passed by Sage Accpac Intelligence to the ODBC Driver for a Report .... 32
Viewing the raw data before it‟s passed through to Excel ............................................................... 34
Creating Excel Formulae in your Report .............................................................................................. 36
Using the “Financial Reports D” Drill-down function ........................................................................ 39
Configuring Dynamic Drill-Downs .......................................................................................................... 41
Hide zero rows .......................................................................................................................................... 44
Sage Accpac Intelligence Report Writing Best Practices................................................................... 47
Useful Contacts ........................................................................................................................................ 50

Alchemex (Pty) Ltd Monday, July 13, 2009
Creating and linking a report
Did you know you can customise the formattimg and layout of the Sage Accpac Intelligence reports?
Why would you want to do this? Sage Accpac Intelligence standard reports are designed to provide a
starting point for the more common reporting requirements. You may however want to change the look
and feel (colours, font style …) to suit your company image, and you might want to change the layout
(move columns, add or remove columns …) to suit your specific company requirements. It is critical
that any changes you make to the report are saved for future use and for the next time you run the
report.
Before we start
You will have to make a opy of the standard Sage Accpac Intelligence reports before you can
make any changes to it.
How to Copy a report
Open report manager and right click the report you want to Copy, select the copy option. Right
click on the report folder you want to paste the copy to and select the Paste option. The copy
of the report will be renamed as “Copy of” and the original report name.
How to Create and Link the report
1. Open your Sage Accpac Intelligence Report Manager
2. Select and run out the report you want to customise
3. Make the changes to the report; ensure that Sheet1 (where Sage Acpac Intelligence places the
Raw Data) and Sheet2 (where Sage Accpac Intelligence places the report parameters) are
unchanged i.e. they remain as the first and second sheets in the workbook.

Alchemex (Pty) Ltd Monday, July 13, 2009
4. Once the changes have been made, leave the workbook open, and go back to Report Manager.
Right click on the report that you want to link your Excel workbook changes to and select the
Create and Link Template option
5. The popup window will show a list of all your open Excel workbooks, select the workbook you
have made the changes to and click OK

Alchemex (Pty) Ltd Monday, July 13, 2009
6. You will be prompted with the message below. Click Yes to create and link the workbook, if
you select No the workbook will not be linked
7. You will also be prompted to specify the template name. It is recommended to keep the
tamplate name the same as the report for ease of reference. Click OK
8. A message will be displayed once the template has been successfully linked
Alchemex (Pty) Ltd Monday, July 13, 2009
Copy and Pasting Sage Accpac Intelligence Reports
Did you know you can copy and paste a report, at any stage, in the report manager?
Where would this be useful?
This can be very useful if you do not want to corrupt the master report, or you would like to create
hybrids of an existing report.
So you might have a sales report that shows a customer analysis on sales, and you want to create
another report that shows sales analysed by Reps instead. The wise thing to do is create a copy of the
original report, and then rename the copy to Sales by Rep, and then customise the new “Sales by rep”
report. You have the benefit of re-using all the information and properties of the original report
without having to create it from scratch. This is how you do it...
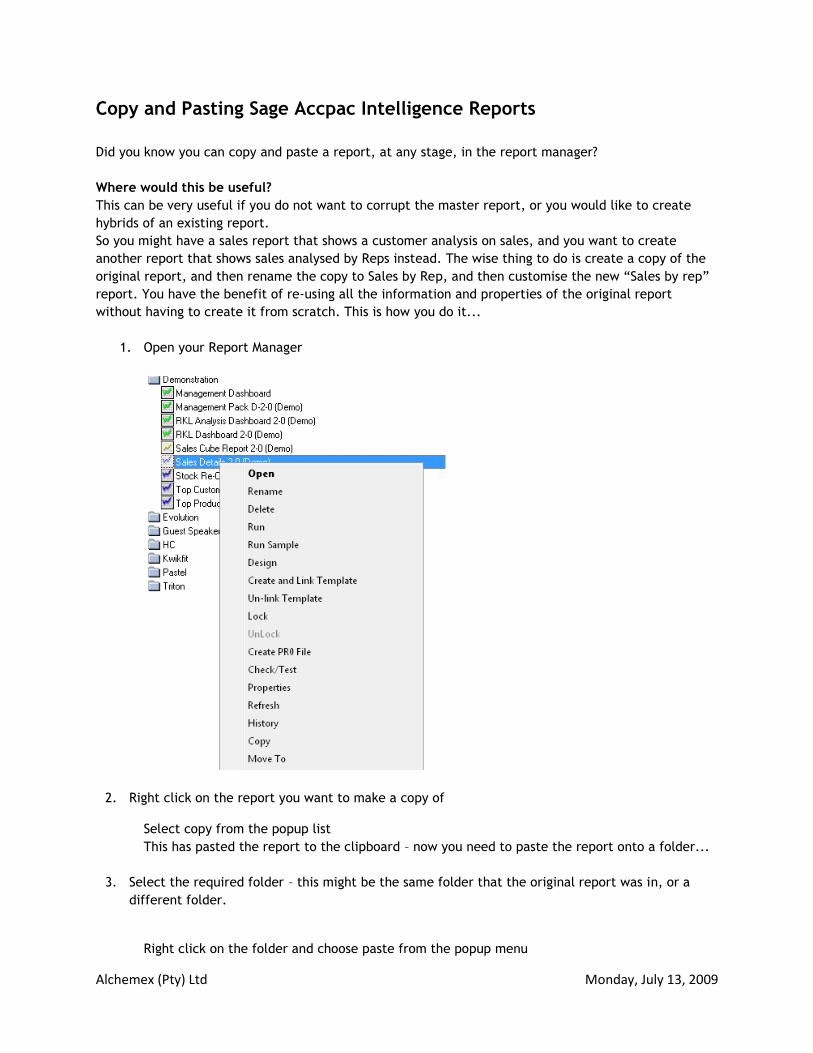
1. Open your Report Manager
2. Right click on the report you want to make a copy of
Select copy from the popup list
This has pasted the report to the clipboard – now you need to paste the report onto a folder...
3. Select the required folder – this might be the same folder that the original report was in, or a
different folder.
Right click on the folder and choose paste from the popup menu

Alchemex (Pty) Ltd Monday, July 13, 2009
Note – you can also use the short-cut keys of Ctrl-C to copy the report, and Ctrl-V to paste it
instead of using the menus.
4. You can now rename the newly copied report – by default the new name will be “Copy of <old
name>” so it can be distinguished from the original report.
5. Right click on the report and select the “rename” option to rename the report.
So what you have now is an exact duplicate of the original report that will get its data from the
same place, and deliver it in the same format – until you make any changes to this new report.

Alchemex (Pty) Ltd Monday, July 13, 2009
Importing and exporting Sage Accpac Intelligence Reports
Note: This function will not be available in the FREE version of Sage Accpac Intelligence.
Why would we want to do this?
One of the great features in Sage Accpac Intelligence is the ability to create reports and be able to
share them with other Accpac Intelligence users. Another significant use is to be able to export
problematic reports and send them to be fixed, and then import them once they are ready – in this day
and age with significant traffic congestion, this can be a huge time and money saving for you. It is
essentially a transport mechanism for reports that removes the risks of cutting and pasting various
elements of a report manually.
Exporting a Report:-
Reports can be exported from one Sage Accpac Intelligence installation and imported into another. The
export function can create either a standard report attachment (.alx extension) or a compressed report
attachment (.al_ extension). Either of these file type may then be distributed for import into other
Acpac Intelligence installation.
To export a report, simply select the report in the Report Manager Interface or from the Tools menu
you can run “Export Report”.
You will be prompted for a Metabase Version. Select the highest version, unless the installation you
intend importing the report to is running on an older version of Sage Accpac Intelligencess Intelligence.
You will be prompted to select a location to save the export file to.

Alchemex (Pty) Ltd Monday, July 13, 2009
Note: Use a compressed file format (AL_ files) to keep file sizes to a minimum. This is useful when you
need to distribute reports.
Export report files or .al_ files can be imported into your Sage Accpac Intelligence installation from the
Report Manager or the Connector Module.
To Import a report using the Report Manager, perform the following steps: -
Open the Report Manager.
Click on "Home" in the Object window
Select the Tools menu.
Select the "Import Report" function
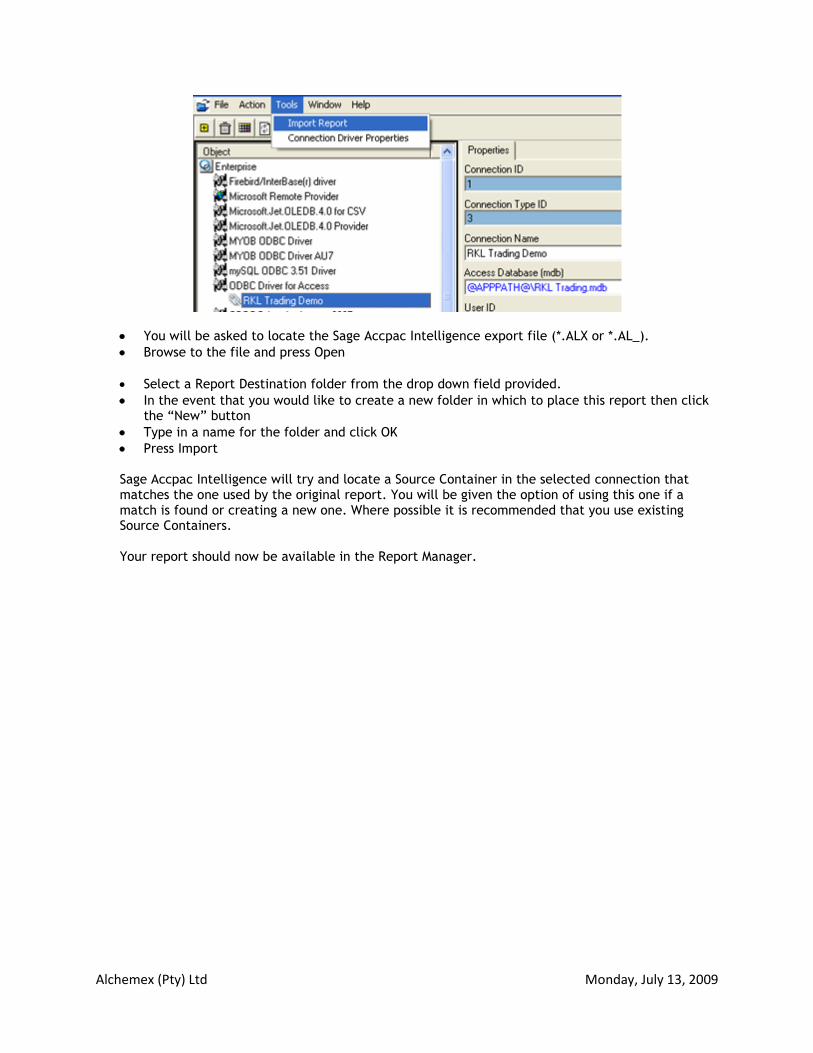
You will be asked to locate the Sage Accpac Intelligence export file (*.ALX or *.AL_)
Browse to the file and press Open.
Sage Accpac Intelligence will show the following dialog screen which contains information for the
import and requires you to select a Target Connection and a Report Destination.

Alchemex (Pty) Ltd Monday, July 13, 2009
Select a Target Connection from the drop down field provided
Select a Report Destination folder from the drop down field provided.
In the event that you would like to create a new folder in which to place this report then click the “New” button
Type in a name for the folder and click OK
Press Import.
Sage Accpac Intelligence will try and locate a Source Container in the selected connection that
matches the one used by the original report. You will be given the option of using this one if a match is
found or creating a new one. Where possible it is recommended that you use existing Source
Containers. Your report should now be available for use in the Report Manager.
To Import a report using the Connector Module, perform the following steps: -
Open the Connector Module from the Sage Accpac Intelligence desktop.
Drill down to and select the Connection from which the report will be drawing data.
Select the Tools menu
Select the "Import Report" function.
Alchemex (Pty) Ltd Monday, July 13, 2009
You will be asked to locate the Sage Accpac Intelligence export file (*.ALX or *.AL_).
Browse to the file and press Open
Select a Report Destination folder from the drop down field provided.
In the event that you would like to create a new folder in which to place this report then click the “New” button
Type in a name for the folder and click OK
Press Import
Sage Accpac Intelligence will try and locate a Source Container in the selected connection that matches the one used by the original report. You will be given the option of using this one if a match is found or creating a new one. Where possible it is recommended that you use existing Source Containers. Your report should now be available in the Report Manager.

Alchemex (Pty) Ltd Monday, July 13, 2009
Automatically distribute Sage Accpac Intelligence Reports to the web
or intranet
Did you know that you can automatically distribute any SAGE ACCPAC INTELLIGENCE reports to the web
or to an intranet.Why would you want to do this?
It often happens that information rich reports, that could help your organisation, are sitting on some
ones desk – if only they could be easily distributed to the right people – effortlessly.
Here‟s how it is done!
1. Open your report manager.
2. Select the report that you want to publish to an intranet/ internet.
3. Select the check box to Show Advanced Properties of a report – it is at the bottom of the
properties tab window.
4. Select the button to „Run Add-ins” - this will be listed in the properties window of the report.

Alchemex (Pty) Ltd Monday, July 13, 2009
.
5. Select the option to „Specify a New Add-in Function‟ and select OK.
6. A box will appear as follows
Select the Add-In Library, and Add-in Library Module as shown above. Select the Add in
Function followed by the OK button.

Alchemex (Pty) Ltd Monday, July 13, 2009
7. A box will pop up asking you to enter all the relevant details for distribution – see below
This will include details about the name of the sheet to be published and a fully qualified path
for the HTML file. (with filename and extension)
8. When you have entered your details, select OK and you will see that a string has been added
into the “Add-Ins” box in the properties window of your report.

Alchemex (Pty) Ltd Monday, July 13, 2009
Auto e-mailing Sage Accpac Intelligence Reports
Did you know that you can automatically distribute any Sage Accpac Intelligence report once it has
been run, to a distribution list of your choice? Why would you want to do this? It often happens that
information rich reports, that could help your organisation, are sitting on some ones desk – if only they
could be easily distributed to the right people – effortlessly.
Here‟s how it is done!
1. Open your report manager.
2. Select the report that you want to setup for e-mailing automatically once it has been run.
3. Select the check box to Show Advanced Properties of a report – it is at the bottom of the
properties tab window.
4. Select the button to „Run Add-ins” - this will be listed in the properties window of the report.

Alchemex (Pty) Ltd Monday, July 13, 2009
.
5. Select the option to „Specify a New Add-in Function‟ and select OK.
6. A box will appear as follows
Select the Add-In Library, and Add-in Library Module as shown above. Select the Add in
Function followed by the OK button.
7. A box will pop up asking you to enter all the relevant details for emailing – see below

Alchemex (Pty) Ltd Monday, July 13, 2009
This will include details about your mail SMTP server which you must get from your Mail
administrator, as well as the „from‟ and „to‟ addresses. To send to multiple e-mail addresses,
use a colon in between addresses. Ensure that when you give the report a name that you
include the “.xls” or “.xlsx” extension as well. Scroll down on this window to see more
available options.
8. When you have entered your details, select OK and you will see that a string has been added
into the “Add-Ins” box in the properties window of your report.
9. Execute the report, and it will automatically be e-mailed to the selected recipients.

Alchemex (Pty) Ltd Monday, July 13, 2009
Hiding and Showing Sage Accpac Intelligence Reports
Why would you like to show or hide reports? It is handy to be able to hide reports that do not need to be run separately, but only as union reports. This will give your object window a neater look. To hide a report: 1. Select the report in the Object window of the Report Manager, under Properties select 2. Show Advanced 3. Under the properties tab, select the option Report Hidden 4. Refresh your object window view by double clicking on Home at the top of the screen 5. Now the report will not show in your list of available reports
To show a hidden report 1. Select the Home object in Report Manager 2. Select Show Hidden Reports

Alchemex (Pty) Ltd Monday, July 13, 2009
Refresh your object window by double clicking on Home label at the top of the screen. You will now be able to view your hidden reports.
Scheduling Sage Accpac Intelligence Reports
Note: This function will not be available in the FREE version of Sage Accpac Intelligence.
Sage Acpac Intelligence reports can be run unattended, from Operating System batch files or under the control of external scheduling software (such as the Microsoft Windows Scheduler or the Microsoft SQL Server Agent). This can be useful when you have certain reports that you need to run on a regular basis.
When reports are run unattended they are automatically closed on completion. Scheduled reports must use the Generate Output Advanced report or the Retain Run Instances option to be useful. See Advance Report Properties for more information.
Typically reports that are scheduled will have the Generate Output File property set so that the unattended reports are saved to a specific location. Set this property under the Advanced options on the Report Properties tab.
To generate the command to schedule a report run:
1. Open the Report Manager 2. Select the report you wish to generate a schedule command for
3. Click on the Schedule Icon . 4. If the report expects parameters then you will be prompted to enter these. Enter any
necessary parameters and click OK. 5. A message box will then appear that will display the syntax for the running the report.
Additionally this text will be placed on the windows clipboard so that it can be pasted into the application or batch file that will be controlling it. An example is shown below.
When reports are run unattended the information that is usually sent to the Process Monitor window is redirected to a log file. You should review this log file to make sure that your reports are running as expected. The log file is called SageAccBI56 and can be found in the Sage Software\Sage Accpac\BXDATA folder in your Accpac shared directory. The file can also be opened directly from the Administrator Tool. To do this Open the Administrator Tool and choose the Menu item Tools > Open Log File.
The application returns a process exit code for the scheduled report to indicate Success (0) or Failure (1) allowing the calling process to check the result of a shelled report.

Alchemex (Pty) Ltd Monday, July 13, 2009
Scheduling a Report using the Windows Scheduler
1. Select the report that you wish to schedule in the Report Manager.
2. Click on the Schedule Icon on the toolbar or right click on the report and choose Generate Scheduler Command.
3. If the report expects parameters then you will be prompted to enter these. 4. A message box will then appear that will display the syntax for running the report. 5. Additionally this text will be placed on the windows clipboard so that it can be pasted into
the scheduled task command field.
Reports that are Scheduled are closed on completion and therefore must use the Generate Output Advanced report or the Retain Run Instances option to be useful. See Advance Report Properties for more information.
Open the Windows Control panel and then open the Scheduled Tasks item.
1. From the menu choose File > New > Scheduled Task. 2. A new Scheduled Task will appear in the explorer window. 3. Rename the task with a meaningful name. 4. Select the new task 5. From the menu, choose File > Properties. 6. Place the cursor in the Run text box, right click and choose Paste. 7. The run command for the report will be copied from the clipboard into the Run box. 8. You can optionally enter a comment describing the scheduled report. 9. Leave the Start In box blank.

Alchemex (Pty) Ltd Monday, July 13, 2009
In the Run As box enter the user name that should be used to run the report under (for domain user accounts use the format domain_name\user_name) . The user name must be a valid account on the domain or local machine with sufficient privileges to run Sage Accpac Intelligence.
To set the Schedule for the Task click on the Schedule Tab and choose the schedule options for the report. The Schedule Tab is shown below.
When you have set the schedule options press the OK button. A password box will appear asking for the password of the user that has been specified to run the Task. Enter the password in the Password box and the Confirm Password box and press OK.
It is important to understand that the user account that is used for the scheduled report must have sufficient permissions to access all the necessary resources to run the Sage Accpac Intelligence report. It is best to log on to the machine that will be running the scheduled report as that user and test that the report can be run interactively under the user account before using the account for scheduled reports

Alchemex (Pty) Ltd Monday, July 13, 2009
Quick Navigating between the Report Manager and Connector
Did you know you can quickly navigate from a specific report in the Sage Accpac Intelligence Report
Manager to the associated data container Sage Accpac Intelligence Connector module.
NB this function is only applicable if you have the Sage Accpac Intelligence Connecotr module.
How to Quickly Navigate to the appropriate data Container
a. Open the Report Manager
b. Double click on the report, double click on Source Container, right click on the report container
name and select Go to Container In Connector
c. A message will pop up, select Yes

Alchemex (Pty) Ltd Monday, July 13, 2009
d. The Connector will open and navigate directly to the container linked to the report you selected
in the Report Manager, where you can make the appropriate changes / checks you need.
9. How to Quickly Navigate to the Appropriate Expression
a. Open your Report Manager
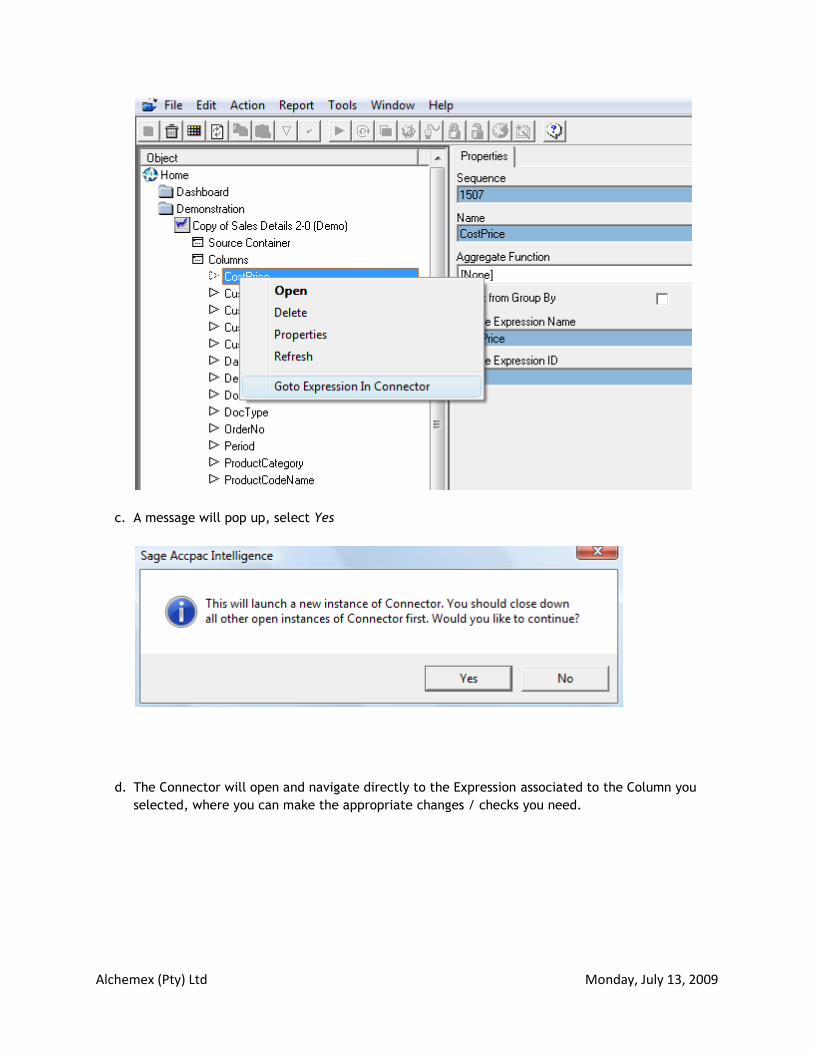
b. Double click on the report, double click on Columns, right click on the column name and select
Go to Expression In Connector
Alchemex (Pty) Ltd Monday, July 13, 2009
c. A message will pop up, select Yes
d. The Connector will open and navigate directly to the Expression associated to the Column you
selected, where you can make the appropriate changes / checks you need.

Alchemex (Pty) Ltd Monday, July 13, 2009

Alchemex (Pty) Ltd Monday, July 13, 2009
Automatically Running Macros
Did you know that you can automatically run macros you have created when you run your report in
Sage Accpac Intelligence?
Why would you want to do this? Macros can be very powerful for doing many different things in Excel
(e.g. additional formatting, filtering, printing etc.).
Here‟s how it is done!
9. Open your report manager.
10. Select the report that you want the macro to run in, run the report or open the Excel
template.
11. Create the macro you want to run automatically, ensuring that in your macro you specify which
sheet you need the macro to work in. (This will help by forcing the macro to select the correct
sheet even after you Create and Link the workbook with a different active worksheet)
Run Report View Excel Template

Alchemex (Pty) Ltd Monday, July 13, 2009
12. Once you have created and tested your macro, save the template back or create and link the
workbook back to the report.
13. Highlight the report in which you have created the macro, under the Properties tab, tick the
Show Advanced option at the bottom of the screen.
14. In the advanced options list that is now available, locate the Run Macros on Completion option
In the text box type the name of the macro you created.
Additional Notes

Alchemex (Pty) Ltd Monday, July 13, 2009
If there is more than one macro that needs to be run, then separate their names with semi-colons.
If a Macro takes parameters then place these in brackets after the macro name in a comma separated list.
Macros will always run after any Add-Ins should you have any Add-Ins placed in the "Run
Add-Ins" property.
Combine macro names and Add-Ins in the same property to ensure the correct order thereof when running the report. Example: To have a macro run before an Add-In, place the macro name in the "Run Add-Ins" property before the Add-In.
15. Once you have entered the name of the macro, make sure you Apply the changes to the report
16. Run the report out and your macro will automatically run.

Alchemex (Pty) Ltd Monday, July 13, 2009
Using aggregate functions in the Sage Accpac Intelligence Report
Manager
Have you written a report that renders huge data volumes into Excel and results in lengthy run times?
There are many scenarios that could cause this but by far the most common issue is the absence of
aggregate function use in reports.
Simply put, an Aggregate is to bring together or to collect into a mass or sum. Examples of aggregates
are SUM, MAX, MIN & COUNT.
Solution:
Launch the Sage Accpac Intelligence Report Manager.
Navigate to the “Columns” Tab and take a close look at the fields you have included in your report. Now identify all the fields that your report needs and then delete the superfluous ones.
Now identify all your DATA or VALUE fields and apply an Aggregate to each of them. The most common aggregate being SUM.

Alchemex (Pty) Ltd Monday, July 13, 2009
What you have done by aggregating is as follows –
You now have a report that groups your results by the remaining fields i.e. Customer Name and then sums your VALUE fields (i.e. Sales amount excl VAT) accordingly.
Thus instead of having a report that renders each and every transaction line item from your source
Transaction Table into “Sheet1”, you now have a report that only renders the exact required data. You
have effectively tuned your report for speed.This simple practice will dramatically reduces runtime and
result in, for example, a 5 minute report now running out in a matter of seconds.
Please note: By default, all fields in your report will have no aggregate function applied to them.
To further reduce the amount of data rendered into your Excel report, you can apply an aggregate filter to your aggregate function, by selecting the Aggregate Filetrs tab in the report manager and applying a relevant filter relevant to the aggregate function e.g. a report that groups your results by Customer Name and then sums your VALUE fields (i.e. Sales amount excl VAT) , ONLY where the sales amount by Customer Name is greater than 1000.

Alchemex (Pty) Ltd Monday, July 13, 2009
Create a run time version of a Sage Accpac Intelligence report and run
it from your desktop
Why would you want to do this? So that you can quickly run reports by double-clicking on a desktop icon without having to navigate your way into the system.
Open the report manager and right click on a report and choose the create PR* option
Browse to a location to save the file to. To run the report, browse to the location where you stored it, and double click on the icon to run it. If there were any report parameters that need to be entered, the box will pop-up asking you to enter them. As the report runs you will see the progress monitor being displayed and the report will be delivered into Excel on the desktop where the report was run. As easy as that!
Alchemex (Pty) Ltd Monday, July 13, 2009
Viewing the SQL code passed by Sage Accpac Intelligence to the ODBC
Driver for a Report
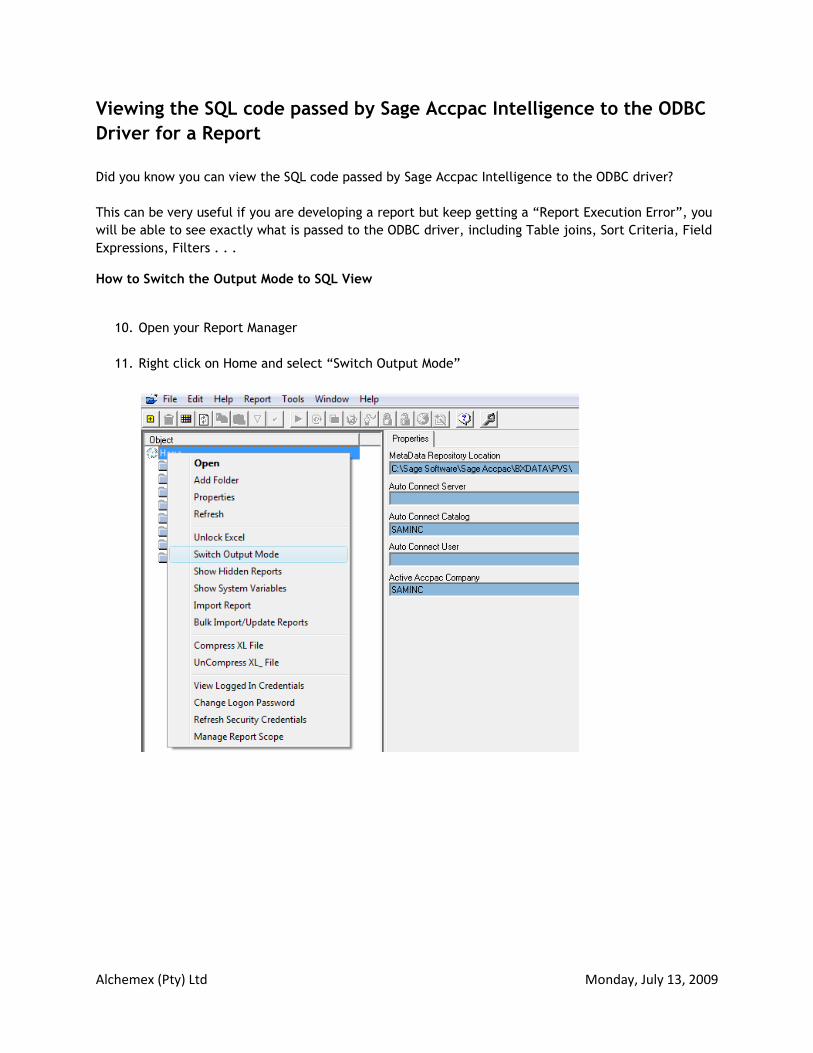
Did you know you can view the SQL code passed by Sage Accpac Intelligence to the ODBC driver?
This can be very useful if you are developing a report but keep getting a “Report Execution Error”, you
will be able to see exactly what is passed to the ODBC driver, including Table joins, Sort Criteria, Field
Expressions, Filters . . .
How to Switch the Output Mode to SQL View
10. Open your Report Manager
11. Right click on Home and select “Switch Output Mode”

Alchemex (Pty) Ltd Monday, July 13, 2009
12. Select the “Screen (SQL Debug)” and click OK
13. Now highlight the problematic Report and run as normal
14. Enter any Parameters the report might have and click OK
15. The SQL Debug window will popup with the SQL code that gets passed to the ODBC
driver

Alchemex (Pty) Ltd Monday, July 13, 2009
16. You can go through the SQL code to try find the problem, then make the relevant changes to
the container (Connector) of the report (Table joins, Field expressions . . .) or to the Report
(Report Manager) itself (Filters, Aggregate Functions . . .)
NOTE: You will not be able the edit the SQL code in the Debug mode, you have to correct / make
changes to the Container or Report directly.
17. From the SQL Debug window you can
Test SQL – Test the SQL code to see if it runs out successfully or not
Continue – To see what the raw data will look like in a Data output window
Things to Keep in Mind
When you open the Report Manager it defaults the Output mode to Excel every time, regardless
of the state you closed the Report Manager in.
In a networked environment of Sage Accpac Intelligence, the Output mode you select will only
be affective on the workstation it was set on.
Viewing the raw data before it‟s passed through to Excel
Did you know you can view the raw data of a report before it‟s passed through to Excel? This can be
very useful if you need to quickly check to see if you are getting the right data from your container or
that your filters and/or parameters are working correctly without waiting for the data to render into
Excel.
How to Switch the Output Mode to Screen (data view)
18. Open your Report Manager
19. Right click on Home and select “Switch Output Mode”
20. Select the “Screen” mode and click OK
21. Now highlight the Report you are working on and run as normal

Alchemex (Pty) Ltd Monday, July 13, 2009
22. Enter any Parameters the report might have and click OK
23. The Data Output window will popup with the raw data
24. You can now easily go through the raw data, sorting fields by clicking on the field headings.
Things to Keep in Mind
When you open the Report Manager it defaults the Output mode to Excel every time, regardless
of the state you closed the Report Manager in.
In a networked environment of Sage Accpac Intelligence, the Output mode you select will only
be affective on the workstation it was set on.

Alchemex (Pty) Ltd Monday, July 13, 2009
Creating Excel Formulae in your Report
Did you know you can create Excel formulae as data expressions in the Administrator module? This can
be very useful if you have a Formula you need to be extended as far down the sheet as the rest of the
dynamic data that is being extracted into Excel.
How to create an Excel Formula in your Report
25. Open your Administrator Module and Browse to the container in which you want to add the
Excel Formula
26. Right Click on the Container and select Add Expression
27. Select Excel Formula option.

Alchemex (Pty) Ltd Monday, July 13, 2009
28. Give the Excel Formula a name e.g. “GrossProfit” then type in the Excel Formula (Do Not put
an = sign in front of the formula, as Sage Accpac Intelligence automatically prefixes all Excel
Formulas with an equal sign), click OK
29. Open your Report Manager and Browse to the Report associated to the above container and
Double click on it.
30. Right Click on Columns and select Add Columns
Alchemex (Pty) Ltd Monday, July 13, 2009
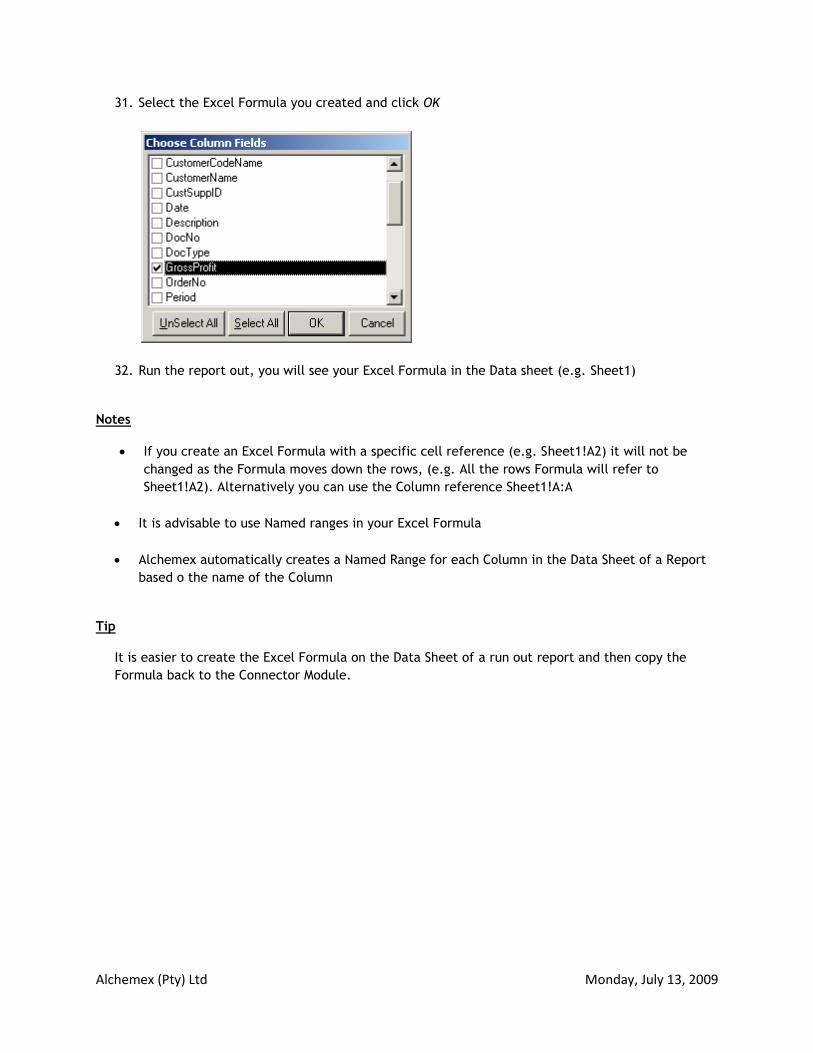
31. Select the Excel Formula you created and click OK
32. Run the report out, you will see your Excel Formula in the Data sheet (e.g. Sheet1)
Notes
If you create an Excel Formula with a specific cell reference (e.g. Sheet1!A2) it will not be
changed as the Formula moves down the rows, (e.g. All the rows Formula will refer to
Sheet1!A2). Alternatively you can use the Column reference Sheet1!A:A
It is advisable to use Named ranges in your Excel Formula
Alchemex automatically creates a Named Range for each Column in the Data Sheet of a Report
based o the name of the Column
Tip
It is easier to create the Excel Formula on the Data Sheet of a run out report and then copy the
Formula back to the Connector Module.

Alchemex (Pty) Ltd Monday, July 13, 2009
Using the “Financial Reports D” Drill-down function
The Sage Accpac Intelligence Management pack gives you the ability to drill-down on Income Statement
and Balance Sheet figures, thus enabling you to view the makeup of balances.
Using the Drill-Down Account Feature:
Click on any part of the row containing the account you want to interrogate. This could be from either the Income Statement or Balance Sheet.
On the Drill-Down Toolbar, (On the left of the Excel 2003 < screen and under the “Add-Ins” tab of Excel 2007 click the "Drill-Down Account" button.
The Ledger Transaction Details sheet will be displayed reflecting the transactions for the selected account
The drill-down feature does not allow for the selection of a month to drill-down to, it will always show all transactions that were extracted as per the date range that was selected at the time of running the report. (In the example below, that would be period 1 to 4)
If your data sets are large it is best to run the ledger transactions out for 1 month only, i.e. the current month.
To go back to the worksheet you were viewing before you "drilled down" click the "Back to last sheet" button on the Drill-Down toolbar.

Alchemex (Pty) Ltd Monday, July 13, 2009
NB: The Drill-Down feature relies on the account number being available in Column A. Column A can be
hidden, but if deleted it will prevent the operation of the drill-down feature
I Cannot find the Drill-Down Account Toolbar:
Press Alt-F8 (or Select, Tools, Macro, Macros, from the menu bar)
Select the macro named "Build Drill-Down toolbar”
Select the Run button to run the macro
The toolbar should now be visible again
OR
Save the workbook, Close it then open it again

Alchemex (Pty) Ltd Monday, July 13, 2009
Configuring Dynamic Drill-Downs
The Drill-Down tool allows you to interrogate data dynamically from within your Excel Reports. A
common scenario might be where one high level Sage Accpac Intelligence Report needs to drill-down to
line level transactional Data in other reports. As a fast interrogation method the Drill-Down tool allows
individual Sage Accpac Intelligence Reports to be executed with parameters based on Excel Cell values.
These reports render their data directly to a fast grid style window or you can opt to drill-down data to
your Excel Report Workbook. The fast grid option will however allow you to dump the data into Excel
via the data screen menu. In this form a Sage Accpac Intelligence Report definition is being used as the
source for an Ad-Hoc data enquiry.
To use the Drill-Down tool locate the "Report Tools" menu on your Excel Menu Bar.
The Drill-Down tool will appear. To execute a pre-configured Drill-Down simply double click on it or
select it then select the Execute Button.
To configure a Drill-Down - Select the Drill-Down and select Edit.
The Configure Drill-Down window will appear. This window is shown below.
To Add a Drill-Down select the Add button and follow the same process outlined below.

Alchemex (Pty) Ltd Monday, July 13, 2009
NOTE: A Drill-Down definition set is contained within an Excel Book or Template. If you change or add
a Drill-Down definition in a Report you should link it back to your Report in the Report Manager to keep
the changes.
The Properties of a Drill-Down Definition are listed below: -
Drill-Down Defined Code: A unique code for the Drill-Down within the Excel Book Drill- Down.
Descriptive Name: A meaningful name used to identify the Drill-Down
Report ID/Code: The Sage Accpac Intelligence Report ID to use for interrogation. The Report ID of a report is listed on the property window of a report in the Report Manager. In Version 6 you are also now able to use the Report Code to specify the report to use for interrogation.
Source Sheet: The Source Sheet used to interrogate from. This is the sheet that has the parameters for the report. This must be the Excel Worksheet name OR the word "ActiveSheet" for the Drill-Down to work from any sheet in the Workbook.
Report Parameter Columns: A semi-colon delimited list of the column numbers or names used to define where to obtain the report parameters from.
Quick Drill-Down / Drill-Down to Workbook: Gives you the choice of having the output displayed in “fast grid” (in a window) or “direct to workbook” style
In the example above whenever the Transactions Drill-Down is executed the values from the
EndingDate named range and Column 3 will be taken for the active/selected row and passed to the
report of ID P9-SD03-2-0. The report will run and render the data to screen. The Data Output screen is
shown below (that was the specific option selected)

Alchemex (Pty) Ltd Monday, July 13, 2009
Once viewed, the window can be closed. However if you wish to analyse the data in Excel then use the
Data to Excel menu provided to transfer the Data into Excel. A number of options are provided for this.
To Add a Drill-Down press the Add button and follow the same process outlined below.
NOTE: A Drill-Down definition set is contained within an Excel Book or Template. If you change or add a
Drill-Down definition in a Report you should link it back to your Report in the Report Manager to keep
the changes.
The Properties of a Drill-Down Definition are listed below: -
Drill-Down Defined Code: A unique code for the Drill-Down within the Excel Book Drill-Down.
Descriptive Name: A meaningful name used to identify the Drill-Down
Report ID/Code: The Sage Accpac Intelligence ID to use for interrogation. The Report ID of a report is listed on the property window of a report in the Report Manager. In Version 6 you are also now able to use the Report Code to specify the report to use for interrogation.
Source Sheet: The Source Sheet used to interrogate from. This is the sheet that has the parameters for the report. This must be the Excel Worksheet name OR the word "ActiveSheet" for the Drill-Down to work from any sheet in the Workbook.

Alchemex (Pty) Ltd Monday, July 13, 2009
Report Parameter Columns: A semi-colon delimited list of the column numbers or names used to define where to obtain the report parameters from.
Quick Drill-Down / Drill-Down to Workbook: Gives you the choice of having the output displayed in “fast grid” (in a window) or “direct to workbook” style
In the example above whenever the Transactions Drill-Down is executed the values from the Columns 1
and 3 will be taken for the active/selected row and passed to the report of ID 1. The report will run
and render the data to screen.
Hide zero rows
Did you know that you can compress a layout to only show the rows that contain values?
Why would you want to do this?
If you have a large general ledger with lots of GL codes and many of them have no balances posted
against them, you don‟t want them to clutter up your reports for printing purposes.
How do I do this?
1. Run out your report from the Sage Accpac Intelligence report manager

Alchemex (Pty) Ltd Monday, July 13, 2009
2. Select the column that you want to hide the zeroes from
3. Select the hide zero rows option from the add-ins->report tools menu

Alchemex (Pty) Ltd Monday, July 13, 2009
4. Confirm or change the column details when prompted and see how the rows are compressed to
display a schedule that is compact and shows only relevant data.
5. Note that the rows are hidden, and not deleted so if subsequent journals are posted to
accounts that did not have values before, these will not be lost.

Alchemex (Pty) Ltd Monday, July 13, 2009
Sage Accpac Intelligence Report Writing Best Practices
The purpose of this document is to provide the best possible guidelines on effective report writing.
Guidelines are categorized as follows:
Getting Started
Connector Module:
Containers
Joins
Expressions
Lookups
Report Manager:
Parameters
Union Sub Reports
Advanced Report Properties
Excel Template File:
Use of VB Code
Use of PivotTables
Page Setup
Page Formats
GETTING STARTED:
Always keep in mind the following key words before, during and on completion of the development of a
report:
Automation
Flexibility
Performance
Ease of use for future support/maintenance

Alchemex (Pty) Ltd Monday, July 13, 2009
CONNECTOR
CONTAINERS:
1. Keep the number of reports per container to a minimum. (Eliminates room for error when editing an expression, if numerous reports are using the same container and the same expression, changing the expression for the purpose of one report could result in a negative impact on the other reports)
2. Name containers as per the report name or similar to. (Ease of use in recognizing the contents of the container).
3. Provide meaningful descriptions on containers. 4. Include expressions in the container that may be useful to the client for future use even if they
are not required on the report in question.
JOINS:
1. Use graphical joins unless you require specific clauses with the join 2. Views and stored procedures should only be used if designing a report from a database where
such views or stored procedures are standard within the database and not client specific. An exception would be if the need arises for an extremely complex report where the end result cannot be achieved in any other way.
EXPRESSIONS:
1. Use data fields, sql expressions, and pass through variables as much as possible. 2. Excel Formulas should be a last resort if the end result cannot be achieved through the above-
mentioned expression types. (Excel formulas have a negative effect on file size and performance)
3. Provide meaningful names for expressions
LOOKUPS:
1. Ensure that lookups are working properly on any field used as a parameter on the report and any other fields that may be used as parameters if customizing the report.
2. Where the functionality of the database allows for the use of “Distinct” ensure that lookups display a distinct list of values.
3. Where necessary, set the lookup type to a Customised Sql Statement and customize the statement in order to achieve the preferred end result. The lookup of the expression does not always have to come from the table listed in the Expression source; it can be set to obtain the value from a different table.

Alchemex (Pty) Ltd Monday, July 13, 2009
REPORT MANAGER
PARAMETERS
1. Rename parameter fields (on the parameters properties screen) where necessary to provide more meaningful options to the user at runtime.
2. Set “Parameters on Second Sheet” on. Having the parameter values within the workbook can be extremely useful in report headings.
UNION REPORTS
1. Where possible place all parameters on the first union sub report which runs. This will eliminate pop ups later in the run process.
Note that Union sub reports run in Reverse Order (LIFO) within a union report.
UNION SUB REPORTS
1. Hide union sub reports from view – less confusion for clients when running reports.
EXCEL TEMPLATE FILE
USE OF VB CODE
1. Keep macros as simple as possible 2. Avoid complex VB code, as this becomes a support issue for future maintenance and is not
supported by Sage Accpac Intelligence. 3. Try and make use of the Add-Ins available in the Sage Accpac Intelligence Report Manager as
some may eliminate the need for complex macros.
PIVOTTABLES
When using a PivotTable in the template file take the following into account:
1. PivotTable Limitations – ensure that you do not display too many row fields that could cause the pivot table limitation to be reached. Use page fields where necessary to further summarise data.
2. When pivoting data from a source data sheet where the data was rendered by Sage Accpac Intelligence, always use the range Sheetname!RawDataCols. This will ensure that the full range of data extracted is always available for use within the pivot table. When adding new columns to a report, these new columns of data will then automatically be included in the pivot table range.

Alchemex (Pty) Ltd Monday, July 13, 2009
3. Turn off the feature “Save data with table layout”. This is a pivot table, “table option” which affects file size when turned on resulting in large template files.
4. Use the feature “Clean Template Pivot Fields” in the Report Manager to clear out pivot table items before exporting the report for delivery. This will ensure that the user of the report does not view items within the pivot table that were used in development of the report.
PAGE SETTINGS
1. Set the following footers on each page: At the bottom left, set the date and time
At the bottom right, set page numbering
2. Set print titles to have row headings repeated at the top of each page 3. Set print titles to have columns repeated at the left of each page where necessary 4. Preview the report and adjust the scaling where necessary 5. Reset margins where necessary
OTHER PAGE FORMATTING
1. Set report headings at the top of each worksheet that is used as a final end result - Include parameter values within the report headings where necessary
2. Set “Freeze Panes” to enable easy scrolling around the worksheet without loosing view of report headings, etc.
3. Hide the display of zero values on the worksheets 4. Hide the display of gridlines on the worksheets 5. Adjust the zoom display if necessary but to a minimum of 75%.
Useful Contacts