MailPlatform User Guide
24
1 © MailPlatform 2014 – Ver. 2.0
-
Upload
mailplatformdk-aps -
Category
Documents
-
view
212 -
download
0
description
Getting Started v2.0
Transcript of MailPlatform User Guide

1 © MailPlatform 2014 – Ver. 2.0

2 © MailPlatform 2014 – Ver. 2.0
Hello and Welcome to MailPlatform! This is your quick reference guide to the basic set-‐up and functionalities. But remember we are always on hand to help you. In this guide we will go through:
Logging In .................................................................................................................................... 4 Your Homepage .......................................................................................................................... 5 Creating a list .............................................................................................................................. 6 Importing Your Contacts ........................................................................................................... 10 Creating a Sign Up Form ............................................................................................................ 13 Creating a Campaign ................................................................................................................. 17 Statistics ................................................................................................................................... 23 Help Me! ................................................................................................................................... 24 We will also give you a few tips on how to work dedicated with email marketing and get the most out of using MailPlatform. If you have further questions or need more information about what else we can offer please feel free to contact us at: [email protected] or check your local MailPlatform website under “resources” or “videos”.
The most important thing for us at MailPlatform is that our solution helps you grow your company and enhance your success. Customer service and satisfaction is one of the key factors of our success and we never lose sight of that. We always spend extensive time with our clients -‐ not only to get you off to a good start but also to ensure that you can continue to develop your email marketing and take advantage of everything our solution offers you. We sincerely hope you find this guide relevant and useful. We value your feedback so please
MailPlatform tip – Systems Need to Communicate It’s essential that you are in control of the way your recipients are stored. Perhaps you have one list in your CMS or shop but another in your newsletter system? If this is the case, you need an email marketing system that can be easily integrated with your other systems. This can be done either through a simple sign-‐up form that sends data into both systems simultaneously or, even easier, with integration through a web service (also called an API or XML API). MailPlatform can provide you with API access.
3 © MailPlatform 2014 – Ver. 2.0
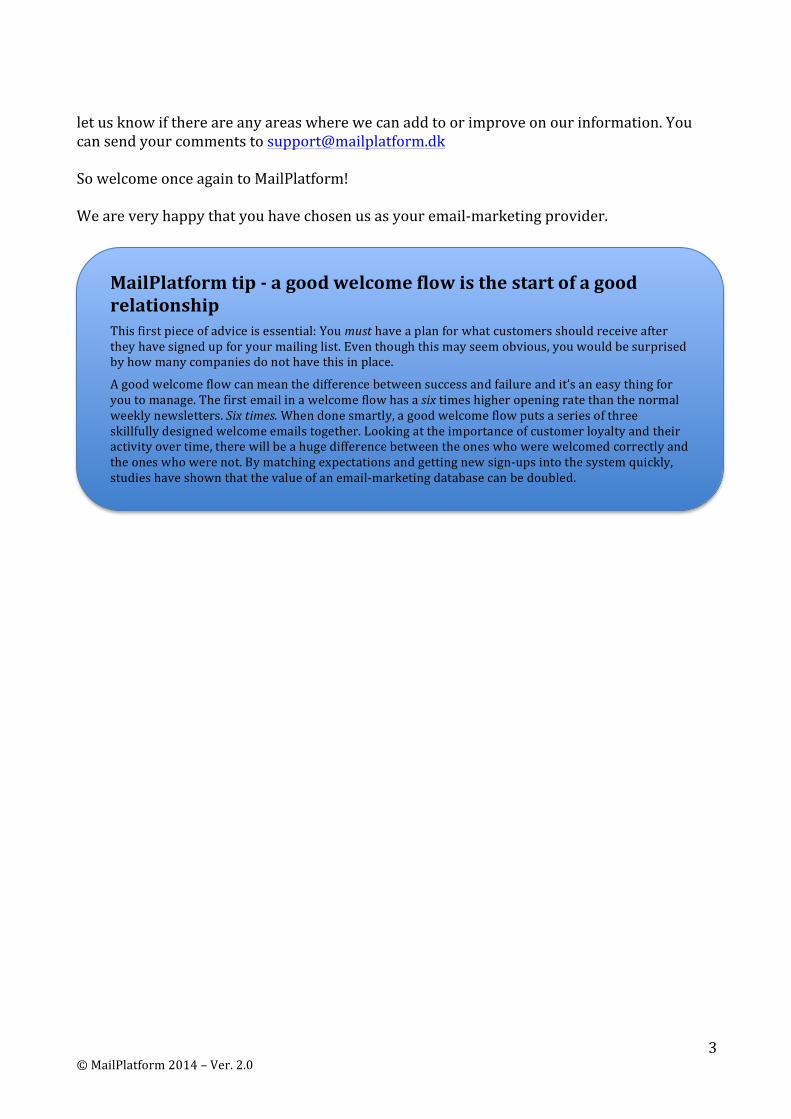
let us know if there are any areas where we can add to or improve on our information. You can send your comments to [email protected] So welcome once again to MailPlatform! We are very happy that you have chosen us as your email-‐marketing provider.
MailPlatform tip -‐ a good welcome flow is the start of a good relationship
This first piece of advice is essential: You must have a plan for what customers should receive after they have signed up for your mailing list. Even though this may seem obvious, you would be surprised by how many companies do not have this in place.
A good welcome flow can mean the difference between success and failure and it’s an easy thing for you to manage. The first email in a welcome flow has a six times higher opening rate than the normal weekly newsletters. Six times. When done smartly, a good welcome flow puts a series of three skillfully designed welcome emails together. Looking at the importance of customer loyalty and their activity over time, there will be a huge difference between the ones who were welcomed correctly and the ones who were not. By matching expectations and getting new sign-‐ups into the system quickly, studies have shown that the value of an email-‐marketing database can be doubled.

4 © MailPlatform 2014 – Ver. 2.0
Logging In Once you have been set up and taken through the system you will receive an email with your login details.
The first time you log in you need to create a password. Simply click the “Forgot Your Password” link and type in the username associated with your account (detailed in the email)
Once you have created your password you are ready to go!
Always keep your login details secure to avoid abuse of your account.

5 © MailPlatform 2014 – Ver. 2.0
Your Homepage When you login to MailPlatform you can choose which page you wish to be taken to first. The homepage is a good place to start because it gives you a good overview of the recent activities on your account.
At the top of the overview you have a set of dropdown menus that contain your day-‐to-‐day functions such as:
● creating and editing contact lists ● creating segments ● importing/exporting contacts ● creating or editing custom database fields ● setting up email campaigns ● generating surveys ● setting up auto responders and triggers ● viewing the statistics from your campaigns.
In the upper right-‐hand corner you will find the more administrative functionalities: creating signup and unsubscribe forms for your website, headers and footers for your emails etc. If you choose to upload your own HTML template, this is also where you will do it.
You can also keep track of how many sending credits you have used and how many you have left.

6 © MailPlatform 2014 – Ver. 2.0
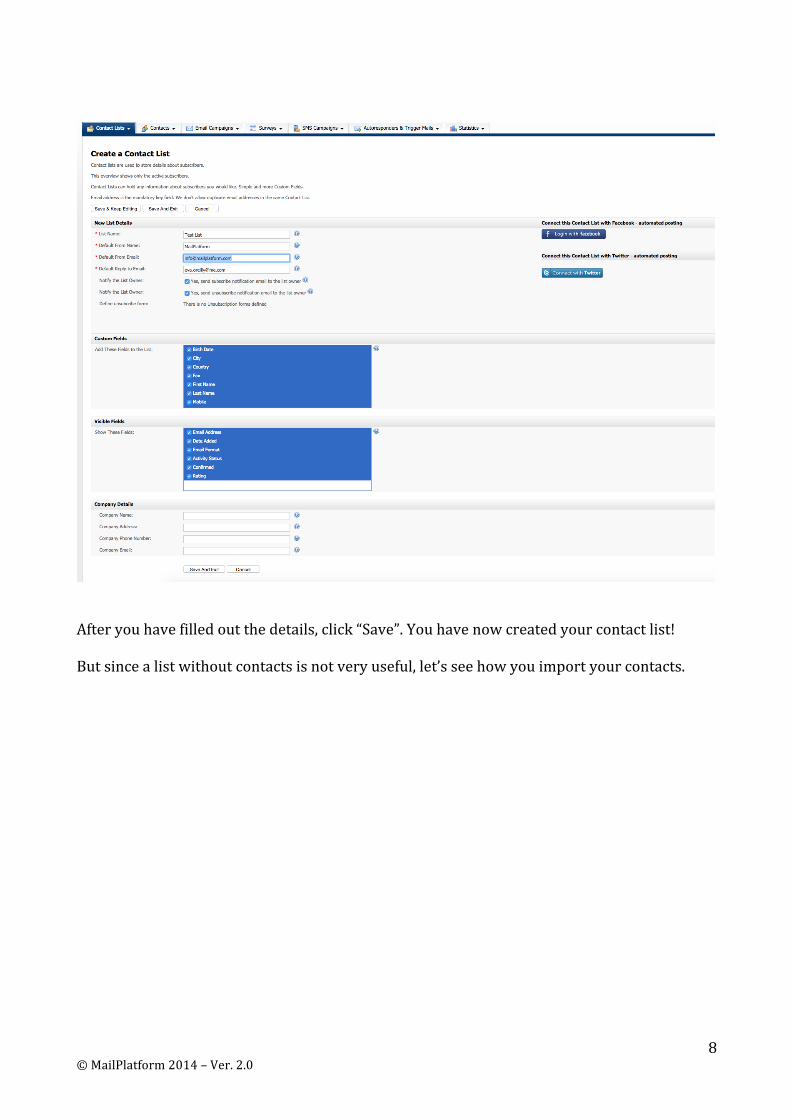
Creating a list The first thing you need to do is to create a contact list. The contact list(s) is the basis for all your future campaigns.
You create your contact list by clicking “Create a Contact List” in the “Contact Lists” menu.
MailPlatform tip -‐ Where do the good recipients come from? All your recipients should have a clear “source” showing you where they came from. This will enable you to quickly discern if there is a pattern concerning where “good” and “bad” recipients come from. A “source” can be your webpage, sign-‐ups in shops, social media activities etc. A “good” recipient is one who opens your email and interacts with it in some way, e.g. by clicking a link, forwarding to a friend or any other goal conversions/KPIs you may have set. If you start to detect a pattern, it can help you target future marketing efforts and show you where your ROI is highest.
Always use a double opt-‐in when your recipients sign up for your newsletter. This helps ensure that the email address is correct and that the recipient exists in reality and are who they claim to be. Unfortunately, there are malicious competitors who try to register SPAM traps to your lists.

7 © MailPlatform 2014 – Ver. 2.0
In the New List Details view you can:
● Name your new mailing list. (Always give a list a name that will make it easy to find when you need it. Don’t choose a name that will make sense to you but not to others who may need to work with the system.)
● Set the default “from” name and email address. Make sure your recipients can clearly see that the email is from you. If you have checked “Notify list owner” when someone (un)subscribes, information will be sent to them. You must choose a valid email address as your sender and send out from your own domain.
● Set the default “reply-‐to email.” This is the email address that your recipients can use if they want to reply to your email. We strongly recommend that you do not use no-‐[email protected] Not only does this increase the chance of your email being viewed as spam, it also sends the wrong message to your customers. Think of it – you are communicating with them but you don’t want them to do the same to you.
● View your unsubscribe forms (you create these in “Forms” in the top right corner) ● Connect the list to Facebook and Twitter so that any email you send out to this list is
automatically posted on your pages In the Custom Fields view you can choose which fields you want included in your mailing list. (To create custom fields to match your existing database, go to Contact Lists – View Custom Fields). In the Visible Fields view you can select which fields you want to see when you’re on the View Contacts page for the mailing list. Company details can be merged into the footer of your template.
8 © MailPlatform 2014 – Ver. 2.0
After you have filled out the details, click “Save”. You have now created your contact list!
But since a list without contacts is not very useful, let’s see how you import your contacts.

9 © MailPlatform 2014 – Ver. 2.0
MailPlatform tip -‐ Why your mailing list?
What does the recipient get out of being on your list? Why can’t they just look at your page every now and then – and then decide if they want to interact with your business?
Seen from the company’s perspective, the answer is obvious: it is profitable to have a well-‐oiled email-‐marketing database. Visitor frequency will be much higher and this will stimulate our customers’ rate of return to our business. Consumers want to be heard. They want customised messages that show your business has understood their needs. It does not have to be a grand model of behavior-‐specific content – a simple set-‐up with 3-‐4 target areas of interest is enough. Customers can either specify these during the initial sign-‐up flow or through a later enrichment flow.
It could also be a more personal element – the newsletter has a real sender who the target audience can identify with– or simply gives good advice and tips. It does not have to be about bonus points or cash benefits. Achieving a dialogue has a far greater long-‐term value.
With all this in mind, it is important to choose an email marketing system that easily allows customers to enrich their profiles and where the customer’s specific interests can be inserted as dynamic content in the emails. If this is too complex, not only will you have to do a lot of unnecessary work, but you could end up falling back on sending the same message to all recipients. MailPlatform allows you to learn from your recipients’ behaviour so that you can easily send them more targeted newsletters with content relevant to their interests.

10 © MailPlatform 2014 – Ver. 2.0
Importing Your Contacts There are two ways of filling your lists with useful contacts. You can either do it manually with “Add a contact” or by using “Import contacts”. Odds are you will need to use the latter to get any existing mailing lists into the system, so we will go through that one.
First choose which list you want to add contacts to.
You will then see two sections you have to fill out. “General Settings” and “Advanced Settings”. In “General Settings” you simply specify that you wish to upload a file and browse for it on your computer.
This file must either be a CSV, TEXT or Excel. If you use a CSV or TEXT you have to make sure that the “Field separator” is a comma (,) and that your file doesn’t contain any commas in the
MailPlatform tip -‐ Never buy recipients for your newsletter
DO NOT buy recipients for your newsletter or mailing list. No matter how great the offer, no matter how tempting. Yes, it may seem like a good idea to buy 50,000 or 100,000 ready-‐made recipients but it is, at best, not worth the money and, at worst, it can be a disaster for your business. Just don’t do it.
Most “buy lists” are filled with spam traps that will destroy the value of your entire mailing list. A spam trap is an old, scrapped email address that the recipient applied for 1-‐2 years ago and the receiving server (TDC, Hotmail, Gmail etc) has turned it into a trap. If your program hits just one of these, you can run the risk of compromising all emails. For example, hotmail could relegate all your emails to the SPAM folder – or choose to completely erase them!

11 © MailPlatform 2014 – Ver. 2.0
cells. You also need to know if your file contains “headers” such as name, gender, email etc.
It is also very important that you use UTF-‐8. UTF-‐8 is not a real format but a way characters are encoded, i.e. a letter will have a code instead of a character. This makes it better for special characters across different languages. Depending on which type of OS you are running we recommend you use a CSV/UTF-‐8 convertor to be sure that the encoding is valid.
In “Advanced Settings” you select whether the recipients you are importing are “confirmed” or “unconfirmed”. It is very important that you distinguish between the two. If your contacts have already been confirmed, then you can chose the “Confirmed” option. “Confirmed” recipients are the ones who have clearly given their consent to receive your emails. If your contacts are not confirmed then chose “Unconfirmed”. Unconfirmed contacts should then receive a confirmation link to ensure they are aware of their presence on your contact list and want to receive emails from your company.
If your have marked your unconfirmed contacts as confirmed and you are sending out emails to them it could have serious consequences. Most likely it will give you as the sender a bad reputation but it could also lead to fines and a high spam rating. If we suspect that you are doing this we will contact you and your account may be suspended. For the sake of all our clients it is paramount not to have “bad senders” on our servers.

12 © MailPlatform 2014 – Ver. 2.0
You have to choose between “HTML” and “Text”. In 99,9% of the cases you will choose “HTML” unless you are only sending emails as plain text.
You also have the option to overwrite existing contacts, i.e. if you are updating your recipients. You can also choose to add the contacts to your auto responders.
After you have selected which file to upload you have to map the headers to your fields in MailPlatform. Use the drop downs to define which fields in MailPlatform should correspond to which fields in your import – Email Address, First Name etc. If you have added your own Custom Fields they will also appear here.
MailPlatform tip -‐ Confirm your recipients
Always use double opt-‐in when your recipients sign up for your newsletter. This ensures that the email address is correct, that the recipient exists in reality and are who they claim to be. Unfortunately, there are malicious competitors who could try to register SPAM traps to your lists.
MailPlatform tip -‐ Entries from Facebook Facebook is a great place to collect subscribers to your newsletter. Many companies have more “likes” on Facebook than they have recipients on the mailing list.
There are many different CMS systems that can integrate with Facebook through their API, e.g. WorldPress, which is free. It has some great tools where the content of the Facebook page can be controlled through the CMS solution. This means that the registration form from the email marketing system can be maintained within WorldPress. Contests and other incentives to sign up can be easily changed and presented in a graphically pleasing manner.

13 © MailPlatform 2014 – Ver. 2.0
Creating a Sign Up Form Once you have imported your contacts, you will want future sign ups to go directly into your lists in MailPlatform. Otherwise you could end up spending all your time importing new members. To do this you have to go to the upper right corner, click “Forms” and then “Create a website form”.
You will now see the following screen.
In Form Name and Type you need to choose what kind of form you want to create. You have the following options:
● Subscription: This is a normal subscription form, such as you would place on your website.
● Unsubscribe: This is a normal form unsubscribe form, also one you could place on your website.
● Unsubscribe flow: Here you can set up a unsubscribe flow. This can also be used to give your recipients the chance to remain with your company but subscribe to other content themes.
● Modify details: Here you can set up a form to have your recipients to update their data or add more info, e.g. birthdays.

14 © MailPlatform 2014 – Ver. 2.0
● Send to a friend: This can be used as a “send to a friend” form.
In this example we will go through the creation of a Subscription Form.
First choose a name for your form. Choose one that makes sense in relation to how it will be used and that will make it easy to find again.
● Use Double Opt-‐In Confirmation: Check this box if you want the recipient to receive an email after submitting the form which will contain a link they must click on to confirm their subscription. Double Opt-‐In is the industry standard so it should be checked. (Check MailPlatform Tips for a reminder of why you should always go for a Double Opt-‐In.)
● Send a “Thank you”: Mark this option if you want the recipient to receive a “Thank you“ email after signing up. You can edit the “Thank you“ email later in this process.
● Email new contact details to you: If you want to receive an email when a new subscriber signs up then check this box. You will receive a copy of the form with their details.
● Use this also as an update form: Check this box if you want to be able to use the same form to allow customers to update their existing details.
In Choose Contact Lists you select which mailing list you wish to use for your form. This is also where you choose which data fields to include on the form, i.e. what data you want to receive from your new signups.
Next go back to the top and click on the Advanced Options tab

15 © MailPlatform 2014 – Ver. 2.0
Here you can choose which Form Design you would like to use. In the “Email campaign format” we advise you set this to “Allow contact to choose” and also check the CAPTCHA option to prevent SPAM.
Then click “Next”
If you checked the Double Opt-‐In box you can now customise the confirmation page and email. You can also choose to take the subscriber to an existing webpage.
In the section below you can choose the sending options and edit the HTML and text version

16 © MailPlatform 2014 – Ver. 2.0
of the email. When you have done this, click “Next” and you can do the same for the “thank you” email and page (if you checked them during the first step in this process).
The last page you need to customise is your Error page. You need this in the event a problem occurs while using your form. This is done in the same way as the Confirmation and Thank You pages. Here you can also choose to take your subscribers to an existing webpage. Click “Save” and the code for your form will be generated. All you need to do is place it on your website.

17 © MailPlatform 2014 – Ver. 2.0
Creating a Campaign Congratulations! You are now ready to create and send your first email campaign.
For now we will focus on the campaign builder. If you want to look into the other functions, you can find them on our website under “Resources” or “Videos”.
Before creating a campaign we recommend that you first create a header and footer. You can either create it yourself in the administrative menu in the upper right hand corner, your agency can create it for you or we can help you for a small additional fee. If you wish to create an entire template we can also help you with this. We can either create it based on existing template designs you have used in the past or build a brand new one for you. This is will also entail a small additional fee.
All templates are tested on almost all mobile, Internet and regular email clients.
MailPlatform tip -‐ A good template with a forwarding function
When you combine a good template with great content you have the best chance for optimal opening and click through rates.
If your default template contains a strong forward, you can track who forwards and who the recipient is. At the same time, you can reward your loyal subscribers, as they become active ambassadors for your business.
Don’t forget to automate a response for forwarding activities. Your loyal subscriber should get a “Thank you” email with a surprise reward. This could be a small discount voucher, the possibility of a personal conversation or whatever best suits your company’s product or services.
You might have a special VIP section in your mailing list – a segment in which selected members receive spontaneous gifts or the like – and you could upgrade subscribers who forward your emails to this segment.

18 © MailPlatform 2014 – Ver. 2.0
Now let’s move onto the builder.
In the “Email Campaigns” tab click “Create Campaign with Builder” to access this screen.
To the right you can see the 3-‐step builder indicator. When you reach Step 3 you will be ready to send your campaign. Please note that you can easily navigate between the three steps by clicking on the numbers.
The first thing you have to do is name your campaign. Remember both to give it a name that makes sense in relation to the campaign and one that will make it easy to find again. Consider for example the difference between these two campaign names: “Hats” and “Hats_discount_16Dec2014”
You also have to give your campaign a pre-‐header. This is a very important field that can have a direct impact on the success of your campaign. Your pre-‐header is an added teaser that the recipient sees before they open the email. It should capture their attention and make them want open the actual email. Like the subject line, it must be relevant to the content of the email. You can experiment with different kinds of pre-‐headers to see which ones work best.
When you have filled out your campaign name and pre-‐header either press “Next” in the lower right-‐hand corner or the “2” in the top right-‐hand corner.

19 © MailPlatform 2014 – Ver. 2.0
On the left side you can see the pre-‐built layouts. If you mouse over you can see a preview and if you click on a pre-‐built layout it will be added on the right side.
In the middle section you have all our standard modules. If you have custom modules they will also be present here. When you want to add a module you simply click on the one you want and it will appear on the right. It is possible to drag and drop the modules to move them around in the order that you want.
When you mouse over you also have the option to delete each module by clicking on the small x in the right upper corner.
To the right you can see what the layout of your email will look like. This is also where you can insert your customised “header” and “footer”.
When you have selected your modules/layout then either click “Continue to editor” or “3”. Remember you can go back and make changes to your campaign while you work on it, you do not need to save and exit first.
You have to give your newsletter an “Email subject” line. This line will be the first thing you recipient will see and, like the pre-‐header, it should give the recipient a clear idea of the content of the email and interest them enough to open it. Experiment with different types of subject lines to see which ones work best for you. Try to put yourself in the recipient’s shoes and think about what makes you open the newsletters that you receive.

20 © MailPlatform 2014 – Ver. 2.0
Once you have written your subject line you can move onto the editor itself. This is where you will find the modules that you added in Step 2, as well as the header and footer that you selected. Now you can insert your text, images, links, bullet points etc.
When you’ve inserted the content that you want, scroll down to the bottom of the editor page to activate or archive the campaign, set-‐up social sharing and send yourself a quick preview of the email.
All you need to do then is click “Save and Exit”. You will then be taken to your campaign overview page.
On you right you have a series of options to choose from. You can “View” your campaign, you can “Send”, “Edit”, “Copy” and “Delete”. In this example we want to send a campaign, so we

21 © MailPlatform 2014 – Ver. 2.0
click “Send”. You can also go to “Send an Email Campaign” in the “Email Campaigns” tab.
You can choose to send the campaign to all contacts in your list, contacts that meet specific criteria or to a segment on your list. You then click “Next”.
Now you have reached the part where you finish setting up your send-‐out. The Email Campaign Settings are the ones that you configured when you set up your contact lists (sender name, email address etc).
You can choose to send your campaign right away or schedule it for sending later. You can also set up repeat sending -‐ this is a useful tool if you send the same message at regular intervals, e.g. you are an agency and need to remind the people on your list to check the new listings every Monday.
MailPlatform tip -‐ What would you like to receive?
Think before you send.
Would you like to receive this newsletter? Is it relevant and interesting or was it clearly made at the last minute to meet a deadline? Put yourself in your subscribers’ shoes. If you wouldn’t want to receive it, then they probably wouldn’t either.
Long term, sending newsletters that don’t engage your recipients will mean unnecessary unsubscriptions or less activity -‐ the opposite of what you really want -‐ and can destroy the value and size of your mailing lists.

22 © MailPlatform 2014 – Ver. 2.0
In the last field you can set up tracking for your campaign. If you have customised your email so that it is address to ‘Dear [NAME]’ this is where you specify which fields in the database to take the information from.
Once you click “Next” your campaign is ready to send. You can see a final overview of how many recipients it will be sent to and verify that all details are correct. Click “Schedule My Email Campaign” and the newsletter will be sent to the sending queue.
Congratulations! You have now created your first campaign.

23 © MailPlatform 2014 – Ver. 2.0
Statistics When you go to “Email campaign statistics” in the Statistics tab, you get an overview of the statistics of your campaigns. You can “View”, “Export” and “Print”.
If you press “View” you can see your statistics for:
● Open ● Links ● Bounces ● Unsubscriptions ● Forwards ● Social activities
Use your statistics to monitor and learn from your campaigns – which subjects lines are the most effective, when is the best time to send out, is sending to certain segments more effective than others etc. The more knowledge you gain, the more efficient your next campaign can be.

24 © MailPlatform 2014 – Ver. 2.0
Help Me! At MailPlatform we are always there to help you. Whether it’s templates, tutorials, questions regarding our solution or help to enhance the power of your email marketing projects – we are there. You can chat with us on the website, email our support or call us at one of our local offices.
Email Our support team answers emails within 8 working hours.
Denmark (Main office): [email protected]
Norway: [email protected]
Sweden: [email protected]
Phone You can always reach us at these local phone numbers.
Denmark (Main Office): +45 72 44 44 44
Thank you for choosing us!