MailChimp Instruction Manual by Spike
22
MailChimp Instruction Manual Spike HQ This manual contains instructions on how to set up a new email campaign, add and remove contacts and view statistics on completed email campaigns from within MailChimp. Throughout the document we have placed screenshots to help clarify the instructions, with the important areas highlighted in orange. Table of Contents Logging into MailChimp Left-hand navigation overview Creating and sending an email Adding content to email template Adding hyperlinks Changing template images Adding images inline with text Hiding a section of text Sending a test email Scheduling an email Adding contacts to the database - individually Adding contacts to the database - large groups (list import Unsubscribing contacts - individually Unsubscribing contacts - large groups Viewing email campaign statistics / reports Printing a report Contact Us 2 2 3 5 7 9 10 12 13 14 16 17 20 21 22 22 22 1
-
Upload
glenn-edley -
Category
Marketing
-
view
111 -
download
1
Transcript of MailChimp Instruction Manual by Spike
MailChimp Instruction ManualSpike HQ
This manual contains instructions on how to set up a new email campaign, add and removecontacts and view statistics on completed email campaigns from within MailChimp.
Throughout the document we have placed screenshots to help clarify the instructions, with theimportant areas highlighted in orange.
Table of Contents
Logging into MailChimp
Left-hand navigation overview
Creating and sending an email
Adding content to email template
Adding hyperlinks
Changing template images
Adding images inline with text
Hiding a section of text
Sending a test email
Scheduling an email
Adding contacts to the database - individually
Adding contacts to the database - large groups (list import)
Unsubscribing contacts - individually
Unsubscribing contacts - large groups
Viewing email campaign statistics / reports
Printing a report
Contact Us
2
2
3
5
7
9
10
12
13
14
16
17
20
21
22
22
22
1

Logging into MailChimp
1. To log into your account, open a web browser (Firefox, Google Chrome, InternetExplorer) and go to: http://mailchimp.com.
2. Click on Log In at the top-right of the page and enter your username and password.3. You will see the following screen:
Left-hand Navigation Overview
1. Campaigns is where you’ll find previously sent emails and where you can create newones.
2. Lists is where you can add, remove and edit contacts’ details.3. Reports is where you can view statistics on sent campaigns.
2

Creating and sending an email
1. Click on Campaigns in the left-hand menu.2. Click Create Campaign.3. You will see the following screen. Choose Regular ol’ Campaign:
4. Note: from here on you can choose to exit at any time by clicking Save & Exit at thetop-right of the screen.
5. You will be taken to the following screen. Choose the list you want to send to. Then clickNext:
3

6. Name your campaign (for example: “Issue 151”) and change the subject line ifnecessary. Make sure the From name and From email address are correct. Click Next:
7. You can now select a template. Click on My Templates or, if you want to pick a defaultMailChimp template or build your own template, click on Predesigned or Email Designerrespectively:
Note: if you need help to setup or design a template, contact Spike: 09 820 9860.
4

8. Select the appropriate template:
Adding content to email template
9. Click on the text block you wish to edit. Editable blocks will have dashed outlines:
5
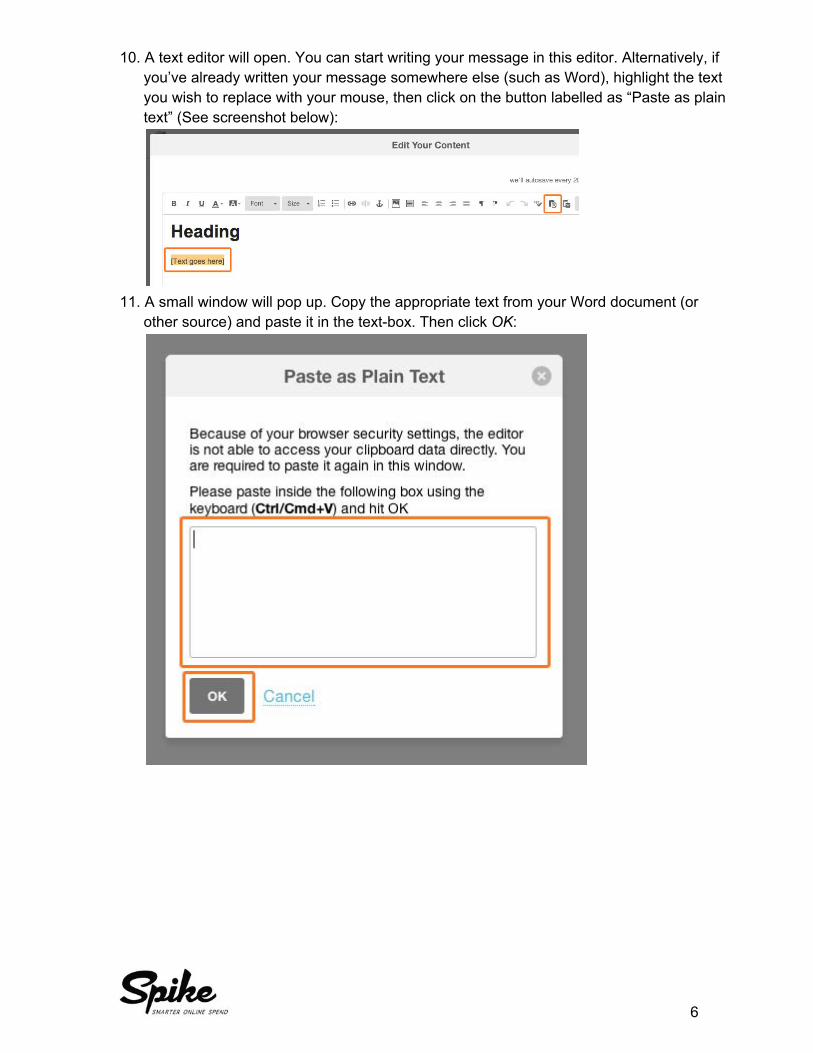
10. A text editor will open. You can start writing your message in this editor. Alternatively, ifyou’ve already written your message somewhere else (such as Word), highlight the textyou wish to replace with your mouse, then click on the button labelled as “Paste as plaintext” (See screenshot below):
11. A small window will pop up. Copy the appropriate text from your Word document (orother source) and paste it in the text-box. Then click OK:
6

12. On the next screen, check over the text you’ve just inserted and make any changes ifnecessary. Double check spelling and grammar. Then click Save & Close.
Adding hyperlinks
13. If you want to turn any of the text into a hyperlink - for example an email address or a linkto a website - you need to click on the appropriate text block to edit it.
14. Then, select the text you wish to turn into a hyperlink and click on the icon that looks like achain / link:
7
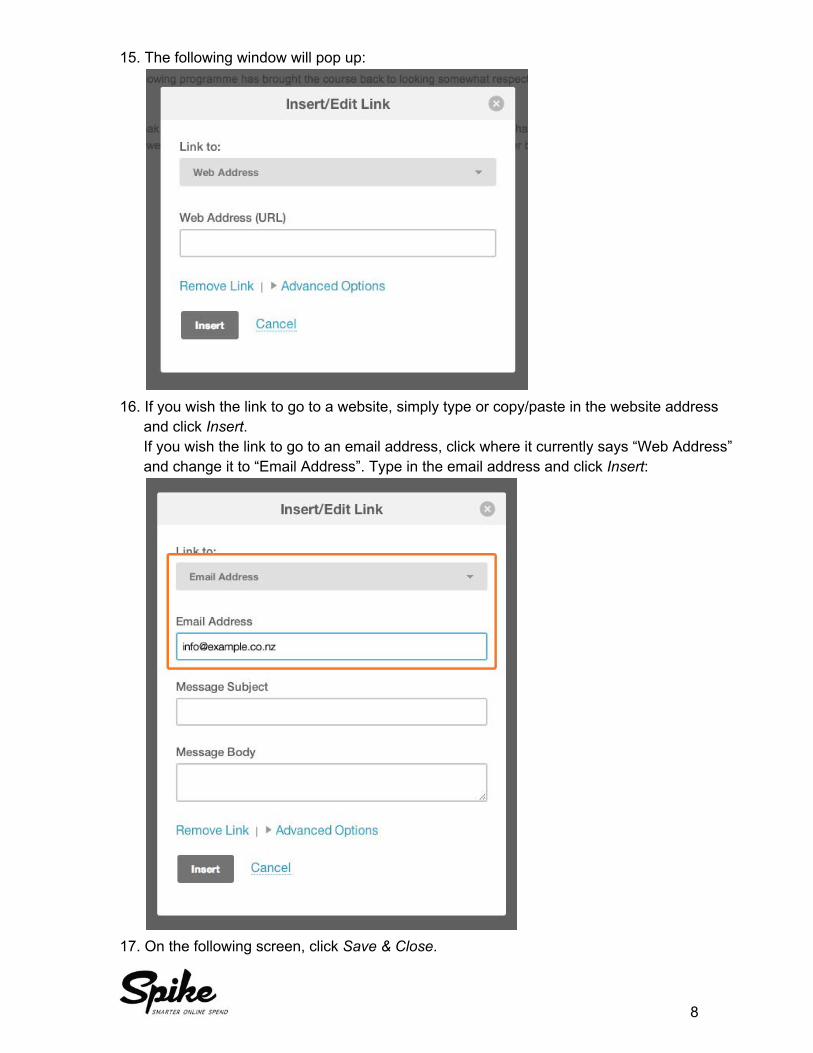
15. The following window will pop up:
16. If you wish the link to go to a website, simply type or copy/paste in the website addressand click Insert.If you wish the link to go to an email address, click where it currently says “Web Address”and change it to “Email Address”. Type in the email address and click Insert:
17. On the following screen, click Save & Close.
8

Changing template images
18. In order to replace an image, simply move your mouse over it and click Change:
19. In the next screen you can upload an image from your computer. Don’t worry about thesize of it; MailChimp will resize it for you. Either find the image on your computer anddrag it onto the cloud icon, OR click Browse for a file. Once you are happy with thechosen image, click Upload:
9

20. In the next screen, all you need to do is make sure the “Width” stays within the mentionedsize and “Keep proportions” is ticked. Then click Save & Insert Image:
Adding images inline with text
21. Click on the text block you wish to add an image to. In the editor, position your cursorwhere you’d like the image to go and click the File Manager icon:
22. Follow the instructions from the previous page on how to upload a new image.
10

23. Once you’ve done that, you’ll get to this screen. Click on Show image style options:
24. In the menu that appears, click on the dropdown menu labelled Align and choose Left orRight. We recommend a maximum width of 250px for left or right-aligned images:
25. Click Save & Insert Image, then Save & Close.
11

Link to a file (such as a PDF or a larger version of an image in your email)
26. Click on the text block that contains the text or image you want to link. Then highlight thatbit of text or click on the image and click on the icon that looks like a chain / link:
27. From the drop-down menu (where it currently says Web Address) choose File. You canupload a new file as per previous instructions (Adding images inline with text) or choosean existing image or file by clicking on the corresponding tab and clicking Select on theappropriate image or file.
Hiding a section
28. If you don’t have any content for a certain text block and would like the hide it (providedthis functionality has been enabled in the template), simply put your mouse on top of theblock and look for the Hide icon (which looks like an eye with a line through it). Click onthis icon:
12
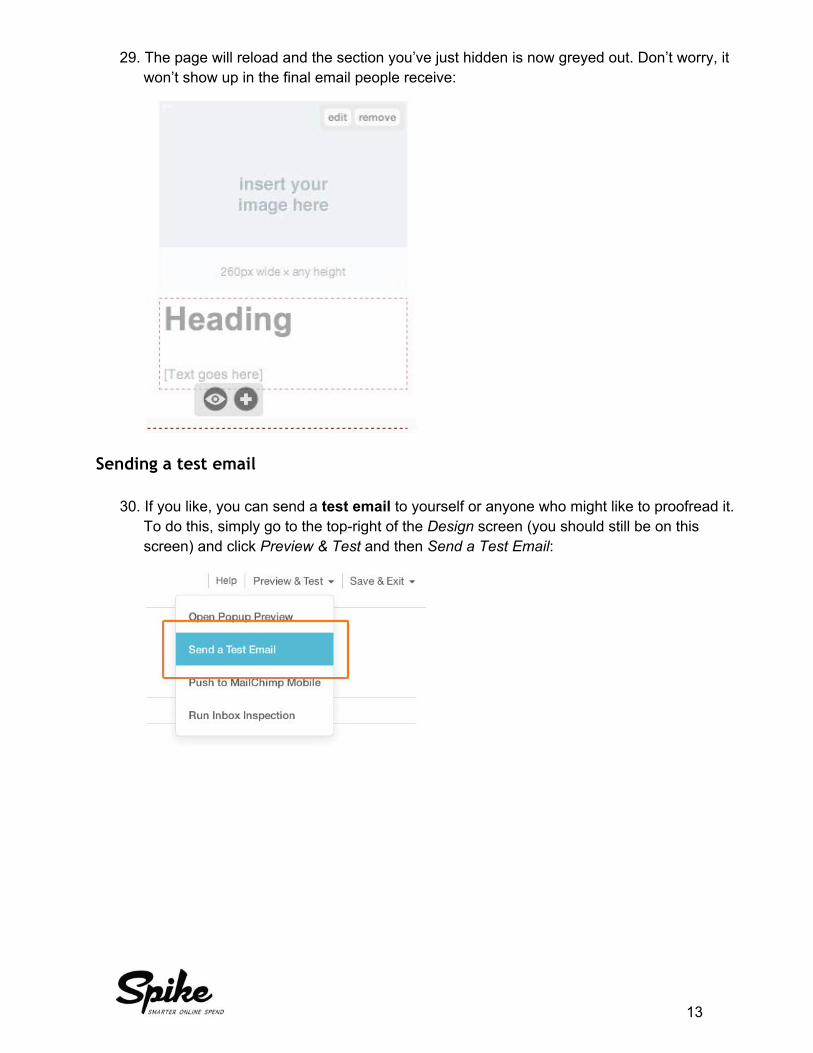
29. The page will reload and the section you’ve just hidden is now greyed out. Don’t worry, itwon’t show up in the final email people receive:
Sending a test email
30. If you like, you can send a test email to yourself or anyone who might like to proofread it.To do this, simply go to the top-right of the Design screen (you should still be on thisscreen) and click Preview & Test and then Send a Test Email:
13

31. A small window will pop up. Put the appropriate email address(es) in there and clickSend Test:
32. Once you are all done with text changes, you can click Next on the bottom-right of yourscreen.
33. On the next screen, Mailchimp will automatically create a “Plain Text Version” of youremail. Just to be on the safe side, click the Copy Text From HTML Email button:
34. Click Next again (bottom-right).
Scheduling an email
35. The next screen will show you an overview of your email. Double-check everything(such as the subject line and the list it is going to be sent to). Once you are happy, pressSchedule (if you want it to go out at a certain time) OR Send (if you want to send it right
14
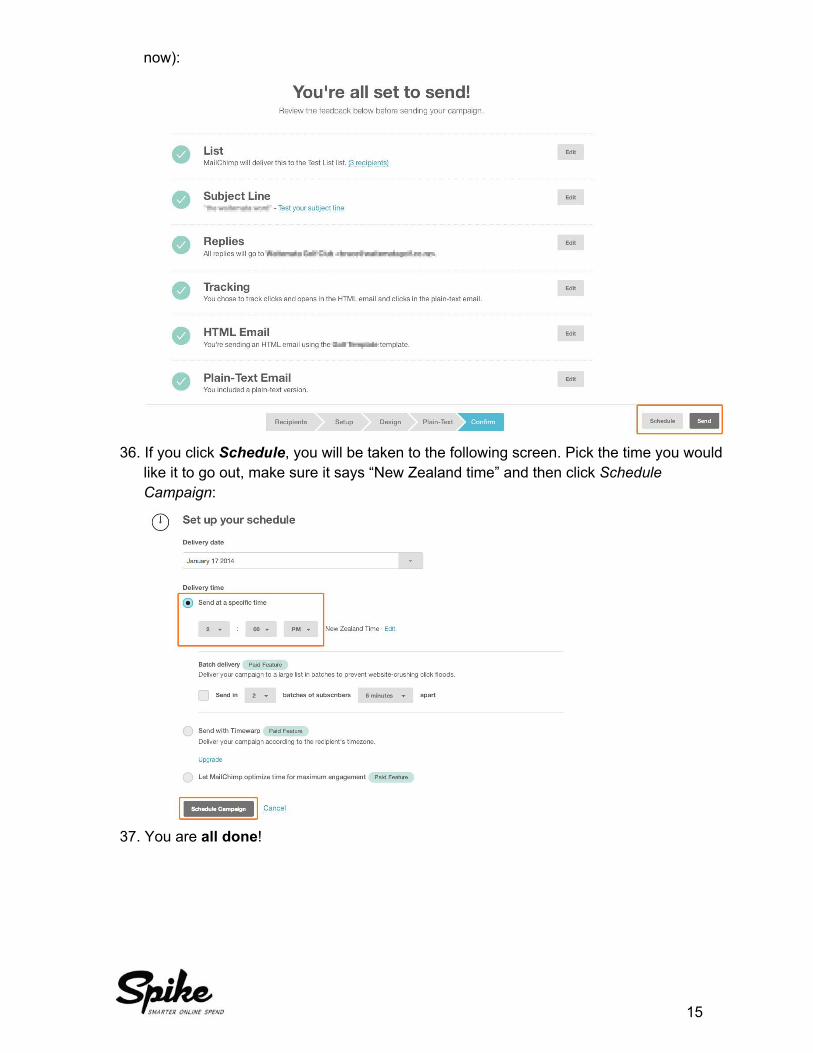
now):
36. If you click Schedule, you will be taken to the following screen. Pick the time you wouldlike it to go out, make sure it says “New Zealand time” and then click ScheduleCampaign:
37. You are all done!
15

Adding contacts to the database
Before you add anyone to your database, they must have given you permission to send themmarketing emails (which these fall under). There are very strict laws around this and MailChimpis very strict on this too.
It is for this reason that every email needs an Unsubscribe option at the bottom, so that whenpeople feel like they don’t want to receive emails from your organisation anymore, they canopt-out at any time.
Adding contacts to the database - individually
1. Click on Lists on the left-hand menu.2. Find the list you want to add a contact to, then click on the Add Contact icon:
3. The following screen will appear. Enter the contact’s email address, first name and lastname (optional).
16
4. Tick the box that says “This person gave me permission to be added to my list.”5. Click Subscribe.6. Repeat steps 3-5 for all contacts you want to add.
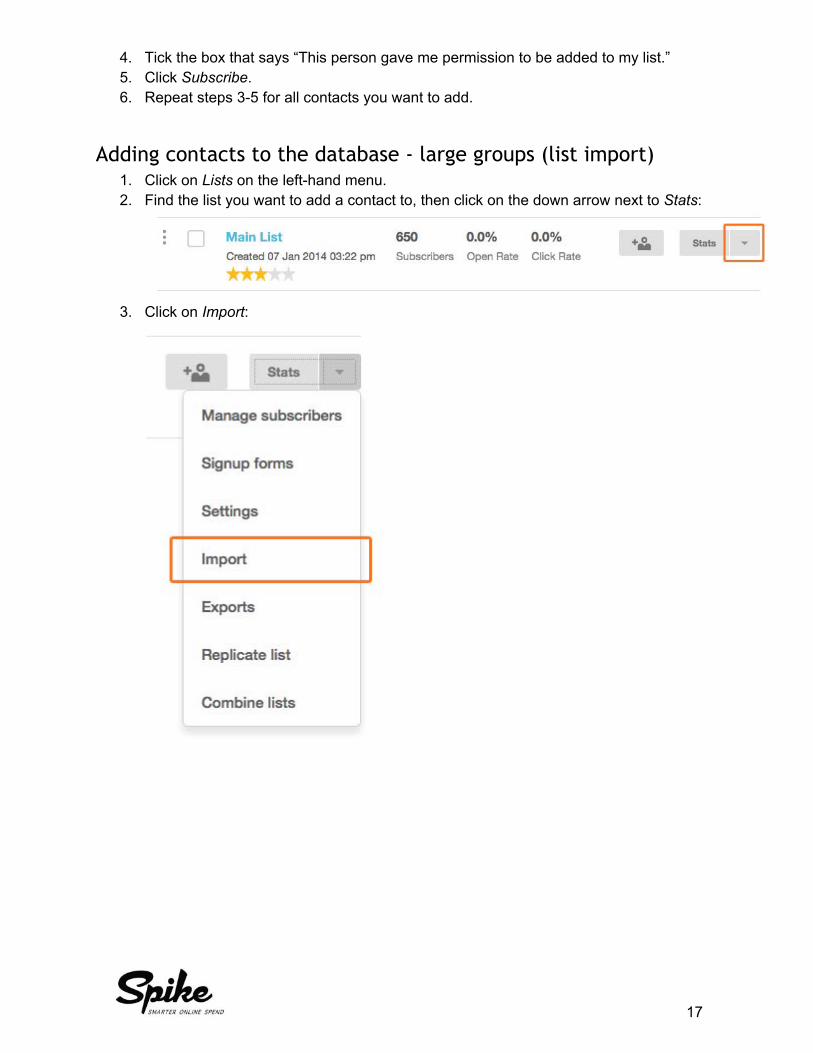
Adding contacts to the database - large groups (list import)1. Click on Lists on the left-hand menu.2. Find the list you want to add a contact to, then click on the down arrow next to Stats:
3. Click on Import:
17
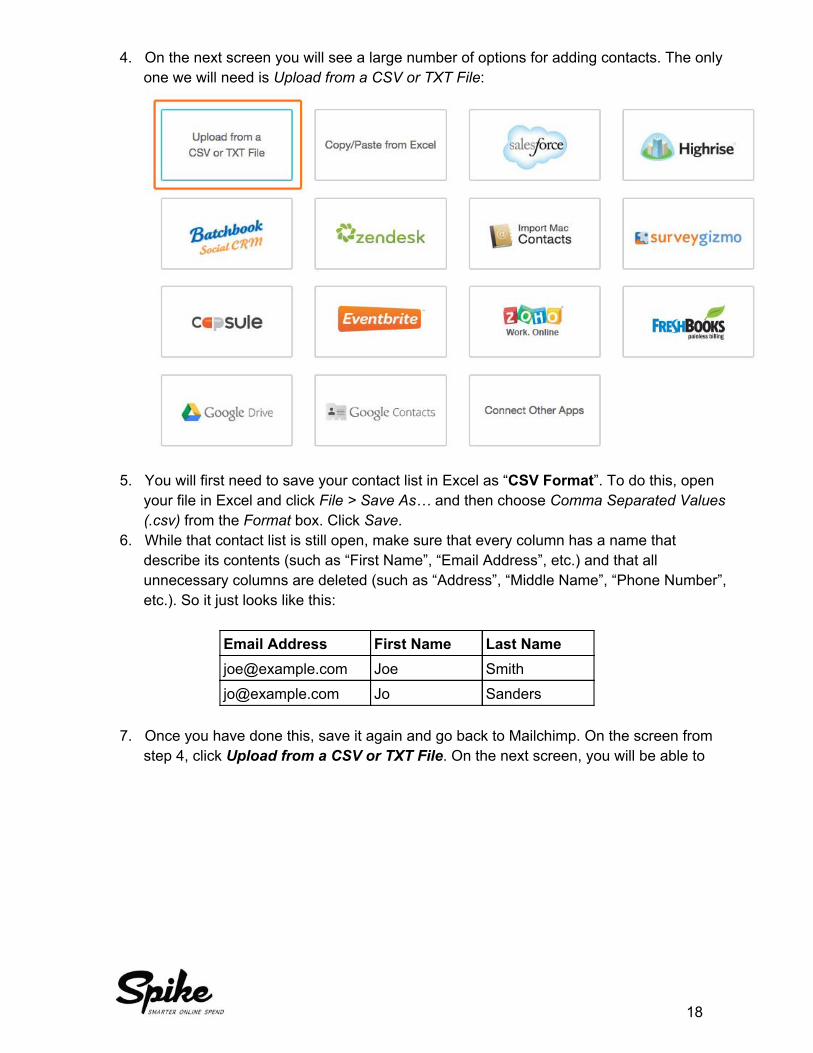
4. On the next screen you will see a large number of options for adding contacts. The onlyone we will need is Upload from a CSV or TXT File:
5. You will first need to save your contact list in Excel as “CSV Format”. To do this, openyour file in Excel and click File > Save As… and then choose Comma Separated Values(.csv) from the Format box. Click Save.
6. While that contact list is still open, make sure that every column has a name thatdescribe its contents (such as “First Name”, “Email Address”, etc.) and that allunnecessary columns are deleted (such as “Address”, “Middle Name”, “Phone Number”,etc.). So it just looks like this:
Email Address First Name Last [email protected] Joe Smith
[email protected] Jo Sanders
7. Once you have done this, save it again and go back to Mailchimp. On the screen fromstep 4, click Upload from a CSV or TXT File. On the next screen, you will be able to
18
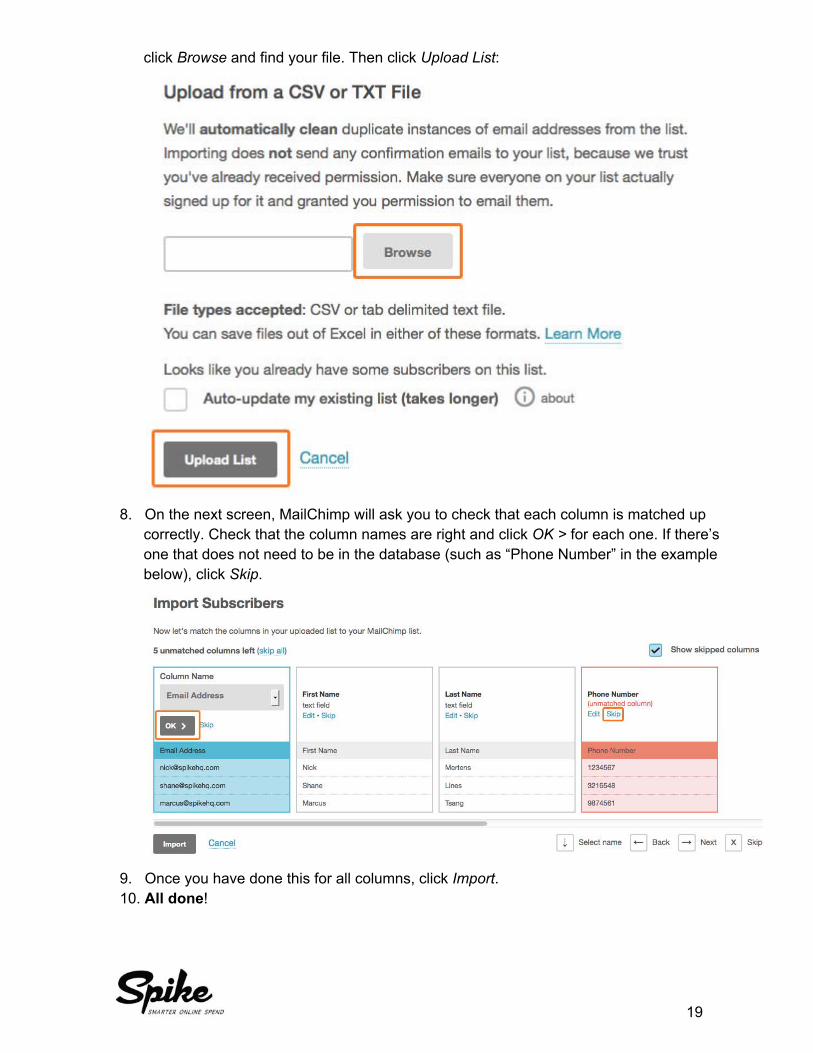
click Browse and find your file. Then click Upload List:
8. On the next screen, MailChimp will ask you to check that each column is matched upcorrectly. Check that the column names are right and click OK > for each one. If there’sone that does not need to be in the database (such as “Phone Number” in the examplebelow), click Skip.
9. Once you have done this for all columns, click Import.10. All done!
19

Unsubscribing contacts - individually
If you wish to unsubscribe one or two people, follow the below steps:
1. Click Lists in the left-hand menu.2. Click on the list that contains the contact you wish to unsubscribe:
3. Click on the Search icon (magnifying glass on the top-right):
4. Type in the email address you wish to unsubscribe and click the Search icon.5. The associated contact will be listed below the search bar. Make sure it is the right one
and click View Profile.6. On this screen, click the Unsubscribe button:
20

Unsubscribing contacts - large groups
If you wish to unsubscribe a large group of people, the previous process might be toolong-winded. Instead, follow the below steps:
1. Click Lists in the left-hand menu.2. Click on the list that contains the contacts you wish to unsubscribe:
3. Click on Manage subscribers, then Unsubscribe people:
4. On the following screen, type orcopy/paste all the email addresses youwish to unsubscribe (email addressesonly, no “First Name”, “Last Name”,etc). Double check you’ve got the rightcontacts, then click Unsubscribe. Seeexample below:
21

Viewing email campaign statistics / reports
This is where you can see how many people opened your email.
1. Click on Reports in the left-hand menu.2. Scroll down the page until you get to a list of campaigns. Find the campaign you are after,
then click View Report:
3. You will then see a page full of statistics.
Printing a report
1. Click on Reports in the left-hand menu.2. Scroll down the page until you get to a list of campaigns. Then click on the down arrow
next to View Report, then click Print:
3. On the next screen, click Print Report.4. Walk to the printer and you’re all done!
Contact Us
For any further questions or help to set up a new template or anything not covered by thisdocument, contact Spike on 09 820 9860 or email [email protected].
22