MagellanTM 1100i - BSR Barcode und RFID · Scanner installation is complete. I/F Cable Connect Here...
40
Magellan TM 1100i Omni-Directional Imaging Scanner Quick Reference Guide — Guida Rapida Guide de Référence Rapide — Guía de Referencia Rápida Schnellanleitung — Referência Rápida 快速参考 — クイック·リファレンス
Transcript of MagellanTM 1100i - BSR Barcode und RFID · Scanner installation is complete. I/F Cable Connect Here...
MagellanTM 1100iOmni-Directional Imaging Scanner
Quick Reference Guide — Guida RapidaGuide de Référence Rapide — Guía de Referencia Rápida
Schnellanleitung — Referência Rápida快速参考 — クイック·リファレンス
Eva.S
BSR

Datalogic ADC, Inc.959 Terry StreetEugene, OR 97402USATelephone: (541) 683-5700Fax: (541) 345-7140
©2009-2015 Datalogic ADC, Inc.An Unpublished Work - All rights reserved. No part of the contents of this documen-tation or the procedures described therein may be reproduced or transmitted in any form or by any means without prior written permission of Datalogic ADC, Inc. or its subsidiaries or affiliates ("Datalogic" or “Datalogic ADC”). Owners of Datalogic prod-ucts are hereby granted a non-exclusive, revocable license to reproduce and trans-mit this documentation for the purchaser's own internal business purposes. Purchaser shall not remove or alter any proprietary notices, including copyright notices, contained in this documentation and shall ensure that all notices appear on any reproductions of the documentation.Should future revisions of this manual be published, you can acquire printed ver-sions by contacting your Datalogic representative. Electronic versions may either be downloadable from the Datalogic website (www.datalogic.com) or provided on appropriate media. If you visit our website and would like to make comments or suggestions about this or other Datalogic publications, please let us know via the "Contact Datalogic" page.
DisclaimerDatalogic has taken reasonable measures to provide information in this manual that is complete and accurate, however, Datalogic reserves the right to change any specification at any time without prior notice.Datalogic and the Datalogic logo are registered trademarks of Datalogic S.p.A. in many countries, including the U.S.A. and the E.U. All other brand and product names may be trademarks of their respective owners.
PatentsSee www.patents.datalogic.com for patent list.
See the Regulatory Addendum included with your productfor additional regulatory, safety and legal information.

Quick Reference Guide 1
Table of Contents
English ....................................................1
Italiano ....................................................5
Español ................................................... 9
Portugues .............................................13
Francais ................................................17
Deutsch .................................................21
Chinese ..................................................25
Japanese ...............................................29

2 Magellan™ 1100i
NOTES

Quick Reference Guide 1
Quick ReferenceThis guide is provided to help get your installation up-and-run-ning quickly and efficiently. For more details, including program-ming information, reference the Product Reference Guide (PRG), which is available for viewing and download from the Datalogic website listed on the back cover of this manual.
InstallationRoute the interface cable from the terminal or host. Plug the AC adapter (if one is used) into a wall outlet and the interface (I/F) cable, then route and attach the I/F cable to the scanner. Verify operation by presenting known-good bar codes to the scanner. The unit should beep1 and/or flash its good read LED and send the bar code data to the host or terminal. If not, refer to the Trou-bleshooting section of this guide.
Scanner installation is complete.
I/F Cable
ConnectHere A/C Adapter
(if needed)
For 220-230 VACadapters, thecord must befacing down asshown in theillustration. Ifinstalled upwards,it will pose anundue strain on thesocket outlet.
To Host/Terminal
The Magellan 1100i utilizes illumix™ intelligent illumination tech-nology to optimize light levels for a variety of bar code scanner functions including automatic reading of bar codes from printed surfaces, mobile devices and image capture in variable contrast environments.
1. Beeper and LED behavior is selectable and may have been disabled by a previous user.
2 Magellan™ 1100i
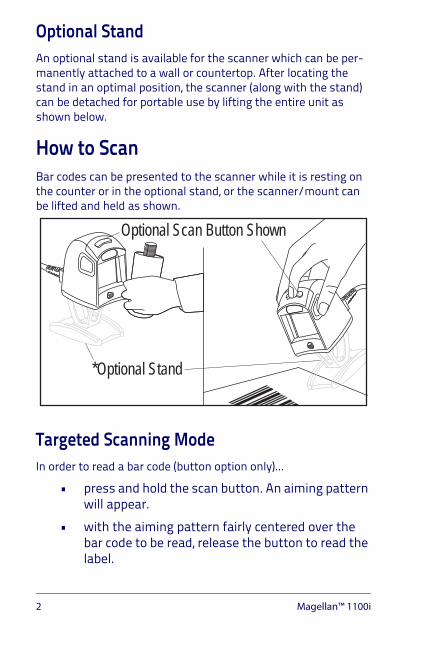
Optional StandAn optional stand is available for the scanner which can be per-manently attached to a wall or countertop. After locating the stand in an optimal position, the scanner (along with the stand) can be detached for portable use by lifting the entire unit as shown below.
How to ScanBar codes can be presented to the scanner while it is resting on the counter or in the optional stand, or the scanner/mount can be lifted and held as shown.
*Optional Stand
Optional Scan Button Shown
Targeted Scanning ModeIn order to read a bar code (button option only)...
• press and hold the scan button. An aiming pattern will appear.
• with the aiming pattern fairly centered over the bar code to be read, release the button to read the label.

The scanner will not read bar codes while the button is pressed.Targeted Scanning Mode will read bar codes in any orientation.The scanner will return to full pattern Omni Mode after a con-figurable time has elapsed.
Quick Reference Guide 3
TroubleshootingIf the scanner is not operating properly, the following checks should be performed:
1. If the scanner uses an external power supply and the exter-nal power supply has failed, the scanner will not operate. Exchange the power supply with a known good power sup-ply and retest operation.
12
4 Product
Reference
Guide
53
2. Verify the interface cable is securely attached to the host. Consult your technical support personnel or refer to your host system manual to verify the proper connection for the scanner.
3. Verify that the interface cable is securely attached to the scanner.
4. Check that the bar codes are of sufficient quality to be recog-nized by the scanner. Wrinkled, smudged, or torn labels can cause the scanner to not read at all. Scan known-good labels of an active symbology1 to check the scanner's read opera-tion.
NOTE
1. Reading of the various bar code symbologies can be independently enabled or disabled in the scanner.

4 Magellan™ 1100i
5. Ensure that the scanner's interface type is compatible with the host terminal by consulting your POS system manual and/or the Product Reference Guide.
If the scanner still does not function properly, contact your local supplier or Datalogic Customer Support Services.
Guida Rapida 5
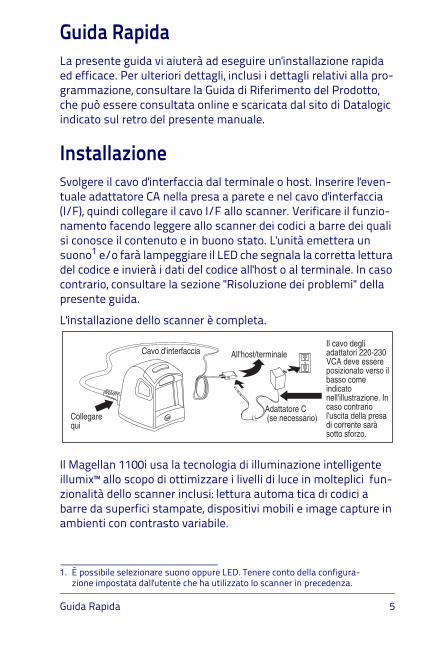
Guida RapidaLa presente guida vi aiuterà ad eseguire un'installazione rapida ed efficace. Per ulteriori dettagli, inclusi i dettagli relativi alla pro-grammazione, consultare la Guida di Riferimento del Prodotto, che può essere consultata online e scaricata dal sito di Datalogic indicato sul retro del presente manuale.
InstallazioneSvolgere il cavo d'interfaccia dal terminale o host. Inserire l'even-tuale adattatore CA nella presa a parete e nel cavo d'interfaccia (I/F), quindi collegare il cavo I/F allo scanner. Verificare il funzio-namento facendo leggere allo scanner dei codici a barre dei quali si conosce il contenuto e in buono stato. L'unità emettera un suono1 e/o farà lampeggiare il LED che segnala la corretta lettura del codice e invierà i dati del codice all'host o al terminale. In caso contrario, consultare la sezione "Risoluzione dei problemi" della presente guida.
L'installazione dello scanner è completa.
Cavo d'interfaccia
Collegarequi
Adattatore C (se necessario)
All'host/terminaleIl cavo degli adattatori 220-230 VCA deve essere posizionato verso il basso come indicato nell'illustrazione. In caso contrario l'uscita della presa di corrente sarà sotto sforzo.
Il Magellan 1100i usa la tecnologia di illuminazione intelligente illumix™ allo scopo di ottimizzare i livelli di luce in molteplici fun-zionalità dello scanner inclusi: lettura automa tica di codici a barre da superfici stampate, dispositivi mobili e image capture in ambienti con contrasto variabile.
1. È possibile selezionare suono oppure LED. Tenere conto della configura-zione impostata dall'utente che ha utilizzato lo scanner in precedenza.

6 Magellan™ 1100i
Supporto OpzionaleÈ disponibile un supporto opzionale che può essere attaccato permanentemente alla parete o sul bancone. Dopo aver posizio-nato il supporto in posizione ottimale, lo scanner e il supporto potranno essere staccati per l'utilizzo mobile sollevando l'intera unità come illustrato in basso.
Come utilizzare lo ScannerÈ possibile presentare i codici al lettore, mentre è posizionato sul bancone oppure inserito nel supporto opzionale, oppure lo scan-ner può essere sollevato come da illustrazione.
*Supporto opzionale
Pulsante opzione
Modalità di Scansione a BersaglioPer utilizzare lo scanner con il pulsante opzione:
• tenere premuto il pulsante. Apparirà un mirino luminoso.• Posizionare il mirino luminoso al centro del codice a
barre da leggere e rilasciare il pulsante opzione per ese-guire la lettura.

Lo scanner non legge i codici, se il pulsante è premuto.La modalità di scansione bersaglio consente di leggere codici orientati in qualunque verso.Lo scanner ritornerà in modalità Omni dopo un periodo di tempo impostabile.
Guida Rapida 7
Risoluzione dei ProblemiNel caso lo scanner non funzionasse correttamente, eseguire i seguenti controlli:
1. Se lo scanner utilizza un'alimentazione esterna e quest'ultima non fosse operativa, lo scanner non funzionerà. Utilizzare una sorgente di alimentazione affidabile e ripro-vare.
12
4 Product
Reference
Guide
53
2. Verificare che il cavo d'interfaccia sia saldamente collegato all'host. Consultare il proprio personale tecnico oppure il manuale del sistema host per controllare il corretto collega-mento dello scanner.
3. Verificare che il cavo d'interfaccia sia saldamente collegato allo scanner.
4. Controllare che i codici a barre siano di qualità sufficiente-mente leggibile per lo scanner. Etichette piegate, strappate o sbavate potrebbero non essere leggibili. Utilizzare etichette sicuramente leggibili che appartenengono ad un sistema di
NOTE

8 Magellan™ 1100i
simbologia1 utilizzato per controllare il funziomento dello scanner in lettura.
5. Assicurarsi che il tipo di interfaccia dello scanner sia compa-tibile con il teminale/host consultando il manuale del POS e/o la Guida di riferimento del prodotto.
Se lo scanner non funziona correttamente, contattare il rivendi-tore locale oppure il Servizio Assistenza Clienti di Datalogic.
1. La lettura delle varie simbologie dei codici a barre può essere indipenden-temente abilitata o disabilitata nello scanner.

Guía de referencia rápida 9
Guía de Referencia RápidaLa finalidad de esta guía es ayudarle a instalar el equipo de forma rápida y eficiente. Para obtener más datos, incluida información de programación, consulte la Guía de referencia del producto (PRG) que podrá ver y descargar de la página Web de Datalogic, cuya dirección aparece en la contracubierta de este manual.
InstalaciónEncamine el cable de interfaz desde el terminal o el equipo cen-tral. Conecte el adaptador de CA (si se utiliza uno) a una toma de corriente de pared y al cable de interfaz (I/F). A continuación encamine y conecte el cable I/F al escáner. Para comprobar el funcionamiento, coloque un código de barras en buen estado ante el escáner. La unidad emitirá un pitido1 y/o parpadeará el LED de lectura correcta y enviará los datos del código de barras al equipo central o al terminal. Si no es así, consulte la sección Solu-ción de averías de esta guía.
La instalación del escáner ha finalizado.
Cable de interfaz
Conectaraquí
Adaptadorde CA (si esnecesario)
Al equipocentral/terminal
Si se utilizan adaptadores de 220-230 V CA, el cable debe orientarse hacia abajo, como muestra la imagen. Si se instala hacia arriba, ejercerá una tensión indebida sobre la toma de corriente.
El Magellan 1100i utiliza la tecnología de Iluminación illumix™ la cual perfecciona niveles de luz para una variedad de funciones de un lector de código de barras incluyendo lectura automática de códigos de barras impresos, en pantallas de dispositivos móviles y captura de imágenes en ambientes con contrastes variables.
1. El funcionamiento del indicador acústico y el LED es seleccionable y es posible que un usuario anterior lo haya desactivado.

10 Magellan™ 1100i
Soporte OpcionalExiste un soporte opcional para el escáner que puede acoplarse de forma permanente a una pared o a un mostrador. Después de colocar el soporte en la posición óptima, se podrá desmontar el escáner (junto con el soporte) si desea trasladarlo de lugar. Para ello, solo tiene que elevar la unidad completa, tal y como muestra la imagen.
Instrucciones Para EscanearLos códigos de barras pueden colocarse delante del escáner mientras éste permanece apoyado sobre el mostrador o el soporte opcional. También es posible elevar y sostener el escá-ner/unidad como muestra la imagen.
*Soporte opcional
Opción de interruptor mostrada
Modo de Exploración de ObjetivoPara leer un código de barras (solo opción de interruptor)...
• Mantenga pulsado el interruptor. Aparecerá un haz para apuntar.
• Centre el haz para apuntar lo más posible sobre el código de barras que vaya a leer y suelte el interruptor para leer la etiqueta.

El escáner no leerá códigos de barras mientras el interruptor permanezca pulsado.El modo de exploración de objetivo leerá los códigos de barras en cualquier dirección.El escáner volverá al modo de haz completo una vez que haya transcurrido un tiempo configurable.
Guía de referencia rápida 11
Solución de ProblemasSi el escáner no funciona correctamente, deberán realizarse las siguientes comprobaciones:
1. Si el escáner utiliza una fuente de alimentación externa y dicha fuente se ha averiado, el escáner no funcionará. Cam-bie la fuente de alimentación por otra en buen estado y res-tablezca el funcionamiento.
12
4 Product
Reference
Guide
53
2. Compruebe que el cable de interfaz está perfectamente aco-plado al equipo central. Pida ayuda al personal de asistencia técnica o consulte el manual del sistema central para com-probar que el escáner esta correctamente conectado.
3. Compruebe que el cable de la interfaz está perfectamente acoplado al escáner.
4. Compruebe que los códigos de barras tienen la calidad sufi-ciente para ser reconocidos por el escáner. El escáner no leerá etiquetas arrugadas, emborronadas o rasgadas. Para comprobar el funcionamiento de la función de lectura del escáner, explore etiquetas que contengan una simbología activa en buen estado1.
NOTA
1. La lectura de distintas simbologías de códigos de barras puede activarse o desactivarse de forma independiente en el escáner.

12 Magellan™ 1100i
5. Asegúrese de que el tipo de interfaz del escáner es compati-ble con el terminal central. Para ello, consulte el manual del sistema POS y/o la Guía de referencia del producto.
Si el escáner sigue sin funcionar correctamente, póngase en con-tacto con su proveedor local o con el Departamento de Atención al Cliente de Datalogic.

Referência Rápida 13
Referência RápidaEste guia é fornecido para ajudar a ter sua instalação funcio-nando rápida e eficientemente. Para obter maiores detalhes, incluindo informações de programação, consultar o Guia de Refe-rência do Produto (PRG), que está disponível para visualização e download a partir do web-site Datalogic listado na contracapa deste manual.
InstalaçãoRotear o cabo de interface a partir do terminal ou do host. Ligar o adaptador C.A. (se for usado um) em uma tomada na parede e o cabo de interface (I/F), então rotear e conectar o cabo I/F ao lei-tor. Verificar a operação apresentando códigos de barra em bom estado e reconhecidos pelo leitor. A unidade deve emitir um bip1 e/ou lampejar sua boa leitura, enviando os dados de código de barras para o host ou terminal. Caso contrário, consultar a seção Diagnóstico deste guia.
A instalação do leitor está completa.
Cabo de interface
Conectaraqui
Adaptador C.A.(se necessário)
Para Host/TerminalPara adaptadores 220-230 VAC, o fio deve estar voltado para baixo, como mostrado na ilustração. Se for instalado para cima, irá causar peso indevido na saída do soquete.
O Magellan 1100i utiliza tecnologia de Iluminação illumix™ que otimiza niveis de luz para uma variedade de funções de um leitor de código de barras, incluindo a leitura automatica de códigos de barras impressos, em telas de dispositivos móveis e captura de imagens em ambientes com contrastes variáveis.
1. O comportamento do bip e do LED pode ser selecionado e pode estar desa-bilitado por um usuário anterior.

14 Magellan™ 1100i
Suporte Opcional Um suporte opcional está disponível para o leitor, que pode ser conectado permanentemente a uma parede ou um balcão. Após localizar o balcão em uma boa posição , o leitor (paralelo ao bal-cão) pode ser destacado para uso portátil, levantando a unidade como mostrado abaixo.
Como Fazer LeituraOs códigos de barra podem ser apresentados ao leitor enquanto este está no balcão ou na suporte opcional, ou o leitor/monta-gem pode ser levantado e segurado como mostrado abaixo.
*Suporte opcional
Opção com Botão
Modo de Leitura DirecionadaPara ler um código de barra (somente opção de butão)...
• Pressionar e segurar o butão. Um padrão almejado irá aparecer.
• Com o padrão almejado centrado no código de barra para ser lido, soltar o butão para ler a etiqueta.

O leitor não irá ler códigos de barra enquanto o butão estiver pressionado.Modo de Leitura Etiquetado irá ler códigos de barra em qualquer orientação.O leitor irá retornar para o padrão total Omni Mode depois que um tempo configurável tiver passado.
Referência Rápida 15
DiagnósticoSe o leitor não estiver operando de forma apropriada, as seguin-tes to verificações devem ser realizadas:
1. Se o leitor usar um fornecimento de energia externo e este estiver falhando, o leitor não irá operar. Trocar o fornecedor de energia com um reconhecidamente bom e testar nova-mente a operação.
12
4 Product
Reference
Guide
53
2. Verificar se o cabo de interface está conectado com segu-rança ao host. Consultar seu suporte técnico ou o manual do sistema host para verificar a conexão apropriada para o leitor.
3. Verificar se o cabo de interface está conectado de forma segura ao leitor.
4. Verificar se os códigos de barra são de qualidade suficiente para serem reconhecidos pelo leitor. Etiquetas dobradas, manchadas ou molhadas podem fazer com que o leitor não as leia. Fazer o scan de etiquetas boas de uma simbologia1 para verificar a operação de leitura do leitor.
NOTA
1. A leitura de várias simbologias de código de barra pode ser independente-mente habilitada ou desabilitada no leitor.

16 Magellan™ 1100i
5. Garantir que o tipo de interface do leitor é compatível com o terminal host, consultando seu manual do sistema PDV e/ou o Guia de Referência do Produto.
Se o leitor não funcionar ainda adequadamente, contactar seu fornecedor local ou os Serviços de Suporte ao Cliente.

Guide de Référence Rapide 17
Guide de Référence RapideCe guide est fourni afin de vous aider à installer rapidement et effica-cement votre lecteur de codes à barres. Pour plus de détails concer-nant les informations sur la programmation, consultez le Guide de Référence du Produit qui est disponible soit pour lecture soit pour téléchargement à partir du site Internet Datalogic indiqué au dos de ce manuel.
InstallationAcheminez le câble d'interface à partir du terminal ou de l'ordinateur hôte. Branchez l'adaptateur CA (courant alternatif) (s'il est nécessaire d'en utiliser un) à une prise du mur et le câble d'interface (I/F), ensuite acheminez et connectez le câble I/F au scanner. Vérifiez l'opération en présentant au scanner des codes à barres corrects. l'unité devrait émettre un bip1 sonore et/ou faire clignoter la diode pour confirmer que la saisie est correcte et envoyez les données du codes à barres à un ordinateur hôte ou au terminal. Si ce n'est pas le cas, consultez la section Diagnostic de Pannes de ce guide.L'installation du scanner est terminée.
Câble d'Interface
Connectezici
Adaptateur CA(si nécessaire)
A l'ordinateurhôte/Terminal
Pour les adaptateurs 220-230 VCA, le cordon doit être face vers le bas comme montré sur l'illustration. S'il est installé vers la haut, ceci provoque une tension excessive au niveau de la prise.
Le scanner Magellan 1100i fonctionne avec la technologie dernière génération d’illumination intelligente illumix™, qui permet d’optimiser les niveaux de lumière automatiquement pour permettre une agres-sivité de lecture inégalée des codes sur papier et écran d’appareils portables ainsi que la capture d’images quelque soit la luminosité.
1. Le bip sonore et le clignotement de la diode LED peuvent être sélectionnés et peuvent avoir été désactivés par un utilisateur précédent.

18 Magellan™ 1100i
Support Facultatif Un support facultatif est disponible pour le scanner qui peut être fixé en permanence à un mur ou à un comptoir. Après avoir placé le sup-port dans une position optimale, le scanner (ainsi que le support) peuvent être détachés pour un usage portatif en levant l'unité com-plète comme illustré ci-dessous.
Comment ScannerLa lecture peut être en mode mains libres pour les pièces faciles à manipuler ou à la main pour les pièces plus encombrantes.
*Support Facultatif
Bouton pour mode ciblée
Mode Saisie CibléeAfin de saisir un code-barre (option commutation uniquement)...
• appuyez et maintenez la pression sur le bouton de commutation. Un rayon de visée apparaîtra.
• centrez bien le rayon de visée au-dessus du codes à barres qui doit être saisi, puis relâchez le bouton pour lire l'étiquette.

Le scanner ne lira pas les codes à barres tant que le bouton sera enfoncé. Le Mode de Saisie Ciblée lira les codes à barres dans n'importe quel sens. Le scanner retournera complètement en mode Omni après qu'un certain temps configurable se sera écoulé.
Guide de Référence Rapide 19
Diagnostic de PannesSi le lecteur ne fonctionne pas correctement, effectuez les vérifica-tions suivantes :
1. Si le lecteur utilise une alimentation électrique extérieure et que l'alimentation extérieure ne fonctionne pas, le lecteur ne fonctionnera pas. Echangez la source d'alimentation avec une autre alimentation électrique correcte et effectuez de nouveau l'opération pour vérification.
12
4 Product
Reference
Guide
53
2. Vérifiez que le câble d'interface est correctement connecté à l'ordinateur hôte/terminal. Consultez votre service tech-nique ou référez-vous au manuel de votre ordinateur hôte afin de vérifier si la connexion au lecteur est correcte.
3. Vérifiez que le câble d'interface est connecté correctement au lecteur.
4. Contrôlez que la qualité des codes à barres est suffisante pour que ceux-ci soient reconnus par le scanner. Les éti-quettes pliées, sales ou déchirées peuvent empêcher le scanner de lire les codes. Saisissez des étiquettes correctes avec une symbologie1 active afin de vérifier que le scanner effectue l'opération de saisie correctement.
NOTE
1. La lecture des différentes symbologies et de codes à barres peuvent être activées ou désactivées de façon indépendante.

20 Magellan™ 1100i
5. Assurez-vous que le type d'interface du scanner est compa-tible avec le terminal hôte en consultant la manuel de votre système POS et/ou le Guide de Référence du Produit.
Si le lecteur ne fonctionne toujours pas correctement, contactez votre four-nisseur local ou le Service d'Assistance Clientèle de Datalogic.

Schnellanleitung 21
SchnellanleitungDiese Anleitung soll eine schnelle und effiziente Installation und Inbetriebnahme ermöglichen. Weitere Einzelheiten, u.a. zur Pro-grammierung, entnehmen Sie dem Produktleitfaden (Product Refe-rence Guide, PRG), der zum Anzeigen und Herunterladen auf der Datalogic-Webseite verfügbar ist (siehe Rückseite dieses Leitfa-dens).
InstallationVerlegen Sie das Interfacekabel vom Haupt- oder Endgerät. Schlie-ßen Sie den Netzadapter (sofern verwendet) an einer Netzsteckdose und am Interfacekabel (IF-Kabel) an, und verlegen Sie das IF-Kabel zum Scanner und schließen es daran an. Führen Sie einen Funkti-onstest aus, indem Sie mit dem Scanner garantiert funktionsfähige Barcodes einlesen. Das Gerät muss einen Piepton1 aussenden und/oder mit der gut sichtbaren LED blinken und die Barcodedaten an das End- oder Hauptgerät senden. Andernfalls ziehen Sie den Abschnitt zu Fehlerbehebung in diesem Leitfaden zurate.Die Scannerinstallation ist abgeschlossen.
Interfacekabel
Hieranschließen
Netzadapter(falls erforderlich)
ZumEnd-/Hauptgerät Bei 220-230 V-
Adaptern, muss das Kabel wie in der Abbildung nach unten zeigen. Wenn es nach oben zeigt, wird die Steckdose unnötig belastet.
Der Magellan 1100i verwendet die intelligente Beleuchtungstechno-logie illumix™ und optimiert so die automatische Erfassung bei einer Vielzahl von Barcodescannerfunktionen. Hierzu gehört das Lesen von gedruckten Barcodes sowie von Barcodes auf mobilen Endgerä-ten und die Bilderfassung in Umgebungen mit unterschiedlich star-ker Beleuchtung.
1. Piepton- und LED-Verhalten können eingestellt werden und sind durch Vornutzer ggf. deaktiviert.

22 Magellan™ 1100i
Optionaler StänderZu dem Scanner gibt es einen optionalen Sockel zur dauerhaften Befestigung an einer Wand oder Ladentheke. Nachdem Sie den Soc-kel optimal positioniert haben, können Sie den Scanner (mit Sockel) für freihändigen Einsatz abnehmen, indem Sie das gesamte Gerät wie unten dargestellt anheben.
ScanverfahrenBarcodes werden mit dem Scanner eingescannt, während dieser auf der Ladentheke steht oder am optionalen Sockel befestigt ist, oder indem der Scanner/die Halterung hochgehoben und wie folgt gehal-ten wird.
*Optionaler Sockel
Optionaler Schalter
ZielscanmodusSo lesen Sie einen Barcode ein (nur optionaler Schalter):
• Schalter gedrückt halten Ein Zielmuster wird angezeigt.
• Zielmuster entsprechend über dem einzulesenden Barcode ausrichten und Schalter zum Scannen des Etiketts loslassen.

Bei gedrücktem Schalter werden die Barcodes vom Scanner nicht eingelesen.Mit dem Zielscanmodus werden Barcodes in jeder Ausrichtung eingelesen.Der Scanner wechselt nach Ablauf einer konfigurierbaren Zeit wieder in den omnidirektionalen Vollmustermodus.
Schnellanleitung 23
FehlerbehebungBei fehlerhaftem Scannerbetrieb prüfen Sie Folgendes:
1. Wenn der Scanner mit einer externen Stromversorgung betrieben wird, funktioniert er nicht, wenn diese ausfällt. Stromversorgung durch ein garantiert funktionsfähiges Gerät ersetzen und Betrieb testen.
12
4 Product
Reference
Guide
53
2. Sicherstellen, dass das Interfacekabel am Endgerät richtig angeschlossen ist. Wenden Sie sich an Ihr zuständiges Tech-nikpersonal oder ziehen Sie das Endgeräthandbuch zurate, um einen ordnungsgemäßen Anschluss des Scanners sicherzustellen.
3. Sicherstellen, dass das Interfacekabel am Scanner richtig angeschlossen ist.
4. Sicherstellen, dass die Barcodes ausreichende Qualität aufweisen, um vom Scanner erkannt zu werden. Zerknitterte, beschmierte, oder angerissene Etiketten machen ein Einlesen unmöglich. Scan-nen Sie garantiert gute Etiketten mit aktiver Symbologie1, um die Einlesefunktion des Scanners zu überprüfen.
HINWEIS
1. Das Einlesen der verschiedenen Barcodesymbologien kann im Scanner unabhängig aktiviert bzw. deaktiviert werden.

24 Magellan™ 1100i
5. Vergewissern Sie sich, dass der Schnittstellentyp des Scan-ners mit dem Endgerät kompatibel ist, indem Sie das Hand-buch des POS-Systems und/oder den Produktleitfaden (Product Reference Guide) zurate ziehen.
Wenn der Scanner weiterhin nicht ordnungsgemäß funktioniert, wenden Sie sich an Ihren örtlichen Händler oder an den Datalogic-Kundensupport.

快速参考 25
快速参考
提供本指南帮助您迅速有效地安装和运行。欲知详情,包括编程信息,请参阅产品参考指南 (PRG),可以从本指南封底列出的 Datalogic 网站浏览和下载该指南。
安装
对从终端或主机来的接口电缆进行布线。将 AC 适配器 ( 如果使用了的话 ) 插入墙壁上的电源插座和 (I/F) 电缆接口,然后布线并将 I/F 电缆连接到扫描器。用已知的好条形码进行检查。扫描器的喇叭
1 应该鸣响并且 / 或者它的 LED 应该闪烁以表示读数正确,同时将条码数据发送到主机或者终端。如果无鸣响或者不闪烁,参阅本指南的故障检修部分。
至此 1, 扫描器安装完毕。
Magellan 1100i 采用 illumix™ 智能照明技术,可优化各种条形码扫描器的亮度级别
功能包括自动读取印刷表面、移动设备上的条形码和捕获各种对比环境中的图像。
1. 蜂鸣器和 LED 的状态可选,并可由先前用户禁止。

26 Magellan™ 1100i
可选用机座
可使用可选机座将扫描器永久地装在墙壁或柜台上。将机座放在一个 佳位置后,可以像图例所示的那样举起整个扫描器 ( 与机座一起 ) 进行使用。
怎样进行扫描
将条码静止在柜台上或者可选机座上对着扫描器,或者将扫描器 / 机座如图所示那样举起后进行扫描。
瞄准扫描模式
为了读条码 ( 仅适用于开关型 ) ,应该:
• 压下开关并保持,进入瞄准模式。
• 在瞄准模式下对准要读取的条码,松开开关读标签。

在开关被按着时扫描器不会读条码。
瞄准扫描模式能在任意方向上读条码。
在一定时间之后扫描器将返回到全向模式。
快速参考 27
故障处理
如果扫描器不能正常工作,应当进行以下检查:
1. 如果扫描器使用外部电源供电而外部电源发生故障,则扫描器不会工作。用已知的能正常工作的电源进行替换并重新进行试验。
12
4 Product
Reference
Guide
53
2. 检验接口电缆与主机是否牢固地连接。咨询技术支持人员或参阅主机系统指南以核实扫描器是否已经适当的连接。
3. 核查接口电缆是否牢固地与扫描器相连接。
4. 检查条码质量是否完好以便能让扫描器识别。起皱纹的、弄脏的、或者撕坏的标签可能导致扫描器根本无法读出。扫描已知完好的标签来检查扫描器的读操作。
注意

28 Magellan™ 1100i
5. 查阅 POS 系统手册和 / 或者产品参考指南确保扫描器
的接口类型与主机终端兼容。
如果扫描器仍然不能正常工作,可与本地供应商或者 Dat-alogic 用户支持服务中心联系。

クイック·リファレンス 29
クイック·リファレンスこのガイドでは、迅速かつ効率的にインストール手順を実行するための情報を提供します。プログラミング情報を含む詳細については、製品リファレンス·ガイド (PRG) を参照してください。 PRG は、このマニュアルの背表紙に記載されている Data-logic Web サイトからダウンロードすることができます。
インストールインターフェース·ケーブルをターミナルまたはホストに接続します。必要に応じて AC アダプタを壁コンセントおよびインターフェース (I/F) ケーブルに接続し、 I/F ケーブルをスキャナに接続します。状態のよいバーコードをスキャンし、正しく作動するか確認してください。ユニットはビープ音1 を発するか、読み取り正常 LED を点滅させ、ホストまたはターミナルにバーコード·データを送信します。正しく作動しない場合は、このガイドのトラブルシューティング·セクションを参照してください。
これで、スキャナのインストールが完了しました。
Magellan 1100i は、illumix™ インテリジェント·イルミネーション·テクノロジーを搭載し、 印刷物、モバイルデバイスやイメージキャプチャからのバーコード読み取りを自動で行い、かつ幅広いコントラストに対応するなど、各種の機能を取り揃えています。
1. ビーパーおよび LED の動作は選択可能です。また、以前のユーザーにより無効にされている場合があります。

30 Magellan™1100i
オプションのスタンドオプションのスタンドを使用すると、壁面または台上にスキャナを固定することができます。スタンドを最適な位置に配置した後でも、図のようにユニット全体を持ち上げることにより、スタンドを取り付けたままスキャナを手持ちで使用することができます。
スキャンの仕方スキャナを卓上またはオプションのスタンドに置いた状態、またはスタンドを取り付けたスキャナを図のように持ち上げた状態で、バーコードをスキャンすることができます。
目標スキャニング·モードバーコードを読み取るには (スイッチ·オプション使用の場合のみ ) …
• スイッチを押したままにします。照準パターンが表示されます。
• 照準パターンを読み取るバーコードの中央に当て、スイッチを放してラベルを読み取ります。

スイッチを押したままの状態では、スキャナはバーコードを読み取りません。 目標スキャニング·モードでは、任意の向きのバーコードを読み取ることができます。 設定時間を過ぎると、スキャナはフル·パターン·オムニ·モードに戻ります。
クイック·リファレンス 31
トラブルシューティングスキャナが正しく作動しない場合は、以下の確認作業を行ってください。
1. 外部電源をお使いの場合は、外部電源が故障するとスキャナも作動しません。信頼できる電源装置と交換し、スキャナが作動するか再テストしてください。
12
4 Product
Reference
Guide
53
2. インターフェース·ケーブルがホストにしっかりと接続されていることを確認してください。スキャナの正しい接続方法については、テクニカルサポートの担当者にお問い合わせいただくか、ホストのシステムマニュアルを参照してください。
3. インターフェース·ケーブルがスキャナにしっかりと接続されていることを確認してください。
4. バーコードの状態がスキャナで認識するのに十分な状態であることを確認してください。ラベルにしわ、汚れ、破れなどがあると、スキャナでまったく読み取れない場合があります。有効なシンボル体系 が印刷された状態のよいラベルをスキャンして、スキャナの読み取り機能をテストしてください1。
注記

32 Magellan™1100i
5. スキャナのインターフェースのタイプとホストターミナルとの互換性を確認してください。確認方法は、POS システムマニュアルまたはスキャナの製品ガイドを参照してください。
上記の方法を実行してもスキャナが正しく作動しない場合は、お近くのサプライヤーまたは Datalogic カスタマーサポートサービスまでご連絡ください。
1. さまざまなバーコード体系ごとに、スキャナでの読み取りを有効または無効にすることができます。

CleaningThe scanner will provide dependable service for many years. The following maintenance procedures will keep your scanner oper-ating at peak performance.
Whenever needed, gently clean the scan window using paper towels or lint-free cleaning tissues dampened with a nonabra-sive, mild, water-based glass cleaner (as shown in the illustration below. The other surfaces can also be cleaned using the same cleaning agents. Do not allow fluids to flow into the internal parts of the scanner.
CAUTION
DO NOT use abrasive cleaning agents or abrasive pads to clean this product. Harsh chemicals, disinfectants, and cleansers can cause damage which will adversely affect scanning performance.
CAUTIONDO NOT spray
cleaners directlyon the scanner!

WarrantyDatalogic warrants to Customer that this product will be free from defects in mate-rials and workmanship for a period of 2years from product shipment.
Datalogic ADC Limited Factory WarrantyWarranty CoverageDatalogic ADC (“Datalogic”) hardware products are warranted against defects in material and workmanship under normal and proper use. The liability of Datalogic under this warranty is limited to furnishing the labor and parts necessary to remedy any defect covered by this warranty and restore the product to its normal operating condition. Repair or replacement of product during the warranty does not extend the original warranty term. Products are sold on the basis of specifications applica-ble at the time of manufacture and Datalogic has no obligation to modify or update products once sold.If Datalogic determines that a product has defects in material or workmanship, Dat-alogic shall, at its sole option repair or replace the product without additional charge for parts and labor, or credit or refund the defective products duly returned to Data-logic. To perform repairs, Datalogic may use new or reconditioned parts, compo-nents, subassemblies or products that have been tested as meeting applicable specifications for equivalent new material and products. Customer will allow Data-logic to scrap all parts removed from the repaired product. The warranty period shall extend from the date of shipment from Datalogic for the duration published by Dat-alogic for the product at the time of purchase (Warranty period). Datalogic warrants repaired hardware devices against defects in workmanship and materials on the repaired assembly for a 90 day period starting from the date of shipment of the repaired product from Datalogic or until the expiration of the original warranty period, whichever is longer. Datalogic does not guarantee, and it is not responsible for, the maintenance of, damage to, or loss of configurations, data, and applications on the repaired units and at its sole discretion can return the units in the “factory default” configuration or with any software or firmware update available at the time of the repair (other than the firmware or software installed during the manufacture of the product). Customer accepts responsibility to maintain a back up copy of its software and data.
Warranty Claims ProcessIn order to obtain service under the Factory Warranty, Customer must notify Data-logic of the claimed defect before the expiration of the applicable Warranty period and obtain from Datalogic a return authorization number (RMA) for return of the product to a designated Datalogic service center. If Datalogic determines Customer’s claim is valid, Datalogic will repair or replace product without additional charge for parts and labor. Customer shall be responsible for packaging and shipping the prod-uct to the designated Datalogic service center, with shipping charges prepaid. Data-logic shall pay for the return of the product to Customer if the shipment is to a location within the country in which the Datalogic service center is located. Cus-tomer shall be responsible for paying all shipping charges, duties, taxes, and any other charges for products returned to any other locations. Failure to follow the applicable RMA policy, may result in a processing fee. Customer shall be responsi-ble for return shipment expenses for products which Datalogic, at its sole discretion, determines are not defective or eligible for warranty repair.

Warranty ExclusionsThe Datalogic Factory Warranty shall not apply to:
(i) any product which has been damaged, modified, altered, repaired or upgraded by other than Datalogic service personnel or its authorized repre-sentatives;
(ii) any claimed defect, failure or damage which Datalogic determines was caused by faulty operations, improper use, abuse, misuse, wear and tear, negligence, improper storage or use of parts or accessories not approved or supplied by Datalogic;
(iii) any claimed defect or damage caused by the use of product with any other instrument, equipment or apparatus;
(iv) any claimed defect or damage caused by the failure to provide proper main-tenance, including but not limited to cleaning the upper window in accor-dance with product manual;
(v) any defect or damage caused by natural or man-made disaster such as but not limited to fire, water damage, floods, other natural disasters, vandalism or abusive events that would cause internal and external component dam-age or destruction of the whole unit, consumable items;
(vi) any damage or malfunctioning caused by non-restoring action as for exam-ple firmware or software upgrades, software or hardware reconfigurations etc.;
(vii) the replacement of upper window/cartridge due to scratching, stains or other degradation and/or
(viii) any consumable or equivalent (e.g., cables, power supply, batteries, key-pads, touch screen, triggers etc.).
No AssignmentCustomer may not assign or otherwise transfer its rights or obligations under this warranty except to a purchaser or transferee of product. No attempted assignment or transfer in violation of this provision shall be valid or binding upon Datalogic.DATALOGIC'S LIMITED WARRANTY IS IN LIEU OF ALL OTHER WARRANTIES, EXPRESS OR IMPLIED, ORAL OR WRITTEN, STATUTORY OR OTHERWISE, INCLUDING, WITHOUT LIMITATION, ANY IMPLIED WARRANTIES OF MERCHANTABILITY, FITNESS FOR A PARTICULAR PURPOSE, OR NONINFRINGEMENT. DATALOGIC SHALL NOT BE LIABLE FOR ANY DAMAGES SUSTAINED BY CUSTOMER ARISING FROM DELAYS IN THE REPLACEMENT OR REPAIR OF PRODUCTS UNDER THE ABOVE. THE REMEDY SET FORTH IN THIS WARRANTY STATEMENT IS THE CUSTOMER’S SOLE AND EXCLUSIVE REMEDY FOR WARRANTY CLAIMS. UNDER NO CIRCUMSTANCES WILL DATALOGIC BE LIABLE TO CUSTOMER OR ANY THIRD PARTY FOR ANY LOST PROFITS, OR ANY INCIDENTAL, CONSEQUENTIAL IN-DIRECT, SPECIAL OR CONTINGENT DAMAGES REGARDLESS OF WHETHER DATALOGIC HAD ADVANCE NOTICE OF THE POSSIBILITY OF SUCH DAMAGES.
Risk of LossCustomer shall bear risk of loss or damage for product in transit to Datalogic. Data-logic shall assume risk of loss or damage for product in Datalogic’s possession. In the absence of specific written instructions for the return of product to Customer, Datalogic will select the carrier, but Datalogic shall not thereby assume any liability in connection with the return shipment.

©2009-2015 Datalogic ADC, Inc. • All rights reserved. • Datalogic and the Datalogic logo are registered trademarks ofDatalogic S.p.A. in many countries, including the U.S.A. and the E.U.
www.datalogic.com
Datalogic ADC, Inc.959 Terry Street | Eugene |OR 97402 | USATelephone: (1) 541-683-5700 | Fax: (1) 541-345-7140
820068314 (Rev. G) March 2015