
MagazineMagazine The future steps out: Augmented Reality · Simple, modern and ... Nicole is a...
33
• An ODROID-W in a Gameboy Advance SP Case • Build a wood game cabinet for the ODROID-C1+ and have the perfect arcade experience at home ODROID Magazine ODROID Magazine Augmented The future steps out: Reality Augmented The future steps out: Reality • Learn how to use your oCAM on amazing projects X86 CPU instuctions • Wireless network monitoring • Multiscope Year Three Issue #28 Apr 2016
Transcript of MagazineMagazine The future steps out: Augmented Reality · Simple, modern and ... Nicole is a...

• An ODROID-W in a Gameboy Advance SP Case
• Build a wood game cabinet for the ODROID-C1+ and have the perfect arcade experience at home
ODROIDMagazine
ODROIDMagazine
AugmentedThe future steps out:
RealityAugmentedThe future steps out:
Reality
• Learn how to use your oCAM on amazing projects
X86 CPU instuctions • Wireless network monitoring • Multiscope
Year ThreeIssue #28Apr 2016

What we stand for.We strive to symbolize the edge of technology, future, youth, humanity, and engineering.
Our philosophy is based on Developers. And our efforts to keep close relationships with developers around the world.
For that, you can always count on having the quality and sophistication that is the hallmark of our products.
Simple, modern and distinctive.So you can have the best to accomplish everything you can dream of.
We are now shipping the ODROID-U3 device to EU countries! Come and visit our online store to shop!
Address: Max-Pollin-Straße 1 85104 Pförring Germany
Telephone & Faxphone: +49 (0) 8403 / 920-920email: [email protected]
Our ODROID products can be found athttp://bit.ly/1tXPXwe

EDITORIAL
ODROID Magazine, published monthly at http://magazine.odroid.com, is your source for all things ODROIDian.Hard Kernel, Ltd. • 704 Anyang K-Center, Gwanyang, Dongan, Anyang, Gyeonggi, South Korea, 431-815 Hardkernel manufactures the ODROID family of quad-core development boards and the world’s first ARM big.LITTLE single board computer.For information on submitting articles, contact [email protected], or visit http://bit.ly/1ypImXs.You can join the growing ODROID community with members from over 135 countries at http://forum.odroid.com.Explore the new technologies offered by Hardkernel at http://www.hardkernel.com.
OpenCV is a popular software application that can be used in cooperation with a digital camera in order to analyze visual input and make decisions based on what the com-
puter interprets from the video image. Hardkernel recently released the oCAM module, which is an inexpensive way to
create a visual processing system that responds to its environment. This month, DongHyun Yoo demon-strates a simple OpenCV applica-
tion that can be used for object tracking with an ODROID-XU4.
Several forum users recently designed retro gaming consoles built around ODROIDs in or-
der to recreate their first gaming experiences, and have shared the designs with the community. We also pres-
ent some great games, including Awkaster, a terminal-based 3D first-person shooter, Cut the Rope 2, where you solve puzzles in order to feed candy to a cute monster, Re-Volt, a fun racing game, and XMage, a client/server package for Magic: The Gathering. Venkat continues his technical series with a multiscope project, and Adrian shows us how to perform network penetration testing using Kismet.

Manuel Adamuz, Spanish EditorI am 31 years old and live in Seville, Spain, and was born in Granada. I am married to a wonderful woman and have a child. A few years ago I worked as a computer technician and programmer, but my current job is related to quality management and information technology: ISO 9001, ISO 27001, and ISO 20000. I am passionate about computer science, especially microcomputers such as the ODROID and Raspberry Pi. I love experimenting with these com-
puters. My wife says I’m crazy because I just think of ODROIDs! My other great hobby is mountain biking, and I occasionally participate in semi-professional competitions.
Andrew Ruggeri, Assistant EditorI am a Biomedical Systems engineer located in New England currently working in the Aerospace industry. An 8-bit 68HC11 microcontroller and assembly code are what got me interested in embedded systems. Nowadays, most proj-ects I do are in C and C++, or high-level languages such as C# and Java. For many projects, I use ODROID boards, but I still try to use 8bit controllers whenever I can (I’m an ATMEL fan). Apart from electronics, I’m an analog analogue photography and film development geek who enjoys trying to speak foreign languages.
Venkat Bommakanti, Assistant EditorI’m a computer enthusiast from the San Francisco Bay Area in California. I try to incorporate many of my interests into single board computer projects, such as hardware tinkering, metal and woodworking, reusing salvaged materials, software development, and creating audiophile music recordings. I enjoy learning something new all the time, and try to share my joy and enthusiasm with the community.
Josh Sherman, Assistant EditorI’m from the New York area, and volunteer my time as a writer and editor for ODROID Magazine. I tinker with computers of all shapes and sizes: tearing apart tablets, turning Raspberry Pis into PlayStations, and experimenting with ODROIDs and other SoCs. I love getting into the nitty gritty in order to learn more, and enjoy teaching oth-ers by writing stories and guides about Linux, ARM, and other fun experimental projects.
Nicole Scott, Art EditorNicole is a Digital Strategist and Transmedia Producer specializing in online optimization and inbound marketing strategies, social media management, and media production for print, web, video, and film. Managing multiple ac-counts with agencies and filmmakers, from web design and programming, Analytics and Adwords, to video editing and DVD authoring, Nicole helps clients with the all aspects of online visibility. Nicole owns anODROID-U2, and a number of ODROID-U3’s and looks forward to using the latest technologies for both personal and business
endeavors. Nicole’s web site can be found at http://www.nicolecscott.com.
James LeFevour, Art EditorI’m a Digital Media Specialist who is also enjoying freelance work in social network marketing and website administra-tion. The more I learn about ODROID capabilities, the more excited I am to try new things I’m learning about. Being a transplant to San Diego from the Midwest, I am still quite enamored with many aspects that I think most West Coast people take for granted. I live with my lovely wife and our adorable pet rabbit; the latter keeps my books and computer
equipment in constant peril, the former consoles me when said peril manifests.
Bruno Doiche, Senior Art EditorWhat does our goofy dude is doing lately? Organizing all his collected music libraries that he got over the last 20 years.
We think it is mostly an exercise in dubious taste, specially when we see Bruno going from Death metal to Depeche Mode for babies. But what we can do, right? At least he listen using headphones most of the time!
Besides this task, he still is a sucker against David, that now trounces him on card games using his own ODROID pow-ered XMAGE server. Less users at the same server means that Bruno now loses his games faster than ever.
Tough life.
OUR AMAZING ODROIDIAN STAFF:
Rob Roy, Chief EditorI’m a computer programmer in San Francisco, CA, designing and building web applications for local clients on my network cluster of ODROIDs. My primary languages are jQuery, Angular JS and HTML5/CSS3. I also develop pre-built operating systems, custom kernels and optimized applications for the ODROID platform based on Hardkernel’s official releases, for which I have won several Monthly Forum Awards. I use my ODROIDs for a variety of purposes,
including media center, web server, application development, workstation, and gaming console. You can check out my 100GB collection of ODROID software, prebuilt kernels and OS images at http://bit.ly/1fsaXQs.

INDEX
objecT TrAckIng - 22
UnIcorn - 15
AwkAsTer - 15
xmAge - 20
mUlTIscope - 18
cUT THe rope 2 - 26
meeT An odroIdIAn - 29
kIsmeT - 27
revolT - 24
AndroId developmenT - 11
gAmeboY AdvAnce - 16
gAme cAbIneT - 6

Display unitChoose the 24 inch
16:10 ratio LCD panel for better gaming expe-rience. Since there are many retro games that run in 4:3 ratio, a 16:10 screen is better than 16:9 for a classic ar-cade game display ratio. The native resolution is 1920x1200 WUXGA. The LCD part number is LTM240CL01. which is made by Samsung. A display frame bezel was made with wood pieces to give a nice vintage style. The console looks like a 1980s-era picture frame.
WOODEn GAME CAbInETFOR RETRO FAnSedited by justin lee
GAME CABINET
being able to emulate games that are either landscape or portrait, one thing that you won’t be able to do is have less than the most fun out of it. guaranteed.
S cott Shin, a Korean Maker, built an environmental friendly wooden game console using an ODROID-C1+. The
most significant advantage is that the console supports portrait mode as well as landscape mode for a much better gaming experience. Let’s see how he made this great console using simple design elements.
Build the main frameThe main frame was designed with Google
SketchUp in order to make wooden blocks for CNC machining. All the material is birch plywood with a thickness of 18mm. The design layout files are available in his Github at http://bit.ly/1XDGtBp.
wood parts by cnc machining
Assemble the wood parts Assemble main frame with the base stand
ODROID MAGAZINE 6

GAME CABINET
The rear side frame of the display unit was made with 0.8mm thickness of steel plate in order to make the display frame more sturdy. There are a few 90-degree bends and screw holes for mounting the ODROID board, as well as an HDMI-to-LVDS video signal conversion board. The power for the ODROID shares 5V rail in the conversion board.
design layout files mount the odroId-c1+
mount and connect the boards with wires and switches
ODROID MAGAZINE 7

Assemble the lvds cable
mount the display unit on the main frame
The pivot function works great
Assemble the steel plate to the bezel frame with screws
Assemble a display mounting part which supports the pivot fea-ture on the steel frame
Attach the display unit
GAME CABINET
ODROID MAGAZINE 8

The plate is prepared for 6 big buttons and one joystick. other small buttons will be mapped to the Android key maps for back, menu, select and more
The Arduino handles the key input events and sends the packet to the odroId board via Usb HId interface joystick and button mapping
mount the joystick parts to the wodden frame
The console is almost done!
Joystick block
GAME CABINET
Due to the limited number of IO ports on the Arduino, a matrix interfacing needs to be implemented. 10Kohm resistors and 1N4181 switching diodes are used to create the matrix.
ODROID MAGAZINE 9

GAME CABINET
The Arduino sketch source code for this project is available at http://bit.ly/1RtSRzp. You can also find further informa-tion about the joystick and buttons schematics at http://bit.ly/1Rs4qgs (Korean). There is a very nice guide to building a two-player system as well.
GameplayBoot the Android OS on ODROID-C1+ and configure the
screen orientation option with the ODROID-Utility app.
As shown in the images, MAME emulates a great fly and shoot game in portrait mode, and 3:4 ratio is activated by the conversion board automatically. The emulator used is MAME4droid ver-sion 0.1398u1, avail-able for free from the Google Play store. We hope to see a two-player platform
using the much more powerful ODROID-C2 in place of the original ODROID-C1+.
customized launcher home screen
A classic dos emulator runs the famous Tetris game in land-scape mode
Arcade game on portrait mode
most native Android games are also working smoothly
ODROID MAGAZINE 10

ANDROID DEVELOPMENT
AnDROID DEvELOpMEnTbuILD YOuR OWn AnDROID SDKby nanik Tolaram
The fun thing about Android is the ability for anyone to add whatever they want and experiment with different things. There are plenty of flavours of Android for dif-
ferent platforms, and each one is unique on its own and offers something that the others don’t. For example, Google offers Android pre-installed on your devices with Google Apps such as YouTube and Google+. You can also provide your own fla-vor of Android that are pre-bundled with your SDK for your users to develop with.
In this article, we are going to take a look at how to add a new service inside Android, and give users the ability to access the service from their application. I will also teach you how to add new functionality into an existing Android SDK. In this example, we are going to use Android Lollipop, although dif-ferent versions of Android use the same process.
System ServiceAt some point during Android development, you will come
across using services that are exposed via the SDK, such as Lo-cationManager (GPS), SensorManager and many more. We are going to create our own service called SampleService. The service will only provide a single method returning the string “ValueFromServer” to the client:
package com.android.server;
import android.content.Context;
import com.android.internal.os.ISampleService;
public final class SampleService extends ISampleSer-
vice.Stub {
private static final String TAG = “SampleService”;
private final Context mContext;
public SampleService(final Context context) {
mContext = context;
}
public String getHello(){
return “ValueFromServer”;
}
}
The class will be created inside the frameworks/base/ser-vices/core/java/com/android/server directory. Notice that it extends ISampleService.Stub, but the question is: where does this class reside? It will be generated by the build process based on the interface that we are going to define inside the file called ISampleService.aidl, as shown below. The .aidl must reside inside frameworks/base/core/java/com/android/internal/os directory.
package com.android.internal.os;
interface ISampleService {
String getHello();
}
The .aidl file will be used by the build process to generate all the relevant files needed for the framework to expose it as a remote service allowing external applications to access it, both
Tailoring your tools is the first and best step to make all Android experiments of your choice sucessful.
ODROID MAGAZINE 11

inside and outside the framework.
Android.mkFor the .aidl file to be processed by the build system, we
need to explicitly specify it in the Android.mk makefile inside the framework/base directory. Look for the LOCAL_SRC_FILES declaration inside the file, then add the line shown in Figure 1. Make sure that there are no spaces after the ‘\’ char-acter, as this will crash the build.
System ManagerThe next step is to create a manager class. This class will
be the main consumer of our service, and also will be the class that every user of our service will have access to. In order for the manager to be made available, there are few steps that need to be done:
package android.os;
import com.android.internal.os.ISampleService;
public class SampleManager {
private static final String TAG = “SampleManager”;
private final ISampleService mService;
/** {@hide} */
public SampleManager(ISampleService service) {
mService = service; }
public String getHello() {
String returnValue = “NOTHING”;
try {
returnValue = mService.getHello();
}
catch (RemoteException e) {
e.printStackTrace();
}
return returnValue;
}
}
This manager class will be the entrance point to our service, and like any other manager in Android, the way to obtain a reference is by using the getSystemService method. We will go through this later in the example.
System ServerThe framework initialize all services using a file called Sys-
temServer.java inside frameworks/base/services/java/com/an-droid/server directory. We are going to add code snippets into this class in order to initialize our SampleService:
….
try {
Slog.i(TAG, “Sample Service”);
ServiceManager.addService(“SampleService”,new
SampleService(context));
} catch (Throwable e) {
reportWtf(“starting SampleService”, e);
}
….
The code must be placed inside the method startOtherSer-vices(), as shown in Figure 2, which will map the string Sam-pleService with our class. This will thenl be consumed by the manager class that is defined in the next section.
ContextEvery application in Android must access the Context ob-
ject. You can think of this object as a global class, which con-tains an API that will allow our application to interact with the framework. In this step, we will expose our service via the Context by changing the code inside the ContextImpl class, containing the implementation of the Context object. Figure 3 shows the code that must be added for our service inside the
ANDROID DEVELOPMENT
aidl declaration inside Android.mk
systemserver.java snippet
ODROID MAGAZINE 12

ContextImpl.java file.
SELinux PolicyIn Android Lollipop, when we define a new service, we need
to add it to the SELinux context file, so that it will be initialized properly to avoid errors. We need to declare our service inside the service_contexts file that reside inside the external/sepolicy directory. Figure 4 shows the extra line that need to be added.
BuildAt this point, we have completed all the necessary setup for
our service. Now, it’s time to run the build sequence, which is outlined below:
Run the following command in order to update the relevant files and inform them of the changes to the framework and SDK. This will update the file called current.txt to host our new service, which will then be used to package the SDK in the next step.
$ make update-api
Make sure there is no error generated when executing step 1, then generate the SDK needed for our IDE:
$ make sdk -j6
On successful compilation, you will see a file generated on the local machine that contains the full Android SDK. In my example, thie file is called android-sdk_eng.nanik_linux-x86.zip, as shown in Figure 5. You will need to copy files from the directory, which is named the same as the .zip file.
I have Android SDK installed in a directory called /home/nanik/Work/android-sdk-linux, as shown in Figure 6. Since we are building the SDK for Lollipop, we need to copy the new SDK into <your_android_sdk_folder>/platforms/android-22. Remove all the files inside the android-22 folder, but before doing that, make a backup copy of the full folder.
The name of the folder containing the SDK is called an-droid-sdk_eng.nanik_linux-x86 in my case, but the name of
ANDROID DEVELOPMENT
contextImpl.java snippet
service_contexts snippetgenerated .zip file sdk
Full Android sdk
ODROID MAGAZINE 13

your file will be slightly different. Next, copy everything from the directory android-sdk_eng.nanik_linux-x86/platforms/android-5.1.1 into the SDK folder under /home/nanik/Work/android-sdk-linux/platforms/android-22, as shown in Figure 7. Now we are ready to use our custom-built SDK.
Sample AppLaunch Android Studio and create a simple Android app.
Make sure that you use the correct SDK version inside build.gradle to ensure that the IDE picks up the correct SDK files. Figure 8 shows what I have in my Studio. The autocomplete feature in the IDE will be able to pick up the SampleManager class, as shown in Figure 9.
The complete source code for the application is shown be-low:
package sample.nanik.com.testsdk;
import android.app.Activity;
import android.os.Bundle;
import android.os.SampleManager;
import android.util.Log;
public class MainActivity extends Activity {
@Override
protected void onCreate(Bundle savedInstanceS-
tate) {
super.onCreate(savedInstanceState);
setContentView(R.layout.activity_main);
SampleManager manager = (SampleManager)getSys
temService(“SampleServiceManager”);
String s = manager.getHello();
Log.i(“MainActivity”,s);
}
}
custom sdk build
build.gradle snippet
samplemanager autocomplete
ANDROID DEVELOPMENT
ODROID MAGAZINE 14

navigating the maze,terminalstyle!
EMULATION AWKASTER
unICORnCpu InSTRuCTIOn EMuLATIOn FOR ARMby @petevine
AWKASTERRETROTASTIC TERMInALbASED FpS GAMInGby justin lee
The Unicorn CPU emula-tor engine and framework, available at http://bit.
ly/1VoerJn, is an exciting new proj-ect written in C that recently received ARM host support. Unicorn emu-lates just the CPU instructions, which enables many interesting possibilities for future emulation projects. Unicorn is based on QEMU, but uses jitting techniques, similar to PyPy, in order to achieve a runtime performance boost. I recommend reading the document at bit.ly/1Vofd9i for a better understanding of the differences.
Instructions for installing Unicorn from the source code can be found at bit.ly/1OgV0wb, which is fairly straightforward. The only dependency is Capstone (bit.ly/1U8Pxz3), which uses the same build system.
Currently, the most mature project for showing off Uni-corn’s capabilities is called Usercorn (bit.ly/1mIlh06). It was written in Go by @lunixbochs, the GLShim pioneer, as a us-erspace emulator like qemu-user. However, unlike qemu-user, which has separate binaries for ARM and x86, it’s able to han-dle all architectures supported by Unicorn at the same time.
I’ve uploaded a “usercorn starter kit” to bit.ly/1U8PXoZ for anyone wishing to try it out without having to install Go first. The bundled busybox binaries should serve the purpose well. For comments, questions, and suggestions, please visit the orig-inal post at bit.ly/1Lu9qcJ.
Bring some old-school gaming fun to your terminal! In this pseudo-3D game inspired by the classics Wolfen-stein 3D and Doom, you can explore a dungeon and
fight monsters. Your objective is to navigate the maze and acti-vate the exit elevator, killing hordes of monsters in the process.
Awkaster can be installed with the following commands:
$ sudo apt-get install gawk
$ git clone\
https://github.com/TheMozg/awk-raycaster.git
$ cd awk-raycaster/
$ gawk -f awkaster.awk
ControlswAsd - movementj/l - turn left/right (hold shift to turn quickly)spacebar - shootnum 1 - 4 - change color modex - activate elevator (arrives after 1000 moves)
More instructions and the source code can be found at http://bit.ly/1P1B4V7. The code is fun and interesting to read. I couldn’t imagine how a 3D game could be written in just 600 lines! For the dungeon wall rendering, the game uses ray casting. Ray casting is a simple rendering algorithm that doesn’t require any 3D modeling or complex computation, which keeps the code simple. Monsters and projectiles are added as sprites after the walls have been rendered.
For comments, questions and suggestions, please visit the original post at bit.ly/1TrhUcg.
ODROID MAGAZINE 15

vance SP “shell.” Here are the specs for the tiny por-
table computer:
• ODROID W (Raspberry pi clone)
• 1300mah battery (cell phone battery [tiny])
• USB hub with 3 USB ports - 1 will be used for wifi internally with 2 available externally
• HDMI port, which is great when used as a movie player on the big screen at home
• Mono speaker hooked to an amp with digital volume with tactile switches for changing volume
• 3.5in screen• Directional Pad with A, B, X, Y,
L, R, Start, and Select buttons
The Gameboy Advance SP (GBA SP) originally used a 16.8 MHz CPU, 96 KB Video RAM, and 32 KB of sys-tem RAM. While this seems like noth-ing for today’s standards, it was actually quite impressive when it was released in 2003. The ODROID-W pumps out 700 MHZ of CPU speed with 512 MB of RAM, with a large library of open source software available.
After obtaining a Gameboy Advance SP “Shell” online, I was able to use a small drill to make room for all of the
Creating portable video game sys-tems has been a hobby of mine for about four years now. I
started out turning console systems such the Nintendo 64 and GameCube into portable devices. Then, I heard about the ODROID projects. I have always wanted to create my own emulating de-vice, but at the time, the Raspberry Pi was the main device to do so. Once the ODROID-W was announced, I knew that this had to be the best way to create a tiny emulating system. What I didn’t expect was for it to fit in a Gameboy Ad-
parts. One of the trickiest tasks was cut-ting the PCB board that was behind the LCD screen. My system uses a 3.5 inch backup camera screen that is usually used in a car as a rearview device. Since these screens have a composite input and can run using 5V with some modifica-tions, it was the perfect screen for this project. The original GBA SP had a 2.9 inch screen with a lower resolution, so this was a nice upgrade, but it required extensive modification in order to fit. I even had to scratch away at some traces on the board to permit the capacitors to be wired back on. I had to do some very small manipulations, which took patience and dexterity.
Because the ODROID-W already has a step-up converter, I was able to use a cell phone battery to power the whole system. Surprisingly, the ODROID-W draws very low power, so a battery with a capacity of 1300mah was able to power
LInuX GAMInGAn ODROID-W HOuSED In AGAMEbOY ADvAnCE Sp CASEby johnny parks
GAMEBOY ADVANCE
Figure 1 - gameboy Advance using an odroId-w
Figure 2 - odroId-w closeup
ODROID MAGAZINE 16

device, I needed something very small. Luckily, I was able to use a device called the Teensy 3.1, which emulates keyboard and mouse movements using tactile but-tons. This device is like a mini Arduino computer, and can be programmed to do different things. Each button on the device was easy to program, but the joy-stick acting as a mouse was a different story. That took about a day of research and testing in order to get the Arduino device to mimic a mouse. The joystick that I used actually came from a Ninten-do 3DS, which I bought online for less than $10 USD.
Once the system was ultimately finished, I loaded a few emulators and played some classic games that brought back nostalgia. I was even able to get the Nintendo 64 emulator running and played a few games of Super Mario 64 on what felt like a GBA SP. The best part was running Quake III, which I remembered playing years ago with a friend. Unfortunately, the online feature was not working, but it was still fun to practice on NPC’s. The system can even surf the web, so there is limitless fun that this ODROID can provide.
Future projects will include an ODROID-C0, which will blow this proj-
the system for over three hours. I even ended up watching all of The Amazing Spiderman on a car ride using the sys-tem. One thing that I was worried about was whether the Wi-Fi adapter would work. When I hooked it up to a USB four port hub, it would rarely connect. I later realized that the Wi-Fi adapter that I used had a large amperage draw on the USB ports. Therefore, I ended up wir-ing the battery’s power supply directly to the Wi-Fi card to give it plenty of amps.
To get the controls working on the
GAMEBOY ADVANCE
ect out of the water. The ODROID-C0 is one of the latest devices that Hardker-nel has released, which can run Android apps. This board also has a step-up regu-lator built in, so that I can use the same cell phone battery to run it. Instead of a GBA SP case, I plan on using a 3DS XL, which has plenty of room for all the components. The ODROID-C0 can run games that the ODROID W can’t run, and Nintendo 64 games and Play-station games will run more smoothly on this system as well. I hope to have this project finished in a couple of months, so keep an eye on the ODROID-C0 fo-rums for updates. And remember; don’t let your dreams be dreams.
Figure 5 - gameboy Advance booting into linux
Figure 4 - bottom of case
Figure 3 - odroId-w installed inside gameboy Advance case
Figure 6 - gameboy with the odroId-w
ODROID MAGAZINE 17

modify it as needed. Details regarding the hardware and software features can be obtained from the links referenced at the end of this article.
System preparationUpgrade the ODROID system using
the well-documented steps listed in the Hardkernel website and past ODROID-Magazine issues, making sure to reboot the system after the upgrade.
If you wish to use an ODROID-C0/C1/C1+, you will have to increase avail-able swap space, since the onboard 1GB RAM memory is insufficient. The fol-lowing commands will make the neces-sary swap space available:
$ sudo fallocate -l 2G /swapfile
$ sudo mkswap /swapfile
$ sudo swapon /swapfile
After the software build process is complete, you can free up the swap space by running the following command:
$ sudo swapoff -a
Software installationThe open source software is QT-
based, and is compatible with QT5. The following commands will install the pre-requisite software infrastructure:
$ sudo apt-get install git \
Almost a year ago, we published an article on the interfacing of a USB-enabled oscilloscope
to an ODROID-C1. In this issue, we will present the interfacing of a low-cost, but highly capable USB-enabled multiscope, called the Xprotolab Plain, to an ODROID-C0/C1/C1+ or an ODROID-XU4. An ODROID-C2 based solution should be available soon.
The board is originally designed and developed by Gabotronics, but offered by Hardkernel as an accessory to some of the ODROID SBCs. The QT5-based cross-platform visualization software is open-source, so the community can
qt5-default \
Libqt5serialport5-dev \
libusb-1.0-0-dev
Next, create a placeholder directory for fetching and placing the source code for the visualization software, which can then be built to create the executable:
$ cd ~ && mkdir xp && cd xp
$ git clone https://github.com/
ganzziani/xscopes-qt
$ cd xscopes-qt
$ qmake
$ make -j8
Attaching multiscopeWe will use the example of waveform
visualization to check the device usage. Attach the provided cable as shown in Figure 2 by connecting the Channel 1
vERSATILE MuLTISCOpEAn OSCILLOSCOpEpROJECT FOR YOuR HOMEby venkat bommakanti
MULTISCOPE
Figure 1 - xprotolab device and Io pins
Figure 2 - wiring diagram
ODROID MAGAZINE 18

You will be presented with a display as shown in Figure 3 using an ODROID-C1+ and an ODROID-VU7. Figure 4 shows the various features of the user in-terface.
ReferencesXProtolab wikihttp://bit.ly/22xfjzn
XProtolab specificationshttp://bit.ly/25hyVdi
Qt documentationhttp://doc.qt.io/qt-5
pin and the AWG pin. Then, attach the provided USB cable to the multiscope and the ODROID board.
Run applicationThe application will have been built
in the working directory noted earlier. From there, you can run it using the fol-lowing command:
$ sudo ./xscope
MULTISCOPE
Figure 3 - multiscope attached to odroId-c1+
Figure 4 - User interface features ODROID Talk Subreddit
http://www.reddit.com/r/odroid
ODROID Magazine
is on Reddit!
ODROID MAGAZINE 19

progress. Players have access to most of the cards created on the server in order to build their decks. So, players can have a super rare, amazing card in their deck, even if they couldn’t normally afford it. Unfortunately, they can’t add the cards available on the server to their perma-nent collection.
PrerequisitesTo install XMage, you first must have
the Java Runtime Environment (JRE) version 1.7.x or later installed on your ODROID system. If you use the Ubun-tu image provided by Hardkernel, you most probably already have it. Other-wise, you can download it from http://bit.ly/1SxvU43.
To check your current running ver-sion of Java, type the following:
$ java -version
openjdk version “1.8.0_01-inter-
nal”
OpenJDK Runtime Environment
(build 1.8.0_01-internal-b15)
OpenJDK 64-Bit Server VM (build
25.01-b15, mixed mode)
InstallationCreate a placeholder directory, then
download the XMage distribution pack-age to it:
$ cd ~/ && mkdir xmage
Have you ever wondered if it pos-sible to play networked/online card games such as Magic: The
Gathering with friends spread across var-ious locations? Yes, you sure can, with an ODROID single board computer and the cross-platform XMage (MAGE: Magic, Another Game Engine) software.
Magic: The Gathering, commonly referred to as Magic, was the first TCG (Trading Card Game) created by Rich-ard Garfield in 1993. Basically, two or more players construct their own deck of cards, based on a set of real cards, and try to defeat an opponent by lowering their life pots to zero, while adhering to the various rules of the game. The cards and all of the concepts of the game are based on fantasy role-playing, much like in the famous Dungeons & Dragons game. Characters include dwarves, elves, orcs, and other fantasy creatures. Some fans of the game just like collecting the cards and do not use them in actual games. This popular game has about 20 million players around the world, and still has new card expansions added every year.
XMage, a Java application, imple-ments an online virtual way to play Magic. It also provides a client/server system where you can create your own private game-server or join an existing public one. The host will enforce the rules of the server, and the clients can either create a new game or join one in
$ wget -c http://bit.ly/
xmage_1_4_9v0w
$ unzip xmage_1.4.9v0.zip -d
xmage/
UsageXMage is divided in two parts: client
and server. If you wish to use your local server, you can start it locally in a ter-minal. You can use one system to run both the client or the server. If you wish to run the server on a separate system, copy the contents of the ~/xmage/mage-server directory to the same location on the new system. Alternatively, you can connect to a public server via the Inter-net. To launch the server locally, type the following after a launching a new terminal window:
$ cd ~/xmage/mage-server
$ chmod +x startServer.sh
$ ./startServer.sh > /dev/null
2>&1 &
From now on, you and your friends can connect to the server using your ODROID’s IP address, even if they use different platforms like Windows or Mac OS. If you want people from out-side your local network to connect to it, you may want to setup a dynamic DNS service like DynDNS or No-IP to make it easier for them to access the server. You might also need to forward port
XMAGEAn OnLInE MAGIC: THEGATHERInGFREE-FOR-ALLby david lima
XMAGE
ODROID MAGAZINE 20

the upper left. If you choose to create a new game, update the rule settings ac-cording to your preferences, such as the cards permitted, the game format (T2, modern, or commander), a password to control the access, and so on. You can then get started with your game. Have your friends connect to the same match/tournament and enjoy!
The first time you start your client, it comes with no card images, mana or ac-tion symbols. To make your game more enjoyable, these assets can be down-loaded using the top right buttons titled Symbols and Images. Click on Symbols and confirm the download. You will see a result dialog when download is com-pleted. Click on Images and select the source from where you want to down-load the images. Usually images from wizards or cardinfo are the best options.
Please keep in mind that XMage is still in a testing phase, so you may dis-cover issues and/or missing functional-ity. If you want to report anything, or have any suggestions, visit their forum at http://bit.ly/1RdBd3F. If you would like to get more information about XMage, visit their website at http://xmage.de. For more information about this game, Magic: The Gathering, visit http://magic.wizards.com. The source code is also available at GitHub, and you can contact the development team on the forums if you wish to contribute to its development. Note that these steps
17171 (if using the default configura-tion) on your router to your ODROID’s local IP address. This configuration var-ies for each router model, so check your router’s manual for further instructions on how to do so.
Usually, the default server configura-tion can be used as-is, but if you want to change it for any reason, go to the xmage/mage-server/config directory and edit the config.xml appropriately. You can modify your server’s name, its pri-mary and secondary bind port, as well as other adjustments. You will find more details for each parameter inside the file. Be careful when editing it, as you might cause the server not to run properly, so be sure to make a backup of your work-ing configuration before making any changes.
Next, start the client software in a new terminal window. In order to prop-erly start the client, you must either be on the system’s graphical interface, if you use a headless ODROID, or export the X11 and forward it from the remote to your local machine. You will then be presented with a server connection win-dow:
$ cd ~/xmage/mage-client
$ chmod +x startClient.sh
$ ./startClient.sh > /dev/null
2>&1 &
If you are using a local server, you will have to enter your server’s informa-tion, such as the IP address, port and a username. If you are using a public serv-er, you can click the Find button in or-der to search for available public servers over the Internet and join them. There is also a password field, but it may not be required, which is a possible incomplete implementation of the authentication code.
After you have successfully connect-ed to the server, you will be taken to the main lobby, where you can either join an ongoing match or tournament, or start a new one yourself using the buttons in
XMAGE
have been tested with the ODROID-XU4, U3, and C1/C1+ models running 32-bit Ubuntu.
ReferencesJava SEhttp://bit.ly/1SxvU43
XMage home pagehttp://xmage.de/
XMage GitHub repositoryhttp://bit.ly/1SbEhzE
XMage forumshttp://bit.ly/1RdBd3F
Magic the Gatheringhttp://bit.ly/1yzBTZO
ODROID MAGAZINE 21

In addition, you will need to install the following software packages, which can be installed using the Synaptic Pack-age Manager application:
• gcc• wget• OpenCV
To prepare your system, open a ter-minal window and enter the following commands.
$ sudo apt-get update && apt-get
dist-upgrade
$ sudo reboot
The first command will update the package list and install a newer distribu-tion update if it is available. The second command will reboot the ODROID. After updating the package list and dis-
I thought many people would be in-terested in an easy to follow guide on how to use the oCam and ODROID-
XU4 for object tracking using OpenCV. This guide will walk you through the steps on how to create and run an object tracking application. The ability to track a specific object over multiple frames is a key technology in applications such as automatic surveillance or robotics. The following example code will track an ob-ject using color properties from the im-age frame.
SetupTo get started, you will need the fol-
lowing items, all of which are available from the Hardkernel store:
• ODROID-XU4• Memory module, either eMMC
or micro SD card, installed with Ubuntu.
• oCam
tribution, install OpenCV by entering the following command:
$ sudo apt-get install libopencv-
dev
As of March 2nd 2016, the latest ver-sion of OpenCV is 2.4.9.
BuildOur example is based on the Cam-
shift (Continuously Adaptive Mean Shift) algorithm, which is a type of Meanshift algorithm, and is used to track an object. More information about these algorithms can be found at http://bit.ly/1pPduzS. In our code, we will use the cvCamShift() function from the OpenCV library in order to provide the camshift algorithm. The following text gives more information about the cvCamShift() function:
RotatedRect CamShift(InputArray
ObJECT TRACKInG uSInG OCAM AnD ODROID-Xu4An EASY STEp-bY-STEp GuIDEby dongHyun Yoo
OBJECT TRACKING
Figure 1 - example screen of object tracking
Figure 2 - Typical configuration of object tracking test set
Figure 3 - command input screen on odroId
ODROID MAGAZINE 22

ODROID-XU4, we are ready to start the object tracking demo using the fol-lowing command:
$ ./demo
The CamShift Demo window has three sections: a control bar panel, a camera image panel, and a histogram panel. Using the top 2 sliders, Vmax and Vmin, you can control the color val-ue range. The bottom slider, Smin, con-trols the saturation range. These sliders help limit the image area within which you track a specific object. Please refer to the detailed explanation about the hue, saturation, and value model of the color space at http://bit.ly/1L6R7zM.
You can start the object tracking by clicking and dragging on the part of the camera image you wish to be tracked with the mouse. Figure 4 shows the ap-plication running while viewing a select-ed area on a juice bottle.
The histogram window shows the
probImage, Rect& window, TermCri-
teria criteria)
Parameters:
probImage – Back projection of
the object histogram. See calc-
BackProject().
window – Initial search window.
criteria – Stop criteria for the
underlying meanShift().
Returns:
Result rectangle
To download the camshiftdemo source file, use the following com-mand, or download the file from your web browser by visiting http://bit.ly/21ykrRF:
$ wget
https://raw.githubusercontent.
com/\
Itseez/opencv/2.4/samples/\
cpp/camshiftdemo.cpp
Now we are ready to build camshift-demo.cpp using the following com-mand:
$ g++ camshiftdemo.cpp -o demo \
-O2 -lopencv_core -lopencv_img-
proc \
-lopencv_highgui -lopencv_video
Here are the meanings of the com-piler options:
-o demo makes an executable binary file called “demo”
-O2 specifies an optimization Level of 2. For more infomation about g++’s optimization settings, please refer to http://bit.ly/1OOnopO.
-l links an external library, we used this to link for four libraries: openvc_core, open_cv_imgproc, opencv_high-gui, and opencv_video.
Running the application
Once the oCam is connected to the
OBJECT TRACKING
Figure 4 - drag a part in the image window to start the tracking
Figure 6 - back projection view mode
Figure 5 - The target area being tracked and the histogram of color components
ODROID MAGAZINE 23

color components within the selected image area over the object being tracked. You can turn on and off the histogram window by pressing the “h” key. You can also change the normal view mode to back to the projection view by press-ing the “b” key. Figures 6 and 7 show the different view modes. Further de-tails about back projection can be found on the OpenCV page at http://bit.ly/1Rqc1MH.
To clear the selection, press the “c” key. You can start tracking a new object by selecting another area the same way as before. Take a look at the video at http://bit.ly/21zZllS, which shows a live view of the object tracking demo cov-ered in this guide using an oCam and ODROID-XU4.
Figure 7 - control of interested region in which the target object to be tracked
OBJECT TRACKING
Today I want to talk about the classic racing game Re-Volt and a recent port of it called RVGL. It’s one of my favorite games and can now be played on the ODROID with beautiful 3D graphics and a mind blowing soundtrack.
What is Re-Volt?Re-Volt is a racing game like no other. Rather than racing big fancy cars against
friends on tracks like the famous Nürnburgring, or racing karts on fantasy tracks, you instead race with radio controlled (RC) cars. This gives the game a very unique perspective, since you play from the point of view of tiny RC cars in all sorts of fun courses such as supermarkets and backyards.
About Re-VoltThe original game was released by Acclaim Entertainment in 1999 on PC, Play-
Station, Nintendo 64 and Dreamcast. But honestly the Dreamcast and PC versions had the best graphics and sound. The game was very unique for its time with stun-ning 3D graphics, a great soundtrack, several multiplayer modes, and even a in-game track editor for creating your own racing tracks without any special tools. As you unlocked features the game offered up to 28 different cars, starting with small battery powered cars and later leading up to gasoline-powered miniature cars. In total there are 13 tracks you can race which all offer reverse, mirror and inverse modes too. The game also has a stunt arena where you can do tricks and stunts with your car to catch stars and unlock even more cars.
And as if all that alone isn’t awesome enough, in Re-Volt you can pick up little thunderbolts on the ground that give you a random weapon or improvement, such as oil slicks, fireworks, or a bowling ball. This is similar to the Mario Kart games where you race each other while fighting at the same time. The uniqueness behind this is that you race from the point of view of an RC car. This means that everything around you is huge as you race around the neighborhood. A basketball becomes a big obstacle, and a real car is 100 times bigger than yourself. If you race in the su-permarket the shelves are huge, and there are hidden paths and shortcuts to explore, which makes it fun to explore the levels you race in. I personally loved this game and it was really fun to play back then. I loved to play it with friends at LAN Parties and have really good memories of playing it. Even today the game remains a time-less classic.
LInuX GAMInGRvGL – RE-vOLT On OpEnGLby Tobias schaaf
RE-VOLT
ODROID MAGAZINE 24

About RVGLRVGL is a reimplementation of Re-Volt in OpenGL for
modern PCs. The RV-Team, and especially Huki and jigebren, have done a lot of work to get this 17-year old game to work on modern platforms and were nice enough to allow us to make a port for ODROIDs too. Thanks to the RV-Team and Huki and jigebren for this amazing port and the chance to use it on ODROIDs. Be sure to check out their project page at http://bit.ly/1UEyENI. Since RVGL uses OpenGL, thanks to ptit-Seb’s GLshim wrapper we can now play it on ODROIDs as well and it’s looking really amazing!
FeaturesAs I said earlier, the RVGL offers stunning 3D graphics,
even in the Menu screen you can already see the impressive graphics with reflecting surfaces and shadows, different light-ning, etc. Look at the reflections of the cars, and even items in the background can be seen through reflections on the ground.
The tracks are very unique. There’s the neighborhood, su-permarket, a museum, botanical garden, and even an old west-ern town. All of these tracks are completely different and it feels like you were thrown in another world; a world where everything is big around you and just waiting for you to be explored.
Racing inside a supermarket, can you imagine what hap-pens if you drive through the cold storage?
As I mentioned earlier you have different weapons that you can collect while racing. For example, there are the fireworks, which either come alone or in a stack of three. There’s also a bowling ball that can slow down the enemy, as well as an Oil slick which makes it hard or impossible to steer. Water bombs come always in three, but don’t auto aim targets like the fire-works. There’s an energy blast that throws everyone out of your way, or a extra battery which will boost your speed for a short period of time. These all are just a few of the extras you can pick up.
RVGL also offers the original multiplayer modes. This means you can either play in splitscreen mode with up to four players on your ODROID, or even play with other players over
Figure 1 - main menu of rvgl running natively on odroId
the LAN or Internet, Which is really awesome. I wonder what it takes to get a ODROID LAN-party together. Playing awe-some games like Re-Volt on LAN on some ODROIDs sounds to me like a really fun thing to do.
The game offers both keyboard and joystick support. Thanks to SDL2, most joystick will work out of the box or can easily be configured, making it even easier to play these games with friends on the same ODROID for added enjoyment.
Installing RVGL
For this game to work you will need the original game data files from your CD or any other copy of the game. As usual, you can install this game from my repository using my images using the following command:
$ apt-get install rvgl-odroid
It also requires the GLshim wrapper from my repository, which should be automatically installed as a dependency. Next put the game data files from your CD in a folder called “.rvgl” (note the leading “dot” in front of rvgl) in your home folder. This is where the game will search for its data files. If the folder does not exist, create it yourself, or try to start the game once. After either of these steps the folder will exist.
Now you can copy the folders from your original game in
LInuX GAMInGRvGL – RE-vOLT On OpEnGLby Tobias schaaf
RE-VOLT
Figure 2 - An in-game shot in the supermarket level
Figure 3 - Another in-game shot from the supermarket level
ODROID MAGAZINE 25

CuT THE ROpE 2HELp nOM-nOM GET HIS CAnDY by rob roy
Cut the Rope 2 is a se-quel to the popular game Cut the Rope,
which is a great physics-based game where you try to deliver candy to a little mon-ster called Om Nom by solving gravity puzzles. It’s free to play, and you can discover hidden prizes and unlock secret levels as you go. The animation is excellent, and the main character is sure to make you smile! Download it from the Google Play Store from the following link:
http://bit.ly/QutCFB
that folder (such as cars, gallery, gfx, levels, and so on). When you start RVGL, it can take quite some time to load, so be patient and wait a little. It’s doing quite some busy tasks in the background, such as checking if all your files have the correct names, and renaming them if not.
If you want the soundtrack, you can place the audio tracks of the original game in a folder called “redbook.” The files should be named track02 to track15 and either be in the .ogg, .mp3, .flac, or .wav format. The game is hard to get nowadays if you want to buy it, since there are some legal discussions about it. Some consider it abandonware, since it’s unclear who has the rights at the moment. Check out this topic for more information on that discussion: http://bit.ly/1RfqRUj
After you have copied all of the game data files into the game folder, you are ready to play. It can take quite a while to start the game, so be patient if nothing seems to happen when you click the game icon.
Final thoughtsI really like this game, and I think it’s better than Mario
Kart or many of the other racing games I’ve played. The tracks are fun to play, and with the inverse and mirror modes it feels like there’s even more levels to play. The multiplayer mode is especially fun, and having the option to play on split screen on the same ODROID makes it even better.
Figure 4 - A firework being used to strike an opposing car
Figure 5 - rvgl in splitscreen multiplayer
RE-VOLT ANDROID GAMING
om nom loves candy, and you can help him get lots of it!
ODROID MAGAZINE 26

about the laws in your area, please con-sult a lawyer and review your local regu-lations.
Meet KismetAfter acquiring permission, the first
thing every penetration tester does is gather information about his or her tar-get. In the context of WiFi networks, this means having a receiver to listen to the broadcasts of all the access-points around you. There are various tools that let you do this, but, the best is Kismet.
Kismet is a wireless network detector, sniffer, and intrusion detection system for Linux with a text-mode interface. Some of its features include 802.11 sniff-ing, PCAP logging, client-server archi-tecture, and XML output for integration with other tools.
We will be using Kismet to collect a list of access-points located within range of our receiver. From the access-point list, we can check whether any informa-tion can be extracted from any of them. To install Kismet, simply run the follow-ing command on an Ubuntu system:
$ sudo apt-get install kismet
Select “Yes” during the installation of Kismet when asked, and type your user-name to be added to the kismet group. To use Kismet, you will need to have a WiFi interface available to monitor with.
The website WiGLE (http://wigle.net) has a large database of wire-less access-points collected from
people wardriving. Wardriving is the act of driving around an area in search of an unprotected wireless network. The to-tal number of access-points in WiGLE’s database is around 120 million. Each access-point in the database contains in-formation about its SSID, geographical location, MAC address, and encryption type. As you may have noticed, we are living in an interconnected world that relies on WiFi to connect every device together. That’s why you should be pay-ing attention to your personal WiFi set-up and making sure it is secure. This se-ries of articles will be your guide through the world of wireless security, and you’ll learn the techniques that the bad guys are using to penetrate your network in order to better protect yourself. Best of all, everything is done using your pre-cious ODROID! Although Kali Linux is the preferred distro for security analy-sis, we’ll be working on HardKernel’s Ubuntu 14.04 (or later).
Before we start, I need to make some-thing clear. Breaking into somebody’s network without permission is a crimi-nal offense, and punishable by law in most countries! All of these tests have been done under laboratory conditions and with the network owner’s consent. If you have any doubts or are uncertain
I tested Kismet with several ODROID wifi modules available from Hardkernel:
Wifi Module 3 http://bit.ly/22nyxraThis module is based on Realtek
RTL8188 chipset. It worked ok, but it didn’t provide the best results compared to the other modules I tested.
Wifi Module 4 http://bit.ly/1FprqF5Module 4 uses the Ralink RT5572
chipset, which adds 5GHz capabilities, but also works in 2.4GHz.
Wifi Module 0 http://bit.ly/1M4LdiCModule 0 is based on the Ralink
RT5370N, and works surprisingly well for its size.
Note that while the wireless interface is in monitor mode. This is similar to Ethernet’s promiscuous mode and you will not be able to use the interface for normal traffic. This means that if you don’t have a wired network connection to your ODROID, you’ll be cutting yourself off from the network when the wifi interface is in monitor mode.
Monitor mode with aircrack-ng
Before you can start using Kismet, you need to set up a monitoring inter
KISMETWIRELESS nETWORK MOnITORInGby Adrian popa
KISMET
ODROID MAGAZINE 27

KISMET
steps needed to compile and install a kernel for the ODROID-C1. These steps assume that you have your build environment already set up.
$ git clone --depth 1 --single-branch -b odroidc-
3.10.y https://github.com/hardkernel/linux
$ cd linux
$ make odroidc_defconfig
$ make menuconfig
$ make -j 4 uImage dtbs modules
$ sudo cp arch/arm/boot/uImage \
arch/arm/boot/dts/*.dtb /media/boot
$ sudo make modules_install
$ sudo make firmware_install
$ kver=`make kernelrelease`
$ sudo cp .config /boot/config-${kver}
$ cd /boot
$ sudo update-initramfs -c -k ${kver}
$ sudo mkimage -A arm -O linux \
-T ramdisk -a 0x0 -e 0x0 -n initrd.img-${kver} -d
initrd.img-${kver} uInitrd-${kver}
$ sudo cp uInitrd-${kver} /media/boot/uInitrd
Note that if you use GCC 5.x, you will get a kernel crash when booting an ODROID-C1. You will need to add the patch from http://bit.ly/1QZlWWi, or compile with GCC 4.8. If you have any problems with compiling the kernel module, you can ask for support on the thread at http://bit.ly/1RlJqbn.
face that is attached to your WiFi card. To do this, you will need the airmon-ng utility, which is part of aircrack-ng pack-age. Aircrack-ng can be installed by typing the following into terminal.
$ sudo apt-get install aircrack-ng
To check whether your wireless driver supports monitor mode, you can run the following command, and Figure 1 shows the result on this command which is one capable wifi interface being found, ‘wlan2’:
$ sudo airmon-ng
Enabling monitor mode support for Wifi Module 3
If you don’t see your device listed, either the hardware or the driver doesn’t support monitor mode. If you have the ODROID WiFi Module 3 and it’s not being listed, it means that you need to upgrade your wifi driver. By default, Hard-kernel’s Ubuntu release loads the 8192cu driver, which is the open source variant of the driver and has less functionality, it can only connect as client. The rtl8192cu driver comes from Realtek and adds support for monitor and hotspot mode.
Unfortunately, this is the step where you need to get techni-cal. Alternatively, you can buy Wifi Module 0 or Wifi Module 4, which work with the default drivers. For Module 3, you’ll need to recompile the kernel to add the rtl8192cu module from backports. You can follow any kernel compilation guide, such as the from ODROID magazine at http://bit.ly/1RlIm7j or from http://bit.ly/1NVRprY. In the kernel configuration, you need to edit the items shown in Table 1.
Note that some of the settings above may be already selected for your kernel, since the default configure settings differ a bit from device to device. Once the kernel has been correctly com-piled, use the necessary commands to install it. I would also recommend that you make a backup of your existing kernel and modules. Once everything has been compiled and setup, reboot your ODROID. For your convenience, here are the
Figure 1 - supported hardware
Table 1 - kernel configuration changes required to use the wiFi module 3
ODROID MAGAZINE 28

KISMET
• Management, which handle authentication, associa-tion, probes, deauthentication, disassociation, and bea-cons.
• Control, which facilitates the exchange of data between stations. It includes Acknowledgement, Clear to Send, and Request to Send frames.
• Data, which encapsulates the actual data that the end user transmits and receives
If you do packet captures on an idle wireless network, you will likely see a lot of management traffic, such as beacons and associations, and very little data or control traffic. Data traffic is bursty in nature, especially during web browsing. You can get an idea of what base stations and what clients are active based on management traffic. A test packet capture that has all three frame types to analyse in Wireshark is available from http://bit.ly/22ouM8k.
Looking at the capture packets, you will notice that control and management traffic is sent unencrypted while data traf-fic is encrypted depending on your encryption type (WEP or WPA).
Back to KismetNow that you have a monitor interface, you can finally start
up Kismet:
Monitor mode - hands onIn this section, we will use “wlan0” as an example of the
Wifi interface we are monitoring with, although the name of your interface might be different. Now that your network card supports monitor mode, you can create a monitor interface. Remember that the Wifi module can’t operate in both monitor mode and client mode at the same time. You can also specify a channel number, or a frequency, that the antenna will tune to. You can get a list of available channels and frequencies by running the following command:
$ iw phy0 info
To start monitoring with airmon-ng, use the following command, keeping in mind that “wlan0” will need to match the interface on your system:
$ sudo airmon-ng start wlan0
You should see a message that a monitor interface called “mon0” was created. Later versions of airmon-ng use a slightly different naming convention, in which case the interface would be named wlan0mon instead. You can now use the monitor interface for interesting things like packet capture, using pro-grams such as wireshark, tcpdump, or Kismet. If you get errors while enabling monitor mode, you should stop the processes listed by airmon-ng and try to enable monitor mode again.
If you’re feeling adventurous, you might get the same results under Android as well. You may need to compile the correct driver for your Android branch kernel and set up aircrack-ng directly in Android. It didn’t work, but if you’re interested, more details are available at http://bit.ly/1S6XAtR.
The 802.11 protocols use layer 2 datagrams to encapsulate the data that needs to be transmitted. There are 3 types of frames based on their purpose:
Figure 2 - monitor mode enabled for wlan2
Figure 3 - wireshark showing a packet capture of 802.11 management traffic
ODROID MAGAZINE 29

as seen in Figure 5. On top, you have the network list (1). If you select a network from the list, Kismet will display below the list of clients associated to that network (2). If you have a GPS active in your system, Kismet can display speed, altitude and location data as well (3). The next section is a textual graph showing the ratio of packets versus data (4). And lastly, the bottom section shows log information, such as errors, probes, etc (5). Colors signify encryption type. Orange is WPA-PSK, red is WEP and green is an Open network.
Collecting data is one thing, but making sense of it is a dif-ferent concept. By default, Kismet will generate logs in the current working directory. If you leave Kismet running for too long, you might run out of disk space! One hour of sniffing produces about 150MB of logs when sniffing in my area. It’s best if you can allocate a separate device, such as a USB disk, or network share in order to write logs, which will prevent crashes due to low disk space. Also, frequent writes on SD cards are not good for the health of the SD card. The logs collected contain various information, as shown in Table 2.
There are various parser scripts available on the Internet that can parse these logs and generate reports or different formats. For example, Kismet Log Viewer (http://bit.ly/1pP2pyF) will generate an HTML summary page from your data.
Although you might have collected many megabytes of data, there is still lots of data you have missed. This is because Kismet performs channel hopping and listens to a single chan-nel at a time. If your plan is to capture specific traffic, you have two options:
$ kismet
The first time you run Kismet, you will have to answer a few questions, such as whether certain colors are visible on your screen. If you wish to start the Kismet server automatically, you should answer yes. Once the Kismet server starts, it will complain that it doesn’t have a packet source defined and will ask if you want to add an interface, to which you should reply “Yes”. In the next window, type in “mon0” into the “Intf field” area.
You can now close the log window, and you should be col-lecting access-points. Kismet works by “hopping” between all channels and listening for management frames. Kismet will create a list of access-points and clients the wifi monitor can hear. While kismet is forming this list, it will continue to cap-ture traffic. If you leave Kismet running for a long time, you will eventually pick up a lot of networks, even if you’re station-ary!
If you keep seeing an error in the log window that says “Packet source ‘mon0’ failed to set channel 1: mac80211_setchannel() could not set channel 1/2412 on interface ‘mon0’ err -25”, you may need to delete the managed network inter-face (the one you used to create the monitor interface). The interface can be deleted with the following command:
$ sudo iw dev wlan0 del
To navigate around in the Kismet interface, use ALT+K to bring up the menu. Use arrows, TAB, and the space bar to navigate and select items. You might want to show more col-umns, which you can activate in by selecting the Kismet -> Preferences -> Client Columns and Kismet -> Preferences -> Network Columns options. You can also use the Sort menu to change the sorting based on your preference.
The main Kismet window is divided into multiple sections,
Figure 4 - Add the mon0 interface in kismet
Figure 5 - kismet scanning
KISMET
ODROID MAGAZINE 30

$ sudo airmon-ng start wlan0 1
$ sudo airmon-ng start wlan1 6
$ sudo airmon-ng start wlan2 11
You should now have 3 monitoring interfaces: mon0, mon1, and mon2. Inside of Kismet, press Alt+K -> Add source… to add all the interfaces, and also Alt+K -> Config Channel… to lock each one to their respective channel.
ConclusionKismet is a powerful passive network
reconnaissance tool used to capture wifi access-point data. By analyzing this data, you can learn a lot about your neighbors and their network usage pat-terns. For instance, I discovered a few open and WEP access-points around my house. Also, I picked up mobile access-points from various taxi companies that had cars in the neighborhood. Strangely enough, I’m picking up an open “Wire-lessNet” SSID both at work and at home that looks like a honeypot, which is probably used to entice a local hacker. Recorded network traffic can also be po-tentially decrypted at a later time when you’ve obtained the network key. Hav-ing an ODROID powered by a power bank gives you excellent flexibility, since you could conceal it near your target, such as in a mailbox, and retrieve it after a day of data collection. However, Kis-met’s best use of for your own defense, by snooping on your personal devices in order to see what kind of data they “leak” about you. We will explore this and more in follow-up articles. Please direct any questions, comments or sug-gestions to ODROID forum thread at http://bit.ly/1o2Vr7I.
could set up to three wireless adapters in monitor mode on non-overlapping channels (e.g. 1, 6 and 11) and have Kismet record data from all monitor in-terfaces at once:
1. Tune your monitor interface to the desired channel and stop Kismet from channel hopping (Alt+K -> Config Channel… -> mon0 -> Lock -> Channel num-ber)
2. If you have the resources, you
Table 2 - log information
Figure 6 - wifi module 3 is thicker than the Usb port and requires a cable to be attached
KISMET
ODROID MAGAZINE 31
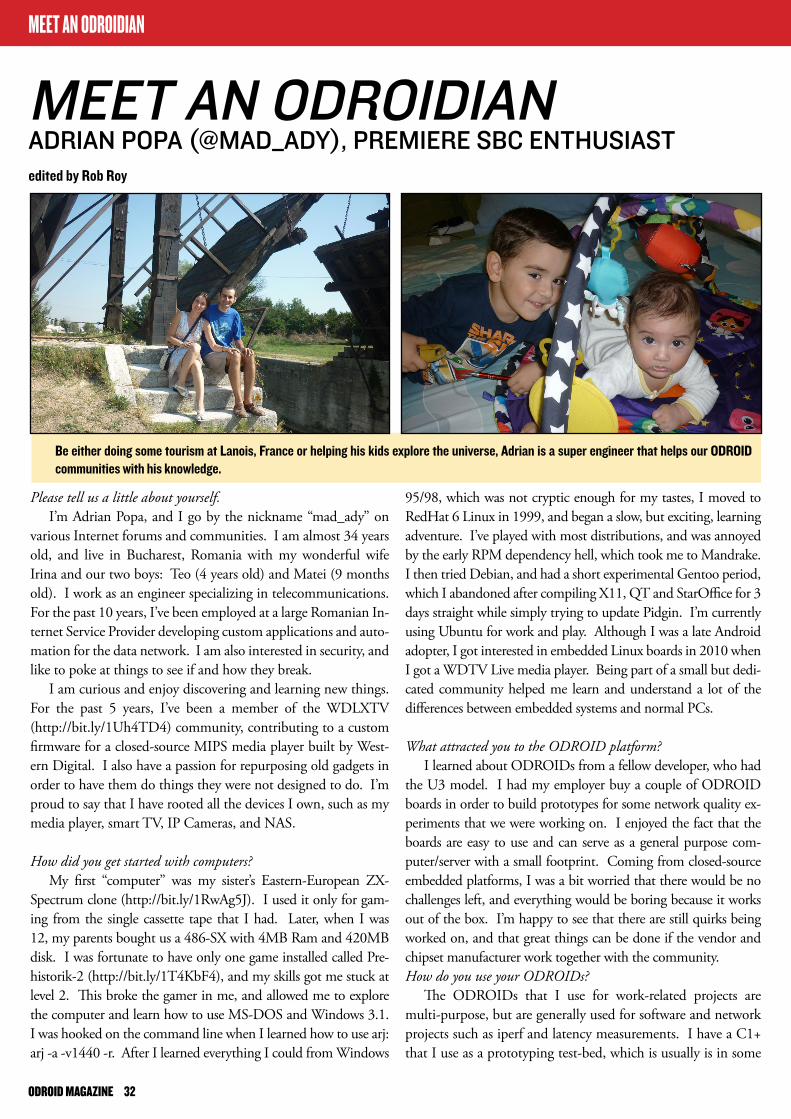
Please tell us a little about yourself.I’m Adrian Popa, and I go by the nickname “mad_ady” on
various Internet forums and communities. I am almost 34 years old, and live in Bucharest, Romania with my wonderful wife Irina and our two boys: Teo (4 years old) and Matei (9 months old). I work as an engineer specializing in telecommunications. For the past 10 years, I’ve been employed at a large Romanian In-ternet Service Provider developing custom applications and auto-mation for the data network. I am also interested in security, and like to poke at things to see if and how they break.
I am curious and enjoy discovering and learning new things. For the past 5 years, I’ve been a member of the WDLXTV (http://bit.ly/1Uh4TD4) community, contributing to a custom firmware for a closed-source MIPS media player built by West-ern Digital. I also have a passion for repurposing old gadgets in order to have them do things they were not designed to do. I’m proud to say that I have rooted all the devices I own, such as my media player, smart TV, IP Cameras, and NAS.
How did you get started with computers?My first “computer” was my sister’s Eastern-European ZX-
Spectrum clone (http://bit.ly/1RwAg5J). I used it only for gam-ing from the single cassette tape that I had. Later, when I was 12, my parents bought us a 486-SX with 4MB Ram and 420MB disk. I was fortunate to have only one game installed called Pre-historik-2 (http://bit.ly/1T4KbF4), and my skills got me stuck at level 2. This broke the gamer in me, and allowed me to explore the computer and learn how to use MS-DOS and Windows 3.1. I was hooked on the command line when I learned how to use arj: arj -a -v1440 -r. After I learned everything I could from Windows
MEET An ODROIDIAnADRIAn pOpA (@MAD_ADY), pREMIERE SbC EnTHuSIASTedited by rob roy
95/98, which was not cryptic enough for my tastes, I moved to RedHat 6 Linux in 1999, and began a slow, but exciting, learning adventure. I’ve played with most distributions, and was annoyed by the early RPM dependency hell, which took me to Mandrake. I then tried Debian, and had a short experimental Gentoo period, which I abandoned after compiling X11, QT and StarOffice for 3 days straight while simply trying to update Pidgin. I’m currently using Ubuntu for work and play. Although I was a late Android adopter, I got interested in embedded Linux boards in 2010 when I got a WDTV Live media player. Being part of a small but dedi-cated community helped me learn and understand a lot of the differences between embedded systems and normal PCs.
What attracted you to the ODROID platform?
I learned about ODROIDs from a fellow developer, who had the U3 model. I had my employer buy a couple of ODROID boards in order to build prototypes for some network quality ex-periments that we were working on. I enjoyed the fact that the boards are easy to use and can serve as a general purpose com-puter/server with a small footprint. Coming from closed-source embedded platforms, I was a bit worried that there would be no challenges left, and everything would be boring because it works out of the box. I’m happy to see that there are still quirks being worked on, and that great things can be done if the vendor and chipset manufacturer work together with the community.How do you use your ODROIDs?
The ODROIDs that I use for work-related projects are multi-purpose, but are generally used for software and network projects such as iperf and latency measurements. I have a C1+ that I use as a prototyping test-bed, which is usually is in some
be either doing some tourism at lanois, France or helping his kids explore the universe, Adrian is a super engineer that helps our odroId communities with his knowledge.
MEET AN ODROIDIAN
ODROID MAGAZINE 32

unstable state or another. I have a brand new C2 that I’m turn-ing into media player since H265 seems to be gaining traction, but it will also be my main work computer, since I usually work remotely over SSH. I plan on starting to learn a bit of hands-on electronics, so the Tinkering Kit will come in handy. I just hope I won’t release the magic black smoke! In the future, when the boys are older, I plan to use the ODROIDs as learning platforms in order to teach them about programming and tinkering.
Which ODROID is your favorite?Since I’m still new to ODROIDs, I haven’t tried the older
models, but so far I like the C1+ the most because it is si-lent, powerful, and has excellent software support. I’ve used the XU3 as well, but I had to limit the maximum frequency to 600MHz in order to keep the fan from running. It makes a decent 8-core server, though it hurts to see it hindered in this way. I’ve only recently gotten my hands on the C2, but it looks like a winner in the long term. It just needs a bit of time before 64-bit software becomes matures enough.
Your hardware and software expertise is very well received in your ODROID Magazine articles and personal blog. How did you be-come so proficient?
The most important thing that I learned during my engineer-ing degree was how to break a big problem into smaller, more manageable problems. Also, if you want to learn or solve some-thing, you usually have to do your homework and try to simplify the problem as much as you can. It also helps if you document your progress. Because I’m a forgetful person, I usually write down the steps to some of the solutions. I have found that years later, when I’m faced with the same problem, I stumble over my own posts and get to thank myself for writing them. Having worked with Linux for over 16 years has taken me through a lot of issues and problems. Persistence alone leads to experience.
What innovations would you like to see in future Hardkernel prod-ucts?
Designing and building an embedded platform that is cost-effective and caters to the needs of most users must be a very chal-lenging task. It is normal for ARM devices to be less flexible and more limited than conventional PCs because of the way they are built (general purpose vs specialized embedded board). So, I’m not going to ask for SATA and PCI, but I’d like to see a passively cooled ODROID with USB3 and Gigabit Ethernet, which would make a great NAS. I know that Hardkernel is looking into ways to make the XU4 passively cooled, and I hope they succeed.
What hobbies and interests do you have apart from computers?I enjoy exploring new places, going on bicycle rides,
reading, and watching movies with my wife. I like learning new things about science, space and technology. The kids
MEET AN ODROIDIAN
like to keep me busy while I’m home, so you can say I’m also an avid Lego builder.
What advice do you have for someone want to learn more about pro-gramming?
Learning programming today is much easier than it was 20 years ago. A new programmer has high-level languages to choose from, with tons of libraries and tutorials. However, this wide se-lection can be daunting: what’s the best language to learn, and what can you do with it? I’d recommend starting with Python, which is versatile, easy to learn and has lots of helpful libraries. I’m a Perl fan because it used to be cool back in my day.
Don’t be afraid to write bad code in the beginning, which is normal and helps you learn from your mistakes. It’s crucial to have a project or goal that you’re interested in which keep you motivated. It also helps if you keep writing code after you’ve learned, so that you won’t forget it. Instead of copying and pasting examples, you should type them in to help you learn the syntax. Choose meaningful variable and function names, and make sure to write comments in your code. You shouldn’t write what the code does, because a programmer can simply read the code, but instead describe why the code is doing what it is doing. This is valuable information after two months when you’ve forgotten all about it. Also, spend some time looking for libraries which already do what you want to do, because most of the time, problems have been already solved, and it’s counterproductive to reinvent the wheel.
Once you’ve learned the basics of programming, you can eas-ily learn the syntax of a different language, which should take 1-2 weeks, which lets you explore some more. The concepts of object-oriented programming, model-view-controller, and other programming paradigms are usually the same between languages. There is a difference between low-level and high-level programming languages. The former requires you to have better understanding of how microprocessors work and how memory is aligned and allocated, and should be used when writing programs that need to be efficient. The latter hides a lot of the complexi-ties of a micro-computer and lets you get the job done quickly, with less headaches. There are great resources online to help you get started, such as Coursera and CodeAcademy, so what are you waiting for?
program and compile while having fun!
ODROID MAGAZINE 33