
Mac OS X Server Advanced Server Administration Version 10.6 Snow Leopard
Getting StartedOn Mac OS X
10.6Snow Leopard
HC
S T
echn
olog
y G
roup

HCS Training Centers, Ltd.
Getting started with Mac OS X: version 10.6.x
Produced by HCS Training Centers, Ltd.
No part of this publication may be reproduced, stored in a retrieval system or transmitted in any form or by any means, electronic, mechanical, photocopying, recording or otherwise without the prior written permission of HCS Training Centers, Ltd.
HCS Training Centers, Ltd. will not be held responsible for any loss of data.
Copyright © 2009 HCS Training Centers, Ltd. All rights reserved
HC
S T
echn
olog
y G
roup

Welcome to The Fundamentals of Mac OS X version 10.6
A fun and exciting look at Apple’s next-generation operating system. Whether you’re an experienced Mac user upgrading to Mac OS 10.6, or have used a personal computer but are new to the Mac, this is the guide for you. From the basics of your new desktop to sharing your Mac with multiple users, you’ll learn everything you need to know to get the most out of Mac OS X.
Throughout this guide, you’ll be presented with the features and applications that make up Mac OS X, organized by topic and accompanied by helpful tips and easy-to-follow practice exercises.
About the Practice FilesIn the practice exercises, you’ll find references to the practice files included with this course. You’ll use these files to practice adding an image to an email message, customizing your desktop picture, and more. If you’re using this guide as part of a class, the practice files may already be installed on your computer, or they will be provided by you instructor at the beginning of the class.
How to Get the Most Out of This CourseWhether or not you’re familiar with the Mac OS, if you’ve used a personal computer, you likely already know enough to start using Mac OS X. this guide will help you pick up the rest. As you go through this guide and spend a little time with Mac OS X, you’ll find that you’re completely up to speed before you know it, and more productive than ever.
Enjoy Getting started with Mac OS X version 10.6. Try the practice exercises, explore on your own, but most of all, have fun. That’s what using a Mac is all about.
HC
S T
echn
olog
y G
roup
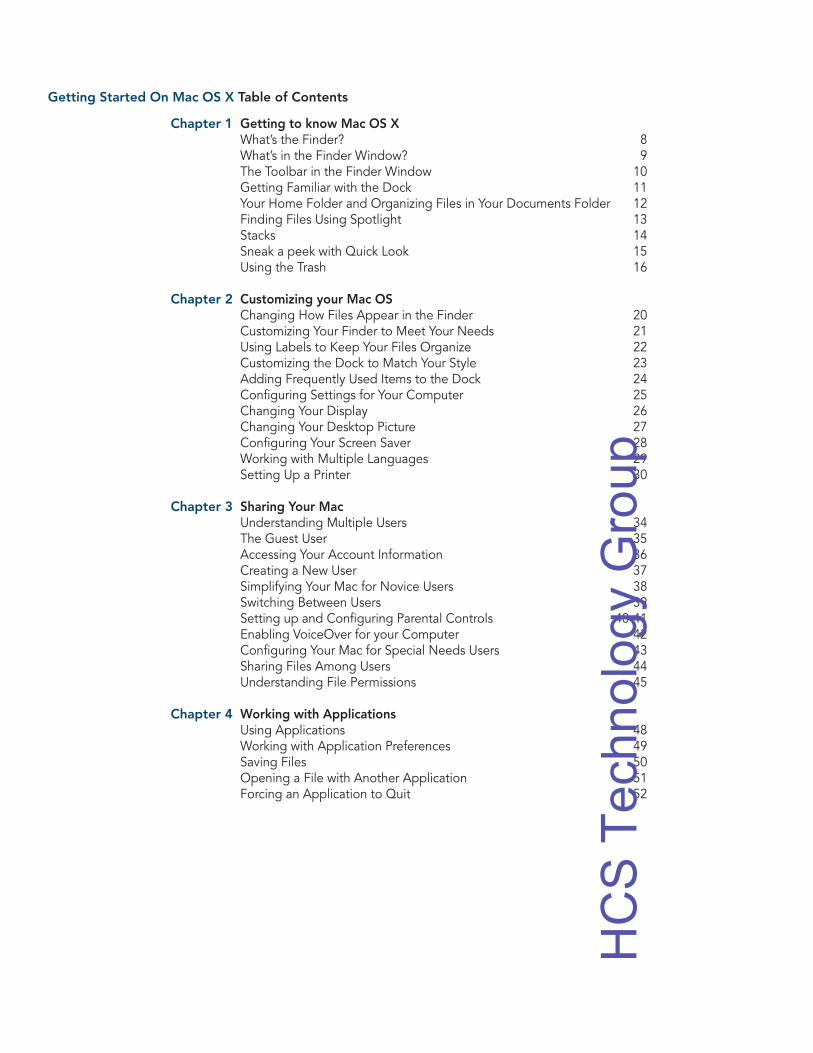
Getting to know Mac OS X What’s the Finder? 8What’s in the Finder Window? 9The Toolbar in the Finder Window 10Getting Familiar with the Dock 11Your Home Folder and Organizing Files in Your Documents Folder 12Finding Files Using Spotlight 13Stacks 14Sneak a peek with Quick Look 15Using the Trash 16
Customizing your Mac OSChanging How Files Appear in the Finder 20Customizing Your Finder to Meet Your Needs 21Using Labels to Keep Your Files Organize 22Customizing the Dock to Match Your Style 23Adding Frequently Used Items to the Dock 24Configuring Settings for Your Computer 25Changing Your Display 26Changing Your Desktop Picture 27Configuring Your Screen Saver 28Working with Multiple Languages 29Setting Up a Printer 30
Sharing Your MacUnderstanding Multiple Users 34The Guest User 35Accessing Your Account Information 36Creating a New User 37Simplifying Your Mac for Novice Users 38Switching Between Users 39Setting up and Configuring Parental Controls 40-41Enabling VoiceOver for your Computer 42Configuring Your Mac for Special Needs Users 43Sharing Files Among Users 44Understanding File Permissions 45
Working with ApplicationsUsing Applications 48Working with Application Preferences 49Saving Files 50Opening a File with Another Application 51Forcing an Application to Quit 52
Chapter 1
Chapter 2
Chapter 3
Chapter 4
Getting Started On Mac OS X Table of Contents
HC
S T
echn
olog
y G
roup

Chapter 5
Chapter 6
Chapter 7
Managing Multiple TasksHiding, Showing, and Minimizing Windows 56Moving Between Applications 57Using Exposé to Find Items on a Busy Desktop 58Moving Data Between Applications 59
Keeping Your Mac SecureKeeping Apple Software Up-to-Date 62Keeping Your Computer Secure 63Keeping Your Home Folder Secure 64Creating and Remembering Passwords 65Backing Up Important Files 66Time Machine 67What to Do When You’re Done Working 68
Mac OS X ToolsSpotlight 72-73Spotlight Searches and Smart Folders 74-75How do You use the Built-In Dictionary 76Getting up to speed with Dashboard 77Address Book 78iChat 79Apple Mail 80-81Safari 82View RSS Feeds with Safari 83Opening files in Preview 84-85QuickTIme X 86-87Organizing yourself iCal 88What is Automator? 89
Glossary 90-91
WIndows Equivilents to Mac OS X 92-94H
CS
Tec
hnol
ogy
Gro
up

HC
S T
echn
olog
y G
roup
Getting to know Mac OS X
If you’ve used a personal computer, you already know enough to start using Mac OS X. In Mac OS X, you’ll find familiar items—such as menus, icons, windows, and folders—that make it easy for you to get started right away. You’ll also find many enhancements that make working with a Mac easier and more enjoyable than ever.
What You’ll LearnIn this chapter, you’ll cover the following topics:
•What’stheFinder?
•What’sintheFinderWindow?
•TheToolbarinTheFinderWindow
•GettingFamiliarwiththeDock
•YourHomeFolderandOrganizingFilesinYour Documents Folder
•FindingFilesUsingSpotlight
•Stacks
•SneakapeekwithQuickLook
•UsingtheTrash
1
HC
S T
echn
olog
y G
roup
8 Getting Started on Mac OS X
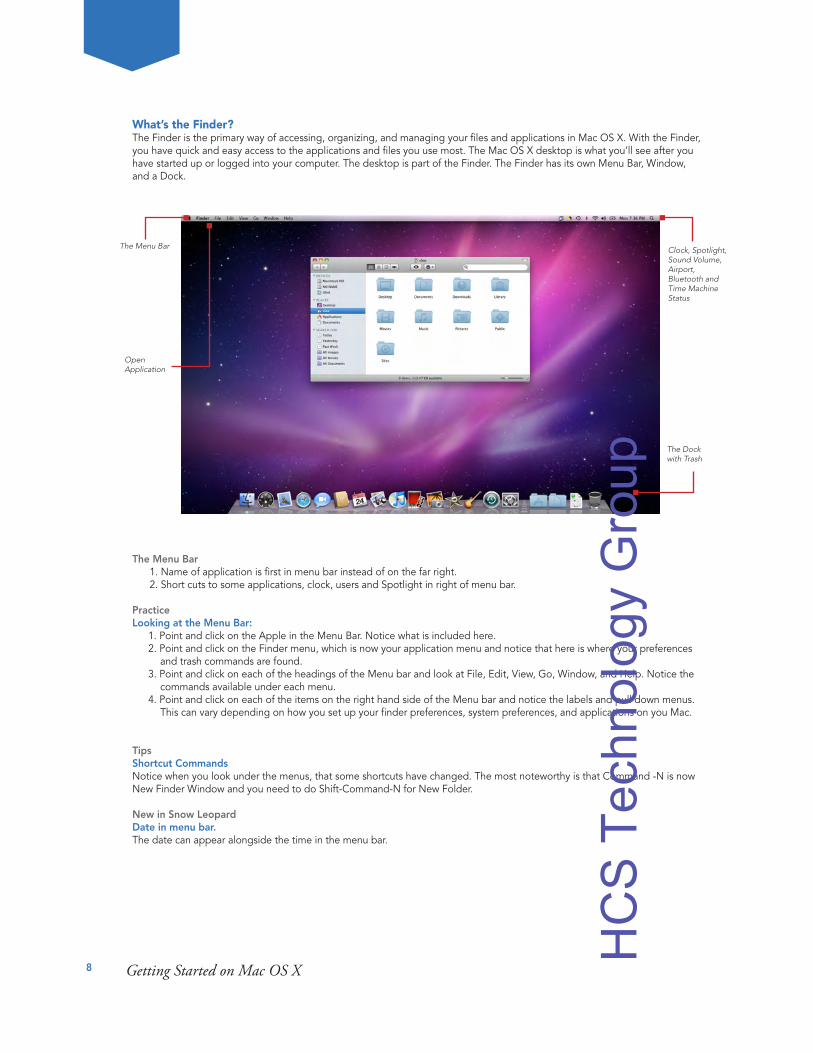
What’s the Finder?The Finder is the primary way of accessing, organizing, and managing your files and applications in Mac OS X. With the Finder, you have quick and easy access to the applications and files you use most. The Mac OS X desktop is what you’ll see after you have started up or logged into your computer. The desktop is part of the Finder. The Finder has its own Menu Bar, Window, and a Dock.
The Menu Bar1. Name of application is first in menu bar instead of on the far right.2. Short cuts to some applications, clock, users and Spotlight in right of menu bar.
PracticeLooking at the Menu Bar:
1. Point and click on the Apple in the Menu Bar. Notice what is included here.2. Point and click on the Finder menu, which is now your application menu and notice that here is where your preferences
and trash commands are found.3. Point and click on each of the headings of the Menu bar and look at File, Edit, View, Go, Window, and Help. Notice the
commands available under each menu.4. Point and click on each of the items on the right hand side of the Menu bar and notice the labels and pull down menus.
This can vary depending on how you set up your finder preferences, system preferences, and applications on you Mac.
TipsShortcut CommandsNotice when you look under the menus, that some shortcuts have changed. The most noteworthy is that Command -N is now New Finder Window and you need to do Shift-Command-N for New Folder.
New in Snow LeopardDate in menu bar.The date can appear alongside the time in the menu bar.
The Dock with Trash
The Menu Bar
Open Application
Clock, Spotlight, Sound Volume, Airport, Bluetooth and Time Machine Status
HC
S T
echn
olog
y G
roup
9
1
Getting to know Mac OS X
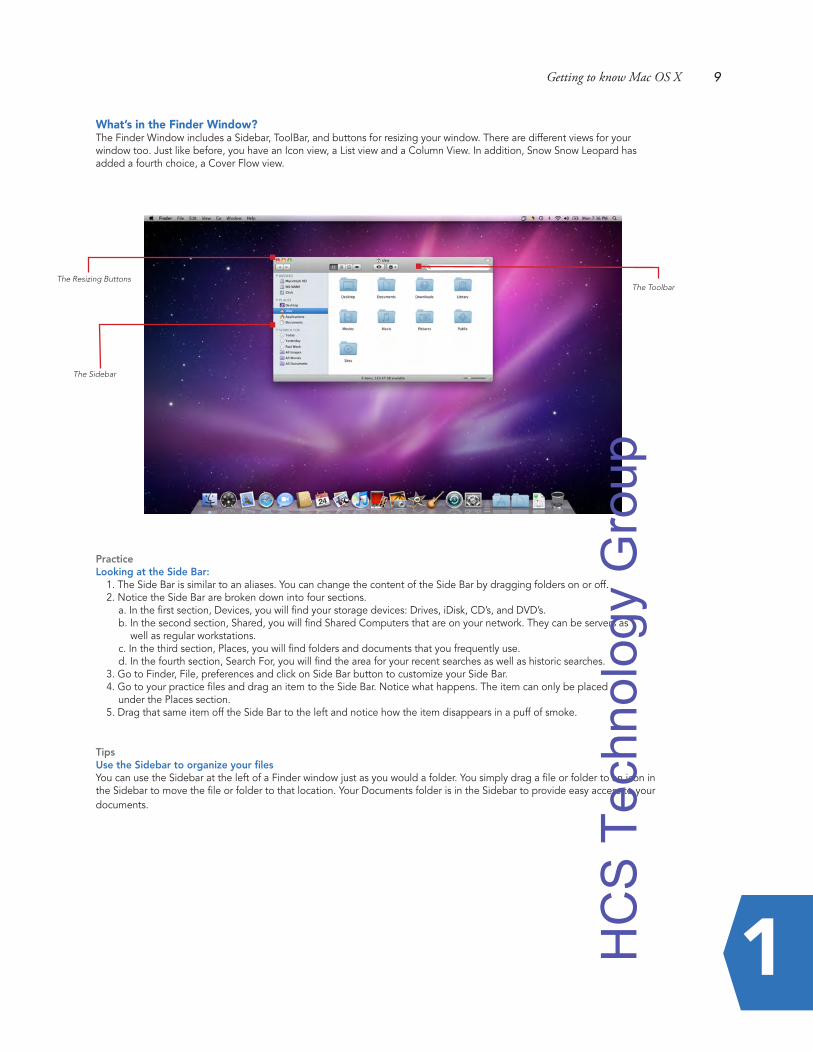
What’s in the Finder Window?The Finder Window includes a Sidebar, ToolBar, and buttons for resizing your window. There are different views for your window too. Just like before, you have an Icon view, a List view and a Column View. In addition, Snow Snow Leopard has added a fourth choice, a Cover Flow view.
PracticeLooking at the Side Bar:
1. The Side Bar is similar to an aliases. You can change the content of the Side Bar by dragging folders on or off. 2. Notice the Side Bar are broken down into four sections.
a. In the first section, Devices, you will find your storage devices: Drives, iDisk, CD’s, and DVD’s. b. In the second section, Shared, you will find Shared Computers that are on your network. They can be servers as
well as regular workstations.c. In the third section, Places, you will find folders and documents that you frequently use.d. In the fourth section, Search For, you will find the area for your recent searches as well as historic searches.
3. Go to Finder, File, preferences and click on Side Bar button to customize your Side Bar. 4. Go to your practice files and drag an item to the Side Bar. Notice what happens. The item can only be placed
under the Places section.5. Drag that same item off the Side Bar to the left and notice how the item disappears in a puff of smoke.
TipsUse the Sidebar to organize your filesYou can use the Sidebar at the left of a Finder window just as you would a folder. You simply drag a file or folder to an icon in the Sidebar to move the file or folder to that location. Your Documents folder is in the Sidebar to provide easy access to your documents.
The Resizing ButtonsThe Toolbar
The Sidebar
HC
S T
echn
olog
y G
roup
10 Getting Started on Mac OS X
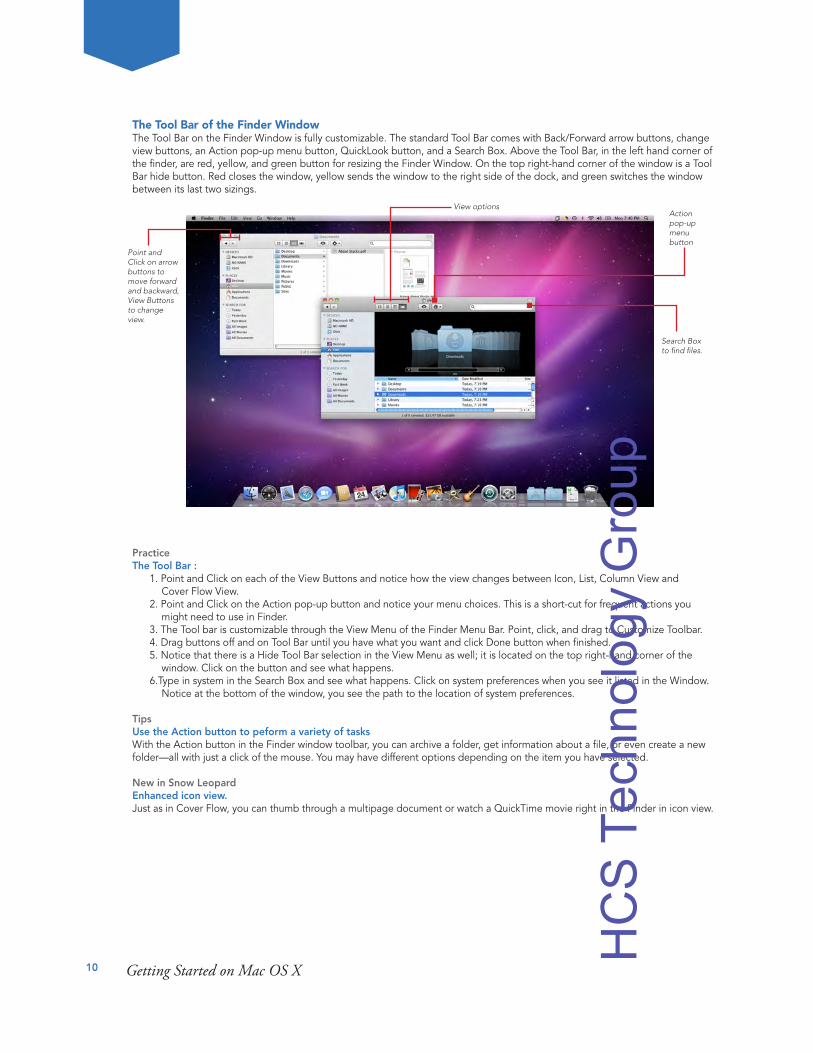
The Tool Bar of the Finder WindowThe Tool Bar on the Finder Window is fully customizable. The standard Tool Bar comes with Back/Forward arrow buttons, change view buttons, an Action pop-up menu button, QuickLook button, and a Search Box. Above the Tool Bar, in the left hand corner of the finder, are red, yellow, and green button for resizing the Finder Window. On the top right-hand corner of the window is a Tool Bar hide button. Red closes the window, yellow sends the window to the right side of the dock, and green switches the window between its last two sizings.
PracticeThe Tool Bar :
1. Point and Click on each of the View Buttons and notice how the view changes between Icon, List, Column View and Cover Flow View.
2. Point and Click on the Action pop-up button and notice your menu choices. This is a short-cut for frequent actions you might need to use in Finder.
3. The Tool bar is customizable through the View Menu of the Finder Menu Bar. Point, click, and drag to Customize Toolbar.4. Drag buttons off and on Tool Bar until you have what you want and click Done button when finished.5. Notice that there is a Hide Tool Bar selection in the View Menu as well; it is located on the top right-hand corner of the
window. Click on the button and see what happens.6.Type in system in the Search Box and see what happens. Click on system preferences when you see it listed in the Window.
Notice at the bottom of the window, you see the path to the location of system preferences.
Tips Use the Action button to peform a variety of tasksWith the Action button in the Finder window toolbar, you can archive a folder, get information about a file, or even create a new folder—all with just a click of the mouse. You may have different options depending on the item you have selected.
New in Snow LeopardEnhanced icon view.Just as in Cover Flow, you can thumb through a multipage document or watch a QuickTime movie right in the Finder in icon view.
Point and Click on arrow buttons to move forward and backward, View Buttons to change view.
Search Box to find files.
Action pop-up menu button
View options
HC
S T
echn
olog
y G
roup
11
1
Getting to know Mac OS X
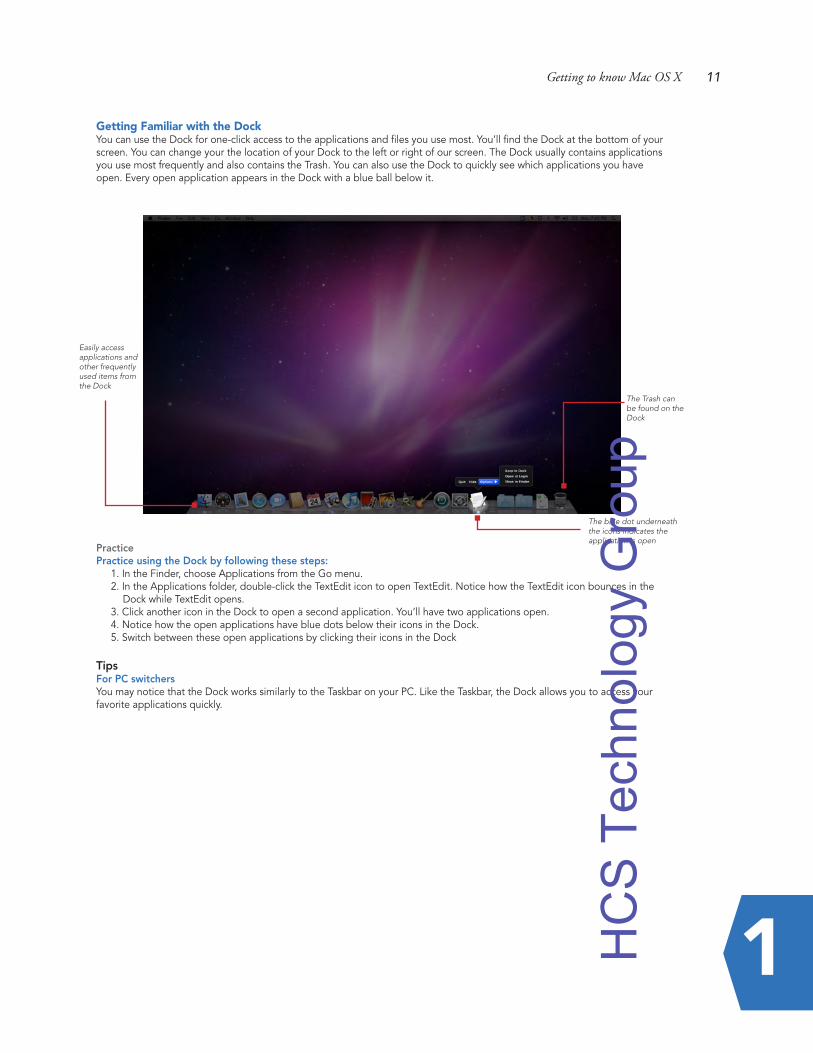
Getting Familiar with the DockYou can use the Dock for one-click access to the applications and files you use most. You’ll find the Dock at the bottom of your screen. You can change your the location of your Dock to the left or right of our screen. The Dock usually contains applications you use most frequently and also contains the Trash. You can also use the Dock to quickly see which applications you have open. Every open application appears in the Dock with a blue ball below it.
PracticePractice using the Dock by following these steps:
1. In the Finder, choose Applications from the Go menu.2. In the Applications folder, double-click the TextEdit icon to open TextEdit. Notice how the TextEdit icon bounces in the
Dock while TextEdit opens.3. Click another icon in the Dock to open a second application. You’ll have two applications open.4. Notice how the open applications have blue dots below their icons in the Dock. 5. Switch between these open applications by clicking their icons in the Dock
TipsFor PC switchersYou may notice that the Dock works similarly to the Taskbar on your PC. Like the Taskbar, the Dock allows you to access your favorite applications quickly.
Easily access applications and other frequently used items from the Dock
The blue dot underneath the icons indicates the application is open
The Trash can be found on the Dock
HC
S T
echn
olog
y G
roup
12 Getting Started on Mac OS X
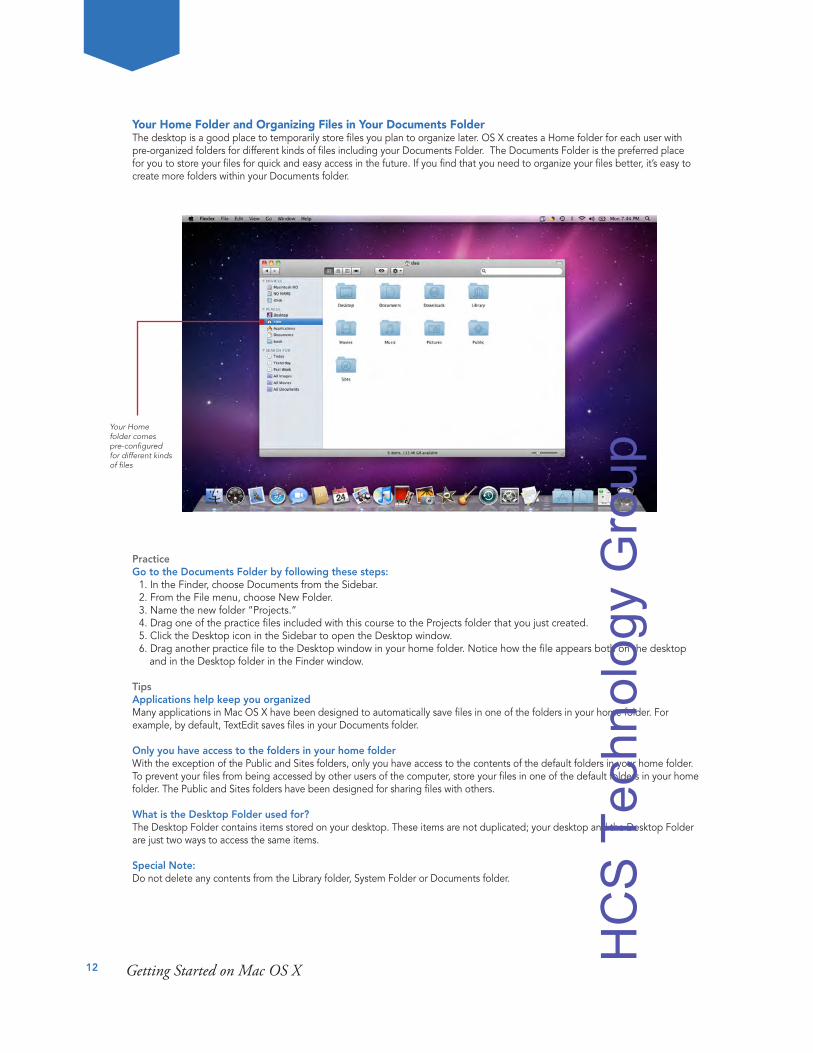
Your Home Folder and Organizing Files in Your Documents FolderThe desktop is a good place to temporarily store files you plan to organize later. OS X creates a Home folder for each user with pre-organized folders for different kinds of files including your Documents Folder. The Documents Folder is the preferred place for you to store your files for quick and easy access in the future. If you find that you need to organize your files better, it’s easy to create more folders within your Documents folder.
PracticeGo to the Documents Folder by following these steps:
1. In the Finder, choose Documents from the Sidebar. 2. From the File menu, choose New Folder.3. Name the new folder “Projects.”4. Drag one of the practice files included with this course to the Projects folder that you just created.5. Click the Desktop icon in the Sidebar to open the Desktop window.6. Drag another practice file to the Desktop window in your home folder. Notice how the file appears both on the desktop
and in the Desktop folder in the Finder window.
TipsApplications help keep you organizedMany applications in Mac OS X have been designed to automatically save files in one of the folders in your home folder. For example, by default, TextEdit saves files in your Documents folder.
Only you have access to the folders in your home folderWith the exception of the Public and Sites folders, only you have access to the contents of the default folders in your home folder. To prevent your files from being accessed by other users of the computer, store your files in one of the default folders in your home folder. The Public and Sites folders have been designed for sharing files with others.
What is the Desktop Folder used for?The Desktop Folder contains items stored on your desktop. These items are not duplicated; your desktop and the Desktop Folder are just two ways to access the same items.
Special Note:Do not delete any contents from the Library folder, System Folder or Documents folder.
Your Home folder comes pre-configured for different kinds of files
HC
S T
echn
olog
y G
roup
13
1
Getting to know Mac OS X
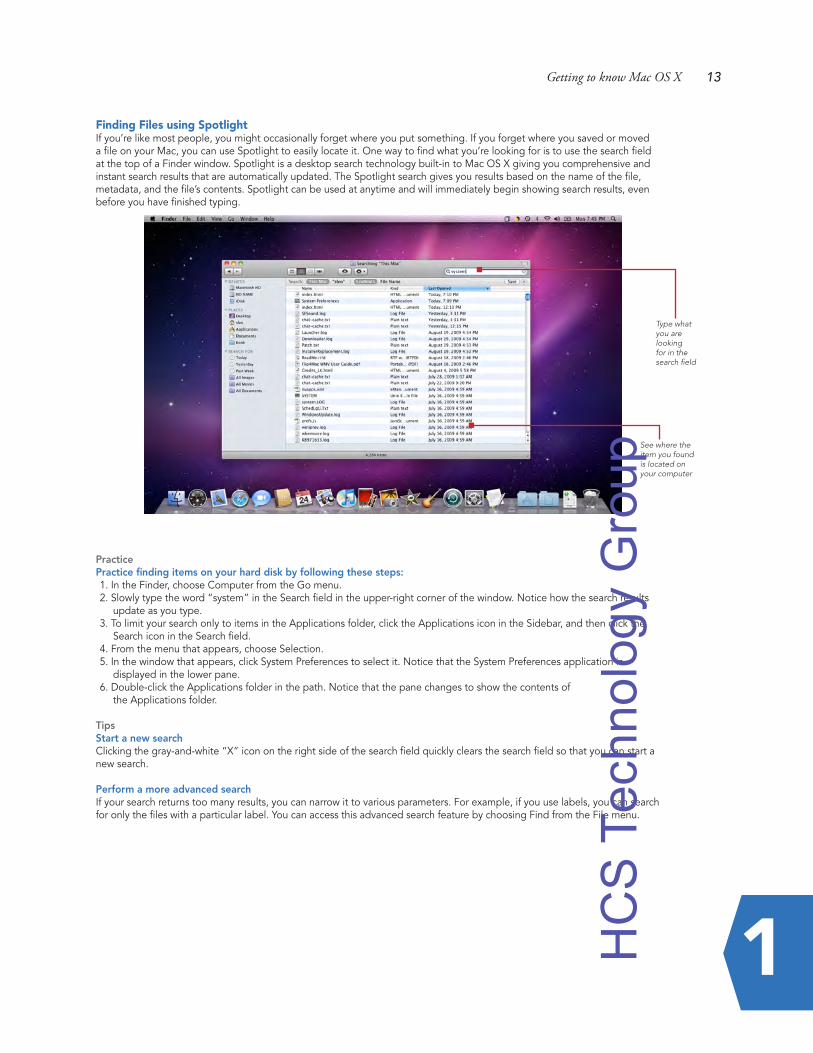
Finding Files using SpotlightIf you’re like most people, you might occasionally forget where you put something. If you forget where you saved or moved a file on your Mac, you can use Spotlight to easily locate it. One way to find what you’re looking for is to use the search field at the top of a Finder window. Spotlight is a desktop search technology built-in to Mac OS X giving you comprehensive and instant search results that are automatically updated. The Spotlight search gives you results based on the name of the file, metadata, and the file’s contents. Spotlight can be used at anytime and will immediately begin showing search results, even before you have finished typing.
PracticePractice finding items on your hard disk by following these steps:1. In the Finder, choose Computer from the Go menu.2. Slowly type the word “system” in the Search field in the upper-right corner of the window. Notice how the search results
update as you type.3. To limit your search only to items in the Applications folder, click the Applications icon in the Sidebar, and then click the
Search icon in the Search field.4. From the menu that appears, choose Selection.5. In the window that appears, click System Preferences to select it. Notice that the System Preferences application is
displayed in the lower pane.6. Double-click the Applications folder in the path. Notice that the pane changes to show the contents of
the Applications folder.
Tips Start a new searchClicking the gray-and-white “X” icon on the right side of the search field quickly clears the search field so that you can start a new search.
Perform a more advanced searchIf your search returns too many results, you can narrow it to various parameters. For example, if you use labels, you can search for only the files with a particular label. You can access this advanced search feature by choosing Find from the File menu.
Type what you are looking for in the search field
See where the item you found is located on your computer
HC
S T
echn
olog
y G
roup

14 Getting Started on Mac OS X
StacksA stack is a Dock item that gives you fast access to a folder of files. When you click a stack, the files within spring from the Dock in a fan or a grid, depending on the number of items (or the preference you set). Snow Leopard starts you off with two premade stacks: one for downloads and the other for documents. The Downloads stack automatically captures files downloaded from Safari, Mail, and iChat, and the Documents stack is a great place to keep things like presentations, spreadsheets, and word processing files. You can create as many stacks as you wish simply by dragging folders to the right side of your Dock. Pretty neat.
PracticeCustomize the view of your Stack in the Dock
1. Hold down the control key and click on the “Documents Stack” In your Dock2. Scroll and select Grid3. Hold down the Control Key4. Scroll and select by Kind5. Notice your Documents Stack are sorted in a Grid and By Kinds of Document
TipsSay goodbye to desktop clutterYou can find your downloads quickly in one dedicated stack. Downloads from Safari, iChat, and Mail are automatically saved to the Downloads stack.
New in Snow LeopardScroll through your stacks.Stacks are now scrollable in grid view, so you can easily view all items in the stack.
Navigate folders in stacks.You can open folders in a stack to see all the files inside. Quickly return to previous folders by clicking the return path icon in the upper left of the stack.
Click on folders to View your stacks
HC
S T
echn
olog
y G
roup
15
1
Getting to know Mac OS X
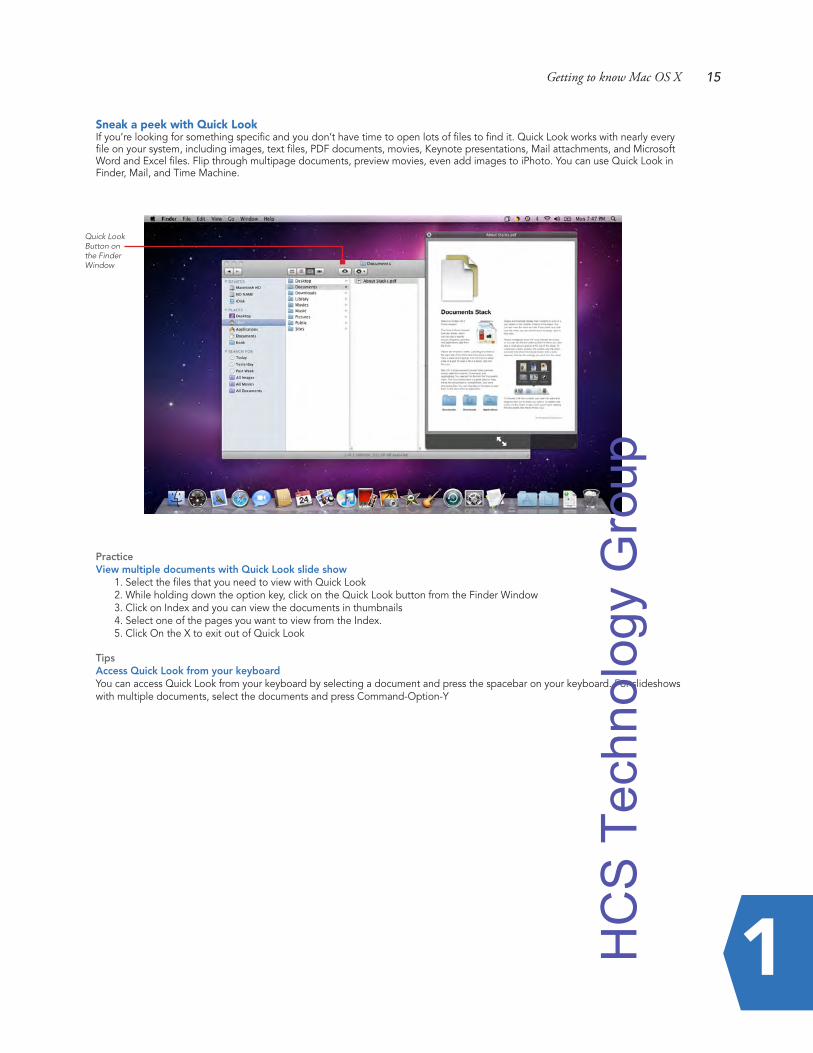
Sneak a peek with Quick LookIf you’re looking for something specific and you don’t have time to open lots of files to find it. Quick Look works with nearly every file on your system, including images, text files, PDF documents, movies, Keynote presentations, Mail attachments, and Microsoft Word and Excel files. Flip through multipage documents, preview movies, even add images to iPhoto. You can use Quick Look in Finder, Mail, and Time Machine.
PracticeView multiple documents with Quick Look slide show
1. Select the files that you need to view with Quick Look2. While holding down the option key, click on the Quick Look button from the Finder Window3. Click on Index and you can view the documents in thumbnails4. Select one of the pages you want to view from the Index.5. Click On the X to exit out of Quick Look
TipsAccess Quick Look from your keyboardYou can access Quick Look from your keyboard by selecting a document and press the spacebar on your keyboard. For slideshows with multiple documents, select the documents and press Command-Option-Y
Quick Look Button on the Finder Window
HC
S T
echn
olog
y G
roup
16 Getting Started on Mac OS X
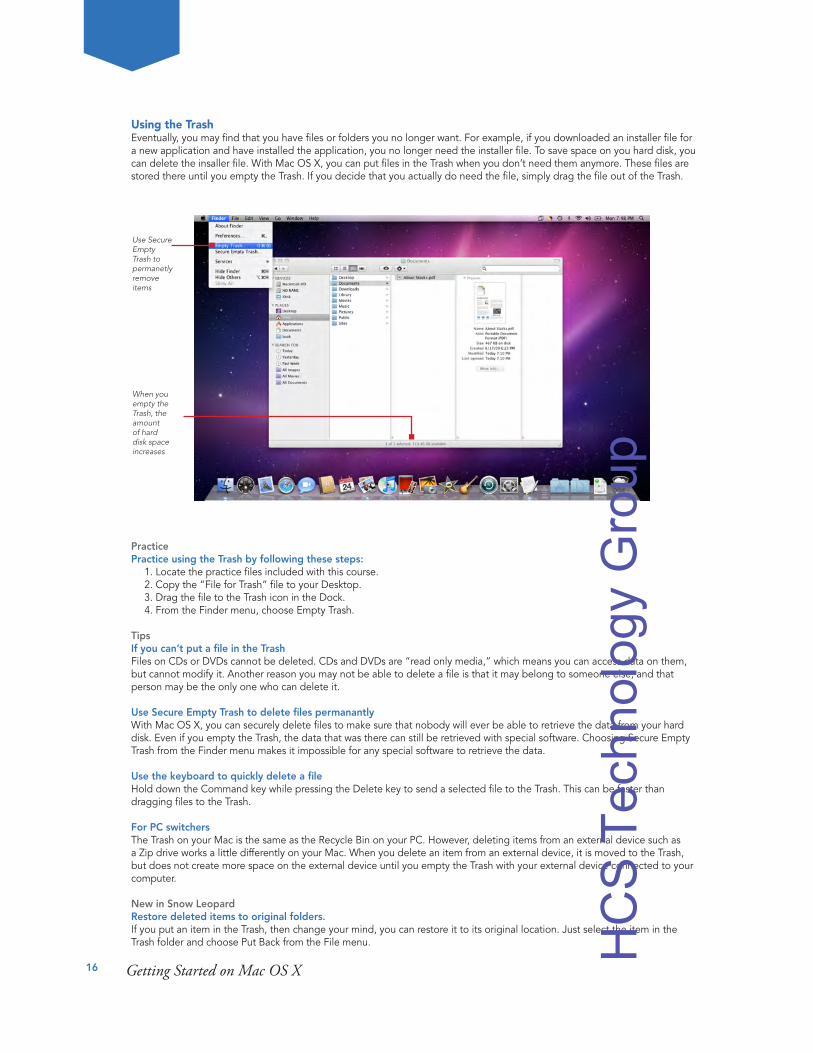
Using the TrashEventually, you may find that you have files or folders you no longer want. For example, if you downloaded an installer file for a new application and have installed the application, you no longer need the installer file. To save space on you hard disk, you can delete the insaller file. With Mac OS X, you can put files in the Trash when you don’t need them anymore. These files are stored there until you empty the Trash. If you decide that you actually do need the file, simply drag the file out of the Trash.
PracticePractice using the Trash by following these steps:
1. Locate the practice files included with this course. 2. Copy the “File for Trash” file to your Desktop.3. Drag the file to the Trash icon in the Dock.4. From the Finder menu, choose Empty Trash.
TipsIf you can’t put a file in the TrashFiles on CDs or DVDs cannot be deleted. CDs and DVDs are “read only media,” which means you can access data on them, but cannot modify it. Another reason you may not be able to delete a file is that it may belong to someone else, and that person may be the only one who can delete it.
Use Secure Empty Trash to delete files permanantlyWith Mac OS X, you can securely delete files to make sure that nobody will ever be able to retrieve the data from your hard disk. Even if you empty the Trash, the data that was there can still be retrieved with special software. Choosing Secure Empty Trash from the Finder menu makes it impossible for any special software to retrieve the data.
Use the keyboard to quickly delete a fileHold down the Command key while pressing the Delete key to send a selected file to the Trash. This can be faster than dragging files to the Trash.
For PC switchersThe Trash on your Mac is the same as the Recycle Bin on your PC. However, deleting items from an external device such as a Zip drive works a little differently on your Mac. When you delete an item from an external device, it is moved to the Trash, but does not create more space on the external device until you empty the Trash with your external device connected to your computer.
New in Snow LeopardRestore deleted items to original folders.If you put an item in the Trash, then change your mind, you can restore it to its original location. Just select the item in the Trash folder and choose Put Back from the File menu.
When you empty the Trash, the amount of hard disk space increases
Use Secure Empty Trash to permanetly remove items
HC
S T
echn
olog
y G
roup
17
1
Getting to know Mac OS X
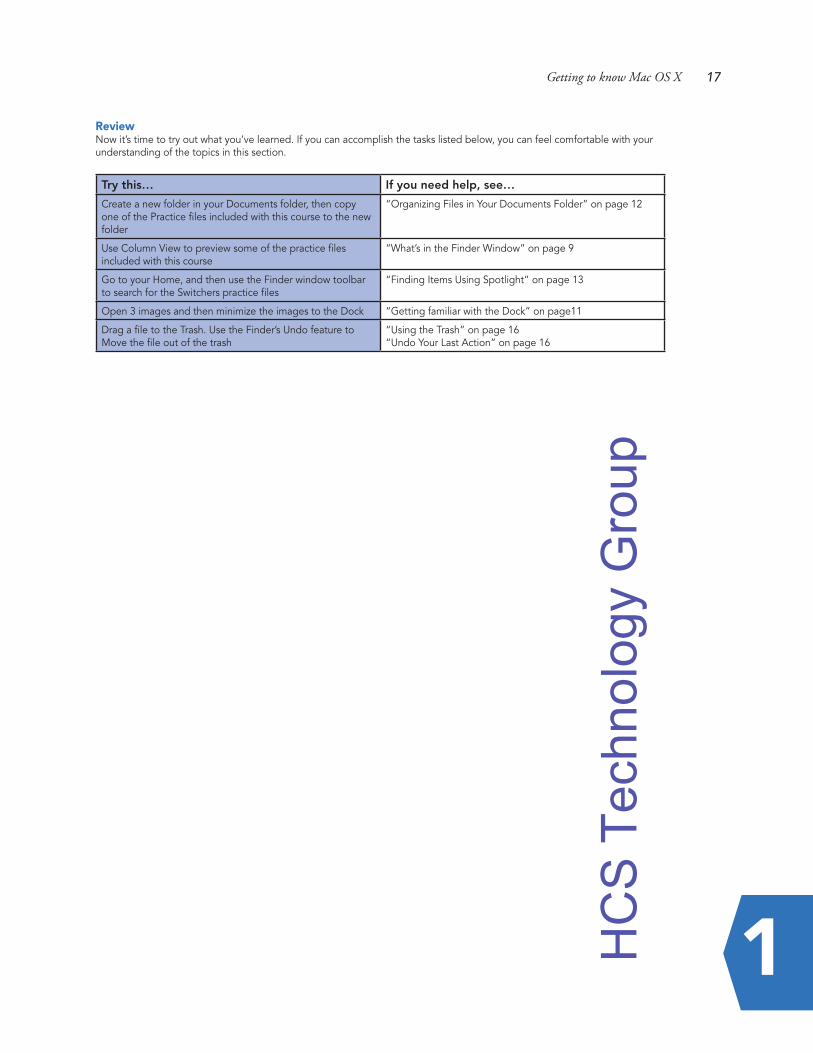
Review Now it’s time to try out what you’ve learned. If you can accomplish the tasks listed below, you can feel comfortable with your understanding of the topics in this section.
Try this… If you need help, see…
Create a new folder in your Documents folder, then copy one of the Practice files included with this course to the new folder
“Organizing Files in Your Documents Folder” on page 12
Use Column View to preview some of the practice files included with this course
“What’s in the Finder Window” on page 9
Go to your Home, and then use the Finder window toolbar to search for the Switchers practice files
“Finding Items Using Spotlight” on page 13
Open 3 images and then minimize the images to the Dock “Getting familiar with the Dock” on page11
Drag a file to the Trash. Use the Finder’s Undo feature to Move the file out of the trash
“Using the Trash” on page 16“Undo Your Last Action” on page 16
HC
S T
echn
olog
y G
roup

HC
S T
echn
olog
y G
roup
Customizing your Mac OSEveryone has a different way of working. Perhaps you like an empty desktop, whereas your business partner prefers to store all of her files and folders right on the desktop. With Mac OS X, you can tailor your Mac to meet both of your needs.
What You’ll LearnIn this chapter, you will cover:
•ChangingHowFilesAppearintheFinder
•CustomizingtheFindertoMeetYourNeeds
•UsingLabelstoKeepYourFilesOrganized
•CustomizingtheDocktoMatchYourStyle •AddingFrequentlyUsedItemstotheDock
•ConfiguringSettingsforYourComputer
•ChangingYourDisplay •ChangingYourDesktopPicture
•ConfiguringYourScreenSaver
•WorkingwithMultipleLanguages
•SettingUpaPrinter
2
HC
S T
echn
olog
y G
roup
20 Getting Started on Mac OS X
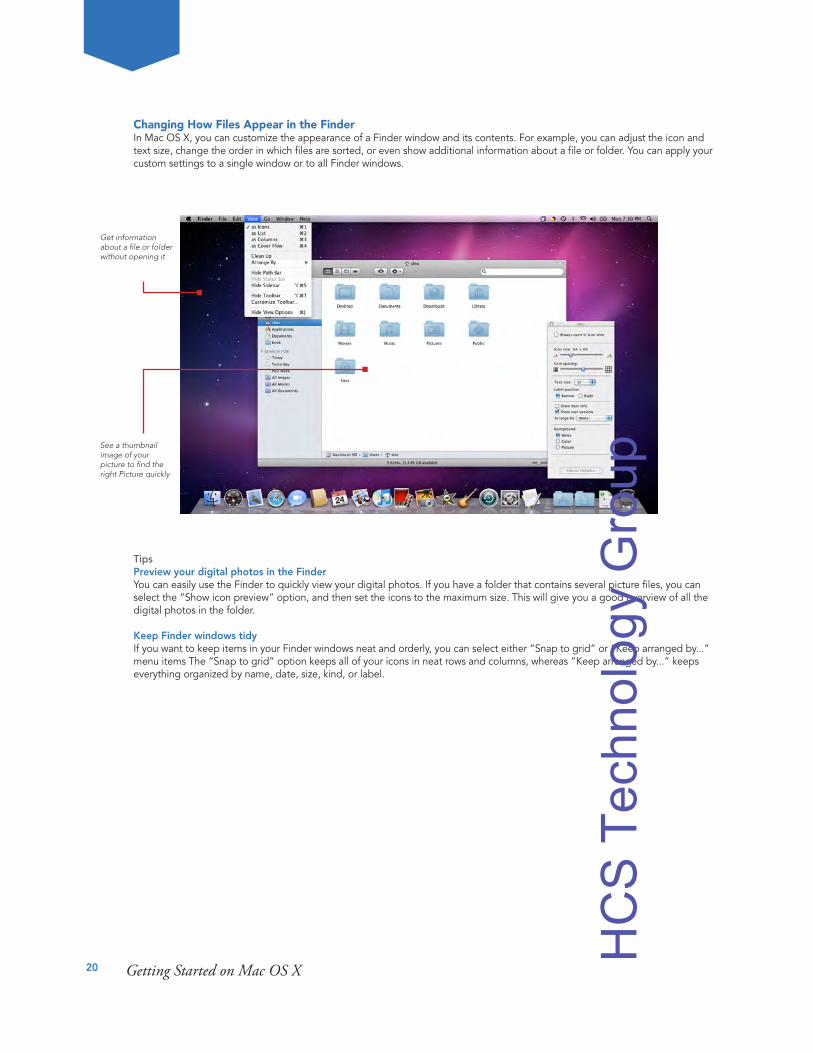
Changing How Files Appear in the FinderIn Mac OS X, you can customize the appearance of a Finder window and its contents. For example, you can adjust the icon and text size, change the order in which files are sorted, or even show additional information about a file or folder. You can apply your custom settings to a single window or to all Finder windows.
TipsPreview your digital photos in the FinderYou can easily use the Finder to quickly view your digital photos. If you have a folder that contains several picture files, you can select the “Show icon preview” option, and then set the icons to the maximum size. This will give you a good overview of all the digital photos in the folder.
Keep Finder windows tidyIf you want to keep items in your Finder windows neat and orderly, you can select either “Snap to grid” or “Keep arranged by...” menu items The “Snap to grid” option keeps all of your icons in neat rows and columns, whereas “Keep arranged by...” keeps everything organized by name, date, size, kind, or label.
Get information about a file or folder without opening it
See a thumbnail image of your picture to find the right Picture quickly
HC
S T
echn
olog
y G
roup
21
2
Customizing Your Mac OS
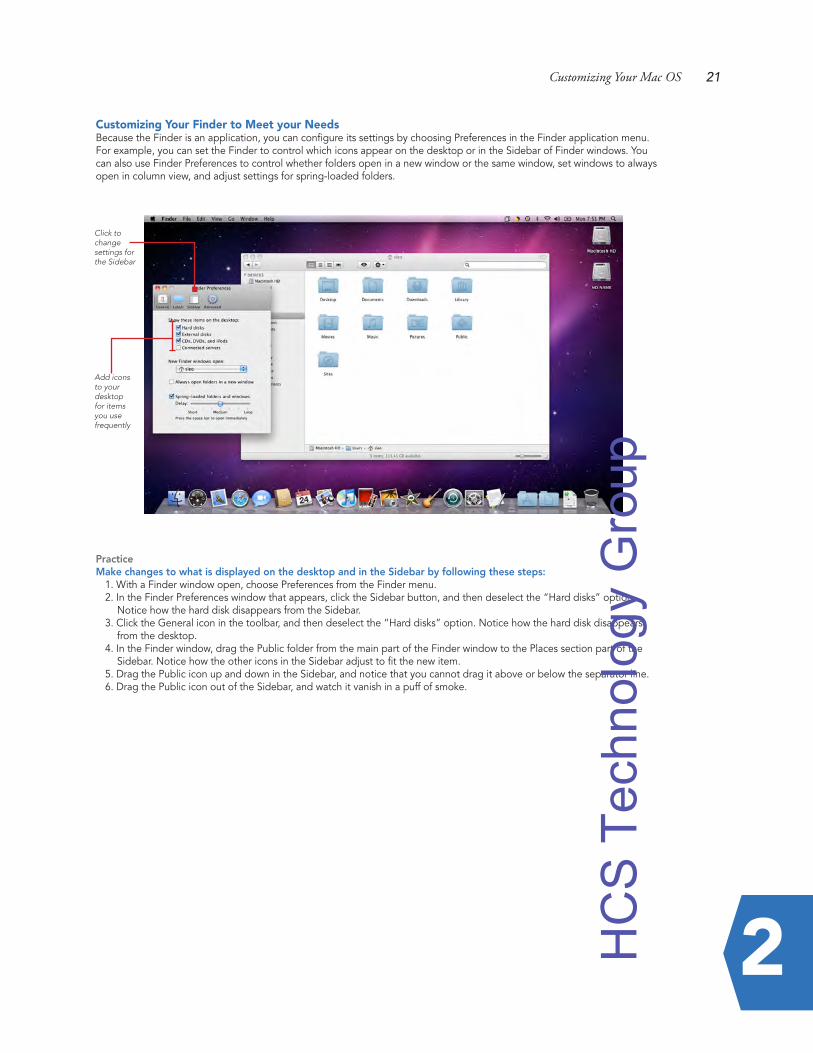
Customizing Your Finder to Meet your NeedsBecause the Finder is an application, you can configure its settings by choosing Preferences in the Finder application menu. For example, you can set the Finder to control which icons appear on the desktop or in the Sidebar of Finder windows. You can also use Finder Preferences to control whether folders open in a new window or the same window, set windows to always open in column view, and adjust settings for spring-loaded folders.
PracticeMake changes to what is displayed on the desktop and in the Sidebar by following these steps:
1. With a Finder window open, choose Preferences from the Finder menu.2. In the Finder Preferences window that appears, click the Sidebar button, and then deselect the “Hard disks” option.
Notice how the hard disk disappears from the Sidebar.3. Click the General icon in the toolbar, and then deselect the “Hard disks” option. Notice how the hard disk disappears
from the desktop.4. In the Finder window, drag the Public folder from the main part of the Finder window to the Places section part of the
Sidebar. Notice how the other icons in the Sidebar adjust to fit the new item.5. Drag the Public icon up and down in the Sidebar, and notice that you cannot drag it above or below the separator line.6. Drag the Public icon out of the Sidebar, and watch it vanish in a puff of smoke.
Add icons to your desktop for items you use frequently
Click to change settings for the Sidebar
HC
S T
echn
olog
y G
roup
22 Getting Started on Mac OS X
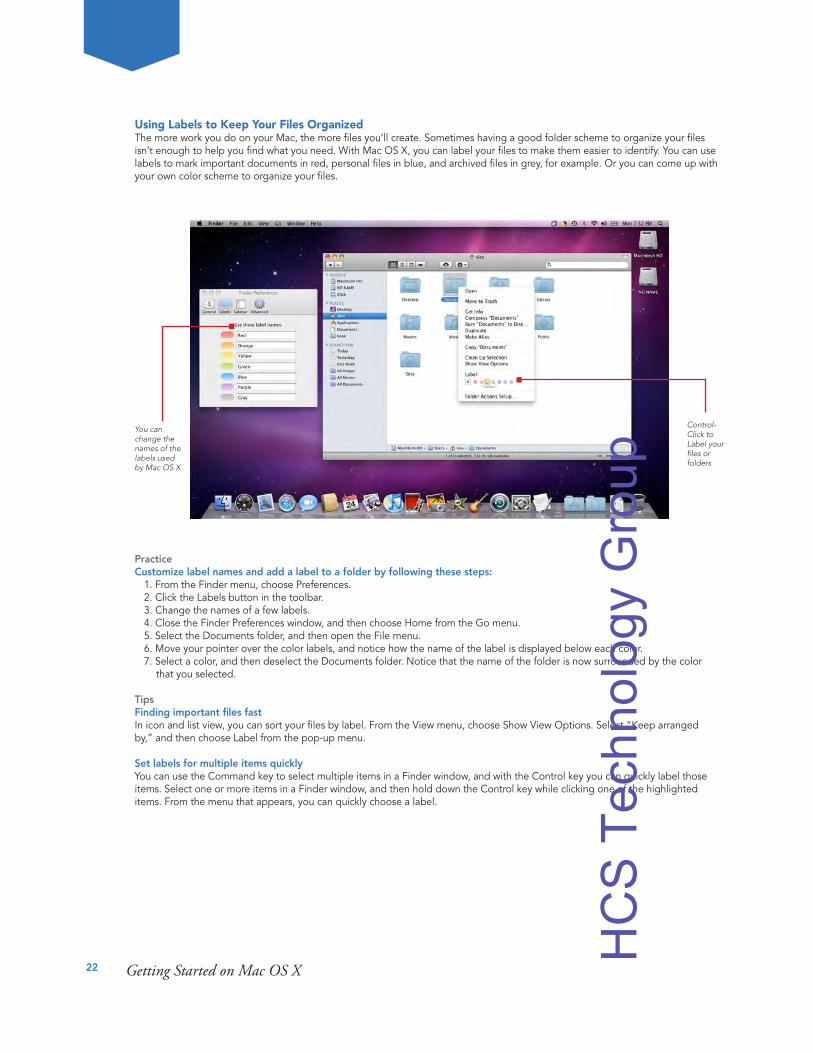
Using Labels to Keep Your Files OrganizedThe more work you do on your Mac, the more files you’ll create. Sometimes having a good folder scheme to organize your files isn’t enough to help you find what you need. With Mac OS X, you can label your files to make them easier to identify. You can use labels to mark important documents in red, personal files in blue, and archived files in grey, for example. Or you can come up with your own color scheme to organize your files.
PracticeCustomize label names and add a label to a folder by following these steps:
1. From the Finder menu, choose Preferences.2. Click the Labels button in the toolbar.3. Change the names of a few labels.4. Close the Finder Preferences window, and then choose Home from the Go menu.5. Select the Documents folder, and then open the File menu.6. Move your pointer over the color labels, and notice how the name of the label is displayed below each color.7. Select a color, and then deselect the Documents folder. Notice that the name of the folder is now surrounded by the color
that you selected.
TipsFinding important files fastIn icon and list view, you can sort your files by label. From the View menu, choose Show View Options. Select “Keep arranged by,” and then choose Label from the pop-up menu.
Set labels for multiple items quicklyYou can use the Command key to select multiple items in a Finder window, and with the Control key you can quickly label those items. Select one or more items in a Finder window, and then hold down the Control key while clicking one of the highlighted items. From the menu that appears, you can quickly choose a label.
You can change the names of the labels used by Mac OS X
Control-Click to Label your files or folders
HC
S T
echn
olog
y G
roup
23
2
Customizing Your Mac OS
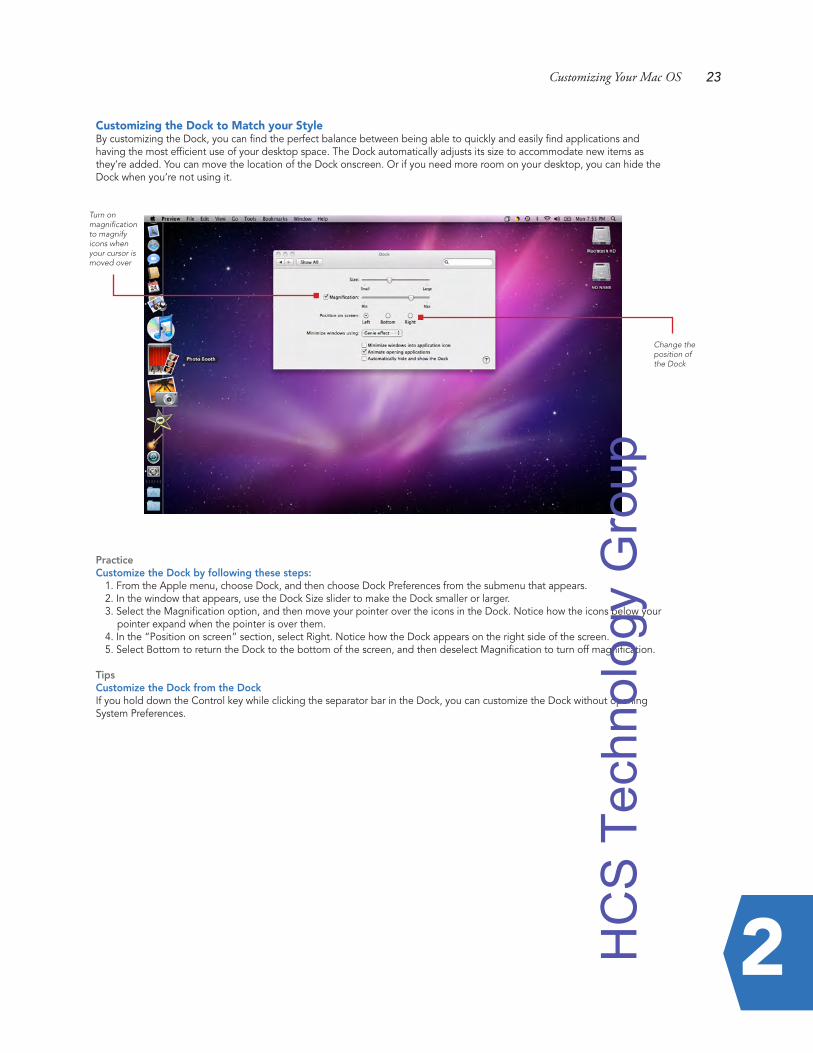
Customizing the Dock to Match your StyleBy customizing the Dock, you can find the perfect balance between being able to quickly and easily find applications and having the most efficient use of your desktop space. The Dock automatically adjusts its size to accommodate new items as they’re added. You can move the location of the Dock onscreen. Or if you need more room on your desktop, you can hide the Dock when you’re not using it.
PracticeCustomize the Dock by following these steps:
1. From the Apple menu, choose Dock, and then choose Dock Preferences from the submenu that appears.2. In the window that appears, use the Dock Size slider to make the Dock smaller or larger.3. Select the Magnification option, and then move your pointer over the icons in the Dock. Notice how the icons below your
pointer expand when the pointer is over them.4. In the “Position on screen” section, select Right. Notice how the Dock appears on the right side of the screen.5. Select Bottom to return the Dock to the bottom of the screen, and then deselect Magnification to turn off magnification.
TipsCustomize the Dock from the DockIf you hold down the Control key while clicking the separator bar in the Dock, you can customize the Dock without opening System Preferences.
Change the position of the Dock
Turn on magnification to magnify icons when your cursor is moved over
HC
S T
echn
olog
y G
roup
24 Getting Started on Mac OS X
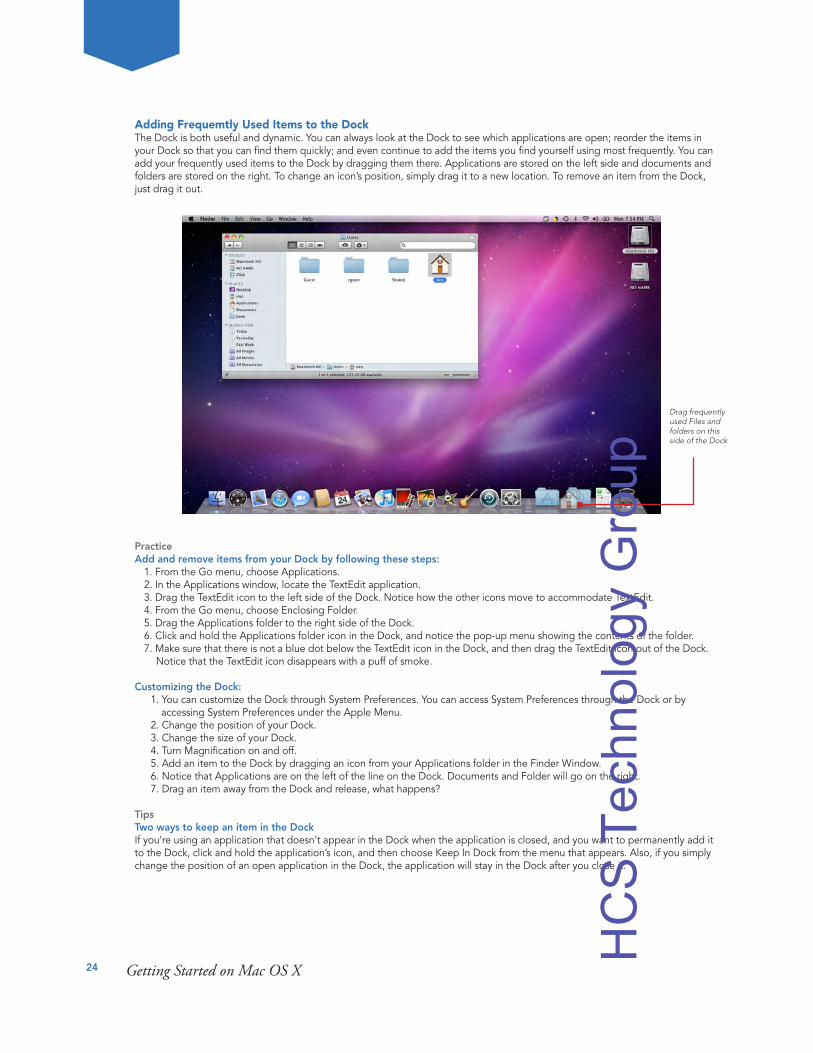
Adding Frequemtly Used Items to the DockThe Dock is both useful and dynamic. You can always look at the Dock to see which applications are open; reorder the items in your Dock so that you can find them quickly; and even continue to add the items you find yourself using most frequently. You can add your frequently used items to the Dock by dragging them there. Applications are stored on the left side and documents and folders are stored on the right. To change an icon’s position, simply drag it to a new location. To remove an item from the Dock, just drag it out.
PracticeAdd and remove items from your Dock by following these steps:
1. From the Go menu, choose Applications.2. In the Applications window, locate the TextEdit application.3. Drag the TextEdit icon to the left side of the Dock. Notice how the other icons move to accommodate TextEdit.4. From the Go menu, choose Enclosing Folder.5. Drag the Applications folder to the right side of the Dock.6. Click and hold the Applications folder icon in the Dock, and notice the pop-up menu showing the contents of the folder.7. Make sure that there is not a blue dot below the TextEdit icon in the Dock, and then drag the TextEdit icon out of the Dock.
Notice that the TextEdit icon disappears with a puff of smoke.
Customizing the Dock:1. You can customize the Dock through System Preferences. You can access System Preferences through the Dock or by
accessing System Preferences under the Apple Menu.2. Change the position of your Dock.3. Change the size of your Dock.4. Turn Magnification on and off.5. Add an item to the Dock by dragging an icon from your Applications folder in the Finder Window.6. Notice that Applications are on the left of the line on the Dock. Documents and Folder will go on the right.7. Drag an item away from the Dock and release, what happens?
TipsTwo ways to keep an item in the DockIf you’re using an application that doesn’t appear in the Dock when the application is closed, and you want to permanently add it to the Dock, click and hold the application’s icon, and then choose Keep In Dock from the menu that appears. Also, if you simply change the position of an open application in the Dock, the application will stay in the Dock after you close it.
Drag frequently used Files and folders on this side of the Dock
HC
S T
echn
olog
y G
roup
25
2
Customizing Your Mac OS
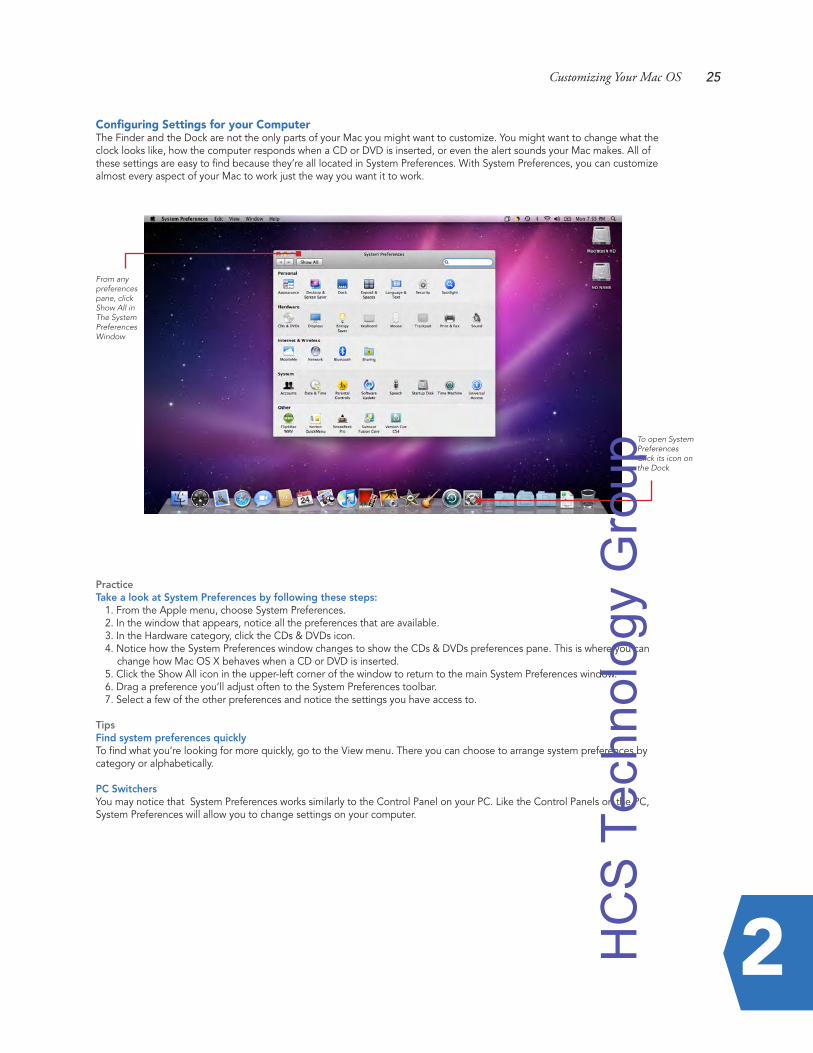
Configuring Settings for your ComputerThe Finder and the Dock are not the only parts of your Mac you might want to customize. You might want to change what the clock looks like, how the computer responds when a CD or DVD is inserted, or even the alert sounds your Mac makes. All of these settings are easy to find because they’re all located in System Preferences. With System Preferences, you can customize almost every aspect of your Mac to work just the way you want it to work.
PracticeTake a look at System Preferences by following these steps:
1. From the Apple menu, choose System Preferences.2. In the window that appears, notice all the preferences that are available.3. In the Hardware category, click the CDs & DVDs icon.4. Notice how the System Preferences window changes to show the CDs & DVDs preferences pane. This is where you can
change how Mac OS X behaves when a CD or DVD is inserted.5. Click the Show All icon in the upper-left corner of the window to return to the main System Preferences window.6. Drag a preference you’ll adjust often to the System Preferences toolbar.7. Select a few of the other preferences and notice the settings you have access to.
TipsFind system preferences quicklyTo find what you’re looking for more quickly, go to the View menu. There you can choose to arrange system preferences by category or alphabetically.
PC SwitchersYou may notice that System Preferences works similarly to the Control Panel on your PC. Like the Control Panels on the PC, System Preferences will allow you to change settings on your computer.
To open System Preferences Click its icon on the Dock
From any preferences pane, click Show All in The System Preferences Window
HC
S T
echn
olog
y G
roup
26 Getting Started on Mac OS X
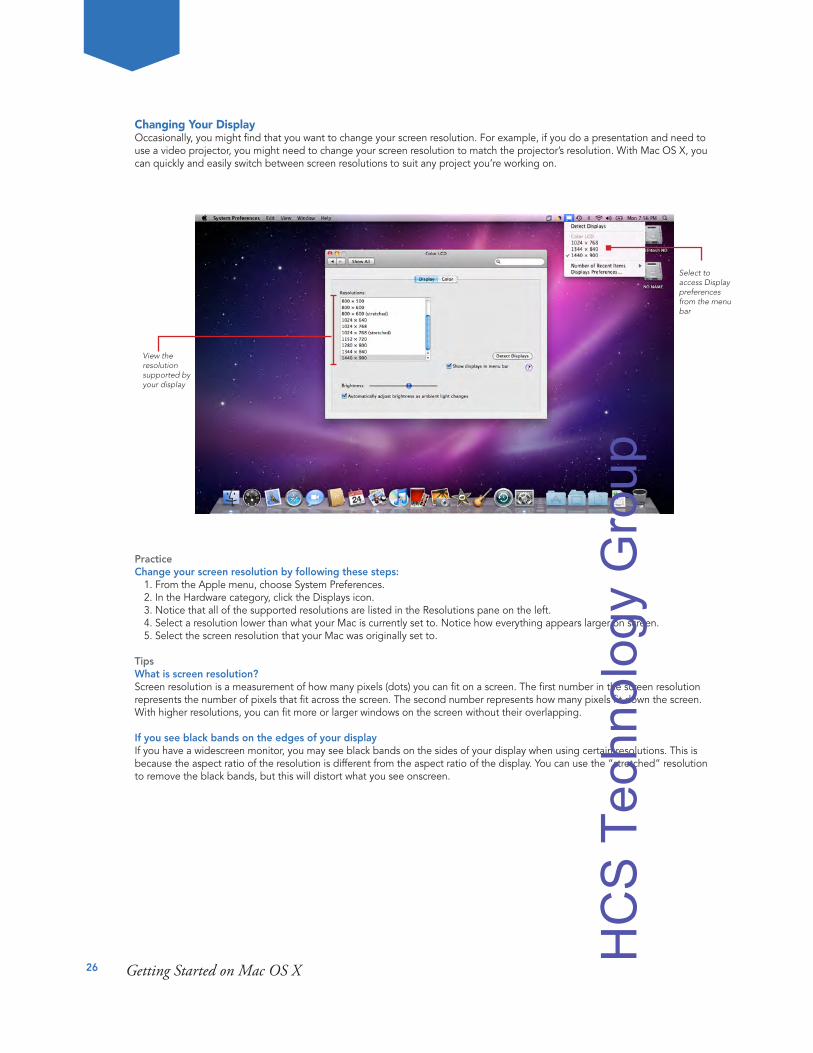
Changing Your DisplayOccasionally, you might find that you want to change your screen resolution. For example, if you do a presentation and need to use a video projector, you might need to change your screen resolution to match the projector’s resolution. With Mac OS X, you can quickly and easily switch between screen resolutions to suit any project you’re working on.
PracticeChange your screen resolution by following these steps:
1. From the Apple menu, choose System Preferences.2. In the Hardware category, click the Displays icon.3. Notice that all of the supported resolutions are listed in the Resolutions pane on the left.4. Select a resolution lower than what your Mac is currently set to. Notice how everything appears larger on screen.5. Select the screen resolution that your Mac was originally set to.
TipsWhat is screen resolution?Screen resolution is a measurement of how many pixels (dots) you can fit on a screen. The first number in the screen resolution represents the number of pixels that fit across the screen. The second number represents how many pixels fit down the screen. With higher resolutions, you can fit more or larger windows on the screen without their overlapping.
If you see black bands on the edges of your displayIf you have a widescreen monitor, you may see black bands on the sides of your display when using certain resolutions. This is because the aspect ratio of the resolution is different from the aspect ratio of the display. You can use the “stretched” resolution to remove the black bands, but this will distort what you see onscreen.
Select to access Display preferences from the menu bar
View the resolution supported by your display
HC
S T
echn
olog
y G
roup
27
2
Customizing Your Mac OS
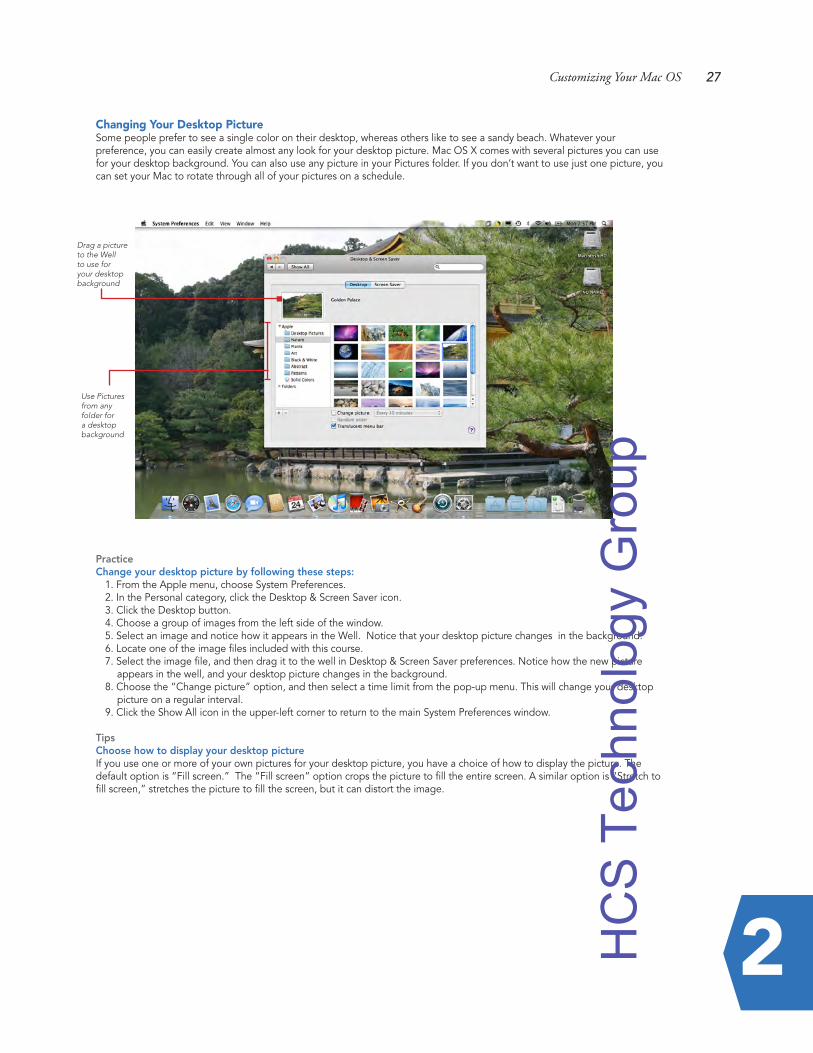
Changing Your Desktop PictureSome people prefer to see a single color on their desktop, whereas others like to see a sandy beach. Whatever your preference, you can easily create almost any look for your desktop picture. Mac OS X comes with several pictures you can use for your desktop background. You can also use any picture in your Pictures folder. If you don’t want to use just one picture, you can set your Mac to rotate through all of your pictures on a schedule.
PracticeChange your desktop picture by following these steps:
1. From the Apple menu, choose System Preferences.2. In the Personal category, click the Desktop & Screen Saver icon.3. Click the Desktop button.4. Choose a group of images from the left side of the window.5. Select an image and notice how it appears in the Well. Notice that your desktop picture changes in the background.6. Locate one of the image files included with this course.7. Select the image file, and then drag it to the well in Desktop & Screen Saver preferences. Notice how the new picture
appears in the well, and your desktop picture changes in the background.8. Choose the “Change picture” option, and then select a time limit from the pop-up menu. This will change your desktop
picture on a regular interval.9. Click the Show All icon in the upper-left corner to return to the main System Preferences window.
TipsChoose how to display your desktop pictureIf you use one or more of your own pictures for your desktop picture, you have a choice of how to display the picture. The default option is “Fill screen.” The “Fill screen” option crops the picture to fill the entire screen. A similar option is “Stretch to fill screen,” stretches the picture to fill the screen, but it can distort the image.
Use Pictures from any folder for a desktop background
Drag a picture to the Well to use for your desktop background
HC
S T
echn
olog
y G
roup

28 Getting Started on Mac OS X
Configuring Your Screen SaverCustomizing your Mac with an attractive desktop picture is fun. But what about when you’re away from your computer? A screen saver is also a fun way to personalize your Mac, and it can keep your Mac more secure when you’re not working. Mac OS X comes with several built-in screen savers you can customize to suit your individual taste. You can even use your own digital pictures as a screen saver. If you can’t decide which screen saver to use, you can set your Mac to randomly select one for you.
PracticeCreate a slideshow screen saver using your own images by following these steps:
1. From the Apple menu, choose System Preferences.2. In the Personal category, click the Desktop & Screen Saver icon.3. In the window that appears, click the Screen Saver button.4. Notice the currently selected screen saver. Click the Test button to try it.5. Move your pointer to exit from the screen saver and return to Desktop & Screen Saver preferences.6. Locate the practice files included with this course.7. Copy the images from the Screen Saver folder to the Pictures folder in your home folder.8. Select Pictures Folder on the left side of the window, and then click the Test button to try the new slideshow.
TipsUse the pointer to control your screen saverIf you don’t want to wait for the screen saver to activate on its own, you can configure it to start when you move the pointer to one or more corners of the screen. Click the Hot Corners button, and then you can set one corner to turn on the screen saver and another to disable it, for example.
New in Snow LeopardScreen saver with flagged photos.Create a screensaver using the photos you have flagged in iPhoto.Screen saver shuffle.Shuffle through your screen saver photos just as you shuffle through songs in iTunes.
See a preview of your screen saver here
HC
S T
echn
olog
y G
roup
29
2
Customizing Your Mac OS
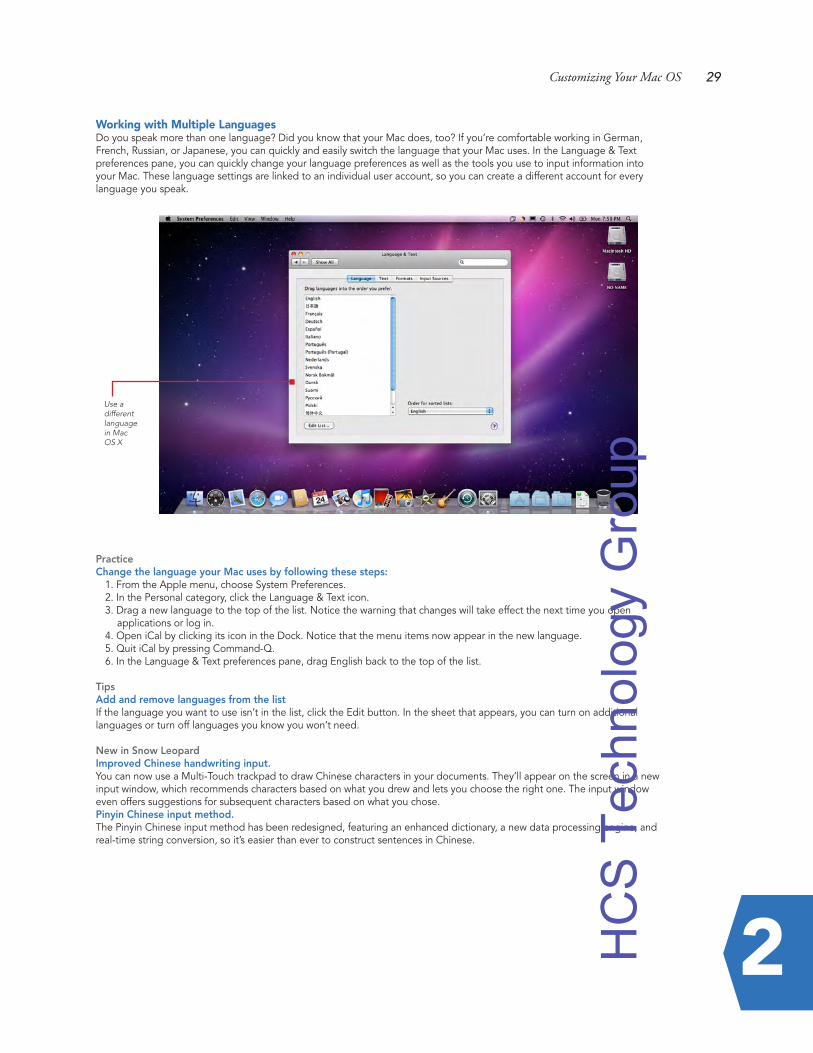
Working with Multiple LanguagesDo you speak more than one language? Did you know that your Mac does, too? If you’re comfortable working in German, French, Russian, or Japanese, you can quickly and easily switch the language that your Mac uses. In the Language & Text preferences pane, you can quickly change your language preferences as well as the tools you use to input information into your Mac. These language settings are linked to an individual user account, so you can create a different account for every language you speak.
PracticeChange the language your Mac uses by following these steps:
1. From the Apple menu, choose System Preferences.2. In the Personal category, click the Language & Text icon.3. Drag a new language to the top of the list. Notice the warning that changes will take effect the next time you open
applications or log in.4. Open iCal by clicking its icon in the Dock. Notice that the menu items now appear in the new language.5. Quit iCal by pressing Command-Q.6. In the Language & Text preferences pane, drag English back to the top of the list.
TipsAdd and remove languages from the listIf the language you want to use isn’t in the list, click the Edit button. In the sheet that appears, you can turn on additional languages or turn off languages you know you won’t need.
New in Snow LeopardImproved Chinese handwriting input.You can now use a Multi-Touch trackpad to draw Chinese characters in your documents. They’ll appear on the screen in a new input window, which recommends characters based on what you drew and lets you choose the right one. The input window even offers suggestions for subsequent characters based on what you chose.Pinyin Chinese input method.The Pinyin Chinese input method has been redesigned, featuring an enhanced dictionary, a new data processing engine, and real-time string conversion, so it’s easier than ever to construct sentences in Chinese.
Use a different language in Mac OS X
HC
S T
echn
olog
y G
roup
30 Getting Started on Mac OS X
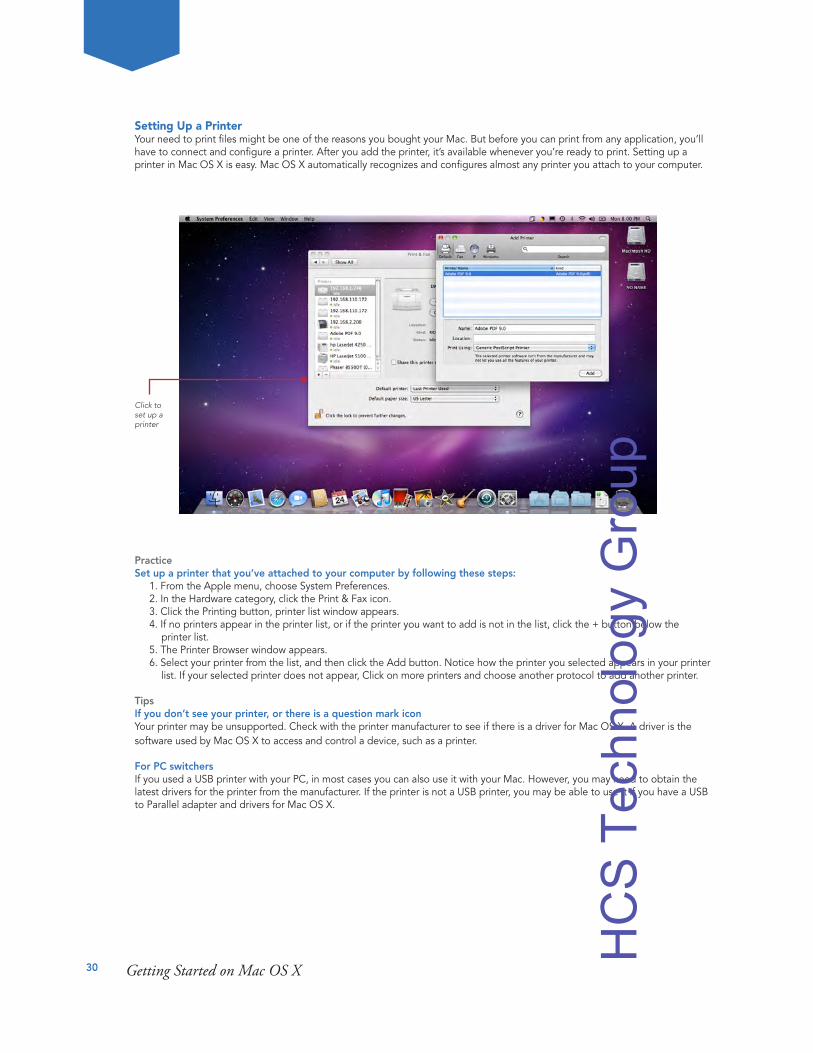
Setting Up a PrinterYour need to print files might be one of the reasons you bought your Mac. But before you can print from any application, you’ll have to connect and configure a printer. After you add the printer, it’s available whenever you’re ready to print. Setting up a printer in Mac OS X is easy. Mac OS X automatically recognizes and configures almost any printer you attach to your computer.
PracticeSet up a printer that you’ve attached to your computer by following these steps:
1. From the Apple menu, choose System Preferences.2. In the Hardware category, click the Print & Fax icon.3. Click the Printing button, printer list window appears.4. If no printers appear in the printer list, or if the printer you want to add is not in the list, click the + button below the
printer list.5. The Printer Browser window appears.6. Select your printer from the list, and then click the Add button. Notice how the printer you selected appears in your printer
list. If your selected printer does not appear, Click on more printers and choose another protocol to add another printer.
TipsIf you don’t see your printer, or there is a question mark iconYour printer may be unsupported. Check with the printer manufacturer to see if there is a driver for Mac OS X. A driver is the software used by Mac OS X to access and control a device, such as a printer.
For PC switchersIf you used a USB printer with your PC, in most cases you can also use it with your Mac. However, you may need to obtain the latest drivers for the printer from the manufacturer. If the printer is not a USB printer, you may be able to use it if you have a USB to Parallel adapter and drivers for Mac OS X.
Click to set up a printer
HC
S T
echn
olog
y G
roup
31
2
Customizing Your Mac OS
ReviewNow it’s time to try out what you’ve learned. If you can accomplish the tasks listed below, you can feel comfortable with your understanding of the topics in this chapter.
Try this... If you need help, see...
Configure the Finder to display the number of items in a folder.
Changing How Files Appear in the Finder on page 18
Label the title of a folder in red, and then sort the contents of your home folder by label.
Using Labels to Keep Your Files Organized on page 20
Move the Dock to the right side of the screen, and then add TextEdit to the Dock.
Customizing the Finder to Meet Your Needs on page 19Adding Frequently Used Items to the Dock on page 22
Change your desktop picture . Changing Your Desktop Picture on page 25
Configure your Mac to use a different language as the primary language.
Working with Multiple Languages on Page 27
HC
S T
echn
olog
y G
roup

HC
S T
echn
olog
y G
roup
Sharing your Mac
With Mac OS X, several users can easily share the same Mac. Because each user can set up an account without worrying that someone else will change the settings, Mac OS X is ideal for coworkers, students, or family members who share a computer. If children or users with special needs use the computer, you can configure Mac OS X to meet their individual needs, too.
What You’ll LearnIn this chapter, you will cover:
•UnderstandingMultipleUsers •GuestUserAccount
•AccessingYourAccountInformation
•CreatingaNewUser
•SimplifyingYourMacforNoviceUsers
•SwitchingBetweenUsers
•SettingupandConfiguringParentalControls
•EnablingVoiceOverforyourComputer
•ConfiguringYourMacforSpecialNeedsUsers
•SharingFilesAmongUsers
•UnderstandingFilePermissions
3
HC
S T
echn
olog
y G
roup
34 Getting Started on Mac OS X
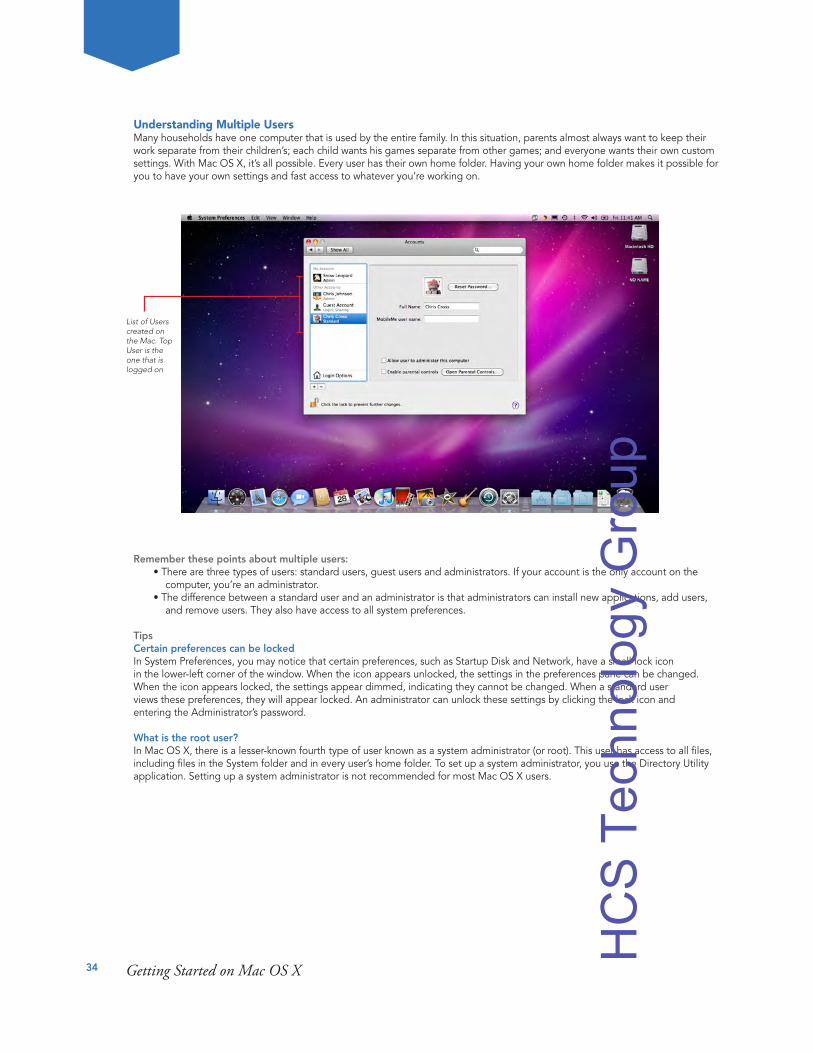
Understanding Multiple UsersMany households have one computer that is used by the entire family. In this situation, parents almost always want to keep their work separate from their children’s; each child wants his games separate from other games; and everyone wants their own custom settings. With Mac OS X, it’s all possible. Every user has their own home folder. Having your own home folder makes it possible for you to have your own settings and fast access to whatever you’re working on.
Remember these points about multiple users:•Therearethreetypesofusers:standardusers,guestusersandadministrators.Ifyouraccountistheonlyaccountonthe
computer, you’re an administrator.•Thedifferencebetweenastandarduserandanadministratoristhatadministratorscaninstallnewapplications,addusers,
and remove users. They also have access to all system preferences.
TipsCertain preferences can be lockedIn System Preferences, you may notice that certain preferences, such as Startup Disk and Network, have a small lock icon in the lower-left corner of the window. When the icon appears unlocked, the settings in the preferences pane can be changed. When the icon appears locked, the settings appear dimmed, indicating they cannot be changed. When a standard user views these preferences, they will appear locked. An administrator can unlock these settings by clicking the lock icon and entering the Administrator’s password.
What is the root user?In Mac OS X, there is a lesser-known fourth type of user known as a system administrator (or root). This user has access to all files, including files in the System folder and in every user’s home folder. To set up a system administrator, you use the Directory Utility application. Setting up a system administrator is not recommended for most Mac OS X users.
List of Users created on the Mac. Top User is the one that is logged on
HC
S T
echn
olog
y G
roup

35
3
Sharing Your Mac
The Guest User Snow Leopard’s Guest account is a separate user account that you can let trusted people, like friends or family, use instead of giving them access to your user account -- which also gives them access to all of your files. Every time someone logs in with you guest account they get a clean Desktop and see everything as if the user was just created. When they log out, any files they created or settings they changed are wiped out, keeping the account clean and fresh for the next guest user that logs in.
Remember these points about Guest Users:•AlldatawillbeerasedonceGuestAccountisloggedout.•GuestsUserscansavedocumentsintotheSharedfolder
TipsYou can enable Parental Controls in the Guest accountParental controls work with the Guest account, so you can limit which applications the account can use, limit Internet access, and impose time restrictions, too. If you don’t want guest users accessing shared folders, be sure to uncheck Allow guests to connect to shared folders
The login window has blank fields in the name and password instead of list of usersIf your login window shows the list of users, just select the Guest user. If the window shows the name and password fields, enter guest in the Name field. The Guest account doesn’t include a password, so don’t worry about entering one
Click on the Check box to activate Guest User Account
HC
S T
echn
olog
y G
roup
36 Getting Started on Mac OS X
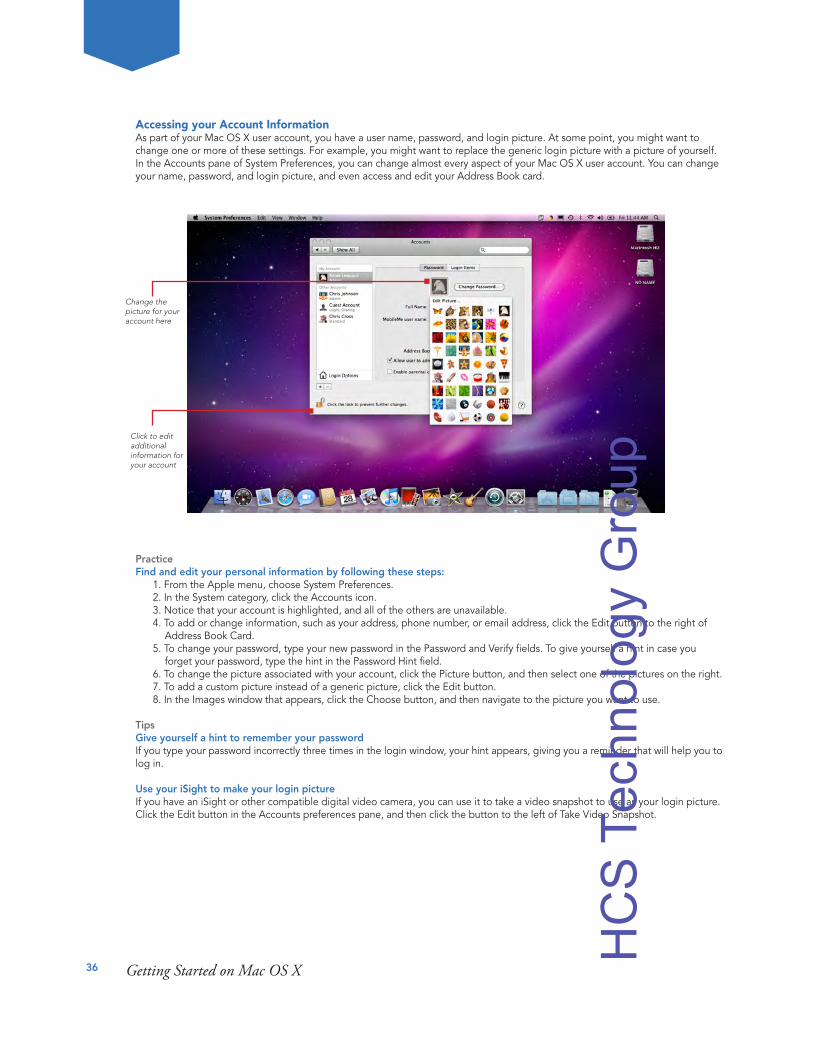
Accessing your Account InformationAs part of your Mac OS X user account, you have a user name, password, and login picture. At some point, you might want to change one or more of these settings. For example, you might want to replace the generic login picture with a picture of yourself. In the Accounts pane of System Preferences, you can change almost every aspect of your Mac OS X user account. You can change your name, password, and login picture, and even access and edit your Address Book card.
PracticeFind and edit your personal information by following these steps:
1. From the Apple menu, choose System Preferences.2. In the System category, click the Accounts icon.3. Notice that your account is highlighted, and all of the others are unavailable.4. To add or change information, such as your address, phone number, or email address, click the Edit button to the right of
Address Book Card.5. To change your password, type your new password in the Password and Verify fields. To give yourself a hint in case you
forget your password, type the hint in the Password Hint field.6. To change the picture associated with your account, click the Picture button, and then select one of the pictures on the right.7. To add a custom picture instead of a generic picture, click the Edit button.8. In the Images window that appears, click the Choose button, and then navigate to the picture you want to use.
TipsGive yourself a hint to remember your passwordIf you type your password incorrectly three times in the login window, your hint appears, giving you a reminder that will help you to log in.
Use your iSight to make your login pictureIf you have an iSight or other compatible digital video camera, you can use it to take a video snapshot to use as your login picture. Click the Edit button in the Accounts preferences pane, and then click the button to the left of Take Video Snapshot.
Click to edit additional information for your account
Change the picture for your account here
HC
S T
echn
olog
y G
roup

37
3
Sharing Your Mac
Creating a New UserIf you want to share your Mac with others, but don’t want them to use your account, you’ll need to create other user accounts. In the Accounts preferences pane, not only can you access and change your own information, but you can also create new user accounts. By setting up new users, you control who has access to your computer, keep their work separate from your own, and even customize their accounts to suit their needs.
PracticeAdd a new user to your Mac by following these steps:
1. From the Apple menu, choose System Preferences.2. In the System category, click the Accounts icon.3. Click the plus sign (+) button in the lower-left corner of the window.4. Enter a name and password for the user you’re adding.5. Notice how Mac OS X fills in the short name for you. You can change the short name if you want to.6. Click the Picture button, and then select a new picture.7. Notice that the new user appears in the list of users on the left.
TipIf you can’t create a new userWhen the Accounts preferences pane is locked, you have access to only your own account information. You’re unable to create or edit other user accounts while the preference is locked. To unlock the window, you’ll need an administrator user name and password.
Create additional administrator usersAdministrators can install applications and change system preferences, as well as create and delete other users. If you want a new user to be able to administer the computer, select the “Administrator” option from the pull down menu.
Standard and Managed usersStandard account lets the user work with the Mac freely, install applications in his or her Home folder and modify some benign System Preferences settings. You can restrict an account further by applying parental controls. These accounts are called managed accounts. You can choose exactly which applications managed users can run and which tasks they can perform in the Finder.
New in Snow LeopardTimer for managed accounts.Parentally controlled accounts with time limits now have a conveniently located timer in the menu bar showing the amount of time remaining.
Use these buttons to create or delete a user
HC
S T
echn
olog
y G
roup
38 Getting Started on Mac OS X
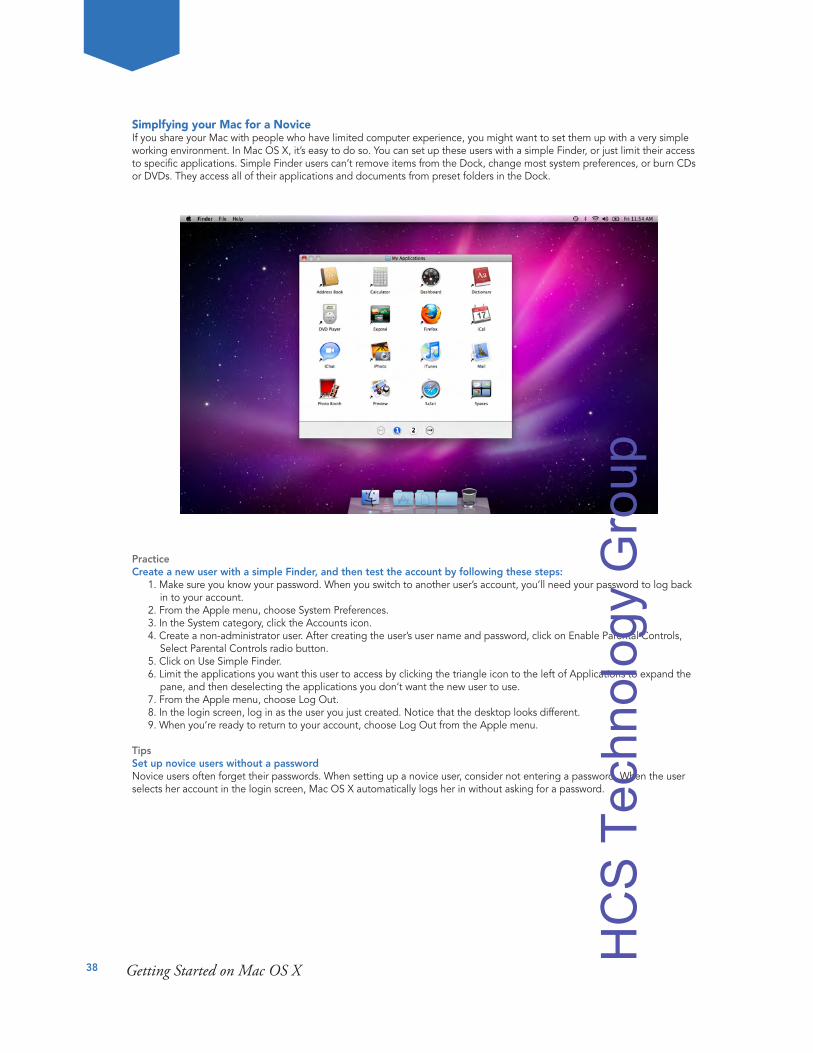
Simplfying your Mac for a NoviceIf you share your Mac with people who have limited computer experience, you might want to set them up with a very simple working environment. In Mac OS X, it’s easy to do so. You can set up these users with a simple Finder, or just limit their access to specific applications. Simple Finder users can’t remove items from the Dock, change most system preferences, or burn CDs or DVDs. They access all of their applications and documents from preset folders in the Dock.
PracticeCreate a new user with a simple Finder, and then test the account by following these steps:
1. Make sure you know your password. When you switch to another user’s account, you’ll need your password to log back in to your account.
2. From the Apple menu, choose System Preferences.3. In the System category, click the Accounts icon.4. Create a non-administrator user. After creating the user’s user name and password, click on Enable Parental Controls,
Select Parental Controls radio button.5. Click on Use Simple Finder.6. Limit the applications you want this user to access by clicking the triangle icon to the left of Applications to expand the
pane, and then deselecting the applications you don’t want the new user to use.7. From the Apple menu, choose Log Out.8. In the login screen, log in as the user you just created. Notice that the desktop looks different.9. When you’re ready to return to your account, choose Log Out from the Apple menu.
TipsSet up novice users without a passwordNovice users often forget their passwords. When setting up a novice user, consider not entering a password. When the user selects her account in the login screen, Mac OS X automatically logs her in without asking for a password.
HC
S T
echn
olog
y G
roup

39
3
Sharing Your Mac
Switching Between UsersWhen working with your Mac, have you found that others frequently want to use it “just for a moment?” With Mac OS X, you can let other users log in to their accounts without having to close what you’re working on. In Mac OS X, switching between users without logging out is known as “fast user switching.” Fast user switching is easy to set up and even easier to use.
PracticeSet up fast user switching and switch between users by following these steps:
1. From the Apple menu, choose System Preferences.2. In the System category, click the Accounts icon.3. Click the Login Options button below the list of accounts.4. Select the “Enable fast user switching” option. Notice that your name appears in the menu bar.5. Click your name in the menu bar, and then choose Login Window.6. Notice the icon to the left of your name in the login window. This means that you are logged in.7. Click your name in the login window, and then enter your password to return to your account.
TipsIf you can’t shut down or restart your MacIf you use fast user switching, you might find that you can’t shut down or restart your Mac because another user is logged in and has one or more applications open. To shut down or restart your Mac, you’ll need an administrator password.
Quickly switch between users without logging out
HC
S T
echn
olog
y G
roup
40 Getting Started on Mac OS X
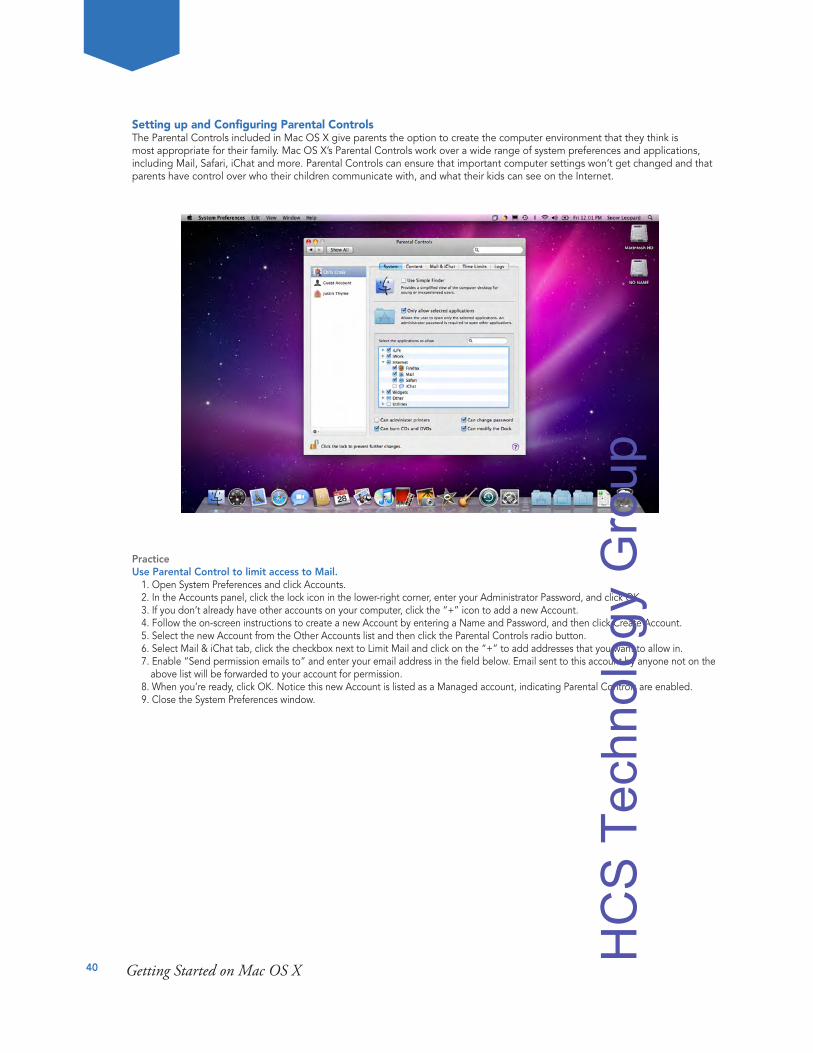
Setting up and Configuring Parental ControlsThe Parental Controls included in Mac OS X give parents the option to create the computer environment that they think is most appropriate for their family. Mac OS X’s Parental Controls work over a wide range of system preferences and applications, including Mail, Safari, iChat and more. Parental Controls can ensure that important computer settings won’t get changed and that parents have control over who their children communicate with, and what their kids can see on the Internet.
PracticeUse Parental Control to limit access to Mail.
1. Open System Preferences and click Accounts.2. In the Accounts panel, click the lock icon in the lower-right corner, enter your Administrator Password, and click OK.3. If you don’t already have other accounts on your computer, click the “+” icon to add a new Account.4. Follow the on-screen instructions to create a new Account by entering a Name and Password, and then click Create Account.5. Select the new Account from the Other Accounts list and then click the Parental Controls radio button.6. Select Mail & iChat tab, click the checkbox next to Limit Mail and click on the “+” to add addresses that you want to allow in.7. Enable “Send permission emails to” and enter your email address in the field below. Email sent to this account by anyone not on the
above list will be forwarded to your account for permission.8. When you’re ready, click OK. Notice this new Account is listed as a Managed account, indicating Parental Controls are enabled.9. Close the System Preferences window.
HC
S T
echn
olog
y G
roup

41
3
Sharing Your Mac
Setting up and Configuring Parental Controls
PracticeTo set limits on computer use
1. Choose Apple menu > System Preferences and click Parental Controls.2. Click the lock icon to unlock it, and then enter an administrator name and password.3. Select the account you want to limit, and then click Time Limits.4. To set a maximum amount of time that the computer can be used during the week (Monday
through Friday), select the “Limit computer use to” checkbox under “Weekday time limits,” and then drag the slider to adjust the number of hours per day the computer can be used.
5. To set a maximum amount of time that the computer can be used during the weekend, select the “Limit computer use to” checkbox under“Weekend time limits,” and then drag the slider to adjust the number of hours per day the computer can be used.
6. To restrict computer use on evenings prior to a weekday (Sunday night through Thursday night), select the “School nights” checkbox under Bedtime and then use the up and down arrows to specify the time during which computer use is blocked.
7. To restrict computer use on Friday night and Saturday night, select the Weekend checkbox under Bedtime and then use the up and down arrows to specify the time during which computer use is blocked.
Parental Controls for iChat1. Choose Apple menu > System Preferences and click Parental Controls.2. Click the lock icon to unlock it, and then type an administrator name and password.3. Select the account you want to limit, and then click Mail & iChat.4. Select “Limit iChat.”5. To allow the user to request permission to exchange messages with someone who’s not on
the list, select “Send permission requests to” and enter the email address of a parent or administrator who can approve or reject the request.
6. To specify the people that the user can exchange messages with, click the Add (+) button and enter the person. Repeat this step for each person you want to add.
Block inappropriate Internet content from a user1. Choose Apple menu > System Preferences and click Parental Controls.2. Click the lock icon to unlock it, and then enter an administrator name and password.3. Select an account in the list of accounts, and then click Content.4. In the Website Restrictions section, select the Internet restrictions you want for Safari.
a. To allow Safari to access Internet content without filtering, select “Allow unrestricted access to websites.”
b. To filter inappropriate Internet content or websites, select “Try to limit access to adult websites automatically.” To adjust how the filter works, and allow or restrict specific sites, click Customize. For more information on adjusting the filter, click the Help button (labeled with a question mark.)
c. Select “Allow access to only these websites” to limit Safari to accessing specific websites that you select.
Parental Controls for Dictionary1. Choose Apple menu > System Preferences, and click Parental Controls.2. Click the lock icon to unlock it, and then enter an administrator name and password.3. Select an account in the list of accounts, and then click Content.4. Select the “Hide profanity in Dictionary” checkbox.
HC
S T
echn
olog
y G
roup

42 Getting Started on Mac OS X
Enabling VoiceOver for Your ComputerVoiceOver is a spoken English interface that enhances the Universal Access capabilities of Mac OS X. VoiceOver provides a new way for the visually impaired to access their Mac through speech, audible cues, and keyboard navigation. When you enable VoiceOver, your computer will speak audio cues to help you navigate your computer. As your pointer passes over an interface item, your computer will tell you exactly what that item is. When you need an email message or web page read aloud to you, VoiceOver can do that as well.
PracticeEnable VoiceOver and have it read text.
1. Go to System Preferences and click Universal Access.2. In the Universal Access Pane, click the Seeing tab.3. In the VoiceOver section, click the On radio button.4. Close the System Preferences window.5. Open a TextEdit document and have VoiceOver read the document, and menus for you by pressing the Control, Option
and left arrow keys on your keyboard.
TipsUsing keyboard commandsKeyboard commands in VoiceOver are activated by pressing Control and Option, while pressing another key, usually one of the function keys. You can find a list of all VoiceOver commands in the VoiceOver Help menu.
Navigating the system using VoiceOverWhen you press Control-Option, and then use the arrow keys, you can navigate to a different area on the screen. With Full Keyboard Access, you can also use the Tab key to go to the next item, and then press Shift-Tab to go back to the previous item. In groups of buttons, you can use the left and right arrow keys to select the button you want.
Selecting checkboxes and buttonsWhen you need to select a checkbox or click a button in VoiceOver, you can use your keyboard by pressing Control-Option-Space bar. These keys will also let you deselect a checkbox and open a pop-up menu.
What is the VoiceOver cursor?When you enable VoiceOver, a box will be displayed around the area where your keyboard or cursor is focused. Your computer will read the text displayed in that area, which is known as the VoiceOver cursor.
Additional text reading optionsWhen you want to read all text in the VoiceOver cursor, press Control-Option-A. If you want VoiceOver to read just a character at a time, press Control-Option-C. Press Control-Option-W to read a word at a time, Control-Option-S for a sentence at a time, and Control-Option-P for a paragraph at a time. HC
S T
echn
olog
y G
roup
43
3
Sharing Your Mac
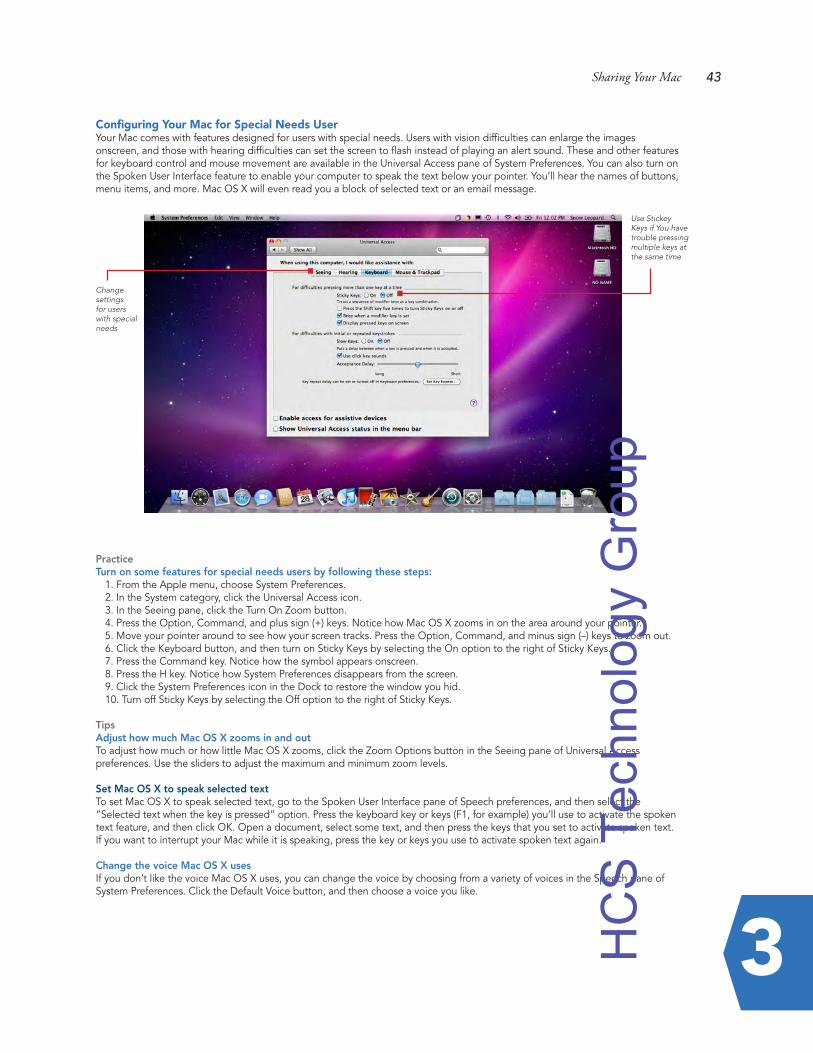
Configuring Your Mac for Special Needs UserYour Mac comes with features designed for users with special needs. Users with vision difficulties can enlarge the images onscreen, and those with hearing difficulties can set the screen to flash instead of playing an alert sound. These and other features for keyboard control and mouse movement are available in the Universal Access pane of System Preferences. You can also turn on the Spoken User Interface feature to enable your computer to speak the text below your pointer. You’ll hear the names of buttons, menu items, and more. Mac OS X will even read you a block of selected text or an email message.
PracticeTurn on some features for special needs users by following these steps:
1. From the Apple menu, choose System Preferences.2. In the System category, click the Universal Access icon.3. In the Seeing pane, click the Turn On Zoom button.4. Press the Option, Command, and plus sign (+) keys. Notice how Mac OS X zooms in on the area around your pointer.5. Move your pointer around to see how your screen tracks. Press the Option, Command, and minus sign (–) keys to zoom out.6. Click the Keyboard button, and then turn on Sticky Keys by selecting the On option to the right of Sticky Keys.7. Press the Command key. Notice how the symbol appears onscreen.8. Press the H key. Notice how System Preferences disappears from the screen.9. Click the System Preferences icon in the Dock to restore the window you hid.10. Turn off Sticky Keys by selecting the Off option to the right of Sticky Keys.
TipsAdjust how much Mac OS X zooms in and outTo adjust how much or how little Mac OS X zooms, click the Zoom Options button in the Seeing pane of Universal Access preferences. Use the sliders to adjust the maximum and minimum zoom levels.
Set Mac OS X to speak selected textTo set Mac OS X to speak selected text, go to the Spoken User Interface pane of Speech preferences, and then select the “Selected text when the key is pressed” option. Press the keyboard key or keys (F1, for example) you’ll use to activate the spoken text feature, and then click OK. Open a document, select some text, and then press the keys that you set to activate spoken text. If you want to interrupt your Mac while it is speaking, press the key or keys you use to activate spoken text again.
Change the voice Mac OS X usesIf you don’t like the voice Mac OS X uses, you can change the voice by choosing from a variety of voices in the Speech pane of System Preferences. Click the Default Voice button, and then choose a voice you like.
Use Stickey Keys if You have trouble pressing multiple keys at the same time
Change settings for users with special needs
HC
S T
echn
olog
y G
roup
44 Getting Started on Mac OS X
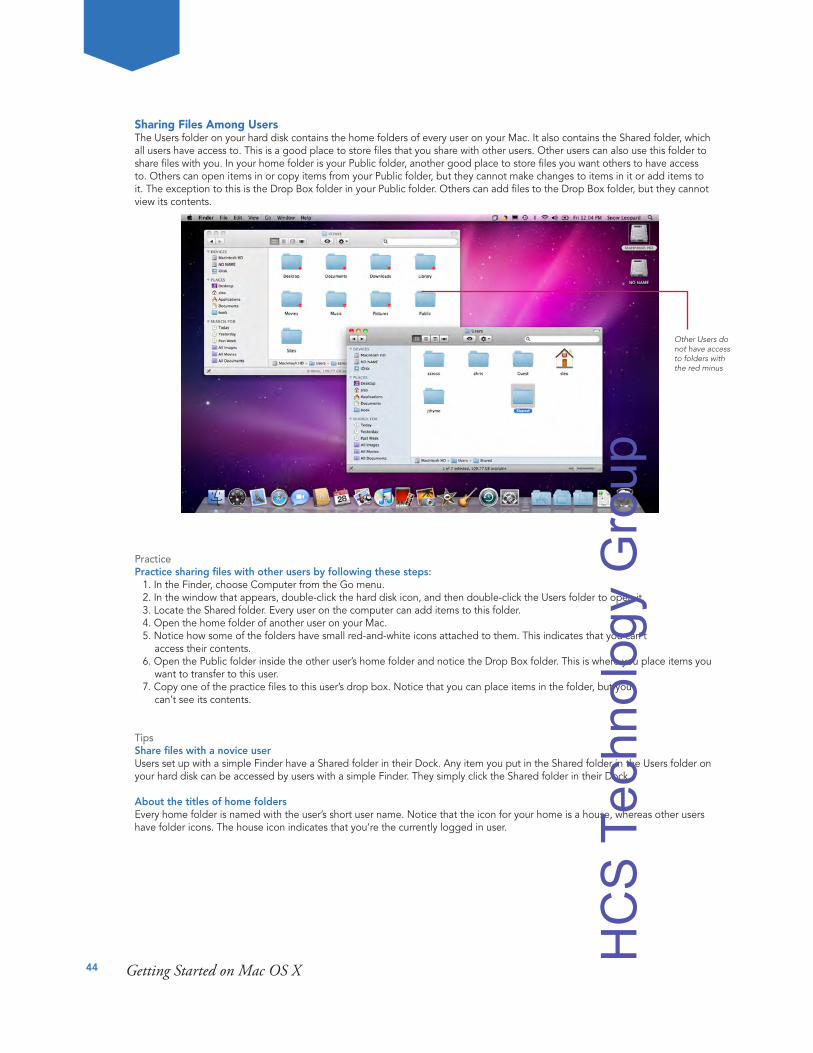
Sharing Files Among UsersThe Users folder on your hard disk contains the home folders of every user on your Mac. It also contains the Shared folder, which all users have access to. This is a good place to store files that you share with other users. Other users can also use this folder to share files with you. In your home folder is your Public folder, another good place to store files you want others to have access to. Others can open items in or copy items from your Public folder, but they cannot make changes to items in it or add items to it. The exception to this is the Drop Box folder in your Public folder. Others can add files to the Drop Box folder, but they cannot view its contents.
PracticePractice sharing files with other users by following these steps:
1. In the Finder, choose Computer from the Go menu.2. In the window that appears, double-click the hard disk icon, and then double-click the Users folder to open it.3. Locate the Shared folder. Every user on the computer can add items to this folder.4. Open the home folder of another user on your Mac.5. Notice how some of the folders have small red-and-white icons attached to them. This indicates that you can’t
access their contents.6. Open the Public folder inside the other user’s home folder and notice the Drop Box folder. This is where you place items you
want to transfer to this user.7. Copy one of the practice files to this user’s drop box. Notice that you can place items in the folder, but you
can’t see its contents.
TipsShare files with a novice userUsers set up with a simple Finder have a Shared folder in their Dock. Any item you put in the Shared folder in the Users folder on your hard disk can be accessed by users with a simple Finder. They simply click the Shared folder in their Dock.
About the titles of home foldersEvery home folder is named with the user’s short user name. Notice that the icon for your home is a house, whereas other users have folder icons. The house icon indicates that you’re the currently logged in user.
Other Users do not have access to folders with the red minus
HC
S T
echn
olog
y G
roup
45
3
Sharing Your Mac
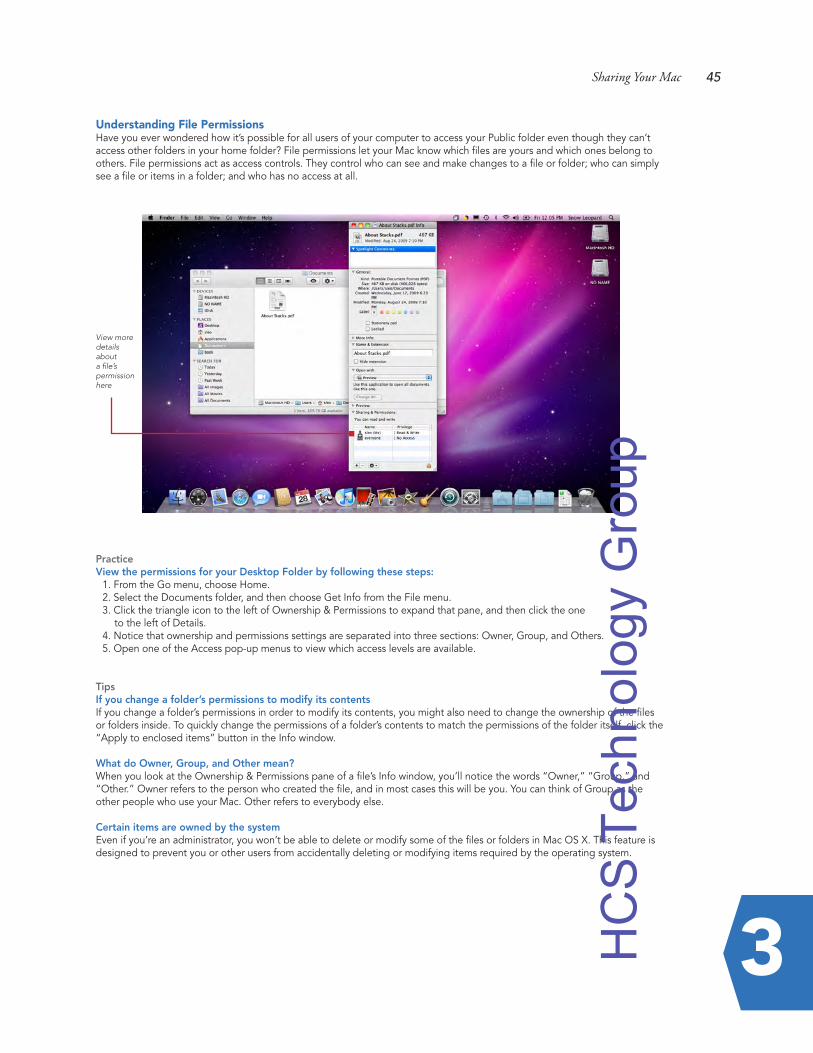
Understanding File PermissionsHave you ever wondered how it’s possible for all users of your computer to access your Public folder even though they can’t access other folders in your home folder? File permissions let your Mac know which files are yours and which ones belong to others. File permissions act as access controls. They control who can see and make changes to a file or folder; who can simply see a file or items in a folder; and who has no access at all.
Practice View the permissions for your Desktop Folder by following these steps:
1. From the Go menu, choose Home.2. Select the Documents folder, and then choose Get Info from the File menu.3. Click the triangle icon to the left of Ownership & Permissions to expand that pane, and then click the one
to the left of Details.4. Notice that ownership and permissions settings are separated into three sections: Owner, Group, and Others.5. Open one of the Access pop-up menus to view which access levels are available.
TipsIf you change a folder’s permissions to modify its contentsIf you change a folder’s permissions in order to modify its contents, you might also need to change the ownership of the files or folders inside. To quickly change the permissions of a folder’s contents to match the permissions of the folder itself, click the “Apply to enclosed items” button in the Info window.
What do Owner, Group, and Other mean?When you look at the Ownership & Permissions pane of a file’s Info window, you’ll notice the words “Owner,” “Group,” and “Other.” Owner refers to the person who created the file, and in most cases this will be you. You can think of Group as the other people who use your Mac. Other refers to everybody else.
Certain items are owned by the systemEven if you’re an administrator, you won’t be able to delete or modify some of the files or folders in Mac OS X. This feature is designed to prevent you or other users from accidentally deleting or modifying items required by the operating system.
View more details about a file’s permission here
HC
S T
echn
olog
y G
roup
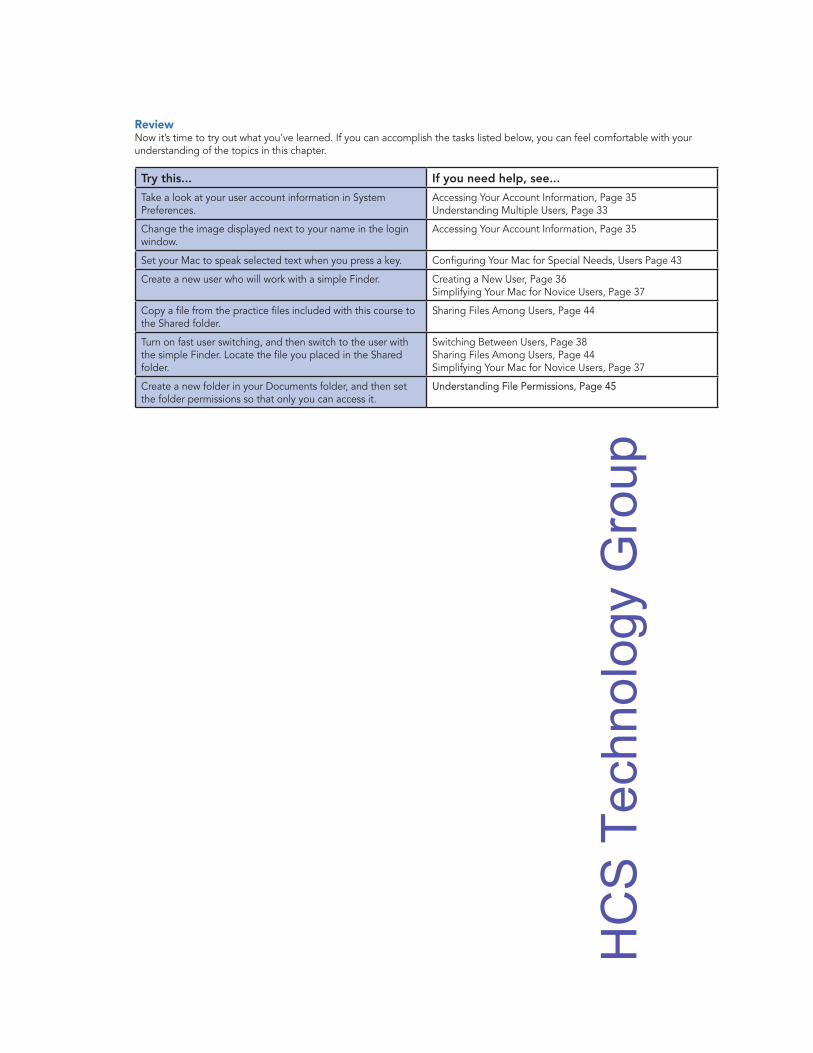
ReviewNow it’s time to try out what you’ve learned. If you can accomplish the tasks listed below, you can feel comfortable with your understanding of the topics in this chapter.
Try this... If you need help, see...
Take a look at your user account information in System Preferences.
Accessing Your Account Information, Page 35Understanding Multiple Users, Page 33
Change the image displayed next to your name in the login window.
Accessing Your Account Information, Page 35
Set your Mac to speak selected text when you press a key. Configuring Your Mac for Special Needs, Users Page 43
Create a new user who will work with a simple Finder. Creating a New User, Page 36Simplifying Your Mac for Novice Users, Page 37
Copy a file from the practice files included with this course to the Shared folder.
Sharing Files Among Users, Page 44
Turn on fast user switching, and then switch to the user with the simple Finder. Locate the file you placed in the Shared folder.
Switching Between Users, Page 38Sharing Files Among Users, Page 44Simplifying Your Mac for Novice Users, Page 37
Create a new folder in your Documents folder, and then set the folder permissions so that only you can access it.
Understanding File Permissions, Page 45
HC
S T
echn
olog
y G
roup
Working with ApplicationsApplications are among the most important parts of your Mac. Today, there are literally thousands of applications available for Mac OS X. In addition to applications written for Mac OS X, your Mac can run applications written for Windows.
What You’ll LearnIn this chapter, you will cover:
•UsingApplications
•WorkingwithApplicationPreferences
•SavingFiles
•OpeningaFilewithAnotherApplication
•ForcinganApplicationtoQuit
4
HC
S T
echn
olog
y G
roup
48 Getting Started on Mac OS X
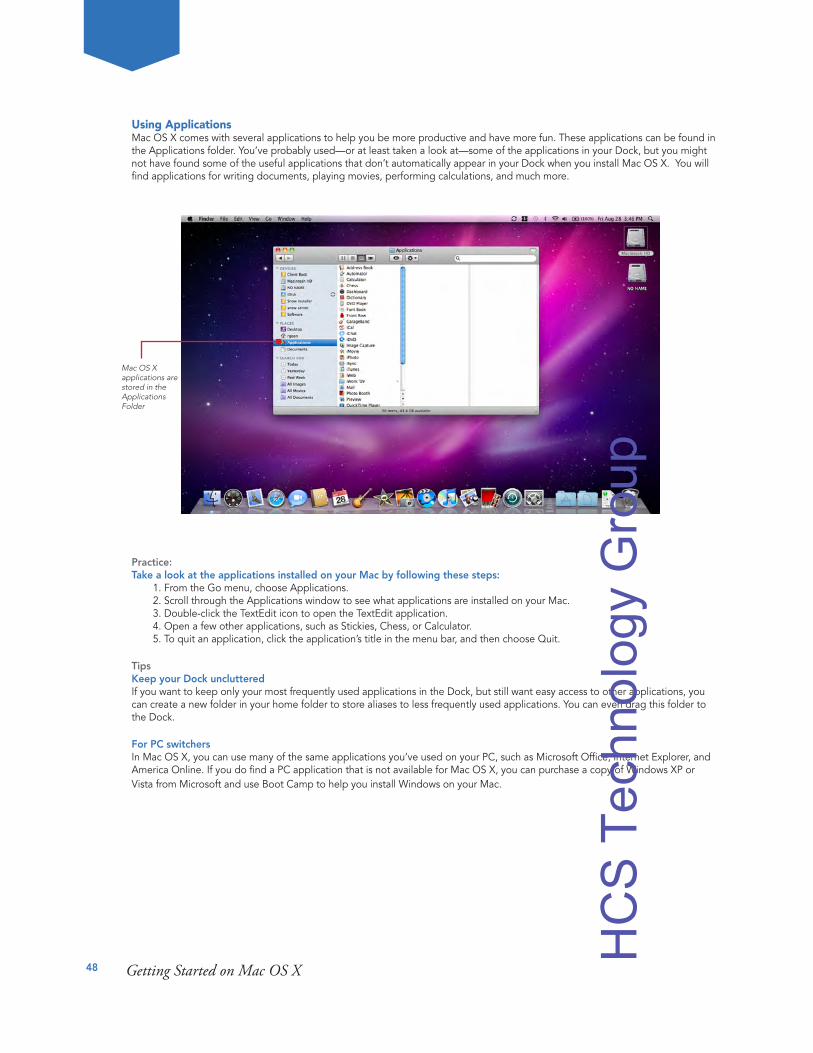
Using ApplicationsMac OS X comes with several applications to help you be more productive and have more fun. These applications can be found in the Applications folder. You’ve probably used—or at least taken a look at—some of the applications in your Dock, but you might not have found some of the useful applications that don’t automatically appear in your Dock when you install Mac OS X. You will find applications for writing documents, playing movies, performing calculations, and much more.
Practice:Take a look at the applications installed on your Mac by following these steps:
1. From the Go menu, choose Applications.2. Scroll through the Applications window to see what applications are installed on your Mac.3. Double-click the TextEdit icon to open the TextEdit application.4. Open a few other applications, such as Stickies, Chess, or Calculator.5. To quit an application, click the application’s title in the menu bar, and then choose Quit.
TipsKeep your Dock unclutteredIf you want to keep only your most frequently used applications in the Dock, but still want easy access to other applications, you can create a new folder in your home folder to store aliases to less frequently used applications. You can even drag this folder to the Dock.
For PC switchersIn Mac OS X, you can use many of the same applications you’ve used on your PC, such as Microsoft Office, Internet Explorer, and America Online. If you do find a PC application that is not available for Mac OS X, you can purchase a copy of Windows XP or Vista from Microsoft and use Boot Camp to help you install Windows on your Mac.
Mac OS X applications are stored in the Applications Folder
HC
S T
echn
olog
y G
roup
49
4
Working with Applications
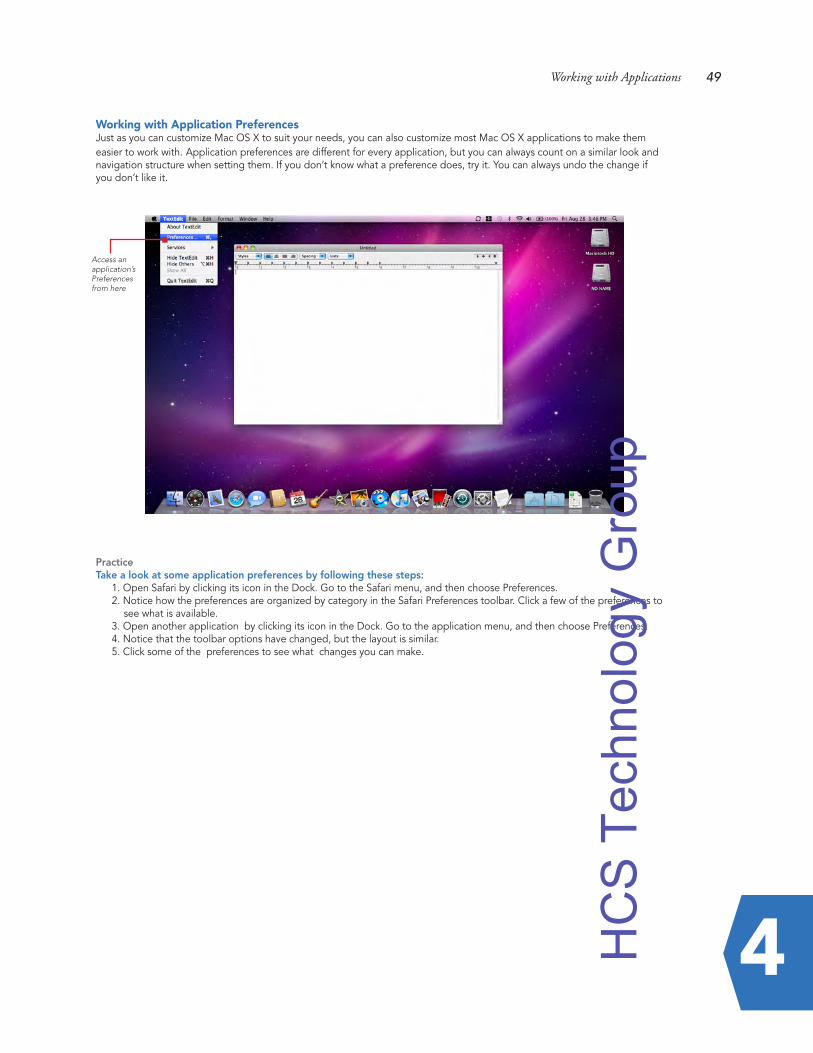
Working with Application PreferencesJust as you can customize Mac OS X to suit your needs, you can also customize most Mac OS X applications to make them easier to work with. Application preferences are different for every application, but you can always count on a similar look and navigation structure when setting them. If you don’t know what a preference does, try it. You can always undo the change if you don’t like it.
PracticeTake a look at some application preferences by following these steps:
1. Open Safari by clicking its icon in the Dock. Go to the Safari menu, and then choose Preferences.2. Notice how the preferences are organized by category in the Safari Preferences toolbar. Click a few of the preferences to
see what is available.3. Open another application by clicking its icon in the Dock. Go to the application menu, and then choose Preferences.4. Notice that the toolbar options have changed, but the layout is similar.5. Click some of the preferences to see what changes you can make.
Access an application’s Preferences from here
HC
S T
echn
olog
y G
roup
50 Getting Started on Mac OS X
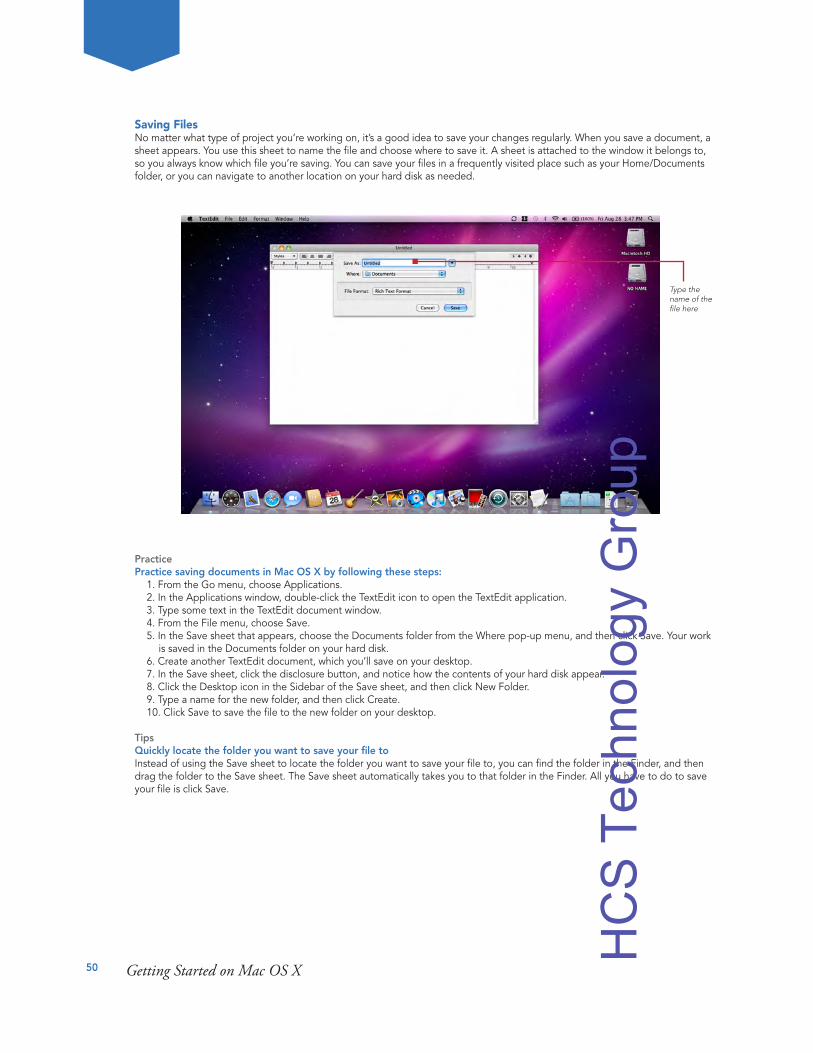
Saving FilesNo matter what type of project you’re working on, it’s a good idea to save your changes regularly. When you save a document, a sheet appears. You use this sheet to name the file and choose where to save it. A sheet is attached to the window it belongs to, so you always know which file you’re saving. You can save your files in a frequently visited place such as your Home/Documents folder, or you can navigate to another location on your hard disk as needed.
PracticePractice saving documents in Mac OS X by following these steps:
1. From the Go menu, choose Applications.2. In the Applications window, double-click the TextEdit icon to open the TextEdit application.3. Type some text in the TextEdit document window.4. From the File menu, choose Save.5. In the Save sheet that appears, choose the Documents folder from the Where pop-up menu, and then click Save. Your work
is saved in the Documents folder on your hard disk.6. Create another TextEdit document, which you’ll save on your desktop.7. In the Save sheet, click the disclosure button, and notice how the contents of your hard disk appear.8. Click the Desktop icon in the Sidebar of the Save sheet, and then click New Folder.9. Type a name for the new folder, and then click Create.10. Click Save to save the file to the new folder on your desktop.
TipsQuickly locate the folder you want to save your file toInstead of using the Save sheet to locate the folder you want to save your file to, you can find the folder in the Finder, and then drag the folder to the Save sheet. The Save sheet automatically takes you to that folder in the Finder. All you have to do to save your file is click Save.
Type the name of the file here
HC
S T
echn
olog
y G
roup
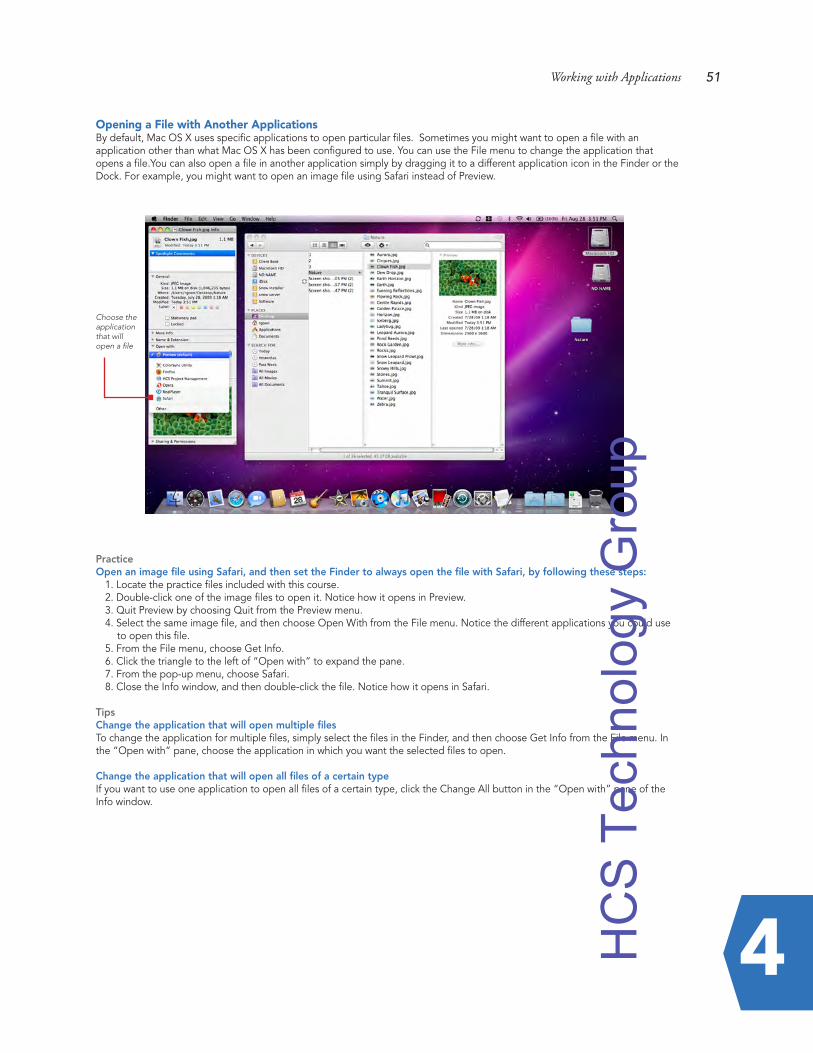
51
4
Working with Applications
Opening a File with Another ApplicationsBy default, Mac OS X uses specific applications to open particular files. Sometimes you might want to open a file with an application other than what Mac OS X has been configured to use. You can use the File menu to change the application that opens a file.You can also open a file in another application simply by dragging it to a different application icon in the Finder or the Dock. For example, you might want to open an image file using Safari instead of Preview.
PracticeOpen an image file using Safari, and then set the Finder to always open the file with Safari, by following these steps:
1. Locate the practice files included with this course.2. Double-click one of the image files to open it. Notice how it opens in Preview.3. Quit Preview by choosing Quit from the Preview menu.4. Select the same image file, and then choose Open With from the File menu. Notice the different applications you could use
to open this file.5. From the File menu, choose Get Info.6. Click the triangle to the left of “Open with” to expand the pane.7. From the pop-up menu, choose Safari.8. Close the Info window, and then double-click the file. Notice how it opens in Safari.
TipsChange the application that will open multiple filesTo change the application for multiple files, simply select the files in the Finder, and then choose Get Info from the File menu. In the “Open with” pane, choose the application in which you want the selected files to open.
Change the application that will open all files of a certain typeIf you want to use one application to open all files of a certain type, click the Change All button in the “Open with” pane of the Info window.
Choose the application that will open a file
HC
S T
echn
olog
y G
roup
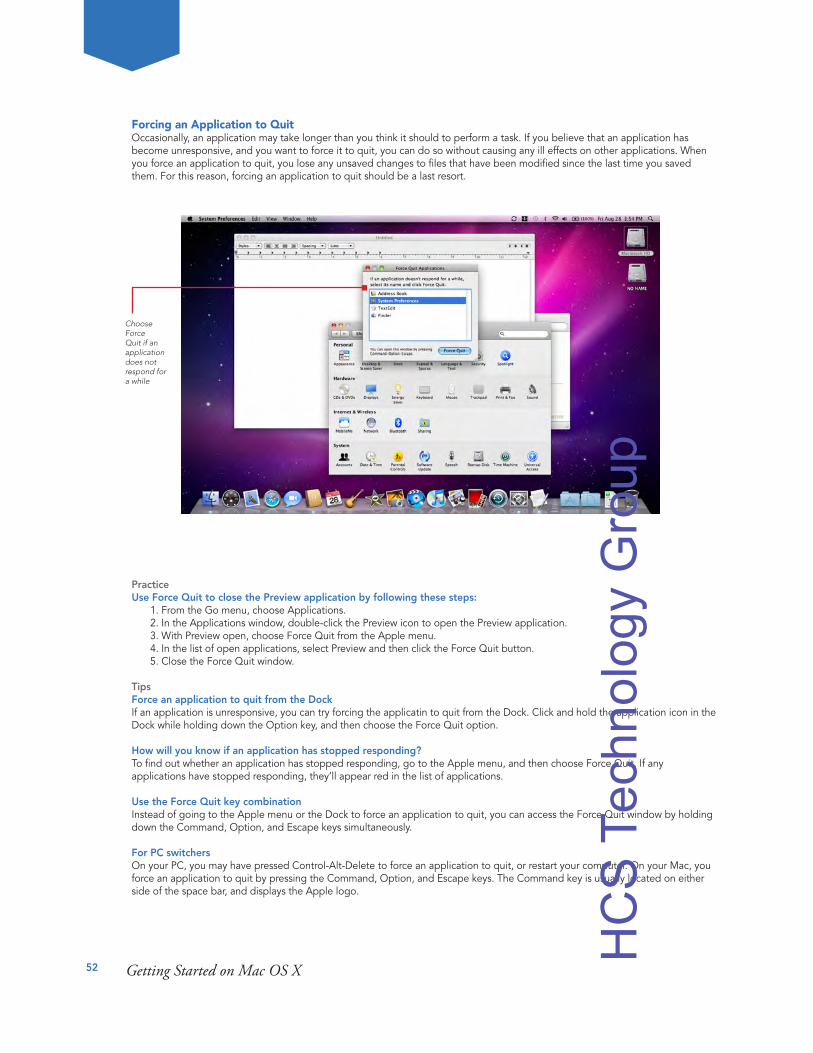
52 Getting Started on Mac OS X
Forcing an Application to QuitOccasionally, an application may take longer than you think it should to perform a task. If you believe that an application has become unresponsive, and you want to force it to quit, you can do so without causing any ill effects on other applications. When you force an application to quit, you lose any unsaved changes to files that have been modified since the last time you saved them. For this reason, forcing an application to quit should be a last resort.
PracticeUse Force Quit to close the Preview application by following these steps:
1. From the Go menu, choose Applications.2. In the Applications window, double-click the Preview icon to open the Preview application.3. With Preview open, choose Force Quit from the Apple menu.4. In the list of open applications, select Preview and then click the Force Quit button.5. Close the Force Quit window.
TipsForce an application to quit from the DockIf an application is unresponsive, you can try forcing the applicatin to quit from the Dock. Click and hold the application icon in the Dock while holding down the Option key, and then choose the Force Quit option.
How will you know if an application has stopped responding?To find out whether an application has stopped responding, go to the Apple menu, and then choose Force Quit. If any applications have stopped responding, they’ll appear red in the list of applications.
Use the Force Quit key combinationInstead of going to the Apple menu or the Dock to force an application to quit, you can access the Force Quit window by holding down the Command, Option, and Escape keys simultaneously.
For PC switchersOn your PC, you may have pressed Control-Alt-Delete to force an application to quit, or restart your computer. On your Mac, you force an application to quit by pressing the Command, Option, and Escape keys. The Command key is usually located on either side of the space bar, and displays the Apple logo.
Choose Force Quit if an application does not respond for a while
HC
S T
echn
olog
y G
roup
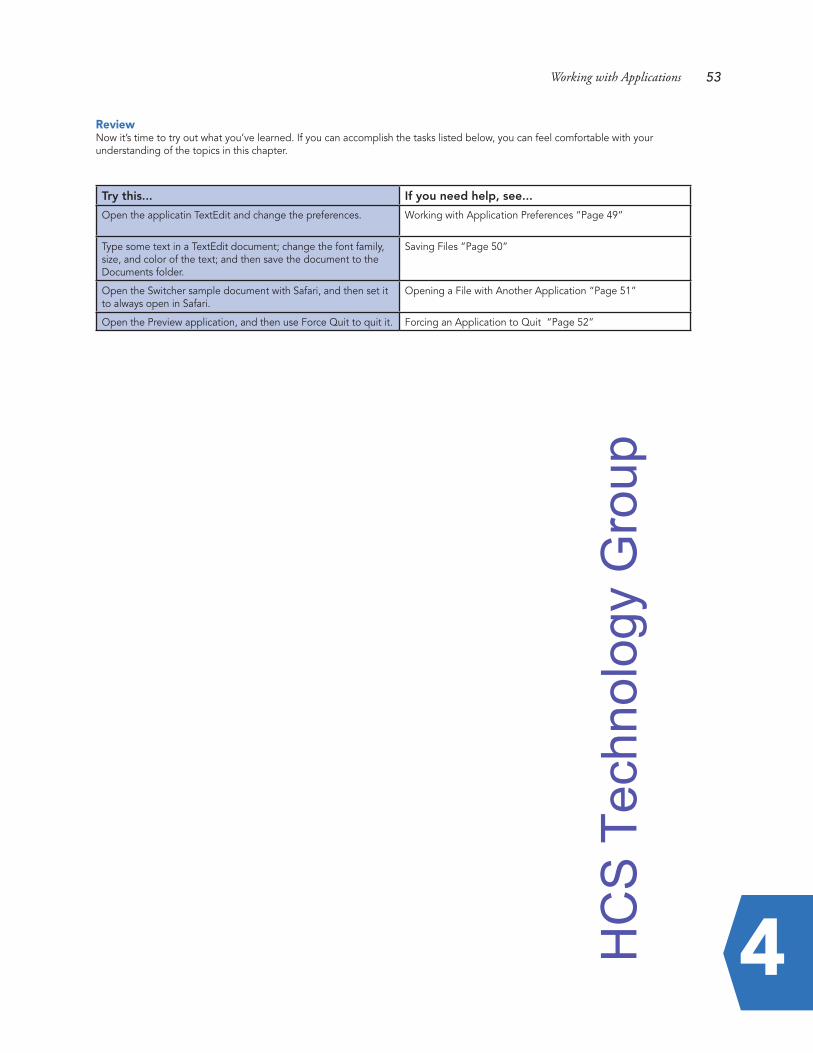
53
4
Working with Applications
ReviewNow it’s time to try out what you’ve learned. If you can accomplish the tasks listed below, you can feel comfortable with your understanding of the topics in this chapter.
Try this... If you need help, see...
Open the applicatin TextEdit and change the preferences. Working with Application Preferences “Page 49”
Type some text in a TextEdit document; change the font family, size, and color of the text; and then save the document to the Documents folder.
Saving Files “Page 50”
Open the Switcher sample document with Safari, and then set it to always open in Safari.
Opening a File with Another Application “Page 51”
Open the Preview application, and then use Force Quit to quit it. Forcing an Application to Quit “Page 52”
HC
S T
echn
olog
y G
roup

HC
S T
echn
olog
y G
roup
Managing Multiple Tasks
Performing multiple tasks at the same time can help you be more productive, and Mac OS X makes it easy to do so. You can run multiple applications at once, switch between those applications, and even work more efficiently by using applications within other applications.
What You’ll LearnIn this chapter, you will cover:
•Hiding,Showing,andMinimizingWindows
•MovingBetweenApplications
•UsingExposétoFindItemsonaBusyDesktop
•MovingDataBetweenApplications
5
HC
S T
echn
olog
y G
roup
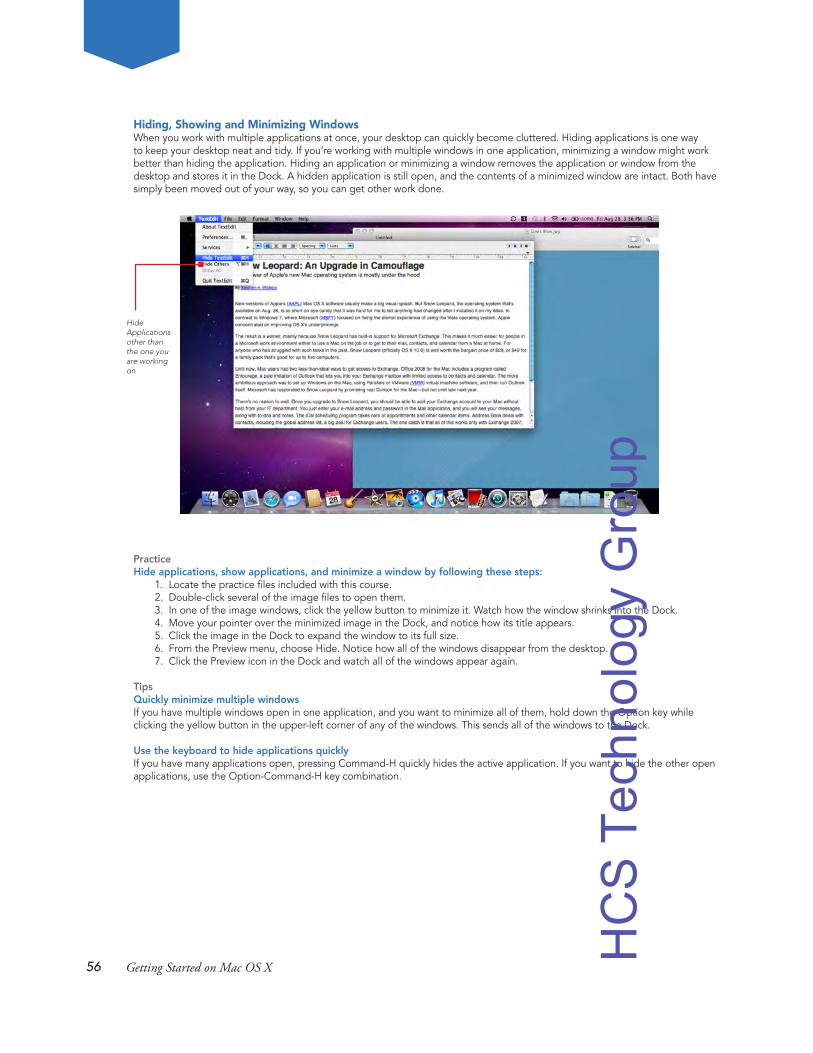
56 Getting Started on Mac OS X
Hiding, Showing and Minimizing WindowsWhen you work with multiple applications at once, your desktop can quickly become cluttered. Hiding applications is one way to keep your desktop neat and tidy. If you’re working with multiple windows in one application, minimizing a window might work better than hiding the application. Hiding an application or minimizing a window removes the application or window from the desktop and stores it in the Dock. A hidden application is still open, and the contents of a minimized window are intact. Both have simply been moved out of your way, so you can get other work done.
PracticeHide applications, show applications, and minimize a window by following these steps:
1. Locate the practice files included with this course.2. Double-click several of the image files to open them.3. In one of the image windows, click the yellow button to minimize it. Watch how the window shrinks into the Dock.4. Move your pointer over the minimized image in the Dock, and notice how its title appears.5. Click the image in the Dock to expand the window to its full size.6. From the Preview menu, choose Hide. Notice how all of the windows disappear from the desktop.7. Click the Preview icon in the Dock and watch all of the windows appear again.
TipsQuickly minimize multiple windowsIf you have multiple windows open in one application, and you want to minimize all of them, hold down the Option key while clicking the yellow button in the upper-left corner of any of the windows. This sends all of the windows to the Dock.
Use the keyboard to hide applications quicklyIf you have many applications open, pressing Command-H quickly hides the active application. If you want to hide the other open applications, use the Option-Command-H key combination.
Hide Applications other than the one you are working on
HC
S T
echn
olog
y G
roup
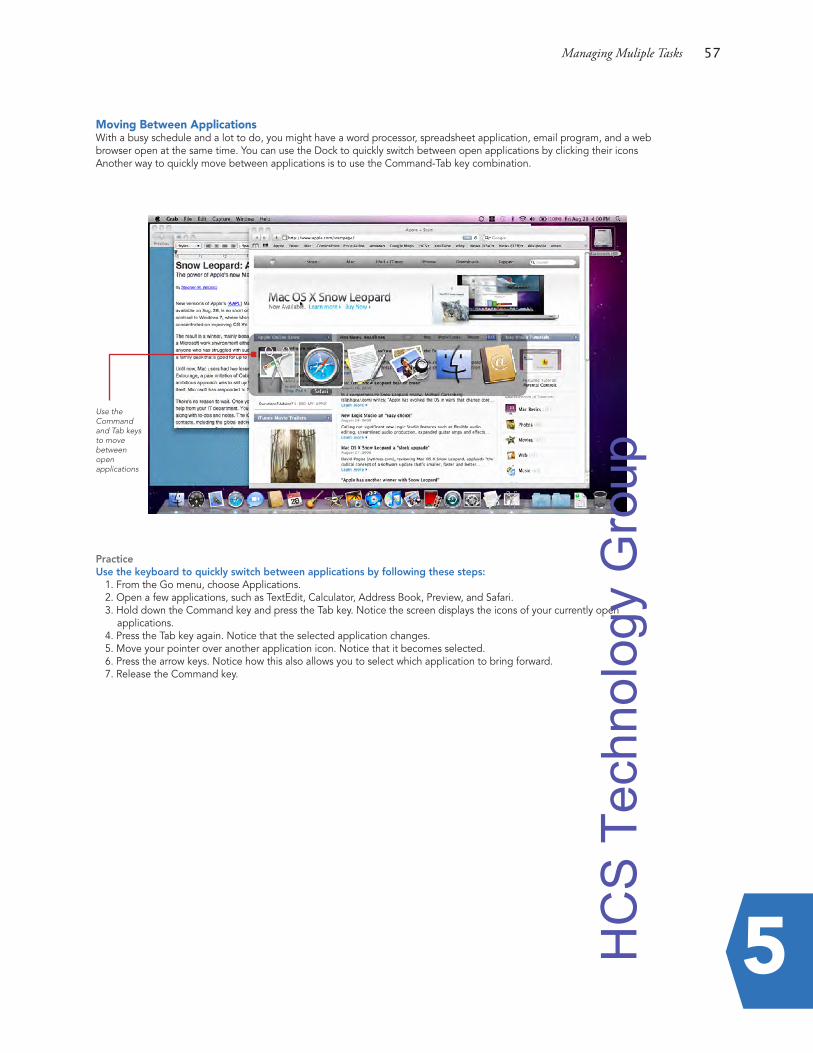
57Managing Muliple Tasks
5
Moving Between ApplicationsWith a busy schedule and a lot to do, you might have a word processor, spreadsheet application, email program, and a web browser open at the same time. You can use the Dock to quickly switch between open applications by clicking their icons Another way to quickly move between applications is to use the Command-Tab key combination.
PracticeUse the keyboard to quickly switch between applications by following these steps:
1. From the Go menu, choose Applications.2. Open a few applications, such as TextEdit, Calculator, Address Book, Preview, and Safari.3. Hold down the Command key and press the Tab key. Notice the screen displays the icons of your currently open
applications.4. Press the Tab key again. Notice that the selected application changes.5. Move your pointer over another application icon. Notice that it becomes selected.6. Press the arrow keys. Notice how this also allows you to select which application to bring forward.7. Release the Command key.
Use the Command and Tab keys to move between open applications
HC
S T
echn
olog
y G
roup
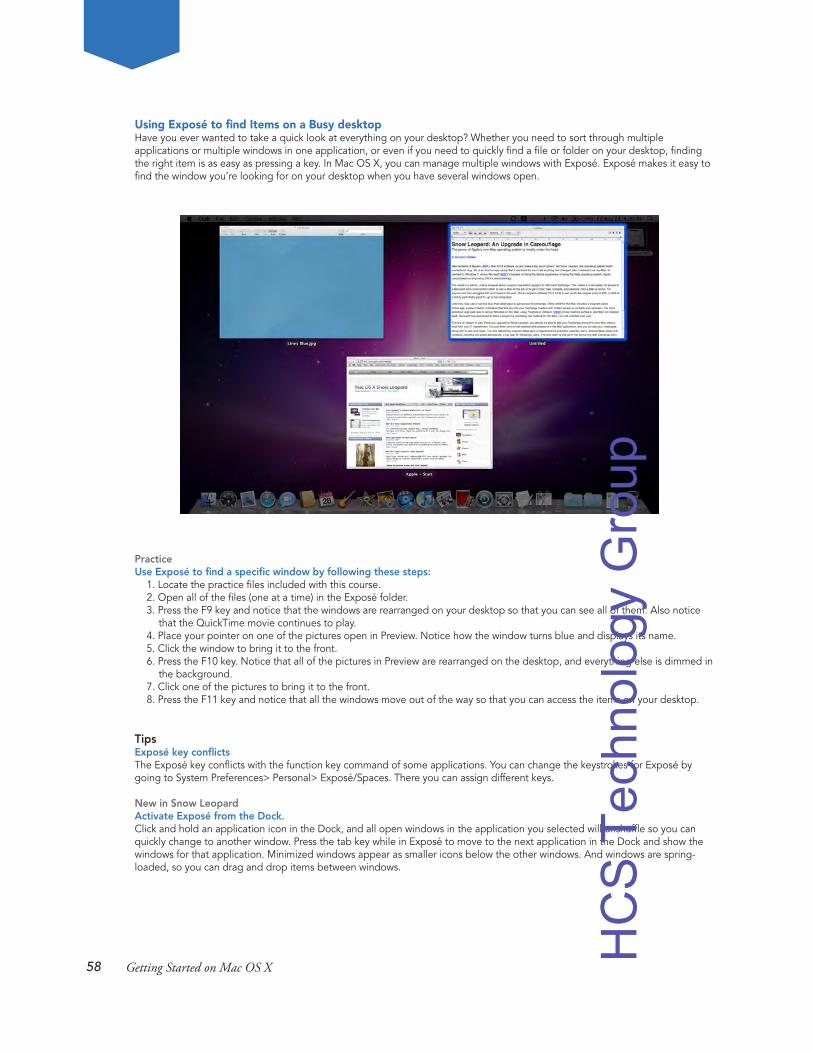
58 Getting Started on Mac OS X
Using Exposé to find Items on a Busy desktopHave you ever wanted to take a quick look at everything on your desktop? Whether you need to sort through multiple applications or multiple windows in one application, or even if you need to quickly find a file or folder on your desktop, finding the right item is as easy as pressing a key. In Mac OS X, you can manage multiple windows with Exposé. Exposé makes it easy to find the window you’re looking for on your desktop when you have several windows open.
PracticeUse Exposé to find a specific window by following these steps:
1. Locate the practice files included with this course.2. Open all of the files (one at a time) in the Exposé folder.3. Press the F9 key and notice that the windows are rearranged on your desktop so that you can see all of them. Also notice
that the QuickTime movie continues to play.4. Place your pointer on one of the pictures open in Preview. Notice how the window turns blue and displays its name.5. Click the window to bring it to the front.6. Press the F10 key. Notice that all of the pictures in Preview are rearranged on the desktop, and everything else is dimmed in
the background.7. Click one of the pictures to bring it to the front.8. Press the F11 key and notice that all the windows move out of the way so that you can access the items on your desktop.
TipsExposé key conflictsThe Exposé key conflicts with the function key command of some applications. You can change the keystrokes for Exposé by going to System Preferences> Personal> Exposé/Spaces. There you can assign different keys.
New in Snow LeopardActivate Exposé from the Dock.Click and hold an application icon in the Dock, and all open windows in the application you selected will unshuffle so you can quickly change to another window. Press the tab key while in Exposé to move to the next application in the Dock and show the windows for that application. Minimized windows appear as smaller icons below the other windows. And windows are spring-loaded, so you can drag and drop items between windows.
HC
S T
echn
olog
y G
roup
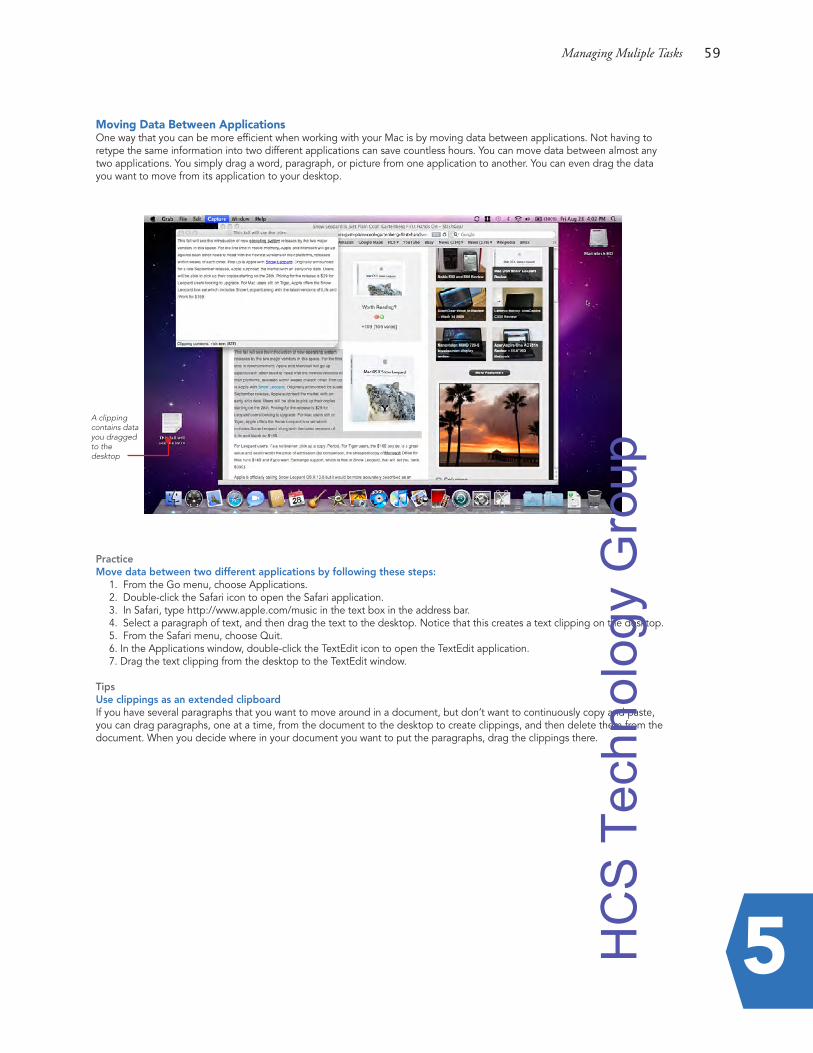
59Managing Muliple Tasks
5
Moving Data Between ApplicationsOne way that you can be more efficient when working with your Mac is by moving data between applications. Not having to retype the same information into two different applications can save countless hours. You can move data between almost any two applications. You simply drag a word, paragraph, or picture from one application to another. You can even drag the data you want to move from its application to your desktop.
PracticeMove data between two different applications by following these steps:
1. From the Go menu, choose Applications.2. Double-click the Safari icon to open the Safari application.3. In Safari, type http://www.apple.com/music in the text box in the address bar.4. Select a paragraph of text, and then drag the text to the desktop. Notice that this creates a text clipping on the desktop.5. From the Safari menu, choose Quit.6. In the Applications window, double-click the TextEdit icon to open the TextEdit application.7. Drag the text clipping from the desktop to the TextEdit window.
TipsUse clippings as an extended clipboardIf you have several paragraphs that you want to move around in a document, but don’t want to continuously copy and paste, you can drag paragraphs, one at a time, from the document to the desktop to create clippings, and then delete them from the document. When you decide where in your document you want to put the paragraphs, drag the clippings there.
A clipping contains data you dragged to the desktop
HC
S T
echn
olog
y G
roup
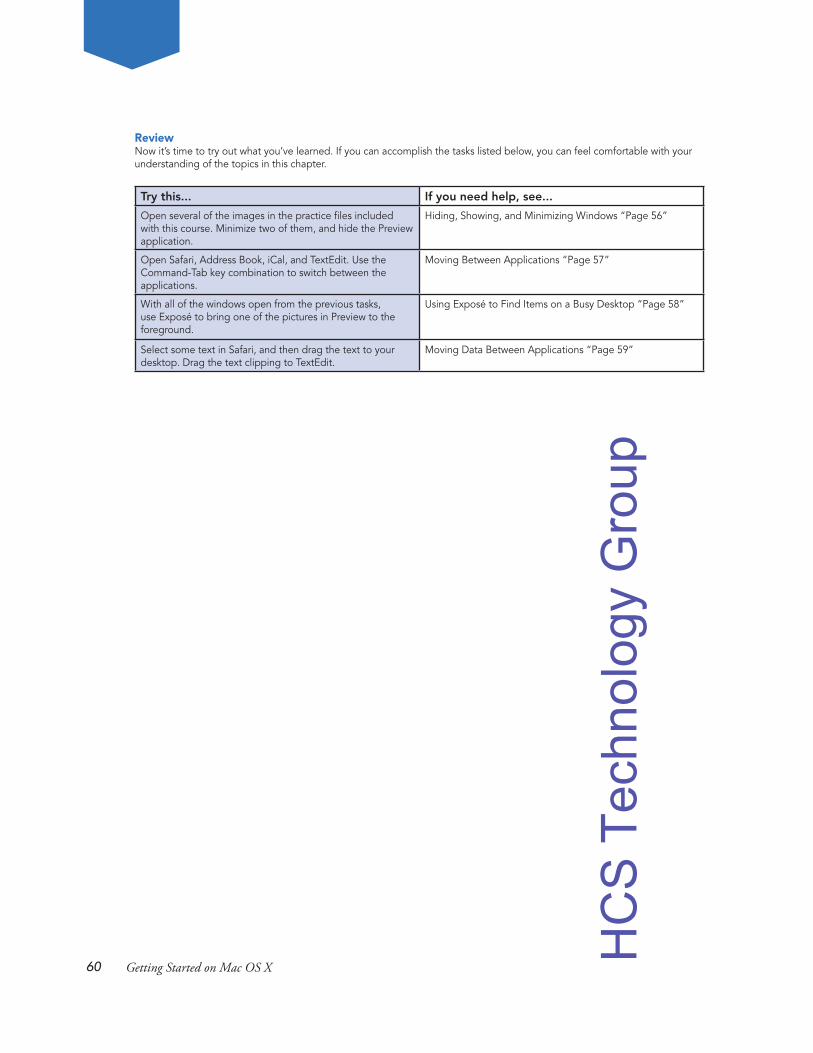
60 Getting Started on Mac OS X
ReviewNow it’s time to try out what you’ve learned. If you can accomplish the tasks listed below, you can feel comfortable with your understanding of the topics in this chapter.
Try this... If you need help, see...
Open several of the images in the practice files included with this course. Minimize two of them, and hide the Preview application.
Hiding, Showing, and Minimizing Windows “Page 56”
Open Safari, Address Book, iCal, and TextEdit. Use the Command-Tab key combination to switch between the applications.
Moving Between Applications “Page 57”
With all of the windows open from the previous tasks, use Exposé to bring one of the pictures in Preview to the foreground.
Using Exposé to Find Items on a Busy Desktop “Page 58”
Select some text in Safari, and then drag the text to your desktop. Drag the text clipping to TextEdit.
Moving Data Between Applications “Page 59”
HC
S T
echn
olog
y G
roup
Keeping Your Mac Secure
Real security comes from knowing nobody can look through your files without your permission. Mac OS X has several security features built in to make your Mac more secure. Most of these features are invisible to most users, so you can feel safe knowing that your Mac is secure even if you don’t notice anything different.
What You’ll LearnIn this chapter, you’ll cover the following topics:
•KeepingAppleSoftwareUp-to-Date
•KeepingYourComputerSecure
•KeepingYourHomeFolderSecure
•CreatingandRememberingPasswords
•ArchivingImportantFiles
•TimeMachine
•WhattoDoWhenYou’reDoneWorking
6
HC
S T
echn
olog
y G
roup
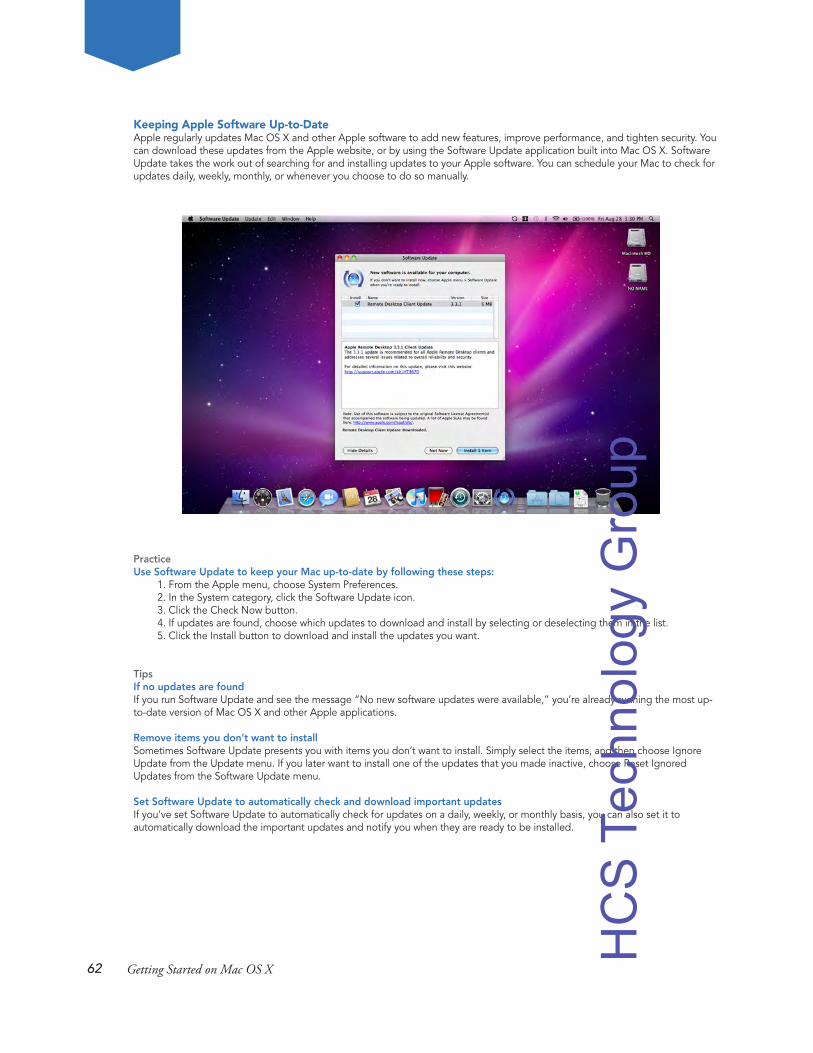
62 Getting Started on Mac OS X
Keeping Apple Software Up-to-DateApple regularly updates Mac OS X and other Apple software to add new features, improve performance, and tighten security. You can download these updates from the Apple website, or by using the Software Update application built into Mac OS X. Software Update takes the work out of searching for and installing updates to your Apple software. You can schedule your Mac to check for updates daily, weekly, monthly, or whenever you choose to do so manually.
PracticeUse Software Update to keep your Mac up-to-date by following these steps:
1. From the Apple menu, choose System Preferences.2. In the System category, click the Software Update icon.3. Click the Check Now button.4. If updates are found, choose which updates to download and install by selecting or deselecting them in the list.5. Click the Install button to download and install the updates you want.
TipsIf no updates are foundIf you run Software Update and see the message “No new software updates were available,” you’re already running the most up-to-date version of Mac OS X and other Apple applications.
Remove items you don’t want to installSometimes Software Update presents you with items you don’t want to install. Simply select the items, and then choose Ignore Update from the Update menu. If you later want to install one of the updates that you made inactive, choose Reset Ignored Updates from the Software Update menu.
Set Software Update to automatically check and download important updatesIf you’ve set Software Update to automatically check for updates on a daily, weekly, or monthly basis, you can also set it to automatically download the important updates and notify you when they are ready to be installed.
HC
S T
echn
olog
y G
roup
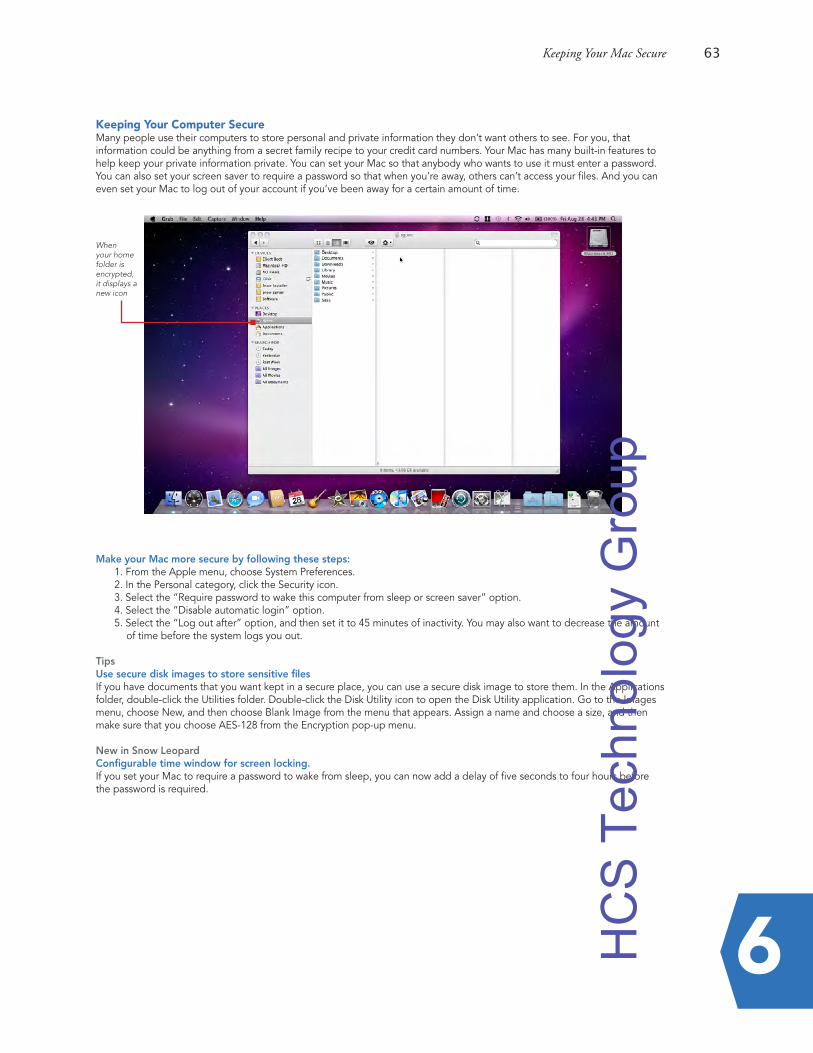
63Keeping Your Mac Secure
6
Keeping Your Computer SecureMany people use their computers to store personal and private information they don’t want others to see. For you, that information could be anything from a secret family recipe to your credit card numbers. Your Mac has many built-in features to help keep your private information private. You can set your Mac so that anybody who wants to use it must enter a password. You can also set your screen saver to require a password so that when you’re away, others can’t access your files. And you can even set your Mac to log out of your account if you’ve been away for a certain amount of time.
Make your Mac more secure by following these steps:1. From the Apple menu, choose System Preferences.2. In the Personal category, click the Security icon.3. Select the “Require password to wake this computer from sleep or screen saver” option.4. Select the “Disable automatic login” option.5. Select the “Log out after” option, and then set it to 45 minutes of inactivity. You may also want to decrease the amount
of time before the system logs you out.
TipsUse secure disk images to store sensitive filesIf you have documents that you want kept in a secure place, you can use a secure disk image to store them. In the Applications folder, double-click the Utilities folder. Double-click the Disk Utility icon to open the Disk Utility application. Go to the Images menu, choose New, and then choose Blank Image from the menu that appears. Assign a name and choose a size, and then make sure that you choose AES-128 from the Encryption pop-up menu.
New in Snow LeopardConfigurable time window for screen locking.If you set your Mac to require a password to wake from sleep, you can now add a delay of five seconds to four hours before the password is required.
When your home folder is encrypted, it displays a new icon
HC
S T
echn
olog
y G
roup
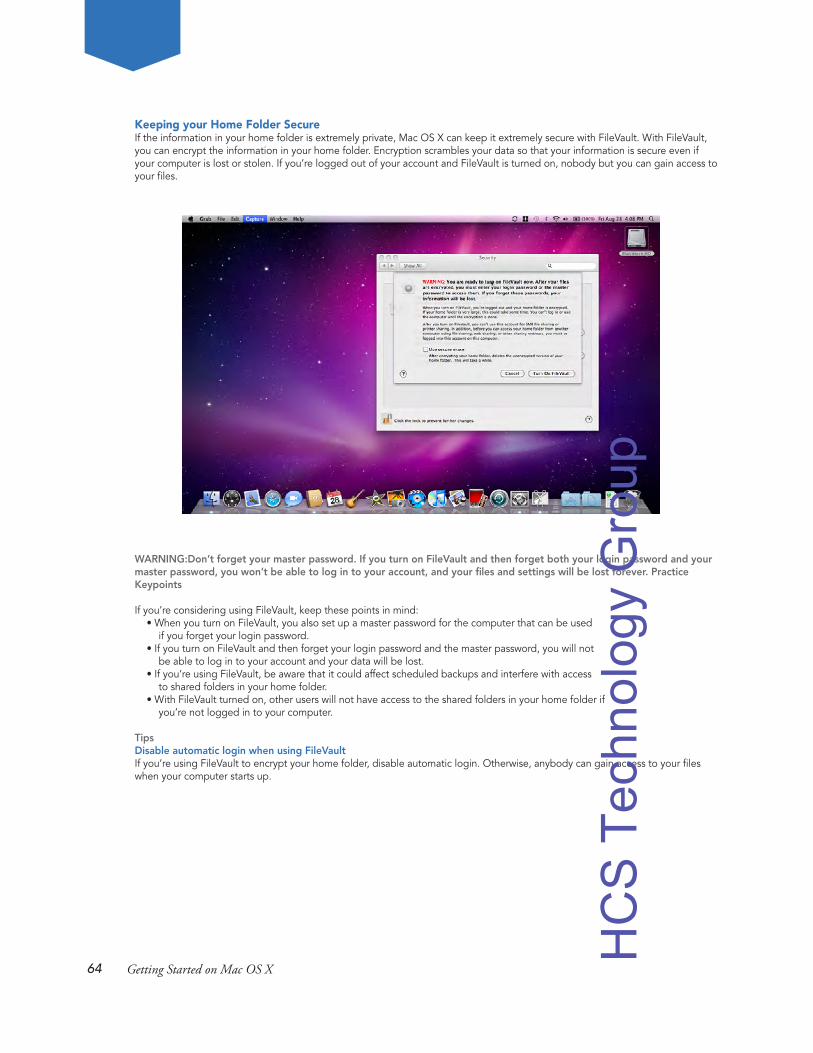
64 Getting Started on Mac OS X
Keeping your Home Folder SecureIf the information in your home folder is extremely private, Mac OS X can keep it extremely secure with FileVault. With FileVault, you can encrypt the information in your home folder. Encryption scrambles your data so that your information is secure even if your computer is lost or stolen. If you’re logged out of your account and FileVault is turned on, nobody but you can gain access to your files.
WARNING:Don’t forget your master password. If you turn on FileVault and then forget both your login password and your master password, you won’t be able to log in to your account, and your files and settings will be lost forever. PracticeKeypoints
If you’re considering using FileVault, keep these points in mind:•WhenyouturnonFileVault,youalsosetupamasterpasswordforthecomputerthatcanbeused
if you forget your login password.•IfyouturnonFileVaultandthenforgetyourloginpasswordandthemasterpassword,youwillnot
be able to log in to your account and your data will be lost.•Ifyou’reusingFileVault,beawarethatitcouldaffectscheduledbackupsandinterferewithaccess
to shared folders in your home folder.•WithFileVaultturnedon,otheruserswillnothaveaccesstothesharedfoldersinyourhomefolderif
you’re not logged in to your computer.
TipsDisable automatic login when using FileVaultIf you’re using FileVault to encrypt your home folder, disable automatic login. Otherwise, anybody can gain access to your files when your computer starts up.
HC
S T
echn
olog
y G
roup
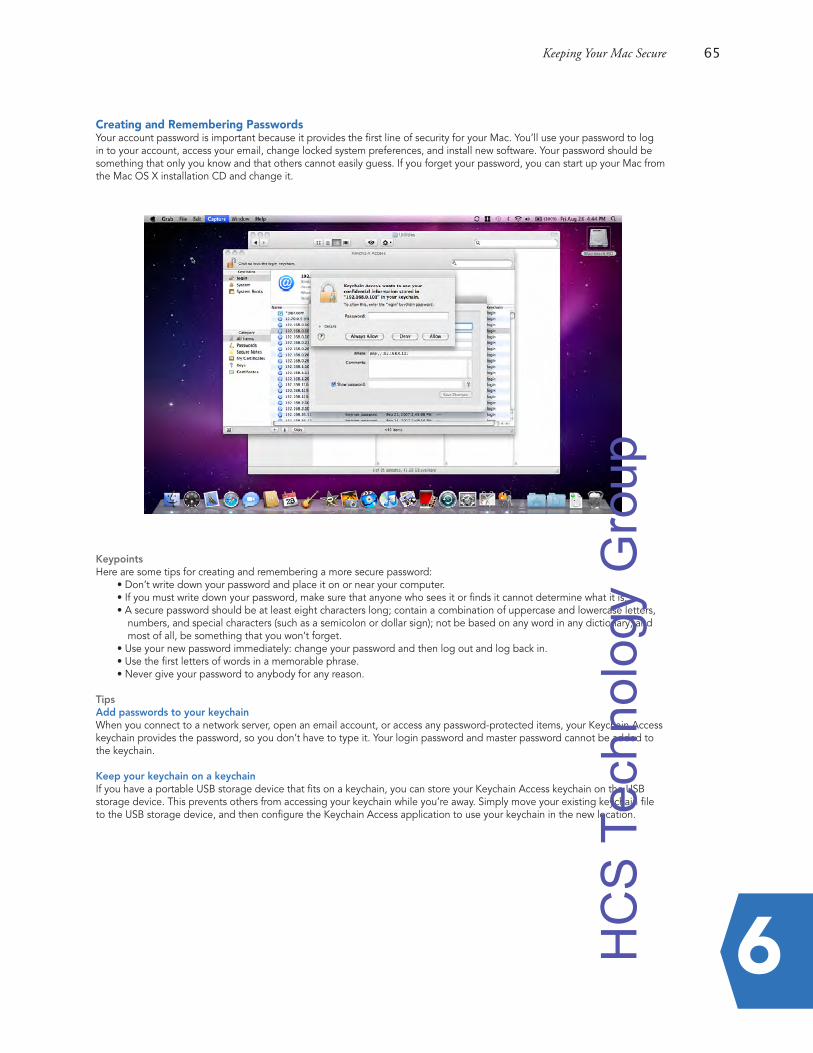
65Keeping Your Mac Secure
6
Creating and Remembering PasswordsYour account password is important because it provides the first line of security for your Mac. You’ll use your password to log in to your account, access your email, change locked system preferences, and install new software. Your password should be something that only you know and that others cannot easily guess. If you forget your password, you can start up your Mac from the Mac OS X installation CD and change it.
KeypointsHere are some tips for creating and remembering a more secure password:
•Don’twritedownyourpasswordandplaceitonornearyourcomputer.•Ifyoumustwritedownyourpassword,makesurethatanyonewhoseesitorfindsitcannotdeterminewhatitis.•Asecurepasswordshouldbeatleasteightcharacterslong;containacombinationofuppercaseandlowercaseletters,
numbers, and special characters (such as a semicolon or dollar sign); not be based on any word in any dictionary; and most of all, be something that you won’t forget.
•Useyournewpasswordimmediately:changeyourpasswordandthenlogoutandlogbackin.•Usethefirstlettersofwordsinamemorablephrase.•Nevergiveyourpasswordtoanybodyforanyreason.
TipsAdd passwords to your keychainWhen you connect to a network server, open an email account, or access any password-protected items, your Keychain Access keychain provides the password, so you don’t have to type it. Your login password and master password cannot be added to the keychain.
Keep your keychain on a keychainIf you have a portable USB storage device that fits on a keychain, you can store your Keychain Access keychain on the USB storage device. This prevents others from accessing your keychain while you’re away. Simply move your existing keychain file to the USB storage device, and then configure the Keychain Access application to use your keychain in the new location.
HC
S T
echn
olog
y G
roup
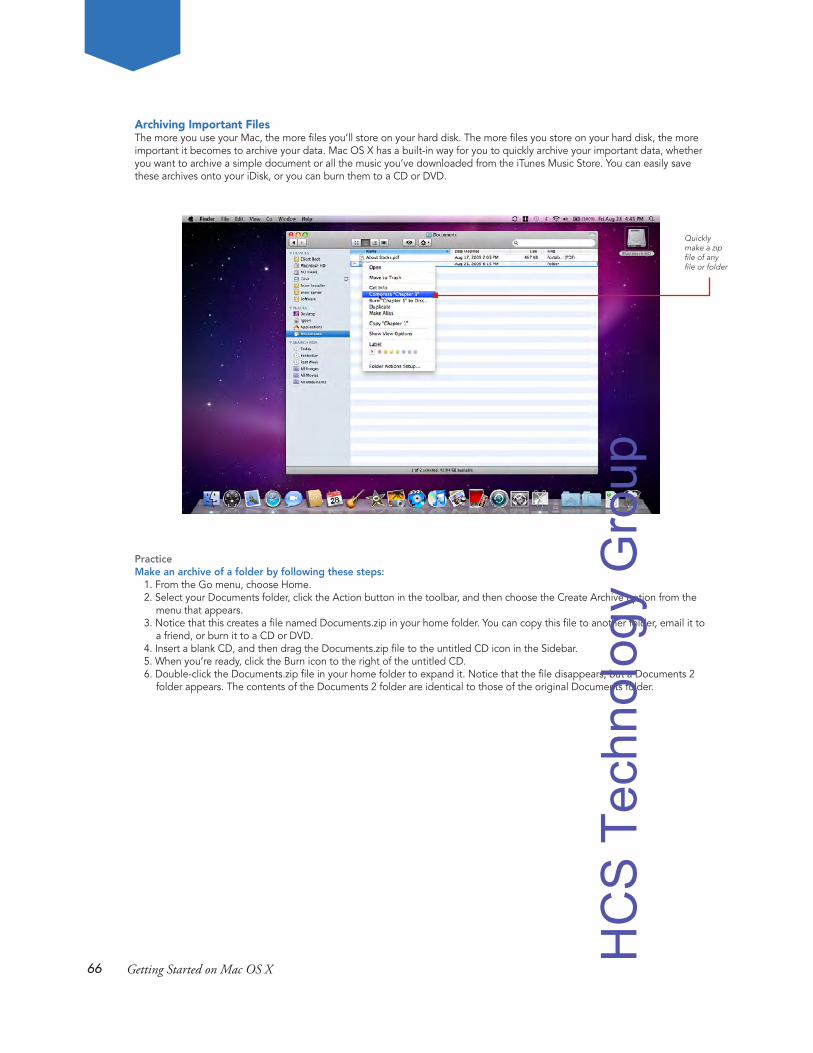
66 Getting Started on Mac OS X
Archiving Important FilesThe more you use your Mac, the more files you’ll store on your hard disk. The more files you store on your hard disk, the more important it becomes to archive your data. Mac OS X has a built-in way for you to quickly archive your important data, whether you want to archive a simple document or all the music you’ve downloaded from the iTunes Music Store. You can easily save these archives onto your iDisk, or you can burn them to a CD or DVD.
PracticeMake an archive of a folder by following these steps:
1. From the Go menu, choose Home.2. Select your Documents folder, click the Action button in the toolbar, and then choose the Create Archive option from the
menu that appears.3. Notice that this creates a file named Documents.zip in your home folder. You can copy this file to another folder, email it to
a friend, or burn it to a CD or DVD.4. Insert a blank CD, and then drag the Documents.zip file to the untitled CD icon in the Sidebar.5. When you’re ready, click the Burn icon to the right of the untitled CD.6. Double-click the Documents.zip file in your home folder to expand it. Notice that the file disappears, but a Documents 2
folder appears. The contents of the Documents 2 folder are identical to those of the original Documents folder.
Quickly make a zip file of any file or folder
HC
S T
echn
olog
y G
roup

67Keeping Your Mac Secure
6
Time MachineTime Machine is the breakthrough automatic backup that’s built right into Mac OS X. It keeps an up-to-date copy of everything on your Mac. Time Machine backs up your system files, applications, accounts, preferences, music, photos, movies, and documents. What makes Time Machine different from other backup applications is that it not only keeps a spare copy of every file, it remembers how your system looked on a given day — so you can revisit your Mac as it appeared in the past. Set it, then forget it.
PracticeRestore a file that was deleted
1. Create a document from TextEdit and save it to the Desktop2. From the Menu bar, pull down from the Time Machine icon in the Menu Bar and select Backup Now3. After the backup is complete, delete the test file4. Launch time machine from the Dock and go to the last backup5. Select the test document and click on restore.6. Confirm document has been restored.
TipsChoose certain folders and files to be backed upLaunch System Preferences and select time Machine Prefernce pane. Click on options and you can choose what folders to be excluded in your backup
HC
S T
echn
olog
y G
roup
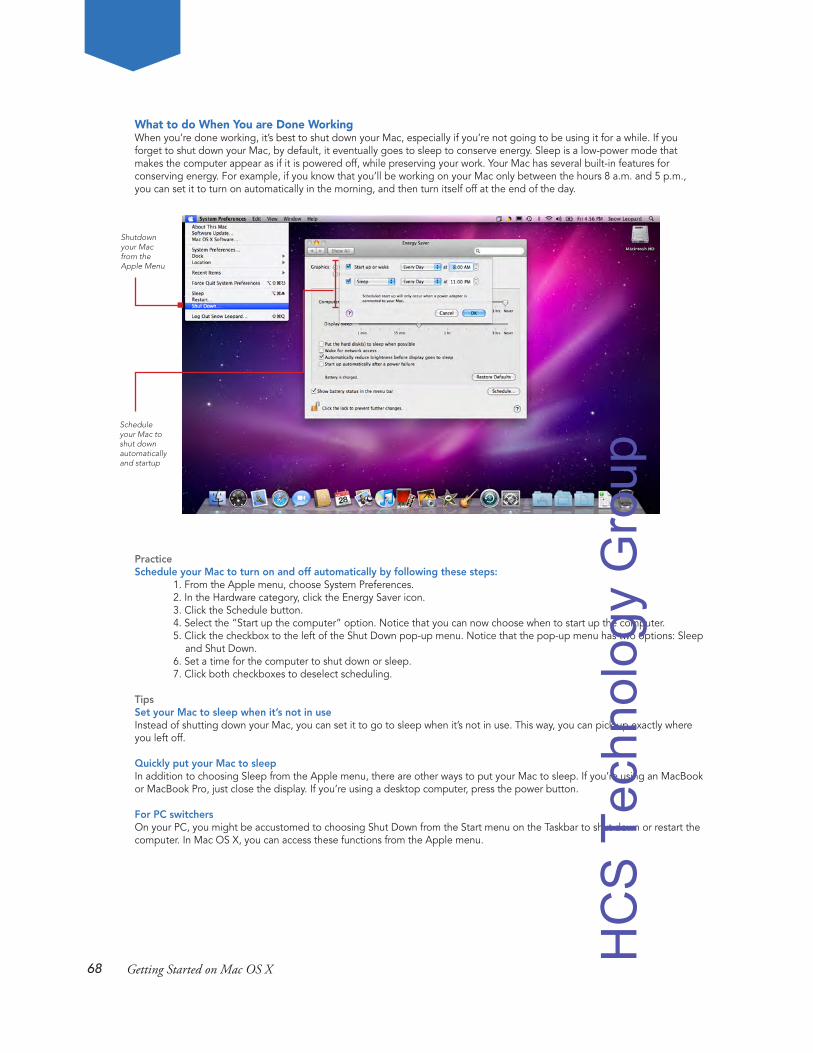
68 Getting Started on Mac OS X
What to do When You are Done WorkingWhen you’re done working, it’s best to shut down your Mac, especially if you’re not going to be using it for a while. If you forget to shut down your Mac, by default, it eventually goes to sleep to conserve energy. Sleep is a low-power mode that makes the computer appear as if it is powered off, while preserving your work. Your Mac has several built-in features for conserving energy. For example, if you know that you’ll be working on your Mac only between the hours 8 a.m. and 5 p.m., you can set it to turn on automatically in the morning, and then turn itself off at the end of the day.
PracticeSchedule your Mac to turn on and off automatically by following these steps:
1. From the Apple menu, choose System Preferences.2. In the Hardware category, click the Energy Saver icon.3. Click the Schedule button.4. Select the “Start up the computer” option. Notice that you can now choose when to start up the computer.5. Click the checkbox to the left of the Shut Down pop-up menu. Notice that the pop-up menu has two options: Sleep
and Shut Down.6. Set a time for the computer to shut down or sleep.7. Click both checkboxes to deselect scheduling.
TipsSet your Mac to sleep when it’s not in useInstead of shutting down your Mac, you can set it to go to sleep when it’s not in use. This way, you can pick up exactly where you left off.
Quickly put your Mac to sleepIn addition to choosing Sleep from the Apple menu, there are other ways to put your Mac to sleep. If you’re using an MacBook or MacBook Pro, just close the display. If you’re using a desktop computer, press the power button.
For PC switchersOn your PC, you might be accustomed to choosing Shut Down from the Start menu on the Taskbar to shut down or restart the computer. In Mac OS X, you can access these functions from the Apple menu.
Schedule your Mac to shut down automatically and startup
Shutdown your Mac from the Apple Menu
HC
S T
echn
olog
y G
roup

69Keeping Your Mac Secure
6
ReviewNow it’s time to try out what you’ve learned. If you can accomplish the tasks listed below, you can feel comfortable with your understanding of the topics in this chapter.
Try this... If you need help, see...
Check for updates to your Mac OS X software, and then check to see if any updates have already been installed.
Keeping Apple Software Up-to-Date ”Page 59”
Set the master password for your Mac. Keeping Your Computer Secure ”Page 60”
Set your Mac to require a password to exit from the screen saver.
Keeping Your Home Folder Secure “Page 61”
Create an archive of your Documents and Library folders. Backing Up Important Files “Page 63”
Set your Mac to automatically start up every morning and shut down every evening
What to Do When You’re Done Working “Page 64”
HC
S T
echn
olog
y G
roup

HC
S T
echn
olog
y G
roup
Mac OS X Tools
With a new Mac OS X, features has been added to enhance your workflow. Mac OS X v10.6 “Snow Leopard” includes tools that will change how you work, play and search on your Mac. From Spotlight, a fast way to search your entire hard drive, to Dashboard, an application that can access a variety of information quickly from your desktop, Mac OS X Snow Leopard represents a major upgrade in the operating system.
What You’ll LearnIn this chapter, you will cover:
•Spotlight
•SpotlightSearchesandSmartFolders
•HowdoYouUsetheBuilt-InDictionary
•GettinguptoSpeedwithDashboard
•AddressBook
•iChat
•AppleMail
•Safari
•View RSS Feeds with Safari
•OpeningfilesinPreview •QuicktimeX
•OrganizingyourselfwithiCal
•WhatisAutomator?
7
HC
S T
echn
olog
y G
roup
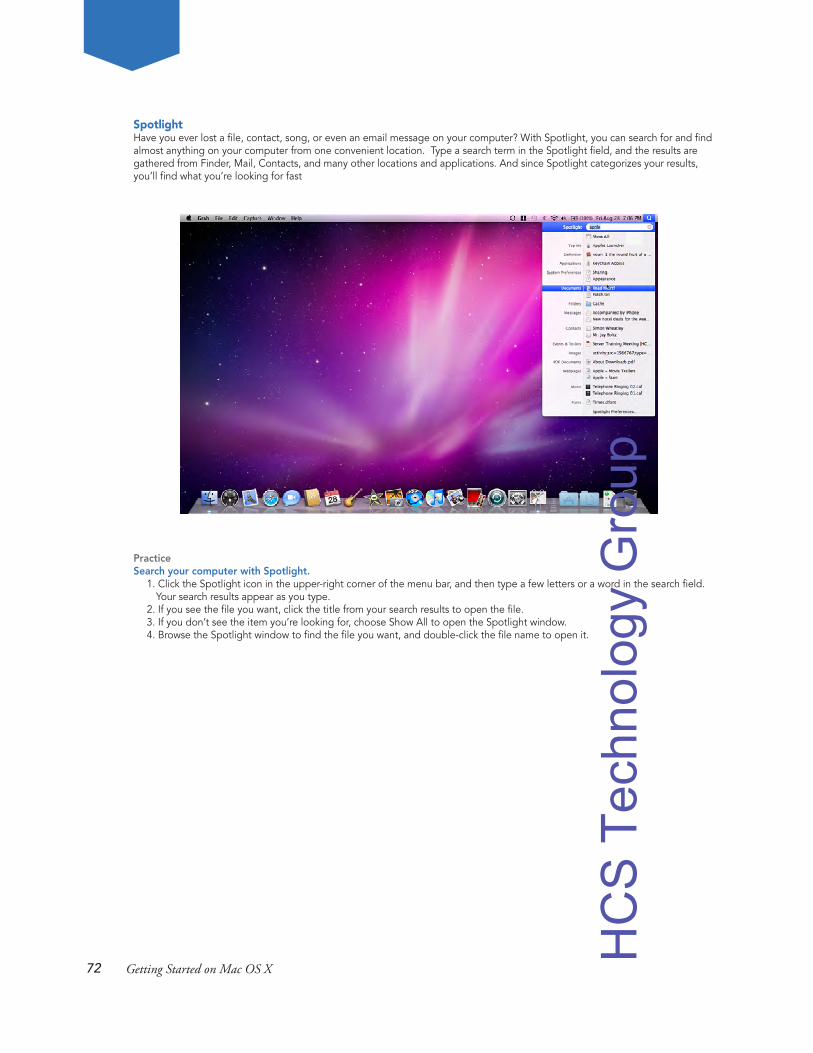
72 Getting Started on Mac OS X
SpotlightHave you ever lost a file, contact, song, or even an email message on your computer? With Spotlight, you can search for and find almost anything on your computer from one convenient location. Type a search term in the Spotlight field, and the results are gathered from Finder, Mail, Contacts, and many other locations and applications. And since Spotlight categorizes your results, you’ll find what you’re looking for fast
PracticeSearch your computer with Spotlight.
1. Click the Spotlight icon in the upper-right corner of the menu bar, and then type a few letters or a word in the search field. Your search results appear as you type.
2. If you see the file you want, click the title from your search results to open the file.3. If you don’t see the item you’re looking for, choose Show All to open the Spotlight window.4. Browse the Spotlight window to find the file you want, and double-click the file name to open it.
HC
S T
echn
olog
y G
roup
73Mac OS X Tools
7
Spotlight
TipsUse the Spotlight windowThe Spotlight window delivers your results in a format that is easy to read. Use the disclosure triangles next to the group headings to expand or collapse a section. Only the five most recent matches are displayed, so that you’re not overwhelmed by a huge list of results. You can click the “more” link to see the entire list of results in that group.
Narrowing your searchesWhen Spotlight finds a long list of results, you can narrow your search by location and date. Click Show All from your list of results, choose a smaller date range under the “When” category, and choose a different location from the “Where” category.
Getting more info in the Spotlight windowIn addition to being able to change the grouping and sort-type of your search results, the Spotlight window gives you good information about the items you’re looking for. Click the Information icon next to an item in the list, and you’ll see additional details without having to open any extra applications.
Use the built-in slideshow in SpotlightWhen images are returned in your search results, you can click the Play button to see a full screen slideshow of your pictures. Sometimes digital cameras format the date into your photo’s filename, so you can do a search on a date, such as “April 29, 2008” to see all of the pictures that you took on that day.
Changing the order in which the spotlight results are displayedIn the Spotlight system preference window, click Search Results and notice the list of categories that appear in your search results. You can drag categories to change the order in which results appears. If you don’t want Spotlight to display results in certain categories, just deselect the checkbox next to that item.
Using privacy settingsIn the Spotlight system preference window, click the Privacy tab. Drag any folder or disk into the list to prevent Spotlight from searching the location. This is great if you have more than one hard drive or a partitioned hard drive that you don’t want indexed.
Use your keyboard to search with SpotlightBy default, holding down the command key then pressing the space bar on your keyboard will open the Spotlight menu. Holding down the command and option keys while pressing the space bar will open the Spotlight window. You can customize Spotlight to work with other key commands in the Spotlight System Preference window.
HC
S T
echn
olog
y G
roup
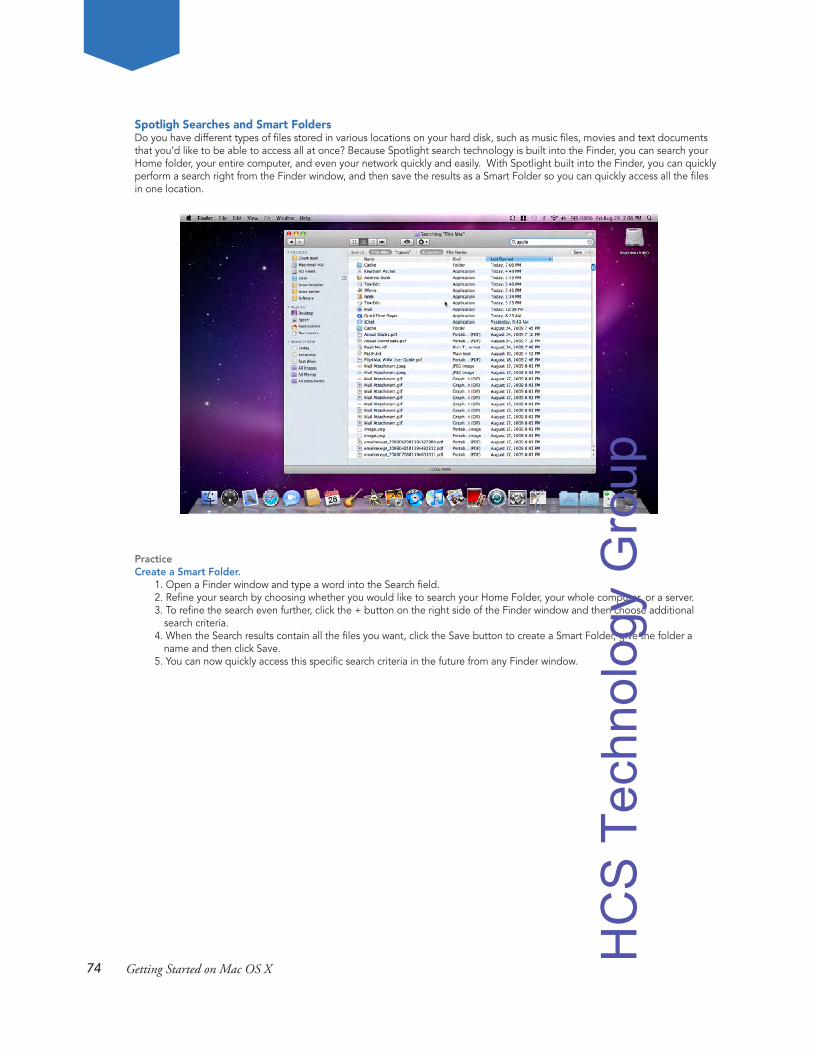
74 Getting Started on Mac OS X
Spotligh Searches and Smart FoldersDo you have different types of files stored in various locations on your hard disk, such as music files, movies and text documents that you’d like to be able to access all at once? Because Spotlight search technology is built into the Finder, you can search your Home folder, your entire computer, and even your network quickly and easily. With Spotlight built into the Finder, you can quickly perform a search right from the Finder window, and then save the results as a Smart Folder so you can quickly access all the files in one location.
PracticeCreate a Smart Folder.
1. Open a Finder window and type a word into the Search field.2. Refine your search by choosing whether you would like to search your Home Folder, your whole computer, or a server.3. To refine the search even further, click the + button on the right side of the Finder window and then choose additional
search criteria.4. When the Search results contain all the files you want, click the Save button to create a Smart Folder, give the folder a
name and then click Save.5. You can now quickly access this specific search criteria in the future from any Finder window.
HC
S T
echn
olog
y G
roup
75Mac OS X Tools
7
TipsSearch in different locationsYou can narrow your search to a specific folder by clicking the Others button. In the sheet that appears either drag a folder in or click the + button to add a folder. If you don’t want a folder to be searched, but don’t want to remove it from the list, you can deselect the box to the left of it to exclude it from the search.
Change how you view Search resultsBy default your search results are displayed as groups, so you can quickly see all files of the same type together. You can change how you view your search results to List view or Icon view by using the view buttons in the Finder toolbar.View the full path to a file. If you want to know exactly where a specific file is on your hard disk, select it in the search window. At the bottom of the Finder window you’ll see the full path to the file. Double-click the file at the bottom of the window to open it, or double-click any folder in the path to open it in a new Finder window.
Edit a Smart FolderIf you ever want to edit a smart folder to include or exclude files, open the Smart folder and then click the Edit button. From there you can change where to search, what to search for and you can even add and remove search criteria, just as you would when creating a Smart Folder.
Delete a Smart FolderBy default Smart Folders are stored in the Saved Searches folder inside your Library folder, as well as in the Sidebar. Removing the Smart folder from the Sidebar will not delete it from your hard disk. If you want to completely remove the Smart folder, go into the Saved Searches folder and drag the Smart Folder to the Trash.
Create a burn folderIf you have several files you want to burn to a CD or DVD, but don’t have a disk available, you can create a burn folder to collect your files and burn the disk later on. To create a burn folder, go to the File menu and choose New Burn Folder. You can use burn folders in combination with Smart folders to do quick backups of important files for a specific project.
HC
S T
echn
olog
y G
roup

76 Getting Started on Mac OS X
How do you Use the Built-In Dictionary?How often do you wish you had a dictionary or theasaurus at your fingertips? Mac OS X now includes a built-in dictionary that enables you to look up words from anywhere in the operating system without being online. Besides using the Dictionary application, you can access the information in a number of ways. You can use the Dashboard widget, or even look up words from within your favorite application.
PracticeLook up a word with the built-in Dictionary.
1. Open the Dictionary application from the Applications folder.2. Enter the word “apple” into the search window.3. Your search results are tabulated and changed as you enter each later.4. When you find apple, double-click it to get your results.
TipSelecting a dictionary to useIn the Dictionary preferences, you can choose to use a specific dictionary or change the order in which dictionaries are displayed. To turn on or off a dictionary, click the checkbox next to the dictionary you want to enable or disable. If you want a dictionary to be viewed first in the results, just drag it to the top of the list.
Increasing and decreasing the font sizeIf you find that the default font size of the Dictionary is too small or too large, you can easily change this by clicking the letter “A” buttons at the top of the window. The larger “A” will make the font larger and the smaller “A” will make it smaller.
Using Dictionary from within other applicationsHave you ever been in an application like Safari, and seen a word you would like to know the definition for? Well now you can easily look up words with the built-in Dictionary. Just highlight a word, control-click, and choose “Look up in Dictionary” from the menu that appears. A window will pop up with the definition. You can choose to view the Dictionary or the Thesaurus. If you want, you can even open the word up in the Dictionary application, by clicking the More button.
Searching with the Dashboard widgetYou can use Dashboard to look up a word in the Dictionary. Just click the Dashboard icon in the Dock, click the view Dashboard widgets icon in the lower-left side of the window, and choose Dictionary. From here you can now do searches on words as well.
New in Snow LeopardAll-new thesaurus.Snow Leopard includes the Oxford American Writer’s Thesaurus second edition. New features help differentiate between easily confused words, find the right shade of meaning, provide context to select the correct word, and give you background on words through the voices of well-known authors. HC
S T
echn
olog
y G
roup
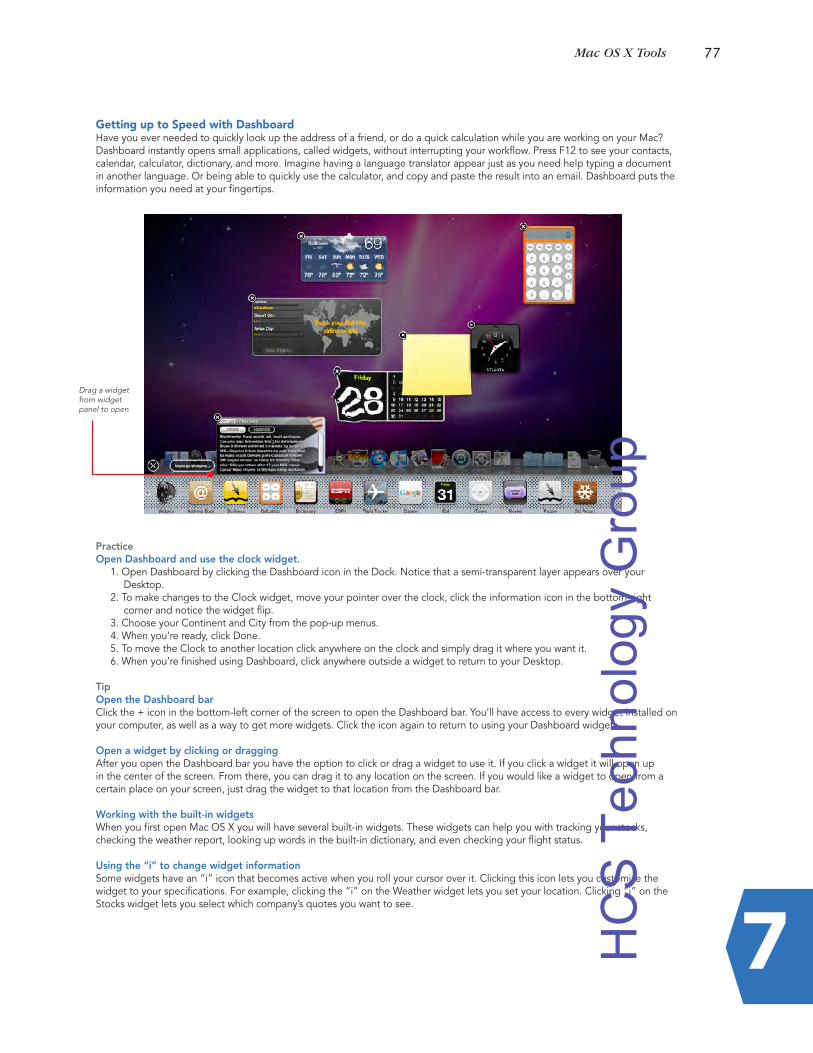
77Mac OS X Tools
7
Getting up to Speed with DashboardHave you ever needed to quickly look up the address of a friend, or do a quick calculation while you are working on your Mac? Dashboard instantly opens small applications, called widgets, without interrupting your workflow. Press F12 to see your contacts, calendar, calculator, dictionary, and more. Imagine having a language translator appear just as you need help typing a document in another language. Or being able to quickly use the calculator, and copy and paste the result into an email. Dashboard puts the information you need at your fingertips.
PracticeOpen Dashboard and use the clock widget.
1. Open Dashboard by clicking the Dashboard icon in the Dock. Notice that a semi-transparent layer appears over your Desktop.
2. To make changes to the Clock widget, move your pointer over the clock, click the information icon in the bottom-right corner and notice the widget flip.
3. Choose your Continent and City from the pop-up menus.4. When you’re ready, click Done.5. To move the Clock to another location click anywhere on the clock and simply drag it where you want it.6. When you’re finished using Dashboard, click anywhere outside a widget to return to your Desktop.
TipOpen the Dashboard barClick the + icon in the bottom-left corner of the screen to open the Dashboard bar. You’ll have access to every widget installed on your computer, as well as a way to get more widgets. Click the icon again to return to using your Dashboard widgets.
Open a widget by clicking or draggingAfter you open the Dashboard bar you have the option to click or drag a widget to use it. If you click a widget it will open up in the center of the screen. From there, you can drag it to any location on the screen. If you would like a widget to open from a certain place on your screen, just drag the widget to that location from the Dashboard bar.
Working with the built-in widgetsWhen you first open Mac OS X you will have several built-in widgets. These widgets can help you with tracking your stocks, checking the weather report, looking up words in the built-in dictionary, and even checking your flight status.
Using the “i” to change widget informationSome widgets have an “i” icon that becomes active when you roll your cursor over it. Clicking this icon lets you customize the widget to your specifications. For example, clicking the “i” on the Weather widget lets you set your location. Clicking “i” on the Stocks widget lets you select which company’s quotes you want to see.
Drag a widget from widget panel to open
HC
S T
echn
olog
y G
roup
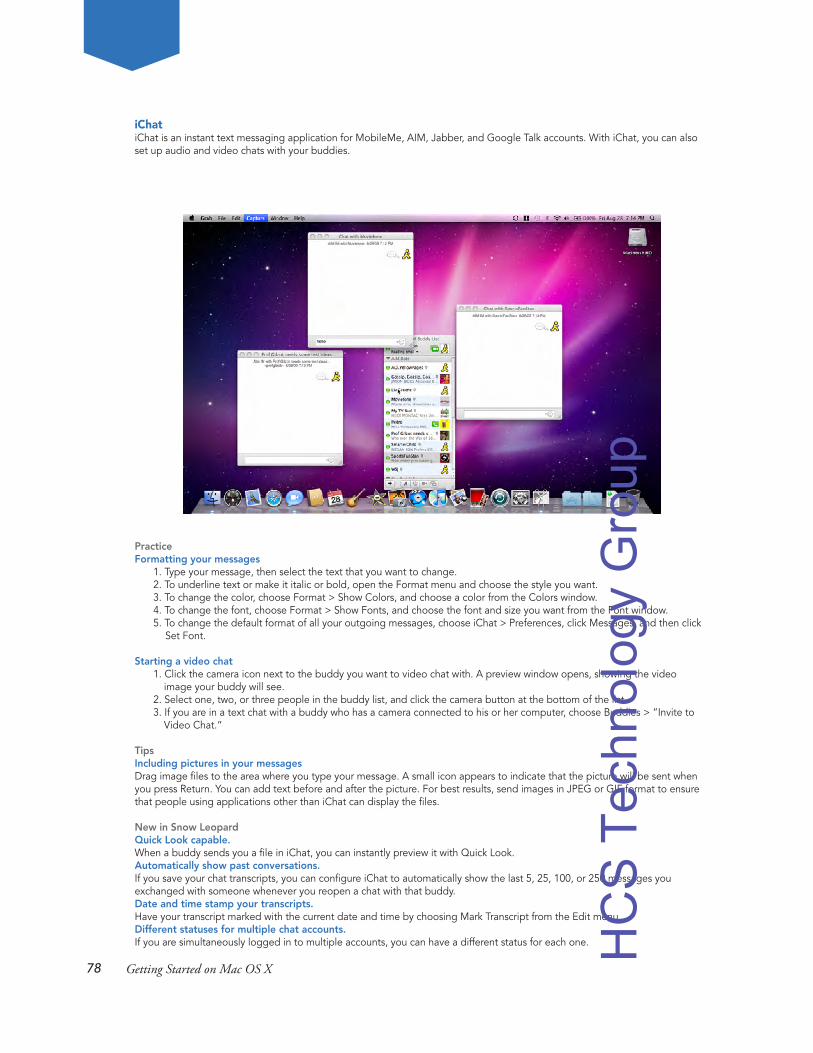
78 Getting Started on Mac OS X
iChatiChat is an instant text messaging application for MobileMe, AIM, Jabber, and Google Talk accounts. With iChat, you can also set up audio and video chats with your buddies.
PracticeFormatting your messages
1. Type your message, then select the text that you want to change.2. To underline text or make it italic or bold, open the Format menu and choose the style you want. 3. To change the color, choose Format > Show Colors, and choose a color from the Colors window.4. To change the font, choose Format > Show Fonts, and choose the font and size you want from the Font window.5. To change the default format of all your outgoing messages, choose iChat > Preferences, click Messages, and then click
Set Font.
Starting a video chat1. Click the camera icon next to the buddy you want to video chat with. A preview window opens, showing the video
image your buddy will see.2. Select one, two, or three people in the buddy list, and click the camera button at the bottom of the list.3. If you are in a text chat with a buddy who has a camera connected to his or her computer, choose Buddies > “Invite to
Video Chat.”
TipsIncluding pictures in your messagesDrag image files to the area where you type your message. A small icon appears to indicate that the picture will be sent when you press Return. You can add text before and after the picture. For best results, send images in JPEG or GIF format to ensure that people using applications other than iChat can display the files.
New in Snow LeopardQuick Look capable.When a buddy sends you a file in iChat, you can instantly preview it with Quick Look.Automatically show past conversations.If you save your chat transcripts, you can configure iChat to automatically show the last 5, 25, 100, or 250 messages you exchanged with someone whenever you reopen a chat with that buddy.Date and time stamp your transcripts.Have your transcript marked with the current date and time by choosing Mark Transcript from the Edit menu.Different statuses for multiple chat accounts.If you are simultaneously logged in to multiple accounts, you can have a different status for each one. HC
S T
echn
olog
y G
roup
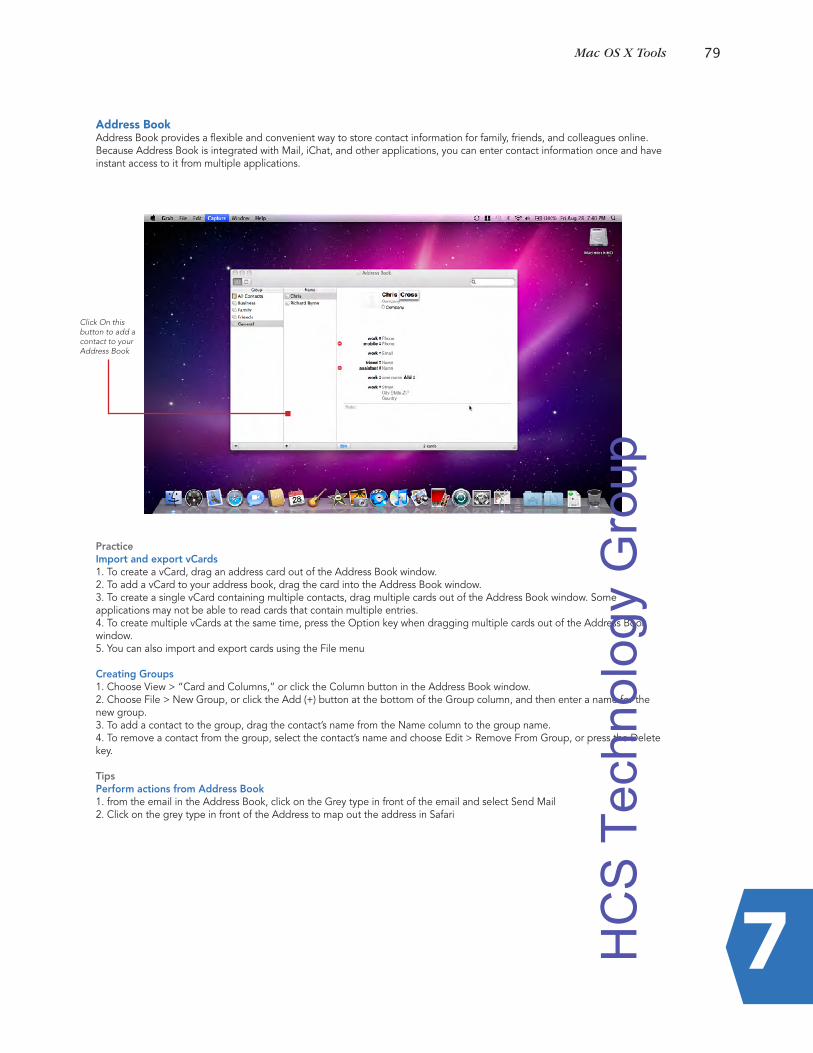
79Mac OS X Tools
7
Address BookAddress Book provides a flexible and convenient way to store contact information for family, friends, and colleagues online. Because Address Book is integrated with Mail, iChat, and other applications, you can enter contact information once and have instant access to it from multiple applications.
PracticeImport and export vCards1. To create a vCard, drag an address card out of the Address Book window.2. To add a vCard to your address book, drag the card into the Address Book window.3. To create a single vCard containing multiple contacts, drag multiple cards out of the Address Book window. Some applications may not be able to read cards that contain multiple entries.4. To create multiple vCards at the same time, press the Option key when dragging multiple cards out of the Address Book window.5. You can also import and export cards using the File menu
Creating Groups1. Choose View > “Card and Columns,” or click the Column button in the Address Book window.2. Choose File > New Group, or click the Add (+) button at the bottom of the Group column, and then enter a name for the new group.3. To add a contact to the group, drag the contact’s name from the Name column to the group name.4. To remove a contact from the group, select the contact’s name and choose Edit > Remove From Group, or press the Delete key.
TipsPerform actions from Address Book1. from the email in the Address Book, click on the Grey type in front of the email and select Send Mail2. Click on the grey type in front of the Address to map out the address in Safari
Click On this button to add a contact to your Address Book
HC
S T
echn
olog
y G
roup
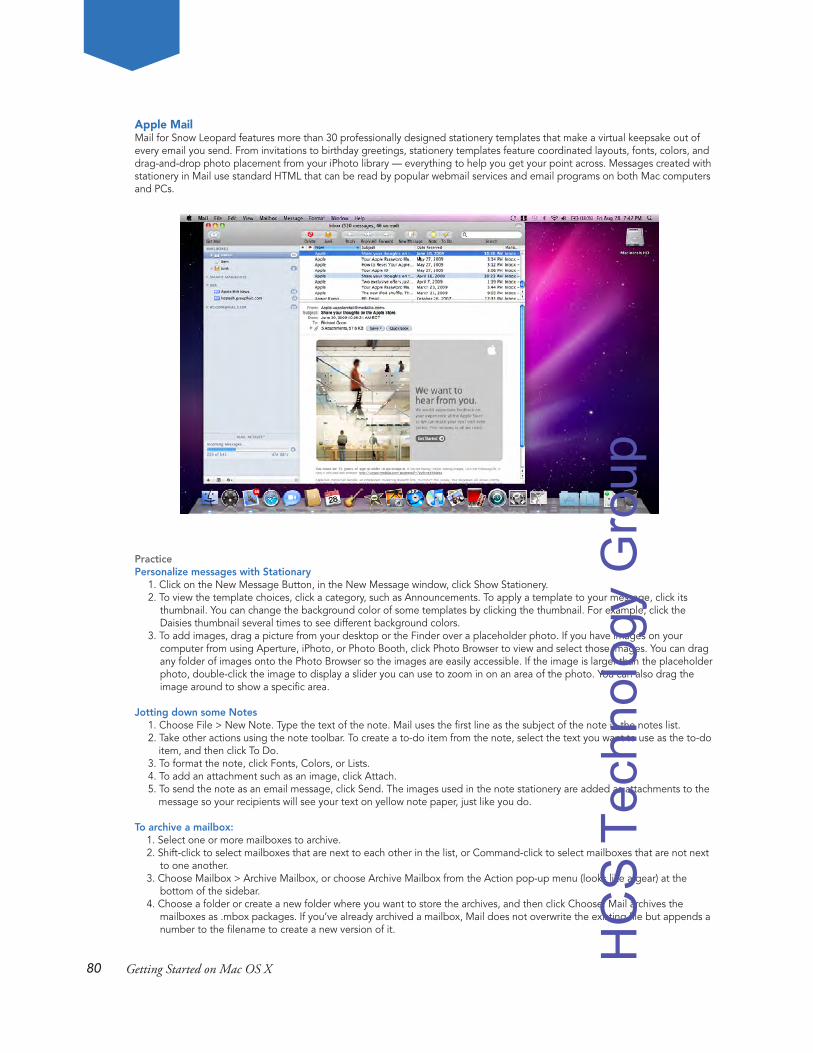
80 Getting Started on Mac OS X
Apple MailMail for Snow Leopard features more than 30 professionally designed stationery templates that make a virtual keepsake out of every email you send. From invitations to birthday greetings, stationery templates feature coordinated layouts, fonts, colors, and drag-and-drop photo placement from your iPhoto library — everything to help you get your point across. Messages created with stationery in Mail use standard HTML that can be read by popular webmail services and email programs on both Mac computers and PCs.
PracticePersonalize messages with Stationary
1. Click on the New Message Button, in the New Message window, click Show Stationery.2. To view the template choices, click a category, such as Announcements. To apply a template to your message, click its
thumbnail. You can change the background color of some templates by clicking the thumbnail. For example, click the Daisies thumbnail several times to see different background colors.
3. To add images, drag a picture from your desktop or the Finder over a placeholder photo. If you have images on your computer from using Aperture, iPhoto, or Photo Booth, click Photo Browser to view and select those images. You can drag any folder of images onto the Photo Browser so the images are easily accessible. If the image is larger than the placeholder photo, double-click the image to display a slider you can use to zoom in on an area of the photo. You can also drag the image around to show a specific area.
Jotting down some Notes1. Choose File > New Note. Type the text of the note. Mail uses the first line as the subject of the note in the notes list.2. Take other actions using the note toolbar. To create a to-do item from the note, select the text you want to use as the to-do
item, and then click To Do.3. To format the note, click Fonts, Colors, or Lists.4. To add an attachment such as an image, click Attach.5. To send the note as an email message, click Send. The images used in the note stationery are added as attachments to the
message so your recipients will see your text on yellow note paper, just like you do.
To archive a mailbox:1. Select one or more mailboxes to archive.2. Shift-click to select mailboxes that are next to each other in the list, or Command-click to select mailboxes that are not next
to one another.3. Choose Mailbox > Archive Mailbox, or choose Archive Mailbox from the Action pop-up menu (looks like a gear) at the
bottom of the sidebar.4. Choose a folder or create a new folder where you want to store the archives, and then click Choose. Mail archives the
mailboxes as .mbox packages. If you’ve already archived a mailbox, Mail does not overwrite the existing file but appends a number to the filename to create a new version of it. H
CS
Tec
hnol
ogy
Gro
up
81Mac OS X Tools
7
To subscribe to RSS feeds:1. Choose File > Add RSS Feeds or click the Add (+) button at the bottom of the sidebar, and then choose Add RSS Feeds.2. Browse and select a feed you’ve bookmarked in Safari, or enter or paste the URL of a new feed.3. To search feeds you’ve bookmarked in Safari, start typing in the search field. To select from a list of bookmarked feeds,
Shift-click to select feeds that are next to each other in the list; Command-click to select feeds that are not next to one another.
4. If you want RSS feeds to be included in your Inbox, click “Show in Inbox.”5. Click Add.
Creating to-do items1. In a note you create or receive, or in a message you receive, select the text you want to track as a to-do item and click To
Do in the toolbar. Or Control-click the text and choose Add To Do from the shortcut menu.2. To change the item’s title or add more text, click in the field and start typing. The original text remains unchanged in a
note or message you received; in a note you created, the original text is updated with your changes.3. To set options such as a due date, alarm, or priority status, or to add the item to one of your iCal calendars, click the
Details arrow to the left of the to-do item.4. When you think of something you want to track, click To Do in the toolbar and then enter information about the to-do
item.
TipUse Data Detectors to add a contact to your Address BookIn a message you’ve received, move the pointer over a phone number, email address, or street address anywhere in the text. Mail detects the information and outlines it as a field with a pop-up menu. Click the arrow and choose an option from the pop-up menu.
New in Snow LeopardSupport for Microsoft Exchange.With Mac OS X Snow Leopard, the Mac is the only computer with built-in support for Microsoft Exchange Server 2007. So you can use your Mac — with all the features and applications you love, including Mail, iCal, and Address Book — at home and at work and have all your messages, meetings, and contacts in one place.
Reorderable Mail sidebar.The sidebar in Mail is now reorderable, so you can arrange your mailboxes exactly the way you want them.
Faster, more responsive Mail.Enjoy snappier performance throughout Mail. It’s up to 2x faster to launch Mail, up to 4x faster to list the contents of a mailbox, up to 2x faster to search, and up to 2x faster to move messages.1
New flight data detector.Data detectors now automatically identify flight numbers in email messages and text documents and take you directly to the Dashboard Flight Tracker widget to get up-to-date flight information.
Improvements to message composition.Dozens of small improvements in Mail make composing and editing HTML email messages more reliable.
More synchronization options.Now everyone, not just iPhone users, can synchronize their contacts through MobileMe, Yahoo!, and Google.
HC
S T
echn
olog
y G
roup
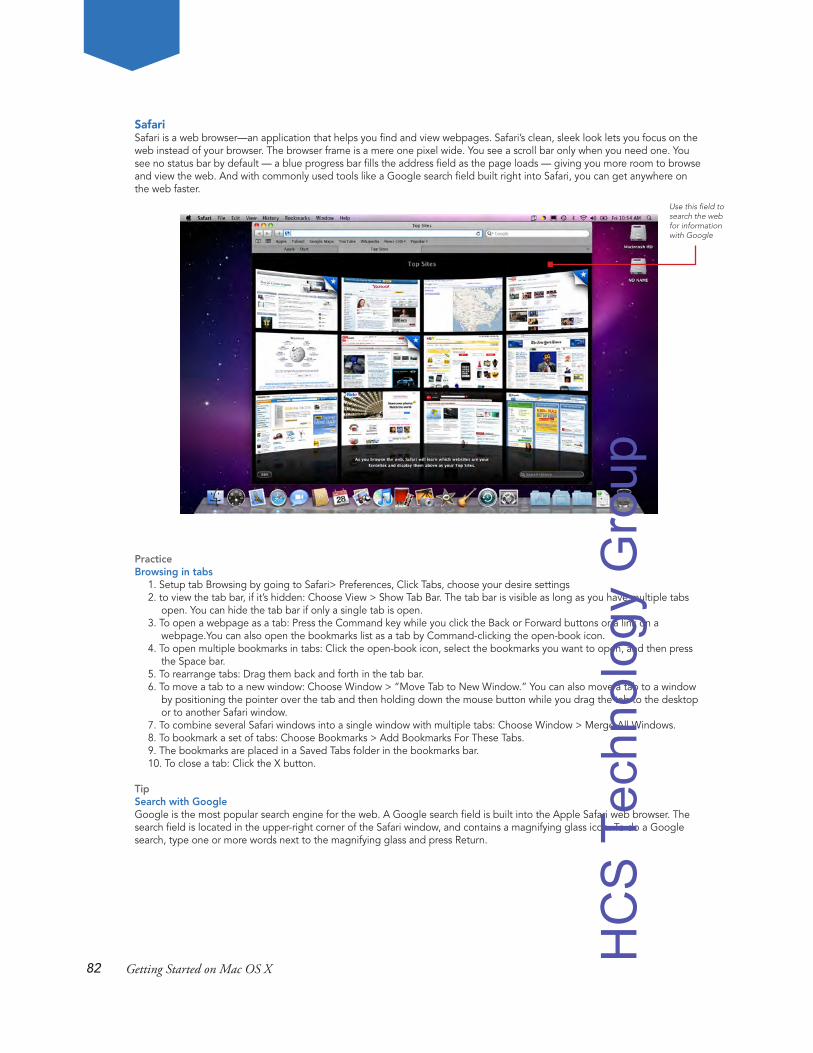
82 Getting Started on Mac OS X
SafariSafari is a web browser—an application that helps you find and view webpages. Safari’s clean, sleek look lets you focus on the web instead of your browser. The browser frame is a mere one pixel wide. You see a scroll bar only when you need one. You see no status bar by default — a blue progress bar fills the address field as the page loads — giving you more room to browse and view the web. And with commonly used tools like a Google search field built right into Safari, you can get anywhere on the web faster.
PracticeBrowsing in tabs
1. Setup tab Browsing by going to Safari> Preferences, Click Tabs, choose your desire settings2. to view the tab bar, if it’s hidden: Choose View > Show Tab Bar. The tab bar is visible as long as you have multiple tabs
open. You can hide the tab bar if only a single tab is open.3. To open a webpage as a tab: Press the Command key while you click the Back or Forward buttons or a link on a
webpage.You can also open the bookmarks list as a tab by Command-clicking the open-book icon.4. To open multiple bookmarks in tabs: Click the open-book icon, select the bookmarks you want to open, and then press
the Space bar.5. To rearrange tabs: Drag them back and forth in the tab bar.6. To move a tab to a new window: Choose Window > “Move Tab to New Window.” You can also move a tab to a window
by positioning the pointer over the tab and then holding down the mouse button while you drag the tab to the desktop or to another Safari window.
7. To combine several Safari windows into a single window with multiple tabs: Choose Window > Merge All Windows.8. To bookmark a set of tabs: Choose Bookmarks > Add Bookmarks For These Tabs.9. The bookmarks are placed in a Saved Tabs folder in the bookmarks bar.10. To close a tab: Click the X button.
TipSearch with GoogleGoogle is the most popular search engine for the web. A Google search field is built into the Apple Safari web browser. The search field is located in the upper-right corner of the Safari window, and contains a magnifying glass icon. To do a Google search, type one or more words next to the magnifying glass and press Return.
Use this field to search the web for information with Google
HC
S T
echn
olog
y G
roup
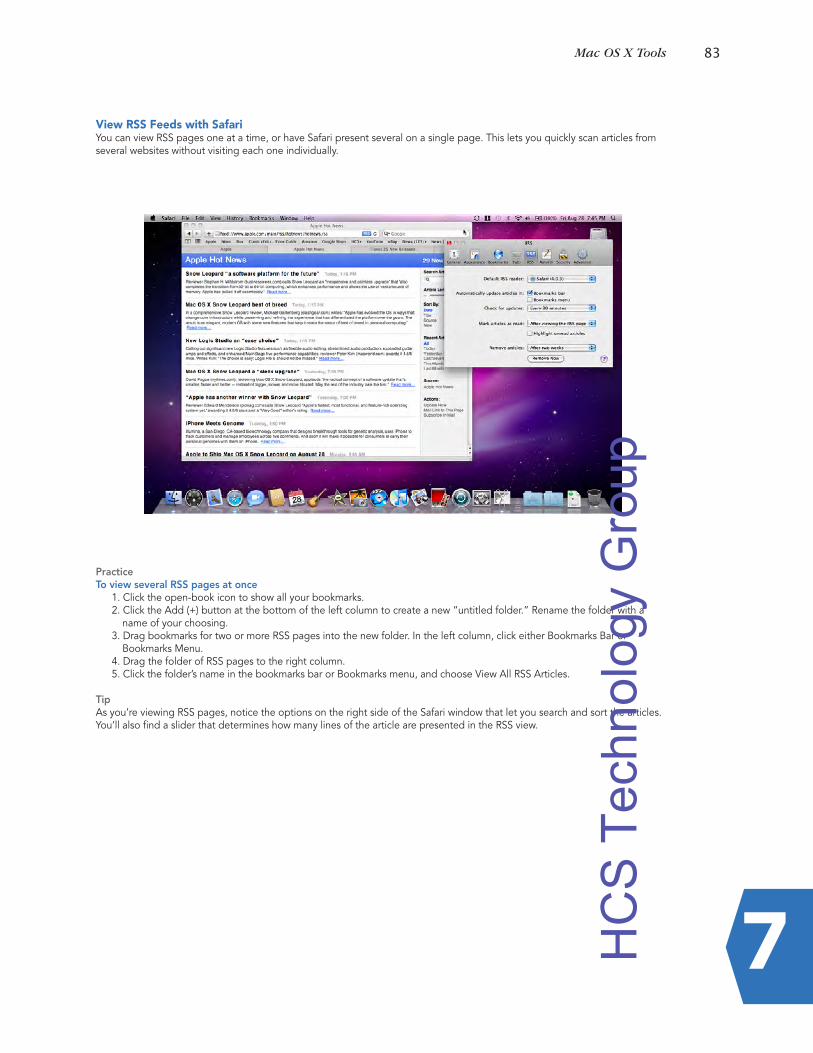
83Mac OS X Tools
7
View RSS Feeds with SafariYou can view RSS pages one at a time, or have Safari present several on a single page. This lets you quickly scan articles from several websites without visiting each one individually.
PracticeTo view several RSS pages at once
1. Click the open-book icon to show all your bookmarks.2. Click the Add (+) button at the bottom of the left column to create a new “untitled folder.” Rename the folder with a
name of your choosing.3. Drag bookmarks for two or more RSS pages into the new folder. In the left column, click either Bookmarks Bar or
Bookmarks Menu.4. Drag the folder of RSS pages to the right column.5. Click the folder’s name in the bookmarks bar or Bookmarks menu, and choose View All RSS Articles.
TipAs you’re viewing RSS pages, notice the options on the right side of the Safari window that let you search and sort the articles. You’ll also find a slider that determines how many lines of the article are presented in the RSS view.
HC
S T
echn
olog
y G
roup
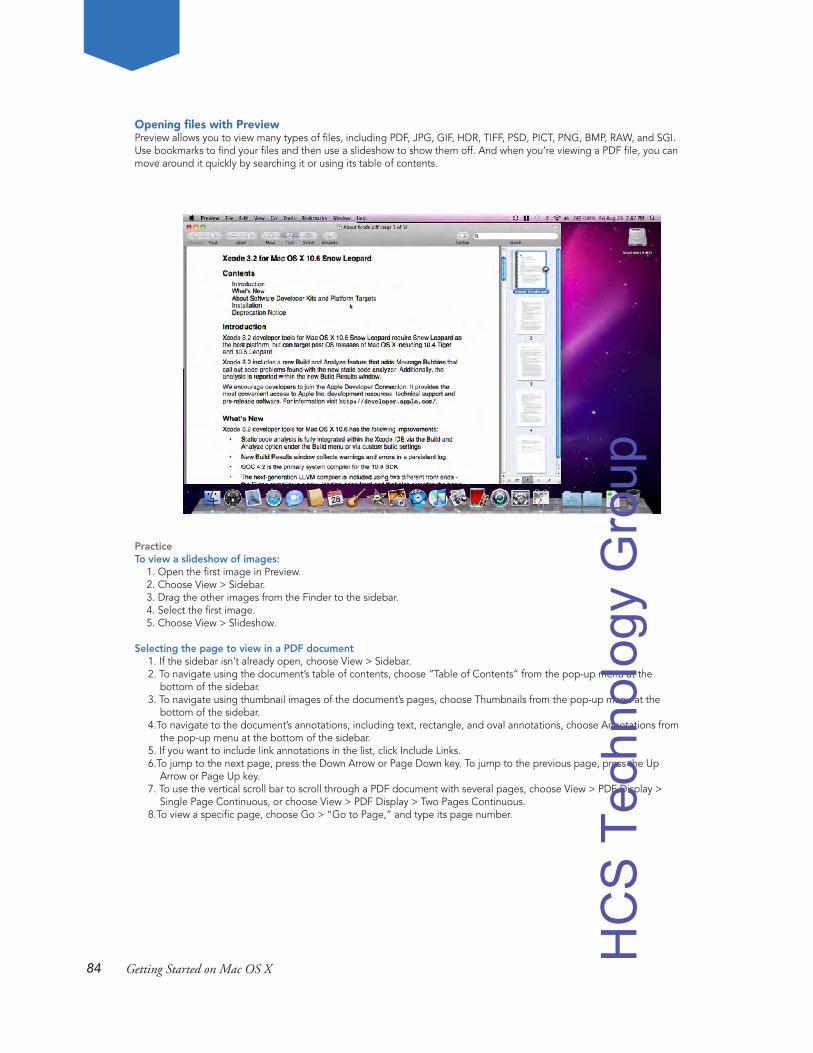
84 Getting Started on Mac OS X
Opening files with PreviewPreview allows you to view many types of files, including PDF, JPG, GIF, HDR, TIFF, PSD, PICT, PNG, BMP, RAW, and SGI. Use bookmarks to find your files and then use a slideshow to show them off. And when you’re viewing a PDF file, you can move around it quickly by searching it or using its table of contents.
PracticeTo view a slideshow of images:
1. Open the first image in Preview.2. Choose View > Sidebar.3. Drag the other images from the Finder to the sidebar.4. Select the first image.5. Choose View > Slideshow.
Selecting the page to view in a PDF document1. If the sidebar isn’t already open, choose View > Sidebar.2. To navigate using the document’s table of contents, choose “Table of Contents” from the pop-up menu at the
bottom of the sidebar.3. To navigate using thumbnail images of the document’s pages, choose Thumbnails from the pop-up menu at the
bottom of the sidebar.4.To navigate to the document’s annotations, including text, rectangle, and oval annotations, choose Annotations from
the pop-up menu at the bottom of the sidebar.5. If you want to include link annotations in the list, click Include Links.6.To jump to the next page, press the Down Arrow or Page Down key. To jump to the previous page, press the Up
Arrow or Page Up key.7. To use the vertical scroll bar to scroll through a PDF document with several pages, choose View > PDF Display >
Single Page Continuous, or choose View > PDF Display > Two Pages Continuous.8.To view a specific page, choose Go > “Go to Page,” and type its page number.
HC
S T
echn
olog
y G
roup

85Mac OS X Tools
7
Extracting an item from a busy background1. In the toolbar, choose Extract Shape from the Select pop-up menu.2. Trace the edge of the image you want to save.3. Make sure the image’s edge is within the thick border that appears as you trace.4. Connect the end of the border back to its beginning, or double-click anywhere to extend the border in a straight line
back to the beginning.5. Use the resize handles to make sure the border contains the image’s edge, and then press Return.6. Preview analyzes the border you drew, determines the outline of the image you want to extract, and washes out
everything outside that outline.7. If you can still see the background through a “hole” in the image, drag in the hole.8. As you drag, Preview removes the dragged area and any pixels adjacent to the dragged area that have the same colors.9. If you want to restore part of what you removed, Option-drag in that area.10. As you Option-drag, Preview adds the dragged area and any pixels adjacent to the dragged area that have the same
colors. Press Return.
Here’s what you can do with bookmarks:1. To add a bookmark, choose Bookmarks > Add Bookmark, and enter a name.2. To rename a bookmark, choose Bookmarks > Edit Bookmarks, and double-click its name.3. To delete a bookmark, choose Bookmarks > Edit Bookmarks, select it, and click Remove.4. To go to a bookmark, choose its name from the Bookmarks menu.
New in Snow LeopardIntelligent text selection.Advanced artificial intelligence analyzes each PDF document to understand the structure of its words, paragraphs, columns, and visual layout and creates a map of the document’s organization. Preview uses this information to help you accurately target the text you want to copy and paste, even if the text is in columns.
Import from scanner.Snow Leopard simplifies scanning by putting scanned data directly into Preview. Now you can scan, view, and correct your files and images in Preview. The scanning interface even detects the placement of images or documents on the scanner to automate the selection of regions to scan.
Enhanced search.Preview uses Grand Central Dispatch to improve search performance, presenting results immediately, even while the document is being indexed.
Digital Asset Exchange support.Collada Digital Asset Exchange (.dae) files are a popular way to share 3D models and scenes between applications. Preview now displays these files with OpenGL-powered 3D graphics, so you can zoom and rotate around a 3D scene and play viewpoint animations. You can also print the scene or save it as an image or movie file. And you can use Quick Look to display them as well.
Higher-quality image scaling.The Adjust Image Size command in Preview uses the advanced Lanczos interpolation algorithm to provide higher-quality scaling with fewer blurry artifacts compared with traditional interpolation methods.
Soft Proof with Profile.Preview makes it easy to see what your images will look like when printed, on the web, or even on a printing press. Using readily available color profiles, Preview applies an on-the-fly color simulation, enabling you to quickly and easily soft-proof large numbers of images.
Contact sheet for images.Open multiple images in a single document as a contact sheet, for a convenient thumbnail view of everything.
HC
S T
echn
olog
y G
roup
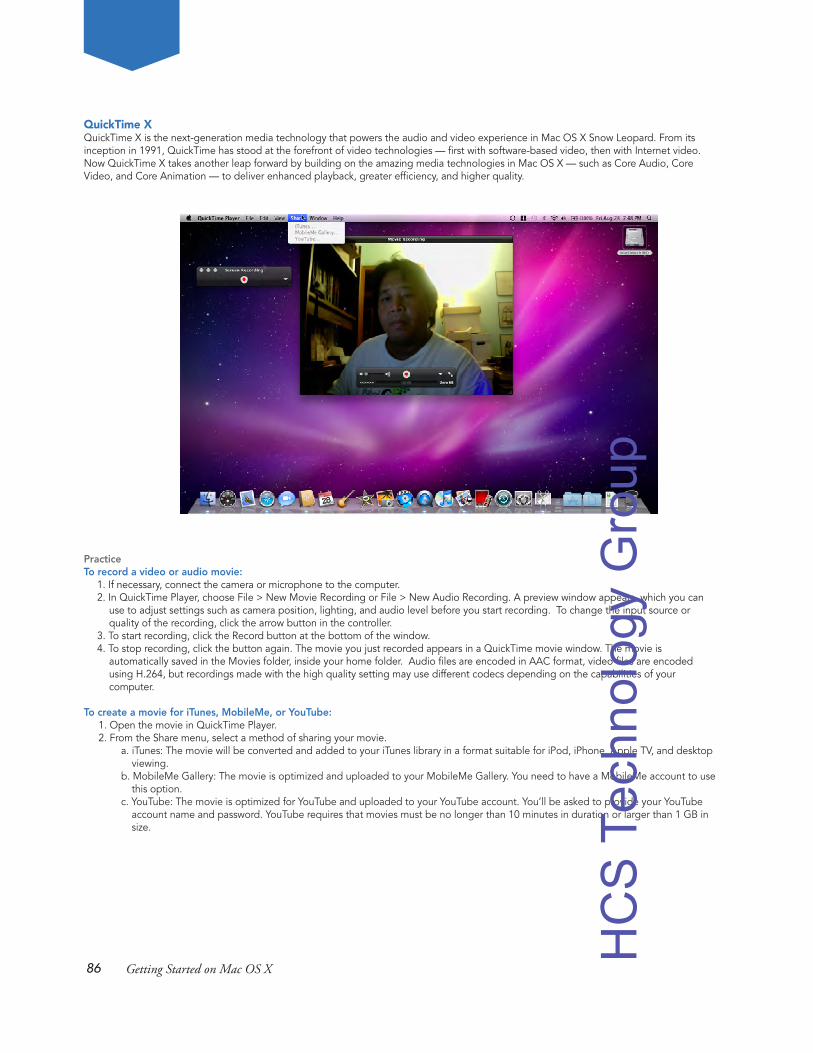
86 Getting Started on Mac OS X
QuickTime XQuickTime X is the next-generation media technology that powers the audio and video experience in Mac OS X Snow Leopard. From its inception in 1991, QuickTime has stood at the forefront of video technologies — first with software-based video, then with Internet video. Now QuickTime X takes another leap forward by building on the amazing media technologies in Mac OS X — such as Core Audio, Core Video, and Core Animation — to deliver enhanced playback, greater efficiency, and higher quality.
PracticeTo record a video or audio movie:
1. If necessary, connect the camera or microphone to the computer.2. In QuickTime Player, choose File > New Movie Recording or File > New Audio Recording. A preview window appears, which you can
use to adjust settings such as camera position, lighting, and audio level before you start recording. To change the input source or quality of the recording, click the arrow button in the controller.
3. To start recording, click the Record button at the bottom of the window.4. To stop recording, click the button again. The movie you just recorded appears in a QuickTime movie window. The movie is
automatically saved in the Movies folder, inside your home folder. Audio files are encoded in AAC format, video files are encoded using H.264, but recordings made with the high quality setting may use different codecs depending on the capabilities of your computer.
To create a movie for iTunes, MobileMe, or YouTube:1. Open the movie in QuickTime Player.2. From the Share menu, select a method of sharing your movie.
a. iTunes: The movie will be converted and added to your iTunes library in a format suitable for iPod, iPhone, Apple TV, and desktop viewing.
b. MobileMe Gallery: The movie is optimized and uploaded to your MobileMe Gallery. You need to have a MobileMe account to use this option.
c. YouTube: The movie is optimized for YouTube and uploaded to your YouTube account. You’ll be asked to provide your YouTube account name and password. YouTube requires that movies must be no longer than 10 minutes in duration or larger than 1 GB in size.
HC
S T
echn
olog
y G
roup

87Mac OS X Tools
7
QuickTime X Shortening a movie
1. Open the movie in QuickTime Player, and then choose Edit > Trim. The trimming bar appears.2. Use the trimming bar to select the portion of the movie that you want to keep.3. Drag the play head, represented by a red vertical line, to find the portions of the movie that you want to eliminate.4. Drag the start and end of the trimming bar, using the yellow handles, to select the portion of the movie that
you want to keep.5. If the start or end of your movie doesn’t have any sound, choose Edit > Select All Excluding Silence to quickly set the
trimming region to exclude the silent portions of your movie.6. Click the Trim button. The movie is shortened to the portion you selected.
TipRecord your screen.Catch the action taking place on your screen with screen recording. Start recording and QuickTime Player captures the activity on your screen and creates a movie file. It’s perfect for creating instructional media or when you need more than a simple screen shot.
Visual chapters.Instead of text-only chapter names, QuickTime Player displays frame-based thumbnail images for each chapter marker, allowing you to easily navigate your chaptered media.
Select all excluding silence.If the start or end of your movie doesn’t have any sound, choose Select All Excluding Silence from the Edit menu to quickly set the trimming region to exclude the silent portions of your movie.
Live HTTP streaming.QuickTime X uses HTTP live streaming technology to play back live video online using the Internet standard HTTP protocol — the same one used to deliver web pages. HTTP live streaming works with common web server infrastructure such as Mac OS X Server and Apache and avoids difficulties caused by firewall and router settings.
HC
S T
echn
olog
y G
roup
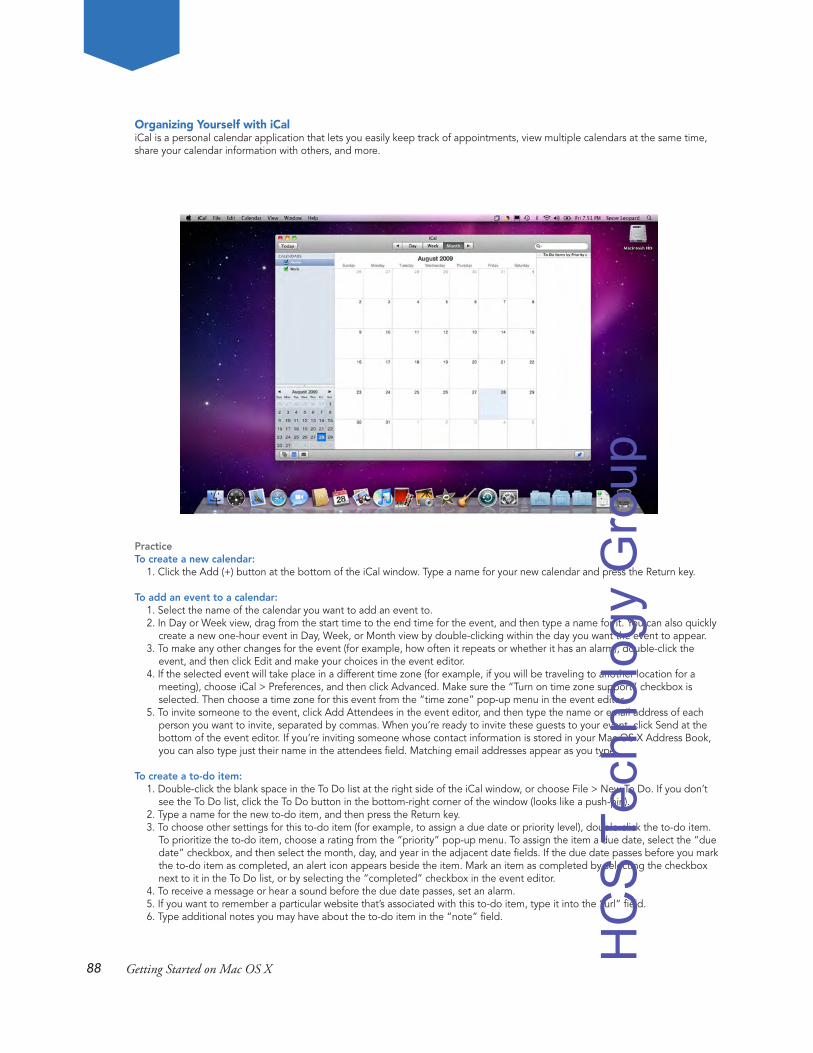
88 Getting Started on Mac OS X
Organizing Yourself with iCaliCal is a personal calendar application that lets you easily keep track of appointments, view multiple calendars at the same time, share your calendar information with others, and more.
PracticeTo create a new calendar:
1. Click the Add (+) button at the bottom of the iCal window. Type a name for your new calendar and press the Return key.
To add an event to a calendar:1. Select the name of the calendar you want to add an event to.2. In Day or Week view, drag from the start time to the end time for the event, and then type a name for it. You can also quickly
create a new one-hour event in Day, Week, or Month view by double-clicking within the day you want the event to appear.3. To make any other changes for the event (for example, how often it repeats or whether it has an alarm), double-click the
event, and then click Edit and make your choices in the event editor.4. If the selected event will take place in a different time zone (for example, if you will be traveling to another location for a
meeting), choose iCal > Preferences, and then click Advanced. Make sure the “Turn on time zone support” checkbox is selected. Then choose a time zone for this event from the “time zone” pop-up menu in the event editor.
5. To invite someone to the event, click Add Attendees in the event editor, and then type the name or email address of each person you want to invite, separated by commas. When you’re ready to invite these guests to your event, click Send at the bottom of the event editor. If you’re inviting someone whose contact information is stored in your Mac OS X Address Book, you can also type just their name in the attendees field. Matching email addresses appear as you type.
To create a to-do item:1. Double-click the blank space in the To Do list at the right side of the iCal window, or choose File > New To Do. If you don’t
see the To Do list, click the To Do button in the bottom-right corner of the window (looks like a push-pin).2. Type a name for the new to-do item, and then press the Return key.3. To choose other settings for this to-do item (for example, to assign a due date or priority level), double-click the to-do item.
To prioritize the to-do item, choose a rating from the “priority” pop-up menu. To assign the item a due date, select the “due date” checkbox, and then select the month, day, and year in the adjacent date fields. If the due date passes before you mark the to-do item as completed, an alert icon appears beside the item. Mark an item as completed by selecting the checkbox next to it in the To Do list, or by selecting the “completed” checkbox in the event editor.
4. To receive a message or hear a sound before the due date passes, set an alarm.5. If you want to remember a particular website that’s associated with this to-do item, type it into the “url” field.6. Type additional notes you may have about the to-do item in the “note” field.
HC
S T
echn
olog
y G
roup
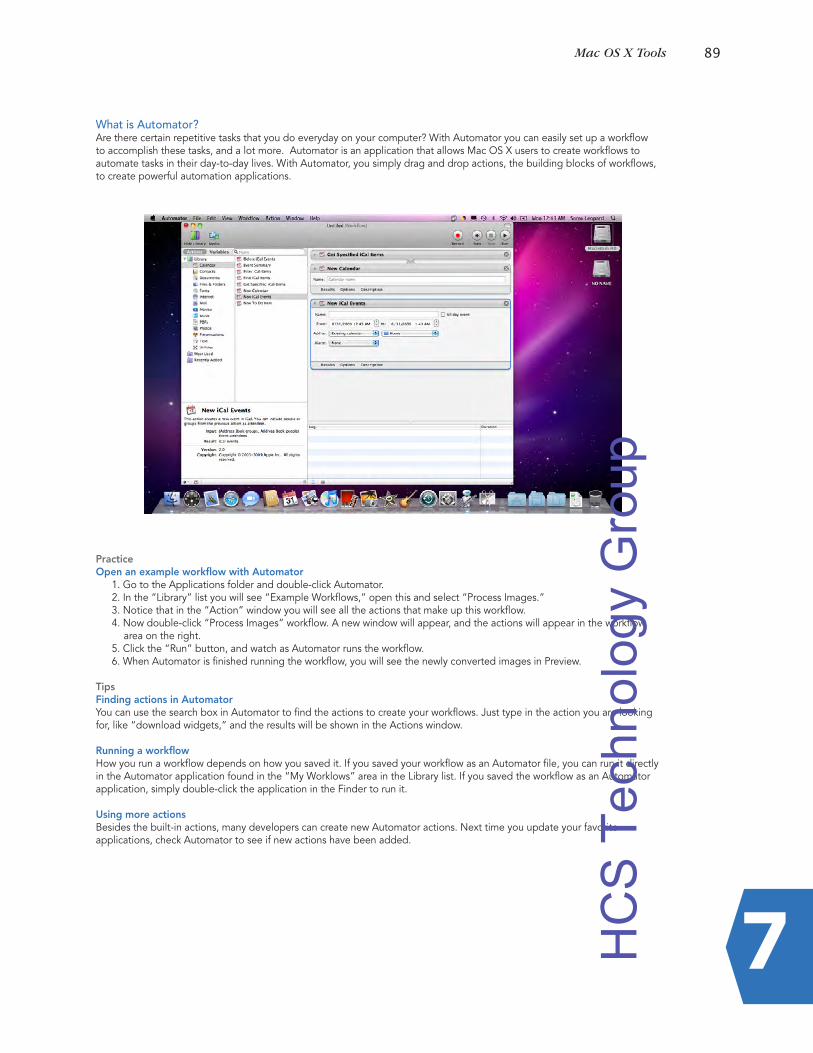
89Mac OS X Tools
7
What is Automator?Are there certain repetitive tasks that you do everyday on your computer? With Automator you can easily set up a workflow to accomplish these tasks, and a lot more. Automator is an application that allows Mac OS X users to create workflows to automate tasks in their day-to-day lives. With Automator, you simply drag and drop actions, the building blocks of workflows, to create powerful automation applications.
PracticeOpen an example workflow with Automator
1. Go to the Applications folder and double-click Automator.2. In the “Library” list you will see “Example Workflows,” open this and select “Process Images.”3. Notice that in the “Action” window you will see all the actions that make up this workflow.4. Now double-click “Process Images” workflow. A new window will appear, and the actions will appear in the workflow
area on the right.5. Click the “Run” button, and watch as Automator runs the workflow.6. When Automator is finished running the workflow, you will see the newly converted images in Preview.
TipsFinding actions in AutomatorYou can use the search box in Automator to find the actions to create your workflows. Just type in the action you are looking for, like “download widgets,” and the results will be shown in the Actions window.
Running a workflowHow you run a workflow depends on how you saved it. If you saved your workflow as an Automator file, you can run it directly in the Automator application found in the “My Worklows” area in the Library list. If you saved the workflow as an Automator application, simply double-click the application in the Finder to run it.
Using more actionsBesides the built-in actions, many developers can create new Automator actions. Next time you update your favorite applications, check Automator to see if new actions have been added.
HC
S T
echn
olog
y G
roup

HC
S T
echn
olog
y G
roup

91
GlossaryAdministrator User type of user account. When logged in as an administrator, You can add user accounts, change system settings and install applications and resources to Be accessed by any user on the computer.
Alias A feature of the Mac OS Extended format athat provides a lightweight reference or pointer to files or folders.
Archive a collection of files and folders, compressed into a single file for space saving or transfer to non-native file systems.
Burn Folder A Finder Feature in Mac OS X. It contains aliases that cab be quickly burned to optical media.
Desktop Folder User-specific location for items on the user’s desktop
Disk Image A Disk Image is a file that works like a drive volume. When opened, It appears on the desktop.
Dock The Dock appears at the bottom of your screen. You use it to open applications, documents, folders, and more. The Dock comes with icons for some applications; you can add others.
Encryption The process Of password-protecting data with the use of a one-time hash called an encryption key.
Exposé A Mac Os X feature that automatically tiles open windows.
FileVault a Mac OS X feature that secures a user’s home folder with AES-128 encryption
Finder The Finder is a program that’s responsible for managing your files, applications, disks, network connections, and devices such as printers. The Finder is always on when your computer is running. The Finder provides a menu bar along the top of the screen, and a Dock at the bottom edge. In between the menu bar and Dock are the desktop and any windows you have opened.
Finder Window Most of the information on your computer is displayed in windows. A window opens when you double-click an icon for a folder or a device such as the hard disk or a CD, or when you click an icon in the Dock.
Firewire Apple’s Implementation of the IEEE 1394 serial bus standard
Folder A named group of related files at a particular Location in the file-system hierarchy
Get Info Finder command that opens the Info window reavealing Spotlight terms, permission settings, application settings, previews and general information about an item.
HTTP (Hypertext Transfer Protocal) A networking protocol used to transfer Information to web browers and WebDAV clients
Keychain Tool in Mac OS X that stores passwords and user identifications for applications, servers and other resources In a encrypted database
HC
S T
echn
olog
y G
roup

92 Getting Started on Mac OS X
LPR A network printer that Is configured by identifying the IP address of either the printer itself or the printer queue it Is connected to.
Master Password Feature of FileVault that Allows the password of encrypted user accounts to be reset using a siingle system-wide password
Menu Bar The menu bar runs along the top of the screen. On the left end of the menu bar are the application menus. The name of the application you are currently using appears in bold next to the Apple menu. There are several other application menus, often with standard names such as “File,” “Edit,” “Format,” Window,” and “Help.”
PDF (Portable Document Format) A standard graphics format used for rendering and printing. It was developed by Adobe.
Permission In a multiuser OS, authorization that provides a measure of security needed to keep one user from modifying or viewing another user’s items on the computer. The three permissions are read, write and execute.
QuickTime Multimedia development, storage and playback standard developed by Apple.
Root (User) Short name for System Administrator. Root has read and write permissions to all areas of the file system.
Secure Empty Trash A Mac OS X feature that repeatedly overwrites deleted files when the Trash is emptied, making files nearly impossible to recover.
Spotlight Desktop search technology for searching file data and metadata
Standard User A user account type inwhich a user can use a basic set of applications and tools.It is limited to making configuration changes that only affect the user’s own account; a standard user cannot make changes to system-wide settings or use.
System Preferences Application used to configure system settings and preferences in Mac OS X.
URL (Uniform Resource Locator) An address of a file or resource accesible on a network server, such as a website on the Internet.
USB (Universal Serial Bus) A serial interface between a computer and add-on device.
Universal Access Mac OS X accessibility software for improving human interface usability and functionality.H
CS
Tec
hnol
ogy
Gro
up
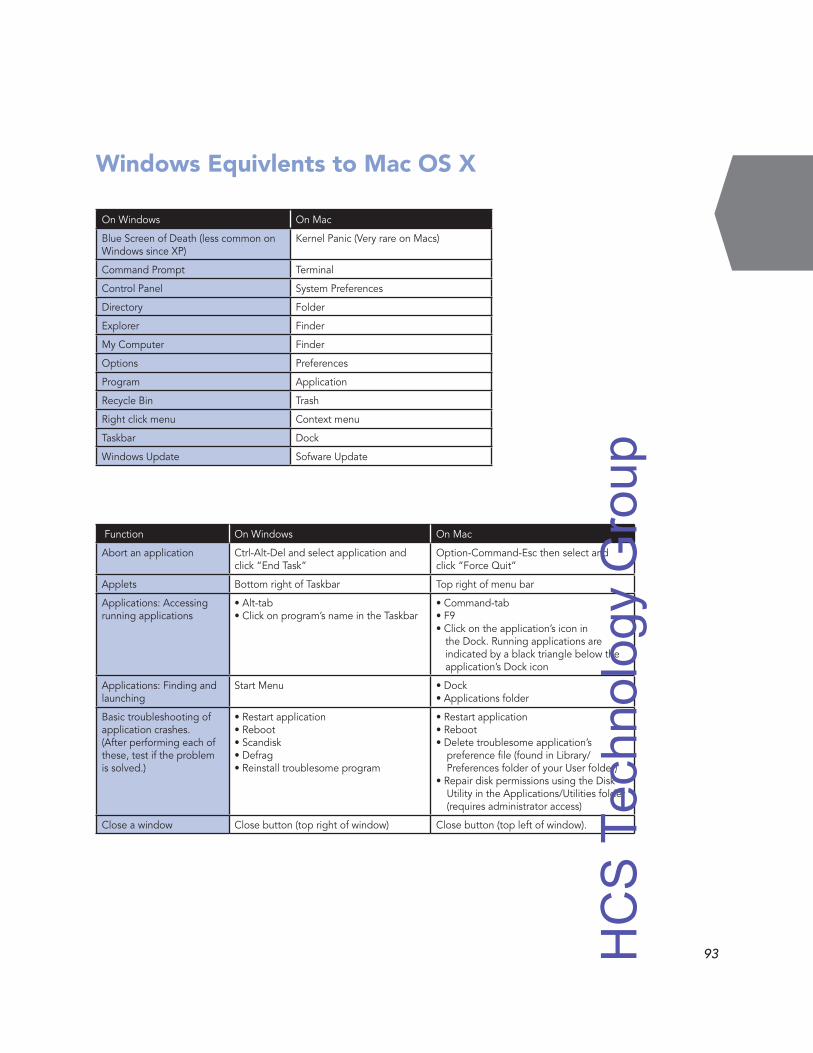
93
Windows Equivlents to Mac OS X
On Windows On Mac
Blue Screen of Death (less common on Windows since XP)
Kernel Panic (Very rare on Macs)
Command Prompt Terminal
Control Panel System Preferences
Directory Folder
Explorer Finder
My Computer Finder
Options Preferences
Program Application
Recycle Bin Trash
Right click menu Context menu
Taskbar Dock
Windows Update Sofware Update
Function On Windows On Mac
Abort an application Ctrl-Alt-Del and select application and click “End Task”
Option-Command-Esc then select and click “Force Quit”
Applets Bottom right of Taskbar Top right of menu bar
Applications: Accessing running applications
•Alt-tab•Clickonprogram’snameintheTaskbar
•Command-tab•F9•Clickontheapplication’siconin
the Dock. Running applications are indicated by a black triangle below the application’s Dock icon
Applications: Finding and launching
Start Menu •Dock•Applicationsfolder
Basic troubleshooting of application crashes. (After performing each of these, test if the problem is solved.)
•Restartapplication•Reboot•Scandisk•Defrag•Reinstalltroublesomeprogram
•Restartapplication•Reboot•Deletetroublesomeapplication’s
preference file (found in Library/Preferences folder of your User folder)
•RepairdiskpermissionsusingtheDiskUtility in the Applications/Utilities folder (requires administrator access)
Close a window Close button (top right of window) Close button (top left of window).
HC
S T
echn
olog
y G
roup
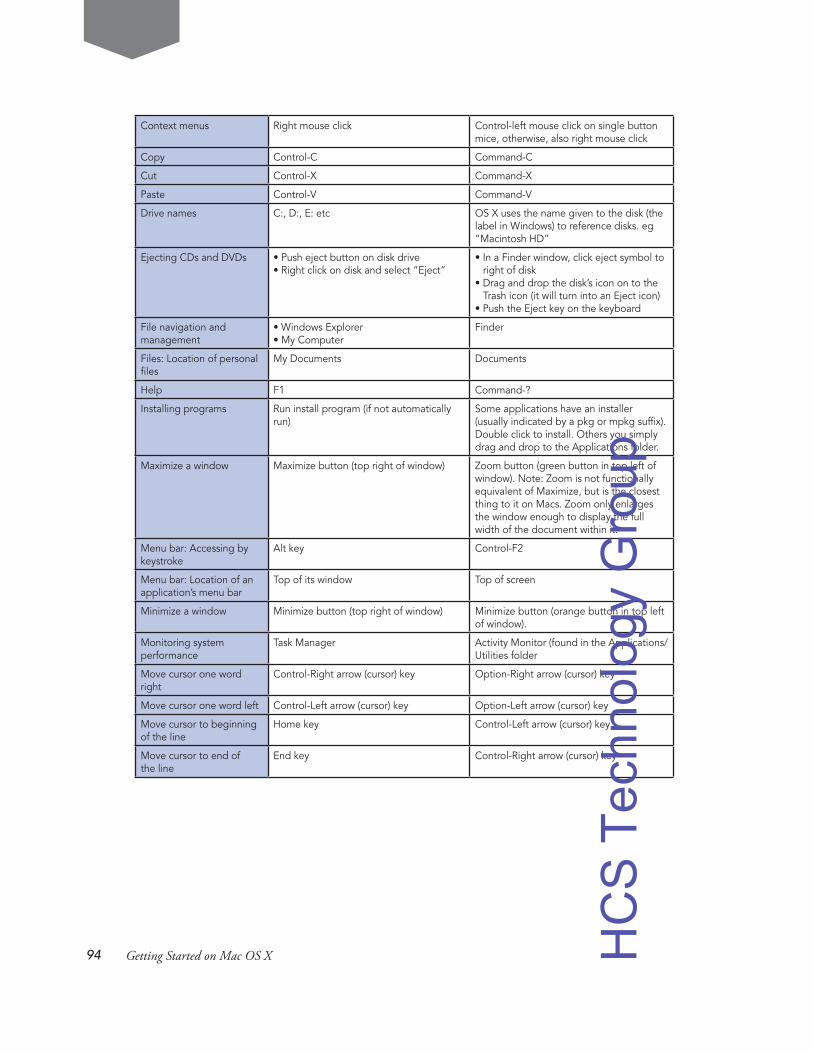
94 Getting Started on Mac OS X
Context menus Right mouse click Control-left mouse click on single button mice, otherwise, also right mouse click
Copy Control-C Command-C
Cut Control-X Command-X
Paste Control-V Command-V
Drive names C:, D:, E: etc OS X uses the name given to the disk (the label in Windows) to reference disks. eg “Macintosh HD”
Ejecting CDs and DVDs •Pushejectbuttonondiskdrive•Rightclickondiskandselect“Eject”
•InaFinderwindow,clickejectsymboltoright of disk
•Draganddropthedisk’siconontotheTrash icon (it will turn into an Eject icon)
•PushtheEjectkeyonthekeyboard
File navigation and management
•WindowsExplorer•MyComputer
Finder
Files: Location of personal files
My Documents Documents
Help F1 Command-?
Installing programs Run install program (if not automatically run)
Some applications have an installer (usually indicated by a pkg or mpkg suffix). Double click to install. Others you simply drag and drop to the Applications folder.
Maximize a window Maximize button (top right of window) Zoom button (green button in top left of window). Note: Zoom is not functionally equivalent of Maximize, but is the closest thing to it on Macs. Zoom only enlarges the window enough to display the full width of the document within it.
Menu bar: Accessing by keystroke
Alt key Control-F2
Menu bar: Location of an application’s menu bar
Top of its window Top of screen
Minimize a window Minimize button (top right of window) Minimize button (orange button in top left of window).
Monitoring system performance
Task Manager Activity Monitor (found in the Applications/Utilities folder
Move cursor one word right
Control-Right arrow (cursor) key Option-Right arrow (cursor) key
Move cursor one word left Control-Left arrow (cursor) key Option-Left arrow (cursor) key
Move cursor to beginning of the line
Home key Control-Left arrow (cursor) key
Move cursor to end of the line
End key Control-Right arrow (cursor) key
HC
S T
echn
olog
y G
roup
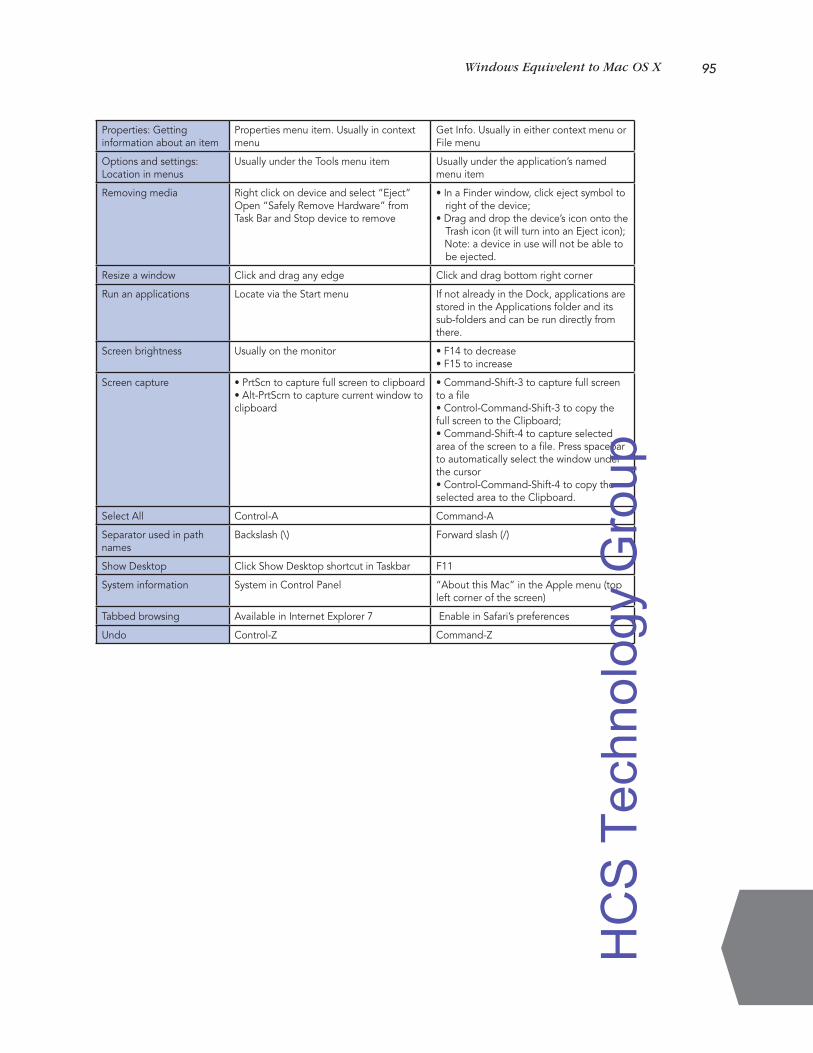
Windows Equivelent to Mac OS X 95
Properties: Getting information about an item
Properties menu item. Usually in context menu
Get Info. Usually in either context menu or File menu
Options and settings: Location in menus
Usually under the Tools menu item Usually under the application’s named menu item
Removing media Right click on device and select “Eject”Open “Safely Remove Hardware” from Task Bar and Stop device to remove
•InaFinderwindow,clickejectsymboltoright of the device;
•Draganddropthedevice’siconontotheTrash icon (it will turn into an Eject icon);
Note: a device in use will not be able to be ejected.
Resize a window Click and drag any edge Click and drag bottom right corner
Run an applications Locate via the Start menu If not already in the Dock, applications are stored in the Applications folder and its sub-folders and can be run directly from there.
Screen brightness Usually on the monitor •F14todecrease•F15toincrease
Screen capture •PrtScntocapturefullscreentoclipboard•Alt-PrtScrntocapturecurrentwindowtoclipboard
•Command-Shift-3tocapturefullscreento a file•Control-Command-Shift-3tocopythefull screen to the Clipboard;•Command-Shift-4tocaptureselectedarea of the screen to a file. Press spacebar to automatically select the window under the cursor•Control-Command-Shift-4tocopytheselected area to the Clipboard.
Select All Control-A Command-A
Separator used in path names
Backslash (\) Forward slash (/)
Show Desktop Click Show Desktop shortcut in Taskbar F11
System information System in Control Panel “About this Mac” in the Apple menu (top left corner of the screen)
Tabbed browsing Available in Internet Explorer 7 Enable in Safari’s preferences
Undo Control-Z Command-ZH
CS
Tec
hnol
ogy
Gro
up