M52tu-M54 VANOS Assembly & Timing Using G.A.S ...€¦ · VANOS unit, secondary timing chain, ......
14
M52tu-M54 VANOS Assembly & Timing Using G.A.S. Professional Cam Tool Kit This procedure covers the reassembly of the BMW M54 & M52-tu VANOS system, which includes: VANOS unit, secondary timing chain, secondary timing chain guides, primary and secondary timing chain tensioners, cam sprockets & related components, setting VANOS cam timing. This procedure is required if you are doing any of the following: Replacing camshafts Replacing primary or secondary timing chains or guides Replacing cam sprockets or related components Replacing cylinder head Just want to reset VANOS cam timing The following tools are required to complete this procedure: German Auto Solutions Professional Cam Timing Tool Kit. Quality torque wrench with a working range of 5-75 ft/lbs. 10mm socket 12mm deep well socket 13mm socket 19mm socket 22mm socket 32mm socket (combination wrench or a large adjustable will work but you won't be able to torque the timing chain tensioner) T30 male Torx driver ( Will need to fit the torque wrench you will be using ) E8 female Torx socket ( Will need to fit the torque wrench you will be using, can substitute 1/4" 6 point socket ) 8mm Allen driver ( Will need to fit the torque wrench you will be using ) 24mm open end wrench or large adjustable wrench Recommended M54 parts replacement list with part numbers: Required Part - Recommended Part - Recommended Based on Wear VANOS Unit Gasket - OEM Part # 11361433817 VANOS Piston Oil Plug with O-ring - 2 required - OEM Part # 11361433513 VANOS Oil Feed Fitting Sealing Washer - 2 required - OEM Part # 32411093596 Pri Chain Tensioner Sealing Washer - OEM Part # 07119963418 Secondary Timing Chain - OEM Part # 11311432177 Secondary Chain Tensioner - OEM Part # 11311738700 Intermediate Chain Guide - OEM Part # 11311722651 Exhaust Cam Stud - 3 required - OEM Part # 11361432373 Torx Head Bolt - 3 required - OEM Part # 11361432752 LH Thread VANOS Piston Torx Bolt - 2 required - OEM Part # 11361748745 Pri Chain Tensioner Spring - OEM Part # 11411706809 Pri Chain Tensioner Piston - OEM Part # 11311703747 Intake Cam Sprocket - OEM Part # 11361744263 Exhaust Cam Sprocket - OEM Part # 11361744262 Main Drive Sprocket - OEM Part # 11361438565 These instructions cover reassembly & timing only, and begin from the point of a completely disassembled VANOS system. If you are starting from a point that is less than fully disassembled, you can progress through the instructions until you find a state that applies to your situation. I highly recommend that you completely read through the entire instructions before you begin to familiarize yourself with the procedure. If you cannot have a computer near by during this procedure, print off these PDF instructions. ****** IMPORTANT - IMPORTANT - IMPORTANT - IMPORTANT - IMPORTANT ****** Home BMW Solutions Porsche Solutions DIY Tech Engine Services Dyno Services Machining About Contact Store Tool Rental
Transcript of M52tu-M54 VANOS Assembly & Timing Using G.A.S ...€¦ · VANOS unit, secondary timing chain, ......

M52tu-M54 VANOS Assembly & Timing Using G.A.S. Professional Cam Tool Kit
This procedure covers the reassembly of the BMW M54 & M52-tu VANOS system, which includes:
VANOS unit, secondary timing chain, secondary timing chain guides, primary and secondary timing chain tensioners, cam sprockets & related
components, setting VANOS cam timing.
This procedure is required if you are doing any of the following:
Replacing camshafts
Replacing primary or secondary timing chains or guides
Replacing cam sprockets or related components
Replacing cylinder head
Just want to reset VANOS cam timing
The following tools are required to complete this procedure:
German Auto Solutions Professional Cam Timing Tool Kit.
Quality torque wrench with a working range of 5-75 ft/lbs.
10mm socket
12mm deep well socket
13mm socket
19mm socket
22mm socket
32mm socket (combination wrench or a large adjustable will work but you won't be able to torque the timing chain tensioner)
T30 male Torx driver ( Will need to fit the torque wrench you will be using )
E8 female Torx socket ( Will need to fit the torque wrench you will be using, can substitute 1/4" 6 point socket )
8mm Allen driver ( Will need to fit the torque wrench you will be using )
24mm open end wrench or large adjustable wrench
Recommended M54 parts replacement list with part numbers:
Required Part - Recommended Part - Recommended Based on Wear
VANOS Unit Gasket - OEM Part # 11361433817
VANOS Piston Oil Plug with O-ring - 2 required - OEM Part # 11361433513
VANOS Oil Feed Fitting Sealing Washer - 2 required - OEM Part # 32411093596
Pri Chain Tensioner Sealing Washer - OEM Part # 07119963418
Secondary Timing Chain - OEM Part # 11311432177
Secondary Chain Tensioner - OEM Part # 11311738700
Intermediate Chain Guide - OEM Part # 11311722651
Exhaust Cam Stud - 3 required - OEM Part # 11361432373
Torx Head Bolt - 3 required - OEM Part # 11361432752
LH Thread VANOS Piston Torx Bolt - 2 required - OEM Part # 11361748745
Pri Chain Tensioner Spring - OEM Part # 11411706809
Pri Chain Tensioner Piston - OEM Part # 11311703747
Intake Cam Sprocket - OEM Part # 11361744263
Exhaust Cam Sprocket - OEM Part # 11361744262
Main Drive Sprocket - OEM Part # 11361438565
These instructions cover reassembly & timing only, and begin from the point of a completely disassembled VANOS system. If you are starting from a
point that is less than fully disassembled, you can progress through the instructions until you find a state that applies to your situation. I highly
recommend that you completely read through the entire instructions before you begin to familiarize yourself with the procedure.
If you cannot have a computer near by during this procedure, print off these PDF instructions.
****** IMPORTANT - IMPORTANT - IMPORTANT - IMPORTANT - IMPORTANT ******
Home BMW Solutions Porsche Solutions DIY Tech Engine Services Dyno Services Machining About Contact Store Tool Rental

Make sure that you read each step fully from beginning to end before you perform any part of a step. Some steps containmultiple procedures, and some steps contain information at the end of the step, that is crucial to completing the stepproperly. We have had several people complete these instructions to make sure that every step is clear and understandable.The only time anyone ever encountered a problem was when they started a step before they read the entire step throughfirst.
Mouse over images in the instructions to view full size
These instruction pertain to the German Auto Solutions 'M54 Professional CamTiming Tool Set'. If you are using the German Auto Solutions 'M54 Personal Cam Timing
Tool Set' please refer to the instructions for that tool kit.
#1
This should be your starting point if you followed the complete VANOS disassembly
procedure outlined on this website.
Steps 2-5 further describe critical conditions that need to be in placebefore beginning the assembly procedure in step 6. If any of theconditions described in steps 2-5 have not been met, refer back to thedisassembly instructions to correct the problem before proceeding.
#2 Crankshaft aligned to TDC timing mark.
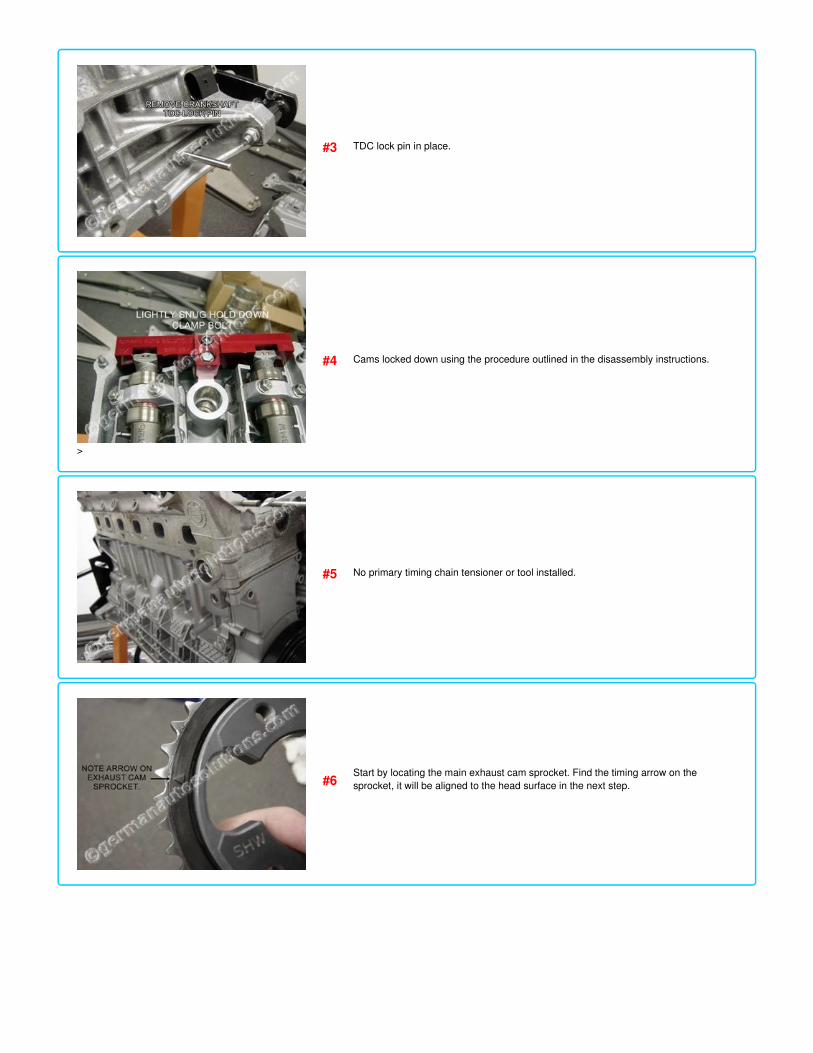
#3 TDC lock pin in place.
>
#4 Cams locked down using the procedure outlined in the disassembly instructions.
#5 No primary timing chain tensioner or tool installed.
#6Start by locating the main exhaust cam sprocket. Find the timing arrow on the
sprocket, it will be aligned to the head surface in the next step.
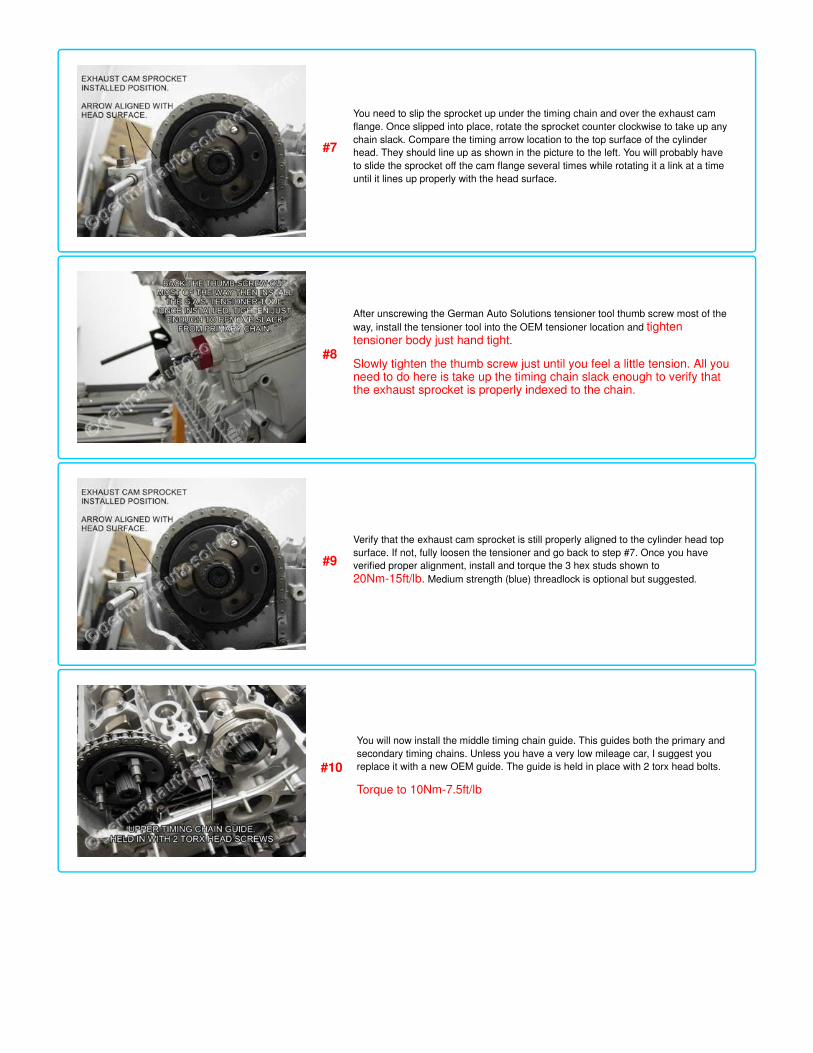
#7
You need to slip the sprocket up under the timing chain and over the exhaust cam
flange. Once slipped into place, rotate the sprocket counter clockwise to take up any
chain slack. Compare the timing arrow location to the top surface of the cylinder
head. They should line up as shown in the picture to the left. You will probably have
to slide the sprocket off the cam flange several times while rotating it a link at a time
until it lines up properly with the head surface.
#8
After unscrewing the German Auto Solutions tensioner tool thumb screw most of the
way, install the tensioner tool into the OEM tensioner location and tightentensioner body just hand tight.
Slowly tighten the thumb screw just until you feel a little tension. All youneed to do here is take up the timing chain slack enough to verify thatthe exhaust sprocket is properly indexed to the chain.
#9
Verify that the exhaust cam sprocket is still properly aligned to the cylinder head top
surface. If not, fully loosen the tensioner and go back to step #7. Once you have
verified proper alignment, install and torque the 3 hex studs shown to
20Nm-15ft/lb. Medium strength (blue) threadlock is optional but suggested.
#10
You will now install the middle timing chain guide. This guides both the primary and
secondary timing chains. Unless you have a very low mileage car, I suggest you
replace it with a new OEM guide. The guide is held in place with 2 torx head bolts.
Torque to 10Nm-7.5ft/lb

#11Locate the secondary timing chain tensioner. If the lock pin is not still in place from
the disassembly procedure, compress the tensioner and install the tensioner lock
pin. The secondary chain tensioner is another recommended replacement item.
#12 Install the tensioner, snug the 4 mounting bolts, then torque to 10Nm-7.5ft/lb.
#13Locate the exhaust cam helix flange. Note the orientation shown. The wide gap
goes up.
#14
Apply some motor oil or assembly lube to the front and back surfaces and
helix splines of the flange. Apply some motor oil or assembly lube to the exhaust
cam helix splines. Slide the exhaust cam helix flange over the hex studs with the
wide gap in the helix facing up.

#15
This is what it should look like. I'm holding it up with my finger because it wants to
fall off if you don't. You will be installing the exhaust helix cup in the next step which
will allow the helix flange to stay in place on its own. You might want to have it
handy before you complete this step.
#16
Locate the exhaust helix cup. Intake and exhaust cups are identical, but if you are
reinstalling used cups, it's best to keep the cups matched to the cams they came off
from. Apply motor oil or assembly lube to the helix cup inside and outside splines.
Line up the wide teeth on the exhaust cam helix cup with the wide gaps on the
camshaft and helix flange. Install the helix cup and push in about half way. You
might have to fiddle with it a little bit to get it started.
#17
This is an easy but critical step. Lay the intake VANOS sprocket, exhaust
VANOS sprocket, and secondary timing chain on the alignment sheet as shown on
the left. Align the wide notch on the intake sprocket helix as shown on the sheet.
While keeping the intake sprocket aligned to the sheet, keep repositioning the
exhaust sprocket until they both line up with the outline. The exhaust sprocket
technically does not have a front or rear so just pick a side to face up. As shown on
the alignment sheet, the exhaust sprocket is symmetrical and has 3 possible correct
orientations. This is hard to get wrong. If you have a one tooth misalignment it will
be obvious.
#18
Apply a film of oil or assembly lube to the front and back faces of both sprockets,
the helix splines on the intake sprocket, and the helix splines on the intake cam
before installation.
Preview steps 22, 23 and 24 before installing the chain and sprocketassembly. This will help you understand how the assembly will bepositioned.
Grasp the chain and sprocket assembly as shown. As you lift the assembly off of
the alignment sheet, keep the protruding section of the intake cam sprocket facing
toward the engine. Slide the assembly onto the cams while keeping the wide notch
on the intake sprocket splines facing up.

#19
Slide the chain and sprocket assembly over the cams as shown.
Please ignore the fact that the exhaust helix cup is not shown installedin this picture. Your exhaust helix cup should be installed.
#20This is how it should look. Make sure everything lines up as shown in thepicture.
#21
Locate the intake helix cup and apply some motor oil or assembly lube to the
outside and inside helix splines. Now install the intake helix cup using the same
procedure you used for the exhaust side. Push the intake cup in until the splined
section is flush with the sprocket as shown in the picture.
#22Install the 3 torx head bolts as shown. Tighten them finger tight, then loosen1/4 turn.

#23
Locate the exhaust sprocket thrust flange and apply a film of oil or assembly lube to
both sides. It doesn't have a front or back and is another symmetrical part. If you're
fussy you can usually tell which side was originally facing out by looking at
the polished contact areas. The side with shinny spots on the very outside edge
(like in picture) faces outward.
#24
Slide the exhaust thrust flange over the studs as shown.
Make sure you slide the flange past the threaded portion of the studsand onto the larger round section.
#25Locate the exhaust sprocket spring washer. Note the side marked "F" faces
outward. Slip the spring washer over the studs like the thrust washer.
#26
Locate the exhaust cam sensor position plate.
Note the orientation, it has an arrow marking like the exhaustsprocket. The arrow needs to line up with the left head surface.
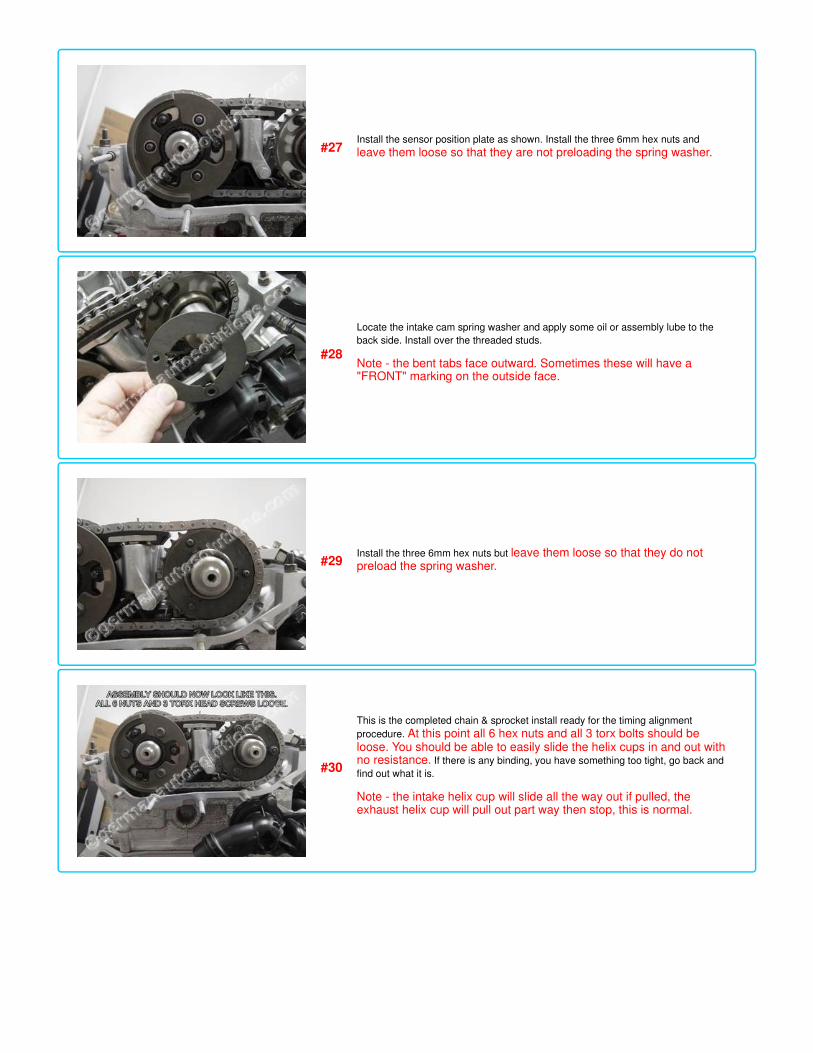
#27Install the sensor position plate as shown. Install the three 6mm hex nuts and
leave them loose so that they are not preloading the spring washer.
#28
Locate the intake cam spring washer and apply some oil or assembly lube to the
back side. Install over the threaded studs.
Note - the bent tabs face outward. Sometimes these will have a"FRONT" marking on the outside face.
#29Install the three 6mm hex nuts but leave them loose so that they do notpreload the spring washer.
#30
This is the completed chain & sprocket install ready for the timing alignment
procedure. At this point all 6 hex nuts and all 3 torx bolts should beloose. You should be able to easily slide the helix cups in and out withno resistance. If there is any binding, you have something too tight, go back and
find out what it is.
Note - the intake helix cup will slide all the way out if pulled, theexhaust helix cup will pull out part way then stop, this is normal.

#31
Make sure that cylinder head VANOS gasket surface is perfectly cleanwith all traces of the old gasket removed.
Wipe off the mounting surface of the German Auto Solutions VANOS Timing Plate
Tool then slide it over the studs and dowels as shown.
Any pieces of old gasket material or dirt caught between the plate andhead could have a minor effect on timing accuracy.
#32
Secure the timing tool in place using OEM VANOS mounting hardware as
shown. Lightly tighten the 2 nuts and 1 stud. You want the plate to be held firmly,
but there is no need to over tighten. 6-7ft/lbs is plenty if you feel the need to torque
them.
#33
Remove the 2 LEFT HAND THREAD torx head screws from their storage
locations and screw them into the intake and exhaust helix cups. If the cups have
been pushed forward you will have to pull them back toward the plate in order to
start the screws. These only need to be lightly snugged.
#34
In this step we will pretension the primary timing chain. The tension is not overly
critical. Once all the slack is taken out of the chain, further tightening does not
accomplish anything. If you severely over tighten the tensioner you coulddamage the timing chain or guide. I found the easiest way to set proper
tension without over tightening is to firmly grasp the exhaust sprocket, (the one
furthest from the front of the engine that the primary chain wraps around) and
wiggle it back and forth. Tighten the tensioner slowly until you can no longer wiggle
the exhaust sprocket, then tighten one more revolution.

#35Next, press down on the secondary chain tensioner and remove the lock pin.
Everything will now be in proper alignment.
#36
Tighten the 6 hex nuts on the intake and exhaust sprockets. The bottom ones are
accessible through the window openings on the timing plate. These do not affect
timing, they only preload the spring washers against the sprockets to keep them
from vibrating against the cam flanges during operation. Snug them up good atthis point but do not torque them yet.
#37
Next tighten the 3 torx head screws on the exhaust sprocket. These screws lock the
relationship between the intake and exhaust VANOS sprockets which sets the
proper timing. They are the only screws that lock the timing in place. Snug themup good at this point but do not torque them yet.
#38
Next remove the German Auto Solutions VANOS timing plate. Don't forget to return
the left hand thread torx screws to their storage locations to prevent them
from getting lost.
While leaving all the other hardware tight, one at a time, remove each of the
6 hex nuts, clean the threads, apply threadlock, and torque to the spec shown.
Since you are only removing one piece of hardware at a time there isno danger of anything moving out of position. The BMW manual does not
specify threadlock on these, but I feel that medium strength (blue) threadlock adds
a margin of safety and has no down side. The torx bolts are held captive by the
exhaust sproket spring washer & cannot be removed at this point.
Torque the 3 torx bolts to 20Nm-15ft/lbs, and the 6 hex nuts to10Nm-7.5ft/lbs.

#39
You can now remove the tensioner tool and install the OEM tensioner. Use a newsealing washer.
Torque to 70Nm-52ft/lbs.
#40 Remove the camshaft locking blocks.
#41 Remove the crankshaft TDC locking tool.
#42
Apply some RTV gasket sealer to the two areas shown in the picture, install a new
VANOS gasket over the studs and dowels, then apply some more RTV at the
same locations on the outside face of the gasket.
I highly recommend Permatex "Ultra Grey" for all engine assembly applications
where a RTV sealant is required.

#43 You can now slide the VANOS unit into place.
#44
Install the OEM VANOS mounting hardware and lift bracket.
Torque the 6mm hex nuts to 10Nm-7.5ft/lbs, and the 8mm stud to24Nm-18ft/lbs.
#45Install the 2 LEFT HAND THREAD torx head screws to secure the VANOS
pistons to the helix cups. I recommend a drop of medium strength threadlock here
as well. Torque to 10Nm-7.5 ft/lbs.
#46
Locate the piston oil plugs. The O-rings on these tend to harden and need to be
replaced. BMW does not sell the O-rings for the plugs separately. New plugs with
O-rings cost less than $2.00 each. I recommend just replacing the entire plug rather
than trying to find O-rings that fit the used plugs.
Apply some oil or assembly lube to the O-rings then push the plugs into the VANOS
pistons until they snap into place.

#47Install new sealing washers on the access plugs then install and torque the plugs to
50Nm-37ft/lbs.
#48Reinstall the exhaust cam position sensor plug and the exhaust VANOS solenoid
plug.
#49
Install the intake VANOS solenoid plug and the VANOS oil feed line. Use new
sealing washers on the oil feed fitting. Torque the oil fitting to 32Nm-24ft/lbs.
You are now finished with the VANOS system timing and assembly.
Content copyright 2015. GermanAutoSolutions.COM. All rights reserved.