
M16 SMART MAGAZINE MANUAL - VirTraM16 SMART MAGAZINE MANUAL PAGE 6 TABLE OF CONTENTS 4. Once the M16...
21
M16 SMART MAGAZINE MANUAL Version 1.0-1012 © 2012 by VirTra Inc. All Rights Reserved. VirTra, the VirTra logo are either registered trademarks or trademarks of VirTra in the United States and/or other countries.
Transcript of M16 SMART MAGAZINE MANUAL - VirTraM16 SMART MAGAZINE MANUAL PAGE 6 TABLE OF CONTENTS 4. Once the M16...

M16 SMART MAGAZINE MANUAL
Version 1.0-1012
© 2012 by VirTra Inc. All Rights Reserved. VirTra, the VirTra logo are either registered trademarks or trademarks of VirTra in the
United States and/or other countries.

COPYRIGHT
Copyright © 2012 by VirTra Inc. All Rights Reserved. No part of this publication may be reproduced, transcribed, stored in a retrieval system, translated into any language, or transmitted in any form or by any means, electronic, mechanical, magnetic, optical, chemical, photocopying, manual, or otherwise, without prior written permission from VirTra Inc.
DISCLAIMER
VirTra Inc. shall not be liable for any incidental or consequential damage resulting from the performance or use of this product. This company makes no representations or warranties regarding the contents of this manual. Information in this manual has been carefully checked for reliability; however, no guarantee is given as to the correctness of the contents. In the interest of continued product improvement, this company reserves the right to revise the manual or include changes in the specifications of the product described within it at any time without notice and without obligation to notify any person of such revision or changes. The information contained in this manual is provided for general use by the customers of the product.
TRADEMARKS
V-RANGE™ is a trademark of VirTra Systems, Inc.
General Notice: Other product names used in this manual are ascribed to their respective owners and acknowl-edged.
M16 Smart Magazine Version 1.0-1012
Author: Robert DowlingEditor: Brent BarcenaLayout/Design: Brent Barcena

TABLE OF CONTENTS
I. SAFETY NOTICES 4
II. MAIN SYSTEM COMPONENTS/OPERATION INSTRUCTIONS 5
2.1 CONNECTIVITY WITH VIRTRA ACCESSORY CONTROLLER 7
2.2 VIRTRA ACCESSORY CONTROLLER SYSTEM 8
2.3 MANUAL DEVICE ADDITION 11
2.4 CLEARING A WIRELESS DEVICE 12
2.5 CLEARING ALL WIRELESS DEVICES 13
2.6 CHANGING WIRELESS MAGAZINE BROADCAST CHANNEL 14
2.7 CHANGING WIRELESS MAGAZINE SIMULATED ROUND CAPACITY 16
2.8 CHANGING WIRELESS MAGAZINE LASER MODE AND LASER ID 17
2.9 SETTING THE JAM SETUP 18
2.10 JAMMING A WIRELESS MAGAZINE (M16) 19
2.11 RELOADING A WIRELESS MAGAZINE 20
III. CONTACT VIRTRA 21

PAGE 4M16 SMART MAGAZINE MANUAL
TABLE OF CONTENTS
I. SAFETY NOTICES
CAUTION: Carbon Dioxide (CO2) can be fatal if ingested or inhaled in abnormally high concentrations. The proce-dures outlined below should ALWAYS be performed in a large, well ventilated room in which dispelling CO2 does not have a significant impact upon the overall air quality.
Requirements
Temperature: 77 – 85° F [25-30° C] indoors temperature.
Storage: Well ventilated room.
CO2 Tank: CO2 tank with siphon tube.
CO2 Refill Station: VirTra Systems proprietary CO2 refill station
M16 Guide Block: M16 magazine black plastic guide block for use in CO2 refill station.
NOTE: As per the Compressed Gas Association standard CGA G-6—2009, Chapter 8: Storage and handling of carbon dioxide,Section 8.1: Uninsulated cylinders,Subsection 8.1.1: Storage precautions.
The M16 magazine should be NEVER be stored or subjected to temperatures in excess of 125° F (51.7° C).
Further, the lower limit of operation ( 77° F or the equivalent of 25° C) should be understood as an ideal lower temperature. Operation occurring at a temperature below the ideal will potentially result in a reduced number of shots and overall reduced WHAT?
PAGE 4 PAGE 5M16 SMART MAGAZINE MANUAL
TABLE OF CONTENTS
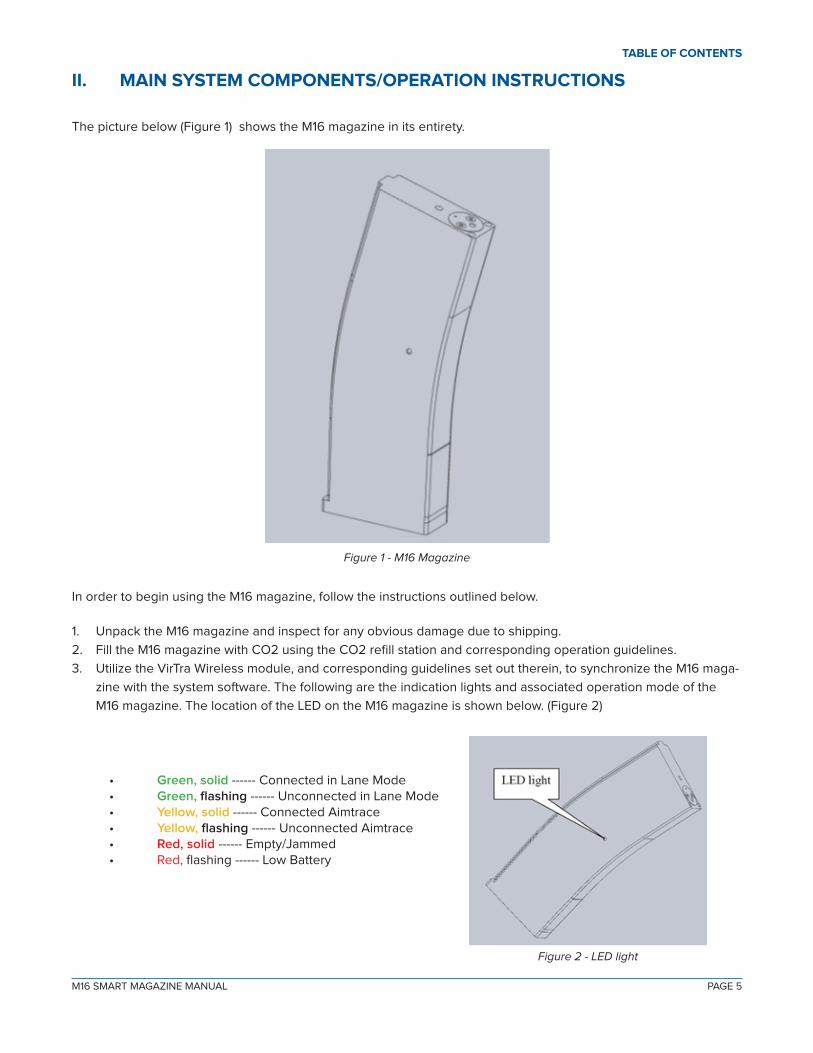
II. MAIN SYSTEM COMPONENTS/OPERATION INSTRUCTIONS
The picture below (Figure 1) shows the M16 magazine in its entirety.
Figure 1 - M16 Magazine
In order to begin using the M16 magazine, follow the instructions outlined below.
1. Unpack the M16 magazine and inspect for any obvious damage due to shipping.
2. Fill the M16 magazine with CO2 using the CO2 refill station and corresponding operation guidelines.
3. Utilize the VirTra Wireless module, and corresponding guidelines set out therein, to synchronize the M16 maga-
zine with the system software. The following are the indication lights and associated operation mode of the
M16 magazine. The location of the LED on the M16 magazine is shown below. (Figure 2)
Figure 2 - LED light
• Green, solid ------ Connected in Lane Mode• Green, flashing ------ Unconnected in Lane Mode• Yellow, solid ------ Connected Aimtrace• Yellow, flashing ------ Unconnected Aimtrace• Red, solid ------ Empty/Jammed• Red, flashing ------ Low Battery

PAGE 6M16 SMART MAGAZINE MANUAL
TABLE OF CONTENTS
4. Once the M16 magazine has been synchronized via the wireless module the user can now set the number of
shots desired. Once the desired number of shots has been achieved the magazine will actuate and catch the
M16 bolt simulating an empty magazine or jam.
5. Once the magazines jamming feature has been activated the user will have to reset it by removing the maga-
zine from the firearm and pushing the lever at the rear of the magazine down. This is simply done by hand, see
figure below. (Figure 3)
Figure 3 - Reset M16 magazine

PAGE 6 PAGE 7M16 SMART MAGAZINE MANUAL
TABLE OF CONTENTS
2.1 CONNECTIVITY WITH VIRTRA ACCESSORY CONTROLLER
This section will provide the reader with a step-by-step method for connecting the programmable M16 magazine with the VirTra Accessory Controller software by way of the Wireless Base Station.
1. Ensure that the Wireless Base station is plugged into the computer that came with the VirTra simulator. A green
light should illuminate once it is plugged in, this indicates the Wireless Base Station is on and active.
2. Assemble the M16 recoil kit per the instructions laid out in the assembly manual.
3. Fill the empty M16 magazine with CO2 utilizing the CO2 Refill Station and steps outlined in the CO2 Refill Sta-
tion Op. Man.
4. Insert the M16 magazine into the M16 rifle that has been retrofitted with the M16 recoil kit.
Figure 4 - VirTra Accessory Controller Icon
5. Start the VirTra Accessory Controller application by double clicking on the Desktop shortcut shown above.
(Figure 4).6. VirTra Accessory Controller should recognize the M16 magazine that is inserted into the M16 rifle and the user
should see the control module shown below. Also, the light should be continuously illuminated on M16 maga-zine.
PAGE 8M16 SMART MAGAZINE MANUAL
TABLE OF CONTENTS
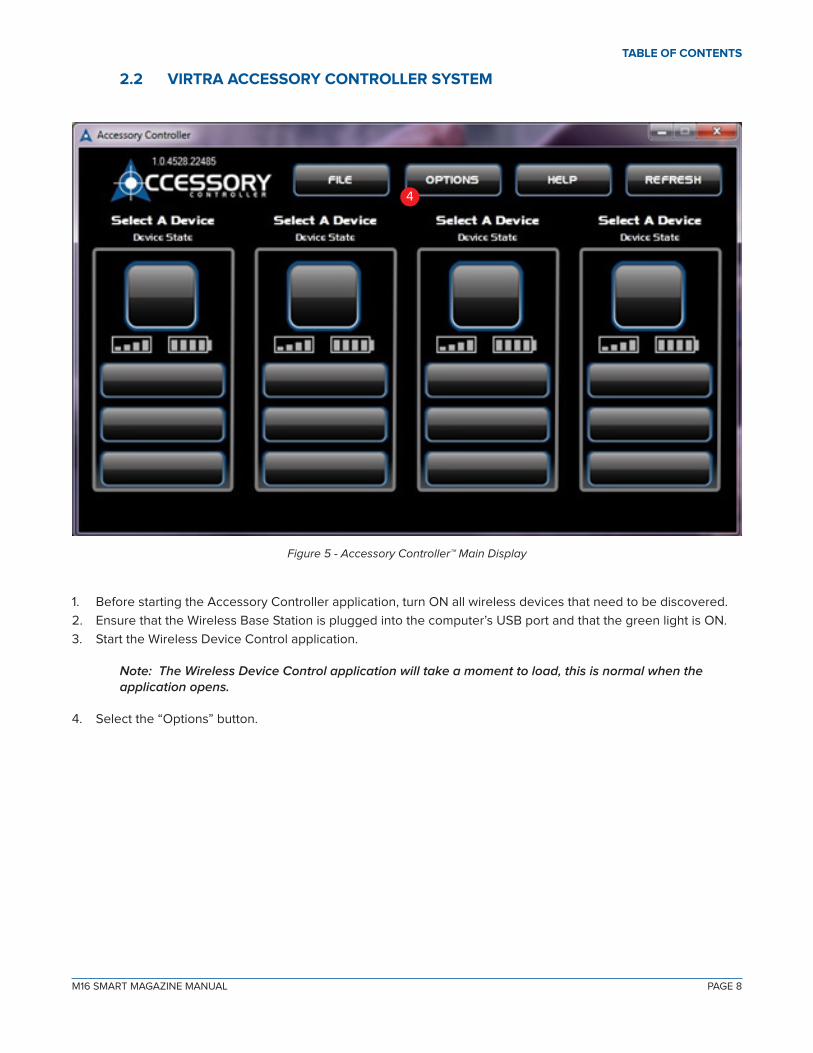
Figure 5 - Accessory Controller™ Main Display
1. Before starting the Accessory Controller application, turn ON all wireless devices that need to be discovered.
2. Ensure that the Wireless Base Station is plugged into the computer’s USB port and that the green light is ON.
3. Start the Wireless Device Control application.
Note: The Wireless Device Control application will take a moment to load, this is normal when the application opens.
4. Select the “Options” button.
2.2 VIRTRA ACCESSORY CONTROLLER SYSTEM
4

PAGE 8 PAGE 9M16 SMART MAGAZINE MANUAL
TABLE OF CONTENTS
Figure 6 - Discover Mode View
5. Select the “Discovery Mode” button.
6. Select the “Refresh” button.
5
6

PAGE 10M16 SMART MAGAZINE MANUAL
TABLE OF CONTENTS
7. All wireless devices have been preconfigured to different channels prior to shipping; therefore the recognized wireless devices fill the “Empty Slots”.
Note: If all of the wireless devices are turned ON and only one empty slot is filled, then the devices may all be on the same channel. See Section 2.6 to change channels.
8. Select the “File” button.
9. Select the “Save Settings” button.
10. Initial setup is complete.
Figure 7 - Main Smart Mag View
8

PAGE 10 PAGE 11M16 SMART MAGAZINE MANUAL
TABLE OF CONTENTS
2.3 MANUAL DEVICE ADDITION
1. Before starting the Accessory Controller application, turn ON all wireless devices that needs to be discovered.
2. Start the Wireless Device Control application.
Note: The Wireless Device Control application will take a moment to load, this is normal operation.
3. Select the “Options” button.
4. Select the “Discovery Mode” button.
5. Select the blank image square on an empty slot.
6. Select the device to add from the selection list that is presented. For this example, we’ll add the Wireless Mag.
7. Change the Device Channel and any other settings before saving. To change Device Channel, go to Section
2.6 of this manual.
8. If adding multiple devices this way repeat steps 2-7 for the remainder of empty slots before completing steps
9-10.
9. Select the “File” button.
10. Select the “Save Settings” button.
11. Initial setup is complete.
Figure 8 -Manual Device Addition
3
56

PAGE 12M16 SMART MAGAZINE MANUAL
TABLE OF CONTENTS
2.4 CLEARING A WIRELESS DEVICE
1. Power OFF the wireless device by either pushing the power button OFF (Threat-Fire™ Belt) or removing the
magazine from the firearm.
2. Select the “Options” button.
3. Select the “Discovery Mode” button.
4. Select the Icon of the wireless device to be removed.
5. Select the “No Device” icon.
Figure 9 - No Device
6. Select the “File” button.
7. Select the “Save Settings” button.
2
4
5
6
7

PAGE 12 PAGE 13M16 SMART MAGAZINE MANUAL
TABLE OF CONTENTS
2.5 CLEARING ALL WIRELESS DEVICES
1. Power OFF the wireless device by either pushing the power button OFF (Threat-Fire™ Belt) or removing the
magazine from the firearm.
2. Select the “Options” button.
3. Select the “Discovery Mode” button.
4. Select the “Refresh” button.
5. A “Please Wait” dialogue will display and all wireless devices will be removed from the display after a few
moments.
6. Select the “File” button.
7. Select the “Save Settings” button.
8. All peripherals will now be removed from the application.
Figure 10 - Wireless Device Clearing ALL
2 5
6
PAGE 14M16 SMART MAGAZINE MANUAL
TABLE OF CONTENTS
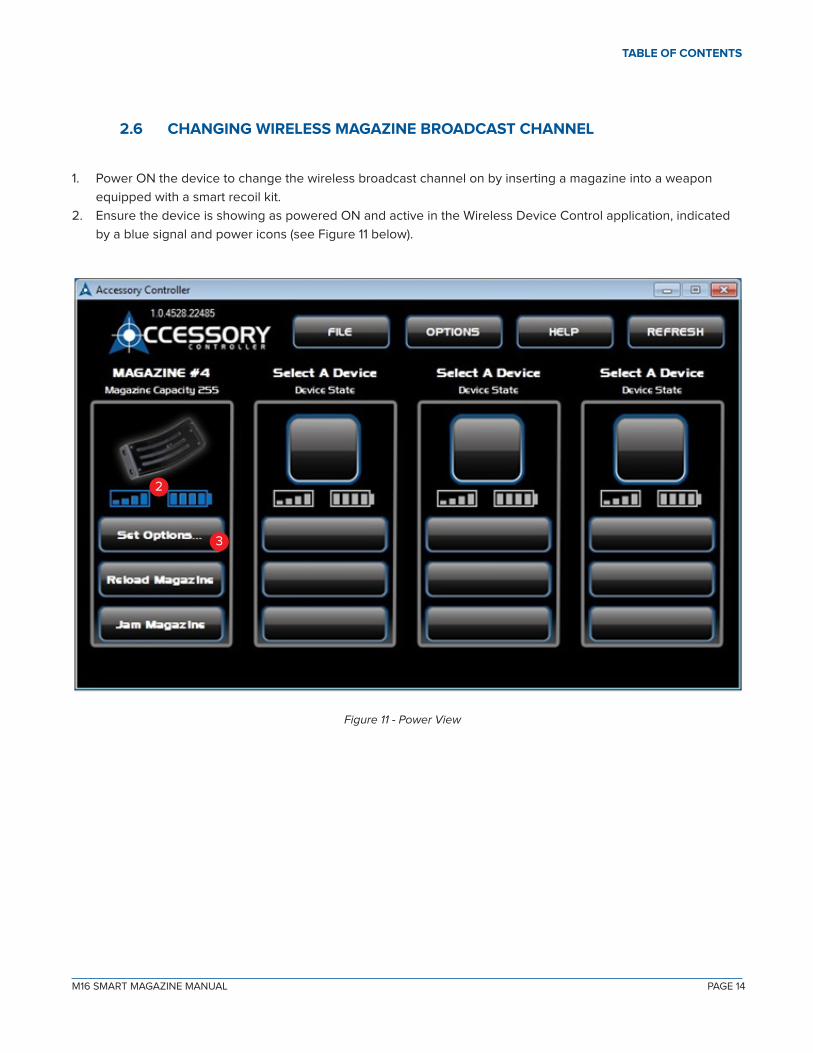
2.6 CHANGING WIRELESS MAGAZINE BROADCAST CHANNEL
1. Power ON the device to change the wireless broadcast channel on by inserting a magazine into a weapon
equipped with a smart recoil kit.
2. Ensure the device is showing as powered ON and active in the Wireless Device Control application, indicated
by a blue signal and power icons (see Figure 11 below).
Figure 11 - Power View
2
3

PAGE 14 PAGE 15M16 SMART MAGAZINE MANUAL
TABLE OF CONTENTS
3. Select the “Set Options” button. Magazine/Laser Setup window opens. See Figure 12 below.
4. Select the “Change Channel” button. A Key Pad opens. Figure 13.
5. Enter a channel between 0-31 where the
wireless device can communicate.
6. Select the “OK” button on the Key Pad once you entered the desired channel.
7. Close the Settings window by clicking on the “X” on the upper right corner.
Figure 12 - Magazine/Laser Setup
Figure 13 - Key Pad
4
6
5
7

PAGE 16M16 SMART MAGAZINE MANUAL
TABLE OF CONTENTS
2.7 CHANGING WIRELESS MAGAZINE SIMULATED ROUND CAPACITY
1. Power ON the wireless magazine to change the capacity by inserting the magazine into a weapon equipped
with a smart recoil device.
2. Ensure the device is showing as powered on and active in the Wireless Device Control application, indicated
by a blue signal and power icons (see Figure 11).
3. Select the “Set Options” button. See Section 2.6, Step 2-3.
4. Under the “Magazine Capacity” column, select the capacity you want the magazine to be set to.
NOTE: If one of the predefined capacities is not appropriate, you may select your own capacity by
selecting the “?” button on this page. A Key Pad will open so you can enter your desired capacity.
Capacity values range from 1-254.
5. Select the “OK” button on the Key Pad once you’ve set the magazine capacity.
Figure 14 - Round Capacity
4

PAGE 16 PAGE 17M16 SMART MAGAZINE MANUAL
TABLE OF CONTENTS
2.8 CHANGING WIRELESS MAGAZINE LASER MODE AND LASER ID
Figure 15 - Laser Mode and Laser ID
1. Power ON the wireless magazine to change the laser options by inserting the magazine into a weapon
equipped with a smart recoil kit.
2. Select the “Set Options” button.
3. The LASER MODE should be set to “LASER ID MODE” by default.
NOTE: To see the laser continuously pulse, for training or calibration purposes, you may select
the “AIM TRACE MODE”.
4. Select the LASER ID you wish to set your weapon to, values range from 1-4.
5. Close the Settings window by clicking on the “X” on the upper right corner.
34
5

PAGE 18M16 SMART MAGAZINE MANUAL
TABLE OF CONTENTS
2.9 SETTING THE JAM SETUP
Figure 16 - Jam Setup
1. Power ON the wireless magazine to change the capacity by inserting the magazine into a weapon equipped
with a smart recoil device.
2. Ensure the device is showing as powered on and active in the Wireless Device Control application, indicated
by a blue signal and power icons (see Figure 7).
3. Select the “Set Options” button.
4. Set the button under Jam Setup to “Enabled”.
5. Select the number of rounds you wish to be fired before the jam occurs.
NOTE: If one of the predefined capacities is not appropriate, you may select your own capacity by
selecting the “?” button on this page. A Key Pad will open so you can enter your desired capacity.
Capacity values range from 1-254.
**The Jam number must be less than the magazine capacity**
6. Select the “OK” button on the Key Pad once the capacity value is set.
7. Close the Settings window by clicking on the “X” on the upper right corner.
4
5

PAGE 18 PAGE 19M16 SMART MAGAZINE MANUAL
TABLE OF CONTENTS
2.10 JAMMING A WIRELESS MAGAZINE (M16)
Figure 17 - Jam Magazine
1. Power ON the wireless magazine by inserting the magazine into a weapon equipped with a smart recoil kit.
2. At any point during normal operation select the “Jam Magazine” button in the Wireless Device Control
application, the next shot will jam the weapon.
3. Remove the magazine from the weapon until the RED LED turns off (about 5 seconds).
4. Unjam the weapon according to the recommended instructions for that weapon.
5. Reinsert the magazine into the weapon. This will cause the jamming tab to detract.
NOTE: You do not have to select the “Reload” button at this point. The shot count will record the last
fired shot and you can continue to fire the remaining shots before reloading. The magazine will
jam automatically when all shots have been fired.
2

PAGE 20M16 SMART MAGAZINE MANUAL
TABLE OF CONTENTS
2.11 RELOADING A WIRELESS MAGAZINE
1. Power ON the wireless magazine by inserting the magazine into a weapon equipped with a smart recoil kit.
2. Set the round capacity to the desired amount. Refer to Section 2.7 of this manual for setting up round capacity.
3. When the magazine has reached the round capacity limit, the “jamming” tab will eject and lock the slide back
on the weapon.
4. Eject the magazine until the RED LED turns off (approximately 5 seconds).
5. Reinsert the magazine into the weapon, the tab will automatically retract
6. Unlock the slide according the recommended procedures for that weapon.
Figure 18 - M16 Diagram 2

PAGE 20 PAGE 21M16 SMART MAGAZINE MANUAL
TABLE OF CONTENTS
III. CONTACT VIRTRA
To download an electronic copy of this manual, please scan the QR code below with your smartphone device or visit:
www.virtra.com/PDF/Manuals/Software/m16SmartMag.pdf
If you have any questions/issues with any part of this manual, please see contact below:
VirTra Service Department
7970 S. Kyrene RoadTempe, AZ 85284 USA
Office: 480.968.1488 x 5029Mobile: 602.616.7504Email: [email protected]